1
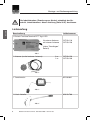
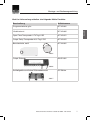
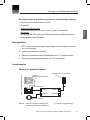
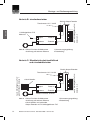
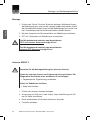
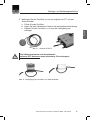
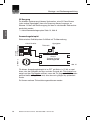
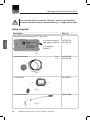
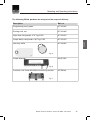
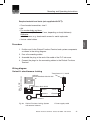
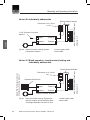
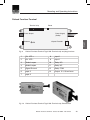
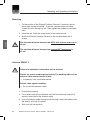
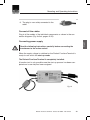
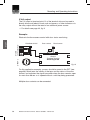
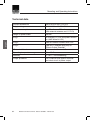
Montage- und Bedienungsanleitung Mounting and Operating Instructions Dialock Furniture Terminal Tag-it ISO Dialock Furniture Terminal Tag-it ISO D GB Inhalt / Contents Deutsch . . . . . . . . . . . . . . . . . . . . . . . . . . . . . . . . . . . . . . . . . . . . . . . . . . 3 English . . . . . . . . . . . . . . . . . . . . . . . . . . . . . . . . . . . . . . . . . . . . . . . . . . 33 2 Montage- und Bedienungsanleitung Inhalt Kurzanleitung für die "Erste" Inbetriebnahme des DFTs ................................... 4 Lieferumfang ...................................................................................................... 6 Einsatzbereich ................................................................................................... 8 Deutsch Leistungsmerkmale ........................................................................................... 8 Grundlagen ........................................................................................................ 9 Montageanleitung ............................................................................................ 10 Montageablauf ............................................................................................................ 11 Anschlussplan ............................................................................................................ 11 Dialock Furniture Terminal ......................................................................................... 13 Montage ...................................................................................................................... 14 Antenne DFANT 2 ....................................................................................................... 14 Transformator ............................................................................................................. 16 6-fach Verteiler ........................................................................................................... 16 Schließgehäuse FLC .................................................................................................. 16 Output Extender (optional) ......................................................................................... 17 Stecker ........................................................................................................................ 18 Inbetriebnahme ................................................................................................ 20 Bedienungsanleitung ........................................................................................ 21 Ansteuerung der Schließeinheit ................................................................................. 21 Schließrechte für Benutzerkarte zuweisen (gleichschließend) .................................. 22 Schließrechte für Benutzerkarte zuweisen (einzelschließend) .................................. 22 Schließrechte für Benutzerkarte entziehen (gleichschließend und einzelschließend) 23 Schließrechte aller Benutzerkarten entziehen ........................................................... 23 Betriebsparameter, Schließart festlegen ..................................................................... 24 Offenzeit einstellen ...................................................................................................... 24 Anzugsverzögerung einstellen .................................................................................... 24 Wechselmodus (Riegelschlossfunktion) aktivieren ..................................................... 25 Bedienung ................................................................................................................... 25 Zusätzliche Anschlüsse des DFT/B Tag-it ISO ................................................ 27 Reset ................................................................................................................ 29 Einfacher Reset ........................................................................................................... 29 Kompletter Reset ......................................................................................................... 30 Makrofunktionen ............................................................................................... 30 Fragen und Antworten ..................................................................................... 31 Technische Daten ............................................................................................ 32 Dialock Furniture Terminal - Stand: 05.2006 - 732.29.133 3 Montage- und Bedienungsanleitung 1. Im Rahmen dieser Anleitung wird wiederholt auf Keys verwiesen. Dies bezieht sich auf unterschiedliche Transponder-Bauformen wie ISO-Karten, Schlüsselanhänger, Key-Sticks etc. Deutsch 2. Im Rahmen dieser Anleitung wird wiederholt auf das Präsentieren von Transponderkarten vor der Antenne des DFT verwiesen. Dies bezieht sich, je nach Ausführung des DFT, entweder auf die interne oder auf die externe Antenne. 3. Im Folgenden wird das Dialock Furniture Terminal kurz DFT genannt. Kurzanleitung für die "Erste" Inbetriebnahme des DFTs 1. Vor der Montage im Möbel die folgenden Komponenten bereitlegen: DFT, externe Antenne (bei DFT mit externer Antenne), Transformator, Programmierkarte und Löschkarte. (siehe Info-Text oben 1.) 2. Antenne mit dem DFT (bei Modell mit externer Antenne) verbinden, jedoch noch keine Verbindung zwischen Transformator und DFT herstellen. Die grüne Programmierkarte und die rote Löschkarte bereithalten. 3. Der nachfolgend beschriebene Ablauf muss zügig und ohne Unterbrechung durchgeführt werden: Verbindung zwischen Transformator und dem DFT herstellen; die LED blinkt grün, es ertönt ein Quittungston. Innerhalb von 5 Sekunden die grüne Programmierkarte im Abstand von max. 2 cm (je nach Ausführung des Transponders) vor die Antenne (siehe Info-Text 2. auf dieser Seite) halten; es ertönt ein kurzer Quittungston zur Bestätigung des Anlernens. Wird die Zeit von 5 Sekunden überschritten bevor die grüne Programmierkarte präsentiert wurde und blinkt die LED bereits rot, keine Transponderkarte mehr vorhalten, sondern Stromversorgung trennen und Verbindung erneut herstellen. Während die LED grün blinkt, die grüne Progammierkarte vor die Antenne halten; es ertönt ein kurzer Quittungston zur Bestätigung des Anlernens. Anschließend die grüne Programmierkarte entfernen. Es ertönen zwei kurze Quittungstöne, die LED blinkt nun rot. Innerhalb 5 Sekunden die rote Löschkarte vor die Antenne halten. Es ertönt ein langer Quittungston. 4 Dialock Furniture Terminal - Stand: 05.2006 - 732.29.133 Montage- und Bedienungsanleitung 4. Nach dem Anlernen der Löschkarte leuchtet die LED rot, das DFT befindet sich nun im normalen Betriebszustand. Schließrechte für Benutzerkarte zuweisen (gleichschließend) Deutsch 1. Die grüne Programmierkarte vor die Antenne halten. Es ertönt ein langer Quittungston, die LED blinkt grün. 2. Die anzulernende Benutzerkarte innerhalb von 5 Sekunden vor die Antenne halten. Wenn die LED dauernd grün leuchtet, ist das Schließrecht für den Benutzerkarte zugewiesen, es ertönt ein kurzer Quittungston. 3. Die angelernte Benutzerkarte entfernen. 4. Innerhalb von 5 Sekunden die nächste anzulernende Benutzerkarte vor die Antenne halten, wenn eine weitere Karte anzulernen ist. Wird keine Benutzerkarte innerhalb von 5 Sekunden vorgehalten, wechselt das DFT in den normalen Betriebszustand. Schließrechte für Benutzerkarten zuweisen (einzelschließend) 1. Die grüne Programmierkarte mehrmals (Anzahl entspricht dem Adresswert) kurz vor die Antenne halten. Beispiel: gewünschte Adresse ist 7, grüne Programmierkarte 7 mal kurz hintereinander vor die Antenne halten. Bei jedem Vorhalten ertönt ein akustisches Signal. 2. Die LED blinkt mehrmals kurz grün (Anzahl entspricht dem Adresswert), pausiert und wiederholt den Blinkvorgang. Es ertönt ein akustisches Signal. 3. Die anzulernende Benutzerkarte innerhalb von 5 Sekunden vor die Antenne halten; wenn die LED kurz grün aufleuchtet, ist das Schließrecht der Benutzerkarte zugewiesen. Es ertönt ein akustisches Signal. 4. Die angelernte Benutzerkarte entfernen. 5. Innerhalb von 5 Sekunden die nächste anzulernende Benutzerkarte vor die Antenne halten, sofern eine weitere Karte für die gleiche Adresse gewünscht wird. Wird keine Benutzerkarte innerhalb dieser 5 Sekunden vorgehalten, wechselt das DFT in den normalen Betriebszustand. Der Mindestabstand zwischen zwei benachbarten DFTs mit internen Antennen oder zwei externen Antennen beträgt 25 cm! Dialock Furniture Terminal - Stand: 05.2006 - 732.29.133 5 Montage- und Bedienungsanleitung Vor Inbetriebnahme (Zuweisung von Karten) unbedingt den Abschnitt „Inbetriebnahme“ dieser Anleitung (Seite 20 ff.) durchlesen. Deutsch Lieferumfang Beschreibung Artikelnummer 1 Dialock Furniture Terminal DFT Tag-it ISO für externe Antenne mit interner Antenne 237.58.110 237.58.120 (siehe "Grundlagen" Seite 9) Abb. 1 1 Antenne (nur bei externer Antenne) 3m 1m 237.58.129 237.58.130 Abb. 2 1 Transformator 821.80.041 Abb. 3 823.28.780 1 6-fach Verteiler Abb. 4 6 Dialock Furniture Terminal - Stand: 05.2006 - 732.29.133 Montage- und Bedienungsanleitung Beschreibung Artikelnummer Programmierkarte grün 917.42.001 Löschkarte rot 917.42.002 Open Time Transponder # 74 Tag-it ISO 917.42.021 Output Delay Transponder # 81 Tag-it ISO 917.42.022 Benutzerkarte, weiß 917.44.001 Deutsch Nicht im Lieferumfang enthalten sind folgende Häfele Produkte: Abb. 5 Output Extender 910.51.081 Abb. 6 Schließgehäuse mit/ohne Rückmeldekontakt 237.56.0xx Abb. 7 Dialock Furniture Terminal - Stand: 05.2006 - 732.29.133 7 Montage- und Bedienungsanleitung Einsatzbereich Deutsch Das Dialock Furniture Terminal ist Bestandteil des elektronischen Schließsystems Dialock und dient als zentrale Einheit für elektromechanische Schließeinrichtungen in Möbeln, wie zum Beispiel in Schränken, Schubladen, Fächern oder Rollläden. Leistungsmerkmale • Komfortable und einfache Bedienung. • Einsatz von bis zu 200 Benutzerkarten pro Terminal. • Ansteuerung von bis zu 6 Schließgehäusen FLC. Mit einem zweiten 6fach Verteiler insgesamt bis zu 11 Schließgehäusen FLC. Das Öffnungsund Schließverhalten ist für jedes Schließgehäuse FLC gleich (gleichschließend). • Möglichkeit der Ansteuerung weiterer Schließgehäuse FLC durch den optional erhältlichen Output Extender. Damit ist auch das Öffnungs- und Schließverhalten für jedes Schließgehäuse FLC unterschiedlich einstellbar (einzeladressierbar). • Einstellbare Schließarten: Schließzyklus (Fallenschlossfunktion) und Wechselmodus (Riegelschlossfunktion). • Anschluss für eine externe LED. • Relaisausgang für akustische Signalgeber o.ä. • Zwei Digitaleingänge z.B. zur Überwachung von Türzuständen. • Einstellbare Anzugsverzögerung der Ausgänge. 8 Dialock Furniture Terminal - Stand: 05.2006 - 732.29.133 Montage- und Bedienungsanleitung Schließzyklus (Fallenschlossfunktion): Beim Vorhalten einer berechtigten Benutzerkarte entriegelt das DFT für einen bestimmten, einstellbaren Zeitraum (= Offenzeit) die angeschlossenen Schließgehäuse FLC. In dieser Zeit kann die Schließeinrichtung (zum Beispiel ein Fach) geöffnet werden. Danach verriegelt das DFT das Schließgehäuse wieder automatisch. Wechselmodus (Riegelschlossfunktion): Beim ersten Vorhalten einer berechtigten Benutzerkarte entriegelt das DFT die Schließgehäuse. Erst nach einem weiteren Vorhalten einer berechtigten Benutzerkarte verriegelt das DFT die Schließgehäuse wieder. Offenzeit: Die Offenzeit bestimmt die Dauer, für welche die FLCs im Schließzyklus nach Erkennen eines berechtigten Schlüssels geöffnet werden, um dann und automatisch wieder geschlossen zu werden. Die Offenzeit kann in Schritten von 1 Sekunde bis auf max. 120 Sekunden eingestellt werden. Anzugsverzögerung der Ausgänge: Nach Erkennen eines berechtigten Benutzerschlüssels werden der Power Output und der Ausgang für den Output Extender erst nach der einstellten Verzögerungszeit geschaltet. Diese Zeit kann in 1-Sekunden-Schritten bis auf max. 10 Sekunden eingestellt werden. Dialock Furniture Terminal - Stand: 05.2006 - 732.29.133 9 Deutsch Grundlagen Montage- und Bedienungsanleitung Montageanleitung Deutsch Sicherheitshinweise: Die Spannungsversorgung darf nur mit einem Sicherheitstransformator erfolgen. Aus Sicherheitsgründen muss während der Montage unbedingt der Transformator vom Netz getrennt sein. Montagevoraussetzung Für die Montage des Dialock Furniture Terminals ist die geeignete Einbaulage und der Einbauort für folgende Systemkomponenten festzulegen: • Dialock Furniture Terminal, DFT • externe Antenne • Transformator • Optional: 6-fach Verteiler • Optional: Schließgehäuse FLC (elektrische Verriegelung) • Optional: Output Extender, externe LED, Schalter, Readkontakte Bei der Montage der einzelnen Systemkomponenten sind die jeweiligen Montageanleitungen zu beachten! Für die Wartung sind die einzelnen Systemkomponenten zugänglich zu halten. Beim Verlegen der Verbindungskabel und der Montage des DFTs besteht Quetsch- und Einklemmgefahr der Leitungen beziehungsweise der Bauteile. Ein genügend großer Abstand zu beweglichen Teilen ist unbedingt einzuhalten. Gegebenenfalls sind die Kabel mit geeigneten Kabelverlängerungen zu versehen. Alle Leitungen sind mit geeigneten Kabelführungen (Kabelbinder und -halter) gegen Verrutschen zu sichern. Zu lange Verbindungskabel sammeln sowie sicher und übersichtlich verlegen. 10 Dialock Furniture Terminal - Stand: 05.2006 - 732.29.133 Montage- und Bedienungsanleitung Benötigtes Material und Werkzeug (nicht im Lieferumfang enthalten): • Kreuzschlitz-Schraubendreher Größe 2 • Vorstecher Deutsch • Korpus und Tür aus Holz: Hospa-Schrauben (Ø 3,5 mm x X mm, je nach Korpusdicke) Ansonsten: Entsprechende Schrauben, z.B. Blechschrauben bei Metallschränken • Verschiedene Kabelführungen Montageablauf 1. DFT und Systemkomponenten gemäß dem Anschlussplan positionieren und montieren. 2. Verbindungsleitungen verlegen. 3. Stecker am Kabelende des Schließgehäuses FLC konfektionieren. 4. Stecker der Verbindungsleitungen am DFT anschließen. Anschlussplan max. 11 Schließgehäuse FLC Variante A: gleichschließend optional: zweiter 6-fach Verteiler Transformator 12 V / 20 VA 6-fach Verteiler Output Power in Antenna Extender 1 Dialock Furniture Terminal externe Antenne Abb. 8a Dialock Furniture Schließsystem Ausführung mit externer Antenne 1 Stromversorgungsleitung Dialock Furniture Terminal - Stand: 05.2006 - 732.29.133 11 Montage- und Bedienungsanleitung Variante B: einzeladressierbar 1 Schließgehäuse FLC Adresse 1 Output Power in Antenna Extender 1 2 Adresse 2 - 9 Deutsch 1 max. 8 Schließgehäuse FLC Dialock Output Extender Transformator 12 V / 20 VA Dialock Furniture Terminal Abb. 8b Dialock Furniture Schließsystem 1 Stromversorgungsleitung Ausführung mit externer Antenne 2 Datenleitung Variante C: Mischbetrieb gleichschließend und einzeladressierbar Dialock Output Extender Output Power in Antenna Extender Dialock Furniture Terminal Adresse 2 - 9 6-fach Verteiler max. 8 Schließgehäuse FLC max. 6 Schließgehäuse FLC gleichschließend, Adresse 1 Transformator 12 V / 20 VA Abb. 8c Dialock Furniture Schließsystem 1 Stromversorgungsleitung Ausführung mit externer Antenne, 2 Datenleitung 6-fach Verteiler und optionalem Output Extender mit 14 Schließgehäusen FLC 12 Dialock Furniture Terminal - Stand: 05.2006 - 732.29.133 Montage- und Bedienungsanleitung Dialock Furniture Terminal Reset Power Output Antenna Abb. 9 Deutsch 1 2 3 4 5 6 7 8 9 10 11 12 13 Klemmleiste Power Supply (Kabel) Output Extender LED Dialock Furniture Terminal Tag-it ISO: Steckerbelegung 1 Ext. LED + 8 Eingang 1 2 Ext. LED - 9 Eingang 1 3 Mode Jumper 10 Relais NO 4 Mode Jumper 11 Relais NC 5 Masse Signal 12 Relais COM 6 Eingang 2 13 Ausgang 5 V, 50 mA max. 7 Eingang 2 Abb. 10 Dialock Furniture Terminal Tag-it ISO: Belegung Klemmleiste, Position Reset-Taster Dialock Furniture Terminal - Stand: 05.2006 - 732.29.133 13 Montage- und Bedienungsanleitung Montage Deutsch 1. Position des Dialock Furniture Terminals festlegen. Wahlweise können die Befestigungsösen auch um 90° gedreht angeordnet werden. Hierfür die Kreuzschlitzschrauben lösen und die Befestigungsösen um 90° drehen. Anschließend die Kreuzschlitzschrauben handfest drehen. 2. Mit dem Vorstecher die Schraubenlöcher am Möbelkorpus markieren. 3. DFT mit 4 Schrauben am Möbelkorpus anschrauben. Der Mindestabstand zwischen zwei benachbarten DFTs mit internen Antennen beträgt 25 cm! Der Mindestabstand zwischen zwei benachbarten externen DFT-Antennen beträgt 25 cm! Antenne DFANT 2 Beachten Sie die Montageanleitung der externen Antenne! Kabel der externen Antenne vor Zugbeanspruchung schützen! Der Biegeradius des Kabels muss mindestens 5 cm betragen! Gegebenenfalls Zugentlastung verwenden. Kabel vor Kabelbruch schützen: Kabel nicht knicken! 1. Position der externen Antenne festlegen. 2. Aussparung mit Ø 35 mm in den Korpus fräsen und Bohrung mit Ø 8 mm für Kabel durchführen. 3. Kabel durchstecken und Antenne einsetzen, einrasten. 4. Frontfolie aufkleben. 14 Dialock Furniture Terminal - Stand: 05.2006 - 732.29.133 Montage- und Bedienungsanleitung a. Öffnen Sie den Ferritfilter. b. Legen Sie eine Schleife des Kabels in die entsprechende Vertiefung. c. Klappen Sie den Ferritfilter zu, so dass die Verriegelung einschnappt. Abb. 11 Antenne DFANT 2 Der Abstand zwischen zwei benachbarten externen DFT-Antennen muss mindestens 25 cm betragen! Abb. 12 Befestigung des Ferritfilters am Antennenkabel Dialock Furniture Terminal - Stand: 05.2006 - 732.29.133 15 Deutsch 5. Befestigen Sie den Ferritfilter so nah wie möglich am DFT auf dem Antennenkabel: Montage- und Bedienungsanleitung Transformator Achten Sie auf sachgerechte Montage des Transformators! Deutsch 1. Position des Transformators festlegen. 2. Mit dem Vorstecher die Schraubenlöcher markieren. 3. Transformator mit 3 Schrauben befestigen. 4. Kabel verlegen und fixieren, ansonsten können Störungen auftreten. 6-fach Verteiler Der 6-fach Verteiler muss auch nach der Montage zugänglich sein! Bei der Wahl der Montage ist unbedingt darauf zu achten, dass alle Anschlüsse auch nach der Montage zugänglich sind. 1. Stecker des 6-fach Verteilers in die Buchse mit der Beschriftung „Power Output“ des DFT einstecken. 2. 6-fach Verteiler gegebenenfalls mit einer Kabelführung sichern. 3. Den optionalen zweiten 6-fach Verteiler gemäß Abb. 8a/c, Seiten 11/12, anschließen. Schließgehäuse FLC Beachten Sie die Montageanleitung des Schließgehäuses FLC! 16 Dialock Furniture Terminal - Stand: 05.2006 - 732.29.133 Montage- und Bedienungsanleitung Output Extender (optional) Bei der Wahl der Montage darauf achten, dass alle Anschlüsse auch nach der Montage zugänglich sind. A 1 2 3 4 5 B 6 7 C D E 8 Abb. 13 Output Extender - Steckerbelegung A Ausgänge 1 - 8, Anschlüsse für Schließgehäuse FLC Adresse 2-9 B Datenleitung vom Dialock Furniture Terminal C Nicht verwenden! D Nicht verwenden! E Stromversorgung (Transformator) 1. Output Extender mit zwei Senkkopfschrauben (Ø = 5 mm) befestigen. 2. Stecker des Schließgehäuses FLC in Ausgang 1 - 8 des Output Extenders einstecken, gegebenenfalls Verlängerungskabel benutzen. 3. Datenleitung zum DFT in Westernbuchse (Anschluss B) einstecken. 4. Stromversorgungskabel (Anschluss E) mit Transformator verbinden. Dialock Furniture Terminal - Stand: 05.2006 - 732.29.133 17 Deutsch Der Output Extender muss auch nach der Montage zugänglich sein! Montage- und Bedienungsanleitung Stecker Deutsch Der Stecker am Ende der Verbindungsleitung des Schließgehäuses FLC muss wie folgt konfektioniert werden: Vor der Konfektionierung des Steckers muss das Kabel vom Schließgehäuse FLC zum DFT, Output Extender oder 6-fach Verteiler verlegt werden. Das Kabel kann so durch kleine und enge Bohrungen und Nute geführt werden. Ein nachträgliches Öffnen des montierten Steckers ist ohne Beschädigung nicht mehr möglich. 1. Steckerflügel auseinander klappen. 2. Kabelenden auseinander spreizen. 3. Kabelenden in den Stecker einführen, bis sie einrasten. Richtigen Sitz durch leichtes Ziehen überprüfen. 4. Einen Steckerflügel zuklappen und das Kabel einlegen. 5. Kabelposition kontrollieren. Kabeladern beim Zuklappen des zweiten Steckerflügels nicht quetschen! 18 Dialock Furniture Terminal - Stand: 05.2006 - 732.29.133 Montage- und Bedienungsanleitung 6. Der Stecker ist fertig konfektioniert. Deutsch Verbindungsleitungen anschließen Die Verbindungsleitungen der einzelnen Systemkomponenten wie in den Anschlussplänen (Abb. 8a/b/c, Seiten 11/12) abgebildet anschließen. Versorgungsspannung anlegen Vor dem Anlegen der Spannungsversorgung an den Transformator die nachfolgende Inbetriebnahme lesen! Nach Anlegen der Spannungsversorgung ist das DFT betriebsbereit und im Modus Inbetriebnahme. Das DFT ist fertig montiert. Ein Funktionstest ist erst nach Abschluss der Inbetriebnahme und nach Zuweisung einer Benutzerkarte möglich. Abb. 14 Dialock Furniture Terminal - Stand: 05.2006 - 732.29.133 19 Montage- und Bedienungsanleitung Inbetriebnahme Deutsch Das DFT wird in der so genannten „Einfachen Betriebsart“ für den StandAlone-(SA) Betrieb ausgeliefert. Nur diese Betriebsart ist in dieser Anleitung beschrieben. Andere Betriebsarten sind nach Rücksprache mit dem Händler oder der Servicestelle möglich. Versorgungsspannung anlegen. Verhindern Sie jeden Missbrauch von Benutzerkarten durch Unbefugte. Bewahren Sie die Programmier- und die Löschkarte an einem sicheren Ort auf, da mit diesen beiden Karten einer beliebigen Benutzerkarte Schließrechte erteilt oder entzogen werden können. Bei der ersten Inbetriebnahme müssen die Programmier- und die Löschkarte wie folgt zugewiesen werden: Dieser Schritt ist nur direkt nach dem ersten Anlegen der Versorgungsspannung möglich. 1. DFT, Antenne, Transformator, Programmier- und Löschkarte bereitlegen. 2. Antenne mit DFT verbinden (bei Modell für externe Antenne) , jedoch noch keine Verbindung zwischen Transformator und DFT herstellen. Die grüne Programmierkarte und die rote Löschkarte bereithalten. 3. Der nachfolgend beschriebene Ablauf muß zügig und ohne Unterbrechung durchgeführt werden: Verbindung zwischen Transformator und DFT herstellen; die LED blinkt grün. Innerhalb von 5 Sekunden den grünen Programmier-Key im Abstand von max. 2 cm (je nach Ausführung des Transponders) vor die Antenne (siehe Seite 4 Info-Text 2.) halten; es ertönt ein kurzer Quittungston zur Bestätigung des Anlernens. Wird die Zeit von 5 Sekunden überschritten bevor die grüne Programmierkarte präsentiert wurde und blinkt die LED bereits rot, keine Transponderkarte mehr vorhalten, sondern Stromversorgung trennen und Verbindung erneut herstellen. Die grüne Programmierkarte entfernen. Es ertönen zwei kurze Quittungstöne, die LED blinkt nun rot. Innerhalb 5 Sekunden die rote Löschkarte vor die Antenne halten. Es ertönt ein langer Quittungston. 4. Nach dem Anlernen der Löschkarte leuchtet die LED rot, das DFT befindet sich im normalen Betriebszustand. 20 Dialock Furniture Terminal - Stand: 05.2006 - 732.29.133 Montage- und Bedienungsanleitung Bedienungsanleitung Einfache Betriebsart / Stand Alone Gleichschließend: Alle Schließgehäuse FLC, die am 6-fach Verteiler angeschlossen sind (Abb. 8a/c) öffnen und schließen gleichzeitig beim Vorhalten einer berechtigten Benutzerkarte. Einzeladressierbar: Jedes am Output Extender (nicht im Lieferumfang enthalten) angeschlossene Schließgehäuse FLC (Abb. 8c) öffnet und schließt unabhängig von den anderen angeschlossenen Schließgehäusen. Berechtigte Benutzerkarten müssen für jedes Schließgehäuse einzeln zugewiesen werden. Die Adressierung der Schließgehäuse erfolgt nach folgendem Anschlussschema: Adresse Anschluss am DFT: 1 Power Output am Output Extender: 2 Ausgang 1 3 Ausgang 2 4 Ausgang 3 5 Ausgang 4 6 Ausgang 5 7 Ausgang 6 8 Ausgang 7 9 Ausgang 8 Dialock Furniture Terminal - Stand: 05.2006 - 732.29.133 21 Deutsch Ansteuerung der Schließeinheit Montage- und Bedienungsanleitung Schließrechte für Benutzerkarte zuweisen (gleichschließend) 1. Die grüne Programmierkarte vor die Antenne halten. Es ertönt ein akustisches Signal. Deutsch 2. LED blinkt grün. 3. Die anzulernenden Benutzerkarte innerhalb von 5 Sekunden vor die Antenne halten; wenn die LED kurz grün aufleuchtet, ist das Schließrecht der Benutzerkarte zugewiesen. Es ertönt ein akustisches Signal. 4. Die angelernte Benutzerkarte entfernen. 5. Innerhalb von 5 Sekunden die nächste anzulernende Benutzerkarte vor die Antenne halten. Schließrechte für Benutzerkarte zuweisen (einzelschließend) 1. Die grüne Programmierkarte mehrmals (Anzahl entspricht dem Adresswert) kurz vor die Antenne halten. Beispiel: gewünschte Adresse ist 7, grüne Programmierkarte 7 mal kurz vor die Antenne halten. Bei jedem Vorhalten ertönt ein akustisches Signal. 2. Die LED blinkt mehrmals kurz grün (Anzahl entspricht dem Adresswert), pausiert und wiederholt den Blinkvorgang. Es ertönt ein akustisches Signal. 3. Die anzulernende Benutzerkarte innerhalb von 5 Sekunden vor die Antenne halten; wenn die LED kurz grün aufleuchtet, ist das Schließrecht der Benutzerkarte zugewiesen. Es ertönt ein akustisches Signal. 4. Die angelernte Benutzerkarte entfernen. 5. Innerhalb von 5 Sekunden die nächste anzulernende Benutzerkarte vor die Antenne halten, wenn eine weiterer Schlüssel für gleiche Adresse gewünscht wird. 22 Dialock Furniture Terminal - Stand: 05.2006 - 732.29.133 Montage- und Bedienungsanleitung Schließrechte für Benutzerkarte entziehen (gleichschließend und einzelschließend) 2. Zu löschenden Benutzerkarte vor die Antenne halten. 3. Die LED leuchtet kurz rot auf; das Schließrecht ist entzogen. Es ertönt ein langer Quittungston. Schließrechte aller Benutzerkarten entziehen Wenn eine Benutzerkarte verloren wurde und nicht mehr schließberechtigt sein soll, müssen alle Benutzerkarten am DFT gelöscht werden. Danach müssen allen weiterhin gültigen Benutzerkarten die Zutrittsrechte wieder zugewiesen werden. 1. Die rote Löschkarte vor die Antenne halten; die LED blinkt rot. Es ertönt ein langer Quittungston. 2. Die grüne Programmierkarte vor die Antenne halten; die LED leuchtet kurz rot auf. Alle Schließberechtigungen sind nun gelöscht. Es ertönt ein langer Quittungston. 3. Allen Benutzerkarten, die wieder schließberechtigt sein sollen, die Zutrittsrechte erneut zuweisen. Siehe „Schließrechte für Benutzerkarte zuweisen“ Seite 22. Dialock Furniture Terminal - Stand: 05.2006 - 732.29.133 23 Deutsch 1. Die rote Löschkarte vor die Antenne halten; die LED blinkt rot. Es ertönt ein langer Quittungston. Montage- und Bedienungsanleitung Betriebsparameter, Schließart festlegen Deutsch Für die Einstellung der Offenzeit (die Zeit, für die das FLC nach Erkennen eines berechtigten Keys geöffnet wird) sowie der Anzugsverzögerung (die Zeit, um die das Öffnen des nach Erkennen eines berechtigten Keys FLC verzögert wird) der FLC ist jeweils ein spezieller Einstelltransponder notwendig. Diese Einstelltransponder sind nicht im Lieferumfang enthalten und sind über den Fachhändler oder direkt bei der Firma Häfele erhältlich. Die Einstellung des Wechselmodus (Riegelschlossfunktion) der FLC erfolgt durch Einsetzen einer Drahtbrücke an den Anschlüssen 3 und 4 der Klemmleiste am DFT/B und anschließendem "Einfachen Reset" (Seite 29). Offenzeit einstellen 1. Den Einstell-Key „Open Time # 74“ vor die Antenne halten. Die LED blinkt abwechselnd rot und grün. 2. Innerhalb von 4 Sekunden die grüne Programmierkarte vor die Antenne halten. Die LED blinkt grün. Die Offenzeit ergibt sich aus der Verweildauer der grünen Programmierkarte vor der externen Antenne (max. 120 Sekunden). Anzugsverzögerung einstellen Mit Hilfe des Spezialtransponders „Anzugsverzögerung“ kann die Zeit zwischen Erkennen eines gültigen Transponders und Schalten des Ausgangs in Sekundenschritten von 0 bis maximal 10 Sekunden eingestellt werden. 1. Den Einstell-Key „Output Delay # 81“ vor die Antenne halten. Die LED blinkt abwechselnd rot und grün. 2. Innerhalb von 4 Sekunden die grüne Programmierkarte vor die Antenne halten. Die LED blinkt grün. 3. Die Dauer der Anzugsverzögerung ergibt sich aus der Verweildauer der Programmierkarte vor der externen Antenne (max. 10 Sekunden). Wird die Programmierkarte länger vorgehalten, so wird die maximale Zeit von 10 Sekunden eingestellt. 24 Dialock Furniture Terminal - Stand: 05.2006 - 732.29.133 Montage- und Bedienungsanleitung Wechselmodus (Riegelschlossfunktion) aktivieren 2. Einfachen Reset ausführen. Die Drahtbrücke wird jetzt erkannt und das DFT wird in die Betriebsart „Wechselmodus/Riegelschlossfunktion“ gebracht. 3. Zum Deaktivieren des Wechselmodus und Umschalten in den Schließzyklus ist die Drahtbrücke wieder zu entfernen und danach erneut ein "Einfacher Reset" auszuführen. Die Offenzeit und der Öffnungsmodus sind für alle angeschlossenen Schließgehäuse FLC gleich. Unterschiedliche Konfigurationen sind nicht möglich. Bedienung 1. Eine zugewiesene Benutzerkarte vor die Antenne halten. Die LED leuchtet grün. 2. Das zu schaltende Element, d.h. das oder die entsprechenden Schließgehäuse FLC, sind für die Dauer der eingestellten Offenzeit (Auslieferungszustand ca. 5 Sekunden) entriegelt. Ist eine Anzugsverzögerung eingestellt, so werden die Schließgehäuse erst nach dieser Zeit angesteuert. Wenn die LED nicht von rot auf grün umschaltet: Die Benutzerkarte näher vor die Antenne halten. Wenn die LED immer noch nicht von rot auf grün umschaltet: Die Benutzerkarte hat keine Berechtigung. Besonderheit Schließverhalten des DFT im Wechselmodus (Riegelschlossfunktion) bei Verwendung des Output Extenders und Benutzerkarte mit unterschiedlichen Berechtigungen (Berechtigungsmuster): Ausgangssituation: alle Schließgehäuse FLC sind verriegelt. Nach dem Vorhalten einer berechtigten Benutzerkarte (Key 1) entriegelt das DFT alle die Schließgehäuse FLC, für die eine Berechtigung besteht. Dialock Furniture Terminal - Stand: 05.2006 - 732.29.133 25 Deutsch 1. Eine Drahtbrücke („Jumper“) zwischen Anschluss 3 und 4 der Klemmleiste einsetzen. Montage- und Bedienungsanleitung Deutsch Wird anschließend eine zweite Benutzerkarte (Key 2) mit anderem Berechtigungsmuster vorgehalten, werden zunächst alle vorher entriegelten Schließgehäuse FLC wieder verriegelt und die LED leuchtet rot. Danach muss der zweite berechtigte Benutzerkarte (Key 2) erneut vorgehalten werden, damit die berechtigten Schließgehäuse entriegelt werden. Beispiel: Berechtigungsplan Schrank Key 1 1 x 2 x 3 Key 2 x 4 x 5 x x Ablaufbeispiel Alle Schließgehäuse FLC 1 – 5 sind verriegelt. LED leuchtet rot. Schritt 1 Key 1 wird vorgehalten: 1. Schließgehäuse FLC 1, 2 und 5 sind entriegelt. 2. Schließgehäuse FLC 3 und 4 sind verriegelt. 3. LED leuchtet grün. Schritt 2 Key 2 wird vorgehalten: 4. alle Schließgehäuse FLC 1 – 5 sind verriegelt. 5. LED leuchtet rot. Schritt 3 Key 2 wird nochmals vorgehalten: 6. Schließgehäuse FLC 3, 4 und 5 sind entriegelt. 7. LED leuchtet grün. 26 Dialock Furniture Terminal - Stand: 05.2006 - 732.29.133 Montage- und Bedienungsanleitung Zusätzliche Anschlüsse des DFT/B Tag-it ISO Das DFT/B bietet an Klemme 1 und 2 der Klemmenreihe einen Anschluss für eine externe LED. Hier ist eine zweipolige bidirektionale LED anzuschließen (rot in die eine Richtung, grün in die andere Richtung). Diese LED zeigt den selben Zustand an wie die im Gerät und in der externen Antenne eingebaute LED. siehe Klemmenbelegungsplan Seite 13, Abb. 9 2 Eingänge für externe Schalter oder Kontakte Das DFT/B verfügt über zwei Signaleingänge als stromgesteuerte Eingänge (Optokoppler-Eingänge). Sie sind für einen Eingangsstrom von 20 mA ausgelegt. Eine interne Stromquelle zum Ansteuern dieser Eingänge ist vorhanden. Jeder Eingang ist mit zwei Federklemmen (6/7 und 8/9) ausgestattet. Das zu einem Eingang gehörige Klemmenpaar kann über einen einfachen Schalter gedrückt werden, um den Eingang zu aktivieren. Die Zustände der Eingänge können ausschließlich in einem Dialock Makroprogramm verwendet werden. siehe Klemmenbelegunsplan Seite 13, Abb. 9 Potentialfreier Ausgang Das DFT/B verfügt über einen potentialfreien Relaisausgang (COM, NC, NO) an den Klemmen 10, 11 und 12. Dieses Relais kann ausschließlich über ein Dialock Makroprogramm angesteuert werden. Die eventuell im DFT eingestellte Anzugsverzögerung wirkt sich nicht auf diesen Ausgang aus. siehe Klemmenbelegunsplan Seite 13, Abb. 9 Für das Relais gelten die folgenden Maximaldaten für die angeschlossene Last. Technische Daten: Schaltleistung, max. 60 VA, 30 W Schaltspannung, max. 125 V AC, 60 V DC Betriebsstrom, max. 1A Dialock Furniture Terminal - Stand: 05.2006 - 732.29.133 27 Deutsch Anschluss für externe LED Montage- und Bedienungsanleitung 5V-Ausgang Zur direkten Ansteuerung kleinerer Verbraucher, wie z.B. Piezo-Buzzer (oder andere Signalgeber) kann die Spannung dieses Ausgangs an Klemme 13 über den Relaisausgang auf den zu schaltenden Verbraucher geschaltet werden. Deutsch siehe Klemmenbelegunsplan Seite 13, Abb. 9 Anwendungsbeispiel: Elektronisches Schließsystem für Möbel mit Türüberwachung DFANT 2 Türkontakt Signalgeber 1 2 3 4 5 6 7 8 9 10 11 12 13 Dialock Schließgehäuse 6-fach Verteiler Dialock Furniture Terminal DFT/B Tag-it ISO Abb. 15 Für dieses Anwendungsbeispiel ist im DFT ein Makro (s. S. 30) zu speichern, das die Gültigkeit der Keys und den Zustand des Türkontaktes auswertet und den Signalgeber aktiviert, wenn die Tür länger als 60 Sekunden geöffnet bleibt oder geöffnet wird, ohne dass ein gültiger Key präsentiert wurde. Es können mehrere Türkontakte angeschlossen werden. 28 Dialock Furniture Terminal - Stand: 05.2006 - 732.29.133 Montage- und Bedienungsanleitung Reset Deutsch Im Gehäuse befindet sich rechts von der Klemmleiste eine Bohrung von ca. 1 mm Durchmesser, hinter der sich der Reset-Taster befindet. Der Hardware-Reset wird auf die folgende Art durchgeführt. Einfacher Reset 1. Spannungsversorgung unterbrechen. 2. Resettaste durch die Öffnung betätigen (z.B. mit einer aufgebogenen Büroklammer) und betätigt halten. 3. Spannungsversorgung wieder herstellen, LED beginnt wechselweise rot/grün zu blinken. 4. Resettaste freigeben, nach kurzer Zeit ist der einfache Reset komplettiert. Funktionen des einfachen Reset 1. Der Projektcode wird auf den Wert 0815 zurückgesetzt. Dies bedingt, dass Spezialtransponder auch ohne die Bestätigung durch den Lerntransponder funktionieren. 2. Lern- und Löschtransponder werden gelöscht, Benutzerkeys bleiben weiterhin gespeichert. 3. Der externe Jumper (Drahtbrücke) für die Riegel- / Fallenfunktion auf Klemme 3 und 4 wird eingelesen und die Betriebsart wird entsprechend im Speicher hinterlegt. Unmittelbar im Anschluss an den Reset sollten unbedingt der grüne Programmier- und der rote Löschtransponder zugewiesen werden. Dies wird angezeigt durch jeweils grünes bzw. rotes Blinken der LED. Dialock Furniture Terminal - Stand: 05.2006 - 732.29.133 29 Montage- und Bedienungsanleitung Kompletter Reset 1. Spannungsversorgung unterbrechen. 2. Resettaste durch die Öffnung betätigen und betätigt halten. Deutsch 3. Spannungsversorgung wieder herstellen, LED beginnt rot/grün wechselweise zu blinken. 4. Resettaste betätigt halten bis das Blinken aufhört und die LED dauerhaft grün leuchtet. 5. Resettaste freigeben, die LED beginnt wieder wechselweise zu blinken. Sobald das wechselweise Blinken aufhört ist der komplette Reset abgeschlossen. Funktionen des kompletten Reset 1. Der komplette Speicherinhalt wird gelöscht (alle Keys, Protokoll etc.) und sämtliche Parameter werden auf die Werkseinstellungen zurück gesetzt. 2. Der externe Jumper Riegel- / Fallenfunktion wird eingelesen und die Betriebsart entsprechend im Speicher hinterlegt. Unmittelbar im Anschluss an den Reset sollten unbedingt der grüne Programmier- und der rote Löschtransponder zugewiesen werden. Dies wird angezeigt durch jeweils grünes, bzw. rotes Blinken der LED. Makrofunktionen Dialock Makros sind Programme, die den Funktionsumfang des DFT erweitern. Ohne derartige Makros besteht keine logische Verknüpfung der Ein- und Ausgänge des DFT. Eine Benutzung der Ein- und Ausgänge ist ohne Makrofunktion nicht möglich. Zur logischen Verknüpfung von Eingangssignalen (Eingang 1 oder Eingang 2) mit dem Relaisausgang des DFT werden Software-Makros eingesetzt. Beispiel: Ein Tür-Überwachungskontakt einer Vitrine ist an Eingang 1 angeschlossen, ein akustischer Signalgeber an Relais 1. Wird nun die Tür der Vitrine nach Präsentieren eines gültigen Keys geöffnet, jedoch nach einer vorgegebenen Zeit nicht geschlossen, so wird über des Relais ein akustischer Alarm ausgelöst, um den Bediener zum Schließen der Tür zu veranlassen. Für die Entwicklung solcher Funktionen wenden Sie sich bitte an Ihren Dialock Service. 30 Dialock Furniture Terminal - Stand: 05.2006 - 732.29.133 Montage- und Bedienungsanleitung Übertragen eines Makros zum DFT 1. Den Transponder-Key mit dem Makro bereithalten. 2. Den Spezialtransponder #79 vor die Antenne halten. Ein kurzer Quittungston erfolgt, die LED blinkt schnell wechselnd rot-grün. Deutsch 3. Mit dem grünem Programmierkey die Berechtigung bestätigen. Die LED blinkt langsam wechselnd rot-grün. 4. Nun den Key mit dem Makro vor die Antenne halten, bis das Blinken endet, die LED leuchtet rot. 5. Fertig. Bei einem kompletten Reset werden im DFT gespeicherte Makros gelöscht und müssen gegebenenfalls wieder aufgespielt werden! Fragen und Antworten Ich habe eine Benutzerkarte verloren und möchte sie sperren. Wie geht das? Wenn eine Benutzerkarte verloren wurde und nicht mehr schließberechtigt sein soll, müssen alle Benutzerkarten im DFT gelöscht werden. Danach müssen allen schließberechtigten Benutzerkarten wieder Zutrittsrechte zugewiesen werden. Siehe unter: „Schließrechte aller Benutzerkarten entziehen“ (Seite 23). Ich habe eine Programmierkarte verloren und möchte sie sperren. Wie geht das? Führen Sie einen Kompletten Reset durch und weisen Sie direkt danach eine Programmier- und die Löschkarte neu zu. Das System öffnet nicht. Was muss ich tun? • Schließmechanik überprüfen, gegebenenfalls die Mechanik zuvor vollständig schließen. • Steckverbindung überprüfen, gegebenenfalls Stecker richtig einrastenlassen. Dialock Furniture Terminal - Stand: 05.2006 - 732.29.133 31 Montage- und Bedienungsanleitung Deutsch Technische Daten Abmessungen 100 x 50 x 25 mm (L x B x H) Versorgungsspannung 11-14 V AC oder 12-17 V DC Stromaufnahme typ. 75 mA, max. 550 mA (bei externer Antenne und 11 Schließgehäusen FLC) Kabellänge zur Spannungsversorgung 100 cm Buchse 1 für Dialock FLC oder 6-fach Verteiler (AMP Mate-N-LOK) Buchse 2 SMB für externe Antenne mit LED Buchse 3 Typ RJ11 (Westernbuchse 4/6) für Dialock Output Extender E/A Klemmleiste Kabelquerschnitt max. 0,5 mm2 Betriebstemperaturbereich 0° – 65° C Luftfeuchtigkeit 0 – 90 %, nicht kondensierend Sicherung 0,5 A intern am Power Output (gegen Überlast und Kurzschluss) 32 Dialock Furniture Terminal - Stand: 05.2006 - 732.29.133 Mounting and Operating Instructions Contents Brief instructions for Starting Up the DFT the first time ................................... 34 Items supplied ................................................................................................ 36 Area of application............................................................................................ 38 Performance characteristics ............................................................................. 38 Basics .............................................................................................................. 39 Instructions for installation ............................................................................... 40 Procedure .................................................................................................................... 41 English Wiring diagram Variant A: simultaneous locking ......................................................... 41 Dialock Furniture Terminal ......................................................................................... 43 Mounting ...................................................................................................................... 44 Antenna DFANT 2 ....................................................................................................... 44 Transformer ................................................................................................................ 46 6-fold distributor block ................................................................................................ 46 FLC Furniture Lock Case ........................................................................................... 46 Output Extender (optional) ......................................................................................... 47 FLC Plug .................................................................................................................... 48 Commissioning ................................................................................................. 50 Short instructions ............................................................................................. 51 Controlling the Furniture Lock Case ........................................................................... 51 Assigning access rights to user keys (simultaneous locking) ..................................... 52 Assigning access rights to user keys (individually locking) ......................................... 52 Withdrawing access rights from a user key (simultaneously and individually locking) 53 Withdrawing access rights from all user keys ............................................................. 53 Operating Parameters, Locking Mode ......................................................................... 54 Setting the Open Time ................................................................................................ 54 Setting the Output Delay Time .................................................................................... 54 Activating the toggle mode (bolt-lock function) ........................................................... 55 Operating instructions ................................................................................................. 55 Additional terminal points of the DFT/B Tag-it ISO .......................................... 57 Reset ................................................................................................................ 59 Simple Reset ............................................................................................................... 59 Complete Reset........................................................................................................... 60 Macro functions ................................................................................................ 60 FAQs ................................................................................................................. 61 Technical data .................................................................................................. 62 Dialock Furniture Terminal - Status: 05.2006 - 732.29.133 33 Mounting and Operating Instructions 1. Within the scope of this instruction manual there are repeatedly references to keys. These keys can be different models of transponder media such as key cards, key tags, key fobs, key sticks, etc. 2. Within the scope of this instruction manual there are repeatedly references to the presentation of transponder keys to the antenna of the DFT. These instructions refer to the internal as well as to the external antenna of the DFT depending on the type of the DFT. English 3. In the following text, the Dialock Furniture Terminal will be called DFT for short. Brief instructions for Starting Up the DFT the first time 1. Before installing in furniture have the following parts ready: Dialock Furniture Terminal DFT, external antenna (in case a DFT for external antenna is used), transformer, programming and erasing key. (See also info above 1.) 2. Connect the antenna to the Dialock Furniture Terminal. Do not connect the transformer to the DFT yet. Keep the green programming key and the red erasing key ready. 3. The following procedure must be carried out quickly and without interruption. Connect the transformer to the DFT. The LED flashes green. The unit gives a buzzing sound to acknowledge. Within 5 sec. hold the green programming key in front of the antenna at a distance of max. 2 cm (depending on transponder type. See information text 2 on this page). The unit buzzes to acknowledge successful teaching. If it flashes for longer than 5 sec. or if it flashes red, do not hold the green programming key in front of it, but disconnect it from the power supply and then re-connect it. While the LED is still flashes green, hold the green programming key in front of the antenna at a distance of max. 2 cm (depending on transponder type). A short beep sounds to acknowledge the assignment of the green programming key. 34 Dialock Furniture Terminal - Status: 05.2006 - 732.29.133 Mounting and Operating Instructions Remove the green programming key. Two short beeps sound and the LED blinks red. Present the red erasing key within 5 sec. A long beep acknowledges the assignment of the erasing key. 4. The LED now lights continuously red, the DFT is now in its normal operating state. Assigning access rights tor user keys (simultaneous locking) 2. Hold the user key to be assigned in front of the antenna within 5 sec. When the LED flashes green briefly, access right has been assigned to that user key and an acoustic signal is heard. 3. Remove the user key just assigned. 4. If another key has to be taught, hold the next user key in front of the antenna within 5 sec. If no user key is held in front within 5 sec. the DFT switches to normal operating mode. Assigning access rights to user keys (individually locking) 1. Hold the green programming key in front of the antenna several times (number of times corresponds to address number). Example: desired address number is 7: hold the green programming key 7 times briefly in front of the antenna. Every time the key is held in front, an acoustic signal is heard. 2. The LED flashes green several times (number of times corresponds to address number) and repeats the flashing process after a short interval. An acoustic signal is heard. 3. Hold the user key to be assigned in front of the antenna within 5 sec. When the LED flashes green briefly, right of access has been assigned to that user key. 4. Remove the user key just assigned. 5. If another card is required for the same address, hold the next user card in front of the antenna within 5 sec. If no user card is held in front within 5 sec. the DFT switches to normal operating mode. The minimum distance between two adjacent DFTs with internal antennas or two external antennas is 25 cm! Dialock Furniture Terminal - Status: 05.2006 - 732.29.133 35 English 1. Present the green programming key to the antenna. A long beeb sounds, the LED flashes green. Mounting and Operating Instructions It is essential that you read the „Start-up“ section (see Page50 ff.) of these instructions before commissioning, i.e. assignment of keys. Items supplied Description Mat. no. 1 Dialock Furniture Terminal DFT Tag-it ISO English for external antenna with internal antenna 237.58.110 237.58.120 (see page 39 "Basics") Fig. 1 1 external antenna 3m 1m 237.58.129 237.58.130 Fig. 2 1 transformer 821.80.041 Fig. 3 823.28.780 1 6-fold distributor Fig. 4 36 Dialock Furniture Terminal - Status: 05.2006 - 732.29.133 Mounting and Operating Instructions Description Mat. no. Programming card, green 917.42.001 Erasing card, red 917.42.002 Open time transponder # 74 Tag-it ISO 917.42.021 Output delay transponder # 81 Tag-it ISO 917.42.022 User key, white 917.44.001 English The following Häfele products are not part of the scope of delivery: Fig. 5 Output extender 910.51.081 Fig. 6 Furniture Lock Case with/without monitoring contact 237.56.0xx Fig. 7 Dialock Furniture Terminal - Status: 05.2006 - 732.29.133 37 Mounting and Operating Instructions Area of application The Dialock Furniture Terminal DFT/B is part of the Dialock electronic locking system. It is the central unit for the electro-mechanical locking systems for furniture such as showcases, drawers, lockers and roller shutters. Performance characteristics • Simple and convenient operation. • Use of up to 200 user keys per DFT. English • Control of up to 6 Furniture Lock Cases FLC, or with a second 6-fold distributor, up to 11 FLCs. The opening and closing process is the same for each FLC Furniture Lock Case (simultaneous action). • Possibility of controlling other FLCs by means of the optional Dialock Output Extender. This allows individual setting of the opening and closing process of each FLCs (individually addressable). • Selectable locking modes: locking cycle (Spring-lock function) and toggle mode (Bolt-lock function). • Output leads for external LED. • Relay output e.g. for buzzers. • Two digital inputs e.g. to monitor door status. • Adjustable output delay 38 Dialock Furniture Terminal - Status: 05.2006 - 732.29.133 Mounting and Operating Instructions Basics SchließzyklLocking cycle (Spring-lock function): When an authorised user key is presented the DFT unlocks the locking unit (FLC) for a certain adjustable period. During this time it is possible to open the furniture, e.g. a locker. After this period the Dialock Furniture Terminal automatically relocks the locking unit. Toggle mode (Bolt-lock function): When an authorised user key is presented the DFT unlocks the locking unit (FLC). However, the DFT keeps the locking unit open until an authorised user key is presented again. English Open Time: The Open Time determines -in locking cycle mode- the time during which the locking unit is held open upon the recognition of a valid key. After the open time has elapsed the locking unit is locked again. The Open Time can be adjusted to a maximum of 120 seconds in steps of 1 second. Output Delay Time: Upon the recognition of a valid key the Power Output and the output for the Output Extender are only activated after the output delay time has elapsed. The Output Delay Time can be adjusted to a maximum of 10 seconds in steps of 1 second. Dialock Furniture Terminal - Status: 05.2006 - 732.29.133 39 Mounting and Operating Instructions Instructions for installation Safety note: Electric power must be supplied via a safety transformer only. For safety reasons the transformer must not be connected to the mains socket during installation. Conditions for installation English Before installing the Dialock Furniture Terminal first determine suitable positions and locations for the system components: • Dialock Furniture Terminal DFT • External antenna • Transformer • Optional: 6-way distributor • Optional: FLC locking housing (electric locking) • Optional: Output extender, external LED, switch, read contacts When installing the individual system components always follow the respective installation instructions. For maintenance, ensure that the individual system components are accessible. When laying the connecting cables and installing the Dialock Furniture Terminal there is a risk for wires or components to be jammed or crushed. Always ensure that there is sufficient clearance between cables and moving parts. If necessary, attach suitable extensions to the cables. Secure all cables and wires with suitable cable guides (cable binders and holders) to prevent them from slipping. Lay all cables safely and clearly. 40 Dialock Furniture Terminal - Status: 05.2006 - 732.29.133 Mounting and Operating Instructions Required material and tools (not supplied with DFT): • Cross-headed screwdriver, size 2 • Awl • For wooden body and door: Hospa screws (Ø 3.5 mm x X mm, depending on body thickness) Otherwise suitable screws, e.g. sheet-metal screws for metal cupboards English • Various cable holders Procedure 1. Position and fix the Dialock Furniture Terminal and system components as shown in the wiring diagram. 2. Pass all connecting cables. 3. Assemble the plug at the end of the cable of the FLC lock case. 4. Connect the plugs for the connecting cables to the Dialock Furniture Terminal. Max. 11 FLC Furniture Lock Cases Wiring diagram Variant A: simultaneous locking Transformer 12 V / 20 VA optional: second distributor block 6-fold distributor block 6-fold Output Power in Antenna Extender 1 Dialock Furniture Terminal External antenna Fig. 8a Dialock Furniture Locking System with external antenna 1 Power-supply cable Dialock Furniture Terminal - Status: 05.2006 - 732.29.133 41 Mounting and Operating Instructions Variant B: individually addressable 1 FLC Furnituer Lock Case English Adress 1 Output Power in Antenna Extender 1 2 Dialock Furniture Terminal Fig. 8b Dialock Furniture Locking System 1 Power-supply cable with external antenna 2 Data cable adresses 2 - 9 1 Max. 8 FLC Furnituer Lock Cases Dialock Output Extender Transformer 12 V / 20 VA Variant C: Mixed operation, simultaneously locking and individually addressable Fig. 8c 42 Distributor block 6-fold Output Power in Antenna Extender Dialock Furniture Terminal Dialock Furniture Locking System with external antenna, 6-fold distributor block and Output Extender with total 14 FLCs Dialock Furniture Terminal - Status: 05.2006 - 732.29.133 1 Power supply cable 2 Data cable Adresses 2 - 9 Transformer 12 V / 20 VA Max. 8 FLC Furnituer Lock Cases Max. 6 FLC Furnituer Lock Cases simultaneously closing, Adress 1 Dialock Output Extender Mounting and Operating Instructions Dialock Furniture Terminal Reset 1 2 3 4 5 6 7 8 9 10 11 12 13 Terminal strip Power Output Fig. 9 Output Extender LED Dialock Furniture Terminal Tag-it ISO: Terminal strip and plug functions 1 Ext. LED + 8 Input 1 2 Ext. LED - 9 Input 1 3 Mode Jumper 10 Relay NO 4 Mode Jumper 11 Relay NC 5 Signal Ground 12 Relay COM 6 Input 2 13 Output 5 V, 50 mA max. 7 Input 2 Fig. 10 English Antenna Power Supply (Cable) Dialock Furniture Terminal Tag-it ISO: Terminal strip, Reset button Dialock Furniture Terminal - Status: 05.2006 - 732.29.133 43 Mounting and Operating Instructions Mounting 1. Fix the position of the Dialock Furniture Terminal. If required, the fastening lugs can be turned 90°. To do this, unscrew the cross-head screws and turn the lugs by 90°. Then tighten the screws to hand tightness. 2. Using the awl, mark the screw holes in the furniture body. 3. Attach the Dialock Furniture Terminal to the furniture body with 4 screws. English The minimum distance between two DFTs with internal antennas is 25 cm! The minimum distance between two external DFT anntennas is 25 cm! Antenna DFANT 2 Follow the installation instructions for the antenna! Protect the antenna cable against pulling. The bending radius of the antenna cable must minimum 50 mm! If necessary, use a pull-relief device. Protect cable against breaking: Do not fold the antenna cable! 1. Position the antenna. 2. Cut a recess with 35 mm diameter into the furniture body, and drill a central 8 mm hole for the antenna cable. 3. Push the antenna cable through the 8 mm hole, insert the antenna into the recess, and lock it in place. 4. Stick front foil into position. 44 Dialock Furniture Terminal - Status: 05.2006 - 732.29.133 Mounting and Operating Instructions 5. Fix the ferrite filter on the cable as near as possible to the DFT unit: English a. Open the ferrite filter, b. lay a simple loop into the respective cavity, and c. close the ferrite filter until the clip snaps in. Fig. 11 Antenna DFANT 2 The minimum distance between two external DFT antennas is 25 cm! Fig. 12 Fixing the ferrite filter to the antenna cable Dialock Furniture Terminal - Status: 05.2006 - 732.29.133 45 Mounting and Operating Instructions Transformer Ensure that you install the transformer correctly! 1. Determine the position of the transformer. 2. Mark the screw holes with the awl. 3. Attach the transformer with 3 screws. English 4. Lay cable and fix it in position. Otherwise malfunctions may occur. 6-fold distributor block The distributor block must remain accessible after installation! When selecting the location, ensure that all the connections also remain accessible after installation. 1. Insert the plug of the 6-fold distributor block into the socket marked „Power Output“ on the Dialock Furniture Terminal. 2. If required, secure the distributor with a cable holder. 3. Connect the optional second 6-fold distributor as shown in figs. 8a/c, pages 41/42. FLC Furniture Lock Case Follow the installation instructions for the FLC Furniture Lock Case! 46 Dialock Furniture Terminal - Status: 05.2006 - 732.29.133 Mounting and Operating Instructions Output Extender (optional) The Dialock Output Extender must remain accessible after installation! When selecting the mounting position ensure that all connections can be easily reached after installation. B C D E English A 1 Fig. 13 2 3 4 5 6 7 8 Output Extender - plug configuration A Outputs 1 - 8, connections for FLC Furniture Lock Cases, adresses 2-9 B Data line from Dialock Furniture Termina C Do not use! D Do not use! E Power supply from transformer 1. Attach Output Extender with 2 countersunk head screws (Ø = 5 mm). 2. Insert plug of Furniture Lock Case FLC to output 1 - 8 of Output Extender. If necessary use extension cable. 3. Plug data line to the Dialock Furniture Terminal into the western socket (connection B). 4. Connect power line (connection E) to the transformer. Dialock Furniture Terminal - Status: 05.2006 - 732.29.133 47 Mounting and Operating Instructions FLC Plug The plug at the end of the FLC connection cable must be assembled as follows: English Before connecting the plug the cable must be laid from the FLC to the DFT, Output Extender, or 6-fold-distributor, because the cable has to be pushed through small holes and grooves. After assembly it is not possible to re-open the plug without damaging it. 1. Pull the sides of the plug apart. 2. Separate the two wires in the cable. 3. Insert the wire ends into the plug until they click into position. Check firm locking by pulling slightly. 4. Close one side of the plug and press the cable into position. 5. Check the position of the cable. Take care not to crush the wires when closing the other side of the plug! 48 Dialock Furniture Terminal - Status: 05.2006 - 732.29.133 Mounting and Operating Instructions 6. The plug is now safely connected to the cable. Connect all the cables Plug in all the cables of the individual components as shown in the connection diagrams (Fig. 8 a/b/c, pages 41/42). English Connecting power supply Read the following instructions carefully before connecting the transformer to the mains socket! When the supply voltage is switched on the Dialock Furniture Terminal is ready for use and in the start-up mode. The Dialock Furniture Terminal is completely installed. A function test is only possible once the start-up process has been completed and a user key has been assigned. Fig. 14 Dialock Furniture Terminal - Status: 05.2006 - 732.29.133 49 Mounting and Operating Instructions Commissioning The Dialock Furniture Terminal is supplied in the so-called “Simple Mode” for Stand Alone (SA) operation. These instructions describe this mode only. Other modes are possible following consultation with the dealer or the service agency. English Ensure that unauthorised persons do not misuse the user keys. Keep the programming and the erasing key in a safe place because they are used to assign and to withdraw access rights to individual user keys. At the first start-up, the programming and erasing keys themselves must be „assigned“: This step can only be carried out directly after applying the supply voltage for the first time. 1. Have the DFT, external antenna (if required), transformer, programming key, and erasing key ready. 2. Connect the antenna to the DFT (in case of a DFT with external antenna). Do not yet connect the transformer to the DFT. Keep the green programming key and the red erasing key ready. 3. The following procedure must be carried out quickly and without interruption: Connect the transformer to the DFT. The LED flashes green. If no key is presented within 5 secs and the LED flashes red, do not present any key to the antenna, but disconnect it from the power supply and then re-connect it. (See page 34, info 2.) While the LED is flashing green, hold the green programming key in front of the antenna at a max. distance of 2 cm. A short beep sounds to acknowledge the assignment of the key. Remove the green programming card. Two short beeps sound and the LED blinks red. Present the red erasing key within 5 sec. A long beep acknowledges the assignment of the erasing key. 4. The LED now lights continuously red, the DFT is in operating mode. 50 Dialock Furniture Terminal - Status: 05.2006 - 732.29.133 Mounting and Operating Instructions Short instructions Simple Mode / Stand Alone Controlling the Furniture Lock Case Individually addressable: Each FLC Furniture Lock Case (fig. 8c) connected to the Output Extender (not included in package) opens and closes irrespective of the other FLCs connected to it. User keys have to be assigned individually to each FLC. The FLCs are addressed according to the following connection scheme: Address Connection on DFT: 1 Power Output on Output Extender: 2 Output 1 3 Output 2 4 Output 3 5 Output 4 6 Output 5 7 Output 6 8 Output 7 9 Output 8 Dialock Furniture Terminal - Status: 05.2006 - 732.29.133 51 English Simultaneous locking: All the FLC Furniture Lock Cases connected to the 6-fold distributor (fig. 8a/c) open and close simultaneously if a valid user key is detected. Mounting and Operating Instructions Assigning access rights to user keys (simultaneous locking) 1. Hold the green programming key in front of the antenna. A beep sounds., the LED flashes green. 2. The LED flashes green. 3. Hold the user key to be assigned in front of the antenna within 5 sec. When the LED flashes green briefly, access right has been assigned to that user key, and a beep sounds. 4. Remove the user key just assigned. English 5. Hold the next user key to be assigned in front of the antenna within 5 sec. Assigning access rights to user keys (individually locking) 1. Hold the green programming key in front of the antenna several times: The number of times corresponds to address number. Example: desired address number is 7: Hold the green programming key 7 times briefly in front of the antenna. Each time the key is presented a beep sounds. 2. The LED flashes green several times according to the address number, pauses, and repeats the flashing. A beep sounds. 3. Hold the user key to be assigned in front of the antenna within 5 sec. When the LED flashes green shortly, access right has been assigned to that user key. 4. Remove the user key assigned. 5. Hold the next user key to be assigned in front of the antenna within 5 sec., if an additional key is desired for the same address. 52 Dialock Furniture Terminal - Status: 05.2006 - 732.29.133 Mounting and Operating Instructions Withdrawing access rights from a user key (simultaneously and individually locking) 1. Hold the red erasing key in front of the antenna. The LED flashes red. A long beep sounds. 2. Hold the user key to be erased in front of the antenna. 3. The LED flashes red. Access right is withdrawn. A long beep sounds. If a user key is lost and thus its access right has to be erased from the DFT, all user keys assigned to the DFT must first be erased, and then reassigned. 1. Hold the red erasing key in front of the antenna. The LED flashes red. A long beep sounds. 2. Hold the green programming key in front of the antenna. The LED lights up red for a moment. All locking rights are erased. A long beep sounds. 3. Re-assign access rights to all user keys. See „Assigning access rights to user keys“, page 52. Dialock Furniture Terminal - Status: 05.2006 - 732.29.133 53 English Withdrawing access rights from all user keys Mounting and Operating Instructions Operating Parameters, Locking Mode Special setup keys are required to respectively set the Open Time, i.e. the time during which the FLC is open before it automatically locks, and the Output Delay, i.e. the time between the recognition of a valid key and the response of the DFT output. These setup keys are not included in the package and can be obtained from a dealer, or directly from Häfele. English The setting of the toggle mode (bolt-lock function) for the FLCs is done by inserting a wire jumper between terminal 3 and 4 on the terminal strip followed by a simple reset of the DFT (see page 59). Setting the Open Time 1. Hold the “Open Time Transponder #74” in front of the antenna. The LED flashes red-green alternately. 2. Hold the green programming key in front of the antenna within 4 sec. The LED flashes green. The open time conforms to the length of time the green programming key is held in front of the antenna (max. 120 sec). Setting the Output Delay Time With the assistance of the special transponder "Output Delay Key #81", the period between the detection of a valid key and the activation of the output can be set between 0 and 10 sec. in steps of one sec. 1. Hold the “Output Delay Key #81” in front of the antenna. The LED flashes red-green alternately. 2. Hold the green programming key in front of the antenna within 4 sec. The LED flashes green. 3. The Output Delay Time conforms to the length of time the green programming key is held in front of the antenna (max. 10 sec). If the key is presented for more than 10 sec the maximally time of 10 sec is set. 54 Dialock Furniture Terminal - Status: 05.2006 - 732.29.133 Mounting and Operating Instructions Activating the toggle mode (bolt-lock function) 1. Insert a jumper between terminal 3 and 4 of the terminal strip. 2. Carry out a simple reset. During this reset the jumper is recognized and the DFT sets to toggle mode. 3. To de-activate the toggle mode and to return to the lock cycle remove the jumper and carry out another simple reset. English For all the FLCs connected the Open Time and the opening mode are the same. Differing configurations are not possible. Operating instructions 1. Hold a valid user key in front of the antenna. The LED lights green. 2. The appliance (i.e. the corresponding FLC) is unlocked for the Open Time set (default = approx. 5 sec). If an Output Delay is set the FLCs are triggered after this time has elapsed. If the LED does not change from red to green: Hold the user key closer to the antenna. If the LED still does not change from red to green: The key is not authorised to access. Special feature Locking process of Dialock Furniture Terminal in toggle mode (bolt-lock function) using the Output Extender and user keys with different authorisations (authorisation pattern): Initial state: All FLCs are locked. As soon as a valid user key (e.g. Key 1) is presented, the Dialock Furniture Terminal unlocks all the FLCs for which authorisation is assigned. Dialock Furniture Terminal - Status: 05.2006 - 732.29.133 55 Mounting and Operating Instructions If a second valid user key (Key 2) with a different authorisation pattern is presented, all the previously unlocked FLCs are locked again, and the LED lights red. The second key (Key 2) must then presented again to unlock the related FLCs. Example: Access plan Key 1 1 x 2 x English Showcase/FLC Key 2 3 x 4 x 5 x x Example All showcases (FLC 1 - 5) are locked. The LED lights red. Step 1 Present Key 1: 1. FLC 1, 2 and 5 are unlocked. 2. FLC 3 and 4 are locked. 3. The LED lights green. Step 2 Present Key 2: 4. All FLCs (1 - 5) are locked. 5. The LED lights red. Step 3 Present Key 2 once more: 6. FLC 3, 4, and 5 are unlocked 7. The LED lights green. 56 Dialock Furniture Terminal - Status: 05.2006 - 732.29.133 Mounting and Operating Instructions Additional terminal points of the DFT/B Tag-it ISO Terminals for external LED At terminal point 1 and 2 of the terminal strip an external LED can be connected. This must be a 2-lead bi-directional bi-color LED. The status of this indicator corresponds with the status of the LED in the DFT or in the external antenna. For details see page 43, fig. 9 The DFT features two signal inputs (current controlled opto-coupled inputs) rated for 20 mA. There is an internal current source to drive these inputs. The inputs (terminal point 6/7 and 8/9 of the terminal strip) can simply be bridged with an ordinary contact to create an input signal. The status of the inputs can only be used with a Dialock macro program. For details see page 43, fig. 9 Potential-free relay output The DFT features a potential-free relay output (COM, NC, NO) at terminal 10, 11 and 12. The control of this relay is subject to application specific Dialock macros. The delayed operation which may possibly be set in the DFT has no effect on this output. For details see page 43, fig. 9 For the relay, note the following maximum data for the connected load. Specifications: Switching power, max. 60 VA, 30 W Switching voltage, max. 125 V AC, 60 V DC Operating current, max. 1A Dialock Furniture Terminal - Status: 05.2006 - 732.29.133 57 English Two inputs for external contacts or switches Mounting and Operating Instructions 5 Volt output The 5 V output at terminal point 13 of the terminal strip can be used to directly drive small electric loads such as buzzers, or other indicators via the relay output without the need of an additional power source. For details see page 43, fig. 9 Example: English Electronic furniture access control with door status monitoring DFANT 2 Door contact Piezo buzzer 1 2 3 4 5 6 7 8 9 10 11 12 13 Dialock Lock cases FLC Distributer 6-fold Dialock Furniture Terminal DFT/B Tag-it ISO Fig. 15 For this application example, a macro should be saved in the DFT (see page 60) which tests the validity of the keys and the status of the door contact, and activates the signal transmitter when the door remains open for more than 60 sec. or is opened without a valid key being presented. Multiple door contacts can be connected. 58 Dialock Furniture Terminal - Status: 05.2006 - 732.29.133 Mounting and Operating Instructions Reset A reset pushbutton is located behind the small 1 mm opening in the DFT housing right of the terminal strip. The hardware reset is accomplished as follows. Simple Reset 1. Disconnect DFT from power supply. 3. Connect DFT to power. The LED flashes alternating red/green. 4. Relase the reset button. After a short time the simple reset is completed. Functions of the Simple Reset 1. The project code is reset to 0815. This causes all special transponders (function keys) to work without the programming key. 2. Programming and erasing keys are deleted. User keys remain stored. 3. A possible jumper on pin 3/4 of the terminal strip is recognized, and the operating mode is set accordingly. Directly after a simple reset a green programming key and a red erasing key should be assigned! This is indicated through green resp. red flashing of the LED. Dialock Furniture Terminal - Status: 05.2006 - 732.29.133 59 English 2. Use a small pin to push the reset button and keep it pushed. Mounting and Operating Instructions Complete Reset 1. Disconnect DFT from power supply. 2. Use a small pin to push the reset button and keep it pushed. 3. Connect DFT to power. The LED flashes alternating red/green. 4. Keep the reset button pressed until the LED stops flashing and continuously lights green. English 5. Release the reset button. The LED flashes alternating green/red. As soon as the alternating of the LED stops the reset is completed. Functions of the complete Reset 1. The data storage of the DFT is completely cleared, i.e. all keys and all parameters are reset to the original default. 2. A possible jumper on pin 3/4 of the terminal strip is recognized, and the operating mode is set. accordingly. Directly after a complete reset a green programming key and a red erasing key should be assigned! This is indicated through green resp. red flashing of the LED. Macro functions Dialock macros are programs which expand the range of functions of the DFT. Without these macros, no logical link exists between the inputs and outputs of the DFT. Without macro function, the inputs and outputs cannot be used. Logical conjunctions between DFT input signals (Input 1 and Input 2) and the relay of the DFT are realised through Dialock macro functions. Example: A store cabinet’s door contact is connected to Input 1, a buzzer is connected to the relay. If now the showcase is opened after the presentation of a valid key, but not closed after a preset time, a sound signal goes off to remind the user to close the cabinet door. For the development of such application specific functions please contact your Dialock Service Partner or the local Häfele Sales Office. 60 Dialock Furniture Terminal - Status: 05.2006 - 732.29.133 Mounting and Operating Instructions Transfer a macro to the DFT 1. Have the key with the macroi ready. 2. Present the special key #79. A confirmation beep sounds, the LED blinks red-green in a fast mode. 3. Confirm the authorisation with the green Programming Key The LED blinks red-green in a slow mode. 4. Present the key with the macro until the LED stops blinking and lights constantly red English 5. Ready. With a Complete Reset all macros stored in a DFT are erased and have to be re-transferred if necessary. FAQs I have lost my user key and want to cancel it. How do I do it? If a user key is lost and is to have its access right withdrawn, all the user keys on the Dialock Furniture Terminal have to be erased and then all the remaining keys have to be re-assigned. See page 53 „Withdrawing access rights from all user keys“. I have lost a programming key and want to cancel it. How do I do it? Accomplish a Complete Reset and immediately re-assign a new green programming key and a new red erasing key. The system does not open. What should I do? • Check the closing mechanism. If necessary, close the mechanism completely beforehand. • Check the plug-in connection. If necessary, allow the plug to click fully into position. Dialock Furniture Terminal - Status: 05.2006 - 732.29.133 61 Mounting and Operating Instructions English Technical data Physical dimensions 100 x 50 x 25 mm (l x w x h) Supply voltage 11-14 V AC or 12-17 V DC Current consumption typ. 75 mA, max. 550 mA (with external antenna and 11 FLCs) Length of power cable 100 cm Plug 1 for Dialock FLC or 6-fold power distributor (AMP Mate-N-LOK) Plug 2 SMB for external antenna with LED Plug 3 Type RJ11 (Western plug 4/6) for Dialock Output Extender I/O terminal block Cable core width max. 0.5 mm2 Operating temperature range 0° – 65° C Humidity 0 – 90 %, non-condensing Output protection 0.5 A internal fuse against overload and short circuit at power output 62 Dialock Furniture Terminal - Status: 05.2006 - 732.29.133 Copyright D Der Nachdruck dieses Dokuments, auch auszugsweise, oder die Nachahmung der Abbildungen und Zeichnungen sowie die Nachahmung der Gestaltung sind verboten. Für Druckfehler und Irrtümer, die bei der Erstellung der Montageanleitung unterlaufen sind, ist jede Haftung ausgeschlossen. Liefermöglichkeiten und technische Änderungen vorbehalten. Stand: 05.2006 GB The reprint of this document, even extracts, or copying of the illustrations and drawings as well as copying of the layout are prohibited. No liability is accepted for printing errors or errors occurred during the creation of the mounting instructions. We reserve the right for technical changes and changes of availability. Status 05.2006 Art. no.: 732.29.133 Sphinx Electronics GmbH & Co KG Tullastraße 3 D-79341 Kenzingen 05.2006 / 732.29.133 Support: (+49) 74 52 / 9 52 84 Email: [email protected]