1
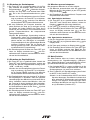
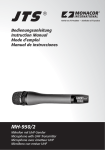
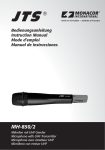
®
Vertrieb von JTS-Produkten — Distribution of JTS products
Bedienungsanleitung
Instruction Manual
MH-8990
Mikrofon mit UHF-Sender
Microphone with UHF Transmitter
DEUTSCH
Bevor Sie einschalten …
Wir wünschen Ihnen viel Spaß mit Ihrem neuen
Gerät von JTS. Bitte lesen Sie diese Bedienungsanleitung vor dem Betrieb gründlich
durch. Nur so lernen Sie alle Funktionsmöglichkeiten kennen, vermeiden Fehlbedienungen
und schützen sich und Ihr Gerät vor eventuellen
Schäden durch unsachgemäßen Gebrauch.
Heben Sie die Anleitung für ein späteres Nachlesen auf.
ENGLISH
Der deutsche Text beginnt auf der Seite 4.
Before switching on …
We wish you much pleasure with your new
JTS unit. Please read these operating instructions carefully prior to operating the unit. Thus,
you will get to know all functions of the unit,
operating errors will be prevented, and yourself
and the unit will be protected against any
damage caused by improper use. Please keep
the operating instructions for later use.
The English text starts on page 8.
2
1
12
➁
MHz
SET
Mh-8990
2
3
4
5
6
➂
12
7
8
F
OF
OF
F
3
POWE
R
E
MUT
9
10
11
➀
DEUTSCH
Bitte klappen Sie die Seite 3 heraus. Sie sehen
dann immer die beschriebenen Bedienelemente.
1
Übersicht der Bedienelemente
1 Mikrofonkapsel
2 Anzeige des Batteriestatus
3 Anzeige der Sendefrequenz oder der Sendegruppe und des Übertragungskanals (Abb. 4)
Nach dem Einschalten des Mikrofons und beim
Betätigen der Tasten (4 – 6) leuchtet die DisplayHintergrundbeleuchtung auf. Sie erlischt automatisch ca. 10 s nach dem letzten Tastendruck.
4 Taste
zur Abwärtssuche für Sendegruppe/
Kanal (im Gruppen-/Kanaleinstellmodus), zum
Verringern der Frequenz (im Frequenzeinstellmodus) bzw. der Empfindlichkeit (im Empfindlichkeitseinstellmodus) und zum Deaktivieren der
Sperrfunktion (im Sperreinstellmodus)
5 Taste
zur Aufwärtssuche für Sendegruppe/
Kanal (im Gruppen-/Kanaleinstellmodus), zum
Erhöhen der Frequenz (im Frequenzeinstellmodus) bzw. der Empfindlichkeit (im Empfindlichkeitseinstellmodus) und zum Aktivieren der Sperrfunktion (im Sperreinstellmodus)
6 Taste SET
bei nicht gesperrtem Mikrofon:
zum Aufrufen und Verlassen der Einstellmodi für
Sendegruppe/Kanal, Frequenz, Empfindlichkeit,
Sperrfunktion → Kap. 5.1, 5.2, 5.3 und 5.4.1
bei gesperrtem Mikrofon:
zum Aufrufen und Verlassen des Einstellmodus für
die Sperrfunktion → Kap. 5.4.2
7 Kappe für das Batteriefach; zum Einsetzen oder
Wechseln der Batterien (2 x 1,5-V-Mignon-Batterie) die Kappe abschrauben
8 Kennzeichnungsring; lässt sich gegen einen der
beiliegenden Farbringe austauschen
9 Ein-/Ausschalter
10 Sicherungskappe zum Abdecken des Schalters,
der gegen unbeabsichtigtes Verstellen geschützt
werden soll
11 Mute-Schalter zur kurzen, störungsfreien Unterbrechung („Räusper-“ bzw. „Rückfrage-Modus“)
und anschließender sofortiger Betriebsbereitschaft
ohne Zeitverzögerung
12 4-poliger Steckkontakt, jeweils an der Mikrofonkapsel (Abb. 2) und am Handteil (Abb. 3);
vor dem Zusammenschrauben von Mikrofonkapsel
und Handteil die Kontakte ineinanderstecken
4
2
Wichtige Hinweise für den Gebrauch
Das Mikrofon entspricht allen erforderlichen Richtlinien der EU und ist deshalb mit
gekennzeichnet.
● Das Mikrofon ist nur zur Verwendung im Innenbereich geeignet. Schützen Sie es vor Tropf- und
Spritzwasser, hoher Luftfeuchtigkeit und Hitze (zulässiger Einsatztemperaturbereich 0 – 40 °C).
● Verwenden Sie für die Reinigung nur ein trockenes,
weiches Tuch, niemals Chemikalien oder Wasser.
● Wird das Mikrofon zweckentfremdet, falsch bedient
oder nicht fachgerecht repariert, kann keine Haftung
für daraus resultierende Sach- oder Personenschäden und keine Garantie für das Mikrofon übernommen werden.
Soll das Mikrofon endgültig aus dem Betrieb
genommen werden, übergeben Sie es zur
umweltgerechten Entsorgung einem örtlichen Recyclingbetrieb.
Werfen Sie verbrauchte Batterien bzw. defekte Akkus
nicht in den Hausmüll, sondern geben Sie sie nur
in den Sondermüll (z. B. Sammelbehälter bei Ihrem
Einzelhändler).
3
Einsatzmöglichkeiten
Dieses dynamische Handmikrofon mit integriertem
Multifrequenz-Sender bildet mit dem MultifrequenzEmpfänger US-1000D von JTS ein drahtloses AudioÜbertragungssystem. Zum Einstellen der Sendefrequenz stehen zwei Modi zur Verfügung, um höchste
Flexibilität zu gewährleisten:
1. Im Gruppenmodus arbeitet das Funkmikrofon mit
vier Sendegruppen (A – D), denen jeweils 16 Übertragungskanäle zugeordnet sind. Insgesamt stehen
also 64 werkseitig eingestellte Übertragungskanäle
zur Verfügung. Diese Kanäle im UHF-Bereich von
790 – 814 MHz können frei ausgewählt werden.
2. Im Frequenzmodus lässt sich die Sendefrequenz
innerhalb des UHF-Bereichs 790 – 814 MHz frei
auswählen (Frequenzraster 25 kHz).
Zum Lieferumfang gehören ein Mikrofonkoffer, ein
Mikrofonhalter und farbige aufsteckbare Kunststoffringe zur Kennzeichnung des Mikrofons.
3.1 Konformität und Zulassung des Funkmikrofons
Das Funkmikrofon ist nach den einschlägigen Normen
der R + TTE-Richtlinie geprüft. Die Konformitätserklärung kann im Internet auf der Homepage von JTS
abgerufen werden: www.jts-germany.de
Der Frequenzbereich 790 – 814 MHz ist in Deutschland allgemein zugeteilt, die Allgemeinzuteilung einzelner Frequenzen des Bereichs ist jedoch an die Art
der Nutzung gebunden. Das Funkmikrofon ist dementsprechend anmelde- und gebührenfrei, sofern bei
der Wahl der Sendefrequenz die Vorgaben der Verfügung 91/2005 beachtet werden. Sie finden die Verfü-
4
Stromversorgung
Setzen Sie nur Batterien des gleichen Typs ein und
tauschen Sie die Batterien immer komplett aus.
● Nehmen Sie bei längerem Nichtgebrauch (z. B. länger als eine Woche) die Batterien heraus. So bleibt
das Mikrofon bei einem eventuellen Auslaufen der
Batterien unbeschädigt.
1) Die Kappe (7) für das Batteriefach abschrauben.
2) Zwei 1,5-V-Batterien der Größe Mignon (R6, AA),
mit den Plus- und Minuspolen wie auf dem Halter
aufgedruckt, einsetzen.
3) Die Batteriefachkappe gerade an das Gewinde des
Mikrofonkörpers ansetzen und festschrauben.
●
5
Inbetriebnahme
1) Das Mikrofon noch ausgeschaltet lassen. Zuerst
den Empfänger auf einen störungsfreien Übertragungskanal einstellen, siehe Bedienungsanleitung
des Empfängers.
2) Danach das Mikrofon einschalten: Den Ein-/Ausschalter (9) unten am Mikrofon in die Position
POWER stellen. Gegebenenfalls vorher die Sicherungskappe (10) nach unten schieben. Im Display
(3) erscheint die eingestellte Sendegruppe mit entsprechendem Übertragungskanal (im Gruppenmodus), z. B.
oder die Sendefrequenz (im
Frequenzmodus) sowie ein Batteriesymbol (2), das
den aktuellen Ladezustand der Batterien in mehreren Stufen anzeigt:
voll
3)
4)
5)
6)
erschöpft
Sind die Batterien verbraucht (Anzeige
), wechselt zusätzlich zur Warnung am Empfänger die Displayfarbe von Grün auf Orange.
Die leicht versenkten Tasten (4 – 6) lassen sich
ohne weitere Hilfsmittel mit der Daumenspitze einfach betätigen.
Das Mikrofon auf die gleiche Sendegruppe und den
gleichen Übertragungskanal oder auf die gleiche
Funkfrequenz wie am Empfänger einstellen:
→ Kapitel 5.1 bzw. Kapitel 5.2.
In das Mikrofon sprechen bzw. singen. Der MuteSchalter (11) muss in der Position OFF stehen,
anderenfalls wird kein Audiosignal übertragen. Durch
Verändern der Empfindlichkeit lässt sich der Lautstärkepegel des Mikrofons korrigieren → Kap. 5.3.
Das Mikrofon kann gesperrt werden, um ein versehentliches Verändern der Einstellungen oder um
ein Ausschalten zu verhindern → Kap. 5.4.
7) Die Signalübertragung lässt sich für kurze Unterbrechungen störungsfrei stumm schalten → Kap. 5.5.
8) Der Kennzeichnungsring (8) kann auch gegen einen
der beiliegenden farbigen Ringe ausgetauscht werden. Mehrere Systeme mit unterschiedlichen Funkfrequenzen lassen sich so farblich codieren.
DEUTSCH
gung im Internet auf der Homepage der Bundesnetzagentur: www.bundesnetzagentur.de
Da für Funksysteme, die in diesem Frequenzbereich arbeiten, in anderen Ländern eventuell andere
gesetzliche Bestimmungen gelten, informieren Sie
sich vor der Inbetriebnahme des Systems außerhalb
Deutschlands bitte bei der MONACOR-Niederlassung
oder der entsprechenden Behörde des Landes.
9) Zum Ausschalten des Mikrofons nach dem Betrieb
den Ein-/Ausschalter (9) auf OFF stellen.
5.1 Einstellen der Sendegruppe und des Übertragungskanals
1) Die Taste SET (6) 2 s gedrückt halten, bis im Display entweder die Anzeige „MHz“ blinkt oder die
Gruppenanzeige , , oder . Blinkt die Anzeige
„MHz“, die Taste SET noch einmal kurz betätigen,
um in den Gruppeneinstellmodus zu gelangen.
Hinweis: Um den Einstellmodus ohne eine Einstellung zu verlassen, die Taste SET so oft drücken,
bis im Display
erscheint. Das Mikrofon
schaltet danach auf normalen Betrieb zurück.
2) Mit den Pfeiltasten die Sendegruppe einstellen: mit
der Taste
(4) werden die Gruppen absteigend
durchlaufen, mit der Taste
(5) aufsteigend. Die
zugehörigen Kanäle und Sendefrequenzen sind in
der Tabelle Abb. 4 angegeben.
3) Durch erneutes Drücken der Taste SET den
Kanaleinstellmodus aufrufen. Im Display blinkt die
Kanalanzeige 1 – 16.
4) Mit den Pfeiltasten den Übertragungskanal einstellen: mit der Taste werden die Kanäle absteigend
durchlaufen, mit der Taste aufsteigend.
5) Die Einstellung durch Drücken der Taste SET speichern. Im Display erscheint kurz
, der Einstellmodus wird verlassen und das Mikrofon wechselt auf den Normalbetrieb.
Gruppe
Kanal
1
2
3
4
5
6
7
8
9
10
11
12
13
14
15
16
A
B
C
D
790,875
792,625
794,250
795,625
797,125
798,875
801,125
802,250
803,625
805,250
805,750
808,625
809,125
810,000
813,250
813,750
790,750
791,375
793,125
794,000
795,250
796,250
796,875
798,000
798,875
800,250
803,250
804,000
805,625
806,750
808,250
813,750
791,125
791,750
792,625
793,750
794,500
796,125
796,875
798,250
799,000
800,875
804,500
805,875
806,625
807,750
808,375
813,750
790,625
791,125
791,875
793,625
795,875
797,125
797,875
799,125
800,875
801,375
802,875
803,375
804,125
806,250
807,625
813,625
Abb. 4 Sendefrequenzen in MHz der Gruppen und Kanäle
®
5
DEUTSCH
5.2 Einstellen der Sendefrequenz
5.4 Mikrofon sperren/entsperren
1) Die Taste SET (6) 2 s gedrückt halten, bis im Display entweder die Anzeige „MHz“ blinkt oder die
Gruppenanzeige , , oder . Blinkt die Gruppenanzeige, die Taste SET noch zweimal kurz betätigen, um in den Frequenzeinstellmodus zu gelangen.
Hinweis: Um den Einstellmodus ohne eine Einstellung zu verlassen, die Taste SET so oft drücken,
bis im Display
erscheint. Das Mikrofon
schaltet danach auf normalen Betrieb zurück.
2) Mit den Pfeiltasten die Frequenz einstellen: bei
jedem Drücken der Taste
(4) verringert sie sich
um 25 kHz, bei jedem Drücken der Taste
(5)
erhöht sie sich um 25 kHz. Zum Durchlaufen eines
großen Frequenzbereiches die entsprechende
Taste gedrückt halten.
Hinweis: Bei gleichzeitiger Verwendung mehrerer
Funksysteme sollten die Funkfrequenzen der
einzelnen Systeme sorgfältig aufeinander abgestimmt werden, um Störungen zu vermeiden.
Frequenzbeispiele für den gleichzeitigen Betrieb
mehrerer Systeme finden Sie im Internet auf
www.jts-germany.de unter „Informationen/Intermodulationsfreies Frequenzsetup“.
3) Die Einstellung durch Drücken der Taste SET speichern. Im Display erscheint kurz
, der Einstellmodus wird verlassen und das Mikrofon wechselt auf den Normalbetrieb.
Bei gesperrtem Mikrofon ist es nicht möglich,
a das Mikrofon auszuschalten; wird bei gesperrtem
Mikrofon der Ein-/Ausschalter (9) auf OFF gestellt,
zeigt das Display
.
b die Einstellmodi für Gruppe/Kanal, Frequenz und
Empfindlichkeit aufzurufen.
5.3 Einstellen der Empfindlichkeit
Die Mute-Funktion dient zur kurzen, störungsfreien
Unterbrechung der Signalübertragung („Räusper-“
bzw. „Rückfrage-Modus“) und anschließender sofortiger Betriebsbereitschaft ohne Zeitverzögerung.
1) Den Schalter MUTE (11) unten am Mikrofon in die
Position MUTE stellen. Gegebenenfalls vorher die
Sicherungskappe (10) nach oben schieben.
2) Zum Fortfahren der Signalübertragung den Schalter MUTE in die Position OFF stellen.
Hinweis: In der Schalterposition MUTE wird keine
Sprache übertragen; das Mikrofon befindet sich
aber weiterhin im Sendemodus und verbraucht
Energie. Bei längeren Unterbrechungen daher
unbedingt das Mikrofon mit dem Ein-/Ausschalter (9) abschalten (Position OFF).
1) Die Taste SET (6) 2 s gedrückt halten, danach die
Taste SET noch dreimal kurz drücken, sodass das
Display die aktuelle Empfindlichkeit anzeigt (0 dB,
-6 dB, -12 dB oder -24 dB).
Hinweis: Um den Einstellmodus ohne eine Einstellung zu verlassen, die Taste SET so oft drücken,
bis im Display
erscheint. Das Mikrofon
schaltet danach auf normalen Betrieb zurück.
2) Die Empfindlichkeit nach der Anzeige AF im Display
des Empfängers so einstellen, dass ein optimaler
Lautstärkepegel des Mikrofons erreicht wird. Bei zu
hoher Lautstärke verzerrt das Mikrofon, dann mit
der Taste
(4) einen niedrigeren Wert einstellen.
Bei zu geringer Lautstärke ergibt sich ein schlechter Rauschabstand, dann mit der Taste (5) einen
höheren Wert einstellen.
3) Die Einstellung durch Drücken der Taste SET speichern. Im Display erscheint kurz
, der Einstellmodus wird verlassen und das Mikrofon wechselt auf den Normalbetrieb.
6
5.4.1 Sperrfunktion aktivieren
1) Die Taste SET (6) 2 s gedrückt halten, danach die
Taste SET noch viermal kurz drücken, sodass im
Display
blinkt (Sperrung deaktiviert).
2) Die Taste (5) drücken: Im Display blinkt
.
3) Die Einstellung durch Drücken der Taste SET speichern. Im Display erscheint kurz
, der Einstellmodus wird verlassen und das Mikrofon wechselt auf den Normalbetrieb.
5.4.2 Sperrfunktion deaktivieren
1) Der Ein-/Ausschalter (9) muss auf POWER stehen.
2) Die Taste SET (6) 3 s gedrückt halten, bis
im
Display blinkt.
3) Die Taste (4) drücken: Im Display blinkt
.
4) Die Einstellung durch Drücken der Taste SET speichern. Im Display erscheint kurz
, der Einstellmodus wird verlassen und das Mikrofon wechselt auf den Normalbetrieb.
5.5 Mute-Funktion
Austausch-Mikrofonkapsel
Die Mikrofonkapsel (1) lässt sich gegen die Kondensator-Mikrofonkapsel DMC-8000-6 von JTS austauschen. Diese hat eine Supernieren-Richtcharakteristik
und einen größeren Frequenzbereich (50 – 18 000 Hz).
1) Die Mikrofonkapsel (1) abschrauben.
2) Die Austausch-Mikrofonkapsel so auf das Handteil
setzen, dass die 4-poligen Steckkontakte (12) von
Kapsel und Handteil ineinanderfassen, dann die
Kapsel auf das Handteil schrauben.
7
Technische Daten
Gerätetyp: . . . . . . . . . dynamisches Handmikrofon
mit PLL-Multifrequenz-Sender
Richtcharakteristik: . . Hyperniere
Funkfrequenzbereich: 790 – 814 MHz
DEUTSCH
6
Audiofrequenzbereich: 50 – 16 000 Hz
Frequenzstabilität: . . . ±0,005 %
Sendeleistung:. . . . . . 10 mW (EIRP)
Einsatztemperatur: . . 0 – 40 °C
Stromversorgung: . . . zwei 1,5-V-Batterien der
Größe Mignon (R6, AA)
Abmessungen:. . . . . . Ø 53 mm x 245 mm
Gewicht:. . . . . . . . . . . 360 g
Änderungen vorbehalten.
Diese Bedienungsanleitung ist urheberrechtlich für MONACOR ® INTERNATIONAL GmbH & Co. KG geschützt.
Eine Reproduktion für eigene kommerzielle Zwecke – auch auszugsweise – ist untersagt.
®
7
ENGLISH
Please unfold page 3. Then you can always see the
operating elements described.
1
Operating Elements
1 Microphone cartridge
2 Battery status indication
3 Indication of the transmission frequency or the transmission group and the transmission channel (fig. 4)
After switching on the microphone and when
actuating the keys (4 – 6), the display background
illumination will light up. It will automatically be
extinguished approx. 10 s after the last actuation of
a key.
4 Key
for scanning the transmission group/channel in descending order (in the group adjusting
mode/channel adjusting mode), for decreasing the
frequency (in the frequency adjusting mode) or the
sensitivity (in the sensitivity adjusting mode), and
for deactivating the locking function (in the lock
adjusting mode)
5 Key
for scanning the transmission group/channel in ascending order (in the group adjusting
mode/channel adjusting mode), for increasing the
frequency (in the frequency adjusting mode) or the
sensitivity (in the sensitivity adjusting mode), and
for activating the locking function (in the lock adjusting mode)
6 Key SET
with the microphone not locked:
to call and exit the adjusting modes for transmission group/channel, frequency, sensitivity, locking
function → chapters 5.1, 5.2, 5.3, and 5.4.1
with the microphone locked:
to call and exit the adjusting mode for the locking
function → chapter 5.4.2
7 Cap for the battery compartment; to insert or
replace the batteries (2 x 1.5 V batteries of size
AA), unscrew the cap
8 Identification ring; can be replaced by one of the
colour-coded rings supplied
9 Power switch
10 Safety cap for covering the switch to be protected
against accidental readjustment
11 Mute switch for short muting (“throat clearing
mode” or “enquiry mode”) with subsequent immediate readiness for operation without delay
12 4-pole contact, each on the microphone cartridge
(fig. 2) and on the handle (fig. 3);
prior to assembling the microphone cartridge and
the handle, fit the contacts into each other
8
2
Important Notes
The microphone corresponds to all required directives
of the EU and is therefore marked with .
● The microphone is suitable for indoor use only. Protect it against dripping water and splash water, high
air humidity, and heat (admissible ambient temperature range 0 – 40 °C).
● For cleaning only use a dry, soft cloth; never use
chemicals or water.
● No guarantee claims for the microphone and no liability for any resulting personal damage or material
damage will be accepted if the microphone is used
for other purposes than originally intended, if it is not
correctly operated or not repaired in an expert way.
If the microphone is to be put out of operation
definitively, take it to a local recycling plant for
a disposal which is not harmful to the environment.
Dead batteries or defective rechargeable batteries
do not belong in the household rubbish; always take
them to a special waste disposal (e. g. collecting container at your retailer).
3
Applications
Together with the multifrequency receiver US-1000D
from JTS, this dynamic hand-held microphone with
integrated multifrequency transmitter makes up a wireless audio transmission system. For adjusting the
transmission frequency, two modes are available to
ensure maximum flexibility:
1. In the group mode, the wireless microphone operates with four transmission groups (A – D) to which
16 transmission channels are assigned respectively, i. e. altogether 64 factory-set transmission
channels are available. These channels in the UHF
range of 790 – 814 MHz can be selected as desired.
2. In the frequency mode, the transmission frequency
within the UHF range of 790 – 814 MHz can be selected as desired (frequency spacing 25 kHz).
The microphone is supplied with a microphone case, a
microphone holder, and coloured push-on plastic rings
for identification of the microphone.
3.1 Conformity and approval of the wireless
microphone
The wireless microphone has been tested according
to the relevant standards of the R + TTE directive. The
declaration of conformity can be found in the Internet
on the JTS home page (www.jts-germany.de).
In the Federal Republic of Germany, the frequency
range of 790 – 814 MHz is generally assigned, however, the general assignment of individual frequencies
of the range is subject to the type of use [see the directive 91/2005 on the home page of the Bundesnetzagentur (Federal Network Agency):
www.bundesnetzagentur.de].
8) The identification ring (8) can be exchanged
against one of the coloured rings supplied. This
allows colour coding of several systems with different radio frequencies.
9) To switch off the microphone after operation, set the
POWER switch (9) to OFF.
4
5.1 Adjusting the transmission group and the
transmission channel
Power Supply
Only insert batteries of the same type and always
replace all batteries.
● If the microphone is not used for a longer period
(e. g. more than a week), remove the batteries.
Thus, the microphone will not be damaged in case
of battery leakage.
1) Unscrew the cap (7) for the battery compartment.
2) Insert two 1.5 V batteries of size AA (R6) with the
positive and negative connections as indicated on
the holder.
3) Place the battery compartment cap straight against
the thread of the microphone body and screw it on.
●
5
Setting the Microphone into Operation
1) Before switching on the microphone, set the receiver to an interference-free transmission channel
(see instruction manual of the receiver).
2) Then switch on the microphone: Set the POWER
switch (9) at the lower end of the microphone to the
position POWER. If required, slide the safety cap
(10) downwards beforehand. The display (3) will
indicate the transmission group adjusted with the
corresponding transmission channel (in the group
mode), e. g.
or the transmission frequency (in
the frequency mode) and a battery symbol (2)
showing the current charging status of the batteries
in several steps:
fully charged
3)
4)
5)
6)
7)
1) Keep the key SET (6) pressed for 2 s until either the
indication “MHz” or the group indication , , or
starts flashing on the display. If the indication “MHz”
starts flashing, shortly actuate the key SET once
again to go to the group adjusting mode.
Note: To exit the adjusting mode without making an
adjustment, press the key SET so many times
until the display shows
. The microphone
will then return to normal operation.
2) Use the cursor keys to adjust the transmission group:
With the key
(4), the groups will be scanned in
descending order; with the key
(5), they will be
scanned in ascending order. The corresponding
channels and transmission frequencies can be
found in the table in fig. 4.
3) Press the key SET again to call the channel adjusting mode. On the display, the channel indication
1 – 16 will start flashing.
4) Use the cursor keys to adjust the transmission
channel: With the key , the channels will be
scanned in descending order; with the key , they
will be scanned in ascending order.
5) To memorize the adjustment, press the key SET.
The display will shortly show
, the adjusting
mode will be exited, and the microphone will go to
normal operation.
Group
exhausted
If the batteries are exhausted (indication
), the
colour of the display on the receiver will additionally
change from green to orange as a warning.
The keys (4 – 6) which are slightly recessed are
easily actuated by means of the tip of your thumb.
Set the microphone to the same transmission
group and the same transmission channel or the
same radio frequency adjusted on the receiver:
→ chapter 5.1 or chapter 5.2
Speak/sing into the microphone. The mute switch
(11) must be in the position OFF, otherwise no
audio signal will be transmitted. The volume level of
the microphone can be readjusted by modification
of the sensitivity → chapter 5.3.
The microphone can be locked to prevent accidental modification of the adjustments or switching off:
→ chapter 5.4.
For short interruptions, the signal transmission can
be muted so that no interference will occur → chapter 5.5.
ENGLISH
In other countries, different legal regulations may
apply for wireless systems operating in this frequency
range. Therefore, please contact the MONACOR
subsidiary or the corresponding authorities of the
country prior to setting the system into operation
outside Germany.
A
B
C
D
790.875
792.625
794.250
795.625
797.125
798.875
801.125
802.250
803.625
805.250
805.750
808.625
809.125
810.000
813.250
813.750
790.750
791.375
793.125
794.000
795.250
796.250
796.875
798.000
798.875
800.250
803.250
804.000
805.625
806.750
808.250
813.750
791.125
791.750
792.625
793.750
794.500
796.125
796.875
798.250
799.000
800.875
804.500
805.875
806.625
807.750
808.375
813.750
790.625
791.125
791.875
793.625
795.875
797.125
797.875
799.125
800.875
801.375
802.875
803.375
804.125
806.250
807.625
813.625
Channel
1
2
3
4
5
6
7
8
9
10
11
12
13
14
15
16
Fig. 4
Transmission frequencies in MHz of the groups and
channels
®
9
ENGLISH
5.2 Adjusting the transmission frequency
5.4 Locking/Unlocking the microphone
1) Keep the key SET (6) pressed for 2 s until either the
indication “MHz” or the group indication , , or
starts flashing on the display. If the group indication
starts flashing, shortly actuate the key SET twice
again to go to the frequency adjusting mode.
Note: To exit the adjusting mode without making an
adjustment, press the key SET so many times
until the display shows
. The microphone
will then return to normal operation.
2) Use the cursor keys to adjust the frequency: Each
time the key (4) is pressed, the frequency will be
decreased by 25 kHz; each time the key
(5) is
pressed, it will be increased by 25 kHz. To scan a
wide frequency range, keep the corresponding key
pressed.
Note: If several wireless transmission systems are
operated at the same time, the radio frequencies
of the individual systems should be carefully
matched to each other to prevent interference.
Examples for frequencies for simultaneous operation of several systems can be found in the
Internet on www.jts-germany.de under “Informationen/Intermodulationsfreies Frequenzsetup”.
3) To memorize the adjustment, press the key SET.
The display will shortly indicate
, the adjusting
mode will be exited and the microphone will go to
normal operation.
With the microphone locked, it is not possible
5.3 Adjusting the sensitivity
1) Keep the key SET (6) pressed for 2 s, then shortly
press the key SET another three times so that the
display will indicate the current sensitivity (0 dB,
-6 dB, -12 dB, or -24 dB).
Note: To exit the adjusting mode without making an
adjustment, press the key SET so many times
until the display shows
. The microphone
will then return to normal operation.
2) Adjust the sensitivity according to the indication AF
on the display of the receiver in such a way to
obtain an optimum volume level of the microphone.
If the volume is too high, the microphone will distort;
in this case, adjust a lower value with the key (4).
If the volume is too low, there will be a poor signalnoise ratio; in this case, adjust a higher value with
the key (5).
3) To memorize the adjustment, press the key SET.
The display will shortly indicate
, the adjusting
mode will be exited and the microphone will go to
normal operation.
10
a to switch off the microphone; if the POWER switch
(9) is set to OFF with the microphone locked, the
display will show
.
b to call the adjusting modes for group/channel, frequency, and sensitivity.
5.4.1 Activating the locking function
1) Keep the key SET (6) pressed for 2 s, then shortly
press the key SET another four times so that the
indication
(lock deactivated) starts flashing
on the display.
2) Press the key
display.
(5):
starts flashing on the
3) To memorize the adjustment, press the key SET.
The display will shortly indicate
, the adjusting
mode will be exited and the microphone will go to
normal operation.
5.4.2 Deactivating the locking function
1) The POWER switch (9) must be set to POWER.
2) Keep the key SET (6) pressed for 3 s until
starts flashing on the display.
3) Press the key
display.
(4):
starts flashing on the
4) To memorize the adjustment, press the key SET.
The display will shortly indicate
, the adjusting
mode will be exited and the microphone will go to
normal operation.
5.5 Mute function
The mute function serves for short muting of the signal
transmission (“throat clearing mode” or “enquiry mode”)
with subsequent immediate readiness for operation
without delay.
1) Set the MUTE switch (11) at the lower end of the
microphone to the position MUTE. If required, slide
the safety cap (10) upwards beforehand.
2) To continue the signal transmission, set the MUTE
switch to the position OFF.
Note: In the switch position MUTE, there will be no
speech transmission; however, the microphone
will still be in the transmission mode and consume power. Therefore, always switch off the
microphone with the POWER switch (9) [position OFF] for longer interruptions.
Replacement Microphone Cartridge
The microphone cartridge (1) can be replaced by the
capacitor microphone cartridge DMC-8000-6 by JTS
which offers a supercardioid characteristic and a wider
frequency range (50 – 18 000 Hz).
1) Unscrew the microphone cartridge (1).
2) Place the replacement microphone cartridge on the
handle in such a way that the 4-pole contacts (12)
of the cartridge and of the handle fit into each other,
then screw the cartridge on the handle.
7
Specifications
Type of unit: . . . . . . . . dynamic hand-held microphone with PLL multifrequency transmitter
Directivity: . . . . . . . . . hypercardioid
ENGLISH
6
Radio frequency
range: . . . . . . . . . . . . 790 – 814 MHz
Audio frequency
range: . . . . . . . . . . . . 50 – 16 000 Hz
Frequency stability: . . ±0.005 %
Transmitting power: . . 10 mW (EIRP)
Ambient temperature: 0 – 40 °C
Power supply: . . . . . . two 1.5 V batteries of size AA
(R6)
Dimensions: . . . . . . . Ø 53 mm x 245 mm
Weight: . . . . . . . . . . . 360 g
Subject to technical modification.
All rights reserved by MONACOR ® INTERNATIONAL GmbH & Co. KG. No part of this instruction manual may
be reproduced in any form or by any means for any commercial use.
®
11
www.jts-germany.de
Copyright © by MONACOR INTERNATIONAL GmbH & Co. KG, Bremen, Germany. All rights reserved.
A-0627.99.01.06.2006