1
English
User’s Manual/Manuel de l’utilisateur/
Benutzerhandbuch/Gebruikershandleiding/
Manuale dell’utente/Manual del usuario/
Manual do utilizador
412556400
English
Illustrations
A
6
1
5
2
4
3
B
9
8
7
11
10
12
C
ձ
ղ
ii
English
D
13
E
ղ
ձ
G
F
14
15
iii
English
H
I
K
J
➁
➀
L
16
iv
English
M
ձ
ղ
17
N
20
18
19
v
English
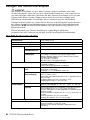
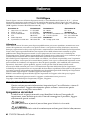
Standards and Approvals
The following standards are applied only to the printers that are so labeled. (EMC is tested using EPSON
power supplies.)
Europe:
CE Marking
For Wi-Fi models (Model: M316A)
For Bluetooth models (Model: M316B)
Directive: 1999/5/EC
Directive: 1999/5/EC
EN 300 328
EN 300 328
EN 301 893
EN 301 489-1
EN 301 489-1
EN 301 489-17
EN 301 489-17
EN 60950-1
EN 60950-1
EN 62311
EN 62311
North America:FCC Class A, CAN ICES-3 (A)/NMB-3 (A)
We, Seiko Epson Corporation, hereby declare that the equipment Models, M316A and M316B, are in
compliance with the essential requirements and other relevant provisions of Directive 1999/5/EC.
WARNING
The connection of a non-shielded printer interface cable to this printer will invalidate the EMC standards
of this device.
You are cautioned that changes or modifications not expressly approved by Seiko Epson Corporation
could void your authority to operate the equipment.
FCC Compliance Statement For American Users
This equipment has been tested and found to comply with the limits for a Class A digital device, pursuant
to Part 15 of the FCC Rules. These limits are designed to provide reasonable protection against harmful
interference when the equipment is operated in a commercial environment.
This equipment generates, uses, and can radiate radio frequency energy and, if not installed and used in
accordance with the instruction manual, may cause harmful interference to radio communications.
Operation of this equipment in a residential area is likely to cause harmful interference, in which case the
user will be required to correct the interference at his own expense.
Türkiye'deki kullanýcýlar için
AEEE Yönetmeliğine Uygundur.
Для українських користувачів
Обладнання відповідає вимогам Технічного регламенту обмеження використання деяких небезпечних
речовин в електричному та електронному обладнанні.
Indication of the manufacturer and the importer in accordance with
requirements of directive 2011/65/EU (RoHS)
Manufacturer: SEIKO EPSON CORPORATION
Address: 3-5, Owa 3-chome, Suwa-shi, Nagano-ken 392-8502, Japan
Telephone: 81-266-52-3131 Fax: 81-266-52-8409
Importer: EPSON EUROPE B.V.
Address: Azië building, Atlas ArenA, Hoogoorddreef 5, 1101 BA Amsterdam Zuidoost, The Netherlands
Telephone: 31-20-314-5000
vi
English
English
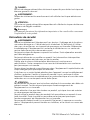
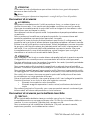
Illustrations
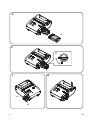
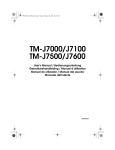
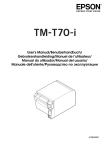
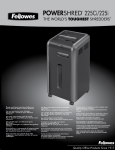
All of the illustrations are at the beginning of this manual. They are identified by letters (A, B, C . . .). Some
of the illustrations have numbers in them. See the list below for the meaning of the numbers. The text has
references to the letters and the numbers. For example: “See Illustration A” or “See A 6.” (“A 6” means
number 6 on Illustration A.)
Illustration A:
1. Roll paper holder
2. Control panel
3. Battery cover
Illustration B:
7. Power LED
8. Error LED
9. Charge LED
4.
5.
6.
10.Battery LED
11.Power button
12.Feed button
Lever
Open button
Roll paper cover
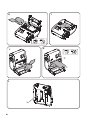
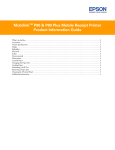
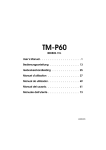
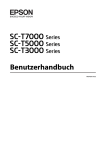
Illustration D:
13. Battery
Illustration F:
14. Connecter for the AC
adapter
15. Connecter for the USB
Illustration L:
16. Belt clip
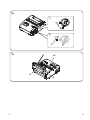
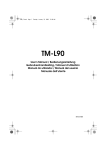
Illustration M:
17. Notch
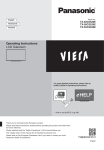
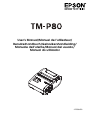
Illustration N:
18. Platen Roller
19. Paper Sensor
20. Thermal head
Cautions
All rights reserved. No part of this publication may be reproduced, stored in a retrieval system, or
transmitted in any form or by any means, electronic, mechanical, photocopying, recording, or otherwise,
without the prior written permission of Seiko Epson Corporation. No patent liability is assumed with
respect to the use of the information contained herein. While every precaution has been taken in the
preparation of this book, Seiko Epson Corporation assumes no responsibility for errors or omissions.
Neither is any liability assumed for damages resulting from the use of the information contained herein.
Neither Seiko Epson Corporation nor its affiliates shall be liable to the purchaser of this product or third
parties for damages, losses, costs, or expenses incurred by purchaser or third parties as a result of:
accident, misuse, or abuse of this product or unauthorized modifications, repairs, or alterations to this
product, or (excluding the U.S.) failure to strictly comply with Seiko Epson Corporation’s operating and
maintenance instructions.
Seiko Epson Corporation shall not be liable against any damages or problems arising from the use of any
options or any consumable products other than those designated as Original EPSON Products or EPSON
Approved Products by Seiko Epson Corporation.
Depending on the area, the interface cable may be included with the product. If so, use that cable.
Seiko Epson Corporation shall not be held liable for any damage resulting from electromagnetic
interference that occurs from the use of any interface cables other than those designated as Epson
approved products by Seiko Epson Corporation.
EPSON is a registered trademark of Seiko Epson Corporation in Japan and other countries/regions.
NOTICE: The contents of this manual are subject to change without notice.
Copyright © 2013 by Seiko Epson Corporation, Nagano, Japan.
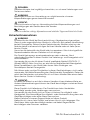
Important Safety Information
This section presents important information intended to ensure safe and effective
use of this product. Read this section carefully and store it in an accessible
location.
Key to Symbols
The symbols in this manual are identified by their level of importance, as defined
below. Read the following carefully before handling the product.
DANGER:
Dangers must be observed carefully to avoid serious injury or death.
TM-P80 User’s Manual 1
English
WARNING:
Warnings must be observed carefully to avoid serious bodily injury.
CAUTION:
Cautions must be observed to avoid minor injury to yourself, damage to
your equipment, or loss of data.
Note:
Notes have important information and useful tips on the operation of your product.
Safety Precautions
WARNINGS:
Shut down your equipment immediately if it produces smoke, a strange odor, or
unusual noise. Continued use may lead to fire. Immediately unplug the equipment
and contact your dealer or a Seiko Epson service center for advice.
Never attempt to repair this product yourself. Improper repair work can be
dangerous.
Never disassemble or modify this product. Tampering with this product may result in
injury or fire.
Be sure to use the specified power source, EPSON PS-11 (Model: M235A).
Connection to an improper power source may cause fire.
Do not allow foreign matter to fall into the equipment. Penetration by foreign objects
may lead to fire.
If water or other liquid spills into this equipment, do not continue to use it. Continued
use may lead to fire. Unplug the equipment immediately and contact your dealer or
a Seiko Epson service center for advice.
CAUTIONS:
Do not connect cables in ways other than those mentioned in this manual. Different
connections may cause equipment damage and burning.
When connecting a serial cable, do not stress the connector part. Doing so may
damage that part.
Be careful not to drop this product. The product may break or cause injury if it is
dropped.
Do not use in locations subject to high humidity or dust levels. Excessive humidity and
dust may cause equipment damage or fire.
Do not place heavy objects on top of this product. Never stand or lean on this
product. Equipment may fall or collapse, causing breakage and possible injury.
To ensure safety, unplug this product before leaving it unused for an extended
period.
Before moving the product, unplug it and unplug all cables connected to it.
Take care not to injure your fingers on the manual cutter
• When you remove printed paper
• When you perform other operations such as loading/replacing roll paper
Do not use aerosol sprayers containing flammable gas inside or around this product.
Doing so may cause fire.
Safety Precautions for Rechargeable Battery Pack
DANGERS:
If any liquid from the battery gets into your eyes, promptly wash it out with clean
water for more than 10 minutes and consult your doctor at once. If you do not, the
liquid may cause loss of eyesight.
Never disassemble or modify the battery pack. This may cause fire, explosion,
leakage, overheating or damage.
Do not expose the battery to fire or heat it. This may cause fire, explosion, leakage,
overheating or damage.
WARNINGS:
Keep the battery pack away from fire or flame if it produces a strange odor or leakage.
2 TM-P80 User’s Manual
English
Otherwise fire or explosion may occur.
Should any battery liquid get on skin or clothing, promptly wash it off with clean
water. If you do not, the liquid may damage your skin.
Do not expose the battery to water. Do not allow water to contact the terminals. This
may cause fire, overheating, or electric shock.
Safety Label
The caution label on the product indicates the following precaution.
CAUTION:
During printing or after printing, the thermal head can be very hot.
Restriction of Use
When this product is used for applications requiring high reliability/safety, such
as transportation devices related to aviation, rail, marine, automotive, etc.;
disaster prevention devices; various safety devices, etc.; or functional/precision
devices, etc.; you should use this product only after giving consideration to
including fail-safes and redundancies into your design to maintain safety and
total system reliability. Because this product was not intended for use in
applications requiring extremely high reliability/safety, such as aerospace
equipment, main communication equipment, nuclear power control equipment,
or medical equipment related to direct medical care, etc., please make your own
judgment on this product’s suitability after a full evaluation.
Notes on Use
❏
❏
❏
❏
❏
❏
❏
❏
❏
❏
The printer does not operate with only the AC adapter. Always install the
enclosed battery OT-BY60II in the printer even when using the AC adapter.
Be sure to use the power button to turn the printer on and off.
To communicate with a computer via a USB cable, connect the cable before
turning on the printer.
To use the USB cable, it is recommended to secure it to avoid stress on it.
Be sure not to open the roll paper cover when the printer is operating.
Protect the printer from impact.
Do not apply excessive force to the printer case.
Do not place food or beverages such as coffee on the case of the printer.
For Bluetooth interface models, when the wireless connection is ended while the
printer is offline, reconnection may not be possible. In such case, remove the cause
of offline and reconnect it.
For Bluetooth interface models, if you establish a radio connection between the
host computer and the printer each time you start printing instead of maintaining
the connection, it may take a while between the time you send a print job and the
time that the printer actually starts printing. This happens because connecting the
host computer and the printer requires some time. The time required for
connection depends on the operating environment.
For American Users
WARNING:
The cords included with this product contain chemicals, including lead,
known to the State of California to cause birth defects or other
reproductive harm. Wash hands after handling. (This notice is provided in
accordance with Proposition 65 in Cal. Health & Safety Code §25249.5 and
following.
TM-P80 User’s Manual 3
English
Notes on Power Supply
Battery Pack
Before using the printer for the first time, charge the battery OT-BY60II. To install and
charge the battery, see "Installing and Charging Battery.”
Read also the safety precautions for the rechargeable battery described previously in
this manual.
WARNING:
Be sure to use the battery OT-BY60II. Using a battery other than the one specified
may cause fire, explosion, leakage, overheating or other damage.
CAUTION:
Dispose of used batteries according to the instructions.
External Power Supply
This product uses a listed power unit marked "Class 2" or "LPS," with the output
voltage of either maximum 1.0 A at DC12 V, or maximum 1.5 A at DC 24 V.
With the optional AC adapter EPSON PS-11 [Model: M235A], the output voltage is
maximum 1.5 A at DC 24 V, and the input voltage is AC 100 V to 240 V.
Recycling the Batteries
Contains a lithium-ion battery. Must be recycled or disposed of properly.
Note:
Do not disassemble the battery pack.
For American Users
The lithium-ion battery is recyclable. At the end of its useful life, under
various state and local laws, it is illegal to dispose of this battery into your
municipal waste stream. Please call 1-800-8-BATTERY for information on
how to recycle this battery.
Unpacking
The following items are included for the standard specification printer. If any item
is damaged, contact your dealer.
❏ Printer
❏ Roll paper
❏ Battery pack (OT-BY60II) and its User’s Manual
❏ USB cable
❏ User’s Manual (this manual)
Downloading Drivers, Utilities, and Manuals
Further product information is written in the TM-P80 Technical Reference Guide.
The latest versions of drivers, utilities, and manuals can be downloaded from one
of the following URLs.
For customers in North America, go to the following web site:
http://www.epsonexpert.com/
For customers in other countries, go to the following web site:
http://download.epson-biz.com/?service=pos
4 TM-P80 User’s Manual
English
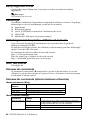
Part Names
See Illustrations A.
Control Panel
The control panel (B) has the Power LED, Error LED, Charge LED, Battery LED,
Feed button, and Power button.
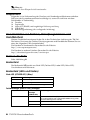
Control Panel (LEDs and Buttons)
Power LED (Blue)
Power LED
On
Off
Flashing
Meanings
Power is on.
Power is off.
The printer is powering-off and powering-on.
Error LED (Orange)
Printer Condition
Error LED
Power On
On
Off
Flashing
Meanings
Printer is offline (paper out, power-on initialization, roll
paper cover open, the remaining battery charge is at E
level).
Printer is in normal operation.
Printer is in error.
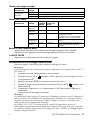
Charge LED (Orange)
Printer Condition
Charge
LED
Power On and
battery
installed
On
Off
Flashing
Meanings
The battery is being charged.
The battery is fully charged.
There is abnormality in battery charging.
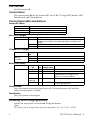
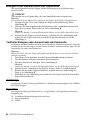
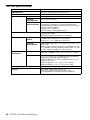
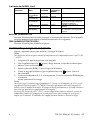
Battery LED (Blue)
Printer Condition
Power On
Battery
LED
Error
LED
Battery
charge status
3 LEDs On
2 LEDs On
1 LED On
Off
Off
Off
Level H
Level M
Level L
1 LED
flashing
3 LEDs Off
Off
Level S
On
Level E
Meanings
You can continue printing, but
replacement or charge of the
battery is recommended.
Replace or charge the battery.
The printer goes offline and printing
is no longer possible.
Power button
Press this button to turn the power on or off. To turn the power off, hold the
button for more than 2 seconds.
Feed button
Press this button to feed paper.
Installing and Charging Battery
Follow the steps below to install and charge the battery.
Note:
The battery can be charged only when the temperature is 0 ~ 40°C {32 ~ 104°F}.
TM-P80 User’s Manual 5
English
1.
Make sure that the printer is turned off.
2.
Turn the lever to the
mark, and slide the battery cover to open it. See
illustration C.
Install the battery (D 13).
3.
Close the battery cover, and turn the lever to the
mark. See illustration E.
Connect the AC adapter to the printer. See illustration F 14 for the connecor.
Recharging starts.
Notes:
Recharging will take approximately 2.5 hours with the AC adapter or with the optional
battery charger OT-CH60II. For detailed information on the battery charger, see its user’s
manual. The time described above is the time required to charge a battery pack that is fully
discharged.
Recharging the battery at 35°C {95°F} or higher activates the internal temperature control of
the printer, which may require a longer charging time than the specified one. The Charge
LED flashes while the charge is stopped.
4.
5.
Installing or Replacing Roll Paper
Follow the steps below to install or replace the roll paper.
CAUTION:
Be sure to use roll paper that meets the specifications.
Note:
Do not use the roll paper that have the paper glued to the core.
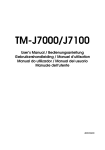
1. Press the open button to open the roll paper cover. See illustration G.
2. Remove the used roll paper core if there is one, and insert the new roll paper.
See illustration H.
Note:
Note the direction the paper comes off the roll.
3. Pull out some paper, close the cover, and tear off the paper with the manual
cutter. See illustration I.
Installing or Replacing Roll Paper Vertically
You can hang the printer vertically on a belt using a belt clip on the back of the
printer. When you use the printer vertically, follow the steps below to install the
roll paper.
Note:
Be sure that the roll paper holder is on the bottom when you use the printer vertically.
1. Press the open button to open the roll paper cover.
2. Remove the used roll paper core if there is one.
3. Set the new roll paper. See illustration J.
Note:
Note the direction the paper comes off the roll.
4. Pull the leading edge of the roll paper. See ➀ in illustration K.
5. Align the left edge of the roll paper with the edge of the cover. See ➁ in
illustration K.
6. Close the roll paper cover and tear off the paper with the manual cutter.
6 TM-P80 User’s Manual
English
Belt Clip
You can hang the printer on your belt using the belt clip (L 16) attached to the back
of the printer.
Buzzer
The factory default is set to On (buzzer sounds) to indicate the following:
❏ Remaining battery charge is not adequate
❏ Roll paper end
❏ Error
Troubleshooting
No lights on the control panel
Check that the battery is installed.
Error LED is flashing or on
❏
❏
❏
❏
❏
The printer temperature may be too high. The printer resumes printing
automatically when the temperature returns to normal.
Make sure that the roll paper cover is properly closed.
Make sure that roll paper is installed.
When the printer power is on, if the Error LED is on and the Battery LED is
off, the remaining battery charge is not enough for printer operation. Replace
or charge the battery.
Turn off the power, wait several seconds, and then turn it on again. If the
error remains, contact a qualified service person.
The battery will not charge
❏
❏
When the battery is not fully charged even if charged for about 5 hours, the
battery is defective.
The battery must be replaced with a new one.
Turn on the printer, install the roll paper and close the roll paper cover.
After that if the Error LED is on and the Charge LED is flashing, the battery is
defective.
The battery must be replaced with a new one.
The Battery cover will not open
Follow the steps below when the Battery cover will not open.
1. Make sure that the printer is turned off.
2.
3.
Turn the lever to the
mark.
Move the notch (M 17) in the direction of the arrow by using a tool such as a
ballpoint pen. See illustration M.
TM-P80 User’s Manual 7
English
Cleaning the Platen Roller/Paper Sensor
CAUTION:
Do not use an alcohol-based solvent. Use of an alcohol-based solvent
might cause the adhesive agent to partially dissolve making its removal
even more difficult.
When paper dust accumulates on the platen rollers or the paper sensor, follow the
steps below to clean them. To maintain good functional capabilities, clean them
regularly (every 6 months).
1. Turn off the printer, open the roll paper cover.
2. Clean the platen roller (N 18) and the paper sensor (N 19) with a cotton swab
lightly moistened with water.
3. Close the roll paper cover after the water has dried.
Cleaning the Thermal Head
CAUTION:
After printing, the thermal head can be very hot. Be careful not to touch it
and to let it cool before you clean it. Do not damage the thermal head by
touching it with your fingers or any hard object.
Do not use water. Use an alcohol-based solvent only.
Turn off the printer, open the roll paper cover, and clean the thermal elements of
the thermal head (N 20) with a cotton swab moistened with an alcohol solvent
(ethanol or IPA).
Epson recommends cleaning the thermal head periodically (generally every
3 months) to maintain print quality.
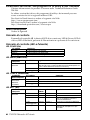
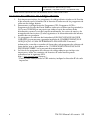
TM-P80 Specifications
Print method
Thermal line printing
Print density
203 dpi × 203 dpi [dpi: dots per 25.4 mm (dots per inch)]
Printing width (default)
72 mm {2.83"}, 576 dot positions
Paper
Roll paper width
79.5 ± 0.5 mm {3.12 ± 0.02"}
Roll paper core
external diameter
18 mm {0.71"} minimum
Specified thermal
paper
NIPPON Paper Industries Co., Ltd. :TF50KS-EY
Oji Holdings Corporation :PD150R/PD160R/PD190R
Kanzaki Specialty Papers (USA) :P30023/P31023/P35024
Koehler: KT55F20/KT48F20
Jujo ThermalOy: AF50KS-E
Mitsubishi HiTec: F5041(48)/F5041(55)
Interface
8 TM-P80 User’s Manual
USB (Compliance: USB 2.0, communication speed: Full-speed
(12 Mbps)
Wireless (Bluetooth®/IEEE802.11a/b/g/n)
Power supply Specified battery
English
Lithium-ion battery: Product name: OT-BY60II, Trade name:
Seiko Epson Corporation
Output: DC 7.4 V, Capacity: 2000 mAh
Supply voltage
Input voltage: Either max. 1.0 A at DC12 V, or max. 1.5 A at
DC 24V
(When using the optional AC adapter EPSON PS-11 [Model:
M235A]) Output voltage: Max. 1.5 A at DC 24V, Input
voltage: AC 100V to 240 V
Temperature Operation
/humidity
Storage
Battery only: 0 ~ 45°C {32 ~ 113°F}, 10 ~ 90% RH
Battery and power unit: 0 ~ 40°C {32 ~ 104°F}, 10 ~ 90% RH
Abnormal operations not found when the printer is left under
the environment of 25°C {77°F}, 60% RH for 2 hours after it was
left in the following conditions:
High temperature and humidity: 45°C {113°F}, 90%RH for 120
hours
High temperature: 70°C {158°F} for 120 hours
Low temperature: -25°C {-13°F} for 120 hours
Overall dimensions
110 × 140 × 64 mm {4.3 × 5.5 × 2.5"} (W × D × H)
Weight (Mass)
Wifi model: Approx. 506 g {1.11 lb}
Bluetooth model: Approx. 500 g {1.10 lb}
(Battery and belt clip included; roll paper excluded)
Note: For the battery specifications, see its User’s Manual.
Open Source Software License
1.
2.
3.
4.
This product includes open source software programs listed in Section 4)
according to the license terms of each open source software program.
We provide the source code of the GPL Programs and LGPL Programs (each
is defined in Section 4) to you on a CD-ROM for a charge covering the cost of
performing such distribution, such as the cost of media, shipping and
handling until five (5) years after the discontinuation of same model of this
product. If you desire to receive the source code above, please contact the
customer support for your region.
The open source software programs are WITHOUT ANY WARRANTY;
without even the implied warranty of MERCHANTABILITY AND FITNESS
FOR A PARTICULAR PURPOSE. See the license agreements of each open
source software program for more details, which are described on "OPEN
SOURCE SOFTWARE LICENSE TERMS" in this documentation.
The list of open source software programs included with this printer product
and the whole license agreements of each license can be found in the
following URL.
http://xxx.xxx.xxx.xxx/licenses/
* For the underlined part in the above URL, input each printer’s IP address.
TM-P80 User’s Manual 9
English
Français
Figures
Toutes les figures sont présentées au début du manuel. Elles sont identifiées par des lettres (A, B, C…).
Certaines des figures portent aussi un numéro. La liste ci-dessous indique ce que signifient ces numéros.
On trouvera dans le texte des renvois aux lettres et aux numéros. Exemple : « Voir la figure A » ou « Voir
A 6 ». (A 6” désigne l’élément 6 de la figure A.)
Figure A:
1. Support de rouleau de papier
2. Panneau de commande
3. Couvercle de la batterie
4. Levier
5. Bouton Ouvrir
6. Capot du rouleau de papier
Figure B:
7. Témoin de marche
8. Témoin d'erreur
9. Témoin de charge
10. Témoin BATT. (Accus)
11. Bouton POWER
(Marche-arrêt)
12. Bouton FEED (Avance
papier)
Figure D:
13. Accus
Figure F:
14. Prise pour l'adaptateur secteur
15. Prise pour l'USB
Figure L:
16. Pince à ceinture
Figure M:
17. Encoche
Figure N:
18. Rouleau d'impression
19. Capteur de papier
20. Tête d’impression thermique
Attention
Tous droits réservés. Sauf autorisation écrite préalable de Seiko Epson Corporation, la reproduction, le
stockage dans un système de rappel de données et la transmission sous quelque forme ou par quelque
moyen que ce soit (électronique, mécanique, par photocopie, enregistrement, etc…) d’une partie
quelconque de la présente publication sont interdits. La société décline toute responsabilité relative à
l’exploitation des informations contenues dans le présent document. Cet ouvrage a été rédigé avec le plus
grand soin ; toutefois, Seiko Epson décline toute responsabilité pour les erreurs et omissions qu’il pourrait
contenir, ainsi que pour tous dommages résultant de l’exploitation des informations qu’il contient.
La responsabilité de Seiko Epson Corporation ou de ses filiales ne saurait être engagée envers l’acheteur
de ce produit ou envers des tiers pour dommages, pertes, frais ou débours encourus par ceux-ci par suite
d’accident ou d’utilisation erronée ou abusive de ce produit, de modification, réparation ou
transformation non autorisé de celui-ci, ou (à l’exclusion des Etats-Unis), de toute utilisation du produit
qui n’est pas strictement conforme aux instructions d’utilisation et de maintenance de Seiko Epson
Corporation.
Seiko Epson Corporation décline toute responsabilité pour dommages ou problèmes découlant de
l’utilisation de tous articles en option ou de toutes fournitures consommables autres que celles désignée
produit d’origine Epson ou produit approuvé Epson par Seiko Epson Corporation.
EPSON est une marque déposée de Seiko Epson Corporation au Japon et dans d’autres pays/régions.
REMARQUE : Les informations contenues dans ce manuel sont sujettes à modification sans préavis.
Copyright © 2012 Seiko Epson Corporation, Nagano, Japan.
Importantes précautions de sécurité
D'importantes informations destinées à assurer un emploi sans danger et efficace
de ce produit sont présentées dans cette section. Lisez-la attentivement et rangezla dans un endroit facile d'accès.
Signification des symboles
Dans ce manuel, les symboles sont identifiés par ordre d'importance de la manière
indiquée ci-après. Lisez attentivement ce qui suit avant de manipuler le produit.
10 TM-P80 Manuel de l’utilisateur
English
DANGER :
Les avis de danger doivent être strictement respectés pour éviter tout risque de
blessure grave ou de mort.
AVERTISSEMENT :
Respectez strictement les avertissements afin d'éviter tout risque de blessure
grave.
ATTENTION :
Ces mises en garde doivent être respectées afin d'éviter les risques de blessure
légère ou de dégâts matériels.
Remarque:
Les remarques fournissent des informations importantes et des conseils utiles concernant
l’exploitation de votre produit.
Précautions de sécurité
AVERTISSEMENT :
Mettre immédiatement l’équipement hors tension s’il dégage de la fumée ou
une odeur étrange ou s’il émet des bruits inhabituels. En persistant à l’utiliser
dans ces circonstances, on risquerait de provoquer un incendie. Débrancher
immédiatement l’équipement et contacter le distributeur ou un centre de
service Seiko Epson pour demander conseil.
Ne jamais essayer de réparer ce produit soi-même. Toute réparation erronée
peut être dangereuse.
Ne jamais démonter ou modifier ce produit. Les interventions intempestives
peuvent provoquer des blessures ou des incendies.
Vérifier que la source d’alimentation électrique est conforme aux
spécifications. Toute connexion à une source d’alimentation non conforme
peut provoquer un incendie.
Ne pas laisser tomber de corps étrangers dans l’équipement. La pénétration de
corps étrangers peut provoquer un incendie.
Si de l'eau ou un autre liquide pénètre dans l'appareil, cessez immédiatement
d'utiliser ce dernier. Il existe un risque d'incendie si vous continuez à utiliser
l'appareil. Débranchez immédiatement le cordon électrique et consultez votre
revendeur ou un centre après-vente Seiko Epson.
ATTENTION :
Se conformer strictement aux instructions relatives à la connexion de câbles du
présent manuel. Tout écart peut provoquer l'endommagement de
l'équipement ou un incendie.
Faites attention à ne pas faire tomber ce produit, qui risque sinon de se briser
ou de provoquer des blessures.
Ne pas utiliser le produit dans des endroits très poussiéreux ou exposés à une
forte humidité. Toute humidité ou poussière excessive peut provoquer
l'endommagement de l'équipement ou un incendie.
Ne pas poser d'objets lourds sur ce produit. Ne jamais s'y appuyer ou monter
dessus. L'équipement pourrait tomber ou s'affaisser, et se casser ou causer des
blessures.
TM-P80 Manuel de l’utilisateur 11
English
Pour plus de sécurité, débrancher ce produit lorsqu'il ne doit pas servir pendant
une période de temps prolongée.
Avant de déplacer l'appareil, déconnectez tous les câbles qui lui sont reliés.
Prenez garde de ne pas vous couper les doigts avec le coupe-papier manuel
•
•
En retirant le papier imprimé
Lors d’autres opérations comme le chargement/remplacement du
rouleau de papier
Ne pas utiliser de bombes à aérosol contenant un gaz inflammable à l’intérieur
ou à proximité de ce produit. Cela pourrait entraîner un incendie.
Précautions de sécurité concernant les accus rechargeables
DANGER :
En cas de contact du liquide des accus avec les yeux, rincer à l’eau propre
pendant au moins 10 minutes et consulter immédiatement un médecin. Ce
liquide peut sinon entraîner une perte de la vue.
Ne jamais démonter ou modifier les accus. Il existe sinon un risque d’incendie,
d’explosion, de fuite, de surchauffe ou de dégâts.
Ne jamais exposer les accus au feu ou les chauffer. Il existe sinon un risque
d’incendie, d’explosion, de fuite, de surchauffe ou de dégâts.
AVERTISSEMENT :
Garder les accus à l’écart des feux ou des flammes s’ils dégagent une odeur
anormale ou s’ils fuient. Il existe sinon un risque d’incendie ou d’explosion.
En cas de contact du liquide des accus avec la peau ou des vêtements, rincer
immédiatement à l’eau propre. Ce liquide risque sinon d’abîmer la peau.
Ne jamais laisser de l’eau entrer en contact avec les accus. Ne jamais laisser
de l’eau entrer en contact avec les bornes. Ceci présenterait un danger
d’incendie, de surchauffe ou de choc électrique.
Étiquette de sécurité
Les étiquettes de mise en garde sur le produit indiquent les précautions suivantes.
ATTENTION :
Durant ou après l’impression, la tête d’impression thermique peut être brûlante.
Restrictions d’emploi
En cas d’utilisation de ce produit pour des applications exigeant une grande
fiabilité/sécurité, telles que des appareils employés en transport aérien,
ferroviaire, maritime, automobile, etc., des appareils de prévention des
catastrophes, divers appareils de sécurité, etc., ou des appareils de fonction/
précision, vous devrez, avant d’utiliser ce produit, considérer l’incorporation à
votre système de dispositifs de sécurité positive et de moyens redondants
assurant la sécurité et la fiabilité de l’ensemble du système. Étant donné que ce
produit n’est pas destiné aux applications exigeant une fiabilité/sécurité extrême,
telles que du matériel aérospatial, du matériel de communications principal, du
matériel de commande nucléaire ou du matériel de soins médicaux directs, etc.,
vous devrez, après une évaluation complète, décider si ce produit convient.
12 TM-P80 Manuel de l’utilisateur
English
Notes relatives à l’emploi
❏
❏
❏
❏
❏
❏
❏
❏
❏
❏
L’imprimante ne fonctionne pas uniquement avec l’adaptateur secteur.
Installez toujours les accus OT-BY60II fournis dans l’imprimante même lors
de l’utilisation de l’adaptateur secteur.
Toujours utiliser le bouton d'alimentation pour mettre l’imprimante en
marche et à l’arrêt.
Pour communiquer avec un ordinateur à l’aide d’un câble USB, branchez le
câble avant de mettre l’imprimante sous tension.
Pour utiliser le câble USB, il est recommandé de le fixer afin d’éviter les
contraintes sur le câble.
Ne jamais ouvrir le capot du compartiment du rouleau de papier pendant que
l’imprimante fonctionne.
Protéger l’imprimante contre les chocs.
Ne pas appliquer de pression excessive au coffret de l’imprimante.
Ne pas placer d’aliments ou de boissons telles que du café sur le coffret de
l’imprimante.
Pour les modèles à interface Bluetooth, lorsque la connexion sans fil est
terminée alors que l’imprimante est hors ligne, la reconnexion peut ne pas
être possible. Dans ce cas, éliminez la cause de la mise hors ligne et
reconnectez-la.
Pour les modèles à interface Bluetooth, si vous établissez une connexion radio
entre l’ordinateur hôte et l’imprimante à chaque fois que vous démarrez
l’impression au lieu de maintenir la connexion, un délai peut s’écouler entre
le moment où vous envoyez un travail d’impression et le moment où
l’imprimante commence effectivement l’impression. Cela se produit car la
connexion entre l’ordinateur hôte et l’imprimante demande du temps. Le
temps requis pour la connexion dépend de l’environnement d’utilisation.
Remarques sur l’alimentation
Accus
Avant d’utiliser l’imprimante pour la première fois, chargez les accus OT-BY60II.
Pour installer et charger les accus, voir « Installation et recharge des accus ».
Lisez également les consignes de sécurité pour les accus indiquées auparavant
dans ce manuel.
AVERTISSEMENT :
Assurez-vous d’utiliser les accus OT-BY60II. L’utilisation de tout autre accu différent de
ceux qui sont spécifiés peut causer un risque d’incendie, d’explosion, de fuite, de
surchauffe ou d’autre dégâts.
ATTENTION :
Mettez les accus usagés au rebut conformément aux instructions.
Alimentation externe
Ce produit utiliser une alimentation de Classe 2 ou LPS avec une tension de sortie
d’un maximum de 1,0 A à 12 Vcc ou d’un maximum de 1,5 A à 24 Vcc.
Avec l’adaptateur secteur en otpion EPSON PS-11 [Modèle : M235A], la tension de
sortie maximum est de 1,5 A à 24 Vcc et la tension d’entrée est de 100 à 240 Vca.
TM-P80 Manuel de l’utilisateur 13
English
Recyclage des accus
Contient des accus lithium-ion. À recycler ou mettre au rebut de manière
appropriée.
Remarque:
Ne démontez pas les accus.
Déballage
L’ensemble standard de l’imprimante comprend les éléments suivants. Si quelque
élément que ce soit est endommagé, contactez le revendeur.
❏ Imprimante
❏ Rouleau de papier
❏ Accus (OT-BY60II) et manuel de l’utilisateur des accus
❏ Câble USB
❏ Manuel de l’utilisateur (le présent manuel)
Téléchargement des pilotes, utilitaires et manuels
Vous trouverez davantage d’informations sur le produit dans le guide de
référence technique TM-P80.
La dernière version des pilotes, des utilitaires et des manuels peut être téléchargée
depuis l’une des URL suivantes.
En Amérique du Nord, accédez au site web suivant :
http://www.epsonexpert.com/
Dans les autres pays, accédez au site web suivant :
http://download.epson-biz.com/?service=pos
Nom des pièces
Voir figure A.
Panneau de commande
Le panneau de commande (B) comprend le voyant d’alimentation, le voyant
d’erreur, le voyant de charge, le voyant d’accus, le bouton d’avance papier
et le bouton d’alimentation.
Panneau de commande (témoins lumineux et boutons)
Témoin de marche (Bleu)
TÉMOIN DE
MARCHE
Allumé
Éteint
Clignotant
Signification
Appareil sous tension.
Appareil hors tension.
L'imprimante passe hors tension, puis sous tension.
Témoin d'erreur (orange)
État de
l’imprimante
Mise en marche
TÉMOIN D’ERREUR
(ERROR)
Allumé
Éteint
Clignotant
14 TM-P80 Manuel de l’utilisateur
Signification
L’imprimante est hors ligne (sortie papier, initialisation
au démarrage, capot du rouleau de papier ouvert, la
charge restante des accus est au niveau E).
L'imprimante est en mode de fonctionnement normal.
L'imprimante affiche une erreur.
English
Témoin de charge (orange)
État de
l’imprimante
Mise en marche
et batterie
installée
Témoin de
charge
Allumé
Éteint
Clignotant
Signification
Les accus sont en cours de charge.
Les accus sont chargés à 100 pour cent.
Il ya une anomalie dans le chargement de la batterie.
Témoin BATT (Bleu)
État de
l’imprimante
BATT.
Témoin
Mise en marche
3 voyants
allumés
2 voyants
allumés
1 voyant
allumé
1 voyant
clignotant
3 voyants
éteints
TÉMOIN
D’ERREUR
(ERROR)
Éteint
État de
charge des
accus
niveau H
Éteint
niveau M
Éteint
niveau L
Éteint
niveau S
Allumé
niveau E
Signification
Vous pouvez continuer
l’impression mais le
remplacement ou la recharge
des accus sont recommandés.
Remplacez ou rechargez les
accus.
L'imprimante passe en état hors
ligne et l'impression n'est plus
possible.
Bouton POWER (Marche-arrêt)
Appuyez sur le bouton pour allumer ou éteindre l’appareil. Pour éteindre
l’appareil, il faut appuyer sur le bouton pendant plus de deux secondes.
AVANCE PAPIER
Appuyez sur ce bouton pour faire avancer le papier.
Installation et recharge des accus
Suivez les étapes ci-dessous pour installer et charger les accus.
Remarque:
Les accus ne peuvent être chargés que lorsque la température est comprise entre 0 et 40 °C
{32 et 104 °F}.
1. Assurez-vous que l’imprimante est hors tension.
2.
3.
Tournez le levier sur la
marque, et faites glisser le couvercle pour l'ouvrir.
Voir illustration C.
Installez les accus (D 13) et refermez le capot des accus.
4.
Fermez le couvercle de la batterie, et tournez le levier sur la
marque. Voir
l'illustration E.
5. Connectez l’adaptateur c.a. à l’imprimante. Voir l’illustration F 14 pour le
connecteur.
Le processus de recharge commence.
Remarque:
Le rechargement dure environ 2,5 heures avec l'adaptateur secteur ou avec le chargeur de
batterie en option OT-CH60II. Pour des informations détaillées sur le chargeur d’accus,
consultez son manuel de l’utilisateur. La durée indiquée ci-dessus est nécessaire pour
recharger des accus complètement déchargés.
La recharge à 35 °C {95 °F} ou plus active le contrôle de température interne de
l’imprimante qui peut entraîner un temps de recharge plus long que celui qui est spécifié.
Le voyant de recharge clignote durant la recharge des accus. La LED de charge clignote
lorsque la charge est arrêtée.
TM-P80 Manuel de l’utilisateur 15
English
Installation ou changement du rouleau de papier
Suivez les étapes suivantes pour installer ou remplacer le rouleau de papier.
ATTENTION :
Veillez à utiliser un rouleau de papier du type spécifié.
Remarque :
Ne jamais utiliser de rouleaux dont le papier est collé au noyau.
1. Appuyez sur le bouton d'ouverture pour ouvrir le couvercle du rouleau de
papier. Voir l'illustration G.
2. Le cas échéant, enlevez le noyau du rouleau usagé, puis insérez un rouleau de
papier neuf. Voir l'illustration H.
Remarque :
Notez le sens de déroulement du papier.
3. Tirez un peu de papier, refermez le couvercle et coupez le papier avec le
coupe-papier manuel. Voir l'illustration I.
Installation ou changement du rouleau de papier
Vous pouvez accrocher l'imprimante verticalement sur un tapis à l'aide d'un clip
de ceinture se trouvant à l'arrière de l'imprimante. soit à une bride-collier
proposée en option. En cas d’utilisation de l’imprimante en position verticale,
procédez comme suit pour installer le rouleau de papier.
Remarque :
Assurez-vous que le support de rouleau de papier soit positionné sur la partie inférieure
lorsque vous utilisez l'imprimante verticalement.
1. Appuyez sur le bouton pour ouvrir le couvercle du compartiment du rouleau
de papier.
2. Enlevez, le cas échéant, le noyau du rouleau de papier épuisé.
3. Réglez le nouveau rouleau de papier. Voir l'illustration J.
Remarque :
Notez le sens de déroulement du papier.
4. Déroulez un peu le rouleau. Voir ➀ dans figure K.
5. Alignez le bord gauche du rouleau de papier sur le bord du couvercle. Voir ➁
dans figure K.
6. Refermez le couvercle et coupez le papier avec le coupe-papier manuel.
Pince à ceinture
Vous pouvez porter l’imprimante à la ceinture au moyen de la pince fixée (L 16) à
l’arrière de l’imprimante.
Signal sonore
Par défaut, le signal sonore est activé pour indiquer les problèmes suivants :
❏ La capacité restante des accus est insuffisante
❏ Fin du rouleau de papier
❏ Erreur
16 TM-P80 Manuel de l’utilisateur
English
Dépannage
Rien ne s’allume sur le panneau de commande
❏
Vérifiez que les accus sont en place.
Le voyant d’erreur (Error) reste allumé ou clignote
❏
❏
❏
❏
❏
Il se peut que la température de l’imprimante soit trop élevée. L’imprimante
reprend automatiquement l’impression lorsque la température redevient
normale.
Vérifiez que le compartiment du rouleau de papier est bien fermé.
Vérifiez qu’un rouleau de papier est en place.
Lorsque l'imprimante est allumée, si la LED erreur est allumée et que la LED de
la batterie n'est pas allumée, il ne reste pas assez de batterie pour faire fonctionner
l'imprimante. Remplacer ou recharger la batterie.
Éteignez l’imprimante, attendez quelques secondes, puis rallumez-la. Si
l’erreur persiste, contactez un technicien-réparateur qualifié.
La batterie ne se chargera pas
❏
❏
Si la batterie n'est pas complètement chargée après environ 5 heures de
recharge, la batterie est défectueuse.
La batterie doit être remplacée.
Allumez l'imprimante, installez le rouleau de papier et fermez le couvercle du
rouleau de papier.
Après cela, si le voyant d'erreur est allumé et que le voyant de charge
clignote, la batterie est défectueuse.
La batterie doit être remplacée.
Le couvercle de la batterie ne s'ouvre pas
Suivez les étapes ci-dessous lorsque le couvercle de la batterie ne s'ouvre pas.
1. Assurez-vous que l’imprimante est hors tension.
2.
3.
Tournez le levier sur la
marque.
Déplacez l'encoche (M 17) dans le sens de la flèche à l'aide d'un outil tel qu'un
stylo à bille. Voir l'illustration M.
Nettoyage du rouleau de platine/capteur de papier
ATTENTION:
Ne pas utiliser un solvant à base d'alcool. L'utilisation d'un solvant à base
d'alcool peut provoquer la dissolution progressive de l'agent adhésif et
rendre son élimination encore plus difficile.
Lorsque la poussière de papier s'accumule sur les rouleaux de platine ou le
capteur de papier, suivez les étapes ci-dessous pour les nettoyer. Pour maintenir
de bonnes capacités fonctionnelles, nettoyez-les régulièrement (tous les 6 mois).
1. Mettez l'imprimante hors tension, ouvrez le couvercle du rouleau de papier.
2. Nettoyez le rouleau d'impression (N 18) et le détecteur de papier (N 19) avec
un coton-tige légèrement humidifié avec de l'eau.
3. Fermez le couvercle du rouleau de papier une fois sec.
TM-P80 Manuel de l’utilisateur 17
English
Nettoyage de la tête d’impression thermique
ATTENTION :
Après l’impression, la tête d’impression thermique peut être brûlante. Faites
attention à ne pas la toucher et laissez-la se refroidir avant de la nettoyer. Faites
attention à ne pas endommager la tête d’impression thermique en la touchant
avec les doigts ou un objet dur.
Ne pas utiliser d'eau. Utiliser un solvant à base d'alcool seulement.
Éteignez l’imprimante, ouvrez le couvercle du rouleau de papier et nettoyez les
éléments thermiques de la tête d’impression (N 20) avec un coton-tige imbibé de
solvant à l’alcool (éthanol ou isopropanol).
EPSON recommande de nettoyer la tête d’impression thermique à intervalle
régulière (normalement tous les 3 mois) afin d’obtenir une qualité d’impression.
TM-P80 Spécifications
Méthode d’impression
Impression thermique en lignes
Densité de points
203 ppp × 203 ppp [points par 25,4 mm {1”}]
Largeur d’impression (Par défaut)
72 mm {2.83"}, 576 positions de point
Papier
79.5 ± 0.5 mm {3.12 ± 0.02"}
Largeur du rouleau
de papier
Diamètre du noyau
18 mm {0.71"} minimum
du rouleau de papier
externe
Spécifiée papier
thermique
Interface
Alimentation
électrique
Température/
Humidité
NIPPON Paper Industries Co., Ltd. :TF50KS-EY
Oji Holdings Corporation :PD150R/PD160R/PD190R
Kanzaki Specialty Papers (USA) :P30023/P31023/P35024
Koehler :KT55F20/KT48F20
Jujo ThermalOy :AF50KS-E
Mitsubishi HiTec :F5041(48)/F5041(55)
USB (conformité : vitesse de conformité USB 2.0 : Full-speed
(12 Mbit/s), Wireless (Bluetooth®/IEEE802.11a/b/g/n)
Accus spécifiés
Accus aux ions lithium : nom du produit : OT-BY60II, nom
commercial : Seiko Epson Corporation
Sortie : 7,4 Vcc, capacité : 2000 mAh
Tension
d’alimentation
Tension d'entrée : soit 1,0 A max à 12 V cc ou 1,5 A max.
à 24 V cc
(lors de l’utilisation de l’adaptateur secteur en option
EPSON PS-11 [Modèle : M235A]) Tension de sortie : 1,5 A
max. à 24 Vcc, Tension d’entrée : de 100 à 240 Vca
Utilisation
Batterie seulement : 0 à 45 °C {32 à 113 °F}, 10 à 90 % HR
Batterie et bloc d'alimentation : 0 à 40 °C {32 à 104 °F}, 10
à 90 % HR
Stockage
Un fonctionnement anormal ne survient pas lorsque
l'imprimante est stockée dans un environnement
affichant 25 °C {77 °F}, 60 % d'humidité relative pendant
2 heures après qu'elle a été laissée dans les conditions
suivantes :
Haute température et d'humidité : 45 °C {113 °F}, 90 %
d'humidité relative pendant 120 heures
Haute température : 70 °C {158 °F} pendant 120 heures
à basse température : -25 °C {-13 °F} pendant 120 heures
Dimensions totales
18 TM-P80 Manuel de l’utilisateur
110 × 140 × 64 mm {4.3 × 5.5 × 2.5"} (L × P × H)
Poids (masse)
English
Modèle WiFi : env. 506 g {1,11 livre}
Modèle Bluetooth : Env. 500 g {1,10 livre}
(Batterie et clip ceinture inclus ; rouleau de papier exclu)
Remarque : pour les spécifications des accus, consultez leur manuel de l’utilisateur.
Licence des logiciels libres
1.
2.
3.
4.
Cette imprimante inclut les logiciels libres répertoriés dans la section 4) et
proposés conformément aux conditions de la licence de chacun des logiciels.
Wij verstrekken de broncode van de GPL Programs en LGPL Programs (qui
sont définis à la section 4) sur un CD-ROM pour un montant couvrant le coût
d’une telle distribution, à savoir le coût du support, l’expédition et la gestion
jusqu’à cinq (5) ans après la fin de production du même modèle que ce
produit.
De programma’s op basis van openbronsoftware zijn ZONDER GARANTIE,
ook zonder impliciete garantie van VERKOOPBAARHEID OF
GESCHIKTHEID VOOR EEN BEPAALD DOEL. Zie de licentievoorwaarden
van elk afzonderlijk programma op basis van openbronsoftware voor meer
informatie, décrits dans « CONDITIONS DE LICENCE DU LOGICIEL OPEN
SOURCE » dans cette documentation.
La liste des programmes libres inclus avec cette imprimante et les contrats de
licence complets de chaque licence se trouvent à l’adresse suivante.
http://xxx.xxx.xxx.xxx/licenses/
* Pour les parties soulignées dans l’adresse ci-dessus, saisissez l’adresse IP de
chaque imprimante.
TM-P80 Manuel de l’utilisateur 19
English
Deutsch
Abbildungen
Alle Abbildungen befinden sich am Anfang dieses Handbuchs und sind mit den Buchstaben (A, B, C…)
gekennzeichnet. Einige Abbildungen enthalten Ziffern. Die Bedeutung der Ziffern entnehmen Sie bitte
der folgenden Liste. Der Text enthält Verweise auf Buchstaben und Ziffern. Beispiel: „Siehe Abbildung A”
oder „Siehe A 6.” (“A 6” bedeutet Nummer 6 in Abbildung A.)
Abbildung A:
1. Rollenpapierhalter
2. Bedienfeld
3. Batterieabdeckung
4. Hebel
5. Öffnungstaste
6. Papierrollenabdeckung
Abbildung B:
7. Netz-LED (POWER LED)
8. Fehleranzeige (ERROR LED)
9. Lade-LED
10.BATT. LED
11.Hauptschalter (POWER)
12.Papiervorschubtaste (FEED)
Abbildung D:
13. Batterie
Abbildung F:
14. Anschluss für AC-Adapter
15. Anschluss für den USB
Abbildung L:
16. Gürtelclip
Abbildung M:
17. Nut
Abbildung N:
18. Druckplattenwalze
19. Papierfühler
20. Thermo-Druckkopf
Vorsicht
Alle Rechte vorbehalten. Diese Veröffentlichung darf ohne ausdrückliche schriftliche Genehmigung der
Seiko Epson Corporation nicht reproduziert, in einem Abrufsystem gespeichert oder in beliebiger Form
und auf jedwede Weise übermittelt werden, weder durch Fotokopieren, Aufzeichnen, noch auf
elektronische, mechanische oder sonstige Weise. Für die hierin enthaltenen Informationen wird keine
Patenthaftung übernommen. Obgleich bei der Zusammenstellung dieser Anleitung mit Sorgfalt
vorgegangen wurde, übernimmt die Seiko Epson Corporation keine Verantwortung für Fehler und
Auslassungen. Zudem wird keine Haftung übernommen für Schäden, die aus der Verwendung der hierin
enthaltenen Informationen entstehen.
Weder die Seiko Epson Corporation noch ihre Tochtergesellschaften sind dem Käufer dieses Produkts
oder Drittparteien gegenüber für Schäden, Verluste, Kosten oder Ausgaben haftbar, die für den Käufer
oder etwaige Drittparteien aufgrund von Unfall, Mißbrauch oder Zweckentfremdung dieses Produkts,
nicht autorisierten Modifikationen, Reparaturen oder Produktumbauten sowie (mit Ausnahme USA)
aufgrund des Versäumnisses anfallen, die Bedienungs- und Wartungsanleitungen der Seiko Epson
Corporation genau einzuhalten.
Die Seiko Epson Corporation ist nicht haftbar für Schäden oder Probleme, die bei Verwendung von
Optionen oder Verschleißteilen auftreten, die nicht als Original-Epson-Produkte oder von der Seiko
Epson Corporation zugelassene Epson Produkte gelten.
EPSON ist ein eingetragenes Warenzeichen der Seiko Epson Corporation in Japan und anderen Ländern/
Gebieten.
HINWEIS: Änderungen am Inhalt dieser Anleitung ohne Vorankündigung vorbehalten.
Copyright © 2012, Seiko Epson Corporation, Nagano, Japan.
Wichtige Sicherheitshinweise
Dieser Abschnitt enthält wichtige Informationen für die sichere und effektive Nutzung
dieses Produkts. Bitte lesen Sie diesen Abschnitt sorgfältig durch und bewahren Sie ihn
leicht zugänglich auf.
Symbole
Die in diesem Handbuch verwendeten Symbole sind der untenstehenden Wichtigkeit
entsprechend definiert. Folgende Angaben vor Umgang mit dem Produkt sorgfältig
durchlesen.
20 TM-P80 Benutzerhandbuch
English
GEFAHREN:
Gefahrenhinweise sind sorgfältig zu beachten, um schwere Verletzungen und
Tod auszuschalten.
WARNUNG:
Warnungen müssen zur Vermeidung von möglicherweise schweren
Körperverletzungen genau beachtet werden.
VORSICHT:
Vorsichtshinweise müssen zur Vermeidung leichter Körperverletzungen und
Beschädigungen des Gerätes beachtet werden.
Hinweis:
Hinweise enthalten wichtige Informationen und nützliche Tipps zum Betrieb des Geräts.
Sicherheitsmassnahmen
WARNUNG:
Schalten Sie das Gerät bei Rauchentwicklung, Abgabe eines eigenartigen
Geruchs oder ungewöhnlichen Geräuschs sofort aus. Bei weiterer Verwendung
besteht Feuergefahr. Ziehen Sie den Netzstecker des Gerätes sofort aus der
Netzsteckdose und benachrichtigen Sie Ihren Händler oder ein Seiko Epson
Service Center.
Versuchen Sie keinesfalls das Gerät selbst zu reparieren. Falsch durchgeführte
Reparaturarbeiten können Gefahren mit sich bringen.
Das Produkt keineswegs auseinandernehmen oder umbauen. Nach
unbefugten Eingriffen in dieses Produkt sind Verletzungs- und Feuergefahr nicht
auszuschließen.
Verwenden Sie nur das für dieses Produkt spezifizierte Netzteil, EPSON PS-11
(Model: M235A). Beim Anschluss an das falsche Netzteil besteht Brandgefahr.
Keine Fremdkörper in das Gerät fallen lassen. Beim Eindringen von
Fremdkörpern besteht Feuergefahr.
Falls Wasser oder sonstige Flüssigkeiten in dieses Gerät eindringen, nicht weiter
verwenden. Bei Weiterverwendung des Geräts besteht Feuergefahr. Ziehen Sie
sofort den Netzstecker und setzen Sie sich mit Ihrem Händler oder einem Seiko
Epson Service Center in Verbindung.
VORSICHT:
Schließen Sie Kabel nur auf die in diesem Handbuch beschriebene Weise an.
Andere Kabelverbindungen können das Gerät beschädigen und einen Brand
verursachen.
Dieses Produkt nicht fallenlassen. Das Produkt kann beim Herabfallen
beschädigt werden oder Verletzungen verursachen.
Verwenden Sie das Gerät nicht an Orten mit hohem Feuchtigkeits- oder
Staubgehalt. Eine übermäßige Feuchtigkeits- oder Staubentwicklung kann das
Gerät beschädigen oder einen Brand verursachen.
Stellen Sie keine schweren Gegenstände auf dieses Produkt.
Stellen Sie sich nie auf das Produkt und lehnen Sie sich nicht dagegen. Das
Gerät kann fallen oder beschädigt werden und dabei Gegenstände
beschädigen oder Personen verletzen.
TM-P80 Benutzerhandbuch 21
English
Aus Sicherheitsgründen ziehen Sie bitte den Netzstecker aus der Netzsteckdose
wenn Sie beabsichtigen, das Gerät über einen längeren Zeitraum nicht zu
verwenden.
Falls das Produkt transportiert werden soll, den Netzstecker und alle
angeschlossenen Kabel abziehen.
Handverletzungen durch die manuelle Schneidvorrichtung zuziehen:
•Beim Herausnehmen des bedruckten Dokuments
•Bei der Durchführung von anderen Arbeiten, wie zum Beispiel beim
Verwenden Sie keine brennbaren Sprühmittel in und in der Nähe des Gerätes.
Brandgefahr!
Sicherheitsvorkehrungen für die wiederaufladbare Batterie (Akku)
GEFAHREN:
Falls Flüssigkeit aus der Batterie in Ihre Augen gelangt, das betroffene Auge
sofort mindestens 10 Minuten mit sauberem Wasser ausspülen und sofort einen
Arzt zu Rate ziehen. Andernfalls kann die Flüssigkeit eine Einbuße der
Sehfähigkeit verursachen.
Den Akku keinesfalls auseinandernehmen oder modifizieren. Andernfalls
besteht Brand-, Explosions-, Auslauf-, Überhitzungs- und Beschädigungsgefahr.
Die Batterie von offenem Feuer fernhalten und nicht erhitzen. Andernfalls
besteht Brand-, Explosions-, Auslauf-, Überhitzungs- und Beschädigungsgefahr.
WARNUNG:
Wenn der Akku einen eigenartigen Geruch entwickelt oder ausläuft, von Feuer
und offenen Flammen fernhalten. Andernfalls besteht Feuer- und
Explosionsgefahr.
Falls Batterieflüssigkeit in Kontakt mit der Haut oder Bekleidung gerät, sofort mit
sauberem Wasser abwaschen. Andernfalls besteht Gefahr, dass die Flüssigkeit
die Haut verletzt.
Wasser von der Batterie fernhalten. Kein Wasser auf die Anschlusspole bringen.
Andernfalls besteht Feuer-, Überhitzungs- und Stromschlaggefahr.
Sicherheitsaufkleber
Die Warnschilder auf dem Produkt weisen auf die folgenden Sicherheitshinweisehin:
VORSICHT:
Während und direkt nach dem Drucken erreicht der Thermo-Kopf sehr hohe
Temperaturen.
Nutzungsbeschränkungen
Wenn dieses Produkt für Anwendungen verwendet wird, bei denen es auf hohe
Zuverlässigkeit/Sicherheit ankommt, wie z.B. Transportvorrichtungen beim Flug-,
Zug-, Schiffs- und Kfz-Verkehr usw., Vorrichtungen zur Katastrophenverhinderung,
verschiedene Sicherheitsvorrichtungen oder Funktions-/Präzisionsgerät usw., sollten
Sie dieses Produkt erst verwenden, wenn Sie Fail-Safe-Vorrichtungen und
Redundanzsysteme in Ihr Design mit einbezogen haben, um die Sicherheit und
Zuverlässigkeit des gesamten Systems zu gewährleisten. Da dieses Produkt nicht für
den Einsatz bei Anwendungen vorgesehen ist, bei denen es auf extrem hohe
Zuverlässigkeit/Sicherheit ankommt, wie beispielsweise in der Raumfahrt, bei
primären Kommunikationseinrichtungen, Kernenergiekontrollanlagen oder
22 TM-P80 Benutzerhandbuch
English
medizinischen Vorrichtungen für die direkte medizinische Pflege usw., überlegen Sie
bitte nach umfassender Evaluierung genau, ob das Produkt für Ihre Zwecke geeignet
ist.
Gebrauchshinweise
❏
❏
❏
❏
❏
❏
❏
❏
❏
❏
Der Drucker arbeitet nicht mit nur dem Netzteil. Legen Sie immer den
beigefügten Akku OT-BY60II in den Drucker ein, auch wenn Sie das Netzteil
benutzen.
Den Drucker nur mit dem An-/Aus-Schalter ein- und ausschalten.
Um über ein USB-Kanel mit einem Drucker zu kommunizieren, schließen Sie das
Kabel an, bevor Sie den Drucker anschalten.
Um das USB-Kabel zu benutzen, ist zu empfehlen, es zu sichern, damit es nicht
gespannt wird.
Keinesfalls die Papierrollenabdeckung öffnen, während der Drucker in Betrieb ist.
Den Drucker vor Stoßeinwirkung schützen.
Keine übermäßige Kraft auf das Druckergehäuse ausüben.
Keine Esswaren oder Getränke (Kaffee usw.) auf den Drucker stellen.
Bei Bluetooth-Schnittstellenmodellen ist keine erneute Verbindung möglich, wenn
die Drahtlosverbindung beendet wird, während der Drucker offline ist. In solch
einem Fall beseitigen Sie die Ursache für den Offline-Zustand und schließen ihn
wieder an.
Bei Bloototth-Schnittstellenmodellen kann eine Weile zwischen dem Zeitpunkt,
zu dem Sie einen Druckjob versenden, und dem Zeitpunkt, zu dem der Drucker
wirlich beginnt zu drucken, vergehen, wenn Sie jedes Mal beim Beginn des
Druckens eine Funkverbindung zwischen dem Hostcomputer und dem Drucker
errichten, anstatt die Verbindung aufrecht zu erhalten.
Anmerkungen zur Stromversorgung
Akku
Bevor Sie den Drucker das erste Mal benutzen, laden Sie den Akku OT-BY60II auf. Um
den Akku einzulegen und zu laden, siehe “Einlegen und Laden des Akkus”.
Lesen Sie auch die Sicherheitsvorkehrungen für den Akku, die vorher in diesem
Handbuch beschrieben sind.
WARNUNG:
Sie müssen unbedingt den Akku OT-BY60II benutzen. Wenn Sie einen anderen als
den vorgeschriebenen benutzen, kann es zu Brand, Explosion, Auslaufen,
Überhitzung oder anderen Schäden kommen.
VORSICHT:
Entsorgen Sie die benutzten Akkus entsprechend den Vorschriften.
Externe Stromversorgung
Dieses Produkt benutzt eine gelistete Stromversorgung der Klasse 2 oder LPS mit einer
Ausgangsspannung von maximal 1,0 A bei DC 12 V oder maximal 1,5 A bei DC 24 V.
Beim optionalen Netzteil EPSON PS-11 [Modell M235A] ist die Ausgangsspannung
maximal 1,5 A bei DC 24 V, und die Eingangsspannung ist AC 100 V bis 240 V.
Wiederverwertung der Batterien
Enthält eine Lithium-Ionen-Batterie. Muss ordnungsgemäß der Wiederverwertung
zugeführt oder entsorgt werden.
TM-P80 Benutzerhandbuch 23
English
Hinweis:
Nehmen Sie den Akkupack nicht auseinander.
Auspacken
Folgendes ist im Lieferumfang des Druckers mit Standardspezifikationen enthalten.
Falls eine der Systemkomponenten beschädigt ist, setzen Sie sich bitte mit dem
Fachhändler in Verbindung.
❏ Drucker
❏ Papierrolle
❏ Akku (OT-BY60II) und zugehörige Bedienungsanleitung
❏ USB-Kabel
❏ Bedienungsanleitung (die vorliegende Anleitung)
Herunterladen von Treibern, Dienstprogrammen und
Handbüchern
Weitere Produktinformationen finden Sie in der Technischen Anleitung des TM-P80.
Die letzten Versionen der Treiber, Dienstprogramme und Handbücher können Sie von
einer der folgenden URLs herunterladen.
Für Kunden in Nordamerika: Besuchen Sie die Website
http://www.epsonexpert.com/
Für Kunden in anderen Ländern: Besuchen Sie die Website:
http://download.epson-biz.com/?service=pos
Namen der Teile
Siehe Abbildung A.
Bedienfeld
Die Bedientafel (B) besteht aus Netz-LED, Fehler-LED, Lade-LED, Akku-LED,
Vorschubtaste und Netztaste.
Bedienfeld (LEDs und Tasten)
Netz-LED (POWER LED) (Blau)
NETZ-LED
Bedeutung
Ein
Strom ist eingeschaltet.
Aus
Strom ist ausgeschaltet.
Blinkt
Der Drucker wird aus- und eingeschaltet.
Fehleranzeige (ERROR LED) (orange)
Drucker-zustand
Fehleranzeige
(ERROR-LED)
Bedeutung
Strom ein
Ein
Der Drucker ist offline (Papier alle,
Anschaltinitialisierung, Rollenpapierabdeckung offen,
Restakkuladung auf E-Stand).
Aus
Drucker ist im Normalbetrieb.
Blinkt
Drucker weist Fehler auf.
24 TM-P80 Benutzerhandbuch
English
Lade-LED (orange)
Drucker-zustand
Lade-LED
Strom ein und Akku
installiert
Ein
Bedeutung
Batterie wird geladen.
Aus
Batterie ist voll aufgeladen.
Blinkt
Es gibt Anomalie in Batterieladung.
BATT. LED (Blau)
Drucker-zustand
BATT. LED
Strom ein
3 LEDs an
2 LEDs an
1 LED an
1 LED
blinkt
3 LEDs aus
Fehleranzeige
(ERROR-LED)
Aus
Aus
Aus
Status der
Akkuladung
Aus
Ladestand S
Ein
Ladestand E
Ladestand H
Ladestand M
Ladestand L
Bedeutung
Sie können mit dem Drucken
fortfahren, aber ein Wechsel
oder eine Aufladung des
Akkus ist zu empfehlen.
Wechsel oder Laden des
Akkus.
Der Drucker geht in den
Offline-Modus und Drucken ist
nicht mehr möglich.
Hauptschalter (POWER)
Diese Taste zum Ein- und Ausschalten des Stroms drücken. Zum Ausschalten des
Stroms muss die Taste länger als 2 Sekunden gedrückt werden.
FEED (Papiervorschubtaste)
Drücken Sie die Papiervorschubtaste.
Einlegen und Laden des Akkus
Befolgen Sie die Schritte unten, um den Akku einzulegen und zu laden.
Hinweis:
Der Akku kann nur geladen werden, wenn die Temperatur zwischen 0 und 40°C ist.
1. Achten Sie darauf, dass der Drucker ausgeschaltet ist.
2.
3.
Den Hebel bis zur
Markierung drehen und die Batterieabdeckung zum
Öffnen schieben. Siehe Abbildung C.
Legen Sie den Akku (D 13) ein und schließen die Akkuabdeckung.
4.
Die Akkuabdeckung schließen und den Hebel bis zur
drehen. Siehe Abbildung E.
Markierung
5.
Schließen Sie den Netzstromadapter an den Drucker an. Sie Abbildung F 14
bezüglich Stecker.
Nun beginnt der Wiederaufladevorgang.
Hinweis:
Ein erneutes Aufladen mit dem AC-Adapter oder mit dem optionalen Ladegerät OT CH60II dauert ungefähr 2,5 Stunden. Detaillierte Informationen zum Akkuladegerät
finden Sie in seinem Benutzerhandbuch. Die oben beschriebene Zeit ist die Zeit, die
erforderlich ist, einen Akkupack zu laden, der vollkommen entladen ist.
Das Aufladen des Akkus bei 35°C oder mehr aktiviert die interne Temperaturreglung des
Druckers, wodurch eine längere Ladezeit als angegeben erforderlich sein kann. Die LadeLED blinkt, wenn das Aufladen des Akkus gestoppt ist.
TM-P80 Benutzerhandbuch 25
English
Einlegen oder Auswechseln der Papierrolle
Den nachfolgenden Schritten folgen, um das Rollenpapier zu installieren oder
auszutauschen.
VORSICHT:
Verwenden Sie nur Papierrollen, die den Spezifikationen entsprechen.
Hinweis:
Verwenden Sie keine Papierrollen, bei denen das Papier am Rollenkern festgeklebt ist.
1. Drücken Sie die Taste zum Öffnen der Papierrollenabdeckung. Siehe
Abbildung G.
2. Nehmen Sie den aufgebrauchten Rollenkern (falls vorhanden) heraus und
legen Sie eine neue Papierrolle ein. Siehe Abbildung H.
Hinweis:
Achten Sie darauf, in welcher Richtung das Papier von der Rolle abgewickelt wird.
3. Ziehen Sie das Papier ein Stück heraus, schließen Sie die Abdeckung und
reißen Sie das Papier mit dem manuellen Papierabschneider ab. Siehe
Abbildung I.
Vertikales Einlegen oder Auswechseln der Papierrolle
Sie können sich den Drucker mit Hilfe eines Gürtelclips an der Rückseite des Druckers
vertikal an den Gürtel hängen. Wenn Sie den Drucker vertikal benutzen, legen Sie die
Papierrolle wie unten beschrieben ein.
Hinweis:
Stellen Sie sicher, dass der Papierrollenhalter auf dem Boden ist, wenn Sie den Drucker
vertikal verwenden.
1. Die Öffnen-Taste drücken, um die Papierrollenabdeckung zu öffnen.
2. Den Rollenkern (sofern vorhanden) herausnehmen.
3. Die neue Papierrolle einlegen. Siehe Abbildung J.
Hinweis:
Achten Sie darauf, in welcher Richtung das Papier von der Rolle abgewickelt wird.
4. Ziehen Sie die Vorderkante des Papiers heraus. Siehe ➀ in Abbildung K.
5. Richten Sie die linke Papierrollenkante an der Kante der Abdeckung aus.
Siehe ➁ in Abbildung K.
6. Schließen Sie die Abdeckung und reißen Sie das Papier mit dem manuellen
Papierabschneider ab.
Gürtelclip
Sie können sich den Drucker mit Hilfe des an der Rückseite befestigten Clips (L 16) an
den Gürtel hängen.
Signalton
Die Werksvorstellung für Signaltöne ist “eingeschaltet”; die Signaltöne weisen auf
Folgendes hin:
❏ Verbliebene Batterieladung reicht nicht aus
❏ Papierrollenende
❏ Fehler
26 TM-P80 Benutzerhandbuch
English
Fehlersuche
Auf dem Bedienfeld leuchten keine Lämpchen
❏
Stellen Sie sicher, dass die Batterie installiert ist.
Error-LED (Fehler-LED) blinkt oder leuchtet
❏
❏
❏
❏
❏
Unter Umständen ist die Druckertemperatur zu hoch. Der Drucker nimmt den
Druckvorgang wieder auf, sobald die Temperatur wieder normal geworden ist.
Achten Sie darauf, dass die Papierrolle-nabdeckung fest geschlossen ist.
Achten Sie darauf, dass eine Papierrolle eingelegt ist.
Wenn der Drucker eingeschaltet ist, die Fehler LED leuchtet und die Batterie LED
nicht leuchtet, reicht die verbleibende Batteriespannung für den Druckerbetrieb
nicht aus. Tauschen Sie die Batterie aus oder laden Sie sie auf.
Schalten Sie den Strom aus, warten Sie einige Sekunden und schalten Sie den
Strom wieder ein. Wenn der Fehler weiter besteht, setzen Sie sich mit einem
qualifizierten Servicetechniker in Verbindung.
Die Batterie lädt nicht
❏
❏
Wenn die Batterie selbst nach ungefähr fünf Stunden Laden nicht voll aufgeladen
ist, dann ist sie defekt.
Die Batterie muss mit einer neuen austauscht werden.
Schalten Sie den Drucker ein, installieren Sie die Papierrolle und schließen Sie die
Papierrollenabdeckung.
Wenn die Fehler LED leuchtet und die Lade LED blinkt, ist die Batterie defekt.
Die Batterie muss mit einer neuen ausgetauscht werden.
Die Batterieabdeckung öffnet nicht
Den nachfolgenden Schritten folgen, wenn die Batterieabdeckung sich nicht
öffnet.
1. Achten Sie darauf, dass der Drucker ausgeschaltet ist.
2.
3.
Den Hebel bis zur
Markierung drehen.
Die Nut (M 17) mit einem Werkzeug, wie z.B. einem Kugelschreiber in
Pfeilrichtung drehen. Siehe Abbildung M.
Reinigung der Schreibwalze/des Papiersensors
VORSICHT:
Keine Lösung auf Alkoholbasis verwenden. Die Nutzung einer Lösung auf
Alkoholbasis kann dazu führen, dass sich das Haftmittel teilweise auflöst und die
Entfernung noch schwieriger macht.
Wenn sich Papierstaub auf den Schreibwalzen oder dem Papiersensor angesammelt,
befolgen Sie die Schritte unten, um sie zu reinigen. Um eine gute Funktionsfähigkeit zu
bewahren, reinigen Sie sie regelmäßig (alle 6 Monate).
1.
2.
3.
Schalten Sie den Drucker aus, öffnen Sie die Rollenpapierabdeckung.
Reinigen Sie die Druckplattenwalze (N 18) und den Papiersensor (N 19) mit
einem leicht mit Wasser befeuchteten Wattestäbchen.
Schließen Sie die Rollenpapierabdeckung, nachdem das Wasser getrocknet
ist.
TM-P80 Benutzerhandbuch 27
English
Reinigen des Thermo-Druckkoptes
VORSICHT:
Der Thermo-Druckkopf ist nach dem Drucken unter Umständen sehr heiß.
Achten Sie darauf, dass Sie ihn nicht versehentlich berühren, und lassen Sie ihn
vor dem Reinigen abkühlen. Berühren Sie den Thermo-Druckkopf nicht mit den
Fingern oder einem harten Gegenstand, damit er nicht beschädigt wird.
Kein Wasser verwenden. Verwenden Sie nur eine Lösung auf Alkoholbasis.
Schalten Sie den Drucker aus, öffnen Sie die Ablöser- und die Schalten Sie den Drucker
aus, öffnen Sie die Papierrollenabdeckung und reinigen Sie die Thermoelemente des
Druckkopfs (N 20) mit einem Wattestäbchen, das mit Alkohollösung (Ethanol, IPA)
befeuchtet wurde.
EPSON empfiehlt, den Thermo-Druckkopf in regelmäßigen Abständen
(normalerweise alle 3 Monate) zu reinigen, um die Druckqualität beizubehalten.
TM-P80 Technische Daten
Druckmethode
Thermozeilen-Druck
Auflösung
203 dpi × 203 dpi [Pixel pro 25,4 mm {1"}]
Druckbreite (Standard)
72 mm {2.83"}, 576 Punktpositionen
Papier
Rollenpapierbreite
79.5 ± 0.5 mm {3.12 ± 0.02"}
Rollenpapier Kern
Außendurchmesser
18 mm {0.71"} Minimum
Angegeben
Thermopapier
NIPPON Paper Industries Co., Ltd. :TF50KS-EY
Oji Holdings Corporation :PD150R/PD160R/PD190R
Kanzaki Specialty Papers (USA) :P30023/P31023/P35024
Koehler :KT55F20/KT48F20
Jujo ThermalOy :AF50KS-E
Mitsubishi HiTec :F5041(48)/F5041(55)
Schnittstelle
USB (Gemäß USB2.0, Übertragungsgeschwindigkeit:
Fullspeed 12 Mbit/s),
Drahtlos (Bluetooth®/IEEE802.11a/b/g/n)
Stromversorgung Vorgeschriebener
Akku
Lithium-ion-Akku: Produktname: OT-BY60II, Markenname:
Seiko Epson Corporation
Ausgang: DC 7,4 V, Kapazität: 2000 mAh
Temperatur/
Luftfeuchtigkeit
Spannung der
Stromversorgung
Eingangsspannung: Entweder max. 1,0 A bei DC12 V, oder
max. 1,5 A bei DC 24 V
(Wenn das optionale Netzteil EPSON PS-11 [Modell M235A]
benutzt wird)
Ausgangsspannung: max. 1,5 A bei DC 24 V,
Eingangsspannung: AC 100 V bis 240 V
Im Betrieb
Batterie nur :0 ~ 45°C {32 ~ 113°F}, 10 ~ 90% RH
Batterie und Aggregat :0 ~ 40°C {32 ~ 104°F}, 10 ~ 90% RH
Lagerung
Abnormaler Betrieb nicht festgestellt, wenn der Drucker in
einer Umgebung von 25°C {77°F} steht, 60% RH für 2
Stunden, nachdem er in den folgenden Zuständen stehen
gelassen wurde:
Hohe Temperatur und Feuchte: 45°C {113°F}, 90%RH für 120
Stunden
Hohe Temperatur: 70°C für 120 Stunden
Niedrige Temperatur: -25°C für 120 Stunden
Gesamtabmessungen
110 × 140 × 64 mm {4.3 × 5.5 × 2.5"} (B × T × H)
Gewicht (Masse)
Wifi Modell :Ca. 506 g {1.11 lb}
Bluetooth Modell :Ca. 500 g {1.10 lb}
(Batterie und Gürtelclip enthalten, Papierrolle nicht
enthalten)
Anmerkung: Bezüglich Technische Daten des Akkus siehe sein Benutzerhandbuch.
28 TM-P80 Benutzerhandbuch
Open Source Software-Lizenz
1.
2.
3.
4.
English
Dieses Druckerprodukt enthält die in Abschnitt 4) aufgeführten Open SourceSoftware-Programme gemäß den Lizenzbedingungen der jeweiligen Open
Source-Software-Programme.
Wir stellen den Quellcode der GPL- und LGPL-Programme (alles ist in
Abschnitt 4 definiert) für Sie auf einer CD-ROM für eine Gebühr, die die
Kosten der Ausführung solch eines Vertriebs abdeckt, z. B. die Kosten des
Mediums, des Versands und der Bearbeitung bis zu fünf (5) Jahren nach der
Einstellung desselben Modells dieses Produkts.
Die Open Source-Software-Programme werden OHNE JEDE GARANTIE
bereitgestellt; auch ohne die implizite Garantie der MARKTGÄNGIGKEIT
UND DER EIGNUNG FÜR EINEN BESTIMMTEN ZWECK. Siehe
Lizenzbedingungen der jeweiligen Open Source-Software-Programme für
weitere Details, die in den “OPEN SOURCE SOFTWARE LICENSE TERMS”
in dieser Dolumentation beschrieben sind.
Die Liste der Open Source-Software-Programme, die in diesem
Druckerprodukt enthalten sind, sowie die vollständigen Lizenzbedingungen
jeder Lizenz finden Sie unter folgender URL.
http://xxx.xxx.xxx.xxx/licenses/
* Für den unterstrichenen Teil der obigen URL geben Sie die IP-Adresse des
jeweiligen Druckers ein.
TM-P80 Benutzerhandbuch 29
English
Nederland
Illustraties
Alle illustraties treft u voor in deze handleiding aan. Ze worden aangeduid door letters (A, B, C…).
Sommige afbeeldingen bevatten cijfers. Zie de onderstaande lijst voor de betekenis van de cijfers. De tekst
bevat een uitleg van de letters en de cijfers. Voorbeeld: ‘Zie afbeelding A’ of ‘Zie A 6.’ (‘A 6’ betekent
nummer 6 in afbeelding A.)
Afbeelding A:
1. Rolpapierhouder
2. Bedieningspaneel
3. Batterijdeksel
4. Hendel
5. Open-knop
6. Deksel van het
rolpapier
Afbeelding B:
Afbeelding D:
7. POWER-lampje 13. Batterij
8. ERROR-lampje
Afbeelding F:
9. OPLADEN-lampje14. Aansluiting voor de AC adapter
10.BATT-lampje
15. Aansluiting voor USB
11.Aan/uitknop
Afbeelding L:
12.FEED-knop
16. Riemclip
Afbeelding M:
17. Nok
Afbeelding N:
18. Roller
19. Papiersensor
20. Thermische kop
Let op
Alle rechten voorbehouden. Niets uit deze uitgave mag worden verveelvoudigd, opgeslagen in een
geautomatiseerd gegevensbestand of openbaar worden gemaakt in enige vorm of op enige wijze, hetzij
elektronisch, mechanisch, door fotokopiëren, opnamen of enige andere manier, zonder voorafgaande
schriftelijke toestemming van Seiko Epson Corporation. Er wordt geen aansprakelijkheid voor octrooien
aanvaard in verband met gebruik van de informatie in deze uitgave. Hoewel bij het samenstellen van
deze uitgave de grootste zorgvuldigheid is betracht, aanvaardt Seiko Epson Corporation geen
aansprakelijkheid voor fouten of omissies. Noch wordt aansprakelijkheid aanvaard voor schade die
voortvloeit uit gebruik van de informatie in deze uitgave.
Noch Seiko Epson Corporation noch een van haar dochterondernemingen kan aansprakelijk worden
gesteld door de koper of door derden voor schade, verliezen of kosten die door de koper of derden zijn
gemaakt als gevolg van ongelukken, onjuist gebruik of misbruik van dit product of door onbevoegden
uitgevoerde modificaties, reparaties of wijzigingen van dit product of (tevens in de VS) het niet in acht
nemen van de aanwijzingen voor gebruik en onderhoud van Seiko Epson Corporation.
Seiko Epson Corporation is niet aansprakelijk voor schade of problemen die voortvloeien uit gebruik van
andere optionele producten of verbruiksgoederen dan die welke door Seiko Epson Corporation zijn
aangemerkt als “originele Epson-producten” of als “door Epson goedgekeurde producten”.
EPSON is een gedeponeerd handelsmerk van Seiko Epson Corporation in Japan en andere landen/
gebieden.
BEKENDMAKING: Wijzigingen in de inhoud van deze handleiding onder voorbehoud.
Copyright © 2012, Seiko Epson Corporation, Nagano, Japan.
Belangrijke veiligheidsinformatie
Dit gedeelte bevat belangrijke informatie voor veilig en effectief gebruik van dit
product. Lees dit gedeelte zorgvuldig door en bewaar het op een goed
toegankelijke plaats.
Verklaring van symbolen
De symbolen in deze handleiding zijn onderverdeeld volgens hun mate van
belangrijkheid, zoals hieronder beschreven. Lees het onderstaande zorgvuldig
door voordat u het product gebruikt.
30 TM-P80 Gebruikershandleiding
English
GEVAAR:
De mededeling 'GEVAAR' moet goed in acht genomen worden om ernstig of
dodelijk lichamelijk letsel te voorkomen.
WAARSCHUWING
Waarschuwingen moeten goed in acht genomen worden om ernstig
lichamelijk letsel te voorkomen.
LET OP:
Voorzorgsmaatregelen moeten in acht genomen worden om licht letsel of
apparatuurschade te voorkomen.
NB:
Tekst met de vermelding ‘NB’ bevat belangrijke informatie en nuttige tips voor gebruik
van het product.
Veiligheidsmaatregelen
WAARSCHUWING
Schakel de apparatuur onmiddellijk uit wanneer hij rook, een vreemde lucht of
ongebruikelijk lawaai produceert. Verder gebruik kan tot brand leiden. Trek de
stekker van het apparaat onmiddellijk uit het stopcontact en neem contact op
met de leverancier of een servicecentrum van Seiko Epson.
Niet proberen om zelf dit product te repareren. Onjuist uitgevoerde reparaties
kunnen gevaarlijk zijn.
Dit product nooit demonteren of wijzigen. Knoeien met dit product kan letsel of
brand veroorzaken.
Gebruik de voorgeschreven voedingsbron. Aansluiten op een verkeerde
voedingsbron kan brand veroorzaken.
Voorkom dat er voorwerpen in de apparatuur vallen. Binnendringen van
voorwerpen kan brand veroorzaken.
Als er water of andere vloeistof in deze apparatuur terechtkomt, moet u verder
gebruik staken. Verder gebruik kan tot brand leiden. Trek de stekker
onmiddellijk uit het stopcontact en neem contact op met de leverancier of
met een servicecentrum van Seiko Epson voor advies.
LET OP:
Sluit de snoeren niet anders aan dan beschreven in deze handleiding.
Verkeerde aansluitingen kunnen apparatuurschade en brand veroorzaken.
Pas op dat u dit product niet laat vallen. Het product kan beschadigd raken of
ongelukken veroorzaken als het valt.
Niet gebruiken op plaatsen met een hoge vochtigheidsgraad of veel stof.
Overmatig vocht en stof kunnen apparatuurschade of brand veroorzaken.
Geen zware voorwerpen bovenop dit product plaatsen. Nooit op dit product
leunen of staan. De apparatuur kan vallen of in elkaar klappen, wat schade en
letsel kan veroorzaken.
Trek voor alle veiligheid de stekker van dit product uit het stopcontact wanneer
het langere tijd niet gebruikt wordt.
Voordat u het product verwijdert, moet u de stekker uit het stopcontact trekken
en alle kabels die er op aangesloten zijn, loshalen.
Wees voorzichtig dat u uw vingers niet bezeert aan de handmatige snijder
•
Wanneer u afgedrukt papier verwijdert
TM-P80 Gebruikershandleiding 31
English •
Wanneer u andere handelingen uitvoert zoals het plaatsen/
vervangen van de papierrol
Geen spuitbussen met brandgevaarlijk gas in of bij dit product gebruiken. Dat
kan brand veroorzaken.
Veiligheidsvoorzorgen voor de oplaadbare batterij
GEVAAR:
Mocht er batterijvloeistof in uw ogen terechtkomen, spoel ze dan meteen met
schoon water gedurende meer dan 10 minuten en raadpleeg uw doktor
onmiddellijk. Nalaten dit te doen kan resulteren in aantasting van uw
gezichtsvermogen.
De batterij nooit demonteren of wijzigen. Dat kan brand, explosies, lekkage,
oververhitting of schade veroorzaken.
Stel de apparatuur niet bloot aan vuur en verhit hem niet. Dat kan brand,
explosies, lekkage, oververhitting of schade veroorzaken.
WAARSCHUWING
Houd de batterij van open vuur vandaan als hij sterk gaat ruiken of lekt. Anders
kan er brand of een explosie optreden.
Spoel batterijvloeistof als die op de huid of kleding terechtkomt meteen met
schoon water weg. Nalaten dit te doen kan resulteren in aantasting van uw
huid door de vloeistof.
Stel de batterij niet bloot aan water. Voorkom dat de polen nat worden. Dat
kan brand, oververhitting of elektrische schokken veroorzaken.
Veiligheidsetiket
De waarschuwingsetiketten op het product geven de volgende
veiligheidsmaatregelen mee.
LET OP:
Tijdens en na het afdrukken kan de thermische kop zeer heet zijn.
Gebruiksbeperkingen
Wanneer dit product gebruikt wordt voor toepassingen die een hoge mate van
betrouwbaarheid/veiligheid vereisen, zoals bijv. transportapparatuur voor
vliegtuigen, treinen, schepen, auto’s, enz.; ramppreventievoorzieningen; diverse
soorten beveiligingsapparatuur, enz.; of functionele/precisieapparatuur, mag u
dit product alleen gebruiken indien uw ontwerp voorziet in redundantie en failsafes ten einde de veiligheid en betrouwbaarheid van het complete systeem te
waarborgen. Omdat dit product niet bestemd is voor toepassingen die een
uitermate hoge mate van betrouwbaarheid/veiligheid vereisen, zoals
luchtvaartapparatuur, primaire communicatieapparatuur, regelapparatuur voor
kerninstallaties of medische apparatuur voor directe medische zorg, wordt u
geacht uw eigen oordeel te hanteren aangaande de geschiktheid van dit product,
op basis van grondige evaluatie.
32 TM-P80 Gebruikershandleiding
English
Opmerkingen voor gebruik
❏
❏
❏
❏
❏
❏
❏
❏
❏
❏
De printer werkt niet met alleen de AC adapter. Plaats altijd de bijgevoegde
OT-BY60II batterij in de printer, zelfs als u de AC adapter gebruikt.
Druk op de aan/uit-knop om de printer aan en uit te zetten.
Als u via een USB-kabel met een computer wilt communiceren, moet u de
kabel aansluiten voordat u de printer inschakelt.
Als u de USB-kabel gebruikt is het aan te raden deze vast te zetten om
spanning op de kabel te voorkomen.
Open het printerdeksel niet terwijl de printer werkt.
Bescherm de printer tegen schokken.
Oefen geen overmatige druk uit op de printerkast.
Zet geen etenswaren of dranken zoals koffie op de printerkast.
Voor Bluetooth interface modellen: als de draadloze verbinding is beëindigd
terwijl de printer is uitgeschakeld, is opnieuw verbinden niet mogelijk.
Verhelp in dit geval de oorzaak van de uitschakeling en maak opnieuw een
verbinding.
Voor Bluetooth interface modellen: als u bij iedere printopdracht een nieuwe
verbinding maakt tussen de computer en de printer, in plaats van de oude te
onderhouden, kan het even duren voordat de printer start met het printen
van de printopdracht. Dit is omdat het verbinden van de computer en de
printer wat tijd nodig heeft. De benodigde tijd hangt af van de
omstandigheden.
Opmerkingen m.b.t. de voeding
Batterij
Laad de OT-BY60II batterij op vóór het eerste gebruik. Zie voor het plaatsen van
de batterij “De batterij plaatsen en opladen.”
Lees ook de veiligheidsvoorzorgsmaatregelen voor de oplaadbare batterij,
voorheen beschreven in deze handleiding.
WAARSCHUWING
Gebruik alleen de OT-BY60II batterij. Gebruik van een andere batterij kan brand,
explosies, lekkage, oververhitting of andere schade veroorzaken.
LET OP:
Voer gebruikte batterijen af volgens de instructies.
Externe voedingsbron
Dit product gebruikt een geregistreerde “Klasse 2” of “LPS,” voedingseenheid,
met een uitgangsvoltage van max. 1.0 A bij DC12 V, of max. 1.5 A bij DC 24V.
Met de optionele EPSON PS-11 [Model: M235A] AC adapter, is het maximale
uitgangsvoltage 1.5 A bij DC 24V, en het ingangsvoltage AC 100V tot 240 V.
Recycleren van de batterijen
Bevat een lithiumionenbatterij. Moet op juiste wijze gerecycleerd of afgevoerd
worden.
NB:
De batterij niet demonteren.
TM-P80 Gebruikershandleiding 33
English
Uitpakken
De printer met standaardspecificaties omvat de volgende items. Neem contact op
met de leverancier als er onderdelen beschadigd zijn.
❏ Printer
❏ Rolpapier
❏ Batterij (OT-BY60II) met gebruiksaanwijzing
❏ USB-kabel
❏ Gebruikershandleiding (deze handleiding)
Downloaden van stuur- en hulpprogramma’s en
gebruiksaanwijzingen
Verdere productinformatie staat beschreven in de TM-P80 technische
referentiegids.
De laatste versies van drivers, toepassingen en handleidingen kunnen worden
gedownload via één van de volgende URL’s.
Klanten in Noord-Amerika kunnen gebruik maken van de volgende website:
http://www.epsonexpert.com/
Klanten in andere landen kunnen gebruik maken van de volgende website:
http://download.epson-biz.com/?service=pos
Naam van onderdelen
Zie afbeelding A.
Bedienfeld
Het bedieningspaneel (B) heeft een aan/uit-LED, Error-LED, opladen-LED,
batterij-LED, Feed-knop en aan/uit-knop.
Bedieningspaneel (signaallampjes en Knoppen)
POWER-lampje (Blauw)
POWER-lampje
Aan
Uit
Knippert
Betekenis
Stroom ingeschakeld.
Stroom uitgeschakeld.
De printer wordt uit- en ingeschakeld.
ERROR-lampje (oranje)
Printertoestand
Stroom aan
ERRORlampje
Aan
Uit
Knippert
Betekenis
De printer is uitgeschakeld (papier op, bezig met initialiseren,
rolpapierdeksel open, de resterende batterijlading is op het E
niveau).
Printer is in normaal bedrijf.
Printer is in storing.
OPLADEN-lampje (oranje)
Printertoestand
Stroom aan en
batterij
geïnstalleerd
OPLADENlampje
Aan
Uit
Knippert
Betekenis
De batterij wordt geladen.
De batterij is helemaal geladen.
Er is afwijking in het laden van accu.
34 TM-P80 Gebruikershandleiding
English
BATT-lampje (Blauw)
Printertoestand
Stroom aan
BATTlampje
3 LED’s
aan
2 LED’s
aan
1 LED aan
1 LED
knippert
3 LED’s uit
ERRORlampje
Uit
Batterij
oplaadstatus
Niveau H
Uit
Niveau M
Uit
Niveau L
Uit
Niveau S
Aan
Niveau E
Betekenis
U kunt doorgaan met printen, maar
vervanging of opladen van de
batterij wordt aangeraden.
Vervang de batterij of laad deze
op.
De printer gaat offline en printen is
niet meer mogelijk.
Aan/uitknop
Druk op de aan/uitknop om de stroom in en uit te schakelen. Om de stroom uit te
schakelen, moet u de knop langer dan 2 seconden ingedrukt houden.
FEED-knop
Druk op deze knop om papier in te voeren.
De batterij plaatsen en opladen
Volg de onderstaande stappen om de batterij te plaatsen en op te laden.
NB:
De batterij kan alleen worden opgeladen als de temperatuur 0 ~ 40°C {32 ~ 104°F} is.
1. Zorg ervoor dat de printer is uitgeschakeld.
2.
3.
4.
5.
Draai de hendel naar de
markering en schuif het batterijdeksel open. Zie
afbeelding C.
Plaats de batterij (D 13) en sluit het batterijdeksel.
Sluit het batterijdeksel en draai de hendel naar de
markering. Zie
afbeelding E.
Sluit de netspanningsadapter aan op de printer. Zie afbeelding F 14 voor de
connector.
Het laden begint nu.
NB:
Opladen duurt ongeveer 2.5 uur met de AC adapter of met de optionele batterijlader OTCH60II. Zie de gebruikshandleiding van de batterijoplader voor gedetailleerde informatie
over de batterijoplader. De hierboven genoemde tijd is de tijd die nodig is voor het opladen
van een volledig ontladen batterij.
De batterij opladen bij 35°C {95°F} of hoger activeert de interne temperatuur controle van
de printer, welke er voor kan zorgen dat de laadtijd langer is dan de aangegeven laadtijd.
De opladen-LED knippert als het laden stopt.
Installeren of vervangen van rolpapier
Volg de onderstaande stappen voor het plaatsen of vervangen van het rolpapier.
LET OP:
Gebruik rolpapier dat voldoet aan de specificaties.
NB:
Geen rolpapier gebruiken waarvan het papier op de kern is vastgelijmd.
1. Druk op de open knop om het rolpapierdeksel te openen. Zie afbeelding G.
TM-P80 Gebruikershandleiding 35
English
2.
3.
Verwijder de rol van het opgebruikte rolpapier (wanneer aanwezig) en
installeer een nieuwe rol papier. Zie afbeelding H.
NB:
Let op de richting waarin het papier van de rol komt.
Trek het papier een klein stukje uit, sluit het deksel en scheur het papier af
met de papiersnijder. Zie afbeelding I.
Verticaal installeren of vervangen van rolpapier
U kunt de printer verticaal aan uw riem hangen met behulp van een riemclip op
de achterkant van de printer. Volg bij verticaal gebruik van de printer de
onderstaande stappen om het rolpapier te installeren.
NB:
Zorg ervoor dat de rolpapierhouder aan de onderkant zit als u de printer verticaal gebruikt.
1. Druk op de open-knop om het rolpapierdeksel te openen.
2. Verwijder de rol van het opgebruikte rolpapier (wanneer aanwezig).
3. Plaats de nieuwe papierrol. Zie afbeelding J.
NB:
Let op de richting waarin het papier van de rol komt.
4. Trek de voorrand van de papierstrook uit. Zie ➀ in afbeelding K.
5. Zet de linkerrand van het rolpapier in lijn met de rand van het deksel. Zie ➁
in afbeelding K.
6. Sluit het rolpapierdeksel en scheur het papier af met de handmatige
papiersnijder.
Riemclip
U kunt de printer aan uw riem hangen met de riemclip (L 16) die op de achterkant
van de printer is aangebracht.
Zoemer
De standaardinstelling is Aan, waarbij de zoemer klinkt in de volgende gevallen:
❏ Resterende batterijlading is onvoldoende.
❏ Rolpapier op.
❏ Fout.
Probleemoplossing
Lampjes op het bedieningspaneel branden niet.
❏
Controleer of de batterij geïnstalleerd is.
Error-lampje knippert of brandt.
❏
❏
❏
❏
De printertemperatuur is misschien te hoog. De printer hervat het printen
automatisch als de temperatuur weer tot een normaal peil is gedaald.
Kijk of het papierroldeksel goed is gesloten.
Zorg dat er rolpapier geïnstalleerd is.
Als de printer aanstaat, de ERROR-LED brand en de batterij-LED uit is, is de
resterende batterijlading niet voldoende voor gebruik van de printer.
Vervang de accu of laad deze op.
36 TM-P80 Gebruikershandleiding
❏
English
Zet de printer uit, wacht enige seconden en zet hem weer aan. Neem contact
op met een bevoegd onderhoudsmonteur als de fout niet verdwijnt.
De accu laadt niet op
❏
❏
Als de accu niet volledig oplaadt, zelfs wanneer de accu ongeveer 5 uur werd
opgeladen, dan is de accu defect.
De accu moet worden vervangen door een nieuwe.
Zet de printer aan, installeer de papierrol en sluit de kap van de papierrol.
Als daarna de Error LED brandt en de Charge LED knippert, dan is de accu
defect.
De accu moet worden vervangen door een nieuwe.
Het batterijdeksel gaat niet open
Volg de volgende stappen als het batterijdeksel niet opengaat.
1. Zorg ervoor dat de printer is uitgeschakeld.
2.
3.
Draai de hendel naar de
markering.
Beweeg de nok (M 17) in de richting van de pijl door middel van bijvoorbeeld
een pen. Zie afbeelding M.
De roller/papiersensor reinigen
LET OP:
Gebruik geen oplosmiddel met alcohol. Het gebruik van een oplosmiddel met
alcohol kan de lijm deels verwijderen wat ervoor zorgt dat het nog moeilijker wordt
om het te verwijderen.
Volg de onderstaande stappen om opgehoopt stof op de roller of de papiersensor
te verwijderen. Maak ze voor een blijvend goed gebruik regelmatig schoon (elke 6
maanden).
1. Schakel de printer uit en open het rolpapierdeksel.
2. Reinig de roller (N 18) en de papiersensor (N 19) met een licht met water
bevochtigd wattenstaafje.
3. Sluit het rolpapierdeksel pas nadat het water is opgedroogd.
Reinigen van de thermische kop
LET OP:
Na het afdrukken kan de thermische kop zeer heet zijn. Raak hem niet aan en
wacht totdat hij is afgekoeld voordat u hem schoonmaakt. Beschadig de
thermische kop niet door hem met uw vingers of harde voorwerpen aan te raken.
Gebruik geen water. Gebruik alleen een op alcohol gebaseerd oplosmiddel.
Zet de printer uit, open het deksel voor de papierrol en maak het
verwarmingselement van de thermische kop (N 20) schoon met een wattenstaafje dat
in een alcoholoplosmiddel is gedrenkt (ethanol, of isopropanol).
EPSON beveelt aan de thermische kop regelmatig (gewoonlijk om de 3 maanden)
te reinigen om een goede afdrukkwaliteit te behouden.
TM-P80 Gebruikershandleiding 37
English
TM-P80 Specificaties
Afdrukmethode
Afdrukken met thermische regel.
Afdrukdensiteit
203 dpi × 203 dpi [dots per 25,4 mm {1"}]
Afdrukbreedte (Standaard)
Papier
Papierrol
buitendiameter
18 mm {0.71"} minimum
Gespecificeerd
thermisch papier
NIPPON Paper Industries Co., Ltd. :TF50KS-EY
Oji Holdings Corporation :PD150R/PD160R/PD190R
Kanzaki Specialty Papers (USA) :P30023/P31023/P35024
Koehler :KT55F20/KT48F20
Jujo ThermalOy :AF50KS-E
Mitsubishi HiTec :F5041(48)/F5041(55)
Interface
Voeding
Temperatuur/
Vochtigheid
72 mm {2.83"}, 576 dotposities
Rolpapier breedte 79.5 ± 0.5 mm {3.12 ± 0.02"}
USB (Conformiteit: USB 2.0, communicatiesnelheid:
Fullspeed (12 Mbps),
Draadloos (Bluetooth®/IEEE802.11a/b/g/n)
Gespecificeerde
batterij
Lithium-ion batterij: Productnaam: OT-BY60II,
Handelsnaam: Seiko Epson Corporation
Output: DC 7.4 V, Capaciteit: 2000 mAh
Spanning
stroomtoevoer
Ingangsspanning: Max. 1.0 A bij DC12 V of max. 1.5 A
bij DC 24V
(Tijdens gebruik van de optionele AC adapter EPSON
PS-11 [Model: M235A]) uitgangsvoltage: Max. 1.5 A bij
DC 24V, ingangsvoltage: AC 100V tot 240 V
Bedrijf
Alleen batterij :0 ~ 45°C {32 ~ 113°F}, 10 ~ 90% RH
Batterij en voeding :0 ~ 40°C {32 ~ 104°F}, 10 ~ 90% RH
Opslag
Normaal bedrijf wanneer de printer wordt gebruikt bij
25°C {77°F}, 60% RH 2 uur nadat de printer onder de
volgende omstandigheden is gebruikt:
Hoge temperatuur en luchtvochtigheid: 45°C {113°F},
90%RH voor 120 uur
Hoge temperatuur: 70°C {158°F} 120 uur lang
Lage temperatuur: -25°C {-13°F} 120 uur lang
Afmetingen
110 × 140 × 64 mm {4.3 × 5.5 × 2.5"} (B × D × H)
Gewicht
Wifi model :Ongeveer 506 g {1.11 lb}
Bluetooth model :Ongeveer 500 g {1.10 lb}
(Inclusief batterij en riemclip; exclusief rolpapier)
NB: Zie de gebruikershandleiding voor de batterij specificaties.
38 TM-P80 Gebruikershandleiding
Licentie voor openbronsoftware
1.
2.
3.
4.
English
Dit printerproduct bevat programma’s op basis van openbronsoftware zoals
vermeld in sectie 4) in overeenstemming met de licentievoorwaarden van elk
afzonderlijk programma op basis van openbronsoftware.
Wir stellen den Quellcode der GPL- und LGPL-Programme (elk programma
is voor u gedefinieerd in sectie 4) op een CD-ROM, welke tegen een
vergoeding is te verkrijgen. Deze vergoeding dekt de kosten van de
distribuering, zoals de kosten van media, verzending en verwerking tot vijf
(5) jaar na de stopzetting van hetzelfde model van dit product.
De programma's op basis van openbronsoftware zijn ZONDER GARANTIE,
ook zonder impliciete garantie van VERKOOPBAARHEID OF
GESCHIKTHEID VOOR EEN BEPAALD DOEL. Zie de licentievoorwaarden
van elk afzonderlijk programma op basis van openbronsoftware voor meer
informatie., welke zijn beschreven in de "OPEN SOURCE SOFTWARE
LICENTIEVOORWAARDEN" in deze documentatie.
De lijst met programma’s op basis van openbronsoftware die voor dit
printerproduct worden gebruikt en de volledige licentievoorwaarden voor
elke licentie kunt u vinden in de volgende URL.
http://xxx.xxx.xxx.xxx/licenses/
* Gebruik voor het onderlijnde deel van de bovenstaande URL het IP adres
van elke printer.
TM-P80 Gebruikershandleiding 39
English
Italiano
TM-P80Figure
Tutte le figure si trovano all'inizio di questo manuale, e sono identificate da lettere (A, B, C…). Alcune
illustrazioni contengono anche numeri. Per il significato dei numeri, vedere l’elenco qui sotto. Il testo
contiene riferimenti alle lettere e ai numeri. Per esempio: “Vedere Illustrazione A” oppure “Vedere A 6.”
(“A 6” significa il numero 6 sull’Illustrazione A.)
Illustrazione A:
1. Supporto del rotolo della carta
2. Pannello di controllo
3. Coperchio della batteria
4. Leva
5. Pulsante di apertura
6. Copertura del rotolo della carta
Illustrazione B:
7. LED POWER
8. LED ERROR
9. LED di carica
10. LED BATT.
11. Pulsante POWER
12. Pulsante FEED
Illustrazione D:
13. Batteria
Illustrazione F:
14. Connettore per l'adattatore CA
15. Connettore per l'USB
Illustrazione L:
16. Fermaglio per la cintura
Illustrazione M:
17. Tacca
Illustrazione N:
18. Rullo della platina
19. Sensore della carta
20. Testina termica
Attenzione
Tutti i diritti riservati. Nessuna parte di questa pubblicazione può essere riprodotta, memorizzata in un
sistema di reperimento, né trasmessa in qualsiasi forma o con qualsiasi mezzo (elettronico, meccanico,
fotocopia, registrazione o altro) senza la preventiva autorizzazione scritta della Seiko Epson Corporation.
Viene esclusa ogni responsabilità di brevetto rispetto all’uso delle informazioni contenute in questa
pubblicazione. Malgrado questo manuale sia stato preparato con la massima cura, la Seiko Epson
Corporation non si assume alcuna responsabilità per eventuali errori o omissioni in esso contenuti, né per
eventuali danni risultanti dall’uso delle informazioni contenute in questo manuale.
Né la Seiko Epson Corporation, né alcuna delle sue affiliate, sarà ritenuta responsabile verso l’acquirente
di questo prodotto, o terze parti, di eventuali danni, perdite, costi o spese sostenuti dall’acquirente o terze
parti risultanti da: incidente, uso improprio o abuso di questo prodotto, o da modifiche non autorizzate,
riparazioni, alterazioni a questo prodotto, oppure (esclusi gli Stati Uniti d’America) dalla totale
inosservanza delle istruzioni per l’uso e la manutenzione impartite dalla Seiko Epson Corporation.
La Seiko Epson Corporation non sarà responsabile di alcun danno o problema insorto dall’uso di qualsiasi
accessorio opzionale o di prodotti consumabili diversi da quelli designati dalla Seiko Epson Corporation
come Prodotti originali Epson o Prodotti approvati dalla Epson.
EPSON è un marchio registrato di Seiko Epson Corporation in Giappone ed in altri paesi/regioni.
AVVISO: il contenuto di questo manuale è soggetto a cambiamenti senza preavviso.
Copyright © 2012 Seiko Epson Corporation, Nagano, Giappone.
Precauzioni di sicurezza
Questa sezione presenta informazioni importanti per l’uso efficiente e sicuro di
questo prodotto. Leggere attentamente questa sezione e conservare queste
informazioni in un posto accessibile.
Spiegazione dei simboli
I simboli usati in questo manuale sono identificati in base al loro grado di
importanza, come definito qui sotto. Prima di maneggiare il prodotto, leggere
attentamente questa sezione.
PERICOLO:
Prestare attenzione ai pericoli per evitare gravi infortuni o la morte.
AVVERTENZA:
Seguire attentamente le note di avvertenza per evitare gravi infortuni alle persone.
40 TM-P80 Manuale dell’utente
English
ATTENZIONE:
Osservare le note di attenzione per evitare infortuni non gravi alla propria
persona o danni all'unità.
Nota:
Le note contengono informazioni importanti e consigli utili per l’uso del prodotto.
Precauzioni di sicurezza
AVVERTENZA:
Spegnere immediatamente l’unità se produce fumo, un odore strano o un
rumore inconsueto. L’uso continuato potrebbe costituire causa d’incendio.
Staccare immediatamente la spina dell’unità e rivolgersi al rivenditore o alla
Seiko Epson per assistenza in merito.
Non riparare mai da soli questa unità. La riparazione impropria potrebbe creare
un pericolo.
Non smontare né modificare mai questo prodotto. La manomissione del
prodotto potrebbe causare lesioni personali, incendio.
Accertarsi di usare la fonte di alimentazione specificata. Il collegamento del
prodotto ad una fonte di alimentazione impropria potrebbe causare incendio.
Evitare che nell’unità entrino corpi estranei. Questi potrebbero causare incendio.
Se acqua o altri liquidi cadono accidentalmente nell'unità, interrompere l'uso
dell'unità. L'uso continuato dell'unità potrebbe causare incendio. Staccare
immediatamente il cavo di alimentazione, quindi rivolgersi per consigli al
rivenditore o al centro di servizio della Seiko Epson.
ATTENZIONE:
Non collegare i cavi in alcun modo diverso da quello indicato in questo manuale.
Collegamenti non corretti possono causare danni all’unità e ustioni personali.
Prestare attenzione a non far cadere il prodotto. Se cade, il prodotto potrebbe
rompersi o causare infortuni alla persona.
Non usare questa unità in ambienti soggetti ad un elevato tasso di umidità o
polvere. L’umidità o la polvere eccessiva può causare danni all’unità o incendio.
Non mettere oggetti pesanti sopra questa unità. Non porsi sopra questa unità
né appoggiarsi. L’unità potrebbe cadere e rompersi o causare lesioni personali.
Per motivi di sicurezza, staccare sempre la spina dell’unità prima di lasciarla
incustodita per un lungo periodo di tempo.
Prima di spostare il prodotto, staccare la spina e tutti i cavi collegati al prodotto.
Prestate attenzione a non ferirvi le dita sulla taglierina manuale
•
•
Quando rimuovete la carta stampata
Quando eseguite operazioni come carico/sostituzione del rotolo di
carta
Per evitare il pericolo d’incendio, non usare spruzzatori aerosol contenenti gas
infiammabili, all’interno del prodotto o vicino ad esso.
Precauzioni di sicurezza per la batteria risarcibile
PERICOLO:
Se un liquido della batteria viene a contatto con gli occhi, lavare
immediatamente con acqua pulita per oltre 10 minuti e consultare subito un
medico. In caso contrario, il liquido può causare cecità.
Non smontare mai né modificare la batteria. Ciò può causare incendio,
esplosione, perdita, surriscaldamento o danni.
TM-P80 Manuale dell’utente 41
English
Non esporre la batteria al fuoco né riscaldarla. Ciò può causare incendio,
perdita, surriscaldamento o danno.
AVVERTENZA:
Tenere la batteria lontano da fuoco o fiamma, se produce un odore strano o
una perdita. Ciò potrebbe dar luogo ad un’esplosione.
Se il liquido della batteria viene a contatto con la pelle o con l’abbigliamento,
lavare immediatamente con acqua pulita. In caso contrario, il liquido può
danneggiare la pelle o l’abbigliamento.
Non esporre la batteria all’acqua. Evitare che l’acqua tocchi i morsetti. Ciò
può causare incendio, surriscaldamento o scossa elettrica.
Etichetta di sicurezza
Le etichette di avvertimento presenti sul prodotto indicano le seguenti
precauzioni.
ATTENZIONE:
Durante o dopo la stampa, la testina termica può essere molto calda.
Limitazioni d’impiego
Quando questo prodotto viene impiegato in applicazioni che richiedono un alto
grado di affidabilità e sicurezza, come dispositivi relativi a trasporti aerei, per
treno, via mare, con motoveicoli, ecc., dispositivi per la prevenzione di disastri,
dispositivi di sicurezza vari ecc. o dispositivi di precisione/funzionali, lo si
dovrebbe usare solo dopo avere preso in considerazione l’inclusione nel progetto
di elementi di ridondanza e resistenza ai guasti aventi lo scopo di mantenere la
sicurezza e l’affidabilità dell’intero sistema. Poiché questo prodotto è stato
progettato per essere usato in applicazioni che richiedono un altissimo grado di
affidabilità e sicurezza, come in apparecchiature aerospaziali, reti di
comunicazione, controllo di impianti nucleari o apparecchi per l’assistenza
medica usati in cura diretta dei pazienti, ecc., si dovrà usare il proprio
discernimento nel valutare a fondo il prodotto e garantire che sia adatto all’uso.
Note sull’uso
❏
❏
❏
❏
❏
❏
❏
❏
La stampante non funziona soltanto con l’adattatore CA. Installate sempre la
batteria OT-BY60II in dotazione nella stampante anche quando utilizzate
l’adattatore CA.
Per accendere e spegnere la stampante, usare solamente il pulsante
dell’alimentazione.
Per comunicare con un computer tramite cavo USB, collegate il cavo prima di
accendere la stampante.
Per utilizzare il cavo USB, si consiglia di fissarlo per evitare sollecitazioni su
di esso.
Non aprire la copertura del rotolo della carta quando la stampante è in
funzionamento.
Proteggere la stampante contro gli urti.
Non applicare forza eccessiva sulla carrozzeria della stampante.
Non posare cibi o bevande, come il caffè, sulla carrozzeria della stampante.
42 TM-P80 Manuale dell’utente
English
❏
Per i modelli con interfaccia Bluetooth, quando la connessione wireless viene
terminata mentre la stampante è offline, potrebbe non essere possibile
effettuare il ricollegamento. In tal caso, rimuovete la causa che ha messo la
stampante offline e ricollegatela.
Per i modelli con interfaccia Bluetooth, se stabilite un collegamento radio tra il
computer host e la stampante ogni volta che avviate la stampa anziché
mantenere la connessione, potrebbe essere necessario attendere per un po’ di
tempo dal momento in cui inviate un lavoro di stampa al momento in cui la
stampante inizia effettivamente a stampare. Questo accade perché il
collegamento del computer host e della stampante richiede del tempo. Il
tempo necessario per il collegamento dipende dall’ambiente operativo.
❏
Note sull’alimentazione
Batteria
Prima di utilizzare la stampante per la prima volta, caricate la batteria OT-BY60II.
Per installare e caricare la batteria, consultate “Installazione e caricamento della
batteria.”
Leggete anche le precauzioni di sicurezza per la batteria ricaricabile descritte in
precedenza nel presente manuale.
AVVERTENZA:
Assicuratevi di utilizzare la batteria OT-BY60II. L’utilizzo di una batteria diversa da
quella specificata potrebbe causare un incendio, un’esplosione, una perdita,
surriscaldamento o altri danni.
ATTENZIONE:
Smaltite le batterie usate in accordo con le istruzioni.
Alimentazione esterna
Questo prodotto utilizza un’unità di alimentazione contrassegnata come di
“Classe 2” o “LPS,” con una tensione di uscita di massimo 1,0 A a 12 V CC, o
massimo 1,5 A a 24V CC.
Con l’adattatore CA opzionale EPSON PS-11 [Modello: M235A], la tensione di
uscita è di massimo 1,5 A a 24V CC, e la tensione di ingresso è da 100V a 240 V CA.
Riciclaggio delle batterie
Contiene una batteria a ioni di litio. Riciclare o eliminare in maniera appropriata.
Nota:
Non smontate la batteria.
Disimballaggio
Gli articoli seguenti sono inclusi con la stampante in configurazione standard. Se
un articolo risulta danneggiato, rivolgersi al rivenditore della stampante.
❏ Stampante
❏ Rotolo della carta
❏ Batteria (OT-BY60II) e relativo Manuale dell’utente
❏ Cavo USB
❏ Manuale dell’utente (questo manuale)
TM-P80 Manuale dell’utente 43
English
Download dei driver, dei programmi di utility e dei manuali
Ulteriori informazioni sui prodotti si trovano nella Technical Reference Guide
TM-P80.
Le ultime versioni dei driver, dei programmi di utility e dei manuali possono
essere scaricate dai siti ai seguenti indirizzi URL.
Per clienti in Nord America, andare al seguente sito Web:
http://www.epsonexpert.com/
Per clienti in altri Paesi, andare al seguente sito Web:
http://download.epson-biz.com/?service=pos
Nomi della parti
Vedere la figura A.
Pannello di controllo
Il pannello di controllo (B) è dotato di LED di accensione, LED di Errore, LED di
carica, LED di Batteria, pulsante di Alimentazione e pulsante di Accensione.
Pannello di controllo (LED e Pulsante)
LED POWER (Blu)
LED POWER
Acceso
Spento
Lampeggiante
Significato
L’alimentazione è attivata.
L’alimentazione è disattivata.
La stampante si sta spegnendo e accendendo.
LED ERROR (arancione)
Condizione della
stampante
Alimentazione
attivata
LED ERROR
Significato
Acceso
La stampante è offline (carta esaurita, inizializzazione
dell’accensione, copertura del rotolo di carta aperta, la
carica della batteria residua è al livello E).
Funzionamento normale della stampante.
Errore della stampante.
Spento
Lampeggiante
LED CARICA (arancione)
Condizione
della stampante
Alimentazione
attivata e
batteria
installata
LED CARICA
Significato
Acceso
Spento
Lampeggiante
La batteria è sotto carica.
La batteria è completamente carica.
Vi è un’anomalia di ricarica delle batterie.
LED BATT.
LED
ERROR
Spento
Spento
Spento
livello H
livello M
livello L
Spento
livello S
Acceso
livello E
LED BATT. (Blu)
Condizione della
stampante
Alimentazione
attivata
3 LED accesi
2 LED accesi
1 LED acceso
1 LED
lampeggiante
3 LED spenti
44 TM-P80 Manuale dell’utente
LED BATT.
Significato
Potete continuare a stampare,
ma si consiglia di sostituire o
caricare la batteria.
Sostituite o caricate la batteria.
La stampante passa allo stato
offline e la stampa non è più
possibile.
English
Pulsante POWER
Premere il pulsante per accendere e spegnere la stampante. Per spegnere la
stampante, tenere premuto il pulsante per più di 2 secondi.
FEED
Premere il pulsante per alimentare la carta.
Installazione e caricamento della batteria
Per installare e caricare la batteria, procedete come di seguito.
Nota:
La batteria può essere caricata soltanto quando la temperatura è 0 ~ 40°C {32 ~ 104°F}.
1. Assicuratevi che la stampante sia spenta.
2.
3.
Ruotare la leva fino al
segno e far scorrere il coperchio della batteria per
aprirlo. Vedere l'illustrazione C.
Installate la batteria (D 13) e chiudete la copertura della batteria.
4.
Chiudere il coperchio della batteria e ruotare la leva fino al
segno. Vedere
l'illustrazione E.
5. Collegare l’adattatore CA alla stampante. Consultate l’istruzione F 14 per il
connettore.
La ricarica avrà inizio.
Nota:
La ricarica richiede circa 2,5 ore con l'adattatore CA o con il caricabatteria opzionale OTCH60II. Per informazioni dettagliate sul caricabatteria, consultate il manuale dell’utente.
L’intervallo di tempo descritto di sopra è il tempo necessario per caricare una batteria
completamente scarica.
Se ricaricate la batteria a 35°C {95°F} o a una temperatura superiore, il controllo della
temperatura interna della stampante si attiva e potrebbe richiedere un tempo di
caricamento maggiore di quello specificato. Il LED di carica lampeggia quando la carica
viene interrotta.
Installazione o sostituzione del rotolo della carta
Seguire i passaggi sottostanti per inserire o sostituire il rotolo di carta.
ATTENZIONE:
Verificare che il rotolo della carta soddisfi le specifiche.
Nota:
Non usare rotoli di carta con la carta incollata al rocchetto.
1. Premere il pulsante apri per aprire il coperchio del rotolo di carta. Vedere
l'illustrazione G.
2. Togliere il rocchetto del rotolo di carta esaurito, se esiste, e installare il nuovo
rotolo. Vedere l'illustrazione H.
Nota:
Notare la direzione di uscita della carta dal rotolo.
3. Tirare un po’ di carta, chiudere la copertura e strappare la carta con la
taglierina manuale. Vedere l'illustrazione I.
TM-P80 Manuale dell’utente 45
English
Installazione o sostituzione verticale del rotolo della carta
La stampante può essere appesa verticalmente alla cintura usando un fermaglio
per cintura sul retro della stampante, oppure una tracolla opzionale. Quando la
stampante viene usata in posizione verticale, per installare il rotolo della carta
procedere come segue:
Nota:
Assicurarsi che il supporto del rotolo di carta si trovi sul fondo quando si utilizza la
stampante in verticale.
1. Premere il pulsante di apertura per aprire la copertura del rotolo della carta.
2. Se esiste, togliere il rocchetto del rotolo di carta esaurito.
3. Mettere il nuovo rotolo di carta. Vedere l'illustrazione J.
Nota:
Notare la direzione di uscita della carta dal rotolo.
4. Tirare il bordo di entrata del rotolo della carta. Vedere ➀ nella figura K.
5. Allineare il margine sinistro del rotolo di carta con il margine della copertura.
Vedere ➁ nella figura K.
6. Chiudere la copertura del rotolo della carta e strappare la carta con la
taglierina manuale.
Fermaglio per la cintura
La stampante può essere appesa alla cintura (L 16) usando il fermaglio situato sul
retro della stampante.
Cicalino
L’impostazione predefinita è Attivato – ON (il cicalino suona) per indicare:
❏ La carica residua della batteria è inadeguata
❏ Rotolo della carta esaurito
❏ Errore
Risoluzione dei problemi
Sul pannello di controllo nessuna spia luminosa è accesa
❏
Controllare che la batteria sia installata.
Il LED Error è acceso o lampeggia
❏
❏
❏
❏
❏
La temperatura della stampante forse è troppo elevata. La stampante
riprende automaticamente l’operazione di stampa appena la temperatura
torna normale.
Verificare che la copertura del rotolo della carta sia correttamente chiusa.
Verificare che il rotolo della carta sia installato.
Quando la stampante è accesa, se il LED Errore è acceso e il LED Batteria è
spento, la carica della batteria residua non è sufficiente per il funzionamento
della stampante. Sostituire o caricare la batteria.
Disattivare l’alimentazione, attendere alcuni secondi, quindi riaccendere la
stampante. Se l’errore persiste, rivolgersi a un tecnico dell’assistenza.
46 TM-P80 Manuale dell’utente
English
La batteria non si carica
❏
❏
Se la batteria non è completamente carica dopo essere rimasta in carica per
circa 5 ore, risulta difettosa.
È necessario sostituire la batteria con una batteria nuova.
Accendere la stampante, installare il rotolo di carta e chiudere la copertura
del rotolo di carta.
Dopo di ciò, se il LED ERRORE è acceso e il LED di carica lampeggia, la
batteria risulta difettosa.
È necessario sostituire la batteria con una batteria nuova.
Il coperchio della batteria non si apre
Seguire i passaggi sottostanti se il coperchio della batteria non si apre.
1. Assicuratevi che la stampante sia spenta.
2.
3.
Ruotare la leva fino al
segno.
Spostare la tacca (M 17) in direzione della freccia utilizzando uno strumento
come una penna a sfera. Vedere l'illustrazione M.
Pulizia del rullo della platina/sensore della carta
ATTENZIONE:
Non utilizzare un solvente a base d'alcol. L'utilizzo di un solvente a base d'alcol
potrebbe causare la dissolvenza parziale dell'agente adesivo rendendone ancora
più difficoltosa la rimozione.
Quando si accumulano polveri di carta sui rulli della platina o sul sensore della
carta, seguire i passaggi sottostanti per la loro pulizia. Per mantenere buone
capacità funzionali, pulirli regolarmente (ogni 6 mesi).
1. Spegnere la stampante, aprire la copertura del rotolo di carta.
2. Pulire il rullo della platina (N 18) e il sensore della carta (N 19) con un
batuffolo di cotone leggermente inumidito con acqua.
3. Chiudere la copertura del rotolo della carta dopo che l'acqua si sarà asciugata.
Pulizia della testina di stampa termica
ATTENZIONE:
Dopo la stampa, la testina di stampa termica può essere molto calda. Non
toccarla e lasciarla raffreddare prima di pulirla. Non danneggiare la testina
termica toccandola con le dita o con un qualsiasi altro oggetto duro.
Non utilizzare acqua. Utilizzare solo un solvente a base di alcol.
Spegnere la stampante, aprire la copertura del rotolo della carta e pulire gli
elementi termici della testina (N 20) con un tamponcino di cotone inumidito con
solvente a base di alcol (etanolo o IPA).
Per mantenere la qualità della stampa, la EPSON raccomanda di pulire
periodicamente la testina termica (generalmente ogni 3 mesi).
TM-P80 Manuale dell’utente 47
English
TM-P80 Specifiche
Metodo di stampa
Stampa della linea termica
Densità punti
203 dpi × 203 dpi [punti per 25,4 mm {1"}]
Larghezza di stampa (Impostazione
predefinita)
72 mm {2.83"}, 576 posizioni del punto
Carta
79.5 ± 0.5 mm {3.12 ± 0.02"}
Larghezza del rotolo
di carta
Rotolo carta diametro 18 mm {0.71"} minimo
del nucleo esterno
Specificato carta
termica
NIPPON Paper Industries Co., Ltd. :TF50KS-EY
Oji Holdings Corporation :PD150R/PD160R/PD190R
Kanzaki Specialty Papers (USA) :P30023/P31023/P35024
Koehler :KT55F20/KT48F20
Jujo ThermalOy :AF50KS-E
Mitsubishi HiTec :F5041(48)/F5041(55)
Interfaccia
USB (Conformità: USB 2.0, velocità di comunicazione:
velocità massima (12 Mbps),
Wireless (Bluetooth®/IEEE802.11a/b/g/n)
Alimentazione Batteria specificata
elettrica
Batteria agli ioni di litio: Nome prodotto: OT-BY60II, Nome
commerciale: Seiko Epson Corporation
Uscita: 7,4 V CC, Capacità: 2000 mAh
Tensione di
alimentazione
Temperatura/ Funzionamento
Umidità
Immagazzinaggio
Tensione in ingresso: max. 1,0 A a DC12 V, o max. 1.5 A a
DC 24V
(quando si utilizza l’adattatore CA opzionale EPSON PS11 [Modello: M235A]) Tensione di uscita: max. 1,5 A a
24V CC, Tensione di ingresso: 100V CA a 240 V
Solo batteria :0 ~ 45°C {32 ~ 113°F}, 10 ~ 90% RH
Batteria e unità di alimentazione :0 ~ 40°C {32 ~ 104°F}, 10
~ 90% RH
Nessun funzionamento anormale rilevato quando la
stampante viene lasciata in un ambiente di 25°C {77°F},
60% RH per 2 ore dopo essere stata lasciata nelle
seguenti condizioni:
Temperatura e umidità elevate: 45°C {113°F}, 90%RH per
120 ore
Alta temperatura: 70°C {158°F} per 120 ore
Bassa temperatura: -25°C {-13°F} per 120 ore
Dimensioni complessive
110 × 140 × 64 mm {4.3 × 5.5 × 2.5"} (L × P × A)
Peso (Massa)
Modello Wifi : circa 506 g {1.11 lb}
Modello Bluetooth: circa 500 g {1.10 lb}
(Batteria e fermaglio per cintura inclusi; carta in rotoli esclusa)
Nota: per le specifiche della batteria, consultate il Manuale dell’utente.
48 TM-P80 Manuale dell’utente
Licenza Software Open Source
1.
2.
3.
4.
English
Questa stampante comprende i programmi software open source elencati
nella sezione 4) in base ai termini di licenza di ciascun programma software
open source.
Proporcionamos el código fuente de los programas GPL y los programas
LGPL (ciascuno è definito nella Sezione 4) su un CD-ROM per un addebito
che copra il costo di eseguire tale distribuzione, come il costo di supporti,
spedizione e movimentazione fino a cinque (5) anni dall’interruzione dello
stesso modello di questo prodotto.
Los programas de software de código abierto no incluyen NINGUNA
GARANTÍA; ni siquiera la garantía implícita de COMERCIABILIDAD NI
IDONEIDAD PARA UN USO ESPECÍFICO. Para más información, consulte
los contratos de licencia de cada uno de los programas de software de código
abierto, descritti in “TERMINI DI LICENZA DEL SOFTWARE OPEN
SOURCE” nella presente documentazione.
L’elenco dei programmi software open source inclusi con questa stampante e
i termini di licenza di ciascun programma sono consultabili al seguente
indirizzo.
http://xxx.xxx.xxx.xxx/licenses/
* Per la parte sottolineata nel suddetto indirizzo, inserire l’indirizzo IP di
ciascuna stampante.
TM-P80 Manuale dell’utente 49
English
Español
Ilustraciones
Todas las ilustraciones se incluyen en la versión inglesa de este manual. Están identificadas por letras (A,
B, C,…). Algunas ilustraciones tienen números en ellas. Vea el significado de los números en la lista de
abajo. El texto hace referencia a las letras y a los números. Por ejemplo: “Vea la Ilustración A” o “Vea A 6.”
(“A 6” significa el número 6 en la Ilustración A.)
Ilustración A:
1. Soporte del rollo de papel
2. Panel de control
3. Tapa de la batería
4. Palanca
5. Botón abierto
6. Tapa del rollo de papel
Ilustración B:
7. Indicador de ALIMENTACIÓN
8. Indicador de ERROR
9. Indicador de CARGA
10. Indicador de BATERÍA
11. Botón de ALIMENTACIÓN
12. Botón de ALIMENTACIÓN de
PAPEL
Ilustración D:
13. Batería
Ilustración F:
14. Conector para adaptador de CA
15. Conector para USB
Ilustración L:
16. Clip de cinturón
Ilustración M:
17. Muesca
Ilustración N:
18. Rodillo de la placa
19. Sensor del papel
20. Cabezal térmico
Cuidado
Se reservan todos los derechos. Ninguna porción de esta publicación podrá reproducirse, guardarse en un
sistema de recuperación de datos o transmitirse en forma o modo alguno, sea electrónico, mecánico,
fotocopiado, grabado o de otra forma, sin el permiso previo y por escrito de Seiko Epson Corporation. No
se asume responsabilidad de patente con respecto al uso de la información contenida aquí. Si bien se han
tomado todas las precauciones en la preparación de este libro, Seiko Epson Corporation no asume
ninguna responsabilidad por errores u omisiones.
Tampoco asume responsabilidad alguna que surja por el uso de la información contenida aquí.
Ni Seiko Epson Corporation ni sus compañías afiliadas serán responsables ante el comprador de este
producto o ante terceros por daños, pérdidas, costos, o gastos incurridos por el comprador o por terceros
como resultado de: accidente, uso indebido, o abuso de este producto o de modificaciones, reparaciones o
alteraciones no autorizadas de este producto, o (excluyendo a los EE.UU.) por no cumplir estrictamente
con las instrucciones de operación y mantenimiento de Seiko Epson Corporation.
Seiko Epson Corporation no será responsable de cualquier daño o problema que surja por el uso de
cualquier opción o producto de consumo que no esté designado como Producto EPSON Original o
Aprobado por Seiko Epson Corporation.
EPSON es una marca registrada de Seiko Epson Corporation en Japón y otros países/regiones.
AVISO: El contenido de este manual está sujeto a cambios sin previo aviso.
Copyright © 2012 SEIKO EPSON Corporation, Nagano, Japón.
Información importante sobre la seguridad
En esta sección se ofrece información importante para asegurar el uso seguro y eficaz
de este producto. Lea esta sección atentamente y guárdela en un lugar accesible.
Clave de los símbolos
Los símbolos incluidos en este manual se identifican por su nivel de importancia,
como se define a continuación. Lea cuidadosamente lo siguiente antes de manejar
el producto.
PELIGRO:
Las indicaciones de peligro tienen que observarse cuidadosamente para
evitar lesiones graves o la muerte.
50 TM-P80 Manual del usuario
English
ADVERTENCIA:
Hay que seguir cuidadosamente las advertencias para evitar daños físicos.
PRECAUCIÓN:
Hay que observar las precauciones para evitar daños físicos menores o daños
en el equipo.
Nota:
Las notas tienen información importante y consejos útiles respecto al uso de su producto.
Precauciones de seguridad
ADVERTENCIA:
Apague su equipo de inmediato si éste produce humo, un olor raro, o un ruido
inusual. El seguir utilizándolo podría ocasionar un incendio. Desenchufe el
equipo de inmediato y después póngase en contacto con su distribuidor o con
el centro de servicio técnico de Epson.
Nunca trate de reparar este producto usted mismo. Una reparación incorrecta
puede ser peligrosa.
Nunca desmonte o modifique este producto. La manipulación de este
producto puede causar lesiones o un incendio.
Cerciórese de usar la fuente de alimentación eléctrica especificada. La conexión
a una fuente de alimentación eléctrica inadecuada puede causar un incendio.
No deje que materiales extraños caigan dentro del equipo, ya que podría
provocar un incendio.
Si se derrama agua o algún otro líquido dentro del equipo, deje de utilizarlo.
Si sigue utilizándolo podría ocasionar un incendio. Desenchufe el cable
eléctrico inmediatamente y después póngase en contacto con su distribuidor
o con el centro de servicio técnico de Epson.
PRECAUCIÓN:
No conecte los cables en formas que difieran a las mencionadas en este
manual. Conexiones diferentes podrían causar daños e incendios.
Tenga cuidado para no dejar caer este producto. El producto se puede
romper o causar lesiones si se cae.
No lo use en lugares sujetos a altos niveles de humedad o de polvo. El exceso
de humedad o de polvo podría causar daños o incendios al equipo.
No ponga objetos pesados encima de este producto. Nunca se apoye sobre
este producto. El equipo podría caerse, causando roturas y posibles lesiones.
Por razones de seguridad, por favor desenchufe este producto antes de
dejarlo sin usar por un largo periodo de tiempo.
Antes de mover el producto, desenchúfelo y desenchufe todos los cables que
estén conectados a él.
Tenga cuidado para no lastimarse los dedos con el cortador manual
•
•
Al retirar papeles impresos
Cuando realice cualquier otra operación, tal como carga/reemplazo
de rollo de papel
No utilice aerosoles que contengan gases inflamables dentro o cerca de este
producto. Si lo hace, podría provocar un incendio.
TM-P80 Manual del usuario 51
English
Precauciones de Seguridad para el Paquete de Batería Recargable
PELIGRO:
Si algún líquido de la batería le entra en los ojos, láveselos rápidamente con
agua limpia durante más de 10 minutos y consulte a su médico lo antes
posible. Si no lo hace, el líquido podría causar la pérdida de la vista.
Nunca desmonte o modifique el paquete de batería. Esto puede causar un
incendio, una explosión, una fuga, un sobrecalentamiento o un daño.
No exponga la batería al fuego ni la caliente. Esto puede causar un incendio,
una explosión, una fuga, un sobrecalentamiento o un daño.
ADVERTENCIA:
Mantenga el paquete de batería alejado del fuego o de las llamas si éste
produce un olor extraño o una fuga. De otra forma podría ocurrir un incendio o
una explosión.
Si algún líquido de la batería llegase a tener contacto con la piel o con la ropa,
enjuáguelas rápidamente con agua limpia. Si no lo hace, el líquido podría
dañarle la piel.
No exponga la batería al agua. No permita que el agua haga contacto con
los terminales. Esto podría causar un incendio, un sobrecalentamiento o un
cortocircuito.
Etiqueta de Seguridad
Las etiquetas de precaución de este producto indican las siguientes precauciones.
PRECAUCIÓN:
Durante la impresión o después de la misma, el cabezal térmico puede estar
muy caliente.
Restricción en el uso
Cuando este producto se usa en aplicaciones que requieren alta fiabilidad/
seguridad tales como los dispositivos relacionados con la aviación, los
ferrocarriles, la marina, los automóviles, etc.; los dispositivos de prevención de
desastres; dispositivos varios de seguridad, etc.; o los dispositivos funcionales/de
precisión, etc., usted deberá tener en cuenta los posibles fallos, las redundancias
de su diseño para mantener la seguridad y la fiabilidad total de su sistema.
Debido a que este producto no tuvo el propósito de usarse en aplicaciones que
requieren de una fiabilidad/seguridad sumamente altas tales como los equipos
aeroespaciales, equipos principales de comunicación, equipos de control en
plantas nucleares, o en equipos médicos relacionados con los cuidados médicos
directos, etc., por favor decida usted mismo sobre la adecuación de este producto
después de una evaluación completa.
Notas sobre el uso
❏
❏
❏
La impresora no opera con tan sólo el adaptador de CA. Instale siempre la
batería adjunta OT-BY60II en la impresora, incluso cuando utilice el
adaptador de CA.
Cerciórese de usar el botón de alimentación para encender y apagar la
impresora.
Para comunicarse con un ordenador mediante un cable USB, conecte el cable
antes de encender la impresora.
52 TM-P80 Manual del usuario
❏
❏
❏
❏
❏
❏
❏
English
Para utilizar el cable USB, se recomienda que lo fije para evitar tensarlo.
Cerciórese de no abrir la cubierta del rollo de papel cuando la impresora está
funcionando.
Proteja la impresora contra los impactos.
No aplique fuerza excesiva al cuerpo de la impresora.
No ponga alimentos ni bebidas como café sobre el cuerpo de la impresora.
Para los modelos con interfaz Bluetooth, cuando la conexión inalámbrica
finalice mientras que la impresora está desconectada, puede que no pueda
realizarse la reconexión. En dicho caso, retire el problema de la desconexión y
vuelva a reconectar.
Para los modelos con interfaz Bluetooth, si establece una conexión de radio
entre el ordenador central y la impresora cada vez que inicia la impresión en
lugar de mantener la conexión, es posible que tarde un tiempo entre el
momento en el que envía el trabajo de impresión y el momento en el que la
impresora empieza realmente a imprimir. Esto se debe a que la conexión
entre el ordenador central y la impresora exige tiempo. El tiempo necesario
para la conexión depende del entorno de funcionamiento.
Notas sobre el suministro de alimentación
El paquete de batería
Antes de utilizar la impresora por primera vez, cargue la batería OT-BY60II. Para
instalar y cargar la batería, véase “Instalación y Recarga de la batería”.
Lea igualmente las precauciones de seguridad para la batería recargable descritas
previamente en este manual.
ADVERTENCIA:
Compruebe que utiliza la batería OT-BY60II. Si utiliza una batería distinta de la
indicada, podrá provocar incendios, explosiones, fugas, sobrecalentamientos u
otros daños.
PRECAUCIÓN:
Coloque las pilas usadas de conformidad con las instrucciones.
Suministro de alimentación externo
Este producto utiliza una unidad de alimentación de “Clase 2” o “LPS”, cuyo
voltaje de salida máximo será de 1,0 A a DC12 V, o de 1,5 A a DC 24V.
Con el adaptador de CA opcional EPSON PS-11 [Modelo: M235A], el voltaje de
salida será como máximo de 1,5 A a DC 24V, y el voltaje de entrada será de AC
100V a 240 V.
Reciclado de baterías
Contiene una batería de litio-ion. Tiene que reciclarse o desecharse en la forma
adecuada.
Nota:
No desmonte el paquete de baterías.
TM-P80 Manual del usuario 53
English
Desembalaje
Los siguientes artículos se incluyen para la impresora de especificaciones
estándar. Si alguno de los artículos está dañado, comuníquese con su distribuidor.
❏ Impresora
❏ Rollo de papel
❏ El paquete de batería (OT-BY60II) y su Manual del usuario
❏ Cable USB
❏ Manual del usuario (este manual)
Cómo descargar controladores, utilidades y manuales
Podrá descubrir más información sobre el producto en la Guía de referencia
técnica TM-P80.
Las últimas versiones de los programas gestores, las utilerías y los manuales se
pueden descargar en uno de los siguientes URLs.
Para los clientes en América del Norte, visiten el siguiente sitio en la Internet:
http://www.epsonexpert.com/
Para los clientes en otros países, visiten el siguiente sitio en la Internet:
http://download.epson-biz.com/?service=pos
Nombre de las piezas
Vea la ilustración A.
Panel de Control
El panel de control (B) tiene una LED de alimentación, una LED de error, una
LED de carga, una LED de batería, un botón de alimentación y un botón de
encendido.
Panel de Control (Indicadores e Botones)
Indicador de ALIMENTACIÓN (Azul)
Indicador de
ALIMENTACIÓN
Encendido
Apagado
Parpadeando
Significa
La alimentación eléctrica está encendida.
La alimentación eléctrica está apagada.
La impresora se está apagando y encendiendo.
Indicador de ERROR (naranja)
Condición de la
impresora
Encendida
Indicador de
ERROR
Encendido
Apagado
Parpadeando
Significa
La impresora está desconectada (salida de papel, inicio
de encendido, cubierta del rollo de papel abierta,
carga restante de la batería en nivel E).
La impresora funciona en modo normal.
La impresora da error.
Indicador de CARGA (naranja)
Condición de la
impresora
Encendida y
batería
instalada
Indicador de
CARGA
Encendido
Apagado
Parpadeando
54 TM-P80 Manual del usuario
Significa
La batería se está cargando.
La batería está completamente cargada.
No hay anormalidad en la carga de baterías.
English
Indicador de BATERÍA (Azul)
Condición de la
impresora
Indicador
BATT.
Indicador
de ERROR
Encendida
3 LED
encendidas
2 LED
encendidas
1 LED
encendida
Apagado
Estado de
carga de la
batería
nivel H
Apagado
nivel M
Apagado
nivel L
1 LED
pestañeando
3 LED
apagadas
Apagado
nivel S
Encendido
nivel E
Significa
Puede seguir imprimiendo,
pero se aconseja cambiar o
recargar la batería.
Cambie o recargue la
batería.
La impresora entra en estado
sin conexión y ya no puede
imprimir.
Botón de ALIMENTACIÓN
Presione el botón para encender o apagar la alimentación eléctrica. Para apagarla,
necesita mantener presionado el botón durante más de 2 segundos.
FEED (ALIMENTACIÓN DE PAPEL)
Presione el botón para alimentar el papel.
Instalación y carga de la batería
Siga los siguientes pasos para instalar y recargar la batería.
Nota:
La batería sólo puede cargarse cuando la temperatura esté comprendida entre 0 y 40°C {32
~ 104°F}.
1. Asegúrese de que la impresora está apagada.
2.
3.
Gire la palanca hacia la
marca y haga deslizar la tapa de la batería para
abrirla. Véase la ilustración C.
Instale la batería (D 13) y cierre la tapa de la batería.
4.
Cierre la tapa de la batería y gire la palanca hacia la
marca. Véase la
ilustración E.
5. Conecte el adaptador de C.A. a la impresora. Véase la ilustración F 14 relativa
al conector.
Ahora comenzará la recarga.
Nota:
Para la recarga se requieren aproximadamente 2.5 horas con el adaptador de CA o con el
cargador de batería opcional OT-CH60II. Para más información acerca del cargador de
batería, véase el manual de usuario. El tiempo indicado previamente es el tiempo necesario
para recargar una batería completamente descargada.
La recarga de la batería a 35ºC {95°F} o a una temperatura superior activa el control de
temperatura interno de la impresora, lo cual puede hacer que el tiempo de recarga sea
mayor que el indicado. El indicador de carga pestañea cuando se detiene la carga.
TM-P80 Manual del usuario 55
English
Instalación o reemplazo del rollo de papel
Siga los siguientes pasos para instalar o sustituir el papel de rollo.
PRECAUCIÓN:
Cerciórese de usar un rollo de papel que cumpla con las especificaciones.
Nota:
No use rollos de papel que tengan el papel pegado al núcleo.
1. Pulse el botón de apertura para abrir la tapa del papel de rollo. Véase la
ilustración G.
2. Quite el núcleo del rollo de papel si lo hay, e inserte el nuevo rollo de papel.
Véase la ilustración H.
Nota:
Fíjese en la dirección por la que sale el papel del rollo.
3. Saque un poco de papel, cierre la cubierta, y arranque el papel usando el
cortador manual. Véase la ilustración I.
Instalación o reemplazo del rollo de papel en forma vertical
Se puede colgar la impresora en forma vertical en un cinturón usando el clip para
cinturón que se halla en la parte trasera de la impresora. Cuando use la impresora
verticalmente, siga estos pasos para instalar el rollo de papel.
Nota:
Cerciórese de que el soporte del papel de rollo esté en el fondo cuando use la impresora
verticalmente.
1. Presione el botón de abrir para abrir la tapa del rollo de papel.
2. Saque el núcleo del rollo de papel usado, si lo hay.
3. Ponga el rollo de papel nuevo. Véase la ilustración J.
Nota:
Fíjese en la dirección por la que sale el papel del rollo.
4. Tire de la punta del rollo de papel. Vea el ➀ en la ilustración K.
5. Alinee el borde izquierdo del rollo de papel con el borde de la tapa. Vea el ➁
en la ilustración K.
6. Cierre la tapa del rollo de papel y corte el papel con el cortador manual.
Clip de cinturón
Pode-se levar a impressora presa ao cinto com um prendedor do cinto (L 16) que
se encontra na parte de trás da impressora.
Timbre
El valor original de fábrica se fija en Encendido (el timbre suena) para indicar lo
siguiente:
❏ La carga restante en la batería no es adecuada
❏ Fin del rollo de papel
❏ Error
56 TM-P80 Manual del usuario
English
Localización de problemas
No hay luces en el panel de control
❏
Verifique que la batería está instalada.
El Indicador de Error está parpadeando o encendido
❏
❏
❏
❏
❏
La temperatura de la impresora podría estar muy alta. La impresora reanuda
la impresión automáticamente cuando la temperatura vuelve a lo normal.
Cerciórese de que la tapa del rollo de papel esté bien cerrada.
Cerciórese de que el rollo de papel esté instalado.
Si, estando la alimentación de la impresora encendida, el indicador de error
está encendido y el indicador de batería está apagado, la carga de batería
restante no es suficiente para hacer funcionar la impresora. Sustituya o cargue
la batería.
Apague la alimentación eléctrica, espere varios segundos, y después
enciéndala nuevamente. Si el error persiste, comuníquese con un técnico de
servicio calificado.
La batería no se carga
❏
❏
Cuando la batería no se carga completamente después de aproximadamente 5
horas de carga, la batería es defectuosa.
La batería debe sustituirse por una nueva.
Encienda la impresora, coloque el papel de rollo y cierre la tapa del papel de
rollo.
Si después de hacerlo, queda encendido el indicador de error y parpadea el
indicador de carga, la batería es defectuosa.
La batería debe sustituirse por una nueva.
La tapa de la batería no se abre
Siga los siguientes pasos cuando la tapa de la batería no se abre.
1. Asegúrese de que la impresora está apagada.
2.
3.
Gire la palanca hacia la
marca.
Mueva la muesca (M 17) hacia la dirección de la fecha usando una
herramienta, como por ejemplo un bolígrafo. Vea la ilustración M.
Limpieza del rodillo de la placa y del sensor del papel
PRECAUCIÓN:
No use disolventes a base de alcohol. El uso de disolventes a base de alcohol
puede hacer que el agente adhesivo se disuelva y se vuelva aún más difícil extraer.
Si se acumula polvo en los rodillos de la placa o en el sensor del papel, siga estos
pasos para limpiarlos: Para que el aparato conserve toda su funcionalidad,
límpielo habitualmente (cada seis meses).
1. Apague la impresora, abra la tapa del papel en rollo.
2. Limpie el rodillo de la placa (N 18) y el sensor de papel (N 19) con un
bastoncillo de algodón ligeramente humedecido con agua.
3. Cierre la tapa del papel en rollo después que el agua se haya secado.
TM-P80 Manual del usuario 57
English
Limpieza del cabezal térmico
PRECAUCIÓN:
Después de imprimir, el cabezal térmico puede estar muy caliente. Cerciórese
de no tocarlo y de permitir que se enfríe antes de limpiarlo. No dañe el cabezal
térmico tocándolo con los dedos o con algún objeto duro.
No use agua. Use solo un disolvente a base de alcohol.
Apague la impresora, abra la tapa del rollo de papel, y limpie los elementos
térmicos del cabezal (G 17) con un bastoncillo de algodón humedecido con un
solvente alcohólico (etanol, o alcohol isopropílico).
EPSON recomienda la limpieza periódica del cabezal térmico (por lo general cada
3 meses) para mantener la calidad de impresión.
TM-P80 Especificaciones
Método de impresión
Impresión térmica de líneas
Densidad de puntos
203 ppp × 203 ppp [por 25,4 mm {1"}]
Ancho de la impresión
(Predeterminado)
72 mm {2.83"}, 576 posiciones de puntos
Papel
Ancho del papel de
rollo
79.5 ± 0.5 mm {3.12 ± 0.02"}
El rollo de papel
núcleo externo
diámetro
18 mm {0.71"} mínimo
Papel térmico
especificado
NIPPON Paper Industries Co., Ltd.: TF50KS-EY
Oji Holdings Corporation: PD150R/PD160R/PD190R
Kanzaki Specialty Papers (EE. UU.): P30023/P31023/
P35024
Koehler: KT55F20/KT48F20
Jujo ThermalOy: AF50KS-E
Mitsubishi HiTec: F5041(48)/F5041(55)
Interfaz
Alimentación
USB (Conformidad: USB 2.0, velocidad de
comunicación: Velocidad máxima (12 Mbps),
Inalámbrica (Bluetooth®/IEEE802.11a/b/g/n)
Batería indicada
Batería de litio-ión: Nombre del producto: OT-BY60II,
Nombre comercial: Seiko Epson Corporation
Salida: DC 7.4 V, Capacidad: 2000 mAh
Tensión de
alimentación
Voltaje de entrada: máx. 1.0 A a CC 12 V, o máx. 1.5 A a
CC 24 V
(Cuando utilice el adaptador de CA opcional EPSON
PS-11 [Modelo: M235A]) Voltaje de salida: Máx. de 1.5 A
a DC 24V, Voltaje de entrada: De 100V a 240 V de CA
Temperatura/ Funcionamiento
Humedad
Almacenamiento
Dimensiones generales
58 TM-P80 Manual del usuario
Solo batería: 0 ~ 45 °C {32 ~ 113 °F}, 10 ~ 90 % HR
Batería y unidad de alimentación: 0 ~ 40 °C {32 ~ 104 °F},
10 ~ 90 % RH
No se ha registrado funcionamiento anormal cuando la
impresora se deja en ambiento de 25 °C {77 °F}, 60 % HR
durante 2 horas después de estar en las siguientes
condiciones:
Elevada temperatura y humedad: 45 °C {113 °F}, 90 %
HR durante 120 horas
Temperatura alta: 70°C {158°F} durante 120 horas
Temperatura baja: -25°C {-13°F} durante 120 hora
110 × 140 × 64 mm {4.3 × 5.5 × 2.5"} (Ancho × Profundidad
× Alto)
Peso (Masa)
English
Modelo Wi-Fi: aprox. 506 g {1.11 lb}
Modelo Bluetooth: aprox. 500 g {1.10 lb}
(con batería y clip para cinturón, sin papel de rollo)
Nota: Para las especificaciones de la batería, véase su Manual de Usuario.
Licencia de software de código abierto
1.
2.
3.
4.
Esta impresora incluye los programas de código abierto citados en la Sección
4) de acuerdo con los términos de la licencia de cada uno de los programas de
software de código abierto.
Fornecemos o código fonte dos Programas GPL, Programas LGPL e
Programas de Licença de Fonte Pública (cada uno se define en el apartado 4) a
Vd. en un CD-ROM por un precio que cubre el coste de realizar dicha
distribución, como el coste del soporte multimedia, los costes de envío y de
manipulación hasta cinco (5) años siguientes a la discontinuación del mismo
modelo de este producto.
Os programas de software de fonte aberta NÃO INCLUEM QUALQUER
GARANTIA; nem mesmo a garantia implícita de COMERCIALIZAÇÃO E
ADEQUAÇÃO A UMA DETERMINADA FINALIDADE. Para mais
informações, consulte os acordos de licença de cada programa de software de
fonte aberta, que se describen en las “CONDICIONES DE LICENCIA DE
PROGRAMA LIBRE” en la presente documentación.
La lista de los programas de software de código abierto que incluye esta
impresora y todos los contratos de licencias de cada licencia puede
consultarse en la siguiente URL.
http://xxx.xxx.xxx.xxx/licenses/
* Para la parte subrayada de la URL anterior, indique la dirección IP de cada
impresora.
TM-P80 Manual del usuario 59
English
Português
Ilustrações
As ilustrações encontram-se todas no início deste manual e estão identificadas por letras (A, B, C…).
Algumas contêm números. Consulte a lista abaixo para obter o significado dos números. O texto faz
referências às letras e aos números. Por exemplo: “Veja a Ilustração A” ou “Veja A 6.” (“A 6” significa o
número 6 na Ilustração A.)
Illustration A:
1. Suporte do papel em rolo
2. Painel do controlo
3. Tampa da bateria
4. Alavanca
5. Botão de ABRIR
6. Tampa do papel em rolo
Illustration B:
7. INDICADOR LUMINOSO DE ALIMENTAÇÃO
8. INDICADOR LUMINOSO DE ERRO
9. INDICADOR LUMINOSO DE carga
10. INDICADOR LUMINOSO BATT.
11. Botão de FUNCIONAMENTO (POWER)
12. Botão de AVANÇO DO PAPEL
Illustration D:
13. Battery
Illustration F:
14. Conector para o adaptador AC
15. Conector para o USB
Illustration L:
16. Prendedor do cinto
Illustration M:
17. Entalhe
Illustration N:
18. Rolo de platina
19. Sensor do papel
20. Cabeça térmica
Importante
Todos os direitos reservados. Esta publicação não pode ser integral ou parcialmente reproduzida, arquivada
nem transmitida por meio de fotocópias, gravação ou qualquer outro sistema mecânico ou electrónico, sem a
prévia autorização por escrito da Seiko Epson Corporation, que não assume qualquer responsabilidade de
patente no que diz respeito ao uso das informações aqui contidas. Uma vez que foram tomadas todas as
precauções na elaboração deste manual, a Seiko Epson Corporation não se responsabiliza por erros ou
omissões, nem por quaisquer danos resultantes do uso das informações aqui contidas.
O comprador deste produto ou terceiros não podem responsabilizar a Seiko Epson Corporation, ou as
suas filiais, por quaisquer danos, perdas, custos ou despesas, incorridos por ele ou por terceiros,
resultantes de acidentes, abusos ou má utilização do produto, de modificações não autorizadas,
reparações ou alterações do produto, ou resultantes ainda da inobservância estrita das instruções de
utilização e manutenção estabelecidas pela Seiko Epson Corporation.
Seiko Epson Corporation shall not be liable against any damages or problems arising from the use of any
options or any consumable products other than those designated as Original EPSON Products or EPSON
Approved Products by Seiko Epson Corporation.
A Seiko Epson Corporation não se responsabiliza por quaisquer avarias ou problemas provocados pela
utilização de opções ou produtos não reconhecidos como sendo produtos genuínos EPSON ou produtos
aprovados pela EPSON.
EPSON é marca registada da Seiko Epson Corporation no Japão e noutros países/regiões.
AVISO: O conteúdo deste manual está sujeito a alterações sem aviso prévio.
Copyright © 2012, Seiko Epson Corporation, Nagano, Japão.
Informações de segurança importantes
Esta secção apresenta informações importantes cuja finalidade é garantir uma
utilização segura e eficaz deste produto. Leia esta secção com atenção e guarde-a
num local de fácil acesso.
Significado dos símbolos
Os símbolos que aparecem neste manual são identificados pelo seu grau de
importância, como se explica abaixo. Leia esta secção com atenção antes de
manusear o produto.
PERIGO:
Devem-se observar as indicações de Perigo rigorosamente para evitar lesões
graves ou fatais.
60 TM-P80 Manual do utilizador
English
IMPORTANTE:
Cuidados que deve ter para evitar lesões físicas graves.
CUIDADO:
Cuidados que deve ter para evitar lesões físicas secundárias ou danos ao
equipamento.
Observação:
As observações mostram informações importantes e sugestões úteis para a operação do seu
produto.
Precauções de segurança
IMPORTANTE:
Desactive o seu equipamento imediatamente se produzir fumo, um odor
estranho ou ruído incomum. Continuar a utilizá-lo pode resultar em incêndio.
Desligue imediatamente a ficha do equipamento e entre em contacto com o
seu revendedor ou com um centro de atendimento da Seiko Epson para obter
orientação.
Nunca tente reparar este produto. Um reparo inadequado pode ser perigoso.
Nunca desmonte nem modifique este produto. Qualquer adulteração deste
produto pode resultar em lesões ou incêndio.
Não deixe de utilizar a fonte de alimentação especificada. A ligação a uma
fonte de alimentação inadequada pode causar incêndio.
Não permita que nenhum material estranho caia no equipamento. A
penetração de objectos estranhos pode resultar em incêndio.
Se água ou outros líquidos derramarem sobre este equipamento, interrompa a
sua utilização. Continuar a utilizá-lo pode resultar em incêndio. Desligue
imediatamente a ficha do equipamento e entre em contacto com o seu
revendedor ou com um centro de atendimento da Seiko Epson para obter
orientação.
CUIDADO:
Não ligue os cabos em formas diferentes daquelas indicadas neste manual.
Ligações diferentes podem causar danos ao equipamento e queimaduras.
Tenha cuidado para não deixar este produto cair. Se cair, o produto pode
quebrar ou causar ferimentos.
Não utilize em locais sujeitos a altos índices de humidade e poeira. O excesso
de humidade e poeira pode causar danos ao equipamento ou incêndio.
Não coloque objectos pesados sobre este produto. Nunca suba nem se apoie
neste produto. O equipamento pode cair ou desmontar, resultando em
quebra e possíveis ferimentos.
Para garantir a segurança, desligue a ficha deste produto antes de
interromper a sua utilização por um período prolongado.
Antes de transportar este produto, desligue a ficha e desligue todos os cabos
ligados ao produto.
Tome cuidado em não ferir os seus dedos no cortador manual
•
Quando remover papel impresso
•
Quando executar outras actividades como carga / substituição de papel
em rolo
Não utilize aspersores aerossóis que contenham gás inflamável no interior ou
em torno deste produto, pois isto pode causar incêndio.
TM-P80 Manual do utilizador 61
English
Precauções de segurança do conjunto da bateria recarregável
PERIGO:
Se algum líquido da bateria atingir os olhos, enxagúe-os imediatamente com
água limpa durante mais de 10 minutos e consulte o médico o mais rápido
possível. Se esta instrução não for respeitada, o líquido pode causar a perda
da visão.
Nunca desmonte nem modifique o conjunto da bateria, pois isso pode causar
incêndio, explosão, fuga, sobreaquecimento ou dano.
Não exponha a bateria ao fogo nem a aqueça, pois isso pode causar
incêndio, explosão, fuga, sobreaquecimento ou dano.
IMPORTANTE:
Se o pacote da bateria produzir um odor estranho ou fugas, mantenha-a
longe do fogo ou das chamas, caso contrário poderá fogo ou uma explosão
poderão ocorrer.
Se algum líquido da bateria atingir a pele ou as roupas, enxagúe
imediatamente com água limpa Se esta instrução não for respeitada, o
líquido pode causar danos à sua pele.
Não exponha a bateria à agua. Não permita que os terminais tenha contacto
com a água, pois isso pode causar incêndio, sobreaquecimento ou choque
eléctrico.
Etiqueta de segurança
As etiquetas de aviso no produto indicam as seguintes precauções.
CUIDADO:
Durante ou após a impressão, a cabeça térmica pode ficar muito quente.
Restrictions d’emploi
En cas d’utilisation de ce produit pour des applications exigeant une grande
fiabilité/sécurité, telles que des appareils employés en transport aérien,
ferroviaire, maritime, automobile, etc., des appareils de prévention des
catastrophes, divers appareils de sécurité, etc., ou des appareils de fonction/
précision, vous devrez, avant d’utiliser ce produit, considérer l’incorporation à
votre système de dispositifs de sécurité positive et de moyens redondants
assurant la sécurité et la fiabilité de l’ensemble du système. Étant donné que ce
produit n’est pas destiné aux applications exigeant une fiabilité/sécurité extrême,
telles que du matériel aérospatial, du matériel de communications principal, du
matériel de commande nucléaire ou du matériel de soins médicaux directs, etc.,
vous devrez, après une évaluation complète, décider si ce produit convient.
Observações sobre a utilização
❏
❏
❏
❏
A impressora não funciona apenas com o transformador CA. Coloque sempre
a bateria OT-BY60II fornecida na impressora, mesmo se utilizar o
transformador CA.
É imprescindível que utilize o botão de alimentação para ligar e desligar a
impressora.
Para comunicar com um computador através de um cabo USB, ligue o cabo
antes de ligar a impressora.
Para utilizar o cabo USB, é recomendável prendê-lo para evitar qualquer
esforço sobre o mesmo.
62 TM-P80 Manual do utilizador
❏
❏
❏
❏
❏
❏
English
Nunca abra a tampa do papel em rolo quando a impressora estiver a funcionar.
Proteja a impressora contra impactos.
Não aplique força em excesso à estrutura da impressora.
Não coloque comida ou bebidas, como café, sobre a estrutura da impressora.
No que respeita aos modelos com ligação Bluetooth, se a ligação sem fios for
terminada quando a impressora estiver offline, pode não ser possível voltar a
estabelecer ligação. Nesse caso, remova a causa do offline e volte a estabelecer
ligação.
No que respeita aos modelos com ligação por Bluetooth, se estabelecer uma
ligação por rádio entre o computador anfitrião e a impressora sempre que
iniciar a impressão em vez de manter a ligação, pode demorar algum tempo
entre o envio de um trabalho de impressão e a impressora começar a
imprimir. Isto ocorre porque é necessário aguardar algum tempo entre a
ligação do computador anfitrião e a impressora. O tempo necessário para
estabelecer ligação depende do ambiente de funcionamento.
Notas sobre fonte de alimentação
Conjunto da bateria
Antes de utilizar a impressora pela primeira vez, carregue a bateria OT-BY60II.
Para instalar e carregar a bateria, consulte “Instalar e carregar a bateria”.
Leia também as precauções de segurança sobre a bateria recarregável, descritas
anteriormente neste manual.
IMPORTANTE:
Certifique-se de que utiliza a bateria OT-BY60II. Se utilizar uma bateria diferente da
especificada, pode ocorrer um incêndio, explosão, fuga, sobreaquecimento ou
outro tipo de danos.
CUIDADO:
Elimine as baterias gastas de acordo com as instruções.
Fonte de alimentação externa
Este produto utiliza uma unidade de alimentação listada, com a marca “Classe 2”
ou “LPS”, com uma tensão de saída máxima de 1,0 A a 12 V CC ou um máximo de
1,5 A a 24 V CC.
Com o transformador CA opcional EPSON PS-11 [Modelo: M235A], a tensão de
saída máxima é de 1,5 A a 24 V CC e a tensão de entrada é entre 100 V e 240 V CA.
Reciclagem das baterias
Contém uma bateria de ião de lítio. Deve-se reciclar ou deitar fora da maneira
apropriada.
Observação:
Não desmonte a bateria.
TM-P80 Manual do utilizador 63
English
Desembalagem
Os itens abaixo estão inclusos com a impressora de especificação standard. Caso
algum item esteja danificado, contacte o seu revendedor.
❏ Impressora
❏ Papel em rolo
❏ Conjunto da bateria (OT-BY60II) e o Manual do Utilizador correspondente
❏ Cabo USB
❏ Manual do Utilizador (este manual)
Download de Drivers, Utilitários e Manuais
Estão disponíveis mais informações sobre o produto no Guia de referência técnica
TM-P80.
As versões mais recentes dos controladores, utilitários e manuais podem ser
transferidas a partir de um dos seguintes URL.
Para clientes na América do Norte, visitar o seguinte sítio Web:
http://www.epsonexpert.com/
Para clientes noutros países, visitar o seguinte sítio Web:
http://download.epson-biz.com/?service=pos
Nomes das peças
Veja a ilustração A.
Painel do controlo
O painel de controlo (B) inclui o LED de alimentação, o LED de erro, o LED de
carga, o LED de carga da bateria, o botão de Alimentação e o botão de
corrente.
Painel de controlo (Indicadores luminosos e Botões)
INDICADOR LUMINOSO DE ALIMENTAÇÃO (Azul)
INDICADOR LUMINOSO
DE ALIMENTAÇÃO
Aceso
Apagado
Intermitente
Significado
Impressora ligada.
Impressora desligada.
A impressora está a ser desligada e ligada.
INDICADOR LUMINOSO DE ERRO (laranja)
Condição da
impressora
Impressora
ligada
INDICADOR
LUMINOSO
DE ERRO
Aceso
Apagado
Intermitente
Significado
A impressora está offline (saída de papel, inicialização de
arranque, tampa do papel de rolo aberta, a carga
restante da bateria está no nível E).
A impressora está a funcionar normalmente.
Ocorreu um erro na impressora.
INDICADOR LUMINOSO DE carga (laranja)
Condição da
impressora
Impressora
ligada e bateria
instalada
INDICADOR
LUMINOSO
DE carga
Aceso
Apagado
Intermitente
64 TM-P80 Manual do utilizador
Significado
A bateria está a carregar
A bateria está completamente carregada.
Existe anormalidade no carregamento da bateria.
English
INDICADOR LUMINOSO BATT. (Azul)
Condição da
impressora
Impressora
ligada
INDICADOR
LUMINOSO
BATT.
3 LED ligado
2 LED
ligados
1 LED ligado
INDICADOR
LUMINOSO
DE ERRO
Apagado
Apagado
Estado de
carga da
bateria
Apagado
nível L
1 LED
intermitente
3 LED
desligados
Apagado
nível S
Aceso
nível E
Significado
nível H
nível M
Pode continuar a imprimir,
mas é recomendável
substituir ou carregar a
bateria.
Substitua ou carregue a
bateria.
A impressora entra no
estado offline e já não é
possível imprimir.
Botão de FUNCIONAMENTO (POWER)
Prima o botão para ligar e desligar a impressora. A operação de desligamento
requer que se mantenha o botão premido por mais de 2 segundos.
AVANÇO DO PAPEL (FEED)
Prima o botão para fazer avançar o papel.
Instalar e carregar a bateria
Siga os passos indicados abaixo para instalar e carregar a bateria.
Observação:
A bateria só pode ser carregada se a temperatura se situar entre 0 e 40 °C.
1. Certifique-se de que a impressora está desligada.
2.
3.
Rode a alavanca para a
marca e deslize a tampa da bateria para abri-la.
Veja a ilustração C.
Coloque a bateria (D 13) e feche a tampa da bateria.
4.
Feche a tampa da bateria e rode a alavanca para a
marca. Veja a
ilustração E.
5. Ligue o adaptador de CA à impressora. Consulte a ilustração F 14 do
conector.
A bateria começará então a recarregar.
Observação:
O processo de recarga demora cerca de 2,5 horas com o adaptador AC ou o carregador de
bateria opcional OT-CH600II. Para obter informações pormenorizadas sobre o carregador
da bateria, consulte o respectivo manual do utilizador. O período descrito acima
corresponde ao tempo necessário para carregar uma bateria totalmente descarregada.
Se recarregar a bateria a uma temperatura de 35 °C ou superior activa o controlo de
temperatura interna da impressora, podendo ser necessário um tempo de recarga superior
ao especificado. O LED de carga fica intermitente quando o processo de carga é
interrompido.
Instalação ou substituição do papel em rolo
Siga os passos indicados abaixo para colocar ou substituir o papel de rolo.
CUIDADO:
Não deixe de utilizar o papel em rolo que cumpre as especificações.
TM-P80 Manual do utilizador 65
English
Observação:
Não utilize rolos em que o papel esteja colado ao tubo central.
1. Prima o botão de abertura para abrir a tampa do papel de rolo. Veja a
ilustração G
2. Retire o tubo central do papel em rolo esgotado, se houver, e insira o novo
papel em rolo. Veja a ilustração H
Observação:
Preste atenção à direcção em que o papel desenrola-se.
3. Puxe um pouco do papel, feche a tampa e corte-o com o cortador manual.
Veja a ilustração I
Instalação ou substituição verticais do papel em rolo
Pode-se levar a impressora verticalmente num cinto utilizando-se um prendedor na
parte de trás da impressora. Quando se utiliza a impressora verticalmente, siga as
etapas a seguir para instalar o papel em rolo.
Observação:
É imprescindível que o suporte do papel de rolo fique na parte inferior quando utilizar a
impressora na vertical.
1. Prima o botão de abrir para abrir a tampa do papel em rolo.
2. Retire o tubo central do papel em rolo esgotado, se houver.
3. Ajuste o novo papel em rolo. Veja a ilustração J.
Observação:
Preste atenção à direcção em que o papel desenrola-se.
4. Puxe o bordo de guia do papel em rolo. Veja o ➀ na ilustração K.
5. Alinhe o bordo esquerdo do papel em rolo com o bordo da tampa. Veja o item
➁ na ilustração K.
6. Feche a tampa do papel em rolo e corte o papel com o cortador manual.
Prendedor do cinto
Pode-se levar a impressora presa ao cinto com um prendedor do cinto (L 16) que
se encontra na parte de trás da impressora.
Alarme sonoro
O standard de fábrica foi ajustado para Ligado (alarme soa) para indicar o
seguinte:
❏ A carga restante da bateria não é adequada.
❏ Acabou o papel em rolo
❏ Erro
Resolução de problemas
Não há luzes acesas no painel de controlo
❏
Verifique se a bateria está instalada.
O INDICADOR LUMINOSO DE Error está aceso ou a piscar
❏
❏
❏
A temperatura da impressora pode estar excessivamente alta. A impressora
continua a impressão automaticamente quando a temperatura volta ao normal.
Certifique-se de que a tampa do papel em rolo esteja adequadamente fechada.
Certifique-se de que o papel em rolo esteja instalado.
66 TM-P80 Manual do utilizador
❏
❏
English
Quando a impressora é ligada, se o LED de erro estiver ligado e o LED da
bateria estiver desligado, a carga restante da bateria não é suficiente para
colocar a impressora em funcionamento. Substitua ou carregue a bateria.
Desligue a alimentação, espere vários segundos e então ligue-a novamente. Se
o erro persistir, contacte um técnico qualificado.
A bateria não fica carregada
❏
❏
Se a bateria não ficar totalmente carregada, mesmo que tenha sido durante
cerca de 5 horas, significa que a bateria está defeituosa.
Deve substituir a bateria por uma nova.
Ligue a impressora, instale o papel em rolo e feche a tampa do papel em rolo.
Em seguida, se o LED de erro acender-se e o LED de carga estiver
intermitente, significa que a bateria está defeituosa.
Deve substituir a bateria por uma nova.
A tampa da bateria não abre
Siga os passos indicados abaixo se a tampa da bateria não abrir.
1. Certifique-se de que a impressora está desligada.
2.
3.
Rode a alavanca para a
marca.
Desloque o entalhe (M 17) na direcção da seta utilizando uma esferográfica
como ferramenta. Veja a ilustração M.
Limpeza do rolo de impressão/sensor do papel
CUIDADO:
Não utilize solventes à base de álcool. O uso de um solvente à base de álcool pode
fazer com que o agente adesivo se dissolva parcialmente, o que torna a remoção
ainda mais difícil.
Em caso de acumulação de poeira nos rolos de impressão ou no sensor do papel,
siga os passos indicados abaixo para proceder à limpeza. Para manter um bom
funcionamento do equipamento, limpe-os com regularidade (de 6 em 6 meses).
1. Desligue a impressora e abra a tampa do papel em rolo.
2. Limpe o rolo de platina (N 18) e o sensor do papel (N 19) com uma cotonete
ligeiramente humedecida com água.
3. Quando a água secar, feche a tampa do papel em rolo.
Limpeza da cabeça térmica
CUIDADO:
Após a impressão, a cabeça térmica pode ficar muito quente. Tenha o cuidado
de não tocá-la e de deixá-la arrefecer antes da limpeza. Não danifique a
cabeça térmica tocando-a com os dedos ou com um objecto duro.
Não utilize água. Utilize apenas um solvente à base de álcool.
Desligue a impressora, abra a tampa do papel em rolo e limpe os elementos
térmicos da cabeça térmica (G 17) com um bastonete de algodão humedecido com
um solvente à base de álcool (etanol ou IPA).
A EPSON recomenda que se limpe a cabeça térmica periodicamente (geralmente a
cada 3 meses) a fim de manter-se a qualidade da impressão.
TM-P80 Manual do utilizador 67
English
TM-P80 Especificações
Método de impressão
Impressão térmica de linhas
Densidade de pontos
203 dpi × 203 dpi [pontos por 25,4 mm {1"}]
Largura de impressão (Por defeito)
72 mm {2.83"}, 576 posições de pontos
Papel
Largura do papel de 79.5 ± 0.5 mm {3.12 ± 0.02"}
rolo
Rolo de papel
diâmetro do núcleo
externo
18 mm {0.71"} mínimo
Especificada papel
térmico
NIPPON Paper Industries Co., Ltd. :TF50KS-EY
Oji Holdings Corporation :PD150R/PD160R/PD190R
Kanzaki Specialty Papers (USA) :P30023/P31023/P35024
Koehler :KT55F20/KT48F20
Jujo ThermalOy :AF50KS-E
Mitsubishi HiTec :F5041(48)/F5041(55)
Interface
Fonte de
alimentação
USB (Conformidade: USB 2.0, velocidade de comunicação:
Full-speed (12 Mbps),
Sem fios (Bluetooth®/IEEE802.11a/b/g/n)
Bateria especificada Bateria de iões de lítio: nome do produto: OT-BY60II, nome
comercial: Seiko Epson Corporation
Saída: 7,4 V CC, Capacidade: 2000 mAh
Voltagem de
consumo
Temperatura/ Funcionamento
Humidade
Armazenamento
Tensão de entrada: máx. 1,0 A a 12 V CC ou máx. 1,5 A a
CC 24 V
(Quando utilizar o transformador CA opcional EPSON PS-11
[Modelo: M235A]) Tensão de saída: Máx. 1,5 A a 24 V CC,
tensão de entrada: 100 V a 240 V CA
Apenas a bateria: 0 ~ 45 °C {32 ~ 113 °F}, 10 ~ HR de 90%
Bateria e unidade de alimentação: 0 ~ 40 °C {32 ~ 104 °F},
10 ~ HR de 90%
Não se verificaram problemas anormais quando a
impressora é colocada a uma temperatura de 25 °C {77
°F}, HR de 60% durante 2 horas depois de permanecer nas
seguintes condições:
Temperatura e humidade elevadas: 45 °C {113 °F}, HR de
90% durante 120 horas
Temperatura elevada: 70 °C durante 120 horas
Temperatura reduzida: -25 °C durante 120 horas
Dimensões totais
110 × 140 × 64 mm {4.3 × 5.5 × 2.5"} (L × P × A)
Peso (massa)
Modelo Wifi: aprox. 506 g {1,11 lb}
Modelo Bluetooth: cerca de 500 g {1.10 lb}
(Bateria e prendedor incluídos; não inclui papel de rolo)
Nota: para obter especificações sobre a bateria, consulte o respectivo manual do utilizador.
68 TM-P80 Manual do utilizador
Licença de software de fonte aberta
1.
2.
3.
4.
English
Este produto inclui programas de software de fonte aberta enumerados na
Secção 4) de acordo com os termos de licença de cada programa de software
de fonte aberta.
Nous proposons le code source des programmes GPL et des programmes
LGPL (Cada um está definido na Secção 4) num CD-ROM mediante o
pagamento de um valor que inclui o custo de execução de tal distribuição, tal
como o custo do suporte, envio e manuseamento até cinco (5) anos após a
interrupção do fabrico do mesmo modelo deste produto.
Les logiciels libres sont proposés SANS AUCUNE GARANTIE, pas même la
garantie implicite de COMMERCIABILITÉ ET D’ADÉQUATION À UN
USAGE SPÉCIFIQUE. Pour plus de détails, reportez-vous aux contrats de
licence de chaque logiciel libre, que estão descritos em “TERMOS DA
LICENÇA DE SOFTWARE DE CÓDIGO FONTE” nesta documentação.
A lista de programas de software de fonte aberta que este produto inclui e
todos os acordos de licença de cada licença são indicados no seguinte URL.
http://xxx.xxx.xxx.xxx/licenses/
* No que respeita à parte sublinhada do URL indicado acima, introduza o
endereço IP de cada impressora.
TM-P80 Manual do utilizador 69
English
WEEE (Waste Electrical and Electronic Equipment) Directive
This information only applies to customers in the European Union, according to Directive
2012/19/EU OF THE EUROPEAN PARLIAMENT AND OF THE COUNCIL OF 04 July
2012 on waste electrical and electronic equipment (WEEE) and legislation transposing and
implementing it into various national legal systems, and to customers in countries in
Europe, Middle East and Africa (EMEA) where they have implemented equivalent
regulations.
For other countries, please contact your local government to investigate the possibility of
recycling your product.
English
Nederlands
The crossed out wheeled bin label that can be found on your
product indicates that this product should not be disposed of via
the normal household waste stream. To prevent possible harm
to the environment or human health please separate this
product from other waste streams to ensure that it can be
recycled in an environmentally sound manner. For more details
on available collection facilities please contact your local
government office or the retailer where you purchased this
product.
Op uw product is een label van een rolcontainer met een kruis
erdoor aangebracht. Dit label wil zeggen dat dit product niet bij
het normale huishoudelijk afval mag worden ingezameld. Om
eventuele schade aan het milieu of de gezondheid van de mens
te voorkomen moet dit product gescheiden van al het ander
afval worden ingezameld, zodat het op een verantwoorde wijze
kan worden verwerkt. Voor meer informatie over uw lokale
afvalinzameling wendt u zich tot uw gemeente of de leverancier
bij wie u dit product hebt gekocht.
Deutsch
Dansk
Der Aufkleber mit durchgekreuzter Mülltonne an diesem
Produkt weist darauf hin, dass dieses Produkt nicht im
normalen Hausmüll entsorgt werden darf. Zur Vermeidung
einer möglichen Beeinträchtigung der Umwelt oder der
menschlichen Gesundheit und um zu gewährleisten, dass es in
einer umweltverträglichen Weise recycelt wird, darf dieses
Produkt nicht in den Hausmüll gegeben werden. Informationen
zu Entsorgungseinrichtungen erhalten Sie bei der zuständigen
Behörde oder dem Geschäft, in dem Sie dieses Produkt
erworben haben.
Etiketten med et kryds over skraldespanden på hjul, der sidder
på produktet, angiver, at dette produkt ikke må bortskaffes
sammen med almindeligt husholdningsaffald. For at beskytte
miljø og helbred skal dette produkt bortskaffes separat, så det
kan genbruges på en måde, der er god for miljøet. Kontakt de
lokale myndigheder eller den forhandler, hos hvem du har købt
produktet, vedrørende steder, hvor du kan aflevere produktet.
Français
L'étiquette apposée sur ce produit et représentant une poubelle
barrée indique que le produit ne peut être mis au rebut avec les
déchets domestiques normaux. Afin d'éviter d'éventuels
dommages au niveau de l'environnement ou sur la santé,
veuillez séparer ce produit des autres déchets de manière à
garantir qu'il soit recyclé de manière sûre au niveau
environnemental. Pour plus de détails sur les sites de collecte
existants, veuillez contacter l'administration locale ou le
détaillant auprès duquel vous avez acheté ce produit.
Italiano
L'etichetta con il contenitore barrato applicata sull'imballo indica
che il prodotto non deve essere smaltito tramite la procedura
normale di smaltimento dei rifiuti domestici. Per evitare
eventuali danni all'ambiente e alla salute umana, separare
questo prodotto da altri rifiuti domestici in modo che possa
essere riciclato in base alle procedure di rispetto dell'ambiente.
Per maggiori dettagli sulle strutture di raccolta disponibili,
contattare l'ufficio competente del proprio comune o il
rivenditore del prodotto.
Español
La etiqueta de un contenedor tachado que hallará en su
producto indica que este producto no se puede tirar con la
basura doméstica normal. Para impedir posibles daños
medioambientales o para la salud, separe este producto de
otros canales de desecho para garantizar que se recicle de una
forma segura para el medio ambiente. Para más información
sobre las instalaciones de recolección disponibles, diríjase a las
autoridades locales o al punto de venta donde adquirió este
producto.
Português
A etiqueta com o símbolo de um contentor de lixo traçado com
uma cruz que aparece no produto indica que este produto não
deve ser deitado fora juntamente com o lixo doméstico. Para
evitar possíveis danos no ambiente ou na saúde pública, por
favor separe este produto de outros lixos; desta forma, terá a
certeza de que pode ser reciclado através de métodos não
prejudiciais ao ambiente. Para obter mais informações sobre os
locais de recolha de lixo disponíveis, contacte a sua junta de
freguesia, câmara municipal ou localonde comprou este
produto.
Suomi
Laite on merkitty jäteastia-symbolilla, jonka yli on vedetty rasti.
Tämä tarkoittaa, ettei laitetta saa hävittää normaalin
talousjätteen mukana. Älä hävitä laitetta normaalin jätteen
seassa vaan varmista, että laite kierrätetään
ympäristöystävällisellä tavalla, jottei ympäristölle tai ihmisille
aiheudu vahinkoa. Lisätietoja kierrätyksestä ja keräyspisteistä
saa ottamalla yhteyttä paikallisiin viranomaisiin tai
jälleenmyyjään, jolta laite ostettiin.
Svenska
Symbolen med en överkorsad soptunna innebär att denna
produkt inte får kastas i vanligt hushållsavfall. För att skydda
miljön ska denna produkt inte kastas tillsammans med vanligt
hushållsavfall utan lämnas för återvinning på tillbörligt sätt. För
mer information om uppsamlingsplatser kontakta din lokala
myndighet eller den återförsäljare där du har köpt produkten.
Norsk
Det er krysset over merket av beholderen på hjul som vises på
produktet, som angir at dette produktet ikke skal kastes
sammen med vanlig husholdningsavfall. Hold dette produktet
atskilt fra annet avfall slik at det kan resirkuleres på en
miljømessig forsvarlig måte og dermed forhindre eventuell
skade på miljø eller helse. Hvis du vil ha mer informasjon om
hvor produktet kan leveres inn, kontakter du kommunale
myndigheter eller forhandleren der du kjøpte dette produktet.
Česky
Štítek s přeškrtnutým odpadkovým košem na kolečkách, který
lze nalézt na výrobku, označuje, že tento product se nemá
likvidovat s běžným domovním odpadem. V zájmu ochrany
životního prostředí a lidského zdraví zlikvidujte tento výrobek
jako tříděný odpad, který se recykluje způsobem šetrným k
životnímu prostředí. Podrobnější informace o sběrných dvorech
pro tříděný odpad získáte na obecním úřadě nebo u prodejce, u
kterého jste příslušný výrobek zakoupili.
English
Magyar
Ελληνικά
A terméken található, áthúzott szemetest ábrázoló címke azt
jelzi, hogy ezt a terméket nem szabad a rendes háztartási
szeméttel együtt kidobni. Az esetleges környezeti- vagy
egészségkárosodást megelõzendõ, kérjük, hogy ezt a terméket
a többi szeméttõl elkülönítve helyezze el, és biztosítsa, hogy azt
környezetbarát módon újrahasznosítsák. A rendelkezésére álló
begyûjtõ létesítményekrõl kérjük tájékozódjon a megfelelõ helyi
állami szerveknél vagy a viszonteladónál, ahol a terméket
vásárolta.
Η διαγραμμένη ετικέτα του τροχοφόρου κάδου απορριμμάτων
που θα βρείτε πάνω στο προϊόν σας υποδεικνύει ότι αυτό το
προϊόν δεν πρέπει να απορρίπτεται μέσω του κανονικού
δικτύου αποκομιδής οικιακών απορριμμάτων. Για να
αποτρέψετε πιθανές επιπτώσεις στο περιβάλλον ή την ατομική
υγεία, παρακαλούμε να διαχωρίσετε αυτό το προϊόν από άλλα
δίκτυα αποκομιδής ώστε να διασφαλίσετε ότι είναι δυνατή η
ανακύκλωσή του με έναν περιβαλλοντικά θεμιτό τρόπο. Για
περισσότερες πληροφορίες σχετικά με τις διαθέσιμες
δυνατότητες συλλογής απορριμμάτων, παρακαλούμε να
επικοινωνήσετε με την τοπική κυβερνητική αρχή ή το
κατάστημα λιανικής από όπου αγοράσατε αυτό το προϊόν.
Polski
Symbol przekreślonego kosza znajdujący się na produkcie
oznacza, że nie może on być utylizowany razem z normalnymi
odpadami z gospodarstwa domowego. Aby zapobiec
potencjalnemu zagrożeniu dla środowiska lub zdrowia
ludzkiego, produkt ten należy odseparować od reszty odpadów
z gospodarstwa domowego i utylizować w ekologicznie
właściwy sposób. Szczegółowe informacje na temat punktów
zbiórki odpadów można uzyskać w lokalnych urzędach lub u
sprzedawcy danego produktu.
Slovensky
Štítok s preškrtnutým odpadkovým košom na kolieskach, ktorý
je možné nájst’ na výrobku, označuje, že tento product sa nemá
likvidovat’ s bežným komunálnym odpadom. V záujme ochrany
životného prostredia a ľudského zdravia zlikvidujte tento
výrobok ako triedený odpad, ktorý sa recykluje spôsobom
šetrným k životnému prostrediu. Podrobnejšie informácie o
zberných dvoroch pre triedený odpad získate na obecnom
úrade alebo u predajcu, u ktorého ste príslušný výrobok
zakúpili.
Slovenski
Prečrtan koš za smeti na etiketi, katero lahko najdete na vašem
izdelku, pomeni, da tega izdelka ne smete odvreči podobno kot
vse ostale smeti. Da bi preprečili morebitne škodljive vplive na
okolje ali zdravje, ločite izdelek od vseh ostalih in poskrbite, da
bo recikliran na okolju prijazen način. Natančne informacije o
tem, kje se nahajajo primerna odlagališča, pridobite v vašem
krajevnem uradu ali pri prodajalcu.
Eesti
Teie tootele kleebitud tähis, mis kujutab ratastega
prügikonteinerit, millele on rist peale tõmmatud, keelab toote
kõrvaldamise majapidamisjäätmetega sarnasel viisil.
Keskkonnale või inimeste tervisele tekitatava võimaliku kahju
vältimiseks eraldage toode teistest jäätmetest, et tagada selle
korduvkasutamine keskkonnasäästlikul viisil. Kui soovite saada
rohkem teavet võimalike kogumispunktide kohta, võtke
ühendust kohaliku omavalituse ametnikuga või teile toote
müünud jaemüüjaga.
Lietuviškai
Užbraukta ratuota šiukšliadėžės etiketė, kurią rasite ant jūsų
produkto, reiškia, kad šis produktas neturėtų būti išmestas kartu
su įprastinėmis buitinėmis šiukšlėmis. Siekiant išvengti galiamos
žalos aplinkai bei žmonių sveikatai, prašome atskirti šį produktą
nuo kitų atliekų, ir įsitikinti, kad jis būtų perdirbtas aplinkai
nepavojingu būdu. Jei reikia išsamesnės informacijos apie
atliekų surinkimo ypatumus, prašome kreiptis į savo vietos
valdžios įstaigas arba į mažmeninį pardavėją, iš kurio jūs
įsigijote šį produktą.
Latviski
Marķējums ar pārsvītrotu atkritumu tvertni uz ritenīšiem, kas
redzams uz izstrādājuma, norāda, ka šo izstrādājumu nedrīkst
likvidēt kopā ar parastajiem sadzīves atkritumiem. Lai novērstu
iespējamo kaitējumu videi vai cilvēku veselībai, lūdzu, atdaliet
šo izstrādājumu no citiem atkritumiem, tādējādi nodrošinot tā
otrreizējo pārstrādi videi drošā veidā. Papildinformācijai par
pieejamajām atkritumu savākšanas iespējām, lūdzu, sazinieties
ar vietējo pašvaldību vai mazumtirgotāju, no kura jūs
iegādājāties šo izstrādājumu.
Türkçe
Ürününüzün üzerinde bulunan çarpı işaretli tekerlekli kutu
etiketi, bu ürünün normal ev atık sistemi vasıtasıyla elden
çıkarılmaması gerektiğini gösterir. Çevreye ve insan sağlığına
zarar vermeyi önlemek için, lütfen bu ürünü çevreye zarar
vermeyecek şekilde geri dönüşüme tabi tutulmak üzere diğer
atıklardan ayırın. Mevcut toplama tesisleri ile ilgili ayrıntılı bilgi
edinmek için, yerel devlet makamlarıyla veya bu ürünü satın
aldığınız satıcıyla irtibata geçin.
Română
Eticheta arătând un coş de gunoi tăiat cu două linii încrucişate,
care poate fi găsită pe produs, indică faptul că acesta nu trebuie
aruncat la gunoi laolaltă cu gunoiul menajer. Pentru a evita
posibila degradare a mediului înconjurător sau a sănătăţii
umane, colectaţi separat acest produs de gunoiul menajer
pentru a vă asigura că poate fi reciclat într-un mod ecologic.
Pentru mai multe detalii privind punctele disponibile de
colectare, contactaţi autorităţile locale sau comerciantul de la
care aţi achiziţionat acest produs.
Български
Етикетът, представляващ зачертано кошче за боклук в
кръг, който можете да видите върху вашия продукт,
означава, че този продукт не трябва да се изхвърля заедно
с обикновените домакински отпадъци. За предпазване от
евентуални щети върху околната среда или човешкото
здраве, моля, отделете този продукт от останалите
отпадъци, за да се гарантира, че той ще бъде рециклиран
по екологично съобразен начин. За повече информация
относно наличните места за събиране на отпадъци, моля,
свържете се с местните власти или търговеца, от когото сте
закупили този продукт.
Hrvatski
Oznaka prekrižene kante za otpad koja se nalazi na vašem
proizvodu znači da se ovaj proizvod ne smije odlagati u obično
kućno smeće. Da bi se spriječili negativni učinci na okoliš ili
ljudsko zdravlje odvojite ovaj proizvod od ostalog otpada da bi
se osiguralo njegovo recikliranje na ekološki prihvatljiv način.
Više pojedinosti o dostupnim reciklažnim dvorištima zatražite u
uredu lokalne samouprave ili od prodavača od kojeg ste kupili
ovaj proizvod.
Mакедонски
Прецртаната ознака во круг за кантата што е прикажана на
производот посочува дека овој производ не смее да се
фрла со редовниот домашен отпад. За да спречите можни
штети за животната средина или по здравјето на луѓето,
одвојте го овој производ од другиот домашен отпад за да
обезбедите негово рециклирање на начин којшто нема да ѝ
наштети на животната средина. Контактирајте со
општинската канцеларија или со продавачот каде што го
купивте овој производ за повеќе детали околу достапните
собирни локации.
Srpski
Okrugla oznaka sa precrtanom kantom za odlaganje otpada
koja se nalazi na proizvodu znači da se ovaj proizvod i priložene
baterije ne smeju odlagati u otpad na uobičajen način. Da bi se
sprečio štetan uticaj na okolinu ili na zdravlje ljudi, odvojte ovaj
proizvod i njegove baterije od ostalog otpada kako bi se oni
reciklirali na ekološki prihvatljiv način. Za više detalja o mestima
za reciklažu obratite se lokalnoj samoupravi ili prodavcu od
koga ste kupili ovaj proizvod.
English
Battery Directive
This information only applies to customers in the European Union, according to Directive
2006/66/EC OF THE EUROPEAN PARLIAMENT AND OF THE COUNCIL OF 6
September 2006 on batteries and accumulators and waste batteries and accumulators
and repealing Directive 91/157/EEC and legislation transposing and implementing it into
the various national legal systems, and to customers in countries in Europe, Middle East
and Africa (EMEA) where they have implemented equivalent regulations.
For other countries, please contact your local government to investigate the possibility of
recycling your product.
English
The crossed out wheeled bin label that can be found on your product
indicates that this product and incorporated batteries should not be
disposed of via the normal household waste stream. To prevent
possible harm to the environment or human health please separate
this product and its batteries from other waste streams to ensure that
it can be recycled in an environmentally sound manner. For more
details on available collection facilities please contact your local
government office or the retailer where you purchased this product.
Use of the chemical symbols Pb, Cd or Hg indicates if these metals
are used in the battery.
Deutsch
Nederlands
Op uw product is een label van een rolcontainer met een kruis erdoor
aangebracht. Dit label wil zeggen dat dit product en de batterijen in
het product niet bij het normale huishoudelijk afval mogen worden
ingezameld. Om eventuele schade aan het milieu of de gezondheid
van de mens te voorkomen moeten dit product en de batterijen
gescheiden van al het ander afval worden ingezameld, zodat alles op
een verantwoorde wijze kan worden verwerkt. Voor meer informatie
over uw lokale afvalinzameling wendt u zich tot uw gemeente of de
leverancier bij wie u dit product hebt gekocht. Gebruik van de
chemische symbolen Pb, Cd of Hg geeft aan of deze metalen
worden gebruikt in de batterij.
Der Aufkleber mit durchgekreuzter Mülltonne an diesem Produkt
weist darauf hin, dass dieses Produkt und darin enthaltene Batterien
nicht im normalen Hausmüll entsorgt werden dürfen. Zur
Vermeidung einer möglichen Beeinträchtigung der Umwelt oder der
menschlichen Gesundheit und um zu gewährleisten, dass es in einer
umweltverträglichen Weise recycelt wird, darf dieses Produkt
mitsamt den Batterien nicht in den Hausmüll gegeben werden.
Informationen zu Entsorgungseinrichtungen erhalten Sie bei der
zuständigen Behörde oder dem Händler, bei dem Sie dieses Produkt
erworben haben. Die Angabe der chemischen Zeichen Pb, Cd oder
Hg bedeutet, dass diese Metalle in der Batterie verwendet werden.
Dansk
Français
Laite on merkitty jäteastia-symbolilla, jonka yli on vedetty rasti. Tämä
tarkoittaa, ettei laitetta tai siihen kuuluvia paristoja saa hävittää
normaalin talousjätteen mukana. Älä hävitä laitetta tai sen paristoja
normaalin jätteen seassa vaan varmista, että laite kierrätetään
ympäristöystävällisellä tavalla, jottei ympäristölle tai ihmisille aiheudu
vahinkoa. Lisätietoja kierrätyksestä ja keräyspisteistä saa ottamalla
yhteyttä paikallisiin viranomaisiin tai jälleenmyyjään, jolta laite
ostettiin. Kemiallisten merkkien Pb (lyijy), Cd (kadmium) tai Hg
(elohopea) käyttö ilmaisee, että paristo sisältää kyseistä metallia.
L’étiquette apposée sur ce produit et représentant une poubelle
barrée indique que le produit et les piles intégrées ne peuvent être
mis au rebut avec les déchets domestiques normaux. Afin d’éviter
d’éventuels dommages au niveau de l’environnement ou sur la
santé, veuillez séparer ce produit et ses piles des autres déchets de
manière à garantir qu’ils soient recyclés de manière sûre au niveau
environnemental. Pour plus de détails sur les sites de collecte
existants, veuillez contacter l’administration locale ou le détaillant
auprès duquel vous avez acheté ce produit. Les symboles chimiques
Pb, Cd et Hg sont utilisés pour désigner les métaux présents dans
les piles.
Italiano
L’etichetta con il contenitore barrato applicata sull’imballo indica che il
prodotto e le batterie incluse non devono essere smaltiti tramite la
procedura normale di smaltimento dei rifiuti domestici. Per evitare
eventuali danni all’ambiente e alla salute umana, separare questo
prodotto e le relative batterie da altri rifiuti domestici in modo che
possano essere riciclati in base alle procedure di rispetto
dell’ambiente. Per maggiori dettagli sulle strutture di raccolta
disponibili, contattare l’ufficio competente del proprio comune o il
rivenditore del prodotto. L’uso dei simboli chimici Pb, Cd o Hg indica
la presenza di tali metalli nelle batterie.
Español
La etiqueta de un contenedor tachado que hallará en su producto
indica que este producto y sus pilas no se pueden tirar con la basura
doméstica normal. Para impedir posibles daños medioambientales o
para la salud, separe este producto y sus pilas de otros canales de
desecho para garantizar que se recicle de una forma segura para el
medio ambiente. Para más información sobre las instalaciones de
recolección disponibles, diríjase a las autoridades locales o al punto
de venta donde adquirió este producto. Los símbolos químicos Pb,
Cd o Hg indican que las pilas contienen ese metal.
Português
A etiqueta com o símbolo de um contentor de lixo traçado com uma
cruz que aparece no produto indica que este produto e as pilhas
incluídas não devem ser deitados fora juntamente com o lixo
doméstico. Para evitar possíveis danos no ambiente ou na saúde
pública, por favor separe este produto e respectivas pilhas de outros
lixos; desta forma, terá a certeza de que podem ser reciclados
através de métodos não prejudiciais ao ambiente. Para obter mais
informações sobre os locais de recolha de lixo disponíveis, contacte
a sua junta de freguesia, câmara municipal ou local onde comprou
este produto. A utilização dos símbolos químicos Pb, Cd ou Hg
indica se estes metais são utilizados na pilha.
Etiketten med et kryds over skraldespanden på hjul, der sidder på
produktet, angiver, at dette produkt og dets batterier ikke må
bortskaffes sammen med almindeligt husholdningsaffald. For at
beskytte miljø og helbred skal dette produkt og dets batterier
bortskaffes separat, så disse dele kan genbruges på en måde, der er
god for miljøet. Kontakt de lokale myndigheder eller den forhandler,
hos hvem du har købt produktet, vedrørende steder, hvor du kan
aflevere produktet. Brugen af de kemiske symboler Pb, Cd eller Hg
angiver, om disse metaller er anvendt i batteriet.
Suomi
Svenska
Symbolen med en överkorsad soptunna innebär att denna produkt
och tillhörande batterier inte får kastas i vanligt hushållsavfall. För att
skydda miljön ska denna produkt och dess batterier inte kastas
tillsammans med vanligt hushållsavfall utan lämnas för återvinning på
tillbörligt sätt. För mer information om uppsamlingsplatser kontakta
din lokala myndighet eller den återförsäljare där du har köpt
produkten. De kemiska symbolerna Pb, Cd eller Hg visar om dessa
metaller används i batteriet.
Norsk
Etiketten på hjulbeholderen på produktet ditt antyder at produktet og
batteriene som hører med, ikke skal avhendes sammen med vanlig
husholdningsavfall. Hold produktet og batteriene atskilt fra annet
avfall, slik at det kan resirkuleres på en miljømessig og forsvarlig
måte og dermed forhindre eventuell skade på miljø eller helse.
Kontakt lokale myndigheter, eller din forhandler, for mer informasjon
angående avhenting av produktet. De kjemiske symbolene Pb, Cd
og Hg antyder om disse metallene har blitt brukt i batteriet.
Česky
Štítek s přeškrtnutým odpadkovým košem na kolečkách, který lze
nalézt na výrobku, označuje, že se tento výrobek a přiložené baterie
nemají likvidovat s běžným domovním odpadem. V zájmu ochrany
životního prostředí a lidského zdraví zlikvidujte tento výrobek a jeho
baterie jako tříděný odpad, který se recykluje způsobem šetrným k
životnímu prostředí. Podrobnější informace o sběrných dvorech pro
tříděný odpad získáte na obecním úřadě nebo u prodejce, u kterého
jste tento výrobek zakoupili. Použité chemické značky Pb, Cd nebo
Hg označují, zda baterie obsahuje tyto kovy.
English
Magyar
A terméken található, áthúzott szemetest ábrázoló címke azt jelzi,
hogy ezt a terméket és a hozzá tartozó elemeket nem szabad a
rendes háztartási szeméttel együtt kidobni. Az esetleges környezetivagy egészségkárosodást megelőzendő, kérjük, hogy ezt a terméket
és az elemeket a többi szeméttől elkülönítve helyezze el, és
biztosítsa, hogy azt környezetbarát módon újrahasznosítsák. A
rendelkezésére álló begyűjtő létesítményekről kérjük tájékozódjon a
megfelelő helyi állami szerveknél vagy a viszonteladónál, ahol a
terméket vásárolta. A Pb, Cd vagy Hg vegyjelek jelzik, ha ilyen
fémeket is felhasználtak az elem gyártása során.
Polski
Symbol przekreślonego kosza znajdujący się na produkcie oznacza,
że nie można produktu oraz wewnętrznego akumulatora utylizować
razem z normalnymi odpadami z gospodarstwa domowego. Aby
zapobiec potencjalnemu zagrożeniu dla środowiska lub zdrowia
ludzkiego, produkt oraz wewnętrzny akumulator należy odseparować
od reszty odpadów z gospodarstwa domowego i utylizować w
ekologicznie właściwy sposób. Szczegółowe informacje na temat
punktów zbiórki odpadów można uzyskać w lokalnych urzędach lub
u sprzedawcy danego produktu. Symbole chemiczne Pb, Cd lub Hg
oznaczają, że metale te zostały zastosowane w akumulatorze.
Slovensky
Štítok s preškrtnutým odpadkovým košom na kolieskach, ktorý je
možné nájsť na výrobku, označuje, že tento produkt a obsiahnuté
batérie sa nemajú likvidovať s bežným komunálnym odpadom. V
záujme ochrany životného prostredia a ľudského zdravia zlikvidujte
tento výrobok a batérie ako triedený odpad, ktorý sa recykluje
spôsobom šetrným k životnému prostrediu. Podrobnejšie informácie
o zberných dvoroch pre triedený odpad získate na obecnom úrade
alebo u predajcu, u ktorého ste príslušný výrobok zakúpili. Použitie
chemických značiek Pb, Cd alebo Hg znamená, že tieto kovy sú
použité v batériách.
Slovenski
Prečrtan koš za smeti na etiketi, katero lahko najdete na vašem
izdelku, pomeni, da niti tega izdelka niti njegovih baterij ne smete
odvreči podobno kot vse ostale smeti. Da bi preprečili morebitne
škodljive vplive na okolje ali zdravje, ločite izdelek in njegove baterije
od vseh ostalih odpadkov in poskrbite, da bodo reciklirani na okolju
prijazen način. Natančne informacije o tem, kje se nahajajo primerna
odlagališča, pridobite v vašem krajevnem uradu ali pri prodajalcu.
Kemijski simboli Pb, Cd in Hg označujejo, katere kovine vsebuje
baterija.
Eesti
Teie tootele kleebitud tähis, mis kujutab ratastega prügikonteinerit,
millele on rist peale tõmmatud, keelab toote ja sellega kaasasolevate
patareide kõrvaldamise majapidamisjäätmetega sarnasel viisil.
Keskkonnale või inimeste tervisele tekitatava võimaliku kahju
vältimiseks eraldage toode ja selle patareid teistest jäätmetest, et
tagada nende korduvkasutamine keskkonnasäästlikul viisil. Kui
soovite saada rohkem teavet võimalike kogumispunktide kohta,
võtke ühendust kohaliku omavalituse ametnikuga või teile toote
müünud jaemüüjaga. Keemiliste sümbolite Pb, Cd või Hg
kasutamine näitab, kas tootes on vastavaid metalle kasutatud.
Lietuviškai
Užbraukta ratuota šiukšliadėžės etiketė, kurią rasite ant jūsų
produkto, reiškia, kad šis produktas ir pridedamos baterijos neturėtų
būti išmestas kartu su įprastinėmis buitinėmis šiukšlėmis. Siekiant
išvengti galiamos žalos aplinkai bei žmonių sveikatai, prašome
atskirti šį produktą ir pridedamas baterijas nuo kitų atliekų, ir įsitikinti,
kad jis būtų perdirbtas aplinkai nepavojingu būdu. Jei reikia
išsamesnės informacijos apie atliekų surinkimo ypatumus, prašome
kreiptis į savo vietos valdžios įstaigas arba į mažmeninį pardavėją, iš
kurio jūs įsigijote šį produktą. Atitinkamų metalų naudojimas
baterijose yra pažymėtas cheminiais simboliais Pb, Cd arba Hg ant
baterijų.
Latviski
Marķējums ar pārsvītrotu atkritumu tvertni uz ritenīšiem, kas redzams
uz izstrādājuma, norāda, ka šo izstrādājumu un tajā iekļautās
baterijas nedrīkst likvidēt kopā ar parastajiem sadzīves atkritumiem.
Lai novērstu iespējamo kaitējumu videi vai cilvēku veselībai, lūdzu,
atdaliet šo izstrādājumu un tā baterijas no citiem atkritumiem, tādējādi
nodrošinot tā otrreizējo pārstrādi videi drošā veidā. Papildinformācijai
par pieejamajām atkritumu savākšanas iespējām, lūdzu, sazinieties
ar vietējo pašvaldību vai mazumtirgotāju, no kura jūs iegādājāties šo
izstrādājumu. Ķīmisko simbolu Pb, Cd un Hg izmantošana uz
marķējuma nozīmē, ka šie metāli ir izmantoti baterijā.
Ελληνικά
Η διαγραμμένη ετικέτα του τροχοφόρου κάδου απορριμμάτων που
θα βρείτε πάνω στο προϊόν σας υποδεικνύει ότι αυτό το προϊόν και οι
ενσωματωμένες μπαταρίες δεν πρέπει να απορρίπτεται μέσω του
κανονικού δικτύου αποκομιδής οικιακών απορριμμάτων. Για να
αποτρέψετε πιθανές επιπτώσεις στο περιβάλλον ή την ατομική υγεία,
παρακαλούμε να διαχωρίσετε αυτό το προϊόν και τις μπαταρίες του
από άλλα δίκτυα αποκομιδής ώστε να διασφαλίσετε ότι είναι δυνατή
η ανακύκλωσή του με έναν περιβαλλοντικά θεμιτό τρόπο. Για
περισσότερες πληροφορίες σχετικά με τις διαθέσιμες δυνατότητες
συλλογής απορριμμάτων, παρακαλούμε να επικοινωνήσετε με την
τοπική κυβερνητική αρχή ή το κατάστημα λιανικής από όπου
αγοράσατε αυτό το προϊόν. Η χρήση των χημικών συμβόλων Pb, Cd
ή Hg υποδεικνύει εάν χρησιμοποιούνται τα μέταλλα αυτά στην
μπαταρία.
Türkçe
Ürününüzün üzerinde bulunan çarpı işaretli tekerlekli kutu etiketi, bu
ürünün ve beraberinde gelen pillerin normal ev atık sistemi
vasıtasıyla elden çıkarılmamasıgerektiğini gösterir. Çevreye ve insan
sağlığına zarar vermeyi önlemek için, lütfen bu ürünü ve pillerinini
çevreye zarar vermeyecek şekilde geri dönüşüme tabi tutulmak
üzere diğer atıklardan ayırın. Mevcut toplama tesisleri ile ilgili ayrıntılı
bilgi edinmek için, yerel devlet makamlarıyla veya bu ürünü satın
aldığınız satıcıyla irtibata geçin. Pb, Cd veya Hg kimyasal
sembollerinin kullanılması, bu metallerin pillerin üretiminde kullanılıp
kullanılmadığını ifade eder.
Română
Eticheta arătând un coş de gunoi tăiat cu două linii încrucişate, care
poate fi găsită pe produs, indică faptul că acesta şi bateriile
încorporate nu trebuie aruncate la gunoi laolaltă cu gunoiul menajer.
Pentru a evita posibila degradare a mediului înconjurător sau a
sănătăţii umane, colectaţi separat acest produs şi bateriile
încorporate şi nu împreună cu gunoiul menajer pentru a vă asigura
că acestea pot fi reciclate într-un mod ecologic. Pentru mai multe
detalii privind punctele disponibile de colectare, contactaţi autorităţile
locale sau comerciantul de la care aţi achiziţionat acest produs.
Utilizarea simbolurilor unor substanţe chimice precum Pb, Cd sau Hg
indică faptul că aceste metale sunt utilizate în baterie.
Български
Етикетът, представляващ зачертано кошче за боклук в кръг,
който можете да видите върху вашия продукт, означава, че този
продукт и батериите към него не трябва да се изхвърлят заедно
с обикновените домакински отпадъци. За предпазване от
евентуални щети върху околната среда или човешкото здраве,
моля, отделете този продукт и батериите му от останалите
отпадъци, за да се гарантира, че той ще бъде рециклиран по
екологично съобразен начин. За повече информация относно
наличните места за събиране на отпадъци, моля, свържете се с
местните власти или търговеца, от когото сте закупили този
продукт. Химическите символи Pb, Cd и Hg посочват дали
съответните метали са използвани в батерията.
Hrvatski
Oznaka prekrižene kante za otpad koja se nalazi na vašem
proizvodu znači da se ovaj proizvod i priložene baterije ne smiju
odlagati u obično kućno smeće. Da bi se spriječili negativni učinci na
okoliš ili ljudsko zdravlje odvojite ovaj proizvod i njegove baterije od
ostalog otpada da bi se osiguralo njihovo recikliranje na ekološki
prihvatljiv način. Više pojedinosti o dostupnim reciklažnim dvorištima
zatražite u uredu lokalne samouprave ili od prodavača od kojeg ste
kupili ovaj proizvod. Korišteni kemijski simboli Pb, Cd ili Hg
označavaju da se ti metali koriste u bateriji.
Mакедонски
Прецртаната ознака во круг за кантата што се покажува на
производот посочува дека овој производ и вклучените батерии
не смее да се фрлаат со редовниот домашен отпад. За да
спречите можни штети за животната средина или по здравјето
на луѓето, одвојте го овој производ и батериите од другиот
домашен отпад за да обезбедите нивно рециклирање на начин
којшто нема да ѝ наштети на животната средина. Контактирајте
со општинската канцеларија или со продавачот каде што го
купивте овој производ за повеќе детали околу достапните
собирни локации. Употребата на хемиските симболи како Pb, Cd
или Hg посочува дека овие метали се употребени во батеријата.
Srpski
Okrugla oznaka sa precrtanom kantom za odlaganje otpada koja se
nalazi na proizvodu znači da se ovaj proizvod i priložene baterije ne
smeju odlagati u otpad na uobičajen način. Da bi se sprečio štetan
uticaj na okolinu ili na zdravlje ljudi, odvojte ovaj proizvod i njegove
baterije od ostalog otpada kako bi se oni reciklirali na ekološki
prihvatljiv način. Za više detalja o mestima za reciklažu obratite se
lokalnoj samoupravi ili prodavcu od koga ste kupili ovaj proizvod.
Hemijski simboli Pb, Cd ili Hg označavaju da se u ovoj bateriji koriste
ti metali.
Printed in China