1
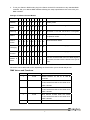
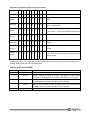
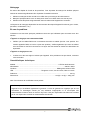
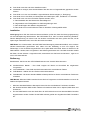
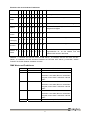
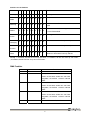
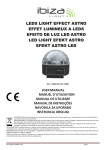
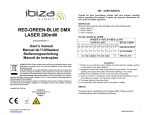
LED Par 56S/156-5mm
151.247 & 151.248
User Manual
Handleiding
Manuel d’Utilisation
Bedienungsanleitung
Manual de instrucciones
Introduction
Unpacking: Thank you for purchasing the LED Par 56S/156-5mm. Every LED Par 56S/156-5mm has
been thoroughly tested and has been shipped in perfect operating condition. Carefully check the
shipping carton for damage that may have occurred during shipping. If the carton appears to be
damaged, carefully inspect your fixture for any damage and be sure all accessories necessary to
operate the unit has arrived intact. In the case damage has been found or parts are missing, please
contact the manufacturer or your dealer for further instructions. Do not return this unit to your dealer
without first contacting.
Introduction: The LED Par 56S/156-5mm is a DMX intelligent Par Can. This Par Can is light weight
and compact which makes it a great piece for mobile DJ’s and clubs. This unit can be used as a stand
alone, or a sound-active mode. The unit can also be controlled via DMX controller.
Warning! To prevent or reduce the risk of electrical shock or fire, do not expose this unit to rain or
moisture.
Caution! There are no user serviceable parts inside this unit. Do not attempt any repairs yourself;
doing so will void your manufactures warranty. In the unlikely event your unit may require service
please contact the manufacturer or your dealer.
PLEASE recycle the shipping carton when ever possible.
General Instructions
To optimize the performance of this product, please read these operating instructions carefully to
familiarize you with the basic operations of this unit. These instructions contain important safety
information regarding the use and maintenance of this unit. Please keep this manual with the unit, for
future reference.
Features
z
Multi-Colors
z
DMX-512 protocol
z
Color Strobe
z
Master/Slave synchronization
z
Electronic Dimming 0-100%
z
Daisy Chain Units Together in DMX
z
Built in Microphone
Mode
Safety Precautions
z
To reduce the risk of electrical shock or fire, do not expose this unit to rain or moisture.
z
Do not spill water or other liquids into or on to your unit.
z
Be sure that the local power outlet match that of the required voltage for your unit.
z
Do not attempt to operate this unit if the power cord has been frayed or broken. Do not attempt to
remove or break off the ground prong from the electrical cord. This prong is used to reduce the
risk of electrical shock and fire in case of an internal short.
z
Disconnect from main power before making any type of connection.
z
Do not remove the cover under any conditions. There are no user serviceable parts inside.
z
Never operate this unit when it’s cover is removed.
z
Never plug this unit in to a dimmer pack.
z
Always be sure to mount this unit in an area that will allow proper ventilation. Allow about 6” (15cm)
between this device and a wall.
2
z
Do not attempt to operate this unit, if it becomes damaged.
z
This unit is intended for indoor use only, use of this product outdoors voids all warranties.
z
During long periods of non-use, disconnect the unit’s main power.
z
Always mount this unit in safe and stable matter.
z
Power-supply cords should be routed so that they are not likely to be walked on or pinched by
items placed upon or against them, paying particular attention to the point they exit from the unit.
z
Cleaning -The fixture should be cleaned only as recommended by the manufacturer. See
“Cleaning” for details.
z
Heat -The appliance should be situated away from heat sources such as radiators, heat registers,
stoves, or other appliances (including amplifiers) that produce heat.
z
The fixture should be serviced by qualified service personnel when:
A. The power-supply cord or the plug has been damaged.
B. Objects have fallen, or liquid has been spilled into the appliance.
C. The appliance has been exposed to rain or water.
D. The appliance does not appear to operate normally or exhibits a marked change in
performance.
Set Up
Power Supply: Before plugging your unit in, be sure the source voltage in your area matches the
required voltage for your LED Par 56S/156-5mm. The LED Par 56S/156-5mm is available in a 120v
and 220v version. Because line voltage may vary from venue to venue, you should be sure your unit
voltage matches the wall outlet voltage before attempting to operate you fixture.
DMX Linking: To ensure proper DMX data transmission, when using several DMX fixtures try to use
the shortest cable path possible. The order in which fixtures are connected in a DMX line does not
influence the DMX addressing. For example; a fixture assigned a DMX address of 1 may be placed
anywhere in a DMX line, at the beginning, at the end, or anywhere in the middle. When a fixture is
assigned a DMX address of 1, the DMX controller knows to send DATA assigned to address 1 to that
unit, no matter where it is located in the DMX chain.
Operating Instructions
Operating Modes: You can use the LED Par 56S/156-5mm in four ways:
z
Sound-Active mode - The unit will react to sound, chasing through the built in programs.
z
Auto Mode - The unit will automatically chase through the different colors.
z
RGB Mode - Choose a single color or colors to stay static.
z
DMX control mode - This function will allow you to control each individual fixtures traits with a
standard DMX 512 controller.
DMX Mode: Operating through a DMX controller give the user the freedom to create their own
programs tailored to their own individual needs. This function also allows you to use your fixtures as
spot lights.
1. This function will allow you to control each individual fixture’s traits with a standard DMX 512
controller.
2. The LED Par 56S/156-5mm uses 5 DMX channels to operate. Please see “DMX Values and
Functions” for the DMX traits.
3
3. To run your fixture in DMX mode, plug in the fixture via the XLR connections to any standard DMX
controller. Set your desired DMX address following the setup specifications that come with your
DMX controller.
Settings of Different Control Modes:
DIP
1
2
3
4
5
6
7
8
9
10
Standby
0
0
0
0
0
0
0
0
0
0
X
X
X
X
X
X
X
X
X
1
Dimming
X
X
X
X
X
X
X
X
0
0
Strobe
X
X
X
X
X
X
0
0
1
0
X
X
X
X
X
X
1
0
1
0
X
X
X
X
X
X
0
1
1
0
X
X
X
X
X
X
1
1
1
0
DMX
Mode
Sound
Active
Fantastic
Changing
Multi
function
Master &
Slave
Function
Standby Mode
DIP Switch 1-9 are for setting of DMX codes.
DIP Switch 1-3 for red; 4-6 for blue; 7-8 for green
DIP Switch 1 for red; 2 for green; 3 for blue. 4-6
for speed of strobe.
Sound Activation Mode
DIP Switch 1-6 for the changing speed.
DIP Switch 1-6 for the changing speed.
The one connected with source of DMX signal is
1
0
0
0
0
0
0
0
0
1
the master; all others are the slaves in the synchr.
chain.
Note: “1” means the DIP switch must be ON; “0” means the DIP Switch must be OFF; “X” means the
DIP switch can be either ON or OFF, depending on what function you to set with the par can.
DMX Values and Functions
Channel
Value
Function
1
0-255
Master Dimmer for the R, G and B
channels
2
0-255
Red, dimmer 0-100% when CH1 within
0-125; strobe from fast to slow when CH1
within 126-255
3
0-255
Green, dimmer 0-100% when CH1 within
0-125; strobe from fast to slow when CH1
within 126-255
4
0-255
Blue, dimmer 0-100% when CH1 within
0-125; strobe from fast to slow when CH1
within 126-255
5
0-255
Master Strobe for the R, G and B channels
4
Cleaning
Due to fog residue, smoke, and dust cleaning the internal and external optical lenses must be carried
out periodically to optimize light output.
1. Use normal glass cleaner and a soft cloth to wipe down the outside casing.
2. Clean the external optics with glass cleaner and a soft cloth every 20 days.
3. Always be sure to dry all parts completely before plugging the unit back in.
Cleaning frequency depends on the environment in which the fixture operates (i.e. smoke, fog residue,
dust, dew).
Trouble Shooting
Listed below are a few common problems the user may encounter, with solutions.
Unit not respond to DMX:
1. Check that the DMX cables are connected properly and are wired correctly (pin 3 is “hot”; on some
other DMX devices pin 2 may be ‘hot’). Also, check that all cables are connected to the right
connectors; it does matter which way the inputs and outputs are connected.
Unit does not respond to sound:
1. Quiet or high pitched sounds will not activate the unit. If problems are not resolved, contact your
dealer for service.
Specifications
Model: .......................................................................................................LED Par 56S/156-5mm
Working Position:.................................................................................. Any safe working position
Voltage: ...................................................................................................................... 220V / 60Hz
Colors: ............................................................................................................... RGB Color Mixing
LED: .................................................................Red 52 x 5mm; Green 52 x 5mm; Blue 52 x 5mm
Gross Weight: .................................................................................................................... 2.0 Kgs
Dimensions: ................................................................................... 214(H) x 214(W) x 194(L) mm
Warranty: ............................................................................................................................. 1 Year
Note: All information is subject to change without prior notice.
Do not attempt to make any repairs yourself. This would invalid your warranty. Do not make any
changes to the unit. This would also invalid your warranty. The warranty is not applicable in case of
accidents or damages caused by inappropriate use or disrespect of the warnings contained in this
manual. SkyTronic cannot be held responsible for personal injuries caused by a disrespect of the
safety recommendations and warnings. This is also applicable to all damages in whatever form.
5
Introduction
Déballage: Nous vous remercions pour l’achat de ce projecteur PAR56S/165-5mm à LED. Chaque
appareil a été testé soigneusement et expédié en parfait état de fonctionnement. Vérifiez si l’emballage
est resté intact pendant le transport. Si le carton présente des dommages, vérifiez l’appareil ainsi que
tous les accessoires. Si l’appareil a été endommagé ou des pièces sont manquantes, contactez
immédiatement votre revendeur.
Introduction: Le projecteur à LED Par 56S/156-5mm est un appareil intelligent, léger et compact qui
convient à la perfection aux DJs mobiles et aux clubs. L’appareil peut être utilisé seul, en mode audio
(activé par la musique) ou commandé par DMX.
Avertissement! Pour éviter tout risque d’électrocution ou d’incendie, ne pas exposer l’appareil à la
pluie ou à l’humidité.
Attention! L’appareil ne contient aucune pièce remplaçable par l’utilisateur. Ne pas essayer de réparer
l’appareil vous-même. Vous invalideriez la garantie. Au cas où l’appareil nécessite une réparation,
rapportez-le à votre revendeur.
S’IL VOUS PLAIT, recyclez le carton d’emballage lorsque c’est possible.
Instructions générales
Afin d’optimiser la performance de ce produit, lisez attentivement les instructions afin de vous
familiariser avec son fonctionnement. Le manuel contient des informations importantes concernant
l’utilisation et la maintenance de cet appareil. Conservez le mode d’emploi à portée de la main.
Caractéristiques
z
Multicolore
z
Protocole DMX-512
z
Stroboscope couleurs
z
Synchronisation Maître/Esclave
z
Variateur électronique 0-100%
z
Branchez
z
Microphone intégré
plusieurs
appareils
en
mode DMX
Précautions d’emploi
z
Afin de réduire le risque d’électrocution ou d’incendie, ne pas exposer cet appareil à la pluie ou à
l’humidité.
z
Ne pas verser de l’eau ou d’autres liquides sur l’appareil.
z
Vérifiez que votre tension secteur correspond bien à la tension d‘alimentation de l’appareil.
z
Ne pas utiliser l’appareil si le cordon d’alimentation est endommagé ou défectueux. Ne pas retirer
le conducteur de terre du câble électrique.
z
Débranchez l’appareil du secteur avant d’effectuer une connexion.
z
Ne pas ouvrir le boîtier. Il ne contient aucune pièce remplaçable par l’utilisateur.
z
Ne jamais faire fonctionner l’appareil lorsque le boîtier est ouvert.
z
Ne jamais brancher cet appareil sur un dimmer pack.
z
Installez l’appareil dans un endroit suffisamment ventilé. Laissez au moins 15cm entre l’appareil et
un mur
z
Ne pas utiliser cet appareil lorsqu’il est endommagé
z
L’appareil convient uniquement pour une utilisation à l’intérieur. L’utilisation à l’extérieur invalide la
garantie.
6
z
En cas de non-utilisation prolongée, débranchez l’appareil du secteur.
z
Installez l’appareil de façon à ce qu’il ne puisse pas tomber.
z
Passez le cordon d’alimentation de façon à ce que personne ne puisse marcher dessus ni qu’il
puisse être écrasé par un objet.
z
Nettoyez l’appareil uniquement de la façon préconisée par le fabricant (voir chapitre
« Nettoyage »)
z
Tenir à l’abri des sources de chaleur telles que des radiateurs, fours, poêles et autres appareils
générant de la chaleur (y compris des amplificateurs).
z
Faire réparer l’appareil par une personne qualifié si
A. Le cordon d’alimentation ou la fiche ont été endommagés
B. Un objet ou un liquide a pénétré dans l’appareil.
C. L’appareil a été exposé à la pluie ou l’humidité.
D. L’appareil ne fonctionne pas correctement ou présente un changement notable dans sa façon
de fonctionner.
Installation
Alimentation: Avant de brancher l’appareil, assurez-vous que votre tension secteur correspond à la
tension d’alimentation du projecteur. Le projecteur est disponible en 120V et 220V. Puisque la tension
secteur peut varier d’un pays à l’autre, vérifiez que l’appareil convient bien à votre tension secteur
avant de l’utiliser.
Chaînage DMX: Afin d’assurer une bonne transmission des données DMX lorsque vous utilisez
plusieurs appareils, essayez de maintenir la longueur de câble aussi courte que possible. L’ordre dans
lequel les appareils sont connectés dans une chaîne DMX n’a aucune incidence sur l’adresse DMX.
P.ex. un appareil dont l’adresse DMX est le 1 peut être placé n’importe où dans la chaîne DMX, aussi
bien au début qu’à la fin ou quelque part au milieu. Si l’adresse affectée à l’appareil est le 1, la
commande DMX sait qu’il doit envoyer les données affectées à l’adresse 1 à cet appareil, peu importe
où il se trouve dans la chaine.
Utilisation
Modes de fonctionnement : Vous pouvez utiliser le projecteur à LED PAR56S/156-5mm de quatre
façons :
z
Mode audio : L’appareil réagit à la musique en passant les programmes intégrés.
z
Mode Auto – L’appareil passera automatiquement les différentes couleurs
z
Mode RVB – Choisissez une couleur et la couleur reste statique.
z
Mode DMX – Cette fonction vous permet de commander chaque appareil individuellement à l’aide
d’une commande DMX 512 standard.
Mode DMX: Une commande DMX confère à l’utilisateur la liberté de créer son propre programme sur
mesure. Cette fonction vous permet également d’utiliser vos appareils comme des projecteurs.
1. Cette fonction vous permet de commander chaque appareil individuellement à l’aide d’une
commande DMX512 standard.
2. Le projecteur à LED PAR56S/156-5mm offre 5 canaux DMX. Voir « Valeurs et Fonctions DMX ».
3. Pour utiliser l’appareil en mode DMX, branchez l’appareil via les fiches XLR sur une commande
DMX standard. Réglez l’adresse DMX en suivant les instructions livrées avec la commande DMX.
7
Réglage des différents modes de fonctionnement
DIP
1
2
3
4
5
6
7
8
9
10
Standby
0
0
0
0
0
0
0
0
0
0
X
X
X
X
X
X
X
X
X
1
Dimming
X
X
X
X
X
X
X
X
0
0
Strobe
X
X
X
X
X
X
0
0
1
0
X
X
X
X
X
X
1
0
1
0
X
X
X
X
X
X
0
1
1
0
X
X
X
X
X
X
1
1
1
0
1
0
0
0
0
0
0
0
0
1
DMX
Mode
Sound
Active
Fantastic
Changing
Multi
function
Master &
Slave
Fonction
Veille
Commutateurs DIP 1-9 pour le réglage des codes
DMX
Commutateur DIP 1-3 pour le rouge ; 4-6 pour le
bleu ; 7-8 pour le vert
Commutateur DIP 1 pour le rouge ; 2 pour le vert ;
3 pour le bleu ; 4-6 pour la vitesse du stroboscope
Mode d’activation par le son
Commutateurs DIP 1-6 pour le changement de
vitesse
Commutateurs DIP 1-6 pour le changement de
vitesse
Celui qui est branché sur la source du signal DMX
est le maître et tous les autres sont des esclaves
dans la chaîne.
Note: “1” signifie que le commutateur DIP doit être placé sur ON. « 0 » signifie que le commutateur DIP
doit être sur OFF. « X » signifie que le commutateur DIP peut être dans l’une ou l’autre position. Cela
dépend de la fonction que vous souhaiter régler.
Valeurs et Fonctions DMX
Canal
Valeur
Fonction
1
0-255
Variateur principal pour les canaux R, V et B
2
0-255
Rouge, variateur 0-100% si canal 1 est dans la zone 0-125,
stroboscope de rapide à lent si le canal 1 est dans la zone 126-255
3
0-255
Vert, variateur 0-100% si canal 1 est dans la zone 0-125, stroboscope
de rapide à lent si le canal 1 est dans la zone 126-255
4
0-255
Bleu, variateur 0-100% si canal 1 est dans la zone 0-125, stroboscope
de rapide à lent si le canal 1 est dans la zone 126-255
5
0-255
Stroboscope principal pour les canaux R, V et B
8
Nettoyage
En raison des dépôts de fumée et de poussière, il est important de nettoyer les lentilles optiques
internes et externes régulièrement afin d’optimiser l’intensité lumineuse.
1. Utilisez un nettoyant à vitre normal et un chiffon doux pour essuyer le boîtier externe.
2. Nettoyez l’optique externe avec un nettoyant à vitres et un chiffon doux tous les 20 jours.
3. Séchez toutes les pièces soigneusement avant de rebrancher l’appareil sur le secteur.
La fréquence de nettoyage dépend de l’environnement dans lequel l’appareil fonctionne (p.ex. fumée,
poussière, condensation, etc.)
En cas de problème
Ci-dessous vous trouverez quelques problèmes communs que l’utilisateur peut rencontrer avec leur
solution.
L’appareil ne réagit par aux commandes DMX
1. Vérifiez que les câbles DMX sont correctement branchés et câblés (broche 3 est positive. Sur
certains appareils DMX, la broche 2 peut être positive). Vérifiez également que tous les câbles
sont connectés sur les bons connecteurs. La façon dont les entrées et sorties sont branchées est
importante.
L’appareil ne réagit pas au son
1. Le silence ou des sons aigus n’activent pas l’appareil. Si le problème n’est pas résolu, contactez
votre revendeur.
Caractéristiques techniques
Modèle: .....................................................................................................LED Par 56S/156-5mm
Alimentation: ...........................................................................................................230Vac / 50Hz
Couleurs: .............................................................................................. Mélange de couleurs RVB
LED: ................................................................ Rouge 52 x 5mm; Vert 52 x 5mm; Bleu 52 x 5mm
Poids brut :........................................................................................................................... 2.0 Kg
Dimensions: ......................................................................................214(H) x 214(L) x 194(l) mm
Note: Sous réserve de modifications sans préavis
N’effectuez jamais aucune réparation vous-même sous peine d’invalider la garantie. Ne pas modifier
l’appareil ce qui invaliderait également la garantie. Le droit de garantie ne s’applique pas en cas
d’accidents ou dommages causés par une utilisation inappropriée ou le non-respect des
avertissements contenus dans ce manuel. SkyTronic n’est pas responsable des blessures causées
par le non-respect des conseils et avertissements de sécurité.
9
Einleitung
Auspacken: Wir danken Ihnen für den Kauf des LED PAR56S/156-5mm Strahlers. Jedes Gerät wurde
sorgfältig getestet und in einwandfreiem Betriebszustand verschifft. Prüfen Sie, dass der Karton keine
Transportschäden aufweist. Falls das der Fall sein sollte, untersuchen Sie sorgfältig das Gerät, ob es
Schäden aufweist und vergewissern Sie sich, dass keine Teile fehlen bzw. beschädigt sind. Im
Schadensfall das Gerät zu Ihrem Fachhändler bringen.
Einleitung: Das Gerät ist ein intelligenter, leichter und kompakter DMX PAR56 LED Strahler, der sich
bestens für mobile DJs und Clubs eignet. Das Gerät kann allein oder im musikaktivierten Betrieb
arbeiten, sowie mit einem DMX Controller.
Warnung! Um Stromschlag und Feuer zu vermeiden, das Gerät vor Regen und Feuchtigkeit schützen.
Vorsicht! Das Gerät enthält keine vom Benutzer auswechselbaren Teile. Keine Reparaturen selbst
ausführen, da sonst der Garantieanspruch verfällt. Falls das Gerät wider Erwarten reparaturbedürftig
ist, bringen Sie es zu Ihrem Fachhändler.
BITTE recyceln Sie so weit wie möglich das Verpackungsmaterial.
Allgemeine Anweisungen
Um die Möglichkeiten des Geräts so gut wie möglich auszunutzen, lesen Sie sorgfältig die Anleitung
durch, um sich mit den Grundfunktionen vertraut zumachen. Die Anleitung enthält wichtige
Sicherheitsinformationen bezüglich der Bedienung und der Wartung des Geräts. Bitte bewahren Sie
die Anleitung zusammen mit dem Gerät auf.
Eigenschaften
z
Mehrfarbig
z
Master/Slave Synchronisierung
z
Farbstroboskop
z
Im DMX Betrieb können mehrere
z
Elektronischer Dimmer 0-100%
Geräte hintereinander geschlossen
z
Eingebautes Mikrofon
werden
z
DMX-512 Protokoll
Sicherheitsmassnahmen
z
Um Stromschlag und Feuer zu vermeiden, das Gerät vor Regen und Feuchtigkeit schützen.
z
Kein Wasser oder andere Flüssigkeiten ins Gehäuse dringen lassen.
z
Achten Sie darauf, dass die Netzspannung der Versorgungsspannung des Geräts entspricht.
z
Das Gerät nicht betreiben, wenn das Netzkabel beschädigt ist. Nicht den Erdleiter vom Kabel
entfernen. Er verhindert Stromschlag und Feuer bei Kurzschluss.
z
Gerät erst vom Netz trennen, bevor Anschlüsse vorgenommen werden.
z
Nicht das Gehäuse öffnen. Es enthält keine vom Bediener auswechselbaren Teile.
z
Das Gerät nicht bei geöffnetem Gehäuse benutzen.
z
Das Gerät nicht an ein Dimmerpack anschließen.
z
Das Gerät nur an einer gut belüfteten Stelle anbringen und 15cm Abstand zwischen dem Gerät
und der Wand lassen.
z
Nicht das Gerät benutzen, wenn es beschädigt ist.
z
Nur für Innengebrauch. Wenn das Gerät im Freien betrieben wird, verfällt der Garantieanspruch.
z
Bei längerem Nichtgebrauch Netzstecker abziehen
10
z
Das Gerät muss fest und sicher installiert werden.
z
Netzkabel so verlegen, dass niemand darauf tritt oder sie von Gegenständen gequetscht werden
können.
z
Das Gerät nur in der vom Hersteller vorgeschriebenen Weise reinigen (s. „Reinigung“)
z
Das Gerät nicht in der Nähe von Hitzequellen wie Heizkörpern, Öfen, Verstärken u.ä. aufstellen.
z
Das Gerät muss von einem Techniker repariert werden, wenn:
A. Das Netzkabel oder der Netzstecker beschädigt sind.
B. Gegenstände oder Flüssigkeiten ins Gehäuse gedrungen sind.
C. Das Gerät Regen oder Wasser ausgesetzt war
D. Das Gerät nicht normal funktioniert oder ein deutlicher Leistungsabfall auftritt.
Installation
Versorgung: Bevor Sie das Gerät ans Netz anschließen, prüfen Sie, dass die Versorgungsspannung
mit Ihrer Netzspannung übereinstimmt. Der PAR Strahler ist in 120V und 220V Ausführung erhältlich.
Das die Netzspannung von einem Land zum anderen verschieden sein kann, prüfen Sie erst, ob die
Spannungen übereinstimmen, bevor Sie das Gerät einschalten.
DMX Kette: Um sicherzustellen, dass die DMX Datenübertragung einwandfrei abläuft, wenn mehrere
Geräte hintereinander geschlossen sind, halten Sie den Kabelweg so kurz wie möglich. Die
Reihenfolge, in der die Geräte angeschlossen sind, spielt dabei keine Rolle. Wenn ein Gerät z.B. die
DMX Adresse 1 besitzt, kann es irgendwo in der Kette angeschlossen sein. Der DMX Controller sendet
die Daten, die der Adresse 1 zugeordnet sind, automatisch zum Gerät mit der Adresse 1, egal wo es
sich in der Kette befindet.
Bedienung
Betriebsarten: Sie können den LED PAR56S/156-5mm auf viererlei Weise benutzen:
z
Musikaktivierter Betrieb – Das Gerät reagiert auf Musik und durchläuft die eingebauten
Programme
z
Automatikbetrieb – Das Gerät durchläuft automatisch die verschiedenen Farben.
z
RGB Betrieb – Wählen Sie eine Farbe und die bleibt statisch.
z
DMX Betrieb – Mit einem Standard DMX512 Steuerpult können Sie die verschiedenen Funktionen
einstellen.
DMX Betrieb: Mit einem DMX Controller können Sie Ihre Programme nach Maß erstellen und auch die
Strahler als Spots einsetzen.
1. Mit einem Standard DMX512 Steuerpult können Sie die verschiedenen Funktionen einstellen.
2. Der Strahler besitzt 5 DMX Kanäle. Weitere Informationen finden Sie im Kapitel „DMX Werte und
Funktionen“.
3. Für den DMX Betrieb muss das Gerät über die XLR Verbinder an einen Standard DMX Controller
angeschlossen werden. Stellen Sie die DMX Adresse gemäß den Angaben des DMX Controllers
ein.
11
Einstellen der verschiedenen Funktionen
DIP
1
2
3
4
5
6
7
8
9
10
Standby
0
0
0
0
0
0
0
0
0
0
X
X
X
X
X
X
X
X
X
1
Dimming
X
X
X
X
X
X
X
X
0
0
Strobe
X
X
X
X
X
X
0
0
1
0
X
X
X
X
X
X
1
0
1
0
X
X
X
X
X
X
0
1
1
0
X
X
X
X
X
X
1
1
1
0
DMX
Mode
Sound
Active
Fantastic
Changing
Multi
function
Master &
Slave
Funktion
Standby Betrieb
DIP Sw 1-9 zur Einstellung des DMX Codes.
DIP Sw 1-3 für Rot; 4-6 für blau; 7-8 für grün
DIP Sw 1 für rot; 2 für grün; 3 für blau; 4-6 für die
Blitzgeschwindigkeit.
Musikaktivierter Betrieb
DIP Sw 1-6 zum Geschwindigkeitswechsel.
DIP Sw 1-6 zum Geschwindigkeitswechsel.
Das Gerät, das an die DMX Signalquelle
1
0
0
0
0
0
0
0
0
1
angeschlossen ist, ist der Master und alle
anderen sind Slaves in der Kette.
Hinweis: “1” bedeutet, der DIP Sw muss auf ON stehen; „0“ bedeutet, der DIP Sw muss auf OFF
stehen; „X“ bedeutet, der DIP Sw kann entweder auf ON oder OFF stehen, je nachdem, welche
Funktion Sie für den Strahler einstellen möchten.
DMX Werte und Funktionen
Kanal
Wert
Funktion
1
0-255
Master Dimmer für die R, G und B Kanäle
2
0-255
Rot, Dimmer 0-100% wenn Kanal 1
zwischen 0-125 steht; Blitz von schnell auf
langsam, wenn Kanal 1 zwischen 126-255
steht
3
0-255
Grün, Dimmer 0-100% wenn Kanal 1
zwischen 0-125 steht; Blitz von schnell auf
langsam, wenn Kanal 1 zwischen 126-255
steht
4
0-255
Blau, Dimmer 0-100% wenn Kanal 1
zwischen 0-125 steht; Blitz von schnell auf
langsam, wenn Kanal 1 zwischen 126-255
steht
5
0-255
Master Stroboskop für R, G und B
12
Reinigung
Aufgrund der Rauch- und Staubablagerungen müssen die internen und externen Linsen regelmäßig
gereinigt werden, um die Lichtausbeute zu optimieren.
1. Das Gehäuse von außen mit normalem Glasreiniger und einem weichen Tuch abwischen.
2. Reinigen Sie die äußere Optik alle 20 Tage mit Glasreiniger und einem weichen Tuch.
3. Trocknen Sie alle Teile sorgfältig ab, bevor Sie das Gerät wieder ans Netz anschließen.
Die Häufigkeit der Reinigung hängt von den Umgebungsbedingungen ab (z.B. Rauch, Staub, Tau)
Fehlerdiagnose
Nachstehend finden Sie einige der häufigsten Probleme und ihre Lösungen
Das Gerät reagiert nicht auf die DMX Befehle
1. Überprüfen Sie, ob die DMX Kabel richtig angeschlossen und verkabelt sind (Stift 3 ist positiv; bei
manchen DMX Geräten ist Stift 2 positiv). Prüfen Sie auch, ob alle Kabel an die richtigen Verbinder
angeschlossen sind. Es macht einen Unterschied, auf welche Weise die Ein- und Ausgänge
angeschlossen sind.
Das Gerät reagiert nicht auf Klang
1. Das Gerät reagiert nicht auf leise oder hohe Töne. Wenn das Problem weiter besteht, wenden Sie
sich an Ihren Fachhändler.
Technische Daten
Modell: ......................................................................................................LED Par 56S/156-5mm
Versorgungsspannung: ...........................................................................................230Vac / 50Hz
LED: ....................................................................Rot 52 x 5mm; Grün 52 x 5mm; Blau 52 x 5mm
Bruttogewicht: ...................................................................................................................... 2.0 Kg
Abmessungen: ............................................................................... 214(H) x 214(W) x 194(L) mm
Hinweis: Änderungen ohne Vorankündigung vorbehalten.
Führen Sie keine Reparaturen selbst aus und nehmen Sie keine Veränderungen am Gerät vor, da
sonst jeglicher Garantieanspruch verfällt. Die Garantie gilt nicht für Unfälle oder Schäden, die durch
unsachgemäßen Gebrauch oder Missachtung der Warnhinweise in dieser Anleitung entstanden sind.
SkyTronic übernimmt keine Haftung für Personen- und Sachschäden, die durch Missachtung der
Sicherheits- und Warnhinweise entstanden sind. Dies gilt für alle Schäden in jeglicher Form.
13
Inleiding
Uitpakken: Wij danken u voor de aankoop van de LED PAR56S/156-5mm -Can. Controleert u of de
verpakking niet beschadigd is. Indien dit wel het geval is controleer dan het product op beschadigingen.
Kijk ook of accessoires aanwezig zijn. Neem contact op met de dealer bij calamiteiten.
Dit product is een intelligente, lichte en compacte DMX PAR56 LED Can, die geschikt is voor de
mobiele DJs (Bars en Disco’s). Het product kan stand-alone of muziekgestuurd werken, zo ook met
een DMX Controller.
Waarschuwing! Om een electrische schok of brand te vermijden, dient het product tegen regen en
vocht te worden beschermd.
Let op! Het product bezit geen voor u van belang zijnde onderdelen. De garantie vervalt als u zelf
reparaties aan het product uitvoert. Bij een defect brengt u deze naar de dealer.
Het verpakkingsmateriaal a.u.b. laten recycelen.
Algemene aanwijzingen
Om vertrouwd te raken met de mogelijkheden van het product dient u eerst de handleiding zorgvuldig
door te lezen. De handleiding bevat informatie over de bediening en het onderhoud van dit product.
Bewaart u a.u.b. deze handleiding als naslagwerk.
Eigenschappen
z
Meerkleuren
z
Master/Slave Synchronisatie
z
Kleurenstrobe
z
In DMX Mode kunnen meerdere
z
Electronische dimmer 0-100%
producten
z
Ingebouwde microfoon
worden.
z
DMX-512 Protocol
seriëel
aangesloten
Veiligheidsmaatregelen
z
Geen water of andere vloeistoffen in het product laten binnendringen.
z
Let er op dat de netspanning overeenkomt met de aangegeven waarde op het
product(230Vac/50Hz).
z
Het product niet gebruiken als het netsnoer beschadigd is. De aardaansluiting nooit verwijderen,
deze verhindert nl een electrische schok of brand bij kortsluiting.
z
Als u het product wilt aansluiten verwijder dan eerst het netsnoer uit het stopcontact.
z
Het product nooit openen; er bevinden zich hier onder spanning staande delen! Dit is
Levensgevaarlijk!
z
Het product niet gebruiken bij geopende behuizing.
z
Het product niet op een dimmer aansluiten.
z
Zorg voor een deugdelijke ventilatie (15cm afstand tussen het product en een wand laten).
z
Het product niet gebruiken als deze beschadigd is.
z
Alleen voor binnenshuis gebruik ; als het product buiten is gebruikt vervalt de garantie.
z
Als het product een tijd niet gebruikt wordt dient de stekker uit het stopcontact te worden gehaald.
z
Het product op een stevige en stabiele plaats monteren.
z
Het netsnoer dusdanig monteren dat deze niet beschadigd kan raken.
z
Het product met een droge doek schoonmaken; géén reinigings –of chemische middelen
14
gebruiken.
z
Het product niet in de buurt van hittebronnen monteren(direct zonlicht,verwarming, oven etc.).
z
Het product moet door vakkundig personeel worden gerepareerd, als:
A. Het netsnoer beschadigd is.
B. Voorwerpen/vloeistoffen in het product zijn gekomen.
C. Regen of water in het product zijn gekomen
D. Het product abnormaal- of helemaal niet meer functioneert.
Installatie
Netspanning: Aangezien de PAR Can in 120V- en 220V -uitvoeringen te verkrijgen zijn, eerst
controleren of de netspanning wel overeenkomt met de ingestelde waarde op het product .
Netspanningen kunnen per land variëren, controleer dus altijd of uw PAR Can juist staat ingesteld.
DMX lus: Om zeker te zijn dat de DMX Data overdracht juist plaatsvindt, dienen zo kort mogelijke
snoeren te worden gebruikt. De volgorde, waarin de Cans zijn aangesloten, spelen daarbij geen rol.
Wanneer een Can b.v. het DMX Adres 1 heeft, is het niet van belang waar deze Can zich in de lus
bevindt. De DMX Controller zendt de Data, voor Adres 1 , automatisch naar de Can met het Adres 1,
egaal waar in de lus.
Bediening
U kunt de LED PAR-Can op 4 manieren gebruiken:
z
Muziekgestuurd – De Can reageert op de muziek en doorloopt een ingebouwd programma.
z
Automatisch – De Can doorloopt automatisch de verschillende kleuren.
z
RGB Mode – U kiest een kleur , die statisch blijft.
z
DMX Mode – Met een Standaard DMX512 Controller kunt u verschillende functies instellen.
DMX Mode: Met een DMX Controller kunt u uw gewenste programma instellen en ook de Can als Spot
gebruiken.
1. De Can bezit 5 DMX kanalen. Zie „DMX Funkties“.
2. In DMX Mode moet de Can via XLR connectoren op een Standaard DMX Controller aangesloten
worden. Stel de gewenste DMX functies in zoals in de volgende tabel is weergegeven.
15
Instellen van de funkties
DIPswitch
1
2
3
4
5
6
7
8
9
10
Funkties
Standby
0
0
0
0
0
0
0
0
0
0
Standby
X
X
X
X
X
X
X
X
X
1
Dimming
X
X
X
X
X
X
X
X
0
0
Strobe
X
X
X
X
X
X
0
0
1
0
X
X
X
X
X
X
1
0
1
0
X
X
X
X
X
X
0
1
1
0
X
X
X
X
X
X
1
1
1
0
1
0
0
0
0
0
0
0
0
1
DMX
Mode
Sound
Active
Fantastic
Changing
Multi
function
Master &
Slave
DIP Sw 1-9 voor instellen van de DMX Codes.
DIP Sw 1-3 voor Rood; 4-6 voor blauw; 7-8 voor
groen
DIP Sw 1 voor rood; 2 voor groen; 3 voor blauw;
4-6 voor flitssnelheid.
Muziekgestuurd
DIP Sw 1-6 voor wisselen (snelheid).
DIP Sw 1-6 voor wisselen (snelheid).
De Can die op de audiobron aangesloten is, is de
Master en alle andere Cans zijn Slaves.
Let op: “1” betekent, de DIP Sw moet op ON staan; „0“ betekent, de DIP Sw moet op OFF staan;
„X“ betekent, de DIP Sw kan of op ON of OFF staan.
DMX Funkties
Kanaal
Funktie
1
0-255
Master Dimmer voor de R, G en B kanalen
2
0-255
Rood, Dimmer 0-100% als kanaal 1
tussen 0-125 staat; strobe van snel naar
langzaam, als kanaal 1 tussen 126-255
staat
3
0-255
Groen, Dimmer 0-100% als kanaal 1
tussen 0-125 staat; strobe van snel naar
langzaam, als kanaal 1 tussen 126-255
staat
4
0-255
Blauw, Dimmer 0-100% als kanaal 1
tussen 0-125 staat; strobe van snel naar
langzaam, als kanaal 1 tussen 126-255
staat
5
0-255
Master Strobe voor R, G en B
16
Reiniging
De LED’s dienen regelmatig gereinigd te worden vanwege stof opeenhoping.
1. De behuizing kan schoongemaakt worden met een licht vochtige doek.
2. Zorg ervoor dat het product droog is alvorens de stekker in het stopcontact te steken.
De schoonmaakfrequentie hangt van de omgeving af ( bv. Rook, Stof etc )
Problemen en oplossingen
Het product reageert niet op de DMX Data
1. Controleer of de DMX kabel juist aangesloten is ( pen 3 ist positief (+); bij sommige DMX
producten is pen 2 positief).
Het product reageert niet op geluid
2. Het product reageert niet op zachte of hoge tonen. Neem contact op met de dealer.
Specificaties
Skytronic bestel nr:. .......................................................................................... 151.247 of 151.248
Model: .......................................................................................................LED Par 56S/156-5mm
Aansluitspanning: ....................................................................................................230Vac / 50Hz
LED: ............................................................ Rood 52 x 5mm; Groen 52 x 5mm; Blauw 52 x 5mm
Gewicht:............................................................................................................................. <2.0 Kg
Afmetingen: .................................................................................... 214(H) x 214(W) x 194(L) mm
Opmerking: Veranderingen en/of modificaties aan het product worden zonder u in kennis te stellen
doorgevoerd.
Laat reparaties over aan vakbekwaam personeel en voer geen modificaties aan het product door,
daar anders de garantie vervaltt. De garantie vervalt bij ongelukken/schade ontstaan door
onvakkundig gebruik of het niet naleven van het gestelde in de handleiding. SkyTronic is niet
aansprakelijk voor schade in welke vorm dan ook, die door misachting van veiligheid en/of
waarschuwingen ontstaan zijn.
17
Introducción
Desembalaje: Gracias por la compra del LED Par 56S/156-5mm. Todos los LED Par 56S/156-5mm
han sido comprobados cuidadosamente han sido enviados en perfectas condiciones. Fíjese
cuidadosamente el embalaje de transporte por si observa algún daño que se haya producido durante
el envío. Si el embalaje parece estar dañado, compruebe todas las piezas por si han sufrido daños y
asegúrese de que están intactos todos los accesorios necesarios para hacer funcionar el aparato. En
caso de daños o pérdida de piezas, por favor contacte con el fabricante o su distribuidor para más
instrucciones. No devuelva este aparato a su distribuidor sin haber contactado con el primero.
Introducción: El LED Par 56S/156-5mm es un foco PAR DMX inteligente. Este foco Par es de peso
ligero y compacto, lo que lo convierte en una pieza ideal para DJ’s móviles y clubs. Este aparato
puede funcionar por si solo o en modo activación por sonido. El aparato también puede controlarse
por DMX.
¡Atención! Para prevenir o reducir el riesgo de descargas eléctricas o incendios, no exponga este
aparato a la lluvia o a la humedad.
¡Precaución! No hay piezas reemplazables por el usuario en el interior del aparato. No intente hacer
reparaciones por usted mismo; el hacerlo invalidará la garantía del fabricante. En el caso de que su
aparato requiera reparaciones, por favor contacte con el fabricante o su distribuidor.
POR FAVOR recicle el material de embalaje siempre que sea posible.
Instrucciones Generales
Para garantizar el funcionamiento óptimo de este producto, por favor lea atentamente estas
instrucciones de uso para familiarizarse con el funcionamiento básico de este aparato. Estas
instrucciones contienen información de seguridad importante acerca del uso y mantenimiento de este
aparato. Por favor guarde este manual con el aparato para futuras consultas.
Características
z
Multicolores
z
Protocolo DMX-512
z
Color Estrobo
z
Sincronización Master/Slave
z
Atenuación electrónica 0-100%
z
Interconectadles en modo DMX
z
Micrófono integrado
Precauciones de seguridad
z
Para reducir el riesgo de descargas eléctricas o incendio, no exponga este aparato a la lluvia o a
la humedad.
z
No derrame agua u otros líquidos dentro o encima del aparato.
z
Asegúrese de que la alimentación local coincide con la requerida por el aparato.
z
No intente poner en marcha el aparato si el cable de alimentación está pelado o roto. No intente
quitar o romper la punta de masa del cable de corriente. Este punto se utiliza para reducir el
riesgo de descargas eléctricas e incendios en caso de cortocircuito.
z
Desconéctelo de la toma de corriente antes de hacer cualquier conexión.
z
No quite la tapa bajo ningún concepto. No hay piezas reemplazables por el usuario en el interior.
z
Nunca haga funcionar este aparato cuando la tapa está abierta.
z
Nunca conecte este aparato a un dimmer pack.
18
z
Asegúrese siempre de montar este aparato en un lugar con ventilación apropiada. Deje un
espacio de unos 15cm entre el aparato y la pared.
z
No intente hacer funcionar el aparato si está dañado.
z
Este aparato está preparado solamente para su uso interior, el uso de este producto en exteriores
invalida todas las garantías.
z
Durante un período prolongado de no usarlo, desconecte el aparato de la toma de corriente.
z
Siempre monte este aparato de una forma segura y estable.
z
Los cables de la fuente de alimentación deberían colocarse de manera que no puedan pisarse o
pincharse por aparatos colocados encima, prestando especial atención al punto de salida desde
el aparato.
z
Limpieza –El conjunto debería limpiarse solo de la forma recomendada por el fabricante. Para
más detalles véase el apartado “Limpieza”.
z
Calor –El aparato debería estar situado fuera del alcance de fuentes de calor como radiadores,
registradores de calor, hornos, u otros dispositivos (incluyendo amplificadores) que desprendan
calor.
z
El conjunto debería repararse por personal técnico cualificado cuando:
A. El cable de alimentación o el enchufe están dañados.
B. Han caído objetos, o ha sido derramado líquido en el aparato.
C. El aparato ha sido expuesto a la lluvia o al agua.
D. Parece que el aparato no funciona correctamente o muestra grandes cambios en el
rendimiento
Instalación
Alimentación: Antes de enchufar el aparato, asegúrese de que el voltaje de su zona coincide con el
requerido por su LED Par 56S/156-5mm. El LED Par 56S/156-5mm está disponible en las versiones
120v y 220v. Debido a que el voltaje de la línea puede variar según el lugar de actuación, debería
asegurarse de que el voltaje es el correcto antes de poner en marcha el conjunto.
Conexión DMX: Para asegurar una transmisión de datos DMX apropiada, cuando use varios
conjuntos DMX procure que la longitud de cable sea el más corto posible. El orden en el que los
conjuntos están conectados en una línea DMX no influye en el direccionamiento DMX. Por ejemplo; un
conjunto asignado a la dirección DMX 1 puede colocarse en cualquier lugar de la línea DMX, al
principio, al final, o por en medio. Cuando un conjunto se asigna a la dirección DMX 1, el controlador
DMX que ha de enviar los datos asignados en esa dirección al aparato, no importa donde esté situado
en la cadena DMX.
Instrucciones de funcionamiento
Modos de funcionamiento: Puede usarse el LED Par 56S/156-5mm de cuatro formas:
z
Modo activación por sonido – El aparato reaccionará al sonido, siguiendo los programas
predeterminados.
z
Modo auto – El aparato seguirá automáticamente los diferentes colores.
z
Modo RGB – Elige un solo color o colores y permanecen estáticos.
z
Modo control DMX – Esta función le permitirá controlar cada conjunto individualmente con un
controlador DMX 512 estándar.
19
Modo DMX: La operación a través de un controlador DMX le da al usuario la libertad de crear sus
propios programas a la medida de sus propias necesidades individuales. Esta función le permite
además usar sus conjuntos como focos.
1. Esta función le permitirá controlar las características individuales de cada conjunto con un
controlador DMX 512 estándar.
2. El LED Par 56S/156-5mm utiliza 5 canales DMX para funcionar. Por favor véase “Valores DMX y
funciones” para ver las características DMX.
3. Para arrancar su conjunto en el modo DMX, conéctelo a través de las conexiones XLR a un
controlador DMX estándar. Programe las direcciones DMX que desee siguiendo las
especificaciones de programación que vienen con su controlador DMX.
Selección de diferentes modos de control:
DIP
1 2
3
4
5
6
7
8
9
10
Standby
0
0
0
0
0
0
0
0
0
0
X X
X
X
X
X
X
X
X
1
Dimming
X X
X
X
X
X
X
X
0
0
Estrobo
X X
X
X
X
X
0
0
1
0
X X
X
X
X
X
1
0
1
0
X X
X
X
X
X
0
1
1
0
X X
X
X
X
X
1
1
1
0
Modo
DMX
Activación
por sonido
Cambios
fantásticos
Multifunció
n
Master
Slave
&
Función
Modo Standby
DIP Switch 1-9 son para la selección de códigos
DMX.
DIP Switch 1-3 para rojo; 4-6 para azul; 7-8 para
verde
DIP Switch 1 para rojo; 2 para verde; 3 para azul.
4-6 para la velocidad del estrobo.
Modo activación por sonido
DIP Switch 1-6 para los cambios de velocidad.
DIP Switch 1-6 para cambiar la velocidad.
El primero conectado con fuente de señal DMX
1
0
0
0
0
0
0
0
0
1
es el master; todos los demás son los esclavos
en la cadena sincronizada.
Nota: “1” significa que el DIP debe estar en ON; “0” significa que el DIP Switch debe estar en OFF; “X”
significa que el DIP switch puede estar en ON u OFF, dependiendo de que función que haya
seleccionado en el foco.
20
Valores DMX y funciones
Canal
Valor
Función
1
0-255
Dimmer Master los canales R, G y B
2
0-255
Rojo, dimmer 0-100% cuando el CH1 esté
dentro de 0-125; estrobo de rápido a lento
cuando CH1 esté dentro de 126-255
3
0-255
Verde, dimmer 0-100% cuando CH1 está
dentro de 0-125; estrobo de rápido a lento
cunado CH1 está dentro de 126-255
4
0-255
Azul, dimmer 0-100% cuando CH1 está
dentro de 0-125; estrobo de rápido a lento
cuando CH1 está dentro de 126-255
5
0-255
Estrobo Master para los canales R, G y B
Limpieza
Debido a residuos de niebla, humo, y polvo, la limpieza de lentes ópticas internas y externas debe
llevarse a cabo periódicamente para asegurar una excelente emisión de luz.
1. Utilice limpia cristales normales y un trapo suave limpiar la carcasa exterior.
2. Limpie las ópticas externas con limpia cristales y un trapo suave cada 20 días.
3. Asegúrese siempre de limpiar todas las partes completamente antes de volver a conectar el
aparato.
Limpiar frecuentemente depende del ambiente donde funcione el aparato (p.ej. humo, niebla, polvo,
rocío).
Soluciones a algunos fallos
A continuación encontrará una lista de problemas comunes que se pueden encontrar con sus
respectivas soluciones.
El aparato no responde al DMX:
1. Compruebe que los cables DMX están conectados correctamente y están conexionados
correctamente (el pin 3 está puenteado; en otros aparatos DMX el pin 2 puede estar puenteado).
Además, compruebe que todos los cables están conectados con los conectores correctos; es
importante la manera en que estén conectadas las salidas y las entradas.
El aparato no responde al sonido:
2. Los sonidos suaves o de tono alto no activarán el aparato. Si los problemas no se resuelven,
contacte con su distribuidor para su reparación.
21
Especificaciones
Modelo: .....................................................................................................LED Par 56S/156-5mm
Posición de trabajo: ............................................................ Cualquier posición de trabajo segura
Voltaje: ....................................................................................................................... 220V / 60Hz
Colores: .................................................................................................... Mezcla de colores RGB
LED: .................................................................Rojo 52 x 5mm; Verde 52 x 5mm; Azul 52 x 5mm
Peso bruto: ........................................................................................................................ 2.0 Kgs
Dimensiones: ................................................................................. 214(H) x 214(W) x 194(L) mm
Garantía: ............................................................................................................................... 1 año
No intente hacer reparaciones por su cuenta ni efectúe cambios en el aparato. Esto invalidaría la
garantía. La garantía no es aplicable en caso de accidentes o daños causados por el uso inapropiado
o por no respetar las advertencias contenidas en este manual. SkyTronic no se hace responsable de
daños personales causados por no seguir las recomendaciones de seguridad y advertencias. Esto es
aplicable también a cualquier tipo de daño.
Nota: Toda información esta sujeta a cambios sin previo aviso.
22
23
Specifications and design are subject to change without prior notice..
www.skytronic.com
Copyright © 2009 by SKYTRONIC the Netherlands