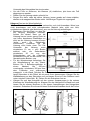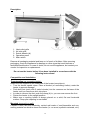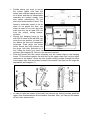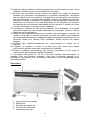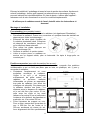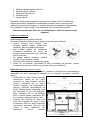
1
NL - Instructieboekje DE - Bedienungsanleitung EN - Instruction booklet FR - Manuel d’utilisation CS - Návod k použití SK - Návod na použitie CONVECTOR Panel de Luxe elektrische convectorkachel elektrische Konvektorheizung electrical convector heater convecteur électrique elektriskt konvektorelement elektrické konvektorové topení elektrický konvektorový ohrievač radiator-convector electric NL Dit symbool op uw apparaat betekent: niet afdekken! EN This symbol on your device means: do not cover! DE Dieses Symbol auf Ihrem Gerät bedeutet: Nicht abdecken! FR Ce symbole sur votre appareil signifie : ne pas couvrir ! DA Dette symbol betyder: Må ikke tildækkes! SV Den här symbolen betyder: får ej övertäckas! NO Dette symbolet på apparatet betyr: Må ikke dekkes til! FI Tämä laitteessa oleva symboli tarkoittaa: ei saa peittää! HU A készülékén lévő szimbólum jelentése: ne takarja le! CS Tento symbol na vašem zařízení znamená: nezakrývejte! PL Ten symbol na urządzeniu oznacza: nie zakrywać! SK Tento symbol na vašom zariadení znamená: nezakrývajte! RO acest simbol ce apare pe aparatul dumneavoastră înseamnă: nu acoperiţi RU Этот символ на вашем устройстве означает: не накрывать! IT Questo simbolo sul dispositivo indica: non coprire! 2 Nederlands Technische gegevens Type Aansluitspanning Vermogen Thermostaat Afmetingen Gewicht CONVECTOR PANEL DE LUXE 220-240Volt / 50Hz 1000W – 2000Watt + 21 x 83 x 47 cm 5 kg Algemene veiligheidsvoorschriften 1. Lees voor gebruik dit instructieboekje zorgvuldig en geheel door. Bewaar het om het in de toekomst nog eens te kunnen raadplegen. 2. Controleer voor gebruik uw nieuwe kachel (incl. kabel en stekker) op zichtbare beschadigingen. Neem een beschadigde kachel niet in gebruik maar biedt hem uw leverancier aan ter vervanging. 3. Gebruik de kachel niet voordat hij volledig geïnstalleerd is conform de voorschriften onder ‘Beschrijving, Samenstelling en Installatie’. 4. Deze kachel is uitsluitend bedoeld voor normaal huishoudelijk gebruik. Gebruik het apparaat alleen voor bijverwarming in huis. 5. Deze kachel is niet geschikt voor gebruik in natte of vochtige ruimtes als badkamers, wasruimtes enz. Zet hem niet op een natte ondergrond en zorg ervoor dat hij niet vanuit een bad, douche o.i.d. kan worden bediend. Plaats hem niet in de nabijheid van een kraan, badkuip, douche, zwembad, fonteintje o.i.d., zorg ervoor dat hij nooit in water kan vallen en voorkom dat water de kachel binnendringt. Mocht de kachel tóch ooit in water vallen, neem dan éérst de stekker uit het stopcontact! Een inwendig nat geworden kachel niet meer gebruiken maar ter reparatie aanbieden. Dompel kachel, snoer of stekker nooit in water of andere vloeistof en raak de kachel nooit met natte handen aan. 6. Aansluitspanning en frequentie, vermeld op het apparaat, dienen overeen te komen met die van het te gebruiken stopcontact. Het te gebruiken stopcontact dient voorzien te zijn van randaarde en de elektrische installatie dient beveiligd te zijn met een aardlekschakelaar (max. 30 mAmp.). 7. Rol de elektrokabel volledig af voor u de stekker in het stopcontact steekt, en zorg ervoor dat hij nergens met de kachel in contact komt of anderszins heet kan worden. Leid de kabel niet onder tapijt door, bedek hem niet met matten, lopertjes o.i.d. en houd de kabel buiten de looproute. Zorg ervoor dat er niet op getrapt wordt en er geen meubels op worden gezet. Leid de kabel niet om scherpe hoeken en wind hem na gebruik niet te strak op! 8. Het gebruik van een verlengsnoer wordt afgeraden omdat dit oververhitting en brand kan veroorzaken. Is het gebruik van een verlengsnoer onvermijdelijk, zorg dan voor een onbeschadigd, goedgekeurd verlengsnoer met een minimale doorsnee van 3 x 2,5 mm² en een minimaal toegestaan vermogen van 2500 Watt. Rol het snoer altijd geheel af om oververhitting te voorkomen! 9. Om overbelasting en doorgebrande zekeringen te voorkomen geen andere apparatuur op hetzelfde stopcontact of dezelfde elektrische groep aansluiten als waar de kachel op aangesloten is. 10. Gebruik de kachel niet buitenshuis en niet in ruimtes, kleiner dan 9 m². 11. Een kachel bevat inwendig hete en/of gloeiende en vonkende delen. Gebruik hem dus niet in een omgeving waar brandstoffen, verf, ontbrandbare vloeistoffen en/of gassen enz. worden bewaard. 3 12. Plaats de kachel niet vlakbij- onder- of gericht op een stopcontact en niet in de buurt van open vuur of warmtebronnen. 13. Gebruik de kachel niet vlakbij of gericht op meubels, dieren, gordijnen, papier, kleding, beddengoed of andere brandbare zaken. Houd dit minstens 1 meter van de kachel verwijderd! 14. Bedek een kachel nooit! Aanzuig- en uitblaasopeningen mogen op geen enkele wijze worden geblokkeerd, om brand te voorkomen. Gebruik de kachel dus ook nooit om kleding op te drogen of iets op te zetten en plaats hem niet op zachte oppervlakken als een bed of hoogpolig tapijt, waardoor openingen afgesloten kunnen raken. 15. De lucht rond een kachel moet vrij kunnen circuleren. Plaats hem dus niet te dicht op muren of grote voorwerpen en niet onder een plank, kast o.i.d. 16. Voorkom dat vreemde voorwerpen door de ventilatie- of uitblaasopeningen de kachel binnendringen. Dit kan een elektrische schok, brand of beschadiging veroorzaken. 17. Laat een werkende kachel nooit zonder toezicht achter maar schakel hem éérst uit en neem vervolgens de stekker uit het stopcontact. Altijd stekker uit het stopcontact als de kachel niet in gebruik is! Pak de stekker daartoe in de hand; trek nooit aan het snoer! 18. Deze kachel wordt heet tijdens het gebruik. Om brandwonden te voorkomen niet met de blote huid de hete oppervlakken aanraken! 19. Schakel altijd de kachel uit, neem de stekker uit het stopcontact en laat de kachel eerst afkoelen wanneer u: - de kachel wilt schoonmaken - onderhoud aan de kachel wilt uitvoeren - de kachel aanraakt of verplaatst. 20. Stel de kachel niet automatisch in werking d.m.v. een tijdklok o.i.d. Voor gebruik dient er altijd op veilige omstandigheden te worden gecontroleerd! 21. Zorg voor zorgvuldig toezicht wanneer dit apparaat wordt gebruikt in de aanwezigheid van kinderen, handelingsonbekwame personen of huisdieren. Dit apparaat is niet geschikt om te worden gebruikt door personen (incl. kinderen) met een fysieke- zintuiglijke- of mentale beperking, of gebrek aan ervaring en kennis, ongeacht of er toezicht is of instructie is gegeven aangaande het gebruik van het apparaat door een persoon die verantwoordelijk is voor hun veiligheid. Er dient op te worden toegezien dat kinderen niet met het apparaat spelen. 22. Houd de kachel schoon. Stof, vuil en/of aanslag in de kachel is een veelvoorkomende reden voor oververhitting. Zorg ervoor dat dergelijke neerslag regelmatig wordt verwijderd. 23. Stel het apparaat niet in werking wanneer u beschadigingen constateert aan apparaat, elektrokabel of stekker, of wanneer het slecht functioneert, is gevallen of op andere wijze een storing vertoont. Breng het complete apparaat terug naar uw leverancier of een erkend elektricien voor controle en/of reparatie. Vraag altijd om originele onderdelen. 24. Gebruik geen toevoegingen/accessoires op de kachel, die niet zijn aanbevolen of geleverd door de fabrikant. 25. Het apparaat (incl. elektrokabel en stekker) mag uitsluitend worden geopend en/of gerepareerd door daartoe bevoegde en gekwalificeerde personen. 26. Gebruik de kachel uitsluitend voor het doel waarvoor hij is ontworpen en op de wijze zoals beschreven in dit instructieboekje. 4 Afwijkingen van 24, 25 en 26 kunnen schade, brand en/of persoonlijk letsel veroorzaken. Zij doen de garantie vervallen en leverancier, importeur en/of fabrikant aanvaarden geen aansprakelijkheid voor de gevolgen! Beschrijving 1. 2. 3. 4. 5. Rooster warmteafgifte Luchtinlaatrooster Zwenkwielen (4x) Bedieningspaneel Hoofdschakelaar Verwijder al het verpakkingsmateriaal en houd het buiten het bereik van kinderen. Controleer na verwijdering van de verpakking of het apparaat geen beschadigingen of tekenen die op een fout/defect/storing kunnen wijzen, vertoont. Gebruik het apparaat in geval van twijfel niet, maar wend u tot uw leverancier ter controle / vervanging. Gebruik de kachel niet voor u hem volgens de onderstaande voorschriften hebt geïnstalleerd! Samenstelling en Installatie Staand (als verplaatsbare kachel): Bevestig de apart meegeleverde voetjes onder de kachel (zie ook de afbeelding): Keer de kachel om, onderzijde boven. Leg er een deken o.i.d. onder, om beschadigingen te voorkomen! Duw de beide voeten (met elk 2 zwenkwielen) in de uitsparing aan de onderzijde van de kachel, tot u ze hoort vastklikken. 5 Om de voetjes te verwijderen duwt u het klemmetje (A) in; nu kunt u het voetje verwijderen. Zet de kachel weer rechtop. Zorg ervoor dat een werkende kachel altijd op een stevige, vlakke en horizontale ondergrond staat. Hoogpolig tapijt is ongeschikt! Hangend (vast bevestigd aan de wand): Kies een stevige, vlakke en loodrechte wand van onbrandbaar en niet-smeltend materiaal (dus niet van hout, synthetisch materiaal o.i.d.!) om de kachel aan op te hangen. Bepaal de plaats waar u de kachel wilt ophangen. Zorg er daarbij voor dat de kachel te allen tijde voldoende vrije ruimte rond zich heeft en er geen brandbare materialen te dicht bij de kachel kunnen komen (zie ook de veiligheidsvoorschriften). Plaats de kachel niet achter een deur! De onderzijde van de kachel dient minimaal 10 cm. van de vloer verwijderd te zijn, de zijkanten minstens 20 cm. van zijmuren en de bovenzijde minimaal 200 cm. van het plafond, overhangende planken enz. Bevestig het ophangframe aan de muur. Boor daartoe 2 gaten in de wand, met een onderlinge afstand van 250mm, minstens 350mm. boven de vloer en volkomen horizontaal van elkaar. Duw pluggen in de boorgaten. Draai twee lange schroeven in de pluggen tot ze nog 8 mm. uitsteken. Hang het frame over de schroeven en laat het in de sleuven naar beneden zakken (zie afb. B). Draai nu de schroeven stevig aan. Haak de kachel nu eerst met de onderste uitsparingen over de onderste klemmen van het ophangframe. Kantel de kachel tegen de wand en laat de bovenste klemmen in de bovenste uitsparingen van de kachel klikken. Schroef de twee kleine borgschroefjes door de gaten in de bovenste klemmen, die zich het dichtst bij de kachel bevinden; de klemmen kunnen nu niet meer worden ingedrukt (zie afb. C). 6 Om de kachel van de wand te nemen eerst de borgschroefjes verwijderen, de bovenste klemmen naar beneden drukken en de kachel voorover kantelen. Nu kunt u de kachel uit de onderste bevestigingen trekken. Ingebruikname en Werking 1. 2. 3. 4. 5. 6. Controlelampje ‘kachel aan’ ’ Controlelampje laag vermogen Controlelampje hoog vermogen Controlelampje verwarming Symbool thermostaat Keuzetoets laag/hoog vermogen 7. Activeringstoets 8. Display 9. Symbool timer 10. Toets ‘hoger’ 11. Toets ‘lager’ 12. Hoofdschakelaar Controleer of de hoofdschakelaar op O (uit) staat. Controleer of de kachel stabiel en goed rechtop staat of hangt, conform alle voorschriften. Steek de stekker in een 220/240V geaard stopcontact. Zet de hoofdschakelaar op I (aan). Het controlelampje ‘kachel aan’ (POWER) licht op. Druk nu op de activeringstoets (7). Op het display verschijnt de kamertemperatuur, het ingestelde vermogen (LO=laag, HI=hoog). Van fabriekswege is de thermostaat ingesteld op 35°C., de timer op 0 uur. Temperatuur instellen Druk nogmaals op de activeringstoets; op het display verschijnt knipperend “35” en “ °C” . Druk op de ‘hoger’ of ‘lager’-toets om de gewenste temperatuur in te stellen: elke keer dat u drukt zal de ingestelde temperatuur met 1 graad toe- of afnemen. De temperatuur is in te stellen van 5 tot 45°C. Als de gewenste temperatuur op het display verschijnt stopt u. De ingestelde temperatuur knippert nu nog 5 seconden op het display, daarna verschijnt weer de kamertemperatuur. De thermostaat is nu ingesteld en het symbool thermostaat (°C) blijft oplichten. Als de kachel brandt, brandt ook controlelampje Verwarming (4) en als de kachel afslaat dooft dit. Timer instellen Druk 2 keer op de activeringstoets. Op het display knippert “0” (of evt. de ingestelde uren) en het timer-symbool. Druk op de ‘hoger’ of ‘lager’-toets om de gewenste werkduur in te stellen: elke keer dat u drukt zal de ingestelde tijd met 1 uur toe- of afnemen. De tijd is in te stellen van 0 tot 24 uur. Als de gewenste werkduur op het display verschijnt stopt u. De ingestelde werkduur knippert nu nog 5 seconden op het display, daarna verschijnt weer de kamertemperatuur. De timer is nu ingesteld en de kachel start 7 de werkduur. Het symbool timer blijft tijdens de werkduur oplichten.Als de ingestelde werkduur is verstreken schakelt de kachel (zonder signaal) uit. De werkduur kan tussentijds worden bijgesteld door weer 2x op de activeringstoets te drukken en de procedure te herhalen. De kachel vergeet de oude instelling en hanteert de nieuw ingestelde werkduur. Vermogen selecteren Door tijdens de werking op de keuzetoets hoog/laag vermogen (6) te drukken schakelt u over van hoog (HI) naar laag (LO) vermogen, of andersom. Uitschakelen Door 3 seconden op de activeringstoets te drukken schakelt u alle functies uit. Het display dooft maar het lampje ‘kachel aan’ (POWER) blijft branden. Om de kachel helemaal uit te schakelen zet u de hoofdschakelaar op ‘ uit’ (O). Neem daarna de stekker uit het stopcontact. Kinderslot Door tijdens de werking de ‘hoger’ en ‘lager’-toets gelijktijdig 3 seconden in te drukken zet u de kachel op het kinderslot. Op het display verschijnt even een vierkantje, daarna weer de instellingen. Wordt er nu op een toets gedrukt dan verschijnt het vierkantje weer even, maar er verandert niets. U deblokkeert de kachel door 3 seconden op de activeringstoets te drukken en vervolgens de ‘hoger’ en ‘lager’-toets weer gelijktijdig 3 seconden in te drukken. Beveiligingen De oververhittingbeveiliging schakelt de kachel uit wanneer hij inwendig te heet wordt. Dat kan gebeuren wanneer de kachel zijn warmte onvoldoende kan afgeven of te weinig frisse lucht kan aanzuigen. Doorgaans is de oorzaak dus (gedeeltelijke) afdekking van de kachel, verstopping van de aanzuig- en/of uitblaasroosters, plaatsing te dicht bij bijv. een muur enz. De kachel zal na afkoeling ook weer automatisch in werking treden maar als de oorzaak niet is weggenomen dreigt herhaling, met alle gevaren vandien. Bij oververhitting dient u de kachel uit te schakelen en de stekker uit het stopcontact te nemen. Geef de kachel tijd om af te koelen, neem de reden van de oververhitting weg en stel de kachel weer in gebruik. Wanneer het probleem blijft optreden of u geen reden voor de oververhitting kunt vinden, de kachel onmiddellijk uitschakelen en de stekker uit het stopcontact nemen. Neem contact op met een servicepunt voor reparatie. Schoonmaak en Onderhoud Houd het kacheltje schoon. Neerslag van stof en vuil in het apparaat is een veelvoorkomende reden van oververhitting! Verwijder dat dus geregeld. Schakel voor schoonmaak- of onderhoudswerk het kacheltje uit, neem de stekker uit het stopcontact en laat het kacheltje afkoelen. Neem de buitenzijde van het kacheltje regelmatig af met een droge of goeduitgewrongen vochtige doek. Gebruik geen scherpe zeep, sprays, schoonmaakof schuurmiddelen, was, glansmiddelen of enige chemische oplossing! Wanneer de kachel hangt ook de achterzijde en de ruimte achter de kachel schoonmaken. Neem daartoe de kacherl van de wand, zie “ Installatie – hangend”. Zuig met de stofzuiger voorzichtig stof en vuil uit de roosters en controleer of de luchtinlaat- en uitblaasopeningen schoon zijn. Let erop tijdens het schoonmaken op geen inwendige onderdelen aan te raken c.q. te beschadigen! De kachel bevat verder geen onderdelen die onderhoud behoeven. 8 Ruim aan het eind van het seizoen het kacheltje schoon op, z.m. in de originele verpakking. Plaats het rechtop op een koele, droge en stofvrije plaats. Wanneer het kacheltje uiteindelijk versleten (of eerder onherstelbaar beschadigd) is, hoort het niet tussen het huishoudelijke afval. Breng het naar een door uw gemeente aangewezen inzamelpunt van elektrische apparatuur, waar men er zorg voor zal dragen dat evt. nog het te gebruiken materialen tot hun bestemming komen. CE - verklaring Hierbij verklaart Euromac bv., Genemuiden-NL dat het product elektrische convectorkachel, merk EUROM, type CONVECTOR PANEL DE LUXE voldoet aan de LVD-richtlijn 2006/95/EC en aan de EMC-richtlijn 2004/108/EG, en in overeenstemming is met de onderstaande normen: EN 55014-1 :2006+A1:2009+A2:2011 EN 55014-2:1997+A1:2001+A2:2008 EN 61000-3-2:2006+A1:2009+A2:2009 EN 61000-3-3 :2013 EN 60335-2-30 :2009+A11 :2012 EN 60335-1 :2012 EN 62233:2008 Genemuiden, 03-06-2014 W.J. Bakker, alg.dir. 9 Deutsch Technische Daten Typ Anschlussspannung Leistung Thermostat Maße: Gewicht CONVECTOR PANEL DE LUXE 220-240Volt / 50Hz 1000Watt - 2000Watt + 21 x 83 x 47 cm 5 kg Allgemeine Sicherheitsvorschriften 1. Lesen Sie dieses Handbuch vor der Benutzung sorgfältig durch. Bewahren Sie diese Anleitung zum späteren Nachschlagen auf. 2. Kontrollieren Sie Ihre neue Heizung (inkl. Kabel und Stecker) vor der Benutzung auf sichtbare Beschädigungen. Nehmen Sie eine beschädigte Heizung nicht in Betrieb, sondern bitten Sie Ihren Lieferanten um Austausch. 3. Benutzen Sie die Heizung nicht, bevor Sie komplett konform den Vorschriften unter ‚Beschreibung, Zusammenstellung und Installation installiert wurde. 4. Diese Heizung eignet sich ausschließlich für die normale Haushaltsanwendung. Benutzen Sie das Gerät nur als zusätzliche Heizung im Haus. 5. Dieser Heizlüfter ist nicht geeignet für die Anwendung in nassen oder feuchten Räumen, wie Badezimmer, Waschraum, usw. Gerät nicht auf einen nassen Untergrund stellen. Achten Sie darauf, dass das Gerät so installiert wird, dass es nicht von einer in der Badewanne oder unter der Dusche befindlichen Person bedient werden kann. Stellen Sie das Gerät nicht in der Nähe eines Wasserhahns, Badewanne, Dusche, Schwimmbad, eines Waschbeckens oder dergleichen auf; sorgen Sie dafür, dass es niemals ins Wasser fallen kann und verhindern Sie, dass Wasser in den Kenvektor dringt. Sollte der Kenvektor doch ins Wasser fallen, entfernen Sie sofort den Stecker aus der Steckdose! Einen inwendig nass gewordenen Kenvektor nicht mehr benutzen, sondern reparieren lassen. Tauchen Sie Kenvektor, Kabel oder Stecker niemals in Wasser oder sonstige Flüssigkeiten und berühren Sie den Kenvektor niemals mit nassen Händen. 6. Anschlussspannung und Frequenz, genannt auf dem Gerät, müssen der benutzten Steckdose entsprechen. Die zu verwendende Steckdose muss geerdet und die elektrische Installation muss mit einem Fehlerstromschutzschalter geschützt sein (max. 30 mAmp.). 7. Rollen Sie das Elektrokabel komplett ab, bevor Sie den Stecker in die Steckdose stecken und sorgen Sie dafür, dass es nirgendwo mit der Heizung in Kontakt kommt oder auf andere Weise heiß werden kann. Führen Sie das Kabel nicht unter einen Teppich durch, bedecken Sie es nicht mit Matten, Läufern und dergleichen und halten Sie das Kabel außerhalb des Laufwegs. Sorgen Sie dafür, dass nicht darauf getreten wird und keine Möbel darauf gestellt werden. Führen Sie das Kabel nicht um scharfe Ecken und wickeln Sie es nach der Benutzung nicht zu straff auf. 8. Vom Gebrauch eines Verlängerungskabels wird abgeraten, weil dieses Überhitzung und Brand verursachen kann. Ist die Benutzung eines Verlängerungskabels unvermeidbar, achten Sie auf ein unbeschädigtes, geprüftes Verlängerungskabel mit einem Mindestdurchmesser von 3 x 1,5 mm² und einer zulässigen Leistung von 1000 Watt. Rollen Sie das Kabel immer komplett ab um Überhitzung zu vermeiden! 9. Um Überlastung und durchgebrannte Sicherungen zu vermeiden, keine anderen Geräte an dieselbe Steckdose oder dieselbe elektrische Gruppe anschließen, an welche die Heizung angeschlossen ist. 10 10. Verwenden Sie das Kabel nicht außer Haus und nicht in Räumen, die kleiner als 6 m² sind. 11. Eine Konvenktorheizung enthält inwendig heiße und/oder glühende Teile. Benutzen Sie diese daher nicht in einer Umgebung, in der Brennstoffe, Farbe, entflammbare Flüssigkeiten und/oder Gase, usw. gelagert werden. 12. Platzieren Sie die Heizung nicht in der Nähe, unter oder auf eine Steckdose gerichtet und nicht in der Nähe eines offenen Feuers oder einer Wärmequelle. 13. Benutzen Sie die Heizung nicht in der Nähe von oder gerichtet auf Möbel, Tieren, Gardinen, Papier, Kleidung, Bettwäsche oder sonstiger brennbarer Gegenstände. Halten Sie mindestens 1 m Abstand von der Heizung! 14. Bedecken Sie die Heizung niemals! Ansaug- und Abblasöffnungen dürfen auf keine Weise blockiert werden, um Brand zu vermeiden. Verwenden Sie die Heizung daher auch niemals, um Kleidung zu trocknen oder etwas darauf zu stellen und platzieren Sie sie nicht auf weichen Oberflächen wie ein Bett oder einen hochflorigen Teppich, wodurch Öffnungen verschlossen werden können. 15. Die Luft rund um die Heizung muss frei zirkulieren können. Platzieren Sie die Heizung daher nicht nahe an Wänden oder großen Gegenständen und nicht unter einem Brett, Schrank oder dergleichen. 16. Verhindern Sie, dass fremde Gegenstände durch die Ventilations- oder Gebläseöffnungen in die Heizung gelangen können. Dies kann zu einem elektrischen Schlag, Brand oder Beschädigung führen. 17. Lassen Sie eine laufende Heizung niemals unbeaufsichtigt, sondern schalten Sie diese zuerst aus und entfernen dann den Stecker aus der Steckdose. Immer den Stecker aus der Steckdose nehmen, wenn die Heizung nicht benutzt wird. Nehmen Sie den Stecker dazu in die Hand, ziehen Sie niemals am Kabel. 18. Diese Heizung wird während der Benutzung heiß. Um Brandwunden zu vermeiden, nicht mit der bloßen Haut die heißen Flächen berühren! 19. Schalten Sie die Heizung immer zuerst aus, bevor Sie den Stecker aus der Steckdose ziehen und lassen Sie die Heizung erst abkühlen, wenn Sie: - die Heizung sauber machen möchten - Wartungsarbeiten an der Heizung ausführen möchten - die Heizung berühren oder verstellen. 20. Setzen Sie die Heizung nicht automatisch mithilfe einer Zeituhr oder dergleichen in Betrieb. Vor der Benutzung immer die sicheren Bedingungen kontrollieren. 21. Achten Sie auf sorgfältige Aufsicht, wenn das Gerät in der Anwesenheit von Kindern oder handlungsunfähigen Personen oder Haustieren benutzt wird. Dieses Gerät ist nicht geeignet, um durch Kinder oder Personen mit körperlichen, sensorischen oder geistigen Behinderungen oder durch Personen ohne Wissen oder Erfahrung mit diesem Gerät bedient zu werden, auch nicht unter Aufsicht oder nach Unterweisung durch eine Person, die für die Sicherheit der oben genannten Personen verantwortlich ist. Kindern darf das Spielen mit dem Gerät nicht erlaubt werden. 22. Halten Sie die Heizung sauber. Staub, Schmutz und/oder Ablagerungen in der Heizung sind eine häufig auftretende Ursache für Überhitzung. Achten Sie darauf, dass solche Ablagerungen regelmäßig entfernt wird. 23. Setzen Sie das Gerät nicht in Betrieb, wenn Sie Beschädigungen am Gerät, am Elektrokabel oder am Stecker feststellen oder wenn es schlecht funktioniert, gefallen ist oder auf andere Weise eine Störung anzeigt. Bringen Sie das komplette Gerät zur Kontrolle und/oder Reparatur zurück zu Ihrem Lieferanten oder einem anerkannten Elektriker. Bitten Sie immer um Originalersatzteile. 24. Verwenden Sie keine Ergänzungen/Zubehör für die Heizung, die nicht vom Hersteller empfohlen oder geliefert werden. 25. Das Gerät (inkl. Elektrokabel und Stecker) darf ausschließlich durch dazu befugte und qualifizierte Personen geöffnet und/oder repariert werden. 11 26. Benutzen Sie die Heizung ausschließlich für den Zweck, für den diese entwickelt wurde und in der Weise, die in diesem Handbuch beschrieben wird. Abweichungen von 24, 25 und 26 können Schaden, Brand und/oder Personenschäden verursachen. Diese führen zum Garantieverfall und Lieferant, Importeur und/oder Hersteller übernehmen keine Haftung für die Folgen. Beschreibung 1. 2. 3. 4. 5. Gitterrost Warmluftabgabe Lufteinlassgitter Lenkrollen (4x) Bedienfeld Hauptschalter Entfernen Sie sämtliches Verpackungsmaterial und halten Sie es außer der Reichweite von Kindern. Kontrollieren Sie nach Entfernung der Verpackung, ob das Gerät Beschädigungen oder Anzeichen eines Fehlers/Defekt/Störung aufweist. Benutzen Sie das Gerät im Zweifelsfall nicht, sondern wenden Sie sich zur Kontrolle / Austausch an Ihren Lieferanten. Benutzen Sie die Heizung nicht, bevor Sie diese konform der unten stehenden Anweisung installiert haben! Zusammenstellung und Installation Stehend (als mobile Heizung): Befestigen Sie die separat gelieferten Füße unter der Heizung (siehe auch die Abbildung). Drehen Sie die Heizung um, Unterseite oben. Legen Sie eine Decke darunter, um Beschädigungen zu vermeiden! Drücken Sie die beiden Füße (mit je 2 Lenkrollen) in die Aussparung auf der 12 Unterseite des Heizgerätes bis sie einrasten. Um die Füße zu entfernen, die Klemme (A) eindrücken; jetzt kann der Fuß abgenommen werden. Stellen Sie die Heizung wieder aufrecht hin. Sorgen Sie dafür, dass die aktive Heizung immer gerade auf einem stabilen, ebenen und waagerechten Boden steht. Hochfloriger Teppich ist ungeeignet! Hängend (fest an der Wand befestigt): Wählen Sie eine stabile, vollkommen senkrechte und nicht brennbare Wand aus nicht brennbarem und nicht schmelzendem Material (also nicht aus Holz, synthetischem Material oder ähnlichem!) aus, um die Heizung aufzuhängen. Bestimmen Sie den Platz, an dem Sie die Heizung aufhängen möchten. Achten Sie darauf, dass um die Heizung herum immer genug Platz ist und keine brennbaren Materialien zu dicht an die Heizung kommen können (siehe auch die Sicherheitsvorschriften). Platzieren Sie die Heizung nicht hinter einer Tür! Die Unterseite der Heizung muss mindestens 10 cm u vom Boden entfernt sein, die Seitenkanten mindestens 20 cm von den Seitenwänden und die Oberseite mindestens 200 cm von der Decke, von überstehenden Bretten, usw. Für die Wandmontage befestigen Sie die Wandhalterung an der Wand. Bohren Sie 2 Befestigungslöcher in einem Abstand von 250 mm voneinander, mindestens 350 mm über dem Fußboden und vollkommen waagrecht in die Wand. Drücken Sie Dübel in die Bohrlöcher. Drehen Sie zwei lange Schrauben in die Dübel, bis sie noch 8 mm herausragen. Hängen Sie die Wandhalterung an den Schrauben auf und lassen Sie sie in den Schlitzen nach unten rutschen (siehe Abb. B). Ziehen Sie die Schrauben fest an. Hängen Sie nun das Heizgerät mit den unteren Aussparungen in die unteren Klemmen der Wandhalterung ein. Klappen Sie das Heizgerät zur Wand hoch und lassen Sie die oberen Klemmen in die oberen Aussparungen des Heizgerätes einrasten. Schrauben Sie die zwei kleinen Sicherheitsschrauben durch die Löcher 13 in die oberen Klemmen, die sich ganz nahe am Heizgerät befinden; die Klemmen können jetzt nicht mehr eingedrückt werden (siehe Abb. C). Um das Heizgerät von der Wand abzunehmen, entfernen Sie zuerst die Sicherheitsschrauben. Drücken Sie die oberen Klemmen nach unten und klappen Sie das Gerät nach vorne. Jetzt können Sie das Gerät aus der unteren Befestigung ziehen. Inbetriebnahme und Funktion 1. Kontrollleuchte „Heizgerät eingeschaltet“ 2. Kontrollleuchte für niedrige Leistung 3. Kontrollleuchte für hohe Leistung 4. Kontrollleuchte für Heizbetrieb 5. Symbol für Thermostat 6. Einstelltaste hohe/niedrige Leistungsstufe 7. Aktivierungstaste 8. Display 9. Symbol für Timer 10. Taste „höher“ 11. Taste „niedriger“ 12. Hauptschalter Prüfen Sie, ob der Hauptschalter auf O (aus) steht. Prüfen Sie, ob das Heizgerät stabil und gerade steht oder hängt, gemäß allen erforderlichen Vorschriften. Stecken Sie den Stecker in eine 220/240V geerdete Steckdose. Schalten Sie den Hauptschalter auf I (ein). Die Kontrollleuchte „Heizgerät eingeschaltet“ (POWER) leuchtet auf. Drücken Sie jetzt die Aktivierungstaste (7). Auf dem Display wird die Raumtemperatur, die eingestellte Leistungsstufe (LO=niedrig, HI=hoch) aufgezeigt. Standard Werkseinstellung: Thermostat 35°C, Timer 0 Uhr. Temperatur einstellen Drücken sie erneut die Aktivierungstaste. Auf dem Display blinkt „35“ und „°C“. Drücken Sie die Taste „höher“ oder „niedriger“, um die gewünschte Temperatur einzustellen: jedes Mal, wenn Sie die Taste drücken, wird die eingestellte Temperatur um 1 Grad erhöht oder gesenkt. Die Temperatur kann von 5 bis 45°C eingestellt werden. Drücken Sie die Taste, bis die gewünschte Temperatur auf dem Display erscheint. Die eingestellte Temperatur blinkt jetzt noch 5 Sekunden lang auf dem Display, danach wird wieder die Raumtemperatur angezeigt. Der Thermostat ist jetzt eingestellt und das Symbol Thermostat (°C) leuchtet. Wenn das Heizgerät aufheizt, leuchtet auch die Kontrollleuchte Heizbetrieb (4) und wenn das Gerät abschaltet, erlischt diese Leuchte. 14 Timer einstellen Drücken Sie 2 Mal die Aktivierungstaste. Auf dem Display blinkt „0“ (oder eventuell eingestellte Stunden) und das Timer-Symbol. Drücken Sie die Taste „höher“ oder „niedriger“, um die gewünschte Betriebszeit einzustellen: jedes Mal, wenn Sie die Taste drücken, nimmt die eingestellte Zeit um 1 Stunde zu oder ab. Die Zeit kann von 0 bis 24 Uhr eingestellt werden. Drücken Sie die Taste, bis die gewünschte Betriebszeit auf dem Display erscheint. Die eingestellte Betriebszeit blinkt jetzt noch 5 Sekunden lang auf dem Display, danach wird wieder die Raumtemperatur angezeigt. Der Timer ist jetzt eingestellt und das Heizgerät startet die Betriebszeit. Das Symbol Timer leuchtet während der gesamten Betriebszeit. Wenn die eingestellte Zeit verstrichen ist, schaltet das Gerät (ohne Signalton) aus. Die Betriebszeit kann zwischendurch geändert werden, indem Sie wieder 2x die Aktivierungstaste drücken und den Vorgang wiederholen. Das Heizgerät vergisst die alte Einstellung und übernimmt die neu eingestellte Betriebszeit. Leistung wählen Wenn das Gerät in Betrieb ist, können Sie mit den Einstelltasten für hohe/niedrige Leistung (6) von einer hohen Leistung (HI) auf eine niedrigere Leistung (LO) umschalten und umgekehrt. Ausschalten Wenn Sie 3 Sekunden die Aktivierungstaste gedrückt halten, schalten Sie alle Funktionen aus. Das Display erlischt, nur die Leuchte „Heizgerät eingeschaltet“ (POWER) leuchtet. Wenn Sie das Gerät ganz ausschalten möchten, stellen Sie den Hauptschalter auf „aus“ (O). Ziehen Sie anschließend den Stecker aus der Steckdose. Kindersicherung Wenn das Gerät in Betrieb ist, halten Sie 3 Sekunden gleichzeitig die beiden Tasten „höher“ und „niedriger“ gedrückt und aktivieren so die Kindersicherung. Auf dem Display erscheinen zuerst kurz ein Kästchen und dann wieder die Einstellungen. Wird jetzt auf eine Taste gedrückt, erscheint wieder kurz das Kästchen, aber es ändert sich weiter nichts. Sie de-aktivieren die Kindersicherung, indem Sie 3 Sekunden die Aktivierungstaste gedrückt halten und dann die Tasten „höher“ und „niedriger“ wieder gleichzeitig 3 Sekunden gedrückt halten. Sicherungen Die Überhitzungssicherung schaltet die Heizung aus, wenn es inwendig zu heiß wird. Das kann geschehen, wenn die Heizung ihre Wärme unzureichend abgeben oder zu wenig frische Luft ansaugen kann. In der Regel ist die Ursache (teilweise) Abdeckung der Heizung, Verstopfung des Ansaug- und/oder Ausblasgitters, Schmutz, Platzierung zu dicht an z.B. einer Wand, usw. Das Heizgerät wird sich nach dem Abkühlen auch wieder automatisch einschalten. Wenn jedoch die Ursache nicht behoben worden ist, droht eine Wiederholung mit den entsprechenden Konsequenzen bzw. sich daraus ergebenden Gefahren. Schalten Sie die Heizung bei Überhitzung aus, nehmen Sie den Stecker aus der Steckdose und geben Sie ihr die Zeit um abzukühlen. Geben Sie dem Gerät Zeit um abzukühlen, beheben Sie die Ursache der Überhitzung und setzen Sie die Heizung wieder in Betrieb. Wenn das Problem weiterhin auftritt oder Sie keine Ursache für die Überhitzung finden können, schalten Sie die Heizung sofort aus und entfernen Sie 15 den Stecker aus der Steckdose. Nehmen Sie mit einer Servicestelle Kontakt auf, um sie reparieren zu lassen. Reinigung und Wartung Halten Sie die Heizung sauber. Ablagerungen von Staub und Schmutz im Gerät ist eine der häufigsten Ursachen für Überhitzung. Entfernen Sie diese also regelmäßig. Schalten Sie für Reinigungs- oder Wartungsarbeiten die Heizung aus, entfernen Sie den Stecker aus der Steckdose und lassen Sie die Heizung abkühlen. Säubern Sie die Außenseite der Heizung regelmäßig mit einem trockenen oder gut ausgewrungenem feuchten Tuch. Benutzen Sie keine scharfe Seife, Sprays, Reinigungs- oder Scheuermittel, Wachs, Glanzmittel oder sonstige chemische Lösungen. Wenn das Heizgerät an der Wand befestigt ist, muss auch die Rückseite und der Bereich hinter dem Gerät gereinigt werden. In diesem Fall nehmen Sie das Heizgerät von der Wand (siehe „Installation - Wandmontage“). Saugen Sie mit dem Staubsauger vorsichtig Staub und Schmutz aus den Gittern und kontrollieren Sie, ob die Luftein- und -ausgänge sauber sind. Achten Sie bei der Reinigung darauf, dass Sie keine inwendigen Teile berühren bzw. beschädigen. Die Heizung enthält ansonsten keine weiteren Teile, die gewartet werden müssen. Räumen Sie die Heizung am Ende der Saison weg, nach Möglichkeit in der Originalverpackung. Platzieren Sie die Heizung aufrecht stehend an einem kühlen, trockenen und staubfreiem Ort. Wenn die Heizung letztendlich verschlissen (oder eher unwiderrufbar beschädigt) ist, gehört sie nicht in den Haushaltsmüll. Bringen Sie die Heizung an die von Ihrer Gemeinde angewiesene Sammelstelle für elektrische Geräte, wo man Sorge dafür tragen wird, dass eventuell noch verwendbare Materialien wieder verwertet werden. CE - Erklärung Hiermit erklärt Euromac BV, Genemuiden-NL, dass das Produkt Elektrische Konvektorheizung, Marke EUROM, Typ CONVECTOR PANEL DE LUXE der LVDRichtlinie 2006/95/EG und der EMC-Richtlinie 2004/108/EC, sowie den folgenden Normen entspricht: EN 55014-1 :2006+A1:2009+A2:2011 EN 55014-2:1997+A1:2001+A2:2008 EN 61000-3-2:2006+A1:2009+A2:2009 EN 61000-3-3 :2013 EN 60335-2-30 :2009+A11 :2012 EN 60335-1 :2012 EN 62233:2008 Genemuiden, 03-06-2014 W.J. Bakker, alg.dir. 16 English Technical data Type Supply Voltage Capacity Thermostat Dimensions Weight CONVECTOR PANEL DE LUXE 220-240Volt / 50Hz 1000Watt – 2000Watt + 21 x 83 x 47 cm 5 kg General safety instructions 1. Before using the machine, carefully read this entire instruction manual. Keep the instruction leaflet somewhere safe so that you can consult it in future. 2. Before using your new heater, check it, including cord and plug, for any visible damage. Do not use a damaged heater, but send it back to your dealer for replacement. 3. Do not use the heater until it is been fully installed in accordance with the instructions under the heading ‘Description, Composition and Installation’. 4. This heater is strictly intended for normal domestic use. Only use it for the additional heating of your home. 5. This heater in not suitable for use in wet or damp spaces such as bathrooms and laundry rooms. Do not place the unit on a wet surface and make sure that it cannot be operated from the bath, shower or similar.Do not place the heater in the vicinity of taps, bathtub, shower, pool, fountains or other sources of moisture. Make sure it cannot fall into water and prevent water from getting into the heater itself. If, at any time, the heater does fall into water, unplug it immediately! Do not use a heater that has a damp interior but have it repaired. Never immerse the heater, cord or plug in water and never touch it with wet hands. 6. The supply voltage and utility frequency, specified on the machine, need to match those of the socket that is used. The socket used needs to be earthed and the electrical installation needs to be secured with a ground-fault circuit interrupter (max. 30 mAmp). 7. Fully extend the cord before plugging in the heater. Make sure it does not come into contact with any part of the heater and prevent it from heating up any other way. Do not run the cord underneath carpeting; do not cover it with mats, carpet strips or similar and make sure it is not placed in any passageways. Make sure the cord cannot be stepped on and that no furniture is placed on top of it. Do not lead the cord around sharp corners and do not roll it up too tightly after use! 8. If possible, do not use an extension cord, as this poses the risk of overheating and fire. If the use of an extension cord is unavoidable, then make sure it is an undamaged, approved extension cord with a minimum diameter of 3 x 1.5 mm² and a minimum permissible power of 1000 Watt. To prevent overheating, always fully extend the cord! 9. To prevent the circuit being overloaded and fuses blowing, make sure no other appliances are connected to the same socket or wired to the same electrical circuit as the heater. 10. Do not use the heater outdoors and do not use it in spaces, smaller than 6 m². 11. A heater contains hot and/or glowing and sparking components. Do not, therefore, use it in areas where fuels, paint, flammable liquids and/or gasses etc. are stored. 17 12. Do not place the heater near, under, or directly opposite a socket and do not place it near an open fire or other heat source. 13. Do not use the heater near or directly opposite furniture, animals, curtains, paper, clothes, bedding or other inflammable objects. Keep them at least 1 metre away from the heater! 14. Never cover a heater! The heater’s air inlets and outlets should never be obstructed in any way, so as to prevent the possibility of fire. Never use the heater to dry clothes and do not place anything on top of the heater. Do not place it on soft surfaces such as beds or deep-pile carpets as they can block openings. 15. Make sure that the air around the heater can circulate freely. Do not place the heater too close to walls or large objects and do not place it under shelves, cupboards or similar. 16. Prevent foreign objects from entering the heater via the venting or exhaust openings as this may lead to electric shock, fire or damage. 17. Never leave the heater unattended when switched on. Always switch the heater off before removing the plug from the socket. Always unplug the heater when not in use! Pull on the plug to remove from the socket, never pull on the cord. 18. Always switch the heater off, unplug it and leave to cool down before: - cleaning the heater - carrying out maintenance on the heater - touching or moving the heater. 19. This machine gets hot when in use. To prevent burns, do not let bare skin come into contact with hot surfaces. 20. Do not use a timer or a similar product to automatically switch on the heater. Always perform safety checks before using the heater! 21. Close supervision is necessary when the product is used near children or incapacitated persons. Do not let children use the appliance as a toy. The device is not suitable for use by persons (including children) with a physical, sensual or mental limitation or a lack of experience and knowledge, irrespective of whether they are being supervised or have been issued with instructions in relation to the use of the device by a person who is responsible for their safety. Always ensure that children cannot play with the device. 22. Keep the heater clean. Dust, dirt and/or a build up of deposits in the heater are a common cause of overheating. Make sure these deposits are removed regularly. 23. Do not turn on the appliance if you have discovered damage to the appliance itself, the cord or the plug, if the appliance is malfunctioning, if it has been dropped or if there are any other signs of a defect. Return the complete product to the vendor or to a certified electrician for inspection and/or repair. Always ask for the original parts. 24. Do not use attachments and/or accessories that have not been recommended or supplied by the manufacturer. 25. The appliance (incl. cord and plug) may only be opened and/or repaired by properly authorised and qualified persons. 26. Only use this heater for its intended purpose and as described in this instruction manual. Not abiding by instructions 24, 25 and 26 may lead to damage, fire an/or personal injuries. A failure to adhere to these rules also immediately nullifies the guarantee and vendor, importer and/or manufacturer do not take responsibility for any of the consequences! 18 Description 1. 2. 3. 4. 5. Heat outlet grille Air inlet grille Swivel wheels (x4) Operation panel Main switch Remove all packaging material and keep out of reach of children. After removing packaging, check the appliance for damage or other signs that could indicate a fault/defect/malfunction. In case of doubt, do not use the appliance, but contact your vendor for inspection or replacement. Do not use the heater before it has been installed in accordance with the following instructions! Composition and Installation Free-standing (as a portable heater): Attach the feet supplied to the underside of the heater (see picture): Turn the heater upside down. Place a blanket (or something similar) under the heater to prevent damage! Push both feet (each with 2 swivel wheels) into the recesses on the base of the heater until you hear them click into place. In order to remove the feet, push the clamp (A) in; you can now remove the foot. Return the heater to the upright position. Make sure a working heater is always placed on a solid, flat and horizontal surface. Deep-pile carpeting is unsuitable! Mounted (secured to a wall): Choose a solid, flat and completely vertical wall made of non-flammable and nonmelting material on which to mount the heater (i.e. no wood, synthetic materials, etc!) 19 Decide where you want to mount the heater. Make sure that the heater has sufficient space around it at all times and that no inflammable materials are located nearby (see also safety instructions). Do not place the heater behind a door! The heater’s underside needs to be at least 10 cm above the floor, the sides at least 20 cm from the side walls and the top at least 200 cm from the ceiling, ceiling beams, etcetera. Secure the hanging frame to the wall. Drill 2 holes in the wall 250 mm away from one another, at least 350 mm above the floor and completely horizontal. Push plugs into these holes. Screw two long screws into the plugs until they protrude by 8 mm. Hang the frame over these screws and allow to drop downwards into the grooves (see diagram B). Now turn the screws to secure. Hook the heater with the lowest recesses over the lowest clips on the hanging frame. Tilt the heater against the wall and let the upper clips click into the upper recesses on the heater. Screw the two smaller locking screws through the holes in the upper clips, that are located closest to the heater; the clips can no longer be depressed (see diagram C). In order to take the heater off the wall, first remove the locking screws, push the upper clips downwards and tilt the heather forwards. Now, you can pull the heater off the lower attachments. 20 Using for the first time and Operation 1. 2. 3. 4. 5. 6. Control light ‘heater on’ Control light ‘low output’ Control light ‘high output’ Control light heating Thermostat symbol Button for selecting low/high output 7. Activation button 8. Display 9. Timer symbol 10. ‘Higher’ button 11. ‘Lower’ button 12. Main switch Check to make sure the main switch is set to O (off). Check that the heater is stable and upright, in line with instructions. Now insert the plug into the 220/240V socket. Set the main switch to I (on). The control light ‘heater on’ (POWER) lights up. Now press the activation button (7). The display will show room temperature and the set output (LO=low, HI=high). At the factory, the thermostat is set to 35°C, the timer to 00.00. Setting temperature Press the activation button again; the display will show a blinking ‘35’ and ‘°C’. Press the ‘higher’ or ‘lower’ button to set the desired temperature: every time you press the button, the set temperature will increase/decrease by 1 degree. The temperature can be set between 5 and 45°C. Once the desired temperate appears on the display, you can stop. The set temperature will blink for 5 seconds on the display, then the room temperature will be displayed again. The thermostat is now set and the thermostat symbol (°C) will be lit up. Once the heater begins to heat, the Heating control light (4) will light up; it goes out when the heater shuts down. Setting timer Press on the activation button twice. The display will blink ‘0' (or the set hours) and the timer symbol. Press the ‘higher’ or ‘lower’ button to set the length of time you would like the unit to work: every time you press the button, the set time will increase/decrease by 1 hour. The time can be set from 0 to 24 hours. Once the desired time appears on the display, you can stop. The set time will blink for 5 seconds on the display, then the room temperature will be displayed again. The timer is now set and the heater will start to work. The timer symbol remains lit up for the set period. Once the set period is up, the heater will switch off (without providing a signal). The set period can be amended while the heater is on by pressing twice on the activation button and repeating the procedure. The heater then forgets the old setting and applies the newly programmed time. Selecting output 21 Pressing the high/low selection button (6) while the heater is on, switches from high (HI) to low (LO) output or the other way around. Switching off Pressing on the activation button for 3 seconds switches all functions off. The display goes out but the ‘heater on’ (POWER) button stays lit up. To switch the heater off completely, set the main switch to ‘off’ (O). Make sure that you then remove the plug from the socket. Child lock When the heater is on, pressing the ‘higher’ and ‘lower' buttons simultaneously for 3 seconds will switch on the device’s child lock. The display will show a square and then the settings. If a button is now pressed, the square will appear again but nothing will change. You can unlock the heater by pressing the activation button for 3 seconds and then pressing the ‘higher’ and ‘lower’ buttons simultaneously for 3 seconds. Safety features In case of internal overheating, the overheating safeguard will switch the heater off. This may occur if the heater cannot give off enough heat or if it cannot draw in enough fresh air. As mentioned above, this is generally caused by (partially) covering the heater, obstructing the air intake and/or outlet grills or installing the heater too close to a wall or something similar. After cooling down, the heater will automatically switch on again but if the cause has not been eliminated, this could be repeated (with all of the corresponding risks) In case of overheating, switch off the heater and unplug. Give the heater time to cool down, remove the source of the overheating and use as normal. If the problem persists or if you have not been able to trace the source of the overheating, turn the heater off immediately and unplug. Contact a servicing point to have the heater repaired. Cleaning and Maintenance Keep the heater clean. Deposits of dust and dirt in the appliance are a common cause of overheating so these should be removed regularly. Switch off the heater, remove the plug from the socket and allow the heater to cool down before cleaning or carrying out maintenance work. Wipe the outside of the heater regularly with a dry or slightly damp cloth. Do not use aggressive soaps, sprays, cleaners or abrasives, waxes, polishes or chemical solutions! If the heater is hung on the wall, clean the back and the space behind the heater. Then remove the heater from the wall, see ‘Installation – hanging’. Use a vacuum cleaner to carefully remove any dust and dirt from the grills and ensure that the air intake and outlet openings are clean. Be careful not to touch or damage any internal parts during cleaning! The heater contains no other parts which need maintenance. At the end of the season, store the cleaned heater in the original packaging if possible. Store it upright in a cool, dry and dust-free place. Do not dispose of heater with household waste when it becomes worn or damaged beyond repair. Take it to your local authority's collection point for electrical appliances where any reusable materials will be collected and redistributed. 22 CE-statement Euromac bv, Genemuiden-NL hereby declares that the EUROM electrical convector heater, type CONVECTOR PANEL DE LUXE, complies with the LVD guideline 2006/95/EG and the EMC guideline 2004/108/EC and meets the following standards: EN 55014-1 :2006+A1:2009+A2:2011 EN 55014-2:1997+A1:2001+A2:2008 EN 61000-3-2:2006+A1:2009+A2:2009 EN 61000-3-3 :2013 EN 60335-2-30 :2009+A11 :2012 EN 60335-1 :2012 EN 62233:2008 Genemuiden, 03-06-2014 W.J. Bakker, alg.dir. --------------------------------------------------------------------------------- Français Données techniques Type Tension Puissance Thermostat Dimensions Poids CONVECTOR PANEL DE LUXE 220-240Volt / 50Hz 1000Watt – 2000Watt + 21 x 83 x 47 cm 5 kg Consignes générales de sécurité 1. Avant utilisation, lisez attentivement et entièrement le présent manuel d’utilisation. Conservez ce mode d'emploi afin de pouvoir le consulter ultérieurement. 2. Avant utilisation, contrôlez votre nouveau radiateur (y compris le cordon et la fiche) quant à la présence de dommages visibles. Ne mettez pas en service un radiateur endommagé, mais apportez-le à votre fournisseur en vue d’un remplacement. 3. N’utilisez pas le radiateur avant de l'avoir installé entièrement selon les instructions fournies sous « Description, Montage et Installation ». 4. Ce radiateur est destiné exclusivement à un usage domestique normal. Utilisez l’appareil uniquement comme chauffage d’appoint domestique. 5. Ce poêle ne convient pas pour une utilisation dans des pièces humides, telles que salles de bains, buanderies, etc. Ne placez pas le convecteur sur un sol mouillé et installez-le hors de portée de points d'eau tels qu'une baignoire, une douche, etc. Ne le placez pas à proximité d’un robinet, d’un lave-mains ou d’une installation telle. Veillez à ce que le radiateur ne puisse jamais tomber dans l’eau et évitez que de l’eau puisse y pénétrer. Si de l'eau a néanmoins pénétré dans le cordon, retirez d’abord la fiche de la prise de courant. Cessez d’utiliser le radiateur si ses composants internes sont humides, et portez-le en réparation. Ne 23 plongez jamais le radiateur, le cordon ou la fiche dans l’eau ou dans un autre liquide et ne touchez jamais le radiateur lorsque vos mains sont mouillées. 6. La tension et la fréquence mentionnées sur l’appareil doivent correspondre à celles de la prise de courant utilisée. La prise de courant utilisée doit être mise à la terre et l’installation électrique doit être protégée par un disjoncteur différentiel (max. 30 mA). 7. Déroulez entièrement le cordon avant d’insérer la fiche dans la prise de courant et veillez à ce qu’il n’entre jamais en contact avec le radiateur ou qu’il ne puisse devenir brûlant de toute autre manière. Ne passez pas le câble sous un tapis, ne le recouvrez pas de tapis, d’un chemin d’escalier ou autre et tenez-le à l'écart des lieux de passage. Veillez à ne pas écraser le câble et à ne pas poser de meubles dessus. Ne passez pas le câble par des angles pointus et ne l’enroulez pas de manière trop serrée après utilisation ! 8. L’utilisation d’une rallonge est déconseillée, puisqu’elle peut entraîner une surchauffe et un incendie. Si l’utilisation d’une rallonge ne peut être évitée, utilisez une rallonge en bon état et agréée, d’un diamètre minimum de 3 x 1,5 mm² et d’une puissance minimale autorisée de 1 000 Watts. Déroulez toujours le cordon entièrement pour éviter toute surchauffe ! 9. Pour éviter une surcharge et le grillage des fusibles, ne branchez aucun autre appareil sur la même prise de courant ou sur le même groupe électrique que le radiateur. 10. N’utilisez pas le radiateur à l’extérieur, ni dans des pièces de moins de 6 m². 11. Un radiateur possède des composants internes chauds et/ou brûlants qui produisent des étincelles. Par conséquent, ne l’utilisez pas dans un environnement où des combustibles, de la peinture, des liquides et/ou des gaz inflammables, etc. sont entreposés. 12. Ne placez pas le radiateur à proximité, en dessous ou dans la direction d’une prise de courant, ni à proximité d’un feu ouvert ou de sources de chaleur. 13. N’utilisez pas le radiateur à proximité ou dans la direction de meubles, d’animaux, de rideaux, de papier, de vêtements, de literie ou de tout autre objet inflammable. Tenez-les au moins à 1 mètre de distance du radiateur ! 14. Ne recouvrez jamais un radiateur ! Pour éviter tout incendie, les orifices d’aspiration et de soufflage ne peuvent être bloqués d’aucune manière. N’utilisez donc jamais le radiateur pour sécher des vêtements ou pour y déposer quelque chose et ne le placez pas sur des surfaces molles, telles qu’un lit ou un tapis à longs poils, ce qui peut obstruer les orifices. 15. L’air autour d’un radiateur doit pouvoir circuler librement. Par conséquent, ne le placez pas trop près de murs ou d'objets volumineux, ni sous une planche, une armoire ou quelqu’élément similaire. 16. Evitez que des corps étrangers pénètrent dans les orifices de ventilation ou de soufflage. Cela peut provoquer un choc électrique, un incendie ou des dommages. 17. Ne laissez jamais un radiateur en service sans surveillance. Eteignez-le d’abord, puis retirez la fiche de la prise de courant. Retirez toujours la fiche de la prise de courant lorsque le radiateur n’est pas en service ! A cet effet, saisissez la fiche. Ne tirez jamais sur le cordon ! 18. Eteignez toujours le radiateur, retirez la fiche de la prise de courant et laissez d’abord refroidir le radiateur pour : - nettoyer le radiateur ; - entretenir le radiateur ; - toucher ou déplacer le radiateur. 19. Ce radiateur devient brûlant lorsqu’il est en service. Pour éviter toute brûlure, ne touchez pas les surfaces brûlantes avec une peau nue ! 24 20. N’allumez pas le radiateur automatiquement avec une minuterie ou autre. Avant utilisation, contrôlez toujours si les conditions sont sûres ! 21. Exercez une surveillance étroite lorsque cet appareil est utilisé en présence d'enfants, de personnes incompétentes ou d’animaux domestiques. Ne laissez pas les enfants jouer avec l’appareil. Cet appareil ne convient pas à une utilisation par des personnes (y compris des enfants) souffrant d'un handicap physique, sensoriel ou mental ou manquant d'expérience ou de connaissance, même si une surveillance est assurée ou que des instructions ont été données sur l'utilisation de l'appareil par une personne responsable de leur sécurité. Il convient de veiller à ce que des enfants ne jouent pas avec l'appareil. 22. Conservez le radiateur en bon état de propreté. De la poussière, de la saleté et/ou des dépôts sont des causes fréquentes de surchauffe. Veillez à enlever régulièrement de tels dépôts. 23. N'allumez pas l’appareil lorsque vous constatez des dommages à l’appareil, au cordon ou à la fiche, ou lorsqu’il fonctionne mal, qu’il est tombé ou qu’il présente tout autre dysfonctionnement. Rapportez l’appareil complet au fournisseur ou à un électricien agréé pour contrôle et/ou réparation. Exigez toujours des pièces d’origine. 24. N’utilisez pas d’ajouts/d’accessoires non recommandés ou fournis par le fabricant. 25. L’appareil (y compris le cordon et la fiche) peut être ouvert et/ou réparé exclusivement par des personnes compétentes et qualifiées. 26. Utilisez le radiateur exclusivement aux fins pour lesquelles il a été conçu et comme décrit dans le présent manuel d’utilisation. Le non-respect des points 24, 25, 26 et 26 peut entraîner des dommages, un incendie et/ou une blessure corporelle. Cela rend la garantie caduque et le fournisseur, l’importateur et/ou le fabricant n’assument aucune responsabilité pour les conséquences ! Description 1. 2. 3. 4. 5. Grille de sortie d'air chaud Entrée d'air Roulettes pivotantes (4) Panneau de commande Interrupteur principal 25 Enlevez la totalité de l’emballage et tenez-la hors de portée des enfants. Après avoir enlevé l’emballage, vérifiez que l’appareil ne présente aucun dommage ou signe pouvant indiquer tout vice/défaut/panne. En cas de doute, n’utilisez pas l’appareil : adressez-vous à votre fournisseur en vue d’un contrôle/remplacement. N’utilisez pas le radiateur avant de l’avoir installé selon les instructions cidessous ! Montage et installation Free-standing (as a portable heater): Fixez les pieds fournis séparément sous le radiateur (voir également l’illustration) : Renversez le radiateur. Posez une couverture ou quelque chose de similaire en dessous pour éviter tout dommage ! Enfoncez les deux pieds (équipés de 2 roulettes pivotantes) dans l'ouverture du dessous du convecteur jusqu'à ce qu'un déclic se fasse entendre. Pour retirer les pieds, appuyez sur l'ergot de blocage (A). Remettez le radiateur en position debout. Veillez à toujours placer un radiateur en service sur un support solide, plan et horizontal. Un tapis à longs poils ne convient pas ! Position suspendue (accroché de manière fixe au mur) : Choisissez un mur solide, plan et parfaitement vertical, composé d’un matériau ininflammable et qui ne fond pas (donc pas en bois, en plastique, etc. !) pour y accrocher le radiateur. Choisissez l’emplacement où vous souhaitez accrocher le radiateur. Veillez à ce qu’il y ait toujours suffisamment de place autour du radiateur et qu’aucun matériau inflammable ne puisse se rapprocher trop près du radiateur (voir aussi les consignes de sécurité). Ne placez pas le radiateur derrière une porte ! La distance entre le dessous du radiateur et le sol doit être d’au moins 10 cm, celle entre les côtés et les murs latéraux d’au moins 20 cm et celle entre le dessus et le plafond, de planches en surplomb, etc. d’au moins 200 cm. Fixez l'armature de support au mur. Pour ce faire, percez deux trous dans le mur à 250 mm l'un de l'autre et à 350 mm au-dessus du niveau du sol. Leur alignement doit être parfaitement 26 horizontal. Enfoncez les chevilles dans les trous. Insérez deux vis longues dans les chevilles en les laissant dépasser de 8 mm. Accrochez le châssis sur les vis et laissez-le descendre dans les glissières (voir fig. B). Serrez les vis fermement. Accrochez d'abord le convecteur en faisant coïncider les ouvertures du dessous avec les ergots du bas de l'armature de support. Redressez le convecteur contre le mur et appuyez dessus jusqu'à ce que les ergots du haut entrent dans les ouvertures correspondantes. Un déclic se fait entendre lorsque le tout est en place. Serrez à fond les deux petites vis de blocage des ergots supérieurs les plus proches du convecteur (voir fig. C). Pour détacher le convecteur du mur, retirez d'abord les petites vis de blocage. Appuyez sur les ergots du haut puis inclinez le convecteur vers l'avant. Vous pouvez à présent retirer le convecteur des fixations du bas. Mise en service et fonctionnement 1. 2. 3. 4. 5. 6. Témoin « convecteur allumé » Témoin de faible puissance Témoin de forte puissance Témoin de réchauffage Pictogramme thermostat Touche de réglage de puissance 7. Touche d'activation 8. Afficheur 9. Pictogramme minuterie 10. Touche haut 11. Touche bas 12. Interrupteur principal Vérifiez que l'interrupteur principal est sur O (éteint). Vérifiez que le convecteur est stable et bien droit, conformément aux instructions. Insérez la fiche dans une prise de 220/240 V avec prise de terre. Placez l'interrupteur principal sur I (allumé). Le témoin « convecteur allumé » (POWER) s'allume. 27 Appuyez sur la touche de mise en marche (7). L'afficheur indique la température ambiante et la puissance choisie (LO = bas ; HI = haut). Le thermostat est réglé en usine sur une température de 35 °C et la minuterie sur 0 h. Réglage de la température Appuyez une nouvelle fois sur la touche d'activation. Les indications « 35 » et « °C » clignotent sur l'afficheur. Appuyez sur la flèche haut ou bas pour régler le convecteur sur la température souhaitée : à chaque pression, la température augmente ou baisse de 1 degré. Elle est réglable de 5 à 45 °C. Lorsque la température souhaitée s'affiche, relâchez la touche fléchée. La température demandée clignote encore 5 secondes sur l'afficheur avant d'être remplacée par la température ambiante. Le thermostat est alors réglé et le pictogramme correspondant (°C) reste allumé. Lorsque le convecteur chauffe, le témoin de chauffage (4) est allumé. Il s'éteint lorsque le convecteur s'arrête. Réglage de la minuterie Appuyez deux fois sur la touche d'activation. Un « 0 » (ou la durée spécifiée précédemment) et le pictogramme de la minuterie clignotent sur l'afficheur. Appuyez sur la flèche haut ou bas pour régler le convecteur sur la durée souhaitée : à chaque pression, la durée augmente ou baisse de 1 heure. Elle est réglable de 0 à 24 heures. Lorsque la durée souhaitée s'affiche, relâchez la touche fléchée. La durée demandée clignote encore 5 secondes sur l'afficheur avant d'être remplacée par la température ambiante. Une fois la minuterie réglée, le convecteur démarre. Le pictogramme reste allumé pendant toute cette durée. Une fois la durée écoulée, le convecteur s'éteint (sans le signaler). Vous pouvez modifier le réglage de la minuterie à tout moment en appuyant de nouveau deux fois sur la touche d'activation et en répétant la procédure cidessus. Le nouveau réglage remplace alors le précédent. Sélection de la puissance Quand le convecteur est allumé, vous pouvez régler la température à tout moment en appuyant (6) sur les touches haut/bas (HI/LO). Arrêt Pour éteindre le convecteur, maintenez la touche marche/arrêt enfoncée pendant 3 secondes. L'afficheur s'éteint, mais le témoin « convecteur allumé » (POWER) reste allumé. Pour mettre le convecteur hors tension, placez l'interrupteur principal sur O (arrêt). Retirez ensuite la fiche de la prise de courant. Sécurité enfants Pour activer la sécurité enfants, appuyez sur les deux touches haut/bas simultanément pendant 3 secondes pendant que le convecteur est allumé. Un petit carré s'affiche brièvement avant d'être remplacé par les réglages actifs. Si vous appuyez sur une touche quelconque, le petit carré réapparaît, mais aucun réglage ne peut être modifié. Pour débloquer la sécurité enfants, appuyez sur la touche marche/arrêt pendant 3 secondes puis maintenez les touches haut/bas enfoncées également pendant 3 secondes. Protections La protection anti-surchauffe éteint le radiateur en cas de surchauffe interne. Cela peut arriver lorsque le radiateur ne peut diffuser suffisamment sa chaleur ou lorsqu’il ne peut aspirer assez d’air frais. Les causes les plus fréquentes sont les suivantes : 28 recouvrement (partiel) du radiateur, obstruction des grilles d’aspiration et/ou de soufflage, installation trop près, par exemple, d’un mur, etc. Une fois refroidi, le convecteur se remet en marche automatiquement. Cependant, si le problème n'est pas réglé, il risque de se représenter avec tous les dangers qu'il comporte. En cas de surchauffe, vous devez éteindre le radiateur et retirer la fiche de la prise de courant. Laissez refroidir le radiateur, réparez la cause de la surchauffe, puis remettez le radiateur en service. Si le problème est récurrent ou que vous ne trouvez pas la cause de la surchauffe, éteignez immédiatement le radiateur et retirez la fiche de la prise de courant. Contactez un service après-vente pour réparation. Nettoyage et entretien Conservez le radiateur en bon état de propreté. Les dépôts de poussière et de saletés dans l’appareil sont une cause fréquente de surchauffe ! Par conséquent, enlevez-les régulièrement. Pour les opérations de nettoyage ou d’entretien, éteignez le radiateur, retirez la fiche de la prise de courant et laissez refroidir le radiateur. Nettoyez régulièrement l’extérieur du radiateur avec un chiffon sec ou un chiffon humide bien essoré. N’utilisez pas de savon corrosif, de sprays, de détergents, d’abrasifs, de cire, de produits lustrants ou toute autre solution chimique ! Si le convecteur est suspendu, n'oubliez pas de le nettoyer également à l'arrière. Pour ce faire, détachez-le du mur. Reportez-vous aux instructions d'installation. A l’aide d’un aspirateur, aspirez délicatement la poussière et les saletés des grilles et contrôlez la propreté des orifices d’aspiration et de soufflage. Pendant le nettoyage, veillez à ne pas toucher ou endommager de composants internes ! Le radiateur ne contient pas d’autres composants qui nécessitent un entretien. A la fin de la saison, rangez soigneusement le radiateur, si possible dans l’emballage d’origine. Placez-le debout dans un endroit frais, sec et à l’abri de la poussière. Lorsque le radiateur est définitivement usé (ou devenu irréparable), ne le mettez pas au rebut avec les déchets ménagers. Apportez-le à un point de collecte pour appareils électriques désigné par votre municipalité, qui se chargera d’acheminer les matériaux éventuellement encore utilisables. Déclaration CE Par la présente, Euromac bv. - Genemuiden-NL, déclare que le produit convecteur électrique de marque EUROM, type CONVECTOR PANEL DE LUXE répond à la directive LVD 2006/95/CE et à la directive EMC 2004/108/CE et est conforme aux normes ci-dessous : EN 55014-1 :2006+A1:2009+A2:2011 EN 55014-2:1997+A1:2001+A2:2008 EN 61000-3-2:2006+A1:2009+A2:2009 EN 61000-3-3 :2013 EN 60335-2-30 :2009+A11 :2012 EN 60335-1 :2012 EN 62233:2008 Genemuiden, 03-06-2014 W.J. Bakker, alg.dir. 29 Česky Technické údaje Typ Napájecí napětí Výkon Termostat Rozměry Hmotnost CONVECTOR PANEL DE LUXE 220-240Volt / 50Hz 1000Watt - 2000Watt + 21 x 83 x 47 cm 5 kg Všeobecné bezpečnostní pokyny 1. Před použitím přístroje si pečlivě přečtěte celý tento návod k obsluze. Návod na použití si pečlivě uschovejte pro případné další použití. 2. Před použitím zkontrolujte celý přístroj včetně kabelu a konektoru, zda není jakkoli viditelně poškozen. Pokud je topení poškozeno, nepoužívejte jej. Poškozené topení zašlete zpět svému prodejci, a požádejte o výměnu. 3. Nepoužívejte topení dříve, než jej kompletně nainstalujete v souladu s pokyny podle odstavce “Popis, sestavení a instalace”. 4. Tento přístroj je striktně určen pro běžné domácí použití. Používejte jej pouze pro přitápění vašeho domova. 5. Toto topení není vhodné pro použití v mokrých nebo vlhkých prostorech, jako jsou koupelny, prádelny a tak dále. Ohřívač neukládejte na mokrá místa a zajistěte, aby osoby ve vaně nebo ve sprše a podobně nedosáhly na ovládací tlačítka. Neumisťujte topení v blízkosti kohoutků, vana, sprchový kout, bazén, fontán a podobně. Ujistěte se, že přístroj nemůže spadnout do vody a že se voda nemůže dostat do topení. Kdykoliv topení spadne do vody, nejdříve jej odpojte! Nepoužívejte topení, pokud je uvnitř vlhké. Nechte jej opravit. Nikdy neponořujte topení, kabel nebo zástrčku do vody a nikdy se jich nedotýkejte mokrýma rukama. 6. Napájecí napětí a frekvence uvedené na přístroji musí odpovídat napětí a frekvenci uvedeným na použité zásuvce. Použitá zásuvka musí být uzemněna a elektrická instalace musí být chráněna proudovým jističem (max. 30 mA). 7. Před připojením topení šňůru úplně natáhněte. Zajistěte, aby se nedotýkala žádné částí topení a zabraňte jejímu ohřevu jakýmkoli jiným způsobem. Nedávejte kabel pod koberec, nepřekrývejte jej rohožemi, kobercovými lištami a podobně, a zajistěte aby neprocházel žádným průchodem. Zajistěte, aby se na kabel nešlapalo a aby na něm nestál žádný kus nábytku. Neveďte kabel kolem ostrých rohů a po použití jej nerolujte příliš těsně! 8. Z důvodu větší bezpečnosti před požárem pokud možno nepoužívejte prodlužovací šňůru. Pokud je použití prodlužovacího kabelu nevyhnutelné, pak se ujistěte, že není poškozen. Používejte schválený prodlužovací kabel s minimálním průměrem 3 x 1,5 mm² a minimálním dovoleným výkonem 1000 W. Kabel vždy plně natáhněte, aby se zabránilo přehřátí! 9. Zajistěte, aby na stejné zásuvce s topením, nebo na stejném kabelovém obvodu nebyl připojen žádný další elektrický spotřebič, aby nedošlo k přetížení obvodu a výpadku pojistky. 10. Nepoužívejte topení venku, ani v prostorech menších, než 6 m². 11. Topení obsahuje teplé, žhavé a zápalné části. Proto jej nepoužívejte v prostorech, kde jsou uskladněny pohonné hmoty, barvy, hořlavé kapaliny nebo plyny. 12. Neumisťujte topení poblíž, pod, nebo proti zásuvce a nestavte jej v blízkosti otevřeného ohně, nebo jiných zdrojů tepla. 30 Nepoužívejte topení v blízkosti nábytku, nebo přímo na nábytku, poblíž zvířat, záclon, papíru, oblečení, lůžkovin nebo jiných hořlavých předmětů. Udržujte vzdálenost nejméně 1 metr od topení! 14. Topení nikdy nezakrývejte! Z důvodu požární bezpečnosti nesmí nic bránit vstupu ani výstupu vzduchu z topení. Nikdy nepoužívejte přístroj k sušení oblečení a nepokládejte nic na horní stranu přístroje. Nestavte přístroj na měkké povrchy, jako jsou postele nebo tlusté koberce, aby nedošlo k zablokování otvorů. 15. Zajistěte, aby kolem topení mohl volně proudit vzduch. Nestavte topení příliš blízko zdi, nebo velkých objektů a nepokládejte jej pod poličky, skříně a podobně. 16. Nedovolte, aby se do přístroje vstupními nebo výstupními otvory dostal cizí předmět. Mohlo by to způsobit úraz elektrickým proudem, požár nebo poškození topení. 17. Zapnutý přístroj nenechávejte nikdy bez dozoru. Nejdříve jej vypněte a potom odpojte. Když topení nepoužíváte, vždy jej odpojte! Při odpojování držte zástrčku, nikdy netahejte za kabel. 18. Vypnout topení, odpojit jej a nechat vychladnout je nutné vždy, když: - chcete vyčistit topení - chcete provést údržbu přístroje - chcete se topení dotknout nebo je přesunout. 19. Když je přístroj v provozu, je horký. Nedotýkejte se holou kůží horkých povrchů, abyste se nepopálili. 20. Na zapínání přístroje nepoužívejte žádný automatický časovač ani podobný výrobek. Před použitím topení vždy proveďte bezpečnostní kontrolu! 21. Pokud přístroj používáte v blízkosti dětí nebo invalidních osob, je nezbytný blízký dohled. Nedovolte, aby si děti s přístrojem hrály. Tento aparát není vhodný k tomu, aby ho používaly osoby (včetně dětí) s fyzickým, smyslovým nebo mentálním omezením nebo osoby s nedostatkem zkušeností a znalostí, bez ohledu na to, zda jsou pod dohledem nebo zda jim osoba, která je odpovědná za jejich bezpečnost, dala pokyny ohledně používání tohoto aparátu. Je třeba dohlížet na to, aby si s tímto aparátem nehrály děti. 22. Udržujte topení v čistotě. Prach, špína nebo nečistoty v topení často způsobují přehřátí. Zajistěte pravidelné odstraňování těchto usazenin. 23. Pokud si všimnete nějakého poškození spotřebiče, kabelu nebo zástrčky, přístroj nezapínejte. Také pokud spotřebič nefunguje správně, když spadl na zem, nebo když zjistíte příznaky jakýchkoli jiných závad. V takovém případě vraťte celý výrobek prodejci nebo certifikovanému elektrikáři ke kontrole a požádejte o opravu. Vždy žádejte originální díly. 24. Nepoužívejte jiné doplňky ani příslušenství, než ty, které doporučuje, nebo dodává výrobce. 25. Přístroj (včetně elektrických kabelů a konektorů) smí otevřít a případně opravit pouze řádně autorizovaná a kvalifikovaná osoba. 26. Přístroj používejte pouze pro účely, pro které byl navržen, a podle tohoto návodu. Nedodržení pokynů 24, 25 a 26 může způsobit škodu, požár nebo zranění. Tím okamžitě zaniká záruka, a prodejce, dovozce ani výrobce nenesou odpovědnost za žádné eventuální následky! 13. 31 Popis 1. Mřížka výstupu teplého vzduchu 2. Mřížka vstupu vzduchu 3. Otočná kolečka (4x) 4. Ovládací panel 5. Hlavní spínač Odstraňte veškerý obalový materiál a odstraňte jej z dosahu dětí. Po odstranění obalu zkontrolujte, zda přístroj není poškozen nebo zda nevykazuje jiné znaky možné poruchy nebo závady. V případě pochybností přístroj nepoužívejte, ale obraťte se na dodavatele a požádejte o kontrolu nebo o výměnu. Nepoužívejte topení dříve, než dokončíte instalaci podle těchto pokynů! Sestavení a instalace Stojící (jako přenosné topení): Připojte přiložené nohy na spodní stranu topného tělesa (viz obrázek): Otočte topení vzhůru nohama. Pod přístroj dejte deku (nebo něco podobného) aby se nepoškodil! Obě nožičky (každou se 2 otočnými kolečky) zatlačte do otvoru na spodní straně ohřívače, dokud neuslyšíte cvaknutí. Chcete-li nožičky odstranit, zatlačte úchytku (A) a nožičky vytáhněte. Postavte topení opět základnou dolů. Zajistěte, aby topení během provozu stálo vždy na pevném, plochém a vodorovném povrchu. Tlusté koberce s dlouhým vlasem jsou nevhodné! 32 Přimontovaný (připevněný ke stěně): Pro montáž topení si vyberte pevnou, plochou a zcela svislou stěnu, postavenou z nehořlavého a netavitelného materiálu (to znamená žádné dřevo, syntetické materiály, a podobně!) Rozhodněte, kde chcete topení přimontovat. Zajistěte, aby kolem topení byl vždy dostatek prostoru, a aby se do jeho blízkosti nedostaly žádné hořlavé materiály (viz též bezpečnostní pokyny). Neumisťujte topení za dveřmi! Dolní strana topení musí být nejméně 10 cm nad podlahou, po stranách nejméně 20 cm od boční stěny, a horní strana musí být nejméně 200 cm od stropu, stropních trámů atd. Závěsný rám upevněte na stěnu. Pro tento účel navrtejte do stěny 2 otvory s roztečí 250 mm, které se musí nacházet minimálně 350 mm nad zemí a zcela vodorovně. Do navrtaných otvorů zasuňte hmoždinky. Do hmoždinek zašroubujte dva dlouhé šrouby tak, aby ještě 8 mm přečnívaly. Rám zavěste na šrouby a nechte ho zapadnout do drážek (viz obr. B). Šrouby pak pevně utáhněte. Ohřívač nejprve zavěste zaklapnutím otvorů na spodní straně ohřívače na dolní úchyty závěsného rámu. Ohřívač nakloňte ke stěně a horní úchyty zacvakněte do otvorů na vrchní straně ohřívače. Dva malé pojistné šrouby zašroubujte skrz otvory v horních úchytech, které se nacházejí nejblíže ohřívači; úchytky už pak nelze zatlačit (viz obr. C). Pro sejmutí ohřívače ze stěny nejprve odstraňte pojistné šrouby, horní úchyty zatlačte dolů a ohřívač nakloňte dopředu. Nyní můžete ohřívač vytáhnout z dolních úchytů. 33 Nastavení a činnost 1. Indikátor pro "ohřívač zapnutý" 7. Aktivační tlačítko 2. Indikátor pro "nízký výkon" 8. Displej 3. Indikátor pro "vysoký výkon" 9. Symbol časovače 4. Indikátor pro "ohřívání" 10. Tlačítko "více" 5. Symbol termostatu 11. Tlačítko "méně" 6. Tlačítko pro výběr vysokého/nízkého 12. Hlavní spínač výkonu Zkontrolujte, zda je hlavní spínač nastaven do polohy O (vypnuto). Zkontrolujte, zda ohřívač stojí nebo pevně visí a zda je v přímé poloze v souladu se všemi předpisy. Zástrčku zasuňte do uzemněné zásuvky s 220/240 V. Hlavní spínač nastavte do polohy I (zapnuto). Rozsvítí se Indikátor "ohřívač zapnutý" (POWER). Stiskněte aktivační tlačítko (7). Na displeji za zobrazí teplota místnosti, nastavený výkon (LO = nízký, HI = vysoký). Ve výrobně byl termostat nastaven na 35 ° C a časovač na 0 hodin. Nastavení teploty Ještě jednou stiskněte aktivační tlačítko. Na displeji se zabliká "35" a "° C". Pro nastavení požadované teploty stiskněte tlačítko "více" nebo "méně": pokaždé, když tlačítko stisknete, se nastavovaná teplota zvýší nebo sníží o jeden stupeň. Teplotu lze nastavit v rozmezí od 5 do 45 ° C. Tlačítko přestaňte tisknout, jakmile se na displeji objeví požadovaná teplota. Nastavená teplota bude na displeji blikat ještě 5 sekund, pak se opět zobrazí teplota místnosti. Termostat je nyní nastaven a symbol termostatu (° C) zůstane svítit. Když je ohřívač v provozu, svítí i Indikátor "ohřívání" (4) a když se ohřívač vypne, zhasne i Indikátor. Nastavení časovače Stiskněte dvakrát aktivační tlačítko. Na displeji zabliká "0" (nebo případně nastavený čas) a symbol časovače. Pro nastavení požadované doby provozu ohřívače stiskněte tlačítko "více" nebo "méně": pokaždé, když tlačítko stisknete, se nastavovaný čas prodlouží nebo zkrátí o jednu hodinu. Čas je nastavitelný od 0 do 24 hodin. Tlačítko přestaňte tisknout, jakmile se na displeji objeví požadovaná provozní doba. Nastavený čas bude na displeji blikat ještě 5 sekund, pak se opět zobrazí teplota místnosti. Časovač je nyní nastaven a ohřívač začne pracovat. Symbol časovače zůstane svítit po celou dobu provozu. Po uplynutí nastavené doby provozu se ohřívač (bez signálu) vypne. 34 Provozní dobu je možné průběžně upravit opětovným 2x stisknutím aktivačního tlačítka a zopakováním postupu. Ohřívač zapomene původní nastavení a použije novou nastavenou dobu provozu. Volba výkonu Stisknutím tlačítka pro výběr vysokého/nízkého výkonu (6) během provozu ohřívače přepnete vysoký výkon (HI) na nízký výkon (LO) či naopak. Vypnutí Podržením stlačeného aktivačního tlačítka po dobu 3 sekund vypnete všechny funkce. Displej se vypne, ale Indikátor "ohřívač zapnutý" (POWER) zůstane svítit. Chcete-li ohřívač zcela vypnout, nastavte hlavní spínač do polohy "vypnuto" (O). Poté vytáhněte zástrčku ze zásuvky. Dětská pojistka Současným stisknutím tlačítka "více" a "méně" během provozu po dobu 3 sekund na ohřívači aktivujete dětskou pojistku. Na displeji se krátce zobrazí čtvereček a pak znovu nastavení. Pokud nyní stisknete některé z tlačítek, znovu se na chvíli objeví čtvereček, ale nic se nezmění. Ohřívač odblokujete tak, že po dobu 3 sekund budete tisknout aktivační tlačítko a potom opět po dobu 3 sekund současně stisknete tlačítko "více" a "méně". Bezpečnostní prvky V případě, že dojde k vnitřnímu přehřátí, funkce ochrany proti přehřátí přístroj automaticky vypne. Taková situace může nastat, když topení nemůže poskytnout dostatek tepla, nebo nemá k dispozici dostatek čerstvého vzduchu. Jak je uvedeno výše, je obvyklou příčinou (částečně) zakrytí topení, bránění vstupu vzduchu do přístroje nebo výstupu vzduchu ven z přístroje, instalace topení příliš blízko stěny a tak dále. Ohřívač se po ochlazení automaticky zapne, ale v případě, že příčina nebyla odstraněna, hrozí zopakování situace se všemi příslušnými riziky. V případě přehřátí přístroj vypněte a odpojte. Dejte přístroji dost času na vychladnutí, odstraňte zdroj přehřátí a pokračujte v normálním provozu. Pokud problém nezmizel nebo pokud se vám nepodařilo zjistit příčinu přehřátí, topení ihned vypněte a odpojte. Kontaktujte servis a požádejte o opravu. Čištění a údržba Udržujte topení v čistotě. Usazování prachu a nečistot v přístroji je častou příčinou přehřátí! Proto tyto usazeniny pravidelně odstraňujte. Před čištěním nebo údržbou topení vypněte, vytáhněte zástrčku ze zásuvky a nechte přístroj vychladnout. Pečlivě otřete povrch topení suchým, nebo téměř suchým hadříkem. Nepoužívejte agresivní mýdla, spreje, čističe nebo abrazivní prostředky, vosky, lešticí ani chemické roztoky! Pokud se ohřívač používá jako závěsný, očistěte i zadní stěnu a prostor za ohřívačem. Pokud se ohřívač chystáte vyčistit, pak ho ze stěny sundejte, viz "Instalace - závěsný ohřívač". Pomocí vysavače opatrně odstraňte prach a nečistoty z topení a vyčistěte přívod vzduchu a výstupní otvory. Dávejte pozor, abyste se při čištění nedotkli žádné vnitřní části a abyste ji nepoškodili! Topení neobsahuje žádné další díly vyžadující údržbu. Na konci sezóny uskladněte vyčištěný přístroj pokud možno v původním obalu. Uložte jej ve vzpřímené poloze v chladném, suchém a čistém, nezaprášeném volném prostoru. Pokud je topení tak opotřebované nebo poškozené, že už jej nelze opravit, nevyhazujte jej s komunálním odpadem. Odneste jej na své místní sběrné místo 35 pro elektrické spotřebiče, kde se shromažďují a přerozdělují všechny recyklovatelné materiály. CE-prohlášení Euromac bv, Genemuiden-NL prohlašuje, že elektrické konvektorové topení EUROM, typ CONVECTOR PANEL DE LUXE, odpovídá předpisu LVD 2006/95/EG a směrnici EMC 2004/108/EC a že je v souladu s následujícími normami: EN 55014-1 :2006+A1:2009+A2:2011 EN 55014-2:1997+A1:2001+A2:2008 EN 61000-3-2:2006+A1:2009+A2:2009 EN 61000-3-3 :2013 EN 60335-2-30 :2009+A11 :2012 EN 60335-1 :2012 EN 62233:2008 Genemuiden, 03-06-2014 W.J. Bakker, alg.dir. --------------------------------------------------------------------------- Slovensky Technické údaje Typ Napájanie Výkon Termostat Rozmery Hmotnosť CONVECTOR PANEL DE LUXE 220-240Volt / 50Hz 1000Watt - 2000Watt + 21 x 83 x 47 cm 5 kg Všeobecné bezpečnostné predpisy 1. Pred použitím zariadenia si pozorne prečítajte celý tento návod na používanie. Návod na použitie si starostlivo uschovajte pre neskoršie použitie. 2. Pred použitím nový ohrievač skontrolujte. Skontrolujte aj kábel a zástrčku, či nevykazujú žiadne vonkajšie poškodenie. Poškodený ohrievač nepoužívajte, pošlite ho späť vášmu predajcovi na výmenu. 3. Ohrievač nepoužívajte, kým nie je úplne zmontovaný podľa pokynov v časti „Popis, zloženie a inštalácia“. 4. Tento ohrievač je prísne určený iba na domáce používanie. Používajte ho iba ako prídavné vykurovanie domácnosti. 36 5. 6. 7. 8. 9. 10. 11. 12. 13. 14. 15. 16. 17. Tento ohrievač nie je vhodný na používanie na mokrých alebo vlhkých miestach, ako je napríklad kúpeľňa a práčovňa. Ohrievač neukladajte na mokré miesta a zaistite, aby osoby vo vani alebo v sprche a podobne nedosiahli na ovládacie tlačidlá. Ohrievač neukladajte v blízkosti kohútikov, vane, sprchy, bazénov, fontán alebo iných zdrojov vlhkosti. Uistite sa, že nemôže spadnúť do vody a zabráňte, aby sa do ohrievača dostala voda. Ak ohrievač spadne do vody, okamžite ho odpojte od zdroja energie! Nepoužívajte ohrievač, ktorý má vlhký vnútrajšok, ale ho okamžite dajte opraviť. Ohrievač, kábel alebo zástrčku nikdy nenamáčajte do vody, ani sa ich nedotýkajte mokrými rukami. Napájanie a úžitková frekvencia, ktoré sú predpísané na stroji musia zodpovedať hodnotám, ktoré sú uvedené pre používanú zásuvku. Použitá zásuvka musí byť uzemnená a elektrická inštalácia musí byť zabezpečená prerušovačom obvodu (max. 30 mA). Pred pripojením ohrievača kábel úplne roztiahnite. Uistite sa, že nie je v kontakte so žiadnou časťou ohrievača a zabezpečte ho pred ohriatím iným spôsobom. Kábel neveďte popod kobercom, neprikrývajte ho rohožami, behúňmi a pod. a uistite sa, že nie je na miestach, kadiaľ sa prechádza. Uistite sa, že na kábel sa nebude stúpať a že na ňom nie je položený žiadny nábytok. Kábel neveďte v okolí ostrých rohov a po použití ho nestláčajte príliš silno! Ak je to možné, nepoužívajte predlžovací kábel, pretože to môže znamenať nebezpečenstvo prehriatia a požiaru. Ak je použitie predlžovacieho kábla nevyhnutné, uistite sa, že používate nepoškodený predlžovací kábel s minimálnym priemerom 3 x 1,5 mm² a minimálnym povoleným napájaním 1000 wattov. Aby ste predišli prehriatiu, kábel vždy úplne roztiahnite! Aby ste predišli preťaženiu okruhu a vypáleniu poistiek, uistite sa, že k rovnakej zásuvke nie sú pripojené žiadne ďalšie zariadenia, alebo že nie sú pripojené k rovnakému okruhu ako ohrievač. Ohrievač nepoužívajte vonku a nepoužívajte ho v priestoroch menších ako 6 m². Ohrievač obsahuje horúce a/alebo žeravé a iskriace komponenty. Preto zariadenie nepoužívajte na miestach, kde sú uložené palivá, farby, horľavé tekutiny a/alebo plyny atď. Ohrievač neukladajte blízko, pod alebo priamo oproti zásuvky, ani do blízkosti otvoreného ohňa alebo iných zdrojov tepla. Ohrievač nepoužívajte v blízkosti alebo priamo oproti nábytku, zvierat, závesov, papiera, odevov, lôžka a iných horľavých predmetov. Uchovávajte minimálne 1 meter od ohrievača! Ohrievač nikdy neprikrývajte! Prívody a vývody vzduchu ohrievača by nikdy nemali byť žiadnym spôsobom zablokované, pretože v opačnom prípade hrozí nebezpečenstvo požiaru. Ohrievač nikdy nepoužívajte na sušenie odevov a na hornú stranu ohrievača nič neumiestňujte. Neukladajte ho na mäkké povrchy, ak sú napríklad postele alebo koberce s vysokým vlasom, pretože by mohli blokovať otvory. Uistite sa, že vzduch v okolí ohrievač cirkuluje voľne. Ohrievač neumiestňujte príliš blízko stien alebo veľkých predmetov a rovnako ich neumiestňujte pod police, skrinky a pod. Zabráňte, aby sa do ohrievača cez ventilačné alebo výfukové otvory dostali cudzie predmety, pretože to môž viesť k poraneniu elektrickým prúdom, požiaru alebo poškodeniu. Keď je ohrievač vypnutý, nikdy ho nenechávajte bez dozoru. Pred vybraním zástrčky zo zásuvky ohrievač vždy vypnite. Keď ohrievač nepoužívate, vždy ho 37 odpojte od napájania! Pri vyberaní zástrčky zo zásuvky vždy ťahajte za zástrčku, nikdy nie za kábel. 18. Ohrievač vždy vypnite, odpojte ho od napájania a nechajte vychladnúť pred: - čistením ohrievača - vykonávaním údržby ohrievača - dotknutím sa alebo presúvaním ohrievača. 19. Tento stroj sa počas používania zohreje. Aby ste predišli popáleninám, nevoľte, aby sa dostala do kontaktu s horúcimi povrchmi holá pokožka. 20. Nepoužívajte časovač ani podobné zariadenia na automatické zapnutie ohrievača. Pred použitím ohrievača vždy vykonajte bezpečnostné kontroly! 21. Ak výrobok používate v blízkosti detí alebo nespôsobilých ľudí, je potrebný dozor. Nedovoľte, aby deti používali zariadenie ako hračku. Toto zariadenie nie je vhodné na to, aby ho používali osoby (vrátane detí) s fyzickým, zmyslovým alebo mentálnym obmedzením, alebo osoby s nedostatkom skúseností a znalostí, bez ohľadu na to, či sú pod dohľadom alebo či im osoba, ktorá je zodpovedná za ich bezpečnosť, dala pokyny ohľadne používania tohto zariadenia. Treba dozerať na to, aby sa s týmto aparátom nehrali deti. 22. Ohrievač udržujte v čistote. Prach, špina a/alebo nazbierané usadeniny v ohrievači sú bežnou príčinou prehriatia. Nezabudnite tieto usadeniny pravidelne odstraňovať. 23. Zariadenie nezapínajte, ak ste objavili poškodenie samotného zariadenia, kábla alebo zástrčky, ak je zariadenie poruchové, ak spadlo alebo sú na ňom iné znaky poškodenia. Celé zariadenie vráťte predajcovi alebo certifikovanému elektrikárovi, na kontrolu a/alebo opravu. Vždy si pýtajte originálne diely. 24. Nepoužívajte doplnky a/alebo príslušenstvo, ktoré neboli odporučené alebo dodané výrobcom. 25. Zariadenie (vrátane kábla a zástrčky) môžu otvárať a/alebo opravovať iba riadne autorizované a kvalifikované osoby. 26. Tento ohrievač používajte iba na určené účely a tak, ako je to popísané v tomto návode na používanie. Nedodržanie pokynov 24, 25 a 26 môže viesť k poškodeniu, požiaru a/alebo poraneniu osôb. Nedodržanie týchto pokynov tiež ruší platnosť záruky a zodpovednosť predajcu, dovozcu a/alebo výrobcu za akékoľvek následky! Popis 38 1. 2. 3. 4. 5. Mriežka výstupu teplého vzduchu Mriežka vstupu vzduchu Natáčacie kolieska (4x) Ovládací panel Hlavný spínač Odstráňte všetok obalový materiál a udržujte mimo dosahu detí. Po odstránení balenia skontrolujte zariadenie na poškodenie a ostatné znaky, ktoré by mohli indikovať poruchu/chybu/zlyhanie. V prípade pochybností zariadenie nepoužívajte, ale kontaktujte svojho predajcu, aby zariadenie skontroloval alebo vymenil. Ohrievač nepoužívajte skôr, ako ho nainštalujete v súlade s nasledovnými pokynmi! Zloženie a inštalácia Voľne stojaci (ako prenosný ohrievač): Pripevnite dodané nožičky na dolnú stranu ohrievača (pozri obrázok): Otočte ohrievač hore nohami. Pod ohrievač položte plachtu (alebo niečo podobné), aby ste predišli poškodeniu! Obe nožičky (každú s 2 natáčacími kolieskami) zatláčajte do otvoru na spodnej strane ohrievača, kým nebudete počuť cvaknutie. Ak chcete nožičky odstrániť, zatlačte úchytku (A) a vytiahnite nožičky. Ohrievač otočte späť do vzpriamenej polohy. Uistite sa, že ohrievač v prevádzke je vždy umiestnený na pevnom, rovnom a vodorovnom povrchu. Koberec s vysokým vlasom je nevhodný! Namontovaný (pripevnený ku stene): Vyberte pevnú, rovnú a úplne kolmú stenu, vyrobenú z nehorľavých a nerozpustných materiálov, na ktorú namontujete ohrievač (tj. nie drevené, syntetické materiály apod.!) Rozhodnite sa, kam chcete ohrievač namontovať. Uistite sa, že v okolí ohrievača je vždy dostatok voľného miesta a v blízkosti nie sú žiadne horľavé materiály (viď bezpečnostné pokyny). Ohrievač neumiestňujte za dvere! Spodná strana ohrievača musí byť minimálne 10 cm nad podlahou, boky minimálne 20 cm od bočných stien a vrchná strana minimálne 200 cm od stropu, stropných trámov, atď. Závesný rám upevnite na stenu. Na tento účel navŕtajte do steny 2 diery s rozstupom 250 mm, ktoré musia byť umiestnené minimálne 350 mm nad zemou a úplne vodorovne. Do navŕtaných otvorov zasuňte 39 hmoždinky. Do hmoždiniek zaskrutkujte dve dlhé skrutky tak, aby ešte 8 mm prečnievali. Rám zaveste na skrutky a nechajte ho zapadnúť do drážok (pozri obr. B). Skrutky potom pevne utiahnite. Ohrievač najprv zaveste zaklapnutím otvorov na spodnej strane ohrievača na dolné úchytky závesného rámu. Ohrievač nakloňte ku stene a horné úchytky zacvaknite do otvorov na vrchnej strane ohrievača. Dve malé poistné skrutky zaskrutkujte cez otvory v horných úchytkách, ktoré sa nachádzajú najbližšie pri ohrievači; úchytky už potom nemožno zatlačiť (pozri obr. C). Pre odobratie ohrievača zo steny najprv odstráňte poistné skrutky, horné úchytky zatlačte nadol a ohrievač nakloňte dopredu. Teraz môžete ohrievač vytiahnuť z dolných úchytov. Nastavenie a prevádzka 1. 2. 3. 4. 5. 6. Indikátor pre „ohrievač zapnutý“ Indikátor pre „nízky výkon“ Indikátor pre „vysoký výkon“ Indikátor pre „ohrievanie“ Symbol termostatu Tlačidlo pre výber vysokého/nízkeho výkonu Skontrolujte, či je hlavný spínač nastavený do polohy O (vypnuté). Skontrolujte, či je ohrievač stojí alebo visí stabilne a v priamej pozícii v súlade so všetkými predpismi. Zástrčku zasuňte do uzemnenej zásuvky s 220/240 V. Hlavný spínač nastavte do polohy I (zapnutý). Rozsvieti sa Indikátor „ohrievač zapnutý“ (POWER). 7. Aktivačné tlačidlo 8. Displej 9. Symbol časovača 10. Tlačidlo „viac“ 11. Tlačidlo „menej“ 12. Hlavný spínač 40 Stlačte aktivačné tlačidlo (7). Na displeji za zobrazí teplota miestnosti, nastavený výkon (LO = nízky, HI = vysoký). Vo výrobni bol termostat nastavený na 35 °C a časovač na 0 hodín. Nastavenie teploty Ešte raz stlačte aktivačné tlačidlo. Na displeji sa zabliká „35“ a „°C“. Pre nastavenie požadovanej teploty stlačte tlačidlo „viac“ alebo „menej“: zakaždým, keď tlačidlo stlačíte, sa nastavovaná teplota zvýši alebo zníži o jeden stupeň. Teplotu je možné nastaviť v rozpätí od 5 do 45 °C. Tlačidlo prestaňte stláčať, keď sa na displeji objaví požadovaná teplota. Nastavená teplota bude na displeji blikať ešte 5 sekúnd, potom sa opäť zobrazí teplota miestnosti. Termostat je teraz nastavený a symbol termostatu (°C) zostane svietiť. Keď je ohrievač v prevádzke, svieti aj Indikátor „ohrievanie“ (4) a keď sa ohrievač vypne, zhasne aj Indikátor. Nastavenie časovača Stlačte dvakrát aktivačné tlačidlo. Na displeji zabliká „0“ (alebo prípadne nastavený čas) a symbol časovača. Pre nastavenie požadovanej doby prevádzky ohrievača stlačte tlačidlo „viac“ alebo „menej“: zakaždým, keď tlačidlo stlačíte, sa nastavovaný čas predĺži alebo skráti o jednu hodinu. Čas je nastaviteľný od 0 do 24 hodín. Tlačidlo prestaňte stláčať, keď sa na displeji objaví požadovaná prevádzková doba. Nastavený čas bude na displeji blikať ešte 5 sekúnd, potom sa opäť zobrazí teplota miestnosti. Časovač je teraz nastavený a ohrievač začne pracovať. Symbol časovača zostane svietiť počas celej doby prevádzky. Po uplynutí nastavenej prevádzkovej doby sa ohrievač (bez signálu) vypne. Prevádzkovú dobu je možné priebežne upraviť opätovným 2x stlačením aktivačného tlačidla a zopakovaním postupu. Ohrievač zabudne pôvodné nastavenie a použije novú nastavenú dobu prevádzky. Voľba výkonu Stlačením tlačidla pre výber vysokého/nízkeho výkonu (6) počas prevádzky ohrievača prepnete z vysokého výkonu (HI) na nízky výkon (LO) alebo naopak. Vypnutie Podržaním stlačeného aktivačného tlačidla po dobu 3 sekúnd vypnete všetky funkcie. Displej sa vypne, ale Indikátor „ohrievač zapnutý“ (POWER) zostane svietiť. Ak chcete ohrievač úplne vypnúť, nastavte hlavný spínač do polohy „vypnuté“ (O). Následne vytiahnite zástrčku zo zásuvky. Detská poistka Súčasným stlačením tlačidla „viac“ a „menej“ počas prevádzky po dobu 3 sekúnd na ohrievači aktivujete detskú poistku. Na displeji sa krátko zobrazí štvorček a potom znovu nastavenia. Ak teraz stlačíte niektoré z tlačidiel, znova sa na chvíľu objaví štvorček, ale nič sa nezmení. Ohrievač odblokujete tak, že po dobu 3 sekúnd budete stláčať aktivačné tlačidlo a potom po dobu 3 sekúnd znova súčasne stlačíte tlačidlo „viac“ a „menej“. Bezpečnostné prvky V prípade interného prehriatia vypne ohrievač ochrana proti prehriatiu. Môže sa tak stať, ak nedokáže ohrievač vydávať viac tepla alebo dostatok čerstvého vzduchu. Tak, ako je uvedené vyššie, všeobecne je to spôsobené (čiastočným) prikrytím ohrievača, zablokovaním mriežok vstupu a/alebo výstupu vzduchu alebo nainštalovaním ohrievača príliš blízko ku stene alebo niečomu podobnému. Ohrievač sa po ochladení automaticky zapne, ale v prípade, že príčina nebola odstránená, 41 hrozí zopakovanie situácie so všetkými príslušnými rizikami. V prípade prehriatia vypnite ohrievač a odpojte ho. Nechajte ohrievač vychladnúť, odstráňte zdroj prehrievania a používajte ako zvyčajne. Ak problém pretrváva, alebo ak neviete určiť zdroj prehriatia, okamžite vypnite ohrievač a odpojte ho od napájania. Kontaktujte servisné stredisko kvôli oprave ohrievača. Čistenie a údržba: Ohrievač udržujte v čistote. Čiastočky prachu a špiny v zariadení sú bežnou príčinou prehriatia, preto by ste ich mali pravidelne odstraňovať. Pred čistením alebo pred údržbou vypnite ohrievač, odpojte zástrčku zo zásuvky a ohrievač nechajte vychladnúť. Vonkajšok ohrievača pravidelne utierajte suchou alebo mierne navlhčenou látkou. Nepoužívajte agresívne mydlá, spreje, čistiace prostriedky ani abrazívne vosky, leštidlá alebo chemické roztoky! Pokiaľ sa ohrievač používa ako závesný, očistite aj zadnú stenu a priestor za ohrievačom. Ak sa ohrievač chystáte vyčistiť, zložte ho zo steny, pozri „Inštalácia – závesný ohrievač“. Pomocou vysávača opatrne odstráňte všetku špinu a prach z mriežok a uistite sa, že otvory vstupu a výstupu vzduchu sú čisté. Dávajte pozor, aby ste sa počas čistenia nedotkli alebo nepoškodili žiadne vnútorné časti! Ohrievač neobsahuje žiadne ďalšie časti, ktoré si vyžadujú údržbu. Ak je to možné, na konci sezóny uskladnite ohrievač v originálnom balení. Uskladňujte ho vo vzpriamenej polohe na chladnom, suchom a bezprašnom mieste. Keď sa ohrievač opotrebuje alebo poškodí tak, že už nebude možná oprava, nevyhadzujte ho s ostatným domácim odpadom. Odneste ho na miestne zberné miesto pre elektrické zariadenia, kde sa zbierajú a prerozdeľujú všetky opätovne použiteľné materiály. CE stanovisko Euromac bv, Genemuiden-NL týmto vyhlasuje, že elektrický konvektorový ohrievač EUROM, typu CONVECTOR PANEL DE LUXE, vyhovuje smerniciam LVD 2006/95/EG a EMC 2004/108/EC a spĺňa nasledovné normy: EN 55014-1 :2006+A1:2009+A2:2011 EN 55014-2:1997+A1:2001+A2:2008 EN 61000-3-2:2006+A1:2009+A2:2009 EN 61000-3-3 :2013 EN 60335-2-30 :2009+A11 :2012 EN 60335-1 :2012 EN 62233:2008 Genemuiden, 03-06-2014 W.J. Bakker, alg.dir. 42 43 EUROMAC BV., Kokosstraat 20, 8281 JC Genemuiden - NL e-mail: [email protected] www.euromac.nl 44