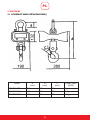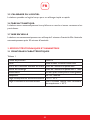
1
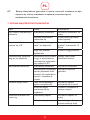
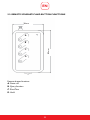
Bedienungsanleitung
User manual | Manuel d´utilisation | Istruzioni per l‘uso | Manual de instrucciones
KRANWAAGEN
SBS-KW-1TE
SBS-KW-5/2K
SBS-KW-3/1K
www.steinbergsystems.de
S T E I N B E R G
S Y S T E M S
Inhalt
Contenu | Content | Contenuto | Contenido | Treść
Deutsch
4
Polski
16
English
28
Français
40
3
Bedienungsanleitung
KRANWAAGEN
SBS-KW-1TE
SBS-KW-5/2K
SBS-KW-3/1K
www.steinbergsystems.de
S T E I N B E R G
S Y S T E M S
DE
1. Einführung
Die direkte optisch-elektronische Kranwaage aus der Steinberg System Serie wurde
aus sicherer und zuverlässiger Hardware und hoch entwickelter Software konzipiert.
Sie hat eine Präzisions-Wägezelle, um Sicherheit zu gewährleisten und ein Hochgeschwindigkeits-A/D Wandlermodul, um Genauigkeit zu gewährleisten. Die Kranwaage
hat eine 30 mm superhelle LED-Anzeige mit 5 Ziffern, mit welcher auch unter schlechten Sichtbedingungen gearbeitet werden kann.
Ausgestattet mit einem einzigartigen intelligenten digitalen Filter mit Schwingungsdämpfung erfolgt das Ablesen schnell und stabil. Die Messung ist hoch präzise und ganz
einfach. Gleichzeitig heben, wiegen und aufnehmen, elektronische Kranwaage aus der
Steinberg Serie, ideal für Metallindustrie, Bau, Lager, Fabrik und Hafen.
2. Produkteigenschaften
2.1 Niedriger Energieverbrauch:
Die Waage läuft über 100 Stunden im Dauerbetrieb. Es gibt eine Schutzschaltung, um
Schäden an der Batterie durch Überladung und Entladung zu vermeiden und so die
Batterielebensdauer zu verlängern.
2.2 Spannungsüberwachung:
Die Waage zeigt die tatsächliche Spannung während des Startvorgangs, es ertönt ein
Alarm, wenn die Batterie schwach ist, sowie Abschaltfunktionen.
2.3 Überlastungsschutz
Wenn die Last 120 % des Endwerts überschreitet, wird der Anwender alarmiert, indem
die Meldung ”-OUE-” angezeigt wird. Wenn die Last bei über 200 % liegt, zeigt das Display “LOC-“ and und die Überlastung wird im System aufgezeichnet.
2.4 Automatisches Speichern und Abfragen
Die Waage kann 30 Gewichtsaufzeichnungen automatisch für die Nutzerabfrage speichern. Ist der Speicher gelöscht, werden die alten Aufzeichnungen überschrieben.
5
DE
2.5 Softwarekalibrierung
Die Waage hat eine hoch entwickelte Software, die schnelle und einfache Kalibrierung
ermöglicht.
2.6 Automatische Tara:
Die Waage wird automatisch tariert, wenn sie nach Laden eines Containers eingeschaltet wird.
2.7 Energie sparen
Nach 5 Minuten Inaktivität geht die Waage automatisch in den Stromsparmodus. Nach
30 Minuten wird sie automatisch abgeschaltet.
3.Technische Beschreibung und Parameter
3.1 Technische Beschreibung
Tabelle 1
Genauigkeitsklasse
Display
Manuelle Nullstellung/ Tarabereich
Überlastungsalarm
Stromversorgung
OIML III
Superhelle 30mm LED mit 5 Ziffern
100%F.S
100% F.S.+100e
6V/4Ah wiederaufladbare Bleisäurebatterie
DC12V, 1000mA
-10°C~ 70°C
≤90%relative Feuchtigkeit unter 20°C
Betriebstemperatur
Adapter
Betriebstemperatur
Betriebsfeuchtigkeit
6
DE
3.2 Technische Parameter
Nennleistung, Auflösung, Teilung, maximale Kapazität, Mindestkapazität, Nullstellenbereich,Tara-Bereich, Nullverfolgungsbereich und Limit-Anzeige (Überlastungsalarm) sind
in Tabelle 2 dargestellt:
Tabelle 2
Rated capacity
Resolution(Standard)
Standard division (e)
Hi-resolution division
Max capacity
Min capacity
Zero range
Tare range
Zero tracking range
Limit display
1000kg
1/2000
500g
200g
1000kg
20d
±60d
Max
±0.5d
Max+9d
3000 kg
1/3000
1kg
500g
3000kg
20d
±60d
Max
±0.5d
Max+9d
5000 kg
1/2500
2kg
1kg
5000kg
20d
±60d
Max
±0.5d
Max+9d
Hinweis e=d=Standardunterteilung
3.3. Fehlerbereich
Tabelle 3
Gewicht
(beschrieben als e)
Ausgangsprüfung
0≤m≤500e
500e<m≤2000e
2000e<m≤3000e
±0.5e
±1.0e
±1.5e
Fehlerbereich
Prüfung nach Reparatur
±1.0e
±2.0e
±3.0e
7
DE
4. Bedienung und Funktionen
4.1 Einschalten
Drehen Sie den mechanischen Schalter auf der Rückseite der Waage auf die ON (Ein)
Position und drücken Sie ON/OFF [EIN/AUS] auf der Vorderseite. Das System geht mit
den folgenden fünf Anzeigen in den Selbstprüfungmodus.
4.1.1 4.1.2 4.1.3 4.1.4 4.1.5 4.1.6 Zuerst wird die Versionsnummer der Software angezeigt. Z. B. UER 2.0
Das zweite Display zeigt die Anzeigesymbole, um zu prüfen, ob ein unvollstän
diger Hub vorhanden ist und ob die Anzeigelampen angehen.
Die dritte Anzeige ist die Kapazität. 1000 bedeutet, dass die max Kapazität 1000 kg ist.
Die vierte Anzeige zeigt die Spannung. z. B. U6.3 bedeutet, dass die aktuelle Spannung bei 6,3 V liegt.
Schließlich wird 0,0 angezeigt, das bedeutet die Waage ist bereit zum Wiegen
Bitte verwenden Sie die Kranwaage (LED) nicht bei extrem starker Lichtein
strahlung (wie direktem Sonneschein) und bitte vergewissern Sie sich, ob das Display klar ist, wenn Sie eingeschalten haben.
4.2 Wiegen
Wenn die Waage stabil ist, wird ”0.0”angezeigt und die entsprechende Anzeigelampe
geht an. Danach ist die Waage bereit für den Wiegevorgang. (Hinweis: es wird empfohlen, die Waage 15 Minuten aufzuwärmen, bevor mit dem Wiegevorgang begonnen wird)
Nach Anbringen der Last, zeigt die Waage innerhalb von 4-5 Sekunden das Gewicht und
dann geht die Stabilitätsanzeige an.
Hinweis: Die Waage alarmiert den Anwender durch Anzeige von “-OUE-” wenn die
Ladung 120 % des Endwerts überschreitet. Wenn die Last den Endwert um 200 %
überschreitet, wird das System automatisch blockiert und die Meldung “LOC-” wird
angezeigt. Die Überladungsaufzeichnungen werden im System aufgezeichnet und beim
Neustart wird “UP200” angezeigt.
8
DE
4.3 Null/Tara:
Die Skala wird beim Einschalten automatisch auf Null gesetzt. Für den Fall, dass vor
dem Einschalten ein Container geladen wird, wird der Behälter tariert, aber die TaraLampe leuchtet nicht. Die Skala unterstützt auch eine manuelle Tara / Null durch Drücken der Null / Tara-Taste auf der Vorderseite oder durch Drücken der Taste C auf
der Fernbedienung, dann leuchtet die Tara-Lampe rot, um anzuzeigen, dass die Waage
tariert und bereit zum Wiegen ist.
4.4 Abfrage
Drücken Sie die Taste Query (Abfrage) auf der Vorderseite oder die Taste B auf der
Fernbedienung, um in den Abfragemodus zu gelangen. Die Waage kann maximal 30 Aufzeichnungen speichern, wenn der Speicher voll ist, werden alte Aufzeichnungen durch
neue überschrieben.
Das System wird nach der Anzeige der Meldung “HIS” zuerst die letzten Aufzeichnungen anzeigen. Jede Aufzeichnung hat zwei Seiten, zum Beispiel zeigt die erste Seite “05”
an (z. B. 05 bedeutet die fünfte und letzte Aufzeichnung) und die zweite Seite zeigt
das Gewicht. Jede Seite wird eine Sekunde lang angezeigt und geht dann automatisch
auf die nächste Seite bis zur ersten Aufzeichnung. Drücken Sie weiterhin die Query/
Abfragetaste auf der Vorderseite oder die Taste B auf der Fernbedienung für 3 Sekunden, dann wird “HIS” angezeigt, um den Abfragemodus zu verlassen und zurück in den
Wiegemodus zu gehen.
4.5 Hold/Halten
Drücken Sie die Taste Hold auf der Vorderseite oder die Taste D auf der Fernbedienung,
um in den Halte-Modus zu gehen. Der aktuelle stabile Gewichtswert kann gehalten
werden, und die Kontrollleuchte in der linken oberen Ecke des Displays leuchtet. Drücken Sie die Taste nochmals um das Menü zu beenden.
4.6 Ausschalten
Wenn Sie fertig sind, drücken Sie 2 Sekunden lang die Taste [ON/OFF], um in den
„AUS-Modus“ zu gelangen, dann wird ——OFF—— angezeigt. Trennen Sie das Gerät
danach von der Stomversorung. Oder drücken Sie auf der Fernbedienung 3 Sekunden
lang die Taste A, dann zeigt die Anzeige “-OFF-”. Bitte drehen Sie den mechanischen
Schalter auf der Rückseite ab, wenn Sie die Kranwaage längere Zeit nicht verwenden.
9
DE
5. Batterie und Laden
Wenn die Batterie leer ist, insbesondere wenn die Spannung unter 5.4V liegt, alarmiert
die Waage den Nutzer durch Anzeige von „LB“. Die Batter muss jetzt aufgeladen werden.
Wenn der Ladezustand unter 5.25 V liegt, geht die Waage in den Schlafmodus. Wieder
wird U5.2 angezeigt und der Summer gibt Alarm. Dann muss die Waage geladen werden.
Die Waage schaltet sich automatisch ab, wenn 20 Mal LB angezeigt wurde, ohne dass
die Waage aufgeladen wird.
Sie kann während dem Betrieb oder wenn sie ausgeschaltet ist, aufgeladen werden.
Es dauert etwa 8 Stunden, bis die Batterie vollständig aufgeladen ist. Beim Laden der
Batterie, leuchtet die AC-Leuchte auf der Vorderseite rot.Wenn das Licht grün ist, zeigt
dies an, dass die Batterie voll geladen ist. Die aufgeladene Batterie wir beim Neustart
der Waage angezeigt.
6.Vorsichtsmassnahmen
Die Elektronische Kranwaage ist ein präzises Messinstrument, die Sicherheitsmaßnahmen sollten immer befolgt werden:
6.1
Überschreiten Sie nicht das maximale Gewicht
6.2
Vertikales Heben und Senken und Ziehen der Lasten ist verboten.
6.3 Bitte prüfen Sie, ob Schrauben, Bolzen oder Sicherungen lose sind, um Sicher
heit und genaue Messung zu gewährleisten.
6.4
Vermeiden Sie die Anwendung bei starkem Regen. Bei der Anwendung im Au
ßenbereich, sollte die Kranwaage bei Gewitter ausgeschaltet werden.
6.5
Beim Einsatz unter hohen Temperaturen, kaufen Sie bitte eine Hoch-Tempe
ratur-Kranwaage. Die Entfernung zwischen Unterseite der Kranwaage und der angehängten Hitzequelle sollte über 1600mm betragen. Die Temperatur des zu wiegenden Artikels sollte nicht mehr als 180°C betragen und ständi
ges Arbeiten bei hoher Temperatur ist verboten
6.6
Überladen Sie die Waage nicht, um eine Beschädigung des Sensors zu ver
meiden. Wenn das Gewicht 120 % erreicht, gibt das System einen Alarmton ab. Bitte entfernen Sie das überschüssige Gewicht umgehend.
10
DE
6.7
Laden Sie die Batterie generell monatliche, auch wenn Sie das Gerät nicht verwenden, um Schäden an der Batterie durch Selbstentladung zu vermeiden.
7. Fehlersuche
Beschreibung
Keine Reaktion nach dem
Einschalten
Ursache
Batterie beschädigt
Der Stecker an der Batterie lost sich
Keine „0.0“ Anzeige ohne Zu kurze Aufwärmzeit
Last
nach dem Einschalten
Automatische Abschaltung Schwache Spannung der
nach dem Einschalten
Batterie, Automatische
Abschaltung bei 5.4V
Fehler beim Laden
Beschädigte Batterie
Schlechter Kontakt zwischen Ladestecker und
Dose, oder beschädigter
Stecker/Dose
Instabiles Gewicht
Empfindliche oder schwache Wägezelle
Wasser oder Feuchtigkeit
in der Waage
Ladelampe leuchtet nicht Beschädigter Adapter
Kontakt des Adapters
defekt
11
Lösung
Batterie ersetzen
Befestigen Sie den losen
Stecker
15 Minuten Aufwärmzeit
abwarten
Bitte laden Sie die Batterie
sofort
Batterie ersetzen
Ersetzen Sie den Ladestecker oder die Dose
Wägezelle ersetzen
Bitte lagern Sie die Waage
an trockenem Ort
Adapter ersetzen
Prüfen Sie den Anschluss
und versuchen Sie es
erneut
DE
Ein- und Ausschalten nicht
möglich
Wiederholte Anzeige der
Spannung
ON/OFF Taste blockiert
oder schlechter Kontakt
Abfragetaste blockiert
oder Kurzschluss
Prüfen und ersetzen Sie
die Taste
Prüfen / ersetzen Sie die
Taste
8. Kalibrierung
Versuchen Sie nicht ohne Standardgewicht zu kalibrieren.
Schalten Sie die Kranwaage ein, nach Anzeige on „0.000“ drücken Sie auf [ON/OFF]
bis „OFF“ und dann „PASS“ angezeigt wird, lassen Sie die Waage los, dann wird „SYS“
angezeigt. Drücken Sie auf QUERY (Abfrage), dann wird “CAL” (Kalibrierung) angezeigt.
Drücken Sie auf [ON/OFF] dann wird „00000“ angezeigt, Sie können das Taragewicht
wie folgt eingeben, indem Sie die Taste [QUERY] und [ON/OFF] drücken: Drücken Sie
die Taste [QUERY] um die blinkende Zahl um eins zu erhöhen (rotierend von 0 bis 9)
und drücken Sie die Taste [ON/OFF] um die blinkende Zahl nach links zu bewegen
(wenn das Taragewicht 3000 kg ist, geben Sie z. B. 03000 ein). Nach der Einstellung des
Taragewichts, können Sie die Taste [on/off] zwei Sekunden lang drücken, dann wird
„CAL“ angezeigt, stornieren Sie das Taragewicht, wenn die Stabilitätsanzeige angeht,
drücken Sie die Abfragetaste [QUERY], dann werden Zahlen angezeigt, diese sind randomisiert. Wenn die Zahlen stabil bleiben, wird das Taragewicht angezeigt. Jetzt ist die
Kalibrierung abgeschlossen.
Wenn Sie das System einstellen wollen, führen Sie erst
die Einstellung, dann die Kalibrierung durch.
12
DE
Einstellung des Systems
Schalten Sie die Kranwaage an, nach Anzeige von „0.000“ drücken Sie [ON/OFF] bis
„OFF“ und dann „PASS“ angezeigt wird, lassen Sie die Waage los, dann wird „SYS“
angezeigt.
Drücken Sie auf [QUERY] dann wird „SCALE“ angezeigt, drücken Sie [ON/OFF], dann
wird „00000“ angezeigt, jetzt können Sie die Kapazität einstellen. Drücken Sie die Taste
[QUERY] um die blinkende Zahl um eins zu erhöhen (rotierend von 0 bis 9) und drücken Sie die Taste [ON/OFF] um die blinkende Zahl nach links zu bewegen (z. B. wenn
die Kapazität 3000 kg ist, geben Sie 03000), dann drücken Sie zwei Sekunden lang [ON/
OFF] bis „SCALE“ angezeigt wird, damit wird die Kapazität bestätigt.
Drücken Sie [QUERY], darauf hin wird „DEC“ angezeigt, drücken Sie [ON/OFF] dann
wird „00000“ angezeigt, drücken Sie [QUERY] um den Radixpunkt nach links zu bewegen. Dann drücken Sie [ON/OFF], um auszuwählen, daraufhin wird „DEC“ angezeigt
(ist die Teilung z. B. 0.5kg, wählen Sie 0000.0; ist die Teilung 1kg, wählen Sie 00000).
Drücken Sie die Abfragetaste [QUERY] dann wird „PL-DE“ angezeigt, drücken Sie [ON/
OFF] dann wird „N1“ angezeigt, Drücken Sie die Abfragetaste [QUERY] UM „N1“oder
„N2“ zu wählen (N1 Teilung der Einheit von 1 bis 9, N2 Teilung 10 bis 19), dann drücken Sie [ON/OFF], um das Menü zu beenden, „PL-DE“ wird angezeigt. Drücken Sie
die Abfragetaste [QUERY] dann wird „CLASS“ angezeigt, drücken Sie [ON/OFF] dann
wird „1“ angezeigt, Drücken Sie die Abfragetaste [QUERY] um „1“ „2“ „5“ auszuwählen, dann drücken Sie [ON/OFF], um das Menü zu beenden, „CLASS“ wird angezeigt.
Dann können Sie das Gerät ausschalten oder verwenden.Wollen Sie weiter kalibrieren,
drücken Sie [QUERY] es wird „UNLOC“ angezeigt, drücken Sie [QUERY] dann wird
„CAL“ angezeigt und Sie können kalibrieren.
13
DE
9. MaSSe
9.1 Kranwaage Zeichnung
Modell
SBS-KW-1TE
SBS-KW-3/1K
SBS-KW-5/2K
A
(mm)
265
450
450
B
(mm)
85
95
95
C
(mm)
35
55
55
14
Nettogewicht
(N.W.)
5kg
11 kg
13 kg
DE
9.2. Fernbedienung und Tastenfunktionen
36mm
85mm
A
B
C
D
Fernebedienungsfunktionen
A. Ausschalten
B. Abfragefunktion
C. Null/Tara
D. Halten
15
Instrukcja obsługi
Wagi dźwigniowe
SBS-KW-1TE
SBS-KW-5/2K
SBS-KW-3/1K
www.steinbergsystems.de
S T E I N B E R G
S Y S T E M S
PL
1. Wprowadzenie
Wagi dźwigniowe firmy Steinberg Systems zbudowane są z niezawodnych podzespołów
sprzętowych oraz zaawansowanego oprogramowania. Urządzenie posiada wysoce precyzyjne ogniwo obciążnikowe, aby zapewnić bezpieczeństwo oraz wysoką szybkość
działania modułu konwersji A/D aby zagwarantować dokładność. Waga dźwigniowa
posiada 5 cyfrowy, super jasny wyświetlacz LED o rozmiarze 30 mm cala. Dzięki niemu
możliwa jest praca urządzenia w ciemności.
Dzięki unikalnemu i inteligentnemu filtrowi cyfrowemu z funkcją anty-wstrząsową i
anty-wibracyjną, odczyt wagi jest zawsze szybki i stabilny. Pomiar jest dokładny i bardzo
prosty. Możliwe jest jednoczesne podnoszenie, ważenie oraz zapis. Elektroniczne wagi
dźwigniowe firmy Steinberg Systems są idealnymi produktami do zastosowań w metalurgii, konstrukcji, hurtowni, fabryce, dokach oraz magazynach.
2. Cechy produktu
2.1 Niski pobór prądu:
Waga może obsłużyć ciągłą pracę przez ponad 100 godzin. Posiada funkcje zabezpieczenia obwodu, pozwalającą na uniknięcie uszkodzenia akumulatora, wynikającego z
przeładowania, a co za tym idzie – pozwala na wydłużenie żywotności akumulatora.
2.2 Monitor napięcia:
Waga pokazuje rzeczywiste napięcie podczas rozruchu urządzenia oraz wyposażona
jest w funkcje wyłączające oraz informujące o niskim stanie mocy akumulatora.
2.3 Ochrona przed przeciążeniem
Gdy ładunek przekracza 120% naturalnej wielkości, użytkownik zostanie poinformowany o przeciążeniu komunikatem “-OUE-„. Gdy ładunek przekracza 200% naturalnej
wielkości, waga wyświetli komunikat “LOC-“ oraz zanotuje wpis o przeciążeniu w systemie.
2.4 Zapis automatyczny oraz funkcja kwerendy (zapytania)
Urządzenie może przechowywać automatycznie 30 wpisów ważenia, umożliwiających
użytkownikowi ich przeszukiwanie zgodnie z zadanymi parametrami wyszukiwania.
Gdy pamięć jest pełna, urządzenie wymazuje rekordy z pamięci i zapisuje nowe wyniki
ważenia.
17
PL
2.5 Kalibracja oprogramowania
Waga wyposażona jest w zaawansowane oprogramowanie, pozwalające na szybką i
wygodną kalibrację.
2.6 Automatyczne tarowanie:
Jeżeli załadowany jest jakikolwiek kontener, waga przeprowadzi automatyczne tarowanie, gdy urządzenie zostanie włączone.
2.7 Oszczędzanie energii
Urządzenie przechodzi automatycznie w stan oszczędzania energii po 5 minutach
bezczynności. Gdy waga nie będzie używana przez 30 minut, nastąpi jej automatyczne
wyłączenie.
3. Specyfikacja techniczna i parametry
3.1 Główne dane techniczne
Tabela 1
Klasa dokładności
Wyświetlacz
Ręczny zakres zero/tara
Alarm informujący o przeciążeniu
Zasilanie
Adapter napięcia
Temperatura robocza
Wilgotność robocza
OIML III
Super jasny, 5-cyfrowy wyświetlacz LED
o rozmiarze 30mm
100%F.S
100% F.S.+100e
6V/4Ah akumulator kwasowy
DC12V, 1000mA
-10°C~ 70°C
≤90%RH gdy temperatura robocza jest
niższa niż 20°C
18
PL
3.2 Parametry techniczne
Wydajność znamionowa, rozdzielczość, podziałka, maksymalna wydajność, minimalna wydajność, zakres zerowania, zakres tarowania, zakres śledzenia zerowania oraz
wyświetlanie ograniczenia (alarm informujący o przeciążeniu) ukazane są w tabeli nr 2:
Tabela 2
Wydajność znamionowa
Rozdzielczość (standardowa)
Standardowa podziałka (e)
Podziałka wysokiej rozdzielczości
Wydajność maksymalna
Wydajność minimalna
Zakres zerowania
Zakres tarowania
Zakres śledzenia zerowania
Wyświetlacz ograniczenia
1000kg
1/2000
500g
200g
1000kg
20d
±60d
Max
±0.5d
Max+9d
3000 kg
1/3000
1kg
500g
3000kg
20d
±60d
Max
±0.5d
Max+9d
5000 kg
1/2500
2kg
1kg
5000kg
20d
±60d
Max
±0.5d
Max+9d
Uwaga! e=d=standardowa podziałka
3.3. Zakres błędu
Tabela 3
ciężar
(opisany jako e)
Zakres błędu
Inspekcja wychodząca
Inspekcja po naprawie
0≤m≤500e
500e<m≤2000e
2000e<m≤3000e
±0.5e
±1.0e
±1.5e
±1.0e
±2.0e
±3.0e
19
PL
4. Obsługa i funkcje
4.1 Włączanie
Przekręcić przełącznik mechaniczny z tyłu wagi w położenie ON i nacisnąć przycisk
[ON/OFF] na przednim panelu. System uruchomi tryb auto-inspekcji z pięcioma
następującymi ekranami.
4.1.1 Pierwszy ekran ukazuje numer wersji oprogramowania. Np. UER 2.0
4.1.2 Drugi ekran dotyczy symboli wskaźnikowych, pozwalając sprawdzić, czy występuje niekompletne uderzenie i czy podświetlanie wskaźników jest włączone.
4.1.3 Trzeci ekran ukazuje wydajność. Na przykład liczba 1000 oznacza, że maksymalna wydajność wynosi 1000 kg.
4.1.4 Czwarty ekran przedstawia napięcie. Np. U6.3 oznacza, że napięcie prądu wynosi 6,3V.
4.1.5 Na końcu pojawia się komunikat 0.0., który oznacza, że urządzenie jest
gotowe do działania.
4.1.6 Prosimy nie używać wagi dźwigniowej (LED) w warunkach wysokie
go naświetlenia (np. w warunkach bezpośredniego narażenia na działanie promieni słonecznych) oraz prosimy upewnić się czy wyświetlacz jest czysty podczas uruchamiania sprzętu.
4.2 Ważenie
Gdy waga będzie gotowa do pracy, pojawi się komunikat “0.0” a kontrolka gotowości
zaświeci się. Następnie, waga będzie gotowa do rozpoczęcia procesu ważenia. (Uwaga:
zalecane jest, aby pozwolić na około 15-minutowe nagrzanie wagi przed rozpoczęciem
ważenia)
Umieścić ładunek. Po około 4-5 sekundach waga pokaże ciężar ładunku, a kontrolka
zaświeci się.
Uwaga: Waga poinformuje użytkownika komunikatem „-OUE-„ gdy ładunek przekroczy 120% naturalnej wielkości plus 100e. Gdy ładunek przekroczy 200% F.S. (naturalna wielkość), nastąpi automatyczna blokada systemu, a wyświetlacz pokaże komunikat
“LOC-“. Rejestr o przeciążeniu zostanie zanotowany w systemie, a po ponownym uruchomieniu pojawi się komunikat „UP200”.
20
PL
4.3 Zerowanie / tarowanie:
Waga zeruje się automatycznie podczas uruchomienia. Jeżeli przed uruchomieniem
został załadowany kontener, będzie on tarowany lecz kontrolka tarowania nie zaświeci
się. Waga obsługuje także ręczne zerowanie / tarowanie poprzez wciśnięcie przycisku
Zero/Tare na przednim panelu lub przycisku C na pilocie. Kontrolka tary zaświeci się
na czerwono, wskazując że przeprowadzono tarowanie oraz że urządzenie jest gotowe
do rozpoczęcia ważenia.
4.4 Zapytanie / kwerenda
Należy nacisnąć przycisk Query na panelu przednim lub przycisk B na pilocie aby wejść
do trybu kwerendy (zapytania).Waga może zapisać maksymalnie 30 rekordów.Automatyczne kasowanie wpisów nastąpi, gdy pamięć będzie pełna. Rozpocznie się wtedy nowa
runda zapisywania rekordów.
System pokaże najpierw ostatni rekord po wyświetleniu “HIS”. Każdy rekord posiada
dwie strony. Na przykład: pierwsza strona pokazuje „05” (np. 05 oznacza piąty i ostatni
rekord), a druga strona pokazuje wartość wagi. Każda strona wyświetlana jest przez
1 sekundę, a następnie pokazywana jest kolejna aż do osiągnięcia pierwszego rekordu.
Naciśnięcie i przytrzymanie przycisku Query na przednim panelu lub przycisku B na
pilocie spowoduje, że pojawi się komunikat „HIS”, a następnie możliwe będzie opuszczenie trybu kwerendy i powrót do trybu ważenia.
4.5 Hold
Należy nacisnąć przycisk Hold na panelu przednim lub przycisk D na pilocie aby wejść
do trybu zatrzymania Hold. Bieżąca wartość ciężaru zostanie zachowana, a kontrolka
wskazania w lewym górnym rogu okna ekranu zaświeci się.
Aby wyjść, należy nacisnąć ten przycisk ponownie.
4.6 Wyłączenie
Po zakończeniu pracy, należy nacisnąć i przytrzymać przez 2 sekundy przycisk [ON/
OFF] aby wejść do trybu wyłączenia urządzenia. Urządzenie wyświetli komunikat ——
OFF——. Po zwolnieniu klawisza, zasilanie zostanie odłączone. Można także nacisnąć
przycisk A na pilocie, przytrzymać go przez 3 sekundy, a następnie zwolnić aby odłączyć
zasilanie. Wyświetlacz wagi wyświetli komunikat „-OFF-“. Należy wyłączyć przełącznik
mechaniczny w tylnej części wagi, jeżeli urządzenie nie będzie używane przez dłuższy
okres czasu.
21
PL
5. Akumulator i ładowanie
Kiedy poziom energii akumulatora jest niski, a w szczególności gdy napięcie spada
poniżej 5,4 V, waga wysyła komunikat alarmowy o treści „LB”. Należy wtedy naładować
wagę.
Gdy poziom energii akumulatora jest mniejszy niż 5,25 V, waga przechodzi w tryb
uśpienia. Urządzenie będzie wyświetlać komunikat U5.2, a brzęczyk uaktywni się.
Następnie konieczne będzie naładowanie wagi.
Urządzenie wyłączy się automatycznie po 20 razowym wyświetleniu komunikatu „LB”
jeżeli waga nie zostanie naładowana.
Ładowanie wagi jest możliwe niezależnie od tego czy jest ona wyłączona czy też w
trakcie pracy. Pełne ładowanie baterii trwa około 8 godzin. Podczas ładowania, kontrolka AC na przednim panelu będzie się świecić na czerwono. Gdy kontrolka będzie się
świecić na zielono, będzie to oznaczać, że akumulator jest w pełni naładowany. Napięcie
naładowanego akumulatora zostanie wyświetlone podczas ponownego uruchamiania
wagi.
6. Środki ostrożności
Elektroniczna waga dźwigniowa jest precyzyjnym przyrządem pomiarowym. Należy
zawsze przestrzegać środków bezpieczeństwa, włączając w to:
6.1
Nie przekraczać maksymalnej wydajności urządzenia
6.2
Pionowe podnoszenie i opuszczanie towarów oraz ich ciągnięcie są
zabronione.
6.3 Należy sprawdzić, czy śruby, sworzeń oraz pierścień sprężynujący zabezpieczający nie są poluzowane lub rozłączone przed upewnieniem się, że możliwe jest zapewnienie bezpieczeństwa oraz dokładnego pomiaru.
6.4
Należy unikać intensywnego i długotrwałego narażenia na działanie de
szczu. Gdy sprzęt używany jest poza zabudowaniami, należy wyłączyć wagę gdy nadejdzie burza.
6.5
W razie pracy w warunkach wysokiej temperatury, należy zakupić wagę dźwigniową dostosowaną do pracy w wysokich temperaturach. Odległość pomiędzy spodem wagi, a źródłem ciepła winna być większa niż 1 600 mm. Temperatura dla ważonego artykułu nie powinna przekraczać 180°C a długotrwała praca w warunkach bardzo wysokiej temperatury jest zabroniona.
6.6
Nie należy przeciążać urządzenia i uważać aby nie uszkodzić czujnika. Gdy waga osiągnie wartość 120% F.S., system wyzwoli sygnał dźwiękowy. Należy natychmiast usunąć nadmiarowy ciężar.
22
PL
6.7
Baterię należy ładować generalnie co miesiąc, nawet jeśli urządzenie nie było używane aby uniknąć uszkodzenia urządzenia przez samoczynne rozładowanie akumulatora.
7. Ocena najczęstszych błędów
Opis
Ocena
Brak reakcji urządzenia po Uszkodzony akumulator
włączeniu
Wtyczka akumulatora
poluzowała się
Przy braku ładunku nie
Zbyt krótki czas “nagrzepojawia się „0.0“
wania” po włączeniu
Automatyczne wyłącznie
wagi po jej włączeniu
Błąd podczas ładowania
Unstable weight value
Kontrolka ładowania nie
świeci się
Waga leży podczas
użytkowania
Ekstremalnie niski poziom
energii w akumulatorze,
automatyczne wyłączenie
przy napięciu 5,4 V
Uszkodzony akumulator
Słaba styczność pomiędzy
wtyczką ładowania oraz
gniazdem lub uszkodzona
wtyczka / uszkodzone
gniazdo
Czułe lub źle działające
ogniwo obciążnikowe
Woda lub wilgoć
przedostały się do
urządzenia
Uszkodzony adapter
Rozwiązanie
Wymienić akumulator na
nowy
Zamocować poprawnie
luźną wtyczkę
Pozwolić wadze na „nagrzanie” przez około 15
minut
Zawiesić wagę pionowo
Należy natychmiast
naładować baterię
Wymienić akumulator
Wymienić wtyk lub
gniazdko
Wymienić ogniwo
obciążnikowe na nowe
Umieścić urządzenie w
suchym miejscu
Wymienić adapter na
nowy
Uszkodzony styk adaptera Sprawdzić gniazdko i ponownie wetknąć wtyk
23
PL
Błąd podczas włączenia
lub wyłączania
Powtórzyć wyświetlanie
napięcia
Zablokowany lub
niekontaktujący przycisk
ON/OFF
Przycisk Query
zablokował się lub
nastąpiło zwarcie
Sprawdzić i wymienić
przycisk
Sprawdzić i wymienić
przycisk
8. Kalibracja
Nie należy próbować kalibracji bez standardowego odważnika.
Włączyć wagę i gdy pojawi się komunikat “0.000” nacisnąć przycisk [ON/OFF] do momentu aż pojawi się „OFF”, a następnie „PASS”. Po zwolnieniu przycisku, wyświetlacz
pokaże komunikat „SYS”. Po naciśnięciu [QUERY] wyświetlony zostanie komunikat
“CAL” . Należy nacisnąć przycisk [ON/OFF]. Wyświetlacz pokaże „00000“. Można
wprowadzić przesuwnik wagi naciskając przycisk [QUERY] oraz [ON/OFF] zgodnie
z poniższym: Nacisnąć przycisk [QUERY] aby zwiększyć o jeden mrugającą liczbę
(wartość obiega od 0 do 9), a następnie nacisnąć przycisk [ON/OFF] aby przesunąć
mrugającą liczbę w lewą stronę (np. gdy przesuwnik wagi ma 3000kg, należy wprowadzić
wartość 03000). Po ustawieniu przesuwnika wagi, można nacisnąć przycisk [on/off] na
dwie sekundy. Pojawi się komunikat „CAL“, należy zawiesić przesuwnik wagi, a gdy
kontrolka gotowości będzie się świecić, należy nacisnąć przycisk [QUERY], co spowoduje wyświetlenie liczb. Są one losowane. Gdy liczby nie będą się zmieniać, zostanie
wyświetlony ciężar przesuwnika wagi. Kalibracja została ukończona.
Jeżeli konieczne jest ustawienie systemu, należy
przeprowadzić kalibrację po zmianie ustawień systemu.
24
PL
Ustawienia systemu
Włączyć wagę i gdy pojawi się komunikat “0.000” nacisnąć przycisk [ON/OFF] do momentu aż pojawi się „OFF”, a następnie „PASS”. Po zwolnieniu przycisku, wyświetlacz
pokaże komunikat „SYS”.
Nacisnąć przycisk [QUERY] i kiedy pojawi się komunikat „SCALE“, nacisnąć przycisk [ON/OFF]. Pojawi się komunikat „00000“. Teraz można wprowadzić ustawienie
wydajności. Nacisnąć przycisk [QUERY] aby zwiększyć mrugającą liczbę o jeden (obieg
od 0 do 9), a następnie nacisnąć przycisk [ON/OFF] aby przenieść mrugającą liczbę
w lewo (np. jeżeli wydajność wynosi 3000kg, należy wprowadzić kombinację 03000),
a następnie nacisnąć przycisk [ON/OFF]. Po dwóch sekundach pojawi się komunikat
„SCALE“, co oznacza, że wartość wydajności została zatwierdzona.
Nacisnąć przycisk [QUERY] i kiedy pojawi się komunikat „DEC“, nacisnąć przycisk
[ON/OFF]. Pojawi się komunikat „00000“. Nacisnąć przycisk [QUERY] aby przenieść
kropkę pozycyjną w lewo. Następnie należy nacisnąć przycisk [ON/OFF] aby dokonać
wyboru; następnie pojawi się komunikat „DEC“(np. gdy wartość podziałki wynosi 0,5kg,
można wybrać 0000.0; jeżeli wartość podziałki wynosi 1kg, można wybrać 00000).
Należy nacisnąć przycisk [QUERY], co spowoduje wyświetlenie komunikatu „PL-DE“,
a następnie należy nacisnąć przycisk [ON/OFF], co spowoduje pojawienie się komunikatu „N1“. Nacisnąć przycisk [QUERY] celem wybrania „N1“ lub „N2“ (N1 oznacza
podział od 1 do 9, a N2 od 10 do 19). Następnie należy nacisnąć przycisk [ON/OFF]
aby wyjść z menu. Na wyświetlaczu pojawi się komunikat „PL - DE“.
Nacisnąć przycisk [QUERY] i kiedy pojawi się komunikat „CLASS“, nacisnąć przycisk
[ON/OFF]. Pojawi się komunikat „1“. Nacisnąć przycisk [QUERY] aby wybrać „1”, „2”,
„5”, a następnie nacisnąć przycisk [ON/OFF] aby wyjść z menu. Ukaże się komunikat
„CLASS“.
Jeżeli nie jest wymagana kalibracja, można wyłączyć wagę, a następnie włączyć ją ponownie aby rozpocząć korzystanie z urządzenia.
Jeżeli konieczne jest przeprowadzenie kalibracji, należy nacisnąć przycisk [QUERY, co
spowoduje wyświetlenie komunikatu „UNLOC“. Nacisnąć przycisk [QUERY]. Pojawi
się komunikat „CAL“. Kolejne kroki należy wykonać zgodnie z opisem dotyczącym
procedury kalibracji.
25
PL
9. Wymiary
9.1 Schemat wagi dźwigniowej
Model
SBS-KW-1TE
SBS-KW-3/1K
SBS-KW-5/2K
A
(mm)
265
450
450
B
(mm)
85
95
95
C
(mm)
35
55
55
26
Ciężar netto
(N.W.)
5kg
11 kg
13 kg
PL
9.2. Schemat pilota zdalnego sterowania oraz funkcji
przycisków
36mm
A
85mm
B
C
D
Funkcje przycisków na pilocie zdalnego sterowania:
A. Wyłączenie
B. Funkcja kwerendy (zapytania)
C. Zerowanie / tarowanie:
D. Funkcja zatrzymania Hold
27
User manual
crane scale
SBS-KW-1TE
SBS-KW-5/2K
SBS-KW-3/1K
www.steinbergsystems.de
S T E I N B E R G
S Y S T E M S
EN
1. Introduction
Steinberg Systems series of direct visual electronic crane scale are composed of safe
and reliable hardware and advanced software. It has high precision load cell to ensure
the safety and high speed A/D conversion module to guarantee the accuracy. The crane
scale has 5 bits of 30mm inch super bright LED display that it is possible to work under
dark light places.
Equipped with unique intelligent digital filter with anti-shake, anti vibration, the reading
of weight is rapid and stable. The measurement is of high precision and easy. Lifting,
weighing and recording at one time, Steinberg Systems series of electronic crane scale
are ideal products for metallurgy, construction, warehouse, factory, dock and storage.
2. Product features
2.1 Low power consumption:
The scale can support continuous working over 100hours. It has the protection circuit
to avoid the battery damage from overcharge and over-discharge, and so as to prolong
the battery life.
2.2 Voltage monitor:
The scale shows the real voltage during start-up process and has the low battery alarm
and power off functions.
2.3 Overload protection
When the load exceeds 120% of the full scale, it will alarm the user by displaying”OUE-”. When the load is over 200% of the full scale, the scale will display “LOC-“ and
save the overload record in the system.
2.4 Auto-save and query function
The scale can save 30 records of the weight automatically for user to query. It will clear
the records when it is full in memory and records new weights.
29
EN
2.5 Software calibration
The scale has the advanced software to support fast, rapid and convenient calibration.
2.6 Auto tare:
The scale will go through automatic tare after power on if there is any container loaded.
2.7 Power saving
The scale will enter into power save mode after 5-minute inactivity. It will power off
automatically after it’s inactive for 30minutes.
3.Technical specifications and parameters
3.1 Main specifications
Table 1
Accuracy Class
Display
Manual Zero/ tare range
Overload alarm
Power supply
Adaptor
Working temperature
Working Humidity
OIML III
Super bright 5-digit 30mm LED
100%F.S
100% F.S.+100e
6V/4Ah rechargeable Lead-Acid battery
DC12V, 1000mA
-10°C~ 70°C
≤90%RH when under 20°C working
temperature
30
EN
3.2 Technical parameters
Rated capacity, resolution, division, maximum capacity, minimum capacity, zero set range,
tare range, zero tracking range and limit display (overload alarm) are shown in table 2:
Table 2
Rated capacity
Resolution(Standard)
Standard division (e)
Hi-resolution division
Max capacity
Min capacity
Zero range
Tare range
Zero tracking range
Limit display
1000kg
1/2000
500g
200g
1000kg
20d
±60d
Max
±0.5d
Max+9d
3000 kg
1/3000
1kg
500g
3000kg
20d
±60d
Max
±0.5d
Max+9d
5000 kg
1/2500
2kg
1kg
5000kg
20d
±60d
Max
±0.5d
Max+9d
Note e=d=standard division
3.3. Error range
Table 3
weight
(described as e)
Outgoing inspection
0≤m≤500e
500e<m≤2000e
2000e<m≤3000e
±0.5e
±1.0e
±1.5e
Error range
Inspection after repair
±1.0e
±2.0e
±3.0e
31
EN
4. Operations and functions
4.1 Power on
Turn the mechanical switch at the back of scale to the ON position and press button
[ON/OFF] on the front panel. The system will enter into self-check mode with the
following five displays.
4.1.1 4.1.2 4.1.3 4.1.4 4.1.5 4.1.6 The first display is the version number of the software. E.g. UER 2.0
The second display is all of the indicating symbols to check whether there is incomplete stroke and whether indicator lamps can light on.
The third display is capacity. For example, 1000 means the max capacity is 1000kg.
The forth display is the voltage display. E.g. U6.3 means that the current volta
ge is 6.3V.
Finally, it displays 0.0 and ready for weighing.
Please do not use the crane scale (LED) under high luminance (like direct sunshine) and please confirm whether the display is clear when power on.
4.2 Weighing operation
When the scale gets steady, it will display ”0.0” and the stable indication lamp will light
up. After that, the scale is ready for weighing operation.(Note: it is recommended to
allow scale 15 minutes of warm-up time before starting weighing operation)
Put the load, the scale will display the weight value after 4-5 seconds and the stable
lamp will light up.
Note: The scale will alarm the user by displaying “-OUE-” when the load exceeds 120%
F.S plus 100e. Once the load exceeds 200% F.S, the system will lock automatically and
display “LOC-”. It will save the overload record in system and display “UP200” when
restart.
32
EN
4.3 Zero/Tare:
The scale will zero automatically when power on. In case that there is container loaded
before power on, the container will be tared but the tare lamp will not light up. The
scale also support manual tare/zero by pressing the Zero/Tare button on the front
panel or button C on the remote, and then the tare lamp will be red to indicate that it
is tared and ready for weighing.
4.4 Query
Press button Query on the front panel or button B on the remote to enter into query
mode. The scale can save 30records at most and will clear automatically when full in
memory and then start a new round of record.
The system will firstly display the last record after display “HIS”. Every record has two
pages, For example, the first page displays “05” (e.g. 05 meaning the fifth and last record) and the second page displays weight value. Each page holds for 1 second and will
turn to next automatically until the first record. Keep pressing Query button on the
front panel or button B on the remote for 3 seconds, it will display “HIS” to quit query
mode and return back to weighing mode.
4.5 Hold
Press button Hold on the front panel or button D on the remote to enter into Hold
mode. The current stable weight value can be held and the indication lamp at the left
upper corner of display window will light up. Push it again to quit
4.6 Power off
When you finish operation, push button [ON/OFF] for 2 seconds to enter into power
off mode by displaying ——OFF——. Cut off power supply after you loosen the key.
Or Press button A on the remote over 3 seconds and loosen it to power off when the
scale displays “-OFF-”. Please turn off the mechanical switch on the back if you do not
use the crane scale for a long time.
33
EN
5. Battery and charging
When there is low power in the battery, specifically when the voltage is less than 5.4V,
the scale will alarm by displaying LB. The scale need to be charged now.
When the battery is less than 5.25V, the scale will go into sleeping mode. It will repeat
displaying U5.2 and the buzzer will give out alarm sound instantly. Then the scale must
be charged.
The scale will power off automatically after displaying LB for 20 times without charging.
It can be charged no matter the scale is switched off or during working. It takes around
8 hours to fully charge the battery. In recharging the battery, the AC lamp on the front
panel will be red. When the light is green, it indicates the battery is charged fully. The
recharged battery voltage will be shown during restarting the scale.
6. Precautions
Electronic crane scale is precise measuring instrument, safety precautions should be
always followed including the following:
6.1
Do not exceed the maximum weight capacity
6.2
Lift and descend goods vertically and dragging goods is forbidden.
6.3 Please check whether the screws, bolt and circlip are loosened or
disengaged before use to ensure safety and accurate measurement
6.4
Avoid any intensive impact and long rain catching. When using outdoor, please turn off the crane scale if there is a thunder.
6.5
When working under high temperature, please buy high-temperature crane scale. The distance between the bottom of crane scale and the hanged heating source should be more than 1600mm. The temperature for weighing article should not be higher than 180°C and long time working under high temperature is forbidden
6.6
Do not overload to avoid the damage of sensor. When the weight reaches 120%F.S, the system will give alarm sound. Please remove the overload weight immediately.
34
EN
6.7
Charge battery generally per month even when not in use to avoid battery damage caused by self-discharge.
7. Simple faulty judge
Description
No react after power on
Judgment
Dead battery
The plug on battery get
loose
It is not“0.0“ without load Short warm-up time after
power on
The scale is lying on
group when using
Power off automatically
Extremely low voltage
after power on
battery, Auto-power off
voltage 5.4V
Failure in charging
Damaged battery
Poor contact between the
charging plug and socket
,or damaged plug/socket
Unstable weight value
Sensitive load cell or bad
load cell
Water inside scale or
damp scale
Charging lamp not light up damaged adaptor
contact defective of the
adaptor
35
Solution
Replace a new battery
Fix the loosen plug
Warm-up for 15 minutes
Please hang up the scale
vertically
Please charge the battery
immediately
Replace the battery
replace the charging plug
or socket
replace a new load cell
Please stock the scale in a
dry place
replace a new adaptor
check the socket and
replug in
EN
Fail in power on or off
Repeat displaying the
voltage
ON/OFF button stuck or
bad contact
Query button stuck or
get short circuit
check and replace the
button
check and replace the
button
8. Calibration
Please don’t attempt to calibration without standard weight.
Turn on crane scale after display „0.000“ press [ON/OFF] until display „OFF“ then display „PASS“, loosen your hand it will display „SYS“. Press [QUERY] it will display “CAL”
. press [ON/OFF] will display „00000“ ,You can input the poise weight by pushing button [QUERY] and [ON/OFF] as follows: push button [QUERY] to increase the flashing
number by one (circulate from 0 to 9) and push button [ON/OFF] to move the flashing
number toward left circular(e.g. if the poise weight is 3000kg,you input 03000).After
poise setting, you can press [on/off] for two seconds and it will display „CAL“, suspend
the poise, after the light of steady lamp is on, press [QUERY], it will display numbers,
the numbers is randomized .after the numbers steady it will display the weight of poise.
Now the calibration is finished.
If you need setting of system, please after setting of system then do calibration.
36
EN
Setting of system
Turn on crane scale after display „0.000“ press [ON/OFF] until display „OFF“ then
display „PASS“, loosen your hand it will display „SYS“.
Press [QUERY] when it display „SCALE“ press [ON/OFF] will display „00000“ now has
enter into setting of capacity. Push button [QUERY] to increase the flashing number by
one (circulate from 0 to 9) and push button [ON/OFF] to move the flashing number
toward left circular (e.g. if capacity is 3000kg, you input 03000), then press [ON/OFF]
two seconds will display „SCALE“, it means the capacity is confirm.
Press [QUERY] it will display „DEC“, press [ON/OFF] will display „00000“, Press
[QUERY] to move the radix point toward left. Then press [ON/OFF] to choose, it will
display „DEC“(e.g. if division is 0.5kg,you could choose 0000.0;if division is 1kg,you
could choose 00000).
Press [QUERY] it will display „PL-DE“, press [ON/OFF] will display „N1“,Press [QUERY] TO CHOOSE“N1“or „N2“(N1 means the division is the unit from 1 to 9, N2
means is decade from 10 to 19),then press [ON/OFF] to exit, it will display „PL - DE“.
Press [QUERY] it will display „CLASS“, press [ON/OFF] will display „1“,Press [QUERY]
to CHOOSE „1“ „2“ „5“,then press [ON/OFF] to exit, it will display „CLASS“.
If don‘t need calibration now you could turn off scale, then turn on scale to use.
If need calibration Press [QUERY] it will display „UNLOC“, press [QUERY] it will display „CAL“. Next step same as up calibration.
37
EN
9. Dimensions
9.1 Crane scale schematic
Model
SBS-KW-1TE
SBS-KW-3/1K
SBS-KW-5/2K
A
(mm)
265
450
450
B
(mm)
85
95
95
C
(mm)
35
55
55
38
Net Weight
(N.W.)
5kg
11 kg
13 kg
EN
9.2. remote schematic and button functions
36mm
A
B
85mm
C
D
Remote button functions
A. Power off
B. Query function
C. Zero/Tare
D. Hold
39
Manuel d‘utilisation
balances à grue
SBS-KW-1TE
SBS-KW-5/2K
SBS-KW-3/1K
www.steinbergsystems.de
S T E I N B E R G
S Y S T E M S
FR
1. Introduction
Les balances à grue électroniques Steinberg Systems sont fabriquées à partir de matériaux sûrs et fiables et disposent d’un logiciel à la pointe de la technologie. La haute
précision du dynamomètre et la haute vitesse de conversion analogique/numérique
garantissent la grande fiabilité de cette balance. Elle possède de plus un écran LED ultra
éclairé à 5 chiffres de 30 mm permettant l’utilisation de la balance dans des lieux peu
éclairés.
Étant équipée d’un filtre digital anti-secousse et anti-vibration unique en son genre, la
lecture du poids est rapide et stable. La mesure est très précise et facilement obtenue.
Levée, pesée et enregistrement sont quasi simultanés, faisant de cette balance un outil
idéal dans la metallurgie, le bâtiment, en entrepôt, usine ou activité portuaire.
2. Particularité des produits
2.1 Alimentation basse consommation:
La balance peut être utilisée en continu pendant 100 heures. Sa protection contre toute
surcharge ou décharge excessive prolonge sa durée de vie.
2.2 Indicateur d’alimentation :
La balance indique le niveau d’alimentation lors du démarrage, signale lorsque la batterie est faible et s’éteint seule lorsque celle-ci est trop basse.
2.3 Protection anti surcharge
Lorsque le poids excède 120% du poids maximal de la plage de mesure, l’écran indique « -OUE-». « -LOC-» s’affiche lorsque le poids atteint 200% du poids maximal, la
surcharge est alors enregistrée dans les données de l’appareil.
2.4 Sauvegarde automatique et fonction de recherche
La balance peut enregistrer automatiquement jusqu’à 30 données que l’utilisateur
pourra ensuite rechercher. Elles seront effacées lorsque la mémoire sera pleine et que
de nouvelles pesées seront effectuées.
41
FR
2.5 Calibrage du logiciel
La balance possède un logiciel conçu pour un calibrage simple et rapide.
2.6 Tare automatique:
La balance tarera automatiquement lorsqu’elle est en marche si aucun contenant n’est
posé dessus.
2.7 Mise en veille
La balance se met automatiquement en veille après 5 minutes d’inactivité. Elle s’éteindra
automatiquement après 30 minutes d’inactivité.
3. Spécificités techniques et paramètres
3.1 Principales caractéristiques
Tableau 1
Classe de précision
Écran
Mise à zéro manuelle/ étendue de la tare
Alerte de surcharge
Alimentation
Adaptateur
Plage de température de fonctionnement
Plage d’humidité de fonctionnement
OIML III
Ultra brillant, 5 chiffres 30mm DEL
100% de l’étendue de pesée max.
100% de l’étendue de pesée max. + 100e
6V/4Ah, piles acides plomb rechargeables
DC12V, 1000mA
-10°C~ 70°C
≤90% humidité relative dans conditions
de température < 20°C
42
FR
3.2 Paramètres techniques
Capacité nominale, résolution, division, capacité maximale, capacité minimale, plage de
réglage du zéro, plage de la tare, plage de recherche du zéro, alerte de surcharge sont
dans le tableau 2 :
Tableau 2
Capacité nominale
Résolution(Standard)
Division standard (e)
Division haute résolution
Capacité max.
Capacité min.
Plage du zéro
Plage de la tare
Plage de recherche du zéro
Alerte de surcharge
1000kg
1/2000
500g
200g
1000kg
20d
±60d
Max
±0.5d
Max+9d
3000 kg
1/3000
1kg
500g
3000kg
20d
±60d
Max
±0.5d
Max+9d
5000 kg
1/2500
2kg
1kg
5000kg
20d
±60d
Max
±0.5d
Max+9d
Remarque : e=d= division standard
3.3. Plage d’erreur
Tableau 3
Poids
(décrit comme e)
Contrôle sortant
0≤m≤500e
500e<m≤2000e
2000e<m≤3000e
±0.5e
±1.0e
±1.5e
Plage d’erreur
Contrôle après réparation
±1.0e
±2.0e
±3.0e
43
FR
4. Opérations et fonctions
4.1 Mise en marche
Appuyez sur On sur l’interrupteur situé au dos de l’appareil et pressez le bouton ON/
OFF sur le devant. Le système interne commence alors son auto-vérification.
4.1.1 4.1.2 4.1.3 4.1.4 4.1.5 4.1.6 Le premier écran est le numéro de version du logiciel. Par exemple : UER 2.0
Le second écran correspond aux symboles pour vérifier que tout est complet et que le signal peut s’allumer.
Le troisième écran indique la capacité. Ainsi 1000 signifie que la capacité max. est 1000 kg.
Le quatrième écran indique la tension. Ainsi U6.3 signifie que la tension est de 6,3V.
Après les vérifications, 0.0 s’affiche, la balance est prête à être utilisée.
N’utilisez pas la balance avec une lumière très forte de type soleil direct et assurez-vous que l’écran est éclairé lorsque la balance est en marche.
4.2 Pesée
Lorsque la balance est prête à être utilisée, 0.0 s’affiche et le signal s’allume.
(Remarque : il est recommandé de laisser la balance en marche 15 minutes avant de
l’utiliser.)
Mettre la charge à peser, le poids s’affiche après environ 4 ou 5 secondes et le signal
s’allume.
Remarque : Lorsque le poids excède 120% du poids maximal de la plage de mesure,
l’écran indique « -OUE-». « -LOC-» s’affiche lorsque le poids atteint 200% du poids
maximal, le système se verrouille alors automatiquement. La surcharge est enregistrée
dans les données de l’appareil et « UP 200 » s’affiche lorsque la balance est remise en
marche.
44
FR
4.3 Zéro/Tare:
La balance se met automatiquement à zéro lorsqu’elle est mise en marche. Si un récipient est déjà suspendu à la balance lorsque vous la mettez en marche, la tare sera
effectuée mais le signal de tare ne s’allumera pas. La tare/mise à zéro peut aussi être
effectuée manuellement en appuyant sur le bouton Zéro/Tare sur le panneau de contrôle ou sur le bouton C de la télécommande. Le signal de tare deviendra alors rouge
pour indiquer que la tare a été effectuée et que la balance est prête à effectuer la pesée.
4.4 Recherche
Appuyez sur le bouton Query sur le panneau de contrôle ou sur le bouton B de la
télécommande pour débuter le mode recherche. La balance peut enregistrer automatiquement jusqu’à 30 données que l’utilisateur pourra ensuite rechercher. Elles seront
effacées lorsque la mémoire sera pleine et que de nouvelles pesées seront effectuées.
La dernière pesée s’affiche lorsqu’on appuie sur « HIS ». Chaque enregistrement comprend deux pages, la première indique de quel enregistrement il s’agit (5 signifie ainsi
que c’est le 5e enregistrement) et la deuxième page indique le poids. Chaque page reste
affichée 1 seconde et passe à la suivante jusqu’à atteindre le premier enregistrement.
Appuyez sur Query ou le bouton B de la télécommande pendant 3 secondes et « HIS
» s’affichera pour indiquer que vous n’êtes plus en mode recherche.
4.5 Hold
Appuyez sur le bouton Hold sur le panneau de contrôle ou le bouton D de la télécommande pour débuter le mode maintien des données. La donnée alors affichée sera
maintenue à l’écran et le signal en haut à gauche s’allume. Appuyez à nouveau pour
quitter le mode Hold.
4.6 Arrêt
Lorsque vous avez terminé vos opérations de pesée, appuyez sur le bouton [ON/OFF]
pendant 2 secondes, ——OFF—— s’affiche alors : la mise à l’arrêt s’effectue lorsque
vous arrêtez d’appuyer sur la touche. De la même manière, vous pouvez aussi appuyer
sur le bouton A de la télécommande pendant 3 secondes. Rappuyez à nouveau sur
l’interrupteur au dos de l’appareil si vous ne comptez pas l’utiliser pour une longue
période.
45
FR
5. Piles et charge
Lorsque l’alimentation est faible, en particulier lorsque la tension est inférieure à 5,4V,
LB s’affiche à l’écran. Cela signifie que vous devez mettre la balance à recharger.
Lorsque l’on passe sous 5,25V, la balance se met en veille. U5.2 est répétitivement affiché et vous entendrez un signal sonore. Cela signifie que vous devez mettre la balance
à recharger immédiatement.
La balance s’éteint automatiquement après que LB ait été affiché 20 fois.
Elle peut être mise à charger alors qu’elle est en fonctionnement ou à l’arrêt. La charge
complète prend environ 8 heures. Le signal AC devient rouge lorsque la balance est
en charge. Lorsqu’il est vert, cela signifie que la charge est finie. La tension des piles
rechargées sera affichée alors que vous remettrez l’appareil en marche.
6. Précautions
La balance à grue électronique est un instrument de mesure précis, les instructions de
sécurité doivent être toujours suivies :
6.1
N’excédez pas la charge maximale
6.2
N’utilisez pas la balance pour lever, traîner ou descendre des articles.
6.3 Vérifiez que les vis, boulons et circlips sont bien fixés avant d’utiliser la balan
ce. Évitez tout choc contre l’appareil et toute exposition à la pluie. Si vous l’utilisez à l’extérieur, éteignez-la en cas d’orage. Equipez-vous d’une balance conçue pour travailler à haute température si vous souhaitez l’utiliser dans des conditions de température élevée. La distance entre le bas de l’appareil et une source de chaleur pesée doit être de plus de 1600mm. La température des objets pesés doit rester inférieure à 180°C et il est défendu de travailler sous des hautes températures
6.4
Vermeiden Sie die Anwendung bei starkem Regen. Bei der Anwendung im Au
ßenbereich, sollte die Kranwaage bei Gewitter ausgeschaltet werden.
6.5
Ne pas surcharger pour ne pas endommager l’appareil. Lorsque le poids atteint 120% du poids maximal, le système émet un signal d’alarme. Ôtez alors immédiatement la surcharge
46
FR
8. Calibrage
Ne tentez aucun calibrage sans poids étalon.
Allumez la balance. Après que „0.000“ se soit affiché, appuyez sur [ON/OFF] jusque
l’affichage de „OFF“ puis de „PASS“ ; cessez d’appuyer, „SYS“ va s’afficher. Appuyez sur
[QUERY], “CAL” va s’afficher. Appuyez sur [ON/OFF], „00000“ s’affiche, vous pouvez
entrer le poids étalon en appuyant sur le bouton [QUERY] et [ON/OFF] comme décrit
ici : appuyez sur [QUERY] pour augmenter le chiffre de un (il va de 0 à 9) et appuyez
sur [ON/OFF] pour mettre le chiffre plus à gauche (par exemple, vous inscrivez 03000
pour 3000kg). Après avoir appuyé sur [on/off] durant 2 secondes, „CAL“ s’affiche, suspendez le poids. Après que le signal de validation se soit allumé, appuyez sur [QUERY],
les chiffres s’affichent. Lorsqu’ils se stabilisent, le nombre affiché correspond au poids
étalon. Le calibrage est terminé.
Le calibrage est à effectuer après le réglage du système.
47
FR
Réglage du système
Allumez la balance. Après que „0.000“ se soit affiché, appuyez sur [ON/OFF] jusque
l’affichage de „OFF“ puis de „PASS“, cessez d’appuyer, „SYS“ va s’afficher.
Appuyez sur [QUERY], puis, une fois que „SCALE“ se sera affiché, sur [ON/OFF].
„00000“ apparaît alors à l’écran. Appuyez sur [QUERY] pour augmenter le chiffre de
une unité (il va de 0 à 9) et appuyez sur [ON/OFF] pour mettre le chiffre plus à gauche (par exemple, vous inscrivez 03000 pour 3000kg). Rappuyez sur [ON/OFF] deux
secondes : „SCALE“ s’affiche, la capacité est confirmée.
Appuyez sur [QUERY] jusqu’à l’affichage de „DEC“, appuyez alors sur [ON/OFF], puis,
une fois que „00000“ sera apparu, appuyez sur [QUERY] pour faire bouger le point vers
la gauche. Appuyez sur [ON/OFF] pour choisir, „DEC“ s’affiche (par exemple si vous
souhaitez afficher les données à 0.5kg près, vous choisissez 0000.0;à 1kg près, vous
choisissez 00000).
Appuyez sur [QUERY], „PL-DE“ s’affiche, appuyez ensuite sur [ON/OFF], „N1“
s’affiche. Appuyez sur [QUERY] pour choisir „N1“ou „N2“(N1 signifie que la précision va de 1 to 9, N2 signifie que la précision va de 10 to 19), puis appuyez [ON/OFF],
„PL-DE“ s’affiche.
Appuyez sur [QUERY], „CLASS“ s’affiche. Appuyez sur [ON/OFF], „1“ s’affiche. Appuyez à nouveau sur [QUERY] pour choisir „1“ „2“ „5“, puis sur [ON/OFF], „CLASS“
s’affiche.
Si vous ne souhaitez pas effectuer un calibrage, éteignez alors l’appareil et rallumez-le
pour pouvoir l’utiliser.
Si vous souhaitez effectuer un calibrage, appuyez sur [QUERY]. Lorsque „UNLOC“
s’affiche, appuyez à nouveau sur [QUERY] pour que „CAL“ s’affiche. Suivez ensuite les
instructions concernant les différentes étapes du calibrage.
48
FR
9. Dimensions
9.1 Schéma de la balance à grue
Modèle
SBS-KW-1TE
SBS-KW-3/1K
SBS-KW-5/2K
A
(mm)
265
450
450
B
(mm)
85
95
95
C
(mm)
35
55
55
49
Poids net
(N.W.)
5kg
11 kg
13 kg
FR
9.2. Schéma de la télecommande
36mm
A
B
85mm
C
D
Fonctions de la télécommande
A: Touche Off
B. Fonction recherche (Query)
C. Zéro/Tare
D. Hold
50
Notizen
Notes | Notes | Note | Notas
51
Notizen
Notes | Notes | Note | Notas
52
Notizen
Notes | Notes | Note | Notas
53
Notizen
Notes | Notes | Note | Notas
54
EMAKS spółka z ograniczoną
odpowiedzialnością sp.k.
E G - Ko n f o r m i t ä t s e r k l ä r u n g
EC- Declaration of Conformity
CE-Déclaration de conformité
Deklaracja zgodności EG
Diese Konformitätserklärung
entspricht der
Europäischen Norm EN 45014
"Allgemeine Kriterien
für die Konformitätserklärungen
von Anbietern".
Die Grundlage der Kriterien
sind ínternationale Dokumente,
insbesondere
ISO/IEG-Leitfa den 22, 1982,
"lnformations on manufacturer's
declaration of conformity with
standards or other technical
specifications".
This Declaration of Conformity is
suitable to the
European Standard EN 45014
"General criteria for supplier's
declaratìon of conformity".
The basis for the criteria has
been found in international
documentation, particularly in:
ISO/IEC Guide 22, 1982,
"Informations on manufacturer's
declaration of conformity with
standards or other technical
specifications".
Cette Déclaration de conformité
correspond à la
norme européenne EN 45014
"Critères généraux pour les
déclarations de conformité des
fournisseurs".
La base des crifères sonf des
documents internationaux,
en particulier le guide 22
ISO/IEC de 1982,
"Informationon manufacturef‘s
declaration of conformìty with
standards or other technical
specifications".
Niniejsze oświadczenie zgodności
jest zgodne z Normą Europejską EN
45014 „Ogólne kryteria dla oświadczeń
zgodności oferentów“. Podsta- wę
kryteriów stanowią międzynarodowe
dokumenty, w szczególności wytycza
ISO/IEG 22, 1982, „lnformations on
manu- facturer‘s declaration of conformity with standards or other technical
specifications“.
Wir
We / Nous / My
emaks spółka z ograniczoną odpowiedzialnością sp.k.
(Name des Anbielets / supplier‘s name / nom du fournisseur / nazwa oferenta)
ul. Fabryczna 14B/01
65-410 Zielona Góra
(Anschrift / address / addresse / adres)
erklären in alleiniger Verantwortung, dass das (die) Produkt(e) / declare under our
sole responsibility that the product(s) / Déclarons sous notre seule responsabilité, que le(s) produit(s) /
oświadcza z wyłączną odpowiedzialnością, że produkt
Kranwaage / Crane Scale / Balances à grue / Wagi hakowe
3004
3083
3084
SBS-KW-1TE Kranwaage / Waga Hakowa 1 Ton
SBS-KW-5/2K | Kranwaage / Waga Hakowa 5 tona
SBS-KW-3/1K | Kranwaage / Waga Hakowa 3 tona
(Bezeichnung, Typ oder Modell, Los-, Chargen- oder Serien-Nr., möglichst Herkunft und Stückzahl
name, type or model, batch or serial numbel possibly sources and number of items
nom, type ou modèle. N° de lot ou de série, si possible I'origine et quantité
nazwa, typ lub model, seria, szarża lub nr serii, właściwego pochodzenia i ilości)
mit folgenden Europäischen Richtlinien übereinstimmt (übereinstimmen):
is (are) in conformity with the following directives: / Répond(ent) aux directives suivanfes:
jest/są zgodny/e z poniższymi wytycznymi:
EMV Richtlinie Nr.:2004/108/EG
EMC Directive No.:2004/108/EC
Directive CEM N°:2004/108/CE
Wytyczna EMV nr:2004/108/EG
Dies wird nachgewiesen durch die Einhaltung folgender Norm(en)
This is documented by the accordance with the following standard(s)
Justifié par Ie respect de la (des) norme(s) suivante(s)
Potwierdza to zgodność z następującą normą
EN 61000-3-2 / -3 EN 55022
EN 61326:1997
EN 61000-4-2 / -3 / -4 / -5 / -6 / -11
(Titel und/oder Nr. sowie Ausgabedatum der Norm(en) oder der anderen normativen Dokumente
Title and/or number and date of issue of the standard(s) or other normative docunent(s)
Titre et/ou numero et date d‘edition de la (des) norme(s) ou autre(s) document(s) nominatif(s))
Nazwa i/lub nr, jak również data wydania normy lub innego dokumentu normatywnego
Änderung
Revision
Révision
Zmiana
Zielona Góra, 28.03.2011
(Ort und Datum der Ausstellung
Place and date of issue
Lieu et date de l'édition
Miejscowość i data wydania)
Unterschrift, signature, podpis
(Name und Unterschrift oder gleichwertige Kennzeichen des Befugten / name and signature or equivalent
marking of authorized person / Nom et signature ou signe equivalent de la personne autorisee /
Nazwisko i podpis lub równoznaczny podpis osoby upoważnionej)
Umwelt- und Entsorgungshinweise
Hersteller an Verbraucher
Sehr geehrte Damen und Herren,
gebrauchte Elektro- und Elektronikgeräte dürfen gemäß europäischer Vorgaben [1] nicht zum unsortierten Siedlungsabfall gegeben werden, sondern müssen getrennt erfasst werden. Das Symbol der Abfalltonne auf Rädern weist auf die Notwendigkeit der
getrennten Sammlung hin. Helfen auch Sie mit beim Umweltschutz. Sorgen Sie dafür, dieses Gerät, wenn Sie es nicht mehr weiter
nutzen wollen, in die hierfür vorgesehenen Systeme der Getrenntsammlung zu geben.
In Deutschland sind Sie gesetzlich [2] verpflichtet, ein Altgerät einer vom unsortierten Siedlungsabfall getrennten Erfassung
zuzuführen. Die öffentlich - rechtlichen Entsorgungsträger (Kommunen) haben hierzu Sammelstellen eingerichtet, an denen
Altgeräte aus privaten Haushalten ihres Gebietes für Sie kostenfrei entgegengenommen werden. Möglicherweise holen die
rechtlichen Entsorgungsträger die Altgeräte auch bei den privaten Haushalten ab.
Bitte informieren Sie sich über Ihren lokalen Abfallkalender oder bei Ihrer Stadt- oder Gemeindeverwaltung über die in Ihrem
Gebiet zur Verfügung stehenden Möglichkeiten der Rückgabe oder Sammlung von Altgeräten.
[1]
RICHTLINIE 2002/96/EG DES EUROPÄISCHEN PARLAMENTS UND DES RATES
über Elektro- und Elektronik - Altgeräte
[2] Gesetz über das Inverkehrbringen, die Rücknahme und die umweltverträgliche Entsorgung
von Elektro- und Elektronikgeräten (Elektro- und Elektronikgerätegesetz - ElektroG).
CONTACT EU
KONTAKT PL
expondo GmbH
Charlottenstr. 18
10117 Berlin
emaks spółka z ograniczoną
odpowiedzialnością sp.k.
Fon: 0049-(0)30 530 27 717
Fax: 0049-(0)30 530 27 662
Mail: [email protected]
Web: www.expondo.de
S T E I N B E R G
ul. Fabyrczna 14B/01
65-410 Zielona Góra
Nr. kom.: +48 506 06 05 74
E-mail: [email protected]
S Y S T E M S