1
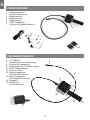
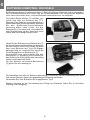
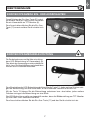
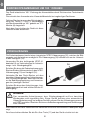
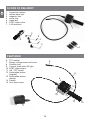
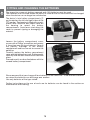
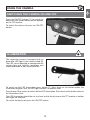
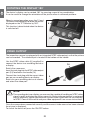
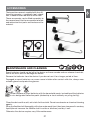
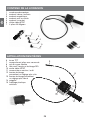
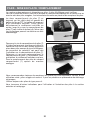
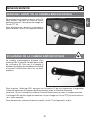
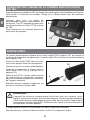
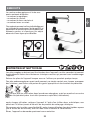
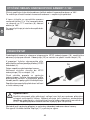
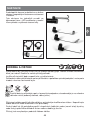
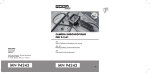
D
GB
INDUSTRIAL
Bedienungsanleitung
F
Bitte lesen und aufbewahren
Art.-Nr. 069107
CZ
EndoskopKamera
Diese Bedienungsanleitung ist eine Original-Bedienungsanleitung
D
INHALTSVERZEICHNIS
Sicherheitshinweise . . . . . . . . . . . . . . . . . . . . . . . . . . . . . . . . . . . . . . . . . . . . . . . . . . . . . . . . . . . . . . . . . . . . . . . . . . . . Seite 3
Lieferumfang . . . . . . . . . . . . . . . . . . . . . . . . . . . . . . . . . . . . . . . . . . . . . . . . . . . . . . . . . . . . . . . . . . . . . . . . . . . . . . . . . . . Seite 4
Technische Daten . . . . . . . . . . . . . . . . . . . . . . . . . . . . . . . . . . . . . . . . . . . . . . . . . . . . . . . . . . . . . . . . . . . . . . . . . . . . . Seite 4
Teilebezeichnung . . . . . . . . . . . . . . . . . . . . . . . . . . . . . . . . . . . . . . . . . . . . . . . . . . . . . . . . . . . . . . . . . . . . . . . . . . . . . . Seite 5
Bestimmungsgemäße Verwendung . . . . . . . . . . . . . . . . . . . . . . . . . . . . . . . . . . . . . . . . . . . . . . . . . . . . . . . . . Seite 5
Vor der Inbetriebnahme . . . . . . . . . . . . . . . . . . . . . . . . . . . . . . . . . . . . . . . . . . . . . . . . . . . . . . . . . . . . . . . . . . . . . . . Seite 5
Batterien einsetzen / wechseln . . . . . . . . . . . . . . . . . . . . . . . . . . . . . . . . . . . . . . . . . . . . . . . . . . . . . . . . . . . . . . . Seite 6
Inbetriebnahme . . . . . . . . . . . . . . . . . . . . . . . . . . . . . . . . . . . . . . . . . . . . . . . . . . . . . . . . . . . . . . . . . . . . . . . . . . . . . . . . . Seite 7
Endoskopkamera ein- und ausschalten . . . . . . . . . . . . . . . . . . . . . . . . . . . . . . . . . . . . . . . . . . . . . . . . . . . . . Seite 7
Endoskopkamerabeleuchtung . . . . . . . . . . . . . . . . . . . . . . . . . . . . . . . . . . . . . . . . . . . . . . . . . . . . . . . . . . . . . . . Seite 7
Endoskopkamerabild um 180 ° drehen . . . . . . . . . . . . . . . . . . . . . . . . . . . . . . . . . . . . . . . . . . . . . . . . . . . . . Seite 8
Videoausgang . . . . . . . . . . . . . . . . . . . . . . . . . . . . . . . . . . . . . . . . . . . . . . . . . . . . . . . . . . . . . . . . . . . . . . . . . . . . . . . . . . Seite 8
Aufsätze . . . . . . . . . . . . . . . . . . . . . . . . . . . . . . . . . . . . . . . . . . . . . . . . . . . . . . . . . . . . . . . . . . . . . . . . . . . . . . . . . . . . . . . . . Seite 9
Wartung und Reinigung . . . . . . . . . . . . . . . . . . . . . . . . . . . . . . . . . . . . . . . . . . . . . . . . . . . . . . . . . . . . . . . . . . . . . . Seite 9
Recycling . . . . . . . . . . . . . . . . . . . . . . . . . . . . . . . . . . . . . . . . . . . . . . . . . . . . . . . . . . . . . . . . . . . . . . . . . . . . . . . . . . . . . . Seite 10
CE-Konformitätserklärung . . . . . . . . . . . . . . . . . . . . . . . . . . . . . . . . . . . . . . . . . . . . . . . . . . . . . . . . . . . . . . . . . . . Seite 11
Garantiekarte . . . . . . . . . . . . . . . . . . . . . . . . . . . . . . . . . . . . . . . . . . . . . . . . . . . . . . . . . . . . . . . . . . . . . . . . . . . . . . . . . . Seite 11
Serviceadressen . . . . . . . . . . . . . . . . . . . . . . . . . . . . . . . . . . . . . . . . . . . . . . . . . . . . . . . . . . . . . . . . . . . . . . . . . . . . . . Seite 48
ZEICHENERKLÄRUNG
= Gehörschutz
tragen
= Schutzbrille
tragen
= Staubmaske
tragen
2
= Schutzhandschuhe tragen
= Bedienungsanleitung lesen
D
Sicherheitshinweise
WARNUNG ! Lesen Sie alle Sicherheitshinweise und Anweisungen. Die Bedienungsanleitung enthält
wichtige und nützliche Hinweise zum korrekten Betrieb.
Versäumnisse bei der Einhaltung der Sicherheitshinweise und Anweisungen können elektrischen
Schlag, Brand und/oder schwere Verletzungen verursachen.
Sach- oder Personenschäden, die durch unsachgemäße Handhabung oder Nichtbeachtung der Bedienungsanleitung und Sicherheitshinweise verursacht werden, führen zum Erlöschen der Gewährleistung und Garantie, für Folgeschäden kann keinerlei Haftung übernommen werden.
1. Halten Sie Kinder und andere Personen während der Benutzung des Gerätes fern.
2. Pflegen Sie Geräte mit Sorgfalt. Kontrollieren Sie, ob bewegliche Teile einwandfrei funktionieren
und nicht klemmen, ob Teile gebrochen oder so beschädigt sind, dass die Funktion des Gerätes
beeinträchtigt ist. Lassen Sie beschädigte Teile vor dem Einsatz des Gerätes reparieren.
3. Gefahrloser Betrieb ist nicht mehr möglich, wenn das Gerät sichtbare Beschädigungen aufweist,
nicht mehr korrekt funktioniert, länger unter ungünstigen Bedingungen gelagert bzw. aufbewahrt wurde oder nach schweren Transportbeanspruchungen. In diesen Fällen ist das Gerät
außer Betrieb zu setzen und gegen unbeabsichtigten Betrieb zu sichern.
4. Bewahren Sie das Gerät bei Nichtgebrauch bzw. nach Gebrauch und Reinigung stets im Kunststoffkoffer auf und bewahren Sie diesen außerhalb der Reichweite von Kindern auf.
5. Ein Betrieb in explosionsgefährdeten Bereichen und die Anwendung bei Menschen oder Tieren
ist nicht zulässig und kann zu Verletzungen und Gefahren führen.
6. Verwenden Sie Geräte, Zubehör, Einsatzwerkzeuge usw. entsprechend diesen Anweisungen.
Berücksichtigen Sie dabei die Anwendungsbedingungen und die auszuführende Tätigkeit. Der
Gebrauch von Geräten für andere als die vorgesehenen Anwendungen kann zu gefährlichen
Situationen führen.
7. Vermeiden Sie zu starke mechanische Belastung und Vibrationen. Unterschreiten Sie nicht den
minimalen Biegeradius.
8. Nur der Kamerakopf mit LED-Licht und der flexible Schwanenhals dürfen in spannungslose
Flüssigkeiten gehalten werden. Die Eintauchtiefe darf 90 cm nicht überschreiten. Beachten Sie
hierzu unbedingt die Markierung am flexiblen Schwanenhals. Der Griff und der Monitor dürfen
keiner Feuchtigkeit ausgesetzt werden.
9. Bevor Sie das Gerät einer räumlichen Temperaturschwankung aussetzen, lassen Sie es ausgeschaltet auf die Zimmertemperatur anpassen. Die mögliche Entstehung von Kondenswasser
kann unter ungünstigen Umständen das Gerät beschädigen.
10. Schauen Sie nicht in das LED-Licht, es kann Ihre Augen blenden und schädigen.
11. Eine bauliche Änderung oder Umbauten am Gerät sind nicht zulässig.
Gerät darf nur für technische Untersuchungen verwendet werden.
Nicht bei Menschen oder Tieren verwenden.
3
D
LIEFERUMFANG
1
2
3
4
5
6
7
Endoskopkamera
Doppelhakenaufsatz
Magnetaufsatz
Spiegelaufsatz
Hakenaufsatz
NTSC-Videokabel
4 Stück AA-Mignon-Batterien
1
2
3
6
4
5
7
TEILEBEZEICHNUNG
6
7
8
9
10
11
12
TFT-Monitor
Batteriefächer inkl. Abdeckung
Flexibler Schwanenhals
Kamerakopf mit LED-Beleuchtung
NTSC-Videoausgang
Ein-/Aus-Taste
Beleuchtungstaste
für hellere Einstellung
13 Beleuchtungstaste
für dunklere Einstellung
14 Handgriff
15 StoßschutzKunststoffmantel
9
8
6
12
11
15
13
14
7
4
10
D
TECHNISCHE DATEN
TFT-Monitor
Auflösung
Sichtfeld
Videoformat
Kamerabeleuchtung
LED
Spannungsversorgung
Stromaufnahme
Umgebungs-/Arbeitstemperatur
Flexibler Schwanenhals – Länge
Min. Biegeradius
Endoskopkamera-Durchmesser
Schutzart flexibler Schwanenhals
Gewicht (ohne Zubehör)
6 cm / 2,4" Bilddiagonale
320 x 240 Pixel
54 °
NTSC
2 LED, weiß
LED Klasse1 nach EN 60825-1:2002
6 V/DC (4 x AA/LR6-Batterien)
Max. 200 mA
0 bis + 45 ° C
Ca. 90 cm
45 mm
Ø 10 mm
IP 67
Ca. 360 g
BESTIMMUNGSGEMÄSSE VERWENDUNG
Die Endoskopkamera ist ein optisches Inspektionsgerät, ausgestattet mit einem wasserdichten
flexiblen Schwanenhals und einer Mini-Farbkamera mit dimmbarer LED-Beleuchtung.
Das Gerät verfügt über einen eingebauten TFT-Monitor, welcher das Kamerabild anzeigt. Zur
weiteren Bildübertragung steht ein NTSC-Videoausgang zur Verfügung.
Die Endoskopkamera ist ein Hilfsmittel zur optischen Untersuchung, Inspektion und Fehlersuche
an spannungslosen Anlagen und Einrichtungen.
Der flexible Schwanenhals und der Kamerakopf mit LED-Beleuchtung sind wasserdicht und
für den Einsatz in wässrigen Flüssigkeiten geeignet. Eine Verwendung in Säuren, Laugen oder
Ölen ist nicht gestattet.
Die Eintauchtiefe darf 90 cm nicht überschreiten. Der Handgriff und der Monitor dürfen
keiner Feuchtigkeit ausgesetzt werden oder gar eingetaucht werden.
Die Versorgung mit Spannung erfolgt über 4 Stück AA-Mignon-Batterien.
VOR DER INBETRIEBNAHME
Überprüfen Sie, ob alle im Lieferumfang genannten Teile vorhanden sind und sich in einwandfreiem
Zustand befinden.
Überprüfen Sie, ob die zu untersuchende Umgebung bzw. der zu untersuchende Gegenstand
spannungsfrei ist. Das Gerät darf nur an spannungsfreien Anlagen, Einrichtungen und Gegenständen verwendet werden.
5
D
BATTERIEN EINSETZEN / WECHSELN
Die Endoskopkamera ist batteriebetrieben, 4 Stück AA-Mignon-Batterien sind zu verwenden.
Bei Erstinbetriebnahme und wenn sich die Endoskopkamera bei verbrauchten Batterien
nicht mehr einschalten lässt, sind die Batterien einzusetzen bzw. zu wechseln.
Die beiden Batteriefächer (7) befinden sich
rechts und links am Gehäuse des TFTMonitors. Das Gehäuse ist ausgestattet mit
einem Stoßschutz-Kunststoffmantel. Schieben
Sie den Stoßschutz-Kunststoffmantel
vorsichtig etwas nach hinten, bis das
Batteriefach (7) sichtbar wird, vermeiden Sie
eine Überdehnung, da der Kunstsoff sonst
reißen oder beschädigt werden kann.
Lösen Sie die Schraube vom Batteriefach (7)
mit einem Kreuzschraubendreher und nehmen
Sie den Deckel seitlich ab, setzen Sie dann
zwei neue Batterien des Typs AA-Mignon
polungsrichtig ein, beachten Sie hierzu die
Polaritätsangaben im Batteriefach (7).
Verschließen und verschrauben Sie das
Batteriefach (7) sorgfältig und schieben Sie
den Stoßschutz-Kunststoffmantel vorsichtig
wieder an die korrekte Stelle.
Für den Wechsel am zweiten Batteriefach
(7) gehen Sie bitte analog vor.
7
Wir empfehlen stets alle vier Batterien gleichzeitig zu wechseln, bei der Verwendung von alten
und neuen Batterien kann eine gegenseitige Entladung stattfinden.
Verwenden Sie stets Batterien des angegebenen Typs.
Weitere Hinweise zu der Verwendung und Pflege von Batterien finden Sie im Abschnitt
Wartung und Reinigung.
6
D
INBETRIEBNAHME
ENDOSKOPKAMERA EIN- UND AUSSCHALTEN
Durch Drücken der Ein-/Aus-Taste (11) schalten Sie das Gerät ein, nach kurzer Zeit sehen
Sie ein Kamerabild am TFT-Monitor (6).
Zum Ausschalten drücken Sie die Ein-/AusTaste (11) erneut und das Gerät schaltet sich
ab.
11
ENDOSKOPKAMERABELEUCHTUNG
Die Endoskopkamera verfügt über eine dimmbare LED-Beleuchtung im Kamerakopf (9).
Dies dient der Anpassung an unterschiedliche
Licht- bzw. Sichtverhältnisse und erlaubt den
Einsatz auch in dunklen Bereichen.
9
Zum Einschalten der LED-Beleuchtung drücken Sie die Taste 12. Jedes weitere Drücken steigert die Beleuchtung um eine Stufe heller, bis die maximale Leuchtkraft erreicht ist.
Mit der Taste 13 können Sie die Beleuchtung reduzieren bzw. abschalten, jedes weitere
Drücken verringert die Beleuchtung um eine Stufe.
Die LED-Beleuchtung sollte so eingestellt werden, dass die Bilddarstellung am TFT-Monitor
(6) nicht über- bzw. unterbelichtet wird.
Zum Ausschalten drücken Sie die Ein-/Aus-Taste (11) und das Gerät schaltet sich ab.
7
D
ENDOSKOPKAMERABILD UM 180 ° DREHEN
Das Gerät erlaubt eine 180 °-Drehung des Kamerabildes durch Drücken einer Tastenkombination.
Dies erlaubt dem Anwender eine Kamerabildkontrolle bei ungünstigen Positionen.
Drücken Sie dazu im normalen Betrieb gleichzeitig die Tasten 12 und 13, anschließend
wird das Kamerabild um 180 ° gedreht am TFTMonitor (6) dargestellt.
Nach dem Ausschalten des Geräts ist diese
Funktion wieder deaktiviert.
6
13
12
VIDEOAUSGANG
Die Endoskopkamera besitzt einen integrierten NTSC-Videoausgang (10), welcher die Bildausgabe zum Aufzeichnen ermöglicht. Der Videoausgang (10) befindet sich an der Unterseite des Handgriffs (14).
Verwenden Sie das beiliegende NTSC-Videokabel (4) zur Verbindung an Ihr Aufzeichnungs- bzw. Wiedergabegerät.
Schalten Sie dann die Endoskopkamera ein.
Stecken Sie den Klinkenstecker in den NTSCVideoausgang (10) am Handgriff (14).
Verbinden Sie den Cinch-Stecker mit dem
korrekten Videoeingang Ihres Aufzeichnungsbzw. Wiedergabegerätes, beachten Sie hierzu die Bedienungsanleitung und Anweisungen des jeweiligen Gerätes.
Schalten Sie dann das Aufzeichnungs- bzw.
Wiedergabegerät ein und wählen Sie den Videoeingang.
14
4
10
Hinweis:
Das verwendete Aufzeichnungs- bzw. Wiedergabegerät muß zur korrekten
Wiedergabe multi-signalfähig sein. Einige Geräte besitzen eine automatische
Videosignalerkennung, bei anderen Geräten müssen Sie den Videoeingang manuell
auf NTSC umstellen. Beachten Sie hierzu die Bedienungsanleitung und Anweisungen
Ihres Gerätes.
Anschließend wird das Kamerabild bei korrektem Anschluß und korrekter Videoquelle angezeigt.
Zum Ausschalten drücken Sie die Ein-/Aus-Taste (11) und das Gerät schaltet sich ab.
8
D
AUFSÄTZE
Im Lieferumfang befinden sich vier verschiedene
Aufsätze.
Der Magnetaufsatz erlaubt Ihnen verlorengegangene metallische Teile zu suchen und zu bergen.
Der Haken- und der Doppelhakenaufsatz erlauben Ihnen verlorengegangene Teile zu suchen und zu bergen.
Der Spiegelaufsatz erlaubt Ihnen verlorengegangene Teile zu suchen und die Beschaffenheit des Untersuchungsmateriales bei ungünstiger Position bzw. Lage festzustellen.
WARTUNG UND REINIGUNG
Verbrauchte Batterien sollten nicht im Gerät verbleiben, da sie korrodieren und ggf. Chemikalien freigesetzt werden können, welche gesundheitsschädlich sind und das Gerät beschädigen
können.
Entfernen Sie die Batterien aus dem Gerät, wenn Sie es längere Zeit nicht benutzen.
Beschädigte oder ausgelaufene Batterien können bei Berührung mit der Haut Verätzungen
verursachen, tragen Sie daher geeignete Handschuhe und eine Schutzbrille.
Entsorgen Sie verbrauchte Batterien nicht über den normalen Hausmüll, sondern geben
Sie diese an den dafür vorgesehenen Sammelstellen (Fachhandel, Wertstoffhof) ab.
Reinigen Sie das Gerät nach jeder Anwendung mit einem weichen, antistatischen und fusselfreien Tuch. Verwenden Sie keine scheuernden oder chemischen Reinigungsmittel.
Spülen Sie den flexiblen Schwanenhals (8) nach jedem Einsatz in wässrigen Flüssigkeiten
(keine Säuren oder Laugen) gründlich mit sauberem Wasser ab und trocknen Sie ihn gut.
Ansonsten ist das Gerät weitgehend wartungsfrei.
9
D
RECYCLING
Dieses Symbol weist darauf hin, dass dieses Produkt gemäß Richtlinie über Elektro- und
Elektronik-Altgeräte (2002/96/EG) und nationalen Gesetzen nicht über den Hausmüll
entsorgt werden darf. Dieses Produkt muss bei einer dafür vorgesehenen Sammelstelle
abgegeben werden. Dies kann z.B. durch Rückgabe beim Kauf eines ähnlichen Produkts
oder durch Abgabe bei einer autorisierten Sammelstelle für die Wiederaufbereitung von
Elektro- und Elektronik-Altgeräte geschehen. Der unsachgemäße Umgang mit Altgeräten
kann aufgrund potentiell gefährlicher Stoffe, die häufig in Elektro- und ElektronikAltgeräten enthalten sind, negative Auswirkungen auf die Umwelt und die menschliche
Gesundheit haben. Durch die sachgemäße Entsorgung dieses Produkts tragen Sie
außerdem zu einer effektiven Nutzung natürlicher Ressourcen bei. Informationen zu
Sammelstellen für Altgeräte erhalten Sie bei Ihrer Stadtverwaltung, dem öffentlichrechtlichen Entsorgungsträger, einer autorisierten Stelle für die Entsorgung von Elektround Elektronik-Altgeräten oder Ihrer Müllabfuhr.
10
D
EC-Konformitätserklärung
Hiermit erklären wir,
WALTER WERKZEUGE SALZBURG GmbH, Gewerbeparkstrasse 9, 5081 Anif, Austria
dass die nachfolgend bezeichnete Maschine aufgrund ihrer Konzipierung und Bauart
sowie in der von uns in Verkehr gebrachten Ausführung, den einschlägigen, grundlegenden
Sicherheits- und Gesundheitsanforderungen der EG-Richtlinien entspricht.
Diese Erklärung bezieht sich nur auf die Maschine in dem Zustand, in dem sie in Verkehr
gebracht wurde. Vom Endbenutzer nachträglich angebrachte Teile und/oder nachträglich
vorgenommene Eingriffe bleiben unberücksichtigt.
Produktbezeichnung / Funktion: Endoskopkamera
TF 2809
Dies ist die Originalversion der EC-Konformitätserklärung.
Typen- / Modellbezeichnung:
Seriennummer/Chargennummer: 90-332 – 2010-04
Handelsbezeichnung:
Rothenberger Industrial Endoskopkamera
Einschlägige EG-Richtlinien:
EG-Maschinenrichtlinie 2006/42/EG
EG-Niederspannungsrichtlinie 2006/95/EG
EG-Richtlinie über elektromagnetische Verträglichkeit (EMV) 2004/108/EG
Angewandte harmonisierte
Normen:
EN 55013:2001 + A1:2003 + A2:2006; EN 55020:2007
Anif, 01-04-2010
Oliver Hahn
Leiter-Einkauf
und Bevollmächtigter der
Technischen Dokumentation
Technische Dokumentation verfügbar bei:
WALTER WERKZEUGE SALZBURG GmbH,
Gewerbeparkstrasse 9, 5081 Anif, Austria
Alexander Reischl
Produktmanager
Garantiekarte
Baujahr: 04/2010
Modell: Endoskopkamera TF 2809
Wir gratulieren Ihnen zum Kauf
dieses Qualitätsproduktes. Unsere
Verpflichtung zur Qualität schließt
natürlich auch unseren Kundendienst ein.
Gewährleistung setzt voraus:
Das Gerät wurde nicht unsachgemäß angewendet, nicht
überlastet, nicht mit falschem
Zubehör verwendet und
Reparaturen nur von einer
autorisierten
Werkstätte
vorgenommen.
Sollten wider Erwarten Defekte
auf Grund von Materialoder Verarbeitungsfehlern bei
Verwendung im Privatbereich
nach dem Kaufdatum auftreten,
leisten wir Gewähr nach dem
Gewährleistungsrecht.
Für den gewerblichen Einsatz
gelten gesonderte Gewährleistungsbedingungen.
Die Gewährleistungsurkunde gilt
nur zusammen mit dem Kaufbeleg.
Bitte beides sorgfältig aufbewahren.
Die Garantiezeit beträgt 2 Jahre und beginnt am Tag des Kaufs. Bitte bewahren Sie den Kassenbon als
Nachweis für den Kauf auf. Die Garantie verlängert sich insoweit für Tage der Dauer der Reparatur.
Während des Gewährleistungszeitraumes können defekte Geräte FREI HAUS an die auf der
Rückseite dieser Anleitung angeführte Adresse gesandt werden.
Im Rahmen des Gewährleistungsrechtes entscheiden wir über Reparatur oder Austausch.
Liegt kein Original-Kaufbeleg bei, so erfolgt ausschließlich eine kostenpflichtige Reparatur.
Nach Ablauf des Gewährleistungszeitraumes haben Sie ebenfalls die Möglichkeit das defekte Gerät zwecks
Reparatur FREI HAUS an uns zu senden.
Kostenvoranschläge sowie Reparaturen nach Ablauf der Gewährleistungsfrist sind auf jeden Fall kostenpflichtig.
Um Ihr Anliegen einfach und effizient bearbeiten zu können, bitten wir Sie wenn möglich Ihre Anfrage per
Email, unter Angabe Ihrer Telefonnummer (wo Sie während der Bürozeiten erreichbar sind) und der
Artikelnummer Ihres Gerätes zu senden.
Bitte senden Sie das Produkt gut verpackt mit einer kurzen Fehlerbeschreibung
sowie Ihrer Adresse (Inkl. Telefonnummer) an uns ein.
Die gesetzliche Gewährleistungspflicht des Übergebers wird durch die Garantie nicht eingeschränkt.
Art.-Nr. 069107
11
D
12
Read carefully and keep for future reference
Inspection
Camera
Art. No. 069107
This is a translation of the original instruction manual.
GB
INDUSTRIAL
Operating
manual
GB
TABLE OF CONTENTS
General Safety Instructions . . . . . . . . . . . . . . . . . . . . . . . . . . . . . . . . . . . . . . . . . . . . . . . . . . . . . . . . . . . . . . . . . .Page 15
Scope of delivery . . . . . . . . . . . . . . . . . . . . . . . . . . . . . . . . . . . . . . . . . . . . . . . . . . . . . . . . . . . . . . . . . . . . . . . . . . . . . Page 16
Technical specifications . . . . . . . . . . . . . . . . . . . . . . . . . . . . . . . . . . . . . . . . . . . . . . . . . . . . . . . . . . . . . . . . . . . . Page 16
Features . . . . . . . . . . . . . . . . . . . . . . . . . . . . . . . . . . . . . . . . . . . . . . . . . . . . . . . . . . . . . . . . . . . . . . . . . . . . . . . . . . . . . . page 17
Scope of use . . . . . . . . . . . . . . . . . . . . . . . . . . . . . . . . . . . . . . . . . . . . . . . . . . . . . . . . . . . . . . . . . . . . . . . . . . . . . . . . . . Page 17
Before using the camera . . . . . . . . . . . . . . . . . . . . . . . . . . . . . . . . . . . . . . . . . . . . . . . . . . . . . . . . . . . . . . . . . . . . .Page 17
Fitting and changing the batteries . . . . . . . . . . . . . . . . . . . . . . . . . . . . . . . . . . . . . . . . . . . . . . . . . . . . . . . . . . Page 18
Using the camera . . . . . . . . . . . . . . . . . . . . . . . . . . . . . . . . . . . . . . . . . . . . . . . . . . . . . . . . . . . . . . . . . . . . . . . . . . . . . Page 19
Switching the camera on and off . . . . . . . . . . . . . . . . . . . . . . . . . . . . . . . . . . . . . . . . . . . . . . . . . . . . . . . . . . . Page 19
Illumination . . . . . . . . . . . . . . . . . . . . . . . . . . . . . . . . . . . . . . . . . . . . . . . . . . . . . . . . . . . . . . . . . . . . . . . . . . . . . . . . . . . . .Page 19
Rotating the display 180° . . . . . . . . . . . . . . . . . . . . . . . . . . . . . . . . . . . . . . . . . . . . . . . . . . . . . . . . . . . . . . . . . . . .Page 20
Video signal output . . . . . . . . . . . . . . . . . . . . . . . . . . . . . . . . . . . . . . . . . . . . . . . . . . . . . . . . . . . . . . . . . . . . . . . . . . . Page 20
Accessories . . . . . . . . . . . . . . . . . . . . . . . . . . . . . . . . . . . . . . . . . . . . . . . . . . . . . . . . . . . . . . . . . . . . . . . . . . . . . . . . . . . .Page 20
Maintenance and cleaning . . . . . . . . . . . . . . . . . . . . . . . . . . . . . . . . . . . . . . . . . . . . . . . . . . . . . . . . . . . . . . . . . . .Page 20
Recycling . . . . . . . . . . . . . . . . . . . . . . . . . . . . . . . . . . . . . . . . . . . . . . . . . . . . . . . . . . . . . . . . . . . . . . . . . . . . . . . . . . . . . . Page 21
CE Declaration of Conformity . . . . . . . . . . . . . . . . . . . . . . . . . . . . . . . . . . . . . . . . . . . . . . . . . . . . . . . . . . . . . . Page 22
Guarantee Certificate . . . . . . . . . . . . . . . . . . . . . . . . . . . . . . . . . . . . . . . . . . . . . . . . . . . . . . . . . . . . . . . . . . . . . . . . .Page 22
Service addresses . . . . . . . . . . . . . . . . . . . . . . . . . . . . . . . . . . . . . . . . . . . . . . . . . . . . . . . . . . . . . . . . . . . . . . . . . . . . Page 48
SYMBOLS USED IN THIS MANUAL
= Wear ear
protection
= Wear eye
protection
= Wear a dust
mask
14
= Wear protective
gloves
= Read the
operating
manual
WARNING! Read all safety notes and instructions. This operating manual contains important and useful
information about the correct operation of this product.
Failure to comply with the safety notes and instructions can cause electric shock, fire, and/or serious
injury.
The manufacturer can accept no responsibility for damage to persons or property and / or consequential
damages caused by incorrect use of this product or by failure to follow the operating manual and safety
instructions. Incorrect use of this kind will invalidate the warranty and the guarantee.
1. Keep children and other people out of the area when operating this product.
2. Treat this product with care. Ensure the moving parts function correctly and do not stick. Check
whether parts are broken or so badly damaged that that the device’s functions are impaired. Have
damaged parts repaired before operating the device.
3. It is not possible to operate the device safely if the device shows visible signs of damage, does
not function properly, was stored for a longer period of time under unfavourable conditions or
has been damaged in transit. In any of these cases stop using the product and secure it so that
it cannot be unintentionally switched on.
4. Put the device into its plastic case after cleaning or using it and store it in the plastic case, out
of the reach of children when it is not in use.
5. Operation of the device in areas where there is a risk of explosion or operation on persons or animals
is not permitted and could lead to injury or danger.
6. Use the device and any accessories or tools etc. according to these instructions. Plan the type
of work you wish to do carefully. The use of this device for applications other than those intended
can lead to dangerous situations.
7. Do not expose the device to excessive mechanical stress or vibrations. Do not bend the flexible
shaft further than the specified minimal bending radius.
8. Only the camera, the LED light and the flexible shaft may be immersed on liquid. Do not immerse
the camera or shaft in liquid carrying electric current. Do not immerse the camera and flexible
shaft in more than 90 cm of liquid. Observe the marking on the flexible shaft for this purpose.
The handle and the monitor must be kept dry and may not be exposed to liquids.
9. Turn the device off and allow it to reach room temperature before exposing it to variations in
temperature. Otherwise condensation can form, which under certain circumstances can damage
the device.
10. Do not stare into the LED light as it can dazzle you or damage your eyes.
11. Modifications to the device are not permitted.
This product may only be used for technical inspections.
Not for use on persons or animals.
15
GB
Safety instructions
GB
SCOPE OF DELIVERY
1
2
3
4
5
6
7
Inspection camera
double-hook tool
magnetic tool
mirror tool
Hook tool
NTSC video cable
4 AA batteries
1
2
3
6
4
5
7
FEATURES
6
7
8
9
10
11
12
TFT monitor
Battery compartment with cover
Flexible shaft
Camera head with LED light
NTSC video output
ON / OFF button
Illumination button
(brighter)
13 Illumination button
(darker)
14 Handle
15 Anti-shock cover
9
8
6
12
11
15
13
14
7
16
10
TFT monitor
Resolution
Max. viewing angle
Video format
Camera illumination
LED
Power source
Rated power
Ambient / operating temperature
Flexible shaft length
Minimum bending radius
Camera diameter
Insulation category - flexible shaft
Weight (without accessories)
2.4“ / 6 cm screen diagonal
320 x 240 Pixel
54 °
NTSC
2 white LEDs
LED Class I according to EN 60825-1:2002
6 V/DC (4 x AA/LR6-Batteries)
Max. 200 mA
0° C - + 45 ° C
approx. 90 cm
45 mm
Ø 10 mm
IP 67
approx. 360 g
SCOPE OF USE
The inspection camera is a device for optical inspection and is fitted with a waterproof flexible
shaft and a mini colour camera with dimmable LED light.
The device is equipped with a built-in TFT monitor, which displays the video taken by the
camera. An NTSC video output is provided for onward transmission of the video signal.
The inspection camera is an aid for optical search, inspection and troubleshooting on non-live
installations and systems.
The flexible shaft and the camera head with LED light are waterproof and suitable for work
in watery liquids. Operation in acids, alkalines and oils is not permitted.
Do not immerse the camera and flexible shaft in more than 90 cm of liquid. The handle and
the monitor may not be exposed to liquids and under no circumstances may they be
immersed.
The device is supplied with power by 4 AA batteries.
BEFORE USING THE CAMERA
Check that all parts mentioned in the scope of delivery are present and in good condition.
Check that there is no risk of contact with live parts in the area or object you wish to inspect.
The device may only be used on machines, installations and objects that are not live.
17
GB
TECHNICAL SPECIFICATIONS
GB
FITTING AND CHANGING THE BATTERIES
The inspection camera is battery powered and 4 AA batteries must be used.
The batteries must be fitted before the device is used for the first time and must be changed
when the device can no longer be switched on.
The device’s twin battery compartments (7)
are located on the left and right sides of the
TFT monitor. The housing is fitted with an antishock cover. Slide the anti-shock cover off
the housing to reveal the battery
compartments. Avoid over-stretching the
cover to prevent ripping or damaging the
material.
Loosen the battery compartment cover
screws with a Phillips screwdriver and remove
it. Insert two new AA type batteries. Consult
the polarity markings in the battery
compartment and be sure not to reverse the
polarities.
Carefully replace the battery compartment
cover and the tighten the screw. Subsequently
carefully slide the anti-shock cover back into
place.
Proceed exactly as described above with the
second battery compartment.
7
We recommend that you change all four batteries at the same time - if old and new batteries
are mixed the batteries can discharge one another.
Use only batteries of the type stated.
Further instructions on the use of and care for batteries can be found in the section on
maintenance and cleaning.
18
GB
USING THE CAMERA
SWITCHING THE CAMERA ON AND OFF
Press the ON/OFF button (11) to switch the
device on. After a short while a picture appears
on the TFT monitor.
To switch the device off press the ON/OFF
button.
11
ILLUMINATION
The inspection camera is equipped with an
dimmable LED light in the camera head (9).
The LED can be adjusted to compensate for
varying light and visibility conditions and
makes operation in dark areas possible.
9
To switch on the LED illumination press button 12. Each touch of the button makes the
illumination brighter, until the LED light reaches it maximum level.
Press button 13 to reduce or switch off the LED illumination. Each touch of the button reduces
the illumination level.
The LED illumination should be set to a level so that the picture on the TFT monitor is neither
too bright nor too dark.
To switch the device off press the ON/OFF button.
19
GB
ROTATING THE DISPLAY 180°
The device’s display can be rotated 180° by pressing a special key combination.
It can be useful to change the orientation of the picture when in awkward positions.
When in normal operation press the 12 and
13 buttons simultaneously to rotate the picture
displayed on the TFT-Monitor by 180°.
This function is deactivated when the device
is switched off.
6
13
12
VIDEO OUTPUT
The inspection camera is equipped with an integrated NTSC video output, so that the picture
can be recorded. The video output is located at the bottom of the handle.
Use the NTSC video cable (4) (supplied) to
connect the device to a recording device or
a display.
Switch the camera on.
Insert the jack plug into the NTSC video output
port (10) located on the handle (14).
Connect the cinch plug with the correct video
port on you recording device or display.
Switch on your recording device or monitor
and select the video port.
14
4
10
Note:
The recording device or display you use must be capable of handling an NTSC video
signal in order to display the picture correctly. Some video equipment is equipped
with an automatic signal type detection system; other types must be set manually
to NTSC. Consult the manual and your video equipment’s on-screen instructions.
Once the camera been connected correctly and the correct video source has been selected
the picture is displayed.
To switch the device off press the ON/OFF button.
20
ACCESSORIES
GB
The inspection camera is supplied with four different accessories – a magnetic tool, a hook
tool, a double-hook tool and a mirror tool.
These accessories can be fitted separately to
the camera head. Use the accessories to locate
and retrieve lost lost parts and to observe the
material.
MAINTENANCE AND CLEANING
Spent batteries should not be left in the device as these corrode and can release chemicals,
which are toxic and can damage the device.
Remove the batteries from the device if you do not use it for a longer period of time.
Damaged or spent batteries can cause cause irritation after contact with skin, always wear
suitable gloves and protective glasses.
Do not dispose of spent batteries with the household waste, instead hand the batteries
in at a designated collection point (dealership or local authority recycling facility).
Clean the device with a soft, anti-static lint-free cloth. Do not use abrasive or chemical cleaning
agents.
Rinse the flexible shaft thoroughly with clean water each time it has been immersed in a watery
liquid (do not immerse the flexible shaft in acids or alkalines) and dry it well.
Otherwise the device requires very little maintenance.
21
GB
RECYCLING
This symbol indicates that this product may not be disposed of together with domestic
waste in compliance with the (2002/96/EC) Regulation pertaining to waste electrical and
electronic devices (WEEE). This product must be handed in at an designated collection
point. This can occur, for example, by returning it when a similar product is purchased
or by handing it in at an authorised collecting point for the recycling of waste electrical
and electronic equipment. Owing to potentially hazardous substances that are frequently
contained in waste electronic equipment, incorrect handling of waste equipment may
have a negative impact on the environment and on the health of human beings. By
disposing of this product correctly, you are also contributing towards an efficient use
of natural resources. Information on collecting points for waste equipment can be
obtained from your local authority, the public waste disposal authority, an authorised
institution for the disposal of waste electrical and electronic equipment or the waste
collection services.
22
EC-Declaration of Conformity
Inspection camera
Type / model identifier:
TF 2809
Serial number / Lot number:
90-332 – 2010-04
Trade name:
Rothenberger Industrial Inspection Camera
Appropriate EC directives:
EC Machinery directive 2006/42/EG
EC Low voltage directive 2006/95/EEC
EC Directive on electromagnetic compatibility (EMC) 2004/108/EEC
Applicable harmonised
standards:
EN 55013:2001 + A1:2003 + A2:2006; EN 55020:2007
This is a translation of the CE declaration of conformity.
Product description / function:
Anif, 01-04-2010
Oliver Hahn
Purchasing Manager
and person responsible for
technical documentation
Technical documentation is available from:
WALTER WERKZEUGE SALZBURG GmbH
Gewerbeparkstrasse 9, 5081 Anif-Austria
GB
We,
WALTER WERKZEUGE SALZBURG GmbH, Gewerbeparkstrasse 9, 5081 Anif, Austria
declare that the design and construction of the following machine, in the form supplied by us,
comply with the basic health and safety requirements of the appropriate EC directives.
This declaration covers the machine only in the condition in which it was supplied by us. It does
not cover parts subsequently fitted by the user or modifications made after purchase.
Alexander Reischl
Product Manager
Warranty Certificate
Year of manufacture: 04/2010
Model: Inspection camera TF 2809
regulations, provided that:
- the device was not put to any use
other than the intended
- was not overloaded
- was not used with the wrong
accessories
- repairs were not carried out
by any other than the
authorized workshop.
The warranty certificate is only
valid in connection with the
receipt. Please keep both in a safe
place. This warranty does not affect
your statutory rights.
Congratulations!
You have made an excellent choice
with the purchase of this quality
product.
Our commitment to quality also
includes our service. Should
you, contrary to expectations,
experience defects due to
material or manufacturing
faults during private use within
24 months of the date of
purchase we shall be liable
for warranty in accordance with
statutory warranty
The product is guaranteed for a period of two years beginning on the day of purchase. Keep your purchase
receipt safe as proof of the date of purchase. The guarantee period can only be extended for the duration of any
repair required.
During the warranty period defective devices can be sent FREIGHT PREPAID to the service address stated
at the end of this booklet. We will, at our discretion either repair or exchange the device in accordance with
warranty legislation.
If the original receipt is not enclosed the repair will be charged for in all cases. After the warranty has expired you
can still send defective devices for repairs FREIGHT PREPAID to the address stated below. Quotes as well as
repairs after the warranty period are to be paid for in all cases.
Ensure the product is sent well packed as no responsibility can be accepted for items lost or damaged
in transit. Include a short description of the problem if possible and do not forget to include your name,
address and a daytime telephone number.
This warranty does not affect your statutory rights.
Art. No. 069107
23
GB
INDUSTRIAL
Notice
d’utilisation
F
à lire et à conserver
Caméra
endoscopique
Article.n° 069107
Le présent mode d'emploi est une traduction du mode d'emploi original
F
SOMMAIRE
Consignes de sécurité . . . . . . . . . . . . . . . . . . . . . . . . . . . . . . . . . . . . . . . . . . . . . . . . . . . . . . . . . . . . . . . . . . . . . . . page 27
contenu de la livraison . . . . . . . . . . . . . . . . . . . . . . . . . . . . . . . . . . . . . . . . . . . . . . . . . . . . . . . . . . . . . . . . . . . . . . page 28
Caractéristiques techniques . . . . . . . . . . . . . . . . . . . . . . . . . . . . . . . . . . . . . . . . . . . . . . . . . . . . . . . . . . . . . . . . . page 28
Désignation des pièces . . . . . . . . . . . . . . . . . . . . . . . . . . . . . . . . . . . . . . . . . . . . . . . . . . . . . . . . . . . . . . . . . . . . . . page 29
Utilisation règlementaire . . . . . . . . . . . . . . . . . . . . . . . . . . . . . . . . . . . . . . . . . . . . . . . . . . . . . . . . . . . . . . . . . . . . . page 29
Avant la mise en service . . . . . . . . . . . . . . . . . . . . . . . . . . . . . . . . . . . . . . . . . . . . . . . . . . . . . . . . . . . . . . . . . . . . page 29
Insertion des piles . . . . . . . . . . . . . . . . . . . . . . . . . . . . . . . . . . . . . . . . . . . . . . . . . . . . . . . . . . . . . . . . . . . . . . . . . . . . page 30
Mise en marche . . . . . . . . . . . . . . . . . . . . . . . . . . . . . . . . . . . . . . . . . . . . . . . . . . . . . . . . . . . . . . . . . . . . . . . . . . . . . . page 31
Marche / arrêt de la caméra endoscopique . . . . . . . . . . . . . . . . . . . . . . . . . . . . . . . . . . . . . . . . . . . . . . . page 31
Eclairage de la caméra endoscopique . . . . . . . . . . . . . . . . . . . . . . . . . . . . . . . . . . . . . . . . . . . . . . . . . . . . page 31
Faire pivoter de 180 ° l’image de la caméra endoscopique . . . . . . . . . . . . . . . . . . . . . . . . . . . . . page 32
Sortie vidéo . . . . . . . . . . . . . . . . . . . . . . . . . . . . . . . . . . . . . . . . . . . . . . . . . . . . . . . . . . . . . . . . . . . . . . . . . . . . . . . . . . . page 32
Embouts . . . . . . . . . . . . . . . . . . . . . . . . . . . . . . . . . . . . . . . . . . . . . . . . . . . . . . . . . . . . . . . . . . . . . . . . . . . . . . . . . . . . . . . page 33
Maintenance et nettoyage . . . . . . . . . . . . . . . . . . . . . . . . . . . . . . . . . . . . . . . . . . . . . . . . . . . . . . . . . . . . . . . . . . page 33
Recyclage . . . . . . . . . . . . . . . . . . . . . . . . . . . . . . . . . . . . . . . . . . . . . . . . . . . . . . . . . . . . . . . . . . . . . . . . . . . . . . . . . . . . . . page 34
Attestation de conformité CE . . . . . . . . . . . . . . . . . . . . . . . . . . . . . . . . . . . . . . . . . . . . . . . . . . . . . . . . . . . . . . . page 35
Carte de garantie . . . . . . . . . . . . . . . . . . . . . . . . . . . . . . . . . . . . . . . . . . . . . . . . . . . . . . . . . . . . . . . . . . . . . . . . . . . . . .page 35
Adresses pour le service après-vente . . . . . . . . . . . . . . . . . . . . . . . . . . . . . . . . . . . . . . . . . . . . . . . . . . . . . page 48
EXPLICATION DES SYMBOLES
= Porter une
protection
acoustique
= Porter des
lunettes de
protection
= Porter un
masque
anti-poussière
26
= Porter des gants
de protection
= Lire la notice
d’utilisation
Avertissement ! Lisez toutes les consignes de sécurité et les instructions. Le manuel d’utilisation renferme
des indications importantes et utiles pour une utilisation correcte.
Les négligences dans le respect des consignes de sécurité et des instructions peuvent être à l’origine
de chocs électriques, brûlures et / ou de blessures graves.
Les dommages corporels ou matériels, provoqués par une manipulation non conforme ou par le non
respect du mode d’emploi et des consignes de sécurité, feront l’objet d’une annulation de la garantie
et des prestations associées, aucun recours sur les conséquences possibles ne sera accepté.
1. Tenir les enfants et tierces personnes à l’écart de l’appareil pendant son utilisation.
2. Prenez grand soin des outils. Contrôlez que les éléments mobiles fonctionnent parfaitement et
qu’ils ne se coincent pas, que des pièces ne sont pas cassées ou endommagées de sorte à altérer
le fonctionnement de l’appareil. Faîtes réparer les pièces endommagées, avant utilisation.
3. Une utilisation sécurisée n’est plus possible lorsque l’appareil porte des dégâts apparents, ne
fonctionne plus correctement, qu’il a été stocké longuement dans des conditions défavorables
ou qu’il a été soumis à des conditions de transport difficiles. Dans ces conditions, l’appareil doit
être mis hors service et protégé contre une remise en service involontaire.
4. Conservez l’appareil, non utilisé ou après utilisation et nettoyage, en permanence dans son
coffret en plastique et hors de portée des enfants.
5. Une utilisation en environnement présentant un danger d’explosion ou alors son emploi sur les
personnes ou les animaux ne sont pas autorisés et peuvent provoquer des blessures et des dangers.
6. Utilisez les appareils, les accessoires, les outils d’insertion etc. conformément à ces instructions.
Tenez compte des conditions d’utilisation et de la tâche à effectuer. L’utilisation d’appareils à d’autres
fins que celles prévues peut entraîner des situations dangereuses.
7. Evitez une contrainte mécanique trop importante ainsi que les vibrations. Ne dépassez pas le rayon
de courbure minimum.
8. Seuls la tête de caméra avec l’éclairage DEL et le col de cygne flexible peuvent être plongés dans
des liquides (hors tension). La profondeur d’immersion ne doit pas excéder 90 cm. Respectez
pour cela, impérativement, le marquage sur le col de cygne flexible. La poignée et l’écran ne doivent
pas être soumis à l’humidité.
9. Avant d’exposer l’appareil à des variations de température ambiante, laissez le, débranché,
s’adapter à la température de la pièce. La formation éventuelle de condensation peut, dans
certaines conditions, endommager l’appareil.
10. Ne regardez pas directement les DEL cela peut vous éblouir et causer des dommages oculaires.
11. La modification structurelle ou les transformations de l’appareil ne sont pas autorisées.
L’appareil ne doit être employé que pour les recherches techniques.
Ne pas employer sur l’homme ou sur les animaux.
27
F
Consignes de sécurité
F
CONTENU DE LA LIVRAISON
1
2
3
4
5
6
7
caméra endoscopique
embout à deux crochets
embout magnétique,
embout avec un miroir
embout à crochet
câble vidéo NTSC
4 piles AA-Mignon
1
2
3
6
4
5
7
APPELLATION DES PIÈCES
6
7
8
9
10
11
12
écran TFT
compartiment piles avec couvercle
col de cygne flexible
tête avec caméra et éclairage DEL
sortie vidéo NTSC
commutateur marche / arrêt
bouton éclairage
permettant un réglage plus clair
13 bouton éclairage permettant
un réglage plus foncé
14 poignée
15 habillage plastique
antichoc
9
8
6
12
11
15
13
14
7
28
10
écran TFT
définition
champ de vision
format vidéo
éclairage de la caméra
DEL
alimentation électrique
consommation de courant
température ambiante / température de fonctionnement
col de cygne flexible - longueur
rayon de courbure min.
diamètre de la caméra endoscopique
type de protection du col de cygne
poids (sans accessoires)
image en diagonale 6 cm / 2,4“
320 x 240 Pixels
54 °
NTSC
2 DEL blanches
DEL de classe 1 selon 60825-1:2002
6 V / CC (4 piles AA / LR6)
max. 200 mA
0 à + 45 °C
env. 90 cm
45 mm
Ø 10 mm
IP 67
env. 360 g
UTILISATION CONFORME
La caméra endoscopique est un appareil d’inspection optique équipé d’un col de cygne flexible
et étanche ainsi que d’une mini caméra couleurs (étanche également) dotée d’un éclairage
DEL à intensité variable.
L’appareil dispose d’un écran TFT intégré montrant l’image de la caméra. Pour les autres
transmissions d’image, une sortie vidéo NTSC est disponible.
La caméra endoscopique est un accessoire d’analyse optique, d’inspection et de recherche
d’erreurs sur des installations et dispositifs hors tension.
Le col de cygne flexible ainsi que la caméra avec l’éclairage DEL sont étanches et adaptés
aux interventions dans les liquides aqueux. L’utilisation dans les acides, les lessives ou les
huiles n’est pas autorisée.
La profondeur d’immersion ne doit pas excéder 90 cm. La poignée et l’écran ne doivent pas
être soumis à l’humidité et surtout pas immergés.
L’alimentation en courant est assurée par 4 piles AA-Mignon.
AVANT LA MISE EN SERVICE
Vérifiez que toutes les pièces comprises dans la fourniture sont bien présentes et qu’elles sont
en bon état.
Vérifiez si l’environnement ou l’objet à contrôler est hors tension. L’appareil ne doit être utilisé
que sur des installations, équipements et objets mis hors tension.
29
F
CARACTERISTIQUES TECHNIQUES
F
PILES - MISE EN PLACE / REMPLACEMENT
La caméra endoscopique est alimentée par piles, 4 piles AA-Mignon sont à utiliser.
Lors de la première mise en service et lorsque la caméra endoscopique ne se remet plus en
marche avec des piles usagées, il est nécessaire de mettre en place ou de remplacer les piles.
les deux compartiments de piles (7) se
trouvent sur les côtés droit et gauche du
boîtier de l’écran TFT. Le boîtier est recouvert
d’un revêtement antichoc. Faites glisser
délicatement le revêtement antichoc en
arrière, jusqu’à ce que le compartiment de
piles (7) soit visible en évitant de l’étirer trop
car le plastique pourrait se déchirer ou être
endommagé.
Desserrez la vis du compartiment de piles (7)
à l’aide d’un tournevis cruciforme et retirez le
couvercle situé sur le côté, mettez ensuite en
place deux piles neuves de type AA-Mignon,
en respectant les polarités, voir pour cela
l’indication sur le compartiment de piles (7).
Refermez et revissez soigneusement le
compartiment de piles (7) et remettez, avec
précaution, le revêtement antichoc en place.
Pour le remplacement des piles du second
compartiment (7) opérez de manière
analogue.
7
Nous recommandons toujours de remplacer les quatre piles simultanément, car lors d’une
utilisation mixte „piles usagées et neuves“ il peut se produire un phénomène de décharge
réciproque.
Utilisez toujours des piles de type prescrit.
Vous trouverez d’autres indications pour l’utilisation et l’entretien des piles à la section
entretien et nettoyage.
30
MISE EN SERVICE
MARCHE / ARRÊT DE LA CAMÉRA ENDOSCOPIQUE
F
En appuyant sur la touche marche / arrêt (11)
vous mettez l’appareil en marche, après
quelques instants, vous voyez une image sur
l’écran TFT (6).
Pour déconnecter, pressez à nouveau la
touche marche / arrêt (11) et l’appareil s’arrête.
11
ÉCLAIRAGE DE LA CAMÉRA ENDOSCOPIQUE
La caméra endoscopique dispose d’un
éclairage DEL à intensité variable dans la tête
de la caméra (9). Cela sert à s’adapter à
différents éclairages ou conditions de visibilité
et permet l’intervention dans les secteurs
sombres.
9
Pour brancher l’éclairage DEL, appuyez sur la touche 12 qui sert également à augmenter
l’intensité lumineuse (à chaque nouvelle pression) jusqu’à l’intensité maximale.
La touche 13 sert à éteindre ou réduire l’intensité lumineuse par palier, à chaque pression.
L’éclairage DEL doit être réglé de manière à ce que l’image sur l’écran TFT (6) ne soit pas sur/ ou / sous-exposée.
Pour déconnecter, pressez la touche marche / arrêt (11) et l’appareil s’arrête.
31
D
FAIRE PIVOTER L’IMAGE DE LA CAMÉRA ENDOSCOPIQUE
DE 180 °
F
L’appareil permet une rotation de 180 ° de l’image de la caméra grâce à une combinaison de touches.
Cela permet à l’utilisateur de contrôler l’image de la caméra même dans des positions
défavorables.
Appuyez pour cela, en mode de
fonctionnement normal, simultanément sur
les touches 12 et 13, l’image de la caméra sera
ensuite présentée sur l’écran TFT (6) tournée
de 180 °.
Cette fonction est de nouveau désactivée
après arrêt de l’appareil.
6
13
12
SORTIE VIDÉO
La caméra endoscopique dispose d’une sortie vidéo NTSC intégrée (10), qui permet la
restitution d’image pour enregistrement. La sortie vidéo (10) se trouve sur la partie inférieure
de la poignée (14).
utilisez le câble vidéo NTSC fourni (4) pour
relier votre appareil lecteur ou enregistreur.
Connectez ensuite la caméra endoscopique.
Branchez le connecteur à cliquet dans la
sortie vidéo NTSC (10) se trouvant sur la
poignée (14).
Reliez le jack RCA à l’entrée vidéo correcte
de votre lecteur ou enregistreur, respectez
pour cela le mode d’emploi et les instructions
de l’appareil concerné.
Branchez ensuite l’appareil enregistreur ou
lecteur et choisissez l’entrée vidéo.
14
4
10
Remarque :
L’appareil de lecture ou enregistrement utilisé doit avoir une capacité „multisignaux“ pour pouvoir assurer une restitution correcte. Certains appareils disposent
d’une reconnaissance automatique du signal vidéo, pour les autres il faudra choisir
manuellement l’entrée vidéo NTSC. Respectez pour cela le manuel d’utilisation et
les indications de votre appareil.
L’image apparaît ensuite si la connexion et la source vidéo sont correctes.
Pour déconnecter, pressez la touche marche / arrêt (11) et l’appareil s’arrête.
32
EMBOUTS
F
La caméra endoscopique est livrée avec
quatre embouts différents:
- un embout magnétique,
- un embout à crochet,
- un embout à deux crochets et
- un embout avec un miroir.
Ces embouts peuvent se fixer individuellement
sur la tête de la caméra avec l’éclairage DEL et
permettent de rechercher et de récupérer des
éléments perdus et d'analyser les objets
observés d'une façon plus détaillée.
ENTRETIEN ET NETTOYAGE
Les piles usagées ne doivent pas être laissées dans l’appareil car elles corrodent et peuvent
éventuellement libérer des substances chimiques nocives qui peuvent aussi endommager
l’appareil.
Enlevez les piles de l’appareil lorsque vous ne l’utilisez pas pendant quelque temps.
Des piles endommagées ou ayant coulé peuvent, par simple contact avec la peau, provoquer
des irritations, pour éviter cela portez des gants appropriés et des lunettes de protection.
Ne pas jeter les piles usées dans les ordures ménagères, mais les remettre à un centre
de récupération prévu à cet effet (commerce spécialisé, déchetterie).
après chaque utilisation, nettoyez l’appareil à l’aide d’un chiffon doux, antistatique, non
peluchant. N’utilisez jamais d’abrasifs ou de produits de nettoyage chimiques.
Rincez avec soin le col de cygne flexible (8), après chaque utilisation dans des liquides aqueux
(pas d’acides ou de lessives), avec de l’eau claire et séchez le correctement.
Sinon, l’appareil ne demande quasiment aucun entretien.
33
F
RECYCLAGE
Ce pictogramme signale que le produit ne doit pas être éliminé dans les ordures
ménagères, conformément aux directives relatives aux appareils électriques et
électroniques usés (2002/96/CE) et à la réglementation nationale. Ce produit doit être
remis à un centre de récupération prévu à cet effet. Ceci peut se faire soit en rendant
le produit, lors de l’achat d’un article analogue, soit en le remettant à un centre de
récupération agréé pour le recyclage d’appareils électriques et électroniques usés. À
cause des matières potentiellement dangereuses fréquemment renfermées dans les
appareils électriques et électroniques usés, la manipulation non conforme d’appareils
usés peut avoir des répercussions négatives aussi bien sur l’environnement que sur la
santé de personnes. En éliminant ce produit de façon conforme, vous contribuez
d’autre part à une exploitation effective des ressources naturelles. Les informations
relatives aux centres de récupération d’appareils usés vous seront fournies par l’autorité
municipale compétente, le responsable de l’élimination des déchets de droit public, un
centre autorisé pour l’élimination d’appareils électriques et électroniques usés ou par
votre service de voierie.
34
Attestation de conformité CE
Désignation du type / modèle :
TF 2809
N° de série / n° de lot :
90-332 – 2010-04
Désignation commerciale :
Rothenberger Industrial Caméra endoscopique
Réglementations CE en vigueur : Réglementation CE concernant les machines, 2006/42/EG
Réglementation CE concernant la faible tension, 2006/95/EG
Réglementation CE concernant la compatibilité électromagnétique (EMV) 2004/108/EG
Normes harmonisées
EN 55013:2001 + A1:2003 + A2:2006; EN 55020:2007
appliquées :
Anif, 01-04-2010
Oliver Hahn
Directeur des achats
Mandataire de la
documentation technique
Documentation technique disponible auprès de / chez :
WALTER WERKZEUGE SALZBURG GmbH,
Gewerbeparkstrasse 9, 5081 Anif, Austria
Alexander Reischl
Chef de produit
Carte de garantie
Année de construction : 04/2010
Caméra endoscopique TF 2809
Nous vous félicitons pour l’achat
de ce produit de qualité. Notre
obligation par rapport à la qualité
inclut bien évidemment notre
SAV.
L’application de la garantie nécessite
les conditions suivantes :
L’appareil n’a pas été utilisé de
façon incorrecte, il n’a pas été
surchargé, il n’a pas été utilisé
avec de mauvais accessoires et
les réparations n’ont été
effectuées que par un atelier
agréé.
Pour une utilisation professionnelle, on applique des conditions
de garantie particulières.
Le certificat de garantie n’est
valable qu’en combinaison avec le
justificatif d’achat.
Veuillez conserver soigneusement ces
deux pièces justificatives.
Si, malgré tout, des défauts
devaient se présenter après
la date d’achat dans le
cadre d’une utilisation privée
en raison de vices de matière
ou de défauts d‘usinage,
nous accordons une garantie,
conformément au droit à la prestation
de garantie.
La durée de la garantie est de deux ans et commence le jour de l'achat. Veuillez par conséquent conserver
le bon d'achat à titre de preuve. La garantie sera prolongée de la valeur du nombre de jours nécessaires à
la réparation.
Durant la période de garantie, les appareils défectueux peuvent être envoyés
FRANCO DOMICILE à l’adresse indiquée au verso du présent mode d’emploi.
Nous déciderons, dans le cadre du droit à la prestation de garantie, s’il faut procéder à
une réparation ou à un remplacement.
Si le justificatif d’achat original n’est pas joint, il sera exclusivement procédé à une réparation payante.
Après expiration de la période de garantie, vous avez également la possibilité de nous renvoyer l’appareil
défectueux FRANCO DOMICILE, afin de le faire réparer.
Les devis ainsi que les réparations après expiration de la période de garantie sont
payants dans tous les cas de figure.
Afin de pouvoir traiter votre demande de manière simple et efficace, nous vous prions d’envoyer votre
demande dans la mesure du possible par E-mail en indiquant votre numéro de téléphone (sous lequel il
est possible de vous joindre aux heures d’ouverture de bureau) ainsi que la référence de votre appareil.
Veuillez nous envoyer votre appareil bien emballé avec une brève description du défaut et nous
communiquer votre adresse (y compris le numéro de téléphone) par la même occasion.
Réf. 069107
35
F
Désignation du produit / fonction : Caméra endoscopique
Il s'agit de la version originale de l'attestation de conformité CE
Nous,
WALTER WERKZEUGE SALZBURG GmbH, Gewerbeparkstrasse 9, 5081 Anif, Austria
certifions sur notre honneur que la machine ci-après mentionnée, ainsi que la version mise par
nos soins sur le marché, répondent de par leur conception et leur forme de construction, aux
directives de la réglementation CE en vigueur.
Cette déclaration ne concerne qu'une machine se trouvant dans le même état que lors de sa
mise en service. L’ajout ultérieur d’accessoires et/ou les interventions effectuées ne sont pas
pris en compte.
F
36
INDUSTRIAL
Návod
k obsluze
Návod si prosím přečtěte a uschovejte
Výr.čís. 069107
CZ
Endoskopická
kamera
Tento návod k obsluze je překladem originálního návodu k obsluze
CZ
OBSAH
Bezpečnostní pokyny . . . . . . . . . . . . . . . . . . . . . . . . . . . . . . . . . . . . . . . . . . . . . . . . . . . . . . . . . . . . . . . . . . . . . Strana 39
Rozsah dodávky . . . . . . . . . . . . . . . . . . . . . . . . . . . . . . . . . . . . . . . . . . . . . . . . . . . . . . . . . . . . . . . . . . . . . . . . . . . . Strana 40
Technické údaje . . . . . . . . . . . . . . . . . . . . . . . . . . . . . . . . . . . . . . . . . . . . . . . . . . . . . . . . . . . . . . . . . . . . . . . . . . . Strana 40
Označení jednotlivých dílů . . . . . . . . . . . . . . . . . . . . . . . . . . . . . . . . . . . . . . . . . . . . . . . . . . . . . . . . . . . . . . . Strana 41
Použití v souladu s určením . . . . . . . . . . . . . . . . . . . . . . . . . . . . . . . . . . . . . . . . . . . . . . . . . . . . . . . . . . . . . . Strana 41
Před uvedením do provozu . . . . . . . . . . . . . . . . . . . . . . . . . . . . . . . . . . . . . . . . . . . . . . . . . . . . . . . . . . . . . . Strana 41
Vkládání / Výměna baterií . . . . . . . . . . . . . . . . . . . . . . . . . . . . . . . . . . . . . . . . . . . . . . . . . . . . . . . . . . . . . . . . . .Strana 42
Uvedení do provozu . . . . . . . . . . . . . . . . . . . . . . . . . . . . . . . . . . . . . . . . . . . . . . . . . . . . . . . . . . . . . . . . . . . . . . . . Strana 43
Zapnutí a vypnutí endoskopické kamery . . . . . . . . . . . . . . . . . . . . . . . . . . . . . . . . . . . . . . . . . . . . . . . . Strana 43
Osvětlení endoskopické kamery . . . . . . . . . . . . . . . . . . . . . . . . . . . . . . . . . . . . . . . . . . . . . . . . . . . . . . . . . Strana 43
Otočení obrazu endoskopické kamery o 180° . . . . . . . . . . . . . . . . . . . . . . . . . . . . . . . . . . . . . . . . . . Strana 44
Videovýstup . . . . . . . . . . . . . . . . . . . . . . . . . . . . . . . . . . . . . . . . . . . . . . . . . . . . . . . . . . . . . . . . . . . . . . . . . . . . . . . . . . Strana 44
Nástavce . . . . . . . . . . . . . . . . . . . . . . . . . . . . . . . . . . . . . . . . . . . . . . . . . . . . . . . . . . . . . . . . . . . . . . . . . . . . . . . . . . . . Strana 45
Údržba a čištění . . . . . . . . . . . . . . . . . . . . . . . . . . . . . . . . . . . . . . . . . . . . . . . . . . . . . . . . . . . . . . . . . . . . . . . . . . . . Strana 45
Recyklace . . . . . . . . . . . . . . . . . . . . . . . . . . . . . . . . . . . . . . . . . . . . . . . . . . . . . . . . . . . . . . . . . . . . . . . . . . . . . . . . . . . Strana 46
CE Prohlášení o shodě . . . . . . . . . . . . . . . . . . . . . . . . . . . . . . . . . . . . . . . . . . . . . . . . . . . . . . . . . . . . . . . . . . . . Strana 47
Záruční karta . . . . . . . . . . . . . . . . . . . . . . . . . . . . . . . . . . . . . . . . . . . . . . . . . . . . . . . . . . . . . . . . . . . . . . . . . . . . . . . .Strana 47
Adresy servisů . . . . . . . . . . . . . . . . . . . . . . . . . . . . . . . . . . . . . . . . . . . . . . . . . . . . . . . . . . . . . . . . . . . . . . . . . . . . . . Strana 48
LEGENDA K POUŽITÝM SYMBOLŮM
= Používejte
ochranu sluchu
= Používejte
ochranné brýle
= Používejte
masku proti
prachu
38
= Používejte
ochranné
rukavice
= Přečtěte si
návod k obsluze
Bezpečnostní pokyny
1. Udržujte děti a ostatní personál v průběhu provozu mimo dosah tohoto elektrického
nářadí.
2. Toto elektrická nářadí pečlivě ošetřujte. Zkontrolujte, zda pohyblivé části bezvadně fungují
a nejsou vzpříčeny, zda nejsou části zlomeny nebo poškozeny způsobem, který by funkci
elektrického nářadí ohrozil. Poškozené části nechte před použitím přístroje opravit.
3. Bezpečný provoz není možný pokud přístroj vykazuje viditelné poškození, nefunguje
správně, byl delší dobu skladován popř. uložen za nepříznivých podmínek nebo po
nadměrném namáhání během přepravy. V těchto případech vyřaďte přístroj z provozu
a zajistěte jej proti neúmyslnému uvedení do provozu.
4. Při nepoužívání popř. po použití a očištění uložte přístroj vždy do kufříku z umělé hmoty
a uskladněte jej mimo dosah dětí.
5. Provoz v prostředí s nebezpečím výbuchu a použití pro vyšetřování lidí nebo zvířat je
nepřípustné a nebezpečné a může vést ke zranění.
6. Elektrické nářadí, příslušenství, použité nástroje atd. používejte v souladu s těmito pokyny.
Přitom postupujte s ohledem na podmínky použití a prováděnou činnost. Použití
elektrického nářadí pro jiné uplatnění, než k jakému je určeno, může vést k nebezpečným
situacím.
7. Zabraňte příliš silnému mechanickému zatížení a vibracím. Při použití dodržte minimální
poloměr ohybu.
8. Do kapalin, které nejsou pod napětím lze ponořit pouze kamerovou hlavu s LED
svítidlem a ohebný labutí krk. Hloubka ponoru nesmí překročit 90 cm. K tomu
bezpodmínečně respektujte značku na ohebném labutím krku. Rukojeť a monitor
nesmí přijít do styku s kapalinou.
9. Předtím, než přístroj vystavíte kolísání okolní teploty, nechte jej vypnutý přizpůsobit
teplotě místnosti. Eventuelní tvorba kondenzační vody může za nepříznivých okolností
přístroj poškodit.
10. Nedívejte se do LED-svítidla, může oslnit a poškodit Vaše oči.
11. Konstrukční změny nebo přestavby přístroje nejsou přípustné.
Přístroj se smí používat pouze pro technické prohlídky.
Nepoužívejte jej pro vyšetření lidí nebo zvířat.
39
CZ
VÝSTRAHA ! Přečtěte si všechny bezpečnostní pokyny a instrukce. Návod k obsluze
obsahuje důležitá a užitečná upozornění pro správný provoz.
Zanedbání a nedodržení bezpečnostních pokynů a instrukcí může způsobit úraz elektrickým
proudem, požár a/nebo těžká zranění.
Věcné škody nebo škody na zdraví, způsobené neodborným zacházením nebo
nerespektováním návodu k obsluze a bezpečnostních pokynů, vedou k zániku záručního
plnění a záruky; za následné škody nelze převzít žádné ručení.
ROZSAH DODÁVKY
1
2
3
4
5
4
5
Endoskopická kamera
Doppelhakenaufsatz
Magnetický nástavec
Spiegelaufsatz
Nástavec s háčkem
NTSC videokabel
4 ks AA Mignon baterií
CZ
1
2
3
6
4
5
7
OZNAČENÍ DÍLU
6
7
8
9
10
11
12
TFT monitor
Přihrádka baterií s krytem
Pružný labutí krk
Kamerová hlava s LED svítidlem
NTSC video výstup
Tlačítko Zap/Vyp
Tlačítko osvětlení
pro nastavení jasu
13 Tlačítko osvětlení
pro ztlumení jasu
14 Rukojeť
15 Plastové
ochranné pouzdro
9
8
6
12
11
15
13
14
7
40
10
TFT monitor
Rozlišení
Zorný úhel
Videoformát
Svítidlo kamery
Napájení proudem
Příkon proudu
Okolní / Pracovní teplota
Pružný labutí krk – délka
Min. poloměr ohybu
Průměr endoskopické kamery
Krytí ohebného labutího krku
Hmotnost (bez příslušenství)
Úhlopříčka obrazovky 6 cm / 2,4”
320 x 240 pixelů
54 °
NTSC
2 LED, bílé
6 V/DC (4 x AA Mignon baterie)
max. 200 mA
0 až + 45 ° C
cca. 90 cm
45 mm
Ø 10 mm
IP 67
cca. 360 g
POUŽITÍ V SOULADU S URČENÍM
Endoskopická kamera je optický inspekční přístroj, vybavený vodotěsným labutím krkem a
barevnou minikamerou se ztlumitelným LED-svítidlem.
Přístroj je vybaven vestavěným TFT monitorem, zobrazujícím obraz kamery. K dalšímu
přenosu obrazu je k dispozici NTSC video výstup.
Endoskopická kamera je pomocným prostředkem pro optickou kontrolu, prohlídku a vyhledávání
závad na zařízení a vybavení, která nejsou pod napětím.
Ohebný labutí krk a kamerová hlava s LED svítidlem jsou vodotěsné a vhodné pro použití v
kapalinách zředěných vodou. Použití v kyselinách, louhách a olejích není povoleno.
Hloubka ponoru nesmí překročit 90 cm. Rukojeť a monitor nesmí přijít do styku s kapalinami
a nesmí být do nich ponořovány.
Napájení proudem je zajištěno 4 ks AA Mignon baterií.
PŘED UVEDENÍM DO PROVOZU
Zkontrolujte, zda jsou všechny díly uvedené v rozsahu dodávky k dispozici a v bezvadném
stavu.
Zkontrolujte, zda není kontrolované prostředí popř. zkoumaný předmět pod napětím. Přístroj
smí být použit pouze na zařízení, vybavení a předmětech, které nejsou pod napětím.
41
CZ
TECHNICKÉ ÚDAJE
CZ
VLOŽENÍ / VÝMĚNA BATERIÍ
Endoskopická kamera je napájena bateriemi, je nutno použít 4 ks AA Mignon baterií.
Při prvním uvedení do provozu a pokud endoskopickou kameru při vybitých bateriích již
nelze zapnout, je nutno vložit popř. vyměnit baterie.
Obě přihrádky baterií (7) jsou umístěny vpravo
a vlevo v tělese TFT monitoru. Těleso je
opatřeno plastovým pouzdrem, odolným proti
nárazu. Posuňte ochranné plastové pouzdro
opatrně trochu dozadu, až je přihrádka baterií
(7) vidět, zamezte nadměrnému pnutí, protože
umělá hmota může prasknout nebo se
poškodit.
Pomocí křížového šroubováku povolte šroub
přihrádky baterií (7) a sejměte bočně víčko,
vložte dvě nové baterie typu AA Mignon
správně připojené k pólům, k tomu dejte pozor
na označení polarity v přihrádce baterií (7).
Zavřete a pečlivě zašroubujte přihrádku baterií
(7) a ochranné plastové pouzdro posuňte
opatrně zpět do správné polohy.
Při výměně baterií v druhé přihrádce baterií
(7) postupujte analogicky.
7
Doporučujeme vyměnit vždy všechny čtyři baterie současně, při použití starých a nových baterií
současně může dojít k vzájemnému vybití.
Použijte vždy baterie udaného typu.
Další pokyny k použití a ošetření baterií naleznete v odstavci Údržba a čištění.
42
UVEDENÍ DO PROVOZU
ZAPNUTÍ A VYPNUTÍ ENDOSKOPICKÉ KAMERY
CZ
Stisknutím tlačítka Zap/Vyp (11) přístroj
zapnete a po krátké době se na TFT monitoru
(6) objeví kamerový obraz.
Pro vypnutí stiskněte tlačítko Zap/Vyp (11)
ještě jednou a přístroj se vypne.
11
OSVĚTLENÍ ENDOSKOPICKÉ KAMERY
Endoskopická kamera je vybavena
ztlumitelným LED osvětlením v kamerové
hlavě (9). To slouží k přizpůsobení rozdílných
světelných poměrů a umožňuje použití v
tmavém prostředí.
9
Pro zapnutí LED osvětlení stiskněte tlačítko 12. Každým dalším stisknutím se jas svítidla
zvyšuje o jeden stupeň, až je dosaženo maximální intenzity osvětlení.
Pomocí tlačítka 13 můžete osvětlení vypnout příp. snížit jeho intenzitu, každé stisknutí tlačítka
snižuje jas svítidla o jeden stupeň.
LED osvětlení by mělo být nastaveno tak, aby zobrazení na TFT monitoru (6) nebylo přesvětleno
příp. osvětleno nedostatečně.
Pro vypnutí stiskněte tlačítko Zap/Vyp (11) a přístroj se vypne.
43
OTOČENÍ OBRAZU ENDOSKOPICKÉ KAMERY O 180°
CZ
Přístroj umožňuje stisknutím kombinace tlačítek otočení kamerového obrazu o 180°.
To umožňuje uživateli kontrolu kamerového obrazu i v nepříznivých polohách.
K tomu stiskněte za normálního provozu
současně tlačítko 12 a 13 a kamerový obraz
se návazně na TFT monitoru (6) zobrazí
otočený o 180°.
Po vypnutí přístroje je tato funkce opět deaktivována.
6
13
12
VIDEOVÝSTUP
Endoskopická kamera je vybavena integrovaným NTSC videovýstupem (10), umožňujícím
obrazový výstup pro záznam. Videovýstup (10) se nachází na spodní straně rukojeti (14).
K propojení Vašeho záznamového příp.
přehrávacího zařízení použijte přiložený NTSC
videokabel (4).
Potom zapněte endoskopickou kameru.
Kolíkovou zástrčku zasuňte do NTSC
videovýstupu (10) na rukojeti (14).
Cinch zástrčku propojte se správným
videovýstupem Vašeho záznamového příp.
přehrávacího zařízení a respektujte přitom
návod k použití a pokyny příslušného přístroje.
Zapněte záznamové příp. přehrávací zařízení
a zvolte videovýstup.
14
4
10
Upozornění:
Použité záznamové příp. přehrávací zařízení musí být pro správnou přehrávku
schopné multisignální funkce. Některé přístroje jsou vybaveny automatickou
identifikací videosignálu, u jiných přístrojů musíte videovstup nastavit manuálně na
NTSC. Respektujte proto návod k obsluze a pokyny pro Váš přístroj.
Následně je při správném připojení a správném videozdroji zobrazen obraz kamery.
Pro vypnutí stiskněte tlačítko Zap/Vyp (11) a přístroj se vypne.
44
NÁSTAVCE
CZ
Endoskopická kamera je dodávána se dvěma
nástavci, magnetickým nástavcem a nástavcem
s háčkem.
Tyto nástavce lze jednotlivě nasadit na
kamerovou hlavu s LED osvětlením a umožní
Vám vyhledat a vytáhnout ztracené díly.
ÚDRŽBA A ČIŠTĚNÍ
Vybité baterie by v přístroji neměly zůstat, protože korodují popř. mohou uniknout chemikálie,
které jsou zdraví škodlivé a mohou přístroj poškodit.
Jestliže přístroj delší dobu nepoužíváte, vyjměte baterie.
Poškozené nebo vyteklé baterie mohou při kontaktu s pokožkou způsobit poleptání, noste proto
vhodné rukavice a ochranné brýle.
Použité baterie nelikvidujte spolu s komunálním odpadem, ale odevzdejte je na určeném
sběrném místě (odborný obchod, sběrný dvůr).
Přístroj po každém použití očistěte měkkým, antistatickým hadříkem bez vláken. Nepoužívejte
žádné abrazivní nebo chemické čisticí prostředky.
Pružný labutí krk (8) po každém použití v kapalinách ředěných vodou (nesmí to být kyseliny
nebo louhy) opláchněte důkladně čistou vodou a dobře jej osušte.
Přístroj jinak nevyžaduje v podstatě žádnou údržbu.
45
CZ
RECYKLACE
Tento symbol upozorňuje na to, že podle směrnice o likvidovaných použitých elektrických
a elektronických zařízeních (2002/96/ES) a národních zákonů se tento výrobek nesmí
likvidovat s domovním odpadem. Tento výrobek se musí odevzdat v určené sběrně. To
lze zajistit např. jeho vrácením při koupi podobného výrobku nebo odevzdáním ve
sběrně, autorizované pro recyklaci použitých elektrických a elektronických zařízení.
Neodborné zacházení s použitými přístroji může mít z důvodu potenciálně nebezpečných
látek, které jsou často obsaženy v odpadních elektrických a elektronických zařízeních,
negativní dopady na životní prostředí a lidské zdraví. Odbornou likvidací tohoto výrobku
navíc přispíváte k efektivnímu využití přírodních zdrojů. Informace o sběrných místech
použitých zařízení obdržíte u své městské správy, veřejnoprávních institucí zabývajících
se likvidací, na autorizovaném místě pro likvidaci použitých elektrických a elektronických
zařízení nebo u svého odvozce odpadu.
46
ES Prohlášení o shodě
Endoskopická kamera
Označení typu / modelu:
TF 2809
Sériové číslo / Číslo šarže:
90-332 – 2010-04
Obchodní označení:
Rothenberger Industrial Endoskopická kamera
Příslušné směrnice ES:
ES Směrnice o strojích 2006/42/EG
ES Směrnice pro nízké napětí 2006/95/ES
ES Směrnice o elektromagnetické kompatibilitě (EMV) 2004/108/EG
EN 55013:2001 + A1:2003 + A2:2006; EN 55020:2007
Použité harmonizované normy:
Anif, 01-04-2010
Oliver Hahn
Vedoucí nákupu
Zplnomocněný pracovník
pro technické podklady
Technické podklady jsou k dispozici / lze obdržet u:
WALTER WERKZEUGE SALZBURG GmbH,
Gewerbeparkstrasse 9, 5081 Anif, Austria
Alexander Reischl
Vedoucí výroby
Záruční karta
Rok výroby: 04/2010
Model: Endoskopická kamera TF 2809
Gratulujeme Vám ke koupi
tohoto vysoce kvalitního výrobku.
Náš závazek být kvalitní
samozřejmě zahrnuje také
služby našim zákazníkům.
Poskytnutí záruky předpokládá:
Přístroj
nebyl
používán
nepřiměřeným způsobem, nebyl
přetěžován, nebyl kombinován
se špatným příslušenstvím a
opravy byly prováděny pouze
autorizovanou opravnou.
Pro průmyslové použití platí
odlišné podmínky pro poskytnutí
záruky.
Záruční listina je platná pouze
s platným dokladem o nákupu
výrobku. Obojí, prosím, pečlivě
uschovejte.
Pokud se po zakoupení proti
očekávání vyskytnou závady
způsobené vadným materiálem
nebo vadným zpracováním
poskytujeme dle záručního
práva záruku na výrobek
používaný v privátní oblasti.
Záruční lhůta v délce 2 let začíná běžet dnem nákupu. Uschovejte si prosím pokladní doklad jako průkaz
nákupu. Záruka se prodlužuje o počet dnů strávených v opravě. V době trvání záruky lze vadné přístroje
zaslat VYPLACENĚ DO FIRMY na adresy, které jsou uvedeny na zadní straně tohoto manuálu.
V rámci záručního práva rozhodneme o opravě či výměně přístroje.
Pokud není přiložen originál dokladu o nákupu přístroje, provedeme opravu výhradně za poplatek.
Rovněž po uplynutí záruční lhůty máte možnost zaslat nám defektní přístroj za účelem opravy VYPLACENĚ
DO FIRMY.
Rozpočty nákladů a opravy po uplynutí záruční lhůty provádíme v každém případě za poplatek.
Abychom mohli Vaši žádost zpracovat snadno a efektivně, zašlete nám, prosím, svou poptávku pokud je to
možné e-mailem, s uvedením Vašeho telefonního čísla (na kterém jste v průběhu našich úředních hodin k
zastižení) a rovněž číslo výrobku.
Výrobek zašlete, prosím, dobře zabalený, přiložte krátký popis závady
a rovněž Vaši adresu (včetně telefonního čísla).
Právní povinnost ručení předavatele není zárukou omezena.
Model č. 069107
47
CZ
Označení výrobku / Funkce:
Toto je originální verze ES Prohlášení o shodě.
Tímto společnost,
WALTER WERKZEUGE SALZBURG GmbH, Gewerbeparkstrasse 9, 5081 Anif, Austria
prohlašuje, že níže uvedený stroj svou koncepcí a druhem
konstrukce a v provedení námi uvedeném do provozu odpovídá příslušným
ustanovením směrnic ES.
Toto prohlášení se vztahuje pouze na stroj ve stavu, v kterém byl uveden do oběhu.
Díly, umístěné dodatečně koncovým uživatelem a/nebo dodatečně provedené zásahy nejsou
brány v úvahu.
INDUSTRIAL
ROTHENBERGER Industrial GmbH
Sodener Str. 47, D-65779 Kelkheim-Fischbach
Tel.: +49 (0)6195 9981 - 0
Email: [email protected]
www.rothenbergerindustrial.com
© Copyright
Nachdruck oder Vervielfältigung – auch auszugsweise – nur mit Genehmigung der
WALTER WERKZEUGE SALZBURG GMBH
Gewerbeparkstrasse 9
5081 Anif / Austria
Diese Druckschrift einschließlich aller ihrer Teile ist urheberrechtlich geschützt.
Jede Verwertung außerhalb der engen Grenzen des Urheberrechtsgesetzes ist ohne Zustimmung
der WALTER WERKZEUGE SALZBURG GMBH unzulässig und strafbar.
Das gilt insbesondere für Vervielfältigungen, Übersetzungen, Mikroverfilmungen und die
Einspeisung und Verarbeitung in elektronischen Systemen.
48