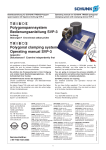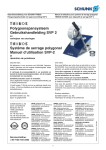
1
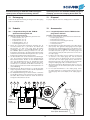
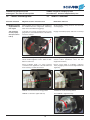
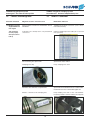
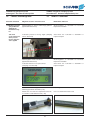
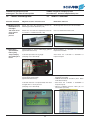
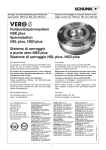
Betriebsanleitung für SCHUNK TRIBOS-Polygonspannsystem mit Spannvorrichtung SVP-2 D
Operating manual for SCHUNK TRIBOS polygonal
clamping system with clamping device SVP-2 D
Polygonspannsystem
Bedienungsanleitung SVP-2 D
Anhang:
Störungen? Erst einmal selbst prüfen
Polygonal clamping system
Operating manual SVP-2 D
Sehr geehrter Kunde,
Dear Customer,
wir gratulieren zu Ihrer Entscheidung für SCHUNK. Damit
haben Sie sich für höchste Präzision, hervorragende
Qualität und besten Service entschieden.
Congratulations on choosing a SCHUNK product. By
choosing SCHUNK, you have opted for the highest
precision, top quality and best service.
Sie erhöhen die Prozesssicherheit in Ihrer Fertigung
und erzielen beste Bearbeitungsergebnisse – für die
Zufriedenheit Ihrer Kunden.
You are going to increase the process reliability of
your production and achieve best machining results –
to the customer's complete satisfaction.
SCHUNK-Produkte werden Sie begeistern.
Unsere ausführlichen Montage- und Betriebshinweise
unterstützen Sie dabei.
SCHUNK products are inspiring.
Our detailed assembly and operation manual will
support you.
Sie haben Fragen? Wir sind auch nach Ihrem Kauf jederzeit für Sie da. Sie erreichen uns unter den unten aufgeführten Kontaktadressen.
Do you have further questions? You may contact us at
any time – even after purchase. You can reach us directly at the below mentioned addresses.
Mit freundlichen Grüßen
Kindest Regards,
Ihre SCHUNK GmbH & Co. KG
Spann- und Greiftechnik
Your SCHUNK GmbH & Co. KG
Precision Workholding Systems
SCHUNK GmbH & Co. KG
Spann- und Greiftechnik
Bahnhofstr. 106-134
74348 Lauffen/Neckar
Deutschland
Tel. +49-7133-103-0
Fax +49-7133-103-2359
[email protected]
www.schunk.com
Reg. No. DE-003496 QM
Reg. No. DE-003496 QM
Service-Hotline:
+49-7133-103-2333
AUSTRIA: SCHUNK Intec GmbH
Tel. +43-7229-65770-0 · Fax +43-7229-65770-14
[email protected] · www.at.schunk.com
BELGIUM, LUXEMBOURG:
SCHUNK Intec N.V. / S. A.
Tel. +32-53-853504 · Fax +32-53-836022
[email protected] · www.be.schunk.com
CANADA: SCHUNK Intec Corp.
Tel. +1-905-712-2200 · Fax +1-905-712-2210
[email protected] · www.ca.schunk.com
CHINA: SCHUNK Intec
Precision Machinery Trading (Shanghai) Co., Ltd.
Tel. +86-21-51760266 · Fax +86-21-51760267
[email protected] · www.cn.schunk.com
CZECH REPUBLIC: SCHUNK Intec s.r.o.
Tel. +420-545229095 · Fax +420-545220508
[email protected] · www.cz.schunk.com
DENMARK: SCHUNK Intec A/S
Tel. +45-43601339 · Fax +45-43601492
[email protected] · www.dk.schunk.com
FRANCE: SCHUNK Intec SARL
Tel. +33-1-64663824 · Fax +33-1-64663823
[email protected] · www.fr.schunk.com
GREAT BRITAIN: SCHUNK Intec Ltd.
Tel. +44-1908-611127 · Fax +44-1908-615525
[email protected] · www.gb.schunk.com
HUNGARY: SCHUNK Intec Kft.
Tel. +36-46-50900-7 · Fax +36-46-50900-6
[email protected] · www.hu.schunk.com
SLOVAKIA: SCHUNK Intec s.r.o.
Tel. +421-37-3260610 · Fax +421-37-6421906
[email protected] · www.sk.schunk.com
INDIA: SCHUNK India Branch Office
Tel. +91-80-40538999 · Fax +91-80-41277363
[email protected] · www.in.schunk.com
SOUTH KOREA: SCHUNK Intec Korea Ltd.
Tel. +82-31-7376141 · Fax +82-31-7376142
[email protected] · www.kr.schunk.com
ITALY: SCHUNK Intec S.r.l.
Tel. +39-031-4951311 · Fax +39-031-4951301
[email protected] · www.it.schunk.com
SPAIN, PORTUGAL: SCHUNK Intec S.L.
Tel. +34-937 556 020 · Fax +34-937 908 692
[email protected] · www.es.schunk.com
JAPAN: SCHUNK Intec K.K.
Tel. +81-33-7743731 · Fax +81-33-7766500
[email protected] · www.tbk-hand.co.jp
SWEDEN: SCHUNK Intec AB
Tel. +46-8-554-42100 · Fax +46-8-554-42101
[email protected] · www.se.schunk.com
MEXICO, VENEZUELA:
SCHUNK Intec S.A. de C.V.
Tel. +52-442-211-7800 · Fax +52-442-211-7829
[email protected] · www.mx.schunk.com
SWITZERLAND, LIECHTENSTEIN:
SCHUNK Intec AG
Tel. +41-523543131 · Fax +41-523543130
[email protected] · www.ch.schunk.com
NETHERLANDS: SCHUNK Intec B.V.
Tel. +31-73-6441779 · Fax +31-73-6448025
[email protected] · www.nl.schunk.com
TURKEY: SCHUNK Intec
Tel. +90-2163662111 · Fax +90-2163662277
[email protected] · www.tr.schunk.com
POLAND: SCHUNK Intec Sp.z o.o.
Tel. +48-22-7262500 · Fax +48-22-7262525
[email protected] · www.pl.schunk.com
USA: SCHUNK Intec Inc.
Tel. +1-919-572-2705 · Fax +1-919-572-2818
[email protected] · www.us.schunk.com
RUSSIA: OOO SCHUNK Intec
Tel. +7-812-326 78 35 · Fax +7-812-326 78 38
[email protected] · www.ru.schunk.com
1
Druck-Nr.: 9942584 02 / SVP-2D / de-en / 08.11.10 K
Appendix:
Disturbances? Examine independently first
Betriebsanleitung für SCHUNK TRIBOS-Polygonspannsystem mit Spannvorrichtung SVP-2 D
Operating manual for SCHUNK TRIBOS polygonal
clamping system with clamping device SVP-2 D
Inhaltsverzeichnis / Table of Contents
Seite / Page
1.
Allgemeines / General
............................................................................................................................
3
1.1 TRIBOS Spannvorrichtung SVP-2 D / TRIBOS clamping device SVP-2 D . . . . . . . . . . . . . . . . . . . . . . . . . . . . . . . . . . . . . . . . . . . . . . . . . . . . . . . . . . . . . . 3
1.2 Typenschild und Sicherheitshinweis / Type plate and safety note . . . . . . . . . . . . . . . . . . . . . . . . . . . . . . . . . . . . . . . . . . . . . . . . . . . . . . . . . . . . . . . . . . . . . . . . 3
2.
Sicherheit / Safety
2.1
2.2
2.3
2.4
4
................................................................................................................................
Symbolerklärung / Symbol explanation . . . . . . . . . . . . . . . . . . . . . . . . . . . . . . . . . . . . . . . . . . . . . . . . . . . . . . . . . . . . . . . . . . . . . . . . . . . . . . . . . . . . . . . . . . . . . . . . . . . . . . . . . 4
Bestimmungsgemäßer Gebrauch / Appropriate use . . . . . . . . . . . . . . . . . . . . . . . . . . . . . . . . . . . . . . . . . . . . . . . . . . . . . . . . . . . . . . . . . . . . . . . . . . . . . . . . . . . . . . . . . 4
Umgebungs- und Einsatzbedingungen / Environmental and operating conditions . . . . . . . . . . . . . . . . . . . . . . . . . . . . . . . . . . . . . . . . . . . . . . . . . . . . 4
Sicherheitshinweise / Safety instructions . . . . . . . . . . . . . . . . . . . . . . . . . . . . . . . . . . . . . . . . . . . . . . . . . . . . . . . . . . . . . . . . . . . . . . . . . . . . . . . . . . . . . . . . . . . . . . . . . . . . . . . 4
3.
Gewährleistung / Warranty
4.
Technische Daten / Technical data
.....................................................................................................................
........................................................................................................
5
5
4.1 TRIBOS Reduziereinsatz Typ S oder R / TRIBOS Reduction insert Type S or R . . . . . . . . . . . . . . . . . . . . . . . . . . . . . . . . . . . . . . . . . . . . . . . . . . . . . 5
4.2 TRIBOS Werkzeughalter / TRIBOS Toolholder . . . . . . . . . . . . . . . . . . . . . . . . . . . . . . . . . . . . . . . . . . . . . . . . . . . . . . . . . . . . . . . . . . . . . . . . . . . . . . . . . . . . . . . . . . . . . . . 6
5.
Bedienung / Operation
5.1
5.2
5.3
5.4
...........................................................................................................................
6.
Hinweise zum Spannen und Lösen / Notes on clamping and unclamping
7.
Befestigung der Spannvorrichtung / Fastening the clamping device
8.
Pflege und Lagerung / Care and storage
9.
Transport / Transport
10.
Wartung und Service / Maintenance and service
11.
12.
7
TRIBOS Werkzeughalter (Typ S und R) / TRIBOS Toolholder (Typ S and R) . . . . . . . . . . . . . . . . . . . . . . . . . . . . . . . . . . . . . . . . . . . . . . . . . . . . . . . . . 7
Druckbegrenzungsgerät / Pressure control device . . . . . . . . . . . . . . . . . . . . . . . . . . . . . . . . . . . . . . . . . . . . . . . . . . . . . . . . . . . . . . . . . . . . . . . . . . . . . . . . . . . . . . . . . . . 8
Anschluss Handlesegerät über RS-232-Schnittstelle / Connecting the hand-held reading device via the RS-232 interface . . . . 10
Spannungsversorgung / Power supply . . . . . . . . . . . . . . . . . . . . . . . . . . . . . . . . . . . . . . . . . . . . . . . . . . . . . . . . . . . . . . . . . . . . . . . . . . . . . . . . . . . . . . . . . . . . . . . . . . . . . . . . . . 11
..........................................
11
...................................................
12
.............................................................................................
13
............................................................................................................................
13
................................................................................
13
Entsorgung / Disposal
..........................................................................................................................
13
Zubehör / Accessories
..........................................................................................................................
14
12.1 Längeneinstellung für die TRIBOS Spannvorrichtung SVP-2 D / Length adjustment for the TRIBOS clamping device SVP-2 D 14
Störungen? Erst einmal selbst prüfen
Disturbances? Examine independently first
13.
..............................................................................................
TRIBOS Werkzeughalter / TRIBOS Toolholder
...................................................................................
15
16
13.1 Werkzeugschaft bei aufgebautem Druck nicht fügbar / Tool shank does not seat properly when pressure has built up . . 16
13.2 Werkzeugschaft nur zum Teil in den Werkzeughalter einfügbar / Tool shank can only be partially inserted into the toolholder . . 19
13.3 Werkzeug lässt sich nicht mehr aus dem Werkzeughalter entfernen / Tool can not be removed from the toolholder . . . . . . 20
13.4 Werkzeugschaft bei geringen Drücken außerhalb des Druckbereichs fügbar /
Tool shank can be seated outside the pressure range if slight pressure is applied . . . . . . . . . . . . . . . . . . . . . . . . . . . . . . . . . . . . . . . . . . . . . . . . 21
13.5 Werkzeugschaft bei Maximaldruck noch nicht fügbar / Tool shank can not yet be seated at maximum pressure . . . . . . . . . . . 22
13.6 Drehmoment/Spannkraft/Haltekraft zu gering / Torque/clamping force/holding force too low . . . . . . . . . . . . . . . . . . . . . . . . . . . . . . . . . . . . 22
13.7 Rundlauffehler am eingespannten Werkzeug / Concentricity errors on clamped tool . . . . . . . . . . . . . . . . . . . . . . . . . . . . . . . . . . . . . . . . . . . . . . 24
14.
TRIBOS Spannvorrichtung SVP-2 / TRIBOS clamping device SVP-2
................................................
25
14.1 SVP-2 Spannvorrichtung erreicht nicht mehr den nötigen Druck / SVP-2 clamping device does not reach required pressure . . . 25
14.2 Spannvorrichtung baut keinen Druck auf / Clamping device does not build up pressure . . . . . . . . . . . . . . . . . . . . . . . . . . . . . . . . . . . . . . . . . . 27
14.3 Öl läuft aus Spannvorrichtung aus / Oil leaking out of clamping device . . . . . . . . . . . . . . . . . . . . . . . . . . . . . . . . . . . . . . . . . . . . . . . . . . . . . . . . . . . . . . . 27
15.
Information / Information
......................................................................................................................
15.1 Auswaschung/Zerstörung an Kunststofftasche / Scouring/damage on synthetic pocket
Kurzanleitung in Bildern / Short picture manual
.......................................................................................
EG-Konformitätserklärung / CE Declaration of Conformance
2
27
...........................................
................................................................
27
28
29
Betriebsanleitung für SCHUNK TRIBOS-Polygonspannsystem mit Spannvorrichtung SVP-2 D
1.
Operating manual for SCHUNK TRIBOS polygonal
clamping system with clamping device SVP-2 D
Allgemeines
1.
General
Das SCHUNK TRIBOS-Polygonspannsystem zeichnet sich
neben den hervorragenden technischen Eigenschaften durch
einfache Bedienbarkeit aus.
The SCHUNK TRIBOS polygonal clamping system stands out
from its competition thanks to its excellent technical properties
and ease of operation.
Das System besteht aus:
The system consists of:
1.1
1.1
TRIBOS Spannvorrichtung SVP-2 D
TRIBOS clamping device SVP-2 D
Aufnahme für Längenmess-System
zur Werkzeugvoreinstellung
Mount for length measuring systems
or tool pre-setting
Entlüftungsschraube
Vent screw
Typenschild
Type plate
Zwischenbüchse
Intermediate sleeve
Rückwand mit Sicherheitshinweis
Rear plate with safety note
Spannungsversorgung – Netzteil
Power supply unit
Schnittstelle – Handscanner
Interface – Handheld scanner
Betätigungshebel
Actuation handle
Druckablassventil /
Pressure release valve
Durchgangslöcher
für Befestigung
Through bores for
fastening
Druckbegrenzungsgerät
Pressure control device
1.2
Typenschild und Sicherheitshinweis
1.2
Type plate and safety note
Typenschild / Type plate
Produktbezeichnung und Ident-Nummer
Name of product and Id-number
Identnummer Typenschild / Id-number type plate
Fortlaufende Vorrichtungsnummer
Serial device number
Baujahr / Construction date
Technische Angaben / Technical data
Sicherheitshinweis / Safety note
3
Betriebsanleitung für SCHUNK TRIBOS-Polygonspannsystem mit Spannvorrichtung SVP-2 D
Operating manual for SCHUNK TRIBOS polygonal
clamping system with clamping device SVP-2 D
2.
Sicherheit
2.
Safety
2.1
Symbolerklärung
2.1
Symbol explanation
Dieses Symbol ist überall dort zu finden wo
besondere Gefahren für Personen oder Beschädigungen des Polygonspannsystems möglich sind.
2.2
This symbol is displayed wherever there is a
danger of injury or where the polygonal clamping
system may suffer damage.
Bestimmungsgemäßer Gebrauch
1.2
Appropriate use
Die Spannvorrichtung wurde konstruiert zum Bestücken und
Wechseln von Werkzeugen in TRIBOS Werkzeughaltern.
TRIBOS Werkzeughalter eignen sich zum Spannen von rotationssymetrischen Werkzeugen oder Werkstücken. Bei Schaftwerkzeugen können alle Schäfte nach DIN 1835 Form A, B, E
bzw. DIN 6535 Form HA, HB, HE gespannt werden (Schafttoleranz h6).
Das Polygonspannsystem (Spannvorrichtung, Reduziereinsätze
und TRIBOS Werkzeughalter) darf ausschließlich im Rahmen
seiner technischen Daten verwendet werden (siehe Kapitel 4).
Ein darüberhinausgehender Gebrauch gilt als nicht bestimmungsgemäß. Für Schäden aus einem solchen Gebrauch haftet
der Hersteller nicht.
The clamping device was designed for loading and changing of
tools in TRIBOS toolholders.
The TRIBOS toolholders are suitable for clamping round tools or
workpieces. In case of shank tools all shanks may be clamped as
per DIN 1835 Form A, B, E or DIN 6535 Form HA, HB, HE (shank
tolerance h6).
The polygonal clamping system (clamping device, reduction
inserts and TRIBOS toolholders) may only ever be employed within the restrictions of its technical specifications (see
chapter 4).
Using the system with disregard to even a minor specification will
be deemed inappropriate use. The manufacturer assumes no liability for any injury or damage resulting from inappropriate use.
2.3
2.3
Umgebungs- und Einsatzbedingungen
Environmental and operating conditions
Die TRIBOS Spannvorrichtung darf nur in sauberen, staubfreien
und trockenen Räumen bei einer Temperatur von + 5° C bis
+ 40° C gelagert und betrieben werden. Die relative Luftfeuchtigkeit darf zwischen 20 – 80 % liegen.
The TRIBOS clamping device may be stored and operated
only in clean, dust-free and dry rooms at a temperature of
+ 5° C to + 40° C. The relative humidity can be between 20 and
80 %.
2.4
2.4
Sicherheitshinweise
Safety instructions
Durch den Sicherheitsverantwortlichen der Anlage ist sicherzustellen, dass:
– nur qualifiziertes Personal mit der Arbeit an den Maschinen
und Geräten beauftragt wird
– diese Personen u.a. die Betriebsanleitungen und die übrigen
Unterlagen der Produktdokumentation bei allen entsprechenden Arbeiten stets verfügbar haben und verpflichtet werden,
diese Unterlagen konsequent zu beachten;
– nicht qualifiziertem Personal Arbeiten an den Geräten und
Maschinen untersagt sind.
Qualifiziertes Personal sind Personen, die aufgrund ihrer
Ausbildung, Erfahrung und Unterweisung sowie Kenntnisse über
einschlägige Normen, Bestimmungen, Unfallverhütungsvorschriften und Betriebsverhältnisse von dem, für die Sicherheit der
Anlage, Verantwortlichen berechtigt worden sind, die jeweils
erforderlichen Tätigkeiten auszuführen und dabei mögliche
Gefahren erkennen und vermeiden können.« (Definition für
Fachkräfte laut VDE 105 oder ICE364).
Mit diesen Sicherheitshinweisen wird kein Anspruch auf
Vollständigkeit erhoben.
The safety representative of the company has to guarantee the
following conditions:
– that only qualified personnel will assigned to operate the
machines and devices
– that this persons have, among others the operating manual
and all other technical documentations available for being
able to perform certain work and who are obliged to the fact,
that the details given conditions (mentioned in the documentation), will be considered consistently;
– that unskilled personnel is not allowed to operate the machines and devices.
Qualified personnel are persons, who, due to their professional
training, experience, instructions as well as knowledge of relevant
standards, stipulations, rules for the prevention of accidents and
operating conditions , are responsible for the safety of the plant
and are allowed to do the necesary works and thereby to recognize and to avoid possible risks.” (Definition on skilled personnel
as per VDE 105 or ICE364).
With these safety references no claim on completeness is
laid.
Die Spannvorrichtung SVP-2 D mit stufenlos einstellbarer Druckbegrenzung ist ein Betriebsmittel für den Einsatz in industriellen
Anlagen.
The clamping device SVP-2 D with continuously adjustable pressure control is an operating material for applications in industrial
plants.
Nur das mitgelieferte Netzteil verwenden:
IN: 60 Watt, 90 – 264 VAC, 50 – 60 Hz, 1.5 A
OUT: 24 V, 2.5 A
Only use the power supply unit provided:
IN: 60 Watts, 90 - 264 VAC, 50 - 60 Hz, 1.5 A
OUT: 24 V, 2.5 A
Die Spannkraft der TRIBOS Spannvorrichtung SVP-2 D
beträgt bis zu 800 000 N!
The clamping force of the TRIBOS clamping device
SVP-2 D can reach up to 800.000 N!
Beachten Sie deshalb bei der Bestückung des TRIBOS
Werkzeughalters mit einem Werkzeug oder bei einem
Werkzeugwechsel: Der Werkzeughalter muss immer bis
Therefore when fitting or replacing a tool in the TRIBOS
Toolholder, please note that the toolholder must always
be inserted into the reduction insert until it contacts the
4
Betriebsanleitung für SCHUNK TRIBOS-Polygonspannsystem mit Spannvorrichtung SVP-2 D
Operating manual for SCHUNK TRIBOS polygonal
clamping system with clamping device SVP-2 D
stop face. Next insert the reduction insert to the stop in
the clamping device.
zur Anschlagfläche in den Reduziereinsatz eingeführt
werden. Danach den Reduziereinsatz bis zum Anschlag
in die Spannvorrichtung fügen.
If this requirement is not observed, the clamping device,
the reduction insert and the toolholder may experience
plastic deformation and loss of function!
Wird dies nicht beachtet, drohen plastische Deformationen und Funktionsverluste an der Spannvorrichtung, am
Reduziereinsatz und am Werkzeughalter!
Only power-actuate the TRIBOS toolholder in the clamping device, if it is correctly aligned in the reduction insert
(toolholder snaps in via the flattened area – see chapter
5, operating manual). If this is not observed, there may be
plastic deformation and loss of function!
Den TRIBOS Werkzeughalter nur dann in der Spannvorrichtung mit Kraft beaufschlagen, wenn er im
Reduziereinsatz richtig positioniert ist (Werkzeughalter
über Abflachung gerastet – siehe Kapitel 5. Bedienung).
Wird dies nicht beachtet, drohen plastische Deformationen und Funktionsverluste!
To prevent loss of functionality, the wear on the reducing sleeve must not exceed 0.04 mm.
Um einen Funktionsverlust zu vermeiden darf die
Abnutzung des Reduziereinsatzes maximal 0.04 mm
betragen.
During clamping operation the indicated pressure of
the toolholder should not be exceeded! Otherwise
the TRIBOS toolholder will be deformed and and no
longer useable!
Die Druckangabe des Werkzeughalters darf
beim Spannen nicht überschritten werden! Der
TRIBOS Werkzeughalter wird sonst deformiert und
unbrauchbar!
If the minimum chucking depth is not respected, this will
result in inaccuracy and loss of torque.
When using TRIBOS toolholders for rotating operations,
protection covers as per EC machine directives, Point
1.4.2.2 B must be used.
Wird die Mindest-Einspanntiefe nicht eingehalten droht
Genauigkeits- und Drehmomentverlust.
Beim Einsatz der TRIBOS Werkzeughalter unter Rotation
müssen Schutzabdeckungen gemäß EG-Maschinenrichtlinie Punkt 1.4.2.2 B vorgesehen werden.
Additional bores, threads or attachments, which are not offered
as a SCHUNK accessory, may only be used subject to written
confirmation from SCHUNK.
Zusätzliche Bohrungen, Gewinde oder Anbauten, die nicht als
Zubehör von SCHUNK angeboten werden, dürfen nur mit schriftlicher Genehmigung der Fa. SCHUNK angebracht werden.
3.
Gewährleistung
3.
Warranty
Die Gewährleistung beträgt 24 Monate ab Lieferdatum Werk bei
bestimmungsgemäßem Gebrauch im 1-Schicht-Betrieb.
Grundsätzlich sind werkstücksberührende Teile und Verschleißteile nicht Bestandteil der Gewährleistung. Beachten Sie hierzu
auch unsere Allgemeinen Geschäftsbedingungen.
The warranty period is 24 months after delivery date from factory
assuming appropriate use in single-shift operation.
Components that come into contact with workpieces and wearing
parts are never included in the warranty. In this context, please
also see our General Terms and Conditions.
4.
Technische Daten
4.
Technical data
4.1
TRIBOS Reduziereinsatz Typ S oder R
4.1
TRIBOS Reduction insert Type S or R
Drucksegment
Pressure segment
Kunststoffring
Plastic ring
5
Betriebsanleitung für SCHUNK TRIBOS-Polygonspannsystem mit Spannvorrichtung SVP-2 D
Operating manual for SCHUNK TRIBOS polygonal
clamping system with clamping device SVP-2 D
4.2 TRIBOS Werkzeughalter
Werkzeughalter Typ S
4.2 TRIBOS Toolholder
Toolholder Type S
Schnitt des Werkzeughalters /
Section of the toolholder
Anschlag / Stop
Mindesteinspanntiefe
Min. clamping
depth
10
Max. Druckangabe
max. pressure indication
Längenverstellweg
Length adjustment
Spann-Ø
Clamping-Ø
Tabelle Typ S
D1
Max.
Spann-Ø Drehzahl
min –1 *
ØD1
Ø
D
2
ma
XXX x.
bar
ØD2
Abflachung / flattened
Table Type S
Mind. übertragbares Drehmoment in Nm **
MindestEinspanntiefe mm
Zul. rad. Kraft F auf
Werkzeughalter bei
50 mm Auskragl. N
Admissible
transm.
torque in Nm **
Min.
Chucking
depth in mm
Admiss. radial force F
on the toolholder at an
overhang of 50 mm N
Betriebstemp. in
°C
Max. Kühlmitteldruck
in bar
Operating Max. coolant
temp. in
pressure
°C
in bars
Werkzeugschaft-Ø
Max.
Druckangabe in bar
Tool
shank-Ø
Max.press.
indication
in bars
D1
clampingØ
Max.
r.p.m.
min –1 *
Ø 6
85000
5
27
225
20 ... 80
80
Ø 8
85000
12
27
370
20 ... 80
80
8h6
Ø 10
85000
20
32
540
20 ... 80
80
10h6
6h6
85000
30
37
650
20 ... 80
80
12h6
85000
50
37
900
20 ... 80
80
14h6
Ø 16
85000
70
38
1410
20 ... 80
80
16h6
Ø 18
85000
100
38
1580
20 ... 80
80
18h6
Ø 20
85000
150
42
1860
20 ... 80
80
20h6
Ø 25
85000
200
47
4400
20 ... 80
80
25h6
Ø 32
85000
280
51
6500
20 ... 80
80
32h6
** abhängig von der Schnittstelle zur Spindel
** abhängig von der Toleranz des Schaftes
** depending on the interface to the spindle
** depending on the shank tolerance
Werkzeughalter Typ R
Toolholder Type R
siehe Werkzeughalter
see toolholder
Ø 12
Ø 14
Schnitt des Werkzeughalters
Section of the toolholder
Anschlag / Stop
Abflachung
flattened
ØD1
max.
XXX bar
ØD2
ØD2
Mindest10 einspanntiefe
Spann-Ø
Clamping-Ø
Max. Druckangabe
max. pressure indication
Längenverstellweg
Length adjustment
6
Min. clamping
depth
Betriebsanleitung für SCHUNK TRIBOS-Polygonspannsystem mit Spannvorrichtung SVP-2 D
Operating manual for SCHUNK TRIBOS polygonal
clamping system with clamping device SVP-2 D
Tabelle Typ R
D1
Max.
Spann-Ø Drehzahl
min –1 *
Table Type R
Mind. übertragbares Drehmoment in Nm **
MindestEinspanntiefe mm
Zul. rad. Kraft F auf
Werkzeughalter bei
50 mm Auskragl. N
Admissible
transm.
torque in Nm **
Min.
Chucking
depth in mm
Admiss. radial force F
on the toolholder at an
overhang of 50 mm N
Betriebstemp. in
°C
Max. Kühlmitteldruck
in bar
Operating Max. coolant
temp. in
pressure
°C
in bars
Werkzeugschaft-Ø
Max.
Druckangabe in bar
Tool
shank-Ø
Max.press.
indication
in bars
Max.
r.p.m.
min –1 *
Ø 6
55000
8
27
225
20 ... 80
80
Ø 8
55000
14
27
370
20 ... 80
80
8h6
Ø 10
55000
24
32
540
20 ... 80
80
10h6
6h6
Ø 12
55000
40
37
650
20 ... 80
80
12h6
Ø 14
55000
80
37
900
20 ... 80
80
14h6
Ø 16
55000
120
38
1410
20 ... 80
80
16h6
Ø 18
55000
180
38
1580
20 ... 80
80
18h6
Ø 20
55000
240
42
1860
20 ... 80
80
20h6
Ø 25
55000
270
47
4400
20 ... 80
80
25h6
Ø 32
55000
350
51
6500
20 ... 80
80
32h6
** abhängig von der Schnittstelle zur Spindel
** abhängig von der Toleranz des Schaftes
** depending on the interface to the spindle
** depending on the shank tolerance
5.
Bedienung
5.
Operation
5.1
Werkzeughalter (Typ S und R)
5.1
Toolholder (Type S and R)
Werkzeughalter Typ S
Toolholder
Type S
siehe Werkzeughalter
see toolholder
D1
clampingØ
Anschlag
Stop
max. bar
XXX
Abflachung
flattened
Werkzeughalter
Typ R
Toolholder
Type R
auf Anschlag
0!
onto Stop
Anschlag
Stop
Reduziereinsatz
Reduction insert
1. Beachten Sie die Druckangabe auf dem Werkzeughalter.
2. Schieben Sie den Reduziereinsatz auf den Werkzeughalter
bis er über die Abflachungen gerastet ist. Um ein mögliches
Spiel zwischen den Abflachungen und dem Reduziereinsatz
zu beseitigen, drehen Sie den Werkzeughalter im Reduziereinsatz nach rechts (im Uhrzeigersinn).
1. Please note the pressure indication on the toolholder.
2. Push the reduction insert onto the toolholder until it snaps
in via the flattened areas. In order to eliminate possible play
between the flattened area and the reduction insert, turn the
toolholder, which is clamped into the reduction insert, to the
right (clockwise).
HINWEIS:
Bei früheren Versionen der Werkzeughalter Type S kann es
sich noch um eine Ausführung ohne Rastflächen handeln.
Bevor Sie diese Werkzeughalter in der Spannvorrichtung
SVP-2-D spannen, setzen Sie sich bitte mit der Fa. SCHUNK
(Tel. +49 -7133 -103 - 2333) in Verbindung. Wir beraten Sie, um
Beschädigungen an Ihren Werkzeughaltern durch falsche
Spannvorgänge auszuschließen.
NOTE:
Former versions of the toolholder type S are not equipped
with a locking surface yet. Before clamping the toolholders
in the clamping device SVP-2-D, please contact SCHUNK
(Phone No. +49-7133-103-2333). We gladly support you in
order to avoid damages at the toolholder caused by wrong
clamping operations.
7
Betriebsanleitung für SCHUNK TRIBOS-Polygonspannsystem mit Spannvorrichtung SVP-2 D
Operating manual for SCHUNK TRIBOS polygonal
clamping system with clamping device SVP-2 D
3. Schieben Sie jetzt den Reduziereinsatz mit Werkzeughalter bis
zum Anschlag in die Spannvorrichtung. Die Lage wird automatisch über die 3 Segmente des Reduziereinsatzes in der
großen Zwischenbüchse der Spannvorrichtung in 120°Winkellage vorgegeben.
3. Now slide the reduction insert and the toolholder into the
clamping device until the stop. The position is automatically
determined by the three segments of the reduction insert in
the large intermediate sleeve of the clamping device at an
angle of 120°.
ACHTUNG!
CAUTION!
Nachdem Sie den Reduziereinsatz mit dem Werkzeughalter bis zum Anschlag in die Spannvorrichtung eingefügt haben, kontrollieren Sie bitte
unbedingt, ob Werkzeughalter und Reduziereinsatz
noch bis zum Anschlag gefügt sind und das
mögliche Spiel des Werkzeughalters durch eine
Rechtsdrehung beseitigt ist! (Beachten Sie auch die
Sicherheitshinweise in Kapitel 2.4).
Once you have inserted the reduction insert with
the toolholder until it contacts the stop of the clamping device, it is essential that you check whether the
toolholder and reduction insert are still correctly
inserted to the stop and that any possible toolholder
play is eliminated by turning to the right! (Please also
note the safety instructions in chapter 2.4).
4. Close the pressure release valve and actuate the actuation
handle until the required pressure is achieved. The tool/
workpiece can be inserted or removed now.
5. To unclamp the device, open the pressure release valve. The
reduction insert with the toolholder can be removed from the
clamping device and the toolholder is now ready for use.
4. Schließen Sie das Druckablassventil und betätigen Sie den
Betätigungshebel so lange, bis der erforderliche Druck
erreicht ist. Das Werkzeug/Werkstück lässt sich jetzt einfügen oder entfernen.
5. Zum Entspannen öffnen Sie das Druckablassventil. Der
Reduziereinsatz mit dem Werkzeughalter kann nun aus der
Spannvorrichtung genommen werden. Der Werkzeughalter
ist jetzt betriebsbereit.
NOTE:
Please observe the notes on ”clamping and unclamping”
provided in chapter 6.
HINWEIS:
Bitte beachten Sie Kapitel 6 – »Hinweise zum Spannen und
Lösen«.
CAUTION!
The pressure indicated on the toolholder should not
be exceeded! Otherwise the toolholder will be
damaged! (See chapter 2.4).
ACHTUNG!
Den auf dem Werkzeughalter angegebenen Druck
nicht überschreiten! Der Werkzeughalter wird sonst
beschädigt! (Siehe Kapitel 2.4).
5.2
Druckbegrenzungsgerät
5.2
1. Schließen Sie die Vorrichtung über das mitgelieferte Netzteil
an die Netzspannung (90 - 264 VAC / 24 VDC / 2.5 A) an.
Es erscheint im 8-stelligen LCD-Display des Druckbegrenzzungsgerätes die Softwareversion.
Nach ungefähr 2 Sekunden schaltet die Anzeige in den
Betriebszustand.
1. Connect the device to the mains voltage (90 - 264 VAC /
24 VDC / 2.5 A) using the supplied power supply unit.
The 8-digit LCD display of the pressure control device will
show the software version.
The display switches into operating mode after approximately 2 seconds.
Anzeige:
Softwareversion
Display:
Software version
F3
F4
F1
F2
Pressure control device
Anzeige:
Betriebszustand
Display:
Operating mode
8
Betriebsanleitung für SCHUNK TRIBOS-Polygonspannsystem mit Spannvorrichtung SVP-2 D
Operating manual for SCHUNK TRIBOS polygonal
clamping system with clamping device SVP-2 D
2. Die Bedienung erfolgt über die Funktionstasten F 1, F 2, F 3
und F 4.
2. The device is operated via the function keys F 1, F 2, F 3
and F 4.
F 1:
F 2:
F 3:
F 4:
F 1:
F 2:
F 3:
F 4:
Taste P
Taste OK
Pfeil links
Pfeil aufwärts
3. Aktivierung der Solldruckeingabe über Taste F1 (P). Die
Eingabe des Solldruckes erfolgt über die Pfeil-Tasten (F 3,
F 4). Mit F 3 wird der Blink-Cursor bewegt und mit F 4 der
Ziffernwert verändert. Mit der Taste F 2 (OK) wird die Eingabe
bestätigt und der Sollwert wird angezeigt.
P key
OK key
Left arrow
Upward arrow
3. Activate the target pressure using the F 1 key (P). The target
pressure is entered using the arrow keys (F 3, F 4). Use F 3
to move the blinking cursor and F4 to change the digit
value. Use the F 2 key (OK) to confirm the entry and display
the target value.
F3
F4
F1
F2
4. Durch mehrmaliges Drücken der Taste F 1 (P) können insgesamt 10 Druckwerte aus dem Speicher aufgerufen werden.
Mit dem Drücken der Taste F 2 (OK) wird der gewählte
Druckwert bestätigt. Die Druckwerte werden von S 0 bis S 9
angezeigt und können individuell hinterlegt werden.
4. Press the F 1 key (P) several times to select from a total of
10 pressure values from the memory. Press the F 2 key
(OK) to confirm the selected pressure value. The pressure
values are displayed from S 0 to S 9 and can be set
individually.
Anzeige:
Ist-Druck
Display:
Actual pressure
5. Druckwerte hinterlegen: Mit Taste F 1 (P) den gewünschten
Sollwert S 0 bis S 9 aufrufen. Über die Pfeiltasten Druck einstellen und mit Taste F1 (P) bestätigen. Der Druckwert wird
gespeichert und es erscheint der nächst höhere Sollwert zur
Eingabe.
Mit F 2 + F 4 können die Sollwerte S 0 – S 9 gelöscht werden.
6. Anzeige des Ist-Druckes P bei erfolgtem Druckaufbau.
5. Setting pressure values: Use the F 1 (P) key to select the
desired target value between S 0 and S 9. Use the arrow keys
to adjust the pressure and confirm using the F 1 (P) key. The
pressure value is stored and the next highest target value
appears for entering.
Use F 2 + F 4 to delete the target values S 0 – S 9.
6. The actual pressure P is displayed when the pressure has
been established.
9
Betriebsanleitung für SCHUNK TRIBOS-Polygonspannsystem mit Spannvorrichtung SVP-2 D
Operating manual for SCHUNK TRIBOS polygonal
clamping system with clamping device SVP-2 D
7. Durch mehrmaliges drücken der Taste F 3 kann der Solldruck
in 5 bar Schritten im Bereich + 20 bar geändert werden.
7. By pressing the F 3 key several times, the target pressure can
be changed in 5 bar steps within the + 20 bar range.
Beispiel für die Druckeingabe: 280 bar
Example for pressure input: 280 bar
Vorgang
Operation
Tastendruck
Keystroke
Aktivieren Druckeingabe
Activate pressure input
Drücken 1 x Taste »P« (F1)
Press 1 x key ”P” (F1)
10er Ziffernauswahl mit Cursor
Tenner digit selection with cursor
Drücken 1 x Taste »r
r« (F3)
Press 1 x key ”r
r” (F3)
10er Zahlenwert einstellen
Adjust tenner digit
Drücken 8 x Taste »q
q« (F4)
Press 8 x key ”q
q” (F4)
100er Ziffernauswahl mit Cursor
Hundred digit selection with cursor
Drücken 1 x Taste »r
r« (F3)
Press 1 x key ”r
r” (F3)
100er Zahlenwert einstellen
Adjust hundred digit value
Drücken 2 x Taste »q
q« (F4)
Press 2 x key ”q
q” (F4)
Wert »280« bestätigen
Confirm value ”280”
Drücken 1 x Taste »OK« (F2)
Press 1 x key ”OK” (F2)
5.3
–
–
Anschluss Handlesegerät über RS-232Schnittstelle
5.3
Blaue Schutzkappe entfernen und Handlesegerät
anschließen (Identification).
Lesegerät ruhig und leicht schräg (Winkel 10 – 20°) zum
Data-Matrix-Code halten.
Blaue Schutzkappe
Blue protective cover
–
–
P
OK
Connecting the hand-held reading device
via the RS-232 interface
Remove the blue protective cover and connection the
hand-held reading device (identification).
Keep the reading device still and slightly angular (angle
10 – 20°) to the data matrix code.
Schnittstelle - Handscanner
Interface – Handheld scanner
Handlesegerät
Handheld
scanner
10
Betriebsanleitung für SCHUNK TRIBOS-Polygonspannsystem mit Spannvorrichtung SVP-2 D
Operating manual for SCHUNK TRIBOS polygonal
clamping system with clamping device SVP-2 D
Data Matrix Code
5.4
Spannungsversorgung
5.4
Power supply
Netzteil
Power
supply unit
Id-No.:
9955608
Typenschild und
Spannungsversorgung
Type plate and
Power supply
Netzkabel für Deutschland
Power cable used in Germany
Id-No.: 9954920
Netzkabel für USA/Kanada
Power cable used in USA/Canada
Id-No.: 9948540
Netzkabel für Schweiz
Power cable used in Switzerland
Id-No.: 9954917
Netzkabel für Italien
Power cable used in Italy
Id-No.: 9954916
Netzkabel für England
Power cable used in UK
Id-No.: 9954919
Das Gerät wird mit dem deutschen Netzkabel ausgeliefert.
Netzkabel für andere Länder können separat bestellt werden.
The unit is deliverd with a German power cable.
Power cables for other countries have to be ordered separately.
6.
6.
–
–
Hinweise zum Spannen und Lösen
Aufgrund von Fertigungs- und Materialtoleranzen sowie
unterschiedliche Werkzeugschaftdurchmesser ist es möglich,
dass sich Werkzeuge oder Werkstücke bereits bei niedrigerem Druck als auf dem Werkzeughalter angegeben fügen
bzw. lösen lassen.
Dieser geringere Druckwert kann wesentlich unter der
Angabe auf dem Werkzeughalter liegen.
Dies hat jedoch keinen Einfluss auf das jeweilige – in der
Tabelle in Kapitel 4.2 – angegebene übertragbare Drehmoment des Werkzeughalters.
–
–
11
Notes on clamping and unclamping
Due to the manufacturing and material tolerances, as well
as the various tool shank diameters, it is possible to insert or
loosen tools or workpieces even at a pressure below that indicated on the toolholder.
This lower pressure value may be significantly less than
that stipulated on the toolholder.
However, this has no influence on the transmissable
torque of the toolholder shown in the table in
chapter 4.2.
Betriebsanleitung für SCHUNK TRIBOS-Polygonspannsystem mit Spannvorrichtung SVP-2 D
–
–
–
–
–
–
–
–
Operating manual for SCHUNK TRIBOS polygonal
clamping system with clamping device SVP-2 D
–
Beachten Sie bitte, dass das Werkzeug/-stück bereits wieder
im Werkzeughalter geklemmt wird, wenn der tatsächliche
Lösedruck in der Spannvorrichtung etwas überschritten ist!
Genauso ist es möglich, dass sich das Werkzeug beim angegebenen Druck nicht mehr in den Werkzeughalter fügen
lässt, sondern schon einige Bar unter diesem Wert!
Kontrollieren Sie deshalb laufend, während Sie den Druck in
der Spannvorrichtung erhöhen, wann sich das Werkzeug/stück im Werkzeughalter fügen oder lösen lässt.
Lässt sich das Werkzeug oder Werkstück bis zum Erreichen
des auf dem Werkzeughalter angegebenen Druckes nicht
lösen oder fügen, brechen Sie den Spannvorgang ab.
Lösen Sie zuerst den Druck der Spannvorrichtung und überprüfen Sie, ob das mögliche Spiel zwischen den Abflachungen des Werkzeughalters und des Reduziereinsatzes
mit einer Rechtsdrehung (Uhrzeigersinn) des Werkzeughalters beseitigt ist. Wiederholen Sie den Spannvorgang.
Lässt sich das Werkzeug/-stück trotz richtiger Position des
Werkzeughalters im Reduziereinsatz nicht lösen oder fügen,
entspannen Sie die Vorrichtung und entnehmen Sie den
Reduziereinsatz mit dem Werkzeughalter. Verdrehen Sie den
Reduziereinsatz auf dem Werkzeughalter um 120 °, schieben
ihn wieder in die Spannvorrichtung und wiederholen Sie den
Spannvorgang. Jetzt muss sich das Werzeug/-stück lösen.
Durch feine Partikel im Kühlschmiermittel kann das Werkzeug im Werkzeughalter anhaften. Führen Sie in diesem Fall
einen Durchschlag durch die hintere Öffnung des TRIBOS
Werkzeughalters ein und lösen Sie das Werkzeug durch
Schieben oder leichte Schläge mit diesem Durchschlag.
Teilweise sind die Werkzeugschäfte mit einer Beschriftung
versehen. Diese Beschriftung hat oftmals Materialaufwerfungen, welche das Fügen in den TRIBOS Werkzeughalter beeinflussen oder gar unmöglich machen. Entfernen
Sie in diesem Fall die Materialaufwerfungen.
Werkzeugschäfte mit Ausnehmungen, insbesondere DIN
1835 Form E bzw. DIN 6535 Form HE, sind häufig verzogen
und können deshalb oftmals nicht in den TRIBOS Werkzeughalter eingefügt werden oder bewirken einen schlechten
Rundlauf. Setzen Sie sich in diesem Fall bitte mit Ihrem
Werkzeuglieferanten in Verbindung. Dasselbe gilt auch,
wenn bei Werkzeugschäften die h6-Qualität unterschritten
(kein Drehmoment) oder überschritten (nicht fügbar) ist.
–
–
–
–
–
–
Please make sure that the tool/workpiece is still clamped in
the toolholder at this time, if the actual unclamping pressure
of the clamping device was exceeded! It is also possible that
the tool can no longer be inserted into the toolholder at the
indicated pressure, but instead at a value that is a few bars
below it!
For this reason, you must constantly check, while gradually
increasing the pressure in the clamping device, precisely
when the tool/workpiece may be inserted into or taken out of
the toolholder.
If it proves impossible to loosen or insert the tool or workpiece from or into the toolholder until the indicated pressure is
achieved, stop the clamping procedure.
Release the pressure of the clamping device first and then
check that any play between the flattened area of the toolholder and the reduction insert is eliminated by turning the toolholder to the right (clockwise). Repeat the clamping
procedure.
If it proves impossible to loosen or insert the tool/workpiece,
even though the toolholder is inserted correctly in the reduction insert, unclamp the device and remove the reduction
insert and the toolholder. Turn the reduction insert on the
toolholder by 120 °, push it into the clamping device again
and repeat the clamping procedure. It should now be possible to loosen the tool/workpiece.
The tool can become stuck in the toolholder as a result of fine
particles in the cooling lubricant. If this is the case, insert a
piercer through the rear opening of the TRIBOS toolholder
and loosen the tool by pushing or gently hitting it with this
piercer.
Sometimes, the tool shanks are marked. These markings are
often “wrapped”. This impairs the insertion of the TRIBOS
toolholder or even makes an insertion impossible. In this
case, remove the wrapping.
Tool shanks with undercuts, especially DIN 1835 shape E or
DIN 6535 shape HE, are often deformed and and thus often
cannot be inserted into the TRIBOS toolholder or may impair
the T. I. R. accuracy. In this case please contact your tool
supplier. The same applies if the h6-quality of the tool shanks
are lower (no torque) or exceeded (cannot be inserted).
For clamping shanks of shape E or HE, please consider the position of the flattening to the pressure segments:
Beim Spannen von Schäften der Formen E bzw. HE beachten
Sie bitte die Lage der Ausnehmung zu den Drucksegmenten:
SRE-Drucksegment /
SRE-Pressure segment
Schaft / Shank
DIN 1835 E
DIN 6535 HE
Werkzeughalter /
Toolholder
Bei dieser Schaftlage im TRIBOS Werkzeughalter liegen die
Spannflächen am Vollschaft an und Sie erreichen somit einen
ähnlichen Effekt wie bei einer Vollschaftspannung. Die Härte am
Werkzeugschaft muss min. HRC 50 betragen (Schaftfestigkeit
min. 1000 N/mm2), damit sich der Werkzeugschaft nicht plastisch
verformt. Bei niedrigerer Härte bzw. Festigkeit besteht eine geringere Überdeckung der Pressverbindung und draus resultiert eine
verminderte Kraftübertragung des Spannsystems.
At this shank position in the TRIBOS toolholder the clamping
faces are positioned at the round shank and thus achieve the
effect of a “round shank clamp”. The hardness at the tool shank
should be min. HRC 50 (Shank stiffness min. 1000 N/mm2) in
order to avoid a deformation of the tool shank. If the degree of
hardness or stiffness should be lower, the compression joint is
not properly covered and thereform results a reduced force transmission of the clamping system.
12
Betriebsanleitung für SCHUNK TRIBOS-Polygonspannsystem mit Spannvorrichtung SVP-2 D
7.
Operating manual for SCHUNK TRIBOS polygonal
clamping system with clamping device SVP-2 D
Befestigung der Spannvorrichtung
auf einer Werkbank
7.
Fastening the clamping device
onto a work bench
Zur Befestigung der TRIBOS Spannvorrichtung SVP-2-D auf
einer Arbeitsplatte, befinden sich in der Bodenplatte 4 Löcher.
Benutzen Sie zur Befestigung Schrauben M8 und Unterlagsscheiben (wenn möglich aus Kunststoff, um optische
Beschädigungen des Gehäuses zu vermeiden).
In order to fasten the TRIBOS clamping device SVP-2-D onto the
working plate, the bottom plate is equipped with 4 holes. Please
use M8 screws for fastening and washers (if possible made of
poly-A, in order to avoid any visual damage to the housing).
8.
8.
Pflege und Lagerung
Care and storage
1. Lagern Sie die TRIBOS Spannvorrichtung drucklos.
2. Lagern und benutzen Sie die Vorrichtung SVP-2-D nur in der
dafür vorgesehenen, waagerechten, Lage. Es kann sonst
passieren, dass die Pumpe Luft ansaugt.
3. Die TRIBOS Spannvorrichtung, der Reduziereinsatz und die
TRIBOS Werkzeughalter sind zur Lagerung leicht einzuölen.
4. Lässt sich der gewünschte Druck nicht mehr erzeugen, kontrollieren Sie bitte den Füllstand des Ölbehälters im Inneren
des Gehäuses. Lösen Sie zum Öffnen des Gehäuses die 4
Schrauben (
3) auf der Rückseite und entfernen Sie die
Rückwand. Der Ölstand kann nun kontrolliert und wenn nötig,
Öl nachgefüllt werden. Der Ölbehälter sollte immer ganz
gefüllt sein.
5. Sollte sich im Drucksystem Luft befinden (durch unsachgemäße Lagerung oder ungenügenden Ölstand im Ölbehälter), können Sie die Luft über die oben im Druckkörper
angebrachte Entlüftung entweichen lassen. Öffnen Sie dazu
etwas die Entlüftungsschraube (
3) und pumpen Sie mit
dem Betätigungshebel, bis die Luft entwichen ist (Ölaustritt).
Schließen Sie die Entlüftungsschraube (Anzugsmoment
max. 3 Nm) und kontrollieren Sie Füllstand des Ölbehälters.
Füllen Sie, wenn nötig, Öl nach.
6. Wenn Sie die Spannvorrichtung längere Zeit nicht benutzen,
decken Sie sie bitte mit der mitgelieferten Schutzhaube ab.
7. Bei jedem Werkzeug/-stückwechsel sollte der Spanndurchmesser im Spannbereich gereinigt werden.
Anmerkung: Passende Zylinderbürsten sind separat erhältlich (siehe aktuelle Preisliste »Zubehör«).
1. Store the TRIBOS clamping device in unpressurized
condition.
2. Only store and use the SVP-2-D device in horizontal position,
because it is just intended for horizontal applications.
Otherwise, the pump may draw in air.
3. Before storing, lightly lubricate the TRIBOS clamping device,
the reduction insert and the TRIBOS toolholder.
4. If the desired pressure can no longer be achieved, check the
oil level in the receptacle inside the housing. To open the
housing, loosen the 4 screws (
3) at the back and remove the back wall. The oil level can now be checked and the
receptacle topped up, if necessary. The oil receptacle should
always be full.
5. If there should be air in the pressure system (caused by
improper storage or insufficient oil in the oil receptacle), you
may release this air using the vent screw on top of the pressure body. To do this, open the vent screw (
3) a little and
pump the actuation handle until the air is expelled (oil will displace). Close the vent screw (starting torque max. 3 Nm) and
check the oil level of the oil receptacle. If necessary, please
refill oil.
6. If you do not intend to use the clamping device for a prolonged period, cover the SVP-2-D with the protective cover provided.
7. Before every toolholder/-workpiece change the contact
surface of the clamping diameter has to be cleaned.
Please note: Suitable cylinder brushes can be ordered
separately (see our current price-list "accessories").
9.
9.
Transport
Verwenden Sie für den Transport nur die SCHUNK
Original-Verpackung.
–
Transport
Use only
original SCHUNK packaging for transport.
Die Spannvorrichtung nur waagerecht transportieren.
Es kann sonst passieren, dass die Pumpe Luft ansaugt.
–
Transport the clamping device only horizontally using.
Otherwise, the pump may draw in air.
10. Wartung und Service
10. Maintenance and service
Die TRIBOS Spannvorrichtung ist wartungsfrei.
Servicearbeiten dürfen ausschließlich von qualifiziertem Personal
durchgeführt werden. Dazu zählen SCHUNK-Sevicetechniker
oder von SCHUNK geschultes Fachpersonal.
The TRIBOS clamping device is maintenance-free.
Servicing may be performed only by qualified personnel. This
includes SCHUNK service technicians or qualified technicians
trained by SCHUNK.
13
Betriebsanleitung für SCHUNK TRIBOS-Polygonspannsystem mit Spannvorrichtung SVP-2 D
Operating manual for SCHUNK TRIBOS polygonal
clamping system with clamping device SVP-2 D
11. Entsorgung
11. Disposal
Senden Sie die Spannvorrichtung zur fachgerechten Entsorgung
an die Fa. SCHUNK zurück.
For proper disposal, return the clamping device to SCHUNK.
12. Zubehör
12. Accessories
12.1 Längeneinstellung für die TRIBOS
Spannvorrichtung SVP-2 D
12.1 Length adjustment for the TRIBOS clamping device SVP-2 D
Montage der Längeneinstellung:
1. Überprüfen Sie die Vollständigkeit der gelieferten Teile:
– 1 Messschieber (Pos. 1)
– 2 Messschenkel (Pos. 2)
– 2 Spannlaschen (Pos. 3)
– 2 Rändelschrauben (Pos. 4)
– 1 Sicherungsbolzen (Pos. 5)
2. Ziehen Sie vorsichtig den beweglichen Schenkel (Pos. 6)
vom Messschieber (Pos. 1) ab. Führen Sie danach den
Messschieber von links nach rechts durch die beiden
geschlitzten Lager (Pos. 7) im Grundkörperhalter (Pos. 8)
der TRIBOS Spannvorrichtung. Schieben Sie nun den
beweglichen Schenkel (Pos. 6) wieder auf den Messschieber
und sichern Sie ihn mit dem Sicherungsbolzen (Pos. 5) in der
Bohrung auf der Rückseite des Messschiebers.
3. Um über die Mitte oder auf die Schneide Ihres Werkzeuges
(Pos. 9) zu kommen, benötigen Sie eine Verlängerung der
Messschieberschenkel. Drehen Sie die Rändelschrauben
(Pos. 4) in die Spannlaschen (Pos. 3). Schieben Sie jeweils
eine Spannlasche über die beiden Schenkel des Messschiebers (Pos. 1) und führen Sie die Messschenkel (Pos. 2)
mit der genuteten Seite am Schenkel in die Spannlasche ein
(siehe Abbildung).
4. Nachdem Sie den Messschenkel (Pos. 2) auf die benötigte
Länge eingeschoben haben, arretieren Sie die Spannlasche
(Pos. 3) mit der Rändelschraube (Pos. 4).
5. Zur Nullpunktbestimmung des Messschiebers schwenken
Sie den Messschieber in eine senkrechte Position und fahren
die beiden Messschenkel zusammen. Stellen Sie dann die
Anzeige des Messchiebers auf null.
Assembly of the length adjustment:
1. Please check that all the components have been delivered:
– 1 Caliper gauge (Item 1)
– 2 Measuring legs (Item 2)
– 2 Brackets for the measuring pins (Item 3)
– 2 Knurled screws (Item 4)
– 1 Safety pin (Item 5)
2. Carefully draw the movable side (Item 6) of the caliper gauge
(Item 1) away. Then guide the caliper gauge from left to right
through the two slotted bearings (Item 7) of the bracket of the
base body (Item 8) of the TRIBOS clamping device. Push the
moveable side (Item 6) again onto the caliper gauge and
secure it with the safety pin (Item 5) in the bore on the rear of
the caliper gauge.
3. In order to reach the cutter of your tool (Item 9), you will need
an extension of the caliper gauge side. Turn the knurled
screw (Item 4) into the bracket (Item 3). Push one bracket
over each side of the caliper gauge (Item 1) and insert the
Measuring legs (Item 2) into the bracket with the slotted side
facing the caliper gauge side (see illustration below).
4. After having inserted the Measuring legs (Item 2) into the
required position, fix the bracket (Item 3) with the knurled
screw (Item 4).
5. For zero-point determination of the caliper gauge, swivel
the caliper gauge into a vertical position and close the two
measuring legs. Then set the display on the caliper gauge to
zero.
4
3 1
9
6
5
7 8
2
Werkzeughalter
Toolholder
Nullpunktbestimmung
Zero-point determination
14
TRIBOS-Polygonspannsystem
Störungen? Erst einmal selbst prüfen
TRIBOS Polygonal clamping System
Disturbances? Examine independently first
Störungen?
Erst einmal selbst prüfen
Disturbances?
Examine independently first
15
TRIBOS-Polygonspannsystem
Störungen? Erst einmal selbst prüfen
TRIBOS Polygonal clamping System
Disturbances? Examine independently first
13. TRIBOS Werkzeughalter
13. TRIBOS Toolholder
Situation / Situation
Mögliche Ursache / Possible cause
Maßnahme / Measure
13.1Werkzeugschaft bei
aufgebautem Druck
nicht fügbar
Werkzeughalter nicht komplett in die Rastflächen
des Reduziereinsatzes eingerastet, Werkzeughalter nicht auf Endanschlag gefügt
Werkzeughalter richtig einrasten und auf Endanschlag fügen
Tool shank does
not seat properly
when pressure has
built up
Toolholder not properly engaged with the engaging surfaces of the reduction insert, toolholder not
seated on end stop
Engage toolholder properly and seat on end stop
Falsche Winkellage Werkzeughalter / Reduziereinsatz Werkzeughalter könnte dadurch überdrückt worden sein
Auf richtige Winkellage Werkzeughalter / Reduziereinsatz achten (Rastfläche muss mit den
Segmenten fluchten)
Wrong toolholder angle / too much pressure
could have been applied to toolholder reduction
insert causing constant deformation
Ensure correct angle on toolholder / reduction
insert (engaging surface must be aligned with the
segments)
TRIBOS nicht auf Rechtsanschlag gedreht
TRIBOS auf Rechtsanschlag drehen
TRIBOS not turned to right-hand stop
Turn TRIBOS to right-hand stop
16
TRIBOS-Polygonspannsystem
Störungen? Erst einmal selbst prüfen
TRIBOS Polygonal clamping System
Disturbances? Examine independently first
13. TRIBOS Werkzeughalter
13. TRIBOS Toolholder
Situation / Situation
Mögliche Ursache / Possible cause
Maßnahme / Measure
13.1Werkzeugschaft bei
aufgebautem Druck
nicht fügbar
Reduziereinsatz nicht bis Anschlag in die Zwischenbüchse der Spannvorrichtung eingeführt
Reduziereinsatz bis Anschlag in die Zwischenbüchse der Spannvorrichtung einfügen
Tool shank does
not seat properly
when pressure has
built up
Reduction insert not inserted into intermediate
sleeve of the clamping device up to the stop
Insert reduction insert into the intermediate sleeve of the clamping device up to the stop
Schaft hat nicht die geforderte Toleranz h6,
Schaft zu groß
Werkzeugschaft mit Toleranz h6 verwenden
Shank does not have the required tolerance h6,
shank is too large
Use tool shank with tolerance h6
Spanndruck zu niedrig oder zu hoch
(Falscher Druckwert eingegeben)
TRIBOS-Drucktabelle beachten (max. Druck
nicht überschreiten)
Clamping pressure is too low or too high
(Wrong pressure value was entered)
Observe TRIBOS pressure table (do not exceed
max. pressure)
17
TRIBOS-Polygonspannsystem
Störungen? Erst einmal selbst prüfen
TRIBOS Polygonal clamping System
Disturbances? Examine independently first
13. TRIBOS Werkzeughalter
13. TRIBOS Toolholder
Situation / Situation
Mögliche Ursache / Possible cause
Maßnahme / Measure
13.1Werkzeugschaft bei
aufgebautem Druck
nicht fügbar
Werkzeughalter wurde im Vorfeld bereits einmal
überdrückt
TRIBOS-Drucktabelle beachten (max. Druck
nicht überschreiten)
Tool shank does
not seat properly
when pressure has
built up
Toolholder has already been over-pressurized
once before
Observe TRIBOS pressure table (do not exceed
max. pressure)
Verschmutzung der Spannstelle
Spannstelle sauber halten
Clamping area dirty
Keep clamping area clean
Aufkleber oder ähnliches an Spannstelle
Spannstelle am Außendurchmesser sauber halten.
Reduziereinsatz muss einwandfrei fügbar sein
Stickers or the like on the clamping area
Keep clamping area clean at the outer diameter.
It must be possible to seat the reduction insert properly
18
TRIBOS-Polygonspannsystem
Störungen? Erst einmal selbst prüfen
TRIBOS Polygonal clamping System
Disturbances? Examine independently first
13. TRIBOS Werkzeughalter
13. TRIBOS Toolholder
Situation / Situation
Mögliche Ursache / Possible cause
Maßnahme / Measure
13.2Werkzeugschaft nur
zum Teil in den
Werkzeughalter einfügbar
Werkzeughalter nicht komplett in die Rastflächen
des Reduziereinsatzes eingerastet
Werkzeughalter richtig einrasten
Tool shank can
only be partially
inserted into the
toolholder
Toolholder has not fully engaged with the engaging areas of the reduction insert
Engage toolholder properly
Reduziereinsatz nicht bis Anschlag in die
Zwischenbüchse der Spannvorrichtung eingeführt
Reduziereinsatz bis Anschlag in die Zwischenbüchse der Spannvorrichtung einfügen
Reduction insert not inserted into intermediate
sleeve of the clamping device up to the stop
Insert reduction insert into the intermediate sleeve of the clamping device up to the stop
Werkzeugschaft qualitativ nicht in Ordnung, hat
z. B. leicht konische Form
Werkzeugschaft überprüfen
→ Werkzeugschaft mit Toleranz h6 verwenden
Quality of tool shank is not OK, e.g. it may have
a slightly conical shape
Check tool shank
→ Use tool shank with tolerance h6
19
TRIBOS-Polygonspannsystem
Störungen? Erst einmal selbst prüfen
TRIBOS Polygonal clamping System
Disturbances? Examine independently first
13. TRIBOS Werkzeughalter
13. TRIBOS Toolholder
Situation / Situation
Mögliche Ursache / Possible cause
Maßnahme / Measure
13.3Werkzeug lässt sich
nicht mehr aus dem
Werkzeughalter entfernen
Passungsrost / Kontaktkorrosion
Spannvorrichtung auf Lösedruck für den Werkzeughalter betätigen. Mit einem passenden Durchschlag den Werkzeugschaft mit einem Hammer
austreiben. Spannbohrung und Werkzeug reinigen
→ neuen Spannvorgang durchführen
Frictional corrosion / contact corrosion
Actuate clamping device on release pressure for the
toolholder. Drive out the tool shank using a hammer
and a suitable drift punch. Clean clamping bore and
tool → carry out new clamping procedure
Laserbeschriftung am Werkzeugschaft vorhanden
Schaftbeschriftung mit feinem Schmirgelpapier
oder Schleifstein entfernen bzw. glätten
Laser inscription located on tool shank
Remove or smoothen inscription on the shank
with a fine emery paper or a grinding stone
Aufkleber oder ähnliches an Spannstelle
Spannstelle am Außendurchmesser sauber halten.
Reduziereinsatz muss einwandfrei fügbar sein
Stickers or the like on the clamping area
Keep clamping area clean at the outer diameter.
It must be possible to seat the reduction insert properly
Werkzeug abgebrochen
Spannvorrichtung auf Lösedruck für den Werkzeughalter betätigen. Mit einem passenden
Durchschlag den Werkzeugschaft mit einem
Hammer austreiben. Spannbohrung reinigen →
neues Werkzeug spannen
Tool broken off
Actuate clamping device on release pressure for
the toolholder. Drive out the tool shank using a
hammer and a suitable drift punch. Clean clamping bore → clamp new tool
Tool can not be
removed from the
toolholder
20
TRIBOS-Polygonspannsystem
Störungen? Erst einmal selbst prüfen
TRIBOS Polygonal clamping System
Disturbances? Examine independently first
13. TRIBOS Werkzeughalter
13. TRIBOS Toolholder
Situation / Situation
Mögliche Ursache / Possible cause
Maßnahme / Measure
13.4Werkzeugschaft bei
geringen Drücken
außerhalb des
Druckbereichs fügbar
Werkzeughalter in falscher Winkellage gedrückt
(Spannstelle deformiert)
Werkzeughalter zu SCHUNK zur Kontrolle/
Reparatur einsenden
Tool shank
can be seated outside the pressure
range if slight pressure is applied
Toolholder pressed at wrong angle (clamping
area is deformed)
Send back the toolholder to SCHUNK for
inspection/repair
Werkzeughalter wurde überdrückt
(Spannstelle deformiert)
Werkzeughalter zu SCHUNK zur Kontrolle/
Reparatur einsenden
Toolholder has been over-pressurized
(clamping area distorted)
Send back the toolholder to SCHUNK for
inspection/repair
Schaft hat nicht die geforderte Toleranz h6,
Werkzeugschaft hat Untermaß (< h6)
Werkzeugschaft mit Toleranz h6 verwenden
Shank does not have the required tolerance h6,
tool shank is under-dimensioned (< h6)
Use tool shank with tolerance h6
21
TRIBOS-Polygonspannsystem
Störungen? Erst einmal selbst prüfen
TRIBOS Polygonal clamping System
Disturbances? Examine independently first
13. TRIBOS Werkzeughalter
13. TRIBOS Toolholder
Situation / Situation
Mögliche Ursache / Possible cause
Maßnahme / Measure
13.5Werkzeugschaft bei
Maximaldruck noch
nicht fügbar
Schaft hat nicht die geforderte Toleranz h6,
Werkzeugschaft hat Übermaß (> h6)
Werkzeugschaft mit Toleranz h6 verwenden
Tool shank can not
yet be seated at
maximum
pressure
Shank does not have the required tolerance h6,
tool shank is over-dimensioned (> h6)
Use tool shank with tolerance h6
Werkzeughalter in falscher Winkellage gedrückt
(Spannstelle deformiert)
Werkzeughalter zu SCHUNK zur Kontrolle/
Reparatur einsenden
Toolholder pressed at wrong angle
(clamping area is deformed).
Send back the toolholder to SCHUNK for
inspection/repair
Werkzeughalter wurde überdrückt, d. h. mit zu
hohem Druck beaufschlagt
(Spannstelle deformiert)
– Werkzeughalter zu SCHUNK zur Kontrolle/
Reparatur einsenden
– TRIBOS-Drucktabelle beachten (max. Druck
nicht überschreiten)
Toolholder has been over-pressurized, that mean
charged with too much pressure
(clamping area is deformed)
– Send back the toolholder to SCHUNK for
inspection/repair
– Observe TRIBOS pressure table (do not
exceed max. pressure)
13.6Drehmoment/
Spannkraft/Haltekraft zu gering
Torque /clamping
force /holding force
too low
22
TRIBOS-Polygonspannsystem
Störungen? Erst einmal selbst prüfen
TRIBOS Polygonal clamping System
Disturbances? Examine independently first
13. TRIBOS Werkzeughalter
13. TRIBOS Toolholder
Situation / Situation
Mögliche Ursache / Possible cause
Maßnahme / Measure
13.6Drehmoment/
Spannkraft/Haltekraft zu gering
Schaft hat nicht die geforderte Toleranz h6,
Werkzeugschaft hat Untermaß (< h6)
Werkzeugschaft mit Toleranz h6 verwenden
Shank does not have the required tolerance h6,
tool shank is under-dimensioned (< h6)
Use tool shank with tolerance h6
Schaft-Mindesteinspanntiefe nicht beachtet
Schaft- Mindesteinspanntiefe beachten
(siehe Kapitel 1.4, Technische Daten)
Minimum shank clamping depth was not observed
Observe minimum shank clamping depth
(see chapter 1.4, Technical Data)
Schmierfilm am Werkzeugschaft oder/und an der
Spannstelle
Spannstelle und Werkzeugschaft entfetten und
reinigen
Lubricant film on tool shank and/or on the clamping area
De-grease and clean clamping area and tool
shank
Werkzeughalter und Werkzeug mit falschen
(zu hohen) Zerspandaten eingesetzt
Zerspandaten/Schnittwerte anpassen
Toolholder and tool were inserted with wrong
(too high) cutting data
Adjust cutting data/cutting values
Torque /clamping
force /holding force
too low
23
TRIBOS-Polygonspannsystem
Störungen? Erst einmal selbst prüfen
TRIBOS Polygonal clamping System
Disturbances? Examine independently first
13. TRIBOS Werkzeughalter
13. TRIBOS Toolholder
Situation / Situation
Mögliche Ursache / Possible cause
Maßnahme / Measure
13.7Rundlauffehler am
eingespannten
Werkzeug
Beschädigung des Werkzeughalters, unsachgemäße Handhabung
Werkzeughalter auf Kollision oder Beschädigung
hin prüfen → evtl. Werkzeughalter zu SCHUNK
zur Kontrolle/Reparatur einsenden
Tool holder damaged, improper handling
Check toolholder for collision or damage → Send
back to SCHUNK for inspection/repair if necessary
Beschädigung der Maschinenspindel
Rund-/Planlauffehler der Maschinenspindel
Maschinenspindel auf Beschädigung hin überprüfen und Rundlauf kontrollieren
Machine spindle damaged Concentricity error/
axial eccentricity error on the machine spindle
Check machine spindle for damage and check
true running
Schleiffehler am Werkzeug
Werkzeug überprüfen und evtl. austauschen
Tool has not been ground properly
Check tool and replace if necessary
Werkzeugschaft nicht vollzylindrisch
Vollzylindrische Werkzeugschäfte verwenden
Tool shank not fully cylindrical
Use fully cylindrical tool shanks
Schaft-Mindesteinspanntiefe nicht beachtet
Schaft- Mindesteinspanntiefe beachten
(siehe Kapitel 1.4, Technische Daten)
Minimum shank clamping depth was not observed
Observe minimum shank clamping depth
(see chapter 1.4, Technical Data)
Concentricity errors
on clamped tool
24
TRIBOS-Polygonspannsystem
Störungen? Erst einmal selbst prüfen
TRIBOS Polygonal clamping System
Disturbances? Examine independently first
14. TRIBOS Spannvorrichtung SVP-2 D
14. TRIBOS clamping device SVP-2 D
Situation / Situation
Mögliche Ursache / Possible cause
Maßnahme / Measure
14.1 SVP-2 Spannvorrichtung
erreicht nicht mehr
den nötigen Druck
Hydraulikventil am Pumpengehäuse SVP-2 offen
Hydraulikventil schließen
Hydraulic valve on pump housing SVP-2 is open
Close hydraulic valve
SVP-2 clamping
device does not
reach required
pressure
Offen
Open
Zu
Close
Ölaustritt am TRIBOS-Druckkörper
(Dichtung)
Dichtung wechseln, Spannvorrichtung zu SCHUNK
zur Kontrolle/Reparatur einsenden
Oil leakage on TRIBOS pressure body
(seal)
Replace seal, send the clamping device to
SCHUNK for inspection/repair
Ölaustritt am TRIBOS-Druckkörper
(Verschraubung)
Verschraubung überprüfen, Spannvorrichtung zu
SCHUNK zur Kontrolle/Reparatur einsenden
Oil leakage on TRIBOS pressure body
(screw connection)
Check screw connection, send the clamping
device to SCHUNK for inspection/repair
Öl / Oil
25
TRIBOS-Polygonspannsystem
Störungen? Erst einmal selbst prüfen
TRIBOS Polygonal clamping System
Disturbances? Examine independently first
14. TRIBOS Spannvorrichtung SVP-2 D
14. TRIBOS clamping device SVP-2 D
Situation / Situation
Mögliche Ursache / Possible cause
Maßnahme / Measure
14.1 SVP-2 Spannvorrichtung
erreicht nicht mehr
den nötigen Druck
Ölaustritt am TRIBOS-Gehäuse
(Verschraubung, Anschlussblock)
Verschraubungen nachziehen, evtl. Öl nachfüllen
und Spannvorrichtung entlüften
→ (siehe Kapitel 7, Pflege und Lagerung)
Oil leakage on TRIBOS pressure body
(screw connection, terminal block)
Retighten screw connections, top up with oil if
necessary and bleed clamping device
→ (see chapter 7, Maintenance and Storage)
SVP-2 clamping
device does not
reach required
pressure
Verschraubung
Screw connection
Einfüllschraube
Filter screw
Verschraubung
Screw connection
Zu wenig Öl in der Spannvorrichtung SVP-2
Ausgleichsbehälter auffüllen und Spannvorrichtung entlüften
→ (siehe Kapitel 7, Pflege und Lagerung)
Not enough oil in the clamping device SVP-2
Fill compensation unit and bleed clamping device
→ (see chapter 7, Maintenance and Storage)
Einfüllschraube
Filter screw
min.
26
TRIBOS-Polygonspannsystem
Störungen? Erst einmal selbst prüfen
TRIBOS Polygonal clamping System
Disturbances? Examine independently first
14. TRIBOS Spannvorrichtung SVP-2 D
14. TRIBOS clamping device SVP-2 D
Situation / Situation
Mögliche Ursache / Possible cause
Maßnahme / Measure
14.2 Spannvorrichtung
baut keinen Druck
auf
Hydraulikventil am Pumpengehäuse SVP-2 offen
Hydraulikventil schließen
Clamping device
does not build up
pressure
Hydraulic valve on pump housing SVP-2 is open
Close hydraulic valve
Zu
Close
Offen
Open
14.3 Öl läuft aus Spannvorrichtung aus
Oil leaking out of
clamping device
Ölaustritt am TRIBOS-Druckkörper (Dichtung)
Dichtung wechseln, Spannvorrichtung zu SCHUNK
zur Kontrolle/Reparatur einsenden
Oil leakage on TRIBOS pressure body (seal)
Replace seal, send the clamping device to
SCHUNK for inspection/repair
15. Information
15. Information
15.1 Auswaschung /
Zerstörung an
Kunststofftasche
Kühlmittel und Späne prallen direkt auf die
Taschen
Hat keinen Einfluss auf Funktion
(Rundlauf, Haltekraft, etc.)
Scouring /
damage on
synthetic pocket
Coolant and chippings are directly hitting the
pockets
Does not affect functioning
(true running, holding force, etc.)
27
SVP-2 D
1
!
2
Drucktabelle beachten!
Take care of pressure chart!
3
4
Auf Anschlag!
On Stop!
5
6
P+
ZU/
CLOSE
7
8
AUF/
OPEN
Ausführliche Bedienungsanleitung beachten!
Take care of our detailed operating manual!
SCHUNK GmbH & Co. KG · Spann- und Greiftechnik · Bahnhofstr. 106-134 · 74348 Lauffen/Neckar
Tel. +49-7133-103-0 · Fax +49-7133-103-2359 · [email protected] · www.schunk.com
Betriebsanleitung für SCHUNK TRIBOS-Polygonspannsystem mit Spannvorrichtung SVP-2 D
Operating manual for SCHUNK TRIBOS polygonal
clamping system with clamping device SVP-2 D
EG-Konformitätserklärung
nach Maschinenrichtlinie 98/37/EG, Anhang II A
Hersteller / Inverkehrbringer
SCHUNK GmbH & Co. KG
Spann- und Greiftechnik
Bahnhofstr. 106 - 134
D-74348 Lauffen/Neckar
Hiermit erklären wir, dass nachfolgend bezeichnetes Produkt
TRIBOS Spannvorrichtung
Serien-/Typenbezeichnung
Seriennummer
SVP-2 d
0201762
den Bestimmungen der oben gekennzeichneten Richtlinie(n) – einschließlich deren zum Zeitpunkt
der Erklärung geltenden Änderungen – entspricht. Bei einer von uns nicht genehmigten Änderung
der Maschine verliert diese Erklärung ihre Gültigkeit.
Folgende harmonisierte Normen wurden angewandt:
EN 1005-2:2003
EN ISO 12100-1:2003
EN ISO 12100-2:2003
EN 61000-6-2
EN 61000-6-4
Sicherheit von Maschinen - Menschliche körperliche Leistung - Teil 2:
Manuelle Handhabung von Gegenständen in Verbindung mit Maschinen
und Maschinenteilen
Sicherheit von Maschinen – Grundbegriffe, allgemeine Gestaltungsleitsätze – Teil 1: Grundsätzliche Terminologie, Methodologie
Sicherheit von Maschinen – Grundbegriffe, allgemeine Gestaltungsleitsätze – Teil 2: Technische Leitsätze
Elektromagnetische Verträglichkeit (EMV) - Teil 6-2: Fachgrundnormen –
Störfestigkeit – Industriebereich (IEC 61000-6-2)
Elektromagnetische Verträglichkeit (EMV) - Teil 6-4: Fachgrundnormen –
Fachgrundnorm Störaussendung – Industriebereich (IEC 61000-6-4)
Folgende nationale oder internationale Normen (oder Teile/Klauseln daraus) und Spezifikationen
wurden angewandt:
Folgende weitere EU-Richtlinien wurden angewandt:
EMV-Richtlinie 2004/108/EG
Lauffen am Neckar
Datum / Unterschrift:
10.10. 2007
Angaben zum Unterzeichner:
Leitung Werkzeughaltersysteme
29
Betriebsanleitung für SCHUNK TRIBOS-Polygonspannsystem mit Spannvorrichtung SVP-2 D
Operating manual for SCHUNK TRIBOS polygonal
clamping system with clamping device SVP-2 D
CE Declaration of Conformance
as defined by Machinery Directive 98/37/EC
Manufacturer
SCHUNK GmbH & Co. KG
Spann- und Greiftechnik
Bahnhofstr. 106 - 134
D-74348 Lauffen/Neckar
We hereby declare that the following
TRIBOS clamping device
Series / model name
Serial number
SVP-2 d
0201762
conforms to the above directives – including the applicable amendments at the time of the
declaration. In any case of an unauthorized modification of the machine, this declaration will lose its
validity.
FThe following harmonized standards were applied:
EN 1005-2:2003
EN ISO 12100-1: 2003
EN ISO 12100-2:2003
EN 61000-6-2
EN 61000-6-4
Safety of machinery – Human physical performance – Part 2: Manual
handling of machinery and component parts of machinery
Safety of machinery – Basic concepts, general principles for design –
Part 1: Basic terminology, methodology (ISO 12100-1: 2003)
Safety of machinery – Basic concepts, general principles for design –Part 2: Technical principles (ISO 12100-2: 2003)
Electromagnetic compatibility (EMC) – Part 6-2: Generic standards –
Immunity for industrial environments (IEC 61000-6-2)
Electromagnetic compatibility (EMC) – Part 6-4: Generic standards –
Emission standard for industrial environments (IEC 61000-6-4)
The following national or international standards (or parts/clauses thereof) and specifications
were applied:
The following further EU guidelines were used:
EMC guideline 89/336/ EEC
Lauffen am Neckar
Date / Signature:
10.10. 2007
Director, Toolholding Systems
Title of the signatory:
30