1
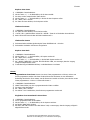
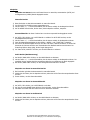
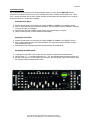
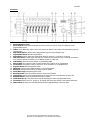
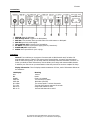
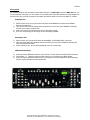
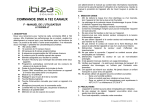
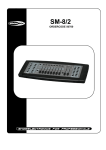
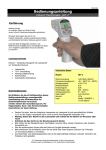
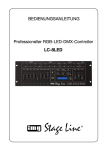
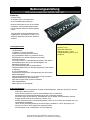
250-444
Bedienungsanleitung
DMX-Lichtmischpult HOLLYWOOD “DMC-192”
Einführung
Geehrter Kunde,
wir möchten Ihnen zum Erwerb Ihres
neuen Lichtmischpultes gratulieren!
Mit dieser Wahl haben Sie sich für ein Produkt
entschieden, welches ansprechendes Design
und durchdachte technische Features gekonnt
vereint.
Lesen Sie bitte die folgenden Bedienhinweise
sorgfältig durch und befolgen Sie diese, um in
möglichst ungetrübten Genuss des Gerätes zu
kommen!
Technische Daten:
Leistungsmerkmale
192 DMX Kanäle
12 Scanner von jeweils 16 Kanälen
30 Bänke mit 8 programmierbaren Szenen
6 programmierbare Chases von jeweils 240 Szenen
8 Schieberegler zur manuellen Bedienung der Kanäle
Zuweisbarer Joystick
File Dump Funktion zur Datenübertragung zwischen zwei Geräten
Automatikprogramm, das von den Geschwindigkeits- und
Blendreglern gesteuert wird
Dauer des Blendens/Einstellung der Blenddauer
Umkehrbare DMX Kanäle, um das Gerät gegenteilig zu den anderen
zu betreiben
8- oder 16-Kanal Betrieb
Feineinstellung des Schwenk- und Neigewinkels über den Joystick
Blackout Mastertaste
Manuelle Überbrückungstaste, um ein Gerät im Flug anzusteuern
Eingebautes Mikrofon für den Audiobetrieb
MIDI Steuerung der Bänke, Chases und Blackout
DMX Polaritätsschalter
Backup Speicher bei Stromausfall
Gewicht: 2.7 kg
Maße: 482*134*85 mm
Betrieb: AC 230 V ~ 50 Hz
Verbrauchsleistung (max.): 30 W
Kanäle: 16
Sicherheitshinweise
Überprüfen Sie vor Inbetriebnahme das Gerät auf Beschädigungen, sollte dies der Fall sein, bitte das
Gerät nicht in Betrieb nehmen!
Ziehen Sie den Netzstecker, wenn Sie das Gerät längere Zeit nicht benutzen.
Das Gerät keinen mechanischen Belastungungen oder Feuchtigkeit aussetzen.
Das Gerät, wegen der Durchlüftung, nicht abdecken und vor direkter Sonneneinstahlung schützen.
Reinigen Sie das Gerät mit einem weichen trockenen Tuch.
Wichtig! Sollten das Gerät einmal beschädigt werden, lassen Sie es nur durch den Hersteller oder eine
Fachwerkstatt instandsetzen.
Lassen Sie das Verpackungsmaterial nicht achtlos liegen, Plastikfolien / -tüten, Styroporteile, etc.,
könnten für Kinder zu einem gefährlichen Spielzeug werden.
Das Gerät gehört nicht in Kinderhände. Es ist kein Spielzeug.
ETT Distribution GmbH Schmalbachstraße 16 38112 Braunschweig
Nachdruck oder Vervielfältigung nur mit ausdrücklicher Genehmigung
250-444
Funktionen:
1. Scanner Tasten (1-12)
2. Szenentasten: Drücken Sie eine der Tasten, um eine der 240 programmierbaren Szenen zu laden oder
zu speichern.
3. Blendregler: Diese Regler bestimmen die Intensität der Kanäle 1 – 8 bzw. 9-16, je nachdem welche
Seite eingestellt ist.
4. Seitenwahltaste: Wählen Sie Seite A (1 ~ 8) oder Seite B (9 ~ 16).
5. Nebeltaste: Aktivierung der Nebelmaschine.
6. Geschwindigkeitsregler: Regelt die Chase-Geschwindigkeit zwischen 0,1 Sekunde und 10 Minuten.
7. Fade Time Regler: Regelung der Umblendzeit. Die Umblendzeit ist die Zeit, die der Scanner braucht,
um sich von der einen Position zur anderen zu bewegen bzw. die Zeit, die er braucht, um ein- oder
auszublenden.
8. LCD Display: Wiedergabe der aktuellen Aktivität oder des aktuellen Programmstatus.
9. Pan Joystick: Regelt die Schwenkbewegung des Scanners.
10. Tilt Joystick: Regelt die Neigung des Scanners.
11. Program Taste: Aktiviert den Programmierbetrieb
12. MIDI/Rec: Steuerung von MIDI oder Aufnahme von Programmen.
13. Auto/Del: Aktivierung des musikgesteuerten Modus oder Auswahl der Szenen und Chases.
14. Music/Bank Copy: Aktiviert den Programmierbetrieb.
15. Bank Up/Down: Mit den Tasten ▲ oder ▼ eine der 30 Bänke wählen.
16. Tap/Display: Einstellung eines Standardrhythmus oder Auswahl der Wertanzeige in % oder 0 ~ 255.
17. Blackout Taste: Schaltet das Gerät in Pausenbetrieb.
18. Chase Taste(1-6): Chase-Aktivierung der programmierten Szene.
19. Fine Taste: Wenn diese Taste gedrückt ist, können Sie mit dem Joystick den Schwenkoder Neigewinkel
des Scanners mit hoher Genauigkeit steuern.
20. Mode Taste: Drücken Sie gleichzeitig FINE und MODE, um den ASSIGN- oder REVERSE-Betrieb
einzuschalten.
ETT Distribution GmbH Schmalbachstraße 16 38112 Braunschweig
Nachdruck oder Vervielfältigung nur mit ausdrücklicher Genehmigung
250-444
Anschlüsse:
1.
2.
3.
4.
5.
6.
7.
8.
MIDI IN: Eingang der MIDI Daten.
DMX Polarity Select: Wahl der DMX-Polarität.
DMX Out: Sendet den DMX-Wert an den DMX-Scanner oder DMX-Pack.
DMX IN: Eingang der DMX Signale.
FOG CONTROL OUT: Anschluss der Nebelmaschine.
DC INPUT: Anschluss für das Netzgerät (DC9-12V, 500mA min).
POWER ON/OFF: Ein/Aus- Schalter.
AUDIO: Cincheingang Audio-In (0.1V~1Vp-p).
Betrieb:
Allgemeines: Mit dem DMC-192 können Sie 12 Scanner von jeweils 16 DMX-Kanälen programmieren,
jeweils 8 Szenen in die 30 Bänke einspeichern und 6 Chases mit 240 Szenen speichern. Zur Steuerung
stehen Ihnen 8 Schiebeschalter, ein Joystick und andere Tasten zur Verfügung. Mit dem Joystick können
Sie einfach und genau die Bewegung eines Geräts steuern. Um das Publikum zu beeindrucken, können
Sie DMX-Kanäle zuteilen und sogar umkehren. Außerdem können Sie mit der File Dump Funktion Daten
von dem einen Gerät auf das andere übertragen.
Erklärung des Displays: Das LCD Display besitzt zwei Zeilen von jeweils 8 Schriftzeichen. Nachfolgend
die Bedeutungen :
LCD
SN1
BK1
CHASE1
STEP 009
DATA 184
SP: 1M54s
TP: 4.25s
ASS 04 05
RES 10 13
Bedeutung
Szene 1
Bank 1
Chase 1 ist aktiviert
Der 9. Schritt eines Chase
DMX Wert (000-255)
Derzeitige Geschwindigkeit 1 Min. 54 Sek.
Zeitabstand zwischen zwei Drücken beträgt 4.25 Sekunden
Zuweisung der DMX Kanäle 4 und 5
Umkehrung der DMX Kanäle 10 & 13
ETT Distribution GmbH Schmalbachstraße 16 38112 Braunschweig
Nachdruck oder Vervielfältigung nur mit ausdrücklicher Genehmigung
250-444
Konfiguration:
Konfiguration des Steuerpults: Das Gerät ist so eingestellt, dass es jedem Effekt 16 Kanäle
zuordnet. Das müssen Sie bei der Zuordnung der Effekte zu den Scanner Tasten auf der linken Seite
berücksichtigen.
Zur DMX Adressierung folgende Tabelle befolgen:
Effektnr.
Digitale DMX
Adresse
Einstellung des DIPSchalters
1
1
1 “ On”
2
17
1 und 5 “ On”
3
33
1 und 6 “ On”
4
49
1, 5 und 6 “ On”
5
65
1 und 7 “ On”
6
81
1, 5 und 7 “ On”
7
97
1, 6 und 7 “ On”
8
113
1, 5, 6 und 7 “ On”
9
129
1 und 8 “ On”
10
145
1, 5 und 8 “ On”
11
161
1, 6 und 8 “ On”
12
177
1, 5, 6 und 8 “ On”
Aktivierung des Programmierbetriebs: Die « PROGRAM » Taste einige Sekunden lang drücken, bis
die LED leuchtet.
Konfiguration des Joysticks:
1) Die « PROGRAM » Taste drücken, bis die LED leuchtet.
2) Gleichzeitig « MODE » und « FINE » drücken. Die «ASSIGN » LED leuchtet. Wenn die « REVERSE » LED
leuchtet, erneut auf « FINE » und « MODE » drücken, um in « ASSIGN » Betrieb zu schalten.
3) Mit den Tasten
/
die Achse (Pan oder Tilt) wählen, die zugewiesen werden soll.
4) Mit der Taste « TAP / DISPLAY » den 8 oder 16 Kanal Betrieb wählen.
5) Mit der entsprechenden Taste den Scanner wählen, dem die Einstellung zugewiesen werden soll.
6) Drücken Sie die Szenennummer, die dem gewünschten Schiebeschalter entspricht, während Sie die
MODE Taste gedrückt halten (Beispiel: wenn Sie die Schwenkung mit dem Schiebeschalter 4 steuern,
halten Sie die MODE-Taste gedrückt und drücken Sie Szenentaste Nr. 4).
7) Drücken Sie danach gleichzeitig die MODE- und FINE-Taste um den ASSIGN-Betrieb zu verlassen.
ETT Distribution GmbH Schmalbachstraße 16 38112 Braunschweig
Nachdruck oder Vervielfältigung nur mit ausdrücklicher Genehmigung
250-444
Szenen:
Programmieren einer Szene
1) In « PROGRAM » Betrieb schalten (S. «Aktivierung des Programmierbetriebs»).
2) Die BLACKOUT LED darf nicht leuchten. Falls das doch der Fall ist, erneut auf die Taste drücken, um den
BLACKOUT Betrieb zu verlassen.
3) Die Schieberegler « SPEED » und « FADE TIME » ganz herunterfahren.
4) Drücken Sie die Scannertaste, die dem Gerät, das Sie steuern wollen, entspricht. Sie können mehrere
Scanner gleichzeitig steuern, indem Sie die verschiedenen entsprechenden Tasten drücken.
5) Stellen Sie die Blendregler und den Joystick in die gewünschte Position. Wählen Sie wenn nötig Seite B
um Kanäle 9 ~ 16 zu steuern.
6) Mit den Tasten
/
die Speicherbank wählen. Sie haben die Wahl zwischen 30 Banken mit jeweils 8
Szenen.
7) Wenn Sie alle Scanner nach Wunsch eingegeben haben, drücken Sie die MIDI / REC-Taste um die Szene
zu speichern.
8) Drücken Sie die Szenentaste, in der Sie die Szene speichern wollen. Alle LEDs leuchten dreimal auf. Das
LCD Display zeigt die Bank und die Szene an.
9) Um die Scanner zu löschen, drücken Sie die gewünschte Scannertaste, deaktivieren Sie den Scanner und
wählen Sie einen anderen.
10) Wiederholen Sie die Schritte 2 bis 7, bis alle Scanner programmiert sind.
11) Wenn Sie keine anderen Geräte eingeben wollen, halten Sie die PROGRAM-Taste einige Sekunden lang
gedrückt um den Programmierbetrieb zu verlassen. Die LED erlischt.
Programmierbeispiel einer Szene
1) In « PROGRAM » Betrieb schalten.
2) Auf die Taste « SCANNER 1 » drücken, um seinen Umblendfader einzuschalten.
3) Wenn Seite « A » nicht gewählt, auf « PAGE SELECT » drücken, um Seite A zu wählen.
4) Den ersten und zweiten Curser ganz hochfahren.
5) Mit den Tasten
/
Bank 1 wählen.
6) Auf « MIDI / REC » drücken.
7) Auf die Szenentaste 1 drücken, um die erste Szene zu speichern.
8) Schritte 4 bis 7 wiederholen, bis alle Szenen in Bank 1 gespeichert sind.
9) Taste « SCANNER 1 » drücken, um den Fader zu deaktivieren.
10) Zum Schluss den Programmierbetrieb verlassen. Nun können Sie manuell das Programm durchlaufen.
Bearbeiten einer Szene
1)
2)
3)
4)
5)
6)
« PROGRAM » Betrieb aktivieren.
Mit den Tasten
/
die Bank wählen, die die Szene enthält.
Die Szene mit der entsprechenden Taste abrufen.
Mit den Schiebereglern und/oder dem Joystick die Szene einstellen.
Zum Schluss die « MIDI / REC » Taste drücken.
Die Szenentaste drücken, die der bearbeiteten Szene entspricht. Hierdurch wird die alte Szene
überschrieben.
7) Achtung: In den Schritten 3 und 6 genau dieselbe Szene wählen, um nicht versehentlich eine andere
Szene zu überschreiben.
Scannereinstellungen kopieren
1) Kopiert die Einstellungen eines Scanners auf einen anderen.
2) Die Taste des zu kopierenden Scanners gedrückt halten.
3) Gleichzeitig auf die Taste des Zielscanners drücken.
ETT Distribution GmbH Schmalbachstraße 16 38112 Braunschweig
Nachdruck oder Vervielfältigung nur mit ausdrücklicher Genehmigung
250-444
Kopieren einer Szene
1)
2)
3)
4)
5)
6)
« PROGRAM » Betrieb aktivieren.
Mit den Tasten
/
die Bank wählen, die die Szene enthält.
Die Szene mit der entsprechenden Taste abrufen.
Mit den Tasten
/
die Bank wählen, in die Sie die Szene kopieren wollen.
Auf « MIDI / REC » drücken.
Die Taste der Szene drücken, die Sie kopieren wollen.
Löschen einer Szene
1)
2)
3)
4)
« PROGRAM » Betrieb aktivieren.
Die Taste der Szene drücken, die Sie löschen wollen.
« AUTO / DEL » gedrückt halten und auf die « SCENE » Taste der zu löschenden Szene drücken.
Nach Löschen der Szene schalten alle DMX Kanalwerte auf 0.
Löschen aller Szenen
1) Gerät ausschalten und dabei gleichzeitig die Tasten PROGRAM und
2) Gerät wieder einschalten. Alle Szenen sind gelöscht.
drücken.
Kopieren einer Bank
1)
2)
3)
4)
5)
« PROGRAM » Betrieb aktivieren.
Mit den Tasten
/
die Bank wählen, die kopiert werden soll.
Auf « MIDI / REC » drücken.
Mit den Tasten
/
die Bank wählen, in die die Bank kopiert werden soll.
Auf « MUSIC / BANK COPY » drücken. Alle LEDs blinken 3 Mal, um anzuzeigen, dass der Vorgang
erfolgreich abgeschlossen wurde.
6) 3 Sekunden lang auf PROGRAM drücken, um die Betriebsart zu verlassen.
Chases:
Programmieren eines Chase: Hinweis: Um einen Chase programmieren zu können, müssen erst
Szenen programmiert werden. Mit dieser Funktion können Sie 240 Szenen in einer bestimmten
Reihenfolge durchlaufen. Es ist ratsam, erst alle Chases im Controller zu löschen, bevor Sie den ersten
Chase programmieren. S. Hierzu « Löschen aller Szenen ».
1)
2)
3)
4)
5)
« PROGRAM » Betrieb aktivieren.
CHASE Taste drücken, um den zu programmierenden Chase zu wählen.
Die Szene in der Bank wählen.
Auf « MIDI / REC » drücken.
Die Schritte 3 und 4 wiederholen, bis alle Szenen programmiert worden sind.
Eingliedern einer Szenenbank in einen Chase
1)
2)
3)
4)
5)
« PROGRAM » Betrieb aktivieren.
Den zu programmierenden Chase wählen.
Mit den Tasten
/
die Bank wählen, die Sie kopieren möchten.
Auf MUSIC / BANK COPY drücken.
Auf MIDI / REC COPY drücken. Alle LEDs blinken 3 Mal, um anzuzeigen, dass der Vorgang erfolgreich
abgeschlossen wurde.
ETT Distribution GmbH Schmalbachstraße 16 38112 Braunschweig
Nachdruck oder Vervielfältigung nur mit ausdrücklicher Genehmigung
250-444
Hinzufügen eines Schritts
1)
2)
3)
4)
5)
6)
« PROGRAM » Betrieb aktivieren.
Die CHASE Taste drücken, in der Sie einen Schritt hinzufügen möchten.
Auf TAP / DISPLAY drücken. Das Display zeigt den derzeitigen Schritt an.
Mit den Tasten
/
zum gewünschten Schritt gehen.
Auf « MIDI / REC » drücken. Das Display zeigt den nächsten Schritt.
Auf « TAP / DISPLAY » drücken. Das Display zeigt den derzeitigen Chase, die Szene und die Bank an.
Erstellen Sie nun eine Szene und speichern Sie sie als neuen Schritt oder wählen Sie eine bereits
programmierte Szene und fügen Sie sie dem Chase hinzu.
7) Nachdem Sie die Szene gewählt haben, auf « MIDI / REC » drücken. Alle LEDs blinken 3 Mal, um
anzuzeigen, dass der neue Schritt dem Chase hinzugefügt wurde.
Löschen eines Schritts
1)
2)
3)
4)
5)
« PROGRAM » Betrieb aktivieren
Den Chase wählen, der die zu löschende Szene enthält.
Auf « TAP / DISPLAY » drücken. Das Display zeigt den derzeitigen Schritt.
Mit den Tasten
/
zum gewünschten Schritt gehen.
Auf “AUTO / DEL” drücken, um den Schritt zu löschen. Alle LEDs blinken 3 Mal, um anzuzeigen, dass der
Vorgang erfolgreich abgeschlossen wurde.
Löschen eines Chase
1) Die Taste des Chase drücken, den Sie löschen möchten.
2) « AUTO / DEL » gedrückt halten und auf « CHASE » drücken. Alle LEDs blinken 3 Mal, um anzuzeigen,
dass der Vorgang erfolgreich abgeschlossen wurde.
Löschen aller Chases
1) Gerät ausschalten. Die Tasten “AUTO/DEL” und “Bank
2) Gerät wieder einschalten. Alle Chases sind gelöscht.
”gleichzeitig drücken.
Wahl des Joysticks/Kanals
Konfiguration des Joysticks
1) Auf « PROGRAM » drücken, bis die LED leuchtet.
2) Gleichzeitig die Tasten MODE und FINE gedrückt halten. Die „ASSIGN“ LED leuchtet. Wenn die
„REVERSE“ LED leuchtet, erneut auf „FINE“ und „MODE“ drücken, um in « ASSIGN » Betrieb zu
schalten.
3) Mit den Tasten
/
die Achse (Schwenken oder Neigen) wählen, die Sie zuweisen möchten.
4) Mit «TAP / DISPLAY» den 8- oder 16-Kanal Betrieb wählen.
5) Drücken Sie den Scanner, den Sie zuweisen wollen.
6) Halten Sie die MODE-Taste gedrückt und drücken Sie die Szene, die dem Schiebschalter, der die
Bewegung steuert, entspricht (z.B. die Schwenkbewegung wird über Schiebeschalter 4 gesteuert, halten
Sie MODE gedrückt und drücken Sie Szenetaste 4).
7) Zum Beenden drücken Sie gleichzeitig MODE und FINE, um den ASSIGN Betrieb zu verlassen.
ETT Distribution GmbH Schmalbachstraße 16 38112 Braunschweig
Nachdruck oder Vervielfältigung nur mit ausdrücklicher Genehmigung
250-444
Umkehrung der Joystickbewegung/des DMX Kanals
1) « PROGRAM » Betrieb aktivieren.
2) Gleichzeitig die Tasten « MODE » und « FINE » drücken, um in ASSIGN Betrieb zu gehen. Erneut auf
MODE und FINE drücken, um in REVERSE Betrieb zu gehen. Die REVERSE LED leuchtet, um die
Aktivierung dieser Betriebsart anzuzeigen.
3) Mit den Tasten
/
zwischen Pan und Tilt umschalten. Die entsprechende LED leuchtet, um die Wahl
anzuzeigen.
4) Mit «TAP / DISPLAY» den 8- oder 16-Kanal Betrieb wählen.
5) Drücken Sie den Scanner, den Sie wählen wollen.
6) Gleichzeitig auf MODE und SCENE drücken, die dem Kanal entspricht, den Sie umkehren möchten
(Beispiel: Wenn Sie eine Szene eines Scanners umkehren möchten, gehen Sie in REVERSE Betrieb und
prüfen Sie, ob die TILT LED leuchtet. Prüfen Sie, welcher Schieberegler die Neigebewegung
7) steuert. Drücken Sie auf MODE und gleichzeitig auf SCENE, die dem Schieberegler entspricht (Regler 5 /
Szene 5)).
8) Ggf. Die Schritte 3 bis 7 wiederholen. Sie können bis zu 48 Kanäle und 12 Scanner umkehren.
Einen Scanner aus den DMX Kanälen löschen
1) ASSIGN oder REVERSE Betrieb aktivieren.
2) Auf die SCANNER Taste des Scanners drücken, den Sie löschen möchten.
3) Gleichzeitig auf MODE und AUTO / DEL drücken. Alle LEDs blinken 3 Mal, um anzuzeigen, dass der
Vorgang erfolgreich abgeschlossen wurde.
Alle DMX Kanäle löschen
1) Controller ausschalten.
2) Gleichzeitig auf MODE und AUTO/DEL drücken.
3) Während Sie beide Tasten gedrückt halten, den Controller wieder einschalten. Alle LEDs blinken kurz,
um anzuzeigen, dass der Vorgang erfolgreich abgeschlossen wurde.
Anzeige des DMX Kanals
1) Gleichzeitig die Tasten « MODE » und « FINE » drücken.
2) Nochmal auf MODE und FINE drücken. Die « REVERSE » LED leuchtet.
3) Den Scanner wählen, der die gewünschten Schwenk- und Neigwerte besitzt. Das Display zeigt die DMX
Werte der Schwenk- und Neigbewegungen.
Blendzeit
Ein-und Ausblendzeit / Zuweisung einer Blendzeit
1) Gerät ausschalten und gleichzeitig auf MODE und TAP / DISPLAY drücken.
2) Gerät wieder einschalten. Auf TAP / DISPLAY drücken, um zwischen FADE TIME und ASSIGN FADE TIME
zu wählen. Das Ergebnis erscheint auf dem Display.
ALL
FD
CH
TIME
OR
ONLY
FD
X/Y
TIME
3) Gleichzeitig auf MODE und TAP / DISPLAY drücken, um die Einstellung zu speichern. Auf BLACKOUT
drücken, um die Betriebsart zu verlassen.
ETT Distribution GmbH Schmalbachstraße 16 38112 Braunschweig
Nachdruck oder Vervielfältigung nur mit ausdrücklicher Genehmigung
250-444
Abspielen:
Abspielen von Szenen: Szenen und Chases können im manuellen, automatischen (AUTO) und
musikgesteuerten (MUSIC) Betrieb abgespielt werden.
Manueller Betrieb
1)
2)
3)
4)
Beim Einschalten ist das Gerät automatisch im manuellen Betrieb.
Die LEDs AUTO und MUSIC müssen ausgeschaltet sein.
Mit den Tasten
/
zum die Bank wählen, die die Szenen enthält, die Sie abspielen möchten.
Auf die SCENE Taste drücken, die der Szene, die Sie abspielen möchten, entspricht.
Automatikbetrieb: Mit dieser Funktion kann eine Szene sequentiell wiedergegeben werden.
1) Auf AUTO / DEL drücken, um in AUTO Betrieb zu schalten. Die AUTO LED leuchtet, um den
Automatikbetrieb anzuzeigen.
2) Mit den Tasten
/
zum die Bank wählen, die die Szenen enthält, die Sie abspielen möchten.
3) Dann die Abspielgeschwindigkeit mit den Reglern « SPEED » und « FADE TIME » einstellen.
4) Sie können die Geschwindigkeit auch mit der Taste TAP SYNC / DISPLAY einstellen. In diesem Fall
bestimmt der Zeitraum zwischen zwei Tastendrucken den Abstand zwischen zwei Schritten. Die
Einstellung bleibt so lange gültig, bis der Regler bewegt wird.
5) Die Taste AUTO / DISPLAY » drücken, um den AUTO Betrieb zu verlassen.
Audio Betrieb (Musiksteuerung)
1) Auf MUSIC / BANK COPY drücken, um den MUSIC Betrieb zu aktivieren.
2) Mit den Tasten
/
zum die Bank wählen, die die Szenen enthält, die Sie abspielen möchten. Die
gewählten Szenen werden dank des eingebauten Mikrofons zum Rhythmus der Musik abgespielt.
3) Auf MUSIC / BANK COPY drücken, um den musikgesteuerten Betrieb zu verlassen.
Abspielen von Chases im manuellen Betrieb
1) Bei Einschalten geht das Gerät automatisch in manuellen Betrieb.
2) Wählen Sie den Chase, den Sie abspielen möchten, indem Sie auf die Taste des entsprechenden Chase
drücken.
3) Erneut drücken, um den Chase abzuwählen.
Abspielen von Chases im Automatikbetrieb
1) Auf AUTO / DEL drücken, um in AUTO Betrieb zu schalten.
2) Auf eine der sechs CHASE Tasten drücken. Erneut drücken, um den Chase abzuwählen.
3) Mit SPEED und FADE TIME den Chase nach Ihren Wünschen einstellen.
Abspielen von Chases im Audiobetrieb
1) Auf MUSIC / BANK COPY drücken, um den MUSIC Betrieb zu aktivieren.
2) Wählen Sie den Chase, den Sie abspielen möchten, indem Sie auf die Taste des entsprechenden Chase
drücken.
ETT Distribution GmbH Schmalbachstraße 16 38112 Braunschweig
Nachdruck oder Vervielfältigung nur mit ausdrücklicher Genehmigung
250-444
Datenübertragung:
Mit der Funktion File Dump können Sie alle gespeicherten Dateien in einen anderen DMC-192 kopieren.
Schließen Sie die beiden Geräte über ein 3-pol. XLR Kabel aneinander. Schließen Sie das Kabel an die « DMX
OUT » Buchse des Geräts, das die Daten enthält. Schließen Sie das andere Ende des Kabels an die « DMX IN »
Buchse des Geräts an, das die Daten empfängt.
Versenden einer Datei:
1) Schalten Sie das Gerät aus. Gleichzeitig die Tasten SCANNER 2, SCANNER 3 und SCENE 1 drücken.
2) Diese 3 Tasten gedrückt halten und Gerät einschalten. Auf dem Display erscheint TRANSMIT. Das Gerät
ist bereit, die Daten zu übertragen.
3) Gleichzeitig auf die Tasten SCENE 7 und 8 drücken, um die Übertragung zu starten.
4) Falls ein Problem auftritt, erscheint ERROR auf dem Display.
Empfangen einer Datei:
1) Schalten Sie das Gerät aus. Gleichzeitig die Tasten SCANNER 8, SCANNER 9 und SCENE 2 drücken.
2) Diese 3 Tasten gedrückt halten und Gerät einschalten. Auf dem Display erscheint RECEIVE und das
Gerät empfängt die Daten.
3) Nach Abschluss der Übertragung geht das Gerät automatisch in Normalbetrieb.
Einstellung des MIDI-Kanals:
1) 3 Sekunden lang auf MIDI / REC drücken. Das LCD zeigt den zuletzt benutzten MIDI Kanal an.
2) Mit den Tasten
/
den DMX Kanal wählen (01 ~ 16), der dem MIDI-Kanal zugewiesen werden soll.
3) Auf MIDI / REC drücken, um die Einstellung zu speichern. Alle LEDs blinken 3 Mal, um anzuzeigen, dass
der Vorgang erfolgreich abgeschlossen wurde.
ETT Distribution GmbH Schmalbachstraße 16 38112 Braunschweig
Nachdruck oder Vervielfältigung nur mit ausdrücklicher Genehmigung
250-444
Reference Manual
DMX-Lighting Mixer HOLLYWOOD „DMC-192”
Preface
Dear Customer,
we like to congratulate you on the
purchase of your new lighting mixer!
You have chosen a product which
combines deliberate technical features
with an appealing design.
Please read this manual conscientiously
and carry out the given instructions before
and while you are using your new device.
Capability Characteristics
192 DMX channels
12 Scanners of 16 channels each
30 Banks of 8 programmable scenes
6 Programmable chases of 240 scenes
8 Sliders for manual control of channels
Assignable joystick for ease of channels
File Dump allows data to be sent or received between two units
Auto mode program controlled by speed and fade time sliders
Fade time/Assign fade time
Reversible DMX channels allows fixture to react in opposition to others
in a chase
8 CHANNEL or 16 CHANNEL mode
Fine adjustment for joystick pan and tilt
Blackout master button
Manual Override button allows you to grab any fixture on the fly
Built in microphone for music triggering
MIDI control over banks, chases and blackout
DMX Polarity selector
Power failure memory
Technical Specifications:
Weight: 2.7 kg
Size: 482*134*85 mm
Operation: AC 230 V ~ 50 Hz
Power Consumption (max.): 30 W
Channels: 16
Security Advices
Before using the device, please check it for any possible damages. In case of damage do not operate it.
Unplug the device if you do not use it for a certain time.
The device may not become subject of mechanical stress and should not be exposed to humidity.
To be considerate of the ventilation do not cover the device and protect it from direct solar radiation.
Clean the device with a dry and soft cloth only.
Caution! Should the device itself get damaged, please let the repair to the manufacturer or to a qualified
service agent.
Please dispose packaging materials properly and do not let play children with it.
The device itself is no toy either. Do not let children play with it too.
ETT Distribution GmbH Schmalbachstraße 16 38112 Braunschweig
Nachdruck oder Vervielfältigung nur mit ausdrücklicher Genehmigung
250-444
Functions:
1.
2.
3.
4.
5.
6.
7.
8.
9.
10.
11.
12.
13.
14.
15.
16.
17.
18.
19.
20.
Scanner Buttons (1-12)
Scene Buttons: Press the scene buttons to load or stored your scenes. There are maximum of 240
programmable scenes.
Faders: These faders are used to control the intensity of channel 1-8 or channel 9-16 depending upon the
selected page.
Page Select Button: Used to select page between Page A(1-8) and Page B(9-16).
Fog Machine Button: Activates Fog Machine.
Speed Slider: Used to adjust the chase speed within the range of 0.1 second to 10 minutes.
Fade Time Slider: Used to adjust the fade time. Fade time is the amount of time it takes for a scanner to
move from one position to another, for the dimmer to fade in or fade out.
LCD Display: Shows the current activity or programming state.
Pan Joystick: This joystick is used to control the Pan of the scanner or for programming.
Tilt Joystick: This joystick is used to control the Tilt of the scanner or for programming.
Program Button: Activates program mode.
MIDI/Rec: Used to control MIDI operation or to record programs.
Auto/Del: Activates Music mode or to delect scenes or chases.
Music/Bank Copy: Activates Program mode.
Bank Up/Down: Press the Up/Down button to select from 30 banks.
Tap/Display: Used to create a standard beat or to change the value mode between % and 0-255.
Blackout Button: Tap to momentarily pause whole output.
Chase Button(1-6): These buttons are used for activating the chase of programmed scenes.
Fine Button: When Fine is on, the Pan or Tilt joystick will control the scanner in the smallest increment.
Mode Button: Pressing Fine and Mode buttons allows to activate Assign or Reverse mode.
ETT Distribution GmbH Schmalbachstraße 16 38112 Braunschweig
Nachdruck oder Vervielfältigung nur mit ausdrücklicher Genehmigung
250-444
Connections:
1.
2.
3.
4.
5.
6.
7.
8.
MIDI IN: Input for MIDI data.
DMX Polarity Select: Toggle for the DMX-polarity.
DMX Out: This connector sends your DMX value to the DMX scanner or DMX pack.
DMX IN: Input for the DMX signals.
FOG CONTROL OUT: Connector for a fog machine.
DC INPUT: Connector for the power supply (DC9-12V, 500mA min).
POWER ON/OFF: On/Off-switch.
AUDIO: Cinch input Audio-In (0.1V~1Vp-p).
Operation:
General: The unit allows you to program 12 scanners with 16 DMX channels each, 30 banks of 8
programmable scenes, 6 chases of 240 scenes using 8 channel sliders, a joystick, and other buttons.
With the ease of the joystick, you can easily and more accurately control the movement of a fixture. To
further your ability to dazzle the audience, this unit allows you to assign and revetment DMX channels.
In addition, two units can set up communication so that they can send or receive a complete file dump.
Display Information: The LCD Display contains a maximum of 2 lines, each of 8 characters. Below are
the definitions.
LCD Display
SN1
BK1
CHASE1
STEP 009
DATA 184
SP: 1M54s
TP: 4.25s
ASS 04 05
RES 10 13
Meaning
Scene 1
Bank 1
Chase 1 is activated
The ninth step of a chase
DMX Value (000-255)
The current speed is 1 minute 54 seconds
The time of the last two taps is 4.25 seconds
Assign DMX channels 4 and 5
Reverse DMX channels 10 and 13
ETT Distribution GmbH Schmalbachstraße 16 38112 Braunschweig
Nachdruck oder Vervielfältigung nur mit ausdrücklicher Genehmigung
250-444
Configuration:
Configuration of the control unit: The unit is preset to allocate 16 channels per fixture. In
order to assign your fixtures to the scanner buttons located on the left side of the unit you will
need to space your fixtures 16 DMX channels apart.
Use the following chart for DMX addressing:
Effect no.
Digital DMX
Address
DIP-switch
setting
1
1
1 “ On”
2
17
1 and 5 “ On”
3
33
1 and 6 “ On”
4
49
1, 5 and 6 “ On”
5
65
1 and 7 “ On”
6
81
1, 5 and 7 “ On”
7
97
1, 6 and 7 “ On”
8
113
1, 5, 6 and 7 “ On”
9
129
1 and 8 “ On”
10
145
1, 5 and 8 “ On”
11
161
1, 6 and 8 “ On”
12
177
1, 5, 6 and 8 “ On”
Enabling the program mode: To enable program mode, hold the program button for seconds until
LED is lit.
Set-up Joystick
1) Press and hold the “Program” button until LED is lit.
2) Press and hold the “Mode” and “Fine” button at the same time, the assign LED should light. If the
reverse LED lights, press “Fine” and “Mode” again to enter assign mode.
3) Use the bank
/
keys to select the axis you wish to assign (Pan or TILT).
4) Use the “Tap/Display” button to select 16 or 8 channel mode.
5) Press the button corresponding to the scanner you wish to assign.
6) While holding the mode button press the scene number corresponding to the slider which controls the
movement. (Example: If pan is controlled by slider number 4, press and hold the “Mode” button while
tapping scene button 4#).
7) When finished press the “Mode” and “Fine” buttons at the same time again to exit Assign mode.
ETT Distribution GmbH Schmalbachstraße 16 38112 Braunschweig
Nachdruck oder Vervielfältigung nur mit ausdrücklicher Genehmigung
250-444
Scenes:
Programming A Scene
Enter program mode (See Enabling Program Mode).
Check the blackout key and verify that the LED is not lit, if it is, press it once to exit blackout mode.
Verify that the speed and fade time sliders are positioned at zero.
Press the scanner button corresponding to the unit wish to control. You may control more than one
scanner at time by pressing the button corresponding to the scanner(s) you wish to program.
5) Move the faders and joystick to the desired position. If necessary, you may select page B to control
channels 9-16.
6) Tap the bank
/
button to choose the bank you want to store this scene into. There are a total of
30 banks you can select; you may store up to 8 scenes in each bank.
7) Once all scanners are programmed into the desired position for the scene, tap the MIDI/REC button to
program this scene into memory.
8) Tap the scene button you wish to store your scene into. All LEDs will flash three times signifying this
operation. The LCD readout will show the bank and scene.
9) To unselect the scanner(s) you have been programming and switch to another simply press the button
of the scanner you have been programming again, deselecting it, and select another scanner.
10) Repeat steps 2-7 until all scenes have been programmed.
11) If you don’t intend to continue programming at this time, press and hold the program button for three
seconds to exit program mode. The LED will go out indicating this selection.
1)
2)
3)
4)
Example Scene Program
1)
2)
3)
4)
5)
6)
7)
8)
9)
10)
Program Enable.
Tap the Scanner 1 button to turn on its fader control.
Verify that the page select is set on page A, if not press the page select button to select page A.
Move the first and second faders all the way up to their maximum value position.
Select bank 1 using the bank
/
buttons.
Press the MIDI/REC button.
Tap scene 1 to store the first scene.
Repeat steps 4-7 until all scenes have been programmed into bank 1.
Tap the scanner 1 button to turn off the fader control.
When finished, disable program mode. You can now manually tap through you have just programmed.
Editing A Scene
1)
2)
3)
4)
5)
6)
7)
Program Enable.
Press the Bank
/ button to select the bank containing the scene you wish to edit.
Select the scene you wish to edit by tapping its scene button.
Use the faders and/or joystick to make the desired adjustments to the scene.
Once you have completed the changes, tap the MIDI/REC button.
Tap the scene button that corresponds to the scene you’re editing. This will override the existing
scene.
Be sure to select the same scene in steps 3 and 6, otherwise you may accidentally record over an
existing scene.
Copy Scanner Settings
1) This setting allows you to copy the settings of one scanner to another.
2) Press and hold down the scanner button you wish to copy.
3) While holding down the button, tap the button of the scanner you wish to copy the settings to.
ETT Distribution GmbH Schmalbachstraße 16 38112 Braunschweig
Nachdruck oder Vervielfältigung nur mit ausdrücklicher Genehmigung
250-444
Copy A Scene
1)
2)
3)
4)
5)
6)
Enable Program Mode.
Tap the Bank
/
button to select the bank containing the scene you wish to copy.
Select the scene you wish to copy by pressing its scene button.
Using the Bank
/
button select the bank you wish to copy the scene to.
Tap the MIDI/REC button.
Tap the scene button you wish to copy the scene to.
Deleting A Scene
1)
2)
3)
Enable Programming Mode.
Press the desired SCENE button to select the scene you wish to delete.
Press and hold down the AUTO/DEL button. While holding the button, tap the SCENE button that
corresponds with the scene you wish to delete.
When the programmed scene is delete, all DMX channel values will be set to 0.
4)
Deleting All Scenes
1)
With the power off to the unit, press and hold down the Program and Bank
time.
Turn the unit back on, and all scenes should be cleared.
2)
buttons at the same
Copy A Bank of Scenes
1)
2)
3)
4)
5)
Enable Programming Mode.
Tap the Bank
/
button until you reach the bank you wish to copy.
Tap the MIDI/REC button.
Tap the Bank
/
button to select the bank you wish to copy to.
Tap the MUSIC/BANK COPY button, all LEDs will briefly flash three times indicating the function has
been completed.
Press the PROGRAM button for three seconds to exit programming mode.
6)
Chases:
Programming a Chase: Note: You must have already programmed scenes in order to program a
chase, this function allows you to cycle through up to 240 scenes in a preselected order. It is
recommended before programming chases for the first time, you delete all chases in the controller. See
Delete All Chases for instructions on how to do so.
1)
2)
3)
4)
5)
Enable Programming Mode.
Tap the CHASE button to select the chase you wish to program.
Select a desired scene from the bank that has scenes stored inside it.
Tap the MIDI/REC button.
Repeat steps 3-4 until all desired scenes have been entered.
Inserting a bank of scenes into a chase
1)
2)
3)
4)
5)
Enable Programming Mode.
Select the chase you wish to program.
Use the Bank
/
key to select the bank of scenes you wish to copy.
Tap the MUSIC/BANK COPY button.
Tap the MIDI/REC COPY button, all LEDs will flash three times indicating that the requested operation
has been performed.
ETT Distribution GmbH Schmalbachstraße 16 38112 Braunschweig
Nachdruck oder Vervielfältigung nur mit ausdrücklicher Genehmigung
250-444
Add A Step
1)
2)
3)
4)
5)
6)
7)
Enable Programming Mode.
Press the corresponding button to the chase you wish to add a step to.
Press the TAP/DISPLAY button, the LCD will show the current step.
Press the Bank
/
button and scroll to the step you wish to insert the step after.
Press the MIDI/REC button, the segment display will read the step one step higher than before.
Tap the TAP/DISPLAY button again. The LCD shows the current chase, scene, and bank. Create a
desired scene and record it as a new step or select a previously programmed scene to add to the
chase.
Once you have selected the scene you wish to add, press the MIDI/REC button again. All LEDs will
flash three times indicating the new step has been inserted into the chase.
Deleting A Step
1)
2)
3)
4)
5)
Enable Programming Mode.
Select the chase that contains the step you wish to delete.
Press the TAP/DISPLAY button, the LCD shows the current step.
Press the Bank
/
button and scroll to the step you wish to delete.
Press the AUTO/DEL button to delete the step. All LEDs will flash three times indicating the requested
operation has been performed.
Delete A Chase
1)
2)
Press the button corresponding to the chase you wish to delete.
Press and hold down the AUTO/DEL button while holding down the CHASE button. All LEDs will flash
three times indicating that the requested operation has been performed.
Delete A Chase
1)
2)
With the power off, press and hold down the AUTO/DEL and Bank
Turn on the device again and all chases should be cleared.
buttons at the same time.
Joystick/Channel Selection
Set-up Joystick
1)
2)
3)
4)
5)
6)
7)
Press and hold the PROGRAN button until LED is lit.
Press and hold the MODE and FINE buttons at the same time, the assign LED should light. If the
reverse LED lights, press FINE and MODE again to enter assign mode.
Use the bank
/
keys to select the axis you wish to assign (Pan or Tilt).
Use the TAP/DISPLAY button to select 16 or 8 channel mode.
Press the button corresponding to the scanner you wish to assign.
While holding the MODE button press the scene number corresponding to the slider which controls the
movement. (Example: If pan is controlled by slider number 4, press and hold the MODE button while
tapping scene button 4#).
When finished press the MODE and FINE button at the same time again to exit Assign mode.
ETT Distribution GmbH Schmalbachstraße 16 38112 Braunschweig
Nachdruck oder Vervielfältigung nur mit ausdrücklicher Genehmigung
250-444
Reverse Joystick Movement/DMX Channel
1)
2)
3)
4)
5)
6)
7)
Enable Programming Mode.
Press the FINE and MODE buttons to enter assign mode, then press FINE and MODE buttons again to
enter reverse mode. The reverse LED lights up indicating reverse mode is active.
Use Bank
/
button to change between the Pan and Tilt, the corresponding LED lights indicating
this selection.
Press the TAP/DISPLAY button to change between 8 CHANNEL and 16 CHANNEL mode.
Press the scanner button to select the scanner.
While holding the MODE button, press the corresponding scene button the channel you wish to
reverse. (For Example: If you are reversing the on one scanner, once you verify that you are in reverse
mode, and the TILT LED is lit, check to see which slider the TILT control is on. Hold the MODE button
and press the SCENE button that is same as the slider number for tilt. (Slider 5/Scene 5).
Continue steps 3-7 as needed. You may reverse a maximum of 48 channels for 12 scanners.
Delete a scanner of DMX Channels
1)
2)
3)
Activate Assign or reverse mode.
Tap the SCANNER button to select the scanner you wish to delete.
Press the mode and AUTO/DEL buttons at the same time. All LEDs will flash three times indicating the
requested operation has been performed.
Clear All DMX Channels
1)
2)
3)
Turn the power to the unit off.
Press the MODE and AUTO/DEL buttons at the same time.
While holding the two buttons, turn the power back on to the unit. All LEDs will flash briefly indicating
the requested operation has been performed.
Display DMX Channel
1)
2)
3)
Press the FINE and MODE buttons at the same time, putting the controller into assign mode.
Press the FINE and MODE buttons again, lighting the reverse LED.
Press the SCANNER button that is set at the desired Pan and Tilt and the LCD will display the DMX
values for Pan and Tilt.
Fade Time:
Fade Time/Assign Fade Time
1)
2)
With the power off, press the mode and TAP/DISPLAY buttons at the same time.
Apply the power again, tap the TAP/DISPLAY button to change between Fade Time and Assign Fade
Time, the LCD reads
ALL
FD
3)
CH
TIME
OR
ONLY
FD
X/Y
TIME
Press the MODE and TAP/DISPLAY buttons at the same time to store your setting into memory. If you
do not wish to save your setting, press the blackout key to exit this operation.
ETT Distribution GmbH Schmalbachstraße 16 38112 Braunschweig
Nachdruck oder Vervielfältigung nur mit ausdrücklicher Genehmigung
250-444
Playback:
Running Scenes: There are three modes in which you can run scenes and chases. They are Manual
mode, Auto mode, and music mode.
Manual Mode:
1)
2)
3)
4)
When the power is turned on, the unit enters manual mode automatically.
Check and verify that both the AUTO and MUSIC LEDs are off.
Use the Bank
/
button to select the bank with the scenes you wish to run.
Press the SCENE button corresponding to the scene you wish to display.
Auto Mode: This function allows you to run a bank of programmed scenes in sequence.
1) Press the AUTO/DEL button to enter into Auto mode. The AUTO LED will light indicating the Auto mode
is active.
2) Use the bank
/
button to select a bank of scenes to run.
3) After selecting the bank of scenes to run, you can use the SPEED slider and FADE TIME slider to adjust
the speed of the scene progression.
4) You can use the TAP SYNC/DISPLAY button to set the speed instead. The amount of time between the
last two taps will instruct the controller in the length of time between steps. This setting will stay in
effect until the speed slider is moved.
5) Press the AUTO/DISPLAY button to exit Auto mode.
Music Mode:
1)
2)
3)
Press the MUSIC/BANK COPY button to activate Music mode.
Use the bank
/
button to select a bank of scenes you wish to run. The scenes selected will run
through sequentially to the beat of the music identified by the built-in microphone.
Tap the MUSIC/BANK COPY button again to exit music mode.
Running Chases in Manual Mode:
1)
2)
3)
When the power is turned on, the unit enters manual mode automatically.
Select the chase you wish to run by pressing the corresponding chase button.
Pressing this button a second time will unselect the chase.
Running Chases in Auto Mode:
1)
2)
3)
Press the AUTO/DEL button to activate Auto mode.
Select the desired by pressing one of six CHASE buttons. Pressing this button a second time will negate
this selection.
Use the SPEED slider and FADE TIME slider to adjust the chase to your specifications.
Running Chases in Music Mode:
1)
2)
Press the MUSIC/BANK COPY button to activate Music mode.
Select the desired chase by pressing one of six Chase buttons, this will activate the chase and cause it
to respond to the rhythms of the music.
ETT Distribution GmbH Schmalbachstraße 16 38112 Braunschweig
Nachdruck oder Vervielfältigung nur mit ausdrücklicher Genehmigung
250-444
File Transfer
File Transfer allows the user to transfer all information stored in one DMC-192 to a second DMC-192 unit. You
must connect the units using 3-pin XLR cables. The unit sending the information will have the cable plugged into
the DMX “Out” plug, and the receiving the information will have the cable running into the DMX “In” location.
Sending a File:
1)
2)
3)
4)
With the power off to the unit, press and hold down the SCANNER 2 and 3 buttons and SCENE 1
button at the same time.
Turn the unit back on while pressing these three buttons, the LCD will read “TRANSMIT” indicating
that the unit is ready to send the files.
Press scene button 7 and 8 at the same time to send the file dump.
If an error occurs during the file dump, the LCD will display “ERROR”.
Receiving a File:
1)
2)
3)
With the power off, press and hold down the SCANNER 8, 9 and SCENE button 2 at a time.
Apply the power again while pressing these three buttons, the LCD shows “RECEIVE” indicating this
unit is receiving the file dump.
When receiving is over, the unit will automatically return to normal mode.
MIDI Channel Setting:
1)
2)
3)
Press and hold the MIDI/REC button for three seconds. The LCD shows the MIDI channel of last time.
Use the bank
/
button to select the DMX channel 01-16 to assign to the MIDI channel.
Press and hold the MIDI/REC button to save your settings. The LEDs will flash three times indicating
that the required operation has been performed.
ETT Distribution GmbH Schmalbachstraße 16 38112 Braunschweig
Nachdruck oder Vervielfältigung nur mit ausdrücklicher Genehmigung