1
USER MANUAL
ENGLISH ( 2 – 4 )
MANUAL DEL USUARIO
ESPAÑOL ( 5 – 7 )
MANUEL D'UTILISATION
FRANÇAIS ( 8 – 10 )
MANUALE UTENTE
ITALIANO ( 11 – 13 )
BEDIENUNGSANLEITUNG
DEUTSCH ( 14 – 16 )
GEBRUIKERSHANDLEIDING
NEDERLANDS ( 17 – 19 )
BOX CONTENTS
•
•
•
•
•
•
iPA Music System
Microphone
Microphone cable (XLR)
Power cable
Quickstart Guide
Safety Instructions & Warranty Information Booklet
QUICK SETUP
1.
2.
3.
Connect iPA Music System's POWER INPUT to power outlet using the included power
cable. (Do not power on iPA Music System yet.)
Optional: Connect microphone to INPUT using standard XLR or 1/4" cable.
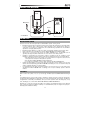
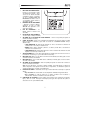
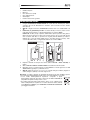
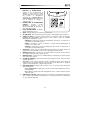
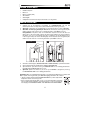
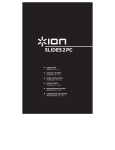
iPad (3rd generation) and iPad 2 users: Power on your iPad (not included). Slide it into
plastic "sled" and gently connect it to the DOCK connector.
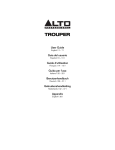
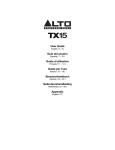
iPad users: iPA Music System's plastic "sled" has a plastic "rail" on each side to
accommodate the new iPad and iPad 2, which are thinner. Use a screwdriver, your
thumbs, etc. to remove these rails before using it (see the illustrations here as well as in
the included Quickstart Guide poster). Power on your iPad (not included). Slide it into the
sled and gently connect it to the DOCK connector.
iPad 2 & iPad ( 3
rd
iPad
generation)
A
B
4.
5.
6.
7.
Set both volume knobs (INPUT VOLUME and DOCK VOLUME) at minimum setting.
Turn iPA Music System's POWER SWITCH to ON.
Play music on iPad. Adjust DOCK VOLUME to a reasonable volume level. The
SIGNAL/PEAK LED will illuminate red.
Optional: Talk into microphone (if one is connected to INPUT). Adjust INPUT VOLUME to
reasonable volume level.
Note: You can connect an extension speaker (another iPA Music System, not
included) to the MIX OUT using a standard XLR cable. If you do this:
• So the extension speaker's playback level matches that of the main speaker,
set the extension speaker's INPUT VOLUME at the "9 o'clock" knob position.
• You can set which channel (left, right, or summed mono) is sent to your
extension speaker. See OUTPUT CHANNEL description under REAR PANEL
OVERVIEW for more information.
2
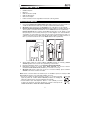
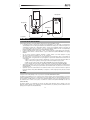
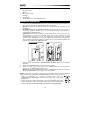
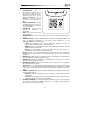
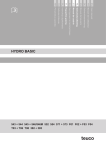
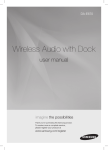
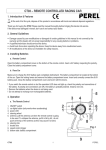
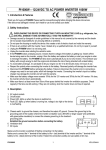
CONNECTION DIAGRAM
iPad*
Microphone
Speaker*
Power
* not included
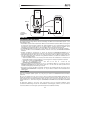
IMPORTANT!
MICROPHONE USAGE
Here are some notes about using microphones with iPA Music System – and in general:
•
iPA Music System includes a dynamic microphone and an XLR cable. Dynamic mics generally require
no power, whereas many condenser mics require "phantom power" supplied by the device it's
connected to. If you want to use a different mic, we recommend using a dynamic mic since iPA Music
System does not supply phantom power.
•
iPA Music System's INPUT is a "combo" jack, which accommodates both XLR- and 1/4"-style cables.
•
Before connecting a mic to the INPUT, be sure the INPUT VOLUME is at its minimum setting.
•
After the mic is connected, slowly increase the INPUT VOLUME level to an appropriate level. A
generally safe range is anywhere between the "9 o'clock" and "3 o'clock" knob positions.
•
Feedback is created when the sound from a speaker is fed back into the mic, resulting in a loud
humming or squealing sound that swells in volume and can get dangerously loud. To avoid feedback:
o Don't place the mic in front of the speaker. If you can't avoid it, use a longer mic cable so the mic
can be placed as far away from the speaker as possible.
o Don't turn up the INPUT VOLUME to extremely high levels.
o If you start to hear feedback—even if it's quiet—turn down the INPUT VOLUME knob.
•
Hold the mic approximately 1-3 inches away from your mouth when using it. Holding it too far away
requires unnecessarily turning up the INPUT VOLUME, and holding it too close can result in overly loud
volumes, feedback, distortion, etc. when speaking.
•
If several different people will be using the mic during a "session," keep an eye on your volume levels
and adjust the INPUT VOLUME knob accordingly, since everyone naturally speaks at different
volumes.
VOLUMES
When a sound source (music, voice, etc.) is loud enough, iPA Music System's SIGNAL/PEAK LED will light
up.
A red light means the sound is loud enough to activate the speaker's protection circuit. This prevents the
speaker from getting damaged from being "blown out," which can happen with other speakers. It's OK if the
red light flickers occasionally or intermittently, but if you hear the speaker's audio becoming fuzzy, overly
loud, "breaking up," etc., turn down the INPUT VOLUME and/or DOCK VOLUME knobs.
Generally, it's a good idea to monitor this light if you're playing several different kinds of music (different
styles of music are produced at different volumes) or if several different people are using the mic (everyone
naturally speaks at different volumes).
3
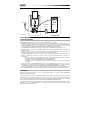
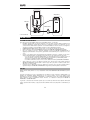
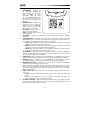
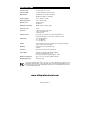
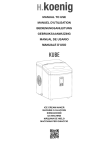
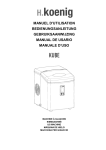
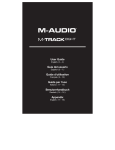
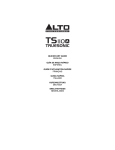
REAR PANEL FEATURES
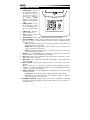
1.
POWER INPUT – Connect
the included power cable to
this input and connect the
other end of the cable to a
power source. Make sure
the
speaker's
POWER
SWITCH is set to "off" when
plugging and unplugging the
10 12
cable.
2. POWER SWITCH – Turns
11
the speaker on/off. Make
sure the VOLUME knob is
set to "zero" before turning it
on.
3. POWER LED – Illuminates
when the speaker is on.
4. DOCK – Connect your iPad
(not included) here.
5. DOCK VOLUME – Turn this knob to adjust the iPad's volume (not included).
6. OUTPUT CHANNEL – Set this switch to determine which channel is sent out of the MIX
OUT (to your extension speaker) and which channel is heard in the iPA Music System
(your "local" speaker):
• LEFT: The left channel will be sent to your extension speaker. The right channel will
be heard through the local speaker.
• MONO: Both left and right channels will be summed and be sent to both your
extension speaker and local speaker.
• RIGHT: The right channel will be sent to your extension speaker. The left channel will
be heard through the local speaker.
7. MIX OUT – Use a standard XLR cable (not included) to connect this jack to the input of
another speaker (i.e., another ALTO Professional speaker).
8. INPUT (XLR / 1/4") – Use a standard 1/4" TRS or XLR cable (not included) to connect
another sound source to this input.
9. INPUT (RCA) – Use a standard stereo RCA cable (not included) to connect another sound
source to this input.
10. INPUT VOLUME – Turn this knob to adjust the volume of a sound source connected to
the inputs.
Note: If you have devices connected to both inputs, this knob will adjust the volume of
both devices. To adjust the mix between the devices, we recommend adjusting the volume
of the device connected to the RCA input.
11. SIGNAL / PEAK LED – This light will illuminate red, depending on the signal level being
sent into the speaker:
• Flickering red: The audio signal is high, triggering the speaker's built-in limiter.
• Solid red: The audio signal being sent to the speaker is "clipping" or distorting.
Reduce the volume of your sound source.
12. LOUDNESS CONTOUR – Engage (depress) this switch to emphasize low and high
frequencies by +3 dB. Disengage the switch for flatter response for live performance or
for maximum output.
4
5
6
9
8 3 7
4
2
1
CONTENIDO DE LA CAJA
•
•
•
•
•
•
iPA Music System
Micrófono
Cable de micrófono (XLR)
Cable de alimentación
Guía de inicio rápido
Folleto de instrucciones de seguridad e información sobre la garantía
INSTALACIÓN RÁPIDA
1.
2.
3.
Conecte la ENTRADA DE ALIMENTACIÓN del iPA Music System en el tomacorriente con
el cable de alimentación incluido. (No encienda el sistema musical iPA todavía.)
Opcional: Conecte el micrófono a la ENTRADA con un cable XLR o de 1/4" estándar.
Usuarios de iPad (3ra generación) y iPad 2: Encienda el iPad (no incluido). Deslícelo al
"trineo" plástico y conéctelo suavemente al conector DOCK (Estación de acoplamiento).
Usuarios de iPad: El "trineo" plástico del iPA Music System tiene un "riel" plástico a cada
lado para alojar los nuevos iPad y iPad 2, que son más delgados. Use un destornillador,
sus pulgares, etc. para retirar estos rieles antes de usarlo (vea las ilustraciones aquí o en
el póster de la Guía de inicio rápido incluido). Encienda el iPad (no incluido). Deslícelo al
trineo y conéctelo suavemente al conector DOCK (Estación de acoplamiento).
iPad 2 & iPad ( 3
rd
iPad
generation)
A
B
4.
5.
6.
7.
Ajuste ambas perillas de volumen (INPUT VOLUME [Volumen de entrada] y DOCK
VOLUME [Volumen de la estación de acoplamiento]) al valor mínimo.
Encienda el iPA Music System con el INTERRUPTOR DE ENCENDIDO.
Reproduzca la música en el iPad. Ajuste DOCK VOLUME a un nivel de volumen
razonable. El LED SIGNAL/PEAK (Señal/Pico) se enciende con luz roja.
Opcional: Hable frente el micrófono (si hay uno conectado a INPUT). Ajuste el INPUT
VOLUME a un nivel de volumen razonable.
Nota: Puede conectar un altavoz de extensión (un otro iPA Music System, no incluido) a MIX
OUT (Salida de mezcla) con un cable XLR estándar. Si lo hace:
• Asi que el volumen del altavoz extensión coincide con el altavoz principal,
ajuste la perillas de volumen INPUT VOLUME [Volumen de entrada] del
altavoz de extensión a la posición de 270 grados de la perilla.
• Puede establecer qué canal (izquierdo, derecho o mono sumando) se envía
al altavoz de extensión. Para más información, consulte la descripción del
CANAL DE SALIDA en VISTA DEL PANEL TRASERO.
5
DIAGRAMA DE CONEXIÓN
iPad*
Micrófono
Suministro
eléctrico
Altavoz*
* no incluido
IMPORTANTE
USO DE MICRÓFONOS
He aquí algunas notas sobre el uso de micrófonos con iPA Music System y en general:
• El iPA Music System incluye un micrófono dinámico y un cable XLR. Generalmente, los micrófonos dinámicos no
requieren alimentación, mientras que muchos micrófonos de condensador requieren "alimentación fantasma"
provista por el dispositivo al que están conectados. Si desea utilizar un micrófono diferente, recomendamos usar
un micrófono dinámico, puesto que el iPA Music System no suministra alimentación fantasma.
• La entrada INPUT del iPA Music System es un conector "combo" que admite cables tipo XLR y de 1/4".
• Antes de conectar un micrófono a la ENTRADA, asegúrese de que INPUT VOLUME (Volumen de entrada) esté
ajustado al mínimo.
• Después de conectar el micrófono, aumente lentamente el nivel de INPUT VOLUME a un nivel apropiado. Un
rango generalmente seguro es entre las posiciones de 270 y 90 grados de la perilla.
• Se produce realimentación cuando el sonido del altavoz se realimenta al micrófono, generándose un fuerte
zumbido o chillido que aumenta de volumen y puede tornarse peligrosamente intenso. Para evitar la
realimentación:
o No coloque el micrófono frente al altavoz. Si no puede evitarlo, utilice un cable de micrófono más largo,
de modo que el micrófono pueda ubicarse lo más lejos posible del altavoz.
o No aumente el ajuste de INPUT VOLUME a niveles demasiado altos.
o Si comienza a oír la realimentación —aunque sea débil— disminuya el ajuste de la perilla INPUT
VOLUME.
• Sostenga el micrófono a aproximadamente 2.5 a 7.5 cm (1 a 3 pulgadas) de su boca cuando lo use. Si lo coloca
demasiado lejos, se requiere aumentar innecesariamente el ajuste de INPUT VOLUME y si lo sostiene demasiado
cerca, pueden producirse volúmenes excesivamente intensos, realimentación, distorsión, etc. al hablar.
• Si van a usar el micrófono varias personas diferentes durante una "sesión", vigile los niveles de volumen y ajuste
la perilla INPUT VOLUME en consecuencia, puesto que cada uno habla naturalmente a volúmenes diferentes.
VOLÚMENES
Cuando una fuente sonora (música, voz, etc.) es suficientemente intensa, se enciende el LED SIGNAL/PEAK
(Señal/pico) del iPA Music System.
La luz roja significa que el sonido es suficientemente intenso como para activar el circuito de protección del altavoz.
De esta forma se evita que el altavoz se dañe por "reventarse", como puede ocurrir con otros altavoces. Está bien si
la luz roja destella ocasional o intermitentemente, pero si oye que el audio del altavoz se torna confuso, demasiado
intenso o entrecortado, disminuya el ajuste de las perillas INPUT VOLUME y/o DOCK VOLUME.
Generalmente, es una buena idea vigilar esta luz si está tocando diferentes clases de música (los distintos estilos
musicales se producen a volúmenes diferentes) o si varias personas diferentes usan el micrófono (cada uno habla
naturalmente a volúmenes diferentes).
6
CARACTERÍSTICAS DEL PANEL TRASERO
1.
ENTRADA DE ALIMENTACIÓN –
Conecte a esta entrada el cable
de alimentación incluido y luego
conecte el otro extremo del cable
al suministro eléctrico. Asegúrese
de que el INTERRUPTOR DE
ENCENDIDO del altavoz esté en
"off" (apagado) cuando enchufe y
10 12
desenchufe el cable.
11
INTERRUPTOR DE ENCENDIDO
– Enciende y apaga el altavoz.
Asegúrese de que la perilla
VOLUME esté ajustada a "cero"
antes de encenderlo.
LED DE ENCENDIDO – Se
ilumina cuando el altavoz está
encendido.
ESTACIÓN DE ACOPLAMIENTO
– Conecte aquí su iPad (no incluido).
VOLUMEN DE LA ESTACIÓN DE ACOPLAMIENTO – Accione esta perilla para ajustar el
volumen del iPad (no incluido).
CANAL DE SALIDA – Ajuste este conmutador para determinar qué canal se emite por la MIX
OUT (su altavoz de extensión) y qué canal se escucha en el SISTEMA MUSICAL iPA (su
altavoz "local"):
• LADO IZQUIERDO: El canal del lado izquierdo se envía a su altavoz de extensión. El
canal derecho se escucha por el altavoz local.
• MONO: Ambos canales, izquierdo y derecho, se suman y envían tanto a su altavoz de
extensión como al altavoz local.
• LADO DERECHO: El canal del lado izquierdo se envía a su altavoz de extensión. El canal
izquierdo se escucha por el altavoz local.
SALIDA DE MEZCLA – Use un cable XLR estándar (no incluido) para conectar este conector a
la entrada de otro altavoz (por ej. otro altavoz Alto Professional).
ENTRADA (XLR / 1/4") – Use un cable de 1/4" TRS o XLR estándar (no incluido) para conectar
su fuente de sonido a esta entrada.
ENTRADA (RCA) – Use un cable RCA estéreo estándar (no incluido) para conectar su fuente
de sonido a esta entrada.
VOLUMEN DE LAS ENTRADAS – Gire esta perilla para ajustar el volumen de la fuente de
sonido conectada a las entradas.
Nota: Si tiene dispositivos conectados a ambas entradas, esta perilla ajusta el volumen de
ambos dispositivos. Para ajustar la mezcla entre los dispositivos, recomendamos ajustar el
volumen del dispositivo conectado a la entrada RCA.
LED DE PICO / SEÑAL – Se ilumina con luz roja en función del nivel de señal que se aplica al
altavoz:
• Rojo fluctuante: La señal de audio es alta, disparando el limitador integrado al altavoz.
4
2.
3.
4.
5.
6.
7.
8.
9.
10.
11.
5
6
9
8 3 7
2
1
• Rojo constante: La señal de audio que se aplica al altavoz está "recortando" o
distorsionando. Reduzca el volumen de su fuente de sonido.
12. CONTORNO DE VOLUMEN– Acople (oprima) este interruptor para resaltar las frecuencias
bajas y altas en +3 dB. Desacople el interruptor para lograr una respuesta más plana en
actuaciones en vivo o para máxima salida.
7
CONTENU DE LA BOÎTE
•
•
•
•
•
•
iPA Music System
Microphone
Câble de microphone (XLR)
Câble d'alimentation
Guide d’utilisation simplifié
Consignes de sécurité et informations concernant la garantie
INSTALLATION
1.
2.
3.
Branchez le câble d’alimentation inclus dans l’entrée d’alimentation du iPA Music System,
puis dans une prise d’alimentation murale. (Ne mettez pas le iPA sous tension tout de
suite.)
Facultatif : Branchez un microphone à l’entrée à l’aide d’un câble XLR standard ou 1/4 po
(6,35 mm).
e
Utilisateurs de iPad 3 génération et de iPad 2 : Mettez le iPad (non inclus) sous
tension. Glissez-le dans le boîtier en plastique, puis insérez-le doucement dans la station
d’accueil.
Utilisateurs iPad : Le boîtier en plastique du iPA Music System dispose d’un adaptateur
afin d’accommoder le nouveau iPad et le iPad 2, qui sont plus minces. Utilisez un
tournevis, vos pouces, etc., pour enlever cet adaptateur avant de l'utiliser (reportez-vous
aux illustrations ici ou dans l'affiche du guide d’utilisation simplifié). Mettez le iPad (non
inclus) sous tension. Glissez-le dans le boîtier en plastique, puis insérez-le doucement
dans la station d’accueil.
iPad 2 & iPad ( 3
rd
iPad
generation)
A
B
4.
5.
6.
7.
Réglez les deux boutons du volume (INPUT VOLUME et DOCK VOLUME) au réglage
minimum.
Mettez le IPA MUSIC SYSTEM sous tension.
Faites jouer de la musique sur le iPad. Réglez le volume (DOCK VOLUME) à des niveaux
raisonnables. La DEL SIGNAL/PEAK passera au rouge.
Facultatif : Parlez dans le microphone (si utilisé). Réglez le volume (INPUT VOLUME) à
des niveaux raisonnables.
Remarque : Vous pouvez brancher un haut-parleur externe (un autre iPA Music System, non
inclus) à la sortie MIX OUT à l’aide d’un câble XLR standard. Si un haut-parleur externe est
branché:
• Pour que le volume du haut-parleur d'extension corresponde à celui du hautparleur principal, réglez le bouton du INPUT VOLUME du haut-parleur externe
à la position « 9 h » du bouton.
• Sélectionnez lequel des canaux (gauche, droite ou mono) sera acheminé au
haut-parleur externe. Veuillez consulter la description du OUTPUT CHANNEL
dans la section CARACTÉRISTIQUE DU PANNEAU ARRIÈRE pour de plus
amples informations.
8
SCHÉMA DE CONNEXION
iPad*
Haut-parleur*
Microphone
Alimentation
* non inclus
IMPORTANT!
L’UTILISATION DE MICROPHONES
Voici quelques remarques concernant l'utilisation de microphones avec le iPA Music System :
•
Le iPA Music System comprend un microphone électrodynamique et un câble XLR. Les microphones
électrodynamiques ne nécessitent généralement aucune alimentation, tandis que de nombreux microphones à
condensateur nécessitent une « alimentation fantôme » fournie par le périphérique auquel il est branché. Si
vous souhaitez utiliser un micro différent, nous vous recommandons d’utiliser un micro électrodynamique
puisque le iPA Music System ne dispose pas d’une alimentation fantôme.
•
L’entrée du iPA Music System est une prise « combo » afin d’accommoder les câbles XLR et 1/4 po (6,35 mm).
•
Avant de brancher un micro à l'entrée, veillez à ce que le volume d’entrée (INPUT VOLUME) soit au réglage
minimum.
•
Une fois le micro branché, augmentez lentement le volume d'entrée à un niveau approprié. La plage
appropriée se situe entre les positions « 9 h » et « 3 h » du bouton.
•
Une contre-réaction est créée lorsque le son d'un haut-parleur est retourné dans le micro, ce qui entraîne un
fort bourdonnement ou un grincement sonore qui augmente et peut devenir extrêmement fort. Afin d’éviter la
contre-réaction :
o Veillez à ne pas placer le micro devant le haut-parleur. Si vous ne pouvez faire autrement, utilisez un
câble pour micro plus long afin de pouvoir éloigner le micro du haut-parleur le plus possible.
o Veuillez à ne pas régler le volume d'entrée (INPUT VOLUME) à des niveaux extrêmement élevés.
o Si vous entendez une contre-réaction, même faible, baissez le volume d’entrée (INPUT VOLUME).
•
Tenez le micro à environ 1 à 3 po de votre bouche. Le tenir trop long nécessite d'augmenter le volume d’entrée
(INPUT VOLUME), et le tenir trop près peut entraîner des niveaux de volume trop élevés, une contre-réaction,
de la distorsion, etc.
•
Si plusieurs personnes doivent utiliser le micro durant une même session, contrôlez les niveaux et ajustez le
bouton du volume d’entrée (INPUT VOLUME) en conséquence, comme chaque personne parle à des niveaux
différents.
VOLUMES
Lorsqu’une source audio (musique, voix, etc.) est assez forte, la DEL SIGNAL/PEAK s’allume.
Une lumière rouge indique que le son est assez fort pour activer le circuit de protection du haut-parleur. Ceci permet
d’éviter d’endommager (« défoncer ») le haut-parleur, chose qui pourrait arriver avec d’autres haut-parleurs. Il n’y a
pas de problèmes si la DEL clignote à l’occasion ou de manière intermittente, mais si vous entendez de la distorsion,
des variations dans le volume, ou des pertes, etc., diminuez le volume d’entrée (INPUT VOLUME) et/ou du socle
(DOCK VOLUME).
De manière générale, il est préférable de contrôler cette DEL lorsque différents styles de musique sont joués
(différents styles de musique sont enregistrés à des niveaux différents) ou plusieurs personnes utilisent le micro
(chaque personne parle à des niveaux différents).
9
CARACTÉRISTIQUES DU PANNEAU ARRIÈRE
1.
2.
3.
4.
5.
6.
ENTRÉE
D’ALIMENTATION
–
Branchez le câble d’alimentation
4
inclus à cette entrée et branchez
l’autre extrémité à une source
d’alimentation électrique. Assurezvous que l’interrupteur de mise en
marche est réglé sur « Off » lorsque
10 12 5
vous branchez/débranchez le câble
d’alimentation.
2
9 11 6
INTERRUPTEUR D'ALIMENTATION
– Il permet de mettre l’appareil sous et
1
8 3 7
hors tension. Assurez-vous que le
bouton du volume soit complètement
fermé (« zéro ») avant de mettre
l’appareil sous tension.
DEL D’ALIMENTATION – S’allume
lorsque le haut-parleur est sous
tension.
SOCLE – Branchez un iPad (non inclus) ici.
DOCK VOLUME (volume du socle) – Ce bouton permet d’ajuster le volume du iPad (non
inclus).
OUTPUT CHANNEL (canal de sortie) – Réglez ce sélecteur afin d'affecter un canal à la sortie
MIX OUT (au haut-parleur externe) et un canal au système de sonorisation iPA (haut-parleur
interne) :
• LEFT (gauche) : Le canal gauche sera envoyé au haut-parleur externe. Le canal de droit
sera envoyé au haut-parleur interne.
• MONO : Canaux gauche et droit seront mélangés et envoyés au haut-parleur externe et au
haut-parleur interne.
7.
8.
9.
10.
11.
12.
• RIGHT (droit) : Le canal droit sera envoyé au haut-parleur externe. Le canal gauche sera
envoyé au haut-parleur interne.
MIX OUT (sortie du mix) – Utilisez un câble XLR standard (non inclus) pour brancher cette
sortie à l’entrée d'un autre haut-parleur, tel qu’un autre haut-parleur Alto Professional.
ENTRÉE (XLR/¼ po) – Utilisez un câble TRS de ¼ po (6,35 mm) ou XLR (non inclus) pour
brancher une autre source audio à cette entrée.
ENTRÉE (RCA) – Utilisez un câble RCA stéréo standard (non inclus) pour brancher une autre
source audio à cette entrée.
VOLUME DES ENTRÉES – Ce bouton permet d’ajuster le volume de la source audio branchée
à ces entrées.
Remarque : Si vous avez des périphériques branchés aux deux entrées, ce bouton permet de
régler le volume des deux périphériques. Pour régler le mix entre les périphériques, nous vous
recommandons d'ajuster le volume du périphérique branché à l’entrée RCA.
DEL SIGNAL/PEAK (signal/écrêtage) – Cette DEL passe au rouge selon le niveau de signal
envoyé au haut-parleur :
• Rouge et clignote : Le signal audio est élevé, activant le limiteur intégré du haut-parleur.
• Rouge foncé : Le signal audio envoyé au haut-parleur est déformé (écrêtage). Baissez le
volume de la source audio.
CONTOUR DU VOLUME – Lorsque cette touche est enfoncée, les basses et hautes fréquences
sont accentuées de +3 dB. Désactivez cette touche pour un son plus plat pour les prestations
ou afin d’optimiser la puissance de sortie.
10
CONTENUTI DELLA CONFEZIONE
•
•
•
•
•
•
iPA Music System
Microfono
Cavo del microfono (XLR)
Cavo di alimentazione
Guida rapida
Istruzioni di sicurezza e garanzia
IMPOSTAZIONE RAPIDA
1.
2.
3.
Collegare l'INGRESSO DI ALIMENTAZIONE del sistema musicale iPA alla presa elettrica
servendosi del cavo di alimentazione in dotazione. (Non accendere ancora il sistema
musicale iPA.)
Opzione: collegare il microfono all'INGRESSO servendosi di un cavo standard XLR o da
1/4".
Utenti iPad (3ª generazione) e iPad 2: accendere l'iPad (non incluso). Farlo scorrere
nella slitta ("sled") in plastica e collegarlo delicatamente al connettore DOCK.
Utenti iPad: la slitta ("sled") in plastica dell'iPA Music System presenta delle guide in
plastica da ciascun lato per accogliere il nuovo iPad e iPad 2, che sono più sottili. Servirsi
di un cacciavite, delle dita, ecc. per rimuovere le guide prima di utilizzarlo (si vedano le
immagini qui o nel poster Guida rapida incluso). Accendere l'iPad (non incluso). Farlo
scorrere nella slitta ("sled") e collegarlo delicatamente al connettore DOCK.
iPad 2 & iPad ( 3
rd
iPad
generation)
A
B
4.
5.
6.
7.
Impostare entrambe le manopole del volume (INPUT VOLUME e DOCK VOLUME) al
minimo.
Girare l'INTERRUTTORE DI ALIMENTAZIONE del sistema musicale iPA su ON.
Riprodurre musica con l'iPad. Regolare il volume DOCK a un livello ragionevole. Il LED
SIGNAL/PEAK (segnale/picco) si illumina di rosso.
Opzione: parlare al microfono (se ve ne è uno collegato all'ingresso INPUT). Regolare il
volume di ingresso (INPUT) su un livello ragionevole.
Nota bene: è possibile colleegare un altoparlante di espansione (un altro iPA Music System,
non in dotazione) all'USCITA MIX servendosi di un cavo XLR standard. Così facendo:
• Così il volume dell'altoparlante di espansione corrisponde a quello
del altoparlante principale, impostare la manopola del INPUT VOLUME del
altoparlante di espansione alla posizione "ore 9".
• È possibile selezionare quale canale (sinistro, destro o mono sommato) viene
inviato all'altoparlante di espansione. Si veda la descrizione della canale di
uscita (OUTPUT CHANNEL) sotto PANORAMICA PANNELLO POSTERIORE
per maggiori informazioni.
11
SCHEMA DEI COLLEGAMENTI
iPad*
Altoparlante*
Microfono
Alimentazione
* non in dotazione
IMPORTANTE!
UTILIZZO DEL MICROFONO
Ecco alcune note in merito all'utilizzo di microfoni con l'iPA Music System – e in generale:
•
l'iPA Music System include un microfono dinamico ed un cavo XLR. I microfoni dinamici solitamente non
richiedono alimentazione, mentre numerosi microfoni a condensatore richiedono che il dispositivo cui sono
connessi fornisca un'alimentazione "phantom". Se si desidera utilizzare un microfono diverso, si consiglia l'uso
di un microfono dinamico, poiché l'iPA Music System non fornisce alimentazione phantom.
•
LINGRESSO dell'iPA Music System è un jack "combo", che accoglie sia cavi XLR che cavi da 1/4".
•
Prima di collegare un microfono all'INGRESSO, assicurarsi che il VOLUME di INGRESSO sia al minimo.
•
Dopo aver collegato il microfono, aumentare lentamente il livello del VOLUME di INGRESSO fino a
raggiungere quello desiderato. Una posizione generalmente sicura della manopola è compresa tra "ore 9" e
"ore 3".
•
Il ritorno si crea quando il suono di un altoparlante viene alimentato nel microfono, causando un forte ronzio o
strido che aumenta di volume e può diventare pericolosamente forte. Per evitare il fenomeno del ritorno:
o non collocare il microfono davanti all'altoparlante. Se è impossibile farne a meno, servirsi di un cavo per
microfono più lungo, in modo da poter collocare il microfono il più lontano possibile dall'altoparlante.
o Non alzare eccessivamente il livello del VOLUME di INGRESSO.
o Se si inizia a sentire ritorno, anche se non eccessivo, abbassare la manopola VOLUME di INGRESSO.
•
Tenere il microfono a circa 2-7 cm dalla bocca durante l'uso. Tenerlo troppo lontano richiede di alzare il
VOLUME di INGRESSO in maniera inutile e tenerlo troppo vicino può portare a volumi eccessivi, ritorno,
distorsione, ecc. mentre si parla.
•
Se diverse persone utilizzeranno il microfono durante una "sessione", tenere d'occhio i livelli del volume e
regolare la manopola del VOLUME di INGRESSO di conseguenza, poiché tutti parlano a volumi diversi.
VOLUMI
Quando una fonte audio (musica, voce, ecc.) è abbastanza elevata, il led SEGNALE/PICCO dell'iPA Music System si
accende.
Una spia rossa indica che il suono è abbastanza forte da attivare il circuito di protezione dell'altoparlante. Ciò
impedisce che l'altoparlante rimanga danneggiato per un eccesso di volume, cosa che può capitare ad altri
altoparlanti. Se la luce rossa lampeggia occasionalmente o a intermittenza, va bene, ma se l'audio dell'altoparlante
inizia a diventare confuso, eccessivamente elevato "interrotto", ecc. abbassare le manopole del VOLUME di
INGRESSO e/o del VOLUME DOCK.
In generale, è una buona idea monitorare questa spia se si suonano tipi diversi di musica (diversi stili musicali
vengono prodotti a diversi volumi) o se più persone diverse utilizzano il microfono (tutti parlano a volumi diversi, per
natura).
12
CARATTERISTICHE PANNELLO POSTERIORE
1.
2.
3.
4.
5.
6.
INGRESSO DI ALIMENTAZIONE –
Collegare il cavo di alimentazione in
4
dotazione a questo ingresso, quindi
collegare l’altro capo del cavo stesso ad
una
sorgente
di
alimentazione.
Assicurarsi che l'INTERRUTTORE DI
ALIMENTAZIONE dell'altoparlante sia su
10 12 5
"off" al momento di collegare e
scollegare il cavo.
2
9 11 6
INTERRUTTORE DI ALIMENTAZIONE
(POWER) – Accende e spegne
1
8 3 7
l'altoparlante.
Assicurarsi
che
la
manopola VOLUME sia impostata su
"zero" prima di accenderlo.
LED DI ALIMENTAZIONE – Si illumina
quando l'altoparlante è acceso.
DOCK – Collegare l'iPad (non in dotazione) a questo livello.
VOLUME DOCK – Girare questa manopola per regolare il volume dell'iPad (non in dotazione).
CANALE DI USCITA – Impostare questo interruttore per determinare quale canale inviare
all'USCITA MIX (all'altoparlante di espansione) e quale canale si sente nel SISTEMA
MUSICALE iPA (l'altoparlante "locale"):
• SINISTRO: il canale sinistro verrà inviato all'altoparlante di estensione. Il canale destro si
sentirà attraverso l'altoparlante locale.
• MONO: i canali destro e sinistro si sommano e vengono inviati sia all'altoparlante di
estensione che a quello locale.
7.
8.
9.
10.
11.
• DESTRO: il canale destro verrà inviato all'altoparlante di estensione. Il canale sinistro si
sentirà attraverso l'altoparlante locale.
USCITA MIX – Servirsi di un cavo standard XLR (non in dotazione) per collegare questo jack
all'ingresso di un altro altoparlante (ad es. un altro altoparlante Alto Professional).
INGRESSO (XLR / 1/4") – Servirsi di un cavo standard TRS o XLR da 1/4" (non in dotazione)
per collegare un'altra fonte audio a questo ingresso.
INGRESSO (RCA) – Servirsi di un cavo standard RCA (non in dotazione) per collegare un'altra
fonte audio a questo ingresso.
VOLUME DEI INGRESSI – Girare questa manopola per regolare il volume di una fonte audio
collegata agli ingressi.
Nota bene: se sono presenti dispositivi collegati a entrambi gli ingressi, questa manopola
regolerà il volume di entrambi i dispositivi. Per regolare il mix tra i dispositivi, si consiglia di
regolare il volume del dispositivo collegato all'ingresso RCA.
LED SEGNALE/PICCO – Questa spia si accende di rosso a seconda del livello del segnale
inviato all'altoparlante:
• Rosso lampeggiante: il segnale audio è elevato e ha fatto scattare il limitatore incorporato
dell'altoparlante.
12.
• Rosso fisso: Il segnale audio inviato all'altoparlante "salta" o è distorto. Ridurre il volume
della fonte audio.
CONTOUR DEL VOLUME – Attivare (premere) questo interruttore per enfatizzare le frequenze
basse e alte di +3 dB. Disattivare l'interruttore per una risposta più piatta per le esibizioni dal
vivo o per il massimo dell'uscita.
13
LIEFERUMFANG
•
•
•
•
iPA Music System
Mikrofon
Mikrofon-Kabel (XLR)
Netzkabel
•
•
Kurzanleitung
Sicherheitshinweise und Garantieinformationen
SCHNELLES EINRICHTEN
1.
2.
3.
Verbinden Sie den NETZEINGANG des IPA Music System mit dem mitgelieferten Netzkabel mit
einer Steckdose. (Schalten Sie das IPA Music System noch nicht ein.)
Optional: Schließen Sie das Mikrofon mithilfe eines Standard-XLR oder 1/4"-Kabels an den
EINGANG an.
Für Benutzer des iPad (3. Generation) und iPad 2: Schalten Sie Ihr iPad ein (nicht im
Lieferumfang enthalten). Schieben Sie es in den Kunststoff-"Schlitten" und verbinden es
vorsichtig mit dem DOCK-Anschluss.
iPad-Benutzer: Der Kunststoff-"Schlitten" des iPA Music System hat auf jeder Seite eine
"Kunststoff-Schiene", da das neue iPad und iPad 2 dünner sind. Verwenden Sie einen
Schraubendreher, Ihre Daumen o.Ä., um diese Schienen zu entfernen, bevor Sie das Gerät
verwenden (siehe Abbildungen hier oder in der mitgelieferten Kurzanleitung). Schalten Sie Ihr
iPad ein (nicht im Lieferumfang enthalten). Schieben Sie es in den Kunststoff-"Schlitten" und
verbinden es vorsichtig mit dem DOCK-Anschluss.
iPad 2 & iPad ( 3
rd
iPad
generation)
A
B
4.
5.
6.
7.
Stellen Sie beide Lautstärkeregler (EINGANGSPEGEL und DOCK-PEGEL) auf die minimale
Einstellung.
Stellen Sie den NETZSCHALTER des IPA Music System auf EIN.
Spielen Sie Musik am iPad ab. Passen Sie den DOCK-PEGEL auf eine angemessene
Lautstärke an. Die SIGNAL/PEAK-LED leuchtet rot.
Optional: Sprechen Sie ins Mikrofon (wenn eines an den EINGANG angeschlossen ist). Passen
Sie den EINGANGSPEGEL auf eine angemessene Lautstärke an.
Hinweis: Sie können einen weiteren Lautsprecher (d.h. iPA Music System, nicht mitgeliefert) mit
einem handelsüblichen XLR-Kabel an den MIX-AUSGANG anschließen. Wenn Sie dies tun:
• Damit die Lautstärken der Lautsprecher identisch sind, stellen Sie
EINGANGSPEGEL Lautstärkeregler (von dem weiter Lautsprecher) auf die "9 Uhr"
Reglerposition.
• Können Sie einstellen, welche Kanäle (links, rechts oder als summiertes Monosignal)
an Ihren zusätzlichen Lautsprecher gesendet werden. Mehr Information finden Sie in
der Beschreibung des AUSGANGS-KANAL unter ÜBERSICHT DER RÜCKSEITE.
14
ANSCHLUSSÜBERSICHT
iPad*
Lautsprecher*
Mikrofon
Stromversorgung
* nicht im
Lieferumfang
enhalten
WICHTIG!
VERWENDUNG DES MIKROFONS
Im Folgenden finden Sie einige Hinweise über die Verwendung eines Mikrofons mit dem iPA Music System – sowie
einige allgemeine Tipps:
• Das iPA Music System enthält ein dynamisches Mikrofon und ein XLR-Kabel. Dynamische Mikrofone benötigen in
der Regel keine Stromversorgung, während viele Kondensatormikrofone eine "Phantomspeisung" durch das
angeschlossene Gerät erfordern. Wenn Sie ein anderes Mikrofon verwenden möchten, empfehlen wir die
Verwendung eines dynamischen Mikrofons, da das iPA Music System keine Phantomspeisung bietet.
• Der EINGANG des iPA Music System ist eine "Combo"-Buchse, die sowohl XLR- als auch 1/4"-Kabel aufnimmt.
• Bevor Sie ein Mikrofon an den EINGANG anschließen, stellen Sie sicher, dass die EINGANGSLAUTSTÄRKE
minimal ist.
• Nachdem das Mikrofon angeschlossen ist, erhöhen Sie langsam die EINGANGSLAUTSTÄRKE auf ein
angemessenes Niveau. Die Reglerpositionen zwischen "9 Uhr" und "3 Uhr" gelten allgemein als sicherer Bereich.
• Eine Rückkopplung entsteht, wenn der Ton aus einem Lautsprecher wieder vom Mikrofon aufgenommen wird,
was sich zu einem immer lauter werdenden und gefährlichen Brummen oder Quietschen entwickeln kann. So
vermeiden Sie Rückkopplungen:
o Stellen Sie das Mikrofon nicht vor einen Lautsprecher. Wenn sich das nicht vermeiden lässt, verwenden Sie ein
längeres Mikrofonkabel, so dass das Mikrofon so weit wie möglich vom Lautsprecher platziert werden kann.
o Vermeiden Sie extrem hohe EINGANGSPEGEL.
o Wenn Sie eine Rückkopplung hören - auch wenn sie nur leise ist - drehen Sie den
EINGANGSLAUTSTÄRKEREGLER zurück.
• Halten Sie das Mikrofon in einer Entfernung von ca. 1-3 cm vom Mund. Halten Sie es zu weit weg, muss die
EINGANGSLAUTSTÄRKE unnötig erhöht werden, halten Sie es zu nahe, kann dies beim Sprechen zu hoher
Lautstärke, Rückkopplung und Verzerrungen etc. führen.
• Wenn mehrere Personen das Mikrofon verwenden, behalten Sie die Lautstärken im Auge und passen Sie die
EINGANGSLAUTSTÄRKEREGLER entsprechend an, da jeder Mensch natürlich mit unterschiedlich lauter
Stimme spricht.
LAUTSTÄRKEN
Wenn eine Schallquelle (Musik, Sprache etc.) laut genug ist, leuchtet die SIGNAL/PEAK LED des iPA Music
System auf.
Ein rotes Licht bedeutet, dass der Sound so laut ist, dass die Lautsprecher-Schutzschaltung aktiviert wird. Dies
bewahrt den Lautsprecher vor Schäden, die bei anderen Lautsprechern auftreten können. Es ist OK, wenn das rote
Licht gelegentlich oder vorübergehend aufflackert. Wenn Sie jedoch hören, dass das Audiosignal verzerrt, zu laut
wird oder "abbricht" etc., drehen Sie die Regler für die EINGANGSLAUTSTÄRKE und/oder die DOCK-LAUTSTÄRKE
zurück.
Im Allgemeinen empfiehlt es sich, dieses Licht zu überwachen, wenn Sie verschiedene Musikstile spielen
(verschiedene Musikrichtungen werden mit unterschiedlichen Lautstärkepegeln produziert) oder wenn mehrere
Personen das Mikrofon verwenden (jeder spricht natürlich mit unterschiedlich lauter Stimme).
15
ÜBERSICHT RÜCKSEITE
1.
NETZEINGANG – Verbinden Sie
das mitgelieferte Netzkabel mit
diesem Eingang und das andere
Ende des Kabels mit einer
Stromquelle. Achten Sie darauf,
dass der NETZSCHALTER des
Lautsprechers auf "off" steht, wenn
Sie das Kabel anschließen oder
10 12
abstecken.
11
NETZSCHALTER – Schaltet den
Lautsprecher ein/aus. Achten Sie
darauf, dass der LAUTSTÄRKERegler auf "Null" steht, bevor Sie
den Lautsprecher einschalten.
POWER-LED – Leuchtet, wenn der
Lautsprecher eingeschaltet ist.
DOCK – Verbinden Sie hier Ihr iPad
(nicht mitgeliefert).
DOCK-PEGEL – Drehen Sie diesen Knopf, um die Lautstärke des iPad (nicht enthalten)
einzustellen.
AUSGANGS-KANAL – Verwenden Sie diesen Schalter, um festzulegen, welcher Kanal zum
MIX-AUSGANG geschickt wird (an Ihren zusätzlichen Lautsprecher) und welcher Kanal über
das IPA MUSIC SYSTEM gehört wird (Ihre "lokalen" Lautsprecher):
4
2.
3.
4.
5.
6.
5
6
9
8 3 7
2
1
• LINKS: Der linke Kanal wird an Ihre zusätzlichen Lautsprecher gesendet. Der rechte Kanal
wird durch die lokalen Lautsprecher zu hören sein.
• MONO: Die linken und rechten Kanäle werden summiert und sowohl an die zusätzlichen
Lautsprecher als auch an die lokalen Lautsprecher gesendet.
7.
8.
9.
10.
11.
12.
• RECHTS: Der rechte Kanal wird an Ihre zusätzlichen Lautsprecher gesendet. Der linke
Kanal wird durch die lokalen Lautsprecher zu hören sein.
MIX-AUSGANG – Verwenden Sie ein handelsübliches XLR-Kabel (nicht im Lieferumfang
enthalten), um diese Buchse mit dem Eingang eines anderen Lautsprechers (d.h. eines weiteren
Alto Professional Lautsprechers) zu verbinden.
EINGANG (XLR / 1/4") – Verwenden Sie ein handelsübliches 1/4"-Klinkenkabel oder ein XLRKabel (nicht im Lieferumfang enthalten), um Ihre Tonquelle mit diesem Eingang zu verbinden.
EINGANG (Cinch) – Verwenden Sie ein handelsübliches Stereo-Cinch-Kabel (nicht im
Lieferumfang enthalten), um eine weitere Tonquelle an diese Buchse anzuschließen.
EINGANGSLAUTSTÄRKE – Drehen Sie diesen Regler, um die Lautstärke der Schallquelle
einzustellen, die an die Eingänge angeschlossen ist.
Hinweis: Wenn Sie Geräte haben, die an beide Eingänge angeschlossen sind, können Sie mit
diesem Regler die Lautstärke beider Geräte einstellen. Um den Mix zwischen den Geräten
anzupassen, empfehlen wir Ihnen die Lautstärke des Geräts einzustellen, das an den CinchEingang angeschlossen ist.
SIGNAL / PEAK LED – Je nach Pegel, der an die Lautsprecher geschickt wird, leuchtet dieses
Licht rot auf:
• Blinkendes Rot: Das Audiosignal ist laut und triggert den im Lautsprecher eingebauten
Limiter.
• Stetes Rot: Das Audiosignal, das an den Lautsprecher geschickt wird, "clippt" oder
verzerrt. Reduzieren Sie die Lautstärke Ihrer Tonquelle.
LOUDNESS CONTOUR – Aktivieren (drücken) Sie diesen Schalter, um niedrige und hohe
Frequenzen um +3 dB zu verstärken. Lösen Sie den Schalter für maximale Leistung oder ein
flacheres Ansprechverhalten bei Live-Auftritten..
16
INHOUD VAN DE DOOS
•
•
•
•
•
•
iPA Music System
Microfoon
Microfoon-kabel (XLR)
Stroomkabel
Snelstartgids
Veiligheidsvoorschriften & boekje met informatie over de garantie
SNELLE OPSTELLING
1.
2.
3.
Verbind met de meegeleverde stroomkabel de STROOMINGANG van het iPA
muzieksysteem met een stopcontact. (Zet het iPA muzieksysteem nog niet aan.)
Optioneel: verbind met een standaard XLR- of 1/4"-kabel de microfoon met de INGANG.
Gebruiker van iPad (3e generatie) en iPad 2: Zet uw iPad aan (niet meegeleverd). De
iPad in de plastic slede schuiven en voorzichtig aansluiten op de DOCK-connector.
iPad-gebruikers: De plastic slede van het iPA Music System heeft aan elke kant een
plastic rail voor de nieuwe iPad en iPad 2, die dunner zijn. Gebruik een schroevendraaier,
uw duimen, enz. om voor het gebruik deze rails te verwijderen (zie de afbeeldingen hier of
in de meegeleverde poster van de Snelstartgids). Zet uw iPad aan (niet meegeleverd). De
iPad in de slede schuiven en voorzichtig aansluiten op de DOCK-connector.
iPad 2 & iPad ( 3
rd
iPad
generation)
A
B
4.
5.
6.
7.
Zet beide volumeknoppen (INGANGSVOLUME en DOCKVOLUME) op de minimumstand.
Zet het iPA muzieksysteem AAN met de AAN/UIT-SCHAKELAAR.
Speel muziek af op de iPad. Verhoog het DOCKVOLUME tot een redelijk geluidsniveau.
Het LED-lampje SIGNAAL/PIEK licht rood op.
Optioneel: spreek in de microfoon (als er een op de INGANG is aangesloten). Verhoog
het INGANGSVOLUME tot een redelijk geluidsniveau.
Opmerking: Met een standaard XLR-kabel kunt u een bijkomende luidspreker (een andere iPA
Music System, niet meegeleverd) op de MIX OUT-uitgang aansluiten. Als u dit doet:
• Dus de volumes identiek, draai INGANGSVOLUME knop van de bijkomende
luidspreker naar de "9 uur" knoppositie.
• Kunt u instellen welk kanaal (links, rechts of één samengesteld monokanaal)
naar uw bijkomende luidspreker wordt gestuurd. Zie voor meer informatie de
beschrijving van UITGANGS-KANAAL onder OVERZICHT ACHTERPANEEL.
17
VERBINDINGSDIAGRAM
iPad*
Luidspreker*
Microfoon
Stroom
* niet inbegrepen
BELANGRIJK!
GEBRUIK VAN DE MICROFOON
Hierna volgen enkele opmerkingen over het gebruik van microfoons met het iPA Music System en in het algemeen:
• Het iPA Music System bevat een dynamische microfoon en een XLR-kabel. Dynamische microfoons vereisen
normaal gezien geen stroom, terwijl condensatormicrofoons "fantoomvoeding" vereisen, geleverd door het
apparaat waarmee hij verbonden is. Als u een andere microfoon wenst te gebruiken, dan raden wij aan een
dynamische microfoon te gebruiken, aangezien iPA Music System geen fantoomvoeding ondersteunt.
• De INGANG van iPA Music System is een gecombineerde ingang, die zowel XLR- als 1/4"-kabels accepteert.
• Vooraleer een microfoon op de INGANG aan te sluiten, moet u ervoor zorgen dat het INGANGVOLUME op
minimumniveau staat.
• Na de microfoon te hebben aangesloten, moet u het INGANGVOLUME geleidelijk verhogen tot een gepast
niveau. Een gewoonlijk veilig bereik is ergens tussen de knopposities voor "9 uur" en "3 uur".
• Er verschijnt feedback wanneer het geluid van de luidspreker terug de microfoon binnenkomt. Dat resulteert in een
luid gebrom of gehuil, dat groeit in volume en gevaarlijk luid kan worden. Om feedback te vermijden:
o Plaats de microfoon niet voor de luidspreker. Als u dat niet kunt vermijden, gebruik dan een langere
microfoonkabel, zodat de microfoon zover als mogelijk van de luidspreker geplaatst kan worden.
o Stel het INGANGVOLUME nooit extreem hoog in.
o Als u feedback begint te horen (zelfs al is het stille feedback), draai dan de knop INGANGVOLUME omlaag.
• Houd de microfoon ongeveer 3-9 cm van uw mond verwijderd tijdens het gebruik. De microfoon te ver af houden,
zorgt ervoor dat het INGANGVOLUME te hoog moet worden ingesteld, en de microfoon te dichtbij houden kan
tijdens het spreken leiden tot een te luid volume, feedback, klankvervorming, enz.
• Als verscheidene mensen de microfoon tijdens een 'sessie' zullen gebruiken, controleer dan de volumeniveaus en
pas de knop voor het INGANGVOLUME naar behoeven aan, omdat iedereen zijn eigen stemvolume heeft.
VOLUMES
Wanneer een geluidsbron (muziek, stem, enz.) luid genoeg is, zal de SIGNAAL-/PIEKLED van het iPA Music System
oplichten.
Een rood licht betekent dat het geluid luid genoeg is om de beveiligingskring van de luidspreker te activeren. Dit
voorkomt dat de luidspreker beschadigd raakt en niet 'uitgeblazen' wordt, wat met andere luidsprekers wel kan
gebeuren. Het is OK als het rode lichtje af en toe oplicht of met tussenpauzes begint te branden. Als u echter hoort
dat het geluid van de luidspreker vaag begint te worden, te luid, dat het vervormt, enz., verlaag dan de knoppen voor
het INGANGVOLUME en/of DOCKVOLUME.
Het is meestal een goed idee om dit lichtje in de gaten te houden als u verschillende soorten muziek afspeelt
(verschillende muziekstijlen worden op verschillende volumes geproduceert) of als verschillende mensen de
microfoon gebruiken (iedereen spreekt van nature uit met een ander volume).
18
KENMERKEN VAN HET ACHTERPANEEL
1.
STROOMINGANG:
sluit
de
meegeleverde stroomkabel aan op
deze ingang en sluit het andere
uiteinde van de kabel aan op een
stroombron. Zorg ervoor dat de
AAN/UIT-SCHAKELAAR van de
luidspreker op "uit" staat bij het
aansluiten en loskoppelen van de
10 12
kabel.
11
AAN/UIT-SCHAKELAAR: schakelt
de luidspreker aan/uit. Zorg ervoor
dat de VOLUME-knop op "nul" staat
voor het inschakelen.
STROOMLED:
gaat
branden
wanneer
de
luidspreker
is
ingeschakeld.
DOCK: sluit hierop uw iPad (niet
meegeleverd) aan.
DOCKVOLUME: draai aan deze knop om het volume van de iPad (niet meegeleverd) aan te
passen.
UITGANGS-KANAAL: met deze schakelaar bepaalt u welk kanaal de uitgang MIX OUT verlaat
(naar uw bijkomende luidspreker) en welk kanaal wordt afgespeeld in het iPA
MUZIEKSYSTEEM (uw "lokale" luidspreker):
4
2.
3.
4.
5.
6.
5
6
9
8 3 7
2
1
• LINKS: Het linkerkanaal wordt naar uw bijkomende luidspreker gestuurd. Het
rechterkanaal wordt afgespeeld op de lokale luidspreker.
• MONO: De linker- en rechterkanalen worden samengesteld en gestuurd naar zowel uw
bijkomende als lokale luidspreker.
7.
8.
9.
10.
11.
• RECHTS: Het rechterkanaal wordt naar uw bijkomende luidspreker gestuurd. Het
linkerkanaal wordt afgespeeld op de lokale luidspreker.
MIX OUT: gebruik een standaard XLR-kabel (niet meegeleverd) om deze aansluiting te
verbinden met de ingang van een andere luidspreker (bijv. een andere Alto Professionalluidspreker).
INGANG (XLR / 1/4"): gebruik een standaard 1/4" TRS- of XLR-kabel (niet meegeleverd) om
een andere geluidsbron op deze ingang aan te sluiten.
INGANG (RCA): gebruik een standaard stereo RCA-kabel (niet meegeleverd) om een andere
geluidsbron op deze ingang aan te sluiten.
INGANGEN-VOLUME: draai aan deze knop om het volume aan te passen van een geluidsbron
die op de ingangen is aangesloten.
Opmerking: Als u op beide ingangen apparaten hebt aangesloten, dan past deze knop het
volume aan voor beide apparaten. Om de geluidsbalans tussen de apparaten aan te passen,
raden wij aan om het volume aan te passen van het apparaat dat is aangesloten op de RCAingang.
SIGNAAL- / PIEKLED: dit licht gaat rood branden, afhankelijk van het signaalniveau dat naar de
luidspreker wordt verstuurd:
• Flikkerend rood: Het geluidssignaal is hoog en activeert de ingebouwde begrenzer van
de luidspreker.
12.
• Vast rood: Het audiosignaal dat naar de luidspreker wordt verstuurd wordt 'afgesneden' of
vervormd. Verminder het volume van uw geluidsbron.
LOUDNESS CONTOUR: deze schakelaar activeren (indrukken) om lage en hoge frequenties
met +3 dB te versterken. De schakelaar uitzetten voor een vlakkere respons tijdens live
uitvoeringen of voor een maximale output.
19
SPECIFICATIONS
Transducer Low:
10" woofer with 1.5" voice coil
Transducer High:
1" titanium diaphragm compression driver
Output Power:
200 W Continuous (135 W LF + 65 W HF)
400 W Peak (270 W LF + 130 W HF)
Frequency Range:
51 Hz – 20 kHz (@ -10 dB)
Frequency Response:
52 Hz – 20 kHz (+3 dB)
Max SPL @ 1m:
123 dB Continuous
126 dB Peak
Nominal Horn Coverage:
80/100° H x 60° V nominal (-6 dB)
Active Crossover:
2.5 kHz
Connectors:
1 Mic/Line XLR -1/4" combo inputs
1 stereo pair of RCA inputs
1 XLR mix output
External Controls:
Input volume, dock volume, power switch with LED indicator,
signal/peak LED indicator, contour switch, output mode switch
Input Control:
-∞ to +50 dB (Line/Mic)
-∞ to +10 dB (RCA)
-∞ to +10 dB (Dock)
Cabinet:
Trapezoidal with floor monitor capability; injection-molded polypropylene
enclosure with perforated steel grille
Mounting:
Integrated pole socket (36 mm diameter)
1 handle
Protections:
Over-excursion, thermal, driver, DSP-based
Power supply:
100 VAC, 110-120 VAC, 220-240 VAC; 50/60 Hz
Inrush current at initial switch-on: 0 A
Inrush current after power supply interruption: 2.20 A
Dimensions (H x W x D):
20.2" x 13" x 11.4" (513 mm x 330 mm x 290 mm)
Weight (speaker only):
26.6 lbs (12.1 kg)
THIS DEVICE COMPLIES WITH PART 15 OF THE FCC RULES. OPERATION IS SUBJECT TO THE
FOLLOWING TWO CONDITIONS: (1) THIS DEVICE MAY NOT CAUSE HARMFUL INTERFERENCE, AND (2)
THIS DEVICE MUST ACCEPT ANY INTERFERENCE RECEIVED, INCLUDING INTERFERENCE THAT MAY
CAUSE UNDESIRED OPERATION.
www.altoprofessional.com
MANUAL VERSION 1.3