1
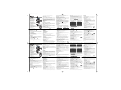
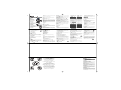
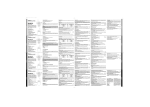
Pagina 1 The Wo r l d in Communication 2 Canale Frequenza › Temperatura di funzionamento da –20° a +55° Ora il ricetrasmettitore è pronto per trasmettere/ricevere. › Peso 78 gr Chiamare (trasmettere) › Dimensioni 54x87x34 mm Tenere premuto il tasto PTT [11]. Parlare ad una distanza di circa 4/10 cm, con un tono di voce nor- › Presa accessori MIC CHG [13]: 2 pin per accessori audio/caricatore da muro e sensore allarme (opzionale) male. Il display [3] visualizza 1 2 3 4 . Rilasciate il tasto PTT [11] al termine della conversazione. Il Vs. Alan 443 invierà al vs. interlocutore una Le funzioni e le specifiche sono soggette a modifiche senza preavviso. 1 RICETRASMETTITORE PMR446 8 CANALI Vano batteria 4 Spingere la linguetta verso il basso, rimuovere il coperchio sollevandolo tramite l’apposito incavo. Inserire 11 12 ALAN 443 é un ricetrasmettitore di nuova generazione del tipo PMR 446 che si può 5 SPK 10 88 88 utilizzare senza licenza, in tutti i paesi Scan Vox ITALIANO Power Saver europei indicati nella tabella “Restrizioni all’uso” in cui sono frequenze autorizzate paneuropee le pmr446: 3 batterie AAA alcaline oppure ricaricabili. Dw Beep MIC CHG 3 **Copertura Prestazioni ottimali si otterranno in campo aperto. Fattori ambientali quali alture, edifici, alberi, fogliame ® 6 9 F potrà ridurre. 7 8 CALL CALL 446.00625 ÷ 446.09375. possono diminuire la copertura. All’interno di un’automobile o di una costruzione metallica, la portata si 13 CH ENTER VOX Dotazione › 2 ricetrasmettitori ALAN 443 Caratteristiche principali: › 1 foglio istruzioni AA” AA” AA” › Freq. 446.00625 ÷ 446.09375 MHz . posizionata nelle vicinanze del neonato da sorvegliare; quella invece utilizzata per ascoltare il bambino andrà impostata sui canali E- (da E1 ad E0), che non dispongono di funzione VOX. Affinché la funzione baby-sitter sia correttamente attivata, i due ricetrasmettitori devono operare sulla Per ottenere il miglior funzionamento della funzione VOX, è importante determinare il livello di Nell’Alan 443 il filtro per la riduzione del rumore di fondo (squelch) è sempre attivo. Per escluderlo, man- stessa frequenza (stesso canale e stesso tono CTCSS, vedi tabella sotto) es: se la radio posta vicino sensibilità ottimale per attivare tale dispositivo. tenere premuto il tasto MON [10]. al neonato è impostata sul canale b1, quella che servirà ai genitori per ascoltare dovrà essere imposta- 1. Spegnere l’apparato. In questo modo, é possibile ricevere anche segnali di bassa intensità. ta sul canale E1. 2. Accendere l’apparato tenendo premuto il tasto CALL [9], Auto power save La sensibilità del VOX nei canali b- é fissata al livello 1, mentre il ritardo del VOX al livello 3 (d3). Il dispositivo automatico di risparmio batterie consente di ridurre i consumi delle batterie fino al Canale Frequenza 50%; se la radio non riceve alcun segnale per più di 7 secondi la funzione viene attivata automaticab1 b2 b3 b4 b5 b6 b7 b8 b9 b0 mente e sul display [3] lampeggia “Power saver”. viene visualizzata sul display [3]: occorre sostituir- Canale Frequenza Tono Vox Livello CTCSS Vox 446.00625 MHz 446.01875 MHz 446.03125 MHz 446.04375 MHz 446.05625 MHz 446.06875 MHz 446.08125 MHz 446.09375 MHz 446.00625 MHz 446.01875 MHz 141.3 Hz 146.2 Hz 151.4 Hz 156.7 Hz 162.2 Hz 167.9 Hz 173.8 Hz 179.9 Hz 186.2 Hz 192.8 Hz ON ON ON ON ON ON ON ON ON ON L1 L1 L1 L1 L1 L1 L1 L1 L1 L1 E1 E2 E3 E4 E5 E6 E7 E8 E9 E0 › Copertura fino a 4-5 km ** tonalità diverse (escludibili); il display [3] opera un auto test per un secondo e visualizza il canale stan- FUNZIONI ALAN 443 1) Accendere gli apparati e selezionare il volume ottimale. › Vox incorporato regolabile su 3 livelli dard numero 1. TASTI / [6] 2) Impostazione della radio da posizionare vicino al neonato › Batterie tipo AAA ricaricabili o alcaline Regolazione volume 1. Selezione canali › Display LCD retroilluminato alfanumerico Per regolare il volume al livello ottimale, tenere premuto il tasto MON [10] e ruotare la manopola ONOFF/VOLUME [1] in senso orario finchè non si ottiene il livello desiderato. Rilasciare il tasto MON [10]. TASTO FUNZIONE F [8] 2 mento del corretto tono CTCSS. 3. Premere il tasto 3. Premere 2 volte il tasto “F” finchè il display mostra il canale selezionato con l’attuale tono CTCSS › d1: ritardo minore (0,5 sec) › Abilitazione/disabilitazione Roger Beep › d2: ritardo medio (1 sec) › Abilitazione/disabilitazione beep tastiera 4. Selezionare il tono CTCSS premendo i tasti / [6. › d3: ritardo maggiore (1,5 sec) › Funzione out-of-range 5. Per confermare l’impostazione, premere › Trasmissione del segnale d’allarme Ora la radio trasmette e riceve utilizzando il tono CTCSS preimpostato. Se non si vuole operare con › Reset alcun tono CTCSS, selezionare “00”. lampeggiante. play per confermare l’avvenuta attivazione. Parlare vicino al microfono [5]: la trasmissione SCAN esegue la scansione (ASCOLTO) di tutti i canali occupati. Si utilizza per controllare le conver- Per abilitare tale funzione : inizia automaticamente. sazioni sugli 8 canali, prima di trasmettere. In presenza di un segnale su un canale (quindi di una con- 1. Accendere l’ALAN 443. Disattivazione funzione VOX: premere nuovamente il tasto VOX [8] per più di 2 secondi: si versazione), la scansione si interromperà. La scansione riprenderà dopo 5 secondi dal cessare del seg- 2. Selezionare il primo canale che si desidera monitorare tramite i tasti / [6]. sentono 2 beep e la scritta “Vox” scompare dal display. nale. 3. Premere ripetutamente il tasto “F” [8] fino a che sul display [3] lampeggia la scritta DW. Attivazione funzione SCAN 4. Selezionare il secondo canale che si desidera ascoltare con i tasti / [6]. 1. Premere il tasto “F” [8] : sul display [3] lampeggia Scan. L'apparato monitora ora ciclicamente solo i due canali impostati fino a che non riceve un segnale. Il 2. Premere i tasti o [6] per attivare la scansione dei canali. monitoraggio riprenderà una volta scomparso il segnale. Per interrompere la funzione Dual Watch, Disattivazione funzione SCAN premere a scelta appare che indica la sua attivazione. I tasti PTT [11], MON [10], CALL [9] e l’illuminazione display ( ) rimangono attivi. Per la disattivazione, premere nuovamente il tasto più di 2 secondi. Si sentiranno 2 beep ed il simbolo [7] per scompare dal display. Alla pressione del tasto The Wo r l d in Communication 2 1 8 CHANNELS TRANSCEIVER PMR446 4 11 ed è indicata sul display con l’icona 88 88 446 transceiver which may be used, Scan Vox Power Saver without license, in all the countries in which Pan-European PMR446 frequencies are authorised Dw Beep MIC CHG 3 13 CH 6 9 7 8 CALL CALL (446.00625 - 446.09375 MHz). F ENTER VOX inizierà a lampeggiare sul display e la radio emetterà un beep. lampeggiante appaiono sul display. 7) Confermare premendo : se la funzione è attivata, il simbolo Questa funzione, dopo essere stata impostata, impiega un minuti per attivarsi. Non appena il sensore capta un rumore causato dal danneggiamento di un vetro e da altre vibrazioni, invia gato il sensore emetterà un tono di allarme. 2. Selezionare un canale premendo / [6]. 3. Premere il tasto “F” [8] 6 volte finchè sul display compare “OFF” Nota: e lampeggia l’icona Per questa funzione, sono necessari due PMR che devono essere sintonizzati sullo stesso canale 4. Selezionare “ON” o “OFF” tramite i tasti / [6]. e tono CTCSS. Il sensore d’allarme va collegato su un solo apparecchio e la relativa funzione va . attivata solo su quest’ultimo. Attivazione dispositivo Out-of-range Reset 1. Abilitare la funzione Out-of-range seguendo la procedura descritta sopra. Nel caso in cui la radio presenti un funzionamento anomalo o si vogliano cancellare le 2. Spegnere i due ricetrasmettitori impostazioni programmate, è sufficiente accenderla tenendo premuto per 2 secondi il tasto “F” [8]. Con questo procedimento, vengono ripristinate le impostazioni di fabbrica. 1. Premere ripetutamente il tasto “F” [8] finché sul display compare = LAMPEGGIANTE . 2. Con i tasti o” [6] selezionare “oFF”. Basic functions KEY FUNCTIONS ple b1). The Display shows Vox and indicates that the function has been activated. The To turn radio on/off /-Buttons PMR switches into transmission mode as soon as a signal/voice is heard from the baby › Alphanumeric backlit LCD Display Rotate the OFF/VOLUME [1] knob clockwise to turn the unit on. The radio beeps with different tones 1. Channel selection › Battery life up to 35 hours (alkaline type) (may be inhibited). The LCD [3] displays a self-test message for 1 second, it will then indicate chan- Select the desired channel and relevant frequency by the / [6] button. To change channel › Operating temperature: –20° to +55° nel 1. rapidly, press and hold the / [6] button until the desired channel appears on the display. › Weight 78 gr Volume adjustment › Size 54x87x34 mm To adjust the volume level, hold MON [10] button down while rotating the OFF/VOLUME [1] knob until › Jack MIC CHG [13]: 2 pins for audio accessories, wall charger and alarm sensor (not included) you reach a comfortable listening level. Rotate it clockwise to increase and anti-clockwise to decrease [4]. 3) Set up control station Select with the / [6] buttons the fitting pre-programmed channel (in that case E1). The VOX function is automatically disabled. Channel Frequency 1 2 3 4 Transmission 446.00625 MHz 446.01875 MHz 446.03125 MHz 446.04375 MHz CTCSS tone NONE NONE NONE NONE Vox Vox level OFF OFF OFF OFF Channel Frequency 5 6 7 8 446.05625 MHz 446.06875 MHz 446.08125 MHz 446.09375 MHz CTCSS tone NONE NONE NONE NONE Vox Vox level OFF OFF OFF OFF For maximum speech clarity, hold the radio 4 to 10 cm away from your mouth, keep the PTT button CALL-BUTTON [9] 1. Sending audio signal By pressing the CALL [9] button your ALAN 443 is sending an audio signal to other users on the same frequency. Battery compartment [11] pressed and speak into the unit [5]. During transmission the display shows To open the battery compartment, hold the unit face down and unhook the battery holder in the lower When the PTT [11] is released, the radio beeps to confirm to other users that your transmission has The PMR has additional pre-programmed baby (b-) and parent (E-) channels fitting together. For the part of the radio; gently slide the cover towards the bottom of the radio. finished (see paragraph “Roger Beep”). baby monitoring channels the VOX sensitivity is fixed at level 1 and VOX delay time is fixed at 3 sec- To get the most use from the VOX feature you must first determine what sensitivity (noise The ALAN 443 accepts 3 x AAA alkaline or rechargeable batteries. Reception onds. level) is needed to activate the VOX circuit. Simply release the PTT [11] button . When you receive a signal, . is displayed. 2. To select babymonitor channels and parent channels 2. VOX sensitivity setting 1) Turn the transceiver off. Channel Frequency CTCSS tone Vox Vox level Channel Frequency CTCSS tone Vox Vox level 2) Hold the CALL [9] button down while turning the radio on. In your ALAN 443 the background noise reduction device (squelch) is activated by default. Hold MON b1 446.00625 MHz 141.3 Hz ON L1 E1 446.00625 MHz 141.3 Hz OFF country specific limitations. possible range are environmental factors such as blockage caused by trees, buildings, or other [10] button down to deactivate it. In this way, even low level signals can be received. b2 446.01875 MHz 146.2 Hz ON L1 E2 446.01875 MHz 146.2 Hz OFF obstructions. Inside a car or a metallic constructions, the range can be reduced. Automatic power save b3 446.03125 MHz 151.4 Hz ON L1 E3 446.03125 MHz 151.4 Hz OFF ALAN 443 is supplied with an automatic current economy circuit. If the transceiver receives no sig- b4 446.04375 MHz 156.7 Hz ON L1 E4 446.04375 MHz 156.7 Hz OFF b5 446.05625 MHz 162.2 Hz ON L1 E5 446.05625 MHz 162.2 Hz OFF › L1: high sensitivity (normal voice with no background noise) b6 446.06875 MHz 167.9 Hz ON L1 E6 446.06875 MHz 167.9 Hz OFF › L2: medium sensitivity (for slightly noisier areas) b7 446.08125 MHz 173.8 Hz ON L1 E7 446.08125 MHz 173.8 Hz OFF › L3: low sensitivity (useful in very noisy areas or if you talk loudly) b8 446.09375 MHz 179.9 Hz ON L1 E8 446.09375 MHz 179.9 Hz OFF 4) Press AA” The maximum range is obtained during use in an open space. The only limitation to maximum AA” ** Coverage use” charts for information regarding AA” Please consult the “Restrictions on the Background noise reduction (Squelch). Main features: › Freq. 446.00625 ÷ 446.09375 MHz Content nal for 7 seconds or longer the “power save function” automatically activates. (“power saver”) blinks › Channel spacing: 12.5 KHz › 2 ALAN 443 transceivers on the display. The battery life may increase by up to 50 %. › 8 channels › 1 user instruction When the batteries are in need of charging, › 20 additional pre-programmed baby (b-) and › carrying strap replace the alkaline batteries or recharge the Ni-Cd/NiMH ones. b9 446.00625 MHz 186.2 Hz ON L1 E9 446.00625 MHz 186.2 Hz OFF › belt clip Jack MIC/CHG [13] b0 446.01875 MHz 192.8 Hz ON L1 E0 446.01875 MHz 192.8 Hz OFF parents (E-) channels fitting together icon will be displayed [3]: it is necessary to › 38 CTCSS-Sub-Tones External charger jack. We recommend use of the appropriate charger only. › Power 500 mW ERP Attention: alkaline batteries cannot be recharged. › Coverage up to 4÷5 km ** Press once the 2. CTCSS-sub-tone setting button [7] to activate display illumination for approx. 10 seconds. sitivity is now adjusted. VOX can be adjusted in 3 positions: [7] to confirm. 3. VOX delay time setting This function keeps the radio in transmit mode after you stop talking. This delay can be adjusted (if it is set too short it may cause transmission to stop between some words) and 4. To enable/disable ROGER BEEP: end transmission tone allows you to speak at a steady rate with no loss of transmission. To activate Out-range-control When PTT [11] is released the radio will beep to confirm to other users that your transmission has 1. Enable Out-Range-control as mentioned above. open traffic: finished. This feature is enabled by default. 2. Turn both radios off. Function mode (F-button) [8] in this case you will hear any communication transmitted on the selected channel. To disable it, follow these steps: 3. Turn on one unit after another (not at the same time) within 5 seconds. Following functions can be selected by pressing the F-Button: group mode CTCSS: 1. Press repeatedly the «F» [8] key until the LCD shows: › d1: short delay (0.5 sec.) 1. SCAN-Mode CTCSS tones are access keys that allows you to receive only messages coming from parties using 2. Select “oFF” by using the / buttons [6]. › d2: medium delay (1 sec.) 2. CTCSS-Sub-Tone setting the same channel and code. Speaker will remain muted until the correct CTCSS tone is received. 3. Press › d3: long delay (1,5 sec.) 3. To activate Dual Watch To activate 38 different CTCSS tones in RX and TX follow these steps: 4. 4. To enable/disable Roger Beep 1. Turn on the radio. The display [3] shows: L 3) Press once the “F” [8] button. The display [3] shows now: 4) Use again the / [6] keys to select the desired delay: 5) Press the 2 [7] or turn the unit off to store your setting. 5. To enable/disable keypad beeps 2. Select with the / [6] buttons one of the 8 channels. 6. Out of range control 3. Press twice the “F” button until the display [3] shows the selected channel with the flashing 1. To enable/disable hands-free transmission mode 7. Alarm transmission CTCSS code segment. ALAN 443 has built-in VOX capability (automatic transmission). 8. Reset 4. Select with the / [6] buttons the desired CTCSS-Code. Hold the VOX [8] button down for longer than 2 sec. You will listen a double beep and “Vox” Notice: In the function mode, press MON [10] button to backlight the display. 5. Press transmission will start automatically. The SCAN mode monitors the busy channels. 2 sec. It is used to check the traffic radio on the 8 channels before transmitting and allows the unit to stop 2. To enable/disable function mode Please follow instructions in paragraph “Function mode”. Enter-Button Press and hold the the display will show button [7] for longer than 2 seconds: You will hear a double beep and to confirm activation. The buttons PTT [11], MON [10], CALL [9] and the display backlighting This feature allows you to scan 2 channels of your choice. It is useful when you want to keep track resume after about 5 seconds. of two other people. a) To enable SCAN: To enable it: 1. Press F [8] key. Scan blinks on the display. 1. Turn the radio on. 2. Hold or [6] buttons down to activate scan. 2. Select by / [6] keys the first channel you want to monitor. 3. Press repeatedly F [8] button until ”Dw” blinks on the display. disappear from the display. Press PTT [11], [7] or CALL [9] button. 4. Select the second channel to be scanned by / [6] buttons. Now the radio begins scanning between these 2 channels until activity is heard on either channel. The scanning restarts when the carrier disappears. will still be active. Repeat the same procedure to unlock the keypad. You will hear a double beep and 3. To activate Dual Watch (DW) on a channel that someone is talking on. When the radio stops on a busy channel, the scan will b) To disable SCAN: 1. Keypad lock will To stop Dual Watch, press PTT [11], or 7. To enable/disable “Alarm transmission”-Mode 1) To fix the optional alarm sensor, follow the instruction described in its user manual (alarm sensor model AS443). 5. To enable/disable the keypad beeps 1. Press repeatedly the « F» [8] key until the LCD shows “oN” and “Beep” blinks. 3) Select by pressing the /[6] buttons a channel with high CTCSS-Sub-Tone (for example channel 5, CTCSS-Sub-Tone 32). 2. Select “oFF” by means of / [6] keys. 4) Select the desired VOX sensitivity level (factory setting is at level 2). 3. Push 5) Press the “F” button seven times until “OFF” with [7] to store the setting; “Beep” disappears. the flashing tones, select “00”. To disable the VOX mode, press the VOX [8] button on the front of the radio for longer than icon disappears from the display [3]. [7] to confirm the setting. Now the radio transmits and receives using the programmed CTCSS tone. If you don’t want CTCSS 1. SCAN-mode [7] for confirmation. 2) Connect the alarm sensor to the MIC CHG [13] jack of your radio. VOX-button will appear on the display to confirm the function is enabled. Speak into the microphone [5]: 2 3) Select the desired VOX level (L1, L2 , L3) by means of the / [6] buttons. The VOX sen- ALAN 443 can receive in two modalities: 2 L 2) Set up baby monitoring station Select with the / [6] buttons one of the pre-programmed baby monitoring channels (for exam- 2. Display illumination 2) Hold the CALL [9] button down while turning the radio on. The display [3] shows: 1) Turn both units on and select the desired volume level. 14 1) Turn the transceiver off. viene visualizzato sul display. un segnale di allarme all’altro ricetrasmettitore; dopo pochi secondi la radio alla quale è colle- 1. Accendere l’apparato. the volume. Release the MON [10] button. Now your Alan 443 is ready to receive and transmit. ® l’icona 6) Premere / [6] per selezionare “ON” o “OFF”. 3. Accenderli di nuovo uno dopo l’altro e non contemporaneamente entro 5 secondi. Disattivazione: livello 2). 5) Premere il tasto “F” sette volte finchè “OFF” e › Batteries: AAA type, rechargeable or alkaline SPK 10 . una frequenza di tono sub-audio alta (per esempio canale 5, tono CTCSS 32). › VOX sensitivity and delay time adjustable in 3 levels Specifications are subject to change without notice. 5 The ALAN 443 is a new generation PMR [3] se la funzione è stata disattivata. 6. Ripetere la stessa procedura con l’altro apparato. a) "traffico aperto" 12 Congratulations on your purchase! [7] per confermare la programmazione; la scritta Beep scompare dal display 5. Confermare premendo ca al vostro interlocutore che può iniziare a parlare. Nell’ALAN 443 questa funzione è attivata di default con quegli utenti che hanno il Vs. stesso canale e codice. La radio rimarrà silenziata fino al ricevi- ® [7] o CALL [9] o PTT [11] . Al rilascio del tasto PTT [11], quindi alla fine di ogni trasmissione, viene emessa una tonalità che indi- I toni CTCSS funzionano come una sorta di codice di accesso e vi consentono di comunicare solo [7], il display si illumina per circa 10 secondi. 3. Premere il tasto 3) Premendo i tasti / [6] selezionare un canale e successivamente un tono CTCSS con 4) Selezionare il livello desiderato di sensibilità del VOX (l’impostazione della fabbrica è il Abilitazione/disabilitazione funzione Out-of-range ALAN 443 può ricevere in due modalità: b) "modalità di gruppo CTCSS" 2. Illuminazione Display 1. Premere ripetutamente il tasto “F” [8] finché sul display compare “oN” con la scritta Beep lam- trollo per 2 volte consecutive, l’icona 4. ROGER BEEP: Tonalità di conferma fine conversazione in questo caso sentirete tutte le conversazioni trasmesse sul canale selezionato. 5. Attivazione/Disattivazione Beep tastiera di. Non appena questa trasmissione si interrompe ed uno dei due apparati non riceve il codice di con- [7] o CALL [9] o PTT [11] . 2. Impostazione toni CTCSS sore (sensore d’allarme mod. AS443). 2) Collegare il sensore d’allarme al jack MIC CHG [13] dell’apparato. Grazie a questa funzione, una coppia di ALAN 443 si trasmette un codice di controllo ogni 30 secon- Consente di monitorare (ascoltare) le conversazioni su 2 canali a scelta. [7] per più di 2 secondi: si sentiranno 2 beep e sul display 1) Per fissare il sensore d’allarme opzionale, seguire le istruzioni riportate nel manuale del sen- scompare dal display [3]. 6. Funzione Out-of-range (fuori portata) 1. Funzione SCAN Mantenere premuto il tasto 7. Abilitare/disabilitare funzione “Avviso di allarme” 2. Premere i tasti o [6] e selezionare “oFF”. [7] . Premere il tasto VOX [8] per più di 2 secondi: si sentiranno 2 beep e “Vox” compare sul dis- Premere: [7] per confermare la scelta. Il ritardo è una funzione del VOX che mantiene la radio in trasmissione quando avete finito di peggiante. 3. DW (Dual Watch) 1. Blocco tastiera volume di voce) 4. Premere 3. Impostazione ritardo VOX [7] per confermare la programmazione. 4. Il Roger Beep adesso è disattivato e l’icona Nota: nella modalità Funzione, l’illuminazione del display avviene premendo il tasto MON [10]. [7] › L3: bassa sensibilità (per luoghi in cui il rumore di fondo è alto o se parlate con un alto 1. Spegnere l’apparato. › Attivazione Dual Watch TASTO volume di voce) › L2: media sensibilità rale, con le pause a cui siete abituati, senza che la trasmissione si interrompa. Utilizzare nuovamente i tasti / [6] per selezionare il ritardo: Fare riferimento al capitolo “Tasto Funzione “F”. › L1: alta sensibilità (per ambienti non molto rumorosi o se parlate con un basso suono/rumore/voce generato in prossimità dell’apparato, il PMR commuta in transmissione. 2. Sezionare il canale desiderato (1 degli 8 canali) tramite i tasti / [6]. 2. Attivazione/disattivazione modo funzione Tale funzione può essere regolata su 3 livelli di sensibilità: mente il canale, tenere premuto i tasti / [6] fino a quando viene selezionato il canale desiderato. › Impostazione toni CTCSS 1. Attivazione/disattivazione del modo VOX (impostazione della fabbrica); 3. Utilizzare ora i tasti e [6] per selezionare il livello di sensibilità VOX desiderato: parlare. Questo ritardo nell’ALAN 443 è regolabile e vi consente di parlare in maniera natu- 1. Accendere l’apparato. TASTO VOX [8] OFF OFF OFF OFF OFF OFF OFF OFF OFF OFF il display [3] visualizza il livello di sensibilità corrente mostra Vox che conferma l’attivazione della funzione baby-sitter. Alla percezione di un qualsiasi › Funzione SCAN [7] per confermare la scelta. 141.3 Hz 146.2 Hz 151.4 Hz 156.7 Hz 162.2 Hz 167.9 Hz 173.8 Hz 179.9 Hz 186.2 Hz 192.8 Hz 2 Selezionare il canale desiderato e la rispettiva frequenza con i tasti /[6]. Per cambiare rapida- Procedimento per l’attivazione dei 38 toni CTCSS in RX e TX: Premere il tasto 446.00625 MHz 446.01875 MHz 446.03125 MHz 446.04375 MHz 446.05625 MHz 446.06875 MHz 446.08125 MHz 446.09375 MHz 446.00625 MHz 446.01875 MHz Tono Vox Livello CTCSS Vox L Selezionare un canale pre-programmato b- (per esempio b1) tramite i tasti / [6]. Il display Le seguenti funzioni si selezionano premendo il tasto F: 2 2. Impostazione sensibilità VOX Eliminazione Rumori di fondo/estensione copertura (Squelch). Ruotare la manopola ON-OFF/VOLUME [1] in senso orario. ALAN 443 emette una serie di beep con 3. Premere una volta il tasto “F” [8]; sul display appare la scritta: ITALIANO . La ricezione di un segnale verrà invece indicata con l’icona › Potenza 500 mW ERP (impostazione della fabbrica); ENGLISH Al rilascio del tasto PTT [11] la vostra radio rimane in modalità di ascolto, indicata sul display dall’icona Attenzione: le batterie alcaline non possono essere ricaricate. L TASTO CALL [9] Premendo il tasto CALL [9], l’ALAN 443 invia un segnale sonoro di avviso/chiamata ad altri Accensione il display [3] visualizza il livello di sensibilità corrente La funzione VOX nei canali E- è disabilitata di default. utenti sintonizzati sullo stesso canale. › 38 toni CTCSS 2. Accendere l’apparato tenendo premuto il tasto CALL [9], Selezionare un canale pre-programmato E- (in questo caso E1) tramite i tasti / [6]. I canali da b1 a b0 hanno la funzione VOX attivata: la radio impostata su questi canali va quindi tore. 14 3) Impostazione della radio in ricezione Ascolto (Ricezione) Presa caricatore esterno. Si raccomanda di caricare le batterie esclusivamente con l’apposito carica- › Autonomia tipica fino a 35 ore con le batterie alcaline 446.05625 MHz 446.06875 MHz 446.08125 MHz 446.09375 MHz Vox Livello Vox OFF OFF OFF OFF 1. Invio segnale audio ED ORA, PRONTI A COMUNICARE! per funzione Babysitter (b-) e monitoraggio (E-) ENGLISH 5 6 7 8 Tono CTCSS - Il PMR ha una serie di canali pre-programmati (b- ed E-) che si utilizzano nella funzione baby-sitter. Presa MIC/CHG [13] › 20 sub-canali pre-programmati Canale Frequenza (Per abilitare la funzione vedi paragrafo “Roger beep”). le al più presto (se a secco) o provvedere alla ricarica per quelle al Ni-Cd e Ni-MH. › gancio per cintura › 8 canali 446.00625 MHz 446.01875 MHz 446.03125 MHz 446.04375 MHz Vox Livello Vox OFF OFF OFF OFF 2. Attivazione dei canali Quando le batterie sono scariche, l’icona › cinghia da polso › Passo di canalizzazione: 12.5 KHz nota di fine trasmissione (Roger Beep). Tono CTCSS - ITALIANO ® ITALIANO 9:42 ENGLISH 17-07-2003 [7] or CALL [9] keys. 6. Out-of-range control icon appears on the display. 6) Press / [6] buttons to select “ON” or “OFF”. The ALAN 443 contents an “out of range” control function. By setting this mode a pair of ALAN 443 7) Press is transmitting every 30 seconds a data control code. As soon as the contact between both units is One minute after the alarm transmission has been set, the alarm transmission will be acti- getting lost and one station doesn’t receive this data control code twice consecutively, the icon vated. As soon as the alarm sensor notes a high noise, caused by damaging the window or starts flashing in the display and you will hear a beep tone. other vibrations, it sends an alarm signal to the control station. If alarm signal is send, the unit To enable/disable Out-range-control initiate after a few seconds an continuous acoustic alarm tone. After receiving the alarm sig- 1. Turn the radio on. nal the control station (second device) starts alarm and the display shows 2. Select by using the / [6] buttons a channel. Notice: For this function you need first of all two PMRs; the most important fact hereby is 3. Press the “F” [8] button six times until the display shows: that both devices are indicated with the same channel- and CTCSS- setting. Only one unit “OFF” and flashing icon. [7] button to confirm your selection. icon. can be connected to alarm sensor and set with alarm transmission mode. 4. Press the / [6] buttons to select “ON” or “OFF”. 5. Press button to confirm your selection. 8. Reset 6. Repeat this operation with second device. In case your ALAN 443 does not work properly or you want to cancel all the user settings, it Notice: It is recommendable to select the babychannels in quiet environments. For all baby moni- is necessary to hold F [8] button down for 2 seconds while switching the unit on. toring channels VOX is automaticallyactivated, that means the unit will transmit as soon as it notes a With this procedure all the settings made by the constructor are restored. noise (during the setting too). Therefore it may be that channels cannot be changed until the signal (noise) is getting lost. ENGLISH ISTR443_5LINGUE Pagina 2 The Wo r l d in Les fonctions et les spécifications peuvent être modifiées sans préavis. Communication 2 Compartiment des batteries Déplacez le couvercle du compartiment et levez-le avec l’entaille fait exprès en décrochant la languette X vers le bas. Insérez 3 batteries alcalines type AAA ou 3 batteries rechargeables. 1 FRANÇAIS ÉMETTEUR RÉCEPTEUR PMR446 8 CANAUX 4 11 ALAN 443 est un émetteur-récepteur de nouvelle génération du type PMR 446. Il peut être utilisé sans licence dans tous les pays européens, indiqués sur le tableau “Restrictions á l’usage”, autorisant les fréquences paneuropéens pmr446: 446.00625÷ 446.09375. 12 5 SPK 10 88 88 Scan Vox Dw Beep Power Saver MIC CHG 3 ® 13 CH 6 9 7 8 CALL F CALL ENTER VOX Les canaux de b1 à b0 ont la fonction VOX activée: donc la radio réglée sur ces canaux doit être Appuyant sur la touche CALL [9], ALAN 443 envoi un signal sonore d’avis/appel aux autres Écoute (Réception) placée à coté du nouveau-né qu’il faut surveiller; la radio utilisée pour écouter l’enfant devra être usagers syntonisés sur le même canal Quand le PTT est relâché [11] votre radio est en mode d’écoute, indiqué sur l’afficheur par l’icône réception d’un signal, au contraire, est indiquée sur l’afficheur par l’icône . La Pour obtenir le fonctionnement au mieux de la fonction VOX, il est important déterminer le Dans l’ALAN 443 le filtre pour la réduction des bruits de fond (squelch) est toujours actif. Pour le désactiv- si la radio placée à côté du nouveau-né est réglée sur le canal b1, l’autre radio pour les parents qui niveau optimal de sensibilité pour activer ce dispositif. er, maintenez la touche MON [10] enfoncée. doivent écouter devra être réglée sur le canal E1. 1. Éteindez l’appareil. De cette façon, il est possible de recevoir aussi des signaux de basse intensité. La sensibilité du VOX dans les canaux b- est fixée au niveau 1, alors que le retard du VOX au niveau 3 2. Allumez l’appareil maintenant appuyé sur la touche CALL [9], Auto power save (Économiseur de batterie) (d3). Emballage › 2 émetteurs-récepteurs ALAN 443 › 1 feuille d’instructions › courroire à poignet › agrafe ceinture Le dispositif automatique économiseur de batteries permet de réduire la consommation des batteries Quand les batteries sont déchargées, l’icône est visualisée sur l’afficheur [3]: il faut remplacer les batteries le plus tôt possible (si elles sont sèches) ou recharger celles au Ni-Cd et au Ni-MH. ET MAINTENANT, PRÊTS À COMMUNIQUER! Prise pour chargeur externe. Nous vous conseillons de charger les batteries exclusivement avec le Allumage chargeur approprié. Attention: les batteries alcalines ne peuvent pas être rechargées. Canal . 1 2 3 4 Fréquence 446.00625 MHz 446.01875 MHz 446.03125 MHz 446.04375 MHz Ton Vox Niveau CTCSS Vox OFF OFF OFF OFF Canal 5 6 7 8 Fréquence 446.05625 MHz 446.06875 MHz 446.08125 MHz 446.09375 MHz Ton Vox Niveau CTCSS Vox OFF OFF OFF OFF jusqu’à la réception du correct ton CTCSS. › Fonction out-of-range 5. Pour confirmer le réglage, appuyez sur Désactivation fonction VOX › Transmission du signal d’alarme Maintenant la radio émet et reçoit avec l’usage du ton CTCSS pré-réglé. Si vous voulez opérer sans Appuyez de nouveau sur la touche VOX [8] pour plus de 2 secondes: vous entendrez 2 bips › Reset tons CTCSS, sélectionnez “00”. et sur l’afficheur disparaîtra l’inscription Vox Note: En modalité Fonction, si vous appuyez sur la touche MON [10], l’afficheur s’éclaire. SCAN permet le balayage (ÉCOUTE) de tous les canaux occupés. Pour activer cette fonction: SCAN est utilisé pour vérifier la conversation sur les 8 canaux avant d’émettre. En présence d’un sig- 1. Allumez ALAN 443. nal trouvé sur un canal (donc d’une conversation), le balayage s’arrête et reprend après 5 secondes 2. Sélectionnez le premier canal que vous voulez écouter avec les touches / [6] . de la fin du signal. 3. Appuyez plusieurs fois sur la touche “F” [8] jusqu'à ce que sur l’afficheur [3] clignote l’inscription 1. Appuyez sur la touche “F” [8]: sur l’afficheur [3] clignote Scan. 4. Sélectionnez le second canal que vous voulez écouter à l'aide des touches et [6] . 2. Appuyez sur les touches ou [6] pour activer le balayage des canaux. Maintenant l'appareil surveille cycliquement seulement les deux canaux réglés lorsqu’une porteuse Désactivation fonction SCAN reçoit un signal. La surveillance reprendra à la disparition du signal. Pour arrêter la fonction Dual Appuyez sur: Watch, appuyez sur [7] ou CALL [9] ou PTT [11] à votre choix. ALAN 443 peut recevoir en deux modalités: À la relâche de la touche PTT [11], donc à la fin de chaque transmission, on entend une tonalité qui a) "trafic ouvert" indique à votre interlocuteur que maintenant il peut parler. Dans l’ALAN 443 cette fonction est activée DEUTSCH 11 1. Appuyez plusieurs fois sur la touche “F” [8] jusqu’à ce que l’afficheur visualise 2. Sélectionnez “oFF” avec les touches ou [6]. 12 SPK 10 88 88 Scan Vox Power Saver Dw Beep MIC CHG 3 ® 13 CH 6 9 7 8 CALL CALL F ENTER VOX Reichweite** Optimale Funkreichweiten können im offenen Gelände erreicht werden. Befinden Sie sich in einem Gebäude/Umfeld mit vielen Stahlkonstruktionen oder in einem PKW, muss mit einer Reichweitenverringerung gerechnet werden. im Display das Symbol . Beim Senden erscheint im Display das Symbol . Rauschunterdrückung/Erhöhung der Reichweite (Squelch). Wird die Taste “MON“ [10] kurz gedrückt, so wird die automatische Rauschunterdrückung (Squelch) für ca. 10 Sek. au›er Funktion gesetzt. In diesem Fall können auch noch sehr schwache Empfangssignale im Rauschen empfangen werden 3. Appuyez sur la touche [7] pour confirmer la programmation; si la fonction a été désactivée, l’in- scription Beep n’est plus sur l’afficheur [3]. 5) Appuyez sur la touche “F” sept fois lorsque l’afficheur visualise “OFF” et l’icône 7) Confirmez appuyant sur Dès que cette émission est terminée et un des deux appareils ne reçoit plus le code de contrôle par 2 commencera à clignoter sur l’afficheur et la radio émettra un bip. clignotantes. : si la fonction est activée, le symbole est visualisé sur l’af- ficheur. Après le réglage il faut une minute pour que cette fonction soit activée. Dès que le senseur capte un bruit causé par l’endommagement d’un verre ou par d’autres vibrations, il envoie un signal d’alarme à l’autre émetteur-récepteur; après peu secondes la radio à laquelle le senseur Activation/désactivation fonction Out-of-range est connecté émettra un ton d’alarme. 1. Allumez l’appareil. Note: 2. Sélectionnez un canal appuyant sur / [6]. Pour cette fonction, sont nécessaires deux PMR qui doivent être syntonisés sur le même canal 3. Appuyez sur la touche “F” [8] 6 fois jusqu’à ce que l’afficheur visualise et ton CTCSS. Il faut connecter le senseur d’alarme seulement sur un appareil et la fonction clignote. relative doit être activée seulement sur cet appareil. 4. Sélectionnez “ON” ou “OFF” avec les touches/ [6]. 5. Confirmez appuyant sur haute fréquence de ton sub-audio (par exemple canal 5, ton CTCSS 32). 6) Appuyez sur / [6] pour sélectionner “ON” ou “OFF”. Grâce à cette fonction, deux ALAN 443 se transmettent un code de contrôle tous les 30 secondes. “OFF” et l’icône 3) Appuyant sur les touches / [6] sélectionnez un canal et après un ton CTCSS avec une 4) Sélectionnez le niveau de sensibilité désiré du VOX (le réglage à l’usine est le niveau 2). . Reset (remise à zéro) Si la radio présente un fonctionnement anomal ou si vous voulez effacer les réglages programmés, il est suffisant d’allumer la radio maintenant appuyé sur la touche “F” [8] pendant 2 secon- 1. Activez la fonction Out-of-range suivant la procédure décrite dessus. des. Avec cette procédure, vous pouvez effectuer une réinitialisation de tous les paramètres pro- 2. Éteindez les deux émetteurs-récepteurs grammés à l’usine. Das Funkgerät verfügt über eine Energiesparfunktion, durch die im Standby-Betrieb der Stromverbrauch um ca. 50 % reduziert wird. Wenn über einen Zeitraum von mehr als 7 Sekunden keine Signale empfangen werden, schaltet das Gerät in die Energiesparfunktion und im Display [3] erscheint Lieferumfang › 2 Funkgeräte ALAN 443 › 1 Bedienungsanleitung › Trageschlaufe › Gürtelclip 1 2 3 4 446.00625 MHz 446.01875 MHz 446.03125 MHz 446.04375 MHz CTCSS Ton nicht eingestellt nicht eingestellt nicht eingestellt nicht eingestellt Kanal Frequenz VOX VOX Level AUS AUS AUS AUS 5 6 7 8 446.05625 MHz 446.06875 MHz 446.08125 MHz 446.09375 MHz CTCSS Ton nicht eingestellt nicht eingestellt nicht eingestellt nicht eingestellt VOX VOX Level AUS AUS AUS AUS 2. Babyüberwachungs- und Elternkontrollkanäle einstellen Das ALAN 443 verfügt über 10 voreingestellte Babyüberwachungskanäle (b0-b9) und weitere 10, “Power Saver”. Batteriezustandsanzeige Wenn die Batteriekapazität erschöpft ist, erscheint im Display [3] das Symbol und zeigt damit an, dass die Batterien ausgewechselt werden müssen oder im Falle von Ni-Cd/Ni-MH-Akkus, die Akkus wieder AA” AA” AA” Grundfunktionen Mikrofon-/Ladebuchse MIC/CHG [13] Ein-/Ausschalten Anschlussmöglichkeit für ein geeignetes Ladegerät. Damit können die im Gerät befindlichen Akkus geladen Drehen Sie den OFF/VOLUME-Drehregler [1] von der linken Raststellung im Uhrzeigersinn nach rechts bis werden. Bitte verwenden Sie dazu nur die Original-Ladegeräte. das Funkgerät eingeschaltet ist. Es erfolgen 4 unterschiedliche Quittungstöne (abschaltbar); das Display [3] ACHTUNG! Niemals Alkalien-Batterien laden! VOX-Empfindlichkeit auf Stufe 1 und die Umschaltzeit auf 3 Sekunden voreingestellt. Kanal b1 b2 b3 b4 b5 b6 b7 b8 b9 B0 Frequenz 446.00625 MHz 446.01875 MHz 446.03125 MHz 446.04375 MHz 446.05625 MHz 446.06875 MHz 446.08125 MHz 446.09375 MHz 446.00625 MHz 446.01875 MHz Kanal CTCSS VOX VOX Ton Level 141.3 Hz An L1 146.2 Hz An L1 151.4 Hz An L1 156.7 Hz An L1 162.2 Hz AN L1 167.9 Hz AN L1 173.8 Hz AN L1 179.9 Hz AN L1 186.2 Hz AN L1 192.8 Hz AN L1 Frequenz E1446.00625 MHz E2 446.01875 MHz E3 446.03125 MHz E4 446.04375 MHz E5 446.05625 MHz E6 446.06875 MHz E7 446.08125 MHz E8 446.09375 MHz E9 446.00625 MHz E0 446.01875 MHz CTCSS VOX VOX Ton Level 141.3 Hz AUS 146.2 Hz AUS 151.4 Hz AUS 156.7 Hz AUS 162.2 Hz AUS 167.9 Hz AUS 173.8 Hz AUS 179.9 Hz AUS 186.2 Hz AUS 192.8 Hz AUS 1) Einschalten und Lautstärke einstellen Schalten Sie beide Geräte ein, indem Sie den Drehregler “OFF/VOL“ (Oberseite des Gerätes) aus der linken Ratstellung weiter im Uhrzeigersinn drehen. Dabei können Sie gleich die gewünschte Lautstärke Drehregler “OFF/VOLUME“ [1] im Uhrzeigersinn bis zur gewünschten Lautstärke. Lassen Sie nun die Taste / -Tasten “MON“ [10] wieder los. Ihr Funkgerät ist jetzt betriebsbereit. 1. Kanalwahl durch Weiterdrehen im Uhrzeigersinn einstellen. Wählen Sie über die UP/DOWN-Tasten [6] einen der vorprogrammierten Babyüberwachungskanäle -Tasten [6] den gewünschte Kanal. Ein Schnellzugriff auf die Kanäle kann Wählen Sie mit Hilfe der / Halten Sie die PTT-Taste [11] gedrückt. Sprechen Sie mit normaler Sprachlautstärke in einem Abstand von vorgenommen werden, wenn die - oder -Taste gedrückt gehalten wird, bis der gewünschte Kanal ca. 5-10 cm Abstand in das Mikrofon. Das Display [3] zeigt im Display erscheint. . Lassen Sie erst die PTT-Taste [11] wieder Gerät geht bei Geräuschen sofort auf Sendung und die Einstellung der Kanäle kann solange nicht gewechselt werden, bis das Signal wieder abfällt. 1. Signalrufton aussenden Durch Drücken der Taste CALL [9] schaltet das Gerät von Empfang auf Sendung um und sendet dabei einen Signalton an die Partnerstation aus (gleicher Kanal vorausgesetzt). 1) Schalten Sie das Gerät [1] aus. 2) Halten Sie die Taste “CALL“ [9] gedrückt und schalten dabei das Gerät wieder ein bis im Display (Werkseinstellung) erscheint. L 2 3) Wählen Sie nun über die Tasten ““ und ““ [6], die gewünschte VOX-Empfindlichkeitsstufe. › L1: höchste Empfindlichkeitseinstellung - ideal für ein ruhiges Umfeld › L2: mittlere Empfindlichkeitseinstellung › L3: niedrigste Empfindlichkeitseinstellung - ideal bei Anschluss einer Sprechgarnitur bzw. Mikrofon-/Lautsprecherkombination sowie bei einem Umfeld mit hoher Geräuschkulisse im Hintergrund [7] um die gewünschte Eingabe zu bestätigen. 3. Einstellen der Umschaltzeit Die automatische Sende-/Empfangsumschaltung wird erst nach einer voreingestellten Zeit aktiv. Dies verhindert bei kurzen Geräuschentwicklungen eine Aussendung. Diese Umschaltzeit des ALAN 443 kann eingestellt werden, so dass eine normale Unterhaltung stattfinden kann, ohne 2) Einstellen der Sendestation – Baby Senden allen Babyüberwachungskanälen wird automatisch die Sprachsteuerung aktiviert, d.h. das 4) Drücken Sie Einstellen der Lautstärke Tastenfunktionen Anmerkung: Nehmen Sie die Einstellung der Sendestation in einem ruhigem Umfeld vor. Bei 2. Einstellen der VOX-Empfindlichkeit führt für ca. 1 Sekunde eine Selbsttestfunktion durch und zeigt dann den Standardkanal Nummer 1 an. Um die gewünschte Lautstärke einzustellen, halten Sie die Taste “MON“ [10] gedrückt und drehen den Elternkontrollmodus ist die VOX (Sprachsteuerung) automatisch abgeschaltet. CALL-Taste entsprechend darauf abgestimmte, Elternkontrollkanäle (E0-E9). Im Babyüberwachungsmodus ist die Automatische Energiesparfunktion aus (z.B. b1). Im Display erscheint das Vox Symbol und zeigt damit an, dass die Sprachsteuerung aktiviert wurde. Das Funkgerät geht auf Sendung, sobald ein Geräusch zu hören ist. dass die Übertragung durch Sende-/Empfangsumschaltungen unterbrochen wird. 1) Schalten Sie das Gerät aus. 2) Halten Sie die Taste CALL gedrückt und schalten Sie das Gerät wieder ein. 3) Einstellen der Empfangsstation - Elternkontrollmodus -Tasten den entsprechenden Elternkontrollkanal aus (in diesem Fall E1). Im Wählen Sie über die / los, wenn Sie mit der Durchsage fertig sind. Ein Quittungston (Roger Beep) bestätigt das Beenden des 14 3) Drücken Sie einmal die Taste “F“ [8]. Im Display erscheint L 2 Funktionsmodus (F-Taste) [8] sendet, die ein gezieltes Rufen bzw. Gerufen werden von Stationen mit der gleichen Kennung ermöglicht. Ausschalten des Quittungston: Alarmsensor (Art. 29304, nicht im Lieferumfang) zu überwachen. Für diese Funktion werden zwei Mit dieser Taste können folgende Funktionseinstellungen vorgenommen werden. Das Gerät bleibt dann solange stummgeschaltet, bis es die gültige Kennung identifiziert. 1. Drücken Sie wiederholt die Taste F [8] bis im Display “oN“ PMR-Geräte benötigt. 1. SCAN (Kanalsuchlauf) Um diese Funktion zu aktivieren gehen Sie wie folgt vor: › d2: mittlere Umschaltzeit (1,0 Sek.) 2. CTCSS-Sub-Ton 1. Schalten Sie das Gerät ein. 2. Wählen Sie mit der Taste ““ [6] “OFF“ aus. › d3: längste Umschaltzeit (1,5 Sek.) 3. Zweikanalüberwachung 2. Drücken Sie zwei Mal die Taste “F“ bis im Display Kanal 1 und das blinkende Ziffernfeld für die CTCSS- 3. Durch Drücken der Taste (Werkseinstellung) erscheint. 2 -Tasten [6] die gewünschte Umschaltzeit mit 4) Wählen Sie über die / › d1: kürzeste Umschaltzeit (0,5 Sek.) 5) Drücken Sie [7] um die gewünschte Eingabe zu bestätigen. VOX-Button 6. Reichweitenkontrolle einstellen 1. Aktivieren der Sprachsteuerung (VOX) gefolgt von Subaudiotöne erscheint. 4. Roger Beep ein- bzw. ausschalten Ihnen 38 Töne zur Verfügung (siehe auch Tabelle). 7. Überwachung durch Alarmsensor 1) Befestigen sie den Alarmsensor wie in der Bedienungsanleitung beschrieben an Ihrem [7] wird die Einstellung bestätigt. Fahrzeug. erlischt im Display [3]. 2) Stecken Sie das Anschlusskabel des Sensors in die Mikrofon-/Ladebuchse MIC/CHG [13] der 5. Ausschalten der Tastaturtöne Überwachungsstation. 3) Wählen Sie über die oder [6]-Tasten einen Kanal mit CTCSS-Subton Belegung aus (z.B. 1. Drücken Sie wiederholt die Taste F [8] bis im Display “oN“ mit dem Schriftzug Beep blinkt. 7. Alarmüberwachung einstellen 4. Um die aktuelle Einstellung zu übernehmen, drücken Sie die Taste Halten Sie die Taste “VOX“ [8] länger als 2 Sekunden gedrückt. Es ertönt ein doppelter 8. Reset Nun empfängt das ALAN 443 nur Empfangssignale mit dem eingestellten Kennungston. Im Sendemodus Quittungston und im Display erscheint der Schriftzug “Vox“. Der Freisprechbetrieb ist damit Durch Drücken der Taste können die einzelnen Funktionen ausgewählt werden (die einzelnen Funktionen wird der Kennungston mit ausgesendet. Wenn Sie die Funktion deaktivieren möchten, wählen Sie die werden nachfolgend noch detailliert beschrieben). Einstellung “00“. aktiviert. Zum Senden sprechen Sie in das Mikrofon [5]: die Sprachsteuerung (VOX) schaltet nun erscheint 4. Der Roger Beep ist nun deaktiviert und das Symbol 3. Wählen Sie nun über die Tasten oder einen gewünschten Kennungston aus. Insgesamt stehen 5. Tastaturtöne ein- bzw. ausschalten DEUTSCH Empfangen aufgeladen werden müssen.. Technische Daten › Frequenz 446.00625 ÷ 446.09375 MHz › Kanalraster 12.5 kHz › 8 Kanäle › 10 voreingestellte Babyüberwachungskanäle › 10 voreingestellte Elternkontrollkanäle › 38 CTCSS-Subaudiotöne › Strahlungsleistung 500 mW ERP › Reichweite bis zu 4÷5 km ** › VOX-Empfindlichkeit und Umschaltzeit in 3 Stufen einstellbar › Batterie Typ AAA wiederaufladbar oder Alkalien › Alphanumerisches LC Display mit Hintergrundbeleuchtung › Betriebsbereitschaft bis zu 35 Stunden mit Alkalien Batterien › Betriebstemperatur –20°C bis +55°C › Gewicht 78 gr. › Abmessungen 54x87x34 mm 1. Appuyez plusieurs fois sur la touche “F” [8] jusqu’à ce que l’afficheur visualise “oN” avec l’inscrip- Kanal Frequenz Funkspruchs. (Um den Roger Beep abzuschalten siehe Absatz “Roger Beep“.) Nach dem Loslassen der PTT-Taste [11] schaltet das ALAN 443 in den Empfangsbetrieb um. Es erscheint Einlegen der Batterien Das Öffnen des Batterie-/Akkufachs auf der Rückseite des Gerätes wird durch Lösen der Batteriefachverriegelung und Anheben und Abziehen des Batteriedeckels vorgenommen. Legen Sie hier 3 Batterien des Typs AAA oder wiederaufladbare Akkus ein. 5 5. Activation/Désactivation Bip clavier 3. Allumez de nouveau les appareils l’un après l’autre et pas en même temps entre 5 secondes. . quer seulement avec les usagers qui ont votre même canal et code. La radio restera silencieuse 2 4 manuel du senseur (senseur d’alarme mod. AS443). 2) Connectez le senseur d’alarme à la prise MIC CHG [13] de l’appareil. Désactivation: Technische Daten können ohne weitere Vorankündigungen geändert werden. Einführung Herzlichen Glückwunsch zu Ihrer Wahl. Das ALAN 443 ist ein modernes PMRFunkgerät (PMR = Professionell Mobile Radio), dass ohne Genehmigung und Gebühren in fast allen europäischen Ländern betrieben werden kann. (Siehe hierzu Tabelle im Anhang Autorisierte Länder für PMR 446 Frequenz: 446.00625 – 446.09375 MHz.) à l’usine et elle est indiquée sur l’afficheur avec l’icône Les tons CTCSS fonctionnent comme une sorte de code d’accès et vous permettent de communi- › Buchsen für Zubehör MIC CHG [13]: Duobuchse für Audiozubehör, Netzstecker und optional erhältlichen Glasbruchsensor 8 Kanal-PMR-Handfunkgerät 1) Pour fixer le senseur d’alarme en option, suivez les instructions que vous trouvez dans le disparaît par l’afficheur [3]. Activation dispositif Out-of-range 4. ROGER BEEP: Tonalité de confirmation de fin conversation b) "modalité de groupe CTCSS" 1 7. Activer/désactiver “Mode - Alarme transmission” [7] pour confirmer la programmation. 6. Répétez la même procédure avec l’autre appareil. 2. Éclairage de l’Afficheur dans ce cas vous entendrez toutes les conversations émises sur le canal sélectionné. › d2: retard moyen (1 sec) fois consécutives, l’icône DW. 2. Réglage des tons CTCSS › d1: le plus petit retard (0,5 sec) 6. Fonction Out-of-range (hors portée) Cette fonction permet la surveillance (écouter) des conversations de 2 canaux à votre choix. [7] ou CALL [9] ou PTT [11] . VOX dans les canaux E- est désactivée à l’usine. 2. Appuyez sur les touches ou [6] et sélectionnez “oFF”. 3. DW (Dual Watch) Activation fonction SCAN Utilisez de nouveau les touches et [6] pour sélectionner le retard: 2 2 3. Appuyez une fois sur la touche “F” [8]; l’afficheur visualise l’inscription: Sélectionnez un canal pré-programmé E- (dans ce cas E1) avec les touches / [6]. La fonction tion Beep clignotant. [7] . L l’afficheur [3] visualise le niveau de sensibilité actuelle 3) Réglage de la radio en réception 4. Le Roger Beep est maintenant désactivé et l’icône CTCSS clignotant. 1. Fonction SCAN quand il entend n’importe quel son/bruit/voix produit à côté de l’appareil. 3. Appuyez sur la touche commence automatiquement. Communication Dès que vous terminez de parler, jusqu’au passage en émission, il y a un bref retard du VOX. 2. Allumez l’appareil maintenant appuyé sur la touche CALL [9], 4. Sélectionnez le ton CTCSS appuyant sur les touches / [6]. in 3. Réglage retard du VOX 1. Éteindez l’appareil. › Activation/désactivation bip clavier Wo r l d [7]. visualise Vox, qui confirme l’activation de la fonction baby-sitter. Le PMR se commute en émission visualisera “Vox” pour confirmer l’activation. Parlez à côté du microphone [5]: la transmission The élevé ou si vous parlez à haute voix) 4. Pour confirmer la sélection, appuyez sur ment le canal, maintenez appuyé sur les touches / [6] jusqu’à la sélection du canal désiré. › Activation/désactivation Roger Beep ® › L3: basse sensibilité (idéal quand on se trouve dans un lieu où le bruit de fond est très tournez le bouton ON-OFF/VOLUME [1] dans le sens des aiguilles d’une montre afin d’obtenir le niveau Appuyez sur la touche VOX [8] pour plus de 2 secondes: vous entendrez 2 bips et l’afficheur [7], l’afficheur s’éclaire pendant environ 10 secondes. › L2: moyenne sensibilité avec les pauses auxquelles vous êtes habitués, sans interrompre la transmission. 3. Appuyez 2 fois sur la touche “F” jusqu’à ce que l’afficheur montre le canal sélectionné avec le ton À la pression de la touche › L1: haute sensibilité (idéal pour milieux silencieux ou si vous parlez à basse voix) Sélectionnez un canal pré-programmé b- (par exemple b1) avec les touches / [6]. L’afficheur › Activation Dual Watch disparaîtra de l’afficheur. Cette fonction peut être réglée sur 3 niveaux de sensibilité: Sélectionnez le canal désiré et la relative fréquence avec les touches /[6]. Pour changer rapide- 1. Activation/désactivation du mode VOX entendrez 2 bips et le symbole OFF OFF OFF OFF OFF OFF OFF OFF OFF OFF Pour vérifier le réglage du volume sur le niveau optimal, maintenez appuyé sur la touche MON [10] et 2. Sélectionnez le canal désiré (1 des 8 canaux) avec les touches / [6]. [7] plus de 2 secondes. Vous 141.3 Hz 146.2 Hz 151.4 Hz 156.7 Hz 162.2 Hz 167.9 Hz 173.8 Hz 179.9 Hz 186.2 Hz 192.8 Hz Avec ALAN 443 ce retard est réglable et cela vous permet de parler de façon naturelle, › Réglage tons CTCSS Pour débloquer le clavier, appuyez encore sur la touche 446.00625 MHz 446.01875 MHz 446.03125 MHz 446.04375 MHz 446.05625 MHz 446.06875 MHz 446.08125 MHz 446.09375 MHz 446.00625 MHz 446.01875 MHz 2) Réglage de la radio qu’il faut placer à côté du nouveau-né TOUCHE VOX [8] restent actives. E1 E2 E3 E4 E5 E6 E7 E8 E9 E0 1. Sélection des canaux 1. Allumez l’appareil. et l’éclairage de l’afficheur L1 L1 L1 L1 L1 L1 L1 L1 L1 L1 Réglage du volume TOUCHE FONCTION F [8] qui indique l’activation. Les touches PTT [11], MON [10], CALL [9] ON ON ON ON ON ON ON ON ON ON 3. Utilisez les touches et [6] pour sélectionner le niveau de sensibilité VOX désiré: 1) Allumez les appareils et sélectionnez le volume optimal. 4/10 cm du microphone. L’afficheur visualise le symbole [3] [7] plus de 2 secondes. Vous entendrez 2 bips et l’afficheur 141.3 Hz 146.2 Hz 151.4 Hz 156.7 Hz 162.2 Hz 167.9 Hz 173.8 Hz 179.9 Hz 186.2 Hz 192.8 Hz Ton Vox Niveau CTCSS Vox TOUCHES / [6] Maintenez appuyé sur la touche PTT [11]. Parlez avec un ton de voix normale à une distance d’environ 1. Blocage du clavier 446.00625 MHz 446.01875 MHz 446.03125 MHz 446.04375 MHz 446.05625 MHz 446.06875 MHz 446.08125 MHz 446.09375 MHz 446.00625 MHz 446.01875 MHz Fréquence tique pour un second et visualise le canal standard numéro 1. Appeler (Émettre) [7] Canal Ton Vox Niveau CTCSS Vox FONCTIONS ALAN 443 Maintenant l’émetteur-récepteur est prêt à émettre / recevoir. Faire référence au chapitre “Touche Fonction “F”. Fréquence série de bips de différentes tonalités (qui peuvent être éliminés); l’afficheur [3] exécute un test automa- › Fonction SCAN visualisera le symbole b1 b2 b3 b4 b5 b6 b7 b8 b9 b0 automatiquement et sur l’afficheur [3] clignote “Power saver”. Procédure pour l’activation des 38 tons CTCSS en RX et TX: Maintenez appuyé la touche Canal 2 L l’afficheur [3] visualise le niveau de sensibilité actuelle; jusqu’à 50%; si la radio ne reçoit pas des signaux pour plus de 7 secondes, cette fonction est activée d’écoute désiré. Relâchez la touche MON [10]. [7]. 2. Réglage de la sensibilité du VOX **Portée Vous pouvez obtenir des performances optimales en champ libre. La portée peut seulement être réduite par des facteurs ambiants, comme les collines, les arbres, les constructions ou d’autres obstacles. Si vous êtes dans une voiture ou une construction métallique, la portée est réduite. Vous pouvez sélectionner les fonctions suivantes appuyant sur la touche F: TOUCHE réglée sur les canaux E- (de E1 à E0), qui n’ont pas la fonction VOX. Pour que la fonction baby-sitter soit activée correctement, les deux émetteurs-récepteurs doivent . 1. Envoi signal audio opérer sur la même fréquence (même canal et même ton CTCSS, voyez le tableau dessous). Exemple: Activation/désactivation du mode fonction FRANÇAIS (Pour activer la fonction consultez le paragraphe “Roger beep”). Tournez le bouton ON-OFF/VOLUME [1] dans le sens des aiguilles d’une montre. ALAN 443 émet une 14 TOUCHE CALL [9] Le PMR a une série des canaux pré-programmés (b- et E-) qu’on utilise dans la fonction baby-sitter. Prise MIC/CHG [13] › d3: le plus long retard (1,5 sec) Pour confirmer l’opération, appuyez sur la touche 2. Activation des canaux (Roger Beep) envoyée par votre Alan 443, sera entendue par votre interlocuteur. Élimination des bruits de fond/extension de la portée (Squelch). AA” AA” AA” Spécifications principales: › Fréq. 446.00625 ÷ 446.09375 MHz › Espacement des canaux: 12.5 KHz › 8 canaux › 20 sub-canaux pré-programmés pour la fonction Babysitter (b-) et surveillance (E-) › 38 tons CTCSS › Puissance 500 mW ERP › Portée jusqu’à 4-5 km ** › Vox réglable sur 3 niveaux (équipé) › Batteries type AAA rechargeables ou alcalines › Afficheur LCD retro-éclairé alphanumérique › Autonomie typique jusqu’ á 35 heures avec des batteries alcalines › Température de fonctionnement de –20° à +55° › Poids 78 gr › Dimensions 54x87x34 mm › Jack pour accessoires MIC CHG [13]: Quand vous avez terminé la conversation relâchez la touche PTT [11]. Une tonalité de fin transmission . 3. Zweikanalüberwachung (DUAL WATCH) 2. Wählen Sie mit den Tasten oder [6] die Einstellung “oFF“ aus. 3. Drücken Sie zur Bestätigung der Einstellung die Taste Kanal 5, CTCSS-Ton 32). [7]; der Schriftzug Beep erlischt im Display [3]. 6. Reichweitenkontrolle 4) Stellen Sie die gewünschte VOX-Empfindlichkeit ein (Werkseinstellung Stufe 2). Das ALAN 443 ist mit einer Reichweitenkontrolle ausgestattet, d.h. solange sich zwei PMR-Geräte noch innerhalb der gegenseitigen Funkreichweite befinden, wird dies durch ein Symbol im Display 5) Drücken Sie die “F“-Taste sieben mal bis “OFF“ und das blinkende Symbol im Display erscheint. automatisch den Sender ein und sendet dabei die Übertragung aus. Anmerkung: Im Funktionsmodus kann die Hintergrundbeleuchtung durch Drücken der Taste “MON“ [10] Um die Sprachsteuerung zu deaktivieren, halten Sie erneut die Taste VOX [8] für länger als 2 aktiviert werden. Diese Funktion erlaubt zwei beliebige Kanäle Ihrer Wahl zu überwachen. Um die Zweikanalüberwachung angezeigt. Sobald der Kontakt zwischen den Geräten über einen Zeitraum von 1 Minute nicht mehr 6) Wählen Sie über die oder [6]-Tasten die Einstellung “ON“ oder OFF“. Sekunden gedrückt. 1. SCAN (Kanalsuchlauf) einzustellen gehen Sie wie folgt vor: hergestellt werden kann, ertönt ein akustisches Warnsignal und im Display blinkt das Symbol 7) Bestätigen Sie die Eingabe durch Drücken der Taste Suchlauf nach belegten Funkkanälen. Beim Scan werden alle 8 Kanäle fortlaufend abgesucht. Wird auf 1. Schalten Sie das ALAN 443 ein. anzuzeigen, das sich das Gerät au›erhalb der Funkreichweite befindet. Eine Minute nach dem die Alarmüberwachung eingestellt wurde, wird der Alarmmodus aktiviert. einem Kanal ein Signal empfangen, unterbricht der Suchlauf für ca. 5 Sekunden kurzzeitig. Danach startet -Tasten [6] einen der zwei Kanäle aus, den Sie überwachen wollen z.B. Kanal 2. Wählen Sie mit den / a) Reichweitenkontrolle programmieren: Sobald der Sensor hoch klingende Geräusche registriert, z.B. durch gewaltsames Aufhebeln der 2. Funktionsmodus Beachten Sie hierzu im nachfolgenden Text den Absatz “Funktionsmodus“. 4. der Kanalsuchlauf wieder. Enter-Button a) SCAN aktivieren: 1. Tastaturverriegelung Halten Sie die Taste 1. Drücken Sie die Taste F [8] solange bis im Display Scan blinkt. [7] länger als 3 Sekunden gedrückt. Es ertönt eine doppelter Quittungston und im Display zeigt das Symbol an, dass die Tastaturverriegelung aktiviert wurde. Die Tasten 2. Drücken Sie die Tasten oder [6] um den Suchlauf zu starten. Sie wieder die Taste [7] länger als 3 Sekunden gedrückt. Es ertönt erneut ein doppelter Quittungston und im Display erlischt das Symbol . 2. Hintergrundbeleuchtung Durch Drücken der Taste Um den Suchlauf zu unterbrechen, drücken Sie die Tasten [7], CALL [9] oder PTT [11]. 2. SUBAUDIOTON CTCSS einstellen Ihr Funkgerät kann, je nach Einstellung und verwendetem Kanal auf zwei verschiedene Arten funktionieren: [7] wird die Displaybeleuchtung für ca. 10 Sekunden eingeschaltet. Offener Funkverkehr (open traffic): um 1. Schalten Sie das Gerät ein. [7]. Autotür oder Einschlagen von Glas, sendet die Station ein Alarmsignal an die Kontrollstation. Erst 3. Drücken Sie mehrmals die Taste F [8] bis im Display der Schriftzug DW [3] blinkt. 2. Drücken Sie mehrmals die Taste “F“, bis im Display die danach setzt bei dem Gerät selbst ein kontinuierlich anhaltender Alarm-Ton ein. Nachdem die 4. Wählen Sie nun über die Taste oder [6] den zweiten Kanal aus, z.B. Kanal 2. Nach ca. 1 Sek. Einstellung “OFF“ und das blinkende Symbol Kontrollstation das Alarmsignal empfangen hat, ertönt ebenso ein Alarm-Ton und im Display wird der zweite Kanal übernommen und die Zweikanalüberwachung gestartet. Sobald nun auf einem dieser Kanäle ein Empfangssignal anliegt, das die eingestellte Schwelle der b) SCAN deaktivieren: PTT [11], MON [10] und CALL [9] werden nicht verriegelt. Um die Tastatur zu Entriegeln halten FRANÇAIS • 2 pins pour accessoires audio / chargeur à mur et détecteur alarme (optionnel) ® FRANÇAIS 9:42 Rauschsperre überschreitet, stoppt das Funkgerät auf diesem Kanal und Sie hören das empfangende Signal. Fällt das Signal für längere Zeit aus, schaltet das Funkgerät wieder zwischen den beiden eingestell- erscheint. 3. Wählen Sie mit den Tasten oder [6] die Einstellung “ON“ aus. erscheint das Symbol 4. Bestätigen Sie die Eingabe durch Drücken der Taste Anmerkung: Für diese Funktion werden 2 PMR-Geräte benötigt, die über die gleiche Kanal- und . 5. Nehmen Sie die gleiche Einstellung bei dem zweiten Gerät vor. b) Reichweitenkontrolle aktivieren: . CTCSS-Subton-Einstellung verfügen müssen. Nur ein Gerät kann mit dem Alarm-Sensor verbunden und entsprechend auf den Überwachungsmodus eingestellt werden. ten Kanälen hin und her. Um die Zweikanalüberwachung zu unterbrechen, drücken Sie kurz die Tasten 1. Nehmen Sie die Einstellung der Reichweitenkontrolle wie im vorhergehenden Absatz beschrieben vor. ENTER [7], CALL [9] oder PTT [11]. 2. Schalten Sie beide Geräte aus. Sollte Ihr Gerät abnormale Funktionen aufweisen oder wenn Sie alle vorgenommenen 3. Schalten Sie die Gerät nacheinander (auf keinen Fall gleichzeitig) wieder ein. Zwischen dem Programmierungen löschen wollen, können Sie durch Drücken der Taste “F“ [8] 4. Roger Beep: Quittungston beim Beenden der Übertragung DEUTSCH 17-07-2003 In diesem Fall hören Sie jede Kommunikation, die auf dem gewählten Funkkanal ausgesendet wird. Der Roger Beep signalisiert dem Funkpartner das Beenden der Funkübertragung (loslassen der PTT- Einschalten der beiden Geräte dürfen max. 5 Sekunden liegen. Gruppenruf (CTCSS): Taste[11]). Die Quittungstöne werden automatisch nach Beenden einer jeden Sendung mit ausgesendet. Überwachung durch Alarmsensor Durch die CTCSS-Subaudiotöne werden parallel zur Übertragung unhörbare Kennungstöne mit ausge- Diese Funktion ist ab Werk aktiviert. Ihr ALAN 443 ist mit einer Alarmfunktion ausgestattet, die es ermöglicht, z.B. Ihr Fahrzeug über einen 8. Resetfunktion (mind. 2 Sekunden) bei gleichzeitigem Einschalten des Funkgerätes einen RESET vornehmen. Danach sind alle Funktionen auf Werkseinstellung zurückgesetzt. DEUTSCH ISTR443_5LINGUE 9:42 Pagina 3 › Toma para accesorios MIC CHG [13]: 2 pin para accesorios audio / cargador de pared y sensor alarma (opcional) ® The Wo r l d in Communication Funciones y especificaciones sujetas a modificaciones sin previa notificación ESPAÑOL TRANSCEPTOR PORTÁTIL PMR446 4 11 12 5 SPK 10 88 88 Scan Vox Power Saver Dw Beep MIC CHG 3 ® 13 CH 6 9 7 8 CALL CALL F ENTER VOX ** Cobertura Las máximas prestaciones se obtienen en campo abierto y sin obstáculos. Factores ambientales como la altura y la temperatura, orográficos como edificios, vegetación y desniveles, pueden disminuir sensiblemente la cobertura. Asimismo, dentro de un automóvil o de una construcción metálica, la cobertura disminuirá. Dotación › 2 transceptores ALAN 443 › 1 manual de instrucciones › correa de mano › pinza cinturón AA” AA” AA” Características principales: › Frecuencia de trabajo: 446.00625 ÷ 446.09375 MHz › Canalización: 12.5 KHz › Nº de canales: 8 › 20 sub-canales pre-programados para función Babysitter (b-) y monitorización E-) › 38 subtonos CTCSS › Potencia 500 mW ERP › Cobertura hasta 4-5 Km ** › VOX incorporado regulable con 3 niveles › Baterías tipo AAA recargables o alcalinas (no suministradas) › Display LCD retro-ilumunado alfanumérico › Autonomía típica de hasta 35 h con baterías alcalinas › Temperatura de funcionamiento: -20 a +55 °C › Peso 78 gr (sin pilas) › Dimensiones 54x87x34 mm (Para habilitar esta función diríjase al párrafo “Roger beep”) . La recepción de 3. Pulse una vez la tecla F [8]; en el display aparece 4. Use nuevamente las teclas / [6] para seleccionar el retardo deseado: usuarios sintonizados en el mismo canal. de estos canales podrá situarse en las proximidades del bebé a vigilar; Por el contrario, el equipo desactivarlo temporalmente, mantenga pulsado MON [10]. De esta manera podr4á recibir señales de destinado a la monitorización del bebé, deberá sintonizarse en los canales E- (de E1 a E0), que no baja intensidad que normalmente no superan el umbral del squelch. tienen la función VOX activada. Para obtener el mejor rendimiento de la función VOX, es importante determinar el nivel de Ahorro automático de baterías Para que la función Babysitter se active correctamente, los dos equipos deben operar sobre la sensibilidad óptimo para activar el dispositivo. Este dispositivo permite reducir el consumo de las baterías hasta un 50%; si la radio no recibe misma frecuencia (mismo canal y subtono CTCSS, vea tabla a continuación), es decir, el número que 1. Apague el equipo rotando el mando [1] en sentido antihorario. ninguna señal durante más de 7 segundos, la función se activa automáticamente y en el display [3] acompaña a la letra (b- ó E-), debe ser el mismo. 2. Encienda el equipo mientras pulsa la tecla CALL [9]; parpadea “power saver”. Cuando las baterías están descargadas, el icono En los canales "b-", la sensibilidad del VOX está fijada al nivel 1, mientras que el retardo está en el aparece en el dis- nivel 3 (d3). el caso de que sean recargables. Canal Frequencia Atención: las baterías alcalinas no pueden ser recargadas. FUNCIONES ALAN 443 play visualiza el canal número 1. TECLAS / Ajuste del volumen 1. Selección del canal b1 b2 b3 b4 b5 b6 b7 b8 b9 b0 2. Ajuste sensibilidad VOX en el display [3] visualizará el nivel de sensibilidad actual L 2 3. Utilice las teclas / [6] para seleccionar el nivel de sensibilidad deseado basándose en play [3]: será necesario sustituirlas lo antes posible (si son alcalinas) o proceder a su recarga en 446.00625 MHz 446.01875 MHz 446.03125 MHz 446.04375 MHz 446.05625 MHz 446.06875 MHz 446.08125 MHz 446.09375 MHz 446.00625 MHz 446.01875 MHz Tono Vox Nivel CTCSS Vox 141.3 Hz 146.2 Hz 151.4 Hz 156.7 Hz 162.2 Hz 167.9 Hz 173.8 Hz 179.9 Hz 186.2 Hz 192.8 Hz ON ON ON ON ON ON ON ON ON ON Canal Frequencia L1 L1 L1 L1 L1 L1 L1 L1 L1 L1 E1 E2 E3 E4 E5 E6 E7 E8 E9 E0 446.00625 MHz 446.01875 MHz 446.03125 MHz 446.04375 MHz 446.05625 MHz 446.06875 MHz 446.08125 MHz 446.09375 MHz 446.00625 MHz 446.01875 MHz las siguientes indicaciones: Tono Vox Nivel CTCSS Vox 141.3 Hz 146.2 Hz 151.4 Hz 156.7 Hz 162.2 Hz 167.9 Hz 173.8 Hz 179.9 Hz 186.2 Hz 192.8 Hz OFF OFF OFF OFF OFF OFF OFF OFF OFF OFF L1 alta sensibilidad: para ambientes no muy ruidosos en los que se puede hablar con un nivel de voz bajo L2 sensibilidad media L3 baja sensibilidad: para ambientes ruidosos en los que se requiere hablar con un nivel de voz alto. 4. Pulse [7] para confirmar la selección. 3. Selección del retardo VOX El retardo es una variable del VOX que mantiene el equipo en transmisión después de haber Para ajustar el volumen a un nivel óptimo, mantenga pulsada la tecla MON [10] y gire el mando ON- Seleccione el canal deseado con su frecuencia respectiva con las teclas / [6]. Para cambiar ráp- a) Encienda el equipo y seleccione el volumen deseado acabado de hablar. Este retardo es regulable en el ALAN 443 y le permite hablar de forma OFF VOLUME [1] en sentido horario hasta obtener el volumen deseado. Suelte el pulsador MON [10]. idamente el canal, mantenga pulsado una de las teclas / [6] hasta que quede seleccionado el b) Ajustes del equipo a situar cerca del bebé natural, con las pausas habituales, sin que la transmisión se interrumpa. Ahora el equipo está a punto para transmitir / recibir. canal deseado. Seleccione un canal b- (por ejemplo b1) mediante las teclas / [6]. El display muestra Vox que tico subtono. El equipo permanecerá en silencio hasta que reciba el subtono CTCSS correcto. 2. Iluminación Display [7], el display se ilumina durante aproximadamente 10 segundos. 2. Pulse dos veces F [8] hasta que el display muestre el canal seleccionado con el actual subtono d2: retardo medio (1 segundo) › Activación DW (Doble Escucha) 3. Seleccione el subtono CTCSS pulsando las teclas / [6]. d3: retardo mayor (1,5 segundos) › Activación/Desactivación Roger Beep 4. Para confirmar la selección, pulse › Activación/Desactivación sonido teclado Ahora el equipo transmite y recibe utilizando el subtono CTCSS seleccionado. Si no desea operar › Función "Fuera de Cobertura" con ningún subtono, seleccione 00. › Transmisión de la señal de alarma 1. Activación/Desactivación de la función VOX › Reset 3. Seleccione el nivel deseado de sensibilidad VOX (originalmente, nivel 2) y el icono 5. Activación/Desactivación del sonido del teclado su equivalencia en frecuencias. 00 = sin subtono) TECLA VOX [8] desaparece del display. 1. Apague el equipo 4. Pulse F [8] siete veces hasta que "OFF" 1. Seleccione el canal deseado mediante / [6] MODO FUNCION (TECLA F [8]) El Roger beep está ahora desactivado y el icono Activación subtonos CTCSS: CTCSS parpadeando (00 - 38; para mayor información vea la tabla anexa de subtonos CTCSS y 1) Pulse repetidamente F [8] hasta que en el display aparezca "oN" con la palabra Beep parpadean- 6. Confirme pulsando do. bolo 2) Pulse / [6] y seleccione "oFF". 3) Pulse parpadeen en el display 5. Mediante / [6] seleccione "ON" u "OFF". [7] para confirmar la programación; la palabra Beep desaparecerá del display. [7] : si la función ha sido activada, se visualizará en el display el sím- . Esta función, después de haber sido seleccionada, necesita un minuto para activarse. Cuando el sensor detecte un ruido causado por la rotura de un vidrio u otra vibración, 6. Función "Fuera de Cobertura" (Out of Range) Gracias a esta función, una pareja de ALAN 443 se transmiten un código de control cada 30 segun- enviará una señal de alarma al otro equipo; después de unos segundos, el equipo al cual está conectado, emitirá un tono de alarma. dos. Apenas se interrumpa esta transmisión y uno de los dos equipos no reciba el código dos veces 3. Función DW (Doble Escucha) Pulse la tecla VOX [8] durante más de dos segundos: se oirán 2 beeps y la palabra Vox Nota: en el modo Función, la iluminación del display se activa pulsando la tecla MON [10] misión de iniciará automáticamente. Desactivación de la función VOX 1. Envío señal audio En el ALAN 443, el filtro para la eliminación del ruido de fondo (squelch) está siempre activo. Para Las siguientes funciones se seleccionan pulsando la tecla F: aparecerá en el display para confirmar la activación. Hable cerca del micrófono [5]: la trans- Seleccione el canal E- equivalente (en nuestro ejemplo, E1) mediante las teclas / [6]. Pulsando la tecla CALL [9], el ALAN 443 envía una señal sonora de aviso/llamada al resto de › Selección subtonos CTCSS [7] para confirmar la selección do en las proximidades de él, conmutará automáticamente a transmisión. c) Ajustes del equipo que monitoriza ción Babysitter. Los canales de b1 a b0 tienen la función VOX activada: el equipo sintonizado en uno d1: retardo menor (0,5 segundos) 5. Pulse confirma la activación de la función Babysitter. Cuando el equipo detecte un ruido genera- Eliminación del ruido de fondo / ampliación de la cobertura (Squelch) serie de beeps de diversa tonalidad (excluibles); durante un segundo se efectúa un auto-test y el dis- Al pulsar la tecla 2 - Vox Nivel Vox OFF OFF OFF OFF El ALAN 443 dispone de una serie de canales pre-programados (b- y E-) que se utilizan en la fun- Gire el mando ON-OFF VOLUME [1] en sentido horario hasta que note un clic. ALAN 443 emitirá una 2 Tono una señal se indicará mediante el icono Encendido L Canal Frequencia CTCSS 5 446.05625 MHz 6 446.06875 MHz 7 446.08125 MHz 8 446.09375 MHz 2. Activación de los canales Toma MIC/CHG [13] ¡Y AHORA, LISTO PARA COMUNICAR! el display [3] visualiza el nivel de sensibilidad actual 446.00625 MHz 446.01875 MHz 446.03125 MHz 446.04375 MHz Vox Nivel Vox OFF OFF OFF OFF TECLA CALL [9] Al soltar el PTT [11] su radio quedará en modo de escucha, indicando el display (opcional). 14 1 2 3 4 Tono CTCSS - Escuchar (recibir) Toma para cargador de baterías. Recomendamos cargar las baterías sólo con el cargador MW904 2. Enciéndalo manteniendo pulsada la tecla CALL [9]; ESPAÑOL . Cuando acabe de hablar, suelte el PTT [11]. Su ALAN 443 enviará al inter- locutor una señal de fin de transmisión (Roger beep) Porta baterías Desplace la lengüeta X hacia abajo, quite la tapa levantándola a través de la lengüeta e inserte 3 baterías AAA alcalinas o recargables. Atención: las baterías alcalinas no pueden ser recargadas 1 ¡Enhorabuena! Su ALAN 443 es un equipo totalmente nuevo del tipo pmr446 que puede ser utilizado, sin necesidad de licencia en todos los países europeos indicados en la tabla “Restricciones al uso”. Mantenga pulsado el PTT [11]. Hable a una distancia de unos 4-10 cm con un tono de voz normal. En el display [3] se visualiza 2 Canal Frequencia Llamar (transmitir) consecutivas, el icono Nota: Para esta función es necesario que dos ALAN 443 estén sintonizados en el mismo Activación/Desactivación función "Fuera de Cobertura" canal y subtono CTCSS. La función de alarma deberá ser activada sólo en el equipo al cual 1) Seleccione el primer canal que desea monitorizar mediante / [6]. 1. Seleccione el canal deseado mediante / [6] va conectado el sensor de alarma. 2) Pulse varias veces F [8] hasta que en el display parpadee DW. 2. Pulse F [8] seis veces hasta que aparezca en el display "OFF" 3) Seleccione ahora el segundo canal a monitorizar mediante las teclas / [6]. 1. Función SCAN comenzará a parpadear en el display y el equipo emitirá un beep. Esta función le permite monitorizar dos canales cualesquiera. Para activarla: y parpadee el icono 8. Reset Pulse la tecla VOX [8] durante más de dos segundos: se oirán 2 beeps y la palabra Vox Permite la exploración de todos los canales para ver cuáles están ocupados. En presencia de una Ahora podrá observar que el equipo cambia cíclicamente de un canal al otro hasta que detecte una 3. Seleccione "ON" o "OFF" mediante / [6] Si detecta un funcionamiento anómalo en la radio o si desea cancelar todas las programa- desaparecerá del display. señal en un canal (probablemente una conversación), la exploración se parará para permitirle señal en uno de ellos. En ese momento, el DW se interrumpirá momentáneamente hasta que desa- 4. Confirme pulsando ciones implementadas en ella basta con efectuar un reset encendiendo la radio mientras se escucharla. Transcurridos 5 segundos después de finalizar la señal, la exploración comenzará de parezca la señal, reanudándose de inmediato. Para interrumpir esta función, pulse PTT [11], CALL 5. Repita idéntico procedimiento con el otro equipo mantiene pulsada la tecla F [8] durante dos segundos. De esta manera se obtienen los nuevo. [9] o Activación dispositivo "Fuera de Cobertura" ajustes originales de fábrica. Si después de efectuar esta operación el problema persiste, 1. Habilite la función "Fuera de Cobertura" siguiendo el procedimiento descrito anteriormente diríjase a su distribuidor o contacte con nuestro Servicio de Asistencia Post-Venta llamando 2. Apague los dos equipos al 902 38 48 78 o bien, mediante el envío de un correo electrónico a [email protected] 2. Activación/Desactivación modo función Vea el capítulo "MODO FUNCION (Tecla F)" 4. Roger beep: tono confirmación fin de conversación 2) Pulsando o [6] activará la exploración. [7] 3) Para interrumpir la exploración basta con pulsar PTT [11], CALL [9] o 1. Bloqueo del teclado Mantenga pulsada la tecla play aparecerá del display ( que indica su activación. PTT [11], MON [10], CALL [9] y la iluminación ) permanecen activas. Oirá dos beeps y el símbolo Al soltar el PTT [11], por lo tanto al final de cada transmisión, el equipo emite una tonalidad que indi[7] desaparecerá del display 2. Selección subtonos CTCSS El ALAN 443 puede comunicarse de dos formas: [7] durante más de 2 segundos. a) tráfico abierto: en este caso, oirá todas las conversaciones existentes en el canal seleccionado b) modo de grupo: los subtonos CTCSS actúan como un código de acceso y le permiten comunicarse sólo con aquellos usuarios que, además de sintonizar el mismo canal, hayan activado idén- 3. Enciéndalos de nuevo uno después del otro y no al mismo tiempo en un margen de 5 segundos ca a su interlocutor que puede comenzar a hablar. En el ALAN 443, esta función está activada por defecto y se indica en el display mediante el icono [7] durante más de 2 segundos: oirá dos beeps y en el dis- Para desactivar el bloqueo, pulse nuevamente la tecla [7] Activación: 1) Pulse la tecla F [8] hasta que en el display parpadee Scan. TECLA ESPAÑOL 17-07-2003 . 7. Activación/Desactivación "Modo Transmisión Alarma" Desactivación: Para fijar el sensor de alarma (opcional), siga las instrucciones del propio sensor (mod. AS443) 1. Pulse repetidamente la tecla F [8] hasta que en el display aparezca 1. Conecte el sensor en la toma MIC CHG [13] del equipo parpadeando. 2. Con las teclas / [6] seleccionará "oFF". 3. Pulse 2. Mediante / [6] seleccione un canal y un subtono CTCSS con una frecuencia alta (por ejemplo, canal 5, subtono CTCSS 32) [7] para confirmar la selección. ® Accessori originali - Original accessories Accessoires originals - Originalzubehör Accessorios originales Consultate il nostro sito www.cte.it per l’elenco aggiornato degli accessori compatibili. For a detailed and updated list of suitable accessories, please go to www.cte.it Eine ständig aktualisierte Übersicht für passendes Zubehör können Sie auf unserer website www.alan-germany.com abrufen oder Sie informieren sich über Neuerungen bei Ihrem Fachhändler. Pour voir la liste de nôtres accessoires compatibles, vous pouvez consulter notre website www.cte.it Consulte nuestra web www.alan.es para una lista actualizada de los accesorios compatibles The Wo r l d in Communication Prodotto o importato da: CTE INTERNATIONAL s.r.l. Via. R.Sevardi 7- 42010 Mancasale - Reggio Emilia Italia Tel. +39 0522 509411 Website: www.cte.it e-mail: [email protected] L’uso di questo apparato può essere soggetto a restrizioni nazionali. Prima dell'uso leggere attentamente le istruzioni. Se il prodotto contiene batterie: non gettare nel fuoco, non disperdere nell’ambiente dopo l’uso, usare gli appositi contenitori per la raccolta. Produced or imported by: CTE INTERNATIONAL s.r.l. Via. R.Sevardi 7 - 42010 Mancasale - Reggio Emilia Italy Tel. +39 0522 509411 Website: www.cte.it e-mail: [email protected] The use of this transceiver can be subject to national restrictions. Read the instructions carefully before installation and use. If the product contains dry cells or rechargeable batteries do not throw the batteries into the fire. To disperse after use, throw into the appropriate containers. Produced or imported by: ALAN UK Unit 2, Callenders, Paddington Drive, Churchward Park, Swindon, Wiltshire, SN5 7YW United Kingdom Tel. +44 1793 882431 e-mail: [email protected] The use of this transceiver can be subject to national restrictions. Read the instructions carefully before installation and use. If the product contains dry cells or rechargeable batteries do not throw the batteries into the fire. To disperse after use, throw into the appropriate containers. Producido o importado por: ALAN COMMUNICATIONS, S.A. C/Cobalto, 48 - 08940 Cornellà de Llobregat - España Tel 902 38 48 78 Website: www.alan.es El uso de este equipo puede estar sujeto a restricciones nacionales. Antes de utilizar, lea atentamente el manual de uso. Si el producto contiene pilas o baterias: no las tire al fuego ni las disperse en el ambiente después de su uso, utilice los contenedores especiales para su recogida. Herstellung/Vertrieb durch: ALAN ELECTRONICS GmbH Daimlerstraße 1k - D-63303 Dreieich Deutschland Telefon ++49 6103 9481-0 Website: www.alan-germany.com Email: [email protected] Die Benutzung dieses Handfunkgerätes ist von den landesspezifischen Bestimmungen abhängig. Vor Benutzung Bedienungsanleitung beachten. Bei Verwendung von Batterien beachten Sie bitte die Umweltbestimmungen. Batterien niemals ins offene Feuer werfen und nur in den dafür vorgesehenen Sammelbehälter entsorgen. ESPAÑOL ISTR443_5LINGUE