1
English
Deutsch
Français
Owner’s Manual
Bedienungsanleitung
Mode d’emploi
Manuale dell'utente
Manual del usuario
Manual do proprietário
Gebruikershandleiding
Italiano
Español
Português
Nederlands
For the USA
Model Name :
Type of Equipment :
Responsible Party :
Address :
Telephone :
DECLARATION OF CONFORMITY
Compliance Information Statement
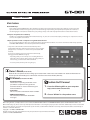
GT-001
Guitar Effects
Roland Corporation U.S.
5100 S. Eastern Avenue, Los Angeles, CA 90040-2938
(323) 890-3700
FEDERAL COMMUNICATIONS COMMISSION
FREQUENCY
STATEMENT
Model RADIO
Name : V-STUDIO
20 (Model Number: INTERFERENCE
VS-20)
For the USA
Type of Equipment : USB Audio Controller
This
equipment Party
has been
tested and
Responsible
: Cakewalk
Inc. found to comply with the limits for a Class B digital device, pursuant to Part 15 of the
FCC Rules. Address
These limits
designed
toBoston,
provideMA
reasonable
protection against harmful interference in a residential
: 268are
Summer
Street,
02210
installation.Telephone
This equipment
generates,
uses, and can radiate radio frequency energy and, if not installed and used in
423-9004
: 02210(617)
accordance with the instructions, may cause harmful interference to radio communications. However, there is no guarantee
that interference will not occur in a particular installation. If this equipment does cause harmful interference to radio or
Namewhich
: FP-80
televisionModel
reception,
can be determined by turning the equipment off and on, the user is encouraged to try to correct the
Type of Equipment
Digital
Piano
interference
by one or: more
of the
following measures:
Corporation
U.S.
Responsible
: Roland
– Reorient Party
or relocate
the receiving
antenna.
5100
S.
Eastern the
Avenue
Los Angeles,
CA 90040-2938
Address
:
– Increase the separation between
equipment
and receiver.
Telephone
: (323) 890-3700
– Connect
the equipment
into an outlet on a circuit different from that to which the receiver is connected.
– Consult the dealer or an experienced radio/TV technician for help.
This device complies with Part 15 of the FCC Rules. Operation is subject to the following two conditions:
(1) this device may not cause harmful interference, and
(2) this device must accept any interference received, including interference that may cause undesired operation.
This equipment requires shielded interface cables in order to meet FCC class B limit.
Any unauthorized changes or modifications not expressly approved by the party responsible for compliance could void the user’s
authority to operate the equipment.
For Canada
CAN ICES-3 (B)/NMB-3 (B)
For Korea
WARNING
For C.A. US (Proposition 65)
This product contains chemicals known to cause cancer, birth defects and other reproductive harm, including lead.
Owner’s Manual
English
Main Features
New COSM amps
These newly remodeled COSM amps offer a distillation of all the sound creation know-how that we’ve built up over the years. They
represent a further evolution that goes beyond conventional vintage amp modeling. From pristinely transparent clean sounds, to
extreme high-gain sounds, these models allow your picking to freely control the amp’s dynamic behavior and its subtle nuances.
The GT-001 is equipped with a USB audio interface function (p. 11). You can record sounds easily by connecting to a computer. You can also
connect a microphone to the GT-001.
Deutsch
Compact size perfect for a tabletop
Simple operations with a computer using dedicated software
You can control the GT-001, edit tones, and manage patches using dedicated software. You can also download a wide variety of patches
from BOSS TONE CENTRAL, our dedicated patch download website.
Français
* The power to this unit will be turned off automatically after a
predetermined amount of time has passed since it was last used for
playing music, or its buttons or controls were operated (Auto Off
function).
If you do not want the power to be turned off automatically,
disengage the Auto Off function (p. 13).
Italiano
• Any settings that you are in the process of editing will be lost
when the power is turned off. If you have any settings that you
want to keep, you should save them beforehand.
• To restore power, turn the power on again (p. 2).
• MIDI Implementation
This is detailed information about MIDI
messages.
1. Enter the following URL on your computer.
http://www.roland.com/manuals/
I
2. Choose “GT-001” as the product name.
Before using this unit, carefully read the sections entitled “USING THE UNIT SAFELY” and “IMPORTANT NOTES” (leaflet “USING THE UNIT SAFELY” and
Owner’s Manual (p. 15)). These sections provide important information concerning the proper operation of the unit. Additionally, in order to feel assured
that you have gained a good grasp of every feature of your new unit, read the Owner’s Manual in its entirety. This manual should be saved and kept on
hand as a convenient reference.
Copyright © 2014 BOSS CORPORATION
All rights reserved. No part of this publication may be reproduced in any form without the written
permission of BOSS CORPORATION.
Nederlands
• Sound List
This is a list of the sounds built into the GT-001.
To obtain the PDF manual
Português
PDF Manual (download from the Web)
• Parameter Guide
Information on operating the GT-001 and all
parameters is explained in this guide. The
Parameter Guide can also be viewed using the
dedicated software.
Español
Owner’s Manual (this document)
Read this first. It explains the basic things you need to know in order to use the GT-001. For detailed information on
how to operate the GT-001, please download and refer to “Parameter Guide” (PDF file).
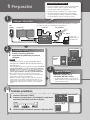
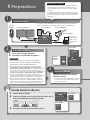
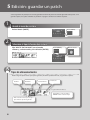
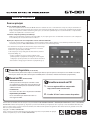
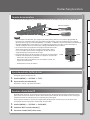
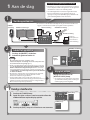
Precautions when connecting
1 Getting Ready
1
* To prevent malfunction and equipment failure, always turn
down the volume, and turn off all the units before making
any connections.
* When connection cables with resistors are used, the
volume level of equipment connected to the inputs (AUX
IN) may be low. If this happens, use connection cables that
do not contain resistors.
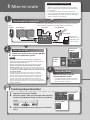
Connect the equipment
* By embedding the AC adaptor cable into the groove on the bottom of the
GT-001, you can prevent the plug from being accidentally disconnected.
PHONES jack OUTPUT jacks
DC IN jack
GUITAR IN jack
AUX IN jack
Connect an audio
player with a
stereo mini jack
2
[ON/OFF] switch
Turn on the power
1. Turn on the [ON/OFF] switch.
2. Switch on the power of the guitar amp.
[OUTPUT
LEVEL]
knob
MEMO
When connected to a computer, the AC adaptor
is unnecessary because power is supplied by the
computer (p. 11).
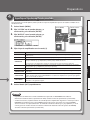
* After you’ve made connections correctly, be sure to turn on
the power in the order of the GT-001 first, and then the
connected system. Powering-on in the incorrect order may
cause malfunctions or damage. When turning the power off,
power-off the connected system first, and then the GT-001.
* This unit is equipped with a protection circuit. A brief interval (a
few seconds) after turning the unit on is required before it will
operate normally.
* Before turning the unit on/off, always be sure to turn the volume
down. Even with the volume turned down, you might hear some
sound when switching the unit on/off. However, this is normal
and does not indicate a malfunction.
3
Adjust the volume
Adjust the volume with the
[OUTPUT LEVEL] knob.
* The volume of an audio player connected to
the AUX IN jack should be adjusted using its
own volume controller.
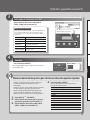
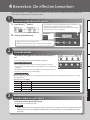
Convenient tuner function
1. Press the [TUNER] button.
2. Play an open string, and tune it so that only the center
[EXIT] button
indicator in the screen is lit.
[TUNER] button
3. When you finish tuning, press the [EXIT] button.
2
Getting Ready
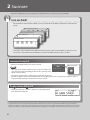
4
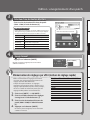
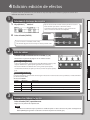
Specify the type of amplifier you have connected
1. Press the [MENU] button.
2. Choose “SYSTEM” with the value knob, and press the
[ENTER] button
English
In order to ensure optimal sound, you should specify the type of amp you’ve connected to the GT-001. Please
take a moment to do this.
Value knob
[ENTER] button.
[ENTER] button.
Deutsch
3. Choose “OUTPUT” with the value knob, and press the
[MENU] button
Knob [4]
Français
4. Choose the type of amp with knob [4].
Explanation
JC-120
Choose this if connected to the guitar input of a Roland JC-120 guitar amp.
SMALL AMP
Choose this if connected to a small guitar amp.
COMBO AMP
Choose this if connected to the guitar input of a combo-type guitar amp (i.e., a single unit that
contains the amp and speaker) other than the JC-120.
Italiano
Value
For some types of guitar amps, the “JC-120” setting might produce better results.
STACK AMP
Choose this if connected to the guitar input of a stack-type guitar amp (i.e., one in which the amp and
speaker are separate units).
Choose this if connected to the RETURN jack of the JC-120.
COMBO RETURN
Choose this if connected to the RETURN jack of a combo-type guitar amp.
STACK RETURN
Choose this if connected to the RETURN jack of a stack-type guitar amp. You should also choose
“STACK RETURN” if you’re using a guitar power amp together with a speaker cabinet.
LINE/PHONES
Choose this if you’re using headphones, or if the GT-001 is connected to monitor speakers, mixer, or
digital recorder.
Español
JC-120 RETURN
Português
5. Press the [EXIT] button a number of times.
Nederlands
MEMO
• The SP TYPE parameter is valid only if OUTPUT is set to “LINE/PHONES.” For details on the SP TYPE
parameter, refer to “Parameter Guide” (PDF file).
• When using headphones, you won’t be able to obtain a sound that is typical of a guitar amp unless
you turn on PREAMP. We recommend that you turn on PREAMP whenever you’re using headphones. To
turn on PREAMP, as shown in procedure 1 in "4 Editing: Editing the Effects" (p. 7), choose [EFFECT]"“Pr
A” or “Pr B” and press the value knob. For details about PREAMP settings, refer to “Parameter Guide”
(PDF file).
3
2 Playing
Now that you’re finished with the preparations, you can get started playing the GT-001.
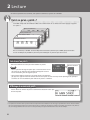
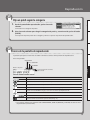
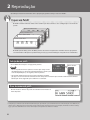
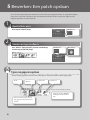
What is a Patch?
The GT-001 contains numerous effects. A combination of these effects and their settings is called a
“patch.”
Preset patch P200
Preset patch P001
User patch U200
User patch U001
Built in to its memory, the GT-001 has 200 (starting from U001) user patches that can be overwritten, and
200 preset patches (starting from P001) that cannot be overwritten.
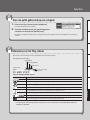
Selecting a patch
Rotate the value knob to scroll through the patches.
Value knob
MEMO
• You can’t switch patches unless you’re in the Play screen (p. 5).
Press the [EXIT] button to return to the Play screen, and then
switch patches.
• You can assign four of your favorite patches to buttons [A]–[D],
and call them up instantly. Choose a patch and continuously hold down one of the buttons for several
seconds to assign it to that button.
Patch number display
The display shows the currently selected patch number and the patch
name.
* The explanations in this manual include illustrations that depict what should typically be shown by the display. Note, however, that
your unit may incorporate a newer, enhanced version of the system (e.g., includes newer sounds), so what you actually see in the
display may not always match what appears in the manual.
4
Playing
Choose a patch based on a category
English
1. When in the Play screen, press the value knob.
The patch categories are displayed.
2. Rotate the value knob to choose the patch category,
and then press the [ENTER] button.
Deutsch
This calls up the first patch in the selected category, and returns to the Play screen.
Français
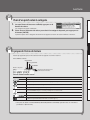
About the Play screen
The screen that appears after you turn on the power is called the “Play screen.”
Italiano
Icons in the display
MASTER BPM
OUTPUT setting
PREAMP Channel
Patch number
Icon
Español
Phantom power
on/off
Explanation
Português
Displays the MASTER BPM.
This is displayed when OUTPUT is set to anything other than LINE/PHONES.
This is displayed when OUTPUT is set to LINE/PHONES.
When the DIVIDER mode is Single, preamp channel “A” is selected.
Nederlands
When the DIVIDER mode is Single, preamp channel “B” is selected.
This is displayed if the DIVIDER mode is Dual.
,
,
This icon is highlighted if the SOLO SW is on.
This is displayed when the phantom power is on (p. 13).
* For details about MASTER BPM, SOLO SW, OUTPUT, and DIVIDER, refer to “Parameter Guide” (PDF file).
5
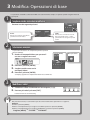
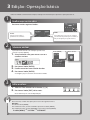
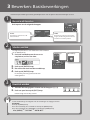
3 Editing: Basic Operation
1
Editing on the GT-001 is extremely simple. Please take a moment to learn the basic operations.
Choose what you’re going to edit
Press one of the following buttons.
2
EFFECT
MENU
Here you can edit the parameters
of each effect.
This lets you access output settings, or
let you set the desired functions for
external pedals.
Select an item
The procedure below is an example when you press the
[MENU] button.
1. Rotate the value knob to move the cursor and
[ENTER] button
choose an item.
2. Press the [ENTER] button.
3. Choose another item with the value knob.
4. Press the [ENTER] button.
The setting for your selected item is displayed.
3
Edit the values
1. Change the displayed value with knobs [1]–[4].
2. Press the [EXIT] button a number of times.
You are returned to the Play screen.
In this manual, the order of operations is written as follows.
Example:
Press the [MENU] button.
Rotate the value knob and choose “SYSTEM,” and then press the [ENTER] button.
Rotate the value knob and choose “AUTO OFF,” and then press the [ENTER] button.
Choose [MENU]"“SYSTEM”"“AUTO OFF.”
6
Value knob
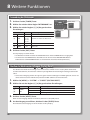
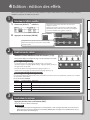
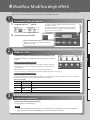
4 Editing: Editing the Effects
1
You can edit the parameters of each effect in the patch. Here we’ll show an example of editing the distortion of
the overdrive effect.
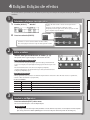
Select the effect that you want to edit
Choose an effect using the value knob to move the cursor.
Press the knob to turn the effect on or off.
While Pressing down the knob and rotating it moves the
position of the effect left or right.
[ENTER] button
Deutsch
2. Press the [ENTER] button.
English
1. Choose [EFFECT]"“OD/DS.”
(Only if the cursor is located at FX1 or FX2)
Use knob [4] to select the effect type for FX1 or FX2.
Français
2
Edit the values
Change the value that is displayed with knobs [1]–[4].
Italiano
You can move the page tab with the value knob.
Convenient Quick Settings
If you select a page tab that shows “QS,” you’ll be able to easily call up settings
(Quick Settings) that have been saved for each effect.
Español
For details on how to save Quick Settings, refer to "Storing settings by effect
(Quick Setting write)" (p. 9).
What does each knob do?
The function (parameter) of each knob will differ depending on the effect. For a list of all parameters, refer to “Parameter
Guide” (PDF file).
When selecting OD/DS
Operation
Explanation
TYPE
Switches the type of overdrive/distortion.
[2]
DRIVE
Adjusts the amount of overdrive/distortion.
[3]
TONE
Adjusts the tone quality. Higher values produce a sharper tone.
[4]
E. LEVEL
Adjusts the volume when the effect is being applied.
Português
Nederlands
3
Knob
[1]
Finish making settings
Press the [EXIT] button a number of times.
You’ll be returned to the Play screen.
NOTE
The edits you made here will be lost if you switch patches. If you want to keep the patch you created,
press the [WRITE] button to save your edits as a user patch (p. 8).
7
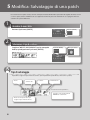
5 Editing: Saving a Patch
When you want to save a patch you have created, save it as a user patch by following the procedure below. If you
do not save the patch, the edited settings will be lost when you turn off the power or switch to another patch.
1
Access the Write menu
Press the [WRITE] button.
2
[WRITE] button
Select the type of write function
Choose “WRITE” (PATCH RIGHT) with the value
knob, and press the [ENTER] button.
[ENTER] button
Value knob
Types of saving
You can choose the type of data to be saved. (By default, the patch will be saved.)
Name
Save
Exchange
Initialize
And if you turn the value knob...
Exchange or copy PREAMP
settings between channels A
and B.
Turn the value knob to choose the
type of data to save.
8
Editing: Saving a Patch
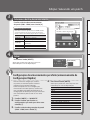
3
Select the write destination
English
Choose the patch write destination
(U001−U200) with knob [4].
Assigning a name
To edit the patch name, choose "INFO" from the types of
saving (p. 8), use the value knob to move the cursor and
use knob [4] to change the character.
Selects the category
Knob [2]
Selects the type of characters
Knob [3]
Switches you between lowercase/
uppercase characters
Knob [4]
Changes the character
Value knob
Moves the cursor
Français
Operation
Knob [1]
Deutsch
4
Controller
Choose the write destination
Press the [WRITE] button.
Italiano
Save
[WRITE] button
Once the patch has been saved, you are returned
to the Play screen.
Español
Storing settings by effect (Quick Setting write)
settings you wish to save with knob [1].
3. Choose the patch write destination
(U001−U200 with knob [2].
Each PREAMP channel
OD/DS
DELAY
CHORUS
REVERB
COMP
Nederlands
1. Choose [WRITE]"“QS WRITE.”
2. Choose the effect containing the
Effects that can be stored in memory
Português
In addition to storing settings in the form of patches,
you can also store settings for individual effects.
Since you can use such stored settings in other
patches, just like with the Preset Quick Setting,
having the effect settings you like stored ahead
of time can come in handy when creating new
patches.
EQ
The PEDAL FX’s WAH and PEDAL BEND
DIVIDER
Each FX1/FX2 effect
ASSIGN 1–8
4. Press the [WRITE] button.
Once the patch has been saved, you are
returned to the Play screen.
9
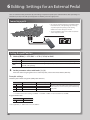
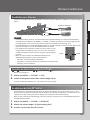
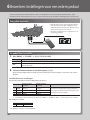
6 Editing: Settings for an External Pedal
You can control various parameters by connecting an expression pedal (such as Roland EV-5: sold separately) or a
footswitch (FS-5U, FS-6: sold separately) to the CTL/EXP jack on the right panel.
Connecting a pedal
* Use only the specified expression pedal (Roland EV-5,
FV-500H, FV-500L; sold separately). By connecting
any other expression pedals, you risk causing
malfunction and/or damage to the unit.
* You can’t simultaneously connect both a footswitch
and an expression pedal.
Setting the pedal function
1. Choose [MENU]"“CTL/EXP”"“CTL1,” “CTL2,” or “EXP.”
Setting
Explanation
[CTL1]/[CTL2]
This sets the function to be controlled using a footswitch (such as the FS-5U or FS-6: sold separately).
[EXP]
This sets the function to be controlled using an expression pedal (such as the Roland EV-5, FV-500L, or
FV-500H: sold separately).
2. Set the parameter values with knobs [1]–[4].
For details about assigning functions to external pedals, refer to “Parameter Guide” (PDF file).
Example settings
Switch the patch numbers using CTL1/2 (A/B pedals of the FS-6)
Parameter
Value of CTL1 (B pedal) Value of CTL2 (A pedal) Explanation
[1]
[2]
[3]
[4]
NUMBER INC
OFF
ON
TOGGLE
FUNC
MIN
MAX
MODE
NUMBER DEC
OFF
ON
TOGGLE
Switches to the next higher patch number using the B
pedal. Switches to the next lower patch number using
the A pedal.
* In addition to the above setting, set “MENU”"“SYSTEM”"“PREF”"“CTL1” and “CTL2” to “SYSTEM.”
Assign the WAH for EXP
Parameter
Value
[1]
WAH
FUNC
* Choose [EFFECT]"‘’PEDAL” and turn on the “PEDAL.”
10
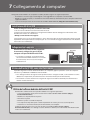
7 Connecting to a Computer
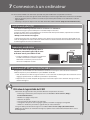
By connecting the GT-001 to a computer via USB, you can do the following.
• Transmit and receive digital audio signals and MIDI messages between the computer and the GT-001
• Edit and manage patches, and display the Parameter Guide (PDF file) on a computer using the dedicated
software
• Download patches from our dedicated BOSS TONE CENTRAL (http://bosstonecentral.com/) website
English
Installing the USB driver
&http://www.roland.com/support/
The program you need to use, and the steps you need to take to install the USB driver will differ depending
on your computer setup, so please carefully read and refer to the Readme.htm file that comes with the
download.
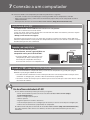
Using a commercially available USB cable,
connect the USB port of your computer with
the USB port of the GT-001.
Français
Connecting to a computer
Deutsch
You must install the USB driver before connecting to a computer:
Please download the USB driver from the website shown below.
Install this special driver before making a USB connection. For further details, refer to the Readme.htm file
that comes with the download.
USB port
Italiano
* When the GT-001 is connected to a computer
via USB, power is supplied from the computer.
Therefore, it is unnecessary to connect the AC
adaptor.
Español
Using the GT-001 as an audio interface
Record the sound of the GT-001 on your computer, or have sound from your computer be output from the
GT-001’s OUTPUT jacks or PHONES jack.
* For details of the audio signal flow when connected via USB and instructions on how to make settings,
refer to “Parameter Guide” (PDF file).
Português
* Refer to the instruction manual for the software you are using to learn how to switch the input source of
the software.
Making use of the GT-001’s dedicated software
Nederlands
Using the dedicated software allows you to do the following:
• Easily download patches from our BOSS TONE CENTRAL (http://bosstonecentral.com/) website
• Edit patch settings
• Name patches
• Organize patches in order and switch them around
• Back up patches and system settings, and return to the backed up settings
• Display the “Parameter Guide” (PDF file) on your computer
The dedicated software can be downloaded from our BOSS TONE CENTRAL (http://bosstonecentral.
com/). For details on how to use the software, refer to the Readme.htm file that comes with the
download.
11
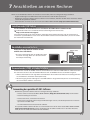
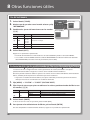
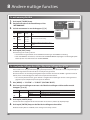
8 Other Useful Functions
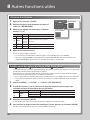
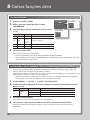
Using the Metronome
1. Press the [TUNER] button.
2. Move the tab with the value knob and choose
[EXIT] button
“METRONOME.”
3. Make Metronome settings with knobs [1]–[4].
Parameter
Value
Explanation
[1]
TEMPO
40–250
Specifies the tempo of the metronome.
[2]
BEAT
1/1–8/1,
1/2–8/2,
1/4–8/4,
1/8–8/8
Selects the time signature.
[3]
OFF/ON
OFF, ON
Turns the metronome on/off.
[4]
LEVEL
0–100
Adjusts the volume of the metronome.
[TUNER] button
4. Press the [EXIT] button.
You are returned to the Play screen.
* The metronome sound is output from the OUTPUT jacks and the PHONES jack.
* Changing the TEMPO will also change the MASTER BPM. For the detail on MASTER BPM, refer to
“Parameter Guide” (PDF file).
Restoring the factory default settings (Factory Reset)
Restoring the GT-001’s system settings (System parameters) to their original factory default settings is
referred to as “Factory Reset.”
Not only can you return all of the settings to the values in effect when the GT-001 was shipped from the
factory, you can also specify the items to be reset.
* When you execute “Factory Reset,” the settings you made will be lost. Save the data you need to your
computer using the dedicated software.
1. Choose [MENU]"“SYSTEM”"“F. RESET” (FACTORY RESET)
2. Choose the type of settings to be restored to the factory default settings with knobs [1]
and [4].
Knob
Parameter
[1]
FROM
[4]
TO
Value
Explanation
SYSTEM
System parameter settings
QUICK
Settings for User Quick Setting
U001–U200
Settings for Patch Numbers U001−U200
3. Press the [WRITE] button.
If you decide to cancel without executing, press the [EXIT] button.
4. To execute the Factory Reset, press the [ENTER] button.
Once the Factory Reset is complete, you are returned to the Play screen.
12
Other Useful Functions
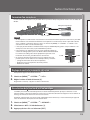
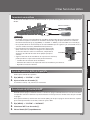
Connecting a microphone
By connecting a microphone to the MIC IN jack on the right-side panel, you can use it with the GT-001’s
effects.
English
Dynamic microphone
Condenser microphone
Deutsch
MEMO
3: COLD
Español
Adjusting the contrast (brightness) of the display
Italiano
• Changing the orientation of the microphone(s).
• Relocating microphone(s) at a greater distance from speakers.
• Lowering volume levels.
Français
• A condenser microphone, which requires phantom power, can be connected to the MIC IN jack. To supply
phantom power to the condenser microphone, follow the procedures in "3 Editing: Basic Operation" (p. 6),
choosing [MENU]"“SYSTEM”"“INPUT,” and selecting “ON” with the knob [4].
• The GUITAR IN jack for a guitar and the MIC IN jack cannot be used at the same time. If both jacks are
connected, the GUITAR IN jack takes precedence.
* This instrument is equipped with balanced (XLR) type jacks. A wiring
diagram for the jack is shown at right. Make connections after first
checking the wiring diagrams of other equipment you intend to
2: HOT
1: GND
connect.
* Acoustic feedback could be produced depending on the location of
microphones relative to speakers. This can be remedied by:
You can adjust the brightness of the display.
Português
1. Choose [MENU]"“SYSTEM”"“LCD.”
2. Adjust the value with the knob [4].
Raising the value (1−16) increases the brightness.
Turning off the Auto Off function
With the factory settings, this function is turned “ON” (power-off in 10 hours). If you want to have the power
remain on all the time, turn it “OFF.”
1. Choose [MENU]"“SYSTEM”"“AUTO OFF.”
2. Select “OFF” using the knob [1].
3. Press the [EXIT] button a number of times.
13
Nederlands
The GT-001 can turn off its power automatically. The power will turn off automatically when 10 hours
have passed since you last played or operated the unit. The display will show a message approximately
15 minutes before the power turns off.
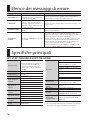
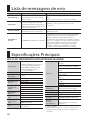
Error Message List
Message
Cause
MIDI BUFFER FULL!
The data cannot be processed
Reduce the volume of MIDI messages transmitted to the GT-001.
correctly due to the high volume of MIDI
Reduce the tempo of the transmitting MIDI device.
messages.
Action
USB OFFLINE!
Transmissions from the connected
device have been interrupted. This message also appears when the power to
the connected device has been turned
off. It does not indicate malfunction.
Check to make sure no cable is disconnected and that there are
no shorts.
DATA WRITE ERROR!
Writing to the memory for storage of
user data failed.
The unit may be damaged. Consult the nearest Roland service
center.
The setting for selecting whether each patch has different settings
for the control pedal, expression pedal, or other items, or whether
all patches share the same settings is called “Preference.”
PREFERENCE IS
SYSTEM!
The “PREFERENCE” is set to “SYSTEM.”
If Preference is set to “SYSTEM,” the patch assignment and manual
mode settings will be ignored. If you want to enable the settings
of the patch, change Preference for the corresponding parameter
to “PATCH.”
To set Preference, choose [MENU]"“SYSTEM”"“PREF,” and
select “PATCH” using the knobs[1]–[4].
Main Specifications
BOSS GT-001: GUITAR EFFECTS PROCESSOR
AD Conversion
24 bits + AF method
GUITAR IN jack: 1/4-inch phone type
* AF method (Adaptive Focus method)
This is a proprietary method from
Roland & BOSS that vastly improves
the signal-to-noise (SN) ratio of the AD
and DA converters.
MIC IN jack: XLR type, balanced, phantom
power (DC 48 V, 10 mA Max)
DA Conversion
24 bits
Sampling
Frequency
44.1 kHz
Patches
200 (User) + 200 (Preset)
AUX IN jack: Stereo miniature phone type
Connectors
PHONES jack: Stereo miniature phone
type
CTL/EXP jack: 1/4-inch TRS phone type
USB COMPUTER port: USB type B
GUITAR IN: -10 dBu
Nominal Input Level MIC IN: -40 dBu
AUX IN: -20 dBu
GUITAR IN: 1 M Ω
Input Impedance
MIC IN: 4 k Ω
AUX IN: 27 k Ω
Nominal Output
Level
Output Impedance
OUTPUT L/MONO, R: -10 dBu
PHONES: -10 dBu
OUTPUT L/MONO, R: 2 k Ω
PHONES: 44 Ω
Recommended
Load Impedance
OUTPUT L/MONO, R: 10 k Ω or greater
Display
Graphic LCD (132 x 32 dots, backlit LCD)
PHONES: 44 Ω or greater
OUTPUT (L/Mono, R) jacks: 1/4-inch
phone type
DC IN jack
Power Supply
AC adaptor or obtained via USB port
(USB bus power)
Current Draw
240 mA
Dimensions
Weight
Accessories
Options
(sold separately)
211 (W) x 135 (D) x 58 (H) mm
8-5/16 (W) x 5-3/8 (D) x 2-5/16 (H) inches
500 g
1 lb 2 oz
Owner’s Manual, Leaflet “USING THE UNIT
SAFELY”, AC adaptor
Dual Footswitch: FS-6
Expression Pedal: FV-500L/500H, Roland
EV-5
* 0 dBu = 0.775 Vrms
* In the interest of product improvement, the specifications and/
or appearance of this unit are subject to change without prior
notice.
14
USING THE UNIT SAFELY
WARNING
WARNING
To completely turn off power to the unit, pull out the plug
from the outlet
Be sure to use only the AC adaptor supplied with
the unit. Also, make sure the line voltage at the
installation matches the input voltage specified
on the AC adaptor’s body. Other AC adaptors
may use a different polarity, or be designed for
a different voltage, so their use could result in
damage, malfunction, or electric shock.
Deutsch
CAUTION
Concerning the Auto Off function
Precautions concerning use of phantom power supply
Always turn the phantom power off when
connecting any device other than condenser
microphones that require phantom power. You
risk causing damage if you mistakenly supply
phantom power to dynamic microphones, audio
playback devices, or other devices that don’t
require such power. Be sure to check the specifications of any
microphone you intend to use by referring to the manual that
came with it.
(This instrument’s phantom power: 48 V DC, 10 mA Max)
Italiano
IMPORTANT NOTES
• Before sending the unit away for
repairs, be sure to make a backup of
the data stored within it; or you may
prefer to write down the needed
information. Although we will do
our utmost to preserve the data
stored in your unit when we carry out
repairs, in some cases, such as when
the memory section is physically
damaged, restoration of the stored
content may be impossible. Roland
assumes no liability concerning the
restoration of any stored content that
has been lost.
Maintenance
• When turning the unit over, be careful
so as to protect the buttons and
knobs from damage. Also, handle the
unit carefully; do not drop it.
)
• Security Slot (
http://www.kensington.com/
(Left Panel)
Additional Precautions
• Any data stored within the unit can be
lost as the result of equipment failure,
incorrect operation, etc. To protect
yourself against the irretrievable loss
of data, try to make a habit of creating
regular backups of the data you’ve
stored in the unit.
• Roland assumes no liability
concerning the restoration of any
stored content that has been lost.
• Never strike or apply strong pressure
to the display.
Licenses/Trademarks
• This product contains eCROS
integrated software platform of eSOL
Co.,Ltd. eCROS is a trademark of eSOL
Co., Ltd. in Japan.
• ASIO is a trademark and software of
Steinberg Media Technologies GmbH.
• Roland, BOSS, and COSM are either
registered trademarks or trademarks
of Roland Corporation in the United
States and/or other countries.
15
Nederlands
• For everyday cleaning wipe the unit
with a soft, dry cloth or one that
has been slightly dampened with
water. To remove stubborn dirt, use a
cloth impregnated with a mild, nonabrasive detergent. Afterwards, be
sure to wipe the unit thoroughly with
a soft, dry cloth.
• Use only the specified expression
pedal (Roland EV-5, FV-500H, FV500L; sold separately). By connecting
any other expression pedals, you risk
causing malfunction and/or damage
to the unit.
Português
Repairs and Data
• Depending on the material and
temperature of the surface on which
you place the unit, its rubber feet may
discolor or mar the surface.
You can place a piece of felt or cloth
under the rubber feet to prevent this
from happening. If you do so, please
make sure that the unit will not slip or
move accidentally.
Español
Placement
Français
The power to this unit will be turned off
automatically after a predetermined amount of
time has passed since it was last used for playing
music, or its buttons or controls were operated
(Auto Off function). If you do not want the power
to be turned off automatically, disengage the
Auto Off function (p. 13).
English
Even with the power switch turned off, this
unit is not completely separated from its main
source of power. When the power needs to be
completely turned off, turn off the power switch
on the unit, then pull out the plug from the
outlet. For this reason, the outlet into which you
choose to connect the power cord’s plug should be one that is
within easy reach and readily accessible.
Use only the supplied AC adaptor and the correct voltage
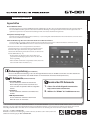
Bedienungsanleitung
English
Eigenschaften
Neue COSM-Verstärker
Das GT-001 besitzt neu gestaltete COSM Amp-Modelle auf Grundlage der über Jahre gesammelten Erfahrungen mit vorherigen Geräten.
Die neuen COSM-Verstärker gehen weit über das herkömmliche Modeling von Vintage-Verstärkern hinaus und ermöglichen ein sehr
dynamisches Spielen der verschiedenen Verstärkertypen inkl. deren unterschiedlichen Klangnuancen.
Das GT-001 besitzt eine USB Audio Interface-Funktion (S. 11) und ermöglicht dadurch Aufnahmen mit einem Rechner. Sie können an das
GT-001 auch ein Mikrofon anschließen.
Deutsch
Kompaktes Desktop Design
Einfache Bedienung über eine auf einem Rechner installierte Software
Sie können über eine spezielle Software das GT-001 über einen Rechner steuern, Tones editieren und Patches verwalten. Von der
Internetseite BOSS TONE CENTRAL können Sie alternative Patches herunter laden.
Français
* Das Gerät wird nach einer voreingestellten Zeit automatisch
ausgeschaltet, wenn es in der Zwischenzeit nicht bedient wurde
bzw. kein Audiosignal erkannt bzw. erzeugt hat. Wenn Sie die
automatische Abschaltung verhindern möchten, de-aktivieren Sie
die Auto Off-Funktion (S. 13).
Italiano
• Bei Ausschalten des Gerätes werden die bis dahin nicht
gespeicherten Änderungen gelöscht. Sichern Sie daher Ihre
Daten regelmäßig.
• Wenn das Gerät automatisch ausgeschaltet wurde, müssen Sie
dieses manuell wieder einschalten (S. 2).
1. Gehen Sie auf die folgende Internetseite:
http://www.roland.com/manuals/
2. Wählen Sie “GT-001” als Produktnamen aus.
•MIDI Implementation
Dieses Dokument enthält die detaillierten
MIDI-Adressen der Parameter.
Lesen Sie zunächst die Abschnitte “SICHERHEITSHINWEISE” und “WICHTIGE HINWEISE”” (separates Beiblatt “USING THE UNIT SAFELY” und Bedienungsanleitung S. 15). Diese geben Ihnen Auskunft über den sicheren Betrieb des Gerätes. Lesen Sie dann diese Anleitung ganz durch, um sich einen
vollständigen Überblick über alle Funktionen zu verschaffen. Bewahren Sie die Anleitung auf und verwenden Sie diese als Referenz.
Copyright © 2014 BOSS CORPORATION
Alle Rechte vorbehalten. Vervielfältigung, als Print oder Datei, als Ganzes oder in Teilen, bedarf einer
schriftlichen Genehmigung der BOSS CORPORATION.
Nederlands
•Sound List
Dieses Dokument enthält die Soundlisten des
GT-001.
Download der PDF-Dokumente
Português
PDF-Dokumente (Download via Internet)
•Parameter Guide
Dieses Dokument enthält eine detaillierte
Beschreibung der Parameter des GT-001 und
kann auch über die spezielle Software aufgerufen
werden.
Español
Bedienungsanleitung (dieses Dokument)
Dieses ist die Referenzanleitung, in der alle wichtigen Bedienschritte am GT-001 beschrieben sind. Eine detaillierte
Beschreibung der Parameter des GT-001 finden Sie im Dokument “Parameter Guide” (PDF-Datei).
1 Vorbereitungen
1
Wichtige Hinweise
* Um eventuellen Fehlfunktionen oder Beschädigungen
vorzubeugen, regeln Sie die Lautstärke auf Minimum
und lassen Sie die Geräte ausgeschaltet, wenn Sie neue
Kabelverbindungen vornehmen.
* Verwenden Sie für den AUX IN-Anschluss nur Audiokabel
ohne integrierten Widerstand, ansonsten wird die
Lautstärke des angeschlossenen Gerätes reduziert.
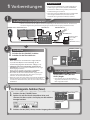
Anschließen von externem Equipment
* Führen Sie das Kabel des AC-Adapters durch die Aussparung an der Unterseite des GT-001, damit bei einer
eventuellen Zugbelastung das Kabel nicht abgezogen und die Stromversorgung unterbrochen wird.
PHONES-Buchse OUTPUT-Buchsen
DC IN-Buchse
GUITAR IN-Buchse
AUX IN-Buchse
Zum Anschluss
eines Audio
Players
(Miniklinke stereo)
2
[ON/OFF]-Schalter
Einschalten
1. Drücken Sie den [ON/OFF]-Schalter.
2. Schalten Sie den Verstärker ein.
[OUTPUT
LEVEL]Regler
HINWEIS
Wenn das Gerät an einem Rechner angeschlossen
ist, ist der AC-Adapter nicht notwendig, da die
Stromversorgung über den Rechner erfolgt (S. 11).
* Schalten Sie immer zuerst das GT-001 und danach den
Verstärker ein, ansonsten können Fehlfunktionen oder sogar
Beschädigungen auftreten.
Gehen Sie beim Auschalten umgekehrt vor: zuerst den
Verstärker ausschalten und danach das GT-001.
* Dieses Gerät ist mit einem Schutzschaltkreis ausgestattet, der
nach Einschalten überbrückt wird, daher dauert es ein paar
Sekunden, bis das Gerät betriebsbereit ist.
* Regeln Sie vor Ein- bzw. Ausschalten die Lautstärke auf Minimum.
Auch bei minimaler Lautstärke ist beim Ein- bzw. Ausschalten
noch ein leises Geräusch hörbar, dieses ist aber normal und keine
Fehlfunktion.
3
Einstellen der Lautstärke
Verwenden Sie den [OUTPUT
LEVEL]-Regler.
* Die Lautstärke des an der AUX IN-Buchse
angeschlossenen Gerätes muss am externen
Gerät eingestellt werden.
Die Stimmgeräte-Funktion (Tuner)
1. Drücken Sie den [TUNER]-Taster.
2. Spielen Sie auf der Gitarre eine offene Saite, und
[EXIT]-Taster
stimmen Sie diese so, dass im Display nur die mittlere
Anzeige leuchtet.
[TUNER]-Taster
3. Drücken Sie den [EXIT]-Taster, um den Vorgang abzuschließen.
2
Vorbereitungen
4
Bestimmen des am Gerät angeschlossenen Verstärkers
1. Drücken Sie den [MENU]-Taster.
2. Wählen Sie mit dem Value-Regler “SYSTEM”, und
[ENTER]-Taster
English
Um einen optimalen Sound zu erreichen, ist es sinnvoll, den angeschlossenen Verstärker im GT-001
auszuwählen.
Value-Regler
drücken Sie den [ENTER]-Taster.
drücken Sie den [ENTER]-Taster.
Deutsch
3. Wählen Sie mit dem Value-Regler “OUTPUT”, und
[MENU]-Taster
Regler [4]
Français
4. Wählen Sie mit Regler [4] den Verstärkertyp aus.
Einstellung
Beschreibung
JC-120
Der Sound des Roland JC-120 Verstärkers.
SMALL AMP
Der Sound eines kleinen Gitarren-Verstärkers.
STACK AMP
Der Sound eines Stack-Verstärkers (Amp und Lautsprecher in zwei getrennten Gehäusen).
JC-120 RETURN
Der Sound eines JC-120, der über die RETURN-Buchse angeschlossen ist.
COMBO RETURN
Der Sound eines Combo-Verstärkers, der über die RETURN-Buchse angeschlossen ist.
STACK RETURN
Der Sound eines Stack-Verstärkers, der über die RETURN-Buchse angeschlossen ist. Diese Einstellung
ist auch geeignet, wenn Sie einen Gitarren-Verstärker mi einem zusätzlichen Lautsprechergehäuse
verwenden.
LINE/PHONES
Verwenden Sie diese Einstellung, wenn Sie Kopfhörer verwenden oder wenn das GT-001 an MonitorLautsprechern, an einem Mixer oder Digital-Recorder angeschlossen ist.
Español
Bei einigen Verstärkern erzeugt die Einstellung “JC-120” eventuell ein besseres Ergebnis. Überprüfen
Sie dieses.
Italiano
Der Sound eines anderen Combo-Verstärkers als den JC-120.
COMBO AMP
Português
5. Drücken Sie mehrfach den [EXIT]-Taster.
Nederlands
HINWEIS
• Der Parameter SP TYPE steht nur zur Verfügung, wenn OUTPUT auf “LINE/PHONES” gestellt ist. Weitere
Informationen finden Sie im “Parameter Guide” (PDF-Datei).
• Bei Verwendung eines Kopfhörers erreichen Sie den typischen Sound eines Gitarren-Verstärkers nur
dann, wenn Sie die Funktion PREAMP aktivieren. Gehen Sie dafür wie folgt vor: Wählen Sie bei Vorgang
1 unter "4 Editieren: Verändern der Effekte" (S. 7) [EFFECT]"“Pr A” oder “Pr B”, und drücken Sie den
Value-Regler. Weitere Informationen finden Sie im Dokument “Parameter Guide” (PDF-Datei).
3
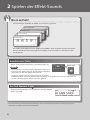
2 Spielen der Effekt-Sounds
Was ist ein Patch?
Die Einstellungen der Effekte des GT-001 sind in "Patches" organisiert.
Preset Patch P200
Preset Patch P001
User Patch U200
User Patch U001
Das GT-001 besitzt 200 User-Patches (beginnend mit U001), die frei eingestellt und gesichert werden
können, und 200 Preset-Patches (beginnend mit P001), die im Preset-Bereich nicht überschrieben
werden können.
Auswählen eines Patches
Wählen Sie das gewünschte Patch mit dem Value-Regler aus.
Value-Regler
HINWEIS
• Patches können nur im Play-Display ausgewählt werden (S. 5).
Drücken Sie den [EXIT]-Taster, um das Play-Display aufzurufen,
und wählen Sie dann das gewünschte Patch aus.
• Sie können auf die Taster [A]–[D] vier Patches für die direkte
Auswahl zuordnen. Gehen Sie dafür wie folgt vor: Wählen Sie das gewünschte Patch aus, und halten Sie
einen der Taster [A]–[D] für mehrere Sekunden gedrückt.
Das Patch Nummern-Display
Im Display wird die Nummer und der Name des aktuell gewählten
Patches angezeigt.
* Die in dieser Anleitung verwendeten Display-Abbildungen dienen nur als Beispiele und müssen nicht zwangsläufig mit den
Abbildungen des Displays Ihres Gerätes übereinstimmen.
4
Spielen der Effekt-Sounds
Auswählen eines Patches nach Kategorien
English
1. Drücken Sie bei angezeigtem Play-Display den ValueRegler.
Die Patch-Kategorien werden angezeigt.
2. Wählen Sie mit dem Value-Regler die gewünsche Patch-Kategorie aus, und drücken Sie
Deutsch
den [ENTER]-Taster.
Das erste Patch der ausgewählten Kategorie wird abgerufen, und das Play-Display erscheint.
Français
Das Play-Display
Die Anzeige im Display nach Einschalten des Gerätes wird als “Play-Display” bezeichnet.
Italiano
Symbole im Display
MASTER BPM
OUTPUT-Einstellung
PREAMP-Kanal
Patch-Nummer
Symbol
Español
Phantomspeisung
ein/aus
Beschreibung
Português
Zeigt den MASTER BPM-Wert an.
Wird angezeigt, wenn OUTPUT eine andere Einstellung als LINE/PHONES besitzt.
Wird angezeigt, wenn OUTPUT auf LINE/PHONES gestellt ist.
Wird angezeigt, wenn bei DIVIDER Mode=Single der Preamp-Kanal “A” ausgewählt ist.
Nederlands
Wird angezeigt, wenn bei DIVIDER Mode=Single der Preamp-Kanal “B” ausgewählt ist.
Wird angezeigt, wenn der DIVIDER Mode auf "Dual" gestellt ist.
,
,
Wird angezeigt, wenn der SOLO SW aktiviert ist.
Wird angezeigt, wenn die Phantomspeisung aktiviert ist (S. 13).
* Weitere Informationen zu MASTER BPM, SOLO SW, OUTPUT und DIVIDER finden Sie im Dokument
“Parameter Guide” (PDF-Datei).
5
3 Editieren: Grundsätzlicher Vorgang
1
Das Einstellen der Parameter des GT-001 ist sehr einfach.
Auswählen, welche Einstellungen verändert werden sollen
Drücken Sie einen der folgenden Taster.
2
EFFECT
MENU
Hier können Sie die EffektParameter einstellen.
Hier können Sie andere Einstellungen
als die Effekt-Parameter einstellen.
Auswählen eines Parameters
Beispiel: Nach Drücken des [MENU]-Tasters.
1. Wählen Sie mit dem Value-Regler die
[ENTER]-Taster
Value-Regler
gewünschte Parametergruppe aus.
2. Drücken Sie den [ENTER]-Taster.
3. Wählen Sie mit dem Value-Regler den
gewünschten Parameter aus.
4. Drücken Sie den [ENTER]-Taster.
Im Display wird die aktuelle Einstellung angezeigt.
3
Verändern der Werte
1. Verwenden Sie dafür die Regler [1]–[4].
2. Drücken Sie den mehrfach den [EXIT]-Taster.
Das Play-Display erscheint wieder.
In dieser Anleitung ist die Abfolge von Bedienschritten wie folgt notiert.
Beispiel:
Wählen Sie [MENU]"“SYSTEM”"“AUTO OFF” entspricht der Aussage:
Drücken Sie den [MENU]-Taster / Wählen Sie mit Value-Regler “SYSTEM”, und drücken Sie den [ENTER]Taster / Wählen Sie mit Value-Regler “AUTO OFF”, und drücken Sie den [ENTER]-Taster:
6
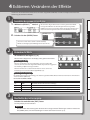
4 Editieren: Verändern der Effekte
1
Sie können die einzelnen Parameter eines im Patch ausgewählten Effektes verändern. Beispiel: Verändern der
Verzerrung des Overdrive-Effektes.
Auswählen des gewünschten Effektes
English
1. Wählen Sie [EFFECT]"“OD/DS”.
Mit dem Value-Regler wird der Cursor auf den gewünschten Effekt
bewegt. Durch Drücken des Value-Reglers wird der ausgewählte
Effektblock ein- bzw. ausgeschaltet. Durch gleichzeitiges Drücken und
Drehen des Value-Reglers wird die Position des Effektes verschoben.
[ENTER]-Taster
Deutsch
2. Drücken Sie den [ENTER]-Taster.
(nur, wenn sich der Cursor auf FX1 oder FX2 befindet)
Wählen Sie mit Regler [4] den Effekttyp für FX1 oder FX2 aus.
Français
2
Verändern der Werte
Verwenden Sie die Regler [1]–[4].
Italiano
Mit dem Value-Regler kann die Display-Seite gewechselt werden.
Quick Settings (QS)
Wenn Sie eine Display-Seite ausgewählt haben, in der das Symbol “QS”
erscheint, können Sie für den ausgewählten Effekt entsprechend vorgegebene
Voreinstellungen (Quick Settings) auswählen.
Español
Weitere Informationen zu diesem Thema finden Sie unter "Sichern der
Einstellungen eines einzelnen Effektes (QS WRITE)" (S. 9).
Die Funktionen der Regler
Die Funktionen der Regler sind abhängig vom aktuell ausgewählten Effekt. Weitere Informationen finden Sie im Dokument
“Parameter Guide” (PDF-Datei).
Parameter
Beschreibung
TYPE
Bestimmt den Overdrive/Distortion-Effekttyp.
[2]
DRIVE
Bestimmt die Stärke des Overdrive/Distortion-Effektes.
[3]
TONE
Bestimmt die Klangfarbe. Je höher der Wert, desto "schärfer" erklingt der Sound.
[4]
E. LEVEL
Bestimmt die Lautstärke des Effektsignals.
Nederlands
3
Regler
[1]
Português
Bei Auswahl des Effektes OD/DS
Abschließen des Editiervorgangs
Drücken Sie mehrfach den [EXIT]-Taster.
Das Play-Display erscheint wieder.
WICHTIG
Bei Umschalten des Patches gehen die bis dahin nicht gesicherten Änderungen verloren. Drücken Sie
den [WRITE]-Taster, um die Einstellungen in einem User Patch zu sichern (S. 8).
7
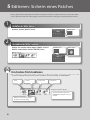
5 Editieren: Sichern eines Patches
Um die geänderten Einstellungen innerhalb eines Patches zu erhalten, müssen Sie diese in einem User-Patch
sichern. Bei Umschalten des Patches gehen ansonsten die bis dahin nicht gesicherten Änderungen verloren.
1
Aufrufen des Write-Menüs
Drücken Sie den [WRITE]-Taster.
2
[WRITE]-Taster
Auswählen der Write-Funktion
Wählen Sie mit dem Value-Regler “WRITE” (PATCH
WRITE), und drücken Sie den [ENTER]-Taster.
[ENTER]-Taster
Value-Regler
Verschiedene Patch-Funktionen
Sie können folgende Funktionen für Patches ausführen. Die Voreinstellung ist "PATCH WRITE"..
Name
Sichern
Vertauschen
Intialisieren
Bei Drehen des Value-Reglers:
Vertauschen bzw. Kopieren der
PREAMP-Einstellungen von Kanal
A und B.
Wählen Sie mit dem Value-Regler
die gewünschte Einstellung.
8
Editieren: Sichern eines Patches
3
Auswählen der Ziel-Speichernummer
English
Wählen Sie mit Regler [4] die ZielSpeichernummer aus (U001−U200).
Benennen des Patches
Um den Patch-Namen zu verändern, wählen Sie als
Speicher-Option "INFO" aus (sieheS. 8), bewegen Sie den
Cursor mit dem Value-Regler auf die gewünschte Position,
und wählen SIe mit Regler [4] das gewünschte Zeichen aus.
Auswählen der Kategorie
Regler [2]
Auswählen der Zeichengruppe
Regler [3]
Umschalten zwischen Groß- und
Kleinschreibung
Regler [4]
Auswählen des Zeichens
Value-Regler
Bewegen des Cursors
Français
Vorgang
Regler [1]
Deutsch
4
Controller
Auswahl der Ziel-Speichernummer
Italiano
Sichern der Einstellungen
Drücken Sie den [WRITE]-Taster.
[WRITE]-Taster
Nach Abschluss des Vorgangs erscheint wieder
das Play-Display.
Español
Sichern der Einstellungen eines einzelnen Effektes (QS WRITE)
gewünschten Effekt aus.
3. Wählen Sie mit Regler [2] die
gewünschte Ziel-Speichernummer aus
(U001−U200).
4. Drücken Sie den [WRITE]-Taster.
Jeder PREAMP-Kanal
OD/DS
DELAY
CHORUS
REVERB
COMP
Nederlands
1.
2. Wählen Sie mit Regler [1] den
Wählen Sie [WRITE]"“QS WRITE”.
Effekt-Einstellungen, die gesichert werden können
Português
Sie können zusätzlich zu den Patches auch
Einstellungen eines einzelnen Effektes sichern.
Damit ist es möglich, die gewünschten
Einstellungen eines Effektes auch für andere Patches
zu nutzen.
EQ
PEDAL FX WAH und PEDAL BEND
DIVIDER
Jeder FX1/FX2-Effekt
ASSIGN 1–8
Nach Abschluss des Vorgangs erscheint wieder
das Play-Display.
9
6 Einstellungen für ein externes Pedal
Sie können über ein an der CTL/EXP-Buchse angeschlossenes Expression-Pedal oder einen Fußschalter (Roland
EV-5, BOSS FS-5U, FS-6; zusätzliches Zubehör) verschiedene Funktionen steuern.
Anschließen eines Pedals
* Verwenden Sie nur das von Roland empfohlene
Expression-Pedal (Roland EV-5, FV-500H, FV-500L;
zusätzliches Zubehör). Bei Benutzung eines
Expression-Pedals eines anderen Herstellers können
Fehlfunktionen auftreten.
* Sie können nur ein Pedal z. Zt. anschließen.
Einstellen der Pedal-Funktion
1. Wählen Sie [MENU]"“CTL/EXP”"“CTL1”, “CTL2” oder “EXP”.
Einstellung
Beschreibung
[CTL1]/[CTL2]
Bestimmt die Funktion für einen Fußtaster (FS-5U oder FS-6).
[EXP]
Bestimmt die Funktion für ein Expression-Pedal (Roland EV-5, BOSS FV-500L, FV-500H).
2. Stellen Sie mit den Reglern [1]–[4] die Parameterwerte ein.
Weitere Informationen zu den Parametern für die Pedale finden Sie im Dokument “Parameter Guide” (PDFDatei).
Beispiel-Einstellungen
Umschalten der Patch-Nummern über CTL1/2 (A/B-Pedale eines FS-6 Doppel-Fußtasters)
Parameter
CTL1 (B Pedal)
CTL2 (A Pedal)
Beschreibung
[1]
[2]
[3]
[4]
NUMBER INC
OFF
ON
TOGGLE
NUMBER DEC
OFF
ON
TOGGLE
Mit dem B-Pedal wird die Patch-Nummer erhöht, mit
dem A-Pedal erniedrigt.
FUNC
MIN
MAX
MODE
* Wählen Sie “MENU”"“SYSTEM”"“PREF”, und stellen Sie “CTL1” und “CTL2” auf “SYSTEM”.
Zuweisen der WAH-Funktion für das Expression-Pedal (EXP)
Parameter
Wert
[1]
WAH
FUNC
* Wählen Sie [EFFECT]"‘’PEDAL”, und schalten Sie den "PEDAL"-Effektblock durch Drücken des Value-Reglers ein.
10
7 Anschließen an einen Rechner
Wenn Sie das GT-001 über USB an einen Rechner anschließen, können Sie folgende Dinge ausführen:
• Digitale Audiosignale und MIDI-Daten zwischen Rechner und GT-001 austauschen
• Mithilfe der speziellen Software Patches editieren und verwalten, Aufrufen der PDF-Datei "Parameter Guide"
innerhalb der speziellen Software
• Herunterladen von Patches von der Internetseite BOSS TONE CENTRAL (http://bosstonecentral.com/)
English
Installieren des USB-Treibers
Vor Anschließen an einen Rechner muss auf diesem der USB-Treiber installiert werden.
Den USB-Treiber finden Sie als Download-Datei auf der folgenden Internetseite:
&http://www.roland.com/support/
Deutsch
Der Installationsvorgang ist unterschiedlich, abhängig vom genutzten Rechner und der entsprechend
installierten Systemsoftware. Lesen Sie zu diesem Thema auch die Datei "Readme.htm", die sich innerhalb
der Download-Datei befindet.
Verbinden Sie den Rechner und das GT-001
mithilfe eines USB-Kabels.
Français
Anschließen an einen Rechner
USB-Anschluss
Italiano
* Bei dieser Verbindung wird das GT-001 über USB
mit Strom versorgt, daher ist in diesem Fall kein
AC-Adapter notwendig.
Sie können den Sound des GT-001 mit einer auf dem Rechner installierten DAW-Software aufzeichnen bzw.
den Sound des Rechners über die OUTPUT-Buchsen bzw. die PHONES-Buchse des GT-001 ausgeben.
Español
Verwenden des GT-001 als Audio-Interface
* Weitere Informationen zum Signalfluss der Audiodaten über USB und zu weiteren Einstellungen finden
Sie im Dokument “Parameter Guide” (PDF-Datei).
Português
* Wie der Eingang für das Audiosignal in der DAW-Software ausgewählt wird, können Sie der Anleitung
der verwendeten Software entnehmen.
Anwendung der speziellen GT-001-Software
Nederlands
Mithilfe der speziellen Software können Sie folgende Dinge ausführen:
• Patches von der Internetseite BOSS TONE CENTRAL (http://bosstonecentral.com/) herunterladen
• Patch-Einstellungen verändern
• Patches benennen, verwalten und sortieren
• Patch-Daten als Backup-Datei und System-Einstellungen sichern, eine Backup-Datei in den internen
Speicher des GT-001 laden
• Das PDF-Dokument “Parameter Guide” aufrufen.
Die spezielle GT-001-Software finden Sie als Download-Datei auf der Internetseite BOSS TONE CENTRAL
(http://bosstonecentral.com/). Details zur Bedienung der Software finden Sie in der Datei "Readme.
htm", die sich innerhalb der Download-Datei befindet.
11
8 Weitere Funktionen
Anwendung des Metronoms
1. Drücken Sie den [TUNER]-Taster.
2. Wählen Sie mit dem Value-Regler “METRONOME” aus.
3. Wählen Sie mit den Reglern [1]–[4] die gewünschten
Einstellungen.
[EXIT]-Taster
[TUNER]-Taster
Parameter
Wert
Beschreibung
[1]
TEMPO
40–250
Bestimmt das Tempo des Metronoms.
[2]
BEAT
1/1–8/1,
1/2–8/2,
1/4–8/4,
1/8–8/8
Bestimmt die Taktart des Metronoms.
[3]
OFF/ON
OFF, ON
Schaltet das Metronom ein bzw. aus.
[4]
LEVEL
0–100
Bestimmt die Lautstärke des
Metronoms.
4. Drücken Sie den [EXIT]-Taster.
Das Play-Display erscheint wieder.
* Der Metronom-Sound wird über die OUTPUT-Buchsen und die PHONES-Buchse ausgegeben.
* Das Verändern des TEMPO-Wertes beeinflusst auch den Parameter MASTER BPM. Weitere
Informationen zu MASTER BPM finden Sie im Dokument “Parameter Guide” (PDF-Datei).
Abrufen der Werksvoreinstellungen (Factory Reset)
Das Abrufen der Werksvoreinstellungen der Parameter des GT-001 wird als “Factory Reset” bezeichnet.
Sie können bestimmen, welche Daten auf deren jeweilige Werksvoreinstellungen zurück gesetzt werden
sollen.
* Durch diesen Vorgang werden alle eigenen gesicherten Einstellungen im GT-001 gelöscht. Sichern Sie
daher vorher Ihre Daten mithilfe der speziellen GT-001-Software auf einem Rechner.
1. Wählen Sie [MENU]"“SYSTEM”"“F. RESET” (FACTORY RESET).
2. Wählen Sie mit den Reglern [1]–[4] die gewünschten Einstellungen.
Regler
Parameter
[1]
FROM
[4]
TO
Wert
Beschreibung
SYSTEM
System-Parametereinstellungen
QUICK
User Quick Setting-Einstellungen
U001–U200
Einstellungen der Patch-Nummern U001−U200
3. Drücken Sie den [WRITE]-Taster.
Wenn Sie den Vorgang abbrechen möchten, drücken Sie den [EXIT]-Taster.
4. Um den Vorgang auszuführen, drücken Sie den [ENTER]-Taster.
Nach Abschluss des Vorgangs erscheint wieder das Play-Display.
12
Weitere Funktionen
Anschließen eines Mikrofons
Sie können an die MIC IN-Buchse ein Mikrofon anschließen und die Effekte des GT-001 für das Stimmensignal
nutzen.
English
Dynamisches Mikrofon
Kondensator-Mikrofon
Deutsch
HINWEIS
3: COLD
Español
Einstellen des Kontrasts (Helligkeit) des Displays
Italiano
• Verändern Sie die Richtung des Mikrofons.
• Vergrößern Sie den Abstand zwischen Mikrofon und Lautsprecher.
• Verringern Sie die Lautstärke.
Français
• Für die MIC IN-Buchse können Sie die Phantomspeisung bei Benutzung eines Kondensator-Mikrofons
wie folgt aktivieren: Wählen Sie [MENU]"“SYSTEM”"“INPUT”, und wählen Sie mit dem Regler [4] die
Einstellung “ON”. Lesen Sie zu diesem Thema "3 Editieren: Grundsätzlicher Vorgang" (S. 6).
• Die GUITAR IN-Buchse und die MIC IN-Buchse können nicht gleichzeitig verwendet werden. Wenn beide
Buchsen verkabelt sind, erhält die GUITAR IN-Buchse Priorität.
* Das GT-001 besitzt symmetrische XLR-Anschlüsse mit der rechts
dargestellten Pin-Belegung. Stellen Sie sicher, dass die mit dem
GT-001 verbundenen externen Geräte die gleiche Pin-Belegung
2: HOT
1: GND
besitzen.
* Wenn nach Anschließen eines Mikrofons Pfeifgeräusche
(Rückkopplung) auftreten, gehen Sie wie folgt vor:
Gehen Sie wie folgt vor.
Português
1. Wählen Sie [MENU]"“SYSTEM”"“LCD”.
2. Stellen Sie den gewünschten Wert mit dem Regler [4] ein.
Je höher der Wert (Einstellbereich: 1−16), desto heller ist das Display.
De-aktivieren der Auto Off-Funktion
Nederlands
Das GT-001 wird in der Werksvoreinstellung nach 10 Stunden automatisch ausgeschaltet, wenn es in der
Zwischenzeit nicht bedient wurde bzw. kein Audiosignal erkannt bzw. erzeugt hat. Ca. 15 Minuten vor der
automatischen Abschaltung erscheint im Display eine entsprechende Hinweismeldung.
Wenn Sie die automatische Abschaltung verhindern möchten, de-aktivieren Sie die Auto Off-Funktion wie
nachfolgend beschrieben.
1. Wählen Sie [MENU]"“SYSTEM”"“AUTO OFF”.
2. Wählen Sie mit dem Regler [1] die Einstellung “OFF”.
3. Drücken Sie mehrfach den [EXIT]-Taster.
13
Fehlermeldungen
Meldung
Grund
MIDI BUFFER FULL!
Verringern Sie die Menge der gleichzeitig an das GT-001
Die Menge der gleichzeitig empfangenen MIDI-Daten war zu hoch und konnte gesendeten MIDI-Daten.
nicht verarbeitet werden.
Reduzieren Sie das Abspieltempo des externen MIDI-Sequenzers.
USB OFFLINE!
Der Sendevorgang des über USB
angeschlossenen Gerätes wurde
unterbrochen.
Mögliche Gründe sind: Das über USB angeschlossene Gerät wurde
ausgeschaltet, oder das USB-Kabel wurde abgezogen oder ist
defekt. Überprüfen Sie dieses.
DATA WRITE ERROR!
Die Daten konnten nicht im Speicher
gesichert werden.
Das Gerät ist eventuell defekt. Benachrichtigen Sie Ihren RolandVertragspartner bzw. Ihr Roland Service Center.
Der Parameter “PREF” ist auf “SYSTEM”
gestellt.
Der Parameter “Preference” bestimmt, ob alle Patches die
im System gesicherten Einstellungen für u.a. Control-Pedal,
Expression-Pedal verwenden (SYSTEM) oder ob jedes Patch seine
eigenen Einstellungen verwendet (PATCH). Bei “SYSTEM” werden
die individuellen Patch-Einstellungen und die Manual ModeEinstellungen ignoriert. Wählen Sie [MENU]"“SYSTEM”"“PREF”,
und wählen Sie mit dem Reglern [1]–[4] “PATCH” oder "SYSTEM"
aus.
PREFERENCE IS
SYSTEM!
Aktion
Technische Daten
BOSS GT-001: GUITAR EFFECTS PROCESSOR
AD-Konvertierung
24 bit + AF-Methode
GUITAR IN-Buchse: Klinke
* Die AF (Adaptive Focus)-Methode
ist eine urheberrechtlich geschützte
Methode von Roland und BOSS und
verbessert den Signal-Rausch-Abstand
(S/N-Verhältnis) der A/D- und
D/A-Wandler in erheblichem Maße.
MIC IN-Buchse: XLR symmetrisch,
Phantomspeisung (DC 48 V, 10 mA Max)
DA-Konvertierung
24 bit
Sampling-Frequenz
44.1 kHz
Patches
200 (User) + 200 (Preset)
Nominaler
Eingangspegel
Eingangswiderstand
GUITAR IN: -10 dBu
MIC IN: -40 dBu
AUX IN: -20 dBu
GUITAR IN: 1 M Ω
MIC IN: 4 k Ω
AUX IN: 27 k Ω
AUX IN-Buchse: Miniklinke stereo
Anschlüsse
OUTPUT (L/MONO, R)-Buchsen (Klinke
mono)
PHONES-Buchse: Stereoklinke
CTL/EXP-Buchse: TRS-Klinke
USB COMPUTER: : USB-Typ B
DC IN-Buchse
Stromversorgung
AC-Adapter oder USB Bus Power
Stromverbrauch
240 mA
Abmessungen
211 (W) x 135 (D) x 58 (H) mm
Gewicht
ca. 500 g
Beigefügtes
Zubehör
Bedienungsanleitung, Informationsblatt
“USING THE UNIT SAFELY”, AC-Adapter
Nominaler
Ausgangspegel
OUTPUT L/MONO, R: -10 dBu
Ausgangswiderstand
OUTPUT L/MONO, R: 2 k Ω
PHONES: 44 Ω
* 0 dBu = 0.775 Vrms
Empfohlener
Lastwiderstand
OUTPUT L/MONO, R: 10 k Ω oder höher
* Änderungen der technischen Daten und des Designs sind ohne
vorherige Ankündigung möglich. Für Druckfehler wird keine
Haftung übernommen.
Display
14
PHONES: -10 dBu
PHONES: 44 Ω oder höher
Grafikfähiges LCD (132 x 32 Punkte,
beleuchtet)
Zusätzliches
Zubehör
Doppel-Fußtaster: FS-6
Expression Pedal: FV-500L/500H, Roland
EV-5
SICHERHEITSHINWEISE
WARNUNG
VORSICHT
Hinweis zur Phantomspeisung
Auch wenn das Gerät ausgeschaltet ist, ist es
noch mit der Stromversorgung verbunden.
Wenn Sie das Gerät vollständig von der
Stromversorgung trennen möchten, ziehen Sie
den Netzdapter aus der Steckdose.
Wenn Sie ein Mikrofon verwenden, das keine
Phantomspeisung benötigt, müssen Sie die
Phantomspeisung ausschalten, ansonsten
können Fehlfunktionen bzw. Beschädigungen
auftreten. Lesen Sie dazu die Anleitung des
verwendeten Mikrofons.
(Die Phantomspeisung dieses Gerätes beträgt: 48 V DC, 10 mA
Max.)
Die Auto Off-Funktion
Deutsch
In der Werksvoreinstellung wird das Gerät
nach einer bestimmten Zeit automatisch
ausgeschaltet, wenn es in der Zwischenzeit nicht
bedient wurde bzw. kein Audiosignal erkannt
bzw. erzeugt hat. Wenn Sie die automatische
Abschaltung de-aktivieren möchten, stellen Sie
den Parameter “Auto Off” auf “aus” (S. 13).
English
Das Gerät vollständig von der Stromversorgung trennen
Nur den beigefügten Netzadapter benutzen
Français
Verwenden Sie immer nur das dem Instrument
beigefügte Netzteil und prüfen Sie, ob die
vom Gerät benötigte Spannung mit der des
Netzteils übereinstimmt. Verwenden Sie keine
anderen Netzteile mit diesem Gerät. Diese
können eine andere Polarität bzw. eine andere
Spannungsversorgung besitzen, daher besteht die Gefahr einer
Beschädigung, einer Fehlfunktion bzw. eines Kurzschlusses.
Italiano
WICHTIGE HINWEISE
Zusätzliche Hinweise
• Dieses Gerät besitzt Gummifüße. Da
diese die Oberfläche z.B. eines Tisches
verfärben können, legen Sie unter
die Gummifüße ein Tuch o.ä. Achten
Sie aber gleichzeitig darauf, dass das
Gerät nicht verrutschen und herunter
fallen kann.
• Es kann vorkommen, dass durch
einen technischen Fehler, durch
eine Fehlbedienung usw. Daten im
Gerät gelöscht werden. Erstellen Sie
daher von wichtigen Daten immer
regelmässig eine Sicherheitskopie.
• Verwenden Sie ein trockenes oder
feuchtes, weiches Tuch. Verwenden
Sie klares Wasser oder ein mildes
neutrales Reinigungsmittel, und
trocknen Sie die Oberfläche immer
gründlich mit einem weichen Tuch.
• Erstellen Sie von wichtigen
Daten immer regelmäßig eine
Sicherheitskopie. Wenn Sie das
Gerät zu einer Reparatur einsenden
müssen, muss das Gerät bei einer
technischen Prüfung eventuell auf die
Werksvoreinstellungen zurück gesetzt
werden, wodurch die Anwenderdaten
gelöscht werden. Roland übernimmt
keine Haftung für Datenverluste
bzw. Folgen, die sich aus einem
Datenverlust ergeben können.
• Verwenden Sie nur das empfohlene
Expression-Pedal (Roland EV-5, FV500H, FV-500L; zusätzliches Zubehör).
Bei Benutzung eines ExpressionPedals eines anderen Herstellers
können Fehlfunktionen auftreten.
• Dieses Gerät beinhaltet eCROSintegrierte Software der eSOL Co.,Ltd.
eCROS ist ein Warenzeichen der eSOL
Co., Ltd. in Japan.
• ASIO ist eine Marke der Steinberg
Media Technologies GmbH.
• Roland, BOSS und COSM sind
eingetragene Warenzeichen bzw.
Warenzeichen der Roland Corporation
in den USA und/oder anderen
Ländern.
• Wenn Sie das Gerät umdrehen,
legen Sie es immer auf eine weiche
Unterlage (z.B. Kissen), damit die
Taster und Regler nicht beschädigt
werden. Lassen Sie das Gerät nicht
fallen.
15
Nederlands
Reparaturen und Datensicherung
• Drücken bzw. schlagen Sie nicht auf
das Display.
Lizenzen/Warenzeichen
Português
Reinigung
• Speichern Sie die Daten der
Sicherheitskopie auf mehreren
Datenträgern. Roland übernimmt
keine Haftung für eventuelle
Fehlfunktionen eines Datenträgers.
• Anschluss für eine Sicherheitskette
auf der linken Seite: Siehe http://
www.kensington.com/
Español
Positionierung
Mode d’emploi
Nouveaux amplis COSM
Ces amplificateurs COSM récemment remodélisés intègrent tout le savoir-faire que nous avons accumulé au cours des années dans le
domaine de la création sonore. Ils représentent une nouvelle évolution qui va au-delà de la conception classique des amplificateurs
vintage. Des sons clairs d’une transparence intacte aux sons extrêmes à haut gain, ces modèles vous permettent de contrôler librement
le comportement dynamique de l’amplificateur et ses nuances subtiles selon vos préférences.
Le GT-001 est équipé d’une fonction d’nterface audio USB (p. 11). Vous pouvez enregistrer facilement des sons en connectant l’appareil à
un ordinateur. Vous pouvez également brancher un microphone sur le GT-001.
Deutsch
Taille compacte idéale pour un dessus de table
English
Principales fonctionnalités
Opérations simples à l’aide d’un ordinateur et du logiciel dédié
Vous pouvez contrôler le GT-001, éditer des sons et gérer des patchs à l’aide du logiciel dédié. Vous pouvez également télécharger une
grande variété de patchs depuis BOSS TONE CENTRAL, notre site Web dédié de téléchargement de patchs.
Français
* L’appareil s’éteindra automatiquement après une période
prédéterminée suivant la dernière performance musicale ou la
dernière utilisation des boutons ou commandes (fonction d’arrêt
automatique).
Si vous ne souhaitez pas que l’appareil s’éteigne automatiquement,
désactivez la fonction d’arrêt automatique (p. 13).
Italiano
• Tous les réglages que vous êtes en train de modifier seront
perdus en cas de mise hors tension de l’appareil. Si vous
souhaitez conserver certains réglages, vous devez les enregistrer
au préalable.
• Pour rallumer l’appareil, mettez-le à nouveau sous tension (p. 2).
• Implémentation MIDI
Il s’agit d’informations détaillées concernant les
messages MIDI.
1. Entrez l’URL suivante sur votre ordinateur :
http://www.roland.com/manuals/
I
2. Choisissez « GT-001 » comme nom de
produit.
Avant d’utiliser l’appareil, veuillez lire attentivement les sections intitulées « CONSIGNES DE SÉCURITÉ » et « REMARQUES IMPORTANTES » (dépliant
« CONSIGNES DE SÉCURITÉ » et Mode d’emploi (p. 15)). Ces sections fournissent des informations importantes relatives au bon fonctionnement de
l’appareil. En outre, pour être sûr d’avoir bien intégré chacune des fonctionnalités fournies par votre appareil, lisez le mode d’emploi dans son intégralité.
Conservez ensuite ce manuel à portée de main pour toute référence ultérieure.
Copyright © 2014 BOSS CORPORATION
Tous droits réservés. Toute reproduction intégrale ou partielle de cette publication est interdite sous
quelque forme que ce soit sans l’autorisation écrite de BOSS CORPORATION.
Nederlands
• Liste des sons
Il s’agit de la liste des sons intégrés dans le GT-001.
Pour obtenir le manuel PDF
Português
Manuel PDF (à télécharger sur Internet)
• Guide des paramètres
Ce guide décrit les informations relatives à
l’utilisation du GT-001 et à l’ensemble de ses
paramètres. Le Guide des paramètres peut
également être visualisé à l’aide du logiciel dédié.
Español
Mode d’emploi (le présent document)
Veuillez lire ce document en premier. Il décrit les connaissances de base que vous devez maîtriser pour utiliser le
GT-001. Pour des informations détaillées sur l’utilisation du GT-001, veuillez télécharger le « Guide des paramètres »
(fichier PDF) et vous y référer.
Précautions lors du branchement
1 Mise en route
1
* Pour éviter tout dysfonctionnement ou toute
défaillance de l’appareil, maintenez toujours le volume
abaissé et éteignez tous les appareils avant d’effectuer les
branchements.
* Si vous utilisez des câbles de connexion pourvus de
résistance, le niveau de volume de l’appareil connecté aux
entrées (AUX IN) peut être faible. Dans ce cas, utilisez des
câbles de connexion sans résistance.
Branchement de l’équipement
Prise
PHONES
* En insérant le câble de l’adaptateur secteur dans la rainure au bas du GT-001,
vous pouvez éviter que la fiche ne se débranche accidentellement.
Prises OUTPUT
Prise DC IN
Prise GUITAR IN
Prise AUX IN
Branchement
d’un lecteur audio
équipé d’une prise
stéréo mini-jack
2
Commutateur
[ON/OFF]
Mise sous tension
1. Mettez sous tension le commutateur [ON/OFF].
2. Allumez l’amplificateur guitare.
MÉMO
En cas de connexion à un ordinateur, l’adaptateur
secteur n’est pas nécessaire puisque l’alimentation est
fournie par l’ordinateur (p. 11).
* Une fois les branchements correctement effectués, veillez à
mettre sous tension le GT-001 en premier, et ensuite le
système connecté. Une mise sous tension dans l’ordre incorrect
peut entraîner des dysfonctionnements ou des dommages. Lors
de la mise hors tension, éteignez d’abord le système connecté,
et ensuite le GT-001.
* Cet appareil est équipé d’un circuit de protection. Un bref
intervalle (quelques secondes) est nécessaire à la mise sous
tension avant que l’appareil puisse fonctionner normalement.
* Avant de mettre l’appareil sous/hors tension, assurez-vous
toujours d’abaisser le volume. Même lorsque le volume est
abaissé, vous pouvez entendre un son lors de la mise sous/hors
tension de l’appareil. Toutefois, ceci est normal et n’indique pas un
dysfonctionnement.
Bouton
[OUTPUT
LEVEL]
3
Réglage du volume
Réglez le volume à l’aide du
bouton [OUTPUT LEVEL].
* Le volume d’un lecteur audio connecté à la
prise AUX IN doit être ajusté à l’aide de son
propre contrôleur de volume.
Fonction pratique d’accordeur
1. Appuyez sur le bouton [TUNER].
2. Jouez une corde à vide, puis accordez-la de manière à
Bouton [EXIT]
ce que seul l’indicateur central sur l’écran soit allumé.
Bouton [TUNER]
3. Une fois l’accordage terminé, appuyez sur le bouton
[EXIT].
2
Mise en route
4
Spécification du type d’amplificateur connecté
1. Appuyez sur le bouton [MENU].
2. Choisissez « SYSTEM » à l’aide du bouton de valeur
Bouton [ENTER]
English
Pour garantir un son optimal, il est conseillé de spécifier le type d’amplificateur que vous avez connecté au
GT-001. Prenez le temps de le faire.
Bouton de valeur
puis appuyez sur le bouton [ENTER].
puis appuyez sur le bouton [ENTER].
Deutsch
3. Choisissez « OUTPUT » à l’aide du bouton de valeur
Bouton [MENU]
Bouton [4]
Français
4. Choisissez le type d’amplificateur à l’aide du bouton
[4].
Explication
JC-120
Choisissez cette option en cas de connexion à l’entrée guitare d’un amplificateur guitare Roland JC-120.
SMALL AMP
Choisissez cette option en cas de connexion à un amplificateur guitare de petite taille.
COMBO AMP
STACK AMP
Italiano
Valeur
Choisissez cette option en cas de connexion à l’entrée guitare d’un amplificateur guitare de type
combo (à savoir un seul appareil contenant l’amplificateur et le haut-parleur) autre que le JC-120.
Pour certains types d’amplificateur guitare, le réglage « JC-120 » peut permettre d’obtenir de meilleurs
résultats.
Choisissez cette option en cas de connexion à la prise RETURN du JC-120.
COMBO RETURN
Choisissez cette option en cas de connexion à la prise RETURN d’un amplificateur guitare de type
combo.
STACK RETURN
Choisissez cette option en cas de connexion à la prise RETURN d’un amplificateur guitare de type
stack. Vous devriez également choisir « STACK RETURN » si vous utilisez un amplificateur de puissance
pour guitare en même temps qu’un ensemble de haut-parleurs.
LINE/PHONES
Choisissez cette option si vous utilisez un casque ou si le GT-001 est connecté à des haut-parleurs de
contrôle, une console de mixage ou un enregistreur numérique.
Português
JC-120 RETURN
Español
Choisissez cette option en cas de connexion à l’entrée guitare d’un amplificateur guitare de type stack
(c’est-à-dire où l’amplificateur et le haut-parleur sont des appareils distincts).
5. Appuyez plusieurs fois sur le bouton [EXIT].
Nederlands
MÉMO
• Le paramètre SP TYPE est valide uniquement si OUTPUT est réglé sur « LINE/PHONES ». Pour plus de
détails sur le paramètre SP TYPE, reportez-vous au « Guide des paramètres » (fichier PDF).
• Si vous utilisez un casque, vous ne pourrez pas obtenir un son caractéristique d’un amplificateur
guitare, à moins d’activer PREAMP. Nous vous recommandons d’activer PREAMP lorsque vous utilisez
un casque. Pour activer PREAMP, comme indiqué dans la procédure 1 de la section « 4 Edition : édition
des effets » (p. 7), choisissez [EFFECT]"« Pr A » ou « Pr B » et appuyez sur le bouton de valeur. Pour plus
de détails sur les réglages PREAMP, reportez-vous au « Guide des paramètres » (fichier PDF).
3
2 Lecture
Une fois les préliminaires terminés, vous pouvez commencer à jouer sur le GT-001.
Qu’est-ce qu’un « patch » ?
Le GT-001 comprend de nombreux effets. Une combinaison de ces effets et de leurs réglages s’appelle
un « patch ».
Patch prédéfini P200
Patch prédéfini P001
Patch utilisateur U200
Patch utilisateur U001
Dans sa mémoire, le GT-001 contient 200 patchs utilisateur (commençant à U001) qui peuvent être
écrasés et 200 patchs prédéfinis (commençant à P001) qui ne peuvent pas être écrasés.
Sélection d’un patch
Tournez le bouton de valeur pour faire défiler les patchs.
Bouton de valeur
MÉMO
• Vous ne pouvez changer de patch que si vous êtes dans l’écran
de lecture (p. 5). Appuyez sur le bouton [EXIT] pour revenir à
l’écran de lecture, puis changez de patch.
• Vous pouvez affecter quatre de vos patchs favoris aux boutons
[A]–[D] et les appeler instantanément. Choisissez un patch et exercez une pression prolongée de quelques
secondes sur l’un des boutons pour affecter le patch à ce bouton.
Affichage du numéro de patch
L’écran affiche le numéro du patch actuellement sélectionné ainsi que
le nom du patch.
* Les explications fournies dans le présent manuel comprennent des illustrations des messages qui s’affichent à l’écran. Notez toutefois
que votre appareil peut intégrer une version plus récente ou améliorée du système (comme par exemple de nouveaux sons). Dans ce
cas, les messages affichés sur votre écran ne correspondent pas toujours aux illustrations de ce mode d’emploi.
4
Lecture
Choix d’un patch selon la catégorie
English
1. Lorsque l’écran de lecture est affiché, appuyez sur le
bouton de valeur.
Les catégories de patch s’affichent.
2. Faites tourner le bouton de valeur pour choisir la catégorie de patch, puis appuyez sur
le bouton [ENTER].
Deutsch
Le premier patch de la catégorie sélectionnée est appelé et l’écran de lecture s’affiche à nouveau.
Français
A propos de l’écran de lecture
L’écran qui apparaît après la mise sous tension est appelé « écran de lecture ».
Italiano
Icônes affichées à l’écran
MASTER BPM
Réglage OUTPUT
Canal PREAMP
Numéro de patch
Icône
Español
Activation/désactivation de
l’alimentation fantôme
Explication
Português
Affiche MASTER BPM.
S’affiche lorsque OUTPUT est défini sur un réglage autre que LINE/PHONES.
S’affiche lorsque OUTPUT est réglé sur LINE/PHONES.
En mode DIVIDER unique, le canal de préampli « A » est sélectionné.
Nederlands
En mode DIVIDER unique, le canal de préampli « B » est sélectionné.
S’affiche en mode DIVIDER double.
,
,
Cette icône est en surbrillance si SOLO SW est activé.
S’affiche lorsque l’alimentation fantôme est activée (p. 13).
* Pour plus de détails sur MASTER BPM, SOLO SW, OUTPUT et DIVIDER, reportez-vous au « Guide des
paramètres » (fichier PDF).
5
3 Edition : opérations de base
1
Les opérations d’édition sont extrêmement simples sur le GT-001. Prenez le temps d’apprendre les opérations
de base.
Choix des éléments à modifier
Appuyez sur l’un des boutons suivants.
2
EFFECT
MENU
Permet de modifier les paramètres
de chaque effet.
Permet d’accéder aux réglages de
sortie et de définir les fonctions
souhaitées pour les pédales externes.
Sélection d’un élément
La procédure ci-dessous montre un exemple de ce qui se
passe lorsque vous appuyez sur le bouton [MENU].
1. Tournez le bouton de valeur pour déplacer le
Bouton [ENTER]
Bouton de valeur
curseur et choisissez un élément.
2. Appuyez sur le bouton [ENTER].
3. Choisissez un autre élément à l’aide
du bouton de valeur.
4. Appuyez sur le bouton [ENTER].
Le réglage pour l’élément sélectionné s’affiche.
3
Modification des valeurs
1. Modifiez les valeurs affichées à l’aide des boutons [1]–[4].
2. Appuyez plusieurs fois sur le bouton [EXIT].
L’écran de lecture s’affiche à nouveau.
Dans ce manuel, l’ordre des opérations est indiqué comme suit.
Exemple :
Appuyez sur le bouton [MENU].
Faites tourner le bouton de valeur et choisissez « SYSTEM », puis appuyez sur le bouton [ENTER].
Faites tourner le bouton de valeur et choisissez « AUTO OFF », puis appuyez sur le bouton [ENTER].
Choisissez [MENU]"« SYSTEM »"« AUTO OFF ».
6
4 Edition : édition des effets
1
Vous pouvez éditer les paramètres de chaque effet dans le patch. Nous montrons ici à titre d’exemple comment
modifier la distorsion de l’effet de saturation.
Sélection de l’effet à modifier
Choisissez un effet à l’aide du bouton de valeur pour
déplacer le curseur.
Appuyez sur le bouton pour activer ou désactiver l’effet.
Maintenez le bouton enfoncé et tournez-le pour déplacer
la position de l’effet vers la gauche ou la droite.
Bouton [ENTER]
Deutsch
2. Appuyez sur le bouton [ENTER].
English
1. Choisissez [EFFECT]"« OD/DS ».
(uniquement si le curseur se trouve sur FX1 ou FX2)
Utilisez le bouton [4] pour sélectionner le type d’effet
pour FX1 ou FX2.
Français
2
Modification des valeurs
Modifiez la valeur affichée à l’aide des boutons [1]–[4].
Italiano
Vous pouvez déplacer l’onglet de page à l’aide du bouton de valeur.
Réglages rapides pratiques
Si vous sélectionnez un onglet de page affichant « QS », vous pourrez
rapidement appeler les réglages (Quick Settings - réglages rapides) qui ont été
enregistrés pour chaque effet.
Español
Pour plus de détails sur l’enregistrement des réglages rapides, voir
« Mémorisation des réglages par effet (écriture de réglage rapide) » (p. 9).
Quelle est la fonction de chaque bouton ?
La fonction (paramètre) de chaque bouton varie selon l’effet. Pour une liste de tous les paramètres, reportez-vous au « Guide
des paramètres » (fichier PDF).
Fonctionnement Explication
TYPE
Permet de changer le type de saturation/distorsion.
[2]
DRIVE
Permet de régler la quantité de saturation/distorsion.
[3]
TONE
Permet de définir la qualité sonore. Des valeurs plus élevées produisent un son plus aigu.
[4]
E. LEVEL
Permet de régler le volume lors de l’application de l’effet.
Nederlands
3
Bouton
[1]
Português
En cas de sélection de OD/DS
Finalisation des réglages
Appuyez plusieurs fois sur le bouton [EXIT].
L’écran de lecture s’affiche à nouveau.
REMARQUE
Les modifications que vous apportez ici seront perdues si vous changez de patch. Pour conserver le
patch que vous avez créé, appuyez sur le bouton [WRITE] pour enregistrer vos modifications sous la
forme d’un patch utilisateur (p. 8).
7
5 Edition : enregistrement d’un patch
Lorsque vous souhaitez enregistrer un patch que vous avez créé, enregistrez-le sous la forme d’un patch
utilisateur en suivant la procédure ci-après : si vous n’enregistrez pas le patch, les réglages modifiés seront
perdus lors de la mise hors tension ou du passage à un autre patch.
1
Accès au menu Ecriture
Appuyez sur le bouton [WRITE].
2
Bouton [WRITE]
Sélectionnez le type de fonction d’écriture
Choisissez « WRITE » (PATCH RIGHT) à l’aide du
bouton de valeur puis appuyez sur le bouton
[ENTER].
Bouton [ENTER]
Bouton de valeur
Types d’enregistrement
Vous pouvez choisir le type de données à enregistrer. (Par défaut, le patch est enregistré.)
Nom
Enregistrement
Echange
Initialisation
Et si vous tournez le bouton de valeur...
Echangez ou copiez les réglages
PREAMP entre les canaux A et B.
Tournez le bouton de valeur
pour choisir le type de données à
enregistrer.
8
Edition : enregistrement d’un patch
3
Sélection d’une destination d’écriture
English
Choisissez la destination d’écriture du patch
(U001−U200) à l’aide du bouton [4].
Affectation d’un nom
Pour modifier le nom du patch, choisissez « INFO » parmi les types
d’enregistrement (p. 8), utilisez le bouton de valeur pour déplacer
le curseur et utilisez le bouton [4] pour modifier le caractère.
Fonctionnement
Bouton [1]
Permet de sélectionner la catégorie
Bouton [2]
Permet de sélectionner le type de caractères
Permet de permuter entre caractères
minuscules et majuscules
Permet de changer le caractère
Bouton [3]
Bouton [4]
Deutsch
Contrôleur
Choix de la destination d’écriture
Français
Bouton de valeur Déplace le curseur
4
Appuyez sur le bouton [WRITE].
Italiano
Enregistrement
Bouton [WRITE]
Une fois le patch enregistré, l’écran de lecture
s’affiche à nouveau.
Español
Mémorisation des réglages par effet (écriture de réglage rapide)
Effets pouvant être mémorisés
Chaque canal PREAMP
OD/DS
DELAY
CHORUS
REVERB
COMP
EQ
3. Choisissez la destination d’écriture du
ASSIGN 1–8
Nederlands
1. Choisissez [WRITE]"« QS WRITE ».
2. Choisissez l’effet contenant les réglages
à enregistrer à l’aide du bouton [1].
Português
Outre la mémorisation de réglages sous la forme
de patchs, vous pouvez également mémoriser les
réglages pour des effets individuels.
Puisque vous pouvez utiliser ces réglages
mémorisés dans d’autres patchs, comme avec le
réglage rapide prédéfini, il peut s’avérer pratique,
lors de la création de nouveaux patchs, que vos
réglages d’effet préférés soient mémorisés.
L’effet WAH de la PEDAL FX et PEDAL BEND
DIVIDER
Chaque effet FX1/FX2
patch (U001−U200) à l’aide du bouton
[2].
4. Appuyez sur le bouton [WRITE].
Une fois le patch enregistré, l’écran de lecture
s’affiche à nouveau.
9
6 Edition : réglages pour une pédale externe
Vous pouvez contrôler divers paramètres en connectant une pédale d’expression (telle que Roland EV-5 : vendue
séparément) ou un commutateur au pied (FS-5U, FS-6 : vendu séparément) à la prise CTL/EXP sur le panneau de
droite.
Connexion d’une pédale
* Utilisez uniquement la pédale d’expression
spécifiée (Roland EV-5, FV-500H, FV-500L ; vendue
séparément). Le branchement de toute autre pédale
d’expression risque de provoquer des dysfonctionnements et/ou d’endommager l’appareil.
* Vous ne pouvez pas brancher simultanément un
commutateur au pied et une pédale d’expression.
Réglage de la fonction de pédale
1. Choisissez [MENU]"« CTL/EXP »"« CTL1 », « CTL2 » ou « EXP ».
Réglage
Explication
[CTL1]/[CTL2]
Permet de définir la fonction à contrôler à l’aide d’un commutateur au pied (par exemple le FS-5U ou le
FS-6 : vendu séparément).
[EXP]
Permet de définir la fonction à contrôler à l’aide d’une pédale d’expression (par exemple la EV-5, FV-500L ou
FV-500H de Roland : vendue séparément).
2. Réglez les valeurs des paramètres à l’aide des boutons [1]–[4].
Pour plus de détails sur l’affectation de fonctions à des pédales externes, reportez-vous au « Guide des
paramètres » (fichier PDF).
Exemples de réglages
Changement de numéros de patch à l’aide de CTL1/2 (pédales A/B du FS-6)
Paramètre
[1]
[2]
[3]
[4]
FUNC
MIN
MAX
MODE
Valeur de CTL1
(pédale B)
NUMBER INC
OFF
ON
TOGGLE
Valeur de CTL2
(pédale A)
NUMBER DEC
OFF
ON
TOGGLE
Explication
Permet de passer au numéro de patch supérieur
suivant à l’aide de la pédale B. Permet de passer
au numéro de patch inférieur suivant à l’aide de la
pédale A.
* Outre le réglage ci-dessus, réglez « MENU »"« SYSTEM »"« PREF »"« CTL1 » et « CTL2 » sur « SYSTEM ».
Affectation de WAH pour EXP
Paramètre
[1]
FUNC
Valeur
WAH
* Choisissez [EFFECT]"« PEDAL » et activez « PEDAL ».
10
7 Connexion à un ordinateur
En connectant le GT-001 à un ordinateur par USB, vous pouvez effectuer les opérations suivantes :
• Transmettre et recevoir des signaux audio numériques et des messages MIDI entre l’ordinateur et le GT-001
• Editer et gérer des patchs, et afficher le Guide des paramètres (fichier PDF) sur un ordinateur à l’aide du
logiciel dédié
• Télécharger des patchs depuis notre site Web dédié BOSS TONE CENTRAL (http://bosstonecentral.com/)
English
Installation du pilote USB
&http://www.roland.com/support/
Le programme que vous avez besoin d’utiliser et les étapes nécessaires pour installer le pilote USB varient
selon la configuration de votre ordinateur. Veuillez donc lire attentivement le fichier Readme.htm livré avec
le téléchargement et suivre les instructions.
A l’aide d’un câble USB disponible dans le
commerce, connectez le port USB de votre
ordinateur avec le port USB du GT-001.
Français
Connexion à un ordinateur
Deutsch
Vous devez installer le pilote USB avant la connexion à un ordinateur :
Veuillez télécharger le pilote USB depuis le site Web indiqué ci-dessous.
Installez ce pilote spécial avant d’établir une connexion USB. Pour plus de détails, reportez-vous au fichier
Readme.htm livré avec le téléchargement.
Port USB
Italiano
* Lorsque le GT-001 est connecté à un ordinateur
via USB, l’alimentation est fournie depuis
l’ordinateur. Il n’est donc pas nécessaire de
connecter l’adaptateur secteur.
Español
Utilisation du GT-001 comme interface audio
Enregistrez le son du GT-001 sur votre ordinateur ou faites en sorte que la sortie du son de l’ordinateur
s’effectue depuis les prises OUTPUT ou la prise PHONES du GT-001.
* Pour des détails sur le flux de signaux audio en cas de connexion via USB et pour des instructions sur les
réglages, reportez-vous au « Guide des paramètres » (fichier PDF).
Português
* Reportez-vous au mode d’emploi du logiciel que vous utilisez pour savoir comment changer la source
d’entrée du logiciel.
Utilisation du logiciel dédié du GT-001
Nederlands
L’utilisation du logiciel dédié vous permet d’effectuer les opérations suivantes :
• Télécharger aisément des patchs depuis notre site Web BOSS TONE CENTRAL (http://
bosstonecentral.com/)
• Modifier les réglages des patchs
• Nommer des patchs
• Classer les patchs dans l’ordre et les échanger
• Sauvegarder des patchs et des réglages système, et rétablir les réglages sauvegardés
• Afficher le « Guide des paramètres » (guide PDF) sur votre ordinateur
Le logiciel dédié peut être téléchargé sur le site BOSS TONE CENTRAL (http://bosstonecentral.
com/). Pour des détails sur l’utilisation du logiciel, reportez-vous au fichier Readme.htm fourni avec le
téléchargement.
11
8 Autres fonctions utiles
Utilisation du métronome
1. Appuyez sur le bouton [TUNER].
2. Déplacez l’onglet à l’aide du bouton de valeur et
Bouton [EXIT]
choisissez « METRONOME ».
3. Effectuez les réglages du métronome à l’aide des
boutons [1]–[4].
Paramètre
Valeur
Explication
[1]
TEMPO
40–250
Permet de spécifier le tempo du métronome.
[2]
BEAT
1/1–8/1,
1/2–8/2,
1/4–8/4,
1/8–8/8
Permet de sélectionner la signature
rythmique.
[3]
OFF/ON OFF, ON
Permet d’activer/de désactiver le métronome.
[4]
LEVEL
Permet de régler le volume du métronome.
0-100
Bouton [TUNER]
4. Appuyez sur le bouton [EXIT].
L’écran de lecture s’affiche à nouveau.
* La sortie du son du métronome s’effectue depuis les prises OUTPUT et la prise PHONES.
* Changer le réglage TEMPO modifie également le réglage MASTER BPM. Pour plus de détails sur le
réglage MASTER BPM, reportez-vous au « Guide des paramètres » (fichier PDF).
Rétablissement des réglages d’usine par défaut (Factory Reset)
La réinitialisation des paramètres système du GT-001 (paramètres système) aux réglages d’usine par défaut
est appelée « Rétablissement des paramètres d’usine ».
Vous pouvez non seulement rétablir tous les paramètres tels qu’ils étaient à la sortie d’usine du GT-001,
mais vous pouvez également spécifier les éléments à réinitialiser.
* En cas d’exécution du « Rétablissement des paramètres d’usine », les réglages que vous avez effectués
sont perdus. Enregistrez les données dont vous avez besoin sur votre ordinateur à l’aide du logiciel
dédié.
1. Choisissez [MENU]"« SYSTEM »"« F. RESET » (FACTORY RESET).
2. A l’aide des boutons [1] et [4], choisissez le type de paramètres pour lesquels vous
souhaitez restaurer les paramètres d’usine par défaut.
Bouton
Paramètre
[1]
FROM
[4]
TO
Valeur
Explication
SYSTEM
Réglages des paramètres système
QUICK
Paramètres pour le réglage rapide utilisateur
U001–U200
Réglages pour les numéros de patch U001−U200
3. Appuyez sur le bouton [WRITE].
Si vous décidez d’annuler sans exécuter le processus, appuyez sur le bouton [EXIT].
4. Pour exécuter le rétablissement des paramètres d’usine, appuyez sur le bouton [ENTER].
Une fois le processus terminé, l’écran de lecture s’affiche à nouveau.
12
Autres fonctions utiles
Connexion d’un microphone
En connectant un microphone à la prise MIC IN sur le panneau droit, vous pouvez l’utiliser avec les effets du
GT-001.
English
Microphone dynamique
Microphone à condensateur
Deutsch
MÉMO
Italiano
Español
Réglage du contraste (luminosité) de l’écran
Français
• Un microphone à condensateur nécessitant une alimentation fantôme peut être connecté à la prise MIC
IN. Pour fournir une alimentation fantôme au microphone à condensateur, suivez la procédure décrite
dans « 3 Edition : opérations de base » (p. 6), en choisissant [MENU]"« SYSTEM »"« INPUT » et en
sélectionnant « ON » à l’aide du bouton [4].
• Il n’est pas possible d’utiliser simultanément une prise GUITAR IN pour guitare et la prise MIC IN. Si les
deux prises sont connectées, la prise GUITAR IN a priorité.
* Cet instrument est équipé de prises de type symétrique (XLR). Un
schéma de câblage pour la prise est affiché à droite. Vérifiez d’abord
les schémas de câblage des autres équipements que vous avez
2 : HOT
1 : GND
l’intention de brancher, puis effectuez les connexions.
* Un mauvais positionnement des micros par rapport aux hautparleurs peut créer un effet Larsen acoustique. Pour y remédier :
• Changez l’orientation du ou des microphones.
3 : COLD
• Éloignez le ou les microphones des haut-parleurs.
• Réduisez le volume.
Vous pouvez régler la luminosité de l’écran.
Português
1. Choisissez [MENU]"« SYSTEM »"« LCD ».
2. Réglez la valeur à l’aide du bouton [4].
Augmentez la valeur (1−16) pour accroître la luminosité.
Désactivation de la fonction d’arrêt automatique
Nederlands
Le GT-001 peut s’éteindre automatiquement. Il s’éteint automatiquement après que 10 heures se sont
écoulées depuis la dernière performance musicale ou la dernière utilisation de l’appareil. L’écran affiche un
message 15 minutes environ avant la mise hors tension.
Par défaut, cette fonction est activée (arrêt automatique dans 10 heures). Si vous souhaitez que l’appareil
reste constamment allumé, désactivez cette fonction.
1. Choisissez [MENU]"« SYSTEM »"« AUTO OFF ».
2. Sélectionnez « OFF » à l’aide du bouton [1].
3. Appuyez plusieurs fois sur le bouton [EXIT].
13
Liste des messages d’erreur
Message
Cause
MIDI BUFFER FULL!
Les données ne peuvent pas être traitées
Réduisez le volume de messages MIDI transmis au GT-001.
correctement en raison du volume
Réduisez le tempo de l’appareil MIDI émetteur.
important de messages MIDI.
USB OFFLINE!
Les transmissions provenant
de l’appareil connecté ont été
interrompues. Ce message apparaît
également en cas de mise hors tension
de l’appareil connecté. Ceci n’indique en
rien un dysfonctionnement.
Vérifiez qu’aucun câble n’a été débranché et qu’il n’y a pas de
court-circuit.
DATA WRITE ERROR!
Echec de l’écriture dans la mémoire à
des fins de sauvegarde des données
utilisateur.
Il est possible que l’appareil soit endommagé. Adressez-vous à
votre centre de service Roland local.
« PREFERENCE » est réglé sur « SYSTEM ».
Le réglage permettant de sélectionner si chaque patch utilise
des paramètres différents pour la pédale de contrôle, la pédale
d’expression ou autres éléments, ou si tous les patchs partagent
les mêmes paramètres est appelé « Préférence ».
Si la préférence est réglée sur « SYSTEM », l’affectation des patchs
et les réglages du mode manuel seront ignorés. Si vous souhaitez
activer les réglages du patch, modifiez la préférence pour le
paramètre correspondant sur « PATCH ».
Pour configurer la préférence, choisissez [MENU]"« SYSTEM »
"« PREF » et sélectionnez « PATCH » à l’aide des boutons [1]–[4].
PREFERENCE IS
SYSTEM!
Solution
Principales caractéristiques
BOSS GT-001 : GUITAR EFFECTS PROCESSOR
Conversion AD
24 bits + méthode AF
Prise GUITAR IN : jack 6,35 mm
* Méthode AF (Adaptive Focus)
Il s’agit d’une méthode propre
à Roland et BOSS, qui améliore
grandement le rapport signal-bruit et
les convertisseurs AD et DA.
Prise MIC IN : type XLR, symétrique,
alimentation fantôme (CC 48 V, 10 mA
max.)
Conversion DA
24 bits
Fréquence
d’échantillonnage
44,1 kHz
Patchs
200 (utilisateur) + 200 (prédéfinis)
Niveau d’entrée
nominale
Impédance d’entrée
Niveau de sortie
nominale
Impédance de sortie
Impédance
de charge
recommandée
Ecran
14
Prise AUX IN : mini-jack stéréo
Connecteurs
Prise PHONES : mini-jack stéréo
Prise CTL/EXP : jack TRS 6,35 mm
Port USB COMPUTER : USB type B
GUITAR IN : -10 dBu
MIC IN : -40 dBu
Prises OUTPUT (L/MONO, R) : jack 6,35
mm
Prise DC IN
Alimentation
Par adaptateur secteur ou obtenue via
port USB (alimentation par bus USB)
GUITAR IN : 1 M Ω
Consommation
240 mA
MIC IN : 4 k Ω
Dimensions
211 (L) x 135 (P) x 58 (H) mm
AUX IN : 27 k Ω
Poids
500 g
OUTPUT L/MONO, R : -10 dBu
Accessoires
Mode d’emploi, dépliant « CONSIGNES
DE SÉCURITÉ », adaptateur secteur
AUX IN : -20 dBu
PHONES : -10 dBu
OUTPUT L/MONO, R : 2 k Ω
PHONES : 44 Ω
OUTPUT L/MONO, R : 10 k Ω ou plus
PHONES : 44 Ω ou plus
Ecran LCD (132 x 32 points, LCD
rétroéclairé)
Options
(vendues
séparément)
Commutateur au pied double : FS-6
Pédale d’expression : FV-500L/500H,
Roland EV-5
* 0 dBu = 0,775 Vrms
* En vue d’améliorer le produit, ses caractéristiques techniques
et/ou son aspect peuvent être modifiés sans avis préalable.
CONSIGNES DE SÉCURITÉ
AVERTISSEMENT
AVERTISSEMENT
Même si le bouton de mise sous tension est
désactivé, l’appareil n’est pas complètement
coupé de sa source d’alimentation principale.
Lorsque vous devez couper complètement
l’alimentation de l’appareil, éteignez le
bouton de mise sous tension de l’appareil puis
débranchez la fiche de la prise murale. Pour cette raison, la
prise de courant à laquelle vous souhaitez brancher la fiche du
cordon d’alimentation de l’appareil doit être facile d’accès.
Utilisez exclusivement l’adaptateur secteur fourni
avec l’appareil. Assurez-vous également que la
tension du secteur correspond à la tension d’entrée
indiquée sur l’adaptateur secteur. Les autres
adaptateurs secteur pouvant utiliser une polarité
différente ou être conçus pour une tension différent,
leur utilisation risque dès lors de provoquer des dommages, des
dysfonctionnements ou une décharge électrique.
A propos de la fonction d’arrêt automatique
ATTENTION
Précautions concernant l’utilisation de l’alimentation
fantôme
Veillez à toujours mettre l’alimentation fantôme
hors tension lorsque vous branchez un appareil
autre que des microphones à condensateur
nécessitant une alimentation fantôme. Vous
risquez d’endommager le matériel si vous
fournissez par erreur une alimentation fantôme à
des microphones dynamiques, à des appareils de lecture audio
ou à d’autres appareils ne nécessitant pas une alimentation de ce
type. Vérifiez les caractéristiques techniques de tout microphone
que vous comptez utiliser en vous référant au manuel fourni.
(Alimentation fantôme de cet instrument : 48 V CC, 10 mA max.)
Italiano
REMARQUES IMPORTANTES
Entretien
• Avant de confier l’appareil à un
réparateur, veillez à effectuer une
sauvegarde des données qui sont
enregistrées dessus, ou, si vous préférez,
notez les informations nécessaires.
Nous faisons de notre mieux pour
préserver les données enregistrées sur
l’appareil lorsque nous procédons à
des réparations. Il peut toutefois arriver
dans certains cas que la restauration du
contenu enregistré soit impossible, par
exemple si la section de la mémoire est
endommagée physiquement. Roland
décline toute responsabilité quant à
la restauration de contenu enregistré
perdu.
• Utilisez uniquement la pédale
d’expression spécifiée (Roland
EV-5, FV-500H, FV-500L ; vendue
séparément). Le branchement de
toute autre pédale d’expression
risque de provoquer des
dysfonctionnements et/ou
d’endommager l’appareil.
• Lorsque vous retournez l’appareil,
faites attention à protéger les boutons
et commandes contre tout dommage.
Veillez à manipuler l’appareil avec soin
; ne le laissez pas tomber.
• Emplacement de sécurité (
)
http://www.kensington.com/
(Panneau gauche)
Précautions supplémentaires
• Le contenu de la mémoire peut être
perdu en cas de dysfonctionnement
ou de mauvaise utilisation de
l’appareil, etc. Pour vous protéger
contre tout risque de perte de
données importantes, nous
vous recommandons d’effectuer
régulièrement des sauvegardes des
données que vous avez enregistrées
sur l’appareil.
• Roland décline toute responsabilité
quant à la restauration de contenu
enregistré perdu.
• Ne frappez jamais l’écran ou ne lui
appliquez jamais de fortes pressions.
Licences/marques commerciales
• Ce produit contient une plate-forme
logicielle intégrée eCROS de eSOL
Co.,Ltd. eCROS est une marque
déposée de eSOL Co., Ltd. au Japon.
• ASIO est une marque de Steinberg
Media Technologies GmbH.
• Roland, BOSS et COSM sont des
marques déposées ou des marques
de Roland Corporation aux États-Unis
et/ou dans d’autres pays.
15
Nederlands
• Pour le nettoyage quotidien de
l’appareil, utilisez un chiffon doux et
sec ou un chiffon légèrement imbibé
d’eau. Pour retirer les saletés tenaces,
utilisez un chiffon imprégné de
détergent doux et non abrasif. Essuyez
ensuite en profondeur l’appareil à
l’aide d’un chiffon doux et sec.
Réparations et données
Português
• Selon le matériau et la température
de la surface sur laquelle vous placez
l’appareil, il est possible que les pieds
en caoutchouc la décolorent ou la
détériorent.
Pour éviter cela, vous pouvez disposer
un morceau de feutre ou un chiffon
sous les pieds en caoutchouc. Ce
faisant, assurez-vous que l’appareil ne
risque pas de glisser ou d’être déplacé
accidentellement.
Español
Emplacement
Français
L’appareil s’éteindra automatiquement après
une période prédéterminée suivant la dernière
performance musicale ou la dernière utilisation
des boutons ou commandes (fonction d’arrêt
automatique). Si vous ne souhaitez pas que
l’appareil s’éteigne automatiquement, désactivez
la fonction d’arrêt automatique (p. 13).
Deutsch
Utilisez uniquement l’adaptateur secteur fourni et la
tension correcte
English
Pour couper complètement l’alimentation de l’appareil,
débranchez la fiche de la prise murale
Manuale dell'utente
English
Funzioni principali
Nuovi amplificatori COSM
I nuovi modelli di amplificatori basati sulla tecnologia COSM sono la perfetta sintesi di tutto il know-how che Roland ha introdotto nei
suoi prodotti durante il corso degli anni. Tuttavia, questi nuovi modelli rappresentano un'ulteriore evoluzione del semplice concetto di
modellazione amplificatore. Dai suoni più cristallini a quelli ad elevato guadagno, questi modelli consentono all'utente di utilizzare la
pennata per controllare la dinamica di amplificazione e tutte le sue sfumature.
L'unità GT-001 dispone di una funzione di interfaccia audio USB (p. 11). Ciò permette di registrare facilmente la propria performance su un
computer. L'unità GT-001 permette anche il collegamento di un microfono.
Deutsch
Dimensioni compatte da scrivania
Facile interfaccia con il computer grazie al software dedicato
Grazie al software dedicato, è facilissimo controllare l'unità GT-001 e modificare i timbri, così come gestire le patch. È anche possibile
scaricare una vasta gamma di patch da BOSS TONE CENTRAL, il sito internet appositamente dedicato agli utenti.
Français
* Questa unità si spegne automaticamente dopo un determinato
periodo di tempo se non si suona o non si utilizzano i pulsanti e i
controlli (funzione di spegnimento automatico).
Se non si desidera che l'unità si spenga automaticamente, disattivare
la funzione di spegnimento automatico (p. 13).
Italiano
• Le modifiche apportate alle impostazioni andranno perse se
si spegne l'unità. È necessario salvare le impostazioni che si
desidera conservare.
• Per ripristinare l'alimentazione, accendere di nuovo l'unità (p. 2).
Español
Manuale dell'utente (il presente documento)
Da leggere per primo. Il manuale descrive le funzioni di base che permettono l'utilizzo dell'unità GT-001. Per maggiori
dettagli su come utilizzare l'unità GT-001, si raccomanda di scaricare la "Parameter Guide" (file in formato PDF).
Manuale in PDF
Per ottenere il manuale in PDF
1. Immettere il seguente URL nella barra degli
Português
indirizzi del browser.
http://www.roland.com/manuals/
I
2. Scegliere "GT-001" come nome del prodotto.
Prima di utilizzare questa unità, leggere attentamente le sezioni intitolate "UTILIZZO SICURO DELL'UNITÀ" e "NOTE IMPORTANTI" (sul foglio "UTILIZZO
SICURO DELL'UNITÀ" e Manuale dell'utente (p. 15)). In queste sezioni vengono fornite informazioni importanti sul corretto impiego dell'unità. È inoltre
consigliabile leggere per intero il Manuale dell'utente per assicurarsi di aver compreso appieno tutte le funzioni offerte dalla nuova unità acquistata. Si
raccomanda di conservare il manuale e tenerlo a portata di mano per usarlo come riferimento.
Copyright © 2014 BOSS CORPORATION
Tutti i diritti riservati. Nessuna parte di questo documento può essere in alcun modo riprodotta senza
autorizzazione scritta di BOSS CORPORATION.
Nederlands
(scaricabile da internet)
• Parameter Guide
Include le funzioni sull'utilizzo dell'unità GT-001
e i dettagli su tutti i suoi parametri. La guida può
essere visualizzata tramite apposito software.
• Elenco suoni
È l'elenco di tutti i suoni interni dell'unità GT-001.
• MIDI Implementation
È la tabella riportante i messaggi MIDI trasmessi
e ricevuti.
Precauzione nei collegamenti
1 Preparativi
1
* Per evitare malfunzionamenti e danni alle apparecchiature,
abbassare sempre il volume e spegnere tutte le unità
prima di eseguire qualsiasi collegamento.
* L'utilizzo di cavi di collegamento con resistori potrebbe
far risultare più basso il volume delle apparecchiature
collegate agli ingressi (AUX IN). In questo caso, utilizzare
cavi di collegamento che non contengono resistori.
Collegare l'attrezzatura
Jack
PHONES
* Incassando il cavo dell'adattatore CA sul fondo dell'unità GT-001, è possibile
prevenire che lo stesso si disconnetta accidentalmente.
Jack OUTPUT
Jack DC IN
Jack GUITAR IN
Jack AUX IN
Collegare un
lettore audio con
jack mini stereo
2
Pulsante [ON/OFF]
Accendere l'unità
1. Premere il pulsante [ON/OFF].
2. Accendere l'amplificatore per chitarra
Manopola
[OUTPUT
LEVEL]
collegato.
MEMO
L'adattatore CA non è necessario quando l'unità è
collegata a un computer, dato che questo le fornisce
corrente (p. 11).
* Dopo aver effettuato tutti i collegamenti, assicurarsi di accendere prima l'unità GT-001, e poi il resto delle apparecchiature
collegate. Invertendo l'ordine di accensione è possibile causare
malfunzionamenti e danni. Per lo spegnimento, spegnere
prima le apparecchiature collegate, e quindi l'unità GT-001.
* Questa unità è dotata di un circuito di protezione. Dopo
l'accensione, è necessario attendere alcuni secondi prima che
l'unità cominci a funzionare normalmente.
* Prima di accendere o spegnere l'unità, abbassare del tutto il
volume. Anche con il volume completamente abbassato, si
potrebbero percepire dei suoni quando si accende o si spegne
l'unità. Questo comportamento è normale e non è indice di
guasto.
3
Regolare il volume
Regolare il volume con la
manopola [OUTPUT LEVEL].
* Il volume del lettore audio collegato al jack
AUX IN dovrebbe essere regolato agendo sul
volume del lettore stesso.
Funzione accordatore
1. Premere il pulsante [TUNER].
2. Suonare una corda aperta, e accordarla in modo da far
Pulsante [EXIT]
accendere l'indicatore centrale sul display.
Pulsante [TUNER]
3. Al termine dell'accordatura, premere il pulsante [EXIT].
2
Preparativi
4
Specificare il tipo di amplificatore collegato
1. Premere il pulsante [MENU].
2. Scegliere "SYSTEM" con la manopola Valore, quindi
Pulsante [ENTER]
English
Per garantire il miglior suono possibile, specificare il tipo di amplificatore collegato all'unità GT-001. Si
raccomanda di non saltare questo passaggio.
Manopola Valore
premere il pulsante [ENTER].
premere il pulsante [ENTER].
Deutsch
3. Scegliere "OUTPUT" con la manopola Valore, quindi
Pulsante [MENU]
Manopola [4]
Français
4. Utilizzare la manopola [4] per scegliere il tipo di
amplificatore.
Spiegazione
JC-120
Da selezionare se l'amplificatore collegato è il modello Roland JC-120.
SMALL AMP
Da selezionare se è stato collegato un piccolo amplificatore.
COMBO AMP
Da selezionare se l'unità è stata collegata a un amplificatore per chitarra combo (es.: un modello che
include sia l'amplificatore che l'altoparlante), ma diverso dal modello JC-120.
Italiano
Valore
Per alcuni tipi di amplificatori per chitarra, l'impostazione "JC-120" potrebbe produrre miglior i risultati.
STACK AMP
Da selezionare se l'unità è stata collegata a uno stack per chitarra (un setup in cui l'amplificatore e gli
altoparlanti sono separati).
Da selezionare se l'unità è collegata al jack RETURN del modello JC-120.
COMBO RETURN
Da selezionare se l'unità è stata collegata al jack RETURN di un amplificatore combo per chitarra.
STACK RETURN
Da selezionare se l'unità è stata collegata al jack RETURN di uno stack per chitarra. "STACK RETURN"
dovrebbe essere scelto quando si utilizza un setup che include testata e cassa per chitarra.
LINE/PHONES
Da selezionare se si stanno utilizzando le cuffie, oppure se l'unità GT-001 è collegata a degli
altoparlanti monitor, a un mixer o a un registratore digitale.
Español
JC-120 RETURN
Português
5. Premere più volte il pulsante [EXIT].
Nederlands
MEMO
• Il parametro SP TYPE è valido solo se OUTPUT è impostato su "LINE/PHONES". Per i dettagli sul
parametro SP TYPE, fare riferimento alla "Parameter Guide" (file in formato PDF).
• In cuffia non sarà possibile ottenere il suono tipico di un amplificatore, a meno che non si attivi
PREAMP. Si raccomanda di attivare PREAMP ogni volta che si utilizzano le cuffie per l'ascolto dei suoni.
Per attivare PREAMP, come mostrato al punto 1 del paragrafo "4 Modifica: Modifica degli effetti" (p.
7), scegliere [EFFECT]""Pr A" o "Pr B" e premere la manopola Valore. Per i dettagli sulle impostazioni
PREAMP, fare riferimento alla "Parameter Guide" (file in formato PDF).
3
2 Suonare
Dopo aver completato la fase dei preparativi, è possibile iniziare a suonare con l'unità GT-001.
Cos'è una Patch?
L'unità GT-001 include numerosi effetti. Ciascuna combinazione di effetti e impostazioni è denominata
"patch".
Patch preimpostata P200
Patch preimpostata P001
Patch utente U200
Patch utente U001
In memoria, l'unità GT-001 include 200 patch utente (a partire dalla numero U001) che possono essere
sovrascritte, e altre 200 patch preimpostate (a partire dalla P001) protette contro la scrittura.
Selezione di una patch
Ruotare la manopola Valore per scorrere le patch.
Manopola Valore
MEMO
• Non è possibile cambiare patch se non si è nella schermata Play
(p. 5). Premere il pulsante [EXIT] per tornare alla schermata Play,
quindi cambiare patch.
• È possibile assegnare fino a quattro patch ai pulsanti [A]–[D], per
poterle in seguito richiamare immediatamente. Per assegnare una patch a un pulsante, scegliere la patch e
tenere premuto il pulsante desiderato per diversi secondi.
Display numero della patch
Sezione del display che mostra il numero e il nome della patch
correntemente selezionata.
* Le spiegazioni riportate nel presente manuale includono illustrazioni che mostrano gli elementi visualizzati in genere sul display.
Tuttavia, nell'unità in uso potrebbe essere incorporata una versione più recente e aggiornata del sistema, ad esempio con nuovi suoni.
Pertanto è possibile che quanto visualizzato effettivamente sul display non corrisponda esattamente a quanto riportato nel manuale.
4
Suonare
Scelta di una patch per categoria
English
1. Dalla schermata Play, premere la manopola Valore.
Appaiono le categorie di patch.
2. Ruotare la manopola Valore per scegliere una
categoria di patch, quindi premere il pulsante [ENTER].
Deutsch
L'unità richiama la prima patch della categoria scelta, e richiama la schermata Play.
Français
Informazioni sulla schermata Play
All'accensione dell'unità, sul display appare sempre la "schermata Play".
Italiano
Icone del display
MASTER BPM
Impostazione OUTPUT
Canale PREAMP
Numero di patch
Icona
Español
Alimentazione
phantom on/off
Spiegazione
Português
Indica il valore di MASTER BPM.
Mostrato quando OUTPUT è impostato su un valore diverso da LINE/PHONES.
Mostrato quando OUTPUT è impostato su LINE/PHONES.
Indica il canale preamplificatore "A" quando la modalità DIVIDER è Single.
Nederlands
Indica il canale preamplificatore "B" quando la modalità DIVIDER è Single.
Mostrato quando la modalità DIVIDER è Dual.
,
,
Icona evidenziata se il parametro SOLO SW è attivato.
Indica l'attivazione dell'alimentazione phantom (p. 13).
* Per i dettagli su MASTER BPM, SOLO SW, OUTPUT e DIVIDER, fare riferimento alla "Parameter Guide" (file
in formato PDF).
5
3 Modifica: Operazioni di base
1
Le operazioni di modifica sull'unità GT-001 sono estremamente semplici. In questo capitolo vengono illustrate
le principali.
Scegliere ciò che si desidera modificare
Premere uno dei seguenti pulsanti.
EFFECT
Pulsante che permette di modificare
i parametri di ciascun effetto.
2
MENU
Pulsante che consente l'accesso alle
impostazioni delle uscite, o quelle
per le funzioni da assegnare ai pedali
esterni.
Selezionare una voce
La procedura in basso è un esempio di quando si preme il
pulsante [MENU].
1. Ruotare la manopola Valore per spostare il
Pulsante [ENTER]
Manopola Valore
cursore e scegliere una voce.
2. Premere il pulsante [ENTER].
3. Scegliere un'altra voce con la
manopola Valore.
4. Premere il pulsante [ENTER].
Sul display appaiono le impostazioni della voce selezionata.
3
Modificare i valori
1. Cambiare il valore visualizzato con le manopole [1]–[4].
2. Premere più volte il pulsante [EXIT].
L'unità richiama la schermata Play.
Nel presente manuale, la convenzione per descrivere l'ordine delle operazioni è la seguente.
Esempio:
Premere il pulsante [MENU].
Ruotare la manopola Valore per scegliere "SYSTEM" e premere il pulsante [ENTER].
Ruotare la manopola Valore per scegliere "AUTO OFF" e premere il pulsante [ENTER].
Scegliere [MENU]""SYSTEM"""AUTO OFF".
6
4 Modifica: Modifica degli effetti
1
I parametri di ciascun effetto della patch possono essere modificati in base alle proprie esigenze. L'esempio che
segue descrive come modificare il grado di distorsione dell'effetto overdrive.
Selezionare l'effetto da modificare
Scegliere un effetto utilizzando la manopola Valore per
spostare il cursore.
Premere la manopola per attivare o disattivare l'effetto.
Tenendo premuta la manopola e ruotandola, l'effetto si
sposta verso sinistra o destra.
Pulsante [ENTER]
Deutsch
2. Premere il pulsante [ENTER].
English
1. Scegliere [EFFECT]""OD/DS".
(Solo se il cursore è su FX1 o FX2)
Utilizzare la manopola [4] per selezionare il tipo di
effetto per FX1 o FX2.
Français
2
Modificare i valori
Cambiare il valore visualizzato con le manopole [1]–[4].
Italiano
È possibile utilizzare la manopola Valore per spostare la scheda di
pagina.
Impostazioni veloci convenienti
Selezionando una scheda di pagina che mostra "QS", è possibile richiamare
facilmente le Impostazioni veloci (Quick Settings) che sono state salvate per
ciascun effetto.
Español
Per i dettagli su come salvare le Impostazioni veloci, fare riferimento al
paragrafo "Salvataggio delle impostazioni per effetti (scrittura Impostazioni veloci)" (p. 9).
Funzione di ciascuna manopola
La funzione (parametro) di ciascuna manopola differisce a seconda del tipo di effetto selezionato. Per l'elenco completo dei
parametri, fare riferimento alla "Parameter Guide" (file in formato PDF).
[1]
Spiegazione
Consente di selezionare il tipo di overdrive/distorsione.
[2]
DRIVE
Consente di regolare la quantità di overdrive/distorsione.
[3]
TONE
Consente di regolare la qualità tonale. A maggior valore corrisponde un tono più
brillante.
[4]
E. LEVEL
Consente di regolare il volume per il suono elaborato dall'effetto.
Nederlands
3
TYPE
Português
Selezionando OD/DS
Manopola Funzione
Completare le impostazioni
Premere più volte il pulsante [EXIT].
L'unità richiama la schermata Play.
NOTA
Le modifiche apportate andranno perse se si cambia patch. Se si desidera conservare le modifiche
apportate, premere il pulsante [WRITE] per salvarle come patch utente (p. 8).
7
5 Modifica: Salvataggio di una patch
Per conservare una patch creata, salvarla come patch utente utilizzando la procedura di seguito descritta. Se non
si salva la patch, tutte le modifiche ad essa apportate andranno perse nel momento in cui si spegne l'unità o si
seleziona una patch differente.
1
Accedere al menu Write
Premere il pulsante [WRITE].
2
Pulsante [WRITE]
Selezionare il tipo di scrittura
Scegliere "WRITE" (PATCH RIGHT) con la manopola
Valore, quindi premere il pulsante [ENTER].
Pulsante [ENTER]
Manopola Valore
Tipi di salvataggio
È possibile scegliere il tipo di dati da salvare. (Per impostazione predefinita, l'unità salva la patch).
Nome
Salvare i dati
Scambio
Inizializzazione
E ruotando la manopola Valore...
Scambia o copia le impostazioni
PREAMP tra i canali A e B.
Ruotare la manopola Valore per
scegliere il tipo di dati da salvare.
8
Modifica: Salvataggio di una patch
3
Selezionare la destinazione di scrittura
English
Utilizzare la manopola [4] per scegliere la patch
su cui effettuare il salvataggio (U001−U200).
Assegnare un nome
Per modificare il nome della patch, scegliere "INFO" dai tipi di
salvataggio (p. 8), utilizzare la manopola Valore per spostare il
cursore e la manopola [4] per cambiare il carattere.
Permette di selezionare la categoria
Manopola [2]
Consente di selezionare il tipo di caratteri
Manopola [3]
Permette di alternare i caratteri maiuscoli
e minuscoli
Manopola [4]
Permette di cambiare il carattere
Manopola
Valore
Permette di spostare il cursore
Français
Funzione
Manopola [1]
Deutsch
4
Regolatore
Scegliere la destinazione di scrittura
Premere il pulsante [WRITE].
Italiano
Salvare i dati
Pulsante [WRITE]
Una volta salvata la patch, l'unità richiama la
schermata Play.
Español
Salvataggio delle impostazioni per effetti (scrittura Impostazioni veloci)
impostazioni che si desidera salvare con
la manopola [1].
3. Scegliere la patch di destinazione per la
scrittura (U001−U200) con la manopola
[2].
Una volta salvata la patch, l'unità richiama la
schermata Play.
Effetti salvabili in memoria
Ciascun canale PREAMP
OD/DS
DELAY
CHORUS
Nederlands
1. Scegliere [WRITE]""QS WRITE".
2. Scegliere l'effetto contenente le
4. Premere il pulsante [WRITE].
Português
Oltre a poter salvare le impostazioni nelle patch,
l'unità permette anche di salvare le impostazioni
individuali degli effetti.
Dato che è possibile utilizzare tali impostazioni
in altre patch, con le Impostazioni veloci è quindi
possibile salvare le impostazioni preferite per gli
effetti in maniera da poterli avere già pronti per
l'inserimento in nuove patch.
REVERB
COMP
EQ
WAH del PEDAL FX e PEDAL BEND
DIVIDER
Ciascun effetto FX1/FX2
ASSIGN 1–8
9
6 Modifica: Impostazioni per un pedale esterno
Collegando un pedale di espressione (come ad esempio il modello Roland EV-5, acquistabile separatamente) o
un interruttore a pedale (come i modelli FS-5U o FS-6, acquistabili separatamente) al jack CTL/EXP sul pannello
destro, è possibile controllare diversi parametri.
Collegamento di un pedale
* Utilizzare solo il pedale di espressione specificato
(Roland EV-5, FV-500H, FV-500L, acquistabili
separatamente). Se si collegano altri pedali di
espressione, è possibile che si verifichino guasti e/o
danni all'unità.
* Non è consentito collegare contemporaneamente
l'interruttore a pedale e il pedale di espressione.
Impostazione della funzione per il pedale
1. Scegliere [MENU]""CTL/EXP"""CTL1", "CTL2" o "EXP".
Impostazione
Spiegazione
[CTL1]/[CTL2]
Specificano la funzione da controllare tramite l'interruttore a pedale (come ad esempio i modelli FS-5U o
FS-6, acquistabili separatamente).
[EXP]
Specificano la funzione da controllare tramite il pedale di espressione (come ad esempio i modelli Roland
EV-5, FV-500L o FV-500H, acquistabili separatamente).
2. Impostare i valori dei parametri con le manopole [1]–[4].
Per i dettagli sull'assegnazione delle funzioni a pedali esterni, fare riferimento alla "Parameter Guide" (file
in formato PDF).
Esempio di impostazione
Cambio del numero di patch mediante l'uso di CTL1/2 (pedali A/B del modello FS-6)
Parametro
[1]
[2]
[3]
[4]
FUNC
MIN
MAX
MODE
Valore di CTL1 (pedale
B)
NUMBER INC
OFF
ON
TOGGLE
Valore di CTL2 (pedale
A)
NUMBER DEC
OFF
ON
TOGGLE
Spiegazione
Seleziona il numero di patch superiore mediante
il pedale B. Seleziona il numero di patch inferiore
mediante il pedale A.
* Oltre alle regolazioni sopra descritte, impostare "MENU"""SYSTEM"""PREF"""CTL1" e "CTL2" su "SYSTEM".
Assegnazione di WAH a EXP
Parametro
[1]
FUNC
Valore
WAH
* Scegliere [EFFECT]""PEDAL" e attivare "PEDAL".
10
7 Collegamento al computer
Collegando l'unità GT-001 a un computer via USB è possibile eseguire le seguenti operazioni.
• Trasmettere e ricevere segnali audio digitali e messaggi MIDI tra il computer e l'unità GT-001.
• Modificare e gestire le patch, e visualizzare la Parameter Guide (in formato PDF) su un computer utilizzando
l'apposito software.
• Scaricare nuove patch dal sito internet dedicato BOSS TONE CENTRAL (http://bosstonecentral.com/)
English
Installazione del driver USB
&http://www.roland.com/support/
Il programma che sarà necessario utilizzare e i passi della procedura relativi all'installazione del driver USB
dipendono dalle impostazioni del computer, per cui si raccomanda di leggere attentamente il file Readme.
htm incluso con il download.
Utilizzando un cavo USB standard reperibile
in commercio, collegare la porta USB del
computer alla porta USB dell'unità GT-001.
Français
Collegamento al computer
Deutsch
Prima di collegare il computer, installare il driver USB.
Scaricare il driver USB dal sito internet descritto in basso.
Installare il driver prima di effettuare il collegamento USB. Per ulteriori dettagli, fare riferimento al file
Readme.htm incluso con il download.
Porta USB
Italiano
* Se collegati, il computer è in grado di fornire
corrente all'unità GT-001 attraverso il cavo USB.
Per tale motivo, non è necessario collegare
l'adattatore CA.
Español
Utilizzo dell'unità GT-001 come interfaccia audio
È possibile registrare il suono dell'unità GT-001 su un computer, oppure riprodurre i suoni del computer
attraverso i jack OUTPUT o PHONES dell'unità GT-001.
* Per i dettagli sul flusso del segnale audio quando l'unità è collegata via USB, e sulle istruzioni su come
effettuare le impostazioni, fare riferimento alla "Parameter Guide" (file in formato PDF).
Português
* Per istruzioni su come selezionare la sorgente di ingresso sul software utilizzato, fare riferimento al
relativo manuale dell'utente.
Utilizzo del software dedicato dell'unità GT-001
Nederlands
Utilizzando il software dedicato è possibile effettuare le seguenti operazioni:
• Scaricare facilmente nuove patch dal sito internet dedicato BOSS TONE CENTRAL (http://
bosstonecentral.com/)
• Modificare le impostazioni delle patch
• Rinominare le patch
• Ordinare le patch e scambiarle di posto
• Fare copie di backup delle patch e delle impostazioni di sistema, per il successivo ripristino
• Visualizzare la "Parameter Guide" (file in formato PDF) sul computer.
Il software dedicato può essere scaricato dal sito internet BOSS TONE CENTRAL (http://
bosstonecentral.com/). Per i dettagli su come utilizzare il software, fare riferimento al file Readme.htm
incluso con il download.
11
8 Altre funzioni utili
Utilizzo del metronomo
1. Premere il pulsante [TUNER].
2. Spostare la scheda con la manopola Valore e scegliere
Pulsante [EXIT]
"METRONOME".
3. Impostare i parametri del metronomo con le
manopole [1]–[4].
Pulsante [TUNER]
Parametro
Valore
Spiegazione
[1]
TEMPO
40-250
Specifica il tempo del metronomo.
[2]
BEAT
1/1–8/1,
1/2–8/2,
1/4–8/4,
1/8–8/8
Seleziona la divisione ritmica.
[3]
OFF/ON
OFF, ON
Consente di attivare/disattivare il
metronomo.
[4]
LEVEL
0-100
Consente di regolare il volume del
metronomo.
4. Premere il pulsante [EXIT].
L'unità richiama la schermata Play.
* Il suono del metronomo è inviato ai jack di uscita OUTPUT e PHONES.
* La modifica del TEMPO incide sul valore di MASTER BPM. Per i dettagli su MASTER BPM, fare riferimento
alla "Parameter Guide" (file in formato PDF).
Ripristino delle impostazioni di fabbrica (Factory reset)
Il ripristino delle impostazioni di sistema originali sull'unità GT-001(così come definite all'uscita dalla
fabbrica), prende il nome di "Factory reset" (Ripristino delle impostazioni di fabbrica).
L'unità GT-001 permette non solo di ripristinare la condizione di sistema originale così come predefinita in
fabbrica, ma anche di specificare quali elementi ripristinare.
* All'esecuzione del "Factory reset"(Ripristino delle impostazioni di fabbrica), tutte le impostazioni
personalizzate andranno perse. Prima di proseguire oltre, salvare i dati su un computer utilizzando il
software dedicato.
1. Scegliere [MENU]""SYSTEM"""F. RESET" (FACTORY RESET).
2. Scegliere le impostazioni che si desidera ripristinare, utilizzando le manopole [1] e [4].
Manopola
Parametro
[1]
FROM
[4]
TO
Valore
Spiegazione
SYSTEM
Impostazioni dei parametri di sistema
QUICK
Impostazioni per le Impostazioni veloci utente.
U001–U200
Impostazioni per i numeri di patch U001−U200
3. Premere il pulsante [WRITE].
Se si decide di annullare l'operazione, premere il pulsante [EXIT].
4. Per eseguire il Factory reset (Ripristino delle impostazioni di fabbrica), premere il pulsante
[ENTER].
Una volta completata l'operazione di ripristino, l'unità richiama la schermata Play.
12
Altre funzioni utili
Collegamento di un microfono
Collegando un microfono al jack MIC IN sul pannello laterale destro, è possibile elaborare il suono della voce
tramite gli effetti interni dell'unità GT-001.
English
Microfono dinamico
Microfono a condensatore
Français
Italiano
Español
Regolazione del contrasto (luminosità) del display
Deutsch
MEMO
• Il microfono a condensatore, che richiede alimentazione phantom, può essere collegato al jack MIC
IN. Per fornire alimentazione phantom al microfono a condensatore, seguire la procedura descritta nel
capitolo "3 Modifica: Operazioni di base" (p. 6), scegliendo [MENU]""SYSTEM"""INPUT" e selezionando
"ON" con la manopola [4].
• Non è consentito utilizzare contemporaneamente il jack GUITAR IN per una chitarra e il jack MIC IN. Se si
collegano tutti e due i jack, l'unità assegna la priorità di funzionamento al jack GUITAR IN.
* L'unità dispone di jack XLR bilanciati. Lo schema di cablaggio è
mostrato sulla destra. Prima di effettuare il collegamento, verificare il
cablaggio dell'attrezzatura che si desidera connettere.
* È possibile che venga generato un effetto di feedback a seconda
2: CALDO
1: TERRA
della posizione dei microfoni rispetto agli altoparlanti. È possibile
porre rimedio nei seguenti modi:
• Modificando l'orientamento dei microfoni.
• Riposizionando i microfoni a una distanza maggiore dagli
altoparlanti.
3: FREDDO
• Abbassando i livelli di volume.
È possibile regolare il contrasto del display.
Português
1. Scegliere [MENU]""SYSTEM"""LCD".
2. Regolare il valore utilizzando la manopola [4].
Alzando il valore (1−16) la luminosità del display aumenta.
Impostazione dello stato per la funzione Auto Off
Con le impostazioni di fabbrica, la funzione di spegnimento automatico è attivata ("ON", spegnimento
dopo 10 ore di inutilizzo). Se si desidera lasciare l'unità sempre accesa, disattivare ("OFF") la funzione di
spegnimento automatico.
1. Scegliere [MENU]""SYSTEM"""AUTO OFF".
2. Selezionare "OFF" utilizzando la manopola [1].
3. Premere più volte il pulsante [EXIT].
13
Nederlands
L'unità GT-001 è in grado di spegnersi autonomamente. Ciò si verifica se non viene utilizzata o suonata per
almeno 10 ore. 15 minuti prima dello spegnimento automatico, sul display dell'unità appare un messaggio.
Elenco dei messaggi di errore
Messaggio
MIDI BUFFER FULL!
USB OFFLINE!
DATA WRITE ERROR!
PREFERENCE IS
SYSTEM!
Causa
Non è stato possibile elaborare
correttamente i dati a causa dell'elevato
numero di messaggi MIDI.
La trasmissione con il dispositivo
collegato è stata interrotta. Questo
messaggio appare inoltre quando il
dispositivo collegato viene spento. Ciò
non indica un guasto.
La scrittura in memoria dei dati utente
è fallita.
Il parametro "PREFERENCE" è impostato
su "SYSTEM".
Soluzione
Ridurre la quantità di messaggi MIDI trasmessi all'unità GT-001.
Ridurre il tempo per il dispositivo MIDI trasmittente.
Verificare che il cavo di collegamento non sia stato scollegato e che
non sia in corto.
È possibile che l'unità sia danneggiata. Consultare il più vicino
centro di assistenza Roland.
Il parametro con il quale si definisce se ogni patch debba includere
impostazioni differenti per il pedale di controllo, il pedale di
espressione e altre voci, o se invece le patch debbano condividere
la stessa impostazione, è chiamato "Preference".
Se questo parametro è impostato su "SYSTEM", l'assegnazione delle
singole patch e le impostazioni effettuate in modalità manuale
vengono ignorate. Se si desidera abilitare le impostazioni decise
per ciascuna patch, regolare Preference su "PATCH".
Per impostare Preference, scegliere [MENU]""SYSTEM""“PREF”
e selezionare "PATCH" utilizzando le manopole [1]–[4].
Specifiche principali
BOSS GT-001: PROCESSORE DI EFFETTI PER CHITARRA
Conversione AD
24 bit + metodo AF
Jack GUITAR IN: cavo jack da 1/4"
* Metodo AF (Adaptive Focus) Metodo
proprietario di Roland e BOSS che
migliora notevolmente il rapporto
segnale-rumore (SN) dei convertitori
AD e DA.
Jack MIC IN: XLR, bilanciato, alimentazione phantom (CD 48 V, 10 mA Max)
Jack AUX IN: cavo jack mini stereo
Connettori
Jack OUTPUT (L/Mono, R): cavo jack
da 1/4"
Conversione DA
24 bit
Jack PHONES: cavo jack mini stereo
Frequenza di
campionamento
44,1 kHz
Jack CTL/EXP: cavo jack phone da 1/4"
TRS
Patch
200 (utente) + 200 (preimpostate)
Porta USB COMPUTER: USB tipo B
Livello di ingresso
nominale
Impedenza di
ingresso
Livello di uscita
nominale
Impedenza di uscita
GUITAR IN -10 dBu
MIC IN: -40 dBu
AUX IN: -20 dBu
GUITAR IN 1 M Ω
MIC IN: 4 k Ω
AUX IN: 27 k Ω
OUTPUT L/MONO, R: -10 dBu
PHONES: -10 dBu
OUTPUT L/MONO, R: 2 k Ω
PHONES: 44 Ω
Impedenza di carico OUTPUT L/MONO, R: 10 k Ω o superiore
consigliata
PHONES: 44 Ω o superiore
Display
14
LCD grafico (132 x 32 punti, LCD
retroilluminato)
Jack DC IN
Alimentazione
Adattatore CA, o tramite connessione
USB (alimentazione via bus USB)
Assorbimento di
corrente
240 mA
Dimensioni
211 (L) x 135 (P) x 58 (A) mm
Peso
500 g
Accessori
Manuale dell'utente, foglio "UTILIZZO
SICURO DELL'UNITÀ", adattatore CA.
Opzioni
(acquistabili
separatamente)
Interruttore a pedale dual: FS-6
Pedale di espressione: FV-500L/500H,
Roland EV-5
* 0 dBu = 0,775 Vrm
* Allo scopo di migliorare il prodotto, le specifiche e/o l'aspetto di
questa unità sono soggetti a modifiche senza preavviso.
UTILIZZO SICURO DELL'UNITÀ
AVVISO
AVVISO
Anche se spenta, l'unità rimane sotto tensione
finché il cavo di alimentazione è inserito in
una presa di corrente elettrica. Se è necessario
scollegare completamente l'alimentazione,
spegnere l'unità, quindi scollegare il cavo di
alimentazione dalla presa di corrente. Per
questo motivo è consigliabile collegare la spina del cavo di
alimentazione a una presa nelle vicinanze e di facile accesso.
Utilizzare esclusivamente l'adattatore CA
in dotazione con l'unità. Assicurarsi inoltre
che l'emissione di corrente al momento
dell'installazione corrisponda alla tensione
di corrente in ingresso specificata sul corpo
dell'adattatore CA. Altri adattatori CA potrebbero
utilizzare una polarità diversa o essere indicati per una tensione
di corrente diversa, pertanto il loro utilizzo potrebbe causare
danni, guasti o produrre scosse elettriche.
Informazioni sulla funzione Auto Off
ATTENZIONE
Precauzioni relative all'utilizzo dell'alimentazione
phantom.
NOTE IMPORTANTI
Manutenzione
• Per la pulizia quotidiana, strofinare
l'unità con un panno soffice e asciutto
o leggermente inumidito con acqua.
Per rimuovere lo sporco ostinato,
utilizzare un panno imbevuto di un
detergente delicato e non abrasivo.
Successivamente, assicurarsi di
asciugare completamente l'unità con
un panno soffice e asciutto.
• Evitare di colpire o premere con forza
sul display.
• Utilizzare solo il pedale di espressione
specificato (Roland EV-5, FV-500H, FV500L, acquistabili separatamente). Se
si collegano altri pedali di espressione,
è possibile che si verifichino guasti e/o
danni all'unità.
• Quando si capovolge l'unità, fare
attenzione a non danneggiare i
pulsanti e le manopole. Maneggiare
l'unità con cautela, evitando di farla
cadere.
• Fessura di sicurezza (
)
http://www.kensington.com/
(Pannello sinistro)
Nederlands
• Prima di spedire l'unità per eventuali
riparazioni, assicurarsi di effettuare
un backup dei dati memorizzati
al suo interno o di prendere nota
delle informazioni necessarie.
Sebbene i tecnici Roland facciano del
proprio meglio per conservare i dati
memorizzati durante gli interventi di
riparazione, in alcuni casi potrebbe
essere impossibile ripristinare i
contenuti memorizzati, ad esempio
se la sezione della memoria è
danneggiata fisicamente. Roland non
si assume alcuna responsabilità circa
il ripristino dei contenuti memorizzati
eventualmente persi.
Precauzioni aggiuntive
• I dati memorizzati nell'unità
potrebbero andare persi in seguito a
guasto dell'apparecchiatura, utilizzo
errato dell'unità ecc. Per evitare di
perdere in modo definitivo i dati, si
consiglia di creare backup regolari dei
dati memorizzati nell'unità.
• Roland non si assume alcuna
responsabilità circa il ripristino dei
contenuti memorizzati eventualmente
persi.
Português
Riparazioni e dati
• In base al materiale e alla temperatura
della superficie su cui si posiziona
l'unità, i piedini di gomma potrebbero
scolorire o rovinare la superficie.
Per evitare che ciò avvenga, è
possibile collocare un pezzo di feltro
o un panno sotto i piedini di gomma.
In tal caso, assicurarsi che l'unità
non scivoli o non si sposti in modo
accidentale.
Español
Posizionamento
Italiano
Prima di collegare un qualsiasi apparato diverso
da un microfono a condensatore, disattivare
l'alimentazione phantom. Fornire alimentazione
phantom a un dispositivo che non la richiede,
come ad esempio un microfono dinamico o
un lettore audio, può causare danni. Prima di
utilizzare un microfono, controllare le rispettive specifiche
tecniche sul corrispondente manuale dell'utente.
(Alimentazione phantom fornita dall'unità: 48 V CD, 10 mA max)
Français
Questa unità si spegne automaticamente dopo
un determinato periodo di tempo se non si
suona o non si utilizzano i pulsanti e i controlli
(funzione di spegnimento automatico). Se non si
desidera che l'unità si spenga automaticamente,
disattivare la funzione di spegnimento
automatico (p. 13).
Deutsch
Utilizzare esclusivamente l'adattatore CA in dotazione e
con la tensione di corrente corretta.
English
Per isolare completamente l'unità dalla rete elettrica,
scollegare la spina dalla presa di corrente
Licenze/Marchi
• Questo prodotto contiene la
piattaforma software integrata eCROS
di eSOL Co.,Ltd. eCROS è un marchio
di eSOL Co., Ltd. in Giappone.
• ASIO è un marchio di Steinberg Media
Technologies GmbH.
• Roland, BOSS e COSM sono marchi
o marchi registrati di Roland
Corporation negli Stati Uniti e/o in
altri paesi.
15
Manual del usuario
English
Características principales
Nuevos amplificadores COSM
Estos renovados amplificadores COSM ofrecen lo mejor de toda nuestra experiencia de años en creación de sonido. Representan una
evolución que va mucho más allá del diseño convencional de modelado de amplificadores retro. De los sonidos prístinos y transparentes
a aquellos sonidos con una ganancia extremadamente alta, estos modelos permiten controlar con total precisión el comportamiento
dinámico del amplificados y sus sutiles matices.
El GT-001 está equipado con una función de interfaz de audio USB (p. 11). Puede grabar sonidos fácilmente conectando la unidad a un
ordenador. También puede conectar un micrófono al GT-001.
Deutsch
Tamaño compacto perfecto para sobremesa
Operaciones sencillas con un ordenador gracias al software dedicado
Puede controlar el GT-001, editar tonos y gestionar patches usando software dedicado. También puede descargar una amplia variedad
de patches en BOSS TONE CENTRAL, nuestro sitio web para la descarga de patches.
Français
* La unidad se apagará automáticamente cuando haya transcurrido
un periodo de tiempo predeterminado desde la última vez que se
usó para reproducir música o se accionó alguno de sus botones o
controles (función Auto Off ).
Si no desea que la unidad se apague automáticamente, desactive la
función Auto Off (p. 13).
Italiano
• Cualquier ajuste que se esté editando se perderá al apagar
la unidad. Si tiene ajustes que desea conservar, asegúrese de
guardarlos primero.
• Para restablecer la alimentación, vuelva a encender la unidad
(p. 2).
• Implementación MIDI
Información detallada sobre mensajes MIDI.
1. Escriba la siguiente URL en su ordenador.
http://www.roland.com/manuals/
I
2. Elija “GT-001” como nombre de producto.
Antes de utilizar esta unidad, lea atentamente las secciones tituladas “UTILIZACIÓN SEGURA DE LA UNIDAD” y “NOTAS IMPORTANTES” (folleto
“UTILIZACIÓN SEGURA DE LA UNIDAD” y manual del usuario (p. 15)). En estas secciones encontrará información importante acerca de la utilización correcta
de la unidad. Además, le recomendamos leer íntegramente el presente manual del usuario para conocer bien todas las funciones de su nueva unidad.
Guarde el manual y téngalo a mano por si necesita consultarlo en algún momento.
Copyright © 2014 BOSS CORPORATION
Todos los derechos reservados. Se prohíbe la reproducción de cualquier parte de esta publicación, en
cualquier formato, sin la previa autorización por escrito de BOSS CORPORATION.
Nederlands
• Lista de sonidos
Lista de los sonidos incorporados en el GT-001.
Para conseguir el manual en PDF
Português
Manual en PDF (descárguelo de Internet)
• Guía de parámetros
Esta guía ofrece información sobre el manejo
del GT-001 y todos los parámetros. La guía de
parámetros también puede verse con el software
dedicado.
Español
Manual del usuario (este documento)
Lea este documento primero. Explica los fundamentos para poder utilizar el GT-001. Para obtener información
detallada sobre el manejo del GT-001, descargue y consulte la “Guía de parámetros” (archivo PDF).
Precauciones al conectar
1 Preparativos
1
* Para evitar que el equipo funcione de manera deficiente
o sufra algún daño, baje siempre el volumen y apague
todas las unidades antes de proceder a realizar cualquier
conexión.
* Si se utilizan cables de conexión con resistencias, el nivel
del volumen del equipo conectado a las entradas (AUX IN)
puede ser bajo. En tal caso, utilice cables de conexión sin
resistencias.
Conecte el equipo
Conector
PHONES
* Al insertar el cable del adaptador de CA en la ranura de la parte inferior del
GT-001, puede evitar que el enchufe se desconecte accidentalmente.
Conectores OUTPUT
Conector DC IN
Conector GUITAR IN
Conector AUX IN
Conecte un
reproductor de
audio con un
conector mini
estéreo
2
Conmutador
[ON/OFF]
Encienda la unidad
1. Pulse el conmutador [ON/OFF].
2. Encienda el amplificador de guitarra.
Mando
[OUTPUT
LEVEL]
RECUERDE
Si está conectado a un ordenador, el adaptador
de CA ya no es necesario, porque la unidad recibe
alimentación a través del ordenador (p. 11).
* Una vez realizadas correctamente las conexiones, asegúrese
de encender los equipos empezando por el GT-001 y, a
continuación, el sistema conectado. Si no enciende los equipos
en el orden adecuado, podrían producirse deficiencias en el
funcionamiento o daños. Para apagar los equipos comience por
el sistema conectado y, a continuación, apague el GT-001.
* La unidad está equipada con un circuito de protección. Es
necesario un breve intervalo de tiempo (unos cuantos segundos)
después del encendido para que funcione con normalidad.
* Antes de encender o apagar la unidad, asegúrese siempre de
bajar el volumen. Incluso con el volumen bajado, podría oírse
algún sonido al encender o apagar la unidad. No obstante, esto
es normal y no indica ninguna deficiencia de funcionamiento.
3
Ajuste el volumen
Ajuste el volumen con el mando
[OUTPUT LEVEL].
* El volumen de cualquier reproductor de audio
conectado al conector AUX IN debe ajustarse
con su propio mando.
Cómoda función de afinación
1. Pulse el botón [TUNER].
2. Toque una cuerda al aire y afínela de forma que solo se
Botón [EXIT]
ilumine el indicador central de la pantalla.
Botón [TUNER]
3. Al terminar de afinar, pulse el botón [EXIT].
2
Preparativos
4
Especifique el tipo de amplificador conectado
1. Pulse el botón [MENU].
2. Elija “SYSTEM” con el mando selector y, a
Botón [ENTER]
English
Para garantizar un sonido óptimo, debe especificar el tipo de amplificador que ha conectado al GT-001. No se
olvide de hacerlo.
Mando selector
continuación, pulse el botón [ENTER].
continuación, pulse el botón [ENTER].
Deutsch
3. Elija “OUTPUT” con el mando selector y, a
Botón [MENU]
Mando [4]
Français
4. Elija el tipo de amplificador con el mando [4].
Explicación
JC-120
Elija este valor si la unidad se ha conectado a la entrada de guitarra de un amplificador de guitarra
Roland JC-120.
SMALL AMP
Elija este valor si la unidad se ha conectado a un pequeño amplificador de guitarra.
COMBO AMP
Elija este valor si la unidad se ha conectado a una entrada de guitarra de un amplificador de guitarra
de tipo combinado (p. ej., amplificador y altavoz juntos) distinto del JC-120.
Italiano
Valor
Con ciertos tipos de amplificador de guitarra, el ajuste “JC-120” ofrecerá mejores resultados.
STACK AMP
Elija este valor si la unidad se ha conectado a una entrada de guitarra de un amplificador de guitarra
de tipo apilado (p. ej., amplificador y altavoz por separado).
Elija este valor si la unidad se ha conectado al conector RETURN de un amplificador de guitarra de tipo
combinado.
STACK RETURN
Elija este valor si la unidad se ha conectado al conector RETURN de un amplificador de guitarra de tipo
apilado. También debe elegir “STACK RETURN” si va a utilizar un amplificador de potencia para guitarra
junto con un módulo de altavoz.
LINE/PHONES
Elija este valor si va a utilizar auriculares o si el GT-001 está conectado a altavoces para monitores, un
mezclador o una grabadora digital.
Português
Elija este valor si la unidad se ha conectado al conector RETURN del JC-120.
COMBO RETURN
Español
JC-120 RETURN
5. Pulse el botón [EXIT] repetidamente.
Nederlands
RECUERDE
• El parámetro SP TYPE solo es válido si OUTPUT está ajustado a “LINE/PHONES” Para obtener
información detallada sobre el parámetro SP TYPE, consulte la “Guía de parámetros” (archivo PDF).
• Si utiliza auriculares, no podrá obtener un sonido típico de amplificador de guitarra a menos que active
PREAMP. Recomendamos que active PREAMP siempre que utilice auriculares. Para activar PREAMP,
como se muestra en el procedimiento 1 de “4 Edición: edición de efectos” (p. 7), elija [EFFECT]"“Pr A”
o “Pr B” y pulse el mando selector. Para obtener información detallada sobre los ajustes de PREAMP,
consulte la “Guía de parámetros” (archivo PDF).
3
2 Reproducción
Ahora que ya ha terminado con los preparativos, puede empezar a reproducir el GT-001.
¿Qué es un patch?
El GT-001 contiene numerosos efectos. Cada combinación de estos efectos y sus ajustes se denomina un
“patch”.
Patch predeterminado P200
Patch predeterminado P001
Patch de usuario U200
Patch de usuario U001
El GT-001 incluye en su memoria 200 patches de usuario (comienzan por U001) que pueden
sobrescribirse y 200 patches predeterminados (comienzan por P001) que no pueden sobrescribirse.
Selección de un patch
Gire el mando selector para desplazarse por los patches.
Mando selector
RECUERDE
• No podrá cambiar de patch si no se encuentra en la pantalla
de reproducción (p. 5). Pulse el botón [EXIT] para regresar a la
pantalla de reproducción y, a continuación, cambie de patch.
• Puede asignar cuatro de sus patches favoritos a los botones
[A]–[D] y recuperarlos al instante. Elija un patch y mantenga presionado uno de los botones durante varios
segundos para asignarlo a dicho botón.
Pantalla del número de patch
La pantalla muestra el número y el nombre del patch seleccionado en
ese momento.
* Las explicaciones de este manual incluyen ilustraciones que describen lo que normalmente debería aparecer en la pantalla. No
obstante, tenga en cuenta que su unidad podría incorporar una versión más reciente y mejorada del sistema (por ejemplo, puede
incluir sonidos nuevos), por lo que es posible que lo que vea en la pantalla no siempre coincida con lo que aparece en el manual.
4
Reproducción
Elija un patch según la categoría
English
1. Desde la pantalla de reproducción, pulse el mando
selector.
Se muestran las categorías de patch.
2. Gire el mando selector para elegir la categoría de patch y, a continuación, pulse el botón
Deutsch
[ENTER].
Se recuperará el primer patch de la categoría y volverá a aparecer la pantalla de reproducción.
Français
Acerca de la pantalla de reproducción
La pantalla que aparece nada más encender la unidad se conoce como “pantalla de reproducción”.
Italiano
Iconos en la pantalla
MASTER BPM
Ajuste de OUTPUT
Canal PREAMP
Número de patch
Icono
Español
Potencia fantasma activada/
desactivada
Explicación
Português
Muestra el MASTER BPM.
Aparece cuando OUTPUT está ajustado a cualquier valor distinto de LINE/PHONES.
Aparece cuando OUTPUT está ajustado a LINE/PHONES.
Cuando el modo DIVIDER es Single, se selecciona el canal de preamplificador “A”.
Nederlands
Cuando el modo DIVIDER es Single, se selecciona el canal de preamplificador “B”.
Aparece cuando el modo DIVIDER es Dual.
,
,
Este icono se ilumina si está activado SOLO SW.
Aparece cuando está activada la potencia fantasma (p. 13).
* Para obtener información detallada sobre MASTER BPM, SOLO SW, OUTPUT y DIVIDER, consulte la “Guía
de parámetros” (archivo PDF).
5
3 Edición: funcionamiento básico
1
La edición en el GT-001 es muy sencilla. En un momento aprenderá las operaciones básicas.
Elija qué quiere editar
Pulse uno de los siguientes botones.
2
EFFECT
MENU
Aquí puede editar los parámetros
de cada efecto.
Desde aquí puede acceder a los ajustes de
salida o establecer las funciones deseadas
para pedales externos.
Seleccione un elemento
El siguiente procedimiento muestra un ejemplo de lo que
sucede al pulsar el botón [MENU].
Botón [ENTER]
1. Gire el mando selector para mover el cursor y
elija un elemento.
2. Pulse el botón [ENTER].
3. Elija otro elemento con el mando selector.
4. Pulse el botón [ENTER].
Se muestra el ajuste del elemento seleccionado.
3
Edite los valores
1. Cambie el valor mostrado con los mandos [1]–[4].
2. Pulse el botón [EXIT] repetidamente.
Regresará a la pantalla de reproducción.
En este manual, el orden de operaciones es el siguiente.
Ejemplo:
Pulse el botón [MENU].
Gire el mando selector para elegir “SYSTEM” y, a continuación, pulse el botón [ENTER].
Gire el mando selector para elegir “AUTO OFF” y, a continuación, pulse el botón [ENTER].
Elija [MENU]"“SYSTEM”"“AUTO OFF”.
6
Mando selector
4 Edición: edición de efectos
1
Es posible editar los parámetros de cada efecto en el patch. Aquí mostraremos un ejemplo de edición de la
distorsión del efecto de saturación.
Seleccione el efecto que desea editar
English
1. Elija [EFFECT]"“OD/DS.”
Elija un efecto usando el mando selector para mover el cursor.
Pulse el mando para activar o desactivar el efecto.
Si mantiene presionado el mando y lo gira, la posición del
efecto se moverá a la derecha o a la izquierda.
Botón [ENTER]
Deutsch
2. Pulse el botón [ENTER].
(Solo si el cursor se encuentra en FX1 o FX2)
Use el mando [4] para seleccionar el tipo de efecto para FX1 o FX2.
Français
2
Edite los valores
Cambie el valor mostrado con los mandos [1]–[4].
Italiano
Puede mover la pestaña de página con el mando selector.
Cómodos ajustes rápidos
Si selecciona una pestaña de página que muestra “QS” (Quick Settings), podrá
recuperar fácilmente los ajustes rápidos guardados con cada efecto.
Español
Para obtener información detallada sobre cómo guardar ajustes rápidos,
consulte “Almacenamiento de ajustes por efecto (escritura de ajustes rápidos)”
(p. 9).
¿Qué hace cada mando?
La función (parámetro) de cada mando variará según el efecto. Para ver una lista de todos los parámetros, consulte la “Guía de
parámetros” (archivo PDF).
Operación
Explicación
TYPE
Cambia el tipo de saturación/distorsión.
[2]
DRIVE
Ajusta la cantidad de saturación/distorsión.
[3]
TONE
Ajusta la calidad de tono. Cuanto mayor sea el valor, más agudo será el tono.
[4]
E. LEVEL
Ajusta el volumen cuando se está aplicando el efecto.
Nederlands
3
Mando
[1]
Português
Al seleccionar OD/DS
Termine de establecer los ajustes
Pulse el botón [EXIT] repetidamente.
Regresará a la pantalla de reproducción.
NOTA
Las ediciones realizadas aquí se perderá si cambia de patch. Si desea conservar el patch creado, pulse el
botón [WRITE] para guardar las ediciones en forma de patch de usuario (p. 8).
7
5 Edición: guardar un patch
Si desea guardar un patch que ha creado, guárdelo en forma de patch de usuario siguiendo estos pasos. Si no
guarda el patch, los ajustes editados se perderán al apagar la unidad o al cambiar de patch.
1
Acceda al menú de escritura
Pulse el botón [WRITE].
2
Botón [WRITE]
Seleccione el tipo de función de escritura
Elija “WRITE” (PATCH RIGHT) con el mando
selector y, a continuación, pulse el botón [ENTER].
Botón [ENTER]
Mando selector
Tipos de almacenamiento
Puede elegir el tipo de datos que quiere guardar. (De forma predeterminada, se guardará el patch).
Nombre
Guárdelos
Intercámbielos
Inicialícelos
Y si gira el mando selector...
Intercambie o copie los ajustes
PREAMP entre los canales A y B.
Gire el mando selector para elegir el
tipo de datos que desee guardar.
8
Edición: guardar un patch
3
Seleccione el destino de escritura
English
Elija el destino de escritura del patch
(U001−U200) con el mando [4].
Asignación de nombres
Para editar el nombre del patch, seleccione “INFO” como
tipo de almacenamiento (p. 8), use el mando selector
para mover el cursor y use el mando [4] para cambiar
el carácter.
Selecciona la categoría
Mando [2]
Selecciona el tipo de caracteres.
Mando [3]
Cambia entre caracteres en
mayúscula y minúscula
Mando [4]
Cambia el carácter
Français
Operación
Mando [1]
Deutsch
Controlador
Elija el destino de escritura
Mando selector Mueve el cursor
Italiano
4
Guárdelo
Pulse el botón [WRITE].
Botón [WRITE]
Una vez guardado el patch, regresará a la pantalla
de reproducción.
Español
1. Elija [WRITE]"“QS WRITE.”
2. Elija el efecto que contenga los ajustes
que quiera guardar con el mando [1].
3. Elija el destino de escritura del patch
(U001−U200) con el mando [2].
4. Pulse el botón [WRITE].
Una vez guardado el patch, regresará a la
pantalla de reproducción.
Efectos que pueden guardarse en memoria
Cada canal PREAMP
OD/DS
Nederlands
Además de guardar ajustes en forma de patches,
también puede guardar ajustes de efectos
individuales.
Como los ajustes almacenados pueden utilizarse
en otros patches, igual que sucede con los
ajustes rápidos predeterminados, guardar los
ajustes de efectos preferidos con antelación
puede ser útil a la hora de crear nuevos patches.
Português
Almacenamiento de ajustes por efecto (escritura de ajustes rápidos)
DELAY
CHORUS
REVERB
COMP
EQ
WAH de PEDAL FX y PEDAL BEND
DIVIDER
Cada efecto FX1/FX2
ASSIGN 1–8
9
6 Edición: ajustes para un pedal externo
Puede controlar distintos parámetros conectando un pedal de expresión (como el Roland EV-5: se vende por
separado) o un conmutador de pedal (FS-5U, FS-6: se venden por separado) al conector CTL/EXP del panel
derecho.
Conexión de un pedal
* Use únicamente el pedal de expresión especificado
(Roland EV-5, FV-500H, FV-500L: se venden por
separado). Si conecta cualquier otro pedal de
expresión, corre el riesgo de que se produzcan
deficiencias de funcionamiento o que la unidad
resulte dañada.
* No es posible conectar al mismo tiempo un
conmutador de pedal y un pedal de expresión.
Ajuste de la función del pedal
1. Elija [MENU]"“CTL/EXP”"“CTL1,” “CTL2,” o “EXP”.
Ajuste
Explicación
[CTL1]/[CTL2]
Permite controlar la función con un conmutador de pedal (como el FS-5U o el FS-6: se venden por
separado).
[EXP]
Permite controlar la función con un pedal de expresión (como el Roland EV-5, el FV-500L o el FV-500H: se
venden por separado).
2. Ajuste los valores de los parámetros con los mandos [1]–[4].
Para obtener información detallada sobre la asignación de funciones a los pedales externos, consulte la
“Guía de parámetros” (archivo PDF).
Ajustes de ejemplo
Cambie los números de patch usando CTL1/2 (pedales A/B del FS-6)
Parámetro
[1]
FUNC
[2]
MIN
[3]
MAX
[4]
MODE
Valor de CTL1 (pedal B)
NUMBER INC
OFF
ON
TOGGLE
Valor de CTL2 (pedal A)
NUMBER DEC
OFF
ON
TOGGLE
Explicación
Cambia al número de patch inmediatamente superior
usando el pedal B. Cambia al número de patch
inmediatamente inferior usando el pedal A.
* Además del ajuste anterior, ajuste “MENU”"“SYSTEM”"“PREF”"“CTL1” y “CTL2” a “SYSTEM”.
Asignación de WAH a EXP
Parámetro
[1]
FUNC
Valor
WAH
* Elija [EFFECT]"‘’PEDAL” y active “PEDAL”.
10
7 Conexión a un ordenador
Si conecta el GT-001 a un ordenador mediante USB, podrá hacer lo siguiente.
• Transmitir y recibir señales de audio digital y mensajes MIDI entre el ordenador y el GT-001
• Editar y gestionar patches y visualizar la guía de parámetros (archivo PDF) en un ordenador con el software
dedicado
• Descargar patches desde el sitio web dedicado BOSS TONE CENTRAL (http://bosstonecentral.com/)
English
Instalación del controlador USB
Deutsch
Antes de conectar la unidad a un ordenador, debe instalar el controlador USB:
descargue el controlador USB en el sitio web que aparece más abajo.
Instale este controlador especial antes de establecer una conexión USB. Para obtener más información,
consulte el archivo Readme.htm que se incluye en la descarga.
&http://www.roland.com/support/
El programa que tendrá que utilizar y los pasos a seguir para instalar el controlador USB dependerán de
la configuración del ordenador, por lo que deberá leer atentamente el archivo Readme.htm incluido en la
descarga.
Utilice un cable USB convencional para
conectar el puerto USB de su ordenador con el
puerto USB del GT-001.
Français
Conexión a un ordenador
Puerto USB
Italiano
* Cuando el GT-001 está conectado a un
ordenador mediante USB, recibirá alimentación
del ordenador. Así, no será necesario conectar el
adaptador de CA.
Español
Uso del GT-001 como interfaz de audio
Grabe el sonido del GT-001 en su ordenador o emita el sonido de su ordenador desde los conectores
OUTPUT o desde el conector PHONES del GT-001.
* Para obtener información detallada sobre el flujo de la señal de audio al conectarse por USB e
instrucciones para realizar los ajustes, consulte la “Guía de parámetros” (archivo PDF).
Português
* Consulte el manual de instrucciones del software que esté utilizando para saber cómo cambiar la fuente
de entrada del software.
Uso del software dedicado del GT-001
Nederlands
El software dedicado permite hacer lo siguiente:
• Descargar fácilmente patches desde nuestro sitio web BOSS TONE CENTRAL (http://
bosstonecentral.com/)
• Editar ajustes de los patches
• Asignar nombres a los patches
• Ordenar los patches y cambiarlos
• Hacer copias de seguridad de patches y ajustes de sistema, y recuperarlos
• Visualizar la “Guía de parámetros” (archivo PDF) en su ordenador
El software específico puede descargarse desde nuestro sitio web BOSS TONE CENTRAL (http://
bosstonecentral.com/). Para obtener información detallada sobre el uso del software, consulte el
archivo Readme.htm incluido en la descarga.
11
8 Otras funciones útiles
Uso del metrónomo
1. Pulse el botón [TUNER].
2. Muévase por las pestañas con el mando selector y elija
Botón [EXIT]
“METRONOME”.
3. Establezca los ajustes del metrónomo con los mandos
[1]–[4].
Parámetro
Valor
Explicación
[1]
TEMPO
40–250
Especifica el tempo del metrónomo.
[2]
BEAT
1/1–8/1,
1/2–8/2,
1/4–8/4,
1/8–8/8
Selecciona el compás.
[3]
OFF/ON
OFF, ON
Activa/desactiva el metrónomo.
[4]
LEVEL
0-100
Ajusta el volumen del metrónomo.
Botón [TUNER]
4. Pulse el botón [EXIT].
Regresará a la pantalla de reproducción.
* El sonido del metrónomo se emite desde los conectores OUTPUT y desde el conector PHONES.
* Si se cambia el valor de TEMPO también cambiará MASTER BPM. Para obtener información detallada
sobre MASTER BPM, consulte la “Guía de parámetros” (archivo PDF).
Restauración de los ajustes predeterminados de fábrica (restablecimiento de fábrica)
La restauración de la configuración del sistema (parámetros de sistema) del GT-001 a sus ajustes
predeterminados de fábrica originales se conoce como “restablecimiento de fábrica”.
No solo es posible restablecer todos los ajustes a los valores activos cuando el GT-001 fue suministrado de
fábrica, también puede especificar los elementos que desea restablecer.
* Al ejecutar el “restablecimiento de fábrica”, los ajustes realizados por usted se perderán. Guarde los
datos que necesite en su ordenador con el software dedicado.
1. Elija [MENU]"“SYSTEM”"“F. RESET” (FACTORY RESET).
2. Elija el tipo de ajustes que quiera restablecer a los valores predeterminados de fábrica con
los mandos [1] y [4].
Mando
Parámetro
[1]
FROM
[4]
TO
Valor
Explicación
SYSTEM
Ajustes de los parámetros de sistema
QUICK
Configuración de los ajustes rápidos de usuario
U001–U200
Configuración de los números de patch U001−U200
3. Pulse el botón [WRITE].
Si desea cancelar la acción sin ejecutarla, pulse el botón [EXIT].
4. Para ejecutar el restablecimiento de fábrica, pulse el botón [ENTER].
Una vez completado el restablecimiento de fábrica, regresará a la pantalla de reproducción.
12
Otras funciones útiles
Conexión de un micrófono
Al conectar un micrófono al conector MIC IN situado en el panel derecho, podrá utilizarlo con los efectos del
GT-001.
English
Micrófono dinámico
Micrófono condensador
3: FRÍO
Italiano
• Cambiando la orientación de los micrófonos.
• Aumentando la distancia de separación entre los micrófonos y los altavoces.
• Bajando los niveles de volumen.
Français
• Es posible conectar al conector MIC IN un micrófono condensador, que precisa de potencia fantasma.
Para suministrar potencia fantasma al micrófono condensador, siga los pasos descritos en “3 Edición:
funcionamiento básico” (p. 6), elija [MENU]"“SYSTEM”"“INPUT” y seleccione “ON” con el mando [4].
• No es posible utilizar al mismo tiempo el conector GUITAR IN para una guitarra y el conector MIC IN. Si se
conectan ambos conectores, GUITAR IN tendrá preferencia.
* Este instrumento está equipado con conectores balanceados
(XLR). A la derecha se muestra un diagrama de cableado para
el conector. Antes de realizar las conexiones, compruebe los
2: CALIENTE
1: TIERRA
diagramas de cableado del resto de los equipos que quiera
conectar.
* Según la ubicación de los micrófonos con respecto a los altavoces,
podría producirse acople acústico. Esto puede remediarse:
Deutsch
RECUERDE
Español
Ajuste del contraste (brillo) de la pantalla
Puede ajustar el brillo de la pantalla.
Português
1. Elija [MENU]"“SYSTEM”"“LCD”.
2. Ajuste el valor con el mando [4].
Si aumenta el valor (1−16), el brillo se incrementará.
El GT-001 puede apagarse automáticamente. La unidad se apagará automáticamente si transcurren 10 horas
sin reproducir sonidos ni utilizarla. La pantalla mostrará un mensaje unos 15 minutos antes de que la unidad
se apague.
En los ajustes de fábrica, está función está activada (“ON”), por lo que se apaga al cabo de 10 horas. Si quiere
que la unidad permanezca encendida, cambie el ajuste a “OFF”.
1. Elija [MENU]"“SYSTEM”"“AUTO OFF”.
2. Seleccione “OFF” con el mando [1].
3. Pulse el botón [EXIT] repetidamente.
13
Nederlands
Desactivación de la función Auto Off
Lista de mensajes de error
Mensaje
MIDI BUFFER FULL!
USB OFFLINE!
DATA WRITE ERROR!
PREFERENCE IS
SYSTEM!
Causa
Los datos no se pueden procesar
correctamente debido al gran número
de mensajes MIDI.
Las transmisiones desde el dispositivo
conectado se han interrumpido. Este
mensaje también aparece cuando la
corriente de dispositivo conectado se
encuentra cortada. No indica ninguna
deficiencia de funcionamiento.
Fallo al escribir en la memoria de
almacenamiento de datos de usuario.
“PREFERENCE” está ajustado a “SYSTEM”.
Acción
Reduzca el número de mensajes MIDI transmitidos al GT-001.
Reduzca la frecuencia de transmisión del dispositivo MIDI.
Asegúrese de que no hay ningún cable desconectado ni
cortocircuitos.
La unidad podría estar dañada. Consulte a su centro de servicio
Roland más cercano.
El ajuste para seleccionar si cada patch tendrá ajustes distintos
para el pedal de control, el pedal de expresión u otros elementos, o
si todos los patches compartirán los mismos ajustes, se denomina
“Preference”.
Si Preference está ajustado como “SYSTEM” las asignación de
patches y los ajustes de modo manual no se tendrán en cuenta. Si
desea habilitar los ajustes del patch, cambie el valor de Preference
del parámetro correspondiente a “PATCH”.
Para ajustar los valores de Preference, elija [MENU]"“SYSTEM”
"“PREF,” y seleccione “PATCH” usando los mandos [1]–[4].
Especificaciones principales
BOSS GT-001: PROCESADOR DE EFECTOS DE GUITARRA
24 bits + método AF
Conversión AD
Conversión DA
24 bits
Frecuencia de
muestreo
44,1 kHz
Patches
200 (usuario) + 200 (predeterminados)
Nivel de entrada
nominal
Impedancia de
entrada
Conector GUITAR IN: tipo telefónico
de 1/4”
* Método AF (método de enfoque
adaptativo): es un método patentado
de Roland & BOSS que mejora significativamente la relación señal-ruido
(S/N) de los convertidores AD y DA.
Conector MIC IN: tipo XLR, balanceado,
potencia fantasma (48 V CC, 10 mA máx.)
Conector AUX IN: tipo telefónico estéreo
miniatura
Conectores
Conector PHONES: tipo telefónico
estéreo miniatura
Conector CTL/EXP: Tipo telefónico TRS de
1/4 de pulgada
GUITAR IN: -10 dBu
MIC IN: -40 dBu
Puerto USB COMPUTER: USB tipo B
AUX IN: -20 dBu
GUITAR IN: 1 M Ω
MIC IN: 4 k Ω
AUX IN: 27 k Ω
Conectores OUTPUT (L/MONO, R): tipo
telefónico de 1/4”
Conector DC IN
Fuente de
alimentación
Adaptador de CA o suministro a través
del puerto USB (alimentación por bus
USB)
Nivel de salida
nominal
OUTPUT L/MONO, R: -10 dBu
Consumo eléctrico
240 mA
PHONES: -10 dBu
Dimensiones
Impedancia de
salida
OUTPUT L/MONO, R: 2 k Ω
211 (anchura) x 135 (fondo) x 58 (altura)
mm
Peso
500 g
Impedancia de
carga recomendada
OUTPUT L/MONO, R: 10 k Ω o superior
Accesorios
Manual del usuario, folleto “UTILIZACIÓN
SEGURA DE LA UNIDAD”, adaptador
de CA
Pantalla
PHONES: 44 Ω
PHONES: 44 Ω o superior
LCD gráfica (132 x 32 puntos, LCD con
retroiluminación)
Opciones
(se venden por
separado)
Conmutador de pedal dual: FS-6
Pedal de expresión: FV-500L/500H,
Roland EV-5
* 0 dBu = 0,775 Vrms
* Con el fin de mejorar el producto, las especificaciones y/o el
aspecto de la unidad pueden modificarse sin previo aviso.
14
UTILIZACIÓN SEGURA DE LA UNIDAD
ADVERTENCIA
ADVERTENCIA
Utilice únicamente el adaptador de CA suministrado y el
voltaje correcto
Aun con el interruptor de alimentación
apagado, esta unidad no está completamente
desconectada de su fuente de alimentación
principal. Cuando necesite apagar la unidad por
completo, apague el interruptor de alimentación
y desenchufe el cable de la toma de corriente. Por
este motivo, es conveniente poder acceder fácilmente a la toma
de corriente en la que vaya a enchufar el cable de alimentación.
Asegúrese de utilizar exclusivamente el adaptador
de CA incluido con la unidad. Asimismo, asegúrese
de que el voltaje de la línea de alimentación
sea el mismo que el voltaje de entrada indicado
en el adaptador de CA. Otros adaptadores de
CA pueden usar una polaridad distinta o estar
diseñados para otro voltaje, por lo que su uso podría causar
daños, deficiencias de funcionamiento o descargas eléctricas.
PRECAUCIÓN
Precauciones relativas al uso de la fuente de potencia
fantasma
Desactive la potencia fantasma siempre que
conecte un dispositivo distinto de los micrófonos
condensadores, que precisan de potencia
fantasma. Podría provocar daños si suministra
accidentalmente potencia fantasma a micrófonos
dinámicos, reproductores de audio u otros
dispositivos que no necesiten este tipo de potencia. Asegúrese
de comprobar las especificaciones de cualquier micrófono que
desee utilizar consultando su manual de instrucciones.
(Potencia fantasma de este instrumento: 48 V CC, 10 mA máx.)
Italiano
NOTAS IMPORTANTES
Mantenimiento
• Para la limpieza diaria utilice un
paño suave y seco, o ligeramente
humedecido con agua. Para eliminar
la suciedad adherida, utilice un paño
impregnado con detergente suave y
no abrasivo. A continuación, no olvide
secar bien la unidad con un paño
suave y seco.
• Use únicamente el pedal de expresión
especificado (Roland EV-5, FV-500H,
FV-500L: se venden por separado).
Si conecta cualquier otro pedal
de expresión, corre el riesgo de
que se produzcan deficiencias de
funcionamiento o que la unidad
resulte dañada.
• Cuando ponga la unidad del revés,
tenga cuidado de proteger los botones
y mandos para que no sufran ningún
daño. Asimismo, manipule la unidad
con cuidado y no deje que se le caiga.
• Ranura de seguridad (
)
http://www.kensington.com/
(panel izquierdo)
Otras precauciones
• Cualquier dato almacenado en
la unidad puede perderse como
resultado de un fallo del equipo, un
funcionamiento incorrecto, etc. Para
evitar la pérdida irrecuperable de
datos, procure acostumbrarse a realizar
copias de seguridad periódicas de los
datos que guarde en la unidad.
Licencias/marcas comerciales
• Roland no asume responsabilidad
alguna en lo relativo a la restauración
del contenido almacenado que se
pierda.
• Roland, BOSS y COSM son marcas
comerciales registradas o marcas
comerciales de Roland Corporation en
Estados Unidos y/o en otros países.
• Nunca golpee ni presione
excesivamente la pantalla.
• Este producto contiene la plataforma
de software integrada eCROS de eSOL
Co., Ltd. eCROS es una marca comercial
de eSOL Co., Ltd. en Japón.
• ASIO es una marca comercial de
Steinberg Media Technologies GmbH.
15
Nederlands
• Si la unidad necesitara alguna
reparación, antes de enviarla asegúrese
de hacer una copia de seguridad de los
datos que tenga almacenados en ella;
o quizá prefiera anotar la información
que pueda necesitar. Aunque
procuraremos por todos los medios
conservar los datos almacenados
en la unidad cuando realicemos las
reparaciones oportunas, hay casos en
los que la restauración de los datos
podría resultar imposible, por ejemplo
cuando la sección de la memoria
está físicamente dañada. Roland no
asume responsabilidad alguna en lo
relativo a la restauración del contenido
almacenado que se pierda.
Português
Reparaciones y datos
• Dependiendo del material y de la
temperatura de la superficie donde
coloque la unidad, las patas de goma
podrían decolorarse o estropear la
superficie.
Para evitarlo, coloque un paño o
fieltro debajo de las patas. Si lo hace,
asegúrese de que la unidad no se
puede mover ni caer accidentalmente.
Español
Colocación
Français
La unidad se apagará automáticamente
cuando haya transcurrido un periodo de
tiempo predeterminado desde la última vez
que se usó para reproducir música o se accionó
alguno de sus botones o controles (función
Auto Off ). Si no desea que la unidad se apague
automáticamente, desactive la función Auto Off (p. 13).
Deutsch
Acerca de la función Auto Off
English
Para apagar completamente la unidad, extraiga el
enchufe de la toma de corriente
Manual do Proprietário
English
Recursos principais
Novos amplificadores COSM
Esses novos amplificadores remodelados COSM oferecem o resultado de todo o conhecimento de criação de som que acumulamos ao
longo dos anos. Eles representam uma maior evolução que vai além da modelagem antiga e convencional de amplificador. De timbres
limpos, e transparentes a timbres de altíssimo ganho e peso, esses modelos permitem que você escolha livremente o comportamento
dinâmico do amplificador e suas nuances sutis.
O GT-001 possui uma função de interface de áudio USB (p. 11). Você pode gravar sons com facilidade conectando-se a um computador.
Você também pode conectar um microfone ao GT-001.
Deutsch
Tamanho compacto perfeito para tabletop
Operações simples com um computador usando software dedicado
Você pode controlar o GT-001, editar timbres e gerenciar patches usando software dedicado. Você também pode baixar uma extensa
variedade de patches do BOSS TONE CENTRAL, nosso site dedicado ao download de patches.
Français
* Essa unidade será desligada automaticamente, depois de um tempo
predeterminado sem tocar, ou sem que seus botões ou controles
tenham sido operados (função Auto Off ).
Se não desejar que ele seja desligado automaticamente, desative a
função Auto Off (p. 13).
Italiano
• Todas as configurações que você estiver editando serão
perdidas quando o equipamento for desligado. Se tiver alguma
configuração que deseje manter, você deverá salvá-la antes disso.
• Para restaurar a energia, ligue novamente o equipamento (p. 2).
• Implementação de MIDI
Essas são informações detalhadas sobre as
mensagens de MIDI.
1. Insira a seguinte URL no computador.
http://www.roland.com/manuals/
I
2. Escolha “GT-001” como o nome do produto.
Antes de usar essa unidade, leia com atenção as seções intituladas “USO SEGURO DA UNIDADE” e “OBSERVAÇÕES IMPORTANTES” (folheto “USO SEGURO
DA UNIDADE” e Manual do Proprietário (p. 15)). Essas seções fornecem informações importantes sobre a operação correta da unidade. Além disso, para
que você conheça todos os recursos da sua nova unidade, leia o Manual do Proprietário integralmente. Este manual deverá ser guardado em local de
fácil acesso para consultas futuras.
Copyright © 2014 BOSS CORPORATION
Todos os direitos reservados. Nenhuma parte desta publicação poderá ser reproduzida em qualquer
formato sem permissão por escrito da BOSS CORPORATION.
Nederlands
• Lista de Sons
Esta é uma lista dos sons incorporados no GT-001.
Para obter o manual em PDF
Português
Manual em PDF (download da Web)
• Guia de Parâmetros
Informações sobre como operar o GT-001 e todos
os parâmetros são explicadas nesse guia. O Guia de
Parâmetros também pode ser visualizado usando o
software dedicado.
Español
Manual do Proprietário (este documento)
Leia este manual primeiro. Ele explica as informações básicas que você precisa saber para usar o GT-001. Para obter
informações detalhadas sobre como operar o GT-001, baixe e consulte o “Guia de Parâmetros” (arquivo PDF).
Precauções quando estiver conectando
1 Introdução
* Para evitar avarias e defeitos no equipamento, sempre
reduza o volume e desligue todas as unidades antes de
fazer qualquer conexão.
* Quando forem usados cabos de conexão com resistores, o
nível de volume do equipamento conectado às entradas
(AUX IN) deve ser baixo. Se isso acontecer, use cabos de
conexão que não contenham resistores.
1
Conecte o equipamento
* Ao inserir o cabo do adaptador CA na ranhura na parte inferior do GT-001,
você poderá impedir que o plugue seja desconectado acidentalmente.
jack
PHONES
jacks OUTPUT
jack DC IN
jack GUITAR IN
jack AUX IN
Conectar um
reprodutor de
áudio com um
miniplugue
estéreo
2
Chave [ON/OFF]
Ligar a alimentação
1. Ligue a chave [ON/OFF].
2. Ligue o amplificador de violão e guitarra.
Botão
[OUTPUT
LEVEL]
MEMO
Quando estiver conectado a um computador, o
adaptador CA é desnecessário porque a alimentação é
fornecida pelo computador (p. 11).
* Depois que você tiver feito as conexões corretamente, ligue nesta ordem primeiro GT-001, em seguida, o sistema conectado.
Ligar na ordem incorreta pode causar mau funcionamento ou
dano. Ao desligar a alimentação, desligue primeiro o sistema
conectado e, em seguida o GT-001.
* Esta unidade está equipada com um circuito de proteção. É
necessário um breve intervalo (alguns segundos) após ligar a
unidade para que ela possa operar normalmente.
* Antes de ligar/desligar a unidade, sempre reduza o volume.
Mesmo com o volume reduzido, você poderá ouvir sons ao ligar/
desligar a unidade. No entanto, isso é normal e não é indício de
mau funcionamento.
3
Ajustar o volume
Ajuste o volume com o botão
[OUTPUT LEVEL].
* O volume de um reprodutor de áudio
conectado ao jack AUX IN deve ser ajustado
usando seu próprio controlador de volume.
Função de afinador
1. Pressione o botão [TUNER].
2. Toque uma corda solta e afine-a para que somente o
Botão [EXIT]
indicador central na tela seja aceso.
Botão [TUNER]
3. Quando você terminar de afinar, pressione o botão
[EXIT].
2
Introdução
4
Especifique o tipo de amplificador que você conectou
1. Pressione o botão [MENU].
2. Escolha “SYSTEM” com o botão de valor e pressione o
Botão [ENTER]
English
Para garantir um som ideal, você deverá especificar o tipo de amplificador que conectou ao GT-001. Dedique um
tempo para fazer isso.
Botão de valor
botão [ENTER].
botão [ENTER].
Deutsch
3. Escolha “OUTPUT” com o botão de valor e pressione o
Botão [MENU]
Botão [4]
Français
4. Escolha o tipo de amplificador com o botão [4].
Valor
Explicação
JC-120
Escolha isso se estiver conectado à entrada de violão e guitarra de um amplificador Roland JC-120.
SMALL AMP
Escolha isso se estiver conectado a um pequeno amplificador de guitarra.
Italiano
COMBO AMP
Escolha isso se estiver conectado à entrada de guitarra de um amplificador guitarra do tipo combo (ou
seja, uma unidade que contém o amplificador e o alto-falante) qualquer outro que não seja o JC-120.
Para alguns tipos de amplificadores de guitarra, a configuração “JC-120” pode produzir melhores
resultados.
Escolha isso se estiver conectado à entrada de guitarra de um amplificador de guitarra tipo stack (ou
seja, um cabeçote e a caixa acústica são separadas).
JC-120 RETURN
Escolha isso se estiver conectado ao jack RETURN do JC-120.
COMBO RETURN
Escolha isso se estiver conectado ao jack RETURN de um amplificador de guitarra do tipo combo.
STACK RETURN
Escolha isso se estiver conectado ao jack RETURN de um amplificador de guitarra tipo stack. Também
deverá escolher “STACK RETURN” se estiver usando um cabeçote junto com caixa acústica.
LINE/PHONES
Escolha isso se estiver usando fones de ouvido ou se o GT-001 estiver conectado aos alto-falantes do
monitor, mixer ou gravador digital.
Español
STACK AMP
Português
5. Pressione o botão [EXIT] várias vezes.
Nederlands
MEMO
• O parâmetro SP TYPE será válido somente se OUTPUT estiver definido como “LINE/PHONES”. Para obter
detalhes sobre o parâmetro SP TYPE, consulte o “Guia de Parâmetros” (arquivo PDF).
• Ao usar fones de ouvido, você não poderá obter um som típico de um amplificador de guitarra a
menos que ligue o PREAMP. Recomendamos que você ligue o PREAMP sempre que estiver usando
fones de ouvido. Para ligar o PREAMP, conforme mostrado no procedimento 1 em “4 Edição: Edição
de efeitos” (p. 7), escolha [EFFECT]"“Pr A” ou “Pr B” e pressione o botão de valor. Para obter detalhes
sobre as configurações de PREAMP, consulte o “Guia de Parâmetros” (arquivo PDF).
3
2 Reprodução
Quando que você tiver terminado com as preparações, poderá começar a tocar o GT-001.
O que é um Patch?
O GT-001 contém inúmeros efeitos. Uma combinação desses efeitos e suas configurações é chamada de
“patch”.
Patch predefinido P200
Patch predefinido P001
Patch de usuário U200
Patch de usuário U001
O GT-001 possui 200 (a partir do U001) patches de usuário incorporado à memória interna que podem
ser substituídos e 200 patches predefinidos (presets) (a partir do P001) que não podem ser substituídos.
Seleção de um patch
Gire o botão de valor para navegar pelos patches.
Botão de valor
MEMO
• Você não pode alternar os patches a menos que esteja na tela
de Reprodução (p. 5). Pressione o botão [EXIT] para retornar para
a tela de Reprodução e, em seguida, alternar patches.
• Você pode atribuir quatro de seus patches favoritos a botões
[A]–[D] e acessá-los instantaneamente. Escolha um patch e mantenha pressionado continuamente um dos
botões por vários segundos para atribuí-lo a esse botão.
Visor de número de patch
O visor mostra o número de patch selecionado no momento e o
nome do patch.
* As explicações contidas neste manual incluem ilustrações que indicam o que normalmente deve ser mostrado pelo visor. Observe, no
entanto, que a unidade pode incorporar uma versão aprimorada do sistema, mais nova, (por exemplo, incluindo sons mais recentes),
logo, o que você efetivamente vê no visor nem sempre corresponderá ao exibido no manual.
4
Reprodução
Escolha um patch com base em uma categoria
English
1. Quando estiver na tela de Reprodução, pressione o
botão de valor.
As categorias de patch são exibidas.
2. Gire o botão de valor para escolher a categoria de patch e pressione o botão [ENTER].
Deutsch
Esse procedimento chama o primeiro patch na categoria selecionada e retorna para a tela de
Reprodução.
Français
Sobre a tela de Reprodução
A tela que é exibida depois que você liga a alimentação é chamada de “tela de Reprodução”.
Italiano
Ícones no visor
MASTER BPM
Configuração OUTPUT
Canal PREAMP
Número de patch
Ícone
Español
Phantom power
ligado/desligado
Explicação
Português
Exibe o MASTER BPM.
Isso é exibido quando OUTPUT está configurado para qualquer outra opção além de LINE/PHONES.
Isso é exibido quando OUTPUT está definido para LINE/PHONES.
Quando o modo DIVIDER for Single, o canal de pré-amplificador “A” será selecionado.
Nederlands
Quando o modo DIVIDER for Single, o canal de pré-amplificador “B” será selecionado.
Isso será exibido se o modo DIVIDER for Dual.
,
,
Esse ícone será destacado se o SOLO SW estiver ligado.
Isso será exibido quando o phantom power estiver ligado (p. 13).
* Para obter detalhes sobre MASTER BPM, SOLO SW, OUTPUT e DIVIDER, consulte o “Guia de Parâmetros”
(arquivo PDF).
5
3 Edição: Operação básica
1
Editar no GT-001 é extremamente simples. Dedique um momento para aprender as operações básicas.
Escolher o que você vai editar
Pressione um dos seguintes botões.
2
EFFECT
MENU
Aqui você pode editar os
parâmetros de cada efeito.
Isso permite que você acesse as configurações de saída ou permite que você defina as
funções desejadas para pedais externos.
Selecionar um item
O procedimento abaixo é um exemplo quando você
pressiona o botão [MENU].
Botão [ENTER]
1. Gire o botão de valor para mover o cursor e
escolher um item.
2. Pressione o botão [ENTER].
3. Escolha outro item com o botão de valor.
4. Pressione o botão [ENTER].
A configuração para seu item selecionado é exibida.
3
Editar os valores
1. Alterar o valor exibido com os botões [1]–[4].
2. Pressione o botão [EXIT] várias vezes.
Você retornará para a tela de Reprodução.
Nesse manual, a ordem das operações é escrita da seguinte maneira.
Exemplo:
Pressione o botão [MENU].
Gire o botão de valor, escolha “SYSTEM” e pressione o botão [ENTER].
Gire o botão de valor, escolha “AUTO OFF” e pressione o botão [ENTER].
Escolha [MENU]"“SYSTEM”"“AUTO OFF”.
6
Botão de valor
4 Edição: Edição de efeitos
1
Você pode editar os parâmetros de cada efeito no patch. Veja um exemplo de edição de distorção do efeito de
overdrive.
Selecionar o efeito que você quer editar
Escolha um efeito usando o botão de valor para mover o
cursor.
Pressione o botão para ligar ou desligar o efeito.
Enquanto pressiona e gira o botão, mova a posição do efeito
para a esquerda ou para a direita.
Botão [ENTER]
Deutsch
2. Pressione o botão [ENTER].
English
1. Escolha [EFFECT]"“OD/DS”.
(Somente se o cursor estiver localizado em FX1 ou FX2)
Use o botão [4] para selecionar o tipo de efeito para FX1 ou FX2.
Français
2
Editar os valores
Altere o valor que é exibido com os botões [1]–[4].
Italiano
Você pode mover a guia de página com o botão de valor.
Configurações rápidas práticas
Se você selecionar uma guia de página que mostra “QS”, poderá facilmente
acessar as configurações rápidas (Quick Settings) que foram salvas para cada
efeito.
Español
Para obter detalhes sobre como salvar as Configurações Rápidas,
consulte “Configurações de armazenamento por efeito (armazenamento de
Configurações Rápidas)” (p. 9).
O que cada botão faz?
A função (parâmetro) de cada botão será diferente dependendo do efeito. Para obter uma lista de todos os parâmetros,
consulte o “Guia de Parâmetros” (arquivo PDF).
Operação
Explicação
TYPE
Alterna o tipo de overdrive/distorção.
[2]
DRIVE
Ajusta a quantidade de overdrive/distorção.
[3]
TONE
Ajusta a qualidade do timbre. Valores mais altos produzem um timbre mais agudo.
[4]
E. LEVEL
Ajusta o volume quando o efeito está sendo aplicado.
Nederlands
3
Botão
[1]
Português
Ao selecionar OD/DS
Concluir as configurações
Pressione o botão [EXIT] várias vezes.
Você será retornado para a tela de Reprodução.
OBSERVAÇÃO
As edições que você fez aqui serão perdidas se você alternar os patches. Se você quiser manter o patch
que criou, pressione o botão [WRITE] para salvar suas edições como um patch de usuário (p. 8).
7
5 Edição: Salvando um patch
Quando você quiser salvar um patch que criou, salve-o como um patch de usuário seguindo o procedimento
abaixo. Se você não salvar o patch, as configurações editadas serão perdidas quando você desligar a
alimentação ou alternar para outro patch.
1
Acessar o menu de Gravação
Pressione o botão [WRITE].
2
Botão [WRITE]
Selecionar o tipo de função de gravação
Escolha “WRITE” (PATCH RIGHT) com o botão de
valor e pressione o botão [ENTER].
Botão [ENTER]
Botão de valor
Tipos de Armazenamento
Você pode escolher o tipo de dados que serão salvos. (Por padrão, o patch será salvo.)
Nome
Salvar
Trocar
Inicializar
E, se você girar o botão de valor...
Troque ou copie as configurações
de PREAMP entre os canais A e B.
Gire o botão de valor para escolher
o tipo de dados para salvar.
8
Edição: Salvando um patch
3
Selecionar o destino do armazenamento
English
Escolha o destino de armazenamento
do patch (U001−U200) com o botão [4].
Atribuição de um nome
Para editar o nome do patch, selecione “INFO” de entre
os tipos de gravação (p. 8), use o botão de valor para
mover o cursor e use o botão [4] para alterar o caractere.
Seleciona a categoria
Botão [2]
Seleciona o tipo de caracteres
Botão [3]
Alterna entre caracteres minúsculos/
maiúsculos
Botão [4]
Altera o caractere
Botão de valor
Move o cursor
Français
Operação
Botão [1]
Deutsch
4
Controlador
Escolher o destino da gravação
Pressione o botão [WRITE].
Italiano
Salvar
Botão [WRITE]
Assim que o patch tiver sido salvo, você será
retornado para a tela de Reprodução.
Español
1. Escolha [WRITE]"“QS WRITE”.
2. Escolha o efeito que contém as
configurações que você quer salvar com
o botão [1].
3. Escolha o destino de gravação do patch
(U001−U200) com o botão [2].
4. Pressione o botão [WRITE].
Assim que o patch tiver sido salvo, você será
retornado para a tela de Reprodução.
Efeitos que podem ser armazenados na memória
Cada canal PREAMP
OD/DS
Nederlands
Além de armazenar configurações na forma
de patches, você também poderá armazenar
configurações para efeitos individuais.
Como você pode usar essas configurações
armazenadas em outros patches, como ocorre
com a Configuração Rápida Predefinida, ter as
configurações de efeito que você quer armazenar
com antecedência pode ser útil ao criar novos
patches.
Português
Configurações de armazenamento por efeito (armazenamento de
Configurações Rápidas)
DELAY
CHORUS
REVERB
COMP
EQ
WAH e PEDAL BEND do PEDAL FX
DIVIDER
Cada efeito FX1/FX2
ASSIGN 1–8
9
6 Edição: Configurações para um pedal externo
Você pode controlar vários parâmetros conectando um pedal de expressão (por exemplo, o Roland EV-5: vendido
separadamente) ou um pedal (FS-5U, FS-6: vendido separadamente) ao plugue CTL/EXP no painel direito.
Conexão de um pedal
* Use apenas o pedal de expressão especificado
(Roland EV-5, FV-500H, FV-500L; vendidos
separadamente). Ao conectar qualquer outro pedal
de expressão, você corre o risco de causar mau
funcionamento e/ou danos na unidade.
* Você não pode conectar simultaneamente um pedal
e um pedal de expressão.
Configurando a função de pedal
1. Escolha [MENU]"“CTL/EXP”"“CTL1”, “CTL2” ou “EXP”.
Configuração
Explicação
[CTL1]/[CTL2]
Isso define a função para ser controlada usando um pedal (por exemplo, FS-5U ou FS-6: vendidos
separadamente).
[EXP]
Isso define a função para ser controlada usando um pedal de expressão (por exemplo, Roland EV-5, FV-500L
ou FV-500H: vendidos separadamente).
2. Defina os valores de parâmetro com os botões [1]–[4].
Para obter detalhes sobre como atribuir funções a pedais externos, consulte o “Guia de Parâmetros”
(arquivo PDF).
Configurações de exemplo
Alterne os números de patch usando CTL1/2 (pedais A/B do FS-6)
Parâmetro
[1]
FUNC
[2]
MIN
[3]
MAX
[4]
MODE
Valor de CTL1 (pedal B)
NUMBER INC
OFF
ON
TOGGLE
Valor de CTL2 (pedal A)
NUMBER DEC
OFF
ON
TOGGLE
Explicação
Alterna para o próximo número mais alto de patch
usando o pedal B. Alterna para o próximo número
mais baixo de patch usando o pedal A.
* Além da configuração acima, defina “MENU”"“SYSTEM”"“PREF”"“CTL1” e “CTL2” como “SYSTEM”.
Atribuir o WAH para EXP
Parâmetro
[1]
FUNC
Valor
WAH
* Escolha [EFFECT]"‘’PEDAL” e ligue o “PEDAL”.
10
7 Conexão a um computador
Ao conectar o GT-001 a um computador por USB, você poderá fazer o seguinte.
• Transmitir e receber sinais de áudio digital e mensagens MIDI entre o computador e o GT-001
• Editar e gerenciar patches, e exibir o Guia de Parâmetros (arquivo PDF) em um computador usando o
software dedicado
• Baixar patches de nosso site dedicado BOSS TONE CENTRAL (http://bosstonecentral.com/)
English
Instalação do driver USB
&http://www.roland.com/support/
O programa que você precisa usar e as etapas que você precisa realizar para instalar o driver USB serão
diferentes dependendo da instalação do seu computador. Portanto, leia com cuidado e consulte o arquivo
Readme.htm que vem com o download.
Usando um cabo USB disponível
comercialmente, conecte a porta USB do seu
computador com a porta USB do GT-001.
Français
Conexão a um computador
Deutsch
Você deve instalar o driver USB antes de conectar a um computador:
Baixe o driver USB do site mostrado abaixo.
Instale esse driver especial antes de fazer uma conexão USB. Para obter mais detalhes, consulte o arquivo
Readme.htm que vem com o download.
Porta USB
Italiano
* Quando o GT-001 estiver conectado a um
computador por USB, a alimentação será
fornecida pelo computador. Portanto, é
desnecessário conectar-se ao adaptador CA.
Español
Usando o GT-001 como uma interface de áudio
Grave o som do GT-001 no computador ou faça o som do seu computador ser gerado pelos plugues
OUTPUT ou pelo plugue PHONES do GT-001.
* Para obter detalhes do fluxo de sinal de áudio quando estiver conectado por USB e instruções sobre
como fazer as configurações, consulte o “Guia de Parâmetros” (arquivo PDF).
Português
* Consulte o manual de instruções para o software que você está usando para saber como alternar a fonte
de entrada do software.
Uso do software dedicado do GT-001
Nederlands
Usar o software dedicado permite que você faça o seguinte:
• Baixar com facilidade os patches de nosso site dedicado BOSS TONE CENTRAL (http://
bosstonecentral.com/)
• Editar as configurações de patch
• Nomear patches
• Organizar patches na ordem e alterná-los
• Fazer backup de patches e das configurações do sistema, e retornar ao backup das configurações
• Exibir o “Guia de Parâmetros” (arquivo PDF) no computador
O software dedicado pode ser baixado do nosso BOSS TONE CENTRAL (http://bosstonecentral.com/).
Para obter detalhes sobre como usar o software, consulte o arquivo Readme.htm que vem com o
download.
11
8 Outras funções úteis
Uso do metrônomo
1. Pressione o botão [TUNER].
2. Mova a guia com o botão de valor e escolha
Botão [EXIT]
“METRONOME”.
3. Faça as configurações do metrônomo com os botões
[1]–[4].
Parâmetro
Valor
Explicação
[1]
TEMPO
40–250
Especifica o andamento do metrônomo.
[2]
BEAT
1/1–8/1,
1/2–8/2,
1/4–8/4,
1/8–8/8
Seleciona o compasso.
[3]
OFF/ON
OFF, ON
Liga e desliga o metrônomo.
[4]
LEVEL
0-100
Ajusta o volume do metrônomo.
Botão [TUNER]
4. Pressione o botão [EXIT].
Você retornará para a tela de Reprodução.
* O som do metrônomo é gerado dos plugues OUTPUT e do plugue PHONES.
* Alterar o TEMPO também alterará o MASTER BPM. Para obter detalhes sobre o MASTER BPM, consulte o
“Guia de Parâmetros” (arquivo PDF).
Restaurando os ajustes padrão de fábrica (restauração aos padrões de fábrica)
A restauração das configurações do sistema do GT-001 (parâmetros de sistema) aos ajustes padrão de
fábrica é referida como “Restauração aos Padrões de Fábrica”.
Além de retornar todas as configurações aos valores em vigor quando o GT-001 foi enviado da fábrica, você
também poderá especificar os itens a serem redefinidos.
* Quando você executa a “Restauração aos Padrões de Fábrica”, as configurações feitas serão perdidas.
Salve os dados necessários no computador usando o software dedicado.
1. Escolha [MENU]"“SYSTEM”"“F. RESET” (FACTORY RESET).
2. Escolha o tipo de configuração a ser restaurado para os ajustes padrão de fábrica com os
botões [1] e [4].
Botão
Parâmetro
[1]
FROM
[4]
TO
Valor
Explicação
SYSTEM
Configurações dos parâmetros do sistema
QUICK
Parâmetros para as configurações rápidas do usuário
U001–U200
Configurações para números de patch U001−U200
3. Pressione o botão [WRITE].
Se você decidir cancelar sem executar, pressione o botão [EXIT].
4. Para executar a Restauração aos Padrões de Fábrica, pressione o botão [ENTER].
Assim que a Restauração aos Padrões de Fábrica estiver concluída, você será retornado à tela de
Reprodução.
12
Outras funções úteis
Conexão de um microfone
Ao conectar um microfone ao jack MIC IN no painel direito, você poderá usá-lo com os efeitos do GT-001.
English
Microfone dinâmico
Microfone condensador
Deutsch
MEMO
Français
Italiano
• Um microfone condensador, que exige um phantom power, pode ser conectado ao plugue MIC IN.
Para fornecer o phantom power para o microfone condensador, siga os procedimentos em “3 Edição:
Operação básica” (p. 6), escolhendo [MENU]"“SYSTEM”"“INPUT” e selecionando “ON” com o botão [4].
• O plugue GUITAR IN para uma guitarra e o jack MIC IN não podem ser usados ao mesmo tempo. Se
ambos os plugues estiverem conectados, o plugue GUITAR IN terá precedência.
* Esse instrumento está equipado com plugues do tipo balanceado
(XLR). Um diagrama de fios para o plugue é mostrado à direita.
Faça as conexões após verificar os diagramas de fios dos outros
equipamentos que você pretende conectar.
* Dependendo da posição do microfone em relação aos alto-falantes, 2: HOT
1: GND
feedback acústico pode ser produzido. Isso pode ser solucionado:
• Alterando a direção dos microfones.
• Reposicionando os microfones para uma distância maior em
relação aos alto-falantes.
3: COLD
• Diminuindo os níveis de volume.
Español
Ajuste do contraste (brilho) do visor
Você pode ajustar o brilho do visor.
Português
1. Escolha [MENU]"“SYSTEM”"“LCD”.
2. Ajuste o valor com o botão [4].
Aumentar o valor (1−16) aumenta o brilho.
Nederlands
Desativar a função Auto Off
O GT-001 pode desativar sua alimentação automaticamente. O equipamento desligará automaticamente
após serem transcorridas 10 horas desde a última utilização da unidade. O visor mostrará uma mensagem
aproximadamente 15 minutos antes de a alimentação ser desligada.
Com os ajustes de fábrica, esta função é ligada “ON” (desligamento em 10 horas). Se você quiser que a
alimentação permaneça ligada o tempo todo, desative “OFF”.
1. Escolha [MENU]"“SYSTEM”"“AUTO OFF”.
2. Selecione “OFF” usando o botão [1].
3. Pressione o botão [EXIT] várias vezes.
13
Lista de mensagens de erro
Mensagem
Causa
Ação
MIDI BUFFER FULL!
Os dados não podem ser processados
corretamente devido ao alto volume de
mensagens MIDI.
Reduza o volume de mensagens MIDI transmitidas para o
GT-001.
USB OFFLINE!
As transmissões do dispositivo conectado
foram interrompidas. Essa mensagem
Verifique se o cabo está desconectado e se não há
também aparece quando a alimentação ao
curto-circuito.
dispositivo conectado foi desligada. Isso não
indica mau funcionamento.
DATA WRITE ERROR!
Falha ao gravar na memória para
armazenamento dos dados do usuário.
Reduza o tempo do dispositivo de transmissão de MIDI.
A unidade pode estar danificada. Consulte o serviço técnico da
Roland mais próximo.
A configuração para selecionar se cada patch tem configurações diferentes para o pedal de controle, pedal de expressão
ou outros itens, ou se todos os patches compartilham as
mesmas configurações é chamada de “Preferência”.
PREFERENCE IS
SYSTEM!
A “PREFERENCE” é definida como “SYSTEM”.
Se a Preferência estiver definida como “SYSTEM”, a atribuição
de patch e as configurações de modo manual serão ignoradas.
Se você quiser habilitar as configurações do patch, altere a
Preferência do parâmetro correspondente para “PATCH”.
Para definir a Preference, escolha [MENU]"“SYSTEM”
"“PREF”, e selecione “PATCH” usando os botões [1]–[4].
Especificações Principais
BOSS GT-001: PROCESSADOR DE EFEITOS DE VIOLÃO OU DE GUITARRA
24 bits + método AF
Conversão AD
Conversão DA
24 bits
Frequência de
Amostragem
44,1 kHz
Patches
200 (usuário) + 200 (predefinições)
Nível de Entrada
Nominal
Impedância de
Entrada
Jack MIC IN: Tipo XLR, balanceado,
phantom power (CC 48 V, 10 mA Máx.)
Entrada AUX IN: Tipo fone miniatura
estéreo
Conectores
Jack CTL/EXP: Tipo fone TRS de 1/4 de
polegada
MIC IN: -40 dBu
Porta USB COMPUTER: USB tipo B
AUX IN: -20 dBu
GUITAR IN: 1 M Ω
MIC IN: 4 k Ω
AUX IN: 27 k Ω
OUTPUT L/MONO, R: -10 dBu
Impedância de
Saída
OUTPUT L/MONO, R: 2 k Ω
Impedância de
Carga Recomendada
OUTPUT L/MONO, R: 10 k Ω ou mais
PHONES: -10 dBu
PHONES: 44 Ω
PHONES: 44 Ω ou mais
LCD gráfica (132 x 32 pontos, LCD com
retroiluminação)
Jack OUTPUT (L/Mono, R): Tipo fone de
1/4 de polegada
Jack PHONES: Tipo fone miniatura
estéreo
GUITAR IN: -10 dBu
Nível de Saída
Nominal
Visor
Jack GUITAR IN: Tipo fone de 1/4 de
polegada
* O método AF (Adaptive Focus) trata-se
de um método de propriedade da
Roland & BOSS que melhora muito
a relação sinal/ruído (S/N) dos
conversores AD e DA.
Jack DC IN
Fonte de
Alimentação
Adaptador CA ou obtida pela porta USB
(alimentação do barramento USB)
Uso de corrente
240 mA
Dimensões
211 (L) x 135 (P) x 58 (A) mm
Peso
500 g
Acessórios
Manual do Proprietário, Folheto “USO
SEGURO DA UNIDADE”, adaptador CA
Opcionais
(vendidos
separadamente)
Pedal duplo: FS-6
Pedal de expressão: FV-500L/500H,
Roland EV-5
* 0 dBu = 0,775 Vrms
* Com a finalidade de aprimorar o produto, as especificações e/
ou aparência desta unidade estão sujeitas a mudanças sem
aviso prévio.
14
USO SEGURO DA UNIDADE
AVISO
AVISO
Para desligar completamente a alimentação da unidade,
retire o plugue da tomada
Não se esqueça de usar apenas o adaptador CA
fornecido com a unidade. Além disso, verifique
se a voltagem da instalação corresponde à
voltagem de entrada especificada no corpo do
adaptador CA. Como outros adaptadores CA
podem usar uma polaridade diferente ou terem
sido projetados para uma voltagem diferente, o uso desses
adaptadores pode resultar em danos, mau funcionamento e
choques elétricos.
CUIDADO
Precauções a respeito do uso da fonte de alimentação
Phantom power (remota)
Sempre desligue o phantom power ao conectar
qualquer dispositivo além dos microfones
condensadores que exigem o phantom power.
Há risco de danos se você fornecer alimentação
phantom power por engano a microfones
dinâmicos, dispositivos de reprodução de áudio
ou outros dispositivos que não exigem esse tipo de alimentação.
Verifique as especificações de todos os microfones que você
pretende usar consultando o manual que vem com eles.
(O phantom power desse instrumento: 48 V CC, 10 mA Máx.)
Italiano
OBSERVAÇÕES IMPORTANTES
Manutenção
• Para a limpeza diária, passe um
pano macio e seco ou levemente
umedecido com água. Para remover
manchas difíceis, use um pano
molhado com detergente suave,
não abrasivo. Em seguida, seque
completamente com um pano limpo,
macio e seco.
Cuidados Adicionais
• Qualquer dado armazenado na
unidade pode ser perdido como
resultado da falha do equipamento,
operação incorreta, etc. Para protegerse contra a perda irrecuperável
de dados, tente criar o hábito de
criar backups regulares dos dados
armazenados na unidade.
• A Roland não assume nenhuma
responsabilidade com relação à
restauração de qualquer conteúdo
armazenado que tenha sido perdido.
• Jamais force ou aplique pressão
demasiada no visor.
• Use apenas o pedal de expressão
especificado (Roland EV-5, FV-500H,
FV-500L; vendidos separadamente).
Ao conectar qualquer outro pedal de
expressão, você corre o risco de causar
mau funcionamento e/ou danos na
unidade.
• Ao virar a unidade, tenha cuidado
para proteger os botões contra danos.
Além disso, manuseie a unidade com
cuidado, não deixe que ela caia.
• Slot de segurança (
)
http://www.kensington.com/
(Painel esquerdo)
Licenças/marcas registradas
• Este produto contém a plataforma de
software integrado eCROS da eSOL
Co.,Ltd. eCROS é uma marca registrada
da eSOL Co., Ltd. no Japão.
• ASIO é marca registrada da Steinberg
Media Technologies GmbH.
• Roland, BOSS e COSM são marcas
comerciais ou marcas comerciais
registradas da Roland Corporation nos
Estados Unidos e/ou em outros países.
15
Nederlands
• Antes de enviar a unidade para
reparos, certifique-se de fazer um
backup dos dados armazenados, ou
se preferir, escreva as informações
necessárias. Embora façamos o
máximo para preservar os dados
armazenados em sua unidade ao
efetuarmos os reparos, em alguns
casos, como quando a seção de
memória está danificada fisicamente,
a restauração do conteúdo
armazenado poderá ser impossível.
A Roland não assume nenhuma
responsabilidade com relação à
restauração de qualquer conteúdo
armazenado que tenha sido perdido.
Português
Reparos e Dados
• Dependendo do material e da
temperatura da superfície sobre a
qual você colocar a unidade, os pés
de borracha poderão perder a cor ou
marcar a superfície.
Você pode colocar um pedaço
de feltro ou tecido sob o apoio
de borracha para evitar que isso
aconteça. Se fizer isso, certifique-se de
que a unidade não possa deslizar ou
se mover acidentalmente.
Español
Posicionamento
Français
Essa unidade será desligada automaticamente,
depois que um valor de tempo predeterminado
transcorrer sem que ele seja utilizado para
tocar, ou seus botões ou controles tenham sido
operados (função Auto Off ). Se não desejar que
ele seja desligado automaticamente, desative a
função Auto Off (p. 13).
Deutsch
Considerações a respeito da função Auto Off
English
Mesmo com a chave de alimentação desligada,
a unidade não estará completamente separada
de sua fonte de alimentação principal. Quando
a energia precisar ser completamente desligada,
desligue a chave de alimentação da unidade e
depois retire o plugue da tomada. Por essa razão,
a tomada em que você deseja conectar o plugue do cabo de
força deve ser de fácil alcance e de acessibilidade imediata.
Use somente o adaptador CA fornecido e a voltagem correta
Gebruikershandleiding
Nieuwe COSM-amps
Deze opnieuw ontworpen COSM-amps vormen de neerslag van alle kennis over het creëren van geluid die we in de loop der jaren
hebben verkregen. Ze staan voor een verdere evolutie die verder gaat dan de gebruikelijke modellering van de versterker. Van een
kraakhelder transparant geluid tot extreme high-gain geluiden, stellen deze modellen u in staat om het dynamische gedrag van de amp
en de subtiele nuances daarvan volledig te beheren.
De GT-001 beschikt over een USB audio-interfacefunctie (p. 11). U kunt eenvoudig geluid opnemen door hem op een computer aan te
sluiten. U kunt ook een microfoon aansluiten op de GT-001.
Deutsch
De compacte afmetingen maken hem zeer geschikt voor een tafelblad
English
Belangrijkste functies
Eenvoudige handelingen met een computer met speciale software
U kunt de GT-001 bedienen, klanken bewerken en patches beheren via speciale software. U kunt ook een grote keuze aan patches
downloaden van BOSS TONE CENTRAL, onze speciale website voor het downloaden van patches.
Français
* Dit apparaat wordt automatisch uitgeschakeld na een vooraf
ingestelde tijdsspanne sinds het apparaat voor het laatst werd
gebruikt om muziek af te spelen of sinds de knoppen of
bedieningselementen van het apparaat voor het laatst werden
gebruikt (Auto Off-functie).
Als u niet wilt dat het apparaat automatisch wordt uitgeschakeld,
schakelt u de Auto Off-functie uit (p. 13).
Italiano
• Instellingen die worden bewerkt op het moment dat het
apparaat wordt uitgeschakeld, gaan verloren. Als u instellingen
hebt gemaakt die u wilt behouden, moet u deze eerst opslaan.
• Schakel het apparaat opnieuw in om de stroomvoorziening te
herstellen (p. 2).
Español
Gebruikershandleiding
(dit document)
Lees dit eerst. Dit bevat een uitleg van de basiszaken die u moet weten om de GT-001 te gebruiken. Download en
raadpleeg de “Parametergids” (PDF-bestand) voor uitgebreide informatie over de bediening van de GT-001.
PDF-handleiding (downloaden vanaf het web)
• MIDI-implementatie
Dit bevat uitgebreide informatie over MIDIberichten.
1. Typ de volgende URL op uw computer:
http://www.roland.com/manuals/
I
2. Kies “GT-001” als productnaam.
Lees zorgvuldig de hoofdstukken “HET APPARAAT VEILIG GEBRUIKEN” en “BELANGRIJKE OPMERKINGEN” (folder “Lees dit eerst” en gebruikershandleiding
p. 15) voordat u het apparaat gaat gebruiken. Deze hoofdstukken bevatten belangrijke informatie over de juiste bediening van het apparaat. Om er
bovendien zeker van te zijn dat u elke functie van uw nieuwe apparaat goed begrijpt, leest u best de hele gebruikershandleiding. Deze handleiding
moet als referentie worden bewaard en voorhanden zijn.
Copyright © 2014 BOSS CORPORATION
Alle rechten voorbehouden. Niets uit deze uitgave mag op enige manier worden gereproduceerd
zonder schriftelijke toestemming van BOSS CORPORATION.
Nederlands
• Lijst met geluiden
Dit is een lijst van de geluiden die zijn
ingebouwd in de GT-001.
De PDF-handleiding ophalen
Português
• Parametergids
Informatie over de bediening van de GT-001
en alle bijbehorende parameters wordt in deze
handleiding uitgelegd. De Parametergids kan ook
met de speciale software worden bekeken.
Voorzorgsmaatregelen bij het aansluiten
1 Aan de slag
1
* Om defecten en storingen in de apparatuur te voorkomen,
moet u altijd het volume omlaag draaien en alle apparaten
uitschakelen voordat u een verbinding maakt.
* Als verbindingskabels met weerstand gebruikt worden,
kan het volumeniveau van de apparatuur die op de
ingangen is aangesloten (AUX IN) laag zijn. Gebruik in dat
geval verbindingskabels zonder weerstand.
Sluit de apparatuur aan
PHONESaansluiting
* Door het snoer van de netstroomadapter in de groef onderaan de GT-001 te
leggen, voorkomt u dat de stekker per ongeluk wordt losgetrokken.
OUTPUT-aansluitingen
DC IN-aansluiting
GUITAR IN-aansluiting
AUX IN-aansluiting
Sluit een
audiospeler aan
met een stereo
mini-aansluiting.
2
[ON/OFF] schakelaar
Schakel het apparaat in
1. Druk op de [ON/OFF] schakelaar.
2. Schakel de gitaarversterker in.
[OUTPUT
LEVEL]regelaar
MEMO
Bij verbinding met een computer is de
netstroomadapter overbodig omdat de computer voor
de stroomvoorziening zorgt (p. 11).
* Nadat u de verbindingen hebt ingesteld, moet u er voor zorgen
dat u de apparaten in de juiste volgorde inschakelt: eerst de
GT-001 en daarna het aangesloten systeem. In de verkeerde
volgorde inschakelen kan storingen of schade veroorzaken. Bij
het uitschakelen, eerst het aangesloten systeem uitschakelen
en daarna de GT-001.
* Dit apparaat is uitgerust met een beveiligingscircuit. Het duurt
even (een paar seconden) voordat het apparaat normaal
functioneert nadat het is ingeschakeld.
* Zet het volume altijd op nul voordat u het apparaat in- of
uitschakelt. Zelfs als het volume volledig op nul staat, kunt u nog
geluid horen wanneer het apparaat wordt in- of uitgeschakeld.
Dit is normaal en wijst niet op een defect.
3
Wijzig het volume
Wijzig het volume met de
[OUTPUT LEVEL]-knop.
* Het volume van een audiospeler aangesloten
op de AUX IN-aansluiting moet met de eigen
volumeregeling worden ingesteld.
Handige stemfunctie
1. Druk op de [TUNER]-knop.
2. Speel een open snaar en stem hem zo dat alleen de
[EXIT]-knop
middenindicator op het display oplicht.
[TUNER]-knop
3. Druk op de [EXIT]-knop als u klaar bent met stemmen.
2
Aan de slag
4
Geef het soort versterker op dat u hebt aangesloten
1. Druk op de [MENU]-knop.
2. Kies “SYSTEM” met de waardeknop en druk op de
[ENTER]-knop
English
Om een optimaal geluid te garanderen, moet u het type versterker opgeven dat u hebt aangesloten op de
GT-001. Neem hier even de tijd voor.
Waardeknop
[ENTER]-knop.
[ENTER]-knop.
Deutsch
3. Kies “OUTPUT” met de waardeknop en druk op de
[MENU]-knop
Knop [4]
Français
4. Selecteer het type versterker met knop [4].
Uitleg
JC-120
Kies dit bij aansluiting op de gitaaringang van een Roland JC-120 gitaarversterker.
SMALL AMP
Kies dit bij aansluiting op een kleine gitaarversterker.
COMBO AMP
Kies dit bij aansluiting op de gitaaringang van een combo-type gitaarversterker (d.w.z. een enkel
apparaat dat de versterker en de luidspreker bevat) anders dan de JC-120.
Italiano
Waarde
Bij sommige soorten gitaarversterkers kan de instelling “JC-120” betere resultaten opleveren.
STACK AMP
Kies dit bij aansluiting op de gitaaringang van een stack-type gitaarversterker (d.w.z. een waarbij de
versterker en de luidspreker gescheiden eenheden zijn).
Kies dit bij verbinding met de RETURN-aansluiting van de JC-120.
COMBO RETURN
Kies dit bij verbinding met de RETURN-aansluiting van een combo-type gitaarversterker.
STACK RETURN
Kies dit bij verbinding met de RETURN-aansluiting van een stack-type gitaarversterker. U moet
ook “STACK RETURN” kiezen als u een gitaarvermogensversterker gebruikt in combinatie met een
luidsprekerkast.
LINE/PHONES
Kies dit als u een hoofdtelefoon gebruikt of als de GT-001 is verbonden met monoluidsprekers, een
mixer, of een digitale recorder.
Español
JC-120 RETURN
Português
5. Druk een paar keer op de [EXIT]-knop.
Nederlands
MEMO
• De parameter SP TYPE is alleen geldig als OUTPUT is ingesteld op “LINE/PHONES”. Raadpleeg de
“Parametergids” (PDF-bestand) voor meer informatie over de parameter SP TYPE.
• Bij het gebruik van een hoofdtelefoon kunt u niet het geluid verkrijgen dat typerend is voor een
gitaarversterker, behalve wanneer u PREAMP inschakelt. We raden aan om PREAMP in te schakelen
telkens wanneer u een hoofdtelefoon gebruikt. Om PREAMP in te schakelen, zoals is weergegeven in
procedure 1 in “4 Bewerken: De effecten bewerken” (p. 7), kiest u [EFFECT]"“Pr A” of “Pr B” en drukt u
op de waardeknop. Zie de “Parametergids” (PDF-bestand) voor meer informatie over de instellingen
van PREAMP.
3
2 Spelen
Nu de voorbereidingen voltooid zijn, kunt u beginnen met het bespelen van de GT-001.
Wat is een Patch?
De GT-001 bevat talloze effecten. Een combinatie van deze effecten en de bijbehorende instellingen
wordt een “patch” genoemd.
Vooraf ingestelde patch P200
Vooraf ingestelde patch P001
Gebruikerspatch U200
Gebruikerspatch U001
In zijn geheugen ingebouwd beschikt de GT-001 over 200 (beginnend met U001) gebruikerspatches
die overschreven kunnen worden, en 200 vooraf ingestelde patches (beginnend met P001) die niet
overschreven kunnen worden.
Selecteer een patch
Draai de waardeknop om door de patches te bladeren.
Waardeknop
MEMO
• U kunt alleen van patch wisselen in het Play-scherm (p. 5). Druk
op de [EXIT]-knop om terug te keren naar het Play-scherm en
verwissel van patch.
• U kunt vier van uw favoriete patches toewijzen aan knoppen
[A]-[D] en ze direct oproepen. Kies een patch en houd een van de knoppen een paar seconden ingedrukt om
de patch daaraan toe te wijzen.
Weergave patchnummer
Het display toont het nummer en de naam van de geselecteerde
patch.
* De informatie in deze handleiding bevat illustraties waarin de standaardweergave van het display wordt afgebeeld. Het is echter
mogelijk dat uw apparaat een nieuwere, verbeterde versie van het systeem bevat (bv. met nieuwere geluiden), zodat de weergave op
uw display kan verschillen van de weergave in de handleiding.
4
Spelen
Kies een patch gebaseerd op een categorie
English
1. Druk in het Play-scherm op de waardeknop.
De patchcategorieën verschijnen.
2. Draai de waardeknop om een patchcategorie te
selecteren en druk op de [ENTER]-knop.
Deutsch
Hierdoor verschijnt de eerste patch in de geselecteerde categorie, waarna u terugkeert naar het Playscherm.
Français
Informatie over het Play-scherm
Het scherm dat verschijnt na het inschakelen, heet het “Play-scherm”.
Italiano
Pictogrammen op het display
MASTER BPM
Instelling OUTPUT
PREAMP kanaal
Patchnummer
Pictogram
Español
Fantoomvoeding
aan/uit
Uitleg
Português
Toont de MASTER BPM.
Dit wordt weergegeven als OUTPUT is ingesteld op iets anders dan LINE/PHONES.
Dit wordt weergegeven als OUTPUT is ingesteld op LINE/PHONES.
Als de DIVIDER-modus Single is, wordt preamp-kanaal “A” geselecteerd.
Nederlands
Als de DIVIDER-modus Single is, wordt preamp-kanaal “B” geselecteerd.
Dit wordt weergegeven als de DIVIDER-modus Dual is.
,
,
Dit pictogram wordt gemarkeerd als de SOLO SW is ingeschakeld.
Dit wordt weergegeven als de fantoomvoeding is ingeschakeld (p. 13).
* Raadpleeg de “Parametergids” (PDF-bestand) voor meer informatie over MASTER BPM, SOLO SW,
OUTPUT en DIVIDER.
5
3 Bewerken: Basisbewerkingen
1
Bewerken op de GT-001 gaat uiterst gemakkelijk. Neem even de tijd om de basishandelingen te leren.
Kies wat u wilt bewerken
Druk op een van de volgende knoppen.
2
EFFECT
MENU
Hier kunt u de waarden voor elk
effect bewerken.
Hier hebt u toegang tot uitvoerinstellingen, of kunt u de gewenste functies
instellen voor externe pedalen.
Selecteer een item
De volgende procedure is een voorbeeld na het indrukken
van de [MENU]-knop.
1. Draai de waardeknop om de cursor te
[ENTER]-knop
verplaatsen, en kies een item.
2. Druk op de [ENTER]-knop.
3. Kies een ander item met de waardeknop.
4. Druk op de [ENTER]-knop.
De instelling voor het geselecteerde item
wordt getoond.
3
Bewerk de waarden
1. Verander de weergegeven waarde met de knoppen [1]–[4].
2. Druk een paar keer op de [EXIT]-knop.
U keert terug naar het Play-scherm.
In deze handleiding is de volgorde van de handelingen als volgt geschreven.
Voorbeeld:
Druk op de [MENU]-knop.
Draai de waardeknop, kies “SYSTEM” en druk op de [ENTER]-knop.
Draai de waardeknop, kies “AUTO OFF” en druk op de [ENTER]-knop.
Kies [MENU]"“SYSTEM”"“AUTO OFF.”
6
Waardeknop
4 Bewerken: De effecten bewerken
1
U kunt de parameters van elk effect in de patch bewerken. Hier tonen we u een voorbeeld van het bewerken van
de distortion (vervorming) van het overdrive-effect.
Selecteer het effect dat u wilt bewerken
Kies een effect door met de waardeknop de cursor te verplaatsen.
Druk op de knop om het effect in of uit te schakelen.
Houd de knop ingedrukt en verdraai hem om de positie van het
effect naar links of rechts te verplaatsen.
[ENTER]-knop
Deutsch
2. Druk op de [ENTER]-knop.
English
1. Kies [EFFECT]"“OD/DS.”
(Alleen als de cursor op FX1 of FX2 staat)
Gebruik knop [4] om het effecttype voor FX1 of FX2 te selecteren.
Français
2
Bewerk de waarden
Italiano
Verander de weergegeven waarde met de knoppen [1]–
[4].
U kunt de paginatab met de waardeknop verplaatsen.
Handige snelinstellingen
Als u een paginatab selecteert met het opschrift “QS” kunt u eenvoudig
instellingen oproepen (Quick Settings, snelinstellingen) die voor elk effect zijn
opgeslagen.
Español
Raadpleeg “Instellingen op effect opslaan (Quick Setting schrijven)” (p. 9) voor
informatie over het opslaan van snelinstellingen.
Wat doet elke knop?
De functie (parameter) van elke knop is afhankelijk van het effect. Raadpleeg de “Parametergids” (PDF-bestand) voor een lijst
met alle parameters.
Handeling
Uitleg
TYPE
Verwisselt het type overdrive/distortion (vervorming).
[2]
DRIVE
Past de hoeveelheid overdrive/distortion aan.
[3]
TONE
Wijzigt de toonkwaliteit. Hogere waarden produceren een scherpere toon.
[4]
E. LEVEL
Past het volume aan als het effect wordt toegepast.
Nederlands
3
Knop
[1]
Português
Bij het selecteren van OD/DS
Rond het maken van instellingen af
Druk een paar keer op de [EXIT]-knop.
U keert terug naar het Play-scherm.
OPGELET
De bewerkingen die u hier hebt gedaan, gaan verloren als u van patch wisselt. Als u de gemaakte patch
wilt bewaren, moet u op de [WRITE]-knop drukken om de bewerkingen als een gebruikerspatch op te
slaan (p. 8).
7
5 Bewerken: Een patch opslaan
Als u een door u gemaakte patch wilt opslaan, moet u hem op de volgende manier als een gebruikerspatch
opslaan. Als u de patch niet opslaat, gaan de bewerkte instellingen verloren nadat u het apparaat hebt
uitgeschakeld of als u van patch wisselt.
1
Open het Write-menu
Druk op de [WRITE]-knop.
2
[WRITE]-knop
Selecteer het type schrijffunctie
Kies “WRITE” (PATCH RIGHT) met de waardeknop
en druk op de [ENTER]-knop.
[ENTER]-knop
Waardeknop
Types van gegevens opslaan
U kunt het type gegevens selecteren dat u wilt opslaan. (Standaard wordt de patch opgeslagen.)
Naam
Opslaan
Uitwisselen
Initialiseren
En als u aan de waardeknop draait....
Verwissel of kopieer PREAMPinstellingen tussen kanalen A
en B.
Draai aan de waardeknop om het
type gegevens te kiezen dat u wilt
opslaan.
8
Bewerken: Een patch opslaan
3
Selecteer de schrijfbestemming
English
Kies de bestemming voor het opslaan van de
patch (U001-U200) met knop [4].
Een naam toewijzen
Kies “INFO” uit de opslagmethoden (p. 8) om de naam van de
patch aan te passen, gebruik de waarderegelaar om de cursor
te verplaatsen en gebruik knop [4] om het teken te wijzigen.
Selecteert de categorie
Knop [2]
Selecteert het type van de tekens
Knop [3]
Wisselt tussen hoofd- en kleine letters
Knop [4]
Wijzigt het teken
Waardeknop
Verplaatst de cursor
Français
Handeling
Knop [1]
Deutsch
4
Controller
Kies de schrijfbestemming
Druk op de [WRITE]-knop.
Italiano
Opslaan
[WRITE]-knop
Nadat de patch is opgeslagen, keert u terug naar
het Play-scherm.
Español
Instellingen op effect opslaan (Quick Setting schrijven)
die u wilt opslaan met knop [1].
3. Kies de bestemming voor het opslaan
Elk PREAMP-kanaal
OD/DS
DELAY
CHORUS
REVERB
COMP
Nederlands
1. Kies [WRITE]"“QS WRITE.”
2. Kies het effect dat de instellingen bevat
Effecten die in het geheugen kunnen worden
opgeslagen
Português
Niet alleen kunt u instellingen opslaan in de vorm
van patches, maar u kunt ze ook opslaan voor
individuele effecten.
Omdat u dergelijke opgeslagen instellingen in
andere patches kunt gebruiken, net als bij de
Preset Quick Setting, is het bij het maken van
nieuwe patches handig om over de gewenste
effectinstellingen te beschikken die u eerder hebt
opgeslagen.
EQ
De PEDAL FX’s WAH en PEDAL BEND
DIVIDER
Elk FX1/FX2-effect
ASSIGN 1–8
van de patch (U001-U200) met knop [2].
4. Druk op de [WRITE]-knop.
Nadat de patch is opgeslagen, keert u terug
naar het Play-scherm.
9
6 Bewerken: Instellingen voor een extern pedaal
U kunt verschillende parameters beheren door een zwelpedaal aan te sluiten (zoals de Roland EV-5, apart
leverbaar) of een voetschakelaar (FS-5U, FS-6, apart leverbaar) op de CTL/EXP-aansluiting op het rechterpaneel.
Een pedaal aansluiten
* Gebruik alleen het opgegeven zwelpedaal (Roland
EV-5, FV-500H, FV-500L, apart verkrijgbaar). Als u
andere zwelpedalen aansluit, kunt u defecten en/of
schade aan het apparaat veroorzaken.
* U kunt niet tegelijkertijd een voetschakelaar en een
zwelpedaal aansluiten.
De pedaalfunctie instellen
1. Kies [MENU]"“CTL/EXP”"“CTL1,” “CTL2,” of “EXP.”
Instelling
Uitleg
[CTL1]/[CTL2]
Dit stelt de functie in die u met een voetschakelaar wilt bedienen (zoals de apart leverbare FS-5U of FS-6).
[EXP]
Dit stelt de functie in die u met een zwelpedaal wilt bedienen (zoals de apart leverbare Roland EV-5,
FV-500L of FV-500H).
2. Stel de parameterwaarden in met de knoppen [1]–[4].
Zie de “Parametergids” (PDF-bestand) voor meer informatie over het toewijzen van functies aan externe
pedalen.
Voorbeelden van instellingen
Verwissel de patchnummers met CTL1/2 (A/B-pedalen van de FS-6)
Parameter
[1]
FUNC
[2]
[3]
[4]
MIN
MAX
MODE
Waarde van CTL1
(B-pedaal)
NUMBER INC (Nummer
verhogen)
OFF
ON
TOGGLE
Waarde van CTL2
(A-pedaal)
NUMBER DEC (Nummer
verlagen)
OFF
ON
TOGGLE
Uitleg
Gaat naar het eerstvolgende hogere patchnummer
met het B-pedaal. Gaat naar het eerstvolgende lagere
patchnummer met het A-pedaal.
* In aanvulling op de bovenstaande instelling stelt u “MENU”"“SYSTEM”"“PREF”"“CTL1” en “CTL2” in op “SYSTEM.”
Wijs de WAH toe voor EXP
Parameter
[1]
FUNC
Waarde
WAH
* Kies [EFFECT]"‘’PEDAL” en schakel “PEDAL” in.
10
7 Op een computer aansluiten
Door de GT-001 over USB op een computer aan te sluiten, kunt u het volgende doen:
• Digitale audiosignalen en MIDI-berichten verzenden en ontvangen tussen de computer en de GT-001
• Patches bewerken en beheren, en de Parametergids (PDF-bestand) op een computer weergeven met de
juiste software
• Patches downloaden van onze website BOSS TONE CENTRAL (http://bosstonecentral.com/)
English
Het USB-stuurprogramma installeren
Deutsch
U moet het USB-stuurprogramma installeren voordat u verbinding maakt met een computer:
Download het USB-stuurprogramma van de hieronder genoemde website.
Installeer dit speciale stuurprogramma voordat u een USB-verbinding maakt. Raadpleeg voor nadere
gegevens het bestand Readme.htm dat met de download wordt meegegeven.
&http://www.roland.com/support/
Het programma dat u nodig hebt en de stappen voor het installeren van het USB-stuurprogramma zijn
afhankelijk van de instellingen van uw computer, dus lees eerst zorgvuldig het bestand Readme.htm dat
moet de download wordt meegeleverd.
Gebruik een gewone USB-kabel om de USBpoort van de computer te verbinden met de
USB-poort van de GT-001.
Français
Op een computer aansluiten
USB-poort
Italiano
* Als de GT-001 via USB op een computer is
aangesloten, wordt de stroomtoevoer door de
computer geregeld. Daarom is het niet nodig
om de netstroomadapter aan te sluiten.
Español
De GT-001 als audio-interface gebruiken
Neem het geluid van de GT-001 op op uw computer of gebruik geluid van uw computer als output van de
GT-001 OUTPUT-aansluitingen of PHONES-aansluiting.
* Raadpleeg de “Parametergids” (PDF-bestand) voor meer informatie over de audiosignaalstroom via een
USB-verbinding en voor instructies over het maken van instellingen.
Português
* Zie de handleiding voor de software die u gebruikt als u wilt weten hoe u de ingangsbron van de
software wisselt.
De speciale software van de GT-001 gebruiken
Nederlands
Met de speciale software kunt u het volgende doen:
• Eenvoudig patches downloaden van onze website BOSS TONE CENTRAL (http://bosstonecentral.
com/)
• Patch-instellingen bewerken
• Patches een naam geven
• Patches sorteren en ze verplaatsen
• Back-up maken van patches en systeeminstellingen, en terugkeren naar de instellingen in de backup
• De “Parametergids” (PDF-bestand) op de computer weergeven
De specifieke software kan worden gedownload van onze BOSS TONE CENTRAL (http://
bosstonecentral.com/). Raadpleeg het bestand Readme.htm dat met de download wordt meegeleverd
voor informatie over het gebruik van de software.
11
8 Andere nuttige functies
De metronoom gebruiken
1. Druk op de [TUNER]-knop.
2. Verplaats de tab met de waardeknop en kies
[EXIT]-knop
“METRONOME”.
3. Stel de metronoom in met de knoppen [1]-[4].
[TUNER]-knop
Parameter
Waarde
Uitleg
[1]
TEMPO
40–250
Geeft het tempo van de metronoom
aan.
[2]
BEAT
(Maat)
1/1–8/1,
1/2–8/2,
1/4–8/4,
1/8–8/8
Selecteert de maatindeling.
[3]
OFF/ON
OFF, ON
Hiermee schakelt u de metronoom in
en uit.
[4]
LEVEL
0-100
Regelt het volume van de metronoom.
4. Druk op de [EXIT]-knop.
U keert terug naar het Play-scherm.
* Het metronome geluid komt van de OUTPUT-aansluiting en de PHONES-aansluiting.
* Door het TEMPO te veranderen, verandert ook de MASTER BPM. Raadpleeg de “Parametergids” (PDFbestand) voor meer informatie over de MASTER BPM.
De standaardinstellingen herstellen (fabrieksinstellingen herstellen)
Het herstellen van de systeeminstellingen (systeemparameters) van de GT-001 naar de oorspronkelijke in
de fabriek ingestelde waarden wordt een “Factory Reset” genoemd.
Niet alleen kunt u alle instellingen terugzetten op de waarden waarmee de GT-001 is geleverd vanaf de
fabriek, maar u kunt ook opgeven welke items u opnieuw wilt instellen.
* Als u “Factory Reset” uitvoert, gaan de door u aangebrachte instellingen verloren. Sla de gewenste
gegevens op de computer op met de speciale software.
1. Kies [MENU]"“SYSTEM”"“F. RESET” (FACTORY RESET).
2. Kies het type instellingen waarvoor u de fabrieksinstellingen wilt herstellen met de
knoppen [1] en [4].
Knop
Parameter
[1]
FROM
[4]
TO
Waarde
Uitleg
SYSTEM
Instellingen systeemparameters
QUICK
Instellingen voor User Quick Setting
U001–U200
Instellingen voor Patchnummers U001−U200
3. Druk op de [WRITE]-knop.
Als u besluit om te stoppen zonder het herstellen uit te voeren, drukt u op de [EXIT]-knop.
4. Druk op de [ENTER]-knop om de fabrieksinstellingen te herstellen.
Nadat de Factory Reset is voltooid, keert u terug naar het Play-scherm.
12
Andere nuttige functies
Een microfoon aansluiten
Door een microfoon aan te sluiten op de MIC IN-aansluiting op het rechter paneel, kunt u deze gebruiken
met de effecten van de GT-001.
English
Dynamische microfoon
Condensatormicrofoon
Français
Italiano
• U kunt op de MIC IN-aansluiting een condensatormicrofoon aansluiten, die fantoomvoeding nodig heeft.
Om de condensatormicrofoon van fantoomvoeding te voorzien, volgt u de procedures in “3 Bewerken:
Basisbewerkingen” (p. 6), kiest u [MENU]"“SYSTEM”"“INPUT,” en selecteert u “ON” met de knop [4].
• De GUITAR IN-aansluiting voor een gitaar en de MIC IN-aansluiting kunnen niet tegelijkertijd worden
gebruikt. Als beide aansluitingen in gebruik zijn, heeft de GUITAR IN-aansluiting voorrang.
* Dit instrument is uitgerust met gebalanceerde aansluitingen van het type XLR. Een bedradingsdiagram
voor de aansluiting is rechts afgebeeld. Maak de aansluitingen nadat
u eerst de bedradingsschema’s hebt geraadpleegd voor andere
apparatuur die u wilt aansluiten.
* Afhankelijk van de locatie van de microfoons ten opzichte van de
2: HOT
1: GND
luidsprekers kan akoestische feedback (rondzingen) ontstaan. Dit
kan worden voorkomen door:
• de richting van de microfoon(s) te wijzigen;
• de microfoon(s) op een grotere afstand van de luidsprekers te
3: COLD
plaatsen;
• het volume te verlagen.
Deutsch
MEMO
Español
Het contrast (helderheid) van het display instellen
U kunt de helderheid van het display regelen.
Português
1. Kies [MENU]"“SYSTEM”"“LCD.”
2. Pas de waarde aan met de knop [4].
Door de waarde te verhogen (1-16) neemt de helderheid toe.
De GT-001 kan zichzelf automatisch uitschakelen. Het apparaat wordt automatisch uitgeschakeld als 10 uur
zijn verstreken nadat het apparaat voor het laatst werd bespeeld of bediend. Op het display verschijnt een
bericht ongeveer 15 minuten voorafgaand aan het uitschakelen.
In de fabrieksinstellingen is deze functie ingeschakeld (uitschakelen na 10 uur). Als u het apparaat continu
aan wilt laten staan, schakelt u de functie uit.
1. Kies [MENU]"“SYSTEM”"“AUTO OFF.”
2. Selecteer “OFF” met de knop [1]
3. Druk een paar keer op de [EXIT]-knop.
13
Nederlands
De functie Auto Off (Automatisch uitschakelen) uitschakelen
Lijst met foutmeldingen
Bericht
Oorzaak
Handeling
MIDI BUFFER FULL!
De gegevens kunnen niet goed worden
verwerkt als gevolg van de grote hoeveelheid
MIDI-berichten.
Beperk het aantal MIDI-berichten dat naar de GT-001 wordt
gezonden.
Verlaag het tempo van het MIDI-apparaat dat de berichten
verzendt.
USB OFFLINE!
Overdracht vanaf het aangesloten apparaat
is onderbroken. Dit bericht verschijnt ook als
Controleer of er geen kabel los zit en of er geen kortsluiting is.
het aangesloten apparaat is uitgeschakeld. Dit
wijst niet op een defect.
DATA WRITE ERROR!
Wegschrijven naar het geheugen voor de
opslag van gebruikersgegevens is mislukt.
Het apparaat is mogelijk beschadigd. Neem contact op met
het dichtstbijzijnde Roland service-centrum.
De “PREFERENCE” (voorkeur) is ingesteld op
“SYSTEM.”
De instelling voor het kiezen of elke patch andere instellingen
heeft voor het bedieningspedaal, het zwelpedaal of andere
items, of dat alle patches dezelfde instellingen delen, heet
“Preference”.
Als Preference is ingesteld op “SYSTEM” worden de instellingen voor patchtoewijzing en handmatige modus genegeerd.
Als u de instellingen van de patch wilt inschakelen, moet u
Preference voor de betreffende parameter wijzigen in “PATCH”.
Om uw voorkeur in te stellen, kies [MENU]"“SYSTEM”
"“PREF” en selecteer “PATCH” door de knoppen [1]-[4] te
gebruiken.
PREFERENCE IS
SYSTEM!
Belangrijkste specificaties
BOSS GT-001: PROCESSOR VOOR GITAAREFFECTEN
AD-conversie
24 bits + AF-methode
GUITAR IN-aansluiting: 1/4”-jack
* AF-methode (adaptieve focusmethode) Dit is een methode die
eigendom is van Roland & BOSS die
de signaal-ruisverhouding (SN) van
de AD- en DA-converters drastisch
verbetert.
MIC IN-aansluiting: XLR-type,
gebalanceerd, fantoomvoeding (DC 48
V, 10 mA Max)
AUX IN-aansluiting: Stereo mini-jack
Aansluitingen
OUTPUT (L/Mono, R) aansluiting:
1/4”-jack
DA-conversie
24 bits
PHONES-aansluiting: Stereo mini-jack
Samplefrequentie
44,1 kHz
Patches
200 (Gebruiker) + 200 (Voorinstelling)
CTL/EXP-aansluiting: 1/4-inch TRS
telefoontype
GUITAR IN: -10 dBu
USB COMPUTER-poort: USB-type B
Nominaal
ingangsniveau
AUX IN: -20 dBu
GUITAR IN: 1 M Ω
Ingangsimpedantie
MIC IN: 4 k Ω
AUX IN: 27 k Ω
Nominaal
uitgangsniveau
OUTPUT L/MONO, R: -10 dBu
Uitgangsimpedantie
OUTPUT L/MONO, R: 2 k Ω
Aanbevolen
belastingsimpedantie
OUTPUT L/MONO, R: 10 k Ω of meer
Display
14
DC IN-aansluiting
MIC IN: -40 dBu
PHONES: -10 dBu
PHONES: 44 Ω
PHONES: 44 Ω of meer
Grafische LCD (132 x 32 beeldpunten,
verlicht LCD)
Stroomtoevoer
Netstroomadapter of verkregen via
USB-poort (USB busvermogen)
Stroomverbruik
240 mA
Afmetingen
211 (B) x 135 (D) x 58 (H) mm
Gewicht
500 g
Accessoires
Gebruikershandleiding, folder “HET
APPARAAT VEILIG GEBRUIKEN”,
netstroomadapter
Opties
(apart verkrijgbaar)
Dubbele voetschakelaar: FS-6
Zwelpedaal FV-500L/500H, Roland EV-5
* 0 dBu = 0,775 Vrms
* Met het oog op productverbetering, kunnen de specificaties
en/of het uitzicht van dit apparaat worden gewijzigd zonder
voorafgaande kennisgeving.
HET APPARAAT VEILIG GEBRUIKEN
WAARSCHUWING
WAARSCHUWING
Gebruik alleen de meegeleverde netstroomadapter en
het juiste voltage
Zelfs als de aan/uitschakelaar uitgeschakeld
is, is dit apparaat niet volledig gescheiden van
de stroombron. Als u de stroom volledig wilt
uitschakelen, schakelt u eerst het apparaat uit en
vervolgens trekt u de stekker uit het stopcontact.
Zorg er daarom voor dat u het netsnoer aansluit
op een stopcontact dat gemakkelijk bereikbaar is.
Gebruik alleen de netstroomadapter die bij het
apparaat is geleverd. Zorg er ook voor dat de
netspanning van de installatie overeenstemt met
de invoerspanning die op de netstroomadapter
is vermeld. Andere netstroomadapters kunnen
een andere polariteit hebben of bedoeld zijn voor
een ander voltage, zodat deze schade, defecten of elektrische
schokken kunnen veroorzaken.
OPGELET
Voorzorgsmaatregelen bij het gebruik van de fantoomvoeding
Schakel de fantoomvoeding altijd uit bij het
aansluiten van een ander apparaat dan de
condensatormicrofoon die de fantoomvoeding
nodig heeft. U kunt schade veroorzaken als
u per ongeluk de fantoomvoeding gebruikt
voor dynamische microfoons, apparatuur voor
geluidsweergave, of andere apparaten die een dergelijke
voeding niet nodig hebben. Controleer de specificaties van
elke microfoon die u van plan bent te gaan gebruiken in de
meegeleverde handleiding.
(De fantoomvoeding van dit instrument: 48 V DC, 10 mA Max)
Italiano
BELANGRIJKE OPMERKINGEN
Onderhoud
• Gebruik een zachte, droge doek of
een doek die licht bevochtigd is met
water om het apparaat dagelijks af te
vegen. Gebruik een doek die met een
zachte, niet-schurende zeepoplossing
is bevochtigd om hardnekkig vuil
te verwijderen. Veeg vervolgens het
apparaat grondig schoon met een
zachte, droge doek.
Extra voorzorgsmaatregelen
• De gegevens die zijn opgeslagen
op het apparaat, kunnen verloren
gaan door storingen, onjuist gebruik
enzovoort. Om dergelijk onherstelbaar
gegevensverlies te voorkomen, moet
u regelmatig back-ups maken van de
gegevens die u op het apparaat hebt
opgeslagen.
• Roland kan niet verantwoordelijk
worden geacht voor het herstel van
eventuele opgeslagen inhoud die
verloren is gegaan.
• Voer nooit druk uit op het display en
sla er nooit tegen.
• Gebruik alleen het opgegeven
zwelpedaal (Roland EV-5, FV-500H,
FV-500L, apart verkrijgbaar). Als u
andere zwelpedalen aansluit, kunt
u defecten en/of schade aan het
apparaat veroorzaken.
• Wees voorzichtig als u het apparaat
ondersteboven draait om te vermijden
dat de knoppen en regelaars worden
beschadigd. Ga voorzichtig om met
het apparaat, laat het niet vallen.
• Veiligheidssleuf (
)
http://www.kensington.com/
(linkerpaneel)
Licenties/handelsmerken
• Dit product bevat het met eCROS
geïntegreerde softwareplatform
van eSOL Co., Ltd. eCROS is een
handelsmerk van eSOL Co., Ltd. in
Japan.
• ASIO is een gedeponeerd
handelsmerk van Steinberg Media
Technologies GmbH.m
• Roland, BOSS en COSM zijn
gedeponeerde handelsmerken
of handelsmerken van Roland
Corporation in de Verenigde Staten
en/of andere landen.
15
Nederlands
• Als het apparaat voor reparatie
wordt ingezonden, maakt u eerst een
back-up van de gegevens die in het
apparaatgeheugen zijn opgeslagen
of noteert u de nodige gegevens op
papier. Hoewel wij ons uiterste best
doen om de gegevens die in het
apparaatgeheugen zijn opgeslagen,
te bewaren wanneer we reparaties
uitvoeren, kan het herstel van de
opgeslagen inhoud in sommige
gevallen onmogelijk zijn, zoals
wanneer het geheugengedeelte
fysiek beschadigd is. Roland kan niet
verantwoordelijk worden geacht voor
het herstel van eventuele opgeslagen
inhoud die verloren is gegaan.
Português
Reparaties en gegevens
• Afhankelijk van het materiaal en
de temperatuur van het oppervlak
waarop u het apparaat plaatst,
kunnen de rubberen voetstukken
mogelijk het oppervlak verkleuren of
ontsieren.
U kunt een stuk vilt of stof onder de
rubberen voetstukken plaatsen om
dit te voorkomen. Zorg er in dit geval
voor dat het apparaat niet verschuift
of per ongeluk in beweging komt.
Español
Plaatsing
Français
Dit apparaat wordt automatisch uitgeschakeld
na een vooraf ingestelde tijdsspanne sinds
het apparaat voor het laatst werd gebruikt om
muziek af te spelen of sinds de knoppen of
bedieningselementen van het apparaat voor het
laatst werden gebruikt (Auto Off-functie). Als
u niet wilt dat het apparaat automatisch wordt uitgeschakeld,
schakelt u de Auto Off-functie uit (p. 13).
Deutsch
Over de functie Auto Off (Automatisch uitschakelen)
English
Om de stroomtoevoer naar het apparaat volledig uit te
schakelen, moet u de stekker uit het stopcontact trekken
For EU Countries
For China
*
5
1
0
0
0
3
9
2
3
1
-
0
1
*