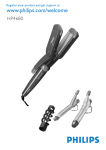
1
Premium Line Multi-Styler Bedienungsanleitung Hair Styler Modell 87515 Instructions for use Notice d´utilisation - Gebruiksaanwijzing Istruzioni per l’uso - Manual de instrucciones Návod k obsluze - Instrukcja obsługi Impressum: Bedienungsanleitung Modell 87515 Stand: Juni 2010 /nd Copyright © Mannheimer Straße 4 68766 Hockenheim Telefon +49 (0) 62 05/94 18-0 Telefax +49 (0) 62 05/94 18-12 E-Mail [email protected] Internet www.unold.de Inhaltsverzeichnis Bedienungsanleitung Modell 87515 Technische Daten................................................................................................................ 6 Für Ihre Sicherheit............................................................................................................... 6 Ihr neuer Hair Styler............................................................................................................ 7 Vor dem Benutzen............................................................................................................... 8 Lockenzange....................................................................................................................... 8 Bürstenaufsatz.................................................................................................................... 9 Alu-Rundbürste................................................................................................................... 9 Haarglätter/Haarcrimper....................................................................................................... 10 Reinigen und Pflegen........................................................................................................... 11 Aufbewahren....................................................................................................................... 11 Garantiebestimmungen........................................................................................................ 50 Service-Adressen................................................................................................................. 52 Entsorgung / Umweltschutz.................................................................................................. 54 Instructions for use Model 87515 Technical Specifications....................................................................................................... 12 Safety Information............................................................................................................... 12 Your new hair styler.............................................................................................................. 13 Before first use.................................................................................................................... 14 Curling Tongs...................................................................................................................... 14 Brush attachment................................................................................................................ 14 Aluminium curling brush...................................................................................................... 15 Hair straightener/hair crimper............................................................................................... 15 Cleaning and care................................................................................................................ 16 Storage............................................................................................................................... 16 Guarantee Conditions........................................................................................................... 50 Waste Disposal / Environmental Protection............................................................................. 54 Notice d´utilisation Modèle 87515 Spécification technique ...................................................................................................... 17 Pour votre sécurité............................................................................................................... 17 Votre nouveau combiné multifonction pour les cheveux........................................................... 18 Avant l‘utilisation................................................................................................................. 19 Fer à boucler....................................................................................................................... 19 Brosse amovible.................................................................................................................. 20 Brosse ronde alu.................................................................................................................. 20 Fer à lisser/fer à gaufrer....................................................................................................... 20 Nettoyage et entretien.......................................................................................................... 22 Rangement......................................................................................................................... 22 Conditions de Garantie......................................................................................................... 50 Traitement des déchets / Protection de l’environnement.......................................................... 54 Gebruiksaanwijzing Model 87515 Technische gegevens . ......................................................................................................... 23 Voor uw veiligheid................................................................................................................ 23 Uw nieuwe Hair Styler.......................................................................................................... 24 Vóór het gebruik.................................................................................................................. 25 Krullentang......................................................................................................................... 25 Borstelopzetstuk.................................................................................................................. 25 Aluminium ronde borstel...................................................................................................... 26 Straightener/wafeltang......................................................................................................... 26 Reiniging en onderhoud....................................................................................................... 27 Opberging........................................................................................................................... 27 Garantievoorwaarden............................................................................................................ 50 Verwijderen van afval / Milieubescherming............................................................................. 54 Inhaltsverzeichnis Istruzioni per l’uso Modello 87515 Dati tecnici ........................................................................................................................ 28 Per la vostra sicurezza.......................................................................................................... 28 Il vostro nuovo Hair Styler..................................................................................................... 29 Prima dell’utilizzo................................................................................................................ 30 Pinza arricciacapelli............................................................................................................. 30 Accessorio spazzola............................................................................................................. 30 Spazzola tonda in alluminio.................................................................................................. 31 Liscia capelli / Frisé............................................................................................................. 31 Pulizia e manutenzione........................................................................................................ 32 Conservazione..................................................................................................................... 33 Norme die garanzia.............................................................................................................. 55 Smaltimento / Tutela dell’ambiente....................................................................................... 59 Norme die garanzia.............................................................................................................. 51 Smaltimento / Tutela dell’ambiente....................................................................................... 55 Manual de instrucciones Modelo 87515 Datos técnicos . .................................................................................................................. 34 Indicaciones de seguridad.................................................................................................... 34 Su nuevo Hair Styler............................................................................................................ 35 Puesta en servicio................................................................................................................ 36 Rizador............................................................................................................................... 36 Cepillo desmontable............................................................................................................ 36 Cepillo redondo de aluminio................................................................................................. 37 Alisador/Ondulador.............................................................................................................. 37 Limpieza y Mantenimiento.................................................................................................... 38 Almacenamiento.................................................................................................................. 38 Condiciones de Garantia....................................................................................................... 51 Disposición / Protección del medio ambiente.......................................................................... 55 Návod k obsluze Modelu 87515 Technické údaje ................................................................................................................. 39 Pro vaši bezpečnost ............................................................................................................ 39 Váš nový Hair Styler............................................................................................................. 40 Před použitím...................................................................................................................... 41 Kulma ............................................................................................................................... 41 Kartáčový nástavec.............................................................................................................. 41 Hliníkový kulatý kartáč......................................................................................................... 42 Žehlička/krepovačka............................................................................................................. 42 Čištění a údržba.................................................................................................................. 43 Skladování ......................................................................................................................... 43 Záruční podmínky................................................................................................................ 51 Likvidace / Ochrana životného prostředí................................................................................. 55 Instrukcja obsługi Model 87515 Dane techniczne.................................................................................................................. 44 Dla Twojego bezpieczeństwa................................................................................................. 44 Twój nowy zestaw do stylizacji włosów.................................................................................... 45 Przed użyciem..................................................................................................................... 46 Lokówka............................................................................................................................. 46 Nakładana szczotka............................................................................................................. 46 Okrągła szczotka z aluminium............................................................................................... 47 Prostownica/karbownica....................................................................................................... 48 Czyszczenie i pielęgnacja..................................................................................................... 49 Przechowywanie.................................................................................................................. 49 Warunki gwarancji............................................................................................................... 51 Utylizacja / ochrona środowiska............................................................................................. 55 Bedienungsanleitung Modell 87515 Technische Daten Leistung: Abmessungen: Gewicht: Kabellänge: Gehäuse: Ausstattung: 20-25 Watt, 100-240 V~, 50/60 Hz Ca. 32,2 x ø 3,7 cm Ca. 0,47 kg Ca. 1,8 m Kunststoff Schwarz/Silber EIN/AUS-Schalter mit Kontrollleuchte Drehbare Knickschutztülle Haarglätter/Haarcrimper-Platten mit keramischer Beschichtung Automatische Voltumschaltung Zubehör: Lockenzange, Bürstenaufsatz, Alu-Rundbürste, Haarglätter/Haarcrimper-Aufsatz, Bedienungsanleitung Technische Änderungen vorbehalten Für Ihre Sicherheit 1. Bitte lesen Sie die folgenden Anweisungen und bewahren Sie diese auf. 2. Dieses Gerät ist nicht dafür bestimmt, durch Personen (einschließlich Kinder) mit eingeschränkten physischen, sensorischen, oder geistigen Fähigkeiten oder mangels Erfahrung und/oder mangels Wissen benutzt zu werden, es sei denn, sie werden durch eine für ihre Sicherheit zuständige Person beaufsichtigt oder erhielten von ihr Anweisungen, wie das Gerät zu benutzen ist. 3. Kinder sollten beaufsichtigt werden, um sicher zu stellen, dass sie nicht mit dem Gerät spielen. 4. Gerät nur an Wechselstrom gemäß Typenschild anschließen. 5. Dieses Gerät darf nicht mit einer externen Zeitschaltuhr oder einem Fernbedienungssystem betrieben werden. 6. Das Gerät darf nicht in Wasser oder eine andere Flüssigkeit eingetaucht werden. Schützen Sie das Gerät vor Nässe. 7. Achten Sie darauf, dass die Zuleitung nicht mit heißen Teilen des Gerätes in Berührung kommt. 8. Strecken Sie die Zuleitung immer auf die ganze Länge aus, um Schäden durch Überhitzung zu vermeiden. 9. Ziehen Sie die Zuleitung nur am Stecker aus der Steckdose, ziehen Sie nie direkt am Kabel. 10.Wenn Sie das Gerät zur Aufbewahrung weglegen, wickeln Sie nie die Zuleitung um das Gerät, um Schäden an der Zuleitung zu vermeiden. 6 11.Das Gerät ist ausschließlich für die Eigenanwendung im privaten Haushalt bestimmt, nicht jedoch für den gewerblichen Bedarf. 12.Das Gerät darf nicht draußen benutzt werden. 13.Halten Sie während des Betriebs ausreichend Abstand zu Wänden und brennbaren Gegenständen wie z. B. Vorhängen. 14.Betreiben Sie das Gerät nicht in der Nähe von Wärmequellen. 15.Verwenden Sie das Gerät aus Sicherheitsgründen nicht, um künstliche Haare zu frisieren. 16.Achten Sie darauf, dass das Gerät oder Teile des Gerätes nie in die Nähe des Gesichts und der Ohren kommen, um Verbrennungen zu vermeiden. 17.Verwenden Sie keine Haarsprays, solange das Gerät in Betrieb ist. 18.Ihr Haar sollte vor Benutzung des Gerätes frei sein von Haarstyling-Produkten wie Schaum oder Gel, um Schäden am Haar zu vermeiden. 19.Die Aufsätze sind nach Gebrauch sehr heiß, bitte gehen Sie vorsichtig damit um, um Verbrennungen zu vermeiden. 20.Schalten Sie das Gerät aus, bevor Sie es zur Seite legen. 21.Nach Gebrauch oder vor dem Reinigen bitte immer das Gerät ausschalten, den Stecker aus der Steckdose ziehen und abkühlen lassen. 22.Solange sich der Stecker in der Steckdose befindet, ist das Gerät, auch wenn es aus- geschaltet ist, in der Nähe von Wasser eine Gefahr. 23.Stecken Sie keine Gegenstände in das Gerät, es besteht durch entstehende Beschädigungen Gefahr durch einen Stromschlag. 24.Das Gerät darf nicht mit Zubehör anderer Hersteller oder Marken benutzt werden, um Schäden zu vermeiden. 25.Öffnen Sie auf keinen Fall das Gehäuse des Gerätes. Es besteht Gefahr durch einen Stromschlag. 26.Prüfen Sie regelmäßig Stecker und Anschlusskabel auf Verschleiß oder Beschädigungen. Bei Beschädigung des Anschlusskabels oder anderer Teile senden Sie das Gerät bitte zur Überprüfung und/oder Reparatur an unseren Kundendienst (Anschrift siehe Garantiebestimmungen). Unsachgemäße Reparaturen können zu erheblichen Gefahren für den Benutzer führen und führen zum Ausschluss der Garantie. 27.Wenn die Anschlussleitung dieses Gerätes beschädigt wird, muss sie durch den Hersteller oder seinen Kundendienst oder eine ähnlich qualifizierte Person ersetzt werden, um Gefährdungen zu vermeiden. Achtung! Das Gerät ist während und nach dem Betrieb sehr heiß! Benutzen Sie das Gerät aus Sicherheitsgründen nie in der Nähe oder in einer gefüllten Badewanne oder Waschbecken bzw. anderen mit Wasser gefüllten Gefäßen. Wenn das Gerät in einem Badezimmer verwendet wird, ist nach Gebrauch der stecker zu ziehen, da die nähe von Wasser eine Gefahr darstellt, auch wenn das Gerät ausgeschaltet ist. Der Hersteller übernimmt keine Haftung bei fehlerhafter Montage, bei unsachgemäßer oder fehlerhafter Verwendung oder nach Durchführung von Reparaturen durch nicht autorisierte Dritte. Ihr neuer Hair Styler 1 1 Haarcrimper 2 Haarglätter 3 Lockenzange 4 Bürstenaufsatz 5 Entriegelungsring 6 Schiebeschalter EIN/AUS 7 Alu-Rundbürste 2 3 7 4 5 6 7 Vor dem benutzen 1. Entfernen Sie alle Verpackungsmaterialien und Transportsicherungen. Halten Sie Kinder wegen der Erstickungsgefahr von den Verpackungsmaterialien fern. 2. Trocknen Sie die Haare nach dem Waschen gut mit einem Handtuch ab. 3. Bitte geben Sie keine Haarpflegeprodukte wie z. B. Gel oder Schaum ins Haar, um Schäden am Haar zu vermeiden. 4. Die besten Ergebnisse erzielen Sie mit trockenem Haar. Ggf. können Sie das Haar mit einem Haartrockner vortrocknen. 5. Bürsten Sie die Haare, bis diese locker fallen. 6. Um die verschiedenen Aufsätze auf das Gerät zu stecken, gehen Sie wie folgt vor: Stellen Sie zunächst sicher, dass das Gerät ausgeschaltet ist und der Stecker aus der Steckdose gezogen ist. Die Markierung am Gerät muss auf stehen, wenn Sie den Aufsatz aufstecken. Nachdem der Aufsatz auf das Gerät aufgesteckt ist, drehen Sie den Entriegelungsring am Griff des Gerätes, bis zum Symbol . 7. Der jeweilige Aufsatz ist nun fest mit dem Gerät verbunden und Sie können mit dem Frisieren beginnen. 8. Um die Aufsätze zu wechseln, drehen Sie den Entriegelungsring auf und ziehen dann den Aufsatz ab. Bitte beachten Sie, dass die Aufsätze nach dem Benutzen heiß sind, lassen Sie daher die Aufsätze vor dem Wechseln abkühlen! Lockenzange Die Lockenzange ist ideal, um kleine Locken zu modellieren. Achtung: Bei direktem Hautkontakt besteht Verbrennungsgefahr, gehen Sie daher sehr vorsichtig mit der Lockenzange um! 1. Bereiten Sie Ihr Haar wie im Kapitel „Vor dem ersten Benutzen“ beschrieben, vor. 2. Stecken Sie die Lockenzange auf das Gerät. 3. Stecken Sie den Stecker in eine Steckdose. 4. Schalten Sie das Gerät am EIN/AUSSchalter ein. 5. Die Kontrollleuchte am Gerät leuchtet auf. 6. Lassen Sie das Gerät für einige Minuten aufheizen, um ein optimales Styling-Ergebnis zu erzielen. 7. Unterteilen Sie das gekämmte Haar in kleine Strähnen, die nicht mehr als fünf Zentimeter breit sein sollten. Trennen Sie bei Bedarf die Haarsträhnen mit einer Haarklammer voneinander ab. 8. Drücken Sie auf das Scharnier auf und legen Sie die Spitze einer Haarsträhne zwischen das Scharnier und den Metallstab. 9. Lassen Sie das Scharnier wieder los. 10.Wickeln Sie nun die Haarsträhne bis zum Haaransatz um die Lockenzange herum. 8 11.Lassen Sie die Haarsträhne in der Lockenzange, bis sich die Haarsträhne warm anfühlt. 12.Wickeln Sie die Haarsträhne vorsichtig ab und öffnen Sie das Scharnier, um die Haarsträhne vom Gerät zu lösen. 13.Wiederholen Sie die Schritte 6 bis 12, um die restlichen Haarsträhnen zu stylen. 14.Bevor Sie die Haare mit Kamm, Bürste oder den Fingern in Form bringen, lassen Sie die Haare etwas abkühlen. 15.Schalten Sie das Gerät am EIN/AUS-Schalter aus und ziehen Sie den Stecker aus der Steckdose. 16.Bitte beachten Sie, dass die Aufsteckteile nach dem Benutzen sehr heiß sind. Wechseln Sie die Aufsätze erst nach einer angemessenen Abkühlzeit aus, um Verbrennungen zu vermeiden. Bürstenaufsatz Der Bürstenaufsatz ist ideal, um große Locken zu modellieren. 1. Bereiten Sie Ihr Haar wie im Kapitel „Vor dem ersten Benutzen“ beschrieben, vor. 2. Stecken Sie die Rundbürste auf das Gerät. 3. Stecken Sie den Stecker in eine Steckdose. 4. Schalten Sie das Gerät am EIN/AUS-Schalter ein. 5. Lassen Sie das Gerät für einige Minuten aufheizen, um ein optimales Style-Ergebnis zu erzielen. 6. Unterteilen Sie das gekämmte Haar in kleine Strähnen, die nicht mehr als fünf Zentimeter breit sein sollten. Trennen Sie bei Bedarf die Haarsträhnen mit einer Haarklammer voneinander ab. 7. Wickeln Sie die Haarsträhne, an der Haarspitze beginnend, um die Rundbürste herum. 8. Lassen Sie die Haarsträhne auf der Rundbüste, bis sich die Haarsträhne warm anfühlt. 9. Wickeln Sie die Haarsträhne vorsichtig ab. Bitte ziehen Sie die Haarsträhne nicht ab, da sonst der Stylingeffekt zerstört werden kann. 10.Wiederholen Sie die Schritte 6 bis 9, um die restlichen Haarsträhnen zu stylen. 11.Schalten Sie das Gerät am EIN/AUS-Schalter aus und ziehen Sie den Stecker aus der Steckdose. 12.Bitte beachten Sie, dass die Aufsteckteile nach dem Benutzen sehr heiß sind. Wechseln Sie die Aufsätze erst nach einer angemessenen Abkühlzeit aus, um Verbrennungen zu vermeiden. Alu-Rundbürste Die Rundbürste ist ideal, um kurzes bis mittellanges Haar zu stylen und um dem Haar mehr Volumen zu geben. 1. Bereiten Sie Ihr Haar wie im Kapitel „Vor dem ersten Benutzen“ beschrieben, vor. 2. Stecken Sie die Rundbürste auf das Gerät. 3. Stecken Sie den Stecker in eine Steckdose. 4. Schalten Sie das Gerät am EIN/AUS-Schalter ein. 5. Lassen Sie das Gerät für einige Minuten aufheizen, um ein optimales Styling-Ergebnis zu erzielen. 6. Unterteilen Sie das gekämmte Haar in kleine Strähnen, die nicht mehr als fünf Zentimeter breit sein sollten. Trennen Sie bei Bedarf die Haarsträhnen mit einer Haarklammer voneinander ab. 7. Wickeln Sie die Haarsträhne, an der Haarspitze beginnend, um die Rundbürste herum. 8. Lassen Sie die Haarsträhne auf der Rundbüste, bis sich die Haarsträhne warm anfühlt. 9. Wickeln Sie die Haarsträhne vorsichtig ab. Bitte ziehen Sie die Haarsträhne nicht ab, da sonst der Stylingeffekt zerstört werden kann. 10.Wiederholen Sie die Schritte 6 bis 9, um die restlichen Haarsträhnen zu stylen. 11.Schalten Sie das Gerät am EIN/AUS-Schalter aus und ziehen Sie den Stecker aus der Steckdose. 12.Bitte beachten Sie, dass die Aufsteckteile nach dem Benutzen sehr heiß sind. Wechseln Sie die Aufsätze erst nach einer angemessenen Abkühlzeit aus, um Verbren-nungen zu vermeiden. 9 Haarglätter/Haarcrimper Die Platten dieses Aufsatzes verfügen jeweils über eine glatte und eine strukturierte Seite. Je nachdem, welchen Effekt Sie erzielen möchten, ziehen Sie einfach die Platten aus dem Aufsatz heraus, wenden die Platten und stecken Sie diese wieder in den Aufsatz hinein. Die Platten des Haarglätter sind mit einer keramischen Schicht ausgestattet, die Ihr Haar schützen. Dennoch sollten Sie Ihr Haar nicht zu oft glätten. Dies gilt insbesondere für coloriertes oder anderweitig chemisch behandeltes Haar (z. B. bei Dauerwellen). Bitte verwenden Sie vor dem Glätten der Haare keine chemischen Haarstylingprodukte wie Haarspray, um Verbrennungen am Haar zu vermeiden. Mit dem Haarglätter (glatte Seite der Platten) können Sie Ihr Haar schonend glätten. Mit dem Haarcrimper (strukturierte Seite der Platten) erhalten Sie kleine Wellen in den Haaren. 1. Bereiten Sie Ihr Haar wie im Kapitel „Vor dem ersten Benutzen“ beschrieben, vor. 2. Achtung: beim Glätten von Haaren sollte das Haar vorher trocken sein. Wenn Sie feuchtes Haar mit dem Haarglätter bearbeiten, fügen Sie dem Haar Schaden zu. Trocknen Sie deshalb das Haar z. B. mit einem Haartrockner gut vor. 3. Stecken Sie den Aufsatz auf das Gerät. Prüfen Sie, ob die gewünschte Plattenseite richtig herum eingelegt ist. 4. Stecken Sie den Stecker in eine Steckdose. Haarglätter: 5. Unterteilen Sie das gekämmte Haar in kleine Strähnen, die nicht mehr als fünf Zentimeter breit sein sollten. Trennen Sie bei Bedarf die Haarsträhnen mit einer Haarklammer voneinander ab. 6. Schalten Sie das Gerät am EIN/AUS-Schalter ein. 7. Lassen Sie das Gerät für einige Minuten aufheizen, um ein optimales Styling-Ergebnis zu erzielen. 8. Öffnen Sie das Gerät und legen Sie die Haarsträhne am Haaransatz zwischen die beiden Glättplatten. 9. Schließen Sie das Gerät wieder. 10.Fahren Sie nun mit dem Gerät langsam und gleichmäßig bis zur Haarspitze herunter. Halten Sie dabei das Gerät immer fest geschlossen. Sie sollten nie länger als zwei Sekunden an einer Stelle bleiben, um das Haar nicht zu schädigen. Wenn Sie einen glatten, enganliegenden Look erhalten möchten, müssen Sie beim Glätten der Haarsträhne immer dicht am Körper bleiben. Wenn Sie das Gerät beim Glätten jedoch anheben, erhalten Sie viel Volumen. 11.Wiederholen Sie die Schritte 5 bis 10, um die restlichen Haarsträhnen zu stylen. 12.Schalten Sie das Gerät am EIN/AUS-Schalter aus und ziehen Sie den Stecker aus der Steckdose. 10 13.Bürsten oder kämmen Sie das Haar nun nicht mehr, da dadurch die Wellen zerstört werden. Bringen Sie das Haar ggf. mit den Fingern in Form. 14.Bitte beachten Sie, dass die Aufsteckteile nach dem Benutzen sehr heiß sind. Wechseln Sie die Aufsätze erst nach einer angemessenen Abkühlzeit aus, um Verbrennungen zu vermeiden. Haarcrimper: 1. Unterteilen Sie das gekämmte Haar in kleine Strähnen, die nicht mehr als fünf Zentimeter breit sein sollten. Trennen Sie bei Bedarf die Haarsträhnen mit einer Haarklammer voneinander ab. 2. Schalten Sie das Gerät am EIN/AUS-Schalter ein. 3. Lassen Sie das Gerät für einige Minuten aufheizen, um ein optimales Styling-Ergebnis zu erzielen. 4. Öffnen Sie das Gerät und legen Sie die Haarsträhne am Haaransatz zwischen die beiden Crimpplatten. 5. Schließen Sie das Gerät wieder. 6. Halten Sie das Gerät nun ca. 5 bis 10 Sekunden geschlossen. Öffnen Sie das Gerät und prüfen Sie, ob das Ergebnis wie von Ihnen gewünscht ist. Wenn nicht, wiederholen Sie den Vorgang. 7. Arbeiten Sie sich vom Haaransatz bis zu den Haarspitzen auf diese Weise vor. 8. Wiederholen Sie die Schritte 3 bis 7, um die restlichen Haarsträhnen zu stylen. 9. Schalten Sie das Gerät am EIN/AUSSchalter aus und ziehen Sie den Stecker aus der Steckdose. 10.Bürsten oder kämmen Sie das Haar nun nicht mehr, da dadurch die Wellen zerstört werden. Bringen Sie das Haar ggf. mit den Fingern in Form. 11.Bitte beachten Sie, dass die Aufsteckteile nach dem Benutzen sehr heiß sind. Wechseln Sie die Aufsätze erst nach einer ange- messenen Abkühlzeit aus, um Verbrennungen zu vermeiden. 12.TIPP: Sie können mit dem Haarglätter auch Wellen frisieren! Legen Sie die Haarsträhne wie gewöhnlich in den Glätter, und glätten Sie das Haar. Drehen Sie dann kurz vor den Haarspitzen das Gerät mit eingelegter Haarsträhne nach innen oder außen (je nach gewünschter Wellenart), um einen sanften Schwung in den Haaren zu kreieren. Reinigen und Pflegen 1. Ziehen Sie den Stecker aus der Steckdose 2. Lassen Sie das Gerät und die Aufsätze vollständig abkühlen. Legen Sie hierzu das Gerät auf eine hitzebeständige Unterlage. 3. Tauchen Sie das Gerät zum Reinigen nie in Wasser oder eine andere Flüssigkeit ein. 4. Wischen Sie das Gerät mit einem feuchten Tuch ab. 5. Verwenden Sie keine kratzenden Schwämme, Scheuermittel, Stahlwolle, metallischen Gegenstände, Desinfektionsmittel oder heißen Reinigungsmittel, da diese zu Beschädigungen führen können. 6. Reinigen Sie die Aufsätze bei Bedarf mit einem feuchten Tuch. Lassen Sie die Aufsätze vollständig trocknen, bevor Sie diese wieder verwenden oder zum Auf-bewahren weglegen. Aufbewahren 1. Ziehen Sie den Stecker aus der Steckdose. 2. Lassen Sie das Gerät und die Aufsätze vollständig abkühlen. Legen Sie hierzu das Gerät auf eine hitzebeständige Unterlage. 3. Wickeln Sie die Zuleitung nicht um das Gerät, um Schäden an der Zuleitung zu vermeiden. 4. Schützen Sie das Gerät vor Staub. 11 Instructions for use Model 87515 Technical Specifications Power Rating: Dimensions: Weight: Cable length: Casing: Equipment: 20-25 W, 100-240 V~, 50/60 Hz Approx. 32,2 x ø 3,7 cm Approx. 0,47 kg Approx. 1,8 m Plastic black/silver EIN/AUS [ON/OFF] switch with indicator light Swivelling protective sleeve Hair straightener/hair crimper plates with ceramic coating Accessories: Curling tongs, brush attachment, aluminium curling brush, hair straightener, hair crimper attachment, instruction manual Technical details subject to change. Safety Information 1. Please read the following information and keep it for future reference. 2. This appliance is not intended for use by persons (including children) with reduced physical, sensory or mental capabilities, or lack of experience and knowledge, unless they have been given supervision or instruction concerning use of the appliance by a person responsible for their safety. 3. Children should be supervised in order to ensure that they do not play with the appliance. 4. Connect the appliance only to an AC power supply with the voltage indicated on the rating plate. 5. Do not operate this appliance with an external timer or remote control system. 6. The appliance may never be immersed in water or other liquids. Keep the appliance dry. 7. Make sure that the lead cable does not touch hot parts of the appliance. 8. Unroll the lead cable completely to avoid damage caused by overheating. 9. Always disconnect the lead cable from the wall socket pulling on the plug, never on the cable. 10.When storing the appliance, never wrap the lead cable around it in order to avoid damaging the cable. 11.The appliance is intended for domestic use only, not for commercial use. 12.The appliance is not intended for outdoor use. 12 13.During operation keep sufficient distance to the walls and flammable objects like e.g. curtains. 14.Do not operate the appliance near any heat source. 15.For safety reasons do not use the appliance to style artificial hair. 16.Keep the appliance away from ears and face to avoid burns. 17.Do not use any hair spray while the appliance is still working. 18.To avoid damage to your hair, your hair should be free of hair-styling products such as foam or gel before using the appliance. 19.The attachments are very hot after use. Handle with care to avoid burns. 20.Disconnect the appliance before depositing. 21.After use and before cleaning always switch the appliance off, disconnect the plug from the wall socket and let it cool off. 22.As long as the appliance is connected to the main power supply, it constitutes a potential danger near water. 23.Do not stick any objects into the appliance, as possible damage may cause electric shock. 24.Use the appliance only for the intended purposes indicated in this manual. 25.Do not use the appliance with accessories of other manufacturers or brands, to prevent damage. 26.Never open the casing of the appliance to prevent electric shock. Attention: The appliance becomes very hot during operation and maintains the heat during some time after disconnection. 27.Check the plug and lead cable regularly for wear and tear. If the lead cable or other parts show damage, please send the appliance to our after-sales service for inspection and repair (for address, see warranty terms). Unauthorised repairs can constitute serious risks for the user and void the warranty. 28.If the lead cable is damaged, it must be replaced by the manufacturer or its aftersales service or a similarly qualified person in order to avoid any hazard. For safety reasons never use the appliance close to or in a bathtub or washbasin or any other container filled with water. If the appliance is used in a bathroom, unplug it from the wall socket after use, since nearby water presents a danger even when the appliance is switched off. The manufacturer will not be liable in the event of incorrect assembly, improper or incorrect use or if repairs are carried out by unauthorized third parties. Your new hair styler 1 1 Hair crimper 2 Hair straightener 3 Curling tongs 4 Brush attachment 5 Unlocking ring 6 Slide switch EIN/AUS [ON/OFF] 7 Aluminium curling brush 2 3 7 4 5 6 13 Before first use 1. Remove all packaging materials and any transport safety devices. Keep packaging material out of reach of children. Danger of suffocation! 2. After washing your hair, dry it thoroughly with a towel. 3. To avoid damage to your hair, your hair should be free of hair-styling products such as foam or gel before using the appliance. 4. Best results are achieved with dry hair. Dry your hair well using a hair dryer, if necessary. 5. Brush your hair until it falls loosely. 6. To attach the different accessories to the appliance please proceed as follows: First check that the appliance is shut off and the plug is not connected to the wall socket. The check mark on the appliance must be set to when attaching the accessory. After having attached the accessory, turn the unlocking ring on the handle of the appliance to the symbol The corresponding accessory is now firmly attached to the appliance and you may start styling. 7. To change the accessory, turn the unlocking ring to the symbol and detach the accessory. Please note that the attachments become very hot during their use. Let the attachments cool off before changing them. Curling Tongs The curling tongs are ideal to form small curls. Attention: Avoid direct skin contact. Danger of burns! Handle curling tongs with care! 1. Prepare your hair as described in the chapter „Before first use“. 2. Attach the curling tongs to the appliance. 3. Connect the plug to a wall socket. 4. Switch the appliance on using the „EIN/ AUS“ [ON/OFF] switch. 5. The control lamp on the appliance lights up. 6. Heat the appliance up for a couple of minutes in order to achieve the best styling result. 7. Separate the combed hair into strands no more than 5 cm wide. If necessary, separate the strands using hair clips. 8. Press the curling tongs open and place the end of a hair section into the curling tongs. 9. Release the curling tongs to close. 10.Now wrap the hair section around the curling tongs towards the root. 11.Leave the section wrapped around the curling tongs until it feels warm. 12.Carefully unwrap the section and open the tongs to let the hair easily slip out. 13.Repeat steps 6 to 12 to style the remaining strands. 14.Before styling your hair with a comb, a brush or your fingers, let it cool for a while. 15.Always switch the appliance off using the EIN/AUS [ON/OFF] switch before disconnecting the plug from the wall socket. 16.Please remember that the accessories and the appliance are very hot after use. Change the accessories only after an adequate cooloff time in order to avoid burns. Brush attachment The brush attachment is ideal to form big curls. 1. Prepare your hair as described in the chapter „Before first use“. 2. Attach the curling tongs to the appliance. Now push the brush attachment to the closed curling tongs until it latches into place. Attention: the end to push over the curling tongs is marked with an arrow and has a univocal mounting position. 3. Connect the plug to a wall socket. 14 4. Switch the appliance on using the „EIN/ AUS“ [ON/OFF] switch. 5. Heat the appliance up for a couple of minutes in order to achieve the best styling result. 6. Separate the combed hair into strands no more than 5 cm wide. If necessary, separate the strands using hair clips. 7. Wrap the section around the rounded brush beginning with the end of the section. 8. Leave the section wrapped around the rounded brush until it feels warm. 9. Carefully unwrap the section. Do not pull on the section as this may destroy the styling effect. 10.Repeat steps 6 to 9 to style the remaining strands. 11.Always switch the appliance off using the EIN/AUS [ON/OFF] switch before disconnecting the plug from the wall socket. Please remember that the accessories and the appliance are very hot after use. Change the accessories only after an adequate cooloff time in order to avoid burns. Aluminium curling brush The curling brush is ideal to style short to medium short hair and to give more volume. 1. Prepare your hair as described in the chapter „Before first use“. 2. Attach the curling brush to the appliance. 3. Connect the plug to a wall socket. 4. Switch the appliance on using the „EIN/ AUS“ [ON/OFF] switch. 5. Heat the appliance up for a couple of minutes in order to achieve the best styling result. 6. Separate the combed hair into strands no more than 5 cm wide. If necessary, separate the strands using hair clips. 7. Wrap the section around the rounded brush beginning with the end of the section. 8. Leave the section wrapped around the rounded brush until it feels warm. 9. Carefully unwrap the section. Do not pull on the section as this may destroy the styling effect. 10.Repeat steps 6 to 9 to style the remaining strands. 11.Always switch the appliance off using the EIN/AUS [ON/OFF] switch before disconnecting the plug from the wall socket. Please remember that the attachments are very hot after use. Change the accessories only after an adequate cool-off time in order to avoid burns. Hair straightener/hair crimper The plates of this attachment have a flat and a ridged side each. According to the effect you want to achieve, just pull the plates off the attachment, turn them and reattach them until they latch into place. The plates of the hair straightener have a ceramic coating, which protects your hair. Nevertheless you should not straighten your hair too often. This applies especially to colour treated or otherwise chemically treated hair (e.g. perms). Before straightening your hair please do not use any chemical hair-styling products like hair spray to avoid burning your hair. Using the hair straightener (flat side of the plates) allows you to gently straighten your hair. The hair crimper (ridged side of the plates) gives your hair little waves. 1. Prepare your hair as described in the chapter „Before first use“. 2. Attention: your hair should be completely dry before straightening. Straightening your hair when it is still damp will damage your hair. Therefore you should dry your hair well using a hair dryer, if necessary. 3. Attach the accessory to the appliance. Check if the plate is inserted with the desired side up. 4. Connect the plug to a wall socket. Hair straightener: 5. Separate the combed hair into strands no more than 5 cm wide. If necessary, separate the strands using hair clips. 6. Switch the appliance on using the „EIN/ AUS“ [ON/OFF] switch. 7. Heat the appliance up for a couple of minutes in order to achieve the best styling result. 8. Open the appliance and place a small section of hair between the straightening plates close to the root. 15 9. Shut the appliance. 10.Now work your way down slowly and evenly to the ends of your hair. Maintain the appliance firmly closed during this process. Never work the same part for more than two seconds to avoid damaging your hair. For an even and straight look, work your way straight down keeping the appliance close to your head. Working your way through slightly lifting the appliance will give your hair more volume. 11.Always switch the appliance off using the EIN/AUS [ON/OFF] switch before disconnecting the plug from the wall socket. 12.Do not brush or comb your hair, as this would destroy the waves. Style your hair with your fingers, if necessary. 13.Please remember that the attachments are very hot after use. Change the accessories only after an adequate cool-off time in order to avoid burns. Hair-Crimper: 1. Separate the combed hair into strands no more than 5 cm wide. If necessary, separate the strands using hair clips. 2. Switch the appliance on using the „EIN/ AUS“ [ON/OFF] switch. 3. Heat the appliance up for a couple of minutes in order to achieve the best styling result. 4. Open the appliance and place a small section of hair between the crimping plates close to the root. 5. Shut the appliance. 6. Maintain the appliance shut for approx. 5-10 seconds. Open the appliance and check if the result is as desired. If not, repeat the procedure. 7. Work your way down to the ends of your hair. 8. Repeat steps 3 to 6 to style the remaining strands. 9. Always switch the appliance off using the EIN/AUS [ON/OFF] switch before disconnecting the plug from the wall socket. 10.Do not brush or comb your hair, as this would destroy the waves. Style your hair with your fingers, if necessary. 11.Please remember that the attachments are very hot after use. Change the accessories only after an adequate cool-off time in order to avoid burns. 12.TIP: You can also curl your hair with the straightener! Place the strand between the plates as usual and straighten your hair. Shortly before the ends of your hair, turn the appliance to the inside or the outside (according to the desired look) to give your hair a gentle movement to inside or the outside. Cleaning and care 1. Unplug the appliance from the wall socket. 2. Leave the appliance and the attachments to cool off completely placing them on a heat resistant surface. 3. Never immerse the appliance or the lead cable in water or other liquids to clean them. 4. Clean the appliance with a damp cloth. 5. Do not use any scrubbing sponges, abrasive agents, steel wool, metal objects, disinfec- tants or hot cleaning agents, since they can damage the appliance. 6. Clean the attachments with a damp cloth, if necessary. Let the attachments dry completely before using them again or storing them. Storage 1. Unplug the appliance from the wall socket. 2. Leave the appliance and the attachments to cool off completely placing them on a heat resistant surface. 16 3. To avoid damage to the lead cable, never wrap it around the appliance. 4. Protect the appliance from dust. Notice d´utilisation Modèle 87515 Spécification technique Puissance : Dimensions : Poids : Longueur de cordon : Boîtier : Caractéristiques : 20-25 W, 100-240 V~, 50/60 Hz Env. 32,2 x ø 3,7 cm Env. 0,47 kg Env. 1,8 m Plastique, noir, argent Interrupteur EIN/AUS [MARCHE/ARRÊT] avec témoin lumineux Bec anti-plis pivotante de câble Plaques avec revêtements en céramique pour fers à lisser et à gaufrer Accessoires : Fer à boucler, brosse amovible, brosse ronde alu, plaques à gaufrer à lisser amovible, notice d‘utilisation Sous réserve de modifications techniques. Pour votre sécurité 1. Veuillez lire attentivement les instructions qui suivent et les ranger soigneusement. 2. Cet appareil n’est pas conçu pour être utilisé par des personnes (enfants compris) aux capacités physiques, sensorielles ou mentales réduites ainsi que des personnes dénuées d’expérience ou ne disposant pas des connaissances nécessaires, sauf sous la surveillance d’une personne responsable de leur sécurité ou suite à des instructions concernant l’utilisation de l’appareil. 3. Les enfants ne devront pas être laissés sans surveillance et ne devront pas jouer avec l’appareil. 4. Raccordez l’appareil uniquement à un courant alternatif compatible aux indications de la plaque signalétique. 5. Cet appareil n’est pas prévu pour être commandé par une minuterie ou un interrupteur à distance. 6. L’appareil ne devra jamais être plongé dans de l’eau ou dans un autre liquide. Protégez l’appareil de l’humidité. 7. Veillez à ce que le cordon n’entre pas en contact avec des parties brûlantes de l’appareil. 8. Étendez toujours le cordon sur toute sa longueur pour éviter les dégâts dus à la surchauffe. 9. Retirez le cordon de la prise secteur en tirant uniquement sur la fiche, ne tirez jamais sur le câble. 10.Lorsque vous rangez l’appareil, n’enroulez jamais le cordon autour de l‘appareil afin d’éviter les dégâts sur le cordon. 11.L‘appareil est destiné exclusivement à l’utilisation personnelle dans le ménage et non à une utilisation professionnelle. 12.L‘appareil ne doit pas être utilisé à l‘extérieur. 13.Respectez une distance suffisante avec les parois et les objets inflammables, par ex. les rideaux. 14.Ne pas utiliser l’appareil à proximité de sources de chaleur. 15.Pour des raisons de sécurité, n’utilisez pas l’appareil pour sécher les cheveux synthétiques. 16.Afin d’éviter les brûlures, veillez à ce que l‘appareil ou les parties de l’appareil ne se trouvent jamais à proximité du visage et des oreilles. 17.N’utilisez pas de spray tant que l‘appareil est en fonctionnement. 18.Afin d’éviter d’abîmer les cheveux, tous les produits de coiffage comme la mousse ou le gel devraient être éliminés avant l’utilisation de l’appareil. 19.Les plaques sont chaudes après l‘usage, maniez-lez avec précaution pour éviter les brûlures. 20.Éteignez l‘appareil avant de le mettre de côté. 21.Toujours éteindre l’appareil, le débrancher et le laisser refroidir après l’utilisation ou avant de le nettoyer. 22.Tant que la fiche se trouve dans la prise secteur, l‘appareil se trouvant à proximité de l‘eau est une source de danger, même s’il est éteint. 17 23.N’introduisez aucun objet dans l‘appareil, les dégâts causés par cette manipulation pourraient provoquer une décharge électrique. 24.Utilisez l‘appareil uniquement pour l‘emploi décrit dans cette notice. 25.N’utilisez pas l’appareil avec des accessoires d’autres fabricants ou marques, afin d’éviter de l’endommager. 26.N’ouvrez jamais le boîtier de l’appareil. Risque d’électrocution. 27.Vérifiez régulièrement l’état de la prise et du cordon d’alimentation. En cas d’usure ou de détérioration du cordon ou d’autres éléments, veuillez retourner l’appareil à notre service clientèle pour le faire contrôler et réparer (vous trouverez l’adresse dans les conditions de garantie). Toute intervention inappropriée peut s’avérer dangereuse pour l’utilisateur et entraînera l’annulation de la garantie. 28.Si le cordon de cet appareil est endommagé, il devra être remplacé par le fabricant, son service après-vente ou par une personne qualifiée afin d’éviter tous risques. Attention ! L‘appareil est très chaud pendant et après l’utilisation ! Pour des raisons de sécurité, n’utilisez jamais l‘appareil à proximité d’une baignoire pleine, d’un lavabo ou tout autre récipient rempli d‘eau. Si l‘appareil est utilisé dans une salle de bain, la prise doit être débranchée après chaque utilisation. en effet, l‘eau représente un danger dans le cas contraire, et ce même si l‘appareil est éteint. Le fabricant n’est nullement responsable en cas de montage non conforme, d‘utilisation irrégulière ou non conforme ou suite à l’exécution de réparations par des tiers non autorisés. Votre nouveau combiné multifonction pour les cheveux 1 1 Fer à gaufrer 2 Fer à lisser 3 Fer à boucler 4 Brosse amovible 5 Bague de déverrouillage 6 Interrupteur coulissant EIN/ AUS [MARCHE/ARRÊT] 7 Brosse ronde alu 2 3 7 5 6 18 4 Avant l‘utilisation 1. Retirez tous les emballages et les sécurités pour le transport. Tenir le matériel d‘emballage hors de portée des enfants afin d’éviter le danger de suffocation. 2. Séchez-vous bien les cheveux à l’aide d’une serviette après les avoir lavés. 3. Veuillez ne pas utiliser de produit de soins capillaires, comme du gel ou de la mousse, pour éviter d’abîmer les cheveux. 4. Vous obtiendrez les meilleurs résultats sur des cheveux séchés. Le cas échéant, vous pouvez vous sécher les cheveux avant avec un sèche-cheveux. 5. Brossez-vous les cheveux jusqu’à ce qu’ils tombent bien souplement. 6. Pour placer les différents accessoires amovibles sur l‘appareil, pratiquez de la façon suivante : d‘abord, assurez-vous que l‘appareil soit éteint et que la fiche ne se trouve pas dans la prise secteur. Le repère de l’appareil doit se trouver sur le symbole lorsque vous placez la pièce amovible. Lorsque la pièce est posée sur l’appareil, faites pivoter la bague de déverrouillage sur la poignée de l‘appareil jusqu’au symbole . 7. La pièce respective est fixée sur l’appareil et vous pouvez commencer avec le coiffage. 8. Pour changer les accessoires, faites pivoter la bague de déverrouillage sur et retirez la pièce. Attention, après l‘utilisation les accessoires sont brûlants, laissez refroidir avant de les changer ! Fer à boucler Le fer à boucler est idéal pour modeler de petites boucles. Attention : danger de brûlures lors de contact direct avec la peau, soyez très prudent lors de l’utilisation du fer à boucler ! 1. Préparez vos cheveux comme décrit dans le chapitre « Avant l’utilisation ». 2. Placez le fer à boucler sur l‘appareil. 3. Branchez la fiche électrique dans la prise secteur. 4. Enclenchez l‘appareil avec la touche EIN/ AUS [MARCHE/ARRÊT]. 5. Le voyant de contrôle de l‘appareil s’illumine. 6. Laissez l’appareil chauffer pendant quelques minutes afin d’obtenir une mise en forme idéale. 7. Former des petites mèches pas plus larges que 5 centimètres dans les cheveux peignés. En cas de besoin, séparez les mèches de cheveux les unes des autres avec une pince. 8. Appuyez sur la charnière et posez la pointe d’une mèche de cheveux entre la charnière et la tige métallique. 9. Relâchez la charnière. 10.Enroulez la mèche de cheveux autour du fer à boucler jusqu’à la racine. 11.Laissez la mèche de cheveux dans le fer à boucler jusqu’à ce qu’elle soit chaude. 12.Déroulez précautionneusement la mèche de cheveux et ouvrez la charnière pour enlevez la mèche de l’appareil. 13.Répétez les pas de 6 à 12 pour mettre en forme les autres mèches. 14.Avant de coiffer ou de mettre les cheveux en forme avec les doigts, laissez les un peu refroidir. 15.Éteignez l’appareil depuis l’interrupteur EIN/AUS [MARCHE/ARRÊT] et retirez la fiche électrique de la prise secteur. 16.Attention, après l’utilisation, les accessoires amovibles et l’appareil sont brûlants. Changez les accessoires après une durée de refroidissement appropriée pour éviter les brûlures. 19 Brosse amovible La brosse amovible est idéale pour modeler de grandes boucles. 1. Préparez vos cheveux comme décrit dans le chapitre « Avant l’utilisation ». 2. Placez le fer à boucler sur l‘appareil. Poussez la brosses amovible sur le fer à boucler fermé jusqu’à ce que la brosse s’enclenche. Attention : une petite flèche se trouve au bout de la brosse amovible, la brosse peut être placée sur le fer à boucler de ce côté uniquement. 3. Branchez la fiche électrique dans la prise secteur. 4. Enclenchez l‘appareil avec la touche EIN/ AUS [MARCHE/ARRÊT]. 5. Laissez l’appareil chauffer pendant quelques minutes afin d’obtenir une mise en forme idéale. 6. Former des petites mèches pas plus larges que 5 centimètres dans les cheveux peignés. En cas de besoin, séparez les mèches de cheveux les unes des autres avec une pince. 7. Enroulez la mèche de cheveux sur la brosse ronde en partant de la pointe. 8. Laissez la mèche de cheveux sur la brosse ronde jusqu’à ce qu’elle soit chaude. 9. Déroulez précautionneusement la mèche de cheveux. Ne tirez pas sur la mèche de cheveux, sinon vous dérangeriez la mise en forme. 10.Répétez les pas de 6 à 9 pour mettre en forme les autres mèches. 11.Éteignez l’appareil depuis l’interrupteur EIN/AUS [MARCHE/ARRÊT] et retirez la fiche électrique de la prise secteur. Attention, après l’utilisation, les accessoires amovibles et l’appareil sont brûlants. Changez les accessoires après une durée de refroidissement appropriée pour éviter les brûlures. Brosse ronde alu La brosse ronde est idéale pour mettre en forme les cheveux courts et mi-longs et pour donner du volume aux cheveux. 1. Préparez vos cheveux comme décrit dans le chapitre « Avant l’utilisation ». 2. Placez la brosse ronde sur l‘appareil. 3. Branchez la fiche électrique dans la prise secteur. 4. Enclenchez l‘appareil avec la touche EIN/ AUS [MARCHE/ARRÊT]. 5. Laissez l’appareil chauffer pendant quelques minutes afin d’obtenir une mise en forme idéale. 6. Former des petites mèches pas plus larges que 5 centimètres dans les cheveux peignés. En cas de besoin, séparez les mèches de cheveux les unes des autres avec une pince. 7. Enroulez la mèche de cheveux sur la brosse ronde en partant de la pointe. 8. Laissez la mèche de cheveux sur la brosse ronde jusqu’à ce qu’elle soit chaude. 9. Déroulez précautionneusement la mèche de cheveux. Ne tirez pas sur la mèche de cheveux, sinon vous dérangeriez la mise en forme. 10.Répétez les pas de 6 à 9 pour mettre en forme les autres mèches. 11.Éteignez l’appareil depuis l’interrupteur EIN/ AUS [MARCHE/ARRÊT] et retirez la fiche électrique de la prise secteur. Attention, après l’utilisation, les accessoires amovibles sont brûlants. Changez les accessoires après une durée de refroidissement appropriée pour éviter les brûlures. Fer à lisser/fer à gaufrer Les plaques de cet accessoire ont chacune un côté lisse et un côté structuré. Selon l’effet désiré, retirez simplement la plaque de la tige, retournez-la et replacez-la sur la tige jusqu’à ce qu’elle s’enclenche. Les plaques du fer à lisser sont recouvertes d’une couche de céramique qui protège les cheveux. Toutefois, vous ne devriez pas lisser vos cheveux trop souvent. Tout particulièrement les cheveux teints ou traités avec d’autres substances chimiques (par ex. une permanente). 20 Afin d’éviter de brûler votre chevelure, n’utilisez pas de produit de coiffage, comme la laque, avant le lissage de vos cheveux. Avec le fer à lisser (côté lisse de la plaque), vous permet de lisser délicatement vos cheveux. Le fer à gaufrer (côté structuré de la plaque) vous permet d’obtenir des vaguelettes dans vos cheveux. 1. Préparez vos cheveux comme décrit dans le chapitre « Avant l’utilisation ». 2. Attention : vos cheveux devraient être bien séchés avant le lissage. Vous endommagez vos cheveux en les traitant avec le fer à lisser s’ils sont encore humides. Pour cette raison, séchez-vous bien les cheveux avant avec un sèche-cheveux. 3. À cet effet, placez l’accessoire amovible sur l‘appareil. Vérifiez que la partie désirée de la plaque soit placée du bon côté. 4. Branchez la fiche électrique dans la prise secteur Fer à lisser : 5. Former des petites mèches pas plus larges que 5 centimètres dans les cheveux peignés. En cas de besoin, séparez les mèches de cheveux les unes des autres avec une pince. 6. Enclenchez l‘appareil avec la touche EIN/ AUS [MARCHE/ARRÊT]. 7. Laissez l’appareil chauffer pendant quelques minutes afin d’obtenir une mise en forme idéale. 8. Ouvrez l‘appareil et posez la mèche de cheveux à la racine entre les deux plaques de lissage. 9. Refermez l‘appareil. 10.Conduisez l’appareil lentement et régulièrement jusqu’à la pointe des cheveux tout en le maintenant fermement fermé. Vous ne devriez pas rester plus de deux secondes au même endroit afin de ne pas endommager les cheveux. Si vous désirez obtenir un look lisse et plat, gardez toujours bien la mèche de cheveux près de la tête pendant le lissage. Toutefois, en relevant l’appareil pendant le lissage, vous obtiendrez du volume. 11.Éteignez l’appareil depuis l’interrupteur EIN/AUS [MARCHE/ARRÊT] et retirez la fiche électrique de la prise secteur. 12.Ne vous peignez plus ou ne vous brossez plus, car vous dérangeriez les ondulations. Le cas échéant, mettez les cheveux en forme avec les doigts. 13.Attention, après l’utilisation, les accessoires amovibles sont brûlants. Changez les accessoires après une durée de refroidissement appropriée pour éviter les brûlures. Fer à gaufrer : 1. Former des petites mèches pas plus larges que 5 centimètres dans les cheveux peignés. En cas de besoin, séparez les mèches de cheveux les unes des autres avec une pince. 2. Enclenchez l‘appareil avec la touche EIN/ AUS [MARCHE/ARRÊT]. 3. Laissez l’appareil chauffer pendant quelques minutes afin d’obtenir une mise en forme idéale. 4. Ouvrez l‘appareil et posez une mèche de cheveux à la racine entre les deux plaques de gaufrage. 5. Refermez l‘appareil. 6. Gardez l’appareil fermé pendant 5 à 10 secondes. Ouvrez l‘appareil vérifiez si le résultat est celui que vous désiriez. Si ce n’est pas le cas, recommencez l’opération. 7. Continuez de cette manière en allant de la racine à la pointe des cheveux. 8. Répétez les pas de 3 à 6 pour mettre en forme les autres mèches. 9. Éteignez l’appareil depuis l’interrupteur EIN/AUS [MARCHE/ARRÊT] et retirez la fiche électrique de la prise secteur. 10.Ne vous peignez plus ou ne vous brossez plus, car vous dérangeriez les ondulations. Le cas échéant, mettez les cheveux en forme avec les doigts. 11.Attention, après l’utilisation, les accessoires amovibles sont brûlants. Changez les accessoires après une durée de refroidissement appropriée pour éviter les brûlures. 12.ASTUCE : avec le fer à lisser, vous pouvez également faire des ondulations ! Posez la mèche de cheveux comme de coutume dans le fer et lissez-vous les cheveux. Pour créer un léger mouvement dans la chevelure, tournez l’appareil contenant la mèche contre l’intérieur ou l’extérieur (selon le genre d’ondulation désirée) juste avant d’arriver à la pointe de cheveux. 21 Nettoyage et entretien 1. Retirez la fiche électrique de la prise secteur. 2. Laissez entièrement refroidir l‘appareil et les accessoires. Pour ceci, posez l‘appareil sur une surface résistante à la chaleur. 3. Pour le nettoyage, ne plongez jamais l’appareil dans de l’eau ou autres liquides. 4. Essuyez l’appareil avec un chiffon humide. 5. N’utilisez pas d’éponges grattantes, de produits à récurer, de paille de fer, d‘objets métalliques, de désinfectants ou de produits de nettoyage très chauds, sous peine de dégradations. 6. En cas de besoin, nettoyez les accessoires avec un chiffon humide. Laissez sécher entièrement les accessoires, avant de les réutiliser ou de les ranger. Rangement 1. Retirez la fiche électrique de la prise secteur. 2. Laissez entièrement refroidir l‘appareil et les accessoires. Pour ceci, posez l‘appareil sur une surface résistante à la chaleur. 22 3. Afin de ne pas endommager le cordon, ne l’enroulez pas autour de l’appareil. 4. Protégez l’appareil de la poussière. Gebruiksaanwijzing Model 87515 Technische gegevens Vermogen: Afmetingen: Gewicht: Snoerlengte: Behuizing: Uitrusting: 20-25 W, 100-240 V~, 50/60 Hz Ca. 32,2 x ø 3,7 cm Ca. 0,47 kg Ca. 1,8 m Kunststof, zwart/zilver AAN/UIT-schakelaar met controlelampje Draaibare snoerbescherming Straightener/wafeltang-platen met keramische coating Toebehoren: Krullentang, borstelopzetstuk, aluminium ronde borstel, straightener/wafeltang-opzetstuk, gebruiksaanwijzing Technische wijzigingen voorbehouden. Voor uw veiligheid 1. Lees a.u.b. de volgende instructies en bewaar deze. 2. Dit apparaat is niet bedoeld voor gebruik door personen (waaronder kinderen) met verminderde lichamelijke, zintuiglijke of mentale capaciteiten, of die gebrek aan ervaring en/of kennis hebben, tenzij zij het apparaat gebruiken onder toezicht van een persoon verantwoordelijk voor hun veiligheid of die hen heeft uitgelegd hoe het apparaat dient te worden gebruikt. 3. Kinderen moeten onder toezicht gehouden worden om te voorkomen dat ze met het apparaat gaan spelen. 4. Sluit het apparaat uitsluitend aan op wisselstroom overeenkomstig het typeplaatje. 5. Dit apparaat mag niet met een externe tijdschakelklok of een afstandsbedieningssysteem worden gebruikt. 6. Het apparaat mag nooit in water of andere vloeistoffen worden gedompeld. Bescherm het apparaat tegen vocht. 7. Zorg ervoor dat het snoer niet met hete componenten van het apparaat in contact komt. 8. Strek het snoer altijd over de hele lengte uit om schade door oververhitting te voorkomen. 9. Trek het snoer altijd aan de aansluitstekker uit het stopcontact, nooit aan het snoer zelf. 10.Wanneer u het apparaat opbergt, wikkel het snoer nooit rond het apparaat om schade aan het snoer te vermijden. 11.Het apparaat is uitsluitend bedoeld voor eigen gebruik in de huishouding, echter niet voor beroepsmatig gebruik. 12.Het apparaat mag niet in de openlucht gebruikt worden. 13.Houd tijdens het gebruik voldoende afstand t.o.v. wanden en brandbare voorwerpen zoals bijv. gordijnen. 14.Gebruik het apparaat niet in de buurt van warmtebronnen. 15.Gebruik het apparaat uit veiligheidsredenen niet op kunstmatig haar. 16.Let erop dat het apparaat of onderdelen van het apparaat nooit in de buurt van uw gezicht en oren komen om verbrandingen te voorkomen. 17.Gebruik geen haarspray zolang het apparaat in bedrijf is. 18.Zorg ervoor, voordat u het apparaat gebruikt, dat uw haar volledig vrij is van haarstyling producten, zoals haarschuim of haargel, om schade aan uw haar te voorkomen. 19.De opzetstukken zijn na het gebruik zeer heet, ga er voorzichtig mee om om brandwonden te voorkomen. 20.Schakel het apparaat uit voordat u dit weglegt. 21.Na het gebruik of voor het reinigen, het apparaat altijd uitschakelen, de stekker uit de contactdoos trekken en het apparaat laten afkoelen. 22.Zolang de netstekker zich in de contactdoos bevindt, kan de nabijheid van water gevaar opleveren, zelfs als het apparaat is uitgeschakeld. 23.Steek geen voorwerpen in het apparaat. Bij beschadiging bestaat er risico op elektrische schok. 23 24.Gebruik het apparaat niet voor andere doeleinden dan in deze gebruiksaanwijzing beschreven. 25.Het apparaat mag niet met toebehoren van andere fabrikanten of merken worden gebruikt om schade te voorkomen. 26.Open in geen geval de behuizing van het apparaat. Er bestaat risico op letsel door elektrische schok. 27.Controleer de stekker en het snoer regelmatig op slijtage en beschadigingen. Stuur het apparaat in geval van beschadigingen van de voedingskabel of andere onderdelen a.u.b. voor controle en/of reparatie aan onze klantenservice (adres zie garantievoorwaarden). Ondeskundig uitgevoerde reparaties kunnen aanzienlijke gevaren voor de gebruiker veroorzaken en leiden tot het vervallen van de garantie. 28.Als het snoer van dit apparaat beschadigd is, dient dit door de fabrikant, zijn klantenservice of een op een soortgelijke manier gekwalificeerde persoon te worden vervangen om gevaren te voorkomen. Attentie! Het apparaat is tijdens en na het gebruik zeer heet! Gebruik het apparaat uit veiligheidsredenen nooit in de buurt van of in een gevulde bad of wastafel of ander waterhoudend object. Als de apparaat in een badkamer gebruikt wordt, na het gebruik van de droger de stekker uit het stopcontact trekken, omdat de nabijheid van water een gevaar vormt, ook als de apparaat uitgeschakeld is. De fabrikant is niet aansprakelijk, indien het apparaat verkeerd gemonteerd, ondeskundig of foutief gebruikt of door niet geautoriseerde derden gerepareerd werd. Uw nieuwe Hair Styler 1 Wafeltang 2 Straightener 3 Krullentang 4 Borstelopzetstuk 5 Ontgrendelingsring 6 Schuifschakelaar AAN/UIT 7 Aluminium ronde borstel 1 2 3 7 5 6 24 4 Vóór het gebruik 1. Verwijder alle verpakkingsmaterialen en transportbeveiligingen. Houd kinderen uit de buurt van de verpakkingsmaterialen vanwege het gevaar voor verstikking. 2. Droog uw haar na het wassen goed met een handdoek af. 3. Doe geen haarstylingproducten zoals gel of mousse in het haar om schade aan het haar te voorkomen. 4. De beste resultaten verkrijgt u met droog haar. Indien nodig kunt u uw haar met een haardroger vooraf drogen. 5. Borstel het haar tot dit luchtig valt. 6. Ga als volgt te werk om de verschillende opzetstukken op het apparaat te steken: Controleer eerst of het apparaat uitgeschakeld is en de stekker uit de contactdoos getrokken is. De markering op het apparaat dient op te staan, wanneer u het optzetstuk erop steekt. Nadat het opzetstuk op het apparaat is gezet, draai de ontgrendelingsring aan de greep van het apparaat tot aan het symbool . 7. Het betreffende opzetstuk is nu vast met het apparaat verbonden en u kunt met het stylen beginnen. 8. Om de opzetstukken te wisselen, draai de ontgrendelingsring op en trek dan het opzetstuk eraf. Denk er om dat de opzetstukken na het gebruik heet zijn. Laat daarom de opzetstukken afkoelen voordat u deze wisselt. Krullentang De krullentang is ideaal om kleine krullen te vormen. Attentie: Bij direct contact met de huid bestaat er risico op brandwonden. Ga daarom zeer voorzichtig met de krullentang om! 1. Bereid uw haar voor zoals in het hoofdstuk “Vóór het gebruik” beschreven. 2. Zet de krullentang op het apparaat. 3. Steek de stekker in een stopcontact. 4. Schakel het apparaat aan de AAN/UIT-knop in. 5. Het controlelampje op het apparaat licht op. 6. Laat het apparaat gedurende enkele min. uten verwarmen om een optimaal styling resultaat te behalen. 7. Verdeel het gekamde haar in dunne strengen van niet meer dan 5 cm breedte. Zet indien nodig de strengen vast met een haarclip. 8. Druk op het scharnier en leg de punt van een streng haar tussen het scharnier en de metalen staaf. 9. Laat het scharnier weer los. 10.Wikkel nu de streng haar tot aan de aanzet om de krullentang. 11.Laat de streng haar in de krullentang tot de streng warm aanvoelt. 12.Wikkel de streng haar voorzichtig af en open het scharnier om de streng haar van het apparaat los te maken. 13.Herhaal de stappen 6 t/m 11 om de overige strengen haar te stylen. 14.Laat uw haar iets afkoelen voordat u dit met kam, borstel of uw vingers in vorm brengt. 15.Schakel het apparaat met de AAN/UITschakelaar uit en trek de stekker uit het stopcontact. 16.Denk er om dat de opzetstukken en het apparaat na het gebruik zeer heet zijn. Wissel de opzetstukken pas na een passende afkoeltijd om brandwonden te voorkomen. Borstelopzetstuk Het borstelopzetstuk is ideaal om grote krullen te vormen. 1. Bereid uw haar voor zoals in het hoofdstuk “Vóór het gebruik” beschreven. 2. Zet de krullentang op het apparaat. Schuif nu het borstelopzetstuk op de gesloten krullentang tot de borstel inklikt. Attentie: het borstelopzetstuk is aan één einde voorzien van een pijltje. De borstel kan alleen aan deze zijde op de krullentang geschoven worden. 3. Steek de stekker in een stopcontact. 4. Schakel het apparaat aan de AAN/UIT-knop in. 25 5. Laat het apparaat gedurende enkele minuten verwarmen om een optimaal styling resultaat te behalen. 6. Verdeel het gekamde haar in dunne strengen van niet meer dan 5 cm breedte. Zet indien nodig de strengen vast met een haarclip. 7. Wikkel de streng haar, beginnend aan het haarpuntje, om de ronde borstel. 8. Laat de streng haar op de ronde borstel tot de streng warm aanvoelt. 9. Wikkel de streng haar voorzichtig af. Trek de streng haar niet van de borstel af omdat anders het stylingeffect kan worden tenietgedaan. 10.Herhaal de stappen 6 t/m 9 om de overige strengen haar te stylen. 11.Schakel het apparaat met de AAN/UITschakelaar uit en trek de stekker uit het stopcontact. Denk er om dat de opzetstukken en het apparaat na het gebruik zeer heet zijn. Wissel de opzetstukken pas na een passende afkoeltijd om brandwonden te voorkomen. Aluminium ronde borstel De ronde borstel is ideaal om kort tot middellang haar te stylen en om meer volume aan het haar te geven. 1. Bereid uw haar voor zoals in het hoofdstuk “Vóór het gebruik” beschreven. 2. Zet de ronde borstel op het apparaat. 3. Steek de stekker in een stopcontact. 4. Schakel het apparaat aan de AAN/UIT-knop in. 5. Laat het apparaat gedurende enkele min. uten verwarmen om een optimaal styling resultaat te behalen. 6. Verdeel het gekamde haar in dunne strengen van niet meer dan 5 cm breedte. Zet indien nodig de strengen vast met een haarclip. 7. Wikkel de streng haar, beginnend aan het haarpuntje, om de ronde borstel. 8. Laat de streng haar op de ronde borstel tot de streng warm aanvoelt. 9. Wikkel de streng haar voorzichtig af. Trek de streng haar niet van de borstel af omdat anders het stylingeffect kan worden tenietgedaan. 10.Herhaal de stappen 6 t/m 9 om de overige strengen haar te stylen. 11.Schakel het apparaat met de AAN/ UIT-schakelaar uit en trek de stekker uit het stopcontact. Denk er om dat de opzetstukken na het gebruik zeer heet zijn. Wissel de opzetstukken pas na een passende afkoeltijd om brandwonden te voorkomen. Straightener/wafeltang De platen van dit opzetstuk zijn telkens voorzien van een gladde en van een gestructureerde zijde. Al naargelang het effect dat u wilt bereiken, trek de platen uit het opzetstuk, draai de platen om en zet deze weer in het opzetstuk tot de platen inklikken. De platen van de straightener zijn voorzien van een keramische coating die uw haar beschermt. Toch raden wij u aan uw haar niet te vaak glad te maken. Dit geldt in het bijzonder voor gekleurd haar of op een andere manier chemisch behandeld haar (bijv. bij een permanent). Gebruik vóór het gladmaken van uw haar geen chemische haarstyling producten, zoals haarspray, om verbrandingen aan het haar te voorkomen. Met de straightener (gladde zijde van de platen) kunt u uw haar op een zachte manier glad maken. Met de wafeltang (gestructureerde zijde van de platen) maakt u golfjes in uw haar. 1. Bereid uw haar voor zoals in het hoofdstuk “Vóór het gebruik” beschreven. 2. Attentie: gebruik de straightener alleen op droog haar. Vochtig haar wordt door het stijlen met de straightener beschadigd. Droog daarom uw haar evt. met een haardroger goed voor. 3. Zet het opzetstuk op het apparaat. Controleer of de gewenste zijde van de platen op de juiste manier is ingezet. 4. Steek de stekker in een stopcontact. 26 Straightener: 5. Verdeel het gekamde haar in dunne strengen van niet meer dan 5 cm breedte. Zet indien nodig de strengen vast met een haarclip. 6. Schakel het apparaat aan de AAN/UIT-knop in. 7. Laat het apparaat gedurende enkele minuten verwarmen om een optimaal styling resultaat te behalen. 8. Open het apparaat en klem een streng haar beginnend bij de aanzet tussen de platen. 9. Sluit het apparaat. 10.Beweeg het apparaat nu langzaam en gelijkmatig tot aan de haarpunt. Houd daarbij het apparaat altijd vast gesloten. Houd het apparaat niet langer dan 2 seconden op één plaats om het haar niet te beschadigen. Als u een gladde, dicht tegen het hoofd aanliggende look wilt verkrijgen, houd het apparaat bij het gladmaken van de streng haar altijd dicht bij uw hoofd. Als u het apparaat bij het stijlen oplicht, verkrijgt u veel volume. 11.Schakel het apparaat met de AAN/UITschakelaar uit en trek de stekker uit het stopcontact. 12.Borstel of kam uw haar nu niet meer omdat daardoor het effect teniet wordt gedaan. Breng het haar indien nodig met uw vingers in vorm. 13.Denk er om dat de opzetstukken na het gebruik zeer heet zijn. Wissel de opzetstukken pas na een passende afkoeltijd om brandwonden te voorkomen. Wafeltang: 1. Verdeel het gekamde haar in dunne strengen van niet meer dan 5 cm breedte. Zet indien nodig de strengen vast met een haarclip. 2. Schakel het apparaat aan de AAN/UIT-knop in. 3. Laat het apparaat gedurende enkele minuten verwarmen om een optimaal styling resultaat te behalen. 4. Open het apparaat en klem een streng haar beginnend bij de aanzet tussen de platen. 5. Sluit het apparaat. 6. Houd het apparaat nu ca. 5-10 seconden gesloten. Open het apparaat en controleer of het gewenste resultaat is bereikt. Zo niet, herhaal dan de procedure. 7. Ga op deze manier te werk van de haaraanzet tot aan de haarpunten. 8. Herhaal de stappen 3 t/m 6 om de overige strengen haar te stylen. 9. Schakel het apparaat met de AAN/UITschakelaar uit en trek de stekker uit het stopcontact. 10.Borstel of kam uw haar nu niet meer omdat daardoor het wafeleffect teniet wordt gedaan. Breng het haar indien nodig met uw vingers in vorm. 11.Denk er om dat de opzetstukken na het gebruik zeer heet zijn. Wissel de opzetstukken pas na een passende afkoeltijd om brandwonden te voorkomen. 12.TIP: U kunt met de straightener ook golven stijlen! Leg de streng haar zoals gewoonlijk in de straightener en maak het haar glad. Draai het apparaat dan kort voordat u de haarpunten bereikt, met de haarstreng erin, nar binnen of naar buiten (al naargelang het gewenste soort golven) om zachte golven in uw haar te creëren. Reiniging en onderhoud 1. Trek de stekker uit de contactdoos. 2. Laat het apparaat en de opzetstukken volledig afkoelen. Leg het aparaat hiervoor op een hittebestendig oppervlak. 3. Dompel het apparaat voor het reinigen nooit in water of een andere vloeistof. 4. Veeg het apparaat met een vochtige doek af. 5. Gebruik geen krassende sponsen, schuurmiddelen, staalwol, metalen voorwerpen, hete reinigingsmiddelen of desinfectiemiddelen omdat deze tot beschadigingen kunnen leiden. 6. Reinig de opzetstukken, indien nodig, met een vochtige doek. Laat de opzetstukken volledig drogen voordat u deze opnieuw gebruikt of opbergt. Opberging 1. Trek de stekker uit de contactdoos. 2. Laat het apparaat en de opzetstukken volledig afkoelen. Leg het aparaat hiervoor op een hittebestendig oppervlak. 3. Wikkel het snoer niet om het apparaat om schade aan het snoer te voorkomen. 4. Bescherm het apparaat tegen stof. 27 Istruzioni per l’uso Modello 87515 Dati tecnici Potenza: Dimensioni: Peso: Lunghezza cavo: Gehäuse: Corpo: 20-25 W, 100-240 V, 50/60 Hz 32,2 x ø 3,7 cm ca. 0,47 kg ca. 1,8 m ca. Plastica nero/argento Interruttore di accensione/spegnimento con spia di controllo luminosa Proteggicavo girevole Piastre liscia capelli /frisé con rivestimento in ceramica Dotazione: Pinza arricciacapelli, accessorio spazzola, spazzola rotonda in alluminio, accessorio liscia capelli / frisè, istruzioni d’uso Con riserva di modifiche tecniche Per la vostra sicurezza 1. Si prega di leggere con attenzione le seguenti istruzioni per l‘uso e di conservarle. 2. Questo apparecchio non è adatto all‘utilizzo da parte di persone (inclusi bambini) dalle limitate capacità fisiche, sensoriali o mentali o prive di esperienza nonché di conoscenza, salvo che l‘utilizzo non avvenga sotto stretta sorveglianza di una persona adulta che risponda della loro sicurezza o che questa abbia provveduto a fornire all‘utilizzatore istruzioni sul funzionamento dell‘apparecchio. 3. I bambini devono essere sorvegliati, onde evitare che giochino con l’apparecchio. 4. Collegare l’apparecchio solo a una presa di corrente alternata con tensione corrispondente a quella indicata sulla targhetta dati. 5. Questo apparecchio non deve essere usato né con orologi programmabili esterni, né con sistemi di comando a distanza. 6. Non immergere per nessun motivo l’apparecchio in acqua o in altri liquidi. Proteggere l’apparecchio dall’umidità. 7. Evitare che il cavo entri in contatto con parti calde dell’apparecchio. 8. Tendere sempre il cavo in tutta la sua lunghezza, onde evitare danni dovuti al surriscaldamento. 9. Per estrarre la spina dalla presa, tirare sempre la spina, mai il cavo di alimentazione. 10.Nel riporre l’attrezzo, non avvolgere il cavo attorno all’apparecchio onde prevenire danni al cavo di alimentazione. 28 11.L‘apparecchio è destinato esclusivamente all‘uso domestico e non è idoneo a un impiego professionale. 12.L’apparecchio non è idoneo all’utilizzo all’aperto. 13.Tenersi a debita distanza dalle pareti e dagli oggetti infiammabili, per esempio dalle tende. 14.L’apparecchio non deve essere utilizzato nelle vicinanze di fondi di calore. 15.Per ragioni di sicurezza, non utilizzare l’apparecchio per asciugare capelli artificiali. 16.Prestare attenzione che l’apparecchio o sue parti non entrino in contatto con il volto o con le orecchie, onde evitare scottature. 17.Non utilizzare spray per capelli quando l’apparecchio è in funzione. 18.Prima di utilizzare l’apparecchio, accertarsi che i capelli da trattare siano privi di prodotti di hair styling come spuma o gel, onde evitare danni ai capelli. 19.Gli accessori dopo l’utilizzo sono molto caldi. Maneggiare con cura, onde evitare scottature. 20.Spegnere l’apparecchio prima di riporlo. 21.Dopo l‘utilizzo o prima di pulire l’apparecchio, spegnere l’apparecchio, estrarre la spina dalla presa di corrente e lasciare raffreddare l’apparecchio. 22.Finché la spina si trova nella presa di corrente, l’apparecchio, anche se spento, è pericoloso se si trova vicino all’acqua. 23.Non infilare oggetti nell’apparecchio, poiché eventuali danneggiamenti possono causare scosse elettriche. 24.Utilizzare l’apparecchio solo per gli scopi menzionati nelle presenti istruzioni. 25.L’apparecchio non deve essere utilizzato con accessori di altre marche o produttori, onde evitare il danneggiamento dello stesso. 26.Durante il funzionamento, non aprire per nessun motivo il corpo dell’apparecchio. Pericolo di scossa elettrica. 27.Verificare con regolarità che la spina e il cavo non siano usurati o danneggiati. Nel caso in cui il cavo di connessione o altre parti siano danneggiati, inviarli per il controllo o la riparazione al nostro servizio clienti (all’indirizzo riportato nelle norme di garanzia). Le riparazioni effettuate da persone non competenti possono esporre l‘utilizzatore a gravi pericoli e comportano l’esclusione dalla garanzia. 28.Se il cavo di alimentazione dell’apparecchio è danneggiato, deve essere sostituito dal produttore, dal servizio clienti o da persona qualificata, onde evitare pericoli. Attenzione! Durante l’utilizzo l’apparecchio si riscalda molto! Per ragioni di sicurezza l’apparecchio non deve essere utilizzato vicino o all’interno di una vasca da bagno, di un lavandino o di altri recipienti contenenti acqua. Si si utilizza l’apparecchio capelli in una stanza da bagno, dopo l‘utilizzo staccare la spina perché la vicinanza di acqua rappresenta un pericolo, anche se il phon è spento. Il produttore non si assume alcuna responsabilità per un utilizzo inappropriato o scorretto oppure in seguito a riparazioni effettuate da officine o persone non autorizzate. Il vostro nuovo Hair Styler 1 Frisé 2 Liscia capelli 3 Pinza arricciacapelli 4 Accessorio spazzola 5 Anello di sblocco 6 Interruttore di accensione e spegnimento EIN/AUS 7 Spazzola tonda in alluminio 1 2 3 7 4 5 6 29 Prima dell’utilizzo 1. Rimuovere tutto il materiale di imballaggio e le eventuali protezioni di trasporto. Tenere lontani i bambini dai materiali di imballaggi: pericolo di soffocamento. 2. Asciugare bene i capelli con un asciugamano dopo il lavaggio. 3. Non applicare prodotti per la cura dei capelli, per esempio gel o schiuma, onde evitare danni ai capelli. 4. I migliori risultati si ottengono utilizzando l’apparecchio a capelli asciutti. Asciugare eventualmente prima i capelli con il phon. 5. Spazzolare i capelli, finché scendono sofficemente. 6. Per infilare i diversi accessori nell’apparecchio, procedere come segue: assicurarsi innanzitutto che l’apparecchio sia spento e che la spina sia stata tolta dalla presa di corrente. Quando si applica l’accessorio, l’apparecchio deve essere impostato su . Quando l’accessorio è applicato, ruotare l’anello di sblocco sul manico dell’apparecchio fino al simbolo . 7. A questo punto l’accessorio è ben fissato all’apparecchio ed è possibile dare inizio alla messa in piega. 8. Per sostituire gli accessori, ruotare l’anello di sblocco su e togliere l’accessorio ruotandolo. Non va dimenticato che dopo l’utilizzo gli accessori sono molto caldi. Si raccomanda quindi di lasciarli raffreddare prima di procedere con la sostituzione! Pinza arricciacapelli La pinza arricciacapelli è ideale per modellare piccoli riccioli. Attenzione: poiché un contatto diretto con la pelle può provocare bruciature, si raccomanda di procedere con la pinza con la dovuta cautela! 1. Preparare i capelli come descritto nel capitolo “Prima dell’utilizzo”. 2. Applicare la pinza arricciacapelli all’apparecchio. 3. Inserire la spina nella presa di corrente. 4. Accendere l’apparecchio premendo il pulsante EIN/AUS. 5. La spia di controllo sull’apparecchio si accende. 6. Lasciare riscaldare l’apparecchio per qualche minuto al fine di ottenere un risultato di piega ottimale. 7. Suddividere i capelli pettinati in piccole ciocche non più ampie di cinque centimetri. In caso di necessità, dividere le ciocche servendosi di un pettine. 8. Premere sulla cerniera e infilare la punta di una ciocca di capelli tra la cerniera e la barretta metallica. 9. Rilasciare la cerniera. 10.A questo punto avvolgere la ciocca di capelli fino all’attaccatura attorno alla pinza. 11.Lasciare la ciocca nella pinza finché si scalda. 12.Svolgere con cautela la ciocca di capelli e aprire la cerniera per staccare la ciocca dall’apparecchio. 13.Ripetere i passaggi da 6 a 12 per fare la piega alle ciocche rimanenti. 14.Prima di sistemare i capelli con pettine, spazzola o dita, lasciare raffreddare un po’ i capelli. 15.Spegnere l’apparecchio premendo il pulsante EIN/AUS e togliere la spina dalla presa di corrente. 16.Si raccomanda la massima attenzione, poiché gli accessori dopo l’utilizzo sono molto caldi. Sostituire gli accessori solo dopo un adeguato periodo di raffreddamento, onde evitare bruciature. Accessorio spazzola DL’inserto spazzola è ideale per modellare riccioli grandi. 1. Preparare i capelli come descritto nel capitolo “Prima dell’utilizzo”. 2. Applicare la pinza arricciacapelli all’apparecchio. Infilare l’accessorio spazzola sulla pinza arricciacapelli chiusa fin30 ché la spazzola si incastra. Attenzione: sull’estremità dell’accessorio è raffigurata una piccola freccia. La spazzola può essere inserita sulla pinza solo da questo lato. 3. Inserire la spina nella presa di corrente. 4. Accendere l’apparecchio premendo il pulsante EIN/AUS. 5. Lasciare riscaldare l’apparecchio per qualche minuto al fine di ottenere un risultato di piega ottimale. 6. Suddividere i capelli pettinati in piccole ciocche non più ampie di cinque centimetri. In caso di necessità, dividere le ciocche servendosi di un pettine. 7. Avvolgere la ciocca, partendo dalla punta, attorno alla spazzola tonda. 8. Lasciare arrotolata la ciocca sulla spazzola tonda finché la ciocca si riscalda. 9. Svolgere con cautela la ciocca di capelli. Non tirare la ciocca, altrimenti l’effetto styling si perde. 10.Ripetere i passaggi da 6 a 9 per fare la piega alle ciocche rimanenti. 11.Spegnere l’apparecchio premendo il pulsante EIN/AUS e togliere la spina dalla presa di corrente. Si raccomanda la massima attenzione, poiché gli accessori dopo l’utilizzo sono molto caldi. Sostituire gli accessori solo dopo un adeguato periodo di raffreddamento, onde evitare bruciature. Spazzola tonda in alluminio La spazzola tonda è ideale per fare la piega a capelli corti e di media lunghezza e per dare ai capelli maggior volume. 1. Preparare i capelli come descritto nel capitolo “Prima dell’utilizzo”. 2. Applicare la spazzola tonda sull’apparecchio. 3. Inserire la spina nella presa di corrente. 4. Accendere l’apparecchio premendo il pulsante EIN/AUS. 5. Lasciare riscaldare l’apparecchio per qualche minuto al fine di ottenere un risultato di piega ottimale. 6. Suddividere i capelli pettinati in piccole ciocche non più ampie di cinque centimetri. In caso di necessità, dividere le ciocche servendosi di un pettine. 7. Avvolgere la ciocca, partendo dalla punta, attorno alla spazzola tonda. 8. Lasciare arrotolata la ciocca sulla spazzola tonda finché le ciocche si riscaldano. 9. Svolgere con cautela la ciocca di capelli. Non tirare le ciocche, altrimenti l’effetto styling si perde. 10.Ripetere i passaggi da 6 a 9 per fare la piega alle ciocche rimanenti. 11.Spegnere l’apparecchio premendo il pulsante EIN/AUS e togliere la spina dalla presa di corrente. Si raccomanda la massima attenzione, poiché gli accessori dopo l’utilizzo sono molto caldi. Sostituire gli accessori solo dopo un adeguato periodo di raffreddamento, onde evitare bruciature. Liscia capelli / Frisé Le piastre di questo accessorio sono dotate di un lato liscio e di un lato ondulato. A seconda dell’effetto che si intende ottenere, togliere semplicemente le piastre dall’accessorio, girare le piastre e reinserirle sull’accessorio finché si incastrano. Le piastre del liscia capelli sono rivestite di uno strato di ceramica che protegge i capelli. Tuttavia si sconsiglia di lisciare i capelli troppo di frequente. Ciò vale soprattutto per i capelli colorati o trattati chimicamente in altro modo (p.es. in caso di permanente). Prima di lisciare i capelli si raccomanda di non applicare prodotti chimici come spray per capelli, onde evitare bruciature ai capelli. Con il liscia capelli (lato liscio delle piastre) è possibile lisciare delicatamente i capelli. Con la piastra per frisè (lato ondulato della piastra) è possibile dare ai capelli una forma ondulata. 1. Preparare i capelli come descritto nel capitolo “Prima dell’utilizzo”. 2. Attenzione: prima di lisciare i capelli, accertarsi che siano asciutti. Se si lisciano i capelli ancora bagnati con il liscia capelli, questi possono danneggiarsi. Asciugare quindi bene i capelli p.es. con un phon. 3. Applicare l’accessorio sull’apparecchio. Verificare che sull’apparecchio sia inserito il lato della piastra desiderato. 4. Inserire la spina nella presa di corrente. Liscia capelli: 5. Suddividere i capelli pettinati in piccole ciocche non più ampie di cinque centimetri. 31 In caso di necessità, dividere le ciocche servendosi di un pettine. 6. Accendere l’apparecchio premendo il pulsante EIN/AUS. 7. Lasciare riscaldare l’apparecchio per qualche minuto al fine di ottenere un risultato di piega ottimale. 8. Aprire l’apparecchio e inserire tra le due piastre la ciocca di capelli in prossimità dell’attaccatura dei capelli. 9. Richiudere quindi l‘apparecchio. 10.Muovere l’apparecchio lentamente e uniformemente fino alla punta dei capelli. Tenere sempre chiuso l’apparecchio. Mai tenere l’apparecchio per più di due secondi nel medesimo posto, onde evitare danneggiamenti. Se si desidera un look liscio, ben fissato e aderente, durante la procedura le ciocche di capelli vanno tenute sempre vicino al corpo. Se invece si alza l’apparecchio, i capelli saranno più voluminosi. 11.Spegnere l’apparecchio premendo il pulsante EIN/AUS e togliere la spina dalla presa di corrente. 12.Non spazzolare né pettinare più i capelli, altrimenti le pieghe si rovinano. Eventualmente dare ai capelli il tocco finale usando le dita. 13.Si raccomanda la massima attenzione, poiché gli accessori dopo l’utilizzo sono molto caldi. Sostituire gli accessori solo dopo un adeguato periodo di raffreddamento, onde evitare bruciature. Piastra per frisé: 1. Suddividere i capelli pettinati in piccole ciocche non più ampie di cinque centimetri. In caso di necessità, dividere le ciocche servendosi di un pettine. 2. Accendere l’apparecchio premendo il pulsante EIN/AUS. 3. Lasciare riscaldare l’apparecchio per qualche minuto al fine di ottenere un risultato di piega ottimale. 4. Aprire l’apparecchio e inserire tra le due piastre per frisè la ciocca di capelli in prossimità dell’attaccatura. 5. Richiudere quindi l‘apparecchio. 6. Lasciare chiuso l’apparecchio per circa 5-10 secondi. Aprire l’apparecchio e verificare che il risultato ottenuto corrisponda a quello desiderato. In caso contrario, ripetere la procedura. 7. Procedere in questo modo dall’attaccatura fino alle punte. 8. Ripetere i passaggi da 3 a 6 per fare la piega alle ciocche rimanenti. 9. Spegnere l’apparecchio premendo il pulsante EIN/AUS e togliere la spina dalla presa di corrente. 10.Non spazzolare né pettinare più i capelli, altrimenti le pieghe si rovinano. Eventualmente dare ai capelli il tocco finale usando le dita. 11.Si raccomanda la massima attenzione, poiché gli accessori dopo l’utilizzo sono molto caldi. Sostituire gli accessori solo dopo un adeguato periodo di raffreddamento, onde evitare bruciature. 12.CONSIGLIO: Con il liscia capelli è possibile fare anche l’effetto ondulato! Inserire tra le due piastre la ciocca di capelli e procedere. Poco prima di aver raggiunto le punte, ruotare l’apparecchio con le ciocche inserite verso l’interno o l’esterno (a seconda del tipo di ondulazione desiderata), per dare brio ai capelli. Pulizia e manutenzione 1. Estrarre la spina dalla presa di corrente. 2. Lasciare raffreddare completamente l’apparecchio e gli accessori. Nel farlo, posizionare l‘apparecchio su una superficie resistente alle temperature elevate. 3. Non immergere l’apparecchio in acqua né in altri liquidi per effettuare le operazioni di pulizia. 4. Pulire l‘apparecchio con un panno umido. 32 5. Non utilizzare spugne o sostanze abrasive, lana d‘acciaio, oggetti metallici, disinfettanti o detergenti caldi, poiché questi possono danneggiare l’apparecchio. 6. Pulire gli accessori con un panno umido. Lasciare asciugare completamente gli accessori prima di riutilizzarli o di riporli. Conservazione 1. Estrarre la spina dalla presa di corrente. 2. Lasciare raffreddare completamente l’apparecchio e la spazzola tonda. Nel farlo, posizionare l‘apparecchio su una superficie resistente alle temperature elevate. 3. Non avvolgere il cavo attorno all’apparecchio onde prevenire danni al cavo di alimentazione. 4. Proteggere l’apparecchio dalla polvere. 33 Manual de instrucciones Modelo 87515 Datos técnicos Potencia: Dimensiones: Peso: Longitud del cable: Carcasa: Prestaciones: 20-25 W, 100-240 V~, 50/60 Hz Aprox. 32,2 x ø 3,7 cm Aprox. 0,47 kg Aprox. 1,8 m Plástico negro/plateado Interruptor principal con piloto de control Protector pivotante del cable Placas alisadoras/onduladotas con recubrimiento cerámico Accesorios: Rizador, cepillo, cepillo redondo de aluminio, alisador/ ondulador, manual de instrucciones Se reservan las modificaciones técnicas Indicaciones de seguridad 1. Rogamos lea atentamente el manual de instrucciones y consérvelo. 2. No deben usar este equipo aquellas personas (incluidos los niños) cuya capacidad física, sensorial o mental esté limitada, ni aquellas personas que carecen de la experiencia y/o los conocimientos necesarios, salvo bajo la supervisión de la persona encargada de su seguridad y que las instruya debidamente en el uso del equipo. 3. Los niños deberían vigilarse para garantizar que no jueguen con el equipo. 4. Conecte el equipo siempre a corriente alterna de acuerdo con las indicaciones en la placa indicadora. 5. Este equipo no debe operarse mediante temporizador externo ni sistema de mando a distancia. 6. No sumerja el equipo en agua u otros líquidos. Proteja el equipo contra la humedad. 7. Asegúrese de que el cable de alimentación no tenga contacto con las piezas calientes del equipo. 8. Desenrolle el cable completamente para evitar daños por el sobrecalentamiento. 9. Al desconectar el equipo, siempre tire del conector del cable de alimentación, nunca del propio cable. 10.Para almacenar el equipo, nunca enrolle el cable alrededor del equipo para no dañarlo. 11.El equipo está diseñado exclusivamente para el uso doméstico, no comercial. 12.El equipo no debe utilizarse en el exterior. 34 13.Mantenga suficiente distancia hacia las paredes y objetos inflamables como, por ejemplo, cortinas. 14.No utilice el equipo cerca de fuentes de calor. 15.Por razones de seguridad, no utilice el equipo para moldear cabellos artificiales. 16.Para evitar quemaduras, tenga cuidado de no acercar el equipo o partes del mismo a la cara y las orejas. 17.No utilice laca de pelo mientras el equipo esté funcionando. 18.El cabello debería estar libre de productos de moldeado como la espuma o el gel para evitar dañarlo. 19.Los accesorios están muy calientes después del uso. Manéjelos con cuidado para evitar quemaduras. 20.Desconecte el equipo antes de depositarlo. 21.Después de utilizar el equipo y antes de limpiarlo, apáguelo, desconecte el conector de la red y deje que el equipo se enfríe. 22.Mientras el conector esté conectado a una toma de corriente, el equipo supone un peligro cuando está cerca del agua, incluso si está apagado. 23.No introduzca ningún objeto en el equipo, ya que por los daños que pueden provocar existe el peligro de electrocución. 24.Utilice el equipo sólo para los usos previstos en el presente manual. 25.Para evitar daños, el equipo no debe utilizarse con accesorios de otros fabricantes o marcas. 26.No abra la carcasa del equipo bajo ningún concepto. Existe peligro por descarga eléctrica. 27.Compruebe regularmente si el conector o el cable de alimentación presentan señales de desgaste o daños. Si detecta daños en el cable de alimentación u otras piezas, envíe el equipo a nuestro servicio técnico para su debida comprobación y/o reparación (encontrará la dirección en nuestras condiciones de garantía). Las reparaciones inapropiadas pueden causar situaciones peligrosas para el usuario y llevan a la extinción de la garantía. 28.Para evitar cualquier peligro, el cable de alimentación dañado debe sustituirlo el fabricante o su servicio técnico u otra persona debidamente cualificada. Atención: El equipo está muy caliente durante e inmediatamente después de su uso. Por razones de seguridad, no utilice el equipo cerca o dentro de bañeras o lavabos u otros recipientes llenos de agua. Si el equipo se utiliza en un cuarto de baño, hay que retirar el enchufe después de su uso, ya que la proximidad del agua supone un peligro incluso cuando el equipo está desconectado. El fabricante no es responsable en caso de montaje erróneo, uso inapropiado o equivocado o después de haber sido efectuadas reparaciones por terceros no autorizados. Su nuevo Hair Styler 1 Ondulador de cabello 2 Plancha de cabello 3 Rizador 4 Cepillo 5 Anilla de desbloqueo 6 Conmutador corredizo EIN/ AUS 7 Cepillo redondo de aluminio 1 2 3 7 4 5 6 35 Puesta en servicio 1. Retire todo el material de embalaje y los seguros de transporte. Mantenga los materiales de embalaje fuera del alcance de los niños. ¡Peligro de asfixia! 2. Después de lavar el cabello, séquelo bien con una toalla. 3. El cabello debería estar libre de productos de moldeado como la espuma o el gel para evitar dañarlo. 4. Conseguirá los mejores resultados con el cabello seco, así que puede secar el cabello utilizando el secador de pelo, si fuera necesario. 5. Cepille el cabello hasta que quede suelto. 6. Para montar los diferentes accesorios en el equipo, proceda como sigue: Asegúrese de que el equipo está apagado y el conector desconectado de la toma de corriente. La marca en el equipo debe estar posicionada en el símbolo al colocar el accesorio. Una vez colocado el accesorio en el equipo, gire la anilla de desbloqueo en el mango del equipo al símbolo . 7. El accesorio correspondiente queda firmemente unido al equipo y podrá empezar moldear el cabello. 8. Para cambiar el accesorio, gire la anilla de desbloqueo al símbolo y retire el accesorio tirando del mismo. Tenga en cuenta que los accesorios están muy calientes después del uso, así que deje que se enfríen antes de cambiarlos. Rizador El rizador es ideal para obtener rizos pequeños. Atención: ¡El contacto directo con la piel puede provocar quemaduras! ¡Maneje el rizador con cuidado! 1. Prepare el cabello tal y como se describe en el capítulo „Puesta en servicio“. 2. Coloque el rizador en el equipo. 3. Conecte el conector a la toma de corriente. 4. Conecte el equipo utilizando el interruptor principal. 5. El piloto de control se enciende. 6. Deje calentar el equipo unos minutos para conseguir el mejor resultado de moldeado. 7. Separe el cabello formando mechones de no más de 5 cm de ancho. Fije los mechones con horquillas, si fuera necesario para separarlos. 8. Abra la pinza y coloque la punta del mechón entre la pinza y la barra de metal. 9. Vuelva a soltar la pinza para cerrarla. 10.Enrolle el mechón alrededor del rizador, empezando desde la punta hacia la raíz. 11.Mantenga el mechón enrollado hasta que se haya calentado un poco. 12.Desenrolle el mechón con cuidado y abra la pinza para soltar el mechón. 13.Repita los pasos 6 a 12 para moldear los mechones restantes. 14.Deje que el cabello se enfríe un poco antes de moldearlo con el peine, el cepillo o los dedos. 15.Desconecte el equipo mediante el interruptor principal y desconéctelo de la toma de corriente. 16.Tenga en cuenta que los accesorios están muy calientes después del uso. Deje que los accesorios se enfríen durante un tiempo adecuado para evitar quemaduras. Cepillo desmontable El cepillo desmontable es ideal para obtener rizos grandes. 1. Prepare el cabello tal y como se describe en el capítulo „Puesta en servicio“. 2. Coloque el rizador en el equipo. Deslice el cepillo por el rizador cerrado hasta que encastre. Atención: El cepillo desmontable tiene una pequeña flecha en un extremo para indicar la dirección de montaje en el rizador. 36 3. Conecte el conector a la toma de corriente. 4. Conecte el equipo utilizando el interruptor principal. 5. Deje calentar el equipo unos minutos para conseguir el mejor resultado de moldeado. 6. Separe el cabello formando mechones de no más de 5 cm de ancho. Fije los mechones con horquillas, si fuera necesario para separarlos. 7. Enrolle el mechón en el cepillo redondo empezando por las puntas. 8. Mantenga el mechón enrollado hasta que se haya calentado un poco. 9. Desenrolle el mechón con cuidado. No tire del cepillo, ya que podría estropear el efecto de moldeo. 10.Repita los pasos 6 a 9 para moldear los mechones restantes. 11.Desconecte el equipo mediante el interruptor principal y desconéctelo de la toma de corriente. Tenga en cuenta que los accesorios están muy calientes después del uso. Deje que los accesorios se enfríen durante un tiempo adecuado para evitar quemaduras. Cepillo redondo de aluminio El cepillo redondo es ideal para moldear el cabello de media melena y darle más volumen. 1. Prepare el cabello tal y como se describe en el capítulo „Puesta en servicio“. 2. Coloque el cepillo redondo en el equipo. 3. Conecte el conector a la toma de corriente. 4. Conecte el equipo utilizando el interruptor principal. 5. Deje calentar el equipo unos minutos para conseguir el mejor resultado de moldeado. 6. Separe el cabello formando mechones de no más de 5 cm de ancho. Fije los mechones con horquillas, si fuera necesario para separarlos. 7. Enrolle el mechón en el cepillo redondo empezando por las puntas. 8. Mantenga el mechón enrollado hasta que se haya calentado un poco. 9. Desenrolle el mechón con cuidado. No tire del cepillo, ya que podría estropear el efecto de moldeo. 10.Repita los pasos 6 a 9 para moldear los mechones restantes. 11.Desconecte el equipo mediante el interruptor principal y desconéctelo de la toma de corriente. Tenga en cuenta que los accesorios están muy calientes después del uso. Deje que los accesorios se enfríen durante un tiempo adecuado para evitar quemaduras. Alisador/Ondulador Las placas de este accesorio tienen un lado liso y el otro arrugado. Según el efecto que desea conseguir, retire las placas del accesorio, gírelas de modo que la superficie deseada mire hacia fuera y vuelva a colocarlas en el accesorio hasta que encastren. La placas del alisador disponen de un recubrimiento cerámico que protege el cabello. Aún así no debería alisar el cabello demasiadas veces. Esto aplica especialmente al cabello teñido o tratado químicamente de otro modo (p. ej. el cabello permanentado). Antes de alisar el cabello, no utilice productos de moldeado químicos como las lacas para evitar quemar el cabello. Con el alisador (lado liso de las placas) podrá alisar el cabello con suavidad. Con el ondulador (lado arrugado de las placas) conseguirá unas ondas suaves. 1. Prepare el cabello tal y como se describe en el capítulo „Puesta en servicio“. 2. Atención: para poder utilizar la plancha, el cabello debe estar seco. Alisar el cabello húmedo con la plancha puede dañarlo, por lo que debería secar bien el cabello utilizando el secador de pelo, si fuera necesario. 3. Coloque el accesorio en el equipo. Compruebe si las placas están con la superficie deseada mirando hacia fuera. 4. Conecte el conector a la toma de corriente. Alisador: 5. Separe el cabello formando mechones de no más de 5 cm de ancho. Fije los mechones con horquillas, si fuera necesario para separarlos. 6. Conecte el equipo utilizando el interruptor principal. 7. Deje calentar el equipo unos minutos para conseguir el mejor resultado de moldeado. 8. Abra el equipo y coloque un mechón de cabello entre las placas con el equipo cerca de las raíces. 37 9. Cierre la plancha y pásela lenta y uniformemente desde el nacimiento del cabello hasta las puntas. Mientras lo haga, mantenga la plancha cerrada. Para no dañar el cabello, no deje que la plancha repose en el mismo punto más de dos segundos. Para conseguir un aspecto liso y ceñido, mantenga la plancha cerca de la cabeza mientras esté alisando el mechón. Si, al contrario, levanta la plancha ligeramente, conseguirá darle más volumen al cabello. 10.Desconecte el equipo mediante el interruptor principal y desconéctelo de la toma de corriente. 11.No cepille o peine el cabello, ya que podría estropear las ondas. Utilice los dedos para darle forma al look, si fuera necesario. 12.Tenga en cuenta que los accesorios están muy calientes después del uso. Deje que los accesorios se enfríen durante un tiempo adecuado para evitar quemaduras. Ondulador: 1. Separe el cabello formando mechones de no más de 5 cm de ancho. Fije los mechones con horquillas, si fuera necesario para separarlos. 2. Conecte el equipo utilizando el interruptor principal. 3. Deje calentar el equipo unos minutos para conseguir el mejor resultado de moldeado. 4. Abra el equipo y coloque un mechón de cabello entre las placas con el equipo cerca de las raíces. 5. Cierre la plancha 6. Mantenga el equipo cerrado durante unos 5 – 10 segundos. Vuelva a abrir el equipo y compruebe si el resultado es el deseado. En caso contrario, repita el proceso. 7. Siga así desde la raíz hasta las puntas. 8. Repita los pasos 3 a 6 para moldear los mechones restantes. 9. Desconecte el equipo mediante el interruptor principal y desconéctelo de la toma de corriente. 10.No cepille o peine el cabello, ya que podría estropear las ondas. Utilice los dedos para darle forma al look, si fuera necesario. 11.Tenga en cuenta que los accesorios están muy calientes después del uso. Deje que los accesorios se enfríen durante un tiempo adecuado para evitar quemaduras. 12.CONSEJO: ¡También puede ondular el cabello utilizando la plancha! Coloque el mechón de cabello en la plancha como de costumbre y alísela. Antes de llegar a las puntas, gire la plancha hacia fuera o hacia dentro (según el aspecto que desee darle al cabello) para conseguir una ondulación suave. Limpieza y Mantenimiento 1. Desconecte el conector de red de la toma de corriente. 2. Deje que el equipo y el cepillo se enfríen completamente colocándolos en una superficie resistente al calor. 3. No sumerja el equipo en agua u otros líquidos para limpiarlo. 4. Limpie la carcasa del equipo con un paño humedecido. 5. No utilice estropajos, agentes limpiadores abrasivos, lana de acero, objetos metálicos, desinfectantes o agentes limpiadores calientes, ya que pueden dañar el equipo. 6. Limpie los accesorios según necesidad utilizando un paño humedecido. Deje que los accesorios sequen completamente antes de volver a utilizarlos o guardarlos. Almacenamiento 1. Desconecte el conector de red de la toma de corriente. 2. Deje que el equipo y el cepillo se enfríen completamente colocándolos en una superficie resistente al calor. 38 3. Para evitar daños en el cable de alimentación, no lo enrolle nunca alrededor de la freidora. 4. Proteja el equipo contra el polvo. Návod k obsluze Modelu 87515 Technické údaje Výkon: Rozměry: Hmotnost: Délka kabelu: Kryt: Vybavení: 20-25 Wattů, 100-240 V~, 50/60 Hz Cca. 32,2 x ø 3,7 cm Cca. 0,47 kg Cca. 1,8 m Plast černý/stříbrný Spínač ZAP/VYP se světelnou kontrolkou Otočná ochrana přívodního kabelu Žehlička/krepovačka s keramickou vrstvou Příslušenství: Kulma, kartáčový nástavec, kulatý hliníkový kartáč, nástavec-žehlička/krepovačka, návod k obsluze Technické změny vyhrazeny. Pro vaši bezpečnost 1. Přečtěte si následující pokyny a pečlivě je uschovejte. 2. Tento přístroj není určen k tomu, aby jej používaly osoby (včetně dětí) s omezenými fyzickými, senzorickými, nebo duševnímu schopnostmi nebo s nedostatkem zkušeností a/nebo s nedostatečnými znalostmi, ledaže by byly pod dozorem osoby zodpovědné za jejich bezpečnost, anebo od této osoby dostaly pokyny, jak přístroj obsluhovat. 3. Děti mají být pod dohledem, aby bylo zajištěno, že si s přístrojem nehrají. 4. Přístroj připojte jen na střídavý proud dle typového štítku. 5. Tento přístroj nesmí být provozován s externími spínacími hodinami nebo systémem dálkového ovládání. 6. Přístroj nesmí být namáčen do vody či jiné kapaliny. Přístroj chraňte před vlhkostí. 7. Dbejte na to, aby se přívod nedostal do kontaktu s horkými částmi přístroje. 8. Přívod vždy roztáhněte po celé délce, abyste předešli poškozením přehřátím. 9. Přívod vytahujte ze zásuvky pouze za zástrčku, nikdy netahejte přímo za kabel. 10.Odkládáte-li přístroj pro skladování, neomotávejte přívodní šňůru kolem přístroje, aby se předešlo poškození přívodu. 11.Přístroj je určen výhradně pro vlastní použití v domácnostech, není však určen k živnostenským účelům. 12.Přístroj se nesmí používat venku. 13.Během provozu udržujte dostatečnou vzdálenost od stěn a hořlavých předmětů jako např. od závěsů. 14.Přístroj neprovozujte v blízkosti zdrojů tepla. 15.Z bezpečnostních důvodů nepoužívejte přístroj k úpravě umělých vlasů. 16.Dbejte na to, aby se přístroj nebo jeho součásti nedostaly do blízkosti obličeje nebo uší, abyste předešli popálení. 17.Dokud je přístroj v provozu, nepoužívejte spreje na vlasy. 18.Vaše vlasy by před použitím přístroje neměly být ošetřeny přípravky pro úpravu účesů jako pěnové tužidlo či gel, abyste předešly poškození vlasů. 19.Nástavce jsou po použití velmi horké. Zacházejte s nimi opatrně, abyste předešli popálení. 20.Než přístroj odložíte, vypněte jej. 21.Po skončení používání přístroje nebo před čištěním přístroj vždy vypněte ,vytáhněte ze zásuvky a nechte jej vychladnout. 22.Dokud je zástrčka v zásuvce, je přístroj i ve vypnutém stavu poblíž vody nebezpečný. 23.Do přístroje nezasunujte žádné předměty, protože vzniklým poškozením hrozí nebezpečí zásahu elektrickým proudem. 24.Přístroj používejte jen k účelům popsaným v návodu. 25.Přístroj nesmí být používán s příslušenstvím jiných značek, aby se předešlo jeho poškození. 26.V žádném případě neotevírejte kryt přístroje. Hrozí nebezpečí zasažení proudem. 27.Pravidelně u zástrčky a přívodu kontrolujte opotřebení a poškození. Při poškození přívodního kabelu nebo jiných součástí zašlete prosím přístroj ke kontrole a opravě 39 Z bezpečnostních důvodů nepoužívejte přístroj v blízkosti naplněné vany nebo umyvadla popř. jiných vodou naplněných nádob. Když se přístroj používá v koupelně, je po použití nutné vytáhnout zástrčku, protože blízkost vody představuje riziko i v případě, že přístroj je vypnutý. našemu zákaznickému servisu (adresa viz záruční podmínky). Neodborné opravy mohou vést ke vzniku závažných nebezpečí pro uživatele a ke ztrátě záruky. 28.Je-li přívodní vedení přístroje poškozeno, musí být nahrazeno výrobcem nebo jeho zákaznickým servisem nebo podobně kvalifikovanou osobou, aby bylo zamezeno případným ohrožením. Pozor: Při přímém kontaktu hrozí nebezpečí popálení, proto s kulmou zacházejte opatrně! Výrobce nepřebírá žádné ručení při chybné montáži, neodborném nebo chybném použití nebo po provedení opravy neautorizovanými třetími osobami. Váš nový Hair Styler 1 1 Krepovačka 2 Žehlička 3 Odjišťovací kroužek 4 Kartáč 5 Kulma 6 Posuvný spínač ZAP/VYP 7 Kulatý hliníkový nástavec 2 3 7 5 6 40 4 Před použitím 1. Odstraňte všechen obalový materiál popř. přepravní zajištění. Kvůli nebezpečí udušení udržujte děti v bezpečné vzdálenosti od obalových materiálů. 2. Po umytí vlasy důkladně vysušte ručníkem. 3. Vlasy neošetřujte žádnými vlasovými prostředky jako např. gelem nebo pěnou, abyste předešly poškození vlasů. 4. Nejlepších výsledků dosáhnete se suchými vlasy. Vlasy příp. předem dobře vysušte fénem. 5. Vlasy kartáčujte dokud nebudou volně splývat. 6. Pro nasazení různých nástavců postupujte následujícím způsobem: Ujistěte se, že je přístroj vypnutý a že je zástrčka vytažená ze zásuvky. Označení na přístroji musí být nastaveno na , pokud nástavec nasazujete. Poté, co je nástavec nasazen na přístroj, otočte zajišťovací kroužek na rukojeti přístroje, až po symbol . Příslušný nástavec je nyní pevně spojen s přístrojem a vy můžete začít s úpravou účesu. 7. Pro výměnu nástavců otočte zajišťovací kroužek na a nástavec sejměte. Zohledněte prosím, že nástavce jsou po použití velmi horké, a proto je nechte před výměnou vychladnout! Kulma Kulma je ideální pro vytvoření malých loken. Pozor: Při přímém kontaktu hrozí nebezpečí popálení, proto s kulmou zacházejte opatrně! 1. Vaše vlasy připravte, jak je popsáno v kapitole „Před první přípravou kávy“. 2. Nasaďte kulmu na přístroj. 3. Zástrčku zasuňte do zásuvky. 4. Přístroj zapněte pomocí spínače ZAP/VYP. 5. Rozsvítí se kontrolka na přístroji. 6. Přístroj nechte na několik minut nahřát, abyste dosáhli optimálního výsledku úpravy účesu. 7. Rozčesané vlasy rozdělte do malých pramínků, které nemají být širší než pět centimetrů. V případě potřeby oddělte pramínky od sebe sponou. 8. Rozevřete kulmu a vložte konec jednoho pramínku do kulmy. 9. Kulmu opět zavřete. 10.Pramen vlasů nyní natočte kolem kulmy až ke kořínkům. 11.Nechte prameny na kulmě do té doby, než se pořádně zahřejí. 12.Opatrně pramen odviňte a otevřete kulmu, abyste pramen uvolnili z přístroje. 13.Opakujte kroky 6 až 11 pro úpravu zbylých pramenů. 14.Než vlasy definitivně upravíte hřebenem, kartáčem nebo prsty, nechte je trochu vychladnout. 15.Přístroj vypněte spínačem ZAP/VYP a vytáhněte zástrčku ze zásuvky. 16.Zohledněte prosím, že nástavce a přístroj jsou po použití velmi horké. Nástavce vyměňte až po uplynutí přiměřeně dlouhé doby vychladnutí, abyste předešli popálení. Kartáčový nástavec Kartáčový nástavec je ideální pro vytvoření velkých loken. 1. Vaše vlasy připravte, jak je popsáno v kapitole „Před první přípravou kávy“. 2. Nasaďte kulmu na přístroj. Nasuňte nyní kartáčový nástavec na zavřenou kulmu až zaskočí. Pozor: na jednom konci kartáčového nástavce je malá šipka, jen na této straně můžete kartáč na kulmu nasadit. 3. Zástrčku zasuňte do zásuvky. 4. Přístroj zapněte pomocí spínače ZAP/VYP. 5. Přístroj nechte na několik minut nahřát, abyste dosáhli optimálního výsledku úpravy účesu. 6. Rozčesané vlasy rozdělte do malých pramínků, které nemají být širší než pět centimetrů. V případě potřeby oddělte pramínky od sebe sponou. 7. Prameny vlasů natáčejte počínaje konečky kolem kulatého kartáče. 41 8. Nechte prameny na kartáči do té doby, než se pořádně zahřejí. 9. Prameny opatrně odviňte. Prameny vlasů nestahujte, protože tím pokazíte efekt natočení. 10.Opakujte kroky 6 až 9 pro úpravu zbylých pramenů. 11.Přístroj vypněte spínačem ZAP/VYP a vytáhněte zástrčku ze zásuvky. Zohledněte prosím, že nástavce a přístroj jsou po použití velmi horké. Nástavce vyměňte až po uplynutí přiměřeně dlouhé doby vychladnutí, abyste předešli popálení. Hliníkový kulatý kartáč Kulatý kartáč je ideální pro natáčení krátkého, polodlouhého účesu a pro dodání objemu. 1. Vaše vlasy připravte, jak je popsáno v kapitole „Před první přípravou kávy“. 2. Nasaďte kulatý kartáč na přístroj. 3. Zástrčku zasuňte do zásuvky. 4. Přístroj zapněte pomocí spínače ZAP/VYP. 5. Přístroj nechte na několik minut nahřát, abyste dosáhli optimálního výsledku úpravy účesu. 6. Rozčesané vlasy rozdělte do malých pramínků, které nemají být širší než pět centimetrů. V případě potřeby oddělte pramínky od sebe sponou. 7. Prameny vlasů natáčejte počínaje konečky kolem kulatého kartáče. 8. Nechte prameny na kartáči do té doby, než se pořádně zahřejí. 9. Prameny opatrně odviňte. Prameny vlasů nestahujte, protože tím pokazíte efekt natočení. 10.Opakujte kroky 6 až 9 pro úpravu zbylých pramenů. 11.Přístroj vypněte spínačem ZAP/VYP a vytáhněte zástrčku ze zásuvky. Zohledněte prosím, že nástavce jsou po použití velmi horké. Nástavce vyměňte až po uplynutí přiměřeně dlouhé doby vychladnutí, abyste předešli popálení. Žehlička/krepovačka Desky nástavce mají vždy hladkou a strukturovanou stranu. Podle toho, jakého efektu chcete dosáhnout, vytáhněte jednoduše desky z nástavce, otočte je a znovu do nástavce zasuňte, doku desky nezaskočí. Desky žehličky jsou vybaveny keramickou vrstvou, která chrání vaše vlasy. Přesto byste vaše vlasy neměli žehlit příliš často. To platí především pro barvené a jinak chemicky upravované vlasy (např. při trvalé). Před žehlením prosím nepoužívejte žádné produkty na ošetření vlasů jako laky, abyste předešli popálení vlasů. Pomocí žehličky (hladká strana desky) můžete vaše vlasy šetrně vyžehlit. Pomocí krepovačky (strukturovaná strana desky) získáte na vlasech drobné vlnky. 1. Vaše vlasy připravte, jak je popsáno v kapitole „Před první přípravou kávy“. 2. Pozor: při žehlení by vlasy měly být zcela suché. Pokud žehlíte vlhké vlasy, poškozujete je. Proto vlasy dobře předem vysušte např. fénem. 3. Nasaďte nástavec na přístroj. Zkontrolujte, zda jste vložili desky správně. 4. Zástrčku zasuňte do zásuvky. Žehlička: 5. Rozčesané vlasy rozdělte do malých pramínků, které nemají být širší než pět centimetrů. V případě potřeby oddělte pramínky od sebe sponou. 6. Přístroj zapněte pomocí spínače ZAP/VYP. 42 7. Přístroj nechte na několik minut nahřát, abyste dosáhli optimálního výsledku úpravy účesu. 8. Přístroj otevřete a vložte pramen vlasů u kořínků mezi obě žehlící plochy. 9. Přístroj opět uzavřete. 10.Přístrojem jeďte pomalu a rovnoměrně až ke konečkům. Držte přitom přístroj vždy pevně uzavřený. Nikdy nezůstávejte na jednom místě déle než dvě sekundy, aby nedošlo k poškození vlasů. Pokud chcete dosáhnout hladkého, přiléhavého vzhledu, musíte při žehlení pramínků vlasů zůstat vždy těsně u hlavy. Pokud však přístroj při žehlení nadzvednete, získáte objem. 11.Přístroj vypněte spínačem ZAP/VYP a vytáhněte zástrčku ze zásuvky. 12.Nyní už vlasy nečešte ani nekartáčujte, protože tím zničíte vlny. Vlasy příp. upravte pomocí prstů. 13.Zohledněte prosím, že nástavce jsou po použití velmi horké. Nástavce vyměňte až po uplynutí přiměřeně dlouhé doby vychladnutí, abyste předešli popálení. Krepovačka: 1. Rozčesané vlasy rozdělte do tenkých pramenů, které by neměly být širší než pět centimetrů. V případě potřeby od sebe pramínky pomocí vlasové spony. 2. Přístroj zapněte pomocí spínače ZAP/VYP. 3. Přístroj nechte na několik minut nahřát, abyste dosáhli optimálního výsledku úpravy účesu. 4. Přístroj otevřete a vložte pramen vlasů u kořínků mezi obě krepovací plochy. 5. Přístroj opět uzavřete. 6. Přístroj nyní přidržte cca 5-10 sekund zavřený. Přístroj otevřete a zkontrolujte, zda je výsledek takový, jaký jste si přáli. Pokud ne, postup opakujte. 7. Tímto způsobem pokračujte od kořínků ke konečkům. 8. Opakujte kroky 3 až 6 pro úpravu zbylých pramenů. 9. Přístroj vypněte spínačem ZAP/VYP a vytáhněte zástrčku ze zásuvky. 10.Nyní už vlasy nečešte ani nekartáčujte, protože tím zničíte vlny. Vlasy příp. upravte pomocí prstů. 11.Zohledněte prosím, že nástavce jsou po použití velmi horké. Nástavce vyměňte až po uplynutí přiměřeně dlouhé doby vychladnutí, abyste předešli popálení. 12.TIP: Pomocí žehličky na vlasy můžete vytvořit i vlny! Pramínky vložte do přístroje obvyklým způsobem a vlasy žehlete. Krátce před dosažením konečků přístroj s vloženými pramínky otočte směrem dovnitř nebo ven (dle požadováno druhu vln), abyste vlasům propůjčili jemný švih. Čištění a údržba 1. Vytáhněte zástrčku ze zásuvky. 2. Nechte přístroj a nástavce zcela vychladnout. Za tímto účelem přístroj položte na žáruvzdornou podložku. 3. V žádném případě neponořujte přístroj do vody či jiné kapaliny. 4. Přístroj otřete navlhčeným hadříkem. 5. Nepoužívejte žádné houby s možností poškrábání, abrazivní prostředky, ocelovou vatu, kovové předměty, desinfekční prostředky nebo horké čistící prostředky , protože tyto mohou vést k poškození. 6. Vyčistěte nástavce v případě potřeby navlhčeným hadříkem. Nástavce nechte zcela vyschnout, než je opět použijete nebo odložíte ke skladování. Skladování 1. Vytáhněte zástrčku ze zásuvky. 2. Nechte přístroj a nástavce zcela vychladnout. Za tímto účelem přístroj položte na žáruvzdornou podložku. 3. Přívodní šňůru nikdy neomotávejte kolem přístroje, abyste zamezili poškození přívodu. 4. Přístroj chraňte před prachem. 43 Instrukcja obsługi Model 87515 Dane techniczne Moc: Wymiary: Ciężar: Długość kabla: Obudowa: Wyposażenie: 20-25 W, 100-240 V~, 50/60 Hz Ok. 32,2 x ø 3,7 cm Ok. 0,47 kg Ok. 1,8 m Tworzywo sztuczne, czarny/srebrny kolor Przycisk WŁ./WYŁ. z kontrolką Obrotowa (?) odgiętka z uchwytem do zawieszania Płytki prostujące/karbujące z ceramiczną powłoką Akcesoria: Lokówka, nakładana szczotka, okrągła szczotka z aluminium, wkłady prostujące/karbujące, instrukcja obsługi Zastrzegamy sobie prawo do zmian technicznych. Dla Twojego bezpieczeństwa 1. Prosimy zapoznać się z poniższą instrukcją i zachować ją na przyszłość. 2. To urządzenie nie jest przeznaczone do użytku przez osoby (łącznie z dziećmi), które wskutek ograniczonych fizycznych, sensorycznych lub psychicznych zdolności, bądź z braku doświadczenia i/lub wiedzy nie są w stanie bezpiecznie obsługiwać urządzenia, chyba że znajdują się one pod nadzorem osoby odpowiedzialnej za ich bezpieczeństwo lub zostały przez nią poinstruowane odnośnie obsługi urządzenia. 3. Nie dopuścić, aby dzieci bawiły się urządzeniem. 4. Podłączać urządzenie tylko do źródła prądu przemiennego o wartości podanej na tabliczce znamionowej. 5. To urządzenie nie nadaje się do użytku w połączeniu z zegarem sterującym lub systemem zdalnego sterowania. 6. Nie zanurzać urządzenia w wodzie lub innej cieczy. Chronić urządzenie przed wilgocią. 7. Zwrócić uwagę na to, aby przewód doprowadzający nie dotykał gorących części urządzenia. 8. Zawsze wyciągać przewód doprowadzający na całej długości, aby uniknąć szkód wskutek przegrzania. 9. Podczas wyciągania wtyczki z gniazdka ciągnąć tylko za wtyczkę przewodu doprowadzającego, a nie za kabel. 10.Podczas przechowywania urządzenia nigdy nie owijać przewodu doprowadzającego wokół urządzenia, aby uniknąć uszkodzenia przewodu. 44 11.Urządzenie jest przeznaczone wyłącznie do użytku domowego, a nie komercyjnego. 12.Nie używać urządzenia na wolnym powietrzu. 13.Podczas używania urządzenia zachować wystarczający odstęp od ścian i palnych przedmiotów takich jak na przykład zasłony. 14.Nie używać urządzenia w pobliżu źródeł ciepła. 15.Ze względów bezpieczeństwa nie używać urządzenia do stylizacji sztucznych włosów. 16.Zwrócić uwagę na to, aby urządzenie lub części urządzenia nie znajdowały się w pobliżu twarzy lub uszu, aby uniknąć poparzeń. 17.Podczas używania urządzenia nie używać lakieru do włosów. 18.Przed użyciem urządzenia włosy powinny być pozbawione produktów do stylizacji takich jak pianka lub żel do włosów, aby uniknąć zniszczenia włosów. 19.Nasadki są podczas użycia bardzo gorące, zachować ostrożność, aby uniknąć poparzeń. 20.Wyłączyć urządzenie przed jego odłożeniem na bok. 21.Po zakończeniu używania lub przed rozpoczęciem czyszczenia wyłączyć urządzenie, wyciągnąć wtyczkę z gniazdka i pozostawić urządzenie do schłodzenia. 22.Gdy wtyczka jest podłączona do gniazdka, urządzenie znajdujące się w pobliżu wody, również w stanie wyłączonym, stanowi potencjalne zagrożenie. 23.Nie wkładać do urządzenia żadnych przedmiotów, istnieje niebezpieczeństwo porażenia prądem wskutek uszkodzenia urządzenia. 24.Używać urządzenia wyłącznie do celów opisanych w tej instrukcji obsługi. 25.Nie używać urządzenia w połączeniu z akcesoriami innych producentów lub innych marek. 26.Nie otwierać obudowy urządzenia. Istnieje niebezpieczeństwo porażenia prądem. 27.Regularnie kontrolować wtyczkę i kabel instalacyjny pod kątem oznak zużycia lub uszkodzenia. W przypadku uszkodzenia kabla instalacyjnego lub innych części odesłać urządzenie w celu sprawdzenia i/lub naprawy do naszego serwisu klienta (adres patrz warunki gwarancji). Nieprawidłowo przeprowadzone naprawy mogą prowadzić do powstania znacznych zagrożeń dla użytkownika i prowadzą do utraty gwarancji. 28.W przypadku uszkodzenia przewodu instalacyjnego urządzenia musi on zostać wymieniony przez producenta, jego serwis lub osobę o podobnych kwalifikacjach, aby uniknąć możliwych zagrożeń. Uwaga! Podczas i po zakończeniu używania urządzenie jest bardzo gorące! Ze względów bezpieczeństwa nigdy nie używać urządzenia w pobliżu lub w wannie napełnionej wodą, umywalce lub innych naczyniach napełnionych wodą. Gdy urządzenie używana jest w łazience, po użyciu należy wyjąć wtyczkę z gniazdka, gdyż bliskość wody stwarza niebezpieczeństwo także wtedy, gdy urządzenie jest wyłączona. Producent nie przejmuje odpowiedzialności za nieodpowiednie bądź wadliwe użytkowanie lub po przeprowadzeniu napraw poprzez nieautoryzowany serwis bądź niekompetentne osoby. Twój nowy zestaw do stylizacji włosów 1 1 Karbownica 2 Prostownica 3 Lokówka 4 Nakładana szczotka 5 Pierścień zwalniający 6 Przełącznik WŁ./WYŁ 7 Okrągła szczotka z aluminium 2 3 7 4 5 6 45 Przed użyciem 1. Usunąć wszystkie materiały opakowaniowe i zabezpieczenia transportowe. Przechowywać materiały opakowaniowe z dala od dzieci ze względu na niebezpieczeństwo uduszenia. 2. Po umyciu dobrze wysuszyć włosy ręcznikiem. 3. Przed użyciem urządzenia nie używać produktów do stylizacji takich jak pianka lub żel do włosów, aby uniknąć zniszczenia włosów. 4. Najlepszy wynik uzyskiwany jest na suchych włosach. Ewentualnie wysuszyć włosy wcześniej suszarką do włosów. 5. Dokładnie wyszczotkować włosy. 6. Aby nałożyć na urządzenie jedną z nasadek, należy postępować w następujący sposób: Upewnić się, czy urządzenie jest wyłączone, a wtyczka wyciągnięta z gniazdka. Przed nałożeniem nasadki oznaczenie na urządzeniu musi być ustawione na symbolu . Po nałożeniu nasadki należy przekręcić pierścień zwalniający na rączce urządzenia aż do pojawienia się symbolu . 7. Wybrana nasadka jest mocno połączona z urządzeniem i stylizacja może zostać rozpoczęta. 8. Aby wymienić nasadkę, należy przekręcić pierścień do ustawienia i zdjąć nasadkę. Zwrócić uwagę na to, że nasadki są po użyciu gorące, dlatego wymieniać nasadki dopiero po ich ochłodzeniu się! Lokówka Lokówka idealnie nadaje się do modelowania małych loków Uwaga! W przypadku bezpośredniego kontaktu ze skórą istnieje ryzyko poparzenia, dlatego też należy się z lokówką bardzo ostrożnie obchodzić! 1. Przygotować włosy w sposób opisany w rozdziale „Przed użyciem“. 2. Nałożyć lokówkę na urządzenie. 3. Włożyć wtyczkę do gniazdka. 4. Włączyć urządzenie przyciskiem WŁ./WYŁ. 5. Na urządzeniu zapala się kontrolka. 6. Odczekać kilka minut do ogrzania się urządzenia, aby osiągnąć optymalny wynik stylizacji. 7. Podzielić uczesane włosy na pasma o szerokości maksymalnie 5 cm. W razie potrzeby rozdzielić pasma włosów spinkami do włosów. 8. Otworzyć zacisk lokówki i włożyć końcówkę pasma włosów między zacisk a element grzejny. 9. Ponownie zamknąć zacisk. 10.Owinąć pasmo włosów wokół lokówki aż do nasady. 11.Pozostawić pasmo włosów w lokówce aż zrobi się ciepłe. 12.Delikatnie odwinąć pasmo włosów i otworzyć zawias, aby zsunąć włosy z urządzenia. 13.Powtórzyć kroki od 6 do 12, aby wykonać stylizację pozostałych włosów. 14.Przed ułożeniem włosów grzebieniem, szczotką lub palcami odczekać, aż włosy trochę się ochłodzą. 15.Wyłączyć urządzenie naciskając przycisk WŁ./WYŁ. i wyciągnąć wtyczkę z gniazdka. 16.Zwrócić uwagę na to, że nasadki i urządzenie są po użyciu bardzo gorące. Aby uniknąć poparzenia, należy wymieniać nasadki dopiero po ich ochłodzeniu się. Nakładana szczotka Nakładana szczotka idealnie nadaje się do modelowania dużych loków. 1. Przygotować włosy w sposób opisany w rozdziale „Przed użyciem“. 2. Nałożyć lokówkę na urządzenie. Nałożyć szczotkę na zamkniętą lokówkę, aż do jej zatrzaśnięcia się. Uwaga! Na nakładanej szczotce widoczna jest strzałka, wskazująca stronę, którą szczotka ma być włożona na lokówkę. 46 3. Włożyć wtyczkę do gniazdka. 4. Włączyć urządzenie przyciskiem WŁ./WYŁ. 5. Odczekać kilka minut do ogrzania się urządzenia, aby osiągnąć optymalny wynik stylizacji. 6. Podzielić uczesane włosy na pasma o szerokości maksymalnie 5 cm. W razie potrzeby rozdzielić pasma włosów spinkami do włosów. 7. Owinąć pasmo włosów wokół okrągłej szczotki rozpoczynając od końcówek włosów. 8. Pozostawić pasmo włosów na szczotce aż zrobi się ciepłe. 9. Ostrożnie odwinąć pasmo włosów. Nie zsuwać pasma włosów ze szczotki, gdyż zniszczony zostanie wówczas zamierzony efekt stylizacji. 10.Powtórzyć kroki od 6 do 9, aby wykonać stylizację pozostałych włosów. 11.Wyłączyć urządzenie naciskając przycisk WŁ./WYŁ. i wyciągnąć wtyczkę z gniazdka. Zwrócić uwagę na to, że nasadki i urządzenie są po użyciu bardzo gorące. Aby uniknąć poparzenia, należy wymieniać nasadki dopiero po ich ochłodzeniu się. Okrągła szczotka z aluminium Okrągła szczotka idealnie nadaje się do stylizacji krótkich do średnio-długich włosów oraz do nadania włosom większej objętości. 1. Przygotować włosy w sposób opisany w rozdziale „Przed użyciem“. 2. Nałożyć okrągłą szczotkę na urządzenie. 3. Włożyć wtyczkę do gniazdka. 4. Włączyć urządzenie przyciskiem WŁ./WYŁ. 5. Odczekać kilka minut do ogrzania się urządzenia, aby osiągnąć optymalny wynik stylizacji. 6. Podzielić uczesane włosy na pasma o szerokości maksymalnie 5 cm. W razie potrzeby rozdzielić pasma włosów spinkami do włosów. 7. Owinąć pasmo włosów wokół okrągłej szczotki rozpoczynając od końcówek włosów. 8. Pozostawić pasmo włosów na szczotce aż zrobi się ciepłe. 9. Ostrożnie odwinąć pasmo włosów. Nie zsuwać pasma włosów ze szczotki, gdyż zniszczony zostanie wówczas zamierzony efekt stylizacji. 10.Powtórzyć kroki od 6 do 9, aby wykonać stylizację pozostałych włosów. 11.Wyłączyć urządzenie naciskając przycisk WŁ./WYŁ. i wyciągnąć wtyczkę z gniazdka. Zwrócić uwagę na to, że nasadki są po użyciu bardzo gorące. Aby uniknąć poparzenia, należy wymieniać nasadki dopiero po ich ochłodzeniu się. 47 Prostownica/karbownica Płytki tej nasadki mają jedną gładką i jedną karbowaną powierzchnię. W zależności od zamierzonego efektu stylizacji należy wyciągnąć płytki z nasadki i obrócić je, po czym ponownie włożyć do nasadki, aż do ich zatrzaśnięcia się. Płytki prostujące pokryte są ceramiczną powłoką, chroniącą włosy przed zniszczeniem. Pomimo tego nie należy włosów za często prostować. Dotyczy to zwłaszcza włosów farbowanych lub po zabiegach chemicznych (jak np. trwała ondulacja). Przed prostowaniem włosów nie używać żadnych produktów stylizacyjnych takich jak lakier do włosów, aby uniknąć zniszczenia włosów. Przy użyciu płytek prostujących (o gładkiej stronie) można włosy delikatnie prostować. Przy użyciu płytek karbujących (o karbowanej stronie) można włosy karbować. 1. Przygotować włosy w sposób opisany w rozdziale „Przed użyciem“. 2. Uwaga! Przed rozpoczęciem prostowania włosy powinny być suche. Prostowanie wilgotnych włosów prowadzi do ich zniszczenia. Dlatego też należy włosy wysuszyć wcześniej na przykład suszarką do włosów. 3. Nałożyć nasadkę na urządzenie. Sprawdzić, czy płytki są włożone odpowiednią stroną. 4. Włożyć wtyczkę do gniazdka. Prostownica: 5. Podzielić uczesane włosy na pasma o szerokości maksymalnie 5 cm. W razie potrzeby rozdzielić pasma włosów spinkami do włosów. 6. Włączyć urządzenie przyciskiem WŁ./WYŁ. 7. Odczekać kilka minut do ogrzania się urządzenia, aby osiągnąć optymalny wynik stylizacji. 8. Otworzyć urządzenie i włożyć pasmo włosów tuż przy nasadzie między obydwie płytki prostujące. 9. Ponownie zamknąć urządzenie. 10.Przesunąć urządzenie powoli i równomiernie aż do końca włosów. Urządzenie powinno być przy tym zamknięte. Nie zatrzymywać się w jednym miejscu przed dłużej niż 2 sekundy, aby uniknąć zniszczenia włosów. Dla uzyskania gładkich, przylegających do głowy włosów, należy podczas prostowania przytrzymywać pasma blisko głowy. Przez uniesienie urządzenia uzyskana zostaje fryzura pełna objętości. 11.Wyłączyć urządzenie naciskając przycisk WŁ./WYŁ. i wyciągnąć wtyczkę z gniazdka. 12.Nie szczotkować i nie czesać włosów, gdyż może to prowadzić do zniszczenia fryzury. Ewentualnie ułożyć włosy palcami. 13.Zwrócić uwagę na to, że nasadki są po użyciu bardzo gorące. Aby uniknąć poparzenia, należy wymieniać nasadki dopiero po ich ochłodzeniu się. 48 Karbownica: 1. Podzielić uczesane włosy na pasma o szerokości maksymalnie 5 cm. W razie potrzeby rozdzielić pasma włosów spinkami do włosów. 2. Włączyć urządzenie przyciskiem WŁ./WYŁ. 3. Odczekać kilka minut do ogrzania się urządzenia, aby osiągnąć optymalny wynik stylizacji. 4. Otworzyć urządzenie i włożyć pasmo włosów tuż przy nasadzie między obydwie płytki karbujące. 5. Ponownie zamknąć urządzenie. 6. Przytrzymać urządzenie zamknięte przez ok. 5-10 sekund. Otworzyć urządzenie i sprawdzić, czy uzyskany został zamierzony efekt stylizacji. Jeżeli nie, powtórzyć. 7. Używać urządzenia w ten sposób rozpoczynając u nasady i przesuwając je w dół włosów. 8. Powtórzyć kroki od 3 do 6, aby wykonać stylizację pozostałych włosów. 9. Wyłączyć urządzenie naciskając przycisk WŁ./WYŁ. i wyciągnąć wtyczkę z gniazdka. 10.Nie szczotkować i nie czesać włosów, gdyż może to prowadzić do zniszczenia fryzury. Ewentualnie ułożyć włosy palcami. 11.Zwrócić uwagę na to, że nasadki są po użyciu bardzo gorące. Aby uniknąć poparzenia, należy wymieniać nasadki dopiero po ich ochłodzeniu się. 12.Porada: Za pomocą prostownicy do włosów możliwe jest również uzyskanie fali! Włożyć pasmo włosów do prostownicy i rozpocząć prostowanie włosów. Na krótko przed osiągnięciem końca pasma włosów obrócić urządzenie do wewnątrz lub na zewnątrz (w zależności od rodzaju żądanej fali), aby uzyskać łagodny skręt. Czyszczenie i pielęgnacja 1. Wyciągnąć wtyczkę z gniazdka sieciowego. 2. Odczekać do całkowitego schłodzenia urządzenia i nasadek. W tym celu położyć je na podstawę odporną na wysoką temperaturę. 3. Nigdy nie zanurzać urządzenia do czyszczenia w wodzie lub innej cieczy. 4. Wycierać urządzenie wilgotną ściereczką. 5. Nie używać szorstkich gąbek, środków do szorowania, wełny stalowej, metalowych przedmiotów, środków odkażających lub gorących środków do czyszczenia, gdyż mogą one prowadzić do uszkodzenia urządzenia. 6. Nasadki czyścić w razie potrzeby wilgotną ściereczką. Odczekać do całkowitego wysuszenia nasadek przed ich ponownym użyciem lub przechowywaniem. Przechowywanie 1. Wyciągnąć wtyczkę z gniazdka sieciowego. 2. Odczekać do całkowitego schłodzenia urządzenia i nasadek. W tym celu położyć je na podstawę odporną na wysoką temperaturę. 3. Nie owijać przewodu doprowadzającego wokół urządzenia, aby uniknąć uszkodzenia przewodu. 4. Chronić urządzenie przed kurzem. 49 GARANTIEBESTIMMUNGEN Wir gewähren auf unsere Geräte eine Garantie von 24 Monaten, bei gewerblichem Gebrauch 12 Monate, ab dem Kaufdatum für Schäden, die bei bestimmungsgemäßem Gebrauch nachweislich auf Werksfehler zurückzuführen sind. Innerhalb der Garantiezeit beheben wir Material- und Herstellungsfehler nach unserem Ermessen durch Reparatur oder Umtausch. Unsere Garantieleistungen gelten ausschließlich für in Deutschland und Österreich verkaufte Geräte. Bei anderen Ländern wenden Sie sich bitte an den zuständigen Importeur. Geräte, für die eine Mängelbeseitigung beansprucht wird, senden Sie bitte zusammen mit einer Kopie des maschinell erstellten Kaufbelegs, aus dem das Kaufdatum ersichtlich sein muss, sowie einer Fehlerbeschreibung gut verpackt und freigemacht an unseren Kundendienst. Im Garantiefall werden dem Kunden entstandene Versandkosten zurückerstattet. Von der Garantie ausgeschlossen sind Schäden durch Verschleiß, unsachgemäße Handhabung und Nichteinhaltung der Wartungs- und Pflegeanweisungen. Der Garantieanspruch erlischt, wenn Reparaturen oder Eingriffe am Gerät von dritter Stelle vorgenommen werden. Eventuelle Ansprüche des Endverbrauchers gegenüber dem Verkäufer oder Händler werden durch diese Garantie nicht eingeschränkt. Guarantee Conditions We guarantee our appliances for 24 months, or in case of commercial use for 12 months, from the date of purchase in case of defects that occur during normal use and are demonstrably due to a factory fault. Within the warranty period we will remedy defective materials or workmanship through repair or replacement, at our option. Our warranty terms apply only to appliances sold in Germany and Austria. For other countries, please contact the responsible importer. In the event of a claim for remedy of defects, please send the appliance to our after sales service, properly packaged and postage paid, together with a copy of the automatically generated sales receipt, which must show the date of purchase, and a description of the defect. If the defect is covered by the warranty, the customer will be reimbursed for the shipping costs. The warranty does not cover damage from normal wear, improper handling and failure to comply with the maintenance and care instructions. The warranty is void if repairs or modifications are made to the appliance by third parties. Any claims of the end consumer vis-à-vis the retailer are not limited by this warranty. Conditions de Garantie Les défauts de l’appareil qui se produisent malgré l’utilisation correcte suite à une faute de l‘usine et dont nous sommes informés immédiatement après qu’ils soient constatés dans les 24 mois après la livraison aux preneur final, seront réparés gratuitement. Notre garantie n’est valide que pour les appareils vendus en Allemagne et en Autriche. Dans tout autre pays veuillez contacter l’importateur. Veuillez envoyer à notre adresse les appareils, pour lesquels vous réclamez une suppression de défauts, avec le bon d’achat montrant la date d’achat, port payé et proprement emballé. Les coûts de transport seront remboursés en cas de garantie en Allemagne et en Autriche. Les défauts causés par usure, utilisation incorrecte ou non-respect des instructions de maintenance sont exclus. Notre obligation de garantie cesse, si de réparations ou des interventions sont accomplies par des tiers. Cette garantie n’affecte pas les droits du consommateur contre le commerçant. Garantievoorwaarden Wij geven op onze apparaten een garantietermijn van 24 maanden, gerekend vanaf de dag van aanschaf. Deze garantie geldt voor schade, die bij correct gebruik aantoonbaar is veroorzaakt door een fout in de productie. Binnen de garantietermijn verhelpen wij materiaal- en productiefouten door herstelling of vervanging naar onze keuze. Onze garantie is slechts geldig voor in Duitsland en Oostenrijk verkopte apparaten. In andere landen a.u.b. de importeur aanspreken. Apparaaten, waarvoor garantie in aanspraak wordt genomen, moeten ons samen met een kopie van de machineel gegenereerde kassabon waaruit de koopdatum duidelijk wordt, alsmede een beschrijving van de fout goed verpakt aan onze klantenservice worden toegezonden, porto betaald. Als er sprake van garantie is, worden de verzendingskosten in Duitsland en Oostenrijk aan de klant vergoed. De garantie dekt geen schade veroorzaakt door slijtage, onbehoorlijk gebruik/foutieve handelingen en niet-naleving van de onderhouds- en reinigingsaanwijzingen. Het recht op garantie vervalt, wanneer reparaties of manipulaties aan het apparaat door derden worden doorgevoerd. Eventuele rechten van de eindgebruiker t.o.v. de verkoper of distributeur worden door deze garantie niet aangetast. 50 Norme die garanzia I nostri prodotti sono garantiti per 24 mesi dalla data di acquisto per i guasti manifestatisi durante un utilizzo conforme alle disposizioni e attribuibili in modo dimostrabile a difetti di fabbricazione. Nel periodo di garanzia porremo rimedio ai difetti materiali e di produzione secondo la nostra valutazione, procedendo alla riparazione o alla sostituzione dell’apparecchio. Le nostre prestazioni di garanzia valgono esclusivamente per gli apparecchi venduti in Germania e Austria. In tutti gli altri casi rivolgersi all‘importatore. Gli apparecchi per i quali si richiede la riparazione di guasti ci devono essere inviati con spedizione affrancata e debitamente imballati, unitamente a una copia del documento di acquisto redatto a macchina dal quale risulti la data di vendita, nonché la descrizione del guasto. In caso di garanzia al cliente verranno rimborsati i costi di spedizione sostenuti. Sono esclusi dalla garanzia i guasti dovuti all’usura, all’uso inappropriato o al mancato rispetto delle regole di manutenzione. Il diritto di garanzia decade qualora siano state effettuate riparazioni o interventi da parte di terzi. Eventuali diritti del consumatore finale verso il venditore o negoziante non vengono limitati dalla presente garanzia. Condiciones de Garantia Otorgamos garantía de 24 meses sobre nuestros aparatos a partir de la fecha de compra por daños que durante su uso comprabadamente tengan que ver con errores de fábrica. Dentro del período de garantía, solucionamos errores de material y de fabricación a consideración nuestra mediante reparación o cambio. Nuestros servicios de garantía son válidos únicamente para los aparatos que han sido vendidos en Alemania y Austria. Para todos los demás casos diríjase por favor al importador correspondiente. Aquellos aparatos que se presentan para eliminar errores, por favor enviarlos junto a una copia del comprobante de compra extendido a máquina, del cual debe desprenderse la fecha de compra, así como una breve descripción de las deficiencias, apropiadamente embalado y con los sellos correspondientes a nuestro servicio al cliente. En caso de garantía, los gastos de envío serán restituidos al cliente. Aquellos daños causados por desgaste están excluidos de la garantía, así como manipulación incorrecta, e incumplimiento de las condiciones de mantenimiento y cuidado. El derecho a garantía expira si las reparaciones o mantenimiento son realizadas por terceros. Todo reclamo del consumidor final ante el vendedor, comerciante no se ve afectado por esta garantía. Záruční podmínky Na naše přístroje poskytujeme záruku v trvání 24 měsíců od data koupě výrobku, záruka se vztahuje na poškození, která prokazatelne vznikla při správném použití v důsledku výrobních vad. Po dobu záruky budeme odstraňovat materiální i výrobní vady opravou nebo výměnou podle našeho uvážení. Poskytnutí záruky výhradně platí pro zařízení prodány v Německu i Rakousku. V jiných zemích se obrat’te prosím na kompetentní dovozce. Přístroje, na které bylo uplatňováno odstranění vad, zašlete prosím s mechanicky vyhotovenou kopií nákupního dokladu, ze kterého musí být bezpodmínečně patrný datum nákupu i s popisem vad, přístroj musí být bezpečně zabalen a nafrankován na náš záruční servis. V připadě opravněné záruky jsou kupujícím vraceny poštovní poplatky. Tato záruka se nevztahuje na poškození způsobená opotřebením, nesprávným zacházením a nedodržováním návodů k údržbě a obsluze. Záruční doba zaniká, když opravy nebo manipulace s přístrojem byly provedeny třetí osobou. Eventuální nároky zákazníka vůči prodejci/obchodníku nejsou touhle zárukou omezeny. Warunki gwarancji Udzielamy na nasze produkty 24 miesięcznej gwarancji od daty zakupu (warunkiem jest zachowanie faktury zakupu lub paragonu) na szkody, które przy użytkowaniu zgodnym z przeznaczeniem wskazują na wadę fabryczną. W czasie trwania gwarancji usuniemy wady materiałowe bądź fabryczne zgodnie z naszym osądem poprzez naprawę lub wymianę. Gwarancja udzielana jest na produkty sprzedawane na terenie Polski, Niemiec i Austrii. W innych krajach proszę zwrócić się do właściwego Importera. Urządzenia, w których wymagane jest usunięcie wady, proszę przesłać razem z kopią faktury zakupu, na której musi być widoczna data zakupu, z załączonym opisem wady, w oryginalnym pudełku, dobrze zapakowane i na własny koszt na adres serwisu: Digitalo.pl Sp. z o.o., ul. Raszyńska 54, 05-090 Raszyn. Gwarancja nie obejmuje szkód wynikających ze zużycia, użytkowania niezgodnie z przeznaczeniem i nieprzestrzegania wskazówek dotyczących konserwacji i pielęgnacji. Roszczenie gwarancji wygasa, jeżeli naprawa bądź otwarcie przedmiotu będą przeprowadzone przez stronę trzecią. Ewentualne roszczenia użytkownika końcowego wobec sprzedawcy/dealera nie są ograniczone tą gwarancją. 51 Service-Adressen Deutschland Mannheimer Straße 4 68766 Hockenheim Österreich Reparaturabwicklung, Ersatzteile: Reparatur-Annahme Österreich ESC Electronic Service Center GmbH Molitorgasse 15 A-1110 Wien Telefon +43 (0) 1/9 71 70 59 Telefax +43 (0) 1/9 71 70 59 E-Mail [email protected] Schweiz MENAGROS SA Route der Servion CH - 1083 Mezières Telefon +41 (0) 21 9 03 01-15 Telefax +41 (0) 21 9 03 01-11 E-Mail [email protected] Internet www.menagros.ch Polen „Quadra-net“ Sp. z o.o. Skadowa 5 61-888 Poznan Skadowa 5 Internet www.quadra-net.pl 52 Kundendienst Telefon +49 (0) 62 05/94 18-27 Telefax +49 (0) 62 05/94 18-22 E-Mail [email protected] Internet www.unold.de Bestellformular Bitte senden Sie das ausgefüllte Bestellformular an: Abteilung Service Mannheimer Straße 4 68766 Hockenheim Anrede / Title Telefon +49 (0) 62 05/94 18-27 Telefax +49 (0) 62 05/94 18-22 E-Mail [email protected] Internet www.unold.de Telefon Phone No. Vorname / First name Name / Surname Telefax Fax No. Straße/Nr. / Street/No. PLZ/Ort / City E-Mail BESTELLUNG / ORDER 87515 Stück Art.-Nr. Bezeichnung Preis €*/ Stück Gesamtpreis € Bürste Lockenzange Bürstenaufsatz Alu-Rundbürste Haarglätterplatten (2 Stück) Haarcrimperplatten (2 Stück) Preise nur gültig bei Bestellungen direkt aus Deutschland. Bei Bestellungen aus anderen Ländern wenden Sie sich bitte direkt an unseren Kundenservice oder Ihren Händler. Preise verstehen sich inkl. Versand und gesetz. MwSt. 53 Entsorgung / Umweltschutz Unsere Geräte werden auf hohem Qualitätsniveau für eine lange Nutzungsdauer hergestellt. Regelmäßige Wartung und fachgerechte Reparaturen durch unseren Kundendienst können die Nutzungsdauer des Gerätes verlängern. Wenn ein Gerät defekt und nicht mehr zu reparieren ist, beachten Sie bitte: Dieses Produkt darf nicht zusammen mit dem normalen Hausmüll entsorgt werden. Sie müssen dieses Produkt an einer ausgewiesenen Sammelstelle zum Recycling von elektrischen oder elektronischen Geräten abliefern. Durch das separate Sammeln und Recyceln von Abfallprodukten helfen Sie mit, die natürlichen Ressourcen zu schonen und stellen sicher, dass das Produkt in gesundheits- und umweltverträglicher Weise entsorgt wird. Waste Disposal / Environmental Protection Our appliances are produced on a high quality level for a long lifetime. Regular maintenance and expert repairs by our aftersales service can extend the useful life of the appliance. If an appliance is defective and repair is not possible we ask you to follow the following instructions for disposal. Do not dispose this appliance together with your standard household waste. Please bring this product to an approved collection point for recycling of electric and electronic products. By separate collection and disposal of waste products you help to protect natural resources and ensure, that the product is disposed in an adequate way to protect health and environment. Traitement des déchets / Protection de l’environnement Nos appareils sont produits selon un standard élevé de qualité pour une longue durée d’utilisation. Un entretien régulier et des réparations compétentes par notre service après-vente prolongent cette durée d’utilisation. Si néanmoins l’appareil est endommagé et ne peut plus être réparé, veuillez suivre les instructions suivantes. Ne jamais disposer ce produit avec les dégâts de ménage. Apportez ce produit à une station de collection pour récupération de produits électriques et électroniques. Par la collection séparée vous aidez à protéger les ressources naturelles et prenez soin, que le produit est démonté sans risque pour la santé et l’environnement. Verwijderen van afval / Milieubescherming Onze apparaten zijn geproduceerd met een hoge qualiteit voor een lange gebruik. Regelmatige onderhoud en vakkundig reparaties door onze klantenservice verlengt de gebruiksduur. Wanneer het apparat defekt is en kan niet meer gerepareerd worden, let op de volgende instructies. Dit product mag niet samen met het normale huishoudelijke afval worden afgevoerd. U dient dit product bij een voor het recycleren van elektrische of elektronische apparaten aangewezen verzamelplaats in te leveren. Door het separaat inzamelen en recycleren van afvalproducten helpt u mee bij het zuinig omgaan met de natuurlijke hulpbronnen en zorgt u ervoor dat het product op een gezondheids- en milieuvriendelijke manier afgevoerd wordt. 54 Smaltimento / Tutela dell’ambiente I nostri apparecchi vengono prodotti rispettando un elevato standard qualitativo per una lunga durata di utilizzo. Una corretta manutenzione e riparazioni adeguate a cura dal nostro servizio clienti possono prolungare la durata di utilizzo del prodotto. Se un apparecchio è difettoso e non più riparabile, per il suo smaltimento si presti attenzione ai punti che seguono. Questo prodotto non deve essere smaltito unitamente ai comuni rifiuti domestici. Consegnare il prodotto a un centro di raccolta per il riciclaggio dei rifiuti elettrici o elettronici. Con la raccolta differenziata dei rifiuti e dei prodotti riciclabili è possibile contribuire alla tutela delle risorse naturali e far smaltire il prodotto nel rispetto dell’ambiente e della salute. Disposición / Protección del medio ambientE Nuestros aparatos se fabrican con un alto nivel de calidad por un largo período de uso. El mantenimiento regular y las reparaciones de tipo técnico a través de nuestro servicio al cliente pueden prolongar la duración del aparato. Cuando un aparato está defectuoso y ya no puede repararse, por favor considere en la disposición final los siguientes puntos: Este producto no puede ser eliminado junto a la basura domiciliaria. Usted debe entregar este producto a un lugar oficial para el reciclaje de aparatos eléctricos o electrónicos. Mediante la clasificación por separado y el reciclaje de productos residuales, Usted contribuye a proteger los recursos naturales y asegura que el producto sea eliminado de forma salubre y acorde con el medio ambiente. Likvidace / Ochrana životného prostředí Naše vyrobené přístroje mají vysoce kvalitní standard pro zajišt’ění jejich dlouhé životnosti. Pravidelné údržby i opravy odborně provedeny naším prodejním servisem mohou mít vliv na prodloužení provozní životnosti přístroje. Když je přístroj vadný a už ho nelze opravit, neopomeňte prosím: Toto zařízení nepatří do běžného domovního odpadku, ale musí být předáno do autorizované sběrny pro recyklování elektrických nebo elektronických zařízení. Separátní sběr a recyklování odpadních produktů umožňuje šetření přírodních zdrojů a zajišt’uje, aby byly odpady likvidovány způsobem, který je pro zdraví a kologii přijatelný. Utylizacja / ochrona środowiska Nasze urządzenia wyprodukowane zostały na wysokim poziomie do długiego użytkowania. Regularna konserwacja i fachowe naprawy poprzez nasz serwis mogą wydłużyć pracę urządzenia. W razie kiedy urządzenie jest uszkodzone i nie nadaje się do naprawy, proszę przestrzegać zaleceń: Ten produkt nie może być zutylizowany razem z normalnymi odpadami domowymi. Muszą Państwo dostarczyć ten produkt do zbiorczego punktu recyklingowego dla urządzeń elektrycznych i elektronicznych. Poprzez oddzielne zbieranie i recykling odpadów pomagają Państwo chronić naturalne zasoby i sprawiają, że ten produkt będzie zutylizowany w sposób bezpieczny dla zdrowia i środowiska naturalnego. 55 Aus dem Hause