1
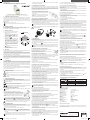
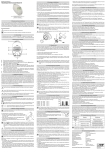
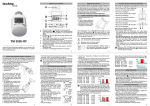
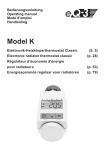
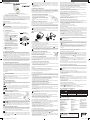
Bedienungsanleitung
Das Wochenprogramm und andere Einstellungen können vor der Montage angepasst werden. Drücken Sie dazu die Mode/Menu-Taste, während in der Anzeige „InS“ steht. Mehr Details finden Sie ab Abschnitt „13. Steuerung und
Konfiguration“.
• Nach abgeschlossener Programmierung steht erneut „InS“ im Display und die
Montage kann erfolgen.
eQ-3 BLUETOOTH ® Smart Heizkörperthermostat
10. Montage am Heizkörper
Die Montage des Heizkörperthermostaten ist einfach und kann ohne Ablassen von
Heizungswasser oder Eingriff in das Heizungssystem erfolgen. Spezialwerkzeug
oder ein Abschalten der Heizung sind nicht erforderlich. Die am Heizkörperthermostat angebrachte Überwurfmutter ist universell einsetzbar und ohne Zubehör passend für alle gängigen Ventile mit dem Gewindemaß M30 x 1,5 mm.
1. Ausgabe Deutsch 04/2015 / Dokumentation © 2015 eQ-3 AG, Deutschland.
Alle Rechte vorbehalten. / CC-RT-BLE-SB, V1.1, Art-Nr. 142279
Swissbrands GmbH / Romain-Rolland-Str. 14-24 / 13089 Berlin / Germany / www.swissbrands.com
Lesen Sie diese Anleitung vollständig und sorgfältig, bevor Sie das Gerät in Betrieb
nehmen. Sie enthält zahlreiche Hinweise zum bestimmungsgemäßen Einsatz des
Gerätes. Beachten Sie insbesondere die Sicherheitshinweise. Bewahren Sie die
Anleitung zum späteren Nachschlagen auf. Wenn Sie das Gerät anderen Personen
zur Nutzung überlassen, übergeben Sie bitte auch diese Anleitung.
• Drehen Sie den Thermostatkopf auf den Maximalwert (gegen den Uhrzeigersinn). Der Thermostatkopf drückt jetzt nicht mehr auf die Ventilspindel
und kann so leichter demontiert werden.
• Entfernen Sie den alten Thermostatkopf. Setzen
Sie bei Bedarf den beiliegenden Stützring oder
Adapter auf.
• Montieren Sie den Heizkörperthermostat auf das
Ventil.
Benutzte Symbole:
Achtung! Hier wird auf eine Gefahr hingewiesen.
10.1 Stützring und Adapter für Danfoss
1. Hinweise zu dieser Anleitung
Bei Bedarf legen Sie den beiliegenden Stützring (I) vor der Montage in den Flansch
des Gerätes ein, um einen festeren Sitz am Ventil zu ermöglichen.
Zur Montage auf Danfoss RA-Ventile kann der beiliegende Adapter verwendet werden. Die Ventilkörper von Danfoss weisen umlaufend längliche Einkerbungen (K)
auf, die auch einen besseren Sitz des Adapters nach dem Aufrasten gewährleisten.
Hinweis. Dieser Abschnitt enthält zusätzliche wichtige Informationen.
2. Lieferumfang
1x Heizkörperthermostat, 1x Adapter Danfoss RA, 1x Stützring, 1x Mutter M4,
1x Zylinderkopfschraube M4 x 12 mm, 2x 1,5 V Mignon/LR6/AA, 3x Bedienungsanleitung in Deutsch/Englisch, Französisch/Niederländisch, Polnisch/Italienisch
K
3. Geräteübersicht
A Überwurfmutter zur Montage am
Heizungsventil
Achten Sie bei der Montage darauf, dass die Zapfen im Inneren des Adapters
(J) eine deckungsgleiche Position zu den Einkerbungen (K) am Ventil haben.
Rasten Sie den Adapter vollständig auf.
Achten Sie bei der Montage darauf, sich nicht die Finger zwischen den Adapterhälften einzuklemmen!
A
B Eingestellte Schaltzeiträume im Wochenprogramm
C Absenk-/Komfort-Temperatur ( ), Fenster-auf-Funktion ( ), Manueller Betrieb
(Manu), Automatikbetrieb (Auto)
D Urlaubsfunktion (
rie-leer-Symbol (
), Wochentag, Batte)
E Mode-/Menu-Taste: Wechsel zwischen
Automatikbetrieb, manuellen Betrieb und
Urlaubsfunktion (Taste kurz drücken);
Öffnen des Konfigurationsmenüs (Taste
mind. 3 Sekunden drücken)
F
G
J
B
C
D
H
I
G
E
Stellrad: Einstellungen vornehmen, z. B.
Temperatur (durch Drehen des Stellrads),
Aktivierung der Boost-Funktion und Bestätigen bzw. Speichern von Einstellungen
im Menü (kurzes Drücken des Stellrads)
F
-Taste: Umschalten zwischen Absenk-/
Komfort-Temperatur
H Temperaturanzeige, Zeit-/Datumsanzeige,
Menüpunkte, Funktionen
4. Allgemeine Funktion
Der elektrische BLUETOOTH ® Smart Heizkörperthermostat ermöglicht eine zeitgesteuerte Regulierung der Raumtemperatur über eine intuitiv bedienbare App.
Die kostenlose App „calor BT“ ist für iOS- und Android-Smartphones verfügbar. Der
Heizkörperthermostat dient zur Regulierung einzelner Heizkörper bzw. der Raumtemperatur.
Durch vorprogrammierte oder individuelle Heiz- und Absenkphasen kann die gewünschte Temperatur komfortabel eingestellt werden.
Der Heizkörperthermostat passt auf alle gängigen Heizkörperventile und ist einfach
zu montieren - ohne Ablassen von Heizungswasser oder einen Eingriff in das Heizungssystem. Die Boost-Funktion ermöglicht ein schnelles, kurzzeitiges Aufheizen
des Heizkörpers durch vollständige Öffnung des Ventils. Durch eine automatische
„Fenster-auf-Erkennung“ wird zusätzlich Energie während des Lüftens gespart.
5. Bestimmungsgemäßer Einsatz
Der Heizkörperthermostat dient zum Regulieren eines gängigen Heizkörperventils.
Betreiben Sie das Gerät nur in Innenräumen und vermeiden Sie den Einfluss von
Feuchtigkeit, Staub sowie Sonnen- oder Wärmebestrahlung. Jeder andere Einsatz
als der in dieser Bedienungsanleitung beschriebene ist nicht bestimmungsgemäß
und führt zu Garantie- und Haftungsausschluss. Dies gilt auch für Umbauten und
Veränderungen. Das Gerät ist ausschließlich für den privaten Gebrauch gedacht.
Hiermit erklärt die eQ-3 AG, dass sich dieses Gerät in Übereinstimmung mit den
grundlegenden Anforderungen und den anderen relevanten Vorschriften der Richtlinie 1999/5/EG befindet. Die vollständige Konformitätserklärung finden Sie unter
www.eQ-3.de.
6. Sicherheitshinweise
Das Gerät ist kein Spielzeug; erlauben Sie Kindern nicht damit zu spielen.
Lassen Sie Verpackungsmaterial nicht achtlos liegen. Dies kann für Kinder zu
einem gefährlichen Spielzeug werden.
Öffnen Sie das Gerät nicht, es enthält keine durch den Anwender zu wartenden Teile. Im Fehlerfall lassen Sie das Gerät von einer Fachkraft prüfen.
7.
Entsorgungshinweise
Gerät nicht im Hausmüll entsorgen!
Elektronische Geräte sind entsprechend der Richtlinie über Elektro- und
Elektronik-Altgeräte über die örtlichen Sammelstellen für Elektronik-Altgeräte zu entsorgen!
Das CE-Zeichen ist ein Freiverkehrszeichen, das sich ausschließlich an die
Behörden wendet und keine Zusicherung von Eigenschaften beinhaltet.
Verbrauchte Batterien gehören nicht in den Hausmüll! Entsorgen Sie
diese in Ihrer örtlichen Batteriesammelstelle!
8. Batterien einlegen (wechseln)
Im Auslieferungszustand sind die Batterien bereits eingelegt. Entfernen Sie
einfach den Isolierstreifen.
Um die Batterien zu wechseln, gehen Sie wie folgt vor:
• Drücken Sie den Batteriefachdeckel an den Einkerbungen
auf beiden Seiten mit den Fingern ein und ziehen Sie ihn
nach unten ab.
• Legen Sie 2 neue Batterien vom Typ LR6/Mignon/AA
(1,5 V) polungsrichtig in das Batteriefach ein.
• Setzen Sie den Batteriefachdeckel wieder auf und rasten
Sie ihn ein.
Die Lebensdauer neuer Alkaline Batterien beträgt ca. 2 Jahre. Ein Batteriesym) im Display weist darauf hin, dass die Batterien auszutauschen sind.
bol (
Nach Entnahme der leeren Batterien sollte bis zum Einlegen der neuen Batterien ca. 1 Minute gewartet werden. Ein Betrieb mit Akkus ist nicht möglich.
Normale Batterien dürfen niemals aufgeladen werden. Es besteht Explosionsgefahr. Batterien nicht ins Feuer werfen! Batterien nicht kurzschließen!
9. Datum und Uhrzeit einstellen
Wenn Batterien eingelegt wurden, werden nach kurzer Anzeige der Firmware-Versionsnummer und kurzem Motorlauf („InS“) automatisch Datum und Uhrzeit abgefragt.
• Stellen Sie Jahr, Monat, Tag, Stunde und Minute durch Drehen des Stellrads ein
und bestätigen Sie durch kurzes Drücken des Stellrads (F).
Datum und Uhrzeit können Sie auch später im Menü unter „dAt“ einstellen.
Während der Eingabe von Datum und Uhrzeit fährt der Motor den Steuerstift bereits zurück.
• Die Anzeige „InS“ mit drehendem „ “ weist darauf hin, dass der Motor noch zurückfährt. Sobald der Heizkörperthermostat am Ventil montiert werden kann, steht
nur „InS“ im Display.
Swiss CC-RT-BLE_UM_GE_eQ-3_220515.indd 1
11. Adaptierfahrt
Nach dem Einlegen der Batterien und der Montage am Ventil wird zur Anpassung
an das Ventil eine Adaptierfahrt („AdA“) durchgeführt.
• Sobald der Heizkörperthermostat auf dem Ventil montiert wurde, drücken Sie kurz
auf das Stellrad, wenn im Display „InS“ steht.
Während der Adaptierfahrt werden „AdA“ und das Aktivitätssymbol ( ) im Display
angezeigt. In der Zwischenzeit ist keine Bedienung möglich.
Wurde die Adaptierfahrt vor der Montage eingeleitet, drücken Sie kurz auf das
Stellrad und der Motor fährt zurück zur Position „InS“. Wird eine Fehlermeldung
(F1, F2, F3) angezeigt, fährt der Motor ebenfalls zurück zur Position „InS“.
12. Display-Inhalt im Normalbetrieb
Im Normalbetrieb werden Schaltzeiträume, Betriebsmodus,
Soll-Temperatur und Wochentag angezeigt.
Die Balken für Schaltzeiträume des Wochenprogramms werden
für jedes zweite Zeitintervall angezeigt.
13. Steuerung und Konfiguration
Nachdem Sie den Heizkörperthermostat montiert und in Betrieb genommen haben,
kann das Gerät individuell gesteuert und konfiguriert werden. Die Steuerung und
Konfiguration kann entweder per BLUETOOTH ® über die App „calor BT“ oder direkt am Gerät erfolgen.
13.1 Steuerung und Konfiguration über App
Um das Gerät per App zu steuern, gehen Sie wie folgt vor:
• Laden Sie die App „calor BT“ aus dem App Store für iOS oder Android herunter
und installieren Sie diese auf Ihrem Smartphone.
• Folgen Sie den Anweisungen in der App.
Sie können den Heizkörperthermostat anschließend über die App steuern und konfigurieren.
13.2 Steuerung und Konfiguration direkt am Gerät
Um die Steuerung und Konfigurationen direkt am Gerät vorzunehmen, gehen Sie
wie in den nachfolgend beschriebenen Abschnitten vor.
13.2.1 Wochenprogramm (Pro)
Im Wochenprogramm lassen sich für jeden Wochentag separat bis zu 3 Heizphasen (7 Schaltzeitpunkte) einstellen. Die Programmierung erfolgt für die ausgewählten Tage, wobei für einen Zeitraum von 00:00 bis 23:59 Uhr Temperaturen hinterlegt werden können.
• Drücken Sie die Mode-/Menu-Taste mindestens 3 Sekunden. Im Display erscheint
„Pro“. Bestätigen Sie durch kurzes Drücken des Stellrads.
• Im Display erscheint „dAy“. Mit dem Stellrad sind einzelne Wochentage, alle Werktage, das Wochenende oder die gesamte Woche auswählbar.
• Bestätigen Sie durch kurzes Drücken des Stellrads.
• Der erste Schaltzeitpunkt wird angezeigt (0:00). Dieser kann nicht verändert werden. Die Heizzeiten werden als Balken angezeigt.
• Bestätigen Sie durch kurzes Drücken des Stellrads.
• Stellen Sie die Temperatur ein, die ab 0:00 Uhr gewünscht ist.
• Bestätigen Sie durch kurzes Drücken des Stellrads.
• Der nächste Schaltzeitpunkt wird angezeigt. Diesen können Sie individuell anpassen.
• Stellen Sie anschließend die Temperatur ein, die ab der gewünschten Uhrzeit
vorherrschen soll.
• Diesen Vorgang können Sie wiederholen, bis die weiteren gewünschten Temperaturen für den Zeitraum von 0:00 bis 23:59 Uhr hinterlegt sind.
• Sind alle 7 Schaltzeitpunkte belegt, wird 23:59 Uhr als Endzeitpunkt zum Bestätigen angezeigt.
Im Auto-Modus kann die Temperatur jederzeit auch über das Stellrad verändert werden. Die geänderte Temperatur bleibt dann bis zum nächsten Schaltzeitpunkt erhalten.
13.2.2 Datum und Uhrzeit einstellen (dAt)
Über das Menü können jederzeit das Datum und die Uhrzeit angepasst werden.
• Drücken Sie die Mode-/Menu-Taste mindestens 3 Sekunden.
• Wählen Sie mit dem Stellrad den Menüpunkt „dAT“ aus.
• Stellen Sie Jahr, Monat, Tag, Stunde und Minute durch Drehen des Stellrads ein
und bestätigen Sie durch kurzes Drücken des Stellrads.
13.2.3 Umschalten Sommer-/Winterzeit (dSt)
Für den Heizkörperthermostat kann eine automatische Umschaltung zwischen Sommer- und Winterzeit aktiviert bzw. deaktiviert werden. Werkseitig ist die automatische Umschaltung aktiviert.
• Drücken Sie die Mode-/Menu-Taste mindestens 3 Sekunden.
• Wählen Sie mit dem Stellrad den Menüpunkt „dSt“ aus.
• Bestätigen Sie die Auswahl durch kurzes Drücken des Stellrads.
• Im Display erscheint „OFF“, wenn die Funktion deaktiviert werden soll oder „On“,
wenn die Funktion aktiviert werden soll.
• Bestätigen Sie Ihre Auswahl durch kurzes Drücken des Stellrads.
13.2.4 Fenster-auf-Funktion (AEr)
Der Heizkörperthermostat erkennt bei einer stark absinkenden Temperatur automatisch, dass ein Raum gelüftet wird. Um Heizkosten zu sparen, wird dann die Temperatur für einen bestimmten Zeitraum herunter geregelt (werkseitig 15 Minuten). Währenddessen wird im Display das Fenster-auf-Symbol ( ) angezeigt.
• Drücken Sie die Mode-/Menu-Taste mindestens 3 Sekunden.
• Wählen Sie mit dem Stellrad den Menüpunkt „AEr“ und bestätigen Sie durch kurzes Drücken des Stellrads.
• Die Temperatur und die Zeit lassen sich mit dem Stellrad einstellen. Mit der Zeitauswahl „0“ lässt sich die Funktion deaktivieren.
13.2.5 Offset-Temperatur einstellen (tOF)
Da die Temperatur am Heizkörper gemessen wird, kann es an einer anderen Stelle
im Raum kälter oder wärmer sein. Um dies anzugleichen, kann ein Temperatur-Offset von bis zu ±3.5 °C eingestellt werden. Werden z. B. 18 °C anstatt eingestellter
20 °C im Raum erreicht, ist ein Offset von -2.0 °C einzustellen.
• Drücken Sie die Mode-/Menu-Taste mindestens 3 Sekunden.
• Wählen Sie mit dem Stellrad den Menüpunkt „tOF“ aus und bestätigen Sie durch
kurzes Drücken des Stellrads.
• Drehen Sie das Stellrad so lange, bis die gewünschte Temperatur erscheint.
• Bestätigen Sie durch kurzes Drücken des Stellrads.
13.2.6 BLUETOOTH ® aktivieren/deaktivieren (bLE)
Die BLUETOOTH ® Funktion des Heizkörperthermostaten kann manuell aktiviert
bzw. deaktiviert werden.
• Drücken Sie die Mode-/Menu-Taste mindestens 3 Sekunden.
• Wählen Sie mit dem Stellrad den Menüpunkt „bLE“ aus und bestätigen Sie durch
kurzes Drücken des Stellrads.
• Im Display erscheint „OFF“, wenn die Funktion deaktiviert werden soll oder „On“,
wenn die Funktion aktiviert werden soll.
• Bestätigen Sie durch kurzes Drücken des Stellrads.
13.2.7 Werkseinstellungen wiederherstellen (rES)
Die Werkseinstellungen des Heizkörperthermostaten können manuell wieder hergestellt werden. Dabei gehen alle vorgenommenen Einstellungen verloren.
• Drücken Sie die Mode-/Menu-Taste mindestens 3 Sekunden.
• Wählen Sie mit dem Stellrad den Menüpunkt „rES“ aus und bestätigen Sie durch
kurzes Drücken des Stellrads.
• Anschließend erscheint „COnF“ im Display.
• Bestätigen Sie durch kurzes Drücken des Stellrads.
13.2.8 Boost-Funktion
Kommen Sie z. B. früher nach Hause und möchten es schnell warm haben, hilft Ihnen die Boost-Funktion. Bei Aktivierung der Boost-Funktion wird das Heizungsventil
sofort für 5 Minuten auf 80 % geöffnet. Die Erwärmung eines Raumes dauert zwar
länger als 5 Minuten, die vom Heizkörper abgegebene Wärme kann dennoch sofort
wahrgenommen werden.
• Drücken Sie kurz das Stellrad zum Aktivieren der Boost-Funktion.
• Die verbleibende Funktionsdauer wird im Sekundentakt heruntergezählt („b300“
bis „b000“).
• Nach Ablauf dieser 5 Minuten wechselt der Heizkörperthermostat in den vorher
aktiven Modus (Auto/Manu) mit der vorher eingestellten Temperatur.
• Die Funktion lässt sich jederzeit vorzeitig durch Betätigen des Stellrads deaktivieren.
Die Boost-Funktion hat keinen unmittelbaren Effekt, wenn der Heizkörper verdeckt ist (z. B. durch ein Sofa). Die Fenster-auf-Funktion ist während der BoostFunktion deaktiviert.
13.2.9 Urlaubsfunktion einstellen
Die Urlaubsfunktion kann genutzt werden, wenn für einen bestimmten Zeitraum eine
feste Temperatur gehalten werden soll (z. B. während eines Urlaubs oder einer Party).
• Drücken Sie die Mode-/Menu-Taste so oft kurz, bis im Display das Koffersymbol
) erscheint.
(
• Stellen Sie über das Stellrad die Uhrzeit ein, bis zu der die Temperatur gehalten
werden soll und bestätigen Sie durch kurzes Drücken des Stellrads.
• Stellen Sie das Datum ein und bestätigen Sie durch kurzes Drücken des Stellrads.
• Stellen Sie die Temperatur ein und bestätigen Sie durch kurzes Drücken des
Stellrads.
Die eingestellte Temperatur bleibt bis zum vorgegebenen Zeitpunkt bestehen. Danach wechselt der Heizkörperthermostat in den Auto-Modus.
13.2.10 Komfort- und Absenk-Temperatur
) kann zwischen diesen beiden
Über die Taste Komfort-/Absenk-Temperatur (
Temperaturen gewechselt werden. Werkseitig liegen diese bei 21.0 °C (KomfortTemperatur) und 17.0 °C (Absenk-Temperatur).
) für mindestens 3 Sekunden gedrückt.
• Halten Sie die Komfort-/Absenktaste (
• Im Display erscheinen das Sonnensymbol ( ) und die aktuell hinterlegte Komfort-Temperatur.
• Verändern Sie die Temperatur mit dem Stellrad und bestätigen Sie durch kurzes
Drücken des Stellrads.
• Im Display erscheinen das Mondsymbol ( ) und die Absenk-Temperatur.
• Verändern Sie die Temperatur mit dem Stellrad und bestätigen Sie durch kurzes
Drücken des Stellrads.
Auch im Auto-Modus kann die Temperatur über die Taste jederzeit geändert werden. Diese bleibt dann bis zum nächsten Schaltzeitpunkt des Programms erhalten.
13.2.11 Heizpause aktivieren (Batterieschonung)
Ist die Heizung im Sommer abgeschaltet, können die Batterien geschont werden.
Dazu wird das Ventil ganz geöffnet. Der Verkalkungsschutz wird weiter durchgeführt.
Um Batterien zu schonen, kann zudem die BLUETOOTH ® Funktion deaktiviert
werden (siehe Abschnitt „13.2.6 Bluetooth® aktivieren/deaktivieren (bLE)“ auf
Seite 1).
Zum Aktivieren der Heizpause gehen Sie wie folgt vor:
• Drehen Sie das Stellrad im manuellen Betrieb (Manu) so lange nach rechts, bis
im Display „On“ erscheint.
• Zum Beenden verlassen Sie den manuellen Betrieb (Manu) oder drehen Sie das
Stellrad nach links.
13.2.12 Frostschutzbetrieb einstellen
Wenn ein Raum nicht geheizt werden soll, kann das Ventil geschlossen werden.
Nur bei Frostgefahr wird das Ventil geöffnet. Der Verkalkungsschutz wird weiter
durchgeführt.
• Drehen Sie das Stellrad im manuellen Betrieb (Manu) so lange nach links, bis im
Display „OFF“ erscheint.
• Zum Beenden verlassen Sie den manuellen Betrieb (Manu) oder drehen Sie das
Stellrad nach rechts.
13.2.13 Kindersicherung / Bediensperre
Die Bedienung des Gerätes kann gesperrt werden.
• Zur Aktivierung/Deaktivierung der Bediensperre, drücken Sie die Tasten Mode-/
kurz gleichzeitig.
Menu und
• Nach erfolgreicher Aktivierung erscheint „LOC“ im Display.
• Zur Deaktivierung der Bediensperre, drücken Sie erneut beide Tasten.
14. Fehlerbehebung und Wartung
Fehlercode im Display
Batteriesymbol (
F1
)
Problem
Behebung
Batterieleistung zu gering
Batterien austauschen
Ventilantrieb schwergängig
Installation prüfen,
Heizungsventil überprüfen
Befestigung des Heizkörperthermostaten überprüfen
Heizungsventil überprüfen
F2
Stellbereich zu groß
F3
Stellbereich zu klein
Zum Schutz vor Ventilverkalkung führt der Heizkörperthermostat einmal wöchentlich am Samstag um 12:00 Uhr eine Entkalkungsfahrt durch. Dabei erscheint „CAL“ im Display.
15. Technische Eigenschaften
Geräte-Kurzbezeichnung:
Versorgungsspannung:
Stromaufnahme:
Batterielebensdauer:
Schutzart:
Verschmutzungsgrad:
Umgebungstemperatur:
Oberflächentemperatur:
Display:
Anschluss:
Wirkungsweise:
Linearer Hub:
Abmessungen (B x H x T):
Gewicht:
Funkfrequenz:
Freifeldreichweite:
CC-RT-BLE-SB
2x 1,5 V LR6/Mignon/AA
100 mA max.
2 Jahre (typ.)
IP20
2
5 bis 35 °C
90 °C (am Heizkörper)
LC-Display
M30 x 1,5 mm
Typ 1
4,3 mm
55 x 60 x 102 mm
162 g (inkl. Batterien)
2,402 GHz - 2,480 GHz
10 m (typ.)
Technische Änderungen sind vorbehalten.
The BLUETOOTH® word
mark and logos are registered trademarks owned
by Bluetooth SIG, Inc. and
any use of such marks by
eQ-3 AG is under license.
Other trademarks and
trade names are those of
their respective owners.
Serviceadresse:
Bevollmächtigter des Herstellers:
www.swissbrands.com
SWISSBRANDS GmbH
Romain-Rolland-Str. 14-24
13089 Berlin / Germany
Technische Änderungen vorbehalten.
Abbildungen ähnlich.
Manufacturer’s authorised representative:
eQ-3 AG
Maiburger Straße 29
26789 Leer / GERMANY
www.eQ-3.de
29.05.2015 10:55:23
Operating manual
eQ-3 BLUETOOTH® Smart Radiator Thermostat
• After the programming has been completed, “InS” is shown again in the display
and installation can take place.
• Turn the control wheel for as long as necessary until the desired temperature appears.
• Confirm by pressing the control wheel shortly.
10. Installation on the radiator
13.2.6 Activate/deactivate BLUETOOTH ® (bLE)
The BLUETOOTH ® function of the radiator thermostat can be activated or deactivated manually.
• Press the Mode/Menu button for at least 3 seconds.
• Select the menu item “bLE” with the control wheel and confirm by pressing the
control wheel shortly.
• The display will show “OFF” to deactivate the function or “On” to activate the function.
• Confirm by pressing the control wheel shortly.
The radiator thermostat is easy to install and can be done without draining heating
water or intervening in the heating system. No special tools are required, nor does
the heating have to be switched off. The union nut attached to the radiator thermostat can be used universally and without accessories for valves of the most popular
manufacturers with a thread size of M30 x 1.5 mm.
• Rotate the thermostat dial to the maximum value
(anti-clockwise). The thermostat dial then no longer
presses against the valve spindle, making it easier to remove.
• Remove the mechanical thermostat head. If required, place the supplied support ring or adapter first.
• Attach the radiator thermostat to the valve.
1st English edition 04/2015 / Documentation © 2015 eQ-3 AG, Germany / All rights reserved.
Translation from the original version in German. / CC-RT-BLE-SB, V1.1, 142279
Swissbrands GmbH / Romain-Rolland-Str. 14-24 / 13089 Berlin / Germany / www.swissbrands.com
1. Information about this manual
Please read this manual completely and carefully before starting to use the device.
The manual contains important information about the intended use of the device.
Especially observe the safety notes. Keep the manual for later consultation. If you
hand over the device to other persons for use, please hand over this manual as well.
Symbols used:
Attention! This indicates a hazard.
10.1 Support ring and adapter for Danfoss
If required, place the provided support ring (I) into the flange before mounting the
radiator thermostat to improve on the stability.
The provided adapter is required for installation on Danfoss RA valves. The Danfoss
valve bodies have elongated notches (K) around their circumference, which also ensure that the adapter is properly seated when it snaps on.
During installation, please ensure that the pins inside the adapter (J) are lined
up with the notches (K) on the valve. Ensure that the adapter is properly clipped
on.
Note. This section contains important additional information.
2. Package contents
1x radiator thermostat, 1x adapter Danfoss RA, 1x support ring, 1x nut M4,
1x cylinder head screw M4 x 12 mm, 2x 1.5 V mignon/LR6/AA, 3x operating manual in
German/English, French/Dutch and Polish/Italian
K
Take care during installation that you do not trap your fingers between
the two
halves of the adapter!
B Defined switching time periods in the
week program
A
J
C Eco/comfort temperature ( ), open-window function ( ), manual mode (Manu),
automatic mode (Auto)
D Holiday function (
battery symbol (
), weekday, empty
)
E Mode/Menu button: Switch between auto
mode, manu mode and holiday function
(press button shortly); configuration menu
(press button for at least 3 seconds)
F
G
Control wheel: Change settings, e.g. temperature (turn the control wheel), activate
the boost function and confirm/save settings in the menu (press control wheel
shortly)
I
B
C
D
H
E
G
button: Switch between eco and comfort temperature
F
H Temperature display, time/date display,
menu items, functions
4. Function
The electric BLUETOOTH ® Smart Radiator Thermostat offers individual control of
the room temperature from a user-friendly and intuitive app.
The app “calor BT” is available for free for iOS and Android smartphones. The radiator thermostat enables the regulation of single radiators or the room temperature.
Thanks to pre-programmed or individually tailored heating and cooling phases, the
desired temperature can be comfortably adjusted.
The radiator thermostat fits to all common radiator valves and is easy to mount without having to drain any water or intervene in the heating system. With the boost
function, cool rooms can be heated within short by opening the heating valve fully.
Thanks to the automatic “open window detection”, additional energy can be saved
during ventilation.
5. Intended use
The radiator thermostat is used to control a conventional radiator valve. Only operate
the device in inside rooms and avoid the influence of moisture, dust and sunlight or
external heat radiation. Using the device for any purpose other than that described
in this operating manual does not fall within the scope of intended use and shall invalidate any warranty or liability. This also applies to any conversion or modification
work. The device is intended for private use only.
eQ-3 AG hereby declares that this device complies with the essential requirements
and other relevant regulations of Directive 1999/5/EC. You can find the full declaration of conformity at www.eQ-3.de.
6. Safety instructions
The device is not a toy; do not allow children to play with it.
Do not leave packaging material lying around. It can be dangerous in the hands
of a child.
Do not open the device: it does not contain any components that need to be
serviced by the user. In the event of an error, please have the device checked
by an expert.
7.
Disposal instructions
Do not dispose of the device with regular domestic waste!
Electronic equipment must be disposed of at local collection points for waste
electronic equipment in compliance with the Waste Electrical and Electronic
Equipment Directive.
The CE sign is a free trading sign addressed exclusively to the authorities and
does not include any warranty of any properties.
Used batteries should not be disposed of with regular domestic waste!
Instead, take them to your local battery disposal point.
8. Inserting (replacing) batteries
In the initial state, the batteries are already inserted. Simply remove the insulation strip.
To replace the batteries, please proceed as follows:
• Press the battery compartment cover on both sides with
your fingers and remove the cover by pushing it downwards.
• Insert 2 new LR6/mignon/AA (1.5 V) batteries in the battery
compartment, making sure they are the right way round.
• Reattach the battery compartment cover and latch it into
place.
The service life of new alkaline batteries is approximately
) on the display indicates that the batteries need
2 years. A battery symbol (
to be replaced. After removing the empty batteries, wait approx. 1 minute before
inserting the new ones. Operation with rechargeable batteries is not possible.
Never recharge standard batteries. Doing so will present a risk of explosion.
Do not throw the batteries into a fire. Do not short-circuit batteries.
9. Set date and time
After inserting batteries, the date and time is automatically requested after a brief
display of the firmware version number and short motor run (“InS”).
• Set the year, month, day, hour and minute with the control wheel and confirm by
pressing the control wheel shortly (F).
You can adjust the time and date in the menu under “dAt”.
The motor moves the control pin backwards during the setting of date and time.
• If “InS” and the rotating activity symbol “ ” are displayed, the motor still reverses.
When only “InS” is shown in the display, the radiator thermostat can be installed
on the valve.
The week program and other settings can be adjusted before installation. Press
the Mode/Menu button for this, while “InS” is shown in the display. You will find
further information in chapter “13. Operation and configuration”.
Swiss CC-RT-BLE_UM_GE_eQ-3_220515.indd 2
13.2.8 Boost function
If, for example, you arrive home earlier than usual, the boost function will help you
to heat the room up quickly. When activating the boost function, the heating valve is
immediately opened to 80 % for 5 minutes. The heating of a room takes longer than
5 minutes, but the heat given off by the radiator can be felt immediately.
• Press the control wheel shortly to activate the boost button.
• The remaining time for the function will be counted down in seconds (“b300” to “b000”).
• After these 5 minutes have elapsed, the actuator changes to the mode which was
previously active (auto/manu) with the previously set temperature.
• The function can be deactivated prematurely at any time by pressing the control
wheel again.
The boost function will not have an immediate effect if the radiator is covered
or concealed (e.g. by a sofa). The open-window function is deactivated while
the boost function is active.
3. Device overview
A Union nut for fitting on the heating valve
13.2.7 Restore factory settings (rES)
The factory settings of the radiator thermostat can be restored manually. If you do
this, you will lose all your settings.
• Press the Mode/Menu button for at least 3 seconds.
• Select the menu item “rES” with the control wheel and confirm by pressing the
control wheel shortly.
• “COnF” then appears in the display.
• Confirm by pressing the control wheel shortly.
11. Adaption run
After inserting batteries and mounting on the valve an adapting run (“AdA”) is performed to adapt to the valve.
• As soon as the radiator thermostat has been mounted to the valve, press the control wheel when “InS” is displayed.
“AdA” and the activity symbol ( ) are displayed. No operations can be performed
in the meantime.
If the adapting run has been initiated prior to mounting, please press the control wheel shortly and the motor reserves to the “InS” position. If an error message (F1, F2, F3) is displayed, the motor similarly travels back to the “InS” position.
12. Display content in normal mode
Switching time periods, operating mode, setpoint temperature
and weekday are displayed in normal mode.
The bars for switching time periods of the week program are
displayed for every second time interval.
13. Operation and configuration
After the radiator thermostat has been mounted and set up, the device can be individually operated and configured. Operation and configuration can be performed
either via BLUETOOTH ® with the app “calor BT” or directly on the device.
13.1 Operation and configuration via app
To control the device via app, please proceed as follows:
• Download the app “calor BT” from the iOS or Android store and install the app on
your smartphone.
• Follow the instructions in the app.
Afterwards, you can control and configure the radiator thermostat via the app.
13.2 Operation and configuration on the device
Operation and configuration can be performed directly on the device. Therefore,
please proceed as described in the following sections.
13.2.1 Week program (Pro)
In the week program, for each weekday up to 3 heating phases (7 change settings)
can be set separately. The programming is carried out for the selected days, whereby
temperature settings have to be set for the entire period between 00:00 and 23:59h.
• Press the Mode/Menu button for at least 3 seconds. The display will show “Pro”.
Confirm by pressing the control wheel shortly.
• “dAy” appears on the display. You can use the control wheel to select a single day
of the week, all weekdays, the weekend, or the entire week.
• Confirm by pressing the control wheel shortly.
• The first switching time point is displayed (00:00). This cannot be changed. The
heating times are displayed as bars.
• Confirm by pressing the control wheel shortly.
• Set the temperature which is desired from 0:00.
• Confirm by pressing the control wheel shortly.
• The next switching time point is displayed. You can adjust this individually.
• Finally set the temperature which should prevail from the selected time.
• You can repeat this procedure until all the other desired temperatures for the time
period from 0:00 to 23:59 have been stored.
• If all 7 switching time points have been allocated, 23:59 is displayed as the final
switching point to be confirmed.
In auto mode, the temperature can be changed at any time using the control
wheel. The modified temperature will then remain the same until the next point
at which the program changes.
13.2.2 Setting date and time (dAt)
Date and time can be adjusted via the menu at any time.
• Press the Mode/Menu button for at least 3 seconds.
• Select the menu item “dAT” with the control wheel.
• Set the year, month, day, hour and minute with the control wheel and confirm by
pressing the control wheel shortly.
13.2.3 Switching between summer and winter time (dSt)
An automatic switching between summer and winter time can be activated and deactivated. The automatic switching is activated in the factory settings.
• Press the Mode/Menu button for at least 3 seconds.
• Select the menu item “dSt” with the control wheel.
• Confirm by pressing the control wheel shortly.
• The display will show “OFF” to deactivate the function or “On” to activate the function.
• Confirm by pressing the control wheel shortly.
13.2.4 Open-window function (AEr)
With a rapidly reducing temperature, the radiator thermostat automatically detects
that a room is being ventilated. In order to save heating costs, the temperature is
then reduced for a certain period of time (15 minutes, set at the factory). Whilst this
) appears on the display.
function is active, the “window open” symbol (
• Press the Mode/Menu button for at least 3 seconds.
• Select the menu item “AEr” with the control wheel and confirm by pressing the
control wheel shortly.
• The temperature and time can be set with the control wheel. The function can be
deactivated by selecting “0” for the time.
13.2.5 Setting offset temperature (tOF)
As the temperature is measured on the radiator, the temperature distribution can vary
throughout a room. To adjust this, a temperature offset of up to ±3.5 °C can be set.
If a nominal temperature of e.g. 20 °C is set but the room presents with only 18 °C,
an offset of -2.0 °C needs to be set.
• Press the Mode/Menu button for at least 3 seconds.
• Select the menu item “tOF” with the control wheel and confirm by pressing the
control wheel shortly.
13.2.9 Setting the holiday function
If you want to maintain a fixed temperature for a certain period, e.g. during your holidays or a party, the holiday function can be used.
• Briefly press the Mode/Menu button repeatedly, until the suitcase symbol ( ) appears in the display.
• Change the time until which the temperature shall remain with the control wheel
and confirm by pressing the control wheel shortly.
• Then set the date and confirm by pressing the control wheel shortly.
• Set the temperature and confirm by pressing the control wheel shortly.
The set temperature will remain until the set end time. Afterwards, the radiator thermostat will switch back to auto mode.
13.2.10 Comfort and reduction temperature
Via the comfort and reduction temperature button ( ) you can change between
these two temperatures. The factory setting for the comfort temperature is 21.0 °C
and the reduction temperature 17.0 °C.
• Press and hold the comfort/reduction temperature button ( ) for at least 3 seconds.
• The sun symbol ( ) and the currently stored comfort temperature appear in the
display.
• Change the temperature with the control wheel and confirm by pressing the control wheel shortly.
• The moon symbol ( ) and the currently stored reduction temperature appear in
the display.
• Change the temperature with the control wheel and confirm by pressing the control wheel shortly.
Even in auto mode, the temperature can be changed at any time using the button. It
will then remain the same until the next point at which the program changes.
13.2.11 Activate heating pause (battery saving)
Battery life can be prolonged by switching the heating off in summer. To achieve this,
the valve is opened fully. The calcification protection continues to run.
In order to save on battery life, you can also deactivate the BLUETOOTH ®
function (see sec. “13.2.6 Activate/deactivate Bluetooth® (bLE)”).
To activate the heating pause, proceed as follows:
• Turn the control wheel in manu mode (manu) to the right until “On” appears in
the display.
• To end it, exit the manu mode (manu) or turn the selector dial to the left.
13.2.12 Set frost protection mode
If a room is not to be heated, the valve can be closed. The valve is only opened if
there is a risk of frost. The calcification protection continues to run.
• Turn the control wheel in manu mode (manu) to the left until “OFF” appears in
the display.
• To end it, exit the manu mode (manu) or turn the control wheel to the right.
13.2.13 Child safeguard/operating lock
The operation of the device can be locked.
• To activate/deactivate the operating lock, press the Mode/Menu and
at the same time.
• After it has been successfully activated, “LOC” appears in the display.
• To deactivate the operating lock, press both buttons again.
button
14. Troubleshooting and maintenance
Error code on the
display
Battery symbol (
Problem
)
F1
Solution
Battery output too low
Replace batteries
Valve drive sluggish
Check installation,
check the heating valve
Please check
mounting of the radiator thermostat
Check the heating valve
F2
Actuating range too wide
F3
Adjustment range too small
The radiator thermostat performs a routine descaling run once a week on Saturday at 12:00 to protect against calcification of the valve. During this, “CAL”
appears in the display.
15. Technical data
Device short description:
Supply voltage:
Current consumption:
Battery life:
Degree of protection:
Degree of pollution:
Ambient temperature:
Surface temperature:
Display:
Connection:
Method of operation:
Linear travel:
Dimensions (W x H x D):
Weight:
Radio frequency:
Open area RF range:
CC-RT-BLE-SB
2x 1.5 V LR6/mignon/AA
100 mA max.
2 years (typ.)
IP20
2
5 to 35 °C
90 °C (at the radiator)
LCD
M30 x 1.5 mm
Type 1
4.3 mm
55 x 60 x 102 mm
162 g (incl. batteries)
2.402 GHz - 2.480 GHz
10 m (typ.)
Subject to technical changes.
The BLUETOOTH ® word mark and logos are registered trademarks owned by Bluetooth SIG, Inc.
and any use of such marks by eQ-3 AG is under license. Other trademarks and trade names are
those of their respective owners.
Serviceadresse:
Bevollmächtigter des Herstellers:
www.swissbrands.com
SWISSBRANDS GmbH
Romain-Rolland-Str. 14-24
13089 Berlin / Germany
Technische Änderungen vorbehalten.
Abbildungen ähnlich.
Manufacturer’s authorised representative:
eQ-3 AG
Maiburger Straße 29
26789 Leer / GERMANY
www.eQ-3.de
29.05.2015 10:55:27