1
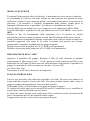
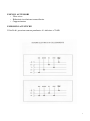
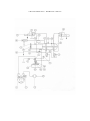
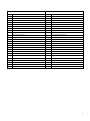
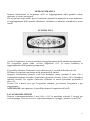
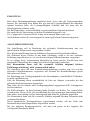
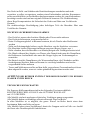
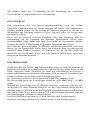
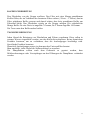
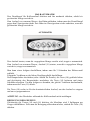
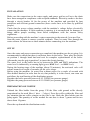
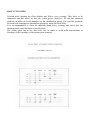
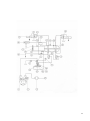
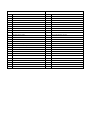
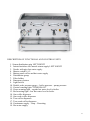
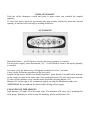
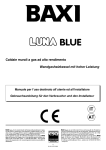
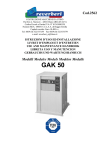
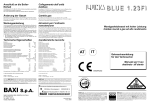
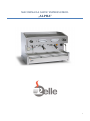
MACCHINA DA CAFFE’ ESPRESSO MOD. „ALPHA“ 1
INDICE
Introduzione
Avvertenze generali
Importanti precauzioni per la sicurezza
Caratteristiche tecniche
Installazione
Messa in funzione
Preparazione del caffè
Pulizia giornaliera
Elenco accessori
Emissioni acustiche
Schema elettrico di collegamento
Circuito idraulico
Descrizione componenti funzionali e di controllo mod. Quadra
Semiautomatica
Automatica
Lavaggio gruppi
Programmazione dosi
Erogazione acqua calda
Erogazione vapore
pag.2
pag.2
pag.3
pag.4
pag.4
pag.5
pag.4
pag.5
pag.5
pag.5
pag.6
pag.7/8
pag.9
pag.10
pag.10
pag.10
pag.11
pag. 11
pag.11
INTRODUZIONE
Prima di utilizzare la macchina per caffè espresso, leggere attentamente questo manuale
di istruzioni. Esso vi fornisce notizie su come utilizzare in modo ottimale le potenzialità
della macchina, su come mantenerla efficiente e come comportarsi in caso di difficoltà.
La macchina per caffè espresso è destinata ad un uso prettamente professionale.
Essa è progettata per la preparazione di bevande calde quali:
Tè, cappuccini, caffè espresso nelle varianti normale, lungo, corto ecc.
Di seguito vengono riportate le istruzioni per un corretto utilizzo.
AVVERTENZE GENERALI
L'installazione, deve essere effettuata in ottemperanza alle norme di sicurezza vigenti , e
da personale qualificato e preparato.
Un installazione errata può causare danni a persone e cose.
La sicurezza di questo apparecchio è totale solo quando è collegato ad un efficace
impianto di messa a terra, eseguito come previsto dalle attuali norme di sicurezza.
E' importante far verificare questo requisito, ed in caso di dubbio, richiedere un controllo
accurato dell'impianto da parte di personale qualificato.
Il costruttore non può essere considerato responsabile di eventuali danni causati
da un errato dispositivo di messa a terra.
E' sconsigliabile l'uso di prolunghe o adattatori elettrici comprese multiple.
Qualora il loro uso si rendesse indispensabile, utilizzare solamente adattatori rispondenti
alle vigenti norme di sicurezza.
Non superare mai il valore di portata in KW indicato nell'adattatore o nelle prolunghe.
E' consigliabile l'installazione di un dispositivo a corrente differenziale (RCD) non
superiore ai 30 mA.
Se il cavo di alimentazione è danneggiato, esso deve essere sostituito da un cavo o da un
assieme speciali disponibili presso il costruttore o il suo servizio assistenza tecnica.
La macchina per caffè espresso è destinata alla preparazione di bevande calde quali
caffè, tè, latte caldo. Questo apparecchio dovrà essere destinato esclusivamente per l'uso
suddetto. Ogni altro utilizzo è da considerasi improprio e pertanto pericoloso.
L'apparecchio non è destinato a essere usato da persone le cui capacità fisiche, sensoriali
o mentali siano ridotte, oppure con mancanza di esperienza o di conoscenza, a meno che
esse abbiano potuto beneficiare, attraverso l'intermediazione di una persona responsabile
della loro sicurezza, di una sorveglianza o di istruzione riguardanti l'uso
dell'apparecchio.
I bambini devono essere sorvegliati per sincerarsi che non giochino con l'apparecchio.
Il costruttore non può ritenersi responsabile di eventuali danni causati da un uso
errato.
Prima di effettuare qualsiasi operazione di manutenzione, disattivare l'apparecchio dalla
rete elettrica tramite l'interruttore generale.
3
Per le operazioni di pulizia quotidiana attenersi specificatamente a quando indicato nel
presente manuale.
In caso di guasto o di cattivo funzionamento, spegnere l'apparecchio, non tentare nessun
intervento di riparazione ma chiamare il tecnico specializzato. Le riparazioni dovranno
essere effettuate esclusivamente da tecnici autorizzati dalla casa costruttrice
utilizzando esclusivamente ricambi originali. Il mancato rispetto di questa norma
compromette la sicurezza dell'apparecchio e fa decadere la garanzia.
La manomissione non autorizzata di qualsiasi parte della macchina fa decadere la
garanzia.
IMPORTANTI PRECAUZIONI PER LA SICUREZZA
- L'apparecchio non è adatto all'uso esterno.
- Non toccare la macchina quando si hanno mani o piedi bagnati o umidi.
- Non usare l'apparecchio a piedi nudi.
- Non utilizzare prolunghe in locali adibiti a doccia o bagno
- Non tirare il cavo di alimentazione per scollegare la macchina dalla presa di
corrente.
- non lasciare esposta la macchina ad agenti atmosferici (pioggia, sole, ecc.)
- non permettere che la macchina sia utilizzata da minori o incapaci.
- Non mettere le mani sotto la lancia a vapore, la lancia acqua calda o sotto il gruppo,
durante l'erogazione di acqua o vapore, per evitare ustioni.
- In condizioni di funzionamento, le lance a vapore, le lance acqua e le coppette
portafiltro sono surriscaldate, vanno maneggiate con attenzione ed impugnate nei punti
previsti.
- Tazze e tazzine devono essere appoggiate sull'apposito piano scaldatazze solo dopo
essere state accuratamente asciugate.
- La macchina del caffè deve essere utilizzata in ambienti con temperatura non inferiore
a 4°C e non superiore a 40°C. Se si prevede che la temperatura possa scendere sotto gli
0°C , spegnere la macchina e svuotare caldaia e scambiatori per evitare il congelamento.
- L'apparecchio non può essere utilizzato laddove son possibili getti d'acqua.
- L'apparecchio deve essere posto in posizione orizzontale.
- L'apparecchio deve essere utilizzato solo da personale qualificato.
ATTENZIONE A MACCHINA FUNZIONANTE LA CALDAIA CONTIENE
VAPORE ED ACQUA CALDA IN PRESSIONE
CARATTERISTICHE TECNICHE
Le macchine per caffè espresso vengono fornite nelle versioni:
EROGAZIONE CONTINUA o ad EROGAZIONE AUTOMATICA
con 1/2/3 GRUPPI.
Tutti i modelli sono completi di elettropompa volumetrica incorporata.
Tutti i modelli montano di serie l'autolivello acqua caldaia.
In tutti i modelli è possibile svuotare tutta l'acqua della caldaia tramite apposito
rubinetto.
Tutti i modelli montano pulsanti di emergenza per far funzionare i gruppi in casi di
guasto della scheda o pulsantiera.
Tutti i modelli sono predisposti per l'installazione dello scaldatazze elettrico (su alcuni
modelli viene fornito di serie).
INSTALLAZIONE
Assicurarsi che gli allacciamenti alla rete idrica ed elettrica, nonché lo scarico siano stati
predisposti a regola d'arte attenendosi scrupolosamente ai regolamenti nazionali vigenti.
E' indispensabile l'installazione del rubinetto di arresto acqua.
La pressione di rete non deve superare 0,6 Mpa.
La macchina è fornita di tubo di connessione alla rete idrica già collegato all'apparecchio
(filtro pompa).
Si raccomanda di non utilizzare tubi già usati.
L'alimentazione elettrica deve essere fatta tramite un interruttore automatico di portata
adeguata alla potenza della macchina e provvisto di protezione termica e di massa a terra
(questi lavori devono essere eseguiti da personale qualificato).
Prima di allacciare elettricamente la macchina, verificare che la tensione di rete
corrisponda a quella per cui è predisposta la macchina. In mancanza di questi
presupposti non si risponde di danni a cose e/o persone derivanti dalla mancata
osservanza delle vigenti norme di sicurezza.
Prima di procedere al collegamento idrico della macchina alla rete, far scorrere l'acqua
dell'impianto idrico per togliere eventuali residui, in seguito interporre un addolcitore tra
la rete idrica e la macchina ,quindi fare scorrere per due-tre minuti acqua attraverso
l'addolcitore prima di collegarlo alla macchina .
5
MESSA IN FUNZIONE
Terminato l'allacciamento idrico ed elettrico, la macchina può essere messa in funzione.
Si raccomanda di verificare che nella caldaia sia stata immessa una quantità di acqua
sufficiente; tramite il carico manuale quindi posizionare l'interruttore di accensione in
posizione 1 ed attendere il completo riempimento della caldaia, quindi girare la
manopola dell'interruttore in posizione 2 per inserire il riscaldamento elettrico.
Il livello dell'acqua in caldaia deve essere compreso tra le indicazioni MIN e MAX.
Il livello dell'acqua è segnalato da una spia luminosa (verde livello MAX – rossa livello
MIN).
Durante la fase di riscaldamento della macchina (circa 30 minuti) la valvola
antirisucchio rilascerà vapore per alcuni secondi fino alla chiusura della stessa valvola.
Prima di utilizzare la macchina effettuare erogazione senza caffè per alcuni secondi con i
portafiltri agganciati, allo scopo di far uscire l'eventuale aria presente nel circuito,
permettendo il completo riscaldamento dei gruppi erogatori.
Regolare la pressione di caldaia tra 0.9/1.2 BAR.(vedi manometro)
Regolare la pressione della pompa tra 8.5/9.5 BAR.(vedi manometro)
PREPARAZIONE DEL CAFFE'
Sganciare il portafiltro dal gruppo. Riempire il filtro di caffè macinato in quantità
proporzionale al filtro usato (1 dose – 2 dosi), pressare il caffè contenuto nel filtro e fare
attenzione che sul bordo del filtro non resti caffè macinato. Riagganciare il portafiltro al
gruppo. La quantità di caffè necessaria per una dose è di circa 7gr.,
per 2 dosi circa 14gr.
Posizionare la tazza sotto il beccuccio di erogazione.
PULIZIA GIORNALIERA
Tutte le sere procedere alla pulizia dei portafiltri e dei filtri. Devono essere immersi in
acqua calda per sciogliere i grassi del caffè. Non usare prodotti chimici onde evitare al
gruppo erogatore danneggiamenti. Usare prodotti specifici.
Utilizzando il filtro cieco procedere al lavaggio dei gruppi erogatori.
Si consiglia di pulire ogni sera la bacinella di scarico e controllare che lo scodellino di
scarico posto sotto la bacinella non sia ostruito.
Le lance del vapore devono essere pulite dopo l'uso in modo da evitare incrostazioni di
latte o l'otturazione dei fori del terminale lancia vapore.
L'apparecchio non deve essere pulito con un getto d'acqua.
ELENCO ACCESSORI
− Filtro cieco
− Riduzioni circolazione termosifonica
− Cappuccinatore
EMISSIONI ACUSTICHE
Il livello di pressione sonora ponderato A è inferiore a 70 dB.
7
CIRCUITO IDRAULICO – HYDRAULIC CIRCUIT
LEGENDA
LEGEND
1
MANOMETRO RETE/POMPA/CALDAIA
1
PUMP PRESSURE GAUGE/BOILER
2
FILTRO PER POMPA
2
PUMP FILTER
3
POMPA
3
PUMP
4
REGOLAZIONE PRESSIONE POMPA
4
PUMP PRESSURE REGULATOR
5
VALVOLA NON RITORNO SCAMBIATORI
5
NON RETURN VALVE (HEAT EXCH)
6
VALVOLA ESPANSIONE
6
EXPANSION VALVE
8
TURBINETTA
8
TURBINE
9
CALDAIA
9
BOILER
10
VALVOLA DI SICUREZZA
10
SAFETY VALVE
11
VALVOLA ANTI-DEPRESSIONE
11
VACUUM RELEASE VALVE
12
GRUPPO EROGATORE
12
COFFEE DISPENSER GROUP
13
ELETTROVALVOLA GRUPPO
13
COFFEE SOLENOIL VALVE
14
STROZZATURA GRUUPPO
14
DISPENSER NECK
15
VALVOLA NON RITORNO CALDAIA
15
BOILER NON RETURN VALVE
16
MISCELATORE ACQUA CALDA
16
HOT WATER MIXER
17
ELETTROVALVOLA ACQUA
17
HOT WATER SOLENOID VALVE
18
LANCIA ACQUA
18
HOT WATER SPOUT
19
VALVOLA CARICO MANUALE
19
WATER FILLING MANUAL VALVE
21
ELETTROVALVOLA LIVELLO
21
AUTOMATIC FILLING SOLENOID VALVE
23
RUBINETTO VAPORE
23
STEAM TAP
26
PRESSOSTATO
26
PRESSURE SWITCH
27
LIVELLO OTTICO
27
LEVER INDICATOR
28
SENSORE TEMPERATURA
28
TEMPERATURE SENSOR
31
SCAMBIATORI DI CALORE
31
HEAT EXCHANGESRS
32
SONDA AUTOLIVELLO
32
AUTOMATIC LEVEL PROBE
33
INIETTORE GRUPPO
33
DISPENSER GROUP INIECTOR
9
DESCRIZIONE COMPONENTI FUNZIONALI E DI CONTROLLO
1. Manopola erogazione vapore DX-SX
2. Lancia INOX snodata erogazione vapore DX-SX
3. Lancia con doccia erogazione acqua calda
4. Interruttore generale 0-1-2
5. Pulsantiera erogazione caffè ed acqua calda
6. Gruppo erogatore
7. Portafiltro
8. Pulsante emergenza
9. Interruttore luminoso
10. Manometro doppia scala – Pressione caldaia – Pressione pompa
11. Lampada spia controllo “TENSIONE ON”
12. Lampada spia verde livello acqua calda caldaia regolare
13. Lampada spia rossa livello acqua caldaia insufficiente
14. Erogazione un caffè
15. Erogazione un caffè lungo
16. Erogazione due caffè
17. Erogazione due caffè lunghi
18. Erogazione continua – Stop – Programmazione
19. Erogazione acqua calda
SEMIAUTOMATICA
Premere l'interruttore di erogazione caffè, al raggiungimento della quantità voluta,
ripremere lo stesso interruttore.
Per erogazione acqua calda, aprire il rubinetto ruotando la manopola in senso antiorario,
al raggiungimento della quantità desiderata, richiudere il rubinetto ruotandolo in senso
orario.
AUTOMATICA
Avviare l'erogazione, la stessa terminerà al raggiungimento delle quantità preimpostate.
Per erogazione acqua calda, avviare erogazione (19), la stessa terminerà al
raggiungimento della quantità preimpostata.
E' possibile effettuare l'infusione con la chiusura per 3 secondi dell'elettrovalvola.
Effettuare la seguente operazione nella pulsantiera di sinistra:
Spegnere l'interruttore generale (vedi foto dettaglio) tenere premuto il tasto (14) e
contemporaneamente accendere l'interruttore generale; lasciare il tasto (14) ed attendere
qualche secondo. Per togliere l'infusione effettuare la stessa operazione premendo il
tasto (15).
Il tasto (18) a destra serve per l'erogazione continua, per fermare l'erogazione e per
programmare.
ATTENZIONE: non sganciare il portafiltro durante l'erogazione del caffè.
LAVAGGIO DEI GRUPPI
Premere contemporaneamente i tasti (14) e (18), la macchina eseguirà 5 lavaggi per
ciascun gruppo. Nel caso in cui si voglia interrompere il lavaggio, premere il tasto (18).
11
PROGRAMMAZIONE DOSI
Attivazione Programmazione
E' possibile programmare contemporaneamente tutte le pulsantiere della macchina
operando solo con la pulsantiera di sinistra.
1) Premere e mantenere premuto per oltre 5 secondi il tasto (18) a destra della
pulsantiera (18) del gruppo che si vuole programmare.
2) Durante il lampeggiare del tasto (18), premere il pulsante che si vuole
programmare. Al raggiungimento della quantità voluta ripremere lo stesso
pulsante per interrompere l'erogazione. Per procedere alla programmazione delle
altre dosi caffè agire allo stesso modo con gli altri pulsanti, compresa la
programmazione della dose di acqua calda.
EROGAZIONE ACQUA CALDA
Per erogare acqua calda premere il tasto (19).
EROGAZIONE DEL VAPORE
Per erogare vapore ruotare la manopola in senso antiorario (1).
INHALTSVERZEICHNIS
Einleitung
Allgemeine Hinweise
Wichtige Sicherheitsmaßnahmen
Technische Eigenschaften
Installierung
Inbetriebnahme
Kaffee Zubereitung
Tägliche Reinigung
Stromlaufplan
Wasserschaltung
Darstellung der Funktions- und Kontrollelemente Modell Quadra
Halbautomatik
Automatik
Reinigung der Gruppen
Programmierung der Dosen
Warmwasserauslauf
Dampfabgabe
Seite 2
Seite 2
Seite 3
Seite 3
Seite 4
Seite 4
Seite 5
Seite 5
Seite 6
Seite 7/8
Seite 9
Seite 10
Seite 10
Seite 10
Seite 11
Seite 11
Seite 11
13
EINLEITUNG
Bitte diese Bedienungsanleitung eingehend lesen, bevor man die Espressomaschine
benutzt. Die Anleitung weist darauf hin, wie man die Leistungsfähigkeit der Maschine
optimal benutzen kann, die Leistungsfähigkeit beibehält und wie man sich bei
Schwierigkeiten verhalten sollte.
Die Kaffeemaschine ist ausschließlich zu professionellem Gebrauch bestimmt.
Sie wurde für die Zubereitung von heißen Getränken hergestellt, wie:
Tee, Cappuccinos, Espresso Kaffee in den Arten normal, dünn, stark, usw.
Anschließend werden die Anweisungen für einen regelrechten Gebrauch angegeben.
ALLGEMEINE HINWEISE
Die Installierung soll in Beachtung der geltenden Sicherheitsnormen und von
qualifiziertem Fachpersonal vorgenommen werden.
Eine falsche Installierung kann zu Schäden an Personen und Gegenständen führen.
Die Sicherheit dieses Gerätes ist nur dann vollständig, wenn es an eine wirksame
Erdleitung angeschlossen ist, wie von den derzeitigen Sicherheitsnormen vorgesehen.
Es ist wichtig, diese Voraussetzung überprüfen zu lassen und bei Zweifel bitte eine
eingehende Überprüfung der Anlage seitens des Fachpersonals anfordern.
Der Konstrukteur kann sich für eventuelle Schäden aufgrund falscher
Erdleitungsvorrichtung nicht verantwortlich halten.
Der Anschluss muss mit einer Sicherheitshauptschaltung versehen sein, wie von den
geltenden Sicherheitsnormen vorgesehen, mit Abstand der Kontaktöffnungen gleich
oder grösser als 3mm.
Die Benutzung von Verlängerungskabel oder Stromadaptern, einschließlich Vielfachen,
ist nicht empfehlenswert.
Falls die Benutzung dieser unentbehrlich ist, bitte nur Adapter verwenden, die den
geltenden Sicherheitsnormen entsprechen.
Man sollte den im Adapter oder Verlängerungskabel angegebenen KW Leistungswert
nie überschreiten.
Die Kaffeemaschine ist dazu bestimmt, heiße Getränke wie Kaffee, Tee, warme Milch
vorzubereiten. Dieses Gerät soll ausschließlich der oben genannten Anwendung dienen.
Jede andere Anwendung wird als unsachgemäß und daher als gefährlich angesehen.
Der Konstrukteur kann sich für eventuelle Schäden aufgrund falschen Gebrauchs nicht
verantwortlich halten.
Bevor irgendwelche Wartungsarbeiten vorgenommen werden, soll das Gerät vom
Stromnetz durch den Hauptschalter abgeschaltet werden.
Bei den täglichen Reinigungsarbeiten, soll man sich genau an die Angaben des
vorliegenden Handbuchs halten.
Das Gerät im Falle von Schäden oder Betriebsstörungen ausschalten und nicht
versuchen, es selber zu reparieren, sondern einen Fachtechniker aufrufen. Reparaturen
sollen ausschließlich von Fachkräften durchgenommen werden, die vom Konstrukteur
berechtigt worden sind und nur originale Ersatzteile benutzen. Die Nichtbeachtung
dieser Regel kompromittiert die Sicherheit des Geräts und führt zum Verfallen der
Garantie.
Die nichtberechtigte Beschädigung jedes beliebigen Teils der Maschine führt zum
Verfallen der Garantie.
WICHTIGE SICHERHEITSMASSNAHMEN
- Das Gerät bei nassen oder feuchten Händen oder Füssen nicht anfassen
- Das Gerät nicht benutzen, wenn man barfuß ist
- Keine Verlängerungskabel in Räumen benutzen, die als Dusche oder Bad benutzt
werden
- Nicht am Zuleitungskabel ziehen, um die Maschine von der Steckdose zu trennen
- Die Maschine keinen Witterungseinflüssen aussetzen (Regen, Sonne, usw.)
- Nicht erlauben, dass die Maschine von Minderjährigen oder Unfähigen benutzt wird
- Die Hände während der Abgabe von Wasser oder Dampf nicht unter die Dampflanze,
die Heißwasser-Auslauflanze oder unter die Gruppe legen, um Verbrennungen zu
vermeiden
- Bei Betrieb sind die Dampflanzen, die Wasserauslauflanze, die Filterhalter und die
Auslaufgruppe überhitzt, daher sollte man sie vorsichtig handhaben und an den
vorgesehenen Stellen anfassen
- Tassen und Mokkatassen sollen auf den dafür vorgesehenen Tassenwärmebereich nur
dann abgestellt werden, wenn sie vorher gründlich abgetrocknet worden sind.
ACHTUNG BEI BETRIEB ENTHÄLT DER BOILER DAMPF UND HEISSES
WASSER UNTER DRUCK
TECNISCHE EIGENSCHAFTEN
Die Espresso Kaffeemaschinen sind in den folgenden Versionen erhältlich:
KONTINUIERLICHER AUSLAUF oder AUTOMATIKAUSLAUF
mit 1/2/3 GRUPPEN.
Alle Modelle sind mit angebauter elektrischer Verdränger-pumpe ausgestattet.
Alle Modelle haben serienmäßige selbstnivellierende Pegel im Boiler.
In allen Modellen ist es möglich, das ganze Wasser im Boiler durch einen dazu
bestimmten Hahn ausfließen zu lassen.
Alle Modelle haben einen Notfallknopf, damit die Gruppen auch im Falle von Ausfall
der Karte oder Druckknopftafel funktionieren.
15
Alle Modelle haben eine Voreinstellung für die Installierung des elektrischen
Tassenwärmers (in einigen Modellen ist es serienmäßig).
INSTALLIERUNG
Sich vergewissern, dass die Wasserversorgungsanschlüsse sowie der Abfluss
fachgerecht eingerichtet sind. Die Stromversorgung soll mittels eines automatischen
Schalters gemacht werden, der der Leistung der Maschine angepasst ist, und der mit
Wärmeschutz und Erdleitung versehen ist (diese Aufgaben sollen von Fachpersonal
durchgeführt werden).
Bevor man die Maschine elektrisch anschließt, sollte man überprüfen, dass die
Netzspannung mit der Spannung der Maschine übereinstimmt. Sollten diese
Voraussetzungen fehlen, haftet man nicht für Schäden an Gegenständen und/oder
Personen, die aus der Nichtbeachtung der geltenden Sicherheitsnormen folgen.
Bevor man die Wasserverbindung der Maschine and das Netz anschließt, sollte man
Wasser aus der Wasseranlage fließen lassen, um eventuelle Reste zu entfernen und
schließlich einen Enthärter zwischen das Wassernetz und die Maschine legen und
danach für zwei-drei Minuten Wasser durch den Enthärter fließen lassen, bevor man
diesen an die Maschine anschließt.
INBETRIEBNAHME
Sobald man mit dem Wasser- und Elektroanschluss fertig ist, kann die Maschine in
Betrieb gesetzt werden. Es ist empfehlenswert zu überprüfen, dass genug Wasser in den
Boiler eingegeben wurde. Schließlich per Hand den Anschaltknopf auf Position 1
schalten und abwarten, bis der Boiler vollkommen gefüllt ist; dann den Einstellknopf auf
Position 2 schalten, um die elektrische Erwärmung einzugeben.
Der Wasserstand im Boiler soll zwischen den MIN und MAX Angaben liegen.
Der Wasserstand durch eine Kontrolllampe signalisiert (grün MAX Stand – rot MIN
Stand).
Während der Erwärmungsphase der Maschine (ungefähr 30 Minuten) gibt das antiAbsaugventil für einige Sekunden Dampf ab, bis das Ventil schließt. Bevor man die
Maschine benutzt, sollte man sie mit dem angehakten Filterhaltern einige Sekunden lang
ohne Kaffee laufen lassen, damit eventuelle Luft in der Schaltung ausströmen kann und
die Auslaufgruppen vollkommen erwärmen können.
Den Druck des Boilers zwischen 0.9/1.2 BAR einstellen.(siehe Druckmessgerät)
Den Druck der Pumpe zwischen 8.5/9.5 BAR einstellen.(siehe Druckmessgerät)
KAFFEE ZUBEREITUNG
Den Filterhalter von der Gruppe auslösen. Den Filter mit einer Menge gemahlenem
Kaffee füllen, die im Verhältnis des benutzten Filters stehen (1 Dosis – 2 Dosen), den im
Filter gehaltenen Kaffee pressen und darauf achten, dass kein gemahlener Kaffee am
Filterrand bleibt. Den Filterhalter wieder an die Gruppe anlegen. Die erforderliche
Menge Kaffee für eine Dosis ist ungefähr 7 Gramm, für 2 Dosen ungefähr 14 Gramm.
Die Tasse unter den Kaffeeauslauf stellen.
TÄGLICHE REINIGUNG
Jeden Abend die Reinigung von Filterhaltern und Filtern vornehmen. Diese sollen in
warmes Wasser eingetaucht werden, um den Kaffeefett aufzulösen. Keine chemischen
Produkte benutzen, um zu verhindern, dass die Auslaufgruppe beschädigt wird.
Spezifische Produkte benutzen.
Danach di Auslaufgruppe putzen, in dem man den Universalfilter benutzt.
Man empfiehlt, jeden Abend die Abflussschüssel zu waschen.
Die Dampflanzen sollten nach dem Gebrauch so geputzt werden, dass
Milchverkrustungen oder Verstopfungen an den Öffnungen der Dampflanze verhindert
werden.
17
CIRCUITO IDRAULICO – WASSERSCHALTUNG
19
LEGENDA
ZEICHENERKLÄRUNG
1
MANOMETRO RETE/POMPA/CALDAIA
1
DRUCKMESSGERÄT NETZ/PUMPE/BOILER
2
FILTRO PER POMPA
2
PUMPE Für FILTER
3
POMPA
3
PUMPE
4
REGOLAZIONE PRESSIONE POMPA
4
PUMPDRUCK EINSTELLUNG
5
VALVOLA NON RITORNO SCAMBIATORI
5
NICHT RÜCKBEWEGENDES VENTIL AUSTAUSCHER
6
VALVOLA ESPANSIONE
6
EXPANSIONSVENTIL
8
TURBINETTA
8
TURBINE
9
CALDAIA
9
BOILER
10
VALVOLA DI SICUREZZA
10
SICHERHEITSVENTIL
11
VALVOLA ANTI-DEPRESSIONE
11
VENTIL GEGEN UNTERDRUCK
12
GRUPPO EROGATORE
12
AUSLAUFGRUPPE
13
ELETTROVALVOLA GRUPPO
13
ELEKTROVENTIL GRUPPE
14
STROZZATURA GRUUPPO
14
DROSSELSTELLE GRUPPE
15
VALVOLA NON RITORNO CALDAIA
15
VENTIL GEGEN UNTERDRUCK BOILER
16
MISCELATORE ACQUA CALDA
16
WARMWASSERMISCHER
17
ELETTROVALVOLA ACQUA
17
EKETROVENTIL WASSER
18
LANCIA ACQUA
18
WASSERAUSLAUFLANZE
19
VALVOLA CARICO MANUALE
19
VENTIL MANUELLE LADUNG
21
ELETTROVALVOLA LIVELLO
21
ELEKTROVENTIL WASSERSTAND
23
RUBINETTO VAPORE
23
DAMPFHAHN
26
PRESSOSTATO
26
DRUCKSCHALTER
27
LIVELLO OTTICO
27
OPTISCHER STAND
28
SENSORE TEMPERATURA
28
TEMPERATURSENSOR
31
SCAMBIATORI DI CALORE
31
WÄRMEAUSTAUSCHER
32
SONDA AUTOLIVELLO
32
AUTOMATISCHER STAND FÜHLER
33
INIETTORE GRUPPO
33
INJECTOR GRUPPE
DARSTELLUNG DER FUNKTIONS- UND KONTROLLELEMENTE
1. Einstellknopf Dampfauslauf R-L
2. Gelenkige Edelstahllanze Dampfauslauf R-L
3. Auslauflanze mit Brause Warmwasserasuslauf
4. Hauptschalter 0-1-2
5. Druckknoptftafel Kaffee- und Warmwasserauslauf
6. Auslauf Gruppe
7. Filterhalter
8. Notfallknopf
9. Signallampe
10. Druckmessgerät doppelte Skala – Druck des Boilers – Druck der Pumpe
11.Warnlicht Kontrolle “SPANNUNG ON”
12. Grünes Warnlicht Stand Boiler warmes Wasser normal
13. Rotes Warnlicht Boiler warmes Wasser ungenügend
14. Auslauf ein Kaffee
15. Auslauf ein dünner Kaffee
16. Auslauf zwei Kaffee
17. Auslauf zwei dünne Kaffee
18. Kontinuierlicher Auslauf – Stopp – Programmierung
19. Auslauf warmes Wasser
21
HALBAUTOMATIK
Den Druckknopf für Kaffeeauslauf drücken und ihn nochmals drücken, sobald sie
gewünschte Menge erreicht ist.
Zum Auslauf von warmem Wasser, den Hahn aufdrehen, indem man den Einstellknopf
gegen den Uhrzeigersinn dreht. Den Hahn im Uhrzeigersinn wieder zudrehen, wenn die
gewünschte Menge erreicht ist.
AUTOMATIK
Den Auslauf starten; wenn die vorgegebene Menge erreicht wird, stoppt es automatisch.
Zum Auslauf von warmem Wasser, Auslauf (19) starten; wenn die vorgegebene Menge
erreicht ist, stoppt es automatisch.
Man kann einen Aufguss durchführen, indem man für 3 Sekunden das Elektroventil
schließt.
Folgendes Verfahren an der linken Druckknopftafel durchführen:
Den Hauptschalter abschalten (siehe Abbild für Details), die Taste (14) gedrückt halten
und gleichzeitig den Hauptschalter anschalten; die Taste (14) loslassen und einige
Sekunden abwarten. Um den Aufguss zu beenden, das gleiche Verfahren durchnehmen,
indem man die Taste (15) drückt.
Die Taste (18) rechts ist für den kontinuierlichen Auslauf, um den Auslauf zu stoppen
und um zu programmieren.
ACHTUNG: den Filterhalter während des Kaffeeauslaufs nicht ausklingen.
REINIGUNG DER GRUPPEN
Gleichzeitig die Tasten (14) und (18) drücken, die Maschine wird 5 Spülungen per
Gruppe durchführen. Falls man die Reinigung abbrechen möchte, einfach die Taste (18)
drücken.
PROGRAMMIERUNG DER DOSEN
Programmierungsaktivierung
Es ist durchaus möglich, gleichzeitig alle Druckknopftafeln der Maschine zu
programmieren, indem man nur die linke Druckknopftafel betätigt.
3) Die Taste (18) auf der rechten Seite der Druckknopftafel der Gruppe drücken, die
man programmieren möchte und für über 5 Sekunden gedrückt halten.
4) Den Druckknopf drücken, den man programmieren möchte, während die Taste
(18) blinkt. Denselben Druckknopf drücken, wenn die gewünschte Menge erreicht
ist, um den Auslauf zu stoppen. Um mit der Programmierung der anderen
Kaffeedosen fortzufahren, mit den anderen Druckknöpfen auf gleiche Weise
vorgehen, einschließlich der Programmierung der Warmwassersdosis.
WARMWASSERAUSLAUF
Zum Auslauf von warmem Wasser, die Taste (19) drücken.
DAMPFABGABE
Zur Dampfabgabe, den Einstellknopf gegen den Uhrzeigersinn drehen (1).
23
CONTENTS
Introduction
General instructions
Important safety precautions
Technical features
Installation
Set up
Preparation of coffee
Daily cleaning
Electric connection system
Plumbing circuit
Description of functional and control units mod. Quadra
Semi-automatic
Automatic
Washing of the groups
Presetting of doses
Hot water supply
Steam supply
p.24
p.24
p.25
p.3
p.4
p.4
p.4
p.5
p.5
p.6/7
p.8
p.9
p.9
p.9
p.10
p.10
p.10
INTRODUCTION
Please carefully read this instruction manual before using the espresso machine. It will
advise how to optimally use the machine’s potentialities, how to keep it in working
order and how to behave in case of problems.
The espresso machine is for professional use only.
It is designed for the preparation of hot drinks such as:
Tea, cappuccino, espresso in the versions regular, weak, short, etc.
Hereafter, instructions for a proper use will be mentioned.
GENERAL INSTRUCTIONS
The installation has to be done in compliance with the security regulations in force and
by qualified and competent personnel.
A wrong installation may cause damage to people and things.
Only if connected to an effective grounding device made according to the current safety
regulations, the device is totally secure.
Verifying this requirement is important and would necessitate a careful check of the
system by part of qualified personnel in case of doubts.
The manufacturer cannot be considered responsible for any damages caused by a
wrong grounding device.
The system has to be equipped with a protective master switch, as per the safety
regulations on force, with distance to the opening contacts equal to 3 mm or more.
The use of extension leads or electric adapters including multiple sockets is unadvisable.
Should it be necessary, please solely use adapters that correspond to the current safety
regulations.
Never exceed the KW power value mentioned on the adapter or the extension leads.
The espresso machine is designed for the preparation of hot drinks such as coffee, tea,
hot milk. This device should be used for the above mentioned purpose only. Any other
use is to be considered wrong and therefore dangerous.
The manufacturer cannot consider himself responsible for any damages caused by
improper use.
Deactivate the device from the electrical grid through the master switch before carrying
out any maintenance works.
As for cleaning, please specifically follow what is mentioned in this manual.
In case of breakdown or malfunction, turn off the device; do not try do make any repair,
but call an expert technician. Repairs should be done by technicians that have been
authorized by the manufacturer, using uniquely original spare parts.
The failure to comply with this regulation compromises the devices’ safety and the
warranty will fail.
Non-authorised damaging of any part of the device makes the warranty fail.
25
IMPORTANT SAFETY PRECAUTIONS
- Do not touch the machine when you have wet or clammy hands or feet.
- Do not use the device with bare feet.
- Do not use extension leads in rooms used as shower or bathroom.
- Do not pull the power cable to disconnect the machine from the power point.
- Do not leave the machine exposed to weather conditions (rain, sun, etc.)
- Do not allow children or unqualified people to use the machine.
- Do not put your hands under the steam nozzle o under the group while water or steam
is being supplied, so to avoid scalds.
- In working conditions, the steam nozzles, the water nozzles and the filter holder cups
are overheated. They have to be handled with care and hold on the appropriate points.
- Cups and little cups have to be put on top of the cup heater only after being thoroughly
wiped.
ATTENTION WHEN WORKING THE BOILER CONTAINS PRESSURED
HOT WATER AND STEAM
TECNICHAL FEATURES
The Espresso machines are provided in the following versions:
CONTINUOUS SUPPLY or AUTOMATIC SUPPLY
With 1/2/3 GROUPS.
All models include built-in volumetric electro pump.
On all models, there is standard self-levelling boiler installed.
On all models, it is possible to drain all water of the boiler through apposite tap.
All models have emergency buttons installed, in order to let the groups work in case the
card or button-panel break down.
All models are prearranged for the installation of electric cup heater (on some models it
is standard).
INSTALLATION
Make sure the connections to the water supply and power grid as well as to the drain
have been arranged in compliance with accepted standards. Electricity needs to be done
through a circuit breaker fit for the power of the machine and provided by heat
protection and efficient ground connection (these works have to be done by qualified
people).
Check that the power voltage matches with the machine’s voltage before electrically
connecting the machine. If such condition is missing, it is not answered for damages to
things and/or people resulting from failed compliance with the current safety
regulations.
Before proceeding with the machine’s water connection to the network, let water flow
from the water system to remove possible residuals. Then, let water flow through the
water softener for about two or three minutes before connecting it to the machine.
SET UP
Once the water and power connection are completed, the machine can be set going. It is
recommended to check that there is sufficient water in the boiler. Then, place the switch
on position 1 through hand load and wait for complete replenishment of the boiler.
Afterwards, turn the grip in position 2 to insert the electric heating.
The water level in the boiler has to be between the MIN and MAX indications. The
water level is indicated by a warning light (green MAX level – red MIN level).
During the heating stage of the machine (about 30 minutes), the anti-suck valve will
release steam for a couple of seconds, till the valve closes.
Before using the machine, let water flow without coffee for a couple of seconds with
filter holders hooked, in order that the air, that probably is in the circuit, can come out
and allows the total heating of the distribution groups.
Regulate the boiler pressure between 0.9/1.2 BAR (see pressure gauge).
Regulate the pump pressure between 8.5/9.5 BAR (see pressure gauge).
PREPARATION OF COFFEE
Unhook the filter holder from the group. Fill the filter with ground coffee directly
proportional to the used filter (1 dose – 2 doses). Press the coffee within the filter and
pay attention that no coffee remains on the filter’s rim. Hook the filter holder onto the
group again. The quantity of coffee needed for one dose is about 7 grams and for two
doses about 14 grams.
Place the cup beneath the distribution nozzle.
27
DAILY CLEANING
Proceed with cleaning the filter holders and filters every evening. They have to be
immersed into hot water, so that the coffee grease dissolves. Do not use chemical
products in order to avoid damages on the distribution group. Use specific products.
Proceed with cleaning the distribution groups by using the front filter.
It is recommendable to clean the draining basin every evening and check that the
draining bowl under the basin is not blocked.
The steam spout has to be clean after use, in order to avoid milk incrustations or
blocking of the openings of the steam spout terminal.
ELECTRIC CONNECTION SYSTEM
PLUMBING CIRCUIT
29
LEGENDA
LEGEND
1
MANOMETRO RETE/POMPA/CALDAIA
1
NET/PUMP/BOILER PRESSURE GAUGE
2
FILTRO PER POMPA
2
PUMP FILTER
3
POMPA
3
PUMP
4
REGOLAZIONE PRESSIONE POMPA
4
PUMP PRESSURE REGULATION
5
VALVOLA NON RITORNO SCAMBIATORI
5
NON RETURN VALVE (HEAT EXCH)
6
VALVOLA ESPANSIONE
6
EXPANSION VALVE
8
TURBINETTA
8
TURBINE
9
CALDAIA
9
BOILER
10
VALVOLA DI SICUREZZA
10
SAFETY VALVE
11
VALVOLA ANTI-DEPRESSIONE
11
VACUUM RELEASE VALVE
12
GRUPPO EROGATORE
12
COFFEE DISPENSER GROUP
13
ELETTROVALVOLA GRUPPO
13
COFFEE SOLENOIL VALVE
14
STROZZATURA GRUPPO
14
DISPENSER NECK
15
VALVOLA NON RITORNO CALDAIA
15
BOILER NON RETURN VALVE
16
MISCELATORE ACQUA CALDA
16
HOT WATER MIXER
17
ELETTROVALVOLA ACQUA
17
HOT WATER SOLENOID VALVE
18
LANCIA ACQUA
18
HOT WATER SPOUT
19
VALVOLA CARICO MANUALE
19
WATER FILLING MANUAL VALVE
21
ELETTROVALVOLA LIVELLO
21
AUTOMATIC FILLING SOLENOID VALVE
23
RUBINETTO VAPORE
23
STEAM TAP
26
PRESSOSTATO
26
PRESSURE SWITCH
27
LIVELLO OTTICO
27
LEVEL INDICATOR
28
SENSORE TEMPERATURA
28
TEMPERATURE SENSOR
31
SCAMBIATORI DI CALORE
31
HEAT EXCHANGESRS
32
SONDA AUTOLIVELLO
32
AUTOMATIC LEVEL DRILL
33
INIETTORE GRUPPO
33
DISPENSER GROUP INJECTOR
DESCRIPTION OF FUNCTIONAL AND CONTROL UNITS
1. Steam distribution grip LEFT-RIGHT
2. Jointed stainless steel nozzle steam supply LEFT-RIGHT
3. Nozzle with pipe hot water supply
4. Master switch 0-1-2
5. Button panel coffee and hot water supply
6. Distribution group
7. Filter holder
8. Emergency button
9. Light switch
10. Double scale pressure gauge – boiler pressure – pump pressure
11. Control warning light “TENSION ON”
12. Green warning light - regular hot water level in boiler
13. Red warning light - low hot water level in boiler
14. One coffee dispenser
15. One weak coffee dispenser
16. Two coffee dispenser
17. Two weak coffee dispenser
18. Continuous supply – Stop – Presetting
19. Hot water supply
31
SEMI-AUTOMATIC
Push the coffee dispenser switch and push it again when you reached the wanted
quantity.
To have hot water, open the tap turning the grip counter clockwise; when the desired
quantity is reached, close the tap by turning clockwise.
AUTOMATIC
Start distribution – it will finish as soon as the preset quantity is reached.
For hot water supply, start distribution (19) – it will finish as soon as the preset quantity
is reached.
You may carry out infusion by closing the solenoid valve for 3 seconds.
Carry out the following operation on the left panel:
Switch off the master switch (see detailed picture), press button (14) and hold it and turn
on the master switch at the same time. Stop pushing button (14) and wait some seconds.
To take off the infusion, carry out the same operation, pressing button (15).
Button (18) on the right is for continuous supply, to stop the distribution and to set.
ATTENTION: do not unhook the filter holder during coffee supply.
CLEANING OF THE GROUPS
Push buttons (14) and (18) at the same time. The machine will carry out 5 washings for
each group. Should you wish to stop the washing, please push button (18).
PRESETTING OF DOSES
Activation of presetting
It is possible to set all panels of the machine at the same time, by using only the left
hand panel.
5) Push and hold button (18) on the right side of the panel (18) of the group you
would like to preset, for more than 5 seconds.
6) While button is flashing (18), push the button you would like to preset. Once the
desired quantity is reached, push the same button to stop distribution. To proceed
with presetting of the other coffee doses, do the same with the other buttons,
including the presetting of hot water dose.
HOT WATER SUPPLY
To dispense hot water, please push button (19).
STEAM SUPPLY
To dispense steam, turn the grip counter clockwise (1).
33