1
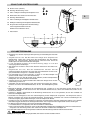
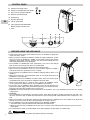
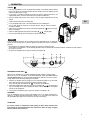
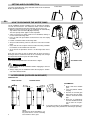
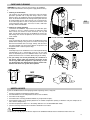
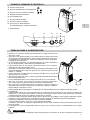
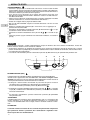
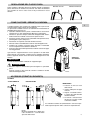
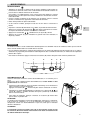
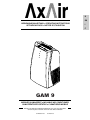
D
EG
BEDIENUNGSANLEITUNG ● OPERATING INSTRUCTIONS
ISTRUZIONI D'USO ● NOTICE D’UTILISATION
I
F
GAM 9
MOBILES KLIMAGERÄT ● MOVABLE AIR CONDITIONER
CLIMATIZZATORE PORTATILE ● CLIMATISEUR MOBILE
Bewahren Sie bitte diese Bedienungsanleitungen auf / Save these instructions
Conservate queste istruzioni / Conserver cette notice d’utilisation
37.4256.015.0
01/2007-ce
INHALTVERZEICHNIS
DAS PRODUKT .......................................................................................................... 2
SCHALT- UND KONTROLLPANEL ............................................................................ 3
VOR INBETRIEBNAHME ............................................................................................ 3
ANWENDUNGSHINWEISE
Kühlung ......................................................................................................4
D
Entfeuchtung (dry) ......................................................................................4
LUFTSTROM-EINSTELLUNG .................................................................................... 5
WIE DIE KONDENSWASSERBEHÄLTER ZU ENTLEEREN ..................................... 5
ZUBEHÖRTEILE (AUF ANFRAGE) ............................................................................ 5
RUNDES FENSTER KIT ...........................................................................5
WARTUNG UND PFLEGE .......................................................................................... 6
NÜTZLICHE RATSCHLÄGE ....................................................................................... 6
KONFORMITÄTSERKLÄRUNG
Dieses Produkt ist mit
Zeichen gekennzeichnet, weil es
den
folgenden
Richtlinien
entspricht:
– Niederspannungsrichtilinie
2006/95/CE.
–E l e k t r o m a g n e t i s c h e
Verträglichkeit 89/336 EWG,
92/31 EWG und 93/68 EWG.
Bei falschem Einsatz des Gerätes
und/oder Nichtbeachtung auch nur
von
Teilen
der
Bedienungsanleitung und der
Installatinsanweisungen wird diese
Erklärung ungültig.
HINWEIS FÜR DIE KORREKTE ENTSORGUNG DES PRODUKTS IN ÜBEREINSTIMMUNG MIT DER
EUROPÄISCHEN
RICHTLINIE 2002/96/EG
Am Ende seiner Nutzzeit darf dieses Gerät nicht zusammen mit dem Hausmüll beseitigt werden.
Es darf zu den örtlichen Sammelstellen oder zu den Fachhändlern, die einen Rücknahmeservice anbieten, gebracht werden.
Die getrennte Entsorgung eines elektrischen und elektronischen Gerätes vermeidet mögliche negative Auswirkungen auf
die Umwelt und die menschliche Gesundheit, die durch eine nicht vorschrichtsmäßige Entsorgung bedingt ist. Zudem
ermöglicht wird die Wiederverwertung der Materialen, aus denen sich das Gerät zusammensetzt, was wiederum eine
bedeutende Einsparung an Energie und Ressourcen mit sich bringt
Zur Erinnerung an die Verpflichtung, die diese Geräte getrennt zu beseitigen, ist das Produkt mit einer durchgestrichen
Mülltonne gekennzeichnet.
DAS PRODUKT
8
6
7
2
1
11
9
12
4
13
3
9
10
1.
2.
3.
4.
5.
6.
7.
2
Schalt- und Kontrollpanel
Luftzufuhr Klappe
Öffnung für Kabelwicklung
Luftansauggrill
Transporträder
Zeitschaltuhr
Flexibler Abluftschlauch
8.
9.
10.
11.
12.
5
Ausblasdüse
Betriebsgrenzen:
Luftfilter
Raumtemperatur:
Stromkabel mit Stecker
Kühlung:
MIN: 15°C T.K. / 12°C F.K
Kondenswasserflußrohr (Haupt-Behälter)
MAX: 35°C T.K. / 24°C F.K
Kondenswasserflußrohr (Untergeordnete- Entfeuchtung:
MIN: 10°C T.K. / 80% R.F.
MAX: 35°C T.K. / 80% R.F.
Behälter)
13. Öffnung für Kabelwicklung
SCHALT-UND KONTROLLPANEL
H
A. Ein/Aus-Taste (ON-OFF)
B. Kühlungs-Entfeuchtungs-Taste
E
C. Hohe / niedrige Ventilatorgeschwindigkeits-Taste
F
D. Wahlschalter des elektrischen Thermostates
D
E. Kühlungs-Kontrolleuchte
F. Hohe Ventilatorgeschwindigkeits-Kontrolleuchte
G
G. Niedrige Ventilatorgeschwindigkeits-Kontrolleuchte
H. Eingeschaltete Anzeigeleuchte für Entfeuchtung;
Die Anzeigeleuchte blinkt wenn der
Kondenswassersbehälter voll ist;
I. Zeitschaltuhr
I
A
D
C
B
VOR INBETRIEBNAHME
●
●
●
●
●
●
●
●
●
●
●
●
●
●
●
Überprüfen Sie, daß die einphasige Nennspannung am Anwendungsort 220/240V
~ 50Hz ist.
Vergewissern Sie sich, daß die elektrische Anlage einen eingemessene
Betriebsstrom liefern kann, außer jenem der normalerweise von den anderen
Geräten (z.B. Haushaltgeräte, Beleuchtungen) verbraucht wird. Sehen die
Bedarfsspitze auf dem Datenschild vom Klimagerät.
Ist ein zweipoliger Schalter mit Schutzsicherung (träge) zu 10 A dem
Versorgungsstecker anzubringen.
Alle elektrische Anschlüsse müssen den örtlichen elektrischen Vorschriften entsprechen.
Vergewissern Sie sich, daß die automatischen Schalter und die
Schutzsicherungen der Anlage in der Lage sind, einen Zulaufstrom von 20A zu tragen (normalerweise weniger als 1 Sekunde Zeit lang).
Das Klimagerät nicht an Orten aufstellen, in denen es von Wassertropfen naß
gemacht werden könnte (z.B. in den Waschküchen).
Vergewissern Sie sich, daß der Ein/Aus-Taste (ON/OFF) auf dem Schaltpanel des
Klimagerätes sich auf der Position OFF befindet.
Vergewissern Sie sich, daß die Steckdose der elektrischen Anlage immer mit wirksamer Erdung versehen ist.
Verwenden Sie den Gerätestecker nicht zum Ein-und Ausschalten des Gerätes:
benutzen Sie immer den Gerätebetriebstaste, die auf dem Kontrollpanel gestellt
ist.
Während des Betriebs, transportieren Sie Das Klimagerät nicht, schalten Sie es aus und ziehen Sie den Stecker aus der
Steckdose. Kontrollieren und auslassen Sie das eventuelle Kondenswasser, durch den Kondenswasserrohr an der
Rückseite der Einheit.
VORSICHT ! Niemals Gegenstände in die Klimaanlage hineinstecken. Es ist sehr gefährlich, da sich der Ventilator mit
hoher Geschwindigkeit dreht.
ACHTUNG! Das Klimagerät ist mit einer Startverzögerung für den Kompressor ausgerüstet. Der Kompressor startet 3
Minuten verzögert nach einem vorstehenden EIN/AUS- Schaltvorgang. Vermeiden Sie schnelle Veränderungen des
Thermostatsreglers gegen beiden Richtungen, wenn der Kompressor arbeitet.
Vergewissern Sie sich, daß keine Hindernisse neben der Inneneinheit den Luftumlauf unterbrechen können. Den Luftzuführ
und Luftansauggrill der Einheit mit Vorhängen oder ähnlich nicht versperren.Keine Gegenstände auf das Gerät legen.
Die Einheit erreicht die höchste Leistungen am folgenden Bedingungen:
1-Der Abluftschlauch ist ruckgezieht, ohne Kurven und ohne Schlauchdüse.
2-Beim ersten Einschalten der Einheit, stellen Sie die NIEDRIGE Ventilator-Geschwindigkeit ein und lassen Sie die Einheit
wenigstens eine Stunde lang laufen, dann stellen Sie die HOHE Ventilator-Geschwindigkeit ein.
Der Hersteller haftet nicht für unsachgemäßen Gebrauch oder Mißachtung nationaler Sicherheitsvorschriften.
WARNUNG
1. Vor jeder Bewegungs- oder Reinigungshandeln, den Stecker aus der Steckdose ziehen.
3
ANWENDUNGSHINWEISE
KÜHLUNG
●
●
D
●
●
●
●
●
●
●
Das Klimagerät so nah wie möglich an das Fenster stellen. Den Abluftschlauch
stecken, indem er an der Rückseite des Gerätes angreift. Den Schlauch ausziehen, so weit es notwendig ist, und durch eine Fensteröffnung (zwischen den
Flügeln) stecken; das Fenster anlehnen.
Falls das Fenster ein Fensterbrett nach innen hat, benutzen Sie die mitgelieferte
Flachdüse. Die Flachdüse auf das Ende des Schlauches stecken.
Das Fenster öffnen und einen der Flügeln durch die Griffe befestigen. Die
Schlauchdüse zwischen den beiden Flügeln stecken.
Scharfes Abnicken des Schlauches vermeiden.
Wird die Seitelucke benutzt, ein Loch von 140 mm in das Fenster schneiden.
Den Thermostatwahlschalter (D) nach rechts auf die Position höchster Kälte drehen.
Die Ein-/Aus-Taste (A)
drücken und das Klimagerät in Betrieb setzen. Die
Kontrolleuchten zeigen die letzte gewählte Funktionen.
Die Kühlbetrieb wählen, indem Sie die Taste (B)
drücken, die Kontrolleuchte
(E) erscheint.
Die Taste (C) drücken, um die hohe Ventilatorgeschwindigkeit zu wählen, die
Kontrolleuchte (F) erscheint.
FALSH!
ANMERKUNG
Das Klimagerät verbraucht das Kondenswasser automatisch, wenn der Ventilator mit der hohen Geschwindigkeit läuft;
wenn der Ventilator mit der niedrigen Geschwindigkeit läuft, wird das Kondenswasser in dem Behälter aufgenommen.
● Den Thermostwahlschalter nach links zum Ausschalten des Kompressors langsam drehen. Das Klimagerät wird automatisch vom Thermostat kontrolliert und hält die gewünschte Raumtemperatur ein.
● Die Ein-/Aus-Taste (A) zum Ausschalten des Klimagerätes wieder drücken (Position OFF).
I
A
D
C
B
ENTFEUCHTUNG
Wenn das Klimagerät als Entfeuchter benutzt wird, kühlt er den Raum nicht.
Wenn das Gerät als Entfeuchter benutzt wird, ist der Anschluß des
Abluftschlauches nicht notwendig. Die Schlauchanschlußöffnung auf der
Rückseite einfach offen lassen, um eine große Entfeuchter Leistung zu erlangen.
●
Den Schlauch abnehmen, indem Sie den auf der Anschluß des Klimagerätes fassen und drehen Sie, um den auszuziehen.
Die Ein / Aus Schalter (A)
drücken, um das Klimagerät in Betrieb zu setzen.
●
Die Entfeuchtungbetrieb mit der Taste (B)
wählen, die Anzeigeleuchte (H)
einschaltet. Die Luftfeuchte des Zimmers (Kondenswasser) wird in den innere
Kondenswasserbehälter vom Klimagerät aufgenommen.
●
Zum Ausschalten des Klimagerätes den Ein / Aus Taste (A) wiederdrucken
(Position OFF).
HINWEIS
Das Klimagerät kann als Entfeuchter benutzt werden, nur wenn die Raumtemperatur
höher als 10 °C ist. Wenn die Temperatur unter 10 °C ist, schaltet sich der
Kompressor aus und die Entfeuchtungsbetrieb nicht aktiviert ist, während der
Ventilator weiterartbeitet.
WARNUNG:
Das Kontrolle anrichtet eine Startverzögerung des Kompressors von etwa drei
Minuten, wenn die Tasten A, B und das Thermostat D aktiviert werden oder
den Stecker des Stromkabels aus und eingezogen wird.
4
H
E
F
G
LUFTSTROM-EINSTELLUNG
Der Luftstrom kann eingestellt werden, indem man eine Klappe auf
dem Luftauslaß bewegt. Mit den beiden Händen eine Luftleitlamelle
fassen und an sich ziehen, um den Luftstrom einzustellen.
Vertikal Lufstrom
Horizontal Lufstrom
D
WIE DIE KONDENSWASSERBEHÄLTER ZU ENTLEEREN
Das Klimagerät beseitigt die Luftfeuchte, die im innen Behälter aufgenommen wird. Das Kondenswasser kann durch den außen Flußrohr
ausgelassen werden, der sich auf der Rückseite des Gerätes befindet.
● Wenn der innere Behälter voll ist, schaltet automatisch das
Klimagerät aus und die Alarm-Kontrolleuchte (H) beginnt zu blinken.
Die Kapazität des Behälters erlaubt einen ca. 6 Stunden langen
Betrieb.
● Den Bestand von Wasser im Klimagerät nachprüfen, indem man
das aussere rückseitige Kondenswasserrohr kontrolliert.
● Die Ein / Aus Taste drücken bis zur Position OFF und den Stecker
aus der Steckdose ziehen.
● Einen Behälter unter das Kondenswasserrohr stellen.
● Das Rohr fassen, indem es von seinen Sitz auf der Rückseite der
Einheit abnehmen.
● Mit dem Zoll die öffnete Ende des Rohres schließen und neigen es
gegen den Behälter, indem die Kondenswasser auslassen.
● Am Ende das Kondenswasserrohr in Sitz wiedereinsetzen.
Jedes Mal sollen Sie die Einheit zu ein anderes Zimmer bringen oder
vor der Lagerung für einen längeren Zeitraum, entleeren Sie auch den
untergeordnete Kondenswasserbehälter durch dem Flußrohr, der sich
am Inneren der Öffnung für Kabelwicklung befindet.
WICHTIG
Am Ende machen Sie den Flußrohr mit dem Stöpsel zu.
WARNUNG
●
●
Die Ein / Aus Taste muß immer in der Position OFF sein, bevor
man den Stecker aus der Steckdose zieht.
Den Stecker aus der Steckdose ziehen, bevor man das innere
Kondenswasser ausläßt.
UNTERGEORDNETE
BEHÄLTER
ZUBEHÖRTEILE (AUF ANFRAGE)
RUNDES FENSTER KIT
EINZELGLAS
DOPPELGLAS
MONTAGE
ANMERKUNG
HOLE
HOLE
HOLE
ANMERKUNG
●
Das Fensterglas lochen.
●
Das runde Fenster ohne
Deckel einsetzen.
●
Die Ausblasedüse vom
Schlauch entfernen.
●
Das Klimagerät ans Fenster
nähern und das Auslaufrohr
in das runde Fenster einsetzen.
Wenn man das Klimagerät in mehreren Zimmer brauchen
will, ist es möglich mehrere runde Fenstern für Luftauslassen
kaufen.
ANMERKUNG
Beseitigen Sie eine oder zwei
Membranen, indem Sie mit der
Schere schneiden, gemäß der Dicke
des Glasses.
5
WARTUNG UND PFLEGE
VORSICHT! Vor Beginn der Reinigungs-und Wartungsvorgänge
ist das Klimagerät abzuschalten und der Stecker aus der
Steckdose zu ziehen.
EG
1. Filterreinigung.
Die Luftfilter mußen wenigstens einmal alle 2 Betriebswochen
überprüft und gereinigt werden. Der Betrieb mit schmutzigen
oder verstopften Filter kann die Leistung des Klimagerätes verkleinern. Die Filter sind hinter die linke und rechte
Luftansauggrille angebracht und werden nach Hinten herausgenommen. Zur Staubentfernung einen Staubsauger benutzen.
Sollte dies nicht ausreichen, den Filter mit lauwarmen
Seifenwasser waschen, gut mit frischem Wasser abspülen und
vor dem Wiedereinsetzen trocknen lassen.
2. Gehäusereinigung.
Das Gehäuse nur mit weichem feuchtem Tuch abwischen.
Wenn das Gehäuse Flecken aufweist, mit etwas lauwarmen
Seifenwasser abwischen. Auf keinem Fall mit heißen Wasser,
angreifenden chemischen Mitteln oder Benzin reinigen. Kein
Wasser auf die Einheit gießen. Es könnte die inneren
Komponenten beschädigen oder einen Kurzschluß verursachen.
Filter
Filter
FILTERREINIGUNG
3. Lagerung.
Vor der Lagerung für einen längeren Zeitraum den Filter reinigen und vergewissern Sie sich, daß die innere
Kondenswasserbehälter leer sind. Das Gerät immer senkrecht
lagern. Keine schweren Gegenstände auf das Gerät legen und
das Klimagerät mit einem Plastik Beutel schützen.
4. Transport .
Das Gerät nur senkrecht transportieren. Falls dies nicht möglich ist, das Gerät auf die rechte Seite legen. So bald wie möglich das Gerät senkrecht wieder stellen. 10 Minuten warten,
bevor es in Betriebsart “Kühlung” gebraucht wird.
5. Aus Sicherheitsgründen das Stromkabel regelmäßig auf
Schäden überprüfen; die elektrische Verbindung der
Einheit ist X-Type, mit dem auf spezialer Weise vorbereiteten Kabel; wenn es beschädigt ist, lassen Sie es durch
einen Servicefachmann ersetzen.
FALSCH!
FALSCH!
FALSCH!
NÜTZLICHE RATSCHLÄGE
Falls das Klimagerät nicht funktioniert, vergewissern Sie sich, bevor den Eingriff des Technischen Kundendiensts verlangen,
daß:
●
●
●
●
●
●
●
der Stecker richtig in der Steckdose eingesetzt ist;
der Hauptschalter eingeschaltet und keine Sicherung unterbrochen ist;
der Luftfilter sauber ist;
der Schlauch ordnungsgemäß verlegt ist, ohne Knick;
der Thermostatwahlschalter sich auf der richtigen Position für die gewünschte Raumtemperatur befindet (indem Sie im
Uhrzeigersinn drehen vergewissern Sie sich, daß der Kompressor sich nach dem Abstandzeit einschaltet);
die Raumtemperatur höher als 15 °C für Kühlungbetrieb und 10°C für Entfeuchtungbetrieb ist;
alle Anweisungen dieses Handbuches genau beachtet wurden.
ACHTUNG
Das Blinken der Kontrollampe (H) und das gleichzeitige Anhalten des Klimagerätes bedeuten, daß die Kondenswasserbehälter
voll ist.
6
CONTENTS
PRODUCT IDENTIFICATION................................................................................. 2
DECLARATION OF CONFORMITY
CONTROL PANEL ................................................................................................. 3
BEFORE USING THE APPLIANCE ....................................................................... 3
This product is marked
as it
satisfies Directives:
– Low voltage no. 2006/95/CE.
– Electromagnetic compatibility no.
no. 89/336 EEC, 92/31 EEC
and 93/68 EEC.
This declaration will become void in
case of of misusage and/or non
observance though partial of
manufacturer's installation and/or
operating instructions.
OPERATION
Cooling ............................................................................................ 4
Dehumidification (dry)...................................................................... 4
SETTING AIR FLOW DIRECTION ......................................................................... 5
HOW TO DISCHARGE THE WATER TANKS ....................................................... 5
ACCESSORIES (SUPPLIED ON REQUEST)......................................................... 5
PORTHOLE KIT ....................................................................................5
CARE AND CLEANING .......................................................................................... 6
EG
USEFUL ADVICE.................................................................................................... 6
INFORMATION FOR CORRECT DISPOSAL OF THE PRODUCT IN ACCORDANCE WITH THE EUROPEAN
DIRECTIVE
2002/96/EC
At the end of its working life this equipment must not be disposed of as an household waste.
It must be taken to special local community waste collection centres or to a dealer providing this service.
Disposing of an electrical and electronic equipment separately avoids possible negative effects on the environment and
human health deriving from an inappropriate disposal and enables its components to be recovered and recycled to obtain
significant savings in energy and resources.
In order to underline the duty to dispose of this equipment separately, the product is marked with a crossed-out dustbin.
PRODUCT IDENTIFICATION
8
6
7
2
1
11
9
12
4
13
3
9
10
1.
2.
3.
4.
5.
6.
7.
8.
Control panel
Supply air deflector
Cable cover
Return air grille
Transportation wheels
Timer
Retractile flexible pipe
Terminal pipe fitting
9. Air filter
10. Electric cable with plug
11. Tube for condensate discharge
(Main tank)
12. Tube for condensate discharge
(Secondary tank)
13. Space for cable winding
5
Operating limits:
Room Temperature:
Cooling:
MIN: 15°C D.B. / 12°C W.B.
MAX: 35°C D.B. / 24°C W.B.
Dehumidification: MIN: 10°C D.B / 80% R.H.
MAX: 35°C D.B. / 80% R.H.
2
CONTROL PANEL
A. ON/OFF Push-button switch
H
B. Cooling / Dehumidification push-button
E
C. High / Low fan speed push-button
D. Electronic thermostat Knob
F
E. Cooling lamp
F. High fan speed lamp
EG
G
G. Low fan speed lamp
H. Light up lamp for dehumidification.
Blinking lamp for full water tank.
I. Timer
I
A
D
C
B
BEFORE USING THE APPLIANCE
●
●
●
●
●
●
●
●
●
●
●
●
●
●
●
Check that the power supply at the location where the air conditioner is going to be
used is 220-240V ~ 50Hz .
Make sure that the electrical installation is suitable to supply continuously current
necessary for the air conditioner in addition to that already used by other electric
appliances (white goods, lighting). See the max electric input indicated on the
name plate positioned on the air conditioner.
The installation of a double-pole switch, protected by 10 A fuses of the delayed
type, upstream the electricity wall socket, is recommended.
The unit has to be connected according to the local electrical rules.
Make sure that circuit breakers, fuses, etc, are of sufficient capacity to handle a
start-up current of 20 A (generally less then 1 second).
Do not install the air conditioner where it could be wetted by drops of water (i.e. in
laundries).
Make sure that the ON - OFF push-button switch on the control panel of the air
conditioner is in OFF position.
Before connecting the air conditioner to a power socket, make sure that the socket
is provided with an earth connection in compliance with local codes.
Never use the power plug as a mean to start or stop the air conditioner: always
use the ON/OFF push-button switch on the air conditioner control panel.
Do not move the air conditioner during operation, turn it off and disconnect the
plug from the power supply. Verify and eventually discharge the condensate water,
through the discharge tube located on the rear of the unit.
WARNING! Do not stick anything into the air outlet of the air conditioner. This is very dangerous because the fan is rotating
at high speed.
WARNING!
The air conditioner is provided with a time-guard system, which does not allow re-starting of compressor until after 3 minutes from a previous stop. So avoid quick movements of the thermostat knob in both directions when compressor is running.
Make sure that there are no obstacles around the unit affecting the free circulation of air. Do not block the air intake and
outlet of the unit with curtains or other. Never put objects on the top of the unit.
The air conditioner reaches the maximum efficiency at the following conditions:
1-The flexible tube is retracted, without bends and without the outlet nozzle.
2-When you switch on the air conditioner for the first time, set the fan at the LOW speed for at least one hour, then set the
HIGH speed.
The manufacturer assumes no responsibilities if the safety regulations or local codes are not observed.
WARNING
3
1. Always unplug the unit from the power socket before moving or cleaning it.
OPERATION
COOLING
●
Place the air conditioner as near as possible to the window. Fit the flexible tube by hooking
it to the rear of the unit. Extend the flexible tube just enough to reach the outdoor, passing
under the window shutters set ajar.
●
In case there is a window sill towards the inside of the room, it might be better to use the
supplied outlet nozzle. Insert the nozzle into the free end of the flexible tube.
●
Open the window and lock one of the shutters. Place the outlet nozzle between the two
shutters.
●
Avoid sharp bends or plies of the flexible tube.
●
In case of porthole utilise make a 140 mm diameter hole in the window pane.
●
Turn the knob (D) of the thermostat in clockwise direction until you reach the position
of maximum cooling.
●
Switch on the air conditioner pressing the ON/OFF push-button (A)
ations are displayed.
●
Select the cooling operation pressing the push-button (B)
●
Press the push-button (C) to select the high fan speed, lamp (F) lights.
EG
,lamps of last oper-
NO!
, lamp (E) lights.
NOTE
The air conditioner disposes of the condensate water automatically at the HIGH fan
speed, on the contrary at the LOW fan speed the condensate water is collected in
the tank.
●
Now slowly twist the thermostat knob back towards the left until the compressor stops.
At this point the air conditioner is set for automatic operation under the control of the electronic thermostat to maintain the room temperature at the pre-set value.
●
To stop the air conditioner press again the ON/OFF push-button. (A).
I
A
D
C
B
DEHUMIDIFICATION (DRY)
When the air conditioner is in the dehumidification mode, it doesn’t cool the room.
When you use the air conditioner in the dehumidification mode, you don’t have to
use the flexible tube. For maximum dehumidification efficiency leave the rear discharge outlet free to discharge directly into the room.
H
E
●
Remove the flexible tube by grasping it at the attachment point on the air conditioner and twisting it until you release it from the blocking hooks.
Press the ON /OFF push button (A)
to start the air conditioner.
F
●
Select dehumidification mode pressing the push button (B)
, lamp (H) lights
up. The humidity of the room (condensate water) will be collected in the internal
tank of the air conditioner.
G
●
To stop the air conditioner press again the ON/OFF push-button. (A).
WARNING !
The air conditioner may be used as dehumidifier only if the room temperature is
above 10 °C. When the room temperature is below 10 °C, the compressor stops and
the dehumidification doesn’t occur, while the fan goes on working.
ATTENTION:
the control causes a compressor starting delay of about three minutes each
time buttons A, B and thermostat D are activated or when the plug of supply
electric cable is took out and in.
4
SETTING AIR FLOW DIRECTION
To set the air flow direction, grasp with both hands one of the deflector
blades and pull towards you
EG
Vertical Flow
Horizontal Flow
HOW TO DISCHARGE THE WATER TANKS
The air conditioner removes humidity of the air, collecting the condensate into the internal tank. The condensate water can be evacuated
through the external discharge tube located on the rear of the unit.
● When the internal tank is full, the air conditioner will automatically
stop and the water tank alarm (H) begins flashing.
The tank capacity allows approx. 6 hours operation.
● Verify the presence of water inside the air conditioner, looking at
the rear external discharge tube.
● Press the ON /OFF push button to switch off the unit, then unplug
the cable.
● Position a container under the discharge tube.
● Grasp the tube removing it from its seat on the rear of the air conditioner
● Close with the inch the open end of the tube and, tilting it towards
the container, let the condensate water flow.
● At the end of the operations reinsert the discharge tube into its
place.
Every time you move the unit to another room or when you store it,
discharge also the condensate water of the secondary tank, through
the tube located inside the space for cable winding.
IMPORTANT
At the end of the operation close the tube with its stopper.
SECONDARY TANK
WARNING
●
●
Always switch off the air conditioner before unplugging it from the
power socket.
Always unplug the air conditioner before discharging the condensate water collected inside.
ACCESSORIES (SUPPLIED ON REQUEST)
PORTHOLE KIT
SINGLE GLASS
DOUBLE GLASS
ASSEMBLING
5
●
Make a hole in the window
pane.
●
Insert the porthole without
the plug.
●
Remove the terminal pipe
fitting of the warm air outlet
from the retractile flexible
pipe.
HOLE
NOTE
HOLE
HOLE
NOTE
NOTE
Eliminate one or two membranes, cutting them with the scissors according
to the thickness of the glass.
●
Bring the air conditioner
near the window and insert
the air outlet in the porthole.
If you want to utilise the air conditioner in several rooms, it is
possible to buy varies portholes for air discharge separately.
CARE AND CLEANING
WARNING! For safety’s sake, be sure to turn the air conditioner
OFF and also disconnect it from the power supply before cleaning
it.
1. Cleaning of the Air Filters.
The air filters must be checked at least once every two weeks
operation. Operation with a dirty filter always causes a lower
efficiency of the air conditioner and severe product damage.The
filters are located behind the left and right intake grilles and can
be removed from the rear side of the unit. Use a vacuum cleaner to remove light dust. If there is sticky dust on the filter, wash
it with lukewarm soapy water, then rinse in clean, cold water
and dry it before reinstallation.
2. Cleaning of Casing and Grille.
To clean the air conditioner, wipe it with a clean soft cloth, lightly moisted. In case it is stained, moisten the cloth with soapy
water. Never use solvents or harsh chemicals, nor very hot
water. Do not pour water over the air conditioner to clean it: this
will damage the internal components and cause an electric
shock hazard.
Filter
EG
Filter
FILTER CLEANING
3. Storage.
If you are not going to make use of the air conditioner for a long
period, before storing it away clean the air filter and verify that
both the internal water tanks are empty. Always store the unit in
the vertical position. Do not put heavy objects on top of the unit
and protect it with a cloth or a plastic bag.
4. Transport.
Preferably keep the air conditioner in the vertical position during
transportation. If this is not possible, then lay it on one side;
when at destination put the air conditioner back in the vertical
position and wait at least 10 minutes before using it for cooling.
5. For your safety care check periodically the conditions of
the electric supply cable; the electrical connection of the
unit is X type with cable prepared in a special way; in case
you should notice any damage due to usage, call the nearest After Sale Service to get the cable replaced.
NO!
NO!
USEFUL ADVICE
If your air conditioner doesn’t work properly, before requesting service, verify that:
●
●
●
●
●
●
●
the plug is properly inserted into the power socket;
the circuit breaker is in the ON position and fuses have not blown;
the air filter is not clogged;
the flexible tube is correctly positioned without any sharp bends nor plies;
the thermostat knob is in the proper position for the suitable temperature (twisting it clockwise verify the compressor restart, after the delayed time);
the room temperature is above 15°C for cooling mode and 10°C for dehumidification mode;
you have correctly carried-out the instructions contained in this manual.
ATTENTION
The blinking of lamp (H), together with the stop of the air conditioner indicate that the condensate water tank is full.
6
INDICE
I
IL PRODOTTO ................................................................................................. 2
PANNELLO COMANDO E CONTROLLO ........................................................ 3
PRIMA DI USARE IL CLIMATIZZATORE ........................................................ 3
MODALITÀ D'USO
Raffreddamento .................................................................................... 4
Deumidificazione (dry) .......................................................................... 4
REGOLAZIONE DEL FLUSSO D'ARIA ............................................................ 5
COME SVUOTARE I SERBATOI CONDENSA ................................................. 5
ACCESSORI (FORNITI SU RICHIESTA) ......................................................... 5
KIT OBLÓ ...................................................................................... 5
MANUTENZIONE E CURA .............................................................................. 6
CONSIGLI UTILI .............................................................................................. 6
DICHIARAZIONE DI CONFORMITÀ
Questo prodotto è marcato
in quanto conforme alle Direttive:
– Bassa Tensione n. 2006/95/CE.
– Compatibilità Elettromagnetica
n. 89/336 CEE, 92/31 CEE
e 93/68 CEE.
Questa dichiarazione sarà nulla nel
caso di impiego diverso da quello
dichiarato dal Fabbricante e/o di
mancata osservanza, anche solo
parziale,
delle
istruzioni
d'installazione e/o d'uso.
INFORMAZIONE PER IL CORRETTO SMALTIMENTO DEL PRODOTTO AI SENSI DELLA DIRETTIVA EUROPEA 2002/96/
CE
Alla fine della sua vita utile questo apparecchio non deve essere smaltito insieme ai rifiuti domestici.
Deve essere consegnato presso appositi centri di raccolta differenziata oppure presso i rivenditori che forniscono questo
servizio.
Smaltire separatamente un apparecchio elettrico ed elettronico consente di evitare possibili effetti negativi sull’ambiente e
sulla salute umana derivanti da uno smaltimento inadeguato e permette di recuperare e riciclare i materiali di cui è composto, con importanti risparmi di energia e risorse.
Per sottolineare l’obbligo di smaltire separatamente queste apparecchiature, sul prodotto è riportato il simbolo del cassonetto barrato.
Lo smaltimento abusivo del prodotto da parte dell’utente comporta l’applicazione delle sanzioni amministrative di cui al
D.Lgs. n. 22/1997 (articolo 50 e successivi).
IL PRODOTTO
8
6
7
2
1
11
9
12
4
13
3
9
10
1.
2.
3.
4.
5.
6.
7.
8.
2
Pannello comando e controllo
Deflettore mandata aria
Sportello cavo elettrico
Griglia aspirazione aria
Ruote trasporto
Programmatore
Tubo flessibile retrattile
Raccordo terminale scarico aria calda
9. Filtro Aria
10. Cavo elettrico con spina
11. Tubo scarico condensa
(serbatoio principale)
12. Tubo scarico condensa
(serbatoio secondario)
13. Alloggiamento cavo
5
Condizioni limite di funzionamento:
Temperatura interna:
Raffreddamento:MIN: 15°C B.S. / 12°C B.U.
MAX: 35°C B.S. / 24°C B.U.
Deumidificazione:MIN: 10°C B.S / 80% U.R.
MAX: 35°C B.S. / 80% U.R.
PANNELLO COMANDO E CONTROLLO
H
A. Pulsante marcia/arresto
B. Pulsante raffreddamento / Deumidificazione
E
C. Pulsante alta / bassa velocità ventilatore
F
D. Manopola termostato elettronico
E. Spia raffreddamento
F. Spia alta velocità ventilatore
G
G. Spia bassa velocità ventilatore
H. Spia accesa per deumidificazione
I
Spia lampeggiante per serbatoio acqua pieno
I. Programmatore
I
A
D
C
B
PRIMA DI USARE IL CLIMATIZZATORE
●
●
●
●
●
●
●
●
●
●
●
●
●
●
●
Verificare che la tensione monofase di alimentazione nel luogo di utilizzo sia di
220V-240V~ 50Hz.
Assicuratevi che l'impianto elettrico sia in grado di erogare la corrente di esercizio
necessaria per il climatizzatore oltre a quella assorbita normalmente da altre utenze (elettrodomestici, illuminazione). Vedere gli assorbimenti massimi sulla targhetta dati posta sul climatizzatore.
Si raccomanda l'installazione di un interruttore bipolare, con fusibile di protezione
da 10 A del tipo ritardato, a monte della presa d'alimentazione.
L'allacciamento alla rete elettrica del climatizzatore deve essere eseguito in
conformità alle norme d'installazione vigenti.
Assicuratevi che interruttori automatici e valvole di protezione dell'impianto siano
in grado di sopportare una corrente di spunto di 20 A, (normalmente per un tempo
inferiore a 1 secondo).
Evitare di installare il climatizzatore in locali dove potrebbe essere investito da
spruzzi d'acqua (es. lavanderie).
Accertatevi che il pulsante marcia - arresto sul pannello di comando del climatizzatore sia nella posizione OFF.
La presa dell'impianto deve essere sempre provvista di messa a terra efficiente.
Non usare mai la spina come mezzo per arrestare o avviare il climatizzatore:
usare sempre il pulsante marcia/arresto sul pannello di comando dell'unità.
Non movimentate il climatizzatore mentre é in funzione, spegnere e togliere la
spina dalla presa di corrente. Controllare ed eventualmente svuotare la condensa,
tramite il tubo di scarico posto sul retro.
PRECAUZIONE! Non inserite oggetti nel condizionatore. É molto pericoloso perché il ventilatore gira ad alta velocità.
ATTENZIONE!
Il climatizzatore è dotato di un sistema di protezione del compressore dai sovraccarichi che non consente la partenza del
compressore se non sono trascorsi almeno 3 minuti da un precedente arresto. Evitare quindi spostamenti veloci della
manopola termostato nei due sensi quando il compressore è in funzione.
Assicurare la libera circolazione dell'aria all'unità interna. Non ostruire con tendaggi o simili la griglia di aspirazione e quella
di mandata. La parte superiore deve essere libera da qualsiasi ostacolo, non depositare oggetti sul climatizzatore.
L’apparecchio raggiunge le massime prestazioni alle seguenti condizioni:
1-Il tubo flessibile é retratto, senza curve e senza bocchetta di raccordo.
2-Alla prima accensione, far funzionare l’apparecchio per almeno un’ora alla BASSA velocità di ventilazione, poi passare
alla ALTA velocità.
Il costruttore non si assume responsabilità alcuna nel caso in cui le norme di sicurezza e antinfortunistiche non vengano
rispettate.
AVVERTIMENTO
1. Prima di eseguire una qualsiasi operazione di spostamento o pulizia, assicuratevi che la spina sia disinserita dalla presa di
corrente.
3
MODALITÁ D'USO
I
RAFFREDDAMENTO
● Avvicinate il più possibile il climatizzatore alla finestra. Inserite il tubo flessibile
agganciandolo, alla parte posteriore del climatizzatore. Estendete il flessibile quanto basta per raggiungere l’esterno passando sotto i battenti accostati della finestra.
Accostate la finestra in posizione di minima apertura.
● Se la finestra ha un davanzale verso l’interno può rendersi necessario l’uso
dell’apposito raccordo terminale fornito in dotazione. Inserite il raccordo nell’estremità libera del flessibile.
● Aprite la finestra e bloccate uno dei battenti con la maniglia. Appoggiate il raccordo
terminale al battente fisso, accostate l’altro battente della finestra.
● Evitate curve troppo strette o pieghe del tubo flessibile.
● Nel caso di utilizzo dell’obló eseguire un foro del diametro di 140 mm nel vetro
della finestra.
● Ruotare la manopola del termostato (D) in senso orario, fino a raggiungere la
posizione del massimo freddo.
● Accendere il climatizzatore premendo il pulsante (A) Marcia/Arresto
, le spie
visualizzano le ultime funzioni selezionate.
● Selezionare la funzione raffreddamento con il pulsante (B)
, si accende la spia
(E).
● Premere il pulsante (C) per selezionare l’alta velocità del ventilatore, si accende la
spia (F).
NO!
NOTA
Il climatizzatore provvede a smaltire automaticamente l’acqua di condensa alla ALTA velocità di ventilazione, mentre alla
BASSA velocità la condensa viene raccolta nel serbatoio.
● Quindi ruotare lentamente la manopola del termostato verso sinistra fino ad ottenere l'arresto del compressore. A questo
punto il climatizzatore è predisposto per funzionare automaticamente sotto il controllo del termostato, mantenendo nel locale la temperatura da voi desiderata.
● Per arrestare il climatizzatore premete nuovamente il pulsante (A) Marcia-Arresto, per riportarlo nella posizione OFF.
I
A
D
C
B
DEUMIDIFICAZIONE (DRY)
Il climatizzatore non raffredda l’ambiente quando funziona come deumidificatore.
Quando usate l’apparecchio come deumidificatore, non dovete collegare il tubo
flessibile. Per ottenere la massima efficienza di deumidificazione lasciate l’attacco di
scarico posteriore libero di scaricare direttamente in ambiente.
●
H
E
Scollegate il tubo flessibile afferrandolo in prossimità del punto di attacco
sull’apparecchio e ruotandolo sino a liberarlo dai ganci di bloccaggio.
Avviate il climatizzatore premendo il pulsante (A) Marcia/Arresto
.
F
●
Selezionate la funzione deumidificazione tramite il pulsante
(B), si accende
la spia (H). L’umidità rimossa dall’ambiente (condensa) sarà raccolta nel serbatoio
interno del climatizzatore.
G
●
Per arrestare il climatizzatore premete nuovamente il pulsante (A) riportandolo
nella posizione OFF.
AVVERTENZA
Il condizionatore può funzionare come deumidificatore solo se la temperatura del
locale è superiore a 10 °C. Quando la temperatura è inferiore a 10 °C il compressore
si ferma e la deumidificazione non ha luogo, mentre il ventilatore continua a funzionare.
ATTENZIONE:
il comando inserisce un ritardo di circa 3 minuti alla partenza del compressore
ogni qualvolta si azionano i pulsanti A, B e il termostato D o togliendo e inserendo la spina del cavo di alimentazione.
4
REGOLAZIONE DEL FLUSSO D'ARIA
Potete regolare la direzione del flusso dell’aria agendo sul deflettore
posto sulla bocca di mandata aria; afferrate una aletta del deflettore
con entrambe le mani e tirate verso di voi per orientare il flusso
dell’aria.
Mandata verticale
Mandata orizzontale
COME SVUOTARE I SERBATOI CONDENSA
I
L’umidità asportata viene raccolta nel serbatoio interno e può essere
scaricata tramite il tubo esterno sul retro dell’unità.
La capacità del serbatoio consente un’autonomia di funzionamento in
deumidificazione di circa 6 ore.
● Quando il serbatoio interno è pieno, il climatizzatore si arresta automaticamente e la spia serbatoio pieno (H) inizia a lampeggiare.
● Verificate la presenza d’acqua all’interno dell’apparecchio controllando visivamente il tubo di scarico esterno posto nel retro.
● Premete il pulsante marcia-arresto, portandolo nella posizione OFF,
quindi togliete la spina dalla presa.
● Posizionate un recipiente al di sotto del tubo di scarico.
● Afferrate il tubo estraendolo dalla sede nel retro dell’apparecchio.
● Chiudete con il pollice l’estremità aperta del tubo e inclinandolo
verso il recipiente lasciate defluire la condensa.
● Al termine delle operazioni riposizionate il tubo di scarico nell’apposito alloggiamento.
Ogni volta che l’apparecchio deve essere spostato in un altro locale
oppure riposto a fine stagione, svuotare anche il serbatoio secondario,
tramite l’apposito tubetto situato all’interno dell’alloggiamento cavo
elettrico.
SERBATOIO
SECONDARIO
IMPORTANTE
A lavoro ultimato richiudere il tubetto con l’apposito tappo.
AVVERTIMENTO
●
●
Arrestate sempre il climatizzatore prima di togliere la spina dalla
presa.
Staccate sempre la spina prima di scaricare la condensa raccolta
all’interno dell’apparecchio.
ACCESSORI (FORNITI SU RICHIESTA)
KIT OBLÒ
VETRO SINGOLO
DOPPIO VETRO
MONTAGGIO
●
Praticare un foro sul vetro
della finestra.
●
Inserire l'oblò privo di tappo
chiusura.
●
Togliere il raccordo terminale scarico aria calda dal tubo
flessibile retrattile.
●
Avvicinare il climatizzatore
alla finestra e inserire il tubo
scarico aria nell'oblò.
FORO
NOTA
FORO
FORO
NOTA
Se si desidera usufruire del climatizzatore in vari locali è possibile acquistare più KIT OBLÓ scarico aria separatamente.
NOTA
Eliminare tagliando con le forbici una
o due membrane a secondo dello
spessore della vetrata.
5
MANUTENZIONE E CURA
ATTENZIONE! Prima di procedere a operazioni di pulizia e manutenzione togliere la spina dalla presa di corrente.
1. Pulizia dei filtri d'aria
I filtri devono essere controllati almeno una volta ogni due settimane di funzionamento. Il funzionamento con filtro sporco o
intasato causa sempre una diminuzione dell’efficienza del climatizzatore e può provocare inconvenienti gravi. I filtri sono
collocati dietro le griglie d’aspirazione sinistra e destra e si possono estrarre dal retro dell’unità. Usate un aspirapolvere per
asportare la polvere. Se ciò non fosse sufficiente lavate il filtro
con acqua tiepida leggermente saponata, sciacquatelo con
acqua fredda e lasciatelo asciugare prima di reinserirlo.
F
Filtro
2. Pulizia involucro e griglia.
Per pulire il climatizzatore strofinatelo con un panno soffice,
leggermente inumidito. Per togliere eventuali macchie usate
acqua saponata. Non usate solventi, benzina o altri composti
chimici aggressivi, né acqua molto calda. Non versate acqua
sul climatizzatore per pulirlo: potreste danneggiare i componenti interni o provocare un corto circuito.
3. Conservazione.
Quando prevedete di non utilizzare il climatizzatore per un
lungo periodo, prima di riporlo pulite il filtro e controllate che
entrambi i serbatoi di raccolta condensa siano vuoti. Se mettete
l’apparecchio in un ripostiglio, abbiate cura di mantenerlo sempre in posizione verticale. Non appoggiate oggetti pesanti sul
piano superiore e possibilmente proteggete il climatizzatore
con un foglio di plastica.
Filtro
PULIZIA FILTRO
4. Trasporto.
Quando trasportate il climatizzatore, mantenetelo se possibile
in posizione verticale. Qualora ciò non fosse possibile, coricatelo sul fianco destro; quando arrivate a destinazione rimettete
subito l’apparecchio in posizione verticale e attendete almeno
10 minuti prima di utilizzarlo in raffreddamento.
5. Per la vostra sicurezza abbiate cura di verificare periodicamente lo stato del cavo di alimentazione; il collegamento
elettrico dell’unità é di tipo X con cavo preparato in modo
speciale; qualora fosse danneggiato dall’uso, per la sostituzione, rivolgersi al Centro Assistenza.
NO!
NO!
CONSIGLI UTILI
Se il climatizzatore non funziona, prima di richiedere l’intervento del Servizio Assistenza verificare che:
●
●
●
●
●
●
●
la spina sia correttamente inserita nella presa di corrente;
l’interruttore generale sia inserito e che non vi sia alcun fusibile interrotto;
il filtro aria sia pulito;
il flessibile sia correttamente posizionato, senza pieghe né curve troppo strette;
la manopola del termostato sia nella posizione più idonea per la temperatura desiderata (ruotandola progressivamente in
senso orario verificare che il compressore si avvii, dopo il periodo di ritardo);
la temperatura ambiente sia superiore a 15°C per la funzione raffreddamento e 10°C in deumidificazione;
tutte le istruzioni contenute in questo manuale siano state osservate scrupolosamente.
ATTENZIONE
La spia (H) lampeggiante con il contemporaneo arresto del condizionatore sono dovuti al serbatoio raccolta condensa pieno.
6
SOMMAIRE
LE PRODUIT .............................................................................................................. 2
TABLEAU DE COMMANDES ..................................................................................... 3
AVANT D’UTILISER LE CLIMATISEUR ..................................................................... 3
MODE D’EMPLOI
Refroidissement ..........................................................................................4
Déshumidification (dry) ...............................................................................4
REGLAGE DU FLUX D’AIR ....................................................................................... 5
COMME VIDER LES RESERVOIRS DE CONDENSAT ............................................ 5
ACCESSOIRES (FOURNIS SUR DEMANDE) ........................................................... 5
KIT HUBLOT ........................................................................5
ENTRETIEN ET NETTOYAGE ................................................................................... 6
DECLARATION DE CONFORMITE
Ce produit est marqué
puisque il est conforme aux
Directives:
– Basse Tension n. 2006/95/CE.
– Compatibilité Electromagnétique
n. 89/336 CEE, 92/31 CEE
et 93/68 CEE.
Cette declaration sera nulle en cas
d'une utilisation différente de celle
déclarée par le Constructeur et/ou
de la non-observation, même si
partielle
des
instructions
d'installation et/ou usage.
F
CONSEILS UTILES ..................................................................................................... 6
AVERTISSEMENT POUR L’ELIMINATION CORRECT DU PRODUIT AUX TERMES DE LA DIRECTIVE EUROPEENNE
2002/96/CE
Au terme de son utilisation cet équipement ne doit pas être éliminé avec les ordures ménagères.
Le produit doit être remis à l’un des centres de collecte sélective locaux ou auprès des revendeurs assurant ce service.
Eliminer séparément un équipement électrique et électronique permet d’éviter des potentielles retombées négatives pour
l’environnement et la santé humaine dérivant d’une élimination incorrect et permet de récupérer les matériaux qui le composent dans le but d’une économie importante en termes d’énergie et de ressources.
Pour rappeler l’obligation d’éliminer séparément ces équipements, le produit porte le symbole d’un caisson à ordures barré.
LE PRODUIT
8
6
7
2
1
11
9
12
4
13
3
9
10
1.
2.
3.
4.
5.
6.
7.
Tableau de commandes
Déflecteur de soufflage d’air
Porte du câble électrique
Grille d’aspiration d’air
Roues pour le déplacement
Programmateur
Manchette d’évacuation d’air/ tube
flexible retractable
8.
9.
10.
11.
Raccord terminal d’expulsion d’air
Filtre à air
Câble électrique avec fiche
Tuyau de drainage sortie de
condesât (principal)
12. Tuyau de drainage sortie de
condesât (secondaire)
13. Compartiment du câble électrique.
5
Limites de fonctionnement:
Température intérieure:
Refroidissement: MIN: 15°C B.S. / 12°C B.H.
MAX: 35°C B.S. / 24°C B.H.
Déshumidification: MIN: 10°C B.S / 80% H.R.
MAX: 35°C B.S. / 80% H.R.
2
TABLEAU DE COMMANDES
H
A. Touche marche - arrêt
E
B. Touche refroidissement / Déshumidification
C. Touche grande et petite vitesse du ventilateur
F
D. Sélecteur thermostat électronique
E. Voyant refroidissement
F. Voyant grande vitesse du ventilateur
G
G. Voyant petite vitesse du ventilateur
H. Voyant allumé pour déshumidification.
Quand le voyant clignote le réservoir est plein.
F
I. Programmateur
I
A
D
C
B
AVANT D’UTILISER LE CLIMATISEUR
●
●
●
●
●
●
●
●
●
●
Vérifiez que la tension du réseau d’alimentation est bien de 220-240V ~ 50Hz.
Assurez-vous que l’installation électrique est en mesure de débiter un courant
nécessaire au climatiseur, en plus du courant normalement utilisé pour d’autres
usages (appareils électroménagers, éclairage). Voir la puissance absorbée sur la
plaquette signalétique du climatiseur.
Nous conseillons l’installation d’un interrupteur bipolaire, avec un fusible de protection de 10 ampères à retardement, en amont de la fiche d’alimentation.
L’unité doit être raccordée selon les normes et règlements électriques en vigueur.
Assurez-vous que le disjoncteur de protection de l’installation est calibré pour supporter un courant de pointe de 20 ampères ( normalement pour un temps inférieur
à une seconde).
Ne pas installer le climatiseur dans un local, où il pourrait recevoir des projections
d’eau (par exemple dans la buanderie).
Vérifiez que la touche marche-arrêt sur le tableau de commandes du climatiseur
est sur la position OFF.
La prise du climatiseur doit toujours être pourvue d’une prise de terre efficace.
N’utilisez jamais la fiche pour arrêter ou mettre en marche le climatiseur; utilisez
toujours l’interrupteur prévu sur le tableau de commande de l’appareil.
Ne pas transportez le climatiseur pendant le fonctionnement, arretez-le et débranchez la fiche de la prise de courant. Vérifier et eventuellement vider l’eau de
condensation, par le tube de vidange placé à l’arrière.
PRECAUTION ! Ne rien introduire dans le climatiseur. Cela est très dangereux car le ventilateur tourne à grande vitesse.
● ATTENTION!
Le climatiseur est pourvu d’un système de protection du compresseur contre les surcharges qui l’empêche de fonctionner
pendant trois minutes après l’arrêt précédent. Evitez donc les déplacements rapides du sélecteur du thermostat dans les
deux sens quand le compresseur fonctionne.
● Assurez-vous que l’air puisse circuler librement autour de l’unité intérieure. Ne pas obstruer avec des rideaux ou similaires
les grilles d’arrivée et de sortie d’air. Ne pas déposer des objets sur le climatiseur.
● Le constructeur décline toute responsabilité dans le cas où les normes de sécurité et de prévention contre les accidents ne
seraient pas respectées.
● Le climatiseur rejoint l’efficacité maximum aux conditions suivantes:
1-Le tube flexible est rétracté, sans courbes et sans le raccord terminal.
2-A la première mise en marche, faire fonctionner le climatiseur avec le ventilateur sur la PETITE vitesse pendant au moins
une heure, puis mettre le ventilateur sur la GRANDE vitesse.
DANGER!
1. Avant de procéder au déplacement ou au nettoyage du climatiseur, débranchez toujours la fiche de la prise de courant
3
MODE D’EMPLOI
REFROIDISSEMENT
●
Approchez au maximum le climatiseur de la fenêtre. Introduire le tube flexible en
l’accrochant à l’arrière de l’unité. Tirez le tube flexible afin d’atteindre l’extérieur en
passant sous les battants entrouverts de la fenêtre.
●
Si la fenêtre a un rebord intérieur, il peut s’avérer nécessaire d’utiliser le raccord
terminal prévu à cet effet (fourni avec l’unité). Introduisez le raccord dans l’extrémité libre du flexible.
●
Ouvrez la fenêtre et bloquez un des battants avec la poignée. Posez le raccord
terminal sur le battant fixe, rapprochez l’autre battant de la fenêtre.
●
Evitez de trop courber ou plier le tube flexible.
●
Si vous utilisez le hublot, pratiquez un trou de 140 mm dans le carreau de la
fenêtre.
●
Déplacez le sélecteur (D) thermostat vers la droite, en position de froid maximum.
●
Appuyez sur la touche (A) marche-arrêt
pour mettre le climatiseur en marche:
les voyants des dernières fonctions sélectionnées s’allumeront.
●
Appuyez sur la touche (B)
●
Appuyez sur la touche (C) pour sélectionner la grande vitesse du ventilateur, le
voyant (F) s’allume.
F
refroidissement, le voyant (E) s’allume.
NON!
REMARQUE
Le climatiseur élimine l’eau de condensation automatiquement à la GRANDE vitesse du ventilateur, tandis que à la PETITE
vitesse l’eau de condensation est recueillie dans le réservoir.
●
Dès lors, déplacez lentement le sélecteur du thermostat vers la gauche afin d’obtenir l’arrêt du compresseur. A ce stade, le
climatiseur est programmé pour fonctionner automatiquement sous le contrôle du thermostat, en maintenant la température
désirée dans la pièce.
●
Pour arrêter le climatiseur, appuyez à nouveau sur la touche (A) marche-arrêt pour mettre l’unité en position OFF.
I
A
D
C
DESHUMIDIFICATION
Quand le climatiseur fonctionne comme déshumidificateur, il ne rafraîchit pas la
pièce.
Quand vous utilisez l’appareil comme déshumidificateur, le tube flexible ne doit
pas être monté sur le climatiseur.
●
Décrochez le tube flexible en saisissant le point d’accrochage sur le climatiseur et
faites-le le tourner jusqu’au décrochage.
Appuyez sur la touche (A)
marche-arrêt pour mettre le climatiseur en marche.
●
Sélectionnez le mode déshumidification en appuyant sur la touche (B)
. le
voyant (H) s’allume. L’humidité absorbée de la pièce (condensât) est recueillie
dans le réservoir intérieur.
●
Pour arrêter le climatiseur, appuyez à nouveau sur la touche (A) marche-arrêt
pour le mettre en position OFF.
B
H
E
F
G
ATTENTION!
Le climatiseur peut fonctionner comme déshumidificateur seulement si la température de la pièce est supérieure à 10 °C. Si la température est inférieure à 10 °C, le
compresseur s’arrête et la déshumidification n’a pas lieu, tandis que le ventilateur
continue a fonctionner.
ATTENTION:
la commande provoque un retard à peu près de trois minutes chaque foi que
les touches A, B et le thermostat D sont activés ou en ôtant et insérant la fiche
du câble d’alimentation électrique.
4
REGLAGE DU FLUX D’AIR
Vous pouvez régler la direction du flux d’air grâce au déflecteur situé
sur la bouche de sortie d’air. Saisir avec les deux mains une ailette du
déflecteur et tirez-la vers vous afin d’orienter le flux d’air.
Flux vertical
Flux Horizontal
COMME VIDER LES RESERVOIRS DE CONDENSAT
Chaque fois que le climatiseur doit être déplacer dans un autre local
ou ranger à la fin de la saison, vider aussi le réservoir secondaire, par
le tube de vidange qui se trouve à l’intérieur du compartiment du câble
électrique.
RESERVOIR
SECONDAIRE
IMPORTANTE
A la fin des opérations boucher le tube avec son bouchon.
DANGER!
●
●
Placez toujours la touche marche / arrêt sur OFF avant de débrancher l’appareil.
Débrancher toujours l’appareil avant de vider l’eau de condensation
collectée à l’intérieur du climatiseur.
ACCESSOIRES (FOURNIS SUR DEMANDE)
KIT HUBLOT
VITRAGE SIMPLE
VITRAGE DOUBLE
MONTAGE
●
Pratiquez un trou dans le
carreau de la fenêtre.
●
Enchâssez le hublot sans
le bouchon.
●
Enlevez le raccord final de
la sortie d’air chaud du
tuyau flexible rétractable.
●
Approchez le climatiseur
de la fenêtre et enchâssez
le tuyau de sortie d’air
dans le hublot.
REMARQUE
TROU
TROU
REMARQUE
TROU
F
L’humidité absorbée est recueillie dans le réservoir intérieur et peut
être vidée par le tube de vidange extérieur à l’arrière de l’unité.
● Quand le réservoir de condensât est plein, le climatiseur s’arrête
automatiquement et le témoin “réservoir plein” (H) commence à clignoter
La capacité du réservoir permet une autonomie de fonctionnement
d’environ 6 heures.
● Vérifier l’existence d’eau à l’intérieur du climatiseur en regardant le
tube de vidange extérieur placé à l’arrière.
● Appuyez sur la touche marche / arrêt, mettez-la en position OFF et
enlevez la fiche de la prise de courant.
● Placez un récipient au dessous du tube de vidange.
● Saisissez le tube et tires le de son logement à l’arrière du climatiseur.
● Fermez avec le pouce l’ouverture du tube et, en l’inclinant vers le
récipient, videz l’eau de condensation.
● A la fin des opérations, remettez le tube de vidange en place.
Si on désire utiliser le climatiseur dans plusieurs locaux, Il
est possible d’acheter séparément plusieurs hublots pour
l’expulsion de l’air.
5
NOTE
Eliminer une ou deux membranes, en
les coupant avec des ciseaux d’après
l’epesseur du vitrage.
ENTRETIEN ET NETTOYAGE
ATTENTION! Avant de procéder à des opérations de nettoyage et
d’entretien, débranchez l’appareil.
1. Nettoyage des filtres à air.
Les filtres doivent être contrôlé au moins une fois toutes les
deux semaines (pendant les périodes de fonctionnement). Le
fonctionnement avec un filtre sale ou obstrué provoque une
diminution de l’efficacité du climatiseur et peut causer de
graves problèmes. Les filtres sont placés derrière des grilles
d’aspiration gauche et droite et s’extraient vers le derrière de
l’unité. Utilisez un aspirateur pour éliminer la poussière. Si ce la
n’ait pas suffisant, lavez le filtre à l’eau tiède et savonneuse,
rincez-le à l’eau froide et séchez-le avant de le replacer.
Filtre
2. Nettoyage de l’habillage et de la grille.
Pour nettoyer le climatiseur, frottez-le avec un chiffon doux,
légèrement humide. Pour enlever les taches éventuelles, utilisez de l’eau savonneuse. N’utilisez jamais de dissolvants,
essence ou autres produits chimiques agressifs, ni de l’eau très
chaude. Ne versez jamais d’eau sur le climatiseur pour le nettoyer: vous pourriez endommager les composants internes ou
provoquer des décharges électriques.
3. En cas de non utilisation.
Si vous prévoyez de ne pas utiliser le climatiseur pendant une
longue période, nettoyez le filtre et vérifiez que les réservoirs
intérieurs sont vide. Si vous rangez l’appareil dans un débarras, prenez bien soin de le mettre en position verticale. Ne
déposez pas d’objets lourds dessus et si possible protégez- le
avec une housse en plastique.
F
Filtre
NETTOYAGE DU FILTRE
4. Transport.
Quand vous transportez le climatiseur, maintenez-le autant que
possible en position verticale. Si cela s’avérait impossible, couchez- le sur un côté; lorsque vous arrivez à destination, remettez au plus vite l’appareil en position verticale et attendez au
moins 10 minutes avant d’utiliser la fonction de refroidissement.
5. Pour votre sécurité, vérifiez périodiquement les conditions
du câble d’alimentation électrique; le branchement électrique de l’unité est du type X avec le câble préparé de
façon spécial; dans le cas où il est endommagé par
l’usage, adressez-vous au Service Après-Vente pour le
remplacement.
NON!
NON!
NON!
CONSEILS UTILES
Si le climatiseur ne fonctionne pas, avant de faire appel au Service Après-Vente, vérifiez que:
●
●
●
●
●
●
●
la fiche est correctement branchée dans la prise de courant;
l’interrupteur général est enclenché et qu’aucun fusible soit brûlé;
le filtre à air est propre;
le tube flexible est placé correctement, ni trop plié, ni trop courbé;
le sélecteur du thermostat est placé correctement pour la température désirée (déplacez le sélecteur progressivement
dans le sens des aiguilles d’une montre jusqu’à la mise en marche du compresseur, après le période de retard);
la température ambiante est supérieure à 15 °C pour le mode refroidissement et 10°C pour la déshumidification.
toutes les instructions contenues dans cette notice ont été scrupuleusement observées.
ATTENTION
Le voyant (H) qui clignote et l’arrêt simultané du climatiseur indiquent que le réservoir de condensât intérieur est plein.
6
AxAir GmbH
GERMANY
S.A.C. - printed in Italy
85748 GARGHING-HOCHBRUECK
RELÉ ALIMENTAZIONE
RELÉ POMPA
CAPACITOR
DEFROST THERMOSTAT
FLAP MOTOR
LOUVER MOTOR
OUTDOOR FAN MOTOR
INDOOR FAN MOTOR
INDICATOR ASSY
MAGNETIC CONTACTOR
NOISE FILTER
OVERLOAD RELAY
CONTROLLER
POWER RELAY
CM
C1, 2, 3,4
DEF THERMO
FLP
LM
FMO
FMI, FM
IND. ASSY
MG
NF
OLR
CE
PR
VALVOLA SOLENOIDE
INT. SICUREZZA A GALL.
TRASFORMATORE DI POTENZA
VALVOLA 4 VIE
STARTING RELAY
SOLENOID VALVE
SAFETY FLOAT SWITCH
ON-OFF SWITCH
THERMISTOR
TIMER
POWER TRANSFORMER
4-WAY VALVE
NEGATIVE PHASE RELAY
RA
SV
MS
ON-OFF SW
TH1, 2,
P
TR1, 2
20S
47C
Wires color legend
Legenda colori fili elettrici
Légende des couleurs des fils électriques
Beschriftung der Leitungs-Farben
Leyenda de los colores de los cable electricos
Legenda das côres dos fios elétricos
F
GREY
ORANGE
PINK
RED
VIOLET
GRY
ORG
PNK
RED
VLT
GIALLO
YELLOW
LIGHT BLUE
YEL
AZU
AZZURRO
BIANCO
VIOLA
ROSSO
ROSA
ARANCIONE
GRIGIO
4-WEG-VENTIL
AZUR
JAUNE
BLANC
VIOLET
ROUGE
ROSE
ORANGE
GRIS
VERT / JAUNE
MARRON
BLEU
NOIR
F
NEGATIVPHASENRELAIS
VERDE / GIALLO
WHITE
WHT
GREEN / YELLOW
GRN / YEL
ZEITSCHALT-UHR
THERMISTOR
EIN/QUS TQSTE
NETZTRANSFORMATOR
MARRONE
BLU
BLUE
BROWN
BLU
MAGNETVENTIL
STARTRELAIS
FESTKÖRPERRELAIS
PUMPE RELAIS
LEISTUNGSRELAIS
STEUERGERÄT
ÜBERLASTRELAIS
LÄRMSCHUTZFILTER
MAGNETKONTGEBER
EANZEIGE-BAUGRUPPE
INNENLÜFTERMOTOR
AUSSENLÜFTERMOTOR
LUFTKLAPPENMOTOR
KLAPPENMOTOR
ENTFROSTER-THERMOSTAT
KONDENSATOR
KOMPRESSORMOTOR
SCHWEMM-SCHUTZSCHALTER
NERO
I
D
KONDENSWASSERPUMPE-MOTOR
BLACK
EG
RELAIS D’ORDRE DE PHASE
VANNE 4 VOIES
TRANSFORMATEUR DE PUISSANCE
PROGRAMMATEUR
THERMISTANCE
TOUCHE MARCHE/ARRÊT
INTERR. DE SECURITE A FLOTTEUR
ELECTROVANNE
RELAIS DE DEMARRAGE
RELAIS A SEMI-CONDUCTEUR
RELAIS POMPE
RELAIS D’ALIMENTATION
CARTE ELECTRONIQUE
RELAIS DE SURCHARGE
FILTRE ANTI PARASSITE
CONTACTEUR MAGNETIQUE
ENSEMBLE INDICATEUR
MOTEUR DE VENTILATEUR INTERIEUR
MOTEUR DE VENTILATEUR EXTERIEUR
MOTEUR D’AUVENT
MOTEUR DE VOLET
THERMOSTAT DE DEGIVRAGE
CONDENSATEUR
MOTEUR DE COMPRESSEUR
MOTEUR POMPE CONDENSATION
BRN
BLK
RELÉ A FASE NEGATIVA
PROGRAMMATORE
TERMISTORE
INTERRUTTORE MARCIA/ARRESTO
RELÉ DI AVVIAMENTO
RELÉ STATO SOLIDO
PUMP RELAY
SOLID STATE RELAY
RP
SSR
SCHEDA ELETTRICA
RELÉ SOVRACCARICO
FILTRO RUMORE
CONTATTORE MAGNETICO
GRUPPO INDICATORI
MOTORE INTERNO VENTOLA
MOTORE ESTERNO VENTOLA
MOTORE DEFLETTORE
MOTORE DEFLETTORE
TERMOSTATO SBRINATORE
CONDENSATORE
MOTORE COMPRESSORE
COMPRESSOR MOTOR
PC
I
MOTORE POMPA CONDENSA
EG
CONDENSATE PUMP MOTOR
SYMBOL
E
P
CONDENSADOR
COMPRESSOR
MOTOR BOMBA DE AGUA
HIMMEL BLAU
GELB
WEISS
VIOLETT
ROT
ROSA
ORANGE
GRAU
GRÜN / GELB
BRAUN
BLAU
SCHWARZ
D
MOTOR DA PLACA
E
MARRÓN
AZUL
NEGRO
CASTANHO
AZUL
PRETO
P
RELÉ DA FASE NEGATIVA
VALVULA DE 4 VIAS
TRANSFORMADOR DE CORRENTE
TIMER
TERMISTOR
INTERRUPTOR LIGAR/DESLIGAR
INTERR. DE SEGURANÇA
VALVULA SOLENOIDE
RELÉ DE ARRANQUE
RELÉ DO ESTADO SÓLIDO
RELÉ BOMBA
RELÉ DA ALIMENTAÇAO
PAINEL ELÉTRICO
RELÉ DE SOBRECARGA
FILTRO DE RUÍDO
CONTADOR MAGNÉTICO
GRUPO DE INDICADORES
MOTOR DA VENTOINHA INTERIOR
MOTOR DA VENTOINHA EXTERIOR
MOTOR COM ABERTURAS LATERAIS
AZUL CLARO
AMARILLO
BLANCO
VIOLETA
ROJO
ROSA
NARANJA
GRIS
AZUL CLARO
AMARELO
BRANCO
VIOLETA
ENCARNADO
COR-DE-ROSA
COR-DE-LARANJA
CINZENTO
VERDE / AMARILLO VERDE / AMARELO
RELÉ DE FASE NEGATIVA
VALVULA DE 4 VIAS
TRANSFORMADOR DE POTENCIA
PROGRAMADOR
TERMISTOR
BOTON ARRANQUE/PARADA
INTERR. DE SEGURIDAD DE FLOTADOR
VALVULA SOLENOIDE
RELÉ DE ARRANQUE
RELÉ DEL ESTADO SOLIDO
RELÉ BOMBA DE AGUA
RELÉ DE ALIMENTACION
CONTROLADOR
RELÉ DE SOBRECARGA
FILTRO DEL RUIDO
CONTACTOR MAGNÉTICO
GRUPO DE INDICADORES
MOTOR INTERIOR DE LA TURBINA
MOTOR EXTERIOR DE LA TURBINA
MOTOR CON ABERTURAS
MOTOR DEL DEFLECTOR
TERMOSTATO DE DESCONGELACION TERMOSTATO DE DESCONGELAÇAO
CONDENSADOR
MOTOR DEL COMPRESOR
MOTOR BOMBA DE AGUA
Símbolos de los esquemas eléctricos / Símbolos dos esquemas elétricos
Electric wiring diagrams’ symbols / Simboli schemi elettici / Symboles des schemas électriques / Symbole der System-Schaltplanen