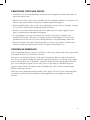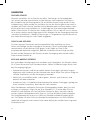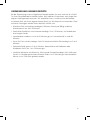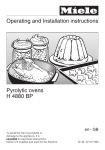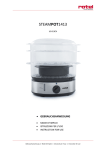
1
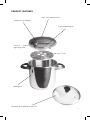
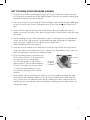
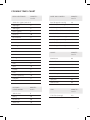
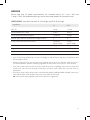
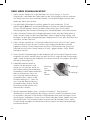
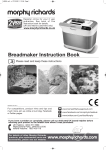
USER MANUAL
PRESSURE COOKER
UK
Model: 18434/18435
Helpline No: 015394 88100
Thank you for choosing the Lakeland Pressure Cooker.
Before using your Pressure Cooker please read these instructions carefully and keep them
for future reference.
Saving considerable time and energy consumption, the traditional method of pressure
cooking is enjoying a revival in today’s kitchens. With your Lakeland Pressure Cooker,
wholesome and delicious meals can be made from scratch in a fraction of the time
thanks to the heat and pressure of steam, including home-made soups, juicy whole roast
chickens, melt-in-the-mouth stews and casseroles, pasta dishes
and well-loved desserts like steamed puddings.
Here at Lakeland, our award-winning family-owned business still offers the same excellent
quality, value for money and exceptional customer service as when we founded the
company back in the 1960s. Our products are hand-picked and thoroughly tested to
ensure they meet our exacting standards, so you can be sure that everything you purchase
will be a pleasure to use for many years to come.
CONTENTS
Product features............................................................................................................. 3
Safety......................................................................................................................... 4-5
Get to know your Pressure Cooker.................................................................................. 5
Handy hints and tips...................................................................................................... 6
Ingredients guide........................................................................................................... 6
Cooking times............................................................................................................. 7-8
Cooking times chart....................................................................................................... 9
Adapting your own recipes.......................................................................................... 10
Recipes................................................................................................................... 11-16
Frequently asked questions........................................................................................... 17
Care and cleaning........................................................................................................ 17
2
PRODUCT FEATURES
Lock and unlock buttons
Red pressure indicator
Pressure cooking lid
Pressure
regulating valve
Trivet
Cooking pot
Complete with additional glass lid
3
SAFETY
Before using your Pressure Cooker please read these instructions carefully and keep them
for future reference.
When using your Pressure Cooker, always follow these safety precautions to avoid injuring
yourself or damaging the appliance. The Pressure Cooker should only be used for its
intended domestic use as described in this user manual.
•Remove all packaging, labels and stickers before using your Pressure Cooker
for the first time.
•CAUTION: Plastic bags and packaging may be dangerous. To avoid risk of
suffocation, keep them out of reach of babies and children. These bags are not
toys.
•Always check the Pressure Cooker for damage before use. If it has been damaged,
dropped or becomes faulty, do not use it. Contact Lakeland customer services on
015394 88100.
•This Pressure Cooker is not intended for use by people (including children) with reduced
physical, sensory or mental capabilities, or lack of experience or knowledge, unless they
have been supervised or instructed in using the appliance by someone responsible for
their safety.
•Children should always be supervised to ensure they do not play with the
Pressure Cooker.
•This Pressure Cooker is for indoor use only. It is for domestic use only.
•To avoid injury or fire risk, do not cover the Pressure Cooker during use.
• Metal surfaces will get very hot during use. To prevent injury, DO NOT TOUCH.
Allow the Pressure Cooker to cool completely before handling.
•Do not immerse the Pressure Cooker lid in water or any other liquid.
•Do not use the Pressure Cooker in the oven. However, the cooking pot with glass lid
may be used in the oven.
•Never use the Pressure Cooker for deep frying.
•During cooking, pressure builds inside the pot, so make sure the lid is securely closed
before use.
•Never force the Pressure Cooker open. Always make sure the red pressure indicator has
dropped before opening the lid.
•When releasing the lid, take care to avoid contact with the steam, which can burn.
•Do not use the Pressure Cooker if the food/liquid are below the minimum fill level or
exceed the maximum level.
•Food should never be dry-cooked. Always minimum of 125ml of liquid in your pot or
enough food/liquid to reach the minimum fill level.
4
GET TO KNOW YOUR PRESSURE COOKER
1. Place the trivet inside the cooking pot if you wish to raise food such as joints of meat
off the base of the pot or out of the cooking liquid. The trivet may also be used to keep
heatproof dishes off the base of the pot.
2. There must always be a minimum of 125ml of liquid in your pot or enough food/liquid
to reach the minimum fill level. Remember never fill your pot above the maximum fill
level.
3. Ensure the lid is open by pressing the unlock button. Place the lid on the Pressure
Cooker, ensuring it sits evenly, then press the lock button. Check the lid is securely fitted
to the pot.
4. Set the cooking pressure. Most foods cook at level 2, which gives fast and economical
results thanks to its high pressure. For more delicate foods including fish, vegetables
such as spinach, and desserts like crème caramel, choose level 1.
(Refer to cooking times chart page 9).
5. Place the Pressure Cooker on the hob with the heat on high. When the valve releases
steam, the red pressure indicator will rise – now turn the heat down as low as you can
while still keeping the red pressure indicator raised.
6. Once the cooking time has elapsed, turn
off the hob and wait 2-3 minutes before
turning the pressure setting down.
Turn the setting down using an oven
glove or cloth. If you have been cooking
at level 2, turn pressure setting to level
1. If you have been cooking at level 1,
turn pressure setting to steam release
position.
Level 2
Direction
in which
lid closes.
Level 1
7. Some recipes calls for ‘quick release’ cooking, usually to rapidly cool down the food
to prevent further cooking. To do this, lift the Pressure Cooker off the hob, carefully
carry it to the sink, run cold water over the lid, avoiding the valves, and the pressure
regulating valve should drop in about 20 seconds, enabling you to unlock the lid and
remove your food.
5
HANDY HINTS AND TIPS
•Your Pressure Cooker is best stored with the lid unlocked to allow air to circulate.
•If in doubt select a lower cooking time. You can always check your food and then leave
it to cook a little longer.
•Cooking liquid doesn’t have to be plain water, alternatives are milk, tomato sauce,
stock or coconut milk.
•Cutting similar foods like meat or vegetables into evenly sized pieces will ensure they cook at the same speed.
•Pressure cooking tends to intensify the flavour of herbs, seasonings, onion and garlic,
so use smaller quantities if adjusting a favourite recipe and choose fresh herbs rather
than dried.
•If your finished dish is too moist, place the cooking pot on the hob without a lid to allow some of the liquid to evaporate.
INGREDIENTS GUIDE
By cooking food faster, your Pressure Cooker helps to seal in most of the goodness,
nutrients, flavour and moisture.
Rice cooks in just a few minutes, whilst chickpeas, beans and pulses such as lentils
in soups also have their cooking time reduced considerably. A whole chicken, large
roasts and pulled pork can be cooked in a fraction of the usual time, and you can take
advantage of cheaper, traditionally slow-cooked cuts of meat for stews and casseroles,
without having to cook them for hours.
Our featured recipes will help you get a feel for your Pressure Cooker, giving you the
confidence to go on and adapt your favourite recipes for pressure cooking.
6
COOKING TIMES
FRESH VEGETABLES
Wash and peel vegetables as normal. They cook very fast in a pressure cooker, usually
on the highest setting. The times in the cooking chart are simply a guide; cooking times
will depend on freshness, storage, size and how the vegetables are chopped. Steaming
the vegetables over the water in the pot and cooking them in the water will give slightly
different cooking times. Whichever you prefer, it’s always best to undercook vegetables, as
you can always cook them a little longer if need be. Once your vegetables are ready, stop
the cooking immediately using the ‘quick release’ method. Frozen veg needs half a minute
or so longer than the times in the chart.
MEAT AND CHICKEN
For improved flavour and colour, we recommend browning your meat and chicken before
pressure cooking. Meat and chicken are usually cooked on the highest setting, and the
cooking times chart (page 9) offers a guide, with cooking times varying according to age
and tenderness, the temperature of the meat before it goes in the pot, size, thickness
and weight. Expensive cuts of meat will dry out and taste bland, so are best
avoided in favour of more economical cuts. Chicken is easily overcooked,
especially boneless fillets.
RICE AND OTHER GRAINS
Pressure cooking yields successful results with rice and other grains. As a guide,
allow 3 cups of water for each cup of grain. Once cooked, quickly drain off the
excess water.
• Grains such as brown rice and barley are cooked at high pressure, followed by a
slow release of pressure (which allows further cooking) – and finally a quick release
of pressure to stop the cooking.
• White rice, including medium and long grain, basmati and jasmine, is also cooked
as above.
• Short rice, such as Arborio, is usually cooked at high pressure, followed by a quick
release of pressure to prevent overcooking.
All grains need a little fat to prevent foaming as they cook, so add around 1 tablespoon
of butter or oil for each cup of grain. Season with salt if desired. Remember that rice and
most grains almost triple in bulk when cooked, so the pressure cooker should only be half
full with grain and cooking liquid. The cooking times chart (page 9) gives a guide to total
cooking times, which include the initial time at high pressure followed by the slow and/or
quick release of pressure times.
7
PULSES
Dried beans, peas and lentils are cooked at the highest pressure, then usually allowed to
stand until the pressure releases naturally from the cooker. Pulses should be washed and
drained well before cooking. There is no need to pre-soak lentils, but soaking pulses will
reduce their cooking time by 5 to 10 minutes, depending on the variety. Remember that
pulses expand during cooking, so don’t overfill the pressure cooker: as a guide, only
one-third fill it with pulses and water. 1 teaspoon of butter or vegetable oil for every
half-cup of pulses to prevent foaming. Don’t add salt as this will make the pulses hard.
The cooking times chart (page 9) offers a guide to cooking times for pulses which have
NOT been soaked overnight. Tenderness after cooking will vary according age and
moisture content. Pulses may appear to store well for lengthy periods, but they do dry out
over time. It’s best to buy little and often and keep them in the fridge or, even better, soak
them overnight, drain and freeze in portion sizes ready for pressure cooking.
8
COOKING TIMES CHART
FRESH VEGETABLES
MINUTES Level 2
MEAT AND CHICKEN
MINUTES Level 2
Artichokes (globe) whole 15
Beef (chopped coarsely) 10
Asparagus 2
Chicken (whole 1.5 kg) 20
Aubergine 2
Chicken pieces (with bone) 10
Beans (green) 6
Chicken fillets (without bone) 5
Beetroot 20
Lamb shanks 25
Broad beans 5
Lamb (chopped coarsely) 20
Broccoli 2
Pork (chopped coarsely) 10
Brussels sprouts 7
Pork ribs (short) 20
Cabbage 4
Veal (chopped coarsely) 10
Carrot 4
Cauliflower 2
Corn 1
Courgette 1
Fennel 13
Leek 2
Okra 10
Parsnip 2
Peas 2
Potato (quarters) 10
Pumpkin 8
Turnip 5
RICE AND
OTHER GRAINS
MINUTES Level 2
Arborio rice 6
Barley 20
Brown rice 20
White rice 10
PULSES
MINUTES Level 2
Black beans 30
Borlotti beans 30
Butter beans 40
Chickpeas 45
Lentils 8
Red kidney beans 30
Soya beans 35
Split peas 20
White beans 30
FISH
Fish Fillet (average)
MINUTES Level 1
2-3
9
ADAPTING YOUR OWN RECIPES
Once you’ve got a feel for your Pressure Cooker by making some of our featured recipes,
you may like to adapt some of your own favourite dishes. We recommend choosing a
recipe from this booklet which is similar to your own and using this as a guide. These
simple rules of thumb may help.
• Chicken on the bone needs 6 minutes’ cooking time per 500g; boneless breasts need just 4-5 minutes.
• Chunks of casserole beef take 10 minutes, and a roast of beef will cook in just under an hour.
• Lamb chops can be ready in just 4-6 minutes, and a lamb shank will take around
25 minutes.
• Cook fish on the lower setting. An average-sized fillet will take just 2-3 minutes.
• Apples cut into quarters will cook in 2-3 minutes. Soft fruits such as strawberries or raspberries take only 1-2 minutes.
• Cabbage, whether red, green or Savoy, will cook in 3-4 minutes. Sliced carrots take just 2 minutes and baby new potatoes can be cooked in 5 minutes.
10
RECIPES
Please note that all spoon measurements are standard metric, so 1 tsp is 5ml and
1 tbsp is 15ml. We recommend using a set of measuring spoons for accurate results.
LENTIL SOUP - quantities for both 3L (4 servings) and 5.5L (6 servings).
Ingredients
3L
5.5L
Olive oil
1 tbsp
1½ tbsp
Smoked back bacon, diced
3 slices
4 slices
Onion, peeled and finely chopped
1 medium
1 large
Carrots, tops removed, cleaned and roughly chopped
3
4
Potato, cleaned, unpeeled and diced
1 medium (about 275g) 1 large (about 350g)
Red lentils, washed well
125g
150g
Vegetable or ham stock
1.25 litres
1.75 litres
Salt to taste
• Over a low heat, gently heat the oil in the cooking pot, add the bacon and fry for 3-4 minutes until
the fat begins to melt.
• Add the chopped onion, turn the heat up to medium and cook for 2-3 minutes, until the onion is
soft and translucent. Add the remaining vegetables and the lentils and cook for 2 more minutes.
•Pour in the stock, place the lid on the pot with the pressure regulating valve turned to high and
lock the lid. Turn the heat up high and bring to pressure, then reduce the heat and cook for
10 minutes.
• Turn off the heat. Release the pressure as described in USING YOUR PRESSURE COOKER, remove the
lid and blend with a stick blender. Taste and season with salt if desired.
TIP: can be made with vegetable stock and no bacon for vegetarians.
11
PULLED PORK - quantities for both 3L (4 servings) and 5.5L (6 servings).
Ingredients
3L
5.5L
Salt
½ tbsp
1 tbsp
Soft dark brown sugar
1 tbsp
2 tbsp
Smoked, sweet paprika
½ tbsp
1 tbsp
Boneless pork shoulder roast, string removed,
cut into chunks the size of medium potatoes
1kg
2kg
Water200ml400ml
• In a bowl, mix the salt, sugar and paprika, then add the pork and combine well. Place the trivet in
the base of the cooking pot, then add the meat and the water.
•Place the lid on the pot with the pressure regulating valve turned to high and lock the lid.
Turn the heat up high on the hob and bring to pressure, then reduce the heat and cook for
10 minutes.
• Turn off the heat. Release the pressure as described in USING YOUR PRESSURE COOKER, remove the
lid and stir in the rest of the seasoning. Using two forks, pull the pork into shreds. Leave to stand for
at least 1 hour, ideally 3-4 hours or overnight, before serving.
12
ROAST CHICKEN - quantities for both 3L (4 servings) and 5.5L (6 servings).
Ingredients
Whole chicken, fresh or defrosted
3L
5.5L
1.2kg
1.5kg
1 tbsp
2 tbsp
Salt and freshly ground black pepper or
1 sachet chicken seasoning mix
Olive oil
Chicken stock450ml700ml
• Coat the skin with salt and pepper or seasoning mix.
•Over a medium heat, warm the oil in the cooking pot, add the chicken and cook for
3-4 minutes, then turn and repeat until the whole bird has browned.
•Lift out the chicken using tongs or forks, place the trivet on the base of the pot and return the
chicken to the pot. Pour in the stock, place the lid on the pot with the pressure regulating valve
turned to high and lock the lid. Turn the heat up high and bring to pressure, then reduce the heat
and cook for 6 minutes per 500g chicken.
• Turn off the heat. Release the pressure as described in USING YOUR PRESSURE COOKER and remove
the lid. With a sharp knife, pierce a chicken leg to ensure the juices run clear and the chicken is fully
cooked. Lift out the chicken and let it rest before carving, or place in a preheated oven at 200˚C, Gas
6 for 10 minutes to crisp the skin. The leftover stock can be made into gravy.
TIP: For a complete roast dinner, use the ‘quick release’ method to open the Pressure Cooker 10
minutes before the chicken is ready and add vegetables such as carrots, broccoli and small potatoes.
Bring back up to pressure and cook for 10 minutes, then make gravy with the juices.
13
LAMB BIRYANI - quantities for both 3L (4 servings) and 5.5L (6 servings).
Ingredients
3L
Ghee or vegetable oil 25g /1 tbsp
Basmati rice, washed thoroughly
225g
5.5L
50g/2 tbsp
350g
Whole cloves23
Onions, peeled, halved and finely sliced
2 medium
2 large
Cloves of garlic, peeled and chopped
2 3
Lamb leg or shoulder, cut into cubes 700g
800g
Black peppercorns 10
12
Root ginger, grated, then juice squeezed 30g
50g
Ground cumin
1 tsp
1½ tsp
Chilli powder
1½ tsp
2¼ tsp
Ground turmeric
¼ tsp
½ tsp
Cardamom pods, crushed, husks removed
3
4
Cinnamon stick
2cm piece
3cm piece
Ground coriander
½ tsp
1 tsp
Whole coriander seeds
½ tbsp
1 tbsp
Bay leaf12
Tomatoes, fresh, chopped
2
3
Salt
½ tsp
1 tsp
Water400ml550ml
• Over a medium heat, warm the ghee or oil in the cooking pot, add the rice and cloves and cook for
about 2 minutes, stirring. Remove the mixture from the pot and set aside.
• Fry the onion and garlic in the pot over a medium heat, add the lamb and cook for 5-10 minutes,
stirring constantly until all the meat has browned.
• Add all the spices, the bay leaf, tomatoes and salt, cook for 3-4 minutes and then pour in the water.
Place the lid on the pot with the pressure regulating valve turned to high and lock the lid. Turn the
heat up high and bring to pressure, then reduce the heat and cook for 15 minutes.
• Turn off the heat. Release the pressure using the ‘quick release’ method as described in USING YOUR
PRESSURE COOKER, remove the lid, add the rice and mix well. Add 300ml water, place the lid back
on and bring back up to pressure, then reduce the heat and cook for 12 more minutes. Take the pot
off the heat, release the pressure, remove the lid and transfer to a warmed serving dish.
TIP: delicious served with a cool relish of chopped cucumber, tomato and onion.
14
MACARONI CHEESE WITH SAUSAGE AND MUSHROOM
- quantities for both 3L (4 servings) and 5.5L (6 servings).
Ingredients
3L
5.5L
Pork sausages 4
6
Onion, peeled and finely chopped
1 medium
1 large
Chestnut mushrooms, cleaned 100g
150g
Macaroni200g300g
Chicken stock300ml400ml
Double cream125ml200ml
Salt½ tsp1tsp
A little freshly ground black pepper
Butter15g25g
Milk100ml150ml
Cheddar cheese, grated
100g
175g
Mozzarella, grated100g150g
• Place the sausages, onion and mushrooms in the cooking pot and cook on a low heat until they start
to soften. Add the macaroni, stock, cream, salt and pepper.
• Place the lid on the pot with the pressure regulating valve turned to high and lock the lid. Turn the
heat up high and bring to pressure, then reduce the heat and cook for 7 minutes.
• Turn off the heat. Release the pressure as described in USING YOUR PRESSURE COOKER and remove
the lid. Add the butter, milk and grated cheese, then place in a serving dish. Serve immediately or
place under a hot grill for 3-4 minutes until crispy and golden.
15
CRÈME BRÛLÉE - quantities for both 3L (4 servings) and 5.5L (6 servings).
Ingredients
3L
5.5L
Free range egg yolks
3
5
Caster sugar, plus a little for caramelising on top
50g
75g
Double cream 300ml
450ml
Whole milk30ml50ml
A few drops of vanilla extract
• Place the trivet on the base of the cooking pot and pour in 300ml water.
• In a large jug, whisk the egg yolks and sugar together, then add the cream, milk and vanilla extract.
• Pour the mixture into 4 or 6 ramekins, or a large heatproof dish. Cover with foil and place on the
trivet – if need be, you can create two layers inside the cooking pot by placing the base of a loosebottomed cake tin or another trivet between the layers.
• Place the lid on the pot with the pressure regulating valve turned to low and lock the lid. Turn the
heat up high and bring to pressure, then reduce the heat and cook for 6 minute for individual
ramekins or 10 minutes for a large dish.
•Turn off the heat and use the ‘quick release’ method to open the Pressure Cooker. Remove the
desserts and chill until ready to serve. Sprinkle with a little extra caster sugar and caramelise under a
hot grill or using a blowtorch before serving.
16
FREQUENTLY ASKED QUESTIONS
Question: Why does the pressure indicator keep dropping during cooking?
Answer: The heat may be too low. Increase the heat slightly until the indicator rises and
stays there.
Question: Why is the Pressure Cooker not getting to pressure?
Answer: The lid may not be fitted correctly, or the seal may be loose or worn. Remove from the heat and, taking care to avoid burns, check the lid is locked on correctly. When the Pressure Cooker is not in use, check the seal
inside the lid has not perished or been damaged. If it has, call Lakeland customer services on 015394 88100.
Question: There’s lots of steam pouring out of the lid and food is escaping too.
Answer: The pressure may not have been fully released before you tried to open the lid. Make sure the indicator has dropped fully before removing the lid.
Question: Food is spitting from the pressure valve and there’s lots of steam.
Answer: Either the pot is too full or the heat is too high. Reduce the heat and, if there’s still a problem, take the pot off the heat, allow the pressure to drop,
remove the lid and take out some food.
CARE AND CLEANING
• Always let the Pressure Cooker cool completely before cleaning.
• Clean each part thoroughly after every use, and before using for the first time.
• Check all the parts periodically.
• Never immerse the lid in water or any other liquid. Wipe it with a clean, damp cloth and then dry before storing.
• Wash the pot in warm, soapy water; rinse and dry.
• Do not use abrasive cleaners or steel wool.
• PLEASE NOTE: the Pressure Cooker is not dishwasher-safe.
• Store the Pressure Cooker with the lid off to let air circulate.
17
18
BEDIENUNGSANLEITUNG
DAMPFKOCHTOPF
D
Modell: 18434/18435
Hotline-Nr.: 0800 444 1500
19
Vielen Dank, dass Sie sich für den Kauf eines Dampfkochtopfes von Lakeland entschieden
haben.
Lesen Sie sich die Bedienungsanleitung vor Inbetriebnahme des Dampfkochtopfes
sorgfältig durch und bewahren Sie diese für den weiteren Gebrauch sicher auf.
Die traditionelle, zeit- und energiesparende Methode des Dampfgarens findet in den
Küchen von heute immer mehr Anhänger. Mit Ihrem Dampfkochtopf von Lakeland
bereiten Sie vollwertige, köstliche Gerichte in einem Bruchteil der gewöhnlichen Zeit zu,
denn die Hitze und der Druck des Dampfes sorgen für schnelles, schonendes Garen. Ihr
neuer Dampfkochtopf eignet sich ebenso für selbstgemachte Suppen wie herrlich saftiges
Brathähnchen, zartestes Gulasch und andere Eintöpfe, Pastagerichte und Lieblingsdesserts
wie gedämpfte Puddings.
Unser mehrfach ausgezeichneter Familienbetrieb legt heute genauso viel Wert auf ein
Höchstmaß an Qualität, ein gutes Preis-Leistungsverhältnis und einen hervorragenden
Kundenservice wie damals in den 60er Jahren, als Lakeland gegründet wurde. Unsere
Artikel werden mit größter Sorgfalt ausgewählt und im Einklang mit unseren strengen
Standards gründlich geprüft. So haben Sie die Gewähr, dass Ihnen jeder Artikel, den Sie
bei uns kaufen, jahrelang Freude bereiten wird.
INHALT
Produktbeschreibung................................................................................................... 21
Sicherheitshinweise................................................................................................. 22-23
Über Ihren Schnellkochtopf.......................................................................................... 24
Praktische Tipps und Tricks........................................................................................... 25
Zutaten im Überblick.................................................................................................... 25
Garzeiten................................................................................................................ 26-27
Garzeiten-Tabelle.......................................................................................................... 28
Verwendung eigener Rezepte....................................................................................... 29
Häufig gestellte Fragen................................................................................................. 30
Pflege und Reinigung................................................................................................... 30
20
AUSSTATTUNGSMERKMALE
Knöpfe zum Verriegeln und Entriegeln
Rote Dampfanzeige
Dampfkochtopf-Deckel
Dampfventil
Topfeinsatz
Kochtopf
Mit zusätzlichem Glasdeckel
21
SICHERHEIT
Lesen Sie sich die Bedienungsanleitung vor Inbetriebnahme des Dampfkochtopfes
sorgfältig durch und bewahren Sie diese für den weiteren Gebrauch sicher auf.
Befolgen Sie beim Gebrauch des Dampfkochtopfes stets diese Sicherheitshinweise,
um Körperverletzungen oder Schäden am Gerät zu vermeiden. Der Dampfkochtopf ist
ausschließlich für die Nutzung im Haushalt gemäß der Beschreibung in der mitgelieferten
Bedienungsanleitung vorgesehen.
•Entfernen Sie vor der ersten Ingebrauchnahme des Dampfkochtopfes alle
Verpackungsmaterialien, Werbeetiketten und sonstigen Aufkleber.
•VORISCHT: Die Kunststoff-Verpackungsmaterialien stellen eine Gefahr dar. Sie dürfen nicht in die Hände von Babys und Kindern gelangen, da Erstickungsgefahr besteht. Diese Verpackungsmaterialien sind kein Spielzeug.
•Überprüfen Sie den Dampfkochtopf vor dem Gebrauch stets auf Schäden. Verwenden
Sie ihn nicht, falls er Schäden oder Defekte aufweist oder versehentlich fallen gelassen
wurde. Kontaktieren Sie den Kundenservice von Lakeland unter der
Rufnummer 0800 444 1500.
•Dieser Dampfkochtopf darf von Personen mit verminderter körperlicher, sensorischer
oder geistiger Fähigkeit oder mit fehlenden Erfahrungen und Kenntnissen sowie von
Kindern nur verwendet werden, wenn sie von einer Person, die für ihre Sicherheit
verantwortlich ist, beaufsichtigt und hinsichtlich der Bedienung des Geräts angeleitet
werden.
•Kinder müssen stets beaufsichtigt werden, um sicherzustellen, dass sie nicht mit dem
Dampfkochtopf spielen.
•Dieser Dampfkochtopf ist nur für die Nutzung in Innenräumen und nur für den
häuslichen Gebrauch gedacht.
•Decken Sie den Dampfkochtopf während des Gebrauchs nicht ab. Es besteht
Verletzungs- und möglicherweise Brandgefahr.
•Die Metalloberflächen werden während des Gebrauchs sehr heiß. Um Verletzungen zu vermeiden, BERÜHREN SIE DIESE NICHT. Lassen Sie den
Dampfkochtopf vollständig abkühlen, bevor Sie ihn berühren.
•Tauchen Sie den Dampfkochtopf-Deckel niemals in Wasser oder andere Flüssigkeiten ein.
•Verwenden Sie den Dampfkochtopf nicht im Ofen. Der Kochtopf mit dem Glasdeckel
hingegen darf im Ofen verwendet werden.
•Verwenden Sie den Dampfkochtopf niemals zum Frittieren.
22
•Während des Kochvorgangs baut sich Druck im Topf auf. Vergewissern Sie sich, dass der
Deckel vor der Ingebrauchnahme des Geräts sicher verschlossen ist.
•Versuchen Sie niemals, den Dampfkochtopf mit Gewalt zu öffnen. Öffnen Sie den Deckel
erst, wenn die rote Dampfanzeige gesunken ist.
•Vermeiden Sie beim Anheben des Deckels den Kontakt mit dem Dampf, da dieser zu
Verbrühungen führen kann.
•Vergewissern Sie sich vor Inbetriebnahme des Dampfkochtopfes, dass Ihr Gargut
bzw. die Garflüssigkeit den Mindestfüllstand erreicht und den Höchstfüllstand nicht
überschreitet.
•Bereiten Sie keine Lebensmittel ohne die Zugabe von Flüssigkeit in Ihrem Dampfkochtopf
zu. Geben Sie immer mindestens 125 ml Flüssigkeit in Ihren Topf oder genügend
Zutaten/Flüssigkeit, sodass der Mindestfüllstand erreicht wird.
23
ÜBER IHREN SCHNELLKOCHTOPF
1. Stellen Sie den Topfeinsatz in den Kochtopf, falls Sie Ihr Gargut, z. B. einen
Fleischbraten, vom Boden des Topfes oder aus der Garflüssigkeit entfernen möchten.
Der Topfeinsatz kann auch verwendet werden, um hitzebeständige Schüsseln vom
Boden des Topfes fernzuhalten.
2. Um die Mindestfüllmenge zu erreichen, geben Sie stets mindestens 125 ml
Kochflüssigkeit bzw. eine ausreichende Menge an Zutaten mit Kochflüssigkeiten
in Ihren Schnellkochtopf. Achten Sie dabei immer darauf, dass Ihre Zutaten/
Kochflüssigkeiten die maximale Füllmenge Ihres Schnellkochtopfs nicht überschreiten.
3. Stellen Sie durch Drücken des Entriegelungsknopfes sicher, dass der Deckel offen ist.
Setzen Sie den Deckel auf den Dampfkochtopf, sodass er gleichmäßig aufliegt, und
betätigen Sie dann den Verriegelungsknopf. Vergewissern Sie sich, dass der Deckel fest
und sicher auf dem Topf sitzt.
4. Stellen Sie den Gardruck ein. Die meisten Lebensmittel lassen sich auf Stufe 2 garen.
Dank des hohen Drucks können Sie hiermit auf energiesparende Weise schnelle
Ergebnisse erzielen. Zartere Lebensmittel wie Fisch, Gemüsesorten wie Spinat und
Nachspeisen wie Crème Caramel sollten auf Stufe 1 gegart werden. (Siehe Tabelle
Kochzeiten Seite 9).
5. Setzen Sie den Dampfkochtopf auf die Herdplatte, die auf eine hohe Temperaturstufe
eingestellt sein sollte. Sobald Dampf aus dem Ventil tritt, steigt die rote Druckanzeige –
regeln Sie die Temperatur der Herdplatte nun so weit herunter wie möglich, ohne dass
die rote Druckanzeige fällt.
6. Sobald die Kochzeit vorbei ist,
schalten Sie den Herd aus und
warten ca. 2-3 Minuten, bevor Sie
die Druckeinstellung herunterdrehen.
Verwenden Sie dazu Kochhandschuhe
oder ein Küchentuch. Wenn Sie
zum Garen die Kocheinstellung 2
verwendet haben, stellen Sie die
Druckeinstellung auf 1. Wenn Sie
zum Garen die Kocheinstellung 1
verwendet haben, drehen Sie die
Einstellung auf die Position zum
Ablassen des Dampfes.
Richtung
zum
Schließen
des
Deckels.
Einstellung 2
Einstellung 1
7. Manche Rezepte erfordern einen „ schnellen Druckablass“. Dies geschieht
üblicherweise, um die Temperatur des Garguts schnell zu senken und weiteres Garen
zu verhindern. Nehmen Sie hierfür den Dampfkochtopf vom Herd und tragen Sie ihn
vorsichtig zum Spülbecken. Lassen Sie nun Wasser über den Deckel, jedoch nicht über
die Ventile laufen. Das Druckventil sollte innerhalb von 20 Sekunden sinken, sodass
Sie den Deckel entriegeln und abnehmen und Ihre Speisen aus dem Dampfkochtopf
entnehmen können.
24
PRAKTISCHE TIPPS UND TRICKS
•Verstauen Sie Ihren Dampfkochtopf am besten mit entriegeltem Deckel, damit die Luft
besser zirkulieren kann.
•Wenn Sie sich nicht sicher sind, verwenden Sie eine niedrigere Kochzeit. Sie können Ihre
Speisen stets zwischendurch überprüfen und bei Bedarf weitergaren.
•Bei der Kochflüssigkeit muss es sich nicht unbedingt um reines Wasser handeln. Variieren
Sie mit Milch, Tomatensoße, Fond oder Kokosnussmilch.
•Zerteilen Sie ähnliche Lebensmittel wie Fleisch oder Gemüse in gleich große Stücke,
damit sie gleichzeitig und gleichmäßig garen.
•Das Dampfgaren kann den Geschmack von Kräutern, Gewürzen, Zwiebeln und
Knoblauch verstärken. Nehmen Sie weniger davon und verwenden Sie frische statt
getrockneter Kräuter, wenn Sie Ihre Lieblingsrezepte im Dampfkochtopf zubereiten.
•Wenn Ihre Speisen nach der Zubereitung noch zu feucht sind, kochen Sie diese ohne
Deckel auf dem Herd weiter, damit mehr Flüssigkeit verdampfen kann.
ZUTATEN IM ÜBERBLICK
Da Ihr Dampfkochtopf Ihre Zutaten schneller als üblich gart, bleiben die meisten gesunden
Nährstoffe, Aromen und Säfte darin erhalten.
Reis gart in nur wenigen Minuten, und auch Kichererbsen, Bohnen und Hülsenfrüchte
wie Linsen in Suppen erfordern eine deutlich geringere Kochzeit. Ein ganzes Huhn, große
Braten und Gerichte wie „Pulled Pork“ werden in einem Bruchteil der gewöhnlichen Zeit
gar. Das Dampfgaren eignet sich vor allem auch für günstigere, traditionell langsam
gegarte Fleischstücke in Eintöpfen und Schmorgerichten, die Sie ohne stundenlanges
Kochen zubereiten können.
Mithilfe unserer Rezeptvorschläge werden Sie ein gutes Gefühl für Ihren Dampfkochtopf
entwickeln und bald auch Ihre eigenen Lieblingsgerichte ans Dampfgaren anpassen
können.
25
GARZEITEN
FRISCHES GEMÜSE
Waschen und schälen Sie Ihr Gemüse wie üblich. Gemüse gart im Dampfkochtopf
sehr schnell und wird normalerweise auf der höchsten Stufe zubereitet. Die Zeiten in
der Gartabelle sind Annäherungswerte. Die tatsächliche Garzeit hängt von der Frische,
Aufbewahrung, Größe und der Art und Weise ab, wie das Gemüse geschnitten wird. Je
nachdem, ob Sie das Gemüse über dem Wasser dämpfen oder im Wasser kochen, fallen
die Garzeiten leicht unterschiedlich aus. Unabhängig von Ihrer bevorzugten Methode
sollten Sie die Garzeit für Gemüse eher niedrig ansetzen. Falls es noch zu hart ist, können
Sie es immer noch ein wenig länger garen lassen. Beenden Sie den Garvorgang mittels des
„schnellen Druckablasses“, sobald Ihr Gemüse gar ist. Tiefgefrorenes Gemüse braucht ca.
eine halbe Minute länger als in der Tabelle angegeben.
FLEISCH UND GEFLÜGEL
Für einen besseren Geschmack und eine appetitliche Farbe empfehlen wir Ihnen,
Fleisch und Geflügel vor dem Dampfgaren anzubraten. Fleisch und Geflügel werden
normalerweise auf der höchsten Stufe gegart. In der Tabelle auf Seite 9 sind
entsprechende Kochzeiten aufgeführt, doch die tatsächliche Garzeit hängt von Alter,
Zartheit und der Temperatur des Fleisches vor dem Garvorgang sowie von der Größe,
Dicke und vom Gewicht ab.
REIS UND ANDERES GETREIDE
Reis und anderes Getreide eignet sich wunderbar zum Dampfgaren. Als Richtwert sollten
Sie 3 Tassen Wasser pro Tasse Getreide ansetzen. Gießen Sie überschüssiges Wasser nach
dem Garvorgang zügig ab.
•Getreide wie Naturreis und Gerste wird bei hohem Druck gegart, der dann langsam
abgelassen wird. Hierdurch gart das Getreide noch etwas weiter. Zum Schluss erfolgt ein
schneller Druckablass, um den Garvorgang zu beenden.
•Weißer Reis, einschließlich Mittel- und Langkorn-, Basmati- und Jasminreis, wird
ebenfalls wie oben zubereitet.
•Kurzkornreis wie z. B. Arborio wird normalerweise bei hohem Druck gegart, gefolgt von
einem schnellen Druckablass, damit der Reis nicht verkocht.
Allen Getreidesorten sollte beim Garen etwas Fett beigegeben werden, damit sie nicht
anfangen, zu schäumen. Fügen Sie pro Tasse Getreide ca. 1 EL Butter oder Öl hinzu.
Würzen Sie nach Belieben mit Salz und Pfeffer. Denken Sie daran, dass Reis und die
meisten anderen Getreidesorten beim Garen zu fast ihrer dreifachen Größe aufquellen.
Der Dampfkochtopf darf also nur zur Hälfte mit Getreide und Kochflüssigkeit gefüllt
sein. Die Tabelle auf Seite 9 führt annähernde Gesamtkochzeiten auf. Diese schließen
sowohl die Anfangszeit unter hohem Druck sowie die Zeit des schnellen bzw. langsamen
Druckablasses ein.
26
HÜLSENFRÜCHTE
Getrocknete Bohnen, Erbsen und Linsen werden bei höchstem Druck gegart und dann
normalerweise stehen gelassen, bis der Dampf von alleine aus dem Topf entwichen ist.
Hülsenfrüchte müssen vor dem Garen gewaschen und gut abgetropft werden. Linsen
brauchen Sie nicht im Voraus einzuweichen, doch je nach Art kann ein vorheriges
Einweichen von Hülsenfrüchten deren Garzeit um ca. 5-10 Minuten verringern. Denken Sie
daran, dass Hülsenfrüchte beim Garen aufquellen, und machen Sie Ihren Dampfkochtopf
nicht zu voll: Als Richtlinie gilt, dass er nur bis zu einem Drittel mit Hülsenfrüchten und
Wasser gefüllt sein sollte. Mit 1 TL Butter oder Pflanzenöl pro halbe Tasse Hülsenfrüchte
verhindern sie, dass diese beim Garen anfangen zu schäumen. Fügen Sie kein Salz hinzu,
da Hülsenfrüchte hierdurch hart werden.
Die Tabelle auf Seite 9 gibt annähernde Garzeiten für Hülsenfrüchte vor, die NICHT
über Nacht eingeweicht wurden. Wie zart die gegarten Hülsenfrüchte sind, hängt von
ihrem Alter und Feuchtigkeitsgehalt ab. Hülsenfrüchte können zwar über einen längeren
Zeitraum aufbewahrt werden, trocknen jedoch im Laufe der Zeit aus. Sie sollten daher
lieber öfters kleinere Mengen kaufen und diese im Kühlschrank lagern. Noch besser ist es,
wenn Sie sie gleich über Nacht einweichen, abtropfen lassen und dann bereits portioniert
für die Zubereitung im Dampfkochtopf einfrieren.
27
TABELLE DER KOCHZEITEN
FRISCHES GEMÜSE
MINUTEN Etage 2
FLEISCH UND GEFLÜGEL
MINUTEN Etage 2
Artischocken (Herzen) ganz 15
Rind (grob geschnitten)
10
Spargel
2
Hühnchen (ganz: 1,5 kg)
20
Auberginen
2
Hühnchen-Teile (mit Knochen) 10
Bohnen (grüne)
6
Rote Beete
20
Hühnchen-Brustfilet
(ohne Knochen)
5
Saubohnen
5
Lammschenkel
25
Brokkoli
2
Lamm (grob geschnitten)
20
Rosenkohl
7
Schwein (grob geschnitten)
10
Kohl
4
Schweinerippchen (kurze)
20
Karotten
4
Kalb (grob geschnitten)
10
Blumenkohl
2
Mais
1
Zucchini
1
Fenchel
13
Schwarze Bohnen
30
Lauch
2
Borlotti-Bohnen
30
Okraschoten
10
Limabohnen
40
Pastinaken
2
Kichererbsen
45
Erbsen
2
Linsen
8
Kartoffeln (geviertelt)
10
Rote Kidneybohnen
30
Kürbis
8
Sojabohnen
35
Steckrüben
5
Schälerbsen
20
Weiße Bohnen
30
REIS UND
ANDERES GETREIDE
MINUTEN Etage 2
Arborio-Reis
6
Gerste
20
Brauner Reis
20
Weißer Reis
10
28
HÜLSENFRÜCHTE
FISCH
Fischfilet (durchschnittlich)
MINUTEN Etage 2
MINUTEN Etage 1
2-3
VERWENDUNG EIGENER REZEPTE
Bei der Zubereitung unserer aufgeführten Rezepte werden Sie nach und nach ein Gefühl
für Ihren Dampfkochtopf entwickelt haben. Nun möchten Sie bestimmt auch einige Ihrer
eigenen Lieblingsrezepte anpassen. Wir empfehlen Ihnen, zunächst eines der Rezepte
aus diesem Heft, das Ihrem eigenen Rezept ähnelt, als Anhaltspunkt zu verwenden. Diese
einfachen Faustregeln werden Ihnen ebenfalls nützlich sein.
•Hühnchen-Teile am Knochen benötigen 6 Minuten Garzeit pro 500 g, entbeinte
Hühnchenbrust nur 4 bis 5 Minuten.
•Gewürfeltes Rindfleisch zum Schmoren benötigt 12 bis 15 Minuten, ein Rinderbraten
eine knappe Stunde.
•Lammkoteletts werden in nur 4 bis 6 Minuten gar, ein Lammschenkel in rund 30
Minuten.
•Garen Sie Fisch auf der niedrigen Stufe. Ein durchschnittliches Filet benötigt nur 2 bis 3
Minuten.
•Geviertelte Äpfel garen in 2 bis 3 Minuten. Beerenfrüchte wie Erdbeeren oder
Himbeeren sind in nur 1 bis 2 Minuten gar.
•Sämtliche Kohlsorten wie Blaukraut, Wirsing und Grünkohl benötigen 3 bis 4 Minuten
Garzeit. In Scheiben geschnittene Karotten sind in nur 2 Minuten gar. Neue Kartoffeln
können in nur 5 Minuten gekocht werden.
29
HÄUFIG GESTELLTE FRAGEN
Frage:
Warum sinkt die Druckanzeige während des Garvorgangs immer wieder ab?
Antwort: Eventuell ist die Temperatur zu niedrig. Steigern Sie die Hitze der Herdplatte
langsam, bis die Anzeige gestiegen ist und auf diesem Stand bleibt.
Frage:
Warum entwickelt sich im Dampfkochtopf kein Druck?
Antwort: Eventuell sitzt der Deckel nicht richtig, oder die Dichtung ist lose oder
verschlissen. Nehmen Sie den Topf vorsichtig vom Herd, damit Sie sich nicht
verbrennen, und überprüfen Sie den korrekten Sitz des Deckels. Überprüfen
Sie die Dichtung im Deckel auf Verschleiß oder Schäden, wenn der Topf nicht
in Gebrauch ist. Sollten Schäden oder Verschleißerscheinungen zu sehen sein,
nehmen Sie unter der Telefonnummer 0800 444 1500 mit dem Kundenservice
von Lakeland Kontakt auf.
Frage:
Aus dem Deckel tritt sehr viel Dampf aus, und auch das Gargut läuft über.
Antwort: Der Druck wurde eventuell nicht vollständig abgelassen, bevor Sie versucht
haben, den Deckel zu öffnen. Nehmen Sie den Deckel erst ab, wenn die
Anzeige vollständig gesunken ist.
Frage:
Aus dem Druckventil treten Gargut sowie große Mengen Dampf aus.
Antwort: Entweder ist der Topf zu voll, oder die Temperatur ist zu hoch. Reduzieren
Sie die Temperatur. Sollte das Problem nicht behoben sein, nehmen Sie den
Topf vom Herd, lassen Sie den Druck abfallen, heben Sie den Deckel ab und
entfernen Sie etwas von dem Gargut.
PFLEGE UND REINIGUNG
•Lassen Sie den Dampfkochtopf vor der Reinigung stets vollständig abkühlen.
•Reinigen Sie jedes einzelne Teil vor der ersten Inbetriebnahme und nach jedem Gebrauch
gründlich.
•Überprüfen Sie alle Komponenten in regelmäßigen Abständen.
•Tauchen Sie den Deckel niemals in Wasser oder andere Flüssigkeiten ein. Wischen Sie ihn
mit einem sauberen, feuchten Tuch ab, bevor Sie ihn verstauen.
•Reinigen Sie den Topf in heißem Wasser mit Spülmittel. Spülen und trocknen Sie ihn
sorgfältig ab.
•Verwenden Sie keine Scheuermittel oder metallenen Scheuerschwämme.
•WICHTIGER HINWEIS: Der Dampfkochtopf ist nicht spülmaschinenfest.
•Verstauen Sie Ihren Dampfkochtopf ohne aufgelegten Deckel, damit die Luft besser
zirkulieren kann.
30
31
32
Lakeland
Alexandra Buildings, Windermere, Cumbria, UK LA23 1BQ
Tel: +44(0)15394 88100 www.lakeland.co.uk
Tel: 0800 444 1500 www.lakeland.de