1
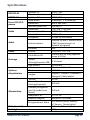
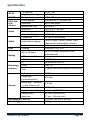
EN
FR
DE
ES
NL
Manual
Manuel d’utilisation
Bedienungsanleitung
Manual de usuario
Handleiding
Digital Video Recorder with
Dino-Lite digital microscope
AMK4012T-D15
AMK4012TL-D15
AMK4012ZT-D15
www.dino-lite.eu
AMK4012T/ZT/TL-D15
OPERATION MANUAL
EN
DE
FR
ES
NL
Manual
Bedienungsanleitung
Manuel d’utilisation
Manual de usuario
Handleiding
2
11
22
34
45
Page 2
AMK4012-D15 manual
AMK4012T/ZT/TL-D15
OPERATION MANUAL
Digital Video Recorder with Dino-Lite digital microscope
Operating instructions
Before operating the unit, please read this manual thoroughly, and
retain it for future reference.
Thank you for purchasing a Dino-Lite with mobile recorder.
Important safety information
•
•
•
•
•
Avoid touching the lens with your finger to protect the product from
electrostatic damage.
Do not drop
Keep dry
Do not use it in high temperature, high humidity environment,
0~40℃ is the best working temperature for this product
Please insert or pull out the SD card or the Dino-Lite when the power
is off. The product or the SD card could be damaged.
Please check www.dino-lite.eu for updated information or if you have
any questions.
AMK4012-D15 manual
Page 3
Basic Information
•
•
•
•
•
•
•
•
•
•
•
•
Page 4
Display: 5-inch HD screen (800X480pix).
Channel Switch: Supports manual & automatic switch between 8
channels.
Recording: Supports seamless cycle and continuous video from the
Dino-Lite digital microscope
Photo: Supports function of taking pictures either from the Dino-Lite
digital microscope
AV IN: TV-IN [NTSC/PAL].
AV OUT: NTSC/PAL].
Battery:Built-in 3200mAh high capacity Li-battery, continuous
record over 10 hours.
Speaker: Built-in speaker of 1W.
Storage: Supports up to 32GB TF card, 4GB SD card supplied.
Language: Supports English/ French/German/Spanish/Dutch.
Power-saving Mode:Automatic shutdown, automatic screen off.
Firmware update: Supports firmware update from SD card.
AMK4012-D15 manual
Connecting the Dino-Lite digital microscope
With the recorder power set to off, connect the plug on the Dino-Lite to the
AV-IN connector on the recorder.
Note: The AMK4012 Dino-Lite is not supported for use on other devices with
2,5 mm AV connector.
How to Charge
Please make sure to charge the battery fully before first usage. Only use the
charger supplied with the product or charge on a PC USB port.
Charge 4~6 hours for a full charge. Do not unplug the charger until the
battery status is full. For the first time charge, please charge for more than 6
but less than 10 hours. A new battery will reach best performance after a few
times full charge and discharge. If the recorder is not used for a longer period,
please recharge every 2-3 months.
Battery capacity symbols:
Basic Operation
1. Power On/Off:Press “ ” to power on, DVR is in working state; press “
”for several seconds to power it off.
2. Working mode switch(switch located at the left corner):
When the switch is on “ ”, DVR is in state of receiving/record/photo;
When the switch is on “ ”, DVR is in playback;
When the switch is on “ ”, DVR is in the state of motion detection.
3. External Storage card
Tis DVR can only recordphoto or video is a storage card has been plugged in.
The screen will show symbol of SD card & its freecapacity.
4. Working as a disk
Connect DVR to computer and power it on, it will work as a disk. Open the
removable disk in the computer, you’ll find the videos and photos in
“RECORD” and “ PHOTO” files under “DICM” directory.
AMK4012-D15 manual
Page 5
Record & Photo
Power DVR on, and select working mode “ ” for recording/photo mode.
1. Photo: In “ ” mode, press “
picture is made.
” once, symbol “ ” flashes once, and one
2. Record: In “ ” mode, press “ ” for 3 seconds, the DVR will start to record
and the screen shows “REC”. Press “ ”again to pause, screen shows “ ”;
press “ ” one more time, to resume recording. Press “ ” to end, it will save
automatically and exit. If you do not press “ ”, the system will automatically
save video in segments until the storage card is full. If “Overwrite” is turned
on and the card is full, it will overwrite the earliest recording and save the
latest one.
3.Mute: In “ ” mode, press “ ” to enter state of mute. Screen displays
“MUTE”. Speaker gives no sound; press “ ” again to recover sound.
Note: Mute setting will not affect earphone volume.
Motion Detect
1.Power DVR on, and select working mode to “ , for motion detect mode.
Press “ ” to exit and go back to system/function menu.
2.In “ ” mode, press “ ” for 3 seconds to enter into motion
detectrecording. When moving objects appear, system will automatically
start to record, and screen will show “REC”. After 10 seconds without moving
objects, system will automatically end recording and save to exit, waiting for
next motion. To end motion detect recording, press “ ”, it will save
automatically and exit.
3. If you do not press “ ”, the system will automatically save video in
segments until the storage card is full. If “Overwrite” is turned on and the
card is full, it will overwrite the earliest recording and save the latest one.
Page 6
AMK4012-D15 manual
Play Video/Photo
When the working mode is set to “ ” you can playback video & photo. Press
“ ”/“ ” to select “Photo” or “Video”. Press “ ” to exit and go back to
main menu.
1. Play Video: When you select “Video”, press “ ” to enter into date folder.
Press “ ”/“ ” to select the date, and press “ ” to enter into the list of
video files. Press “ ”/“ ” to select, and press “ ” to play video. Press“
”/“ ” to adjust volume. Press “ ” long time to fast forward; press “ ” long
time to rewind; press“ ” to pause; press“ ” again to release pause; press “
” to exit.
2. Play Photos: Select “Photo”and press “ ” to enter into photo folder. Press
“ ”/“ ” to select pictures, then press “ ” to view. Press “ ” to view next
one; press “ ” to view previous one. Press “ ” to exit.
3. Delete Photo & Video: In list mode, press “ ”/” ” to select files. Press “
”to get the delete dialogue. Press ” ”/” ” to select
“All”/”Current”/“Cancel”.Press “ ” to confirm.
Function Settings
Power DVR on, working mode switched to “ ”/“ ”, press “ ” to enter into
function and system setting menu. Press “ ”/“ ” to select “Function”, then
press “ ” to enter into function menu.
1.Recorder Resolution: Press“ ”/“ ” to select “Recorder Resolution” and
press “ ” toenter. Press “ ”/“ ” to select “720X576” / “720X480”. Press “
” to confirm and exit.
AMK4012-D15 manual
Page 7
2. Frame Rate: Press“ ”/“ ” to select “Frame Rate” and press “ ” to
enter. Press“ ”/“ ”to select “30 FPS”/“25 FPS”, and press “ ” to confirm
& exit.
3. Video Segment Sizes: Press “ ”/“ ” to select “Video Segment Sizes”,
then press “ ” to enter. Press “ ”/“ ” to select “10 MIN”/“30MIN”/“60
MIN”. Press “ ” to confirm & exit.
4. Overwrite: Press “ ”/“ ” to select “ Overwrite”, and press “ ” to enter.
Press “ ”/“ ” to select “Off”/ “On”, and press “ ” to confirm & exit. If
“Overwrite” is on, DVR will cycle record, and save the latest video.
5. Time Stamp: Press “ ”/“ ” to select “Time Stamp”, and press “ ” to
enter. Press “ ”/“ ” to select “Off”/ “On”, and press “ ” to confirm &
exit. If it’s on, video will be saved with synchronous time.
6. Information Display:Press “ ”/“ ” to select “Information Display”, and
press “ ” to enter. Press “ ”/“ ” to select “Off”/ “On”, and press “ ” to
confirm & exit. If it’s on, screen will display information of working frequency,
channel, audio state, date & time, etc. If you select “Off”, no information will
be displayed.
7. Video Setting: Press “ ”/“ ” to select “Video Setting”, and press “ ” to
enter. Press “ ”/“ ” to select “Brightness” or “Contrast”; then press “ ”
to enter; then press “ ”/“ ” to adjust brightness or contrast. Press “ ” to
exit
System Settings
Power DVR on, working mode switched to “ ”/“ ”, press “ ” to enter into
function & system setting. Press “ ”/“ ” to select “System”; then press “
” to enter into system menu.
1. Date time: Press “ ”/“ ” to select “Date Time”, and press “ ” to enter.
Press “ ” again to move the cursor, and press “ ”/“ ” to adjust date &
time. Press “ ” to exit.
Page 8
AMK4012-D15 manual
2. Language: Press “ ”/“ ” to select “Language”, and press “ ” to enter.
Press “ ”/“ ” to choose your language. And press “ ” to confirm and exit.
3. AV Out: Press “ ”/“ ” to choose “AV Out”, and press “ ” to enter.
Press“ ”/“ ” to choose “PAL/NTSC”, press “ ” to confirm video displayed
on TV screen. Pull out AV cable, video will show on DVR screen.
4. Format: To format the SD card, press “ ”/“ ” to select “Format”, and
press “ ” to enter. Press “ ”/“ ” to choose “Yes”. Press “ ” to confirm &
exit.
5. Power Save: Press “ ”/“ ” to select “Power Save”, and press “ ” to
enter:
a) Auto LCD Off: Press “ ”/“ ” to select “ Auto LCD Off”, and press “ ” to
enter. Press “ ”/“ ” to select “1 MIN”/“5 MIN”/“Off”, and press “ ” to
confirm & exit. If “Auto LCD Off” is on, the LCD screen will automatically shut
off when the set time is due. Press any key to recover screen display.
b)Auto Power Off: Press “ ”/“ ” to select “Auto Power Off”and press “ ”
to enter.Press “ ”/“ ” to select “ 5 MIN”/“10 MIN”/“Off”, and press “ ”
to confirm & exit. If you turn on “Auto Power Off”, the DVR will automatically
shut off when the set time is due.
6. Firmware Update: Press “ ”/“ ” to select “Firmware Update”, and press
“ ” to enter. Press “ ”/“ ” to select “Yes”, and press“ ” to start
update. Please remember to save the update file “zburnT_C11.run.elf” at the
root directory of the SD card.
7. Default Setup: Press “ ”/“ ” to select “Default Setup”and press “ ” to
enter. Press “ ”/“ ” to select “Yes” and press “ ” to confirm. Press “ ”
to exit.
8. Memory Info: Press“ ”/“ ” to select “Memory Info”, and press “
view capacity of SD card. Press “ ” to exit.
9. Version: Press“ ”/“ ” to select “Version”and press “
information. Press “ ” to exit.
AMK4012-D15 manual
” to
” to view version
Page 9
10.Display Mode: Press“ ”/“ ” to choose “Display Mode”. Press “ ”/“
” to choose “16:9/4:3”. Then press “ ” to confirm. Press “ ” to exit.
Troubleshooting
1. The recorder does not power on: maybe the battery is empty, try to
recharge.
2. The Dino-Lite is connected but there is no image: check if the plug is
in the AV-in port and properly inserted. If this does not work, try to
change the settings or return to Default Setup.
3. System halted: Press the RESET key to turn on player again.
4. File cannot play: Maybe the format of video file is not supported by
this DVR, please convert it into the supported format.
5. The text is in messy code: make sure the correct language is selected.
6. It can’t upload / download files or can’t find the disk in PC: Replace
USB cable/USB port.
7. It cannot save a file: there is no SD card in theDVR, please insert SD
card; or SD card memory is full, please delete some files to release
memory; or there is damaged area in memory, please format it.
Package Content
The following items are in the package.
Dino-Lite AMK digital microscope
MSD15 recorder
Clip
User manual
USB Cable
AV Cable
AC adapter(with EU/UK/US plug)
4GB Micro SD Card
Page 10
1x
1x
1x
1x
1x
1x
1x
1x
AMK4012-D15 manual
Specifications
AV IN
AV OUT
HD 5-inch
LCD screen
Video
TV system
Output voltage
TV system
Active area
Resolution
Luminance for LCM
Resolution
Video compression
Play format
Frequency
Audio
Earphone Output
Photo
Speaker
Format
Storage
Operating
system
Power
Micro SD card
4GB recording time
2GB photos
PC
Port
Language
Voltage
Current(recording
mode)
Current(recording
with screen off
mode)
AC adapter
Built-in battery
Wired record
Size (L x W x H)
Weight(g)
AMK4012-D15 manual
NTSC / PAL
3.6-4.2 V
NTSC/PAL
108mm(W) X 64.8mm(H)
800 x 480 Pixel
200 cd/㎡
720*576 / 720*480
MPEG-AVI 30fps
MPEG-AVI
20Hzz-20KHz stereo
Left 20 mW+ right 20mW [16O](suit to
largest volume)
1W
JPG/JPEG, 720*576
Micro SD Card 4GB (support up to
32GB)
2-4 hours
30000pcs
Windows & Mac OS
USB 2.0
English/French/German/Spanish/Dutch
DC 5V
450 mA
230 mA
DC 5V 2A
Li-battery 3200Mah
≥14hours(off-screen);
≥7hours(on-screen)
131mm x 86mm x 18mm
200g
Page 11
AMK4012T/ZT/TL-D15
BEDIENUNGSANLEITUNG
Digitaler Videorekorder mit Dino-Lite Digitalmikroskop
Bedienungsanleitung
Lesen Sie bitte vor dem Betrieb des Geräts diese Anleitungen
aufmerksam durch und bewahren Sie sie für späteres Nachschlagen
auf.
Vielen Dank, dass Sie sich für ein Dino-Lite mit mobilem Rekorder entschieden
haben.
Wichtige Sicherheitshinweise
•
•
•
•
•
Berühren Sie nicht das Objektiv, um das Gerät vor elektrostatischen
Schäden zu bewahren.
Lassen Sie das Gerät nicht fallen.
Halten Sie das Gerät trocken.
Benutzen Sie das Gerät nicht bei hohen Temperaturen und hoher
Luftfeuchtigkeit; 0~40 °C ist die beste Arbeitstemperatur.
Zur Vermeidung von Schäden SD-Karte oder das Dino-Lite nur
anschließen oder abtrennen, wenn das Gerät ausgeschaltet ist.
Auf www.dino-lite.eu finden Sie aktuelle Informationen und
Antworten auf Ihre Fragen.
Page 12
AMK4012-D15 manual
Allgemeine Informationen
•
•
•
•
•
•
•
•
•
•
•
•
Display: 5-Zoll HD-Bildschirm (800x480 Pixel).
Kanalumschaltung: Unterstützt manuelle und automatische
Umschaltung zwischen 8 Kanälen.
Aufnahme: Unterstützt Endlosaufnahme und kontinuierliches Video
vom Dino-Lite Digitalmikroskop
Foto: Unterstützt Bildaufnahme vom Dino-Lite Digitalmikroskop.
AV-Eingang: TV-IN [NTSC/PAL].
AV-Ausgang:[NTSC/PAL].
Akku:Integrierter 3200 mAh Lithium-Akku mit hoher Kapazität für
kontinuierliche Aufnahmedauer von mehr als 10 Stunden.
Lautsprecher: Eingebauter Lautsprecher 1 W.
Speicherkapazität: Unterstützt bis zu 32 GB TF-Karte, 4 GB SD-Karte
gehört zum Lieferumfang.
Sprachen: Unterstützt Englisch/Französisch/Deutsch/Spanisch/
Niederländisch.
Energiesparmodus:Automatische Abschaltung, automatische
Bildschirmabschaltung.
Firmware-Update: Unterstützt Firmware-Update von SD-Karte.
AMK4012-D15 manual
Page 13
Dino-Lite Digitalmikroskop anschließen
Schließen Sie das Dino-Lite bei ausgeschaltetem Rekorder am Anschluss AV-IN
des Rekorders an.
Hinweis: Das AMK4012 Dino-Lite unterstützt nicht die Benutzung anderer
Geräte mit 2,5 mm AV-Anschluss.
Laden
Der Akku muss vor Erstgebrauch geladen werden. Benutzen Sie nur das
mitgelieferte Ladegerät oder laden Sie über PC USB-Port.
Ein Ladezyklus dauert 4 bis 6 Stunden. Trennen Sie das Ladegerät nicht ab,
bevor der Ladezyklus abgeschlossen ist. Der erste Ladezyklus dauert 6 bis 10
Stunden. Ein neuer Akku erreicht seine volle Leistung erst nach mehreren
Ladezyklen. Bei längerer Nichtbenutzung laden Sie den Akku alle 2-3 Monate.
Symbole Akkukapazität:
Allgemeine Bedienungshinweise
1. Ein- und ausschalten: Drücken Sie zum Einschalten, der DVR ist
betriebsbereit; halten Sie für einige Sekunden zum Ausschalten gedrückt.
2. Umschalter Betriebsmodus (linke Seite):
Mit Schalterstellung auf ist der DVR im Empfangs-/Aufnahme-/Fotomodus.
Mit Schalterstellung auf ist der DVR im Wiedergabemodus.
Mit Schalterstellung auf ist der DVR im Bewegungserkennungsmodus.
3. Speicherkarte
Der DVR kann nur Fotos oder Videos aufzeichnen, wenn eine Speicherkarte
eingesteckt ist. Das Symbol für die SD-Karte und die freie Speicherkapazität
werden angezeigt.
4. Externes Laufwerk
Bei Anschluss des DVR am Computer arbeitet er als Massenspeichergerät.
Öffnen Sie das Laufwerk im Computer, um die Video- und Fotodateien in den
Ordnern „RECORD“ und „PHOTO“ im Verzeichnis „DICM“ anzuzeigen.
Page 14
AMK4012-D15 manual
Aufnahme und Foto
Schalten Sie den DVR ein und wählen Sie
als Aufnahme-/Fotomodus.
1. Foto: Im Modus drücken Sie einmal
ein Foto wir aufgenommen.
, das Symbol
blinkt einmal und
2. Aufnahme: Im Modus halten Sie für 3 Sekunden gedrückt, der DVR
startet die Aufnahme und auf dem Bildschirm wird „REC“ angezeigt. Drücken
Sie zur Unterbrechung der Aufnahme (Pause) erneut , wird angezeigt;
drücken Sie erneut , um die Aufnahme fortzusetzen. Drücken Sie , um
die Aufnahme zu beenden, automatisch zu speichern und die Funktion zu
verlassen. Drücken Sie nicht erneut , so speichert das System das Video
automatisch in Segmenten, bis die Speicherkarte voll ist.
Ist „Überschreiben“ aktiviert und Sie drücken nicht , um die Aufnahme zu
beenden, so speichert das System das Videoautomatisch in Segmenten.
Wenn die Karte voll ist, werden die ältesten Segmente jeweils überschrieben.
AMK4012-D15 manual
Page 15
3.Stummschaltung: Im Modus drücken Sie , um das Gerät
stummzuschalten. Auf dem Bildschirm wird „STUMM“ angezeigt. Drücken Sie
erneut , um die Stummschaltung wieder aufzuheben.
Hinweis: Die Stummschaltung hat keine Auswirkung auf die
Lautstärkeeinstellung der Ohrhörer.
Bewegungserkennung
1. Schalten Sie den DVR ein und wählen Sie als
Bewegungserkennungsmodus. Drücken Sie zum Verlassen der Funktion
und Rückkehr in das System-/Funktionsmenü.
2. Im Modus halten Sie für 3 Sekunden zum Aufrufen der Aufnahme mit
Bewegungserkennung gedrückt. Erkennt das System nun Bewegung, so
startet es automatisch die Aufnahme und auf dem Bildschirm wird „REC“
angezeigt. Nach 10 Sekunden ohne Bewegungserkennung beendet das
System die Aufnahme wieder automatisch und speichert; auf die nächste
Bewegungserkennung wird gewartet. Zur Beendigung der Aufnahme mit
Bewegungserkennung drücken Sie , die Aufnahme wird automatisch
gespeichert und die Funktion wird verlassen.
3. Drücken Sie nicht zum Beenden der Aufnahme, so speichert das System
das Video automatisch in Segmenten, bis die Speicherkarte voll ist. Ist
„Überschreiben“ aktiviert und Sie drücken nicht , um die Aufnahme zu
beenden, so speichert das System das Videoautomatisch in Segmenten.
Wenn die Karte voll ist, werden die ältesten Segmente jeweils überschrieben.
Page 16
AMK4012-D15 manual
Video/Foto wiedergeben
Im Modus können Sie Videos und Foto abspielen. Drücken Sie / zur
Auswahl von „Foto“ oder „Video“. Drücken Sie zum Verlassen der Funktion
und Rückkehr in das Hauptmenü.
1. Video abspielen: Bei Auswahl von „Video“ drücken Sie zum Aufrufen
des Datumordners. Mit / wählen Sie das Datum, dann drücken Sie zur
Anzeige einer Liste von Videodateien. Mit / wählen Sie aus, dann
drücken Sie zur Wiedergabe des Videos. Mit / stellen Sie die
Lautstärke ein. Halten Sie für den schnellen Vorlauf gedrückt und halten
Sie für den Rücklauf gedrückt. Drücken Sie , um die Wiedergabe zu
unterbrechen (Pause) und drücken Sie erneut , um die Wiedergabe
fortzusetzen. Mit verlassen Sie die Funktion.
2. Fotos anzeigen: Wählen Sie „Foto“ unddrücken Sie zum Aufrufen des
Fotoordners. Drücken Sie / zur Auswahl des Bildes, dann drücken Sie
zur Anzeige. Mit zeigen Sie das nächste Bild an, mit das vorherige Bild.
Mit verlassen Sie die Funktion.
3. Fotos und Videos löschen: Im Listenmodus drücken Sie / zur Auswahl
der Dateien. Drücken Sie , um den Löschdialog aufzurufen. Drücken Sie /
zur Auswahl von „Alle“/„Aktuell“/„Annullieren“. Drücken Sie zur
Bestätigung.
Funktionen einstellen
Schalten Sie den DVR ein und wählen Sie als Modus oder , dann drücken
Sie zum Aufrufen des Funktions- und Systemeinstellungsmenüs. Drücken
Sie / zur Auswahl von „Funktion“, dann drücken Sie zum Aufrufen des
Funktionsmenüs.
AMK4012-D15 manual
Page 17
1. Rekorder Auflösung: Drücken Sie / zur Auswahl von „Recorder
Auflösung“ und dann zum Aufrufen der Funktion. Drücken Sie / zur
Auswahl von „720X576“ oder „720X480“. Drücken Sie zur Bestätigung und
zum Verlassen der Funktion.
2. Frame Rate: Drücken Sie / zur Auswahl von „Frame Rate“ und dann
zum Aufrufen der Funktion. Drücken Sie / zur Auswahl von „30 FPS“ oder
„25 FPS“, und drücken Sie zur Bestätigung und zum Verlassen der
Funktion.
3. Video Segment Größe:Drücken Sie / zur Auswahl von „Video Segment
Größe“ und dann zum Aufrufen der Funktion. Drücken Sie / zur
Auswahl von „10 MIN“ oder „30MIN“ oder „60 MIN“. Drücken Sie zur
Bestätigung und zum Verlassen der Funktion.
4. Überschreiben: Drücken Sie / zur Auswahl von „Überschreiben“ und
dann zum Aufrufen der Funktion. Drücken Sie / zur Auswahl von
„Aus“ oder „An“, und drücken Sie zur Bestätigung und zum Verlassen der
Funktion.Ist „Überschreiben“ aktiviert, so zeichnet der DVR kontinuierlich auf
und das jeweils letzte Video wird gespeichert.
5. Zeitstempel:Drücken Sie / zur Auswahl von „Überschreiben“ und dann
zum Aufrufen der Funktion. Drücken Sie / zur Auswahl von
„Ausgeschaltet“ oder „Angeschaltet“, und drücken Sie zur Bestätigung und
zum Verlassen der Funktion.Ist die Funktion aktiviert, so wird das Video mit
der Uhrzeit gespeichert.
6. Informationen Bildschirm:Drücken Sie / zur Auswahl von
„Informationen Bildschirm“ und dann zum Aufrufen der Funktion. Drücken
Sie / zur Auswahl von „Aus“ oder „Angeschaltet“, und drücken Sie zur
Bestätigung und zum Verlassen der Funktion.Ist die Funktion aktiviert, so
werden auf dem Bildschirm Informationen zu Frequenz, Kanal, Audio, Datum
und Uhrzeit usw. angezeigt. Wählen Sie „Aus“, so werden keine
Informationen angezeigt.
7. Video Setting:Drücken Sie / zur Auswahl von „Video Setting“ und
dann zum Aufrufen der Funktion. Drücken Sie / zur Auswahl von
Page 18
AMK4012-D15 manual
„Helligkeit“ oder „Kontrast“, dann drücken Sie zum Aufrufen der
jeweiligen Funktion. Mit / stellen Sie die Helligkeit bzw. den Kontrast ein.
Mit verlassen Sie die Funktion.
Systemeinstellungen
Schalten Sie den DVR ein und wählen Sie als Modus oder , dann drücken
Sie zum Aufrufen des Funktions- und Systemeinstellungsmenüs. Drücken
Sie / zur Auswahl von „System“ und dann zum Aufrufen des
Systemmenüs.
1. Datum Uhrzeit:Drücken Sie / zur Auswahl von „Datum Uhrzeit“ und
dann zum Aufrufen der Funktion. Drücken Sie erneut zum Bewegen des
Cursors, dann stellen Sie mit / Datum und Uhrzeit ein. Mit verlassen
Sie die Funktion.
2. Sprache: Drücken Sie / zur Auswahl von „Sprache“ und dann zum
Aufrufen der Funktion. Drücken Sie / zur Auswahl der Sprache.Und
drücken Sie zur Bestätigung und zum Verlassen der Funktion.
3. AV Ausgang: Drücken Sie / zur Auswahl von „AV Ausgang“ und dann
zum Aufrufen der Funktion.Drücken Sie / zur Auswahl von
„PAL/NTSC“, dann drücken Sie zur Bestätigung, dass das Video auf dem
Fernsehbildschirm angezeigt wird. Ziehen Sie das AV-Kabel ab, um das Video
auf dem Bildschirm des DVR anzuzeigen.
4. Formatieren: Drücken Sie / zur Auswahl von „Formatieren“ der SDKarte, dann drücken Sie zum Aufrufen der Funktion. Drücken Sie / zur
Auswahl von „Ja“. Drücken Sie zur Bestätigung und zum Verlassen der
Funktion.
5. Stromspar: Drücken Sie / zur Auswahl von „Stromspar“ und dann
zum Aufrufen der Funktion.
a) Auto LCD Aus: Drücken Sie / zur Auswahl von „Auto LCD Aus“ und
dann zum Aufrufen der Funktion.Drücken Sie / zur Auswahl von „1
MIN“ oder „5MIN“ oder „Aus“ und drücken Sie zur Bestätigung und zum
Verlassen der Funktion.Ist „Auto LCD Aus“ aktiviert, so schaltet sich der LCDBildschirm automatisch nach der voreingestellten Zeit aus. Drücken Sie eine
AMK4012-D15 manual
Page 19
beliebige Taste, um den Bildschirm wieder einzuschalten.
b) Automatische Abschaltung:Drücken Sie / zur Auswahl von
„Automatische Abschaltung“ und dann zum Aufrufen der
Funktion.Drücken Sie / zur Auswahl von „5 MIN“ oder „10 MIN“ oder
„Aus“ und drücken Sie zur Bestätigung und zum Verlassen der Funktion.Ist
„Automatische Abschaltung“ aktiviert, so schaltet sich der DVR automatisch
nach der voreingestellten Zeit aus.
6. Firmware Aktualisieren:Drücken Sie / zur Auswahl von „Firmware
Aktualisieren“ und dann zum Aufrufen der Funktion.Drücken Sie / zur
Auswahl von „Ja“, danndrücken Sie , um die Aktualisierung zu starten.
Speichern Sie die Aktualisierungsdatei „zburnT_C11.run.elf“ im
Stammverzeichnis der SD-Karte.
7. Defaults: Drücken Sie / zur Auswahl von „Defaults“ und dann zum
Aufrufen der Funktion.Drücken Sie / zur Auswahl von „Ja“ und drücken
Sie zur Bestätigung. Mit verlassen Sie die Funktion.
8. Memory Info: Drücken Sie / zur Auswahl von „Memory Info“ und
dann zur Anzeige der Kapazität der SD-Karte. Mit verlassen Sie die
Funktion.
9. Version: Drücken Sie / zur Auswahl von „Version“ und dann zur
Anzeige der Versions-Informationen. Mit verlassen Sie die Funktion.
10. Bildschirm-Verhältnis: Drücken Sie / zur Auswahl „BildschirmVerhältnis“. Drücken Sie / zur Auswahl „16:9/4:3“. Drücken Sie zur
Bestätigung. Mit verlassen Sie die Funktion.
Störungsbehebung
1. Der Rekorder lässt sich nicht einschalten: Akku erschöpft, bitte laden.
2. Das Dino-Lite ist angeschlossen, es wird jedoch kein Bild angezeigt:
Vergewissern Sie sich, dass der Stecker fest im AV-Eingang sitzt. Ist
dies nicht das Problem, so ändern Sie die Einstellungen oder kehren
Sie zu den Standardeinstellungen zurück.
3. System eingefroren: Drücken Sie die RESET-Taste.
Page 20
AMK4012-D15 manual
4. Datei wird nicht wiedergegeben: Format der Videodatei wird nicht
durch DVR unterstützt, wandeln Sie die Datei in das unterstützte
Format um.
5. Der Text ist nicht lesbar: Vergewissern Sie sich, dass die richtige
Sprache eingestellt ist.
6. Dateien können nicht hoch- oder heruntergeladen werden oder das
Laufwerk wird nicht auf dem PC angezeigt: Tauschen Sie das USBKabel aus oder wählen Sie einen anderen USB-Port.
7. Datei kann nicht gespeichert werden: Keine SD-Karte im DVR
eingesetzt, bitte SD-Karte einsetzen; SD-Karte ist voll, einige Dateien
löschen, um Speicherkapazität frei zu machen; Speicher beschädigt,
bitte neu formatieren.
Lieferumfang
Folgende Artikel gehören zum Lieferumfang.
Dino-Lite AMK Digitalmikroskop
MSD15 Rekorder
Clip
Bedienungsanleitung
USB-Kabel
AV-Kabel
Netzteil (mit EU/GB/US Stecker)
4 GB microSD-Karte
AMK4012-D15 manual
1x
1x
1x
1x
1x
1x
1x
1x
Page 21
Spezifikationen
AV-Eingang
AV-Ausgang
HD 5-Zoll LCDBildschirm
Video
TV-System
Ausgangsspannung
TV-System
Aktiver Bereich
Auflösung
Luminanz für LCM
Auflösung
Videokompression
Wiedergabeformat
Frequenz
Audio
Ohrhörerausgang
Foto
Lautsprecher
Format
Speicher
Betriebssystem
Power
microSD-Karte
4 GB Aufnahmezeit
2 GB Fotos
PC
Port
Sprachen
Spannung
Stromaufnahme
(Aufnahmemodus)
Stromaufnahme
(Aufnahme mit
abgeschaltetem
Bildschirm)
Netzteil
Integrierter Akku
Aufnahmedauer
Abmessungen (L x B x H)
Gewicht (g)
Page 22
NTSC / PAL
3,6-4,2 V
NTSC / PAL
108 mm (B) x 64,8 mm (H)
800 x 480 Pixel
200 cd/m2
720x576 / 720x480
MPEG-AVI 30 fps
MPEG-AVI
20 Hz-20 kHz Stereo
Links 20 mW + rechts 20 mW
[16 Ω] (für größte Lautstärke
geeignet)
1W
JPG/JPEG, 720*576
microSD-Karte 4 GB
(unterstützt bis zu 32 GB)
2-4 Stunden
30000 Bilder
Windows & Mac OS
USB 2.0
Englisch/Französisch/Deutsch/
Spanisch/Niederländisch
DC 5 V
450 mA
230 mA
DC 5V 2A
Lithium-Akku 3200 mAh
≥14 Stunden (Bildschirm aus);
≥7 Stunden (Bildschirm ein)
131 mm x 86 mm x 18 mm
200 g
AMK4012-D15 manual
AMK4012T/ZT/TL-D15
MANUEL D'UTILISATION
Enregistreur vidéo numérique (DVR) avec microscope numérique Dino-Lite
Mode d'emploi
Avant de faire fonctionner l'appareil, veuillez lire attentivement ce
manuel et le conserver pour référence future.
Merci d'avoir acheté un Dino-Lite avec enregistreur portable.
Informations de sécurité importantes
•
•
•
•
•
Évitez de toucher l'objectif avec vos doigts pour protéger le produit
contre les décharges électrostatiques.
Ne laissez pas tomber
Conserver au sec
Ne pas utiliser à haute température, environnement très humide, 0 ~
40°C est la meilleure température de fonctionnement pour ce produit
Veuillez n’insérer ou retirer la carte SD ou le Dino-Lite que lorsque
l'alimentation est coupée. Le produit ou la carte SD peuvent être
endommagés.
Veuillez regarder www.dino-lite.eu pour plus d'informations mises à
jour ou si vous avez des questions.
AMK4012-D15 manual
Page 23
Information de base
•
•
•
•
•
•
•
•
•
•
•
•
Page 24
Affichage : Écran HD de 5 pouces (800X480pix).
Sélecteur de canal : Prend en charge le commutateur manuel et
automatique entre 8 canaux.
Enregistrement :Prend en charge le cycle continu et vidéo en continu
à partir du microscope numérique Dino-Lite
Photo : Supporte la fonction de prise de vue du microscope
numérique Dino-Lite
Entrée AV: EntréeTV [NTSC/PAL].
Sortie AV : NTSC/PAL.
Batterie :Batterie Li intégrée haute capacité 3200 mAh,
enregistrement continu plus de 10 heures.
Haut-parleur :Haut-parleur intégré de 1W.
Stockage : Prend en charge jusqu'à 32 Go TF, carte SD 4 Go fournie.
Langue : Prise en charge Anglais / Français / Allemand / Espagnol /
Néerlandais.
Mode économie d'énergie :Arrêt automatique, arrêt automatique de
l’écran.
Mise à jour du micrologiciel : Prise en charge de la mise à jour du
micrologiciel de la carte SD.
AMK4012-D15 manual
Raccordement du microscope numérique Dino-Lite
Avec l'alimentation de l'enregistreur éteinte, branchez la prise sur le Dino-Lite
et l'entrée AV de l'enregistreur.
Remarque: Le Dino-Lite AMK4012 ne prend pas en charge l’utilisation sur
d'autres appareils avec un connecteur AV 2,5mm.
Comment charger
Veuillez-vous assurer que la batterie est complètement chargée avant la
première utilisation. Utilisez uniquement le chargeur fourni par le produit ou
chargez la sur un port USB du PC.
Chargez 4 ~ 6 heures pour une charge complète. Ne pas débrancher le
chargeur jusqu'à ce que l'état de la batterie soit chargé. Pour la première
charge, veuillez charger pendant plus de 6h, mais moins de 10 heures. Une
nouvelle batterie atteindra une meilleure performance après quelques
charges et décharges complètes. Si l'appareil n'est pas utilisé pendant une
longue période, veuillez recharger tous les 2-3 mois.
Symboles de capacité de la batterie :
Fonctionnement de base
1. Mise sous tension : Appuyez sur “ ” pour mettre sous tension, le DVR est
en état de fonctionnement ; appuyez sur “ ” pour plusieurs secondes pour
le mettre hors tension.
2. Commutateur de mode de fonctionnement (interrupteur situé à l'angle
gauche) :
Lorsque l'interrupteur est sur “ ”, le DVR est en état de réception /
enregistrement / photo;
Lorsque l'interrupteur est sur “ ”, le DVR est en lecture ;
Lorsque l'interrupteur est sur “ ”, le DVR est dans l’état de détection de
mouvement.
3. Carte de stockage externe
Ce DVR peut uniquement enregistrer les photos et vidéos sur une carte de
AMK4012-D15 manual
Page 25
stockage qui a été branchée. L'écran affichera le symbole de la carte SD et sa
capacité libre.
4. Apparaitre comme un disque
Connectez le DVR à l'ordinateur et allumez le, il apparaitra comme un disque.
Ouvrez le disque amovible dans l'ordinateur, vous trouverez les fichiers vidéo
et photos dans les répertoires "RECORD" et "Photo" sous "DICM".
Enregistrement et photo
Allumez le DVR, et sélectionnez le mode marche “ ” pour le mode
enregistrement et photo.
1. Photo : Dans le mode “ ”, appuyez sur “
clignotera une fois, et une photo est prise.
” une fois, le symbole “ ”
2. Enregistrement : Dans le mode “ ”, appuyez sur “ ” pendant 3 secondes,
le DVR commencera l’enregistrement et l'écran affichera “REC”. Appuyez sur
“ ” de nouveau pour mettre en pause, l’écran affichera “ ” ; appuyez sur “
” une autre fois pour reprendre l’enregistrement. Appuyez sur “ ” pour
terminer, il va automatiquement sauvegarder et quitter. Si vous n’appuyez
pas sur “ ”, le système va automatiquement sauvegarder des fichiers vidéo
en segments jusqu'à ce que la carte mémoire soit pleine.
Si "écraser" est activé et que vous n'appuyez pas sur “ ” pour terminer
l'enregistrement, le système va automatiquement sauvegarder les fichiers
Page 26
AMK4012-D15 manual
vidéo en segments. Lorsque la carte est pleine, il écrasera le premier
enregistrement pour enregistrer le dernier.
3. Sourdine : Dans le mode “ ”, appuyez sur “ ” pour entrer dans le mode
sourdine. L’écran affiche “MUTE”. Le haut-parleur ne donne aucun son ;
appuyez sur “ ” à nouveau pour récupérer le son.
Remarque : Le réglage de la sourdine n'affectera pas le volume de l’écouteur.
Détection de mouvement
1. Allumez le DVR, et sélectionnez le mode marche “ , pour le mode de
détection de mouvement. Appuyez sur “ ” pour quitter et revenir au menu
système/fonction.
2.Dans le mode“ ”, appuyez sur “ ” pendant 3 secondes pour entrer dans
l'enregistrement en détection de mouvement. Lorsque les objets en
mouvement apparaissent, le système va automatiquement commencer à
enregistrer, et l'écran affichera "REC". Après 10 secondes sans objets en
mouvement, le système arrêtera automatiquement l'enregistrement et
sauvegardera pour quitter, en attendant le prochain mouvement. Pour
mettre fin à l'enregistrement en détection de mouvement, appuyez sur “ ”,
il va automatiquement sauvegarder et quitter.
3. Si vous n'appuyez pas sur “ ” pour terminer l'enregistrement, le système
enregistrera automatiquement en segments jusqu'à ce que la carte mémoire
soit pleine. Si "écraser" est activé et que vous n'appuyez pas sur “ ” pour
terminer l'enregistrement, le système enregistrera automatiquement dans
des segments. Et lorsque la carte est pleine, il écrasera le premier
enregistrement pour enregistrer le dernier.
AMK4012-D15 manual
Page 27
Lecture Vidéo/Photo
Lorsque le mode marche est positionné sur “ ” vous pouvez lire les vidéos et
photos. Appuyez sur “ ”/“ ” pour sélectionner “Photo” ou “Vidéo”.
Appuyez sur “ ” pour quitter et revenir au menu principal.
1. Lecture Vidéo : Quand vous sélectionnez “Vidéo”, appuyez sur “ ” pour
entrer dans le dossier de date. Appuyez sur “ ”/“ ” pour sélectionner la
date, et appuyez sur “ ” à entrer dans la liste de fichiers vidéo. Appuyez sur
“ ”/“ ” pour sélectionner, et appuyez sur “ ” pour lire la vidéo. Appuyez
sur “ ”/“ ” pour régler le volume. Appuyez sur “ ” longtemps pour
l'avance rapide ; appuyez sur “ ” longtemps pour le retour en arrière ;
appuyez sur “ ” pour mettre en pause ; appuyez sur“ ” à nouveau pour
libérer la pause ; appuyez sur “ ” pour quitter.
2. Lecture Photo : Sélectionnez “Photo” et appuyez sur “ ” pour entrer dans
le dossier de photo. Appuyez sur “ ”/“ ” pour sélectionner la photo, puis
appuyez sur “ ” pour la visualiser. Appuyez sur “ ” pour afficher la suivante
; appuyez sur “ ” pour afficher la précédente. Appuyez sur “ ” pour
quitter.
3. Supprimer Photo et Vidéo : En mode liste, appuyez sur “ ”/” ” pour
sélectionner les fichiers. Appuyez sur “ ” pour obtenir le dialogue de
Page 28
AMK4012-D15 manual
suppression. Appuyez sur ” ”/” ” pour sélectionner
“All”/”Current”/“Cancel”. Appuyez sur “ ” pour confirmer.
Réglages des fonctions
Allumez le DVR, le mode marche bascule sur “ ”/“ ”, appuyez sur “ ” pour
accéder au menu de configuration des fonctions et système. Appuyez sur “
”/“ ” pour sélectionner “Function”, puis appuyez sur “ ” pour entrer dans
le menu fonctions.
1. Résolution de l'enregistreur : Appuyez sur “ ”/“ ” pour sélectionner
“Recorder Résolution” et appuyez sur “ ” pour entrer. Appuyez sur “ ”/“
” pour sélectionner “720X576” / “720X480”. Appuyez sur “ ” pour confirmer
et quitter.
2. Frame Rate : Appuyez sur “ ”/“ ” pour sélectionner “Frame Rate” et
appuyez sur “ ” pour entrer. Appuyez sur “ ”/“ ” pour sélectionner “30
FPS”/“25 FPS”et appuyez sur “ ” pour confirmer et quitter.
3. Segment Tailles vidéo :Appuyez sur “ ”/“ ” pour sélectionner “Segment
Tailles vidéo”puis appuyez sur “ ” pour entrer. Appuyez sur “ ”/“ ” pour
sélectionner“10 MIN”/“30MIN”/“60 MIN”.Appuyez Sur “ ” pour confirmer
et quitter.
4. Ecraser :Appuyez sur “ ”/“ ” pour sélectionner “Ecraser” et appuyez sur
“ ” pour entrer. Appuyez sur “ ”/“ ” pour sélectionner
“Arrêt”/“Marche”et appuyez sur “ ” pour confirmer et quitter.Si “Ecraser”
est activé, le DVR bouclera et enregistrera la dernière vidéo.
5. Horodatage :Appuyez sur “ ”/“ ” pour sélectionner “Horodatage” et
appuyez sur “ ” pour entrer. Appuyez sur “ ”/“ ” pour sélectionner
“Arrêt”/“Marche”et appuyez sur “ ” pour confirmer et quitter.S'il est activé,
la vidéo sera enregistrée avec le temps synchrone.
6. Ecran d'information : Appuyez sur “ ”/“ ” pour sélectionner “Ecran
d'information” et appuyez sur “ ” pour entrer. Appuyez sur “ ”/“ ” pour
sélectionner “Arrêt”/“Marche”et appuyez sur “ ” pour confirmer et
quitter.S'il est activé, l'écran affiche les informations de fréquence de
AMK4012-D15 manual
Page 29
fonctionnement, le canal, l'état audio, date et heure, etc. Si vous sélectionnez
"Arrêt", aucune information ne sera affichée.
7. Réglage vidéo :Appuyez sur “ ”/“ ” pour sélectionner “Réglage vidéo”
et appuyez sur “ ” pour entrer.Appuyez sur “ ”/“ ” pour sélectionner
“Brightness” ou “Contrast”; puis appuyez sur “ ” pour entrer ; puis appuyez
sur “ ”/“ ” pour régler la luminosité ou le contraste. Appuyez sur “ ”
pour quitter.
Paramètres système
Allumez le DVR, le mode marche bascule sur “ ”/“ ”, appuyez sur “ ” pour
entrer dans le réglage de la fonction et du système. Appuyez sur “ ”/“ ”
pour sélectionner “System”; puis appuyez sur “ ” pour accéder au menu
système.
1. Date Heure :Appuyez sur “ ”/“ ” pour sélectionner “Date Heure” et
appuyez sur “ ” pour entrer.Appuyez sur “ ” encore une fois pour déplacer
le curseur, puis appuyez sur “ ”/“ ” pour ajuster la date et l’heure.Appuyez
sur “ ” pour quitter.
2. Langue : Appuyez sur “ ”/“ ” pour sélectionner “Langue” et appuyez sur
“ ” pour entrer.Appuyez sur “ ”/“ ” pour choisir votre langue.Appuyez
sur “ ” pour confirmer et quitter.
3. Sortie AV : Appuyez sur “ ”/“ ” pour choisir “Sortie AV” et appuyez sur “
” pour entrer.Appuyez sur “ ”/“ ” pour sélectionner “PAL/NTSC”,
appuyez sur “ ” pour confirmer la vidéo affichée sur l'écran du téléviseur.
Tirez le câble AV, la vidéo s'affichera sur l'écran du DVR.
4. Format :Pour formater la carte SD, appuyez sur “ ”/“ ” pour
sélectionner “Format”, et appuyez sur “ ” pour entrer. Appuyez sur “
pour confirmer et quitter.
”
5. Économie d'énergie : Appuyez sur “ ”/“ ” pour choisir “Économie
d'énergie” et appuyez sur “ ” pour entrer.
a) Auto LCD Arrêt : Appuyez sur “ ”/“ ” pour choisir “Auto LCD Arrêt” et
appuyez sur “ ” pour entrer.Appuyez sur “ ”/“ ” pour sélectionner “1
Page 30
AMK4012-D15 manual
MIN”/“5 MIN”/“Arrêt”et appuyez sur “ ” pour confirmer et quitter.Si “Auto
LCD Arrêt” est activé, l'écran LCD s'éteint automatiquement lorsque l'heure
préréglée est atteinte. Appuyez sur n'importe quelle touche pour récupérer
l’écran.
b) Mise hors tension automatique: Appuyez sur “ ”/“ ” pour choisir “Mise
hors tension automatique” et appuyez sur “ ” pour entrer.Appuyez sur “
”/“ ” pour sélectionner “5 MIN”/“10 MIN”/“Arrêt”et appuyez sur “ ” pour
confirmer et quitter.Si vous activez “Mise hors tension automatique”, le DVR
s'éteint automatiquement lorsque l'heure préréglée est atteinte.
6. Mise à jour du micrologiciel :Appuyez sur “ ”/“ ” pour choisir “Mise à
jour du Firmware” et appuyez sur “ ” pour entrer.Appuyez sur “ ”/“ ”
pour sélectionner “Oui”, et appuyez sur “ ” pour démarrer la mise à jour.
Veuillez ne pas oublier de sauvegarder le fichier update "zburnT_C11.run.elf"
dans le répertoire racine de la carte SD.
7. Par défaut :Appuyez sur “ ”/“ ” pour choisir “Par défaut” et appuyez sur
“ ” pour entrer.Appuyez sur “ ”/“ ” pour sélectionner “Oui”, et appuyez
sur “ ” pour confirmer.Appuyez sur “ ” pour quitter.
8. Info mémoire : Appuyez sur “ ”/“ ” pour sélectionner “Info mémoire”,
et appuyez sur “ ” pour voir la capacité de la carte SD. Appuyez sur “ ”
pour quitter.
9. Version : Appuyez sur “ ”/“ ” pour sélectionner “Version” et appuyez
sur “ ” pour afficher les informations de version. Appuyez sur “ ” pour
quitter.
10.Mode d'affichage : Appuyez sur “ ”/“ ” pour choisir "Mode
d'affichage ”. Appuyez sur “ ”/“ ” pour choisir "16:9/4:3”. Puis appuyez sur
“ ” pour confirmer. Appuyez sur “ ” pour quitter.
AMK4012-D15 manual
Page 31
Dépannage
1. L'enregistreur ne s'allume pas : peut-être que la batterie est vide,
essayez de la recharger.
2. Le Dino-Lite est connecté mais il n'y a pas d'image : Vérifiez si la prise
est dans le port d’entrée AV et correctement insérée. Si cela ne
fonctionne pas, essayez de modifier les paramètres ou revenir à la
configuration par défaut.
3. Le système s'est arrêté : Appuyez sur la touche RESET pour activer le
lecteur à nouveau.
4. Le fichier ne peut pas fonctionner : Peut-être que le format du fichier
vidéo n'est pas supporté par ce DVR, veuillez convertir au format pris
en charge.
5. Le texte est dans un code illisible : assurez-vous que la langue
correcte est sélectionnée.
6. Il ne peut pas transférer / télécharger des fichiers ou ne peut pas
trouver le disque sur PC : Remplacer le câble USB / port USB.
7. Il ne peut pas enregistrer un fichier : il n'y a pas de carte SD dans le
DVR, veuillez insérer la carte SD, ou la carte mémoire SD est pleine,
veuillez supprimer certains fichiers pour libérer de la mémoire, ou il y
a une zone endommagée dans la mémoire, veuillez formater.
Contenu de l'emballage
Les éléments suivants sont dans le lot.
Le microscope numérique Dino-Lite
AMK
L’enregistreur MSD15
Attache
Mode d'emploi
Câble USB
Câble AV
Adaptateur AC (avec prise EU/UK/US)
Carte Micro SD 4GB
Page 32
1x
1x
1x
1x
1x
1x
1x
1x
AMK4012-D15 manual
Spécifications
ENTREE AV
SORTIE AV
Ecran LCD HD 5pouces
Vidéo
Système TV
Tension de sortie
Système TV
Zone active
Résolution
Brillance pour LCM
Résolution
Compression Vidéo
Format de lecture
Fréquence
Audio
Sortie écouteur
Photo
Ecouteur
Format
Carte Micro SD
Stockage
Système
d'exploitation
Alimentation
Temps
d'enregistrement 4GB
2GB photos
PC
Port
Langue
Tension
Courant (mode
d'enregistrement)
Courant (enregistrer
avec le mode écran
éteint)
Adaptateur AC
Batterie intégrée
Enregistrement filaire
Taille (L x l x H)
Poids (g)
AMK4012-D15 manual
NTSC / PAL
3.6-4.2 V
NTSC / PAL
108mm(L) X 64.8mm(H)
800 x 480 Pixel
200 cd/㎡
720*576 / 720*480
MPEG-AVI 30fps
MPEG-AVI
20 Hzz-20 KHz stéréo
Gauche 20 mW + droite 20mW
[16O] (convient pour un
volume plus grand)
1W
JPG/JPEG, 720*576
Carte Micro SD 4GB (capacité
jusqu'à 32 Go)
2-4 heures
30.000 pcs
Windows & Mac OS
USB 2.0
Anglais / Français / Allemand /
Espagnol / Néerlandais
5V DC
450 mA
230 mA
5V DC 2A
Batterie Li 3200Mah
≥14 heures (écran allumé) ;
≥7 heures(écran éteint)
131mm x 86mm x 18mm
200g
Page 33
AMK4012T/ZT/TL-D15
MANUAL DE FUNCIONAMIENTO
Grabadora de vídeo digital con microscopio digital Dino-Lite
Instrucciones de uso
Antes de utilizar la unidad, lea este manual íntegramente y
consérvelo para consultarlo en el futuro.
Gracias por comprar un Dino-Lite con grabadora móvil.
Información importante sobre seguridad
•
•
•
•
•
Evitar tocar el objetivo con los dedos para proteger el producto de
daños electrostáticos.
No dejar caer
Manténgase seca
No usar en ambientes con temperatura y humedad excesivas; 0~40℃
es la mejor temperatura de funcionamiento para este producto
Introducir o extraer la tarjeta SD o el Dino-Lite cuando esté apagado.
El producto o la tarjeta SD podría dañarse.
Visite www.dino-lite.eu para obtener información actualizada o si
tiene alguna duda.
Page 34
AMK4012-D15 manual
Información básica
•
•
•
•
•
•
•
•
•
•
•
•
Visor: pantalla de HD de 5” (800 X 480 píx.).
Cambio de canal: permite el cambio manual y automático entre 8
canales.
Grabación: admite ciclos sin interrupciones y vídeos continuos desde
el microscopio digital Dino-Lite
Fotos: permite la función de tomar fotografías con el microscopio
digital Dino-Lite
ENTRADA AV: TV-IN [NTSC/PAL].
SALIDA AV: NTSC/PAL].
Batería:batería de litio 3200 mAh de alta capacidad integrada,
grabación continua de más de 10 horas.
Altavoz: altavoz integrado de 1 W.
Almacenamiento: admite tarjeta TF de hasta 32 GB; se suministra con
tarjeta SD de 4 GB.
Idioma: admite los idiomas inglés/francés/alemán/español/holandés.
Modo ahorro de energía:apagado automático, apagado de pantalla
automático.
Actualización del firmware: permite la actualización del firmware
desde la tarjeta SD.
•
•
AMK4012-D15 manual
Page 35
Conexión del microscopio digital Dino-Lite
Con el botón de encendido de la grabadora en posición de apagado (“off”),
conecte la toma del Dino-Lite al conector de la entrada AV en la grabadora.
Nota: El AMK4012 de Dino-Lite no es compatible para usar con otros
dispositivos con un conector AV de 2,5 mm.
Cómo cargar
Asegúrese de cargar la batería completamente antes del primer uso. Utilice
únicamente el cargador suministrado con el producto o cárguela usando un
puerto USB de un ordenador.
Cargar entre 4 y 6 horas para una carga completa. No desenchufe el cargador
hasta que el estado de la batería aparezca como completo. Para la primera
carga, cargue la batería durante más de 6 horas, pero menos de 10 horas.
Una batería nueva alcanzará el mejor rendimiento tras varias cargas y
descargas completas. Si no va a usar la grabadora durante un período de
tiempo largo, recárguela cada 2 ó 3 meses.
Símbolos de capacidad de la batería:
Funcionamiento básico
1. Encendido/Apagado: pulse “ ” para el encendido, el DVR está en estado
operativo; pulse “ ” durante varios segundos para apagarlo.
2. Interruptor de modo de funcionamiento (interruptor situado en la esquina
izquierda):
Cuando el interruptor esté en “ ”, el DVR está en estado de
recepción/grabación/fotos;
Cuando el interruptor esté en “ ”, el DVR está en reproducción;
Cuando el interruptor esté en “ ”, el DVR está en estado de detección de
movimiento.
3. Tarjeta de almacenamiento externo
Este DVR solo puede grabar vídeos o tomar fotos cuando se haya introducido
Page 36
AMK4012-D15 manual
una tarjeta de almacenamiento. La pantalla mostrará el símbolo de la tarjeta
SD y su capacidad disponible.
4. Funcionamiento como disco
Conecte el DVR a un ordenador y enciéndalo; funcionará como un disco. Abra
el disco extraíble en el ordenador; encontrará los vídeos y las fotos en los
archivos “GRABACIONES” y “ FOTOS” en el directorio “DICM”.
Grabaciones y fotos
Encienda el DVR y seleccione el modo de funcionamiento “ ” para pasar al
modo de grabaciones/fotos.
1. Fotos: en el modo “ ”, pulse “
vez y tomará una fotografía.
” una vez; el símbolo “ ” parpadeará una
2. Grabaciones: en el modo “ ”, pulse “ ” durante 3 segundos; el DVR
empezará a grabar y “REC” aparecerá en la pantalla. Pulse “ ” otra vez para
pausarlo; en la pantalla aparecerá “ ”; pulse “ ” una vez más, para
reanudar la grabación. Pulse “ ” para terminar y la grabación se guardará
automáticamente y salir. Si no pulsa “ ”, el sistema guardará
automáticamente el vídeo en segmentos, hasta que la tarjeta de
almacenamiento esté llena.
Si la función “Sobrescribir” está activada y no pulsa “ ” para terminar la
grabación, el sistema guardará el vídeo automáticamente en segmentos.
AMK4012-D15 manual
Page 37
Cuando la tarjeta esté llena, sobrescribirá la grabación más antigua y
guardará la más reciente.
3. Silenciar: en el modo “ ”, pulse “ ” para pasar al estado de
silenciamiento. En la pantalla aparecerá “SILENCIAR”. El altavoz no emitirá
ningún sonido; pulse “ ” de nuevo para recuperar el sonido.
Nota: El ajuste de silenciar no afectará al volumen de los auriculares.
Detección de movimiento
1. Encienda el DVR y seleccione el modo de funcionamiento “ , para el modo
de detección de movimiento. Pulse “ ” para salir y volver al menú del
sistema/de funciones.
2.En el modo“ ”, pulse “ ” durante 3 segundos para pasar a la grabación
de detección de movimiento. Cuando aparezcan objetos en movimiento, el
sistema empezará a grabar automáticamente y en la pantalla aparecerá
“REC”. Después de 10 segundos sin que haya objetos en movimiento, el
sistema dejará de grabar automáticamente, guardará la grabación y saldrá,
esperando el siguiente movimiento. Para terminar la grabación de detección
de movimiento, pulse “ ”. La guardará automáticamente y saldrá.
3. Si no pulsa “ ” para terminar de grabar, el sistema guardará la grabación
automáticamente en segmentos, hasta que la tarjeta de almacenamiento
esté llena. Si la función “Sobrescribir” está activada y no pulsa “ ” para
terminar de grabar, el sistema guardará la grabación automáticamente en
segmentos. Y cuando la tarjeta esté llena, sobrescribirá la grabación más
antigua y guardará la más reciente.
Page 38
AMK4012-D15 manual
Reproducir vídeos/ver fotos
Cuando el modo de funcionamiento esté ajustado en “ ”, usted podrá
reproducir vídeos y ver fotos. Pulse “ ”/“ ” para seleccionar “Fotos” o
“Vídeos”. Pulse “ ” para salir y volver al menú principal.
1. Reproducir vídeos: cuando seleccione “Vídeos”, pulse “ ” para entrar en
la carpeta de la fecha. Pulse “ ”/“ ” para seleccionar la fecha y pulse “ ”
para entrar en la lista de archivos de vídeo. Pulse “ ”/“ ” para seleccionar
y “ ” para reproducir el vídeo. Pulse“ ”/“ ” para ajustar el volumen.
Pulse “ ” durante más tiempo para el avance rápido; pulse “ ” durante
más tiempo para rebobinar hacia atrás; pulse“ ” para hacer pausa; pulse“
” de nuevo para abandonar la pausa; pulse “ ” para salir.
2. Ver fotos: seleccione “Fotos” y pulse“ ” para entrar en la carpeta de
fotos. Pulse “ ”/“ ” para seleccionar las fotos y luego “ ” para verlas.
Pulse “ ” para ver la siguiente y “ ” para ver la anterior. Pulse “ ” para
salir.
3. Borrar fotos y vídeos: en el modo lista, pulse “ ”/” ” para seleccionar
los archivos. Pulse “ ”para ver el cuadro de diálogo de borrado. Pulse ”
”/” ” para seleccionar “Todos”/”Actual”/“Cancelar”. Pulse “ ” para
confirmar.
AMK4012-D15 manual
Page 39
Ajustes de funciones
Encienda el DVR, cambie el modo de funcionamiento a “ ”/“ ”, pulse “ ”
para entrar en el menú de ajustes de funciones y del sistema. Pulse “ ”/“ ”
para seleccionar “Función” y luego “ ” para entrar en el menú de funciones.
1. Resolución de la grabadora: pulse“ ”/“ ” para seleccionar “Resolución
de la grabadora” y pulse “ ” para entrar. Pulse “ ”/“ ” para seleccionar
“30 FPS”/“25 FPS”. Pulse “ ” para confirmar y salir.
2. Frecuencia de imagen: pulse“ ”/“ ” para seleccionar “Frecuencia de
imagen” y pulse “ ” para entrar. Pulse “ ”/“ ” para seleccionar “30
FPS”/“25 FPS”. Pulse “ ” para confirmar y salir.
3. Vídeo Tamaño de Segmento:Pulse “ ”/“ ” para seleccionar “Vídeo
Tamaño de Segmento” y luego “ ” para entrar. Pulse “ ”/“ ” para
seleccionar “10 MIN”/“30MIN”/“60 MIN”. Pulse “ ” para confirmar y salir.
4. Sobrescribir: pulse“ ”/“ ” para seleccionar “Sobrescribir” y pulse “ ”
para entrar. Pulse “ ”/“ ” para seleccionar “Apagado” / “Conectar”. Pulse “
” para confirmar y salir.Si la función “Sobrescribir” está activada, el DVR
grabará en ciclos y guardará el último vídeo.
5. Sello de tiempo:pulse“ ”/“ ” para seleccionar “Sello de tiempo” y pulse
“ ” para entrar. Pulse “ ”/“ ” para seleccionar “Apagado” / “Conectar”.
Pulse “ ” para confirmar y salir.Si está activado, el vídeo se guardará en
tiempo sincrónico.
6. Pantalla de información:pulse“ ”/“ ” para seleccionar “Pantalla de
información” y pulse “ ” para entrar. Pulse “ ”/“ ” para seleccionar
“Dejar” / “Conectar”. Pulse “ ” para confirmar y salir.Si está activada, la
pantalla mostrará información de la frecuencia de funcionamiento, canal,
estado audio, fecha y hora, etc. Si selecciona “Dejar”, no aparecerá
información alguna.
7. Configuración de vídeo:pulse“ ”/“ ” para seleccionar “Configuración de
vídeo” y pulse “ ” para entrar.Pulse “ ”/“ ” para seleccionar
Page 40
AMK4012-D15 manual
“Luminosidad” o “Contraste”; luego pulse “ ” para entrar y después “
” para ajustar la luminosidad o el contraste. Pulse “ ” para salir.
”/“
Ajustes del sistema
Encienda el DVR, cambie el modo de funcionamiento a “ ”/“ ”, pulse “ ”
para entrar en los ajustes de funciones y del sistema. Pulse “ ”/“ ” para
seleccionar “Sistema”; luego pulse “ ” para entrar en el menú del sistema.
1. Fecha Hora:pulse“ ”/“ ” para seleccionar “Fecha Hora” y pulse “ ”
para entrar.Pulse “ ” de nuevo para mover el cursor y “ ”/“ ” para
ajustar la fecha y la hora.Pulse “ ” para salir.
2. Idioma: pulse“ ”/“ ” para seleccionar “Idioma” y pulse “ ” para
entrar.Pulse “ ”/“ ” para elegir el idioma.Pulse “ ” para confirmar y salir.
3. Salida de AV: pulse“ ”/“ ” para seleccionar “Salida AV” y pulse “ ”
para entrar.Pulse“ ”/“ ” para seleccionar “PAL/NTSC” y“ ” para
confirmar que se muestre el vídeo en la pantalla de la televisión. Retire el
cable AV; el vídeo aparecerá en la pantalla del DVR.
4. Formato: para formatear la tarjeta SD, pulse “ ”/“ ” para seleccionar
“Formato” y “ ” para entrar. Pulse “ ” para confirmar y salir.
5. De ahorro de energía: pulse“ ”/“ ” para seleccionar “De ahorro de
energía” y pulse “ ” para entrar:
a) Auto LCD Dejar: pulse“ ”/“ ” para seleccionar “Auto LCD Dejar” y pulse
“ ” para entrar. Pulse“ ”/“ ” para seleccionar “1 MIN”/“5 MIN”/“Dejar” y
pulse “ ” para confirmar y salir. Si el “Auto LCD Dejar” está activado, la
pantalla LCD se apagará automáticamente al llegar a la hora fijada. Pulse
cualquier tecla para recuperar la visualización en pantalla.
b) Apagado automático: pulse“ ”/“ ” para seleccionar “Apagado
automático” y pulse “ ” para entrar. Pulse“ ”/“ ” para seleccionar “5
MIN”/“10 MIN”/“Dejar” y pulse “ ” para confirmar y salir. Si activa el
“Apagado automático”, el DVR se apagará automáticamente al llegar a la hora
fijada.
AMK4012-D15 manual
Page 41
6. Actualización del firmware:pulse“ ”/“ ” para seleccionar “Actualización
del firmware” y pulse “ ” para entrar. Pulse “ ”/“ ” para seleccionar “Sí”
y “ ” para empezar la actualización. Recuerde guardar el archivo de
actualización “zburnT_C11.run.elf” en el directorio raíz de la tarjeta SD.
7. Configuración predeterminada: pulse“ ”/“ ” para seleccionar
“Configuración predeterminada” y pulse “ ” para entrar. Pulse “ ”/“
para seleccionar “Si” y “ ” para confirmar.Pulse “ ” para salir.
”
8. Información de memoria: pulse“ ”/“ ” para seleccionar “Información
de memoria” y “ ” para ver la capacidad de la tarjeta SD. Pulse “ ” para
salir.
9. Versión: pulse“ ”/“ ” para seleccionar “Versión” y “
información sobre la versión. Pulse “ ” para salir.
” para ver
10.Modo de visualización: pulse“ ”/“ ” para seleccionar “Modo de
visualización”. Pulse“ ”/“ ” para seleccionar “16:9/4:3”. Luego pulse “
para confirmar. Pulse “ ” para salir.
”
Localización y resolución de problemas
1. La grabadora no se enciende: quizás la batería no está cargada;
intente recargarla.
2. El Dino-Lite está conectado pero no hay imagen: compruebe si la
toma está en el puerto de entrada AV y si está introducida
correctamente. Si esto no funcionase, intente cambiar los ajustes o
vuelva a la Configuración predeterminada.
3. Sistema parado: pulse la tecla RESET (reseteo) para volver a encender
el reproductor.
4. El archivo no se puede reproducir: quizás el formato del archivo de
vídeo no es compatible con este DVR; por favor, conviértalo al
formato permitido.
5. El texto aparece como un código confuso: asegúrese de que haya
seleccionado el idioma correcto.
6. No se pueden cargar / descargar archivos o no puede encontrar el
disco en el ordenador: sustituya el cable USB / puerto USB.
Page 42
AMK4012-D15 manual
7. No se puede guardar un archivo: no hay una tarjeta SD en el DVR;
introduzca una tarjeta SD; o la memoria de la tarjeta SD está llena;
borre algunos archivos para liberar memoria; o puede que haya una
parte dañada en la memoria; por favor, formatéela.
Contenido del paquete
Los siguientes artículos están incluidos en el paquete:
Microscopio digital AMK de Dino-Lite
Grabadora MSD15
Clip
Manual de usuario
Cable USB
Cable AV
Adaptador de CA (con enchufe para
UE/Reino Unido/EE. UU.)
Tarjeta Micro SD de 4 GB
AMK4012-D15 manual
1x
1x
1x
1x
1x
1x
1x
1x
Page 43
Especificaciones
ENTRADA AV
SALIDA AV
Pantalla LCD HD
de 5”
Vídeo
Sistema TV
Voltaje de salida
Sistema TV
Área activa
Resolución
Luminancia para LCM
Resolución
Compresión de vídeo
Formato de
reproducción
Frecuencia
Audio
Salida de auriculares
Fotos
Altavoz
Formato
Tarjeta Micro SD
Almacenamiento
Sistema
operativo
Potencia
4 GB de tiempo de
grabación
2 GB de fotos
Ordenador
Puerto
Idioma
Voltaje
Corriente (modo
grabación)
Corriente(grabación
con el modo de
pantalla apagada)
Adaptador CA
Batería integrada
Grabación con cable
Tamaño (largo x ancho x alto)
Peso (g)
Page 44
NTSC / PAL
3,6-4,2 V
NTSC / PAL
108 mm(ancho) X 64,8 mm(alto)
800 x 480 Píxeles
200 cd/㎡
720*576 / 720*480
MPEG-AVI 30fps
MPEG-AVI
20 Hzz-20 KHz estéreo
Izquierdo 20 mW + derecho 20 mW
[16O](se adapta al mayor volumen)
1W
JPG/JPEG, 720*576
Tarjeta Micro SD de 4 GB
(compatible hasta 32 GB)
2-4 horas
30.000 fotos
Windows & Mac OS
USB 2.0
Inglés/francés/alemán/
español/holandés
5 V CC
450 mA
230 mA
5V CC 2A
Batería de litio 3200Mah
≥14horas (sin pantalla);
≥7horas(con pantalla)
131 mm x 86 mm x 18 mm
200 g
AMK4012-D15 manual
AMK4012T/ZT/TL-D15
GEBRUIKSAANWIJZING
Digitale videorecorder met Dino-Lite digitale microscoop
Gebruiksinstructies
Lees voor gebruik van het apparaat eerst zorgvuldig deze handleiding
door en bewaar deze voor toekomstige naslag.
Bedankt voor het aanschaffen van een Dino-Lite met mobiele recorder.
Belangrijke veiligheidsinformatie
•
•
•
•
•
Voorkom aanraking van de lens met uw vinger om het product te
beschermen tegen elektrostatische schade.
Niet laten vallen
Droog houden
Niet gebruiken bij hoge temperatuur of in een zeer vochtige
omgeving, 0~40℃ is de beste gebruikstemperatuur voor dit product
Plaats of neem de SD-kaart uit de Dino-Lite wanneer de stroom is
uitgeschakeld. Het product of de SD-kaart kunnen beschadigd raken.
Zie www.dino-lite.eu voor nieuwe informatie of indien u vragen
heeft.
AMK4012-D15 manual
Page 45
Basisinformatie
•
•
•
•
•
•
•
•
•
•
•
•
Page 46
Display: 5 inch HD-scherm (800X480pix).
Kanaalschakelaar: Ondersteunt handmatig en automatisch schakelen
tussen 8 kanalen.
Opnemen: Ondersteunt naadloze cyclus en continue video van de
Dino-Lite digitale microscoop
Foto: Ondersteunt het nemen van foto's van de Dino-Lite digitale
microscoop
AV IN: TV-IN [NTSC/PAL].
AV UIT: NTSC/PAL].
Batterij: Ingebouwde 3200 mAh Li-batterij met hoge capaciteit,
meer dan 10 uur continue opnemen.
Luidspreker: Ingebouwde 1W luidspreker.
Opslag: Tot 32GB TF-kaart ondersteund, 4GB SD-kaart meegeleverd.
Taal: Engels/Frans/Duits/Spaans/Nederlands ondersteund.
Energiezuinige stand:Automatisch uitschakelen, scherm automatisch
uit.
Firmware-update: Ondersteuntfirmware-update vanaf SD-kaart.
AMK4012-D15 manual
Aansluiten van de Dino-Lite digitale microscoop
Met de stroom van de recorder uitgeschakeld, sluit de stekker van de DinoLite aan op de AV-IN-aansluiting op de recorder.
Opmerking: De AMK4012 Dino-Lite is niet bedoeld voor gebruik met andere
apparaten met een 2,5 mm AV-aansluiting.
Opladen
Zorg dat de batterij volledig is opgeladen voor het eerste gebruik. Gebruik
alleen de met het product meegeleverde oplader, of laad op via een USBpoort van een pc.
Laad 4~6 uur voor een volle lading. Ontkoppel de oplader niet tot de
batterijstatus vol is. Laad de eerste keer a.u.b. meer dan 6 uur op, maar
minder dan 10. Een nieuwe batterij behaalt zijn beste prestaties na enkele
keren volledig op- en ontladen te zijn. Als de recorder langere tijd niet wordt
gebruikt, laad dan elke 2-3 maanden opnieuw op.
Batterijcapaciteitssymbolen:
Basisbediening
1. Power On/Off: “ ” indrukken om in te schakelen, DVR is klaar voor
gebruik; “ ” enkele seconden indrukken om uit te schakelen.
2. Werkmodusschakelaar (schakelaar bevindt zich in de linker hoek):
Wanneerde schakelaar op “ ” staat, kan de DVR
ontvangen/opnemen/fotograferen;
Wanneer de schakelaar op “ ” staat, kan de DVR afspelen;
Wanneer de schakelaar op “ ”, kan de DVR beweging detecteren.
3. Externe opslagkaart
Deze DVR kan alleen foto's en video's opnemen wanneer een opslagkaart is
geplaatst. Het scherm geeft het symbool van een SD-kaart en de vrije ruimte
aan.
AMK4012-D15 manual
Page 47
4. Gebruik als schijf
Sluit de DVR aan op een computer, schakel deze in en de DVR werkt als schijf.
Open de verwisselbare schijf op de computer en u zult de video's en foto's
vinden in de mappen “RECORD” en “ PHOTO” in de map “DICM”.
Opname en foto
Schakel de DVR in en selecteer de gebruiksmodus “ ” voor opname/fotomodus.
1. Foto: Druk in de modus “ ” eenmaal op “
eenmaal en er wordt één foto genomen.
”, het symbool “ ” knippert
2. Opnemen: Druk in de modus “ ” 3 seconden op “ ”, de DVR begint met
opnemen en het “REC”wordt weergegeven op het scherm. Druk nogmaals op
“ ”om te pauzeren; het scherm geeft “ ” aan; druk nogmaals op “ ” om
het opnemen te hervatten. Druk op “ ” om te stoppen, er wordt
automatisch opgeslagen en afgesloten. Wanneer u niet op “ ”drukt, slaat
het systeem de video automatisch op in segmenten tot de opslagkaart vol is.
Indien “Overwrite” (Overschrijven) is ingeschakeld en u niet op “ ” drukt om
het opnemen te stoppen, zal het systeemde video automatisch in segmenten
opslaan. Wanneer de kaart vol is, wordt de eerste opname overschreven door
de laatste.
Page 48
AMK4012-D15 manual
3. Dempen: Druk in de modus “ ” op “ ” om te dempen. Het scherm geeft
“MUTE” (Gedempt) aan. De luidspreker produceert geen geluid; druk
nogmaals op “ ” om het geluid weer in te schakelen.
Opmerking: Dempen heeft geen invloed op het volume van eenkoptelefoon.
Bewegingsdetectie
1. Schakel de DVR in en selecteer de gebruiksmodus “ voor
bewegingsdetectiemodus. Druk op “ ” om af te sluiten en terug te gaan
naar het systeem-/functiemenu.
2.Druk in de modus“ ” 3 seconden op “ ” om naar
bewegingsdetectieopname te gaan. Wanneer bewegende voorwerpen
verschijnen, begint het systeem automatisch met opnemen en geeft het
scherm “REC” aan. Na 10 seconden zonder bewegende voorwerpen stopt en
slaat het systeem de opname automatisch op en sluit af, in afwachting van de
volgende beweging. Druk op “ ” om de bewegingsdetectieopname te
stoppen; er wordt automatisch opgeslagen en afgesloten.
3. Indien u niet op “ ” drukt om de opname te stoppen, slaat het systeem
de video automatisch op in segmenten tot de opslagkaart vol is. Indien
“Overwrite” (Overschrijven) is ingeschakeld en u niet op “ ” drukt om de
opname te stoppen, slaat het systeem de video automatisch in segmenten
op. Wanneer de kaart vol is, wordt de eerste video door de laatste
overschreven.
AMK4012-D15 manual
Page 49
Video/foto weergeven
Wanneer de gebruiksmodus is ingesteld op “ ”, kunt u video's en foto's
afspelen. Druk op “ ”/“ ” om “Photo” (Foto) of “Video” te selecteren. Druk
op “ ” om af te sluiten en terug naar het hoofdmenu te gaan.
1. Video afspelen: Wanneer u “Video” selecteert, druk op “ ” om de
datummap te openen. Druk op “ ”/“ ” om de datum te selecteren en druk
op “ ” om de lijst van videobestanden te openen. Druk op “ ”/“ ” om te
selecteren en druk op “ ” om de video af te spelen. Druk op “ ”/“ ” om
het volume aan te passen. Hou “ ” langere tijd ingedrukt om vooruit te
spoelen en “ ” om terug te spoelen; druk op “ ” om te pauzeren; druk
nogmaals op “ ” om het afspelen te hervatten; druk op “ ” om af te
sluiten.
2. Foto's afspelen: Selecteer “Photo” (Foto) en druk op “ ” om de fotomap
te openen. Druk op “ ”/“ ” om foto's te selecteren, druk vervolgens op “
” om weer te geven. Druk op “ ” om de volgende weer te geven; druk op “
” om de vorige weer te geven. Druk op “ ” om af te sluiten.
3. Foto's en video's verwijderen: Druk in de lijstmodus op “ ”/” ” om
bestanden te selecteren. Druk op “ ”voor de verwijderingsdialoog. Druk op
” ”/” ” om “All”/”Current”/“Cancel” (Alles/Huidige/Annuleren) te
selecteren. Druk op “ ” om te bevestigen.
Page 50
AMK4012-D15 manual
Functie-instellingen
Schakel de DVR in, zet de gebruiksmodus op “ ”/“ ”, druk op “ ” om naar
het functie- en systeeminstellingenmenu te gaan. Druk op “ ”/“ ” om
“Function” (Functie) te selecteren, druk vervolgens op “ ” om naar het
functiemenu te gaan.
1. Recorder resolutie: Druk op “ ”/“ ” om “Recorder resolutie” te
selecteren en druk op “ ” om het menu te openen. Druk op “ ”/“ ” om
“720X576” / “720X480”te selecteren. Druk op “ ” om te bevestigen en af te
sluiten.
2. Frame Rate: Druk op “ ”/“ ” om “Frame Rate” te selecteren en druk op
“ ” om het menu te openen. Druk op “ ”/“ ” om “30 FPS”/“25 FPS”te
selecteren, en druk op “ ” om te bevestigen en af te sluiten.
3. Video Segment Afmeting:Druk op “ ”/“ ” om “Video Segment
Afmeting” te selecteren en druk op “ ” om het menu te openen. Druk op “
”/“ ” om “10 MIN”/“30MIN”/“60 MIN”te selecteren. Druk op “ ” om te
bevestigen en af te sluiten.
4. Overschrijven: Druk op “ ”/“ ” om “Overschrijven” te selecteren en
druk op “ ” om het menu te openen. Druk op “ ”/“ ” om “Uit”/“Aan”te
selecteren, en druk op “ ” om te bevestigen en af te sluiten. Indien
“Overschrijven” is ingeschakeld, zal de DVR ruimte hergebruiken en de
nieuwste video opslaan.
5. Tijdstempel:Druk op “ ”/“ ” om “Tijdsstempel” te selecteren en druk op
“ ” om het menu te openen. Druk op “ ”/“ ” om “Uit”/“Aan”te
selecteren, en druk op “ ” om te bevestigen en af te sluiten. Wanneer dit is
ingeschakeld, wordt de video opgeslagen met de tijd.
6. Informatie scherm: Druk op “ ”/“ ” om “Informatie scherm” te
selecteren en druk op “ ” om het menu te openen. Druk op “ ”/“ ” om
“Uit”/“Aan”te selecteren, en druk op “ ” om te bevestigen en af te sluiten.
Wanneer dit is ingeschakeld, wordt op het scherm informatie weergegeven
betreffende frequentie, kanaal, audiostatus, datum en tijd, etc. Indien u “Off”
(Uit) selecteert, wordt geen informatie weergegeven.
AMK4012-D15 manual
Page 51
7. Video Setting:Druk op “ ”/“ ” om “Video Setting” te selecteren en druk
op “ ” om het menu te openen. Druk op “ ”/“ ” om “Helderheid” of
“Contrast” te selecteren en druk op “ ” om het menu te openen; druk
vervolgens op “ ”/“ ” om de helderheid of het contrast aan te passen.
Druk op “ ” om af te sluiten.
Systeeminstellingen
Schakel de DVR in, zet de gebruiksmodus op “ ”/“ ”, druk op “ ” om naar
het systeem- en systeeminstellingenmenu te gaan. Druk op “ ”/“ ” om
“System” (Systeem) te selecteren en druk op “ ” om het systeemmenu te
openen.
1. Datum Tijd:Druk op “ ”/“ ” om “Datum Tijd” te selecteren en druk op “
” om het menu te openen. Druk nogmaals op “ ” om de cursor te
verplaatsen en druk op “ ”/“ ” om de datum en tijd aan te passen.Druk op
“ ” om af te sluiten.
2. Taal: Druk op “ ”/“ ” om “Taal” te selecteren en druk op “ ” om het
menu te openen.Druk op “ ”/“ ” om uw taal te selecteren.En druk op “ ”
om te bevestigen en af te sluiten.
3. AV Out: Druk op “ ”/“ ” om “AV Out” te selecteren en druk op “ ” om
het menu te openen.Druk op “ ”/“ ” om “PAL/NTSC” te kiezen, druk op “
” om het op het televisiescherm weergegeven beeld te bevestigen.
Wanneer de AV-kabel wordt ontkoppeld, wordt de videoweergegeven op het
DVR-scherm.
4. Formatteren: Om de SD-kaart te formatteren drukt u op “ ”/“ ” om
“Formatteren” te selecteren, druk vervolgens op “ ” om het menu te
openen.Druk op “ ”/“ ” om “Ja” te kiezen.Druk op “ ” om te bevestigen
en af te sluiten.
5. Stroombesparing: Druk op “ ”/“ ” om “Stroombesparing” te selecteren
en druk op “ ” om het menu te openen.
a) Auto LCD uit: Druk op “ ”/“ ” om “Auto LCD uit” te selecteren en druk
op “ ” om het menu te openen.Druk op “ ”/“ ” om “1 MIN”/“5
MIN”/“Uit” te selecteren en druk op “ ” om te bevestigen en af te
Page 52
AMK4012-D15 manual
sluiten.Indien “Auto LCD uit” is ingeschakeld, wordt het LCD-scherm
automatisch uitgeschakeld wanneer de ingestelde tijd is verlopen. Druk op
een willekeurige toets om het scherm weer in te schakelen.
b) Automatische uitschakeling: Druk op “ ”/“ ” om “Automatische
uitschakeling” te selecteren en druk op “ ” om het menu te openen.Druk op
“ ”/“ ” om “5 MIN”/“10 MIN”/“Uit” te selecteren en druk op “ ” om te
bevestigen en af te sluiten.Indien u “Automatische uitschakeling” inschakelt,
wordt de DVR automatisch uitgeschakeld na de ingestelde tijd.
6. Firmware-update:Druk op “ ”/“ ” om “Firmware-update” te selecteren
en druk op “ ” om het menu te openen.Druk op “ ”/“ ” om “Ja” te
selecteren en druk op“ ” om het updaten te starten. Denk eraan het
updatebestand “zburnT_C11.run.elf” in de hoofdmap van de SD-kaart op te
slaan.
7.Defaults:Druk op “ ”/“ ” om “Defaults” te selecteren en druk op “ ”
om het menu te openen. Druk op “ ”/“ ” om “Ja” te selecteren en druk
op“ ” om te bevestigen.Druk op “ ” om af te sluiten.
8.Geheugen Info: Druk op “ ”/“ ” om “Geheugen Info” te selecteren en
druk op “ ” om de capaciteit van de SD-kaart te bekijken. Druk op “ ” om
af te sluiten.
9. Versie: Druk op“ ”/“ ” om “Versie” te selecteren en druk op “
versie-informatie weer te geven. Druk op “ ” om af te sluiten.
” om de
10. Weergavemodus: Druk op“ ”/“ ” om “Weergavemodus” te
selecteren. Druk op“ ”/“ ” om “16:9/4:3” te selecteren. En druk op“ ”
om te bevestigen.Druk op “ ” om af te sluiten.
AMK4012-D15 manual
Page 53
Problemen oplossen
1. De recorder kan niet worden ingeschakeld: misschien is de batterij
leeg, probeer opteladen.
2. De Dino-Lite is aangesloten maar er is geen beeld: controleer of de
stekker in de AV IN-aansluiting zit en goed is aangesloten. Probeer,
indien dit niet werkt, de instellingen aan te passen of de
standaardconfiguratie te herstellen.
3. Systeem gestopt: druk op de RESET-toets om de speler weer in te
schakelen.
4. Bestand kan niet wordenafgespeeld: Misschien wordt de indeling van
het videobestand niet ondersteund door deze DRV, converteer naar
een ondersteunde indeling.
5. De tekst is onleesbaar: zorg dat de juiste taal is ingesteld.
6. Bestanden kunnen niet worden geüpload of gedownload, of kan de
schijf niet vinden op de pc: probeer een andere USB-kabel/USB-poort.
7. Een bestand kan niet worden opgeslagen: er zit geen SD-kaart in
deDVR, plaats een SD-kaart; of SD-kaartgeheugen is vol, verwijder
enkele bestanden om ruimte vrij te maken; of het bevat beschadigde
delen, opnieuw formatteren.
Verpakkingsinhoud
De verpakking bevat de volgende onderdelen.
Dino-Lite AMK digitale microscoop
MSD15 recorder
Clip
Gebruiksaanwijzing
USB-kabel
AV-kabel
Wisselstroomadapter (met
EU/UK/US-stekker)
4GB Micro SD-kaart
Page 54
1x
1x
1x
1x
1x
1x
1x
1x
AMK4012-D15 manual
Specificaties
AV IN
AV UIT
HD 5 inch
LCDscherm
Video
TV-systeem
Uitgangsspanning
TV-systeem
Actief gebied
Resolutie
Helderheid LCM
Resolutie
Videocompressie
Afspeelindeling
Frequentie
Audio
Koptelefoonuitgang
Foto
Luidspreker
Indeling
Opslag
Besturings
systeem
Micro SD-kaart
4GB opnametijd
2GB foto's
Pc
Poort
Taal
Voltage
Amperage
(opnamemodus)
Amperage(opneme
Stroom
n met scherm uit)
Wisselstroomadapter
Ingebouwde batterij
Aangesloten
opnemen
Afmetingen (L x B x H)
Gewicht (g)
AMK4012-D15 manual
NTSC / PAL
3,6-4,2 V
NTSC / PAL
108 mm (B) X 64,8mm (H)
800 x 480 pixels
200 cd/㎡
720*576 / 720*480
MPEG-AVI 30 fps
MPEG-AVI
20 Hzz-20 KHz stereo
Links 20 mW + rechts 20mW [16O]
(aanpassen aan hoogste volume)
1W
JPG/JPEG, 720*576
Micro SD-kaart 4GB (tot 32 GB
ondersteund)
2-4 uur
30000 stuks
Windows & Mac OS
USB 2.0
Engels/Frans/Duits/Spaans/Nederland
s
DC 5V
450 mA
230 mA
DC 5V 2A
Li-batterij 3200 Mah
≥14 uur (scherm uit);
≥7 uur(scherm aan)
131 mm x 86 mm x 18 mm
200 g
Page 55
Warranty
The Dino-Lite product is delivered with a two year warranty from the date of purchase by the
end customer. The MS-D15 recorder is delivered with a one year warranty from the date of
purchase by the end customer. Please note that accessories (i.e. detachable caps/extensions)
are not covered under warranty. For warranty issues please contact the reseller or store where
you bought the product.
The content of this manual has been prepared with care, but Dino-Lite Europe does not
warrant for any mistakes or omission. Dino-Lite Europe is not responsible for loss of personal
data, productivity or otherwise resulting from wrong operation or product failure. The
software, hardware and this manual may be modified without further notice.
Support
If you have any problem or issue with your Dino-Lite or the MS-D15 recorder, please contact
your reseller or check the Dino-Lite Europe support pages at www.dino-lite.eu.
Dino-Lite Europe/IDCP BV
The Netherlands
Tel. +31 20 6186322
Fax. +31 20 6189692
e-mail: [email protected]
web: www.dino-lite.eu
AnMo Electronics Corporation and its authorized representative in the EU, IDCP BV, declare
that the apparatus Dino-Lite comply with the essential requirements and other relevant
provisions of Directive 1999/5/EC. The original Declaration of Conformity can be found at
www.dino-lite.eu/doc/dino-lite.pdf.
IDCP BV declares that the MS-D15 recorder complies with the essential requirements and
other relevant provisions of Directive 1999/5/EC. The original Declaration of Conformity can be
found at www.dino-lite.eu/doc/msd15.pdf.
2014 © AnMo/IDCP BV/Dino-Lite Europe.
No part of this publication may be reproduced or distributed unless for
personal use in conjunction with usage of Dino-Lite digital microscopes.
Page 56
AMK4012-D15 manual
Version 2014Q1 Copyright © 2014 IDCP BV