1
KDC-4554U
KDC-4054UB
KDC-4054UR
KDC-3454UQ
KDC-3354UGY
KDC-3254URY
KDC-3054UG
KDC-3054UR
KDC-3054URY
KDC-316UR
CD-RECEIVER
INSTRUCTION MANUAL
CD-RECEIVER
BEDIENUNGSANLEITUNG
© 2011 JVC KENWOOD Corporation
Cover_KDC-4054UB_002A_f.indd 1
GET0744-002A (EW/E0)
8/26/11 1:42:25 PM
CONTENTS
Safety
3
Function settings
15
Preparation
4
Troubleshooting
17
Installation/connection
19
How to attach/detach the faceplate
How to reset your unit
Basic operations
5
Getting started
7
Canceling the display demonstration
Setting the demonstration mode
Adjusting the clock
Initial settings before operations
Listening to the radio
Specifications
10
Start playing a disc
Connecting a USB device
Connecting an iPod (for
)
Selecting Repeat Play
Selecting Random Play
Selecting a folder/track/file
Functions of
with iPod
Selecting a song by alphabet
Selecting App & iPod Control Mode
Adjust [SETTINGS] mode settings
Listening to the other external
components
13
Using the remote controller (RC-405) 13
Equipped for
Basic operations
Direct Access Tuning
Direct Music Search
23
8
Adjust [SETTINGS] mode settings
Listening to a disc/ USB device/ iPod
Basic procedure
Warning
Caution
Wiring connection
Installing the unit
Removing the unit
Information on Disposal of Old
Electrical and Electronic Equipment and
Batteries (applicable for EU countries
that have adopted separate waste
collection systems)
Products and batteries with the
symbol (crossed-out wheeled
bin) cannot be disposed as
household waste.
Old electrical and electronic
equipment and batteries should
be recycled at a facility capable
of handling these items and
their waste byproducts.
Contact your local authority
for details in locating a recycle
facility nearest to you. Proper
recycling and waste disposal
will help conserve resources
whilst preventing detrimental
effects on our health and the
environment.
Notice: The sign “Pb” below the
symbol for batteries
indicates that this
battery contains lead.
2
EN02-23_KDC-4054UB[E]f.indd 2
8/25/11 10:04:14 AM
WARNING
Stop the car before operating the unit.
Important to know...
To prevent a short circuit, never put or
leave any metallic objects (such as coins or
metal tools) inside the unit.
Caution: Adjust the volume so that you
can hear sounds outside the car. Driving
with the volume too high may cause an
accident.
Condensation: When the car is airconditioned, moisture may collect on the
laser lens. This may cause disc read errors.
In this case, remove the disc and wait for
the moisture to evaporate.
This unit can only play the CDs with:
The illustrations in this manual are
examples used to explain more clearly
how the controls are used. Therefore, what
appears on the illustrations may differ from
what appears on the actual equipment.
A USB connection cable, CA-U1EX
(max.: 500 mA) (optional accessory) is
required for connecting a USB device.
You can connect an Apple iPod/iPhone
with
.
The word “iPod” appearing in this manual
indicates the iPod or iPhone connected
to this unit with a connection cable,
KCA-iP102 (optional accessory).
If you experience problems during
installation, consult your Kenwood dealer.
When you purchase external components,
check with your Kenwood dealer to make
sure that they work with your model and in
your area.
Detailed information and notes about the
playable audio files are stated in an online
manual on the following site:
www.kenwood.com/cs/ce/audiofile/
ENGLISH
Safety
Declaration of Conformity with regard
to the EMC Directive 2004/108/EC
Manufacturer:
JVC KENWOOD Corporation
3-12, Moriyacho, Kanagawa-ku, Yokohamashi, Kanagawa, 221-0022, Japan
EU Representative’s:
Kenwood Electronics Europe BV
Amsterdamseweg 37, 1422 AC UITHOORN,
The Netherlands
This Product is not installed by the
manufacturer of a vehicle on the
production line, nor by the professional
importer of a vehicle into an EU Member
State.
The marking of products using lasers
The label is attached to the chassis/case
and says that the component uses laser
beams that have been classified as Class 1.
It means that the unit is utilizing laser
beams that are of a weaker class. There is
no danger of hazardous radiation outside
the unit.
For Turkey
Bu ürün 26891sayılı Resmi Gazete’de
yayımlanan Elektrikli ve Elektronik Eşyalarda
Bazı Zararlı Maddelerin Kullanımının
Sınırlandırılmasına Dair Yönetmeliğe uygun
olarak üretilmiştir.
This product complies with Directive,
Number 26891 regarding “REGULATION ON
THE RESTRICTION OF THE USE OF CERTAIN
HAZARDOUS SUBSTANCES IN ELECTRICAL
AND ELECTRONIC EQUIPMENT”.
3
EN02-23_KDC-4054UB[E]f.indd 3
8/19/11 4:11:38 PM
Preparation
How to attach/detach the faceplate
If this unit fails to operate properly, press the
reset button.
1
2
How to reset your unit
1
Do not expose the faceplate to direct
sunlight, excessive heat, or humidity. Also
avoid places with too much dust or the
possibility of water splashing.
Keep the faceplate in its casing while
detached.
The faceplate is a precision piece of
equipment and can be damaged by shocks
or jolts.
To prevent deterioration, do not touch the
terminals of the unit and faceplate with
your fingers.
3
1
2
2
Reset button
The unit returns to factory settings when the
reset button is pressed.
Remote controller (RC-405) is equipped
for
. (page 13, 14)
Maintenance
Cleaning the unit: Wipe off the dirt on the panel with a dry silicon or soft cloth. Failure to
observe this precaution may result in damage to the monitor or unit.
Cleaning the connector: The unit may not function
properly if the connectors between the unit and faceplate
are dirty. Detach the faceplate and clean the connector
with a cotton swab gently, being careful not to damage
the connector.
Connector (on the reverse
side of the faceplate)
Handling discs
Do not touch the recording surface of the disc.
Do not stick tape etc. on the disc, or use a disc with tape stuck on it.
Do not use any accessories for the disc.
Clean from the center of the disc and move outward.
Clean the disc with a dry silicon or soft cloth. Do not use any solvents.
When removing discs from this unit, pull them out horizontally.
Remove the rims from the center hole and disc edge before inserting a disc.
4
EN02-23_KDC-4054UB[E]f.indd 4
8/19/11 4:11:38 PM
ENGLISH
Basic operations
Display window
Loading slot
Ejects the disc
Volume knob
USB terminal
Detaches the faceplate
Auxiliary input jack
The following indicator lights up when...
ST : A stereo broadcast is received (FM).
IN : A disc is in the unit.
TI : Traffic Information function is turned
on.
RDS : Radio Data System service is available.
:
: [PRESET EQ] is set to an EQ
mode other than [NATURAL].
(page 15)
B.BOOST : [BASS BOOST] is set to
[B.BOOST LV1], [B.BOOST LV2]
or [B.BOOST LV3]. (page 15)
: In Search Mode or when a
Playlist is displayed.
The illustration and button names used for
explanation in this manual are of
(unless mentioned
otherwise).
Refer to the table below for the difference:
For
EQ
iPod
3 (ALL RDM)
3
Continued...
5
EN02-23_KDC-4054UB[E]f.indd 5
8/19/11 4:11:38 PM
When you press or hold the following button(s)...
Button
SRC
General operation
Turns on.
Turns off if pressed and held.
Selects the available sources (TUNER, USB/ iPod, CD, AUX, STANDBY), if the
power is turned on.
• If the source is ready, playback also starts.
• “iPod” or “CD” is selectable only when an iPod is connected or a disc is loaded.
Volume knob
(turn)
Adjusts the volume level.
Selects items.
Volume knob
(press)
Confirms selection.
Enters [FUNCTION] settings.
Selects the FM bands (FM1/ FM2/ FM3) or MW/ LW when “TUNER” is
selected as the source.
Enters Music Search mode.
1 (–) / 2 (+)
6(
)
Selects the previous/next folder.
Pauses/resumes playback of a disc/ USB device/ iPod.
4/¢
Searches for radio station.
Selects track/file.
Fast-forwards/reverses tracks if pressed and held.
SCRL DISP
Changes the display information.
Scrolls the display information if pressed and held.
Enters clock adjustment mode directly (page 7) if pressed and held while
in clock display screen.
iPod
For
:
Selects “iPod” source.
Enters the controlling mode (MODE ON/ MODE OFF) for iPod playback if
pressed and held. (page 12)
For
:
Selects Random Play. (page 11)
Returns to the previous item.
Exit from setting mode if pressed and held.
6
EN02-23_KDC-4054UB[E]f.indd 6
8/19/11 4:11:40 PM
ENGLISH
Getting started
Canceling the display demonstration
The display demonstration is always turned on unless you cancel it.
When you turn on the power (or after you reset the unit), the display shows:
[CANCEL DEMO] \ [PRESS] \ [VOLUME KNOB]
1 Press the volume knob.
[YES] is selected as the initial setup.
2 Press the volume knob again to confirm.
[DEMO OFF] appears.
If no operation is done for about 15 seconds or if you turn the volume knob to select [NO] in
step 2, [DEMO MODE] appears and the display demonstration starts.
Setting the demonstration mode
1 Press the volume knob to enter [FUNCTION].
2 Turn the volume knob to select [DEMO MODE], then press to enter.
3 Turn the volume knob to select [ON] or [OFF].
If [ON] is selected, display demonstration starts if no operation is done for about
20 seconds.
4 Hold
to finish the procedure.
Adjusting the clock
1
2
3
4
Press the volume knob to enter [FUNCTION] mode.
Turn the volume knob to select [SETTINGS], then press to enter.
Turn the volume knob to select [CLOCK], then press to enter.
Turn the volume knob to select [CLOCK ADJUST] / [CLOCK ADJ], then press to enter.
Clock hour flashes on the display.
5 Turn the volume knob to adjust the hour, then press to enter minute adjustment.
Clock minutes flashes on the display.
6 Turn the volume knob to adjust the minute, then press to confirm.
Press 4 / ¢ to move between the hour and minute adjustment.
7 Hold
to finish the procedure.
Initial settings before operations
1
2
3
4
Press SRC to enter [STANDBY] mode.
Press the volume knob to enter [FUNCTION] mode.
Turn the volume knob to select [INITIAL SET], then press to enter.
Turn the volume knob to make a selection, then press to confirm.
See table on page 8 for selection.
5 Hold
to finish the procedure.
Continued...
7
EN02-23_KDC-4054UB[E]f.indd 7
8/19/11 4:11:41 PM
Item
PRESET TYPE
KEY BEEP
RUSSIAN SET
P-OFF WAIT
BUILT-IN AUX/
BUILTIN AUX
CD READ
Selectable setting (Preset: *)
NORMAL/ NORM *: Memorizes one station for each preset button in each band (FM1/ FM2/ FM3/ MW/
LW). ; MIX: Memorizes one station for each preset button regardless of the selected band (FM1/ FM2/
FM3/ MW/ LW).
ON */ OFF: Activates/deactivates the keypress tone.
ON: Folder name, file name, song title, artist name, album name are displayed in Russian (if applicable). ;
OFF *: Cancels.
Sets the duration when the unit will automatically turns off (while in standby mode) to save the battery.
––– : Cancels ; 20M *: 20 minutes ; 40M: 40 minutes ; 60M: 60 minutes
ON *: Enables “AUX” in source selection. Sound of the connected external component is produce through
the car speakers. ; OFF: Disables “AUX” in source selection.
1 *: Automatically distinguishes between audio file disc and music CD. ; 2: Forces to play as a music CD. No
sound can be heard if an audio file disc is played.
SWITCH PREOUT/ Except for
:
SWITCH PRE
REAR */ SUB-W: Selects whether rear speakers or a subwoofer are connected to the line out terminals on
the rear of the unit (through an external amplifier).
SP SELECT
OFF */ 5/4/ 6 × 9/6/ OEM: Selects the speaker size for optimum performance.
F/W UP xx.xx
YES *: Starts upgrading the firmware. ; NO: Cancels (upgrading is not activated).
For details on how to update the firmware, see: www.kenwood.com/cs/ce/
Listening to the radio
Hold for about 2 seconds to memorize the current station.
Press briefly to recall memorized station.
1 Press SRC to select “TUNER.”
2 Press
repeatedly to select a band (FM1/ FM2/ FM3/ MW/ LW).
3 Press 4 / ¢ to search for a station.
8
EN02-23_KDC-4054UB[E]f.indd 8
8/19/11 4:11:41 PM
ENGLISH
Adjust [SETTINGS] mode settings
While listening to the radio...
1 Press the volume knob to enter [FUNCTION] mode.
2 Turn the volume knob to select [SETTINGS], then press to enter.
3 Turn the volume knob to make a selection, then press to confirm.
See table below for selection.
4 Hold
to finish the procedure.
Item
LOCAL SEEK
SEEK MODE
AUTO MEMORY
MONO SET
PTY SEARCH
TI
NEWS SET
AF SET
REGIONAL
AUTO TP SEEK/
ATP SEEK
Selectable setting (Preset: *)
ON: Searches only FM stations with good reception. ; OFF *: Cancels.
Selects the tuning mode for 4 / ¢ buttons.
AUTO1 *: Automatically search for a station. ; AUTO2: Search in the order of the stations in the preset
memory. ; MANUAL: Manually search for a station.
YES *: Automatically starts memorizing 6 stations with good reception. ; NO: Cancels (automatic
memorizing is not activated). (Selectable only if [NORMAL] / [NORM] is selected for [PRESET TYPE].)
(page 7, 8)
ON: Improve the FM reception (but the stereo effect may be lost). ; OFF *: Cancels (stereo effect resumes).
Selects the available Program Type (see table below). Then, press 4 / ¢ to start searching.
Press the volume knob to enter PTY language selection. Turn the volume knob to select the PTY language
(ENGLISH */ FRENCH/ GERMAN), then press to confirm.
ON: Allows the unit to temporarily switch to Traffic Information. ; OFF *: Cancels.
00M – 90M: Sets the time for receiving the next news bulletin. ; OFF *: Cancels.
ON *: Automatically searches for another station broadcasting the same program in the same Radio Data
System network with better reception when the current reception is poor. ; OFF: Cancels.
ON *: Switches to another station only in the specific region using the “AF” control. ; OFF: Cancels.
ON *: Automatically searches for a station with better reception when the traffic information‘s reception
is poor. ; OFF: Cancels.
[MONO SET/ PTY SEARCH] is selectable only when the source is “FM.”
[TI/ NEWS SET/ AF SET/ REGIONAL/ AUTO TP SEEK/ ATP SEEK] is selectable only when the source is “FM.” If other
playback source is selected, these settings are selectable under [TUNER SET] item. (page 17)
Available Program Type ([SPEECH] : White character item. ; [MUSIC] : Black character item) :
SPEECH
MUSIC
NEWS
AFFAIRS
INFO
SPORT
EDUCATE
DRAMA
CULTURE
SCIENCE
VARIED
POP M (music) ROCK M (music) EASY M (music)
LIGHT M (music) CLASSICS
OTHER M (music) WEATHER
FINANCE
CHILDREN
SOCIAL
RELIGION
PHONE IN
TRAVEL
LEISURE
JAZZ
COUNTRY
NATION M (music)
OLDIES
FOLK M (music) DOCUMENT
The unit will search for the Program type categorized under [SPEECH] or [MUSIC] if selected.
The Radio Data System feature won't work where the service is not supported by any
broadcasting station.
If the volume is adjusted during reception of traffic information, the adjusted volume is
memorized automatically. It will be applied the next time Traffic Information function is
turned on.
9
EN02-23_KDC-4054UB[E]f.indd 9
8/19/11 4:11:42 PM
Listening to a disc/ USB device/ iPod
Loading slot
Ejects the disc. (“NO DISC” appears and “IN” indicator goes off.)
Press to select track/file.
Hold to fast-forwards/reverses.
Press to select previous/next folder.
• Not available if “ALL RANDOM” is
selected.
Start playing a disc
1 Press SRC to turn on the power.
2 Insert a disc into the loading slot.
Playback starts automatically.
3 Press number button 6 (
) to
resume/pause playback (if necessary).
USB terminal
Slide open the cover,
then make the following
connection.
The source automatically
switches, and playback
starts.
Connecting a USB
device
CA-U1EX (Max.: 500 mA)
(optional accessory)
USB device (commercially available)
Connecting an iPod
Discs that cannot be used
Discs that are not round.
Discs with coloring on the recording surface or discs
that are dirty.
You cannot play a Recordable/ReWritable disc that
has not been finalized. (For the finalization process
refer to your disc writing software, and your disc
recorder instruction manual.)
8 cm CD cannot be used. Attempt to insert using an
adapter can cause malfunction.
(for
)
Apple iPod
(commercially available)
KCA-iP102
(optional accessory)
10
EN02-23_KDC-4054UB[E]f.indd 10
8/19/11 4:11:42 PM
Press number button 4 (REP) repeatedly
to make a selection.
Audio CD : TRACK/ TRAC (track) REPEAT,
REPEAT OFF
AAC/MP3/WMA :
FILE REPEAT, FOLDER/ FOLD (folder)
REPEAT, REPEAT OFF
iPod : FILE REPEAT, REPEAT OFF
Selecting Random Play
Press number button 3 (ALL RDM) or
repeatedly to make a selection.
Audio CD : DISC RANDOM, RANDOM OFF
AAC/MP3/WMA/iPod :
FOLDER/ FOLD (folder) RANDOM,
RANDOM OFF
For AAC/MP3/WMA/iPod : Press and hold
number button 3 (ALL RDM) or
to
select “ALL RANDOM.”
– Applicable only if “RANDOM OFF” is
selected initially.
– For
: Changes the iPod browsing item to
“songs.”
Selecting a folder/track/file
1 Press
to enter Music Search mode.
“SEARCH” appears, then the current file
name appears on the display.
2 Turn the volume knob to select a folder/
track/file, then press to confirm.
To return to the root folder (or first track for
audio CD), press number button 5.
To return to the previous folder, press .
To cancel the Music Search mode, press
and hold .
< or > on the display indicates that
preceded/next item is available.
For USB device * and iPod: To skip search,
press 4 / ¢.
* This operation is effective only for the files
registered in the database created with
Kenwood Music Editor. (See right column.)
About Audio file
Playable Audio file: AAC-LC (.m4a), MP3 (.mp3),
WMA (.wma)
Playable disc media: CD-R/RW/ROM
Playable disc file format: ISO 9660 Level 1/2, Joliet,
Romeo, Long file name.
Playable USB device file system: FAT16, FAT32
Although the audio files are complied with the standards
listed above, the play maybe impossible depending on the
types or conditions of media or device.
ENGLISH
Selecting Repeat Play
About USB device
This unit can play AAC/MP3/WMA files stored on a USB
mass storage class device.
Install the USB device in the place where it will not
prevent you from driving your vehicle properly.
You cannot connect a USB device via a USB hub and
Multi Card Reader.
Make sure all important data has been backed up to
avoid losing the data.
Connecting a cable whose total length is longer than
5 m can result in abnormal playback.
About “KENWOOD Music Editor”
This unit supports the PC application “KENWOOD Music
Editor Light ver1.1” or later.
When you use the audio file with database information
added by the “KENWOOD Music Editor Light ver1.1,”
you can search a file by title, album or artist name using
Music Search.
In the Instruction manual, the term “USB device” is
used to mean the device that contains audio files with
database information added with KENWOOD Music
Editor.
“KENWOOD Music Editor Light ver1.1” is available from
the following web site: www.kenwood.com/cs/ce/
For further information on “KENWOOD Music Editor
Light ver1.1,” refer to the site above or the application
help.
11
EN02-23_KDC-4054UB[E]f.indd 11
8/25/11 10:04:29 AM
Functions of
with iPod
Selecting a song by alphabet
Adjust [SETTINGS] mode settings
1 Press
to enter Music Search mode.
“SEARCH” appears.
2 Turn the volume knob to select a
category, then press to confirm.
3 Press
again to enter alphabet search
mode.
“SEARCH <– – –>”/ “SRCH <– – –>”
appears.
4 Turn the volume knob to select the
character to be searched for.
5 Press 4 / ¢ to move to the entry
position.
You can enter up to three characters.
6 Press the volume knob to start
searching.
7 Turn the volume knob to select a folder/
track/file, then press to confirm.
While listening to an iPod...
1 Press the volume knob to enter
[FUNCTION] mode.
2 Turn the volume knob to select
[SETTINGS], then press to enter.
3 Turn the volume knob to select
[SKIP SEARCH], then press to enter.
4 Turn the volume knob to make a
selection, then press to confirm.
0.5% (initial)/ 1%/ 5%/ 10% : Sets the
ratio of skip when searching for a song in
Music Search mode.
(Holding 4 / ¢ skips songs at 10%
regardless of the setting made.)
5 Hold
to finish the procedure.
To return to the previous folder, press .
To return to the top menu, press number
button 5.
To cancel the Alphabet Search mode, press
and hold .
A longer searching time is required if there
are many songs or playlists in the iPod.
To search for a character other than A to Z
and 0 to 9, enter only “ * ”.
The article (a, an, the) of songs name will
be skipped during search.
Selecting App & iPod Control Mode
Press and hold iPod to make a selection.
MODE ON: Control iPod from the iPod *.
“APP&iPod MODE”/ “APP&iPod” appears
on the display.
MODE OFF: Control iPod from the unit.
* You can still control play/pause, select files,
fast-forward/reverse files from the unit.
About compatible iPod/iPhone
Made for
– iPod touch (1st, 2nd, 3rd, and 4th generation)
– iPod classic
– iPod with video
– iPod nano (1st, 2nd, 3rd, 4th, 5th, and 6th generation)
– iPhone 4
– iPhone 3GS
– iPhone 3G
– iPhone
For the latest compatible list and software version of
iPod/iPhone, see: www.kenwood.com/cs/ce/ipod
If you start playback after connecting the iPod, the
music that has been played by the iPod is played first.
In this case, “RESUMING” is displayed without
displaying a folder name, etc. Changing the browse
item will display a correct title, etc.
You cannot operate iPod if “KENWOOD” or “✓”
displayed on iPod.
12
EN02-23_KDC-4054UB[E]f.indd 12
8/25/11 10:04:29 AM
ENGLISH
Listening to the other external
components
Preparation : Make sure [ON] is selected for [BUILT-IN AUX] / [BUILTIN AUX]. (page 7, 8)
1 Press SRC to select “AUX.”
2 Turn on the external component and
start playing.
3 Turn the volume knob to adjust the
volume.
Auxiliary input jack
3.5 mm stereo mini plug
(commercially available)
Portable audio device
(commercially available)
Using the remote controller (RC-405)
Equipped for
Remote sensor
Do not expose to bright sunlight.
Preparation:
When you use the remote controller for the
first time, pull out the insulation sheet.
Insulation sheet
If the effectiveness of the remote
controller decreases, replace the battery.
2
3
4
1
Continued...
13
EN02-23_KDC-4054UB[E]f.indd 13
8/19/11 4:11:43 PM
RC-405
Caution:
Do not set the remote control in hot places
such as on the dashboard.
Lithium battery.
Danger of explosion if the battery is
incorrectly replaced. Replace only with the
same or equivalent type.
The battery pack or batteries shall not be
exposed to excessive heat such sunshine,
fire or the like.
Keep battery out of reach of children and in
original package until ready to use. Dispose
of used batteries promptly. If swallowed
contact physician immediately.
(Not used.)
Basic operations
Direct Access Tuning
SRC
VOL
5/∞
1 Press FM+ / AM– to select a band.
2 Press DIRECT to enter Direct Access
Tuning mode.
“– – – –” appears on the display.
3 Press the number buttons to enter the
frequency.
4 Press 4 / ¢ ( + ) to search for the
frequency.
: Selects the available sources.
: Adjusts the volume level.
: Selects folder/track/file (in Music
Search mode).
ENT
: Pauses/resumes playback.
Confirms selection (in Music
Search mode).
*AM– / #FM+ : Selects bands.
Selects folders.
4 / ¢ (+) : Searches for radio station.
Selects track/file.
1–6
: Selects preset station.
AUD
: Enters [AUDIO CTRL] settings
directly.
ATT
: Attenuates the sound. (To return
to the previous level, press the
button again.)
: Returns to the previous item (in
Music Search mode).
EXIT
: Exit from setting mode.
To cancel Direct Access Tuning mode, press
or EXIT.
If no operations is done for 10 seconds
after step 3, Direct Access Tuning is
automatically canceled.
Direct Music Search
• Not available if Random Play is selected.
• Not applicable for iPod and Kenwood Music
Editor.
1 Press DIRECT to enter Direct Music
Search Mode.
“– – –” appears.
2 Press the number buttons to enter the
track number.
3 Press 4 / ¢ to search for the music.
To cancel the Direct Music Search Mode,
press
or EXIT.
14
EN02-23_KDC-4054UB[E]f.indd 14
8/19/11 4:11:44 PM
1 Press the volume knob to enter [FUNCTION] mode.
2 Turn the volume knob to select [AUDIO CONTROL] / [AUDIO CTRL] or [SETTINGS], then
press to enter.
3 Turn the volume knob to make a selection, then press to confirm.
See table below for selection.
Repeat step 3 until the desired item is selected/activated.
Press
to return to the previous item.
4 Hold
to finish the procedure.
ENGLISH
Function settings
[AUDIO CONTROL] / [AUDIO CTRL] : While listening to any source except in STANDBY state...
Item
Selectable setting (Preset: *)
SUB-W LEVEL
Except for
:
–15 — +15 (Preset: 0): Adjusts the subwoofer output level.
BASS LEVEL
–8 — +8 (Preset: 0): Source tone memory: Adjusts the level to memorize in each source. (Before
making an adjustment, select the source you want to adjust.)
MID LEVEL
TRE LEVEL
EQ PRO
BASS ADJUST BASS CTR FRQ/ BASS C FRQ
BASS LEVEL
60/ 80/ 100 */ 200: Selects the center frequency.
–8 — +8 (Preset: 0): Adjusts the level.
BASS Q FACTOR/ BASS Q FCTR 1.00 */ 1.25/ 1.50/ 2.00: Adjusts the quality factor.
MID ADJUST
TRE ADJUST
BASS EXTEND
ON: Turns on the extended bass. ; OFF *: Cancels.
MID CTR FRQ/ MID C FRQ
0.5K/ 1.0K */ 1.5K/ 2.5K: Selects the center frequency.
MID LEVEL
–8 — +8 (Preset: 0): Adjusts the level.
MID Q FACTOR/ MID Q FCTR
0.75/ 1.00 */ 1.25: Adjusts the quality factor.
TRE CTR FRQ/ TRE C FRQ
10.0K/ 12.5K */ 15.0K/ 17.5K: Selects the center frequency.
TRE LEVEL
–8 — +8 (Preset: 0): Adjusts the level.
PRESET EQ
NATURAL */ USER/ ROCK/ POPS/ EASY/ TOP40/ JAZZ/ POWERFUL: Selects a preset sound mode
suitable to the music genre. (Selects [USER] to use the customized bass, middle, and treble settings.)
BASS BOOST
B.BOOST LV1/ B.BOOST LV2/ B.BOOST LV3: Selects your preferred bass boost level. ;
B.BOOST OFF *: Cancels.
LOUDNESS
LOUDNESS LV1 */ LOUD LV1 */ LOUDNESS LV2/ LOUD LV2: Selects your preferred low and high
frequencies boost to produce a well-balanced sound at a low volume level. ;
LOUDNESS OFF/ LOUD OFF: Cancels.
BALANCE
L15 — R15 (Preset: 0): Adjusts the left and right speaker output balance.
FADER
R15 — F15 (Preset: 0): Adjusts the rear and front speaker output balance.
SUBWOOFER SET/ Except for
:
SUB-W SET
ON *: Turns on the subwoofer output. ; OFF: Cancels.
Continued...
15
EN02-23_KDC-4054UB[E]f.indd 15
8/25/11 10:04:37 AM
[AUDIO CONTROL] / [AUDIO CTRL] : While listening to any source except in STANDBY state...
Item
Selectable setting (Preset: *)
DETAILED SET/ DETAIL SET
:
LPF SUBWOOFER/ Except for
THROUGH *: All signals are sent to the subwoofer. ; 85HZ/ 120HZ/ 160HZ: Frequencies higher than
LPF SUB-W
85 Hz/ 120 Hz/ 160 Hz are cut off.
:
SUB-W PHASE Except for
REVERSE/ REV (180°)/ NORMAL/ NORM (0°) *: Selects the phase angle of the subwoofer output to
be in line with the speaker output for optimum performance. (Selectable only if a setting other than
[THROUGH] is selected for [LPF SUBWOOFER/ LPF SUB-W].)
SUPREME SET
ON *: Creates realistic sound by interpolating the high-frequency components that are lost in AAC/
MP3/WMA audio compression. ; OFF: Cancels. (Selectable only when playback an AAC/MP3/WMA
disc or a USB device, except iPod.)
VOLUME OFFSET/ –8 — +8 (for AUX) ; –8 — 0 (for other sources): Presets the volume adjustment level of each
source. The volume level will automatically increase or decrease when you change the source. (Before
VOL OFFSET
making an adjustment, select the source you want to adjust.)
(Preset: 0)
:
Except for
[SUB-W LEVEL/ SUBWOOFER SET/ SUB-W SET/ LPF SUBWOOFER/ LPF SUB-W/ SUB-W PHASE] is selectable only if
[SWITCH PREOUT/ SWITCH PRE] is set to [SUB-W]. (page 7, 8)
[SUB-W LEVEL/ LPF SUBWOOFER/ LPF SUB-W/ SUB-W PHASE] is selectable only if [SUBWOOFER SET/ SUB-W SET] is
set to [ON].
[SETTINGS]
Item
Selectable setting (Preset: *)
AUX NAME SET/
AUX NAME
CLOCK
CLOCK ADJUST/
CLOCK ADJ
TIME SYNC
AUX */ DVD/ PORTABLE/ GAME/ VIDEO/ TV: Selects the desired name for the connected component.
(Selectable only if “AUX” is selected as the source.)
DISP & KEY (for
COLOR SELECT
DISP DIMMER
TEXT SCROLL
KEY DIMMER
(For details, see page 7.)
ON *: Synchronizes the Radio Data System station time data and the unit’s clock. ; OFF: Cancels.
)
VARIABLE SCAN */ COLOR 01 – COLOR 24/ USER: Selects your preferred key illumination color.
You can create your own color (when [COLOR 01] — [COLOR 24] or [USER] is selected). The color you
created can be selected when you select [USER].
1. Hold the volume knob to enter the detail color adjustment mode.
2. Press 4 / ¢ to select the color (R/ G/ B) to adjust. Turn the volume knob to adjust the level
(0 — 9).
3. Press the volume knob to confirm and exit.
ON: Dims the display illumination. ; OFF *: Cancels.
AUTO */ ONCE: Selects to scroll the display information automatically, or scroll only once. ;
OFF: Cancels.
DIMMER LV1: Dims the key illumination constantly. ; DIMMER LV2: Dims the key illumination darker
than DIMMER LV1. ; DIMMER OFF *: Cancels.
16
EN02-23_KDC-4054UB[E]f.indd 16
8/25/11 10:04:37 AM
Item
Selectable setting (Preset: *)
DISPLAY (for
)
DISP DIMMER ON: Dims the display illumination. ; OFF *: Cancels.
TEXT SCROLL AUTO */ ONCE: Selects to scroll the display information automatically, or scroll only once. ;
OFF: Cancels.
TUNER SET
TI/ NEWS SET/ AF SET/ REGIONAL/ AUTO ATP SEEK/ ATP SEEK: Selectable only if any source other
than tuner source is selected. (For details, see page 9.)
ENGLISH
[SETTINGS]
Troubleshooting
Symptom
Remedy/Cause
Sound cannot be heard.
Adjust the volume to the optimum level. / Check the cords and connections.
“PROTECT” appears and no operations
can be done.
Check to be sure the terminals of the speaker leads are covered with insulating
tape properly, then reset the unit. If “PROTECT” does not disappear, consult your
nearest service center.
Sound cannot be heard. / The unit does
not turn on. / Information shown on the
display is incorrect.
The connectors are dirty. Clean the connectors. (page 4)
The unit does not work at all.
Reset the unit. (page 4)
[P-OFF WAIT] does not work.
Turn off the demonstration mode. (page 7)
Radio reception is poor. / Static noise
while listening to the radio.
Connect the antenna firmly. / Pull the antenna out all the way.
“IN” flashes.
The CD player is not operating properly. Reinsert the disc properly. If the condition
did not improve, turn off the unit and consult your nearest service center.
CD-R/CD-RW cannot be played back and Insert a finalized CD-R/CD-RW (finalize with the component which you used for
tracks cannot be skipped.
recording).
Disc sound is sometimes interrupted.
Stop playback while driving on rough roads. / Change the disc. / Check the cords
and connections.
“NA FILE” appears.
The unit is playing an unsupported audio file.
“NO DISC” appears.
Insert a playable disc into the loading slot.
“TOC ERROR” appears.
The CD is quite dirty. / The CD is upside-down. / The CD is scratched a lot. Try
another disc instead.
“ERROR 99” appears.
The unit is malfunctioning for some reason. Press the reset button on the unit. If
the “ERROR 99” code does not disappear, consult your nearest service center.
Continued...
17
EN02-23_KDC-4054UB[E]f.indd 17
8/19/11 4:11:45 PM
Symptom
Remedy/Cause
“COPY PRO” appears.
A copy-protected file is played.
“READ ERROR” appears.
Copy the files and folders for the USB device again. If the error message is still
displayed, initialize the USB device or use other USB devices.
“NO DEVICE” appears.
No USB device is connected. Connect an USB device, and change the source to
USB again.
“NO MUSIC” appears.
The connected USB device contains no playable audio file.
“NA DEVICE” appears.
Connect a supported USB device, and check the connections.
“USB ERROR” appears.
Remove the USB device, turn the unit off, then turn it on again. If the unit still
showing the same display, try to connect another USB device.
“iPod ERROR” appears.
Reconnect the iPod. / Reset the iPod.
Noise is generated.
Skip to another track or change the disc.
Tracks cannot play back as you have
intended them to play.
Playback order is determined when files are recorded.
“READING” keeps flashing.
Longer readout time is required. Do not use too many hierarchies and folders.
Elapsed playing time is not correct.
This is caused by how the tracks are recorded.
The number of songs contained in
Podcast files are not counted in this unit as this unit does not support the playback
“SONGS” category of this unit is different of podcast files.
from that contained in “SONGS” category
of iPod.
Correct characters are not displayed (e.g.
album name).
This unit can only display letters (upper case), numbers, and a limited number of
symbols. Cyrillic alphabets (upper case) can also be displayed if [RUSSIAN SET] is
set to [ON]. (page 7, 8)
Muting upon the reception of a phone call
To use this feature, connect the MUTE lead to your telephone using a commercial telephone
accessory. (page 20, 21)
When a call comes in, “CALL” appears.
The audio system pauses.
To continue listen to the audio system during a call, press
audio system resumes.
SRC. “CALL” disappear and the
When a call ends, “CALL” disappear.
The audio system resumes.
18
EN02-23_KDC-4054UB[E]f.indd 18
8/19/11 4:11:45 PM
Part list:
A Faceplate..............................................................
B Escutcheon.........................................................
C Mounting sleeve .............................................
D Casing for faceplate ......................................
E Wiring harness..................................................
F Removal tool .....................................................
(×1)
(×1)
(×1)
(×1)
(×1)
(×2)
Basic procedure
1 Remove the key from the ignition
switch, then disconnect the · terminal
of the car battery.
2 Make proper input and output wire
connections.
\ “Wiring connection” (page 20, 21)
3 Install the unit to your car.
\ “Installing the unit” (page 22)
4 Reconnect the · terminal of the car
battery.
5 Reset the unit. (page 4)
Warning
The unit can only be installed in a car with
a 12 V DC power supply, negative ground.
If you connect the ignition wire (red) and
the battery wire (yellow) to the car chassis
(ground), you may cause a short circuit,
that in turn may start a fire. Always connect
those wires to the power source running
through the fuse box.
Disconnect the battery’s negative terminal
and make all electrical connections before
installing the unit.
Insulate unconnected wires with vinyl tape
or other similar material. To prevent a short
circuit, do not remove the caps on the ends
of the unconnected wires or the terminals.
Be sure to ground this unit to the car’s
chassis again after installation.
Caution
If your car’s ignition does not have an ACC
position, connect the ignition wires to a
power source that can be turned on and
off with the ignition key. If you connect
the ignition wire to a power source with
a constant voltage supply, as with battery
wires, the battery may die.
Do not use your own screws. Use only the
screws provided.
Install this unit in the console of your
vehicle. Make sure the faceplate will not hit
the lid of the console (if any) when closing
and opening.
After the unit is installed, check whether
the brake lamps, blinkers, wipers, etc. on
the car are working properly.
Mount the unit so that the mounting angle
is 30° or less.
If the fuse blows, first make sure the wires
aren’t touching to cause a short circuit,
then replace the old fuse with one with the
same rating.
Connect the speaker wires correctly to the
terminals to which they correspond. The
unit may be damaged or fail to work if you
share the · wires or ground them to any
metal part in the car.
When only two speakers are being
connected to the system, connect the
connectors either to both the front output
terminals or to both the rear output
terminals (do not mix front and rear).
Do not touch the metal part of this unit
during and shortly after the use of the
unit. Metal part such as the heat sink and
enclosure become hot.
Mounting and wiring this product requires
skills and experience. For safety‘s sake, leave
this work to professionals.
If you experience problems during
installation, consult your Kenwood dealer.
ENGLISH
Installation/connection
19
EN02-23_KDC-4054UB[E]f.indd 19
8/25/11 10:04:48 AM
Wiring connection
For
:
FRONT REAR/SW
REAR/SW
R
L
Rear/subwoofer output terminals
R
L
Front output terminals
Rear/subwoofer output terminals
Fuse (10 A)
Antenna terminal (JASO)
Light blue/yellow
(Steering remote control wire)
Blue/White
(Power control wire/ Antenna
control wire)
Brown
(Mute control wire)
STEERING WHEEL
REMOTE INPUT
REMOTE CONT
ANT CONT
P. CONT
MUTE
To the steering wheel remote control adapter
To the power control terminal when using the optional power
amplifier, or to the antenna control terminal in the vehicle.
To the terminal that is grounded when either the telephone rings
or during conversation. (To connect the Kenwood navigation
system, consult your navigation manual.)
Connecting the ISO connectors on some VW/Audi or
Opel (Vauxhall) automobiles
You may need to modify the wiring of the supplied
wiring harness as illustrated below.
Yellow (Battery wire)
Red (Ignition wire)
Ignition wire
(Red)
Red (A7)
Yellow
Blue/White
Red
Black
Color and function
Battery
Power control
Ignition (ACC)
Earth (ground) connection
Vehicle
A4 (Yellow)
Battery wire
(Yellow)
ISO connectors
Pin
A4
A5
A7
A8
A7 (Red)
Unit
Yellow (A4)
Default wiring
Pin
B1 / B2
B3 / B4
B5 / B6
B7 / B8
Color and function
Rear speaker (right)
Purple ª / Purple/black ·
Gray ª / Gray/black ·
Front speaker (right)
White ª / White/black ·
Front speaker (left)
Green ª / Green/black ·
Rear speaker (left)
20
EN02-23_KDC-4054UB[E]f.indd 20
8/25/11 10:04:48 AM
ENGLISH
For
:
Fuse (10 A)
Antenna terminal (JASO)
White
White/Black
To front speaker (left)
Gray
To front speaker (right)
Gray/Black
Green
Green/Black
To rear speaker (left)
Purple
Purple/Black
To rear speaker (right)
Blue
(Antenna control wire)
Blue/White
(Power control wire)
Brown
(Mute control wire)
ANT CONT
P. CONT
MUTE
To the antenna control terminal in the vehicle.
(Not used.)
To the terminal that is grounded when either the telephone rings or
during conversation. (To connect the Kenwood navigation system,
consult your navigation manual.)
Car fuse box
Red (Ignition wire)
Ignition key switch
Yellow (Battery wire)
Car fuse box
Black (Ground wire)
To the metallic body or chassis of the car
Battery
21
EN02-23_KDC-4054UB[E]f.indd 21
8/19/11 4:11:47 PM
Installing the unit
1
2
Connect the wiring harness
to the unit. Other wiring
connection has been completed
earlier. (page 20, 21)
Before attaching, make
sure the direction of the
escutcheon is correct.
(Wider hooks on the
top side.)
Dashboard of your car
Bend the appropriate tabs
to hold the mounting
sleeve firmly in place.
Removing the unit
1 Detach the faceplate.
2 Engage the catch pin on the
removal tools into the holes on
both sides of the escutcheon, then
pull it out.
3 Insert the removal tools deeply into
the slots on each side, then follow
the arrows instructions as shown
on the right.
22
EN02-23_KDC-4054UB[E]f.indd 22
8/19/11 4:11:47 PM
FM tuner section
Frequency range:
FM1/ FM2/ FM3 (50 kHz space):
87.5 MHz — 108.0 MHz
For
:
FM1/ FM2 (50 kHz space):
87.5 MHz — 108.0 MHz
FM3 (30 kHz space):
65.00 MHz — 74.00 MHz
Usable sensitivity (S/N= 26 dB): 1.0 μV/75 Ω
Quieting sensitivity (DIN S/N = 46 dB): 2.5 μV/75 Ω
Frequency response (±3 dB): 30 Hz — 15 kHz
Signal-to-Noise ratio (MONO): 63 dB
Stereo separation (1 kHz): 40 dB
MW tuner section
Frequency range (9 kHz space):
531 kHz — 1 611 kHz
Usable sensitivity (S/N= 20 dB): 36 μV
USB interface
USB standard: USB1.1/ 2.0 (Full speed)
Maximum supply current: DC 5 V
1A
File system: FAT16/ 32
AAC decode: AAC-LC “.m4a” files
MP3 decode: Compliant with MPEG-1/2 Audio
Layer-3
WMA decode: Compliant with Windows
Media Audio
ENGLISH
Specifications
Audio section
Maximum output power: 50 W × 4
Output power (DIN 45324, +B = 14.4 V): 30 W × 4
Speaker impedance: 4 Ω — 8 Ω
Tone action: Bass: 100 Hz ±8 dB
Middle: 1 kHz ±8 dB
Treble: 12.5 kHz ±8 dB
Preout level / load (CD) (except
):
2 500 mV/10 kΩ
Preout impedance: ≤ 600 Ω
LW tuner section
Frequency range: 153 kHz — 279 kHz
Usable sensitivity (S/N = 20 dB): 57 μV
CD player section
Laser diode: GaAIAs
Digital filter (D/A): 8 Times Over Sampling
D/A converter: 24 Bit
Spindle speed: 500 rpm — 200 rpm (CLV)
Wow & Flutter: Below Measurable Limit
Frequency response (±1 dB): 20 Hz — 20 kHz
Total harmonic distortion (1 kHz): 0.01 %
Signal-to-Noise ratio (1 kHz): 105 dB
Dynamic range: 90 dB
AAC decode: AAC-LC “.m4a” files
MP3 decode: Compliant with MPEG-1/2 Audio
Layer-3
WMA decode: Compliant with Windows
Media Audio
Auxiliary input section
Frequency response (±3 dB): 20 Hz — 20 kHz
Input maximum voltage: 1 200 mV
Input impedance: 10 kΩ
General
Operating voltage (11 V — 16 V allowable): 14.4 V
Maximum current consumption: 10 A
Installation size (W × H × D):
182 mm × 53 mm × 158 mm
Weight: 1.3 kg
Subject to change without notice.
23
EN02-23_KDC-4054UB[E]f.indd 23
8/26/11 4:50:09 PM
INHALT
Sicherheit
3
Funktionseinstellungen
15
Vorbereitung
4
Störungssuche
17
Einbau/Anschluss
19
Anbringen/Abnehmen der Frontblende
Wissenswertes über die Rückstellung Ihres
Gerätes
Grundbedienung
5
Erste Schritte
7
Abbrechen der Display-Demonstrationen
Einstellen des Demonstrationsmodus
Uhr einstellen
Werkseitige Einstellungen vor dem Betrieb
Rundfunkempfang
8
Anpassen der Einstellungen im
[SETTINGS]-Modus
Hören von Disc/ USB-Gerät/ iPod
10
Starten des Abspielens einer Disc
Anschließen eines USB-Geräts
Anschließen eines iPod (für
)
Auswählen der Wiederholwiedergabe
Auswählen der Zufallswiedergabe
Auswählen eines Ordners/Tracks/Datei
Funktionen von
mit iPod
Wählen eines Musikstücks nach Alphabet
Wählen von App & iPod-Steuermodus
Anpassen der Einstellungen im
[SETTINGS]-Modus
Hören von den anderen externen
Komponenten
13
Verwendung der Fernbedienung
(RC-405)
13
Ausgerüstet für
Grundbedienung
Direktzugriff-Senderabstimmung
Direkte Musiksuche
Grundlegendes Verfahren
Warnung
Vorsicht
Verdrahtungsanschluss
Einbau der Einheit
Ausbau des Geräts
Technische Daten
23
Entsorgung von gebrauchten
elektrischen und elektronischen
Geräten und Batterien (anzuwenden in
den Ländern der Europäischen Union
und anderen europäischen Ländern mit
einem separaten Sammelsystem für
solche Geräte)
Das Symbol (durchgestrichene
Mülltonne) auf dem Produkt oder
seiner Verpackung weist darauf
hin, dass dieses Produkt nicht
als normaler Haushaltsabfall
behandelt werden darf, sondern
an einer Annahmestelle für das
Recycling von elektrischen und
elektronischen Geräten und
batterien abgegeben werden
muss.
Durch Ihren Beitrag zur
korrekten Entsorgung dieses
Produktes schützen Sie die
Umwelt und die Gesundheit
Ihrer Mitmenschen.
Unsachgemässe oder falsche
Entsorgung gefährden Umwelt
und Gesundheit. Weitere
Informationen über das
Recycling dieses Produktes
erhalten Sie von Ihrer Gemeinde
oder den kommunalen
Entsorgungsbetrieben.
Achtung: Das Zeichen „Pb“
unter dem Symbol
fur Batterien zeigt an,
dass diese Batterie Blei
enthalt.
2
GE_KDC-4054UB_001A_f.indd 2
8/25/11 5:55:38 PM
Sicherheit
Wichtige Hinweise...
Stellen Sie sicher, dass keine
Metallgegenstände (Münzen, Nadeln,
Werkzeuge usw.) ins Innere des Geräts
gelangen und Kurzschlüsse verursachen.
Vorsicht: Stellen Sie die Lautstärke so
ein, dass Sie immer noch Geräusche von
außerhalb des Fahrzeugs hören können.
Fahren mit zu hoher Lautstärke kann
Unfälle verursachen.
Kondensation: Wenn das Fahrzeug eine
Klimaanlage hat, kann sich Beschlag auf der
Laserlinse bilden. Dadurch können DiscLesefehler verursacht werden. Nehmen
Sie in diesem Fall die CD aus dem Gerät
und warten Sie eine Zeit lang, bis die
Kondensation getrocknet ist.
Dieses Gerät kann nur CDs mit der
folgenden Kennung wiedergeben:
Die in dieser Bedienungsanleitung
dargestellten Abbildungen dienen der
Veranschaulichung der Bedienung Ihres Geräts.
Daher können die Abbildungen von der
tatsächlichen Anzeige am Gerät abweichen.
Ein USB-Verbindungskabel, CA-U1EX
(max.: 500 mA) (optionales Zubehör) ist zum
Anschließen eines USB-Geräts erforderlich.
Sie können einen Apple iPod/iPhone mit
anschließen.
Die in diesem Handbuch verwendete
Bezeichnung „iPod“ weist auf den über das iPodAnschlusskabel, KCA-iP102 angeschlossenen
iPod oder das iPhone hin (optionales Zubehör).
Sollten Sie Probleme bei der Installation
des Geräts haben, lassen Sie sich bitte von
Ihrem Kenwood-Fachhändler beraten.
Lassen Sie sich beim Kauf von externer
Komponenten von Ihrem KenwoodHändler beraten um sicherzustellen, dass
das Zubehör von Ihrem Modell und in
Ihrem Bereich unterstützt wird.
Detailinformationen und Hinweise über
abspielbare Audiodateien werden im
Online-Handbuch auf der folgenden
Website gegeben:
www.kenwood.com/cs/ce/audiofile/
GE_KDC-4054UB_001A_f.indd 3
Konformitätserklärung in Bezug auf die
EMC-Vorschrift 2004/108/EC
Hersteller:
JVC KENWOOD Corporation
3-12, Moriyacho, Kanagawa-ku, Yokohamashi, Kanagawa, 221-0022, Japan
EU-Vertreter:
Kenwood Electronics Europe BV
Amsterdamseweg 37, 1422 AC UITHOORN,
Niederlande
DEUTSCH
WARNUNG
Halten Sie das Fahrzeug vor der Bedienung
des Geräts an.
Dieses Produkt wird weder vom Hersteller
eines Fahrzeugs während der Produktion
noch von einem professionellen Importeur
eines Fahrzeugs in einen EU-Mitgliedsstaat
eingebaut.
Kennzeichnung von Geräten mit LaserAbtastern
Das Etikett ist am Chassis/Gehäuse
angebracht und besagt, dass sich die
Komponente Laserstrahlen bedient, die
als Laserstrahlen der Klasse 1 klassifiziert
wurden. Dies weist darauf hin, dass sich
das Gerät Laserstrahlen bedient, die einer
schwächeren Klasse angehören. Das
bedeutet, dass durch den sehr schwachen
Laserstrahl keine Gefahr durch gefährliche
Strahlungen außerhalb des Geräts besteht.
3
8/25/11 5:55:39 PM
Vorbereitung
Anbringen/Abnehmen der
Frontblende
Wissenswertes über die
Rückstellung Ihres Gerätes
Sollte das Gerät nicht richtig funktionieren,
drücken Sie die Rückstelltaste.
1
2
1
1
3
2
Setzen Sie die Frontblende nicht direktem
Sonnenlicht, extremer Wärme oder
Luftfeuchtigkeit aus. Schützen Sie beides
darüber hinaus vor Staub und Spritzwasser.
Bewahren Sie die Frontblende in ihrem Etui
auf, wenn sie abgenommen wurde.
Bei der Frontblende handelt es sich
um ein Präzisionsbauteil, das durch
Erschütterungen oder Stöße beschädigt
werden kann.
Um Beschädigungen zu vermeiden,
berühren Sie die Anschlüsse des Geräts
nicht mit den Fingern.
2
Rückstelltaste
Die Rückstelltaste löscht alle individuellen
Eingaben und stellt das Gerät auf die
werkseitige Grundeinstellung zurück.
Fernbedienung (RC-405) ist mit
mitgeliefert. (Seite 13, 14)
Wartung
Reinigung des Geräts: Wischen Sie das Äußere des Systems mit einem trockenen
Silikonlappen oder weichen Lappen sauber. Wenn diese Vorsichtsmaßregel missachtet wird,
besteht die Gefahr von Schäden am Monitor oder Gerät.
Reinigung des Steckverbinders: Das Gerät arbeitet
möglicherweise nicht richtig, wenn die Anschlüsse
zwischen Gerät und Frontblende verschmutzt sind. Die
Frontblende abnehmen und den Anschluss sanft mit
einem Wattetupfer oder Lappen reinigen, wobei darauf
geachtet werden muss, die Anschlusskontakte nicht zu
beschädigen.
Anschluss (an der Rückseite
der Frontblende)
Handhabung von Discs
Berühren Sie nicht die Aufnahme-Oberfläche der Disc.
Kleben Sie keine Aufkleber oder ähnliches auf eine Disc. Verwenden Sie dem
entsprechend auch keine Discs, auf denen sich bereits ein Aufkleber befindet.
Verwenden Sie kein Zubehör für die Disc.
Reinigen Sie CDs stets von der Mitte einer Disc nach außen hin.
Reinigen Sie die Disc mit einem trockenen Silikonlappen oder weichen Lappen.
Verwenden Sie keine Lösungsmittel.
Ziehen Sie Discs beim Entfernen aus dem Gerät horizontal heraus.
Nehmen Sie vor dem Einsetzen einer Disc die Ränder vom Mittenloch und der Disc-Kante
ab.
4
GE_KDC-4054UB_001A_f.indd 4
8/25/11 5:55:40 PM
Grundbedienung
Ladeschlitz
Lautstärke-Regler
DEUTSCH
Displayfenster
Disc auswerfen
USB-Anschluss
Frontblende abnehmen
Auxiliary-Eingabebuchse
Die folgende Anzeige leuchtet auf, wenn...
ST : Eine Stereosendung wird empfangen
(UKW).
IN : Sich eine Disc im Gerät befindet.
TI : Die Verkehrsfunk-Funktion
eingeschaltet ist.
RDS : Ein Radio Data System-Service
verfügbar ist.
Bei
EQ
:
: [PRESET EQ] ist auf einen
anderen EQ-Modus als
[NATURAL] gestellt. (Seite 15)
B.BOOST : [BASS BOOST] ist auf
[B.BOOST LV1], [B.BOOST LV2]
oder [B.BOOST LV3] gestellt.
(Seite 15)
: Im Suchmodus oder wenn eine
Wiedergabeliste angezeigt wird.
Die Abbildungen und Tastenbezeichnungen
für die Erklärungen in diesem Handbuch
beziehen sich auf
(wenn nicht anders angegeben).
Die Tabelle unten nennt die Unterschiede.
iPod
3 (ALL RDM)
3
Fortsetzung...
5
GE_KDC-4054UB_001A_f.indd 5
8/25/11 5:55:40 PM
Wenn Sie die folgende(n) Taste(n) drücken oder gedrückt halten...
Taste
Allgemeine Bedienung
SRC
Schaltet ein.
Schaltet aus, wenn gedrückt gehalten.
Wählt die verfügbaren Quellen (TUNER, USB/ iPod, CD, AUX, STANDBY),
wenn die Stromversorgung eingeschaltet ist.
• Wenn die gewählte Quelle startbereit ist, startet auch die Wiedergabe.
• „iPod“ oder „CD“ sind nur wählbar, wenn ein iPod angeschlossen oder eine Disc
eingelegt ist.
Lautstärke-Regler
(drehen)
Zum Einstellen des Lautstärkepegels.
Wählen Sie Gegenstände.
Lautstärke-Regler
(drücken)
Bestätigt die Auswahl.
Schaltet auf die [FUNCTION]-Einstellungen.
Wählt die UKW-Frequenzbänder (FM1/ FM2/ FM3) oder MW/ LW, wenn
„TUNER“ als Quelle gewählt ist.
Schaltet auf Musiksuche.
1 (–) / 2 (+)
6(
)
Wählt den vorherigen/nächsten Ordner.
Schaltet Wiedergabe einer Disc/ eines USB-Geräts/ eines iPod auf Pause/
Fortsetzen.
4/¢
Sucht nach einem Radiosender.
Wählt Track/Datei.
Läuft in Tracks schnell vor/zurück, wenn gedrückt gehalten.
SCRL DISP
Ändert die Display-Information.
Scrollt die Display-Informationen, wenn gedrückt gehalten.
Schaltet direkt auf Uhreinstellmodus (Seite 7), wenn gedrückt gehalten,
während der Uhr-Anzeigebildschirm erscheint.
iPod
Bei
:
Wählt „iPod“ als Quelle.
Schaltet auf den Steuermodus (MODE ON/ MODE OFF) für iPodWiedergabe um, wenn gedrückt gehalten. (Seite 12)
Bei
:
Wählt Zufallswiedergabe. (Seite 11)
Kehrt zum vorherigen Element zurück.
Verlässt den Einstellmodus, wenn gedrückt gehalten.
6
GE_KDC-4054UB_001A_f.indd 6
8/25/11 5:55:49 PM
Erste Schritte
Abbrechen der Display-Demonstrationen
Wenn Sie die Stromversorgung einschalten (nach dem Rücksetzen des Geräts), erscheint
folgende Anzeige im Display:
[CANCEL DEMO] \ [PRESS] \ [VOLUME KNOB]
1 Drücken Sie den Lautstärke-Regler.
[YES] ist als ursprüngliches Setup gewählt.
2 Drücken Sie den Lautstärke-Regler erneut zum Bestätigen.
[DEMO OFF] erscheint.
Wenn etwa 15 Sekunden lang keine Bedienung vorgenommen wird, oder wenn Sie den
Lautstärke-Regler drehen, um [NO] in Schritt 2 zu wählen, erscheint [DEMO MODE], und die
Display-Demonstration beginnt.
DEUTSCH
Die Display-Demonstration ist immer eingeschaltet, ausgenommen wenn Sie sie abbrechen.
Einstellen des Demonstrationsmodus
1 Drücken Sie den Lautstärke-Regler, um auf [FUNCTION] zu schalten.
2 Drehen Sie den Lautstärkeregler zum Wählen von [DEMO MODE], und drücken Sie
dann zum Eingeben.
3 Drehen Sie den Lautstärke-Regler, um [ON] oder [OFF] zu wählen.
Wenn [ON] gewählt ist, beginnt die Display-Demonstration, wenn etwa 20 Sekunden lang
keine Bedienung vorgenommen wird.
4 Halten Sie
gedrückt, um den Vorgang fertigzustellen.
Uhr einstellen
1 Drücken Sie den Lautstärke-Regler, um auf den [FUNCTION]-Modus zu schalten.
2 Drehen Sie den Lautstärkeregler zum Wählen von [SETTINGS], und drücken Sie dann
zum Eingeben.
3 Drehen Sie den Lautstärkeregler zum Wählen von [CLOCK], und drücken Sie dann zum
Eingeben.
4 Drehen Sie den Lautstärkeregler zum Wählen von [CLOCK ADJUST] / [CLOCK ADJ], und
drücken Sie dann zum Eingeben.
Die Stunden-Uhranzeige blinkt im Display.
5 Drehen Sie den Lautstärkeregler zum Einstellen der Stunde, und drücken Sie dann für
die Minuteneinstellung.
Die Minuten-Uhranzeige blinkt im Display.
6 Drehen Sie den Lautstärke-Regler zum Einstellen der Minute, und drücken Sie dann zum
Bestätigen.
Drücken Sie 4 / ¢, um zwischen der Stunden- und Minuteneinstellung umzuschalten.
7 Halten Sie
gedrückt, um den Vorgang fertigzustellen.
Werkseitige Einstellungen vor dem Betrieb
1 Drücken Sie SRC, um auf [STANDBY]-Modus zu schalten.
2 Drücken Sie den Lautstärke-Regler, um auf den [FUNCTION]-Modus zu schalten.
3 Drehen Sie den Lautstärkeregler zum Wählen von [INITIAL SET], und drücken Sie dann
zum Eingeben.
4 Drehen Sie den Lautstärke-Regler, um eine Auswahl vorzunehmen, und drücken Sie
dann zum Bestätigen.
Siehe Tabelle auf Seite 8 zur Auswahl.
5 Halten Sie
gedrückt, um den Vorgang fertigzustellen.
Fortsetzung...
7
GE_KDC-4054UB_001A_f.indd 7
8/25/11 5:55:51 PM
Gegenstand
Wählbare Einstellung (Preset: *)
PRESET TYPE
NORMAL/ NORM *: Speichert einen Sender für jede Sendespeichertaste in jedem Frequenzband (FM1/
FM2/ FM3/ MW/ LW). ; MIX: Speichert einen Sender für jede Sendespeichertaste ungeachtet des
Frequenzbands (FM1/ FM2/ FM3/ MW/ LW).
KEY BEEP
ON */ OFF: Aktiviert/deaktiviert den Tastendruck-Signalton.
RUSSIAN SET
ON: Ordnername, Dateiname, Songtitel, Interpretenname, Albumname werden auf russisch angezeigt (wo
zutreffend). ; OFF *: Hebt auf.
P-OFF WAIT
Stellt die Zeitdauer ein, bis das Gerät automatisch ausschaltet (im Standby-Modus), um Batteriestrom zu
sparen.
––– : Hebt auf ; 20M *: 20 Minutes ; 40M: 40 Minutes ; 60M: 60 Minutes
BUILT-IN AUX/ ON *: Aktiviert Sie „AUX“ in der Quellenwahl. Ton von der angeschlossenen externen Komponente wird
BUILTIN AUX
über die Fahrzeuglautsprecher ausgegeben. ; OFF: Deaktivieren Sie „AUX“ in der Quellenwahl.
CD READ
1 *: Hiermit wird automatisch zwischen Discs mit Audiodateien und Musik-CDs unterschieden. ; 2: Hiermit
wird die Wiedergabe zwangsweise als Musik-CD durchgeführt. Es kommt kein Ton, wenn eine Disc mit
Audiodateien abgespielt wird.
SWITCH PREOUT/ Außer bei
:
SWITCH PRE
REAR */ SUB-W: Wählt, ob hintere Lautsprecher oder ein Subwoofer an die Line-Out-Buchsen an der
Rückseite des Geräts angeschlossen sind (über einen externen Verstärker).
SP SELECT
OFF */ 5/4/ 6 × 9/6/ OEM: Wählt die Lautsprechergröße für optimale Leistung.
F/W UP xx.xx
YES *: Startet die Aktualisierung der Firmware. ; NO: Bricht ab (Aktualisierung wird nicht ausgeführt).
Einzelheiten darüber, wie Sie die Firmware aktualisieren können, siehe: www.kenwood.com/cs/ce/
Rundfunkempfang
Halten Sie für etwa 2 Sekunden gedrückt, um den aktuellen Sender zu speichern.
Drücken Sie kurz, um den gespeicherten Sender aufzurufen.
1 Drücken Sie SRC zum Wählen von „TUNER“.
2 Drücken Sie
wiederholt, um ein Frequenzband auzuwählen (FM1/ FM2/ FM3/ MW/
LW).
3 Drücken Sie 4 / ¢, um einen Sender zu suchen.
8
GE_KDC-4054UB_001A_f.indd 8
8/25/11 5:55:51 PM
Anpassen der Einstellungen im [SETTINGS]-Modus
Gegenstand
Wählbare Einstellung (Preset: *)
LOCAL SEEK
ON: Sucht nur UKW-Sender mit gutem Empfang. ; OFF *: Hebt auf.
SEEK MODE
Wählt den Abstimmmodus für 4 / ¢-Tasten.
AUTO1 *: Sucht automatisch nach einem Sender. ; AUTO2: Suche nach den im Senderspeicher abgelegten
Sendern. ; MANUAL: Sucht manuell nach einem Sender.
AUTO MEMORY YES *: Beginnt automatisch die Speicherung von 6 Sendern mit gutem Empfang. ; NO: Hebt auf
(automatische Speicherung ist nicht aktiviert). (Nur wählbar, wenn [NORMAL] / [NORM] für
[PRESET TYPE] gewählt ist.) (Seite 7, 8)
MONO SET
ON: Verbessern Sie den UKW-Empfang (aber der Stereoeffekt kann verloren gehen). ; OFF *: Hebt auf
(Stereoeffekt wird wieder hergestellt).
PTY SEARCH
Wählt den verfügbaren Programmtyp (siehe Tabelle unten). Dann 4 / ¢ drücken, um den Suchlauf
zu starten.
Drücken Sie den Lautstärkeregler zum Einschalten der PTY-Sprachauswahl. Drehen Sie den Lautstärkeregler
zum Wählen der PTY-Sprache (ENGLISH */ FRENCH/ GERMAN), und drücken Sie dann zum Bestätigen.
TI
ON: Lassen Sie das kurzzeitig auf Verkehrsinformation schalten. ; OFF *: Hebt auf.
NEWS SET
00M – 90M: Stellt die Zeit zum Empfang der nächsten Nachrichtensendung ein. ; OFF *: Hebt auf.
AF SET
ON *: Sucht automatisch einen anderen Sender auf, der das gleiche Programm im gleichen Radio Data
System-Netzwerk sendet und einen besseren Empfang aufweist, falls der aktuelle Empfang schlecht ist. ;
OFF: Hebt auf.
REGIONAL
ON *: Schaltet auf einen anderen Sender in der spezifischen Region nur mit der „AF“-Steuerung. ;
OFF: Hebt auf.
AUTO TP SEEK/ ON *: Sucht automatisch einen Sender mit besserem Empfang auf, wenn der Empfang eines
ATP SEEK
Verkehrsinformationen-Senders schlecht ist. ; OFF: Hebt auf.
DEUTSCH
Während des Rundfunkempfangs...
1 Drücken Sie den Lautstärke-Regler, um auf den [FUNCTION]-Modus zu schalten.
2 Drehen Sie den Lautstärkeregler zum Wählen von [SETTINGS], und drücken Sie dann
zum Eingeben.
3 Drehen Sie den Lautstärke-Regler, um eine Auswahl vorzunehmen, und drücken Sie
dann zum Bestätigen.
Siehe Tabelle unten zur Auswahl.
4 Halten Sie
gedrückt, um den Vorgang fertigzustellen.
[MONO SET/ PTY SEARCH] ist nur wählbar, wenn die Quelle „FM“ ist.
[TI/ NEWS SET/ AF SET/ REGIONAL/ AUTO TP SEEK/ ATP SEEK] ist nur wählbar, wenn die Quelle „FM“ ist. Wenn eine
andere Wiedergabequelle gewählt ist, sind diese Einstellungen unter dem Element [TUNER SET] wählbar. (Seite 17)
Verfügbare Programmart ([SPEECH] : Elemente in weißer Schrift. ; [MUSIC] : Elemente in schwarzer Schrift) :
SPEECH
MUSIC
NEWS
AFFAIRS
INFO
SPORT
EDUCATE
DRAMA
CULTURE
SCIENCE
VARIED
POP M (Musik) ROCK M (Musik) EASY M (Musik)
LIGHT M (Musik) CLASSICS
OTHER M (Musik) WEATHER
FINANCE
CHILDREN
SOCIAL
RELIGION
PHONE IN
TRAVEL
LEISURE
JAZZ
COUNTRY
NATION M (Musik)
OLDIES
FOLK M (Musik) DOCUMENT
Das Gerät sucht den Programmtyp, der unter [SPEECH] oder [MUSIC] kategorisiert ist, wenn gewählt.
Die Radio Data System-Funktion funktioniert nur dort, wo der Dienst durch einen Sender
unterstützt wird.
Wenn die Lautstärke während des Empfangs von Verkehrsinformationen eingestellt wird,
wird die eingestellte Lautstärke automatisch gespeichert. Wird die Verkehrsfunk-Funktion
das nächste Mal aufgerufen, wird diese Einstellung übernommen.
9
GE_KDC-4054UB_001A_f.indd 9
8/25/11 5:55:53 PM
Hören von Disc/ USB-Gerät/ iPod
Ladeschlitz
Disc auswerfen. („NO DISC“ erscheint, und die Anzeige „IN“ erlischt.)
Drücken, um ein Musikstück/eine
Datei auszuwählen.
Halten, um vor/zurück zu laufen.
Drücken, um den vorherigen/
nächsten Ordner zu wählen.
• Nicht verfügbar, wenn „ALL RANDOM“
gewählt ist.
Starten des Abspielens einer Disc
1 Drücken Sie SRC, um das Gerät
einzuschalten.
2 Setzen Sie eine Disc in den Ladeschlitz
ein.
Wiedergabe beginnt automatisch.
3 Drücken Sie die Zifferntaste
6(
) zum Fortsetzen/Pausieren der
Wiedergabe (wenn erforderlich).
Discs, die nicht verwendet werden
können
Discs mit nicht runder Form.
Discs die auf der Aufnahme-Oberfläche eingefärbt
oder verschmutzt sind.
Eine Recordable/ReWritabel Disc, die nicht
abgeschlossen (finalisiert) wurde, kann
nicht wiedergegeben werden. (Einzelheiten
hinsichtlich der Finalisierung finden Sie in den
Bedienungsanleitungen Ihrer Brennsoftware sowie
Ihres Disc-Recorders.)
8-cm-CDs können nicht verwendet werden.
Falls Sie dennoch versuchen, eine solche CD mit
einem Adapter zu verwenden, kann es zu einer
Fehlfunktion kommen.
USB-Anschluss
Die Abdeckung
offenschieben, und dann
die folgende Verbindung
herstellen.
Die Quelle wird
automatisch umgeschaltet,
und die Wiedergabe startet.
Anschließen eines
USB-Geräts
CA-U1EX (Max.: 500 mA)
(optionales Zubehörteil)
USB-Gerät (im Handel erhältlich)
Anschließen eines iPod
(für
)
Apple iPod
(im Handel erhältlich)
KCA-iP102
(optionales Zubehörteil)
10
GE_KDC-4054UB_001A_f.indd 10
8/25/11 5:55:53 PM
Drücken Sie die Zifferntaste 4 (REP)
wiederholt, um eine Auswahl zu treffen.
Audio CD : TRACK/ TRAC (Titel) REPEAT,
REPEAT OFF
AAC/MP3/WMA : FILE REPEAT, FOLDER/
FOLD (Ordner) REPEAT, REPEAT OFF
iPod : FILE REPEAT, REPEAT OFF
Auswählen der Zufallswiedergabe
Drücken Sie die Zifferntaste 3 (ALL RDM)
oder
wiederholt, um eine Auswahl
zu treffen.
Audio CD : DISC RANDOM, RANDOM OFF
AAC/MP3/WMA/iPod : FOLDER/ FOLD
(Ordner) RANDOM, RANDOM OFF
Für AAC/MP3/WMA/iPod : Halten Sie die
Zifferntaste 3 (ALL RDM) oder
gedrückt,
um um „ALL RANDOM“ zu wählen.
– Trifft nur zu, wenn „RANDOM OFF“
anfänglich gewählt ist.
– Bei
: Schaltet das Anzeigeelement des iPods
auf „songs“ um.
Auswählen eines Ordners/Tracks/
Datei
1 Drücken Sie , um auf Musiksuche zu
schalten.
„SEARCH“ erscheint, und dann erscheint
der aktuelle Dateiname im Display.
2 Drehen Sie den Lautstärke-Regler, um
einen Ordner/ein Musikstück/eine Datei
zu wählen, und drücken Sie dann zum
Bestätigen.
Zum Zurückkehren zur obersten Ordnerebene
(oder dem ersten Musikstück auf einer Audio
CD) drücken Sie die Zifferntaste 5.
Zum Zurückkehren zum vorherigen Ordner
drücken Sie .
Zum Beenden Sie des Musiksuche-Modus
halten Sie
gedrückt.
< oder > im Display zeigt an, dass das
vorherige/nächste Element verfügbar ist.
Für USB-Gerät * und iPod: Zum Überspringen
der Suche 4 / ¢ drücken.
* Dieser Vorgang ist nur für Dateien möglich,
die in einer mit dem Kenwood Music Editor
erstellten Datenbank registriert sind. (Siehe
rechte Spalte.)
GE_KDC-4054UB_001A_f.indd 11
Über Audiodateien
Wiederzugebende Audiodateien: AAC-LC (.m4a),
MP3 (.mp3), WMA (.wma)
Abspielbare Disc-Medien: CD-R/RW/ROM
Abspielbare Disc-Dateiformate: ISO 9660 Level 1/2,
Joliet, Romeo, Lange Dateinamen.
Mögliche Dateisysteme auf USB-Geräten: FAT16, FAT32
Obwohl die Audiodateien den oben aufgeführten
Standards entsprechen, kann das Abspielen unter
Umständen auf Grund von Typ oder Zustand der Medien
bzw. Geräte nicht möglich sein.
Wissenswertes über USB-Geräte
Diese Einheit kann AAC/MP3/WMA-Dateien abspielen,
die auf einem USB-Massenspeichergerät gespeichert
sind.
Installieren Sie das USB-Gerät an einer Stelle, an der
es Sie nicht beim sicheren Fahren Ihres Fahrzeuges
behindert.
Sie können kein USB-Gerät über einen USB-Hub und ein
Multi Card Reader-Gerät anschließen.
Stellen Sie sicher, dass alle wichtigen Daten mit Backup
gesichert sind, um Datenverlust zu vermeiden.
Der Anschluss eines Kabels mit einer Gesamtlänge
von mehr als 5 m kann eine fehlerhafte Wiedergabe
verursachen.
DEUTSCH
Auswählen der
Wiederholwiedergabe
Wissenswertes über den „KENWOOD
Music Editor“
Dieses Gerät unterstützt die PC-Anwendung
„KENWOOD Music Editor Light ver1.1“ oder höher.
Wenn Sie eine Audiodateien verwenden, der
mit „KENWOOD Music Editor Light ver1.1“
Dateiinformationen beigefügt wurden, können Sie
mit der Funktion Musiksuche nach Titeln, Alben oder
Interpreten suchen.
In der Bedienungsanleitung werden mit dem Begriff
„USB device“ Geräte bezeichnet, die Audiodateien
enthalten, denen mit KENWOOD Music Editor
Dateiinformationen beigefügt wurden.
„KENWOOD Music Editor Light ver1.1“ ist auf der
folgenden Webseite erhältlich:
www.kenwood.com/cs/ce/
Näheres über „KENWOOD Music Editor Light ver1.1“
finden Sie auf der oben genannten Webseite oder in der
Hilfe-Datei der Anwendung.
11
8/25/11 5:55:55 PM
Funktionen von
mit iPod
Wählen eines Musikstücks nach
Alphabet
Anpassen der Einstellungen im
[SETTINGS]-Modus
1 Drücken Sie , um auf Musiksuche zu
schalten.
„SEARCH“ erscheint.
2 Drehen Sie den Lautstärke-Regler, um
eine Kategorie zu wählen, und drücken
Sie dann zum Bestätigen.
3 Drücken Sie
erneut, um auf
alphabetische Musiksuche zu schalten.
„SEARCH <– – –>“/ „SRCH <– – –>“
erscheint.
4 Drehen Sie den Lautstärke-Regler, um
das Zeichen auswählen, nach dem
gesucht werden soll.
5 Drücken Sie 4 / ¢, um auf die
Eingabeposition umzuschalten.
Sie können bis zu drei Zeichen eingeben.
6 Drücken Sie den Lautstärke-Regler zum
Starten der Suche.
7 Drehen Sie den Lautstärke-Regler, um
einen Ordner/ein Musikstück/eine Datei
zu wählen, und drücken Sie dann zum
Bestätigen.
Zum Zurückkehren zum vorherigen Ordner
drücken Sie .
Zum Zurückschalten zum Top-Menü
drücken Sie die Zifferntaste 5.
Zum Beenden Sie des Alphabetsuchegedrückt.
Modus halten Sie
Eine längere Suchzeit ist erforderlich, wenn
viele Musikstücke oder Wiedergabelisten
im iPod sind.
Um nach einem anderen Zeichen als die
Buchstaben A bis Z oder die Zahlen 0 bis 9
zu suchen, geben Sie nur „ *“ ein.
Der Artikel (ein, eine, einer, der) des
Namens des Musikstücks wird bei der
Suche übersprungen.
Während des Hörens von einem iPod...
1 Drücken Sie den Lautstärke-Regler, um
auf den [FUNCTION]-Modus zu schalten.
2 Drehen Sie den Lautstärkeregler zum
Wählen von [SETTINGS], und drücken
Sie dann zum Eingeben.
3 Drehen Sie den Lautstärkeregler zum
Wählen von [SKIP SEARCH], und
drücken Sie dann zum Eingeben.
4 Drehen Sie den Lautstärke-Regler,
um eine Auswahl vorzunehmen, und
drücken Sie dann zum Bestätigen.
0.5% (Anfänglich)/ 1%/ 5%/ 10% :
Stellt den Grad des Überspringens bei
der Suche nach einem Musikstück im
Musiksuche-Modus ein.
(Wenn 4 / ¢ gedrückt gehalten
wird, werden Musikstücke bei 10%
übersprungen, ungeachtet der
Einstellung.)
5 Halten Sie
gedrückt, um den Vorgang
fertigzustellen.
Wählen von App & iPod-Steuermodus
Halten Sie iPod gedrückt, um eine Wahl
zu treffen.
MODE ON: Steuern Sie den iPod vom iPod *.
„APP&iPod MODE“/ „APP&iPod“ erscheint
im Display.
MODE OFF: Steuern Sie den iPod vom Gerät.
* Sie können weiterhin Wiedergabe/
Pause, Auswahl von Dateien, Vorspulen/
Zurückspulen von Dateien vom Gerät steuern.
Über kompatible iPod/iPhone Geräte
Made for
– iPod touch (1st, 2nd, 3rd und 4th generation)
– iPod classic
– iPod with video
– iPod nano (1st, 2nd, 3rd, 4th, 5th und 6th generation)
– iPhone 4
– iPhone 3GS
– iPhone 3G
– iPhone
Für die neueste Kompatibilitätsliste und SoftwareVersion des iPod/iPhone siehe:
www.kenwood.com/cs/ce/ipod
Wenn Sie die Wiedergabe nach dem Anschließen
des iPod starten, werden zuerst die bereits vom iPod
abgespielten Musiktitel gespielt.
In diesem Fall erscheint die Anzeige „RESUMING“
ohne Anzeige von Ordnername usw. Durch Ändern
des Anzeigeelements wird der korrekte Titel usw.
angezeigt.
Sie können den iPod nicht bedienen, wenn „KENWOOD“
oder „✓“ auf dem iPod angezeigt wird.
12
GE_KDC-4054UB_001A_f.indd 12
8/25/11 5:55:55 PM
Hören von den anderen externen
Komponenten
DEUTSCH
Vorbereitung: Stellen Sie sicher, dass [ON] für [BUILT-IN AUX] / [BUILTIN AUX] gewählt ist.
(Seite 7, 8)
1 Drücken Sie SRC zum Wählen von
„AUX“.
2 Schalten Sie die externe
Komponente ein und starten Sie die
Wiedergabe.
3 Drehen Sie den Lautstärke-Regler,
um die Lautstärke einzustellen.
Auxiliary-Eingabebuchse
3,5-mm-Stereo-Ministecker
(im Handel erhältlich)
Tragbares Audiogerät
(im Handel erhältlich)
Verwendung der Fernbedienung
(RC-405)
Ausgerüstet für
Fernbedienungssensor
Nicht hellem Sonnenlicht aussetzen.
Vorbereitung:
Bei der ersten Verwendung der
Fernbedienung ziehen Sie das Schutzblatt
heraus.
Schutzblatt
Wenn die Wirksamkeit der Fernbedienung
nachlässt, die Batterie wechseln.
2
3
4
1
Fortsetzung...
13
GE_KDC-4054UB_001A_f.indd 13
8/25/11 5:55:56 PM
RC-405
(Nicht verwendet.)
Vorsicht:
Bewahren Sie die Fernbedienung nicht an
heißen Orten wie beispielsweise auf dem
Armaturenbrett auf.
Lithium-Batterie.
Wenn Sie die Batterie falsch einlegen, besteht
die Gefahr einer Explosion. Ersetzen sie die
Batterie ausschließlich durch gleiche Batterien
oder durch Batterien desselben Typs.
Batteriepackung oder Batterien sollten
keiner großen Hitze, wie beispielsweise
Sonneneinstrahlung, Feuer oder
Ähnlichem, ausgesetzt werden.
Bewahren Sie Batterien bis zur Verwendung
außerhalb der Reichweite von Kindern und
in der Originalverpackung auf. Entsorgen
Sie gebrauchte Batterien umgehend. Bei
Verschlucken der Batterie sofort einen Arzt
aufsuchen.
Grundbedienung
Direktzugriff-Senderabstimmung
SRC
VOL
1 Drücken Sie FM+ /AM–, um ein
Frequenzband zu wählen.
2 Drücken Sie DIRECT, um auf
Direktzugriff-Abstimmmodus zu schalten.
„– – – –“ erscheint im Display.
3 Drücken Sie die Zifferntasten, um die
Frequenz einzugeben.
4 Drücken Sie 4 / ¢ ( + ), um nach der
Frequenz zu suchen.
Zum Beenden Sie des DirektzugriffAbstimmmodus halten Sie
oder EXIT
gedrückt.
Wenn 10 Sekunden nach Schritt 3 keine
Bedienung vorgenommen wird, wird
Direktzugriff-Abstimmung automatisch
automatisch abgebrochen.
: Wählt die verfügbaren Quellen.
: Zum Einstellen des
Lautstärkepegels.
5 / ∞ : Sucht nach Ordner/Track/Dateien
(im Musiksuche-Modus).
ENT
: Schaltet die Wiedergabe auf
Pause/Fortfahren.
Bestätigt die Auswahl (im
Musiksuche-Modus).
*AM– / #FM+ : Wählt Frequenzbänder aus.
Auswahl von Ordern
4 / ¢ (+) : Sucht nach einem
Radiosender.
Wählt Track/Datei.
1–6
: Wählt den voreingestellten
Sender.
AUD
: Schaltet direkt auf [AUDIO CTRL]Einstellungen.
ATT
: Dämpft den Ton. (Zum
Zurückschalten auf den
vorherigen Pegel drücken Sie die
Taste erneut.)
: Kehrt zum vorherigen Element
zurück (im Musiksuche-Modus.)
EXIT
: Beenden des Einstellmodus.
Direkte Musiksuche
• Nicht verfügbar, wenn Zufallswiedergabe
gewählt ist.
• Nicht für iPod und Kenwood Music Editor
verfügbar.
1 Drücken Sie DIRECT, um auf Direkte
Musiksuche zu schalten.
„– – –“ erscheint.
2 Drücken Sie die Zifferntasten, um die
gewünschte Spurnummer einzugeben.
3 Drücken Sie 4 / ¢, um Musik zu
suchen.
Zum Beenden Sie des Direkte MusiksucheModus halten Sie
oder EXIT gedrückt.
14
GE_KDC-4054UB_001A_f.indd 14
8/25/11 5:55:58 PM
1 Drücken Sie den Lautstärke-Regler, um auf den [FUNCTION]-Modus zu schalten.
2 Drehen Sie den Lautstärkeregler zum Wählen von [AUDIO CONTROL] / [AUDIO CTRL]
oder [SETTINGS], und drücken Sie dann zum Eingeben.
3 Drehen Sie den Lautstärke-Regler, um eine Auswahl vorzunehmen, und drücken Sie
dann zum Bestätigen.
Siehe Tabelle unten zur Auswahl.
Wiederholen Sie Schritte 3, bis der gewünschten Gegenstand gewählt/aktiviert ist.
Zum Zurückkehren zum vorherigen Element drücken Sie .
4 Halten Sie
gedrückt, um den Vorgang fertigzustellen.
[AUDIO CONTROL] / [AUDIO CTRL] : Beim Hören einer beliebigen Quelle außer im
STANDBY-Betrieb...
Gegenstand
Wählbare Einstellung (Preset: *)
SUB-W LEVEL
Außer bei
:
–15 — +15 (Preset: 0): Stellt den Subwoofer-Ausgangspegel ein.
BASS LEVEL
–8 — +8 (Preset: 0): Klangeinstellung nach Quelle: Stellen Sie den Pegel zum Speichern in jeder
Quelle ein. (Bevor Sie eine Einstellung vornehmen, wählen Sie eine anzupassende Quelle aus.)
MID LEVEL
DEUTSCH
Funktionseinstellungen
TRE LEVEL
EQ PRO
BASS ADJUST BASS CTR FRQ/ BASS C FRQ
BASS LEVEL
60/ 80/ 100 */ 200: Wählt die Mittenfrequenz.
–8 — +8 (Preset: 0): Stellt den Pegel ein.
BASS Q FACTOR/ BASS Q FCTR 1.00 */ 1.25/ 1.50/ 2.00: Stellt den Qualitätsfaktor ein.
MID ADJUST
TRE ADJUST
BASS EXTEND
ON: Schaltet den erweiterten Bass ein. ; OFF *: Hebt auf.
MID CTR FRQ/ MID C FRQ
0.5K/ 1.0K */ 1.5K/ 2.5K: Wählt die Mittenfrequenz.
MID LEVEL
–8 — +8 (Preset: 0): Stellt den Pegel ein.
MID Q FACTOR/ MID Q FCTR
0.75/ 1.00 */ 1.25: Stellt den Qualitätsfaktor ein.
TRE CTR FRQ/ TRE C FRQ
10.0K/ 12.5K */ 15.0K/ 17.5K: Wählt die Mittenfrequenz.
TRE LEVEL
–8 — +8 (Preset: 0): Stellt den Pegel ein.
PRESET EQ
NATURAL */ USER/ ROCK/ POPS/ EASY/ TOP40/ JAZZ/ POWERFUL: Wählt einen VorwahlKlangmodus, der für das Musikgenre geeignet ist. (Wählt [USER] zur Verwendung der
benutzerangepassten Einstellungen für Tiefen, Mitten und Höhen.)
BASS BOOST
B.BOOST LV1/ B.BOOST LV2/ B.BOOST LV3: Wählt Ihren bevorzugten Bass-Boost-Pegel. ;
B.BOOST OFF *: Hebt auf.
LOUDNESS
LOUDNESS LV1 */ LOUD LV1 */ LOUDNESS LV2/ LOUD LV2: Wählt Ihre bevorzugten niedrigen und
hohen Frequenzen, um eine gute Klangwirkung auch bei niedriger Lautstärke zu erhalten. ;
LOUDNESS OFF/ LOUD OFF: Hebt auf.
BALANCE
L15 — R15 (Preset: 0): Stellt die Balance zwischen linkem und rechtem Lautsprecherausgang ein.
FADER
R15 — F15 (Preset: 0): Stellt die Ausgangsbalance zwischen vorderen und hinteren Lautsprechern ein.
:
SUBWOOFER SET/ Außer bei
SUB-W SET
ON *: Schaltet den Subwoofer-Ausgang ein. ; OFF: Hebt auf.
Fortsetzung...
15
GE_KDC-4054UB_001A_f.indd 15
8/25/11 5:56:01 PM
[AUDIO CONTROL] / [AUDIO CTRL] : Beim Hören einer beliebigen Quelle außer im
STANDBY-Betrieb...
Gegenstand
Wählbare Einstellung (Preset: *)
DETAILED SET/ DETAIL SET
:
LPF SUBWOOFER/ Außer bei
LPF SUB-W
THROUGH *: Alle Signale werden zum Subwoofer gesendet. ; 85HZ/ 120HZ/ 160HZ: Höhere
Frequenzen als 85 Hz/ 120 Hz/ 160 Hz werden abgeschnitten.
SUB-W PHASE Außer bei
:
REVERSE/ REV (180°)/ NORMAL/ NORM (0°) *: Wählt den Phasenwinkel des Subwoofer-Ausgangs
so, dass er dem Lautsprecher-Ausgang für optimale Leistung entspricht. (Nur wählbar, wenn eine
andere Einstellung als [THROUGH] für [LPF SUBWOOFER/ LPF SUB-W] gewählt ist.)
SUPREME SET
ON *: Erzeugt realistischen Klang durch Interpolation der Hochfrequenzkomponenten erzeugt, die bei
AAC/ MP3/ WMA-Audiokompression verlorengehen. ; OFF: Hebt auf. (Nur wählbar bei Wiedergabe
einer AAC/ MP3/ WMA-Disc oder eines USB-Geräts mit Ausnahme von iPod.)
VOLUME OFFSET/ –8 — +8 (für AUX) ; –8 — 0 (für andere Quellen): Speichert die Lautstärkepegeleinstellung jeder
Quelle als Vorwahl. Der Lautstärkepegel wird automatisch angehoben oder abgesenkt, wenn Sie die
VOL OFFSET
Quelle ändern. (Bevor Sie eine Einstellung vornehmen, wählen Sie eine anzupassende Quelle aus.)
(Preset: 0)
Außer bei
:
[SUB-W LEVEL/ SUBWOOFER SET/ SUB-W SET/ LPF SUBWOOFER/ LPF SUB-W/ SUB-W PHASE] ist nur wählbar, wenn
[SWITCH PREOUT/ SWITCH PRE] auf [SUB-W] gestellt ist. (Seite 7, 8)
[SUB-W LEVEL/ LPF SUBWOOFER/ LPF SUB-W/ SUB-W PHASE] ist nur wählbar, wenn [SUBWOOFER SET/ SUB-W SET]
auf [ON] gestellt ist.
[SETTINGS]
Gegenstand
AUX NAME SET/
AUX NAME
CLOCK
CLOCK ADJUST/
CLOCK ADJ
TIME SYNC
DISP & KEY (für
COLOR SELECT
DISP DIMMER
TEXT SCROLL
KEY DIMMER
Wählbare Einstellung (Preset: *)
AUX */ DVD/ PORTABLE/ GAME/ VIDEO/ TV: Wählt den gewünschten Namen für die angeschlossene
Komponente. (Nur wählbar, wenn „AUX“ als Quelle gewählt ist.)
(Einzelheiten siehe Seite 7.)
ON *: Synchronisiert die Radio Data System-Senderzeitdaten und die Uhr des Geräts. ; OFF: Hebt auf.
)
VARIABLE SCAN */ COLOR 01 – COLOR 24/ USER: Wählen Sie Ihre bevorzugte TastenBeleuchtungsfarbe.
Sie können Ihre eigene Farbe erzeugen (wenn [COLOR 01] – [COLOR 24] oder [USER] gewählt ist). Die
erzeugte Farbe kann gewählt werden, wenn Sie [USER] wählen.
1. Halten Sie den Lautstärke-Regler gedrückt, um auf Detail-Farbabstimmung zu schalten.
2. Drücken Sie 4 / ¢, um die Farbe (R/ G/ B) zum Anpassen zu wählen. Drehen Sie den
Lautstärke-Regler, um den Pegel einzustellen (0 — 9).
3. Drücken Sie den Lautstärke-Regler zum Bestätigen und Beenden.
ON: Blendet die Displaybeleuchtung Geräts ab. ; OFF *: Hebt auf.
AUTO */ ONCE: Wählt automatisches Scrollen der Displayinformationen, oder einmaliges Scrollen. ;
OFF: Hebt auf.
DIMMER LV1: Blendet die Tastenbeleuchtung konstant ab. ; DIMMER LV2: Blendet die
Tastenbeleuchtung stärker als DIMMER LV1 ab. ; DIMMER OFF *: Hebt auf.
16
GE_KDC-4054UB_001A_f.indd 16
8/25/11 5:56:02 PM
[SETTINGS]
Gegenstand
Wählbare Einstellung (Preset: *)
)
DISP DIMMER ON: Blendet die Displaybeleuchtung Geräts ab. ; OFF *: Hebt auf.
TEXT SCROLL AUTO */ ONCE: Wählt automatisches Scrollen der Displayinformationen, oder einmaliges Scrollen. ;
OFF: Hebt auf.
TUNER SET
TI/ NEWS SET/ AF SET/ REGIONAL/ AUTO ATP SEEK/ ATP SEEK: Nur wählbar, wenn eine andere Quelle
als Tuner-Quelle gewählt ist. (Einzelheiten siehe Seite 9.)
DEUTSCH
DISPLAY (für
Störungssuche
Symptom
Es wird kein Ton gehört.
Abhilfe/Ursache
Die Lautstärke auf den optimalen Pegel einstellen. / Prüfen Sie die Kabel und
Verbindungen.
„PROTECT“ erscheint, und es können keine Prüfen Sie, um sicherzustellen, dass die Klemmen der Lautsprecherkabel richtig
Bedienungen vorgenommen werden.
mit Isolierband abgedeckt sind, und setzen Sie dann das Gerät zurück. Wenn
„PROTECT“ nicht erscheint, wenden Sie sich an den Kundendienst.
Es wird kein Ton gehört. / Die Einheit
schaltet nicht ein. / Die im Display
gezeigte Information ist falsch.
Die Anschlüsse sind verschmutzt. Reinigen Sie die Anschlüsse. (Seite 4)
Das Gerät funktioniert überhaupt nicht.
Setzen Sie das Gerät zurück. (Seite 4)
[P-OFF WAIT] funktioniert nicht.
Schalten Sie den Demonstrationsmodus aus. (Seite 7)
Der Radioempfang ist schlecht. /
Statikrauschen beim Radiohören.
Schließen Sie das Antennenkabel fest an. / Ziehen Sie die Antenne vollständig
heraus.
„IN“ blinkt.
Der CD-Player funktioniert nicht ordnungsgemäß. Setzen Sie die Disc erneut
richtig ein. Wenn sich der Zustand nicht verbessert, schalten Sie das Gerät ein und
wenden sich an den Kundendienst.
CD-R/CD-RW kann nicht abgespielt
werden, und Musikstücke können nicht
übersprungen werden.
Setzen Sie eine finalisierte CD-R/CD-RW (mit der zur Aufnahme verwendeten
Komponente finalisieren) ein.
Der Disc-Klang ist manchmal
unterbrochen.
Stoppen Sie die Wiedergabe beim Fahren auf einer holperigen Straße. / Ändern Sie
die Disc. / Prüfen Sie die Kabel und Verbindungen.
„NA FILE“ erscheint.
Das Gerät gibt eine nicht unterstützte Audiodatei wieder.
„NO DISC“ erscheint.
Setzen Sie eine abspielbare Disc in den Ladeschlitz ein.
„TOC ERROR“ erscheint.
Die CD ist sehr verschmutzt. / Die CD ist verkehrt herum eingelegt. / Die CD ist stark
zerkratzt. Tauschen Sie die Disc aus.
„ERROR 99“ erscheint.
Das Gerät arbeitet aufgrund eines internen Fehlers nicht ordnungsgemäß. Drücken
Sie die Rückstelltaste am Gerät. Erlischt die Meldung „ERROR 99“ nicht, wenden
Sie sich an den Kundendienst.
Fortsetzung...
17
GE_KDC-4054UB_001A_f.indd 17
8/25/11 5:56:03 PM
Symptom
Abhilfe/Ursache
„COPY PRO“ erscheint.
Eine kopiergeschützte Datei wird wiedergegeben.
„READ ERROR“ erscheint.
Kopieren Sie die Dateien und Ordner für das USB-Gerät erneut. Wenn die
Fehlermeldung weiterhin angezeigt wird, initialisieren Sie das USB-Gerät oder
verwenden Sie andere USB-Geräte.
„NO DEVICE“ erscheint.
Es ist kein USB-Gerät angeschlossen. Schließen Sie ein USB-Gerät an und schalten
Sie die Quelle erneut zu USB um.
„NO MUSIC“ erscheint.
Auf dem angeschlossenen USB-Gerät befinden sich keine wiederzugebenden
Audiodateien.
„NA DEVICE“ erscheint.
Schließen Sie ein unterstütztes USB-Gerät an und prüfen Sie die Anschlüsse.
„USB ERROR“ erscheint.
Nehmen Sie das USB-Gerät ab und schalten Sie das Gerät aus und dann wieder ein.
Falls das Gerät weiterhin dieselbe Anzeige zeigt, verwenden Sie bitte ein anderes
USB-Gerät.
„iPod ERROR“ erscheint.
Erneutes Anschließen des iPod. / Setzen Sie den iPod erneut zurück.
Rauschen wird erzeugt.
Springen Sie zu einem anderen Musikstück oder wechseln Sie die Disc.
Tracks können nicht so abgespielt werden, Die Wiedergabe-Reihenfolge wird bestimmt, wenn die Dateien aufgezeichnet
wie Sie es wollten.
werden.
„READING“ blinkt weiter
Längere Auslesezeit ist erforderlich. Verwenden Sie nicht zu viele Hierarchien und
Ordner.
Verflossene Spielzeit ist nicht richtig.
Dies liegt daran, wie die Titel aufgezeichnet sind.
Die Anzahl der in der Kategorie „SONGS“
des Geräts enthaltenen Titel entspricht
nicht der Anzahl der Titel, die in der
Kategorie „SONGS“ des iPods enthalten
sind.
Podcast-Dateien werden in diesem Gerät nicht gezählt, da es die Wiedergabe von
Podcast-Dateien nicht unterstützt.
Richtige Zeichen werden nicht angezeigt
(z.B. Albumname).
Dieses Gerät kann nur Buchstaben (Großbuchstaben), Zahlen und eine begrenzte
Anzahl von Symbolen anzeigen. Kyrillische Buchstaben (Großbuchstaben) können
auch angezeigt werden, wenn [RUSSIAN SET] auf [ON] gestellt ist. (Seite 7, 8)
Stummschaltung beim Empfang eines Telefonanrufs
Zur Verwendung dieses Merkmals schließen Sie die MUTE-Leitung an Ihr Telefon mit einem
im Handel erhältlichen Telefonzubehör an. (Seite 20, 21)
Wenn ein Anruf ankommt, wird „CALL“ angezeigt.
Die Audiowiedergabe wird unterbrochen.
Um die Audioanlage auch während eines Anrufs zu höhren, drücken Sie
verschwindet und die Wiedergabe vom Audiosystem wird fortgesetzt.
SRC. „CALL“
Wenn ein Anruf beendet wird, verschwindet „CALL“
Die Audiowiedergabe wird fortgesetzt.
18
GE_KDC-4054UB_001A_f.indd 18
8/25/11 5:56:04 PM
Einbau/Anschluss
(×1)
(×1)
(×1)
(×1)
(×1)
(×2)
Grundlegendes Verfahren
1 Ziehen Sie den Schlüssel aus dem
Zündschloss, und trennen Sie dann den
·-Pol der Autobatterie ab.
2 Schließen Sie die Eingangs- und
Ausgangskabel richtig an.
\ „Verdrahtungsanschluss“ (Seite 20,
21)
3 Bauen Sie das Autoradio in Ihrem
Fahrzeug ein.
\ „Einbau der Einheit“ (Seite 22)
4 Schließen Sie den ·-Pol der
Autobatterie an.
5 Setzen Sie das Gerät zurück. (Seite 4)
Warnung
Das Gerät kann nur in einem Fahrzeug mit
12 V Gleichstromsystem und negativer
Masse eingebaut werden.
Wenn Sie das Zündkabel (rot) und
das Batteriekabel (gelb) mit dem
Fahrzeugchassis (Masse) in Berührung
kommen lassen, können Sie einen
Kurzschluss verursachen, der zu einem
Brand führen kann. Schließen Sie immer
diese Kabel über den Sicherungskasten an
die Stromversorgung an.
Trennen Sie den negativen
Batterieanschluss abtrennen und stellen
alle elektrischen Anschlüsse her, bevor das
Gerät eingebaut wird.
Isolieren Sie nicht angeschlossene Kabel
mit Vinylband oder ähnlichem Material.
Entfernen Sie die Schutzhülsen von den
Enden nicht angeschlossener Kabel und
Anschlüsse nicht, damit keine Kurzschlüsse
entstehen.
Sicherstellen, daß das Gerät nach dem
Einbau a Chassis des Fahrzeugs geerdet
wird.
Vorsicht
Wenn die Zündung Ihres Fahrzeugs
keine ACC-Position hat, schließen Sie die
Zündkabel an eine Stromquelle an, die mit
dem Zündschlüssel ein- und ausgeschaltet
werden kann. Falls Sie das Zündkabel an
eine Stromquelle mit Konstantspannung wie
beispielsweise ein Batteriekabel anschließen,
kann die Batterie verbraucht werden.
Verwenden Sie für den Einbau
ausschließlich die mitgelieferten
Schrauben. Verwenden Sie ausschließlich
die mitgelieferten Schrauben.
Montieren Sie dieses Gerät in der Konsole
Ihres Fahrzeugs. Stellen Sie sicher dass die
Frontblende nicht den Deckel der Konsole
(falls vorhanden) beim Schließen und
Öffnen anstößt.
Überprüfen Sie nach der Montage des Geräts,
ob die Bremslichter, Blinker, Scheibenwischer
usw. ordnungsgemäß funktionieren.
Installieren Sie das Gerät so, dass der
Montagewinkel 30˚ oder weniger beträgt.
Wenn die Sicherung durchbrennt,
überprüfen Sie zuerst, dass die Drähte sich
nicht berühren und einen Kurzschluss
verursachen. Ersetzen Sie dann die
durchgebrannte Sicherung durch eine neue
Sicherung mit den gleichen Nenngrößen.
Schließen Sie beide Pole der Lautsprecher
an den Lautsprecherausgängen am Gerät
an. Das Gerät kann beschädigt werden
oder den Dienst versagen, wenn Sie die
·-Pole zusammenführen oder über
Metallteile des Fahrzeugs erden.
Wenn nur zwei Lautsprecher am Gerät
angeschlossen werden, schließen Sie die
Steckverbinder entweder an beide vorderen
Ausgänge oder beide hinteren Ausgänge an
(mischen Sie nicht vorne und hinten).
Berühren Sie die Metallteile des Geräts
während oder kurz nach der Benutzung
nicht. Metallteile wie der Kühlkörper und
das Gehäuse werden heiß.
Die Montage sowie die Verkabelung dieses
Gerätes macht besondere Fähigkeiten und
Erfahrung erforderlich. Überlassen Sie diese
Arbeiten ausgewiesenem Fachpersonal.
Sollten Sie Probleme bei der Installation
des Geräts haben, lassen Sie sich bitte von
Ihrem Kenwood-Fachhändler beraten.
DEUTSCH
Teileliste:
A Frontblende .......................................................
B Wappenschild...................................................
C Einbauhalterung .............................................
D Gehäuse für Frontblende ..........................
E Kabelbaum .........................................................
F Ausbauwerkzeug............................................
19
GE_KDC-4054UB_001A_f.indd 19
8/25/11 5:56:04 PM
Verdrahtungsanschluss
Bei
:
L
FRONT REAR/SW
REAR/SW
R
Hintere Ausgang/SubwooferAusgangsbuchsen
R
L
Vordere Ausgangsbuchsen
Hintere Ausgang/SubwooferAusgangsbuchsen
Sicherung (10 A)
Antennenanschluss (JASO)
Hellblau/Gelb
(Lekungs-Fernbedienungskabel)
Blau/Weiß
(Stromsteuerungskabel/
Antennensteuerungskabel)
Braun
(Stummschaltungs-Steuerkabel)
STEERING WHEEL
REMOTE INPUT
REMOTE CONT
ANT CONT
P. CONT
MUTE
Zum Lenkrad-Fernbedienungsadapter.
Bei Verwendung des optionalen Leistungsverstärkers entweder
einen Anschluss an den Stromsteuerungsanschluss oder an den
Antennensteuerungsanschluss des Fahrzeugs durchführen.
An den geerdeten Anschluss anschließen, während das Telefon
klingelt oder während Sie einen Anruf erledigen. (Lesen Sie
hinsichtlich des Anschlusses an das Kenwood-Navigationssystem
die Bedienungsanleitung des betreffenden Geräts.)
Anschluss des ISO-Anschlusses an manche VW/Audi
oder Opel (Vauxhall) Automobile.
Sie müssen möglicherweise die Verkabelung des
mitgelieferten Kabelbaums modifizieren, wie unten
gezeigt.
Gelb (Batteriekabel)
Rot (Zündkabel)
Zündkabel
(Rot)
Rot (A7)
Farbe und Funktion
Batterie
Gelb
Blau/Weiß Stromsteuerung
Zündung (ACC)
Rot
Erdungsanschluss (Masse)
Schwarz
Fahrzeug
A4 (Gelb)
Batteriekabel
(Gelb)
ISO-Anschlüsse
Stift
A4
A5
A7
A8
A7 (Rot)
Gerät
Gelb (A4)
Standardverkabelung
Stift
B1 / B2
B3 / B4
B5 / B6
B7 / B8
Farbe und Funktion
Lila ª / Lila/Schwarz ·
Hinterer Lautsprecher (rechts)
Vorderer Lautsprecher (rechts)
Grau ª / Grau/Schwarz ·
Weiß ª / Weiß/Schwarz · Vorderer Lautsprecher (links)
Hinterer Lautsprecher (links)
Grün ª / Grün/Schwarz ·
20
GE_KDC-4054UB_001A_f.indd 20
8/25/11 5:56:04 PM
Bei
:
Sicherung (10 A)
Weiß
Weiß/Schwarz
DEUTSCH
Antennenanschluss (JASO)
Zum vorderen Lautsprecher (links)
Grau
Zum vorderen Lautsprecher (rechts)
Grau/Schwarz
Grün
Grün/Schwarz
Zum hinteren Lautsprecher (links)
Lila
Lila/Schwarz
Zum hinteren Lautsprecher (rechts)
Blau
(Antennensteuerungskabel)
Blau/Weiß
(Stromsteuerungskabel)
Braun
(StummschaltungsSteuerkabel)
ANT CONT
P. CONT
MUTE
Zum Antennensteueranschluss im Fahrzeug.
(Nicht verwendet.)
An den geerdeten Anschluss anschließen, während das Telefon
klingelt oder während Sie einen Anruf erledigen. (Lesen Sie
hinsichtlich des Anschlusses an das Kenwood-Navigationssystem die
Bedienungsanleitung des betreffenden Geräts.)
Auto-Sicherungskasten
Rot (Zündkabel)
Gelb (Batteriekabel)
Schwarz (Massekabel)
Zur metallenen Karosserie oder zum Fahrwerk des Autos
Zündschalterschlüssel
AutoSicherungskasten
Batterie
21
GE_KDC-4054UB_001A_f.indd 21
8/25/11 5:56:08 PM
Einbau der Einheit
1
2
Den Verdrahtungskabelbaum an
den Einheit anschließen. Andere
Verkabelungsverbindungen
wurden vorher fertiggestellt.
(Seite 20, 21)
Vor dem Anbringen stellen Sie
sicher, dass die Richtung des
Wappenschilds korrekt ist.
(Breitere Haken auf der
Oberseite.)
Armaturenbrett Ihres
Autos
Biegen Sie die entsprechenden
Metalllaschen, um die
Einbauhalterung sicher
festzuhalten.
Ausbau des Geräts
1 Nehmen Sie die Frontblende ab.
2 Lassen Sie den Vorsprung am
Ausbauwerkzeug in die Löcher an
beiden Seiten des Wappenschilds
eingreifen.
3 Setzen Sie das Ausbauwerkzeug
tief in die Schlitze an jeder Seite
ein und folgen dann den mit Pfeil
gekennzeichneten Anweisungen
wie rechts gezeigt.
22
GE_KDC-4054UB_001A_f.indd 22
8/25/11 5:56:08 PM
Technische Daten
Frequenzbereich:
FM1/ FM2/ FM3 (50 kHz-Abstimmschritte):
87,5 MHz — 108,0 MHz
Bei
:
FM1/ FM2 (50 kHz-Abstimmschritte):
87,5 MHz — 108,0 MHz
FM3 (30 kHz-Abstimmschritte):
65,00 MHz — 74,00 MHz
Empfindlichkeit (Rauschabstand = 26 dB):
1,0 μV/75 Ω
Empfindlichkeitsschwelle (DIN S/N = 46 dB):
2,5 μV/75 Ω
Frequenzgang (±3 dB): 30 Hz — 15 kHz
Rauschabstand (MONO): 63 dB
Kanaltrennung (1 kHz): 40 dB
MW-Tuner
Frequenzbereich (9 kHz-Abstimmschritte):
531 kHz — 1 611 kHz
Empfindlichkeit (Rauschabstand = 20 dB): 36 μV
LW-Tuner
Frequenzbereich: 153 kHz — 279 kHz
Empfindlichkeit (Rauschabstand = 20 dB): 57 μV
CD-Player
Laserdiode: GaAIAs
Digitalfilter (D/A): 8-faches Oversampling
D/A-Wandler: 24 Bit
Spindeldrehzahl: 500 U/min — 200 U/min
(CLV)
Tonhöhenschwankung: Unterhalb der
Messgrenze
Frequenzgang (±1 dB): 20 Hz — 20 kHz
Gesamtklirrfaktor (1 kHz): 0,01 %
Rauschabstand (1 kHz): 105 dB
Dynamikbereich: 90 dB
AAC-Decodierung: AAC-LC „.m4a“-Dateien
MP3-Decodierung: Unterstützt MPEG-1/2
Audio Layer-3
WMA-Decodierung: Unterstützt Windows
Media Audio
USB-Schnittstelle
USB Standard: USB1.1/ 2.0
(Höchstgeschwindigkeit)
Maximaler Versorgungsstrom: DC 5 V
1A
Dateisystem: FAT16/ 32
AAC-Decodierung: AAC-LC „.m4a“-Dateien
MP3-Decodierung: Unterstützt MPEG-1/2
Audio Layer-3
WMA-Decodierung: Unterstützt Windows
Media Audio
DEUTSCH
UKW-Tuner
Audio-Bereich
Maximale Ausgangsleistung: 50 W x 4
Ausgangsleistung (DIN 45324, +B = 14,4 V):
30 W x 4
Lautsprecherimpedanz: 4 Ω — 8 Ω
Klangregler: Bass: 100 Hz ±8 dB
Mitten: 1 kHz ±8 dB
Höhen: 12,5 kHz ±8 dB
Vorverstärkerpegel/Last (CD) (ausgenommen
): 2 500 mV/10 kΩ
Vorverstärkungsimpedanz: ≤ 600 Ω
Zusatzeingangssektion
Frequenzgang (±3 dB): 20 Hz — 20 kHz
Maximaler Spannungseingang: 1 200 mV
Eingangsimpedanz: 10 kΩ
Allgemeines
Betriebsspannung (11 V — 16 V zulässig): 14,4 V
Maximale Stromaufnahme: 10 A
Einbaumaße (B × H × T):
182 mm × 53 mm × 158 mm
Gewicht: 1,3 kg
Änderungen ohne Vorankündigung bleiben
vorbehalten.
23
GE_KDC-4054UB_001A_f.indd 23
8/26/11 4:50:32 PM
“Made for iPod,” and “Made for iPhone” mean that an electronic accessory has been designed to connect
specifically to iPod, or iPhone, respectively, and has been certified by the developer to meet Apple
performance standards. Apple is not responsible for the operation of this device or its compliance with safety
and regulatory standards. Please note that the use of this accessory with iPod or iPhone may affect wireless
performance.
iPhone, iPod, iPod classic, iPod nano, and iPod touch are trademarks of Apple Inc., registered in the U.S. and
other countries.
The “AAC” logo is a trademark of Dolby Laboratories.
Rear_KDC-4054UB[E]f.indd 1
8/19/11 4:12:12 PM

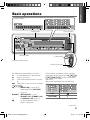
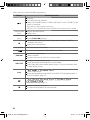

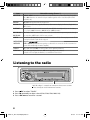

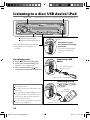

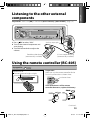
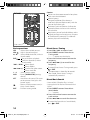
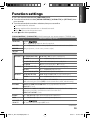

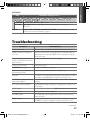
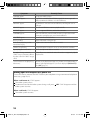


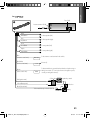
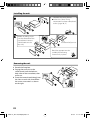
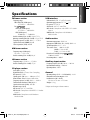
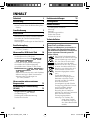

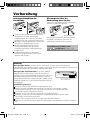


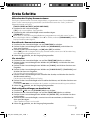
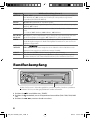
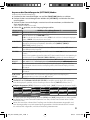


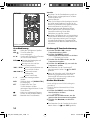

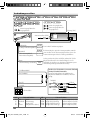


![KDC-U40R KDC-U30R - [::] Kenwood ASC](http://vs1.manualzilla.com/store/data/006743705_1-a036d89f55b074750892751168fd91ae-150x150.png)