1
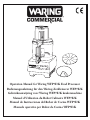
Operation Manual for Waring WFP7E/K Food Processor
Bedienungsanleitung für den Waring-Zerkleinerer WFP7E/K
Gebruiksaanwijzing voor Waring WFP7E/K keukenmachine
Manuel d’Utilisation du Robot Culinaire WFP7E/K
Manuel de Instrucciones del Robot de Cocina WFP7E/K
Manuale operativo per Robot da Cucina WFP7E/K
IMPORTANT SAFEGUARDS
When using electrical appliances, basic safety precautions should always be followed, including these:
1. Read all instructions.
2. Blades are sharp. Handle carefully.
3. Your Waring® food processor is a piece of kitchen equipment and as with all other kitchen
equipment, extreme care must be used when operating it. Although training requirements
are minimal, only responsible and prudent individuals should be allowed to operate this
food processor. Should not be used by or near children or individuals with certain disabilities.
4. To avoid injury, never place cutting blade or disc on base without first having put the bowl
properly in place.
5. Keep hands as well as spatulas and other utensils away from moving blades or discs while
processing food to prevent the possibility of severe personal injury or damage to the food
processor. A plastic scraper may be used, but must be used only when the food processor is
not running.
6. To protect against risk of electrical shock, do not put base in water or other liquid.
7. Unplug from outlet when not in use, before putting on or taking off parts, before removing
food from work bowl, and before cleaning. To unplug, grasp plug and pull from electrical outlet.
Never pull cord.
8. Avoid contact with moving parts. Never feed food by hand when slicing or grating. Always use
food pusher.
9. Make sure motor has completely stopped before removing the lid.
10. Do not operate any appliance with a damaged cord or plug, or after appliance has been dropped
or damaged in any manner. Return appliance to the nearest authorized service facility for
examination, repair or adjustment.
11. The use of attachments not recommended or sold by Waring may cause fire, electric shock
or injury.
12. Do not use outdoors.
13. Do not let cord hang over edge of table or counter, or touch hot surfaces.
14. Do not attempt to defeat the cover interlock mechanism.
15. Be certain cover is securely locked in place before operating appliance.
16. If the machine malfunctions for any reason, discard any food being processed at that time.
17. This appliance is not intended for use by persons (including children) with reduced physical,
sensory or mental capabilities, or lack of experience and knowledge, unless they have been given
supervision or instruction concerning use of the appliance be a person responsible for their safety.
18. Children should be supervised to ensure that they do not play with the appliance.
SAVE THESE INSTRUCTIONS
Warranty
For Waring® products sold outside of the U.S. and Canada the warranty is the responsibility of the
local importer or distributor. This warranty may vary according to local regulations.
WARNING: This warranty is void if appliance is used on Direct Current (D.C.)
Important UK Wiring Instructions
This appliance is supplied with a fitted plug; however, for your information, should you wish to change
the plug, the wires in the mains lead of the appliance are coloured in accordance with the following
code:
Green and Yellow:
Earth
Blue:
Neutral
Brown:
Live
Warning: The severed plug should be disposed of to avoid a possible shock hazard and should never be
inserted into a 13A socket. As the colours of the mains lead of this appliance may not correspond to the
coloured markings identifying terminals in your plug, proceed as follows: the wire which is coloured
Green and Yellow must be connected to the terminal in the plug which is marked with the letter E or
by the earth symbol or coloured Green or Green and Yellow. The wire which is coloured Blue must
be connected to the terminal which is marked with the letter N or coloured Black or Blue. The wire
which is coloured brown must be connected to the terminal which is marked with the letter L, or
coloured Red or Brown.
NOTE: If the terminals of the plug are unmarked or if you are in any doubt, consult a qualified
electrician. If a BS1363 Fused Plug is used, this must be fitted with the correct amperage fuse – 13A.
This applies to UK models only.
CONTENTS
Important Safeguards. . . . . . . . . . . . . . . . . . . . . . . . . . . . . . . . . . . . . . . . . . . 2
Warranty. . . . . . . . . . . . . . . . . . . . . . . . . . . . . . . . . . . . . . . . . . . . . . . . . 3
Important UK Wiring Instructions. . . . . . . . . . . . . . . . . . . . . . . . . . . . . . . . . . . 3
The Parts. . . . . . . . . . . . . . . . . . . . . . . . . . . . . . . . . . . . . . . . . . . . . . . . . 5
Assembly of Batch Bowl Parts . . . . . . . . . . . . . . . . . . . . . . . . . . . . . . . . . . . . . . 7
Disassembly of Batch Bowl Parts . . . . . . . . . . . . . . . . . . . . . . . . . . . . . . . . . . . . 9
Operating the Controls . . . . . . . . . . . . . . . . . . . . . . . . . . . . . . . . . . . . . . . . . 10
Food Preparation . . . . . . . . . . . . . . . . . . . . . . . . . . . . . . . . . . . . . . . . . . . . 11
Food Pusher Selection. . . . . . . . . . . . . . . . . . . . . . . . . . . . . . . . . . . . . . . . . . 11
Resetting Thermal Protection. . . . . . . . . . . . . . . . . . . . . . . . . . . . . . . . . . . . . . 11
Use Instructions for S-Blade in the Batch Bowl. . . . . . . . . . . . . . . . . . . . . . . . . . . . 12
Accessory Disc Selection and Use. . . . . . . . . . . . . . . . . . . . . . . . . . . . . . . . . . . . 13
Slicing Operation . . . . . . . . . . . . . . . . . . . . . . . . . . . . . . . . . . . . . . . . . . . . 13
Grating Operation . . . . . . . . . . . . . . . . . . . . . . . . . . . . . . . . . . . . . . . . . . . 14
Troubleshooting. . . . . . . . . . . . . . . . . . . . . . . . . . . . . . . . . . . . . . . . . . . . . 15
Cleaning . . . . . . . . . . . . . . . . . . . . . . . . . . . . . . . . . . . . . . . . . . . . . . . . . 16
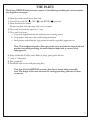
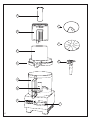
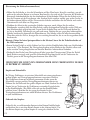
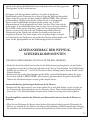
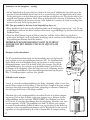
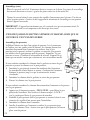
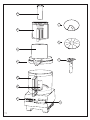
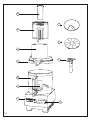
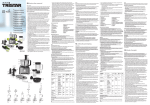
THE PARTS
The Waring WFP7E/K food processor consists of the following standard parts and accessories
(see diagram on next page):
1.Motor base with vertical heavy-duty shaft
2.Control lever with ON ( ), OFF ( ), and PULSE ( ) positions
3. Safety interlock (not shown)
Prevents machine from operating until cover is in place
4. Clear work bowl with dry capacity of 7 cups
5. Clear work bowl cover
a.Large oval-shaped feed tube for maximum use of cutting surface
b. Large pusher with safety sleeve and locking mechanism
c. Small pusher used within the large pusher for smaller vegetables, pepperoni, etc.
Note: This combination pusher allows use of the entire feed tube for large foods and
provides controlled processing for small-diameter foods such as carrots, celery and pepperoni.
6. Sharp and durable S-blade (cutter blade) to chop, grind, purée and mix
7. 2 mm, 5⁄64" slicing disc
8. Fine grating disc
9. Detachable stem for use with processing discs
Note that all of the WFP7E/K accessory discs have a unique offset removable
stem. The design of this stem increases the cutting/processing efficiency of these
accessories.
5c
7
5b
8
5a
5
9
4
6
1
2
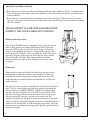
ASSEMBLy of BATCH BOWL PARTS
WFP7E/K
We will use the terms bowl, work bowl and batch bowl interchangeably throughout this instruction
book. They mean the same thing.
• Clean and sanitize the motor base, and wash, rinse, and sanitize the bowl, cover, food pusher, food
pusher insert and processing tools prior to initial use.
• Place the base on a counter or table near an outlet. Position it so you look at the front of the unit
and can see the control levers. Be certain that the cord is unplugged and the OFF ( ) lever has
been pressed. Do not plug in the cord until the processor is completely assembled.
• Pick up the transparent work bowl, holding it in both hands with the handle toward you.
• Place the bowl on the base, fitting its central tube over the motor shaft on the base and placing its
handle slightly to the left of front-center (at about a 7-o’clock position).
• Press the bowl down so the lower rim fits around the circular platform. Turn the bowl
counterclockwise (anticlockwise) as far as it will go. It will lock into position with the tabs on the
sides of the platform.
Read this if assembling the batch bowl parts to use S-bade (cutter blade).
• Pick up the metal blade, noting the diagram on the top of plastic center. It matches the shape of the
motor shaft.
• Place the S-blade over the tip of the motor shaft, lining up the inside of the hub with the shaft.
Press it down firmly, rotating the center hub until the blade assembly is fully seated. It should
easily drop into place. Be sure it is pushed down as far as it will go. If it is not all the way down, it
may become damaged. Push only on the center section (plastic part); never touch the cutting blade
as it is extremely sharp.
• Check to be sure the blade is all the way down by turning it back and forth while lightly pushing it
down. If properly installed and fully seated, the lower blade will be positioned just above the inside
bottom of the bowl.
• If processing food with the S-blade, now is the time to add the food or liquid to the work bowl.
• Always process dry food first, then add wet food.
Read this if assembling batch bowl parts to use accessory discs in batch bowl.
• Do not put any food in the bowl before placing the accessory disc onto the shaft.
CK
LO
• Select the appropriate accessory disc: grating disc or slicing disc.
• Hold the disc with the cutting side facing your hand. Be careful not to scrape your
hand on sharp edges. Notice the bottom of the disc has a plastic receptacle for the
detachable stem. Holding the stem with your thumb on the release switch, place
the center and right-most two tabs in the two open slots on the bottom of the disc
CK
U NLO
and rotate clockwise. Refer to diagram.
• Once the stem is installed in the proper disc, carefully guide the center disc hub over the metal shaft
so the double flats on the shaft line up with the disc stem. Put the disc on top of the shaft and rotate
until it drops down and into place. Be sure it is pushed down as far as it will go. Push on the outside
rim only; never touch the cutting blades. It should easily drop into place, but if not, then gently rock
it back and forth until you feel the disc drop into place.
Note: Do not put any food in the bowl before placing the accessory disc onto the shaft.
(batch bowl assembly continues)
(batch bowl assembly continued)
• Place the cover on the bowl, with the feed tube to the left of the handle (at about 7-o’clock position).
The locking tabs on the back of the cover should be at the right of the locking tabs on the back rim
of the work bowl.
• Rotate the cover counterclockwise (anticlockwise) to lock it into place. When the cover is rotated
into place, the safety interlock tab on the front of the cover will fit snugly in the interlock mechanism
above the handle.
Never attempt to start the food processor without the cover locked into position.
Pushers and safety sleeve
Your Waring Food Processor is equipped with a safety sleeve with
built-in large pusher and locking mechanism. Note: Your food
processor will not operate unless the safety sleeve is locked into
place and the interlock mechanism is engaged. Pick up the sleeve
and large pusher. With the release tab facing the front of the food
processor, drop the pusher into the feed tube (the sleeve should
slide around the feed tube). Press firmly until the interlock
mechanism clicks into place. Your food processor is now ready
to operate.
Pusher use
Drop food to be processed down the small feed tube and use the
small pusher to guide the food into the work bowl. To lock the
small pusher into the large pusher, simply slide it into the small
feed tube and turn counterclockwise (anticlockwise) until the tab
locks into place.
You may also want to process food that does not fit in the small feed
tube. To do so, remove the sleeve and large pusher by pressing the
release tab that says “PRESS HERE”. Add food to be processed
into the feed tube. Slide the white “LOCK” lever to the left. This
will allow the large pusher to move in and out of the safety sleeve.
Slip the sleeve back into place on the cover, making sure the
interlock mechanism is engaged. If using a processing disc, the food
will sit on the disc and push the pusher up into the extended position.
Make sure the small pusher is locked into the large pusher. Turn the
food processor on and push the large pusher down to guide food into
the processing disc.
DISASSEMBLY of BATCH BOWL PARTS
WFP7E/K
ALWAYS UNPLUG THE CORD BEFORE DISASSEMBLING.
• Turn the bowl cover clockwise until the safety interlock tab on the cover is disengaged and the tabs
are clear of the groove in the tower. The feed tube will be at a position between 7 o’clock and
9 o’clock. In this position you can lift the cover off the bowl.
• Remove the large food pusher and sleeve from the feed tube by pressing the release tab that says
“PRESS HERE”. Remove the small pusher from the large pusher.
Disassembly when removing the S-blade
• Remove the work bowl from the unit by rotating clockwise to disengage the tabs on the bottom of
the bowl platform from the work bowl. When the bowl handle is on the left (about 7 o’clock), you
can gently lift the bowl straight up and out.
It is recommended that you remove the bowl from the motor base before you
remove the S-blade.
• To remove the blade, keep a slight downward pressure on the top of the center hub of the blade
while removing the bowl from the motor base. This will form a seal to prevent food particles from
spilling into the center tube of the bowl, and onto the motor base or the work surface. Then remove
the S-blade from the bowl. Handle the S-blade with caution; the blades are extremely sharp.
Disassembly when removing an accessory disc
• Do not remove the work bowl until the accessory disc is removed.
• To remove an accessory disc, place your fingers on the outer edge of two opposite sides of the disc
and lift. The disc should remove cleanly. To remove the detachable stem, hold the disc in one hand
with the stem facing away from your hand. Be careful not to scrape your hand on any sharp edges,
depress the release switch with your thumb and rotate counterclockwise (anticlockwise).
• Remove the work bowl from the unit by rotating clockwise to disengage the tabs on the bottom
of the bowl platform from the work bowl. When the bowl handle is on the left (about 7 o’clock),
you can gently lift the bowl straight up and out.
OPERATING THE CONTROLS
• Plug the machine into an electrical outlet. The outlet must be 230 volts (50 Hz).
• There are two control levers located on the base of the machine. They are on the front and they give
you fingertip control of processing. They are large enough to find easily in case of emergency.
The control lever has 3 positions: ON ( )
OFF ( )
PULSE (
How they work:
ON ( ): Lift the lever up to start the motor.
OFF ( ): To turn the motor off, move the lever to the OFF ( ) position.
PULSE ( ): To pulse the motor, press the lever down, then release. The motor will run as long as you hold the lever down; it stops when you release the lever. Try it a few times.
)
How to use
Continuous Use
For continuous processing, lift the lever to the ON (
) position.
Pulsing
The pulsing function is intended for use with the S-blade in the work bowl.
• The motor runs as long as you hold the lever down; it stops when you release the lever.
• You control pulsing. You control the duration of each pulse by the amount of time you hold the
lever down. You control the frequency of pulses by the rate at which you press the lever. The interval
between pulses must be long enough to allow everything in the work bowl to fall to the bottom.
• Pulsing gives you precise control over chopping, mincing, blending and mixing. You can process food
to any texture or consistency you want, from coarse to fine.
• Pulsing is also useful in processing hard foods. Pulse the food a few times to break up into smaller
parts. Then proceed with continuous use after the pieces are broken up and easier to process.
• Always use the lever for pulsing. Never move the bowl (or chute) and cover assembly on or off to
control pulses. It is less efficient and could damage the machine.
Turning off
Always turn the machine to the OFF ( ) position and wait until the blade or disc comes to a
complete stop before removing the pusher assembly. The motor stops within seconds after the
machine is turned off.
10
FOOD PREPARATION
• Prepare all food items to be processed by washing and peeling as required. Remove pits, stones, and
large seeds.
• Cut vegetables, meats, cheeses, etc. into sizes that will fit into your choice of small feed tube or large feed tube for processing with accessory discs, or into sizes as required by your processing task.
• Preparation for slicing: Produce that is long and cylindrical such as carrots, cucumbers and celery
should be cut flat at both ends. This will provide a consistent slice for all food processed.
FOOD PUSHER SELECTION
S-blade usage
The small pusher is not required when processing in the bottom of the work bowl with the S-blade.
However, the small feed tube can be used for adding ingredients while the food processor is running.
It is recommended that the food pushers be left in place to prevent splashing and avoid unwanted
additions to the work bowl.
Small pusher
This pusher with smaller chute is typically used when inserting vegetables vertically for smaller cuts.
It should be used when slicing foods such as carrots, celery, pepperoni, etc. when a consistent, flat
result is desired.
This pusher is also desired when a shorter grate or slice is desired as opposed to a longer slice using
the larger feed tube and pusher.
Large pusher
This pusher with larger chute is typically used when inserting vegetables horizontally for longer cuts.
This pusher is used when a longer grate or slice is desired. It is also used when processing large
volumes of food or bulky food items such as potatoes or onions.
RESETTING THERMAL PROTECTION
The WFP7E/K Food Processors are equipped with an automatic reset switch to protect the motor
from overheating.
If your food processor stops running under heavy use, turn the power switch off and unplug the power
cord. Empty the work bowl of all its contents and allow approximately 5 minutes for the motor to cool
down.
Plug the power cord back into the outlet and continue processing.
If your food processor does not function properly following this procedure, discontinue use and
contact your local distributor.
11
USE INSTRUCTIONS for S-BLADE
(Cutter Blade) in the BATCH BOWL
WFP7E/K
• The S-blade (cutter blade) is designed for chopping, grinding, puréeing, blending and mixing of
ingredients required in almost all recipes.
• Assemble the bowl and blade as instructed in the Assembly of Batch Bowl Parts section (page 7).
Chopping and Mincing
• To chop or mince in the bowl, fill the bowl with food product up to the top of the bowl’s inner tube,
or up to ¾ full.
• To chop or mince most effectively, you must start and stop the blades quickly to control the
consistency of the chop by pulsing. Use the Pulse ( ) option to accomplish this as described
under pulsing. Continue pulsing until the desired consistency has been reached.
• If chopped foods are processed continuously, the food will be processed unevenly, i.e., food on the
bottom will be finely chopped and food on the top will be more coarse.
Chopping Meat
Cut meat into 1-inch cubes to ensure an even chop. Process a maximum of 1.25 lbs. Press the control
lever to Pulse ( ) for 1 to 2 seconds, 3 times. Then press the control lever to On ( ) for a
maximum of 30 seconds for desired consistency.
Chopping Hard Cheese
Cut cheese into 1-inch cubes to ensure an even chop. Process a maximum of 1.00 lb. Press the control
lever to Pulse ( ) for 1 to 2 seconds, 3 times. Then press the control lever to On ( ) for a
maximum of 30 seconds for desired consistency.
Chop Onions, Celery, Cabbage, etc.
Cut onions in quarters, and other vegetables into 1-inch cubes. Place the cubed food into the work
bowl up to the top of the bowl’s inner tube, and pulse until you reach the desired consistency.
Note: If you let the blade run too long, the ingredients on the bottom will become puréed or give
you uneven results.
Purée or Mix
To purée tomatoes, vegetables and fruits, make sauces, or mix and blend ingredients, place the
ingredients into the bowl, turn the unit on and allow it to run continuously until you reach the
desired consistency. Do not let the machine run unattended. If your recipe exceeds more than
1.8 quarts of wet ingredients, please process in several batches.
12
Turn the machine off.
• Always switch the food processor off by putting the lever to the OFF (
that the power is not supplied to the motor.
) position. This assures
• Always switch the food processor off and wait until rotation stops before removing the cover.
• While the safety interlock switch will turn the machine off if the cover is rotated clockwise, or the
cover is removed while running, this should not be the means of ON/OFF ( , ) operation.
• Before rotating the lid, always make sure the machine is off by pressing the lever to the OFF (
position as a safety precaution, in the event that the machine was not turned off properly.
)
Accessory Disc Selection and Use
The WFP7E/K food processor disc accessories are made to perform a large variety of food
processing tasks. Two (2) accessory discs are included with the WFP7E/K food processor. As of this
printing they are:
2 mm, 5⁄64" slicing disc
Fine grating disc
Slicing Operation
•Prepare all food items to be processed by washing and peeling as required. Remove pits, stones, and
large seeds. Be sure the food will fit into the proper feed chute. Foods such as carrots, cucumbers,
etc., should be cut flat at both ends to provide a consistent slice throughout the whole product.
•With foods like cabbage, lettuce or any product that has an undesirable core, the core should be
removed. Medium size cabbage or lettuce heads may be cut into thirds to fit in the feed chute. Larger
heads may need to be quartered.
•When food preparation is complete, fill the chosen feed chute, put the pusher in place, turn the
machine on and monitor the results.
•Never try to slice soft cheese. Slice only hard cheese such as Parmesan. Do not use block sizes larger
than 3.5" x .750" x 4.0" (89mm x 19mm x 101mm). Always use well-chilled cheese when slicing. It is
recommend to place cheese in refrigerator for at least 1 hour before slicing. Do not slice mozzarella
in this unit. Damage to the unit may occur.
•When sliced food reaches nearly full capacity of the bowl, remove all sliced food from the bowl.
13
Grating Operation
• Prepare all food items to be processed by washing and peeling as required. Remove pits, stones, and
large seeds. Be sure the food will fit into the proper feed chute.
• Select which feed tube to use. Horizontal placement of carrots will result in a long grated product,
while using the smaller chute and inserting the food vertically will give you a short grated product.
•Never try to grate soft cheese. Grate only hard cheese such as Parmesan. Do not use block sizes
larger than 3.5" x .750" x 4.0" (89mm x 19mm x 101mm). Always use well-chilled cheese when
grating. It is recommend to place cheese in refrigerator for at least 1 hour before slicing.
Do not grate mozzarella in this unit. Damage to the unit may occur.
• For grating cheese, it is recommended that a slight pulsating pressure be applied with the pusher,
alternating push/no push until the cheese block is completely grated. Cheese grating puts more
strain on the food processor motor than other tasks and may cause overheating if too much pressure
is applied in a continuous manner.
• You can typically expect to grate ten (10) pounds of cheese in about five (5) minutes. It is
recommended that you plan your food preparation in a manner that will allow for five minutes
of grating, followed by five minutes of food preparation while the machine rests.
• When grated food reaches nearly full capacity of the bowl, remove all grated food from the bowl.
14
TROUBLESHOOTING
This section describes potential problems and the correct solutions for them. Problems that cannot
be solved with the guidelines listed below should be referred to one of your local distributors for
assistance. A listing of authorized service agencies is supplied with each Waring food processor.
Unit does not start when assembled correctly
• Pull the plug and try plugging into another outlet.
• Turn lever to ON ( ).
• Make sure the bowl is properly positioned on the motor base, that the bowl or chute cover is on
properly, and that the safety interlock tab on the cover has properly engaged the safety interlock
switch.
Unit stops running during processing
• The unit may have overheated. Refer to Resetting Thermal Protection section (page 11).
• Turn unit OFF ( ) and unplug.
• Remove bowl attachment.
• Remove food being processed from inside the bowl.
• Allow unit to cool for 5 minutes.
• Reassemble unit, and run first with the bowl empty, then add food back into the bowl and try again.
Unit will not come up to full speed
• Bowl is overloaded – remove food being processed and reload using smaller quantities.
If unit does not operate after you have followed the above
• Check outlet to be sure there is current.
• Check to be sure circuit breaker is on.
• Check to be sure the fuse is not blown if there are fuses on this circuit.
• Contact your local distributor.
If unit starts to spark or smoke
• Turn unit off, unplug it, and call local factory-authorized service agency.
If food processor makes grinding noise
• Turn unit off, unplug, disassemble, check bowl and blade to see if they have been rubbing together.
• If bowl and blade are rubbing, call your local distributor.
15
CLEANING
Clean the food processor and accessories prior to initial use and after each use. Do not use harsh
abrasive-type cleaners on any part of the food processor. Wash the motor shaft with a small brush.
Wash, rinse, sanitize and dry the bowl, covers, small food pusher, large food pusher, accessory discs,
and S-blades prior to initial use, and after use, unless they will be used again immediately. These
items are all dishwasher safe, and may be cleaned and rinsed in the dishwasher instead of manually
in the sink.
Wash and rinse all of the above items after each use.
A stiff bristle brush will help to knock food particles out of the crevices of the discs and blades before
washing. Handle very carefully as the blades are sharp.
For manual cleaning, it is recommended that you use washing solutions based on non-sudsing
detergents, and chlorine-based sanitizing solutions that have a minimum chlorine concentration
of 100 PPM. The following washing, rinsing, and sanitizing solutions, or their equivalents, may
be used:
SOLUTION
Washing
Rinsing
Sanitizing
PRODUCT
*Ajax® Sanitizer
Cleaner Powder
DILUTION IN WATER
¼ oz. per 2½ gallons
Plain Water
**Clorox®
Institutional
1 tablespoon per
gallon
TEMPERATURE
Hot 115°F (46°C)
Warm 95°F (35°C)
Cold 50°F (10-21°C)
To clean and sanitize the motor base
Clean and sanitize the motor base prior to initial use and after each use. Unplug the unit, then
wipe down the exterior surfaces of the motor base with cloths or sponges dampened with a soluble
detergent. Next, wipe down with rinse water. Prevent liquid from running into the motor base by
wringing out all excess moisture from cloths or sponges before using them.
NEVER IMMERSE THE MOTOR BASE IN WATER OR ANY OTHER LIQUID.
Allow the unit to air-dry before using again.
Never use harsh abrasive-type cleaners on any part of the Commercial Food Processor.
*Ajax® is a registered trademark owned by the Colgate-Palmolive Company
**Clorox® is a registered trademark owned by the Clorox Company
16
NOTES
_______________________________________________________________________________________
_______________________________________________________________________________________
_______________________________________________________________________________________
_______________________________________________________________________________________
_______________________________________________________________________________________
_______________________________________________________________________________________
_______________________________________________________________________________________
_______________________________________________________________________________________
_______________________________________________________________________________________
_______________________________________________________________________________________
_______________________________________________________________________________________
_______________________________________________________________________________________
_______________________________________________________________________________________
_______________________________________________________________________________________
_______________________________________________________________________________________
_______________________________________________________________________________________
_______________________________________________________________________________________
_______________________________________________________________________________________
_______________________________________________________________________________________
_______________________________________________________________________________________
_______________________________________________________________________________________
_______________________________________________________________________________________
_______________________________________________________________________________________
_______________________________________________________________________________________
_______________________________________________________________________________________
_______________________________________________________________________________________
_______________________________________________________________________________________
_______________________________________________________________________________________
17
WICHTIGE
SICHERHEITSVORKEHRUNGEN
Bei jedem Gebrauch eines Elektrogeräts sollten grundlegende Sicherheitsvorkehrungen wie die
folgenden beachtet werden:
1. Die gesamte Anleitung durchlesen.
2. Die Klingen sind scharf. Mit Vorsicht handhaben.
3. Ihr Waring® Zerkleinerer ist ein Küchengerät, bei dessen Bedienung – wie bei allen
Küchengeräten – mit äußerster Vorsicht vorgegangen werden muss. Obwohl nur eine minimale
Einweisung in den Gebrauch des Geräts erforderlich ist, sollte die Bedienung dieses Zerkleinerers
nur verantwortlichen und umsichtigen Personen gestattet werden. Dieses Gerät darf nicht von
oder in der Nähe von Kindern oder Personen mit bestimmten Behinderungen verwendet werden.
4. Um Verletzungen zu vermeiden, darf das Schneidmesser oder die Schneidscheibe nicht auf den
Sockel aufgesetzt werden, ohne zuvor die Schüssel ordnungsgemäß anzubringen.
5. Hände sowie Schaber und andere Utensilien beim Zerkleinern von Lebensmitteln von den sich
bewegenden Messern oder Schneidscheiben fern halten, um die Gefahr schwerer Verletzungen
oder Beschädigungen des Zerkleinerers zu vermeiden. Ein Plastikschaber darf verwendet werden,
aber nur, wenn der Zerkleinerer nicht in Betrieb ist.
6. Den Sockel zum Schutz vor Stromschlägen nicht in Wasser oder andere Flüssigkeiten eintauchen.
7. Das Netzkabel von der Steckdose abziehen, wenn das Gerät nicht verwendet wird, bevor
Zubehörteile aufgesetzt oder abgenommen, Speisen aus der Arbeitsschüssel entfernt und das
Gerät gereinigt wird. Zum Abziehen des Netzsteckers diesen fassen und aus der Steckdose
herausziehen. Niemals am Kabel ziehen.
8. Den Kontakt mit bewegten Teilen vermeiden. Beim Schneiden oder Raspeln die Speiseprodukte
niemals von Hand zuführen. Stets den Stopfer verwenden.
9. Vor dem Abnehmen des Deckels sicherstellen, dass der Motor ganz zum Stillstand gekommen ist.
10. Ein Elektrogerät mit einem beschädigten Netzkabel oder Stecker, fallen gelassene und auf
irgendeine Weise beschädigte Geräte nicht in Betrieb nehmen. Das Gerät zur Untersuchung,
Reparatur und/oder Einstellung an die nächstgelegene autorisierte Kundendiensteinrichtung
zurückgeben.
11. Der Gebrauch von Zubehörteilen, die nicht von Waring empfohlen oder verkauft werden, kann
Brände, Stromschläge oder Verletzungen verursachen.
12. Nicht im Freien verwenden.
13. Das Netzkabel nicht über die Kante eines Tisches oder einer Arbeitsfläche herabhängen oder
heiße Oberflächen berühren lassen.
14. Keinen Versuch unternehmen, den Verriegelungsmechanismus des Deckels zu umgehen.
15. Vor der Bedienung des Geräts sicherstellen, dass der Deckel ordnungsgemäß verriegelt ist.
16. Bei Funktionsstörungen des Geräts aus beliebigen Gründen alle zum Zeitpunkt des Auftretens
der Störung zerkleinerten Speisen wegwerfen.
18
17. Dieses Gerät ist nicht zum Gebrauch durch Personen (einschließlich Kindern) mit
eingeschränkten körperlichen oder geistigen Fähigkeiten und geschädigten Sinnesnerven oder
mit mangelnden Erfahrungen und Kenntnissen vorgesehen, außer wenn diese beim Gebrauch
des Geräts von einer für ihre Sicherheit verantwortlichen Person beaufsichtigt oder von dieser
in seiner Verwendung unterwiesen wurden.
18. Kinder müssen beaufsichtigt werden, um sicherzustellen, dass sie nicht mit dem Gerät spielen.
DIESE GEBRAUCHSANLEITUNG
AUFBEWAHREN
GARANTIE
Für außerhalb der USA und Kanadas vertriebene Waring® Produkte gelten die Garantiebedingungen
des örtlichen Importeurs oder Vertriebshändlers. Diese Garantie kann sich je nach den örtlichen
Vorschriften unterscheiden.
ACHTUNG: Diese Garantie ist nichtig, wenn das Gerät mit Gleichstrom betrieben wird.
Wichtige Verdrahtungshinweise für
Grossbritannien
Dieses Gerät wird mit einem fest angebrachten Stecker geliefert; sollten Sie diesen jedoch austauschen
wollen, so beachten Sie bitte, dass die Drahtleiter im Netzkabel des Geräts farblich wie folgt kodiert
sind:
Grün und Gelb: Masse
Blau: Null
Braun: Phasen
Achtung: Der abgetrennte Stecker sollte zur Vermeidung möglicher Stromschläge entsorgt werden
und darf keinesfalls in eine 13-A-Buchse eingesteckt werden. Da die Farben im Hauptkabel dieses
Geräts möglicherweise nicht den Farbmarkierungen zur Kennzeichnung der Pole des Steckers
entsprechen, gehen Sie wie folgt vor: Der grün und gelb gekennzeichnete Leiter muss an der
Steckerklemme angeschlossen werden, die mit dem Buchstaben E (bzw. dem Massesymbol oder
farblich mit Grün oder Grün und Gelb gekennzeichnet ist. Der blaue Draht muss an die mit dem
Buchstaben N oder den Farben Schwarz oder Blau markierte Klemme angeschlossen werden. Der
braune Draht muss an die mit dem Buchstaben L oder den Farben Rot oder Braun
markierten Klemmen angeschlossen werden.
HINWEIS: Wenn die Klemmen im Stecker nicht markiert sind oder Sie sich nicht sicher sind, ziehen
Sie einen geschulten Elektriker zu Rate. Wenn eine Schmelzsicherungspatrone BS1363 verwendet
wird, muss diese mit einer Sicherung mit der richtigen Amperezahl (13 A) versehen werden. Dies gilt
nur für Modelle für Großbritannien.
19
INHALT
Wichtige Sicherheitsvorkehrungen. . . . . . . . . . . . . . . . . . . . . . . . . . . . . . . . . . .
Garantie. . . . . . . . . . . . . . . . . . . . . . . . . . . . . . . . . . . . . . . . . . . . . . . . .
Wichtige Verdrahtungshinweise für Großbritannien. . . . . . . . . . . . . . . . . . . . . . . . . .
Teilebeschreibung . . . . . . . . . . . . . . . . . . . . . . . . . . . . . . . . . . . . . . . . . . . .
Zusammensetzen der Schüsselkomponenten. . . . . . . . . . . . . . . . . . . . . . . . . . . . . .
Auseinanderbau der Schüsselkomponenten. . . . . . . . . . . . . . . . . . . . . . . . . . . . . . .
Gebrauch der Bedienelemente . . . . . . . . . . . . . . . . . . . . . . . . . . . . . . . . . . . . .
Speisenvorbereitung. . . . . . . . . . . . . . . . . . . . . . . . . . . . . . . . . . . . . . . . . . .
Wahl des Stopfers . . . . . . . . . . . . . . . . . . . . . . . . . . . . . . . . . . . . . . . . . . . .
Zurücksetzen des Überhitzungsschutzes. . . . . . . . . . . . . . . . . . . . . . . . . . . . . . . .
Gebrauchsanleitung für das S-Messer in der Arbeitsschüssel . . . . . . . . . . . . . . . . . . . . .
Auswahl und Gebrauch von Zubehörschneidscheiben. . . . . . . . . . . . . . . . . . . . . . . . .
Schneiden . . . . . . . . . . . . . . . . . . . . . . . . . . . . . . . . . . . . . . . . . . . . . . . .
Raspeln. . . . . . . . . . . . . . . . . . . . . . . . . . . . . . . . . . . . . . . . . . . . . . . . . .
Problembeseitigung . . . . . . . . . . . . . . . . . . . . . . . . . . . . . . . . . . . . . . . . . . .
Reinigung . . . . . . . . . . . . . . . . . . . . . . . . . . . . . . . . . . . . . . . . . . . . . . . .
20
18
19
19
21
23
25
26
27
28
28
29
30
30
31
32
33
TEILEBESCHREIBUNG
Der Waring-Zerkleinerer WFP7E/K besteht aus den folgenden Standardteilen und
Zubehörteilen (siehe Diagramm auf der nächsten Seite):
1. Motorsockel mit vertikaler Hochleistungswelle
2. Bedienschalter mit den Einstellpositionen ON/EIN ( ), OFF/AUS ( ) und
PULSE/IMPULS ( )
3. Sicherheitsverriegelung (nicht abgebildet).
Verhindert den Betrieb des Geräts ohne aufgesetzten Deckel.
4. Transparente Arbeitsschüssel mit einem Fassungsvermögen von 1,7 l (trocken).
5. Transparenter Arbeitsschüsseldeckel
a. Großer, ovaler Einfüllzylinder zur maximalen Nutzung der verfügbaren Schneidfläche
b. Großer Stopfer mit Schutzhülle und Verriegelungsmechanismus
c. Kleiner, im großen Stopfer verwendeter kleiner Stopfer für kleineres Gemüse,
Peperoniwurst usw.
Hinweis: Dank diesem Kombinationsstopfer kann der ganze Einfüllzylinder für größere
Speiseprodukte verwendet werden, und Lebensmittel mit einem kleineren Durchmesser
(z. B. Karotten, Stangensellerie und Peperoniwurst) können kontrolliert zerkleinert
werden.
6. Scharfes und haltbares S-Messer (Schneidmesser) zum Hacken, Mahlen, Pürieren und Mischen
7. 2-mm-Schneidscheibe
8. Feinraspelscheibe
9. Abnehmbarer Schaft zum Gebrauch mit Zerkleinerungsscheiben
Beachten Sie, dass alle WFP7E/K-Zubehörscheiben einen speziellen entfernbaren Offset Schaft besitzen. Durch das Design dieses Schaftes wird die Schneid-/
Zerkleinerungseffizienz dieser Zubehörteile gesteigert.
21
5c
7
5b
8
5a
5
9
4
6
1
2
22
ZUSAMMENSETZEN DER WFP7E/KSCHÜSSELKOMPONENTEN
In dieser Bedienungsanleitung werden die Begriffe „Schüssel“ und „Arbeitsschüssel“ synonym
verwendet, d. h. sie haben die gleiche Bedeutung.
•Reinigen und sterilisieren Sie vor dem erstmaligen Gebrauch des Geräts den Motorsockel; waschen,
spülen und sterilisieren Sie die Schüssel, den Deckel, den Stopfer, den Stopfereinsatz und die Zerklei
nerungswerkzeuge.
•Stellen Sie den Sockel auf einer Arbeitsfläche oder einem Tisch in der Nähe einer Steckdose ab.
Wenn Sie auf die Vorderseite des Geräts blicken, sollten Sie den Bedienschalter sehen können. Das
Netzkabel muss abgezogen sein und der Bedienschalter in der Stellung OFF/AUS ( ) stehen.
Schließen Sie das Kabel erst dann an der Steckdose an, wenn der Zerkleinerer vollständig zusammengesetzt ist.
•Nehmen Sie die transparente Arbeitsschüssel in beide Hände, wobei der Griff auf Sie gerichtet ist.
•Setzen Sie die Schüssel auf den Sockel. Der Mittenzylinder muss über die Motorwelle am Sockel
geschoben und der Griff etwas nach links von der Mitte versetzt werden (etwa in die 7-UhrPosition).
•Drücken Sie die Schüssel nach unten, sodass ihr unterer Rand um die Kreisplattform passt. Drehen
Sie die Schüssel bis zum Anschlag nach links (gegen den Uhrzeigersinn). Sie wird mithilfe der
Laschen an den Seiten der Plattform verriegelt.
Lesen Sie die folgenden Hinweise, wenn die einzelnen Teile der Schüssel für den Gebrauch des
S-Messers (Schneidmessers) zusammengesetzt werden sollen.
•Nehmen Sie unter Beachtung des Diagramms oben auf dem Kunststoffmittelteil das Metallmesser
zur Hand. Es ist der Form der Motorwelle angepasst.
•Legen Sie das S-Messer über das obere Ende der Motorwelle und richten Sie die Innenseite der
Nabe mit der Welle aus. Drücken Sie das Messer mit festem Druck nach unten und drehen Sie die
Mittennabe, bis die Messergruppe ganz eingepasst ist. Sie sollte sich problemlos einsetzen lassen.
Drücken Sie sie ganz nach unten. Wenn sie sich nicht in der untersten Position befindet, kann sie
beschädigt werden. Drücken Sie nur gegen das Kunststoffteil in der Mitte; berühren Sie keinesfalls
das Messer, das extrem scharf ist.
•Überprüfen Sie, ob das Messer ganz nach unten gedrückt wurde, indem Sie es bei leichtem Druck
nach unten hin und her drehen. Wenn das Messer richtig eingesetzt wurde und es ganz eingepasst ist,
befindet sich das untere Messer knapp über dem Innenboden der Schüssel.
•Wenn Sie Speiseprodukte mit dem S-Messer zerkleinern möchten, müssen Sie jetzt die Lebensmittel
oder Flüssigkeiten in die Arbeitsschüssel geben.
•Zerkleinern Sie trockene Speisen immer zuerst, bevor Sie feuchte Lebensmittel hinzufügen.
Lesen Sie die folgenden Hinweise, wenn die einzelnen Teile der Schüssel für den Gebrauch
von Zubehörscheiben in der Schüssel zusammengesetzt werden sollen.
•Geben Sie keine Speiseprodukte in die Schüssel, bevor Sie die Zubehörscheibe auf VERRIEGELN
die Welle aufsetzen.
•Wählen Sie die richtige Zubehörscheibe – die Raspel- oder die Schneidscheibe
– aus.
(Fortsetzung des Schüsselzusammenbaus auf der nächsten Seite)
ENTRIEGELN
23
(Fortsetzung des Schüsselzusammenbaus)
•Halten Sie die Scheibe so, dass die Schneidseite auf Ihre Hand weist. Seien Sie vorsichtig, um sich
nicht an den scharfen Kanten zu verletzen. Beachten Sie, dass sich auf der Unterseite der Scheibe ein
Kunststoff-Aufnahmebehälter für den abnehmbaren Schaft befindet. Halten Sie den Schaft so fest,
dass der Daumen auf der Freigabetaste ruht. Stecken Sie die mittlere und die ganz rechte Lasche in
die beiden offenen Schlitze auf der Unterseite der Scheibe und drehen Sie die Scheibe nach rechts.
Orientieren Sie sich dabei am Diagramm.
•Nachdem der Schaft in die gewünschte Scheibe eingesetzt wurde, führen Sie die mittlere
Scheibennabe vorsichtig über den Metallschaft, sodass die doppelten Flachstellen an der Welle mit
dem Scheibenschaft ausgerichtet sind. Legen Sie die Scheibe oben auf die Welle und drehen Sie
sie, bis sie herabfällt. Drücken Sie sie ganz nach unten. Drücken Sie nur gegen den Außenrand der
Scheibe; berühren Sie keinesfalls die Schneidmesser. Die Scheibe sollte von selbst herunterfallen.
Wenn dies nicht der Fall ist, bewegen Sie sie vorsichtig hin und her, bis sie an die vorgesehene Stelle
herabrutscht.
Hinweis: Geben Sie keine Speiseprodukte in die Schüssel, bevor Sie die Zubehörscheibe auf
die Welle aufsetzen.
•Setzen Sie den Deckel so auf die Schüssel auf, dass sich der Einfüllzylinder links vom Griff befindet
(etwa in der 7-Uhr-Position). Die Verriegelungslaschen auf der Rückseite des Deckels sollten sich
rechts von den Verriegelungslaschen am hinteren Rand der Arbeitsschüssel befinden.
•Drehen Sie den Deckel zum Verriegeln nach links (gegen den Uhrzeigersinn). Wenn der Deckel
durch Drehen verriegelt wird, passt die Sicherheitsverriegelungslasche auf der Vorderseite des
Deckels genau in den Verriegelungsmechanismus über dem Griff.
VERSUCHEN SIE NICHT, DEN ZERKLEINERER OHNE VERRIEGELTEN DECKEL IN BETRIEB ZU NEHMEN.
Stopfer und Schutzhülle
Ihr Waring-Zerkleinerer ist mit einer Schutzhülle mit einem eingebauten
großen Stopfer und Verriegelungsmechanismus ausgerüstet. Hinweis:
Der Zerkleinerer kann nur in Betrieb genommen werden, wenn die
Schutzhülle arretiert und der Verriegelungsmechanismus aktiviert ist.
Nehmen Sie die Hülle und den großen Stopfer zur Hand. Stecken Sie den
Stopfer bei zur Vorderseite des Zerkleinerers weisender Freigabelasche
in den Einfüllzylinder. (Die Hülle sollte sich um den Einfüllzylinder
schieben lassen.) Drücken Sie fest gegen den Stopfer, bis der
Verriegelungsmechanismus mit einem Klicken einrastet. Der Zerkleinerer
ist jetzt betriebsbereit.
Gebrauch des Stopfers
Geben Sie die zu zerkleinernden Speisen in den kleinen Einfüllzylinder
und drücken Sie sie mit dem kleinen Stopfer in die Arbeitsschüssel. Um
den kleinen Stopfer im großen Stopfer zu verriegeln, schieben Sie ihn
24
einfach in den kleinen Einfüllzylinder hinein und drehen ihn nach links (gegen den
Uhrzeigersinn), bis die Lasche einrastet.
Sie können auch Speiseprodukte zerkleinern, die nicht in den kleinen
Einfüllzylinder passen. Entfernen Sie zu diesem Zweck die Hülle und den großen
Stopfer, indem Sie gegen die mit dem Aufdruck „PRESS HERE“ (Hier drücken)
gekennzeichnete Freigabelasche drücken. Geben Sie die zu zerkleinernden
Speisen in den Einfüllzylinder. Schieben Sie den weißen, mit „LOCK“
gekennzeichneten Verriegelungshebel nach links. Auf diese Weise kann sich der
große Stopfer in die Schutzhülle hinein und aus dieser heraus bewegen. Schieben
Sie die Hülle wieder auf die Abdeckung, wobei der Verriegelungsmechanismus
aktiviert sein muss. Bei Gebrauch einer Zerkleinerungsscheibe ruhen die
Lebensmittel auf der Scheibe und schieben den Stopfer nach oben in die
ausgefahrene Position. Der kleine Stopfer muss im großen Stopfer verriegelt
sein. Schalten Sie den Zerkleinerer ein und drücken Sie den großen Stopfer nach
unten, um die Speiseprodukte auf die Zerkleinerungsscheibe zu schieben.
AUSEINANDERBAU DER WFP7E/KSCHÜSSELKOMPONENTEN
VOR DEM AUSEINANDERBAU STETS DAS NETZKABEL ABZIEHEN.
•Drehen Sie den Schüsseldeckel nach rechts, bis die Sicherheitsverriegelungslasche auf dem Deckel
freigegeben wird und die Laschen sich nicht mehr in der Nut im Turm befinden. Der Einfüllzylinder
befindet sich zwischen der 7- und 9-Uhr-Position. In dieser Stellung können Sie den Deckel von der
Schüssel abheben.
•Entfernen Sie den großen Speisenstopfer und die Hülle aus dem Einfüllzylinder, indem Sie gegen
die mit dem Aufdruck „PRESS HERE“ (Hier drücken) gekennzeichnete Freigabelasche drücken.
Nehmen Sie den kleinen Stopfer aus dem großen Stopfer heraus.
Auseinanderbau bei gleichzeitigem Entfernen des S-Messers
•Entfernen Sie die Arbeitsschüssel vom Sockel, indem Sie sie nach links drehen, um die Laschen auf
der Unterseite der Schüsselplattform von der Schüssel zu lösen. Wenn sich der Schüsselgriff links
(etwa in der 7-Uhr-Position) befindet, können Sie die Schüssel vorsichtig nach oben wegheben.
Es wird empfohlen, zunächst die Schüssel vom Motorsockel und erst dann das S-Messer zu
entfernen.
•Üben Sie zum Entfernen des Messers einen leichten Abwärtsdruck oben gegen die Mittennabe des
Messers aus, während Sie die Schüssel vom Motorsockel abnehmen. Dadurch entsteht eine Dichtung,
die verhindert, dass Lebensmittelreste in den Mittenzylinder der Schüssel und auf den Motorsockel
25
oder die Arbeitsfläche fallen. Nehmen Sie dann das S-Messer aus der Schüssel heraus. Seien Sie beim
Umgang mit dem S-Messer vorsichtig, da dieses extrem scharf ist.
Auseinanderbau bei gleichzeitigem Entfernen einer Zubehörscheibe
•Nehmen Sie die Arbeitsschüssel erst nach dem Entfernen der Zubehörscheibe ab.
•Um eine Zubehörscheibe herauszunehmen, fassen Sie diese am Außenrand an zwei
gegenüberliegenden Seiten und heben Sie die Scheibe an. Die Scheibe sollte sich problemlos
entfernen lassen. Zum Entfernen des abnehmbaren Schaftes halten Sie die Scheibe in einer Hand;
dabei muss der Schaft von der Hand weg weisen. Achten Sie darauf, sich nicht an den scharfen
Kanten zu verletzen; drücken Sie die Freigabetaste mit dem Daumen und drehen Sie die Scheibe
nach links (gegen den Uhrzeigersinn).
•Entfernen Sie die Arbeitsschüssel vom Sockel, indem Sie sie nach links drehen, um die Laschen auf
der Unterseite der Schüsselplattform von der Schüssel zu lösen. Wenn sich der Schüsselgriff links
(etwa in der 7-Uhr-Position) befindet, können Sie die Schüssel vorsichtig nach oben wegheben.
GEBRAUCH DER BEDIENELEMENTE
•Schließen Sie das Gerät an einer 230-V-Steckdose an (50 Hz).
•Vorne am Sockel des Geräts befindet sich ein Bedienschalter, mit dem Sie den Zerkleinerungsprozess
mit den Fingerspitzen steuern können. Der Schalter ist groß genug, um im Notfall leicht bedient
werden zu können.
Der Bedienschalter ON/EIN ( )
kann auf 3 Positionen OFF/AUS ( )
eingestellt werden:
PULSE/IMPULS (
Schalterfunktion:
)
ON/EIN ( ): Drücken Sie den Schalter nach oben, um den Motor
zu starten.
OFF/AUS ( ): Schalten Sie den Motor aus, indem Sie den Schalter in die
Position OFF/AUS ( ) drücken.
PULSE/IMPULS ( ): Arbeiten Sie mit dem Motor im Impulsbetrieb,
indem Sie den Schalter nach unten drücken und wieder loslassen. Der
Motor läuft so lange, wie Sie den Schalter gedrückt halten. Er bleibt stehen,
wenn Sie ihn freigeben. Versuchen Sie es einfach ein paar Mal.
Gebrauchsanleitung
Dauerbetrieb
Drücken Sie den Schalter für einen Dauerbetrieb des Geräts nach oben in die Position ON/EIN (
26
).
Impulsbetrieb
Die Impulsfunktion ist bei Verwendung des S-Messers in der Arbeitsschüssel vorgesehen.
•Der Motor läuft so lange, wie Sie den Schalter gedrückt halten. Er bleibt stehen, wenn Sie ihn
freigeben.
•Sie kontrollieren die Impulsfunktion. Sie bestimmen die Dauer jedes Impulses, indem Sie den
Schalter eine bestimmte Zeit lang gedrückt halten. Außerdem bestimmen Sie die Impulsfrequenz
durch die Häufigkeit, mit der Sie den Schalter betätigen. Das Intervall zwischen den einzelnen
Impulsen muss lang genug sein, dass alle Speisen in der Arbeitsschüssel wieder auf den Boden der
Schüssel fallen können.
•Mit Motorimpulsen können Sie präzise hacken, zerstückeln, pürieren und mischen. Sie können
Lebensmittel zu jeder gewünschten Beschaffenheit oder Konsistenz, von grob bis fein, zerkleinern.
•Der Impulsbetrieb bietet sich auch beim Zerkleinern harter Lebensmittel an. Bearbeiten Sie die
jeweilige Speise ein paar Mal im Impulsbetrieb, um sie zu zerbröckeln. Schalten Sie dann, wenn
kleinere Teile vorliegen, die leichter zerkleinert werden können, auf Dauerbetrieb um.
•Verwenden Sie für den Impulsbetrieb immer den Schalter. Steuern Sie die Impulsfunktion keinesfalls
durch Abnehmen und Wiederaufsetzen der Schüssel (des Stutzens) und des Deckels. Dies ist eine
weniger effiziente Methode, durch die das Gerät beschädigt werden könnte.
Ausschalten
Schalten Sie das Gerät stets in die Position OFF/AUS ( ) und warten Sie, bis das Messer oder die
Schneidscheibe zum Stillstand gekommen sind, bevor Sie die Stopfereinheit entfernen. Der Motor
bleibt wenige Sekunden nach dem Ausschalten des Geräts stehen.
SPEISENVORBEREITUNG
•Waschen und schälen Sie alle Lebensmittel nach Bedarf, um sie auf die Zerkleinerung vorzubereiten.
Entfernen Sie alle Obst- und Gemüsekerne.
•Schneiden Sie Gemüse, Fleisch, Käse usw. zu Größen zurecht, die in den kleinen oder großen
Einfüllzylinder passen, um sie mit Zubehörscheiben zu zerkleinern, bzw. zu Größen, die dem jeweils
anstehenden Zerkleinerungsvorhaben entsprechen.
•Vorbereitung auf das Schneiden: Langes, zylindrisches Gemüse wie Karotten, Gurken und
Stangensellerie sollte an beiden Enden flach abgeschnitten werden. Auf diese Weise werden alle zur
Zerkleinerung vorgesehenen Lebensmittel gleichmäßig geschnitten.
27
WAHL DES STOPFERS
Gebrauch des S-Messers
Der kleine Stopfer wird nicht benötigt, wenn Speiseprodukte auf dem Boden der Arbeitsschüssel
mit dem S-Messer zerkleinert werden. Der kleine Einfüllzylinder kann jedoch zum Hinzufügen von
Zutaten in den laufenden Zerkleinerer benutzt werden. Ein Entfernen des Stopfers wird nicht
empfohlen, da dieser Spritzer verhindert und vermeidet, dass der Schüssel unerwünschte Zutaten
hinzugefügt werden.
Kleiner Stopfer:
Dieser Stopfer mit dem kleineren Stutzen wird gewöhnlich dann verwendet, wenn Gemüse für
kleinere Schnitte senkrecht eingeführt wird. Er sollte zum Schneiden von Karotten, Stangensellerie,
Peperoniwurst usw. benutzt werden, wenn gleichmäßig große, flache Scheiben erwünscht sind.
Dieser Stopfer bietet sich auch für kürzere Raspeln oder Scheiben an, im Gegensatz zu den längeren
Scheiben, die mit dem großen Einfüllzylinder und Stopfer erzielt werden.
Großer Stopfer
Dieser Stopfer mit dem größeren Stutzen wird gewöhnlich dann verwendet, wenn Gemüse waagerecht
eingeführt wird, um größere Scheiben zu schneiden.
Dieser Stopfer wird verwendet, wenn eine längere Raspel oder Scheibe erzeugt werden soll. Außerdem
wird er zum Zerkleinern größerer Lebensmittelmengen oder größerer Speiseprodukte wie Kartoffeln
oder Zwiebeln benutzt.
ZURÜCKSETZEN DES ÜBERHITZUNGSSCHUTZES
Die Zerkleinerer des Typs WFP7E/K sind mit einem automatischen Rücksetzschalter ausgerüstet, der
den Motor vor Überhitzung schützt.
Wenn der Zerkleinerer bei starker Beanspruchung aussetzt, schalten Sie den Netzschalter aus und
ziehen Sie das Netzkabel ab. Leeren Sie die Arbeitsschüssel vollständig aus und lassen Sie den Motor
ca 5 lang abkühlen.
Schließen Sie das Netzkabel wieder an und fahren Sie mit dem Zerkleinern fort.
Wenn der Zerkleinerer nach diesem Verfahren nicht richtig funktioniert, verwenden Sie ihn nicht
weiter und kontaktieren Sie Ihren lokalen Fachhändler.
28
GEBRAUCHSANLEITUNG FÜR DAS S-MESSER
(SCHNEIDMESSER) IN DER WFP7E/K-SCHÜSSEL
•Das S-Messer (Schneidmesser) wurde zum Hacken, Mahlen, Pürieren und Mischen praktisch aller in
Rezepten zu findender Zutaten konstruiert.
•Setzen Sie die Schüssel und das Messer nach der Anleitung im Abschnitt “Zusammensetzen der
Schüsselkomponenten” (Seite 23) zusammen.
Hacken und Zerstückeln
•Zum Hacken und Zerstückeln von Speisen in der Schüssel füllen Sie diese bis zum oberen Rand des
Innenzylinders der Schüssel (zu ca. ¾) mit dem Lebensmittelprodukt.
•Für ein möglichst effektives Hacken und Zerstückeln müssen Sie das Messer mit der Impulsoption
schnell starten und stoppen, um einen einheitlichen Hackvorgang zu gewährleisten. Sie erreichen
dies mit der unter „Impulsbetrieb“ beschriebenen Schalterstellung PULSE/IMPULS ( ). Setzen
Sie die Impulse so lange fort, bis die gewünschte Konsistenz vorliegt.
•Wenn gehackte Speisen im Dauerbetrieb zerkleinert werden, führt dies zu unregelmäßigen
Ergebnissen, d. h. Speisen in der unteren Hälfte der Schüssel werden feiner gehackt und Speisen in
der oberen Hälfte gröber.
Hacken von Fleisch
Schneiden Sie Fleisch zu 2,5 cm großen Würfeln zurecht, um gleichmäßige Hackergebnisse zu
gewährleisten. Zerkleinern Sie nicht mehr als 0,55 kg auf einmal. Drücken Sie den Bedienschalter
dreimal für jeweils 1 oder 2 Sekunden in die Position PULSE/IMPULS ( ). Drücken Sie den
Bedienschalter dann für eine Dauer von maximal 30 Sekunden auf ON/EIN ( ), um die gewünschte
Konsistenz herzustellen.
Hacken von Hartkäse
Schneiden Sie Käse zu 2,5 cm großen Würfeln zurecht, um gleichmäßige Hackergebnisse zu
gewährleisten. Zerkleinern Sie nicht mehr als 0,45 kg auf einmal. Drücken Sie den Bedienschalter
dreimal für jeweils 1 oder 2 Sekunden in die Position PULSE/IMPULS ( ). Drücken Sie den
Bedienschalter dann für eine Dauer von maximal 30 Sekunden auf ON/EIN ( ), um die gewünschte
Konsistenz herzustellen.
Hacken von Zwiebeln, Stangensellerie, Kohl usw.
Vierteln Sie Zwiebeln und schneiden Sie andere Gemüsesorten zu 2,5 cm großen Würfeln zurecht.
Geben Sie die Speisewürfel bis zum oberen Rand des Innenzylinders in die Arbeitsschüssel und
arbeiten Sie im Impulsmodus, bis die gewünschte Konsistenz vorliegt.
Hinweis: Wenn Sie das Messer zu lange laufen lassen, werden die Bestandteile im Boden der Schüssel
püriert oder Sie erhalten uneinheitliche Ergebnisse.
29
Pürieren oder Mischen
Um Tomaten, Gemüse und Obst zu pürieren, Soßen anzufertigen oder Zutaten gründlich zu
vermischen, geben Sie die gewünschten Speiseprodukte in die Schüssel, schalten das Gerät ein und
lassen es im Dauerbetrieb laufen, bis die angestrebte Konsistenz erreicht ist. Lassen Sie das Gerät nicht
unbeaufsichtigt laufen. Wenn Ihr Rezept Nasszutaten von mehr 1,7 l vorsieht, zerkleinern Sie diese in
mehreren Partien.
Schalten Sie das Gerät aus.
•Schalten Sie den Zerkleinerer immer aus, indem Sie den Schalter in die Position OFF/AUS ( )
drücken. Dadurch wird sichergestellt, dass dem Motor kein Strom mehr zugeführt wird.
•Schalten Sie vor dem Abnehmen des Deckels immer zuerst den Zerkleinerer aus und warten Sie, bis
sich das Messer bzw. die Scheibe nicht mehr dreht.
•Das Gerät wird zwar auch dann ausgeschaltet, wenn durch Rechtsdrehung des Deckels der Sicherhei
tsverriegelungsschalter entsperrt oder der Deckel bei laufendem Motor abgenommen wird, doch darf
diese Methode nicht als Ersatz für das Drücken des Schalters in die Position ON/OFF (EIN/AUS)
( , ) verwendet werden.
•Bevor Sie den Deckel drehen, müssen Sie als Vorsichtsmaßnahme durch Drücken des Schalters in
die Position OFF/AUS ( ) stets sicherstellen, dass das Gerät auch wirklich ordnungsgemäß a
usgeschaltet wurde.
Auswahl und Gebrauch von
Zubehörschneidscheiben
Mit den Zubehörscheiben zum Zerkleinerer WFP7E/K kann eine breite Vielfalt von Speisenzerkle
inerungsaufgaben ausgeführt werden. Im Lieferumfang des Zerkleinerers WFP7E/K sind zwei (2)
Zubehörscheiben inbegriffen. Zum Zeitpunkt der Drucklegung dieser Anleitung waren dies:
die 2-mm-Schneidscheibe
die Feinraspelscheibe
Schneiden
•Waschen und schälen Sie alle Lebensmittel nach Bedarf, um sie auf die Zerkleinerung vorzubereiten.
Entfernen Sie alle Obst- und Gemüsekerne. Vergewissern Sie sich, dass die Speiseprodukte in den
jeweiligen Einfüllstutzen passen. Lebensmittel wie Karotten, Gurken usw. sollten an beiden Enden
flach abgeschnitten werden, damit das ganze Produkt in einheitlich große Scheiben geschnitten wird.
•Bei Speisen wie Kohl, Kopfsalat oder anderen Produkten mit einem unerwünschten Strunk sollte
dieser entfernt werden. Kohl- oder Salatköpfe mittlerer Größe können in Drittel unterteilt werden,
damit sie in den Einfüllstutzen passen. Größere Köpfe müssen evtl. geviertelt werden.
30
•Füllen Sie nach der Speisenvorbereitung den ausgewählten Einfüllstutzen, setzen Sie den Stopfer ein,
schalten Sie das Gerät ein und kontrollieren Sie die Ergebnisse.
•Versuchen Sie auf keinen Fall, Weichkäse zu schneiden. Schneiden Sie nur Hartkäse wie Parmesan.
Verwenden Sie keine Speisenblöcke, die größer sind als 89 x 19 x 101 mm. Verwenden Sie zum
Schneiden immer nur gut gekühlten Käse. Es wird empfohlen, Käse mindestens 1 Stunde vor dem
Schneiden in den Kühlschrank zu geben. Dieses Gerät ist nicht zum Schneiden von Mozzarella
geeignet. Ein entsprechender Versuch kann Schäden am Gerät verursachen.
•Wenn die geschnittene Speise die Schüssel fast völlig füllt, muss diese geleert werden.
Raspeln
•Waschen und schälen Sie alle Lebensmittel nach Bedarf, um sie auf die Zerkleinerung vorzubereiten.
Entfernen Sie alle Obst- und Gemüsekerne. Vergewissern Sie sich, dass die Speiseprodukte in den
jeweiligen Einfüllstutzen passen.
•Wählen Sie aus, welchen Einfüllzylinder Sie verwenden möchten. Bei einem waagerechten Zuführen
von Karotten entsteht ein langes, geraspeltes Produkt, und bei Verwendung des kleineren Stutzens
mit senkrecht eingeführten Karotten ein kurzes, geraspeltes Produkt.
•Versuchen Sie auf keinen Fall, Weichkäse zu raspeln. Raspeln Sie nur Hartkäse wie Parmesan.
Verwenden Sie keine Speisenblöcke, die größer sind als 89 x 19 x 101 mm. Verwenden Sie zum
Raspeln immer nur gut gekühlten Käse. Es wird empfohlen, Käse mindestens 1 Stunde vor dem
Schneiden in den Kühlschrank zu geben. Dieses Gerät ist nicht zum Raspeln von Mozzarella
geeignet. Ein entsprechender Versuch kann Schäden am Gerät verursachen.
•Zum Raspeln von Käse wird empfohlen, einen leichten Impulsdruck mit dem Stopfer auszuüben und
abwechselnd zu drücken und nicht zu drücken, bis der Käseblock ganz geraspelt ist. Beim Raspeln
von Käse wird der Zerkleinerermotor stärker belastet als für andere Aufgaben und er kann sich
überhitzen, wenn dauerhaft zu viel Druck ausgeübt wird.
•Sie können im Normalfall davon ausgehen, in fünf Minuten etwa 4,5 kg Käse zu raspeln. Es wird
empfohlen, die Speisenvorbereitung so zu planen, dass auf fünf Minuten Raspeln fünf Minuten für
die Vorbereitung von Lebensmitteln folgen, während denen die Maschine ruht.
•Wenn die geraspelte Speise die Schüssel fast völlig füllt, muss diese geleert werden.
31
PROBLEMBESEITIGUNG
In diesem Abschnitt sind potenzielle Probleme und geeignete Abhilfemaßnahmen beschrieben. Lassen
Sie sich bei Problemen, die unter Anwendung der unten aufgeführten Richtlinien nicht gelöst werden
können, von einem örtlichen Fachhändler weiterhelfen. Eine Liste autorisierter Kundendienstniederlas
sungen liegt jedem Waring-Zerkleinerer bei.
Gerät startet bei korrektem Zusammenbau nicht
•Ziehen Sie den Stecker ab und schließen Sie das Gerät an einer anderen Steckdose an.
•Drücken Sie den Schalter auf ON/EIN ( ).
•Stellen Sie sicher, dass die Schüssel richtig auf dem Motorsockel ruht, dass der Schüssel- oder
Stutzendeckel richtig aufgesetzt wurde und dass die Sicherheitsverriegelungslasche auf dem Deckel
richtig in den Sicherheitsverriegelungsschalter eingerückt wurde.
Gerät schaltet sich während der Zerkleinerung aus
•Das Gerät hat sich möglicherweise überhitzt. Lesen Sie den Abschnitt zum Zurücksetzen des
Überhitzungsschutzes (Seite 28).
•Schalten Sie das Gerät durch Drücken des Bedienschalters auf OFF/AUS ( ) aus und ziehen Sie
den Netzstecker ab.
•Entfernen Sie das Schüsselzubehör.
•Entfernen Sie die in Bearbeitung befindliche Speise aus der Schüssel.
•Lassen Sie das Gerät 5 Minuten lang abkühlen.
•Setzen Sie das Gerät wieder zusammen und lassen Sie es zunächst mit einer leeren Schüssel laufen,
bevor Sie ein Speiseprodukt einfüllen und es nochmals versuchen.
Gerät läuft nicht zu höchster Drehzahl hoch
•Die Schüssel ist überladen. Entfernen Sie die in Bearbeitung befindliche Speise und füllen Sie die
Schüssel mit kleineren Mengen.
Gerät funktioniert nach Durchführung der obigen Schritte immer noch nicht
•Stellen Sie sicher, dass an der Steckdose Strom anliegt.
•Stellen Sie sicher, dass kein Schutzschalter ausgelöst wurde.
•Stellen Sie bei einem mit Sicherungen geschützten Schaltkreis sicher, dass die Sicherung nicht
durchgebrannt ist.
•Wenden Sie sich an Ihren örtlichen Fachhändler.
Am Gerät treten Funken oder Rauch auf
•Schalten Sie das Gerät aus, ziehen Sie das Netzkabel ab und wenden Sie sich an eine vom Werk
autorisierte Kundendienstniederlassung.
32
Zerkleinerer erzeugt Schleifgeräusche
•Schalten Sie das Gerät aus, ziehen Sie das Netzkabel ab und überprüfen Sie, ob Schüssel und Messer
gegeneinander reiben.
•Wenn dies der Fall ist, wenden Sie sich an Ihren örtlichen Fachhändler.
REINIGUNG
Reinigen Sie den Zerkleinerer und alle Zubehörteile vor dem erstmaligen und nach jedem weiteren
Gebrauch. Reinigen Sie keine Teile des Zerkleinerers mit aggressiven, scheuernden Reinigungsmitteln.
Waschen Sie die Motorwelle mit einer kleinen Bürste ab.
Waschen, spülen, sterilisieren und trocknen Sie die Schüssel, die Deckel, den kleinen Stopfer, den
großen Stopfer, die Zubehörscheiben und das S-Messer vor dem erstmaligen und nach jedem weiteren
Gebrauch, außer wenn sie sofort wieder verwendet werden sollen. Alle diese Teile sind spülmaschinenfest und können auch in der Geschirrspülmaschine anstatt von Hand im Spülbecken gereinigt und
abgespült werden.
Waschen und spülen Sie die oben genannten Teile nach jedem Gebrauch.
Speisereste können vor dem Waschen mit einer steifborstigen Bürste aus den Fugen und Spalten der
Scheiben und Messer entfernt werden. Die Messer sind sehr scharf und mit Vorsicht zu behandeln.
Zum Reinigen von Hand werden Waschlösungen auf der Basis nicht schäumender Reinigungsmittel
und Sterilisierungslösungen auf Chlorbasis mit einer Chlormindestkonzentration von 100 ppm
empfohlen. Es können die folgenden Wasch-, Spül- und Sterilisierungslösungen oder gleichwertige
Produkte verwendet werden:
LÖSUNG
PRODUKT
LÖSUNG IN WASSER
Waschen
*Ajax® Sterilisierprodukt
7,6 ml pro 10 l
Reinigungspulver Spülen Einfaches Wasser
Sterilisieren
1 Esslöffel
**Clorox® Bleichmittel für kommerzielle
pro 3,8 l Einrichtungen
TEMPERATUR
Heiß (46 °C)
Warm (35 °C)
Kalt (10-21 °C
Reinigen und Sterilisieren des Motorsockels
Reinigen und sterilisieren Sie den Motorsockel vor dem erstmaligen und nach jedem weiteren
Gebrauch. Ziehen Sie das Netzkabel ab und wischen Sie die Außenflächen des Motorsockels mit zuvor
mit einem löslichen Reinigungsmittel angefeuchteten Tüchern oder Schwämmen ab. Wischen Sie den
Sockel dann mit Spülwasser ab. Stellen Sie durch Auswringen überschüssiger Flüssigkeit aus Tüchern
oder Schwämmen vor deren Gebrauch sicher, dass keine Flüssigkeit in den Motorsockel eindringen
kann.
33
DEN MOTORSOCKEL NICHT IN WASSER ODER ANDERE FLÜSSIGKEITEN
EINTAUCHEN.
Lassen Sie das Gerät vor der Wiederverwendung an der Luft trocknen. Reinigen Sie keine Teile des
kommerziellen Zerkleinerers mit aggressiven, scheuernden Reinigungsmitteln.
*Ajax® ist eine eingetragene Marke der Colgate-Palmolive Company.
**Clorox® ist eine eingetragene Marke der Clorox Company.
34
NOTIZEN
_______________________________________________________________________________________
_______________________________________________________________________________________
_______________________________________________________________________________________
_______________________________________________________________________________________
_______________________________________________________________________________________
_______________________________________________________________________________________
_______________________________________________________________________________________
_______________________________________________________________________________________
_______________________________________________________________________________________
_______________________________________________________________________________________
_______________________________________________________________________________________
_______________________________________________________________________________________
_______________________________________________________________________________________
_______________________________________________________________________________________
_______________________________________________________________________________________
_______________________________________________________________________________________
_______________________________________________________________________________________
_______________________________________________________________________________________
_______________________________________________________________________________________
_______________________________________________________________________________________
_______________________________________________________________________________________
_______________________________________________________________________________________
_______________________________________________________________________________________
_______________________________________________________________________________________
_______________________________________________________________________________________
_______________________________________________________________________________________
_______________________________________________________________________________________
_______________________________________________________________________________________
35
BELANGRIJKE
VEILIGHEIDSVOORSCHRIFTEN
Volg bij gebruik van elektrische apparaten altijd fundamentele voorzorgsmaatregelen. Deze zijn
onder meer:
1. Lees alle instructies door.
2. De messen zijn scherp. Ga er dus zeer voorzichtig mee om.
3. Uw Waring® keukenmachine is een keukenapparaat en net zoals bij alle keukenapparaten, moet u
goed opletten als u het bedient. Hoewel gebruik van het apparaat heel snel kan worden aangeleerd, mogen alleen verantwoordelijke en voorzichtige personen deze keukenmachine bedienen.
Laat niet gebruiken door of in de buurt van kinderen of personen met bepaalde handicaps.
4. Breng om letsel te vermijden het snijmes of de snijschijf nooit in de basis aan zonder dat de mengkom goed is aangebracht.
5. Houd als het apparaat in werking is handen, spatels en ander keukengerei uit de buurt van bewegende messen of schijven om het risico op ernstig lichamelijk letsel of beschadiging van de keukenmachine te voorkomen. Een plastic spatel mag wel worden gebruikt, maar dan wel alleen als de
keukenmachine niet in werking is.
6. Dompel de basis niet onder in water of een andere vloeistof om elektrische schokken te vermijden.
7. Trek de stekker uit het stopcontact als het apparaat niet in gebruik is en vóór u het gaat schoonmaken. De stekker uit het stopcontact halen doet u door hem vast te houden uit het stopcontact te
trekken. Trek nooit aan het snoer.
8. Vermijd contact met draaiende onderdelen. Gebruik bij het snijden of raspen nooit uw handen om
voedsel door de vulopening te voeren. Gebruik altijd de stamper.
9. Verwijder het deksel pas nadat de motor volledig tot stilstand is gekomen.
10. Gebruik een apparaat nooit indien het snoer of de stekker beschadigd is, of indien het is gevallen of
op een of andere manier beschadigd. Laat het apparaat bij het dichtstbijzijnde erkende servicecentrum nakijken, repareren of regelen.
11. Gebruik van niet door Waring aanbevolen of verkochte hulpstukken kan brand, elektrische schok
of letsel veroorzaken.
12. Niet buiten gebruiken.
13. Laat het snoer niet over de rand van de tafel of het aanrecht hangen, of in aanraking komen met
hete oppervlakken.
14. Probeer het vergrendelingsmechanisme van het deksel niet te forceren.
15. Controleer of het deksel goed vergrendeld is voordat u het apparaat bedient.
16. Indien het apparaat om wat voor reden dan ook niet werkt, moet u het voedsel dat werd verwerkt
weggooien.
17. Dit apparaat is niet bedoeld voor gebruik door personen met een beperkt lichamelijk, zintuiglijk
of verstandelijk vermogen (ook kinderen) of met onvoldoende ervaring of kennis, tenzij onder
toezicht of indien gebruik van het apparaat werd uitgelegd door iemand die verantwoordelijk is
voor hun veiligheid.
36
18. Houd toezicht op kinderen zodat ze niet met het apparaat kunnen spelen.
BEWAAR DEZE AANWIJZINGEN
Garantie
Voor Waring® producten die buiten de VS en Canada worden verkocht, valt de garantie onder de
verantwoordelijkheid van de lokale importeur of distributeur. Deze garantie kan variëren naargelang de
plaatselijke voorschriften.
WAARSCHUWING: Indien dit apparaat met gelijkstroom (DC) wordt gebruikt, vervalt de garantie.
Belangrijke instructies voor Britse
bedrading
Dit apparaat is voorzien van een standaard stekker. Indien u de stekker echter wilt vervangen, volgt
hier ter informatie de kleurencode van de draden in het netsnoer van het apparaat:
groen en geel
blauw
bruin
aarde
neutraal
stroomdraad
Waarschuwing: Gooi de verwijderde stekker weg om risico op schok te voorkomen. Stop de stekker nooit in een stopcontact van 13A. Indien het netsnoer van dit apparaat anders gekleurd is dan de
gekleurde merktekens die de aansluitklemmen in uw stekker identificeren, gaat u als volgt te werk:
verbind de groene en gele draad met de aansluitklem in de stekker die met de letter ‘E’ of het aardsymbool aangeduid is of groen en geel is gekleurd; verbind de blauwe draad met de aansluitklem die met
de letter ‘N’ gemarkeerd is of zwart of blauw is gekleurd; verbind de bruine draad met de aansluitklem
die met de letter ‘L’ gemarkeerd is of rood of bruin is gekleurd.
NB.: Neem bij twijfel of als de aansluitklemmen niet zijn gemarkeerd contact op met een bevoegde
elektricien. Zorg bij gebruik van een BS1363 haakse Engelse stekker dat de zekering de juiste stroomsterkte heeft, nl. 13A. Dit geldt alleen voor Britse modellen.
37
INHOUD
Belangrijke veiligheidsvoorschriften . . . . . . . . . . . . . . . . . . . . . . . . . . . . . . . . . .
Garantie . . . . . . . . . . . . . . . . . . . . . . . . . . . . . . . . . . . . . . . . . . . . . . . . .
Belangrijke instructies voor Britse bedrading . . . . . . . . . . . . . . . . . . . . . . . . . . . . .
Onderdelen. . . . . . . . . . . . . . . . . . . . . . . . . . . . . . . . . . . . . . . . . . . . . . . .
De onderdelen van de mengkom monteren . . . . . . . . . . . . . . . . . . . . . . . . . . . . . .
De onderdelen van de mengkom demonteren . . . . . . . . . . . . . . . . . . . . . . . . . . . . .
Gebruik van de keuzeschakelaars . . . . . . . . . . . . . . . . . . . . . . . . . . . . . . . . . . .
Voedingsmiddelen voorbereiden . . . . . . . . . . . . . . . . . . . . . . . . . . . . . . . . . . . .
De stamper selecteren. . . . . . . . . . . . . . . . . . . . . . . . . . . . . . . . . . . . . . . . . .
De thermische beveiliging resetten. . . . . . . . . . . . . . . . . . . . . . . . . . . . . . . . . . .
Gebruiksinstructies voor sikkelmes in de mengkom . . . . . . . . . . . . . . . . . . . . . . . . . .
Keuze en gebruik van de hulpschijven . . . . . . . . . . . . . . . . . . . . . . . . . . . . . . . . .
Plakken snijden . . . . . . . . . . . . . . . . . . . . . . . . . . . . . . . . . . . . . . . . . . . . .
Raspen . . . . . . . . . . . . . . . . . . . . . . . . . . . . . . . . . . . . . . . . . . . . . . . . . .
Probleemoplossing. . . . . . . . . . . . . . . . . . . . . . . . . . . . . . . . . . . . . . . . . . . .
Schoonmaken . . . . . . . . . . . . . . . . . . . . . . . . . . . . . . . . . . . . . . . . . . . . . .
38
36
37
37
39
41
43
44
45
45
46
46
48
48
48
49
50
ONDERDELEN
De Waring WFP7E/K keukenmachine heeft de volgende standaard onderdelen en hulpstukken
(zie tekening op volgende pagina):
1. Motorblok met verticale, duurzame as
2. Keuzeschakelaar met AAN ( ), UIT ( ) en PULS ( ) standen
3. Ingebouwde beveiliging (niet afgebeeld) om te voorkomen dat machine start zonder dat het
deksel is aangebracht
4. Transparante mengkom met een inhoud van 1,6 kg droog volume
5. Transparant mengkomdeksel
a. Grote, ovale vulopening voor optimaal gebruik van snijvlak
b. Grote stamper met beschermkoker en vergrendelingsmechanisme
c. Kleine stamper die in de grote stamper wordt aangebracht voor kleinere groenten,
pepertjes enz.
NB.: Met deze stampercombinatie kunt u de hele vulopening gebruiken voor grotere
stukken voedsel en kunnen kleinere voedingsmiddelen zoals wortelen, selderij en
pepertjes gecontroleerd worden verwerkt.
6. Scherp en duurzaam sikkelmes (snijmes) voor hakken, malen, pureren en mixen
7. Snijschijf van 2 mm, 5⁄64"
8. Fijne raspschijf
9. Afneembaar koppelstuk voor gebruik met verwerkingsschijven
Merk op dat alle hulpschijven van de WFP7E/K een unieke zijdelings afneembaar
koppelstuk hebben. Dankzij deze uitvoering kunnen deze hulpstukken efficiënter
snijden/verwerken.
39
5c
7
5b
8
5a
5
9
4
6
1
2
40
DE ONDERDELEN VAN DE MENGKOM VAN DE
WFP7E/K MONTEREN
In deze handleiding worden de woorden kom, werkkom en mengkom worden door elkaar heen gebruikt, maar ze hebben wel dezelfde betekenis.
•Maak voor het eerste gebruik het motorblok goed schoon en was, spoel en reinig de kom, het deksel,
de as, de stamper en de hulpstukken.
•Plaats het motorblok op een aanrecht of tafel nabij een stopcontact. Zet het motorblok zo dat de
voorkant van het apparaat naar u toe is gericht en u de keuzeschakelaars kunt zien. Controleer of de
stekker niet in het stopcontact zit en de UIT ( ) toets is ingedrukt. Stop de stekker pas in het stopcontact als het apparaat volledig is gemonteerd.
•Neem de transparante werkkom met beide handen vast, met het handvat naar u toe.
•Plaats de kom op de basis, pas de buis in het midden over de motoras op de basis en zorg dat het
handvat een beetje naar links staat (ongeveer op 7 uur).
•Druk de kom omlaag zodat de onderrand om het cirkelvormige platform past. Draai de kom zo ver
mogelijk linksom (tegen de klok in). De kom klikt met de klepjes aan de zijkant van het platform vast.
Lees dit om de onderdelen van de mengkom te monteren voor gebruik met het sikkelmes
(snijmes).
•Pak het metalen mes op en merk op dat het motief aan de bovenkant van het plastic middengedeelte
dezelfde vorm heeft als de motoras.
•Leg het sikkelmes over de punt van de motoras; zorg dat de binnenkant van de naaf op een lijn ligt
met de as. Druk het mes stevig omlaag, draai aan de middennaaf tot het messamenstel helemaal is
verzonken. Het zou vlot op zijn plaats moeten vallen. Zorg dat het zo ver mogelijk naar beneden
gedrukt is. Als het niet helemaal naar beneden is gedrukt, kan het beschadigd raken. Oefen alleen
druk uit op het centrale deel (plastic deel); raak nooit het snijmes aan want dit is vlijmscherp.
•Controleer of het mes helemaal naar beneden is gedrukt door het heen en weer te draaien terwijl u
lichte neerwaartse druk uitoefent. Als het juist is aangebracht en helemaal is verzonken, zit het onderste mes net boven de binnenbodem van de kom.
•Indien u ingrediënten gaat verwerken met het sikkelmes kunt u nu voedsel of
vloeistoffen in de werkkom doen.
•Verwerk altijd eerst droge ingrediënten en dan pas vloeibare/vochtige ingrediënten.
Lees dit om de onderdelen van de mengkom te monteren voor gebruik met de hulpschijven.
•Doe pas voedsel in de kom als de hulpschijf op de as zit.
•Kies de juiste schijf: de raspschijf of de snijschijf.
ot
sl
•Houd de schijf met de snijkant naar uw hand toe. Pas op dat u uw hand niet aan
de scherpe randen schaaft. Merk op dat de onderkant van de schijf een plastic
contactpunt heeft voor het afneembare koppelstuk. Houd het koppelstuk vast met
uw duim op de ontgrendelknop, breng de twee klepjes in het midden en helemaal
rechts in de open gleufjes aan de onderkant van de schijf en draai rechtsom. Zie
n
ope
tekening.
(monteren van de mengkom wordt vervolgd)
41
(monteren van de mengkom - vervolg)
•Als het koppelstuk in de juiste schijf zit, schuift u de naaf van de middenschijf voorzichtig over de
metalen as zodat de dubbele platte kant van de as op een lijn ligt met het koppelstuk van de schijf.
Zet de schijf op de as en draai hem tot hij naar beneden op zijn plaats valt. Zorg dat de schijf zo ver
mogelijk naar beneden gedrukt is. Druk alleen op de buitenrand; raak nooit de snijmessen aan. De
schijf zou gemakkelijk op zijn plaats moeten vallen. Indien niet, zwenkt u de schijf voorzichtig heen
en weer tot u voelt dat hij op zijn plaats valt.
NB.: Doe pas voedsel in de kom als de hulpschijf op de as zit.
•Plaats het deksel op de kom met de vulopening links van de handgreep (ongeveer op 7 uur). De vergrendelklepjes achteraan het deksel moeten rechts van de vergrendelklepjes op de achterrand van de
werkkom zitten.
•Draai het deksel linksom (tegen de klok in) zodat het vastklikt. Als het deksel op zijn plaats is
gedraaid, zit het klepje van de ingebouwde beveiliging aan de voorkant van het deksel stevig in het
vergrendelingsmechanisme boven het handvat.
PROBEER DE KEUKENMACHINE NOOIT TE STARTEN
ZONDER DAT HET DEKSEL STEVIG OP ZIJN PLAATS VASTZIT.
Stampers en beschermkoker
Uw Waring keukenmachine heeft een beschermkoker met een ingebouwde
grote stamper en een vergrendelingsmechanisme. NB.: Uw keukenmachine
werkt alleen als de beschermkoker stevig op zijn plaats zit en het vergrendelingsmechanisme vastzit. Pak de koker en de grote stamper. Zorg dat de
ontgrendelknop naar de voorkant van de keukenmachine is gericht en laat
de stamper in de vulopening vallen (de koker zou om de vulopening moeten
passen). Stevig aandrukken tot het vergrendelingsmechanisme op zijn plaats
klikt. Uw keukenmachine is nu klaar voor gebruik.
Gebruik van de stamper
Laat de te verwerken voedingsmiddelen in de kleine vulopening vallen en voer deze
met de kleine stamper in de werkkom. U kunt de kleine stamper in de grote stamper
bevestigen door hem eenvoudig in de kleine vulopening te schuiven en linksom te
draaien (tegen de klok in) tot het klepje vastklikt.
Misschien wilt u ook voedingsmiddelen verwerken die niet in de kleine vulopening passen. Dit kan door de koker en de grote stamper weg te halen en dan het
ontgrendelklepje met het opschrift “PRESS HERE” (hier drukken) in te drukken. Voer de te verwerken ingrediënten door de vulopening. Schuif de witte toets
met het opschrift “LOCK” (vergrendelen) naar links. Zo kan de grote stamper
in en uit de beschermkoker. Schuif de koker terug op zijn plaats op het deksel en
controleer of het vergrendelingsmechanisme vastzit. Bij gebruik van een verwerkingsschijf, rust de ingrediënten op de schijf en duwen deze de stamper omhoog
42
zodat hij uitschuift. Controleer of de kleine stamper vastzit in de grote. Schakel de keukenmachine in
en duw de grote stamper omlaag om de ingrediënten in de verwerkingsschijf te voeren.
DE ONDERDELEN VAN DE MENGKOM VAN DE
WFP7E/K DEMONTEREN
TREK DE STEKKER ALTIJD UIT HET STOPCONTACT VOORDAT U DE
ONDERDELEN DEMONTEERT
•Draai het deksel van de kom rechtsom tot het klepje van de ingebouwde beveiliging op het deksel
loskomt en de klepjes vrijkomen uit de gleuf in de toren. De vulopening staat ergens tussen 7 uur en
9 uur. In deze stand kunt u het deksel van de kom halen.
•Haal de grote stamper en de beschermkoker uit de vulopening door op de ontgrendelknop met het
opschrift “PRESS HERE” (hier drukken) te drukken. Haal de kleine stamper uit de grote stamper.
Demonteren om het sikkelmes te verwijderen
•Haal de werkkom van de unit door deze rechtsom te draaien zodat de klepjes onderaan het
komonderstel van de werkkom vrijkomen. Wanneer het handvat van de kom naar links staat
(ongeveer op 7 uur), kunt u de kom voorzichtig recht omhoog wegtillen.
Aanbevolen wordt de kom van het motorblok te halen voordat u het sikkelmes verwijdert.
•Om het mes te verwijderen, oefent u licht neerwaartse druk uit op de middennaaf van het mes terwijl
u de kom van het motorblok haalt. Hierdoor ontstaat een afsluiting waardoor wordt voorkomen dat
stukjes voedsel worden gemorst in de opening in het midden van de kom en op het motorblok of het
werkoppervlak. Haal vervolgens het sikkelmes uit de kom. Pak het sikkelmes heel voorzichtig vast; de
messen zijn vlijmscherp.
Demonteren om een hulpschijf te verwijderen
•Verwijder de werkkom pas nadat de hulpschijf is verwijderd.
•Om een hulpschijf te verwijderen, plaatst u uw vingers op de buitenrand aan weerskanten van de
schijf en tilt u deze omhoog. De schijf zou vlot moeten loskomen. Om het afneembare koppelstuk te
verwijderen, houdt u de schijf in een hand met de het koppelstuk weg van uw hand. Let op dat u uw
hand niet aan de scherpe randen schaaft, druk de ontgrendelknop in met uw duim en draai de hulpschijf linksom (tegen de klok in).
•Haal de werkkom van de unit door deze rechtsom te draaien zodat de klepjes onderaan het
komonderstel van de werkkom vrijkomen. Wanneer het handvat van de kom naar links staat
(ongeveer op 7 uur), kunt u de kom voorzichtig recht omhoog wegtillen.
43
GEBRUIK VAN DE KEUZESCHAKELAARS
•Steek de stekker van de machine in een stopcontact van 230V (50 Hz).
•Het motorblok van het apparaat heeft twee keuzeschakelaars. Deze zitten vooraan en kunnen met de
vingertoppen worden bediend. Ze zijn groot genoeg en dus gemakkelijk terug te vinden in geval van
nood.
De keuzeschakelaar
AAN (
)
heeft 3 standen:
UIT (
)
PULS (
Deze werken als volgt: AAN (
)
): Duw de toets omhoog om de motor in te schakelen
UIT (
): Duw de toets in de UIT-stand om de motor uit te schakelen
PULS ( ): Voor onderbroken werking van de motor, duwt u de toets
omlaag en laat u hem vervolgens los. De motor treedt in werking zolang u de
toets omlaag geduwd houdt en stopt wanneer u hem loslaat. Probeer het een
paar keer uit.
Gebruik
Continu werking
Zet de toets in de AAN (
) stand voor continu werking.
Onderbroken werking (puls)
De pulsfunctie is bedoeld voor gebruik met het sikkelmes in de werkkom.
•De motor blijft in werking zolang u de knop omlaag gedrukt houdt en stopt wanneer u hem loslaat.
•U bepaalt dit zelf. Hoe lang elke puls aanhoudt, bepaalt u zelf en hangt af van hoe lang u de toets
omlaag houdt gedrukt. U bepaalt de frequentie van de pulsen door de snelheid waarmee u op de toets
drukt. De afstand tussen pulsen moet lang genoeg zijn om alle ingrediënten in de werkkom naar de
bodem te laten vallen.
•Met de pulstoets kunt u het hakken, versnipperen, mengen en mixen precies onder controle houden.
U kunt ingrediënten verwerken tot de substantie en fijnheid van uw keuze, van grof tot fijn.
•De pulsfunctie is ook handig om hard voedsel te verwerken. Druk enkele keren op de pulstoets om
het in kleinere stukje te breken. Nadat de stukjes zijn gebroken en beter te verwerken, schakelt u over
op continu werking.
•Puls altijd met de toets. De kom (of de vultrechter) met het deksel omhoog en omlaag bewegen om
de pulsfunctie te sturen te houden is verboden. Dat is minder doeltreffend en zou het apparaat
kunnen beschadigen.
44
Uitschakelen
Zet het apparaat altijd in de UIT ( ) stand en wacht tot het mes of de schijf volledig tot stilstand is
gekomen voordat u de stamper weghaalt. De motor stopt binnen een paar seconden nadat het apparaat
is uitgeschakeld.
VOEDINGSMIDDELEN VOORBEREIDEN
•Was en schil alle ingrediënten, indien nodig. Verwijder de pitten, stenen en grote zaadjes.
•Snijd groenten, vlees, kaas enz. in stukken die naar keuze in de kleine of de grote vulopening passen
voor verwerking door de hulpschijven, of in stukken van de voor deze bepaalde verwerking gewenste
grootte.
•Voorbereiden voor het snijden: Bij groenten en fruit met een lange, ronde vorm zoals wortelen, komkommers en selderij moet u de eindjes recht afsnijden. Zo worden alle ingrediënten allemaal even fijn
gesneden.
DE STAMPER SELECTEREN
Bij gebruik van het sikkelmes
De kleine stamper is niet nodig wanneer onderaan in de werkkom wordt gewerkt met het sikkelmes. U
kunt echter wel gebruik maken van de kleine vulopening om ingrediënten toe te voegen terwijl de keukenmachine in werking is. Aanbevolen wordt de stampers aan te brengen om spatten te voorkomen en
te vermijden dat er iets in de werkkom terechtkomt.
Kleine stamper
Deze stamper met de kleinere vultrechter wordt doorgaans gebruikt om groenten verticaal in te voeren
voor kleinere stukjes. Gebruik hem om ingrediënten zoals wortelen, selderij, pepertjes enz. in gelijke
fijne, platte stukken te snijden.
Deze stamper is ook geschikt om kortere stukjes te raspen of te snijden, dit in tegenstelling tot langere
stukken waarvoor de grotere vulopening en stamper worden gebruikt.
Grote stamper
De stamper met de grote vultrechter wordt doorgaans gebruikt om groenten horizontaal in te voeren
voor langere stukken.
Gebruik deze stamper om langere stukken te raspen of snijden. Hij wordt ook gebruikt om grote
hoeveelheden voedsel te verwerken of dikke ingrediënten zoals aardappelen of uien.
45
DE THERMISCHE BEVEILIGING RESETTEN
De WFP7E/K keukenmachine heeft een automatische reset-schakelaar die voorkomt dat de motor
oververhit raakt.
Indien uw keukenmachine stilvalt bij zwaar gebruik, schakelt u de stroomschakelaar uit en trekt u
de stekker uit het stopcontact. Maak de werkkom helemaal leeg en laat de motor een vijftal minuten
afkoelen.
Stop de stekker in het stopcontact en werk verder.
Indien uw keukenmachine daarna nog steeds niet goed werkt, stop dan met werken en neem contact
op met uw lokale distributeur.
GEBRUIKSINSTRUCTIES VOOR SIKKELMES
(SNIJMES) IN DE MENGKOM VAN DE WFP7E/K
•Het sikkelmes (snijmes) is bestemd voor het hakken, malen, pureren, mengen en mixen van
ingrediënten die in zowat alle recepten voorkomen.
•Monteer de kom en het mes volgens de instructies in het deel ‘De onderdelen van de mengkom
monteren (pagina 41).
Grof en fijn hakken
•Voor grof of fijn hakken in de mengkom, voert u voedingsmiddelen in de mengkom tot maximum de
bovenrand van de binnenste vulopening of ¼ gevuld.
•Met de pulstoets kunt u uiterst efficiënt en gelijkmatig grof of fijn te hakken. Hiermee worden de
messen aan- en uitgezet om het hakken te sturen. Maak hiervoor gebruik van de PULS ( )
functie (zie: ‘Onderbroken werking (puls)’) Blijf de pulstoets gebruiken tot de gewenste fijnheid
wordt bereikt.
•De ingrediënten continu hakken resulteert in een ongelijkmatige verwerking: de voedingsmiddelen
onderaan zijn dan fijn gehakt en de voedingsmiddelen bovenaan zijn grover.
Vlees hakken
Snijd het vlees in blokjes van 2.5 cm om gelijkmatig hakken te verzekeren. Verwerk maximaal 500
gram. Druk de keuzeschakelaar voor de pulsfunctie ( ) 3 keer 1 à 2 seconden in. Druk dan maximum
30 seconden op AAN ( ) tot de gewenste fijnheid wordt bereikt.
Harde kaas hakken
Snijd de kaas in blokjes van 2.5 cm om gelijkmatig hakken te verzekeren. Verwerk maximaal 500 gram.
Druk de keuzeschakelaar voor de pulsfunctie ( ) 3 keer 1 à 2 seconden in. Zet de toets dan maximaal
30 seconden op AAN ( ) tot de gewenste fijnheid wordt bereikt.
46
Uien, selderij, kool e.d. hakken
Snijd de uien in vier stukken. Andere groenten snijdt u in blokjes van 2,5 cm. Leg de gesneden stukken
in de werkkom tot maximum de bovenrand van de binnenste vulopening en druk op de pulstoets tot de
gewenste fijnheid wordt bereikt.
NB.: Als u het mes te lang laat draaien, worden de ingrediënten op de bodem gepureerd of verkrijgt u
een ongelijkmatig resultaat
Pureren of mixen
Om tomaten, groenten en fruit te pureren, sauzen te bereiden of ingrediënten te mixen of te mengen,
doet u de ingrediënten in de kom. Schakel vervolgens u het apparaat in en houd het ononderbroken in
werking tot de gewenste fijnheid wordt bereikt. Laat de machine niet onbeheerd achter. Recepten van
meer dan 1,7 l vochtige ingrediënten moeten in meerdere beurten worden verwerkt.
Schakel het apparaat uit.
•Om de keukenmachine uit te schakelen, zet u de toets in de UIT (
de stroomtoevoer naar de motor is afgesloten.
) stand. Zo wordt verzekerd dat
•Schakel de keukenmachine altijd eerst uit en laat de draaiende delen tot stilstand komen vóórdat u
het deksel verwijdert.
•Hoewel de ingebouwde beveiliging de machine uitschakelt als het deksel rechtsom wordt gedraaid
of als het deksel wordt weggehaald wanneer de machine in werking is, is dit niet de manier om de
machine AAN/UIT ( , ) te schakelen.
•Controleer voordat u het deksel opendraait altijd of de machine is uitgeschakeld door de toets als
voorzorgsmaatregel in de UIT ( ) stand te zetten, gewoon voor het geval dat de machine niet goed
is uitgeschakeld.
47
Keuze en gebruik van de hulpschijven
De hulpschijven van de WFP7E/K keukenmachine zijn ontworpen om voedingsmiddelen op vele
verschillende manieren te verwerken. Met de WFK7E/K keukenmachine worden twee (2) hulpschijven
meegeleverd. Op het moment van publicatie zijn dit:
2 mm, 5⁄64" snijschijf
fijne raspschijf
Plakken snijden
•Was en schil alle ingrediënten, indien nodig. Verwijder pitten, stenen en grote zaadjes. Zorg dat de
voedingsmiddelen in de geschikte vultrechter passen. Bij voedingsmiddelen zoals wortelen, komkommers enz. moeten moet u de eindjes recht afsnijden Zo worden ze allemaal in gelijke plakjes
gesneden.
•Bij voedingsmiddelen zoals kool, sla of andere producten waarvan het hart niet wordt gebruikt, moet
u dit eerst verwijderen. Middelgrote kolen of slakroppen mag u in drie stukken snijden zodat ze in de
vultrechter passen. Grotere kolen of slakroppen moet u eventueel in vier stukken snijden.
•Als u klaar bent met de voorbereiding van de ingrediënten, vult u de geselecteerde vultrechter.
Aansluitend brengt u de stamper aan, schakelt u de machine in en houdt u het resultaat in het oog.
•Probeer nooit zachte kaas in plakjes te snijden. Snijd alleen harde kaassoorten zoals parmezaan in
plakjes. Gebruik geen blokjes die groter zijn dan 89 mm x 19 mm x 101mm (3,5" x 0,750" x 4,0").
Zorg dat de kaas die u in plakjes gaat snijden altijd goed koud is. Aanbevolen wordt de kaas minstens
1 uur in de koelkast te leggen voor u hem in plakjes snijdt. Gebruik dit apparaat niet om mozzarella
in plakjes te snijden want dat kan schade veroorzaken aan de keukenmachine.
•Maak de kom leeg als deze bijna gevuld is met plakjes.
Raspen
•Was en schil alle ingrediënten, indien nodig. Verwijder pitten, stenen en grote zaadjes. Zorg ervoor
dat de voedingsmiddelen in de geschikte vultrechter passen.
•Kies de vulopening die u gaat gebruiken. Als u wortelen horizontaal invoert, krijgt u langere slierten.
Als u de kleinere vultrechter gebruikt en de voedingsmiddelen verticaal invoert, krijgt u kortere slierten.
•Probeer nooit zachte kaas te raspen. Rasp alleen harde kaassoorten zoals parmezaan. Gebruik geen
blokjes die groter zijn dan 89 mm x 19 mm x 101mm (3,5" x 0,750" x 4,0"). Zorg dat de kaas die u
gaat raspen altijd goed koud is. Aanbevolen wordt de kaas minstens 1 uur in de koelkast te leggen
voor u hem in plakjes snijdt. Gebruik dit apparaat niet om mozzarella in plakjes te snijden want dat
kan schade veroorzaken aan de keukenmachine.
•Voor het raspen van kaas wordt aanbevolen lichtjes pulserende druk uit te oefenen met de stamper en
afwisselend te druk/geen druk uit te oefenen tot het hele stuk kaas is geraspt. Kaas raspen belast de
keukenmachine zwaarder dan andere bewerkingen. Als continu te veel druk wordt uitgeoefend, kan
de motor oververhit raken.
48
•U kunt ervan uitgaan dat tien (10) pond kaas raspen ongeveer vijf (5) duurt. Aanbevolen wordt bij de
tijdsplanning voor het voorbereiden van de ingrediënten vijf minuten te voorzien voor raspen, gevolgd door vijf minuten voorbereiding terwijl de machine rust.
•Maak de kom leeg als deze bijna gevuld is met slierten.
PROBLEEMOPLOSSING
In dit deel worden eventuele problemen en de bijbehorende oplossing beschreven. Indien een probleem niet met onderstaande richtlijnen kan worden opgelost, moet u uw lokale distributeur om hulp
vragen. Elke Waring keukenmachine wordt met een lijst van erkende servicecentra geleverd.
De keukenmachine start niet hoewel het toch juist is gemonteerd
•Trek de stekker uit het stopcontact en probeer een ander stopcontact.
•Zet de toets AAN ( ).
•Controleer of de kom goed op het motorblok zit, of het deksel van de kom of trechter goed op zijn
plaats zit, en of het klepje van de ingebouwde beveiliging op het deksel goed in de schakelaar van de
ingebouwde beveiliging zit.
De keukenmachine valt stil tijdens het verwerken
•Het apparaat is eventueel oververhit. Raadpleeg het deel 'De thermische beveiliging resetten’
(pagina 46).
•Schakel het apparaat UIT ( ) en trek de stekker uit het stopcontact.
•Verwijder de mengkom.
•Maak de kom leeg.
•Laat de keukenmachine 5 minuten afkoelen.
•Monteer het apparaat opnieuw en laat het eerst met een lege kom draaien. Vul de kom weer met
voedingsmiddelen en probeer het opnieuw.
De keukenmachine draait niet op volle kracht
•De kom is te vol -- haal de voedingsmiddelen uit de kom en doe er kleinere hoeveelheden in.
Indien de keukenmachine nog steeds niet werkt nadat u het bovenstaande
hebt geprobeerd…
•Controleer of het stopcontact onder stroom staat.
•Controleer of de stroomonderbreker is ingeschakeld.
•Controleer of de zekering niet is gesprongen (als die er al zijn op dit circuit).
•Neem contact op met uw lokale distributeur.
49
Er komen vonken of rook uit de keukenmachine
•Schakel het apparaat uit, trek de stekker uit het stopcontact en neem contact op met het lokale erkende servicecentrum.
De keukenmachine maakt een knarsend geluid
•Schakel het apparaat uit, trek de stekker uit het stopcontact, demonteer de mengkom en het mes en
controleer of deze tegen elkaar hebben geschuurd.
•Neem indien dit het geval is contact op met uw lokale distributeur.
SCHOONMAKEN
Maak de keukenmachine en hulpstukken voor het eerste gebruik en na elk gebruik schoon. Gebruik
geen ruwe schuurmiddelen voor gelijk welk deel van de keukenmachine. Reinig de motoras met een
borsteltje.
Was, spoel, reinig en droog de kom, de deksels, de kleine stamper, de grote stamper, de hulpschijven
en sikkelmessen voor het eerste gebruik en telkens na gebruik, tenzij ze onmiddellijk weer worden
gebruikt. Al deze onderdelen zijn geschikt voor de vaatwasser; u mag ze dus in de vaatwasser wassen en
spoelen in plaats van met de hand in de wasbak.
Was en spoel alle bovengenoemde onderdelen na elk gebruik.
Voor u de schijven en messen wast, kunt u met een stijve borstel restjes voedingsmiddelen uit de
spleten en gleuven halen. Ga heel voorzichtig te werk want de messen zijn scherp.
Voor schoonmaken met de hand wordt aanbevolen schoonmaakproducten te gebruiken op basis van
niet-schuimende afwasmiddelen en chloorhoudende reinigingsmiddelen met een minimum chloorgehalte van 100 PPM. De volgende afwas-, spoel- en reinigingsmiddelen of gelijkwaardig mogen worden
gebruikt:
OPLOSSING
Wassen
Spoelen
PRODUCT
*Ajax® Reinigend
schuurpoeder
VERDUNNING IN WATER
7 gram per
9,5 liter
Gewoon water
Reinigen
**Chlorox®
1 eetlepel per
50
TEMPERATUUR
Warm 46oC (115oF)
Lauw 35oC (95oF)
Koud 10-21oC
(50oF)
Het motorblok schoonmaken en reinigen
Het motorblok moet voor het eerste gebruik en na elk gebruik worden schoongemaakt en gereinigd.
Trek de stekker uit het stopcontact en neem alle buitenoppervlakken van het motorblok af met een
doek of spons bevochtigd met een wateroplosbaar afwasmiddel. Aansluitend afnemen met spoelwater.
Wring de doek of spons voor gebruik eerst uit om te voorkomen dat vloeistof binnendringt in het
motorblok.
HET MOTORBLOK NOOIT IN WATER OF EEN ANDERE VLOEISTOF ONDERDOMPELEN.
Laat het apparaat aan de lucht drogen voor u het weer gebruikt.
Gebruik nooit ruwe schuurmiddelen voor gelijk welk deel van deze keukenmachine voor commercieel
gebruik.
*Ajax® is een geregistreerd handelsmerk van Colgate-Palmolive Company
**Clorox® is een geregistreerd handelsmerk Clorox Company
51
IMPORTANTES CONSIGNES DE
SÉCURITÉ
Lorsque vous utilisez des appareils électriques, vous devez toujours suivre des mesures de sécurité élémentaires, parmi lesquelles les suivantes :
1. Lisez toutes les instructions.
2. Les lames sont très aiguisées. Manipulez-les avec précaution.
3. Comme c’est le cas avec tout appareil ménager, il vous faudra être prudent lorsque vous utilisez le
Robot Culinaire de Waring®. Bien que simple d’utilisation, ce robot ne doit être utilisé que par
des personnes vigilantes. Il ne devrait pas être utilisé par ou près d’enfants ou d’individus souffrant
d’un certain handicap.
4. Afin de prévenir tout risque de blessure, n’installez jamais la lame ou les disques avant de vous être
assuré que le bol est en place.
5. Tout contact avec la lame ou le disque alors que l’appareil est en marche pourrait provoquer des
blessures graves ou bien endommager l’appareil. Vous pouvez utiliser une spatule en plastique une
fois que l’appareil est arrêté.
6. Afin de prévenir tout risque de choc électrique, ne placez pas le socle-moteur dans l’eau ou tout
autre liquide.
7. Débranchez l’appareil lorsque vous ne l’utilisez pas, avant de démonter ou d’assembler les pièces,
avant de vider le contenu du bol et avant de nettoyer l’appareil. Saisissez le cordon d’alimentation
par la fiche. Ne tirez jamais sur le cordon.
8. Évitez tout contact avec les éléments en mouvement. N’introduisez jamais les doigts dans
l’entonnoir. Utilisez le poussoir.
9. Attendez que le moteur soit à l’arrêt avant de retirer le couvercle.
10. N’utilisez jamais l’appareil si le cordon d’alimentation ou la fiche sont endommagés, si l’appareil est
tombé ou s’il est abîmé. Envoyez-le à un service après-vente autorisé afin qu’il soit inspecté, réparé
ou révisé.
11. N’utilisez que les accessoires recommandés ou vendu par Waring®. Utiliser d’autres accessoires
pourrait provoquer un incendie, un choc électrique ou une blessure.
12. N’utilisez pas l’appareil à l’extérieur.
13. Ne laissez pas le cordon électrique pendre au bord d’une table ou d’un plan de travail ou toucher
une surface chaude.
14. N’essayez pas de forcer le mécanisme de sécurité de l’appareil.
15. Vérifiez que le couvercle est bien fermé avant de mettre l’appareil en marche.
16. En cas de mauvais fonctionnement de l’appareil pendant l’utilisation, jetez le contenu du bol.
17. Cet appareil ne devrait pas être utilisé par des enfants ou des personnes souffrant d’un handicap
physique, mental ou sensoriel ou ne sachant pas l’utiliser, à moins que la personne responsable de
leur sécurité leur ait donné les instructions nécessaires ou les supervise.
18. Ne laissez pas les enfants s’amuser avec cet appareil.
52
GARDEZ CES INSTRUCTIONS
GARANTIE
La garantie des produits Waring® vendus à l’extérieur des État-unis et du Canada est la responsabilité
de l’importateur ou du distributeur régional. Les droits de garantie peuvent varier d’un pays ou d’une
région à l’autre.
ATTENTION : Utiliser cet appareil sur courant continu annulera la garantie.
IMPORTANTES INSTRUCTIONS DE
CÂBLAGE AU R.U.
Cet appareil est muni d’une fiche ajustée standard. Suivez les instructions suivantes si vous désirez
changer la fiche. Les fils électriques à l’intérieur du cordon d’alimentation sont de trois couleurs :
Vert/jaune : Terre
Bleu : Neutre
Marron : Tension
Avertissement : La fiche peut provoquer un choc électrique, même une fois coupée. Jetez la fiche une
fois coupée et ne la branchez jamais dans une prise de courant de 13 ampères.
Il se peut que la couleur des fils électriques ne corresponde pas à la couleur des bornes de la nouvelle
fiche. Si c’était le cas : Connectez le fil vert/jaune à la borne identifiée par la lettre E, le symbole de
terre , de couleur verte ou de couleur verte/jaune. Connectez le fil bleu à la borne identifiée par la
lettre N ou de couleur noire ou bleue. Connectez le fil marron à la borne identifiée par la lettre L ou
de couleur rouge ou marron.
IMPORTANT : Si les bornes de la nouvelle fiche comportent pas d’identification ou si vous avez un
doute quelconque, contactez un électricien. Si vous utilisez une prise à trois broches de type BS1363,
veillez à utiliser des fusibles de 13 ampères. Ces mesures s’adressent uniquement aux modèles conçus
pour le Royaume Uni.
53
TABLE DES MATIÈRES
Importantes consignes de sécurité. . . . . . . . . . . . . . . . . . . . . . . . . . . . . . . . . . . .
Garantie. . . . . . . . . . . . . . . . . . . . . . . . . . . . . . . . . . . . . . . . . . . . . . . . .
Importante instructions de câblage au R.U. . . . . . . . . . . . . . . . . . . . . . . . . . . . . . .
Pièces. . . . . . . . . . . . . . . . . . . . . . . . . . . . . . . . . . . . . . . . . . . . . . . . . . .
Assemblage. . . . . . . . . . . . . . . . . . . . . . . . . . . . . . . . . . . . . . . . . . . . . . . .
Désassemblage. . . . . . . . . . . . . . . . . . . . . . . . . . . . . . . . . . . . . . . . . . . . . .
Fonctionnement de l’appareil. . . . . . . . . . . . . . . . . . . . . . . . . . . . . . . . . . . . . .
Préparation des aliments. . . . . . . . . . . . . . . . . . . . . . . . . . . . . . . . . . . . . . . . .
Choix du poussoir . . . . . . . . . . . . . . . . . . . . . . . . . . . . . . . . . . . . . . . . . . . .
Coupe-circuit de sécurité. . . . . . . . . . . . . . . . . . . . . . . . . . . . . . . . . . . . . . . .
Utilisation de la lame . . . . . . . . . . . . . . . . . . . . . . . . . . . . . . . . . . . . . . . . . .
Utilisation des disques . . . . . . . . . . . . . . . . . . . . . . . . . . . . . . . . . . . . . . . . .
Utilisation du disque éminceur . . . . . . . . . . . . . . . . . . . . . . . . . . . . . . . . . . . . .
Utilisation du disque râpeur. . . . . . . . . . . . . . . . . . . . . . . . . . . . . . . . . . . . . . .
Dépannage. . . . . . . . . . . . . . . . . . . . . . . . . . . . . . . . . . . . . . . . . . . . . . . .
Nettoyage . . . . . . . . . . . . . . . . . . . . . . . . . . . . . . . . . . . . . . . . . . . . . . . .
54
52
53
53
55
57
59
60
61
61
61
62
63
63
64
65
66
PIÈCES
Le Robot Culinaire WFP7E/K de Waring comprend les pièces et accessoires suivants (voir le
diagramme qui suit) :
1. Socle-moteur avec axe d’entraînement à usage intensif
2. Bouton de commande à 3 positions :
MARCHE (ON) (
ARRÊT (OFF) (
INTERMITTENCE (PULSE) (
)
)
)
3. Mécanisme de verrouillage (n’apparaît pas sur le diagramme)
Empêche l’appareil de se mettre en marche si le couvercle n’est pas bien fermé
4. Bol transparent d’une capacité de 7 tasses (1,5 litres)
5. Couvercle transparent
a. Goulotte d’alimentation ovale
b. Gros poussoir avec manchon de sécurité, idéal pour les gros aliments
c. Petit poussoir, idéal pour les petits aliments (légumes, pepperoni, etc.)
Remarque : Le petit poussoir s’emboîte dans le gros poussoir. Ce système de poussoir 2-en-1
permet d’utiliser le Robot Culinaire avec une grande variété d’aliments.
6. Lame aiguisée et résistante pour couper, hacher, réduire en purée et mixer
7. Disque éminceur de 2 mm
8. Disque râpeur
9. Arbre amovible*
* Les disques du modèle WFP7E/K utilisent un arbre amovible qui accroît leur efficacité.
55
5c
7
5b
8
5a
5
9
4
6
1
2
56
ASSEMBLAGE
· Nettoyez et désinfectez le socle-moteur. Lavez, rincez et désinfectez le bol, le couvercle, l’entonnoir,
les poussoirs et les accessoires avant d’utiliser l’appareil pour la première fois.
· Placez l’appareil sur un plan de travail ou une table à proximité d’une prise de courant et de façon à
faire face aux boutons de commande. Vérifiez que l’appareil est débranché et que le bouton de commande est en position d’arrêt ( ). Ne branchez pas l’appareil avant d’avoir terminé l’assemblage.
· Tenez le bol entre les deux mains, la poignée face à vous, et placez-le au-dessus du socle-moteur.
Alignez l’axe du socle-moteur avec le cylindre qui se trouve au centre du bol. La poignée devrait se
trouver à gauche.
· Enfoncez le bol sur la base, puis tournez-le dans le sens inverse des aiguilles d’une montre jusqu’à ce
qu’il se bloque.
Assemblage de la lame
· Prenez la lame par la partie en plastique. Notez son axe, conçu pour s’adapter à l’axe du socle-moteur.
· Alignez l’axe de la lame avec l’axe du moteur et enfoncez-la. Vous ne devriez pas rencontrer de résistance. Ne touchez jamais la lame, cette dernière étant très aiguisée. Prenez-la toujours par la partie en
plastique.
· Vérifiez que la lame est bien engagée. Mal engagée, elle pourrait provoquer des dommages. Pour cela,
enfoncez-la tout en la tournant de droite à gauche. Elle devrait s’arrêter juste avant le fond du bol.
· Si vous souhaitez utiliser l’appareil avec la lame, vous pouvez maintenant placer les ingrédients
dans le bol.
· Commencez par les aliments secs, ensuite les aliments liquides.
Assemblage des disques
· N’introduisez aucun aliment dans le bol jusqu’à ce que le disque choisi soit en place.
· Choisissez le disque voulu. Prenez le disque dans votre main, le côté coupant vers votre paume.
· Prenez l’arbre amovible dans l’autre main. Appuyez sur le bouton de déverrouillage de l’arbre,
enfoncez-le au centre du disque et tournez-le dans le sens des aiguilles d’une montre pour le bloquer.
· Une fois que l’arbre est en place, alignez le pivot du disque choisi avec l’axe du
VERROUILLER
socle-moteur et enfoncez le disque sur ce-dernier. Vous ne devriez pas rencontrer
de résistance. En cas de difficulté, tournez le disque légèrement jusqu’à ce qu’il
s’emboîte sur l’axe. Enfoncez le disque autant que possible. Poussez sur les bords
du disque uniquement. Ne touchez jamais les lames ou les râpes.
DÉVERROUILLER
57
Assemblage (suite)
· Placez le couvercle sur le bol. L'entonnoir devrait se trouver sur la droite. Les pattes de verrouillage
du couvercle devraient se trouver à gauche des pattes situées sur le devant du bol.
· Tournez le couvercle dans le sens contraire des aiguilles d’une montre pour le fermer. Une fois en
place, les pattes situées à l’arrière du bol engageront le mécanisme de verrouillage et vous pourrez
mettre l’appareil en marche.
IMPORTANT : L’appareil ne fonctionnera pas si le couvercle n’est pas correctement fermé. Ce
mécanisme de sécurité est très important et ne devrait pas être contré.
N’ESSAYEZ JAMAIS DE METTRE L’APPAREIL EN MARCHE ALORS QUE LE COUVERCLE N’EST PAS BIEN FERMÉ.
Assemblage des poussoirs
Le Robot Culinaire est doté d’un système de poussoir 2-en-1 permettant
de l’utiliser avec une grande variété d’aliments. Les aliments peuvent être
introduits directement dans l’entonnoir (on utilisera alors le gros
poussoir pour les pousser) ou dans la goulotte au centre du gros poussoir
(on utilisera alors le petit poussoir pour les pousser). Important : Le gros
poussoir se trouve à l’intérieur d’un manchon de sécurité. L’appareil ne se
mettra pas en marche à moins que ce dernier ne soit correctement installé.
Si vous souhaitez introduire les aliments dans la goulotte au centre du gros
poussoir et pousser les aliments avec le petit poussoir :
1) Introduire le gros poussoir (entouré du manchon) dans l’entonnoir.
Le manchon de sécurité devrait se trouver à l’extérieur de l’entonnoir.
Enfoncer le poussoir jusqu’à ce que le mécanisme de sécurité
s’enclenche.
2) Introduire les aliments dans la goulotte au centre du gros poussoir.
3) Pousser les aliments avec le petit poussoir.
Si vous souhaitez introduire les aliments directement dans l’entonnoir et les pousser
avec le gros poussoir :
1) Appuyer sur la languette marquée « PRESS HERE » pour libérer le gros
poussoir de l’entonnoir. Faire coulisser le bouton marqué « LOCK »
vers la gauche pour libérer le gros poussoir du manchon.
2) Emboîter le petit poussoir dans le gros poussoir et tournez-le dans le sens
contraire des aiguilles d’une montre pour l’immobiliser.
3) Introduire les aliments dans l’entonnoir.
4) Installer le manchon sur l’entonnoir et utiliser le gros poussoir pour
pousser les aliments. Note : Assurez-vous que le petit poussoir est bien en
place avant de pousser.
58
DÉSASSEMBLAGE
DÉBRANCHEZ TOUJOURS L’APPAREIL AVANT DE LE DÉSASSEMBLER.
· Tournez le couvercle dans le sens des aiguilles d’une montre pour désengager le mécanisme de
verrouillage et débloquer les pattes. Retirez le couvercle.
· Appuyez sur la languette marquée « PRESS HERE » pour retirer le gros poussoir et le manchon de
l’entonnoir, puis retirez le petit poussoir du gros poussoir.
Désassemblage de la lame
· Tournez le bol dans le sens des aiguilles d’une montre pour libérer les pattes de verrouillage. La
poignée du bol devrait se trouver légèrement à gauche du centre. Soulevez le bol délicatement pour
le dégager du socle.
Il est conseillé de retirer le bol du socle-moteur avant d’enlever la lame.
· Appuyez sur la partie plastique de la lame tout en soulevant le bol. Cela évitera que les aliments dégoulinent sur le socle-moteur. Vous pouvez maintenant retirer la lame en toute sécurité.
Manipulez-la avec précaution, car elle est très aiguisée.
Désassemblage du disque
· Retirez le disque avant de retirer le bol.
· Pour retirer un disque, prenez-le par les bords entre les deux mains et soulevez-le jusqu’à ce qu’il se
dégage de l’axe. Pour retirer l’arbre, appuyez sur le bouton de déverrouillage du disque et tournez le
disque dans le sens contraire des aiguilles d’une montre. Prenez garde de ne pas toucher les lames ou
les râpes. Ces dernières sont très aiguisées.
· Tournez le bol dans le sens des aiguilles d’une montre pour libérer les pattes de verrouillage. La
poignée du bol devrait se trouver légèrement à gauche du centre. Soulevez le bol délicatement pour
le dégager du socle.
59
FONCTIONNEMENT DE L’APPAREIL
· Branchez l’appareil dans une prise électrique de 230 volts (50 Hz).
· Le bouton de commande à 3 positions est facile à utiliser. Il suffit de le lever ou de le descendre pour
activer la fonction voulue :
MARCHE (ON) (
ARRÊT (OFF) (
) : Sert à mettre l’appareil en marche en mode continu.
) : Sert à arrêter l’appareil.
INTERMITTENCE (PULSE) (
) : Sert à utiliser l’appareil en mode intermittent.
Modes de fonctionnement
Usage continu :
Pour utiliser l’appareil en mode continu, placez le bouton à la position ON (
)
Usage intermittent :
Important : Utilisez le mode intermittent avec la lame uniquement.
· Pour utiliser le mode intermittent, placez le bouton à la position PULSE ( ). Le moteur continuera
à tourner aussi longtemps que vous presserez le bouton et s’arrêtera lorsque vous le relâcherez.
· Le mode intermittent permet de contrôler le nombre et la durée de chaque pulsation avec précision.
Laissez le temps aux aliments de redescendre entre deux pulsations.
· Le mode intermittent permet de contrôler la consistance des aliments que vous hachez, mixez ou
liquéfiez avec précision.
· Le mode intermittent est aussi pratique pour broyer ou moudre les aliments durs. Utilisez-le pour
broyer les aliments en petits morceaux, puis terminez de les moudre en mode continu.
· Utilisez toujours le bouton de commande pour contrôler les pulsations. N’essayez jamais de les contrôler en secouant l’appareil. Cela pourrait l’endommager.
Arrêt :
Pour éteindre l’appareil, placez le bouton à la position OFF ( ). Attendez que la lame ou le disque
soit complètement immobile avant de retirer le couvercle ou le poussoir. Cela prendra seulement
quelques secondes.
60
PRÉPARATION DES ALIMENTS
· Lavez et pelez les aliments si nécessaire. Enlevez les queues, les pépins et les noyaux.
· Coupez les fruits, les légumes, le fromage ou la viande à la taille désirée ou de façon à ce que les
morceaux entrent dans l’entonnoir.
· Pour obtenir des rondelles uniformes (carottes, concombres, céleri), coupez les deux extrémités du
légume pour qu’elles soient plates.
CHOIX DU POUSSOIR
Remarque – Lorsque vous utilisez la lame
Le petit poussoir n’est pas nécessaire lorsque vous utilisez la lame et si vous le souhaitez, vous pouvez
introduire des aliments dans le gros poussoir alors que l’appareil est en marche. Il est toutefois recommandé de laisser les deux poussoirs en place afin d’éviter les éclaboussures.
Petit poussoir
Le petit poussoir est parfait pour pousser les aliments introduits à la verticale pour obtenir des
morceaux plus petits ou plus fins. Il s’utilise typiquement pour couper les carottes, le céleri ou les saucisses en rondelles fines et uniformes. Il sert aussi à râper fin et couper en fines lamelles.
Gros poussoir
Le gros poussoir est parfait pour pousser les aliments introduits à l’horizontale pour obtenir des
morceaux plus gros ou plus épais. Il s’utilise typiquement pour râper gros, couper en lamelles épaisses
et pousser les gros aliments comme les pommes de terre ou les oignons entiers.
Coupe-Circuit de sécurité
Le Robot Culinaire WFP7E/K est équipé d’un coupe-circuit qui arrête le moteur en cas de surchauffe.
Si cela se produisait, éteignez (OFF) puis débranchez l’appareil. Videz le contenu du bol et laissez
l’appareil reposer pendant 5 minutes avant de le rebrancher. Si l’appareil ne se remet pas en marche,
contactez un service après-vente autorisé.
61
UTILISATION DE LA LAME
La lame est conçue pour hacher, broyer, réduire en purée, mixer ou mélanger tout type d’ingrédients.
Installez la lame comme indiqué dans la section « Assemblage » avant de mettre les ingrédients dans le
bol.
Broyer et hacher
•Placez les ingrédients dans le bol. Ne dépassez pas le haut du cylindre en plastique ou les ¾ de la
hauteur du bol.
•Pour obtenir de meilleurs résultats, utilisez la fonction intermittente PULSE (
pressez puis relâchez le bouton jusqu’à obtention de la consistance désirée.
). Pour ce faire,
•L’utilisation du mode continu pour broyer ou hacher produira des résultats irréguliers (les ingrédients
au fond du bol seront broyés plus finement).
Hacher de la viande
Coupez la viande en morceaux de 2,5 centimètres et placez les morceaux dans le bol. Ce dernier a une
capacité d’environ 550g de viande. Utilisez le mode intermittent PULSE ( ) jusqu’à obtention de la
consistance désirée. Si l’appareil a du mal à hacher, retirez un peu de viande et continuez.
Réduire du fromage dur en poudre
Coupez le fromage en cubes de 2,5 centimètres et placez les morceaux dans le bol. Ce dernier une
capacité d’environ 450g de fromage. Utilisez le mode intermittent (2 ou 3 pulsations) pour broyer le
fromage, puis le mode continu (maximum 30 secondes) pour le réduire en poudre. Vous obtiendrez de
meilleurs résultats avec des fromages secs. Les fromages gras ont tendance s’empâter.
Hacher des oignons, du céleri, du chou etc.
Coupez les oignons en quartiers et les autres légumes en morceaux de 2,5 centimètres. Placez les
morceaux dans le bol, sans dépasser le haut du cylindre en plastique. Utilisez le mode intermittent
jusqu’à obtention de la consistance désirée.
Note : Ne hachez pas trop. Cela peut produire des résultats irréguliers ou réduire les ingrédients qui
se trouvent au fond du bol en purée.
Réduire en purée ou mixer
Pour réduire les fruits et les légumes en purée, émulsionner une sauce ou mixer, placez les ingrédients dans le bol et utilisez le mode continu jusqu’à obtention de la consistance désirée. Ne laissez pas
l’appareil sans surveillance pendant ce temps. La capacité du bol est de 1,7 litres.
62
Arrêter l’appareil
•Placez le bouton de commande à la position OFF (
moteur.
) pour éteindre l’appareil. Cela arrêtera le
•Éteignez toujours l’appareil et attendez que la lame soit complètement immobile avant d’ouvrir le
couvercle.
•Le mécanisme de sécurité arrêtera l’appareil si vous tournez ou enlevez le couvercle. Toutefois, ne
vous servez pas de cette méthode pour arrêter l’appareil.
•Par précaution, placez toujours le bouton de commande à la position OFF (
couvercle.
) avant de retirer le
UTILISATION DES DISQUES
Le Robot Culinaire WFP7E/K inclut deux disques, qui vous permettront d’accomplir une grande
variété de tâches :
Un disque éminceur de 2 mm
Un disque râpeur
UTILISATION DU DISQUE ÉMINCEUR
•Lavez et pelez les aliments si nécessaire. Enlevez les queues, les pépins et les noyaux. Assurez-vous
que les aliments entrent dans l’entonnoir voulu. Pour obtenir des rondelles uniformes (carottes,
concombres), coupez les deux extrémités du légume pour qu’elles soient plates.
•Laitue, choux et autres aliments avec un cœur dur: coupez en morceaux et retirez le cœur. Les laitues
ou choux moyens peuvent être coupés en 3 ou en 4 morceaux.
•Introduisez les aliments dans l’entonnoir désiré, poussez-les avec le poussoir et mettez l’appareil en
marche.
•N’essayez pas de couper en tranches du fromage mou, comme de la mozzarela. Cela pourrait
endommager l’appareil. Seuls les fromages durs, comme le Parmesan, peuvent être coupés en
tranches. Coupez le fromage si nécessaire. Les morceaux ne devraient pas mesurer plus de 9x2x1
centimètres. Réfrigérez le fromage pendant au moins 1 heure avant de le couper en tranches.
•Videz le bol une fois que les ingrédients ont atteint la capacité maximale.
63
UTILISATION DU DISQUE RÂPEUR
· Lavez et pelez les aliments si nécessaire. Enlevez les queues, les pépins et les noyaux. Assurez-vous
que les aliments entrent dans l’entonnoir voulu.
· Placez les aliments dans l’entonnoir voulu, horizontalement pour obtenir des longs bouts, verticalement pour obtenir des petits bouts.
· N’essayez pas de râper du formage mou, comme de la mozzarela. Cela pourrait endommager
l’appareil. Seul les fromages durs, comme le Parmesan, peuvent être râpés. Coupez le fromage si
nécessaire. Les morceaux ne devraient pas mesurer plus de 9x2x1 centimètres. Réfrigérez le fromage
pendant au moins 1 heure avant de le râper.
· Pour éviter que le moteur ne surchauffe, il est conseillé d’appuyer puis de relâcher le poussoir tour à
tour jusqu’à ce que le fromage soit complètement râpé.
· Le Robot Culinaire est capable de râper jusqu’à 4,5kg (10 livres) de fromage en 5 minutes. Laissez
l’appareil reposer pendant 5 minutes après 5 minutes d’opération continue.
· Videz le bol une fois que les ingrédients râpés ont atteint la capacité maximale.
64
DÉPANNAGE
Vous trouverez dans cette section la solution aux problèmes les plus courants. Si cette liste ne solutionne pas votre problème, veuillez contacter un service après-vente autorisé.
L’appareil ne se met pas en marche
· Débranchez l’appareil et branchez-le dans une autre prise de courant.
· Mettez l’appareil en marche à l’aide du mode ON ( ).
· Vérifiez que le bol est bien installé, que le couvercle est bien fermé et que les pattes de blocage du
couvercle sont bien engagées.
L’appareil s’arrête pendant l’utilisation
· Arrêtez l’appareil à l’aide du mode OFF ( ).
· Retirez le bol du socle.
· Videz le contenu du bol.
· Laissez l’appareil reposer pendant 5 minutes.
· Remettez le bol sur le socle-moteur, refermez le couvercle et faites fonctionner l’appareil à vide avant
de le remplir à nouveau.
L’appareil n’atteint pas la vitesse maximale
· Le bol est trop chargé. Videz-le et recommencez avec un moindre contenu.
L’appareil fonctionne toujours mal
· Vérifiez que la prise de courant est sous tension.
· Vérifiez que le disjoncteur est allumé.
· Vérifiez que le fusible n’est pas grillé.
· Appelez le revendeur local.
L’appareil jette des étincelles ou émet de la fumée
· Éteignez l’appareil, débranchez-le puis contactez un service après-vente autorisé.
L’appareil grince
· Éteignez l’appareil, débranchez-le puis démontez-le afin de vérifier si la lame touche le bol.
· Si la lame touche le bol, contactez un service après-vente autorisé.
65
NETTOYAGE
Nettoyez l’appareil et tous les éléments avant d’utiliser l’appareil pour la première fois et après chaque
utilisation. N’utilisez pas de détergents abrasifs. Nettoyez l’axe du moteur avec une petite brosse.
Lavez, rincez, désinfectez et séchez le bol, le couvercle, les poussoirs, la lame et les disques avant
d’utiliser l’appareil pour la première fois et après chaque utilisation, à moins que vous ne réutilisiez
l’appareil immédiatement. Tous les éléments sont lavables au lave-vaisselle.
Nettoyez la lame et les disques à l’aide d’une brosse avant de les laver. La lame et les disques sont très
aiguisés. Manipulez-les avec précaution.
Pour le lavage à la main, nous vous conseillons d’utiliser une solution de nettoyage à base d’un détergent non émulsionnant et une solution désinfectante à base de chlore, avec une concentration minimum de 100 parties par million. Vous pouvez utiliser les solutions suivantes ou leur équivalent :
SOLUTION
PRODUIT
PROPORTIONS
DE DILUTION
TEMPÉRATURE
Nettoyage
*Ajax® en poudre
2 cuillères à soupe
pour 9,5 litres d’eau
Chaude 46°C (115°F)
Rinçage
Eau claire
Désinfectant
**Eau de javel Clorox®
Tiède 35°C (95°F)
1 cuillère à soupe
pour 4 litres d’eau
Froide 50-70°C
(10-21°F)
Nettoyage du socle-moteur
Nettoyez et désinfectez le socle-moteur avant d’utiliser l’appareil pour la première fois et après chaque
utilisation. Débranchez l’appareil et essuyez le socle avec une éponge imbibée de détergent liquide.
Essuyez ensuite le socle avec une éponge imbibée d’eau claire. Essorez bien l’éponge pour que le
liquide ne pénètre pas dans les ouvertures du socle-moteur.
N’IMMERGEZ JAMAIS LE SOCLE-MOTEUR DANS L’EAU OU DANS TOUT AUTRE LIQUIDE.
Laissez sécher l’appareil à l’air libre et attendez qu’il soit sec avant de l’utiliser à nouveau.
N’utilisez jamais de détergents abrasifs pour nettoyer cet appareil ou ses éléments.
* Ajax® est une marque déposée par Colgate-Palmolive Company
** Clorox® est une marque déposée par Clorox Company
66
67
MEDIDAS DE SEGURIDAD
IMPORTANTES
Cuando se usan aparatos eléctricos, siempre se deben tomar precauciones básicas de seguridad, entre
las cuales las siguientes:
1. Lea todas las instrucciones.
2. Las cuchillas son muy filudas. Manipúlelas con sumo cuidado
3. Como todo electrodoméstico, el Robot de Cocina de Waring® se tiene que operar con mucha
precaución. Aunque no se necesite mucha preparación para operar este aparato, sólo debería ser
usado por personas cuidadosas.
4. Para reducir el riesgo de heridas, asegúrese que el recipiente esté seguramente ensamblado antes
de instalar la cuchilla o el disco.
5. Para reducir el riesgo de herida seria o de daño al aparato, mantenga las manos y los utensilios
alejados de la cuchilla o del disco mientras el aparato está encendido. Se puede usar espátula de
plástico, únicamente cuando el aparato está apagado.
6. Para reducir el riesgo de choque eléctrico, no coloque el bloque-motor en agua u otro líquido.
7. Desconecte el aparato cuando no lo está usando, antes de instalar o de remover partes, antes de
sacar alimentos del recipiente y antes de limpiarlo. Para desconectar el aparato, coja el cable por
la clavija. No jale el cable.
8. No toque los elementos en movimiento. Nunca introduzca la mano en la boca de llenado.
Siempre use el empujador.
9. Espere hasta que la cuchilla o el disco esté completamente inmóvil antes de remover la tapa o el
empujador.
10. Nunca utilice el aparato si el cable o el enchufe están dañados, si el aparato ha caído o si está
dañado. Regréselo a un centro de servicio autorizado para que lo revisen, lo ajusten o lo reparen.
11. Sólo emplee accesorios recomendados para uso con este aparato o vendidos por Waring®. El uso
de otros accesorios podría provocar un incendio, un choque eléctrico o una herida.
12. No utilice este aparato en exteriores.
13. No permita que el cable cuelgue del borde de la mesa o del mostrador y manténgalo alejado de
las superficies calientes.
14. No intente forzar el sistema de seguridad de la tapa.
15. Asegúrese que la tapa esté correctamente instalada antes de encender el aparato.
16. En caso de mal funcionamiento durante el uso, tire el contenido del recipiente a la basura.
17. Personas (incluso niños) con capacidades físicas, mentales o sensoriales reducidas, o personas que
no sepan utilizar este aparato, o no deberían utilizarlo, al menos que la persona responsable por
su seguridad esté presente o le haya dado instrucciones relativas al uso del mismo.
18. No permita que niños jueguen con el aparato.
GUARDE ESTAS INSTRUCCIONES
68
GARANTÍA
La garantía de los productos Waring® que fueron adquiridos fuera de los Estados Unidos y de Canadá
es la responsabilidad del distribuidor o del importador local. Los derechos de garantía pueden variar
según las regulaciones locales.
ADVERTENCIA: El utilizar este aparato con corriente directa (C.D.) invalidará la garantía.
IMPORTANTES INSTRUCCIONES
DE CABLEADO EN EL REINO UNIDO
El cable de este aparato está equipado con una clavija ajustada estándar. Si fuera necesario cambiar la
clavija, siga las instrucciones siguientes:
Los alambres adentro del cable de alimentación vienen codificados en colores de acuerdo con el código
siguiente:
VERDE Y AMARILLO = TIERRA
AZUL
=
NEUTRO
MARRÓN =
VIVO
Precaución: Para prevenir todo riesgo de descarga eléctrica, tire la clavija a la basura después de
cortarla y nunca la enchufe en una toma de 13 amperios.
Puede que los colores de los alambres no coinciden con los colores que identifican los terminales de la
nueva clavija. Si fuera el caso, siga los pasos siguientes: Conecte el alambre verde y amarillo al terminal
marcado E, identificado con la señal de tierra , de color VERDE o de color VERDE Y AMARILLO.
Conecte el alambre azul al terminal marcado N, de color NEGRO o de color AZUL. Conecte el
alambre marrón al terminal marcado L, de color ROJO o de color MARRÓN.
NOTA: Si los terminales no están identificados o si usted no está seguro de cómo efectuar las
conexiones, comuníquese con un electricista profesional. Si desea usar una clavija con fusible de tipo
BS1363, use un fusible de 13 amperios. Estas instrucciones se dirigen a los modelos diseñados para el
Reino Unido únicamente.
69
ÍNDICE
Medidas de seguridad importantes. . . . . . . . . . . . . . . . . . . . . . . . . . . . . . . . . . .
Garantía. . . . . . . . . . . . . . . . . . . . . . . . . . . . . . . . . . . . . . . . . . . . . . . . .
Importantes instrucciones de cableado en el Reino Unido. . . . . . . . . . . . . . . . . . . . . . .
Partes. . . . . . . . . . . . . . . . . . . . . . . . . . . . . . . . . . . . . . . . . . . . . . . . . . .
Ensamblado . . . . . . . . . . . . . . . . . . . . . . . . . . . . . . . . . . . . . . . . . . . . . . .
Desensamblado . . . . . . . . . . . . . . . . . . . . . . . . . . . . . . . . . . . . . . . . . . . . .
Funcionamiento del aparato. . . . . . . . . . . . . . . . . . . . . . . . . . . . . . . . . . . . . . .
Preparación de los alimentos. . . . . . . . . . . . . . . . . . . . . . . . . . . . . . . . . . . . . .
Selección del empujador. . . . . . . . . . . . . . . . . . . . . . . . . . . . . . . . . . . . . . . . .
Cortacircuito de seguridad . . . . . . . . . . . . . . . . . . . . . . . . . . . . . . . . . . . . . . .
Utilización de la cuchilla . . . . . . . . . . . . . . . . . . . . . . . . . . . . . . . . . . . . . . . .
Utilización de los discos. . . . . . . . . . . . . . . . . . . . . . . . . . . . . . . . . . . . . . . . .
Utilización del disco rebanador. . . . . . . . . . . . . . . . . . . . . . . . . . . . . . . . . . . . .
Utilización del disco rallador. . . . . . . . . . . . . . . . . . . . . . . . . . . . . . . . . . . . . .
Resolución de problemas . . . . . . . . . . . . . . . . . . . . . . . . . . . . . . . . . . . . . . . .
Limpieza. . . . . . . . . . . . . . . . . . . . . . . . . . . . . . . . . . . . . . . . . . . . . . . . .
70
68
69
69
71
73
75
75
76
76
77
77
78
78
79
79
80
PARTES
El Robot de Cocina WFP7E/K de Waring incluye las partes y accesorios siguientes (diagrama
en la página siguiente):
1. Bloque-motor con árbol de servicio pesado
2. Botón de mando con 3 posiciones:
ENCENDIDO (ON) ( )
APAGADO (OFF) ( )
PULSO (PULSE) ( )
3. Mecanismo de seguridad (no enseñado)
Impide que el aparato se ponga en marcha al menos que la tapa esté correctamente instalada
4. Recipiente transparente con capacidad para 7 tazas (1,5 litros)
5. Tapa transparente
a. Boca de llenado ovalada
b. Empujador grande con manguito de seguridad, ideal para los alimentos grandes
c. Empujador pequeño, ideal para los alimentos pequeños o finos (verduras, pepperoni, etc.)
Nota: El empujador pequeño se encaja en el empujador grande. Este sistema de
empujadores 2-en-1 permite procesar una gran variedad de alimentos.
6. Cuchilla filosa y resistente, para picar, preparar puré y mezclar
7. Disco rebanador de 2 mm
8. Disco rallador
9. Eje amovible*
* P
ara lograr un rendimiento óptimo, los discos del modelo WFP7E/K utilizan
un eje amovible.
71
5c
7
5b
8
5a
5
9
4
6
1
2
72
ENSAMBLADO
•Antes de usar el aparato por primera vez, limpie y desinfecte el bloque-motor, luego lave, enjuague
y desinfecte el recipiente, la tapa, la boca de llenado, el empujador y los accesorios.
•Coloque el aparato sobre una mesa o un mostrador, cerca de un tomacorriente. Averigüe que el
aparato está desconectado y apagado ( ). No enchufe el aparato antes de haber
ensamblado todas las piezas.
•Coja el recipiente con ambas manos, el asa delante y colóquelo encima de la base. Haga coincidir el
árbol del motor con el cilindro que se encuentra en el centro del recipiente. El asa se encontrará a
mano izquierda.
•Baje el recipiente sobre la base y gírelo en el sentido antihorario para sujetarlo.
Ensamblado de la cuchilla
•Coja la cuchilla por la parte de plástico. Note su contorno y la forma del eje, diseñado para ajustarse
al árbol del motor.
•Haga coincidir el eje de la cuchilla con el árbol del motor e instale la cuchilla sobre éste. No se
debería encontrar resistencia. Nunca toque los filos de la cuchilla, porque están muy filudos. Siempre
coja la cuchilla por la parte de plástico.
•Averigüe que la cuchilla está bien asegurada. Si no lo estuviera, podría dañar el aparato. Para
asegurarse que la cuchilla esté correctamente posicionada, voltéela de un lado a otro al mismo tiempo
que la presiona hacia abajo. La cuchilla debería encontrarse casi en el fondo del recipiente.
•Si usted desea utilizar el aparato con la cuchilla, puede agregar los ingredientes ahora.
•Procese los ingredientes secos antes de agregar los ingredientes líquidos.
rt
e
s
Ensamblado de los discos
•No ponga ningún alimento en el recipiente hasta haber instalado el disco deseado.
•Escoja el disco deseado y sosténgalo de manera que el lado filudo del mismo apunte hacia la palma de
su lado.
•Coja el eje del disco en la otra mano. Oprima el botón de liberación e introduzca el eje en el centro
del disco, luego gírelo en el sentido horario para sujetarlo.
e
•Después de acoplar el eje con el disco, introduzca el eje sobre el árbol del motor.
rt
ue
No debería
encontrar resistencia. Si fuera necesario, gire el eje ligeramente hasta que caiga en
posición. Asegure el disco, apretando los bordes del mismo únicamente. Nunca
toque los filos.
•Ponga la tapa sobre el recipiente. La boca de llenado debería encontrarse a mano
sue
izquierda del agarre. Las anclas ubicadas en la parte trasera de la tapa deberían
mala
encontrarse a la derecha de las anclas ubicadas en la parte trasera del recipiente.
•Gire la tapa en el sentido antihorario para cerrarla. Las anclas desactivarán el mecanismo de
seguridad y el aparato podrá encenderse.
IMPORTANTE: El aparato no se pondrá en marcha al menos que la tapa esté instalada de
manera correcta. No intente vencer este mecanismo de seguridad.
73
Ensamblado (continvación)
NUNCA INTENTE PONER EL APARATO EN MARCHA AL MENOS QUE LA TAPA NO ESTÉ CORRECTAMENTE INSTALADA.
Ensamblado de los empujadores
El Robot de Cocina está dotado de un sistema de empujadores
2-en-1 que permite procesar una gran variedad de alimentos. Los
alimentos pueden introducirse directamente en la boca de llenado del
recipiente (se usará el empujador grande para empujarlos) o en la boca de
llenado pequeña ubicada en el centro del empujador grande (se usará el
empujador pequeño para empujarlos). Importante: El empujador grande
se encuentra adentro de un manguito de seguridad. El aparato no se
pondrá en marcha al menos que el manguito esté correctamente instalado.
Para introducir alimentos en la boca de llenado pequeña y
empujarlos con el empujador pequeño:
1) I ntroduzca el empujador grande (junto con el manguito) en la boca
de llenado. El manguito rodeará la boca de llenado. Empuje el
empujador hasta que el mecanismo de seguridad se enganche.
2) Introduzca los alimentos en la boca de llenado ubicada en el centro
del empujador grande.
3) Empuje los alimentos con el empujador pequeño.
Para introducir los alimentos directamente en la boca de llenado
del recipiente y empujarlos con el empujador grande:
1) Oprima la lengüeta marcada “PRESS HERE” para sacar el
empujador grande de la boca de llenado. Deslice el botón marcado
“LOCK” hacia la izquierda para separar el empujador grande del
manguito.
2) Embuta el empujador pequeño en el empujador grande y gírelo
en el sentido antihorario para sujetarlo.
3) Introduzca los alimentos en la boca de llenado.
4) Instale el manguito sobre la boca de llenado y empuje los alimentos con el
empujador grande. Nota: Asegúrese que el empujador pequeño esté seguro en posición
antes de empujar los alimentos.
74
DESENSAMBLADO
SIEMPRE DESCONECTE EL APARATO ANTES DE DESENSAMBLARLO.
•Gire la tapa en el sentido horario para desactivar el mecanismo de seguridad y liberar las anclas.
Saque la tapa.
•Presione la lengüeta marcada “PRESS HERE” para sacar el empujador grande y el manguito de la
boca de llenado, luego saque el empujador pequeño del empujador grande.
Remoción de la cuchilla
Remueva el recipiente de la base antes de sacar la cuchilla.
•Gire el recipiente en el sentido horario para liberar las anclas. Cuando el agarre del recipiente se
encuentre ligeramente a mano izquierda del centro, levante el recipiente de la base.
•Presione la parte plástica de la cuchilla mientras levanta el recipiente. Esto evitará que los alimentos
se derramen hacia el bloque motor. Saque la cuchilla con mucho cuidado, porque es muy filuda.
Remoción del disco
Saque el disco antes de remover el recipiente de la base.
•Coja el disco por la orilla entre ambas manos y levántelo. Oprima el botón de liberación del disco
y gire el eje en el sentido antihorario para desacoplar el disco. Tenga cuidado de no tocar los filos,
porque son muy filudos.
•Gire el recipiente en el sentido horario para liberar las anclas. Cuando el agarre del recipiente se
encuentre ligeramente a mano izquierda del centro, levante el recipiente de la base.
FUNCIONAMIENTO DEL APARATO
•Conecte el aparato a un tomacorriente de 230 voltios (50 Hz).
•El botón de mando con 3 posiciones es muy fácil de usar. Simplemente alce o baje el botón para
activar el modo deseado:
ENCENDIDO (ON) ( ) : Sirve para procesar en modo continuo.
APAGADO (OFF) ( ) : Sirve para apagar el aparato.
PULSO (PULSE) ( ) : Sirve para pulsar.
75
Modos de funcionamiento
Modo continuo
Para utilizar el aparato en modo continuo, ponga el botón de mando en la posición ON (
)
Modo intermitente (Pulso)
Importante: Sólo use la función de pulso con la cuchilla, no con los discos.
Para utilizar la función de pulso, ponga el botón de mando en la posición PULSE ( ).
El motor permanecerá encendido mientras oprima el botón de pulso y se apagará al aflojarlo.
•La función de pulso permite controlar la duración de cada pulso con precisión. Permita que los
alimentos bajen entre dos pulsos.
•La función de pulso permite controlar con precisión la consistencia de los alimentos al picar, batir o
licuar.
•También es conveniente para picar alimentos duros. Utilice la función de pulso para picar los
alimentos y termine de molerlos usando el modo continuo.
•Siempre use el botón de pulso para controlar los pulsos. Nunca intente controlar los pulsos moviendo
el recipiente o la tapa. Esto podría dañar el aparato.
Cómo apagar el aparato:
Para apagar el aparato, ponga el botón de mando en la posición OFF ( ). Espere hasta que la cuchilla
o el disco esté completamente inmóvil antes de sacar la tapa o el empujador.
Esto demora sólo unos segundos.
PREPARACIÓN DE LOS ALIMENTOS
•Lave las frutas y las verduras y pélelas si fuera necesario. Remueva las pepas, pepitas y semillas.
•Corte las frutas, las verduras, la carne o el queso en pedazos suficientemente pequeños para
introducirse en la boca de llenado deseada.
•Si desea cortar alimentos largos (zanahorias, pepinos o apio) en rodajas, corte las extremidades rectas.
Esto producirá rodajas más regulares.
SELECCIÓN DEL EMPUJADOR
Nota – Cuando utiliza la cuchilla
No es necesario que el empujador pequeño esté puesto para utilizar el robot con la cuchilla. Los
alimentos pueden introducirse en la boca de llenado mientras el aparato está en marcha. Sin embargo,
para evitar las salpicaduras, le recomendamos que ambos empujadores siempre estén en posición.
76
Empujador pequeño
El empujador pequeño es perfecto para introducir alimentos verticalmente, para obtener pedazos más
finos o más pequeños. Se utiliza generalmente para cortar las zanahorias, el apio o la salchicha en
rodajas finas. También sirve para rallar fino.
Empujador grande
El empujador grande es perfecto para introducir alimentos horizontalmente, para obtener pedazos más
gruesos o más grandes. Se utiliza generalmente para rallar grueso, cortar en rodajas gruesas y procesar
alimentos enteros como papas o cebollas.
CORTACIRCUITO DE SEGURIDAD
El Robot de Cocina WFP7E/K está equipado con un cortacircuito de seguridad que apagara el motor
si éste se recalentará. Si esto ocurriera, apague (OFF) luego desconecte el aparato. Bote el contenido
del recipiente y permita que el aparato repose durante 5 minutos antes de conectarlo otra vez. Si el
aparato no se pusiera en marcha, comuníquese con un centro de servicio autorizado.
UTILIZACIÓN DE LA CUCHILLA
La cuchilla sirve para picar, moler, preparar puré, mezclar y licuar. Instale la cuchilla (véase la sección
“Ensamblado”) antes de poner los alimentos en el recipiente.
Picar
•Ponga los alimentos en el recipiente, sin pasar la cumbre del cilindro de plástico o los ¾ del
recipiente.
•Para lograr resultados óptimos, utilice la función PULSE ( ). Oprima y afloje sucesivamente el
botón de pulso hasta obtener la consistencia deseada.
•No se recomienda utilizar el modo continuo para picar, porque produciría resultados irregulares
(los pedazos que se encuentran en el fondo del recipiente serían más finos que el resto).
Picar carne
Corte la carne en pedazos de 2,5 centímetros y ponga los pedazos en el recipiente. El recipiente tiene
una capacidad de 550g (1.25 libras) de carne. Utilice la función PULSE ( ) hasta obtener la consistencia deseada. Si el aparato tiene dificultades para picar, remueva un poco de carne y siga picando.
Moler queso duro
Corte el queso en cubitos de 2,5 centímetros y ponga los cubitos en el recipiente. El recipiente tiene
una capacidad de 450g (1 libra) de queso. Pulse 2 ó 3 veces para picar el queso, luego use el modo continuo (máximo 30 segundos) para molerlo. Se obtendrán mejores resultados usando quesos secos. Los
quesos más grasos suelen aglomerarse.
Picar cebolla, apio, col
77
Corte las cebollas en cuartos y las demás verduras en pedazos de 5 a 7 centímetros. Ponga los
pedazos en el recipiente, sin pasar la cumbre del cilindro de plástico. Pulse hasta obtener la consistencia
deseada.
Nota: No pique demasiado. Esto producirá resultados irregulares o convertirá los alimentos que se
encuentran en el fondo del recipiente en puré.
Preparar puré
Para preparar puré de frutas o de verduras, montar salsas o mezclar ingredientes líquidos, ponga los
ingredientes en el recipiente y utilice el modo continuo hasta obtener la consistencia deseada. No deje
el aparato desatendido mientras está funcionando. La capacidad del recipiente es de 1,7 litros.
Apagar el aparato
•Ponga el botón de mando en la posición OFF ( ), Esto apagará el motor.
•Siempre apague el aparato y espere hasta que la cuchilla esté totalmente inmóvil antes de sacar la tapa
o el empujador.
•El sistema de seguridad apagará el aparato si se voltea o se remueve la tapa. Sin embargo, no se
debería usar este método para apagar el aparato.
•Siempre ponga el botón de mando en la posición OFF ( ) antes de remover la tapa.
UTILIZACIÓN DE LOS DISCOS
El Robot de Cocina WFP7E/K incluye dos discos, los cuales permitirán procesar una gran variedad
de alimentos:
•Un disco rebanador de 2 mm
•Un disco rallador
UTILIZACIÓN DEL DISCO REBANADOR
•Lave y pele los alimentos si fuera necesario. Remueva las pepas, pepitas y semillas. Averigüe que los
alimentos caben en la boca de llenado deseada. Para obtener rodajas regulares, corte las extremidades
de las zanahorias, de los pepinos, etc.
•Corte los alimentos con corazón duro (como lechuga y col) en pedazos y saque el corazón. Las
lechugas y los coles medianos pueden cortarse en 3 ó 4 pedazos.
•Introduzca los pedazos en la boca de llenado deseada, empújelos con el empujador y ponga el aparato
en marcha.
•No intente rebanar queso suave, como Mozzarela. Esto podría lastimar el aparato. Sólo rebane quesos
duros, como queso Parmesano. Corte el queso en pedazos si fuera necesario. Los pedazos no deberían
medir más de 9x2x1 centímetros. Refrigere el queso durante 1 hora o más antes de rebanarlo.
•Vacíe el recipiente cuando alcance la capacidad máxima.
78
UTILIZACIÓN DEL DISCO RALLADOR
•Lave y pele los alimentos si fuera necesario. Remueva las pepas, pepitas y semillas. Averigüe que los
alimentos caben en la boca de llenado deseada.
•Ponga los alimentos en la boca de llenado deseada, horizontalmente para obtener pedazos largos y
verticalmente para obtener pedazos cortos.
•No intente rallar queso suave, como Mozzarela. Esto podría lastimar el aparato. Sólo ralle quesos
duros, como queso Parmesano. Corte el queso en pedazos si fuera necesario. Los pedazos no deberían
medir más de 9x2x1 centímetros. Refrigere el queso durante 1 hora o más antes de rallarlo.
•Para evitar que el motor caliente demasiado, haga presión luego afloje el empujador sucesivamente,
hasta que el queso esté completamente rallado.
•El Robot de Cocina puede rallar hasta 4,5kg (10 libras) de queso en 5 minutos. Permita que el
aparato repose durante 5 minutos después de 5 minutos de operación continua.
•Vacíe el recipiente cuando alcance la capacidad máxima.
RESOLUCIÓN DE PROBLEMAS
Esta sección describe los problemas más comunes. Si esta lista no soluciona su problema, por favor
comuníquese con un centro de servicio autorizado.
El aparato no se enciende
•Desconecte el aparato y enchúfelo en otro tomacorriente.
•Ponga el botón de mando en la posición ON ( ).
•Averigüe que el recipiente está instalado correctamente, que la tapa está bien cerrada y que las anclas
están encajadas.
El aparato se apaga durante el uso
•Ponga el botón de mando en la posición OFF ( ).
•Saque el recipiente de la base.
•Vacíe el contenido del recipiente.
•Permita que el aparato repose durante 5 minutos.
•Vuelva a instalar el recipiente, cierre la tapa y haga funcionar el aparato con el recipiente vacío antes
de llenarlo otra vez.
El aparato no alcanza la velocidad máxima
•Vacíe el recipiente e intente otra vez, poniendo menos alimentos en el recipiente.
79
El aparato aún no funciona correctamente
•Averigüe que el tomacorriente está funcionando.
•Averigüe que el cortacircuito está encendido.
•Averigüe que el fusible no está quemado.
•Comuníquese con un centro de servicio autorizado.
El aparato produce chispas o humo
•Apague, luego desconecte el aparato. Comuníquese con un centro de servicio autorizado.
El aparato rechina
•Apague y desconecte el aparato, luego averigüe que la cuchilla no está tocando el recipiente.
•Si la cuchilla toca el recipiente, comuníquese con un centro de servicio autorizado.
LIMPIEZA
Limpie el aparato y todos los accesorios antes de usarlo por primera vez y después de cada uso.
No use detergentes abrasivos. Limpie el árbol del motor con un cepillo pequeño.
Lave, enjuague, sanee y seque el recipiente, la tapa, los empujadores, la cuchilla y los discos antes de
usar el aparato por primera vez y después de cada uso, al menos que lo vuelva a usar inmediatamente.
Todas las piezas son aptas para lavavajillas.
Limpie la cuchilla y los discos con un cepillo duro antes de lavarlos. Manipúlelos con cuidado, puesto
que son muy filudos.
Para lavar a mano, le recomendamos usar soluciones limpiadoras con detergentes no emulgentes y
soluciones para sanear con cloro, usando una concentración mínima de 100 PPM. Se pueden usar las
soluciones siguientes a sus equivalentes:
SOLUCIÓN
PRODUCTO
Para limpiar
*Ajax® en polvo
DILUCIÓN EN AGUA TEMPERATURA
2 cucharadas
por 9,5 litros de agua Para enjuagar
Agua
Para sanear
**Clorox®
80
1 cucharada por 4 litros de agua
Caliente 46°C
(115°F)
Tibia 35°C
(95°F)
Fría 50-70°C
(10-21°F)
Limpieza del bloque-motor
Limpie y sanee el bloque-motor antes de usar el aparato por primera vez y después de cada uso.
Desconecte el aparato y limpie la base con una esponja o un paño humedecido con detergente líquido.
Enjuague la base con una esponja o un paño humedecido con agua. Estruje la esponja o el paño
cuidadosamente para evitar que el líquido penetre en el motor.
NUNCA PONGA EL BLOQUE-MOTOR EN AGUA U OTRO LÍQUIDO.
Permita que el aparato seque al aire libre antes de usarlo.
Nunca use detergentes abrasivos para limpiar el aparato o los accesorios.
* Ajax® es una marca registrada por Colgate-Palmolive Company
** Clorox® es una marca registrada por Clorox Company
81
PRECAUZIONI IMPORTANTI
Durante l’uso di elettrodomestici occorre sempre seguire alcune precauzioni fondamentali di sicurezza,
tra le quali:
1. Leggere tutte le istruzioni.
2. Le lame sono taglienti e vanno maneggiate con cautela.
3. Così come per tutti gli attrezzi da cucina, il robot Waring® deve essere utilizzato con estrema
attenzione. Benché richieda un addestramento minimo, il robot da cucina deve essere utilizzato
esclusivamente da persone responsabili e prudenti. Esso non deve essere usato da parte o nelle
vicinanze di bambini o di disabili.
4. Per evitare infortuni, non innestare mai la lama o il disco sulla base senza aver prima inserito la
ciotola.
5. Tenere le mani, le spatole e altri utensili lontano dalle lame o dai dischi in movimento durante la
preparazione degli alimenti, per evitare la possibilità di gravi lesioni alle persone o danni al robot
da cucina. Quando il robot non è in funzione, è possibile utilizzare un raschietto in plastica.
6. Per evitare il rischio di scosse elettriche, non immergere la base in acqua o in altri liquidi.
7. Staccare la spina dalla presa di corrente quando non si utilizza l’apparecchio, prima di inserire
o estrarre delle parti, prima di rimuovere i cibi dalla ciotola da lavoro e prima di procedere alla
pulizia. Per togliere la spina, afferrarla tirandola dalla presa di corrente. Non tirare il cavo.
8. Evitare il contatto con le parti in movimento. Non inserire i cibi con le mani mentre si affetta o
grattugia. Utilizzare sempre l’apposito pestello.
9. Prima di togliere il coperchio, verificare che il motore sia completamente fermo.
10. Non usare elettrodomestici con cavi o spine danneggiati, oppure apparecchi caduti o in qualche
modo danneggiati. Restituire l’apparecchio al centro di assistenza autorizzato più vicino
richiedendone la verifica, la regolazione o la riparazione.
11. L’uso di accessori non raccomandati o venduti da Waring è vietato in quanto potrebbe causare
incendi, scosse elettriche o lesioni.
12. Non utilizzare all’aperto.
13. Non lasciare il cavo sospeso sul bordo di un tavolo o di un banco ed evitare che tocchi superfici
calde.
14. Non tentare di neutralizzare il meccanismo di blocco del coperchio.
15. Prima di utilizzare l’apparecchio, assicurasi che il coperchio sia ben chiuso.
16. Se l’apparecchio non dovesse funzionare per qualsiasi motivo, scartare i cibi al suo interno.
17. Questo apparecchio non è destinato all’uso da parte di persone (bambini compresi) con ridotte
capacità fisiche, mentali o sensoriali o privi di esperienza e conoscenza, a meno che siano
sorvegliati o istruiti in merito all’uso dell’apparecchio da parte di una persona responsabile
della loro sicurezza.
18. Verificare che i bambini non giochino con l’apparecchio.
CONSERVARE QUESTE ISTRUZIONI
82
Garanzia
Per i prodotti Waring® venduti al di fuori degli Stati Uniti e del Canada, la responsabilità della
garanzia spetta all’importatore o al distributore locale. La garanzia può variare a seconda delle
disposizioni locali.
AVVERTENZA: l’uso dell’apparecchio con corrente continua (c.c.) invalida la garanzia.
ISTRUZIONI IMPORTANTI SUI COLLEGAMENTI
ELETTRICI (PER IL SOLO REGNO UNITO)
Collegamenti elettrici
Il cavo di alimentazione di questo robot da cucina include una spina di tipo BS da 13 A incorporata
(fusa). Nel caso si rendesse necessario rimuovere la spina fusa e sostituirla con una spina di tipo BS da
13 AM ricollegabile, il collegamento va fatto come indicato di seguito:
(N.B. - Gettare la vecchia spina nel rispetto delle norme in vigore)
Classe I (1)
I fili elettrici osservano la seguente codifica cromatica:
VERDE E GIALLO = CAVO DI TERRA
AZZURRO = NEUTRO
MARRONE = SOTTO TENSIONE
Dato che i colori dei fili potrebbero non corrispondere ai contrassegni colorati che identificato i
terminali della spina, procedere come segue:
- Il filo di colore verde e giallo deve essere collegato al terminale della spina contrassegnato dalla
lettera E o dal simbolo [symbol] o colorato in verde e giallo, o verde e giallo.
- Il filo di colore azzurro deve essere collegato al terminale contrassegnato dalla lettera N o di colore
nero.
- Il filo di colore marrone deve essere collegato al terminale contrassegnato dalla lettera L o di colore
rosso.
Con questo elettrodomestico, se si usa una spina da 13 A, si deve avere un fusibile da 13 A. Se invece si
usa una spina di qualsiasi altro tipo, si deve avere un fusibile da 10 A, installato nella spina o nel pannello di distribuzione.
Avvertenza!
Una spina tagliata e inserita in una presa da 13 A costituisce un grave pericolo per la sicurezza
(rischio di scossa elettrica). Assicurarsi che una volta tagliata, la spina venga smaltita nel
rispetto delle norme in vigore.
83
SOMMARIO
Precauzioni importanti . . . . . . . . . . . . . . . . . . . . . . . . . . . . . . . . . . . . . . . . .
Garanzia . . . . . . . . . . . . . . . . . . . . . . . . . . . . . . . . . . . . . . . . . . . . . . . . .
Istruzioni importanti sui collegamenti elettrici (Per il solo regno unito) . . . . . . . . . . . . . . .
Parti . . . . . . . . . . . . . . . . . . . . . . . . . . . . . . . . . . . . . . . . . . . . . . . . . . .
Montaggio delle parti della ciotola . . . . . . . . . . . . . . . . . . . . . . . . . . . . . . . . . . .
Smontaggio delle parti della ciotola . . . . . . . . . . . . . . . . . . . . . . . . . . . . . . . . . .
Uso dei comandi. . . . . . . . . . . . . . . . . . . . . . . . . . . . . . . . . . . . . . . . . . . . .
Preparazione degli alimenti . . . . . . . . . . . . . . . . . . . . . . . . . . . . . . . . . . . . . . .
Scelta del pestello. . . . . . . . . . . . . . . . . . . . . . . . . . . . . . . . . . . . . . . . . . . .
Ripristino della protezione termica. . . . . . . . . . . . . . . . . . . . . . . . . . . . . . . . . . Istruzioni per l’uso della lama falciforme nella ciotola. . . . . . . . . . . . . . . . . . . . . . . . .
Scelta e uso dei dischi accessor;. . . . . . . . . . . . . . . . . . . . . . . . . . . . . . . . . . . . .
Affettatura . . . . . . . . . . . . . . . . . . . . . . . . . . . . . . . . . . . . . . . . . . . . . . . .
Grattugia. . . . . . . . . . . . . . . . . . . . . . . . . . . . . . . . . . . . . . . . . . . . . . . . .
Risoluzione dei problemi. . . . . . . . . . . . . . . . . . . . . . . . . . . . . . . . . . . . . . . .
Pulizia . . . . . . . . . . . . . . . . . . . . . . . . . . . . . . . . . . . . . . . . . . . . . . . . . .
84
82
83
83
85
87
89
90
91
91
91
92
93
93
94
94
95
PARTI
Il robot da cucina Waring WFP7E/K è composto dalle parti standard e dagli accessori seguenti
(fare riferimento al diagramma alla pagina seguente):
1. Base del motore con albero verticale resistente
2. Leva di comando con posizioni ON ( ), OFF ( ), e PULSE ( ), (‘accesso’, ‘spento’
e ‘intermittenza’)
3. Blocco di sicurezza (non mostrato in figura) per evitare il funzionamento dell'apparecchio
senza il coperchio
4. Ciotola da lavoro trasparente con capienza di 1,7 litri
5. Coperchio della ciotola da lavoro trasparente
Tubo di inserimento grande ovale per massimizzare la superficie di taglio
Pestello grande con manicotto di sicurezza e meccanismo di blocco
Pestello piccolo all’interno di quello grande per verdure piccole, salame piccante, ecc.
Nota: il doppio pestello consente di usare il tubo di inserimento per i cibi
voluminosi e di controllare la lavorazione di cibi a piccolo diametro come carote,
sedano e salame piccante.
6. Lama falciforme affilata e durevole (coltello) per tritare, macinare, frullare e impastare
7. Disco per affettare fine (2 mm)
8. Disco per grattugiare fine
9. Asticciola rimovibile da usare con i dischi ('acceso‘, ‘spento’ e ‘intermittenza’) e
PULSE ( ),OFF ( )
Tutti i dischi accessori WFP7E/K sono dotati di un’asticciola rimovibile, il cui design aumenta
l’efficienza di taglio/lavorazione degli accessori.
85
5c
7
5b
8
5a
5
9
4
6
1
2
86
MONTAGGIO DELLE PARTI
DELLA CIOTOLA WFP7E/K
I termini ciotola e ciotola da lavoro sono usati come sinonimi in questo libretto di istruzioni.
•Prima dell’uso, pulire e disinfettare la base del motore e lavare, sciacquare e disinfettare ciotola,
coperchio, pestello, manicotto e strumenti di lavorazione.
•Porre la base su un banco o tavolo accanto a una presa di corrente. Posizionarla in modo da avere di
fronte la parte anteriore dell'apparecchio e le leve di comando. Verificare che il cavo sia staccato e che
la leva OFF ( ) sia stata premuta. Non inserire il cavo prima di aver terminato di montare il robot.
•Afferrare la ciotola da lavoro trasparente con entrambe le mani, con il manico rivolto verso di sé.
•Porre la ciotola sopra la base, incastrando il tubo centrale sopra l’albero del motore sulla base e
posizionando il manico leggermente a sinistra rispetto alla parte anteriore centrale (all’incirca sulla
posizione delle ore 7).
•Spingere la ciotola verso il basso in modo che il bordo inferiore combaci con la piattaforma circolare.
Ruotare la ciotola in senso antiorario finché scatta in sede con le linguette ai lati della piattaforma.
Leggere di seguito per il montaggio delle parti della ciotola da usare con la lama falciforme
•Afferrare la lama di metallo, osservando il diagramma nella parte superiore del centro di plastica.
Corrisponde alla forma dell’albero del motore.
•Posizionare la lama falciforme sopra la punta dell’albero del motore, allineando l’interno del punto
centrale con l’albero. Premerlo saldamente verso il basso, ruotando il centro finché la lama è bene
in sede. Dovrebbe innestarsi facilmente. Se non è completamente in sede, potrebbe danneggiarsi.
Spingere soltanto la sezione centrale (parte in plastica); non toccare mai la lama che è estremamente
affilata.
•Verificare che la lama sia completamente inserita ruotandola avanti e indietro e allo stesso tempo
spingendola leggermente verso il basso. Se correttamente installata e completamente inserita, la lama
inferiore si trova appena al di sopra del fondo interno della ciotola.
•Se si lavorano alimenti con la lama falciforme, a questo punto aggiungere cibi o liquidi alla ciotola da
lavoro.
•Inserire sempre i cibi secchi per primi, seguiti da quelli umidi.
hi
se
r
Leggere di seguito per il montaggio delle parti della ciotola da usare con i dischi accessori nella
ciotola.
a
tur
•Non inserire cibi nella ciotola prima di aver posizionato il disco accessorio
ra
sull’albero.
•Scegliere il disco corretto: per grattugiare o affettare.
•Tenere il disco con il lato di taglio rivolto verso la mano. Fare attenzione a non
graffiarsi le mani sui bordi affilati. La parte inferiore del disco ha un’area di plastica
cc
per inserire l’asticciola rimovibile.Tenendo l’asticciola con il pollice sul pulsante di
s blo
sblocco, posizionare la linguetta centrale e le prime due a destra nelle due fessure in
fondo al disco e ruotare in senso orario. Fare riferimento
al diagramma.
• Una volta installata l’asticciola nel disco corretto, guidare attentamente il centro del disco sull’albero
di metallo in modo che le parti piatte doppie sull’albero siano allineate con l’asticciola del disco.
Porre il disco sopra l’albero e ruotarlo finché scende in posizione. Spingerlo sino in fondo, toccando
soltanto il bordo esterno, mai le lame. Dovrebbe innestarsi facilmente, altrimenti farlo oscillare
leggermente finché entra in sede. (Segue ciotola)
87
(Segue ciotola)
Nota: non inserire cibi nella ciotola prima di posizionare il disco accessorio sull’albero.
•Appoggiare il coperchio sulla ciotola, con il tubo di inserimento sulla
sinistra rispetto al manico (all’incirca sulla posizione delle ore 7). Le
linguette di bloccaggio sulla parte posteriore del coperchio dovrebbero
trovarsi a destra rispetto a quelle poste sul bordo posteriore della ciotola
da lavoro.
•Ruotare il coperchio in senso antiorario per fissarlo. Quando il coperchio
è in sede, la linguetta del blocco di sicurezza sulla parte anteriore del
coperchio s'infila perfettamente nel meccanismo di blocco sopra il manico.
NON AVVIARE MAI IL ROBOT DA CUCINA
SENZA PRIMA AVER FISSATO IL COPERCHIO.
Pestelli e manicotto di sicurezza
Il robot da cucina Waring è dotato di un manicotto di sicurezza con il
pestello grande integrato e un meccanismo di blocco. Nota: il robot da
cucina non funziona se il manicotto di sicurezza non è inserito e il
meccanismo di blocco innestato. Afferrare il manicotto e il pestello grande.
Con la linguetta di sgancio rivolta verso la parte anteriore del robot, calare
il pestello nel tubo di inserimento (il manicotto dovrebbe scorrere intorno
al tubo di inserimento). Premere saldamente finché il meccanismo di blocco
scatta in sede. A questo punto il robot è pronto per l’uso.
Uso del pestello
Calare gli ingredienti da lavorare nel tubo di inserimento piccolo e usare il
pestello piccolo per guidare il cibo nella ciotola da lavoro. Per bloccare il
pestello piccolo all’interno di quello grande, farlo scorrere nel tubo e
ruotarlo in senso antiorario finché la linguetta si blocca.
Per lavorare alimenti che non entrano nel tubo di inserimento piccolo,
rimuovere il manicotto e il pestello grande premendo la linguetta di sgancio
con la dicitura “PRESS HERE” (“PREMI QUI”). Aggiungere gli alimenti
da lavorare nel tubo di inserimento. Far scorrere verso sinistra la leva bianca
con la dicitura “LOCK” (“BLOCCA”). In questo modo il pestello grande
può entrare e uscire dal manicotto di sicurezza. Infilare di nuovo il manicotto sul coperchio, verificando che il meccanismo di blocco sia innestato. Se si usa un disco, il cibo
poggerà su di esso spingendo in alto il pestello nella posizione estesa. Assicurarsi che il pestello piccolo
sia bloccato all’interno di quello grande. Accendere il robot e spingere verso il basso il pestello grande
per guidare il cibo nel disco.
88
SMONTAGGIO DELLE PARTI
DELLA CIOTOLA WFP7E/K
PRIMA DELLO SMONTAGGIO STACCARE SEMPRE IL CAVO.
•Ruotare il coperchio della ciotola in senso orario finché la linguetta del blocco di sicurezza sul
coperchio si sblocca e le linguette sono lontane dalla scanalatura sulla torre. Il tubo di riempimento
si troverà sulla posizione tra le ore 7 e 9. In questa posizione è possibile sollevare il coperchio
dalla ciotola.
•Estrarre il pestello grande e il manicotto dal tubo di riempimento premendo il pulsante di sgancio
con la dicitura “PRESS HERE”. Estrarre il pestello piccolo da quello grande.
Smontaggio con estrazione della lama falciforme
• Estrarre la ciotola da lavoro dall’unità ruotando in senso orario per sbloccare le linguette sul fondo
della piattaforma dalla ciotola da lavoro. Quando il manico della ciotola si trova sulla sinistra (sulle
ore 7), sollevare delicatamente la ciotola verso l'alto e l'esterno.
Si raccomanda di estrarre la ciotola dalla base del motore prima di
togliere la lama falciforme.
• Per estrarre la lama, esercitare una leggera pressione verso il basso in cima alla parte centrale
della lama, rimuovendo la ciotola dalla base del motore. In questo modo si formerà un sigillo che
impedisce alle particelle alimentari di passare nel tubo centrale della ciotola e nella base del motore
o nella superficie di lavoro. Estrarre quindi la lama dalla ciotola, maneggiandola con cautela (le lame
sono estremamente affilate).
Smontaggio con estrazione di un disco accessorio
•Non estrarre la ciotola da lavoro prima di aver estratto il disco accessorio.
•Per rimuovere un disco, appoggiare le dita sul bordo esterno dei due lati opposti del disco e
sollevarlo. Il disco dovrebbe staccarsi di netto. Per estrarre l’asticciola rimovibile, tenere il disco in
una mano con l’asticciola rivolta lontano dalla mano. Fare attenzione a non graffiarsi la mano sui
bordi affilati, premere il pulsante di sgancio con il pollice e ruotare in senso antiorario.
•Estrarre la ciotola da lavoro dall’unità ruotando in senso orario per sbloccare le linguette sul fondo
della piattaforma dalla ciotola da lavoro. Quando il manico della ciotola si trova sulla sinistra (sulle
ore 7), sollevare delicatamente la ciotola verso l'alto e l'esterno.
89
USO DEI COMANDI
•Collegare l’apparecchio a una presa elettrica (da 230 volt, 50 Hz).
•Sulla base, nella parte anteriore, sono presenti due leve di comando che offrono un controllo a portata di mano. Sono sufficientemente grandi per individuarle immediatamente in caso di emergenza.
La leva di comando ha 3 posizioni: ON ( )
OFF ( )
PULSE (
)
Come funzionano: ON ( ): sollevare la leva per avviare il motore.
OFF ( ): per spegnere il motore, spostare la leva in posizione OFF ( ).
PULSE ( ): per usare il motore a intermittenza, premere la leva verso il
basso, quindi rilasciarla. Il motore rimane acceso finché si tiene premuta la
leva e si arresta quando la si rilascia. Fare qualche prova.
Modalità d’uso
Uso continuo
Per una lavorazione continua, sollevare la leva in posizione ON(
).
Intermittenza
La funzione a intermittenza è destinata all’uso con la lama falciforme all’interno della ciotola da lavoro.
•Il motore rimane acceso finché si tiene premuta la leva e si arresta quando la si rilascia.
•L’intermittenza viene controllata dall’operatore. La durata di ciascun impulso viene controllata dal
tempo in cui si tiene premuta la leva. La frequenza degli impulsi viene controllata dalla frequenza con
cui si preme la leva. L’intervallo tra gli impulsi deve essere abbastanza lungo da consentire agli ingredienti nella ciotola da lavoro di ricadere sul fondo.
•La funzione a intermittenza offre un controllo preciso delle operazioni di tritatura, macinatura,
impasto e mescolamento. È possibile lavorare i cibi in qualsiasi consistenza desiderata, da grossa a
fine.
•L’intermittenza è utile anche per lavorare cibi duri, per ridurli in pezzi più piccoli. Dopodiché si può
passare all’uso continuo con dei pezzi più piccoli e facili da lavorare.
•Usare sempre la leva per la funzione a intermittenza. Non spostare mai la ciotola e il coperchio per
controllare gli impulsi: è un metodo meno efficiente che può danneggiare l’apparecchio.
Spegnimento
Porre sempre l’apparecchio in posizione OFF ( ) e attendere che la lama o il disco si fermi prima di
estrarre il pestello. Il motore si arresta dopo alcuni secondi una volta spento l'apparecchio.
90
PREPARAZIONE DEGLI ALIMENTI
•Preparare tutti i cibi da lavorare lavandoli ed eventualmente sbucciandoli. Scartare noccioli e semi.
•Tagliare le verdure, la carne, i formaggi, ecc. in pezzi che si possano infilare nel tubo di inserimento
piccolo o grande con i dischi accessori, oppure in dimensioni adatte al tipo di lavorazione.
•Preparazione per l’affettatura: tagliare le estremità di alimenti lunghi e cilindrici (per esempio carote,
cetrioli e sedano) in modo che siano piatte per ottenere fette uniformi per l’ingrediente lavorato.
Questo pestello viene usato per ricavare scaglie o fette più lunghe, oppure per lavorare grosse quantità
di cibi o alimenti voluminosi come patate e cipolle.
SCELTA DEL PESTELLO
Uso della lama falciforme
Non occorre usare il pestello piccolo durante la lavorazione dei cibi sul fondo della ciotola da lavoro
mediante la lama falciforme. Tuttavia è possibile usare il tubo di riempimento piccolo per aggiungere
gli ingredienti mentre il robot è in funzione. Si raccomanda di lasciare fermi i pestelli per evitare
schizzi e aggiunte indesiderate nella ciotola da lavoro.
Pestello piccolo
Il pestello con il canale più piccolo viene generalmente usato per inserire verdure verticalmente per
ottenere tagli più piccoli. Va utilizzato per affettare cibi quali carote, sedano, salame piccante, ecc.,
quando si desidera ottenere un taglio piatto e uniforme.
Questo pestello è utile anche per ottenere scaglie o fette più corte rispetto alle fette più lunghe ricavate
con il tubo di inserimento e il pestello grande.
Pestello grande
Il pestello con il canale più grande viene generalmente usato per inserire verdure orizzontalmente in
modo da ottenere tagli più lunghi.
RIPRISTINO DELLA PROTEZIONE TERMICA
I robot da cucina WFP7E/K sono dotati di un interruttore di ripristino automatico che protegge il
motore dal surriscaldamento.
Se il robot cessa di funzionare in caso di uso intenso, spegnere l'interruttore e staccare il cavo di
alimentazione. Svuotare la ciotola da lavoro e fare raffreddare il motore per circa 5 minuti.
Inserire di nuovo il cavo di alimentazione nella presa e continuare l’uso dell’apparecchio.
Se il robot non funziona correttamente in seguito a questa procedura, interrompere l’uso e rivolgersi
al distributore locale.
91
ISTRUZIONI PER L’USO DELLA LAMA
FALCIFORME NELLA CIOTOLA WFP7E/K
•La lama falciforme (coltello) serve per tritare, macinare, frullare, impastare e mescolare gli ingredienti
necessari in quasi tutte le ricette.
•Montare la ciotola e la lama in base alle istruzioni della sezione Montaggio delle parti della ciotola
(pagina 87).
Tritatura e macinatura
•Per tritare o macinare nella ciotola, riempirla con gli ingredienti desiderati fino alla parte superiore
del tubo interno della ciotola, o riempirla per ¾.
• Per tritare o macinare nel modo più efficace, avviare e arrestare rapidamente le lame per
controllare la consistenza con la funzione a intermittenza. Usare l’opzione PULSE ( ) per
ottenere questo risultato come descritto nella relativa sezione. Continuare l’uso a intermittenza sino
a ottenere la consistenza desiderata.
•Se si lavorano in continuo i cibi tritati, essi risulteranno disomogenei, ovvero la parte sul fondo sarà
tritata fine, mentre quella in alto sarà più grossa.
Tritatura della carne
Tagliare la carne a dadini di 2,5 cm per ottenere una tritatura uniforme. Lavorare al massimo 0,5 kg.
Premere la leva su PULSE ( ) per 1-2 secondi, per 3 volte. Quindi premere la leva su ON ( ) per
un massimo di 30 secondi sino a ottenere la consistenza desiderata.
Tritatura di formaggi duri
Tagliare il formaggio a dadini di 2,5 cm per ottenere una tritatura uniforme. Lavorare al massimo 0,4
kg. Premere la leva su PULSE ( ) per 1 - 2 secondi, per 3 volte. Quindi premere la leva su ON ( )
o a per un massimo di 30 secondi sino a ottenere la consistenza desiderata.
Tritatura di cipolle, sedano, cavolo, ecc.
Tagliare le cipolle in quarti e gli altri ortaggi in dadini di 2,5 cm. Inserire i dadini nella ciotola da
lavoro riempiendola sino alla cima del tubo interno della ciotola e usare la funzione a intermittenza
sino a ottenere la consistenza desiderata.
Nota: se si lascia la lama in funzione per troppo tempo, gli ingredienti sul fondo risulteranno frullati o
disomogenei.
Frullato o miscela
Per frullare i pomodori, le verdure e la frutta, preparare salse o mescolare e amalgamare gli ingredienti,
inserire i cibi nella ciotola, accendere l’apparecchio e farlo funzionare in continuo sino a ottenere la
consistenza desiderata. Non lasciare incustodito l’apparecchio in funzione. Se la ricetta supera circa 2
litri di ingredienti umidi, lavorare in piú represe.
92
Spegnere l’apparecchio.
• Spegnere sempre il robot spostando la leva in posizione OFF ( ). In questo modo l’alimentazione
non viene fornita al motore.
•Spegnere sempre il robot e attendere la fine della rotazione prima di togliere il coperchio.
• Mentre l’interruttore del blocco di sicurezza spegne l’apparecchio se il coperchio viene ruotato in
senso orario o rimosso durante il funzionamento, l'apparecchio non deve essere acceso o spento in
questo mondo ( , ).
• Prima di ruotare il coperchio, verificare che l’apparecchio sia spento premendo la leva in posizione
OFF ( ) come precauzione, in caso l’apparecchio non sia stato spento correttamente.
Scelta e uso dei dischi accessori
I dischi accessori del robot da cucina WFP7E/K sono adatti a eseguire svariati tipi di lavorazione dei
cibi. Con il robot WFP7E/K sono forniti in dotazione due (2) dischi accessori. Al momento della
stampa sono:
Disco per affettare fine (2 mm)
Disco per grattugiare fine
Affettatura
•Preparare tutti i cibi da lavorare lavandoli ed eventualmente sbucciandoli. Scartare noccioli e semi.
Verificare che i cibi si infilino nel tubo di inserimento corretto. Per i cibi quali carote, cetrioli, ecc.,
tagliare le estremità in modo piatto per ottenere fette uniformi.
•Per i cibi quali cavoli, lattuga o prodotti con una parte centrale indesiderata, quest'ultima va
eliminata. Cespi di cavolo o lattuga di medie dimensioni possono venire tagliati in tre parti in
modo da poterli infilare agevolmente nel tubo di riempimento. Cespi più grandi vanno tagliati in
quattro parti.
•Al termine della preparazione, riempire il tubo, posizionare il pestello, accendere l'apparecchio e
osservare i risultati.
•Non tentare mai di affettare formaggi molli. Affettare soltanto formaggi duri come il parmigiano.
Non usare blocchi di dimensioni superiori a 89 mm x 19 mm x 101 mm. Usare sempre formaggi
freddi per l’affettatura. Si raccomanda di mettere il formaggio in frigorifero per almeno un’ora
prima di affettarlo. Non affettare la mozzarella per evitare di danneggiare l’apparecchio.
•Quando i cibi affettati raggiungono quasi la capienza massima della ciotola, svuotarla.
93
Grattugia
•Preparare tutti i cibi da lavorare lavandoli ed eventualmente sbucciandoli. Scartare noccioli e semi.
Verificare che i cibi si infilino nel tubo di inserimento corretto.
Scegliere il tubo di inserimento desiderato. L’inserimento orizzontale di carote risulterà in un tipo di
grattugia lungo, mentre l’uso del tubo piccolo e l’inserimento verticale dei cibi forniscono un tipo di
grattugia più corto.
•Non tentare mai di grattugiare formaggi molli. Grattugiare soltanto formaggi duri come il
parmigiano. Non usare blocchi di dimensioni superiori a 89 mm x 19 mm x 101 mm. Usare sempre
formaggi freddi per la grattugia. Si raccomanda di mettere il formaggio in frigorifero per almeno
un’ora prima di affettarlo. Non grattugiare la mozzarella per evitare di danneggiare l’apparecchio.
•Per grattugiare il formaggio, si raccomanda di applicare una leggera pressione a intermittenza con
il pestello, alternando la spinta finché il blocco di formaggio risulta completamente grattugiato. La
grattugia del formaggio sottopone il motore del robot a una maggiore tensione rispetto ad altri tipi di
lavorazione e può causare surriscaldamento se viene applicata continuamente un’eccessiva pressione.
•Generalmente si possono grattugiare 4,5 kg di formaggio in circa 5 minuti. Si raccomanda di
pianificare la preparazione dei cibi in modo da grattugiare per cinque minuti, seguiti da cinque
minuti di preparazione degli alimenti mentre si lascia riposare l’apparecchio.
•Quando i cibi grattugiati raggiungono quasi la capienza massima della ciotola, svuotarla.
RISOLUZIONE DEI PROBLEMI
Questa sezione descrive eventuali problemi e propone le relative soluzioni. I problemi non risolvibili
tramite le indicazioni riportate di seguito devono essere segnalati al distributore locale. Il robot da
cucina Waring viene fornito con un elenco di centri di assistenza autorizzati.
L’unità non si avvia una volta montata correttamente
•Estrarre la spina e inserirla in una presa diversa.
• Spostare la leva su ON ( ).
•Assicurarsi che la ciotola sia posizionata correttamente sulla base del motore, che il coperchio della
ciotola o del tubo sia inserito e che la linguetta del blocco di sicurezza sul coperchio sia innestata
correttamente sull’interruttore del blocco di sicurezza.
L’unità cessa di funzionare durante la lavorazione
• L’unita potrebbe essere surriscaldata. Fara rifeimento alla sezione Ripristino della protezione termica
(pagina 91)
• Porre l’unità in posizione OFF ( ) e staccare la spina.
•Estrarre la ciotola.
• Svuotare la ciotola dai cibi.
• Lasciare raffreddare l’unitá e farla funzionare con la ciotola vuota, quindi riempirla con del cibo e
riprovare.
94
L’unità non raggiunge la velocità massima
• La ciotola è sovraccarica: svuotarla e riempirla con una quantità inferiore di cibo.
Se l’unità non funziona dopo aver seguito le precedenti indicazioni
•Verificare che vi sia corrente nella presa elettrica.
•Verificare che l’interruttore sia acceso.
•In caso di presenza di fusibili sul circuito, verificare che il fusibile non sia bruciato.
•Rivolgersi al distributore locale.
Se l’unità emette scintille o fumo
• Spegnere l’unità, staccare la spina e chiamare un centro di assistenza autorizzato.
Se il robot emette uno stridio
•Spegnere l’unità, staccare la spina, smontare l’apparecchio e verificare se la ciotola e la lama sfregano
l’una contro l’altra.
•Se ciotola e lama sfregano, rivolgersi al distributore locale.
PULIZIA
Pulire il robot da cucina e gli accessori prima e dopo l’uso. Non usare detergenti abrasivi su alcuna
parte del robot. Pulire l’albero del motore con uno spazzolino.
Lavare, sciacquare, disinfettare e asciugare ciotola, coperchi, pestello piccolo e grande, dischi accessori
e lame falciformi prima e dopo l’uso, a meno che vengano riutilizzati immediatamente. Questi componenti possono essere lavati in lavastoviglie piuttosto che a mano nel lavandino.
Lavare e risciacquare tutti i componenti elencati dopo l’uso.
Usare una spazzola con setole dure per rimuovere le particelle alimentari dalle fessure dei dischi e delle
lame prima di procedere al lavaggio. Maneggiare con estrema cautela in quanto le lame sono affilate.
Per la pulizia manuale, si raccomanda di usare soluzioni basate su detergenti senza schiuma e soluzioni
disinfettanti a base di cloro con una concentrazione minima di 100 PPM. È possibile utilizzare le seguenti soluzioni (o altre equivalenti) per il lavaggio, il risciacquo e la disinfezione:
SOLUZIONE
Lavaggio
Risciacquo
PRODOTTO
DILUIZIONE IN ACQUA
TEMPERATURA
Polvere disinfettante
*Ajax®
7,5 ml per
46°C
Acqua
Disinfezione
**Clorox®
1: cucchiaio per
cerca 4 litri
35°C
10-21°C
95
Per pulire e disinfettare la base del motore
Pulire e disinfettare la base del motore prima e dopo l’uso. Staccare la spina e strofinare le superfici
esterne della base con un panno o una spugna inumiditi di una soluzione detergente. Quindi passare
un panno inumidito di acqua. Evitare la penetrazione di liquidi nella base del motore strizzando bene
panni o spugne prima di usarli.
NON IMMERGERE MAI LA BASE DEL MOTORE IN ACQUA O ALTRI LIQUIDI.
Fare asciugare all’aria l’unità prima di riutilizzarla.
Non usare mai detergenti abrasivi su qualsiasi parte del robot da cucina.
*Ajax® è un marchio depositato di Colgate-Palmolive
**Clorox® è un marchio depositato di Clorox
96
NOTE
_______________________________________________________________________________________
_______________________________________________________________________________________
_______________________________________________________________________________________
_______________________________________________________________________________________
_______________________________________________________________________________________
_______________________________________________________________________________________
_______________________________________________________________________________________
_______________________________________________________________________________________
_______________________________________________________________________________________
_______________________________________________________________________________________
_______________________________________________________________________________________
_______________________________________________________________________________________
_______________________________________________________________________________________
_______________________________________________________________________________________
_______________________________________________________________________________________
_______________________________________________________________________________________
_______________________________________________________________________________________
_______________________________________________________________________________________
_______________________________________________________________________________________
_______________________________________________________________________________________
_______________________________________________________________________________________
_______________________________________________________________________________________
_______________________________________________________________________________________
_______________________________________________________________________________________
_______________________________________________________________________________________
_______________________________________________________________________________________
_______________________________________________________________________________________
_______________________________________________________________________________________
_______________________________________________________________________________________
_______________________________________________________________________________________
_______________________________________________________________________________________
_______________________________________________________________________________________
_______________________________________________________________________________________
_______________________________________________________________________________________
97
NOTE
_______________________________________________________________________________________
_______________________________________________________________________________________
_______________________________________________________________________________________
_______________________________________________________________________________________
_______________________________________________________________________________________
_______________________________________________________________________________________
_______________________________________________________________________________________
_______________________________________________________________________________________
_______________________________________________________________________________________
_______________________________________________________________________________________
_______________________________________________________________________________________
_______________________________________________________________________________________
_______________________________________________________________________________________
_______________________________________________________________________________________
_______________________________________________________________________________________
_______________________________________________________________________________________
_______________________________________________________________________________________
_______________________________________________________________________________________
_______________________________________________________________________________________
_______________________________________________________________________________________
_______________________________________________________________________________________
_______________________________________________________________________________________
_______________________________________________________________________________________
_______________________________________________________________________________________
_______________________________________________________________________________________
_______________________________________________________________________________________
_______________________________________________________________________________________
_______________________________________________________________________________________
_______________________________________________________________________________________
_______________________________________________________________________________________
_______________________________________________________________________________________
_______________________________________________________________________________________
_______________________________________________________________________________________
_______________________________________________________________________________________
98
NOTE
_______________________________________________________________________________________
_______________________________________________________________________________________
_______________________________________________________________________________________
_______________________________________________________________________________________
_______________________________________________________________________________________
_______________________________________________________________________________________
_______________________________________________________________________________________
_______________________________________________________________________________________
_______________________________________________________________________________________
_______________________________________________________________________________________
_______________________________________________________________________________________
_______________________________________________________________________________________
_______________________________________________________________________________________
_______________________________________________________________________________________
_______________________________________________________________________________________
_______________________________________________________________________________________
_______________________________________________________________________________________
_______________________________________________________________________________________
_______________________________________________________________________________________
_______________________________________________________________________________________
_______________________________________________________________________________________
_______________________________________________________________________________________
_______________________________________________________________________________________
_______________________________________________________________________________________
_______________________________________________________________________________________
_______________________________________________________________________________________
_______________________________________________________________________________________
_______________________________________________________________________________________
_______________________________________________________________________________________
_______________________________________________________________________________________
_______________________________________________________________________________________
_______________________________________________________________________________________
_______________________________________________________________________________________
_______________________________________________________________________________________
99
©2007 Waring
Waring Commercial
314 Ella T. Grasso Avenue
Torrington, CT 06790
Waring™ Commercial is a registered trademark of Conair Corporation.
Any other trademarks or service marks used herein are
the trademarks or service marks of their respective owners.
Waring™ Commercial is een gedeponeerd
handelsmerk van Conair Corporation.
Alle andere hierin gebruikte handels- of servicemerken zijn
de handelsmerken van hun respectieve eigenaars.
Waring™ Commercial est une marque déposée de Conair Corporation. Toutes
marques déposées ou marques de commerce ci-incluses
appartiennent à leurs propriétaires respectifs.
Waring™ Commercial è un marchio depositato di Conair Corporation.
Tutti gli altri marchi di fabbrica o di servizio riportati sono marchi di fabbrica o
di servizio dei rispettivi proprietari.
Waring™ Commercial es una marca registrada de Conair Corporation. Todas
marcas registradas o marcas de comercio mencionadas en ésta pertenecen a
sus titulares respectivos.
Waring™ Commercial ist eine eingetragene Marke der Conair Corporation.
Alle sonstigen in diesem Dokument erwähnten Marken oder Dienstleistungsmarken sind Marken oder Dienstleistungsmarken
ihrer jeweiligen Inhaber.
www.waringproducts.com
Printed in China
Gedrukt in China
Imprimé en Chine
Stampato in Cina
Impreso en la China
Gedruckt in China
07WR30168
IB-8080