1
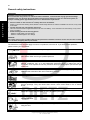
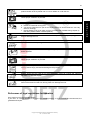
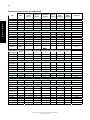
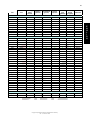
1 CAN BUS Interface Bedienungsanleitung Instruction manual 66030 Audiotechnik Dietz® Vertriebs-GmbH ● Benzstr. 12 ● 67269 Grünstadt ● [email protected] ● www.dietz.biz Copyright © by Audiotechnik Dietz® Vertriebs-GmbH ● Germany Rev 11, Stand: 09 / 2010 D E U T S C H 2 Inhaltsverzeichnis Inhaltsverzeichnis ....................................................................................................................................................2 Allgemeine Hinweise ...............................................................................................................................................2 Lieferumfang............................................................................................................................................................3 Allgemeine Sicherheitshinweise ..............................................................................................................................3 Hinweise auf Voraussetzungen für den Bestimmungsmäßigen Betrieb .................................................................4 Folgende Fahrzeugtypen werden unterstützt:.........................................................................................................5 Funktionsweise 66030.............................................................................................................................................8 Kabelbelegung (Interface) .......................................................................................................................................8 Installation................................................................................................................................................................9 Selbstständiges Anlernen und Funktionen............................................................................................................12 Funktionseinstellungen..........................................................................................................................................14 Funktions- und Radioherstellertabelle ...................................................................................................................15 PSA Einstellungsmenü ..........................................................................................................................................16 OPEL Einstellungsmenü........................................................................................................................................18 Wartungshinweise .................................................................................................................................................20 Technische Daten..................................................................................................................................................20 Allgemeine Hinweise Sehr verehrter Kunde, vielen Dank, dass Sie sich für ein Produkt der Firma Audiotechnik Dietz entschieden haben. Sie haben eine hervorragende Wahl getroffen. Bei der Entwicklung des Produktes wurde besonders auf Ihre persönliche Sicherheit, kombiniert mit bestmöglichstem Bedienungskomfort, modernem Design und aktuelle Produktionstechniken geachtet. Aber trotz größtmöglicher Sorgfalt kann es bei unsachgemäßer Installation oder Benutzung, oder bei falscher Bedienung zu Verletzungen oder/und Sachschäden kommen. Bitte lesen Sie deshalb die Ihnen vorliegende Bedienungsanleitung sorgfältig und vollständig durch und bewahren Sie diese auf! Dieses Produkt erfüllt die Anforderungen der geltenden europäischen und nationalen Richtlinien. Die Konformität wurde nachgewiesen, die entsprechenden Unterlagen und Erklärungen sind beim Hersteller hinterlegt. Alle Artikel aus unserer Produktion durchlaufen eine 100%ige Prüfung – zu Ihrer Sicherheit. Wir behalten uns vor, jederzeit technische Änderungen durchzuführen, die dem Fortschritt dienen. Je nach Artikel und Einsatzzweck ist es eventuell notwendig, vor der Installation bzw. Inbetriebnahme die gesetzlichen Bestimmungen des jeweiligen Landes zu prüfen. Das Gerät ist bei Garantieansprüchen in der Originalverpackung mit beigelegtem Kaufbeleg und detaillierter Fehlerbeschreibung dem Verkäufer einzuschicken. Beachten sie hierbei die Rücksendebestimmungen des Herstellers (RMA). Es gelten die gesetzlichen Gewährleistungsvorschriften. Der Garantieanspruch und auch die Betriebserlaubnis erlischt durch: a) unbefugte Änderungen am Gerät oder Zubehör, die nicht vom Hersteller oder dessen Partnern durchgeführt oder genehmigt wurden b) öffnen des Gehäuses eines Gerätes c) selbst ausgeführte Reparaturen am Gerät d) unsachgemäße Nutzung / nicht bestimmungsgemäße Nutzung / Betrieb e) Gewalteinwirkung auf das Gerät (Herabfallen, mutwillige Zerstörung, Unfall, etc.) Beachten Sie beim Einbau alle sicherheitsrelevanten und gesetzmäßigen Bestimmungen. Das Gerät darf nur durch geschultes Fachpersonal oder ähnlich qualifizierte Personen eingebaut werden. Copyright © by Audiotechnik Dietz® Vertriebs-GmbH ● Germany Rev 11, Stand: 09 / 2010 3 Lieferumfang - 1 St. Bedienungsanleitung - 1 St. Interface - 1 St. Anschlusskabel - 1 St. Jumper Allgemeine Sicherheitshinweise WARNUNG Die Installation darf nur durch geschultes Fachpersonal durchgeführt werden. Installationen nur im spannungslosen Zustand vornehmen. Dafür z.B. die Batterie vom Bordnetz trennen, beachten Sie dabei bitte die Vorgaben des Fahrzeugherstellers. Verwenden Sie niemals sicherheitsrelevante Schrauben, Bolzen oder sonstige Befestigungspunkte an Lenkung, Bremssystem oder anderen Komponenten, um Ihre eigene Fahrsicherheit nicht zu gefährden. Schließen Sie das Gerät nur an 12V KFZ Spannung mit Masseverbindung zur Karosserie an. Diese Unterbaugruppe ist nicht zugelassen zum Einsatz in LKWs oder anderen KFZ mit 24V Bordspannung. Vermeiden Sie den Einbau des Gerätes an Stellen wodurch die Fahrsicherheit oder die Funktionstüchtigkeit anderer im Fahrzeug verbauter Unterbaugruppen eingeschränkt würde. HINWEIS Bitte verwenden Sie die in dieser Montageanleitung vorgeschriebenen Anschlüsse zur Montage des Gerätes. Die hier aufgeführten Hinweise treffen zwar auf die meisten, aber nicht auf alle Produkte gleichermaßen zu! Sollten Sie Fragen hierzu haben, wenden Sie sich bitte an Ihren Händler. Lassen Sie das Gerät nicht fallen! Vermeiden Sie Beschädigungen! Ist das Gerät heruntergefallen, oder ist das Gehäuse beschädigt, wenden Sie sich bitte an einen Servicepartner. Achtung! Gefahr von Elektroschock! Öffnen Sie nie das Gehäuse! Es gibt keine zu wartenden Teile im Inneren. Lassen Sie Service- oder Reparaturarbeiten nur von qualifizierten Personen durchführen. Achtung! Gefahr von Brand oder Elektroschock! Setzen Sie das Gerät keinem Regen oder anderer Feuchtigkeit (Badewanne, Schwimm- oder Spülbecken) aus. Stellen Sie keine wasserbeinhaltenden Objekte wie beispielsweise Trinkgläser oder Blumenvasen auf dem Gerät ab. Achtung! Gefahr von Elektroschock! Vermeiden Sie bei Gewitter eine Berührung mit dem Gehäuse und ziehen Sie die Stecker der Spannungsversorgung und Antennen vom Gerät ab, um Schäden zu vermeiden. Achtung! Gefahr von Brand oder Elektroschock! Überlasten Sie auf keinen Fall die Stromanschlüsse oder die Verlängerungskabel. Achtung! Gefahr von Brand oder Elektroschock! Stecken Sie niemals Fremdkörper in die Öffnungen am Gehäuse! Die Gegenstände können Kurzschlüsse verursachen. Achtung! Gefahr von Brand oder Elektroschock! Sollte das Kabel oder der Anschlußstecker des Gerätes beschädigt sein, ziehen Sie den Stecker heraus und wenden Sie sich an einen Servicepartner. Achtung! Gefahr von Brand oder Elektroschock! Sorgen Sie dafür, dass das Stromanschlußkabel nicht gequetscht wird. Copyright © by Audiotechnik Dietz® Vertriebs-GmbH ● Germany Rev 11, Stand: 09 / 2010 D E U T S C H D E U T S C H 4 Schalten Sie bei Rauch-, Geräusch- und/oder Geruchsentwicklung das Gerät sofort ab und trennen Sie es sofort von der Spannungsversorgung. Benutzen Sie das Gerät nicht weiter! Setzen Sie das Gerät keiner starken Sonnenbestrahlung oder anderen starken Hitzeeinwirkungen aus! Montieren Sie das Gerät nie in der Nähe von oder gar über Radiatoren, Warmluftschläuchen oder anderen Wärmequellen. Sorgen Sie für genügend Luftzirkulation um Schäden an den Gerätekomponenten zu vermeiden. Ziehen Sie bitte den Stecker der Stromversorgung, wenn: a) Sie das Gerät längere Zeit nicht benutzen b) Sie das Gerät reinigen möchten (benutzen Sie keine feuchten- oder Sprüh-Reiniger. Verwenden Sie nur trockene Tücher zur Reinigung). c) das Gerät trotz Überprüfung mit Hilfe der Fehlersuche nicht funktioniert (wenden Sie sich in diesem Falle an einen unserer Servicepartner) Platzieren Sie das Gerät nie in staubiger Umgebung. Staubzusammenballung infolge von Temperatureinwirkung kann das Gerät zerstören. Verstopfen Sie keine Öffnungen am Gehäuse, an der Rückseite oder am Boden. Stellen Sie das Gerät nie auf ein Bett, Sofa oder ähnliche Oberflächen. Auch hier können die Öffnungen verdeckt werden. Stellen Sie das Gerät nie in geschlossen umbaute Möbel, wenn dadurch die Luftzirkulation gefährdet wird. Stellen Sie das Gerät nicht auf instabile Unterkonstruktionen. Durch Herunterfallen des Gerätes könnten Sie verletzt und das Gerät beschädigt werden. Lassen Sie Reparaturen immer nur von unseren Servicepartnern durchführen! Bei selbst reparierten Geräten erlischt der Garantieanspruch! Wenn Sie eine durchgeschmolzene Sicherung ersetzen müssen, schalten Sie das Gerät ab und trennen Sie es von der Spannungsversorgung. Benutzen Sie nur Sicherungen gleicher Stärke als Ersatz, um Schäden am Gerät zu vermeiden! Hinweise auf Voraussetzungen für den Bestimmungsmäßigen Betrieb Setzen Sie das Gerät nur in dem ihm zugedachten Bereich ein. Bei zweckfremdem Gebrauch, nicht fachgerechter Installation oder bei Umbauten erlöschen die Betriebserlaubnis und der Garantieanspruch. Copyright © by Audiotechnik Dietz® Vertriebs-GmbH ● Germany Rev 11, Stand: 09 / 2010 5 Folgende Fahrzeugtypen werden unterstützt: Auto Jahr Lenkradsteuerung Zündung (positiv) 147 159 Brera Spider GT MITO 2006> 2005> 2006> 2006> 2008> 66600 O O 66600 O O O O O O A3 A4 A3 A4 A6 / Q7 A5 TT 2004> 2004> 2007> 2007> 2006> 2007> 2007> O O O O O O O O O O O O O O AUDI mit BOSE 2004> O O Speedimpuls Rückwärtsgang (positiv) Handbremse (negativ) Kabelsatz O O O O O O O O O O O O O O O 66100 66100 66100 66100 66100 O O O O O O O O O O O O O O O O O O O O O O O O O O O O 66105 66105 66175 66175 x x 66175 O O O O 66110 Beleuchtung (positiv) ALFA ROMEO O O O O O AUDI BMW X3 - X5 – Mini (K-Bus) 2003> O x x x x x 1er, 3er, 5er Mini - X5 X6 2005> 2007> 2008> O O O O O O O O O O O O O O O O O O 66120 bis 03 66115 ab 03 66115 66115 66115 CHRYSLER – Einschaltimpuls für Endstufe (ab 2008) Jeep Grand Cherokee 2005> O O O O O O 66125 300C COMPASS Voyager 2005> 2006> 2008> O O O O O O O O O O O O O O O O O O 66125 66125 66130 C2, C3, C4 C4 Picasso C5 2006> 2006> 2008> O O O O O O O O O O O O O O O 66155 66155 66155 Nitro Caliber 2007> 2007> O O O O Idea Croma (neu) Grande Punto Scudo Stilo Bravo 500 Panda Ducato 2005> 2005> 2006> 2007> 2004> 2007> 2007> 2004> 2007> O O O O O O O 66600 66600 O O O O O O O O O CITROËN O O O DODGE - Einschaltimpulse für Endstufe (ab 2008) O O O O O O O O 66130 66130 O O O O O O O O O O O O O O O O O O O O O O O O O O O 66100 66100 66100 66155 66100 66100 66100 66100 66100 FIAT O O O O O O O O O Copyright © by Audiotechnik Dietz® Vertriebs-GmbH ● Germany Rev 11, Stand: 09 / 2010 D E U T S C H D E U T S C H 6 Speedimpuls Rückwärtsgang (positiv) Handbremse (negativ) Kabelsatz O O O O O O O O O O O O O O O O O O O O O x x x x x x x O O O O O O 66100 66100 O O O O O O O O O O O O x O O O O O O O O O O O O O x O O O O O O O O O O O O O O O 66135 66135 66135 66140 66135 66140 66135 x 66135 66145 66135 66135 66135 66135 O O O O O O O O O O O O O O O O O O O O O O O O O O O O O O O O PEUGEOT – Aktivierung der Parksensoren mit 61160 O O O O O O O O 66150 66150 66150 66150 66150 66150 66150 66150 Auto Jahr Lenkradsteuerung Zündung (positiv) S-Max C-Max Mondeo Transit Tourneo Kuga Fiesta 2006> 2006> 2006> 2007> 2007> 2008> 2002-2008 66600 66600 66600 66600 66600 66600 66600 O O O O O O O Beleuchtung (positiv) FORD O O O x O x O LANCIA Ypsilon New Delta 2006> 2008> O O O O A-Klasse B-Klasse C-Klasse E-Klasse CLK SLK R-Klasse Actros ML Sprinter ML (neu) GL SL C-Klasse 2003> 2004> 2003> 2004> 2003> 2003> 2006> 2007> 2004> 2007> 2005> 2006> 2006> 2007> O O O O O O O O O O O O O O O O O O O O O x O O O O O O Corsa Astra H Vectra C Signum Tigra Zafira B Meriva Antara 2004> 2004> 08/04> 2004> 2004> 2004> 2004> 2006> O O O O O O O O 207 307 407 308 2006> 2006> 2006> 2008> O O MERCEDES O O O O O O O x O O O O O O OPEL O O O O O O O O O O O O O O O O O O O O O O O O 66155 66155 66155 66155 O O O O O O x x PORSCHE Cayenne Boxter 2006> 2006> O O O O O O Copyright © by Audiotechnik Dietz® Vertriebs-GmbH ● Germany Rev 11, Stand: 09 / 2010 7 Auto Jahr Lenkradsteuerung Zündung (positiv) Modus Clio Megane Megane III Laguna Laguna III Espace 2006> 2006> 2006> 2008> 2006> 2008> 2006> O O O O O O O x x x O x O x Beleuchtung (positiv) Speedimpuls Rückwärtsgang (positiv) Handbremse (negativ) Kabelsatz x x x O x O x x x x O x O x x x x O x O x 66160 66160 66160 66165 66160 66165 66160 O O O O O O O O O O O O 66150 66150 66150 66150 O O O O O O 66175 66175 O O O O O O O O O x x x RENAULT x x x O x O x SEAT Altea Cordoba Leon Ibiza (neu) 2004> 2004> 2004> 2009> O O O O O O O O O O O O Octavia II Yeti 2006> 2009> O O O O V70 XC70 XC90 2004> 2007> 2007> O O O O O O Golf V Golf Plus Touran Passat Touareg New Touareg EOS T5 Tiguan Passat CC Golf VI Scirocco 2004> 2004> 2004> 2004> 2004> O O O O O O O O O O O O O O O O O O O O O O O O O O O O O O 66175 66175 66175 66175 66175 2007> O O O O O O 66175 2007> 2007-11/09 2007> 2008> 2008> 2008> O O O O O O O O O O O O O O O O O O O O O O O O O O O O O O 66175 66175 66175 66180 66180 O O O O O O 66180 SKODA O O VOLVO O O O VW Copyright © by Audiotechnik Dietz® Vertriebs-GmbH ● Germany Rev 11, Stand: 09 / 2010 D E U T S C H D E U T S C H 8 Funktionsweise 66030 Die o.g. Baugruppe ist ein Interface, das aus dem CAN Protokoll eines Fahrzeugs folgende Signale ausliest. Decodiert werden Fahrzeugabhängig: - Zündung (Klemme 15, max. 500 mA belastbar!) Beleuchtung (Kl. 58, max. 100 mA belastbar!) Speedimpuls: Rechtecksignal 4,5 Hz bzw. 0,85 Hz pro km/h (max. < 5 mA belastbar!) Rückwärtsgang (Fahrzeugspezifisch, max. 100 mA belastbar!) Lenkradfernbedienung (wenn vorhanden) für nachfolgend aufgeführte Geräte unterschiedlicher Hersteller Kabelbelegung (Interface) Kabel Funktion Rot Schwarz Grün Weiß Pink Orange Grau Blau Gelb/Weiß Dauerplus Masse CAN High CAN Low / K-Bus Zündungsausgang, positiv Beleuchtung, positiv Geschwindigkeitssignal Rückwärtsgang, positiv Handbremse, negativ Die Lenkradfernbedienung wird nur adaptiert, wenn diese im Originalzustand des Fahrzeugs vorhanden ist und über den CAN Datenbus mit dem Original Radio kommuniziert. Kompatible Geräte zur Adaption der Lenkradfernbedienung mit 66030 über Radiospezifischen Adapter: 66401: ALPINE 66402: BLAUPUNKT 66403: CLARION – JVC 66404: KENWOOD 66405: PIONEER – SONY 66406: PANASONIC – ZENEC 66407: VDO Hinweis: Um bei MERCEDES Fahrzeugen die Lenkradfernbedienung nutzen bzw. programmieren zu können, muss im Kombiinstrument (Tacho) „AUDIO“ angezeigt werden. Copyright © by Audiotechnik Dietz® Vertriebs-GmbH ● Germany Rev 11, Stand: 09 / 2010 9 Installation Copyright © by Audiotechnik Dietz® Vertriebs-GmbH ● Germany Rev 11, Stand: 09 / 2010 D E U T S C H D E U T S C H 10 Copyright © by Audiotechnik Dietz® Vertriebs-GmbH ● Germany Rev 11, Stand: 09 / 2010 11 Die in den Abbildungen der CAN Bus Anschlüsse zeigen alle den Anschlussstecker des Radios. Copyright © by Audiotechnik Dietz® Vertriebs-GmbH ● Germany Rev 11, Stand: 09 / 2010 D E U T S C H D E U T S C H 12 Die in den Abbildungen der CAN Bus Anschlüsse zeigen alle den Anschlussstecker des Radios. !!!ACHTUNG BEI DODGE NITRO KÖNNEN DIE CAN BUS LEITUNGEN AUCH VERTAUSCHT IM FAHRZEUG VORKOMMEN!!! Copyright © by Audiotechnik Dietz® Vertriebs-GmbH ● Germany Rev 11, Stand: 09 / 2010 13 Selbstständiges Anlernen und Funktionen Nachdem das Interface mit dem Fahrzeug verbunden ist erkennet es selbstständig in welchem Fahrzeug es sich befindet und stellet das dementsprechende Fahrzeugprotokoll ein. Solange die Synchronisation läuft blinkt die rote LED des Interfaces (Fahrzeug nicht erkannt oder keine CAN Bus Verbindung). Sobald die Synchronisation des Fahrzeugs abgeschlossen ist, blinkt die grüne LED. In dieser Zeit muss, wenn benötigt, der Radiohersteller (Liste ab Seite 15) ausgewählt werden. Dies ist aber nur möglich so lange die LED blinkt. Bei dem Interface ist als Standard Radio CLARION eingestellt, dies wird durch einmaliges blinken der grünen LED angezeigt. Die folgende Tabelle zeigt die Positionierung der Jumper der Radios sowie der Signale für Bremse und Rückwärtsgang. Um ein anderes Radio auszuwählen drücken Sie die VOLUME + Taste um in der Radiotabelle einen Schritt weiter zu gehen oder die VOLUME - Taste um einen Schritt zurück. Wenn das Radio gewählt ist, bestätigen Sie mit der SEEK + Taste. Die grüne LED leuchtet dauerhaft um die Auswahl zu bestätigen. Es ist Wichtig, dass der Jumper JP1 in der richtigen Position für ALPINE und SONY Autoradios gesetzt ist. J1 J2 J3 J4 J5 1-2 ALPINE, SONY Handbremse negativ Rückwärtsgang negativ BLAUPUNKT K-Bus Fahrzeug 2-3 bei Auslieferung Handbremse positiv Rückwärtsgang positiv CAN Bus Fahrzeug Die Jumper sind bei der Auslieferung wie folgt gesetzt: J1 auf 2-3, J2 auf 1-2, J3 auf 2-3, J4 offen und J5 auf 2-3 Das Interface kann durch drücken der Reset Taste (Bohrung im Gehäuse) zurück gesetzt werden. Hierzu muss die Zündung ausgeschaltet und die CAN Bus Leitungen abgeklemmt sein und die ResetTaste solange gedrückt werden bis die rote LED erlischt. Copyright © by Audiotechnik Dietz® Vertriebs-GmbH ● Germany Rev 11, Stand: 09 / 2010 D E U T S C H D E U T S C H 14 Funktionseinstellungen Das Interface 66030 bietet die Möglichkeit verschiedene Einstellungen spezifisch zu ändern. Vorraussetzung zum ändern dieser Einstellungen ist, dass das Interface korrekt mit dem CAN Datenbus verbunden ist, d.h. die grüne LED leuchtet. Sobald die grüne LED leuchtet muss 3-mal der versenkte Taster gedrückt werden. Die LED blinkt dann rot. Als nächster Schritt muss die Zündung 3-mal angeschaltet werden. Die LED des Interface fängt im Intervall 1mal an 1-mal aus an gelb zu blinken. Das Gelbe blinken der LED zeigt an welche der in der Tabelle aufgeführten Option gerade verändert werden kann. Mit einem druck auf den versenkten Taster kann ein Menüpunkt weiter gesprungen werden. Durch längeres drücken des Tasters am Interface, bis die grüne LED leuchtet, kann der dementsprechende Menüpunkt geändert werden. Dieser Vorgang muss bei jeder Veränderung einer der Beschriebenen Optionen wiederholt werden. LED blinken Grundeinstellung Optionseinstellung SEEK für 10 Sekunden verfügbar nachdem die Lautstärketaste gedrückt wurde. Geschwindigkeitsabhängiges Handbremssignal, wenn das Fahrzeug unter 3 km/h schnell ist. Geschwindigkeitsabhängige SEEK Funktion, wenn das Fahrzeug über 3 km/h schnell ist. 1 SEEK immer verfügbar 2 Handbremssignal, wenn die Handbremse angezogen ist. 3 SEEK immer verfügbar 4 26.000 Geschwindigkeitsimpulse per Meile 4.000 Geschwindigkeitsimpulse per Meile 5 SEEK immer verfügbar SEEK im Audiomenü verfügbar (nur MERCEDES und VW) Copyright © by Audiotechnik Dietz® Vertriebs-GmbH ● Germany Rev 11, Stand: 09 / 2010 15 Funktions- und Radioherstellertabelle LED CLARION Kabel + IR KENWOOD KABEL + IR JVC KABEL + IR ALPINE KABEL + IR PIONEER IR PIONEER KABEL SONY KABEL 1 2 3 4 5 6 7 VDO KABEL + IR 8 1 VOLUME + 2 VOLUME - 3 MEM + SEEK + 4 MEM - 5 BAND FM BAND + MEM + 6 X AM BAND - MEM - SEEK - 7 QUELLE 8 STUMM PANASONIC BLAUPUNKT Kabel + IR KABEL LED 11 16 SONY IR PANASONIC CAR AV KABEL + IR ZENEC 1 KABEL + IR ZENEC 2 KABEL + IR KENWOOD DT KABEL CLARION BS KABEL 17 19 41 42 50 1 VOLUME + - 2 VOLUME - - 51 VOLUME + VOLUME - 3 MEM + SEEK + UP UP MEM + 4 MEM - SEEK - DOWN DOWN MEM - 5 BAND MEM + MEM + X OK UP - 6 X BAND MEM - X DOWN DOWN - 7 QUELLE OK/MENU - BAND INPUT SEL QUELLE 8 STUMM STORE - STUMM ALPINE 2 Kabel LED ALPINE 3 Kabel PANASONIC 3 KABEL 53 54 52 1 VOLUME + 2 VOLUME - 3 SEEK + 4 SEEK - 5 UP MEM + 6 DOWN MEM - 7 QUELLE BAND 8 STUMM - PLAY Kabel = Adapterkabel 6640X IR = Adapterkabel 66198 Copyright © by Audiotechnik Dietz® Vertriebs-GmbH ● Germany Rev 11, Stand: 09 / 2010 D E U T S C H D E U T S C H 16 Das Interface 66030 erlaubt es bei Fahrzeugen CITROËN, PEUGEOT und OPEL die Systemeinstellungen für Uhrzeit, Datum, Sprache und Allgemeine Einstellungen zu ändern auch wenn das originale Radio ausgebaut ist. PSA Einstellungsmenü Das Einstellungsmenü ist zeitlich begrenzt. Änderungen müssen innerhalb von 30 Sekunden vorgenommen werden, da sonst das Interface in den normalen Modus zurück wechselt. Um die Einstellungen zu beenden muss die Zündung ausgeschaltet und der Zündschlüssel gezogen werden. Um in das Einstellungsmenü zu gelangen muss die Zündung an und das Radio ausgeschaltet werden. Dann die Tasten MODE und SEEK>> jeweils doppelt hintereinander drücken. Das Fahrzeugdisplay wechselt dann in die Anzeige Menü DISPLAY ADJUST. Durch erneutes Drücken der SEEK>> Taste können die Unterschiedlichen Menüs ausgewählt werden. Mit der SRC Taste wird das dementsprechende Einstellungsmenü angewählt um Einstellungen zu machen. In unserem Beispiel ist das Menü DISPLAY ADJUST ausgewählt um Uhrzeit und Datum einzustellen. Ein Untermenü wird mit der Taste MEMO abwärts ausgewählt. Copyright © by Audiotechnik Dietz® Vertriebs-GmbH ● Germany Rev 11, Stand: 09 / 2010 17 Ein Untermenü wird mit der Taste SRC ausgewählt. In unserem Beispiel ist die Stundeneinstellung aktiviert Um in unserem Beispiel die Stundeneinstellung vorzunehmen muss eine der beiden SEEK Tasten betätigt werden. SEEK >> für eine Stunde mehr und SEEK << für eine Stunde weniger. Mit der SRC Taste wird die Einstellung übernommen. Die beschrieben Einstellungen gelten für alle anderen Untermenüs. Die Menüeinstellungen sind alle zeitlich auf 30 Sekunden begrenzt. Findet in dieser Zeit keine Einstellung statt wird das Einstellungsmenü automatisch beendet. Um erneut in das Einstellungsmenü zu wechseln reicht es aus die Taste VOLUME + zu drücken. Um die Einstellungen zu beenden muss die Zündung ausgeschaltet und der Zündschlüssel gezogen werden. Copyright © by Audiotechnik Dietz® Vertriebs-GmbH ● Germany Rev 11, Stand: 09 / 2010 D E U T S C H D E U T S C H 18 OPEL Einstellungsmenü Das Einstellungsmenü ist zeitlich begrenzt. Änderungen müssen innerhalb von 30 Sekunden vorgenommen werden, da sonst das Interface in den normalen Modus zurück wechselt. Um die Einstellungen zu beenden muss die Zündung ausgeschaltet und der Zündschlüssel gezogen werden. Um in das Einstellungsmenü zu gelangen muss die Zündung an und das Radio ausgeschaltet werden. Dann die Tasten < und > jeweils doppelt hintereinander drücken. Das Fahrzeugdisplay wechselt dann in die Anzeige Menü System. Nach drücken der Tasten <> wechselt die Anzeige in das Menü CLOCK SYNC OFF. Durch erneutes drücken der Taste <> wechselt das Display in das Menü HH MM um die Stunden einzustellen. In unserem Beispiel zeigt die Uhrzeit 11:08 Uhr. Um die Stunden zu erhöhen verwenden Sie die SEEK Λ bzw. SEEK V um die Zeit zu verringern. Um die Minuten einstellen zu können muss die Taste ◄► gedrückt werden. Der Cursor wechselt dann von der Stunden zu der Minuten Anzeige. Copyright © by Audiotechnik Dietz® Vertriebs-GmbH ● Germany Rev 11, Stand: 09 / 2010 19 Die Minuten können mit den Tasten SEEK Λ bzw. SEEK V geändert werden. Wenn die Zeiteinstellung beendet ist kann mit der Taste ◄► zur Datumseinstellung gewechselt werden. Im Display wird DD MM Jahr angezeigt. Das Datum kann mit den Tasten SEEK Λ bzw. SEEK V geändert werden. Wenn die Einstellung des Tages gemacht ist kann mit der Taste ◄► zum Monat und Jahr gewechselt werden. Die Einstellungen werden jeweils mit den Tasten SEEK Λ bzw. SEEK V vorgenommen. Nachdem Uhrzeit und Datum eingestellt sind können noch weitere Einstellungen wie Zündungslogig aus und Sprache verändert werden. Auch diese Einstellungen werden mit den Tasten SEEK Λ bzw. SEEK V vorgenommen. Wenn alle Einstellungen vorgenommen wurden wechselt das Einstellungsmenü automatisch in den normalen Modus zurück. Danach muss zum Abschluss die Zündung ausgeschaltet und der Zündschlüssel abgezogen werden. Copyright © by Audiotechnik Dietz® Vertriebs-GmbH ● Germany Rev 11, Stand: 09 / 2010 D E U T S C H D E U T S C H 20 Wartungshinweise Das Gerät bedarf keiner Wartung. Zum Reinigen des Gerätes benutzen Sie bitte nur ein trockenes Tuch zum Abwischen. Gegebenenfalls können Sie bei stärkerer Verschmutzung das Gerät vorsichtig mit einem leicht angefeuchteten Tuch reinigen. Benutzen Sie keinesfalls scharfe Reinigungsmittel zum Säubern des Gerätes. Technische Daten Spannungsversorgung: 12 V DC Spannungs-Arbeitsbereich: 10,0 – 14,6 V DC Ruhestrom: 2 mA Leistungsaufnahme max.: 0,58 W Temperaturbereich: -40 bis +85 °C Gewicht: 0,068 kg Abmessungen: 70 x 70 x 30 mm Das Gerät ist für den automotiven Bereich gedacht und hat daher eine Lebensdauer von maximal 10 Jahren. Audiotechnik Dietz® Vertriebs-GmbH Benzstr. 12 D-67269 Grünstadt Germany [email protected] www.dietz.biz Copyright © by Audiotechnik Dietz® Vertriebs-GmbH ● Germany Rev 11, Stand: 09 / 2010 21 Table of content Table of content .....................................................................................................................................................21 General advice.......................................................................................................................................................21 Scope of delivery ...................................................................................................................................................21 General safety instructions ....................................................................................................................................22 References of legal regulations for operation........................................................................................................23 Following types of cars are supported:..................................................................................................................24 Operating mode 66030..........................................................................................................................................27 Installation..............................................................................................................................................................28 FUNCTIONS SETTING .........................................................................................................................................33 Function- and manufacture chart...........................................................................................................................34 PSA MENU SETTING ...........................................................................................................................................35 OPEL MENU SETTING .........................................................................................................................................37 Service notes .........................................................................................................................................................39 Technical data .......................................................................................................................................................39 General advice Dear client, many thanks for having chosen an Audiotechnik Dietz product. You have made a magnificent choice. While developing this product, your personal safety combined with the best operating service, modern design and an up-to-date production technique was especially taken into account. Unfortunately, despite the utmost care injuries and/or damages might occur due to improper installation and/or use. Please read the attached instruction manual completely with great care and keep it! This product meets the actual European and national directions. The conformity was proved, the respective documents and explanations are stored with the manufacturer. All articles of our production line pass through a 100 % check - for your safety and security. We reserve the right to carry out technical changes which serve the improvement at any time. According to each article and purpose, it is sometimes necessary to check each country’s legal regulations before installing and starting the unit. In case of guarantee claims, the device has to be sent back to the seller in the original packaging with the attached bill of purchase and detailed defect's description. Please pay attention to the manufacturer's return requirements (RMA). The legal warranty directions are valid. The guarantee claim as well as the operating permission becomes invalid due to: a) unauthorized changes to the device or accessories which have not been approved or carried out by the manufacturer or its partners b) opening the device's frame c) device's repairs carried out by one's own d) improper use / operation e) brute force to the device (drop, wilful damage, accident etc.) During installation, please pay attention to all safety relevant and legal directions. The device has only to be installed by trained personnel or similarly qualified people. Scope of delivery - 1 pc. instruction manual - 1 pc. Interface - 1 pc. Cable kit - 1 pc. Jumper Copyright © by Audiotechnik Dietz® Vertriebs-GmbH ● Germany Rev 11, Stand: 09 / 2010 E N G L I S H 22 General safety instructions WARNINGS Installation requires special knowledge. Do not install the unit yourself. For safe and reliable installation, consult a dealer having special knowledge. Installation may only be done during idle status. Disconnect the battery from the car’s electrical system, for example. Thereby, please pay attention to the car’s manufacturer-requirements. E N G L I S H Never use bolts or nuts from the car’s safety devices for installation. If bolts or nuts from the steering wheel, brakes or other safety devices are used for installation of the unit, it may cause an accident. Use the unit with a DC 12V negative ground car. This unit cannot be used in large trucks which use a DC 24V battery. If it is used with a DC 24V battery, it may cause a fire or accident. Avoid installing the unit in following places: - Where it would hinder your safe driving. - Where it could damage the car’s fittings. CAUTION Since there may be legal regulations defining the permissible installation locations for this unit, be sure to install it in a location complying with any such laws. The references in this chapter apply to most of our products, but not to all. If you have further questions, please contact your local dealer. Do not hit this product. Avoid any damage. Warning! Risk of electric shock! Never remove the cover. There are no user-serviceable parts inside. Refer servicing to qualified personal. Warning! Risk of fire or electric shock! Do not use this product near water (for example bathtub, washbowl, etc.) or in wet basements (swimming pool). To reduce the risk of casualties, never expose the unit any moisture. Never put a wet object (like a flower pot) on the unit. Warning! Risk of electric shock! To protect the unit against damage, unplug the power cable and the antennas of the unit if a thunder is present. Warning! Risk of fire or electric shock! Do not overload wall outlets and extension cords. Warning! Risk of fire or electric shock! Never insert objects of any kind into this product through openings. They can cause short circuits, which could result in fire or electric shock. Warning! Risk of fire or electric shock! When the cable or plug of this product is broken, please pull out the plug and refer servicing to qualified personal. Warning! Risk of fire or electric shock! Don’t put anything on the power cable! This can damage the cable. If smoking, abnormal sound or peculiar smell happens, disconnect the power source. Stop using this unit. Copyright © by Audiotechnik Dietz® Vertriebs-GmbH ● Germany Rev 11, Stand: 09 / 2010 23 Protect the unit against any kind of heat. Never mount it close to heat sources. This product should never be placed near or over a radiator or under the sun. This product should not be placed in a built-in installation such as a bookcase or rack unless proper ventilation is provided. Unplug the power cable if: a. the unit is unused for a long time b. you want to clean the unit. (Do not use liquid cleaners or aerosol cleaners. Use a dry cloth for cleaning). c. the unit doesn’t work, even after you have consulted the troubleshooting chapter (in this case, please contact a service-partner). Do not place this unit on extension dust. If the temperature is highly damp, agglomerate dust will damage the unit. Do not block Slots and openings in the cabinet or in the back or bottom. The openings should never be blocked by placing the product on a bed, sofa, rug or other similar surfaces. This product should not be placed in a built-in installation such as a bookcase or rack unless proper ventilation is provided. Do not place this product on an unstable cart, stand, table, etc. The product may fall, causing serious injury and serious damage to the product. Repairs should only be made by our service-partners. Never do a repair self, otherwise the claim of guarantee expires. Unplug the unit from the power source if you have to replace a burned fuse. Only use fuses of the same kind and size. Wrong fuses can damage the unit! References of legal regulations for operation Only use this unit in the intended domain. If you use it in a foreign domain, if the unit is not installed properly, or if the unit will be reconstructed, the guarantee will expire. Copyright © by Audiotechnik Dietz® Vertriebs-GmbH ● Germany Rev 11, Stand: 09 / 2010 E N G L I S H 24 Following types of cars are supported: Car Year Steeringwheel control Ignition (positiv) 147 159 Brera Spider GT MITO 2006> 2005> 2006> 2006> 2008> 66600 O O 66600 O O O O O O A3 A4 A3 A4 A6 / Q7 A5 TT 2004> 2004> 2007> 2007> 2006> 2007> 2007> O O O O O O O O O O O O O O AUDI mit BOSE 2004> O O Reverse gear (positiv) HandBreak (negativ) Cable kit O O O O O O O O O O O O O O O 66100 66100 66100 66100 66100 O O O O O O O O O O O O O O O O O O O O O O O O O O O O 66105 66105 66175 66175 x x 66175 O O O O 66110 Illumination Speed(positiv) impulse ALFA ROMEO E N G L I S H O O O O O AUDI BMW X3 - X5 – Mini (K-Bus) 2003> O x x x x x 1er, 3er, 5er Mini - X5 X6 2005> 2007> 2008> O O O O O O O O O O O O O O O O O O 66120 up to 03 66115 03 on 66115 66115 66115 CHRYSLER – Amplifier wake up system (2008 on) Jeep Grand Cherokee 2005> O O O O O O 66125 300C COMPASS Voyager 2005> 2006> 2008> O O O O O O O O O O O O O O O O O O 66125 66125 66130 O O O O O O O O O 66155 66155 66155 CITROËN C2, C3, C4 C4 Picasso C5 2006> 2006> 2008> O O O O O O Nitro Caliber 2007> 2007> O O O O Idea Croma (neu) Grande Punto Scudo Stilo Bravo 500 Panda Ducato 2005> 2005> O O O O 2006> O 2007> 2004> 2007> 2007> 2004> 2007> O O O O 66600 66600 O O O DODGE – Amplifier wake up system (2008 on) O O O O O O O O 66130 66130 O O O O O O O O 66100 66100 O O O O O 66100 O O O O O O O O O O O O O O O O O O O O O O O O O O O O O O 66155 66100 66100 66100 66100 66100 FIAT Copyright © by Audiotechnik Dietz® Vertriebs-GmbH ● Germany Rev 11, Stand: 09 / 2010 25 Car Year Steeringwheel control Ignition (positiv) Illumination (positiv) Speedimpulse Reverse gear (positiv) HandBreak (negativ) Cable kit O O O O O O O O O O O O O O O O O O O O O x x x x x x x O O O O O O 66100 66100 O O O O O O O O O O O O x O O O O O O O O O O O O O x O O O O O O O O O O O O O O O 66135 66135 66135 66140 66135 66140 66135 x 66135 66145 66135 66135 66135 66135 O O O O O O O O O O O O O O O O O O O O O O O O 66150 66150 66150 66150 66150 66150 66150 66150 FORD S-Max C-Max Mondeo Transit Tourneo Kuga Fiesta 2006> 2006> 2006> 2007> 2007> 2008> 2002-2008 66600 66600 66600 66600 66600 66600 66600 O O O O O O O Ypsilon New Delta 2006> 2008> O O O O A-Klasse B-Klasse C-Klasse E-Klasse CLK SLK R-Klasse Actros ML Sprinter ML (neu) GL SL C-Klasse 2003> 2004> 2003> 2004> 2003> 2003> 2006> 2007> 2004> 2007> 2005> 2006> 2006> 2007> O O O O O O O O O O O O O O O O O O O O O x O O O O O O O O O x O x O LANCIA O O MERCEDES O O O O O O O x O O O O O O OPEL Corsa Astra H Vectra C Signum Tigra Zafira B Meriva Antara 2004> 2004> 08/04> 2004> 2004> 2004> 2004> 2006> O O O O O O O O O O O O O O O O 207 307 407 308 2006> 2006> 2006> 2008> O O O O O O O O Cayenne 2006> O O Boxter 2006> O O O O O O O O O O PEUGEOT – Parking sensors recovery system with 61160 O O O O O O O O O O O O O O O O 66155 66155 66155 66155 O O O O x O O O O x PORSCHE Copyright © by Audiotechnik Dietz® Vertriebs-GmbH ● Germany Rev 11, Stand: 09 / 2010 E N G L I S H 26 Car Year Steeringwheel control Ignition (positiv) Illumination (positiv) Speedimpuls Reverse gear (positiv) Handbreak (negativ) Cable kit x x x O x O x x x x O x O x x x x O x O x 66160 66160 66160 66165 66160 66165 66160 O O O O O O O O O O O O 66150 66150 66150 66150 O O O O O O 66175 66175 O O O O O O O O O x x x RENAULT Modus Clio Megane Megane III Laguna Laguna III Espace 2006> 2006> 2006> 2008> 2006> 2008> 2006> O O O O O O O x x x O x O x Altea Cordoba Leon Ibiza (neu) 2004> 2004> 2004> 2009> O O O O O O O O Octavia II Yeti 2006> 2009> x x x O x O x SEAT O O O O SKODA O O O O O O VOLVO V70 XC70 XC90 2004> 2007> 2007> O O O O O O O O O Golf V Golf Plus Touran Passat Touareg New Touareg EOS T5 Tiguan Passat CC Golf VI Scirocco 2004> 2004> 2004> 2004> 2004> O O O O O O O O O O O O O O O O O O O O O O O O O O O O O O 66175 66175 66175 66175 66175 2007> O O O O O O 66175 2007> 2007-11/09 2007> 2008> 2008> 2008> O O O O O O O O O O O O O O O O O O O O O O O O O O O O O O 66175 66175 66175 66180 66180 O O O O O O 66180 VW Copyright © by Audiotechnik Dietz® Vertriebs-GmbH ● Germany Rev 11, Stand: 09 / 2010 27 Operating mode 66030 The assembly mentioned above is an interface able to read out following signals from the CAN protocol of a car. Decryption as follows (depending on car’s configuration): - ignition (terminal 15, 500 mA maximum load!) illumination (terminal. 58, 100 mA maximum load!) speed impulse: square wave signal, 4,5 Hz or rather. 0,85 Hz per km/h (< 5 mA maximum load!) reverse gear (depends on cars’ configuration, 100mA maximum load!) steering wheel remote control (if exists) for afterwards mentioned units from different manufacturers For more specific information about features, please refer to the installation manual from the cable kit of the concerning car. Assignment of the wires with loose ends (Interface) Cable Function Red Black Green White Pink Orange Grey Blue Yellow / White Permanent +12V Ground CAN High CAN Low / K-Bus Ignition output, positive Illumination, positive Speed impulse Reverse gear, positive Hand brake, negative Steering wheel remote control will only be adapted when it was originally built in and communicates via CAN data bus with the OEM radio. Compatible units for adaptation of the steering wheel controls with via radio specific adapter: 66401: ALPINE 66402: BLAUPUNKT 66403: CLARION – JVC 66404: KENWOOD 66405: PIONEER – SONY 66406: PANASONIC – ZENEC 66407: VDO Note: For use or programming steering wheel control the cluster (speedo) must shown “AUDIO”, otherwise steering wheel function is not able to use. Copyright © by Audiotechnik Dietz® Vertriebs-GmbH ● Germany Rev 11, Stand: 09 / 2010 E N G L I S H 28 Installation E N G L I S H Copyright © by Audiotechnik Dietz® Vertriebs-GmbH ● Germany Rev 11, Stand: 09 / 2010 29 E N G L I S H Copyright © by Audiotechnik Dietz® Vertriebs-GmbH ● Germany Rev 11, Stand: 09 / 2010 30 E N G L I S H All shown connectors are back of the radio. Copyright © by Audiotechnik Dietz® Vertriebs-GmbH ● Germany Rev 11, Stand: 09 / 2010 31 E N G L I S H All shown connectors are back of the radio. !!!ATTENSION IN DODGE NITRO THE CAN BUS WIRES COULD BE SWAPPED IN THE VEHICLE!!! Copyright © by Audiotechnik Dietz® Vertriebs-GmbH ● Germany Rev 11, Stand: 09 / 2010 32 SELF-RECOGNITION AND FUNCTIONS The selection of the protocol comes through SELF-RECOGNITION. After connections for inserting the module to the connector are terminated, the unit will undertake the synchronization in a few seconds, signalled by RED quick flashes of the module’s LED. E N G L I S H As soon as the synchronization has been completed, the protocol of the vehicle must be selected. This operation will be confirmed by the GREEN FLASHING light of the module’s LED. The unit is ready for SELECTING THE AUTORADIO. The default module presents the first radio to be selected which is the CLARION, the GREEN LED carries out 1 FLASH. The table below indicates the position of the radio. In order to select a different radio press VOLUME + to go onwards or VOLUME - to go backwards. Once the radio is chosen, confirm with SEEK +. The GREEN LED will become fixed confirming the selection. It is also necessary to put the JUMPER JP1 in the correct position for ALPINE and SONY head units. J1 J2 J3 J4 J5 1-2 ALPINE, SONY Handbrake negativ Reverse gear negativ BLAUPUNKT K-Bus vehicle 2-3 by delivery Handbrake positiv Reverse gear positiv CAN Bus vehicle The Jumpers are set as follow by delivery: J1 on 2-3, J2 on 1-2, J3 on 2-3, J4 open, J5 on 2-3 You can reset the interface as follow: Connect the power ONLY, not the CAN bus wires. The LED will light GREEN, when it will switch off release the button, the RESET is done. Copyright © by Audiotechnik Dietz® Vertriebs-GmbH ● Germany Rev 11, Stand: 09 / 2010 33 FUNCTIONS SETTING The Interface has an option to change some individual settings / functions. First of all it is important that the unit had recognised a car CAN Bus protocol. So the LED must be light GREEN. Now press 3 times the UNICANPLUS button and you will see that the LED will flash RED. The number of flashes are to determinate which car protocol was selected by the unit. Now turn the ignition ON of the car 3 times. The LED will flash YELLOW with intervals of 1 flash and one pause. The number of the flash means the number of the option we can change, by pressing quickly the button; we will jump to the second option available and so on for all the options available (5). If we need to change the default state of an option, press for a long the unit button till the LED, after a quick switch off, will light GREEN fix. Options and Flash numbers Default 1 SEEK always available 2 Hand brake available when hand brake is on 3 SEEK always available 4 speed impulse frequency 26000 pulse/mile 5 SEEK always available Option SEEK available for 10 sec. after a volume press Odometric hand brake available when car is under 3 km/h Odometric seek available when car is over 3 km/h speed impulse frequency 4000 pulse/mile SEEK available in audio menu (only MERCEDES and VW) Copyright © by Audiotechnik Dietz® Vertriebs-GmbH ● Germany Rev 11, Stand: 09 / 2010 E N G L I S H 34 Function- and manufacture chart E E N N G G L LI SI S H H LED 1 2 3 4 5 6 7 CLARION cable + IR KENWOOD cable + IR JVC cable + IR 1 2 3 MEM + MEM BAND X FM AM BAND + BAND - ALPINE cable + IR 4 5 VOLUME + VOLUME SEEK + SEEK - PIONEER cable SONY cable VDO cable + IR 6 7 8 KENWOOD DT cable CLARION BS cable UP DOWN UP DOWN OK/MENU 50 UP DOWN - 51 VOLUME + VOLUME MEM + MEM BAND INPUT SEL SRC STORE - MUTE MEM + MEM SRC 8 MUTE PANASONIC BLAUPUNKT cable + IR cable LED 1 2 3 4 5 6 7 PIONEER IR 11 MEM + MEM BAND X SONY IR 16 PANASONIC ZENEC 1 CAR AV cable + IR cable + IR 17 VOLUME + VOLUME SEEK + SEEK MEM + MEM SRC MEM + BAND 8 19 X X 41 OK DOWN MUTE ALPINE 2 cable ALPINE 3 cable PANASONIC 3 cable 52 54 MEM + MEM BAND PLAY LED 1 2 3 4 5 6 7 UP DOWN SRC 53 VOLUME + VOLUME SEEK + SEEK UP DOWN SRC 8 MUTE - cable = adaptor cable 6640X IR = adaptor cable 66198 Copyright © by Audiotechnik Dietz® Vertriebs-GmbH ● Germany Rev 11, Stand: 09 / 2010 ZENEC 2 cable + IR 42 35 Interface 66030 allows you to set some functions that usually are managed with the OEM head unit. By making a simple and intuitive procedure it’s possible to set functions such as Hour, Date, Language and General Setting PSA MENU SETTING THE MENU’ AVAILABILITY IT’S UNDER TIME, IF ANY BUTTONS IS PRESSED WITHIN 30 SECONDS, THE SYSTEM EXIT AUTOMATICALLY. TO RESET THE SETTING FUNCTION ONCE ENDED THE MODIFICATIONS, DISCONNECT THE IGNITION KEY. To enter the menu setting just turn on the ignition, switch OFF the radio, then press the sequence of buttons MODE and SEEK >> twice. Once done this operation the car display will visualize the voice MENU. Each time we will press SEEK >> button, we will navigate the Main Menu. To select one of the Sub Menu press SRC button. In the example below we visualize DISPLAY ADJUST in which we can modify hours and date. Each time we will press MEMO V button, we will navigate the DIPLAY ADJUST sub menu. Copyright © by Audiotechnik Dietz® Vertriebs-GmbH ● Germany Rev 11, Stand: 09 / 2010 E N G L I S H 36 To select one of the sub menu voices press SRC button. In the example below we visualize HOUR. E N G L I S H Each time we will press SEEK >> button, we will increase the HOUR. To decrease press SEEK << button. To confirm press SRC button. The menu selection logic is the same for all sub menu voices. Below a simplified description. Menu setting it’s under time, if any button is pressed within 30 seconds the system exit automatically. To reactivate the menu just press volume + Once ended the setting switch OFF the ignition and extract the key. Copyright © by Audiotechnik Dietz® Vertriebs-GmbH ● Germany Rev 11, Stand: 09 / 2010 37 OPEL MENU SETTING THE MENU’ AVAILABILITY IT’S UNDER TIME, IF ANY BUTTONS IS PRESSED WITHIN 30 SECONDS, THE SYSTEM EXIT AUTOMATICALLY. TO RESET THE SETTING FUNCTION ONCE ENDED THE MODIFICATIONS, DISCONNECT THE IGNITION KEY. To enter the menu setting just turn on the ignition, switch OFF the radio, then press the sequence of buttons ◄► and MODE twice. Once done this operation the car display will visualize the voice MENU. Now by pressing ◄► button will be diplayed the first MENU voice CLOCK SYNC OFF. Jump this function by pressing ◄► once again in order to display the MENU voice HH MM that allows setting the HOURS. In the example it’s 11 o’clock. If we want to increase press SEEK Λ button. If we want to decrease press button. SEEK V Now by pressing ◄► button will be displayed the second voice of the MENU HH MM That allows to set the MINUTES. Copyright © by Audiotechnik Dietz® Vertriebs-GmbH ● Germany Rev 11, Stand: 09 / 2010 E N G L I S H 38 In the example the minutes are 08. If we want to increase press SEEK Λ button. If we want to decrease press SEEK V button. E N G L I S H Once the HOUR setting is done by pressing the ◄► button will be displayed the MENU voice for the DATE setting HH MM YEAR. In the example the day is 24th. If we want to increase press SEEK Λ button. If we want to decrease press SEEK V button. Once the DAY setting is done by pressing the ◄► button we will display the MENU DD MM YEAR that is the MONTH setting, by pressing the ◄► button again will be displayed DD MM YEAR that is the YEAR setting. The setting are managed always with SEEK Λ button to increase or SEEK V button to decrease. Other MENU voices are available after TIME and DATE: IGN LOGIC OFF and LANGUAGE. To change them just press SEEK Λ or SEEK V buttons. Once the setting is done wait the automatic exit from the MENU, then switch OFF the ignition and extract the car key. Copyright © by Audiotechnik Dietz® Vertriebs-GmbH ● Germany Rev 11, Stand: 09 / 2010 39 Service notes This unit does not need any servicing. Do not open the housing. There are no user-serviceable parts inside. Wipe gently with a dry cloth over the surface to clean the unit. If there is more tough dirt, first use a light wet cloth and then uses a dry one. Never use corrosive cleaners to clean the unit. Technical data Power supply: 12 V DC Working Voltage: 10,0 – 14,6 V DC Quiescent current: 2 mA Power consumption: 0,58 W Temperature range: -40 - +85 °C Weight: 0,068 kg Dimensions: 70 x 70 x 30 mm This unit is only for automotive use and has therefore a lifetime of max. 10 years. Audiotechnik Dietz® Vertriebs-GmbH Benzstr. 12 D-67269 Grünstadt Germany [email protected] www.dietz.biz Copyright © by Audiotechnik Dietz® Vertriebs-GmbH ● Germany Rev 11, Stand: 09 / 2010 E N G L I S H