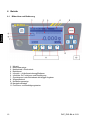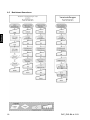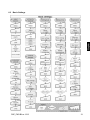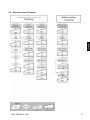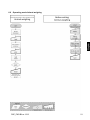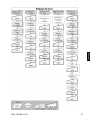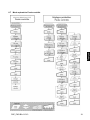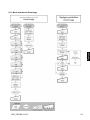
1
KERN & Sohn GmbH Ziegelei 1 D-72336 Balingen E-Mail: [email protected] Tel: +49-[0]7433- 9933-0 Fax: +49-[0]7433-9933-149 Internet: www.kern-sohn.com Betriebsanleitung Präzisionswaage Operating instructions Precision balance Mode d’emploi Balance de précision KERN PKP / PKS Version 1.3 06/2013 PKP_PKS-BA-def-1313 Weitere Sprachversionen finden Sie online unter www.kern-sohn.com/manuals Další jazykové verze najdete na webu pod adresou www.kern-sohn.com/manuals Yderligere sprogversioner finder de online på www.kern-sohn.com/manuals Más versiones de idiomas se encuentran online bajowww.kern-sohn.com/manuals Rohkem keeli internetis aadressil www.kern-sohn.com/manuals Vous trouverez d’autres versions de langue online sous www.kern-sohn.com/manuals Further language versions you will find online under www.kern-sohn.com/manuals A használati utasítás egyéb nyelveken a www.kern-sohn.com/manuals címről tölthető le Trovate altre versioni di lingue online inwww.kern-sohn.com/manuals Ytterligere språkversjoner finner du online under www.kern-sohn.com/manuals Bijkomende taalversies vindt u online op www.kern-sohn.com/manuals Encontram-se online mais versões de línguas em www.kern-sohn.com/manuals Inne wersje językowe znajdą Państwo na stronie www.kern-sohn.com/manuals Другие языковые версии Вы найдете по адресу в Интернете www.kern-sohn.com/manuals Ytterligare språkversioner finns online under www.kern-sohn.com/manuals Muita kieliversioita löydät osoitteesta www.kern-sohn.com/manuals Ostale jezikovne različice boste našli online na www.kern-sohn.com/manuals Diğer lisan versiyonlarını internetten www.kern-sohn.com/manuals adresinden temin edeblirsiniz D KERN PKP / PKS Version 1.3 06/2013 Betriebsanleitung Industriewaage mit Grafikanzeige Inhaltsverzeichnis 1 2 Technische Daten ..................................................................................................... 5 Grundlegende Hinweise (Allgemeines) ................................................................... 8 2.1 2.2 2.3 2.4 Bestimmungsgemäße Verwendung ..................................................................................................... 8 Sachwidrige Verwendung ..................................................................................................................... 8 Gewährleistung ...................................................................................................................................... 8 Prüfmittelüberwachung ........................................................................................................................ 8 3 Grundlegende Sicherheitshinweise ........................................................................ 9 3.1 3.2 Hinweise in der Betriebsanleitung beachten ...................................................................................... 9 Ausbildung des Personals .................................................................................................................... 9 4 Transport und Lagerung .......................................................................................... 9 4.1 4.2 Kontrolle bei Übernahme ...................................................................................................................... 9 Verpackung / Rücktransport................................................................................................................. 9 5 Auspacken, Aufstellung und Inbetriebnahme ...................................................... 10 5.1 5.2 5.2.1 5.3 5.4 5.5 5.6 5.7 Aufstellort, Einsatzort ......................................................................................................................... 10 Auspacken ............................................................................................................................................ 10 Aufstellen ............................................................................................................................................... 10 Netzanschluss...................................................................................................................................... 10 Anschluss von Peripheriegeräten ...................................................................................................... 10 Erstinbetriebnahme ............................................................................................................................. 10 Justierung ............................................................................................................................................ 11 Justieren ............................................................................................................................................... 11 6 Betrieb...................................................................................................................... 12 6.1 6.2 6.3 6.4 6.5 6.6 6.7 6.8 6.9 6.10 6.11 Bildschirm und Bedienung ................................................................................................................. 12 Ein-Ausschalten der Waage ............................................................................................................... 13 Grundeinstellungen ............................................................................................................................. 14 Betriebsart Zählen ............................................................................................................................... 17 Betriebsart Summieren ....................................................................................................................... 18 Betriebsart Dosieren ........................................................................................................................... 19 Betriebsart Kontrollwiegen ................................................................................................................. 20 Betriebsart Prozent .............................................................................................................................. 21 Betriebsart Tierwiegen ........................................................................................................................ 22 Betriebsart Rezeptieren ...................................................................................................................... 23 Betriebsart Flächengewicht ................................................................................................................ 24 7 Druckformular ......................................................................................................... 25 7.1 7.2 Inhalt des Formularausdrucks ........................................................................................................... 25 Gestaltung des Formularausdrucks .................................................................................................. 26 PKP_PKS-BA-d-1313 3 8 Schnittstellen ........................................................................................................... 27 8.1 8.2 8.2.1 8.2.2 8.3 8.4 Datenausgang RS 232 C ..................................................................................................................... 27 Schnittstelle RS 232C.......................................................................................................................... 27 Es gibt 4 Arten der Datenausgabe über RS 232C................................................................................. 28 Beschreibung des Datentransfers ......................................................................................................... 28 Drucker ................................................................................................................................................. 29 Unterflurwägung .................................................................................................................................. 29 9 Wartung, Instandhaltung, Entsorgung .................................................................. 30 9.1 9.2 9.3 Reinigen ............................................................................................................................................... 30 Wartung, Instandhaltung .................................................................................................................... 30 Entsorgung .......................................................................................................................................... 30 10 11 Kleine Pannenhilfe .................................................................................................. 31 Konformitätserklärung............................................................................................ 32 4 PKP_PKS-BA-d-1313 1 Technische Daten Modelle PKS: PKS 200-3 PKS 360-3 PKS 2000-2 PKS 3600-2 PKS 10K0.1 0,001 g 0,001 g 0,01 g 0,01 g 0,1 g Wägebereich (max) 200 g 360 g 2.000 g 3.600 g 10.000 g Tarierbereich (subtraktiv) 200 g 360 g 2.000 g 3.600 g 10.000 g Reproduzierbarkeit 0,001 g 0,002 g 0,01 g 0,02 g 0,1 g Linearität ±0,003 g ±0,005 g ±0,03 g ±0,05 g ±0,3 g Kleinstes Stückgewicht 0,001 g 0,001 g 0,01 g 0,01 g 0,1 g 0,5/1,0/1,5/ 2,0 kg 1,0/2,0/3,0/ 3,6 kg 2/5/10 kg 2000 g 2 kg+1 kg 10 kg KERN Ablesbarkeit (d) Justierpunkte Empf. Justiergewicht F1 (nicht beigegeben) 50/100/150/ 100/200/300 200 g /360 g 200 g 200g + 100g Luftfeuchtigkeit max. 80% rel. (nicht kondensierend) Einschwingzeit (typisch) 3 sec. Zulässige Umgebungstemperatur Anwärmzeit +10 °C ... + 40 °C 2 Std 4 Std Gehäuse (B x T x H) mm Ø 81 130 x 130 Einheiten PKP_PKS-BA-d-1313 2 Std ja Wägeplatte, Edelstahl mm Datenschnittstelle 4 Std 167 x 250 x 85 Vibrationsfilter Gewicht kg (netto) 2 Std 150 x 170 s. Menue 1 1 1,5 1,5 1,7 ja (RS232) 5 Modelle PKP: KERN PKP 300-3 PKP 420-3 PKP 3000-2 PKP 4200-2 0,001 g 0,001 g 0,01 g 0,01 g Wägebereich (max) 300 g 420 g 3.000 g 4.200 g Tarierbereich (subtraktiv) 300 g 420 g 3.000 g 4.200 g Reproduzierbarkeit 0,002 g 0,002 g 0,02 g 0,02 g Linearität ±0,005 g ±0,005 g ±0,05 g ±0,05 g Kleinstes Stückgewicht 0,001 g 0,001 g 0,01 g 0,01 g 50/100/200/ 300 g 100/200/300/ 400 g Ablesbarkeit (d) Justierpunkte Empf. Justiergewicht 200 g + 100 g F1 (nicht beigegeben) 200 g + 200 g 2 kg + 1 kg Luftfeuchtigkeit max. 80% rel. (nicht kondensierend) Einschwingzeit (typisch) 3 sec. Zulässige Umgebungstemperatur Anwärmzeit 4 Std 4 Std Einheiten 4 Std 4 Std 180 x 310 x 90 Vibrationsfilter Wägeplatte, Edelstahl mm 2 kg + 2 kg +10 °C ... + 40 °C Gehäuse (B x T x H) mm 6 1.0/1,5/2,0/3,0 1.0/2,0/3,0/4,0 kg kg ja Ø 106 Ø 150 s. Menue Gewicht kg (netto) 2,3 Datenschnittstelle ja (RS232) PKP_PKS-BA-d-1313 KERN PKP 12K0.05 PKP 16K0.1 PKP 24K0.1 0,05 g 0,1 g 0,1 g Wägebereich (max) 12.000 g 16.000 g 24.000 g Tarierbereich (subtraktiv) 12.000 g 16.000 g 24.000 g Reproduzierbarkeit 0,05 g 0,1 g 0,1 g Linearität ±0,15 g ±0,3 g ±0,3 g Kleinstes Stückgewicht 0,05 g 0,1 g 0,1 g 2/5/10/12 kg 5/10/15/16 kg 5/10/15/20/24 kg 10 kg 10 kg + 5 kg 20 kg Ablesbarkeit (d) Justierpunkte Empf. Justiergewicht F1 (nicht beigegeben) Luftfeuchtigkeit max. 80% rel. (nicht kondensierend) Einschwingzeit (typisch) 3 sec. Zulässige Umgebungstemperatur Anwärmzeit Gehäuse (B x T x H) mm Vibrationsfilter +10 °C … + 40 °C 2 Std 2 Std 180 x 310 x 90 ja Wägeplatte, Edelstahl mm 160 x 200 Einheiten s. Menue Gewicht kg (netto) 2,7 Datenschnittstelle ja (RS232) PKP_PKS-BA-d-1313 2 Std 7 2 Grundlegende Hinweise (Allgemeines) Unbedingt vor Aufstellung und Inbetriebnahme die gesamte Betriebsanleitung durcharbeiten und beachten! 2.1 Bestimmungsgemäße Verwendung Die von Ihnen erworbene Waage dient der Bestimmung des Wägewertes von Wägegut. Sie ist zur Verwendung als „nichtselbsttätige Waage“ vorgesehen, d.h. das Wägegut wird manuell, vorsichtig und mittig auf die Wägeplatte aufgebracht. Nach Erreichen eines stabilen Wägewertes kann der Wägewert abgelesen werden. 2.2 Sachwidrige Verwendung Waage nicht für dynamische Verwiegungen verwenden. Werden kleine Mengen vom Wägegut entnommen oder zugeführt, so können durch die in der Waage vorhandene „Stabilitätskompensation“ falsche Wägeergebnisse angezeigt werden! (Beispiel: Langsames Herausfließen von Flüssigkeiten aus einem auf der Waage befindlichen Behälter.) Keine Dauerlast auf der Wägeplatte belassen. Diese kann das Messwerk beschädigen. Stöße und Überlastungen der Waage über die angegebene Höchstlast (Max), abzüglich einer eventuell bereits vorhandenen Taralast, unbedingt vermeiden. Waage könnte hierdurch beschädigt werden. Waage niemals in explosionsgefährdeten Räumen betreiben. Die Serienausführung ist nicht Ex-geschützt. Die Waage darf nicht konstruktiv verändert werden. Dies kann zu falschen Wägeergebnissen, sicherheitstechnischen Mängeln sowie der Zerstörung der Waage führen. Die Waage darf nur gemäß den beschriebenen Vorgaben eingesetzt werden. Abweichende Einsatzbereiche/Anwendungsgebiete sind von KERN schriftlich freizugeben. 2.3 Gewährleistung Gewährleistung erlischt bei - Nichtbeachten unserer Vorgaben in der Betriebsanleitung - Verwendung außerhalb der beschriebenen Anwendungen - Veränderung oder Öffnen des Gerätes - mechanische Beschädigung, und Beschädigung durch Medien, Flüssigkeiten - natürlichem Verschleiß und Abnützung - nicht sachgemäße Aufstellung oder elektrische Installation - Überlastung des Messwerkes 2.4 Prüfmittelüberwachung Im Rahmen der Qualitätssicherung müssen die messtechnischen Eigenschaften der Waage und eines eventuell vorhandenen Prüfgewichtes in regelmäßigen Abständen überprüft werden. Der verantwortliche Benutzer hat hierfür ein geeignetes Intervall sowie die Art und den Umfang dieser Prüfung zu definieren. Informationen bezüglich der Prüfmittelüberwachung von Waagen sowie die hierfür notwendigen Prüfgewichte sind auf der KERN- Homepage (www.kern-sohn.com) verfügbar. In unserem akkreditierten DKDKalibrierlaboratorium können Prüfgewichte und Waagen schnell und kostengünstig kalibriert werden (Rückführung auf das nationale Normal). 8 PKP_PKS-BA-d-1313 3 Grundlegende Sicherheitshinweise 3.1 Hinweise in der Betriebsanleitung beachten Lesen Sie diese Betriebsanleitung vor der Aufstellung und Inbetriebnahme sorgfältig durch, selbst dann, wenn Sie bereits über Erfahrungen mit KERN-Waagen verfügen. Alle Sprachversionen beinhalten eine unverbindliche Übersetzung. Verbindlich ist das deutsche Originaldokument. 3.2 Ausbildung des Personals Das Gerät darf nur von geschulten Mitarbeitern bedient und gepflegt werden. 4 Transport und Lagerung 4.1 Kontrolle bei Übernahme Überprüfen Sie bitte die Verpackung sofort beim Eingang sowie das Gerät beim Auspacken auf eventuell sichtbare äußere Beschädigungen. Bei sichtbaren Beschädigungen lassen Sie sich die Beschädigung vom Überbringer durch Unterschrift bestätigen. Ware und Verpackung nicht verändern, keine Teile der Lieferung entnehmen. Melden Sie den Schaden sofort (innerhalb von 24 Std.) dem Paketdienst schriftlich an. 4.2 Verpackung / Rücktransport Alle Teile der Originalverpackung für einen eventuell notwendigen Rücktransport aufbewahren. Für den Rücktransport ist nur die Originalverpackung zu verwenden. Vor dem Versand alle angeschlossenen Kabel und losen/beweglichen Teile trennen. Evt. vorgesehene Transportsicherungen wieder anbringen. Alle Teile z.B. Glaswindschutz, Wägeplatte, Netzteil etc. gegen Verrutschen und Beschädigung sichern. PKP_PKS-BA-d-1313 9 5 Auspacken, Aufstellung und Inbetriebnahme 5.1 Aufstellort, Einsatzort Die Waagen sind so konstruiert, dass unter den üblichen Einsatzbedingungen zuverlässige Wägeergebnisse erzielt werden. Exakt und schnell arbeiten Sie, wenn Sie den richtigen Standort für Ihre Waage wählen. Beachten Sie deshalb am Aufstellort folgendes: Waage auf eine stabile, gerade Fläche stellen; extreme Wärme sowie Temperaturschwankungen z.B. durch Aufstellen neben der Heizung oder direkte Sonneneinstrahlung vermeiden; Waage vor direktem Luftzug durch geöffnete Fenster und Türen schützen; Erschütterungen während des Wägens vermeiden; Waage vor hoher Luftfeuchtigkeit, Dämpfen und Staub schützen; Setzen Sie das Gerät nicht über längere Zeit starker Feuchtigkeit aus. Eine nicht erlaubte Betauung (Kondensation von Luftfeuchtigkeit am Gerät) kann auftreten, wenn ein kaltes Gerät in eine wesentlich wärmere Umgebung gebracht wird. Akklimatisieren Sie in diesem Fall das vom Netz getrennte Gerät ca. 2 Stunden bei Raumtemperatur. statische Aufladung von Wägegut, Wägebehälter und Windschutz vermeiden. Beim Auftreten von elektromagnetischen Feldern, bei statischen Aufladungen sowie bei instabiler Stromversorgung sind große Anzeigeabweichungen (falsche Wägeergebnisse) möglich. Der Standort muss dann gewechselt werden. 5.2 Auspacken Die Waage vorsichtig aus der Verpackung nehmen, Plastikhülle entfernen und die Waage am vorgesehenen Arbeitsplatz aufstellen. 5.2.1 Aufstellen Waage mit Fußschrauben nivellieren, bis sich die Luftblase in der Libelle im vorgeschriebenen Kreis befindet. 5.3 Netzanschluss Die Stromversorgung erfolgt über das externe Netzgerät. Der aufgedruckte Spannungswert muss mit der örtlichen Spannung übereinstimmen. Verwenden Sie nur KERN- Originalnetzgeräte. Die Verwendung anderer Fabrikate bedarf der Zustimmung von Kern. 5.4 Anschluss von Peripheriegeräten Vor Anschluss oder Trennen von Zusatzgeräten (Drucker, PC) an die Datenschnittstelle muss die Waage unbedingt vom Netz getrennt werden. Verwenden Sie mit Ihrer Waage ausschließlich Zubehör und Peripheriegeräte von KERN, diese sind optimal auf Ihre Waage abgestimmt. 5.5 Erstinbetriebnahme Eine Anwärmzeit von 2 Stunden nach dem Einschalten stabilisiert die Messwerte. Die Genauigkeit der Waage ist abhängig von der örtlichen Fallbeschleunigung. Unbedingt die Hinweise im Kapitel „Justierung“ beachten. 10 PKP_PKS-BA-d-1313 5.6 Justierung Da der Wert der Fallbeschleunigung nicht an jedem Ort der Erde gleich ist, muss jede Waage – gemäss dem zugrundeliegenden physikalischen Wägeprinzip – am Aufstellort auf die dort herrschende Fallbeschleunigung abgestimmt werden (nur wenn die Waage nicht bereits im Werk auf den Aufstellort justiert wurde). Dieser Justiervorgang, muss bei der ersten Inbetriebnahme, nach jedem Standortwechsel sowie bei Schwankungen der Umgebungstemperatur durchgeführt werden. Um genaue Messwerte zu erhalten, empfiehlt es sich zudem, die Waage auch im Wägebetrieb periodisch zu justieren. 5.7 Justieren Mit einem Justiergewicht ist die Waagengenauigkeit jederzeit überprüfbar und neu einstellbar. Achtung: Bei geeichten Waagen ist die Justiermöglichkeit verunmöglicht. Vorgehen bei der Justierung: Stabile Umgebungsbedingungen beachten. Eine kurze Anwärmzeit von ca. 15 Minuten zur Stabilisierung ist notwendig. PKP_PKS-BA-d-1313 11 6 Betrieb 6.1 Bildschirm und Bedienung 1. Uhrzeit 2. Bereichsanzeige 3. Netzbetrieb / Akkubetrieb 4. Betriebsart 5. Infozeile – Artikelbezeichnung/Bediener 6. Infofelder für Funktionen und Bestätigung 7. Gewichtswert oder Betriebsart abhängige Angaben 8. Wägestillstand 9. Nullstellunganzeige 10. Navigationstasten 11. Funktions- und Bestätigungstasten 12 PKP_PKS-BA-d-1313 6.2 Ein-Ausschalten der Waage Waage mit der ON/OFF-Taste ein- bzw. ausschalten PKP_PKS-BA-d-1313 13 6.3 14 Grundeinstellungen PKP_PKS-BA-d-1313 PKP_PKS-BA-d-1313 15 16 PKP_PKS-BA-d-1313 6.4 Betriebsart Zählen PKP_PKS-BA-d-1313 17 6.5 18 Betriebsart Summieren PKP_PKS-BA-d-1313 6.6 Betriebsart Dosieren PKP_PKS-BA-d-1313 19 6.7 20 Betriebsart Kontrollwiegen PKP_PKS-BA-d-1313 6.8 Betriebsart Prozent PKP_PKS-BA-d-1313 21 6.9 22 Betriebsart Tierwiegen PKP_PKS-BA-d-1313 6.10 Betriebsart Rezeptieren PKP_PKS-BA-d-1313 23 6.11 Betriebsart Flächengewicht 24 PKP_PKS-BA-d-1313 7 Druckformular 7.1 Inhalt des Formularausdrucks PKP_PKS-BA-d-1313 25 7.2 Gestaltung des Formularausdrucks x=Leerzeichen Felder „Zeile“ und „Spalte“ sind Positionsdruckeingabefelder Feld „Variable“ ist ein Auswahlfeld aus festgelegten Ausdruckmöglichkeiten Feld „Fixtext“ bietet die Möglichkeit Texte im Druck vorzugeben. Feld „Bezeichnung“ ist ein Texteingabefeld um z.B. vor Werte Informationen wie Brutto; Tara; Netto; Pcs voran zu stellen. Feld „ Aktiviert: Ein“ übernimmt diese Zeile in das Druckformular. 26 PKP_PKS-BA-d-1313 8 Schnittstellen 8.1 Datenausgang RS 232 C Technische Daten: 8-bit ASCII Code 1 Startbit, 8 Datenbits, 1 Stopbits, kein Paritätsbit Baudrate wählbar auf 2400, 4800, 9600 Baud (Werkseinstellung) und 19200 Baud. Sub-D Stecker 9-polig notwendig Bei Betrieb mit Schnittstelle ist der fehlerfreie Betrieb nur mit dem entsprechenden KERN-Schnittstellenkabel (max. 2 m) sichergestellt Pinbelegung der Waagenausgangsbuchse (Frontansicht) Sub-D-Buchse 9 pol. 5 1 9 6 Pin 2: Transmit data Pin 3: Receive data Pin 5: Signal ground 8.2 Schnittstelle RS 232C Datenausgabe über Schnittstelle RS 232C Allgemeines Voraussetzung für die Datenübertragung zwischen Waage und einem Peripheriegerät (z.B. Drucker, PC ...) ist, dass beide Geräte auf dieselben Schnittstellenparameter (z.B. Baudrate, Parität ...) eingestellt sind. PKP_PKS-BA-d-1313 27 8.2.1 Es gibt 4 Arten der Datenausgabe über RS 232C Datenausgabe durch PRINT- Taste Der Druckvorgang kann mittels PRINT- Taste ausgelöst werden. Die Einstellungen AUTOPRINT und AUTOPRINT sollten hierbei ausgeschaltet sein. AUTOPRINT (Datenausgabe nach Gewichtsauflage) Die Einstellung AUTOPRINT befindet sich im Menupunkt “Datenübertragung G10“ bei Grundeinstellungen und kann dort an- oder abgeschaltet werden. Ist AUTOPRINT aktiv, so wird nach Entlastung der Waage und anschließender Belastung nach Erreichen des Stillstandes der aktuelle Wägewert über die RS 232 Datenschnittstelle gesendet. Dauer-PRINT (ständige Datenausgabe) Die Einstellung Dauer-Print befindet sich im Menüpunkt “Datenübertragung G10“ bei Grundeinstellungen und kann dort an- oder abgeschaltet werden. Ist Dauer-Print aktiv, so werden ständig die aktuellen Wägewerte über die RS 232 Datenschnittstelle gesendet. Datenausgabe durch Fernsteuerkommandos Die Einstellung Fernsteuerbefehl befindet sich im Menupunkt “Datenübertragung G10“ bei Grundeinstellungen und kann dort an- oder abgeschaltet werden. Mit Fernsteuerkommandos, die als ASCII-Zeichen an die Waage übertragen werden, können folgende Funktionen an der Waage ausgelöst werden (jeweils mit CR, LF abschließen!): t Tarierung w Ein Wägewert (auch instabil) wird von der Waage über die serielle Schnittstelle gesendet s Ein stabiler Wägewert wird von der Waage über die serielle Schnittstelle gesendet. Nach Empfang eines der Zeichen w oder s sendet die Waage ohne Druckerpause zwischen den Zeichen. 8.2.2 Beschreibung des Datentransfers Jede Datenübertragung hat folgenden Aufbau: Bit.Nr. 1 N 2 3 N N 4 N 5 N 6 B 7 B 8 B 9 10 11 12 13 14 15 16 17 18 19 20 B B B B B B B B 0 • 0 0 Bit.Nr. 21 22 23 24 25 26 E E E E CR LF N B*: B, 0, ., g: E CR: LF: 28 = = = = = = Numerator Blank oder bei Autotara an im Nullbereich. Blank oder Wägewert mit Einheit, je nach Belastung der Waage. Einheit Carriage Return Line Feed PKP_PKS-BA-d-1313 8.3 Drucker Über die serielle Schnittstelle RS 232 kann ein Drucker angeschlossen werden. Im Ausdruck erscheint das Gewicht in Gramm. Im Zählmodus wird die Stückzahl oder die Gewichtsangabe ausgedruckt. Im Prozentmodus werden die Prozentanteile oder die Gewichtsangabe ausgedruckt. Der Ausdruck erfolgt auf Betätigung der PRINT- Taste. Mit dem Numerator kann jeder Ausdruck fortlaufend numeriert werden. Durch Ausschalten der Waage oder Benutzung der CLEAR- Funktion wird der Numerator wieder auf (000) gesetzt. 8.4 Unterflurwägung Gegenstände, welche aufgrund ihrer Größe oder Form nicht auf die Waageschale gestellt werden können, können mit Hilfe einer Unterflurwägung gewogen werden. Gehen Sie wie folgt vor: Schalten Sie die Waage aus. Drehen Sie die Waage um, beachten Sie hierbei, dass die Wägeplatte nicht belastet wird. Öffnen Sie den Verschlussdeckel am Waagenboden Haken zur Unterflurwägung einhängen Stellen Sie die Waage über eine Öffnung Hängen Sie das Wägegut an den Haken und führen Sie die Wägung durch ▬ ▬ VORSICHT ▬ Unbedingt darauf achten, dass alle angehängten Gegenstände stabil genug sind, um das gewünschte Wägegut sicher zu halten (Bruchgefahr). Niemals Lasten über die angegebene Höchstlast (Max) hinaus anhängen (Bruchgefahr) Es ist stets darauf zu achten, dass sich unter der Last keine Lebewesen oder Gegenstände befinden, die Schaden nehmen könnten. Nach Beendigung der Unterflurwägung muss die Öffnung am Waagenboden unbedingt wieder verschlossen werden (Staubschutz). PKP_PKS-BA-d-1313 29 9 Wartung, Instandhaltung, Entsorgung 9.1 Reinigen Vor der Reinigung trennen Sie das Gerät bitte von der Betriebsspannung. Benutzen Sie bitte keine aggressiven Reinigungsmittel (Lösungsmittel o.ä.), sondern nur ein mit milder Seifenlauge angefeuchtetes Tuch. Achten Sie darauf, dass keine Flüssigkeit in das Gerät eindringt und reiben Sie mit einem trockenen, weichen Tuch nach. Lose Probenreste/Pulver können vorsichtig mit einem Pinsel oder Handstaubsauger entfernt werden. Verschüttetes Wägegut sofort entfernen. 9.2 Wartung, Instandhaltung Das Gerät darf nur von geschulten und von KERN autorisierten Servicetechnikern geöffnet werden. Vor dem Öffnen vom Netz trennen. 9.3 Entsorgung Die Entsorgung von Verpackung und Gerät ist vom Betreiber nach gültigem nationalem oder regionalem Recht des Benutzerortes durchzuführen. 30 PKP_PKS-BA-d-1313 10 Kleine Pannenhilfe Bei einer Störung im Programmablauf sollte die Waage kurz ausgeschaltet und vom Netz getrennt werden. Der Wägevorgang muss dann wieder von vorne begonnen werden. Hilfe: Störung Die Gewichtsanzeige leuchtet nicht. Mögliche Ursache Die Waage ist nicht eingeschaltet. Die Verbindung zum Netz ist unterbrochen (Netzkabel nicht eingesteckt/defekt). Die Netzspannung ist ausgefallen. Die Gewichtsanzeige ändert sich Luftzug/Luftbewegungen fortwährend Vibrationen des Tisches/Bodens Die Wägeplatte hat Berührung mit Fremdkörpern. Elektromagnetische Felder/ Statische Aufladung (anderen Aufstellungsort wählen/ falls möglich störendes Gerät ausschalten) Das Wägeergebnis ist offensichtlich Die Waagenanzeige steht nicht auf Null falsch Die Justierung stimmt nicht mehr. Es herrschen starke Temperaturschwankungen. Elektromagnetische Felder/ Statische Aufladung (anderen Aufstellungsort wählen/ falls möglich, störendes Gerät ausschalten) Beim Auftreten anderer Fehlermeldungen Waage aus- und nochmals einschalten. Bleibt die Fehlermeldung erhalten, bitte den Hersteller benachrichtigen. PKP_PKS-BA-d-1313 31 11 Konformitätserklärung KERN & Sohn GmbH D-72322 Balingen-Frommern Postfach 4052 E-Mail: [email protected] Tel: 0049-[0]7433- 9933-0 Fax: 0049-[0]7433-9933-149 Internet: www.kern-sohn.de Konformitätserklärung EC-Konformitätserklärung EC- Déclaration de conformité EC-Dichiarazione di conformità EC- Declaração de conformidade EC-Deklaracja zgodności D GB CZ E F I NL P PL RUS Konformitätserklärung Declaration of conformity Prohlášení o shode Declaración de conformidad Déclaration de conformité Dichiarazione di conformitá Conformiteitverklaring Declaração de conformidade Deklaracja zgodności Заявление о соответствии EC-Declaration of -Conformity EC-Declaración de Conformidad EC-Conformiteitverklaring EC- Prohlášení o shode EC-Заявление о соответствии Wir erklären hiermit, dass das Produkt, auf das sich diese Erklärung bezieht, mit den nachstehenden Normen übereinstimmt. We hereby declare that the product to which this declaration refers conforms with the following standards. Tímto prohlašujeme, že výrobek, kterého se toto prohlášení týká, je v souladu s níže uvedenými normami. Manifestamos en la presente que el producto al que se refiere esta declaración está de acuerdo con las normas siguientes Nous déclarons avec cela responsabilité que le produit, auquel se rapporte la présente déclaration, est conforme aux normes citées ci-après. Dichiariamo con ciò che il prodotto al quale la presente dichiarazione si riferisce è conforme alle norme di seguito citate. Wij verklaren hiermede dat het product, waarop deze verklaring betrekking heeft, met de hierna vermelde normen overeenstemt. Declaramos por meio da presente que o produto no qual se refere esta declaração, corresponde às normas seguintes. Niniejszym oświadczamy, że produkt, którego niniejsze oświadczenie dotyczy, jest zgodny z poniższymi normami. Мы заявляем, что продукт, к которому относится данная декларация, соответствует перечисленным ниже нормам. Electronic Balance: KERN PKP / PKS EU Directive 2004/108/EC 2006/95/EC Datum Standards EN 55011: 2009+A1 :2010 EN 55022: 2010/AC:2011 EN 55024: 2010 EN45501 : 1992-10+AC :1993-08 OIML R 76-1 : 2006 OIML R 76-2 : 2006 EN60950 08.04.2013 Signatur Date Signature Ort der Ausstellung Place of issue 72336 Balingen Albert Sauter KERN & Sohn GmbH Geschäftsführer Managing director KERN & Sohn GmbH, Ziegelei 1, D-72336 Balingen, Tel. +49-[0]7433/9933-0 Fax +49-[0]7433/9933-149, E-Mail: [email protected], Internet: www.kern-sohn.com 32 PKP_PKS-BA-d-1313 Hinweis gemäß Batterieverordnung – BattV QYP 05 (Rev. 1.0) Nur gültig für Deutschland! Im Zusammenhang mit dem Vertrieb von Batterien und Akkus sind wir als Händler gemäß Batterieverordnung verpflichtet, Endverbraucher auf folgendes hinzuweisen: Endverbraucher sind zur Rückgabe gebrauchter Batterien/Akkus gesetzlich verpflichtet. Batterien/Akkus können nach Gebrauch in kommunalen Sammelstellen oder im Handel zurückgegeben werden. Dabei muss das übliche Gebrauchsende der Batterien/Akkus erreicht sein, ansonsten muss Vorsorge gegen Kurzschluss getroffen werden. Schadstoffhaltige Batterien sind mit einem Zeichen, bestehend aus einer durchgestrichenen Mülltonne und dem chemischen Symbol (Cd = Cadmium, Hg = Quecksilber, oder Pb = Blei) des für die Einstufung als schadstoffhaltig ausschlaggebenden Schwermetalls versehen. Schadstoffarme Batterien nur mit einer durchgestrichenen Mülltonne. Die Rückgabemöglichkeit beschränkt sich auf Batterien der Art, die wir in unserem Sortiment führen oder geführt haben, sowie auf die Menge, deren sich Endverbraucher üblicherweise entledigen. PKP_PKS-BA-d-1313 33 GB KERN PKP / PKS Version 1.3 06/2013 Operating instructions Industrial scale with graphic display Table of Contents 1 2 Technical Data ........................................................................................................... 4 Basic Information (General) ..................................................................................... 7 2.1 2.2 2.3 2.4 Proper use .............................................................................................................................................. 7 Improper Use ......................................................................................................................................... 7 Warranty ................................................................................................................................................. 7 Monitoring of Test Resources ............................................................................................................. 7 3 Basic Safety Precautions ......................................................................................... 8 3.1 3.2 Pay attention to the instructions in the Operation Manual ............................................................... 8 Personnel training ................................................................................................................................. 8 4 Transportation & Storage ......................................................................................... 8 4.1 4.2 Testing upon acceptance ..................................................................................................................... 8 Packaging / return transport ................................................................................................................ 8 5 Unpacking, Setup and Commissioning ................................................................... 9 5.1 5.2 5.2.1 5.3 5.4 5.5 5.6 5.7 Installation Site, Location of Use ......................................................................................................... 9 Unpacking .............................................................................................................................................. 9 Placing ..................................................................................................................................................... 9 Mains connection .................................................................................................................................. 9 Connection of peripheral devices........................................................................................................ 9 Initial Commissioning ........................................................................................................................... 9 Adjustment ........................................................................................................................................... 10 Adjustment ........................................................................................................................................... 10 6 Operation ................................................................................................................. 11 6.1 6.2 6.3 6.4 6.5 6.6 6.7 6.8 6.9 6.10 6.11 Screen and operation .......................................................................................................................... 11 How to turn on/off balance ................................................................................................................. 12 Basic Settings ...................................................................................................................................... 13 Operating mode Counting .................................................................................................................. 16 Operating mode Totalizing ................................................................................................................. 17 Operating mode Dispensing .............................................................................................................. 18 Operating mode Check weighing ...................................................................................................... 19 Operating mode Percent ..................................................................................................................... 20 Operating mode Animal weighing ..................................................................................................... 21 Screen Operating mode Recipe ......................................................................................................... 22 Operating mode Grammage ............................................................................................................... 23 7 Print form ................................................................................................................. 24 7.1 7.2 Contents of the form impression ....................................................................................................... 24 Arrangement of form printout ............................................................................................................ 25 2 PKP_PKS-BA-e-1313 8 Interfaces ................................................................................................................. 26 8.1 8.2 8.2.1 8.2.2 8.3 8.4 Data output RS 232 C .......................................................................................................................... 26 Interface RS 232C ................................................................................................................................ 26 There are 4 kinds of data output via RS 232C....................................................................................... 27 Explanation of the data transfer ............................................................................................................. 27 Printer ................................................................................................................................................... 28 Underfloor weighing ............................................................................................................................ 28 9 Service, maintenance, disposal ............................................................................. 29 9.1 9.2 9.3 Cleaning ................................................................................................................................................ 29 Service, maintenance .......................................................................................................................... 29 Disposal ................................................................................................................................................ 29 10 11 Instant help .............................................................................................................. 30 Declaration of conformity....................................................................................... 31 PKP_PKS-BA-e-1313 3 1 Technical Data Models PKS: PKS 200-3 PKS 360-3 PKS 2000-2 PKS 3600-2 PKS 10K0.1 0,001 g 0,001 g 0,01 g 0,01 g 0,1 g Weighing range (max) 200 g 360 g 2.000 g 3.600 g 10.000 g Taring range (subtractive) 200 g 360 g 2.000 g 3.600 g 10.000 g Reproducibility 0,001 g 0,002 g 0,01 g 0,02 g 0,1 g Linearity ±0,003 g ±0,005 g ±0,03 g ±0,05 g ±0,3 g Smallest piece weight 0,001 g 0,001 g 0,01 g 0,01 g 0,1 g 0,5/1,0/1,5/ 2,0 kg 1,0/2,0/3,0/ 3,6 kg 2/5/10 kg 2000 g 2 kg+1 kg 10 kg KERN Readability (d) Adjustment points Recommended adjusting weight F1 (not supplied) 50/100/150/ 100/200/300 200 g /360 g 200 g 200g + 100g Humidity of air max. 80% rel. (non-condensing) Stabilization time (typical) 3 sec. Allowable ambient temperature +10 °C ... + 40 °C Warm-up time 2 hours 4 hours Housing (B x D x H) mm Ø 81 130 x 130 Units 4 2 hours yes Weighing plate stainless steel mm Data interface 4 hours 167 x 250 x 85 Vibration filter Weight kg (net) 2 hours 150 x 170 see menu 1 1 1,5 1,5 1,7 yes (RS232) PKP_PKS-BA-e-1313 Models PKP: KERN PKP 300-3 PKP 420-3 PKP 3000-2 PKP 4200-2 Readability (d) 0,001 g 0,001 g 0,01 g 0,01 g Weighing range (max) 300 g 420 g 3.000 g 4.200 g Taring range (subtractive) 300 g 420 g 3.000 g 4.200 g Reproducibility 0,002 g 0,002 g 0,02 g 0,02 g Linearity ±0,005 g ±0,005 g ±0,05 g ±0,05 g Smallest piece weight 0,001 g 0,001 g 0,01 g 0,01 g 50/100/200/ 300 g 100/200/300/ 400 g 200 g + 100 g 200 g + 200 g Adjustment points Recommended adjusting weight F1 (not supplied) Humidity of air +10 °C ... + 40 °C 4 hours 4 hours Housing (B x D x H) mm 4 hours yes Ø 106 Ø 150 see menu Weight kg (net) 2,3 Data interface yes (RS232) PKP_PKS-BA-e-1313 4 hours 180 x 310 x 90 Vibration filter Units 2 kg + 2 kg 3 sec. Permitted environmental temperature Weighing plate stainless steel mm 2 kg + 1 kg max. 80% rel. (non-condensing) Stabilization time (typical) Warm-up time 1.0/1,5/2,0/3,0 1.0/2,0/3,0/4,0 kg kg 5 KERN PKP 12K0.05 PKP 16K0.1 PKP 24K0.1 Readability (d) 0,05 g 0,1 g 0,1 g Weighing range (max) 12.000 g 16.000 g 24.000 g Taring range (subtractive) 12.000 g 16.000 g 24.000 g Reproducibility 0,05 g 0,1 g 0,1 g Linearity ±0,15 g ±0,3 g ±0,3 g Smallest piece weight 0,05 g 0,1 g 0,1 g 2/5/10/12 kg 5/10/15/16 kg 5/10/15/20/24 kg 10 kg 10 kg + 5 kg 20 kg Adjustment points Recommended adjusting weight F1 (not supplied) Humidity of air max. 80% rel. (non-condensing) Stabilization time (typical) 3 sec. Permitted environmental temperature Warm-up time Housing (B x D x H) mm Vibration filter 6 +10 °C ... + 40 °C 2 hours 2 hours 2 hours 180 x 310 x 90 yes Weighing plate stainless steel mm 160 x 200 Units see menu Weight kg (net) 2,7 Data interface yes (RS232) PKP_PKS-BA-e-1313 2 Basic Information (General) It is absolutely necessary that you read and understand the operating instructions prior to installation and commissioning and follow the instructions during the process! 2.1 Proper use The balance you purchased is intended to determine the weighing value of material to be weighed. It is intended to be used as a “non-automatic“ balance, i.e. the material to be weighed is manually and carefully placed in the centre of the weighing plate. As soon as a stable weighing value is reached the weighing value can be read. 2.2 Improper Use Do not use balance for dynamic weighing. In the event that small quantities are removed or added to the material to be weighed, incorrect weighing results can be displayed due to the “stability compensation“ in the balance (Example: Slowly draining fluids from a container on the balance.). Do not leave permanent load on the weighing plate. This may damage the measuring system. Impacts and overloading exceeding the stated maximum load (max) of the balance, minus a possibly existing tare load, must be strictly avoided. Balance may be damage by this. Never operate balance in explosive environment. The serial version is not explosion protected. The structure of the balance may not be modified. This may lead to incorrect weighing results, safety-related faults and destruction of the balance. The balance may only be used according to the described conditions. Other areas of use must be released by KERN in writing. 2.3 Warranty Warranty claims shall be voided in case - Our conditions in the operation manual are ignored - The appliance is used outside the described uses - The appliance is modified or opened - mechanical damage and damage caused by media, liquids - natural wear and tear - The appliance is improperly set up or incorrectly electrically connected - The measuring system is overloaded 2.4 Monitoring of Test Resources In the framework of quality assurance the measuring-related properties of the balance and, if applicable, the testing weight, must be checked regularly. The responsible user must define a suitable interval as well as type and scope of this test. Information is available on KERN’s home page (www.kern-sohn.com) with regard to the monitoring of balance test substances and the test weights required for this. Our accredited DKD calibration laboratory offers fast and inexpensive adjustment for test weights and weighing balances (reset to national normal weight). PKP_PKS-BA-e-1313 7 3 Basic Safety Precautions 3.1 Pay attention to the instructions in the Operation Manual Carefully read this operation manual before setup and commissioning, even if you are already familiar with KERN balances. Versions in other languages are non-binding translations. The only binding version is the original document in German. 3.2 Personnel training The appliance may only be operated and maintained by trained personnel. 4 Transportation & Storage 4.1 Testing upon acceptance When receiving the appliance, please check packaging immediately, and the appliance itself when unpacking for possible visible damage. In case of visible damage have the damage verified by the messenger’s signature. Do not alter goods or packaging and do not remove any parts of the delivery. Report the damage immediately (within 24 hours) in writing to the parcel service. 4.2 Packaging / return transport Keep all parts of the original packaging for a possibly required return. Only use original packaging for returning. Prior to dispatch disconnect all cables and remove loose/mobile parts. Reattach possibly supplied transport securing devices. Secure all parts such as the glass wind screen, the weighing platform, power unit etc. against shifting and damage. 8 PKP_PKS-BA-e-1313 5 Unpacking, Setup and Commissioning 5.1 Installation Site, Location of Use The balances are designed in a way that reliable weighing results are achieved in common conditions of use. You will work accurately and fast, if you select the right location for your balance. Therefore, observe the following for the installation site: Place the balance on a firm, level surface; Avoid extreme heat as well as temperature fluctuation caused by installing next to a radiator or in the direct sunlight; Protect the balance against direct draughts due to open windows and doors; Avoid jarring during weighing; Protect the balance against high humidity, vapors and dust; Do not expose the device to extreme dampness for longer periods of time. Nonpermitted condensation (condensation of air humidity on the appliance) may occur if a cold appliance is taken to a considerably warmer environment. In this case, acclimatize the disconnected appliance for ca. 2 hours at room temperature. Avoid static charging of the material to be weighed, weighing container and windshield. If electro-magnetic fields or static charge occur, or if the power supply is unstable major deviations on the display (incorrect weighing results) are possible. In that case, the location must be changed. 5.2 Unpacking Carefully remove the balance from the packaging, remove plastic cover and setup balance at the intended workstation. 5.2.1 Placing Level balance with foot screws until the air bubble of the water balance is in the prescribed circle. 5.3 Mains connection Power is supplied via the external mains adapter. The stated voltage value must be the same as the local voltage. Only use original KERN mains adapters. Using other makes requires consent by KERN. 5.4 Connection of peripheral devices Before connecting or disconnecting of additional devices (printer, PC) to the data interface, always disconnect the balance from the power supply. With your balance, only use accessories and peripheral devices by KERN, as they are ideally tuned to your balance. 5.5 Initial Commissioning A warming up time of 2 hours after switching on stabilizes the measuring values. The accuracy of the balance depends on the local acceleration of gravity. Strictly observe hints in chapter “Adjustment”. PKP_PKS-BA-e-1313 9 5.6 Adjustment As the acceleration value due to gravity is not the same at every location on earth, each balance must be coordinated - in compliance with the underlying physical weighing principle - to the existing acceleration due to gravity at its place of location (only if the balance has not already been adjusted to the location in the factory). This adjustment process must be carried out during the initial start-up, after change in location and variation of surrounding temperature. To receive accurate measuring values it is also recommended to adjust the balance periodically in weighing operation. 5.7 Adjustment With an adjustment weight, the weighing accuracy can be checked and re-adjusted at any time. Attention: In the verified balances the adjustment is not possible. Procedure when adjusting: Observe stable environmental conditions. A short warming up time of ca. 15 minutes is recommended for stabilization. 10 PKP_PKS-BA-e-1313 6 Operation 6.1 Screen and operation 1. Time 2. Range display 3. Network operation / rechargeable battery operation 4. Operation mode 5. Info line – Item description/Operator 6. Info fields for functions and confirmation 7. Weight value or operating mode relative indications 8. Weighing stoppage 9. Zero setting display 10. Navigation keys 11. Functional and acknowledgement buttons PKP_PKS-BA-e-1313 11 6.2 How to turn on/off balance Turn balance on/off by using the ON/OFF button 12 PKP_PKS-BA-e-1313 6.3 Basic Settings PKP_PKS-BA-e-1313 13 14 PKP_PKS-BA-e-1313 PKP_PKS-BA-e-1313 15 6.4 16 Operating mode Counting PKP_PKS-BA-e-1313 6.5 Operating mode Totalizing PKP_PKS-BA-e-1313 17 6.6 18 Operating mode Dispensing PKP_PKS-BA-e-1313 6.7 Operating mode Check weighing PKP_PKS-BA-e-1313 19 6.8 20 Operating mode Percent PKP_PKS-BA-e-1313 6.9 Operating mode Animal weighing PKP_PKS-BA-e-1313 21 6.10 Screen Operating mode Recipe 22 PKP_PKS-BA-e-1313 6.11 Operating mode Grammage PKP_PKS-BA-e-1313 23 7 Print form 7.1 24 Contents of the form impression PKP_PKS-BA-e-1313 7.2 Arrangement of form printout x = space character The fields „line“ and „column“ are position printing input fields Field „Variable“ is a selection field of fixed printing possibilities Field „Fix text“ offers the possibility to specify texts for printout. The field „designation“ is a text input field to add information such as gross, tare, net, pcs to the values. Field „Activated: on“ takes over this line into the print form. PKP_PKS-BA-e-1313 25 8 Interfaces 8.1 Data output RS 232 C Technical data: 8-bit ASCII Code 1 start bit, 8 data bits, 1 stop bit, no parity bit Baud rate selectable from 2400, 4800, 9600 Baud (factory setting) and 19200 Baud. Sub-D plug 9-channel required For operation with interface faultless operation is only ensured with the correct KERN – interface cable (max. 2m) Pin allocation of the balance output socket (front view) Sub-D jack 9-channel 5 1 9 6 Pin 2: Transmit data Pin 3: Receive data Pin 5: Signal ground 8.2 Interface RS 232C Data output via interface RS 232C General The previous condition for the data transfer between balance and a peripheral device (e.g. printer, PC ...) is that the appliances are set to the same interface parameters (e.g. baud rate, parity ...). 26 PKP_PKS-BA-e-1313 8.2.1 There are 4 kinds of data output via RS 232C Data output using the PRINT key The printing process can be triggered by pressing the PRINT key. The settings AUTOPRINT and AUTOPRINT should be disabled for this process. AUTOPRINT (data output according to weight application) The setting AUTOPRINT is located on the menu item “Data transfer G10“ for basic settings where you can turn it on or off. When AUTOPRINT is active, the current weighing value will be sent via the RS 232 date interface after unloading and subsequent loading of the balance as soon as the balance is in resting position. Permanent PRINT (continuous data output) The setting Permanent Print is located on the menu item “Data transfer G10“ for basic settings where you can turn it on or off. When Permanent Print is active, the current weighing values will be sent continuously via the RS 232 data interface. Data output and remote control commands The setting Remote Control Command is located on the menu item “Data transfer G10“ for basic settings where you can turn it on or off. Remote control commands transferred as ASCII characters to the balance can be used to trigger the following functions on the balance (always finish with CR, LF!): t Taring w The balance sends a weighing value (also unstable) via the serial interface. s The balance sends a stable weighing value via the serial interface. After receiving either character w or s, the balance will send without a printer pause between the characters. 8.2.2 Explanation of the data transfer Each data transfer is structured as follows: Bit.Nr. 1 N 2 3 N N 4 N 5 N 6 B 7 B 8 B 9 10 11 12 13 14 15 16 17 18 19 20 B B B B B B B B 0 • 0 0 Bit.Nr. 21 22 23 24 25 26 E E E E CR LF N B*: B, 0, ., g: E CR: LF: = = = = = = Numerator Blank or for autotare on in zero range. Blank or weighing value giving unit according to loading of the balance Unit Carriage Return Line Feed PKP_PKS-BA-e-1313 27 8.3 Printer The serial interface RS 232 facilitates the connection of a printer. The printout shows the weight in grams. In counting mode either the piece number or the weight details will be printed out. In percentage mode the percentage proportion or the weight details will be printed out. Printout will take place after pressing the PRINT key. It is possible to number each printout continuously with the help of the numerator. The numerator will be reset to (000) each time the balance is turned off or the CLEAR function is actuated. 8.4 Underfloor weighing Objects which are unsuitable for placement on the weighing tray due to their size or shape can be weighed with the help of the underfloor weighing facility. Proceed as follows: Switch off balance. Turn over the balance and in doing so take care that the weighing plate is not loaded. Open the closing lid on the bottom of your balance. Mount the hooks for underfloor weighing. Put the balance over an opening Suspend the goods to be weighed from the hook and carry out the weighing. ▬ ▬ CAUTION ▬ Always ensure that all suspended objects are stable enough to hold the desired goods to be weighed safely (danger of breaking). Never suspend loads that exceed the stated maximum load (max) (danger of breaking) Always ensure that there are no persons, animals or objects that might be damaged underneath the load. After completing the underfloor weighing the opening on the bottom of the balance must always be closed (dust protection). 28 PKP_PKS-BA-e-1313 9 Service, maintenance, disposal 9.1 Cleaning Before cleaning, please disconnect the appliance from the operating voltage. Please do not use aggressive cleaning agents (solvents or similar agents), but a cloth dampened with mild soap suds. Ensure that no liquid penetrates into the device and wipe with a dry soft cloth. Loose residue sample/powder can be removed carefully with a brush or manual vacuum cleaner. Spilled weighing goods must be removed immediately. 9.2 Service, maintenance The appliance may only be opened by trained service technicians who are authorized by KERN. Before opening, disconnect from power supply. 9.3 Disposal Disposal of packaging and appliance must be carried out by operator according to valid national or regional law of the location where the appliance is used. PKP_PKS-BA-e-1313 29 10 Instant help In case of an error in the program process, briefly turn off the balance and disconnect from power supply. The weighing process must then be restarted from the beginning. Help: Fault The displayed weight does not glow. Possible cause The balance is not switched on. The mains supply connection has been interrupted (mains cable not plugged in/faulty). Power supply interrupted. The displayed weight is permanently changing Draught/air movement Table/floor vibrations Weighing plate has contact with other objects. Electromagnetic fields / static charging (choose different location/switch off interfering device if possible) The weighing value is obviously The display of the balance is not at zero wrong Adjustment is no longer correct. Great fluctuations in temperature. Electromagnetic fields / static charging (choose different location/switch off interfering device if possible) Should other error messages occur, switch balance off and then on again. If the error message remains inform manufacturer. 30 PKP_PKS-BA-e-1313 11 Declaration of conformity KERN & Sohn GmbH D-72322 Balingen-Frommern Postfach 4052 E-Mail: [email protected] Tel: 0049-[0]7433- 9933-0 Fax: 0049-[0]7433-9933-149 Internet: www.kern-sohn.de Declaration of conformity EC-Konformitätserklärung EC- Déclaration de conformité EC-Dichiarazione di conformità EC- Declaração de conformidade EC-Deklaracja zgodności D GB CZ E F I NL P PL RUS Konformitätserklärung Declaration of conformity Prohlášení o shode Declaración de conformidad Déclaration de conformité Dichiarazione di conformitá Conformiteitverklaring Declaração de conformidade Deklaracja zgodności Заявление о соответствии EC-Declaration of -Conformity EC-Declaración de Conformidad EC-Conformiteitverklaring EC- Prohlášení o shode EC-Заявление о соответствии Wir erklären hiermit, dass das Produkt, auf das sich diese Erklärung bezieht, mit den nachstehenden Normen übereinstimmt. We hereby declare that the product to which this declaration refers conforms with the following standards. Tímto prohlašujeme, že výrobek, kterého se toto prohlášení týká, je v souladu s níže uvedenými normami. Manifestamos en la presente que el producto al que se refiere esta declaración está de acuerdo con las normas siguientes Nous déclarons avec cela responsabilité que le produit, auquel se rapporte la présente déclaration, est conforme aux normes citées ci-après. Dichiariamo con ciò che il prodotto al quale la presente dichiarazione si riferisce è conforme alle norme di seguito citate. Wij verklaren hiermede dat het product, waarop deze verklaring betrekking heeft, met de hierna vermelde normen overeenstemt. Declaramos por meio da presente que o produto no qual se refere esta declaração, corresponde às normas seguintes. Niniejszym oświadczamy, że produkt, którego niniejsze oświadczenie dotyczy, jest zgodny z poniższymi normami. Мы заявляем, что продукт, к которому относится данная декларация, соответствует перечисленным ниже нормам. Electronic Balance: KERN PKP / PKS EU Directive 2004/108/EC 2006/95/EC Datum Standards EN 55011: 2009+A1 :2010 EN 55022: 2010/AC:2011 EN 55024: 2010 EN45501 : 1992-10+AC :1993-08 OIML R 76-1 : 2006 OIML R 76-2 : 2006 EN60950 08.04.2013 Signatur Date Signature Ort der Ausstellung 72336 Balingen Place of issue Albert Sauter KERN & Sohn GmbH Geschäftsführer Managing director KERN & Sohn GmbH, Ziegelei 1, D-72336 Balingen, Tel. +49-[0]7433/9933-0 Fax +49-[0]7433/9933-149, E-Mail: [email protected], Internet: www.kern-sohn.com PKP_PKS-BA-e-1313 31 F KERN PKP / PKS Version 1.3 06/2013 Mode d’emploi Balance industrielle à affichage graphique Sommaire 1 2 Caractéristiques techniques .................................................................................... 4 Indications fondamentales (généralités) ................................................................. 7 2.1 2.2 2.3 2.4 Utilisation conforme aux prescriptions............................................................................................... 7 Utilisation inadéquate ........................................................................................................................... 7 Garantie .................................................................................................................................................. 7 Vérification des moyens de contrôle ................................................................................................... 7 3 Indications de sécurité générales............................................................................ 8 3.1 3.2 Observez les indications du mode d´emploi ...................................................................................... 8 Formation du personnel ....................................................................................................................... 8 4 Transport et stockage ............................................................................................... 8 4.1 4.2 Contrôle à la réception de l´appareil ................................................................................................... 8 Emballage / réexpédition ...................................................................................................................... 8 5 Déballage, installation et mise en service .............................................................. 9 5.1 5.2 5.2.1 5.3 5.4 5.5 5.6 5.7 Lieu d´installation, lieu d´utilisation .................................................................................................... 9 Déballage................................................................................................................................................ 9 Implantation ............................................................................................................................................. 9 Branchement secteur ............................................................................................................................ 9 Raccordement d’appareils périphériques........................................................................................... 9 Première mise en service ..................................................................................................................... 9 Ajustage ............................................................................................................................................... 10 Ajustage ............................................................................................................................................... 10 6 Fonctionnement ...................................................................................................... 11 6.1 6.2 6.3 6.4 6.5 6.6 6.7 6.8 6.9 6.10 6.11 Ecran et commande ............................................................................................................................ 11 Mise en marche et à l'arrêt de la balance .......................................................................................... 12 Réglages de base ................................................................................................................................ 13 Mode opératoire Comptage ................................................................................................................ 16 Mode opératoire Totalisation ............................................................................................................. 17 Mode opératoire Dosage .................................................................................................................... 18 Mode opératoire Pesée contrôle ........................................................................................................ 19 Mode opératoire Pourcentage............................................................................................................ 20 Mode opératoire Pesée animaux ....................................................................................................... 21 Mode opératoire Mélange ................................................................................................................... 22 Mode opératoire Grammage............................................................................................................... 23 7 Formulaire d’impression ........................................................................................ 24 7.1 7.2 Contenu du formulaire imprimé ......................................................................................................... 24 Structuration du formulaire imprimé ................................................................................................. 25 2 PKP_PKS-BA-f-1313 8 Interfaces ................................................................................................................. 26 8.1 8.2 8.2.1 8.2.2 8.3 8.4 Sortie de données RS 232 C ............................................................................................................... 26 Interface RS 232C ................................................................................................................................ 26 Il y a 4 types de sorties des données sur RS 232C ............................................................................... 27 Description du transfert des données .................................................................................................... 27 Imprimante ........................................................................................................................................... 28 Pesage en sous-sol ............................................................................................................................. 28 9 Maintenance, entretien, élimination ...................................................................... 29 9.1 9.2 9.3 Nettoyage ............................................................................................................................................. 29 Maintenance, entretien ........................................................................................................................ 29 Elimination ........................................................................................................................................... 29 10 11 Aide succincte en cas de panne ............................................................................ 30 Déclaration de conformité ...................................................................................... 31 PKP_PKS-BA-f-1313 3 1 Caractéristiques techniques Modèles PKS: PKS 200-3 PKS 360-3 PKS 2000-2 PKS 3600-2 PKS 10K0.1 0,001 g 0,001 g 0,01 g 0,01 g 0,1 g Plage de pesée (max) 200 g 360 g 2.000 g 3.600 g 10.000 g Plage de tarage (par soustraction) 200 g 360 g 2.000 g 3.600 g 10.000 g Reproductibilité 0,001 g 0,002 g 0,01 g 0,02 g 0,1 g Linéarité ±0,003 g ±0,005 g ±0,03 g ±0,05 g ±0,3 g Plus petit poids à la pièce 0,001 g 0,001 g 0,01 g 0,01 g 0,1 g 0,5/1,0/1,5/ 2,0 kg 1,0/2,0/3,0/ 3,6 kg 2/5/10 kg 2000 g 2 kg+1 kg 10 kg KERN Lisibilité (d) Points d’ajustage Poids d’ajustage F1 conseillé (non indiqué) 50/100/150/ 100/200/300 200 g /360 g 200 g 200g + 100g Degré hygrométrique max. 80% rel. (non condensant) Essai de stabilité (typique) 3 sec. Température ambiante autorisée Temps de préchauffage +10 °C ... + 40 °C 2 heures 4 heures Boîtier (larg x prof x haut) mm Ø 81 130 x 130 Unités 4 2 heures oui Plateau de pesée acier inox mm Interface données 4 heures 167 x 250 x 85 Filtre vibrant Poids kg (net) 2 heures 150 x 170 voir menu 1 1 1,5 1,5 1,7 oui (RS232) PKP_PKS-BA-f-1313 Modèles PKP: KERN PKP 300-3 PKP 420-3 PKP 3000-2 PKP 4200-2 0,001 g 0,001 g 0,01 g 0,01 g Plage de pesée (max) 300 g 420 g 3.000 g 4.200 g Plage de tarage (par soustraction) 300 g 420 g 3.000 g 4.200 g Reproductibilité 0,002 g 0,002 g 0,02 g 0,02 g Linéarité ±0,005 g ±0,005 g ±0,05 g ±0,05 g Plus petit poids à la pièce 0,001 g 0,001 g 0,01 g 0,01 g 50/100/200/ 300 g 100/200/300/ 400 g 200 g + 100 g 200 g + 200 g Lisibilité (d) Points d’ajustage Poids d’ajustage F1 conseillé (non indiqué) Degré hygrométrique +10 °C ... + 40 °C 4 heures 4 heures Boîtier (larg x prof x haut) mm Poids kg (net) Interface données PKP_PKS-BA-f-1313 4 heures 4 heures 180 x 310 x 90 Filtre vibrant Unités 2 kg + 2 kg 3 sec. Température ambiante autorisée Plateau de pesée acier inox mm 2 kg + 1 kg max. 80% rel. (non condensant) Essai de stabilité (typique) Temps de préchauffage 1.0/1,5/2,0/3,0 1.0/2,0/3,0/4,0 kg kg oui Ø 106 Ø 150 voir menu 2,3 ja (RS232) 5 KERN PKP 12K0.05 PKP 16K0.1 PKP 24K0.1 0,05 g 0,1 g 0,1 g Plage de pesée (max) 12.000 g 16.000 g 24.000 g Plage de tarage (par soustraction) 12.000 g 16.000 g 24.000 g Reproductibilité 0,05 g 0,1 g 0,1 g Linéarité ±0,15 g ±0,3 g ±0,3 g Plus petit poids à la pièce 0,05 g 0,1 g 0,1 g 2/5/10/12 kg 5/10/15/16 kg 5/10/15/20/24 kg 10 kg 10 kg + 5 kg 20 kg Lisibilité (d) Points d’ajustage Poids d’ajustage F1 conseillé (non indiqué) Degré hygrométrique max. 80% rel. (non condensant) Essai de stabilité (typique) 3 sec. Température ambiante autorisée Temps de préchauffage Boîtier (larg x prof x haut) mm Filtre vibrant 2 heures 2 heures oui 160 x 200 Unités voir menu Interface données 2 heures 180 x 310 x 90 Plateau de pesée acier inox mm Poids kg (net) 6 +10 °C ... + 40 °C 2,7 oui (RS232) PKP_PKS-BA-f-1313 2 Indications fondamentales (généralités) Lire à fond et observer la totalité de la notice d’utilisation avant l’implantation et la mise en service! 2.1 Utilisation conforme aux prescriptions La balance que vous avez achetée sert à la détermination de la valeur de pesée de matières devant être pesées. Elle est conçue pour être utilisée comme „balance non automatique“, c´à d. que les matières à peser seront posées manuellement et avec précaution au milieu du plateau de pesée. La valeur de pesée peut être lue une fois stabilisée. 2.2 Utilisation inadéquate Ne pas utiliser la balance pour des pesées dynamiques. Dans le cas où de petites quantités des matières à peser sont retirées ou ajoutées, le dispositif de « compensation de stabilité » intégré dans la balance peut provoquer l´affichage de résultats de pesée erronés. (Exemple : lorsque des liquides dégoulinent lentement d´un récipient posé sur la balance.) Ne pas laisser trop longtemps une charge sur le plateau de pesée. A long terme, cette charge est susceptible d´endommager le système de mesure. Eviter impérativement de cogner la balance ou de charger cette dernière au-delà de la charge maximale indiquée (Max.) après déduction éventuelle d´une charge de tare déjà existante. Sinon, la balance pourrait être endommagée. Ne jamais utiliser la balance dans des endroits où des explosions sont susceptibles de se produire. Le modèle série n´est pas équipé d´une protection contre les explosions. Toute modification constructive de la balance est interdite. Ceci pourrait provoquer des résultats de pesée erronés, des défauts sur le plan de la technique de sécurité ainsi que la destruction de la balance. La balance ne doit être utilisée que selon les prescriptions indiquées. Les domaines d´utilisation/d´application dérogeant à ces dernières doivent faire l´objet d´une autorisation écrite délivrée par KERN. 2.3 Garantie La garantie n´est plus valable en cas - non-observation des prescriptions figurant dans notre mode d´emploi - utilisation outrepassant les applications décrites - modification ou d´ouverture de l´appareil - d´endommagement mécanique et d´endommagement lié à des matières ou des liquides - de détérioration naturelle et d´usure - mise en place ou d´installation électrique inadéquates - surcharge du système de mesure 2.4 Vérification des moyens de contrôle Les propriétés techniques de mesure de la balance et du poids de contrôle éventuellement utilisé doivent être contrôlées à intervalles réguliers dans le cadre des contrôles d´assurance qualité. A cette fin, l´utilisateur responsable doit définir un intervalle de temps approprié ainsi que le type et l´étendue de ce contrôle. Des informations concernant la vérification des moyens de contrôle des balances ainsi que les poids de contrôle nécessaires à cette opération sont disponibles sur le site KERN (www.kern-sohn.com). Grâce à son laboratoire de calibrage accrédité DKD, KERN propose un calibrage rapide et économique pour les poids d´ajustage et les balances (sur la base du standard national). PKP_PKS-BA-f-1313 7 3 Indications de sécurité générales 3.1 Observez les indications du mode d´emploi Lisez attentivement la totalité de ce mode d´emploi avant l´installation et la mise en service de la balance, et ce même si vous avez déjà utilisé des balances KERN. Toutes les versions en langues étrangères incluent une traduction sans engagement. Seul fait foi le document allemand original. 3.2 Formation du personnel L´appareil ne doit être utilisé et entretenu que par des collaborateurs formés à cette fin. 4 Transport et stockage 4.1 Contrôle à la réception de l´appareil Nous vous prions de contrôler l´emballage dès son arrivée et de vérifier lors du déballage que l´appareil ne présente pas de dommages extérieurs visibles. En cas de dommages apparents, veuillez vous faire confirmer par signature les dommages par le porteur. Ne pas modifier la marchandise ni l’emballage, ne pas dissocier d’éléments de la livraison. Déclarer le vice sur-le-champ (en l’espace de 24 heures) par écrit au service délivreur. 4.2 Emballage / réexpédition Conservez tous les éléments de l’emballage d’origine en vue d’un éventuel transport en retour. L´appareil ne peut être renvoyé que dans l´emballage d´origine. Avant expédition démontez tous les câbles branchés ainsi que toutes les pièces détachées et mobiles. Evtl. remontez les cales de transport prévues. Calez toutes les pièces p. ex. pare-brise en verre, plateau de pesée, bloc d’alimentation etc. contre les déplacements et les dommages. 8 PKP_PKS-BA-f-1313 5 Déballage, installation et mise en service 5.1 Lieu d´installation, lieu d´utilisation La balance a été construite de manière à pouvoir obtenir des résultats de pesée fiables dans les conditions d´utilisation d´usage. Vous pouvez travailler rapidement et avec précision à condition d´installer votre balance à un endroit approprié. A cette fin, tenez compte des points suivants concernant le lieu d´installation: Placer la balance sur une surface solide et plane; Eviter d´exposer la balance à une chaleur extrême ainsi qu’une fluctuation de température, par exemple en la plaçant près d´un chauffage, ou de l´exposer directement aux rayons du soleil; Protéger la balance des courants d´air directs pouvant être provoqués par des fenêtres ou des portes ouvertes; Eviter les secousses durant la pesée; Protéger la balance d´une humidité atmosphérique trop élevée, des vapeurs et de la poussière; N´exposez pas trop longtemps l’appareil à une humidité élevée. L´installation d´un appareil froid dans un endroit nettement plus chaud peut provoquer l´apparition d´une couche d´humidité (condensation de l´humidité atmosphérique sur l´appareil) non autorisée. Dans ce cas, laissez l´appareil coupé du secteur s´acclimater à la température ambiante pendant env. 2 heures. Eviter une charge électrostatique des matières à peser, du récipient et de la cage de pesée. L´apparition de champs électromagnétiques ou de charges électrostatiques, ainsi que électricité instable peut provoquer des divergences d´affichage importantes (résultats de pesée erronés). Il faut alors installer l’appareil à un autre endroit. 5.2 Déballage Sortir avec précaution la balance de l’emballage, retirer la pochette en plastique et installer la balance au poste de travail prévu à cet effet. 5.2.1 Implantation Procéder à la mise à niveau de la balance à l´aide des vis des pieds, jusqu´à ce que la bulle d´air du niveau se trouve dans le cercle prescrit. 5.3 Branchement secteur L´alimentation en courant s´effectue au moyen du bloc externe d´alimentation secteur. La valeur de tension imprimée sur l´appareil doit concorder avec la tension locale. N´utilisez que des blocs d´alimentation secteur livrés par KERN. L´utilisation d´autres marques n´est possible qu´avec l´autorisation de KERN. 5.4 Raccordement d’appareils périphériques Avant le raccordement ou le débranchement d´appareils supplémentaires (imprimante, PC) à l´interface de données, la balance doit impérativement être coupée du secteur. N´utilisez avec votre balance que des accessoires et des périphériques livrés par KERN, ces derniers étant adaptés de manière optimale à votre balance. 5.5 Première mise en service Un temps de chauffe de 2 heures intervenant après la mise en marche stabilise les valeurs de mesure. La précision de la balance dépend de l´accélération due à la pesanteur. Il est impératif de tenir compte des indications du chapitre Ajustage. PKP_PKS-BA-f-1313 9 5.6 Ajustage Etant donné que la valeur d´accélération de la pesanteur varie d´un lieu à l´autre sur la terre, il est nécessaire d´adapter chaque balance – conformément au principe physique fondamental de pesée – à l´accélération de la pesanteur du lieu d´installation (uniquement si la balance n´a pas déjà été ajustée au lieu d´installation en usine). Ce processus d´ajustage doit être effectué à chaque première mise en service et après chaque changement de lieu d´installation et à fluctuations de la température d’environs. Pour obtenir des valeurs de mesure précises, il est recommandé en supplément d´ajuster aussi périodiquement la balance en fonctionnement de pesée. 5.7 Ajustage Avec un poids d’ajustage la précision de la pesée est susceptible d’être contrôlée et réajustée à tout moment. Attention: Les balances déjà étalonnées ne peuvent plus être ajustées. Procédure à suivre pour l’ajustage: Veillez à avoir des conditions environnementales stables. Un bref temps de réchauffage d’env. 15 minutes est judicieux pour la stabilisation. 10 PKP_PKS-BA-f-1313 6 Fonctionnement 6.1 Ecran et commande 1. Heure 2. Affichage de la plage 3. Fonctionnement réseau / fonctionnement accu 4. Mode de fonctionnement 5. Ligne informative - nom d’article/opérateur 6. Plages informatives pour fonctions et confirmation 7. Valeur pondérale ou indications en fonction du mode opératoire 8. Arrêt de pesée 9. Affichage mise à zéro 10. Touches de navigation 11. Touches de fonction et de confirmation PKP_PKS-BA-f-1313 11 6.2 Mise en marche et à l'arrêt de la balance Mettre la balance en marche ou à l’arrêt sur la touche ON/OFF 12 PKP_PKS-BA-f-1313 6.3 Réglages de base PKP_PKS-BA-f-1313 13 14 PKP_PKS-BA-f-1313 PKP_PKS-BA-f-1313 15 6.4 16 Mode opératoire Comptage PKP_PKS-BA-f-1313 6.5 Mode opératoire Totalisation PKP_PKS-BA-f-1313 17 6.6 18 Mode opératoire Dosage PKP_PKS-BA-f-1313 6.7 Mode opératoire Pesée contrôle PKP_PKS-BA-f-1313 19 6.8 20 Mode opératoire Pourcentage PKP_PKS-BA-f-1313 6.9 Mode opératoire Pesée animaux PKP_PKS-BA-f-1313 21 6.10 Mode opératoire Mélange 22 PKP_PKS-BA-f-1313 6.11 Mode opératoire Grammage PKP_PKS-BA-f-1313 23 7 Formulaire d’impression 7.1 24 Contenu du formulaire imprimé PKP_PKS-BA-f-1313 7.2 Structuration du formulaire imprimé x = blanc Les champs „ligne“ et „colonne“ sont des champs de saisie impression de position Le champ „Variable“ est un champ de sélection des possibilités d’impression définies Le champ „texte fixe“ offre la possibilité de définir des textes à l’impression. Le champ „désignation“ est un champ saisie de texte pour p.ex. antéposer des informations comme brut, tare, net, pcs aux valeurs. Champs „Activé: Marche“ prend cette ligne dans le formulaire d’impression. PKP_PKS-BA-f-1313 25 8 Interfaces 8.1 Sortie de données RS 232 C Caractéristiques techniques : Code ASCII de 8 bits 1 bit de démarrage, 8 bits de donnée, 1 bit d’arrêt, pas de bit de parité Taux bit/sec pouvant être sélectionné entre 2400, 4800 et 9600 bauds (réglage d’usine) (réglages d’usine) et 19200 bauds. connecteur D-Sub, à 9 pôles à connexion soudée indispensable pour la mise en œuvre d’un interface seul le recours à un câble d’interface KERN respectif de max. 2 m permet un fonctionnement irréprochable Attribution des broches du boîtier de sortie de la balance (aperçu frontal) connecteur D-SUB, à 9 pôles 5 9 1 6 Pin 2: Transmit data Pin 3: Receive data Pin 5: Signal ground 8.2 Interface RS 232C Edition de données sur RS 232C Généralités Le transfert entre la balance et un appareil périphérique (p. ex. imprimante, PC ...) suppose que les deux appareils soient réglés en fonction des mêmes paramètres d’interface (p. ex. vitesse de transmission en bauds, parité ...). 26 PKP_PKS-BA-f-1313 8.2.1 Il y a 4 types de sorties des données sur RS 232C Edition de données sur la touche PRINT Le processus d’impression peut être déclenché sur la touche PRINT. Les réglages AUTOPRINT et AUTOPRINT devraient être hors circuit. AUTOPRINT (édition des données après dépose d’un poids) Le réglage AUTOPRINT se trouve dans le point de menu “Transfert de données G10“ dans les réglages de base et peut y être mis en marche ou à l’arrêt. Si AUTOPRINT est activé, la valeur de la pesée actuelle est transférée par l’interface RS 232 après délestage de la balance et chargement consécutif après mise à l’arrêt complet. PRINT permanent (édition permanente des données) Le réglage de PRINT permanent se trouve dans le point de menu “Transfert de données G10“ dans les réglages de base et peut y être mis en marche ou à l’arrêt. Si PRINT permanent est activé, les valeurs de la pesée actuelles sont transférées en permanence par l’interface RS 232. Edition des données par commande à distance Le réglage ordre télécommande se trouve dans le point de menu “Transfert de données G10“ dans les réglages de base et peut y être mis en marche ou à l’arrêt. Par commandes à distance, qui sont transférées sous forme de signes ASCII à la balance, il est possible de déclencher les fonctions suivantes à la balance (clôturer respectivement par CR, LF!): t w Tarage Une valeur de pesée (même instable) est envoyée par la balance par le truchement de l’interface sérielle Une valeur de pesée stable est envoyée par la balance par le truchement de l’interface sérielle s Après réception de l’un des signes w ou s la balance émet sans pause d’impression entre les signes. 8.2.2 Description du transfert des données Chaque transfert de données se compose de la façon suivante: Bit.Nr. 1 N 2 3 N N 4 N 5 N 6 B 7 B 8 B 9 10 11 12 13 14 15 16 17 18 19 20 B B B B B B B B 0 • 0 0 Bit.Nr. 21 22 23 24 25 26 E E E E CR LF N B*: B, 0, ., g: = = = E CR: LF: = = = Numérateur Espace blanc ou en autotarage dans la gamme du zéro. Espace blanc ou valeur de pesée avec unité, en fonction de la charge de la balance. Unité Carriage Return Line Feed PKP_PKS-BA-f-1313 27 8.3 Imprimante Une imprimante peut être raccordée par l’interface sérielle RS 232. Sur l’impression le poids est indiqué en grammes. En mode de comptage c’est la quantité ou le poids qui est édité. En mode à pourcent ce sont les pourcentages ou le poids qui sont édités. L’édition s’effectue sur appel de la touche PRINT. Le numérateur permet de numéroter en continu chaque édition. Par la mise hors circuit ou l’utilisation de la fonction CLEAR, le numérateur est remis à zéro (000). 8.4 Pesage en sous-sol Des objets, qui par leur taille ou leur forme ne peuvent être déposés sur le plateau de la balance, peuvent être pesés grâce au système de pesage par en dessous. Procédez de la manière suivante: Mettez la balance hors circuit. Retourner la balance en veillant que le plateau de pesage ne soit pas mis sous charge. Ouvrez le couvercle au fond de la balance. Accrocher les crochets pour le pesage en sous-sol Posez la balance sur une ouverture. Accrochez l’objet à peser au crochet et réalisez la pesée. ▬ ▬ ATTENTION ▬ Veillez obligatoirement à ce que tous les objets suspendus soient assez stables pour maintenir l’objet à peser voulu (risque de bris). Ne lestez jamais avec des charges supérieures à la charge maximale (max) (risque de bris) Veillez toujours, à ce qu’il n’y ait pas d’être vivant ou d’objet sous la charge, qui risquerait d’être lésé ou endommagé. A la fin du pesage en sous-sol, il faut obligatoirement refermer la trappe dans le fond de la balance (protection contre la poussière). 28 PKP_PKS-BA-f-1313 9 Maintenance, entretien, élimination 9.1 Nettoyage Avant le nettoyage, coupez l´appareil de la tension de fonctionnement. N´utilisez pas de produits de nettoyage agressifs (dissolvants ou produits similaires) mais uniquement un chiffon humidifié avec de la lessive de savon douce. Veillez à ce que les liquides ne puissent pas pénétrer dans l´appareil et frottez ensuite ce dernier avec un chiffon doux sec. Les poudres/restes d´échantillon épars peuvent être retirés avec précaution à l´aide d´un pinceau ou d´un aspirateur-balai. Retirer immédiatement les matières à peser renversées sur la balance. 9.2 Maintenance, entretien L´appareil ne doit être ouvert que par des dépanneurs formés à cette fin et ayant reçu l´autorisation de KERN. Avant d´ouvrir l´appareil, couper ce dernier du secteur. 9.3 Elimination L´élimination de l´emballage et de l´appareil doit être effectuée par l´utilisateur selon le droit national ou régional en vigueur au lieu d´utilisation. PKP_PKS-BA-f-1313 29 10 Aide succincte en cas de panne En cas d´anomalie dans le déroulement du programme, la balance doit être arrêtée pendant un court laps de temps et coupée du secteur. Le processus de pesée doit alors être recommencé depuis le début. Aide: Défaut L´affichage de poids ne s´allume pas. Cause possible La balance n´est pas en marche. La connexion au secteur est coupée (câble de secteur pas branché/défectueux). Panne de tension de secteur. L´affichage de poids change Courant d´air/circulation d´air continuellement Vibrations de la table/du sol Le plateau de pesée est en contact avec des corps étrangers. Champs électromagnétiques/ charge électrostatique (changer de lieu d´installation/ si possible, arrêter l´appareil provoquant l´anomalie) Il est évident que le résultat de pesée est L´affichage de la balance n´est pas sur zéro Faux L´ajustage n´est plus bon. Changements élevés de température. Champs électromagnétiques/ charge électrostatique (changer de lieu d´installation/ si possible, arrêter l´appareil provoquant l´anomalie) Au cas où d´autres messages d´erreur apparaissent, arrêter puis rallumer la balance. Si le message d´erreur ne disparaît pas, informer le fabricant. 30 PKP_PKS-BA-f-1313 11 Déclaration de conformité KERN & Sohn GmbH D-72322 Balingen-Frommern Postfach 4052 E-Mail: [email protected] Tel: 0049-[0]7433- 9933-0 Fax: 0049-[0]7433-9933-149 Internet: www.kern-sohn.de Déclaration de conformité EC-Konformitätserklärung EC- Déclaration de conformité EC-Dichiarazione di conformità EC- Declaração de conformidade EC-Deklaracja zgodności D GB CZ E F I NL P PL RUS Konformitätserklärung Declaration of conformity Prohlášení o shode Declaración de conformidad Déclaration de conformité Dichiarazione di conformitá Conformiteitverklaring Declaração de conformidade Deklaracja zgodności Заявление о соответствии EC-Declaration of -Conformity EC-Declaración de Conformidad EC-Conformiteitverklaring EC- Prohlášení o shode EC-Заявление о соответствии Wir erklären hiermit, dass das Produkt, auf das sich diese Erklärung bezieht, mit den nachstehenden Normen übereinstimmt. We hereby declare that the product to which this declaration refers conforms with the following standards. Tímto prohlašujeme, že výrobek, kterého se toto prohlášení týká, je v souladu s níže uvedenými normami. Manifestamos en la presente que el producto al que se refiere esta declaración está de acuerdo con las normas siguientes Nous déclarons avec cela responsabilité que le produit, auquel se rapporte la présente déclaration, est conforme aux normes citées ci-après. Dichiariamo con ciò che il prodotto al quale la presente dichiarazione si riferisce è conforme alle norme di seguito citate. Wij verklaren hiermede dat het product, waarop deze verklaring betrekking heeft, met de hierna vermelde normen overeenstemt. Declaramos por meio da presente que o produto no qual se refere esta declaração, corresponde às normas seguintes. Niniejszym oświadczamy, że produkt, którego niniejsze oświadczenie dotyczy, jest zgodny z poniższymi normami. Мы заявляем, что продукт, к которому относится данная декларация, соответствует перечисленным ниже нормам. Electronic Balance: KERN PKP / PKS EU Directive 2004/108/EC 2006/95/EC Datum Standards EN 55011: 2009+A1 :2010 EN 55022: 2010/AC:2011 EN 55024: 2010 EN45501 : 1992-10+AC :1993-08 OIML R 76-1 : 2006 OIML R 76-2 : 2006 EN60950 08.04.2013 Signatur Date Signature Ort der Ausstellung 72336 Balingen Place of issue Albert Sauter KERN & Sohn GmbH Geschäftsführer Managing director KERN & Sohn GmbH, Ziegelei 1, D-72336 Balingen, Tel. +49-[0]7433/9933-0 Fax +49-[0]7433/9933-149, E-Mail: [email protected], Internet: www.kern-sohn.com PKP_PKS-BA-f-1313 31