1
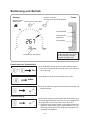
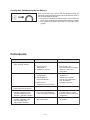
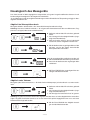
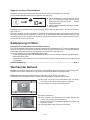
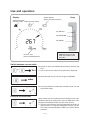
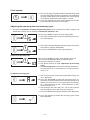
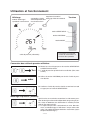
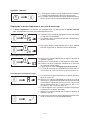
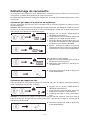
Vakuumtechnik im System Technology for Vacuum Systems Technologie du vide Betriebsanleitung Instructions for use Mode d’emploi DVR 2 Analog/Digitales Grobvakuummeßgerät Analog/Digital Rough Vacuum Gauge Manomètre Analogue/Digital à Vide Grossier Technische Beratung Gebiet Nord: Gebiet Mitte: Gebiet Süd: Kundendienst und Service: Telefon: 09342/808-264 Telefon: 09342/808-263 Telefon: 09342/808-225 Telefon: 09342/808-209 After sales service: Contact your local dealer or call (++49) 9342/808-193. Service après-vente: Veuillez s.v.p. contacter votre distributeur local ou appeler le (++49) 9342/808-193. Achtung! Unbedingt beachten! Attention! Important notes! Attention! Notes importantes! Verbot! Falsche Handhabung führt eventuell zu Schäden. Not permitted! Misuse may cause damage. Interdit! Toute mauvaise utilisation peut provoquer des dommages. Hinweis, Tip. Note. Remarque. 10.12.2002 Inhaltsverzeichnis ➨ Unbedingt beachten! ➨ Technische Daten ➨ Bedienung und Betrieb ➨ Fehlersuche ➨ Neuabgleich ➨ Kalibrierung im Werk ➨ Wechsel der Batterie ➨ Hinweise zur Einsendung ins Werk Reparatur - Rückgabe - DKD-Kalibrierung ➨ Unbedenklichkeitsbescheinigung 10.12.2002 Unbedingt beachten! Nach dem Auspacken Gerät auf Vollständigkeit und Beschädigungen überprüfen. Transportverschlüsse entfernen und aufbewahren. ☞ Hinweise zu Bedienung und Betrieb beachten. ☞ Alle anwendbaren Vorschriften beachten und die geforderten Maßnahmen durchführen. ☞ Messgerät und Vakuumleitung so anordnen, dass kein Kondensat in den im Messgerät eingebauten Drucksensor zurückfließen kann. Die Stromversorgung des Geräts erfolgt über eine 9V Batterie. ☞ Empfohlener Typ siehe ”Technische Daten”. ☞ Die Batterie ist frei von Quecksilber und Cadmium. ☞ Die Batterie darf nicht aufgeladen, geöffnet, ins Feuer geworfen, über 100°C erhitzt oder mit Wasser in Berührung gebracht werden. ☞ Beim Austausch der Batterie auf richtiges Einsetzen achten. ☞ Bei der Verwendung von Batterien anderer chemischer Systeme (z. B. Alkali) kann sich eine wesentlich geringere Betriebsdauer ergeben. ☞ Die Verwendung von Akkus ist aufgrund ihrer kleineren Kapazität nicht zu empfehlen. Das Gerät ist nicht geeignet zum Einsatz mit gefährlichen oder explosiven Gasen oder Gasen, die explosions- oder zündfähige Gemische bilden können. Verträglichkeit mit den medienberührten Werkstoffen prüfen, siehe Kapitel “Technische Daten“. Max. zulässiger Druck am Messgerät: 2 bar absolut. ☞ Bei Drücken über 1060 mbar blinkt die Anzeige. Max. zulässige Umgebungstemperatur bei Lagerung und Betrieb: 60°C. Max. zulässige Medientemperatur am Druckaufnehmer (Gas!): 80°C. Eingriffe am Gerät nur durch sachkundige Personen. Nur Originalteile und Originalzubehör verwenden. ☞ Bei der Verwendung von Komponenten anderer Hersteller kann die Funktion bzw. Sicherheit oder die elektromagnetische Verträglichkeit eingeschränkt sein. Reparatur / DKD-Kalibrierung von eingesandten Geräten ist nur gemäß den gesetzlichen Bestimmungen (Arbeitssicherheit, Umweltschutz) und Auflagen möglich, siehe Kapitel “Hinweise zur Einsendung ins Werk“. 10.12.2002 Technische Daten Typ Dr uckaufnehmer Automatisches Abschalten Dr uckanzeige Messzyklus Messbereich Max. zulässiger Dr uck am Messgerät Messgenauigkeit (nach erfolgtem Abgleich und bei gleichbleibender Temperatur) Temperaturgang Max. Medientemperatur am Dr uckaufnehmer (Gas!) Zulässige Umgebungstemperatur bei Betr ieb Zulässige Umgebungstemperatur bei Lager ung Vakuumanschluss Stromversorgung G ew i c h t Gehäusemaße (L x B x H) DVR 2 kapazitiv / keramisch E i n s c h a l t d a u e r w ä h l b a r 1 - 9 9 9 M i nu t e n o d e r " O n " ( D a u e r b e t r i e b ) ( we r k s e i t i g 1 5 M i nu t e n ) analoge und digitale LCD Anzeige: mbar, Torr oder hPa (umschaltbar) w ä h l b a r : a u t o m a t i s c h , 1 x p r o 3 s, 1 x p r o 1 s, 3 x p r o 1 s ( we r k s e i t i g : a u t o m a t i s c h ) 1 mbar - 1080 mbar (1 Torr - 810 Torr) 2 bar absolut <+/-1 mbar (0,75 Torr) +/-1 digit <+/- 0,07 mbar/K (<0,05 Torr/K) +80°C +10°C bis +60°C -10°C bis +60°C K l e i n f l a n s c h D N 1 6 u n d e i n s c h ra u bb a r e gestufte Schlaucholive für Vakuumschläuche mit 6/10 mm Innendurchmesser Batter ie 9V Lithium, 1,2 Ah, Ultralife U 9VL 375 g 115 mm x 115 mm x 66 mm Komponenten Vakuumanschluss Dichtungen Sensorgehäuse Sensor Medienberühr te Werkstoffe PBT FPM (z. B. Viton®*) Edelstahl Aluminiumoxidkeramik * eingetragenes Warenzeichen Du Pont Technische Änderungen vorbehalten! 10.12.2002 Bedienung und Betrieb Anzeige Abgleichmodus / Warnsymbol Automatisches Abschalten Batterie wechseln / Anzeige der Kapazität der Batterie Tasten Taste EIN/AUS Taste AUF/AB (Stelltaste) Taste MODE Die Drucktasten befinden sich auf der Rückseite des Geräts auf der Höhe der jeweiligen Symbole der Vorderseite. Druckeinheit, umschaltbar Umschalten der Druckeinheit: + Torr ➨ Taste MODE während des Einschaltens gedrückt halten. ☞ Die zuletzt eingestellte Druckeinheit (Torr, mbar oder hPa) wird angezeigt. ➨ Mit Stelltaste gewünschte Druckeinheit einstellen. mbar ➨ Mit Taste EIN/AUS eingestellte Druckeinheit bestätigen und Modus beenden. Druckmessung: Nach dem Einschalten zeigt das Gerät den Absolutdruck (gasartunabhängiger Totaldruck) zwischen 1 mbar und 1080 mbar in der eingestellten Druckeinheit (Torr, mbar oder hPa) an. ☞ Der Drucksensor wurde im Werk auf ein Referenznormal abgeglichen. Aufgrund der guten Langzeitstabilität ist ein kundenseitiger Neuabgleich in der Regel nicht erforderlich (siehe Kapitel “Neuabgleich“). 10.12.2002 Uhrensymbol ☞ Das Erscheinen des Uhrensymbols während der Druckmessung zeigt an, dass sich das Gerät in ca. einer Minute ausschalten wird. ➨ Nach Drücken der Taste EIN/AUS verschwindet das Uhrensymbol und die Einschaltdauer wird auf den gewählten Wert zurückgesetzt. Einstellen der Einschaltdauer und des Messzyklus ☞ Die Zeit bis zum automatischen Abschalten (Einschaltdauer) des Geräts ist zwischen 1 und 999 Minuten bzw. ”On” (Dauerbetrieb) frei wählbar. Die Werkseinstellung beträgt 15 Minuten. ➨ Mit der Taste MODE geht das Gerät in den Modus zur Einstellung der Einschaltdauer. ☞ Das Uhrensymbol und die derzeit eingestellte Einschaltdauer in Minuten erscheinen. ☞ Pfeil nach rechts zeigt an, dass mit der Taste AUF/AB die Einschaltdauer verlängert werden kann. Einschaltdauer verkürzen: ➨ Mit Taste MODE Stellrichtung umschalten. ➨ Dann mit Taste AUF/AB den Wert verkleinern. ➨ Mit Taste EIN/AUS die eingestellte Einschaltdauer bestätigen. ☞ Gerät geht in den Modus zur Einstellung des Messzyklus. ☞ Die Messhäufigkeit kann zwischen Automatik, 1 Messung pro 3s,1 Messung pro 1s und 3 Messungen pro 1s gewählt werden. Messhäufigkeit einstellen: ☞ Der zuletzt ausgewählte Messzyklus (werkseitig: ”A”) wird angezeigt. ➨ Mit Taste AUF/AB den Messzyklus auswählen: A = Automatik (automatische Anpassung des Messzyklus; häufigeres Messen bei großer Druckänderung), S1 = 1 Messung pro 3s, S2 = 1 Messung pro 1s, S3 = 3 Messungen pro 1s. ☞ Das Blinken des Pfeils (nur bei ”S1”, ”S2” oder ”S3”) symbolisiert die Häufigkeit der Druckmessung. ☞ Mit Taste MODE kann die Stellrichtung umgeschaltet werden. ➨ Mit Taste EIN/AUS den eingestellten Messzyklus bestätigen und Routine beenden. 10.12.2002 Anzeige des Entladezustands der Batterie Beim Ausschalten des Geräts wird der Entladezustand der Stromversorgungseinheit qualitativ durch die Zahl der Pfeile in der Analoganzeige dargestellt. ☞ Erscheint das Batteriesymbol im Display während des Betriebs, sollte die Stromversorgungseinheit erneuert werden. ☞ Eine fehlerfreie Funktion des Geräts ist nicht mehr sichergestellt. Fehlersuche Festg estellte Fehler M ö g l i c h e U rs a c h e Fehlerbeseitigung Keine Anzeige im Display o d e r A n ze i g e e r l i s c h t . Î Batter ie leer? ) B a t t e r i e we c h s e l n . Î Automatisches Abschalten? Î Andere Ursachen? ) Einschalten, ggf. Einschaltdauer ver länger n. ) G e r ä t z u r R e p a ra t u r einsenden. ) Dr uckaufnehmer neu abgleichen. ) Aufnehmer trocknen lassen bzw. abpumpen, neu abgleichen. ) B a t t e r i e we c h s e l n . Falsche Anzeige. Î Dr uckaufnehmer ungenau abgeglichen? Î Feuchtigkeit im Dr uckaufnehmer? Î Batter ie leer, Batter iesymbol erscheint? Î Batter ie leer? A n z e i g e f l a cke r t u n d / o d e r ) B a t t e r i e we c h s e l n . Batter iesymbol erscheint. Î Bei dem anliegenden ) Auf Atmosphärendr uck Gerät kann nicht in Routine "Abgleich unter Dr uck kann der Abgleich belüften oder auf einen Atmosphärendr uck bzw. n i c h t d u r c h g e f ü h r t we r d e n . Dr uckwer t kleiner 20 mbar Vakuum" gebracht werden. evakuieren. ) G e r ä t z u r R e p a ra t u r Alle Segmente der LCD Î Defekt an Sensor oder Messelektronik? einsenden. w e r d e n a n g e ze i g t o d e r ke i n e A n z e i g e t r o t z Wechsel der Batter ie. 10.12.2002 Neuabgleich des Messgeräts Das Gerät wurde im Werk abgeglichen. Aufgrund der sehr guten Langzeitstabilität des Sensors ist ein kundenseitiger Neuabgleich in der Regel nicht erforderlich. Je nach Betriebsart und Genauigkeitsanforderungen wird im Einzelfall eine Überprüfung und ggf. ein Neuabgleich erforderlich sein. Abgleich bei Atmosphärendruck Messgerät belüften. Sicherstellen, dass tatsächlich Atmosphärendruck anliegt. Achtung: Genauen Luftdruck ermitteln, z. B. mit genauem Kontrabarometer oder vom Wetteramt, Flugplatz usw. erfragen (Höhenunterschied beachten). ➨ Stelltaste während des Einschaltens gedrückt halten. ☞ Das Gerät geht in den Abgleichmodus (angezeigt durch Warndreieck). ☞ Pfeil nach rechts zeigt an, dass mit der Stelltaste der Druckwert vergrößert werden kann. + ➨ Mit der Stelltaste den angezeigten Wert auf den genauen, am Ort des Geräts herrschenden Atmosphärendruck einstellen. Falls der angezeigte Wert verkleinert werden soll: ➨ Mit Taste MODE die Stellrichtung umschalten. ➨ Dann mit der Stelltaste den angezeigten Wert verkleinern. ➨ Mit Taste EIN/AUS den angezeigten Wert bestätigen und Modus beenden. Abgleich unter Vakuum Messgerät (über Vakuumanschluss, z. B. mittels Drehschieberpumpe) auf einen Druck < 0,5 mbar evakuieren. ➨ Stelltaste während des Einschaltens gedrückt halten. ☞ Das Gerät geht in den Abgleichmodus (ange+ zeigt durch Warndreieck). ☞ Die Anzeige wird automatisch auf “0“ gesetzt. Achtung: Liegt der tatsächliche Druck beim Abgleich unter 0,5 mbar, so ist der Abgleichfehler vernachlässigbar. Liegt der Druck über 0,5 mbar, so ist das Gerät nicht optimal abgeglichen bzw. muss auf einen Referenzdruck eingestellt werden. ➨ Mit der Taste EIN/AUS den Abgleich bestätigen und den Modus beenden. 11.12.2002 Abgleich auf einen Referenzdruck Messgerät auf einen genau bekannten Referenzdruck zwischen 0 und 20 mbar evakuieren. Gerät in Abgleichmodus bringen (siehe Abgleich unter Vakuum). ➨ Mit der Stelltaste kann die Anzeige von ”0” auf den am Vakuumanschluß herrschenden Referenzdruck im Bereich von 0 ...... 20 mbar eingestellt werden. ➨ Mit Taste EIN/AUS Abgleich bestätigen und Modus beenden. Achtung: Die Unsicherheit in der Bestimmung des Referenzdrucks geht direkt in die Messunsicherheit des Geräts ein. Erfolgt der Abgleich auf den angegebenen Enddruck einer Membranpumpe und wird der Druck nicht mit einem genauen Vakuummeter bestimmt, so kann u. U. ein beträchtlicher Messfehler dann entstehen, wenn die Membranpumpe den spezifizierten Enddruck nicht erreicht (Kondensatanfall, schlechter Zustand, Ausfall oder Verschmutzung der Ventile). Kalibrierung im Werk Normgerechte und akkreditierte Prüfmittelüberwachung Das VACUUBRAND Kalibrierlabor für die Messgröße Druck im Meßbereich 10-3 mbar bis 1000 mbar ist durch die Physikalisch-Technische Bundesanstalt (PTB) als Kalibrierlaboratorium nach DIN EN ISO/IEC 17025:2000 akkreditiert und unter der Registriernummer DKD-K-19201 registriert. Durch eine Kalibrierung im VACUUBRAND Kalibrierlabor - werden die Forderungen der DIN ISO 9000ff und 10012 nach einer Kalibrierung der Prüfmittel in festgelegten Intervallen erfüllt. - werden die Vakuummeßgeräte auf das nationale Normal der Physikalisch-Technischen Bundesanstalt zurückgeführt. DKD-Nachkalibrierung .............................................................................................................. 90 02 17 Wechsel der Batterie Hinweis: Auf der Platine befinden sich Bauteile, die empfindlich gegen elektrostatische Entladung sind. Bauteile nicht mit der Hand berühren. Ggf. Platine und ausführende Person geeignet erden. Achtung: Nur Batterie des empfohlenen Typs verwenden (siehe ”Technische Daten”). Die Batterie darf nicht geladen oder an externe Spannungsquellen angeschlossen werden! ➨ Mit einem Kreuzschlitzschraubendreher die vier Senkschrauben an der Gehäuserückseite herausdrehen. ➨ Gehäuseteile vorsichtig auseinandernehmen. ➨ Batterie entnehmen. ➨ Neue Batterie in das Batteriefach einsetzen, Polarität beachten (siehe Prägung im Batteriefach). ☞ Beim Zusammenbau auf korrekte Lage der Tastermatte und der Platine achten. ➨ Gehäusehälften wieder zusammenschrauben. Platine Batterie Tastermatte 15.07.2003 Hinweise zur Einsendung ins Werk Reparatur - Rückgabe - DKD-Kalibrierung Wenn die Maßnahmen aus dem Abschnitt ”Fehlersuche” erfolglos bleiben: Gerät zur Reparatur einsenden. Bei Eingriffen in das Gerät erlischt der Gewährleistungsanspruch. Die Verantwortung für die Sicherheit und die Gesundheit unserer Mitarbeiter sowie gesetzliche Vorschriften machen es zwingend erforderlich, dass das Formblatt “Unbedenklichkeitsbescheinigung“ für alle Produkte, die an uns zurückgesandt werden, von dazu autorisiertem Fachpersonal vollständig ausgefüllt und unterschrieben wird. Eine Kopie sollte per Telefax oder Brief vorab an uns gesandt werden, damit die Information vor dem Eintreffen des Produkts vorliegt. Das Original muss den Frachtpapieren beigefügt werden. Ohne Vorliegen der vollständig ausgefüllten Unbedenklichkeitsbescheinigung ist eine Annahme der Sendung und Reparatur / DKD-Kalibrierung nicht möglich, die Sendung wird ggf. zurückgewiesen. Bei Kontakt mit Chemikalien, radioaktiven, gesundheits- und umweltgefährdenden Stoffen muss das Produkt vor der Einsendung ins Werk dekontaminiert werden. Um das Produkt zügig und wirtschaftlich reparieren zu können, benötigen wir ferner eine genaue Beschreibung der Beanstandung und der Einsatzbedingungen. Kostenvoranschläge werden nur auf ausdrücklichen Wunsch und nur gegen Berechnung erstellt. Bei Reparaturauftragserteilung oder Erwerb eines neuen Produkts anstatt der Reparatur, werden die angefallenen Kosten nicht berechnet, bzw. berechnete Kosten gutgeschrieben. ☞ Sollten Sie aufgrund des Kostenvoranschlags keine Reparatur wünschen, senden wir das Produkt ggf. demontiert und unfrei zurück! Darüberhinaus tauschen wir auf Ihren Wunsch auch optisch nicht mehr ansprechende Teile aus. Beim Versand der Produkte ist, falls zutreffend, zu beachten: ☞ Produkt dekontaminieren und reinigen. ☞ Alle Öffnungen luftdicht verschließen. ☞ Produkt sicher verpacken, ggf. Originalverpackung anfordern (nur gegen Berechnung), und vollständig kennzeichnen, insbesondere Unbedenklichkeitsbescheinigung beifügen. Wir sind sicher, dass Sie für diese Maßnahmen, deren Anforderung und Aufwand außerhalb unserer Einflussmöglichkeiten liegen, Verständnis haben. Verschrottung und Entsorgung: Das gesteigerte Umweltbewusstsein und die verschärften Vorschriften machen eine geordnete Verschrottung und Entsorgung eines nicht mehr gebrauchs- und reparaturfähigen Produkts zwingend erforderlich. ☞ Sie können uns ermächtigen, zu Ihren Lasten das Produkt geordnet zu entsorgen. 11.12.2002 Unbedenklichkeitsbescheinigung Erklärung zur Sicherheit, gesundheitlichen Unbedenklichkeit und Altölentsorgung. Die Sicherheit und Gesundheit unserer Mitarbeiter, die Gefahrstoffverordnung GefStoffV, die Vorschriften zur Sicherheit am Arbeitsplatz und die Vorschriften zur Altölentsorgung machen es erforderlich, dass dieses Formblatt für alle Produkte, insbesondere Pumpen, Pumpstände, Mess- und Regelgeräte, die an uns zurückgeschickt werden, ausgefüllt wird. Ohne Vorliegen des vollständig ausgefüllten Formblatts ist eine Reparatur / DKD-Kalibrierung nicht möglich. a) Eine vollständig ausgefüllte Kopie dieses Formblatts soll per Telefax (++49)9342/59880 oder Brief vorab an uns gesandt werden, so dass die Information vorliegt, bevor das Produkt eintrifft. Eine weitere Kopie soll dem Produkt beigefügt werden. Ggf. ist auch die Spedition zu informieren (GGVE, GGVS, RID, ADR). b) Unvollständige Angaben oder Nichteinhalten dieses Ablaufs führen zwangsläufig zu beträchtlichen Verzögerungen in der Abwicklung. Bitte haben Sie Verständnis für Maßnahmen, die außerhalb unserer Einflussmöglichkeiten liegen, und helfen Sie mit, den Ablauf zu beschleunigen. c) Bitte unbedingt vollständig ausfüllen. 1. Produkt (Typ): ............................................ 5. Transportweg / Spediteur: 2. Serien-Nr.: .................................................. ........................................................................................... Tag der Einsendung an VACUUBRAND: 3. Medien, mit denen das Produkt in Kontakt kam, bzw. die prozessbedingt entstehen konn ten: 3.1 Name, chemische Bezeichnungen, ggf. Formel: a) ................................................................... b) ................................................................... ........................................................................................... Wir wünschen bei Lackschäden eine Nachlackierung bzw. bei optisch nicht mehr ansprechenden Teilen einen Austausch gegen Berechnung (siehe ”Hinweise zur Einsendung ins Werk”): ❑ ja ❑ nein c) ................................................................... d) ................................................................... Wir erklären, dass alle anwendbaren Maßnahmen getroffen wurden: 3.2 Wichtige Informationen und Vorsichtsmaßnahmen, z. B. Gefahrklasse: - Das Öl aus der Pumpe wurde abgelassen. Achtung: Altölentsorgung beachten! - Das Pumpeninnere wurde gereinigt. - Die Saug- und Drucköffnung des Produkts wurden verschlossen. - Das Produkt wurde sicher verpackt (ggf. Originalverpackung [nur gegen Berechnung] anfordern) und vollständig gekennzeichnet. - Der Spediteur wurde (wenn vorgeschrieben) über die Gefährlichkeit der Sendung informiert. a) ................................................................... b) ................................................................... c) ................................................................... d) ................................................................... 4. Erklärung zur Gefährlichkeit der Stoffe (bitte Zutreffendes abzeichnen): ❑ 4.1 für ungefährliche Stoffe: Wir versichern für das o. g. Produkt, dass - keine toxische, ätzende, mikrobiologische, explosive, radioaktive oder sonstwie gefährliche Kontamination erfolgte. - das Produkt frei von gefährlichen Stoffen ist. - das Öl entleert bzw. eventuelle Medienrückstände entfernt wurden. ❑ 4.2 für gefährliche Stoffe: © 2001 VACUUBRAND GMBH + CO KG Printed in Germany Es ist uns bekannt, dass wir gegenüber Dritten, hier insbesondere mit der Handhabung/Reparatur des Produkts betrauten Mitarbeitern der VACUUBRAND, gemäß § 823 BGB direkt haften. Unterschrift: ....................................................................... Name: ................................................................................. Position: .............................................................................. Wir versichern für das o. g. Produkt, dass - alle toxischen, ätzenden, mikrobiologischen, explosiven, radioaktiven oder anderweitig gefährlichen Stoffe, die mit dem Produkt gepumpt wurden oder in Kontakt kamen, in 3.1 aufgelistet sind und alle Angaben vollständig sind. - das Produkt vorschriftsmäßig ❑ gereinigt ❑ dekontaminiert ❑ sterilisiert wurde. VACUUBRAND GMBH + CO KG -Vakuumtechnik im System- Wir versichern, dass wir gegenüber VACUUBRAND für jeden Schaden, der durch unvollständige oder unrichtige Angaben entsteht, haften und VACUUBRAND gegenüber eventuell entstehenden Schadensansprüchen Dritter freistellen. Firmenstempel: .................................................................. Datum: ................................................................................ D-97866 Wertheim - Postfach 1664 D-97877 Wertheim - Alfred-Zippe-Str. 4 Tel. (++49)9342 / 808-0 - Fax (++49)9342 / 59880 Contents ➨ Safety information! ➨ Technical data ➨ Use and operation ➨ Troubleshooting ➨ Readjustment of the vacuum gauge ➨ Calibration in the factory ➨ Replacement of the battery ➨ Notes on return to the factory Repair - Return - DKD-Calibration ➨ Health and safety clearance form 11.12.2002 Safety information! Remove all packing material, remove the product from its packing-box, remove the protective covers and keep them, inspect the equipment. If the equipment is damaged, notify the supplier and the carrier in writing within three days; state the item number of the product together with the order number and the supplier’s invoice number. Retain all packing material for inspection. Do not use the equipment if it is damaged. If the equipment is not used immediately, replace the protective covers. Store the equipment in suitable conditions. ☞ Read this manual before installing or operating the equipment. ☞ Obey all applicable regulations and realize all required measures. ☞ Position the vacuum gauge and the vacuum connection in the vacuum system in a way that no draining of condensate towards the pressure transducer inside the vacuum gauge can occur. The current supply of the devices is realized by the incorporated 9V battery. ☞ Recommended type see section ”Technical data”. ☞ The battery is free from mercury and cadmium. ☞ The battery must not be charged, opened, thrown into fire, heated to more than 100°C or brought in contact with water. ☞ When replacing the battery, always insert it correctly into the battery compartment. ☞ When using a battery with a different chemical system (e. g. alkaline), lifetime may be considerably shorter. ☞ The use of an accumulator is not recommended because of its low capacity. The devices are not suitable when working with dangerous or explosive gases or explosive or flammable mixtures. Ensure that the materials of the wetted parts are compatible (see “Technical data“). If necessary adopt suitable measures. Max. permitted pressure at the vacuum gauge: 2 bar absolute. ☞ The display flashes at pressures above 1060 mbar. Max. ambient temperature for storage and operation: 60°C. Max. temperature of gaseous media at the pressure transducer (gas!): 80°C. Ensure that maintenance is done only by suitably trained and supervised technicians. Ensure that the maintenance technician is familiar with the safety procedures which relate to the equipment processed by the vacuum system and that the equipment if necessary is approximately decontaminated before starting maintenance. Use only genuine spare parts and accessories. ☞ Otherwise safety and performance of the equipment as well as the electromagnetic compatibility of the equipment might be reduced. In order to comply with law (occupational, health and safety regulations and regulations for environmental protection) products returned to the manufacturer can be repaired / DKD calibrated only when following certain procedures (see section ”Notes on return to the factory”). 11.12.2002 Technical data Type P r e s s u r e t ra n s d u c e r Automatic sleep mode Pressure reading Measur ing cycle time M e a s u r i n g ra n g e Max. per mitted pressure at the vacuum gauge U n c e r t a i n t y ( w i t h t ra n s d u c e r c a r e f u l l y a d j u s t e d a n d a t c o n s t a n t t e m p e ra t u r e ) Temperature coefficient M a x . t e m p e ra t u r e o f g a s e o u s m e d i a a t t h e p r e s s u r e t ra n s d u c e r ( g a s ! ) Per mitted ambient temperature range ( o p e ra t i o n ) Per mitted temperature range (storage) Vacuum connection DVR 2 capacitive / ceramic user selectable operation time 1-999 minutes or "On" (continuous operation) (factor y-set: 15 m i nu t e s ) analogue und digital LCD display mbar, Torr or hPa (to be switched between) selectable: automatic, 1 x within 3s, 1 x within 1 s, 3 x within 1s (factor y-set: automatic) 1 mbar - 1080 mbar (1 Torr - 810 Torr) 2 bar absolute <+/-1 mbar (0.75 Torr) +/-1 digit <+/- 0.07 mbar/K (<0.05 Torr/K) +80°C +10°C to +60°C Power supply Mass Dimensions of housing (L x W x H) -10°C to +60°C small flange NW 16 and screw-in stepped hose nozzle for vacuum hoses with 6/10 mm inside diameter batter y 9V lithium, 1.2 Ah, Ultralife U 9VL 375 g 115 mm x 115 mm x 66 mm Components Vacuum connection Seals P r e s s u r e t ra n s d u c e r h o u s i n g P r e s s u r e t ra n s d u c e r Wetted par ts PTB F P M ( e. g . V i t o n ® * ) stainless steel aluminiumoxide-ceramic * reg. trade mark Du Pont We reserve the right for technical modification without prior notice! 11.12.2002 Use and operation Display adjustment mode/ warning symbol automatic sleep mode replace battery/ display of battery capacity Keys key ON/OFF key UP/DOWN key MODE The keys are on the rear side of the device underneath the symbols at the front side. vacuum units (to be switched between) Switch between vacuum units: + Torr ➨ Switch off. Press key MODE simultaneously with key ON/ OFF. ☞ The vacuum unit as from the last operation is displayed. ➨ Select desired vacuum unit by using key UP/DOWN. mbar ➨ Press key ON/OFF to confirm the selected vacuum unit and to terminate mode. Pressure measurement: Upon switching on, the absolute pressure (total pressure, independent of gas type) ranging from 1 mbar to 1080 mbar is displayed in the selected vacuum unit (Torr, mbar or hPa). ☞ The pressure transducer has been adjusted in the factory. In general, there is no need for readjustment by the user because of the excellent longtime stability (see section ”Readjustment”). 10.12.2002 Clock symbol ☞ The vacuum gauge is equipped with an automatic sleep mode to save battery power when the instrument is not used. When the clock symbol appears on the display, the vacuum gauge will switch off automatically after approx. 1 minute. ➨ Press key ON/OFF, the clock symbol disappears and the preselected operation time will start again. Adjusting the operating time and measuring cycle ☞ The time until automatic switching off (operating time) can be set by the user within a range of 1 to 999 minutes (factory-set: 15 minutes) or continuous operation ”On”. ➨ Press key MODE to select the time setting mode. ☞ The clock symbol and the actually set operating time in minutes are displayed. ☞ The arrow in the right direction indicates that the time can be increased by using key UP/DOWN. ➨ Press key UP/DOWN to increase operating time. To decrease operating time: ➨ ➨ ➨ ☞ Press key MODE to change arrow direction to the left. Press key UP/DOWN to decrease operating time. Press key ON/OFF to confirm. The device switches to mode ”adjustment of measuring cycle”. ☞ The measuring cycle can be chosen between Automatic, 1 measurement in 3s, 1 measurement in 1s and 3 measurements in 1s. To adjust measuring cycle: ☞ The measuring cycle as from the last operation (factory-set: ”A”) is displayed. ➨ Press key UP/DOWN to select the measuring cycle: A = Automatic (automatic determination of the measuring cycle; frequent measurement in case of great pressure change), S1 = 1 measurement in 3s, S2 = 1 measurement in 1s, S3 = 3 measurements in 1s. ☞ The flashing of the arrow (only ”S1”, ”S2” or ”S3”) symbolizes the frequency of the pressure measurement). ☞ Press key MODE to change the direction of the adjustment. ➨ Press key ON/OFF to confirm the measuring cycle and to terminate mode. 11.12.2002 Display of the status of discharge of the battery When switching off the device, the remaining battery capacity is displayed qualitatively by the number of arrows in the display for a few seconds. ☞ If the battery symbol appears in the display during measurement, the battery should be replaced. ☞ The correct function of the device is no longer ensured. Troubleshooting Fa u l t Possible cause R e m e dy No display or display d i s a p p e a r s. Î Batter y empty? ) Replace batter y. Î Automatic sleep mode? ) Switch on, increase o p e ra t i n g t i m e i f necessar y. ) Contact local distr ibutor. ) Readjust pressure transducer. ) Dr y, respectively evacuate t h e t ra n s d u c e r a n d readjust if necessar y. ) Replace batter y. Incorrect display. Display is flicker ing and/or b a t t e r y s y m b o l a p p e a r s. Adjustment mode cannot be activated. All segments of the LCD are displayed or no display although batter y has been replaced. Î Other cause? Î P r e s s u r e t ra n s d u c e r h a s dr ifted off? Î Moisture in the pressure t ra n s d u c e r ? Î Batter y empty, batter y symbol is displayed? Î Batter y empty? Î A t t h e c u r r e n t p r e s s u r e, readjustment is not possible. Î P r e s s u r e t ra n s d u c e r o r measur ing electronics defective? 11.12.2002 ) Replace batter y. ) Admit air to atmospher ic pressure or evacuate to a pressure < 20 mbar. ) Contact local distr ibutor. Readjustment of the vaccum gauge The equipment has been adjusted at the factory. In general, there is no need for adjustment by the user because of the excellent longtime stability. Depending on operation conditions, type of application and accuracy requirements, an inspection and readjustment may become necessary. Adjustment at atmospheric pressure Admit air to the vacuum gauge. Make sure that the vacuum connection at the vacuum gauge is at atmospheric pressure. Attention: Determine the exact actual atmospheric pressure, e. g. by using an accurate barometer or get accurate reading from the weather service, e. g. at the next airport, etc. (take into account the difference in altitude between e. g. airport and laboratory). ➨ Press key UP/DOWN simultaneously with key ON/OFF. ☞ The vacuum gauge switches to the adjustment mode (indicated by a warning triangle). ☞ The arrow in the right direction indicates that the pressure value can be increased by using key UP/DOWN. ➨ Press key UP/DOWN to increase the reading to actual atmospheric pressure. + To reduce the reading: ➨ Press key MODE to change arrow direction to the left. ➨ Then press key UP/DOWN to reduce the reading. ➨ Press key ON/OFF to confirm adjustment and to terminate mode. Adjustment under vacuum Evacuate the vacuum gauge to a pressure <0.5 mbar (<0.4 Torr) e. g. by applying a good rotary vane pump. ➨ Press key UP/DOWN simultaneously with key ON/OFF. ☞ The vacuum gauge switches to the adjustment mode (indicated by a warning triangle) ☞ The reading is adjusted automatically to ”zero”. + Attention: Adjustment under vacuum with a pressure higher than 0.5 mbar (0.4 Torr) reduces the accuracy of measurement. If the pressure is significantly higher than 0.5 mbar (0.4 Torr), adjustment to a reference pressure is recommended. ➨ Press key ON/OFF to confirm adjustment and to terminate mode. 12.12.2002 Adjustment at reference pressure Evacuate the vacuum gauge to an exact known reference pressure within the range of 0 .... 20 mbar (0 .... 15 Torr). Switch vacuum gauge to the adjustment mode (see ”Adjustment under vacuum”). ➨ Press key UP/DOWN to adjust the display from ”0” (”zero”) to the actual reference pressure in the vacuum line in the range of 0 to 20 mbar (0 to 15 Torr). ➨ Press key ON/OFF to confirm adjustment and to terminate mode. Attention: The accuracy of the value of the reference pressure will directly affect the accuracy of the adjustment. If the nominal ultimate vacuum of a diaphragm pump is used as ”reference” vacuum, the accuracy of the adjustment of the vacuum gauge might be doubtful. The diaphragm pump may not achieve the specified value due to condensate, poor state, failure of the valves or the diaphragm. Calibration in the factory Control of measuring equipment The VACUUBRAND DKD calibration laboratory is accredited by the Physikalisch-Technische Bundesanstalt (PTB; German national institute for science and technology and the highest technical authority of the Federal Republic of Germany for the field of meteorology and certain sectors of safety engineering) for the measurable variable pressure in the pressure range from 10-3 mbar to 1000 mbar in accordance with the general criteria for the operation of testing laboratories defined in the standard EN ISO/IEC 17025:2000. Calibration in the VACUUBRAND calibration laboratory: - To meet the requirements of the DIN ISO 9000ff and 10012 series of standards regarding the calibration of inspection, measuring and test equipment at specified intervals. - To document that the vacuum gauges calibrated are traceable to the national standard of the PTB. DKD recalibration ...................................................................................................................... 90 02 17 Replacement of the battery Note: Some of the components on the printed circuit board are sensitive to electrostatic discharge. Do not touch components. If necessary, ground the printed circuit board and the person replacing the battery suitably. Attention: Use only a battery of the recommended type (see ”Technical data”). The battery must not be charged or connected to an external voltage. ➨ Unscrew the four countersunk head screws at the rear side of the housing by using a Phillips screw driver. ➨ Disassemble the housing parts carefully. printed circuit board battery switch pad ➨ Remove the battery. ➨ Insert the new battery in the battery compartment correctly matching the positive and negative polarity (as shown by the engraving inside the compartment). ☞ When reassembling the vacuum gauge, make sure that the switch pad and the printed circuit board are positioned correctly. ➨ Carefully screw both parts of the housing together. 15.07.2003 Notes on return to the factory Repair - return - DKD calibration If the measures listed in section ”Troubleshooting” do not work: Return the equipment to the factory for inspection and repair. Opening or disassembly of the equipment voids all warranties and the licence if necessary. Safety and health of our staff, laws and regulations regarding the handling of dangerous goods, occupational health and safety regulations and regulations regarding safe disposal of waste require that for all pumps and other products the “Health and safety clearance form“ must be send to our office duly completed and signed before any equipment is dispatched to our premises. Fax or post a completed copy of the health and safety clearance form to us in advance. The declaration must arrive before the equipment. Enclose a second completed copy with the product. If the equipment is contaminated you must notify the carrier. No repair / DKD calibration is possible unless the correctly completed form is returned. Inevitably, there will be a delay in processing the equipment if information is missing or if this procedure is not obeyed. Eventually, acceptance of the returned equipment will be refused. If the product has come in contact with chemicals, radioactive substances or other substances dangerous to health or environment, the product must be decontaminated prior to sending it back to the factory. To expedite repair and to reduce costs, please enclose a detailed description of the problem and the products´ operation conditions with every product returned for repair. We submit quotations only on request and always at the customer´s expense. If an order is given, the costs incurred are offset from the costs for repair or from the purchase price, if the customer prefers to buy a new product instead of repairing the defective one. ☞ If you do not wish a repair on the basis of our quotation, the equipment might be returned to you disassembled and at your charge! We replace parts due to optical aspects upon your request (at your expense). Before returning the equipment ensure that (if applicable): ☞ Equipment has been cleaned and/or decontaminated. ☞ All ports have been sealed. ☞ Equipment has been properly packed, if necessary, please order an original packaging (costs will be charged), marked as appropriate and the carrier has been notified. ☞ Ensure that the completed health and safety declaration is enclosed. We hope for your understanding for these measures, which are beyond our control. Scrapping and waste disposal: Dispose of the equipment and any components removed from it safely in accordance with all local and national safety and environmental requirements. Particular care must be taken with components which have been contaminated with dangerous substances from the process. Do not incinerate fluoroelastomer seals and “O“-rings. ☞ You may authorize us to dispose of the equipment at your expense. 12.12.2002 . Health and safety clearance form Declaration concerning safety, potential hazards and safe disposal of waste, e. g. used oil. Safety and health of our staff, laws and regulations regarding the handling of dangerous goods, occupational health and safety regulations, safety at work laws and regulations regarding safe disposal of waste, e. g. waste oil, require that for all pumps and other products this form must be send to our office duly completed and signed before any equipment is dispatched to our premises. Products will not be accepted for any procedure and handling and repair / DKD calibration will not start before we have received this declaration. a) Fax or post a completed copy of this form to us in advance. The declaration must arrive before the equipment. Enclose a second, completed copy with the product. If the product is contaminated you must notify the carrier (GGVE, GGVS, RID, ADR). b) Inevitably, the repair process will be delayed considerably, if this information is missing or this procedure is not obeyed. We hope for your understanding for these measures which are beyond our control and that you will assist us in expediting the repair procedure. c) Make sure that you know all about the substances which have been in contact with the equipment and that all questions have been answered correctly and in detail. 1. Product (Model): ........................................ 2. Serial No.: .................................................. 5. Way of transport / carrier: ........................................................................................... Day of dispatch to VACUUBRAND: 3. List of substances in contact with the equipment or reaction products: 3.1 Chemical/substance name, chemical symbol: a) ................................................................... b) ................................................................... ........................................................................................... If the paint is damaged, we wish a repaint or a replacement of parts due to optical aspects at our expense (see “Notes on return to the factory“): ❑ yes ❑ no c) ................................................................... d) ................................................................... 3.2 Important informations and precautions, e. g. danger classification: a) ................................................................... b) ................................................................... c) ................................................................... d) ................................................................... 4. Declaration (please mark as applicable): ❑ 4.1 for non dangerous goods: We assure for the returned product that - neither toxic, corrosive, biologically active, explosive, radioactive nor contamination dangerous in any way has occurred. - the product is free of dangerous substances. - the oil or residues of pumped media have been drained. ❑ We declare that the following measures where applicable - have been taken: - The oil has been drained from the product. Important: Dispose of according to national regulations. - The interior of the product has been cleaned. - All inlet and outlet ports of the product have been sealed. - The product has been properly packed, if necessary, please order an original packaging (costs will be charged) and marked as appropriate. - The carrier has been informed about the hazardous nature of the goods (if applicable). We assure VACUUBRAND that we accept liability for any damage caused by providing incomplete or incorrect information and that we shall indemnify VACUUBRAND from any claims as regards damages from third parties. We are aware that as expressed in § 823 BGB (Public Law Code of Germany) we are directly liable for injuries or damages suffered by third parties, particularly VACUUBRAND employees occupied with handling/ repairing the product. Signature: ........................................................................... Name (print): ...................................................................... 4.2 for dangerous goods: We assure for the returned product that - all substances, toxic, corrosive, biologically active, explosive, radioactive or dangerous in any way which have pumped or been in contact with the product are listed in 3.1, that the information is complete and that we have not withheld any information. - the product, in accordance with regulations, has been ❑ cleaned ❑ decontaminated ❑ sterilized. VACUUBRAND GMBH + CO KG -Vakuumtechnik im System© 2001 VACUUBRAND GMBH + CO KG Printed in Germany Job title (print): ................................................................... Company´s seal: ............................................................... Date: ................................................................................... D-97866 Wertheim - Postfach 1664 D-97877 Wertheim - Alfred-Zippe-Str. 4 Tel. (++49)9342 / 808-0 - Fax (++49)9342 / 59880 Contenu ➨ Notes importantes! ➨ Données techniques ➨ Utilisation et fonctionnement ➨ Causes de mauvais fonctionnement ➨ Réétalonnage du vacuomètre ➨ Etalonnage en usine ➨ Remplacement du batterie ➨ Remarques concernant le renvoi à l’usine Réparation- renvoi - étalonnage DKD ➨ Déclaration de sécurité 12.12.2002 Notes importantes! Lors du déballage, vérifiez qu´aucun dommage n´a été occasionné durant le transport et que la livraison est complète, puis enlevez et gardez les fixations de transport. ☞ Observez des instructions d´utilisation. ☞ Respectez toutes les réglementations applicables et effectuez toutes mesures requises. ☞ Placez le vacuomètre et le tuyau de raccordement d´une manière qu´un refluement de condensat vers le capteur de pression intégré ne soit pas possible. L´alimentation en courant des vacuomètres s´effectue par la batterie 9V intégré. ☞ Type recommandé voyez chapitre ”Données techniques”. ☞ La batterie ne contenue pas de mercure et de cadmium. ☞ La batterie ne doit pas être chargée, ouverte, jetée sur le feu, chauffée à plus de 100°C ou mise en contact avec de l´eau. ☞ En remplacement la batterie, veillez à ce qu’elle soit logée correctement. ☞ Si la batterie avec un système chimique différent (p.ex. alcaline) est utilisée, la durée de service peut être réduite considérablement. ☞ L´utilisation des accus n´est pas recommandée à cause de leur faible puissance. Le dispositif n’est pas approprié pour travailler avec des gaz dangereux ou explosifs ou des gaz, qui peuvent former des mélanges potentiellement explosifs ou inflammables. Veillez à ce que des gaz soient compatibles avec les matériaux exposés à ce milieu (voyez chapitre “Données techniques“). Si nécessaire, prenez les mesures qui s´imposent. Pression maxi admissible au vacuomètre: 2 bar absolue. ☞ En cas de pressions supérieures à 1060 mbar, l´affichage clignote. Température ambiante maxi admissible en marche et pour stockage: 60°C. Température maxi au milieu gazeux au capteur de pression: 80°C. Les interventions sur le produit ne doivent être effectuées que par un personnel qualifié. Utilisez uniquement des pièces de rechange et accessoires originaux. ☞ Si des composants d´autre fabricants sont utilisés, le fonctionnement, la précision, la sécurité ou la compatibilité électromagnétique peuvent être affectés. Comme stipulé dans les réglementations statutaires (réglementations relatives aux risques professionnels, à la santé et à la sécurité et réglementations concernant la protection de l´environnement), les composants qui sont retournés au fabricant ne peuvent être acceptés, traités ou réparés que sous certaines conditions (voyez chapitre “Remarques concernant le renvoi à l´usine“). 12.12.2002 Données techniques Type Capteur de pression Mode d´économie d´énergie Affichage de pression C y c l e d e m e s u ra g e Gamme de mesure Pression maxi admissible au vacuomètre Précision de mesure (avec capteur s o i g n e u s e m e n t é t a l o n n é e t t e m p é ra t u r e constante) Dér ive avec température Température maxi du milieu gazeux au capteur de pression Température de fonctionnement Température de stockage Raccord de vide Alimentation Poids Dimensions du car ter (L x l x H) Composants Raccord de vide Joints Bâti du capteur Capteur DVR 2 capacitive / céramique durée d´opération sélectable de 1-999 minutes ( p r é s é l e c t i o n e n u s i n e : 1 5 m i nu t e s ) o u m a r c h e c o n t i nu e " O n " LCD analogique et numér ique mbar, Torr ou hPa (sélectable) sélectable: automatique, 1 x dans 3s, 1 x dans 1 s, 3 x d a n s 1 s ( p r é s é l e c t i o n e n u s i n e : automatique) 1 mbar - 1080 mbar (1 Torr - 810 Torr) 2 bar absolue <+/-1 mbar (0,75 Torr) +/-1 digit <+/- 0,07 mbar/K (<0,05 Torr/K) +80°C +10°C à +60°C -10°C à +60°C petite br ide DN 16 et embout à olive étagé pour tuyuax 6/10 mm de diamètre intér ieur batter ie 9V, 1,2 Ah, Ultralife U 9VL 375 g 115 mm x 115 mm x 66 mm M a t é r i a u x ex p o s é s a u g a z d a n s l e s y s t è m e à vide PBT FPM (p.ex. Viton®*) acier inox oxyde d´aluminium-céramique * marque déposée Du Pont Sous réserve des modifications techniques! 12.12.2002 Utilisation et fonctionnement Affichage mode d´étalonnage / symbole d´avertissement remplacez la batterie / vacuomètre s´eteint affichage d´état de la batterie automatiquement dans une minute environ Touches touche START/STOP touche HAUT/BAS touche MODE Les touches ses trouvent au dos du vacuomètre sur le niveau des symboles unité de pression (sélectable) Conversion des unités de pression affichées: + Torr ➨ Mettez hors circuit. Appuyez sur les touches START/STOP et MODE simultanément. ☞ L´unité de pression qui était choisie est affichée (Torr, mbar ou hPa). ➨ Utilisez la touche HAUT/BAS pour choisir l´unité de pression désirée. mbar ➨ Confirmez l´unité de pression choisie et terminez le mode en appuyant sur la touche START/STOP. Mesurage de pression (absolue): Après la mise en marche du vacuomètre, le vide comme pression absolue (pression totale indépendante du type de gaz) entre 1 mbar et 1080 mbar est affichée dans l´unité de pression choisie (Torr, mbar ou hPa). ☞ Le capteur de pression a été étalonné en usine. Normalement, un réétalonnage par l´utilisateur n´est pas nécessaire grâce à la stabilité de longue durée du vacuomètre (voyez chapitre ”Réétalonnage”). 12.12.2002 Symbole ”montre” ☞ L´affichage du symbole ”montre” indique que le vacuomètre s´éteindra automatiquement dans une minute environ. ➨ Le symbole ”montre” disparaît et la durée d´opération recommence de nouveau si la touche START/STOP est appuyée. Réglage de la durée d´opération et du cycle de mesurage ☞ La durée d´opération du vacuomètre est selectable entre 1 et 999 minutes ou marche continue ”On”. Une durée de 15 minutes est présélectionnée en usine. ➨ Commutez dans le mode de réglage de la durée d´opération à l´aide de la touche MODE. ☞ Le symbole ”montre” et la durée d´opération sélectionnée en minutes sont affichés. ☞ Une flèche dirigée à droite indique que la valeur affichée peut être augmentée à l´aide da la touche HAUT/BAS. Pour réduire la durée d´operation: ➨ Appuyez sur la touche MODE pour changer la direction de la flèche à gauche. ➨ Diminuez la valeur affichée à l´aide la touche HAUT/BAS. ➨ Confirmez la durée d´opération sélectionnée en appuyant sur la touche START/STOP. ☞ L’appareil est en mode ”réglage du cycle de mesurage”. ☞ Le cycle de mesurage est sélectable entre automatique, 1 mesure dans 3s, 1 mesure dans 1s et 3 mesures dans 1s. Pour changer le cycle de mesurage: ☞ Le cycle de mesurage présélectionné est affiché (présélectionné en usine: ”A”). ➨ Appuyez sur la touche HAUT/BAS pour ajuster le cycle de mesurage: A = automatique (adaptation du cycle de mesurage automatique à l’application; plus de mesures si la pression change fréquemment), S1 = 1 mesure dans 3s, S2 = 1 mesure dans 1s, S3 = 3 mesures dans 1s. ☞ La flèche clignote ce qui symbolise la fréquence de mesure (seulement en cas de S1, S2 ou S3). ☞ Appuyez sur la touche MODE pour changer la direction de la flèche à gauche. ➨ Confirmez le cycle de mesurage sélectionné et terminez le mode en appuyant sur la touche START/STOP. 12.12.2002 Affichage de l’état de décharge de la batterie Si le vacuomètre est mis hors service, la capacité de la batterie est affichée qualitativement par le nombre de flèches sur l’affichage analogique pour quelques secondes. ☞ Si le symbole ”batterie” apparaît sur l’écran pendant le fonctionnement du vacuomètre, il est recommandé de remplacer la batterie. ☞ Un fonctionnement correct de l’appareil n’est plus assuré. Causes de mauvais fonctionnement Défaut C a u s e s p o s s i bl e s Remède Pas d'affichage ou l'affichage s'éteint. Î Batter ie est déchargée? ) R e m p l a c e z l a b a t t e r i e. Î Arrêt automatique? ) R e m e t t e z e n m a r c h e, augmentez la durée d ' o p e r a t i o n s i n é c e s s a i r e. ) Retour nez le dispositif à l ' u s i n e p o u r r é p a ra t i o n . ) Réétalonnez le vacuomètre. Î Autres causes? L'affichage de la pression est incorrect. Î Le capteur de pression n'est pas étalonné correctement? Î Humidité dans le capteur? Î L a b a t t e r i e e s t d é c h a r g é e, le symbole "batter ie" est affiché? Î Batter ie est déchargée? L'affichage vacille et/ou le symbole "montre" est affiché. Î A l a p r e s s i o n a c t u e l l e, u n Le mode de réétalonnage du vacuomètre ne peut réétallonage n'est pas pas être activé. possible? Tous les segments du LCD Î Le capteur de pression ou l'électronique de sont affichés ou pas mesurage défectueux? d ' a f f i c h a g e m a l gr é l a b a t t e r i e a é t é r e m p l a c é e. 15.07.2003 ) Séchez ou pompez le capteur, réétalonnez le cas échéant. ) R e m p l a c e z l a b a t t e r i e. ) R e m p l a c e z l a b a t t e r i e. ) Aérez à pression atmosphér ique ou evacuez à une pression < 20 mbar. ) Retour nez le dispositif à l ' u s i n e p o u r r é p a ra t i o n . Réétalonnage du vacuomètre Le vacuomètre a été étalonné en usine. Normalement, un réétalonnage par l´utilisateur n´est pas nécessaire grâce à la stabilité de longue durée du capteur de pression. En fonction du mode d´utilisation et exigences de précision, un contrôle et un réétalonnage peuvent s´avérer nécessaires. Ajustement par rapport à la pression atmosphérique Aérez le vacuomètre. Assurez-vous que le raccord de vide au niveau du régulateur est exposé à la pression atmosphérique. Attention: Déterminez la pression atmosphérique actuelle exactement, par exemple à l´aide d´un baromètre précis ou en vous informant auprès d´un service météorologique, auprès de l´aéroport le plus proche, (tenir compte d´une différence d´altitude éventuelle). ➨ Appuyez sur les touches START/STOP et HAUT/BAS simultanément. ☞ Le vacuomètre se met en mode d´étalonnage (indiqué par un triangle d´avertissement). ☞ Une flèche dirigée à droite indique que la valeur de pression affichée peut être augmentée en appuyant sur la touche HAUT/BAS. ➨ Ajustez l´ affichage par rapport à la pression atmosphérique exacte au lieu où il se trouve le vacuomètre à l´aide de la touche HAUT/BAS. + Pour diminuer la valeur affichée: ➨ Appuyez sur la touche MODE pour changer la direction de la flèche à gauche. ➨ Diminuez la valeur affichée à l´aide de la touche HAUT/BAS. ➨ Confirmez et terminez le mode en appuyant la touche START/STOP. Ajustement par rapport au vide Faites le vide dans le vacuomètre (en utilisant un raccord de vide, p.ex. au moyen d´une pompe à palettes) jusqu´à obtention d´une pression < 0,5 mbar. ➨ Appuyez sur les touches START/STOP et HAUT/BAS simultanément. ☞ Le vacuomètre se met en mode d´étalonnage + (indiqué par un triangle d´avertissement) ☞ L´affichage est réglé sur ”zéro” automatiquement. Attention: L´ajustement par rapport au vide avec une pression actuelle supérieur à 0,5 mbar, réduit la précision de mesure. Si la pression est supérieur à 0,5 mbar, l´ajustement par rapport à une pression de référence est recommandé. ➨ Confirmez et terminez le mode en appuyant la touche START/STOP. 12.12.2002 Ajustement par rapport à une pression de référence Faites le vide dans le vacuomètre jusqu´à une pression de référence connue exactement au-dessous de 20 mbar. Activez le mode d´étalonnage en appuyant sur les touches START/STOP et HAUT/BAS simultanément. ➨ Utilisez les touches HAUT/BAS pour ajuster l´affichage de ”zéro” par rapport à la pression de référence actuelle sur la ligne de raccordement du vide dans une gamme de 0 à 20 mbar. ➨ Confirmez et terminez le mode en appuyant la touche START/STOP. Attention: La précision de la détermination de la pression de référence influence la précision de la mesure. Si un ajustement par rapport au vide est effectué sans instrument de référence exacte seulement sur le vide limite nominal d´une pompe à membrane, la précision de mesure du vacuomètre peut être moins bonne, si la pompe à membrane n´atteint pas la valeur spécifiée (formation de condensat, mauvais état, défaillance ou contamination des clapets). Etalonnage en usine Contrôle des équipements de mesure Le laboratoire d´étalonnage VACUUBRAND est accrédité par le Physikalisch-Technische Bundesanstalt (PTB; organisme agrée conformément à l´article 14 de la Directive du Conseil des Communautés Européennes du 18 décembre 1975 (76/117/CEE)) pour les essais de la variable mesurée pression dans la gamme de 10-3 mbar à 1000 mbar en conformité avec les critères généraux concernant le fonctionnement de laboratoires d´essais définits dans la norme EN ISO/IEC 17025:2000 et registré sous le no. DKD-K19201. Etalonnage dans le laboratoire d´étalonnage VACUUBRAND: - Afin de satisfaire aux normes DIN ISO 9000ff et 10012 concernant l´étalonnage des équipements de contrôle, de mesure et d´essai à intervalles spécifiés. - Afin de documenter la tracabilité des appareils et instruments de mesure par rapport à l´étalon national du PTB. DKD calibration ......................................................................................................................... 90 02 17 Remplacement de la batterie Note: Sur le circuit imprimé, il y a des composants qui sont sensibles à un décharge électrostatique. Ne touchez pas les composants avec la main. Si nécessaire, mettez à la terre d´une façon appropriée le circuit imprimé et la personne remplaçant la batterie. Attention: Utilisez seulement la batterie du type recommandé (voyez chapitre ”Données techniques”). La batterie ne doit pas être chargée ni raccordée à une source de tension externe! ➨ Enlevez les quatre vis à tête conique à l´aide d´un tournevis cruciforme. ➨ Séparez les deux parties du bâti soigneusement. ➨ Enlevez la batterie. ➨ Insérez la batterie neuve dans la partie arrière du bâti, faites attention aux polarités (voyez l´empreinte à l´intérieur du bâti). ☞ En rassemblement le vacuomètre, veillez à ce que le clavier silicone et le circuit imprimé soient logés correctement. ➨ Vissez les deux parties du bâti soigneusement. circuit imprimé batterie clavier silicone 29.09.2003 Remarques concernant le renvoi à l´usine Réparation - renvoi - étalonnage DKD Si les mesures mentionnées dans le chapitre ”Causes de mauvais fonctionnement” ne sont pas couronnées de succès: Retournez le produit en usine pour réparation. L´ouverture et la désagrégation du produit causent forclusion de garantie et le cas échéant le agrément. Par égard pour la santé et la sécurité de nos employés et comme requis par l´ordonnance relative aux matériaux dangereux, les réglementations concernant la sécurité sur le lieu de travail ainsi que les réglementations régissant l´enlèvement des déchets et des huiles usagés, il est absolument essentiel de remplir le formulaire ”Déclaration de sécurité” pour toutes les pompes et tous les autres produits qui nous sont retournés. Renvoyez-nous à l´avance une copie complétée de ce formulaire par télécopie ou par la poste, afin que l´information soit disponible avant que la pompe/les composants arrivent. Si nécessaire, en avisez aussi le transporteur. Aucune acceptation, traitement, réparation ou étalonnage DKD ne sont possibles sans l´envoi du formulaire complété. La réparation / l´étalonnage DKD seront inévitablement prolongés de façon considérable, si une information fait défaut ou si cette procédure n´est pas respectée. Si le dispositif est entré en contact avec des produits chimiques, des substances radioactives ou d´autres substances dangereuses pour la santé ou l´environnement, le dispositif doit être décontaminé avant son renvoi à l´usine. Pour assurer une réparation rapide et économique, prière de joindre aussi une description détaillée du problème et des conditions de fonctionnement du dispositif, avec chaque dispositif qui doit être retourné pour réparation. Nous ne faisons de devis que sur demande et toujours au frais du client. Si une commande nous parvient, les coûts occasionnés sont défalqués des coûts de réparation ou du prix d´achat d´une nouvelle pièce. ☞ Si vous ne souhaitez pas une réparation sur base de notre devis estimatif, l´équipement sera vous retourné démonté et à vos frais. Sur demande, nous remplaçons des pièces d´utilité esthétique à vos frais. Avant de nous retourner le dispositif, assurez-vous que le cas échéant: ☞ Le dispositif a été nettoyé et/ou décontaminé. ☞ Les ports ont été obturés. ☞ Le dispositif a été correctement emballé et marqué, le cas échéant, commandez l´emballage original (les coûts vous seront facturés). Assurez vous que la ”Déclaration de sécurité” a été jointe. Nous sollicitons votre compréhension pour les mesures qui ne sont pas de notre ressort et vous prions de nous aider à accélérer le processus. Mise à la ferraille et mise au rebut des déchets: En raison de la prise de conscience accrue de l´environnement et des réglementations toujours plus stricts, il est impératif de mettre en oeuvre les bonnes procédures, en ce qui concerne la mise à la ferraille et la mise au rebut des déchets provenant des pompes à vide ou de leurs composants qui ne sont plus repérables. ☞ Vous pouvez nous donner l´autorisation de rebuter correctement le dispositif à vos frais. 16.12.2002 Déclaration de sécurité Déclaration relative à la sécurité, au caractère inoffensif et à l´élimination des déchets et des huiles usagées. La sécurité et la santé de nos collaborateurs, les règlements sur les produits dangereux, les règlements sur la sécurité du travail et les règlements sur l´élimination des déchets et des huiles usagées imposent impérativement le retour de ce formulaire dûment rempli, pour toutes les pompes et autre produits qui nous sont retournés. En l´absence de ce formulaire entièrement rempli une acceptation, traitement, réparation ou étalonnage DKD ne sont pas possibles. a) Envoyez-nous tout d´abord une copie dûment remplie de ce formulaire par télécopie (++49 9342 / 59880) ou par lettre, de sorte que les informations soient déjà disponibles avant l´arrivée du produit. Joignez une autre copie à la pièce. Il faut éventuellement informer également le transporteur (GGVE, GGVS, RID, ADR). b) Des données incomplètes ou l´inobservation de ces formalités conduisent obligatoirement à un retard important du traitement. Nous sollicitons votre compréhension pour ces mesures qui se situent en dehors de nos possibilités d´influence et vous prions de nous aider à accélérer le processus. c) Veuillez absolument remplir complètement! 1. Pièce (Type): .............................................. 5. Mode de transport / transporteur: 2. Numéro de série: ....................................... ........................................................................................... Jour de l´expédition à VACUUBRAND: 3. Désignation chimique des substances en contact avec le produit, respectivement des substances qui pouvaient se former éventuellement pendant le processus: 3.1 Nom, description chimique, éventuellement formule chimique: a) ................................................................... ........................................................................................... b) ................................................................... Si la peinture est endommagés, nous souhaitons que les composants soient repeints ou que les pièces esthétiques soient remplacées à nos frais (voyez ”Réparation en usine - Etalonnage DKD”): c) ................................................................... ❑ oui d) ................................................................... 3.2 Informations importantes et mesures de précaution, par exemple degré de danger: a) ................................................................... b) ................................................................... c) ................................................................... d) ................................................................... 4. Déclaration sur la classification des substances (cochez les réponses correspondantes): ❑ 4.1 pour substances non dangereuses: Pour la pièce citée ci-dessus, nous certifions - qu´aucune contamination toxique, corrosive, microbiologique, explosive, radioactive ou autrement dangereuse était causée par le fonctionnement. - que le produit est lexempt de substances dangereuses. - que l´huile ou d´éventuels restes de substances pompées ont été vidangés. ❑ 4.2 pour substances dangereuses: Pour la pièce citée ci-dessus, nous certifions - que toutes les substances toxiques, corrosives, microbiologiques, explosives, radioactives ou autrement dangereuses, qui ont été pompées avec la pièce citée ci-dessus ou étaient en contact avec elle, sont énumérées complètement sous le point 3.1. - que le produit a été ❑ nettoyé ❑ décontaminé ❑ stérilisé selon les réglementations. VACUUBRAND GMBH + CO KG -Technologie pour Systèmes de Vide© 2001 VACUUBRAND GMBH + CO KG Printed in Germany ❑ non Nous déclarons avoir pris les mesures suivantes, si applicable: - L´huile de la pompe a été vidangée. Attention: Respectez les directives sur l´élimination des huiles usagées! - L´intérieur du produit a été nettoyé. - Les ouvertures d´aspiration et de refoulement du produit ont été obturées. - Le produit a été correctement emballé (le cas échéant, commandez l´emballage original; le coûts vous seront facturés) et correctement identifié. - Le transporteur a été informé (si nécessaire) du danger de l´envoi. Nous certifions que nous prenons la responsabilité vis à vis de VACUUBRAND pour tout dommage résultant de données incomplètes ou inexactes et que nous dégageons VACUUBRAND de toute réparation de dommages éventuellement causés aux tiers. Nous avons connaissance du fait que nous sommes directement responsables vis à vis de tiers - tout particulièrement vis à vis des collaborateurs de VACUUBRAND chargés de la manipulation / réparation de la pièce - selon § 823 du BGB (code civil allemand). Signature: ........................................................................... Nom (en caractères): ........................................................ Position (en caractères): ................................................... Cachet de l´entreprise: ...................................................... Date: ................................................................................... D-97866 Wertheim - B. P. 1664 D-97877 Wertheim - Alfred-Zippe-Str. 4 Tel. (++49)9342 / 808-0 - Télécopie: (++49)9342 / 59880 04.07.2002 Wir wollen unsere Kunden durch unsere technischen Schriften informieren und beraten. Die Übertragbarkeit von allgemeinen Erfahrungen und Ergebnissen unter Testbedingungen auf den konkreten Anwendungsfall hängt jedoch von vielfältigen Faktoren ab, die sich unserem Einfluss entziehen. Wir bitten deshalb um Verständnis, dass aus unserer Beratung keine Ansprüche abgeleitet werden können. Die Übertragbarkeit ist daher im Einzelfall vom Anwender selbst sehr sorgfältig zu überprüfen. Disclaimer: Our technical literature is only intended to inform our customer. The validity of general empirical values and results obtained under test conditions for specific applications depend on a number of factors beyond our control. It is therefore strictly the users´ responsibility to very carefully check the validity of application to their specific requirements. No claims arising from the information provided in this literature will, consequently, be entertained. Au travers de cette documentation, nous souhaitons informer et conseiller nos clients. Chaque application étant spécifique, nous ne pouvons garantir la transposition exacte des valeurs mesurées dans des conditions de tests. Aussi nous vous prions de comprendre qu’aucune réclamation ne pourra être acceptée sur la base de ces informations. Il appartient donc à chaque utilisateur de vérifier soigneusement si les données peuvent être transposées à son application. VACUUBRAND GMBH + CO KG -Vakuumtechnik im System© 2002 VACUUBRAND GMBH + CO KG Printed in Germany 99 90 01 D-97866 Wertheim - Postfach 1664 D-97877 Wertheim - Alfred-Zippe-Str. 4 Tel. (++49)9342 / 808-0 - Fax (++49)9342 / 59880 29.09.2003