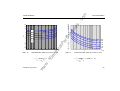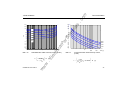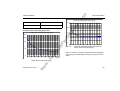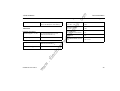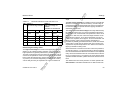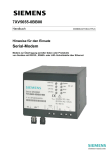
1
om
.c
w
ww
C53000-K1174-C001-7
19.04.02
1 2 3 4 5 6
1 2 3 4 5 6
1 2 3 4 5 6
1 2 3 4 5 6
DT O/C
50/51
I>>
MIN 2
MAX 20/.
I>>
MIN 2
MAX 20/.
TI>>
MIN 0
MAX 1.575
TI>>
MIN 0
MAX 1.575
Ip
MIN 0.8/1.3*
MAX 4/.
I>
MIN 0.8/1.3*
MAX 6.2/.
TIp
MIN 0.05
MAX 3.15
TI>
[s]
[I/IN]
1 2 3 4 5 6
1.6
0.8
0.4
0.2
0.1
0.05
ON
3.2
1.6
0.8
0.4
0.2
0.1
ON
0.8
0.4
0.2
0.1
0.05
0.025
[I/IN]
ON
.E
lec
tri
ca
lP
Handbuch
Manual
16
8
4
2
1
0.5
[s]
60 Hz
IE
8
IEC 51
7SJ45
-
50 Hz
I>>
N INV
V INV
E INV
8
FREQ.
MODE
8
Digitaler Überstromzeitschutz
Numerical Overcurrent Protection
ENTER
8
SIPROTEC easy
ERROR
ON
ar
tM
an
ua
ls
TRIP
SIPROTEC7SJ4
RUN
ON
s
MIN 0
MAX 6.3
16
8
4
2
1
0.5
0.8
0.4
0.2
0.1
0.05
0.025
3.2
1.6
0.8
0.4
0.2
0.1
3.2
1.6
0.8
0.4
0.2
0.1
*: PULSE OUTPUT/CONTACT OUTPUT
om
Handbuch 7SJ45
Inhalt
Contents
Manual 7SJ45
.c
1.7.1 Grundeinstellungsblock....................................... 12
1.7.2 Parametereinstellungen ...................................... 13
7SJ45 mit Relaisausgang - Gerätekonfiguration
über Steckbrücke
16
1.9
Montage und Inbetriebsetzung ......................... 18
ar
tM
an
ua
ls
1.8
1
Betriebsanleitung............................................... 4
1.9.1 Schalttafeleinbau ................................................ 19
1.1
Konformität .......................................................... 4
1.9.2 Hutschienenmontage .......................................... 20
1.2
Allgemeine Hinweise ........................................... 4
1.2.1 Qualifiziertes Personal .......................................... 5
1.9.3 Anschluss............................................................ 21
1.9.4 Inbetriebsetzung ................................................. 22
1.10 Wartung ............................................................ 25
1.2.3 Marken .................................................................. 6
1.11 Technische Daten ............................................. 26
tri
ca
lP
1.2.2 Bestimmungsgemäßer Gebrauch ......................... 6
1.2.4 Copyright............................................................... 6
1.2.5 Haftungsausschluss .............................................. 6
Aus- und Einpacken des Gerätes ....................... 7
1.4
Lagerung ............................................................. 7
1.5
Anwendung ......................................................... 7
1.6
Aufbau ................................................................. 8
1.7
Einstellungen ..................................................... 11
C53000-K1174-C001-7
ww
w
.E
lec
1.3
2
Operating Instructions .................................... 43
2.1
Conformity ......................................................... 43
2.2
General information .......................................... 43
2.2.1 Qualified personnel ............................................. 44
2.2.2 Use as prescribed ............................................... 45
2.2.3 Registered trademarks........................................ 45
2.2.4 Copyright............................................................. 45
2
Unpacking and packing ..................................... 46
2.4
Storage ............................................................. 46
2.5
Applications ....................................................... 46
2.6
Construction ...................................................... 47
2.7
Settings ............................................................. 50
ar
tM
an
ua
ls
2.3
om
2.2.5 Disclaimer of liability............................................ 45
Manual 7SJ45
.c
Handbuch 7SJ45
2.7.1 Basic Settings Block............................................ 51
2.7.2 Parameter settings .............................................. 52
7SJ45 with relay output - device configured by a
jumper
55
2.9
Installation and commissioning ......................... 57
tri
ca
lP
2.8
2.9.1 Panel flush mounting........................................... 58
2.9.2 Standard rail mounting ........................................ 59
lec
2.9.3 Connection .......................................................... 60
2.9.4 Commissioning.................................................... 61
.E
2.10 Maintenance ...................................................... 64
C53000-K1174-C001-7
ww
w
2.11 Technical Data .................................................. 65
3
om
7SJ45 Handbuch
Betriebsanleitung
1.1
Konformität
Das Produkt ist im Rahmen der Technischen Daten
UL-zugelassen:
ar
tM
an
ua
ls
.c
1
Konformität
IND. CONT. EQ.
TYPE 1
69CA
tri
ca
lP
Das Produkt entspricht den Bestimmungen der Richtlinie des Rates der Europäischen Gemeinschaften zur Angleichung der
Rechtsvorschriften der Mitgliedstaaten über die elektromagnetische Verträglichkeit (EMV–Richtlinie 89/336/EWG) und betreffend elektrische Betriebsmittel zur Verwendung innerhalb bestimmter Spannungsgrenzen (Niederspannungsrichtlinie 73/23/
EWG).
lec
Diese Konformität ist das Ergebnis einer Prüfung, die durch die
Siemens AG gemäß Artikel 10 der Richtlinie in Übereinstimmung
mit den Fachgrundnormen EN 50 081 und EN 50 082 für die
EMV–Richtlinie und der Norm EN 60 255–6 für die Niederspannungsrichtlinie durchgeführt worden ist.
Allgemeine Hinweise
Diese Betriebsanleitung enthält die erforderlichen Informationen
für den bestimmungsgemäßen Gebrauch der darin beschriebenen Produkte. Sie wendet sich an technisch qualifiziertes Personal, welches speziell ausgebildet ist oder einschlägiges Wissen
auf dem Gebiet der Mess-, Steuerungs- und Regelungstechnik,
im folgenden Automatisierungstechnik genannt, besitzt.
Die Kenntnis und das technisch einwandfreie Umsetzen der in
dieser Anleitung enthaltenen Sicherheitshinweise und Warnungen sind Voraussetzung für gefahrlose Installation und Inbetriebnahme, sowie für Sicherheit bei Betrieb und Instandhaltung des
beschriebenen Produkts. Nur qualifiziertes Personal im Sinne
der nachfolgenden Erläuterung verfügt über das erforderliche
Fachwissen, um die in dieser Unterlage in allgemeingültiger Weise gegebenen Sicherheitshinweise und Warnungen im konkreten Einzelfall richtig zu interpretieren und in die Tat umzusetzen.
C53000-K1174-C001-7
ww
w
.E
Das Erzeugnis steht im Einklang mit der internationalen Norm der
Reihe IEC 60 255 und der nationalen Norm DIN 57 435/Teil 303
(entspr. VDE 0435/Teil 303).
1.2
4
om
7SJ45 Handbuch
[email protected]
Tel:
+49 (1805) 247000
Fax:
+49 (1805) 242471
WARNUNG!
ar
tM
an
ua
ls
Sollten weitere Informationen gewünscht werden oder sollten besondere Probleme auftreten, die in dieser Unterlage nicht ausführlich genug behandelt werden, dann erhalten Sie zusätzliche
Auskünfte von der Hotline:
mail:
.c
Diese Betriebsanleitung ist fester Bestandteil des Lieferumfangs.
Sie kann jedoch nicht sämtliche Details zu allen Ausführungen
des beschriebenen Produkts und auch nicht jeden denkbaren
Fall der Aufstellung, des Betriebes oder der Instandhaltung berücksichtigen.
Allgemeine Hinweise
Beim Betrieb elektrischer Geräte stehen zwangsläufig bestimmte Teile
dieser Geräte unter gefährlicher Spannung. Bei Nichtbeachtung der
Warnhinweise können deshalb schwere Körperverletzungen oder
Sachschäden auftreten.
Nur entsprechend qualifiziertes Personal darf an diesem Gerät arbeiten. Der einwandfreie und sichere Betrieb dieses Gerätes setzt sachgemäßen Transport, fachgerechte Lagerung, Aufstellung und Montage,
sowie sorgfältige Bedienung und Instandhaltung voraus.
tri
ca
lP
1.2.1 Qualifiziertes Personal
sind Personen, die mit Aufstellung, Montage, Inbetriebsetzung
und Betrieb des Produktes vertraut sind und über entsprechende
Qualifikationen verfügen, wie z.B.:
•
Ausbildung oder Unterweisung bzw. Berechtigung Geräte/
Systeme gemäß den Standards der Sicherheitstechnik einund auszuschalten, zu erden und zu kennzeichnen.
•
Ausbildung oder Unterweisung gemäß den Standards der Sicherheitstechnik in Pflege und Gebrauch angemessener Sicherheitsausrüstung.
•
Schulung in erster Hilfe
C53000-K1174-C001-7
ww
w
.E
lec
Außerdem weisen wir darauf hin, dass der Inhalt dieser ProduktDokumentation nicht Teil einer früheren oder bestehenden Vereinbarung, Zusage oder eines Rechtsverhältnisses ist oder dieses abändern soll. Sämtliche Verpflichtungen von Siemens ergeben sich aus dem jeweiligen Kaufvertrag, der auch die vollständige und allein gültige Gewährleistungsregelung enthält. Diese
vertraglichen Gewährleistungsbestimmungen werden auch
durch die Ausführungen in dieser Unterlage weder erweitert noch
beschränkt.
5
om
7SJ45 Handbuch
Allgemeine Hinweise
1.2.4 Copyright
Beachten Sie bitte folgendes:
Copyright © Siemens AG 2001. All rights reserved.
.c
1.2.2 Bestimmungsgemäßer Gebrauch
ar
tM
an
ua
ls
Weitergabe und Vervielfältigung dieser Unterlage, Verwertung
und Mitteilung ihres Inhalts ist nicht gestattet, soweit nicht ausdrücklich zugestanden. Zuwiderhandlungen verpflichten zu
Schadenersatz. Alle Rechte vorbehalten, insbesondere für den
Fall der Patenterteilung oder GM–Eintragung.
WARNUNG!
Das Gerät darf nur für die im Katalog und in der technischen Beschreibung vorgesehenen Fälle und nur in Verbindung mit von Siemens empfohlenen bzw. zugelassenen Fremdgeräten und -komponenten verwendet werden.
tri
ca
lP
Der einwandfreie und sichere Betrieb des Produktes setzt sachgemäßen Transport, sachgemäße Lagerung, Aufstellung und Montage sowie
sorgfältige Bedienung und Instandhaltung voraus.
1.2.3 Marken
Wir haben den Inhalt der Druckschrift auf Übereinstimmung mit
der beschriebenen Hard- und Software geprüft. Dennoch können
Abweichungen nicht ausgeschlossen werden, so dass wir für die
vollständige Übereinstimmung keine Gewähr übernehmen.
Die Angaben in diesem Handbuch werden regelmäßig überprüft,
und notwendige Korrekturen sind in den nachfolgenden Auflagen
enthalten. Für Verbesserungsvorschläge sind wir dankbar.
Technische Änderungen bleiben, auch ohne Ankündigung, vorbehalten.
C53000-K1174-C001-7
ww
w
.E
lec
SIPROTEC ist eingetragene Marke der SIEMENS AG. Die übrigen Bezeichnungen in diesem Handbuch können Marken sein,
deren Benutzung durch Dritte für deren Zwecke die Rechte der
Inhaber verletzen können.
1.2.5 Haftungsausschluss
6
om
7SJ45 Handbuch
Aus- und Einpacken des Gerätes
zugehöriger Ersatzbaugruppen gilt der Temperaturbereich von
–25 °C bis +55 °C (siehe auch Abschnitt 1.11).
Es wird empfohlen, bei der Lagerung einen eingeschränkten
Temperaturbereich zwischen +10 °C und +35 °C einzuhalten,
um einer vorzeitigen Alterung der eingesetzten Elektrolytkondensatoren vorzubeugen.
ar
tM
an
ua
ls
Die Geräte werden im Werk so verpackt, dass sie die Anforderungen nach IEC 60255–21 erfüllen.
.c
1.3
Aus- und Einpacken des Gerätes
Das Aus- und Einpacken ist mit der üblichen Sorgfalt ohne Gewaltanwendung und nur unter Verwendung von geeignetem
Werkzeug vorzunehmen. Die Geräte sind durch Sichtkontrolle
auf einwandfreien mechanischen Zustand zu überprüfen.
Die Transportverpackung kann bei Weiterversand in gleicher
Weise wiederverwendet werden. Die Lagerverpackung der Einzelgeräte ist nicht für Transport ausreichend. Bei Verwendung
anderer Verpackung muss das Einhalten der Transportanforderungen entsprechend IEC 60255–21–1 Klasse 2 und
IEC 60255–21–2 Klasse 1 sichergestellt werden.
Lagerung
lec
1.4
tri
ca
lP
Bevor das Gerät erstmalig in Betrieb genommen wird, soll es
mindestens 2 Stunden im Betriebsraum gelegen haben, um einen Temperaturausgleich zu schaffen und Feuchtigkeit und Betauung zu vermeiden.
.E
Wenn das Gerät nicht sofort zum Einsatz kommen soll, kann es
nach Prüfung gelagert werden. Bitte beachten Sie dabei:
C53000-K1174-C001-7
ww
w
SIPROTEC® easy – Geräte sollen in trockenen und sauberen
Räumen gelagert werden. Für die Lagerung des Gerätes oder
Bei der nicht betauungsfesten Ausführung des Gerätes darf die
relative Feuchte weder zur Kondenswasser- noch zur Eisbildung
führen.
Außerdem empfiehlt es sich bei langer Lagerungszeit, das Gerät
etwa alle 2 Jahre für 1 bis 2 Tage in Betrieb zu nehmen, um die
eingesetzten Elektrolytkondensatoren zu formieren. Ebenso soll
vor einem geplanten Einsatz des Gerätes verfahren werden. Bei
extremen klimatischen Verhältnissen (Tropen) wird damit gleichzeitig ein „Vorheizen“ erreicht und Betauung vermieden.
1.5
Anwendung
Das Schutzgerät SIPROTEC® easy 7SJ45 ist ein digitaler Überstromzeitschutz zur Anwendung
•
als selektiver Kurzschlussschutz in elektrischen Versorgungsnetzen mit einseitiger Einspeisung.
•
als Reserveschutz bei Vergleichsschutzeinrichtungen.
Als Leitungsschutz ist das Gerät in Netzen mit geerdeter, niederohmig geerdeter, isolierter oder kompensierter Sternpunktausführung einsetzbar.
7
om
7SJ45 Handbuch
Überstromzeitschutz
•
•
2-stufiger Überstromzeitschutz. Eine Normalstufe für Phasenströme (UMZ oder AMZ) ist immer vorhanden. Bei der
zweiten Stufe kann zwischen Hochstromstufe für Phasenströme (UMZ) oder Normalstufe für berechnete Erdströme
(UMZ oder AMZ) gewählt werden.
Das Schutzgerät 7SJ45 enthält in kompakter Bauform alle Komponenten für:
•
Messwerterfassung und Auswertung
•
Meldungs- und Befehlsausgabe
•
Bedienung und Anzeige
•
Ansteuerung eines optionalen Schauzeichens
•
Wandlerstromversorgung
Gerätevarianten
Unempfindlich gegen Gleichstromglieder, Einschalt- und Ladeströme sowie gegen höherfrequente Ausgleichsvorgänge.
Wahlweise stehen Geräte mit Impulsausgang bzw. Relaisausgang zur Verfügung.
Überwachungsfunktionen
Überwachung der Hardware und Software, dadurch erhöhte
Zuverlässigkeit. Die Überwachung steuert die LEDs “RUN”
und “ERROR”.
•
Gerät mit Impulsausgang
Diese Geräte erfordern einen leistungsarmen Auslöser im
Leistungsschalter (24 V/0,1 Ws 20 Ω) und sind für Schaltanlagen neuerer Bauart konzipiert (siehe Bild 1-27 und siehe
Bestelldaten und Zubehör im Kapitel 1.11).
Im Fehlerfall wird der Aus-Kreis für 100 ms freigegeben. Bei
einem Schaltvorgang wird das Aus-Kommando so lange wiederholt, bis der Leistungsschalter angesprochen hat.
Zwischen den Auslösungen wird eine Pausenzeit von 500 ms
eingelegt. Diese kann sich verlängern, wenn sehr niedrige
Fehlerströme vorliegen.
C53000-K1174-C001-7
ww
w
.E
lec
•
Aufbau
AMZ–Schutz mit integrierendem Messverfahren (disk emulation), Kennlinien nach IEC oder ANSI.
tri
ca
lP
•
1.6
ar
tM
an
ua
ls
Der digitale Überstromzeitschutz SIPROTEC
folgende Funktionen:
® easy 7SJ45 bietet
.c
Das Gerät ist als Reserveschutz bei Transformatoren einsetzbar.
Aufbau
8
Frontansicht
3
ON
1 2 3 4 5 6
ON
MIN 0
MAX 1.575
TI>>
MIN 0
MAX 1.575
MIN 0.8/1.3 *
MAX 4/.
I>
MIN 0.8/1.3 *
MAX 6.2/.
MIN 0.05
MAX 3.15
TI>
1 2 3 4 5 6
TIp
1 2 3 4 5 6
1.6
0.8
0.4
0.2
0.1
0.05
ON
Ip
1 2 3 4 5 6
3.2
1.6
0.8
0.4
0.2
0.1
[s]
[I/IN]
ON
TI>>
1 2 3 4 5 6
MIN 2
MAX 20/.
0.8
0.4
0.2
0.1
0.05
0.025
[s]
ON
I>>
MIN 0
MAX 6.3
16
8
4
2
1
0.5
0.8
0.4
0.2
0.1
0.05
0.025
3.2
1.6
0.8
0.4
0.2
0.1
3.2
1.6
0.8
0.4
0.2
0.1
SW1
SW2
SW3
SW4
SW5
4
*: PULSE OUTPUT/CONTACT OUTPUT
Bild 1-1
Gerätefront Bedien- und Anzeigeelemente des
7SJ45
C53000-K1174-C001-7
ww
w
.E
lec
Die Gehäuse sind so bemessen, dass die 7SJ45-Geräte in der
Regel in bestehende Schalttafelausschnitte passen.
In der betauungsfesten Ausführung ist die Baugruppe des Gerätes mit Schutzlack versiegelt. Das Gerät ist dann selbst in rauesten Umgebungsbedingungen mit extremer Feuchte einsetzbar.
MIN 2
MAX 20/.
8
Hutschienenmontage
DT O/C
50/51
I>>
8
•
ENTER
[I/IN]
60 Hz
IE
8
16
8
4
2
1
0.5
tri
ca
lP
Schalttafeleinbau und
2
-
50 Hz
I>>
N INV
V INV
E INV
8
IEC 51
•
ERROR
1
FREQ.
MODE
Das Gerät ist lieferbar für:
SIPROTEC7SJ4
RUN
TRIP
Im Fehlerfall wird für mindestens 500 ms ausgelöst. Bei einem Schaltvorgang bleibt das Aus-Kommando anstehen, bis
der Leistungsschalter auslöst.
Gehäuse
Aufbau
.c
Gerät mit Relaisausgang
Diese Geräte passen in konventionelle Schaltanlagen. Als
Hilfsspannungsquelle für die Auslösespule kann der Auslösewandler im Stromwandlerkreis oder eine andere Hilfsspannungsquelle verwendet werden (siehe Bild 1-24 bis Bild 1-26
und siehe Bestelldaten und Zubehör im Kapitel 1.11).
ar
tM
an
ua
ls
•
om
7SJ45 Handbuch
9
ar
tM
an
ua
ls
1. Schauzeichen (optional)
Das Schauzeichen signalisiert eine erfolgte Auslösung.
Durch Drücken der Taste wird die Auslösemeldung zurückgesetzt.
om
Auf der Gerätefront (Bild 1-1) befinden sich folgende Bedien- und
Anzeigeelemente:
.c
7SJ45 Handbuch
2. Betriebszustands-Anzeigen
Die beiden LEDs “RUN” und “ERROR” zeigen den Betriebszustand des Gerätes an.
Aufbau
ANSI
Phase
Erdstrom
3. ENTER
Taste zum Aktivieren von Geräteeinstellungen, wenn Veränderungen an den DIP-Schaltern vorgenommen wurden.
tri
ca
lP
4. DIP-Schalter
Zur Parametrierung des Gerätes stehen fünf 6-polige DIPSchalter zur Verfügung. Die möglichen Einstellungen werden
im Kapitel Parametereinstellungen beschrieben.
Phase
Erdstrom
C53000-K1174-C001-7
ww
w
.E
lec
Auf der Geräterückseite (Bild 1-2) befinden sich die Anschlussleisten mit den Schraubklemmen:
IEC
10
1.7
Einstellungen
Einstellungen
.c
Rückansicht
om
7SJ45 Handbuch
ar
tM
an
ua
ls
Alle für die Parametrierung erforderlichen Einstellelemente befinden sich auf der Frontplatte. Die Wahl von Grundeinstellungen
wie z.B. Wahl der Auslösekennlinie erfolgt über Schalter nach
dem Auswahlverfahren (siehe Abschnitt 1.7.1). Die Einstellung
der Ansprechwerte und Zeitfaktoren erfolgt nach dem Additionsverfahren ebenfalls über Schalter. Hierbei sind die den einzelnen
Schalterstellungen zugeordneten Einzelwerte jeweils zum Gesamtwert zu addieren.
Geräterückseite Anschlüsse 7SJ45, z.B. Gerät
mit Impulsausgang
Bei Lieferung sind alle DIP-Schalter auf der Front in Schalterstellung “off” (bei Blick auf die Front Schalter nach rechts geschoben). Durch Ändern der Schalterstellung der einzelnen DIPSchalter wird das Gerät parametriert. Führen Sie dazu einen
dünnen Gegenstand (Stift) in die Kerbe ein und bewegen den
Schalter in die gewünschte Position.
.E
lec
Bild 1-2
tri
ca
lP
In der Lieferversion ist die Frontplatte für die Nutzung der Hochstromstufe bedruckt (siehe Abschnitt 1.7.1). In dieser Parametrierung ist die Auswertung des berechneten Erdstromes nicht
vorgesehen. Die Kennlinienart (IEC oder ANSI) ist mit der Bestellung festgelegt und entsprechend aufgedruckt.
on
off
Das Leistungsschild mit den für das Gerät wichtigen Daten befindet sich seitlich am Gehäuse.
Schalterbelegung DIP-Schalter
C53000-K1174-C001-7
ww
w
Bild 1-3
11
om
1.7.1 Grundeinstellungsblock
Einstellungen
.c
7SJ45 Handbuch
WARNUNG!
FREQ. 50 Hz
MODE I>>
N INV
IEC 51 V INV
E INV
Bild 1-4
ar
tM
an
ua
ls
Mit dem Grundeinstellungsblock (Bild 1-4) legen Sie die Funktion
des Gerätes fest.
Mit Umschaltung auf IE am Grundeinstellungsblock ändert sich die
Bedeutung einiger Parameter. Die Frontplattenbedruckung muss
durch das beiliegende Klebeschild mit den aktuellen Parametern
überdeckt werden!
Achtung! Klebeschild lässt sich nach dem Aufkleben nicht wieder entfernen!
60 Hz
IE
DT O/C
50/51
Grundeinstellungsblock, Beispiel IEC-Gerät
Auswahl der Betriebsart
tri
ca
lP
Der oberste Schalter des Grundeinstellungsblocks ist nicht belegt!
FREQ. 50 Hz / 60 Hz
lec
Mit diesem Schalter wird das Gerät an die vorhandene Netzfrequenz angepasst.
MODE I>> / IE
C53000-K1174-C001-7
ww
w
.E
Mit diesem Schalter legen Sie fest, welche Parameter ausgewerte werden. Hochstromstufe (I>>) aktiv oder Auswertung der berechneten Erdströme (IE).
Mit den verbleibenden 3 Schaltern legen Sie die Betriebsart des
Schutzgerätes fest.
Soll das Gerät als unabhängiger Überstromzeitschutz
(DT O/C 50/51) arbeiten, so bringen Sie die Schalter 1 bis 3 am
Grundeinstellungsblock in Schalterstellung “off” (siehe Tabelle 11 auf Seite 13).
Ist die Betriebsart “DT O/C 50/51” gewählt, gilt für die Parametereinstellungen die schwarze Beschriftung!
Soll das Gerät als abhängiger Überstromzeitschutz (nach
IEC 51 bzw. ANSI 51) arbeiten, so wählen Sie die gewünschte
Kennlinie aus, indem Sie einen der Schalter 1 bis 3 in die Schalterstellung “on” bringen (siehe Tabelle 1-1 auf Seite 13):
Achtung! Es darf nur ein Schalter in Schalterstellung “on”
sein!
12
Folgende Typen von abhängigen ÜberstromzeitschutzKennlinien können ausgewählt werden:
Kennlinien nach ANSI
N INV
Normal abhängig
M INV
Moderately inverse
V INV
Stark abhängig
V INV
Very inverse
E INV
Extrem abhängig
E INV
Extremely inverse
tri
ca
lP
Kennlinien nach IEC
om
Tabelle 1-1
Beispiele für Einstellung am Grundeinstellungsblock
ar
tM
an
ua
ls
Werden zwei oder mehr Schalter auf “on” gestellt, blinkt die rote
LED “ERROR”. In diesem Zustand sind alle Schutzstufen deaktiviert. Wählen Sie nur eine Überstromzeitschutz-Kennlinie aus.
Um die korrigierte Einstellung zu übernehmen, betätigen Sie die
Taste “ENTER”. Die LED “ERROR” hört nun auf zu blinken.
Die Überstromzeitschutzkennlinien finden Sie im Kapitel Technische Daten (Bild 1-11 bis Bild 1-20).
FREQ. 50 Hz
MODE I>>
N INV
IEC 51 V INV
E INV
FREQ. 50 Hz
MODE
I>>
N INV
IEC 51 V INV
E INV
60 Hz
IE
DT O/C
50/51
60 Hz
IE
DT O/C
50/51
lec
Ist die Betriebsart IEC 51 bzw. ANSI 51 gewählt, gilt für die Parametereinstellungen die weiße Beschriftung!
Hier gewählt:
Gerät eingestellt für Netzfrequenz 50 Hz
Auswertung IE berechnet
Betriebsart: unabhängiger
Überstromzeitschutz
Hier gewählt:
Gerät eingestellt für Netzfrequenz 50 Hz
Hochstromstufe aktiv
Betriebsart: abhängiger Überstromzeitschutz, Kennlinienart: Very inverse
1.7.2 Parametereinstellungen
Die am Grundeinstellungsblock ausgewählte Einstellung des Gerätes bestimmt die möglichen Einstellwerte. Die folgende Tabelle
zeigt die Parameterzuordnung in Abhängigkeit von der Bestellvariante und der am Grundeinstellungsblock gewählten Betriebsart:
C53000-K1174-C001-7
ww
w
.E
Einstellungen
.c
7SJ45 Handbuch
13
om
Parameterzuordnung DIP-Schalter 2 bis 5 (siehe
Bild 1-1 auf Seite 9)
SW 1 MODE I>>
Hochstromstufe vorhanden
MODE IE
Hochstromstufe nicht vorhanden
Auswertung IE berechnet
DT O/C 50/51 IEC 51 ANSI 51 DT O/C 50/51 IEC 51 ANSI 51
schwarze
Beschriftung
gültig!
schwarze
Beschriftung
gültig!
weiße
Beschriftung
gültig!
SW 2 I>>
I>>
I>>
IE>
IEp
IEp
SW 3 TI>>
TI>>
TI>>
TIE>
TIEp
DE
SW 4 I>
Ip
Ip
I>
SW 5 TI>
TIp
D
TI>
Ermittlung der Einstellwerte
tri
ca
lP
weiße
Beschriftung
gültig!
Ip
Ip
TIp
D
lec
Die Hochstromstufe I>> dient der von einem Staffelplan unabhängigen schnellen Auslösung und wird in der Regel an großen
Impedanzen (Transformatoren, Längsdrosseln) verwendet. Sie
wird so eingestellt, dass sie nur bei einem Kurzschluss vor oder
innerhalb dieser Impedanz anspricht. Dabei ist zu beachten,
dass Transformatoren, Drosseln und Motoren beim Einschalten
einen erhöhten Magnetisierungsstrom (Rush-Strom) aufnehmen
Der Einsatz der Erdstromstufe IE> ist in wirksam oder halbstarr
geerdeten Netzen sinnvoll. Diese Stufe wird etwas unterhalb des
kleinsten zu erwartenden Erdkurzschlussstromes eingestellt. Die
Zeiteinstellung kann nach einem getrennten Staffelplan für Erdfehler erfolgen.
Für die Einstellung der Überstromstufe I> ist vor allem der maximale Betriebsstrom maßgebend. Eine Anregung durch Überlast muss ausgeschlossen werden, wenn das Gerät als Kurzschlussschutz arbeitet. In diesem Fall sollte daher bei Leitungen
etwa 20%, bei Transformatoren und Motoren etwa 50% oberhalb
des maximal zu erwartenden (Über-)Laststroms eingestellt werden. Dabei ist besonders bei einem Einsatz hinter geregelten
oder parallel betriebenen Transformatoren darauf zu achten,
dass der Einstellwert unterhalb des für den geplanten Schutzbereich zu erwartenden kleinsten Kurzschlussstromes liegt. Die
Einstellzeiten sind dem für das Netz aufgestellten Staffelplan zu
entnehmen.
In der Betriebsart als abhängiger Überstromzeitschutz ist zu beachten, dass die eingestellen Kennlinien zweier benachbarter
Relais mindestens einen Abstand von einer Staffelzeit (ca. 0,3 s)
haben. Diese Kennlinien werden über den Maßstabsfaktor TIp
oder D eingestellt (siehe Bild 1-11 bis Bild 1-20). Da das Gerät
7SJ45 mit disk emulation arbeitet, sind insbesondere bei Staffelung die Rückfallkennlinien zu berücksichtigen.
C53000-K1174-C001-7
ww
w
.E
können. Bei Maschinen kann hier eine kurze Verzögerungszeit
zur Überbrückung des Einschaltstroms nötig sein. Daher ist die
I>>-Stufe verzögerbar.
ar
tM
an
ua
ls
Tabelle 1-2
Einstellungen
.c
7SJ45 Handbuch
14
om
7SJ45 Handbuch
.c
Am Gerät werden auf den Nennstrom des Gerätes bezogene
Stromschwellwerte eingestellt, z.B.
Stromwandler INP / INS
ar
tM
an
ua
ls
Der abhängige Überstromzeitschutz des 7SJ45 arbeitet mit einer
disk emulation. Dabei wird das Verhalten der Scheibe elektromechanischer Relais digital nachgebildet. Bei mehreren aufeinander folgenden Fehlern wird so gewährleistet, dass die “Vorgeschichte” infolge der Trägheit der Scheibe mitberücksichtigt und
das Zeitablaufverhalten angepasst wird. Der 7SJ45 teilt dazu den
Wirkungsbereich der disk emulation in eine Aufintegrationszone
(1,1 bis 20 ⋅ I/IP) und in eine Abintegrationszone (< 0,9 ⋅ I/IP). Dazwischen liegt der Bereich der Nichtintegrationszone. In diesem
Bereich ruht die virtuelle Scheibe.
tri
ca
lP
Die Wandlerstromversorgung des 7SJ45 bedingt, dass das Gerät bei einphasiger Versorgung und Strömen kleiner 0,8 ⋅ IN nicht
mehr arbeitsfähig ist. Der dann stattfindende Gerätereset impliziert ein Rücksetzen der virtuellen Scheibe. Die Arbeitsbereiche
der Rückfallkennlinien sind daher auch von der Wahl des Wertes
für IP und den Versorgungsbedingungen abhängig. Wird beispielhaft IP = 4,0 gewählt, erfolgt ein Rückfallen der disk emulation bei einphasiger Versorgung bei I/IP = 0,2 infolge eines Geräteresets. Bei erneuter Anregung beginnt dann die Ablaufzeit von
vorn.
lec
Durch Betätigen der Taste “ENTER” wird die virtuelle Scheibe
ebenfalls zurückgesetzt.
Einstellungen
100 A / 1 A
Nennstrom des Gerätes IN
1A
maximaler Betriebstrom
120 A
Sicherheitsfaktor (angenommen)
1,25
120A I NS
Ip = -------------- ⋅ -------- ⋅ 1, 25 = 1, 5 ⋅ I N
100A IN
Die Einstellung sämtlicher Parameter erfolgt nach dem Additionsverfahren. Bei einigen Parametern sind feste Ober- und Untergrenzen vorhanden.
Einstellwert =
å Schalterwerte
C53000-K1174-C001-7
ww
w
.E
Die disk emulation bringt Vorteile, wenn der Staffelplan des Überstromzeitschutzes mit anderen im Netz befindlichen Geräten auf
elektromechanischer Basis koordiniert werden muss.
15
Parameter
om
Beispiele Parametereinstellung mit DIP-Schaltern
Schalterstellung
I>>
16
8
4
2
1
Bedeutung
Einstellbereich
Einstellung Anrege- 2 IN ... 20 IN; ∞
schwelle Hochstrom- Schrittweite: 0,5 IN
stufe nach dem Additionsverfahren, z.B.
7,5 IN
0,5
0,8
0,4
0,2
0,1
0,05
0,025
Auslösezeit Hoch0 ms ... 1575 ms
stromstufe, Einstel- Schrittweite: 25 ms
lung nach dem Additionsverfahren, z.B.
0,275 s = 275 ms
tri
ca
lP
T I>>
lec
Wird ein Wert unterhalb des minimalen Einstellwertes eingestellt,
so gilt der minimal einstellbare Wert (siehe Hinweis auf Seite 31).
Wird ein Wert oberhalb des maximalen Einstellwertes eingestellt,
so gilt der maximal einstellbare Wert.
Die mit „∞“ gekennzeichneten Parameter bieten die Möglichkeit,
dass die zugehörige Schutzstufe unwirksam geschaltet werden
kann. Dazu sind alle Schalter in Schalterstellung “on” zu bringen.
Eine Änderung der Einstellungen während des Betriebes wird
nicht sofort übernommen, sondern durch Blinken der grünen LED
“RUN” angezeigt.
Das Blinken stoppt bei Wiederherstellen der ursprünglichen Einstellungen.
Bei Änderung der Parameter bleibt die vorher eingestellte Funktionalität solange erhalten, bis durch Betätigen der Taste
“ENTER” oder durch einen Geräteneuanlauf die neuen Parameter übernommen werden. Die LED “RUN” leuchtet grün.
1.8
7SJ45 mit Relaisausgang - Gerätekonfiguration über
Steckbrücke
Mit Hilfe einer Steckbrücke auf der Flachbaugruppe kann der
Auslösekreis an die Applikation angepasst werden (siehe Bild 1-5).
Die Steckbrücke X30 schaltet einen Überspannungsableiter parallel zu dem Öffnerkontakt des Auslöserelais (siehe Bild 1-8).
Diese Schutzmaßnahme wird nur benötigt, wenn das Gerät zusammen mit Auslösehilfswandlern eingesetzt wird (X30 in Stellung 2-3).
Dies ist die werkseitige Voreinstellung.
Soll mit Hilfe einer vorhandenen Hilfsspannung ausgelöst werden, ist die Steckbrücke X30 in die Stellung 1-2 zu bringen.
C53000-K1174-C001-7
ww
w
.E
Die Einstellbereiche für die Parameter entnehmen Sie den
Technischen Daten (1.11) oder den Angaben auf der Gerätefront.
ar
tM
an
ua
ls
Tabelle 1-3
7SJ45 mit Relaisausgang - Gerätekonfiguration über Steckbrücke
.c
7SJ45 Handbuch
16
om
7SJ45 Handbuch
7SJ45 mit Relaisausgang - Gerätekonfiguration über Steckbrücke
.c
Zum Umstecken der Steckbrücken müssen folgende Arbeitsschritte durchgeführt werden:
•
Stromwandler kurzschließen!
•
Trennen Sie das Gerät allpolig vom Stromwandlerkreis.
•
Rückwand vom Gehäuse abnehmen. Dazu mit einen Schraubendreher die 4 Befestigungsschrauben in den Ecken des
Gehäuses entfernen. An den Schraubanschlussblöcken anfassen und vorsichtig die Rückwand mit der daran befestigten
Baugruppe ca. 5 cm aus dem Gehäuse ziehen.
ar
tM
an
ua
ls
WARNUNG!
Bei Durchführung der Änderungsmaßnahmen vor Ort sind unbedingt
die Handhabungshinweise für den Umgang mit elektrostatisch gefährdeten Baugruppen und Bauelementen zu beachten (EGB).
GEFAHR!
Vorsicht!
tri
ca
lP
Die Sekundäranschlüsse der Stromwandler müssen kurzgeschlossen
sein, bevor die Stromzuleitungen zum Gerät unterbrochen werden!
Steckbrücke bei 7SJ45 mit Relaisausgang
X30
Funktion
1-2
ohne Auslösehilfswandler
2-3
mit Auslösehilfswandler
•
Ziehen Sie nun die Baugruppe vollständig aus dem Gehäuse.
•
Kurzschlussstecker X30 umsetzen. Bild 1-5 veranschaulicht
die Lage der Steckbrücke auf der Baugruppe.
•
Nach der Umkonfigurierung wird das Gerät in umgekehrter
Reihenfolge zusammengebaut.
C53000-K1174-C001-7
ww
w
.E
lec
Tabelle 1-4
Bei Geräten mit Schauzeichen:
Wenn Sie die Baugruppe ca. 5 cm aus dem Gehäuse gezogen haben,
ziehen Sie vorsichtig den Stecker der Kabelgarnitur aus der Stiftwanne
X11 ab!
17
Montage und Inbetriebsetzung
H1
X11
S6
S1
X30
T5
S2
32 1
T3
S4
S3
T2
tri
ca
lP
S5
T4
ar
tM
an
ua
ls
WARNUNG!
T6
T1
Montage und Inbetriebsetzung
.c
1.9
Beim Betrieb elektrischer Geräte stehen zwangsläufig bestimmte Teile dieser Geräte unter gefährlicher Spannung. Bei Nichtbeachtung
der Bedienungshinweise können deshalb schwere Körperverletzungen oder Sachschäden auftreten. Insbesondere müssen
alle Warnhinweise unbedingt beachtet werden.
Das Schutzgerät 7SJ45 ist als Einbaugerät in einen Schaltschrank
einzubauen oder für Schalttafelaufbau auf einer Hutschiene zu montieren. Nach dem Einbau muss der gesamte Klemmenbereich ausreichend gegen unzulässiges Berühren spannungsführender Teile geschützt sein.
Lage der Brücken beim 7SJ45 mit Relaisausgang
C53000-K1174-C001-7
ww
w
.E
lec
Bild 1-5
om
7SJ45 Handbuch
18
om
7SJ45 Handbuch
Montage und Inbetriebsetzung
167,3
150,2
38,5
17,1
65,5
.c
Führen Sie folgende Montageschritte durch:
•
Gerät von vorne in die Schalttafel einschieben.
•
An der Ober- und Unterseite des Tubus befinden sich Befestigungskegel zum Einclipsen der Gewindestangen. Die Gewindespitze muss in Richtung Gerätefront zeigen.
ar
tM
an
ua
ls
1.9.1 Schalttafeleinbau
147
135,7
Hinweis!
Das Ende der Gewindestange ist mit einer Hülse versehen, in welche
ein Schraubendreher eingesteckt werden kann!
tri
ca
lP
75
78,5
68+0,1
•
Erdungsschraube des Gerätes mit Schutzerde der Schalttafel
oder des Schrankes verbinden.
•
Elektrischen Anschluss über die Schraubanschlüsse nach
Anschlussplan herstellen (siehe Kapitel 1.9.3).
.E
Maßzeichnungen
C53000-K1174-C001-7
ww
w
Bild 1-6
Gerät von hinten mit Gewindestangen sichern.
lec
138+1
Schalttafelausschnitt 72×144
DIN 43700/IEC61554
•
19
om
7SJ45 Handbuch
Montage und Inbetriebsetzung
.c
1.9.2 Hutschienenmontage
44,5
32,5
ar
tM
an
ua
ls
WARNUNG!
.E
Das Gerät lässt sich auf eine Tragschiene 35 mm (nach DIN EN
50022) montieren. Führen Sie die folgenden Montageschritte
durch:
•
Die vier M2-Schrauben in den Ecken auf der Geräterückseite
entfernen.
•
Hutschienenadapter nach beiliegender Komplettierungsanleitung zusammenfügen.
•
Hutschienenadapter aufsetzen und mit den beiliegenden
Schrauben M2×12 plus Unterlegscheiben befestigen.
•
Gerät mit Hutschienenadapter auf Hutschiene aufschnappen
und mit Justierschrauben ausrichten.
Vorsicht!
Der Hutschienenadapter ist nur für Vor-Ort-Montage zugelassen!
C53000-K1174-C001-7
w
Hutschienenmontage
ww
Bild 1-7
78,5
75
47
65,5
156,2
lec
173,3
tri
ca
lP
147
135,7
137
Bevor das Schutzgerät auf einer Hutschiene montiert wird, müssen
die elektrischen Anschlüsse hergestellt werden. Nach der Montage
des Gerätes auf der Hutschiene sind die Schraubanschlussblöcke
nicht mehr zugänglich.
20
om
Montage und Inbetriebsetzung
.c
7SJ45 Handbuch
WARNUNG!
ar
tM
an
ua
ls
Hinweis!
Es wird empfohlen, das Gerät nach der Montage auf beiden Seiten
durch Endwinkel bzw. Endhalter für Tragschienen gegen Verrutschen
zu sichern.
Achtung! Die Endwinkel bzw. Endhalter gehören nicht zum Lieferumfang!
1.9.3 Anschluss
Vor Beginn jeglicher Arbeiten ist das Gerät vom Netz zu trennen und
zu erden.
Bevor das Gerät erstmalig in Betrieb genommen wird, sollte es
mindestens zwei Stunden im Betriebsraum gelegen haben, um
einen Temperaturausgleich zu schaffen und Feuchtigkeit und
Betauung zu vermeiden.
Das Gerät wird einbaufertig geliefert, d.h. die Klemmschrauben
sind gelöst.
tri
ca
lP
WARNUNG!
Anschlüsse
Direktanschluss: Massivleiter oder Litzenleiter mit Adernendhülse für Leitungsquerschnitte bis 3,3 mm2, entsprechend AWG 12.
Nur Kupferleiter verwenden!
Die Anschlussdrähte sind um 8 mm abzuisolieren, in die
Schraubklemme einzuführen und so zu sichern, dass sie beim
Festschrauben nicht wieder herausgeschoben werden. Nach
dem Anschrauben (Anzugsdrehmoment max. 1 Nm) sind die Anschlüsse auf festen Sitz hin zu überprüfen.
C53000-K1174-C001-7
ww
w
.E
lec
Der einwandfreie und sichere Betrieb des Gerätes setzt sachgemäßen Transport, fachgerechte Lagerung, Aufstellung und Montage unter Beachtung der Warnungen und Hinweise des Gerätehandbuches
voraus.
Insbesondere sind die Allgemeinen Errichtungs- und Sicherheitsvorschriften für das Arbeiten an Starkstromanlagen (z.B. DIN, VDE, EN,
IEC oder andere nationale und internationale Vorschriften) zu beachten. Nichtbeachtung können Tod, Körperverletzung oder erheblichen
Sachschaden zur Folge haben.
Die Klemmschrauben sind als Kreuzschlitzschrauben für die Betätigung mittels Schraubendreher 2 x 0,5 ausgeführt.
21
om
Montage und Inbetriebsetzung
Das Schutzgerät 7SJ45 ist entsprechend dem Anschlussschaltplan anzuschließen (Bild 1-8 bzw. Bild 1-9).
1.9.4 Inbetriebsetzung
.c
7SJ45 Handbuch
X1_4
X2_5
X1_2
X2_4
X1_3
X2_3
X1_1
X2_2
X2_1
7SJ45XX-1
Anschlussschaltplan 7SJ45 mit Relaisausgang
X2_6
X2_5
+
X1_4
-
X1_3
X2_4
X2_3
X2_1
.E
Beim Betrieb elektrischer Geräte stehen zwangsläufig bestimmte Teile dieser Geräte unter gefährlicher Spannung. Es können deshalb
schwere Körperverletzung oder Sachschaden auftreten, wenn nicht
fachgerecht gehandelt wird.
Nur qualifiziertes Personal soll an diesem Gerät arbeiten. Dieses
muss gründlich mit den einschlägigen Sicherheitsvorschriften und
Vorsichtsmaßnahmen sowie den Warnhinweisen dieses Handbuches
vertraut sein.
Vor allem ist zu beachten:
• Vor Anschluss irgendwelcher Verbindungen ist das Gerät am
Schutzleiteranschluss zu erden.
• Gefährliche Spannungen können in allen mit der
Spannungsversorgung und mit den Mess- bzw. Prüfgrößen
verbundenen Schaltungsteilen anstehen.
• Auch nach Abtrennen der Anschlussleitungen können gefährliche
Spannungen im Gerät vorhanden sein (Kondensatorspeicher).
• Die unter Technische Daten (1.11) genannten Grenzwerte dürfen
nicht überschritten werden, auch nicht bei Prüfung und
Inbetriebsetzung.
Anschlussschaltplan 7SJ45 mit Impulsausgang
C53000-K1174-C001-7
ww
w
Bild 1-9
7SJ45XX-0
lec
X1_1
X2_2
tri
ca
lP
Bild 1-8
ar
tM
an
ua
ls
WARNUNG!
X2_6
22
Montage und Inbetriebsetzung
.c
Auslöseprüfung
Die Sekundäranschlüsse der Stromwandler müssen an diesen
kurzgeschlossen sein, bevor die Stromzuleitungen zum Gerät
unterbrochen werden!
Ist ein Prüfschalter vorhanden, welcher die Stromwandlersekundärleitungen automatisch kurzschließt, reicht es aus, diesen in Stellung
„Prüfen“ zu bringen, sofern die Kurzschließer vorher überprüft worden sind.
Standardprüfung
Bei dieser Prüfung wird die gesamte Gerätefunktion einschließlich der Auslösekreise getestet. Verbinden Sie das Gerät mit einer Sekundärprüfeinrichtung für Schutzgeräte unter Beachtung
der Sicherheitshinweise.
ar
tM
an
ua
ls
GEFAHR!
Bei der Überprüfung des Gerätes mit einer Sekundärprüfeinrichung ist darauf zu achten, dass keine anderen Messgrößen aufgeschaltet sind und die Prüfeinrichtung eingeprägte Ströme liefert. Die Auslöseprüfung sollte mit angeschlossenem Leistungsschalter und mit den für den Betrieb vorgegebenen Einstellwerten durchgeführt werden.
Vorsicht!
tri
ca
lP
Um die Selbstüberwachung des Gerätes zu aktivieren, ist ein
Laststrom von mindestens 80% Nennstrom bei einphasigem Betrieb erforderlich. Die LED “RUN” muss leuchten. Ein Blinken der
LED “RUN” weist darauf hin, dass eine vorgenommene Einstellung noch nicht übernommen wurde. Betätigen Sie die Taste
“ENTER”, um die Einstellungen zu übernehmen.
.E
lec
Leuchtet die LED “ERROR”, dann wurde von der Selbstüberwachung im Relais ein Fehler erkannt. Rotes Blinken der LED weist
auf eine inkosistente Einstellung des Grundeinstellungsblocks
hin. Bitte korrigieren Sie die Einstellung.
ww
w
Falls keine LED leuchtet, überprüfen Sie den Anschluss der
Wandlerkreise.
C53000-K1174-C001-7
om
7SJ45 Handbuch
Bei dieser Prüfung wird der Leistungsschalter ausgelöst. Prüfungen
mit Strömen über 2mal Gerätenennstrom führen zur Überlastung der
Eingangskreise und dürfen nur kurzzeitig durchgeführt werden (siehe
1.11). Danach ist eine Abkühlpause einzulegen!
Löschen Sie die Anzeige des Schauzeichens mit Hilfe der mechanischen Rückstelltaste, falls das Schauzeichen aktiviert ist.
Speisen Sie mit der Prüfeinrichtung einen Prüfstrom unterhalb
der eingestellten Auslöseschwelle ein. Das Gerät darf nicht auslösen. Speisen Sie nun einen Prüfstrom oberhalb der eingestellten Auslöseschwelle ein. Der Auslöser bzw. der Leistungsschalter müssen betätigt werden.
23
om
Montage und Inbetriebsetzung
Ist dies nicht der Fall:
Ströme lange genug anstanden (siehe Bild 1-22 bzw.
Bild 1-23).
G Überprüfen Sie alle Anschlüsse.
Die Erdanregungen werden mit einem einphasigen Strom, die
Phasenanregungen mit einem dreiphasigen Strom getestet.
Stellen Sie sicher, dass die für diese Prüfung verwendete Prüfeinrichtung die für eine Auslösung des Leistungsschalters erforderliche Leistung bereitstellen kann.
Bereitschalten des Gerätes
Wenn im aktuellen Betriebsfall mindestens 80% Nennstrom fließen, muss die grüne LED “RUN” leuchten. Die rote LED
“ERROR” darf nicht leuchten. Bei einphasiger Versorgung sind
die Geräte 7SJ45 ab Eingangsströmen von 0,8 IN voll einsatzfähig.
ar
tM
an
ua
ls
G Prüfen Sie, insbesondere bei kleinen Fehlerströmen, ob die
Die Anzeige des Schauzeichens auf der Frontplatte wird durch
Betätigen der mechanischen Rückstelltaste am Schauzeichen
gelöscht.
.c
7SJ45 Handbuch
Falls ein Prüfschalter vorhanden ist, muss dieser in Betriebsstellung geschaltet sein.
Das Gerät ist nun betriebsbereit.
tri
ca
lP
Verbinden Sie das Gerät wieder mit den Primärwandlern und entfernen Sie die Kurzschlussbrücken aus dem Wandlerkreis. Prüfen Sie den korrekten Wandleranschluss z.B. mit einer Stromzange.
Die Schrauben sind fest anzuziehen. Alle Klemmenschrauben –
auch nicht benutzte – müssen fest angezogen werden.
C53000-K1174-C001-7
ww
w
.E
lec
Überprüfen Sie nochmals die Einstellwerte des Gerätes. Insbesondere kontrollieren Sie die richtige Einstellung des Grundeinstellungsblocks. Eine erfolgte Änderung der Einstellungen des
Gerätes wird nicht sofort übernommen, sondern nur durch ein
Blinken der LED “RUN” angezeigt. Durch Betätigen der Taste
„ENTER“ oder durch einen Geräteneuanlauf werden geänderte
Einstellungen aktiviert.
24
om
7SJ45 Handbuch
Wartung
.c
1.10
Wartung
Hinweis!
ar
tM
an
ua
ls
Das Gerät 7SJ45 bedarf keiner Wartung.
Wenn Sie ein Gerät nach erfolgreicher Reparatur zurückerhalten, befinden sich alle Steckbrücken auf Leiterplatten im Ursprungszustand
gemäß MLFB. Die Projektierungs- und Einstellparameter entsprechen
ebenfalls dem ursprünglichen Lieferzustand.
Hinweis!
C53000-K1174-C001-7
ww
w
.E
lec
tri
ca
lP
Von Instandsetzungsversuchen an defekten Geräten oder Baugruppen wird dringend abgeraten, da speziell ausgesuchte elektronische
Bauteile eingesetzt sind, die nach den Richtlinien für EGB (Elektrostatisch Gefährdete Bauelemente) zu behandeln sind. Vor allem sind
auch für das Arbeiten an den Leiterplatten spezielle Fertigungstechniken erforderlich, um die Multilayer–Platten, die empfindlichen Bauteile
und die Schutzlackierung nicht zu beschädigen.
Defekte Geräte sind ins Herstellerwerk einzusenden. Hierzu ist möglichst die Original–Transportverpackung zu verwenden. Bei Verwendung anderer Verpackung muss das Einhalten der Schwing- und
Schockbeanspruchungen entsprechend IEC 60 255–21–1 Klasse 2
und IEC 60 255–21–2 Klasse 1 sichergestellt werden. Vor der Rücksendung sollten alle Projektierungs- und Einstellparameter abgelesen
und protokolliert werden. Falls Einstellbrücken auf Leiterplatten geändert wurden, sollten auch diese notiert werden.
25
Technische Daten
Ausgänge
om
1.11
.c
7SJ45 Handbuch
Technische Daten
Impulsausgang (7SJ45XX-0*)
Allgemeine Gerätedaten
Stromeingänge
ar
tM
an
ua
ls
Anzahl:
1 Impulsausgang
24 V DC / 0,1 Ws
Relaisausgang (7SJ45XX-1*)
Nennfrequenz fN
50 Hz oder 60 Hz (einstellbar)
Nennstrom IN
1 A oder 5 A
Leistungsaufnahme
– bei IN = 1 A oder 5 A
Belastbarkeit Strompfad
– thermisch (effektiv)
50·IN für 1 s
15·IN für 10 s
2·IN dauernd
tri
ca
lP
ca. 1,4 VA bei IN
100·IN für eine Halbschwingung
Empfohlene Primärstromwandler:
10P 10, 2,5 VA bzw. je nach Anforderung
und benötigter Auslöseleistung
1 Wechsler
Schaltleistung
EIN 1000 W/VA
AUS 30 VA
40 W ohmsch
25 VA bei L/R ≤ 50 ms
Schaltspannung
≤ 250 V DC, ≤ 240 V AC
zulässiger Strom pro Kontakt
5 A dauernd
30 A für 0,5 s (Einschaltstrom)
Störschutzkondensator über den
Kontakten
Keramik, 4,7 nF, 250 V
UL-Listung für Relaisausgang mit folgenden Nenndaten:
120 Vac
240 Vac
240 Vac
24 Vdc
48 Vdc
240 Vdc
120 Vac
240 Vac
Pilot duty, B300
Pilot duty, B300
5 A General Purpose
5 A General Purpose
0.8 A General Purpose
0.1 A General Purpose
1/6 hp (4.4 FLA)
1/2 hp (4.9 FLA)
C53000-K1174-C001-7
ww
w
.E
lec
– dynamisch (Scheitelwert)
Anzahl:
26
EMV–Prüfungen
Vorschriften
IEC 60255 (Produktnormen)
ANSI C37.90.0/.1/.2
UL508
Weitere Vorschriften siehe Einzelprüfungen
Isolationsprüfungen
IEC 60255–5
Spannungsprüfung (Stückprüfung) alle Kreise mit Ausnahme
Impulsausgang gegen Erde
2,5 kV (eff), 50 Hz, 1 min
Spannungsprüfung (Typprüfung)
über offene Kommandokontakte
1,0 kV (eff), 50 Hz, 1 min
Stoßspannungsprüfung (Typprüfung)
alle Kreise, Klasse III
5 kV (Scheitel); 1,2/50 µs; 0,5 J;
3 positive und 3 negative Stöße in Abständen von 1 s
Normen:
IEC 60255–6, IEC 60255–22
EN 50263 (Produktnormen)
EN 50082–2 (Fachgrundnorm)
EN 61000–6–2
IEC 61000–4 (Basisnormen)
Hochfrequenzprüfung
IEC 60255–22–1, Klasse III
2,5 kV (Scheitel); 1 MHz; τ = 15 µs;
Ri = 200 Ω; 400 Stöße je s;
Prüfdauer ≥ 2 s
Entladung statischer Elektrizität
IEC 60255–22–2, Klasse III
EN 61000–4–2, Klasse III
4 kV/6 kV Kontaktentladung; 8 kV Luftentladung; beide Polaritäten; 150 pF;
Ri = 330 Ω
Bestrahlung mit HF–Feld,
amplitudenmoduliert,
IEC 60255-22-3 und
IEC 61000–4–3, Klasse III
10 V/m; 80 MHz bis 1000 MHz; 80 %;
1 kHz; AM
Bestrahlung mit HF–Feld, pulsmoduliert IEC 61000–4–3/
ENV 50204, Klasse III
10 V/m; 900 MHz; Wiederholfrequenz
200 Hz; Einschaltdauer 50 %
30 V/m; 1890 MHz; Wiederholfrequenz
200 Hz; Einschaltdauer 50 %
Schnelle transiente Störgrößen/
Burst
IEC 60255–22–4 und
IEC 61000–4–4, Klasse IV
4 kV; 5/50 ns; 5 kHz; Burstlänge = 15 ms;
Wiederholrate 300 ms; beide Polaritäten;
Ri = 50 Ω; Prüfdauer 1 min
C53000-K1174-C001-7
ww
w
.E
lec
tri
ca
lP
Normen:
EMV–Prüfungen zur Störfestigkeit (Typprüfungen)
ar
tM
an
ua
ls
Normen:
Technische Daten
.c
Elektrische Prüfungen
om
7SJ45 Handbuch
27
om
7SJ45 Handbuch
Längs: 2 kV; 42Ω, 0,5µF
Quer: 1 kV; 42Ω, 0,5µF
Normen:
.c
EMV-Prüfungen zur Störaussendung (Typprüfungen)
Impuls: 1,2/50µs
ar
tM
an
ua
ls
Energiereiche Stoßspannungen
(SURGE), IEC 61000-4-5 Installationsklasse III
Messeingänge, Binärausgabe
Technische Daten
10 V; 150 kHz bis 80 MHz; 80 %; 1 kHz;
AM; Ri = 150 Ω
Magnetfeld mit energietechnischer Frequenz IEC 61000–4–8,
Klasse IV
IEC 60255–6
30 A/m dauernd;
300 A/m für 5 s; 50 Hz
0,5 mT; 50 Hz
Gedämpfte Schwingungen
IEC 60694, IEC 61000–4–12,
Klasse III
2,5 kV (Scheitelwert, Polarität alternierend) 100 kHz, 1 MHz, 10 MHz und
50 MHz; Ri = 200 Ω; Dauer ≥ 2 s
Oscillatory Surge Withstand Capability
ANSI/IEEE C37.90.1
nicht über offene Kontakte
2,5 bis 3 kV (Scheitelwert); 1 bis 1,5 MHz
gedämpfte Welle; 50 Stöße je s;
Dauer ≥ 2 s; Ri = 150 Ω bis 200 Ω
Fast Transient Surge Withstand
Capability ANSI/IEEE C37.90.1
nicht über offene Kontakte
4 kV bis 5 kV; 10/150 ns;
50 und 120 Pulse je s;
beide Polaritäten; Dauer ≥ 2 s; Ri = 80 Ω
Radiated Electromagnetic Interference
ANSI/IEEE C37.90.2
35 V/m; 25 MHz bis 1000 MHz
amplituden- und pulsmoduliert
Funkstörfeldstärke
IEC CISPR 22
EN 55022,
VDE 0878 Teil 22
30 MHz bis 1000 MHz
Grenzwertklasse B
C53000-K1174-C001-7
ww
w
.E
lec
tri
ca
lP
Leitungsgeführte HF, amplitudenmodul. IEC 60255-22-6 und
IEC 61000–4–6, Klasse III
EN 50081–* (Fachgrundnorm)
28
om
7SJ45 Handbuch
Schwing- und Schockbeanspruchung beim Transport
(nur Einbauversion)
Schwing- und Schockbeanspruchung bei stationärem Einsatz
IEC 60255-21 und IEC 60068-2
Schwingung
IEC 60255-21-1, Klasse 2
IEC 60068-2-6
Sinusförmig
10 Hz bis 60 Hz: ±0,075 mm Amplitude;
60 Hz bis 150 Hz: 1 g Beschleunigung
Frequenzdurchlauf 1 Oktave/min
20 Zyklen in 3 Achsen senkrecht zueinander
Sinusförmig
1 Hz bis 8 Hz: ±4 mm Amplitude (horizontale Achsen)
1 Hz bis 8 Hz: ±2 mm Amplitude (vertikale
Achse)
8 Hz bis 35 Hz: 1 g Beschleunigung (horizontale Achsen)
8 Hz bis 35 Hz: 0,5 g Beschleunigung
(vertikale Achse)
Frequenzdurchlauf 1 Oktave/min
1 Zyklus in 3 Achsen senkrecht zueinander
IEC 60255-21 und IEC 60068-2
Schwingung
IEC 60255-21-1, Klasse 2
IEC 60068-2-6
Sinusförmig
5 Hz bis 8 Hz: ±7,5 mm Amplitude;
8 Hz bis 150 Hz: 2 g Beschleunigung
Frequenzdurchlauf 1 Oktave/min
20 Zyklen in 3 Achsen senkrecht zueinander
Schock
IEC 60255-21-2, Klasse 1
IEC 60068-2-27
Halbsinusförmig
15 g Beschleunigung, Dauer 11 ms,
je 3 Schocks in beiden Richtungen der
3 Achsen
Dauerschock
IEC 60255-21-2, Klasse 1
IEC 60068-2-29
Halbsinusförmig
10 g Beschleunigung, Dauer 16 ms,
je 1000 Schocks in beiden Richtungen
der 3 Achsen
C53000-K1174-C001-7
ww
w
.E
lec
Schwingung bei Erdbeben
IEC 60255-21-3, Klasse 1
IEC 60068-3-3
Halbsinusförmig
5 g Beschleunigung, Dauer 11 ms,
je 3 Schocks in beiden Richtungen der
3 Achsen
tri
ca
lP
Schock IEC 60255-21-2,
Klasse 1
ar
tM
an
ua
ls
Normen:
Normen:
.c
Mechanische Prüfungen
Technische Daten
29
om
7SJ45 Handbuch
Konstruktive Ausführungen
Temperaturen
–20 °C bis +70 °C
bei 2 x IN Dauerstrom: –20 °C bis +55 °C
Grenztemperaturen bei
Lagerung
–25 °C bis +55 °C
Grenztemperaturen bei Transport
–25 °C bis +85 °C
Feuchte
Zulässige Betauung nach IEC 60654-1,
Klasse III
Schalttafeleinbaugehäuse DIN43700/
IEC61554
Aufrüstbar für Hutschienenmontage
(nur für Vor-Ort-Montage empfohlen)
Abmessungen (BxHxT)
78,5x147x205,8 (incl. Vollsichttür u. Klemmen)
Gewicht (Masse) ca.
1,5 kg
Schutzart Gehäuse gemäß IEC 60529
Betriebsmittel vorne
IP 51
Betriebsmittel hinten
IP 20
Personenschutz
IP 1X
C53000-K1174-C001-7
ww
w
.E
lec
Zulässige Feuchtebeanspruchung (Betauungsfest)
Im Jahresmittel ≤75 % relative Feuchte;
an 30 Tagen im Jahr bis zu 95 % relative
Feuchte; Betauung ist unzulässig
tri
ca
lP
Zulässige Feuchtebeanspruchung (Standard)
Gehäuse
ar
tM
an
ua
ls
Temperatur bei Betrieb
.c
Klimabeanspruchungen
Technische Daten
30
om
7SJ45 Handbuch
Einstellbereiche/Stufung AMZ (IEC 51 bzw. ANSI 51)
.c
Überstromzeitschutz
Technische Daten
Stromanregung I>> (Phasen) 2 IN bis 20 IN oder unwirksam,
Stufung 0,5 IN
0,5 IN bis 6,2 IN
oder unwirksam, Stufung 0,1 IN
Stromanregung IE> (Erde
berechnet);
dreiphasige Versorgung;
siehe Hinweis
0,5 IN bis 6,2 IN
oder unwirksam, Stufung 0,1 IN
Verzögerungszeiten T I>>
0 bis 1575 ms, Stufung 25 ms
Verzögerungszeiten T I>
0 bis 6300 ms, Stufung 100 ms
tri
ca
lP
Stromanregung I> (Phasen);
dreiphasige Versorgung;
siehe Hinweis
Stromanregung Ip (Phasen);
dreiphasige Versorgung;
siehe Hinweis
0,5 IN bis 4 IN
oder unwirksam, Stufung 0,1 IN
Stromanregung IEp> (Erde
berechnet);
dreiphasige Versorgung;
siehe Hinweis
0,5 IN bis 4 IN
oder unwirksam, Stufung 0,1 IN
Verzögerungszeiten T Ip
(IEC)
0,05 bis 3,15 s, Stufung 0,05 s
Verzögerungszeiten D (ANSI)
0,5 bis 15,00 s, Stufung 0,25 s
ar
tM
an
ua
ls
Einstellbereiche/Stufung UMZ (DT O/C 50/51)
Hinweis!
C53000-K1174-C001-7
ww
w
.E
lec
Die eingestellten Zeiten sind reine Verzögerungszeiten.
Das Gerät lässt minimale Einstellwerte von 0,5 IN zu (dreiphasig). Bei
einphasiger Versorgung ist der auf der Front aufgedruckte minimale
Grenzwert von 0,8 IN (7SJ45XX-0*) bzw. 1,3 IN (7SJ45XX-1*) zu berücksichtigen.
Vorsicht!
Bei Einstellung der Parameter ist die maximale dauerhafte thermische
Belastbarkeit der Strompfade von 2 IN zu beachten.
31
om
100
ar
tM
an
ua
ls
500
100
20
10
3,20
0,40
0,20
1
0,10
0,5
0,3
0,2
0,05
0,1
T [s]
↑
p
0,05
0,05
Bild 1-10
t [s]
0,80
0,1
0,2
I/Ip
0,3
tri
ca
lP
5
3
2
3,20
5
0,9
0,5
Rückfallkennlinie IEC Typ A (Normal abhängig,
N INV)
æ
ö
9, 7
t = ç -----------------------------÷ ⋅ T P
ç
2÷
è 1 – (I ⁄ IP) ø
[s]
1,60
3
2
0,80
1
0,40
0,5
0,20
0,3
0,2
0,10
0,1
0,05
0,05
1,1
Bild 1-11
2
3
5
I/Ip
10
20
↑
←T
p
[s]
Ansprechkennline IEC Typ A (Normal abhängig,
N INV)
Normal Invers /
(Typ A)
æ
ö
0, 14
t = ç ---------------------------------------÷ ⋅ T
ç
÷ P
0, 02
– 1ø
è ( I ⁄ IP )
[s]
C53000-K1174-C001-7
ww
w
Normal Invers /
(Typ A)
lec
t [s]
10
1,60
.E
20
Technische Daten
.c
7SJ45 Handbuch
32
om
500
ar
tM
an
ua
ls
100
3,20
100
1,60
20
0,40
10
0,20
5
3
2
0,10
10
5
t [s]
t [s]
0,80
20
0,05
0,1
0,2
I/Ip
0,3
0,9
0,5
Rückfallkennlinie IEC Typ B (Stark abhängig,
V INV)
æ
ö
43, 2
t = ç -----------------------------÷ ⋅ T P
ç
2÷
è 1 – (I ⁄ IP) ø
[s]
3
2
3,20
1
1,60
0,5
0,80
0,3
0,2
0,40
0,20
0,1
0,10
0,05
1,1
Bild 1-13
Very Inverse /
(Typ B)
2
3
5
I/Ip
10
20
0,05
↑
←T
p
[s]
Ansprechkennlinie IEC Typ B (Stark abhängig,
V INV)
13, 5
t = æ --------------------ö ⋅ T
[s]
è I ⁄ I – 1ø
P
P
C53000-K1174-C001-7
ww
w
Very Inverse /
(Typ B)
lec
Bild 1-12
p
.E
0,05
0,05
↑
T [s]
tri
ca
lP
1
0,5
0,3
0,2
0,1
Technische Daten
.c
7SJ45 Handbuch
33
om
100
500
ar
tM
an
ua
ls
3,20
100
1,60
20
0,40
10
0,20
5
3
2
0,10
10
5
t [s]
t [s]
0,80
20
0,05
3,20
↑
T [s]
p
0,05
0,05
0,1
0,2
I/Ip
0,3
tri
ca
lP
0,5
0,5
0,3
0,2
0,9
0,5
æ
ö
58, 2
t = ç -----------------------------÷ ⋅ T P
ç
2÷
è 1 – (I ⁄ IP) ø
[s]
1,60
0,3
0,2
0,80
0,1
0,05
0,40
1,1
Bild 1-15
2
3
5
I/Ip
10
0,05
20
0,10
0,20
↑
←T
p
[s]
Ansprechkennlinie IEC Typ C (Extrem abhängig,
E INV)
Extrem Invers /
(Typ C)
æ
ö
80
t = çç -----------------------------÷÷ ⋅ T P [ s ]
2
è ( I ⁄ IP ) – 1ø
C53000-K1174-C001-7
ww
w
Extrem Invers /
(Typ C)
lec
Rückfallkennlinie IEC Typ C (Extrem abhängig,
E INV)
.E
Bild 1-14
3
2
1
1
0,1
Technische Daten
.c
7SJ45 Handbuch
34
om
Technische Daten
.c
7SJ45 Handbuch
500
ar
tM
an
ua
ls
500
200
200
100
100
20
20
5,00
1
1,00
0,50
0,1
D [s]
0,1
0,2
I/Ip
0,3
0,5
0,9
Rückfallkennlinie ANSI moderately inverse,
(M INV)
.E
Bild 1-16
↑
tri
ca
lP
2,00
0,5
0,3
0,2
0,05
0,05
t [s]
5
3
2
10
lec
t [s]
10
15,00
10,00
C53000-K1174-C001-7
ww
w
æ
ö
0, 97
t = çç -----------------------------÷÷ ⋅ D
2
è 1 – ( I ⁄ IP ) ø
[s ]
5
3
2
15,00
10,00
1
5,00
0,5
0,3
0,2
2,00
0,1
0,50
0,05
1,1
Bild 1-17
1,00
2
3
5
I/Ip
10
20
↑
D [s]
Ansprechkennlinie ANSI moderately inverse,
(M INV)
æ
ö
0, 0103
t = çç --------------------------------------- + 0, 0228÷÷ ⋅ D
0, 02
–1
è ( I ⁄ IP )
ø
[s ]
35
om
Technische Daten
.c
7SJ45 Handbuch
500
ar
tM
an
ua
ls
500
200
200
100
100
5,00
10
2,00
5
3
2
1,00
1
D [s]
20
10
t [s]
20
0,50
↑
0,5
0,3
0,2
0,1
Bild 1-18
0,1
0,2
I/Ip
0,3
0,5
0,9
Rückfallkennlinie ANSI very inverse, (V INV)
.E
æ
ö
4, 32
t = ç -----------------------------÷ ⋅ D
ç
2÷
è 1 – ( I ⁄ IP ) ø
lec
0,05
0,05
5
3
2
15,00
10,00
1
tri
ca
lP
t [s]
15,00
10,00
5,00
0,1
1,00
0,05
2,00
0,50
1,1
Bild 1-19
2
3
5
I/Ip
10
20
↑
D [s]
Ansprechkennlinie ANSI very inverse, (V INV)
æ
ö
3, 922
t = ç ----------------------------- + 0, 0982÷ ⋅ D [ s ]
ç
÷
2
è (I ⁄ IP) – 1
ø
C53000-K1174-C001-7
ww
w
[s ]
0,5
0,3
0,2
36
om
Technische Daten
.c
7SJ45 Handbuch
ar
tM
an
ua
ls
500
500
200
100
200
100
15,00
10,00
5,00
20
2,00
5
3
2
1,00
1
D [s]
10
t [s]
10
0,50
↑
0,1
Bild 1-20
0,1
0,2
I/Ip
0,3
0,5
0,9
Rückfallkennlinie ANSI extremely inverse, (E INV)
C53000-K1174-C001-7
ww
w
.E
æ
ö
5, 82
t = ç -----------------------------÷ ⋅ D
ç
2÷
è 1 – ( I ⁄ IP ) ø
lec
0,05
0,05
5
3
2
1
0,5
0,3
0,2
tri
ca
lP
t [s]
20
[s ]
15,00
10,00
0,5
0,3
0,2
5,00
0,1
0,05
2,00
1,1
Bild 1-21
2
3
5
I/Ip
10
0,50
↑
20
1,00
← D [s]
Ansprechkennlinie ANSI extremely inverse,
(E INV)
æ
ö
5, 64
t = çç ----------------------------- + 0, 02434÷÷ ⋅ D [ s ]
2
è ( I ⁄ IP ) – 1
ø
37
om
7SJ45 Handbuch
.c
Ansprechzeiten
Technische Daten
einphasige Versorgung (Relaisausgang)
ca. 32 ms
Gesamtgerät Relaisausgang
ca. 38 ms
ar
tM
an
ua
ls
Gesamtgerät Impulsausgang
1000
[ms]
Auslösezeiten bei Zuschaltung auf Fehler
einphasige Versorgung (Impulsausgang)
100
10000
t [ms]
tri
ca
lP
1000
10
3
4
5
6
7
8
1
Bild 1-23
2
3
4
5
6
7
8
9 I [IN] 10
Maximale Auslösezeiten beim Zuschalten auf
Fehler, Gerät mit Relaisausgang
Bild 1-22 und Bild 1-23 zeigen maximale Werte bei einphasiger
Versorgung. Bei mehrphasiger Versorgung verringern sich die
Zeiten.
9 I [IN]10
Maximale Auslösezeiten beim Zuschalten auf
Fehler, Gerät mit Impulsausgang
C53000-K1174-C001-7
ww
w
2
.E
1
Bild 1-22
lec
100
10
38
om
7SJ45 Handbuch
Abweichung des Messwertes durch versch. Einflussgrößen
ca. 0,95 bei UMZ (DT O/C 50/51)
ca. 0,91 bei AMZ (IEC 51 bzw. ANSI 51)
Toleranzen
UMZ (DT O/C 50/51)
Stromanregungen I>, I>>, IE>
Verzögerungszeiten T
5 % vom Einstellwert, bzw. 5 % vom
Nennwert (bei Schwellen < IN)
1 % bzw. 30 ms
AMZ (IEC 51 bzw. ANSI 51)
5 % vom Einstellwert, bzw. 5 % vom
Nennwert (bei Schwellen < IN)
Zeitablauf für 2 ≤ I/IP ≤ 20
5 % bzw. 50 ms
< 2,5%
Frequenz im Bereich
0,9 < f/fN < 1,1:
< 10%
Oberschwingungen:
bis 10% 3. und 5. Harmonische:
< 1%
Gleichanteile:
< 5%
Temperatur im Bereich –5°C bis
70°C
< 0,5 % / 10 K
C53000-K1174-C001-7
ww
w
.E
lec
tri
ca
lP
Anregeschwellen
Frequenz im Bereich
0,95 < f/fN < 1,05:
ar
tM
an
ua
ls
Rückfallverhältnis
.c
Rückfallverhältnis
Technische Daten
39
Wandlerstromversorgter digitaler Überstromzeitschutz
SIPROTEC easy 7SJ45
6
7SJ45
Stromwandler: IN
8
9
10 11 12
0
0
1
5A
5
A
A
8
Auslöser
Impulsausgang
0
Relaisausgang
1
Konstruktiver Aufbau
9
Hutschienenmontage
B
Einbaugehäuse
E
Regionsspezifische Funktionsausprägungen
10
Region Welt, 50/60 Hz, standard
A
Region Welt, 50/60 Hz, betauungsfest
B
IEC/ ANSI
Schutzrelais mit Impulsausgang
Niedrigenergieauslöser 3AX1104-2B
•
Schutzrelais mit Relaisausgang
Hilfswandler für den Auslösekreis:
4AM5065-2CB (1A) oder 4AM5070-8AB (5A)
Wandlerstromauslöser
3AX1102-2A (Bemessungs-Betriebsstrom 0,5 A) oder
3AX1102-2B (Bemessungs-Betriebsstrom 1 A)
13
IEC
lec
0
ANSI
1
16
0
1
C53000-K1174-C001-7
ww
w
.E
Schauzeichen
mit
0
7
1A
ohne
13 14 15 16
•
tri
ca
lP
BESTELL-NR.:
7
.c
Zubehör:
Technische Daten
ar
tM
an
ua
ls
Bestelldaten und Zubehör
om
7SJ45 Handbuch
40
om
Anschlussbeispiele
L1 L2 L3
L1 L2 L3
3AX1102-2A
oder
3AX1102-2B
ar
tM
an
ua
ls
2-Wandlerschaltung mit Hilfswandler und Auslöserelais
7SJ45XX-1
3AX1102-2A
oder
3AX1102-2B
Bild 1-25
3-Wandlerschaltung mit Hilfswandler und Auslöserelais
C53000-K1174-C001-7
ww
w
.E
lec
Bild 1-24
4AM5070-8AB
4AM5065-2CB
7SJ45XX-1
tri
ca
lP
4AM5070-8AB
4AM5065-2CB
Technische Daten
.c
7SJ45 Handbuch
41
om
L1 L2 L3
L1 L2 L3
Technische Daten
7SJ45XX-0
Standardauslöser
24V DC
0,1 Ws
Hilfsspannung
3-Wandlerschaltung mit Relaisausgang und Hilfsspannung
Bild 1-27
3-Wandlerschaltung mit Impulsausgang
C53000-K1174-C001-7
ww
w
.E
lec
Bild 1-26
tri
ca
lP
ar
tM
an
ua
ls
7SJ45XX-1
.c
7SJ45 Handbuch
42
om
Manual 7SJ45
Operating Instructions
2.1
Conformity
This product is UL-certified with the values as stated in the
Technical Data:
ar
tM
an
ua
ls
.c
2
Conformity
IND. CONT. EQ.
TYPE 1
69CA
tri
ca
lP
This product complies with the directive of the Council of the
European Communities on the approximation of the laws of the
Member States relating to electromagnetic compatibility (EMC
Council Directive 89/336/EEC) and concerning electrical
equipment for use within specified voltage limits (Low-voltage
directive 73/23 EEC).
This conformity is proved by tests conducted by Siemens AG in
accordance with Article 10 of the Council Directive in agreement
with the generic standards EN 50081 and EN 50082 for EMC
directive, and with the standard EN 60255–6 for the low-voltage
directive.
General information
These operating instructions contain the information that is
necessary for the proper and safe operation of the products
described. This booklet is intended for technically qualified
personnel having received special training in, or having special
knowledge of, measurement and control engineering, hereinafter
called automation engineering.
The knowledge and correct application of the warnings and
instructions contained in this booklet are prerequisites to the safe
installation and commissioning of this product, as well as to
proper and safe operation and maintenance. Only qualified
personnel as defined in the section below have the necessary
special knowledge required for a correct interpretation of the
general safety hints and warnings given in this booklet, and for
their application to the job in hand.
C53000-K1174-C001-7
ww
w
.E
lec
The device is designed in accordance with the international
standards of IEC 60 255 and the German standards DIN 57 435
part 303 (corresponding to VDE 0435 part 303).
2.2
43
om
Manual 7SJ45
[email protected]
Phone:
+49 (1805) 247000
Fax:
+49 (1805) 242471
WARNING!
ar
tM
an
ua
ls
If you wish any further information, or if you are faced with special
problems that this booklet does not deal with in sufficient detail,
please feel free to contact our hotline for any questions that you
might have.
E-Mail:
.c
These operating instructions are included in the scope of
delivery. They cannot, however, deal with every detail of all
versions of the product described, nor with all possible cases of
erection, operation or maintenance.
General information
Hazardous voltages are present in this electrical equipment during
operation. Non–observance of the safety rules can result in severe
personal injury or property damage.
Only qualified personnel shall work on and around this equipment. The
successful and safe operation of this device is dependent on proper
handling, storage, installation, operation, and maintenance.
tri
ca
lP
2.2.1 Qualified personnel
•
Training and instruction (or other qualification) for switching,
grounding and designating devices and systems in accordance with safety standards.
•
Training or instruction in accordance with safety standards for
care and use of certain safety equipment.
•
First aid training.
C53000-K1174-C001-7
ww
w
.E
lec
We should also like to point out that the contents of this product
documentation are not part of any earlier or currently existing
agreement or legal relationship, nor apt to modify such an
agreement or relationship. All obligations incurred by Siemens
result from the purchase contract, which also contains the
complete and solely applicable warranty regulations. Contractual
warranty regulations are neither extended nor restricted by the
contents of this documentation.
are those persons who are qualified to set up, install, place into
service, and operate this device, and who possess the following
qualifications:
44
om
Manual 7SJ45
General information
2.2.4 Copyright
Please observe the following:
Copyright © Siemens AG 2001. All rights reserved.
.c
2.2.2 Use as prescribed
The device may only be used for the applications described in the
catalogue and only in combination with third party equipment
recommended or approved by Siemens.
tri
ca
lP
The successful and safe operation of this device is dependent on
proper handling, storage, installation, operation, and maintenance.
ar
tM
an
ua
ls
Dissemination or reproduction of this document, or evaluation
and communication of its contents, is not authorized except
where expressly permitted. Violations are liable for damages. All
rights reserved, particularly for the purposes of patent application
or trademark registration.
WARNING!
2.2.3 Registered trademarks
We have checked the contents of this document and every effort
has been made to ensure that the descriptions of both hardware
and software are as accurate as possible. However, deviations
from the description cannot be completely ruled out, so that no
liability can be accepted for any errors or omissions contained in
the information given.
The data in this manual are checked regularly and the necessary
corrections are included in subsequent editions. We are grateful
for any improvements that you care to suggest.
Subject to technical modifications without notice.
C53000-K1174-C001-7
ww
w
.E
lec
SIPROTEC is a registered trademark of SIEMENS AG. Other
designations in this manual may be trademarks that if used by
third parties for their own purposes may violate the rights of the
owner.
2.2.5 Disclaimer of liability
45
om
Manual 7SJ45
Unpacking and packing
In the non-condensation proof version, the relative humidity must
not lead to condensation or ice buildup.
ar
tM
an
ua
ls
The 7SJ45 is packaged at the factory to meet the requirements
of IEC 60255–21.
To avoid premature aging of the electrolyte capacitors in the
device, a temperature range of +10 °C to +35 °C (+50 °F to
+95 °F) is recommended for storage.
.c
2.3
Unpacking and packing
Unpacking and packing must be done with normal care, without
using force, and with appropriate tools. Visually check the device
immediately upon arrival for correct mechanical condition.
The transport packing can be reused in the same manner for
further shipment. Storage packaging alone, for individual
devices, is not sufficient for shipping. If other packaging is used,
shock requirements under IEC 60255–21–1 Class 2 and
IEC 60255–21–2 Class 1 must be met.
2.4
tri
ca
lP
Before commissioning the device for the first time, it must have
been in the final operating area for at least 2 hours. This time
allows the device to attain temperature equilibrium, and
dampness and condensation to be avoided.
Storage
lec
If the device is not to be used immediately, it can be stored after
completing the initial inspections. Please observe the following:
SIPROTEC® easy devices and associated assemblies should be
2.5
Applications
The SIPROTEC® easy 7SJ45 is a numerical overcurrent
protection that can be used
•
as a selective short-circuit protection in electrical supply
networks with single-end infeed
•
as a back-up protection in differential protection installations
For line protection, the device can be used in networks with
earthed, low resistance earthed, isolated or compensated neutral
point.
The device can also be used as a back-up protection for
transformers.
C53000-K1174-C001-7
ww
w
.E
stored in a dry and clean place, with a maximum temperature
range of –25 °C to +55 °C (–13 °F to +131 °F) (see also Section
2.11).
After extended storage, the device should be operated,
approximately every two years, for one or two days to regenerate
the electrolytic capacitors in the device. This procedure should
also be done prior to the device being put in-service. Under
extreme climatic conditions (tropics), preheating is achieved at
the same time, and condensation is prevented.
46
Inverse-time overcurrent protection with integrating
measurement method (disk emulation), IEC or ANSI
characteristics.
Insensitivity against DC components, inrush and charging
currents as well as higher-frequency transients.
Monitoring functions
Increased reliability thanks to monitoring of the hardware and
software. The monitoring function controls the RUN and
ERROR LEDs.
•
Measuring and processing
•
Alarm and command output
•
Operation and indication
•
Control of an optional mechanical trip indication
•
Auxiliary supply from current transformers
Variants
The user can choose between variants with pulse output and
relay output.
•
Versions with pulse output
These devices require a low energy trip actuator in the circuit
breaker (24V/0.1 Ws 20 Ω) and are designed for modern
switchgear (see Figure 2-27 and see also the ordering data
and accessories in section 2.11).
In case a fault occurs the trip circuit is released for 100 ms.
When a switching operation is carried out, the trip command
is repeated until the circuit breaker picks up. Between trips
C53000-K1174-C001-7
ww
w
.E
lec
•
ar
tM
an
ua
ls
•
2-stage overcurrent protection. The device has always a
normal stage for phase currents (definite-time or inversetime). For the second stage, the user can choose between a
high-current stage for phase currents (definite-time) or a
normal stage for calculated earth currents (definite-time or
inverse-time).
tri
ca
lP
•
Construction
The 7SJ45 overcurrent protection is a compact unit that
comprises all components for:
Overcurrent protection
•
2.6
Construction
.c
The Numerical Overcurrent Protection SIPROTEC® easy 7SJ45
offers the following scope of functions:
om
Manual 7SJ45
47
Versions with relay output
These devices can be fitted in conventional types of switchgear. The auxiliary trip transformer in the current transformer
circuit or another power source can be used as power supply
source for the trip coil (see Figure 2-24 to Figure 2-26 and see
ordering data and accessories in chapter 2.11).
ar
tM
an
ua
ls
TIp
MIN 0
MAX 1.575
TI>>
MIN 0
MAX 1.575
8
MIN 0.8/1.3 *
MAX 4/.
I>
MIN 0.8/1.3 *
MAX 6.2/.
MIN 0.05
MAX 3.15
TI>
1 2 3 4 5 6
1.6
0.8
0.4
0.2
0.1
0.05
ON
Ip
ON
MIN 2
MAX 20/.
3.2
1.6
0.8
0.4
0.2
0.1
1 2 3 4 5 6
I>>
TI>>
1 2 3 4 5 6
MIN 2
MAX 20/.
MIN 0
MAX 6.3
16
8
4
2
1
0.5
0.8
0.4
0.2
0.1
0.05
0.025
[s]
3.2
1.6
0.8
0.4
0.2
0.1
[I/IN]
3.2
1.6
0.8
0.4
0.2
0.1
[s]
SW1
SW2
SW3
SW4
SW5
4
*: PULSE OUTPUT/CONTACT OUTPUT
Figure 2-1
Device front with indication and control elements
7SJ45
C53000-K1174-C001-7
ww
w
.E
lec
The housings of the 7SJ45 devices are dimensioned to fit into
most existing panel cutouts.
In the condensation-proof version, the module inside the device
is sealed with protective lacquer, so that the device can be used
even in very rough and extremely humid environmental
conditions.
DT O/C
50/51
I>>
0.8
0.4
0.2
0.1
0.05
0.025
[I/IN]
ON
16
8
4
2
1
0.5
60 Hz
IE
8
IEC 51
1 2 3 4 5 6
Standard rail mounting
3
ON
•
ENTER
1 2 3 4 5 6
Panel flush mounting and
2
ON
•
ERROR
-
50 Hz
I>>
N INV
V INV
E INV
8
FREQ.
MODE
tri
ca
lP
The device is available for
SIPROTEC7SJ4
1
In case there is a fault tripping will be carried out for at least
500 ms. When a switching operation is carried out the trip
command remains in a waiting state until the circuit-breaker
trips.
Housing
Construction
RUN
TRIP
8
•
Front view
.c
there is a dead time of 500 ms. The time can be prolonged for
extremely low fault currents.
om
Manual 7SJ45
48
ar
tM
an
ua
ls
1. Mechanical trip indication (optional)
The mechanical trip indication shows whether a trip has
occurred. The trip indication is reset by pressing the key next
to it.
om
On the front panel (Figure 2-1) the following indication and control
elements are located:
.c
Manual 7SJ45
2. Indication of operating states
The LEDs “RUN” and “ERROR” show the operating state of
the device.
Construction
ANSI
phase
earth
3. ENTER
This key is used to activate the device settings, after changing
the settings of the DIP switches.
tri
ca
lP
4. DIP switches
Five 6-pole DIP switches are provided for setting the device.
The possible settings are described in the section Parameter
settings.
phase
earth
C53000-K1174-C001-7
ww
w
.E
lec
On the back of the device (Figure 2-2), the terminal blocks with
the screw terminals are located:
IEC
49
Rear view
Settings
Settings
.c
2.7
om
Manual 7SJ45
ar
tM
an
ua
ls
Those control elements that are required for the parameter
setting are all found on the front panel. Basic settings such as the
selection of the tripping characteristic are selected by switches
on a yes or no basis (see section 2.7.1). Pickup values and time
factors are also selected by switches on an additive basis, with
the individual values assigned to each switch position being
added to a total value.
Terminals on the rear 7SJ45, here for a device
with impulse output
When delivered from the factory, all DIP switches on the front are
in ”off” position (pushed to the right as seen from the front). The
parameter settings are entered by changing the positions of the
individual DIP switches. This is done by inserting a pointed
instrument (e.g. a pencil) into the notch and moving the switch
into the desired position.
lec
Figure 2-2
tri
ca
lP
When delivered from the factory, the printing on the front panel is
for use of the high-current stage (see section 2.7.1). This
parameter setting does not provide the evaluation of the
calculated earth current. The type of characteristic (IEC or ANSI)
has been specified on ordering and is printed on the front panel.
Figure 2-3
off
On/off position of DIP switches
C53000-K1174-C001-7
ww
w
.E
The nameplate sticker, showing important information such as
power supply rating, nominal current rating, and ordering number
(MLFB), is located on the side of the housing.
on
50
om
2.7.1 Basic Settings Block
Settings
.c
Manual 7SJ45
WARNING!
FREQ. 50 Hz
MODE I>>
N INV
IEC 51 V INV
E INV
Figure 2-4
ar
tM
an
ua
ls
The Basic Settings Block (Figure 2-4) is used to select the basic
settings.
Changing the IE switch of the Basic Settings Block alters the
meaning of some parameters. Put the sticker that shows the new
parameter settings on top of the front panel printing!
Please note that the sticker cannot be removed again after it has
been applied!
60 Hz
IE
DT O/C
50/51
Basic Settings Block, example IEC device
tri
ca
lP
The top switch of the Basic Settings Block is not assigned!
FREQ. 50 Hz/ 60 Hz
Selecting the operating mode
The other 3 switches are used to define the operating mode of the
protection.
If you want to operate the device as definite-time overcurrent
protection (DT O/C 50/51), set switches 1 to 3 of Basic Settings
Block to switch position ”off” (see Table 2-1 on page 52).
If you have selected ”DT O/C 50/51” the black printing will
apply for the parameter settings.
MODE I>> / IE
If you want to operate the device as an inverse-time
overcurrent protection (IEC 51 or ANSI 51) , select the desired
characteristic by setting one of the switches 1 to 3 to “on” (see
Table 2-1 on page 52).
lec
This switch sets the device to the existing rated frequency.
C53000-K1174-C001-7
ww
w
.E
This switch defines which parameters will be evaluated. Highcurrent stage (I>>) active or evaluation of calculated earth
currents (IE)
Please note that only one switch may be in "on" position!
If two or more switches are set to ”on” the red ”ERROR” LED
flashes. In this state all protection stages are deactivated. Now
select one overcurrent protection characteristic. Press the
51
om
"ENTER" key to activate the modified settings. The "ERROR"
LED now stops blinking.
Characteristics according to IEC Characteristics according to
ANSI
N INV
Normal inverse
M INV
Moderately inverse
V INV
Very inverse
V INV
Very inverse
E INV
Extremely inverse
E INV
Extremely inverse
Table 2-1
Setting examples of the MODE switches
ar
tM
an
ua
ls
The following types of inverse overcurrent protection
characteristics can be selected:
FREQ. 50 Hz
MODE I>>
N INV
IEC 51 V INV
E INV
FREQ. 50 Hz
tri
ca
lP
The characteristics of the overcurrent protection can be found in
the section Technical Data (Figure 2-11 to Figure 2-20).
I>>
N INV
IEC 51 V INV
E INV
60 Hz
IE
DT O/C
50/51
60 Hz
IE
DT O/C
50/51
These settings mean:
Device set to 50 Hz rated
frequency
Evaluation of calculated IE
Operating mode: definite-time
overcurrent protection
These settings mean:
Device set to 50 Hz rated
frequency
High-current stage active
Operating mode: inverse-time
overcurrent protection,
characteristic type: Very
inverse
2.7.2 Parameter settings
The values that can be set are determined by the basic device
setting selected on the Basic Settings Block. The following table
shows the parameter allocation in dependence on the variant
ordered and the operating mode selected by the MODE switch:
C53000-K1174-C001-7
ww
w
.E
lec
If the operating mode IEC 51 or ANSI 51 is selected, the white
marking applies for the parameter settings!
MODE
Settings
.c
Manual 7SJ45
52
om
Manual 7SJ45
Settings
Parameter allocation for DIP switches 2 to 5
SW 1 MODE I>>
High-current stage available
MODE I>>
High-current stage not
available
Evaluation of calculated IE
DT O/C 50/51 IEC 51 ANSI 51 DT O/C 50/51 IEC 51 ANSI 51
Black printing White printing
applies!
applies!
Black printing White printing
applies!
applies!
I>>
I>>
IE>
IEp
IEp
SW 3 TI>>
TI>>
TI>>
TIE>
TIEp
DE
SW 4 I>
Ip
Ip
I>
Ip
Ip
SW 5 TI>
TIp
D
TI>
TIp
D
Determining the setting values
tri
ca
lP
SW 2 I>>
lec
The high-current stage I>> is used for fast tripping that does not
depend on any selective tripping schedule; it is mainly used for
high-impedance equipment (transformers, paralleling reactors).
The high-current stage is set such that it only picks up in case of
a short-circuit upstream or inside of such equipment. It should be
kept in mind that transformers, reactors and motors may absorb
on power-up an increased magnetizing current (inrush current).
A short delay time may be required in the case of machines to
The setting of the overcurrrent stage I> is mainly determined by
the maximum load current. It must be excluded that the device
picks up due to an overload while it is operated as a short-circuit
protection. In that case, the overcurrent stage should be set for
line protection to approx. 20 % above the highest (over-)load
current to be expected, and to approx. 50 % for transformer and
motor protection. When using the device downstream of
controlled or parallelly operated transformers, make sure that the
setting value is lower than the lowest short-circuit current to be
expected for the planned protection zone. Refer to the selective
tripping schedule for setting times.
Where the device is used for inverse-time overcurrent protection,
an interval of approx. 0.3 s (typical interval for selective tripping)
must be observed between the set characteristics of two adjacent
relays. These characteristics are set on the basis of the scale factor TIp or D (see Figure 2-11 to Figure 2-20). Since device 7SJ45
operates with disk emulation, please observe the reset characteristics.
The definite time overcurrent protection of 7SJ45 operates with
disk emulation. It emulates the behavior of disks of electrome-
C53000-K1174-C001-7
ww
w
.E
The earth current stage IE> is a useful function in networks with
effective or resistance or reactance earthing. Set this stage to
somewhat less than the lowest earth fault current to be expected.
For the time setting, a separate selective tripping schedule for
earth faults can be used.
ar
tM
an
ua
ls
Table 2-2
.c
bridge the inrush current. Therefore a delay can be set for the I>>
stage.
53
om
Manual 7SJ45
Settings
The current thresholds relating to the rated device current are set
on the device. These thresholds include:
.c
chanical relays. In case several faults occur successively it is ensured that the "prehistory" is taken into consideration due to the
inertia of the disk and that the time behavior is matched. The
7SJ45 divides the operation range of the disk emulation into an
incrementing zone (1.1 to 20 ⋅ I/IP) and a decrementing zone
(< 0,9 ⋅ I/IP). The zone in between is called idle state zone since
this is the zone where the virtual disk is in idle state.
ar
tM
an
ua
ls
Current transformer INP / INS
100 A / 5 A
5A
Maximum load current
120 A
The current transformer supply of 7SJ45 conditions that the device is unable to operate with single-phase supply and currents
smaller than 0.8 ⋅ IN. The device and the virtual disk are reset.
The operation zones of the reset characteristics therefore depend on the setting value selected for IP and the supply conditions. If, for instance, IP = 4.0 is selected, the disk emulation (with
single-phase supply and I/IP = 0.2) is reset due to a device reset.
When the disk emulation is picked up again, the time counter
starts at zero.
Safety factor (assumed)
1.25
If you press the "ENTER" key, the disk emulation will also be
reset.
All parameters are set on an additive basis. Some parameters
have fixed upper and lower thresholds.
tri
ca
lP
Rated device current IN
120A I NS
Ip = -------------- ⋅ -------- ⋅ 1,. 25 = 1,. 5 ⋅ I N
100A IN
Setting, value =
å Switch, values
C53000-K1174-C001-7
ww
w
.E
lec
The disk emulation offers its advantages when the grading coordination chart of the time overcurrent protection is combined (on
electromechanical base) with other devices connected to the system.
54
om
Manual 7SJ45
7SJ45 with relay output - device configured by a jumper
Examples of parameter settings by DIP switches
Parame Switch
ter
position
Meaning
Setting range
I>>
Pick-up threshold of
high-current stage,
setting on an additive
basis, e.g. 7.5 IN
2 IN ... 20 IN;
infinite (∞)
Steps: 0.5 IN
16
8
4
2
1
2.8
0,5
lec
0.8
0.4
0.2
0.1
0.05
0.025
Trip time for high0 ms ... 1575 ms
current stage, setting Steps: 25 ms
on an additive basis,
e.g. 0.275 s = 275 ms
tri
ca
lP
T I>>
Settings changes that are made after power on are not applied at
once but only indicated by the "RUN" LED blinking green.
The LED stops blinking if the original settings are restored.
If parameters are changed, the functionality is retained until the
"ENTER"-button is pushed or parameters are transmitted to the
device after restart. The "RUN" LED shines green.
ar
tM
an
ua
ls
Table 2-3
.c
The setting ranges for the parameters can be found in the
Technical Data (2.11) or on the indications on the front panel.
7SJ45 with relay output - device configured by a
jumper
The trip circuit can be adapted to the system connecting a jumper
to the p.c.b. (see Figure 2-5).
The jumper X30 controls a surge arrester in parallel to the NC
contact of the trip relay (see Figure 2-8). This safety measure is
only required if the 7SJ45 is used in combination with auxiliary
trip transformers (X30 in position 2-3).
This setting is pre-defined in the factory.
If the tripping is to be performed by means of an existing auxiliary
voltage, set jumper X30 to position 1-2.
.E
If you set a value below the minimum setting, the minimum
setting applies (see Note on page 29).
C53000-K1174-C001-7
ww
w
If you set a value above the maximum setting, the maximum
setting applies.
Parameters marked with "∞“ allow to deactivate the associated
protection stage. To do so, set all switches to “on” position.
55
om
Manual 7SJ45
7SJ45 with relay output - device configured by a jumper
DANGER!
•
Short-circuit the current transformers!
•
Disconnect all transformer circuit connections.
ar
tM
an
ua
ls
When changes are made on-site, the user must strictly observe the
guidelines for the handling of electrostatic sensitive devices (ESD).
.c
To change the setting of the jumper, proceed as follows:
WARNING!
•
Remove the rear plate of the housing. To do so, remove the
4 fastening screws in the housing corners with a screwdriver.
Hold the rear plate by the screw terminal blocks and pull it
approx. 5 cm out of the housing, with the module attached to
it.
Caution!
tri
ca
lP
The output terminals of the current transformers must be shortcircuited before the power supply lines to the device are
disconnected.
Jumper at 7SJ45 with relay output
X30
Function
1-2
without auxiliary trip transformer
2-3
with auxiliary trip transformer
•
Now pull the module completely out of the device.
•
Re-locate short-circuit jumper X30. Figure 2-5 illustrates the
jumper location on the module.
•
After changing the jumper setting, perform the above steps in
reverse order to re-assemble the device.
C53000-K1174-C001-7
ww
w
.E
lec
Table 2-4
Only for devices with mechanical trip indication:
After you have pulled the module approx. 5 cm out of the module,
carefully remove the connector of the cable assembly from the pin
connector X11!
56
Installation and commissioning
H1
X11
S6
S1
X30
T5
S2
32 1
T3
S4
S3
T2
Hazardous voltages are present in this electrical equipment during
operation. Non–observance of the safety rules can result in severe
personal injury or property damage. In particular, all safety notes and
warnings must be strictly observed.
The 7SJ45 overcurrent protection must be installed in a switchgear
cubicle, or on a standard DIN rail if installed on a switchgear panel.
After the installation, the entire terminal area must be sufficiently
protected against inadvertent contact with live parts.
tri
ca
lP
S5
T4
ar
tM
an
ua
ls
WARNING!
T6
T1
Installation and commissioning
.c
2.9
Jumper location for the 7SJ45 with relay output
C53000-K1174-C001-7
ww
w
.E
lec
Figure 2-5
om
Manual 7SJ45
57
om
Manual 7SJ45
Installation and commissioning
167.3
150.2
38.5
17.1
65.5
.c
To mount the device, proceed as follows:
•
Insert the device from the front into the panel cutout.
•
The top and bottom of the housing have conical fastening
elements that are snapped onto the clips of the threaded
rods. The tip of the thread must point towards the device front.
ar
tM
an
ua
ls
2.9.1 Panel flush mounting
147
135,7
Note!
The ends of the threaded rods have a sleeve for insertion of a
screwdriver!
tri
ca
lP
75
78.5
68+0,1
•
Connect the earthing screw on the device with the protective
earthing of the switchgear panel or cubicle
•
Make the electrical connections by wiring the screw terminals
as specified in the connection diagram (see section 2.9.3).
.E
Dimensional drawings
C53000-K1174-C001-7
ww
w
Figure 2-6
Secure the device from the back by screwing in the threaded
rods
lec
138+1
Switchgear panel section72×144
DIN 43700/IEC61554
•
58
om
Manual 7SJ45
Installation and commissioning
.c
2.9.2 Standard rail mounting
44.5
32.5
ar
tM
an
ua
ls
WARNING!
.E
C53000-K1174-C001-7
•
Remove the four M2 screws in the corners of the rear plate.
•
Assemble the DIN rail adapter according to the enclosed
assembly instructions.
•
Place the DIN rail adapter and fasten it with screws M2×12
(coming with the device) integrating the washers.
•
Snap the device with the DIN rail adapter fitted onto the DIN
rail and fasten it with screws.
WARNING!
The DIN rail adapter is recommended for local mounting only.
w
Standard rail mounting
ww
Figure 2-7
The device can be installed on a 35 mm standard DIN rail
(acc. to DIN EN 50022). Proceed as follows for the installation:
78.5
75
47
65.5
156.2
lec
173.3
tri
ca
lP
147
135.7
137
All electrical connections must be made before installing the
protection device on the DIN rail. The screw terminal blocks are no
longer accessible after installation on the DIN rail.
59
om
Installation and commissioning
.c
Manual 7SJ45
WARNING!
ar
tM
an
ua
ls
Note!
We recommend to secure the device after installation on both sides
by end brackets or clips against slipping from the DIN rail.
Please note that end brackets or clips are not included in the delivery!
Before starting any work at all, the device must be disconnected from
the power supply and earthed.
Before commissioning the device for the first time, it must have
been in the final operating area for at least 2 hours. This time
allows the device to attain temperature equilibrium, and
dampness and condensation to be avoided.
2.9.3 Connection
The device is delivered ready for installation, i.e. with the terminal
screws loosened.
tri
ca
lP
WARNING!
Connections
Direct cable connections: solid or stranded conductor with
connector sleeve; conductor with cross-section up to 3.3 mm2, or
AWG 12. Use copper conductors only!
Strip the connecting wires to a length of 8 mm, insert them into
the screw terminals, and secure them such that they will not slip
out while tightening the screw. After tightening the screws
(maximum tightening torque 1 Nm), verify that the wires to the
terminals are tightly connected.
C53000-K1174-C001-7
ww
w
.E
lec
The successful and safe operation of this device is dependent on
proper handling, storage, installation, operation, and maintenance.
Of particular importance are the general installation and safety
regulations for work in a high-voltage environment (for example,
ANSI, IEC, EN, DIN, or other national and international regulations).
These regulations must be observed. Non-observance can result in
death, personal injury, or severe property damage.
The terminal screws are Phillips screws that can be turned with a
2 x 0.5 screwdriver.
60
om
Installation and commissioning
Make the wiring of the 7SJ45 protection device as specified in the
circuit diagram (Figure 2-8 or Figure 2-9).
2.9.4 Commissioning
.c
Manual 7SJ45
X1_4
X2_5
X1_2
X2_4
X1_3
X2_3
X1_1
X2_2
X2_1
7SJ45XX-1
Circuit diagram 7SJ45 with relay output
X2_6
X2_5
+
X1_4
-
X1_3
X2_4
X2_3
X2_1
.E
Hazardous voltages are present in this electrical equipment during
operation. Severe personal injury or property damage can result if the
device is not handled properly.
Only qualified personnel shall work on and around this equipment
after becoming thoroughly familiar with all warnings and safety
notices in this instruction manual as well as with the applicable safety
steps, safety regulations, and precautionary measures.
Particular attention mutst be drawn to the following:
• The device is to be earthed to the substation earth before any other
connections are made.
• Hazardous voltages can exist in the power supply and at the
connections to current transformers, voltage transformers, and test
circuits.
• Hazardous voltages can be present in the device even after the
communication cables have been removed, i.e. capacitors can still
be charged.
• The limit values given in Technical Data (2.11) must not be
exceeded, neither during testing nor during commissioning.
Circuit diagram 7SJ45 with pulse output
C53000-K1174-C001-7
ww
w
Figure 2-9
7SJ45XX-0
lec
X1_1
X2_2
tri
ca
lP
Figure 2-8
ar
tM
an
ua
ls
WARNING!
X2_6
61
om
Manual 7SJ45
Installation and commissioning
.c
Tripping test
The output terminals of the current transformers must be shortcircuited on the transformers themselves before the power
supply lines to the device are disconnected.
Where a test switch is available that short-circuits automatically the
output lines of the current transformer, it will be sufficient to set it to
"Test" position, provided that the short-circuiters have been checked
in the first place.
Standard test
This test is used to check the overall function of the device,
including the trip circuits. Connect the device to a secondary test
equipment for protective devices. Observe the safety
instructions!
ar
tM
an
ua
ls
DANGER!
When testing the device with secondary test equipment, make
sure that no other measurement quantities are connected and
that the testing unit is supplied by load-independent currents.
The trip test should be performed with the circuit breaker
connected, and with the setting values that are specified for
operation.
Caution!
tri
ca
lP
A load current of at least 80% the rated current is necessary to
activate the self-monitoring function of the device with singlephase supply. The "RUN" LED must be on.
lec
A flashing LED indicates a problem of the device settings.
If the LED "RUN" flashes green, a setting has been made but not
yet applied. Press the "ENTER" key to activate the new settings.
If the LED "ERROR" flashes red, there is an inconstency of the
Basic Settings Block. Please correct the setting.
If the trip indication is activated, press the Reset key to reset it.
Using the test equipment, apply a test current below the set
tripping threshold. The device must not trip. Apply now a test
current above the set tripping threshold. The trip actuator or the
circuit breaker must be actuated.
C53000-K1174-C001-7
ww
w
.E
If none of the LEDs is lit, check the connection of the transformer
circuits.
This test trips the circuit breaker. Tests with currents that exceed more
than twice the rated device current cause an overload of the input
circuits and may only be performed for a short time (see 2.11).
Afterwards the device has to cool off!
62
om
Manual 7SJ45
Installation and commissioning
Final preparation of the device
G Check if the fault currents were applied long enough (for low
Re-connect the device with the primary transformers and remove
the short-circuiting links from the transformer circuit. Check the
correct connection of the transformers, e.g. with a current probe.
G Check all connections.
Earth pickup stages are tested with single-phase current, the
phase pickup stages with three-phase current.
ar
tM
an
ua
ls
fault currents).
.c
If the circuit breaker does not trip:
Make sure that the equipment used for this test can supply the
power that is necessary to trip the circuit breaker.
Firmly tighten all screws. Tighten all terminal screws, including
those that are not used.
Check again the device settings. It is especially important to
check the correct setting of the Mode switches. Settings changes
that are made after power on are not applied at once but only
indicated by a blinking "RUN" LED. The new settings are
activated by pressing the "ENTER" key or by restarting the
device.
If the current in your application is at least 80% of the rated
current, the green "RUN“ must be on. The red "ERROR" LED
must not be lit. With single-phase supply the 7SJ45-devices can
be fully utilized from input currents of 0.8 IN onwards.
If a test switch is available, it must be in the operating position.
The device is now ready for operation.
C53000-K1174-C001-7
ww
w
.E
lec
tri
ca
lP
The trip indication on the front panel is mechanically reset by
means of the key next to it.
63
om
Manual 7SJ45
Maintenance
.c
2.10
Maintenance
Note!
ar
tM
an
ua
ls
The 7SJ45 does not require any maintenance.
Repaired devices are returned from the factory with all jumpers on the
printed circuit boards set in the original positions according to the
ordering number. All configuration and setting parameters have the
default setting.
Note!
C53000-K1174-C001-7
ww
w
.E
lec
tri
ca
lP
Siemens strongly recommends that no repairs on defective devices or
boards are done. Special electronic components are used according
to the guidelines to ESD (Electrostatic Sensitive Devices). Most
importantly, special production techniques are necessary to avoid
damaging the wave-soldered multi-layer board, the sensitive
components, and the protective lacquer.
Defective devices should be returned to the manufacturer. The original
packaging material should be used for returning a device. If other
packaging material is used, then the device and other contents must
be provided with protection against shock according to
IEC 60255–21–1 Class 2 and IEC 60255–21–2 Class 1. Before
returning a device, retrieve and save all configuration and setting
parameters and any important information. Note any changes that
were made to the jumpers on the internal printed circuit boards after
the device was first delivered.
64
om
Manual 7SJ45
Technical Data
Outputs
.c
2.11
Technical Data
1 impulse output (7SJ45XX-0*)
Current inputs
Rated frequency fN
50 Hz or 60 Hz (adjustable)
Rated current IN
1 A or 5 A
Power consumption
– at IN = 1 A or 5 A
Overload capability of current
path
– thermal (rms)
50·IN for 1 s
15·IN for 10 s
2·IN continuous
tri
ca
lP
approx. 1.4 VA at IN
ar
tM
an
ua
ls
Number:
100·IN for one half-cycle
Recommended primary current
transformers:
10P 10, 2.5 VA or according to the
requirements and the required tripping
power
Relay output (7SJ45XX-1*)
Number:
1 changeover contact
Switching capability
MAKE 1000 W/VA
BREAK 30 VA
40 W resistive
25 VA at L/R ≤ 50 ms
Switching voltage
≤ 250 V DC, ≤ 240 V AC
Permissible current per contact
5 A continuous;
30 A for 0.5 s (inrush current)
Interference suppression capacitors across relay contacts
Ceramic, 4.7 nF, 250 V
UL-Listing for relay output with the following rated data:
120 Vac
240 Vac
240 Vac
24 Vdc
48 Vdc
240 Vdc
120 Vac
240 Vac
Pilot duty, B300
Pilot duty, B300
5 A General Purpose
5 A General Purpose
0.8 A General Purpose
0.1 A General Purpose
1/6 hp (4.4 FLA)
1/2 hp (4.9 FLA)
C53000-K1174-C001-7
ww
w
.E
lec
– dynamic (peak value)
1 pulse output
24 V DC / 0.1 Ws
65
EMC tests
Specifications
IEC 60255 (product standards)
ANSI C37.90.0/.1/.2
UL508
See also standards for individual tests
Insulation tests
Standards:
IEC 60255–5
High-voltage test (routine test)
all circuits except for
impulse output–earth
2.5 kV (rms), 50 Hz, 1 min
1.0 kV (rms), 50 Hz, 1 min
Impulse voltage test
(routine test)
all circuits, Class III
5 kV (peak value); 1.2/50 µs; 0.5 J;
3 positive and 3 negative surges in
intervals of 1 s
Standards:
IEC 60255–6, IEC 60255–22
EN 50263 (product standards)
EN 50082–2 (generic standard)
EN 61000–6–2
IEC 61000–4 (basic standards)
High frequency test
IEC 60255-22-1, Class III
2.5 kV (peak value); 1 MHz; τ = 15 µs;
Ri = 200 Ω; 400 surges per s; test
duration ≥ 2 s
Electrostatic discharge
IEC 60255–22-2, Class III
EN 61000-4-2, Class III
4 kV/6 kV contact discharge; 8 kV air
discharge; both polarities; 150 pF;
Ri = 330 Ω
Irradiation with HF field
amplitude modulated,
IEC 60255-22-3 and IEC 610004-3, Class III
10 V/m; 80 MHz to 1000 MHz; 80 %;
1 kHz; AM
Irradiation with HF field, pulse
modulated IEC 61000–4–3,
Class III
10 V/m; 900 MHz; repetition frequency
200 Hz; duty cycle 50 %
30 V/m; 1890 MHz; repetition frequency
200 Hz; duty cycle 50 %
Fast transient disturbance/burst
IEC 60255–22–4 and
IEC 61000–4–4, Class IV
4 kV; 5/50 ns; 5 kHz; burst duration =
15 ms; repetition rate 300 ms; both
polarities; Ri = 50 Ω; test duration 1 min
C53000-K1174-C001-7
ww
w
.E
lec
tri
ca
lP
High-voltage test (routine test)
across open command contacts
EMC tests for immunity (type tests)
ar
tM
an
ua
ls
Standards:
Technical Data
.c
Electrical tests
om
Manual 7SJ45
66
om
Manual 7SJ45
Circuit groups to earth: 2 kV; 42Ω, 0.5µF
Across circuit groups: 1 kV; 42Ω, 0.5µF
10 V; 150 kHz to 80 MHz; 80 %; 1 kHz;
AM; Ri = 150 Ω
Power system frequency
magnetic field IEC 61000–4–8,
Class IV
IEC 60255–6
30 A/m continuous;
300 A/m for 5 s; 50 Hz
0.5 mT; 50 Hz
Damped vibrations
IEC 60694, IEC 61000-4-12,
Class III
2.5 kV (peak value, alternating polarity)
100 kHz, 1 MHz, 10 MHz and 50 MHz,
Ri = 200 Ω; duration ≥ 2 s
Oscillatory Surge Withstand
Capability
ANSI/IEEE C37.90.1
not across open contacts
2.5 to 3 kV (peak value); 1 to 1.5 MHz
damped vibration; 50 surges per s;
duration ≥ 2 s; Ri = 150 Ω to 200 Ω
Fast Transient Surge Withstand
Capability ANSI/IEEE C37.90.1
not across open contacts
4 kV to 5 kV; 10/150 ns;
50 and 120 pulses per s;
both polarities; duration ≥ 2 s; Ri = 80 Ω
Radiated Electromagnetic
Interference
ANSI/IEEE C37.900.2
35 V/m; 25 MHz to 1000 MHz
amplitude and pulse modulated
Radio noise field strength
IEC CISPR 22
EN 5022,
VDE 0878 Part 22
EN 50081–* (generic standard)
30 MHz to 1000 MHz
limit class B
C53000-K1174-C001-7
ww
w
.E
lec
tri
ca
lP
Line conducted HF, amplitude
module. IEC 60255-22-6 and
IEC 61000–4–6, Class III
Standards:
.c
EMC tests for noise emission (type tests)
Impulse: 1.2/50µs
ar
tM
an
ua
ls
High energy surge voltages,
IEC 61000-4-5 Installation class III
Measuring inputs, binary output
Technical Data
67
om
Manual 7SJ45
Vibration and Shock Stress Tests for Transportation
(only for panel flush mounting device)
Standards:
IEC 60255-21 and IEC 60068-2
Vibrations
IEC 60255-21-1, Class II
IEC 60068-2-6
Sinusoidal
10 Hz to 60 Hz: ±0,075 mm amplitude;
60 Hz to 150 Hz: 1 g acceleration
frequency sweep 1 oktave/min
20 sweep cycles in 3 axes (vertically
to each other)
Shock IEC 60255-21-2, Class I
tri
ca
lP
Sinusoidal
1 Hz to 8 Hz: ±4 mm amplitude
(horizontal vectors)
1 Hz to 8 Hz: ±2 mm amplitude
(vertical vector)
8 Hz to 35 Hz: 1 g acceleration
(horizontal vectors)
8 Hz to 35 Hz: 0.5 g acceleration
(vertical vector)
frequency sweep 1 oktave/min
1 sweep cycle in 3 axes
(vertically ot each other)
IEC 60255-21 and IEC 60068-2
Vibration
IEC 60255-21-1, Class II
IEC 60068-2-6
Sinusoidal
5 Hz to 8 Hz: ±7.5 mm amplitude;
8 Hz to 150 Hz: 2 g acceleration
frequency sweep 1 oktave/min
20 sweep cycles in 3 axes
(vertically to each other)
Shock
IEC 60255-21-2, Class I
IEC 60068-2-27
Semi-sinusoidal
15 g acceleration, duration 11 ms,
each 3 shocks (in both directions
of the 3 axes)
Continuous shock
IEC 60255-21-2, Class I
IEC 60068-2-29
Semi-sinusoidal
10 g acceleration, duration 16 ms,
each 1000 shocks (in both directions
of the 3 axes)
C53000-K1174-C001-7
ww
w
.E
lec
Vibration on earthquake
IEC 60255-21-3, Class I
IEC 60068-3-3
Semi-sinusoidal
5 g acceleration, duration 11 ms,
each 3 shocks (in both directions
of the 3 axes)
Standards:
ar
tM
an
ua
ls
Vibration and Shock Stress Tests for Stationary Application
.c
Mechanical Tests
Technical Data
68
om
Manual 7SJ45
Design
Temperatures
–20 °C to +70 °C = –4 °F to +158 °F,
with continuous current of 2 IN:
–20 °C to +55 °C
Limiting temperatures for
storage
–25 °C to +55 °C = –13 °F to +131 °F
Limiting temperatures for
transport
–25 °C to +85 °C = –13 °F to +185 °F
Humidity
Condensation is permissible according to
IEC 60654-1, Class III
Housing for panel flush mounting
DIN43700/IEC61554
Can be adapted for standard rail
mounting (only for local mounting
recommended).
Dimensions (WxHxD)
78.5x147x205.8 (incl. transparent cover
and terminal blocks)
Weight approx.
1.5 kg
Degree of protection for housing according to IEC 60529
Device front
IP 51
Device back
IP 20
Protection of personnel
IP 1X
C53000-K1174-C001-7
ww
w
.E
lec
Permissible humidity
(Condensation proof)
Mean value per year ≤75 % relative
humidity; on 30 days of the year up to
95 % relative humidity; condensation
must be avoided!
tri
ca
lP
Permissible humidity (Standard)
Housing
ar
tM
an
ua
ls
Recommended operating
temperature
.c
Climatic stress tests
Technical Data
69
om
Manual 7SJ45
Setting ranges / increments for inverse-time protection
(IEC 51 or ANSI 51)
Pickup current I>> (phases)
2 IN to 20 IN or ineffective,
increments 0.5 IN
0.5 to 6.2 IN
or ineffective, increments 0.1 IN
Pickup current IE>
(earth calculated);
three-phase supply;
see Note
0.5 to 6.2 IN
or ineffective, increments 0.1 IN
Delay times T I>>
0 to 1575 ms, increments 25 ms
Delay times T I>
0 to 6300 ms, increments 100 ms
tri
ca
lP
Pickup current I> (phases);
three-phase supply;
see Note
C53000-K1174-C001-7
ww
w
.E
lec
The set times are pure delay times.
Pickup current Ip (phases);
three-phase supply;
see Note
0.5 IN to 4 IN
or ineffective, increments 0.1 IN
Pickup current IEp> (earth
calculated);
three-phase supply;
see Note
0.5 IN to 4 IN
or ineffective, increments 0.1 IN
Delay times T Ip (IEC)
0.05 to 3.15 s,
increments 0.05 s
Delay times D (ANSI)
0.5 to 15.00 s,
increments 0.25 s
ar
tM
an
ua
ls
Setting ranges / increments for definite-time protection
(DT O/C 50/51)
.c
Overcurrent protection
Technical Data
Note!
The device allows minimum setting values of 0.5 IN (three-phase supply).
With single-phase supply, please observe the minimum setting values of
0.8 IN (7SJ45XX-0*) or 1.3 IN (7SJ45XX-1*) printed on the front panel.
WARNING!
When setting the parameters, note that the maximum thermal overload
capability of the current path is 2 IN.
70
om
500
Technical Data
.c
Manual 7SJ45
ar
tM
an
ua
ls
100
100
20
3.20
0.40
0.20
1
0.10
0.5
0.3
0.2
0.05
0.1
Tp [s]
↑
0.05
0.05
Figure 2-10
t [s]
0.80
0.1
0.2
I/Ip
0.3
tri
ca
lP
5
3
2
3.20
5
0.9
0.5
Reset time characteristic as per IEC Type A
(normal inverse, N INV)
æ
ö
9.7
t = ç -----------------------------÷ ⋅ T P
ç
2÷
è 1 – (I ⁄ IP) ø
C53000-K1174-C001-7
ww
w
Normal inverse /
(Type A)
lec
t [s]
10
10
1.60
.E
20
[s]
1.60
3
2
0.80
1
0.40
0.5
0.20
0.3
0.2
0.10
0.1
0.05
0.05
1.1
Figure 2-11
2
3
5
I/Ip
10
20
↑
←T
p
[s]
Trip characteristic as per IEC Type A
(normal inverse, N INV)
Normal inverse /
(Type A)
æ
ö
0.14
t = ç --------------------------------------÷ ⋅ T
ç
÷
P
0.02
– 1ø
è ( I ⁄ IP )
[ s]
71
om
500
100
ar
tM
an
ua
ls
3.20
100
1.60
20
0.40
10
0.20
5
3
2
0.10
10
5
t [s]
t [s]
0.80
20
0.05
0.5
0.3
0.2
0.1
0.2
I/Ip
0.3
0.9
0.5
Reset time characteristic as per IEC Type B
(very inverse, V INV)
æ
ö
43.2
t = ç -----------------------------÷ ⋅ T
ç
2÷ P
è 1 – (I ⁄ IP) ø
[s]
3
2
3.20
1
1.60
0.5
0.80
0.3
0.2
0.40
0.20
0.1
0.10
0.05
1.1
Figure 2-13
Very inverse /
(Type B)
2
3
5
I/Ip
10
20
0.05
↑
←T
p
[s]
Trip characteristic as per IEC Type B
(very inverse, V INV)
13.5
t = æ --------------------ö ⋅ T
[s]
è I ⁄ I – 1ø
P
P
C53000-K1174-C001-7
ww
w
Very inverse /
(Type B)
lec
Figure 2-12
p
.E
0.05
0.05
↑
T [s]
tri
ca
lP
1
0.1
Technical Data
.c
Manual 7SJ45
72
om
500
100
ar
tM
an
ua
ls
3.20
100
1.60
20
0.40
10
0.20
5
3
2
0.10
10
5
t [s]
t [s]
0.80
20
0.05
T [s]
p
0.1
0.2
I/Ip
0.3
tri
ca
lP
↑
0.9
0.5
æ
ö
58.2
t = ç -----------------------------÷ ⋅ T
ç
2÷ P
è 1 – (I ⁄ IP) ø
C53000-K1174-C001-7
ww
w
Extremely inverse /
(Type C)
lec
Reset time characteristic as per IEC Type C
(extremely inverse, E INV)
.E
Figure 2-14
3.20
0.5
0.5
0.3
0.2
0.05
0.05
3
2
1
1
0.1
Technical Data
.c
Manual 7SJ45
[s]
1.60
0.3
0.2
0.80
0.1
0.05
0.40
1.1
Figure 2-15
2
3
5
I/Ip
10
0.05
20
0.10
0.20
↑
←T
p
[s]
Trip characteristic as per IEC Type V
(extremely inverse, E INV)
Extremely inverse /
(Type C)
æ
ö
80
t = ç -----------------------------÷ ⋅ T
[ s]
ç
÷ P
2
è ( I ⁄ IP ) – 1ø
73
om
500
ar
tM
an
ua
ls
500
200
200
100
100
20
20
15.00
10.00
5.00
1
1.00
0.50
0.1
D [s]
Figure 2-16
↑
0.1
0.2
I/Ip
0.3
0.5
tri
ca
lP
2.00
0.5
0.3
0.2
0.05
0.05
10
t [s]
5
3
2
0.9
Reset time characteristic as per ANSI,
moderately inverse, (M INV)
.E
æ
ö
0.97
t = ç -----------------------------÷ ⋅ D
ç
2÷
è 1 – ( I ⁄ IP ) ø
lec
t [s]
10
Technical Data
.c
Manual 7SJ45
15.00
10.00
1
5.00
0.5
0.3
0.2
2.00
0.1
0.50
0.05
1.1
Figure 2-17
1.00
2
3
5
I/Ip
10
20
↑
D [s]
Pickup characteristic as per ANSI,
moderately inverse, (M INV)
æ
ö
0.0103
t = ç -------------------------------------- + 0.0228÷ ⋅ D [ s ]
ç
÷
0.02
–1
è ( I ⁄ IP )
ø
C53000-K1174-C001-7
ww
w
[s ]
5
3
2
74
om
Technical Data
.c
Manual 7SJ45
ar
tM
an
ua
ls
500
500
200
200
100
100
5.00
10
2.00
5
3
2
1.00
1
D [s]
20
10
t [s]
20
0.50
↑
0.5
0.3
0.2
0.1
Figure 2-18
0.1
0.2
I/Ip
0.3
0.5
0.9
Reset time characteristic as per ANSI,
very inverse, (V INV)
.E
æ
ö
4.32
t = ç -----------------------------÷ ⋅ D
ç
2÷
è 1 – ( I ⁄ IP ) ø
lec
0.05
0.05
5
3
2
15.00
10.00
1
tri
ca
lP
t [s]
15.00
10.00
5.00
0.1
1.00
0.05
2.00
0.50
1.1
2
3
5
I/Ip
10
20
↑
D [s]
Figure 2-19 Pickup characteristic as per ANSI,
very inverse, (V INV)
æ
ö
3.922
t = ç ----------------------------- + 0.0982÷ ⋅ D
ç
÷
2
è (I ⁄ IP) – 1
ø
[s ]
C53000-K1174-C001-7
ww
w
[s ]
0.5
0.3
0.2
75
om
Technical Data
.c
Manual 7SJ45
500
ar
tM
an
ua
ls
500
200
100
200
100
15.00
10.00
5.00
20
2.00
5
3
2
1.00
1
D [s]
10
t [s]
10
0.50
↑
0.1
Figure 2-20
0.1
0.2
I/Ip
0.3
0.5
0.9
Reset time characteristic as per ANSI,
extremely inverse, (E INV)
.E
æ
ö
5.82
t = ç -----------------------------÷ ⋅ D
ç
2÷
è 1 – ( I ⁄ IP ) ø
lec
0.05
0.05
5
3
2
1
0.5
0.3
0.2
tri
ca
lP
t [s]
20
5.00
0.1
0.05
2.00
1.1
Figure 2-21
2
3
5
I/Ip
10
0.50
20
1.00
↑
← D [s]
Pickup characteristic as per ANSI,
extremely inverse, (E INV)
æ
ö
5.64
t = ç ----------------------------- + 0.02434÷ ⋅ D [ s ]
ç
÷
2
è ( I ⁄ IP ) – 1
ø
C53000-K1174-C001-7
ww
w
[s ]
15.00
10.00
0.5
0.3
0.2
76
om
Manual 7SJ45
.c
Pickup times
Technical Data
single phase supply (relay output)
approx. 32 ms
Complete device relay output
approx. 38 ms
ar
tM
an
ua
ls
Complete device pulse output
1000
t [ms]
Tripping times when switching onto a fault
single phase supply (impulse output)
100
10000
t [ms]
tri
ca
lP
1000
10
3
4
5
6
7
8
9 I [IN]10
2
3
4
5
6
7
8
9 I [IN] 10
Maximum tripping time when switching onto a
fault, device with relay output
Figure 2-22 and Figure 2-23 show maximum values for
single-phase supply. Multi-phase supply will result in shorter
times.
Maximum tripping time when switching onto a
fault, device with pulse output
C53000-K1174-C001-7
ww
w
2
1
Figure 2-23
.E
1
Figure 2-22
lec
100
10
77
om
Manual 7SJ45
Technical Data
Measured value deviations due to various influences
approx. 0.95 for definite time protection
(DT O/C 50/51)
approx. 0.91 for inverse-time protection
(IEC 51 or ANSI 51)
Tolerances
Definite time (DT O/C 50/51)
5 % of the setting value, or 5 % of the
rated value (for thresholds < 1IN)
Delay times T
1 % or 30 ms
Inverse time (IEC 51 or ANSI 51)
< 2,5%
Frequency in range
0.9 < f/fN < 1.1:
< 10%
Harmonics:
up to 10% 3rd and 5th harmonic:
< 1%
Direct components:
< 5%
Temperature in range -5°C to
70°C
< 0.5 % / 10 K
tri
ca
lP
Pickup current I>, I>>, IE>
Frequency in range
0.95 < f/fN < 1.05:
ar
tM
an
ua
ls
Dropout/pickup ratio
.c
Dropout / pickup ratio
5 % of the setting value, or 5 % of the
rated value (for thresholds < 1IN)
Time behavior for 2 ≤ I/IP ≤ 20
5 % or 50 ms
C53000-K1174-C001-7
ww
w
.E
lec
Pick-up thresholds
78
Numerical Overcurrent Protection powered by current transformers
SIPROTEC easy 7SJ45
6
ORDER NO.:
7
7SJ45 0
8
9 10 11 12
0
-
0
13 14 15 16
A
-
A
|
|
|
|
|
|
|
|
1A
5A
1
5
|
|
|
|
|
|
|
|
|
|
|
|
|
|
|
Trip
8
Pulse output
Relay output
0
1
|
|
|
|
9
|
|
|
|
|
B |
E |
|
|
10
|
|
|
|
|
|
|
|
|
|
|
|
|
|
|
|
|
|
|
|
A
B
|
|
|
|
13
0
1
|
|
|
|
|
|
16
0
1
Construction
Standard rail mounting
Flush mounting housing
Region-specific Function Versions
Region world, 50/60Hz; standard
Region world, 50/60Hz; condensation proof
IEC / ANSI
IEC
ANSI
Mechanical trip indication
Protective relay with pulse output
Low-energy trip release 3AX1104-2B
•
Protective relay with relay output
Auxiliary transformer for the trip circuit:
4AM5065-2CB (1A) or 4AM5070-8AB (5A)
Current transformer-operated trip release 3AX1102-2A (rated
normal current 0.5 A) or
3AX1102-2B (rated normal current 1 A)
C53000-K1174-C001-7
ww
w
.E
lec
without
with
|
•
tri
ca
lP
|
7
|
Current Transformer: IN
.c
Accessories:
Technical Data
ar
tM
an
ua
ls
Ordering data and accessories
om
Manual 7SJ45
79
om
Connection examples
L1 L2 L3
L1 L2 L3
3AX1102-2A
or
3AX1102-2B
ar
tM
an
ua
ls
2-phase CT connection with auxiliary trip
transformer and relay output
7SJ45XX-1
3AX1102-2A
or
3AX1102-2B
Figure 2-25
3-phase CT connection with auxiliary trip
transformer and relay output
C53000-K1174-C001-7
ww
w
.E
lec
Figure 2-24
4AM5070-8AB
4AM5065-2CB
7SJ45XX-1
tri
ca
lP
4AM5070-8AB
4AM5065-2CB
Technical Data
.c
Manual 7SJ45
80
om
L1 L2 L3
L1 L2 L3
tri
ca
lP
ar
tM
an
ua
ls
7SJ45XX-1
Technical Data
.c
Manual 7SJ45
7SJ45XX-0
24V DC
0.1 Ws
auxiliary voltage
standard release
Figure 2-27
3-phase CT connection with pulse output
C53000-K1174-C001-7
ww
w
.E
lec
Figure 2-26 3-phase CT connection with relay output and
auxiliary voltage
81