1
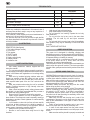
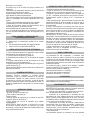
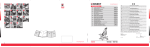
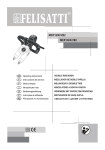
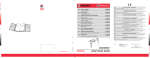
HF30/2000V
ELECTRIC BREAKER
DEMOLEDOR ELÉCTRICO
MARTEAU-PIQUEUR
MARTELLO
STEMMHAMMER
МОЛОТОК
1
5
4
2
3
8
1
10
9
6
2
TECHNICAL DATA
Model
HF30/2000V
Rated power
W
2000
Impact rate
/min
1500
Impact energy
J
Tool holder / bit length
Approx. weight (without accessories)
Follow very carefully the instructions in this manual, save it
and keep close at hand, ready to carry out any inspection of
parts that may be necessary.
If the machine is used carefully and normal maintenance is
carried out, it will work well for a long time.
The functions and use of the tool you have bought shall be
only those described in this manual. Any other use of the tool
is strictly forbidden.
ILLUSTRATIONS
DESCRIPTION (See figures)
1. Tool holder (hexagon socket)
2. Front cover
3. Tool retainer
4. ON/OFF switch
5. Lock-on button
6. Supply cord with plug
8. Auxiliary handle
9. Ventilation slots
SAFETY INSTRUCTIONS
• See “Safety Instructions” manual, supplied with this
instruction manual.
• For your personal safety, always connect the machine to
a mains supply protected by a differential and thermal cut-out
switch, in accordance with regulations on low-voltage wiring
sitemaps.
• Hold tools by insulated gripping surfaces when performing an operation where the cutting tool may contact
hidden wiring or its own cord. Contact with a “live” wire will
make exposed metal parts of the tool “live” and shock the
operator.
• Wear ear protectors when using the tool for extended
periods. Prolonged exposure to high intensity noise can
cause hearing loss.
• Wear a hard hat (safety helmet), safety glasses and/or
face shield. It is also highly recommended that you wear a
dust mask and thickly padded gloves.
• Be sure the bit is secured in place before operation.
• Under normal operation, the tool is designed to produce vibration. The screws can come loose easily, causing a
breakdown or accident. Check tightness of screws carefully
before operation.
• In cold weather or when the tool has not been used for
a long time, let the tool warm up for a while by operating it
under no load. This will loosen up the lubrication. Without
proper warmup, hammering operation is difficult.
• Always be sure you have a firm footing.
• Be sure no one is below when using the tool in high
locations.
30
/mm
kg
30/410
3,0
• Hold the tool firmly with both hands.
• Keep hands away from moving parts.
• Do not leave the tool running. Operate the tool only
when hand-held.
• Do not point the tool at any one in the area when
operating. The bit could fly out and injure someone
seriously.
• Do not touch the bit or parts close to the bit immediately
after operation; they may be extremely hot and could burn
your skin.
SAVE THESE INSTRUCTIONS.
BRIEF DESCRIPTION
This power tool is designed for chiselling, chipping and
demolishing concrete, rocks and asphalt with high efficiency.
A pneumatic percussion unit generates the power necessary
for hammer drilling or chiselling in masonry.
Just like when we hit a conventional chisel with hammer,
a free piston strikes the bit or chisel, which can move
lengthways, through an intermediate part.
This free piston is driven by a second piston activated by an
electric motor through an air cushion. This electro-pneumatic
principle offers great percussion elasticity and work free from
recoil.
BEFORE USING THIS TOOL
WARNING! Before carrying out any work, check, for instance,
using a metal detector, that there are no elec-tric wires or gas
or water pipes under the surfaces you wish to work on.
Make sure the mains voltage is correct: it must be the same
as that on the specification label. Machines with 230V can
also be connected to a 220-V mains supply.
WARNING! Always disconnect the plug from the socket
before doing any work on the machine.
Always check the position of ON/OFF switch. The power tool
must be connected to the power supply socket only when
this switch is in OFF position. If the plug is con-nected to
a receptacle while the power switch is in the ON position,
the power tool will start operating im¬mediately, which could
cause a serious acci¬dent.
• Make sure the cord and the plug are in order. If the
replacement of the supply cord is neces¬sary, this has to be
done by the manufacturer or his agent in order to avoid a
safety hazard.
• Switch off and unplug the machine prior to any procedure on the power tool or in case of mains drop out.
• In case of work area remote from the power source,
use as short as practicable extension cord with proper crosssection.
• Make sure the auxiliary handle is properly mounted and
3
securely fastened.
CHANGING THE POSITION OF
THE AUXILIARY HANDLE
hanging the position of the auxiliary handle
1. Unscrew the auxiliary handle M in an anticlockwise
direction.
2. Turn the auxiliary handle M to the required position.
3. Screw the auxiliary handle M in place again.
FITTING THE WORKING TOOLS
1. Clean and then smear the tool shank with grease or
machine oil (Fig. 1).
2. Pull the tool retainer lever (3) toward yourself.
3. Rotate 180° clockwise the tool retainer lever (3) while
pulling it.
4. Next, insert the tool shank into the hexagonal tool holder
(1) on the front cover (2).
5. Clamp the tool by turning the tool retainer (3) by half a turn
in the opposite direction (Fig. 2).To remove the bit, follow the
above described procedures in reverse order.
MAINS CONNECTION
Warning! Connect only to a single-phase AC current supply
and only to the mains voltage specified on the rating plate.
Connection to sockets without earth protec-tion is possible as
the appliance features protective class II insulation according
to European Standard EN50114. Radio interference
suppression complies with the European Standard EN
55014.
SWITCHING ON - SWITCHING OFF
Brief activation:
▪ Switching on: Press ON/OFF switch (4).
▪ Switching off: Release ON/OFF switch (4).
Ccontinuous use:
▪ Switching on: Press ON/OFF switch (4) and in pressed
position lock it by button (5).
▪ Switching off: Press ON/OFF switch (4) once and release
it immediately.
WARNING: Before plugging in the tool, always check to see
that the trigger switch (4) actuates properly and returns to
OFF position when released.
OPERATION
Insert the plug into the socket.
▪ Apply the tool tip at 80–100 mm from the edge of the
material to be processed and press the trigger switch (4).
▪ Start operating at 70°–80° to the surface and guide the tool
tip to the edge. Then change the angle to 90° and break the
processed mate¬rial.
▪ Operate the machine by utilizing its empty weight to
achieve optimum performance. Insufficient force shall cause
tool rebound. Too high pressure against the surface shall
decrease efficiency.
In some cases, it is necessary to punch the tool tip against
the crushing position forcibly in order to actuate the striking
motion. This is not due to mal¬function of the tool. It means
that the safeguard mechanism against no-load striking is
working.
WARNING: Sometimes the striking motion does not start
even when the motor rotates because the oil has become
4
thick. If the demolition hammer is operated at low ambient
temperature or after storage, let the ma-chine run for five
minutes in order to warm up.
▪ Turn the tool at regular intervals to achieve uni¬form wear
and aid self-sharpening.
NOISE AND VIBRATION
This tool has been designed and made to reduce noise to a
minimum. However, in spite of this, in certain circumstances
the maximum noise level in the place of work could exceed 85
dBA. In this case, the op-erator should wear ear protection.
The machine’s noise and vibration levels, measured in
compliance with EN50144, usually reach:
Acoustic pressure = 95 dB(A)
Sound-power level = 107 dB(A)
Use ear protection!
Vibration acceleration = 14,5 m/s2
ACCESSORIES
Accessories and their corresponding order number can be
found in our catalogues.
MAINTENANCE AND CARE
WARNING-Always unplug the machine before carrying out
work on it.
- When you notice a decrease in hammer output, take the
machine to an Official Service Centre.
- Tool inspection: Using a blunt cutting tool leads to less
efficient work and could damage the motor, therefore cutting
tools should be sharpened or re-placed as soon as any wear
is noticed.
- Inspect the mounting screws: Regularly in-spect all
the mounting screws and ensure they are firmly tightened.
Should any screw be loose, tighten it immediately. Failure to
do so could put you at seri-ous risk.
- oil filling:
The electric tool is supplied with the sufficient quantity of
lubricant in the container. The lubricant shall not be added
into a new pick hammer. We recommend adding 30 g of
lubricant into the container 3 months after the initial start of
the tool’s operation in the case of its continuous service.
1. Switch the machine on so that it operates for some time
and warms up.
2. Switch the electric tool off and remove the power cable
plug out of the socket.
3. Unscrew the crankcase cover (10), using the special
wrench.
4. Add 30 g of oil. Use only Mobil Delvac MX specialpurpose oil with SAE 15W-40 viscosity.*
* Both semi-synthetic and synthetic motor oils of
equivalent viscosity are approved for use.
5. Reinstall the crankcase cover (10) and tighten it well.
Clean the machine with a soft cloth.
WARNING: Harmful or fatal if swallowed. Contains
petroleum distillate. If swallowed, do not induce vomiting. Call a doctor immediately. Store away from heat or
open flame. Keep away from children.
- Motor maintenance: Take the utmost care to ensure
that the motor winding is not damaged and does not become
damp with oil or water.
- Brush replacement: The brushes disconnect
automatically and should be replaced after 150-200 hours
use or when they are less than 10 mm long. Have them
replaced by an Official Service Centre.
- Clean the machine thoroughly after each use with a
blast of dry air.
- The vents of the machine should be kept clear at all
times.
- Check that the mains lead is in good condition. If it is not,
take it to an Official Service Centre to have it replaced.
- Use only Felisatti accessories and spares. The parts the
changing of which is not covered in this in-struction manual,
should be replaced in a Felisatti Official Service Centre (See
Warranty/Official Ser-vice Centre address leaflet).
WARRANTY
Do not dispose of electric tools
in the household waste!
In accordance with European Directive 2002/96/EC
relating to old electrical and electronic appliances
and its translation into national law, used electric
tools must be collected separately and recycled in
an ecologically desirable way.
See general warranty conditions printed on the attached
sheet.
DECLARATION OF
CONFORMITY
We hereby declare, under our sole
responsibility, that the FELISATTI
brand products described in this
manual comply with the following
standards or standard documents:
EN 50144, EN 55014 and EN 61000
in accordance with EU Directives
73/23/EC, 89/336/EC, 98/37/EC and
2002/95/EC.
07
Jordi Carbonell
Santiago Lopes
We reserve the right to make technical changes 12/2007
5
CARACTERÍSTICAS TÉCNICAS
Modelo
HF30/2000V
Potencia nominal
Frecuencia de las percusiones en marcha en vacío
Energía de la percusión
Conexión / longitud del terminal
Peso aprox. (sin accesorios)
Respetar escrupulosamente las instrucciones conteni-das en
este manual, guardarlo con atención y tenerlo a mano para
eventuales controles de las partes indicadas.
Si se utiliza la máquina con cuidado y se cumple el normal
mantenimiento, su funcionamiento será prolongado.
Las funciones y el uso de la herramienta que usted compró
son sólo y exclusivamente aquellas indicadas en este
manual. Está totalmente prohibido cualquier otro uso de la
herramienta.
ILUSTRACIONES
DESCRIPCIÓN (Ver figuras indicadas)
1. Caja del terminal (hexaédrica)
2. Tapa delantera
3. Palanca de fijación
4. Interruptor
5. Botón de bloqueo del interruptor
6. Cable de alimentación con enchufe
8. Empuñadura adicional
9. Rejillas de ventilación
INSTRUCCIONES DE SEGURIDAD
• Ver el manual adjunto “Instrucciones de Seguridad” que
se suministra conjuntamente con el presente ma-nual de
instrucciones.
• Conecte siempre la máquina a una red protegida por
interruptor diferencial y magnetotérmico, para su segu-ridad
personal, según normas establecidas para insta-laciones
eléctricas de baja tensión.
•
Cuando realice tareas en las que la herramienta
de corte pueda tocar cables con corriente, sostenga la
herramienta por las superficies aisladas. El contacto con un
cable con corriente hará que la corriente circule por las partes
metálicas expuestas y podrá electrocu-tar al operario.
•
Póngase protectores de oídos cuando utilice la herramienta durante largo tiempo. La exposición prolon-gada a
altos niveles de ruido puede ocasionar pérdida auditiva.
•
Pómngase casco (casco de seguridad), gafas de
protección y/o pantalla facial. También se recomienda
encarecidamente utilizar una mascara contra el polvo y
guantes gruesos bien acolchados.
•
Asegúrese de que la broca esté sujetada firmemente
en posición antes utilizar la herramienta.
•
En condiciones de funcionamiento normal, la herramienta produce vibración. Los tornillos se podrán aflojar
fácilmente, pudiendo ocasionar averías o acci-dentes.
Compruebe que estén bien apretados antes de utilizar la
herramienta.
• A bajas temperaturas o cuando la herramienta no haya
6
W
2000
/min
1500
J
30
/mm
kg
30/410
18.5
sido utilizada durante largo tiempo, deje que ésta se caliente
durante varios minutos haciéndola fun-cionar en vacío. Esto
agilizará la lubricación. Sin un calentamiento apropiado, la
operación de percusión resultará difícil de realizar.
• Asegúrese siempre de pisar sobre suelo firme.
• Asegúrese de que no haya nadie debajo cuando utilice
la herramienta en lugares altos.
• Sujete la herramienta firmemente con ambas manos.
• Mantenga las manos alejadas de las piezas giratorias.
•
No deje la herramienta funcionando. Téngala en
marcha solamente cuando esté es sus manos.
•
No apunte la herramienta hacia nadie que se encuentre en la zona de trabajo. La broca podría salir des-pedida y
lesionar seriamente a alguien.
•
No toque la broca ni las partes próximas a ella inmediatamente después de utilizarla; podrían estar muy calientes
y producirle quemaduras de piel.
GUARDE ESTAS INSTRUCCIONES.
DESCRIPCIÓN ABREVIADA
La herramienta eléctrica está destinada a morta¬jar, romper
y desconchar hormigón, rocas y asfal¬to, y posee gran
productividad.
Igual que sucede cuando golpeamos un cincel convencional con un martillo, un pistón libre golpea la broca o
cincel, que puede moverse longitudinalmente, a través de
una pieza intermedia. Este pistón libre es impulsado por
un pistón accionado por un motor eléctrico a través de un
amortiguador de aire.
ANTES DE USAR ESTA HERRAMIENTA
¡ATENCIÓN! Antes de efectuar un trabajo, verificar p.ej.
mediante un detector de metales, si no se ocultan bajo las
superficies conductores eléctricos y tuberías de gas y agua.
Cerciorarse de que la tensión de la red sea correcta: La
indicación de tensión en la placa de características debe
coincidir con la tensión de red. Los aparatos a 230V pueden
conectarse también a una tensión de red de 220V.
Revise la posición del interruptor. La herramienta
eléctrica debe conectarse y desconectarse
de la red de alimentación eléctrica sólo cuando el interruptor
esté desconectado. Si el enchufe se introduce en la toma
de corriente mientras que el interruptor esté conectado, la
herramienta eléctrica se pondrá inmediatamente
en funcionamiento, siendo ello una premisa de accidente.
▪ Cerciórese del buen estado del cable de alimentación
y del enchufe. Si el cable de alimentación
está dañado, la sustitución de éste debe realizarse por el
fabricante o por un técnico
de servicio suyo a fin de evitar los peligros relativos a la
sustitución.
▪ Desconecte la herramienta eléctrica y retire el enchufe de
la toma de corriente antes de realizar
cualquier trabajo sobre ésta, o bien cuando
haya decaído la tensión de alimentación.
▪ Si la zona de trabajo está lejos de la fuente de alimentación,
utilice el prolongador de sección apropiada más corto
posible.
▪ Revise si la empuñadura adicional ha sido colocada
correctamente y si ha sido atiesada de forma fiable.
▪ Antes de la primera puesta en funcionamiento de la
herramienta eléctrica, es necesario añadir
aceite de máquinas del envase que se suministra
junto con la herramienta eléctrica. La máquina se suministra
con una pequeña cantidad de aceite de máquinas en el
depósito.
CÓMO CAMBIAR LA ORIENTACIÓN DE
LA EMPUÑADURA AUXILIAR
1. Desenrosque la empuñadura auxiliar M en sentido
antihorario.
2. Gire la empuñadura auxiliar M al ángulo deseado.
3. Vuelva a roscar la empuñadura auxiliar M.
INSTALACIÓN DE LOS ÚTILES DE TRABAJO
1. Limpie y lubrique levemente con grasa lubri¬cante o aceite
para máquinas la cola del termi¬nal (Fig. 1).
2. Tire de la palanca de fijación (3) hacia Ud.
3. Simultáneamente, gírela a 180° en el sentido de la aguja
del reloj.
4. Coloque posteriormente la cola del terminal en la caja
hexaédrica (1) en la tapa delantera (2).
5. Apriete el terminal, girando la palanca de fija¬ción (3) en el
sentido inverso (Fig. 2).
Ejecute los pasos descritos anteriormente en el orden inverso
para retirar el terminal.
CONEXIÓN ELÉCTRICA
¡Atención! Conectar solamente a corriente alterna
monofásica y sólo a la tensión indicada en la placa de
características. También se puede conectar a una base
de enchufe sin contacto de protección, ya que el aparato
posee un aislamiento según norma europea EN 50144. La
protección antiparasitaria corresponde a la norma europea
EN 55014.
ARRANCAR / PARAR
Accionamiento breve:
▪ Arrancar: apriete el interruptor (4).
▪ Parar: suelte el interruptor (4).
Trabajo continuo:
▪ Arrancar: apriete el interruptor (4), y, estando en posi-ción
de apriete, fíjelo con el botón (5).
▪ Parar: apriete una sola vez el interruptor (4) y suéltelo
inmediatamente.
ADVERTENCIA: Antes de poner el en-chufe en la toma
de corriente, verifique siempre si el interruptor (4) puede
accionarse, y si des-pués de haber sido soltado puede volver
a la posición de desconexión.
OPERACIÓN CON EL MARTILLO DEMOLlEDOR
▪ Conecte el enchufe en la toma de corriente.
▪ Ponga el terminal a 80–100 mm en la parte extrema del
material que se va a procesar y apriete el interruptor (4).
▪ Empiece a operar hacia la superficie bajo un ángulo de
70°–80°, orientando la punta del ter¬minal hacia el borde.
Posteriormente, cambie el ángulo a 90° y desconche el
material.
▪ Para un trabajo óptimo, deberá utilizarse el propio peso del
martillo demoledor. El termi¬nal saltará en caso de que la
presión sea in¬suficiente. Si la presión es excesiva, bajará
la productividad.
A veces, para empezar el movimiento de percu¬sión es
necesario clavar la punta de la herramien¬ta en la superficie
que se está procesando, lo cual no se debe a un desperfecto
sino al hecho de que se ha accionado el mecanismo de
percusiones en marcha en vacío.
ADVERTENCIA: A veces, a pesar de que el motor eléctrico
está girando, la herra-mienta eléctrica no realiza acciones de
percu-sión, ya que el aceite de máquinas se ha espe-sado.
Al utilizar el martillo demoledor cuando las temperaturas
del entorno son bajas, o bien después de haber estado en
conservación, dé-jelo funcionar inicialmente durante cinco
minu-tos en marcha en vacío para que se caliente.
▪ Voltee el terminal de vez en cuando, a intervalos
regulares. Con ello se desgastará de modo uniforme y
contribuirá al proceso de autoafilado.
RUIDO Y VIBRACIÓN
La herramienta ha sido proyectada y construida para
reducir al mínimo los ruidos, a pesar de esto en espe-ciales
condiciones el nivel de ruido máximo en el sitio de trabajo
podría ser superior a 85 dBA. En este caso el operador debe
protegerse del ruido excesivo por medio de la utilización de
protectores auditivos.
Los niveles de ruido y vibración de la máquina, medidos
según la norma EN 50144, se elevan normalmente a:
Nivel de presión acústica = 89 dB (A)
Nivel de potencia acústica = 102 dB (A)
¡Se han de usar protectores auditivos!
Aceleración de vibración = 14,5 m/s2
ACCESORIOS
Los accesorios y sus correspondientes números para pedido,
están reflejados en nuestros catálogos.
MANTENIMIENTO Y CUIDADOS
ADVERTENCIA-Desconecte siempre el enchufe antes de
llevar a cabo cualquier trabajo en la máquina.
- Cuando haya disminuido la potencia de la percusión,
llevar la máquina al Servicio de Asistencia Técnica.
- Inspección de la herramienta: La utilización de una
herramienta de corte gastada disminuirá la eficiencia de
trabajo y podría causar desperfectos en el motor, por tanto
es necesario afilar o cambiar las herramien-tas de corte tan
pronto como se note abrasión en és-tas.
- Inspeccionar los tornillos de montaje: Regularmen-te
inspeccionar todos los tornillos de montaje y asegu-rarse
de que estén apretados firmemente. Si cualquier tornillo
estuviera suelto, volver a apretarlo inmediata-mente. El no
hacer esto provocaría un riesgo serio.
- llenado de aceite.
La herramienta eléctrica se suministra con una cantidad
7
requerida del lubricante en el depósito. No se admite
agregar lubricante en el martillo rompepavimentos nuevo. Se
recomienda rellenar 30 g del lubricante dentro de 3 meses
del primer arranque de la herramienta a condición de su
utilización permanente.
1. Arrancar la herramienta para que funcione un plazo
determinado y se caliente.
2. Desconectar la herramienta y desenchufar el cable de
alimentación.
3. Desenroscar la tapa del cárter (10) con ayuda de la llave
especial.
4. Rellenar 30 g del aceite. Utilizar solamente el aceite
especial “Mobil Delvac MX” con la viscosidad SAE 15W-40.
* Se admite la utilización de los aceites de motor semisintéticos
y sintéticos con la viscosodad igual.
5. Instalar la tapa del cárter (10) en su lugar y tensarla
bien. Limpiar la herramienta con un trapo blando.
ADVERTENCIA: Si se ingiere una cantidad del aceite
de máquinas, se producirán consecuencias nocivas
o fatales para la salud, ya que contiene destilado de
petróleo. Si se tra-ga aceite de máquinas, no se deben
provocar vómitos. Consulte inmediatamente a un
médi-co. Guárdelo lejos del calor y del fuego abierto.
¡Manténgalo lejos del alcance de los niños!
- Mantenimiento del motor: Prestar el mayor cuidado y
asegurarse de que el bobinado del motor no se dañe y/o se
humedezca con aceite o agua.
- Sustitución de las escobillas: Las escobillas son de
desconexión automática y deben sustituirse al cabo de
unas 150 - 200 horas de trabajo o bien cuando su longitud
sea inferior a 10 mm. Para ello, debe acudir a un centro de
asistencia autorizado para que efectúe el cambio.
- Limpiar esmeradamente la máquina después de
utilizarla mediante un chorro de aire seco.
- Las ranuras de ventilación de la máquina deben estar
despejadas en todo momento.
- Comprobar que el cable de toma de corriente esté en
buen estado y, en caso contrario, acudir a un centro de
asistencia técnica para que lo sustituya.
- Sólo se deben utilizar accesorios y piezas de repuestos
Felisatti. Piezas cuyo recambio no está descrito en estas
instrucciones de uso, deben sustituirse en un cen-tro de
asistencia técnica Felisatti (Consulte el folleto Garantia/
Direcciones de Centros de Asistencia Técni-ca).
GARANTÍA
Ver condiciones generales de concesión de Garantía en
impreso anexo a estas instrucciones.
8
¡No se deshaga de las
herramientas
eléctricas
a
través de los contenedores de
basura doméstica!
De acuerdo con la directriz europea 2002/96/CE
referente a los residuos de los equipamientos
eléctricos y electrónicos y a la conversión en el
derecho nacional, las herramientas eléctricas
usadas deben ser separadas y deben estar sujetas
a un reciclaje que respete el medio ambiente.
DECLARACIÓN DE
CONFORMIDAD
Declaramos bajo nuestra sola
responsabilidad que los productos
marca FELISATTI descritos en
este manual están en conformidad
con las normas o documentos
normalizados siguientes: EN 50144,
EN 55014 y EN 61000 de acuerdo
con las directivas 73/23/CE, 89/336/
CE, 98/37/CE y 2002/95/CE.
07
Jordi Carbonell
Santiago Lopes
Reservado el derecho de modificaciones técnicas 12/2007
CARACTÉRISTIQUES TECHNIQUES
Modèle
HF30/2000V
Puissance nominale
W
2000
Cadence de frappe au ralenti
/min
1500
Force de frappe
J
30
Emmanchement / Longueur de l’outil
mm
30/410
Poids approx.(sans accessoires)
kg
Respecter scrupuleusement les instructions figurant dans ce
manuel, le conserver avec soin et à proximité pour le contrôle
éventuel des éléments indiqués.
Si la machine est utilisée avec soin et son entretien
normalement assuré, son fonctionnement sera prolongé.
Les fonctions et l’utilisation de la machine que vous avez
acquise sont celles indiquées dans ce manuel. Tout autre
usage de la machine est formellement interdit.
ILLUSTRATIONS
DESCRIPTION (Voir dessin)
1. Nez d’outil (hexagonal)
2. Couvercle avant
3. Verrou de fixation
4. Interrupteur
5. Bouton de verrouillage de l’interrupteur
6. Fil d’alimentation à fiche
8. Poignée accessoire
9. Ouïes de ventilation
INSTRUCTIONS DE SÉCURITÉ
Voir le manuel «Instructions de sécurité» joint à ce livret
d’instructions.
•
Pour votre sécurité personnelle, branchez toujours la
machine sur secteur protégé par un disjoncteur diffé-rentiel
et magnétothermique, selon les normes éta-blies pour les
installations électriques à basse ten-sion.
• Tenez l’outil par ses surfaces de saisie isolées lors d’une
opération au cours de laquelle l’outil tranchant risque d’entrer
en contact avec un filage caché ou avec son propre cordon.
Le contact avec un fil sous tension mettrait sous tension les
parties métalliques de l’outil, électrocutant l’utilisateur.
• Veuillez porter un serre-tête antibruit lorsque vous
utilisez l’outil sur une longue période. L’exposition prolongée
de l’ouïe à un bruit intense peut entraîner la surdité.
• Portez un casque rigide (casque de protection) ainsi
que des lunettes de protection et/ou un écran facial. Le port
d’un masque à poussière et de gants épais est également
fortement recommandé.
• Assurez-vous que le foret est solidement installé avant
l’utilisation.
• L’outil est conçu pour produire des vibrations dans des
conditions normales d’utilisation. Les vis peuvent facilement
se desserrer et entraîner une panne ou un accident. Avant
l’utilisation, vérifiez soigneusement si les vis sont bien
serrées.
• Par temps froid ou lorsque l’outil est resté inutilisé
pendant une longue période, faites-le
réchauffer pendant quelques minutes en le faisant
fonctionner à vide. Cela réchauffera le lubrifiant. Sans un
réchauffement adéquat, le martelage s’effectue difficilement.
18.5
• Assurez-vous toujours de travailler en position stable.
• Lorsque vous utilisez l’outil dans un endroit élevé,
assurez-vous qu’il n’y a personne en bas.
• Tenez l’outil fermement à deux mains.
• Gardez les mains éloignées des pièces en mouvement.
• Ne laissez pas l’outil tourner. Ne le faites fonctionner
que lorsque vous le tenez.
• Ne pointez l’outil vers personne autour de vous pen-dant
l’utilisation. Le foret pourrait être éjecté et blesser quelqu’un
grièvement.
• Ne touchez pas le foret ou les parties situées près du
foret immédiatement après l’utilisation ; ils peuvent être
extrêmement chauds et brûler votre peau.
CONSERVEZ CES INSTRUCTIONS.
BRÈVE DESCRIPTION
Cette machine est conçue pour creuser, briser et démolir du béton, des roches et de l’asphalte avec une grande
efficacité.
Comme c’est le cas lorsque l’on frappe un burin conventionnel
avec un marteau, un piston libre frappe le foret ou le burin,
qui peuvent se déplacer longitudinalement, dans le portemandrin. Ce piston libre est animé par compression d’air par
un piston actionné par le moteur. Ce principe électropneumatique offre une grande élasticité de percussion et un travail
sans effet “retour”.
AVANT D’EMPLOYER CETTE MACHINE
ATTENTION! Avant tout travail, vérifier, avec un détec-teur
de métaux, par exemple, si des conducteurs électri-ques ou
des tuyaux de gaz et d’eau ne se situeraient pas sous les
surfaces à percer.
S’assurer que la tension du secteur est correcte : L’indication
de tension sur la plaque signalétique doit coïncider avec
la tension du secteur. Les appa-reils à 230 V peuvent être
branchés aussi sur du 220 V.
ATTENTION ! Débranchez toujours la fiche avant d’effectuer
un travail quelconque sur la machine.
▪ Vérifier la position de l’interrupteur. La machine doit être
branchée et débranchée uniquement à inter-rupteur en
position ARRÊT. Si la ma¬chine est branchée au secteur
quand l’inter¬rupteur est en position MARCHE, la machine
se mettra en mar-che immédiatement ce qui prédispose à
des acci-dents.
▪ S’assurer du bon état du fil d’alimentation et de la fiche. Si
le fil d’alimentation est endommagé il devra être remplacé
par le producteur ou un service après-vente agrée, pour
éviter les dan¬gers d’un remplacement mal effectué.
▪ Arrêter la machine et retirer la fiche du secteur avant
toute intervention sur l’appareil ou lors¬que le courant
9
d’alimentation est coupé.
▪ Si l’endroit de travail est éloigné de la source de courant,
utiliser une rallonge la plus courte possible à section
appropriée.
▪ S’assurer que la poignée accessoire est bien montée et
fermement serrée.
▪ Avant la première mise en marche de la ma¬chine il est
nécessaire de rajouter de l’huile du contenant fourni avec
la machine. La machine est livrée avec une faible quantité
d’huile dans le réservoir.
COMMENT CHANGER L’ORIENTATION
DE LA POIGNÉE AUXILIAIRE
1. Dévissez la poignée auxiliaire M dans le sens contraire
des aiguilles d’une montre.
2. Tournez la poignée auxiliaire M de manière à obtenir
l’angle désiré.
3. Vissez à nouveau la poignée auxiliaire M.
METTRE EN PLACE ET ENLEVER UN OUTIL
1. Nettoyer et lubrifier légèrement la queue de l’outil avec de
la graisse ou de l’huile à machine (Fig. 1).
2. Déverrouiller le verrou (3) en le tirant vers vous.
3. En même temps tournez-le à 180° dans le sens des
aiguilles d’une montre.
4. Mettre en place la queue de l’outil dans le nez hexa-gonal
(1) dans le couvercle avant (2).
5. Verrouillez l’outil en tournant le verrou (3) dans le sens
inverse (Fig. 2).Pour enlever l’outil, effectuer ces actions
dans l’ordre inverse.
BRANCHEMENT ÉLECTRIQUE
Attention ! Brancher uniquement sur courant alternatif
monophasé et seulement à la tension indiquée sur la plaque
signalétique. On peut aussi effectuer le bran-chement
sur une base de fiche sans contact à mise à la terre, car
l’appareil possède un isolement classe II conformément à
la norme européenne EN 50144. La protection antiparasite
correspond à la norme euro-péenne EN 55014.
MISE EN MARCHE – ARRÊT
travail de courte durée:
▪ Mise en marche: interrupteur (4) est appuyé.
▪ Arrêt: interrupteur (4) est relâché.
travail continu:
▪ Mise en marche: interrupteur (4) est appuyé et fixé en cette
position avec le bouton (5).
▪ Arrêt: interrupteur (4) est appuyé une seule fois et relâ-ché
de suite.
AVERTISSEMENT: Avant de brancher la fiche au secteur
toujours vérifier que l’inter-rupteur (4) peut être actionné et
que relâché il retourne en position ARRÊT.
SUGGESTIONS DE TRAVAIL
▪ Brancher la fiche au secteur.
▪ Positionnez l’outil à 80–100mm du matériau sur lequel vous
allez intervenir et appuyez sur l’interrupteur (4).
▪ Commencez le travail sous un angle de 70°–80° par
rapport à la surface en pintant l’extrémité de l’outil vers le
bord. Ensuite changez l’angle à 90° brisez le matériau.
▪ Pour un rendement optimal utilisez le poids de la machine
elle-même. Une pression insuffisante
10
fera sursauter l’outil. La pression excessive diminue le
rendement.Parfois, pour que le mouvement de frappe
commence, il est nécessaire que la pointe de l’outil soit
enfoncée dans le matériau traité. Ceci n’est pas dû à un
défaut, mais signifie que le mécanisme de sécurité de frappe
au ralenti a été activé.
AVERTISSEMENT: Parfois, suite à une huile épaissie, la
machine n’effectue aucun mouvement de frappe bien que le
moteur élec-trique continue à tourner. Lors d’une utilisation
du brise-béton à température basse ou après longue
conservation, laisser la machine chauf-fer au ralenti cinq
minutes pour chauffer.
▪ À des intervalles égaux retournez l’outil. Cela assurera une
usure homogène et aidera le processus d’auto-affûtage.
BRUIT ET VIBRATION
L’outil a été conçu et construit avec objectif de réduire le
niveau de bruit au maximum. Malgré cela, dans certai-nes
conditions, le niveau de bruit maximal sur le lieu de travail
peut être supérieur à 85 dBA. Dans ce cas, l’opérateur
doit se protéger du bruit excessif en utilisant un casque de
protection antibruit.
Les niveaux de bruit et de vibration de la machine, mesurés
selon la norme EN50144, s’élèvent normale-ment à :
Pression sonore = 89 dB (A)
Puissance sonore = 102 dB (A)
Employer des protecteurs individuels!
Accélération de la vibration = 14,5 m/s2
ACCESSOIRES
Les accessoires et leurs références sont répertoriées dans
nos catalogues.
ENTRETIEN
AVERTISSEMENT - Avant toute intervention sur la machine,
débranchez toujours la prise.
- Si la puissance de la percussion diminue, confier la
machine au Service Après-vente.
- Examen de l’outil : L’utilisation d’un outil de coupe
usagé diminuera l’efficacité du travail et peut endom-mager
le moteur ; il faut donc affûter ou changer les outils de coupe
régulièrement.
- Examen des vis de montage : Examiner régulière-ment
toutes les vis de montage et vérifier qu’elles sont bien serrées.
Si une vis est desserrée, la resserrer immédiatement. Ne pas
le faire pourrait être préjudi-ciable.
- Verser de l’huile : L’outil électroportatif est livré avec
la quantité de graisse nécessaire dans son réservoir. Il est
interdit
- huilage: Les outils électriques sont fournis avec la
quantité nécessaire du lubrifiant dans le réservoir. Il n’est pas
permis d’additionner du lubrifiant dans un nouveau marteau–
piqueur. Nous recommandons d’additionner 30 g du lubrifiant
3 mois après le premier démarrage de l’outil en cas de son
travail continu.
1. Mettez en marche l’outil, pour qu’il travaille pendant un
temps certain et qu’il se réchauffe.
2. Débranchez l’outil et tirez la broche du câble d’alimentation
de la rosette.
3. Dévisser le couvercle du carter (10) au moyen d’une clef
spéciale.
4. Versez 30 g de l’huile. Utilisez seulement l’huile spéciale
«Mobil Delvac MX» à viscosité SAE 15W-40.*
* Il est permis d’utiliser des huiles à moteurs semi–synthétiques
comme synthétiques de la viscosité équivalente.
5. Remettez le couvercle du carter à sa place (10) et le serrez
ferme. Nettoyez la machine par un torchon mou.
AVERTISSEMENT: En cas d’avalement peut provoquer
des injures et même la mort. Contient un distillat de
pétrole. En cas d’avalement ne pas inciter des vomissements. Consulter immédiatement un médecin.
Conserver éloigné des sources de chaleur ou d’une
flamme ouverte. Garder hors de la portée des enfants!
- Entretien du moteur : Apporter le plus grand soin à
l’entretien du moteur et s’assurer que le bobinage du moteur
n’est pas endommagé et/ou humidifié avec de l’huile ou de
l’eau.
- Remplacement des charbons : La déconnexion des
charbons est automatique et ils doivent être remplacés au
bout d’environ 150-200 heures de service ou bien quand leur
longueur est inférieure à 10 mm. Le chan-gement devra alors
être effectué par un centre d’assistance agréé.
- Nettoyer soigneusement la machine après son utilisation avec un jet d’air sec.
- Les ouies d’aération de la machine doivent toujours être
dégagées et propres.
- Vérifier que le câble et la prise de courant soient en bon
état. Dans le cas contraire, les faire remplacer dans un centre
d’assistance agréé.
- N’utiliser que des accessoires et des pièces de rechange Felisatti. Les pièces détachées hors accessoires doivent être remplacées dans un centre d’assistance
technique Felisatti (Consultez l’imprimé Garantie/Adresses
de Centres Agréés S.A.V).
Ne pas jeter les éutils
électriques dans les ordures
ménagères !
Conformément à la directive européenne 2002/96/
CE relative aux appareils électriques et électroniques
usagés et sa version nationale, les outils électriques
doivent être collectés séparément et recyclés de
manière écophile.
DÉCLARATION DE
CONFORMITÉ
Nous déclarons sous notre seule
responsabilité que les produits
FELISATTI décrits dans ce manuel
sont conformes aux normes ou
documents suivants : EN 50144, EN
55014 et EN 61000 en accord avec
les directives 73/23/CE, 89/336/CE,
98/37/CE et 2002/95/CE.
GARANTIE
Consulter les conditions générales de Garantie sur l’imprimé
annexe à ces instructions.
07
Jordi Carbonell
Santiago Lopes
Tous droits de modifications techniques réservés 12/2007
11
CARATTERISTICHE TECNICHE
Modello
HF30/2000V
Potenza nominale
Frequenza dei colpi a vuoto
Energia del colpo
W
2000
/min
1500
J
30
Fissaggio / lunghezza della punta
/mm
Peso appross.(senza accessori)
kg
Rispettare scrupolosamente le istruzioni contenute in questo
manuale, conservarlo con cura e a portata di mano per
eventuali controlli delle parti indicate.
Se la macchina viene utilizzata con attenzione e si esegue la
normale manutenzione, il suo funzionamento sarà prolungato
nel tempo.
Le funzioni e gli usi dell’utensile che avete comprato sono
unicamente quelli indicati in questo manuale. È assolutamente
proibito ogni altro uso dell’utensile.
ILLUSTRAZIONI
DESCRIZIONE (Vedere le figure)
1. Sede per punta (esagonale)
2. Coperchio anteriore
3. Leva per bloccaggio
4. Interruttore
5. Pulsante di blocco dell’interruttore
6. Cavo di alimentazione con spina
8. Impugnatura supplementare
9. Aperture di ventilazione
ISTRUZIONI DI SICUREZZA
•
Vedere il manuale allegato “Istruzioni di Sicurezza”
fornito insieme al presente manuale di istruzioni.
•
La macchina va collegata, per la vostra sicurezza
personale, solo a reti elettriche dotate di salvavita e di
disgiuntore termico ai sensi delle norme vigenti per gli
impianti elettrici a bassa tensione.
• Tenere l’utensile per le superfici di presa isolate quando
si esegue una operazione in cui l’utensile pot-rebbe fare
contatto con fili elettrici nascosti o con il suo stesso cavo di
alimentazione. Il contatto con un filo elettrico “sotto tensione”
mette le parti metalliche dell’utensile “sotto tensione” con
pericolo di scosse per l’operatore.
• Indossare le protezioni per le orecchie se si usa l’utensile
per lunghi periodi di tempo. L’esposizione prolungata ai forti
rumori potrebbe causare la perdita dell’udito.
• Indossare un casco (copricapo di sicurezza), occhiali e/
o maschera di protezione. Si raccomanda anche di indossare
una maschera antipolvere e guanti imbottiti.
•
Accertarsi che la punta sia saldamente fissata prima
dell’uso.
• L’utensile produce vibrazioni. Le viti potrebbero perciò
allentarsi, causando guasti o incidenti. Controllare con cura
che le viti siano salde prima di usare l’utensile.
• D’inverno o se l’utensile non è stato usato per un lungo
periodo di tempo, lasciarlo riscaldare per diversi minuti
facendolo funzionare a vuoto. Ciò scioglie il lubrificante.
Senza un riscaldamento sufficiente, l’operazione di
martellamento è difficile.
12
30/410
18.5
•
Accertarsi sempre di avere i piedi appoggiati saldamente.
• Accertarsi che non ci sia nessuno sotto quando si usa
l’utensile in un posto alto.
• Tenere saldamente l’utensile con entrambe le mani.
• Tenere le mani lontane dalle parti mobili.
•
Non far funzionare l’utensile senza usarlo. Farlo
funzionare soltanto tenendolo in mano.
• Non puntare l’utensile sulle persone quando lo si usa. La
punta potrebbe schizzare via e ferire seriamente qualcuno.
• Non toccare la punta o le parti adiacenti subito dopo
l’uso, perché potrebbero essere molto calde e causare
bruciature.
CONSERVATE QUESTE ISTRUZIONI.
BREVE DESCRIZIONE
Questo elettroutensile è destinato alla scalpellatura,
frantumazione e demolizione di calcestruzzo, rocce ed
asfalto, ad alto rendimento.
Così come si batte col martello su un normale scalpello,
in questa macchina utensile a battere sulla punta o sullo
scalpello è uno stantuffo, che può muoversi longitudinalmente
per mezzo di un elemento intermedio. Lo stantuffo è mosso
da un altro pistone, a sua volta azionato da un motore
elettrico tramite un ammortizzatore ad aria.
PRIMA DI USARE QUESTA MACCHINA
ATTENZIONE! Prima di eseguire un lavoro, verificare p.es. mediante un rivelatore di metalli - se sotto le superfici
passano dei cavi elettrici o i tubi dell’acqua o del gas.
Controllare che la tensione di rete sia quella adeguata:
deve coincidere con la tensione indicata nella targhetta
segnaletica. Gli apparecchi a 230V possono essere collegati
anche a una rete con tensione di 220V.
ATTENZIONE! Staccare sempre la spina dalla presa prima di
eseguire qualsiasi intervento sulla macchina.
▪ Verificare in che posizione si trova l’interrutto¬re. Innestare
in e disinnestare l’elettroutensile dalla presa della rete
soltanto ad interruttore disinserito. Se la spina viene innestata
nella presa mentre l’interruttore è nella posizione inserita,
l’elettroutensile si metterà subito in moto, cosa che potrebbe
provocare un infortunio.
▪ Accertarsi dello stato di efficienza del cordone
d’alimentazione e della spina. Se il cordone è danneggiato,
la sostituzione deve essere ese¬guita dal fabbricante o da un
suo specialista di centro assistenza, per evitare i pericoli che
risulterebbero in seguito alla sostituzione.
▪ Disinserire l’elettroutensile e disinnestare la spina dalla
presa prima di effettuare qualsia¬si maneggiamento su di
esso, o ad abbassa¬mento della tensione d’alimentazione.
▪ Se l’area del lavoro è lontana dalla fonte di alimentazione,
usare una prolunga che sia la più corta possibile, con sezione
adatta.
▪ Verificare che l’impugnatura supplementare sia messa
correttamente e stretta in maniera affidabile.
▪ Prima della messa in moto iniziale dell’elettroutensile è
necessario aggiungere olio dalla confezione fornita insieme
all’elettroutensile. La macchina viene fornita con piccola
quantità di olio nel serbatoio.
MODIFICA DELL’ORIENTAMENTO
DELL’IMPUGNATURA LATERALE
1. Svitare l’impugnatura ausiliare M nel senso antiorario.
2. Ruotare l’impugnatura laterale M secondo l’angolo
desiderato.
3. Avvitare nuovamente l’impugnatura ausiliare M.
di percussione,
si deve piantare l’estremità della punta nella
superficie lavorata. Ciò non è dovuto a qualche difetto, ma
significa che è scattato il meccanismo di protezione per colpi
a vuoto.
ATTENZIONE: Qualche volta anche se il motore gira,
l’elettroutensile non fa movimen-ti di percussione, in quanto
l’olio è addensito. Nell’usare lo scalpellatore in bassa
temperatu-ra dell’ambiente, o dopo un periodo di disuso,
all’inizio farlo funzionare a vuoto per cinque mi-nuti, per
riscaldarsi.
▪ Ad intervalli di tempo regolari invertire la punta. Ciò giova
alla sua usura uniforme e aiuta il processo
di autoaffilatura.
RUMORI E VIBRAZIONI
1. Pulire e lubrificare lievemente il codolo della punta con
grasso o con olio fluido (Fig. 1).2. Tirare la leva per bloccaggio
(3) verso sé stessi.
3. Girarla simultaneamente a 180° in senso orario.
4. Mettere quindi il codolo della punta nella sede esagonale
(1) nel coperchio anteriore (2).5 Serrare la punta, girando la
leva per bloccaggio
(3) nel senso opposto (Fig. 2).Per levare la punta, eseguire i
passi descritti sopra
in ordine inverso.
L’utensile è stato progettato e costruito per ridurre al minimo
i rumori; ciononostante, in condizioni particolari il livello
massimo di rumore nel locale di lavoro potrebbe essere
superiore a 85 dB(A). In questo caso l’operatore deve
proteggersi dal rumore eccessivo con l’impiego di protezioni
per l’udito.
I livelli di rumore e di vibrazione della macchina, misurati
secondo la norma EN50144, raggiungono normalmente i
seguenti valori:
Pressione acustica = 89 dB(A)
Potenza acustica = 102 dB(A)
Usare protezioni per l’udito!
Accelerazione della vibrazione = 14,5 m/s2
COLLEGAMENTO ELETTRICO
ACCESSORI
Attenzione! Collegare soltanto a corrente alternata monofase
e solo alla tensione indicata nella etichetta. Si può collegare
anche a una presa priva di protezione di terra, poiché
l’apparecchio è dotato di isolamento classe II ai sensi della
norma europea EN 50144. La protezione contro le correnti
parassite è conforme alla norma europea EN 55014.
Gli accessori e i relativi numeri di codice per le ordinazioni
sono riportati nei nostri cataloghi.
INSTALLAZIONE DEGLI UTENSILI DI LAVORO
AVVIAMENTO/ARRESTO
Messa in moto per breve tempo:
▪ Avviamento: Premere l’interruttore (4).
▪ Arresto: Rilasciare l’interruttore (4).
Lavoro continuativo:
▪ Avviamento: Premere l’interruttore (4) e, tenendolo
premuto, bloccarlo con il pulsante (5).
▪ Arresto: Premere l’interruttore (4) una sola volta,
e rilasciarlo subito.
ATTENZIONE: Prima di mettere la spina nella presa,
controllare sempre che l’in-terruttore (4) possa essere
azionato e, dopo il rilascio, ritornare nella posizione
disinserita.
LAVORO CON LO SCALPELLATORE
▪ Innestare la spina nella presa.
▪ Tenere la punta a 80–100 mm dal bordo del materiale da
lavorare, e premere l’interruttore (4).
▪ Iniziare il lavoro sotto un angolo di 70°–80° verso la
superficie, volgendo l’estremità della punta verso il bordo.
Cambiare quindi l’angolo a 90° e staccare il materiale.
▪ Per un lavoro ottimale impiegare il proprio peso dello
scalpellatore. Se la pressione è insufficiente,
la punta rimbalzerà. Ad una pressione
eccessiva la resa cala.Talvolta, affinché cominci il movimento
CURA E MANUTENZIONE
AVVERTENZA - Prima di compiere qualsiasi intervento sulla
macchina, staccate sempre la spina dalla presa elettrica.
- Quando notate che la potenza di percussione diminuisce,
fate controllare la macchina presso un centro di assistenza
tecnica autorizzato.
- Ispezione dell’utensile: L’uso di un utensile da taglio
consumato farà diminuire la qualità del lavoro e potrebbe
causare guasti al motore; è quindi necessario affilare o
sostituire gli utensili di taglio non appena si nota che sono
deteriorati.
- Ispezionare le viti: Ispezionare regolarmente tutte le viti
di assemblaggio e verificare che siano ben serrate. Se una
vite dovesse allentarsi, serrarla immediatamente. In caso
contrario si possono correre seri pericoli.
- riempimento d’olio:L’attrezzo elettrico è fornito con
una quantità d’olio necessaria. Non è ammessa l’aggiunta
dell’olio in un martello percussore nuovo. È raccomandato
aggiungere nel serbatoio 30 grammi d’olio passati i 3 mesi
dopo il primo avviamento dell’attrezzo nel caso del suo
funzionamento continuo.
1. Accendete la macchina per farla lavorare un certo tempo
e riscaldarsi.
2. Spegnete l’attrezzo elettrico e togliete la spina del cavo
di alimentazione dalla presa.
3. Svitate il coperchio del carter (10), usando una chiave
speciale.
4. Versate dell’olio in entità di 30g. Utilizzate solo l’olio
speciale «Mobil Delvac MX» con la viscosità SAE 15W-40.*
* è ammesso l’impiego anche dell’olio per motori
13
semisintetico e sintetico avente la viscosità equivalente.
5. Rimontate il coperchio del carter (10) e stringetelo bene.
Pulite la macchina con un panno morbido.
ATTENZIONE: Inghiottito provoca con-seguenze
dannose o fatali. Contiene distillato di petrolio. Se viene
ingerito, non provocare vomito. Consultare subito un
medico. Conser-vare lontano da calore o fuoco aperto.
Tenerlo lontano dai bambini!
- Manutenzione del motore: Fare molta attenzione ad
evitare che l’avvolgimento del motore si danneggi e/o si
bagni d’olio o d’acqua.
- Sostituzione delle spazzole: Le spazzole sono a
disinserzione automatica e vanno sostituite dopo 150-200
ore circa di funzionamento, oppure quando la loro lunghezza
è inferiore a 10 mm. Per sostituirle rivolgersi a un centro di
assistenza tecnica autorizzato.
- Pulire accuratamente la macchina dopo l’uso con un
getto d’aria asciutta.
- Le aperture di ventilazione della macchina non devono
essere sempre libere.
- Verificare che il cavo di alimentazione sia in buone
condizioni; in caso contrario, farlo sostituire presso un centro
di assistenza tecnica autorizzato.
- Usare solo accessori e ricambi originali Felisatt Per
quanto riguarda i pezzi la cui sostituzione non è descritta in
queste istruzioni per l’uso, farli sostituire presso un centro di
assistenza tecnica autorizzato Felisatti il foglietto Garanzia/
Indirizzi dei Centri di assistenza tecnica).
Non introdurre attrezzi elettrici
nei rifiuti di casa!
Secondo la normativa europea 2002/96/CE in
riferimento agli apparecchi elettrici ed elettronici
e le leggi nazionali, gli apparecchi elettrici usurati
devono essere raccolti separatamente e portati al
riciclaggio, rispettando le norme ambientali.
DICHIARAZIONE DI
CONFORMITÀ
Dichiariamo sotto la nostra esclusiva
responsabilità che i prodotti della
marca FELISATTI descritti in questo
manuale sono conformi alle norme o
ai regolamenti seguenti: EN 50144,
EN 55014 e EN 61000-3, ai sensi
delle direttive 73/23/CEE, 89/336/
CEE, 98/37/CEE e 2002/95/CE.
GARANZIA
Vedere le condizioni generali di validità della garanzia
riportate sul foglietto allegato a queste istruzioni.
07
Jordi Carbonell
Santiago Lopes
Riservato il diritto di apportare modifiche tecniche 12/2007
14
TECHNISCHE DATEN
Modell
HF30/2000V
Verbrauchsleistung
Leerlaufgeschwindigkei
Stoßenergie
W
2000
/min
1500
J
Anschluß/Länge des Instrumentes
30
/mm
Gewicht
kg
Bitte beachten Sie strikt die Hinweise dieser Betriebsanleitung.
Sie muss stets komplett, in einwandfrei lesbarem Zustand
und bei der Arbeit verfügbar sein, um etwaige Überprüfungen
an den verschiedenen Teilen vornehmen zu können.
Durch bestimmungsgemäße Verwendung und Beachtung der
entsprechenden Wartungshinweise, kann die Lebensdauer
der Maschine wesentlich verlängert werden.
Dieses Werkzeug ist nur für den in dieser Anleitung
beschriebenen Gebrauch vorgesehen. Jeglicher andere
Gebrauch der Maschine ist untersagt!
ABBILDUNGEN
BESCHREIBUNG (Siehe entspr. Abbildungen)
1. Werkzeugaufnahme (Sechskantaufnahme)
2. Vordere Abdeckung
3. Stopphebel
4. Hauptschalter
5. Arretierung des Hauptschalters
6. Netzleitung mit Stecker
7. Ölstandsanzeige (HF25/1500)
8. Zusatzhandgriff
9. Lüftungsschlitze
SICHERHEITSHINWEISE
• Siehe die entsprechenden “Sicherheitsanweisungen”
die zusammen mit der vorliegenden Betriebsanleitung
geliefert werden.
• Schützten Sie sich vor elektrischem Schlag. Vermeiden
Sie Körperberührung mit geerdeten Teilen, zum Beispiel
Rohren, Heizkörpern, Herden und Kühlschränken. Die
Verwendung eines Fehlerstromschutzschalters wird für alle
Arbeiten mit Elektrowerkzeugen empfohlen.
• Halten Sie das Werkzeug nur an den isolierten
Griffflächen, wenn Sie Arbeiten ausführen, bei denen
die Gefahr besteht, dass verborgene Kabel oder das
eigene Kabel angebohrt werden. Bei Kontakt mit einem
stromführenden Kabel werden die freiliegenden Metallteile
der Maschine ebenfalls stromführend, so dass der Benutzer
einen elek-trischen Schlag erleiden kann.
• Tragen Sie Gehörschützer bei längerer Benutzung
der Maschine. Lang anhaltende Lärmbelastung kann zu
Gehörschäden führen.
• Tragen Sie Schutzhelm, Schutzbrille und/oder Gesichtsschutz. Das Tragen einer Staubmaske und dick
gepolsterter Handschuhe ist ebenfalls zu empfehlen.
• Vergewissern Sie sich vor der Arbeit, dass derBohrer
sicher montiert ist.
• Die Maschine ist so ausgelegt, dass sie bei normalem
Betrieb Vibrationen erzeugt. Durch Lokkerung
von
30/410
18,5
Schrauben kann es zu einem Ausfall oder Unfall kommen.
Überprüfen Sie sorgfältig die Festigkeit der Schrauben vor
der Arbeit.
• Lassen Sie das Werkzeug bei niedrigen Temperaturen oder nach längerer Nichtbenutzung mehrere Minuten
im Leerlauf warmlaufen. Dadurch wird die Schmierung
verbessert. Schlagbohren mit einem nicht richtig
warmgelaufenen Werkzeug ist schwierig.
• Achten Sie stets auf sicheren Stand.
• Vergewissern Sie sich bei Einsatz der Maschine an
hochgelegenen Arbeitsplätzen, dass sich keine Per-sonen
darunter aufhalten.
• Die Maschine sicher mit beiden Händen festhalten.
• Halten Sie die Hände von rotierenden Teilen fern.
• Lassen Sie die Maschine nicht unbeaufsichtigt laufen.
Benutzen Sie die Maschine nur mit Handhaltung.
• Richten Sie die Maschine während des Betriebs nicht auf
umstehende Personen. Der Bohrer könnte herausschnellen
und schwere Verletzungen verursa-chen.
• Vermeiden Sie eine Berührung des Bohrereinsatzes
oder der umliegenden Teile unmittelbar nach der Bearbeitung,
weil sie dann noch sehr heiß sind und Hautverbrennungen
verursachen können.
BEWAHREN SIE DIESE HINWEISE
SORGFÄLTIG AUF.
KURZBESCHREIBUNG
Dieses Elektrogerät ist für Abbau- und Abbrucharbeiten
von Beton, Stein und Asphalt mit hoher Leistung geeignet.
Gleich wie beim Schlagen mit einem Hammer auf einen
konventionellen Meißel schlägt ein frei laufender Kolben auf
den Bohrer oder Meißel, der sich über ein Zwischenstück in
Längsrichtung bewegen kann. Dieser freilaufende Kolben
wiederum wird über einen Luftstoßdämpfer von einem Kolben
betätigt, der von einem Elektromotor angetrieben wird.
VOR DER INBETRIEBNAHME DIESER MASCHINE
ACHTUNG! Prüfen Sie vor Beginn der Arbeiten z. B. mit
einem Metalldetektor, ob sich unter den Oberflächen keine
elektrischen Leitungen und Gas- oder Wasserleitungen
befinden.
ACHTUNG! Vor allen Arbeiten an der Maschine Stecker aus
der Steckdose ziehen.
▪ Überprüfen Sie die Stellung des Hauptschalters.
Das Elektrogerät soll nur bei ausgeschaltetem
Hauptschalter an das Versorgungsnetz angeschlossen und
von ihm abgetrennt werden.
Wenn Sie den Stecker in die Dose einsteDE
cken, solange der Hauptschalter eingeschaltet ist, wird das
Elektrogerät gleich starten, was eine Voraussetzung für
15
Unfall ist.
▪ Stellen Sie sicher, dass das Netzkabel und der Stecker in
Ordnung sind. Falls das Versorgungskabel
beschädigt ist, soll der Austausch nur von dem Hersteller
oder einem seinen Vertreter
vorgenommen werden, um die Gefahren bei dem Austausch
zu vermeiden.
▪ Vor jeder Arbeit am Gerät oder beim Ausfall der
Netzspannung ziehen Sie den Netzstecker aus der
Steckdose.
▪ Falls die Arbeitszone von der Versorgungsquelle
entfernt ist, verwenden Sie nach Möglichkeit
kürzere Leitung mit geeignetem Querschnitt.
▪ Stellen Sie sicher, dass der Zusatzhandgriff auf korrekt
eingestellt ist und die Schrauben fest angezogen sind.
▪ Vor der ersten Inbetriebnahme des Elektrogerätes
sollen Sie Öl aus der mitgelieferten Verpackung nachfüllen.
Die Maschine wird mit einer kleinen Menge Öl im Tank
geliefert.
VERSTELLEN DES ZUSATZHANDGRIFFS
1. Abschrauben des Zusatzhandgriffes M entgegen dem
Uhrzeigersinn.
2. Zusatzhandgriff M um gewünschten Winkel verdrehen.
3. Schrauben Sie den Zusatzhandgriff M wieder ein.
EINSETZEN DER ARBEITSWERKZEUGE
1. Reinigen und fetten Sie leicht den Werkzeug¬schaft mit
Schmierstoff oder Maschinenöl (Abb. 1).
2. Ziehen Sie den Stopphebel (3) in Ihre Rich¬tung.
3. Drehen Sie ihn gleichzeitig um 180° in Uhrzei¬gersinn.
4. Stecken Sie anschließend den Werkzeug¬schaft in die
Werkzeugaufnahme (1) in der vorderen Abdeckung (2).
5 Verriegeln Sie das Werkzeug, indem Sie den Stopphebel
(3) in die Gegenrichtung drehen (Abb. 2).
Um das Werkzeug abzunehmen, führen Sie die oben
beschriebenen Schritte in umgekehrter Rei¬henfolge aus.
NETZANSCHLUSS
Achtung! Nur an Einphasen Wechselstrom und nur an
die auf dem Leistungsschild angegebene Netzspannung
anschließen. Anschluss ist auch an Steckdosen ohne
Erdungsschutzkontakt möglich, da das Gerät über eine
Schutzisolierung Klasse II nach Europanorm EN 50144
vorliegt. Die Funkentstörung entspricht der Europanorm EN
55014.
STARTEN - STOPPEN
Kurzzeitige betätigung:
▪ Starten: Hauptschalter (4) betätigen.
▪ Stoppen: Hauptschalter (4) loslassen.
Dauerbetrieb:
▪ Starten: Hauptschalter (4) betätigen und in diesem Zustand
mit der Arretierung (5) arretie¬ren.
▪ Stoppen: Hauptschalter (4) einmal kurz drü¬cken und
gleich loslassen.
ARNEITEN MIT DEM AUFBRUCHHAMMER
▪ Stecken Sie den Netzstecker in die Steckdose.
▪ Setzen Sie das Werkzeug ca. 80–100 mm vor der Kante
des zu bearbeitenden Materials an und betätigen Sie den
Hauptschalter (4).
16
▪ Beginnen Sie die Arbeit in einem Winkel von 70°–80° zur
Oberfläche und richten Sie die Spitze zur Kante. Danach in
Richtung 90° be¬wegen und das Material wegbrechen.
▪ Für eine optimale Leistung nutzen Sie das Ei¬gengewicht
des Aufbruchhammers aus. Bei zu geringem Anpressdruck
springt das Werk¬zeug. Ein zu hoher Anpressdruck setzt die
Leistung herab.
Um die Schlagbewegung auszuführen ist es manchmal
erforderlich, die Werkzeugspitze in die bearbeiteten Oberfläche
zu stoßen. Das ist nicht auf eine Störung zurückzuführen,
sondern bedeu¬tet, dass das Schutzmechanismus bei
Leerlauf¬schlägen angesprochen hat.
WARNUNG: Es kann vorkommen, dass das Gerät trotzt
rotierendem Motor kei-ne Schlagbewegungen ausführt,
da das Öl verdickt ist. Wenn Sie den Aufbruchhammer bei
niedrigeren Temperaturen oder nach einer langen Ruhepause
verwenden, lassen Sie ihn zum Aufwärmen erst fünf Minuten
im Leerlauf laufen.
▪ Drehen Sie das Werkzeug regelmäßig. Dies sorgt
für gleichmäßige Abnutzung und unter¬stützt den
Selbstschärfungsprozess.
LÄRM UND VIBRATIONEN
Das Werkzeug wurde für eine minimale Geräuschentwicklung
konstruiert und gebaut. Unter besonderen Bedingungen
jedoch kann das maximale Geräuschniveau im Arbeitsbereich
85 dBA überschreiten. In diesem Fall muss sich der Benutzer
durch einen Gehörschutz schützen.
Die Schall- und Vibrationsniveaus des Geräts bei einer
Messung gemäß der Norm EN 50144 liegen normalerweise
bei:
Dauerschalldruckpegel = 89dB(A)
Schalleistungspegel = 102 dB(A)
Tragen Sie einen Gehörschutz!
Hand- Armvibration = 14,5 m/s2
ZUBEHÖR
Das Zubehör und die entsprechenden Bestellnummer finden
Sie in unseren Katalogen.
WARTUNG UND PFLEGE
WARNHINWEIS - Ziehen Sie vor der Durchführung von
Arbeiten an der Maschine immer zuerst den Netzstecker aus
der Steckdose.
- Wenn sich die Schlagleistung verringert hat, bringen Sie
die Maschine zu einem Kundendienstcenter.
- Prüfung des Werkzeugs: Die Verwendung eines
abgenutzten Bohrers verringert die Arbeitsleistung und
könnte zu Schäden am Motor führen. Daher müssen die
Bohrwerkzeuge nachgeschliffen oder ersetzt werden, sobald
deren Abnutzung festgestellt wird.
- Überprüfung der Montageschrauben: Überprüfen Sie in
regelmäßigen Abständen, dass die Montageschrauben fest
angezogen sind, und ziehen Sie eine lose Schraube sofort
wieder fest an. Dies könnte sonst eine ernsthafte Gefahr
darstellen.
- ÖL EINFÜLLEN: Das Elektrowerkzeug wird mit
ölgefülltem Tank geliefert. Die Einfüllung des Öls bei der
ersten Inbetriebnahme des Schlaghammers ist unzulässig.
Es wird empfohlen, beim kontinuierlichen Betrieb des
Werkzeugs ca. 30 g Öl 3 Monate nach der ersten
Inbetriebnahme nachzufüllen.
1. Schalten Sie die Maschine ein, lassen Sie die Maschine
einige Zeit laufen.
2. Schalten Sie das Elektrowerkzeug aus und ziehen Sie den
Stromkabelstecker aus der Steckdose.
3. Schrauben Sie den Öleinfülldeckel (10) ab, verwenden Sie
dazu einen Schlüssel.
4. Füllen Sie ca. 30 g Öl ein. Verwenden Sie nur das Öl Mobil
Delvac MX mit Viskosität SAE 15W-40.*.
* Der Einsatz der halbsynthetischen
und
vollsynthetischen Öle mit gleicher Viskosität ist
zulässig.
5. Montieren Sie den Deckel (10) und ziehen Sie ihn fest.
Reinigen Sie die Maschine mit einem Lappen.
WARNUNG: Beim Verschlucken führt zur Verletzung oder
zum Tod. Beinhaltet Erd-öldestilat. Beim Verschlucken
keinen Brechen verursachen. Unverzüglich einen Arzt
konsul-tieren. Fern von Wärme und eier aufbewahren.
Vor Kindern fernhalten!
- Wartung des Motors: Achten Sie darauf, dass kein Öl
oder Wasser in den Motor eindringen kann.
- Ersatz der Kohlebürsten: Die Kohlebürsten verfügen
über eine automatische Abschaltung und müssen nach ca.
150-200 Arbeitsstunden oder bei einer Länge von unter 10
mm ersetzt werden. Wenden Sie sich zur Durchführung des
Austauschs an eines der Kundendienstcenter.
- Reinigen Sie die Maschine nach der Arbeit mit trockener
Druckluft.
- Die Belüftungsschlitze der Maschine müssen immer frei
sein.
- Überprüfen Sie den korrekten Zustand des Netzkabels.
Sollte dieses beschädigt oder abgenutzt sein, wenden
Sie sich zur Durchführung des Austauschs an eines der
Kundendienstcenter.
-Verwenden
Sie
nur
Originalzubehör
und
Originalersatzteile von Felisatti. Jene Teile, die in der
Bedienungsanleitung nicht beschrieben sind, müssen in
einem Kundendienstcenter von Felisatti ersetzt werden
(Siehe Blatt Garantie / Anschriften der Kundendienstcenter).
Wenn die Maschine nicht mehr
benutzbar oder nicht mehr zu
reparieren ist, versichern Sie
sich, dass die Entsorgung gemäß
den örtlichen Vorschriften und
von autorisiertem Fachpersonal
vorgenommen wird.
GARANTIE
Siehe allgemeine Garantiebedingungen, die dieser
Betriebsanleitung als Anlage beigefügt werden.
GERÄUSCH- UND VIBRATIONSWERTE
Das Werkzeug wurde für eine minimale
Geräuschentwicklung konstruiert und gebaut. Unter
besonderen Bedingungen jedoch kann das
maximale Geräuschniveau im Arbeitsbereich 85
dBA überschreiten. In diesem Fall muss sich der
Benutzer durch einen Gehörschutz schützen.
Die Schall- und Vibrationswerte des Geräts gemäß
der Norm EN 50144 liegen normalerweise bei:
Schalldruck = 92 dB(A)
Lautstärke = 105 dB(A)
Gehörschutz verwenden!
Vibrationsbeschleunigung = 3,1 m/s2
KONFORMITÄTSERKLÄRUNG
Wir erklären unter unserer
eigenen Verantwortung, dass
die
in
diesem
Handbuch
beschriebenen Produkte der
Marke Felisatti
konform zu
folgenden Normen sind: EN
50144, EN 55014 und EN 610003 gemäß den Richtlinien 73/23/
EG, 89/336/EG, 98/37/EG und
2002/95/EG.
GARANTIE
Siehe allgemeine Garantiebedingungen, die
Betriebsanleitung als Anlage beigefügt werden.
dieser
07
Jordi Carbonell
Santiago Lopes
We reserve the right to make technical changes 07/2007
17
ТЕХНИЧЕСКИЕ ХАРАКТЕРИСТИКИ
Модель
Номинальная мощность
Частота ударов
Наибольшая энергия удара
Тип соединение/длина инструмента
Масса (без аксессуаров)
Соблюдайте все правила эксплуатации, изложенные в
этой инструкции. Храните инструкцию в надежном месте.
Инструкция должна находиться под рукой для консультаций во время технического обслуживания электроинструмента.
Бережное обращение с электроинструментом и соблюдение всех описанных ниже правил по уходу, значительно продлят срок его эксплуатации.
Данный электроинструмент должен использоваться
только по своему прямому назначению, предусмот-ренному настоящей инструкцией по эксплуатации. Категорически запрещается любое другое при-менение электроинструмента.
ВНЕШНИЙ ВИД
ОПИСАНИЕ (смотрите рисунки)
1. Гнездо для инструмента (шестигранник).
2. Букса
3. Фиксатор инструмента
4. Выключатель
5. Кнопка, блокирующая выключатель
6. Кабель питания с вилкой
8. Рукоятка дополнительная
9. Отверстия вентиляционные
ПРАВИЛА ПО ТЕХНИКЕ БЕЗОПАСНОСТИ
• Внимательно ознакомьтесь с прилагаемыми к этой
инструкции “Правилами по технике безо-пасности”.
• Для Вашей безопасности электроинструмент должен подключаться к электросети, защищенной магнитотепловым однофазным автоматом (УЗО), предохраняющим электросеть от пере-грузок и коротких замыканий.
•
Держите инструмент за изолированные части при
выполнении операции, когда рабочие инструменты могут
контактировать со скрытой проводкой или своим собственным шнуром. Контакт с проводом под напряжением
с открытыми металлическими частями инструмента и
может вы-звать поражение оператора электрическим током.
•
При использовании инструмента в течение длительного времени пользуйтесь средствами инди-видуальной защиты, такими, как защитные очки, перчатки,
ботинки, а также средствами защиты органов слуха.
Длительное воздействие шума высокой интенсивности
может привести к потере слуха.
•
Надевайте каску (защитный шлем), защитные очки
и/или лицевой щиток. К тому же, настоятельно рекомендуется надевать пылезащитную маску, защиту для слуха
и перчатки с толстой мягкой прокладкой.
•
Перед эксплуатацией следует убедиться, что инструмент надежно зафиксирован.
• При эксплуатации инструмента от воздействия вибрации винты могут отвинтиться, став причиной поломки
18
Вт
/мин
Дж
/мм
кг
HF30/2000V
2000
1500
30
30/410
18,5
или несчастного случая. Перед работой внимательно
проверяйте плотное завинчивание винтов.
•
В холодную погоду, или когда инструмент не использовался в течение длительного времени, дайте
инструменту прогреться в течение нескольких минут,
эксплуатируя его без нагрузки. При этом смазка разогревается. Без прогрева отбойная опе-рация является
затруднительной.
•
Будьте всегда уверены, что у Вас имеется устойчивая опора.
•
Убедитесь в том, что внизу никого нет, когда используете инструмент в возвышенных местах.
•
Держите инструмент крепко обеими руками. Держите руки подальше от движущихся частей.
•
Не оставляйте инструмент работающим. Управляйте инструментом, удерживая его двумя руками.
• Не направляйте инструмент ни на кого вокруг Вас во
время эксплуатации. Долото может вылететь и нанести
кому-либо серьезную травму.
•
Не прикасайтесь к долоту или частям, близко расположенным к долоту, сразу же после эксплуатации; они
могут быть очень горячими и обжечь Вашу кожу.
СОХРАНИТЕ ЭТУ ИНСТРУКЦИЮ.
КРАТКОЕ ОПИСАНИЕ
Этот электроинструмент предназначен для долбле-ния,
разрушения бетона, скал и асфальта и обладает высокой производительностью.
Принцип его работы аналогичен использованию молотка
и зубила.
Работает он следующим образом: с помощью электромотора, приводится в действие компрессионновакуумный
механизм, который через промежуточную массу оказывает ударное действие на хвостовую часть инструмента.
ПОДГОТОВКА К РАБОТЕ
ВНИМАНИЕ! Перед началом работ, с помощью металлоискателя убедитесь в отсутствии электро-проводок,
водопроводных или газовых труб.
Также убедитесь в том, что напряжение электросети соответствует рабочему напряжению электроинстру-мента:
рабочее напряжение указано на табличке характеристик
на корпусе электроинструмента. Если на табличке характеристик указано напряжение 2З0 В, то электроинструмент также можно включать в сеть под напряжением 220
В.
ВНИМАНИЕ! Всегда отключайте питающий кабель от
электросети перед техническим обслуживанием электроинструмента.
Проверьте, в каком положении находится выключатель.
Электроинструмент должен присоединяться и отключаться от сети питания только при выключен-ном выклю-
чателе. Если Вы введете штепсель в контакт в то время,
когда переключатель находится во включенном положении, электроинструмент сразу же будет задействован,
что может привести к несча-стному случаю
Убедитесь в исправности кабеля питания и штепсе-ля.
Если кабель питания поврежден, замена должна быть
осуществлена производителем или его сервизным специалистом во избежание опасностей, которыми чревата
замена.
Выключайте электроинструмент и вытаскивайте штепсель из контакта перед началом любой работы по нему
или при снятии напряжения питания
Если зона работы удалена от источника питания, используйте по возможности более короткий удлинитель с
подходящим сечением.
Проверьте, поставлена ли дополнительная рукоятка правильно и надежно ли она затянута.
ИЗМЕНЕНИЕ ПОЛОЖЕНИЯ
ВСПОМОГАТЕЛЬНОЙ РУКОЯТКИ
тель (4) и вернуться в положение
того, как будет отпущен.
1. Ослабьте дополнительную рукоятку M в вращая её в
направлении против часовой стрелки.
2. Поверните дополнительную рукоятку M относи-тельно оси инструмента в удобное для вас положение.
3. Закрепите дополнительную рукоятку M вращая её в
направлении по часовой стрелки.
ВНИМАНИЕ! Иногда, несмотря на то, что электро-двигатель вращается, электроинструмент не произ-водит
удар ввиду сгущения масла. При эксплуатации отбойного молотка при низкой температуре окружающей среды
или после консервации, дайте ему поработать в течении
пяти минут на холостом ходу, для прогрева.
УСТАНОВКА РАБОЧИХ ИНСТРУМЕНТОВ
▪ Через определенные интервалы времени поворачивайте инструмент. Это способствует его равномерному
изнашиванию и процессу самозатачивания.
1. Очистите и слегка смажьте хвостовую часть рабочего
инструмента специальной смазкой или машинным маслом (Рис. 1).
2. Потяните рычаг фиксатора (3) к себе.
3. Одновременно с этим поверните на 180° по ходу часовой стрелки.
4. Вставьте после этого хвостовую часть инструмента в
шестигранное гнездо (1) буксы (2).
5. Вставьте наконечник, вращая рычаг фиксатора (3) в
обратном направлении (Рис. 2).
Для снятия наконечника выполните вышеуказанные
действия в обратной последовательности.
ПОДКЛЮЧЕНИЕ К СЕТИ
Внимание! Электроинструмент следует подклю-чать
только к однофазной сети переменного тока, напряжение которой соответствует напряжению, указанному на
табличке характеристик. Инструмент выполнен в исполнении класса II - защитное за-земление в соответствии
с европейским стандар-том EN 50144. и поэтому можно
его подключать к розеткам, не имеющим заземления.
Подавление радиопомех соответствует европейскому
стандарту EN 55014.
ПУСК - ОСТАНОВКА
Кратковременное действие:
▪ Пуск: нажать на переключатель (4).
▪ Остановка: отпустить переключатель (4).
Продолжительная работа:
▪ Пуск: нажать на переключатель (4) и в на¬жатом состоянии застопорить кнопкой (5).
▪ Остановка: нажать на переключатель (4) один раз и
сразу же отпустить.
ВНИМАНИЕ! Перед тем, как вставить штепсель в розетку, всегда проверяйте, может ли сработать переключа-
«Выключено» после
ЭКСПЛУАТАЦИЯ
▪ Установите инструмент на расстоянии 70–100 мм от
кромки материала, который будете обрабатывать и нажмите на переключатель (4).
▪ Начните работать под углом 70°–80° к поверхности,
направляя острие наконечника к кромке. После этого
смените угол на 90° и отбейте материал.
▪ Для оптимальной работы используйте собственную
тяжесть отбойного молотка. При недостаточном усилии
инструмент будет отскакивать. В случае чрезмерного нажатия снижается производительность, иногда, для того,
чтобы начать ударное движение, приходится ударять
инструментом в обрабатываемую поверхность. Это не
вызвано неисправно-стью, а означает, что сработал защитный механизм ударов на холостой ход.
ШУМ И ВИБРАЦИЯ
При разработке данного инструмента особое внима-ние
уделялось снижению уровня шума. Несмотря на это, в
некоторых случаях уровень шума на рабочем месте может достигнуть 85 дБА. В этой ситуации оператор должен
использовать средства звуковой защиты.
Уровень шума и вибрации инструмента соответствует
нормативам ЕN50144, и имеет следующие номинальные
параметры:
Акустическое давление = 89 дБ (A)
Акустический резонанс = 102 дБ (A)
Пользуйтесь средствами звуковой защиты!
Ускорение вибрации = 14,5 м/с2
АКСЕССУАРЫ
Аксессуары можно заказать по каталогу, указав их порядковый номер.
ПРАВИЛА ПО ТЕХНИЧЕСКОМУ ОБСЛУЖИВАНИЮ
ВНИМАНИЕ - Перед уходом за электроинструмен-том
всегда отключайте питающий кабель от электро-сети.
- Если Вы заметили снижение энергии удара, то необходимо сдать электроинструмент в центр технического
обслуживания для его ремонта.
- Проверка электроинструмента: Использование изношенного сменного инструмента снижает эффективность выполняемой работы и может привес-ти к выходу
из строя мотора или редуктора, поэтому необходимо
периодически затачивать или заменять износившийся
сменный инструмент, как только в этом появляется необходимость.
- Осмотр винтов корпуса: Регулярно проверяйте надежность крепления всех винтов. При обнаружении ос19
лабленного винта немедленно затяните его. В противном
случае Вы подвергаете себя риску получения травмы.
- заливка масла: Электроинструмент поставляется с необходимым количеством смазки в резервуаре. Не допускается добавление смазки в новый отбойный молоток.
Рекомендуем добавить в резервуар 30 г смазки через 3
месяца после первоначального пуска инструмента при
непрерывной его работе.
1. Включите машину, чтобы она поработала определенное время и разогрелась.
2. Выключите электроинструмент и выньте штепсель кабеля питания из розетки.
3. Открутите крышку картера (10), используя, специальный ключ.
4. Залейте масло в объеме 30 г. Используйте только
специальное масло «Mobil Delvac MX» вязкостью SAE
15W-40.*
* Допускается использовать и полусинтетические и синтетические моторные масла эквивалентной
вязкости.
5. Установите обратно крышку картера (10) и хорошо затяните ее. Почистите машину мягкой тряпкой.
ВНИМАНИЕ!: При попадании в рот может причинить
ранения или смерть. Содержит продукт дистилляции
нефти. В случае поглощения не вызывать рвоты. Немедленно обеспечить консультацию врача. Хранить
далеко от источников тепла и открытого огня. Хранить вне доступа детей.
- Уход за электродвигателем: Необходимо особенно
бережно относиться к электродвигателю, избегать попадания воды или масла в его обмотки.
- Замена щеток: Щетки автоматически отключаются при их износе. Их необходимо менять после каждых
150 - 200 часов эксплуатации, или когда их длина станет меньше 10 мм. Эта операция должна выполняться
только в центрах технического обслуживания, имеющих
разреше-ние на этот вид деятельности.
- После работы тщательно продувайте перфоратор
сильной струей сухого воздуха.
- Вентиляционные отверстия электроинструмента
должны находиться всегда открытыми и чистыми.
- Перед использованием электроинструмента проверьте исправность кабеля. Если кабель поврежден, то
необходимо обратиться в центр технического обслуживания для его ремонта или замены.
- Разрешается использовать только аксессуары и запчасти фирмы Felisatti. Замена неисправных деталей, за
исключением тех, которые описываются в этой инструкции, должна производиться только в центрах технического обслуживания фирмы Felisatti (Смотрите прилагаемый
гарантийный талон/адреса Центров Технического Обслуживания).
ГАРАНТИЯ
Условия гарантии смотрите в гарантийном талоне, прилагаемом к этой инструкции по эксплуатации.
20
Запрещается выбрасывать
электроинструмент вместе с
бытовыми отходами!
В соответствии с Директивой ЕС номер 2002/96/
EC относительно старых электрических и
электронных устройств и ее приложением к
национальному
законодательству
бывшие
в
употреблении
электрические
приборы
необходимо собирать отдельно и утилизировать
способами, не наносящими вреда экологии.
ДЕКЛАРАЦИЯ
О СООТВЕТСТВИИ
Мы со всей ответственностью заявляем, что электроинструменты
марки FELISATTI, описание которых приведено в данной инструкции, соответствуют требованиям следующих нормативных
документов: EN 50144, EN 55014
и EN 61000-3 в соответствии с директивами ЕС 73/23/EEC, 89/336/
EEC, 98/37/EEC, 2002/95/CEE.
07
Jordi Carbonell
Santiago Lopes
Производитель оставляет за собой право вносить технические изменения
12/2007
21
22
23
Interskol Power Tools S.L.
Carretera de Sant Joan de les Abadesses s/n17500 RIPOLL, (Girona), SPAIN
Tel +34972700200
Fax +34972700554
e-mail: [email protected]