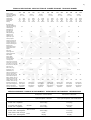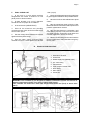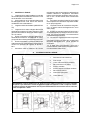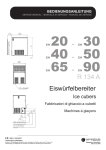
1
Der Link zu den Scotsman Barline Eiswürfelbereiter bei Kälte-Berlin
Ihr Scotsman Barline Fachhändler:
Kälte-Berlin
Am Pfarracker 41
12209 Berlin
Fon: +49 30 74 10 40 22
Fax: +49 30 74 10 40 21
Mail: [email protected]
Internet: www.kaelte-berlin.com
MANUEL DE SERVICE - BEDIENUNGSANLEITUNG
18 - 21 - 31 - 40
50 - 65 - 90
R 134 A
Ice cubers
Fabbricatori
di ghiaccio a cubetti
Machines á glaçons
Eiswürfelbereiter
REV. 02/2010
a)
TABLE OF CONTENTS
PAGE
INDICE
PAG
TABLE DES MATIERES
PAGE
INHALT
SEITE
GENERAL INFORMATION
AND INSTALLATION
1
INFORMAZIONI GENERALI
ED INSTALLAZIONE
11
INFORMATIONS GENERALES
ET INSTALLATION
21
ALLGEMEINES UND
INSTALLATION
Introduction
Unpacking and inspection
Location and levelling
1
1
1
Introduzione
11
Disimballaggio ed ispezione 11
Posizionamento e livellamento 11
Introduction
21
Déballage et examen
21
Logement et mise de niveau 21
Einleitung
32
Auspacken und Kontrollieren 32
Stellplatz und Aufstellung
32
Electrical connection
Water supply and drain
connection
Final check list
Installation practice
1
2
3
3
Collegamenti elettrici
Alimentazione idraulica
e scarico
Controllo finale
Schema di installazione
12
13
13
Branchement électrique
Branchement d’arrivée
et d’évacuation eau
Liste de contrôle final
Schema d’installation
22
23
23
Elektrische Anschlüsse
Wasserversorgung und
Abflußleitungen
Endkontrolle
Installation
33
34
34
OPERATING INSTRUCTION
4
ISTRUZIONI DI
FUNZIONAMENTO
14
MISE EN SERVICE
24
BETRIEBSANLEITUNG
35
Start up
Operational checks
4
4
Avviamento
14
Controlli durante il funzion. 14
Démarrage
24
Contrôle pendant le fonctionn. 24
Inbetriebnahme
Kontrolle bei Betrieb
35
35
OPERATING PRINCIPLES
6
PRINCIPIO DI
FUNZIONAMENTO
16
PRINCIPE DE
FONCTIONNEMENT
26
BETRIEB
37
Freezing cycle
Harvest cycle
6
6
Ciclo di congelamento
Ciclo di scongelamento
16
16
Cycle de congélation
Cycle de démoulage
26
26
Gefrierzyklus
Abtauzyklus
37
37
ANWEISUNGEN ZUR
WARTUNG UND REINIGUNG
40
CLEANING INSTRUCTIONS OF
WATER SYSTEM
9
12
ISTRUZIONI PER LA PULIZIA
DEL CIRCUITO IDRAULICO 19
22
INSTRUCTION DE NETTOYAGE
DU CIRCUIT HYDRAULIQUE
30
32
33
b)
B
C
A
18
B
C
A
21 - 31
B 18 mm (inch)
B 21 mm (inch)
B 31 mm (inch)
A
334 (13 1/8)
389 (15 5/16)
465 (18 5/16)
B
457 (18)
515 (20 9/32)
586 (23 3/64)
C
597 (23 1/2)
640 (25 13/64)
690 (27 11/64)
c)
A
C
B
50
B
C
A
40 - 65 - 90
B 40 mm (inch)
B 50 mm (inch)
B 65-90 mm (inch)
A
529 (20 19/32)
529 (20 53/64)
699 (27 11/64)
B
525 (20 43/64)
535 (21 1/16)
536 (21 1/32)
C
815 (31 5/8)
796 (31 17/64)
885 (34 17/32)
d)
e)
TECHNICAL SPECIFICATIONS - SPECIFICHE TECNICHE - DONNÉES TECHNIQUE - TECHNISCHE ANGABEN
18A
Electric voltage
Alimentazione elettrica
Alimentation électrique
Netzspannung
Condensation
Condensazione
Condensation
Kühlung
230/50/1
-10 ÷ +10%
Air
Aria
Air
Luft
Bin capacity (kg)
Capacità contenitore (kg)
Capacité bac glaçons (kg)
Lademenge (kg)
Net weight (kg)
Peso netto (kg)
Poids net (kg)
Nettogewicht (kg)
Cubes per cycle
Cubetti per ciclo
Glaçons par cycle
Würfel per Zyklus
Compressor power HP
Potenza compressore CV
Puissance compresseur CV
Kompressorleistung PS
Running amps
Amperaggio di marcia
Ampérage en marche
Ampere
Start amps
Amperaggio d’avv.
Ampérage de démarr.
Start Ampere
Power (Watts)
Potenza (Watt)
Puissance (Watts)
Leistung (Watt)
Power cons. in 24 hrs (Kwh)
Consumo elettr. in 24 ore (Kwh)
Cons. electr. en 24 hrs (Kwh)
Stromverbrauch in 24 Std. (kWh)
Wire size (mm2)
Sezione cavi (mm2)
Section fils (mm2)
Kabelstärke (mm2)
Water consumption (lt/hr)
Consumo acqua (lt/ora)
Consommation eau (lt/hr)
Wasserverbrauch (lt/std)
Refrig. charge R 134 A (gr)
Carica refrig. R 134 A (gr)
Charge refrig. R 134 A (gr)
Kühlmittel - Füll. R 134 A (gr)
Refrigerant metering device
Disp. espansione refrigerante
Détente du Rèfrigérant
Kühlmittel - Expansionssystem
18W
Water
Acqua
Eau
Wasser
21A
21W
31A
230/50/1
-10 ÷ +10%
Air
Aria
Air
Luft
31W
40A
230/50/1
-10 ÷+10%
Water
Acqua
Eau
Wasser
Air
Aria
Air
Luft
Water
Acqua
Eau
Wasser
40W
230/50/1
-10 ÷ +10%
Air
Aria
Air
Luft
Water
Acqua
Eau
Wasser
6,5
8
15
16
30
35
39
45
15
18
24
1/5
1/5
2,2
50A
50W
230/50/1
-10 ÷ +10%
Air
Aria
Air
Luft
Water
Acqua
Eau
Wasser
18
18
65A
65W
230/50/1
-10 ÷ +10%
Air
Aria
Air
Luft
Water
Acqua
Eau
Wasser
90A
90W
230/50/1
-10 ÷ +10%
Air
Aria
Air
Luft
Water
Acqua
Eau
Wasser
30
30
50
61
73
24
32
48
48
1/4
3/8
3/8
1/2
3/4
2,2
2,4
3,2
3,5
3,8
5,3
9
9
11
17
18
20
26
310
310
380
500
550
670
830
6,3
7,8
10
10
13
16
3 x 1,5
3 x 1,5
3 x 1,5
3 x 1,5
3 x 1,5
3 x 1,5
N/A
N/A
3 x 1,5
N/A
N/A
3
11*
4
12*
6
16*
8
30 *
7
34*
11
42*
N/A
N/A
250
250
260
250
290
250
320
250
450
300
450
330
Capillary tube
Tubo capillare
Tube Capillaire
Kapillarrohr
Capillary tube
Tubo capillare
Tube Capillaire
Kapillarrohr
Capillary tube
Tubo capillare
Tube Capillaire
Kapillarrohr
Capillary tube
Tubo capillare
Tube Capillaire
Kapillarrohr
Capillary tube
Tubo capillare
Tube Capillaire
Kapillarrohr
Capillary tube
Tubo capillare
Tube Capillaire
Kapillarrohr
Capillary tube
Tubo capillare
Tube Capillaire
Kapillarrohr
Water - Acqua - Eau - Wasser: 15°C (60°F)
OPERATING PRESSURES - PRESSIONI DI FUNZIONAMENTO - PRESSIONES DE FONCTIONNEMENT - BETRIEBSDRÜCKE
Discharge pressure - Pressione di mandata
Haute pression - Hochdruckbereich
Suction pressure - Pressione di aspirazione
Basse pression - Niederdrück
Freezing cycle - Ciclo di congelamento
Cycle de Congélation - Gefrierfase
End of freezing cycle - Fine ciclo di congelamento
Fin du cycle de congélation - Ende der Gefrierfase
Air cooled - Raffr. ad aria
Refroid. à air - Luftgekühlt
18-21-31-40
7÷11 bar
100÷155 psig
0÷0.1 bar
0÷1.5 psig
Air cooled - Raffr. ad aria
Refroid. à air - Luftgekühlt
50-65-90
8.5÷10 bar
120÷140 psig
0.2÷0.3 bar
3÷4 psig
Water cooled - Raffr. ad acqua
Refroid. à eau - Wassergekühlt
18-21-31-40-50
8.5÷10 bar
120÷140 psig
0÷0.1 bar
0÷1.5 psig
Water cooled - Raffr. ad acqua
Refroid. à eau - Wassergekühlt
65-90
9.5 bar
130 psig
0.2÷0.3 bar
3÷4 psig
18 - 21 - 31 - 40
f)
WIRING DIAGRAM - SCHEMA ELETTRICO - SCHÉMA ÉLECTRIQUE - SCHALTUNGSSCHEMA
AIR & WATER COOLED - RAFFREDDAMENTO AD ARIA ED AD ACQUA.
REFROIDISSEMENT A AIR ET A EAU - LUFT- UND WASSERGEKÜHLT
230/50-60/1
B - WHITE
BIANCO
BLANC
WEISS
N - BLACK
NERO
NOIR
SCHWARZ
A - BLUE
BLU
BLEU
BLAU
M - BROWN
MARRONE
MARRON
BRAUN
GV - YELLOW GREEN
GIALLO VERDE
JAUNE VERT
GELB - GRÜN
12
11
1
2
10
5
6
8
7
4
9
3
2
9
10
3
8
11
7
5
6
4
12
A
JUST FOR WATER COOLED UNIT
SOLO PER RAFF. AD ACQUA
SEUL POUR REFR. A EAU
NUR FÜR WASSERGEKÜHLTE EINHEIT
1 TERMINAL BOARD - MORSETTIERA
BORNIER - ANSCHLUSSKASTEN
2 EVAPORATOR THERMOSTAT - TERMOSTATO EVAPORATORE
THERMOSTAT EVAPORATEUR - VERDAMPFERTHERMOSTAT
3 BIN THERMOSTAT - TERMOSTATO CONTENITORE
THERMOSTAT CABINE - SPEICHERTHERMOSTAT
4 COMPRESSOR - COMPRESSORE
COMPRESSEUR - KOMPRESSOR
B
JUST FOR AIR COOLED UNIT
SOLO PER RAFF. AD ARIA
SEUL POUR REFR. A AIR
NUR FÜR LUFTGEKÜHLTE EINHEIT
5 WATER PUMP - POMPA
POMPE A EAU - WASSERPUMPE
6 FAN MOTOR - VENTILATORE
MOTOVENTILATEUR - LÜFTERMOTOR
7 WATER SOL. VALVE - VALV. INGR. ACQUA
VANNE ARRIVÉE EAU - WAISSEREINLASSVENTIL
8 HOT. GAS VALVE - VALVOLA GAS CALDO
VANNE GAZ CHAUDS - HEISSGASVENTIL
9 HI TEMP. THERMOSTAT - TERMOSTATO DI MASSIMA
THERMOSTAT DE SECURITÉ - SICHERHEITSTHERMOSTAT
10 FILLING SWITCH - INTERRUTTORE CARICO
INTERRUPTEUR CHARGEMENT EAU - FÜLLSCHALTER
11 PRESSURE CTRL - PRESSOSTATO
PRESSOSTAT - DRUCKSCHALTER
12 COND. WATER SOL. VALVE - VALV. ALIM. ACQUA COND.
VANNE ARR. EAU CONDEN. - WASSEREINLASSVENTIL KOND.
d
50
g)
WIRING DIAGRAM - SCHEMA ELETTRICO - SCHÉMA ÉLECTRIQUE - SCHALTUNGSSCHEMA
AIR & WATER COOLED - RAFFREDDAMENTO AD ARIA ED AD ACQUA.
REFROIDISSEMENT A AIR ET A EAU - LUFT- UND WASSERGEKÜHLT
230/50-60/1
14
TIMER
2
3
12
13
A - BLUE
AZZURRO
BLEU
BLAU
B - WHITE
BIANCO
BLANC
WEISS
M - BROWN
MARRONE
MARRON
BRAUN
N - BLACK
NERO
NOIR
SCHWARZ
G - GREY
GRIGIO
GRIS
GRAU
11
9
1
4
7
6 - 10
5
8
12
11
13
9
2
14
1
6 - 10
1 TERMINAL BOARD - MORSETTIERA
BORNIER - ANSCHLUSSKASTEN
2 EVAPORATOR THERMOSTAT - TERMOSTATO EVAPORATORE
THERMOSTAT EVAPORATEUR - VERDAMPFERTHERMOSTAT
3 BIN THERMOSTAT - TERMOSTATO CONTENITORE
THERMOSTAT CABINE - SPEICHERTHERMOSTAT
4 COMPRESSOR - COMPRESSORE
COMPRESSEUR - KOMPRESSOR
5 WATER PUMP - POMPA
POMPE A EAU - WASSERPUMPE
13
7
8
5
6 FAN MOTOR - VENTILATORE
MOTOVENTILATEUR - LÜFTERMOTOR
7 WATER SOL. VALVE - VALV. INGR. ACQUA
VANNE ARRIVÉE EAU - WAISSEREINLASSVENTIL
8 HOT. GAS VALVE - VALVOLA GAS CALDO
VANNE GAZ CHAUDS - HEISSGASVENTIL
9 PRESSURE CTRL - PRESSOSTATO
PRESSOSTAT - DRUCKSCHALTER
10 COND. WATER SOL. VALVE - VALV. ALIM. ACQUA COND.
VANNE ARR. EAU CONDEN. - WASSEREINLASSVENTIL KOND.
4
11 SWITCH - INTERRUTTORE
INTERRUPTEUR - SCHALTER
12 HI THERMOSTAT - TERMOSTATO DI SICUREZZA
THERMOSTAT DE SECURITE - SICHERHEITSTHERMOSTAT
13 TIMER - TIMER
PENDULE - ZEITHUR
14 COMPRESSOR SWITCH - INTERRUTTORE COMPRESSORE
INTERRUPTEUR COMPRESSEUR - KOMPRESSORSCHALTER
d
65 - 90
h)
WIRING DIAGRAM - SCHEMA ELETTRICO - SCHÉMA ÉLECTRIQUE - SCHALTUNGSSCHEMA
AIR & WATER COOLED - RAFFREDDAMENTO AD ARIA ED AD ACQUA.
REFROIDISSEMENT A AIR ET A EAU - LUFT- UND WASSERGEKÜHLT
230/50-60/1
A - BLUE
AZZURRO
BLEU
BLAU
B - WHITE
BIANCO
BLANC
WEISS
M - BROWN
MARRONE
MARRON
BRAUN
N - BLACK
NERO
NOIR
SCHWARZ
G - GREY
GRIGIO
GRIS
GRAU
10
TIMER
2
3
9
13
12
11
1
14
8
7
5
4
6
9
12
3
11
2
14
10
1
4
6
1 TERMINAL BOARD - MORSETTIERA
BORNIER - ANSCHLUSSKASTEN
2 EVAPORATOR THERMOSTAT - TERMOSTATO EVAPORATORE
THERMOSTAT EVAPORATEUR - VERDAMPFERTHERMOSTAT
3 BIN THERMOSTAT - TERMOSTATO CONTENITORE
THERMOSTAT CABINE - SPEICHERTHERMOSTAT
4 COMPRESSOR - COMPRESSORE
COMPRESSEUR - KOMPRESSOR
5 WATER PUMP - POMPA
POMPE A EAU - WASSERPUMPE
13
7
8
5
6 FAN MOTOR - VENTILATORE
MOTOVENTILATEUR - LÜFTERMOTOR
7 WATER SOL. VALVE - VALV. INGR. ACQUA
VANNE ARRIVÉE EAU - WAISSEREINLASSVENTIL
8 HOT. GAS VALVE - VALVOLA GAS CALDO
VANNE GAZ CHAUDS - HEISSGASVENTIL
9 HI TEMP. THERMOSTAT - TERMOSTATO DI MASSIMA
THERMOSTAT DE SECURITÉ - SICHERHEITSTHERMOSTAT
10 COMPRESSOR SWITCH - INTERRUTTORE COMPRESSORE
INTERRUPTEUR COMPRESSEUR - KOMPRESSORSCHALTER
11 PRESSURE CTRL - PRESSOSTATO
PRESSOSTAT - DRUCKSCHALTER
12 SWITCH - INTERRUTTORE
INTERRUPTEUR - SCHALTER
13 TIMER - TIMER
PENDULE - ZEITHUR
14 CONTACTOR - TELERUTTORE
CONTACTEUR - SCHALTSCHUTZ
i)
e
18
17
32
16
38
15
14
13
32
27
21
15
10
21
TEMPERATURA ACQUA - WATER TEMPERATURE
TEMPÉRATURE DE L'EAU - WASSERTEMPERATUR
RAFFREDDAMENTO AD ARIA - AIR COOLED MODELS
CONDENSATION PAR AIR - LUFTKÜHLUNG
Kg.
28
°C
10
27
21
26
25
24
23
22
32
21
20
19
38
18
17
31
16
15
14
32
27
21
15
40
10
21
36
32
32
38
30
28
26
24
22
32
27
21
15
10
TEMPERATURA ACQUA - WATER TEMPERATURE
TEMPÉRATURE DE L'EAU - WASSERTEMPERATUR
40
PRODUZIONE GHIACCIO PER 24 ORE - ICE PRODUCED PER 24 HRS.
PRODUCTION DE GLACE PAR 24 HEURES - EISWÜRFELPRODUKTION IN 24 STD.
°C
TEMPERATURA AMBIENTE - AMBIENT TEMPERATURE
TEMPÉRATURE AMBIANT - RAUMTEMPERATUR
PRODUZIONE GHIACCIO PER 24 ORE - ICE PRODUCED PER 24 HRS.
PRODUCTION DE GLACE PAR 24 HEURES - EISWÜRFELPRODUKTION IN 24 STD.
RAFFREDDAMENTO AD ARIA - AIR COOLED MODELS
CONDENSATION PAR AIR - LUFTKÜHLUNG
34
21
20
19
18
32
17
38
16
15
14
13
32
27
21
15
10
TEMPERATURA ACQUA - WATER TEMPERATURE
TEMPÉRATURE DE L'EAU - WASSERTEMPERATUR
RAFFREDDAMENTO AD ACQUA - WATER COOLED MODELS
CONDENSATION PAR EAU - WASSERKÜHLUNG
Kg.
28
°C
10
27
21
26
32
25
24
38
23
22
21
20
19
18
17
16
15
27
21
15
10
TEMPERATURA ACQUA - WATER TEMPERATURE
TEMPÉRATURE DE L'EAU - WASSERTEMPERATUR
TEMPERATURA ACQUA - WATER TEMPERATURE
TEMPÉRATURE DE L'EAU - WASSERTEMPERATUR
38
21
14
32
10
Kg.
42
22
TEMPERATURA AMBIENTE - AMBIENT TEMPERATURE
TEMPÉRATURE AMBIANT - RAUMTEMPERATUR
19
°C
10
Kg.
23
TEMPERATURA AMBIENTE - AMBIENT TEMPERATURE
TEMPÉRATURE AMBIANT - RAUMTEMPERATUR
21
20
RAFFREDDAMENTO AD ACQUA - WATER COOLED MODELS
CONDENSATION PAR EAU - WASSERKÜHLUNG
RAFFREDDAMENTO AD ACQUA - WATER COOLED MODELS
CONDENSATION PAR EAU - WASSERKÜHLUNG
°C
Kg.
42
40
38
10
36
21
34
32
32
38
30
28
26
24
22
32
27
21
15
10
TEMPERATURA ACQUA - WATER TEMPERATURE
TEMPÉRATURE DE L'EAU - WASSERTEMPERATUR
TEMPERATURA AMBIENTE - AMBIENT TEMPERATURE
TEMPÉRATURE AMBIANT - RAUMTEMPERATUR
21
PRODUZIONE GHIACCIO PER 24 ORE - ICE PRODUCED PER 24 HRS.
PRODUCTION DE GLACE PAR 24 HEURES - EISWÜRFELPRODUKTION IN 24 STD.
22
PRODUZIONE GHIACCIO PER 24 ORE - ICE PRODUCED PER 24 HRS.
PRODUCTION DE GLACE PAR 24 HEURES - EISWÜRFELPRODUKTION IN 24 STD.
°C
10
Kg.
23
TEMPERATURA AMBIENTE - AMBIENT TEMPERATURE
TEMPÉRATURE AMBIANT - RAUMTEMPERATUR
RAFFREDDAMENTO AD ARIA - AIR COOLED MODELS
CONDENSATION PAR AIR - LUFTKÜHLUNG
TEMPERATURA AMBIENTE - AMBIENT TEMPERATURE
TEMPÉRATURE AMBIANT - RAUMTEMPERATUR
PRODUZIONE GHIACCIO PER 24 ORE - ICE PRODUCED PER 24 HRS.
PRODUCTION DE GLACE PAR 24 HEURES - EISWÜRFELPRODUKTION IN 24 STD.
PRODUZIONE GHIACCIO PER 24 ORE - ICE PRODUCED PER 24 HRS.
PRODUCTION DE GLACE PAR 24 HEURES - EISWÜRFELPRODUKTION IN 24 STD.
Capacità di produzione - Ice making capacity - Capacité de production - Eisproduktionskapazität
l)
32
40
38
38
36
34
32
30
32
27
21
15
10
50
TEMPERATURA ACQUA - WATER TEMPERATURE
TEMPÉRATURE DE L'EAU - WASSERTEMPERATUR
Kg.
75
°C
70
10
21
65
32
60
38
55
50
45
40
32
27
21
15
10
TEMPERATURA AMBIENTE - AMBIENT TEMPERATURE
TEMPÉRATURE AMBIANT - RAUMTEMPERATUR
RAFFREDDAMENTO AD ARIA - AIR COOLED MODELS
CONDENSATION PAR AIR - LUFTKÜHLUNG
65
TEMPERATURA ACQUA - WATER TEMPERATURE
TEMPÉRATURE DE L'EAU - WASSERTEMPERATUR
RAFFREDDAMENTO AD ARIA - AIR COOLED MODELS
CONDENSATION PAR AIR - LUFTKÜHLUNG
°C
10
Kg.
85
21
80
32
75
70
38
65
60
55
50
32
27
21
15
10
TEMPERATURA ACQUA - WATER TEMPERATURE
TEMPÉRATURE DE L'EAU - WASSERTEMPERATUR
90
°C
10
48
21
46
44
32
42
38
40
38
36
34
32
30
32
27
21
15
10
TEMPERATURA AMBIENTE - AMBIENT TEMPERATURE
TEMPÉRATURE AMBIANT - RAUMTEMPERATUR
42
Kg.
50
TEMPERATURA ACQUA - WATER TEMPERATURE
TEMPÉRATURE DE L'EAU - WASSERTEMPERATUR
RAFFREDDAMENTO AD ACQUA - WATER COOLED MODELS
CONDENSATION PAR EAU - WASSERKÜHLUNG
Kg.
75
°C
70
10
21
65
32
60
38
55
50
45
40
32
27
21
15
10
TEMPERATURA AMBIENTE - AMBIENT TEMPERATURE
TEMPÉRATURE AMBIANT - RAUMTEMPERATUR
44
RAFFREDDAMENTO AD ACQUA - WATER COOLED MODELS
CONDENSATION PAR EAU - WASSERKÜHLUNG
TEMPERATURA ACQUA - WATER TEMPERATURE
TEMPÉRATURE DE L'EAU - WASSERTEMPERATUR
RAFFREDDAMENTO AD ACQUA - WATER COOLED MODELS
CONDENSATION PAR EAU - WASSERKÜHLUNG
°C
10
Kg.
85
21
80
32
75
38
70
65
60
55
50
32
27
21
15
10
TEMPERATURA ACQUA - WATER TEMPERATURE
TEMPÉRATURE DE L'EAU - WASSERTEMPERATUR
TEMPERATURA AMBIENTE - AMBIENT TEMPERATURE
TEMPÉRATURE AMBIANT - RAUMTEMPERATUR
21
46
PRODUZIONE GHIACCIO PER 24 ORE - ICE PRODUCED PER 24 HRS.
PRODUCTION DE GLACE PAR 24 HEURES - EISWÜRFELPRODUKTION IN 24 STD.
48
PRODUZIONE GHIACCIO PER 24 ORE - ICE PRODUCED PER 24 HRS.
PRODUCTION DE GLACE PAR 24 HEURES - EISWÜRFELPRODUKTION IN 24 STD.
°C
10
PRODUZIONE GHIACCIO PER 24 ORE - ICE PRODUCED PER 24 HRS.
PRODUCTION DE GLACE PAR 24 HEURES - EISWÜRFELPRODUKTION IN 24 STD.
Kg.
50
TEMPERATURA AMBIENTE - AMBIENT TEMPERATURE
TEMPÉRATURE AMBIANT - RAUMTEMPERATUR
RAFFREDDAMENTO AD ARIA - AIR COOLED MODELS
CONDENSATION PAR AIR - LUFTKÜHLUNG
TEMPERATURA AMBIENTE - AMBIENT TEMPERATURE
TEMPÉRATURE AMBIANT - RAUMTEMPERATUR
PRODUZIONE GHIACCIO PER 24 ORE - ICE PRODUCED PER 24 HRS.
PRODUCTION DE GLACE PAR 24 HEURES - EISWÜRFELPRODUKTION IN 24 STD.
PRODUZIONE GHIACCIO PER 24 ORE - ICE PRODUCED PER 24 HRS.
PRODUCTION DE GLACE PAR 24 HEURES - EISWÜRFELPRODUKTION IN 24 STD.
PRODUZIONE GHIACCIO PER 24 ORE - ICE PRODUCED PER 24 HRS.
PRODUCTION DE GLACE PAR 24 HEURES - EISWÜRFELPRODUKTION IN 24 STD.
Capacità di produzione - Ice making capacity - Capacité de production - Eisproduktionskapazität
Page 1
GENERAL INFORMATION
AND INSTALLATION
A.
INTRODUCTION
These Cubers are quality designed, engineered
and manufactured.
Their ice making systems are thoroughly tested
providing the utmost in flexibility to fit the needs
of a particular user.
These ice makers have been engineered to our
own rigid safety and performence standards.
NOTE. To retain the safety and performance
built into this icemaker, it is important that
installation and maintenance be conducted
in the manner outlined in this manual.
B.
UNPACKING AND INSPECTION
1. Visually inspect the exterior of the packing
and skid. Any severe damage noted should be
reported to the delivering carrier and a concealed
damage claim form filled in subjet to inspection of
the contents with the carrier’s representative
present.
2. a) Cut and remove the plastic strip securing
the carton box to the skid.
b) Cut open the top of the carton and remove
the polystyre protection sheet.
c) Pull out the polystyre posts from the
corners and then remove the carton.
3. Remove the front and the rear panels of the
unit and inspect for any concealed damage.
Notify carrier of your claim for the concealed
damage as stated in step 1 above.
4. Open the bin door and remove all internal
support packing and masking tape.
7. See data plate on the rear side of the unit
and check that local main voltage corresponds
with the voltage specified on it.
CAUTION. Incorrect voltage supplied to
the icemaker will void your parts
replacement program.
8. Remove the manufacturer’s registration
card from the inside of the User Manual and fillin all parts including: Model and Serial Number
taken from the data plate.
Forward the completed self-addressed
registration card to the factory.
C.
LOCATION AND LEVELLING
WARNING. This Ice Cuber is designed for
indoor installation only. Extended periods
of operation at temperatures exceeding
the following limitations will constitute
misuse under the terms of the
Manufacturer’s Limited Warranty
resulting in LOSS of warranty coverage.
1. Position the unit in the selected permanent
location.
Criteria for selection of location include:
a) Minimum room temperature 10°C (50°F)
and maximum room temperature 40°C (100°F).
b) Water inlet temperatures: minimum 5°C
(40°F) and maximum 35°C (90°F).
c) Well ventilated location for air cooled
models. Clean the air cooled condenser at
frequent intervals.
d) Service access: adequate space must
be left for all service connections through the rear
of the ice maker. A minimum clearance of 15 cm
(6") must be left at the sides of the unit for routing
cooling air drawn into and exhausted out of the
compartment to maintain proper condensing
operation of air cooled models.
NOTE. With the unit in “built-in” conditions,
the ice production is gradually reduced in
respect to the levels shown in the graph, up
to a maximum of 10% at room temperatures
higher than 32°C.
The daily ice-making capacity is directly
related to the condenser air inlet temperature, water temperature and age of the machine.
5. Check that refrigerant lines do not rub
against or touch other lines or surfaces, and that
the fan blade moves freely.
6. Use clean damp cloth to wipe the surfaces
inside the storage bin and the outside of the
cabinet.
To keep your CUBER at peak performance
levels, periodic maintenance checks must
be carried out as indicated on Cleaning
Section of this manual.
2. Level the unit in both the left to right and
front to rear directions.
Page 2
D.
ELECTRICAL CONNECTIONS
See data plate for current requirements to
determine wire size to be used on electrical
connections. All icemakers require a solid earth
wire.
The ice machines are supplied from the factory
completely pre-wired and require only electrical
power connections to wire cord provided on the
back of the unit.
Make sure that the ice machine is connected to
its own circuit and individually fused (see data
plate for fuse size).
The maximum allowable voltage variation should
not exceed -10% and +10% of the data plate
rating. Low voltage can cause faulty functioning
and may be responsible for serious damage to
the overload switch and motor windings.
NOTE. All external wiring should conform to
national, state and local standards and
regulations.
Check voltage on the line and the ice maker’s
data plate before connecting the unit.
E.
WATER SUPPLY AND DRAIN
CONNECTIONS
fitting and a shut-off valve installed in an
accessible position between the water supply
line and the unit.
Water supply - Water cooled models
(65-90)
The water cooled versions of series 65 and 90
require two separate inlet water supplies, one for
the water sprayed for making the ice cubes and
the other for the water cooled condenser.
Connect the 3/4" male fitting of the water
regulating valve using the flexible hose supplied
with the unit to the cold water supply line with
regular plumbing fitting and a shut-off valve
installed in an accessible position between the
water supply line and the unit.
Water drain
The recommended drain tube is a plastic or
flexible tube with 18 mm (3/4") I.D. runs to an
open trapped and vented drain. When the drain
is a long run, allow 3 cm pitch per meter (1/4"
pitch per foot).
A vertical open vent, at the unit drain connection,
is also required for proper sump drainage.
General
When choosing the water supply for the ice cuber
consideration should be given to:
a) Length of run
b) Water clarity and purity
c) Adequate water supply pressure
Since water is the most important single ingredient
in producting ice you cannot emphasize too
much the three items listed above.
Low water pressure, below 1 bar may cause
malfunction of the ice maker unit.
Water containing excessive minerals will tend to
produce cloudy coloured ice cubes, plus scale
built-up on parts of the water system.
Water supply
Connect the 3/4" male fitting of the solenoid
water inlet valve, using the flexible hose supplied,
to the cold water supply line with regular plumbing
Water drain - Water cooled models
The water drain line from the condenser, on
water cooled versions, is internally connected
with the drain fitting of the unit.
It is strongly recommended therefore to install a
vertical open vent on unit drain line high point to
ensure good draining and to direct the drain line
to a trapped and vented floor drain receptacle.
This to make sure of the proper flow of the
drained water as, in case of poor drainage, the
water ranning out from the condenser may
inopportunely flow, through the unit drain tubing,
into the ice storage bin.
NOTE. The water supply and the water drain
must be installed to conform with the local
code. In some case a licensed plumber and/
or a plumbing permit is required.
Page 3
F.
FINAL CHECK LIST
1 bar (14 psi).
1. Is the unit in a room where ambient
temperatures are within a minimum of 10°C
(50°F) even in winter months?
2. Is there at least a 15 cm (6") clearance
around the unit for proper air circulation?
3.
8. Have the bin liner and cabinet been wiped
clean?
9. Has the owner/user been given the User
Manual and been instructed on the importance of
periodic maintenance checks?
Is the unit level? (IMPORTANT)
4. Have all the electrical and plumbing
connections been made, and is the water supply
shut-off valve open?
5. Has the voltage been tested and checked
against the data plate rating?
6. Has the water supply pressure been
checked to ensure a water pressure of at least
G.
7. Check all refrigerant lines and conduit lines
to guard against vibrations and possible failure.
10. Has the Manufacturer’s registration card
been filled in properly? Check for correct model
and serial number against the serial plate and
mail the registration card to the factory.
11. Has the owner been given the name and the
phone number of the authorized Service Agency
serving him?
INSTALLATION PRACTICE
1.
2.
3.
4.
5.
6.
7.
8.
9.
Hand shut-off valve
Water filter
Water supply line (flexible hose)
3/4" male fitting
Vented drain
Open trapped vented drain
Drain fitting
Main switch
Power line
WARNING. This icemaker is not designed for outdoor installation and will not function in
ambient temperatures below 10°C (50°F) or above 40°C (100°F).
This icemaker will malfunction with water temperatures below 5°C (40°F) or above 35°C
(90°F).
Page 4
OPERATING INSTRUCTIONS
START UP
After having correctly installed the ice maker and
completed the plumbing and electrical
connections, perform the following “Start-up” procedure.
18-21-31-40
A.
Remove the unit front panel and locate the
cleaning switch on the control box.
B.
Set the cleaning switch in the cleaning
position (II). This will close the electrical circuit to
the water inlet valve and to the hot gas valve.
C.
Switch ON the power line disconnect
switch. Unit will start up in water filling phase
mode.
During this phase the components energized
are:
WATER INLET SOLENOID VALVE
HOT GAS SOLENOID VALVE
The Water pump and the Fan motor are also in
operation.
D.
Let unit stay in water filling phase mode for
about three/four minutes till water is coming out
from the drain hose, then move the cleaning
switch to the operation position (I).
D.
Set the master switch to the ON position.
The compressor switch must stay in the OFF
position. This will close the electrical circuit to the
water inlet valve and to the hot gas valve.
E.
Switch ON the power line disconnect
switch. Unit will start up in defrost cycle mode.
During this cycle the components energized are:
WATER INLET SOLENOID VALVE
HOT GAS SOLENOID VALVE
TIMER MOTOR
F.
After completion of harvest cycle (about
three minutes) move the compressor switch to
ON position.
NOTE. During the defrost cycle, the water
inlet solenoid valve is energized. The water
flows through the valve to the back side of the
evaporator platen and then down to fill up the
icemaker sump tank for the next freezing
cycle.
OPERATIONAL CHECKS
A.
The unit now starts its first freezing cycle
with the following components in operation:
COMPRESSOR
WATER PUMP
50-65-90
A.
Remove the unit front panel and locate the
timer shaft on the control box.
B.
Check that master and the compressor
switch located on the lower left hand side of the
control box are both in the OFF position.
C.
Rotate the timer shaft protruding through
the front of the control box clockwise, until and
audible click is heard indicating that the actuator
arm of the microswitch has dropped into the cam
slot (Fig. A).
FAN MOTOR in air cooled version
B.
Check to see through the ice discharge
opening that the spray system is correctly seated
and that the water jets uniformely reach the
interior of the inverted cup molds; also make sure
that the plastic curtain is hanging freely and there
is not excessive water spilling through it.
C.
The ice making process takes place
thereby, with the water sprayed into the molds
that gets gradually refrigerated by the heat
exchanged with the refrigerant flowing into the
evaporator serpentine.
D.
On units 18-21-31-40 when the evaporator
temperature reaches a preset value the
evaporator thermostat or cube size control
changes its contacts; the freezing cycle ends and
starts the defrost or harvest cycle.
E.
On units 50-65-90 the time clock does not
rotate at the end of the harvest cycle. It starts
later when the cube size thermostat control bulb
(pig tail) located on the evaporator coil reaches a
temperature of approx. -15°C (5°F).
Page 5
Freezing time will range between 20 and 22
minutes in a 21°C ambient temperature, longer if
above this temperature and shorter if below. The
average complete cycle time is between 23 and
25 minutes.
It should, however, be remembered that if the
room temperature returns later to the 20 ÷ 30°C
range, the knob indicator must once again be
turned to point to the dot (see fig. below).
F.
Check, during the first defrost/harvest
cycle, that the incoming water flows correctly into
the sump reservoir in order to re-fill it and the
surplus overflows through the overflow drain tube.
G.
Check the texture of ice cubes just
released. Right size must have a small depression
(about 5-6 mm) in their crown.
If not, wait for the second defrost/harvest cycle
before performing any adjustment.
H.
If required on model 18, 21, 31 and 40, the
length of the freezing cycle can be modified by
turning the knob of the cube size control or
evaporator thermostat located in front of the
control box until the desired size is achieved.
• If the temperature of the room in
which the machine
is place is below
20°C, the cubes will
tend to be partly
hollowed out (see
fig. on right).
• If, on the other
hand, the room
temperature is
above 30 °C the
cubes produced
will have a jagged
rim of ice around
the crown.
If it is thought necessary, the above situations
can be rectified by, in the first case, turning the
control knob (as little or as much as is required)
clockwise and, in the second case, turning the
knob to the right counterclockwise.
If the ice cubes are shallow and cloudy, it is
possible that the ice maker runs short of water
during the end of the freezing cycle or, the quality
of the supplied water requires the use of an
appropriate water filter or conditioner.
I.
At the end of the defrost or harvest cycle
hold a handful of ice cubes against the bulb of the
storage bin thermostat; the icemaker switch OFF
in about one-two minutes.
Take out the ice from the storage bin thermostat.
The ice maker should restart automatically in
three-four minutes.
NOTE. The bin thermostat is factory set at
1°C (35°F) OUT and 4°C (39°F) IN.
K.
Re-fit the unit front panel then instruct the
owner/user on the general operation of the ice
machine and about the cleaning and care it
requires.
Page 6
PRINCIPLE OF OPERATION
How it works
In the ice makers the water used to make the ice
is kept constantly in circulation by a water pump
which primes it to the spray system nozzles from
where it is diverted into the inverted cup molds of
the evaporator (Fig. A).
A small quantity of the sprayed water freezes into
ice; the rest of it cascades by gravity into the
sump assembly below for recirculation.
FREEZING CYCLE (Fig. B)
The hot gas refrigerant discharged out from the
compressor reaches the condenser where, being
cooled down, condenses into liquid. Flowing into
the liquid line it passes through the drier/filter,
then it goes all the way through the capillary tube
where it looses its pressure.
Next the refrigerant enters into the evaporator
serpentine (which has a larger diameter then the
capillary tube) and starts to boil off; this reaction
is emphasized by the heat transferred by the
sprayed water.
The refrigerant then increases in volume and
changes entirely into vapor.
The vapor refrigerant then passes through the
suction accumulator (used to prevent that any
small amount of liquid refrigerant may reach the
compressor) and through the suction line. In both
the accumulator and the suction line it exchanges
heat with the refrigerant flowing into the capillary
tube (warmer), before to be sucked in the
compressor and to be recirculated as hot
compressed refrigerant gas.
The freezing cycle on18-21-31-40 is controlled
by only the evaporator thermostat which has its
bulb in contact with the evaporator serpentine
while in 50-65-90 there is an second phase
controlled by a timer.
The electrical components in operation during
the freezing cycle are:
COMPRESSOR
WATER PUMP
FAN MOTOR (in air cooled version)
On 18-21-31-40 air cooled versions the refrigerant
head pressure is gradually reduced from a value
of approx. 11 bars (155 psig) at the beginning of
the freezing cycle with the unit at 21°C (70°F)
ambient temperature, to a minimun value of
approx. 7 bars (100 psig) just at the end of the
freezing cycle few seconds before the starting of
the defrost cycle.
On 50-65-90 air cooled versions the refrigerant
head pressure is kept between two pre-set values
(10÷8,5 bar - 140÷120 psig) with the unit a 21°C
(70°F) ambient temperature.
The declining of the pressure is relied to the
reduction of the evaporating pressure, caused
by the progressive growth of the ice thickness
into the inverted cup molds and to the flow of air
drown through the air cooled condenser by the
fan motor. The above values are in relation as
well to the ambient temperature of the ice maker
site and they are subject to rise with the increase
of this temperature.
On 18-21-31-40-50 water cooled versions the
refrigerant head pressure ranges between 8.5
and 10 bars (120÷140 psig) being controlled by
an automatic hi pressure control that energizes a
water solenoid valve located on the water line to
the condenser, which rates the cooling water to
the condenser.
On 65-90 water cooled versions the head
pressure is constant at 9.5 bar (135 psig)
controlled by a water regulating valve.
At starting of freezing cycle the refrigerant suction
or lo-pressure lowers rapidly to 1.0 bar - 14 psig
then it declines gradually - in relation with the
growing of the ice thickness - to reach, at the end
of the cycle, approx. 0÷0.1 bar - 0÷1.5 psig on
the models 18, 21, 31 and 40 and 0.2÷0.3 bar
(3÷4 psig) on models 50, 65 and 90 with the
cubes fully formed in the cup molds.
The total length of the freezing cycle ranges from
23 to 25 minutes.
DEFROST OR HARVEST CYCLE (Fig. D)
On 18-21-31-40 the temperature of the evaporator
thermostat, in contact with the evaporator
serpentine, drops to a pre-set value it changes its
electrical contacts energizing the herebelow
shown components.
(On 50-65-90 when the timer microswitch drops
down into the lower portion of the cam it changes
its electrical contacts energizing the same
components).
COMPRESSOR
WATER INLET SOLENOID VALVE
HOT GAS SOLENOID VALVE
The incoming water, passing through the water
inlet valve and the flow control, runs over the
evaporator platen and then flows by gravity
through the dribbler holes down into the sump/
reservoir (Fig. C).
The water filling the sump/reservoir forces part of
the surplus water from the previous freezing
cycle to go out to the waste through the overflow
pipe. This overflow limits the level of the sump
water which will be used to produce the next
batch of ice cubes.
Meanwhile the refrigerant, as hot gas discharged
from the compressor, flows through the hot gas
valve directly into the evaporator serpentine bypassing the condenser.
The hot gas circulating into the serpentine of the
evaporator warms up the copper molds causing
the harvest of the ice cubes. The ice cubes,
released from the cups, drop by gravity onto a
slanted cube chute, then through a curtained
opening they fall into the storage bin.
Page 7
On 18-21-31-40 when the temperature of the
evaporator thermostat bulb reaches the value of
+3÷4°C their electrical contacts move back to the
previous position activating a new freezing cycle
and deenergizing both the hot gas and the water
inlet valves (closed).
On 50-65-90 as soon as the timer microswitch
completes the bottom part of the cam and it is
pushed again, it activates a new freezing cycle
deenergizing both the hot gas and the water inlet
valves (closed).
NOTE. On models 18, 21, 31 and 40 the
length of the defrost/harvest cycle (not
adjustable) changes according to the
ambient temperature (shorter for hi ambient
temperature and longer for low one).
COMPONENTS DESCRIPTION
A. WATER PUMP
The water pump operates continually throughout
the freezing cycle. The pump primes the water
from the sump to the spray system and through
the spray nozzles sprays it into the inverted cup
molds to be frozen into crystal clear ice cubes.
B.
WATER INLET SOLENOID VALVE 3/4 MALE FITTING
The water inlet solenoid valve is energized only
during the defrost cycle.
When energized it allows a metered amount of
incoming water to flow over the evaporator cavity
to assist the hot gas in defrosting the ice cubes.
The water running over the evaporator cavity
drops by gravity, through the dribbler holes of the
platen, into the sump reservoir.
On 18-21-31-40-50 water cooled versions the
water inlet solenoid valve has one inlet and two
outlets with two separate solenoids energized
the first (ice productioon) by the contacts 3-2 of
the evaporator thermostat and the second (water
cooled condenser) by a specific hi pressure
control.
C. HOT GAS SOLENOID VALVE
The hot gas solenoid valve consists basically in
two parts: the valve body and the valve coil.
During the defrost cycle the hot gas valve coil is
activated so to attract the hot gas valve piston in
order to give way to the hot gas discharged from
compressor to flow directly into the evaporator
serpentine to defrost the formed ice cubes.
D. BIN THERMOSTAT
The bin thermostat control body is located in the
front of control box behind the front panel.
The thermostat sensing tube is located into a
bulb holder on the side wall of the ice storage bin
where it automatically shuts the icemaker OFF
when in contact with the ice and re-starts the
icemaker when the ice is removed. Factory
settings are 1°C (35°F) OUT and 4°C (39°F) IN.
E.
CUBE SIZE CONTROL (EVAPORATOR
THERMOSTAT)
18-21-31-40
The cube size control (evaporator thermostat)
body is located in the control box behind the front
panel; it’s basically a reverse acting temperature
control which closes the contacts 3-2 when its
temperature decreases and closes the opposite
contacts 3-4 when the temperature rises.
The thermostat sensing bulb is located into a
plastic tube (bulb holder) secured by two clips
directly to the evaporator serpentine.
This control determines the length of the freezing
cycle and correspondingly the size of the cubes.
A lower setting will produce a larger cube
(oversize) while a higher setting a smaller cuber
(shallow size).
When closed on contacts 3-2 it activates the
defrost or harvest cycle components.
The cube size control is set up in the factory
(knob in the black dot position) and doesn't
require any adjustment when the ambient
temperature remains between 20 and 30°C
(70 and 90°F).
50-65-90
The evaporator thermostat with its sensing bulb
intimately in contact with the regrigerant outlet
tube from the evaporator senses the evaporating
refrigerant temperature (which declines in the
course of the freezing cycle) and when this one
reaches the pre-set value, it switches its contacts
from 3-4 to 3-2 to activate the finishing cycle (2nd
phase) which has a pre-set extension determined
by the large diameter lobe of the timer cam.
F. FAN MOTOR (Air cooled version)
The fan motor on 18-21-31-40 is electrically
connected in parallel to the water pump and it
operates continuously only during the freezing
cycle keeping the proper head pressure by
circulating air through the condenser fins.
On 50-65-95 the operation of fan motor is
controlled by a fan pressure control adjusted at
preset values.
G. COMPRESSOR
The hermetic compressor is the heart of the
refrigerant system and it is used to circulate and
retrieve the refrigerant throughout the entire
system. It compresses the low pressure
refrigerant vapor causing its temperature to rise
and become high pressure hot vapor (hot gas)
which is then released through the discharge
valve.
H. WATER SPRAY SYSTEM
Through its nozzles it sprays the water in each
individual cup to be frozen into ice.
I.
SAFETY HI TEMPERATURE THERMOSTAT
Located in the control box it is a manual reset
switch that trips OFF the operation of the machine
when its bulb (located on the liquid line just
before the drier) reaches the temperature of
70°C (158°F).
Page 8
J. CLEANING SWITCH (only 18-21-31-40)
Located on the bottom left side of the control box
is used to energize the water inlet and the hot gas
valves so to charge the water into the sump tank
of the machine.
K.
HI PRESSURE CONTROL (Water cooled
version)
Used only on 18-21-31-40-50 water cooled
versions it operates to keep between 8.5 and 10
bars (120 ÷ 140 psig) the hi-side or discharge
pressure of the refrigerant system by energizing
the coil of the water inlet solenoid valve that
control the cooling water flow to the condenser.
L.
TIMER (only 50-65-90)
Equipped with two microswitches which plungers
ride one timer cam, the timer is located inside the
control box.
The function of the timer begins when activated
by the cube size control (evap. thermostat).
The large diameter lobe of its cam determines
the length of the 2nd portion of the freezing cycle,
while the cam small diameter lobe, determines
the time cycle for the harvest sequence.
The timer cam can be adjusted to vary the defrost
time as required.
WARNING. Never set the defrost time for
longer than 4 minutes as this will
jeopardize the compressor motor
windings.
It goes without saying that an extension of the
defrost period will directly reduce the timed portion
of the freezing cycle and viceversa.
Consequently any variation made at the timer
cam setting requires a compensation adjustment,
very fine and very accurate, of the evaporator
thermostat.
M.
MASTER SWITCH (only 50-65-90)
Fitted in the control box the master switch has to
be used to start-up and to stop the ice maker
operation.
N.
COMPRESSOR SWITCH (only 50-65-90)
Located in the control box is used to de-energized
the compressor during the cleaning.
O.
FAN PRESSURE CONTROL
(only 50-65-90)
Used on air cooled ice makers to maintain the
head pressure within the preset values.
P.
WATER REGULATING VALVE
(only 65-90 Water cooled version only)
This valve controls the head pressure in the
refrigerant system by regulating the flow of water
going to the condenser.
As pressure increases, the water regulating valve opens to increase the flow of cooling water.
Q.
CONTACTOR (65-90 only)
It operates in order to close or open the electrical
circuit to the compressor.
Page 9
MAINTENANCE AND CLEANING INSTRUCTIONS
CLEANING INSTRUCTIONS OF WATER
SYSTEM
1. Remove the front and top panels to gain
access either to the control box and to the
evaporator.
2. Make sure that all ice cubes have been
released from their cups, then switch OFF the
machine at main power switch, on models 18-2131-40, and on compressor and master switches
on models 50-65-90.
3. Scoop out all the ice cubes stored into the
bin in order to prevent them from being
contaminated with the cleaning solution.
4. On 18-21-31 remove the plastic cup located
on the bottom of sump/freezing chamber to drain
out all water and scale deposits.
Allow the ice maker to operate for about 20
minutes. Then turn the cleaning toggle switch to
the "cleaning" position (II) till the release of the
ice cubes from their cups.
NOTE. The amount Cleaner and the time
needed for the cleaning of water system
depends of the water conditions.
2. Turn the cube size control knob
counterclockwise to the OFF position to shut-off
the ice maker then flush out the cleaning solution
from the sump reservoir then pour onto the
evaporator cavity two or three liters of clean
potable water to rinse the mold cups and the
platen.
3. If necessary remove the water spray platen
to clean it separately.
5. Remove the curtain then, using a bottle,
poor fresh water into the bottom of the sump/
freezing chamber to clean out any possible scale
deposit.
6. Install again the curtain as well as the
bottom plastic cup.
7. On all other models, flush out the water from
the sump reservoir by removing the overflow
stand pipe.
8. Prepare the cleaning solution by diluting in
a plastic container one or two liters of warm water
(45°-50°C) with a 0,1-0,2 liters of Ice Machine
Cleaner (on 18-21-31-40) and 0,2-0,3 liters on
50-65-90.
WARNING. The Ice Machine Cleaner
contains Phosphoric and Hydroxyacetic
acids.
These compounds are corrosive and may
cause burns if swallowed, DO NOT induce vomiting. Give large amounts of water
or milk. Call Physician immediately.
In case of external contact flush with
water. KEEP OUT OF THE REACH OF
CHILDREN.
9. Remove the evaporator cover then slowly
pour onto the evaporator platen the cleaning
solution. With the help of a brush dissolve the
most resistant and remote scale deposits in the
platen.
18-21-31-40
1. On 18-21-31-40 switch ON again the
machine at main power switch to start the
icemaking process.
4. Turn again the cube size control knob to the
normal operating position (black dot). The water
pump is again in operation to circulate the water
in order to rinse the entire water system.
Do the operation as per steps 8 and 9 twice so to
be sure no more traces of descaling solution
remains into the sump.
Pour on the upper side of the evaporator platen
fresh water with a capfull of disinfectant solution
then turn again the machine in normal operating
mode so to sanitize all the water system for
approx. 10 minutes.
NOTE. Do not mix descaling with disinfectant
solution to avoid the generation of a very
aggressive acid.
5. Flush out the disinfectant solution from the
sump reservoir then with the switch in "cleaning"
position, turn the cube size control knob to the
normal operating position.
When water starts overflowing through the
drain line, set the switch to "operation" position.
The unit is now ready to resume normal
operation.
Page 10
50-65-90
1. On 50-65-90 slowly rotate the clock knob
clockwise with the aid of a screwdriver until the
microswitch actuator arm is at the start position of
the freezing cycle.
8. Pour on the upper side of the evaporator
platen fresh water with a capfull of disinfectant
solution then put again the master switch in ON
position so to sanitize all the water system for
approx. 10 minutes.
NOTE. Do not mix descaling with
disinfectant solution to avoid the generation
of a very aggressive acid.
Immediately set the master switch to the ON
position. Leave the compressor switch in the
OFF position.
2. Allow the system to operate for about 20
minutes into the freezing cycle. No ice will be
produced because the compressor is not in
operation.
3. At the end of this period set the master
switch to the OFF position to shut off the icemaker.
4. Remove the overflow drain tube from its
seat to drain out all the cleaning solution and
most of the mineral concentration through the
drain tube and then replace it in its seat.
5. Pour onto the evaporator cavity two or three
liters of clean potable water to rinse the mold
cups and the platen.
6. If necessary remove the water spray platen
to clean it separately.
7. Set again the master switch in ON position.
The water pump is again in operation to circulate
the water in order to rinse the entire water
system.
9. Flush out the disinfectant solution from
the sump reservoir.
Slowly rotate the time clock knob clockwise
until the microswitch actuator arm is in the
START position of the harvest cycle and then
set the master switch to the ON position. Let
the unit run normally through this part of the
cycle. When the defrost has been completed
rotate the time clock knob manually until the
defrost cycle starts again. Do this two times.
Once the water reservoir is properly filled up,
set the compressor switch to the ON position.
The unit is now ready to resume the normal
operation.
10. Place again the evaporator cover and the
unit service panels.
11. Place again the evaporator cover and the
unit service panels.
12. At completion of the freezing and harvest
cycle make sure of proper texture and clearness
of the ice cubes and that, they do not have any
acid taste.
ATTENTION. In case the ice cubes are
cloudy-white and have an acid taste, melt
them immediately by pouring on them
some warm water. This to prevent that
somebody could use them.
13. Wipe clean and rinse the inner surfaces of
the storage bin.
REMEMBER. To prevent the accumulation
of undesirable bacteria it is necessary to
sanitize the interior of the storage bin with an
anti-algae disinfectant solution every week.
Pagina 11
INFORMAZIONI GENERALI
ED INSTALLAZIONE
5. Controllare che le tubazioni del circuito
refrigerante non tocchino altre tubazioni o superfici, e che il ventilatore giri liberamente.
A.
6. Usando un panno pulito e umido, pulire le
pareti interne del contenitore del ghiaccio e le
superfici esterne dell’apparecchio.
INTRODUZIONE
I fabbricatori di ghiaccio in cubetti sono stati
progettati e costruiti con un elevato standard
qualitativo.
Essi vengono collaudati interamente per diverse
ore e sono in grado di assicurare il massimo
rendimento relativamente ad ogni particolare
uso e situazione.
NOTA. Per non compromettere o ridurre le
caratteristiche di qualità e sicurezza di questo fabbricatore di ghiaccio si raccomanda,
nell’effettuare l’installazione e le operazioni
periodiche di manutenzione, di attenersi scrupolosamente a quanto prescritto in questo
manuale.
B.
DISIMBALLAGGIO ED ISPEZIONE
1. Ispezionare visivamente l’imballo esterno
in cartone e il basamento in legno usati per la
spedizione. Qualsiasi danno evidente sull’imballo esterno deve essere riferito allo spedizioniere;
in questo caso, procedere ad ispezionare l’apparecchio con il rappresentante dello spedizioniere
presente.
2. a) Tagliare e rimuovere i nastri in plastica
che mantengono sigillato l’imballo di cartone.
b) Aprire la parte superiore dell’imballo e
togliere i fogli e gli angolari protettivi di polistirolo.
c) Sollevare l’intero cartone sfilandolo dall’apparecchio.
3. Togliere il pannello frontale ed il pannello
posteriore dell’apparecchio ed ispezionare lo
stesso onde accertare se abbia subito danni.
Notificare allo spedizioniere eventuali danni subiti come riportato al punto 1.
4. Aprire lo sportello e togliere tutti i supporti
interni usati per la spedizione e i nastri adesivi di
protezione.
7. Osservare i dati riportati sulla targhetta
fissata alla parte posteriore del telaio vicino ai
raccordi idraulici ed elettrici, e verificare che il
voltaggio della rete elettrica disponibile corrisponda a quello riportato sulla targhetta dell’apparecchio.
ATTENZIONE. Un errato voltaggio dell’alimentazione elettrica annullerà automaticamente il vostro diritto alla garanzia.
8. Compilare la cartolina di garanzia posta
all’interno del Manuale d’Uso, segnando sia il
modello che il numero di serie dell’apparecchio
rilevandolo dalla targhetta fissata al telaio.
Spedire la cartolina debitamente compilata al
costruttore.
C.
POSIZIONAMENTO E LIVELLAMENTO
ATTENZIONE. Questo fabbricatore di
ghiaccio è stato progettato per essere
installato all’interno di locali in cui la
temperatura ambiente non scenda mai al
di sotto di 10°C ne superi i 40°C.
Periodi prolungati di funzionamento a temperature al di fuori dei seguenti limiti
costituiscono cattivo uso secondo i termini di garanzia e fanno decadere automaticamente il vostro diritto alla garanzia.
1. Posizionare l’apparecchio nel luogo di installazione definitivo.
I criteri per la sua scelta sono:
a) Minima temperatura ambiente 10°C e
massima temperatura ambiente 40°C.
b) Temperature dell’acqua di alimentazione: minima 5°C massima 35°C.
c) Luogo ben aerato per assicurare un
efficace ventilazione all’apparecchio e quindi un
corretto funzionamento del condensatore.
d) Spazio adeguato per i collegamenti di
servizio previsti nella parte posteriore dell’apparecchio. Lasciare almeno 15 cm di spazio attorno
all’unità così da permettere una corretta ed efficace circolazione d’aria soprattutto nei modelli
raffreddati ad aria.
Pagina 12
2. Livellare l’apparecchio in entrambe le direzioni, dall’anteriore alla posteriore e da sinistra a
destra mediante i piedini.
NOTA. Questo fabbricatore di ghiaccio incorpora dei componenti delicati e di massima precisione pertanto bisogna evitargli urti
e scossoni violenti.
D.
COLLEGAMENTI ELETTRICI
Osservare la targhetta dell’apparecchio così da
determinare, in funzione dell’amperaggio indicato, tipo e sezione del cavo elettrico da usarsi.
Tutti gli apparecchi sono muniti di un cavo di
alimentazione elettrica per cui si richiede un
collegamento dello stesso ad una linea elettrica
provvista di cavo di messa a terra e che faccia
capo ad un proprio interruttore magneto-termico
munito di fusibili adeguati, come indicato nella
targhetta di ogni singolo apparecchio.
La variazione massima di voltaggio consentita
non deve eccedere il 10% del valore di targa o
essere inferiore al 10% dello stesso. Un basso
voltaggio può causare un funzionamento anomalo e può essere la causa di seri danni alle
protezioni ed agli avvolgimenti elettrici.
NOTA. Tutti i collegamenti esterni devono
essere fatti a regola d’arte in conformità con
quanto stabilito dalle norme locali da parte di
personale qualificato.
Prima di collegare il fabbricatore di ghiaccio alla
linea elettrica accertarsi ancora una volta che il
voltaggio dell’apparecchio, specificato sulla
targhetta, corrisponda al voltaggio misurato.
E.
ALIMENTAZIONE IDRAULICA E
SCARICO
Premessa
Nella scelta dell’alimentazione idraulica al
fabbricatore di ghiaccio a cubetti si deve tenere
presente:
a) Lunghezza della tubazione
b) Limpidezza e purezza dell’acqua
c) Adeguata pressione dell’acqua di alimentazione
Una bassa pressione dell’acqua di alimentazione, inferiore ad 1 bar, può causare dei disturbi di
funzionamento dell’apparecchio. L’uso di acque
contenenti una quantità eccessiva di minerali
darà luogo ad una produzione di cubetti di ghiaccio opachi e ad una notevole incrostazione delle
parti interne del circuito idraulico.
Alimentazione idraulica
Collegare il raccordo da 3/4 di pollice maschio
della valvola solenoide di ingresso acqua alla
linea di alimentazione idrica utilizzando il tubo in
plastica rinforzato del tipo alimentare atossico
fornito.
La linea di alimentazione idraulica deve essere
munita di un rubinetto di intercettazione posto in
un luogo accessibile nei pressi dell’apparecchio.
Alimentazione idraulica - Modelli raffreddati
ad acqua
Nei modelli raffreddati ad acqua la valvola di
ingresso acqua è dotata di due raccordi di uscita
uno collegato al condensatore, il secondo per la
produzione del ghiaccio.
Scarico acqua
Usare, come tubo di scarico, il tubo in plastica
rigida spiralato avente diametro interno di 18 mm.
fornito in dotazione
Lo scarico dell’acqua in eccesso avviene per
gravità; per avere un regolare deflusso è indispensabile che lo scarico disponga di una presa
d’aria e vada in un sifone aperto.
Scarico acqua - Modelli raffreddati ad acqua
Lo scarico dal condensatore, nei modelli raffreddati ad acqua, è raccordato internamente allo
scarico dell’apparecchio.
Prestare particolare attenzione a raccordare
correttamente lo scarico dell’apparecchio al sifone aperto del locale in quanto l’acqua scaricata
dal condensatore, qualora lo scarico non fosse
correttamente realizzato (pendenza inadeguata,
strozzature, ecc.) potrebbe ritornare all’interno
del contenitore del ghiaccio.
NOTA. Tutti i collegamenti idraulici devono
essere eseguiti a regola d’arte in conformità
con le norme locali. In alcuni casi è richiesto
l’intervento di un idraulico patentato.
Pagina 13
F.
CONTROLLO FINALE
1. L’apparecchio è stato installato in un locale
dove la temperatura ambiente è di almeno 10°C
anche durante i mesi invernali?
refrigerante e del circuito idraulico verificando se
esistono vibrazioni o sfregamenti. Controllare
inoltre che le fascette stringitubo siano ben serrate e che i cavetti elettrici siano fermamente
collegati.
2. Ci sono almeno 15 cm di spazio dietro ed ai
lati dell’apparecchio onde avere una efficace
ventilazione del condensatore?
8. Sono stati controllati i bulloni di ancoraggio
del compressore? Permettono a questi di oscillare sui propri supporti?
3. L’apparecchio è ben livellato? (IMPORTANTE)
9. Le pareti interne del contenitore del ghiaccio e le pareti esterne dell’apparecchio sono
state pulite?
4. L’apparecchio è stato collegato alla linea di
alimentazione elettrica? É stato eseguito il collegamento alle tubazioni dell’acqua di alimentazione e di scarico?
5. É stato controllato il voltaggio della linea di
alimentazione elettrica? Corrisponde al voltaggio specificato sulla targhetta dell’apparecchio?
6. É stata controllata la pressione dell’acqua
di alimentazione in modo da assicurare all’apparecchio una pressione di ingresso di almeno 1
bar?
7.
Controllare tutte le tubazioni del circuito
G.
10. É stato consegnato il libretto di istruzione e
sono state date al proprietario le istruzioni necessarie per il funzionamento e la manutenzione
periodica dell’apparecchio?
11. La cartolina di garanzia è stata compilata?
Controllare il numero di serie ed il modello sulla
targhetta dell’apparecchio, quindi spedirla al
costruttore.
12. É stato dato al proprietario il nome ed il
numero telefonico del servizio di assistenza tecnica autorizzato della zona?
SCHEMA DI INSTALLAZIONE
1.
2.
3.
4.
5.
6.
7.
8.
9.
Rubinetto di intercettazione
Filtro acqua
Linea di alimentazione idraulica
Raccordo da 3/4 di pollice
Scarico ventilato
Scarico acqua con sifone ventilato
Raccordo di scarico
Interruttore principale
Linea elettrica
ATTENZIONE. Questo fabbricatore di ghiaccio non è stato progettato per essere installato
all’aperto o per funzionare a delle temperature ambienti inferiori a 10°C o superiori a 40°C.
Lo stesso vale per la temperatura dell’acqua di alimentazione che non deve essere inferiore
a 5°C o superiore a 35°C.
Pagina 14
ISTRUZIONI DI
FUNZIONAMENTO
ne il compressore tramite il relativo interruttore
(posizione ON).
B
CICLO DI
SBRINAMENTO
AVVIAMENTO
Dopo aver correttamente installato l'apparecchio ed averlo collegato alla rete elettrica ed
idraulica, seguire la seguente procedura per
l'avviamento.
CICLO DI
CONGELAMENTO
CAMMA CON LE INDICAZIONI DEL CICLO
DI CONGELAMENTO E SBRINAMENTO
18-21-31-40
1. Togliere dal fabbricatore di ghiaccio il pannello frontale e localizzare l'interruttore di lavaggio.
2. Spostare l'interruttore di lavaggio sulla posizione "Lava - II". Questo chiude il circuito
elettrico della valvola di ingresso dell'acqua e
della valvola gas caldo.
3. Spostare, a questo punto, l'interruttore posto sulla linea di alimentazione elettrica sulla
posizione ON (acceso). L'apparecchio partirà
nella fase di caricamento acqua con i seguenti
componenti in funzione:
VALVOLA INGRESSO ACQUA
VALVOLA GAS CALDO
Sono in funzione anche la Pompa ed il
Motoventilatore.
4. Lasciare funzionare la macchina nella fase
di caricamento acqua per circa tre - quattro
minuti fino ad avere dell'acqua allo scarico dell'apparecchio. Quindi spostare l'interruttore di
lavaggio sulla posizione "Funziona - I".
50-65-90
1. Togliere dal fabbricatore di ghiaccio il pannello frontale e localizzare la scatola elettrica.
2. Controllare che l'interruttore principale e
l'interruttore del compressore posti nella scatola
elettrica siano sulla posizione OFF (spento).
3. Ruotare il gambo del timer (fig. B) che
sporge dalla scatola elettrica, in senso orario
finchè si udirà un click; ciò indicherà che il
microinterruttore del timer è scattato nella parte
bassa della camma, parte che corrisponde al
ciclo di sbrinamento.
4. Mettere in funzione l'apparecchio all'interruttore principale (posizione ON). L'interruttore
del compressore deve rimanere sulla posizione
OFF.
5.
Ripetere quanto descritto al punto 3.
6. Dopo il completamento del secondo ciclo di
sbrinamento (circa tre minuti) mettere in funzio-
NOTA. Durante la fase di sbrinamento l'acqua entra nell'apparecchio, attraverso la valvola solenoide di ingresso dell'acqua, eccitata durante questa parte del ciclo, e attraverso
l'apposita tubazione è indirizzata sulla parte
superiore dell'evaporatore. Dopo aver coperto l'intera superficie di plastica
dell'evaporatore, l'acqua viene scaricata, attraverso tre fori di drenaggio, nella vaschetta
di raccolta, riempiendola.
CONTROLLI DURANTE FUNZIONAMENTO
A. L'apparecchio inizia così il suo primo ciclo
di congelamento con i seguenti componenti in
funzione:
COMPRESSORE
POMPA
MOTOVENTILATORE per i modelli raffreddati
ad aria.
B. Osservare attraverso l’apertura di scarico
dei cubetti che la piastra spruzzante sia correttamente posizionata e che l’acqua venga uniformemente spruzzata all’interno dei bicchierini
rovesciati dell’evaporatore.
Verificare che la tendina di plastica sia posizionata correttamente impedendo la fuoriuscita
dell’acqua attraverso le proprie lamelle.
C. Il processo di fabbricazione del ghiaccio ha
così inizio con l’acqua che viene continuamente
spruzzata all’interno dei bicchierini rovesciati e
con la temperatura dell’evaporatore che gradualmente si abbassa.
D. Nei modelli 18-21-31-40 quando la temperatura dell'evaporatore raggiunge un valore
predeterminato il termostato evaporatore commuta i suoi contatti dando luogo alla fine del ciclo
di congelamento ed all'inizio del ciclo di
scongelamento.
E. Nei modelli 50-65-90 all'inizio del ciclo di
congelamento il termostato evaporatore è la
"mente" che regola la durata della prima fase del
ciclo di congelamento. Come si raggiunge la sua
temperatura di intervento, questi inverte i suoi
contatti chiudendo il circuito al motorino del timer
attraverso i contatti normalmente aperti del
microinterruttore.
Pagina 15
Il ciclo di congelamento prosegue per altri 12
minuti finchè il microinterruttore raggiunge la
parte bassa della camma.
A questo punto il microinterruttore del timer inverte i suoi contatti diseccitando così la bobina
dei relé di comando per i tre minuti corrispondenti
al ciclo di sbrinamento o di caduta dei cubetti.
Con la bobina del relé di comando diseccitata i tre
contatti del medesimo assumono la posizione
opposta chiudendo il circuito del motorino del
timer per i tre minuti corrispondenti ed il circuito
della bobina della valvola di ingresso acqua e
della valvola del gas caldo. La camma del timer
continua a girare fino ad azionare il pulsante del
microinterruttore facendo così iniziare un nuovo
ciclo di congelamento.
Il microinterruttore del timer ha un contatto normalmente aperto ed un contatto normalmente
chiuso che rappresentano rispettivamente la fase
di congelamento e la fase di sbrinamento.
L'azione della camme apre i contatti normalmente aperti e chiude i contatti normalmente chiusi; il
motore del timer continua ad operare attraverso
i contatti del relé di comando e i contatti normalmente chiusi del microinterruttore.
F
Verificare che durante la fase di
scongelamento l’acqua di alimentazione vada a
reintegrare quella precedentemente usata per la
produzione dei cubetti e che quella eccedente
trabocchi nel tubo di troppo pieno e fluisca nella
tubazione di scarico dell’apparecchio.
G. Osservare i cubetti di ghiaccio prodotti.
Questi devono essere della giusta dimensione
con una cavità nella parte della corona di circa
4-5 mm.
Nel caso contrario, attendere il secondo ciclo di
produzione del ghiaccio, prima di effettuare qualsiasi regolazione.
H. Se necessario, nei modelli 18, 21, 31 e 40 la
durata del ciclo di congelamento può essere
modificata ruotando la manopola del termostato
evaporatore posta nella scatola elettrica fino al
raggiungimento della dimensione ottimale.
• Se la temperatura del locale in cui
è posto l'apparecchio è inferiore a
20°C, i cubetti prodotti possono avere un incavo pronunciato al loro intervento (Vedi figura a lato).
• Se invece la temperatura ambiente
sarà superiore a
30°C i cubetti prodotti tenderanno
ad avere delle
frastagliature di
ghiaccio attorno
alla corona.
Chi lo ritenesse necessario, può migliorare le
sopra illustrate situazioni di cubetti ruotando nel
primo caso in senso orario il volantino di comando e, nel secondo caso, in senso antiorario.
Occorre però tener presente che, qualora la temperatura ambiente rientrasse entro i 20 ÷ 30°C,
l'indicatore del volantino andrà riportato in corrispondenza del punto di riferimento (Vedi illustrazione sotto).
Controllare l'aspetto dei cubetti di ghiaccio prodotti: cubetti aventi delle corrette dimensioni
esterne ma particolarmente opachi, indicano che
il fabbricatore di ghiaccio ha avuto una mancanza d'acqua durante la fase finale del ciclo di
congelamento o che, l'acqua usata per la produzione del ghiaccio è di pessima qualità e quindi
si rende necessario l'uso di filtri adeguati o di un
condizionatore d'acqua.
I.
Durante il ciclo di sbrinamento, coprire con
una manciata di cubetti il bulbo sensibile del
termostato contenitore e verificare lo spegnimento dell'apparecchio dopo circa due o tre
minuti. Togliere la manciata di cubetti dal bulbo
sensibile e controllare che l'apparecchio si rimetta in moto in circa tre o quattro minuti.
NOTA. Il termostato contenitore é tarato per
spegnere la macchina a +1°C e riaccenderla
a +4°C.
K. Rimontare i pannelli precedentemente rimossi quindi istruire il proprietario sul funzionamento del fabbricatore di ghiaccio così come
sulle operazioni di pulizia ed igienizzazione del
medesimo.
Pagina 16
PRINCIPIO DI
FUNZIONAMENTO
Nei fabbricatori di ghiaccio l’acqua usata per la
produzione del ghiaccio è tenuta costantemente
in movimento da una pompa elettrica che attraverso un sistema spruzzante dirige l’acqua a
pressione moderata all’interno dei bicchierini
rovesciati dell’evaporatore.
Qui una parte dell’acqua spruzzata ghiaccia all’istante; il rimanente di essa ricade nel sottostante
serbatoio di recupero per essere ricircolata.
CICLO DI CONGELAMENTO
Il refrigerante allo stato gassoso ed ad alta
temperatura viene pompato dal compressore e,
passando poi attraverso il condensatore, si trasforma in refrigerante allo stato liquido.
La linea del liquido permette al refrigerante di
fluire dal condensatore al tubo capillare attraverso il filtro deumidificatore. Durante il passaggio
attraverso il tubo capillare il refrigerante allo
stato liquido perde gradualmente parte della sua
pressione e conseguentemente parte della sua
temperatura. Successivamente raggiunge ed
entra nella serpentina dell’evaporatore.
L’acqua spruzzata nei bicchierini rovesciati
dell’evaporatore cede calore al refrigerante circolante all’interno della serpentina, causandone
l’evaporazione, ed il conseguente cambiamento
del suo stato fisico, cioè da liquido diviene vapore. Il refrigerante allo stato vaporoso dopo essere passato attraverso l’accumulatore viene aspirato nuovamente nel compressore tramite la
linea di aspirazione.
Nei modelli 18-21-31-40 il ciclo di congelamento
è regolato solo da un controllo della temperatura
(termostato evaporatore) che determina la durata del ciclo e di conseguenza la dimensione dei
cubetti; nei modelli 50-65-90 esiste una seconda
fase del ciclo di congelamento controllato da un
timer.
I componenti in funzione durante il ciclo di
congelamento sono:
IL COMPRESSORE
LA POMPA
IL VENTILATORE (nei modelli raffreddati ad aria)
Nei modelli 18-21-31-40 raffreddati ad aria la
pressione di mandata del sistema refrigerante
(alta pressione) cala progressivamente da un
valore di circa 11 bar (con temperatura ambiente
di 21°C), che si riscontra all’inizio del ciclo di
congelamento, fino ad un valore minimo di 7 bar
proprio alla fine del ciclo di congelamento.
Nei modelli 50-65-90 la pressione di mandata è
controllata da un pressostato ventilatore tra
10-8.5 bar. Questi valori sono influenzati della
temperatura dell’ambiente in cui è installato l’apparecchio e aumentano proporzionalmente con
l’aumentare di quest’ultima.
Nei modelli 18-21-31-40-50 raffreddati ad acqua
le pressioni di mandata del sistema refrigerante
sono mantenute tra due valori prestabiliti
(8.5 - 10 bar) tramite l’azione di un pressostato
automatico che comanda elettricamente una
valvola solenoide di ingresso acqua posta sulla
linea di alimentazione al condensatore.
Nei modelli 65-90 raffreddati ad acqua la pressione di mandata é mantenuta a 9.5 bar tramite
l'ausilio di una valvola pressostatica.
Con apparecchi installati in condizioni normali
(21°C ambiente) la pressione di aspirazione o
bassa pressione scende rapidamente a 1 bar
all’inizio del ciclo di congelamento, cioè quando
il cubetto di ghiaccio inizia a formarsi, declinando
lentamente a circa a 0÷0.1 bar allorché il cubetto
di ghiaccio è completamente formato.
CICLO DI SCONGELAMENTO O
SBRINAMENTO
Nei modelli 18-21-31-40 al momento in cui il
termostato evaporatore sente la temperatura
corrispondente ai cubetti di ghiaccio di dimensione piena, i contatti dello stesso cambiano posizione attivando il ciclo di sbrinamento.
Nei modelli 50-65-90 come il microinterruttore
cade nella parte bassa della camme del timer
avrà inizio il ciclo di sbrinamento.
I componenti in funzione sono:
COMPRESSORE
VALVOLA DI INGRESSO ACQUA
VALVOLA DEL GAS CALDO
L’acqua in immissione passa attraverso la valvola solenoide di ingresso ed il controllo di flusso
che è posto all’interno della medesima, arriva
sulla parte superiore dell’evaporatore da dove
cola, attraverso i fori di drenaggio, nel sottostante
serbatoio di pescaggio della pompa. Il livello
massimo dell’acqua nel serbatoio è limitato da
un tubo di troppo pieno che ha la funzione di
indirizzare verso lo scarico l’acqua in eccesso.
Il refrigerante allo stato gassoso, pompato dal
compressore, viene ora dirottato dalla valvola
del gas caldo aperta direttamente alla serpentina
dell’evaporatore, seguendo il percorso più diretto
cioè, non passando attraverso il condensatore.
Il gas caldo circolante all’interno della serpentina
dell’evaporatore, fa aumentare la temperatura
dei bicchierini causando quindi lo stacco dai
medesimi dei cubetti di ghiaccio.
I cubetti che si staccano cadono sopra un piano
inclinato da dove scivolano attraverso l’apertura
con tendina a lamelle, per cadere all’interno del
contenitore del ghiaccio.
Grazie al fluire del gas caldo nella serpentina
dell'evaporatore, la temperatura dello stesso sale
e conseguentemente sale anche la temperatura
del bulbo sensibile del termostato evaporatore il
quale cambia i suoi contatti e, di conseguenza
nei modelli 18-21-31-40 disattiverà la bobina
della valvola gas caldo e della valvola di ingresso
acqua ed attiverà la pompa di circolazione dell'acqua e il ventilatore iniziando così un nuovo
ciclo di congelamento.
Nei modelli 50-65-90 tali contatti attiveranno il
timer utile al completamento del ciclo di sbrinamento (parte bassa della camma) dopodiché
avrà inizio un nuovo ciclo di congelamento (parte
alta della camma).
NOTA. Nei modelli 18, 21, 31 e 40 la durata
della fase di sbrinamento (non regolabile)
varia in funzione della temperatura ambiente
(più lunga per ambienti freddi, più corta per
ambienti caldi).
Pagina 17
DESCRIZIONE DEI COMPONENTI
A. POMPA
La pompa opera in continuazione soltanto durante il ciclo di congelamento dirigendo l'acqua
verso la piastra spruzzante.
Dalla piastra spruzzante l'acqua, attraverso sei
spruzzatori, viene diretta all'interno dei bicchierini rovesciati subendo, in questa fase, una certa
aerazione permettendo così di ottenere un cubetto
di ghiaccio solido e cristallino.
B.
VALVOLA SOLENOIDE DI INGRESSO
DELL'ACQUA - RACCORDO DA 3/4
GAS MASCHIO
La valvola solenoide di ingresso dell'acqua posta
nella parte posteriore dell'apparecchio, è eccitata solamente durante il ciclo di sbrinamento.
Quando è eccitata permette, ad una limitata quantità d'acqua, di fluire verso la parte superiore della
piastra evaporatore assistendo così il gas caldo
durante la fase di distacco dei cubetti. Quest'acqua
viene quindi scaricata dalla piastra dell'evaporatore,
attraverso i fori di scarico, nel serbatoio di raccolta
sottostante da dove viene aspirata dalla pompa e
diretta alla piastra spruzzante.
Nei modelli 18, 21, 31, 40 e 50 raffreddati ad
acqua la valvola solenoide di ingresso acqua è
caratterizzata da un'entrata e due uscite separate, dotata di due solenoidi alimentate, la prima
(produzione ghiaccio) dai contatti 3-2 dal termostato evaporatore e la seconda (condensazione) da un pressostato.
C.
VALVOLA SOLENOIDE DEL
GAS CALDO
La valvola solenoide del gas caldo è composta
essenzialmente da due parti, rispettivamente il
corpo e la bobina.
Durante il ciclo di sbrinamento la bobina, collocata sulla parte superiore della valvola gas caldo è
attivata attraendo pertanto il pistoncino posto
all'interno del corpo valvola.
Questo apre il passaggio al gas caldo pompato
dal compressore, consentendogli di fluire direttamente nella serpentina dell'evaporatore distaccando così i cubetti di ghiaccio dai bicchierini.
D.
TERMOSTATO CONTENITORE
Il tubo sensibile del termostato contenitore (tubo
capillare) è inserito nel tubo portabulbo fissato
sulla parete della cabina di deposito del ghiaccio
ed ha il compito di interrompere il funzionamento
dell'apparecchio quando il tubo sensibile è coperto dal ghiaccio e di farlo ripartire non appena il
ghiaccio sia stato rimosso. Il termostato contenitore è tarato direttamente in fabbrica per fermare
l'apparecchio a 1°C e riattaccarlo a 4°C.
E.
TERMOSTATO EVAPORATORE
(CONTROLLO DELLA DIMENSIONE
DEI CUBETTI)
Nei modelli 18, 21, 31 e 40 il termostato
evaporatore posto nella parte frontale della scatola elettrica, è essenzialmente un controllo della
temperatura che chiude i suoi contatti 3-2 quan-
do la temperatura scende (ciclo di congelamento)
e li apre chiudendo i contatti 3-4 quando la
temperatura sale (ciclo di sbrinamento).
Questo controllo determina la durata del ciclo di
congelamento e di conseguenza la dimensione
dei cubetti di ghiaccio. Una bassa regolazione
produrrà cubetti di ghiaccio troppo pieni mentre
al contrario un'alta regolazione produrrà cubetti
di ghiaccio incompleti (troppo vuoti). Nei modelli
18-21-31-40 i contatti del termostato evaporatore
sulla seconda posizione (contatti 3-2) chiudono
il circuito elettrico ai componenti del ciclo di
sbrinamento controllandone la sua durata.
Il termostato evaporatore è regolato in fabbrica
(manopola su puntino nero) e non richiede
aggiustamenti quando la temperatura ambiente
rimane tra 20 e 30°C.
Nei modelli 50-65-90 quando i contatti del termostato sono chiusi, viene messo in funzione il
timer che completa il ciclo di congelamento passando successivamente al ciclo di sbrinamento.
F. VENTILATORE (RAFFR. AD ARIA)
Nei modelli 18-21-31-40 il ventilatore, collegato
al circuito elettrico attraverso i contatti 3-4 del
termostato evaporatore, opera soltanto durante
il ciclo di congelamento, facendo circolare l'aria
attraverso il condensatore e mantenendo così,
entro valori prestabiliti l'alta pressione.
Nelle versioni a raffreddamento ad aria 50-60-95
il funzionamento é controllato costantemente dal
pressostato
G. COMPRESSORE ERMETICO
Il compressore ermetico ha il compito di far circolare il refrigerante attraverso l'intero sistema.
Esso aspira il refrigerante sotto forma di vapore
a bassa pressione e temperatura, lo comprime,
facendone aumentare di conseguenza sia la
pressione che la temperatura, e lo trasforma in
vapore ad alta pressione e temperatura che
lascia il compressore attraverso la valvola di
scarico.
H. SCIVOLO E PIASTRA SPRUZZANTE
L'acqua, forzata dalla pompa all'interno della
piastra spruzzante, fuoriesce attraverso sei spruzzatori i quali hanno il compito di imprimere un
movimento rotatorio al getto d'acqua e di dirigerlo verso i bicchierini raffreddati dell'evaporatore.
I.
TERMOSTATO DI SICUREZZA
Posto nella parte inferiore della scatola elettrica
è del tipo a reinserimento manuale ed arresta il
funzionamento dell'apparecchio quando il suo
bulbo (ancorato alla linea dal liquido poco prima
del filtro deumidificatore) raggiunge la temperatura di 70°C.
J. INTERRUTTORE DI LAVAGGIO (18-21-31-40)
Interruttore manuale, posto nella scatola elettrica eccita la bobina della valvola del gas caldo e
della valvola di ingresso dell'acqua per il
caricamento manuale dell'acqua e per risciacquare il circuito idraulico dell'apparecchio durante le operazioni di pulizia.
Pagina 18
K. PRESSOSTATO (18-21-31-40-50)
Usato nei modelli raffreddati ad acqua ha il
compito di mantenere la pressione di mandata
tra 8-5 e 10 bar alimentando elettricamente la
bobina della valvola di ingresso acqua che controlla il flusso di acqua al condensatore.
L.
VALVOLA PRESSOSTATICA
(solo 65-90 modelli raffr. ad acqua)
La valvola pressostatica mantiene ad un valore
costante l'alta pressione nel circuito refrigerante
variando il flusso di acqua di raffreddamento del
condensatore.
Come la pressione sale la valvola pressostatica
si apre ulteriormente per accrescere il flusso
d'acqua di raffreddamento al condensatore.
M. TIMER (solo 50-65-90)
Dopo la messa in funzione da parte del termostato evaporatore, il timer completa la parte finale
del ciclo di congelamento. Il timer compie un giro
completo in 15 minuti di cui 12 minuti sono la
parte finale del ciclo di congelamento e i rimanenti 3 minuti comprendono il ciclo di sbrinamento.
Tutti i componenti elettrici sono collegati sulla
morsettiera del timer e, attivati da un
microinterruttore in fase di congelamento o di
sbrinamento attraverso i contatti del relé di comando. Questo microinterruttore è comandato
da una camma in plastica direttamente collegata
al motorino del timer. La camma consiste di due
dischetti in plastica che possono essere regolati
nel caso si desiderasse diminuire o aumentare il
ciclo di sbrinamento.
N.
PRESSOSTATO DI COMANDO
VENTILATORE
(50-65-90 modelli raffreddati ad aria)
E' un pressostato di pressione a funzionamento
automatico. Elettricamente collegato al ventilatore del condensatore ha la funzione di attaccare
o staccare il ventilatore mantenendo, entro un
certo livello la pressione di condensazione.
O. TELERUTTORE (solo 65-90)
Il teleruttore è comandato dalla scheda elettronica per chiudere ed aprire il circuito elettrico al
compressore.
P. INTERRUTTORE PRINCIPALE (50-65-90)
Interruttore manuale, posto nella parte laterale
destra della scatole elettrica, spegne l'intero apparecchio.
Q.
INTERRUTTORE DEL COMPRESSORE
(50-65-90)
Posto nella parte laterale destra della scatola
elettrica proprio di fianco all'interruttore principale, arresta solo il funzionamento del compressore.
Pagina 19
ISTRUZIONI PER LA PULIZIA
DEL CIRCUITO IDRAULICO
1. Togliere il pannello frontale e superiore per
accedere sia alla scatola elettrica che
all’evaporatore.
2. Attendere la fine del ciclo di sbrinamento
quindi arrestare l'apparecchio all'interruttore generale esterno nei modelli 18, 21, 31 e 40 o
all'interruttore generale della macchina nei modelli 50-65-90.
NOTA. La quantità di disincrostante così
come il tempo necessario per la
disincrostazione dipendono dalle condizioni
del circuito idraulico (incrostazioni).
b) Spegnere l'apparecchio ruotando il termostato evaporatore in senso antiorario, scaricare
la soluzione disincrostante dal serbatoio quindi
versare nella parte superiore dell'evapo-ratore 2
o 3 litri di acqua potabile per risciacquare sia i
bicchieri che la piastra in plastica.
c) Se necessario rimuovere la piastra spruzzante per essere pulita separatamente.
3. Prelevare tutto il ghiaccio stivato nel contenitore in modo che questi non venga contaminato con la soluzione disincrostante.
4. Nei modelli 18, 21 e 31 togliere il tappo in
plastica posto sotto il serbatoio dell'acqua in
modo da scaricare l'acqua contenuta assieme ai
depositi calcarei.
5. Togliere la tendina quindi, usando una bottiglia, versare dell'acqua sul fondo del serbatoio
in modo da rimuovere eventuali scaglie di calcare.
6. Installare di nuovo la tendina così come il
tappo in plastica.
7. In tutti gli altri modelli, sollevare il tubo di
troppo pieno per scaricare l'acqua dal serbatoio.
8. In un secchio pulito preparare la soluzione
disincrostante diluendo in 1-2 litri di acqua potabile calda (45-50°C) 0,2 litri di disincrostante
(20-30-40) e 0,2-0,3 litri (50-60-95).
ATTENZIONE. I disincrostanti per produttori di ghiaccio contengono una soluzione di acido fosforico e idrossiacetico.
Questa soluzione è corrosiva e, se ingerita, può causare disturbi intestinali. Non
provocare il vomito. In questo caso bisogna bere una abbondante quantità di acqua o di latte e chiamare subito il medico.
Nel caso di contatto esterno è sufficiente
lavare la parte con acqua.
TENERLO LONTANO DALLA PORTATA
DEI BAMBINI.
9. Rimuovere il coperchio dell’evaporatore e
versare lentamente la soluzione disincrostante
tra le formine di rame. Impiegare un pennello per
sciogliere le incrostazioni presenti negli angoli
più remoti.
18-21-31-40
a) Nei modelli 18-21-31-40 avviare nuovamente la macchina all'interruttore esterno.
Lasciare l’apparecchio in funzione per circa 20
minuti quindi posizionare l'interruttore di "lavaggio" sulla posizione "lava - II" per scongelare i
cubetti dall'evaporatore.
d) Ruotare di nuovo la manopola del termostato evaporatore sulla posizione di funzionamento normale. La pompa è di nuovo in funzionamento per ricircolare l'acqua così da risciacquare l'intero circuito idraulico.
50-65-90
a) Nei modelli 50-65-90 ruotare la camme del
Timer con l'aiuto di un cacciavite fino a che il
microinterruttore sia posizionato all'inizio della
parte alta della camme.
Accendere l'apparecchio all'interruttore principale. Lasciare l'interruttore del compressore sulla posizione OFF (spento).
b) Lasciare funzionare l'apparecchio per circa
20 minuti. Non verrà prodotto del ghiaccio in
quanto il compressore è mantenuto spento.
c) Arrestare il funzionamento dell'apparecchio
agendo sull'interruttore principale, quindi estrarre dal serbatoio acqua il tubo di troppo pieno e
lasciar defluire il liquido rimasto attraverso la
tubazione di scarico.
Pagina 20
d) Risciacquare il serbatoio e rimettere il troppo pieno.
10. Versare sulla parte superiore dell'evaporatore una caraffa d'acqua contenente della sostanza battericida, quindi rimettere in funzione
l'apparecchio allo scopo di igienizzare tutto il
circuito idraulico per circa 10 minuti.
ATTENZIONE. Non miscelare la sostanza
battericida con il disincrostante al fine di
evitare la generazione di acidi molto aggressivi.
11. Arrestare la macchina e scaricare la soluzione disinfettante dal serbatoio quindi, con
l'ausilio dell'interruttore di lavaggio sulla posizione "lava", nei modelli 18, 21, 31 e 40 ruotare il termostato evaporatore nella posizione di funzionamento normale mentre nei modelli 50-65-90
ruotare lentamente il gambo del timer in senso
orario finchè il microinterruttore sia nella posizione di inizio del ciclo di sbrinamento.
12. Porre l'interruttore principale sulla posizione ON (acceso).
13. Lasciare che l'apparecchio compia un ciclo
di sbrinamento completo quindi ruotare di nuovo
il gambo del timer onde avere un secondo ciclo
di sbrinamento.
14. Quando dallo scarico si nota la fuoriuscita
dell'acqua posizionare l'interruttore di lavaggio
su "funziona" (18-21-31-40) e accendere il compressore ponendo l'interruttore specifico su ON
(50-65-90) al fine di rimettere l'apparecchio nelle
condizioni di funzionamento normale.
15. L'apparecchio è ora pronto per il funzionamento automatico e continuo.
16. Rimontare il coperchio dell'evaporatore ed
i pannelli precedentemente rimossi.
17. Controllare che i cubetti di ghiaccio prodotti
dopo il primo ciclo di congelamento siano trasparenti e che non abbiano sapore acidulo.
ATTENZIONE. Non utilizzare i cubetti opachi-bianchi e di sapore acidulo prodotti
dopo il procedimento di pulizia del sistema idraulico con il disincrostante.
Per ogni evenienza è bene versare dell'acqua tiepida all'interno del contenitore
così da sciogliere i cubetti di ghiaccio
appena prodotti.
18. Sciacquare ed asciugare le pareti interne
del contenitore del ghiaccio.
NOTA. Ricordarsi che per evitare l’accumulo
di batteri indesiderati è necessario pulire ed
igienizzare le pareti interne del contenitore
ogni settimana con una soluzione di acqua
mista ad una sostanza battericida.
Page 21
INFORMATIONS GÉNÉRALES
ET INSTALLATION
A.
INTRODUCTION
Dans ce manuel vous trouverez les indications
nécessaires et la marche à suivre pour réaliser:
l’installation, le démarrage, le fonctionnement,
l’entretien et le nettoyage des machines à glace.
Ces machines ont été étudiées, conçues,
construites et vérifiées avec le maximum de soin
pour satisfaire la clientèle la plus exigeante.
NOTA. Pour préserver les caractéristiques
de qualité et de securité des fabriques de
glace, il est fondamental d’effectuer les
opérations d’installation et de maintenance
strictement selon les instructions indiquées
dans ce manuel de service.
B.
DÉBALLAGE ET VÉRIFICATION
1. Examiner l’extérieur du carton d’emballage
et s’assurer qu’il n’y a pas d’avarie imputable au
transport. Celle-ci pouvant entraîner un dommage
caché sur la machine, exiger un examen intérieur
en présence du transporteur.
2. a) Couper et enlever les sangles en plastique
maintenant le cartonnage sur son socle.
b) Ouvrir le dessus du carton et enlever la
plaque et les plots d’angle de polystyrène de
protection.
c) Enlever entièrement la boîte en carton.
3. Démonter les panneaux de la machine et
s’assurer qu’il n’y a pas de dégats à l’intérieur.
Faire une déclaration auprès du transporteur
dans le cas d’un dommage caché, comme indiqué
au paragraphe 2 ci-dessus.
4. Ouvrir la porte cabine et enlever tous les
supports intérieurs d’emballage et les rubans
adhésifs de protection.
5. S’assurer que les tuyauteries frigorifiques
ne frottent, ni ne touchent, ni entre elles ni à
d’autres surfaces et que l’hélice du ventilateur du
condenseur tourne librement.
6. Nettoyer les parois intérieures de la cabine
de stockage et les parois extérieures du meuble.
7. S’assurer que la tension d’alimentation
correspond bien aux indications mentionnées
sur la plaque signaletique fixée à l’arrière sur le
chassis.
ATTENTION. Tout incident occasionné
par l’utilisation d’une mauvaise tension
d’alimentation annulera vos droits à la
GARANTIE.
8. Retirer du Mode d’Emploi la fiche de garantie
et la remplir avec soin en y indiquant le type et le
numero de série relevés sur la plaque
signalétique. Envoyer un exemplaire à l’Usine.
C.
LOGEMENT ET MISE DE NIVEAU
ATTENTION. Cette machine n’est pas faite
pour fonctionner à l’extérieur lorsque les
températures de l’air ambiant sont en
dessous de +10°C ou au dessus de +40°C.
Le fonctionnement prolongé hors de ces
limites est considéré annule les clauses
du contrat de garantie.
1. Mettre en place la machine dans l'emplacement
qui lui est réservé. Pour le choix de l'emplacement
tenir compte:
a) température ambiante du local compris
entre +10°C et +40°C.
b) température de l’eau d’alimentation
compris entre +5°C et +35°C.
c) endroit bien ventilé pour assurer un
refroidissement correct du condenseur.
d) espace suffisant pour accèder aux
branchements à l’arrière. Un espace libre de
15 cm minimum est nécessaire autour de l’unité
pour le passage de l’air frais sur le condenseur
des groupes à air et son évacuation.
NOTA. Dans le cas d’une machine encastrée
et, en fonction de l’augmentation de la
température de l’ambiance au-delà de +30°C,
la production indiquées sur le diagramme
sont à diminuer progressivement jusqu’à 10%
maximum.
La capacité de production est directement
liée à la température d’arrivée de l’air sur le
condenseur, à la température de l’eau et à
l’ancienneté de la machine.
Pour conserver à votre machine à glace en
cubes sa capacité maximum de production,
il est nécéssaire de procéder périodiquement
à son entretien comme reporté au chapitre
correspondant.
2. Mettre de niveau la machine en utilisant les
pieds réglables.
Page 22
D.
BRANCHEMENTS ÉLECTRIQUES
Déterminer en fonction des indications mentionnées sur la plaque signalétique (puissance,
intensité) la dimension du cable nécessaire pour
l’alimentation électrique de la machine.
Tous les machines sont expédiées complètement
cablées avec leur cordon d’alimentation
électrique. S’assurer que la machine à bien sa
ligne d’alimentation qui est branchée à un
interrupteur bipolaire murale pourvu des fusibles
et d’un conducteur de terre.
Voir la plaque signalétique pour déterminer le
calibre du fusible.
Tout le cablage extérieur devra être conforme
aux normes électriques en vigueur.
Vérifier la conformité du voltage de la ligne
d’alimentation avec la plaque d’immatriculation
avant de brancher la machine.
La tension admissible maximum ne doit pas
dépasser 10% de la valeur indiquée sur la plaque,
même lors du démarrage. Le sous-voltage
admissible ne doit pas dépasser 10%.
Un sous-voltage peut occasionner un mauvais
fonctionnement et détériorer les contacts et les
enroulements de moteur.
Avant de brancher la machine vérifiez encore
une fois la tension disponible contre les indications
de la plaque signaletique.
NOTA. Les branchements électriques doivent
être fait par un professionnel dans le respect
des normes locales.
Une pression trop basse, inférieure à 1 bar, peut
être une cause de mauvaise fabrication de la
glace.
Une eau trop fortement chlorée peut être
améliorée en utilisant des filtres au charbon de
bois ou au charbon actif.
Alimentation d’eau
Raccorder avec le tuyau flexible en plastique
alimentaire fourni avec la machine, l’alimentation
d’eau générale au raccord 3/4" GAS mâle situé
sur la vanne électromagnétique d’arrivée d’eau.
Installer, à un endroit accéssible, entre l’arrivée
et la machine une vanne d’arrêt.
L’eau est très dure ou avec des impurités en
excès il sera préferable monter sur l'arrivée d'eau
de la machine un filtre éfficace, positionné avec
sa flêche dans le sens de circulation de l’eau.
Les modeles refroidi par eau sont equipées
d'une vanne d'arrivée eau avec une entré et deux
sorties; une est branchée au condenseur, la
deuxieme est urilisée par la production des
glaçons.
Évacuation d’eau
Le tube d’évacuation recommandé est un tube
en plastique rigide de 18 mm diamétre int.
conduissant à un siphon de sol ouvert avec une
pente de 3 cm par metre.
Pour faciliter l’écoulement d’eau dans le tube
d’évacuation il est nécessaire de mettre une
prise d’air verticale au niveau du raccordement
d’évacuation.
Évacuation d’eau - Modèles refroidis par eau
E.
BRANCHEMENTS D’ARRIVÉE ET
D’ÉVACUATION D’EAU
Généralites
Pour le choix du mode d’alimentation d’eau sur la
machine à glaçons il faudra tenir compte:
a) de la distance entre le réseau et la
machine
b) de la clarté et de la pureté de l’eau
c) de sa préssion.
La glace est obtenue à partir de l’eau. Les points
ci-dessus sont donc importantes pour le bon
fonctionnement de la machine.
L’eau contenant, en quantité, des sels minéraux
aura tendance à produire des cubes d’autant
plus opaques qu’elle contiendra plus de sels.
L’évacuation du condenseur, sur les machines à
eau, est raccordé au écoulement commun, à
l’intérieur de la machine.
Pour ce-là il faut bien prévoir l’installation d’une
prise d’air verticale sur le point plus haut de la
tuyauterie d’évacuation en manière d’avoir un
bon écoulement d’eau et il faut aussi s’assurer
que l’eau s’écoule bien dans un siphon de sol
ouverte.
Celà afin d’éviter, qu’en cas de mauvaise vidange,
que l’eau d’évacuation du condenseur puisse
dégorger dans la cabine de stockage.
NOTA. L’alimentation et l’évacuation d’eau
doivent être installées par un professionnel
dans le respect des normes locales.
Page 23
F.
LISTE DE CONTRÔLE FINAL
1. Est-ce que la machine a été placée dans
une pièce où la température ambiante ne descend
jamais au dessous de +10°C durant les mois
d’hiver?
2. Y-a t-il au moins 15 cm d’espace libre à
l’arrière et autour de la machine pour une bonne
aèration?
3.
La machine à t-elle été mise de niveau?
4. Tous les raccordements électriques et d’eau
y compris la vanne d’arrêt ont-ils été effectués?
5. La tension électrique d’alimentation
correspond t-elle bien aux indications de la plaque
signalétique?
6. S’est-on assuré que la préssion minimum
de l’eau fournie ne sera jamais inférieur à 1 bar?
G.
7. Avez-vous vérifié que toutes les tuyauteries
frigorifiques et autres sont à l’abri des vibrations,
de l’usure et d’un éventuel défaut?
8. Les boulons de blocage du compresseur
ont-ils été retirés? S’assurer que le compresseur
est bien calé sur ses silenblocs.
9. La cabine et l’extérieur de la machine à
t’elle été essuyés proprement?
10. Avez-vous bien remis le manuel contenant
les instructions d’utilisation au client? Avez-vous
attiré son attention sur l’importance de l’entretien
périodique de la machine?
11. Avez-vous rempli correctement la fiche de
garantie? Avez-vous bien vérifié le type et le
numéro de série sur la plaque avant de l’envoyer?
12. Avez-vous donné le nom du client et son
numéro de téléphone au représentant local de
son secteur?
INSTALLATION PRATIQUE
1.
2.
3.
4.
5.
6.
7.
8.
9.
Vanne d’arrêt
Filtre d’eau
Alimentation d’eau
Raccord de 3/4 mâle
Évacuation avec prise d’air
Évacuation d’eau à siphon
Raccord d’évacuation
Interrupteur général
Ligne d’alimentation électrique
ATTENTION. Cette machine à glace n’est pas prévue pour fonctionner à l’extérieur.
L’utiliser pour des températures ambiante comprises entre +10°C et +40°C et d’eau comprises
entre +5°C et +40°C.
Page 24
INSTRUCTIONS DE
FONCTIONNEMENT
DÉMARRAGE
Après avoir installé correctement la fabrique de
glace et avoir completé le branchements
hydrauliques et électriques, effectuez les
opérations de démarrage ci-dessous:
18-21-31-40
1. Enlevez le panneau frontal et localisez le
boîtier de contrôle.
2. Positionnez l'interrupteur de nettoyage sur
la position "NETTOYAGE" (II) pour alimenter les
bobines de la vanne d'arrive d'eau et de gaz
chauds.
3. Mettez l’interrupteur principale en position
ON (Marche) pour mettre la machine sous tension.
Pendant cette phase les composants en
fonctionnement sont.
LA VANNE D’ARRIVÉE D’EAU
LA VANNE DE GAZ CHAUDS.
La pompe a eau et le motoventilateur sont
aussi en fonctionnement.
4. Laissez la machine dans la phase de
remplissage d'eau par trois/quatre minutes
jusqu'à ce que l'eau arrive en correspondance au
trop plain (eau écoule par la vidange) puis
repositionner l'interrupteur de nettoyage sur la
position FONCTIONNEMENT (I).
50-65-90
1. Enlever le panneau frontal et localiser la
boîtier de contrôle.
2. Avec les interrupteurs du compresseur et
principal a l'arrêt (OFF) tourner la tige du timer
(fig. B) dans le sens de la monte, jusqu'à le
"click"; cet indiquera que le microinterrupteur du
timer est tombé dans la partie basse de la camme
qu'il correspond a la phase du degivrage.
3. Mettre en marche la machine avec
l'interrupteur general (ON). L'interrupteur du
compresseur doit resté sur OFF.
4. Tourner de nouveau la tige du timer jusqu'à
le "click" une deuxiéme fois.
5. Aprés le deuxiéme cycle de degivrage
appuier sur l'interrupteur du compresseur pour
mettre en marche le compresseur.
B
CICLO DI
SBRINAMENTO
CICLO DI
CONGELAMENTO
CAMMA CON LE INDICAZIONI DEL CICLO
DI CONGELAMENTO E SBRINAMENTO
NOTA. Pendant la phase de remplissage
d'eau ainsi que pendant le cycle de demoulage
la vanne d'arrive d'eau est alimenté
electriquement. L'eau arrive sur la platine
évaporateur et s'écoule par les trous bien
dans le réservoir d'eau pour être utilisé dans
le prochain cycle de congelation.
VÉRIFICATIONS DE FONCTIONNEMENT
A. La machine commence sa premier cycle de
congelation avec le démarrage des élements
suivants:
COMPRESSEUR
POMPE A EAU
MOTOVENTILATEUR pour les machines
refroidis par air.
B. Vérifiez, à travers l’ouverture de passage
des glaçons, que le système d’arrosage d’eau
est bien positionné et que l’eau vient à bien être
aspergé à l’intérieur des godets de l’évaporateur.
Vérifier aussi que les lamelles en plastique du
rideau sont bien libre de basculer et qu’il n’y à pas
d’eau qui passe au travers d’elles.
C. Le processus de fabrication de glace
commence lorsque l’eau est aspergé à l’intérieur
des godets.
Ceux-ci viennent à être graduellement réfrigerés
par l’évaporation du réfrigérant qui circule dans le
serpentin d’évaporateur.
D. Dans les modéls 18-21-31-40 pendant le
cycle de congelation la temperature de
l'évaporateur et ainsi que quelle du bulbe du
thermostat évaporateur se baisse. Quand il arrive
a un valeur predeterminé les contacts du
thermostat évaporateur changes de position pour
faire demarré le cycle de dégivrage. La durée
d'un cycle de congélation s'échelonne entre 20 et
22 minutes, dans une ambiance de +21°C. Elle
est plus longue ou plus courte selon que la
température ambiante est plus élevée ou plus
basse.
La longeur total du cycle varie entre 23-25 minutes.
E. Dans les modéles 50-65-90 lorsque le bulbe
du thermostat évaporateur, logé sur la serpentine
de l'évaporateur, atteint la température
d'enclanchement démarre le moteur du
temporisateur actionnant ainsi la came qui avec
les microinterrupteurs contrôle la 2ème phase du
cycle de congélation jusqu'à la fin.
Pendant cette phase les composants en
fonctionnement sont:
COMPRESSEUR
BOBINE DU CONTACTEUR (65-90)
POMPE A EAU
VENTILATEUR (pour les machines refroidis par
air)
MOTEUR DU TEMPORISATEUR
Page 25
Après un temps de 18÷20 min. de congélation,
dans une ambiance avec une température
hypotetétique de 21°C a lieu le cycle de dégivrage
avec l'activation simultanée des vannes de gaz
chauds et arrivée d'eau.
Les composants électriques en fonctionnement
sont:
COMPRESSEUR
BOBINE DU CONTACTEUR (65-90)
VANNE D'ARRIVÉE D'EAU
VANNE DE GAZ CHAUDS
MOTEUR DU TEMPORISATEUR
Il est possible de remédier aux inconvénients
illustrés ci-dessus en tournant, dans le premier
cas, le bouton légérement dans les sense de la
montre et dans le second cas, ou contraire.
F. Contrôlez, pendant le cycle de démoulage,
que l’eau qui arrive coule bien sur la platine
évaporateur, pour tomber dans le réservoir, de
manière de rétablir le niveau d’eau jusqu’au bord
du trop plein et que le surplus d’eau s’écoule bien
à la vidange.
G. Contrôlez l’apparence et la forme des
glaçons qui viennent de tomber dans la cabine.
Les glaçons corrects doivent avoir un creux de
5-6 mm dans leur embase.
Lorsqu’ils ne sont pas conformes, attendre la fin
du second cycle avant de faire un réglage
éventuel.
H. Si nécessaire, dans les modéles 18, 21, 31
et 40 on peut varier la longueur de ce cycle avec
le bouton du thermostat évaporateur (sens des
aiguilles d'une montre), jusqu’à obtention de la
dimension correcte.
• Si la temperature ambiente dans
laquelle se trouve
l'appareil est inférieure à 20°C, les
cubes peuvent
présenter un creux
intérieur
(voir
croquis).
• Si par contre la
température ambiente est supérieure à 30°C, les
cubes auront tendence à avoir des
dentelures de glace autour de leur
base.
Si les glaçons se presentent opaques et avec un
creux trop profond dans leur centre, cela peut
provenir d’une manque partielle d’eau qui s’est
vérifiée pendant la phase finale du cycle de
congélation ou, il peut bien provenir d’une
mauvaise qualité de l’eau.
Pour ce dernier cas, il sera nécessaire d’avoir un
filtre ou un équipement de traitement d’eau.
I.
La machine étant en cours de démoulage,
tenir de la glace contre le bulbe du thermostat de
contrôle de cabine pour tester l'arrêt, la machine
devrait s'ARRÊTER à la fin du cycle de démoulage.
NOTA. Dans les minutes qui suivent le retrait
de la glace sur le bulbe du thermostat, le
bulbe se réchauffera et la machine se
remettra en marche. Cette fonction est réglée
en usine et ne doit pas être modifiée avant
d'avoir procédé à des essais complets. Le
réglage normal est d'environ 1,5°C pour la
coupure, et 4°C pour le réenclenchement.
K. Remontez les panneaux enlevés avant et
expliquez avec soin au client/utilisateur les
spécifications importantes de la machine, la
mise en route et l’entretien, en parcourant toutes
les procédures du MODE D’EMPLOI.
Page 26
PRINCIPE DE
FONCTIONNEMENT
Dans les machines à glaçons SCOTSMAN l’eau
pour la fabrication de la glace est continuellement
en mouvement. Une pompe électrique de
circulation la pulvérise sous une pression
adéquate à travers les jets, dans les godets
inversés de l’évaporateur.
Une partie de cette eau se cristalise au contact
des godets réfrigérés. La glace obtenue en forme
de cloche sur les parois remplit petit à petit les
godets donnant les glaçons finals.
CYCLE DE CONGÉLATION
Le gaz réfrigérant est refoulé par le compresseur
dans le condenseur, où il est refroidi et condensé
en liquide par l’air ou par l’eau de refroidissement.
Le réfrigérant liquide traverse le filtre déshydrateur
et passe en suite par le tube capillaire où,
l’échange de chaleur lui fait perdre un peu de sa
pression et de sa température.
Le réfrigérant liquide pénétre dans le serpentin
évaporateur (qui est un tube de diamètre supérieur
à celui du capillaire) où il se détend et commence
à s’évaporer partiellement.
Ce changement d’état est aussi provoqué par
l’eau aspergé dans les godets qui fournit la
chaleur nécessaire pour l’évaporation complète
du réfrigérant.
Le réfrigérant en vapeur passe en suite au travers
de l’accumulateur et retourne au compresseur via tuyauterie d’aspiration où il échange de la
chaleur avec le capillaire - pour être refoulé de
nouveau.
Dans les modéles 18, 21, 31 et 40 le cycle de
congélation est contrôlé par le thermostat
évaporateur qui a son bulbe logé dans un tuyau
en plastique en contact avec le serpentin
évaporateur; dans les modéles 50, 65 et 90,
aprés la phase controlée par le thermostat
évaporateur, il y a une phase controlée par le
timer.
Les composants électriques en fonctionnement
pendant le cycle de congèlation sont:
COMPRESSEUR
POMPE A EAU
VENTILATEUR (Pour les machines refroidis
par air).
Sur les machines 18, 21, 31 et 40 à air, pendant
le cycle de congélation, la haute pression du
réfrigérant régresse graduellement d’ une valeur
de 11 bars, générallement marquée au début du
cycle quand la machine se trouve dans une
ambiance de 21°C, à une valeur de 7 bars,
marqués à la fin du cycle, à savoir, juste quelque
seconds avant le démoulage. Les valeurs
indiquées sont aussi liées à la température
ambiante, donc elles sont sujets à augmenter si
la température de l’ambiance s’élève.
Sur les mêmes machines refroidi à eau et aussi
dans le modél 50, la haute pression de réfrigérant
a une plage de variation qui va de 8,5 à 10 bars
etant contrôlée par un pressostat H.P. qui
commande, par une électrovanne d’arrivée d’eau
logée sur le tube d’entrée d’eau du condenseur,
le flux d’eau de refroidissement.
Pour les modeles 50, 60 et 90 refroidis par air
pendant le cycle de congélation, la haute préssion
du réfrigérant varie entre 8÷10 bar par l'action de
contrôle d'un pressostat automatique.
Quand la pression du refrigerant dans le
condenseur monte au dessus d'une certaine
limite, le pressostat ferme ses contacts ainsi de
mettre en fonctionnement le Moto-ventilateur.
Quand se vérifie la situation contraire, c'est à
dire, la pression du refrigerant dans le condenseur
descend au dessous d'une valeur limite, le
pressostat ouvre ses contacts et coupe, par
conséquent, le fonctionnement du motoventilateur.
Sur modèles 65 et 90 refroidis par eau la pression
du réfrigérant refoulé est maintenue constante a
9 bar par le contrôle de la vanne pressostatique
fait sur le flux d'eau de refroidissement du
condenseur.
NOTA. Dans les cas où la température (or
pression correspondant) du condenseur
monte à un valeur supérieur à 70°C a cause
d'une manque partiale or totale d'eau de
refroidissement, or du condenseur bloqué
par la saleté pour le versions refroidis par air,
un dispositif de sécurité par activation
manuel arrête le fonctionnement de la
machine.
Aprés avoir examiné la raison de l'arrét et
avoir remedié la situation, il faut the presser
le bouton de rearmement en passant par
les trou sur le panneau avant or remuer le
même.
Pour les machines installée dans des ambiances
de 21°C la basse pression, au départ du cycle,
régresse rapidement à une valeur de 1,0 ÷ 0,9
bars pour baisser plus lentement, ayant un rapport
inversement proportionel à l’augmen-tation
d’épaisseur des glaçons, jusqu’à ce qu’elle atteint
une valeur de 0 ÷ 0,1 bar à la fin du cycle
correspondant aux cubes de glace bien formés.
La longueur total du cycle de congélation varie
entre 20-22 minutes.
CYCLE DE DÉMOULAGE
Dans les modéles 18, 21, 31 et 40 lorsque la
température correspondante à la dimension
requise pour les cubes de glace est atteinte dans
l'évaporateur, le thermostat changes ses contacts
pour alimenter le cycle de démoulage.
Dans les modéles 50, 65 et 90 lorsque le
temporisateur a completé la deuxiéme partie du
cycle de congélation de la machine, a lieu la
phase de démoulage.
Page 27
Le composants électriques en fonctionnement
pendant ce cycle sont:
COMPRESSEUR
BOBINE DU CONTACTEUR (65 et 90)
VENTILATEUR (refroidis par air)
VANNE D'ARRIVÉE D'EAU
VANNE GAZ CHAUDS
TEMPORISATEUR (50, 65 et 90)
L’eau qui arrive dans la machine, en passant par
la vanne d’arrivée et par le limiteur de débit,
s’écoule sur la platine évaporateur, dont l’eau
travers les troux d’écoulement et tombe dans le
réservoir.
Cette eau se mélange avec celle qui est restée
du cycle précedent, pour faire monter le niveau
jusqu’au bord du trop plein.
L’excés d’eau du réservoir s’évacue par le trop
plein de la vidange, de ce fait limite la
concentration des sels mineraux dans le réservoir.
Entre temps les gaz chauds déchargé par le
compresseur sont dévié, par la vanne de gaz
chauds ouverte, directement dans le serpentin
évaporateur.
Le gaz chauds qui circule dans le serpentine
évaporateur chauffe suffisement les godets pour
faire décoller de leur intérieur les glaçons formés.
Les glaçons liberés tombent sur le plan de chute
et ils sont canalisés, au travers de l’ouverture de
sortie glace, dans la cabine de stockage.
NOTA. Dans les modéles 18, 21, 31 et 40 la
durée du cycle de dégivrage (non réglable)
est reliée a la temperature ambiante (plus
courte avec temperature ambiante chaud et
plus long avec ambiante froid).
Dans les autres la durée du cycle de dégivrage
est déterminée par l'ampleur de l'encoche
sur le profil de la came du temporisateur;
cette ampleur est réglée en usine. Si ont
veuille varier la durée du cycle de dégivrage
il faut tourner la vis de réglage de la came
pour augmenter ou réduire son encoche.
ATTENTION. La phase de démoulage est
la plus critique pour les composants
électriques du système réfrigérant, en
particulier pour le compresseur.
Pour éviter d'abuser de ces composants
et réduire les possibilites de les faire
tomber en panne, il ne faut pas supérer le
4 minutes de durée de ce cycle.
Dans les modéles 18, 21, 31 et 40 le thermostat,
du fait de la remontée de la température dans
l'évaporateur, coupe le contact alimentant les
vannes électromagnétiques "gaz chauds" et eau
et remet en service la pompe et le ventilateur du
condenseur. L'ensemble est reparti pour un
nouveau cycle de congélation.
Dans les modéles 50, 65 et 90 la même chose est
fait par le temporisateur (partie haute de la
camme).
Page 28
DESCRIPTION DES COMPOSANTS
A. Pompe a eau
La pompe à eau fonctionne en permanence
pendant la phase de congélation et réfoule l’eau
en direction du système d’arrosage pour
l’asperger à l’intérieur des godets/moules, ce
faisant, l’eau vient à être aèrée, chose qui permet
la formation de glaçons transparents et solides.
B. Électrovanne d’admission d’eau
L’électrovanne d’admission d’eau est activé
pendent la phase de démoulage.
Quand elle est activée une quantité d’eau
suffisante circule entre les godets de la platine
évaporateur, aidant ainsi le gaz chauds à
démouler les glaçons.
L’eau s’écoule à travers les trous de la platine
pour tomber dans le réservoir, situé sous
l’évaporateur, d’où elle est recyclée par la pompe
à eau en direction du système d’arrosage.
Une électrovanne d’arrivée d’eau spécial est
utilisée sur les machines refroidis par eau avec
une entre et deux sorties pour alimenter d’eau le
condenseur et le réservoir (cuve). Cette deuxieme
sortie de l'électrovanne est commande par un
pressostat H.P. et elle faites arriver au condenseur
un débit d’eau adequate pour maintenir la valeur
de pression de condensation entre la plage
voulue.
C. Électrovanne de gaz chaud
L’électrovanne de gaz chauds comprend deux
parties: le corps avec son noyau plongeur et la
bobine. Elle est montée sur la ligne de refoulement
du compresseur et est alimentée pendant le
cycle de démoulage.
Pendant le démoulage, la bobine, placée au
dessus du corps de la vanne, est excitée attirant
ainsi le noyau plongeur à l’intérieur du corps de
la vanne pour dévier le gaz chauds, provenent du
compresseur, directement dans le serpentine
évaporateur pour démoulier les glaçons formées.
D. Thermostat de cabine
Le corps du thermostat est placé dans la boîtier
electrique. Son bulbe est fixé sur une coté à
l'intérieur de la cabine de stockage. Il arrête
automatiquement la machine quand la cabine
est pleine de glace et la remet en service quand
il en manque. Il est règlé à l'usine pour couper à
+ 1°C et enclencher à + 4°C.
Vérifier, avant remplacement, son bon
fonctionnement en plaçant de la glace sur le
bulbe avant de le monter sur la machine.
Un déclic audible indiquera la coupure.
E.
Thermostat controlant la dimension des
cubes ou thermostat d'evaporateur
18-21-31-40
Le thermostat est logé dans la boitier electrique,
à l'intérieur de la machine. Son fonctionnement
est lié à la température de l'évaporateur par
intermédiaire de son bulbe placé sur un de ses
tubes.
Cet appareil fixe la durée du cycle de congélation
et, parallèlement, la dimension des cubes.
Une coupure plus basse produira un plus gros
cube, alors qu'une coupure plus haute donnera
un cube plus petit.
En tournant dans le sens des aiguilles d'une
montre, la coupure se fait sur + froid, inversement
sur - froid avec en butée, une position "STOP".
Réglé en usine sur la position "Bouton noire", il
est recommandé d'agir progressivement et peu
à la fois à chaque règlage.
Si le premier contact est lié à la température, le
second est inverseur. Il commande et contrôle
les composants du cycle de démoulage.
50-65-90
Ce thermostat a son bulbe lié à la fin du serpentin
évaporateur pour en y relever la température du
refrigerant (déclinant pendant le cours du cycle)
et en relation à ca, il change ses contacts de 34 à 3-2 (sensibilité reglable par la vis de réglage)
pour activer le moteur du temperisateur qui vade
son côté a completer le cycle de congélation
(2ème phase temporisée).
Cette phase, comme spécifié dans le chapitre
précedent, à une durée pré-fixée en rapport à
l'ampleur de l'extérieur de la came du
temporisateur.
F.
Motoventilateur
(Versions refroidis par air)
Le fonctionnement du motoventilateur pour les
modèles 50, 65 et 90 est commandé su travers
le pressostat HP pendant le cycle de congélation
pour aspirer l'air de refroidissement à travers les
ailettes du condenseur.
Pendant la 2ème phase du cycle de congélation
il arrive à fonctionner par intermittance parceque
la pression de condensation est maintenu entre
les valeurs de 8.5÷10 bar.
Dans les autres modèles 18, 21, 31 et 40 il est en
fonctionnement continu pendant le cycle de
congelation.
G.
Compresseur
Le compresseur, du type hermétique, est le
coeur du circuit réfrigérant, il véhicule et récupère
le réfrigérant à travers l’ensemble du système.
Il comprime le réfrigérant vapeur, à basse
pression, augmentant ainsi sa température et le
transforme en gaz chauds à haute pression qui
vient déchargé par le clapet de réfoulement.
H.
Plate-forme d'arrosage et plan de chute
des cubes
Le système d'arrosage utilisé sur cette unité est
du modèle fixe. Aspirée dans réserve, d'eau est
refoulée par la pompe, à travers un jeu de six
buses de pulvérisation, dans les godets inversés
de l'évaporateur.
I.
Thermostat de securité
Se dispositif fonctionne à titre de prècaution,
pour ARRÊTER l'alimentation électrique de la
machine dans le cas un arrêt du ventilateur ou un
Page 29
manque d'eau se produirait au niveau du
condenseur. Arrêt la machine quand la temperature du condenseur montes a 70°C.
J.
Interrupteur de nettoyage.
"Cleaning Cycle" (18-21-31-40)
Interrupteur manuel "Cleaning-Opérations" logé
sur la boitier électrique, alimentant les vannes
électromagnétiques d'eau et de "gaz chauds"
pour assurer le dégivrage manuel et le rinçage
du circuit d'eau lors des operations de nettoyage.
K.
Pressostat H.P.
(18, 21, 31, 40 et 50 refroidi par eau)
Utilisée seulement sur les machines refroidis
par eau le pressostat H.P. contrôle le
fonctionnement de la vanne d’alimentation d’eau
au condenseur pour limiter les variations de la
pression de la condensation (8,5÷10 bars) selon
la température de l’eau.
ATTENTION. Pour éviter d'endommager
irréparablement le compresseur il ne faut
pas exagérer avec la durée du cycle de
dégivrage et la limiter a un temps de 4
minutes maximum.
Il faut tenir compte qui à chaque variation du
réglage de la came du temporisateur il est
nécessaire faire un réglage conpensatif à niveau
thermostat évaporateur c'est à dire que si on
veuille augmenter la phase de démoulage à
niveau came, il faut fare correspondre a cette
variation une augmentation du cycle de
congélation en tournant la vis de réglage du
thermostat évaporateur dans le sens des aiguilles
d'une montre et viceversa dans la situation
contraire.
O.
L.
Vanne de régulation d'eau
(Modèles refroidis par eau 65 et 90)
Cette vanne maintient la haute préssion constante en contrôlant le débit d'eau circulant dans
le condenseur à eau.
Comme la haute pression monte, la vanne de
régulation s'ouvre un peu plus pour augmenter
le débit d'eau dans le condenseur.
M.
Contacteur (Seulement sur 65 et 90)
Placé à l'interieur de la boîte électrique le relais
a la fonction de alimenter ou non le compresseur,
en function à la position de l'interrupteur général.
N.
Temporisateur (50, 65 et 90)
Le temporisateur est logé dans la boîtier de
contrôle.
Ce temporisateur a deux microinterrupteurs
activés par la came dont l'extérieur correspond
à la 2ème phase du cycle de congélation et le
creux au démoulage.
La came est composée de deux disques qui
peuvent être juxtaposés, en conséquence, pour
augmenter ou diminuer la répartition en durée
de chaque phase.
Interrupteur du compresseur (65 et 90)
Logé sur la partie frontale de la boîtier de contrôle,
cet interrupteur du compresseur positionable
sur les deux suivantes situations:
Fonctionnement (I). Active directement
l'alimentation électrique du compresseur, ou,
comme dans les modèles 65 et 90, le contacteur.
Arrêt (0). Arrête le fonctionnement du
compresseur tandis que la pompe continue a
fonctionner.
P.
Pressostat HP (50, 65 et 90 a air)
Utilisée soit sur les modèles refroidis par air, ce
pressostat limites le variations de la pression de
condensation (entre 8.5÷10 bars) avec l'arrêt et
la mise en route du ventilateur.
Q.
Interrupteur principale (65 et 90)
Logé sur le dévant de la boite electrique, il sert a
couper ou a remettre en fonctionnement la
machine.
Page 30
INSTRUCTIONS
DE NETTOYAGE DU
CIRCUIT D’EAU
1. Enlevez les panneaux de dévant et
supérieur de manière à avoir accès à la boîte de
contrôle et à l’évaporateur.
2. Attendez que la machine complète le cycle
en cours et termine aussi le démoulage puis,
arrêter momentanément la machine à
l’interrupteur extérieure, dans les modéles 18,
21, 31 et 40 ou a l'interrupteur du compresseur,
dans les 50, 65 et 90.
3. Enlevez toute la glace deposée dans la
cabine de stockage pour éviter qu’elle soit
contaminée par la solution de nettoyage.
durant 3 minutes et faire le demoulage des
glaçons.
NOTE. La quantité de CLEANER à employer
et le temps nécéssaire pour le nettoyage du
circuit sont liés aux caractéristiques de l'eau
utilisée (dureté et propreté).
b) Au bout de ce temps, arrêtez la machine
tournant le bouton contrôlant la dimension des
cubes dans le sens contraire de la montre.
Effectuez les operations pour évacuer totalement
la solution détartrante puis versez de l'eau dans
le réservoir pour effectuer un bon rinçage et
repositionner le tube du trop plein.
c) Si nécessaire enlevez la plate-forme
d'arrosage pour la nettoyer soigneusement à la
main.
4. Dans les modéles 18, 21 et 31 demontez le
capouchon en plastique placé au dessous du
réservoir eau pour vidanger l'eau contenù ainsi
que les dépôts de calcaire.
5. Demontez le rideau puis, avec une bouteille,
versez de l'eau sur le fond du réservoir pour faire
tomber les ecailles de calcaire.
6. Installez de nouveau the capouchon
plastique ainsi que le rideau.
7. Dans tous les autres modéles, enlevez le
tube de trop plain pour vider le reservoir.
8. Préparez la solution de nettoyage suivante:
mélangez environ 100-200 gr de Ice Machine
Cleaner dans 2 lt. environ d’eau chaude
(45 - 50°C) contenue dans un bac en plastique.
ADVERTISSEMENT. Le produit de
nettoyage Ice Machine Cleaner contient
de l’acide phosphorique et de l’acide
hydroxyacétique.
Ces constituants sont corrosif et peuvent
provoquer des brulures en cas
d’absorption. NE PAS PROVOQUER DE
VOMISSEMENT.
Administrer de grandes quantité d’eau ou
de lait. Appeler immédiatement le
médecin. En cas de contact externe, rincer
abondamment avec de l’eau. GARDER
HORS DE PORTEE DES ENFANTS.
d) Tourner le bouton contrôlant la dimènsion
des cubes sur la position de fonctionnement
normal.
e) Faisez-le deux fois pour s'assurer de un
bon rinçage et que il n'y pas des traces du produit
detartrante.
50-65-90
a) Dans les modéles 50,65 et 90, tournez la
tige du temporisateur dans le sens de la montre
avec un tournevis jusqu'à le microinterrupteur
soit positionné au debut de la partie haute de la
camme.
9. Enlevez le couvercle d’évaporateur puis
verser lentement sur l’évaporateur la solution
préparée avant.
A l’aide d’un pinceau nettoyez les points cachés
où les dépôts calcaires sont les plus résistants.
18-21-31-40
a) Dans les modéles 18, 21, 31 et 40, mettez
en marche la machine a l'interrupteur extérieur.
Laissez la machine à glace fonctionner pendant
environ 20 minutes puis placer le bouton interrupteur de nettoyage sur la position "Lava - II"
Demarez la machine avec l'interrupteur principal
sur "I-ON". Lassez l'interrupteur du compresseur
sur "0-OFF".
Page 31
b) Laissez la machine à glace fonctionner
dans cette position pendant environ 20-25
minutes puis arrêter la machine avec l'interrupteur
général.
NOTA. Quand la machine est en LAVAGE,
le seul composent en fonctionnement est la
pompe à eau qui doit faire circuler la solution
de nettoyage à l’intérieur du circuit d’eau.
c) Enlevez le tube de trop plain pour vider le
réservoir.
d) Rincez le réservoir et remonter le tube de
trop plain.
10. Versez sur l'évaporateur de l'eau potable
avec une dose de produit alguecide puis mettez
en marche la machine par environ 10 minutes
pour stériliser le systeme hydraulique de la
machine.
NOTA. Ne melanger pas le produit detartrante
avec le produit alguecide pour eviter la
generation d'un acid tres agressive.
11. Arrêtez la machine et vidangez le réservoir
puis, avec l'interrupteur de nettoyage sur la
position "NETTOYAGE - II", dans les modéles
18, 21,31 et 40, tournez le thermostat évaporateur
sur la position de fonctionnement normal.
Dans les modéles 50, 65 et 90 tourner la camme
du timer a fin que les microinterrupteurs soient
dans la position "debut phase de dégivrage"
(partie basse de la came).
Apres ça mettre l'interrupteur général sur "I-ON".
Si faisant, ont vient d'activer la vanne d'arrivée
d'eau pour permettre un correct remplissage.
12. Une fois que le niveau d'eau déborde par le
trop plein (eau qui coule par le tuyau de vidange)
il faut mettre l'interrupteur du compresseur sur
I-ON (50, 65 et 90) ou placer l'interrupteur de
NETTOYAGE sur la position "MARCHE - I", au
but de faire marcher la machine en
fonctionnement automatique.
13. Replacez le couvercle de l'évaporateur et
remontez les panneaux enlevés avant.
14. Quand le cycle est completé et les glaçons
sont démoulés examinez chaque cube de glace
pour s’assurer qu’ils sont bien transparent et que
tout le goût acide a été eliminé.
ATTENTION. Si les glaçons sont opaques
et ils ont un goût acide il faut les faire
fondre en versant sur eux de l’eau chaude.
15. Nettoyez avec un chiffon propre les parois
intérieures de la cabine de stockage.
RAPPELEZ: que pour prévenir l’accumulation
des bactéries ou micro-organismes indésirables il est bien nécessaire de stériliser toutes
les semaines l’intérieur de la cabine de
stockage à l’aide du produit desinfectant/anti
algues.
Seite 32
ALLGEMEINES UND
INSTALLATION
A. EINLEITUNG
Dieser Eiswürfelbereiter wurde mit hoher Qualität
gestaltet, entworfen und hergestellt.
Ihr System der Eiswürfelbereitung unterliegt
strengsten Qualitätskontrollen, um den höchsten
Ansprüchen in bezug auf Anpassung an die
Wünsche eines jeden Kunden gerecht zu werden.
Unsere Eisbereiter werden so entworfen, daß sie
unseren hausinternen strengen Sicherheits- und
Qualitätsanforderungen gerecht werden.
HINWEIS. Zur Beibehaltung der Sicherheit
und der Leistung dieses Eisbereiters its es
wichtig, daß die Anweisungen zur Installation
und zur Bedienung, wie in dieser Anleitung
aufgeführt, beachtet werden.
B. AUSPACKEN UND KONTROLLIEREN
1. Führen Sie eine Sichtprüfung der äußeren
Verpackung und der Rutschen durch. Jeder von
Ihnen bemerkte, ernsthafte Schaden ist dem
Anlieferer zu melden. In Anwesenheit eines
Repräsentanten des jeweiligen Transportunternehmens ist dann ein Schadensbericht in
bezug auf die Überprüfung und den
Packungsinhalt auszufüllen.
2. a) Schneiden und entfernen Sie zur
Sicherung angebrachten Kunststoffstreifen von
der Kartonverpackung.
b) Öffnen Sie die Oberseite des Kartons,
und entfernen Sie die Schutzabdeckung aus
Styropor.
c) Ziehen Sie die Styroporteile aus den
Ecken, und entfernen Sie den Karton.
3. Entfernen Sie die Vorder- und die Rückwand
der Einheit, und untersuchen Sie sie auf versteckte
Schäden. Wenn ein versteckter Schaden vorliegt,
wenden Sie sich, wie unter Schritt 1 beschrieben,
an das jeweilige Transportunternehmen.
4. Die Klappe öffnen und alle Stützelemente
und Verstärkungen sowie die Klebebandstreifen
entfernen.
5. Stellen Sie sicher, daß die Kühlschlangen
nicht gegeneinander scheuern oder sich
gegenseitig oder andere Oberflächen berühren.
Darüber hinaus müssen sich die Ventilatorflügel
frei bewegen können.
6. Benutzen Sie ein sauberes, feuchtes Tuch,
um die Oberflächen auf der Innenseite des
Vorratsbehälters sowie die Außenseite der
Einheit zu reinigen.
7. Beachten Sie das Typenschild, die sich auf
der Rückseite des Gerätes befindet, um
sicherzustellen, daß Ihre Netzspannung mit der
Betriebsspannung des Gerätes übereinstimmt.
WARNUNG. Eine falsche Spannung der
elektrischen
Versorgung
wird
automatisch Ihre Garantierechte
annullieren.
8. Nehmen Sie die Registrierkarte des
Herstellers aus der Bedienungsanleitung, und
tragen Sie alle Teile dort ein, einschließlich der
Modell- und Seriennummer, die Sie dem
Typenschild entnehmen können.
Senden Sie die ausgefüllte, adressierte
Registrierkarte zum Hersteller.
C. STELLPLATZ UND AUFSTELLUNG
1. Stellen Sie das Gerät an dem ausgewählten,
permanenten Stellplatz auf.
Die Kriterien für die Auswahl eines Platzes sind:
a) Eine Raumtemperatur von wenigstens
10°C und höchstens 40°C.
b) Die Temperatur des zufließenden Wasser:
Mindestens 5°C und höchstens 40°C.
c) Ein gut belüfteter Platz für die luftgekühlten
Modelle. Reinigen Sie den luftgekühlten
Kondenser in regelmäßigen Abständen.
d) Wartungszugang: Es muß ausreichend
Platz für die Wartungsverbindungen auf der
Rückseite des Eiswürfelbereiters vorhanden sein.
Ein minimaler Abstand von 15 cm muß zu den
Seiten der Einheit gelassen werden, damit der
kühlende Luftzug in die und aus der Einheit auch
weiterhin für einen guten Kondensationsvorgang
der luftgekühlten Modelle gewährleistet.
HINWEIS. Bei eingebauten Gerät verringert
sich die Eisleitung in Bezug auf das was im
Diagramm angegeben bis zu Erreichung
des max. 10% bei Raumtemperaturen höher
als 32°C.
Die tägliche Leistung verändert sich in Bezug
auf die verschiedene Raumtemperatur,
Wasserverorgungtemperatur, und Standort
der Maschine. Um eine optimale Leistung
ihres EISBEREITERS einzuhalten soll eine
periodische Wartung durchgeführt werden,
wie im Abschnitt dieser Bedienungsanleitung angegeben.
Seite 33
2.
Richten Sie das Gerät sowohl von links
nach rechts, als auch von vorn nach hinten aus.
HINWEIS. Dieser Eisbereiter besteht aus
empfindlichen Prezisionsbestandteilen so
dass eventuelle Stösse vermeidet werden
müssen.
D.
ELEKTRISCHE ANSCHLÜSSE
Informieren Sie sich auf dem Typenschild über
die geltenden Voraussetzungen der
Kabelstärken, die Sie für die elektrischen
Anschlüsse benötigen. Bei allen Eisbereitern ist
ein solides Erdungskabel erforderlich.
Das Gerät wird vom Hersteller komplett mit allen
Kabeln geliefert, es ist nur noch erforderlich, die
Verbindung zum elektrischen Strom mit dem auf
der Rückseite des Gerätes befindlichen
Stromkabel herzustellen.
Stellen Sie sicher, daß das Gerät an seinen
eigenen Stromkreis angeschlossen und
individuell abgesichert ist (entnehmen Sie dem
Typenschild die Sicherungsgröße).
Die maximal zulässigen Spannungsschwankungen liegen im Bereich von –10% und
+10% der auf dem Typenschild angegebenen
Spannung. Eine zu niedrige Spannung kann
eine fehlerhafte Funktion verursachen und
verantwortlich für eine erhebliche Beschädigung
des Überspannungsschalters oder der
Motorspule sein.
HINWEIS. Alle externen Stromkabel sollten
gemäß den nationalen Richtlinien verlegt
werden.
Bevor Sie das Gerät anschließen, überprüfen
Sie die Spannung Ihres Stromnetzes sowie
die auf dem Typenschilsd angegebene
Spannung.
E.
WASSERVERSORGUNG UND
ABFLUSSLEITUNGEN
Allgemeine Information
Bei der Wahl der Wasserversorgung für den
Eisbereiter sollten Sie folgendes berücksichtigen:
a) Die Versorgungslänge
b) Wasserreinheit und –klarheit
c) Ausreichenden Wasserversorgungsdruck
Da Wasser der wichtigste Einzelbestandteil bei
der Herstellung von Eis ist, können Sie den oben
aufgeführten drei Punkten nicht genügend
Beachtung schenken. Niedriger Wasserdruck
unterhalb von 1 bar kann eine Fehlfunktion der
Eisbereitereinheit zur Folge haben. Aus Wasser,
das einen Überschuß an Mineralien enthält,
entstehen zumeist trübe Eiswürfel. Darüber
hinaus lagert sich Kalk an den Teilen des
Wassersystems ab.
Wasserversorgung
Schließen Sie das 3/4“ Steckverbindungsstück
des Wassereinlaß – Magnetventils unter
Verwendung der im Lieferumfang enthaltenen,
biegsamen Schlauch an den regulären
Sanitäranschlüssen der Kaltwasser –
Versorgungsleitung an. Ein Absperrventil ist an
einer zugänglichen Stelle zwischen der
Wasserversorgungsleitung
und
der
Eisbereitereinheit zu installieren.
WASSERVERSORGUNG-WASSERGEKÜHLTE
MASCHINEN
Die wassergekühlten Maschinen müssen an zwei
getrennte Wasser-versorgungsleitungen
angeschlossen werden, d.h. eine Leitung für die
Eiswürfel-Produktion und eine Leitung für den
wassergekühlten Kondensator.
Wasserabfluß
Das empfohlene Ablaufrohr ist ein Kunststoffrohr
oder ein biegsames Rohr mit einem
Innendurchmesser von 18 mm (3/4“), welches zu
einem offenen, übergitterten und belüfteten
Abfluß verlegt ist. Wenn der Abfluß über eine
lange Strecke erfolgt, lassen Sie die Leitung pro
Meter um 3 cm höher legen.
Ferner ist eine vertikale, offene Belüftung an der
Abflußverbindung der Einheit erforderlich, um
die korrekte Drainage des Auffangbeckens zu
gewährleisten.
Wasserabfluß – Wassergekühlte Modelle
Die Wasserablaufleitung vom Kondensator ist
bei wassergekühlten Versionen intern mit den
Abflußanschlüssen der Einheit verbunden.
Es ist aus diesem Grund überaus ratsam, eine
vertikale, offene Lüftung über dem höchsten
Punkt der Abflusses der Einheit zu installieren,
um einen guten Abfluß zu gewährleisten. Ferner
wird empfohlen, die Abflußleitung zu einer
übergitterten und belüfteten Abflußvorrichtung
im Boden zu führen, um einen guten Abfluß zu
gewährleisten, da bei einem schlechten Abfluß
das Wasser, welches aus dem Kondenser läuft,
im ungünstigsten Fall durch die Abflußrohre der
Einheit in den Eisvorratsbehälter fliessen kann.
HINWEIS: Die Wasserversorgung und der
Wasserabfluß müssen gemäß den nationalen
Bestimmungen verlegt werden. In einigen
Fällen sind ein eingetragener Klempner
und/oder eine Verlegungsgenehmigung
erforderlich.
Seite 34
F.
ENDKONTROLLE:
1. Befindet sich die Einheit in einem Raum, in
dem die Mindesttemperatur 10°C beträgt, auch
in den Wintermonaten?
2. Ist um die Einheit herum ein Mindestabstand
von wenigstens 15 cm für eine gute Luftzirkulation
gegeben?
3.
Steht die Einheit gerade auf einer ebenen
Oberfläche? (WICHTIG)
4.
Wurden alle elektrischen Leitungen und
alle Rohre verlegt und ist das Absperrventil offen?
5. Wurde die Spannung geprüft und gemäß
den Daten auf dem Typenschild kontrolliert?
6. Wurde der Wasserversorgungsdruck
überprüft, um einen Wasserdruck von wenigstens
1 bar sicherzustellen?
7. Überprüfen Sie alle Leitungen des GefrierHydraulischen Kreises, um Schwingungen,
G.
Scheuern und eventuelle Störungen
auszuschliessen.
Uberpüfen Sie auch alle Rohrklemmen (gut
befestigt) und elektrische Kabel (gut
angeschlossen).
8. Wurden die Befestigungsschrauben des
Kompressors überprüft?
9. Wurden der Vorratsbehälter ausgewischt
und die Außenseite des Behälters gereinigt?
10 Hat der Eigentümer / Benutzer die
Bedienungsanleitung erhalten und ist er/sie über
die
Wichtigkeit
der
regelmäßigen
Wartungskontrollen informiert worden?
11 Wurde die Herstellerregistrierkarte korrekt
ausgefüllt? Kontrollieren Sie mit Hilfe des
Typenschilds, ob das korrekte Modell und die
richtige Seriennummer eingetragen ist). Schicken
Sie die Registrierkarte an den Hersteller.
12 Hat der Eigentümer den Namen und die
Telefonnummer der für Ihn zuständigen
Kundendienst – Fachvertretung erhalten?
INSTALLATION
1. Manuell zu betätigendes Absperrventil
2. Wasserfilter
3. Wasserversorgungsleitung (biegsamer
Schlauch)
4. 3/4" Steckverbindung
5. Belüfteter Abfluß
6. Offener, übergitterter, belüfteter Abfluß
7. Abflußanschluß
8. Hauptschalter
9. Stromkabel
WARNUNG. Dieser Eisbereiter ist nicht für Aufstellung im Freien geplant und arbeitet nicht
unter Raumtemperaturen unter 10°C bzw. über 40°C.
Das gleiche gilt für Wassertemperaturen die nicht unter 5°C oder über 35°C sein müssen.
Seite 35
Betriebsanleitung
Inbetriebnahme
Nachdem Sie den Eisbereiters korrekt installiert
haben und alle Rohre und elektrischen
Verbindungen verlegt sowie alle Anschlüsse
vorgenommen haben, führen Sie die folgenden
Schritte zur Inbetriebnahme durch.
18-21-31-40
A. Entfernen Sie die Frontabdeckung der
Einheit und suchen Sie den Reinigungsschalter.
B. Stellen Sie den Reinigungsschalter in die
Position “Reinigen“ (II). Hierdurch wird der
elektrische Stromkreis zum Wassereinlaßventil
und zum Heißgas - Magnetventil gesperrt.
C. Schalten Sie den Stromkabel –
Deaktivierungsschalter ein (ON). Die Einheit
schaltet in die Wasserfüllphase ein. Während
dieser Phase werden folgende Komponenten
aktiviert:
Wassereinlaß – Magentventil
Heißgas – Magnetventil
Die Wasserpumpe und der Ventilatormotor sind
ebenfalls in Betrieb.
D. Lassen Sie die Einheit ungefähr 3 bis 4
Minuten im Abtauzyklus, bis das Wasser aus
dem Abflußschlauch kommt, bringen Sie dann
den Reinigungsschalter wieder in die
Betriebsposition (I).
50-65-90
A. Entfernen Sie die Frontabdeckung der
Einheit und suchen die die Timer-Welle in den
Schaltkasten.
B. Kontrollieren Sie, dass der Haupt-und
Kompressorschalter in der untere - linke Seite
des Schaltkastens beide auf OFF sind.
C. Drehen Sie die Timer-Welle, durch die
Frontseite des Schaltkastens, im Uhrzeigersinn
bis man ein "click" hört: dies bedeutet dass der
Mikroschalter des Timers in der unteren Seite
des Nockens ausgelöst ist.
F. Nach Beendung der Abtauphase (etwa 3
Minuten) den Kompressorschalter auf ON stellen.
B
ABTAUPHASE
GEFRIERPHASE
NOCKEN MIT ANGABE
DER GEFRIER-ABTAUPHASE
HINWEIS: Während des Abtauzyklus wird
das Wassereinlaß – Magnetventil aktiviert.
Das Wasser fließt durch das Ventil zur
Oberfläche der Verdampferplatte und dann
abwärts, um die Auffangvorrichtung des
Eisbereiters für den nächsten Gefrierzyklus
zu füllen.
Betriebskontrolle
A. Die Einheit startet jetzt ihren ersten
Gefrierzyklus, hierbei sind die folgenden
Bestandteile in Betrieb:
Kompressor
Wasserpumpe
Ventilatormotor bei der luftgekühlten Version
B. Sehen Sie durch die Eisauswurföffnung, um
sicherzustellen, daß das Sprühsystem korrekt
montiert ist und daß die Wasserdüsen das Innere
der Kegelformer gleichzeitig erreichen; stellen
Sie ferner sicher, daß der Kunststoffvorhang frei
hängt und daß nicht zu viel Wasser durch diesen
hindurchdringt.
C. Das Eisbereitungsverfahren verläuft so, daß
Wasser in die Former gesprüht wird und dann
allmählich gefriert, wobei die Wärme an das
Kühlmittel abgegeben wird, welches in die
Verdunsterschlange geleitet wird.
D. Das Gerät in betrieb setzen bei Stellung des
Hauptschalters auf ON. Der Kompressorschalter
soll auf Position OFF bleiben Dies schliesst den
elektrischen Kreis zu dem Wassereinlass - und
Heissgasventil.
D. In die Modelle 18-21-31-40, wenn die
Verddampfertemperatur einen vorher
festgelegten Wert erreicht, ändert der
Verdampferthermostat oder die Würfelgrößensteuerung die Kontakte; der Gefrierzyklus endet
und der Abtauzyklus beginnt.
Bei den Modelle 50-65-90 dreht sich der Timer
nicht an Ende der Abtauphase. Er startet später,
wenn der Verdampferthermostat-Fühler, in dem
Verdampfer gestellt, die Temperatur von etwa 15°C (5F) erreicht.
E. Das Gerät beginnt seine erste Gefrierphase,
bei Betätigung des ON Schalters.
Folgende Bestandteile sind aktiviert:
Wassereinlassventil
Heissgasventil
Timer Motor
E. Der Gefriervorgang dauert zwischen 20 und
22 Minuten bei einer Umgebungtemperatur von
21°C. Der Vorgang dauert länger, wenn die
Temperatur höher ist, weniger lange, wenn die
Temperatur niedriger ist. Ein durchschnittlich
durchgeführter Zyklus dauert zwischen 23 und
25 Minuten.
Seite 36
F. Überprüfen Sie während des ersten Abtau/ Ausgabezyklus‘, daß das Wasser korrekt in die
Auffangvorrichtung fließt und diese korrekt
aufgefüllt wird. Das überschüssige Wasser muß
in das Überfluß – Ablaufrohr geleitet werden.
Es soll bemerkt werden dass wenn die
Raumtemperatur später wieder auf 20÷30°C
sinkt, bei soll der Knopf wieder auf dem weissen
Punkt gedreht werden (siehe Ab. unten).
G. Kontrollieren Sie die Beschaffenheit der
frischen Eiswürfel. Die korrekte Größe muß eine
kleine Vertiefung (ungefähr 5 – 6 mm) an der
Oberseite aufweisen. Sollte dies nicht der Fall
sein, warten Sie den zweiten Abtau- /
Ausgabezyklus ab, bevor Sie Veränderungen
vornehmen.
H. Sofern notwendig, bei den Modelle 21, 31
und 50 kann die Länge des Gefrierzyklus durch
Drehen des Verdampfer-thermostat auf der
Vorderseite der Schalttafel angepaßt werden,
bis die gewünschte Größe erreicht wird.
• Wenn die Raumtemperatur, wo
sich das Gerät
befindet, unter
20ºC liegt, werden
die Würfel teilweise
hohl sein (siehe
Abbildung rechts).
• Wenn die Raumtemperatur, wo
sich das Gerät
befindet, höher als
30ºC liegt, werden
die hergestellten
Würfel
einen
dickeren Eisrand
um der "Krone"
herum haben.
Wenn unbedingt notwendig kann die
obengenannte Situation wie folgt abgeändert
werden:
in dem ersten Fall bei Drehung, im Uhrzeigersinn,
des Kontrolknopfes (wenig oder mehr, wie man
will)
in dem zweiten Fall bei Drehung, im
Gegenuhrzeigersinn (nach rechts) des
Kontrolknopfes.
Wenn die Eiswürfel flach und trüb sind, ist es
möglich, daß der Eisbereiter gegen Ende des
Gefrierzyklus mit zu wenig Wasser versorgt wird
oder daß die Qualität des zufließenden Wassers
den Einsatz eines entsprechenden Wasserfilters
oder Conditioners erforderlich macht.
I. Halten Sie während des Ausgabezyklus‘
eine Handvoll Eiswürfel gegen den
Temperaturfühler des Vorratsbehälterthermostats. Der Eisbereiter schaltet sich dann
innerhalb von 1 bis 2 Minuten ab.
Entnehmen Sie das Eis aus dem
Vorratsbehälterthermostat. Der Eisbereiter
nimmt innerhalb von 3 bis 4 Minuten den Betrieb
automatisch wieder auf.
HINWEIS: Der Vorratsbehälterthermostat ist
werkseitig eingestellt auf 1°C AUS und 4°C
EIN.
K.
Bringen Sie die Frontabdeckung der
Einheit wieder an und weisen Sie dann den
Eigentümer / Benutzer in den allgemeinen Betrieb
des Eisbereiters ein, und informieren Sie Ihn
ferner über alle erforderlichen Reinigungs- und
Wartungsmaßnahmen.
Seite 37
Betrieb
Funktionsweise des Eisbereiters
Im Eisbereiter wird das Wasser, das zur
Eisherstellung benötigt wird, ständig von einer
Wasserpumpe in Bewegung gehalten. Diese
Wasserpumpe pumpt es zur Sprühsystemdüse,
von wo aus es in die Kegelformer des Verdunsters
geleitet wird (siehe Abb. A).
Eine geringe Menge des gesprühten Wassers
friert zu Eis der Rest läuft bedingt durch die
Schwerkraft kaskadenartig zurück in die
Auffangvorrichtung darunter und kann so erneut
in Umlauf gebracht werden.
Gefrierzyklus (Abb. B)
Das Heißgaskühlmittel, daß vom Kompressor
abgeschieden wird, erreicht den Kondenser, wo
es heruntergekühlt wird und in den flüssigen
Zustand kondensiert. Es fließt dann in die
Flüssigkeitsleitung und passiert den Trockner /
Filter. Von dort aus fließt es bis zum
Kapillarröhrchen, wo es seinen Druck verliert.
Daraufhin gelangt das Kühlmittel in die
Verdunsterschlange (diese weist einen größeren
Durchmesser als das Kapillarröhrchen auf) und
beginnt zu kochen. Dieser Vorgang wird noch
unterstützt durch die Wärme die von dem
Sprühwasser übertragen wird.
Das Kühlmittelvolumen erhöht sich, es wird
vollständig zu Dampf. Der Kühldampf passiert
den Saugakkumulator (dieser wird verwendet,
um zu verhindern, daß kleine Mengen von
flüssigem Kühlmittel in den Kompressor
gelangen) und gelangt durch die Saugleitung.
Sowohl im Akkumulator als auch in der
Saugleitung gibt es die Wärme an das Kühlmittel
ab, welches durch das Kapillarröhrchen fließt
(Wärmer), bevor es in den Kompressor gesaugt
wird und als heiß komprimiertes Kühlmittelgas
wieder in Umlauf gelangt.
Der Gefrierzyklus der 18-21-31-40 Modelle wird
vom Verdunsterthermostat gesteuert dessen
Temperaturfühler in Berührung mit der
Verdunsterschlange steht, während in den 5065-90 Modelle gibtes eine zweite Phase von dem
Timer gesteuert.
Die elektrischen Komponenten, die während des
Gefrierzyklus in Betrieb sind, sind folgende:
Kompressor
Wasserpumpe
Ventilatormotor (bei der luftgekühlten Version)
Bei den 18-21-31-40 luftgekühlten Versionen ist
der Kühlmitteldruck allmählich von ungefähr 11
bar (155 psig) zu Beginn des Gefrierzyklus mit
einer Einheit bei 21°C Umgebungstemperatur
auf einen Mindestwert von ungefähr 7 bar (100
psig) während der letzten Sekunden kurz vor
Ende des Gefrierzyklus und bevor der
Abtauzyklus beginnt gesenkt.
Bei den 50-65-90 Versionen der hochdruck
Kühlmittel ist zwishen zwei vorherbestimmten
Werte eingehalten (10÷8,5 bar - 140÷120 psig), mit
der Maschine in einer Raumtemperatur von 21°C.
Das Sinken des Drucks hängt mit der
Reduzierung des Verdunstungsdrucks
zusammen, der von dem progressiven
Wachstum der Eisstärke in den Kegelformern
und dem vom Ventilator kommenden Luftstroms
durch den luftgekühlten Kondenser verursacht
wird. Die oben aufgeführten Werte sind direkt
abhängig von der Umgebungstemperatur des
Eisbereiter-standorts. Die Werte steigen, wenn
die Umgebungstemperatur sich erhöht.
Bei den 18-21-31-40-50 wassergekühlten Versionen
liegt der Kühlmitteldruck zwischen 8,5 und 10
bar (120 – 140 psig). Der Druck wird gesteuert
durch eine automatische Hochdrucksteuerung,
die ein Wassereinlaß - Magnetventil an der
Wasserleitung zum Kondenser, durch die das
Kühlwasser zum Kondensor gelangt, betätigt.
Bei den 65-90 wassergekühlten Modelle ist der
Hochdruck regelmässig bei 9,5 bar, von dem
Wasserregulierventil kontrolliert.
Zu Beginn des Gefrierzyklus sinkt die Ansaugung
des Kühlmittels oder der Niedrigdruck schnell
auf 1,0 bar (-14 psig), danach fällt der Druck
allmählich ab – in direktem Bezug zur
wachsenden Eisstärke – um schließlich gegen
Ende des Zyklus ungefähr 0 + 0,1 bar (- 0 + 1,5
psig) für die Modelle 21-31-40 und 0.2 ÷ 0.3 bar
(3 ÷ 4 psig) für die Modelle 50-65-90 zu erreichen,
wenn die Eiswürfel im Kegelformer vollkommen
ausgeformt sind. Die Gesamtlänge des
Gefrierzyklus liegt zwischen 23 und 25 Minuten.
Abtau- oder Ausgabezyklus (Abb. D)
Bei den 18-21-31-40 Modelle, wenn die
Temperatur des Verdampfer-thermostats, der
sich in Berührung mit der Verdunsterschlange
befindet, auf einen vorher eingestellten Wert
fällt, ändern sich hierdurch die elektrischen
Kontakte, so daß folgende Komponenten aktiviert
werden (Bei den 50-65-90 Modelle, wenn der
Mikroschalter des Timers in der unteren Seite
des Nockens fällt, ändert dieser seine elektrische
Kontakte und aktiviert die selben Bestandteilen):
Kompressor
Wassereinlaß – Magnetventil
Heißgas – Magnetventil
Das zufließende Wasser fließt zunächst durch
das Wassereinlaß - Magnetventil und die
Flußsteuerung, läuft über die Verdunsterplatte
und wird dann von der Schwerkraft durch die
Tropflöcher in die Auffangvorrichtung / den
Behälter (Abb. C) gelenkt.
Durch das Wasser, das in die Auffangvorrichtung
/ den Behälter gelangt, wird das überschüssige
Wasser des vorherigen Gefrierzyklus verdrängt
und fließt in das Überflußrohr. Dieser Überfluß
begrenzt das Niveau der Wasserauffangvorrichtung. Das aufgefangene Wasser wird dazu
verwendet, um den nächsten Satz Eiswürfel zu
produzieren.
Das Kühlmittel wird als Heißgas vom Kompressor
abgeschieden und gelangt durch das Heißgas –
Magnetventil direkt in die am Kondensor vorbei
führende Verdunsterschlange.
Seite 38
Der Heißgasumlauf in die Verdunsterschlange
erwärmt die Kupferformen, so daß die Eiswürfel
ausgeworfen werden. Die aus den Kegelformern
ausgeworfen en Eiswürfel fallen durch die
Schwerkraft auf eine geneigte Würfelrutsche,
gelangen durch die Öffnung mit dem Vorhang
und fallen in den Eiswürfel – Vorratsbehälter. Bei
den 18-21-31-40 Modelle wenn die Temperatur
des Temperaturfühlers des Verdunstertermostats
eine Höhe von +3 ±4°C erreicht, werden dessen
elektrische Kontakte zurück auf die vorherige
Position bewegt und ein neuer Gefrierzyklus wird
aktiviert. Sowohl das Heißgas – als auch das
Wassereinlaß – Magnetventil werden deaktiviert
(geschlossen).
Bei den 50-65-90 Modelle, wenn der Mikroschalter
des Timers die untere Seite des Nockens beendet
ist und wieder betätigt wird, eine neue
Gefrierphase beginnt (Heisgassventil und
Magnetventil werden deaktiviert - geschlossen).
HINWEIS: Bei den 18-21-31-40 Modelle die
Länge des Abtau- / Auswerfzyklus‘ ist
abhängig (nicht einstellbar) von der
Umgebungstemperatur (kürzer bei hoher
Umgebungstemperatur und länger bei
niedriger Umgebungstemperatur).
Beschreibung der Komponenten
A. Wasserpumpe
Die Wasserpumpe arbeitet kontinuierlich während
des Gefrierzyklus‘. Die Pump pumpt das Wasser
aus der Auffangvorrichtung in das Sprühsystem.
Durch die Sprühdüsen wird das Wasser in die
Kegelformer gesprüht, wo es zu kristallklaren
Eiswürfeln gefriert.
B. Wassereinlaß – Magnetventil – 3/4"
Steckverbindungsstück
Das Wassereinlaß – Magnetventil wird nur
während des Abtauzyklus aktiviert.
Wenn es aktiviert ist, läßt es eine bestimmte
Menge zufließenden Wassers über die
Verdunstervertiefung fließen, um somit
zusammen mit dem Heißgas für das Abtauen
des Eises zu sorgen. Das Wasser, daß über die
Verdunstervertiefung läuft, tropft, bedingt durch
die Schwerkraft, durch die Tropflöcher der Platte
in die Auffangvorrichtung.
Bei den 18, 21, 31, 40-50 wassergekühlten
Versionen ist das Wassereinlaß – Magnetventil
mit einem Einlaß und zwei Auslässen mit zwei
voneinander getrennten Topfmagneten
ausgestattet, wobei der erste (für die
Eisproduktion) durch die Kontakte 3 – 2 des
Verdunsterthermostats aktiviert wird und der
zweite (wassergekühlter Kondenser) durch eine
spezielle Hochdruck-steuerung.
C. Heißgas – Magnetventil
Das Heißgas – Magnetventil besteht
hauptsächlich aus zwei Teilen: Dem Ventilkörper
und der Ventilspule. Das Heißgas - Magnetventil
befindet sich and der Heißgasleitung und wird
von den Kontakten 3 – 2 des Verdunster-
thermostats während des Abtauzyklus aktiviert.
Während des Abtauzyklus wird das die Heißgas
– Ventilspule aktiviert, und zieht somit den Kolben
des Heißgas – Magnetventils an. Hierdurch kann
das Heißgas, das vom Kompressor abgeschieden
wird, direkt in die Verdunsterschlange gelangen,
um dort die geformten Eiswürfel durch Antauen
zu lösen.
D. Vorratsbehälterthermostat
Das Steuerteil des Vorratsbehälterthermostats
befindet sich vorne auf der Schalttafel hinter der
abnehmbaren Abdeckung.
Das Fühlrohr des Thermostats befindet sich in
einem Temperaturfühlhalter an der Seitenwand
des Eisauffangbehälters, wo es den Eisbereiter
automatisch abschaltet, wenn der Fühler in
Berührung mit dem Eis kommt und den Eisbereiter
automatisch wieder aktiviert, wenn das Eis
entfernt wird. Die werkseitigen Einstellungen sind
1°C AUSSCHALTEN und 4°C EINSCHALTEN.
E.
Würfelgrößensteuerung
(Verdampferthermostat)
18-21-31-40
Die Würfelgrößensteuerung (Verdampferthermostat) sitzt vorne auf der Schalttafel hinter
der abnehmbaren Abdeckung. Sie ist hauptsächlich
eine umgekehrt fungierende Temperatursteuerung, die die Kontakte 3 – 2 schließt, wenn
die Temperatur fällt und die gegenüberliegenden
Kontakte 3 – 4 schließt, wenn die Temperatur steigt.
Der Temperaturfühler befindet sich in einem
Kunststoffrohr (Fühlerhalter), der von zwei
Klemmen direkt an der Verdunsterschlange
befestigt ist.
Diese Steuerung bestimmt die Länge des
Gefrierzyklus und demzufolge auch die Größe
der Eiswürfel.
Eine niedrigere Einstellung resultiert in größeren
Eiswürfeln (Übergröße) während eine höhere
Einstellung geringere Eiswürfeln (flache Würfel)
zur Folge hat. Wenn die Kontakte 3 – 2
geschlossen sind, aktiviert sie die Komponenten
des Abtau- oder Auswerfzyklus‘.
Die Würfelgrößensteuerung wird werkseitig
eingestellt (Knopf in der Position mit dem
schwarzen Punkt) und muß nicht weiter eingestellt
werden, sofern die Temperaturanforderungen
zwischen 20 und 30°C eingehalten werden (70
und 90°F)
50-65-90
Der Verdampferthermostat mit seinem
empfindlichen Fühler in Kontakt mit dem Aussen
rohr des Verdampfers "liest" die KühlmittelVerdampfungstemperatur (die während der
Gefrierphase sinkt) und wenn diese den
vorherbestimmten Wert erreicht, schaltet er seine
Kontakte von 3-4 an 3-2, um die Endphase (2e
Phase) zu aktivieren. Diese 2e Phase hat eine
vorherbestimmte Dauer, durch die Diameterbreite
der Kreislinie des Timernockens bestimmt ist.
F. Ventilatormotor (luftgekühlte Version)
Der Ventilatormotor ist elektrisch mit der
Wasserpumpe parallelgeschaltet und arbeitet
kontinuierlich während des Gefrierzyklus‘, um
Seite 39
den richtigen Druck durch die Luftzirkulation
durch die Kondenserrippen zu gewährleisten.
Bei 50-65-90 der Betrieb des Ventilatormotors ist
durch ein Pressostat, an vorherbestimmten Werte
eingestellt, kontrolliert.
G. Kompressor
Der hermetisch versiegelte Kompressor ist das
Kernstück des Kühlmittelsystems. Er wird
verwendet, um das Kühlmittel im gesamten
System umlaufen zu lassen und zum Schluß
wieder aufzufangen. Er komprimiert den
Niedrigdruck – Kühldampf, läßt dessen
Temperatur somit steigen und wandelt den
Niedrigdruck – Kühldampf in Hochdruck –
Heißdampf (Heißgas), welcher durch das
Abgabeventil abgelassen wird.
H. Wassersprühsystem
Durch die Düsen dieses Systems wird das Wasser
in jede einzelne Kegelform gesprüht, wo es zu
Eis gefriert.
L. Timer (Zeituhr - nur 50-65-90)
Ist mit 2 Mikroschalter ausgerüstet und befindet
sich in dem Schaltkasten.
Der Betrieb des Timers beginnt wenn der
Verdampferthermostat ihn aktiviert.
Die breitere diameter-Kreislinie seines Nockens
bestimmt den zweiten Teil der Gefrierphase
während der kleinere die Abtauphase.
Das Timernockens kann eingestellt werden um
die Abtauzeit abzuändern.
ACHTUNG. Die Abtauzeit nie für mehr als
4 Minuten einstellen, da dies den
Kompressormotor in Gefahr bringen wird.
Er läuft ohne anzuzeigen, dass eine Erweiterung
der Abtauzeit direkt die Teilzeit der Gefrierphase,
und umgekehrt, verkürzen wird.
Deshalb jede Änderung der Timernockens
benötigt eine sehr sorgfältige Ausgleicheinstellung der Verdampferthermostats.
I . Hochtemperatur – Sicherheitsthermostat
Der Thermostat befindet sich unten an der
Schalttafel. Er ist ein manueller Rückstellschalter,
der auslöst und den Betrieb der Eismaschine
unterbricht, wenn der Temperaturfühler (der sich
an der Leitung vor dem Trockner befindet), eine
Temperatur von 70°C erreicht.
M. Hauptschalter (nur 50-65-90)
Befindet sich in dem Schaltkasten, schaltet das
Gerät ein-aus.
J. Reinigungsschalter (nur 18-21-31-40)
Er befindet sich unten links an der Schalttafel
und wird verwendet, um das Wassereinlaß – und
das Heißgas – Magnetventil zu betätigen, so daß
das Wasser in die Auffangvorrichtung der
Maschine gelangen kann.
O. Lüfter-Pressostat (nur 50-65-90)
Verwendet auf Luftgekühlte Modelle, hält den
Hochdruck zwischen der vorherbestimnten Werte
ein.
K. Hochdrucksteuerung
(Wassergekühlte Version)
Diese Steuerung wird nur in wassergekühlten
18-21-31-40 Versionen verwendet. Bei zwischen
8,5 und 10 bar (120 + 140 psig) sorgt sie dafür,
daß der Druck des Kühlmittelsystems gehalten
oder gesenkt wird, indem sie die Spule des
Wassereinlaß – Magnetventils, das wiederum
den Fluß des Kühlwassers zum Kondenser
steuert, aktiviert.
N. Kompressorschalter (nur 50-65-90)
Befindet sich in dem Schaltkasten, deaktiviert
den Kompressor während der Reinigung.
P.
Wasserregulierventil
(nur 65-90 wassergekühlt)
Dieses Ventil steuert den Hochdruck im
Kältemittelkreislauf, bei Regulierung der
Wassermenge zu dem Kondensator. Wenn der
Druck steigert, öffnet sich das Ventil um den
Wasserstrom zu erhöhen.
Q. Fernschalter (nur 65-90)
Schliesst oder öffnet den elektrischen Kreis zu
dem Kompressor.
Seite 40
Anweisungen zur Wartung
und Reinigung
Lassen Sie den Eisbereiter ungefähr 20 Minuten
lang arbeiten. Drehen Sie dann den Reinigungsschalter in die Position "Reinigen", bis die Eiswürfel
aus ihren Kegelformen gelöst sind (II).
Anweisungen zur Reinigung des Wassersystems
HINWEIS: Die Menge an Reinigungsmittel
und die Zeit, die für die Reinigung des
Wassersystems benötigt wird, hängt vom
Wasserzustand ab.
1. Entfernen Sie die vordere und obere
Abdeckung, um Zugang zur Schalttafel und zum
Verdampfer ermöglichen.
2. Stellen Sie sicher, daß alle Eiswürfel aus
Ihren Kegelformen gelöst worden sind. Das Gerät
durch den Hauptschalter, bei den Modelle 18-2131-40, ausschalten; bei den Modelle 50-65-90
durch den Kompressor-und Hauptschalter.
3. Entfernen Sie alle Eiswürfel, die sich noch
im Vorratsbehälter befinden, damit sie nicht mit
der Reinigungslösung kontaminiert werden.
2. Drehen Sie den Würfelgrößen –
Steuerungsknopf entgegen dem Uhrzeigersinn
in die Position OFF (AUS), um den Eisbereiter
auszuschalten. Spülen Sie dann die
Reinigungslösung aus der Auffangvorrichtung.
Danach gießen Sie zwei bis drei Liter reinen
Trinkwassers in die Verdunstervertiefung, um
die Kegelformen und die Platte abzuspülen.
3. Gegebenenfalls entfernen Sie die
Wassersprühplatte und reinigen diese separat.
4. Bei den 18-21-31 das Kunstoffteil in der
unteren Seite des Gefriergehäuses beseitigen
um den das ganze Wasser und Kalkablagerung
zu entfernen.
5. Die Jalousie beseitigen, und mit einer
Flasche frisches Wasser in der unteren Seite des
Gefriergehäuses spühlen.
6. Die Jalousie sowie das Kunstoffteil wieder
einsetzen.
7. Für alle Modelle, das Wasser von dem
Behälter/Reservoir, durch die Entfernung des
Ueberlaufschlauch, rausfliessen lassen.
8. Bereiten Sie eine Reinigungslösung vor,
indem Sie einen oder zwei Liter warmes Wasser
(45° - 50°C) mit 0,1 - 0,2 Liter Eismaschinenreiniger (für 18-21-31-40) und 0,2 - 0,3 liter (für
50-65-90) verdünnen.
WARNUNG: Der Eismaschinenreiniger
enthält Phosphor und Hydroxysäure.
Diese Bestandteile sind korrodierend und
können Verbrennungen verursachen,
wenn Sie geschluckt werden. Sollte dies
der Fall sein, forcieren Sie nicht künstlich
ein Übergeben. Geben Sie große Mengen
Wasser oder Milch zu trinken. Rufen Sie
sofort einen Arzt.
Bei einem Hautkontakt spülen Sie die
entsprechende Stelle mit Wasser ab.
HALTEN SIE DAS REINIGUNGSMITTEL
AUSSER REICHWEITE VON KINDERN!
9. Entfernen Sie die Abdeckung des
Verdunsters und gießen Sie dann die
Reinigungslösung langsam über die
Verdunsterplatte. Lösen Sie die hartnäckigsten
Schmutz- und Kalkablagerungen von der Platte.
18-21-31-40
1. Bei den 18-21-31-40 Modelle das Gerät
wieder durch dem Hauptschalter einschalten um
die Eisproduktion beginnen zu lassen.
4. Drehen Sie den Würfelgrößen – Steuerungsknopf wieder in die normale Betriebsposition
(schwarzer Punkt). Die Wasserpumpe nimmt
den Betrieb auf und läßt Wasser umlaufen, um
das gesamte Wassersystem zu reinigen.
Führen Sie die Schritte 8 und 9 zweimal aus, um
sicherzustellen, daß keine Spuren von Entkalkerbzw. Reinigungslösung mehr in der
Auffangvorrichtung vorhanden sind.
Gießen Sie frisches Wasser unter Zugabe einer
Kappe Desinfizierungslösung auf die Oberseite
der Verdunsterplatte. Bringen Sie die Maschine
erneut in normalen Betrieb, um das ganze
Wassersystem ungefähr 10 Minuten lang zu
desinfizieren.
HINWEIS: Mischen Sie die Reinigungs- bzw.
Entkalkungslösung nicht mit der Desinfektionslösung, es könnte sich ansonsten eine sehr
aggressive Säure bilden.
5. Spülen Sie die Desinfizierungslösung aus
der Auffangvorrichtung. Stellen Sie sicher, daß
sich der Reinigungsschalter in der Position
Reinigung“ befindet und drehen sie den
Würfelgrößen – Steuerungsknopf in die normale
Betriebsposition.
Wenn das Wasser anfängt, durch die
Abflußleitung zu fließen, setzen Sie den
Reinigungsschalter wieder zurück in die
Betriebsstellung. Die Einheit ist jetzt bereit für
den normalen Betrieb.
Seite 41
50-65-90
1. Der Timerknopf langsam mit einem
Schraubenzieher im uhrzeigersinn drehen bis
der Mickroschalter die Start Position der
Gefrierphase erreicht.
ABTAUPHASE
GEFRIERPHASE
NOCKEN MIT ANGABE
DER GEFRIER-ABTAUPHASE
Dann gleich den Hauptschalter auf ON stellen,
der Kompressorschalter auf OFF lassen.
2. Lassen Sie das Gerät etwa 20 Minuten in
der Gefrierphase arbeiten. Kein Eis wird
produziert da der Kompressor nicht in Betrieb ist.
3. An Ende dieser Zeit den Hauptschalter auf
OFF stellen, um das Gerät auszuschalten.
4. Der Überlauf-ablauf Schlauch entfernen um
die Reinigungslösung und die Mineralreste durch
den Ablaufrohr rausfliessen zu lassen; dann den
Überlaufschlauch wieder einsetzen.
HINWEIS: Mischen sie die Reinigungs-bzw.
Entkalkungslösung nicht mit der
Desinfektionslösung, es könnte sich ansosten
eine seht agressive Säure bilden.
9. Die Desinfizierungslösung vom Reservoir/
Behälter rausfliessen lassen.
Der Timerknopf langsam im Uhrzeigersinn drehen
bis der Mikroschalter die Start Position der
Abtauphase erreicht.
Dann gleich den Hauptschalter auf ON stellen.
Lassen Sie das Gerät in dieser Phase laufen.
Wenn die Abtauphase beendet ist drehen Sie
den Timerknopf, manuell, bis die Abtauphase
wieder startet. Machen Sie dies zwei Mal.
Wenn das Wasserreservoir wieder voll ist, den
Kompressorschalter auf ON stellen. Das Gerät
ist jetzt antriebsbereit.
Drehen Sie den Würfelgrößen – Steuerungsknopf
im Uhrzeigersinn zurück in die normale
Betriebsposition (schwarzer Punkt), um den
Eisbereitungsvorgang erneut zu starten.
10. Montieren Sie die Verdunsterabdeckung und
die Wartungsabdeckungen der Einheit.
11. Nnachdem der Gefrier- und der
Auswerfzyklus abgeschlossen sind, stellen Sie
sicher, daß die Eiswürfel die richtige Konsistenz
und Transparenz aufweisen und daß sie keine
sauren Geschmack haben.
6. Wenn nötig die Wassersprühplatte separat
entfernen und reinigen.
ACHTUNG: Wenn die Eiswürfel trüb sind
und einen sauren Geschmack haben,
schmelzen Sie sofort durch Begießen mit
warmem Wasser. Dies verhindert, daß
diese Eiswürfel von jemandem anders
verwendet werden.
7. Stellen Sie wieder den Hauptschalter auf
ON. Die Wasserpumpe ist wieder aktiviert und
somit das Wasser den kompletten
Wasserkreislauf spült.
12. Wischen Sie die Innenflächen des
Vorratsbehälters sauber und spülen Sie sie
nochmals ab.
8. Giessen Sie frisches Wasser unter Zugabe
einer kappe Desinfizierungslösung auf die obere
Seite der Verdampfungsplatte und das Gerät
erneut in Betrieb setzen um das ganze
Wassersystem etwa 10 Minuten lang
desinfizieren.
ERINNERUNG: Um die Sammlung von
unerwünschten Bakterien zu verhindern ist
es notwendig, das Innere des Vorratsbehälters einmal pro Woche mit einem Anti –
Algen – Desinfizierungsmittel auszuwischen.
5. Giessen Sie 2-3 Liter frisches Wasser auf
den Verdampfer um die Platte zu spülen.