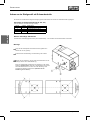
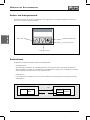
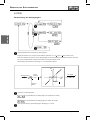
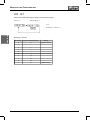
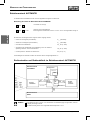
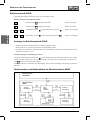
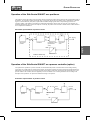
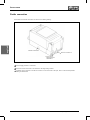
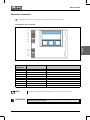
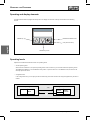
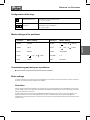
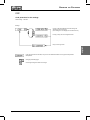
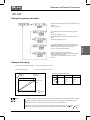
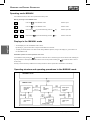
1
SideControl S/HART Positioner Type 8635 Betriebsanleitung / Operating Instructions INHALT SideControl S/HART Positioner Typ 8635 ALLGEMEINE HINWEISE ............................................................................ AH 1 Darstellungsmittel .................................................................................................... AH 2 Allgemeine Sicherheitshinweise ............................................................................ AH 2 Gerätebezogene Hinweise ....................................................................................... AH 3 Schutz gegen Beschädigung durch elektrostatische Aufladung ........................ AH 3 Lieferumfang ............................................................................................................. AH 4 Garantiebestimmungen ........................................................................................... AH 4 EG-Baumusterprüfbescheinigung .......................................................................... AH 5 SYSTEMBESCHREIBUNG ........................................................................... SB 1 Aufbau des SideControl S/HART ............................................................................ SB 2 Merkmale des Aufbaus ............................................................................................ SB 3 Funktion des Positioners SideControl S/HART .................................................... SB 4 Betrieb des SideControl S/HART als Stellungsregler .......................................... SB 5 Betrieb des SideControl S/HART als Prozeßregler ............................................... SB 5 Schnittstellen des SideControl S/HART ................................................................. SB 6 Eigenschaften der Software .................................................................................... SB 7 Technische Daten ..................................................................................................... SB 8 Werkseinstellungen..................................................................................... SB 8 Daten des SideControl S/HART ................................................................. SB 9 INSTALLATION ............................................................................................... IE 1 Anbau und Montage des SideControl S/HART........................................................ IB 2 Anbau an ein Stetigventil mit Schubantrieb nach NAMUR .................................... IB 2 Anbau an ein Stetigventil mit Schwenkantrieb ....................................................... IB 4 Fluidischer Anschluß ................................................................................................. IB 6 Elektrischer Anschluß ............................................................................................... IB 7 Typ 8635S/HART/Betriebsanleitung-Nr. 803 889 - ind00/oct00 IN 1 deutsch Inhalt INHALT BEDIENUNG DES STELLUNGSREGLERS ................................................ BS 1 Bedien- und Anzeigeelemente ................................................................................ BS 2 Bedienebenen ........................................................................................................... BS 2 Inbetriebnahme und Einrichten als Stellungsregler ............................................. BS 3 Grundeinstellungen ...................................................................................................... BS 3 Vorgehensweise zum Festlegen der Grundeinstellungen ....................................... BS 3 Werkseinstellungen ...................................................................................................... BS 3 Konfigurieren der Zusatzfunktionen ...................................................................... BS 7 deutsch Tasten in der Konfigurierebene ................................................................................... BS 7 Konfiguriermenü ........................................................................................................... BS 7 Zusatzfunktionen .......................................................................................................... BS 9 Bedienung des Prozesses ..................................................................................... BS 23 Betriebszustand AUTOMATIK ............................................................................... BS 24 Betriebszustand HAND .......................................................................................... BS 25 BEDIENUNG DES PROZESSREGLERS ..................................................... BP 1 Einrichten einer Prozeßregelung ............................................................................ BP 2 Automatischen Anpassung des Reglers an die Betriebsbedingungen ............. BP 3 Zusatzfunktion P.CONTRL ......................................................................................................................... BP 4 Start der Routine zur Linearisierung der Prozeßkennlinie P.QLIN............................... BP 10 Bedienung des Prozesses ..................................................................................... BP 11 Betriebszustand AUTOMATIK ............................................................................... BP 12 Manuelles Verändern des Prozeßsollwerts: ........................................................ BP 13 Betriebszustand HAND .......................................................................................... BP 14 WARTUNG DES STELLUNGSREGLERS .................................................. WS 1 Wartung ..................................................................................................................... WS 2 Fehlerbehebung ....................................................................................................... WS 2 Fehlermeldungen auf dem LC-Display .......................................................... WS 2 Fehlermeldung beim Einschalten .................................................................. WS 2 Fehlermeldungen bei der Durchführung der Funktion X.TUNE ............................ WS 2 Sonstige Störungen ........................................................................................ WS 2 WARTUNG DES PROZESSREGLERS ....................................................... WP 1 Wartung ..................................................................................................................... WP 2 Fehlerbehebung ....................................................................................................... WP 2 Fehlermeldungen auf dem LC-Display .......................................................... WP 2 Fehlermeldung beim Einschalten .................................................................. WP 2 Fehlermeldungen bei der Durchführung der Funktion X.TUNE ............................ WP 2 Fehlermeldung bei der Durchführung der Funktion P.Q'LIN .................................. WP 2 Sonstige Störungen ........................................................................................ WP 2 IN 2 Typ 8635S/HART/Betriebsanleitung-Nr. 803 889 - ind00/oct00 INHALT ANHANG FUNKTIONEN DES STELLUNGSREGLERS Funktion ................................................................................................................................................ Seite ADDfunc .................................................................................................................................................................................................. BS 3 X.tune ...................................................................................................................................................................................................... BS 4 END ........................................................................................................................................................................................................... BS 5 Charact ................................................................................................................................................................................................ BS 10 Cutoff .................................................................................................................................................................................................. BS 12 Dir.cmd .................................................................................................................................................................................................. BS 13 Dir.act .................................................................................................................................................................................................. BS 14 SPLtrng ................................................................................................................................................................................................ BS 15 X.limit .................................................................................................................................................................................................... BS 16 X.time ..................................................................................................................................................................................................... BS 17 X.control ............................................................................................................................................................................................. BS 18 CODE ...................................................................................................................................................................................................... BS 19 BIN-IN ..................................................................................................................................................................................................... BS 20 cal.user ............................................................................................................................................................................................... BS 21 setfact ................................................................................................................................................................................................. BS 22 FUNKTIONEN DES PROZESSREGLERS Funktion ................................................................................................................................................ Seite X.tune ...................................................................................................................................................................................................... BP 3 P.control ................................................................................................................................................................................................ BP 4 P.co - dbnd ....................................................................................................................................................................................... BP 6 P.co - para ........................................................................................................................................................................................ BP 7 P.co - setp ........................................................................................................................................................................................ BP 7 P.co - filt .......................................................................................................................................................................................... BP 8 P.CO SCAL ........................................................................................................................................................................................... BP 9 P.QLIN .................................................................................................................................................................................................... BP 10 Typ 8635S/HART/Betriebsanleitung-Nr. 803 889 - ind00/oct00 IN 3 deutsch Bedienstruktur des SideControl S/HART ............................................................... BS 1 Tabelle für Ihre Einstellungen am Stellungsregler ................................................ TS 1 Tabellen für Ihre Einstellungen am Prozessregler ................................................. TP 1 deutsch INHALT IN 4 Typ 8635S/HART/Betriebsanleitung-Nr. 803 889 - ind00/oct00 ALLGEMEINE HINWEISE deutsch ALLGEMEINE HINWEISE Inhalt Darstellungsmittel .......................................................................................................................................... AH 2 Allgemeine Sicherheitshinweise ................................................................................................................... AH 2 Gerätebezogene Hinweise ............................................................................................................................. AH 3 Schutz gegen Beschädigung durch elektrostatische Aufladung .............................................................. AH 3 Lieferumfang ................................................................................................................................................... AH 4 Garantiebestimmungen .................................................................................................................................. AH 4 EG-Baumusterprüfbescheinigung ................................................................................................................ AH 5 Typ 8635 S/HART AH 1 ALLGEMEINE HINWEISE Darstellungsmittel In dieser Betriebsanleitung werden folgende Darstellungsmittel verwendet: markiert einen Arbeitsschritt, den Sie ausführen müssen ACHTUNG! deutsch HINWEIS kennzeichnet Hinweise, bei deren Nichtbeachtung Ihre Gesundheit oder die Funktionsfähigkeit des Gerätes gefährdet ist kennzeichnet wichtige Zusatzinformationen, Tips und Empfehlungen Allgemeine Sicherheitshinweise Bitte beachten Sie die Hinweise dieser Betriebsanleitung sowie die im Datenblatt spezifizierten Einsatzbedingungen und zulässigen Daten des elektropneumatischen Stellungsreglers, damit das Gerät einwandfrei funktioniert und lange einsatzfähig bleibt: AH 2 • Das Gerät hat das Herstellerwerk in einem sicherheitstechnisch einwandfreiem und geprüften Zustand verlassen. Für die weitere korrekte Funktion sind sachgemäßer Transport, Lagerung bzw. Installation notwendige Voraussetzungen. • Halten Sie sich bei der Einsatzplanung und dem Betrieb des Gerätes an die allgemeinen Regeln der Technik! • Installation und wartungsbedingte Eingriffe in das Gerät dürfen nur von qualifiziertem Fachpersonal und mit geeignetem Werkzeug vorgenommen werden. • Beachten Sie die geltenden Unfallverhütungs- und Sicherheitsbestimmungen für elektrische Geräte während des Betriebes und der Wartung des Gerätes! • Treffen Sie geeignete Maßnahmen, um unbeabsichtigtes Betätigen oder unzulässige Beeinträchtigungen auszuschließen ! • Bei Nichtbeachtung dieser Hinweise und unzulässigen Eingriffen in das Gerät entfällt jegliche Haftung des Herstellers, ebenso erlischt die Garantie auf Geräte und Zubehörteile! Betriebsanleitung-Nr. 803 899 ALLGEMEINE HINWEISE • Beachten Sie für Installation und Betrieb in explosionsgefährdeten Bereichen die jeweiligen nationalen Vorschriften. In Deutschland ist dies die VDE 0165. • Beachten Sie beim elektrischen Anschluß der eigensicheren Stromkreise die Angaben der jeweiligen Konformitätsbescheinigungen. • Ergreifen Sie geeignete Maßnahmen, die eine elektrostatische Aufladung von Kunststoff-Gehäuseteilen verhindern (siehe EN 100 015 - 1). • An die Ein- und Ausgänge der Platinen dürfen keine Komponenten angeschlossen werden, deren elektrische Daten außerhalb der für den eigensicheren Betrieb ermittelten und im Datenblatt des Stellungsreglers angegebenen Grenzen liegen. • An die serielle Schnittstelle dürfen in explosionsgefährdeten Bereichen nur eigensichere Geräte angeschlossen werden. • Die Abnahme der Kunststoffabdeckung darf nur vom Hersteller erfolgen! • Eingriffe in das Gerät bei offenem Gehäuse dürfen nicht in sehr feuchter oder aggressiver Atmosphäre vorgenommen werden. Treffen Sie Vorkehrungen, die unbeabsichtigte mechanische Beschädigungen der Platinen oder ihrer Bauelemente ausschließen. Beschränken Sie die Zeitdauer der Öffnung des Gehäuses auf das unbedingt notwendige Maß. Schutz gegen Beschädigung durch elektrostatische Aufladung Das Gerät enthält elektronische Bauelemente, die gegen elektrostatische Entladung (ESD) empfindlich reagieren. Berührung mit elektrostatisch aufgeladenen Personen oder Gegenständen gefährdet diese Bauelemente. Im schlimmsten Fall werden sie sofort zerstört oder fallen nach der Inbetriebnahme aus. Beachten Sie die Anforderungen nach EN 100 015 - 1, um die Möglichkeit eines Schadens durch schlagartige elektrostatische Entladung zu minimieren bzw. zu vermeiden. Achten Sie ebenso darauf, daß Sie elektronische Bauelemente nicht bei anliegender Versorgungsspannung berühren. ACHTUNG VORSICHT BEI HANDHABUNG ! ELEKTROSTATISCH GEFÄHRDETE BAUELEMENTE / BAUGRUPPEN Typ 8635 S/HART AH 3 deutsch Gerätebezogene Hinweise ALLGEMEINE HINWEISE Lieferumfang Überzeugen Sie sich unmittelbar nach Erhalt der Sendung, daß der Inhalt nicht beschädigt ist und mit dem auf dem beigelegten Packzettel angegebenen Lieferumfang übereinstimmt. Generell besteht dieser aus: • dem SideControl S/HART • der Bedienungsanleitung für den SideControl S/HART Anbausätze für Schub- oder Schwenkantriebe erhalten Sie als Zubehör. Bei Unstimmigkeiten wenden Sie sich bitte umgehend an unseren Kundenservice: deutsch Bürkert Steuer- und Regelungstechnik Chr.-Bürkert-Str. 13-17 Service-Abteilung D-76453 Ingelfingen Tel.: (07940) 10-252 Fax: (07940) 10-428 oder an Ihre Bürkert-Niederlassung. Garantiebestimmungen Diese Druckschrift enthält keine Garantiezusagen. Wir verweisen hierzu auf unsere allgemeinen Verkaufs- und Geschäftsbedingungen. Voraussetzung für die Garantie ist der bestimmungsgemäße Gebrauch des Gerätes unter Beachtung der spezifizierten Einsatzbedingungen. ACHTUNG! AH 4 Die Gewährleistung erstreckt sich nur auf die Fehlerfreiheit des SideControl. Es wird jedoch keine Haftung übernommen für Folgeschäden jeglicher Art, die durch Ausfall oder Fehlfunktion des Gerätes entstehen könnten. Betriebsanleitung-Nr. 803 899 deutsch ALLGEMEINE HINWEISE Typ 8635 S/HART AH 5 deutsch ALLGEMEINE HINWEISE AH 6 Betriebsanleitung-Nr. 803 899 deutsch ALLGEMEINE HINWEISE Typ 8635 S/HART AH 7 deutsch ALLGEMEINE HINWEISE AH 8 Betriebsanleitung-Nr. 803 899 SYSTEMBESCHREIBUNG deutsch SYSTEMBESCHREIBUNG INHALT Systembeschreibung ..................................................................................................................................... Aufbau des SideControl S/HART .................................................................................................................. Merkmale des Aufbaus ................................................................................................................................... Funktion des Positioners SideControl S/HART ........................................................................................... Betrieb des SideControl S/HART als Stellungsregler ................................................................................. Betrieb des SideControl S/HART als Prozeßregler ..................................................................................... Schnittstellen des SideControl S/HART ....................................................................................................... Eigenschaften der Software .......................................................................................................................... Technische Daten ........................................................................................................................................... Werkseinstellungen ........................................................................................................................................ Daten des SideControl S/HART ..................................................................................................................... Typ 8635 S/HART SB 1 SB 2 SB 3 SB 4 SB 5 SB 5 SB 6 SB 7 SB 8 SB 8 SB 9 SB 1 SYSTEMBESCHREIBUNG Der SideControl S/HART ist ein digitaler Stellungsregler (Positioner) für pneumatisch betätigte Stetigventile mit einfachwirkenden Schubantrieben oder Schwenkantrieben. Der SideControl S/HART kann über eine Tastatur mit Display bedient werden. Darüber hinaus steht als Option eine Kommunikation nach dem HART-Protokoll zur Verfügung. deutsch Aufbau des SideControl S/HART Display mit 3 Bedientasten Schraubklemmen Verschraubungen PG13,5 Erdungsschraube SB 2 Betriebsanleitung-Nr. 803 899 SYSTEMBESCHREIBUNG Merkmale des Aufbaus • Wegmeßsystem sehr hoch auflösendes Leitplastikpotentiometer • Mikroprozessorgesteuerte Elektronik für die Signalverarbeitung, Regelung und Ansteuerung des Piezostellsystems; Sollwertvorgabe und die Versorgung der Elektronik erfolgt über ein 4..20-mA-Normsignal Bedienelemente Die Einstellung des Gerätes (Konfigurierung und Parametrierung) kann lokal über drei innenliegende Tasten erfolgen. Zur Anzeige dient ein innenliegendes 8stelliges 16-Segment-LC-Display. Hiermit kann auch der Sollwert oder der Istwert angezeigt werden. • Stellsystem Zur Ansteuerung des Ventilantriebs dient ein Piezostellsystem. • Stellungsrückmeldung (als Option - in Vorbereitung) über 2 induktive Näherungsschalter (Initiatoren) • Elektrische Schnittstellen PG13,5-Durchführungen mit Schraubklemmen • Pneumatische Schnittstellen: Innengewinde G1/4’’ • Gehäuse Aluminium-Gehäuse (hartanodisiert und kunststoffbeschichtet) mit aufklappbarem Deckel und unverlierbaren Schrauben. • Anbau an Schub- und Schwenkantriebe nach NAMUR-Empfehlung (DIN IEC 534 T6 bzw. VDI/VDE 3845) Typ 8635 S/HART SB 3 deutsch • SYSTEMBESCHREIBUNG Funktion des Positioners SideControl S/HART deutsch Funktionsschema des Positioners in Verbindung mit einem Stellventil mit einfachwirkendem Membranantrieb SB 4 Betriebsanleitung-Nr. 803 899 SYSTEMBESCHREIBUNG Betrieb des SideControl S/HART als Stellungsregler Der Positioner regelt die Stellung des pneumatischen Antriebs aus, wobei das Wegmeßsystem die aktuelle Position (POS)des Antriebs erfaßt. Der Regler vergleicht diesen Stellungs-Istwert mit dem als Normsignal vorgebbaren Sollwert (CMD). Liegt eine Regeldifferenz (Xd1) vor, wird ein pulsweitenmoduliertes Spannungssignal als Stellgröße an das Stellsystem gegeben. Bei positiver Regeldifferenz wird über den Ausgang B1 das Belüftungspiezoventil angesteuert, bei negativer Regeldifferenz über den Ausgang E1 das Entlüftungspiezoventil. Auf diese Weise wird die Position des Antriebs bis zur Regeldifferenz 0 verändert. Z1 stellt eine Störgröße dar. deutsch Schematische Darstellung der Stellungsregelung Betrieb des SideControl S/HART als Prozeßregler (Option) Wird der Positioner als Prozeßregler betrieben, wird die zuvor erwähnte Stellungsregelung zum untergeordneten Hilfsregelkreis. Insgesamt ergibt sich somit eine Kaskadenregelung. Der Prozeßregler (als Hauptregelkreis) ist im SideControl als PID-Regler implementiert. Als Sollwert wird in diesem Fall der Prozeß-Sollwert (SP) vorgegeben und mit dem Istwert (PV) der zu regelnden Prozeßgröße, der von einem Sensor geliefert wird, verglichen. Die Bildung der Stellgröße erfolgt entsprechend der Beschreibung des Stellungsreglers. Z2 stellt eine auf den Prozeß wirkende Störgröße dar. Schematische Darstellung der Prozeßregelung Typ 8635 S/HART SB 5 SYSTEMBESCHREIBUNG Schnittstellen des SideControl S/HART deutsch Schematische Darstellung der Schnittstellen des SideControl S/HART HINWEIS SB 6 Der SideControl S/HART ist ein 2-Leiter-Gerät, d.h. die Spannungsversorgung erfolgt über das 4..20-mA-Signal. Betriebsanleitung-Nr. 803 899 SYSTEMBESCHREIBUNG Eigenschaften der Software • Automatische Anpassung des Stellungsreglers an das verwendete Stellventil • Dichtschließfunktion • Hubbegrenzung • Begrenzung der Stellgeschwindigkeit • Korrekturkennlinie zur Anpassung der Betriebskennlinie wählbar (zur Verfügung stehen verschiedene Standardkennlinien oder eine frei programmierbare Kennlinie) • Unempfindlichkeitsbereich • Umkehr der Wirkrichtung von Soll- und Istwert • Aufteilung des Einheitssignalbereichs auf 4 Stellungsregler • Skalierung des Istwert-Eingangs • Codeschutz • Rücksetzen auf Werkseinstellungen deutsch Stellungsregler mit Zusatzfunktionen Prozeßregler (Option) • PID-Regler; Parameter einstellbar • Eingänge skalierbar • Auswahl der Sollwertvorgabe (über 4..20-mA-Signal oder über Tasten) Kommunikation über HART-Protokoll (Option) Typ 8635 S/HART SB 7 SYSTEMBESCHREIBUNG Technische Daten Werkseinstellungen deutsch Funktion Funktion Werkseinstellung Werkseinstellung ACTFUNC FUNCSNGL P.CO - DBND 1%* CHARACT CHA LIN P.CO - SETP SETP INT * CUTOFF CUT P.CO - INP INP 4'20A * DIR.CMD DIR.CRISE P.CO - FILT 0* DIR.ACT DIR.ARISE P.CO - SCAL UNIT L/S * SPLTRNG SR = 0 (%); SR = 100 (%) CODE CODE 0000 X.LIMIT LIM = 0%, LIM = 100% X.TIME keine Begrenzung X.CO DBND 1% = 1 %; CUT = 99% * Prozeßregler SB 8 Betriebsanleitung-Nr. 803 899 SYSTEMBESCHREIBUNG Daten des SideControl S/HART Betriebsbedingungen Zulässige Umgebungstemperatur -25...+65°C (bei Nicht-Ex-Geräten oder T4/T5) -25...+60°C (bei T6) Schutzart IP 65 nach EN 60529 (nur bei korrekt angeschlossenem Kabel) CE-Zeichen konform bzgl. EMV-Richtlinie 89/336/EWG Explosionsschutz (optional) EEX ia IIC T4/T5/T6 deutsch Konformität mit folgenden Normen Mechanische Daten Außenmaße Gehäuse (B x H x T) 174 x 88 x 93 Gehäusematerial Aluminium hartanodisiert und kunststoffbeschichtet Dichtmaterial NBR / Neoprene Sonstige Außenteile rostfreier Stahl (V4A) Masse ca. 1,5 kg Elektrische Daten Anschlüsse 2 PG13,5-Durchführungen mit Schraubklemmen 0,14 bis 1,5 mm2 Versorgung über Einheitssignal 4 - 20 mA Pneumatische Daten Steuermedium Instrumentenluft, öl-, wasser- und staubfrei Drucktaupunkt mind. 10 Grad unterhalb der niedrigsten Betriebstemperatur Ölgehalt ≤ 1 mg/m³ Staubgehalt ≤ 40 µm Teilchengröße Temperaturbereich der Druckluft -25...+65°C (bei Nicht-Ex-Geräten oder T4/T5) -25...+60°C (bei T6) Druckbereich 1,4..6,0 bar Schwankung des Versorgungsdrucks ± 10 % Luftleistung Steuerventil bei 1,4 bar Druckabfall über Ventil bei 6 bar Druckabfall über Ventil ca. 55 Nl/min für Be- und Entlüftung ca. 170 Nl/min für Be- und Entlüftung Eigenluftverbrauch im ausgeregelten Zustand 0,0 Nl/min Anschlüsse Innengewinde G1/4'' Typ 8635 S/HART SB 9 deutsch SYSTEMBESCHREIBUNG SB 10 Betriebsanleitung-Nr. 803 899 INSTALLATION deutsch INSTALLATION Inhalt: Anbau und Montage des SideControl S/HART .............................................................................................. IB 2 Anbau an ein Stetigventil mit Schubantrieb nach NAMUR .......................................................................... IB 2 Anbau an ein Stetigventil mit Schwenkantrieb ............................................................................................. IB 4 Fluidischer Anschluß ....................................................................................................................................... IB 6 Elektrischer Anschluß ...................................................................................................................................... IB 7 Typ 8635 S/HART IB 1 INSTALLATION Anbau und Montage des SideControl S/HART Der Positioner Typ SideControl kann an unterschiedliche Stetigventile angebaut werden. Infrage kommen hierbei Stetigventile mit Schubantrieb nach NAMUR oder mit Schwenkantrieb. Anbau an ein Stetigventil mit Schubantrieb nach NAMUR Die Übertragung der Ventilstellung auf das ins SideControl eingebaute Wegmeßsystem erfolgt über einen Hebel (nach NAMUR). Anbausatz an Schubantriebe (Id.-Nr. 787 215) (kann als Zubehör von Bürkert bezogen werden) deutsch Lfd. Nr. 1 2 3 4 5 6a 6b 7 8 9 10 11 12 13 14 15 16 17 18 19 21 Stück 1 1 2 1 1 1 1 2 4 2 6 6 2 1 1 1 3 3 1 1 4 Benennung NAMUR-Anbauwinkel IEC 534 Abgriffbügel Klemmstück Mitnehmerstift Konusrolle Hebel NAMUR für Hubbereich 3 - 35 mm Hebel NAMUR für Hubbereich 35 - 130 mm U-Bolzen Sechskantschraube DIN 933 M8 x 20 Sechskantschraube DIN 933 M8 x 16 Federring DIN 127 A8 Scheibe DIN 125 B8,4 Scheibe DIN 125 B6,4 Feder VD-115E 0,70x11,3x32,7x3,5 Federscheibe DIN 137 A6 Sicherungsscheibe DIN 6799 - 3,2 Federring DIN 127 A6 Sechskantschraube DIN 933 M6 x 25 Sechskantmutter DIN 934 M6 Vierkantmutter DIN 557 M6 Sechskantmutter DIN 934 M8 Montage Montieren Sie den Bügel (2) mit Hilfe der Klemmstücke (3), Sechskantschrauben (17) und Federringe (16) an der Antriebsspindel. Wählen Sie entsprechend dem Hub des Antriebs den kurzen (lfd. Nr. 6a) oder den langen (lfd. Nr. 6b) Hebel aus. Schwenkbereich des Hebels (60°) Bauen Sie den Hebel zusammen (falls nicht vormontiert). Der Abstand des Mitnehmerstiftes von der Achse sollte gleich dem Antriebshub sein. Dadurch ergibt sich ein Schwenkbereich des Hebels von 60°. So ist sichergestellt, daß das Wegmeßsystem mit guter Auflösung arbeitet. Die auf dem Hebel aufgedruckte Skala ist nicht relevant. Abstand = Hub des Antriebs IB 2 Betriebsanleitung-Nr. 803 899 INSTALLATION Stecken Sie den Hebel auf die Achse des SideControl auf und schrauben Sie ihn fest. Befestigen Sie den Anbauwinkel (1) mit Sechskantschrauben (9), Federringen (10) und Scheiben (11) auf der Rückseite des SideControl. Die Wahl der verwendeten M8-Gewinde am Side Control hängt von der Antriebsgröße ab. Halten Sie zur Ermittlung der richtigen Position des SideControl mit dem Anbauwinkel an den Antrieb. Dabei muß die Konusrolle (5) am Hebel des Wegmeßsystems im Bügel (2) am Antrieb über den gesamten Hubbereich frei laufen können. Bei 50% Hub sollte die Hebelstellung in etwa waagrecht sein (s. u. "Ausrichtung des Hebelmechanismus"). deutsch HINWEIS Bei Antrieb mit Gußrahmen Befestigen Sie den Side Control Positioner mit Anbauwinkel mit einer oder mehreren Sechskantschrauben (8), Scheiben (11) und Federringen (10) am Gußrahmen. Bei Antrieb mit Säulenjoch Befestigen Sie den SideControl Positioner mit Anbauwinkel mit den U-Bolzen (7), Scheiben (11), Federringen (10) und Sechskantmuttern (21) am Säulenjoch. Ausrichtung des Hebelmechanismus Der Hebelmechanismus kann erst dann korrekt ausgerichtet werden, wenn das Gerät elektrisch und pneumatisch angeschlossen ist. Fahren Sie den Antrieb im Handmodus auf halben Hub (entsprechend der Skala am Antrieb). Verschieben Sie das Gerät in der Höhe derart, daß der Hebel waagrecht steht. Fixieren Sie anschließend das Gerät entgültig am Antrieb. Typ 8635 S/HART IB 3 INSTALLATION Anbau an ein Stetigventil mit Schwenkantrieb Die Achse des im SideControl integrierten Wegmeysystems wird direkt an die Achse des Schwenkantriebs angekoppelt. Anbausatz an Schwenkantriebe (Id.-Nr. 651 741) (kann als Zubehör von Bürkert bezogen werden) deutsch Lfd. Nr. 1 2 3 4 Stück 1 2 4 4 Benennung Adapter Gewindestift DIN 913 M4 x 4 Zylinderschraube DIN 933 M6 x 12 Federring B6 Weitere notwendige Zubehörteile Anbaukonsole mit Befestigungsschrauben (nach VDI/VDE 3845) - vom Hersteller des Schwenkantriebs zu beziehen Montage: Legen Sie die Anbauposition des SideControl fest (parallel zum Antrieb oder um 90° gedreht). Ermitteln Sie die Grundstellung und Drehrichtung des Antriebs. Stecken Sie den Adapter (1) auf die Achse des SideControl auf und befestigen Sie ihn mit 2 Gewindestiften (2). Einer der Gewindestifte soll dabei auf der Anflachung an der Achse aufliegen (Verdrehschutz!). Dabei ist zu gewährleisten, daß sich die Achse des SideControl nur in einem der in der Zeichnung unten angegebenen Bereiche bewegen kann (Beachten Sie die Anflachung an der Achse!). IB 4 Betriebsanleitung-Nr. 803 899 INSTALLATION deutsch Setzen Sie denSideControl auf die Anbaukonsole auf und befestigen Sie ihn mit 4 Zylinderschrauben (3) und Federringen (4). Setzen Sie den SideControl mit der Anbaukonsole auf den Schwenkantrieb auf und befestigen Sie ihn. HINWEIS Wird nach dem Start der Funktion X.TUNE im LC-Display die Meldung X.ERR 5 angezeigt, ist die Ausrichtung der Achse des SideControl zur Achse des Antriebs nicht korrekt. Überprüfen Sie in diesem Fall die Ausrichtung wie oben beschrieben. Wiederholen Sie anschließend die Funktion X.TUNE . Typ 8635 S/HART IB 5 INSTALLATION Fluidischer Anschluß deutsch Die Lage der pneumatischen Anschlüsse zeigt die folgende Zeichnung E ntlü ftu ng sa nschlu ß 3 Ve rsorg u n g sd rucka nsch luß 1 A rbe itsa nschlu ß 2 Legen Sie den Versorgungsdruck an den Druckanschluß 1. Verbinden Sie den Arbeitsanschluß 2 mit der Kammer des einfachwirkenden Antriebs. Schließen Sie an den Anschluß 3 nach Möglichkeit einen Schalldämpfer oder ähnliches an. Wird der Anschluß offengelassen, besteht die Gefahr, daß Spritzwasser in den SideControl eindringt. IB 6 Betriebsanleitung-Nr. 803 899 INSTALLATION Elektrischer Anschluß ÖffnenSie zum elektrischen Anschluß des Side Control den Gehäusedeckel durch Lösen der 2 Schrauben. Belegung der Anschlußklemmen deutsch 11 + 12 13 + 14 81 82 41 + 42 51 + 52 - Bezeichnung der Klemme 11 + 12 13 + 14 81 Belegung Äußere Beschaltung Sollwert + Sollwert Prozeß-Istwert + (Option) Prozeß-Istwert - (Option) Binärer Eingang 4..20 mA-Signal GND 4..20 mA-Signal GND über Schalter (Schließer) verbunden mit Klemme 82 82 41 + 42 51+ 52 - Binärer Eingang Initiator 1 + (Option) Initiator 1 - (Option) Initiator 2 + (Option) Initiator 2 - (Option) HINWEIS ACHTUNG! Typ 8635 S/HART Der Anschluß eines Potentialausgleichsleiters (PE) an die Elektronik ist nicht erforderlich. Beachten Sie beim elektrischen Anschluß der eigensicheren Stromkreise in jedem Fall die Angaben in der beiliegenden Konformitätsbescheinigung! IB 7 deutsch INSTALLATION IB 8 Betriebsanleitung-Nr. 803 899 DES STELLUNGSREGLERS BEDIENUNG DES STELLUNGSREGLERS Inhalt: Bedien- und Anzeigeelemente ........................................................................................................................BS 2 Bedienebenen ..................................................................................................................................................BS 2 Inbetriebnahme und Einrichten als Stellungsregler .....................................................................................BS 3 Grundeinstellungen .................................................................................................................................. BS 3 Vorgehensweise zum Festlegen der Grundeinstellungen ....................................................................... BS 3 Werkseinstellungen des Stellungsreglers ................................................................................................ BS 3 Konfigurieren der Zusatzfunktionen ..............................................................................................................BS 6 Tasten in der Konfigurierebene ................................................................................................................ BS 6 Konfiguriermenü ...................................................................................................................................... BS 6 Zusatzfunktionen ..................................................................................................................................... BS 8 CHARACT ................................................................................................................................................................................................ BS 10 CUTOFF ................................................................................................................................................................................................... BS 12 DIR.CMD .................................................................................................................................................................................................. BS 13 DIR.ACT ................................................................................................................................................................................................... BS 14 SPLTRNG ................................................................................................................................................................................................ BS 15 X.LIMIT .................................................................................................................................................................................................... BS 16 X.TIME ..................................................................................................................................................................................................... BS 17 X.CONTROL ............................................................................................................................................................................................. BS 18 CODE ....................................................................................................................................................................................................... BS 19 BIN-IN ..................................................................................................................................................................................................... BS 20 CAL.USER ............................................................................................................................................................................................... BS 21 SETFACT ................................................................................................................................................................................................. BS 22 Bedienung des Prozesses ............................................................................................................................BS 23 Betriebszustand AUTOMATIK .......................................................................................................................BS 24 Betriebszustand HAND .................................................................................................................................BS 25 Typ 8635 S/HART BS 1 deutsch BEDIENUNG BEDIENUNG DES STELLUNGSREGLERS Bedien- und Anzeigeelemente deutsch Der SideControl S/HART ist mit einem 3-Tasten-Bedien- und Anzeigeelement mit LC-Display ausgestattet. Die Funktion der Tasten ist in den folgenden Kapiteln beschrieben. PFEIL-Taste "oben" HAND/AUTOMATIK-Taste LED (ohne Funktion) PFEIL-Taste "unten" Bedienebenen Die Bedienung des SideControl S/HART erfolgt über zwei Bedienebenen: • Prozeßbedienebene: Nach Einschalten des Gerätes ist die Prozeßbedienebene aktiv. In dieser Ebene schalten Sie zwischen den Betriebszuständen AUTOMATIK und HAND um. Im Betriebszustand AUTOMATIK läuft die Stellungs- bzw. Prozeßregelung, im Betriebszustand HAND kann das Ventil manuell auf- bzw. zugefahren werden. • Konfigurierebene: In der Konfigurierebene spezifizieren Sie bei der ersten Inbetriebnahme die Grundfunktionen und konfigurieren bei Bedarf Zusatzfunktionen. Prozeßbedienebene HAND AUTOMATIK 5 sec Konfigurierebene Grundfunktionen Zusatzfunktionen End BS 2 Betriebsanleitung-Nr. 803 899 BEDIENUNG DES STELLUNGSREGLERS Belegung der Tasten HAND/AUTOMATIK-Taste Wechsel zwischen Haupt- und Untermenüpunkten, z. B. ACT FUNC - FUNCSNGL Pfeiltasten Wechsel zwischen gleichberechtigten Menüpunkten, z. B. ACTFUNC - CHARACT Funktion Werkseinstellung Funktion Werkseinstellung ACTFUNC FUNCSNGL SPLTRNG SR = 0 (%); SR = 100 (%) CHARACT CHA LIN X.LIMIT LIM = 0%, LIM = 100% DIR.CMD DIR.CRISE X.TIME keine Begrenzung CUTOFF CUT X.CO DBND 1% DIR.ACT DIR.ARISE CODE CODE 0000 = 1 %; CUT = 99% deutsch Werkseinstellungen des Stellungsreglers Inbetriebnahme und Einrichten als Stellungsregler ➔ Führen Sie vor Beginn der Inbetriebnahme die fluidische und elektrische Installation aus Grundeinstellungen Bei der ersten Inbetriebnahme des Positioners ist die automatischen Anpassung des Stellungsreglers an die jeweiligen Betriebsbedingungen (X.TUNE) zu starten. Die dazu notwendigen Schritte werden im folgenden näher erläutert. Vorgehensweise Nach dem Einschalten der Betriebsspannung befindet sich der Positioner in der Prozeßbedienebene im Betriebszustand AUTOMATIK. Zum Festlegen der Grundeinstellungen schalten Sie in die Konfigurierebene um. Halten Sie dazu die HAND/AUTOMATIK-Taste 5 Sekunden lang gedrückt. Danach erscheint auf dem Display mit ADDFUNCT der erste Menüpunkt des Hauptmenüs. Zur Durchführung einer Einstellung unter einem Menüpunkt drücken Sie erneut kurz die HAND/AUTOMATIK-Taste. Danach erscheint auf dem Display einer der Menüunterpunkte. Zwischen diesen Unterpunkten kann durch Betätigen der Pfeiltasten hinund hergeschaltet werden. Die eigentliche Einstellung erfolgt dadurch, daß bei dem ausgewählten Unterpunkt des Menüs die HAND/AUTOMATIK-Taste gedrückt wird. Zwischen den Haupmenüpunkten (ADDFUNCT, X.TUNE...) kann ebenfalls durch Betätigen der Pfeiltasten gewechselt werden. Typ 8635 S/HART BS 3 BEDIENUNG DES STELLUNGSREGLERS Hauptmenü für die Einstellungen bei der Inbetriebnahme bei der Erstinbetriebnahme überspringen deutsch Betriebszustand AUTOMATIK oder HAND ADDFUNCT siehe Abschnitt "Konfigurierung von Zusatzfunktionen" ➔ Überspringen Sie diesen Menüpunkt bei der ersten Inbetriebnahme BS 4 Betriebsanleitung-Nr. 803 899 BEDIENUNG DES STELLUNGSREGLERS X.TUNE Autotune für Stellungsregler Starten der automatische Anpassung des Stellungsreglers an die jeweiligen Betriebsbedingungen (X.TUNE): • Anpassung des Sensorsignals an den (physikalischen) Hub des verwendeten Ventils • Ermittlung von Parametern zur Ansteuerung des integrierten Piezo-Stellsystems • Einstellung der Reglerparameter des Stellungsreglers. Die Optimierung erfolgt nach den Kriterien einer möglichst kurzen Ausregelzeit und Überschwingungsfreiheit. ➔ Schalten Sie die Betriebsspannung ein ➔ Halten Sie die HAND/AUTOMATIK-Taste ➔ Betätigen Sie die PFEIL-Taste ➔ Halten Sie die HAND/AUTOMATIK-Taste Display-Anzeige TUNE 5 5 Sekunden lang gedrückt deutsch Folgende Funktionen werden selbsttätig ausgelöst: Umschalten in die Konfigurierebene Scrollen zum Menüpunkt X.TUNE 5 Sekunden lang gedrückt Start von X.TUNE Beschreibung Countdown von 5 bis 0 zum Starten von Autotune TUNE 4 : TUNE 0 ¦ X.TUNE 1 ¦ X.TUNE 2 ¦ X.TUNE 3 ¦ X.TUNE 4 : Anzeige der gerade ablaufenden AutotunePhase (der Fortgang wird durch einen sich drehenden Balken am linken Rand des Displays angezeigt) X.TUNE.END Anzeige blinkend => Ende der Autotune X.ERR X.X Anzeige bei Auftreten eines Fehlers (Anzeige rechts: Fehlernummer) ➔ Drücken Sie kurz die HAND/AUTOMATIK-Taste Speichern der Betriebsbedingungen ➔ Betätigen Sie die PFEIL-Taste Scrollen zum Menüpunkt END ➔ Drücken Sie kurz die HAND/AUTOMATIK-Taste Rücksprung in den Betriebszustand AUTOMATIK oder HAND Anmerkung: Bei Inbetriebnahme des Positioners ist die Ausführung von “X.TUNE” unbedingt erforderlich. Hierbei ermittelt der Positioner selbsttätig die für das verwendete Ventil und die aktuell vorliegenden Betriebsbedingungen (Versorgungsdruck) optimalen Einstellungen. Die Funktion “X.TUNE” sollte bei drucklosem oder abgesperrtem Ventil durchgeführt werden, da sonst Druckschwankungen im Ventil zu einer Fehlanpassung des Reglers führen können. Der Versorgungsdruck (pneumatische Hilfsenergie) sollte auf den Wert eingestellt werden, der auch im späteren Betrieb herrscht! ACHTUNG! Typ 8635 S/HART Während der Ausführung der Autotune-Funktion bewegt sich das Ventil selbsttätig aus seiner augenblicklichen Stellung. Führen Sie aus diesem Grund die Autotune niemals bei laufendem Prozeß durch! BS 5 BEDIENUNG DES STELLUNGSREGLERS END Verlassen des Hauptmenüs ➔ Zum Verlassen des Hauptmenüs wählen Sie mit den Pfeiltasten ➔ Nach Drücken der HAND/AUTOMATIK-Taste den Menüpunkt END. befindet sich das Gerät wieder in dem Betriebszustand, in dem deutsch es sich vor dem Umschalten in das Hauptmenü befand (HAND oder AUTOMATIK). BS 6 Betriebsanleitung-Nr. 803 899 BEDIENUNG DES STELLUNGSREGLERS Konfigurieren der Zusatzfunktionen HINWEIS Das Bedienkonzept des Positioners basiert auf einer strikten Trennung zwischen Grund- und Zusatzfunktionen. Im Auslieferungszustand des Gerätes sind nur die Grundfunktionen ADDFUNCT, X.TUNE und END aktiviert. Sie sind für den normalen Betrieb ausreichend. Für anspruchsvollere Regelungsaufgaben wählen und spezifizieren Sie Zusatzfunktionen in der Konfigurierebene. Betätigen der Taste Betätigen der Taste im Menü in einem ausgewählten und bestätigten Menüpunkt Blättern nach oben (Auswahl) Inkrementieren (Vergrößern) von Zahlenwerten Blättern nach unten (Auswahl) Dekrementieren (Verkleinern) von Zahlenwerten im Menü im Menü ADDFUNCT Bestätigen des gewählten Menüpunktes Bestätigung des gewählten Menüpunktes des Zusatzmenüs zur Aufnahme in das Hauptmenü. Der Menüpunkt wird im Zusatzmenü mit einem Stern (*) gekennzeichnet. Der Menüpunkt erscheint im Hauptmenü und kann dort ausgewählt und bearbeitet werden. Bestätigen eingestellter Werte Bestätigung des gewählten, mit einem Stern gekennzeichneten Menüpunktes des Zusatzmenüs zur Streichung aus dem Hauptmenü. Konfiguriermenü Umschalten zwischen Prozeßbedienebene und Konfigurierebene Prozeßbedienebene HAND AUTOMATIK 5 sec Konfigurierebene Grundfunktionen Zusatzmenü END ➔ Um das Konfiguriermenü zu aktivieren, drücken Sie in der Prozeßbedienebene die HAND/AUTOMATIK-Taste 5 Sekunden lang. Das Konfiguriermenü besteht aus einem Haupt- und einem Zusatzmenü. Das Hauptmenü enthält zunächst die Grundfunktionen, die bei der Erstinbetriebnahme unbedingt erforderlich sind. Das Zusatzmenü umfaßt die wählbaren Zusatzfunktionen. Es ist über den Menüpunkt ADDFUNCT des Hauptmenüs erreichbar. Eine Spezifizierung von Gerätefunktionen und -parametern ist nur innerhalb des Hauptmenüs möglich. Bei Bedarf läßt sich aber das Hauptmenü um Zusatzfunktionen aus dem Zusatzmenü erweitern, die dann ebenfalls spezifiziert werden können. Typ 8635 S/HART BS 7 deutsch Tasten in der Konfigurierebene BEDIENUNG DES STELLUNGSREGLERS Aufnahme von Zusatzfunktionen ins Hauptmenü ➔ Wählen Sie im Hauptmenü den Menüpunkt ADDFUNCT aus ( ➔ Sie gelangen durch Betätigen der ➔ Wählen Sie mit den ➔ Durch Drücken der -Taste 5 s drücken). -Taste in das Zusatzmenü. -Tasten die gewünschte Zusatzfunktion aus. -Taste bestätigen Sie die Aufnahme der Zusatzfunktion in das Hauptmenü. Die Funktion wird automatisch mit einem Stern (*) gekennzeichnet. Alle markierten Funktionen werden nach Bestätigung von ENDFUNCT in das Hauptmenü übernommen. deutsch ➔ Geben Sie im Hauptmenü die Parameter der Zusatzfunktionen ein. Entfernen von Zusatzfunktionen aus dem Hauptmenü ➔ Wählen Sie im Hauptmenü den Menüpunkt ADDFUNCT aus ( ➔ Sie gelangen durch Betätigen der ➔ Wählen Sie mit den ➔ Durch Drücken der -Taste 5 s drücken).. -Taste in das Zusatzmenü. -Tasten eine mit (*) gekennzeichnete Zusatzfunktion aus. -Taste bestätigen Sie das Entfernen der Zusatzfunktion (der kennzeichnende Stern (*) wird entfernt). ➔ Nach Bestätigung von ENDFUNCT mit der -Taste ist die Zusatzfunktion deaktiviert und aus dem Hauptmenü entfernt. Einstellen von Zahlenwerten Zahlenwerte stellen Sie in den dafür vorgesehenen Menüpunkten durch ein- oder mehrmaliges Betätigen der Tasten (Vergrößern des Zahlenwertes) oder Stelle mit (Verkleinern des Zahlenwertes) ein. Bei vierstelligen Zahlen kann nur die blinkende eingestellt werden. Durch Betätigen der -Taste schalten Sie zur jeweils nächsten Stelle um. Prinzip der Aufnahme von Zusatzfunktionen ins Hauptmenü Hauptmenü Bestätigung des ausgewählten Menüpunktes Zusatzmenü Auswahl des Menüpunktes ADDFUNCT Rückkehr zum erweiterten Hauptmenü Erweitertes Hauptmenü BS 8 Bestätigung der ausgewählten Zusatzfunktion und Übernahme ins Hauptmenü Betriebsanleitung-Nr. 803 899 BEDIENUNG DES STELLUNGSREGLERS Zusatzfunktionen Auswahl der Übertragungskennlinie zwischen Eingangssignal und Hub (Korrekturkennlinie) Dichtschließfunktion Wirksinn zwischen Eingangssignal und Sollposition Signalbereichsaufteilung; Eingangssignal in %, für den das Ventil den gesamten Hubbereich durchläuft. Begrenzung des mechanischen Hubbereichs Begrenzung der Stellgeschwindigkeit Parametrierung des Stellungsreglers (Parametrierung des PID-Prozeßreglers) In der Version als Stellungsregler ohne Funktion! Codeschutz für Einstellungen Aktivierung des Binäreingangs Kalibrierung Rücksetzen auf die Werkseinstellungen Typ 8635 S/HART BS 9 deutsch Zuordnung des Belüftungszustands der Antriebskammer (Anschluß 21) zur Istposition BEDIENUNG DES STELLUNGSREGLERS Ausführliche Beschreibung der ZusatzFunktionen CHARACT Auswahl der Übertragungskennlinie zwischen Eingangssignal und Hub (Korrekturkennlinie) Kundenspezifische Kennlinie (Characteristic) Werkseinstellung: CHA LIN Mit dieser Zusatzfunktion wählen Sie eine Übertragungskennlinie bezüglich Stellungssollwert (Soll-Position) und Ventilhub zur Korrektur der Durchfluß- bzw. Betriebskennlinie aus. deutsch Lineare Kennlinie Gleichprozentige Kennlinie 1 : 25 Gleichprozentige Kennlinie 1 : 33 Gleichprozentige Kennlinie 1 : 50 Invers gleichprozentige Kennlinie 25 : 1 Invers gleichprozentige Kennlinie 33 : 1 Invers gleichprozentige Kennlinie 50 : 1 Benutzerdefinierte, über Stützstellen frei programmierbare Kennlinie Die Durchflußkennlinie kV = f(s) kennzeichnet den Durchfluß eines Ventils, ausgedrückt durch den kV-Wert, in Abhängigkeit vom Hub s der Antriebsspindel. Sie ist durch die Formgebung des Ventilsitzes und der Sitzdichtung festgelegt. Im allgemeinen werden zwei Typen von Durchflußkennlinien realisiert, die lineare und die gleichprozentige. Normierter Ventilhub [%] Bei linearen Kennlinien sind gleichen Hubänderungen ds gleiche kV-Wert-Änderungen dkV zugeordnet (dkV = n lin * ds). Bei einer gleichprozentigen Kennlinie entspricht einer Hubänderung ds eine gleichprozentige Änderung des kVWertes Normierter Stellungssollwert [%] (dkV/kV = ngleichpr * ds). Die Betriebskennlinie Q = f(s) gibt den Zusammenhang zwischen dem Volumenstrom Q, der durch das in eine Anlage eingebaute Ventil fließt und dem Hub s wieder. In diese Kennlinie gehen die Eigenschaften der Rohrleitungen, Pumpen und Verbraucher ein. Sie weist deshalb eine von der Durchflußkennlinie verschiedene Form auf. Bei Stellaufgaben für Regelungen werden an den Verlauf der Betriebskennlinie meist besondere Anforderungen gestellt, z. B. Linearität. Aus diesem Grund ist es gelegentlich erforderlich, den Verlauf der Betriebskennlinie in geeigneter Weise zu korrigieren. Zu diesem Zweck ist im SideControl S/HART ein Übertragungsglied vorgesehen, das verschiedene Kennlinien realisiert. Diese werden zur Korrektur der Betriebskennlinie verwendet. Die gleichprozentigen Kennlinien 1:25, 1:33, 1:50, 25:1, 33:1 und 50:1 und eine lineare Kennlinie können eingestellt werden. Darüber hinaus ist es möglich, eine Kennlinie über Stützstellen frei zu programmieren bzw. automatisch einmessen zu lassen. BS 10 Betriebsanleitung-Nr. 803 899 BEDIENUNG DES STELLUNGSREGLERS Eingabe der frei programmierbaren Kennlinie Die Kennlinie wird über 21 Stützstellen definiert, die gleichmäßig über den Stellungssollwertbereich von 0..100 % verteilt sind. Ihr Abstand beträgt 5 %. Jeder Stützstelle kann ein frei wählbarer Hub (Einstellbereich 0..100 %) zugeordnet werden (Bild 6.8). Die Differenz zwischen den Hubwerten zweier benachbarter Stützstellen darf nicht größer als 20 % sein. Stellen Sie zur Eingabe der Kennlinienpunkte (Funktionswerte) zunächst den Menü-Punkt CHA FREE ein. Nach Betätigen der HAND/AUTOMATIK-Taste wird auf dem Display mit der Anzeige 0 (%) die erste Stützstelle vorgegeben. Daneben steht als Funktionswert zunächst 0 (%). Mit den Pfeiltasten stellen Sie den Funktionswert von 0 bis 100 % ein. Nach Bestätigung mit der HAND/AUTOMATIK-Taste wird die nächste Stützstelle auf dem Display angezeigt, usw. Drücken Sie schließlich zur Bestätigung des zur letzten Stützstelle (100 %) gehörenden Funktionswertes die HAND/AUTOMATIK-Taste, erfolgt der Rücksprung zum Menüpunkt CHARACT. deutsch Beispiel einer programmierten Kennlinie Ventilhub [%] Einheitssignal [%] Eingabe der Stützstellen: Ventilhub [%] (Eingabe mittels Pfeiltasten) Stellungssollwert [%] (Stützstelle) HINWEIS Typ 8635 S/HART zurück nach CHARACT Notieren Sie der eingegebenen Stützstellen in der Tabelle im Anhang BS 11 BEDIENUNG DES STELLUNGSREGLERS Cutoff Dichtschließfunktion CUT Werkseinstellung: = 1 %; CUT = 99% Diese Funktion bewirkt, daß das Ventil außerhalb des Regelbereiches dicht schließt. Geben Sie hier Grenzen für den Sollwert ein (in %), ab denen der Antrieb vollständig entlüftet bzw. belüftet wird. Das Öffnen bzw. die Wiederaufnahme des Regelbetriebes erfolgt mit einer Hysterese von 1 %. deutsch Dichtschließschwelle Entlüftung (0 = nicht aktiv); Einstellbereich: 0..25 % Dichtschließschwelle Belüftung (100 = nicht aktiv); Einstellbereich: 75..100 % Ventilhub [%] Einstellbar von 75 ... 100 % Sollwert [%] Einstellbar von 0 ... 25 % BS 12 Betriebsanleitung-Nr. 803 899 BEDIENUNG DES STELLUNGSREGLERS Dir.cmd Wirksinn zwischen Eingangssignal und Sollposition Werkseinstellung: DIR.CRISE Über diese Zusatzfunktion stellen Sie den Wirkungssinn zwischen dem Eingangssignal und der Sollposition des Antriebs ein. Direkte Wirkungsrichtung (z.B. 4 mA bzw. 0 V → 0% 20 mA bzw. 5/10 V → 100%) deutsch Inverse Wirkungsrichtung (z.B. 4 mA bzw. 0 V → 100% 20 mA bzw. 5/10 V → 0%) Sollposition RISE FALL Eingangssignal Typ 8635 S/HART BS 13 BEDIENUNG DES STELLUNGSREGLERS Dir.act Zuordnung des Belüftungszustands der Antriebskammer zur Istposition Werkseinstellung: DIR.ARISE deutsch Über diese Zusatzfunktion stellen Sie den Wirkungssinn zwischen dem Belüftungszustand des Antriebs und der Istposition ein. Direkte Wirkungsrichtung (entlüftet → 0% belüftet → 100%) Inverse Wirkungsrichtung (entlüftet → 100% belüftet → 0%) Sollposition RISE FALL entlüftet BS 14 belüftet Belüftungszustand Betriebsanleitung-Nr. 803 899 BEDIENUNG DES STELLUNGSREGLERS SPLtrng Signalbereichsaufteilung (Split range); Min. und Max.-Werte des Eingangssignal in %, für den das Ventil den gesamten Hubbereich durchläuft Werkseinstellung: SR = 0 (%); SR = 100 (%) Eingabe des minimalen Wertes des Eingangssignals in % (0..75 (%) des Einheitssignalbereichs) Eingabe des maximalen Wertes des Eingangssignals in % (25..100 (%) des Einheitssignalbereichs) Aufspalten eines Einheitssignalbereichs in zwei Sollwertbereiche Ventilhub [%] Sollwert [mA] Sollwertbereich SideControl 1 Typ 8635 S/HART Sollwertbereich Side Control 2 BS 15 deutsch Mit dieser Zusatzfunktion schränken Sie den Sollwertbereich des Side Control S/HART durch Festlegen eines minimalen und eines maximalen Wertes ein. Dadurch ist es möglich, einen genutzten Einheitssignalbereich (4..20 mA, 0..20 mA, 0..10 V oder 0..5 V) auf mehrere SideControl S/HART aufzuteilen (ohne oder mit Überlappung). Auf diese Weise können mehrere Ventile abwechselnd oder bei überlappenden Sollwertbereichen gleichzeitig als Stellglieder genutzt werden. BEDIENUNG DES STELLUNGSREGLERS X.limit Begrenzung des mechanischen Hubbereichs Werkseinstellung: LIM = 0%, LIM = 100% Diese Zusatzfunktion begrenzt den (physikalischen) Hub auf vorgegebene %-Werte (minimal und maximal). Dabei wird der Hubbereich des begrenzten Hubes gleich 100 % gesetzt. Wird im Betrieb der begrenzte Hubbereich verlassen, werden negative POS-Werte oder POS-Werte größer 100 % angezeigt. deutsch Eingabe des Anfangswertes des Hubbereichs in % 0..50% des Gesamthubes Eingabe des Endwertes des Hubbereichs in % 50..100% des Gesamthubes Der Mindestabstand zwischen LIM Begrenzter Hub [%] und LIM beträgt 50% Physikalischer Hub [%] Regelbereich im Automatik-Betrieb Stellbereich im Handbetrieb Unbegrenzter Hub Begrenzter Hub Sollwert [mA] BS 16 Betriebsanleitung-Nr. 803 899 BEDIENUNG STELLUNGSREGLERS DES X.time Begrenzung der Stellgeschwindigkeit Werkseinstellung: keine Begrenzung Beim Ausführen der Funktion X.TUNE wird für T.OPN und T.CLS automatisch die minimale Öffnungs- und Schließzeit für den gesamten Hub eingetragen. Somit kann dann mit maximaler Geschwindigkeit verfahren werden. deutsch Soll die Stellgeschwindigkeit begrenzt werden, so können für T.OPN und T.CLS Werte eingegeben werden, die zwischen den durch die X.TUNE ermittelten Minimalwerten und 60 s liegen. Öffnungsgeschwindigkeit Eingabe in s Schließgeschwindigkeit Auswirkung einer Begrenzung der Öffnungsgeschwindigkeit bei einem Sollwertsprung Ventilhub [%] Sollwert Istwert t T.OPN Typ 8635 S/HART BS 17 BEDIENUNG DES STELLUNGSREGLERS X.contrl deutsch Parametrierung des Stellungsreglers Unempfindlichkeitsbereich (Totband) des Stellungsreglers Eingabe des Totbands in %, bezogen auf den skalierten Hubbereich; d. h. LIM minus LIM (siehe Funktion x.limit) Durch diese Funktion wird erreicht, daß der Stellungsregler erst ab einer bestimmten Regeldifferenz anspricht. Die Funktion schont die Magnetventile im SideControl S/HART und den pneumatische Antrieb. Die Einstellung wird während der Ausführung von X.TUNE automatisch optimiert. Xd1' Stellungssollwert Regeldifferenz zum Regler Xd1 Xd1 Xd1' Totband StellungsIstwert Parameter des Stellungsreglers Proportionalbeiwert für Stellungsregler (zum Schließen des Ventils) Proportionalbeiwert für Stellungsregler (zum Öffnen des Ventils) Ende der Parametrierung des Stellungsreglers. Rücksprung zu X.CONTRL BS 18 Betriebsanleitung-Nr. 803 899 BEDIENUNG DES STELLUNGSREGLERS CODE Codeschutz für die Einstellungen Werkseinstellung: Code 0000 Einstellungen: Verriegelung des Einstiegs in die Konfigurierebene Eingabe des 4stelligen Codes Ist der Codeschutz aktiviert, wird bei jeder gesperrten Bedienhandlung zuerst die Eingabe des Codes verlangt: Verändern der blinkenden Stelle/Ziffer Bestätigen der Ziffer und Umschalten zur nächsten Stelle Typ 8635 S/HART BS 19 deutsch Verriegelung aller Handlungen, die den Betriebszustand des Geräts verändern würden. (Die Anzeige am Display kann umgeschaltet werden.) BEDIENUNG DES STELLUNGSREGLERS BIN-IN Aktivierung des Binäreingangs Auswahl der Funktion des Binäreingangs Anfahren einer Sicherheitsposition Binäreingang deaktiviert deutsch Eingabe der Sicherheitsposition (0..100%) Typ des Binäreingangs normally closed (0..5 V = 1; 10..30 V = 0) normally open (0..5 V = 0; 10..30 V = 1) Ende der Einstellung des Binäreingangs BS 20 Betriebsanleitung-Nr. 803 899 BEDIENUNG DES STELLUNGSREGLERS cal.user deutsch Nachträgliche Kalibrierung der Istwert-Anzeige und der Eingänge für Stellungs-Sollwert, Prozeß-Sollwert und ProzeßIstwert Ende der Kalibrierung CAl.pos Kalibrierung der Positionsanzeige (0 - 100 %) Übernahme der minimalen Position: minimale Position des Ventils über Pfeiltasten anfahren und durch Drücken der HAND/AUTOMATIK-Taste bestätigen Übernahme der maximalen Position: Fahren Sie die maximale Position des Ventils über die Pfeiltasten an und bestätigen Sie diesen Wert durch Drücken der HAND/AUTOMATIK-Taste cal inp Kalibrierung des Stellungs-Sollwerts (4..20 mA) Übernahme des minimalen Eingangssignals (4 mA): Legen Sie den minimalen Wert des Einheitssignals am Eingang an und bestätigen Sie diesen durch Drücken der HAND/AUTOMATIK-Taste Übernahme des maximalen Eingangssignals (20 mA): Legen Sie den maximalen Wert des Einheitssignals am Eingang an und bestätigen Sie diesen durch Drücken der HAND/AUTOMATIK-Taste Cal fact Typ 8635 S/HART Rücksetzen der Einstellungen unter CAL.USER auf die Werkseinstellungen: Halten Sie die HAND/AUTOMATIK-Taste gedrückt, bis der Countdown abgelaufen ist. BS 21 BEDIENUNG DES STELLUNGSREGLERS setfact Rücksetzen auf die Werkseinstellungen Mit dieser Funktion können alle vom Benutzer vorgenommenen Einstellungen auf den Zustand bei Auslieferung zurückgesetzt werden. Alle EEPROM-Parameter mit Ausnahme der Kalibrierwerte werden auf Default-Werte zurückgesetzt. Anschließend wird ein Hardware-Reset durchgeführt. deutsch 3s BS 22 Halten Sie zum Auslösen der Funktion die HAND/AUTOMATIK-Taste ca. 3 s gedrückt, bis der Countdown abgelaufen ist. Betriebsanleitung-Nr. 803 899 BEDIENUNG DES STELLUNGSREGLERS Bedienung des Prozesses Nach jedem Einschalten der Betriebsspannung befindet sich der Positioner automatisch in der Prozeßbedienebene. Aus der Konfigurierebene wechseln Sie durch Bestätigen des Menüpunkts END mit der -Taste in die Prozeßbedienebene. Von der Prozeßbedienebene aus wird der normale Regelbetrieb ausgeführt und überwacht (Betriebszustand AUTOMATIK), sowie das Ventil manuell auf- oder zugefahren (Betriebszustand HAND). Wechseln zwischen den Betriebszuständen: Betätigen Sie zum Umschalten zwischen den Betriebszuständen HAND und AUTOMATIK die deutsch -Taste. Sowohl im Betriebszustand HAND als auch im Betriebszustand AUTOMATIK schalten Sie durch 5 sec Drücken der -Taste über 5 Sekunden in die Konfigurierebene um. Beim Zurückschalten in die Prozeßbedienebene wird der Betriebszustand eingenommen, der vor dem Umschalten eingestellt war. Betriebszustand Display AUTOMATIK ein Hochkomma-Zeichen läuft ständig von links nach rechts HAND - Typ 8635 S/HART BS 23 BEDIENUNG DES STELLUNGSREGLERS Betriebszustand AUTOMATIK Im Betriebszustand AUTOMATIK wird der normale Regelbetrieb ausgeführt und überwacht. Bedeutung der Tasten im Betriebszustand AUTOMATIK: oder Umschalten der Anzeige deutsch Anzeigen im Betriebszustand AUTOMATIK Bezüglich des Stellungsreglers sind folgende Anzeigen möglich: • Ist-Position des Ventilantriebs: POS__xxx (0..100%) • Soll-Position des Ventilantriebs nach Umskalierung durch evtl. aktivierte Split-Range-Funktion oder Korrekturkennlinie: CMD__xxx (0..100%) Eingangssignal für Soll-Position: INP__xxx (0 .. 5/10 V oder 0/4 .. 20 mA) • Durch Betätigen der Tasten schalten Sie zwischen diesen Anzeigemöglichkeiten um. Betriebszustand AUTOMATIK Konfigurieren Menüpunkt END (> 5 Sek.) POS__XXX CMD__XXX INP__XXX oder Keine Bedienhandlung Anzeige umschalten Taste loslassen Betriebszustand HAND BS 24 Betriebsanleitung-Nr. 803 899 BEDIENUNG DES STELLUNGSREGLERS Betriebszustand HAND Im Betriebszustand HAND kann das Ventil manuell auf- oder zugefahren werden. Bedeutung der Tasten im Betriebszustand HAND: Drücken der Taste im Betriebszustand HAND: Auffahren des Antriebs Drücken der Taste im Betriebszustand HAND: Gedrückthalten der Taste und : und gleichzeitiges Drücken der Taste : Auffahren im Schnellgang Gedrückthalten der Taste und und gleichzeitiges Drücken der Taste deutsch Zufahren des Antriebs Zufahren im Schnellgang Anzeigen im Betriebszustand HAND: • Angezeigt wird die zuletzt im Betriebszustand AUTOMATIK eingestellte Anzeige. Mit der Auswahl von POS__xxx kann die Ist-Position des Ventilantriebs überprüft werden. Normal-/Schnellgang bei Handbetätigung des Ventils: Drücken Sie im Betriebszustand HAND die Taste , fährt das Stetigventil über den Antrieb kontinuierlich auf. Nach Loslas- sen der Taste wird dieser Vorgang unterbrochen, und das Ventil bleibt in der eingenommenen Stellung stehen. Durch Drücken der Taste fährt das Ventil in entsprechender Weise zu. Drücken Sie zusätzlich zu einer PFEIL-Taste die zweite PFEIL-Taste, fährt das Ventil im Schnellgang in die Richtung der zuerst betätigten Taste. Betriebszustand AUTOMATIK Betriebszustand HAND Ventil zu Normalgang loslassen Taste loslassen Keine Bedienhandlung Taste loslassen (> 5 Sek.) Ventil auf Normalgang loslassen Menüpunkt Ventil zu Schnellgang END Ventil auf Schnellgang Konfigurieren Typ 8635 S/HART BS 25 DES STELLUNGSREGLERS deutsch BEDIENUNG BS 26 Betriebsanleitung-Nr. 803 899 DES PROZESSREGLERS BEDIENUNG DES PROZESSREGLERS Inhalt: Einrichten einer Prozeßregelung .................................................................................................................. BP 2 Automatischen Anpassung des Reglers an die Betriebsbedingungen .................................................... BP 3 Zusatzfunktion P.CONTRL ............................................................................................................................................................................. BP 4 Start der Routine zur Linearisierung der Prozeßkennlinie P.QLIN ................................................................................. BP 10 Bedienung des Prozesses ........................................................................................................................... BP 11 Betriebszustand AUTOMATIK ...................................................................................................................... BP 12 Manuelles Verändern des Prozeßsollwerts: ............................................................................................... BP 13 Betriebszustand HAND ................................................................................................................................ BP 14 Typ 8635 S/HART BP 1 deutsch BEDIENUNG BEDIENUNG DES PROZESSREGLERS deutsch Werkseinstellungen des Prozeßreglers Funktion Werkseinstellung P.co - dbnd 1% P.co - setp setp int P.co - Filt 0 P.co - scal unit l/s Einrichten einer Prozeßregelung Um den SideControl S/HART als Prozeßregler betreiben zu können, führen Sie folgende Schritte aus: ➔ Führen Sie in jedem Fall zunächst die Selbstparametrierung für Stellungsregler (X.TUNE ) durch. ➔ Nehmen Sie die Zusatzfunktion P.CONTRL über das Konfiguriermenü ins Hauptmenü auf. Mit der Funktion P.CONTRL wird die Funktion P.QLIN automatisch ins Hauptmenü eingefügt. ➔ Nehmen Sie Grundeinstellungen für den Prozeßregler unter P.CONTRL vor. Linearisierung der Prozeßkennlinie: Falls es sich um eine Durchflußregelung handelt, kann die Prozeßkennlinie automatisch linearisiert weden: ➔ Lösen Sie die Funktion P.QLIN aus. ACHTUNG! Halten Sie folgende Reihenfolge in jedem Fall ein! BP 2 X.TUNE P.QLIN Betriebsanleitung-Nr. 803 889 BEDIENUNG DES PROZESSREGLERS Selbstparametrierung für Stellungsregler X.tune ➔ Über den Menüpunkt X.TUNE starten Sie das Programm zur automatischen Parametrierung des Side Control. • Anpassung des Sensorsignals an den (physikalischen) Hub des verwendeten Stellgliedes • Ermittlung von Parametern der PWM-Signale zur Ansteuerung der im Side Control integrierten Magnetventile • Einstellung der Reglerparameter des Stellungsreglers. Die Optimierung erfolgt nach den Kriterien einer möglichst kurzen Ausregelzeit bei gleichzeitiger Überschwingungsfreiheit. deutsch Folgende Funktionen werden selbsttätig ausgelöst: ➔ Sie starten die Autotune-Funktion durch den Aufruf von X.TUNE im Hauptmenü. ➔ Halten Sie anschließend die HAND/AUTOMATIK-Taste 5 Sekunden lang gedrückt. Start der automatischen Anpassung des Reglers an die jeweiligen Betriebsbedingungen Display-Anzeige TUNE 5 Beschreibung Countdown von 5 bis 0 zum Starten von Autotune 5s TUNE 4 : TUNE 0 ¦ X.TUNE 1 ¦ X.TUNE 2 ¦ X.TUNE 3 ¦ X.TUNE 4 : Anzeige der gerade ablaufenden AutotunePhase (der Fortgang wird durch einen sich drehenden Balken am linken Rand des Displays angezeigt) X.TUNE.END Anzeige blinkend => Ende der Autotune X.ERR X.X Anzeige bei Auftreten eines Fehlers (Anzeige rechts: Fehlernummer s. Kapitel "Wartung und Fehlerbehebung") Anmerkung: Die Grundeinstellungen für den SideControl S/HART werden werksseitig durchgeführt. Bei Inbetriebnahme ist jedoch das Ausführen von ”X.TUNE” unbedingt erforderlich. Hierbei ermittelt der SideControl selbsttätig die für die aktuell vorliegenden Betriebsbedingungen optimalen Einstellungen. ACHTUNG! Vermeiden Sie eine Fehlanpassung des Reglers, indem Sie X.TUNE in jedem Fall bei dem im späteren Betrieb zur Verfügung stehenden Versorgungsdruck (= pneumatische Hilfsenergie) durchführen. Falls von der Strömung durch das Ventil erhebliche Störkräfte zu erwarten sind (z.B. durch starke Druckschwankungen), sollte X.TUNE ohne Mediumsdruck durchgeführt werden. Typ 8635 S/HART BP 3 BEDIENUNG DES PROZESSREGLERS Zusatzfunktion P.CONTRL deutsch (siehe auch Kapitel "Bedienung des Stellungsregler - Konfigurieren der Zusatzfunktionen") Parametrierung des PID-Prozeßreglers BP 4 Betriebsanleitung-Nr. 803 889 BEDIENUNG DES PROZESSREGLERS P.contrl Parametrierung des Prozeßreglers Unempfindlichkeitsbereich (Totband) des PID-Prozeßreglers Parameter des PID-Prozeßreglers deutsch Art der Sollwertvorgabe Filterung des Prozeß-Istwerteingangs Skalierung des Prozeßreglers Speichern der neuen Parameter Ende der Parametrierung des Prozeßreglers Typ 8635 S/HART BP 5 BEDIENUNG DES PROZESSREGLERS P.co - dbnd Unempfindlichkeitsbereich (Totband) des Prozeßreglers Werkseinstellung: 1% (bezogen auf die Spanne des gewählten Prozeß-Istwert-Eingangs) Durch diese Funktion wird erreicht, daß der Prozeßregler erst ab einer bestimmten Regeldifferenz anspricht. Dadurch werden die Magnetventile im SideControl und der pneumatische Antrieb geschont. deutsch Eingabe des Totbands in % Eingabe des Totbands in % bezogen auf die Spanne des gewählten Prozeß-Istwert-Eingangs Für PV verwendeter Eingangstyp Bereich Spanne (als Bezug für das Totband) Beispiel: 1% Tontband entsprechen 4..20 mA 4 .. 20 mA 16 mA 0,16 mA Frequenz 0 .. 1000Hz 1000 Hz 10 Hz Pt100 -20 .. +220°C 240°C 2,4°C Unempfindlichkeitsbereich bei Prozeßregelung Xd2' Prozeß-Sollwert Regeldifferenz zum Regler Xd2 Xd2 Xd2' Totband ProzeßIstwert BP 6 Betriebsanleitung-Nr. 803 889 BEDIENUNG DES PROZESSREGLERS P.co - para Parameter des PID-Prozeßreglers Proportionalbeiwert 0...99.99 (Werkseinstellung 1.00) Nachstellzeit 0.5...999.9 (Werkseinstellung 999.9) deutsch Vorhaltezeit 0.5...999.9 (Werkseinstellung 0) Arbeitspunkt 0.0...100 % (Werkseinstellung 0 %) s. Anhang HINWEIS Notieren Sie die eingegebenen Parameter in der Tabelle im Anhang C P.co - setp Art der Sollwertvorgabe (intern / extern) Sollwertvorgabe intern über die Tasten am SideControl Sollwertvorgabe extern über den Einheitssignaleingang Typ 8635 S/HART BP 7 BEDIENUNG DES PROZESSREGLERS P.co - filt Filterung des Prozeß-Istwerteingangs. Gültig für alle Prozeß-Istwert-Typen. Bereich: 0..9 Werkseinstellung: 0 FILT xx deutsch Einstellung in 10 Stufen: 0..9 Einstellung in 10 Stufen BP 8 Einstellung entspricht Grenzfrequenz [Hz] Wirkung 0 10 geringste Filterung 1 5 2 3 3 2 4 1 5 0,7 6 0,5 7 0,3 8 0,2 9 0,1 größte Filterung Betriebsanleitung-Nr. 803 889 BEDIENUNG DES PROZESSREGLERS P.CO SCAL Skalierung des Prozeßreglers Position des Dezimalpunkts für Prozeß-Istwert- und Sollwert (Einstellbereich: 0..3) deutsch Unterer Skalierungswert für den Prozeß-Istwert (process value); der Wert wird 4 mA zugeordnet. Oberer Skalierungswert für den Prozeß-Istwert (process value); der Wert wird 20 mA zugeordnet Unterer Skalierungswert für den Prozeß-Sollwert (setpoint); wird dem größten Strom- bzw. Spannungswert des Einheitssignals zugeordnet. Diese Einstellung ist nur dann aktiv, wenn P.CO SETP / SETP EXT gewählt ist. Oberer Skalierungswert für den Prozeß-Sollwert (setpoint); wird dem kleinsten Strom- bzw. Spannungswert des Einheitssignals zugeordnet. Diese Einstellung ist nur dann aktiv, wenn P.CO SETP / SETP EXT gewählt ist. Skalierungsbeispiel: Prozeß-Istwert vom Transmitter: 4..20 mA entspricht 0..10 l/min Prozeß-Sollwert von SPS: 4..20 mA entspricht 0..8 l/min Beispiel für die Eingabe von Skalierwerten Skalierwert [l/min] ProzeßIstwert ProzeßSollwert PV PV SP SP Variante 1 Variante 2 Variante 3 0 1.0 0 0.8 0 10.0 0 8.0 0 100.0 0 80.0 Eingangssignal [mA] HINWEIS Bei der Eingabe kleiner Skalierungswerte werden zur Erhöhung der Anzeigegenauigkeit automatisch Nachkommastellen ergänzt, so daß die maximal mögliche Digitspanne zwischen dem jeweiligen unteren und oberen Skalierungswert gegeben ist. Die Verstärkung KP des Prozeßreglers bezieht sich auf die eingestellten Skalierungswerte. Bei P.CO SETP / SETP INT (Sollwertvorgabe über die Pfeiltasten) ist die Skalierung des Sollwertes über SP und SP nicht möglich. Der Sollwert kann entsprechend der skalierten Prozeßgröße (PV , PV ) direkt eingegeben werden. Typ 8635 S/HART BP 9 BEDIENUNG DES PROZESSREGLERS P.QLIN Start der Routine zur Linearisierung der Prozeßkennlinie Diese Funktion ist nur dann sinnvoll, wenn eine Durchflußregelung durchgeführt werden soll ➔ Sie starten die Routine zur Linearisierung der Prozeßkennlinie durch Aufruf des Menüpunktes P.QLIN im Hauptmenü und Drücken der HINWEIS -Taste für 5 Sekunden. Die Funktion P.Q'LIN kann nur gestartet werden, wenn der Menüpunkt P.CONTRL / P.COINP / INPFREQ oder P.CONTRL / P.COINP / Inp4'20 mA ausgewählt wurde. deutsch Mit dem Aktivieren der Funktion P.CONTRL wird die für die Prozeßregelung erforderlichen Funktionen P.QLIN ins Hauptmenü kopiert. Über diese Funktion wird das Programm zur selbsttätigen Ermittlung der Stützstellen für eine Korrekturkennlinie gestartet. Das Programm erhöht in 20 Schritten den Ventilhub von 0 bis 100 % und mißt die zugehörige Prozeßgröße. Die Wertepaare der Korrekturkennlinie werden als freiprogrammierbare Kennlinie unter dem Menüpunkt CHARACT/CHAFREE abgelegt und können unter diesem Menüpunkt angesehen werden. Wenn der Menüpunkt CHARACT nicht unter dem Menüpunkt ADDFUNC ins Hauptmenü übernommen wurde, geschieht die Übernahme bei Ausführen der Funktion P.Q'LIN automatisch. Gleichzeitig wird der Menüpunkt CHARACT/CHAFREE aktiviert. Anzeige während Aufruf und Durchführung der Routine Display-Anzeige BP 10 Beschreibung P.QLIN 5 P.QLIN 4 : P.QLIN 0 Countdown von 5 bis 0 zum Starten der Routine ¦ P.QLIN 0 ¦ P.QLIN 1 ¦ P.QLIN 2 ¦ P.QLIN 3 : Anzeige der Stützstelle, die gerade angefahren wird (der Fortgang wird durch einen sich drehenden Balken am linken Rand des Displays angezeigt) P.QLIN.END (blinkend) Ende der Routine Q.ERR X.X Anzeige bei Auftreten eines Fehlers (rechts wird die Fehlernummer angezeigt - siehe Kap "Fehlerbehebung") Betriebsanleitung-Nr. 803 889 BEDIENUNG DES PROZESSREGLERS Bedienung des Prozesses Nach jedem Einschalten der Betriebsspannung befindet sich der SideControl S/HARTautomatisch in der Prozeßbedienebene. Aus der Konfigurierebene wechseln Sie durch Bestätigen des Menüpunkts END mit der -Taste in die Prozeßbedienebene. Von der Prozeßbedienebene aus wird der normale Regelbetrieb ausgeführt und überwacht (Betriebszustand AUTOMATIK), sowie das Ventil manuell auf- oder zugefahren (Betriebszustand HAND). Wechseln zwischen den Betriebszuständen: Betätigen Sie zum Umschalten zwischen den Betriebszuständen HAND und AUTOMATIK die deutsch -Taste. Sowohl im Betriebszustand HAND als auch im Betriebszustand AUTOMATIK schalten Sie durch 5 sec Drücken der -Taste über 5 Sekunden in die Konfigurierebene um. Beim Zurückschalten in die Prozeßbedienebene wird der Betriebszustand eingenommen, der vor dem Umschalten eingestellt war. Betriebszustand Display AUTOMATIK ein Hochkomma-Zeichen läuft ständig von links nach rechts HAND - Typ 8635 S/HART BP 11 BEDIENUNG DES PROZESSREGLERS Betriebszustand AUTOMATIK Im Betriebszustand AUTOMATIK wird der normale Regelbetrieb ausgeführt und überwacht. Bedeutung der Tasten im Betriebszustand AUTOMATIK: Umschalten der Anzeige oder deutsch oder Verändern des Prozeßsollwertes Bei konfigurierter Zusatzfunktion P.CONTRL / P.CO SETP / SETP INT und eingestellter Anzeige SP > 3 sec Bei aktiviertem Prozeßregler können folgende Größen angezeigt werden: • Istwert der Prozeßgröße (Prozeßistwert): PV___(-999..9999) • Sollwert der Prozeßgröße (Prozeßsollwert): SP___(-999..9999) • Ist-Position des Ventilantriebs: POS__xxx (0..100%) • Soll-Position des Ventilantriebs nach Umskalierung durch evtl. aktivierte Split-Range-Funktion oder Korrekturkennlinie: CMD__xxx (0..100%) Innentemperatur im Gehäuse des SideControl: TEMP_xx.x (in °C) • Durch Betätigen der Pfeiltasten schalten Sie zwischen diesen Anzeigemöglichkeiten um. Bedienstruktur und Bedienabläufe im Betriebszustand AUTOMATIK Betriebszustand AUTOMATIK Konfigurieren Menüpunkt END (> 5 Sek.) oder Anzeige umschalten Keine Bedienhandlung SP oder Prozeßsollwert einstellen aktiv Taste loslassen Taste loslassen Betriebszustand HAND HINWEIS BP 12 Ist der Menüpunkt BIN IN / BIN FUNC / FUNC SPOS aktiviert und der Binäreingang wird geschaltet, erscheint im Display die Anzeige SAFE xxx. Der Zahlenwert XXX gibt die zuvor ausgewählte Sicherheitsposition in % an. Betriebsanleitung-Nr. 803 889 BEDIENUNG DES PROZESSREGLERS Manuelles Verändern des Prozeßsollwerts: oder > 3 sec Wurde beim Konfigurieren die Zusatzfunktion P.CONTRL / P.CO SETP / SETP INT (Einstellen des Sollwertes über Tasten) spezifiziert, kann bei eingestellter Anzeige SP (Setpoint) durch Betätigen einer der beiden Pfeiltasten von länger als 3 Sekunden der Modus zum Verändern des Prozeßsollwertes aktiviert werden. Nach dem Loslassen der Taste blinkt die erste Stelle des Prozeßsollwertes. Sie stellen die erste Stelle des Prozeßsollwertes ein. oder -Taste wird der eingestellte Wert übernommen. deutsch Nach Bestätigen der In gleicher Weise verfahren Sie mit den übrigen Stellen. Nach Bestätigung der vierten Stelle erfolgt der Rücksprung. Typ 8635 S/HART BP 13 BEDIENUNG DES PROZESSREGLERS Betriebszustand HAND Im Betriebszustand HAND kann das Ventil manuell auf- oder zugefahren werden. Bedeutung der Tasten im Betriebszustand HAND: Drücken der Taste im Betriebszustand HAND: Auffahren des Antriebs Drücken der Taste im Betriebszustand HAND: Zufahren des Antriebs Gedrückthalten der Taste und gleichzeitiges Drücken der Taste Gedrückthalten der Taste und gleichzeitiges Drücken der Taste : Auffahren im Schnellgang deutsch und und : Zufahren im Schnellgang Anzeigen im Betriebszustand HAND • Angezeigt wird die zuletzt im Betriebszustand AUTOMATIK eingestellte Anzeige. Mit der Auswahl von PV__xxx kann der Ist-Wert der Prozeßgröße überprüft werden. • Zur Anzeige der Ist-Position des Ventilantriebs während des HAND-Betriebes , stellen Sie zuvor im Betriebszustand AUTOMATIK auf die Anzeige POS__xxx um. Normal-/Schnellgang bei Handbetätigung des Ventils: Drücken Sie im Betriebszustand HAND die Taste , fährt das Stetigventil über den Antrieb kontinuierlich auf. Nach Loslassen der Taste wird dieser Vorgang unterbrochen, und das Ventil bleibt in der eingenommenen Stellung stehen. Durch Drücken der Taste fährt das Ventil in entsprechender Weise zu. Drücken Sie zusätzlich zu einer Pfeiltaste die zweite Pfeiltaste, fährt das Ventil im Schnellgang in die Richtung der zuerst betätigten Taste. Bedienstruktur und Bedienabläufe im Betriebszustand HAND Betriebszustand AUTOMATIK Betriebszustand HAND Ventil zu Normalgang loslassen Taste loslassen Keine Bedienhandlung Taste loslassen (> 5 Sek.) Ventil auf Normalgang loslassen Menüpunkt Ventil zu Schnellgang END Ventil auf Schnellgang Konfigurieren BP 14 Betriebsanleitung-Nr. 803 889 WARTUNG DES STELLUNGSREGLERS deutsch WARTUNG DES STELLUNGSREGLERS Inhalt: WARTUNG ........................................................................................................................ WS 2 FEHLERBEHEBUNG ........................................................................................................ WS 2 Fehlermeldungen auf dem LC-Display ............................................................................................... WS 2 Fehlermeldung beim Einschalten ....................................................................................................... WS 2 Fehlermeldungen bei der Durchführung der Funktion X.TUNE ............................................................................. WS 2 Sonstige Störungen ............................................................................................................................. WS 2 Typ 8635 S/HART WS 1 WARTUNG DES STELLUNGSREGLERS Der SideControl S/HART ist bei Betrieb entsprechend den in dieser Anleitung angegebenen Anweisungen wartungsfrei. FEHLERMELDUNGEN UND STÖRUNGEN Fehlermeldungen auf dem LC-Display deutsch Fehlermeldung beim Einschalten Anzeige Fehlerursachen Abhilfe INT.ERROR Interner Fehler nicht möglich, Gerät defekt Fehlermeldungen bei der Durchführung der Funktion X.TUNE Anzeige Fehlerursachen Abhilfe X.ERR 1 Keine Druckluft angeschlossen Druckluft anschließen X.ERR 2 Druckluftausfall während Autotune Druckluftversorgung kontrollieren X.ERR 3 Antrieb bzw. StellsystemEntlüftungsseite undicht nicht möglich, Gerät defekt X.ERR 4 Stellsystem-Belüftungsseite undicht nicht möglich, Gerät defekt X.ERR 5 Der Totbereich des internen Wegmeßsystems wird überfahren Ausrichtung der Achse des SideControl überprüfen und korrigieren (s. Kap. "Installation") Sonstige Störungen WS 2 Problem mögliche Ursachen Abhilfe POS = 0 (bei CMD > 0%) bzw. POS = 100%, (bei CMD < 100%) Dichtschließfunktion (CUTOFF) ist unbeabsichtigt aktiviert Dichtschließfunktion (CUTOFF) deaktivieren Betriebsanleitung-Nr. 803 889 WARTUNG DES PROZESSREGLERS deutsch WARTUNG DES PROZESSREGLERS Inhalt: WARTUNG ........................................................................................................................ WP 2 FEHLERBEHEBUNG ........................................................................................................ WP 2 Fehlermeldungen auf dem LC-Display ............................................................................................... WP 2 Fehlermeldung beim Einschalten ....................................................................................................... WP 2 Fehlermeldungen bei der Durchführung der Funktion X.TUNE ............................................................................. WP 2 Fehlermeldung bei der Durchführung der Funktion P.Q'LIN ............................................................... WP 2 Sonstige Störungen ............................................................................................................................. WP 2 Typ 8635 S/HART WS 1 WARTUNG DES PROZESSREGLERS Der SideControl S/HARTist bei Betrieb entsprechend den in dieser Anleitung angegebenen Anweisungen wartungsfrei. FEHLERMELDUNGEN UND STÖRUNGEN Fehlermeldungen auf dem LC-Display deutsch Fehlermeldung beim Einschalten Anzeige Fehlerursachen Abhilfe INT.ERROR Interner Fehler nicht möglich, Gerät defekt Fehlermeldungen bei der Durchführung der Funktion X.TUNE Anzeige Fehlerursachen Abhilfe X.ERR 1 Keine Druckluft angeschlossen Druckluft anschließen X.ERR 2 Druckluftausfall während Autotune Druckluftversorgung kontrollieren X.ERR 3 Antrieb bzw. StellsystemEntlüftungsseite undicht nicht möglich, Gerät defekt X.ERR 4 Stellsystem-Belüftungsseite undicht nicht möglich, Gerät defekt X.ERR 5 Der Totbereich des internen Wegmeßsystems wird überfahren Ausrichtung der Achse des SideControl überprüfen und korrigieren (s. Kap. "Installation") Fehlermeldung bei der Durchführung der Funktion P.Q'LIN Anzeige Fehlerursachen Q.ERR 1 Kein Versorgungsdruck angeschlossen Versorgungsdruck anschließen Keine Änderung der Prozeßgröße Q.ERR 2 Abhilfe Prozeß kontrollieren, ggf. Pumpe einschalten bzw. das Absperrventil öffnen Aktuelle Stützstelle des Ventilhubs wurde nicht erreicht, da • Versorgungsdruckausfall während P.QLIN • Versorgungsdruck kontrollieren • keine AUTOTUNE durchgeführt wurde • AUTOTUNE durchführen Sonstige Störungen WS 2 Problem mögliche Ursachen Abhilfe POS = 0 (bei CMD > 0%) bzw. POS = 100%, (bei CMD < 100%) Dichtschließfunktion (CUTOFF) ist unbeabsichtigt aktiviert Dichtschließfunktion (CUTOFF) deaktivieren Betriebsanleitung-Nr. 803 889 ANHANG: BEDIENSTRUKTUR deutsch ANHANG: BEDIENSTRUKTUR Inhalt: Bedienstruktur des SideControl S/HART ........................................................................................................ BS 1 Typ 8635 S/HART BS 1 deutsch ANHANG: BEDIENSTRUKTUR BS 2 Betriebsanleitung-Nr. 803 889 deutsch ANHANG: BEDIENSTRUKTUR Typ 8635 S/HART BS 3 deutsch ANHANG: BEDIENSTRUKTUR BS 4 Betriebsanleitung-Nr. 803 889 ANHANG: TABELLEN STELLUNGSREGLER deutsch ANHANG: TABELLEN STELLUNGSREGLER Inhalt: Tabelle für Ihre Einstellungen am Stellungsregler ........................................................................................ TS 1 Typ 8635 S/HART TS 1 ANHANG: TABELLEN STELLUNGSREGLER TABELLE FÜR IHRE EINSTELLUNGEN AM STELLUNGSREGLER Einstellungen der freiprogrammierten Kennlinie Stützstelle (Stellungssollwert in %) Ventilhub [%] Datum: Datum: Datum: Datum: 0 5 deutsch 10 15 20 25 30 35 40 45 50 55 60 65 70 75 80 85 90 95 100 TS 2 Betriebsanleitung-Nr. 803 889 ANHANG: TABELLEN PROZESSREGLER Inhalt: Tabellen für Ihre Einstellungen am Prozessregler ........................................................................................ TP 1 Typ 8635 S/HART TP 1 deutsch ANHANG: TABELLEN PROZESSREGLER ANHANG: TABELLEN PROZESSREGLER TABELLEN FÜR IHRE EINSTELLUNGEN AM PROZESSREGLER Einstellungen der freiprogrammierten Kennlinie Stützstelle (Stellungssollwert in %) Ventilhub [%] Datum: Datum: Datum: Datum: 0 5 10 15 deutsch 20 25 30 35 40 45 50 55 60 65 70 75 80 85 90 95 100 Eingestellte Parameter des Prozeßreglers Datum: Datum: Datum: Datum: KP TN TV X0 DBND DP PV PV SP SP UNIT KFAC TP 2 Betriebsanleitung-Nr. 803 889 CONTENTS SideControl S/HART Positioner Type 8635 Contents Symbols ................................................................................................................... GN 2 General safety notes ................................................................................................ GN 2 Device-related notes ................................................................................................ GN 3 Protection from damage by electrostatic charging .............................................. GN 3 Scope of delivery...................................................................................................... GN 4 Warranty conditions ................................................................................................. GN 4 EC Type test certificate ............................................................................................ GN 5 SYSTEM DESCRIPTION .............................................................................. SD 1 System description .................................................................................................. SD 1 Construction of the SideControl S/HART .............................................................. SD 2 Design features ........................................................................................................ SD 3 Function of the SideControl S/HART positioner ................................................... SD 4 Operation of the SideControl S/HART as a positioner ......................................... SD 5 Operation of the SideControl S/HART as a process controller ........................... SD 5 Interfaces of the SideControl S/HART.................................................................... SD 6 Software characteristics .......................................................................................... SD 7 Technical data ........................................................................................................... SD 8 Works settings ............................................................................................. SD 8 Data of the SideControl S/HART ................................................................ SD 9 INSTALLATION .............................................................................................. IN 1 Attachment and assembly of the SideControl S/HART .......................................... IN 2 Attachment to a continuous valve with linear actuator acc. to NAMUR .............. IN 2 Attachment to a continuous valve with part-turn actuator .................................... IN 4 Fluidic connection...................................................................................................... IN 6 Electrical connection ................................................................................................. IN 7 Type 8635S/HART/Operating instructions no. 803 889 - ind00/oct00 CO 1 english GENERAL NOTES ........................................................................................GN 1 CONTENTS OPERATING THE POSITIONER................................................................... OP 1 Operating and display elements ............................................................................. OP 2 Operating levels ....................................................................................................... OP 2 Commissioning and set-up as a positioner .......................................................... OP 3 Basic settings ............................................................................................................... OP 3 Procedure for specifying the basic settings ............................................................. OP 3 Works settings of the positioner ................................................................................. OP 3 Configuring the supplementary functions ............................................................ OP 6 Keys in the configuration level ................................................................................... OP 6 Configuration menu...................................................................................................... OP 6 Supplementary functions ............................................................................................ OP 8 Operating the process ........................................................................................... OP 23 Operating mode AUTOMATIC ................................................................................ OP 24 Operating mode MANUAL ..................................................................................... OP 25 OPERATING THE PROCESS CONTROLLER .............................................OC 1 english Setting up a process control system ..................................................................... OC 2 Automatic adaptation of the controller to the operating conditions .................. OC 3 Supplementary function P.CONTRL ..................................................................................................... OC 4 Starting the routine for linearization of the process characteristic P.QLIN ........... OC 10 Operating the process ........................................................................................... OC 11 Operating mode AUTOMATIC ................................................................................ OC 12 Manual changing of the process set point .......................................................... OC 13 Operating mode MANUAL ..................................................................................... OC 14 MAINTENANCE OF THE POSITIONER .......................................................MP 1 Error messages on the LC display ......................................................................... MP 2 Error messages on switching on ............................................................................ MP 2 Error messages on execution of the function X.TUNE........................................................... MP 2 Other malfunctions .................................................................................................. MP 2 MAINTENANCE OF THE PROCESS CONTROLLER ................................ MC 1 Error messages on the LC display ......................................................................... MC 2 Error message on switching on ............................................................................. MC 2 Error messages on execution of the function X.TUNE ......................................................... MC 2 Error messages on execution of the function P.Q'LIN ............................................. MC 2 Other malfunctions .................................................................................................. MC 2 CO 2 Type 8635S/HART/Operating instructions no. 803 889 - ind00/oct00 CONTENTS APPENDIX Operating structure of the SideControl S/HART ................................................... AO 1 Tables for noting your settings on the positioner.................................................. TP 2 Tables for noting your settings on the process controller.................................... TC 2 FUNCTIONS OF THE POSITIONER Charact ................................................................................................................................................................................................ OP 10 Cutoff .................................................................................................................................................................................................. OP 12 Dir.cmd .................................................................................................................................................................................................. OP 13 Dir.act .................................................................................................................................................................................................. OP 14 SPLtrng ................................................................................................................................................................................................ OP 15 X.limit .................................................................................................................................................................................................... OP 16 X.time ..................................................................................................................................................................................................... OP 17 X.control ............................................................................................................................................................................................. OP 18 CODE ...................................................................................................................................................................................................... OP 19 BIN-IN ..................................................................................................................................................................................................... OP 20 cal.user ............................................................................................................................................................................................... OP 21 setfact ................................................................................................................................................................................................. OP 22 FUNCTIONS OF THE PROCESS CONTROLLER Function ................................................................................................................................................ Seite X.tune ..................................................................................................................................................................................................... OP 3 P.control ............................................................................................................................................................................................... OP 4 P.co - dbnd ...................................................................................................................................................................................... OP 6 P.co - para ....................................................................................................................................................................................... OP 7 P.co - setp ....................................................................................................................................................................................... OP 7 P.co - filt ......................................................................................................................................................................................... OP 8 P.CO SCAL .......................................................................................................................................................................................... OP 9 P.QLIN .................................................................................................................................................................................................... OP 10 Type 8635S/HART/Operating instructions no. 803 889 - ind00/oct00 CO 3 english Function ................................................................................................................................................ Seite english CONTENTS CO 4 Type 8635S/HART/Operating instructions no. 803 889 - ind00/oct00 GENERAL NOTES english GENERAL NOTES Contents Symbols ........................................................................................................................................................... GN 2 General safety notes ...................................................................................................................................... GN 2 Device-related notes ....................................................................................................................................... GN 3 Protection from damage by electrostatic charging ..................................................................................... GN 3 Scope of delivery ............................................................................................................................................ GN 4 Warranty conditions ....................................................................................................................................... GN 4 EC Type test certificate .................................................................................................................................. GN 5 Type 8635 S/HART GN 1 GENERAL NOTES Symbols The following symbols are used in these operating instructions: marks a work step that you must carry out ATTENTION! NOTE marks notes on whose non-observance your health or the functioning of the device will be endangered marks important additional information, tips and recommendations Safety notes english Please observe the notes in these operating instructions together with the conditions of use and permitted data that are specified in the data sheets of the electropneumatic positioner, in order that the device will function perfectly and remain operable for a long time: GN 2 • This device left the manufacturer’s works in a faultless condition with regard to technical safety and was tested. Proper transport, storage and installation are the prerequisites for continued correct functioning. • Keep to standard engineering rules in planning the use of and operating the device! • Interventions for installation and maintenance work are only allowed by specialist personnel using suitable tools. • Observe the current regulations on accident prevention and safety for electrical devices during operation and maintenance of the device! • Take suitable precautions to prevent unintentional operation or damage by unauthorized action! • On non-observance of these notes and unauthorized interference with the device, we will refuse all liability and the warranty on device and accessories will become void! Operating instructions no. 803 889 GENERAL NOTES • For installation and operation in potentially hazardous (explosive) locations, observe the relevant national regulations. In Germany, these are to be found in VDE 0165. • On electrical connection of the inherently safe circuits, observe the data in the relevant certificate of conformity. • Take suitable precautions to prevent electrostatic charging of plastic parts of the housing (see EN 100 015 - 1). • No components shall be connected to the inputs and outputs of the boards whose electrical data lie outside the limits determined for inherently safe operation and stated on the data sheet for the positioner. • In potentially hazardous (explosive) locations, only inherently safe devices shall be connected to the serial interface. • The plastic covering shall be removed only by the manufacturer. • Interventions in the device with the housing open shall not be carried out in very humid or aggressive atmospheres. Take precautions to prevent inadvertent mechanical damage to the boards or their components. Limit the duration of opening of the housing to that which is absolutely necessary. Protection from damage by electrostatic charging This device contains electronic components that are sensitive to electrostatic discharge (ESD). Contact to electrostatically charged persons or objects will endanger these components. In the worst case, they will be immediately destroyed or will fail after commissioning. Observe the requirements of EN 100 015 - 1 in order to minimize the possibility of, or avoid, damage from instantaneous electrostatic discharge. Also take care not to touch components that are under supply voltage. ATTENTION! EXERCISE CAUTION ON HANDLING! ELECTROSTATICALLY SENSITIVE COMPONENTS / MODULES Type 8635 S/HART GN 3 english Device-related notes GENERAL NOTES Scope of delivery Immediately after receipt of a shipment, make sure that the contents are undamaged and match the scope of delivery stated on the packing slip. In general this consists of: • SideControl S/HART • Operating Instructions SideControl S/HART Add-on kits for linear and part-turn actuators may be obtained as accessories. If there are discrepancies, please contact immediately our customer service: Bürkert Steuer- und Regelungstechnik Chr.-Bürkert-Str. 13-17 Service Department D-76453 Ingelfingen Tel.: (07940) 10-252 Fax: (07940) 10-428 english or your Bürkert branch. Warranty conditions This document contains no warranty statements. In this connection we refer to our general sales and business conditions. A prerequisite for validity of the warranty is use of the device as intended with observance of the specified conditions of use. ATTENTION! GN 4 The warranty covers only faultless condition of the SideControl. No liability will be accepted for consequential damage of any kind that may arise from failure or malfunctioning of the device. Operating instructions no. 803 889 english GENERAL NOTES Type 8635 S/HART GN 5 english GENERAL NOTES GN 6 Operating instructions no. 803 889 english GENERAL NOTES Type 8635 S/HART GN 7 english GENERAL NOTES GN 8 Operating instructions no. 803 889 SYSTEM DESCRIPTION english SYSTEM DESCRIPTION Contents System description ......................................................................................................................................... Construction of the SideControl S/HART .................................................................................................... Design features ............................................................................................................................................... Function of the SideControl S/HART positioner ......................................................................................... Operation of the SideControl S/HART as a positioner ............................................................................... Operation of the SideControl S/HART as a process controller ................................................................. Interfaces of the SideControl S/HART .......................................................................................................... Software characteristics ................................................................................................................................ Technical data ................................................................................................................................................. Works settings ................................................................................................................................................ Data of the SideControl S/HART ................................................................................................................... Type 8635 S/HART SD 1 SD 2 SD 3 SD 4 SD 5 SD 5 SD 6 SD 7 SD 8 SD 8 SD 9 SD 1 SYSTEM DESCRIPTION The SideControl S/HART is a digital positioner for pneumatically operated continuous valves with single-acting linear or part-turn actuators. The SideControl S/HART can be operated via keys with a display. Furthermore, communication acc. to the HART protocol is available as an option. Construction of SideControl S/HART english Display with 3 operating keys Screw terminals Screw fittings PG13,5 Earth (grounding) screw SD 2 Operating instructions no. 803 889 SYSTEM DESCRIPTION Design features • Position sensor Very high resolution conductive plastic potentiometer • Microprocessor controlled electronics For signal processing, control and driving the piezoelectric positioning system; set point setting and supply of the electronics via a 4..20 mA standard signal. • Operating elements The device can be set (configuration and parametrization) locally via three inside keys. An inside, 8-digit, 16-segment LC display is provided, which can also show the set point or actual value. • Positioning system • english A piezoelectric positioning system serves to drive the valve actuator. Position repeater (option, planned) via 2 inductive proximity switches (initiators) • Electrical interfaces PG13.5 bushings with screw terminals • Pneumatic interfaces G1/4" interior thread • Housing Aluminium housing (hard anodized and plastic-coated) with swing-up cover and captive screws • Attachment to linear and part-turn actuators acc. to NAMUR recommendation (DIN IEC 534 T6 bzw. VDI/VDE 3845) Type 8635 S/HART SD 3 SYSTEM DESCRIPTION Function of the SideControl S/HART positioner Functional diagram of the positioner with a control valve with single-acting diaphragm actuator SideControl Actual position External position set point Positioner english Pneumatic actuator (single-acting) Positioning system pressurize Pressure supply Position sensor Lever mechanism Valve (actuator) exhaust Exhaust air SD 4 Operating instructions no. 803 889 SYSTEM DESCRIPTION Operation of the SideControl S/HART as a positioner The positioner controls the position of the pneumatic actuator, whereby the position sensor measures the actual position (POS) of the actuator. The controller compares this actual value of the position with the set point (CMD), which is presented as a standard signal. If a control difference (Xd1) exists, a pulse-width modulated voltage signal is sent to the positioning system as the correcting variable. If the difference is positive, the pressurizing piezoelectric valve is driven via output B1; if it is negative, the exhausting piezoelectric valve is driven via output E1. In this way, the position of the actuator is altered until the control difference is 0. Z1 represents a disturbance. Schematic representation of position control Z1 B1 Xd1 CMD Valve opening Pk E1 Positioner Positioning system (piezoelectric valve) Continuous valve english Set point of position POS Position sensor Position control loop Operation of the SideControl S/HART as a process controller (option) If the positioner is operated as a process controller, the abovementioned position control becomes a lower-ranking auxiliary control loop. The overall result is a cascade control system. The process controller (as a main control loop) is implemented in the SideControl as a PID controller. In this case the process set point (SP) is preset and compared with the actual value (PV) of the process variable to be controlled, which is supplied by a sensor. Formation of the correcting variable is done according to the description of the positioner. Z2 represents a disturbance acting on the process. Schematic representation of position control Z2 SP Set point of process Process controller Process variable Valve opening CMD Xd2 Position control loop Process PV Transmitter Type 8635 S/HART SD 5 SYSTEM DESCRIPTION Interfaces of the SideControl S/HART english Schematic representation of the interfaces of the SideControl S/HART NOTE SD 6 The SideControl S/HART is a 2-conductor device, i.e. the voltage supply is provided via the 4..20 mA signal. Operating instructions no. 803 889 SYSTEM DESCRIPTION Software characteristics • Automatic adaptation of positioner to the control valve in use • Tight-closing function • Stroke limitation • Limitation of correction speed • Correction characteristic may be chosen to match the operating curve (various standard characteristics or a freely programmable curve are available) • Insensitivity range • Reverse of direction of flowed transferred of set point and actual value • Splitting of the standard signal range over 4 positioners • Scaling of the set-point input • Code protection • Reset to works settings english Positioner with supplementary functiond Process controller (optional) • PID controller; parameters may be adjusted • Inputs scalable • Selection of set-point value (via 4..20-mA signal or keys) Communication via HART protocol (optional) Type 8635 S/HART SD 7 SYSTEM DESCRIPTION Technical Data Works settings english Function Function Works setting Works setting ACTFUNC FUNCSNGL P.CO - DBND 1%* CHARACT CHA LIN P.CO - SETP SETP INT * CUTOFF CUT P.CO - INP INP 4'20A * DIR.CMD DIR.CRISE P.CO - FILT 0* DIR.ACT DIR.ARISE P.CO - SCAL UNIT L/S * SPLTRNG SR = 0 (%); SR CODE CODE 0000 X.LIMIT LIM = 0%, LIM X.TIME no limitation X.CO DBND 1% = 1 %; CUT = 99% = 100 (%) = 100% * Process controller SD 8 Operating instructions no. 803 889 SYSTEM DESCRIPTION Data of the SideControl S/HART Operating conditions Permissible ambient temperature -25...+65°C (with non-Ex devices or T4/T5) -25...+60°C (with T6) Protection class IP 65 to EN 60529 (only with correctly connected cable) Conformity to the following standards CE symbol Conformity wrt. EMC Guideline 89/336/EWG Explosion protection (optional) EEX ia IIC T4/T5/T6 Housing dimensions, outside 174 x 88 x 93 Housing material Aluminium hard anodized and plastic-coated Sealing material NBR / Neoprene Other exterior parts stainless steel (V4A) Mass approx. 1,5 kg english Mechanical data Electrical data Connections 2 PG13.5 bushings with screw terminals 0.14 to 1.5 1,5 mm2 Supply via standard signal 4 - 20 mA Pneumatic data Control medium instrument air, free from oil, water and dust Pressure dew point at least 10 degrees below lowest operating temperature Oil content ≤ 1 mg/m³ Dust content ≤ 40 µm particle size Temperature range of compressed air -25...+65°C (with non-Ex devices or T4/T5) -25...+60°C (with T6) Pressure range 1,4..6,0 bar Supply pressure variation ± 10 % Air flow capacity of control valve at 1.4 bar pressure drop over valve at 6 bar pressure drop over valve ca. 55 Nl/min STP for pressurizing and exhausting ca. 170 Nl/mSTP in for pressurizing and exhausting Self-consumption of air in balanced state 0,0 Nl/min STP Connections G1/4'' internal thread Type 8635 S/HART SD 9 english SYSTEM DESCRIPTION SD 10 Operating instructions no. 803 889 INSTALLATION english INSTALLATION Contents: Attachment and assembly of the SideControl S/HART ................................................................................ IN 2 Attachment to a continuous valve with linear actuator acc. to NAMUR ..................................................... IN 2 Attachment to a continuous valve with part-turn actuator .......................................................................... IN 4 Fluidic connection ............................................................................................................................................ IN 6 Electrical connection ........................................................................................................................................ IN 7 Type 8635 S/HART IN 1 INSTALLATION Attachment and assembly of the SideControl S/HART The positioner Type SideControl may be attached to different continuous valves. The valves which may be used are continuous valves with a linear activator acc. to NAMUR and such with a part-turn actuator. Attachment to a continuous valve with linear actuator acc. to NAMUR Transmission of the valve position to the position sensor built into the SideControl is via a lever (acc. to NAMUR). Add-on kit to linear activator (ID no. 787 215) (obtainable from Bürkert as an accessory) english Serial no. 1 2 3 4 5 6a 6b 7 8 9 10 11 12 13 14 15 16 17 18 19 21 Quantity 1 1 2 1 1 1 1 2 4 2 6 6 2 1 1 1 3 3 1 1 4 Designation NAMUR attachment bracket U-piece Clamping pieces Driving pin Conical roller NAMUR lever (stroke range 3 - 35 mm) NAMUR lever (stroke range 35 - 130 mm) U-bolt Hex screw DIN 933 M8 x 20 Hex screw DIN 933 M8 x 16 Lock washer DIN 127 A8 Washer DIN 125 B8,4 Washer DIN 125 B6,4 Spring VD-115E 0.7x11.3x32.8x3.5 Spring washer DIN 137 A6 Retaining washer DIN 6799 - 3.2 Lock washer DIN 127 A6 Hex screw DIN 933 M6 x 25 Hex nut DIN 934 M6 Square nut DIN 557 M6 Hex nut DIN 934 M8 Assembly Mount U-piece (2) using clamping pieces (3), hex screws (17) and lock washers (16) on actuator spindle. Select the short (Serial no. 6a) or long (serial no. 6b) lever, depending on the actuator stroke. Swing angle of lever (60°) Assemble the lever (if not preassembled). The distance of the driving pin from the axle should be equal to the stroke. This results in a swing angle of the lever of 60°. This assures that the position sensor works with good resolution.The scale printed on the lever is irrelevant. Distance = stroke of actuator IN 2 Operating instructions no. 803 889 INSTALLATION Push the lever onto the axle of the SideControl and screw it tight. Fix attachment bracket (1) with hex screws (9), lock washers (10) and washers (11) to the rear side of the SideControl. Which M8 thread on the SideControl is chosen depends on the size of the actuator. To determine the correct position, hold the SideControl with bracket against the actuator. The conical roller (5) on the lever of the position sensor must be able to move freely in U-piece (2) on the actuator over the entire stroke. At 50% stroke, the lever position should be roughly horizontal (see under „Alignment of the lever mechanism“). english NOTE Actuator with cast frame Fix the SideControl positioner with bracket by means of one or more hex screws (8), washers (11) and lock washers (10) to the cast frame. Actuator with post yoke Fix the SideControl positioner with bracket with U-bolt (7), washers (11), lock washers (10) and hex nuts (21) to the post yoke. Alignment of the lever mechanism The lever mechanism can only be aligned properly when the device has been connected electrically and pneumatically. In the manual mode, move the actuator to half stroke (corresponding to scale on actuator). Move the device vertically until the lever is horizontal. Fix the device finally to the actuator. Type 8635 S/HART IN 3 INSTALLATION Attachment to a continuous valve with part-turn actuator The axle of the position sensor built into the SideControl is coupled directly to the axle of the part-turn actuator. Add-on kit to part-turn activator (ID no. 651 741) (obtainable from Bürkert as an accessory) Serial no. 1 2 3 4 Quantity 1 2 4 4 Designation Adapter Setscrew DIN 913 M4 x 4 Cap screw DIN 933 M6 x 12 Lock washer B6 Other accessories required Attachment bracket with fixing screws (acc. to VDI/VDE 3845), available from the manufacturer of the part-turn actuator. english Assembly: Determine the orientation of attachment of the SideControl (parallel to the actuator or rotated by 90°). Determine the basic position and direction of rotation of the actuator Push adapter (1) onto the axle of the SideControl and fix it with 2 setscrews (2). IN 4 Swing angle 90° Flat on the axle! Swing angle 90° Flat on the axle! One of the setscrews should press onto the flat on the axle (to prevent slip!). It must be assured that the axle of the SideControl can move only in one of the ranges shown below in the drawings (observe the flat on the axle!). Operating instructions no. 803 889 INSTALLATION Place the SideControl on the bracket and fix it with 4 cap screws (3) and lock washers (4). NOTE english Place the SideControl with the bracket on the part-turn actuator and fix it. If after starting the function X.TUNE the message X.ERR 5 appears in the LC display, the alignment of the axle of the SideControl to the axle of the actuator is incorrect. In this case, check the alignment as described above. Then repeat the function X.TUNE . Type 8635 S/HART IN 5 INSTALLATION Fluidic connection english The locations of the fluidic connections are shown in the following drawing: EExhaust ntlü ftu ng sconnection 3 a nschlu ß 3 Ve rsorg u n g sSupply pressure d rucka nsch luß connection 1 1 Service A rbe its-connection 2 a nschlu ß 2 Connect supply pressure to connection 1 Connect the service connection to the chamber of the single-acting actuator. If possible, connect a silencer or the like to connection 3. If the connection is left open, there is a risk of water splashes entering the SideControl. IN 6 Operating instructions no. 803 889 INSTALLATION Electrical connection To make electrical connections, open the cover of the SideControl by unscrewing the 2 screws. Configuration of the terminals 11 + 12 13 + 14 - english 81 82 41 + 42 51 + 52 - Terminal designation 11 + 12 13 + 14 81 82 41 + 42 51 + 52 - NOTE ATTENTION! Type 8635 S/HART Allocation External connection Set point + Set point Process actual value + (option) Process actual value - (option) Binary input Binary input Initiator 1 + (option) Initiator 1 - (option) Initiator 2 + (option) Initiator 2 - (option) 4..20 mA signal GND 4..20 mA signal GND connected via switch (make contact) to terminal 82 Connection of a potential equalization conductor (PE) to the electronics is unnecessary. During the electrical connection of the inherently safe circuits, always observe the data in the attached Certificate of Conformity! IN 7 english INSTALLATION IN 8 Operating instructions no. 803 889 OPERATING THE POSITIONER english OPERATING THE POSITIONER Contents: Operating and display elements ................................................................................................................... OP 2 Operating levels .............................................................................................................................................. OP 2 Commissioning and set-up as a positioner ................................................................................................ OP 3 Basic settings ......................................................................................................................................... OP 3 Procedure for specifying the basic settings ........................................................................................... OP 3 Works settings of the positioner ............................................................................................................. OP 3 Configuring the supplementary functions .................................................................................................. OP 6 Keys in the configuration level ................................................................................................................ OP 6 Configuration menu ................................................................................................................................ OP 6 Supplementary functions ........................................................................................................................ OP 8 CHARACT ................................................................................................................................................................................................ OP 10 CUTOFF ................................................................................................................................................................................................... OP 12 DIR.CMD .................................................................................................................................................................................................. OP 13 DIR.ACT .................................................................................................................................................................................................. OP 14 SPLTRNG ................................................................................................................................................................................................ OP 15 X.LIMIT .................................................................................................................................................................................................... OP 16 X.TIME ..................................................................................................................................................................................................... OP 17 X.CONTROL ............................................................................................................................................................................................. OP 18 CODE ....................................................................................................................................................................................................... OP 19 BIN-IN ..................................................................................................................................................................................................... OP 20 CAL.USER ............................................................................................................................................................................................... OP 21 SETFACT ................................................................................................................................................................................................. OP 22 Operating the process ................................................................................................................................. OP 23 Operating mode AUTOMATIC ...................................................................................................................... OP 24 Operating mode MANUAL ........................................................................................................................... OP 25 Type 8635 S/HART OP 1 OPERATING THE POSITIONER Operating and display elements The SideControl S/HART is equipped with 3 keys and an LC display. The functions of the keys are described in the following sections. ARROW key "up" MANUAL/AUTOMATIC KEY english LED (without function) ARROW key "down" Operating levels Operation of the SideControl S/HART is done via 2 operating levels: • Process operating level: After the device is switched on, the process operating level is active. In this level, you can switch between the operating modes AUTOMATIC and MANUAL. In the AUTOMATIC mode, position or process control run. In the MANUAL mode, the valve can be manually opened and closed. • Configuration level: In the configuration level, you can specify the first commissioning of the basic functions and configure supplementary functions if needed. Process operating level MANUAL AUTOMATIC 5 sec Configuration level Basic functions End OP 2 Supplementary functions Operating instructions no. 803 889 OPERATING THE POSITIONER Configuration of the keys HAND/AUTOMATIC key Switch between main and sub-menu items, e.g. ACT FUNC - FUNCSNGL Arrow keys Switch between equal-ranking items, e.g. ACTFUNC - CHARACT Function Works setting Function Works setting ACTFUNC FUNCSNGL SPLTRNG SR = 0 (%); SR = 100 (%) CHARACT CHA LIN X.LIMIT LIM = 0%, LIM = 100% DIR.CMD DIR.CRISE X.time no limitation CUTOFF CUT X.CO DBND 1% DIR.ACT DIR.ARISE CODE CODE 0000 = 1 %; CUT = 99% english Works settings of the positioner Commissioning and set-up as a positioner ➔ Before commissioning, execute the fluidic and electrical installations. Basic settings On first commissioning of the positioner, the automatic adaptation of the positioner to the current operating conditions (X.TUNE) must be started. The necessary steps are explained in the following. Procedure After the voltage supply has been switched on, the positioner is in the process operating level in the AUTOMATIC mode. To specify the basic settings, switch to the configuration level. Depress the MANUAL/AUTOMATIC key for 5 seconds. The display then shows ADDFUNCT, the first item of the main menu. To make a setting under a menu item, press the MANUAL/AUTOMATIC key again. Then one of the menu items appears on the display. The arrow keys are used to switch between these sub-items. The actual setting is done by pressing the MANUAL/ AUTOMATIC key at the selected sub-item of the menu. The arrow keys are also used to switch between the items of the main menu (ADDFUNCT, X.TUNE...). Type 8635 S/HART OP 3 OPERATING THE POSITIONER Main menu for settings on commissioning Jump over on first commissioning english Operating mode AUTIOMATIC or MANUAL ADDFUNCT see section „Configuring the supplementary functions“ ➔ Jump over this menu item on first commissioning OP 4 Operating instructions no. 803 889 OPERATING THE POSITIONER X.TUNE Autotune for positioner Start the automatic adaptation of the positioner to the current operating conditions (X.TUNE): The following functions are initiated automatically: • Adaptation of the sensor signal to the (physical) stroke of the valve used • Determination of parameters for driving the integral piezoelectric positioning system • Setting of the controller parameters of the positioner. Optimization is done according to the criteria: as short a correcting time as possible and freedom from overshoot. ➔ Switch on the voltage supply ➔ Depress the MANUAL/AUTOMATIC key ➔ Press the ARROW key ➔ Depress the MANUAL/AUTOMATIC key Switch to configuration level Scrollen zum Menüpunkt X.TUNE for 5 seconds Start of X.TUNE english Display for 5 secondes Descritption TUNE 5 Countdown from 5 to 0 to start of Autotune TUNE 4 : TUNE 0 ¦ X.TUNE 1 Display of the autotune phase in progress at the moment (the continuation is indicated by rotating bars to the left of the display) ¦ X.TUNE 2 ¦ X.TUNE 3 ¦ X.TUNE 4 : X.TUNE.END Flashing display => End of Autotune X.ERR X.X Message on occurrence of an error (to right of display: error number) ➔ Press briefly the MANUAL/AUTOMATIC key Store operating conditions ➔ Press the arrow key Scroll to menu item END ➔ Press briefly the MANUAL/AUTOMATIC key Jump to mode AUTOMATIC or MANUAL Note: On commissioning the positioner, execution of “X.TUNE” is absolutely necessary. It allows the positioner to determine the optimum settings for the valve used and the current operating conditions. The function “X.TUNE” should be executed with the valve unpressurized or shut off, since otherwise pressure variations in the valve may cause faulty adaptation of the controller. The supply pressure (pneumatic auxiliary energy) should be set to the value that will exist in later operation! ATTENTION! Type 8635 S/HART During execution of the autotune function, the valve moves autonomously from its momentary position. For this reason, never execute an autotune when a process is running! OP 5 OPERATING THE POSITIONER END Quitting the main menu ➔ To quit the main menu, select the item END with the arrow keys ➔ After pressing the MANUAL/AUTOMATIC key . the device is back to the mode in which it was before switching english over to the main menu (MANUAL or AUTOMATIC). OP 6 Operating instructions no. 803 889 OPERATING THE POSITIONER Configuring the supplementary functions NOTE The operating concept for the positioner is based on a strict separation between the basic and supplementary functions. In the delivered state, only the basic functions ADDFUNCT, X.TUNE are activated. These suffice for normal operation. For more demanding control applications, you can select and specify supplementary functions in the configuration level. Press key Press key in menu in a selected and confirmed menu item Scroll up (select) Increment numeric value Scroll down (select) Decrement numeric value in menu in menu ADDFUNCT Confirm selected menu item Confirm selected menu item of supplementary menu to add it to the main menu. The menu item is marked with an asterisk (*) in the supplementary menu. The menu item appears in the main menu and can be selected and edited there. Confirm set value english Assignment of the keys in the configuration menu Confirm the menu item selected and marked with an asterisk in the supplementary menu for deletion from the main menu. Configuration menu Switching between the process operating level and the configuration level Process operating level MANUAL AUTOMATIC 5 sec Configuration level Basic functions END Supplementary menu ➔ To activate the configuration menu, press (in the process operating level) the MANUAL/AUTOMATIC key for 5 seconds. The configuration menu consists of a main and a supplementary menu. The main menu contains initially the basic functions which are absolutely necessary for first commissioning. The supplementary menu comprises supplementary functions which may be selected. It may be reached via the menu item ADDFUNCT of the main menu. Specification of device functions and parameters is possible only within the main menu. If needed, the main menu may be extended by additional functions and parameters from the supplementary menu, which can then also be specified. Type 8635 S/HART OP 7 OPERATING THE POSITIONER Addition of supplementary functions to the main menu ➔ Select in the main menu the item ADDFUNCT (press ➔ By pressing the ➔ With the key for 5 sec.). key, you enter the supplementary menu. keys, select the desired supplementary function. ➔ By pressing the key, you confirm addition of the supplementary function to the main menu. The function is automatically marked with an asterisk (*). All marked functions are added to the main menu after confirmation of ENDFUNCT . ➔ In the main menu, enter the parameters for the supplementary functions. Deletion of supplementary functions from the main menu english ➔ Select in the main menu the item ADDFUNCT (press ➔ By pressing the ➔ With the key for 5 sec.). key, you enter the supplementary menu. keys, select a supplementary function marked with (*). ➔ By pressing the key, you confirm deletion of the supplementary function (the asterisk (*) marking is deleted). ➔ After confirmation of ENDFUNCT with the key, the supplementary function is deactivated and deleted from the main menu. Setting of numeric values Numeric values are set in the menu items provided by pressing the keys (increment value) or more times. In the case of 4-digit numbers, only the flashing digit can be set with (decrement value) one or . By pressing the key, you can switch to the next digit. Principle of adding supplementary functions to the main menu Main menu Confirm selected menu item Supplementary menu Select menu item ADDFUNCT Return to augmented main menu Augmented main menu OP 8 Confirm selected supplementary function and add to main menu Operating instructions no. 803 889 OPERATING THE POSITIONER Supplementary functions Select the transfer characteristic between input signal and stroke (correction characteristic) Tight-closing function Sense of action between input signal and set-point position Allocation of state of pressurization of actuator chamber (Port 21) to actual position Splitting of signal range; input signal in % for which the valve runs through the entire stroke range. Limitation of mechanical stroke range english Limitation of correcting speed Parametrization of positioner (Parametrization of PID process controller) In version as positioner: no function! Code protection for settings Activation of binary input Calibration Reset to works settings Type 8635 S/HART OP 9 OPERATING THE POSITIONER Detailed description of the supplementary functions CHARACT Selection of the transfer characteristic between input signal and stroke (correction curve) Customized characteristic Works setting: CHA LIN With this function, you can select a transfer characteristic with respect to set-point position and valve stroke to correct the flow or operating curve. Linear characteristic Equipercentile characteristic 1 : 25 Equipercentile characteristic 1 : 33 Equipercentile characteristic 1 : 50 english Inverse equipercentile characteristic 25 : 1 Inverse equipercentile characteristic 33 : 1 Inverse equipercentile characteristic 50 : 1 User-defined characteristic, freely programmable via fixed points The flow characteristic kV = f(s) describes the flow through a valve, expressed by the kv value, as a function of the stroke s of the actuator spindle. It is determined by the shape of the valve seat and the seat seal. In general, two types of flow characteristic are realized: the linear and the equipercentile. Normalizes valve stroke [%] With both characteristics, equal changes in stroke ds are allocated to equal changes in kV value dkV (dkV = n lin * ds). With an equipercentile characteristic, a change in stroke ds corresponds to an equipercentile change in kv value Normalized position set point [%] (dkV/kV = ngleichpr * ds). The operating characteristic Q = f(s) represents the relationship between the volumetric flow Q passing through a valve installed in a system and the stroke s. This characteristic contains the properties of the piping, pumps and consumers. It hence has a different shape from the flow characteristic. For positioning applications of controllers, special requirements are usually made on the shape of the characteristic, e.g. linearity. For this reason it is sometimes necessary to correct its shape in a suitable manner. For this purpose, a transfer member is provided in the SideControl S/HART which realizes different characteristics. These are used to correct the operation characteristic. The equipercentile characteristics 1:25, 1:33, 25:1, 33:1 and 50:1 and a linear characteristic may be set. Furthermore, it is possible to freely program a characteristic via fixed points or have it calibrated automatically. OP 10 Operating instructions no. 803 889 OPERATING THE POSITIONER Entering the freely programmable characteristic The characteristic is defined via 21 fixed points distributed evenly over the 0...100 % range of the position set point. They are separated by 5 %. Each fixed point may be allocated to a freely selectable stroke (setting range 0...100 %) (Fig. 6.8). The difference between two adjacent values of stroke may not exceed 20 %. To enter the point on the characteristic (values of the function), first select the menu item CHA FREE . After pressing the MANUAL/ AUTOMATIC key, the first fixed point is displayed (0 %). Next to it is the value of the function (initially 0 %). With the arrow keys, set a value of the function between 0 and 100 %. After pressing the MANUAL/AUTOMATIC key, the next fixed point is displayed, etc. Finally, press the MANUAL/AUTOMATIC key to confirm the value of the function belonging to the last fixed point (100 %). The display returns to the menu itemCHARACT. Example of a programmed characteristic english Valve stroke [%] Standard signal [%] Entering the fixed points: Valve stroke [%] (enter with arrow keys) Position set point [%] (fixed point) NOTE Type 8635 S/HART Return to CHARACT The fixed points that were entered should be noted in the table in the Appendix. OP 11 OPERATING THE POSITIONER Cutoff Tight-closing function Works setting: CUT = 1 %; CUT = 99% This function causes the valve to close tight outside the control range. Enter here the limits for the set point (in %) outside which the actuator is to be completely pressurized or exhausted, respectively. Opening or resumption of control occurs with a hysteresis of 1 %. Tight-closing threshold exhaust (0 = inactive); setting range: 0..25 % english Tight-closing threshold pressurize (100 = inactive); setting range: 75..100 % Valve stroke [%] Setting range: 75 ... 100 % Set point [%] Setting range: 0 ... 25 % OP 12 Operating instructions no. 803 889 OPERATING THE POSITIONER Dir.cmd Sense of action between input signal and set-point position Works setting: DIR.CRISE With this supplementary function, you can set the sense of action between input signal and set-point position of the actuator. Direct sense of action (e.g. 4 mA or 0 V → 0% 20 mA or 5/10 V → 100%) Inverse sense of action (e.g. 4 mA or 0 V → 100% 20 mA or 5/10 V → 0%) english Set-point position RISE FALL Input signal Type 8635 S/HART OP 13 OPERATING THE POSITIONER Dir.act Allocation of the state of pressurization of the actuator chamber to the actual position Works setting: DIR.ARISE english With this supplementary function, you can set the sense of action between the state of pressurization of the actuator and the actual position. Set-point position Direct sense of action (exhausted → 0% pressurized → 100%) Inverse sense of action (exhausted → 100% pressurized → 0%) RISE FALL exhausted OP 14 pressurized State of pressurization Operating instructions no. 803 889 OPERATING THE POSITIONER SPLtrng Splitting of signal range (split range); max. and min. values of the input signal in % for which the valve runs through the entire stroke Works setting: SR = 0 (%); SR = 100 (%) With this supplementary function you can limit the set-point range of the SideControl S/HART by specifying a minimum and a maximum value. In this way it is possible to split the standard signal range (4..20 mA, 0..20 mA, 0..10 V or 0..5 V) over several SideControl S/HARTs (with or without overlap). In this way, several valves may be used alternately or, with overlapping set-point ranges, simultaneously as a servo components. Entering the minimum value of the input signal in % (0..75 (%) of the input signal range) english Entering the maximum value of the input signal in % (25..100 (%) of the input signal range) Splitting a standard signal range into two set-point ranges Valve stroke [%] Set-point [mA] Set-point range SideControl 1 Type 8635 S/HART Set-point range Side Control 2 OP 15 OPERATING THE POSITIONER X.limit Limitation of the mechanical stroke range LIM = 0%, LIM = 100% Works setting: This supplementary function limits the (physical) stroke to preset % values (minimum and maximum). The range of the limited stroke is thereby set to 100 %. If the limited stroke range is left during operation, negative or positive POS values greater than 100 % are displayed. Entering the start value of the stroke range in % 0..50% of the overall stroke Entering the end value of the stroke range in % 50..100% of the overall stroke english The minimum separation between LIM beträgt 50% Physical stroke [%] Unlimited stroke Correcting range in automatic mode Correcting range in manual mode Limited stroke [%] and LIM Limited stroke Set-point [mA] OP 16 Operating instructions no. 803 889 OPERATING THE POSITIONER X.time Limitation of the correcting speed Works setting: no limitation On execution of the function X.TUNE, the minimum opening and closing times are entered automatically for T.OPN and T.CLS for the entire stroke. In this way, the maximum speed can be run. If the correcting speed is to be limited, values can be entered for T.OPN and T.CLS that lie between the minimum values determined by X.TUNE and 60 s. Opening speed Entry in s english Closing speed Effect of limitation of the opening speed after a step in the set point Valve stroke [%] Set point Actual value t T.OPN Type 8635 S/HART OP 17 OPERATING THE POSITIONER X.contrl english Parametrization of the positioner Insensitivity range (dead band) of the positioner Entry of the dead band in %, referred to the scaled stroke range; i.e. LIM minus LIM (see function x.limit) This function assures that the positioner cuts in only above a certain control difference. The function reduces wear on the solenoid valves in the SideControl S/HART and the pneumatic actuator. The setting is optimized automatically during the execution of X.TUNE . Xd1' Position set point Control difference to controller Xd1 Xd1 Xd1' Dead band Position actual value Parameters of the positioner Proportional parameter for positioner (to close the valve) Proportional parameter for positioner (to open the valve) End of parametrization of positioner. Jump back to X.CONTRL OP 18 Operating instructions no. 803 889 OPERATING THE POSITIONER CODE Code protection for the settings Works setting: Code 0000 Settings: Locking of all manipulations that would change the operating mode of the device. (The messages on the display can be switched over.) Locking of entry into the configuration level english Entry of the 4-digit code If the code protection is activated, entry of the code will be demanded on every protected operative manipulation: Changing the flashing digit Confirming the digit and switch to next digit Type 8635 S/HART OP 19 OPERATING THE POSITIONER BIN-IN Activation of the binary input Selection of the function of the binary input Move to a safety position Binary input deactivated Entry of the safety position (0..100%) Type of binary input english normally closed (0..5 V = 1; 10..30 V = 0) normally open (0..5 V = 0; 10..30 V = 1) End of setting of binary input OP 20 Operating instructions no. 803 889 OPERATING THE POSITIONER cal.user english Postcalibration of the actual value display and the inputs for position set point, process set point and process actual value End of calibration CAl.pos Calibration of the position display (0 - 100 %) Storage of the minimum position: move to minimum position via arrow keys and confirm by pressing the MANUAL/AUTOMATIC key cal inp Calibration of the position set point (4..20 mA) Storage of the minimum input signal (4 mA): Apply the minimum value of the standard signal to the input and confirm it by pressing the MANUAL/ AUTOMATIC key Storage of the maximum input signal (20 mA): Apply the maximum value of the standard signal to the input and confirm it by pressing the MANUAL/ AUTOMATIC key Cal fact Type 8635 S/HART Reset of the settings under CAL.USER to the works settings: Hold down the MANUAL/AUTOMATIC key until the countdown has finished OP 21 OPERATING THE POSITIONER setfact Resetting to the works settings With this function, all the settings made by the user can be reset to the status on delivery. All EEPROM parameters with the exception of the calibration values are reset to the default values. Then a hardware reset is executed. To initiate the function, hold down the MANUAL/ AUTOMATIC key for approx 3 s until the countdown has finished. english 3s OP 22 Operating instructions no. 803 889 OPERATING THE POSITIONER Operating the process Each time after switching on the voltage supply, the positioner is automatically in the process operating level. To get there from the configuration level, confirm the menu item END by pressing the key. In the process operating level, the normal controlled operation is executed and monitored (in the AUTOMATIC mode), and the valve opened or closed by hand (MANUAL mode). Switching between the operating modes: Operate the key to switch between the MANUAL and AUTOMATIC modes. Both in the MANUAL and the AUTOMATIC modes, you can change to the configuration level by pressing the key for longer than 5 seconds. On switching back to the process operating level, the operating mode is resumed that was set before switching over. Operating mode Display AUTOMATIC An apostrophe (‘) runs continuously from left to right MANUAL - Type 8635 S/HART english 5s OP 23 OPERATING THE POSITIONER Operating mode AUTOMATIC In the AUTOMATIC mode, the normal controlled operation is executed and monitored. Meaning of the keys in the AUTOMATIC mode: or Switch over the display Meaning of the keys in the AUTOMATIC mode With reference to the positioner, the following displays are possible: Actual position of valve actuator: • Set-point position of valve actuator after rescaling by possible activation of the split-range function or correction characteristic: • english POS__xxx (0..100%) • CMD__xxx (0..100%) INP__xxx (0 .. 5/10 V oder 0/4 .. 20 mA) Input signal for set-point position: By pressing the keys you can switch between these display options. AUTOMATIC mode Configuration Menu item END (> 5 Sek.) POS__XXX CMD__XXX INP__XXX or No operating action Switch over display Release key MANUAL mode OP 24 Operating instructions no. 803 889 OPERATING THE POSITIONER Operating mode MANUAL In the MANUAL mode, the valve can be opened and closed by hand. Meaning of the keys in the MANUAL mode: Press the key in the MANUAL mode. Actuator opens Press the key in the MANUAL mode: Actuator closes Hold down the Hold down the and key and simultaneously press the : key Actuator opens fast key and simultaneously press the : key Actuator closes fast english and Displays in the MANUAL mode: • The last display set in the AUTOMATIC mode is shown. By selecting POS__xxx, the actual position of the valve actuator can be checked. Normal/fast operation on manual operation of the valve: In the MANUAL mode, pressing the key causes the continuous valve to continuously open via the actuator. After releasing the key, this procedure is interrupted and the valve remains in the current position. Pressing the key causes the valve to close in the same way. Pressing a second arrow key in addition to the first key causes the valve to operate fast in the direction of the first key. AUTOMATIC mode MANUAL mode Valve closes at normal speed Release Release key No operating action Release key (> 5 Sek.) Valve opens at normal speed Release Menu item Valve closes fast END Valve opens fast Configuration Type 8635 S/HART OP 25 THE POSITIONER english OPERATING OP 26 Operating instructions no. 803 889 OPERATING THE PROCESS CONTROLLER english OPERATING THE PROCESS CONTROLLER Contents: Setting up a process control system ............................................................................................................ OC 2 Automatic adaptation of the controller to the operating conditions ........................................................ OC 3 Supplementary function P.CONTRL ........................................................................................................................................................ OC 4 Starting the routine for linearization of the process characteristic P.QLIN ............................................................. OC 10 Operating the process .................................................................................................................................. OC 11 Operating mode AUTOMATIC ...................................................................................................................... OC 12 Manual changing of the process set point ................................................................................................. OC 13 Operating mode MANUAL ............................................................................................................................ OC 14 Type 8635 S/HART OC 1 OPERATING THE PROCESS CONTROLLER Works settings of the process controller Function Works setting P.co - dbnd 1% P.co - setp setp int P.co - Filt 0 P.co - scal unit l/s Setting up a process control system english In order to be able to operate the SideControl S/HART as a process controller, you must execute the following steps: ➔ In all cases, carry out the self-parametrization for positioners (X.TUNE ). ➔ Via the configuration menu, add the supplementary function P.CONTRL to the main menu (The function P.CONTRL will also be activated into the main menu.). ➔ Call up the basic setting for the process controller under P.CONTRL. Linearization of the process characteristic: If you are dealing with a flow control system, the process characteristic can be linearized automatically: ➔ Initiate the function P.QLIN . ATTENTION! In all cases, keep to the following sequence! OC 2 X.TUNE P.QLIN Operating instructions no. 803 889 OPERATING THE PROCESS CONTROLLER Self-parametrization for positioners X.tune ➔ Via the menu item X.TUNE, start the automatic parametrization of the SideControl. The following functions are initiated automatically: • Adaptation of the sensor signal to the (physical) stroke of the actuator used • Determination of parameters of the PWM signal for driving the solenoid valves integrated in the SideControl • Setting of the controller parameters of the positioner. Optimization is done according to the criteria: as short a correcting time as possible and freedom from overshoot. ➔ The autotune function is started by calling up X.TUNE in the main menu. ➔ Then hold down the MANUAL/AUTOMATIC key for 5 seconds. Display TUNE 5 english Start the automatic adaptation of the controller to the current operating conditions Description Countdown from 5 to 0 to start of Autotune 5s TUNE 4 : TUNE 0 ¦ X.TUNE 1 ¦ X.TUNE 2 Display of the autotune phase in progress at the moment (the continuation is indicated by rotating bars to the left of the display) ¦ X.TUNE 3 ¦ X.TUNE 4 : X.TUNE.END Flashing display => end of Autotune X.ERR X.X Message on occurrence of an error (to right of display: error number, see section „Maintenance and error messages“) Note: The basic settings of the SideControl S/HART are made in the works. On commissiong, however, execution of ”X.TUNE” is absolutely necessary. It allows the SideControl to determine autonomously the optimum settings for the current operating conditions. ATTENTION! To avoid faulty adaptation of the controller, X.TUNE should be executed in all cases at the supply pressure (pneumatic auxiliary energy) that will exist in later operation. If the flow through the valve is expected to give rise to considerable disturbing forces (e.g. through strong variations in pressure), X.TUNE should be executed in the absence of medium pressure. Type 8635 S/HART OC 3 OPERATING THE PROCESS CONTROLLER Supplementary function P.CONTRL english (see also the section „Operating the positioner - configuring the supplementary functions“) Parametrization of the PID controller OC 4 Operating instructions no. 803 889 OPERATING THE PROCESS CONTROLLER P.contrl Parametrization of the process controller Insensitivity range (dead band) of the PID process controller Parameters of the PID process controller Type of set-point setting Filtering of the process actual value input english Scaling of the process controller Storage of the new parameters End of the parametrization of the process controller Type 8635 S/HART OC 5 OPERATING THE PROCESS CONTROLLER P.co - dbnd Insensitivity range (dead band) of the process controller Works setting: 1% (relative to the range width of the selected process actual value) This function assures that the process controller cuts in only above a certain control difference. The function reduces wear on the solenoid valves in the SideControl S/HART and the pneumatic actuator. Entering the dead band in % english Entering the dead band in % relative to the range width of the selected process actual value input Input type used for PV Range Range width (as reference for the dead band) Example: 1% dead band corresponds to 4..20 mA 4 .. 20 mA 16 mA 0,16 mA Frequenzy 0 .. 1000Hz 1000 Hz 10 Hz Pt100 -20 .. +220°C 240°C 2,4°C Insensitivity range with process control Xd2' Process set point Control difference to controller Xd2 Xd2 Xd2' Dead band Process actual value OC 6 Operating instructions no. 803 889 OPERATING THE PROCESS CONTROLLER P.co - para Parameters of the PID process controller Proportional action factor 0...99.99 (works setting 1.00) Reset time 0.5...999.9 (works setting 999.9) Rate time 0.5...999.9 (works setting 0) Operating point 0.0...100 % (works setting 0 %) NOTE english See Appendix The parameters that were entered should be noted in the table in Appendix C. P.co - setp Type of set-point setting (internal / external) Set-point setting internally via the keys on the SideControl Set-point setting externally via the standard signal input Type 8635 S/HART OC 7 OPERATING THE PROCESS CONTROLLER P.co - filt Filtering of the process actual value input, valid for all types of process actual value. Range: 0..9 Works setting: 0 FILT xx Setting in 10 steps: 0..9 english Setting in 10 steps OC 8 Setting Limiting frequency [Hz] Effect 0 10 minimum filter effect 1 5 2 3 3 2 4 1 5 0,7 6 0,5 7 0,3 8 0,2 9 0,1 maximum filter effect Operating instructions no. 803 889 OPERATING THE PROCESS CONTROLLER P.CO SCAL Scaling the process controller Position of the decimal point for process actual value and set point (Setting range: 0..3) Lower scaling value for process actual value (process value); the value is assigned to 4 mA Lower scaling value for process set point; the value is assigned to the maximum current or voltage value of the standard signal. This setting is active only when P.CO SETP / SETP EXT has been selected. Higher range value for process setpoint (setpoint); assigned to the lowest current/voltage value of the external setpoint signal. This setting is only activated if P.CO SETP / SETP EXT is selected. Example of scaling: Process actual value from transmitter: 4..20 mA corresponds to 0..10 l/min Prozeß-Sollwert von SPS: 4..20 mA corresponds to 0..8 l/min Example for entering scaling values Scaling value[l/min] Process actual value Process set point PV PV SP SP Variant 1 Variant 2 Variant 3 0 1.0 0 0.8 0 10.0 0 8.0 0 100.0 0 80.0 Input signal [mA] NOTE On entering small scaling values, decimal places are automatically added to increase the precision of display, such that the maximum possible digit range is given between the lower and upper scaling values in each case. The amplification factor Kp of the process controller refers to the scaling values set. With P.CO SETP / SETP INT (set-point entry via the arrow keys), scaling of the set-point via SP and SP is not possible. The set point may be entered directly corresponding to the scaled process variable (PV , PV ). Type 8635 S/HART OC 9 english Upper scaling value for process actual value (process value); the value is assigned to 20 mA OPERATING THE PROCESS CONTROLLER P.QLIN Starting the routine for linearization of the process characteristic This function makes sense only when flow control is to be carried out. ➔ You start the routine for linearization of the process characteristic by calling up the menu item P.QLIN in the main menu and pressing the key for 5 seconds. The function P.Q'LIN can only be started when the menu item P.CONTRL / P.COINP / INPFREQ or item P.CONTRL / P.COINP / Inp4'20 mA has been selected. NOTE With the activation of the function P.CONTRL , the functions P.QLIN , which are required for process control, are copied into the main menu. Via these functions, the program is started for autonomous determination of the fixed points for a correction characteristic. The program increases in 20 steps the valve stroke from 0 to 100 % and measures the associated process variables. The pairs of values of the correction characteristic are stored as a freely programmable characteristic under the menu item CHARACT/CHAFREE and may be viewed under this menu item. english If the menu item CHARACT was not transfered under the menu item ADDFUNC to the main menu, this is done automatically on execution of the function P.Q'LIN . At the same time, the menu item CHARACT/CHAFREE is activated. Display during calling up and execution of the routine Display OC 10 Description P.QLIN 5 P.QLIN 4 : P.QLIN 0 Countdown from 5 to 0 for starting the routine ¦ P.QLIN 0 ¦ P.QLIN 1 ¦ P.QLIN 2 ¦ P.QLIN 3 : Display of the fixed point that is being approached at the moment (the continuation is indicated by rotating bars to the left of the display) P.QLIN.END (flashing) End of routine Q.ERR X.X Message on occurrence of an error (to right of display: error number, see section „Error messages“) Operating instructions no. 803 889 OPERATING THE PROCESS CONTROLLER Operating the process Each time after switching on the voltage supply, the SideControl S/HART is automatically in the process operating level. To get there from the configuration level, confirm the menu item END by pressing the key. In the process operating level, the normal controlled operation is executed and monitored (in the AUTOMATIC mode), and the valve opened or closed by hand (MANUAL mode). Switching between the operating modes: Operate the key to switch between the MANUAL and AUTOMATIC modes. Both in the MANUAL and the AUTOMATIC modes, you can change to the configuration level by 5 sec pressing the key for longer than 5 seconds. Operating mode Display AUTOMATIC An apostrophe (‘) runs continuously from left to right MANUAL - Type 8635 S/HART english On switching back to the process operating level, the operating mode is resumed that was set before switching over. OC 11 OPERATING THE PROCESS CONTROLLER Operating mode AUTOMATIC In the AUTOMATIC mode, the normal controlled operation is executed and monitored. Meaning of the keys in the AUTOMATIC mode: Switch over the display or or Change the process set point With configured supplementary functions P.CONTRL / P.CO SETP / SETP INT and display set to SP > 3 sec english With the process controller activated, the following parameters can be displayed: • Actual value of process variable (process actual value): PV___(-999..9999) • Set point of process variable (process set point): SP___(-999..9999) • Actual position of valve actuator: POS__xxx (0..100%) • Set-point position of valve actuator after rescaling through optionally activated split-range function or correction characteristic: CMD__xxx (0..100%) Temperature inside housing of SideControl: TEMP_xx.x (in °C) • By pressing the arrow keys, you can switch between these display options. Operating structure and operating procedures in the AUTOMATIC mode AUTOMATIC mode Configuration Menu item END (> 5 Sek.) or Switch over display No operating action SP or Set process set point aktiv Release key Release key MANUAL mode NOTE OC 12 If the menu item BIN IN / BIN FUNC / FUNC SPOS is activated and the binary input is connected, the message SAFE xxx appears in the display. The number XXX represents the previously selected safety position in %. Operating instructions no. 803 889 OPERATING THE PROCESS CONTROLLER Manual changing of the process set point: or > 3 sec If the supplementary function P.CONTRL / P.CO SETP / SETP INT (setting of the set point via keys) was specified on configuration, then with the display SP (Setpoint) set (set point) and on pressing one of the arrow keys for longer than 3 seconds, the mode for changing the process set point can be activated. After release of the key, the first digit of the process set point flashes Stelle des Prozeßsollwertes. The first digit of the process set point can be set. or After confirmation with the key, the set value is stored. english In the same manner, the other digits are set. After confirmation of the last digit, the display returns to the previous mode. Type 8635 S/HART OC 13 OPERATING THE PROCESS CONTROLLER Operating mode MANUAL In the MANUAL mode, the valve can be opened and closed by hand. Meaning of the keys in the MANUAL mode: Press the key in the MANUAL mode: Actuator opens Press the key in the MANUAL mode: Actuator closes Hold down the key and simultaneously press the key: Actuator opens fast Hold down the key and simultaneously press the key: Actuator closes fast and and english Displays in the MANUAL mode • The last display set in the AUTOMATIC mode is shown. By selecting PV__xxx, the actual value of the process variable can be checked. • To display the actual position of the valve actuator during MANUAL operation, change to the display POS__xxx in advance in the AUTOMATIC mode. Normal/fast operation on manual operation of the valve: In the MANUAL mode, pressing the key causes the continuous valve to continuously open via the actuator. After releasing the key, this procedure is interrupted and the valve remains in the current position. Pressing the the same way. key causes the valve to close in Pressing a second arrow key in addition to the first key causes the valve to operate fast in the direction of the first key. Operating structure and operating procedures in the MANUAL mode AUTOMATIC mode MANUAL mode Valve closes at normal speed Release Release keay No operating action Release keay (> 5 sec.) Valve opens at normal speed Release Menu item Valve closes fast END Valve opens fast Configuration OC 14 Operating instructions no. 803 889 MAINTENANCE OF THE POSITIONER english MAINTENANCE OF THE POSITIONER Contents: Error messages on the LC display ..................................................................................................... MP 2 Error messages on switching on ........................................................................................................ MP 2 Error messages on execution of the function X.TUNE ................................................................................................ MP 2 Other malfunctions ............................................................................................................................... MP 2 Type 8635 S/HART MP 1 MAINTENANCE OF THE POSITIONER When operated according to these Operating Instructions, the SideControl S/HART is maintenance free. ERROR MESSAGES AND MALFUNCTIONS Error messages on the LC display Error message on switching on Display Cause of error Remedy INT.ERROR Internal error None, device faulty english Error messages on execution of the function X.TUNE Display Cause of error Remedy X.ERR 1 No compressed air connected Connect compressed air X.ERR 2 Air pressure failure during Autotune Check compressed air supply X.ERR 3 Actuator system leaky on exhaust side None, device faulty X.ERR 4 Actuator system leaky on pressurized side None, device faulty X.ERR 5 The dead band of the internal position sensor system is exceeded Check alignment of the axle of the SideControl and correct (see chapter „Installation“) Other malfunctions MP 2 Problem Possible causes Remedy POS = 0 (bei CMD > 0%) or POS = 100%, (bei CMD < 100%) Tight-closing function (CUTOFF) has been inadvertently activated Deactivate tight-closing function (CUTOFF) Operating instructions no. 803 889 MAINTENANCE OF THE PROCESS CONTROLLER english MAINTENANCE OF THE PROCESS CONTROLLER Contents Error messages on the LC display ..................................................................................................... MC 2 Error message on switching on .......................................................................................................... MC 2 Error messages on execution of the function X.TUNE ............................................................................................... MC 2 Error messages on execution of the function P.Q'LIN ......................................................................... MC 2 Other malfunctions .............................................................................................................................. MC 2 Type 8635 S/HART MC 1 MAINTENANCE OF THE PROCESS CONTROLLER When operated according to these Operating Instructions, the SideControl S/HART is maintenance free. ERROR MESSAGES ON THE LC DISPLAY Error message on switching on Display Causes of error Remedy INT.ERROR Internal error None, device faulty english Error messages on execution of the function X.TUNE Display Causes of error Remedy X.ERR 1 No compressed air connected Check compressed air X.ERR 2 Air pressure failure during Autotune Check compressed air supply X.ERR 3 Actuator system leaky on exhaust side None, device faulty X.ERR 4 Actuator system leaky on pressurized side None, device faulty X.ERR 5 The dead band of the internal position sensor system is exceeded Check alignment of the axle of the SideControl and correct (see chapter „Installation“) Error messages on execution of the function P.Q'LIN Display Causes of error Remedy Q.ERR 1 No pressure supply connected Connect pressure supply No change in process variable Check process: if necessary switch on pump or open shut-off valve Q.ERR 2 Current fixed point of valve stroke has not been reached because • Pressure supply failure during P.QLIN • Check pressure supply • No AUTOTUNE was executed • Execute AUTOTUNE Other malfunctions MC 2 Problem Possible causes Remedy POS = 0 (with CMD > 0%) or POS = 100%, (with CMD < 100%) Tight-closing function (CUTOFF) has been inadvertently activated Deactivate tight-closing function (CUTOFF) Operating instructions no. 803 889 APPENDIX: OPERATING STRUCTURE APPENDIX: OPERATING english STRUCTURE Contents: Operating structure of the SideControl S/HART ............................................................................................ AO 1 Type 8635 S/HART AO 1 english APPENDIX: OPERATING STRUCTURE AO 2 Operating instructions no. 803 889 english APPENDIX: OPERATING STRUCTURE Type 8635 S/HART AO 3 english APPENDIX: OPERATING STRUCTURE AO 4 Operating instructions no. 803 889 APPENDIX: TABLES FOR POSITIONER english APPENDIX: TABLES FOR POSITIONER Contents: Tables for noting your settings on the positioner ......................................................................................... TS 2 Type 8635 S/HART TS 1 APPENDIX: TABLES FOR POSITIONER TABLES FOR NOTING YOUR SETTINGS ON THE POSITIONER Settings of the freely programmable characteristic Ref. point (Set point of position in %) Valve stroke [%] Date: Date: Date: Date: 0 5 10 15 20 25 30 35 english 40 45 50 55 60 65 70 75 80 85 90 95 100 TS 2 Operating instructions no. 803 889 APPENDIX: TABLES FOR PROCESS CONTROLLER english APPENDIX: TABLES FOR PROCESS CONTROLLER Contents: Tables for noting your settings on the process controller ............................................................................ TC 2 Type 8635 S/HART TC 1 APPENDIX: TABLES FOR PROCESS CONTROLLER TABLES FOR NOTING YOUR SETTINGS ON THE PROCESS CONTROLLER Settings of the freely programmable characteristic Ref. point (Set point of position in %) Valve stroke [%] Date: Date: Date: Date: 0 5 10 15 20 25 30 35 40 45 english 50 55 60 65 70 75 80 85 90 95 100 Parameters set on the process controller Date: Date: Date: Date: KP TN TV X0 DBND DP PV PV SP SP UNIT KFAC TC 2 Operating instructions no. 803 889 Steuer- und Regeltechnik Christian-Bürkert-Str. 13-17 74653 Ingelfingen Telefon (0 79 40) 10-0 Telefax (0 79 40) 10-204 Berlin: Dresden: Frankfurt: Hannover: Dortmund: München: Stuttgart: Tel. (0 30) 67 97 17-0 Tel. (03 59 52) 36 30-0 Tel. (0 61 03) 94 14-0 Tel. (05 11) 902 76-0 Tel. (0 23 73) 96 81-0 Tel. (0 89) 82 92-28-0 Tel. (07 11) 4 51 10-0 Australia: Seven Hills NSW 2147 Ph. (02) 96 74 61 66, Fax (02) 96 74 61 67 Korea: Seoul 137-130 Ph. (02) 34 62 55 92, Fax (02) 34 62 55 94 Austria: 1150 Wien Ph. (01) 894 13 33, Fax (01) 894 13 00 Malaysia: 11700, Sungai Dua, Penang Ph. (04) 657 64 49, Fax (04) 657 21 06 Belgium: 2100 Deurne Ph. (03) 325 89 00, Fax (03) 325 61 61 Netherlands: 3606 AV Maarssen Ph. (0346) 58 10 10, Fax (0346) 563 17 Canada: Oakville, Ontario L6L 6M5 Ph. (0905) 847 55 66, Fax (0905) 847 90 06 New Zealand: Mt Wellington, Auckland Ph. (09) 570 25 39, Fax (09) 570 25 73 China: 215011 Suzhou Ph. (0512) 808 19 16, Fax (0512) 824 51 06 Norway: 2026 Skjetten Ph. (063) 84 44 10, Fax (063) 84 44 55 Czech Republic: 75121 Prosenice Ph. (0641) 22 61 80, Fax (0641) 22 61 81 Poland: PL-00-684 Warszawa Ph. (022) 827 29 00, Fax (022) 627 47 20 Denmark: 2730 Herlev Ph. (044) 50 75 00, Fax (044) 50 75 75 Singapore: Singapore 367986 Ph. 383 26 12, Fax 383 26 11 Finland: 00370 Helsinki Ph. (09) 54 97 06 00, Fax (09) 5 03 12 75 South Africa: East Rand 1462 Ph. (011) 397 29 00, Fax (011) 397 44 28 France: 93012 Bobigny Cedex Ph. (01) 48 10 31 10, Fax (01) 48 91 90 93 Spain: 08950 Esplugues de Llobregat Ph. (093) 371 08 58, Fax (093) 371 77 44 Great Britain: Stroud, Glos, GL5 2QF Ph. (01453) 73 13 53, Fax (01453) 73 13 43 Sweden: 21120 Malmö Ph. (040) 664 51 00, Fax (040) 664 51 01 Hong Kong: Kwai Chung NT Ph. (02) 24 80 12 02, Fax (02) 24 18 19 45 Switzerland: 6331 Hünenberg ZG Ph. (041) 785 66 66 Fax (041) 785 66 33 Italy: 20060 Cassina De'Pecchi (MI) Ph. (02) 95 90 71, Fax (02) 95 90 72 51 Taiwan: Taipei Ph. (02) 27 58 31 99, Fax (02) 27 58 24 99 Ireland: IRE-Cork Ph. (021) 86 13 16, Fax (021) 86 13 37 Turkey: Yenisehir-lzmir Ph. (0232) 459 53 95, Fax (0232) 459 76 94 Japan: Tokyo 167-0054, Ph.(03) 53 05 36 10, Fax (03) 53 05 36 11 USA: Irvine, CA 92614 Ph. (0949) 223 31 00, Fax (0949) 223 31 98 www.buerkert.com [email protected] Technische Änderungen vorbehalten. We reserve the right to make technical changes without notice. Sous resérve de modification techniques. © 2000 Bürkert Werke GmbH & Co.