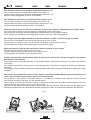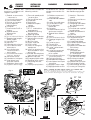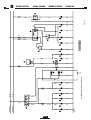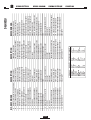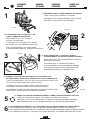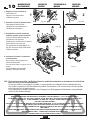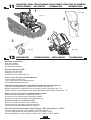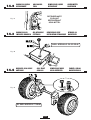
1
MANUALE TECNICO
NOTICE TECNIQUE
TECHNICAL HANDBOOK
TECHNISCHES HANDBUCH
2
3
4
1
5
1)
Indirizzo fabbricante – Constructer’s address
Adresse du constructeur – Herstellersanschrift
2)
Modello – Model – Modéle – Modell
3)
Massa – Meight – Poids – Gewicht
4)
Motore – Engine – Moteur – Motor
5)
Anno costruzione – Construction’s year
Annee de construction – Baujahr
4/52
1
INDICE
INDEX
SOMMAIRE
INHALT
1 - INDICE – INDEX – SOMMAIRE – INHALT ............................................................................................................................................................................................. 5
2 - AI NOSTRI CLIENTI – TO OUR CUSTOMERS – A NOS CLIENTS – AN UNSERE KUNDEN .......................................................................................................... 6
3 - RESPONSABILITA' DELL'OPERATORE – USER'S RESPONSIBILITY – RESPONSABILITE DU CONDUCTEUR – VERANTWORTLICHKEIT DES BEDIENERS ........... 7
4 - NORME DI SICUREZZA – SAFETY PRECAUTIONS – NORMES DE SECURITE – SICHERHEITSVORSCHRIFTEN...................................................................... 8
4.1 - PENDENZE – SLOPES – PENTES – STEILHÄNGE ........................................................................................................................................................................ 12
4.2 - TRASPORTO E SCARICO – TRANSPORT AND UNLOADING – TRANSPORT ET DÉCHARGEMENT – TRANSPORT UND ABLADUNG ........................... 13
5 - CARATTERISTICHE TECNICHE – TECHNICAL DETAILS – DETAILS TECHNIQUES – TECHNISCHE EINZELHEITEN .................................................................... 14
6 - COMANDI E STRUMENTI – CONTROLS AND INSTRUMENTS – COMMANDES – BEDIENUNGSGERAETE ................................................................................ 16
7 - UTILIZZO COMANDI E STRUMENTI – INSTRUMENTS – COMMANDES – BEDIENUNGSGERAETE ............................................................................................ 17
7.1 - AVANZAMENTO-RETROMARCIA – FORWARD-REVERSE – AVANCEMENT-MARCHE ARRIERE – VORWÄRTS-RÜCKWARTS ......................................... 17
7.2 - LEVA FRENO DI STAZIONAMENTO – PARKING BRAKE LEVER – LEVIER FREIN DE STATIONNEMENT – HEBEL DER FESTELLBREMSE ................... 17
7.3 - BLOCCO DIFFERENZIALE – DIFFERENTIAL LOCKING DEVICE – BLOC DIFFERENTIEL – DIFFERENTIALSPERRE ....................................................... 18
7.4 - LEVA BY-PASS – BY-PASS LEVER – LEVIER BY-PASS – UMGEHUNGSHEBEL ...................................................................................................................... 18
7.5 - ACCELERATORE A MANO – ACCELERATOR – ACCELERATEUR – BESCHLEUNIGUNGSHEBEL ............................................................................................ 18
7.6 - PRESA DI FORZA – P.T.O. – PRISE DE FORCE – ZAPFWELLE .............................................................................................................................................. 19
7.7 - SOLLEVAMENTO IDRAULICO PIATTO TOSAERBA – HYDRAULIC LIFTING OF THE EQUIPMENT –
SOULÈVEMENT HYDRAULIQUE DE L’APPAREILLAGE – HYDRAULISCHE AUFHEBUNG DER EINRICHTUNG ..................................................................... 19
7.8 - RIBALTAMENTO IDRAULICO DEL CESTO – HYDRAULIC TILTING OF TRAY
RENVERSEMENT HYDRAULIQUE DU BAC – HYDRAULISCHES KIPPEN DES GRASAUFSAMMELBEHÄLTERS ................................................................... 20
7.8a ELEVATORE – ELEVATOR – ELEVATEUR – ELEVATOR ........................................................................................................................................................... 21
7.9 DESCRIZIONE FUNZIONI COMPUTER – FUNCTIONS COMPUTER – FONCTIONNE COMPUTER – BESCHREIBUNG ARBEITET COMPUTER .............. 22
8 - SCHEMA ELETTRICO – WIRING DIAGRAM – SCHEMA ELECTRIQUE – SCHALTPLAN .......................................................................................................... 23-27
9 - AVVIAMENTO MOTORE – ENGINE STARTING – DEMARRAGE DU MOTEUR – MOTOR-START ................................................................................................. 28
10 - MOVIMENTAZIONE DELLA MACCHINA – DRIVING THE MACHINE – CONDUITE DE LA MACHINE – FAHREN DER MASCHINE ............................................. 29
11 - TAGLIO DELL'ERBA E SISTEMA DI RACCOLTA AUTOMATICO – CUTTING AND AUTOMATIC GRASS COLLECTION
COUPE DE L’HERBE ET SYSTEME DE RAMASSAGE AUTO – MÄH UND-AUTOMATISCHES SAMELN DES GRASES .................................................................. 30
12 - ARRESTO MOTORE – STOPPING THE MOTOR – ARRÊT DU MOTEUR – STILLSTAND MOTOR ................................................................................................. 30
13 - RIFORNIMENTO – TANK FILLING – REMPLISSAGE RESERVOIR – TANKFÜLLING ...................................................................................................................... 31
14 - MANUTENZIONE ODINARIA – MAINTENANCE – MANUTENTION – WARTUNG ............................................................................................................................ 32
14.1 - RABBOCCO OLIO MOTORE – ADD MOTOR OIL – REMPLISSAGE HUILE MOTEUR – MOTOROL NACHFULLEN .......................................................... 33
14.2 - RABBOCCO LIQUIDO REFRIGERANTE – ADD COOLING FLUID – REMPLISSAGE LIQUIDE REFRIGERANT – ABKUHLMITTEL NACHFULLEN ......... 34
14.3 - RABBOCCO OLIO IMPIANTO IDRAULICO – ADD HYDRAULIC SYSTEM OIL
REMPLISSAGE HUILE INSTALLATION HYDRAULIQUE – HYDRAUL. OL NACHFULLEN ........................................................................................................ 34
14.4 - RABBOCCO OLIO ASSALE ANTERIORE – ADD FRONT AXIAL OIL – REMPLISSAGE HUILE AXIAL ANTERIEUR – VORDER. AXALOL NACHFULLEN ... 34
14.5 - BATTERIA – BATTERY – BATTERIE – BATTERIE ................................................................................................................................................................... 35
14.6 - FILTRO ARIA – AIR FILTER – FILTRE AIRE – LUFTFILTER .................................................................................................................................................... 35
14.7 - RETE RADIATORE – RADIATOR NET – FILET RADIATEUR – RADIATORNETZ .................................................................................................................. 35
14.8 - FILTRO OLIO MOTORE – MOTOR OIL FILTER – FILTRE HUILE MOTEUR – MOTOROLFILTER ........................................................................................ 36
14.9 - PRESSIONE PNEUMATICI – TYRE PRESSURE – PRESSION PNEUS – REIFENDRUCK ................................................................................................... 36
14.10 - REGOLAZ. TENSIONE CINGHIE – BELT TENSION ADJUSTEMENT – RÉGLAGE TENSION COURROIES – VERSTELLUNG DER RIEMENSPANNUNG ......... 37
14.11 - PULIZIA DELLA MACCHINA – CLEANING THE MACHINE – NETTOYAGE DE LA MACHINE – SÄUBERN DER MASCHINE ......................................... 38
14.12 - FILTRO IMMERSO – IMMERSED FILTER – FILTRE IMMERGE’ – GETAUCHTER .............................................................................................................. 39
14.13 - FILTRO IN PRESSIONE – FILTER UNDER PRESSURE – FILTRE SOUS PRESSION – DRUCKFILTER ........................................................................... 39
14.14 - FILTRO SERVIZI – SERVICES FILTER – FILTRE SERVICES – DIENSTFILTER .................................................................................................................. 39
14.15 - INGRASSAGGIO PEDALE – PEDAL GREASING – GRAISSAGE PEDALE – PEDALSCHMIERUNG ................................................................................. 39
15 - MANUTENZIONE STRAODINARIA – EXTRAORDINARY MAINTENANCE – ENTRETIEN EXTRAORDINAIRE – AUßERORDENTLICHE ................................... 41
16 - INATTIVITÁ DEL RASAERBA – INACTIVITY OF MOWER DECK – INACTIVITÉ DE LA TONDEUSE – UNAKTIVITÄT DER MÄHWERKS .................................... 42
17 - CIRCOLAZIONE STRADALE – ROAD TRANSPORT – CIRCOLATION ROUTIÈRE – STRASSENVERKEHR ............................................................................... 43
18 - ETICHETTE DI SICUREZZA – SAFETY STIKERS – ETIQUETTES DE SECURITE – SICHERHEITSANKLEBER ........................................................................... 45
19 - NOTE GENERALI – NOTE – INFORMATION – ANWEISUNG ............................................................................................................................................................ 46
20 - VISUALIZZAZIONE CODICI DI ERRORE – ERROR CODE DISPLAY – AFFICHAGE DES CODES D'ALARME – ANZEIGE DER FEHLERCODES ................... 47-50
5/52
2
AI NOSTRI CLIENTI
TO OUR COSTUMERS
A NOS CLIENTS
AH UNSERE KUNDEN
- Siamo orgogliosi di
averLa come cliente.
- Prima della messa in
funzione l'operatore dovrà studiare attentamente questo manuale
per una migliore comprensione della macchina e per i suggerimenti
in esso indicati per il suo
uso e manutenzione.
Le motrici PG - SR
possono essere equipaggiate con svariate
attrezzature; è quindi
importante che l’utente
studi, congiuntamente
al presente manuale,
anche quello relativo
all’attrezzatura che egli
intende montare sulla
propria motrice.
- Le macchine sono
state
studiate
e
realizzate per il miglior
lavoro
nelle più
disparate condizioni;
come sempre la qualità
del lavoro è in relazione
alla
manutenzione
ordinaria eseguita.
- Per specifiche informazioni e consigli d'uso non
contenute in questo
libretto si rivolga al
Rivenditore, il quale sarà
lieto di aiutarla rispondendo alle Sue domande
sull'uso e manutenzione di
queste macchine.
We are pleased to
welcome you as one of
our customers.
To ensure best possible
performance of your
machine as well as for
useful tips for using and
maintaining it, we kindly
ask you to read through
carefully the User’s
Manual.
The engines PG - SR
can be fitted with various
equipments: it is therefore important that the
user studies, in addition
to this manual, also the
manual ref-erring to the
equi-pment that he
intends to mount on his
engine.
The machine has been
planned and designed
to give best performance under difficult
conditions. Its working
performance largely
depends of course on
its main-tenance.
Should queries arise
that have not been dealt
with within these
instructions, then please
contact your dealer who
will be able to assist you
further.
Nous sommes Heureux de
vous compter parmis nos
clients et vous remercions
de votre confiance.
Avant la mise en route, le
conducteur doit lire
attentivement ce manuel
pour une meilleure
compréhension de la
manipulation de la tondeuse et des conseils
d'utilisation et d'entretien
de la machine.
Les motrices PG - SR
peuvent être équipées
avec des outillages variés
; il est donc important que
l’utilisateur étudie, conjointement à ce manuel,
aussi celui qui se réfère à
l’outillage qu’il veut monter
sur sa motrice.
La tondeuse a été
spécialement étudiée et
réalisée pour obtenir un
travail et un rendement
meilleurs dans des conditions les plus difficiles.
La qualité et le résultat sont
toujours fonction du mode
d'utilisation entretien de la
machine.
Pour tout conseil ou indication non mentionnés
sur ce manuel d'utilsation,
veuillez vous adresser à
votre concessionnaire local
qui est habilité à répondre
à vos différentes questions
sur l'utilisation et l'entretien
de votre matériel.
Wir freuen uns Sie zu
unseren Kunden zählen
zu dürfen. Für ein besseres Verständnis der
Maschine sowie nützliche Ratschläge zum
Betrieb und Unterhalt
der Maschine, bitten wir
Sie diese Bedienungsanleitung aufmerksam
durchzulesen.
Die Zugmaschinen PG
- SR können mit verschiedenen Einrichtungen ausgerüstet
werden: es ist deshalb
wichtig, daß der Benutzer, zusam-men mit
dieser Betriebsanleitung, auch die
Beriebsanleitung der
gewälten Einricht-ung
aufmerksa-m liest.
Die Maschine wurde
geplant und verwirklicht
für optimale Arbeit unter schwierigen Bedingungen; die Arbeitsqualität hängt natürlich auch vom Unterhalt
der Maschine ab.
Für besondere Fragen ,
die in dieser Bedienungsanleitung nicht beantwortet sind, wenden
Sie sich bitte jederzeit
an Ihren Händler, der
Ihnen gerne weiterhilft.
QUESTO SIMBOLO
E' USATO PER RICHIAMARE LA VOSTRA ATTENZIONE SULLE
PRECAUZIONI DI SICUREZZA
CHE DEVONO ESSERE ESEGUITE DALL’OPERATORE
PER EVITARE INCIDENTI.
QUANDO VEDETE QUESTO
SIMBOLO FATE ATTENZIONE, NE VA DELLA SICUREZZA VOSTRA E DEGLI ALTRI.
THIS SIGN IMPLIES THAT SAFETY REGULATIONS MUST BE COMPLIED WITH AT ALL TIMES
BY THE USER SO AS TO
AVOID ACCIDENTS.
PLEASE, BE CAREFUL
WHEN YOU SEE THIS SIGN.
IT IS FOR YOUR AND
OTHER PEOPLE'S SAFETY.
CE SYMBOLE EST
UTILISE POUR ATTIRER VOTRE ATTENTION SUR LES CONSIGNES DE SECURITE QUI
DOIVENT ETRE SUIVIES PAR
LE CONDUCTEUR AFIN
D'EVITER TOUT ACCIDENT.
LORSQUE VOUS APERCEVEZ CE SYMBOLE, FAITES
ATTENTION.
IL Y VA DE VOTRE SECURITE ET DE CELLE DES PERSONNES QUI VOUS ENTOURENT.
DIESES SYMBOL
BEDEUTET, DAß
DIE SICHERHEITSVORSCHRIFTEN VOM
BEDIENER DER MASCHINE
UNBEDINGT BEACHTET
WERDEN MÜSSEN, UM
UNFÄLLE ZU VERMEIDEN.
FÜR IHRE SICHERHEIT UND
DIE VON ANDEREN MÜSSEN SIE VORSICHTIG SEIN
WENN SIE DIESES SYMBOL
SEHEN.
6/52
3
RESPONSABILITA’
DELL’OPERATORE
USER’S
RESPONSIBILITY
RESPONSABILITE DU
CONDUCTEUR
VERANTWORTLICHKEIT
DES BEDIENERS
E' responsabilità dell'operatore leggere attentamente il manuale e capire il corretto procedimento operativo delle macchine, di lubrificare e di mantenere la stessa secondo
le istruzioni di questo manuale.
L'operatore è responsabile del controllo della sua
macchina e della sostituzione e riparazione delle
parti soggette a continua
usura che potrebbero
causare danni ad altre
persone.
L'operatore è responsabile dei danni cagionati a
terzi, a se stesso e a cose,
dall'uso improprio della
macchina ed in contrasto
alle indicazioni riportate
su questo manuale.
La macchina deve essere utilizzata e sottoposta
a manutenzione esclusivamente da persone a conoscenza delle caratteristiche specifiche e che
abbiano compreso le norme di sicurezza.
Mai consentire l'uso della macchina a bambini e
adolescenti. Eventuali
normative locali possono
fissare un'età minima per
l'operatore.
Utilizzare solo attacchi,
parti e accessori studiati
e forniti dalla Nostra
azienda per lo specifico
modello da Voi acquistato; per informazioni rivolgersi al vostro Rivenditore.
E' fatto quindi assoluto divieto di eseguire trasformazioni e modifiche sulla
macchina non previste da
questo libretto.
It is imperative that the
user reads through this
manual carefully so as
to become acquainted
with its working procedure, maintenance of
parts and proper lubrication according to our
instructions.The user is
also responsible for
checking,repairing and
for possible replacement of worn-out parts
which could cause
injuries.The user is responsible for damages
caused to third parties
by improper use.
The machine must be
used and maintained
only by persons with a
good knowledge of its
specific features and
who have fully understood the safety rules.
Never let children or minors near the machine.
Local laws, if any, may
state a minimum age for
the operator.
Never take passengers.
Only use attachments
and accessories which
have been recommended and supplied by
your dealer.
It is strictly prohibited to
do any alterations or reconstructions to the
machine which are not
mentioned in this manual.
Le conducteur doit lire
attentivement la notice pour
comprendre correctement le
mode de fonctionnement de
la machine; il est responsable
de la lubrification et de la
maintenancedecettedernière
conformémentauxindications
données dans cette notice.
- Le conducteur est responsable du contrôle de son
matériel, du remplacement et
des réparations des pièces
particulièrement sujettes à
usure qui pourraient provoquer des lésions à des tiers.
- Le conducteur est responsable des éventuelles
lésionsprovoquéesàdestiers,
à soimême et aux choses, si
elles sont dûes à une utilisation
impropre de la machine et en
contraste avec les indications
données sur cette notice.
La machine doit être
utilisée et soumise à
entretien exclusivement
par des personnes à
connaissance des caractéristiques spécifiques et
qui ont compris les normes
de sécurité.
Ne jamais permettre aux
enfants ou adolescents
d’utiliser la machine.D’éventuelles normes locales
peuvent fixer un age minimum pour l’opérateur.
- Utiliser uniquement des
attelages, des pièces de
rechange et des accessoires
étudiés et fournis par notre
usine pour le modèle
spécifique que vous avez
acheté; vous adresser à notre
concessionnaire le plus
proche pour plus de renseignements. Il est interdit
d’effectuer sur cette machine
des modifications ou des
transformations qui ne sont
pasprévuesdanscettenotice.
Es ist Pflicht der Bedieners, dieses Handbuch
aufmerksam zu lesen
und die Arbeitsvorgänge der Maschine zu verstehen, die Ausrüstung
zu unterhalten und fachgerecht gemäß unseren
Anweisungen zu schmieren.Er ist ebenfalls verantwortlich für Kontrolle
, Reparaturen und evte.
Ersatz von stark beanspruch-ten Teilen , die
Schäden an Personen
verursachen könnten.
Der Bediener ist für
Schäden an Drittpersonen und an sich selber
verantwortlich, welche
durch unsachgemäßen
Gebrauch entstehen.
Es darf nur von Personen
mit ausreichender Kenntnis der technischen
Eigenschaften und korrekten Anwendung der
Sicherheitsbestimmungen
benutzt und gewartet
werden.
Die Maschine nie an Kindern oder Minderjährigen anvertrauen.
Örtliche Rechtsvorschriften können eventuelle ein
Grenzalten für den Bediener durchsetzen.
Nur Aggregate und Zubehör ,die vom Hersteller für das Modell konstruiert und geliefert wurden verwenden; Informationen sind jederzeit
beim Händler zu erhalten. Es ist strikt verboten,
Änderungen oder Umbauten an der Maschine
vorzunehmen, die nicht
in diesem Handbuch
ver-merkt sind.
L'OPERATORE NELL'USO
DELLA MACCHINA DEVE
OSSERVARE SCRUPOLOSAMENTE LE NORME DI
SICUREZZA CONTENUTE
IN QUESTO LIBRETTO, LE
NORME DI PREVENZIONE
DEGLI INFORTUNI, ALTRE
NORME DI SICUREZZA
GENERICHE, LE DISPOSIZIONI DI MEDICINA DEL
LAVORO.
WHEN
USING
THE
MACHINE, THE OPERATOR
MUST SCRUPULOUSLY
OBSERVE THE SAFETY
RULES CONTAINED IN
THIS MANUAL, THE RULES
FOR THE PREVENTION OF
ACCIDENTS, OTHER GENERAL SAFETY RULES, THE
PROVISIONS OF WORK
MEDICINE.
L'OPÉRATEUR EN UTILISANT
LA MACHINE DOIT SCRUPULEUSEMENT
OBSERVER LES NORMES DE
SÉCURITÉ CONTENUES
DANS CE MANUEL, LES
NORMES POUR LA PRÉVENTION DES ACCIDENTS, LES
AUTRES NORMES DE
SÉCURITÉ GÉNÉRALES, LES
DISPOSI-TIONS DE MÉDICINE DU TRAVAIL.
BEIM GEBRAUCH DER
MASCHINE MUSS DER
OPERATOR DIE IN DIESER
BETRIEBSANLEITUNG
ENTHALTENEN
SICHERHEITSNORMEN, DIE NORMEN FÜR UMFALL-VORBEUGUNG SOWIE AUCH ANDERE
ALLGEMEINE SICH-ERHEITSNORMEN UND DIE VORSCHRIFTEN DER ARBEITSMEDIZIN GEWISSENHAFT BEACHTEN.
7/52
4
NORME DI
SICUREZZA
IL PRUDENTE OPERATORE E' IL MIGLIORE OPERATORE
Molti incidenti possono
essere evitati osservando le precauzioni indicate in questo libretto.
PARTE GENERALE
1) Leggete attentamente il manuale in ogni sua
parte.
2) Ogni volta prima dell'uso ispezionate la
macchina in ogni sua
parte e prestate attenzione
a
malfunzionamenti, bulloni e viti allentate, coltelli, e altre parti danneggiate o non ben fissate. E' fatto assoluto
divieto l'uso della macchina non in perfette
condizioni, quindi prima
dell'uso intervenite eseguendo le operazioni di
controllo e manutenzione consigliate.
3) Famigliarizzate con
tutte le parti ed i controlli
della macchina prima
della messa in moto.
4) L’uso della macchina
è consentito a una sola
persona adulta e consapevole. Non permettere l’uso a bambini e
adolescenti.
Evitate di utilizzare il
rasaerba in condizioni
fisiche non idonee.
5) Tenere persone e
cose a distanza di
sicurezza come
prescritto successivamente.
6) Utilizzate solo parti e
accessori forniti da Noi
e non permettete nessuna modifica o trasfor-
SAFETY
STANDARDS
NORMES DE
SECURITE
ONLY A CAREFUL
USER IS A GOOD
USER
If you follow the Safety
Instructions in the manual you can avoid accidents.
MAIN PART
1) Read through carefully each section of these instructions.
2) Check the machine
before every use for
defect, for e.g. loose
screws and bolts, loosened or damaged blades or other parts which
are not secure.It is absolutely forbidden to use
the machine in improper conditions.
Therefore, before starting your machine go
through the control and
service instructions as
recommended.
3) Before starting the
machine acquaint yourself with all the parts and
with the checking system.
4) The machine should
only be used by adults
with experience. Dont let
children use it.
Avoid using the lawnmower if you do not feel
physically fit for the job.
5) Keep people
within a certain security distance as
explained hereafter.
6) Only use original parts and accessories. Do
not make any changes
thereto.
For information, please
consult your dealer.
7) Replace lost or damaged safety stickers
UN CONDUCTEUR
PRUDENT EST LE
MEILLEUR
DES
CONDUCTEURS
De nombreux incidents peuvent être évités
en observant les précautions indiquées
dans ce livret. La machine doit être utilisée
par des conducteurs attentionnés et formés
pour la conduite de celle-ci.
CONSIGNES GENERALES
1) Lire attentivement le
manuel.
2) Avant chaque utilisation, vérifier les endroits et les piéces qui seraient susceptibles de
dégrader le matériel,
lors d'un mauvais fonctionnement. Boulons et
vis dessérés , lames ou
autres piéces dégradées ou mal serrées
sont des cas où il n'est
pas recommandé d'utiliser la tondeuse, car
elle ne serait pas en
parfaite condition de
travail. Il est donc indispensable d'intervenir
avant l'utilisation.
3) Se familiariser avec
tous les témoins de contrôle avant la mise en
route.
4) La machine ne doit
être seulement utilisée
que par des adultes
d’expérience. Ne jamais laisser des enfants s’en servir.
Éviter d’utiliser la
tondeuse en conditions
phisiques
non
appropriées.
5) Tenir les person-
8/52
SICHERHEITSVORSCHRIFTEN
NUR EIN VORSICHTIGER BEDIENER IST EIN GUTER
BEDIENER.
Wenn Sie die Sicherheitsvorschriften in dieses
Handbuch beachten
können sehr viele Unfälle vermieden werden.
HAUPTANWEISUNGEN
1) Lesen Sie aufmerksam
jeden Abschnitt dieser
Bedienungsanleitung.
2) Überprüfen Sie jedesmal vor Gebrauch der
Maschine , ob ein Defekt
vorhanden ist , ob
Schrauben und Muttern
gelockert sind, Messer
oder andere Teile beschädigt oder schlecht
befestigt sind. Es ist absolut verboten die Maschine in unkorrektem
Zustand in Betrieb zu
nehmen.Führen Sie deshalb vor der Inbetriebnahme die empfohlenen
Kontroll-und Unterhaltsarbeiten durch.
3)Machen Sie sich vor
Inbetriebsnahme der
Maschine mit allen Teilen oder Kontrollarbeiten vertraut.
4) Die Maschine muß nur
von Fachleuten benuzt
werden. Nie kinder Sie
beutzen lassen.
Vermeidet
den
Rasenmäher unter nicht
geeigneten physischen
Bedingungen
zu
benützen.
5) Personen mit eine
gewisse Sicherheitsentfernug wie danach erklärt fernhalten.
mazione. Per informazioni contattate il Vs. Rivenditore.
7) Riapplicare di nuovo
tutte le decalcomanie di
sicurezza e ammonimento danneggiate, illeggibili o mancanti.
Controllate la lista delle
decalcomanie nella apposita sezione di sicurezza. Mantenere pulite
le decalcomanie da fango, sporcizia e polvere.
8) Tenete mani, piedi e
voi stessi lontani da ogni
parte in movimento.
9) Non usate la macchina senza protezioni e
coperchi nella giusta
posizione e in buone
condizioni.
Non impiegare la macchina se i dispositivi di
sicurezza non sono in
perfetta efficienza.
Non manomettere mai
per alcun motivo i
dispositivi di sicurezza.
10) Se colpite o agganciate un oggeto fermate immediatamente la
macchina, disattivare la
presa di forza, spegnere il motore, appoggiate l'attrezzatura a terra e
controllatela in ogni sua
parte. Prima di ripartire
assicuratevi di aver ripristinato le condizioni
per un funzionamento
ottimale della macchina.
11) Quando non utilizzate
la
macchina,
disattivate la PTO, abbassate l'attrezzatura
facendola appoggiare a
terra, spegnete il motore e togliete la chiave.
12) Non accendete mai
il motore della macchina in luogo chiuso o
or warning labels. Chek
the list of safety stickers
in the “SAFETY PRE
CAUTIONS” section of
this manual. Wipe dust
and dirt off the stickers.
8)Keep hands and feet,
as well as your body
away from the moving
parts.
9) Never use the machine without protection
and covers in the right
position and perfect condition.
Do not use the machine
if its safety devices are
not perfectly efficient.
For no reason, tamper
with the machine safety
devices.
10) Should an object
have been run over or
got stuck, stop immediately. Turn off the engine
and remove the ignition
key. Disengage the
P.T.O., put the attachment onto the ground
and inspect it. Do not
start using the machine
until you are sure that it
is in perfect working order.
11) When you have finished working with the
machine, disengage the
P.T.O., put the attachment lower down so
that it touches the
ground, turn off the engine and remove the key.
12) Never start the engine in a closed room.
Exhaust fumes are poisonous.
Before carrying out
maintenance operations
on the machine make
sure that the same is off.
Before intervening on the
electrical installation,
disconnect the power
cables from the battery
nes à une distance
de sécurité comme
conseillé plus loin.
6) Utiliser seulement
des pièces de rechange et des accessoires
d'origine fournis par notre usine. Ne permettre
aucune modification ni
trasformation. Pour plus
de renseignements,
contactez votre revendeur.
7) Remplacer toutes les
décalcolmanies de sécurité qui pourraient être
illisibles, dégradées, ou
manquantes. Contrôler
la liste des décalcomanies avec l'illustré du
paragraphe sécurité.
Les maintenir propres et
lisibles.
8) Maintenir éloignés
vos pieds et mains de
toutes pièces en mouvement.
9) Ne pas utiliser la machine sans protection
ou couvercle à leur place et en bon état.
Ne pas utiliser la
machine si les dispositifs
de sécurité ne sont pas
en parfaite efficacité.
Ne jamais violer pour
n’importe quelle raison
les dispositifs de
sécurité.
10) Si vous açcrochez
ou percutez un objet,
arrêtez immediatement
le moteur, enlevez les
clefs de contact, débrayez la prise de force,
posez l'accessoire au
sol et contrôlez chaque
élément. Avant de repartir, assurez-vous que
tout est en parfait état
de fonctionnement, afin
d'obtenir le meilleur travail et le meilleur rendement.
9/52
6) Verwenden Sie nur Originalteile und -zubehör und
erlauben Sie keine Abänderungen. Für Auskünfte
wenden Sie sich an Ihren
Händler.
7) Ersetzen Sie fehlendeoder beschädigte Sicherheitsaufkleber oder Warnhinweise. Kontrollieren
Sie die Liste der Sicherheitsaufkleber. Entfernen Sie
die Kleber von jeglichem
Schmutz oder Unrat.
8) Halten Sie Hände und
Füsse sowie sich selber
von beweglichen Teilen
fern.
9) Benützen Sie die Maschine nicht ohne Schutz
und Deckel in der richtigen Position und in einwandfreiem Zustand.
Nicht die Maschine
bedienen, wenn die Sicherheitsvorrichtungen nicht
in perfekter Leistungsfähigkeit sind.
Nie aus irgendwelchem
Grund die Sicherheitsvorrichtungen antasten.
10) Halten Sie unverzüglich an, wenn Sie einen Gegenstand überfahren oder
sich an den verklemmt haben.
Schalten Sie den Motor aus
und nehmen Sie den
Schlüssel weg. Kuppeln
Sie die Zapfwelle aus , stellen Sie das Aggregat auf
den Boden und kontrollieren Sie es in jedem
Detail.Nehmen Sie die
Maschine erst wieder in
Betrieb, wenn Sie sich vergewissert haben , daß sich
die Maschine in einem optimalen Betriebszustand
befindet.
11)Wenn Sie die Maschine
nicht mehr benutzen,
Zapfwelle auskupplen ,
Aggregat tiefer legen so-
senza adeguata ventilazione. I fumi di scarico
sono tossici.
Prima di eseguire le
operazioni di manutenzione sulla macchina
assicurarsi che la stessa sia spenta. Se si
deve intervenire sull’impianto elettrico, scollegare i cavi di tensione
dai poli della batteria.
13) Non permettete che
si sviluppino fiamme o
scintille vicino al serbatoio del carburante o
alla batteria.
14) Mai parcheggiare la
macchina in discesa.
15) Utilizzate la macchina e le attrezzature ad
una velocità compatibile con le esigenze di sicurezza e le caratteristiche del modello usato.
16) Usate estrema prudenza utilizzando la
macchina sui pendii.
Riducete al minimo la
velocità.
17) Nell'uso e manutenzione della macchina
indossate un abbigliamento adeguato: occhiali, guanti ed altri indumenti di protezione.
18) Utilizzare la macchina in condizioni di visibilità buone.
19) Non utilizzare la
macchina per trainare.
20) E' tassativamente
vietato avviare la macchina senza l’attrezzatura correttamente
montata.
21) Tutti i conducenti
dovrebbero ricevere
una formazione professionale e pratica. Tale
formazione dovrebbe
mettere in risalto:
- la necessità di prestare attenzione e di esse-
terminals.
13) Be careful that flames
or sparks do not get near
the petrol tank.
14) Never park on slopes.
15) Machine speed should
be suited to the ground you
are working on.
16) Working on slopes requires extreme caution and
reduced speed.
17) When using the machine wear suitable clothing,
glasses, gloves and any
other protective clothing.
18) Only use the machine
with good visibility.
19) Do not use the machine for towing.
20) It is absolutely
forbidden to start the
machine if the equipment
is not correctly mounted.
21) All drivers should
receive a professional and
practical training. Such
training should highlight
the following:
- the necessity of paying
attention and being
concentrated
when
working on machines
where the driver is sitting.
- a machine sliding down
a slope can be brought
again under control by
pulling the brakes. The
main causes for the loss of
control are:
a) insufficient grip of the
wheels;
b) driving too fast;
c) inadequate braking;
d) type of machine
unsuitable for the job
required;
e) lack of awareness of the
effect of the condition of
the ground, particularly of
slopes ;
f) the equipments are
wrongly attached and the
loads are consequently
badly distributed.
11) Lorsque la machine
est à l'arrêt, débrayez la
prise de force. Posez au
sol l'accessoire, enlevez
la clef de contact.
12) Ne pas laisser le
moteur en marche dans
un local fermé, les fumées d'échappement
étant toxiques.
Avant d’exécuter les
opérations d’entretien
sur la machine s’assurer
qu’elle soit éteinte.
Si on doit intervenir sur
installation électrique,
débrancher les câbles
de tension des poles de
la batterie.
13) Attention: ne pas faire d'étincelles à proximité du réservoir et de
la batterie.
14) Ne jamais laisser arrêter la machine en pente.
15) Utiliser la machine
et les accessoires à une
vitesse compatible avec
les exigences de sécurité et suivant le modèle
utilisé.
16) Etre d'une extrême
prudence pour le travail
en pente. Réduire la vitesse au maximum.
17) Pour l'utilisation et
l'entretien de la machine, s'équiper de vêtements adéquats, lunettes, gants et autres vêtements de protection.
18) Utiliser la machine
seulement avec une
bonne visibilité.
19) Ne pas utiliser la
machine pour remorquer.
20) Il est absolument
interdit démarrer la
machine sans que
l’outillage
soit
correctement monté.
21)Tous les conduc-
10/52
daß es den Boden
berührt,Motor abstellen
und den Schlüssel abnehmen.
12) Motor nie in geschlossenen Räumen starten.
Die Abgase sind giftig.
Bevor man die Wartungsarbeiten durchführt,
prüfen, ob die Maschine
ausgeschalten ist.
Wenn man an der
Elektroanlage intervenieren muss, müssen
die Spannungskabeln
aus den Polen der Batterie
gezogen werden.
13) Geben Sie acht, daß
sich weder Flammen
noch Funken in der Nähe
des Benzintanks bilden.
14) Parkieren Sie nie im
Gefälle.
15) Arbeitsgeschwindigkeit der Maschine und
dem Boden anpassen.
16) An Hängen nur mit
äußerster Vorsicht und mit
reduzierter Geschwindigkeit arbeiten.
17) Beim Arbeiten sowie
beim Unterhalt empfehlen wir passende Kleider,
Brillen, Handschuhe und
andere Schutzgegenstände.
18) Nur die Maschine
benutzen wenn Man gut
sehen kann.
19) Die Maschine nicht
zum schleppen verwenden.
20) Es ist streng verboten
die Maschine zu starten,
wenn die Einrichtung
nicht genau eingebaut ist.
21) Alle Fahrer müssten
eine Praxisausbildung
haben. Diese Ausbildung sollte das folgende hervorheben:
- die Notwendigkeit, um
aufzupassen und sich zu
re concentrati quando
si lavora con le macchine con conducente seduto.
- il controllo di una macchina che slitta lungo
un pendio non potrà essere ristabilito azionando i freni. Le principali ragioni della perdita di controllo sono:
a) insufficiente aderenza delle ruote;
b) guida troppo veloce;
c) frenata inadeguata;
d) tipo di macchina inadatto al lavoro richiesto;
e) mancata consapevolezza dell'effetto delle
condizioni del terreno,
in particolare dei pendii;
f) attacco non corretto
delle attrezzature e
conseguente mal ripartizione dei carichi.
22) Durante le fasi di
lavoro, indossare sempre calzature resistenti
e pantaloni lunghi. Non
utilizzare la macchina
quando si è a piedi
scalzi o si indossano
sandali.
23) Ispezionare a fondo
l'area nella quale deve
essere utilizzata la macchina e rimuovere tutti
gli oggetti che potrebbero essere lanciati dalla macchina.
24) Disinnestare sempre la presa di forza
durante le fasi di trasferimento della macchina.
22) During the phases of
work, always wear strong
shoes and long trousers.
Do not use the machine
when you are bare-footed
or wearing sandals.
23) Inspect thoroughly the
area where the machine is
to be used and remove all
the object that could be
thrown by the machine.
24) Always disengage the
P.T.O. when transferring
the machine.
teurs devraient recevoir
uneformation professionnelle et pratique.
professionnelle et Cette
formation devrait faire ressortir:
- la nécessité de faire
attention et de se
concentrer lorsque l’on
travaille avec des machines à conducteur assis.
- le contrôle sur une
machine qui dérape le
long d’une pente ne
pourra pas se faire en
actionnant les freins.
Les raisons principales de
la perte de contrôle sont:
a)adhérence insuffisante des roues;
b) conduite trop rapide;
c) freinage insuffisant;
d) type de machine
inadapté au travail
demandé;
e) non-conscience de
l’effet des conditions du
terrain, en particulier
des pentes;
f) fixation non correcte
des outillages et, par
conséquent, mauvaise
répartition
des
chargements.
22) Pendant les phases
de travail, porter
toujours
des
chaussures résistentes
et des pantalons longs.
Ne pas utiliser la
machine lorsque l’on a
les pieds nus ou des
sandales.
23) Inspecter à fond la
zone sur laquelle la
machine doit être
utilisée et enlever tous
les objets qui pourraient
être projetés par la
machine.
24) Débroyer toujours la
prise de force pendant
les phases de déplacement de la machine.
11/52
konzentrieren, wenn man
mit Maschinen mit
sitzendem
Fahrer
arbeitet.
Die Kontrolle über eine an
einem Abhang entlang
rutschenden Maschine
kann nicht durchs Bremsen wiederh-ergestellt
werden. Die wichtigsten
Gründe
für
den
Kontrollverlust sind:
a) eine ungenügende
Bodenhaftung der Räder;
b) ein zu schnelles
Fahren;
c) ein unzulängliches
Bremsen;
d) das Maschinentyp ist
für die verlangten Arbeit
ungeeignet;
e) keine Ahnung über die
Wirkung der Bodenbedingungen, insbesonders
über Steilhänge;
f) falsche Befestigung der
Einrichtung
mit
darausfolgender
schlechter Einteilung der
Laden.
22) Bei den Arbeitsgängen, tragen Sie immer
Sicherheitsschuhe und
eine lange Hose. Nie
Maschine verwenden,
wenn man barfüßig ist
oder Sandalen trägt.
23)
Sorgfältig
die
mähende Zone überprüfen
und
alle
Gegenstände entfernen,
die von der Maschine
ausgeworfen werden
könnten .
24) Wenn die Maschine
verlegt wird, kuppeln Sie
immer den Außenantrieb
aus.
4.1
PENDENZE
SLOPES
PENTES
STEILHÄNGE
Non utilizzare la macchina con pendenze longitudinali superiori a 15°.
Do not use the machine on longitudinali slopes of more than 15°.
Ne pas utiliser la machine sur des pentes longitudinales supérieures à 15°.
Nicht bei einem Längsgefälle von über 15° einsetzen.
Non utilizzare la macchina con pendenze laterali superiori a 12°.
Do not use the machine on lateral slopes higher of more than 12°.
Ne pas utiliser la machine sur des pentes latérales supérieures à 12°.
Nicht bei einem seitlichen Gefälle von über 12° einsetzen.
Durante le fasi di lavoro non affrontare pendenze di nessun tipo (laterali e longitudinali) con il piatto alzato.
Do not proceed on slopes of any kind (lateral or longitudinal) with the plate lifted.
Ne pas aborder aucun type de pentes (latérales et longitudinales) avec le plateau soulevé.
Nie an Hängen (mit seitlichem oder Längsgefälle) arbeiten, wenn der Teller hochgestellt ist.
Non fermare o avviare improvvisamente la macchina durante la salita o la discesa lungo un pendio.
Do not stop or start suddenly the machine when going up or down a slope.
Ne pas arrêter ou démarrer tout à coup la machine en montant ou descendant une pente.
Nicht die Maschine bergauf oder bergab stoppen oder plötzlich starten.
Mantenere bassa la velocità della macchina sui pendii e durante le curve strette.
Proceed with low speed on slopes or narrow curves.
Conduire à basse vitesse sur les pentes ou les virages étroits.
Auf Steigungen oder scharfen Kurven langsam fahren.
Prestare attenzione ad eventuali dossi, buche o altri pericoli nascosti. Se il terreno è irregolare, la macchina
può ribaltarsi più facilmente.
Pay attention to any road humps, potholes or other hidden dangers. If the ground is irregular, the machine can overturn
more easily.
Faire attention aux dos-d’âne, nids-de-poule ou d’autres dangers cachés. Si le terrain est irrégulier, la machine peut culbuter plus
facilement.
Auf Erdhügel, Löcher im Boden oder andere Gefahrenquellen achten. Bei unebenem Gelände kann die Maschine leicht
umkippen.
Non operare in prossimità di banchine, fossi o argini; la macchina potrebbe ribaltarsi improvvisamente se una
ruota supera il bordo di questi ultimi, oppure se la banchina cede.
Do not operate in the proximity of shoulders, ditches or river banks; the machine could suddenly overturn if a wheel
goes beyond the edge of the latter, or if the shoulder cedes.
Ne pas opérer à proximité de bas-côtés, fossés ou berges; la machine pourrait culbuter soudainement si une roue
supère le bord de ces derniers, ou si la si le bas-côté cède.
Auch nicht in der Nähe von Straßenrändern, Gräben oder Dämmen arbeiten. Falls ein Rad über den Rand dieser
Erhebungen gelangt oder der Straßenrand nachgibt, besteht die Gefahr des plötzlichen Umkippens der Maschine.
Fig. 1
MAX
12°
MAX
12/52
15°
MAX 15°
4.2
TRASPORTO E SCARICO
TRANSPORT AND UNLOADING
TRANSPORT ET DÉCHARGEMENT
TRANSPORT UND ABLADUNG
La macchina è pesante e può provocare seri danni da schiacciamento.
Caricarla e scaricarla con cautela utilizzando rampe di carico. (Fig. 2)
Trasportare la macchina su un rimorchio omologato. Durante il trasporto, applicare il freno di stazionamento,
e fissare la macchina con dispositivi omologati come cinghie, catene o funi.
N.B.: se la macchina è imballata e posta sopra al proprio pallets è possibile movimentarla con il muletto.
The machine is heay and can cause serious crushing damages.
Load and unload it with care and use loading ramps. (Fig. 2)
Transport the machine on a homologated trailer. During transport, use the the parking brake and fix the machine with
homologated devices, such as belts, chains or ropes.
N.B.: if the machine is packed and mounted on its pallet, it is possible to move it with a forklift.
La machine est lourde et peut provoquer de graves dégats d’aplatissement. Il faut la charger et décharger avec caution
en se servant de rampes de chargement. (Fig. 2)
Transporter la machine sur un remorque homologué.
Pendant le transport, mettre le frein de stationnement, et fixer la machine avec des dispositifs homologués comme des courroies,
chaînes ou cordes.
N.B.: si la machine est emballée et posée sur une palette, on peut la transporter par chariot élevateur.
Der Rasenmäher kann aufgrund seines beträchtlichen Gewichts schwere Quetschverletzungen verursachen. Beim Aufund Abladen sollte man deshalb zur Vorsicht eine Laderampe verwenden. (Abb. 2)
Die Maschine mit einem zulassungsgeprüften Anhänger transportieren. Während des Transports die Handbremse
anziehen und die Maschine mit vorschriftsmäßigen Befestigungsvorrichtungen, wie Riemen, Ketten oder Seile fixieren.
Hinweis: Falls die Maschine verpackt ist und auf einer Palette befestigt ist, kann sie mit dem Gabelstapler befördert
werden.
Fig. 2
PORTATA MINIMA 1200 Kg
CAPACITY 1200 Kg
PORTÉE 1200 Kg
TRÄGFÄHIGKEIT 1200 Kg
IMPORTANTE: il freno di stazionamento non è sufficiente a bloccare la macchina durante il trasporto. Fissare adeguatamente la macchina al veicolo con dispositivi omologati.
IMPORTANT: the parking brake is not sufficient for locking the machine durante transport. Fix appropriately
the machine to the vehicle with homologated devices.
IMPORTANT: le frein de stationnement ne suffit pas à bloquer la machine pendant le transport. Fixer
d’une façon adéquate la machine au véhicule avec des dispositifs homologués.
WICHTIG: Die Standbremse ist keine Garantie für die sichere Blockierung der Maschine während des
Transports. Sie muss deshalb mit geeigneten Vorrichtungen auf dem Fahrzeug befestigt werden.
13/52
5
TECHNICAL
FEATURES
CARATTERISTICHE
TECNICHE
CARACTERISTIQUES
TECHNIQUES
TECHNISCHE
EINZELHEITEN
Fig. 3
2110
1560
2300
Misure espresse in mm.
Measurement in mm.
Mesures exprimées en mm.
Abmessungen in mm.
✱✱
✱✱
✱✱
Vedi manuale tecnico dell’attrezzatura
See technical manual for the equipment
Voir manuel technique de l’équipment
Siehe technische Betriebsanleitung des Apparates
Le misure indicate valgono anche per i modelli “SR”.
The measurements shown also apply for “SR” models.
Les mesures indiquées sont valables aussi pour les modèles “SR”.
Die angegebenen Abmessungen sind auch für Modelle “SR” gültig.
PG270W / SR270W
DAIHATSU
950 DT
Motore - Engine - Moteur - Motor
Potenza - Engine power - Puissance Moteur - Motorleistung
HP - PS
31
cc.
952
n°
3
Cilindrata - Displacement - Cylindrée - Hubraum
N° Cilindri - Number of Cylinders - Nombre de cylindres - Zylinderzahl
3600
Giri al 1' - Rpm - Tours/min. - Drehzahl/Min.
Ruote motrici - Driving wheels - Roues motrices - Antriebsräder
anteriori con possibilità bloccaggio differenziale
front with possibility of differential locking
avant avec possibilité de blocage différentié
mit differenzierter sperrungsmöglichkeit
Tipo di avanzamento - Type of progress - Type d’avancement - Vorschubtyp
idrostatico - hydrostatic
hydrostatique - hydrostatische
Freno di servizio - Service brake - Frein de service - Hilfsbremse
idrostatico - hydrostatic
hydrostatique - hydrostatische
meccanico a disco
mechanical disk
mécanique à disque
mekanische scheiben
Freno di stazionamento - Parking brake - Frein de stationnement - Parkbremse
Velocità max - Max Speed - Vitesse max - Geschwindigkeit
km/h
Capacità serbatoio carburante - Fuel tank - Capacité du réservoir - Tankinhalt
Capacità cesto di raccolta - Basket capacity - Capacité corbeille - Korbkapazität
Portata max cassonetto di carico - Max container capacity
Portée max caisson de chargement - Höchste Ladegewicht des Containers
✱
Solo modelli “PG”.
Only “PG” models.
Seulement modèles “PG”.
Nur Modelle “PG”.
Solo modelli “SR”.
Only “SR” models.
Seulement modèles “SR”.
Nur Modelle “SR”.
14/52
✱
14,6
L.
18
L.
600
Kg
80
5
CARATTERISTICHE
TECNICHE
TECHNICAL
FEATURES
CARACTERISTIQUES
TECHNIQUES
PESI - WEIGHTS - POIDS - GEWICHT (solo motrice - only engine - seul moteur - nur maschine)
MODELLO - MODEL - MODÈLE - MODELL
MASSA - MASS - MASSE - MASSE
PG 270 W
PG 270 W
ELEVATORE - ELEVATOR -ELEVATEUR -ELEVATOR
SR 270 W
kg
825
kg
870
kg
855
APPARATO RASAERBA/ATTREZZATURA - LAWNMOWER DEVICE/EQUIPMENT
APPARAT TONDEUSE/ÉQUIPEMENT - RASENMÄHAPPARAT/AUSRÜSTUNG
Consultare il manuale tecnico specifico dell’attrezzatura o del rasaerba.
Consult the specific technical manual for the equipment or mower.
Consulter le manuel technique spécifique de l’équipment ou de la tondeuse.
Schlagen Sie die Betriebsanleitung der Vorrichtung bzw. des Rasenmähers nach.
LIVELLO DI POTENZA ACUSTICA - LEVEL OF ACOUSTIC POWER
NIVEAU DE PUISSACE ACOUSTIQUE - NIVEAU DER SCHALLEISTUNG
LARGHEZZA DI TAGLIO “L”
WIDTH OF CUT “L”
LARGEUR DE COUPE “L”
BREITE DES SCHNITTES “L”
L = 122/130 cm
Rilevato - Found
Relevé - Gefunde
103,5 dB (A)
Garantito - Guaranteed
Garanti - Garantiert
105
dB (A)
• Esposizione dell’accelerazione delle membra superiori: ... < 2,5 m/s2.
Exposition of acceleration of superior limbs: ............................ < 2,5 m/s2.
Exposition de l’accélération des membres supérieurs: ............ < 2,5 m/s2.
Austellung der Beschleunigung von oberen Gliedmassen: ...... < 2,5 m/s2.
• Esposizione dell’accelerazione del corpo: .......................... < 0,5 m/s2.
Exposition of body acceleration: ............................................... < 0,5 m/s2.
Exposition de l’accélération du corps: ...................................... < 0,5 m/s2.
Austellung der Körpebeschleunigung: ...................................... < 0,5 m/s2.
• Valore rumorosità posto operatore: ...................................... 89,8 dB(A)
Noise value at operator’s place: ................................................ 89,8 dB(A)
Valeur du bruit à l’emplacement de l’opérateur: ............................... 89,8 dB(A)
Gerauschpegel am Bedienersitz: .............................................. 89,8 dB(A)
15/52
TECHNISCHE
EINZELHEITEN
6
CONTROLS AND
INSTRUMENTS
COMANDI E
STRUMENTI
COMMANDES
BEDIENUNGSGERAETE
Il sistema di guida del The machine includes the
tosaerba è composto dai following controls:
seguenti comandi:
La tondeuse est composée des commandes suivantes:
Die Maschine hat folgenden Bedienungsgeräte:
1) Pedale avanzamento
- retromarcia
2) Leva freno di stazionamento
3) Leva acceleratore
4) Chiave avviamento
5) Presa bipolare
nebulizzatore
6) Computer
7) Inserimento P.d.P. e
turbina
8) Pedale blocco
differenziale
9) Volante
10) Spie luci indicatore di direzione
11) Regolazione longitudinale sedile
12) Leva By-Pass
13) Spia luci
14) Interruttore luci e clacson
15) Leva sollevamento
attrezzatura
16) Leva ribaltamento
cesto/cassonetto /
presa rapida
17) Leva azionamento elevatore
(solo vers. elevatore)
18) Deviatore frecce
19) Interruttore luci emergenza
20) Interruttore luce
lampada rotante
21) Regolazione altezza sedile
22) Regolazione durezza molleggio
1) Pédale avancement –
marche arrièr
2) Levier frein de stationnement
3) Levier d'accélérateur
4) Cle de demarrage
5) Prise bipolaire
nébuliseur
6) Computer
7) Declenchement prise
de force et turbine
8) Pedale bloc differentiel
9) Volant
10) Témoin feux indicateur de direction
11) Réglage longinal siège
12) Levier by-pass
13) Témoin feux
14) Interrupteur feux
15) Levier soulevement
outillage
16) Levier renversement
corbeille/poubelle /
prise rapide
17) Levier actionnement élévateur
(seul version élévateur)
18) Deviateur flèches
19) Interrupteur feux d’urgence
20) Interrupteur feu lampe
tournante
21) Réglage hauteur siège
22) Réglage durété ressorts
1) Vorwärts- Rückwätrspedal
2) Hebel der feststellbremse
3) Gashebel
4) Zündschlüssel
5) Zweipolige Steckdose
des Sprühdüsenkits
6) Computer
7) Einsetzen der zapfwel
le und turbine
8) Hebel der differential
sperre
9) Lenkrad
10) Blinker-Kontrollampe
11) Longitudinale Ver
stellung des Sitzes
12) Umgehungshebel
13) Leuchten-Kontrollampe
14) Lichtershalter
15) Hebel zum Heben der
Einrichtung
16) Hebel zum
Umkippen des
Korbes/Müllcontainer / Schnellgriff
17) Elevatorbetätigungshebel
(nur elevator-version)
18) RichtungsanzeigerWechselschalter
19) Notleuchten-Schalter
20) Drehlampe-Schalter
21) Höheverstellung des Sitzes
22) Verstellung der Federungshärte
1) Forward speed pedal
-reverse gear
2) Parking brake lever
3) Acelerator
4) Switch key
5) Nebulizer bipolar
socket
6) Computer
7) P.T.O. and turbine
engagement
8) Differential locking
device peda
9) Steering Wheel
10) Blinker lights indicator
11) Adjusting the longitu
dinal seat
12) By-Pass lever
13) Lights indicator
14) Light switch
15) Lever for lifting the
equipment
16) Lever for overturning
basket/rubbish skip /
quick grip
17) Elevator activating lever
(only elevator version)
18) Blinkers deviator
19) Emergency lights switch
20) Rotating lamp switch
21) Adjusting the seat
height
22) Adjusting the spring hardness
Tutti i comandi descritti valgono anche per i modelli “SR”.
All controls described are also valid for “SR” models.
Toutes les commandes décrites sont aussi valables pour les modèles “SR”.
Alle beschriebene Bedienungsteile sind auch für die Modelle “SR” gültig.
Fig. 4
12
15 17 16
9
7
3
8
21
1
11
22
18
19
6
14
5
10
13
20
2
16/52
4
UTILIZZO COMANDI USING CONTROLS AND UTILISATION COMMANDES GEBRAUCH VON KONTROLLEN
INSTRUMENTS
ET INSTRUMENTS
UND INSTRUMENTEN
E STRUMENTI
7
7.1
AVANZAMENTO-RETROMARCIA
FORWARD-REVERSE
Fig. 5a
➚
LEVA FRENO DI
STAZIONAMENTO
B
PARKING BRAKE
LEVER
➡
Fig. 6a
➡
7.2
Fig. 5b
➭
➭
A
AVANCEMENT-MARCHE ARRIERE VORWÄRTS-RÜCKWARTS
Fig. 6b
17/52
➚
LEVIER FREIN DE
STATIONNEMENT
HEBEL DER
FESTELLBREMSE
7.3
BLOCCO DIFFERENZIALE
BLOC DIFFERENTIEL
DIFFERENTIALSPERRE
➡
Fig. 7a
➡
7.4
DIFFERENTIAL LOCKING DEVICE
Fig. 7b
LEVA BY-PASS
BY-PASS LEVER
LEVIER BY-PASS
Fig. 7c
UMGEHUNGSHEBEL
Fig. 7d
EVITARE IL TRAINO DELLA MACCHINAPER LUNGHI TRATTI CON BY -PASS INSERITO
AVOID TOWING THE MACHINE FOR LONG STRETCHES WITH INSERTED BY -PASS
ÉVITER DE TRAÎNER LA MACHINE PENDANT DE LONGUES DISTANCES AVEC BY -PASS INSÉRÉ
DAS SCHLEPPEN DER MASCHINE ÜBER WEITE STRECKEN MIT EINGEKUPPELTEM BY PASS VERMEIDEN
ACCELERATORE
A MANO
ACCELERATEUR
MANUEL
HAND-THROTTLE
HANDBEDIENTER
BESCHLEUNIGER
MA
X
MI
N
➜
Fig. 8a
➜
7.5
18/52
Fig. 8b
7.6
PRESA DI FORZA
P.T.O.
PRISE DE FORCE
Fig. 9
ZAPFWELLE
Fig. 10
Fig. 11
Fig. 12
STOP!!
7.7
SOLLEVAMENTO IDRAULICO
PIATTO TOSAERBA
HYDRAULIC LIFTING
OF THE EQUIPMENT
SOULÈVEMENT HYDRAULIQUE
DE L’APPAREILLAGE
HYDRAULISCHE AUFHEBUNG
DER EINRICHTUNG
A
Fig. 13
➚
Fig. 14
A
➚
B
B
19/52
RIBALTAMENTO
7.8 IDRAULICO DEL CESTO
HYDRAULIC TILTING
OF TRAY
RENVERSEMENT
HYDRAULIQUE DU BAC
HYDRAULISCHES KIPPEN DES
GRASAUFSAMMELBEHÄLTERS
E
Fig. 15
E
➚
F
E
➚
F
Fig. 16
F
Leva ribaltamento cesto.
Basket overturning lever.
Levier renversement corbeille.
Hebel zum korbkippen.
Leva azionamento prese rapide.
Lever for quick grips control.
Levier actionnement prises rapides.
Hebel zur Betätigung der Schnellgriffe.
Fig. 17
E
➚
➚
F
20/52
Fig. 18
ELEVATORE
ELEVATOR
ELEVATEUR
➚
➚
D
Leva sollevamento cesto.
Basket lifting lever.
Levier soulevement corbeille.
Hebel zum anheben.
ELEVATOR
E
C
E
➚
7.8a
➚
Fig. 19
F
F
C
Leva ribaltamento cesto.
Basket overturning lever.
Levier renversement corbeille.
Hebel zum korbkippen.
D
Fig. 20
Fig. 21
Durante le fasi di trasferimento, soprattutto nelle curve,
non procedere in nessun caso con il cesto espulso.
When transferring the machine, especially when making curves,
do not procede in any case with the basket outside.
Pendant les phases de déplacement, surtout dans les curves,
en aucun cas avancer avec la corbeille expulsée.
Wenn die Maschine verlegt werden muß, besonders bei Kurven,
unbedingt nicht mit ausgestoßenem Korb fahren.
21/52
7.9
DESCRIZIONE
FUNZIONI COMPUTER
DESCRIPTION
FUNCTIONS COMPUTER
BESCHREIBUNG ARBEITET
DESCRIPTION
FONCTIONNE COMPUTER COMPUTER
7
6
Fig. 23
Fig. 22
5
4
3
2
1
Premendo il pulsante in pos. - 6 - è possibile:
- visualizzare sul display la temperatura del
liquido del radiatore;
- il n° di ore complessivo di funzionamento
della macchina (contaore).
1. SPIA PRESSIONE OLIO MOTORE
MOTOR OIL PRESSURE LAMP
TEMOIN PRESSION HUILE MOTEUR
MOTORÓLDRUCKANZEIGER
Sul display vengono visualizzati inoltre:
- il conto alla rovescia per il preriscaldo delle
candelette;
- tutti i codici di errore (vedi cap. 13);
- eseguire la diagnostica degli interruttori
presenti sulla macchina (vedi cap. 8).
2. SPIA RISERVA CARBURANTE
FUEL RESERVE LAMP
TEMOIN RESERVE CARBURANT
TREIBSTOFFRESERVEANZEIGER
By pushing the button in pos. - 6 - you can:
- visualize on the display the temperature of the
radiator liquid;
- the total number of hours worked by the
machine (hour counter).
3. SPIA ALTERNATORE BATTERIA
BATTERY ALTERNATOR LAMP
TEMOIN ALTERNATEUR BATTERIE
BATTERIEGENERATORANZEIGER
The display also shows the following :
- the count-down for the pre-heating plugs;
- all the error codes (see chap. 13);
- carry out a diagnostic of the switches mounted
on the machine (see chap. 8).
En appuyant sur le bouton en pos. - 6 - on peut:
- afficher sur l’écran la température du liquide du
radiateur;
- le nombre d’heures total de fonctionnement de
la machine (compteur d’heures).
Sur l’écran sont aussi affichés:
- le compte à rébours pour le préchauffage des
bougies;
- tous les codes d’erreur (voir chap. 13);
- exécuter le diagnostic des interrupteurs qui se
trouvent sur la machine (voir chap. 8).
4. SPIA FRENO DI STAZIONAMENTO INSERITO
PARKING BRAKE INSERTED LAMP
TEMOIN FREIN DE STATIONNEMENT INSERE
PARKBREMSE-EIN-ANZEIGER
5. SPIA TEMP. MAX. LIQUIDO REFRIGERANTE
COOLING FLUID MAX TEMP. LAMP
TEMOIN TEMP. MAX. LIQUIDE REFRIGERANT
ANZEIGER DER MAX. ABKUHLMITTELTEMPERATUR
Beim Drucken des Knopfes auf Pos. - 6 - ist es möglich:
- die Temperatur der Radiatorflüßigkeit anzuzeigen;
- die totale Arbeitsstundenzahl der Maschine
(Stundenzähler) anzuzeigen.
Außerdem zeigt der Display das Folgende an:
- das Countdown für die Vorheizung der
Glühkerzen ;
- alle Fehlerkoden (vedi Kap. 13);
- die Diagnostik der an der Maschine eingebauten
Schalter (Siehe Kap. 8).
22/52
6. PULSANTE
BUTTON
BOUTON
KNOPF
7. DISPLAY
DISPLAY
AFFICHEUR
DISPLAY
23/52
N-0.5
N-0.5
N-0.5
N-0.5
N-0.5
N-0.5
22
21
22
21
22
21
22
21
22
21
22
21
45
14
13
46
14
13
47
14
13
48
14
13
50
14
13
49
14
13
C-0.5
H-0.5
R-0.5
BR-0.5
AN-0.5
GR-0.5
N-6
41
41
41
43
21 6 5 7 8 9 23 1 14 2 18 19 4
86
85
30
87A 87
13
12
26 15 20 25 22
EN-1
P
11
24
27
R-6
26
42
GN-0.5
GN-1
N-1
N-1
GN-1
40
R-6
56b
+12 VCC
GN-1
57/58
86
85
30
87A 87
DN-0.5
13
MN-1
MB-1
M-4
70A
M-4
1
39
51
56a
R-6
49
A-2.5
38
M-0.5
14
E-0.5
37
20A
A-2.5
A-1.5
A-2.5
RE-1
HN-1.5
A-1
A-2.5
30
INT
0 1 2
R-4
30
A-2.5
35
M
34
50
M-4
29
15/54
N-1.5
M
26
N-1
30
31
M-4
-
N
32
R
M
N-35
N-35
28
N-35
+
R-6
G
V
2
24
1
23
Fig. 24
DAIHATSU
L L
1
A-1
2
N-1
25
SCHEMA ELECTRIQUE
V-1
MB-1
WIRING DIAGRAM
MB-1
RE-1
R-2.5
A-1
F-0.5
SCHEMA ELETTRICO
N-6
Y
A-1
8
SCHALTPLAN
N-0.5
MB-1
23
24
25
26
27
28
29
30
31
32
34
35
37
38
39
40
41
42
43
45
46
47
48
49
50
51
DESCRIPTION
24/52
FARBPALETTE
ORANGE
WEIß
ROSA
GRAU
GRÜN
BLAU
GELB
HIMMELBLAU
BRAUN
SCHWARZ
ROT
VIOLETT
QUESTO SIMBOLO INDICA LA MASSA
THIS SYMBOL INDICATE THE EARTH
CE SYMBOL INDIQUE LA TERRE
DIESES SYMBOL ZEIGT DIE ERDE AN
NEBENSTECKDOSE-SCHALTER
STRASSENVERKEHR-SPEISEKABELKONNEKTOR
NEBENSTECKDOSE
DREHLAMPE
VORDERE SCHEIWERFER
SCHALTER VORDERE SCHEINWERFER
ZÜNDSCHLOSS
12V-BATTERIE
MOTOR
SPANNUNGSREGLER
SUMMER
BLÄTTER-SCHÜTTELMOTOR
SENSOR DER WASSERTEMP.
ÖLDRUCKSENSOR
KRAFTSTOFFPEGELSCHWIMMER
ELEKTROVENTIL F. MOTORANHALTEN
VORWÄRMGLUHKERZEN
VORWÄRMRELAIS
VORWÄRMGLUHKERZENKONTROLLE
MOTORBTEILLUNG SCHALTER
KORBHEBE-SCHALTER
SITZSCHALTER
PARKBREMSE-SCHALTER
KORBVOLL-SCHALTER
P.T.O. HEBEL SCHALTER
STARTRELAIS
BESCHREIBUNG
SCHEMA ELECTRIQUE
PALETTE DES COULEURS
ORANGE
BLANC
ROSE
GRIS
VERT
BLEU
JAUNE
AZUR
MARRON
NOIR
ROUGE
VIOLET
INTERR. PRISE AUXILIAIRE
CONNECTEUR ALIM. CABLAGE ROUTIER
PRISE AUXILIAIRE
LAMPE ROTANTE
PHARES
INTERRUP. PHARES
DEMARREUR ELECTRIQUE
BATTERIE 12V
MOTEUR
RÉGLEUR DE TENSION
SONNETTE
MOTEUR SECOUSS. FEUILLES
SENS. TEMP. EAU
SENSEUR PRESSION HUILE
FLOTTEUR NIVEAU CARBURANT
ÉLECTROVALVE ARRÊT MOTEUR
BOUGIE DE PRÉCHAUFFAGE
RELAIS DE PRÉCHAUFFAGE
COMMANDE PRÉCHAUFFAGE BOUGIES
INTERR. COMPART. MOTEUR
INTERR. PANIE SOULEVE'
INTERR. SIEGE
INTERR. FREIN DE STATIONNEMENT
INTERR. PANIE PLEIN
INTERR. LEVIER P.T.O.
RELAIS DE DÉMARRAGE
DESCRIPTION
WIRING DIAGRAM
COLOUR PALETTE
ORANGE
WITHE
PINK
GREY
GREEN
BLUE
YELLOW
SKY-BLU
BROWN
BLACK
RED
VIOLET
AUXILIARY SOCKET SWITCH
ROAD WIRING SUPPLY CONNECTOR
AUXILIARY SOCKET
ROTARY LAMP
FRONT HEADLIGHTS
FRONT HEADLIGHTS SWITC
IGNITION SWITCH
12V BATTERY
MOTOR
VOLTAGE REGULATOR
BUZZER
LEAVES SHAKING MOTOR
WATER TEMP. SENSOR
OIL PRESSURE SENSOR
FUEL GAUGE FLOAT
MOTOR STOP ELECTROVALVE
PREHEATING GLOW-PLUGS
PREHEATING RELAY
GLOW-PLUGS PREHEATING CONTROL
MOTOR COMPAR. SWITCH
BASKET LIFTED SWITCH
SEAT SWITCH
PARKING BRAKE SWITCH
BASKET FULL SWITCH
P.T.O. LEVER SWITCH
START RELAY
SCHEMA ELETTRICO
TABELLA COLORI
A ARANCIONE
B BIANCO
C ROSA
D GRIGIO
E VERDE
F BLÙ
G GIALLO
H AZZURRO
M MARRONE
N NERO
R ROSSO
V VIOLA
INTERR. PRESA AUSILIARIA
CONN. ALIMENT. CABLAGGIO STRADALE
PRESA AUSILIARIA
LAMPADA ROTANTE
PROIETTORI ANTERIORI
COMANDO LUCI E CLACSON
INTERRUTTORE AVVIAMENTO
BATTERIA 12V
MOTORINO AVVIAMENTO
REGOLATORE DI TENSIONE
AVVISATORE ACUSTICO
MOTORE SCUOTITORE FOGLIE
SENSORE TEMP. ACQUA
SENSORE PRESSIONE OLIO
GALLEGG. LIVELLO CARBURANTE
ELETTROV. GASOLIO ARRESTO MOTORE
CANDELETTE PRERISCALDO
RELE' PRERISCALDO
COMANDO PRERISC. CANDELETTE
INTERRUTTORE VANO MOTORE
INTERRUTTORE CESTO ALZATO
INTERRUTTORE SEDILE
INTERRUTTORE FRENO TIRATO
INTERRUTTORE CESTO PIENO
INTERRUTTORE LEVA P.T.O.
RELE' AVVIAMENTO
RIF. DESCRIZIONE
DAIHATSU
8
SCHALTPLAN
8
SCHEMA ELETTRICO
WIRING DIAGRAM
SCHEMA ELECTRIQUE
SCHALTPLAN
DIAGNOSTICA SUGLI INTERRUTTORI – SWITCH DIAGNOSTICS
DIAGNSTIC SUR LES INTERRUPTEURS – SCHALTER-DIAGNOSTIK
VISUALIZZAZIONE – DISPLAY
VISUALISATION – ANZEIGE
INTERRUTT. CONTROLLATO – CONTROLLED SWITCH
INTERRUPTEUR CONTRÔLÉ – KONTROLLIERTER SCHALTER
STATO 0 – 0-STATE
ETAT 0 – ZUSTAND 0
STATO 1 – 1-STATE
ETAT 1 – ZUSTAND 1
P1
PTO - PTO
PRISE DE FORCE - KRAFTABNAHME
CHIUSO - OFF
FERMÉ - GESCHLOSSEN
APERTO - ON
OUVERT - OFFEN
P2
CESTO PIENO - FULL BASKET
PANIER PLEIN - KORB VOLL
CHIUSO - OFF
FERMÉ - GESCHLOSSEN
APERTO - ON
OUVERT - OFFEN
P3
FRENO TIRATO - BRAKE ENGAGED
FREIN ACTIONNÉ - BREMSE GEZOGEN
CHIUSO - OFF
FERMÉ - GESCHLOSSEN
APERTO - ON
OUVERT - OFFEN
P4
SEDILE - SEAT
SIÈGE - SITZ
CHIUSO - OFF
FERMÉ - GESCHLOSSEN
APERTO - ON
OUVERT - OFFEN
P5
CESTO ALZATO - RAISED BASKET
PANIER LEVÉ - KORB GEHOBEN
CHIUSO - OFF
FERMÉ - GESCHLOSSEN
APERTO - ON
OUVERT - OFFEN
P6
VANO MOTORE - MOTOR COMPARTEMENT
LOGEMENT MOTEUR - MOTORRAUM
CHIUSO - OFF
FERMÉ - GESCHLOSSEN
APERTO - ON
OUVERT - OFFEN
Fig. 25
1) Premere il tasto clessidra sul computer (par. 7.9).
Press the sand-glass key on the computer (par. 7.9).
Appuyer sur la touche sablier de l’ordinateur (par. 7.9).
Drücken Sie die Sanduhr-Taste am Computer (Abs. 7.9).
2) Ruotare la chiave di accensione su “ON” (par.9).
Turn the ignition key on “ON” (par.9).
Tourner la clé d’allumage sur “ON” (par.9).
Stellen Sie den Zündschlüßel auf “ON” (Abs. 9).
3) Rilasciare il tasto clessidra e visualizzare il primo messaggio sul display “P1”.
Release the sand-glass key and view the first message on the display (“P1”).
Relâcher la touche sablier et afficher le premier message sur l’écran “P1”.
Lassen Sie die Sanduhr-Taste, um die erste Nachricht am Display “P1” zu visualisieren.
4) Azionare il micron in esame tramite l’apposito comando (vedi tabella) per verificarne la funzionalità.
Push the relevant microswitch through the special control (see table) to check its functionality.
Actionner le micro en question au moyen de la commande spécifique (voir tableau) pour en vèrifier
la fonctionnalité.
Betätigen Sie den Mikroschalter durch die betreffende Kontrolle (siehe Tabelle) um dessen
Leistungsfähigkeit zu prüfen.
5) Premere di nuovo il tasto clessidra per passare alla verifica del secondo microinterruttore (“P2”).
Press once more the sand-glass key to check the second microswitch (“P2”).
Appuyer à nouveau sur la touche sablier pour passer au contrôle du deuxième microinterrupteur (“P2”).
Drücken Sie nochmals die Sanduhr-Taste, um den zweiten Mikroschalter (“P2”) zu prüfen.
6) Procedere come descrittto nei punti 4) e 5) per il controllo degli altri micron.
Proceed as described at points 4) and 5) to check the remaining microswitches.
Procéder comme décrit aux points 4) et 5) pour le contrôle des autres micros.
Gehen Sie vor wie an Punken 4) und 5) angezeigt, um die restlichen Mikroschalter zu prüfen.
25/52
2
3
G-1
G-1
N-1
GV-2,5
7,5A
49
4
5
6
GN-1
GN-1
GIA' ESISTENTE NEL CABLAGGIO CENTRALE
N-1
GV-1,5
GN-1
N-1
56a
Z-1
8
7
9
7,5A
R-1
C-2,5
56b
G-1
N-1
7,5A
GV-1,5
G-1
N-1
57/58
N-1
13
14
21
22
10
B
11
12
+
14
B-1,5
E
49
15
AN-1
DAIHATSU
13
C
SG-1,5
15
2
1
54
30
16
B-1,5
49a
D
R
L
A-1
17
A-1
N-1
N-1
Fig. 26
18
F
SCHEMA ELECTRIQUE
- MASSA
1
A
Z1
N-1
30
LB-1
N-1
C-2,5
GN-1
N-1
RN-1
RN-1
N-1
+12V/15int.avv.
N-1
10A
BN-1,5
R-2,5
SN-1
N-1
VB-1,5
AN-1
7,5A
M-1
C-1
+12V/30int.avv.
N-1
7,5A
A-1
26/52
N-1
WIRING DIAGRAM
RN-1
N-1
AN-1
SCHEMA ELETTRICO
N-1
8
SCHALTPLAN
A
B
C
D
E
F
1
2
3
4
5
6
7
8
9
10
11
12
13
14
15
16
17
18
COMANDO LUCI/CLACSON (GIA SUL CABLAGGIO CENTR.)
SCHEDA TEMPORIZZATA LUCI STOP
INTERMITTENZA LUCI DIREZIONE
INTERRUTTORE LUCI EMERGENZA
DEVIATORE LUCI DIREZIONE
INTERRUTTORE LAMPADA ROTANTE
SPIA LUCI DI POSIZIONE
LUCE DI POSIZIONE ANTERIORE SX
LUCE DI POSIZIONE POSTERIORE DX
LUCE TARGA
LUCE DI POSIZIONE ANTERIORE DX
LUCE DI POSIZIONE POSTERIORE SX
LUCE ANABBAGLIANTE DX
LUCE ANABBAGLIANTE SX
AVVISATORE ACUSTICO
MICROINTERRUTTORE LUCI STOP
LUCE STOP
LUCE STOP
SPIA INDICATORE DI DIREZIONE
LUCE DI DIREZIONE ANTERIORE SX
LUCE DI DIREZIONE POSTERIORE SX
LUCE DI DIREZIONE ANTERIORE DX
LUCE DI DIREZIONE POSTERIORE DX
LAMPADA ROTANTE
RIF. DESCRIZIONE
27/52
FARBPALETTE
HIMMELBLAU
WEIß
ORANGE
GELB
GRAU
BLAU
BRAUN
SCHWARTZ
ROT
ROSA
GRÜN
VIOLETT
SCHEMA ELECTRIQUE
PALETTE DES COULEURS
AZUR
BLANC
ORANGE
JAUNE
GRIS
BLEU
MARRON
NOIR
ROUGE
ROSE
VERT
VIOLET
LEUCHTE/HUPE-KONTROLLE
BREMS/LEUCHTE-TAKTKARTE
WARNBLINKER-LEUCHTE
NOTLEUCHTENSCHALTER
BLINKER-WECHSELSCHALTER
DREHLAMPENSCHALTER
POSITIONSLEUCHTE-KONTROLLAMPE
LINKE VORDERE POSITIONSLEUCHTE
RECHTE HINTERE POSITIONSLEUCHTE
NUMMERSCHILD-LEUCHTE
RECHTE VORDERE POSITIONSLEUCHTE
LINKE HINTERE POSITIONSLEUCHTE
RECHTE ABBLENDLEUCHTE
LINKE ABBLENDLEUCHTE
HUPE
BREMSLEUCHTENMIKROSCHALTER
BREMSLEUCHTE
BREMSLEUCHTE
RICHTUNGSANZEIGER-KONTROLLAMPE
LINK. VORD. RICHTUNGSANZEIGER
LINK. HINT. RICHTUNGSANZEIGER
RECHT. VORD. RICHTUNGSANZEIGER
RECHT. HINT. RICHTUNGSANZEIGER
DREHLAMPE
BESCHREIBUNG
WIRING DIAGRAM
COLOUR PALETTE
SKY-BLU
WITHE
ORANGE
YELLOW
GREY
BLUE
BROWN
BLACK
RED
PINK
GREEN
VIOLET
COMMANDE FEUX/CLAXON
CARTE TEMPORISÉE FEUX D’ARRÊT
INTERMITTENCE FEUX DIRECTION
INTERRUPTEUR FEUX D’URGENCE
DÉVIATEUR FEUX DIRECTION
INTERRUPTEUR LAMPE TOURNANTE
TEMOIN FEUX DE POSITION
FEU DE POSITION AVANT GAUCHE
FEU DE POSITION ARRIERE DROIT
FEU PLAQUE
FEU DE POSITION AVANT DROIT
FEU DE POSITION ARRIERE GAUCHE
FEU DE CROISEMENT DROIT
FEU DE CROISEMENT GAUCHE
AVISATEUR ACOUSTIQUE
MICROINTERR. FEUX D’ARRÊT
FEU D’ARRÊT
FEU D’ARRÊT
TEMOIN INDICATEUR DE DIRECTION
FEU DE DIRECTION AVANT GAUCHE
FEU DE DIRECTION ARRIERE GAUCHE
FEU DE DIRECTION AVANT DROIT
FEU DE DIRECTION ARRIERE DROIT
LAMPE ROTANTE
DESCRIPTION
SCHEMA ELETTRICO
TABELLA COLORI
A AZZURRO
B BIANCO
C ARANCIONE
G GIALLO
H GRIGIO
L BLÙ
M MARRONE
N NERO
R ROSSO
S ROSA
V VERDE
Z VIOLA
LIGHTS/HORN CONTROL
BRAKE LIGHTS TIME CARD
BLINKING INDICATOR LIGHTS
EMERGENCY LIGHTS SWITCH
INDICATOR LIGHTS DEVIATOR
LAMP ROTATING SWITCH
PARKING LIGHTS INDICATOR
FRONT LS PARKING LIGHT
REAR RS PARKING LIGHT
PLATE LIGHT
FRONT RS PARKING LIGHT
REAR LS PARKING LIGHT
RS DIMMED HEADLIGHT
LS DIMMED HEADLIGHT
HORN
BRAKE LIGHTS MICROSWITCH
BRAKE LIGHT
BRAKE LIGHT
BLINKER WARNING LIGHT
FRONT LS BLINKING LIGHT
REAR LS BLINKING LIGHT
FRONT RS BLINKING LIGHT
REAR RS BLINKING LIGHT
ROTARY LAMP
DESCRIPTION
DAIHATSU
8
SCHALTPLAN
AVVIAMENTO
MOTORE
9
STRARTING
THE ENGINE
1
STARTEN DES
MOTORES
DEMARRAGE
DU MOTEUR
1) PRENDERE POSTO CORRETTAMENTE SUL SEDILE.
TAKE YOUR PLACE CORRECTLY ON SEAT.
PRENDRE PLACE CORRECTEMENT SUR LE SIÈGE.
AUF DEM SITZ RICHTIG PLATZ NEHMEN.
Fig. 27
Fig. 28
2
2) ASSICURARSI CHE LA LEVA P.D.P. SIA
COMPLETAMENTE DISINSERITA.
MAKE SURE THAT P.T.O. LEVER IS
ENTIRELY DISENGAGE.
S’ASSURER QUE LE LEVIER DE LA PRISE
DE FORCE SOIT ENTIÈREMENT DÉBROYÉ.
Fig. 29
3
➡
SICH VERGEWISSERN, DASS DER HEBEL
AUßENANTRIEB KOMPLETT AUSGESCHALTEN IST.
3) ASSICURARSI CHE LA LEVA DEL FRENO DI
STAZIONAMENTO SIA COMPLETAMENTE INSERITA.
MAKE SURE THAT THE PARKING BRAKE LEVER IS
ENTURELY ENGAGED.
S’ASSURER QUE LE LEVIER DU FREIN DE
STATIONNEMENT SOIT ENTIÈREMENT INSÉRÉE.
SICH VERGEWISSERN, DASS DER HEBEL DER
HANDBREMSE KOMPLETT INSERIERT IST.
0
4) GIRARE LA CHIAVE DI ACCENSIONE SULLA POSIZIONE “ON”
ED ASPETTARE L’EVENTUALE PRERISCALDO DELLE CANDELETTE.
ON
TURN THE IGNITION KEY TO THE “ON” POSITION AND WAIT UNTIL THE
GLOW PLUGS ARE PREHEATED, IF NECESSARY.
TOURNER LA CLÉ D’ALLUMAGE SUR LA POSITION “ON” ET
ATTENDRE L’ÉVENTUEL PRÉCHAUFFAGE DES BOUGIES.
AVV.
DEN ZÜNDSCHLÜSSEL AUF DIE POSITION “ON” DREHEN UND AUF DIE
EVENTUELLE VORWÄRMUNG DER KERZEN WARTEN.
Fig. 30
5) GIRARE LA CHIAVE DI ACCENSIONE VERSO IL SIMBOLO PER ACCENDERE IL MOTORE.
TURN THE IGNITION KEY ONTO THE SYMBOL TO START THE MOTOR.
TOURNER LA CLÉ D’ALLUMAGE VERS LE SYMBOLE POUR DÉMARRER LE MOTEUR.
DEN ZÜNDSCHLÜßEL ZU DAS SYMBOL DREHEN, UM DEN MOTOR ANZULASSEN.
5
6
4
6)
6)
6)
6)
CON TEMPERATURA INFERIORE A 0° C MANTENERE IL MOTORE A MEDIO REGIME PER ALMENO 5 MINUTI
WITH TEMPERATURE UNDER 0° C KEEP THE MOTOR AT MEDIUM SPEED FOR AT LEAST 5 MINUTES
AVEC TEMPÉRATURE AU-DESSOUS DE 0° C MAINTENIR LE MOTEUR À MOYEN RÉGIME PENDANT AU MOINS 5 MINUTES
MIT TEMPERATUR UNTER 0° C MOTOR MIT MITTLERER DREHHZAHL FÜR MINDESTENS 5 MINUTEN HALTEN
28/52
1
➚
MIN
Fig. 35a
3 4
➭
A
➭
B
3 - Selezionare la velocità desiderata
mediante il pedale posto sul lato DX
Select the desired speed though the
pedal fitted on the right side.
Sélectionner la vitesse volue à travers la
pédale placée sur le côté droit.
Die gewünschte Geschwindigkeit mit
den auf der rechten Seite vorhandenen
Pedalen einstellen.
2
MAX
Fig. 35
2 - Disinserire il freno di stazionamento.
Disengage the parking brake.
Débroyer frein de stationnement.
Handbremse ausschalten.
4 - Azionando il volante si comanda la
ruota posteriore.
By moving the steering wheel one
steers the back wheel.
En tournant le volant on agit sur la roue
arrière.
Durch betätigen des Lenkrades
betätigen Sie das Hinteresrad.
FAHREN DER
MASCHINE
➡
1 - Regolare la leva acceleratore.
Set throttle lever
Regler le levier accelerateur
Gashebel regulieren
UTILISATION DE LA
MACHINE
➚
10
DRIVING THE
MACHINE
MOVIMENTAZIONE
DELLA MACCHINA
Fig. 36
B
Fig. 37
A
N.B.: Per arrestare le macchina é sufficiente rilasciare i pedali di avanzamento o retromarcia; una volta ferma
tirare la leva del freno di stazionamento.
To stop the machine, just release the forward or reverse pedals; once stopped, pull the parking brake lever.
Pour arrêter la machine, il suffit de relâcher les pédales d’avancement ou de marche arrière; une fois arrêtée,
tirer le levier du frein de stationnement.
Um die Maschine zu stoppen, genugt es, das Fortgangs- bzw. Rückgangspedal freizulassen; wenn gestoppt,
ziehen Sie den Parkbremshebel.
FINCHE' NON SARETE ESPERTI NELLA GUIDA, AVANZATE A VELOCITA' RIDOTTA,
MANTENENERE PERSONE E ANIMALI AD ALMENO 3 mt. DI DISTANZA .
T0 BEGIN DRIVE AT SLOW SPEED, FOR SAFETY REASONS MAKE SURE THAT
PEOPLE AND ANIMALS ARE AT LEAST 3 METERS AWAY
FROM THE MACHINE.
TANT QUE VOUS NE SEREZ PAS FAMILIARISES A LA CONDUITE DE LA MACHINE,
UTILISEZ UNE VITESSE REDUITE EN TENANT
LES PERSONNES OU ANIMAUX A UNE DISTANCE DE SECURITE MINIMUM DE 3
METRES.
AM ANFANG MIT REDUZIERTER GESCHWINDINGKEIT FAHREN. HALTEN SIE
PERSONEN UND TIERE MIT EINEM SICHERHEIT
SABSTAND VON 3 METERN FERN.
29/52
11
TAGLIO DELL’ERBA E SISTEMA CUTTING AND AUTOMATIC COUPE DE L’HERBE ET SYSTEME SCHNITT UND AUTOMATISCHE
DI RACCOLTA AUTOMATICO GRASS COLLECTION
DE RAMASSAGE AUTO
AUFNAHME DES GRASES
1
Fig. 38a
Fig. 38
2
4
3
Fig. 39a
Fig. 39
12
ARRESTO MOTORE
STOPPING THE MOTOR
ARRÊT DU MOTEUR
- Arrestare la macchina.
Stop the machine.
Arrêter la machine.
Die Maschine anhalten.
- Disinnestare la leva PDP
Declutch the PDP lever.
Débrayer le levier PDP.
Kuppeln Sie den Hebel PDP aus.
- Tirare la leva del freno di stazionamento.
Pull the parking brake lever.
Tirer le levier du frein de stationnement.
Den Handbremshebel anziehen.
- Abbassare completamente l’attrezzatura tramite apposita leva (par 7.7).
Fully lower the equipment by means of the specific lever (par 7.7).
Baisser entièrement l’équipement en se servant du levier spécifique (par 7.7).
Lassen Sie die Vorrichtung durch den dazugehörenden Hebel völlig herab (Abs. 7.7).
- Assicurarsi che il cesto sia completamente rientrato.
Make sure that the basket is completely drawn in.
S’assurer que la corbeille soit entièrement rentrée.
Prüfen Sie, ob den Korb völlig zurückgekommen ist.
- Portare il motore al n° minimo dei giri.
Reduce the motor revolution to the minimum
Porter le moteur au nombre minimum des tours.
Den Motor auf die Mindestdrehungen bringen.
- Girare la chiave di accensione dalla posizione “ON” alla posizione “STOP”.
Turn the ignition key from “ON” position to “STOP” position.
Tourner la clé d’allumage de la position “ON” à la losition “STOP”.
Den Zündschlüssel von der Position “ON” auf die Position “STOP” drehen.
30/52
STILLSTAND MOTOR
13
RIFORNIMENTO
TANK FILLING
REMPLISSAGE RESERVOIR
TANKFÜLLING
IL RIFORNIMENTO DEL CARBURANTE DEVE ESSERE ESEGUITO IN LUOGHI APERTI O SUFFICIENTEMENTE VENTILATI,
CON MOTORE SPENTO E IN ASSENZA DI FIAMME O SCINTILLE.
ASSICURARSI INOLTRE CHE IL CARBURANTE SIA QUELLO INDICATO DALLA TARGHETTA POSTA SUL SERBATOIO.
AVVERTENZA: IL CARBURANTE E' ALTAMENTE INFIAMMABILE.
CONSERVARE IL CARBURANTE IN APPOSITI RECIPIENTI. FARE RIFORNIMENTO DI CARBURANTE SOLAMENTE ALL'APERTO
E NON FUMARE DURANTE QUESTA OPERAZIONE. AGGIUNGERE CARBURANTE PRIMA DI AVVIARE IL MOTORE. NON TOGLIERE MAI IL TAPPO DEL SERBATOIO NE' AGGIUNGERE CARBURANTE QUANDO IL MOTORE E' IN FUNZIONE O QUANDO E'
CALDO.
IN CASO DI FUORIUSCITA DEL CARBURANTE, NON TENTARE DI AVVIARE IL MOTORE MA ALLONTANARE LA MACCHINA DALL'AREA DOVE E' AVVENUTA LA FUORIUSCITA EVITANDO DI CREARE FONTI DI ACCENSIONE FINCHE' NON SI SONO DISSIPATI
I VAPORI. RIMETTERE A POSTO CORRETTAMENTE I TAPPI DEL SERBATOIO E DEL CONTENITORE DEL CARBURANTE.
NON IMMAGAZZINARE MAI LA MACCHINA CON CARBURANTE NEL SERBATOIO ALL'INTERNO DI UN EDIFICIO DOVE I VAPORI
POSSONO RAGGIUNGERE UNA FIAMMA LIBERA O UNA SCINTILLA.
LASCIARE RAFFREDDARE IL MOTORE PRIMA DI IMMAGAZZINARE LA MACCHINA IN UN QUALUNQUE AMBIENTE CHIUSO.
ONLY FILL THE TANK IN OPEN AIR OR IN A SUFFICIENTLY VENTILATED ROOM.
THE ENGINE MUST BE TURNED OFF AND NO FLAMES OR SPARKS SHOULD BE MADE.
CHECK THAT THE CARBURANT IS THE ONE INDICATED BY THE LABEL ON THE TANK
WARNING: CARBURANT IS HIGHLY INFLAMMABLE.
KEEP THE CARBURANT IN JERRYCANS. FILL THE TANK WITH PETROL ONLY IN OPEN AIR AND DO NOT SMOKE DURING THIS OPERATION. ADD
CARBURANT BEFORE STARTING THE ENGINE. NEVER REMOVE THE TANK LID NOR ADD CARBURANT WHEN THE ENGINE IS WORKING OR
IS HOT.
IN CASE OF CARBURANT ESCAPE, DO NOT TRY TO START THE ENGINE BUT MOVE THE MACHINE AWAY FROM THE PLACE WHERE THE ESCAPE
TOOK PLACE AND AVOID CREATING IGNITION SOURCES UNTIL CARBURANT FUMES HAVE DISSIPATED. REPLACE THE CORRECT LIDS ON THE
TANK AND ON THE JERRYCAN.
NEVER STORE THE MACHINE WITH CARBURANT IN THE TANK INSIDE A BUILDING WHERE THE FUMES MIGHT REACH SOME FREE FLAMES OR
SPARKS.
LET THE ENGINE COOL DOWN BEFORE STORING THE MACHINE IN ANY CLOSED ENVIRONMENT.
LE PLEIN DE CARBURANT DOIT ETRE EFFECTUE DANS UN LIEU AERE OU SUFFISAMENT VENTILE AVEC MOTEUR ARRETE ET
EN L'ABSENCE DE FLAMMES OU D'ETINCELLES.
S'ASSURER QUE LE CARBURANT SOIT CELUI INDIQUE SUR LA PLAQUE APPOSEE SUR LE RESERVOIR.
AVERTISSEMENT: L'ESSENCE EST TRÈS INFLAMMABLE.
CONSERVER LE CARBURANT DANS DES JERRYCANES SPÉCIAUX. AJOUTER L'ESSENCE SEULEMENT EN PLEIN AIR ET NE
PAS FUMER PENDANT CETTE OPÉRATION. AJOUTER DU CARBURANT AVANT DE DÉMARRER LE MOTEUR. NE JAMAIS ENLEVER LE BOUCHON DU RESERVOIR D'ESSENCE NI AJOUTER DE L'ESSENCE LORSQUE LE MOTEUR EST EN MARCHE OU
LORQU'IL EST CHAUD. EN CAS DE SORTIE D'ESSENCE, NE PAS ESSAYER DE DÉMARRER LE MOTEUR MAIS PLUTOT ÉLOIGNER LA MACHINE DE LA ZONE OU LA SORTIE A EU LIEU TOUT EN ÉVITANT DE CRÉER DES SOURCES D'ALLUMAGE JUSQU'À
CE QUE LES VAPEURS D'ESSENCE SE SOIENT DISSIPÉÉS. REMETTRE LE BOUCHONS DU RESERVOIR ET DU JERRYCANE
D'ESSENCE CORRECTAMENT A LEUR PLACE.
NE JAMAIS STOCKER LA MACHINE AVEC DE L'ESSENCE DANS SON RESERVOIR A l'INTERIEUR D'UN IMMEUBLE OU LES
VAPEURS PEUVENT ATTEINDRE UNE FLAMME LIBRE OU UNE ÉTINCELLE.
LAISSER REFROIDIR LE MOTEUR AVANT DE STOCKER LA MACHINE DANS UN ENDROIT FERMÉ.
FÜLLEN SIE DEN TANK NUR IM FREIEN ODER IN REICHLICH BELUFTETEN RÄUMEN.
DER MOTOR MUß DABEI ABGESTELLT SEIN UND ES DÜRFEN KEINE FLAMMEN ODER FUNKEN ENTSTEHEN.
VERGEWISSERN SIE SICH, DAß DER TREIBSTOFF DEN ANGABEN AUF DEM TANK ENTSPRICHT.
WARNUNG: KRAFTSTOFF IST ÄUßERST LEICHT ENTFLAMMBAR.
HALTEN SIE DEN BRENNSTOFF IN SPEZIELLEN BEHÄLTERN. NUR UNTER FREIEM HIMMEL TANKEN UND BEI DIESER BETÄTIGUNG NICHT RAUCHEN. VOR DEM ANLASSEN BRENNSTOFF HINZUFÜGEN. NIE DEN TANKVERSCHLUß ENTFERNEN ODER
KRAFTSTOFF HINFÜGEN, WENN DER MOTOR LÄUFT ODER WENN ER HEIß IST.
IM FALLE EINEM EINTWEICHEN VON KRAFTSTOFF, DEN MOTOR NICHT ZU ANLASSEN VERSUCHEN SONDERN DIE MASCHINE
AUS DER ENTWEICHZONE WEGNEHMEN UND EVENTUELLE FEUERQUELLEN VERMEIDEN BIS ZUR VERSCHWINDUNG VON
DEN BENZINDÄMPFEN. DIE VERSCHLÜßE VOMBENZINTANK UND BENZINBEHÄLTERTANK WIEDER KORREKT EINSETZEN.
NIE DIE MASCHINE MIT KRAFTSTOFF IM TANK IN EINEM GEBÄUDE LAGERN, WO DIE BENZINDÄMPFE EINE FREIE FLAMME
ODER FUNKE ERREICHEN KÖNNTEN.
DEN MOTOR ABKÜHLEN LASSEN BEVOR DIE MASCHINE IN EINEM GESCHLOSSENEN RAUM GELAGERT WIRD.
OK
Fig. 40
NO !!
Fig. 41
31/52
14
MANUTENZIONE
ORDINARIA
ORDINARY
MAINTENANCE
ORDINAIRE ENTRETIEN
WARTUNG
Dovendo eseguire operazioni di manutenzione, impiegare esclusivamente ricambi originali, per
garantire alla macchina sempre la massima affidabilità.
If you have to carry out maintenance operations, use only original spare parts, to ensure the same maximum
reliability to the machine.
Si l’on doit effectuer des opérations d’entretien, utiliser uniquement des pièces de rechange originales,
pour assurer à la machine toujours le maximum de fiabilité.
Wenn Wartungsarbeiten nötig sind, benutzen Sie ausschließlich originale Ersatzteile, damit der Maschine
die höchste Zuverläßigkeit gewährleistet wird.
Prima di eseguire le operazioni di manutenzione, prendere visione completa delle indicazioni
fornite nel paragrafo 4 “Norme di Sicurezza”.
Before carrying out any maintenance work, read carefully the indications given in the paragraph 4
“Safety rules”.
Avant d’exécuter les opérations d’entretien, prendre vision complète des indications fournies au
paragraphe 4 “Normes de Sécurité”.
Bevor man Wartungsarbeiten beginnt, soll man sorgfältig die am Abschnitt 4 angegebenen
“Sicherheitsnormen ” durchlesen.
Se si deve intervenire sulla macchina con il cesto alzato, assicurarsi che sia inserita
correttamente la sicura meccanica “S”.
In case you have to intervene on the machine with lifted basket, make sure that the machanical lock “S”
is correctly engaged.
Si on doit intervenir sur la machine avec la corbeille levée, s’assurer que la sécurité mécanique “S” soit
correctement insérée.
Wenn man bei der Maschine mit aufgehobenem Korb intervenieren muss, soll man sich vergewissern, dass
die mechanische Sicherung “S“ korrekt eingeschalten ist.
S
Fig. 42
Fig. 43
32/52
Fig. 44
Fig. 45
14.5
14.10
14.2
14.4
14.14
14.7
14.15
14.1
14.6
14.8
14.13
14.3
14.1
14.12
RABBOCCO OLIO
MOTORE
ADD MOTOR
OIL
REMPLISSAGE HUILE
MOTEUR
MOTOROL
NACHFULLEN
DAIHATSU
Fig. 46b
➭
Fig. 46a
Consultare il Manuale Uso e Manutenzione del motore
Consult the Use and Maintenance manual of the motor
Consulter le manuel d’emploi et d’entretien du moteur
Siehe betriebs- wartungsanleitung des motors
OIL SHELL HELIX PLUS 10W40
33/52
14.2
RABBOCCO LIQUIDO
REFRIGERANTE
ADD COOLING
FLUID
REMPLISSAGE LIQUIDE
REFRIGERANT
REFRIGERANTE
COOLANT
RÉFRIGÉRANT
KÜHLMITTEL
Fig. 47
14.3
ABKUHLMITTEL
NACHFULLEN
RABBOCCO OLIO
ADD HYDRAULIC
IMPIANTO IDRAULICO SYSTEM OIL
REMPLISSAGE HUILE
INSTALLATION HYDRAULIQUE
HYDRAUL. OL
NACHFULLEN
SHELL HYDRAULIC OIL ISO VG-46
Fig. 48
14.4
RABBOCCO OLIO ASSALE
ANTERIORE
ADD FRONT
AXIAL OIL
Fig. 49
OIL SHELL HARVELLA T 15W-40
34/52
REMPLISSAGE HUILE
AXIAL ANTERIEUR
VORDER. AXALOL
NACHFULLENOLIO
14.5
BATTERIA
BATTERY
Fig. 50
14.6
FILTRO ARIA
BATTERIE
BATTERIE
Verificare periodicamente il livello dell’elettrolito e, se necessario,
aggiungere acqua distillata, prestando attenzione al livello indicato
sul corpo della batteria.
Check periodically the electrolyte level and, if necessary, add distilled water,
checking the level indicated on the battery body.
Vérifier périodiquement le niveau de l’électrolyte et, si nécessaire, ajouter
de l’eau distillée, en faisant attention au niveau indiqué sur le corps de la
batterie.
Periodisch den Stand des Elektrolyts zu prüfen und, wenn notwendig,
Destillierwasser dazugeben, wobei man auf das angezeigte Niveau an dem
Batteriekörper achtet.
AIR FILTER
FILTRE AIRE
LUFTFILTER
CONTROLLI PERIODICI
PERIODICAL CHECKS
CONTROLES PERIODIQUES
PERIODISCHE KONTROLLE
Fig. 51
RETE RADIATORE
RADIATOR NET
FILET RADIATEUR
AIR
CONTROLLI PERIODICI
PERIODICAL CHECKS
CONTROLES PERIODIQUES
PERIODISCHE KONTROLLE
Fig. 52
35/52
RADIATORNETZ
➠
14.7
14.8
FILTRO
OLIO MOTORE
MOTOR
OIL FILTER
FILTRE
HUILE MOTEUR
MOTOROLFILTER
DAIHATSU
Fig. 53
Fig. 54
Fig. 54a
Consultare il manuale Uso e Manutenzione del motore.
Consult the use and maintenance manual of the motor.
Consulter le manuel d’emploi et d’entretien du moteur.
Siehe betriebs- wartungsanleitung des motors.
14.9
PRESSIONE
PNEUMATICI
PRESSION
PNEUS
TYRE
PRESSURE
REIFENDRUCK
Fig. 55
Fig. 55b
Fig. 55a
1,8 bar
1,8 bar
1,3 bar
1,3 bar
Se i pneumatici anteriori sono gonfiati ad una pressione diversa, le lame taglieranno l'erba ad altezza diversa.
If the front tires are inflated at different pressures, the blades will mow the grass at different heights.
Si les pneus antérieurs sont gonflés à une pression différente, les lames couperont le gazon à des hauteurs différentes.
Sind die Vorderreifen mit einem anderen Druck aufgepumpt, schneiden die Messer das Gras auf einer anderen Höhe.
36/52
14.10
REGOLAZIONE
TENSIONE CINGHIE
BELT TENSION
ADJUSTEMENT
VERSTELLUNG DER
RIEMENSPANNUNG
RÉGLAGE TENSION
COURROIES
- Dopo le prime 5÷10 ore di lavoro, regolare la tensione delle cinghie della PdP:
1) Disinserire completamente la P.d.P. e segnare con un pennarello la posizione del
tirante T (Fig. 56/1).
2) Inserire la P.d.P. e controllare se la quota segnata in figura 56/2 è di 10-12 mm. Se è minore,
agire sulla vite A (Fig. 56/3) e sulla vite B (Fig. 56/4).
- After the first 5÷10 hours of work, adjust the P.T.O. belts tension:
1) Fully disengage the P.T.O. and mark with a felt-tip the position of tie-rod T (Fig. 56/1).
2) Insert the P.d.P. and check if the value marlek on Fig. 56/2 is 10-12 mm. If it is different,
act on the relevant screw A (Fig. 56/3) and to the screw B (Fig. 56/4).
- Après les premières 5÷10 heures de travail, régler la tension des courroiesde la PdP:
1) Débrayer entièrement la P.d.P. et marquer avec un crayon-feutre la position du tirant T (Fig. 56/1).
2) Insérer la P.d.P. et vérifier si la cote marquée en fig. 56/2 est de 10-12 mm. Si elle est différente,
agir sur la vis A (Fig. 56/3) et sur la vis B (Fig. 56/4).
5÷10
h
- Nach den ersten 5÷10 Arbeisstunden, die Antrieb-Riemenspannung regeln :
1) Den Antrieb völlig auskuppeln und die Position der Zugstange T mit einem Farbstift markieren (Fig. 56/1).
2) Den Antrieb einkuppeln und prüfen, ob derauf Abb. 56/2 markierte Wert 10-12 mm beträgt. Wenn nicht , Schraube
A und B (Fig. 56/3-56/4) drehen.
Prestare attenzione all’ingombro dell’occhio del cilindro.
Pay attention to the dimensions of the eye of the cylinder.
Faire attention aux dimensions de l’oeil du cylindre.
Beachten Sie die Abmessungen des Zylinderauge.
56/3
56/4
A
B
Fig. 56
T
56/1
T
56/2
T
37/52
12-15 mm
14.11
PULIZIA DELLA
MACCHINA
CLEANING THE
MACHINE
NETTOYAGE DE LA
MACHINE
ACQUA
WATER
ACQUA
WATER
Fig. 57
38/52
SÄUBERN DER
MASCHINE
14.12
FILTRO
IMMERSO
IMMERSED
FILTER
FILTRE
IMMERGÉ
GETAUCHTER
FILTER
Vedi tab. manutenzioni pag. 41
See tab. maintenance page 41
Voir tab. entretiens page 41
Siehe Wartunbgstab. Seite. 41
Fig. 57a
14.13
FILTRO IN
PRESSIONE
FILTER UNDER
PRESSURE
FILTRE SOUS
PRESSION
DRUCKFILTER
Fig. 57b
Vedi tab. manutenzioni pag. 41
See tab. maintenance page 41
Voir tab. entretiens page 41
Siehe Wartunbgstab. Seite. 41
14.14
FILTRO
SERVIZI
SERVICES
FILTER
Fig. 57c
Vedi tab. manutenzioni pag. 41
See tab. maintenance page 41
Voir tab. entretiens page 41
Siehe Wartunbgstab. Seite. 41
14.15
INGRASSAGGIO
PEDALE
DIENSTFILTER
FILTRE
SERVICES
PEDAL
GREASING
GRAISSAGE
PÉDALE
Vedi tab. manutenzioni pag. 41
See tab. maintenance page 41
Voir tab. entretiens page 41
Siehe Wartunbgstab. Seite. 41
PEDALSCHMIERUNG
Fig. 57d
39/52
DESCRIZIONE - DESCRIPTION - DESCRIPTION - BESCHREIBUNG
40/52
CHANGER
FILTRE AIR
NIVEAU LIQUIDE
REFROIDISSEMENT
CHANGER LIQUIDE
REFROIDISSEMENT
ENTRETIEN
MOTEUR
CHANGE FILTRE
IMMERGÉ
CHANGE FILTRE SERVICE
CHANGE CARTOUCHE
FILTRE MOTEUR
AIR FILTER
CHANGE
COOLING LIQUID
LEVEL
COOLING LIQUID
CHANGE
MOTOR
MAINTENANCE
CHANGING THE IMMERSED
FILTER
CHANGING THE SERVICE
FILTER
GREASING THE FORWARD
SPEED PEDAL
CAMBIO
FILTRO ARIA
LIVELLO LIQUIDO
REFRIGERANTE
CAMBIO LIQUIDO
REFRIGERANTE
MANUTENZIONE
MOTORE
CAMBIO FILTRO
IMMERSO
CAMBIO FILTRO SERVIZI
CAMBIO CARTUCCIA
FILTRO MOTORE
WECHSEL VON DER
MOTORFILTERPATRONE
WECHSEL VOM DIENSTFILTER
WECHSEL VOM GETAUCHTEN
FILTER
MOTORWARTUNG
KÜHLFLÜßIGKEITWECHSEL
KÜHLFLÜßIGKEITSTAND
LUFTFILTERWECHSEL
VERGASERFILTER-WECHSEL
WECHSEL VON DER
DRUCKÖLFILTERPATRONE
WECHSEL VOM HYDROSTAT.
ANTRIEBSÖL
MOTORÖLWECHSEL
MOTORÖLSTAND
REINIGUNG DES
LUFTFILTERS
SCHMIERUNG
TIEFE ALGEMEINE
REINIGUNG
GROBE ALGEMEINE
REINIGUNG
MESSERANSCHLEIFEN
REINIGUNG DER
HYDR. ANTRIEBE
REINIGUNG DER
FANGKORBSGITTE
Queste operazioni di pulizia devono essere fatte preferibilmente con aria compressa. Evitare acqua.
These cleaning operations must be carried out preferibly with compressed air. Avoid using water.
Ces opérations de nettoyage doivent etre effectuées préférablement à l’air comprimé. Eviter l’eau.
Diese Reinigungsarbeiten sollten mit Druckluft durchgeführt werden. Wasser vermeiden.
CHANGER FILTRE
CARBURANT
CARBURATEUR
FILTER CHANGE
CAMBIO FILTRO
CARBURANTE
=
CHANGE CARTOUCHE FILTRE
HUILE SOUS PRESSION
CHANGING THE PRESSURE
OIL FILTER CARTRIDGE
CAMBIO CARTUCCIA
FILTRO OLIO IN PRESSIONE
NETTOYAGE
FILTRE AIR
AIR FILTER
CLEANING
PULIZIA
FILTRO ARIA
CHANGE HUILE TRANSM.
HYDROSTATIQUE
NIVEAU HUILE TRANSM.
HYDROST. ET SYST. HYDRAUL.
HYDROST. DRIVE AND
HYDRAULIC SYST. OIL LEVEL
LIV. OLIO TRASM. IDROST.
ED IMP. IDRAULICO
CHANGING. HYDROSTATIC
DRIVE OIL
NIVEAU HUILE TRANSM.
ROUES
WHEEL TRANSM. OIL
LEVEL
LIV. OLIO TRASM.
RUOTE
CAMBIO OLIO TRASM.
IDROSTATICA
GRAISSAGE
GREASING
INGRASSAGGIO
CHANGER HUILE
MOTEUR
NETTOYAGE GENERAL
COMPLET
ACCURATE GENERAL
CLEANING
PULIZIA GENERALE
ACCURATA
MOTOR OIL
CHANGE
NETTOYAGE
GENERAL
OVERALL
CLEANING
PULIZIA GENERALE
DI MASSIMA
CAMBIO OLIO
MOTORE
AFFUTAGE
LAMES
BLADE
SHARPENING
AFFILATURA
LAME
NIVEAU HUILE
MOTEUR
NETTOYAGE TRANSM.
HYDRAULIQUES
HYDRAULIC DRIVE
CLEANING
PULIZIA TRASM.
IDRAULICHE
MOTOR OIL
LEVEL
ÖLSTAND DES HYDROST. ANTRIEBES
UND HYDR. ANLAGE
NETTOYAGE GRILLE
DU BAC
HOPPER GRID
CLEANING
PULIZIA RETE
CONTENITORE
X
++
X
+++
X
X
+++
X
X
X
X
X
X
X
X
++
++
++
++
++
+
++
+
++
X
X
X
=
=
=
X
+++
X
+++
X
+++
X
50 100 200 400 500
++
X
X
+
X
30
X
X
X
X
+
X
5 10
X
+
X
+++
ORE
HOURS
HEURES
STUNDEN
++
LIVELLO OLIO
MOTORE
ÖLSTAND DES
RÄDERANTRIEBES
VERIFICATION
COURROIES
BELT
CHECK
VERIFICA
CINGHIE
RIEMENKONTROLLE
NETTOYAGE GRILLE DU
RADIATEUR
RADIATOR GRID
CLEANING
PULIZIA RETE
RADIATORE
REINIGUNG DER
RADIATORGITTE
OPERAZIONI PRINCIPALI DI MANUTENZIONE - MAIN MAINTENANCE OPERATIONS OPERATIONS PRINCIPALES D’ENTRETIEN - WICHTIGSTE WARTUNGSARBEITEN
+
In caso di condizioni di lavoro particolarmenrte gravoso la periodicità deve essere inferiore
In case of particularly heavy working conditions, these operations must be carried more frequently
En cas de conditions de travail particuliérement lourdes, la périodicité devra être inférieure
Bei besondersschwierigen Arbeitsumständen, soll die Kontrollezeit kürzer sein
Manutenzione motore: consultare il manuale Uso e Manutenzione del motore
Motor maintenance: check the motor operating and maintenance manual
Entretien moteur: consulter la notice d’emploi et d’entretien
Motorwartung: siehe die Betriebs und- Wartungsanleitung des Motors
+++
Cambio iniziale - Registrazione iniziale
Initial change - Initial adjustment
Changement initial - Réglage initial
Anfangswechsel - Anfangseinstellung
15
MANUTENZIONE
STRAORDINARIA
EXTRAORDINARY
MAINTENANCE
ENTRETIEN
EXTRAORDINAIRE
AUßERORDENTLICHE
Per la manutenzione straordinaria della macchina rivolgersi esclusivamente ad
un’officina di assistenza autorizzata.
For the extraordinary maintenance of the machine, contact only an authorised service center.
Pour l’entretien extraordinaire de la machine, s’adresser exlusivement à une usine d’assistence autorisée.
Für die außerplanmäßige Wartung der Maschine sollte man sich ausschließlich an eine autorierte
Servicewerkstatt wenden.
41/52
16
INATTIVITÁ DEL
RASAERBA
INACTIVITY OF
MOWER DECK
INACTIVITÉ DE LA
TONDEUSE
UNAKTIVITÄT DER
MÄHWERKS
Se si verifica il caso in cui il rasaerba PG-SR debba rimanere inutilizzato per parecchio tempo, è conveniente eseguire alcune operazioni per garantire l’efficienza al suo riutilizzo e la durata nel tempo dello stesso:
- scollegare l’attrezzatura dalla motrice e seguire le operazioni indicate nel relativo manuale uso e manutenzione per predisporla “fuori servizio”;
- eseguire tutte le indicazioni fornite nel manuale uso e manutenzione del motore per predisporre lo stesso
in “fuori servizio”;
- smontare la batteria, ricaricarla e deporla in un luogo asciutto e areato;
- pulire accuratamente la motrice avendo un occhio di riguardo dove si sono formate incrostazioni dovute
a residui di terriccio e di erba;
- eseguire le operazioni di “manutenzione ordinaria” descritte precedentemente e, se necessario, eseguire
anche la “manutenzione straordinaria”;
- parcheggiare la motrice in un luogo asciutto e areato, coprendola con un adeguato telo di protezione non
impermeabile;
- durante il periodo di inattività, mantenere sempre alla pressione indicata i pneumatici e, periodicamente,
variare il punto d’appoggio dei pneumatici con il suolo.
In case the PG-SR lawnmower has to remain idle for a long period of time, it is convenient to carry out some operations to ensure its
efficiency when reused and the duration of the same for years:
-Disconnect the equipment from the engine and follow the operations indicated in the relevant use and maintenance manual to
prearrange it for “out of service”.
-Carry out all the indications given in the use and maintenance manual of the motor prearrange the same for “out of service”.
-Remove the battery, recharge it and store it in a dry and ventilated place.
-Clean carefully the engine with an eye in particular where there are incrustations due to soil and grass residues.
-Carry out the of “ordinary maintenance” operations described above and,if necessary, carry out also the “extraordinary maintenance”
-Park the engine in a dry and ventilated place and cover it with a suitable non-impermeable protection sheet.
-During the period of inactivity, always maintain the pressure indicated for the tyres and, periodically, change the resting point of the
tyres on the ground.
Au cas où le tondeuse PG-SR doit rester inutilisée pendant beaucoup de temps, il convient d’exécuter quelques opérations pour
assurer l’efficacité à sa réutilisation et sa durée dans le temps:
-Déconnecter l’équipement de la motrice et suivre les opérations indiquées dans le manuel d’emploi et d’entretien pour la prédisposer
en “hors service”.
-Exécuter toutes les indications fournies dans le manuel d’emploi et d’entretien du moteur pour prédisposer la même en
“hors service”.
-Démonter la batterie, la récharger et la déposer dans un endroit sec et aéré.
-Nettoyer soigneusement la motrice en particulier où il y a des incrustations dues à des résidus de terreau et d’herbe.
-Exécuter les opérations d’“entretien ordinaire” précédemment décrites et,si nécessaire, exécuter aussi l’“entretien extraordinaire”
-Stationner la motrice dans un endroit sec et aéré en la couvrant avec une toile de protection non impermeable.
-Pendant la période d’inattivité maintenir toujours à la pression indiquée les pneus et, périodiquement, varier le point d’appui des
pneus au sol.
Sollte es der Fall sein, dass der Rasenmäher PG-SR für mehrere Zeit unbenützt bleibt, ist es vorteilhaft einige Handlungen
durchzuführen, welche die Leistungsfähigkeit bei seiner Wiederbenützung und eine lange Haltbarkeit desselben garantieren :
-Die Ausrüstung vom Wagen abkuppeln und die Handlungen, welche im betreffenden Betriebs- und Wartungshandbuch angezeigt
sind, durchführen, um diese für „außer Dienst“ vorzusehen.
-Alle Anzeigen, welche im Betrieb- und Wartungshandbuch des Motores angeführt sind ausführen, um denselben für „außer Dienst“
vorzusehen.
-Die Batterie ausbauen, aufladen und in einem trockenen und gelüfteten Raum lagern.
-Sorgfältig den Wagen reinigen, wobei man besonders auf die Überkrustungen von Erd- und Grasresten Acht geben soll.
-Die Handlungen durchführen, welche in der „gewöhnlichen Wartung“ vorher beschrieben worden sind, und wenn notwendig, auch
die „außergewöhnliche Wartung“ durchführen.
-Den Wagen in einem trockenen und gelüfteten Raum parken mit einem geeigneten und nicht wasserdichten Schutztuch
überdecken.
-Während der Wagen unaktiv ist, die Reifen immer mit dem vorgesehenen Luftdruck halten und periodisch die Unterlage der Reifen
am Boden ändern.
42/52
17
CIRCOLAZIONE
STRADALE
ROAD TRANSPORT
CIRCOLATION ROUTIÈRE
STRASSENVERKEHR
I rasaerba PG e SR, essendo dotati di omologazione stradale (*), hanno la possibilità di circolare su strade pubbliche a condizione che
siano rispettate le regole seguenti:
- il rasaerba deve essere obbligatoriamente munito di regolare immatricolazione, di carta di circolazione
(libretto), di targa correttamente installata e di assicurazione sui sinistri (assicurazione RC auto);
- il conducente del rasaerba deve essere regolarmente munito della patente di guida (almeno di categoria B) non scaduta;
- l’impianto di illuminazione e i dispositivi di frenatura di cui é dotato il rasaerba devono essere correttamente funzionanti e in perfetta
efficienza;
- tutti i dispositivi di illuminazione devono rimanere completamente visibili. Si ricorda che il dispositivo a lampada rotante (lampeggiante)
deve essere sempre in funzione, anche durante le ore diurne;
- il rasaerba PG-SR può circolare con e senza le attrezzature collegate (**). Quando la circolazione su strada avviene senza attrezzatura si
consiglia di tenere i bracci anteriori dell’attacco a 2 punti della motrice completamente sollevati. Quando il trasferimento su strada avviene
con attrezzatura collegata é obbligatorio tenere la stessa completamente sollevata e assicurata al telaio della macchina tramite l’apposito
blocco meccanico;
- la macchina, nella parte anteriore, è dotata di un gancio di traino sfruttabile in caso di avaria
del rasaerba (fig. 58);
- devono essere sempre rispettati i limiti e le condizioni tecniche espressamente indicati nella
carta di circolazione del rasaerba.
- per quanto riguarda le norme per la circolazione stradale valgono quelle relative al Codice
della Strada.
(*) : solo per le versioni in cui è prevista.
(**): le attrezzature che possono equipaggiare il rasaerba durante la circolazione stradale sono
espressamente indicate nella carta di circolazione.
PRIMA DI CIRCOLARE SU STRADE APERTE AL
TRAFFICO FAMIGLIARIZZATE CON TUTTI I COMANDI
RELATIVI AI CONTROLLI DELLA MACCHINA.
Fig. 58
The PG-SR lawnmowers, since they are accompanied by road approval certificate(*), have the possibility of circulating on public roads
provided the following rules are observed:
-The lawnmower must obligatorily be accompanied by a regular registration, a registration document(log book), a correctly mounted
number plate and an insurance against road accidents (car liability insurance).
-The driver of the lawnmower must carry a regular driving licence (at least, type B).
-The lighting installation and the braking devices of the lawnmower must be correctly operating and in perfect efficiency.
-All the lighting devices must be fully visible. Please keep in mind that the rotating lamp device (blinker) must always be on, even during
day time.
-The PG-SR lawnmower can circulate with and without the equipments attached (**). When circulating on a road without equipment, it is
recommended to keep the front arms of the 2-point attachment on the engine fully lifted. When the road trasfer is made with equipment
connected, it is obligatory to keep the same entirely lifted and fastened to the machine body by means of the mechanical lock.
-The machine, in its front part, is fitted with a tow bar that can be exploited in case of troubles with the lawnmower (Fig.58).
- The technical limits and conditions expressly indicated in the registration document of the lawnmower must always be respected
-As to the road traffic rules, the standard Rules of the Road apply
(*): only for the versions where this is foreseen.
(**): the equipments that can equip the lawnmower during road circulation
are expressly indicated in the registration document.
BEFORE TRAVELLING ON ROADS OPENED TO
TRAFFIC, YOU SHOULD BECOME FAMILIAR WITH ALL
THE CONTROLS OF THE MACHINE.
Fig. 58
43/52
17
CIRCOLAZIONE
STRADALE
ROAD TRANSPORT
CIRCOLATION ROUTIÈRE
STRASSENVERKEHR
Les tondeusea PG-SR puisqu’elles sont équipés d’homologation routière(*), ont la possibilité de circuler sur les routes publiques à conditions
qu’on respecte les règles qui suivent:
-La tondeuse doit être obligatoirement pourvue d’immatriculation régulière, de carte de circulation(carte grise), de plaque correctement
installée et d’assurance contre les accidents (assurance RC auto).
-Le conducteur de la tondeuse doit être régulièrement pourvu de permis de conduire (au moins de catégorie B) non échu.
-L’installation d’illumination et les dispositifs de freinage dont la tondeuse est équipé doivent être correctement fonctionnants et en parfaite
efficacité.
-Tous les dispositifs d’illumination doivent rester entièrement visibles. On rappelle que le dispositif à lampe tournante (clignotante) doit être
toujours en marche, même pendant les heures du jour.
-La tondeuse PG-SR peut circuler avec et sans les équipements reliés (**). Lorsque la circulation routière a lieu sans outillage, on
récommande de tenir les bras antérieurs de la fixation à 2 points de motrice entièrement soulevés. Lorsque le trasfert sur route a lieu avec
équipement branché il est obligatoire qu’on le tienne entièrement soulevé et assuré au châssis de la machine à l’aide du bloc mécanique.
-La machine, dans la partie avant, est équipée d’un crochet d’attelage exploitable en cas d’avarie de la tondeuse(Fig.58).
-Il faut toujours respecter les limites et les conditions techniques expressement indiqués sur la carte de circulation de la tondeuse.
-Pour ce qui concerne les normes pour la circulation routière se référer à celles du Code de la Route
(*): seulement pour les versions où elle est prévue.
(**): les équipements qui peuvent equiper la tondeuse pendant la circulation routière
sont expressement indiqués sur la carte de circulation.
AVANT DE CIRCULER SUR DES ROUTES OUVERTES
A LA CIRCULATION, IL FAUT QUE VOUS PRENIEZ
CONFIANCE AVEC TOUTES LES COMMANDES
CONCERNANT LES CONTRÔLES DE LA MACHINE.
Fig. 58
Da die Rasenmäher PG-SR mit einer Strassenzulassung ausgestattet sind, haben diese die Möglichkeit auf öffentlichen Straßen zu fahren,
jedoch unter der Bedingung, dass folgende Regeln eingehalten werden:
Der Rasenmäher muss obligatorisch mit einer regulären Immatrikulation, einem Zulassungspapier, mit einem korrekt montierten Nummernschild
und mit Unfallversicherung versehen sein.
-Der Fahrer des Rasenmähers muss im Besitz des Führerscheines sein (mindestens Kategorie B), welcher nicht ausgelaufen sein darf.
-Die Beleuchtungsanlage und die Bremsvorrichtungen mit welcher der Rasenmäher ausgestattet ist, müssen richtig funktions- und
leistungsfähig sein.
-Alle Beleuchtungsvorrichtungen müssen komplett sichtbar bleiben. Man erinnert dabei, dass die Rundumkennleuchte immer funktionieren
muss, auch während der Tagesstunden.
-Der Rasenmäher PG-SR kann mit oder ohne den verkuppelten Ausrüstungen verkehren (**). Wenn man auf Strassen ohne Einrichtungen
fährt, muß man die vorderen Arme der doppelte Befestigung der Zugmaschine völlig aufgehoben halten. Wenn die Verlegung auf Straße mit
verkuppelter Ausrüstung erfolgt, ist es obligatorisch diese komplett hochheben und am Wagengestell mit der vorgesehenen mechanischen
Sperre zu sichern.
-Der Wagen ist am vorderen Teil mit einem Schlepphaken versehen, welcher bei einem Schaden des Rasenmähers genützt werden
kann(Abb.58).
-Es müssen immer die Grenzen und die technischen Bedingungen, welche in dem
Zulassungspapier des Rasenmähers angezeigt sind, eingehalten werden.
-Was die Verkehrsregeln betrifft, gelten diese laut Straßenverkehrsgesetz.
(*): nur für dafür vorgesehene Versionen
(**): die Ausrüstungen, welche den Rasenmäher während des Straßenverkehrs
ausstatten können, sind ausdrücklich in dem Zulassungspapier versehen..
BEVOR MAN AUF OFFENEN STRASSEN FÄHRT, MUß
MAN SICH MIT ALLEN STEUERUNGEN DER
MASCHINE VERTRAUT MACHEN.
Abb. 58
44/52
18
ETICHETTE DI SICUREZZA
SAFETY STICKERS
ETIQUETTES DE SECURITE
SICHERHETSANKLEBER
Fig. 59
8
10
1
8
3
2
13
4
6
5
6
8
3
5-6-9
14
14
11
4
1
11
2
9
12
7
13
10
7
12
45/52
19
NOTE GENERALI
NOTES
INFORMATIONS GENERALES
ALLGEMEINE HINWEISE
A.
– PER INTERVENTI TECNICI NON CONTEMPLATI NEL SEGUENTE MANUALE, INTERPELLARE UN NOSTRO
CENTRO ASSISTENZA AUTORIZZATO.
– PLEASE CONTACT OUR AUTHORISED DEALER FOR ANYTHING THAT IS NOT DEALT WITH IN THIS MANUAL
– VEUILLEZ CONTACTER UN SPECIALISTE AGREE POUR TOUTE INTERVENTION NON MENTIONNEE DANS CETTE
NOTICE.
– WENDEN SIE SICH ZUR DURCHFÜHRUNG TECHNISCHER EINGRIFFE, DIE NICHT IN DIESEM HANDBUCH
BEHANDELT WERDEN, BITTE AN EINE ZUGELASSENE KUNDENDIENSTSTELLE.
B.
– CONSERVARE IL LIBRETTO USO E MANUTENZIONE IN LUOGO ADATTO A MANTENERLO INALTERATO. IL
PRESENTE MANUALE PUO’ ESSERE MODIFICATO SENZA PREAVVISO, NE ULTERIORI OBBLIGHI, AL FINE DI
INCLUDERE VARIAZIONI E MIGLIORAMENTI ALLE UNITA’ GIA’ INVIATE.
E’ VIETATA LA RIPRODUZIONE O LA TRADUZIONE DI QUALSIASI PARTE DI QUESTO LIBRETTO SENZA
PREAVVISO SCRITTO DEL PROPRIETARIO.
– ALWAYS KEEP THIS TECHNICAL HANDBOOK IN A SAFE PLACE FOR FUTURE REFERENCE. IT CAN BE MODIFIED
WITHOUT PRIOR NOTICE OR ANY ADDITIONAL OBLIGATIONS IN ORDER TO IMPROVE THE PRODUCT.
REPRODUCTION OR TRANSLATION OF ANY PART OF THIS MANUAL IS NOT ALLOWED WITHOUT THE
OWNER’S PRIOR WRITTEN CONSENT.
– CONSERVER CETTE NOTICE INTACTE DANS UN ENDROIT APPROPRIE. CETTE NOTICE PEUT ETRE MODIFIEE
SANS PREAVIS NI OBLIGATIONS DE QUELQUE SORTE POUR APPORTER DES VARIATIONS ET DES
AMELIORATIONS.
LA REPRODUCTION OU LA TRADUCTION DE CETTE NOTICE OU D’UNE PARTIE QUELCONQUE DE CETTE
DERNIERE NON AUTORISEE PAR ECRIT PAR LE CONSTRUCTEUR EST INTERDITE.
– BEWAHREN SIE DIESES ANLEITUNGSHANDBUCH AN EINEM GEEIGNETEN ORT AUF, UM ES IN EINEM GUTEN
ZUSTAND ZU ERHALTEN. DIESES HANDBUCH KANN JEDERZEIT OHNE ANKÜNDIGUNG BZW. SONSTIGE
VERPFLICHTUNGEN GEÄNDERT WERDEN, UM ÄNDERUNGEN UND VERBESSERUNGEN AN DEN BEREITS
GELIEFERTEN EINHEITEN DARIN AUFZUNEHMEN.
REPRODUKTION ODER ÜBERSETZUNG IRGEND WELCHER TEILE DIESES HANDBUCHES SIND OHNE
VORHERIGE SCHRIFTLICHE GENEHMIGUNG DES EIGENTÜMERS VERBOTEN
46/52
20
VISUALIZZAZIONE CODICI ERRORE
POSIZIONE
DI ERRORE
CODICE
ERRORE
Fase di test
iniziale
Ciclo preriscaldo candelette
Ciclo di funzionamento
Qualsiasi
fase
AVVISAT.
ACUST.
DESCRIZIONE
DELL'ALLARME
POSSIBILI CAUSE
E/O RIMEDI
DURATA DELLA
SEGNALAZIONE
ERRORE
E1 lamp.
Il test sul sensore preriscaldo ha
rilevato una temperatura inferiore al range previsto
È probabile che il sensore preriscaldo non sia correttamente
inserito
Finchè non si rimuove
la condizione d'errore
1
E2 lamp.
Il test sul sensore preriscaldo ha
rilevato una temperatura inferiore al range previsto
È probabile che il sensore preriscaldo non sia correttamente
inserito
Finchè non si rimuove
la condizione d'errore
1
E3 lamp.
Il test sul sensore temperatura
acqua ha rilevato una temperatura superiore al range
È probabile che il sensore tem- Finchè non si rimuove
peratura acqua non sia corret- la condizione d'errore
tamente inserito
2
E4 lamp.
Il test sul sensore temperatura
acqua ha rilevato una temperatura inferiore al range
È probabile che il sensore tem- Finchè non si rimuove
peratura acqua non sia corret- la condizione d'errore
tamente inserito
2
E10
Il test sulla sicurezza ha individuato che la PTO è inserita
Disinserire la PTO
Finchè non si rimuove
la condizione d'errore
1
E11
Il test sulla sicurezza ha individuato che il freno di stazionamento è disinserito
Inserire il freno di stazionamento
Finchè non si rimuove
la condizione d'errore
2
E12
Il test sulla sicurezza ha individuato che il guidatore non seduto sul sedile
Il guidatore si sieda sul
sedile
Finchè non si rimuove
la condizione d'errore
3
E14
Il test sulla sicurezza ha individuato che il vano motore è
aperto
Chiudere il vano motore
Finchè non si rimuove
la condizione d'errore
5
E20
Il test sulla sicurezza ha individuato che la PTO è inserita
Disinserire la PTO
Finchè non si rimuove la
condizione d'errore e non
si riaccende il motore
1
E21
Il test sulla sicurezza ha individuato che il freno di stazionamento è disinserito
Inserire il freno di stazionamento
Finchè non si rimuove la
condizione d'errore e non
si riaccende il motore
2
E22
Il test sulla sicurezza ha individuato che l'uomo non è seduto
sul sedile
Sedersi sul sedile
Finchè non si rimuove la
condizione d'errore e non
si riaccende il motore
3
E24
Il test sulla sicurezza ha individuato che il vano motore è
aperto
Chiudere il vano motore
Finchè non si rimuove la
condizione d'errore e non
si riaccende il motore
5
Disinserire PTO e mantenere
il motore a regime medio
Finchè la temperatura non
torna normale
6
Temp.
lamp.
Suono
interm.
Il test sulla temperatura della
acqua ha rilevato che il motore
ha superato la temperatura di
100°C
E30
Suono
interm.
lent.mo
C'è il cesto pieno e la PTO inserita
Finchè non si esce dalla
condizione di allarme
7
E31
Suono
interm.
lent.
Il filtro dell'aria è intasato
Finchè non si esce dalla
condizione di allarme
7
CC1
Vi è un corto circuito all'uscita
preriscaldo candelette
Verificare il circuito preriscaldo candelette
Finchè non si rimuove la
condizione d'errore e non
si riaccende il motore
0
CC2
Vi è un corto circuito all'uscita
arresto motore
Verificare il circuito arresto motore
Finchè non si rimuove la
condizione d'errore e non
si riaccende il motore
0
CC3
Vi è un corto circuito all'uscita
avvisatore acustico
Verificare il circuito avvisatore acustico
Finchè non si rimuove la
condizione d'errore e non
si riaccende il motore
0
47/52
20
ERROR CODE DISPLAY
ERROR
POSITION
ERROR
CODE
Initial test
phase
E1 lamp
The test on the pre-heating sensor The pre-heating sensor has
has detected a lower temperature probably not been activated
than the envisaged range
correctly
Until the error condition
is removed
1
E2 lamp
The test on the pre-heating sensor The pre-heating sensor has
has detected a lower temperature probably not been activated
than the envisaged range
correctly
Until the error condition
is removed
1
E3 lamp
The test on the water temperature sensor has detected a higher
temperature than the range
The water temperature sensor
has probably not been activated correctly
Until the error condition
is removed
2
E4 lamp
The test on the water temperature sensor has detected a lower
temperature than the range
The water temperature sensor
has probably not been activated correctly
Until the error condition
is removed
2
E10
The safety test has found the
PTO activated
Disconnect the PTO
Until the error condition
is removed
1
E11
The safety test has found the
parking brake is off
Apply the parking brake
Until the error condition
is removed
2
E12
The safety test has found the
driver is not in his seat
The driver must sit on the
seat
Until the error condition
is removed
3
E14
The safety test has found the
engine compartment open
Close the engine compartment
Until the error condition
is removed
5
E20
The safety test has found the
PTO activated
Disconnect the PTO
Until the error condition
is removed and the engine
switched back on
1
E21
The safety test has found the
parking brake is off
Apply the parking brake
Until the error condition
is removed and the engine
switched back on
2
E22
The safety test has found the
man is not in his seat
Sit on the seat
Until the error condition
is removed and the engine
switched back on
3
E24
The safety test has found the
engine compartment open
Close the engine compartment
Until the error condition
is removed and the engine
switched back on
5
Disengage PTO and keep
motor at medium speed
until temperature
returns normal.
6
Glow plug
heating cycle
Operating
cycle
Any phase
BUZZER
ALARM
DESCRIPTION
POSSIBLE CAUSES
AND/OR REMEDIES
LENGTH OF
SIGNAL
ERROR
Lamp
temp.
Beeps
The water temperature test has
found that the engine has
exceeded the temperature of
100°C
E30
Very
slow
beeps
The basket is full and the PTO
activated
Until you quit the alarm
condition
7
E31
Slow
beeps
The air filter is clogged
Until you quit the alarm
condition
7
CC1
There is a short circuit on the
glow plug heating output
Check the glow plug heating
circuit
Until the error condition
is removed and the engine
switched back on
0
CC2
There is a short circuit on the
engine stop output
Check the engine stop
circuit
Until the error condition
is removed and the engine
switched back on
0
CC3
There is a short circuit on the
buzzer output
Check the buzzer circuit
Until the error condition
is removed and the engine
switched back on
0
48/52
20
AFFICHAGE DES CODES D‘ALARM
POSITION
D'ERREUR
CODE
ERREUR
Phase de test
initial
Cycle préchauffage cylindres
Cycle de fonctionnement
Toute
phase
SIGNAL
SONORE
DESCRIPTION
DE L'ALARME
CAUSES POSSIBLES
ET/OU SOLUTIONS
DUREE DU
SEGNAL
E1clign.
Le test sur le capteur de préchauffage a détecté une température
inférieure à la tolérance admise.
Il est probable que le capteur
de préchauffage n’est pas
correctement en place.
Tant que la condition
d’erreur est présente.
1
E2 clign.
Le test sur le capteur de préchaufa détecté une température
inférieure à la tolérance admise.
Il est probable que le capteur
de préchauffage n’est pas
correctement en place.
Tant que la condition
d’erreur est présente.
1
E3 clign.
Le test sur le capteur de températu- Il est probable que le capteur
re d’eau a détecté une température de température d’eau n’est
supérieure à la tolérance admise.
pas correctement en place.
Tant que la condition
d’erreur est présente.
2
E4 clign.
Le test sur le capteur de températu- Il est probable que le capteur
re d’eau a détecté une température de température d’eau n’est
inférieure à la tolérance admise.
pas correctement en place.
Tant que la condition
d’erreur est présente.
2
E10
Le test sur la sécurité a détecté
l’enclenchement de la (PTO).
Débrayer la prise de force
(PTO).
Tant que la condition
d’erreur est présente.
1
E11
Le test sur la sécurité a détecté
que le frein de stationnement
est désenclenché.
Enclencher le frein de
stationnement.
Tant que la condition
d’erreur est présente.
2
E12
Le test sur la sécurité a détecté
que le conducteur n’est pas
assis sur le siège.
Le conducteur doit
s’asseoir sur le siège.
Tant que la condition
d’erreur est présente.
3
E14
Le test sur la sécurité a détecté
que le capot moteur est ouvert.
Le test sur la sécurité a détecté
l’enclenchement de la prise de
de force (PTO).
Fermer le capot moteur.
Tant que la condition
d’erreur est présente.
Tant que la condition
d’erreur est présente et
que le moteur n’est pas
remis en marche.
5
E20
Débrayer la prise de force
(PTO).
ERREUR
1
E21
Le test sur la sécurité a détecté
que le frein de stationnement
est désenclenché.
Enclencher le frein de
stationnement.
Tant que la condition
d’erreur est présente et
que le moteur n’est pas
remis en marche.
2
E22
Le test sur la sécurité a détecté
que le conducteur n’est pas
assis sur le siège.
Le conducteur doit
s’asseoir sur le siège.
Tant que la condition
d’erreur est présente et
que le moteur n’est pas
remis en marche.
3
E24
Le test sur la sécurité a détecté
que le capot moteur est ouvert.
Fermer le capot moteur.
Tant que la condition
d’erreur est présente et
que le moteur n’est pas
remis en marche.
5
Le test de température d’eau
signale que la température du
moteur a dépassé 100°C.
Débrayer PTO et maintenir
le moteur à régime moyen
usque la température
redevient normale.
6
Temp.
clign.
Son
interm.
E30
Son interm. Le casier est plein et la prise
interm.
de force (PTO) est enclenchée.
Tant que la condition
d’erreur est présente.
7
E31
Son interm. Le filtre à air est bouché.
lent.
Court-circuit en sortie
préchauffage cylindres.
Tant que la condition
d’erreur est présente.
Tant que la condition
d’erreur est présente et
que le moteur n’est pas
remis en marche.
7
CC1
Vérifier le circuit de
préchauffage cylindres.
0
CC2
Court-circuit en sortie
arrêt moteur.
Vérifier le circuit de
d'arrêt moteur.
Tant que la condition
d’erreur est présente et
que le moteur n’est pas
remis en marche.
0
CC3
Court-circuit en sortie
avertisseur sonore.
Vérifier le circuit de
avertisseur sonore.
Tant que la condition
d’erreur est présente et
que le moteur n’est pas
remis en marche.
0
49/52
20
ANEIGE DER FEHLERCODES
FEHLER
STELLUNG
FEHLER
CODE
AnfangsTestphase
Vorwärmzyklus der
Zündkerzen
Betriebszyclus
Alle
Phasen
SIGNAL
HUPE
BESCHREIBUNG DES
ALARMES
MÖGLICHE URSACHEN UND/
ODER ABHILFEN
DAUER DER
SIGNALISIERUNG
FEHLER
E1 blink.
Der Test am Vorwärmsensor hat eine
niedrigere Temperatur ermittelt als
von der Spanne vorgesehen
Vorwärmsensor wahrscheinlich
nicht korrekt eingeschaltet
Bis Fehlerzustand
behoben ist
1
E2 blink.
Der Test am Vorwärmsensor hat eine
niedrigere Temperatur ermittelt als
von der Spanne vorgesehen
Vorwärmsensor wahrscheinlich
nicht korrekt eingeschaltet
Bis Fehlerzustand
behoben ist
1
E3 blink.
Der Test am Sensor der Wassertemperatur hat eine über der Spanne
Temperatur ermittelt
Sensor der Wassertemperatur
wahrscheinlich nicht korrekt
eingeschaltet
Bis Fehlerzustand
behoben ist
2
E4 blink.
Der Test am Sensor der Wassertemperatur hat eine unter der Spanne
liegende
Sensor der Wassertemperatur
wahrscheinlich nicht korrekt
eingeschaltet
Bis Fehlerzustand
behoben ist
2
E10
Der Sicherheitstest hat ergeben, daß
die Kraftadnahme eingeschaltet ist
Kraftabnahme ausschalten
Bis Fehlerzustand
behoben ist
1
E11
Der Sicherheitstest hat ergeben, daß
die Standbremse ausgeschaltet ist
Standbremse einschalten
Bis Fehlerzustand
behoben ist
2
E12
Der Sicherheitstest hat ergeben, daß
der Fahrer nicht auf dem Sitz sitzt
Fahrer muß sich auf den Sitz
setzen
Bis Fehlerzustand
behoben ist
3
E14
Der Sicherheitstest hat ergeben, daß
der Motorraum offensteht
Motorraum schließen
Bis Fehlerzustand
behoben ist
5
E20
Der Sicherheitstest hat ergeben, daß
die Kraftabnahme eingeshaltet ist
Kraftabnahme ausschalten
Bis Fehlerzustand
behoben und Motor wieder
angezündet ist
1
E21
Der Sicherheitstest hat ergeben, daß
die Standbremse ausgeschaltet ist
mento è disinserito
Standbremse einschalten
namento
Bis Fehlerzustand
behoben und Motor wieder
angezündet ist
2
E22
Der Sicherheitstest hat ergeben, daß
der Mann nicht auf dem Sitz sitzt
Sich auf den Sitz setzen
Bis Fehlerzustand
behoben und Motor wieder
angezündet ist
3
E24
Der Sicherheitstest hat ergeben, daß
der Motorraum offensteht
Motorraum schließen
Bis Fehlerzustand
behoben und Motor wieder
angezündet ist
5
PTO auskuppeln und Motor zu bis die Temperatur
mittlerer Drehhzahl laufen lassen wieder normal ist.
Temp.
blink.
Interm.
Ton
Der Test der Wassertemperatur hat
ergeben, daß der Motor die Temperatur von 100°C überschritten hat
6
E30
Ganz
langs.
inter.Ton
Der Korb ist voll und die
Kraftabnahme eingeschaltet
Bis Alarmzustand
verlassen wird
7
E31
Langs.
interm.
Ton
Der Luftfilter ist verstopft
Bis Alarmzustand
verlassen wird
7
CC1
Kurzschluß am Ausgang der
Zündkerzen-Vorwärmung
Vorwärmkreislauf der
Zündkerzen überprüfen
Bis Fehlerzustand behoben
und Motor wieder
angezündet ist
0
CC2
Kurzschluß am Ausgang der
Motorstoppung
Kreislauf der Motorstoppung
überprüfen
Bis Fehlerzustand behoben
und Motor wieder
angezündet ist
0
CC3
Kurzschluß am Ausgang der
Signalhupe
Kreislauf der Signalhupe
überprüfen
Bis Fehlerzustand behoben
und Motor wieder
angezündet ist
0
50/52
COD. 00555600073
2006/00
PROFESSIONAL MOWERS
BIEFFEBI s.r.l.
Via dell'Artigianato ,7
46023 Gonzaga (Mantova) Italy
Tel. 0376.52641 - Fax 0376.588270
e-mail: [email protected]
GIANNI FERRARI s.r.l.
Via Vespucci ,53 (z.ind. Ranaro)
42046 Reggiolo (Reggio Emilia) Italy
Tel. 0522.973697 - Fax 0522.973707
e-mail: [email protected]
www.gianniferrari.com