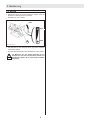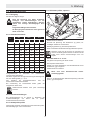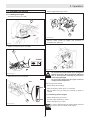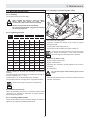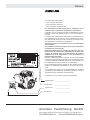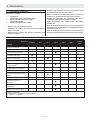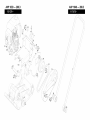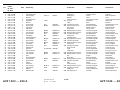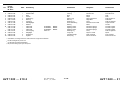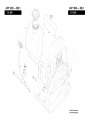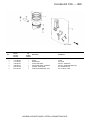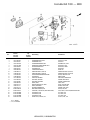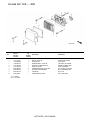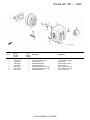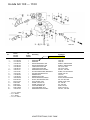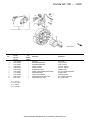
1
Sicherheitsbestimmungen
Betriebsanleitung
Ersatzteile
Safety regulations
Operating instructions
Spare parts
Consignes de sécurité
Mode d’emploi
Piéces de rechange
AVP 1033
AVP 1040
EG-Konformitätserklärung
EC-Declaration of Conformity / Déclaration „CE“ de Conformité / Declaración de conformidad de la CE
gemäß Maschinen-Richtlinie 98/37/EG, Anhang II A und Geräuschrichtlinie 2000/14/EG
as defined by the Machinery directive 98/37/EC Annex II A and Noise directive 2000/14/EC
conformément à la directive „CE“ relative aux machines 98/37/CE, Annexe II A et la directive du bruit 2000/14/CE
conforme a la directiva de maquinaria 98/37/CE, Anexo II A y a la directiva sobre ruidos 2000/14/CE
Hersteller (Name und Anschrift):
Manufacturer (name and adress):
Fabricant (nom et adress):
Fabricante (nombre y dirección):
Ammann Verdichtung GmbH
Josef-Dietzgen-Straße 36
D-53773 Hennef
Vibrationsplatte / Vibration plate / Plaque vibrante
Hiermit erklären wir, dass die Maschine (Typ)
Herewith we declare that the machine (Type)
Par la présente, nous déclarons que la machine (Type)
Por la presente, declaramos que la máquina (Tipo)
Leistung / Output / Puissance / Potencia:
AVP 1033
AVP 1040
Honda GX100 Honda GX100
Seriennummer:
Serial number:
Numéro de série:
Número de serie:
weitere Informationen siehe Typenschild
look at machine plate for more information
informations détaillés sur plaque type
para más información consulte la placa de características
folgenden einschlägigen Bestimmungen entspricht:
complies with the following provisions applying to it:
correspond aux dispositions pertinentes suivantes:
corresponde a las siguientes disposiciones pertinentes:
98/37/EG Anhang II A;
98/37/EC Annex II A;
98/37/CE Annexe II A;
98/37/CE Anexo II A
Angewandte harmonisierte Normen :
Applied harmonized standards:
Normes harmonisées appliquées:
Normas armonizadas aplicadas:
EN 500-1 ; EN 500-4
Die benannte Stelle nach 2000/14/EG
The notified body of 2000/14/EC
L’organisme habilité de 2000/14/CE
El organismo citado según 2000/14/CE
TÜV Immissionsschutz und Energiesysteme GmbH
Abteilung Immissionsschutz
D-51101 Köln
2.2 kW
2.2 kW
89/336/EWG
89/336/EC
89/336/CE
89/336/CE
wurde (wird) eingeschaltet zur / was (is) engaged for / intervient pour / ha (habrá) intervenido para:
Konformitätsbewertung nach Anhang VIII aus 2000/14/EG
valuation of conformity to Annex VIII of 2000/14/EC
conformément à l’Annexe VIII de 2000/14/CE
la evaluación de conformidad, según Anexo VIII de 2000/14/CE
ISO 9001 Zertifikats-Nr.:
ISO 9001 certificate No.:
ISO 9001 attestation no:
ISO 9001 nº de certificado:
Gemessener Schallleistungspegel LWA,m
Measured sound power level LWA,m
Niveau de puissance de son L WA,m
Nivel de potencia sonora medido LWA,m
100 dB
100 dB
Garantierter Schallleistungspegel LWA,g
Guaranted sound power level LWA,g
Niveau de puissance de son garanti L WA,g
Nivel de potencia sonora garantizado L WA,g
105 dB
105 dB
Hennef, 01.07.2007
Ort, Datum
Place, date / Lieu, date / Lugar, fecha
09100 67054
ppa. Dipl.-Ing. Reiner Schulz, Technische Leitung
Unterschrift, Angabe der Funktion im Unternehmen
Signature, acting in the company / Signature, en qualitè de /
Firma, en calidad de Assinatura
Aufbewahrung der technischen Unterlagen bei o.g. Person
Technical documents are kept by the above mentioned person
Conservation des documents techniques par la personne susmentionnée
La persona arriba indicada guarda la documentación técnica
Ammann Verdichtung GmbH | Josef-Dietzgen-Straße 36 | D-53773 Hennef | Tel. +49 (0) 2242 / 88 02-0 | Fax +49 (0) 2242 / 88 02-59
Geschäftsführer : Holz, Bernd; Stryffeler, Christian | HRB 1949 Amtsgericht Siegburg | [email protected] | www.ammann-group.com
Vorwort
Die vorliegende Anleitung umfaßt:
•
•
•
Sicherheitsbestimmungen
•
•
erleichtert, sich mit der Maschine vertraut zu machen
•
•
•
die Zuverlässigkeit der Maschine im Einsatz auf der Baustelle
Betriebsanleitung
Wartungsanleitung
Diese Anleitung wurde für den Bediener auf der Baustelle
und den Wartungsmann geschrieben.
Die Benutzung dieser Anleitung
vermeidet Störungen durch unsachgemäße Bedienung.
Die Beachtung der Wartungsanweisung erhöht
die Lebensdauer der Maschine
vermindert Reperaturkosten und Ausfallzeiten.
Bewahren Sie diese Anleitung ständig am Einsatzort der
Maschine auf.
Bedienen Sie die Maschine nur mit Einweisung und unter
Beachtung dieser Anleitung.
Beachten Sie unbedingt die Sicherheitsbestimmungen,
sowie die Richtlinien der Tiefbau-Berufsgenossenschaft
„Sicherheitsregeln für den Betrieb von Straßenwalzen und
Bodenverdichtern“ und die einschlägigen Unfallverhütungsvorschriften.
Die Ammann Verdichtung GmbH haftet nicht für die Funktion der
Maschine bei Handhabung, die nicht der üblichen Benutzung
entspricht, sowie bei nicht bestimmungsgemäßer Verwendung
der Maschine.
Sie
haben
keine
Gewährleistungsansprüche
bei
Bedienungsfehlern, mangelnder Wartung und falschen
Betriebsstoffen.
Gewährleistungs- und Haftungsbedingungen der allgemeinen
Geschäftsbedingungen der Ammann Verdichtung GmbH werden
durch vorstehende Hinweise nicht erweitert.
Änderungen ohne vorherige Ankündigung im Zuge der
technischen Entwicklung behalten wir uns vor.
Bitte eintragen (Vom Typenschild entnehmen)
Masch.-Typ.: _____________________
Masch.-Nr.:
_____________________
Motor-Nr.:
_____________________
Motor-Typ:
_____________________
Ammann Verdichtung GmbH
Josef-Dietzgen-Straße 36 • D-53773 Hennef / Postfach 11 63 • D-53758 Hennef
Printed in Germany Ref.-Nr. 011 98 005/C 07/08 Ha
FAX 02242/8802-59 • FAX 02242/8802-89 (Service)
Inhalt
Contents
Table des matières
1.
Sicherheitsbestimmungen . . . . . . 2 1.
Safety regulations . . . . . . . . . . 20 1.
Consignes de sécurité . . . . . . . 37
2.
Technische Daten . . . . . . . . . . . 4 2.
Technical Data . . . . . . . . . . . . 22 2.
Caractéristiques techniques . . . . 39
3.
3.1
3.2
3.3
3.4
Bedienung
Beschreibung. . . . . .
Vor der Inbetriebnahme
Bedienung Motor . . . .
Betrieb . . . . . . . . .
.
.
.
.
.
.
.
.
.
.
.
.
.
.
.
.
.
.
.
.
.
.
.
.
.
.
.
.
.
.
.
.
6
6
7
8
3.
3.1
3.2
3.3
3.4
Operation
Description . . . . .
Prior to use . . . . .
Operation the engine
Operation . . . . . .
.
.
.
.
.
.
.
.
.
.
.
.
.
.
.
.
.
.
.
.
.
.
.
.
.
.
.
.
.
.
.
.
.
.
.
.
24
24
25
26
3.
3.1
3.2
3.3
3.4
Mise en oeuvre
Description . . . . . . .
Avant la mise en service
Utilisation du moteur . .
Fonctionnement . . . . .
.
.
.
.
.
.
.
.
.
.
.
.
.
.
.
.
.
.
.
.
.
.
.
.
.
.
.
.
41
41
42
43
4. Transport
4. Transport
4. Transport
4.1 Transport . . . . . . . . . . . . . . . . 9 4.1 Transportation. . . . . . . . . . . . . 27 4.1 Transport . . . . . . . . . . . . . . . 44
5.
5.1
5.2
5.3
5.4
5.5
5.6
Wartung
Allgemeine Hinweise . . . . . . . . .
Wartungsübersicht . . . . . . . . . .
Schmierplan. . . . . . . . . . . . . .
Firmenalternative Schmierstofftabelle
Wartungsarbeiten Motor . . . . . . .
Wartung Maschine . . . . . . . . . .
10
10
11
11
12
13
5.
5.1
5.2
5.3
5.4
5.5
5.6
Maintenance
General notes . . . . . . . . .
Maintenance schedule . . . .
Lubrication schedule . . . . .
Alternative lubricant schedule.
Engine maintenance . . . . .
Machine maintenance . . . .
.
.
.
.
.
.
.
.
.
.
.
.
.
.
.
.
.
.
.
.
.
.
.
.
28
28
29
29
30
31
5.
5.1
5.2
5.3
5.4
5.5
5.6
Maintenance
Indications générales . . . . . . . . . 45
Vue d’ensemble de la maintenance . 45
Tableau de lubrification . . . . . . . . 46
Autres lubrifiants possibles . . . . . . 46
Travaux de maintenance sur le moteur 47
Maintenance de la machine. . . . . . 48
6. Aide en case de défaillances
6. Troubleshooting
6. Hilfe bei Störungen
6.1 Allgemeine Hinweise . . . . . . . . . 15 6.1 General information . . . . . . . . . . 33 6.1 Indications générales . . . . . . . . . 50
6.2 Störungstabelle . . . . . . . . . . . . 15 6.2 Fault table . . . . . . . . . . . . . . . 33 6.2 Tableau des défaillances . . . . . . . 50
1
1. Sicherheitsbestimmungen
Diese Ammann-Maschine ist dem heutigen Stand und den Sicherheitshinweise in der Betriebs- und Wartungsgeltenden Regeln der Technik entsprechend gebaut.
anleitung
Dennoch können von dieser Maschine Gefahren für
Personen und Sachwerte ausgehen, wenn sie:
In der Betriebsanleitung werden folgende Benennungen bzw.
Zeichen für besonders wichtige Angaben benutzt:
• nicht bestimmungsgemäß verwendet wird,
Besondere Angaben hinsichtlich der wirtschaftlichen
• von nicht unterwiesenem und geeignetem Personal bedient
Verwendung der Maschine.
wird,
•
•
Hinweis
unsachgemäß verändert oder umgebaut wird,
die Sicherheitsbestimmungen nicht beachtet werden.
Daher muss jede Person, die mit der Bedienung, Wartung
oder Reparatur der Maschine befaßt ist, die Betriebsanleitung und besonders die Sicherheitsbestimmungen
lesen und befolgen. Gegebenenfalls ist dies vom
Einsatzunternehmen durch Unterschrift bestätigen zu
lassen.
Besondere Angaben bzw. Ge- und Verbote zur
Schadensverhütung.
Achtung
Angaben bzw. Ge- und Verbote zur Verhütung von
Personen- oder umfangreichen Sachschäden.
Gefahr
Darüber hinaus sind anzuweisen und einzuhalten:
•
•
•
einschlägige Unfallverhütungsvorschriften,
allgemein anerkannte sicherheitstechnische Regeln,
Umwelt
länderspezifische Bestimmungen.
Angaben zur sicheren und umweltschonenden Entsorgung von Betriebs- und Hilfsstoffen sowie Austauschteilen.
Maschine transportieren
Bestimmungsgemäße Verwendung
Nur gemäß Betriebsanleitung verladen und transportieren!
Nur geeignetes Transportmittel und Hebezeug mit ausreichender Tragfähigkeit verwenden!
- Sand
Geeignete Anschlagmittel an den dafür vorgesehenen An- Kies (evtl. Grobkies)
schlagstellen befestigen.
- Magerbeton
Nur tragfähige und standsichere Verladerampen benutzen. Die
Rampenneigung muss flacher sein als die Steigfähigkeit der
- Bitumen-Kies (mittel- u. feinkörnig)
Maschine.
- Verbundsteinpflaster
Die Maschine gegen Abkippen oder Abrutschen sichern.
Nicht bestimmungsgemäße Verwendung
Für Personen besteht Lebensgefahr, wenn sie unter schwebende Lasten treten oder unter schwebenden Lasten stehen.
Es können jedoch von der Maschine Gefahren ausgehen, wenn
sie von nicht unterwiesenem Personal, unsachgemäß oder zu Maschine auf Transportfahrzeugen gegen Abrollen, Verrutschen und Umkippen sichern.
nicht bestimmungsgemäßem Gebrauch eingesetzt wird.
Nicht auf hartem Beton, abgebundener Bitumendecke oder stark Maschine starten
gefrorenem Boden mit Vibration fahren.
Vor dem Starten
Wer darf die Maschine bedienen?
Mit den Bedien- und Steuerelementen und der Arbeitsweise der
Nur geeignete, eingewiesene und dazu beauftragte Personen Maschine und der Arbeitsumgebung vertraut machen. Dazu
über 18 Jahre dürfen die Maschine führen. Wartung und gehören z. B. Hindernisse im Arbeitsbereich, die Tragfähigkeit
Reparatur insbesondere von Hydraulikanlagen erfordern be- des Bodens und notwendige Absicherungen.
sondere Kenntnisse und dürfen nur von Fachpersonal aus- Persönliche Schutzausrüstung (Sicherheitsschuhe, Schallschutzmittel etc.) benutzen.
geführt werden.
Prüfen ob alle Schutzvorrichtungen fest an ihrem Platz sind.
Umbauten und Veränderungen an der Maschine
Maschine nicht mit defekten Instrumenten oder Steuerorganen
Eigenmächtige Veränderungen, An- und Umbauten an der starten.
Maschine sind aus Sicherheitsgründen nicht gestattet.
Starten
Nicht von uns gelieferte Ersatzteile und Sonderausstattungen Bei Maschinen mit Handstart nur vom Hersteller geprüfte
sind auch nicht von uns freigegeben. Der Einbau und/oder die Sicherheitskurbeln benutzen und Bedienanleitung des MoVerwendung solcher kann die Fahr- und Betriebssicherheit torenherstellers genau befolgen.
derMaschine beeinträchtigen.
Beim Handkurbelstart von Dieselmotoren auf richtige Stellung
Für Schäden, die durch die Verwendung von nicht originalen zum Motor und auf richtige Handstellung an der Kurbel achten.
Teilen oder Sonderausstattungen entstehen, ist jegliche HafEin- und Ausschaltvorgänge, Kontrollanzeigen gemäß Betung des Herstellers ausgeschlossen.
triebsanleitung genau beachten.
Maschinen mit Elektrostart nur vom Bedienfeld aus starten und
bedienen.
Das Starten und Betreiben der Maschine in explosionsgefährdeten Umgebungen ist verboten!
Starten in geschlossenen Räumen, Tunneln, Stollen oder
tiefen Gräben
Motorabgase sind lebensgefährlich!
Diese Maschine ist nur zu verwenden zur Verdichtung von:
2
1. Sicherheitsbestimmungen
aufnahmemittel mit ausreichender Tragkraft verwenden. Teile
sorgfältig an Hebezeugen befestigen und sichern!
Ersatzteile müssen den vom Hersteller festgelegten technischen Anforderungen entsprechen. Deshalb nur original Ersatzteile verwenden.
Vor Arbeiten an Hydraulikleitungen sind diese drucklos zu
machen. Unter Druck austretendes Hydrauliköl kann schwere
Verletzungen verursachen.
Arbeiten an hydraulischen Einrichtungen dürfen nur Personen
mit speziellen Kenntnissen und Erfahrungen in der Hydraulik
durchführen!
Überdruckventile nicht verstellen.
Hydrauliköl bei Betriebstemperatur ablassen - Verbrühungsgefahr!
Auslaufendes Hydrauliköl auffangen und umweltfreundlich
entsorgen.
Bei abgelassenem Hydrauliköl Motor auf keinen Fall starten.
Nach allen Arbeiten (bei noch druckloser Anlage) die Dichtheit
aller Anschlüsse und Verschraubungen prüfen.
Alle Schläuche und Verschraubungen sind regelmäßig auf
Undichtigkeiten und äußerlich erkennbare Beschädigungen zu
überprüfen!
Beschädigungen umgehend beseitigen.
Hydraulik-Schlauchleitungen bei äußerlichen Beschädigungen
bzw. generell in angemessenen Zeitabständen (entsprechend
der Verwendungszeit) auswechseln, auch wenn keine sicherheitsrelevanten Mängel erkennbar sind.
Die elektrische Ausrüstung der Maschine regelmäßig überprüfen. Mängel wie lose Verbindungen, Scheuerstellen bzw. angeschmorte Kabel müssen sofort beseitigt werden.
Alle Schutzvorrichtungen nach Wartungs- und Instandsetzungsarbeiten wieder ordnungsgemäß anbringen und überprüfen.
Deshalb ist bei Betrieb in geschlossenen Räumen, Tunneln,
Stollen oder tiefen Gräben sicherzustellen, daß ausreichend gesundheitlich zuträgliche Atemluft vorhanden ist (s. UVV Bauarbeiten, VGB 37, 40 und 41).
Maschine führen
Bedienungseinrichtungen, die sich bestimmungsgemäß beim
Loslassen selbständig verstellen, dürfen nicht festgelegt werden.
Schutzeinrichtungen und Bremsen bei Fahrtbeginn auf ihre
Wirksamkeit prüfen.
Bei Rückwärtsfahrt, insbesondere an Grabenkanten und Absätzen sowie vor Hindernissen die Maschine so führen, daß eine
Sturzgefahr oder Quetschungen des Maschinenführers
ausgeschlossen sind.
Stets ausreichenden Abstand zu Baugrubenrändern und Böschungen halten sowie jede Arbeitsweise unterlassen, die die
Standsicherheit der Maschine beeinträchtigt!
Maschine stets so führen, daß Handverletzungen durch feste
Gegenstände vermieden werden.
An Abhängen vorsichtig und immer in direkter Richtung nach
oben fahren.
Starke Steigungen bergauf rückwärts befahren, um ein Kippen
der Maschine auf den Maschinenführer auszuschließen.
Werden Mängel an den Sicherheitseinrichtungen oder andere
Mängel, die den sicheren Betrieb der Maschine beeinträchtigen,
festgestellt, ist der Betrieb der Maschine sofort einzustellen und
der Mangel zu beheben.
Bei Verdichtungsarbeiten in der Nähe von Gebäuden oder über
Rohrleitungen u.ä. Auswirkung der Vibration auf das Gebäude
bzw. die Leitungen prüfen und gegebenenfalls die Verdichtungsarbeit einstellen.
Maschine parken
Maschine möglichst auf ebenem Untergrund abstellen, Antrieb
stillsetzen, gegen ungewollte Bewegung und unbefugtes Benutzen sichern.
Wenn vorhanden, den Treibstoffhahn schließen.
Geräte mit integrierter Fahrvorrichtung nicht auf dem Fahrwerk
abstellen oder lagern. Die Fahrvorrichtung ist nur für den Transport des Gerätes geschaffen.
Prüfung
Straßenwalzen, Grabenwalzen und Vibrationsplatten sind entsprechend den Einsatzbedingungen und den Betriebsbedingungen nach Bedarf, jedoch jährlich mindestens einmal, durch
einen Sachkundigen auf deren Sicherheit zu überprüfen.
Tanken
Nur bei abgestelltem Motor tanken.
Kein offenes Feuer, nicht rauchen.
Keinen Kraftstoff verschütten. Auslaufenden Kraftstoff auffangen, nicht in den Boden versickern lassen.
Auf dichten Sitz des Tankdeckels achten.
Undichte Treibstofftanks können zu Explosionen führen und
müssen deshalb sofort ausgetauscht werden.
Wartungs- und Instandsetzungsarbeiten
In der Betriebsanleitung vorgeschriebene Wartungs-, Inspektions- und Einstelltätigkeiten und -termine einschließlich Angaben zum Austausch von Teilen einhalten.
Wartungsarbeiten dürfen nur qualifizierte und dazu beauftragte
Personen durchführen.
Wartungs- und Instandsetzungsarbeiten dürfen nur bei stillstehendem Antrieb durchgeführt werden.
Wartungs- und Instandsetzungsarbeiten nur durchführen, wenn
die Maschine auf ebenem und tragfähigem Untergrund abgegestellt, gegen Wegrollen gesichert ist.
Beim Austausch von größeren Baugruppen und Einzelteilen nur
geeignete und technisch einwandfreie Hebezeuge sowie Last3
512
~ 920
~ 1100
2. Technische Daten
B
341
~ 540
011 31 511.cdr
AVP 1033
AVP 1040
330 mm
400 mm
54 kg
57 kg
1. Abmessungen
Arbeitsbreite B
2. Gewicht
Einsatzgewicht
3. Antrieb
Honda GX 100
Motortyp
1-Zyl-4-Takt-Benzin
Bauart
2,2 kW (3.0 PS)
Leistung
bei
3600 1/min
Einschaltdrehzahl d. Fliehkraftkuppl.
2000 1/min
Kühlung
Luft
Kraftstofftankinhalt
1.2 l
0.7 l/h
Verbrauch
20°
max. Schräglage
30 %
max. Steigfähigkeit
über Fliehkraftkupplung und Keilriemen
Antriebsart
4
2. Technische Daten
AVP 1033
AVP 1040
4. Vortriebsgeschwindigkeit
max. 22 m/min
Vortriebsgeschwindigkeit
5. Vibration
Rüttelkraft
10.5 kN
Rüttelfrequenz
100 Hz
6. Arbeitsfläche
Grundgerät
0.11 m²
0.136 m²
9.3 N/cm²
7.7 N/cm²
7. Spez. Auflagedruck
Spez. Auflagedruck
8. Sonderzubehör
Wasserberieselung 5 l
9. Geräusch- und Vibrationsangabe
Die nachfolgend aufgeführten Geräusch- und Vibrationsangaben nach der EG-Maschinenrichtlinie in der Fassung (98/37/EG)
wurden unter Berücksichtigung der u.a. harmonisierten Normen und Richtlinien ermittelt.
Im betrieblichen Einsatz können sich je nach den vorherrschenden Bedingungen hiervon abweichende Werte ergeben.
9.1 Geräuschangabe1)
Die gemäß Anhang 1, Abschnitt 1.7.4.f der EG-Maschinenrichtlinie geforderte Geräuschangabe beträgt für:
Schalldruckpegel am Bedienerplatz LPA
89 dB
Gemessener Schalleistungspegel LWA,m
100 dB
Garantierter Schallleistungspegel LWA,g
105 dB
Die Geräuschwerte wurden unter Berücksichtigung folgender Richtlinien und Normen ermittelt:
Richtlinie 2000/14/EG / EN ISO 3744 / EN 500-4
9.2 Vibrationsangabe
Die gemäß Anhang 1, Abschnitt 3.6.3.a der EG-Maschinenrichtlinie geforderte Angabe der Hand-Arm-Vibrationswerte:
Gewichteter Effektivwert der Beschleunigung
der oberen Körpergliedmaßen ahv liegt bei
11.1 m/s²
Der Beschleunigungswert wurde unter Berücksichtigung folgender Richtlinien und Normen ermittelt:
EN 500-4 / ISO 2631-1 / DIN EN ISO 5349 / DIN EN ISO 8041 / VDI-Richtlinie 2057
1)
Da bei dieser Maschine der zulässige Beurteilungsschallpegel von 85 dB (A) überschritten werden kann, sind vom
Bediener Schallschutzmittel zu tragen.
5
3. Bedienung
3.1 Beschreibung
3.2 Vor der Inbetriebnahme
Persönliche Schallschutzmittel
Gehörverlust!
Die AVP 1033 / 1040 ist eine Vibrationsplatte, die nach dem
Schleppschwingsystem arbeitet. Das heißt, dass sich die Platte
nur in Vorwärtsrichtung bewegt.
Der Motor treibt über Fliehkraftkupplung und Keilriemen den
Vibrator an.
Das Gerät dient zur Verdichtung von Sand, Kies (evtl. Grobkies),
Magerbeton, Bitumen-Kies (mittel- u. feinkörnig) und Verbundsteinpflaster.
Gefahr
3.1.1 Geräteübersicht
1
5
3
B1033001
1
2
3
4
5
Sicherheitsbestimmungen beachten.
Die Motor-Betriebsanleitung lesen. Die dort aufgeführten Hinweise zur Sicherheit, Bedienung und
Wartung beachten.
Gefahr
2
–
Betriebs- und Wartungsanleitung beachten.
Nicht auf hartem Beton oder abgebunden Bitumendecken arbeiten.
4
aufsetzen
Deichsel
Motor
Keilriemenscheibe mit Fliehkraftkupplung
Erreger
Grundplatte
6
•
•
•
•
Maschine auf ebenem Boden abstellen
•
•
Schraubverbindungen auf festen Sitz prüfen.
Motorölstand prüfen
Kraftstoffvorrat prüfen.
Fehlende Schmierstoffe
stofftabelle ergänzen.
entsprechend
Zustand von Motor und Maschine prüfen.
der
Schmier-
3. Bedienung
3.3 Bedienung Motor
•
Motorschalter (4) auf «ON» drehen.
3.3.1 Motor starten
•
Kraftstoffhahn (1) auf «ON» stellen.
OFF ON
1
OFF
ON
4
ON
Honda GX 100_05
OFF
•
Anlassergriff (5) leicht ziehen bis Widerstand spürbar wird,
dann kräftig durchziehen.
Honda GX 100_14
•
Chokehebel (2) auf «CLOSE» schieben.
2
CLOSE
CLOSE
Honda GX 100_06
OPEN
Honda GX 100_03
•
Achtung
Gashebel (3) auf Vollgas stellen.
5
Anlassergriff (5) nicht gegen den Motor
zurückschnellen lassen. Startseil von Hand in die
Ausgangsstellung zurückführen um Anlasserschäden zu vermeiden.
Bei warmem Motor oder hoher Aussentemperatur
Choke (2) nicht benutzen.
min
Nach Anspringen des Motors:
•
•
•
min
max
Drehzahlhebel auf Leerlauf stellen.
Motor 1 ... 2 min. warmlaufen lassen.
Chokehebel (2) während des Warmlaufens auf «OPEN»
schieben.
3.3.2 Motor abstellen
3
•
•
•
max
Honda GX 100_04
Gashebel (3) auf «min» stellen.
Motorschalter (4) auf «OFF» drehen.
Kraftstoffhahn (1) auf «OFF» stellen.
In Notsituationen den Motoschalter auf «OFF»
drehen, um den Motor abzustellen.
Hinweis
7
3. Bedienung
3.4 Betrieb
•
Sobald der Motor auf kurzes Gasgeben reagiert, kann die
Maschine in Betrieb genommen werden.
•
Gashebel auf «max» stellen.
min
min
max
3
max
Honda GX 100_04
•
Die Maschine an der Deichsel führen und durch seitliches
Verschieben lenken.
•
Zum Anhalten der Maschine den Gashebel auf «min» stellen.
Achtung
Die Maschine nur mit Vollgas betreiben und in
Kurzpausen stets auf Leerlauf stellen. Gefahr von
Kupplungsschäden durch schleifende Fliehkraftkupplung!
8
4. Transport
4.1 Transport
3
Das Gerät nach dem Verladen gegen Verrutschen
und Kippen sichern.
Gefahr
Sicherstellen, dass keine Personen gefährdet
werden.
60 kg
Beim Transportieren und Verladen das Gerät
waagerecht halten, um Auslaufen von Kraftstoff
zu vermeiden. Verschütteter Kraftstoff oder
Kraftstoffdämpfe können sich entzünden oder zur
Explosion führen.
Da das Gerät leicht von zwei Personen getragen
werden kann, wurde auf Anschlagpunkte
verzichtet. Das Gerät kann daher nicht mit
Hebezeug verladen oder angehoben werden. Unfallgefahr!
3
B1033003.cdr
Das Gerät nur mit zwei erwachsenen Personen
tragen. Gefahr von Gesundheitsschäden!
•
Die Deichsel kann zum leichteren Transport abgenommen
werden:
Zum Transport das Gerät an den vorgesehenen Griffen (3)
anheben und tragen.
Vorsicht vor dem heissen Motor. Verbrennungsgefahr!
Gefahr
•
2
1
B1033002.cdr
•
•
•
Klappsplinte (1) herausziehen.
Deichsel (2) leicht nach aussen ziehen und abnehmen.
Klappsplinte (1) wieder in die Bohrungen stecken um sie
gegen Verlust zu sichern.
9
Das Gerät kann im Kofferraum eines PKW transportiert
werden.
5. Wartung
5.1 Allgemeine Hinweise
•
Sorgfältige Wartung:
Für sichere und umweltfreundliche Entsorgung von
Betriebsstoffen und Austauschteilen sorgen.
•
Kurzschlüsse an stromführenden Kabeln unbedingt
vermeiden.
•
Beim Reinigen der Maschine mit Hochdruckwasserstrahl die elektrischen Bauteile nicht direkt abspritzen.
•
Nach dem Waschen die Bauteile mit Druckluft trockenblasen, um Kriechströme zu vermeiden.
ð
ð
ð
ð
ð
höhere Lebensdauer
größere Funktionssicherheit
geringere Ausfallzeiten
höhere Zuverlässigkeit
geringere Reparaturkosten
•
•
Sicherheitsbestimmungen beachten!
•
•
•
Vor Wartungsarbeiten Zündkerzenstecker abziehen.
Wartungsarbeiten nur bei abgestelltem Motor durchführen.
Vor Wartungsarbeiten Motor und Maschine reinigen.
Maschine auf ebenem Untergrund abstellen, gegen
Wegrollen und Abrutschen sichern.
5.2 Wartungsübersicht
Intervalle
Arbeiten
täglich
Maschine reinigen
l
Motorölstand prüfen1)
l
Motoröl wechseln1)
Luftfilter prüfen1)
20 h
50 h
À
100 h
200 h
500 h
bei
Bedarf
l
l
Luftfilter reinigen1)
l
l
Luftfiltereinsatz wechseln1)2)
l
Zündkerze prüfen/reinigen1)
l
Zündkerze wechseln1)2)
l
1)
l
Ventilspiel prüfen
l
Erreger: Ölstand prüfen
Erreger: Öl wechseln2)
À
Gummipuffer prüfen
l
Keilriemenspannung prüfen
l
Schraubverbindungen auf festen
Sitz prüfen
À
l
À è erstmals
1)
Motor-Betriebsanleitung beachten
2)
mindestens 1x jährlich
10
l
l
5. Wartung
5.3 Schmierplan
Menge [l]
Wechsel-Intervalle
[Betriebsstunden]
Motor
0,4
1001)
Erreger
0,5
2002)
oder jährlich
Schmierstelle
1)
2)
Schmierstoff
Bestell-Nr.
Motorenöl
API SG-CE
SAE 10W40
806 01 100
erstmals nach 20 Betriebsstunden
erstmals nach 100 Betriebsstunden
5.4 Firmenalternative Schmierstofftabelle
Motoröl
API SG-CE
SAE 10W40
Getriebeöl
gem. JDM J 20 C
Spez. Hydro-Öl
ISO-VG 32
Hydr.-Öl
HVLP 46
ATF – Öl
Fluid HGS
Vitam GF 32
Vitam HF 46
ATF 22
Energol HLP-HM 32
Bartran HV 46
Autran MBX
ARAL
Extra Turboral
SAE 10W40
BP
Vanellus C6 Global Plus Hydraulik TF-JD
SAE 10W40
CASTROL
Tection SAE 10W40
Agri Trans Plus
Hyspin SP 32
Hyspin AVH-M 46
TQ-D
ESSO
Ultra 10W40
Torque Fluid 56
Univis N 32
Univis N 46
ATF 21611 II-D
FINA
a. Kappa FE
b. Kappa Turbo DI
Transfluid AS
a. Hydran TSX 32
2)
b. Biohydran TMP 32
——
Finamatic II D
FUCHS
Titan Unic MC
Agrifarm UTTO MP
a. Renolin ZAF 520
2)
b. Plantohyd 32 S
Renolin B 46 HVI
Titan ATF 3000
KLEENOIL
PANOLIN
——
Panolin HLP Synth 322)
——
——
MOBIL
a. Delvac SHC
a. Mobilfluid 424
b. Mobil Super M 10W40 b. Mobilfluid 426
1)
c. Mobil Super S 10W40
Mobil DTE 24
Univis N 46
ATF 220
SHELL
Engine Oil DG 1040
Tellus T32
Tellus T 46
a. Donax TA
b. Donax TX
TOTAL
Rubia Polytrafic 10W-40 Transmission MP
Azolla ZS 32
Equivis ZS 46
Fluide ATX
1)
2)
——
Donax TD
Teilsynthetisches Leichtlauföl
Biologisch abbaubares Mehrbereichshydrauliköl auf Esterbasis; die Mischbarkeit und Verträglichkeit mit mineralölbasischen sowie mit biologisch abbaubaren Hydraulikölen sollte imEinzelfall geprüft werden. Der Restmineralölgehaltsollte gemäß VDMA-Einheitsblatt 24 569 reduziert werden.
TAB01003_DE.cdr
11
5. Wartung
5.5 Wartungsarbeiten Motor
Achtung
5.5.3 Luftfiltereinsatz reinigen
In dieser Betriebsanleitung sind nur die täglichen
Motorwartungsarbeiten aufgeführt. Beachten Sie
die Motor-Betriebsanleitung und die dort aufgeführten Wartungshinweise und -intervalle.
5
4
3
5.5.1 Kraftstoff nachfüllen
Nur bei abgestelltem Motor tanken
Gefahr
Kein offenes Feuer
nicht rauchen
nicht in geschlossenen Räumen tanken.
1
1,2 l
max.
•
•
•
Honda GX 100_15
1)
Honda GX 100_02
Motor nicht ohne Luftfilter laufenlassen, dies führt
zu beschleunigtem Motorverschleiß.
Achtung
•
•
•
•
•
2
Keinen Staub in den Vergaser gelangen lassen.
Gefahr von Motorschäden.
Schrauben (1) herausdrehen und Filterdeckel (2) abnehmen.
Schaumstoffelement (3) aus dem Filterdeckel herausnehmen
Papierelement (4) aus dem Filtergehäuse (5) entnehmen.
Gefahr
Umgebung des Kraftstoffeinfüllstutzens reinigen
Zur Reinigung des Luffiltereinsatzes niemals
Benzin oder Reinigungslösungen mit niedrigem
Flammpunkt verwenden. Brand- und Explosionsgefahr!
Kraftstoffeinfüllstutzen öffnen,und
Schaumstoffelement reinigen:
Kraftstoffstand durch Sichtkontrolle prüfen
•
In warmem Seifenwasser reinigen, gründlich mit Wasser
abspülen und trocknen lassen.
Oder
ggf. Kraftstoff1) nachfüllen
Tankverschluß fest schließen
Normalbenzin bleifrei nach EN 228
•
Mit nichtbrennbarem Lösungsmittel reinigen und trocknen
lassen.
Papierelement reinigen:
5.5.2 Motorölstand prüfen
•
Papierelement leicht gegen harte Unterlage klopfen, um
hartnäckige Verschmutzungen zu entfernen.
Oder
max.
1
min.
•
Mit Druckluft (max. 2 bar) von der sauberen, zum Motor
gerichteten Seite ausblasen.
•
Verschmutzungen am Filterdeckel und -gehäuse mit einem
feuchten Lappen entfernen. Unbedingt beachten, dass dabei
kein Schmutz in die Luftkammer zum Vergaser gelangt.
•
Filterelemente (3+4) einsetzen, Deckel (2) anbringen und
Schrauben (1) festziehen.
Bei starkem Staubgehalt der Ansaugluft
Filtereinsatz ggf. mehrmals täglich reinigen.
Hinweis
Honda GX 100_01
•
•
•
•
•
•
Vibrationsplatte waagerecht abstellen
Öleinfüllstutzen (1) öffnen
Ölstand prüfen
und evtl. bis zum Rand des Einfüllstutzens (max.) auffüllen
Dichtung am Peilstab prüfen, ggf. ersetzen
Öleinfüllstutzen verschließen
12
den
5. Wartung
5.6 Wartung Maschine
5.6.5 Keilriemen prüfen, spannen
5.6.1 Reinigung
Die Maschine täglich reinigen.
Achtung
X » 15 mm
2
Nach der Reinigung alle Kabel, Schläuche,
Leitungen und Verschraubungen auf Undichtigkeiten, lockere Verbindungen, Scheuerstellen und sonstige Beschädigungen überprüfen.
1
Festgestellte Mängel sofort beheben.
3
Zur Reinigung keine brennbaren oder agressiven
Stoffe verwenden.
2
5.6.2 Anziehdrehmomente
ø
10.9
8.8
12.9
B1033004.cdr
Nm
ft lb
Nm
ft lb
Nm
ft lb
M4
3
2
4,4
3
5
4
M5
6
4
8,7
6
10
7
M6
10
7
15
11
18
13
M8
25
18
36
26
43
31
M 10
49
36
72
53
84
61
M 12
85
62
125
92
145
106
M 14
135
99
200
147
235
173
M 16
210
154
310
228
365
269
M 18
300
221
430
317
500
368
M 20
425
313
610
449
710
523
M 22
580
427
830
612
970
715
M 24
730
538
1050
774
1220
899
•
•
Keilriemenschutz abbauen
•
•
Befestigungsmuttern (2) der Gummipuffer lösen.
Zustand und Spannung des Keilriemens (1) prüfen, beschädigten Keilriemen auswechseln.
Durch Verschieben der Motorkonsole (3) Keilriemen spannen.
Hinweis
Beachten, dass sich die Konsole (3) verschiebt und
nicht nur die Puffer gedehnt werden. In diesem Fall die
Puffer durch leichte Hammerschläge nach vorn
klopfen.
Durchdrückmaß X: ca. 15 mm
Festigkeitsklassen für Schrauben mit unbehandelter,
ungeschmierter Oberfläche.
Die Werte ergeben eine 90 %ige Ausnutzung der Streckgrenze;
bei einer Reibungszahl µges = 0,14.
Das
Einhalten
der
Anziehdrehmomente
wird
mit
Drehmoment-Schlüsseln kontrolliert.
Bei Verwendung von Schmiermittel MoS2 gelten die
angegebenen Werte nicht.
•
•
•
Auf gleiche Vorspannung der Puffer achten.
•
Keilriemenschutz montieren.
Gummipuffer festschrauben.
Antrieb von Hand durchdrehen und Durchdrückmaß erneut
kontrollieren, ggf. korrigieren.
Motor nicht ohne
Verletzungsgefahr!
Keilriemenschutz
starten.
Gefahr
•
Selbstsichernde Muttern nach jeder Demontage
erneuern.
Hinweis
5.6.3 Schraubverbindungen
Bei Vibrationsgeräten ist es wichtig, in Abständen die
Schraubverbindungen
auf
festen
Sitz
zu
prüfen.
Anziehdrehmomente beachten.
5.6.4 Gummipuffer prüfen
Gummipuffer auf Risse und Ausbrüche sowie festen Sitz prüfen,
bei Beschädigungen sofort auswechseln.
13
Nach ca. 25 Betriebsstunden Keilriemenspannung nochmals
prüfen, ggf. nachspannen.
5. Wartung
5.6.6 Erreger: Ölwechsel/Ölstand
1
B1030005.cdr
Ölwechsel bei warmem Getriebeöl durchführen.
Hinweis
•
•
Ölablassschraube (1) lösen und herausdrehen.
Altöl ablassen.
Vorsicht beim Ablassen von heißem Öl: Verbrühungsgefahr!
Gefahr
Auslaufendes Öl auffangen und umweltfreundlich
entsorgen.
Umwelt
Nach dem Ablassen des Altöls:
•
Neues Getriebeöl einfüllen;
Ölmenge u. -qualität: siehe Schmierplan.
0.5 l
API SG-CE
SAE 10W40
max
min
1
B1033006.cdr
•
Der Ölstand muß mindestens bis an die Unterkante des
Gewindes (min) reichen.
•
Ölablassschraube
verwenden.
einschrauben;
neuen
Dichtring
14
6. Hilfe bei Störungen
6.1 Allgemeine Hinweise
•
•
•
Sicherheitsbestimmungen beachten.
Immer zuerst die am besten zugänglichen, bzw. deren
Prüfung am einfachsten ist, Ursachen überprüfen
(Sicherungen, Leuchtdioden usw.).
•
Nicht mit umlaufenden Teilen in Berührung kommen.
•
Bei Störungen nochmals in der Betriebs- und Wartungsanleitung über richtige Bedienung und Wartung
nachlesen.
•
Können Sie die Störungsursache nicht selbst erkennen
oder beseitigen, wenden Sie sich bitte an eine
Ammann-Service Niederlassung.
Reparaturarbeiten dürfen nur qualifizierte und dazu
beauftragte Personen durchführen.
6.2 Störungstabelle
Mögliche Ursache
Abhilfe
Bemerkungen
Motor springt nicht an
Kraftstoffmangel
Kraftstoff nachfüllen
Kraftstoffhahn geschlossen
Kraftstoffhahn auf «OPEN» stellen
Keine Kraftstoffversorgung am
Vergaser
Überprüfen
Motorschalter auf «OFF»
Motorschalter auf «ON» stellen
Keine Funkenbildung an der
Zündkerze
Überprüfen
Zur Überprüfung Ablassschraube am
Vergaser lösen (Kraftstoffhahn auf «OPEN»)
Kerzenstecker entfernen. Zünkerzenbasis
reinigen
Zündkerze in den Kerzenstecker einsetzen.
Seitenelektrode der Zündkerze an eine
beliebige
Stelle
des
Motors
halten,
Starterseilzug
herausziehen
und
auf
Funkenbildung prüfen.
Honda GX 100_10
Keine Funkenbildung ð Kerze auswechseln
Funkenbildung ð Kerze einschrauben und
Motor versuchen zu starten
Wenn der Motor immer noch nicht anspringt, lassen Sie ihn bei einem autorisierten Ammann- oder Honda-Service überprüfen.
Motorleistung lässt nach
Luftfilter verschmutzt
Luftfilter reinigen; ggf. auswechseln
Motor läuft, Gerät bewegt sich nicht vorwärts
Keilriemenspannung zu gering
Keilriemen nachspannen
Keilriemen gerissen
Keilriemen auswechseln
Beläge der Fliehkraftkupplung
verschlissen
Beläge u. Federn ersetzen
15
Ammann-Service
Safety regulations
Operating instructions
AVP 1033
AVP 1040
Foreword
These instructions include:
•
•
•
Safety regulations
Operating instructions
Maintenance instructions
These instructions have been prepared for operation on the
construction site and for the maintenance motorer.
These instructions are intended to simplify operation of the machine and to avoid malfunctions through improper operation.
Observing the maintenance instructions will increase the reliability and service life of the machine when used on the construction site and reduce repair costs and downtimes.
Always keep these instructions at the place of use of the
machine.
Only operate the machine as instructed and follow these instructions.
Observe the safety regulations as well as the guidelines of
the civil motorering trade association „Safety rules for the
operation of road rollers and compactors“ and the pertinent
regulations for the prevention of accidents.
Ammann Verdichtung GmbH is not liable for the function of
themachine when used in an improper manner and for other than
the intended purpose.
Operating errors, improper maintenance and the use of incor- rect
operating materials are not covered by the warranty.
The above information does not extend the warranty and lia- bility
conditions of business of Ammann Verdichtung GmbH.
Please enter (data on machine type plate)
Mach.-type
:______________________
Mach.-No.
:______________________
Engine-type
:______________________
Engine-No.
:______________________
Ammann Verdichtung GmbH
Josef-Dietzgen-Straße 36 • D-53773 Hennef / Postfach 11 63 • D-53758 Hennef
FAX 02242/8802-59 • FAX 02242/8802-89 (Service)
1. Safety regulations
This Ammann machine has been built according to the state Safety information in the operating and maintenance
of the art in compliance with the pertinent rules.
instructions
Nevertheless, these machines can still constitute a hazard
to persons and property if:
The following signs and designations are used in the manual to
designate instructions of particular importance.
• not used for the intended purpose,
Refers to special information on how to use the machine
• not operated by suitably qualified and instructed personnel,
most efficiently.
modified
or
converted
in
an
improper
manner,
•
•
the pertinent safety regulations are not observed
For this reason, any person entrusted with the operation,
maintenance or repair of the machine is obliged to read and
follow the operating instructions and particulary to observe
the safety regulations. If necessary, this must be confirmed
by the signature of the company using the machine.
Furthermore, the following must be made known and
observed:
•
•
•
Important
Refers to special information and/or orders and
prohibitions directed towards preventing damage
Attention
Refers to orders and prohibitions designed to
prevent injury or extensive damage.
Danger
pertinent regulations for the prevention of accidents,
Environment
generally recognised safety rules,
Information on safe and environmentally-friendly
disposal of operating and ancillary agents as well
as replacement parts.
Transporting the machine
country-specific regulations
Only load and transport the machine as specified in the operating
instructions.
This machine is only intended for the compaction of:
Only use suitable means of transport and lifting gear with sufficient bearing capacity!
sand
Attach suitable slinging means to the points of attachment progravel (possibly coarse gravel)
vided.
lean concrete
Only use sturdy loading ramps with sufficient bearing capacity.
asphaltic bitumen-coated gravel (medium and fine grained) The ramp inclination must be flatter than the gradient climbing
ability of the machine.
paving stones
Secure the machine to prevent it from tilting or slipping.
Improper use
It is highly dangerous to walk or stand under suspended loads.
The machine can constitute hazards if not used by instructed Secure the machine on transport vehicles to prevent it from rolpersonnel or for other than the intended purpose.Not be used on ling, slipping and tilting.
hard concrete, hardened bitouminous surfacing or frozen soil.
Normal use
Starting the machine
Who is allowed to operate the machine?
Only suitably qualified, instructed and authorised persons over
18 years of age may operate the machine. Maintenance and
repairs, particularly on the hydraulic system, require special
knowledge and must be undertaken only by qualified personnel.
Conversions and modifications to the machine
Unauthorised modifications and conversion of the machine are
not permitted for safety reasons.
Spare parts and special equipment not delivered by us are also
not approved by us. The installation and/or the use of such parts
can also have a detrimental effect on the operating safety.
The manufacturer disclaims all liability for any damage resulting
from the use of non-original parts or special equipment.
Prior to starting
Familiarise yourself with the operating and control elements and
the mode of operation of the machine and the working environment. This includes, e.g. obstacles in the working area, bearing
capacity of the ground and the necessary safety provisions.
Use personal protective equipment (safety footwear, hearing
protectors, etc.).
Check to ensure that all safety devices are firmly in place.
Do not start the machine if instruments or control devices are
faulty.
Starting
For machines with handstart, only use the safety cranks tested
by the manufacturer, and precisely follow the operating
instructions of the engine manufacturer.
To crank-start diesel engines, note the correct position to the
engine and the correct hand position on the crank.
The handcrank must be turned with maximum force until the
engine starts, otherwise the crank can rebound.
Precisely follow the starting and stopping procedures specified in
the operating instructions and observe indicator lights.
Only start and operate machines with an electrical starter from
the instrument panel.
Starting and operation of the machine in potentially explosives
atmospheres is forbidden!
Starting in enclosed spaces, tunnels, mines or deep ditches
Engine exhaust fumes are highly dangerous!
20
1. Safety regulations
For this reason, when operating the machine in enclosed spaces,
tunnels, mines or deep ditches, it is important to ensure that
there is sufficient air to breath (see UVV „Construction work“,
VBG 37, paragraphs 40 and 41).
Machine control
Before working on hydraulic lines, these must previously be
rendered pressureless. Hydraulic oil discharging under pressure can cause serious injuries.
Work on hydraulic devices must be undertaken only by persons
with a special knowledge of hydraulics and the necessary experience!
Do not adjust pressure relief valves.
Drain hydraulic oil at operating temperature—caution risk of
scalding!
Collect discharging hydraulic oil and dispose of the same in an
environmentally-friendly manner.
Do not start the engine with hydraulic oil drained!
After completing all work (with the system still pressureless),
inspect all connections and bolted connections for leaks.
Inspect all hoses and bolted connections for leaks at regular
intervals and externally visible damage! Rectify any damage
immediately.
Replace externally damaged hydraulic hoselines at regular
intervals (depending on time used), even when no safety-relevant faults are visible.
Inspect the electrical equipment of the machine at regular
intervals. Faults such as loose connections, worn or scorched
cables must be immediately.
Properly refit and inspect all protective devices after maintenance and repairs.
Operating devices which adjust themselves automatically when
released in normal use, must not be locked.
Check protective devices and brakes for proper functioning prior
to operation.
When reversing, particularly on the edges and banks of ditches,
as well as in front of obstacles, the machine operator cannot fall
or be crushed.
Always keep a safe distance away from the edges and banks of
ditches and refrain from any actions which could cause the
machine to topple over!
Always control the machine, so that hand injuries through hard
objects are avoided!
Always ascend slopes carefully in a direct path.
Reverse up steep slopes to prevent the machine from toppling
over on to the machine operator.
If faults on the safety devices or other faults detrimental to the
safe operation of the machine are noticed, operation of the
machine must be stopped immediately and the faults remedied.
When undertaking compaction work in the vicinity of buildings or
above pipelines and similar, check the effect of the vibrations on
the buildings and pipes and stop compaction work if necessary. Testing
Road rollers, trench rollers and vibrating plates must be tested
for safety by an expert depending on the particular application
Park the machine on a firm and level surface.
and operating conditions as required, however at least once a
Shutdown the drive and secure it to prevent accidental move- year.
ment and unauthorised use. If available, close the fuel valve. Do
not place or store equipment with integrated moving gear on the
chassis. The moving gear is intended only for transportation purposes.
Parking the machine
Filling petrol
Only fill petrol with the engine shutdown.
No open fire, do not smoke.
Do not spill any fuel, collect discharging fuel in a suitable container, prevent fuel from seeping into the soil.
Ensure that the filler cap is tight.
Leaky fuel tanks constitute an explosion hazard and must therefore be replaced immediately.
Maintenance and repairs
Observe the maintenance, inspection and adjustments and
intervals specified in the operating instructions, as well as the
information for part replacement.
Maintenance work must be undertaken only by qualified and
authorised persons.
Maintenance and repairs must only be undertaken with the drive
stationary.
Only carry out maintenance and repairs when the machine is
parked on a firm and even surface and is secured to prevent it
from rolling.
When changing larger assemblies and individual components,
only use suitable and perfectly functioning hoisting and lifting
gear with suitable bearing capacity. Attach and secure parts to
lifting gear carefully!
Spare parts must comply with the technical requirements of the
manufacturer. Therefore only use original spare parts.
21
~ 1100
512
~ 920
2. Technical Data
B
341
~ 540
011 31 511.cdr
AVP 1033
1. Dimensions
Working width B
330 mm
2. Weights
Operating weight
54 kg
3. Drive
Motor-type
Honda GX 100
Type of construction
1-cyl-4-stroke gasoline
Power
2.2 kW (3.0 hp)
by speed
3600 1/min
shift in of centrifugal clutch
2000 1/min
Cooling
Air
Fuel capacity
1.2 l
Fuel consumption
0.7 l/h
max. sloping position
20°
max. grade ability
30 %
Drive
via centrifugal clutch and V-belt
22
2. Technical Data
4. Speed
Speed
max. 22 m/min
5. Vibration
Vibration force
10.5 kN
Vibration frequency
100 Hz
6. Working surface
Working surface
0.11 m²
0.136 m²
9.3 N/cm²
7.7 N/cm²
7. Spec. surface pressure
Spec. surface pressure
8. Optional equipment
Water tank 5 l
9. Noise and Vibration data
The following noise and vibration data according to EC Machinery Directive in the version (98/37/EC), was determined, taking into
account the following standards and directives.
In operational use, values can deviate depending on the prevailing conditions.
9.1 Noise data1)
The noise data specified in Appendix 1, sub-clause 1.7.4.f of the EC Machinery Directive is for:
the sound pressure level at the
operator place is LPA
89 dB
Measured sound power level LWA,m
100 dB
Guaranted sound power level LWA,g
105 dB
The noise values were determined, taking into account the following directives and standards:
Directive 2000/14/EC / EN ISO 3744 / EN 500-4
9.2 Vibration data
Hand/arm vibration values according to Appendix 1, sub-clause 3.6.3.a of the EC Machinery Directive:
Weighted effective acceleration of
the upper limbs ahv is
11.1 m/s²
The acceleration value was determined, taking into account the following directives and standards:
EN 500-4 / ISO 2631-1 / DIN EN ISO 5349 / DIN EN ISO 8041 / VDI Directive 2057
1)
Since the permissible noise rating level of 85 dB(A) can be exceeded with this machine, the operator must wear suitable
hearing protection.
23
3. Operation
3.1 Description
3.2 Prior to use
Wear personal hearing protection to prevent
hearing loss!
The AVP 1033 / 1040 is a forward moving vibratory plate that
uses a traction-oscillating system.
The engine drives the vibrator via a centrifugal clutch and V-belt
The machine is suitable for the compaction of sand, gravel
(possibly
coarse
gravel),
lean
concrete,
asphaltic
bitumen-coated gravel (medium and fine grained) and paving
stones.
The machine should not be used on hard concrete
or asphaltic surfacing.
Danger
3.1.1 Equipment list
Danger
Observe operating and maintenance instructions
Read the engine operating instructions. Observe
the information on safety, operation and
maintenance contained in these instructions.
•
•
•
•
•
•
1
4
2
5
3
B1033001
1
2
3
4
5
Observe the safety regulations.
Control arm
Engine
V-belt pulley with centrifugal clutch
Exciter
Base plate
24
Park the machine on level ground
Check the engine oil level
Check fuel level
Top-up missing lubricant according to the lubricant chart
Check screwed connections for tightness
Check the condition of the engine and machine.
3. Operation
3.3 Operation the engine
•
Set the engine switch (4) to «ON»
3.3.1 Starting the engine
•
Turn the fuel valve (1) to «ON»
OFF ON
1
OFF
ON
4
ON
Honda GX 100_05
OFF
•
Pull the starter handle (5) slightly until resistance is
noticeable, then pull firmly
Honda GX 100_14
•
Push the choke lever (2) to «CLOSE»
2
CLOSE
CLOSE
Honda GX 100_06
OPEN
Honda GX 100_03
•
Attention
Set throttle lever (3) to full throttle
5
Do not allow the starter handle (5) to spring back
against the engine. Move the starting cable back
into its initial position manually to prevent the
starter being damaged.
Do not use the choke when the engine is warm or
at high outside tempertures.
min
After the engine has started:
min
max
•
•
•
Set the throtte lever to idling
Allow the engine to warm up for 1 to 2 minutes
Set the choke lever (2) during the warming up phase to
«OPEN»
3.3.2 Switching off the engine
3
max
•
•
•
Set the throttle lever (3) to «min.»
Turn the engine switch (4) to «OFF»
Set the fuel valve (1) to «OFF»
Honda GX 100_04
In case of emergencies, the engine switch should be
turned to «OFF» to switch off the engine.
Important
25
3. Operation
3.4 Operation
•
When the engine responds to brief acceleration, the machine
can be operated.
•
Set the throttle lever to «max.»
min
min
max
3
max
Honda GX 100_04
•
•
Steer the machine by moving the control arm sideways.
To stop the machine, set the throttle lever to «min.».
Attention
Only operate the machine at full throttle and set to
idling when interrupting work for short periods of
time to prevent the centrifugal clutch slipping and
being damaged.
26
4. Transportation
4.1 Transport
3
Secure the machine against slipping and tilting
after loading.
Danger
60 kg
Ensure that no persons are endangered.
Keep the machine horizotnal when loading and
transporting to avoid the discharge of fuel. Spilt
fuel or fuel vapours can ignite or result in
explosion.
As the machine can easily be carried by two
persons, no points of attachment have been
provided. The machine can therefore not be
loaded or lifted with a lifting appliance, due to a
risk of accident.
The machine should only be carried by two adults;
risk of danger to health.
The control arm can be removed for easier transport.
3
B1033003.cdr
•
The machine should be lifted and carried by the handle (3)
provided.
Caution hot engine; risk of burns!
Danger
•
2
1
B1033002.cdr
•
•
•
Remove the folding splint (1).
Pull the control arm (2) outwards slightly and remove.
Reinsert folding splint (1) into the bores to prevent loss.
27
The machine can be transported in the boot of a car.
5. Maintenance
5.1 General notes
Careful maintenance:
ð
increased service life
ð
increased function
ð
reduced downtimes
ð
increased reliability
ð
reduced repair costs
•
•
Observe the safety regulations!
•
The engine and machine should be cleaned thorougly
before carrying out maintenance work.
•
Park the machine on a flat surface and secure it against
rolling away and slipping.
•
Ensure that operating materials and replaced parts are
disposed of safely and in an environmentally - friendly
way.
•
It is essential that short-circuits be prevented in cables
carrying current.
•
When cleaning the machine with a high-pressure water
jet, do not spray the electrical components directly.
•
After washing the components, blow-dry them with
compressed air in order to prevent surface leakage
current and corrosion.
Maintenance works should only be carried out when the
engine is shut off.
5.2 Maintenance schedule
Intervals
Works
daily
Clean machine
l
Check engine oil level1)
l
Change engine oil1)
20 h
50 h
200 h
500 h
as
required
l
À
Check air filter1)
100 h
l
Clean air filter1)
l
l
Change air filter element1) 2)
l
Check/clean spark plug1)
l
Change spark plug1) 2)
l
1)
Check, adj. the valve clearance
l
À
l
Exciter: Check oil level
Exciter: Change oil2)
À
Check rubber buffer
l
Check V-belt
l
Retightened screw connections
À
l
À è first time
1)
Observe the engine manual
2)
or annually
28
l
l
5. Maintenance
5.3 Lubrication schedule
Quantity [l]
Change intervals
[op. hrs.]
Engine
0,4
1001)
Exciter
0,5
2002)
or annually
Lubrication point
1)
2)
Lubricant
Order No.
Engine oil
API SG-CE
SAE 10W40
806 01 100
first time after 20 h
first time after 100 h
5.4 Alternative lubricant schedule
Engine oil
API SG-CE
SAE 10W40
Gear oil in acc.
with JDM J 20 C
Special hydro-oil
ISO-VG 32
Hydr.-oil
HVLP 46
ATF – oil
Fluid HGS
Vitam GF 32
Vitam HF 46
ATF 22
Energol HLP-HM 32
Bartran HV 46
Autran MBX
ARAL
Extra Turboral
SAE 10W40
BP
Vanellus C6 Global Plus Hydraulik TF-JD
SAE 10W40
CASTROL
Tection SAE 10W40
Agri Trans Plus
Hyspin SP 32
Hyspin AVH-M 46
TQ-D
ESSO
Ultra 10W40
Torque Fluid 56
Univis N 32
Univis N 46
ATF 21611 II-D
FINA
a. Kappa FE
b. Kappa Turbo DI
Transfluid AS
a. Hydran TSX 32
2)
b. Biohydran TMP 32
——
Finamatic II D
FUCHS
Titan Unic MC
Agrifarm UTTO MP
a. Renolin ZAF 520
2)
b. Plantohyd 32 S
Renolin B 46 HVI
Titan ATF 3000
KLEENOIL
PANOLIN
——
Panolin HLP Synth 322)
——
——
MOBIL
a. Delvac SHC
a. Mobilfluid 424
b. Mobil Super M 10W40 b. Mobilfluid 426
1)
c. Mobil Super S 10W40
Mobil DTE 24
Univis N 46
ATF 220
SHELL
Engine Oil DG 1040
Tellus T32
Tellus T 46
a. Donax TA
b. Donax TX
TOTAL
Rubia Polytrafic 10W-40 Transmission MP
Azolla ZS 32
Equivis ZS 46
Fluide ATX
1)
2)
——
Donax TD
Semi-synthetic light-duty oils
Biological multi-purpose hydraulic-oils;
The miscibility and compatibility with mineral oil based hydraulic oils and biological hydraulic-oils should be examined in the individual case.
The residual mineral oil content should be reduced acc. to VDMA specification 24 569.
TAB01003_GB.cdr
29
5. Maintenance
5.5 Engine maintenance
Attention
5.5.3 Cleaning the air filter element
These operating instructions only contain
information on daily engine maitenance work.
Observe the engine operating instructions and the
notes on maintenance and intervals contained in
the same.
5
4
3
5.5.1 Refilling fuel
Only fill fuel with the engine switched off.
Danger
No naked flame.
No smoking!
Do not fill fuel in enclosed areas.
1
1,2 l
max.
•
•
•
Remove foam element (3) from the filter cover.
Remove paper element (4) from filter housing (5)
Danger
Clean the area around the fuel filler cap.
Prevent dust entering the carburettor to avoid
engine damage.
Unscrew screws (1) and remove filter cover (2).
Honda GX 100_15
1)
Honda GX 100_02
Do not let the engine run without air filter to avoid
premature wear.
Attention
•
•
•
•
2
Never use petrol or cleaning solutions with a low
flash point for cleaning the filter element; fire and
explosion hazard!
Cleaning the foam element:
Open the fuel filler cap and check fuel level visually
•
Top up fuel1) if necessary.
Close fuel filler cap tightly
Unleaded fuel according to EN 228
Clean with warm soapy water, rinse thoroughly with water and
allow to dry.
Or
•
Clean with a non-flammable solvent and allow to dry.
Cleaning the paper element:
5.5.2 Checking the engine oil level
•
Tap the paper element lightly against a hard surface to
remove stubborn dirt.
Or
max.
1
•
Blow out with compressed air (max. 2 bar) from the clean side
facing towards the engine.
•
Remove dirt on the filter cover and housing with a most cloth
ensuring that no dirt is able to enter the air chamber to the
carburettor.
•
Insert filter elements (3+4), fit cover (2) and tighten screws (1).
min.
Important
Honda GX 100_01
Place the vibratory plate horizontal
Open the fuel filler cap (1).
Check the oil level and fill to the edge of the fuel filler cap (max.) if
necessary.
Check the dipstick seal and replace if necessary.
Close the fuel filler cap.
30
If the intake air has a high dust content, the filter
element should be cleaned several times a day as
required.
5. Maintenance
5.6 Machine maintenance
5.6.5 Checking and tensioning the V-belt
5.6.1 Cleaning
The machine should be cleaned daily.
Attention
X » 15 mm
2
After cleaning the machine, check all cables,
hoses, pipes and unions for leaks, loose
connections, chafe marks and other damage.
1
Rectify any noticed defects immediately.
Do not use any flammable or aggressive materials
for cleaning purposes.
3
5.6.2 Tightening torques
ø
8.8
10.9
2
12.9
Nm
ft lb
Nm
ft lb
Nm
ft lb
M4
3
2
4,4
3
5
4
M5
6
4
8,7
6
10
7
M6
10
7
15
11
18
13
M8
25
18
36
26
43
31
M 10
49
36
72
53
84
61
M 12
85
62
125
92
145
106
M 14
135
99
200
147
235
173
M 16
210
154
310
228
365
269
M 18
300
221
430
317
500
368
M 20
425
313
610
449
710
523
M 22
580
427
830
612
970
M 24
730
538
1050
774
1220
B1033004.cdr
•
•
The remove the V-belt guard
•
•
Loosen rubber buffer fixing nuts (2)
Check the condition and tension of the V-belt (1), replace
damaged V-belts
Tension the V-belt by shifting the engine bracket (3)
Important
To be noted is that the bracket (3) moves and not only
the buffers are elongated. In this case, the buffers
should be tapped forward lightly with a hammer.
Deflection X: About 15 mm
Ensure uniform buffer tension
715
•
•
•
899
•
Fit V-belt guard
Strength classes for all bolts with untreated, non-lubricated
surfaces.
The values indicate 90% utilisation of the tesile yield strength; at
a friction coefficient of μ—- = 0.14.
Tighting torques can be verified with torque wrenches.
The specified values do not apply when using lubricant MoS2.
Tighten rubber buffers
Crank the drive manually, recheck deflection and correct if
necessary
Do not start engine without V-belt guard, risk of
injury.
Danger
•
Renew self-locking nuts after each disassembly.
Important
5.6.3 Bolted connections
When using vibrating machines, it is important that the bolted
connections are checked for tighteness at regular intervals.
Observe tightening torques.
5.6.4 Checking rubber buffers
Check rubber buffers for cracks and other damage as well as for
tighteness and replace immediately if damaged.
31
After about 25 operating hours, recheck the V-belt tension and
retension if necessary.
5. Maintenance
5.6.6 Exciter: Oil change/oil level
1
B1030005.cdr
Oil changes should be carried out with the gear oil
warm
Important
•
•
Loosen oil drain plug (1) and unscrew
Drain old oil
Caution when draining hot oil, risk of scalding!
Danger
Collect discharging oil and dispose of in an
environmentally friendly manner.
Environment
•
•
After draining the old oil:
Fill new gear oil; oil capacity and quality: see lubrication
schedule
0.5 l
API SG-CE
SAE 10W40
max
min
1
B1033006.cdr
•
•
The oil level must reach to the lower edge of the thread (min.)
Screw in oil drain plug, use a new sealing ring.
32
6. Troubleshooting
6.1 General information
•
•
Observe the safety information
•
In case of faults, the operating and maintenance
instructions must be referred to for correct operation and
maintenance.
•
If the cause of the fault cannot be located or remedied, an
authorised Ammann Service Centre should be contacted.
•
Always first check the most likely causes (fuses, LEDs,
etc.)
Only qualified and authorised persons may carry out
repair work
6.2 Fault table
Possible cause
Remedy
Remarks
Engine does not start
Fuel deficiency
Refill fuel
Fuel valve closed
Set fuel valve to «OPEN»
No fuel supply at carburettor
Check
Engine switch set to «OFF»
Set engine switch to «ON»
No spark at spark plug
Check
To check, loosen drain screw on carburettor
(fuel valve set to «OPEN»)
Remove plug connector. Clean base of spark
plug.
Fit spark plug in plug connector.
Hold side electrode of spark plug against any
point of the engine, pull out the starter cable
and check for spark information.
Honda GX 100_10
No spark ð replace plug
Spark ð fit plug and attempt to start engine
If the engine still does not start, contact an authorised Ammann or Honda Service Centre.
Reduced engine performance
Air filter clogged
Clean air filter; replace if necessary
Engine runs, machine does not move forward
Insufficient V-belt tension
Retention V-belt
V-belt broken
Replace V-belt
Centrifugal clutch lining worn
Replace linings and springs
33
Ammann-Service
Consignes de sécurité
Mode d’emploi
AVP 1033
AVP 1040
Préface
Ces instructions comprennent:
•
•
•
Des consignes de sécurité
Des instructions de service
Des instructions de maintenance
Ces instructions ont été écrites pour le conducteur sur le
chantier et pour la personne chargée de la maintenance.
L’utilisation de ces instructions facilite la familiarisation avec la
machine et évite des défaillances dues à une manipulation incorrecte.
Le respect des instructions de maintenance et de réparation accroît la fiabilité de la machine lors de son utilisation sur le chantier, augmente la durée de vie de la machine et réduit les coûts
des réparations et les temps d’immobilisation.
Conservez toujours ces instructions sur le lieu d’utilisation
de la machine.
Ne conduisez la machine qu’après avoir reçu des directives
et respectez ces instructions.
Respectez absolument les cnsignes de sécurité, ainsi que
les directives de l’association professionelle du génie civil
„Règles de sécurité pour le fonctionnement de rouleaux
compresseurs et de compacteurs” et les prescriptions de
prévention des accidents.
Ammann Verdichtung GmbH n’assume aucune responsabilité
pour le fonctionnement de la machine en cas de manipulation non
conforme à l’utilisation habituelle, ainsi qu’en cas d’utili- sation de
la machine de manière non conforme à sa destination.
Vous ne bénéficiez d’aucune garantie en cas d’erreurs de manipulation, de maintenance insuffisante et de carburants non adaptés.
Les conditions de garantie et de responsabilité des conditions
générales de vente d’Ammann Verdichtung GmbH ne sont pas
somplétées par les indications susmentionnées.
Compléter S.V.P. (consulter la plaque de la machine)
Type de mach. :___________________
No.de mach.
:___________________
Type de mot.
:___________________
No.de mot.
:___________________
Ammann Verdichtung GmbH
Josef-Dietzgen-Straße 36 • D-53773 Hennef / Postfach 11 63 • D-53758 Hennef
FAX 02242/8802-59 • FAX 02242/8802-89 (Service)
1. Consignes de sécurité
Cette machine Ammann est conformé à l’état actuel et aux Indications relatives à la sécurité dans les instrucrègles valides de la technique. Cette machine peut cepentions de fonctionnement et de maintenance
dant être source de dangers pour les personnes et les biens
corporels:
Dans l’instructions de service, les symboles suivants sont utilisés pour des indications particulièrement importantes:
• si elle n’est pas utilisée conformément à sa destination
Les indications particulières suivantes concernent
• si elle est conduite par du personnel n’ayant pas reçu
l’exploitation économique de la machine.
d’instructions ou non approprié
•
•
Important
si elle est modifiée ou transformée de manière non adéquate
si les consignes de sécurité ne sont pas respectées
Pour cette raison, toute personne chargée de conduire la
machine, d’assurer sa maintenance ou de la réparer doit lire
les instructions de service, particulièrement les consignes
de sécurité, et les respecter. Le cas échéant, ceci doit être
confirmé par l’entreprise qui utilise la machine par le biais
d’une signature.
De plus, l’attention doit être attirée sur
•
•
•
•
les prescriptions de prévention des accidents afférentes
Les indications ou obligations et interdictions
suivantes concernent la prévention des risques.
Attention
Danger
Environnement
les règles techniques de sécurité généralement reconnues
Les obligations et interdictions suivantes
concernent la prévention de dommages corporels
ou de dégâts matériels importants.
Indications relatives à l’élimination sûre et respectueuse de l’environnement de carburants et de
matières consommables secondaires ainsi que de
pièces de rechange.
Transport de la machine
les prescriptions spécifiques au pays d’utilisation,
La machine peut cependant être source de dangers si elle est
utilisée ou si elle est mal conduite par du personnel n’ayant pas
reçu d’instructions ou si elle est utilisée d’une manière non
conforme à sa destination.
Ne pas travailler sur du béton dur, un revêtement en bitume non
pris ou du sol très gelé.
Ne transporter et charger la machine que conformément aux
instructions de service!
N’utiliser que des moyens de transport et de levage dont la force
portante est suffisante!
Fixer des moyens d’arrêt adaptés aux emplacements d’arrêt
prévus à cet effet.
N’utiliser que des rampes de chargement stables dont la force
portante est suffisante. L’inclinaison de la rampe doit être
inférieure que la possibilité de montée de la machine.
Assurer la machine afin qu’elle ne puisse ni se renverser ni
glisser.
Les personnes qui se rendent ou se trouvent sous des charges
suspendues sont en danger de mort.
Sur les véhicules de transport, assurer la machine afin qu’elle ne
puisse ni rouler, ni glisser, ni se reverser.
Qui peut conduire la machine?
Démarrage de la machine
et ces dernières doivent être respectées
Utilisation conforme à la destination
La machine sert à compacter du sable, du gravier
(éventuellement du gravier grossier), du béton maigre, du
gravier bitumineux (à grain moyen et fin) et des pavés en pierre
mixte.
Utilisation non conforme à la destination
Seules des personnes adéquates âgés de plus de 18 ans, ayant
reçu des instructions et en ayant été chargés sont autorisées à
conduire la machine. La maintenance et la réparation, en
particulier de l’installation hydraulique, néces- sitent des
connaissances particulières et ne doivent être effectuées que
par du personnel spécialisé.
Avant le démarrage
Se familiariser avec les éléments de manipulation et de
commande, ainsi qu’avec le mode de fonctionnement de la
machine et l’environnement de travail. Ceci concerne par ex. les
obstacles présents dans la zone de travail, la portance du sol et
les dispositifs de sécurité nécessaires.
Utiliser l’équipement personnel de protection (chaussures de
Transformations et modifications sur la machine
sécurité, casque de protection contre le bruit etc.).
Pour des raisons de sécurité, il est interdit de procéder de son
Vérifier que tous les dispositifs de protection sont bien en place.
propre chef à des modifications, à des ajouts et à des
Ne pas démarrer une machine dont les instruments ou les
transformations sur la machine.
organes de commande sont défectueux.
Les pièces de rechanges ou équipements spéciaux non livrés
par nos soins ne sont pas autorisés. Le montage et/ou Démarrage
l’utilisation de telles pièces peut également altérer la sécurité de Pour les machines à démarrage manuel, n’utiliser que les
fonctionnement.
manivelles de sécurité contrôlées par le fabricant et respecter les
En cas de dommage dus à l’utilisation de pièces ou d’équipe- instructions de service du fabricant de moteur.
ments spéciaux non originaux, toute responsabilité du fabricant Pour le démarrage à la manivelle de moteurs diesel, veiller à la
est exclue.
position correcte par rapport au moteur et à la position correcte
de la main sur la manivelle.
Bien tirer de toutes ses forces sur la manivelle jusqu’à ce que le
moteur se soit mise en marche, étant donné que sinon il peut y
avoir un retour de manivelle.
Ne démarrer et conduire les machines à démarrage électrique
qu’à partir du tableau de commande.
Le démarrage et l’exploitation de la machine dans des
environnements où il y a danger d’explosion est interdit!
37
1. Consignes de sécurité
Démarrage dans des espaces clos, des tunnels, des
galeries ou des fossés profonds
Les gaz d’échappement du moteur mettent la vie en danger!
Pour cette raison, lors du fonctionnement dans des espaces
clos, des tunnels, des galeries ou des fossés profonds, il faut
s’assurer qu’il y a assez d’air à respirer non nocif pour la santé
(voir prescriptions de prévention des accidents du travail
“Travaux de construction”, VBG 37 §§40 et 41).
Conduite de la machine
Les équipements de conduite qui se règlent automatiquement
lorsqu’on les lâche, conformément à leur destination, ne doivent
pas être fixés.
Vérifier l’efficacité des équipements de protection et des freins
avant la mise en marche.
En cas de marche arrière, en particulier au bord de fossés et sur
des terrasses, ainsi que devant des obstacles, conduire la
machine de manière à ce que tout danger de chute ou de
coincement du conducteur soit exclu.
Toujours rester à une distance suffisante des bords des
fondements et des talus et ne jamais travailler d’une manière qui
altère la stabilité de la machine!
Toujours conduire la machine de manière à éviter que les mains
soient blessées par des objets fixes.
Sur les pentes, rouler prudement et toujours directement vers le
haut.
Prendre les montées importantes en marche arrière afin
d’exclure un renversement de la machine sur le conducteur de la
machine.
Si des défauts des équipements de sécurité ou d’autres défauts
qui altèrent le fonctionnement sûr la machine sont constatés, le
fonctionnement de la machine doit être immédiatement
interrompu et le défaut éliminé.
Lors de travaux de compression à proximité de bâtiments ou
au-dessus de conduites et d’équipements semblables, vérifier
l’effet de la vibration sur le bâtiment ou les conduites et
interrompre le travail de compression si nécessaire.
Stationnement de la machine
Dans la mesure du possible, placer la machine sur un sol plan et
solide, arrêter l’entraînement, assurer contre tout mouvement
non voulu et contre toute utilisation par des personnes non
autorisées.
Le cas échéant, fermer le robinet de carburant. Ne pas placer ou
stocker les appareils qui ont un dispositif de roulement intégré
sur le mécanisme de roulement. Le dispositif de roulement est
uniquement destiné à transporter l’appareil.
Approvisionnement en combustible
Ne procéder à l’approvisionnement en combustible si le moteur
arrêté.
Pas de feu découvert, ne pas fumer.
Ne pas renverser de carburant. Récupérer le carburant qui
s’écoule, ne pas le laisser s’enfoncer dans le sol.
Veiller à ce que le couvercle du réservoir soit bien en place et
étanche.
Des réservoirs de carburant non étanches peuvent être à
l’origine d’explosions et doivent donc être immédiatement
remplacés.
des pièces doivent être respectés.
Les travaux de maintenance ne doivent être exécutés que par
des personnes qualifiées qui ont été chargées.
Les travaux de maintenance et de réparation ne doivent être
effectués qu’entraînement arrêté.
Les travaux de maintenance ne doivent être exécutés lorsque la
machine est placée sur un sol plan et résistant à l’écrasement et
assurée contre le roulement.
Lors du remplacement de sous-groupes assez importants et de
pièces détachées, n’utiliser que des moyens de levage ainsi que
de suspension des charges adéquats et en parfait état technique
de capacité suffisante. Fixer les pièces soigneusement aux
moyens de levage et les assurer!
Les pièces de rechange doivent être conformes aux exigences
techniques fixées par le fabricant. Pour cette raison, n’utiliser
que des pièces de rechange originales.
Avant de travailler sur des conduites hydrauliques, celles-ci
doivent être exemptes de pression. De l’huile hydraulique
s’échappant sous pression peut provoquer des blessures
graves.
Des travaux sur les équipements hydrauliques ne peuvent être
effectués que par des personnes bénéficiant de connaissances
et d’expérience spéciales dans le domaine de l’hydraulique!
Ne pas modifier le réglage des soupapes de surpression.
Vidanger l’huile hydraulique à la température de fonctionnement - Risque de s’échauder!
Récupérer l’huile hydraulique qui s’échappe et l’éliminer de
manière écophile.
Ne démarrer le moteur sous aucun prétexte lorsque l’huile
hydraulique a été vidangée.
Après tous les travaux (l’installation étant toujours exempte de
pression), contrôler l’étanchéité de tous les raccords et raccords
vissés.
Tous les tuyaux et raccords vissés doivent être régulièrement
vérifiés, afin de détecter des fuites et des dommages visibles!
Remédier immédiatement tous les dommages.
En cas de dommages apparents ou, plus généralement, à
intervalles réguliers (en fonction de la durée d’utilisation),
remplacer les conduites de tuyaux hydrauliques, même si aucun
défaut altérant la sécurité n’est reconnaissable.
Avant de travailler sur les installations électriques de la machine,
la batterie doit être débranchée, elle doit en outre être recouverte
d’un matériau isolant ou la démontée.
Vérifier régulièrement l’équipement électrique de la machine.
Les défauts comme des liaisons relâchées, des emplacements
présentant des traces de frottement et/ou des câbles carbonisés doivent être immédiatement éliminés.
Remettre correctement en place et vérifier tous les dispositifs de
protection après les travaux de maintenance et de réparation.
Contrôle
La sécurité des rouleaux compresseurs, des rouleaux de
tranchées et des plaques vibrantes doit être contrôlée par un
expert en fonction des besoins, conformément aux conditions
d’utilisation et d’exploitation, mais cependant une fois par an au
minimum.
Travaux de maintenance et de réparation
Les activités de maintenance, d’inspection et de réglage
prescrites dans les instructions de services, les intervalles
d’exécution ainsi que les indications relatives au remplacement
38
~ 1100
512
~ 920
2. Caractéristiques techniques
B
341
~ 540
011 31 511.cdr
AVP 1033
AVP 1040
330 mm
400 mm
54 kg
57 kg
1. Dimension
Largeur de travail B
2. Poids brut
Poids brut
3. Entraînement
Moteur-type
Honda GX 100
Construction, moteur
1-cyl-4-temps Benzin
Puissance
2.2 kW (3.0 CV)
à
3600 1/min
Nombre à l’entraînement de l’embrayage
Centrifuge
2000 1/min
Refroidissement
aire
Content de réservoir de carburant
1.2 l
Consommation carburant
0.7 l/h
Inclinée max.
20°
Possibilité de montée max.
Entraînement
30 %
par embrayage centrifuge et courroie trapézoïdale
39
2. Caractéristiques techniques
4. Vitesse avant
Vitesse avant
max. 22 m/min
5. Vibration
Force vibratoire totale
10.5 kN
Fréquence vibratoire
100 Hz
6. Surface de compactage
Machine de base
0.11 m²
0.136 m²
9.3 N/cm²
7.7 N/cm²
7. Pression spec. au sol
Pression spec. au sol
8. Accessoires spéciaux
Arrosage d’eau 5 l
9. Indications relatives au bruit et aux vibrations
Les indications relatives au bruit et aux vibrations mentionnées ci-dessous conformément à la directive CE sur les machines dans
sa version (98/37/CE) ont été déterminées en tenant compte, entre autres, des normes et directives harmonisées.
Les valeurs peuvent diverger en fonction des conditions qui règnent pendant l’exploitation.
L’indication de bruit exigée conformément à l’annexe 1, paragraphe 1.7.4.f de la directive CE sur les machines est de :
Niveau de pression acoustique au poste
de conduite LPA
89 dB
Niveau de puissance de son LWA,m
100 dB
Niveau de puissance de son garanti LWA,g
105 dB
Les valeurs de bruit ont été déterminées en tenant compte des directives et normes suivantes :
directive 2000/14/CE / EN ISO 3744 / EN 500-4
9.2 Indication de vibration
L’indication des valeurs de vibration main/bras exigée conformément à l’annexe 1, paragraphe 3.6.3.a de la directive CE sur les
machines :
Valeur effective pondérée de l’accélération des membres supérieurs ahv est de
11.1 m/sec²
La valeur d’accélération a été déterminée en tenant compte des directives et normes suivantes :
EN 500-4 / ISO 2631-1 / DIN EN ISO 5349 / DIN EN ISO 8041 / directive VDI 2057
*Etant donné qu’avec cette machine le niveau sonore d’évaluation admissible de 85 dB(A) peut être dépassé, le
conducteur devra porter un casque de protection contre le bruit.
40
3. Mise en oeuvre
3.1 Description
3.2 Avant la mise en service
Utiliser les équipements personnels antibruit –
perte de l’acuité auditive !
L’AVP 1033 / 1040 est une plaque vibrante qui fonctionne selon
le système de vibration par traction. Cela signifie que la plaque
ne se déplace que vers l’avant.
Le moteur entraîne le vibreur par le biais d’un embrayage
centrifuge et d’une courroie trapézoïdale.
La machine sert à compacter du sable, du gravier
(éventuellement du gravier grossier), du béton maigre, du
gravier bitumineux (à grain moyen et fin) et des pavés en pierre
mixte.
Ne pas travailler sur du béton dur ou sur un
revêtement en bitume qui a déjà pris.
Danger
3.1.1 Vue d’ensemble de la machine
1
4
2
5
3
Danger
Respecter les instructions de service et de
maintenance.
Lire les instructions de service du moteur.
Respecter les indications relatives à la sécurité, à
la conduite et à la maintenance qu’elles
contiennent.
•
•
•
•
Placer la machine sur un sol plan.
•
•
Contrôler le bon serrage des raccords vissés.
B1033001
1
2
3
4
5
Respecter les consignes de sécurité.
Timon
Moteur
Poulie à courroie trapézoïdale avec embrayage centrifuge
Excitateur
Plaque de base
41
Contrôler le niveau d’huile du moteur.
Contrôler la réserve de carburant.
Compléter les lubrifiants manquants conformément au
tableau des lubrifiants.
Contrôler l’état du moteur et de la machine.
3. Mise en oeuvre
3.3 Utilisation du moteur
•
Placer l’interrupteur de démarrage (4) sur « ON ».
3.3.1 Faire démarrer le moteur
•
Placer le robinet de carburant (1) sur « ON ».
OFF ON
1
ON
4
ON
Honda GX 100_05
OFF
•
Honda GX 100_14
•
OFF
Tirer légèrement sur la poignée du démarreur (5) jusqu’à ce
qu’une résistance soit sensible puis tirer dessus
énergiquement.
Pousser le levier d’étrangleur (2) sur « CLOSE ».
2
CLOSE
CLOSE
OPEN
Honda GX 100_06
Honda GX 100_03
•
Placer le levier des gaz (3) sur plein régime.
Attention
min
max
Honda GX 100_04
Ne pas laisser la poignée de démarrage (5)
rebondir contre le moteur. Ramener le câble de
démarrage dans sa position initiale à la main, afin
d’éviter d’endommager le démarreur.
Ne pas utiliser le levier d’étrangleur (2) si le
moteur est chaud ou si la température extérieure
est élevée.
min
3
5
max
Après le démarrage du moteur :
•
•
•
placer le levier de régime sur marche à vide.
faire chauffer le moteur pendant 1 à 2 minutes
pousser le levier d’étrangleur (2) sur « OPEN » pendant
l’échauffement.
3.3.2 Arrêter le moteur
•
•
•
Placer le levier des gaz (3) sur « min ».
Tourner l’interrupteur de démarrage (4) sur « OFF »
Placer le robinet de carburant (1) sur « OFF ».
En cas d’urgence, arrêter le moteur en plaçant
l’interrupteur de démarrage sur « OFF ».
Important
42
3. Mise en oeuvre
3.4 Fonctionnement
•
Dès que le moteur réagit à un bref actionnement des gaz, la
machine peut être mise en service.
•
Placer le levier des gaz sur « max ».
min
min
max
3
max
Honda GX 100_04
•
Guider la machine par le timon et la diriger en la déplaçant
latéralement.
•
Pour arrêter la machine, placer le levier des gaz sur « min ».
Attention
Ne faire fonctionner la machine qu’à plein régime
et toujours la mettre en marche à vite pendant les
pauses brèves. Risque de dommages de
l’embrayage dus à un frottement de l’embrayage
centrifuge !
43
4. Transport
4.1 Transport
3
Après le chargement, bloquer la machine afin
qu’elle ne puisse ni glisser ni se renverser.
Danger
S’assurer que personne n’est mis en danger.
60 kg
Lors du transport et du chargement, maintenir la
machine horizontale afin d’éviter que du carburant
s’écoule. Du carburant renversé ou des vapeurs
de carburant peuvent s’enflammer ou provoquer
une explosion.
Etant donné que la machine peut facilement être
portée par deux personnes, on a renoncé à
l’équiper de points de suspension. La machine ne
peut donc pas être chargée ou soulevée avec des
engins de levage. Risque d’accident !
Seules deux personnes adultes sont autorisées à
porter la machine. Risques pour la santé !
Le timon peut être enlevé pour faciliter le transport.
3
B1033003.cdr
•
Pour transporter la machine, la soulever et la porter au niveau
des poignées prévues à cet effet (3).
Attention au moteur chaud. Risque de brûlure!
Danger
•
2
1
B1033002.cdr
•
•
•
Retirer les goupilles fendues de rabattement (1).
Tirer légèrement le timon (2) vers l’extérieur et l’enlever.
Insérer à nouveau les goupilles fendues de rabattement (1)
dans les orifices afin de ne pas les perdre.
44
La machine peut être transportée dans le coffre d’une voiture.
5. Maintenance
5.1 Indications générales
•
Maintenance soignée:
Nettoyer soigneusement le moteur et la machine avant
d’effectuer des travaux de maintenance.
•
Placer la machine sur une surface plane, l’assurer de
manière à ce qu’elle ne puisse pas rouler ou glisser.
•
Assurer une élimination des carburants et des pièces
remplacées respecteuse de l’environnement.
•
Eviter absolument des courts-circuits des câbles
conducteurs.
•
Lors du nettoyage de la machine avec un jet d’eau sous
haute pression, ne pas diriger le jet directement sur les
éléments électriques.
•
Après le lavage, sécher les éléments à l’air comprimé afin
d’éviter les courants de fuite superficielle et la corrosion.
ð
ð
ð
ð
ð
durée de vie
plus grande sécurité de fonctionnement
temps d’immobilisation plus reduits
plus grande fiabilité
frais de réparation moins élevés
•
•
Respecter les consignes de sécurité!
•
Débrancher les cosses des bougies d’allumage des
moteurs à essence.
N’effectuer de travaux de maintenance que lorsque le
moteur est arrêté.
5.2 Vue d’ensemble de la maintenance
Intervalles
Travaux
quotidien
20 h
50 h
100 h
200 h
500 h
si nécessairef
l
Nettoyer la machine
Contrôler le niveau d’huile1)
l
1)
Echanger l’huile du moteur
l
À
Contrôler le filtre à air1)
l
Nettoyer le filtre d’huile1)
l
l
Remplacer le filtre à air1) 2)
l
Bougie d’allumage:
nettoyer/vérifier1)
l
Bougie d’allumage: remplacer1) 2)
1)
Contrôler le jeu des soupapes
l
l
À
Excitateur: contrôler le niveau
d’huile
l
Excitateur: echanger l’huile2)
À
Contrôler le tampon en
caoutchouc
l
Contrôler la tension de courroie
trapezoïdale
l
Resserrer les raccord visses
À
l
À è la première fois
1)
Respecter les instructions de service de moteur
2)
1 fois par an au minimum
45
l
l
5. Maintenance
5.3 Tableau de lubrification
Lieu de lubrification
Quantité [l]
Intervalles de
remplacement [h de fct]
0,4
1001)
0,5
2002)
ou 1 fois par an
Moteur
Excitateur
1)
2)
Lubrifiant
Numéro de l’article
Huile moteur
API SG-CE
SAE 10W40
806 01 100
la première fois 20 h de fct.
la première fois 100 h de fct.
5.4 Autres lubrifiants possibles
Huile moteur
API SG-CE
SAE 10W40
Huile à engrenages
selon JDM J 20 C
Huile hydr. spéciale
ISO-VG 32
Huile hydr.
HVLP 46
Huile ATF
Fluid HGS
Vitam GF 32
Vitam HF 46
ATF 22
Energol HLP-HM 32
Bartran HV 46
Autran MBX
ARAL
Extra Turboral
SAE 10W40
BP
Vanellus C6 Global Plus Hydraulik TF-JD
SAE 10W40
CASTROL
Tection SAE 10W40
Agri Trans Plus
Hyspin SP 32
Hyspin AVH-M 46
TQ-D
ESSO
Ultra 10W40
Torque Fluid 56
Univis N 32
Univis N 46
ATF 21611 II-D
FINA
a. Kappa FE
b. Kappa Turbo DI
Transfluid AS
a. Hydran TSX 32
2)
b. Biohydran TMP 32
——
Finamatic II D
FUCHS
Titan Unic MC
Agrifarm UTTO MP
a. Renolin ZAF 520
2)
b. Plantohyd 32 S
Renolin B 46 HVI
Titan ATF 3000
KLEENOIL
PANOLIN
——
Panolin HLP Synth 322)
——
——
MOBIL
a. Delvac SHC
a. Mobilfluid 424
b. Mobil Super M 10W40 b. Mobilfluid 426
1)
c. Mobil Super S 10W40
Mobil DTE 24
Univis N 46
ATF 220
SHELL
Engine Oil DG 1040
Tellus T32
Tellus T 46
a. Donax TA
b. Donax TX
TOTAL
Rubia Polytrafic 10W-40 Transmission MP
Azolla ZS 32
Equivis ZS 46
Fluide ATX
1)
2)
——
Donax TD
Huiles semi-synthétiques
Huile hydraulique biodégradable à base d’ester; l'aptitude au mélange et la compatibilité avec des huiles hydrauliques à base d'huile minérale
devraient être vérifiées au cas par cas. La teneur résiduelle en huile minérale devrait être réduite conformément à la fiche standard
24 569 VDMA (Association Allemande des Constructeurs de Machines et d'Installations).
TAB01003_F.cdr
46
5. Maintenance
5.5 Travaux de maintenance sur le moteur
Attention
Seuls les travaux quotidiens de maintenance du
moteur sont mentionnées dans ces instructions
de service. Respectez les instructions de service
du moteur et les indications et intervalles de
maintenance qui y sont mentionnés.
5.5.1 Ravitaillement en carburant
•
•
Contrôler le niveau d’huile
•
Contrôler le joint d’étanchéité de la jauge de niveau, le
remplacer si nécessaire
•
Fermer la tubulure de remplissage d’huile
Eventuellement ajouter de l’huile jusqu’au bord inférieur de la
tubulure de remplissage (max.)
5.5.3 Nettoyer la cartouche du filtre à air
Ne procéder au ravitaillement en carburant que
moteur arrêté
Danger
5
4
Pas de flamme nue
Ne pas fumer
3
Ne pas effectuer le ravitaillement en carburant
dans des locaux fermés.
1,2 l
max.
1
2
Honda GX 100_02
Ne pas faire fonctionner le moteur sans filtre à air,
ceci accélère l’usure du moteur.
Attention
Honda GX 100_15
•
Nettoyer le pourtour de la tubulure de remplissage du
carburant
•
Ouvrir la tubulure de remplissage du carburant et effectuer un
contrôle visuel du niveau de carburant
•
•
Rajouter du carburant1) si nécessaire
1)
Bien fermer le couvercle du réservoir
Essence normale sans plomb conformément à EN 228
5.5.2 Contrôle du niveau d’huile du moteur
•
•
•
Ne pas laisser de poussière pénétrer dans le
carburateur. Risque de dommages du moteur.
Desserrer les vis (1) et enlever le couvercle du filtre (2)
Retirer l’élément en mousse (3) du couvercle du filtre
Enlever l’élément en papier (4) du logement du filtre (5).
Danger
Ne jamais utiliser d’essence ou de solutions de
nettoyage à point éclair bas pour nettoyer la cartouche filtrante. Risque d’incendie et d’explosion !
Nettoyer l’élément en mousse :
•
Nettoyer dans de l’eau savonneuse
soigneusement à l’eau et laisser sécher.
Ou
chaude,
rincer
• Nettoyer avec un solvant non combustible et laisser sécher.
Nettoyer l’élément en papier :
•
max.
1
Taper légèrement l’élément en papier contre un support dur
afin d’enlever les impuretés tenaces.
Ou
•
Purger à l’air comprimé (2 bars maxi.) du côté propre dirigé
vers le moteur.
•
Enlever les impuretés du couvercle et du logement du filtre
avec un chiffon humide. Veiller absolument à ce que des
impuretés ne pénètrent pas dans le compartiment d’air du
carburateur.
•
Mettre les éléments du filtre (3+4) en place, positionner le
couvercle (2) et serrer les vis (1).
min.
Honda GX 100_01
•
•
Déposer la plaque vibrante sur une surface horizontale
Important
Ouvrir la tubulure de remplissage d’huile (1)
47
Si l’air aspiré contient beaucoup de poussière,
nettoyer la cartouche filtrante plusieurs fois par jour si
nécessaire.
5. Maintenance
5.6 Maintenance de la machine
5.6.5 Contrôler et tendre la courroie trapézoïdale
5.6.1 Nettoyage
2
Nettoyer la machine tous les jours.
Attention
Après le nettoyage, vérifier tous les câbles,
flexibles, conduites et raccords vissés afin de
détecter des fuites, des liaisons mal serrées, des
défauts provoqués par des frottements et d’autres
dommages éventuels.
X » 15 mm
1
Eliminer immédiatement les vices constatés.
3
Ne pas utiliser de substances combustibles ou
corrosives pour le nettoyage.
2
5.6.2 Couples de serrage
ø
8.8
10.9
12.9
B1033004.cdr
Nm
ft lb
Nm
ft lb
Nm
ft lb
M4
3
2
4,4
3
5
4
M5
6
4
8,7
6
10
7
M6
10
7
15
11
18
M8
25
18
36
26
M 10
49
36
72
M 12
85
62
M 14
135
M 16
•
•
Démonter la protection de la courroie trapézoïdale
13
•
43
31
Desserrer les écrous de serrage (2) des tampons en
caoutchouc.
•
53
84
61
Tendre la courroie trapézoïdale en déplaçant la console du
moteur (3).
125
92
145
106
99
200
147
235
173
210
154
310
228
365
269
M 18
300
221
430
317
500
368
M 20
425
313
610
449
710
523
M 22
580
427
830
612
970
715
M 24
730
538
1050
774
1220
899
Contrôler l’état et la tension de la courroie trapézoïdale (1),
remplacer la courroie trapézoïdale endommagée.
Important
Veiller à ce que la console (3) se déplace et à ce que
les tampons ne soient pas seulement tendus. Dans ce
cas, faire avancer les tampons à légers coups de
marteau.
Cote d’enfoncement X : env. 15 mm
Classes de résistances pour les vis à la surface non traitée et
non lubrifiée.
Les valeurs donnent une exploitation à 90 % de la limite
d’élasticité ; pour un coefficient de frottement µtot = 0,14.
Le respect des couples de serrage est contrôlé avec des clés
dynamométriques.
Les valeurs indiquées ne sont pas valable si du lubrifiant MoS2
est utilisé.
•
•
•
Veiller à ce que la précontrainte des tampons soit identique.
•
Monter la protection de la courroie trapézoïdale.
Serrer les vis des tampons en caoutchouc.
Faire tourner l’entraînement à la main et contrôler à nouveau
la cote d’enfoncement, la corriger si nécessaire.
Ne pas faire démarrer le moteur sans protection
de courroie trapézoïdale. Risque de blessure !
Danger
•
Renouveler les écrous autobloquants après chaque
démontage.
Important
5.6.3 Raccords vissés
Sur les machines vibrantes, il est important de contrôler à
intervalles réguliers que les raccords vissés sont bien serrés.
Respecter les couples de serrage.
5.6.4 Contrôle des tampons en caoutchouc
Contrôler les tampons en caoutchouc afin de détecter des
fissures et des creux éventuels et de s’assurer qu’ils sont bien
fixés, les remplacer immédiatement en cas de dommages.
48
Après env. 25 heures de service, contrôler encore une fois la
tension de la courroie trapézoïdale, la retendre si nécessaire.
5. Maintenance
5.6.6 Excitateur : vidange d’huile/niveau d’huile
1
B1030005.cdr
Effectuer la vidange d’huile lorsque l’huile d’engrenage
est chaude.
Important
•
•
Desserrer le bouchon de vidange d’huile (1) et l’enlever.
Vidanger l’huile usagée.
Prudence lors de la vidange d’huile chaude :
risque de brûlure !
Danger
Récupérer l’huile qui s’écoule et l’éliminer dans le
respect de l’environnement.
Environment
Après la vidange de l’huile usagée :
•
verser de l’huile d’engrenage fraîche ;
quantité et qualité de l’huile : voir plan de lubrification
0.5 l
API SG-CE
SAE 10W40
max
min
1
B1033006.cdr
•
le niveau d’huile doit atteindre au minimum le bord inférieur du
filetage (mini.).
•
serrer la vis de vidange d’huile ; utiliser un joint d’étanchéité
neuf.
49
6. Aide en case de défaillances
6.1 Indications générales
•
•
Respecter les consignes de sécurité.
•
En cas de défaillances, relire les points des instructions
de service et de maintenance relatifs à l’utilisation et à la
maintenance correctes.
•
Si vous ne pouvez pas reconnaître ou éliminer
vous-même la cause de la défaillance, veuillez vous
adresser à une filiale de service après-vente d’Ammann.
Seules des personnes qualifiées et mandatées sont
autorisées à effectuer des travaux de réparation.
•
Toujours commencer par vérifier les causes les mieux
accessibles et/ou celles dont le contrôle est le plus
simple (coupe-circuits, diodes électroluminescentes
etc.).
•
Ne pas toucher des pièces en rotation.
6.2 Tableau des défaillances
Cause possible
Remède
Remarques
Le moteur ne démarre pas
Manque de carburant
Ajouter du carburant
Robinet de carburant fermé
Placer le robinet de carburant sur
« OPEN »
Pas d’alimentation en carburant du Vérifier
carburateur
Pour effectuer la vérification, desserrer la vis
de vidange du carburateur (robinet de
carburant sur « OPEN »)
Interrupteur de démarrage sur
« OFF »
Placer l’interrupteur de démarrage sur
« ON »
Pas de formation d’étincelle sur la
bougie d’allumage
Vérifier
Enlever la cosse de bougie. Nettoyer la base de
la bougie d’allumage.
Introduire la bougie dans la cosse de bougie.
Tenir l’électrode latérale de la bougie
d’allumage à un endroit quelconque du moteur,
retirer le câble du démarreur et contrôler qu’il y
a bien formation d’étincelles.
Honda GX 100_10
Pas de formation d’étincelles ð remplacer la
bougie
Formation d’étincelle ð visser la bougie et
essayer de faire démarrer le moteur
Si le moteur ne démarre toujours pas, faites-le vérifier dans un point de service après-vente Ammann ou Honda agréé.
La puissance du moteur diminue
Filtre à air encrassé
Nettoyer le filtre à air ; le remplacer si
nécessaire
Le moteur fonctionne, la machine n’avance pas
Tension de la courroie
trapézoïdale trop faible
Retendre la courroie trapézoïdale
Courroie trapézoïdale cassée
Remplacer la courroie trapézoïdale
Garnitures de l’embrayage
centrifuge usagées
Remplacer les garnitures et les ressorts
50
Service après-vente Ammann
Ersatzteile
Spare parts
Piéces de rechange
AVP 1033
AVP 1040
Ersatzteile
Wichtig!
Um Ersatzteilbestellungen schnell und richtig ausführen zu können, benötigen
wir folgende Angaben:
1. Maschinen-Nr.:
__________________________________________
2. Maschinen-Typ:
__________________________________________
3. ggf. Motor-Typ:
__________________________________________
(Für Ihren Gebrauch hier einschreiben, die Angaben entnehmen
Sie bitte dem Typenschild)
4. Artikelbezeichnung, Artikel-Nr. und Stückzahl.
5. Versandart (per Post, Eil- oder Flugpost, Spedition oder Nachtverteiler).
6. Genaue Versandanschrift, falls erforderlich mit Bahn- oder Poststation.
Nur Original-Ersatzteile gewährleisten eine einwandfreie, von uns geprüfte
Beschaffenheit. Deshalb nur derartige Ersatzteile verwenden, da wir sonst keine
Garantie übernehmen.
Serial No.
Fabr. No.
Service weight (kg)
Power output (kW)
Constr. year
AMMANN Verdichtung GmbH
D-53773 Hennef
Made in Germany
Bei Garantiefällen das schadhafte Teil einsenden und vor der Schadensbehebung Ihren Vertragshändler oder unsere Kundendienstabteilung
informieren (FAX 02242 / 88 02 89).
Bei Garantiefällen an Verbrennungsmotoren setzen Sie sich bzgl. der
Schadensbehebung und Garantieabwicklung bitte mit dem Motoren- hersteller
oder einer seiner Vertragswerkstätten in Verbindung.
Die Abbildungen sind wegen technischer Weiterentwicklung für die Ausführung unverbindlich.
Ihre Ersatzteilbestellung richten Sie bitte an die nächste Händlerverkaufs- stelle
oder an:
Ammann Verdichtung GmbH
Josef-Dietzgen-Strasse 36
D-53773 Hennef
FAX 0 22 42 / 88 02 89
Postfach 11 63
D-53758 Hennef
Spare parts
Important!
In order to enable spare parts orders to be processed quickly and correctly, we
require the following data:
1. Machine number:
__________________________________________
2. Machine type:
__________________________________________
3. Motor type:
__________________________________________
(enter here for your own use; the data is shown on the type plate of the
machine)
4. Article designation, article number and quantity.
5. Dispatch mode (by post, express or air mail delivery, forwarding agent
or distributor.
6. Exact dispatch address, if necessary with train or postal station.
Only original spare parts ensure a perfect condition tested by us; no warranty
can be given if original spare parts are not used.
Serial No.
Fabr. No.
Service weight (kg)
Power output (kW)
Constr. year
AMMANN Verdichtung GmbH
D-53773 Hennef
Made in Germany
In case of warranty claims, send in the damaged part and notify your athorised
dealer or our service department prior to repairing the damage (fax: 0049 22 42 /
88 02 89).
In case of warranty claims for combustion engines, please contact the engine
manufacturer or one of his authorised repair workshops to repair the damage or
process the warranty claim.
Because of the steady development of our products, the shown illustrations are
non-committal.
To order spare parts, please contact your local dealer or write to:
Ammann Verdichtung GmbH
Josef-Dietzgen-Strasse 36
D-53773 Hennef
FAX 0049 22 42 / 88 02 89
Postfach 11 63
D-53758 Hennef
Piéces de rechange
Important!
Pour pouvoir traiter rapidement et correctement les commandes de pièces de
rechange, nous avons besoin des indications suivantes:
1. No. de machine:
__________________________________________
2. Type de machine:
__________________________________________
3. Type de moteur:
__________________________________________
(à insicre ici pour votre usage; prière d’utiliser les indications données
sur la plaque signalétique de la machine)
4. Désignation d’article, no. d’article et quantité.
5. Type d’expédition (par poste, express ou poste aérienne, commissionnaire de transport ou messagerie).
6. Adress exacte d’expédition, si nécessaire avec la station ferroviaire ou
postale.
Serial No.
Fabr. No.
Service weight (kg)
Power output (kW)
Constr. year
AMMANN Verdichtung GmbH
D-53773 Hennef
Made in Germany
Seules les pièces de rechange originales garantissent des propriétés parfaites
contrôlées par nos soins. N’utilisez donc que ces pièces de rechange, étant
donné que sinon nous n’assumerons aucune garantie.
En cas de recours à la garantie, renvoyer la pièce défectueuse et informer votre
vendeur contractuel ou notre département de service après-vente (FAX0049 22
42 / 88 02 89).
En cas de recours à la garantie pour des moteurs à combustion, veuillez
contacter le fabricant du moteur ou un de ses ateliers contractuels pour
l’élimination du dommage et le règlement de la garantie.
En raison de l’evulotion technique, les figures ne sont pas définitives pour la
construction.
Veuillez adresser votre commande de pièce de rechange au point de vente le
plus proche ou à:
Ammann Verdichtung GmbH
Josef-Dietzgen-Strasse 36
D-53773 Hennef
FAX 0049 22 42 / 88 02 89
Postfach 11 63
D-53758 Hennef
Onderdelen
Belangrijk!
Om onderdeelbestellingen vlug en goed uit te kunnen voeren hebben wij de
volgende gegevens nodig:
1. Machinenr.:
_________________________________
2. Machintyp:
_________________________________
3. Event. motortype:
_________________________________
(Het beste hier opschrijven)
4. Vroegere aanduiding, artikelnummer en aantal stuks.
5. Wijze van verzending (per post, snel- of vliegpost, expeditie of nachtdistributie).
6. Nauwkierig adres, indien nodig met spoorstation of Post- kantoor. De
gegevens vindt u op het typeplaatje van de machine.
Uitsluitend originele onderdelen garanderen een onberispelijke, door uns
gecontroleerde kwaliteit. Daarom uitsluitend zulke onderdelen gebruiken omdat
wij anders geen garantie kunnen geven.
Serial No.
Fabr. No.
Service weight (kg)
Power output (kW)
Constr. year
AMMANN Verdichtung GmbH
D-53773 Hennef
Made in Germany
Bij garantie het beschadigte onderdeel toesturen en vóór het opheffen van de
schade uw handelaar of onze klantenservice informeren (FAX: 0049
2242/8802-89).
Bij garantie aan verbrandingsmotoren neemt u omtrent het opheffen van de
schade en de afwikkeling van de garantie met de motorfabriek of een werkplaats
waarmee hij een contract heeft, contact op.
De afbeeldingen zijn wegens de technische verdere ont-wikkeling voor de
uitvoering niet bindend.
Uw onderdelenbestelling
handelaarskantoor of aan:
stuurt
u
het
beste
aan
Ammann Verdichtung GmbH
Josef-Dietzgen-Straße 36
D-53773 Hennef
Telefax 0049 2242/8802-89
Postfach1163
D-53758 Hennef
het
dichtbijzijnde
Reservedele
Vigtigt!
De kan forvente korrekt levering ved bestilling af reservedele. Dertil skal vi bruge
følgende oplysninger:
1. Maskinnummer:
________________________________
2. Maskintype:
________________________________
3. Evt. motortype:
________________________________
(skriv nummeret her til Deres egen brug;se
oplysningerne på maskinens typeskilt.)
4. Artikelbetegnelse, artikel-nr. og ønsket antal
5. Ønsket forsendelsesmåde (postpakke, ekspres- eller luftpost, spedition eller tilstilling om natten)
6. Nøjagtig adresse, om nødvendigt med bane- og poststation
Kun originale reservedele, der er kvalitetsafprøvet af os før leveringen,
garanterer en upåklagelig beskaffenhed. Vi tilråder kun at anvende disse
reservedele, idet garantiydelsen ellers bortfalder.
Serial No.
Fabr. No.
Service weight (kg)
Power output (kW)
Constr. year
AMMANN Verdichtung GmbH
D-53773 Hennef
Made in Germany
I tilfælde af garantiydelse bedes den defekte del indsendt. Informer Deres
forhandler eller vor kundeservice (fax 0049 22 42 / 88 02-89) før fejlen udbedres.
I forbindelse med garantiydelser for forbrændingsmotoren bedes De kontakte
producenten af motoren eller dennes værksted med hensyn til udbedring af
skaden og afvikling af garantien.
Illustrationerne er uforbindende for modellen på grund af den tekniske
videreudvikling.
Send venligst bestilling af reservedele til den nærmeste forhandler eller til:
Ammann Verdichtung GmbH
Josef-Dietzgen-Straße 36
D-53773 Hennef
FAX 0049 22 42 / 88 02-89
Postfach11 6
D-53758 Hennef
Piezas de repuesto
¡Importante!
Para poder despachar rápida y correctamente los pedidos de recambios
necesitamos que se nos faciliten las siguientes indicaciones:
1. No. de máquina:
_______________________________
2. Tipo de máquina:
_______________________________
3. Tipo de motor:
_______________________________
(Anótelo aquí, para usarlo Vd.; Se ruega tomar las indicaciones de la
placa de caracteríticas fijada a la máquina.)
4. Denominación del artículo, No. del artículo y cantidad.
5. Modo de envío (por correo, correo urgente, correo aéreo,
empresa de transportes o distribuidor nocturno).
6. Dirección de envío exacta, caso de ser necesario indicando
también la estación de ferrocarril o postal.
Serial No.
Fabr. No.
Service weight (kg)
Power output (kW)
Constr. year
AMMANN Verdichtung GmbH
D-53773 Hennef
Made in Germany
Tan sólo recambios originales garantizan una característica perfecta,
ensayada por nosotros. Por tal motivo, sólo se han de emplear tales recambios,
puesto que, de no hacerlo, no concedemos garantía alguna.
Se nos tiene que enviar la pieza defectuosa en los casos de garantía. Además,
antes de ponerse a reparar el daño, se tiene que informar del caso a su
comerciante contratado o a nuestro departamento del servicio postventa (FAX
00492242 / 8802-89).
En casos de garantía para motores de combustión se ruega ponerse en
contacto con el fabricante de motores o uno de sus talleres contratados para
gestionar la reparación del daño y hacer los tramites de la garantía.
Las figuras se entienden sin compromiso para la construcción, en razón al
progreso tecnológico ulterior.
Se le ruega que su pedido de recambios lo dirija al punto de venta del
establecimiento comercial más próximo o a:
Ammann Verdichtung GmbH
Josef-Dietzgen-Strasse 36
D-53773 Hennef
FAX 0049 22 42 / 88 02 89
Postfach 11 63
D-53758 Hennef
Peças de reposição
Importante!
Para se poder despachar uma encomenda de peças sobresselentes rápida e
correcta, precisamos dos seguintes dados:
1. Número da máquina ______________________________
2. Modelo da máquina _______________________________
3. Modelo do motor
_______________________________
(registar aqui para sua utilização; Estes dados podem ser deduzidos da
placa de referência da máquina.)
4. Designação do artigo, número do artigo e número de peças.
5. Modalidade de envio (via correio,
por expeditor ou distribuição nocturna).
via
expresso,
via
aérea,
6. Direcção correcta de destinatário; em caso de necessidade,
mencionar a respectiva estação de caminho-de-ferro ou posto
de correio.
Serial No.
Fabr. No.
Service weight (kg)
Power output (kW)
Constr. year
AMMANN Verdichtung GmbH
D-53773 Hennef
Made in Germany
Só as peças sobresselentes originais é que garantem a boa qualidade, por
nós testada. Por isso, deve utilizar-se apenas peças originais, caso contrário
nós não assumimos qualquer responsabilidade.
No caso de ter garantia, enviar a peça danificada e informar o seu fornecedor ou
os nossos serviços ao cliente, antes da reparação dos danos.
Com respelto à reparação de avarias nos casos de motores de combustão com
garantia, queira contactar o fabricante de motores ou um dos seus
concessionários.
Para fazer a sua encomenda de peças sobrsselentes é favor dirigir-se ao seu
fornecedor ou a:
Ammann Verdichtung GmbH
Josef-Dietzgen-Straße 36
D-53773 Hennef
Telefax 0049 2242/8802-89
Postfach1163
D-53758 Hennef
Parti di ricambo
Importante!
Per metterci nella condizione di evadere velocemente e corret- tamente una
Vostra ordinazione di parti di ricambio, dovete per cortesia
1. Macchina n.:
_________________________________
2. Macchina tipo:
_________________________________
3. Event. motore tipo: _________________________________
(scrivetelo qui per ogni Vostra ulteriore necessità; Rilevate i dati
tecnici della macchina dalla rispettiva targhetta applicata sulla macchina
stassa.)
4. Denominazione articolo, Articolo n. e numero di pezzi richiesti
5. Tipo di spedizione (per posta, espresso o area, casa spedizioni o
consegna notturna)
6. Indirizzo molto preciso per la consegna, se necessario anche con
indicazione della stazione ferroviaria o dell’ufficio postale.
Serial No.
Fabr. No.
Service weight (kg)
Power output (kW)
Constr. year
AMMANN Verdichtung GmbH
D-53773 Hennef
Made in Germany
Le parti Originali di Ricambio garantiscono una qualità perfetta e da noi
controllata. Quindi si raccomanda di usare solo tali parti di ricambio, visto che in
caso contrario noi non diamo alcuna garanzia.
Se subentrasse un caso di garanzia dovete assolutamente inviarci la parte
difettosa e, ancora prima di eliminare detto guasto, dovete informare il
Concessionario o il nostro Reparto Assistenza Cliente (via telefax: 0049
2242/8802-89).
Se subentrasse un caso di garanzia per i motori Diesel, Vi pre- ghiamo di
contattare, sia per l’eliminazione del guasto che per l’applicazione della
garanzia, la fabbrica del motore oppure un suo concessionario.
Vi preghiamo infine di indirezzare La Vostra Ordinazione per le parti di ricambio
al Concessionario più vicino oppure a
Ammann Verdichtung GmbH
Josef-Dietzgen-Straße 36
D-53773 Hennef
Telefax 0049 2242/8802-89
Postfach1163
D-53758 Hennef
Dicht- und Klebstoffe
Sealing- and bonding adhesives
Etanchéifiant et Colle
Isolatie- en lijmstoffen
Tætnings- og klæbemidler
Lim- och tätningsmedel
Materiales de juntas y de adhesivos
Materiais de vedação e colantes
Adesivi e collanti
Ê
Ë
Ì
Í
Î
Ï
Ð
Ñ
Ò
10
11
12
13
14
A1
A2
A3
A4
A5
A6
A7
A8
A9
A10
A11
A12
A13
A14
A15
TAB01010.cdr
2-9L0 00 002
2-806 05 260
2-806 02 010
2-9IH 00 001
2-9K0 00 020
2-806 05 060
2-806 05 200
2-806 05 170
2-806 02 050
2-806 05 310
2-806 03 017
2-806 05 290
2-9L0 00 001
2-9L0 00 006
2-806 05 090
Loctite 262
Loctite 5205
Shell Alvania R3
Epple 22
Klüber 46 MR401
Atmosit Compact
Sico Met 50
Omni Visc 1002
Shell Alvania EP1
Beta Link K1
Metaflux
Loctite 5910
Loctite Cleaner 7063
Loctite 221
Omni Visc 1050
250 ml
300 ml
1.0 kg
250 ml
0.75 kg
75 ml
20 g
600 g
300 ml
450 ml
50 ml
50 ml
siehe Hinweis auf den Bildtafeln
as specified in the individual tables
suivant les marques sur les tableau correspondant
zie aanwijzing op de betreffende borden
se henvesningen på de enkelte tegninger
se anvisningarna på skyltarna
véase indicación sobre detalles en las láminas de figuras
cide indicação nos quadros de imagens individuais
seguire le indicazioni sul quadro corrispondente
Pos.
Artikel-Nr.
Part-No.
No. piéce
No. Pieza
1 2-011
2 2-011
3 2-801
4 2-801
5 2-801
6 2-801
7 2-011
8 2-801
9 2-812
10 2-802
11 A 2-011
B 2-011
12 2-0P5
13 2-801
14 2-822
21
21
35
32
03
58
20
37
01
52
11
11
04
67
01
002
003
447
280
130
137
005
040
044
170
001
002
306
071
048
Stück
1
1
2
1
2
2
1
1
1
2
1
1
4
8
8
Bezeichnung
Dichtscheibe
Dichtscheibe
O-Ring
Wellendichtring
Rillenkugellager
Sicherungsring
Erregerwelle
Dichtring
Verschlussschraube
Kunststoffstopfen
Grundplatte
Grundplatte
Gummipuffer
Spannscheibe
6-kt.-Mutter
AVP 1033 — 100.2
Identification
OR 68x4
J 80x2.5
DIN 472
A 14x18
M 14x1.5
DIN 7603
DIN 910–5.8
10 FSt
M 10
DIN 6796
DIN 985–8
von / from / de / de
bis / to / à / hasta
Joint disc
Joint disc
O-ring
Shaft sealing ring
Groove ball bearing
Retaining ring
Exciter shaft
Cu Joint washer
A3C Screw plug
Plastic plug
Base plate
Base plate
Rubber buffer
A3B Conical spring washer
Hexagon nut
111 289
Désignation
Denominación
Disque d' étanchéité
Disque d' étanchéité
Joint torique
Joint d’étanchéité radiale
Roulement rainuré à bille
Circlips
Arbre d’excentrique
Bague d’étanchéité
Vis de fermeture
Bouchon plastifiée
Plaque de base
Plaque de base
Tampon en caoutchouc
Rondelle élastique
Écrou hexagonale
Disco de empaquetadura
Disco de empaquetadura
Junta tórica
Retén para árbol
Cojinete de bolas
Anillo de seguridad
Arbol del excitador
Aro de guarnición
Tornillo de cierre
Tapón plástico
Placa básica
Placa básica
Tope de goma
Arandela élastico cónica
Tuerca hexagonal
AVP 1040 — 100.2
Pos.
Artikel-Nr.
Part-No.
No. piéce
No. Pieza
01
02
03
04
05
06
07
08
09
10
11
12
13
14
15
16
17
18
19
20
21
22
23
24
25
26
27
28
29
30
31
32
33
34
35
2-817
2-801
2-802
2-011
2-822
2-802
2-011
2-011
2-001
2-011
2-817
2-802
2-013
2-816
2-817
2-801
2-011
2-801
2-011
2-011
2-816
2-801
2-011
2-801
2-011
2-813
2-801
2-011
2-817
2-011
2-817
2-801
2-817
2-802
2-832
03
67
12
31
01
52
31
31
13
31
03
03
50
03
03
50
20
59
41
41
04
67
31
74
31
02
67
41
03
31
04
40
03
12
01
060
080
151
001
030
028
006
015
101
005
082
008
001
070
100
098
002
141
003
001
076
071
011
161
010
118
101
004
090
009
089
360
074
050
140
Stück
Qty.
Bezeichnung
Quantité
Cantidad
9
16
1
1
5
1
1
2
1
1
2
1
1
3
1
1
1
1
1
1
2
4
2
2
2
2
2
1
1
1
2
1
1
1
2
6-kt-Schraube
Spannscheibe
Motor
Motorkonsole
6-kt-Mutter
Stopfen
Griff
Buchse
Steinschutz
Motorblech
6-kt-Schraube
Fliehkraftkupplung
Keilriemenschutz
6-kt-Schraube
6-kt-Schraube
Passfeder
Keilriemenscheibe
Sicherungsring
Federelement-Satz
Deichsel
6-kt-Schraube
Spannscheibe
Buchse
Klappsplint
Bolzen
Zyl.-Schraube
Spannscheibe
Klemme
6-kt-Schraube
Griff
6-kt-Schraube
Keilriemen
6-kt-Schraube
Ablenker
Blechschraube
AVP 1033 — 200.2
Identification
M 8x20
8 FSt
Benzin
DIN 933–8.8
DIN 6796
M 8x20
DIN 985–8
M 8x25
DIN 933–8.8
M 8x50
M 8x35
A 8x7x20
DIN 931–8.8
DIN 933–8.8
DIN 6885
A 28x1.5
(19a+19b)
DIN 471
M 10x50
10 FSt
DIN 931–8.8
DIN 6796
M 6x40
6 FSt
DIN 912–8.8
DIN 6796
M 8x30
DIN 933–8.8
M 10x25
DIN 933–8.8
12.5x825 (LA) XPA 800
M 8x22
DIN 933–8.8
3.9x8
DIN 7981
von / from / de / de
bis / to / à / hasta
A3B hexagon head cap screw
A3B conical spring washer
engine
engine console
hexagon nut
plug
grip
bush
stone protection
engine plate
A3B hexagon head cap screw
centrifugal clutch
V-belt guard
A3B hexagon head cap screw
A3B hexagon head cap screw
adjusting spring
V-belt pulley
safety ring
spring element kit
tow bar
A3B hexagon head cap screw
A3B conical spring washer
bush
pin
bolt
A3B socket head cap screw
A3B conical spring washer
clamp
A3B hexagon head cap screw
grip
A3B hexagon head cap screw
V-belt
A3B hexagon head cap screw
muffler cap
A3B plate screw
111 289
117 669
Désignation
Denominación
vis à tête hexagonale
rondelle élastique
moteur
console de moteur
écrou hexagonale
bouchon
poignée
douille
protecteur de pierre
tôle de moteur
vis à tête hexagonale
embrayage centrifuge
protection à courroie
vis à tête hexagonale
vis à tête hexagonale
ressort d`ajustage
poulie à courroie
bague de sécurité
jeu de élément ressort
timon
vis à tête hexagonale
rondelle élastique
douille
goupille
boulon
vis à tête cylindrique
rondelle élastique
pince
vis à tête hexagonale
poignée
vis à tête hexagonale
courroie trapézoïdale
vis à tête hexagonale
tuyau d’échappement
vis de tôle
tornillo hexagonal
arandela élastico cónica
motor
consola de motor
tuerca hexagonal
tapón
empuñadura
casquillo
protección de piedra
chapa de motor
tornillo hexagonal
embrague centrifugo
protección de correa
tornillo hexagonal
tornillo hexagonal
chaveta
polea en V
anillo de seguro
juego de elementos elástico
timon
tornillo hexagonal
arandela élastico cónica
casquillo
clavija
bolón
tornillo cilindrico
arandela élastico cónica
pinza
tornillo hexagonal
empuñadura
tornillo hexagonal
correa trapezoidal
tornillo hexagonal
tubo de escape
tornille de chapa
Pos.
1
2
3
4
5
6
7
8
9
10
11
12
13
14
15
16
17
18
19
20
21
22
23
24
25
26
27
28
29
30
31
32
33
34
35
36
Artikel-Nr.
Part-No.
No. piéce
No. Pieza
2-801
2-011
2-801
2-011
2-011
2-801
2-011
2-801
2-813
2-802
2-011
2-817
2-817
2-801
2-822
2-802
2-817
2-801
2-817
2-822
2-801
2-011
2-801
2-013
2-816
2-817
2-011
2-802
2-817
2-801
2-011
2-011
2-817
2-801
2-802
2-832
50
20
59
41
41
74
41
67
02
12
31
03
03
67
01
03
03
67
03
01
67
31
40
50
03
03
31
52
03
67
31
31
04
67
12
01
098
002
141
001
003
161
004
101
118
151
005
066
074
080
030
008
090
080
066
030
080
030
360
001
070
100
006
350
082
080
015
014
046
071
050
140
Stück
1
1
1
1
2
2
1
2
2
1
1
4
1
5
1
1
1
1
4
4
4
1
1
1
3
1
1
1
2
6
2
1
2
2
1
2
Bezeichnung
Passfeder
Keilriemenscheibe
Sicherungsring
Deichsel
Federelementsatz
Klappsplint
Klemme
Spannscheibe
Zyl.-Schraube
Benzinmotor
Motorblech
6-kt.-Schraube
6-kt.-Schraube
Spannscheibe
6-kt.-Mutter
Fliehkraftkupplung
pp g
6-kt.-Schraube
Spannscheibe
6-kt.-Schraube
6-kt.-Mutter
Spannscheibe
Motorkonsole
Keilriemen
Keilriemenschutz
6-kt.-Schraube
6-kt.-Schraube
Griff
Kunststoffstopfen
6-kt.-Schraube
Spannscheibe
Buchse
Steinschutz
6-kt.-Schraube
Spannscheibe
Ablenker
Blechschraube
AVP 1033 — 200.4
A 8x7x20
DIN 6885
A 28x1.5
DIN 471
4.5x32
A3C
6 FSt
M 6x40
DIN 6796
DIN 912–8.8
A3B
A3B
M 8x20
M 8x22
8 FSt
M8
DIN 933–8.8
DIN 933–8.8
DIN 6796
DIN 985–8
A3B
A3B
A3B
M 8x30
8 FSt
M 8x20
M8
8 FSt
DIN 933–8.8
DIN 6796
DIN 933–8.8
DIN 985–8
DIN 6796
A3B
A3B
A3B
12.5x825 (LA)
XPA-800
M 8x50
M 8x35
DIN 931–8.8
DIN 933–8.8
A3B
A3B
M 8x25
8 FSt
DIN 933–8.8
DIN 6796
A3B
A3B
M 10x16
10 FSt
DIN 933–8.8
DIN 6796
A3B
A3B
3.9x8
DIN 7981
A3B
von / from / de / de
bis / to / à / hasta
A3B
Identification
Désignation
Denominación
Key
V-belt pulley
Retaining ring
Drawbar
Spring element kit
Linch pin
Clamp
Conical spring washer
Socket head cap screw
Petrol engine
Engine sheet
Hexagonal head cap screw
Hexagonal head cap screw
Conical spring washer
Hexagon nut
Centrifugal
g clutch
Hexagonal head cap screw
Conical spring washer
Hexagonal head cap screw
Hexagon nut
Conical spring washer
Engine console
V-belt
V-belt guard
Hexagonal head cap screw
Hexagonal head cap screw
Grip
Plastic plug
Hexagonal head cap screw
Conical spring washer
Bush
Stone protection
Hexagonal head cap screw
Conical spring washer
Muffler cap
Self-tapping screw
Clavette
Poulie de courroie
Circlips
Timon
Jeu de élément ressort
Goupille clip
Borne
Rondelle élastique
Vis à tête cylindrique
Moteur à essence
Tôle de moteur
Vis à tête hexagonale
Vis à tête hexagonale
Rondelle élastique
Écrou hexagonale
Embrayage
y g centrifuge
g
Vis à tête hexagonale
Rondelle élastique
Vis à tête hexagonale
Écrou hexagonale
Rondelle élastique
Console de moteur
Courroie trapézoïdale
Protection de courroie
Vis à tête hexagonale
Vis à tête hexagonale
Poignée
Bouchon plastifiée
Vis à tête hexagonale
Rondelle élastique
Douille
Protecteur de pierre
Vis à tête hexagonale
Rondelle élastique
Tuyau d’échappement
Vis Parker
Chaveta
Polea en V
Anillo de seguridad
Timón
Juego de elementos elástico
Pasador clip
Rozadera
Arandela élastico cónica
Tornillo cilindrico
Motor de gasolina
Chapa de motor
Tornillo hexagonal
Tornillo hexagonal
Arandela élastico cónica
Tuerca hexagonal
Embrague
g centrifugo
g
Tornillo hexagonal
Arandela élastico cónica
Tornillo hexagonal
Tuerca hexagonal
Arandela élastico cónica
Consola de motor
Correa trapezoidal
Protección de correa
Tornillo hexagonal
Tornillo hexagonal
Empuñadura
Tapón plástico
Tornillo hexagonal
Arandela élastico cónica
Casquillo
Protección de piedra
Tornillo hexagonal
Arandela élastico cónica
Tubo de escape
Tornillo autorroscante
117 670
AVP 1040 — 200.4
Artikel-Nr.
Part-No.
No. piéce
No. Pieza
Pos.
1
2
3
4
5
6
7
8
9
10
1)
1)
1)
11
12
13
14
2)
2)
1)
2)
2)
2)
2-801
2-802
2-802
2-802
2-802
2-801
2-802
2-801
2-802
2-801
2-801
2-801
2-801
2-802
2-802
2-802
59
03
03
03
03
36
03
01
03
63
63
63
59
03
03
03
532
258
257
233
252
070
253
240
250
270
289
297
214
236
235
238
Stück
Bezeichnung
1
1
1
1
1
2
1
1
1
–
–
–
1
2
2
2
Sicherungsring
Abdeckscheibe
Nabe
Scheibe
Abstandsring
Nilosring
Sprengring
Rillenkugellager
Gehäuse
Paßscheibe
Paßscheibe
Paßscheibe
Sicherungsring
Belagbügel
Fliehgewicht
Zugfeder
A 42x1.75
DIN 471
PS 40x50x0.1
PS 40x50x0.3
PS 40x50x0.5
A 40x1.75
DIN 988
DIN 988
DIN 988
Identification
Désignation
Denominación
Retaining ring
Covering
Nave
Disk
Distance ring
Nilos ring
Retaining ring
Groove ball bearing
Housing
Adjusting washer
Adjusting washer
Adjusting washer
Retaining ring
Lining strap
Centrifugal weight
Draw spring
Circlip
Recouvrement
Moyeu
Disque
Bague d’écartement
Bague Nilos
Circlip
Roulement rainuré à bille
Boitier
Rondelle d' ajustage
Rondelle d' ajustage
Rondelle d' ajustage
Circlip
Support d`enduit
Poids centrifugal
Ressort de traction
Anillo de seguridad
Recumbrimiento
Cubo
Disko
Anillo de distancia
Anillo Nilos
Anillo de seguridad
Cojinete de bolas
Carcasa
Arandela de ajuste
Arandela de ajuste
Arandela de ajuste
Anillo de seguridad
Zapata
Peso centrifugo
Resorte de tracción
nach Bedarf / according to demand / selon les besoins / según las necesidades
Can be exchanged only in sets of 2
nur satzweise je 2 Stück austauschbar
Ne peut etre echange qu’en jeux de 2 pieces
AVP 1033 — 210.2
von / from / de / de
bis / to / à / hasta
111 289
AVP 1040 — 210.2
Artikel-Nr.
Part-No.
No. piéce
No. Pieza
Pos.
1 2) 2-802 52 400
2 2-802 50 110
3 2-011 61 002
4 2-817 03 066
5 2-801 67 080
6 2-822 01 030
7 A 2-011 61 004
B 2-011 61 011
8 2-011 61 003
9 2-817 04 097
10 2-801 66 032
11 2-011 61 001
12 2-817 03 040
13 2-801 61 280
14 2-0M1 01 306
15 2-802 52 070
16 1) 2-011 61 013
17 A AF-O-11060003)
B AF-O-11061003)
1)
2)
3)
von / from / de / de
bis / to / à / hasta
Option
Stück
1
1
1
2
2
2
1
1
2
2
2
1
2
2
1
2
1
1
1
Bezeichnung
Identification
Désignation
Denominación
Tankdeckel
Ablasshahn
Konsole
6-kt.-Schraube
Spannscheibe
6-kt.-Mutter
Berieselungsrohr
Berieselungsrohr
Rohrschelle
6-kt.-Schraube
Sicherungsscheibe
Wasserbehälter
6-kt.-Schraube
Scheibe
Kunststoffschlauch
Kunststoffstopfen
Hitzeschutzblech
Wasserberieselung ZSB.
Wasserberieselung ZSB.
Tank cover
Water cock
Console
Hexagonal head cap screw
Conical spring washer
Hexagon nut
Sprinkling pipe
Sprinkling pipe
Pipe retaining clip
Hexagonal head cap screw
Lock washer
Water tank
Hexagonal head cap screw
Washer
Plastic hose
Plastic plug
Heat shield
Irrigation system, assy.
Irrigation system, assy.
Couvercle de reservoir
Robinet à l’eau
Console
Vis à tête hexagonale
Rondelle élastique
Écrou hexagonale
Tube d’arrosage
Tube d’arrosage
Collier de serrage
Vis à tête hexagonale
Rondelle de sécurité
Réservoir d’eau
Vis à tête hexagonale
Rondelle
Tuyau plastifiée
Bouchon plastifiée
Isolant thermique
Dispositif d’irrigation, ass.
Dispositif d’irrigation, ass.
Tapa de depósito
Grito
Consola
Tornillo hexagonal
Arandela élastico cónica
Tuerca hexagonal
Tubo de riego
Tubo de riego
Abrazadera de tubo
Tornillo hexagonal
Arandela de seguridad
Depósito de agua
Tornillo hexagonal
Arandela
Tubo plástico
Tapón plástico
Aislamiento térmico
Instalación de riego de agua, ens.
Instalación de riego de agua, ens.
M 8x20
8 FSt
M8
DIN 933–8.8
DIN 6796
DIN 985–8
A3B
A3B
M 10x30
VS 10
inkl. Pos. 1+2
M 8x16
R9
DIN 933–8.8
A3B
A3B
DIN 933–8.8
DIN 440–St
A3B
A3B
Pos. 1 – 16
Pos. 1 – 16
AVP 1033
AVP 1040
147 170 (TA 2192)
158 290: 2-802 52 310
AVP 1033 — 300.2
von / from / de / de
bis / to / à / hasta
111 289
AVP 1040 — 300.2
Pos.
Artikel-Nr.
Part-No.
No. piéce
No. Pieza
2 2-002
3 2-002
4 2-002
5 A 2-002
B 2-002
7 2-011
02
04
01
05
05
31
605
129
260
348
350
500
Stück
Bezeichnung
Identification
Désignation
Denominación
1
1
1
1
1
–
Klebeschild
Klebeschild
Klebeschild
Klebeschild
Klebeschild
Satz Schilder
Adhesive plate
Adhesive plate
Adhesive plate
Adhesive plate
Adhesive plate
Sign kit
Plaque d’auto-collante
Plaque d’auto-collante
Plaque d’auto-collante
Plaque d’auto-collante
Plaque d’auto-collante
Jeu de panneaus
El escudo adhesiva
El escudo adhesiva
El escudo adhesiva
El escudo adhesiva
El escudo adhesiva
Juego de escudos
AVP 1033 — 400.2
AVP 1033
AVP 1040
von / from / de / de
bis / to / à / hasta
111 289
AVP 1040 — 400.2
Honda GX 100 — 100
Pos.
1
2
3
4
5
6
8
9
10
12
13
14
15
15
Artikel-Nr.
Part-No.
No. piéce
No. Pieza
12000-Z0D-405
12201-Z0D-305
12204-Z0D-305
12311-Z0D-000
12355-Z0D-000
12365-Z0D-000
15571-ZM7-003
15572-ZM7-000
15721-Z0D-000
90014-952-000
91202-KJ9-003
93500-030050A
98056-5575798056-55777-
Stück
Qty.
Quantité
Cantidad
1
-1
-1
1
1
1
1
1
1
6
1
1
1
1
Bezeichnung
Identification
ZYLINDERGEHAEUSE KOMPL.
FUEHRUNGSEINHEIT, AUSLASSVENTIL (O.S.)
FUEHRUNG, EIN. VENTIL (OS)
KOPFDECKEL
ENTLUEFTUNGSABDECKUNG A
ENTLUEFTUNGSABDECKUNG B
VENTIL, OELAUSLASS
ANSCHLAGPLATTE
ENTLUEFTUNGSSCHLAUCH
FLANSCHENSCHRAUBE, 6X14(CT200)
SIMMERRING, 20X32X6
KEGELKOPFSCHRAUBE, 3X5
ZUENDKERZE (U16FSR-UB)
ZUENDKERZE (CR5HSB)
BARREL ASSY., CYLINDER
GUIDE ASSY., EX. VALVE (O.S.)
GUIDE, IN. VALVE (OS)
COVER, HEAD
COVER COMP. A, BREATHER
COVER COMP. B, BREATHER
VALVE, OIL OUTLET
PLATE, STOPPER
TUBE, BREATHER
BOLT, FLANGE, 6X14 (CT200)
OIL SEAL, 20X32X6
SCREW, PAN, 3X5
PLUG, SPARK (U16FSR-UB)
PLUG, SPARK (CR5HSB)
ZYLINDERBUCHSE / CYLINDER BARREL
Honda GX 100 — 200
Pos.
1
4
5
6
7
8
9
10
11
12
13
14
15
19
20
21
23
25
Artikel-Nr.
Part-No.
No. piéce
No. Pieza
11300-Z0D-405
12351-Z0D-T00
15600-ZM7-003
15625-ZE1-003
16510-ZL8-000
16531-ZE1-000
16541-Z0D-000
90121-952-000
90131-ZE1-000
90451-ZE1-000
90601-ZE1-000
90602-ZE1-000
91202-KJ9-003
94101-0680094251-0800094301-0820095701-0801800
96100-6204000
Stück
Qty.
Quantité
Cantidad
1
1
2
2
1
1
1
8
2
1
2
1
1
2
1
2
4
1
Bezeichnung
Identification
KURBELGEHAEUSEDECKEL KOMPL.
BETT, MOTOR
OELEINFUELLVERSCHLUSS KOMPL.
DICHTUNG, OELEINFUELLKAPPE
DREHZAHLREGLER
DREHZAHLREGLERSCHIEBER
DREHZAHLREGLERARMWELLE
FLANSCHENSCHRAUBE, 6X25(CT200)
ABLASSCHRAUBE
DRUCKSCHEIBE, 6MM
SCHEIBE, ABLASSCHRAUBE, 10.2MM
KLEMME, DREHZAHLREGLERHALTER
SIMMERRING, 20X32X6
GLATTE SCHEIBE, 6MM
VORSTECKER, 8MM
PASSSTIFT, 8X20
FLANSCHENSCHRAUBE, 8X18
RADIALKUGELLAGER, 6204
COVER ASSY., CRANKCASE
BED, ENGINE
CAP ASSY., OIL FILLER
PACKING, OIL FILLER CAP
GOVERNOR ASSY.
SLIDER, GOVERNOR
SHAFT, GOVERNOR ARM
BOLT, FLANGE, 6X25 (CT200)
BOLT, DRAIN PLUG
WASHER, THRUST, 6MM
WASHER, DRAIN PLUG, 10.2MM
CLIP, GOVERNOR HOLDER
OIL SEAL, 20X32X6
WASHER, PLAIN, 6MM
PIN, LOCK, 8MM
DOWEL PIN, 8X20
BOLT, FLANGE, 8X18
BEARING, RADIAL BALL, 6204
KURBELGEHÄUSEABDECKUNG / CRANKCASE COVER
Honda GX 100 — 300
Pos.
3
8
Artikel-Nr.
Part-No.
No. piéce
No. Pieza
13310-Z0D-910
96100-6204000
Stück
Qty.
Quantité
Cantidad
1
1
Bezeichnung
Identification
KURBELWELLE KOMPL.
RADIALKUGELLAGER, 6204
CRANKSHAFT COMP.
BEARING, RADIAL BALL, 6204
KURBELWELLE / CRANKSHAFT
Honda GX 100 — 400
Pos.
1
2
3
4
4
5
6
Artikel-Nr.
Part-No.
No. piéce
No. Pieza
13010-Z0D-003
13101-Z0D-000
13111-ZE0-000
13200-Z0D-000
13200-Z0D-305
90001-ZM7-000
90551-ZE0-000
Stück
Qty.
Quantité
Cantidad
1
1
1
1
-1
2
2
Bezeichnung
Identification
KOLBENRING SATZ
KOLBEN
KOLBENBOLZEN
PLEUELSTANGE KOMPL.
PLEUELSTANGE KOMPL. (UNTENLEIM)
SCHRAUBE, PLEUELSTANGE
SICHERUNG, KOLBENBOLZEN, 13MM
RING SET, PISTON
PISTON
PIN, PISTON
ROD ASSY., CONNECTING
ROD ASSY., CONNECTING(UNDER SIZE)
BOLT, CONNECTING ROD
CLIP, PISTON PIN, 13MM
KOLBEN+PLEUELSTANGE / PISTON+CONNECTING ROD
Honda GX 100 — 500
Pos.
1
2
3
4
5
6
7
8
9
10
11
12
13
14
Artikel-Nr.
Part-No.
No. piéce
No. Pieza
12209-KT7-013
14320-Z0D-010
14324-Z0D-000
14400-Z0D-003
14431-Z0D-000
14441-Z0D-000
14461-ZL8-000
14711-Z0D-000
14721-Z0D-000
14751-Z0D-000
14771-ZM3-010
90012-333-000
90206-001-000
91301-ZM0-V31
Stück
Qty.
Quantité
Cantidad
1
1
1
1
1
1
2
1
1
2
2
2
2
1
Bezeichnung
Identification
DICHTUNG, VENTILSCHAFT
RIEMENSCHEIBE KOMPL., NOCKEN- WELLE
WELLE, NOCKEN-RIEMENSCHEIBE
STEUERRIEMEN (61YU7 G-200)
KIPPHEBEL, EIN. VENTIL
KIPPHEBEL, AUSPUFFVENTIL
ACHSE, KIPPHEBEL
VENTIL, EINLASS
AUSPUFFVENTIL
VENTILFEDER
HALTER, VENTILFEDER
EINSTELLSCHRAUBE, VENTILSPIEL
EINSTELLMUTTER, VENTILSPIEL
O-RING, 6.8X1.9(ARAI)
SEAL, VALVE STEM
PULLEY COMP., CAMSHAFT
SHAFT, CAM PULLEY
BELT, TIMING (61YU7 G-200)
ARM, IN. VALVE ROCKER
ARM, EX. VALVE ROCKER
SHAFT, ROCKER ARM
VALVE, IN.
VALVE, EX.
SPRING, VALVE
RETAINER, VALVE SPRING
SCREW, TAPPET ADJUSTING
NUT, TAPPET ADJUSTING
O-RING, 6.8X1.9 (ARAI)
NOCKENWELLE / CAMSHAFT
Honda GX 100 — 600
Artikel-Nr.
Part-No.
No. piéce
No. Pieza
Pos.
1 1)
1 2)
2
3
4
5
6
7
8
9 1)
9 2)
10
11
12
13
1)
2)
28400-Z0D-V02ZA
28400-Z0D-V03ZA
28410-Z0D-V02ZA
28421-Z0D-V02
28422-ZG0-W02
28433-ZG0-W02
28441-ZW6-003
28442-ZH8-003
28461-ZH8-003
28462-Z0D-V02
28462-Z0D-V03
28467-Z0D-V02
28468-Z0D-V02
90003-ZH8-003
95701-0600800
Stück
Qty.
Quantité
Cantidad
1
1
1
1
2
1
1
1
1
1
1
1
1
1
3
Bezeichnung
Identification
RUECKLAUFANLASSER KOMPL. *NH1*
RUECKLAUFANLASSER KOMPL. *NH1*
GEHAEUSE KOMPL., RUECKLAUF- ANLASSER *NH
HASPEL, RUECKLAUFANLASSER
SPERRKLINKE, ANLASSER
FUEHRUNG, SPERRKLINKE
FEDER, FRIKTION
RUECKLAUFANLASSERFEDER
GRIFF, ANLASSER
RUECKLAUFANLASSERSEIL
RUECKLAUFANLASSERSEIL
SEITENPLATTE
GLEITPLATTE
FESTSTELLSCHRAUBE
FLANSCHENSCHRAUBE, 6X8
STARTER ASSY., RECOIL *NH1*
STARTER ASSY., RECOIL *NH1*
CASE COMP., RECOIL STARTER*NH1*
REEL, RECOIL STARTER
RATCHET, STARTER
GUIDE, RATCHET
SPRING, FRICTION
SPRING, RECOIL STARTER
GRIP, STARTER
ROPE, RECOIL STARTER
ROPE, RECOIL STARTER
PLATE, SIDE
PLATE, SLIDE
SCREW, SETTING
BOLT, FLANGE, 6X8
bis / to 1019282
von / from 1019283
SEILZUGSTARTER / RECOIL STARTER
Honda GX 100 — 700
Pos.
1
2
4
Artikel-Nr.
Part-No.
No. piéce
No. Pieza
19610-Z0D-T00ZA
35120-Z0D-V81
90014-952-000
Stück
Qty.
Quantité
Cantidad
1
1
4
Bezeichnung
Identification
DECKEL KOMPL., VENTILATOR *NH1*
MOTORABSCHALTER KOMPL.
FLANSCHENSCHRAUBE, 6X14(CT200)
COVER COMP., FAN *NH1*
SWITCH ASSY., ENGINE STOP
BOLT, FLANGE, 6X14 (CT200)
GEBLÄSEABDECKUNG / FAN COVER
Honda GX 100 — 800
Artikel-Nr.
Part-No.
No. piéce
No. Pieza
Pos.
1
2
3
4
5
6
7
8
10 1)
10 2)
11
12
13
14
15
16
17
18
19
20
21
22
22
22
23
1)
2)
16010-ZM7-003
16011-ZE0-005
16013-ZG0-811
16015-ZM7-003
16016-ZH7-W01
16024-ZB9-005
16028-ZG0-811
16044-Z0D-003
16100-Z0D-013
16100-Z4E-003
16124-ZE0-005
16166-Z0D-003
16211-Z0D-000
16212-Z0D-000
16221-ZG0-801
16953-Z0D-003
16954-ZE1-812
16956-ZE1-811
16957-ZE1-812
93500-030061H
95003-0501031
99101-ZG0-0550
99101-ZG0-0580
99101-ZG0-0600
99204-ZE2-0350
Stück
Qty.
Quantité
Cantidad
1
1
1
1
1
1
1
1
1
1
1
1
1
1
1
1
1
1
1
2
1
-1
-1
1
1
Bezeichnung
Identification
DICHTUNG SATZ
SCHWIMMERVENTIL SATZ
SCHWIMMER SATZ
SCHWIMMERKAMMER SATZ
GEMISCHREGULIERSCHRAUBE SATZ
ABLASSCHRAUBE SATZ
SCHRAUBE SATZ
STARTERKLAPPENSATZ
VERGASER KOMPL. (BF32F B)
VERGASER KOMPL. (BF32H A)
LEERLAUFBEGRENZUNGSSCHRAUBE
HAUPTDUESE
ISOLATOR, VERGASER
DICHTUNG, ISOLATOR
DICHTUNG, VERGASER
HEBEL, HAHN
BEFESTIGUNGSPLATTE, HEBEL
FEDER, HAHNHEBEL
PACKUNG, BENZINHAHN
KEGELKOPFSCHRAUBE, 3X6
VINYLROHR, 3.5X6.5X100 (95003-05001-60M)
HAUPTDUESE, #55
HAUPTDUESE, #58
HAUPTDUESE, #60
DUESE SATZ, STARTER, #35
GASKET SET
VALVE SET, FLOAT
FLOAT SET
CHAMBER SET, FLOAT
SCREW SET, PILOT
SCREW SET, DRAIN
SCREW SET
CHOKE SET
CARBURETOR ASSY. (BF32F B)
CARBURETOR ASSY. (BF32H A)
SCREW, THROTTLE STOP
NOZZLE, MAIN
INSULATOR, CARBURETOR
PACKING, INSULATOR
PACKING, CARBURETOR
LEVER, COCK
PLATE, LEVER SETTING
SPRING, COCK LEVER
PACKING, FUEL COCK
SCREW, PAN, 3X6
TUBE, VINYL, 3.5X6.5X100(95003-05001-60M
JET, MAIN, #55
JET, MAIN, #58
JET, MAIN, #60
JET SET, PILOT, #35
bis / to 1009677
von / from1009678
VERGASER / CARBURATOR
Honda GX 100 — 900
Artikel-Nr.
Part-No.
No. piéce
No. Pieza
Pos.
1 1)
1 2)
2
3
5
6
7
8
9
12
1)
2)
17211-ZL8-013
17211-ZL8-023
17218-Z0D-000
17220-Z0D-V20
17274-ZT3-000
17231-Z0D-000
90004-Z0D-000
90011-Z0D-000
90041-Z0D-V20
94050-06000-
Stück
Qty.
Quantité
Cantidad
1
1
1
1
1
1
2
2
1
1
Bezeichnung
Identification
EINSATZ, LUFTFILTER
EINSATZ, LUFTFILTER
FILTER,AUSSEN
GEHAEUSE KOMPL., LUFTFILTER
PACKUNG, LUFTANSAUGGELENK
DECKEL, LUFTFILTER
FLANSCHENSCHRAUBE, 5X77(CT200)
DICHTUNG, AUSPUFFKAMMER
STEHBOLZEN
FLANSCHENMUTTER, 6MM
ELEMENT, AIR CLEANER
ELEMENT, AIR CLEANER
FILTER, OUTER
CASE COMP., AIR CLEANER
PACKING, AIR INTAKE JOINT
COVER, AIR CLEANER
BOLT, FLANGE, 5X77 (CT200)
BOLT, AIR CLEANER COVER
BOLT, STUD
NUT, FLANGE, 6MM
bis / to 1006015
von / from 1006016
LUFTFILTER / AIR CLEANER
Honda GX 100 — 1000
Pos.
1
2
3
5
7
9
10
12
Artikel-Nr.
Part-No.
No. piéce
No. Pieza
18310-ZM0-000
18320-Z0M-780
18331-883-810
18350-ZL8-000
18381-Z0D-000
90004-ZL8-000
90014-952-000
90055-ZE1-000
Stück
Qty.
Quantité
Cantidad
1
1
1
-1
1
2
3
-1
Bezeichnung
Identification
SCHALLDAEMPFER KOMPL.
SCHUTZ KOMPL., AUSPUFFTOPF
KAPPE, AUSPUFFTOPF
FUNKENFAENGER KOMPL.
DICHTUNG, AUSPUFFTOPF
FLANSCHENSCHRAUBE, 6X79(CT200)
FLANSCHENSCHRAUBE, 6X14(CT200)
SCHNEIDSCHRAUBE, 4X6
MUFFLER COMP.
PROTECTOR COMP., MUFFLER
CAP, MUFFLER
ARRESTER COMP., SPARK
GASKET, MUFFLER
BOLT, FLANGE, 6X79 (CT200)
BOLT, FLANGE, 6X14 (CT200)
SCREW, TAPPING, 4X6
SCHALLDÄMPFER / MUFFLER
Honda GX 100 — 1100
Artikel-Nr.
Part-No.
No. piéce
No. Pieza
Pos.
2
3 1)
3 2)
5
6
7
8
10 2)
11 2)
12 2)
13 3)
13 4)
14
17
18
21 3)
22 3)
24 4)
25 4)
26 1)
1)
2)
3)
4)
16952-ZE6-000
17511-Z4C-000
17511-ZM7-010
17532-Z0D-T00
17533-Z0D-T00
17561-Z0D-000
17566-Z0D-T02
17620-ZL8-013
17622-ZL8-003
17624-ZL8-003
17701-Z0D-000
17701-Z4E-003
19052-MB4-880
90343-ZE6-000
90510-KY1-000
95002-0208095002-0210095002-4080008
95002-4105008
17620-Z0J-800
Stück
Qty.
Quantité
Cantidad
1
1
1
2
1
1
1
1
1
1
1
1
2
2
2
1
1
1
1
1
Bezeichnung
Identification
ab Masch.-Nr. 147
BENZINSIEB
BENZINTANK
BENZINTANK
BEFESTIGUNGSGUMMI A, TANK
BEFESTIGUNGSGUMMI B, TANK
STREBE A, KRAFTSTOFFTANK
STREBE B, KRAFTSTOFFTANK
BENZINTANKVERSCHLUSS KOMPL.
ENTLUEFTUNGSSCHWAMM, BENZINKAPPE
DICHTUNG, BENZINVERSCHLUSS
BENZINSCHLAUCH
BENZINSCHLAUCH (FKM)
BEFESTIGUNGSHUELSE, KANISTER
MUTTER, SELBSTSICHERND, 6MM
GLATTE SCHEIBE, 15MM
KLEMME, SCHLAUCH (B8)
KLEMME, SCHLAUCH (B10)
SCHLAUCHKLAMMER (D8)
SCHLAUCHKLAMMER (D10.5)
BENZINTANKVERSCHLUSS KOMPL.
von / from 1066449
bis / to 1066448
bis / to 1009677
von / from 1009678
KRAFTSTOFFTANK / FUEL TANK
178
STRAINER, FUEL
TANK, FUEL
TANK, FUEL
RUBBER A, TANK MOUNTING
RUBBER B, TANK MOUNTING
STAY A, FUEL TANK
STAY B, FUEL TANK
CAP ASSY., FUEL TANK
SPONGE, FUEL CAP BREATHER
PACKING, FUEL CAP
TUBE, FUEL
TUBE, FUEL (FKM)
COLLAR, CANISTER MOUNTING
NUT, SELF-LOCK, 6MM
WASHER, PLAIN, 15MM
CLIP, TUBE (B8)
CLIP, TUBE (B10)
CLAMP, TUBE (D8)
CLAMP, TUBE (D10.5)
CAP ASSY., FUEL TANK
Honda GX 100 — 1200
Artikel-Nr.
Part-No.
No. piéce
No. Pieza
Pos.
1
2 1)
2 2)
4 3)
4 4)
5
7
8
9
10
12
1)
2)
3)
4)
13331-ZM7-000
28451-Z0D-V02
28451-Z0D-V03
30500-Z0D-013
30500-Z0D-023
30564-ZA5-000
30701-883-000
31110-Z0D-003
32195-Z0D-000
90022-888-010
94050-12000-
Stück
Qty.
Quantité
Cantidad
1
1
1
1
1
1
1
1
1
2
1
Bezeichnung
Identification
SPEZIALKEIL
ANLASSERRIEMENSCHEIBE
ANLASSERRIEMENSCHEIBE
ZUENDSPULE KOMPL.
ZUENDSPULE KOMPL.
GUMMITUELLE, SCHNUR
KLEMME, HOCHSPANNUNGSSCHNUR (8MM)
SCHWUNGRAD KOMPL.
SCHNUR, STOPPSCHALTER
FLANSCHENSCHRAUBE, 6X20(CT200)
FLANSCHENMUTTER, 12MM
KEY, SPECIAL
PULLEY, STARTER
PULLEY, STARTER
COIL ASSY., IGNITION
COIL ASSY., IGNITION
GROMMET, CORD
CLIP, HIGH TENSION CORD (8MM)
FLYWHEEL COMP.
CORD, STOP SWITCH
BOLT, FLANGE, 6X20 (CT200)
NUT, FLANGE, 12MM
bis / to 1019749
von / from 1019750
bis / to 1090474
von / from 1090475
SCHWUNGRAD+ZÜNDSPULE / FLYWHEEL+IGNITION COIL
Honda GX 100 — 1300
Pos.
1
2
3
4
5
9
10
11
14
15
Artikel-Nr.
Part-No.
No. piéce
No. Pieza
16500-Z0D-T00
16551-Z0D-010
16555-Z0D-000
16561-Z0D-000
16562-Z0D-000
16584-883-300
90014-952-000
90015-ZE5-010
93500-050250A
94050-06000-
Stück
Qty.
Quantité
Cantidad
1
1
1
1
1
1
2
1
1
1
Bezeichnung
Identification
KONTROLLER KOMPL.
DREHZAHLREGLERARM
DREHZAHLREGLERSTANGE
DREHZAHLREGLERFEDER
RUECKHOLFEDER, DROSSELFEDER
EINSTELLFEDER, KONTROLLE
FLANSCHENSCHRAUBE, 6X14(CT200)
SCHRAUBE, DREHZAHLRERARM
KEGELKOPFSCHRAUBE, 5X25
FLANSCHENMUTTER, 6MM
CONTROL ASSY.
ARM, GOVERNOR
ROD, GOVERNOR
SPRING, GOVERNOR
SPRING, THROTTLE RETURN
SPRING, CONTROL ADJUSTING
BOLT, FLANGE, 6X14 (CT200)
BOLT, GOVERNOR ARM
SCREW, PAN, 5X25
NUT, FLANGE, 6MM
REGLER / CONTROL
Honda GX 100 — 1400
Artikel-Nr.
Part-No.
No. piéce
No. Pieza
Pos.
1 1)
2
3
4
5
7 2)
87521-Z0D-V01
87528-ZG0-W40
87528-Z0D-000
87532-Z4E-000
87601-Z0D-R30
87521-Z0D-V02
1)
2)
Stück
Qty.
Quantité
Cantidad
1
1
1
1
1
1
Bezeichnung
Identification
EMBLEM (RAMMER)
MARKE, HAHN (AUSSEN)
MARKE, STARTERKLAPPENANZEIGE
MARKE, DROSSELANZEIGE
MARKE, TYP (VEA)
EMBLEM (RAMMA)(GX100)
EMBLEM (RAMMER)
MARK, COCK (EXTERNAL)
MARK, CHOKE INDICATION
MARK, THROTTLE INDICATION
MARK, TYPE (VEA)
EMBLEM (RAMMA)(GX100)
– 1066473
1066474 –
SCHILDER / LABEL