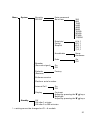
1
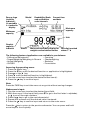
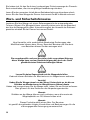
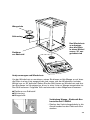
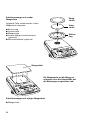
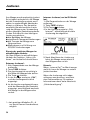
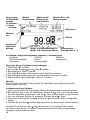
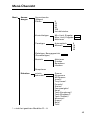
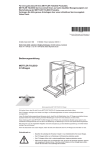
Pinnacle Series
Pinnacle-Serie
Analytical and Precision Balances
Analysen- und Präzisionswaagen
Operating Instructions / Betriebsanleitung
English – page 3
Deutsch – Seite 27
2
Contents
Warning and Safety Information . . . 4
Troubleshooting Guide . . . . . . . . . . 18
Specifications . . . . . . . . . . . . . . . . . . . 5
Balance Operating Menu . . . . . . . . . 19
Getting Started . . . . . . . . . . . . . . . . . . 8
Accessories . . . . . . . . . . . . . . . . . . . . 22
Calibration and Adjustment . . . . . . 12
Declaration of Conformity . . . . . . . . 23
Operation. . . . . . . . . . . . . . . . . . . . . . 14
Counting . . . . . . . . . . . . . . . . . . . . 17
Target weighing/
Weighing in Percent . . . . . . . . . . 17
Checkweighing. . . . . . . . . . . . . . . 17
Animal Weighing . . . . . . . . . . . . . 17
Formulation . . . . . . . . . . . . . . . . . 17
Statistics . . . . . . . . . . . . . . . . . . . . 17
GLP/ISO . . . . . . . . . . . . . . . . . . . . . 17
Printing . . . . . . . . . . . . . . . . . . . . . 17
Confirmation of an
EC Type-Approval Certificate . . . . . 25
Plates and Markings . . . . . . . . . . . . . 26
3
Denver Instrument Pinnacle Series balances meet high quality standards, and
with proper care and treatment will provide many years of trouble-free service.
Please read this manual carefully before operating your new Denver
Instrument balance.
Warning and Safety Information
Calibrate (adjust) your balance using a reference weight of the appropriate
accuracy class. A measuring instrument is only as accurate as the standard
that was used as a reference in calibration. For assistance in the selection of
reference weights, please contact Denver Instrument Company.
!
Caution
The operator shall be responsible for any modifications to Denver Instrument
equipment and for any connections of cables or equipment not supplied
by the Denver Instrument Company and must check and, if necessary,
correct these modifications and connections.
!
Caution
Use of this product in a manner other than that specified by the manufacturer
may impair any safety protection provided by the equipment.
!
Warning
Do not drop objects (such as weights or samples) on the weighing pan,
as this will damage the balance's internal mechanisms.
Warning
Never lift balance by the weighing pan or pan support as this may cause
damage to internal mechanisms.
Always lift and transport the balance by its base, including when
removing the balance from the packaging.
Note:
Loads that exceed the balance's maximum capacity by 15%
can damage the weighing system.
Note:
This product may contain a rechargeable battery.
The user is responsible for disposing of the equipment,
including the battery, in accordance with local ordinances and regulations.
4
Specifications
Standard Models
Precision and Analytical Balances
Models
Capacity
Readability
Taring range
Repeatability, (s)
Linearity
Response time
Pan size
P-114*
110 g
0.1 mg
0 to 110 g
0.1 mg
0.2 mg
3 seconds
79mm d
(3.1 in.)
P-214*
210 g
0.1 mg
0 to 210 g
0.1 mg
0.2 mg
3 seconds
79mm d
(3.1 in.)
P-314*
310 g
0.1 mg
0 to 310 g
0.1 mg
0.3 mg
3 seconds
79mm d
(3.1 in.)
Precision Balances
Models
Capacity
Readability
P-203*
200 g
0.001 g
P-403*
400 g
0.001 g
P-603D*
100/600 g
0.001/0.01g
P-402*
400 g
0.01g
P-602*
600 g
0.01g
P-2002*
2000 g
0.01 g
Taring range
Repeatability, (s)
Linearity
Response time
0 to 200 g
0.001 g
0.002 g
3 seconds
0 to 400 g
0.001 g
0.002 g
3 seconds
0 to 100/600 g
0.002/0.01 g
0.003/0.02 g
4 seconds
0 to 400 g
0.01 g
0.02 g
3 seconds
0 to 600 g
0.01 g
0.02 g
3 seconds
0 to 2000g
0.01 g
0.02 g
3 seconds
Pan size
114mm
(4.5 in.)
d114mm d 114mm d
(4.5 in.)
(4.5 in.)
114mm d 114mm d 178 x 178mm
(4.5 in.)
(4.5 in.)
(7.0 x 7.0 in.)
Models
Capacity
Readability
P-4002*
4000 g
0.01 g
P-4002D*
400/4000 g
0.01/0.1 g
P-8002D
800/8000 g
0.01/0.1 g
P-6001*
6000 g
0.1 g
P-8001
8000 g
0.1 g
Taring range
Repeatability, (s)
Linearity
Response time
0 to 4000 g
0.01 g
0.02 g
3 seconds
0 to 400/4000 g
0.02/0.1 g
0.03/0.2 g
4 seconds
0 to 800/8000 g
0.02/0.1 g
0.03/0.2 g
4 seconds
0 to 6000 g
0.1 g
0.2 g
3 seconds
0 to 8000 g
0.1 g
0.2 g
3 seconds
Pan size
178 x 178mm 178 x 178mm
(7.0 x 7.0 in.) (7.0 x 7.0 in.)
178 x 178mm
(7.0 x 7.0 in.)
178 x 178mm 178 x178mm
(7.0 x 7.0 in.) (7.0 x 7.0 in.)
* PI models with internal calibration
5
Specifications
Verified Models with an EC Type-Approval Certificate
Precision Analytical Balances
Models
PI-114A
Accuracy class 1) k
Type
BD BP 100
Max. capacity,
Max1)
110 g
Scale interval, d 1) 0.1 mg
Taring range
(subtractive)
0 to 110 g
Verification scale
interval, e 1)
1 mg
Minimum
capacity, Min 1) 10 mg
Response time 3 seconds
Pan size
79 mm d
(3.1 in.)
PI-214A
k
BD BP 100
PI-314A
k
BD BP 100
PI-225DA
k
BC BP 100
210 g
0.1 mg
310 g
0.1 mg
60/220 g
0.01/0.1 mg
0 to 210 g
0 to 310 g
0 to 220 g
1 mg
1 mg
1 mg
10 mg
3 seconds
79 mm d
(3.1 in.)
10 mg
3 seconds
79 mm d
(3.1 in.)
1 mg
6/3 seconds
79 mm d
(3.1 in.)
Precision Balances
Models
PI-203A
Accuracy class 1) K
Type
BD BP 200
Max. capacity,
Max1)
200 g
Scale interval, d 1) 0.001 g
Taring range
(subtractive)
0 to 200 g
Verification scale
interval, e 1)
0.01 g
Minimum
capacity, Min 1) 0.02 g
Response time
3 seconds
Pan size
114mm d
(4.5 in.)
1)
6
PI-403A
PI-602A
PI-2002A
K
K
K
BD BP 200 BD BP 200 BD BP 200
PI-4002A
K
BD BP 200
PI-6001A
K
BD BP 200
400 g
0.001 g
600 g
0.01 g
2000 g
0.01 g
4000 g
0.01 g
6000 g
0.1 g
0 to 400 g
0 to 600 g
0 to 2000g
0 to 4000 g
0 to 6000 g
0.01 g
0.1 g
0.1 g
0.1 g
1g
0.02 g
3 seconds
114mm d
(4.5 in.)
0.5 g
3 seconds
114mm d
(4.5 in.)
0.5 g
3 seconds
178x178mm
(7.0 x 7.0 in.)
0.5 g
5g
3 seconds 3 seconds
178x178mm 178x178mm
(7.0 x 7.0 in.) (7.0 x 7.0 in.)
Council Directive 90/384/EEC on non-automatic weighing instruments used within
the European Economic Area
General Specifications:
Dimensions (WxDxH), analytical models:
Dimensions (WxDxH), precision models:
Weighing chamber dimensions:
Allowable operating temperature range:
Storage temperature:
Humidity:
Net weight (analytical balances):
Net weight (precision balances):
Power requirements/frequency: AC:
371 x 239 x 338mm (14.6 x 9.4 x 13.3 in.)
371 x 239 x 97mm (14.6 x 9.4 x 3.8 in.)
211 x 203 x 249mm (8.3 x 8.0 x 9.8 in.)
10° - 30°C (50° - 86°F)
-10° - 30°C (14° - 86°F)
< 90% RH
6.8 kg (15 lbs)
4.54 kg (10 lbs)
120-240V 50/60Hz; other voltages available
NOTE:
The battery is not a user-serviceable part. If the battery does not recharge while
the AC adapter is plugged in, contact an authorized service technician.
Caution:
Use only the AC adapter/charger supplied with balance.
Contact Denver Instrument for replacement.
7
Getting Started
Installation Instructions
Your balance is designed to provide
reliable weighing results under normal ambient conditions. When
choosing a location to set up your
new balance, observe the following
so that you will be able to work with
added speed and accuracy:
§ Set up the balance on a even,
stable surface.
§ Avoid exposing the balance to
extreme heat radiation from
heaters or direct sunlight
§ Due not use the balance at temperatures exceeding the allowable
operating temperature range (+10°
to +30°C; 50° to 86°F) as this could
negatively affect balance operation
and accuracy.
§ Protect the balance from direct
exposure to drafts.
§ Protect the balance from aggressive chemical vapors.
§ Avoid strong magnetic fields generated by other devices.
§ Avoid exposing the balance to
extreme vibrations during weighing
§ Line voltage to the balance should
be reasonably constant and free
from fluctuation.
Conditioning the Balance
Moisture in the air can condense on
the surfaces of a cold balance whenever it is brought to a substantially
warmer place. If you transfer the
balance to a warmer area, make
sure to condition it for about 2 hours
at the new ambient temperature,
leaving it unplugged from the power
supply. Afterwards, keep the balance
connected to the power supply.
8
Warranty
In the unlikely event that your balance
should require servicing within the
3-year warranty period, please contact the office listed below for your
country, and state the model number,
serial number and the problem:
Federal Republic of Germany:
DENVER INSTRUMENT GmbH
Robert-Bosch-Breite 10
37079 Goettingen
Germany
Telephone: +49 (0) 551/209 773-0
Telefax: +49 (0) 551/209 773-9
Internet:
http://www.DenverInstrument.com
E-mail: [email protected]
Seal on Balances Verified for Use
in Legal Metrology in the EU*:
A protective seal is required for verified balances (see page 24). The protective seal consists of a sticker. This
seal will be irreparably damaged if
you attempt to remove it. If the seal is
broken, the validity of verification will
become void and you must have
your balance re-verified.
* including the Signatories of
the Agreement on the European
Economic Area
Weighing pan
Spill ring
Stainless steel
platform
Place the draft
shield on the
balance so the
grooves line up
approximately
at a 30° angle
Analytical Balances and Draft Shield
To attach draft shield, place it upon the balance so the grooves line up when
the draft shield is approximately at a 30° angle. Pull the pin at the rear of the
draft shield and turn clockwise until it is in line with the balance. Release the
pin. Place the components listed below inside the chamber in the order given:
§ Stainless steel platform
§ Spill ring
§ Weighing pan
Connecting Model PI-225DA to the
Electronics Box
– Plug the male connector on the
cable into the female connector on
the electronics box
9
Precision Balances with Round Pan
Weighing
pan
Place the components listed below
on the balance in the order given:
Base pan
§ Shield ring
§ Base pan
§ Weighing pan
§ Draft shield (optional)
§ Draft shield cover (optional)
Shield ring
Weighing pan
Place the weighing pan on the
balance so the rubber feet line up
with the holes
Precision Balances with Square Pan
§ Weighing pan
10
Connecting the Balance to AC Power
After conditioning the balance (see page 8), simply plug the AC adapter into
the rear of the balance and connect the adapter to an appropriate power outlet;
the balance switches on automatically. To avoid extended warm-up periods,
leave the balance plugged in and switched on at all times.
PI-225DA
§ Insert the right-angle plug from the AC adapter into the jack on the
electronics box.
USB port*
RS-232
port
Ethernet
Power
connection*
Opening
for antitheft
locking
device
Back panel
Leveling the Balance
Level the balance any time it is installed in a new location. Make sure all four
feet touch the work surface. Adjust the leveling feet until the air bubble is
centered in the level indicator.
The number of leveling feet depends on the balance model:
Analytical models: 2 front feet
Precision models with round pan: 2 front feet
Precision models with square pan: 4 feet, one in each corner
* = not on verified PI … A models
11
Calibration and Adjustment
Calibration technically means to
determine the difference between
the weighing instrument readout
and the actual weight on the platform
to determine the accuracy. Adjustment means to bring a weighing
instrument to the level of accuracy
required for its use and adjusted.
Although the term “calibration” is
used throughout this manual, as is
common in the USA, we are referring
to “adjustment” (see first paragraph).
Your balance was calibrated at
the factory; however, it must be
re-calibrated upon installation and
subsequently on a regular basis.
The recommended calibration interval is once per week, using a certified
calibration weight. Calibration must
also be performed any time the
balance has been moved, leveled,
or disconnected from power, as well
as following a significant change in
ambient temperature. Additional
calibration may be required for
compliance with ISO/GLP standards.
Note on Verified Balances Used
in Legal Metrology:
Before using your balance in legal
metrology, perform internal calibration at the place of installation.
External Calibration/Adjustment*
1. Remove all items from the balance.
2. Press TARE.
3. Carefully center the calibration
weight on the weighing pan.
4. Press the
key.
5. The display shows ”CAL“ and
the weight.
6. When calibration is complete, the
weight value is displayed and the
balance returns to the normal
weighing mode.
Internal Calibration (PI models only)
1. Remove all items from the balance.
2. Press TARE.
3. Press the
key.
4. The display shows ”CAL Internal“
and calibration is performed
automatically.
5. When calibration/adjustment is
complete, the balance automatically
returns to the normal weighing
mode.
Note:
If ”Internal Cal“ is deactivated (”Off“
in the operating menu), only external
calibration can be performed.
If calibration/adjustment cannot
be completed, an error message
is displayed. See ”Troubleshooting
Guide“ for details on error codes and
messages.
* on verified PI … A models, external calibration must be performed
by a Denver service technician.
12
DenverCal: Automatic Calibration/
Adjustment of PI…A Models
"DenverCal" flashes on the display to
indicate that the ambient temperature
has changed, or the specified time
interval has elapsed, since the last
calibration. The balance is ready to
perform automatic calibration/
adjustment.
Automatic calibration/adjustment
is performed once the following
two criteria have been met:
The load has not changed within
the last 2 minutes. The “DenverCal”
signal has been flashing for at least
15 seconds
"DenverCal" continues to flash until
internal calibration/adjustment has
been completed successfully.
13
Operation
Menu Key
Calibration
Key
Navigational
Keys
Max 2000g
PESER
Print Key
Tare/Zero Key
Enter Key
Warm-up Time
To deliver exact results, the balance must be connected to AC power for
at least 2 hours before weighing. Only after this time will the balance have
reached the required operating temperature. We recommend leaving balance
plugged in so that all components are at operating temperature and the balance
is ready for use at any time.
14
Note on Verified Balances Used in
Legal Metrology (PI… A Models):
$ The balance must warm up
for at least 24 hours after initial
connection to AC power.
$ The type-approval certificate for
verification applies to non-automatic weighing instruments only;
for automatic operation with
or without auxiliary measuring
devices, you must comply with the
regulations applicable in your
country.
Taring the Balance
1. Place a container on the weighing
pan. The balance registers the
weight of the container.
2. Press the TARE key.
3. ”TARING“ is displayed to indicate
that the balance is being tared.
4. The display shows 0.0000 grams
(or selected weight unit and
resolution) once taring is concluded successfully.
5. When the readout is stable, the
Denver Instrument logo appears in
the upper left corner of the display.
When unstable, a "U" is displayed.
$ The temperature range indicated
on the verification ID label must
not be exceeded during operation.
Example:
BD BP 200
K 0 to +40°C
15
Denver logo
(stability
indicator);
U=unstable
L =Locked-in
display
Model
Readability/Scale
and verification
scale intervals
Current time
and date
Maximum
capacity
Minimum
capacity
Unit
Graphic
capacity
indicator
Status
Main and secondary display for
weights and calculated values
Last digit marked
when e ≠ d
The following features/applications are available in your balance:
• Calibration/Adjustment
• Counting
• Target/Weighing/Weighing in Percent • Checkweighing
• Animal Weighing
• Statistics
• GLP/ISO
• Formulation
▲
Accessing the operating menu:
1. Press the Menu key
.
2. Press the ▼ key until the desired function or application is highlighted.
3. Press or the
key.
4. Press ▼ until the desired function is highlighted.
5. Use the arrow keys to select the desired menu item(s).
6. Press the
key to confirm input.
Note:
Press the TARE key to exit the menu at any point without saving changes.
▲
▲
Alphanumeric input:
1. Use the arrow keys to select the desired input field.
2. With the cursor in the input field, press ▼ to go to the first letter in alphabet,
or ▲ to scroll through numbers.
3. Press the key to go to the next character(s).
4. Repeat this process until the desired value is entered.
5. Press the
key to confirm input and return to the main menu.
Press the key to return to the previous character. You can press and hold
arrow keys to scroll quickly.
16
Counting
With the Counting application, you
can determine a number of parts of
approximately equal weight. Place
the reference sample quantity of
parts on the balance to determine the
reference weight first; the next load
on the balance is then calculated as
a number of pieces having the same
weight, based on this reference
value. The readout shows both the
piece count and the corresponding
weight, in the primary weight unit.
Target Weighing/Weighing in Percent
This application allows you to obtain
weight readouts in a percentage proportional to a reference weight. The
balance will display both the percentage and the total weight in primary
weight unit.
Checkweighing
This application gives you plainlanguage responses indicating the
relation of the load on the balance to
user-defined target and tolerance
limits.
Animal Weighing
The Animal Weighing application
is used for measuring animals that
move continuously during weighing.
This feature can also be used for
measurements taken in environments with extreme vibrations and/or
drafts.
“L” on the display indicates that the
result is shown as a locked-in display
value.
Formulation
This feature allows you to weigh
out several different components in
a single container. Simply place your
container on the pan and press the
TARE key. Add components one at
a time, pressing ENTER after each
component. The weight of each individual component is displayed as the
primary weight, and the total weight
is shown in the secondary weight
display.
Statistics
Your balance is equipped with internal memory for 250 data records.
You can calculate and print various
statistics, including number of values,
minimum weight, maximum weight,
range, average, standard deviation
and total weight.
GLP/ISO
Your balance has a number of features that let you configure data
records for compliance with GLP and
ISO documentation requirements.
Activate the GLP/ISO header to
include all required data on printouts.
Printing
The balance has a bi-directional
RS-232 port for communication with
serial peripheral devices, such as
a printer or computer. In addition,
the balance excluding PI… A models
has a USB port* not on verified PI… A
models for connection to a computer.
Ambient Conditions
You can adapt the balance by selecting the appropriate menu setting, to
compensate for ambient conditions
such as vibration and drafts.
* = not on verified PI… A models
17
System
The System menu lets you configure various features of your balance.
You can assign password protection for menu settings, change the acoustic
signal, restore factory defaults, and adjust the RS-232 interface settings for use
with a computer or printer.
▲
Restoring Factory Defaults
To restore all settings to the factory defaults:
1. Press the Menu key.
2. To open the System menu, press ▼ repeatedly until “System” is displayed,
then press .
3. To restore the factory settings in the menu, press ▼ repeatedly until
“Defaults” is displayed, then press .
▲
Troubleshooting Guide
OVER
(CAPACITY ERROR)
The load exceeds the
balance capacity.
Unload the balance
or remove obstruction.
Display capacity is
exceeded.
Decrease weight on
balance.
UNDER
The load is too light.
Check pan position.
Unload the balance and
switch it off and then on
again.
CAL
ADD WEIGHT
Calibration/adjustment
started without weight
on pan.
Add weight and press
CAL key again.
CAL
OUT OF RANGE
Weight cannot be
detected.
Unload pan and add
appropriate weight.
Other errors
Error has occurred.
Switch the balance off
and then on again. If the
error persists, contact
a service technician.
18
Balance Operating Menu
Menu
Applications
Normal Mode
(Weighing)
Counting
(ref. sample
quantity)
5
10
20
50
100
Custom (User-defined)
Checkweighing
Minimum limit, input:
Maximum limit, input:
Enable
Animal Weighing
Automatic
Manual
5
10
15
20
Target Weighing, reference weight:
(Weighing in Percent)
Statistics
Enable
Print
Calculate
Clear
Formulation
Units
Primary
Secondary*
Grams
Kilograms
Milligrams
Ounces*
Troy ounces*
Pounds*
Grains*
Pennyweights*
Carats
Hong Kong taels*
Singapore taels*
Taiwanese taels*
Mommes*
Drams*
Baht*
Tola*
* = not on verified PI… A models
19
Balance Operating Menu
Menu
Ambient
Conditions
GLP/ISO
Application filter
Low
Normal
High
Stability
Fine (vibration) (1/2 digit)
Normal (1 digit)
Coarse (2 digits)
Very Coarse (4 digits)
Auto zero
On
Off
User:
Date
Time
(MM-DD-YY)
24-hour
12-hour
Sample ID:
Number:
Header
Print
Language
20
On/Off
Mode
Manual (print on request1)
Stable (automatic when stable)
Interval
5 seconds
30 seconds
60 seconds
user definable
Format*
Type 1
Type 2
Type 3
Type 4
Type 5
Type 6
Type 7
Type 8
English
German
French
Spanish
* = not on verified PI… A models
) = PI… A models: only when readout is stable
1
(HH:MM:SS)
(HH:MM:AM/PM)
Menu
System
Security
RS-232
Speaker
(Acoustic signal)
Defaults
(Restore)
Enter password
Baud rate
300
600
1200
2400
4800
9600
19,200
38,400
57,600
115,200
Data bits/
Parity/
Stop bit
8, N, 1
8, E, 1
8, O, 1
7, E, 1
7, O, 1
Handshake
None
Hardware
Echo
On
Off
On
Off
Factory
Software version
Platform serial number
Standby
Internal Cal*
On
Off
Display
Contrast:
Adjust by pressing the ▼ ▲ keys
Backlight:
Adjust by pressing the ▼ ▲ keys
Off
Off after 1 minute
Off after 2 to 999 minutes
* = setting cannot be changed on PI… A models
21
Accessories
Analytical draft shield chamber for milligram models
602643.1
In-use cover (analytical models and models with round pan)
602619.1
In-use cover (square pan models)
602620.1
Printer
901042.1
Cable with 9-pin connector for balance
902225.1
Weigh below hanger*
Calibration weights: contact your distributor for a complete list
Complete operating instructions available at:
www.denverinstrument.com
* = not allowed in applications involving legal metrology
(such as legal for trade)
22
77000440.8
23
24
25
26
Inhaltsverzeichnis
Warn- und Sicherheitshinweise ......28
Fehlermeldungen .............................42
Technische Daten .............................29
Menü-Übersicht................................43
Inbetriebnahme ................................32
Zubehör.............................................46
Justieren ...........................................36
Konformitätserklärungen ................47
Betrieb...............................................38
Zählen...........................................41
Ziel-/Prozentwägen ......................41
Kontrollwägen .............................41
Tierwägen.....................................41
Rezeptieren ..................................41
Statistik.........................................41
GLP/ISO ........................................41
Drucken ........................................41
Bestätigung einer
EG-Bauartzulassung.........................49
Schilder und Marken........................50
27
Sie haben sich für den Kauf einer hochwertigen Präzisionswaage der PinnacleSerie entschieden, die eine sorgfältige Handhabung erfordert.
Lesen Sie den gesamten Inhalt dieser Betriebsanleitung aufmerksam durch,
bevor Sie die neue Waage der Denver Instrument GmbH in Betrieb nehmen.
Warn- und Sicherheitshinweise
Justieren Sie Ihre Waage mit einem Referenzgewicht der entsprechenden
Toleranz (Klasse). Ein Messgerät kann niemals präziser sein als der Standard,
der ihm als Bezugsgröße dient. Unterstützung bei der Auswahl der Referenzgewichte erhalten Sie bei Denver Instrument GmbH.
!
Achtung!
Vom Hersteller nicht ausdrücklich genehmigte Änderungen oder
Modifikationen können dazu führen, dass dem Benutzer die Erlaubnis
zum Betreiben dieses Gerätes entzogen wird.
!
Vorsicht!
Die unsachgemäße und vom Hersteller nicht vorgesehene Nutzung
dieser Waage kann zu einer Beeinträchtigung der durch das Gerät
gewährleisteten Schutzvorrichtungen führen.
!
Vorsicht!
Lassen Sie keine Gegenstände auf die Waagschale fallen.
Dadurch können Schäden am Mechanismus im Wageninnern auftreten.
Vorsicht!
Heben Sie die Waage niemals an der Waag-/Unterschale an, da dies zu
Schäden am Mechanismus im Waageninnern führen könnte.
Heben und transportieren Sie die Waage stets, indem Sie am Sockel anfassen.
Dies gilt auch für das Entfernen des Verpackungsmaterials.
Hinweis:
Schäden an der Waage können auch auftreten, wenn die maximale
Wägekapazität um 15% überschritten wird.
Hinweis:
Dieses Produkt enthält einen Akku. Der Benutzer
ist gemäß den geltenden lokalen Vorschriften und Bestimmungen für die
ordnungsgemäße Entsorgung verantwortlich.
28
Technische Daten
Standard-Modelle:
Präzisions- und Analysenwaagen
Modelle
P-114*
P-214*
P-314*
Wägebereich
Ablesbarkeit
Tarierbereich
Reproduzierbarkeit (s)
Linearität
Einschwingzeit
Abmessungen
Waagschale
110 g
0,1 mg
0 bis 110 g
0,1 mg
0,2 mg
3 Sek.
d 79 mm
210 g
0,1 mg
0 bis 210 g
0,1 mg
0,2 mg
3 Sek.
d 79 mm
310 g
0,1 mg
0 bis 310 g
0,1 mg
0,3 mg
3 Sek.
d 79 mm
Präzisionswaagen
Modelle
P-203*
P-403*
P-603D*
P-402*
P-602*
P-2002*
Wägebereich
200 g
400 g
100/600 g
400 g
600 g
2000g
Ablesbarkeit
0,001 g
0,001 g
0,001/0,01g
0,01g
0,01g
0,01 g
Tarierbereich
0 bis 200 g 0 bis 400 g 0 bis 100/600 g 0 bis 400 g 0 bis 600 g 0 bis 2000g
Reproduzierbarkeit, (s)
0,001 g
0,001 g
0,002/0,01 g
0,01 g
0,01 g
0,01 g
Linearität
0,002 g
0,002 g
0,003/0,02 g
0,02 g
0,02 g
0,02 g
3 Sek.
4 Sek.
3 Sek.
3 Sek.
3 Sek.
Einschwingzeit 3 Sek.
Abmessungen
Waagschale
Ø 114 mm Ø 114 mm Ø 114 mm
Ø 114 mm Ø 114 mm 178 x 178 mm
Modelle
P-4002*
P-4002D*
P-8002D
P-6001*
P-8001
Wägebereich
4000 g
400/4000 g
800/8000 g
6000 g
8000 g
Ablesbarkeit
0,01 g
0,01/0,1 g
0,01/0,1 g
0,1 g
0,1 g
Tarierbereich
0 bis 4000 g
0 bis 400/4000 g 0 bis 800/8000 g 0 bis 6000 g 0 bis 8000 g
Reproduzierbarkeit, (s)
0,01 g
0,02/0,1 g
0,02/0,1 g
0,1 g
0,1 g
Linearität
0,02 g
0,03/0,2 g
0,03/0,2 g
0,2 g
0,2 g
4 Sek.
3 Sek.
3 Sek.
178 x 178mm
178 x 178mm 178 x 178mm
Einschwingzeit 3 Sek.
4 Sek.
Abmessungen 178 x 178mm 178 x 178mm
Waagschale
* PI-Modelle mit interner Justiergewichtsschaltung
29
Technische Daten
Geeichte Modelle mit EG-Bauartzulassung:
Präzisions- und Analysenwaagen
Modelle
Typbezeichnung
Genauigkeitsklasse 1)
Wägebereich Max 1)
Ziffernschritt d 1)
Tarierbereich
(substraktiv)
Eichwert e 1)
Mindestlast Min.1)
Einschwingzeit
Abmessungen
Waagschale
PI-114A
BD BP 100
k
110 g
0,1 mg
0 bis 110 g
PI-214A
BD BP 100
k
210 g
0,1 mg
0 bis 210 g
PI-314A
BD BP 100
k
310 g
0,1 mg
0 bis 310 g
PI-225DA
BC BP 100
k
60/220 g
0,01/0,1 mg
0 bis 220 g
1 mg
10 mg
3 Sek.
d 79 mm
1 mg
10 mg
3 Sek.
d 79 mm
1 mg
10 mg
3 Sek.
d 79 mm
1 mg
1 mg
6/3 Sek.
d 79 mm
Präzisionswaagen
Modelle
PI-203A
PI-4002A
PI-6001A
Typbezeichnung
Genauigkeitsklasse 1)
BD BP 200 BD BP 200 BD BP 200 BD BP 200
BD BP 200
BD BP 200
K
K
K
K
K
K
Wägebereich
200 g
400 g
600 g
2000 g
4000 g
6000 g
Ziffernschritt d 1)
0,001 g
0,001 g
0,01 g
0,01 g
0,01 g
0,1 g
Tarierbereich
(substraktiv)
0 bis 200 g 0 bis 400 g 0 bis 600 g 0 bis 2000 g 0 bis 4000 g 0 bis 6000 g
Eichwert e 1)
PI-403A
PI-602A
PI-2002A
0,01 g
0,01 g
0,1 g
0,1 g
0,1 g
1g
Mindestlast Min.
0,02 g
0,02 g
0,5 g
0,5 g
0,5 g
5g
Einschwingzeit
Abmessungen
Waagschale
3 Sek.
3 Sek.
3 Sek.
3 Sek.
3 Sek.
3 Sek.
Ø 114 mm Ø 114 mm Ø 114 mm 178x178mm 178x178mm 178x178mm
1)
1)
Richtlinie 90/384/EWG für nichtselbsttätige Waagen für den Bereich des
Europäischen Wirtschaftsraumes
30
Allgemeine technische Daten
Abmessungen (Lx B x H) Analysenwaagen:
Abmessungen (L x B x H) Präzisionswaagen:
Abmessungen Wägeraum:
Betriebstemperatur:
Lagertemperatur:
Feuchtigkeit:
Nettogewicht (Analysenwaagen):
Nettogewicht (Präzisionswaagen):
Netzanschluss:
371 x 239 x 338 mm
371 x 239 x 97 mm
211 x 203 x 249 mm
+10° – +30°C
–10° – +30°C
< 90% relative Feuchtigkeit
6,80 kg
4,54 kg
100-240 V 50/60 Hz
Hinweis:
Der Akku kann nicht vom Benutzer selber gewartet werden. Falls die Batterie
nicht mit Hilfe des Netzgerätes aufgeladen werden kann, wenden Sie sich bitte
an einen autorisierten Kundendienstmitarbeiter.
Vorsicht:
Verwenden Sie für diese Waage ausschließlich das im Lieferumfang enthaltene
Netz- bzw. Ladegerät!
Für einen Ersatz wenden Sie sich bitte an die Denver Instrument GmbH.
31
Inbetriebnahme
Aufstellhinweise
Wenn Sie den Standort für Ihre neue
Waage auswählen, sollten Sie folgende Hinweise beachten, um eine praktische Handhabung zu gewährleisten
und die Wägegeschwindigkeit zu
optimieren:
§ Stellen Sie die Waage auf eine stabile, feste und ebene Standfläche.
§ Vermeiden Sie Standorte mit extremen Hitzeschwankungen oder
direkter Sonneneinstrahlung.
§ Raumtemperaturen über 30°C
(86°F) bzw. unter 10°C (50°F)
können den Betrieb und die Genauigkeit der Waage beeinträchtigen.
§ Schützen Sie die Waage vor
direkter Zugluft.
§ Schützen Sie die Waage vor
aggressiven chemischen Dämpfen.
§ Stellen Sie die Waage nicht in der
Nähe starker magnetischer Felder
auf, die durch andere Geräte verursacht werden.
§ Vermeiden Sie Standorte, an denen
Vibrationen entstehen können.
§ Setzen Sie die Waage nicht über
längere Zeiträume übermäßiger
Feuchtigkeit aus.
§ Um optimale Ergebnisse zu erzielen, sollte die Waage mindestens
zwei Stunden bei Raumtemperatur
aufgestellt werden, bevor sie an
die Stromversorgung angeschlossen wird.
§ Die Netzspannung, mit der die
Waage betrieben wird, sollte ausreichend stabil und schwankungsfrei sein.
32
Garantie
Sollte Ihr Gerät innerhalb der Garantiezeit von 3 Jahren einmal technische
Unterstützung benötigen, so verständigen Sie bitte unter Angabe des
Gerätetypes, der Serien-Nummer und
des Grundes Ihrer Beanstandung in
der Bundesrepublik Deutschland:
DENVER INSTRUMENT GmbH
Robert-Bosch-Breite 10
37079 Göttingen
Telefon (0551) 209773-0
Telefax (0551) 209773-9
Internet:
http://www.DenverInstrument.com
E-Mail: [email protected]
Waage akklimatisieren
Eine Betauung kann auftreten
(Kondensation von Luftfeuchtigkeit
am Gerät), wenn ein kaltes Gerät in
eine wesentlich wärmere Umgebung
gebracht wird. Das vom Netz
getrennte Gerät ca. 2 Stunden bei
Raumtemperatur akklimatisieren.
Das Gerät ständig am Netz lassen.
Versiegelungsmarke an geeichten
Varianten:
Bei geeichten Waagen ist eine Versiegelung gefordert (siehe Seite 50).
Diese Versiegelung erfolgt mit einer
Klebemarke. Beim Versuch, sie zu
entfernen, wird sie zerstört. In diesem
Fall erlischt die Eichgültigkeit und die
Waage muss nachgeeicht werden.
Waagschale
Schirmring
Plattform
aus Edelstahl
Den Windschutz
so aufsetzen,
dass die Rillen
in einem Winkel
von ca. 30° ausgerichtet sind
Analysenwaagen und Windschutz
Um den Windschutz zu montieren, setzen Sie diesen auf die Waage so auf, dass
die Rillen in einer Linie ausgerichtet sind, wenn sich der Windschutz in einem
Winkel von ca. 30° befindet. Ziehen Sie den Stift hinten am Windschutz und drehen Sie diesen im Uhrzeigersinn, bis er in einer Linie zur Waage ausgerichtet ist.
Den Stift loslassen. Folgende Teile nacheinander in den Wägeraum einsetzen:
§ Plattform aus Edelstahl
§ Schirmring
§ Waagschale
Verbindung Waage – Elektronik-Box
herstellen bei PI-225DA
– Stecker des Verbindungskabels in die
Anschlussbuchse der Elektronik-Box
stecken
33
Präzisionswaagen mit runder
Waagschale
Waagschale
Folgende Teile nacheinander in den
Wägeraum einsetzen:
Unterschale
§ Schirmring
§ Unterschale
§ Waagschale
§ Innerer Wägeraumwindschutz
(optional)
§ Winschutzdeckel (optional)
Schirmring
Waagschale
Die Waagschale auf die Waage so
aufsetzen, dass die Gummifüße auf
die Bohrungen ausgerichtet sind.
Präzisionswaagen mit eckiger Waagschale
§ Waagschale
34
Netzanschluss der Waage herstellen
Hat die Waage Raumtemperatur erreicht, stecken Sie den Stecker des Netzgerätes in die Rückseite der Waage und schließen Sie dieses an eine geeignete
Steckdose an. Die Waage wird automatisch eingeschaltet. Zur Vermeidung
übermäßig langer Aufwärmzeiten sollte die Waage ständig angeschlossen und
auf „Ein” geschaltet sein.
PI-225DA
§ Winkelstecker des Netzgerätes an der Elektronik-Box einstecken.
USBAnschluss*
RS232Schnittstelle
EthernetStromÖffnung für
Anschluss* anschluss Kabel und
Verriegelungsmechanismus
Rückseite der Waage
Waage ausrichten
Nach jedem Standortwechsel muss die Waage neu ausgerichtet werden. Sorgen
Sie dafür, dass alle Füße die Standfläche berühren.
Stellfüße justieren, bis die Luftblase genau in der Mitte der Libelle steht.
Je nach Modell variiert die Anzahl der Stellfüße.
Analysenwaagen: 2 Stellfüße an der Vorderseite
Präzisionsmodelle mit runder Waagschale: 2 Stellfüße an der Vorderseite
Präzisionsmodelle mit eckiger Waagschale: 4 Stellfüße (ein Fuß pro Ecke)
* = nicht bei geeichten Modellen PI… A
35
Justieren
Ihre Waage wurde werkseitig justiert.
Es ist jedoch erforderlich, die Waage
bei der Erstaufstellung sowie auch
später in regelmäßigen Abständen
erneut zu justieren. Der Hersteller
empfiehlt die wöchentliche Justierung der Waage unter Verwendung
eines zulässigen Gewichtsstandards.
Zu den Gründen für eine häufigere
Justierung gehören:
§ das Bewegen der Waage
§ signifikante Temperaturänderungen
§ das Trennen der Waage vom
Netzanschluss
§ Maßnahmen zur Erfüllung von
ISO/GLP-Anforderungen
Einsatz der geeichten Waagen im
eichpflichtigen Verkehr:
Vor dem Einsatz im eichpflichtigen
Verkehr die Funktion „Intern Justieren” am Aufstellort durchführen.
Externes Justieren*:
1. Alle Gegenstände von der Waage
entfernen.
2. Taste TARE drücken.
3. Das Justiergewicht vorsichtig in
die Mitte der Waagschale stellen.
4. Die Taste
drücken.
5. In der Anzeige erscheint „CAL”,
und das Justiergewicht wird
angezeigt.
6. Ist die Justierung abgeschlossen,
wird der Messwert des Gewichts
angezeigt, anschließend wechselt
die Waage in den Wägemodus
zurück.
* = bei geeichten Modellen PI…A
nur durch Denver Kundendienst
möglich
36
Internes Justieren (nur bei PI-Modellen):
1. Alle Gegenstände von der Waage
entfernen.
2. Taste TARE drücken.
3. Die Taste
drücken.
4. In der Anzeige erscheint „CAL
Internal”, anschließend wird die
Justierung durchgeführt.
5. Nach Abschluss der Justierung
kehrt die Waage automatisch in
den Wägemodus zurück.
Hinweis:
Wenn „Internal Cal” im Menü ausgestellt ist, kann die Waage nur extern
justiert werden.
Wenn die Justierung nicht abgeschlossen werden kann, erscheint
eine Fehlermeldung. Für weitere
Informationen dazu siehe Abschnitt
„Fehlerbeseitigung”.
DenverCal: Automatisch Justieren
bei Modellen PI…A
Die Waage meldet sich selbständig
mit blinkendem DenverCal in der
Anzeige, wenn sich die Umgebungstemperatur gegenüber der letzten
Justierung geändert hat oder ein
Zeitintervall überschritten wurde.
Die Waage will sich dann selbst justieren.
Die automatische Justierung
wird durchgeführt, wenn folgende
Voraussetzungen erfüllt sind:
Kein Lastwechsel während der
letzten 2 Minuten.
Nach Ablauf einer Warnanzeige
von 15 Sekunden.
„DenverCal“ blinkt solange, bis
eine interne Justierung erfolgreich
durchgeführt wurde.
37
Betrieb
Menütaste
Justiertaste
Steuerungstasten
Max 2000g
Drucktaste
Tarier-/Nullstelltaste
Eingabetaste
Aufwärmzeit
Um präzise Ergebnisse zu erzielen, benötigt die Waage eine Aufwärmzeit
und muss zu diesem Zweck mindestens 2 Stunden an das Stromnetz angeschlossen sein. Erst nach dieser Zeit hat die Waage die erforderliche Betriebstemperatur erreicht. Es wird empfohlen, die Waage ständig an die Stromversorgung anzuschließen, so dass alle Komponenten aufgewärmt sind und
die Waage einsatzbereit ist.
38
Geeichte Waagen im eichpflichtigen Verkehr einsetzen
(PI…A Models):
$ Anwärmzeit von mindestens
24 Stunden einhalten nach
erstmaligem Anschluss an
das Stromnetz.
$ Die Bauartzulassung zur Eichung
gilt nur für nichtselbstätige Waagen; für selbsttätigen Betrieb mit
oder ohne zusätzlich angebaute
Einrichtungen sind die für den Aufstellort geltenden nationalen Vorschriften zu beachten.
Die Waage tarieren
1. Stellen Sie dazu einen Behälter auf
die Waagschale. Die Waage registriert das Gewicht des Behälters.
2. Drücken Sie die TARE-Taste.
3. In der Anzeige erscheint „TARIEREN”. Dies zeigt an, dass die
Waage tariert wird.
4. Nach erfolgreichem Tariervorgang
wird die Nullanzeige angezeigt
(in der gewählten Einheit der vorbestimmten Auflösung).
5. Ist der Wägewert stabil, erscheint
oben links in der Anzeige das Logo
von Denver Instrument. Bei einem
instabilen Wägewert erscheint ein
„U”.
$ Auf dem Kennzeichnungschild
angegebener Temperaturbereich
(°C) darf beim Betrieb nicht überschritten werden.
Beispiel:
BD BP 200
K 0…+40°C
39
Denver Logo
als Stabilitätssymbol;
U=Unstabil
L =Feste
Anzeige
ModellBezeichnung
Ablesbarkeit/
Ziffernschritt
und Eichwert
Aktuelle Zeit- und
Datumsangabe
Höchstlast
Mindestlast
Graphische
Kapazitätsanzeige
Einheit
Status
Haupt- und Nebenanzeige für
Wäge- und verrechnete Werte
Differenzierte
Anzeigestelle e ≠ d
Ihre Waage verfügt über folgende Funktionen / Anwendungen:
• Justieren
• GLP/ISO
• Statistik
• Ziel-/Prozentwägen
• Zählen
• Rezeptieren
• Tierwägen
• Kontrollwägen
▲
Zugang zu diesen Funktionen/Anwendungen:
1. Taste Menü
drücken.
2. Die richtige Kategorie mit der Taste ▼ wählen.
3. Bestätigen mit Taste oder
.
4. Die Taste ▼ drücken, bis die gewünschte Funktion erscheint.
5. Die Navigationspfeile benutzen, um die weitere Auswahl zu treffen.
6. Menüeinstellungen bestätigen: Taste
drücken.
Hinweis:
Durch Drücken der TARE-Taste können Sie jedes Menü ohne Speicherung der
Änderungen verlassen.
▲
▲
In alphanumerischen Feldern:
1. Um in das korrekte Feld zu gelangen, können Sie die Navigationstasten benutzen.
2. Befindet sich der Cursor im Textkasten, drücken Sie ▼, um zum ersten Buchstaben des Alphabets zu gelangen, und die ▲-Taste, um die Zahlen zu durchlaufen.
3. Um zum nächsten Zeichen zu gelangen, drücken Sie die -Taste.
4. Wiederholen Sie diesen Vorgang, bis Sie die gewünschten Ziffern ausgewählt
haben.
5. Drücken Sie die Taste
zur Bestätigung und um ins Hauptmenü zurückzukehren.
Hinweis: Durch Drücken der -Taste kehren Sie zur vorherigen Ziffer zurück,
um diese zu bearbeiten. Für einen Schnelldurchlauf können Sie eine beliebige
Navigationstaste gedrückt halten.
40
Zählen
Im Zählmodus können Sie die Stückzahl von Teilen bestimmen, die ungefähr das gleiche Gewicht aufweisen.
Für die Referenzmenge wird ein
Bezugsgewicht festgelegt, und die
Waage wiegt und zählt ähnliche Stücke. Die Waage zeigt sowohl die
Stückzahl als auch das zugehörige
Gewicht in der zuvor ausgewählten
Primäreinheit an.
Ziel-/Prozentwägen
Diese Anwendung ermöglicht es
Ihnen, das Wägeergebnis in Prozent
proportional zu einem Bezugsgewicht
abzulesen. Die Waage zeigt sowohl
die Prozentzahl als auch das Gesamtgewicht in der vom Benutzer definierten Primäreinheit an.
Kontrollwägen
Bei dieser Anwendung werden Ihnen
Hinweise im Klartext zu den benutzerdefinierten Grenzwerten angezeigt.
Tierwägen
Der Tierwägemodus erleichtert das
Wiegen von Tieren, die sich während
der Gewichtsbestimmung ständig
bewegen. Diese Funktion lässt sich
auch für Messungen in Umgebungen
mit starken Vibrationen oder starker
Zugluft einsetzen.
Anzeige „L“:
Das Messergebnis erscheint als feste
Anzeige.
Rezeptieren
Diese Funktion gestattet das Auswägen mehrerer unterschiedlicher Komponenten in einem Behälter. Stellen
Sie den Behälter dazu einfach auf
die Waagschale und drücken Sie
die Taste TARE. Fügen Sie dann die
einzelnen Komponenten hinzu und
drücken Sie danach jeweils die
Taste
. Angezeigt werden das
Gewicht der einzelnen Komponenten
sowie als sekundäre Gewichtsangabe
das Gesamtgewicht.
Statistik
Ihre Waage verfügt über einen
internen Speicher für 250 Datensätze.
Damit lassen sich Statistiken erstellen
und ausdrucken, u.a. Anzahl der Posten, Mindestgewicht, Höchstgewicht,
Bereich, Durchschnitt, Standardabweichung sowie Gesamtgewicht.
GLP/ISO
Ihre Waage besitzt eine Reihe von
Funktionen, anhand derer die kundenspezifische Einstellung unterschiedlicher Protokollierungsverfahren möglich wird, die sich an den
GLP- und ISO-Anforderungen orientieren. Wurde der GLP/ISO-Protokollkopf ausgewählt, wird er bei allen
Datenpunkten ausgedruckt.
Drucken
Diese Waage verfügt über einen
bidirektionalen RS232-Anschluss.
Zusätzlich ist ein USB-Anschluss*
vorhanden für Anschluss der Waage
an einen Rechner, welcher die
Verbindung zu zusätzlichen seriellen
Geräten wie z.B. einem Drucker oder
Rechner ermöglicht.
Umgebungsbedingungen
Um sich ändernde Gegebenheiten
(u.a. Vibrationen und Luftzug) zu
kompensieren, kann Ihre Waage auf
optimale Wägebedingungen eingestellt werden.
* = nicht bei geeichten Modellen
PI…A
41
System
Im Systemmenü können Sie Ihre Waage nach Ihren individuellen Bedürfnisse
einstellen. Geben Sie ein Passwort ein, ändern Sie das akustische Signal, stellen Sie die Werkseinstellungen wieder her oder gleichen Sie die Einstellungen
des RS232 mit den Einstellungen Ihres Rechners oder Druckers ab.
▲
Wiederherstellen der Werkseinstellungen
Zur Wiederherstellung aller werkseitigen Einstellungen:
1. Menü-Taste drücken.
2. System wählen: Taste ▼ mehrmals drücken und bestätigen mit Taste .
3. Rückstellen wählen: Taste ▼ mehrmals drücken und bestätigen mit Taste
▲
.
Fehlermeldungen
ÜBER
(Höchstlast Fehler)
Der Wägebereich ist
überschritten.
Waage entlasten bzw.
nach einer Blockierung
suchen.
Anzeigeüberlauf.
Gewicht auf der Waage
reduzieren.
UNTER
Zu geringe Beladung.
Position der Waagschale
überprüfen.
CAL
ADD WEIGHT
Justieren erfolgt
ohne Gewicht auf
der Waagschale.
Gewicht auflegen und
erneut die CAL-Taste
drücken.
CAL
Ausserhalb
Gewicht kann nicht
erkannt werden.
Waagschale entlasten
und korrektes Gewicht
auflegen.
Andere
Fehlermeldungen
Es ist ein Fehler
aufgetreten.
Strom ein- und
ausschalten. Wenden
Sie sich zwecks Unterstützung an einen
Techniker.
42
Menü-Übersicht
Menü
Anwendungen
Normalmodus
(Wägen)
Zählen
5
10
20
50
100
frei definierbar
Kontrollwägen
Min. Limit, Eingabe:
Max. Limit, Eingabe:
Aktivieren
Tierwägen
Automatisch
Manuell
5
10
15
20
Zielwägen, Bezugsgewicht:
(Prozentwägen)
Statistik
Aktivieren
Drucken
Berechnen
Löschen
Rezeptieren
Einheiten
primär
sekundär*
Gramm
Kilogramm
Milligramm
Unzen*
Troy-Unzen*
Pounds*
Grains*
Pennyweights*
Karat
Taels (Hongkong)*
Taels (Singapur)*
Taels (Taiwan)*
Mommes*
Drams*
Baht*
Tola*
* = nicht bei geeichten Modellen PI… A
43
Menü-Übersicht
Menü
Umgebungsbedingungen
GLP/ISO
Filter
Niedrig
Normal
Hoch
Stabilität
Fein (1/2 Ziffernschritt)
Normal (1 Ziffernschritt)
Grob (2 Ziffernschritte)
Sehr grob (4 Ziffernschritte)
Automatische
Nullstellung
Ein
Aus
Anwender:
Datum
Uhrzeit
Probennummer:
Anzahl:
Protokollkopf
Drucken
Sprachen
44
Ein/Aus
Modus
Manuell (Einzelprint)1)
Stabil (Automatisch bei Stillstand)
Intervall
5 Sekunden
30 Sekunden
60 Sekunden
Individuell
Format*
Typ 1
Typ 2
Typ 3
Typ 4
Typ 5
Typ 6
Typ 7
Typ 8
Englisch
Deutsch
Französisch
Spanisch
* = nicht bei geeichten Modellen PI… A
) = Modelle PI… A: Nur bei Stillstand
1
(MM-TT-JJ)
(TT-MM-JJ)
24 Stunden
(HH:MM:SS)
12 Stunden
(HH:MM:AM/PM)
Menü
System
Sicherheit
RS232
Ton
(Akustisches
Signal)
Rückstellen
(Reset)
Passwort (max. 9 Zeichen):
Baudrate
300
600
1200
2400
4800
9600
19200
38400
57600
115200
Bits/Parität/
Stopbit
8, N, 1
8, E, 1
8, O, 1
7, E, 1
7, O, 1
Handshake
None (Kein
Handshake)
Hardware
Echo
Ein
Aus
Ein
Aus
Standard (werkseitig)
Software Version
Serienkennummer (Plattform)
Standby
Interne CAL*
(Justieren)
Ein
Aus
Anzeige
Kontrast: Einstellen mit ▼ ▲
Helligkeit: Einstellen mit ▼ ▲
Aus
Aus nach 1 Minute
Aus nach 2 bis 999 Minuten wählbar
* = Einstellungsänderung entfällt bei geeichten Modellen PI…A
45
Zubehör
Analysen-Aufsatz für Milligramm-Modelle
602643.1
Arbeitsschutzhaube: (Analysenwaagen und Modelle
mit runder Waagschale)
602619.1
Arbeitsschutzhaube: (Modelle mit eckiger Waagschale)
602620.1
Drucker
901042.1
9-poliges Kabel für die Waage
902225.1
Unterflurwägeeinrichtung*
Kalibriergewichte – für eine vollständige Liste wenden
Sie sich bitte an Ihren Händler
Das vollständige Bedienungshandbuch ist unter
www.denverinstrument.com erhältlich.
* = Für eichpflichtige Anwendungen nicht erlaubt
46
77000440.8
47
48
49
50
Europe, Asia and Australia:
Denver Instrument GmbH
Robert-Bosch-Breite 10
37079 Goettingen, Germany
Tel: +49-551-20977-30
Fax: +49-551-20977-39
Internet:
www.denverinstrument.com
U.K. and Ireland:
Denver Instrument Company
Denver House, Sovereign Way
Trafalgar Business Park
Downham Market
Norfolk PE38 9SW England
Tel: +44-136-63862-42
Fax: +44-136-63862-04
North and South America:
Denver Instrument Company
6542 Fig Street
Arvada, Colorado 80004
1-800-321-1135
Tel: +1-303-431-7255
Fax: +1-303-423-4831
98648-011-89
Printed in Germany on paper that has been bleached
without any use of chlorine · W8A000 · KT
Publication No. WPI6001-a04084
Copyright by Denver Instrument GmbH, Goettingen, Germany.
All rights reserved. No part of this publication may be reprinted
or translated in any form or by any means without the prior
written permission of Denver Instrument GmbH.
The status of the information, specifications and illustrations in
this manual is indicated by the date given below. Denver Instrument
GmbH reserves the right to make changes to the technology, features, specifications, and design of the equipment without notice.
Status: August 2004, Denver Instrument GmbH, Goettingen,
Germany.