1
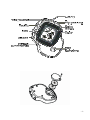
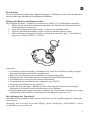
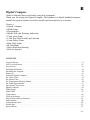
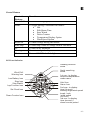
Digitaler Kompass
Windmesser
digitaler Kompass
Digital Compass
Wind Gauge
Digital Compass
Windmesser
Wind Gauge
Thermometer
Thermometer
Wind Chill Messung mit Warnsignal
Uhr mit Alarm
1/100 Stoppuhr mit Zwischenzeitmessung
Count Down Timer
Taschenlampe mit blauem Licht
Wind Chill with Warning Indication
Clock with Alarm
1/100 Stop Watch with Lap Function
Count Down Timer
Blue Flash Light
EL Hintergrundbeleuchtung
EL Backlight
Wassergeschütztes Gehäuse
Water Resistant Housing
Befestigungsöse für Kordel
Hook for lanyard
-1-
-2-
D
Digitaler Kompass / Windmesser
Bitte lesen Sie diese Anleitung sorgfältig durch, um sich mit dem Kompass / Windmesser vertraut
zu machen.
Dieser Kompass / Windmesser ist für Freizeit- und professionelle Anwendung im Outdoorbereich
bestens geeignet.
Funktionen
•
•
•
•
•
•
•
•
•
•
•
digitaler Kompass
Windmesser
Thermometer
Wind Chill Messung mit Warnsignal
Uhr mit Alarm
1/100 Stoppuhr mit Zwischenzeitmessung
Count Down Timer
Taschenlampe mit blauem Licht
EL Hintergrundbeleuchtung
Wassergeschütztes Gehäuse
Befestigungsöse für Kordel
Inhalt
Bedienelemente. . . . . . . . . . . . . . . . . . . . . . . . . . . . . . . . . . . . . . . . . . . . . . . . . . . . . . . . . . . . . . . . 4
LCD-Display. . . . . . . . . . . . . . . . . . . . . . . . . . . . . . . . . . . . . . . . . . . . . . . . . . . . . . . . . . . . . . . . . . . 4
Erste Schritte. . . . . . . . . . . . . . . . . . . . . . . . . . . . . . . . . . . . . . . . . . . . . . . . . . . . . . . . . . . . . . . . . . 5
Einlegen der Batterie und Batteriewechsel. . . . . . . . . . . . . . . . . . . . . . . . . . . . . . . . . . . . . . . . 5
Das Anbringen der Tragekordel. . . . . . . . . . . . . . . . . . . . . . . . . . . . . . . . . . . . . . . . . . . . . . . . 5
Einschalten. . . . . . . . . . . . . . . . . . . . . . . . . . . . . . . . . . . . . . . . . . . . . . . . . . . . . . . . . . . . . . . . 6
Den Kompass eichen (kalibrieren) . . . . . . . . . . . . . . . . . . . . . . . . . . . . . . . . . . . . . . . . . . . . . . 6
Uhrzeit einstellen . . . . . . . . . . . . . . . . . . . . . . . . . . . . . . . . . . . . . . . . . . . . . . . . . . . . . . . . . . . 6
Alarmzeit einstellen . . . . . . . . . . . . . . . . . . . . . . . . . . . . . . . . . . . . . . . . . . . . . . . . . . . . . . . . . 7
Temperaturanzeige einstellen . . . . . . . . . . . . . . . . . . . . . . . . . . . . . . . . . . . . . . . . . . . . . . . . . 7
Anzeige der Windgeschwindigkeit einstellen . . . . . . . . . . . . . . . . . . . . . . . . . . . . . . . . . . . . . 7
Betriebsanleitung. . . . . . . . . . . . . . . . . . . . . . . . . . . . . . . . . . . . . . . . . . . . . . . . . . . . . . . . . . . . . . 8
Digitaler Kompass . . . . . . . . . . . . . . . . . . . . . . . . . . . . . . . . . . . . . . . . . . . . . . . . . . . . . . . . . . 8
Windmessung. . . . . . . . . . . . . . . . . . . . . . . . . . . . . . . . . . . . . . . . . . . . . . . . . . . . . . . . . . . . . . 8
Messung Wind Chill . . . . . . . . . . . . . . . . . . . . . . . . . . . . . . . . . . . . . . . . . . . . . . . . . . . . . . . . 9
Temperatur. . . . . . . . . . . . . . . . . . . . . . . . . . . . . . . . . . . . . . . . . . . . . . . . . . . . . . . . . . . . . . . . 9
Uhrzeit mit Alarm. . . . . . . . . . . . . . . . . . . . . . . . . . . . . . . . . . . . . . . . . . . . . . . . . . . . . . . . . . . 9
Stoppuhr. . . . . . . . . . . . . . . . . . . . . . . . . . . . . . . . . . . . . . . . . . . . . . . . . . . . . . . . . . . . . . . . . . 9
Stoppuhr mit Zwischenzeitmessung. . . . . . . . . . . . . . . . . . . . . . . . . . . . . . . . . . . . . . . . . . . . 10
Count Down Timer. . . . . . . . . . . . . . . . . . . . . . . . . . . . . . . . . . . . . . . . . . . . . . . . . . . . . . . . . 10
Taschenlampe. . . . . . . . . . . . . . . . . . . . . . . . . . . . . . . . . . . . . . . . . . . . . . . . . . . . . . . . . . . . . 10
Spezifikationen . . . . . . . . . . . . . . . . . . . . . . . . . . . . . . . . . . . . . . . . . . . . . . . . . . . . . . . . . . . . . . . 11
-3-
D
Bedienelemente
Taste
Wind Chill
Mode
Reset/Set
Start/Stop
Funktion
Aktivierung der Wind Chill Messung (subjektiv empfundene
Temperatur)
Mit dieser Taste wechseln Sie zwischen den 6 Funktionen:
•
Standardanzeige [Uhrzeit/Temp]
•
Alarmzeit [ALM]
•
Stoppuhr [STW]
•
Count Down Timer [TMR]
•
Temperaturanzeige [°C/°F]
•
Wind Chill Messung [---]
Um Änderung im ausgewählten Einstellmodi vorzunehmen
EL
Start-Stop Funktion für Stoppuhr und Timer.
Umstellung von Anzeigemodi auf Einstellmodi.
Um die EL Hintergrundbeleuchtung einzuschalten
Bearing
Aktivierung der KOMPASS - Funktion
Flash
Ein/Aus - Schalter der Taschenlampe
LCD-Display
-4-
D
Erste Schritte
Vor der ersten Inbetriebnahme Ihres digitalen Kompasses / Windmessers müssen Sie die Batterien
einlegen und einige individuelle Einstellungen durchführen.
Einlegen der Batterie und Batteriewechsel
Dieser digitaler Kompass / Windmesser wird mit zwei CR2032 (3 Volt) Knopfzellen betrieben.
1. Öffnen Sie mit einem Kreuzschlitzschraubendreher die Schraube des Batteriefachdeckels
und heben diesen vorsichtig ab.
2. legen Sie die Batterien mit dem Pluspol (+) nach oben in das Batteriefach.
3. Legen Sie den Batteriefachdeckel wieder auf und verschrauben diesen wieder.
4. Sollte das Batteriewarnsignal im Display erscheinen, wechseln Sie gem. 1-3 die Batterien
gegen neue (2 Stück CR2032, 3 Volt) aus.
Anmerkung:
• Verwenden Sie diesen Kompass / Windmesser erst, wenn Sie die Batterien richtig eingelegt
haben und das Batteriefach wieder verschlossen ist
• Halten Sie die Knopfzellen fern von Kindern (Verschluckungsgefahr)
• Entsorgen Sie die verbrauchten Batterien sachgerecht (Batterierücknahmestellen)
• Verbrennen oder zerstören Sie diese Knopfzellen niemals
• Verwenden Sie nur neue Batterien des richtigen Typs (CR2032)
• Tauschen Sie diese Batterien nur paarweise
• Sollten Sie diesen Kompass / Windmesser über einen längeren Zeitraum nicht benötigen,
entfernen Sie die Batterien um ein Auslaufen dieser zu verhindern.
• Sollte das Batteriewarnsignal im Display erscheinen, die Taschenlampe schwach sein, sonstige
unerklärliche Fehler auftraten, wechseln Sie bitte die Batterien gegen neue aus.
Das Anbringen der Tragekordel
Unterhalb des Batteriefachs befindet sich eine kleine Öse, welche zur Befestigung der Tragekordel
vorgesehen ist.
Anmerkung: bitte verwenden Sie nicht die Öffnung (mit der Markierung „WIND SPEED“ ) welche
zur Windmessung verwendet wird.
-5-
D
Einschalten
Nach dem Einlegen der Batterie (bzw. nach einem Batteriewechsel)
•
Erscheinen kurz alle Segmente des Displays
•
Die Hintergrundbeleuchtung schaltet sich für ca. 3 Sekunden ein
ohne Betätigung irgendeiner Taste
•
die Umgebungstemperatur wird in der ersten Zeile
•
die Stunden und Minuten (12.00 Uhr nach Batteriewechsel) in der zweiten Zeile
•
die Sekunden in der dritten Zeile
angezeigt. Dies ist auch die Standardanzeige
Anmerkung:
•
Bei jedem Betätigen einer der Funktionstasten schaltet sich die Hintergrundbeleuchtung
automatisch an.
•
Bei jedem Betätigen einer aktiven Taste (nicht Taschenlampe!) ertönt ein kurzer Ton
Den Kompass eichen (kalibrieren)
1.
2.
3.
4.
Betätigen Sie in der Standardanzeige die Taste [BEARING] um die Kompassfunktion
aufzurufen (siehe auch Seite 8)
drücken Sie nun die Taste [RESET/SET] und halten diese gedrückt( ca. 2 Sek.), bis
„CAL“ im Display erscheint.
drehen Sie den Kompass 2x horizontal um seine eigene Achse (Das Display zeigt nach
oben!).
Um den Kalibriervorgang zu beenden drücken Sie nun die Taste [RESET/SET]
Anmerkung
Metallische Gegenstände oder starke Stromverbraucher(z.B. Motoren, Trafos o.ä.) können die
Messung verfälschen. Achten Sie bitte darauf, daß sich derartige Gegenstände nicht in
unmittelbarer Nähe befinden (Handy, Strommasten, Stahlbetonwände o.ä.). Sollte im Display
„ERR“ erscheinen, sind mehrere Magnetfelder vom Kompass ermittelt worden. Kalibrieren Sie
dann bitte den Kompass an einem anderen Ort.
Uhrzeit einstellen
1.
2.
3.
4.
5.
6.
7.
8.
Betätigen Sie in der Standardanzeige die Taste [START/STOP] und halten diese ca. 2 Sek.
gedrückt. Im Display erscheint das Symbol für die Uhrzeiteinstellung und die
Sekundenanzeige blinkt.
Durch Betätigen der Taste [RESET/SET] stellen Sie die Sekunden auf Null
Betätigen Sie die Taste [START/STOP] und die Minutenanzeige blinkt
Mit Taste [RESET/SET] stellen Sie nun die Minuten ein
Betätigen Sie erneut die Taste [START/STOP] und die Stundenanzeige blinkt
Mit Taste [RESET/SET] stellen Sie nun die Stunden ein
Um das Zeitsystem von 12 auf 24 Stunden umzustellen, drücken Sie bitte ein weiteres mal
die Taste [START/STOP], in der dritten Zeile erscheint eine 12, bzw. 24 für das 12 bzw. 24
Stundensystem. Welches Sie durch betätigen der Taste [RESET/SET] auswählen können.
Ein erneutes Betätigen der Taste [START/STOP] beendet den Einstellmodus. Dieser wird
auch verlassen, wenn eine längere Zeit keine Taste betätigt wird.
-6-
D
Alarmzeit einstellen
1.
2.
3.
4.
5.
6.
1.
2.
3.
4.
Betätigen Sie in der Standardanzeige die Taste [MODE]. Im Display erscheint das Symbol
für die Alarmzeit.
Betätigen Sie die Taste [START/STOP] und die Stundenanzeige blinkt
Mit Taste [RESET/SET] stellen Sie nun die Stunden ein
Betätigen Sie erneut die Taste [START/STOP] und die Minutenanzeige blinkt
Mit Taste [RESET/SET] stellen Sie nun die Minuten ein
Ein erneutes Betätigen der Taste [START/STOP] beendet den Einstellmodus. Dieser wird
auch verlassen, wenn eine längere Zeit keine Taste betätigt wird.
Die Alarmfunktion Aktivieren / Deaktivieren Sie, indem Sie in der Standardanzeige die
Taste [MODE] betätigen um in die Alarmfunktion zu gelangen.
Betätigen Sie die Taste [RESET/SET] für ca. 2 Sek. Um den Alarm ein/auszuschalten.
Das Symbol (%) rechts im Display zeigt an, daß der Alarm aktiv ist.
Ein erneutes Betätigen der Taste [Mode] beendet den Einstellmodus. Dieser wird auch
verlassen, wenn eine längere Zeit keine Taste betätigt wird.
Temperaturanzeige einstellen
1.
2.
3.
Betätigen Sie in der Standardanzeige 4 x die Taste [MODE].
Im Display blinkt die Temperaturanzeige.
Betätigen Sie die Taste [RESET/SET] um zwischen °C und °F umzuschalten
Ein erneutes Betätigen der Taste [Mode] beendet den Einstellmodus. Dieser wird auch
verlassen, wenn eine längere Zeit keine Taste betätigt wird.
Anzeige der Windgeschwindigkeit einstellen
1.
2.
3.
Betätigen Sie in der Standardanzeige 5 x die Taste [MODE].
Im Display blinkt „kmph“.
Betätigen Sie die Taste [RESET/SET] um zwischen „mph“ (miles per hour) und
„kmph“ (kilometer per hour, kmh) umzuschalten
Ein erneutes Betätigen der Taste [Mode] beendet den Einstellmodus. Dieser wird auch
verlassen, wenn eine längere Zeit keine Taste betätigt wird.
-7-
D
Betriebsanleitung
In den folgenden Kapiteln werden die einzelnen Funktionen und deren Anwendung näher
beschrieben
Digitaler Kompaß
Die Funktionsweise des elektronischen Kompass ähnelt im wesentlichen dem klassischen NadelKompass.
(a). Schnellmessung (zur schnellen Orientierung im Gelände)
1. Halten Sie den Kompass waagrecht in die Marschrichtung (mit dem Display nach oben),
betätigen Sie in der Standardanzeige kurz die Taste [Bearing].
Nach ca. 2 Sekunden erscheint im Display die Marschrichtungszahl (xxx°) und
Himmelsrichtung (z.B. NW) in welche der Kompass gehalten wurde.
2. Nach ca. 2 MInuten erscheint wieder die Standardanzeige
(B). Dauermessung (zur exakten Positionsbestimmung)
1. Halten Sie den Kompass waagrecht in die Marschrichtung (mit dem Display nach oben),
betätigen Sie in der Standardanzeige die Taste [Bearing] und halten diese gedrückt.
Nach ca. 2 Sekunden erscheint im Display die Marschrichtungszahl (xxx°) und
Himmelsrichtung (z.B. NW) in welche der Kompass gehalten wurde, diese aktualisiert
sich jede Sekunde (solange [BEARING] gerdückt bleibt)
2. Nach ca. 2 Sekunden erscheint wieder die Standardanzeige
Anmerkung: erneutes Betätigen der Taste [MODE] führt Sie wieder in die Standardanzeige.
Windmessung
Die Windmessung aktivieren sie wie folgt:
1. Betätigen Sie die Taste [WIND CHILL] aus der Standardanzeige heraus.
2. nach ca 11 Sekunden wird Ihnen die aktuelle Windgeschwindigkeit des Windes in
welches Sie dieses Gerät halten, angezeigt
3. die Messung erfolgt nun jede Sekunde
4. die Messung wird nach ca. 2 Minuten wieder beendet und kehrt automatisch in die
Standardanzeige zurück.
5. möchten Sie die Anzeige früher beenden betätigen Sie die Taste [MODE]
6. da die Messung zu jeder Sekunde erfolgt, können Sie durch erneutes Betätigen der Taste
[WIND CHILL] das Messergebnis festhalten. Im Display erscheint die Anzeige „Hold“.
Durch erneutes Betätigen der Taste [WIND CHILL] heben Sie diese Funktion wieder auf.
7. Windgeschwindigkeiten kleiner 9,5 kmph (6 mph) werden durch „LO“,
Windgeschwindigkeiten größer 48 kmph (30 mph) mit „HI“ angezeigt, da diese außerhalb
des Messbereiches liegen.
-8-
D
Messung Wind Chill
Die Wind Chill Funktion erzeugt ein Warnsignal nach folgenden Kriterien.
1 Die Wind Chill Messung erfolgt während der Windmessung zu jeder Sekunde.
2 Wenn der Wind Chill Faktor - 25 (Messung in °C) bzw. – 13 (Messung in °F) beträgt, ertönt ein
Alarmsignal sowie „COLD“ im Display.
Anmerkung: Zu Ermittlung des Wind Chill Faktors werden Windgeschwindigkeit und
Umgebungstemperatur benötigt.
Erklärung: Wind Chill ist die empfundene Temperatur. Sie ist nicht identisch mit der
Temperatur, die am Thermometer angezeigt wird. Kalte Luft erscheint kälter, wenn ein
Wind weht. Z.B. Bei 0°C und einer Windgeschwindigkeit von 20kmph friert jemand
genauso, wie jemand bei -5 Grad und Windstille.
Temperatur
1.
2.
Die Temperaturmessung erfolgt in der Standardanzeige alle 30 Sekunden automatisch.
Die Temperaturanzeige (°C bzw. °F) stellen Sie gemäß Kapitel „Temperaturanzeige
auswählen“ auf Seite 7 ein.
Uhrzeit mit Alarm
1.
2.
3.
Die Uhrzeitanzeige erfolgt kontinuierlich in der Standardanzeige, Einstellung gemäß
Kapitel „Uhrzeit einstellen“ auf Seite 6
Betätigen Sie aus der Standardanzeige heraus 1 mal die Taste [MODE] nun wird Ihnen die
Alarmzeit angezeigt. Betätigen Sie nun die Taste [RESET / SET] für ca. 2 Sekunden um
die Alarmfunktion ein- bzw. auszuschalten. Im Display erscheint bei aktivem Alarm das
Symbol „%“ dauerhaft.
Das Alarmsignal ertönt zur eingestellten Alarmzeit für ca. 2 Minuten, durch Betätigen
einer der Funktionstasten beenden Sie den Signalton.
Stoppuhr
1.
2.
3.
4.
5.
Betätigen Sie die Taste [MODE] 2 mal aus der Standardanzeige heraus,
um in die Stoppuhrfunktion zu gelangen. Im Display wird Ihnen „STW“ angezeigt.
Durch Betätigen der Taste [START / STOP] starten bzw. stoppen Sie Zeitmessung.
Durch erneutes Betätigen der Taste [START / STOP] setzen Sie eine unterbrochene
Zeitmessung fort.
Durch Betätigen der Taste [RESET / SET] bei gestoppter Zählung setzen Sie die Anzeige
wieder auf Null zurück.
Mit der Taste [MODE] gelangen Sie wieder in die Standardanzeige.
-9-
D
Stoppuhr mit Zwischenzeitmessung
1.
2.
3.
4.
5.
6.
7.
Betätigen Sie die Taste [MODE] 2 mal aus der Standardanzeige heraus, um in die
Stoppuhrfunktion zu gelangen. Im Display wird Ihnen „STW“ angezeigt.
Drücken Sie die Taste [START / STOP] um eine Zeitmessung zu starten.
Die Zwischenzeitmessung erhalten Sie durch Betätigen der Taste [RESET / SET] (die
Zeitmessung erfolgt weiterhin im Hintergrund)
Erneutes Betätigen der Taste [RESET / SET] führt zur normalen Zeitmessung zurück.
Mit der Taste [START / STOP] beenden Sie die Zeitmessung.
Durch Betätigen der Taste [RESET / SET] bei gestoppter Zählung setzen Sie die Anzeige
wieder auf Null zurück.
Mit der Taste [MODE] gelangen Sie wieder in die Standardanzeige zurück.
Count Down Timer (99 – 1 Min)
1.
2.
3.
4.
5.
Betätigen Sie die Taste [MODE] 3 mal aus der Standardanzeige heraus, um zur Count
Down Timerfunktion zu gelangen. Im Display wird Ihnen „TMR“ angezeigt.
Drücken Sie die Taste [RESET / SET] um die Startzeit einzustellen (dies ist nur
Minutenweise möglich, bei gedrückter [RESET / SET] erfolgt ein Schnelldurchlauf).
Durch Betätigen der Taste [START / STOP] starten Sie den Timer.
In der unteren Zeile wird Ihnen die Anfangszeit angezeigt.
Wenn der Timer 00.00 erreicht hat, ertönt ein Alarmsignal, welches Sie durch Drücken
einer Funktionstaste beenden.
Mit der Taste [MODE] gelangen Sie wieder in die Standardanzeige zurück.
Taschenlampe
Die Taste zum Ein/Ausschalten der Taschenlampe befindet sich an der Oberseite des Gehäuses
unterhalb des Displays.
1. Betätigen Sie diese Taste um die Taschenlampe Ein/Auszuschalten
2. Die Taschenlampe leuchtet solange Sie die Taste gedrückt halten.
- 10 -
D
Spezifikationen
Kompassgenauigkeit . . . . . . . . . . . . . . . . . . . . . . . . . . . . . . . . . . . . . . . . . . . . . . . . . . . . . . . . . . ± 5 °
Genauigkeit Windmessung
6-15 mph / 9,7 - 25 kmph . . . . . . . . . . . . . . . . . . . . . . . . . . . . . . . . . . . . . . . . . . . . . . . . . . . . . . ± 2
16-30 mph / 26 - 48 kmph . . . . . . . . . . . . . . . . . . . . . . . . . . . . . . . . . . . . . . . . . . . . . . . . . . . . . . ± 3
Genauigkeit Thermometer
-20 °C - 0 °C . . . . . . . . . . . . . . . . . . . . . . . . . . . . . . . . . . . . . . . . . . . . . . . . . . . . . . . . . . . . . . . . . ± 2
0 °C - 40 °C . . . . . . . . . . . . . . . . . . . . . . . . . . . . . . . . . . . . . . . . . . . . . . . . . . . . . . . . . . . . . . . . ± 2
40 °C - 60 °C. . . . . . . . . . . . . . . . . . . . . . . . . . . . . . . . . . . . . . . . . . . . . . . . . . . . . . . . . . . . . . . . . ± 2
Wind Chill Schwelle . . . . . . . . . . . . . . . . . . . . . . . . . . . . . . . . . . . . . . . . . . . . . . . . . . . . . . . . -25 °C
Genauigkeit Uhrzeit pro Tag . . . . . . . . . . . . . . . . . . . . . . . . . . . . . . . . . . . . . . . . . . ± 0,67sesek/Tag
Energieverbrauch
Standardanzeige. . . . . . . . . . . . . . . . . . . . . . . . . . . . . . . . . . . . . . . . . . . . . . . . . . . . . . . . . . . 0,04 mA
Kompassfunktion. . . . . . . . . . . . . . . . . . . . . . . . . . . . . . . . . . . . . . . . . . . . . . . . . . . . . . . . . . . 15,0 mA
Thermometer- und Windmessung. . . . . . . . . . . . . . . . . . . . . . . . . . . . . . . . . . . . . . . . . . . . . . 4,5 mA
EL Hintergrundbeleuchtung. . . . . . . . . . . . . . . . . . . . . . . . . . . . . . . . . . . . . . . . . . . . . . . . . . . 15,0 mA
Taschenlampe. . . . . . . . . . . . . . . . . . . . . . . . . . . . . . . . . . . . . . . . . . . . . . . . . . . . . . . . . . . . . . . 9,0 mA
Anzeigeschwelle Batteriewechsel. . . . . . . . . . . . . . . . . . . . . . . . . . . . . . . . . . . . . . . . . . . . . . . . . . 4 V
Dimensionen (l x b x h). . . . . . . . . . . . . . . . . . . . . . . . . . . . . . . . . . . . .. . . . . . . (89 x 66,5 x 23,5) mm
Gewicht (ohne Kordel). . . . . . . . . . . . . . . . . . . . . . . . . . . . . . . . . . . . . . . . . . . . . . . . . . . . . . . . ca. 70g
- 11 -
E
Digital Compass
Owner's Manual Please read before using this equipment.
Thank you for buying the Digital Compass. This product is a digital handheld compass
suitable for general outdoor activities and also professional use as in marine.
Features
• Digital Compass
• Wind Gauge
• Thermometer
• Wind Chill with Warning Indication
• Clock with Alarm
• 1/100 Stop Watch with Lap Function
• Count Down Timer
• Blue Flash Light
• EL Backlight
• Water Resistant Housing
• Hole for lanyard
CONTENTS
Control Buttons . . . . . . . . . . . . . . . . . . . . . . . . . . . . . . . . . . . . . . . . . . . . . . . . . . . . . . . . . . . . . . . . . 13
LCD Icon Indication . . . . . . . . . . . . . . . . . . . . . . . . . . . . . . . . . . . . . . . . . . . . . . . . . . . . . . . . . . . . . 13
Preparation. . . . . . . . . . . . . . . . . . . . . . . . . . . . . . . . . . . . . . . . . . . . . . . . . . . . . . . . . . . . . . . . . . . . 14
Installing the Battery . . . . . . . . . . . . . . . . . . . . . . . . . . . . . . . . . . . . . . . . . . . . . . . . . . . . . . . . . . . . . 14
Attaching the Lanyard . . . . . . . . . . . . . . . . . . . . . . . . . . . . . . . . . . . . . . . . . . . . . . . . . . . . . . . . . . . . 14
Power-up . . . . . . . . . . . . . . . . . . . . . . . . . . . . . . . . . . . . . . . . . . . . . . . . . . . . . . . . . . . . . . . . . . . . . . 15
Calibrate Digital Compass . . . . . . . . . . . . . . . . . . . . . . . . . . . . . . . . . . . . . . . . . . . . . . . . . . . . . . . . 15
Set Clock Time . . . . . . . . . . . . . . . . . . . . . . . . . . . . . . . . . . . . . . . . . . . . . . . . . . . . . . . . . . . . . . . . . 15
Set Alarm Time . . . . . . . . . . . . . . . . . . . . . . . . . . . . . . . . . . . . . . . . . . . . . . . . . . . . . . . . . . . . . . . . . 16
Set Temperature Display Option . . . . . . . . . . . . . . . . . . . . . . . . . . . . . . . . . . . . . . . . . . . . . . . . . . . . 16
Set Wind Speed Option . . . . . . . . . . . . . . . . . . . . . . . . . . . . . . . . . . . . . . . . . . . . . . . . . . . . . . . . . . . 17
Operational Instruction . . . . . . . . . . . . . . . . . . . . . . . . . . . . . . . . . . . . . . . . . . . . . . . . . . . . . . . . . . . 18
Digital Compass . . . . . . . . . . . . . . . . . . . . . . . . . . . . . . . . . . . . . . . . . . . . . . . . . . . . . . . . . . . . . . . . 18
Wind Gauge . . . . . . . . . . . . . . . . . . . . . . . . . . . . . . . . . . . . . . . . . . . . . . . . . . . . . . . . . . . . . . . . . . . 18
Wind Chill . . . . . . . . . . . . . . . . . . . . . . . . . . . . . . . . . . . . . . . . . . . . . . . . . . . . . . . . . . . . . . . . . . . . 19
Temperature . . . . . . . . . . . . . . . . . . . . . . . . . . . . . . . . . . . . . . . . . . . . . . . . . . . . . . . . . . . . . . . . . . . 19
Clock with Alarm . . . . . . . . . . . . . . . . . . . . . . . . . . . . . . . . . . . . . . . . . . . . . . . . . . . . . . . . . . . . . . . 19
Stop Watch with Lap Function . . . . . . . . . . . . . . . . . . . . . . . . . . . . . . . . . . . . .. . . . . . . . . . . . . . . . 19
Lap Function . . . . . . . . . . . . . . . . . . . . . . . . . . . . . . . . . . . . . . . . . . . . . . . . . . . . . . . . . . . . . . . . . . . 20
Count Down Timer . . . . . . . . . . . . . . . . . . . . . . . . . . . . . . . . . . . . . . . . . . . . . . . . . . . . . . . . . . . . . . 20
Flash Light . . . . . . . . . . . . . . . . . . . . . . . . . . . . . . . . . . . . . . . . . . . . . . . . . . .. . . . . . . . . . . . . . . . . . 21
Specifications . . . . . . . . . . . . . . . . . . . . . . . . . . . . . . . . . . . . . . . . . . . . . . . . . . . . . . . . . . . . . . . . . 22
- 12 -
E
Control Buttons
Control
Buttons
Wind Chill
Mode
Function
To activate wind guage (and also wind chill) function
Reset/Set
Start/Stop
EL
Bearing
To toggle among 6 functions/edit modes:
• Idle
• Edit Alarm Time
• Stop Watch
• Down Counter
• Temperature Display Option
• Wind Speed Option
To make change during edit modes
To start/stop a timer or change field in edit mode
To turn on EL backlight
To activate digital compass
Flash
To turn ON/OFF the flash light
LCD Icon Indication
Heading direction
arrow
Wind Chill
Warning Icon
Low Battery Icon
Stop Icon
Stop Watch/
Lap Function Icon
Set Clock Icon
Down Counter Icon
North searching
arrow
1st row - to display
direction/temperature/
mode name
Hold Icon
Alarm Icon
2nd row - to display
time (hh:mm) /
bearing angle/wind speed
kmph / mph
(wind speed
unit icon)
3rd row - to display
time (second) /
down counter period
- 13 -
E
PREPARATION
Before using the digital compass, you need to insert batteries into the unit. Also you may
want to set up some of the features listed below for your particular application.
INSTALLING THE BATTERY
Your digital compass is powered by two CR2032 type (3-volt buttoncell) batteries.
1. Use a screwdriver to loosen the screw from the battery compartment cover.
Remove the cover.
2. Install the batteries, positive side (+) up.
3. Replace the battery cover and secure it with the screw.
4. When the low battery icon appears, or the compass stops operating properly,
replace the batteries.
NOTE
•
•
•
•
•
•
•
•
Do not operate your compass until batteries are properly installed and the
battery cover is in place and secured.
Keep button-cell batteries out of reach of children. Swallowing a button-cell
battery can be fatal.
Dispose of old batteries promptly and properly. Do not burn or bury batteries.
Use only fresh batteries of the required size and recommended type.
Do not mix old and new batteries or different types of batteries (standard or
alkaline).
If you do not plan to use the compass for a month or more, remove the batteries.
Batteries can leak chemicals that can destroy electronic parts.
When the low battery icon appears, the EL, Digital Compass, Temperature and
Wind guage function will be disabled. But the time will be shown in the display
for some time until your compass stops operating properly.
ATTACHING THE LANYARD
Slide the lanyard’s small loop under the bar near the battery door of the compass. Then
pull the lanyard’s large loop through the small loop and fasten it.
Note: Do not insert anything to the smaller bar(temperature sensor) near the microphone
which use for wind speed measurement.
- 14 -
E
Power-up
When first powered-up (or after replacing batteries), the compass will be turned ON in the
following sequence:
• all LCD segments ON for a second and
• EL backlight ON for 3 seconds.
Without any key pressed,
• Time 12:00 (starting time) will be shown at the 2nd row, 00 will be shown at 3rd
row, and current temperature (e.g. 23 °C) will be shown at 1st row in the display
- this is in idle mode.
• the EL backlight will turn OFF after 3 seconds.
Note:
• When any operation key is pressed, the EL backlight will turn ON and it will
automatically turned off after 3 seconds from the last key operation.
• When any key is pressed, the "beep" sound will be heard.
Calibrate Digital Compass
1. Under idle mode, press BEARING button to enter into compass mode (see
Operational Instruction - Digital Compass on page 18).
2. Press and hold RESET/SET button, the message “CAL” is shown in the 1st row of
the display.
3. Turn the compass horizontally (with display facing up) for 2 complete
revolutions.
4. Press RESET/SET button once to finish and exit the calibration mode.
Note: For accurate measurement, please keep far away from metal during the calibration
or use of the Digital Compass. If "ERR" is shown in the 1st row of display, this is a sign
that there may be too much magnetic material nearby or you don’t turn the unit around.
Move to another location and repeat calibration.
Set Clock Time
1. Under idle mode, press and hold START/STOP button. The Clock Edit Mode will
show by turning on Set Clock icon.
2. Clock time editing starts with "Second" decades first. The "second" digits will
flash.
3. Press RESET/SET button once to reset the second decade to "00".
4. Press START/STOP again to select the "Minute" decade for editing - The Minute
decade will flash.
5. Press and release RESET/SET button once to count up 1 minute. Press and hold
RESET/SET button to make Fast Minute count up.
6. Press START/STOP again to select the "Hour" to edit – the Hour digits will flash.
7. Press and release RESET/SET button once to count up 1 hour. Press and hold
RESET/SET button will make Fast Hour count up.
8. Press START/STOP again to select the 12/24 hour format.
- 15 -
E
9.
Press RESET/SET button to toggle between 12 and 24 hour format. The 3rd row
of the display shows 12 or 24.
10. Press START/STOP once to exit the edit mode. The setting are saved.
11. If no button is pressed for 30 seconds, the unit will return to idle mode
automatically without save. All changes are ignored - nothing is saved.
Note: In Clock Edit Mode, pressing START/STOP button again and again will change the
edit field as follows: second -> minute -> hour - > 12/24 hour format -> exit (back to idle
mode).
Set Alarm Time
1. Under idle mode, press MODE button once. This action enters Alarm Edit Mode.
The Alarm icon is ON(If you enable Alarm function before.) or flashing(If you
do not enable the Alarm function before). The 1st row of display shows "ALM"
message.
2. Press START/STOP once to select Alarm Hour to edit. The Hour digits will flash.
3. Press and release RESET/SET button once to count up 1 hour. Press and hold
RESET/SET button will make Fast Hour count up.
4. Press START/STOP again to select Alarm Minute to edit. The Minute digits will
flash.
5. Press and release the RESET/SET button once to count up 1 minute. Press and
hold RESET/SET button will make Fast Minute count up automatically.
6. Press START/STOP again to save, current Alarm icon is on or flashing.
7. Press and hold RESET/SET button to toggle the enable/disable Alarm. Alarm
icon is on for Alarm set, Alarm icon flash for not selected(in idle mode, Alarm
icon is ON when Alarm is set).
NOTE:
• The step 7 can be operated following Step 1 also.
• Without further key operation for 3 seconds, the unit return to idle mode when
enable/disable alarm setting.
• If no button is pressed for 30 seconds, the unit will return to idle mode
automatically. (To exit manually, press MODE button five times.)
Set Temperature Display Option
1. Under idle mode, press MODE button four times. The temperature reading will
flash.
2. Press and release RESET/SET button to toggle the temperature reading from
degree C to degree F (or from degree F to degree C) with saving current degree
setting.
3. If no button is pressed for 30 seconds, the unit will return to idle mode
automatically with saving current degree setting.(To exit manually, press MODE
button twice.)
- 16 -
E
Set Wind Speed Option
1. Under idle mode, press MODE button five times. The Set Wind Speed kmph icon
will flash.
2. Press and release RESET/SET button to toggle the wind speed unit (and reading)
from mph to kmph with saving current unit setting.
3. If no button is pressed for 30 seconds, the unit will return to idle mode
automatically. (To exit manually, press MODE button once.)
- 17 -
E
OPERATIONAL INSTRUCTION
This digital compass has several built-in functions and the following sections describe the
operation procedures in detail for each of these functions.
Digital Compass
The digital compass works similar to a normal analog compass. It has the two modes of
operations:
(a). One time reading mode (measures the head direction one time only) 1. Under idle mode, press BEARING button once and wait for two seconds. The
current head point direction and bearing angle are shown at the 1st and 2nd rows
of the display respectively.
2. The measured direction will be displayed on the first row of the display for two
minutes. If no button is pressed after two minutes, the unit will return to idle
mode automatically.
(b). Continuous reading mode (continuously measures the head direction) 1. Press and hold BEARING button, the head direction and bearing angle will
update every second.
2. If no button is pressed after two minutes, the unit will return to idle mode
automatically.
NOTE: Pressing MODE button once will return unit to idle mode.
Wind Gauge
The wind gauge measures the wind speed in the following ways:
1. Under idle mode, press and release WIND CHILL button once to enter Wind Speed
measuring mode.
2. Wait for 11 seconds after pressing WIND CHILL. The measured wind speed will be
displayed in the 2nd row of the display. (The temperature reading is also displayed in the
1st row of the display).
3. The wind speed will be updated at every second.
4. The unit will continuously sampling the wind speed for 2 minutes. If no button is pressed
after two minutes, The unit will return to idle mode automatically.
5. Under Wind Speed Mode, pressing and releasing MODE button once will return to idle
mode.
6. During wind speed measurement, press and release WIND CHILL button once to hold the
current reading. The HOLD icon is turned ON. Press and release WIND CHILL button
again to continue the measurement. The HOLD icon is turned OFF. Once the reading is
held and if no button is pressed after two minutes, the unit will return to idle mode
automatically.
7. If wind speed is lower than 6mph or higher than 30mph, "LO" or "HI" will be shown
respectively.
- 18 -
E
Wind Chill
The wind chill function generates a warning indication when the weather condition is
below the default rating.
1. The Wind Chill measurement is ON during wind speed measurement. The Wind
Chill Temperature will be measured at every second.
2. When the corresponding Wind Chill factor* falls below -13 (when temperature in
°F) or -25 (when temperature in °C), the *COLD* icon will be displayed with a
short reminder beep that is generated every second.
Note: * Wind Chill factor depends on both wind speed and temperature.
Temperature
1. The temperature reading is ON by default during idle mode. The current
temperature will be shown on the 1st row of the display and will be continuously
updated every 30 seconds.
2. There are two types of temperature display option: degree C and degree F. To
select either option, please refer to "Set Temperature Display Option" on page 19
Clock with Alarm
1. The clock is ON by default during idle mode. The time is shown in the 2nd and
3rd rows of the display. To set the time, please refer to "Set Clock Time" on page
15.
2. The clock has an alarm function. Please refer to "Set Alarm Time" on page 19 to
set up alarm time.
3. When the clock alarms, the unit return to idle mode, without any key press, the
alarm tone will last for about 2 minutes.
Stop Watch with Lap function
1. Under idle mode, press and release the MODE button twice to enter into Stop
Watch mode. The 1st row of the LCD will show the "STW" message.
2. The STOP WATCH icon is ON and the display shows 00'00" on 2nd row and 00
on 3rd row.
3. Press START/STOP button once to start the up-counting of the time. The STOP
WATCH icon will flash.
4. Press START/STOP button again to stop or pause the counting time. The STOP
WATCH icon will stop flashing. Press START/STOP again to restart counting.
5. When the count time is stopped, press and release RESET/SET button to clear the
time and return to stand-by (for another timing activity).
Note: You can press MODE button once to exit at any procedure of the above. In other
mode, the Stop Watch/Lap Function icon will keep flashing once the Stop Watch/Lap
function was enabled before.
- 19 -
E
Lap Function
1. During the time counting(STOP WATCH icon is flashing), press RESET/SET
button once to freeze the displayed counting for easy reading. The timing
function is still running, but the display is not being updated. This is the Lap
Fucntion.
2. To exit from Lap function, press RESET/SET button again to return to normal
time counting. The display will not show count activity.
3. When Lap function is activated, pressing the START/STOP button will stop the
background counting and the STOP icon will stop flashing. To read the stopped
time, press and release the RESET/SET button once to display the stopped
reading.
4. To clear the reading (with STOP icon), press and release RESET/SET button
once.
Count Down Timer
1. Under idle mode, press MODE button three times to enter into Down Counter
Mode. The 1st row of the display shows the "TMR" message.
2. The Down Counter icon is turned ON and the display will show 99'00" on the
2nd row and 99 on the 3rd row for the initial down count settings.
3. Press and release START/STOP button once to start downcounting. The Down
Counter icon is flashing .
4. Press and release START/STOP button again to pause or stop the down-counting.
The STOP icon will stop flashing and is steadily ON.
5. Press and release START/STOP button again to resume the down-counting
process.
6. When the counting is stopped, press RESET/SET to clear the counting and return
to stand-by (step 2).
7. If count down timer reaches 00:00, it stops automatically and alerts with a 2
minute alarm tone.
NOTE:
• The default (and maximum) down count period is 99 minutes.
• To change the total count down period (shown in the 3rd row of the display),
press and release RESET/SET button once to decrease the count down period by
1 minute. Press and hold RESET/SET button to continuously decrease the total
count down period.
• You can press MODE button once to exit at any procedure of the above. In other
mode, the Down Counter icon will keep flashing once the Count Down function
was enabled before.
- 20 -
E
Flash Light
The flash light is at the bottom tip of the compass, to activate the flash light:
1. Pressing and holding down the FLASH button at any time will turn ON the Flash
Light.
2. Flash Light will be ON so as long as the FLASH button is being held down.
3. When FLASH button is released, the flash light will turn OFF immediately.
- 21 -
E
SPECIFICATIONS
Compass Accuracy . . . . . . . . . . . . . . . . . . . . . . . . . . . . . . . . . . . . . . . . . . . . . . . . . . . . . . . . . . . . ± 5o
Wind Gauge Accuracy
6-15 mph . . . . . . . . . . . . . . . . . . . . . . . . . . . . . . . . . . . . . . . . . . . . . . . . . . . . . . . . . . . . . . . . . . . . . ± 2
16-30 mph . . . . . . . . . . . . . . . . . . . . . . . . . . . . . . . . . . . . . . . . . . . . . . . . . . . . . . . . . . . . . . . . . . . . ± 3
Thermometer Accuracy
-20oC - 0oC . . . . . . . . . . . . . . . . . . . . . . . . . . . . . . . . . . . . . . . . . . . . . . . . . . . . . . . . . . . . . . . . . . . ± 2
0oC - 40oC . . . . . . . . . . . . . . . . . . . . . . .. . . . . . . . . . . . . . . . . . . . . . . . . . . . . . . . . . . . . . . . . . . . . ± 2
40oC - 60oC . . . . . . . . . . . . . . . . . . . . . . . . . . . . . . . . . . . . . . . . . . . . . . . . . . . . . . . . . . . . . . . . . . ± 2
Wind Chill Threshold . . . . . . . . . . . . . . . . . . . . . . . . . . . . . . . . . . . .. . . . . . . . . . . . . . . . . . . . . . -25oC
Clock Accuracy per day . . . . . . . . . . . . . . . . . . . . . . . . . . . . . . . . . . . . . . . . . . . . . . . ± 0.67s sec/day
Current Consumption
Standby Mode . . . . . . . . . . . . . . . . . . . . . . . . . . . . . . . . . . . . . . . . . . . . . . . . . . . . . . . . . . . . 0.04 mA
Compass Mode . . . . . . . . . . . . . . . . . . . . . . . . . . . . . . . . . . . . . . . . . . . . . . . . . . . . . . . . . . . . 15.0 mA
Thermometer and Wind Gauge Mode . . . . . . . . . . . . . . . . . . . . . . . . . . . . . . . . . . . . . . . . . . . 4.5 mA
EL turns ON . . . . . . . . . . . . . . . . . . . . . . . . . . . . . . . . . . . . . . . . . . . . . . . . . . . . . . . . . . . . . . 15.0 mA
Flash light turns ON . . . . . . . . . . . . . . . . . . . . . . . . . . . . . . . . . . . . . . . . . . . . . . . . . . . . . . . . . 9.0 mA
Low Battery Indication . . . . . . . . . . . . . . . . . . . . . . . . . . . . . . . . . . . . . . . . . . . . . . . . . . . . . . . . . . 4V
Dimensions(HWD) . . . . . . . . . . . . . . . . . . . . . . . . . .. . . . . . . . . .. . . . . . . . . . . .(89 x 66.5 x 23.5)mm
Weight(Lanyard Included) . . . . . . . . . . . . . . . . . . . . . . . . . . . . . . . . . . . . . . . . . . . . . . . . . . . . . . . 21g
- 22 -


![[1] Mode démploi à l'intérieur Operating instructions](http://vs1.manualzilla.com/store/data/006924622_1-3d82bf845e22d928f2112d94e645c825-150x150.png)