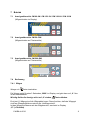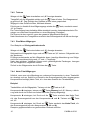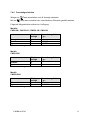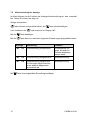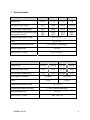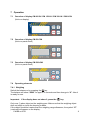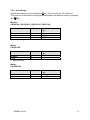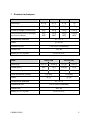
1
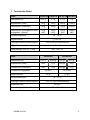
KERN & Sohn GmbH
Ziegelei 1
D-72336 Balingen
E-Mail: [email protected]
Tel: +49-[0]7433- 9933-0
Fax: +49-[0]7433-9933-149
Internet: www.kern-sohn.com
Betriebsanleitung
Operating instructions
Mode d'emploi
KERN CM
Versie 1.8
10/2006
D, GB, F
CM-BA-def-0618
D
KERN CM
Version 1.8 10/2006
Betriebsanleitung
Taschenwaage
Inhaltsverzeichnis
1
2
3
4
5
6
7
8
9
2
TECHNISCHE DATEN-----------------------------------------------------------------------------------------------3
KONFORMITÄTSERKLÄRUNG ----------------------------------------------------------------------------------4
GRUNDLEGENDE HINWEISE (ALLGEMEINES) ------------------------------------------------------------5
3.1
BESTIMMUNGSGEMÄßE VERWENDUNG------------------------------------------------------------------------5
3.2
SACHWIDRIGE VERWENDUNG ----------------------------------------------------------------------------------5
3.3
GEWÄHRLEISTUNG -----------------------------------------------------------------------------------------------5
3.4
PRÜFMITTELÜBERWACHUNG ------------------------------------------------------------------------------------5
GRUNDLEGENDE SICHERHEITSHINWEISE ----------------------------------------------------------------6
4.1
HINWEISE IN DER BETRIEBSANLEITUNG BEACHTEN ---------------------------------------------------------6
4.2
AUSBILDUNG DES PERSONALS ---------------------------------------------------------------------------------6
TRANSPORT UND LAGERUNG ---------------------------------------------------------------------------------6
5.1
KONTROLLE BEI ÜBERNAHME-----------------------------------------------------------------------------------6
5.2
VERPACKUNG -----------------------------------------------------------------------------------------------------6
AUSPACKEN, AUFSTELLUNG UND INBETRIEBNAHME -----------------------------------------------6
6.1
AUFSTELLORT, EINSATZORT ------------------------------------------------------------------------------------6
6.2
AUSPACKEN -------------------------------------------------------------------------------------------------------7
6.2.1 Aufstellen -----------------------------------------------------------------------------------------------------7
6.2.2 Lieferumfang -------------------------------------------------------------------------------------------------7
6.3
BATTERIEBETRIEB UND –WECHSEL ----------------------------------------------------------------------------7
6.4
WINDSCHUTZ + WÄGESCHALE (CM 50-C2N, CM 500-GN1) --------------------------------------------8
6.5
ERSTINBETRIEBNAHME ------------------------------------------------------------------------------------------8
6.6
JUSTIERUNG -------------------------------------------------------------------------------------------------------8
6.7
JUSTIEREN---------------------------------------------------------------------------------------------------------8
BETRIEB ----------------------------------------------------------------------------------------------------------------9
7.1
ANZEIGENÜBERSICHT CM 60-2N / CM 150-1N / CM 320-1N / CM 1K1N ----------------------------9
7.2
ANZEIGENÜBERSICHT CM 50-C2N----------------------------------------------------------------------------9
7.3
ANZEIGENÜBERSICHT CM 500-GN1--------------------------------------------------------------------------9
7.4
BEDIENUNG--------------------------------------------------------------------------------------------------------9
7.4.1 Wägen ---------------------------------------------------------------------------------------------------------9
7.4.2 Tarieren ----------------------------------------------------------------------------------------------------- 10
7.4.3 Plus/Minus-Wägungen----------------------------------------------------------------------------------- 10
7.4.4 Netto-Total-Wägungen ---------------------------------------------------------------------------------- 10
7.4.5 Fremdwägeeinheiten------------------------------------------------------------------------------------- 11
7.5
HINTERLEUCHTUNG DER ANZEIGE --------------------------------------------------------------------------- 12
7.6
TASCHENRECHNERFUNKTIONEN ----------------------------------------------------------------------------- 13
WARTUNG, INSTANDHALTUNG, ENTSORGUNG ------------------------------------------------------- 13
8.1
REINIGEN -------------------------------------------------------------------------------------------------------- 13
8.2
WARTUNG, INSTANDHALTUNG -------------------------------------------------------------------------------- 13
8.3
ENTSORGUNG --------------------------------------------------------------------------------------------------- 13
KLEINE PANNENHILFE ------------------------------------------------------------------------------------------ 14
CM-BA-d-0618
1 Technische Daten
KERN
Ablesbarkeit (d)
CM 60-2N CM150-1N CM 320-1N CM 1K1N
0,01 g
0,1 g
0,1 g
1g
Wägebereich (max)
60 g
150 g
320 g
1.000 g
Tarierbereich (subtraktiv)
60 g
150 g
320 g
1.000 g
Empfohlenes Justiergewicht nicht
beigegeben, (Klasse)
50 g
(M2)
100 g
(M3)
200 g
(M3)
1000 g
(M3)
Betriebstemperatur
18 – 25 °C
Wägeeinheiten
g / tol / tlt
Zulässige relative Luftfeuchtigkeit
< 85 %(nicht kondensierend)
Wägeplatte mm
70 x 80
Gesamtwaage (B x H x T) mm
KERN
Ablesbarkeit (d)
85 x 130 x 25
CM 50-C2N
CM 500-GN1
0,01 ct
0,002 g
0,1 gn
0,01 g
Wägebereich (max)
50ct
10 g
500 gn
32 g
Tarierbereich (subtraktiv)
50ct
10 g
500 gn
32 g
Prüfgewicht beigegeben
Wägeeinheiten
Betriebstemperatur
Zulässige relative Luftfeuchtigkeit
Wägeplatte mm
Gesamtwaage (B x H x T) mm
CM-BA-d-0618
5 g (M1)
10 g (M2)
ct / g
g / gn
18 – 25 °C
< 85 % (nicht kondensierend)
40 x 50
85 x 130 x 25
3
2 Konformitätserklärung
Konformitätserklärung
Die elektronische Taschenwaage
Typ:
KERN CM 60-2N
KERN CM 150-1N
KERN CM 320-1N
KERN CM 1K-1N
KERN CM 50-C2N
KERN CM 500-GN1
entspricht den Anforderungen folgender EG-Richtlinie:
EG-EMV-Richtlinie
(Richtlinie über die elektromagnetische Verträglichkeit)
in der Fassung 89/336/EWG
Angewandte harmonisierte Normen, insbesondere
Standards for electronic scale.
EN 61000-6-3 :2001
EN 61000-6-1 :2001
Standard for calculator :
EN 55022 : 1998+A1 : 2000
EN 55024 : 1998+A1 : 2001
Bei einer nicht mit KERN abgestimmten Änderung des oben beschriebenen Gerätes
verliert diese Erklärung ihre Gültigkeit.
Datum: 01.10.2004
Unterschrift:
Gottl. KERN & Sohn GmbH
Geschäftsführung
Gottl. KERN & Sohn GmbH, Ziegelei 1, 72336 Balingen-Frommern, Tel. 07433/9933-0, Fax 07433/9933-149
4
CM-BA-d-0618
3 Grundlegende Hinweise (Allgemeines)
3.1 Bestimmungsgemäße Verwendung
Die von Ihnen erworbene Waage dient zum Bestimmen des Wägewertes von Wägegut. Sie ist zur Verwendung als „nichtselbsttätige Waage“ vorgesehen, d.h. das Wägegut wird manuell, vorsichtig und mittig auf die Wägeplatte aufgebracht. Nach Erreichen eines stabilen Wägewertes kann der Wägewert abgelesen werden.
3.2 Sachwidrige Verwendung
Waage nicht für dynamische Verwiegungen verwenden. Werden kleine Mengen vom
Wägegut entnommen oder zugeführt, so können durch die in der Waage vorhandene
„Stabilitätskompensation“ falsche Wägeergebnisse angezeigt werden! (Beispiel:
Langsames herausfliessen von Flüssigkeiten aus einem auf der Waage befindlichen
Behälter.)
Keine Dauerlast auf der Wägeplatte belassen. Diese kann das Messwerk beschädigen.
Stöße und Überlastungen der Waage über die angegebene Höchstlast (Max), abzüglich einer eventuell bereits vorhandenen Taralast, unbedingt vermeiden. Waage
könnte hierdurch beschädigt werden.
Waage niemals in explosionsgefährdeten Räumen betreiben. Die Serienausführung
ist nicht Ex-geschützt.
Die Waage darf nicht konstruktiv verändert werden. Dies kann zu falschen Wägeergebnissen, sicherheitstechnischen Mängeln sowie der Zerstörung der Waage führen.
Die Waage darf nur gemäß den beschriebenen Vorgaben eingesetzt werden. Abweichende Einsatzbereiche/Anwendungsgebiete sind von KERN schriftlich freizugeben.
3.3 Gewährleistung
Gewährleistung erlischt bei
•
•
•
•
•
•
•
Nichtbeachten unserer Vorgaben in der Betriebsanleitung
Verwendung außerhalb der beschriebenen Anwendungen
Veränderung oder öffnen des Gerätes
mechanische Beschädigung, und Beschädigung durch Medien, Flüssigkeiten
natürlichem Verschleiß und Abnützung
nicht sachgemäße Aufstellung oder elektrische Installation
Überlastung des Messwerkes
3.4 Prüfmittelüberwachung
Im Rahmen der Qualitätssicherung müssen die messtechnischen Eigenschaften der
Waage und eines eventuell vorhandenen Prüfgewichtes in regelmäßigen Abständen
überprüft werden. Der verantwortliche Benutzer hat hierfür ein geeignetes Intervall
sowie die Art und den Umfang dieser Prüfung zu definieren. Informationen bezüglich
der Prüfmittelüberwachung von Waagen sowie die hierfür notwendigen Prüfgewichte
sind auf der KERN-Hompage (www.kern-sohn.com) verfügbar. In seinem akkreditiertem DKD-Kalibrierlaboratorium können bei KERN schnell und kostengünstig Prüfgewichte und Waagen kalibriert werden (Rückführung auf das nationale Normal).
CM-BA-d-0618
5
4 Grundlegende Sicherheitshinweise
4.1 Hinweise in der Betriebsanleitung beachten
Lesen Sie diese Betriebsanleitung vor der Aufstellung und Inbetriebnahme sorgfältig
durch, selbst dann, wenn Sie bereits über Erfahrungen mit KERN-Waagen verfügen.
4.2 Ausbildung des Personals
Das Gerät darf nur von geschulten Mitarbeitern bedient und gepflegt werden
5 Transport und Lagerung
5.1 Kontrolle bei Übernahme
Überprüfen Sie bitte die Verpackung sofort beim Eingang sowie das Gerät beim Auspacken auf eventuell sichtbare äußere Beschädigungen.
5.2 Verpackung
Bewahren Sie alle Teile der Originalverpackung für einen eventuell notwendigen
Rücktransport auf.
Für Rücktransport ist nur die Originalverpackung zu verwenden.
6 Auspacken, Aufstellung und Inbetriebnahme
6.1 Aufstellort, Einsatzort
Die Waagen sind so konstruiert, dass unter den üblichen Einsatzbedingungen zuverlässige Wägeergebnisse erzielt werden.
Exakt und schnell arbeiten Sie, wenn Sie den richtigen Standort für Ihre Waage wählen.
Beachten Sie deshalb am Aufstellort folgendes:
6
•
Waage auf eine stabile, gerade Fläche stellen;
•
extreme Wärme sowie Temperaturschwankungen z.B. durch Aufstellen neben
der Heizung oder direkte Sonneneinstrahlung vermeiden;
•
Waage vor direktem Luftzug durch geöffnete Fenster und Türen schützen;
•
Erschütterungen während des Wägens vermeiden;
•
Waage vor hoher Luftfeuchtigkeit, Dämpfen und Staub schützen;
•
Setzen Sie das Gerät nicht über längere Zeit starker Feuchtigkeit aus. Eine
nicht erlaubte Betauung (Kondensation von Luftfeuchtigkeit am Gerät) kann
auftreten, wenn ein kaltes Gerät in eine wesentlich wärmere Umgebung gebracht wird. Akklimatisieren Sie in diesem Fall das vom Netz getrennte Gerät
ca. 2 Stunden bei Raumtemperatur.
•
statische Aufladung von Wägegut und Wägebehälter vermeiden.
CM-BA-d-0618
Beim Auftreten von elektromagnetischen Feldern, bei statischen Aufladungen sowie
bei instabiler Stromversorgung sind große Anzeigeabweichungen (falsche Wägeergebnisse oder ein Fehlverhalten des Taschenrechners) möglich. Der Standort muss
dann gewechselt werden.
Sollte der Taschenrechner durch statische Aufladung ein Fehlverhalten zeigen, so
schalten Sie den Taschenrechner mit der Taste „ON/AC“ aus und anschließend wieder an.
6.2
Auspacken
Die Waage vorsichtig aus der Verpackung nehmen, Plastikhülle entfernen und die
Waage am vorgesehenen Arbeitsplatz aufstellen.
6.2.1 Aufstellen
Die Waage ist so aufzustellen, dass die Wägeschale genau waagrecht steht.
6.2.2 Lieferumfang
Serienmäßiges Zubehör:
•
•
•
•
•
•
6.3
Taschenwaage
Batterien
Betriebsanleitung
Prüfgewicht (nur bei CM 5-C2N, CM 500-GN1)
Wägegefäß (nur bei CM 50-C2N, CM 500-GN1)
Windschutz (nur bei CM 50-C2N, CM 500-GN1)
Batteriebetrieb und –wechsel
• Zur Batterieschonung schaltet die Waage 3 – 4 Minuten nach abgeschlossener Wägung automatisch ab.
•
Ist die Batterie verbraucht, erscheint im Display „LO“.
und sofort Batterie wechseln.
Schalter drücken
Batteriewechsel
1. Batteriedeckel an Waagenunterseite öffnen
(Batteriedeckel entriegeln, (Bild 1+2)
2. 2 AAA-Batterien einlegen (Bild 3)
3. Batteriedeckel wieder einsetzen
Wird die Waage längere Zeit nicht benützt, Batterien herausnehmen und getrennt
aufbewahren. Auslaufen von Batterieflüssigkeit könnte die Waage beschädigen.
CM-BA-d-0618
7
6.4
Windschutz + Wägeschale (CM 50-C2N, CM 500-GN1)
•
•
•
•
Vor dem Wägen:
Wägeschale aufsetzen
Windschutz entfalten
Wägegut in Wägeschale
Windschutz aufsetzen
•
Nach dem Wägen:
Windschutz und Wägeschale über Wägeplatte
6.5 Erstinbetriebnahme
Eine Anwärmzeit von 1 Minute nach dem Einschalten stabilisiert die Messwerte.
Die Genauigkeit der Waage ist abhängig von der örtlichen Fallbeschleunigung.
Unbedingt die Hinweise im Kapitel „ Justierung “ beachten.
6.6 Justierung
Da der Wert der Erdbeschleunigung nicht an jedem Ort der Erde gleich ist, muss jede Waage – gemäss dem zugrundeliegenden physikalischen Wägeprinzip – am Aufstellort auf die dort herrschende Erdbeschleunigung abgestimmt werden ( nur wenn
die Waage nicht bereits im Werk auf den Aufstellort justiert wurde). Dieser Justiervorgang, muss bei der ersten Inbetriebnahme, nach jedem Standortwechsel sowie
bei Schwankungen der Umgebungstemperatur durchgeführt werden. Um genaue
Messwerte zu erhalten, empfiehlt es sich zudem, die Waage auch im Wägebetrieb
periodisch zu justieren.
6.7
Justieren
Mit einem Justiergewicht ist die Waagengenauigkeit jederzeit überprüfbar und neu
einstellbar.
Vorgehen bei der Justierung:
Stabile Umgebungsbedingungen beachten. Eine kurze Anwärmzeit von ca. 1 Minute
zur Stabilisierung ist zweckmäßig.
Taste drücken und gedrückt halten, im Display erscheint zuerst kurz „CAL “, anschließend erscheint die genaue Größe des Justiergewichtes .
Justiergewicht in die Mitte der Wägeplatte stellen.
Kurze Zeit später erscheint „ F“, dann schaltet die Waage automatisch ab.
Bei einem Justierfehler oder falschem Justiergewicht erscheint „ E“ im Display.
CM-BA-d-0618
8
7 Betrieb
7.1
Anzeigenübersicht CM 60-2N / CM 150-1N / CM 320-1N / CM 1K1N
(Wägeeinheiten im Display)
7.2
Anzeigenübersicht CM 50-C2N
(Wägeeinheiten auf Tastaturfolie)
7.3
Anzeigenübersicht CM 500-GN1
(Wägeeinheiten auf Tastaturfolie)
7.4
Bedienung
7.4.1 Wägen
Waage mit
Taste einschalten.
Die Waage zeigt für etwa 3 Sekunden „8888“ im Display und geht dann auf „0“. Nun
ist sie betriebsbereit.
Wichtig: Sollte die Anzeige nicht auf „0“ stehen,
Taste drücken.
Erst jetzt (!) Wägegut auf die Wägeplatte legen. Darauf achten, daß das Wägegut
nicht am Waagengehäuse oder an der Unterlage streift.
Ist das Wägegut schwerer als der Wägebereich, erscheint im Display
„E“ (= Überlast) .
CM-BA-d-0618
9
7.4.2 Tarieren
Waage mit der
-Taste einschalten und „0“ Anzeige abwarten.
Taragefäß auf die Wägeplatte stellen und die
Taste drücken. Die Waagenanzeige geht auf „0“. Das Gewicht des Gefäßes ist nun intern gespeichert.
Wägegut in das Gefäß einfüllen, Meßwert ablesen.
Drückt man im Anschluß des Wägevorgangs wieder die
Taste, erscheint erneut
„0“ im Display.
Der Tariervorgang kann beliebige Male wiederholt werden, beispielsweise beim Einwiegen von mehreren Komponenten zu einer Mischung (Zuwiegen).
Die Grenze ist dann erreicht, wenn der gesamte Wägebereich belegt ist.
Nach Abnehmen des Taragefäßes erscheint das Gesamtgewicht als Minus-Anzeige.
7.4.3 Plus/Minus-Wägungen
Zum Beispiel zur Stückgewichtskontrolle
Waage mit der
Taste einschalten und „0“-Anzeige abwarten.
Sollgewicht auf Wägeplatte legen und mit
Taste auf „0“ tarieren. Sollgewicht wieder abnehmen.
Prüflinge nacheinander auf die Wägeplatte legen, jeweilige Abweichung zum Sollgewicht wird vorzeichenrichtig nach „+“ und „-“ angezeigt.
Nach dem gleichen Verfahren können auch gewichtsgleiche Packungen, bezogen
auf ein Sollgewicht, hergestellt werden.
Zurück in den Wägemodus durch Drücken der
Taste.
7.4.4 Netto-Total-Wägungen
Nützlich, wenn man eine Mischung aus mehreren Komponenten in einen Tarabehälter einwiegt und am Schluß zur Kontrolle das Summengewicht aller eingewogenen
Komponenten benötigt (Netto-Total, d.h. ohne das Gewicht des Tarabehälters).
Beispiel:
Tarabehälter auf die Wägeplatte, Tarieren mit der
Taste auf „0“.
Taste (Memory) auf „0“. Memory- aktivieKomponente n einwiegen, tarieren mit
rung wird durch ein Dreieck am linken Rand des Displays angezeigt.
Komponente o einwiegen, bei Druck auf die
Taste erscheint das Netto-Total,
d.h. das Summengewicht von den Komponenten n und o .Tarieren mit
auf „0“.
Taste
Komponente p einwiegen, bei Druck auf
Taste erscheint das Netto-Total, d.h.
das Summengewicht von den Komponenten n, o und p.
Rezeptur gegebenenfalls zum gewünschten Endwert auffüllen.
10
CM-BA-d-0618
7.4.5 Fremdwägeeinheiten
Taste einschalten und „0“-Anzeige abwarten.
Waage mit
Mit der
Taste kann zwischen den verschiedenen Einheiten gewählt werden.
Folgende Wägeeinheiten stehen zur Verfügung:
Modelle:
CM60-2N / CM150-1N / CM320-1N / CM1K1N
Gramm *
Tael Taiwan
Tola
*Werkseinstellung
Display
anzeige
Umrechnungsfaktor
1g=
g
tlt
tol
1
0.02667
0.08573
Display
anzeige
Umrechnungsfaktor
1g=
g
ct
1
5
Display
anzeige
Umrechnungsfaktor
1g=
g
gn
1
15.43236
Modell:
CM50-C2N
Gramm *
Carat
*Werkseinstellung
Modell:
CM500-GN1
Gramm *
Grain
*Werkseinstellung
CM-BA-d-0618
11
7.5
Hinterleuchtung der Anzeige
Im Menü können sie die Funktion der Anzeigenhinterleuchtung ein- bzw. ausschalten. Gehen Sie hierzu wie folgt vor:
Waage ausschalten.
Taste drücken und gedrückt halten, die
nach Loslassen der
Taste einmal betätigen,
Taste erscheint im Display „bl“.
Mit der
Taste bestätigen.
Mit der
Taste kann nun zwischen folgenden Einstellungen ausgewählt werden:
Mit
12
Anzeige
Einstellung
Funktion
„bl“
on
Hinterleuchtung eingeschaltet
Kontrastreiche Anzeige, die auch im
Dunkeln abgelesen
werden kann.
„bl“
off
Hinterleuchtung ausgeschaltet
Batterieschonung
„bl“
Ch
Hinterleuchtung schaltet sich
10 Sekunden nach Erreichen
eines stabilen Wägewertes
automatisch ab
Batterieschonung
Taste Ihre ausgewählte Einstellung bestätigen.
CM-BA-d-0618
7.6 Taschenrechnerfunktionen
(Modelle CM 50-C2N u. CM 500-GN1 verfügen über keinen Taschenrechner)
KERN CM Taschenrechner
ON/AC
Taschenrechner einschalten /
Alle Speicher löschen
+
Grundrechenart Addition
-
Grundrechenart Subtraktion
÷
Division
x
Multiplikation
=
Ergebnis
%
Prozent
M+
Zum Speicherinhalt addieren
M-
Vom Speicherinhalt subtrahieren
MC
Speicher löschen
MR
Speicherinhalt auslesen
+/-
Vorzeichenwechsel
√
Wurzel
,
Komma
C
löschen
Hinweis:
Ein Datenaustausch zwischen Waage und Taschenrechner ist nicht möglich.
8 Wartung, Instandhaltung, Entsorgung
8.1 Reinigen
Vor der Reinigung trennen Sie das Gerät bitte von der Betriebsspannung.
Benutzen Sie bitte keine aggressiven Reinigungsmittel (Lösungsmittel o.ä.), sondern
nur ein mit milder Seifenlauge angefeuchtetes Tuch. Achten Sie darauf, dass keine
Flüssigkeit in das Gerät eindringt und reiben Sie mit einem trockenen, weichen Tuch
nach.
Lose Probenreste/Pulver können vorsichtig mit einem Pinsel oder Handstaubsauger
entfernt werden.
Verschüttetes Wägegut sofort entfernen.
8.2 Wartung, Instandhaltung
Das Gerät darf nur von geschulten und von KERN autorisierten Servicetechnikern
geöffnet werden.
8.3 Entsorgung
Die Entsorgung von Verpackung und Gerät ist vom Betreiber nach gültigem nationalem oder regionalem Recht des Benutzerortes durchzuführen.
CM-BA-d-0618
13
9 Kleine Pannenhilfe
Bei einer Störung im Programmablauf sollte die Waage kurz ausgeschaltet werden.
Der Wägevorgang muss dann wieder von vorne begonnen werden.
Hilfe:
Störung
Mögliche Ursache
Die Gewichtsanzeige leuchtet nicht.
• Die Waage ist nicht eingeschaltet.
• Die Batterien sind falsch eingelegt oder
leer.
• Es sind keine Batterien eingelegt.
Die Gewichtsanzeige ändert sich
• Luftzug/Luftbewegungen
fortwährend
• Vibrationen des Tisches/Bodens
• Die Wägeplatte hat Berührung mit Fremdkörpern.
• Elektromagetische Felder/ Statische Aufladung(Anderen Aufstellungsort wählen/
falls möglich störendes Gerät ausschalten)
Das Wägeergebnis ist offensichtlich
• Die Waagenanzeige steht nicht auf Null
falsch
• Die Justierung stimmt nicht mehr.
• Es herrschen starke Temperaturschwankungen.
• Elektromagetische Felder/ Statische Aufladung(Anderen Aufstellungsort wählen/
falls möglich, störendes Gerät ausschalten)
Beim Auftreten anderer Fehlermeldungen Waage aus- und nochmals einschalten.
Bleibt Fehlermeldung erhalten, Hersteller benachrichtigen.
14
CM-BA-d-0618
KERN & Sohn GmbH
Ziegelei 1
D-72336 Balingen
E-Mail: [email protected]
Tel: +49-[0]7433- 9933-0
Fax: +49-[0]7433-9933-149
Internet: www.kern-sohn.com
Operating instructions
Pocket balance
KERN CM
Version 1.8
10/2006
GB
CM-BA-e-0618
GB
KERN CM
Version 1.8 10/2006
Operation instructions
Pocket Balance
Table of contents
1
2
3
Technical data ----------------------------------------------------------------------------------- 3
Declaration of conformty--------------------------------------------------------------------- 4
Fundamental information (general)------------------------------------------------------- 5
3.1
3.2
3.3
3.4
4
Fundamental safety information----------------------------------------------------------- 6
4.1
4.2
5
6.2.1
6.2.2
6.3
6.4
6.5
6.6
6.7
7.4.1
7.4.2
7.4.3
7.4.4
7.4.5
7.5
7.6
2
Installation ---------------------------------------------------------------------------------------------------- 7
List of items supplied--------------------------------------------------------------------------------------- 7
Battery operation and change--------------------------------------------------------------------- 7
Draft shield + weighing container (CM 50-C2N, CM 500-GN1) -------------------------- 8
Initial start-up ------------------------------------------------------------------------------------------ 8
Adjustment --------------------------------------------------------------------------------------------- 8
Adjusting------------------------------------------------------------------------------------------------ 8
Overview of display CM 60-2N / CM 150-1N / CM 320-1N / CM 1K1N ---------------- 9
Overview of display CM 50-C2N ----------------------------------------------------------------- 9
Overview of display CM 500-GN1 --------------------------------------------------------------- 9
Operating elements---------------------------------------------------------------------------------- 9
Weighing ------------------------------------------------------------------------------------------------------ 9
Taring -------------------------------------------------------------------------------------------------------- 10
Plus/Minus Weighings ----------------------------------------------------------------------------------- 10
Net-total weighings --------------------------------------------------------------------------------------- 10
Unit change------------------------------------------------------------------------------------------------- 11
Rear illuminated display -------------------------------------------------------------------------- 12
Calculator -------------------------------------------------------------------------------------------- 13
Maintenance, upkeep, disposal -----------------------------------------------------------13
8.1
8.2
8.3
9
Place of installation, place of use ---------------------------------------------------------------- 6
Unpacking---------------------------------------------------------------------------------------------- 7
Operation------------------------------------------------------------------------------------------ 9
7.1
7.2
7.3
7.4
8
Acceptance check------------------------------------------------------------------------------------ 6
Packaging ---------------------------------------------------------------------------------------------- 6
Unpacking, installation and commissioning ------------------------------------------ 6
6.1
6.2
7
Observe the information in the operating instructions -------------------------------------- 6
Staff training ------------------------------------------------------------------------------------------- 6
Transport and storage ------------------------------------------------------------------------ 6
5.1
5.2
6
Intended use------------------------------------------------------------------------------------------- 5
Inappropriate use------------------------------------------------------------------------------------- 5
Guarantee ---------------------------------------------------------------------------------------------- 5
Monitoring the test substances ------------------------------------------------------------------- 5
Cleaning ---------------------------------------------------------------------------------------------- 13
Maintenance, upkeep ----------------------------------------------------------------------------- 13
Disposal ---------------------------------------------------------------------------------------------- 13
Troubleshooting -------------------------------------------------------------------------------14
CM-BA-e-0618
1 Technical data
KERN
Readout (d)
CM 60-2N
CM150-1N CM 320-1N CM 1K1N
0,01 g
0,1 g
0,1 g
1g
Weighing range (max)
60 g
150 g
320 g
1.000 g
Taring range (subtractive)
60 g
150 g
320 g
1.000 g
Recommended adjusting weight,
not included (class)
50 g
(M2)
100 g
(M3)
200 g
(M3)
1000 g
(M3)
Optimal temperature range
18 – 25 °C
Units
g / tol / tlt
Permissible relative humidity
< 85 %(non-condensing)
Weighing plate mm
70 x 80
Size (B x H x T) mm
85 x 130 x 25
KERN
Readout (d)
CM 50-C2N
CM 500-GN1
0,01 ct
0,002 g
0,1 gn
0,01 g
Weighing range (max)
50ct
10 g
500 gn
32 g
Taring range (subtractive)
50ct
10 g
500 gn
32 g
Test weight (included)
Units
Optimal temperature range
Permissible relative humidity
5 g (M1)
10 g (M2)
ct / g
g / gn
18 – 25 °C
< 85 % (non-condensing)
Weighing plate mm
40 x 50
Size (B x H x T) mm
85 x 130 x 25
CM-BA-e-0618
3
2 Declaration of conformty
Declaration of Conformity
The electronic pocket balance
Type:
KERN CM 60-2N
KERN CM 150-1N
KERN CM 250-1N
KERN CM 1K1N
KERN CM 50-C2N
KERN CM 500-GN1
correspond to the following EC requirements:
EC-EMC-directive
version 89/336/EEC
Compatible norms are, in particular
Standards for electronic scale.
EN 61000-6-3 :2001
EN 61000-6-1 :2001
Standard for calculator :
EN 55022 : 1998+A1 : 2000
EN 55024 : 1998+A1 : 2001
If a change is made to the above mentioned appliances without consulting KERN
this declaration will become invalid
Date: 01.10 2004
Signature:
Gottl. KERN & Sohn GmbH
Management
Gottl. KERN & Sohn GmbH, Ziegelei 1, 72336 Balingen-Frommern, Tel. 07433/9933-0, Fax 07433/9933-149
4
CM-BA-e-0618
3 Fundamental information (general)
3.1
Intended use
The balance you have acquired serves to determine the weighing value of the material to be weighed. It is intended to be used as a “non-automatic“ balance, i.e. the
material to be weighed is manually and carefully placed in the centre of the weighing
plate. The weighing value can be read off after a stable weighing value has been obtained.
3.2
Inappropriate use
Do not use the balance for dynamic weighing. In the event that small quantities are
removed or added to the material to be weighed, incorrect weighing results can be
displayed due to the “stability compensation“ in the balance. (Example: Slowly draining fluids from a container on the balance.)
Do not leave a permanent load on the weighing plate. This can damage the measuring equipment.
Be sure to avoid impact shock and overloading the balance in excess of the prescribed maximum load rating (max.), minus any possible tare weight that is already
present. This could cause damage to the balance.
Never operate the balance in hazardous locations. The series design is not explosion-proof.
Structural alterations may not be made to the balance. This can lead to incorrect
weighing results, faults concerning safety regulations as well as to destruction of the
balance.
The balance may only be used in compliance with the described guidelines. Varying
areas of application/planned use must be approved by KERN in writing.
3.3
Guarantee
The guarantee is not valid following
•
•
•
•
•
•
•
non-observation of our guidelines in the operating instructions
use outside the described applications
alteration to or opening of the device
mechanical damage and damage caused by media, liquids
natural wear and tear
inappropriate erection or electric installation
overloading of the measuring equipment
3.4
Monitoring the test substances
The metrology features of the balance and any possible available adjusting weight
must be checked at regular intervals within the scope of quality assurance. For this
purpose, the answerable user must define a suitable interval as well as the nature
and scope of this check. Information is available on KERN’s home page (www.kernsohn.com) with regard to the monitoring of balance test substances and the test
weights required for this. Test weights and balances can be adjusted quickly and at
a reasonable price in KERN’s accredited DKD calibration laboratory (return to national normal).
CM-BA-e-0618
5
4 Fundamental safety information
4.1
Observe the information in the operating instructions
Please read the operating instructions carefully before erecting and commissioning,
even if you already have experience with KERN balances.
4.2
Staff training
The device may only be operated and looked after by trained members of staff.
5 Transport and storage
5.1
Acceptance check
Please check the packaging immediately upon delivery and the device during unpacking for any visible signs of external damage.
5.2
Packaging
Please retain all parts of the original packaging in case it should be necessary to return items at any time.
Only the original packaging should be used for return consignments.
6 Unpacking, installation and commissioning
6.1 Place of installation, place of use
The balance is constructed in such a way that reliable weighing results can be
achieved under normal application conditions.
By selecting the correct location for your balance, you will be able to work quickly and
precisely.
Therefore please observe the following at the place of installation:
6
•
Place the balance on a firm, level surface;
•
Avoid extreme heat as well as temperature fluctuation caused by installing
next to a radiator or in the direct sunlight;
•
Protect the balance against direct draughts due to open windows and doors;
•
Avoid jarring during weighing;
•
Protect the balance against high humidity, vapours and dust;
•
Do not expose the device to extreme dampness for longer periods of time. Inadmissible bedewing (condensation of air moisture on the device) can occur if
a cold device is taken into a significantly warmer environment. In this case,
please acclimatise the device for approx. 2 hours at room temperature after it
has been disconnected from the mains.
•
Avoid static charging of the material to be weighed, weighing container and
windshield.
CM-BA-e-0618
Major display deviations (incorrect weighing results, or a failure function of the calculator) are possible if electromagnetic fields occur as well as due to static charging and
instable power supply. It is then necessary to change the location.
If the calculator is interrupted by static charging, reset it to normal by pressing the
“ON/AC” button.
6.2
Unpacking
Carefully remove the balance from its packaging, remove the plastic wrapping and
position the balance in its intended working location.
6.2.1 Installation
Install the balance in such a fashion that the weighing plate is absolutely horizonta.
6.2.2 List of items supplied
Standard accessories:
•
Pocket balance
•
Batteries
•
Operating instructions
•
Test weight (only CM 5-C2N, CM 500-GN1)
•
Weighing container (only CM 50-C2N, CM 500-GN1)
•
Draft shield (only CM 50-C2N, CM 500-GN1)
6.3
Battery operation and change
• Battery conservation through automatic power-off 3 –4 minutes after ending a
weighing operation.
• When the battery power is used the display will show “LO”. Press the
key and
change the batteries at once.
Battery change
1. Open the battery compartment cover located at
the bottom of the balance (Unblocking battery
compartment cover ( picture 1+2).
2. Insert 2 AAA type batteries (picture 3) .
3. Re-insert and lock the battery cover.( picture 4).
When the balance is not in use for a longer period of time remove batteries and keep
them separately. Leakage of battery liquid might damage the balance.
CM-BA-e-0618
7
6.4
Draft shield + weighing container (CM 50-C2N, CM 500-GN1)
Before weighing:
• Put on Weighing pan
• Unfold draft shield
• Place the weighing material
on weighing plate.
• put on draft shield.
After weighing:
• Put Draft shield and weighing
pan over weighing plate
6.5 Initial start-up
A warm-up time of 1 minutes stabilises the measured values after switching on.
The accuracy of the balance depends on the local acceleration of the fall.
Please be sure to observe the information in the chapter on adjusting.
6.6 Adjustment
As the acceleration value due to gravity is not the same at every location on earth,
each balance must be coordinated – in compliance with the underlying physical
weighing principle - to the existing acceleration due to gravity at its place of location (
only if the balance has not already been adjusted to the location in the factory). This
adjustment process must be carried out during the initial start-up, after change in location and variation of surrounding temperature. It is also recommendable to adjust
the balance periodically during weighing operation in order to obtain exact measured
values.
6.7 Adjusting
Using a precision weight, the accuracy of the balance can be checked at any time
and adjusted.
Adjustment procedure:
Check that the surrounding conditions are stable.
A short warm-up time of about 1 minutes are recommended for stabilisation.
Press
key approx. 3 seconds, ”CAL ” and then the exact weight of the adjusting
weight will appear the display.
Place the adjusting weight on the centre of the weighing plate.
“ F” will appear somewhat later, and then turn off.
In case of an adjusting error or a wrong adjusting weight “ E” appears in the display.
8
CM-BA-e-0618
7 Operation
7.1
Overview of display CM 60-2N / CM 150-1N / CM 320-1N / CM 1K1N
(Units on display)
7.2
Overview of display CM 50-C2N
(Units on panel sheet)
7.3
Overview of display CM 500-GN1
(Units on panel sheet)
7.4
Operating elements
7.4.1 Weighing
Switch the balance on by pressing the
key.
The balance will show “8888” for approx. 3 seconds and then change to “0”. Now it
is ready for use.
Important: If the display does not show 0, press the
key.
Only now (!) place object on the weighing pan. Make sure that the weighing object
does not stripe or touch the housing or base.
If the object should be heavier than the weighing range allowance, the symbol “E”
(overload) will appear on the display .
CM-BA-e-0618
9
7.4.2 Taring
Switch the balance on by pressing the
key, then wait for the “0” indication.
Place the tare cup on the weighing plate and press the
“0”. Now the weight of the cup is memorised internally.
Fill the object into the cup, read the measuring value.
key. Indication will go to
By pressing the
key after a weighing procedure, “0” will appear on the display
again.
The taring procedure can be repeated continuously, for instance when mixing several
components.
The limit is reached when the full weighing range is overlay.
After having removed the tare cup , the total weight will appear as a negative value.
7.4.3 Plus/Minus Weighings
For instance to control piece-weights.
Switch the balance on by pressing the
key, then wait until “0” is indicated.
Place rated weight on the weighing plate and tare on “0” by
key. Remove rated
weight.
Place the objects on the weighing pan successively, the balance will show any deviation from the rated weight in “+” and “-“.
According to the same procedure packages with the same weight, related to a rated
weight, can be produced. Return to the weighing mode by pressing the
key.
7.4.4 Net-total weighings
Useful when a mixture of several components will be weighed in a tare cup, and finally the sum weight of all components weighed in will be needed for direction (nettotal, i.e. without the weight of the tare cup).
Example:
Tare cup on weighing plate, tare on “0“ by pressing the
key.
Weigh component n and tare back to “0” with the
key. The activation of the
memory is shown by a triangle on the far left of the display.
Weigh component o, by pressing the
key the net total is displayed, this means
the sum of component n and o. Tare to “0” by pressing the
key.
Weigh component p, by pressing the
key the net-total is displayed, this means
the sum of the components n and o and p.
If necessary fill the formula container up to the desirable level. To return to the weighing mode press the
10
key
CM-BA-e-0618
7.4.5 Unit change
Switch the balance on by pressing the
key, then wait for the “0” indication.
The units set in the balance can be selected between the different units, by pressing
the
key
Models:
CM 60-2N / CM 150-1N / CM 320-1N / CM 1K1N
Gramm *
Tael Taiwan
Tola
* Factory setting
Display
Conversion factor
1g=
g
tlt
tol
1
0.02667
0.08573
Display
Conversion factor
1g=
g
ct
1
5
Display
Conversion factor
1g=
g
gn
1
15.43236
Model:
CM 50-C2N
Gramm *
Carat
* Factory setting
Model:
CM 500-GN1
Gramm *
Grain
* Factory setting
CM-BA-e-0618
11
7.5 Rear illuminated display
To choose the backlight mode, please follow the below instruction for the setting:
Turn off the balance.
Press and hold the
key, then press the
key one time; after that release the
key. Display shows„bl“.
Press the
key to confirm the entry of the backlight mode.
Press the
key to switch among the modes:
Display
Mode
Function
„bl“
on
Backlight on
Contrasting display which
can also be read in the
dark.
„bl“
off
Backlight off
Save the battery
„bl“
Ch
Backlight switches automatically off 10 sec after
stable indication
Save the battery
Confirm with the
12
key.
CM-BA-e-0618
7.6 Calculator
(not included in models CM50-C2N and CM500-GN1)
KERN CM Calculator
ON/AC
Switch ON /All clear
+
Addition
-
Subtraction
÷
Division
x
Multiplication
=
Result
%
Percent
M+
Memory plus
M-
Memory minus
MC
Memory clear
MR
Independent Memory recall
+/-
Sign change
√
Square Root
,
Comma
C
Clear
Notice:
Data exchange between balance and pocket calculator is not possible.
8 Maintenance, upkeep, disposal
8.1
Cleaning
Please disconnect the device from the operating voltage before cleaning.
Only use a cloth dampened with mild suds and not aggressive cleaning agents (solvents or similar). Please ensure that fluids are not able to get into the device and rub
off using a clean, soft cloth.
Loose sample residue/powder can be removed carefully using a brush or hand vacuum cleaner.
Remove any spilt material to be weighed immediately.
8.2
Maintenance, upkeep
The device may only be opened by trained service engineers authorised by KERN.
8.3
Disposal
The operating company shall dispose of the packaging and the device in compliance
with the valid national or regional law of the operating location.
CM-BA-e-0618
13
9 Troubleshooting
The balance should be switched off for a short time following an interruption in the
programme sequence . It is then necessary to repeat the weighing process from the
beginning.
Help:
Interruption
Possible cause
Weight display is not illuminated.
• The balance is not switched on.
• The batteries are wrongly inserted, the
batteries are empty
• No batteries are attached
The weight display changes continu- • Draught/air movement
ally
• Table/floor vibrations
• The weighing plate is in contact with foreign matter.
• Electromagnetic fields / static charging
(choose different location/switch off interfering device if possible)
The weighing result is obviously in- • The balance display is not set to zero
correct
• Adjustment is no longer correct.
• Great fluctuations in temperature.
• Electromagnetic fields / static charging
(choose different location/switch off interfering device if possible)
Switch the balance off if other error messages should appear and then switch on
again. Contact the manufacturer if the error message does not disappear.
14
CM-BA-e-0618
KERN & Sohn GmbH
Ziegelei 1
D-72336 Balingen
E-Mail: [email protected]
Tel: +49-[0]7433- 9933-0
Fax: +49-[0]7433-9933-149
Internet: www.kern-sohn.com
Mode d'emploi
Balance de poche
KERN CM
Version 1.8
10/2006
F
CM-BA-f-0618
F
KERN CM
Version 1.8 10/2006
Mode d’emploi
Balance de poche
Table des matières
1
Données techniques_____________________________________________ 3
2
Déclaration de conformité ________________________________________ 4
3
Indications fondamentales (généralités) ____________________________ 5
3.1
3.2
3.3
3.4
4
6.2.1
6.2.2
6.3
6.4
6.5
6.6
6.7
7.4.1
7.4.2
7.4.3
7.4.4
7.4.5
7.5
7.6
Installation ___________________________________________________________ 7
Contenu livré _________________________________________________________ 8
Alimentation par piles et remplacement _________________________________
Paravent + Récipient (CM50-C2N, CM500-GN1)__________________________
Première mise en service ____________________________________________
Ajustage _________________________________________________________
Ajuster __________________________________________________________
8
8
9
9
9
Vue d’ensemble des affichages CM60-2N/CM150-1N/CM320-1N/CM1K1N ____
Vue d’ensemble des affichages CM50-C2N_____________________________
Vue d’ensemble des affichages CM500-GN1____________________________
Commande ______________________________________________________
10
10
10
10
Pesage _____________________________________________________________
Tarage _____________________________________________________________
Pesage plus/moins ____________________________________________________
Pesage total - net _____________________________________________________
Autres unités de pesée_________________________________________________
10
11
11
11
12
Affichage rétro éclairé______________________________________________ 13
Fonctions de la calculatrice _______________________________________ 14
Intenance, entretien, élimination __________________________________ 14
8.1
8.2
8.3
9
2
Lieu d´installation, lieu d´utilisation_____________________________________ 7
Déballage ________________________________________________________ 7
Fonctionnement _______________________________________________ 10
7.1
7.2
7.3
7.4
8
Contrôle à la réception de l´appareil____________________________________ 6
Emballage________________________________________________________ 6
Déballage, installation et mise en service ___________________________ 7
6.1
6.2
7
Observez les indications du mode d´emploi ______________________________ 6
Formation du personnel _____________________________________________ 6
Transport et stockage ___________________________________________ 6
5.1
5.2
6
5
5
5
6
Indications fondamentales concernant la sécurité ____________________ 6
4.1
4.2
5
Utilisation conforme à la destination de l´appareil _________________________
Utilisation inadéquate _______________________________________________
Garantie _________________________________________________________
Vérification des moyens de contrôle____________________________________
Nettoyage _______________________________________________________ 14
Maintenance, entretien _____________________________________________ 14
Elimination ______________________________________________________ 14
Aide succincte en cas de panne __________________________________ 15
CM-BA-f-0618
1 Données techniques
KERN
CM 60-2N
CM150-1N
CM 320-1N
CM 1K1N
0,01 g
0,1 g
0,1 g
1g
Portée (max.)
60 g
150 g
320 g
1.000 g
Portée de tarage (soustractive)
60 g
150 g
320 g
1.000 g
Recommandé poids d’ajustage,
non fourni (classe)
50 g
(M2)
100 g
(M3)
200 g
(M3)
1000 g
(M3)
Lecture (d)
Température ambiante
18 – 25 °C
Unités
g / tol / tlt
Humidité de l’air
< 85 %(non condensée)
Plateau mm
70 x 80
Boîtier (L x P x H) mm
KERN
Lecture (d)
85 x 130 x 25
CM 50-C2N
CM 500-GN1
0,01 ct
0,002 g
0,1 gn
0,01 g
Portée (max.)
50ct
10 g
500 gn
32 g
Portée de tarage (soustractive)
50ct
10 g
500 gn
32 g
Poids de contrôle (fourni)
Unités
Température ambiante
Humidité de l’air
Plateau mm
Boîtier (L x P x H) mm
CM-BA-f-0618
5 g (M1)
10 g (M2)
ct / g
g / gn
18 – 25 °C
< 85 % (non condensée)
40 x 50
85 x 130 x 25
3
2 Déclaration de conformité
Déclaration de conformité
L’instrument de pesage à fonctionnement non automatique
Type:
KERN CM 60-2N
KERN CM 150-1N
KERN CM 250-1N
KERN CM 1K1N
KERN CM 50-C2N
KERN CM 500-GN1
Correspond aux exigences de la directive :
Directrive-CE relative à la
CEM
Version 89/336/EEC
Normes harmonisées appliquées en particulier
Standards for electronic scale.
EN 61000-6-3 :2001
EN 61000-6-1 :2001
Standard for calculator :
EN 55022 : 1998+A1 : 2000
EN 55024 : 1998+A1 : 2001
Cette déclaration de conformité perd sa validité si des modifications ont été apportées à l’appareil décrit ci-dessus sans l’accord de KERN.
Date: 01.10.2004
Signature:
Gottl. KERN & Sohn GmbH
La direction
Gottl. KERN & Sohn GmbH, Ziegelei 1, 72336 Balingen-Frommern, Tel. 07433/9933-0, Fax 07433/9933-149
4
CM-BA-f-0618
3 Indications fondamentales (généralités)
3.1
Utilisation conforme à la destination de l´appareil
La balance que vous avez achetée sert à la détermination de la valeur de pesée de
matières devant être pesées. Elle est conçue pour être utilisée comme „balance non
automatique“, c´à d. que les matières à peser seront posées manuellement et avec
précaution au milieu du plateau de pesée. La valeur de pesée peut être lue une fois
stabilisée.
3.2 Utilisation inadéquate
Ne pas utiliser la balance pour des pesées dynamiques. Dans le cas où de petites
quantités des matières à peser sont retirées ou ajoutées, le dispositif de « compensation de stabilité » intégré dans la balance peut provoquer l´affichage de résultats
de pesée erronés. (Exemple : lorsque des liquides dégoulinent lentement d´un récipient posé sur la balance.)
Ne pas laisser trop longtemps une charge sur le plateau de pesée. A long terme,
cette charge est susceptible d´endommager le système de mesure.
Eviter impérativement de cogner la balance ou de charger cette dernière au-delà de
la charge maximale indiquée (Max.) après déduction éventuelle d´une charge de tare
déjà existante. Sinon, la balance pourrait être endommagée.
Ne jamais utiliser la balance dans des endroits où des explosions sont susceptibles
de se produire. Le modèle série n´est pas équipé d´une protection contre les explosions.
Toute modification constructive de la balance est interdite. Ceci pourrait provoquer
des résultats de pesée erronés, des défauts sur le plan de la technique de sécurité
ainsi que la destruction de la balance.
La balance ne doit être utilisée que selon les prescriptions indiquées. Les domaines
d´utilisation/d´application dérogeant à ces dernières doivent faire l´objet d´une autorisation écrite délivrée par KERN.
3.3
Garantie
La garantie n´est plus valable en cas
•
de non-observation des prescriptions figurant dans notre mode d´emploi
•
d´utilisation outrepassant les applications décrites
•
de modification ou d´ouverture de l´appareil
•
d´endommagement mécanique et d´endommagement lié à des matières ou
des liquides
•
de détérioration naturelle et d´usure
•
de mise en place ou d´installation électrique inadéquates
•
de surcharge du système de mesure
CM-BA-f-0618
5
3.4
Vérification des moyens de contrôle
Les propriétés techniques de mesure de la balance et du poids de contrôle éventuellement utilisé doivent être contrôlées à intervalles réguliers dans le cadre des contrôles d´assurance qualité. A cette fin, l´utilisateur responsable doit définir un intervalle
de temps approprié ainsi que le type et l´étendue de ce contrôle. Des informations
concernant la vérification des moyens de contrôle des balances ainsi que les poids
de contrôle nécessaires à cette opération sont disponibles sur le site KERN
(www.kern-sohn.com). Grâce à son laboratoire de calibrage accrédité DKD, KERN
propose un calibrage rapide et économique pour les poids d´ajustage et les balances
(sur la base du standard national).
4 Indications fondamentales concernant la sécurité
4.1
Observez les indications du mode d´emploi
Lisez attentivement la totalité de ce mode d´emploi avant l´installation et la mise en
service de la balance, et ce même si vous avez déjà utilisé des balances KERN.
4.2
Formation du personnel
L´appareil ne doit être utilisé et entretenu que par des collaborateurs formés à cette
fin.
5 Transport et stockage
5.1
Contrôle à la réception de l´appareil
Nous vous prions de contrôler l´emballage dès son arrivée et de vérifier lors du déballage que l´appareil ne présente pas de dommages extérieurs visibles.
5.2
Emballage
Conservez l´ensemble des pièces de l´emballage d´origine pour le cas où l´appareil
devrait être renvoyé au fabricant.
L´appareil ne peut être renvoyé que dans l´emballage d´origine.
6
CM-BA-f-0618
6 Déballage, installation et mise en service
6.1
Lieu d´installation, lieu d´utilisation
La balance a été construite de manière à pouvoir obtenir des résultats de pesée fiables dans les conditions d´utilisation d´usage.
Vous pouvez travailler rapidement et avec précision à condition d´installer votre balance à un endroit approprié.
A cette fin, tenez compte des points suivants concernant le lieu d´installation:
•
Placer la balance sur une surface solide et plane;
•
Eviter d´exposer la balance à une chaleur extrême ainsi qu’une fluctuation de
temperature, par example en la plaçant près d´un chauffage, ou de l´exposer
directement aux rayons du soleil;
•
Protéger la balance des courants d´air directs pouvant être provoqués par
des fenêtres ou des portes ouvertes;
•
Eviter les secousses durant la pesée;
•
Protéger la balance d´une humidité atmosphérique trop élevée, des vapeurs
et de la poussière;
•
N´exposez pas trop longtemps la balance à une humidité élevée.
L´installation d´un appareil froid dans un endroit nettement plus chaud peut
provoquer l´apparition d´une couche d´humidité (condensation de l´humidité
atmosphérique sur l´appareil) non autorisée. Dans ce cas, laissez l´appareil
coupé du secteur s´acclimater à la température ambiante pendant env. 2 heures.
•
Eviter une charge électrostatique des matières à peser, du récipient et de la
cage de pesée.
L´apparition de champs électromagnétiques ou de charges électrostatiques, ainsi
que éléctricité instable peut provoquer des divergences d´affichage importantes (résultats de pesée erronés, nonfonctionnement de la calculatrice). Il faut alors installer
la balance à un autre endroit.
Si la calculatrice est interrompée par une charge statique, il faut la remettre dans le
mode normal en appuyant la touche ON/AC.
6.2
Déballage
Sortir avec précaution la balance de l’emballage, retirer la pochette en plastique et
installer la balance au poste de travail prévu à cet effet.
6.2.1 Installation
La balance doit être installée de manière à ce que le plateau de pesée soit placé
exactement à l´horizontale.
CM-BA-f-0618
7
6.2.2 Contenu livré
Accessoires série:
• Balance de poche
• Batteries
• Mode d‘emploi
• Poids de contrôle (seulement avec la CM 5-C2N, CM 500-GN1)
• Récipient (CM 50-C2N, CM 500-GN1)
• Paravent (CM 50-C2N, CM 500-GN1)
6.3
•
•
Alimentation par piles et remplacement
Afin de ménager les piles, la balance se met automatiquement hors service 3 à 4
minutes après le la fin de la dernière pesée.
Lorsque la pile est épuisée, le message « LO » apparaît sur l’écran. Appuyez
alors sur la touche «
» et remplacez la pile immédiatement.
Piles et remplacement
1. Ouvrir le couvercle de l’emplacement des piles
au dessous de la balance.Débloquer le couvercle
de l’emplacement des piles (photo 1+2).
2. Placer 2 batteries AAA ( photo 3).
3. Reinstaller le couvercle de l’emplacement des
piles.Bloquer le couvercle de l’emplacement des
piles ( photo 4).
6.4
Paravent + Récipient (CM 50-C2N, CM 500-GN1)
Avant le pesage:
•
•
•
•
8
Poser le récipient
Déplier l’abri contre le vent
Poser le matériel dans le récipient
Installer la l’abri contre le vent
Après le pesage:
•
Mettre l’abri contre le vent et le
récipient sur le plateau
CM-BA-f-0618
6.5 Première mise en service
Un temps de chauffe de 1 minutes intervenant après la mise en marche stabilise les
valeurs de mesure.
La précision de la balance dépend de l´accélération due à la pesanteur.
Il est impératif de tenir compte des indications du chapitre Ajustage.
6.6
Ajustage
Etant donné que la valeur d´accélération de la pesanteur varie d´un lieu à l´autre sur
la terre, il est nécessaire d´adapter chaque balance – conformément au principe physique fondamental de pesée – à l´accélération de la pesanteur du lieu d´installation
(uniquement si la balance n´a pas déjà été ajustée au lieu d´installation en usine). Ce
processus d´ajustage doit être effectué à chaque première mise en service et après
chaque changement de lieu d´installation età fluctuations du temperature d’environs.
Pour obtenir des valeurs de mesure précises, il est recommandé en supplément
d´ajuster aussi périodiquement la balance en fonctionnement de pesée.
6.7
Ajuster
L’exactitude de la balance peut être à tout moment contrôlée et réglée à nouveau au
moyen d ‘un poids d ‘ajustage.
Ajustage (CAL)
Pressez la touche
et restez sur la touche jusque à l’affichage montre « CAL » et
après le valeur du poids d’ajustage.
Posez le poids de d’ajustage au centre du plateau de la balance.
« F » apparaît pendant un court instant, puis la balance s’éteint
S’il y a une erreur d’ajustage ou un poids d’ajustage, il apparît „E“ sur l’afficheur incorrect.
CM-BA-f-0618
9
7 Fonctionnement
7.1
Vue d’ensemble des affichages CM 60-2N/CM 150-1N/CM 320-1N/CM 1K1N
(Unités de pesage dans le display)
7.2
Vue d’ensemble des affichages CM 50-C2N
(Unités de pesage sur le clavier)
7.3
Vue d’ensemble des affichages CM 500-GN1
(Unités de pesage sur le clavier)
7.4
Commande
7.4.1 Pesage
.
Allumer la balance en appuyant sur
L’indication « 8888 » apparaît pendant environ trois secondes, puis un « 0 »
s’affiche : la balance est prête.
Important : Si « 0 » ne veut pas se stabiliser, appuyer sur
.
Ensuite, poser l’objet sur le plateau. Assurez-vous qu’il ne soit pas en contact avec le
carter ou le support.
Si l’objet dépasse la charge autorisée, un « E » (=Surcharge) apparaît.
10
CM-BA-f-0618
7.4.2 Tarage
Mettez la Balance en marche avec la touche
l’écran affiche « 0 ».
et attendez que
Posez le récipient de tare sur le plateau et appuyez sur la touche
. L’écran de la
balance affiche « 0 ». Le poids du récipient est maintenant enregistré dans la mémoire interne.
Placez l’objet à peser dans le récipient et lisez la valeur indiquée.
après avoir terminé la pesée, le « 0 »
Si l’on appuie de nouveau sur la touche
réapparaît à l’écran.
Le tarage peut être renouvelé plusieurs fois ; par exemple, en cas de pesage de plusieurs composantes pour un mélange (pesage de composantes).
Après avoir retiré le récipient de tare, l’affichage du poids total apparaît en tant que
valeur négative.
7.4.3 Pesage plus/moins
Par exemple pour le contrôle du poids unitaire.
Mettre la balance en marche à l’aide de la touche
et attendre que le signe « 0 »
apparaisse.
Posez le poids de référence sur le plateau et procédez au tarage à « 0 » à l’aide de
la touche
. Retirez le poids de référence.
Placez les échantillons les uns après les autres sur le plateau ; chaque déviation par
rapport au poids de référence est indiquée par le signe « + » ou « - ».
Selon le même procédé, des emballages de poids identique peuvent être fabriqués,
avec pour référence un poids de consigne.
Appuyez sur la touche
pour retourner au mode de pesage.
7.4.4 Pesage total - net
Pratique lorsque l’on veut peser plusieurs composants d’un mélange, et à la fin, pour
le contrôle de la somme totale des poids (poids net total c’est-à-dire sans le poids du
récipient de tare).
Exemple :
Poser le récipient de tare sur le plateau et appuyer sur
.
Peser le composant n. Tarer à Zéro avec la touche
. L’activation de la mémoire
interne est indiquée par la présence d’un triangle sur l’écran.
Peser le composant o. En appuyant sur la touche
des poids n et o apparaît. Tarer à zéro avec la touche
, le poids total net (somme
.
Peser le composant p. En appuyant sur la touche
, le poids total net (somme
des poids n et o et p apparaît.
Procéder de la même manière autant de fois que nécessaire. Revenir au mode de
pesage avec la touche
CM-BA-f-0618
.
11
7.4.5 Autres unités de pesée
Mettez la Balance en marche avec la touche
que l’écran affiche « 0 ».
et attendez
Avec la touche
one peut choisir entre les différents unités.
Les unités de pesée suivantes sont disponibles :
Modèle:
CM 60-2N / CM 150-1N / CM 320-1N / CM 1K1N
Gramm *
Tael Taiwan
Tola
* Réglage par l’usine
Affichage
Facteur de conversion
1g=
g
tlt
tol
1
0.02667
0.08573
Affichage
Facteur de conversion
1g=
g
ct
1
5
Affichage
Facteur de conversion
1g=
g
gn
1
15.43236
Modèle:
CM 50-C2N
Gramm *
Carat
* Réglage par l’usine
Modèle:
CM 500-GN1
Gramm *
Grain
* Réglage par l’usine
12
CM-BA-f-0618
7.5 Affichage rétro éclairé
Dans le menu vous pouvez activer et désactiver la fonction d’affichage rétro éclairé.
Veuillez suivre les pas suivants:
Eteindre la balance.
Pressez la touche
et laisser pressé. Presser la touche
, il apparaît „bl“.
cher la touche
Confirmer avec la touche
La touche
une fois. Après relâ-
.
permet maintenant de choisir parmi les options suivantes :
Affichage Sélection
Fonction
„bl“
rétro éclairé activé
affichage contrasté
pouvant également
être lu dans
l’obscurité
on
„bl“
off
rétro éclairé désactivé
économiser les piles
„bl“
Ch
rétro éclairé s’éteint automatique
après 10 secondes après avoir
obtenu une indication stable
économiser les piles
Confirmer avec la touche
CM-BA-f-0618
.
13
7.6 Fonctions de la calculatrice
(pas de calculatrice avec le modèle CM50-C2N, CM500-GN1)
KERN CM Calculatrice
ON/AC
Allumer la calculatrice /annuler les
mémoires
+
Opération fondamentale addition
-
Opération fondamentale soustraction
÷
Division
x
Multiplication
=
Résultat
%
Pourcentage
M+
Mémoire plus
M-
Mémoire moins
MC
Vidage de mémoire
MR
Rappel de mémoire indépendante
+/-
Changement du signe
√
Racine carrée
,
Comma
C
Annuler
Notice :
On ne peut pas échanger des dates entre la balance et la calculatrice
8 Intenance, entretien, élimination
8.1 Nettoyage
N´utilisez pas de produits de nettoyage agressifs (dissolvants ou produits similaires)
mais uniquement un chiffon humidifié avec de la lessive de savon douce. Veillez à ce
que les liquides ne puissent pas pénétrer dans l´appareil et frottez ensuite ce dernier
avec un chiffon doux sec. Les poudres/restes d´échantillon épars peuvent être retirés
avec précaution à l´aide d´un pinceau ou d´un aspirateur-balai.
Retirer immédiatement les matières à peser renversées sur la balance.
8.2 Maintenance, entretien
L´appareil ne doit être ouvert que par des dépanneurs formés à cette fin et ayant reçu l´autorisation de KERN.
8.3 Elimination
L´élimination de l´emballage et de l´appareil doit être effectuée par l´utilisateur selon
le droit national ou régional en vigueur au lieu d´utilisation.
14
CM-BA-f-0618
9 Aide succincte en cas de panne
En cas d´anomalie dans le déroulement du programme, la balance doit être arrêtée
pendant un court laps de temps et coupée du secteur. Le processus de pesée doit
alors être recommencé depuis le début.
Aide:
Anomalie
Cause possible
L´affichage de poids ne s´allume pas. • La balance n´est pas en marche.
• Les piles ne sont pas mis correctement ou
bien sont vides
• Il n'y a pas des piles dans la balance
L´affichage de poids change
• Courant d´air/circulation d´air
continuellement
• Vibrations de la table/du sol
• Le plateau de pesée est en contact avec
des corps étrangers.
• Champs électromagnétiques/ charge électrostatique (changer de lieu d´installation/
si possible, arrêter l´appareil provoquant
l´anomalie)
Il est évident que le résultat de pesée • L´affichage de la balance n´est pas sur
est
zéro
erroné
• L´ajustage n´est plus bon.
• Changements élevés de température.
• Champs électromagnétiques/ charge électrostatique (changer de lieu d´installation/
si possible, arrêter l´appareil provoquant
l´anomalie)
Au cas où d´autres messages d´erreur apparaissent, arrêter puis rallumer la balance.
Si le message d´erreur ne disparaît pas, informer le fabricant.
CM-BA-f-0618
15