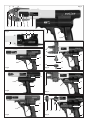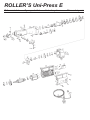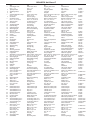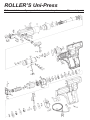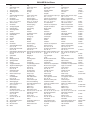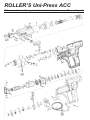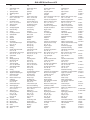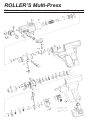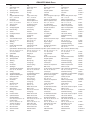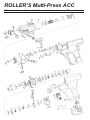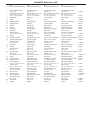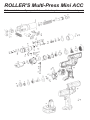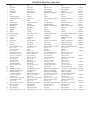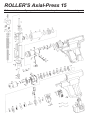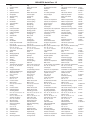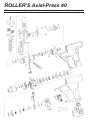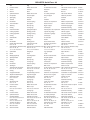
1
1
2
3
4
ROLLER’S Uni-Press E 1
ROLLER’S Uni-Press 2
ROLLER’S Uni-PressACC 3
ROLLER’S Multi-Press 4
ROLLER’S Multi-Press Mini ACC 5
ROLLER’S Multi-Press ACC 6
ROLLER’S Axial-Press15 7
ROLLER’S Axial-Press40 8
ROLLER’S Akku-Exparo Mini Q&E 9
ROLLER’S Akku-Exparo Q&E 9
deu
5
1
2
3
4
5
6
7
8
9
Elektro-Radialpresse
Elektro-Radialpresse mit Abschaltelektronik
Elektrohydraulische Radialpresse mit Zwangsablauf
Akku-Radialpresse mit Abschaltsignal
Akku-Radialpresse mit Zwangsablauf
Akku-Radialpresse mit Zwangsablauf
Akku-Axialpresse
Akku-Axialpresse
Akku-Aufweiter für Wirsbo Quick & Easy
Betriebsanleitung
Vor Inbetriebnahme lesen!
6
eng
Electric radial press
Electric radial press with electronic cutout circuit
Electro-hydraulic radial press with automatic circuit control
Akku radial press with cutout signal
Akku radial press with forced movement
Akku radial press with forced movement
Akku axial press
Akku axial press
Akku expander for Wirsbo Quick & Easy
Operating Instructions
7
Please read before commissioning!
fra
8
1
2
3
4
5
6
7
8
9
1 Sertisseuse électrique pour sertissage radial
2 Sertisseuse électrique pour sertissage radial
avec débrayage électronique
3 Sertisseuse électro-hydraulique pour sertissage radial
avec marche forcée
4 Sertisseuse à accu pour sertissage radial avec signal d’arrêt
5 Sertisseuse à accu pour sertissage radial avec marche forcée
6 Sertisseuse à accu pour sertissage radial avec marche forcée
7 Sertisseuse à accu pour sertissage axial
8 Sertisseuse à accu pour sertissage axial
9 Emboîteur à accu pour Wirbso Quick & Easy
Instructions d’emploi
A lire avant la mise en service!
S 11/08
Made in
Germany
Albert Roller GmbH & Co KG · Werkzeug- und Maschinenfabrik
Neue Rommelshauser Str. 4 · D-71332 Waiblingen
Postfach 1651 · D-71306 Waiblingen
Telefon +49 7151 17 27-0 · Telefax +49 7151 17 27- 87
www.albert-roller.de · email: [email protected]
570285 A
9
A
10
12
B
1
11
12
Fig. 1
2
Fig. 2
3
4
7
5
8
9
8
6
9
6
14
13
15
13
6
18
6
9
8
9
16
17
Fig. 6
Fig. 3
8
13
13
6
8
6
14
9
9
8
Fig. 4
Fig. 7
13
13
6
8
Fig. 5
9
16
Fig. 8
18
15
6
8
9
Fig. 9
Fig. 11
Fig. 10
deu
deu
Für die Anwendung der ROLLER Presszangen, ROLLER Pressköpfe und
ROLLER Aufweitköpfe für die verschiedenen Rohrverbindungs-Systeme gelten die jeweils aktuellen ROLLER Verkaufsunterlagen. Werden vom
Systemhersteller Komponenten von Rohrverbindungs-Systemen geändert
oder neu in den Markt gebracht, muss deren aktueller Anwendungsstand
bei ROLLER (Fax +49 7151 17 27 - 87) angefragt werden. Änderungen und
Irrtümer vorbehalten.
BEWAHREN SIE DIESE ANWEISUNGEN GUT AUF.
b) Tragen Sie persönliche Schutzausrüstung und immer eine Schutzbrille. Das Tragen persönlicher Schutzausrüstung, wie Staubmaske, rutschfeste Sicherheitsschuhe, Schutzhelm oder Gehörschutz, je nach Art und
Einsatz des elektrischen Gerätes, verringert das Risiko von Verletzungen.
c) Vermeiden Sie eine unbeabsichtigte Inbetriebnahme. Vergewissern
Sie sich, dass der Schalter in der Position „AUS“ ist, bevor Sie den
Stecker in die Steckdose stecken. Wenn Sie beim Tragen des elektrischen Gerätes den Finger am Schalter haben oder das Gerät eingeschaltet an die Stromversorgung anschließen, kann dies zu Unfällen führen. Überbrücken Sie niemals den Tippschalter.
d) Entfernen Sie Einstellwerkzeuge oder Schraubenschlüssel, bevor Sie
das elektrische Gerät einschalten. Ein Werkzeug oder Schlüssel, der sich
in einem drehenden Geräteteil befindet, kann zu Verletzungen führen. Greifen Sie niemals in sich bewegende (umlaufende) Teile.
e) Überschätzen Sie sich nicht. Sorgen Sie für einen sicheren Stand und
halten Sie jederzeit das Gleichgewicht. Dadurch können Sie das Gerät
in unerwarteten Situationen besser kontrollieren.
f) Tragen Sie geeignete Kleidung. Tragen Sie keine weite Kleidung oder
Schmuck. Halten Sie Haare, Kleidung und Handschuhe fern von sich
bewegenden Teilen. Lockere Kleidung, Schmuck oder lange Haare können von sich bewegenden Teilen erfasst werden.
g) Wenn Staubabsaug- und -auffangeinrichtungen montiert werden können, vergewissern Sie sich, dass diese angeschlossen sind und richtig verwendet werden. Das Verwenden dieser Einrichtungen verringert
Gefährdungen durch Staub.
h) Überlassen Sie das elektrische Gerät nur unterwiesenen Personen.
Jugendliche dürfen das elektrische Gerät nur betreiben, wenn sie über 16
Jahre alt sind, dies zur Erreichung ihres Ausbildungszieles erforderlich ist
und sie unter Aufsicht eines Fachkundigen gestellt sind.
A) Arbeitsplatz
D) Sorgfältiger Umgang und Gebrauch von elektrischen Geräten
a) Halten Sie Ihren Arbeitsbereich sauber und aufgeräumt. Unordnung
und unbeleuchtete Arbeitsbereiche können zu Unfällen führen.
b) Arbeiten Sie mit dem elektrischen Gerät nicht in explosionsgefährdeter Umgebung, in der sich brennbare Flüssigkeiten, Gase oder Stäube befinden. Elektrische Geräte erzeugen Funken, die den Staub oder die
Dämpfe entzünden können.
c) Halten Sie Kinder und andere Personen während der Benutzung des
elektrischen Gerätes fern. Bei Ablenkung können Sie die Kontrolle über
das Gerät verlieren.
a) Überlasten Sie das elektrische Gerät nicht. Verwenden Sie für Ihre Arbeit das dafür bestimmte elektrische Gerät. Mit dem passenden elektrischen Gerät arbeiten Sie besser und sicherer im angegebenen Leistungsbereich.
b) Benutzen Sie kein elektrisches Gerät, dessen Schalter defekt ist. Ein
elektrisches Gerät, das sich nicht mehr ein- oder ausschalten lässt, ist gefährlich und muss repariert werden.
c) Ziehen Sie den Stecker aus der Steckdose, bevor Sie Geräteeinstellungen vornehmen, Zubehörteile wechseln oder das Gerät weglegen.
Diese Vorsichtsmaßnahme verhindert den unbeabsichtigten Start des Geräts.
d) Bewahren Sie unbenutzte elektrische Geräte außerhalb der Reichweite von Kindern auf. Lassen Sie Personen das elektrische Gerät
nicht benutzen, die mit diesem nicht vertraut sind oder diese Anweisungen nicht gelesen haben. Elektrische Geräte sind gefährlich, wenn
Sie von unerfahrenen Personen benutzt werden.
e) Pflegen Sie das elektrische Gerät mit Sorgfalt. Kontrollieren Sie, ob
bewegliche Geräteteile einwandfrei funktionieren und nicht klemmen,
ob Teile gebrochen oder so beschädigt sind, dass die Funktion des
elektrischen Gerätes beeinträchtigt ist. Lassen Sie beschädigte Teile
vor dem Einsatz des elektrischen Gerätes von qualifiziertem Fachpersonal oder von einer autorisierten ROLLER Vertrags-Kundendienstwerkstatt reparieren. Viele Unfälle haben ihre Ursache in schlecht
gewarteten Elektrowerkzeugen.
f) Halten Sie Schneidwerkzeuge scharf und sauber. Sorgfältig gepflegte
Schneidwerkzeuge mit scharfen Schneidkanten verklemmen sich weniger
und sind leichter zu führen.
g) Sichern Sie das Werkstück. Benutzen Sie Spannvorrichtungen oder einen Schraubstock, um das Werkstück festzuhalten. Es ist damit sicherer
gehalten als mit Ihrer Hand, und Sie haben außerdem beide Hände zur Bedienung des elektrischen Gerätes frei.
h) Verwenden Sie elektrische Geräte, Zubehör, Einsatzwerkzeuge usw.
entsprechend diesen Anweisungen und so, wie es für diesen speziellen Gerätetyp vorgeschrieben ist. Berücksichtigen Sie dabei die Arbeitsbedingungen und die auszuführende Tätigkeit. Der Gebrauch von
elektrischen Geräten für andere als die vorgesehenen Anwendungen kann
zu gefährlichen Situationen führen. Jegliche eingenmächtige Veränderung
am elektrischen Gerät ist aus Sicherheitsgründen nicht gestattet.
Fig. 1–8
1 Presszange
2 Zangenhaltebolzen
3 Druckleiste
4 Verriegelungsstift
5 Pressrollen
6 Gehäusegriff
7 Drehrichtungshebel
8 Tippschalter
9 Schaltergriff
10
11
12
13
14
15
16
17
18
Pressbacke
Presskontur
Bolzen
Rückstelltaste
Pressköpfe
Aufweitvorrichtung
Aufweitkopf
Aufweitbacken
Aufweitdorn
Allgemeine Sicherheitshinweise
ACHTUNG! Sämtliche Anweisungen sind zu lesen. Fehler bei der Einhaltung
der nachstehend aufgeführten Anweisungen können elektrischen Schlag,
Brand und/oder schwere Verletzungen verursachen. Der nachfolgend verwendete Begriff „elektrisches Gerät“ bezieht sich auf netzbetriebene Elektrowerkzeuge (mit Netzkabel), auf akkubetriebene Elektrowerkzeuge (ohne Netzkabel), auf Maschinen und auf elektrische Geräte. Verwenden Sie das elektrische Gerät nur bestimmungsgemäß und unter Beachtung der allgemeinen
Sicherheits- und Unfallverhütungsvorschriften.
B) Elektrische Sicherheit
a) Der Anschlussstecker des elektrischen Gerätes muss in die Steckdose passen. Der Stecker darf in keiner Weise verändert werden. Verwenden Sie keine Adapterstecker gemeinsam mit schutzgeerdeten
elektrischen Geräten. Unveränderte Stecker und passende Steckdosen
verringern das Risiko eines elektrischen Schlages. Ist das elektrische Gerät
mit Schutzleiter ausgerüstet, darf es nur an Steckdosen mit Schutzkontakt
angeschlossen werden. Betreiben Sie das elektrische Gerät auf Baustellen, in feuchter Umgebung, im Freien oder bei vergleichbaren Aufstellarten
nur über einen 30mA-Fehlerstrom-Schutzschalter (FI-Schalter) am Netz.
b) Vermeiden Sie Körperkontakt mit geerdeten Oberflächen, wie von Rohren, Heizungen, Herden und Kühlschränken. Es besteht ein erhöhtes
Risiko durch elektrischen Schlag, wenn Ihr Körper geerdet ist.
c) Halten Sie das Gerät von Regen oder Nässe fern. Das Eindringen von
Wasser in ein Elektrogerät erhöht das Risiko eines elektrischen Schlages.
d) Zweckentfremden Sie das Kabel nicht, um das Gerät zu tragen, aufzuhängen oder um den Stecker aus der Steckdose zu ziehen. Halten
Sie das Kabel fern von Hitze, Öl, scharfen Kanten oder sich bewegenden Geräteteilen. Beschädigte oder verwickelte Kabel erhöhen das
Risiko eines elektrischen Schlages.
e) Wenn Sie mit einem elektrischen Gerät im Freien arbeiten, verwenden
Sie nur Verlängerungskabel, die auch für den Außenbereich zugelassen sind. Die Anwendung eines für den Außenbereich geeigneten Verlängerungskabels verringert das Risiko eines elektrischen Schlages.
C) Sicherheit von Personen
a) Seien Sie aufmerksam, achten Sie darauf, was Sie tun, und gehen Sie
mit Vernunft an die Arbeit mit einem elektrischen Gerät. Benutzen Sie
das elektrische Gerät nicht, wenn Sie müde sind oder unter dem Einfluss von Drogen, Alkohol oder Medikamenten stehen. Ein Moment der
Unachtsamkeit beim Gebrauch des Gerätes kann zu ernsthaften Verletzungen führen.
E) Sorgfältiger Umgang und Gebrauch von Akkugeräten
a) Stellen Sie sicher, dass das elektrische Gerät ausgeschaltet ist, bevor
Sie den Akku einsetzen. Das Einsetzen eines Akkus in ein elektrisches
Gerät, das eingeschaltet ist, kann zu Unfällen führen.
deu
deu
b) Laden Sie die Akkus nur in Ladegeräten auf, die vom Hersteller empfohlen werden. Für ein Ladegerät, das für eine bestimmte Art von Akkus
geeignet ist, besteht Brandgefahr, wenn es mit anderen Akkus verwendet
wird.
c) Verwenden Sie nur die dafür vorgesehenen Akkus in den elektrischen
Geräten. Der Gebrauch von anderen Akkus kann zu Verletzungen und
Brandgefahr führen.
d) Halten Sie den nicht benutzten Akku fern von Büroklammern, Münzen, Schlüsseln, Nägeln, Schrauben oder anderen kleinen Metallgegenständen, die eine Überbrückung der Kontakte verursachen könnten. Ein Kurzschluss zwischen den Akkukontakten kann Verbrennungen
oder Feuer zur Folge haben.
e) Bei falscher Anwendung kann Flüssigkeit aus dem Akku austreten.
Vermeiden Sie den Kontakt damit. Bei zufälligem Kontakt mit Wasser
abspülen. Wenn die Flüssigkeit in die Augen kommt, nehmen Sie zusätzlich ärztliche Hilfe in Anspruch. Austretende Akkuflüssigkeit kann zu
Hautreizungen oder Verbrennungen führen.
f) Bei Temperaturen des Akku/Ladegerätes oder Umgebungstemperaturen 5°C/40°F oder b 40°C/105°F darf der Akku/das Ladegerät nicht
benutzt werden.
g) Entsorgen Sie schadhafte Akkus nicht im normalen Hausmüll, sondern übergeben Sie sie einer autorisierten ROLLER Vertrags-Kundendienstwerkstatt oder einem anerkannten Entsorgungsunternehmen.
F) Service
a) Lassen Sie Ihr Gerät nur von qualifiziertem Fachpersonal und nur mit
Original Ersatzteilen reparieren. Damit wird sichergestellt, dass die Sicherheit des Geräts erhalten bleibt.
b) Befolgen Sie Wartungsvorschriften und die Hinweise über den Werkzeugwechsel.
c) Kontrollieren Sie regelmäßig die Anschlussleitung des elektrischen
Gerätes und lassen Sie sie bei Beschädigung von qualifiziertem Fachpersonal oder von einer autorisierten ROLLER Vertrags-Kundendienstwerkstatt erneuern. Kontrollieren Sie Verlängerungskabel regelmäßig und ersetzen Sie sie, wenn sie beschädigt sind.
Spezielle Sicherheitshinweise
•
•
•
•
•
•
•
•
•
•
•
•
•
•
Persönliche Schutzausrüstung benutzen (z. B. Schutzbrille).
Abnormale Körperhaltung vermeiden, nicht zu weit vorbeugen.
Vor Wechseln der Press- bzw. Aufweitwerkzeuge Netzstecker ziehen, bzw.
Akku entnehmen!
Die Antriebsmaschinen entwickeln eine sehr hohe Presskraft. Deshalb besonders vorsichtig sein. Während der Arbeiten dritte Personen vom Arbeitsbereich fernhalten.
Antriebsmaschinen während des Betriebes nur am Gehäusegriff (6) und
am Schaltergriff (9) festhalten. Nicht in sich bewegende Teile (Pressbereich,
Aufweitbereich) greifen!
Radialpressen niemals bei nicht verriegeltem Zangenhaltebolzen (2) betreiben. Bruchgefahr!
Radialpressen mit Presszange immer rechtwinklig zur Rohrachse auf den
Pressverbinder aufsetzen. Niemals schräg aufsetzen.
Radialpressen nicht ohne eingesetzte Presszange starten. Pressvorgang
nur zur Herstellung einer Pressverbindung ablaufen lassen. Ohne Pressgegendruck durch den Pressverbinder wird die Antriebsmaschine bzw. die
Presszange unnötig hoch belastet.
Vor Verwendung von Presszangen fremder Fabrikate prüfen, ob diese für
die Antriebsmaschine geeignet sind. Betriebsanleitung des PresszangenHerstellers lesen und beachten.
Axialpressen nur mit ganz eingesteckten Pressköpfen betreiben. Bruchgefahr!
Axialpressen mit Pressköpfen immer rechtwinklig zur Rohrachse auf den
Druckhülsenverbinder aufsetzen. Niemals schräg aufsetzen.
Aufweitköpfe bis zum Anschlag an die Aufweitvorrichtung aufschrauben.
Beschädigte Presszangen, Pressköpfe, Aufweitköpfe nicht instandsetzen.
Bruchgefahr!
Einbau- und Montageanweisung der Systemhersteller lesen und beachten.
1. Technische Daten
1.1. Artikelnummern
ROLLER’S Uni-Press E Antriebsmaschine
ROLLER’S Uni-Press Antriebsmaschine
ROLLER’S Uni-Press ACC Antriebsmaschine
ROLLER’S Multi-Press Mini ACC Antriebsmaschine
ROLLER’S Multi-Press Antriebsmaschine
572100
577001
577000
578000
571000
ROLLER’S Multi-Press ACC Antriebsmaschine
ROLLER’S Axial-Press 15 Antriebsmaschine
ROLLER’S Axial-Press 40 Antriebsmaschine
ROLLER’S Akku-Exparo Mini Q & E Antriebsmaschine
ROLLER’S Akku-Exparo Q & E Antriebsmaschine
ROLLER’S Akku 12 V, 1,3 Ah
ROLLER’S Akku 12 V, 2,0 Ah
ROLLER’S Spannungsversorgung 230 V
Schnellladegerät 12–18 V
Stahlblechkasten ROLLER’S Uni-Press E
Stahlblechkasten ROLLER’S Uni-Press
Stahlblechkasten ROLLER’S Uni-Press ACC
Stahlblechkasten ROLLER’S Multi-Press
Stahlblechkasten ROLLER’S Axial-Press 15 und 40
Stahlblechkasten ROLLER’S Multi-Press Mini ACC,
ROLLER’S Akku-Exparo Mini Q & E
Stahlblechkasten ROLLER’S Akku-Exparo Q & E
1.2. Arbeitsbereich
ROLLER’S Multi-Press Mini ACC
Radialpresse zur Herstellung von Pressverbindungen
aller gängigen Pressfitting-Systeme an Stahlrohren,
nichtrostenden Stahlrohren, Kupferrohren,
Kunststoffrohren, Verbundrohren
571001
573001
573005
575002
575001
571513
571510
571535
565220
570280
570280
570280
571280
573280
575280
573280
Ø 10–40 mm
ROLLER’S Uni-Press, Uni-Press ACC,
Multi-Press, Multi-Press ACC
Radialpresse zur Herstellung von Pressverbindungen
aller gängigen Pressfitting-Systeme an Stahlrohren,
nichtrostenden Stahlrohren, Kupferrohren,
Kunststoffrohren, Verbundrohren
Ø 12–76 (108) mm
Axialpressen zur Herstellung von Druckhülsenverbindungen (Schiebehülsenverbindungen) an
nichtrostenden Stahlrohren, Kupferrohren,
Kunststoffrohren, Verbundrohren und zum Aufweiten von Kunststoffrohren, Verbundrohren
Ø 12–32 mm
ROLLER’S Akku-Exparo Mini Q & E zum Aufweiten von
Rohren/Ringen für das System Wirsbo Quick & Easy
bis Ø 32 mm
ROLLER’S Akku-Exparo Q & E zum Aufweiten von
PE-X-Rohren für das System Wirsbo Quick & Easy
Ø 15–40 mm
1.3. Schubkraft / Presskraft
Schubkraft der Radialpressen (bis Ø 108 mm)
Presskraft der Radialpressen (bis Ø 108 mm)
Schubkraft der Radialpresse Mini (bis Ø 40 mm)
Presskraft der Radialpresse Mini (bis Ø 40 mm)
Presskraft ROLLER’S Axial-Press 15
Presskraft ROLLER’S Axial-Press 40
1.4. Elektrische Daten
ROLLER’S Uni-Press E,
ROLLER’S Uni-Press,
ROLLER’S Uni-Press ACC
32 kN
100 kN
24 kN
70 kN
15 kN
40 kN
230 V 1~; 50-60 Hz; 400 W; 1,8 A
S3 15% (AB 2/10 min)
schutzisoliert (73/23/EWG)
funkentstört (89/326/EWG)
ROLLER’S Multi-Press,
Axial-Press 15/40, Akku-Exparo
12 V =; 2,0 Ah; 20 A
ROLLER’S Multi-Press Mini ACC
Akku-Exparo Mini
12 V =; 1,3 Ah; 18 A
Schnelladegerät (1h)
Input
Output
230 V~; 50-60 Hz; 1,0 A
12–18 V -–
--; 50 W; 2,65 A
Spannungsversorgung
230 V
Input
Output
230 V~; 50-60 Hz
12 V -–
--; 1,0 A
1.5. Abmessungen
ROLLER’S Uni-Press E
ROLLER’S Uni-Press
ROLLER’S Uni-Press ACC
ROLLER’S Multi-Press Mini ACC
ROLLER’S Multi-Press,
Multi-Press ACC
ROLLER’S Axial-Press 15/40
ROLLER’S Akku-Exparo Mini
ROLLER’S Akku-Exparo
430×110×85 mm (16,9”×4,3”×3,3”)
365×235×85 mm (14,4”×9,2”×3,3”)
365×235×85 mm (14,4”×9,2”×3,3”)
288×260×80 mm (11,3”×10,2”×3,1”)
338×290×85 mm (13,3”×11,4”×3,3”)
330×320×85 mm (13”×12,6”×3,3”)
293×248×80 mm (11,5”×9,8”×3,1”)
300×290×85 mm (11,8”×12,6”×3,3”)
deu
deu
1.6. Gewichte
ROLLER’S Uni-Press E Antriebsmaschine
4,4 kg (9,6 lb)
ROLLER’S Uni-Press Antriebsmaschine
4,6 kg (10,0 lb)
ROLLER’S Uni-Press ACC Antriebsmaschine
4,6 kg (10,0 lb)
ROLLER’S Multi-Press Mini ACC ohne Akku
2,1 kg (4,5 lb)
ROLLER’S Multi-Press Antriebsmaschine ohne Akku 4,5 kg (9,8 lb)
ROLLER’S Axial-Press 15/40 Antriebsm. ohne Akku 4,3 kg (9,4 lb)
ROLLER’S Akku-Exparo Mini Antriebsm. ohne Akku 2,0 kg (4,4 lb)
ROLLER’S Akku-Exparo Antriebsmaschine ohne Akku 3,2 kg (7,0 lb)
ROLLER’S Akku 12 V, 1,3 Ah
0,45 kg (1,0 lb)
ROLLER’S Akku 12 V, 2,0 Ah
0,7 kg (1,5 lb)
Presszange Mini (Durchschnitt)
1,2 kg (2,6 lb)
Presszange (Durchschnitt)
1,8 kg (3,9 lb)
Pressköpfe (Paar, Durchschnitt)
0,27 kg (0,6 lb)
Aufweitkopf (Durchschnitt)
0,16 kg (0,3 lb)
1.7. Lärminformation
Arbeitsplatzbezogener Emissionswert
ROLLER’S Uni-Press E
ROLLER’S Uni-Press
ROLLER’S Uni-Press ACC
ROLLER’S Multi-Press Mini ACC
ROLLER’S Multi-Press
ROLLER’S Axial-Press 5
ROLLER’S Axial-Press 15/40
ROLLER’S Akku-Exparo Mini
ROLLER’S Akku-Exparo
82 dB(A)
77 dB(A)
77 dB(A)
72 dB(A)
73 dB(A)
81 dB(A)
75 dB(A)
77 dB(A)
73 dB(A)
1.8. Vibrationen
Gewichteter Effektivwert der Beschleunigung
2,5 m/s2
2. Inbetriebnahme
Für die Anwendung der ROLLER Presszangen, ROLLER Pressköpfe und
ROLLER Aufweitköpfe für die verschiedenen Rohrverbindungs-Systeme
gelten die jeweils aktuellen ROLLER Verkaufsunterlagen. Werden vom
Systemhersteller Komponenten von Rohrverbindungs-Systemen geändert oder neu in den Markt gebracht, muss deren aktueller Anwendungsstand bei ROLLER (Fax +49 7151 17 27 - 87) angefragt werden.
2.1. Elektrischer Anschluss
Netzspannung beachten! Vor Anschluss der Antriebsmaschine bzw. des
Schnellladegerätes prüfen, ob die auf dem Leistungsschild angegebene
Spannung der Netzspannung entspricht. Auf Baustellen, in feuchter Umgebung, im Freien oder bei vergleichbaren Aufstellarten das elektrische
Gerät nur über 30mA-Fehlerstrom-Schutzeinrichtung (FI-Schalter) am
Netz betreiben.
Der mit ROLLER Antriebsmaschinen gelieferte Akku sowie Ersatzakkus
sind ungeladen. Vor erstem Gebrauch Akku laden. Zum Laden nur ROLLER’S Schnellladegerät (Art.-Nr. 565220) verwenden. Ist der Akku in das
Schnellladegerät eingesteckt, blinkt die rote Kontrollleuchte. Nach ca. 1
h schaltet die Kontrollleuchte auf Dauerbetrieb, d. h. der Akku ist geladen.
Der Akku erreicht erst nach mehreren Ladungen die volle Kapazität.
2.2. Montage (Wechsel) der Presszange (1) bei Radialpressen (Fig. 1)
Netzstecker ziehen bzw. Akku entnehmen. Nur Presszangen mit systemspezifischer Presskontur entsprechend dem zu pressenden Pressfitting-System verwenden. ROLLER Presszangen sind auf beiden Pressbacken mit Buchstaben zur Kennzeichnung der Presskontur und mit einer
Zahl zur Kennzeichnung der Größe beschriftet. Einbau- und Montageanweisung der Systemhersteller lesen und beachten. Niemals mit unpassender Presszange (Presskontur, Größe) pressen. Die Pressverbindung könnte unbrauchbar und die Maschine sowie die Presszange könnten beschädigt werden.
(4) einrastet. Dabei die Druckleiste (3) direkt über dem Zangenhaltebolzen
niederdrücken. Radialpressen nicht ohne eingelegte Presszange starten.
Pressvorgang nur zur Herstellung einer Pressverbindung ablaufen lassen.
Ohne Pressgegendruck durch den Pressverbinder wird die Antriebsmaschine bzw. die Presszange unnötig hoch belastet.
Niemals bei nicht verriegeltem Zangenhaltebolzen (2) pressen.
Bruchgefahr!
2.3. Montage (Wechsel) der Pressköpfe (14) bei Axialpressen
(Fig. 6, 7)
Akku entnehmen. Nur systemspezifische Pressköpfe verwenden. ROLLER Pressköpfe sind mit Buchstaben zur Kennzeichnung des Druckhülsen-Systems und mit einer Zahl zur Kennzeichnung der Größe beschriftet. Einbau- und Montageanweisung des Systemherstellers lesen
und beachten. Niemals mit unpassenden Pressköpfen (DruckhülsenSystem, Größe) pressen. Die Verbindung könnte unbrauchbar und die
Maschine sowie die Pressköpfe könnten beschädigt werden.
Gewählte Pressköpfe (14) ganz einstecken, gegebenenfalls drehen bis
sie einrasten (Kugelrastung). Pressköpfe und Aufnahmebohrung in der
Pressvorrichtung sauber halten.
2.4. Montage (Wechsel) des Aufweitkopfes (16) bei ROLLER’S AxialPress 15 (Fig. 6)
Akku entnehmen. Aufweitvorrichtung (15) (Zubehör) montieren. Hierzu
Verbindungsflächen säubern, Aufweitvorrichtung aufsetzen, die beiden
Zylinderschrauben fest anziehen. Aufweitdorn (18) leicht fetten. Gewählten Aufweitkopf bis zum Anschlag an Aufweitvorrichtung aufschrauben.
Nur systemspezifische Aufweitköpfe verwenden. ROLLER Aufweitköpfe
sind mit Buchstaben zur Kennzeichnung des Druckhülsen-Systems und
mit einer Zahl zur Kennzeichnung der Größe beschriftet. Einbau- und Montageanweisung des Systemherstellers lesen und beachten. Niemals mit
unpassenden Aufweitköpfen (Druckhülsen-System, Größe) aufweiten.
Die Verbindung könnte unbrauchbar und die Maschine sowie die Aufweitköpfe könnten beschädigt werden.
Darauf achten, dass die Druckhülse beim Aufweitvorgang ausreichenden
Abstand zum Aufweitkopf hat, da anderenfalls die Aufweitbacken (17) verbogen werden oder brechen können.
Für Pressungen an engen Stellen kann die Aufweitvorrichtung abgenommen werden.
2.5. Montage (Wechsel) des Aufweitkopfes (16) bei ROLLER’S
Akku-Exparo Mini Q & E, ROLLER’S Akku-Exparo Q & E (Fig. 8)
Akku entnehmen. Nur original Aufweitköpfe Wirsbo Quick & Easy verwenden. Einbau- und Montageanweisung des Systemherstellers lesen
und beachten. Niemals mit unpassenden Aufweitköpfen (System, Größe)
aufweiten. Die Verbindung könnte unbrauchbar und die Maschine sowie
die Aufweitköpfe könnten beschädigt werden. Aufweitdorn (18) leicht fetten. Gewählten Aufweitkopf bis zum Anschlag an Aufweitvorrichtung aufschrauben. ROLLER Aufweitköpfe P und Cu sind für den Akku-Rohraufweiter ROLLER’S Akku-Exparo Mini Q & E, ROLLER’S Akku-Exparo
Q & E nicht geeignet und dürfen deshalb nicht verwendet werden.
3. Betrieb
3.1. Radialpressen (Fig. 1 bis 5)
Vor jeder Verwendung ist mit der Antriebsmaschine und der jeweils eingesetzten Presszange eine Probepressung mit eingelegtem Pressverbinder vorzunehmen. Die Presszange muss völlig schließen. Dabei ist nach
vollendeter Pressung das völlige Schließen der Pressbacken (10) sowohl
an deren Spitze (Fig. 1, bei "A") als auch auf der Höhe der Verbindungslasche (Fig. 1, bei "B") zu beobachten. Die Dichtheit der Verbindung ist zu
prüfen (länderspezifische Vorschriften, Normen, Richtlinien usw. beachten).
Vor jeder Verwendung ist die Presszange, insbesondere die Presskontur
(11) beider Pressbacken (10), auf Schäden und Abnützung zu kontrollieren. Beschädigte oder abgenützte Presszangen nicht mehr verwenden.
Es besteht sonst die Gefahr nicht ordnungsgemäßer Pressung bzw. Unfallgefahr.
Antriebsmaschine vorteilhafterweise auf Tisch oder Boden legen. Montage
(Wechsel) der Presszange kann nur erfolgen, wenn die Pressrollen (5)
ganz zurückgefahren sind. Gegebenenfalls bei ROLLER’S Uni-Press 2000
und ROLLER’S Uni-Press E Drehrichtungshebel (7) nach links drücken
und Tippschalter (8) betätigen, bei ROLLER’S Multi-Press die Rückstelltaste (13) solange drücken, bis die Pressrollen (5) ganz zurückgefahren
sind.
Entsteht beim Schließen der Presszange ein deutlicher Grat an der Presshülse, kann die Pressung fehlerhaft bzw. undicht sein (siehe 5. Störungen).
Zangenhaltebolzen (2) öffnen. Hierzu Verriegelungsstift (4) drücken, der
Zangenhaltebolzen (2) springt federbelastet heraus. Gewählte Presszange
(1) einsetzen. Zangenhaltebolzen (2) vorschieben, bis Verriegelungsstift
3.1.1. Arbeitsablauf
Presszange (1) mit der Hand so weit zusammendrücken, dass die Presszange über den Pressverbinder geschoben werden kann. Antriebsma-
deu
schine mit Presszange dabei rechtwinklig zur Rohrachse auf den Pressfitting aufsetzen. Presszange loslassen, so dass sie sich um den Pressfitting schließt. Antriebsmaschine am Gehäusegriff (6) und am Schaltergriff (9) halten.
Bei ROLLER’S Uni-Press E Drehrichtungshebel (7) nach rechts (Vorlauf)
schalten und Tippschalter (8) drücken. Tippschalter (8) gedrückt halten
bis die Pressung fertiggestellt und die Presszange geschlossen ist. Drehrichtungshebel (7) nach links (Rücklauf) schalten und Schalter (8) drücken
bis die Pressrollen zurückgefahren sind und die Rutschkupplung anspricht.
Rutschkupplung nicht unnötig belasten.
Bei ROLLER’S Uni-Press und ROLLER’S Multi-Press Tippschalter (8)
gedrückt halten bis die Presszange völlig geschlossen ist. Dies wird durch
ein akustisches Signal (Knacken) angezeigt. Rückstelltaste (13) so lange
drücken, bis die Pressrollen (5) ganz zurückgefahren sind.
Bei ROLLER’S Multi-Press Mini ACC, ROLLER’S Multi-Press ACC und
ROLLER’S Uni-Press ACC Tippschalter (8) gedrückt halten bis die Presszange völlig geschlossen ist. Nach vollendeter Pressung schaltet die Antriebsmaschine automatisch auf Rücklauf um (Zwangsrücklauf).
Presszange mit der Hand zusammendrücken, so dass sie vom Pressfitting abgezogen werden kann.
3.1.2. Funktionssicherheit
Bei ROLLER’S Uni-Press E wird der Pressvorgang durch Loslassen des
Tippschalters (8) beendet. Zur mechanischen Sicherheit der Antriebsmaschinen wirkt in beiden Endstellungen der Pressrollen zusätzlich eine
drehmomentabhängige Sicherheits-Rutschkupplung.
ROLLER’S Uni-Press und ROLLER’S Multi-Press beendet den Pressvorgang automatisch unter Abgabe eines akustischen Signales (Knacken).
ROLLER’S Multi-Press Mini ACC, ROLLER’S Multi-Press ACC und
ROLLER’S Uni-Press ACC beenden den Pressvorgang automatisch unter
Abgabe eines akustischen Signales (Knacken) und laufen automatisch
zurück (Zwangsablauf).
Wichtig: Nur mit dem völligen Schließen der Presszange ist die einwandfreie
Pressung hergestellt. Nach vollendeter Pressung ist das völlige Schließen
der Pressbacken (10) sowohl an deren Spitze (Fig. 1, bei "A") als auch auf
der Höhe der Verbindungslasche (Fig. 1, bei "B") zu beobachten. Entsteht
beim Schließen der Presszange ein deutlicher Grat an der Presshülse,
kann die Pressung fehlerhaft bzw. undicht sein (siehe 5. Störungen).
3.1.3. Arbeitssicherheit
Zur Arbeitssicherheit sind die Antriebsmaschinen mit einem SicherheitsTippschalter ausgerüstet. Dieser ermöglicht jederzeit, insbesondere aber
bei Gefahr, ein sofortiges Stillsetzen der Antriebsmaschinen. Die Antriebsmaschinen können in jeder Stellung auf Rücklauf umgeschaltet werden.
3.2. Axialpressen (Fig. 7, 8)
3.2.1. Pressen mit ROLLER’S Axial-Press 15 und ROLLER’S Axial-Press 40
Vormontierte Druckhülsenverbindung in die Pressköpfe (14) einlegen und
in die Pressköpfe (14) drücken. Tippschalter (8) nur leicht drücken, so
dass die Pressköpfe langsam bis zur Anlage am Druckhülsenverbinder
zusammenfahren. Achtung Quetschgefahr! Nicht in den Bereich der sich
bewegenden Pressköpfe greifen! Antriebsmaschine am Gehäusegriff (6)
und am Schaltergriff (9) halten, Tippschalter (8) so lange gedrückt halten,
bis die Druckhülse am Bund des Druckhülsenverbinders anliegt. Dies wird
auch durch ein akustisches Signal (Knacken) angezeigt. Rückstelltaste
(13) drücken, bis die Pressköpfe (14) ganz zurückgefahren sind.
Beim Druckhülsensystem IV werden unterschiedliche Pressköpfe für eine Rohrgröße benötigt. Einbau- und Montageanweisung des Systemherstellers lesen und beachten.
Beim Druckhülsensystem RV muss vor- und fertiggepresst werden, d. h.
die Pressköpfe müssen zuerst auf weiten Abstand der Aufnahmen für den
Druckhülsenverbinder eingesteckt werden. Vor einem zweiten Pressvorgang werden die Pressköpfe durch drehen um 180° auf engen Abstand
der Aufnahmen für den Druckhülsenverbinder gesteckt. Einbau- und Montageanweisung des Systemherstellers lesen und beachten.
3.2.2. Aufweiten mit ROLLER’S Axial-Press 15
Druckhülse über das Rohr schieben, Aufweitkopf bis zum Anschlag in das
Rohr einführen und Aufweitkopf/Antriebsmaschine gegen das Rohr drücken.
Antriebsmaschine einschalten (8). Darauf achten, dass die Druckhülse
beim Aufweitvorgang ausreichenden Abstand zum Aufweitkopf hat, da
anderenfalls die Aufweitbacken (17) sich verbiegen oder brechen kön-
deu
nen. Tippschalter (8) so lange gedrückt halten, bis das Rohr aufgeweitet
ist. Dies wird auch durch ein akustisches Signal (Knacken) angezeigt.
Rückstelltaste (14) drücken, bis der Aufweitkopf wieder geschlossen ist.
Eventuell mehrfach aufweiten. Einbau- und Montageanweisung des Systemherstellers lesen und beachten.
3.3. ROLLER’S Akku-Exparo Mini Q & E, ROLLER’S Akku-Exparo Q & E
(Fig. 8)
Einbau- und Montageanweisung des Systemherstellers lesen und beachten. Q & E Ring entsprechender Größe auf Rohr schieben. Aufweitkopf in das Rohr einführen und Aufweitkopf/Antriebsmaschine gegen das
Rohr drücken. Antriebsmaschine einschalten (8). Ist der Aufweitkopf geöffnet, schaltet die Antriebsmaschine automatisch auf Rücklauf und der Aufweitkopf wird wieder geschlossen. Tippschalter (8) weiter gedrückt halten und Aufweitkopf/Antriebsmaschine nachschieben. Aufweitvorgang so
lange wiederholen, bis die Aufweitbacken (17) bis zum Anschlag in das
Rohr eingeschoben sind. Einbau- und Montageanweisung des Systemherstellers lesen und beachten.
4. Instandhaltung
Wichtig! Unbeschadet dieser genannten Wartung sollten die ROLLER
Antriebsmaschinen zusammen mit allen Werkzeugen (Presszangen,
Pressköpfen, Aufweitköpfen) mindestens einmal jährlich einer autorisierten ROLLER Vertrags-Kundendienstwerkstatt zur Inspektion eingereicht
werden.
4.1. Wartung
Vor Wartungsarbeiten Netzstecker ziehen bzw. Akku entnehmen!
Presszangen, Pressköpfe und Aufweitköpfe, insbesondere auch deren
Aufnahmen, sauber halten. Stark verschmutzte Metallteile z. B. mit Terpentinöl reinigen, anschließend gegen Rost schützen.
Kunststoffteile (Gehäuse, Akkus) nur mit milder Seife und feuchtem Tuch
reinigen. Keine Haushaltsreiniger verwenden. Diese enthalten vielfach
Chemikalien, die Kunststoffteile beschädigen könnten. Keinesfalls Benzin, Terpentinöl, Verdünnung oder ähnliche Produkte zur Reinigung von
Kunststoffteilen verwenden.
Darauf achten, dass Flüssigkeiten niemals in das Innere des elektrischen
Gerätes gelangen. Das elektrische Gerät niemals in Flüssigkeit tauchen.
4.1.1. Presszangen
Presszangen regelmäßig auf Leichtgängigkeit prüfen. Gegebenenfalls
Presszangen reinigen und die Bolzen (12) der Pressbacken mit Maschinenöl schmieren, Presszange jedoch nicht demontieren! Ablagerungen
in der Presskontur (11) entfernen. Funktionsfähigen Zustand aller Presszangen regelmäßig durch eine Probepressung mit eingelegtem Pressverbinder prüfen. Die Pressbacken (10) müssen nach vollendeter Pressung sowohl an deren Spitze (Fig. 1, bei "A") als auch auf der Höhe der
Verbindungslasche (Fig. 1, bei "B") schließen. Beschädigte oder abgenützte Presszangen nicht mehr verwenden. Im Zweifelsfall Antriebsmaschine zusammen mit allen Presszangen einer autorisierten ROLLER
Vertrags-Kundendienstwerkstatt zur Inspektion einreichen.
4.1.2. Radialpressen
Presszangenaufnahme sauber halten, insbesondere Pressrollen (5) und
Zangenhaltebolzen (2) regelmäßig reinigen und anschließend mit Maschinenöl schmieren. Antriebsmaschine regelmäßig durch Herstellung
einer Pressung mit dem größten verwendeten Pressverbinder auf Funktionssicherheit prüfen. Schließt die Presszange bei dieser Pressung vollständig (siehe oben), so ist die Funktionssicherheit der Antriebsmaschine
gegeben.
ROLLER’S Multi-Press Mini ACC und ROLLER’S Multi-Press ACC sind
mit einer Service-Elektronik ausgestattet. Nach ca. 10.000 Pressungen
blinkt die Diode am Schaltergriff (9). Dann ist eine Inspektion fällig. Diese wird von einer autorisierten ROLLER Vertrags-Kundendienstwerkstatt
durchgeführt.
4.1.3. Axialpressen
Pressköpfe (14) und Aufnahmebohrungen in der Pressvorrichtung sauber halten. Aufweitköpfe (16) und Aufweitdorn (18) sauber halten. Von
Zeit zu Zeit Aufweitdorn (18) leicht fetten.
4.1.4. ROLLER’S Akku-Exparo Mini Q & E, ROLLER’S Akku-Exparo Q & E
Aufweitköpfe (16) und Aufweitdorn (18) sauber halten. Von Zeit zu Zeit
Aufweitdorn (18) leicht fetten.
deu
4.2. Inspektion/Instandsetzung
Vor Instandsetzungs- und Reparaturarbeiten Netzstecker ziehen bzw.
Akku entnehmen! Diese Arbeiten dürfen nur von anerkannten Fachkräften oder unterwiesenen Personen durchgeführt werden.
Nach ca. 10.000 Pressungen/Aufweitungen, jedoch mindestens einmal
jährlich, ist eine Inspektion des Press-/Aufweitwerkzeuges erforderlich.
Das Getriebe der Antriebsmaschine ROLLER’S Uni-Press E ist wartungsfrei. Es läuft in einer Dauerfettfüllung und muss deshalb nicht geschmiert
werden. Die Motoren bei ROLLER’S Uni-Press E, ROLLER’S Uni-Press
und ROLLER’S Uni-Press ACC haben Kohlebürsten. Diese verschleißen
und müssen deshalb von Zeit zu Zeit geprüft bzw. erneuert werden. Nur
Original ROLLER’S Uni-Press Kohlebürsten verwenden. Die ROLLER
Akku-Antriebsmaschinen arbeiten elektrohydraulisch. Bei mangelhafter
Presskraft oder Ölverlust muss die Antriebsmaschine von ROLLER oder
einer autorisierten ROLLER Vertrags-Kundendienstwerkstatt geprüft bzw.
instandgesetzt werden.
Beschädigte oder abgenutzte Presszangen, Pressköpfe, Aufweitköpfe
können nicht instandgesetzt werden.
5. Störungen
5.1. Störung
Antriebsmaschine läuft nicht.
Ursache
• Abgenutzte Kohlebürsten (ROLLER’S Uni-Press E, Uni-Press,
Uni-Press ACC).
• Anschlussleitung defekt (ROLLER’S Uni-Press E, Uni-Press,
Uni-Press ACC).
• Akku leer oder defekt (ROLLER Akku-Antriebsmaschinen).
• Antriebsmaschine defekt.
5.2. Störung
Radialpresse stellt Pressung nicht fertig, Presszange schließt nicht völlig.
Ursache
• Antriebsmaschine überhitzt (ROLLER’S Uni-Press E, Uni-Press,
Uni-Press ACC).
• Abgenutzte Kohlebürsten (ROLLER’S Uni-Press E, Uni-Press,
Uni-Press ACC).
• Rutschkupplung defekt (ROLLER’S Uni-Press E).
• Akku leer oder defekt (ROLLER Akku-Antriebsmaschinen).
• Antriebsmaschine defekt.
• Falsche Presszange (Presskontur, Größe) eingesetzt.
• Presszange schwergängig oder defekt.
5.3. Störung
Beim Schließen der Presszange entsteht ein deutlicher Grat an der Presshülse.
Ursache
• Beschädigte oder abgenutze Presszange/Presskontur
• Falsche Presszange (Presskontur, Größe) eingesetzt.
• Nicht geeignete Abstimmung von Presshülse, Rohr und Stützhülse.
deu
unsachgemäße Behandlung oder Missbrauch, Missachtung von Betriebsvorschriften, ungeeignete Betriebsmittel, übermäßige Beanspruchung, zweckfremde Verwendung, eigene oder fremde Eingriffe oder andere Gründe, die ROLLER nicht zu vertreten hat, zurückzuführen sind,
sind von der Garantie ausgeschlossen.
Garantieleistungen dürfen nur von einer autorisierten ROLLER VertragsKundendienstwerkstatt erbracht werden. Beanstandungen werden nur
anerkannt, wenn das Produkt ohne vorherige Eingriffe in unzerlegtem Zustand einer autorisierten ROLLER Vertrags-Kundendienstwerkstatt eingereicht wird. Ersetzte Produkte und Teile gehen in das Eigentum von
ROLLER über.
Die Kosten für die Hin- und Rückfracht trägt der Verwender.
Die gesetzlichen Rechte des Verwenders, insbesondere seine Mängelansprüche gegenüber dem Händler, bleiben unberührt. Diese HerstellerGarantie gilt nur für Neuprodukte, welche in der Europäischen Union, in
Norwegen oder in der Schweiz gekauft werden.
7. ROLLER Vertrags-Kundendienstwerkstätten
Firmeneigene Fachwerkstatt für Reparaturen:
SERVICE-CENTER
Neue Rommelshauser Straße 4
D-71332 Waiblingen
Telefon (0 7151) 5 68 08 - 60
Telefax (0 7151) 5 68 08 - 64
Wir holen Ihre Maschinen und Werkzeuge bei Ihnen ab!
Nutzen Sie in der Bundesrepublik Deutschland unseren Abholservice.
Einfach anrufen unter Telefon (0 7151) 5 68 08 - 60.
Oder wenden Sie sich an eine andere autorisierte ROLLER Vertrags-Kundendienstwerkstatt in Ihrer Nähe.
8. EG-Konformitätserklärung
ROLLER erklärt hiermit, dass die in dieser Betriebsanleitung beschriebenen Maschinen mit den Bestimmungen der Richtlinien 98/37/EG,
89/336/EWG und 73/23/EWG konform sind. Folgende Normen werden
entsprechend angewandt: DIN EN ISO 12100-1, DIN EN 12348, DIN EN
50144-1, DIN EN 55014-1, DIN EN 55014-2, DIN EN 60204-1, DIN EN
60335-1, DIN EN 60335-2-45, DIN EN 60745-1, DIN EN 60745-2-9, DIN
EN 60745-2-11, DIN EN 61000-3-2, DIN EN 61000-3-3, DIN EN 61029-1,
DIN EN 61029-2-9.
Waiblingen, 01.11.2008
Albert ROLLER GmbH & Co KG
Werkzeug- und Maschinenfabrik
D-71332 Waiblingen
5.4. Störung
Pressbacken schließen bei unbelasteter Presszange bei "A" und "B"
(Fig. 1) versetzt.
Ursache
• Presszange fiel zu Boden, Druckfeder verbogen.
5.5. Schadensfälle
Zur Vermeidung von Schäden am Pressgerät darauf achten, dass bei Arbeitssituationen, wie in den Fig. 9 bis 11 beispielhaft gezeigt, keine Verspannung zwischen Presszange, Fitting und Antriebsmaschine auftritt.
6. Hersteller-Garantie
Die Garantiezeit beträgt 12 Monate nach Übergabe des Neuproduktes
an den Erstverwender, höchstens jedoch 24 Monate nach Auslieferung
an den Händler. Der Zeitpunkt der Übergabe ist durch die Einsendung
der Original-Kaufunterlagen nachzuweisen, welche die Angaben des Kaufdatums und der Produktbezeichnung enthalten müssen. Alle innerhalb
der Garantiezeit auftretenden Funktionsfehler, die nachweisbar auf Fertigungs- oder Materialfehler zurückzuführen sind, werden kostenlos beseitigt. Durch die Mängelbeseitigung wird die Garantiezeit für das Produkt
weder verlängert noch erneuert. Schäden, die auf natürliche Abnutzung,
Rainer Hech
eng
eng
For use of the ROLLER’S pressing tongs, ROLLER’S pressing heads and
ROLLER’S expanding heads for the various pipe connection systems, the
currently valid ROLLER sales documents are applicable. If the system
manufacturer alters components of pipe connection systems or markets new
ones, their current application status must be enquired about at ROLLER
(Fax +49 7151 17 27 - 87). Subject to modification without notice, errors and
omissions excepted.
Figs. 1–8
1 Pressing tongs
2 Tong retaining bolt
3 Pressure plate
4 Locking pin
5 Press rollers
6 Housing grip
7 Rotation direction lever
8 Inching switch
9 Pistol grip
10
11
12
13
14
15
16
17
18
Pressing jaw
Pressing contour
Bolt
Reset button
Pressing heads
Expander
Expanding head
Expanding jaws
Expanding mandrel
General Safety Rules
To reduce the risk of injury, user must read and understand instruction
manual.
WARNING! Read all instructions. Failure to follow all instructions listed below
may result in electric shock, fire and/or serious injury. The term „power tool“ in
all of the warnings listed below refers to your mains operated (corded) power
tool or battery operated (cordless) power tool, also machines and electric units.
Only use the power tool for the purpose for which it was intended, with the due
attention to the general safety and accident prevention regulations.
SAVE THESE INSTRUCTIONS.
A) Work area
a) Keep work area clean and well lit. Cluttered and dark areas invite accidents.
b) Do not operate power tools in explosive atmospheres, such as in the
presence of flammable liquids, gases or dust. Power tools create sparks
which may ignite the dust or fumes.
c) Keep children and bystanders away while operating a power tool. Distractions can cause you to lose control.
B) Electrical safety
a) Power tool plugs must match the outlet. Never modify the plug in any
way. Do not use any adapter plugs with earthed (grounded) power tools.
Unmodified plugs and matching outlets will reduce risk of electric shock. If
the power tool comes with an earthed wire, the plug may only be connected
to an earthed receptacle. At work sites, in damp surroundings, in the open
or in the case of comparable types of use, only operate the power tool off
the mains using a 30 mA fault current protected switch (FI breaker).
b) Avoid body contact with earthed or grounded surfaces such as pipes,
radiators, ranges and refrigerators. There is an increased risk of electric
shock if your body is earthed or grounded.
c) Do not expose power tools to rain or wet conditions. Water entering a
power tool will increase the risk of electric shock.
d) Do not abuse the cord. Never use the cord for carrying, pulling or unplugging the power tool. Keep cord away from heat, oil, sharp edges
or moving parts. Damaged or entangled cords increase the risk of electric shock.
e) When operating a power tool outdoors, use an extension cord suitable
for outdoor use. Use of a cord suitable for outdoor use reduces the risk of
electric shock.
C) Personal safety
a) Stay alert, watch what you are doing and use common sense when
operating a power tool. Do not use a power tool while you are tired or
under the influence of drugs, alcohol or medication. A moment of inattention while operating power tools may result in serious personal injury.
b) Use safety equipment. Always wear eye protection. Safety equipment
such as dust mask, non skid safety shoes, hard hat, or hearing protection
used for appropriate conditions will reduce personal injuries.
c) Avoid accidental starting. Ensure the switch is in the off position before plugging in. Carrying power tools with your finger on the switch or
plugging in power tools that have the switch on invites accidents.
d) Remove any adjusting key or wrench before turning the power tool
on. A wrench or a key left attached to a rotating part of the power tool may
result in personal injury.
e) Do not overreach. Keep proper footing and balance at all times. This
enables better control of the power tool in unexpected situations.
f) Dress properly. Do not wear loose clothing or jewellery. Keep your
hair, clothing and gloves away from moving parts. Loose clothes, jewellery or long hair can be caught in moving parts.
g) If devices are provided for the connection of dust extraction and collection facilities, ensure these are connected and properly used. Use of
these devices can reduce dust related hazards.
h) Only allow trained personnel to use the power tool. Apprentices may
only operate the power tool when they are over 16, when this is necessary
for their training and when they are supervised by a trained operative.
D) Power tool use and care
a) Do not force the power tool. Use the correct power tool for your application. The correct power tool will do the job better and safer at the rate for which it was designed.
b) Do not use the power tool if the switch does not turn it on and off. Any
power tool that cannot be controlled with the switch is dangerous and must
be repaired.
c) Disconnect the plug from the power source before making any adjustments, changing accessories, or storing power tools. Such preventive
safety measures reduce the risk of starting the power tool accidentally.
d) Store idle power tools out of the reach of children and do not allow persons unfamiliar with the power tool or these instructions to operate
the power tool. Power tools are dangerous in the hands of untrained users.
e) Maintain power tools. Check for misalignment or binding of moving
parts, breakage of parts and any other condition that may affect the
power tools operation. If damaged, have the power tool repaired by a
qualified expert or by an authorised ROLLER after-sales service facility
before use. Many accidents are caused by poorly maintained power tools.
f) Keep cutting tools sharp and clean. Properly maintained cutting tools
with sharp cutting edges are less likely to bind and are easier to control.
g) Secure the workpiece. Use clamps or a vice to hold the workpiece. This
is safer than holding it with your hand, and also it frees both hands to operate the equipment.
h) Use the power tool, accessories and tool bits etc., in accordance with
these instructions and in the manner intended for the particular type
of power tool, taking into account the working conditions and the work
to be performed. Use of the power tool for operations different from those
intended could result in a hazardous situation. All unauthorised modifications to the power tool are prohibited for safety reasons.
E) Battery tool use and care
a) Ensure the switch is in the off position before inserting battery pack.
Inserting the battery pack into power tools that have the switch on invites
accidents.
b) Recharge only with the charger specified by the manufacturer. A charger that is suitable for one type of battery may create a risk of fire when used
with another battery pack.
c) Use battery tools only with specifically designated battery packs. Use
of any other battery packs may create a risk of injury and fire.
d) When battery pack is not in use, keep it away from other metal objects
like paper clips, coins, keys, nails, screws, or other small metal objects
that can make a connection from one terminal to another. Shorting the
battery terminals may cause bums or a fire.
e) Under abusive conditions, liquid may be ejected from the battery, avoid
contact. If contact accidentally occurs, flush with water. If liquid contacts eyes, additionally seek medical help. Liquid ejected from the battery may cause irritation or bums.
f) Do not use the battery/charger at battery/charger temperatures or ambient temperatures of 5°C/40°F or b 40°C/105°F.
g) Do not dispose defective batteries in the normal domestic waste. Take
them to an authorised ROLLER after-sales service facility or to a reputed waste disposal company.
F) Service
a) Have your power tool serviced by a qualified repair person using only identical replacement parts. This will ensure that the safety of the power tool is maintained.
b) Comply with maintenance instructions and instructions on tool replacements.
c) Check mains lead of power tool regularly and have it replaced by a
qualified expert or an authorised ROLLER after-sales service facility
eng
eng
in case of damage. Check extension cable regularly and replace it
when damaged.
ROLLER’S Akku-Exparo Q & E for expanding of PE-X pipes
for the System Wirsbo Quick & Easy
Ø 15–40 mm
Specific Safety Instructions
•
•
•
•
•
•
•
•
•
•
•
•
•
•
Use personal safety equipment (e.g. goggles).
Avoid unnatural postures, and do not lean too far forward.
Before changing the pressing or expanding tools, pull the mains plug or take
out the battery!
The drive units develop a very high pressing force. For that reason, be particularly careful. Keep all other persons away from the working area during
working.
Hold the drive units only by the housing grip (6) and the pistol grip (9)
during operation. Keep your hands away from moving parts (pressing area,
expanding area)!
Never operate radial presses when the tongs shank (2) is not locked. Risk
of fracture!
Always position radial presses with the pressing tongs on the press fitting
at right angles to the pipe axis. Never position it askew.
Do not start radial presses without pressing tongs inserted. Do not start the
pressing operation except to make a press joint. Unless counter pressure
is applied by the press fitting, the drive unit or pressing tongs will be needlessly
stressed.
Before using pressing tongs from other manufacturers, check that they are
suitable for the drive unit. Consult and comply with the pressing tongs
manufacturers’ instructions for use.
Only operate axial presses with pressing heads fully inserted. Risk of fracture!
Always position axial presses with the pressing tongs on the compression
sleeve fitting at right angles to the pipe axis. Never position it askew.
Screw expanding heads as far as they will go onto the expander.
Do not attempt to repair damaged pressing tongs, pressing heads or
expanding heads. Risk of fracture!
Consult and comply with the instructions for installation and fitting of the
system’s manufacturers.
1. Technical Data
1.1. Article numbers
ROLLER’S Uni-Press E drive unit
ROLLER’S Uni-Press drive unit
ROLLER’S Uni-Press ACC drive unit
ROLLER’S Multi-Press Mini ACC drive unit
ROLLER’S Multi-Press drive unit
ROLLER’S Multi-Press ACC drive unit
ROLLER’S Axial-Press 15 drive unit
ROLLER’S Axial-Press 40 drive unit
ROLLER’S Akku-Exparo Mini Q & E drive unit
ROLLER’S Akku-Exparo Q & E drive unit
ROLLER’S battery 12 V, 1,3 Ah
ROLLER’S battery 12 V, 2,0 Ah
ROLLER’S voltage supply 230 V
Rapid charger 12–18 V
Sheet steel case, ROLLER’S Uni-Press E
Sheet steel case, ROLLER’S Uni-Press
Sheet steel case, ROLLER’S Uni-Press ACC
Sheet steel case, ROLLER’S Multi-Press
Sheet steel case, ROLLER’S Axial-Press 15 and 40
Sheet steel case, ROLLER’S Multi-Press Mini ACC,
ROLLER’S Akku-Exparo Mini Q & E
Sheet steel case, ROLLER’S Akku-Exparo Q & E
ROLLER’S Akku-Exparo Mini Q & E for expanding tubes/coils
of the System Wirsbo Quick & Easy
up to Ø 32 mm
572100
577001
577000
578000
571000
571001
573001
573005
575002
575001
571513
571510
571535
565220
570280
570280
570280
571280
573280
575280
573280
1.2. Capacity
ROLLER’S Multi-Press Mini ACC
Radial press for making press joints in all standard press
fitting systems on steel pipes, stainless steel pipes,
copper pipes, plastic pipes,
composite pipes
Ø 10–40 mm
ROLLER’S Uni-Press, Uni-Press ACC, Multi-Press, Multi-Press ACC
Radial presses for making press joints in all standard press
fitting systems on steel pipes, stainless steel pipes,
copper pipes, plastic pipes, composite pipes
Ø 12–76 (108) mm
Axial presses for making compression sleeve joints (sliding
sleeve joints) on stainless steel pipes, steel pipes, copper
pipes, plastic pipes, composite pipes and for expanding
plastic pipes, composite pipes
Ø 12–32 mm
1.3. Thrust / pressing power
Thrust of radial presses (up to Ø 108 mm)
Pressing power of radial presses (up to Ø 108 mm)
Thrust of radial press Mini (up to Ø 40 mm)
Pressing power of radial press Mini (up to Ø 40 mm)
Pressing power ROLLER’S Axial-Press 15
Pressing power ROLLER’S Axial-Press 40
1.4. Electric Data
ROLLER’S Uni-Press E,
ROLLER’S Uni-Press,
ROLLER’S Uni-Press ACC
230 V 1~; 50-60 Hz; 400 W; 1.8 A
S3 15% (AB 2/10 min)
all-insulated (73/23/EWG)
interference-suppressed
(89/326/EWG)
ROLLER’S Multi-Press,
Axial-Press 15/40, Akku-Exparo
12 V =; 2.0 Ah; 20 A
ROLLER’S Multi-Press Mini ACC
Akku-Exparo Mini
Rapid charger (1h)
Voltage supply
230 V
32 kN
100 kN
24 kN
70 kN
15 kN
40 kN
12 V =; 1.3 Ah; 18 A
Input
Output
Input
Output
1.5. Dimensions
ROLLER’S Uni-Press E
ROLLER’S Uni-Press
ROLLER’S Uni-Press ACC
ROLLER’S Multi-Press Mini ACC
ROLLER’S Multi-Press,
Multi-Press ACC
ROLLER’S Axial-Press 15/40
ROLLER’S Akku-Exparo Mini
ROLLER’S Akku-Exparo
230 V~; 50-60 Hz; 1.0 A
--; 50 W; 2.65 A
12–18 V -–
230 V~; 50-60 Hz
--; 1.0 A
12 V -–
430×110×85 mm (16.9”×4.3”×3.3”)
365×235×85 mm (14.4”×9.2”×3.3”)
365×235×85 mm (14.4”×9.2”×3.3”)
288×260×80 mm (11.3”×10.2”×3.1”)
338×290×85 mm (13.3”×11.4”×3.3”)
330×320×85 mm (13”×12.6”×3.3”)
293×248×80 mm (11.5”×9.8”×3.1”)
300×290×85 mm (11.8”×12.6”×3.3”)
1.6. Weights
ROLLER’S Uni-Press E drive unit
4.4 kg (9.6 lb)
ROLLER’S Uni-Press drive unit
4.6 kg (10.0 lb)
ROLLER’S Uni-Press ACC drive unit
4.6 kg (10.0 lb)
ROLLER’S Multi-Press Mini ACC without battery
2,1 kg (4,5 lb)
ROLLER’S Multi-Press drive unit without battery
4.5 kg (9.8 lb)
ROLLER’S Axial-Press 15/40 drive unit without battery 4.3 kg (9.4 lb)
ROLLER’S Akku-Exparo Mini drive unit without battery 2.0 kg (4.4 lb)
ROLLER’S Akku-Exparo drive unit without battery
3.2 kg (7.0 lb)
ROLLER’S battery 12 V, 1.3 Ah
0.45 kg (1.0 lb)
ROLLER’S battery 12 V, 2.0 Ah
0.7 kg (1.5 lb)
Pressing tongs Mini (average)
1.2 kg (2.6 lb)
Pressing tongs (average)
1.8 kg (3.9 lb)
Pressing heads (pair, average)
0.27 kg (0.6 lb)
Expanding head (average)
0.16 kg (0.3 lb)
1.7. Noise information
Emission at workplace
ROLLER’S Uni-Press E
ROLLER’S Uni-Press
ROLLER’S Uni-Press ACC
ROLLER’S Multi-Press Mini ACC
ROLLER’S Multi-Press
ROLLER’S Axial-Press 5
ROLLER’S Axial-Press 15/40
ROLLER’S Akku-Exparo Mini
ROLLER’S Akku-Exparo
1.8. Vibrations
Weighted effective value of acceleration
82 dB(A)
77 dB(A)
77 dB(A)
72 dB(A)
73 dB(A)
81 dB(A)
75 dB(A)
77 dB(A)
73 dB(A)
2.5 m/s2
2. Preparations for Use
For use of the ROLLER’S pressing tongs, ROLLER’S pressing heads and
ROLLER’S expanding heads for the various pipe connection systems, the
currently valid ROLLER sales documents are applicable. If the system
eng
manufacturer alters components of pipe connection systems or markets
new ones, their current application status must be enquired about at
ROLLER (Fax +49 7151 17 27 - 87).
2.1. Electrical connection
Note the mains voltage! Before connecting the drive unit or the rapid
charger, check whether voltage on the rating plate matches the mains voltage. At work sites, in damp surroundings, in the open or in the case of
comparable types of use, only operate the equipment off the mains using
a 30mA fault current protected switch (FI breaker).
The battery supplied with ROLLER’S drive units and the spare batteries
are not charged. Charge the battery before initial operation. Only use the
ROLLER’S rapid charger (Art. No. 565220) for charging. Once the battery is inserted into the rapid charger, the red indicator light flashes. After
about 1 hour, the indicator light switches to permanent, meaning the
battery is charged. The battery only reaches its full capacity after several
charges.
2.2. Installing (changing) the pressing tongs (1) in radial presses (Fig. 1)
Pull the mains plug or remove the battery. Only use pressing tongs with
a system-specific pressing contour matching the press fitting system for
pressing. ROLLER’S pressing tongs have a letter on both pressing jaws
to identify the pressing contour and a number to identify the size. Consult
and comply with the instructions for installation and fitting of the system's
manufacturers. Never use non-matching pressing tongs (pressing contour, size) for pressing work. The press joint could be unserviceable, and
both the machine and the pressing tongs might be damaged.
The drive unit is best placed on a bench or the floor. Installing (changing)
the pressing tongs is only possible when the press rollers (5) in are fully
retracted. If necessary, in the case of the ROLLER’S Uni-Press 2000 and
ROLLER’S Uni-Press E, set the rotation direction lever (7) to the left and
operate the inching switch (8), and in the case of the ROLLER’S MultiPress press the reset button (13) until the press rollers (5) are fully retracted.
Open the tongs shank (2). To do so, press the locking pin (4), the tongs
shank (2) jumps out under spring loading. Insert selected pressing tongs
(1). Push home the tongs shank (2) until the locking pin (4) engages. While
doing so, press down the pressure plate (3) directly above the tongs shank.
Do not start radial presses without pressing tongs inserted. Do not start
the pressing operation except to make a press joint. Unless counter pressure is applied by the press fitting, the drive unit or pressing tongs will be
needlessly stressed.
Never operate press when the tongs shank (2) is not locked. Risk of
fracture!
2.3. Installing (changing) the pressing heads (14) in axial presses
(Figs. 6, 7)
Remove the battery. Only use system-specific pressing heads. ROLLER’S
pressing heads have a letter to identify the compression sleeve system
and a number to identify the size. Consult and comply with the instructions for installation and fitting of the system's manufacturer. Never use
non-matching pressing heads (compression sleeve system, size) for pressing work. The press joint could be unserviceable, and both the machine
and the pressing heads might be damaged.
Push the selected pressing heads (14) right in, if necessary turning them
until they engage (ball catch). Keep the pressing heads and locating hole
inside the pressing device clean.
2.4. Installing (changing) the expanding head (16) in ROLLER’S
Axial-Press 15 (Fig. 6)
Remove the battery. Fit the expander (15) (accessory) To do so, clean the
connecting surfaces, attach the expander, and tighten the two fillister-head
screws. Lightly grease the expanding mandrel (18). Screw the selected
expanding head as far as it will go onto the expander. Only use systemspecific expanding heads. ROLLER’S expanding heads have a letter to
identify the compression sleeve system and a number to identify the size.
Consult and comply with the instructions for installation and fitting of the
system's manufacturer. Never use non-matching expanding heads (compression sleeve system, size) for expansion work. The press joint could
be unserviceable, and both the machine and the expanding heads might
be damaged.
Ensure that the compression sleeve has sufficient clearance from the
expanding head during the expansion process, otherwise the expanding
jaws (17) might become bent or broken.
eng
For pressing jobs in cramped places, the expander attachment can be
removed.
2.5. Installing (changing) the expanding head (16) in ROLLER’S AkkuExparo Mini Q & E, ROLLER’S Akku-Exparo Q & E (Fig. 8)
Remove the battery. Only use genuine expanding heads for Wirsbo Quick
& Easy. Consult and comply with the instructions for installation and fitting
of the system's manufacturer. Never use non-matching expanding heads
(system, size) for expansion work. The joint could be unserviceable, and
both the machine and the expanding heads might be damaged. Lightly
grease the expanding mandrel (18). Screw the selected expanding head
as far as it will go onto the expander. ROLLER’S expanding heads P and
Cu are not suitable for the Akku pipe expander ROLLER’S Akku-Exparo
Mini Q & E, ROLLER’S Akku-Exparo Q & E, and must therefore not be
used.
3. Operation
3.1. Radial presses (Figs. 1 to 5)
Before use, always perform a trial pressing with the drive unit and the
pressing tong inserted, with the press fitting in place. The pressing tongs
must close completely. Complete closing of the pressing jaws (10) both
at their tips (Fig. 1, at "A") and at the level of the connecting link (Fig. 1,
at "B") must be observed after completion of pressing. The tightness of
the connection must be checked (country-specific regulations, standards,
guidelines etc. must be followed).
Before use, always check the pressing tongs, in particular the pressing
contour (11) of both pressing jaws (10), for damage or wear. Do not use
damaged or worn pressing tongs again. Otherwise there is a risk of incorrect pressing or accidents.
If during closing of the pressing tongs a marked ridge is created on the
compression sleeve, the pressing may be defective or not tight (see 5.
Trouble).
3.1.1. Working procedure
Press the pressing tongs (1) together manually until they can be pushed
over the press fitting. Always position the drive unit with the pressing tongs
on the press fitting at right angles to the pipe axis. Release the pressing
tongs so that they close around the press fitting. Hold the drive unit by the
housing grip (6) and the pistol grip (9).
In the case of the ROLLER’S Uni-Press E, set the rotation direction lever
(7) to the right (advance) and press the inching switch (8). Hold down the
inching switch (8) until pressing is completed and the pressing tongs are
closed. Set the rotation direction lever (7) to the left (return) and press the
switch (8) until the press rollers have retracted and the slipping clutch
responds. Do not put unnecessary loads on the slipping clutch.
In the case of the ROLLER’S Uni-Press and ROLLER’S Multi-Press, hold
down the inching switch (8) until the pressing tongs are completely closed.
This is indicated by an acoustic signal (clicking). Press the reset button
(13) until the press rollers (5) are fully retracted.
In the case of the ROLLER’S Multi-Press Mini ACC, ROLLER’S MultiPress ACC and the ROLLER’S Uni-Press ACC, hold down the inching
switch (8) until the pressing tongs are completely closed. After completion
of pressing, the drive unit switches automatically to return (forced return).
Press the pressing tongs together manually so that they can be removed
from the press fitting.
3.1.2. Operating safety
In the case of the ROLLER’S Uni-Press E, the pressing operation is ended by releasing the inching switch (8). For the mechanical safety of the
drive units, a torque-controlled safety slipping clutch is operative in both
end positions of the press rollers.
The ROLLER’S Uni-Press and ROLLER’S Multi-Press ends the pressing
operation automatically, emitting an acoustic signal (clicking). The ROLLER’S Multi-Press Mini ACC, ROLLER’S Multi-Press ACC and the ROLLER’S Uni-Press ACC ends the pressing operation automatically, emitting an acoustic signal (clicking), and returns automatically (forced movement).
Important: Only complete closing of the pressing tongs provides a perfect press joint. Complete closing of the pressing jaws (10) both at their
tips (Fig. 1, at "A") and at the level of the connecting link (Fig. 1, at "B")
must be observed after completion of pressing. If during closing of the
eng
eng
pressing tongs a marked ridge is created on the compression sleeve, the
pressing may be defective or not tight (see 5. Trouble).
Ensure that liquids never get inside the electrical equipment. Never immerse the electrical equipment in liquid.
3.1.3. Working safety
To ensure safe working, the drive units are equipped with a safety inching
switch. This permits immediate switching off of the drive units at any time,
particularly if a potential hazard arises. The drive units can be switched to
the return function in any position.
4.1.1. Pressing tongs
Check the pressing tongs for easy action at regular intervals. If necessary
clean the pressing tongs and lubricate the bolts (12) of the pressing jaws
with machine oil, however do not dismantle the pressing jaw! Remove any
deposits in the pressing contour (11). Check that all pressing tongs are
functional at regular intervals by a trial pressing operation with the press
fitting inserted. The pressing jaws (10) must close (10) both at their tips
(Fig. 1, at "A") and at the level of the connecting link (Fig. 1, at "B") after
completion of pressing. Do not use damaged or worn pressing tongs again.
If in doubt, return the drive unit together with all pressing tongs to an
authorised ROLLER after-sales service facility for inspection.
3.2. Axial presses (Figs. 7, 8)
3.2.1. Pressing with the ROLLER’S Axial-Press 15 and Axial-Press 40
Place the preassembled compression sleeve fitting inside the pressing
heads (14) and press them into the latter. Only press the inching switch
(8) lightly, so that the pressing heads move together slowly until they are
in contact with the compression sleeve fitting. Caution – danger of crushing! Keep your hands away from the moving pressing heads! Hold the
drive unit by the housing grip (6) and the pistol grip (9), and keep the inching switch (8) pressed until the compression sleeve is in contact with
the collar of the compression sleeve fitting. This is also indicated by an
acoustic signal (clicking). Press the reset button (13) until the pressing
heads (14) are fully retracted.
With the compression sleeve system IV, various pressing heads are needed
for one pipe size. Consult and comply with the instructions for installation
and fitting of the system's manufacturer.
In the case of the compression sleeve system RV, preliminary and final
pressing is necessary, i.e. the pressing heads must first be inserted with
a wide spacing of the receptacles for the compression sleeve fitting. Before a second pressing operation, the pressing heads are set to a narrow
spacing of the receptacles for the compression sleeve fitting by a 180°
rotation. Consult and comply with the instructions for installation and fitting of the system's manufacturer.
3.2.2. Expansion with ROLLER’S Axial-Press 15
Push the compression sleeve over the pipe, insert the expanding head
as far as it will go into the pipe, and press the expanding head/drive unit
against the pipe. Switch on the drive unit (8). Ensure that the compression sleeve has during the expansion process sufficient clearance from
the expanding head, otherwise the expanding jaws (17) might become
bent or broken. Hold down the inching switch (8) until the pipe has been
expanded. This is also indicated by an acoustic signal (clicking). Press
the reset button (13) until the expanding head has closed again. If necessary repeat the expansion. Consult and comply with the instructions
for installation and fitting of the system's manufacturer.
3.3. ROLLER’S Akku-Exparo Mini Q & E, ROLLER’S Akku-Exparo Q & E
(Fig. 8)
Consult and comply with the instructions for installation and fitting of the
system's manufacturer. Slide a Q & E ring of appropriate size onto the
pipe. Insert the expansion head into the pipe and press the expanding
head/drive unit against the pipe. Switch on the drive unit (8). When the
expanding head is opened, the drive unit switches automatically to return
and the expanding head is closed again. Keep holding the inching switch
(8) down and push the expanding head/drive unit further. Keep repeating
the expansion process until the expanding jaws (17) are slid all the way
into the pipe. Consult and comply with the instructions for installation and
fitting of the system's manufacturer.
4. Maintenance
Important! Irrespective of the above maintenance work, the ROLLER’S
drive units should be returned together with all tools (pressing tongs, pressing heads, expanding heads) at least once a year to an authorised
ROLLER after-sales service facility for inspection.
4.1. Maintenance
Before maintenance work, pull the mains plug or remove the battery.
Keep the pressing tongs, pressing heads and expanding heads, and particularly their receptacles, clean. Clean heavily soiled metal parts with turpentine oil, for example, and then rustproof them.
Clean plastic parts (housing, batteries) only with a mild soap and a damp
cloth. Do not use domestic cleaning agents. These frequently contain chemicals that can attack plastic parts. On no account use petrol, turpentine
oil, thinners or similar products to clean plastic parts.
4.1.2. Radial presses
Keep the press tongs receptacle clean, in particular clean the press rollers (5) and tongs shank (2) at regular intervals and then lubricate them
with machine oil. Check the functional reliability of the drive unit regularly
by making a pressing with the largest press fitting used. If the pressing
tongs close completely during this pressing operation (see above), the
drive unit is functionally reliable.
The ROLLER’S Multi-Press Mini ACC and ROLLER’S Multi-Press ACC
are fitted with an electronic servicing feature. After about 10,000 pressing
operations, the diode on the pistol grip (9) starts to flash. An inspection is
then due. This is performed by an authorised ROLLER after-sales service facility.
4.1.3. Axial presses
Keep the pressing heads (14) and locating holes inside the pressing device
clean. Keep the expanding heads (16) and expanding mandrel (18) clean.
Lightly grease the expanding mandrel (18) from time to time.
4.1.4. ROLLER’S Akku-Exparo Mini Q & E, ROLLER’S Akku-Exparo Q & E
Keep the expanding heads (16) and expanding mandrel (18) clean. Lightly
grease the expanding mandrel (18) from time to time.
4.2. Inspection/repair
Before any repair work, pull the mains plug or remove the battery. This
work may only be performed by authorised experts or by trained personnel.
After around 10,000 pressing/expanding operations, but at least once a
year, inspection of the pressing/expanding tool is necessary.
The gearboxes of the drive unit in the ROLLER’S Uni-Press E is maintenance-free. They operate in a permanent grease filling and therefore require no lubrication. The motors of the ROLLER’S Uni-Press E, ROLLER’S Uni-Press and ROLLER’S Uni-Press ACC have carbon brushes.
These are subject to wear and must therefore be inspected or replaced
from time to time. Only use genuine ROLLER’S Uni-Press carbon brushes. The ROLLER’S Akku drive units operate electrohydraulically. If the
pressing power is insufficient or oil is lost, the drive unit must be inspected and if necessary repaired by ROLLER or by an authorised ROLLER
after-sales service facility.
Damaged or worn pressing tongs, pressing heads or expanding heads
cannot be repaired.
5. Trouble
5.1. Trouble
Drive unit does not operate.
Cause
Worn carbon brushes (ROLLER’S Uni-Press E, Uni-Press,
Uni-Press ACC).
• Mains lead defective (ROLLER’S Uni-Press E, Uni-Press,
Uni-Press ACC).
• Battery empty or defective (ROLLER’S Akku drive units).
• Drive unit defective.
•
5.2. Trouble
Radial press does not finish pressing operation, pressing tongs do not
close completely.
Cause
• Drive unit overheated (ROLLER’S Uni-Press E, Uni-Press,
Uni-Press ACC).
eng
•
•
•
•
•
•
fra
Worn carbon brushes (ROLLER’S Uni-Press E, Uni-Press,
Uni-Press ACC).
Slipping clutch defective (ROLLER’S Uni-Press E).
Battery empty or defective (ROLLER’S Akku drive units).
Drive unit defective.
Incorrect pressing tongs (pressing contour, size) inserted.
Pressing tongs with stiff action or defective.
5.3. Trouble
During closing of the pressing tongs, a marked ridge is created on the
compression sleeve.
Cause
Damaged or worn pressing tongs/pressing contour
• Incorrect pressing tongs (pressing contour, size) inserted.
• Unsuitable matching of compression sleeve, pipe and support sleeve.
•
5.4. Trouble
Pressing jaws close unevenly when the pressing tongs are not loaded
at "A" and "B" (Fig. 1)
Cause
Pressing tongs have been dropped, compression spring is bent.
•
5.5. Damages
For preventing damages make sure to avoid operating situations like exemplarily shown in Fig. 9 through 11, that no distortion between pressing
tongs, fitting and drive unit occurs.
6. Manufacturer’s Warranty
The warranty period shall be 12 months from delivery of the new product
to the first user but shall be a maximum of 24 months after delivery to the
Dealer. The date of delivery shall be documented by the submission of
the original purchase documents, which must include the date of purchase
and the designation of the product. All functional defects occurring within
the warranty period, which clearly the consequence of defects in production or materials, will be remedied free of charge. The remedy of defects
shall not extend or renew the guarantee period for the product. Damage
attributable to natural wear and tear, incorrect treatment or misuse, failure
to observe the operational instructions, unsuitable operating materials,
excessive demand, use for unauthorized purposes, interventions by the
Customer or a third party or other reasons, for which ROLLER is not
responsible, shall be excluded from the warranty.
Services under the warranty may only be provided by customer service
stations authorized for this purpose by ROLLER. Complaints will only be
accepted if the product is returned to a customer service station authorized by ROLLER without prior interference in an unassembled condition.
Replaced products and parts shall become the property of ROLLER.
The user shall be responsible for the cost of shipping and returning the
product.
The legal rights of users, in particular the right to claim damages from the
Dealer, shall not be affected. This manufacturer’s warranty shall apply
only to new products purchased in the European Union, in Norway or Switzerland.
7. EC declaration of conformity
ROLLER declares that the products decribed in this user manual comply
with corresponding directives 98/37/EG, 89/336/EWG and 73/23/EWG.
Correspondingly this applies to the following norms: DIN EN ISO 12100-1,
DIN EN 12348, DIN EN 50144-1, DIN EN 55014-1, DIN EN 55014-2,
DIN EN 60204-1, DIN EN 60335-1, DIN EN 60335-2-45, DIN EN 60745-1,
DIN EN 60745-2-9, DIN EN 60745-2-11, DIN EN 61000-3-2, DIN EN
61000-3-3, DIN EN 61029-1, DIN EN 61029-2-9.
Waiblingen, 01.11.2008
Albert ROLLER GmbH & Co KG
Manufacturer of Tools and Machines
D-71332 Waiblingen
Les documents de vente ROLLER actuels et respectifs sont valables pour
l'usage des pinces à sertir ROLLER, des têtes à sertir ROLLER et des têtes
à emboîtures ROLLER sur les différents systèmes de raccordement de tubes.
Si le fabricant de système modifie des composants du système de raccordement de tubes ou sont nouvellement mis sur le marché, il faut que leur
situation actuelle d'application soit demandée auprès de la société ROLLER
(Télécopie + 49 7151 17 27-87). Sous réserves de modifications et d'erreurs.
Fig. 1–8
1 Pince à sertir
2 Axe de retenue des pinces
3 Plaque d'appui
4 Broche de verrouillage
5 Galets presseurs
6 Poignée corps de machine
7 Inverseur de rotation
8 Interrupteur à impulsion
9 Poignée interrupteur
10
11
12
13
14
15
16
17
18
Mâchoire de sertissage
Profil de sertissage
Axe
Touche de rappel
Têtes à sertir
Dispositif d'emboîture
Tête à emboîtures
Mâchoire à emboîtures
Broche à emboîtures
Remarques générales pour la sécurité
ATTENTION! Toutes les directives doivent être lues. Le non-respect des directives enummérées ci-après peuvent entraîner une décharge électrique,
des brûlures, et/ou des graves blessures. Le terme utilisé ci-après „appareil
électrique“ se réfère aux outils électriques sur secteur (avec câble de réseau), aux outils électriques sur accu (sans câble de réseau), aux machines
et aux outils électriques. N'utiliser l'appareil que pour accomplir les tâches
pour lesquelles il a été spécialement conçu et conformément aux prescriptions relatives à la sécurité du travail et à la prévention des accidents.
CONSERVER PRECIEUSEMENT CES DIRECTIVES.
A) Poste de travail
a) Maintenir le poste de travail propre et rangé. Le désordre et un poste
de travail non éclairé peut être source d'accident.
b) Ne pas travailler avec l'appareil électrique dans un milieu où il existe
un risque d'explosion, notamment en présence de liquides, de gaz
ou de poussières inflammables. Les appareils électriques produisent
des étincelles, qui peuvent mettre le feu à la poussière ou aux vapeurs.
c) Tenir les enfants et des tierces personnes à l'écart pendant l'utilisation de l'appareil électrique. Il y a un risque de perte de contrôle de
la machine en cas de distraction.
B) Sécurité électrique
a) La fiche mâle de l'appareil électrique doit être appropriée à la prise
de courant. La fiche mâle ne doit en aucun cas être modifée. Ne pas
utiliser d'adaptateur de fiche mâle avec un appareil électrique avec
mise à la terre. Des fiches mâles non modifiées et des prises de courant
appropriées réduisent le risque d'une décharge électrique. Si l'appareil
est doté d'un conducteur de protection, ne brancher la fiche mâle que sur
une prise de courant avec mise à la terre. Sur chantier, en plein air ou sur
un autre mode d'installation, n'utiliser l'appareil électrique qu'avec un
dispositif de protection à courant de défaut de 30 mA (déclencheur par
courant de défaut) sur réseau.
b) Eviter le contact avec des surfaces avec mise à la terre, comme les
tubes, radiateurs, cuisinières et réfrigérateurs. Il y a un risque élevé
de décharge électrique lorsque le corps est en contact avec la terre.
c) Tenir l'appareil électrique à l'écart de la pluie ou de milieux humides.
La pénétration d'eau dans un appareil électrique augmente le risque de
décharge électrique.
d) Ne pas utiliser le câble pour des fins auxquelles il n'a pas été prévu,
notamment pour porter l'appareil, l'accrocher ou pour débrancher
l'appareil en tirant sur la fiche mâle. Tenir le câble éloigné de la chaleur, de l'huile, des angles vifs et des pièces de l'appareil en mouvement. Des câbles endommagés ou emmêlés augmentent le risque d'une
décharge électrique.
e) Si vous travaillez avec l'appareil électrique à l'extérieur, n'utiliser que
des rallonges autorisées pour les travaux à l'extérieur. L'utilisation
d'une rallonge appropriée pour l'extérieur réduit le risque d'une décharge
électrique.
C) Sécurité des personnes
Rainer Hech
a) Etre attentif, veiller à ce que l'on fait et se mettre au travail avec bon
sens si l'on utilise un appareil électrique. Ne pas utiliser l'appareil
électrique en étant fatigué ou en étant sous l'influence de drogues,
fra
d'alcools ou de médicaments. Un moment d'inattention lors de l'utilisation de l'appareil peut entraîner de sérieuses blessures.
b) Porter des équipements de protection personnels et toujours des
lunettes de protection. Le port d'équipements de protection personnels,
comme un masque respiratoire, des chaussures de sécurité anti-dérapantes, un casque de protection ou une protection accoustique selon le
type de l'utilisation de l'appareil électrique, réduit le risque de blessures.
c) Eviter toute utilisation involontaire ou incontrôlée. Veiller à ce que
l'interrupteur soit en position „O“ avant l'enfichage sur la prise de
courant. Porter un appareil électrique avec le doigt sur l'interrupteur ou
brancher un appareil allumé au secteur peut entraîner des accidents. Ne
jamais ponter un interrupteur.
d) Retirer les outils de réglage ou tournevis, avant la mise en service
de l'appareil électrique. Un outil ou une clé se trouvant dans une pièce
de l'appareil en mouvement peut entraîner des blessures. Ne jamais porter
de main dans des pièces en mouvement (tournantes).
e) Ne pas se sur-estimer. Veiller à une position sûre et garder l'équilibre
à tout moment. De ce fait, l'appareil peut être mieux contrôlé dans des
situations inattendues.
f) Porter des vêtements appropriés. Ne pas porter de vêtements amples,
ni de bijoux. Ecarter les cheveux, les vêtements et les gants des
pièces en mouvement.Des vêtements amples, des bijoux ou des cheveux
longs pourraient être happés par des pièces en mouvement.
g) Si des dispositifs d'aspiration et de réception de poussière peuvent
être montés, veiller à ce qu'ils soient branchés et utilisés correctement. L'utilisation de ces dispositions réduit les dangers liés à la poussière.
h) Ne céder l'appareil électrique qu'à du personnel spécialement formé.
Utilisation interdite aux jeunes gens de moins de 16 ans, sauf en cas de
formation professionnelle et sous surveillance d'une personne qualifiée.
D) Manipulation et utilisation méticuleuse d'appareils électriques
a) Ne pas surcharger l'appareil électrique. Utiliser l'appareil électrique
approprié à votre travail. Avec les appareils électriques adéquats, le
travail est meilleur et plus sûr dans la marge de puissance indiquée.
b) Ne pas utiliser d'appareils électriques dont l'interrupteur est défectueux. Un appareil électrique qui ne s'allume ou ne s'éteint plus est
dangereux et doit être réparé.
c) Retirer la fiche mâle de la prise de courant avant d'effectuer des réglages sur l'appareil, de changer des pièces ou de ranger l'appareil.
Cette mesure de sécurité empêche une mise en marche involontaire de
l'appareil.
d) Tenir des appareils électriques inutilisés hors de portée des enfants.
Ne pas céder l'appareil électrique à des personnes dont son utilisation ne leur est pas familière ou qui n'ont pas lu ces directives. Les
appareils électriques sont dangereux s'ils sont utilisés par des personnes
non expérimentés.
e) Prendre scurpuleusement soin de l'appareil électrique. Contrôler si
les pièces de l'appareil en mouvement fonctionnement impeccablement et si elles ne coincent pas, si des pièces sont cassées ou
endommagées, si le fonctionnement de l'appareil électrique est préjudiciable. Avant l'utilisation de l'appareil électrique, faire réparer les
pièces endommagées par des professionnels qualifiés ou par une
station S.A.V. agrée sous contrat avec ROLLER. De nombreux accidents sont dûs à la mauvaise maintenance des outils électriques.
f) Tenir les outils de coupe aiguisés et propres. Des outils de coupe avec
des arêtes aiguisées scrupuleusement soignés coincent moins et sont
plus faciles à utiliser.
g) Consolider la pièces à usiner. Utiliser des dispositifs de serrage ou un
étau pour immobiliser la pièce à usinier. Ainsi, elle est mieux retenue qu'à
la main et en plus les deux mains sont libres pour le maniement de
l'appareil.
h) Utiliser les appareils électriques, les accessoires, les outils etc. conformément à ces directives et comme cela est prescrit pour ce type
spécifique d'appareil. Tenir co mpte des conditions de travail et de
la tâche à réaliser. Utiliser les appareils électriques pour accomplir des
tâches différentes de celles pour lesquelles ils ont été conçus, peut entraîner des situations dangereuses. Pour des raisons de sécurité, toute
modification injustifiée sur l'appareil électrique est formellement interdite.
E) Manipulation et utilisation méticuleuse d'appareils sur accu
a) S'assurer que l'appareil électrique est éteint, avant de brancher l'accu.
Le branchement d'un accu sur un appareil électrique en marche peut entraîner des accidents.
fra
b) Charger les accus uniquement avec les chargeurs recommandés
par le fabricant. Il y a un risque d'incendie si un chargeur, approprié pour
un type précis d'accus, est utilisé avec d'autres accus.
c) N'utiliser que les accus prévus à cet effet avec les appareils électriques. L'utilisation d'autres accus peut entraîner des blessures et des
risques d'accident.
d) Tenir l'accu non utilisé éloigné de trombones de bureau, pièces de
monnaie, clés, clous, vis ou autres petits objets métalliques pouvant
provoquer un court-circuit entre les bornes de l'accu. Un court-circuit
entre les bornes de l'accu peut provoquer des blessures et un risque
d'incendie.
e) En cas de mauvaise utilisation, il peut y avoir des fuites de liquide.
Eviter le contact avec ce liquide. En cas de contact, rincer à l'eau. Si
le liquide pénètre dans les yeux, rincer à l'eau et consulter immédiatement un médecin. Des fuites de liquide provenant de l'accu peuvent
entraîner des irritations de la peau ou des brulûres.
f) Ne pas utiliser le chargeur si les températures du chargeur ou les
températures ambiantes sont inférieures à 5°C/40°F ou b 40°C/105°F.
g) Ne pas jeter les accus défectueux dans les ordures ménagères, mais
les remettre à une station S.A.V. agrée, sous contrat avec ROLLER
ou à une sociéte reconnue pour le traitement des déchets.
F) Service après vente
a) Faire réparer son appareil uniquement par des professionnels qualifés en utilisant des pièces d'origines. Cela garantit le maintien de la
sécurité de l'appareil.
b) Suivre les prescriptions de maintenance et les recommandations
pour le changement des outils.
c) Contrôler régulièrement le câble de raccordement de l'appareil électrique et le faire remplacer s'il est endommagé par un professionnel
qualifié ou par une station S.A.V. agrée, sous contrat avec ROLLER.
Contrôler régulièrement les rallonges et les remplacer si elles sont
endommagées.
Remarques particulières concernant la sécurité
•
•
•
•
•
•
•
•
•
•
•
•
•
•
Utilisez des équipements de protection personnels (par ex. lunettes de protection).
Eviter toute position anormale du corps, ne pas pencher trop en avant.
Avant le remplacement des outils à sertir et à emboîtures, débrancher la
fiche au secteur ou, le cas échéant, retirer l'accu.
Les machines d'entraînement développent une très importante force de
compression. Il faut donc être très prudent. Pendant les travaux avec les
outils à sertir, tenir à l'écart les tierces personnes de la zone de travail.
En cours de fonctionnement, ne maintenir les machines d'entraînement
que par les poignées de corps (6) et d'interrupteur (9). Ne pas toucher les
pièces en mouvement (Zone à sertir et à emboîture).
Ne jamais actionner les sertisseuses radiales sans avoir verrouillé l'axe de
retenue des pinces (2). Risque de rupture !
Appliquer toujours les sertisseuses radiales bien perpendiculaires à l'axe
du tube sur la bague à sertir, jamais en biais.
Ne pas démarrer les sertisseuses radiales sans avoir mis en place la pince
à sertir. N'actionner le mouvement de sertissage que pour la réalisation d'un
accouplement. Sans contre-pression de sertissage par la bague à sertir, la
machine d'entraînement ou la pince à sertir serait inutilement surchargée.
Avant utilisation de pinces à sertir d'autres fabrications, vérifier sil elles conviennent à la machine d'entraînement. Lire et respecter les instructions de
service du fabricant des pinces à sertir.
N'actionner les sertisseuses axiales que si les têtes à sertir sont véritablement en place. Risque de rupture !
Les sertisseuses axiales, avec têtes à sertir, sont toujours à appliquer bien
perpendiculairement à l'axe du tube sur la bague à sertir et jamais en biais.
Visser à fond les têtes à emboîtures sur le dispositif d'emboîture.
Ne pas réparer les pinces à sertir, têtes à sertir, têtes à emboîtures endommagées. Risque de rupture !
Lire et respecter les instructions d'assemblage et de montage des fabricants de systèmes.
1. Caractéristiques techniques
1.1. Références
ROLLER’S Uni-Press E machine d'entraînement
ROLLER’S Uni-Press machine d'entraînement
ROLLER’S Uni-Press ACC machine d'entraînement
ROLLER’S Multi-Press Mini ACC machine d'entraînement
572100
577001
577000
578000
fra
fra
ROLLER’S Multi-Press machine d'entraînement
ROLLER’S Multi-Press ACC machine d'entraînement
ROLLER’S Axial-Press 15 machine d'entraînement
ROLLER’S Axial-Press 40 machine d'entraînement
ROLLER’S Akku-Exparo Mini Q & E machine d'entraînement
ROLLER’S Akku-Exparo Q & E machine d'entraînement
ROLLER’S Accu 12 V, 1,3 Ah
ROLLER’S Accu 12 V, 2,0 Ah
ROLLER’S Alimentation en courant 230 V
Chargeur rapide 12–18 V
Coffret métallique ROLLER’S Uni-Press E
Coffret métallique ROLLER’S Uni-Press
Coffret métallique ROLLER’S Uni-Press ACC
Coffret métallique ROLLER’S Multi-Press
Coffret métallique ROLLER’S Axial-Press 15 et 40
Coffret métallique ROLLER’S Multi-Press Mini ACC,
ROLLER’S Akku-Exparo Mini Q & E
Coffret métallique ROLLER’S Akku-Exparo Q & E
571000
571001
573001
573005
575002
575001
571513
571510
571535
565220
570280
570280
570280
571280
573280
575280
573280
1.2. Domaine d'application
ROLLER’S Multi-Press Mini ACC
Sertisseuse radiale pour la réalisation d'assemblages par
raccord à sertir pour tous les systèmes Pressfitting courants
sur tubes en acier, acier inoxydable, cuivre,
matières plastiques, composite
Ø 10–40 mm
ROLLER’S Uni-Press, Uni-Press ACC, Multi-Press, Multi-Press ACC
Sertisseuses radiales pour la réalisation d'assemblages par
raccord à sertir pour tous les systèmes Pressfitting courants
sur tubes en acier, acier inoxydable, cuivre, matières
plastiques, composite
Ø 12–76 (108) mm
Sertisseuses axiales pour la réalisation d'assemblages par
compression axiale des bagues d'accouplement (assemblage
par bagues coulissantes) sur tubes acier, acier inox, cuivre,
matières plastiques, composite et pour emboîtures sur
tubes en matières plastiques et composite
Ø 12–32 mm
ROLLER’S Akku-Exparo Mini Q & E pour emboîtures de tubes/
bagues du système Wirsbo Quick & Easy
jusqu'à Ø 32 mm
ROLLER’S Akku-Exparo Q & E pour emboîtures sur tubes
en PE-X du système Wirsbo Quick & Easy
Ø 15–40 mm
1.3. Force de poussée et compression
Force de poussée de sertisseuses radiales (jusqu'à Ø 108 mm) 32 kN
Force de compression des sertiss. radiales (jusqu'à Ø 108 mm) 100 kN
Force de poussée de sertisseuses radiales Mini
(jusqu'à Ø 40 mm)
24 kN
Force de poussée de sertisseuses radiales Mini
(jusqu'à Ø 40 mm)
70 kN
Force de compression des ROLLER’S Axial-Press 15
15 kN
Force de compression des ROLLER’S Axial-Press 40
40 kN
1.4. Caractéristiques électriques
ROLLER’S Uni-Press E,
ROLLER’S Uni-Press,
ROLLER’S Uni-Press ACC
230 V 1~; 50-60 Hz; 400 W; 1,8 A
S3 15% (AB 2/10 min)
Double isolation (73/23/CEE)
Antiparasité (89/326/CEE)
ROLLER’S Multi-Press,
Axial-Press 15/40, Akku-Exparo
12 V =; 2,0 Ah; 20 A
ROLLER’S Multi-Press Mini ACC
Akku-Exparo Mini
12 V =; 1,3 Ah; 18 A
Chargeur rapide (1h)
Input
Output
230 V~; 50-60 Hz; 1,0 A
12–18 V -–
--; 50 W; 2,65 A
Alimentation en courant
230 V
Input
Output
230 V~; 50-60 Hz
--; 1,0 A
12 V -–
1.5. Dimensions
ROLLER’S Uni-Press E
ROLLER’S Uni-Press
ROLLER’S Uni-Press ACC
ROLLER’S Multi-Press Mini ACC
ROLLER’S Multi-Press,
Multi-Press ACC
ROLLER’S Axial-Press 15/40
430×110×85 mm (16,9”×4,3”×3,3”)
355×235×85 mm (14,4”×9,2”×3,3”)
355×235×85 mm (14,4”×9,2”×3,3”)
288×260×80 mm (11,3”×10,2”×3,1”)
338×290×85 mm (13,3”×11,4”×3,3”)
330×320×85 mm (13”×12,6”×3,3”)
ROLLER’S Akku-Exparo Mini
ROLLER’S Akku-Exparo
293×248×80 mm (11,5”×9,8”×3,1”)
300×290×85 mm (11,8”×12,6”×3,3”)
1.6. Poids
ROLLER’S Uni-Press E machine d'entraînement
4,4 kg (9,6 lb)
ROLLER’S Uni-Press machine d'entraînement
4,6 kg (10,0 lb)
ROLLER’S Uni-Press ACC machine d'entraînement
4,6 kg (10,0 lb)
ROLLER’S Multi-Press Mini ACC sans accu
2,1 kg (4,5 lb)
ROLLER’S Multi-Press machine d'entraîn. sans accu 4,5 kg (9,8 lb)
ROLLER’S Axial-Press 15/40 machine d'entr. sans accu4,3 kg (9,4 lb)
ROLLER’S Akku-Exparo Mini machine d'entraînement
sans accu
2,0 kg (4,4 lb)
ROLLER’S Akku-Exparo machine d'entraîn. sans accu 3,2 kg (7,0 lb)
ROLLER’S Accu 12 V, 1,3 Ah
0,45 kg (1,0 lb)
ROLLER’S Accu 12 V, 2,0 Ah
0,7 kg (1,5 lb)
Pince à sertir Mini (moyenne)
1,2 kg (2,6 lb)
Pince à sertir (moyenne)
1,8 kg (3,9 lb)
Tête à sertir (paire, moyenne)
0,27 kg (0,6 lb)
Tête à emboîtures (moyenne)
0,16 kg (0,3 lb)
1.7. Information sonore
Valeur émissive relative au poste de travail
ROLLER’S Uni-Press E
ROLLER’S Uni-Press
ROLLER’S Uni-Press ACC
ROLLER’S Multi-Press Mini ACC
ROLLER’S Multi-Press
ROLLER’S Axial-Press 5
ROLLER’S Axial-Press 15/40
ROLLER’S Akku-Exparo Mini
ROLLER’S Akku-Exparo
82 dB(A)
77 dB(A)
77 dB(A)
72 dB(A)
73 dB(A)
81 dB(A)
75 dB(A)
77 dB(A)
73 dB(A)
1.8. Vibrations
Valeur effective pondérée de l'accélération
2,5 m/s2
2. Mise en service
Les documents de vente ROLLER, actuels et respectifs, sont valables
pour l'utilisation des pinces à sertir ROLLER, des têtes à sertir ROLLER
et des têtes à emboîtures ROLLER sur les différents systèmes de raccords de tubes. Si le fabricant de système modifie des composants des
systèmes de raccordement de tube ou sont nouvellement mis sur le marché, il faut que leur situation actuelle d'application soit demandée auprès
de la société ROLLER (Télécopie + 49 7151 17 27-87).
2.1. Branchement électrique
Contrôler la tension du réseau ! Avant le branchement de la machine d'entraînement, le cas échéant du chargeur rapide, veiller à ce que la tension du courant corresponde à celle indiquée sur la plaque signalétique.
Sur chantier, en milieu humide, en plein air ou par d'autres modes
d'installation, l'appareil électrique ne doit fonctionner qu'avec un dispositif de protection à courant de défaut de 30 mA (déclencheur par courant
de défaut) sur réseau.
L'accu livré avec la machine d'entraînement ROLLER, ainsi que les accus de rechange ne sont pas chargés. Charger les accus avant la première utilisation. Pour le chargement, n'utiliser que le chargeur rapide (Réf.
565220). Dès que l'accu est incorporé dans le chargeur, le témoin lumineux rouge du chargeur se met à clignoter. Après 1 heure environ, le témoin lumineux reste fixe, c.à.d. que l'accu est chargé. L'accu n'atteindra
sa capacité maximum qu'après plusieurs chargements.
2.2. Montage (changement) de la pince à sertir (1) sur sertisseuses
radiales (Fig. 1)
Débrancher la prise au secteur, voire retirer l'accu. N'utiliser que des pinces
à sertir avec profil de sertissage spécifique correspondant au système à
sertir Pressfitting. Les pinces à sertir ROLLER sont marquées sur les deux
mâchoires de serrage d'une lettre pour l'identification du profil de sertissage et d'un chiffre pour identifier la dimension. Lire et respecter les indications d'assemblage et de montage des fabricants de systèmes. Ne jamais
sertir avec une pince à sertir inadéquate (profil de sertissage, dimension)
car le sertissage pourrait devenir inutilisable et la machine, ainsi que la
pince à sertir, pourraient subir des dommages.
Il est bon de déposer la machine d'entraînement sur une table ou parterre.
Le montage (changement) de la pince à sertir ne peut être effectué que
si les galets presseurs (5) sont revenus en position arrière extrême. Le
cas échéant, il faut, pour ROLLER’S Uni-Press 2000 et ROLLER’S Uni-
fra
fra
Press E, pousser la manette inverseur de rotation (7) vers la gauche et
actionner l'interrupteur à impulsion (8). Sur ROLLER’S Multi-Press, appuyer sur le bouton de remise à zéro (13) jusqu'à ce que les galets presseurs (5) soient revenus en position arrière.
Ouvrir l'axe de retenue des pinces (2) en poussant sur la broche de verrouillage (4). L'axe de retenue des pinces (2), sort sous l'impulsion d'un
ressort. Monter la pince à sertir (1) choisie. Pousser l'axe de retenue de
la pince à sertir (2) vers l'avant, jusqu'à ce que la broche de verrouillage
(4) est enchiqueté. Appuyer, en même temps, sur la plaque d'appui (3)
directement au dessus de l'axe de retenue de la pince à sertir. N'actionner
le mouvement de sertissage que pour la réalisation d'un assemblage par
raccord à sertir. Sans contre-pression de sertissage par la bague à sertir, la machine d'entraînement, voire la pince à sertir, seraient inutilement
surchargées.
Ne jamais effectuer de sertissage si l'axe de retenue de la pince (2)
n'est pas verrouillée. Risque de rupture!
2.3. Montage (changement) des têtes à sertir (14) sur sertisseuses
axiales (Fig. 6, 7)
Retirer l'accu. N'utiliser que des têtes à sertir spécifiques aux systèmes.
Les pinces à sertir ROLLER sont marquées, par des lettres pour l'identification du système de bague à sertir et d'un chiffre pour identifier la
dimension. Lire et respecter les indications d'assemblage et de montage
du fabricant de système. Ne jamais sertir avec des têtes à sertir inadéquates (système de bague à sertir, dimension) car le sertissage pourrait
devenir inutilisable et la machine ainsi que les têtes à sertir pourraient
subir des dommages.
Introduire à fond les têtes à sertir (14) choisies, le cas échéant, tourner
jusqu'en position de crantage (crantage à billes). Tenir propre les têtes à
sertir et le logement dans le porte pinces à sertir.
2.4. Montage (changement) de la tête à emboîture (16) sur ROLLER’S
Axial-Press 15 (Fig. 6)
Retirer l'accu. Monter le dispositif d'emboîture (15) (accessoires). Pour
cela, nettoyer les faces de raccordements, poser le dispositif d'emboîture,
serrer fortement les 2 vis à tête cylindrique. Graisser légèrement la broche
d'emboîtement (18). Visser la tête à emboîture choisie jusqu'à la butée
sur le dispositif d'emboîture. N'utiliser que des têtes à emboîtures spécifiques aux systèmes. Les têtes à emboîtures ROLLER sont marquées
par des lettres pour l'identification du système bague à sertir et d'un chiffre pour identifier la dimension. Lire et respecter les indications d'assemblage
et de montage du fabricant de système. Ne jamais faire des emboîtures
avec des têtes à emboîtures inadéquates (système de bagues à sertir,
dimension), car la jonction pourrait devenir inutilisable et la machine, ainsi
que les têtes à emboîtures pourraient subir des dommages.
Veiller, lors du procédé d'emboîtement, à ce que la bague à sertir ait
suffisamment d'espace envers la tête à emboîtures, sinon les mâchoires
d'emboîtures (17) risquent de se déformer ou de se casser.
Pour la réalisation de sertissages en un endroit étroit, la dispositif d'emboîture peut être démonté.
2.5. Montage (changement) de la tête à emboîtures (16) sur ROLLER’S
Akku-Exparo Mini Q & E, ROLLER’S Akku-Exparo Q & E (Fig. 8)
Retirer l'accu. N'utiliser que des têtes à emboîture d'origine Wirsbo Quick
& Easy. Lire et respecter les indications d'assemblage et montage du
fabricant de système. Ne jamais emboîter avec des têtes à emboîtures
inadéquates (système, dimension), car la jonction pourrait devenir inutilisable et la machine, ainsi que les têtes à emboîtures pourraient subir des
dommages. Graisser légèrement la broche d'emboîtement (18). Visser à
fond (butée) la tête à emboîture sur le dispositif d'emboîture. Les têtes à
emboîtures P et Cu ROLLER sont appropriées pour l'emboîteur à accu
ROLLER’S Akku-Exparo Mini Q & E, ROLLER’S Akku-Exparo Q & E et
ne doivent donc pas être utilisées.
semblage (observer les réglementations, normes, directives, etc…, en vigueur dans les différents pays).
Avant toute utilisation, vérifier si la pince à sertir comporte des dommages
et usures, en particulier le profil de sertissage (11) des deux mâchoires(10).
S'il y a, pendant la fermeture de la pince à sertir, formation d'une bavure
importante sur la bague à sertir, il se peut que le sertissage soit défectueux, voire non étanche (voir 5. Défauts).
3.1.1. Mode opératoire
Comprimer à la main la pince à sertir (1) jusqu'à la faire passer par dessus
la bague à sertir. Poser la machine d'entraînement avec la pince à sertir
perpendiculaire au tube sur le Pressfitting. Lâcher la pince à sertir pour
qu'elle se referme autour du Pressfitting. Maintenir la machine d'entraînement par la poignée corps de machine (6) et la poignée interrupteur (9).
Pour ROLLER’S Uni-Press E, pousser l'inverseur de rotation (7) vers la
droite (avance) et appuyer sur l'interrupteur à impulsion (8). Maintenir l'interrupteur à impulsion (8) en position marche jusqu'à achèvement du
sertissage et jusqu'à fermeture de la pince à sertir. Pousser l'inverseur de
rotation (7) vers la gauche (recul) et actionner l'interrupteur à impulsion
(8) jusqu'au recul total des galets presseurs et jusqu'à ce que l'accouplement à friction réagisse. Ne pas surcharger inutilement l'accouplement à
friction.
Pour ROLLER’S Uni-Press et ROLLER’S Multi-Press, maintenir l'interrupteur à impulsion (8) en position marche jusqu'à la fermeture complète de la pince à sertir. Cela sera signalé par un signal acoustique (clic).
Rester appuyé sur l'inverseur (10) jusqu'à ce que les galets presseurs (5)
soient revenus en arrière.
Pour ROLLER’S Multi-Press Mini ACC, ROLLER’S Multi-Press ACC et
ROLLER’S Uni-Press ACC, maintenir l'interrupteur à impulsion (8) en position marche jusqu'à la fermeture complète de la pince à sertir. Après le
sertissage achevé, la machine d'entraînement se met automatiquement
sur marche retour (marche arrière forcée).
Comprimer la pince à la main pour pouvoir la retirer du Pressfitting.
3.1.2. Sécurité de fonctionnement
Pour ROLLER’S Uni-Press E, le procédé de sertissage est terminé après
relâchement de l'interrupteur à impulsion (8). Pour la sécurité mécanique
de la machine d'entraînement, un accouplement de sécurité à friction supplémentaire, également commandé par un limiteur de couple, est activé
aux deux fins de course des galets presseurs.
ROLLER’S Uni-Press et ROLLER’S Multi-Press termine le processus de
sertissage automatiquement en émettant un signal acoustique (clic). ROLLER’S Multi-Press Mini ACC, ROLLER’S Multi-Press ACC et ROLLER’S
Uni-Press ACC termine le processus de sertissage automatiquement en
émettant un signal acoustique (clic) et revient automatiquement en arrière
(marche arrière forcée).
Important: Pour obtenir un sertissage correct, il est nécessaire que les
pinces à sertir soient complètement fermées. Il faut, après le sertissage
achevé, vérifier et observer la fermeture totale des mâchoires de serrage (10), aussi bien à hauteur des pointes (Fig. 1, en “A”), qu'à hauteur du
collier d'assemblage (Fig. 1, en “B”). S'il y a, pendant la fermeture de la
pince à sertir, formation d'une bavure importante sur la bague à sertir, il
se peut que le sertissage soit défectueux, voire non étanche (voir 5.
Défauts).
3.1.3. Sécurité de travail
Pour des raisons de sécurité de travail, la machine d'entraînement à sertir
est équipée d'un interrupteur de sécurité à impulsion. Celui-ci permet à
tout moment, mais surtout en cas de danger, l'arrêt immédiat de la machine
d'entraînement et, de ce fait, celui de l'entraînement de la pince. La machine
d'entraînement peut être inversée sur marche arrière (recul) quelle que
soit la position.
3. Fonctionnement
3.2. Sertisseuses axiales (Fig. 7, 8)
3.1. Sertisseuses radiales (Fig. 1 à 5)
Avant chaque utilisation, il faut procéder à un essai de sertissage avec
une bague à sertir mise en place et la pince adéquate. La pince à sertir
doit fermer totalement. Il faut, pendant cet essai, vérifier et observer, après
le sertissage achevé, la fermeture totale des mâchoires de serrage (10)
aussi bien à hauteur des pointes (Fig 1, en “A”), qu'à hauteur du collier
d'assemblage (Fig. 1, en “B”). Vérifier également l'étanchéité de l'as-
3.2.1. Sertissages avec ROLLER’S Axial-Press 15 et Axial-Press 40
Mettre en place et pousser dans les têtes à sertir (14) l'assemblage par
compression pré-montée. Appuyer légèrement sur l'interrupteur à impulsion (8), afin que les têtes à sertir avancent doucement jusqu'à toucher
la bague d'accouplement. Attention danger d'écrasement! Ne pas mettre de mains dans la zône de mouvements des têtes à sertir! Maintenir la
machine d'entraînement par la poignée corps de la machine (6) et poig-
fra
fra
née interrupteur (8) en position marche, jusqu'à ce que la bague à sertir
touche la bague d'accouplement, ce qui est annoncé par un signal acoustique (clic). Appuyer sur le bouton de remise à zéro (13), jusqu'au recul
total des têtes à sertir (14).
Différentes têtes à sertir sont nécessaires dans le système d'assemblage par compression axiale des bagues d'accouplement avec bague à sertir IV, pour une seule dimension de tube. Lire et respecter les indications
d'assemblage et de montage du fabricant de systèmes.
Le système d'assemblage par compression axiale des bagues d'accouplement avec bagues à sertir RV, exige un pré-sertissage et un sertissage
de finition, càd qu'il faut placer les têtes à sertir à une distance maxi des
logements pour le raccord d'accouplement de bagues à sertir. Avant la
deuxième compression, les têtes à sertir seront, en pivotant de 180°,
placées à une distance mini des logements du raccord d'accouplement
des bagues à sertir. Lire et respecter les indications d'assemblage et de
montage du fabricant de systèmes.
3.2.2. Emboîtures avec ROLLER’S Axial-Press 15
Glisser la bague à sertir sur le tube, introduire la tête à emboîtures jusqu'à la butée dans le tube et pousser la machine d'entraînement de la tête à emboîture contre le tube. Mettre en marche la machine d'entraînement (8). Pendant le processus d'emboîture, il faut veiller à ce que la bague à sertir soit suffisamment espacé de la tête à emboîture, sinon, les
mâchoires à emboîtures (17) pourraient se déformer ou casser. Actionner
l'interrupteur d'impulsion (8) jusqu'à ce que le tube soit évasé. La fin du
processus sera signalée par un signal acoustique (clic). Actionner le bouton de remise à zéro (14), jusqu'à ce que la tête à emboîture soit refermée. Répéter éventuellement l'emboîture. Lire et respecter les indications d'assemblage et montage et montage du fabricant de système.
3.3. ROLLER’S Akku-Exparo Mini Q & E, ROLLER’S Akku-Exparo Q & E
(Fig. 8)
Lire et respecter les indications d'assemblage et de montage du fabricant
de systèmes. Glisser la bague Q & E respective sur le tube. Introduire la
tête à emboîtures dans le tube. Introduire la tête à emboîture dans le tube et pousser la machine d'entraînement de la tête à emboîtures contre
le tube. Mettre la machine d'entraînement (8) en marche. Dès ouverture
de la tête à emboîture, la machine d'entraînement se met automatiquement en marche arrière et la tête à emboîture se referme à nouveau. Maintenir l'interrupteur à impulsion (8) en position marche et faire avancer la
machine d'entraînement de la tête à emboîtures. Répéter le processus
d'emboîtement jusqu'à ce que les mâchoires à emboîtures (17) sont en
butée dans le tube. Lire et respecter les indications d'assemblage et de
montage du fabricant de systèmes.
4. Maintenance
Important! Intact après cet entretien sus-cité, les machines d'entraînement devraient, avec tous les outils (pinces à sertir, têtes à sertir, têtes à
emboîtures), au moins une fois par an, faire l'objet d'une inspection auprès d'un atelier de S.A.V. autorisé, sous contrat avec ROLLER.
4.1. Entretien
Débrancher la prise du secteur, ou selon le cas, retirer l'accu, avant tous
travaux d'entretien!
Maintenir propre les pinces à sertir, les têtes à sertir et les têtes à emboîtures, en particulier leurs logements. Nettoyer les pièces métalliques fortement encrassées avec, par ex., de l'huile de térébenthine et protéger
contre l'oxydation.
Les pièces en matières plastiques (corps de machine, accus) sont à nettoyer qu'avec du savon doux et un torchon humide. Ne pas utiliser de produits nettoyants ménagers. Ces derniers contiennent souvent des produits chimiques pouvant détériorer les pièces en matières plastiques. N'utiliser, en aucun cas, ni essence, ni huile de térébenthine, ni diluants ou
autre produits similaires pour nettoyer les pièces en matières plastiques.
Veiller à ce qu'aucun liquide ne parvienne à pénétrer dans un appareil
électrique. Ne jamais tremper un appareil électrique dans un liquide.
4.1.1. Pinces à sertir
Vérifier régulièrement le bon fonctionnement des pinces à sertir, le cas
échéant, les nettoyer et graisser les axes (12) des mâchoires à sertir avec
de l'huile pour machine, sans démonter les pinces à sertir. Eliminer, les
dépôts sur le profil de sertissage (11). Vérifier régulièrement l'état de fonctionnement de toutes les pinces à sertir avec un raccord d'accouplement
inversé. Les mâchoires de sertissage (10) doivent, après achèvement du
sertissage, fermer tant à hauteur des extrémités (Fig. 1, en “A”), qu'à
hauteur du collier de raccordement (Fig. 1 en “B”). Ne pas réutiliser des
pinces endommagées ou usées. En cas de doute, envoyer pour inspection, la machine d'entraînement avec toutes les pinces à sertir dans un
atelier de S.A.V. autorisé, sous contrat avec ROLLER.
4.1.2. Sertisseuses radiales
Maintenir propre les logements des pinces à sertir. En particulier, nettoyer régulièrement les galets presseurs (5) et les axes de retenue des
pinces à sertir (2) et huiler avec de l'huile de la machine. Tester régulièrement la sécurité de fonctionnement de la machine d'entraînement,
en effectuant un sertissage avec le plus grand raccord d'accouplement.
Si la pince à sertir ferme totalement pendant ce sertissage (voir cidessus), la sécurité de fonctionnement de la machine d'entraînement
est atteinte.
ROLLER’S Multi-Press Mini ACC et ROLLER’S Multi-Press ACC sont
équipées d'un système électronique. Après environ 10 000 sertissages,
une diode sur la poignée de commande s'allume. Une inspection vient
alors à échéance. Cette inspection sera effectuée par un atelier de S.A.V.,
autorisé, sous contrat avec ROLLER.
4.1.3. Sertisseuses axiales
Maintenir propre les têtes à sertir (14) et les perçages de positionnement
du porte-pinces à sertir. Maintenir propre les têtes à emboîtures (16) et la
broche à emboîture (18). Graisser légèrement, de temps en temps, la
broche à emboîtures.
4.1.4. ROLLER’S Akku-Exparo Mini Q & E, ROLLER’S Akku-Exparo Q & E
Tenir propre les têtes à emboîtures (16) et la broche à emboiture (18).
Graisser légèrement, de temps en temps, la broche à emboîtures.
4.2. Inspection / Réparation
Débrancher la prise au secteur, voire retirer l'accu, avant toute intervention
pour les travaux de maintenance ou de réparation. Ces travaux ne doivent être réalisés que par des professionnels confirmés ou par des personnes compétentes.
Après 10 000 sertissages / emboîtures, il est, cependant, nécessaire
d'effectuer, au moins un fois par an, une inspection de l'outil de sertissage et à emboîture.
L'engrenage de la machine d'entraînement ROLLER’S Uni-Press E est
sans entretien. Le moteur de ROLLER’S Uni-Press E, ROLLER’S UniPress et ROLLER’S Uni-Press ACC est équipé de balais de charbon.
Ceux-ci s'usent et doivent être régulièrement contrôlés, voire remplacés.
N'utiliser que des balais de charbon d'origine ROLLER’S Uni-Press. Les
machines d'entraînement à accu ROLLER fonctionnent de façon électrohydraulique. En cas de manque de pression ou de fuite d'huile, la
machine d'entraînement doit être vérifiée par ROLLER ou un atelier de
S.A.V. autorisé, sous contrat avec ROLLER.
5. Défauts
5.1. Défaut
La machine ne marche pas.
Cause
• Balais de charbon usés (ROLLER’S Uni-Press E, Uni-Press 2000,
Uni-Press ACC).
• Câble de raccordement défectueux (ROLLER’S Uni-Press E,
Uni-Press, Uni-Press ACC).
• Accu vide ou défectueux (Machines d'entraînement à accu ROLLER).
• Machine d'entraînement défectueuse.
5.2. Défaut
La sertisseuse radiale n'achève pas le sertissage. La pince à sertir ne
ferme pas complètement.
Cause
• La machine d'entraînement surchauffe (ROLLER’S Uni-Press E,
Uni-Press, Uni-Press ACC).
• Balais de charbon usés (ROLLER’S Uni-Press E, Uni-Press,
Uni-Press ACC).
fra
fra
•
•
•
•
•
Accouplement à friction défectueux (ROLLER’S Uni-Press E).
Accu vide ou défectueux (machines d'entraînement à accu ROLLER).
Machine d'entraînement défectueuse.
Utilisation d'une fausse pince à sertir (profil de sertissage, dimension).
Fonctionnement dur ou défectuosité de la pince à sertir.
5.3. Défaut
Formation d'une bavure importante sur la bague à sertir lors de la
fermeture de la pince à sertir.
Cause
• Pince à sertir/profil de sertissage défectueux ou usé.
• Utilisation d'une fausse pince à sertir (profil de sertissage, dimension).
• Mauvais accord entre bague à sertir, tube et bague support.
5.4. Défaut
Fermeture décalée des mâchoires à sertir, sans contrainte de la pince à
sertir, en “A” et “B” (Fig. 1).
7. Déclaration de conformité CEE
ROLLER déclare par la présente, que les machines citées dans cette
notice d’utilisation sont conformes aux Directives 98/37/EG, 89/336/EWG
et 73/23/EWG. Les normes suivantes ont été appliquées: DIN EN ISO
12100-1, DIN EN 12348, DIN EN 50144-1, DIN EN 55014-1, DIN EN
55014-2, DIN EN 60204-1, DIN EN 60335-1, DIN EN 60335-2-45, DIN EN
60745-1, DIN EN 60745-2-9, DIN EN 60745-2-11, DIN EN 61000-3-2,
DIN EN 61000-3-3, DIN EN 61029-1, DIN EN 61029-2-9.
Waiblingen, 01.11.2008
Albert ROLLER GmbH & Co KG
Usine de fabrication d'outils et de machines
D-71332 Waiblingen
Cause
• Chute à terre de la pince à sertir, ressort de compression déformé.
5.5. Sinistres
Afin de prévenir tout dommage au niveau de la sertisseuse il est recommandé, dans des situations de travail similaires à celles présentées en
Fig. 9 à 11, de ne pas provoquer de tension entre la machine d’entraînement, la pince à sertir et le raccord.
6. Garantie du fabricant
Le délai de garantie est de 12 mois à compter de la date de prise en charge
du nouveau produit par le premier utilisateur, au plus 24 mois à compter
de la date de livraison chez le revendeur. La date de la délivrance est à
justifier par l’envoi des documents d’achat originaux, qui doivent contenir
les renseignements sur la date d’achat et la désignation du produit. Tous
les défauts de fonctionnement qui se présentent pendant le délai de
garantie et qui sont dus à des vices de fabrication ou de matériel, seront
remis en état gratuitement. Le délai de garantie pour le produit n’est ni
prolongé ni renouvelé par la remise en état. Sont exclus de la garantie
tous les dommages consécutifs à l’usure naturelle, à l’emploi et traitement
non appropriés, au non respect des instructions d’emploi, à des moyens
d’exploitation non-adéquats, à un emploi forcé, à une utilisation inadéquate, à des interventions par l’utilisateur ou des personnes non compétentes ou d’autres causes n’incombant pas à la responsabilité de ROLLER.
Les prestations sous garantie ne doivent être effectuées que par des
ateliers de service après-vente REMS autorisés. Les appels en garantie
ne seront reconnus que si le produit est renvoyé à l’atelier ROLLER en
état non démonté et sans interventions préalables. Les produits et les pièces remplacés redeviennent la propriété de ROLLER.
Les frais d’envoi et de retour seront à la charge de l’utilisateur.
Les droits juridiques de l’utilisateur, en particulier pour ses réclamations
vis à vis du revendeur, restent inchangés. Cette garantie du fabricant n’est
valable que pour les nouveaux produits, achetés au sein de l’Union
Européenne, en Norvège ou en Suisse.
Rainer Hech
ROLLER’S Uni-Press E
Teileverzeichnis
Spare parts list
Liste des pièces
Elenco dei pezzi
ROLLER’S Uni-Press E
––
3
5
6
––
8
––
10
11
12
13
14
15
––
19
20
21
22
23
24
25
26
27
28
29
30
31
32
––
35
43
44
45
46
47
48
49
50
––
51
53
55
––
––
57
58
59
60
62
63
64
65
66
––
67
68
––
deu
eng
fra
ita
Rollenträger mont.
Pos. 1, 2, 4
Spiralspannstift
Antriebsgehäuse
Stift
Zangenhaltebolzen compl.
Pos 7, 10, 68
Druckfeder
Druckleiste mont.
Pos. 9, 11, 12 und 13
Senkschraube
Druckfeder
Verriegelungsstift
Halbmondring
Zylinderschraube
Rillenkugellager
Ritzel komplett
Pos.16 –19
Sicherungsscheibe
O-Ring
Passscheibe
Spindel
Druckmutter
Passfeder
Axial-Nadelkranz
Laufscheibe
Sicherungsring
Stützring
Stirnrad
Sicherungsscheibe
Zylinderschraube
Lagerplatte
Ritzelwelle m. Rutschkupplung
Pos. 15, 33, 34, 36– 41
Rillenkugellager
Zwischengehäuse
O-Ring
Blechschraube
O-Ring
Haltestift
Schutz
Flachkopfschraube
Rillenkugellager
Anker mit Lüfter 110 V
Pos. 51 und 52
Anker mit Lüfter 230 V
Pos. 51 und 52
Lüfter
Rillenkugellager
Stator 110 V
Stator 230 V
Gehäuseschalen
Pos. 56 und 61
Schalter
Kohlebürsten Paar
Kohlebürsten Paar
Schenkelfeder 110 V
Schenkelfeder 230 V
Kondensator kompl.
Blechschraube
Linsenschraube
Biegeschutz
Anschlussleitung 110 V
Anschlussleitung 230 V
Anschlussleitung CH
Kohleführung
Motor kompl. 110 V
Pos. 50 bis 67
Motor kompl. 230 V
Pos. 50 bis 67
Motor kompl. CH
Pos. 50 bis 67
Sprengring
Anschlagscheibe
Getriebefett
Roller holder mont.
Pos. 1, 2, 4
Spiral pin
Housing
Pin
Tongs shank compl.
Pos 7, 10, 68
Pressure spring
Pressure plate mont.
Pos. 9, 11, 12 and 13
Countersunk screw
Pressure spring
Thrust piece
Crescent ring
Fillister head screw
Grooved ball bearing
Pinion compl.
Pos.16 –19
Locking washer
Locking ring
Adjusting washer
Spindle
Pressure nut
Key
Axial needle collar
Washer
Locking ring
Back-up ring
Wheel
Locking washer
Fillister head screw
Bearing plate
Pinion shaft w. safety clutch
Pos. 15, 33, 34, 36– 41
Grooved ball bearing
Intermediate housing
Locking ring
Sheet metal screw
Locking ring
Pin
Protector
Countersunk screw
Grooved ball bearing
Rotor with ventilator 110 V
Pos. 51 and 52
Rotor with ventilator 230 V
Pos. 51 and 52
Ventilator
Grooved ball bearing
Stator 110 V
Stator 230 V
Housing shells
Pos. 56 and 61
Switch
Carbon bruhes pair
Carbon bruhes pair
Key 110 V
Key 230 V
Capacitor compl.
Sheet metal screw
Fillister head screw
Rubber sleeve
Connecting cable 110 V
Connecting cable 230 V
Connecting cable CH
Carbon guide
Motor compl. 110 V
Pos. 50 – 67
Motor compl. 230 V
Pos. 50 – 67
Motor compl. CH
Pos. 50 – 67
Snap ring
Washer
Gear flow grease
Support galets mont.
Pos. 1, 2, 4
Goupille spiralée
Carcasse
Goupille
Axe de serrage de la pince cpl.
Pos 7, 10, 68
Ressort de compression
Barre de pression mont.
Pos. 9, 11, 12 et 13
Vis à tête fraisée
Ressort de compression
Goupille d’ouverture
Bague d’arret
Vis à tête cylindrique
Roulement à billes
Pignon compl.
Pos.16 –19
Rondelle de sécurité
Joint torique
Rondelle d’ajustage
Arbre
Ecrou de compression
Clavette
Cage à aiguilles axiale
Rondelle
Circlip
Bague d’appui
Roue droite
Rondelle de sécurité
Vis à tête cylindrique
Plaque d’àppui
Arbre pignon av. embray sécur.
Pos. 15, 33, 34, 36 – 41
Roulement à billes
Carcasse intermediaire
Joint torique
Vis à tôle
Joint torique
Tige
Protection
Vis à tête platé
Roulement à billes
Induit avec ventilateur 110 V
Pos. 51 et 52
Induit avec ventilateur 230 V
Pos. 51 et 52
Ventilateur
Roulement à billes
Stator 110 V
Stator 230 V
Coquille carcasse
Pos. 56 et 61
Interrupteur
Balais de charbon paire
Balais de charbon paire
Clavette 110 V
Clavette 230 V
Condensateur compl.
Vis à tôle
Vis tête fraisée bombée
Douille en caoutchouc
Raccordement 110 V
Raccordement 230 V
Raccordement CH
Guide de charbon
Moteur compl. 110 V
Pos. 50 – 67
Moteur compl. 230 V
Pos. 50 – 67
Moteur compl. CH
Pos. 50 – 67
Jonc
Rondelle
Graisse à engrenages
Portarulli mont.
Pos. 1, 2, 4
Spina elastica
Carcassa
Perno
Bullone della ganascia compl.
Pos 7, 10, 68
Molla di compressione
Barretta di pressione mont.
Pos. 9, 11, 12 e 13
Vite a testa svasata
Molla di compressione
Spina di compressione
Anello mezzaluna
Vite a testa cilindrica
Cuscinetto a sfere
Pignone compl.
Pos.16 –19
Ranella di sicurezza
Guarnizione O-Ring
Ranella di regolazione
Albero
Dado di compressione
Chiavetta
Gabbia assiale a rullini
Ranella
Anello di sicurezza
Rondella d’appoggio
Ruota dentata cilindrica
Ranella di sicurezza
Vite a testa cilindrica
Piastra di supporta
Albero pignone a innest. sicurr.
Pos. 15, 33, 34, 36 – 41
Cuscinetto a sfere
Carcassa intermedia
Guarnizione O-Ring
Vite da lamiera
Guarnizione O-Ring
Spina
Protezione
Vite a testa cilindrica
Cuscinetto a sfere
Indotto con ventilatore 110 V
Pos. 51 e 52
Indotto con ventilatore 230 V
Pos. 51 e 52
Ventilatore
Cuscinetto a sfere
Statore 110 V
Statore 230 V
Calotta carcassa
Pos. 56 e 61
Interruttore
Carboncini paio
Carboncini paio
Chiavetta 110 V
Chiavetta 230 V
Condensatore compl.
Vite da lamiera
Vite a testa svasata con perno
Manicotto di protezione
Cavo d’allacciamento 110 V
Cavo d’allacciamento 230 V
Cavo d’allacciamento CH
Guida carboncini
Motore compl. 110 V
Pos. 50 – 67
Motore compl. 230 V
Pos. 50 – 67
Motore compl. CH
Pos. 50 – 67
Rondella
Ranella
Grasso ingranaggi
570226
088072
572251 A
570210
570239
570213
570211
083176
341010
570208 R
059035
081010
057088
572212
059042
060009
086051
570203 R
572202 R
582039
057103
057104
059100
570216 R
572221 R
059101
081093
582018 R
572214 R
057001
570207 R
060109
083073
060175
570214 R
570231 R
570232
057004
572526 R110
572526 R220
572525
057162
572524 R110
572524 R220
572501 R
572507
572520 R110
572520 R220
572522
572523
027006
083064
083169
032057
572527 R110
572527 R220
572527 RSEV
572529 R
572505 R110
572505 R220
572505 ASEV
059112
570237 R
091002 R0,5
ROLLER’S Uni-Press
Teileverzeichnis
Spare parts list
Liste des pièces
Elenco dei pezzi
ROLLER’S Uni-Press
––
3
5
6
––
8
––
10
11
12
13
14
15
16
17
18
19
20
21
22
––
––
––
31
32
33
34
42
43
44
––
––
51
––
65
70
––
72
––
––
––
100
101
102
103
104
deu
eng
fra
Rollenträger mont.
Pos. 1, 2, 4
Spiralspannstift
Antriebsgehäuse
Stift
Zangenhaltebolzen kompl.
Pos. 7, 10, 14
Druckfeder
Druckleiste mont.
Pos. 9, 11, 12 und 13
Senkschraube
Druckfeder
Verriegelungsstift
Halbmondring
Anschlagscheibe
Schutz
Flachkopfschraube
Gewindestift
O-Ring
Distanz
Hülse
Scheibe
Druckfeder
Vorschubkolben kompl.
Pos. 23– 25
Ersatz Ventil Druckseite
Pos. 26– 28
Hydraulikblock Standard kompl.
Pos. 26–29, 34–41, 45–49
und 105
Zylinderstift
Hebel
Betätigungsknopf
Spiralspannstift
O-Ring
Ausgleichsbehälter
Stopfen mit Stabmagnet
Überdruckventil
Pos. 45– 49
Gehäuseschalen
Pos. 50 und 99
Brems-Relais kompl.
Isolierring
mit Kohlehalter
Pos. 66– 69
Kohlebürsten Paar
Rillenkugellager
Anker mit Lüfter 230 V
Pos 71 und 72
Stator 230 V
Motor kompl.
mit Gehäuse 230 V
Pos. 50, 51, 65– 73, 99– 103
Planetengetriebe
Pos. 74– 85
Pumpe kompl.
Pos. 86– 94, 96 – 98
Schalter
Anschlussleitung 230 V
Biegeschutz
Blechschraube
Ritzel
Roller holder mont.
Support galets mont.
Pos. 1, 2, 4
Pos. 1, 2, 4
Spiral pin
Goupille spiralée
Housing
Carcasse
Pin
Goupille
Tongs shank compl.
Axe de serrage de la pince cpl.
Pos. 7, 10, 14
Pos. 7, 10, 14
Pressure spring
Ressort de compression
Pressure plate mont.
Barre de pression mont.
Pos. 9, 11, 12 und 13
Pos. 9, 11, 12 und 13
Countersunk screw
Vis à tête fraisée
Pressure spring
Ressort de compression
Thrust piece
Goupille d’ouverture
Crescent ring
Bague d’arret
Washer
Rondelle
Protector
Protection
Countersunk screw
Vis à tête platé
Grub screw
Vis sans tête
Locking ring
Joint torique
Distance
Distance
Bushing
Douille
Washer
Rondelle
Pressure spring
Ressort de compression
Feed piston
Piston d’avance
Pos. Pos. 23– 25
Pos. Pos. 23 – 25
Valve pressure side
Soupape coté pression
Pos. 26– 28
Pos. 26 – 28
Hydraulic block Standard compl. Bloc hydraul. Standard compl.
Pos. 26–29, 34–41, 45–49
Pos. 26–29, 34–41, 45–49
and 105
et 105
Straight pin
Tige cylindrique
Lever
Levier
Actuating button
Bouton d’actionnement
Spiral pin
Goupille spiralée
Locking ring
Joint torique
Compensating reservoir
Reservoir de compensation
Plug with magnet
Bouchon avec magnet
Valve body
Corps de soupape
Pos. 45– 49
Pos. 45 – 49
Housing shells
Coquille carcasse
Pos. 50 and 99
Pos. 50 et 99
Relay compl.
Relais compl.
Insulating ring
Bague isolante
with carbon holder
avec support de charbon
Pos. 66– 69
Pos. 66 – 69
Carbon bruhes pair
Balais de charbon paire
Grooved ball bearing
Roulement à billes
Rotor with ventilator 230 V
Induit avec ventilateur 230 V
Pos 71 and 72
Pos 71 et 72
Stator 230 V
Stator 230 V
Motor compl.
Moteur compl.
with housing 230 V
avec carcasse 230 V
Pos. 50, 51, 65– 73, 99 – 103
Pos. 50, 51, 65 – 73, 99 – 103
Planetary gear drive
Engranage planetaire
Pos. 74– 85
Pos. 74 – 85
Pump compl.
Pompe compl.
Pos. 86– 94, 96– 98
Pos. 86 – 94, 96 – 98
Switch
Interrupteur
Connecting cable 230 V
Raccordement 230 V
Rubber sleeve
Douille en caoutchouc
Sheet metal screw
Vis à tôle
Pinion
Pignon
ita
Portarulli mont.
Pos. 1, 2, 4
Spina elastica
Carcassa
Perno
570226
088072
571251 A
570210
Bullone della ganascia compl.
Pos. 7, 10, 14
570239
Molla di compressione
570213
Barretta di pressione mont.
Pos. 9, 11, 12 und 13
570211
Vite a testa svasata
083176
Molla di compressione
341010
Spina di compressione
570208 R
Anello mezzaluna
059035
Ranella
570237 R
Protezione
570231 R
Vite a testa cilindrica
570232
Perno filettato
084072
Guarnizione O-Ring
060009
Distanza
577205 A
Astuccio
577204 R
Ranella
086053
Molla di compressione
571265 R
Pistone d’avanzamento
Pos. Pos. 23 – 25
577202
Valvola lato di pressione
Pos. 26 – 28
571278 R
Blocco idraulico Standard compl.
Pos. 26–29, 34–41, 45–49
e 105
571240
Spina cilindrica
088189
Leva
571208 R
Pulsante d’azionamento
571214 R
Spina elastica
088120
Guarnizione O-Ring
060015
Contenitore di compensazione 571212 R
Tappo con calamita
571249 R
Corpo valvola
Pos. 45 – 49
571228
Calotta carcassa
Pos. 50 e 99
577503 R
Relais compl.
577516 R220
Anello di isolamento
con supporto carboncini
Pos. 66 – 69
577512
Carboncini paio
577511 R
Cuscinetto a sfere
057162
Indotto con ventilatore 230 V
Pos 71 e 72
577506 R220
Statore 230 V
577507 R220
Motore compl.
con carcassa 230 V
Pos. 50, 51, 65 – 73, 99 – 103
577501 R220
Ingranaggio planetario
Pos. 74 – 85
571235
Pompa compl.
Pos. 86 – 94, 96 – 98
571220
Interruttore
577509
Cavo d’allacciamento 230 V
535037 R220
Manicotto di protezione
032057
Vite da lamiera
083064
Pignone
571241 R
ROLLER’S Uni-Press ACC
Teileverzeichnis
Spare parts list
Liste des pièces
Elenco dei pezzi
ROLLER’S Uni-Press ACC
––
3
5
6
––
8
––
10
11
12
13
14
15
16
17
18
19
20
––
22
23
––
––
28
29
30
––
––
––
57
58
60
––
62
––
65
70
––
72
––
––
100
101
102
103
104
105
106
deu
eng
fra
ita
Rollenträger mont.
Pos. 1, 2, 4
Spiralspannstift
Antriebsgehäuse
Stift
Zangenhaltebolzen kompl.
Pos. 7, 10 und 105
Druckfeder
Druckleiste mont.
Pos. 9, 11, 12 und 13
Senkschraube
Druckfeder
Verriegelungsstift
Halbmondring
Schutz
Flachkopfschraube
Gewindestift
O-Ring
Distanz
Scheibe
Druckfeder
Vorschubkolben kompl.
Pos. 20– 23
Stützring
O-Ring
Ersatz Ventil Druckseite
Pos. 24– 26
Hydraulikblock ACC kompl.
Pos. 24– 27, 31– 56
Zylinderstift
Hebel
Betätigungsknopf
Überdruckventil
Pos. 34– 38
Ventil Saugseite
Pos. 39– 45 und 59
Ventil Steuerkolben
Pos. 46– 56
O-Ring
Ausgleichsbehälter
Stopfen mit Stabmagnet
Gehäuseschalen
Pos. 61 und 99
Brems-Relais kompl.
Isolierring
mit Kohlehalter
Pos. 66– 69
Kohlebürsten Paar
Rillenkugellager
Anker mit Lüfter 230 V
Pos 71 und 73
Stator 230 V
Planetengetriebe
Pos. 74– 85
Pumpe kompl.
Pos. 86– 98
Schalter
Anschlussleitung
Biegeschutz
Blechschraube
Hülse
Anschlagscheibe
Ritzel
Roller holder mont.
Pos. 1, 2, 4
Spiral pin
Housing
Pin
Tongs shank compl.
Pos. 7, 10 and 105
Pressure spring
Pressure plate mont.
Pos. 9, 11, 12 and 13
Countersunk screw
Pressure spring
Thrust piece
Crescent ring
Protector
Countersunk screw
Grub screw
Locking ring
Distance
Washer
Pressure spring
Feed piston compl.
Pos. 20– 23
Back-up ring
Locking ring
Valve pressure side
Pos. 24– 26
Hydraulic block ACC compl.
Pos. 24– 27, 31– 56
Straight pin
Lever
Actuating button
Valve body
Pos. 34– 38
Valve suction side
Pos. 39– 45 and 59
Piston valve
Pos. 46– 56
Locking ring
Compensating reservoir
Plug with magnet
Housing shells
Pos. 61 and 99
Relay compl.
Insulating ring
with carbon holder
Pos. 66– 69
Carbon bruhes pair
Grooved ball bearing
Rotor with ventilator 230 V
Pos 71 and 73
Stator 230 V
Planetary gear drive
Pos. 74– 85
Pump compl.
Pos. 86– 98
Switch
Connecting cable
Rubber sleeve
Sheet metal screw
Bushing
Washer
Pinion
Support galets mont.
Pos. 1, 2, 4
Goupille spiralée
Carcasse
Goupille
Portarulli mont.
Pos. 1, 2, 4
Spina elastica
Carcassa
Perno
Axe de serrage de la pince cpl.
Pos. 7, 10 et 105
Ressort de compression
Barre de pression mont.
Pos. 9, 11, 12 et 13
Vis à tête fraisée
Ressort de compression
Goupille d’ouverture
Bague d’arret
Protection
Vis à tête platé
Vis sans tête
Joint torique
Distance
Rondelle
Ressort de compression
Piston d’avance compl.
Pos. 20 – 23
Bague d’appui
Joint torique
Soupape coté pression
Pos. 24 – 26
Bloc hydraul. ACC compl.
Pos. 24 – 27, 31– 56
Tige cylindrique
Levier
Bouton d’actionnement
Corps de soupape
Pos. 34 – 38
Soupape coté aspiration
Pos. 39 – 45 et 59
Soupape piston pilote
Pos. 46 – 56
Joint torique
Reservoir de compensation
Bouchon avec magnet
Coquille carcasse
Pos. 61 et 99
Relais compl.
Bague isolante
avec support de charbon
Pos. 66 – 69
Balais de charbon paire
Roulement à billes
Induit avec ventilateur 230 V
Pos 71 et 73
Stator 230 V
Engranage planetaire
Pos. 74 – 85
Pompe compl.
Pos. 86 – 98
Interrupteur
Raccordement
Douille en caoutchouc
Vis à tôle
Douille
Rondelle
Pignon
Bullone della ganascia compl.
Pos. 7, 10 e 105
Molla di compressione
Barretta di pressione mont.
Pos. 9, 11, 12 e 13
Vite a testa svasata
Molla di compressione
Spina di compressione
Anello mezzaluna
Protezione
Vite a testa cilindrica
Perno filettato
Guarnizione O-Ring
Distanza
Ranella
Molla di compressione
Pistone d’avanzamento compl.
Pos. 20 – 23
Rondella d’appoggio
Guarnizione O-Ring
Valvola lato di pressione
Pos. 24 – 26
Blocco idraulico ACC compl.
Pos. 24 – 27, 31– 56
Spina cilindrica
Leva
Pulsante d’azionamento
Corpo valvola
Pos. 34 – 38
Valvola lato d’aspirazione
Pos. 39 – 45 e 59
Valvola cursore
Pos. 46 – 56
Guarnizione O-Ring
Contenitore di compensazione
Tappo con calamita
Calotta carcassa
Pos. 61 e 99
Relais compl.
Anello di isolamento
con supporto carboncini
Pos. 66 – 69
Carboncini paio
Cuscinetto a sfere
Indotto con ventilatore 230 V
Pos 71 e 73
Statore 230 V
Ingranaggio planetario
Pos. 74 – 85
Pompa compl.
Pos. 86 – 98
Interruttore
Cavo d’allacciamento
Manicotto di protezione
Vite da lamiera
Astuccio
Ranella
Pignone
570226
088072
571251 A
570210
570239
570213
570211
083176
341010
570208
059035
570231 R
570232
084072
060009
577205 A
086053
571265 R
577202
060245
060244
571278 R
571275
088189
571268 R
571214 R
571228
571239 R
571273 R
060015
571212 R
571249 R
577503 R
577516 R220
577512
577511 R
057162
577506 R220
577507 R220
571235
571220
577509
535037 R220
032057
083064
577204 R
570237 R
571241 R
ROLLER’S Multi-Press
Teileverzeichnis
Spare parts list
Liste des pièces
Elenco dei pezzi
ROLLER’S Multi-Press
deu
eng
fra
ita
Rollenträger mont.
Pos. 1, 2, 4
Roller holder mont.
Pos. 1, 2, 4
Support galets mont.
Pos. 1, 2, 4
Portarulli mont.
Pos. 1, 2, 4
570226
3
Spiralspannstift
Spiral pin
Goupille spiralée
Spina elastica
088072
5
Antriebsgehäuse
Housing
Carcasse
Carcassa
571251 A
6
Stift
Pin
Goupille
Perno
570210
7
Zangenhaltebolzen kompl.
Pos. 7, 10 und 81
Tongs shank compl.
Pos. 7, 10 and 81
Axe de serrage de la pince cpl.
Pos. 7, 10 et 81
Bullone della ganascia compl.
Pos. 7, 10 e 81
570239
570213
––
Druckfeder
Pressure spring
Ressort de compression
Molla di compressione
––
8
Druckleiste mont.
Pos. 9, 11, 12 und 13
Pressure plate mont.
Pos. 9, 11, 12 and 13
Barre de pression mont.
Pos. 9, 11, 12 et 13
Barretta di pressione mont.
Pos. 9, 11, 12 e 13
570211
10
Senkschraube
Countersunk screw
Vis à tête fraisée
Vite a testa svasata
083176
11
Druckfeder
Pressure spring
Ressort de compression
Molla di compressione
341010
12
Verriegelungsstift
Thrust piece
Goupille d’ouverture
Spina di compressione
570208 R
13
Halbmondring
Crescent ring
Bague d’arret
Anello mezzaluna
059035
14
Schutz
Protector
Protection
Protezione
570231 R
15
Flachkopfschraube
Countersunk screw
Vis à tête platé
Vite a testa cilindrica
570232
17
O-Ring
Locking ring
Joint torique
Guarnizione O-Ring
060009
18
Scheibe
Washer
Rondelle
Ranella
086053
––
Vorschubkolben kompl.
Pos. 19, 20 + 21
Feed piston compl.
Pos. 19, 20 + 21
Piston d’avancement compl.
Pos. 19, 20 + 21
Pistone di avanzamento compl.
Pos. 19, 20 + 21
571238
20
Stützring
Back-up ring
Bague d’appui
Rondella d’appoggio
060245
21
O-Ring
Locking ring
Joint torique
Guarnizione O-Ring
060244
––
Ersatz Ventil Druckseite
Pos. 22– 24
Valve pressure side
Pos. 22– 24
Soupape coté pression
Pos. 22 – 24
Valvola lato di pressione
Pos. 22 – 24
571278 R
––
Hydraulikblock Standard kompl. Hydraulic block Standard compl. Bloc hydraul. Standard compl.
Pos. 22 – 25, 30, 33 – 37,
Pos. 22 – 25, 30, 33 – 37,
Pos. 22 – 25, 30, 33 – 37,
43 – 48, 83 und 84
43 – 48, 83 and 84
43 – 48, 83 et 84
Blocco idraulico Standard compl.
Pos. 22 – 25, 30, 33 – 37,
43 – 48, 83 e 84
571240
27
Zylinderstift
Straight pin
Tige cylindrique
Spina cilindrica
28
Hebel
Lever
Levier
Leva
571208 R
29
Betätigungsknopf
Actuating button
Bouton d’actionnement
Pulsante d’azionamento
571214 R
30
Spiralspannstift
Spiral pin
Goupille spiralée
Spina elastica
088120
31
Stützring
Back-up ring
Bague d’appui
Rondella d’appoggio
060264
32
O-Ring
Locking ring
Joint torique
Guarnizione O-Ring
060258
33
Druckfeder
Pressure spring
Ressort de compression
Molla di compressione
061049
34
Stahlkugel
Steel ball
Bille d’acier
Sfera di acciaio
057046
––
Ventilschraube Saugseite
Pos. 35– 37, 48 und 83
Valve screw suction side
Pos. 35– 37, 48 and 83
Vis de soupape coté aspiration Vite a valvola lato d’aspirazione
Pos. 35 – 37, 48 et 83
Pos. 35 – 37, 48 e 83
571229 R
38
O-Ring
Locking ring
Joint torique
Guarnizione O-Ring
39
Ausgleichsbehälter
Compensating reservoir
Reservoir de compensation
Contenitore di compensazione 571212 R
40
Stopfen mit Stabmagnet
Plug with magnet
Bouchon avec magnet
Tappo con calamita
––
Gehäuseschalen
Pos. 41 und 77
Housing shells
Pos. 41 and 77
Coquille carcasse
Pos. 41 et 77
Calotta carcassa
Pos. 41 e 77
571503R
42
Druckfeder
Pressure spring
Ressort de compression
Molla di compressione
571265 R
43
O-Ring
Locking ring
Joint torique
Guarnizione O-Ring
060241
––
Überdruckventil
Pos. 43 – 47
Valve body
Pos. 43 – 47
Corps de soupape
Pos. 43 – 47
Corpo valvola
Pos. 43 – 47
571228
49
Linsenschraube
Fillister head screw
Vis tête fraisée bombée
Vite a testa svasata con perno
083137
––
Motor kompl.
Pos. 50, 53, 54 und 57
Motor compl.
Pos. 50, 53, 54 und 57
Moteur compl.
Pos. 50, 53, 54 und 57
Motore compl.
Pos. 50, 53, 54 und 57
575500 R12
51
O-Ring
Locking ring
Joint torique
Guarnizione O-Ring
060253
52
Linsenschraube
Fillister head screw
Vis tête fraisée bombée
Vite a testa svasata con perno
083134
55
Zylinderschraube
Fillister head screw
Vis à tête cylindrique
Vite a testa cilindrica
081123
––
Planetengetriebe
Pos. 49, 51, 52, 56, 58 – 67
Planetary gear drive
Pos. 49, 51, 52, 56, 58 – 67
Engranage planetaire
Pos. 49, 51, 52, 56, 58 – 67
Ingranaggio planetario
Pos. 49, 51, 52, 56, 58 – 67
571235
––
Pumpe kompl.
Pos. 31, 32, 55, 68 – 76
Pump compl.
Pos. 31, 32, 55, 68 – 76
Pompe compl.
Pos. 31, 32, 55, 68 – 76
Pompa compl.
Pos. 31, 32, 55, 68 – 76
571220
––
Schalter mit Leitung
Pos. 78, 81 und 82
Switch with cable
Pos. 78, 81 and 82
Interrupteur avec cable
Pos. 78, 81 et 82
Interruttore con cavo
Pos. 78, 81 e 82
575528 R
79
Blechschraube
Sheet metal screw
Vis à tôle
Vite da lamiera
083064
80
81
ROLLER’S Akku
Scheibe
ROLLER’S Akku
Washer
ROLLER’S Akku
Rondelle
ROLLER’S Akku
Ranella
571510A12
570237 R
088189
060015
571249 R
ROLLER’S Multi-Press ACC
Teileverzeichnis
Spare parts list
Liste des pièces
Elenco dei pezzi
ROLLER’S Multi-Press ACC
eng
fra
ita
1– 21 siehe ROLLER’S Multi-Press
deu
see ROLLER’S Multi-Press
voir ROLLER’S Multi-Press
vedi ROLLER’S Multi-Press
––
Ersatz Ventil Druckseite
Pos. 22– 24
Valve pressure side
Pos. 22– 24
Soupape coté pression
Pos. 22 – 24
Valvola lato di pressione
Pos. 22 – 24
––
Hydraulikblock ACC kompl.
Pos. 22 – 26, 33 – 37,
43 – 47, 84 – 95 und 97
Hydraulic block ACC compl.
Pos. 22 – 26, 33 – 37,
43 – 47, 84 – 95 and 97
Bloc hydraulique ACC compl.
Pos. 22 – 26, 33 – 37,
43 – 47, 84 – 95 et 97
Blocco idraulico ACC compl.
Pos. 22 – 26, 33 – 37,
43 – 47, 84 – 95 e 97
571275
27
Zylinderstift
Straight pin
Tige cylindrique
Spina cilindrica
088189
28
Hebel
Lever
Levier
Leva
571268 R
29
Betätigungsknopf
Actuating button
Bouton d’actionnement
Pulsante d’azionamento
571214 R
30
Spiralspannstift
Spiral pin
Goupille spiralée
Spina elastica
088120
31
Stützring
Back-up ring
Bague d’appui
Rondella d’appoggio
060264
32
O-Ring
Locking ring
Joint torique
Guarnizione O-Ring
060258
33
Druckfeder
Pressure spring
Ressort de compression
Molla di compressione
061049
34
Stahlkugel
Steel ball
Bille d’acier
Sfera di acciaio
057046
––
Ventil Saugseite
Pos. 33– 37, 95 und 97
Valve suction side
Pos. 33– 37, 95 and 97
Valve coté aspiration
Pos. 33 – 37, 95 et 97
Valvola lato d’aspirazione
Pos. 33 – 37, 95 e 97
571239 R
38
O-Ring
Locking ring
Joint torique
Guarnizione O-Ring
060015
39
Ausgleichsbehälter
Compensating reservoir
Reservoir de compensation
Contenitore di compensazione 571212 R
40
Stopfen mit Stabmagnet
Plug with magnet
Bouchon avec magnet
Tappo con calamita
––
Gehäuseschalen
Pos. 41 und 77
Housing shells
Pos. 41 and 77
Coquille carcasse
Pos. 41 et 77
Calotta carcassa
Pos. 41 e 77
571503R
42
Druckfeder
Pressure spring
Ressort de compression
Molla di compressione
571265 R
43
O-Ring
Locking ring
Joint torique
Guarnizione O-Ring
060241
––
Überdruckventil
Pos. 43 – 47
Valve body
Pos. 43 – 47
Corps de soupape
Pos. 43 – 47
Corpo valvola
Pos. 43 – 47
571228
49
Linsenschraube
Fillister head screw
Vis tête fraisée bombée
Vite a testa svasata con perno
083137
––
Motor kompl.
Pos. 50, 53, 54 und 57
Motor compl.
Pos. 50, 53, 54 und 57
Moteur compl.
Pos. 50, 53, 54 und 57
Motore compl.
Pos. 50, 53, 54 und 57
575500 R12
51
O-Ring
Locking ring
Joint torique
Guarnizione O-Ring
060253
52
Linsenschraube
Fillister head screw
Vis tête fraisée bombée
Vite a testa svasata con perno
083134
55
Zylinderschraube
Fillister head screw
Vis à tête cylindrique
Vite a testa cilindrica
081123
––
Planetengetriebe
Pos. 49, 51, 52, 56, 58 – 67
Planetary gear drive
Pos. 49, 51, 52, 56, 58 – 67
Engranage planetaire
Pos. 49, 51, 52, 56, 58 – 67
Ingranaggio planetario
Pos. 49, 51, 52, 56, 58 – 67
571235
––
Pumpe kompl.
Pos. 31, 32, 55, 68 – 76
Pump compl.
Pos. 31, 32, 55, 68 – 76
Pompe compl.
Pos. 31, 32, 55, 68 – 76
Pompa compl.
Pos. 31, 32, 55, 68 – 76
571220
––
Schalter mit Leitung
Pos. 78, 81 und 82
Switch with cable
Pos. 78, 81 and 82
Interrupteur avec cable
Pos. 78, 81 et 82
Interruttore con cavo
Pos. 78, 81 e 82
575528 R
79
Blechschraube
Sheet metal screw
Vis à tôle
Vite da lamiera
083064
80
ROLLER’S Akku
ROLLER’S Akku
ROLLER’S Akku
ROLLER’S Akku
571510A12
83
Service-Elektronik
Electronic service control
Electronique de service
Servizio elettronico
571530 R
––
Ventil Steuerkolben
Pos. 84– 92
Piston valve
Pos. 84– 92
Soupape piston pilote
Pos. 84 – 92
Valvola cursore
Pos. 84 – 92
575244 R
96
97
Gewindestift
Scheibe
Grub screw
Washer
Vis sans tête
Rondelle
Perno filettato
Ranella
084072
570237 R
571278 R
571249 R
ROLLER’S Multi-Press Mini ACC
Teileverzeichnis
Spare parts list
Liste des pièces
Elenco dei pezzi
ROLLER’S Multi-Press Mini ACC
deu
eng
fra
ita
1
Pressrolle
Press roller
Galet presseur
Rulli di pressione
578211 R
2
Nadelrolle
Needle roller
Galet à aiguille
Rulli di gabbia
057182
3
Rollenträger
Roller holder
Support galets
Portarulli
578204 R
4
Druckfeder
Pressure spring
Ressort de compression
Molla di compressione
061083
5
Stift
Pin
Tige
Spina
578228 R
6
Antriebsgehäuse
Housing
Carter
Carcassa
578201 A
7
Zangenhaltebolzen
Tongs shank
Axe de serrage de la pince
Bullone della ganascia
578236 R
8
Knopf
Button
Bouton
Pulsante
578254 R
9
Senkschraube
Countersunk screw
Vis à tête fraisée
Vite a testa svasata
083175
10
Spiralspannstift
Spiral pin
Goupille spiralée
Spina elastica
088123
11
Druckfeder
Pressure spring
Ressort de compression
Molla di compressione
061072
12
Anschlag PL
Stop bolt PL
Arrêt PL
Arresto PL
571252 PL
13
Scheibe
Washer
Rondelle
Ranella
086055
14
Riegel
Locking
Verrouillage
Chiusura
578253 R
15
Linsenschraube
Fillister head screw
Vis tête fraisée bombée
Vite a testa svasata con perno
083169
16
Gewindestift
Grub screw
Vis sans tête
Perno filettato
084072
17
O-Ring
Locking ring
Joint torique
Guarnizione O-Ring
060252
18
Scheibe
Washer
Rondelle
Ranella
578205 R
19
Druckfeder
Pressure spring
Ressort de compression
Molla di compressione
061058
21
O-Ring
Locking ring
Joint torique
Guarnizione O-Ring
060255
22
Stützring
Back-up ring
Bague d’appui
Rondella d’appoggio
060267
––
Vorschubkolben kompl.
Pos. 19 – 22
Feed piston compl.
Pos. 19 – 22
Piston d’avancement compl.
Pos. 19 – 22
Pistone di avanzamento compl.
Pos. 19 – 22
578202 R
––
Rückschlagventil
Pos. 25 – 29
Valve
Pos. 25 – 29
Soupape
Pos. 25 – 29
Valvola
Pos. 25 – 29
578278 R
––
Hydraulikblock kompl.
im Tausch Pos. 20–23,
25–31, 32–50, 52–54
Hydraulic block compl.
Pos. 20–23, 25–31,
32–50, 52–54
Bloc hydraulique compl.
Pos. 20–23, 25–31,
32–50, 52–54
Blocco idraulico compl.
Pos. 20–23, 25–31,
32–50, 52–54
575247
––
Ventil Saugseite
Pos. 39 – 44
Valve suction side
Pos. 39 – 44
Valve coté aspiration
Pos. 39 – 44
Valvola lato d’aspirazione
Pos. 39 – 44
578280 R
––
Überdruckventil
Pos. 29, 32 – 36
Valve body
Pos. 29, 32 – 36
Corps de soupape
Pos. 29, 32 – 36
Corpo valvola
Pos. 29, 32 – 36
578279 R
––
Ventil Steuerkolben
Pos. 45 – 50, 52 – 54
Piston valve
Pos. 45 – 50, 52 – 54
Soupape piston pilote
Pos. 45 – 50, 52 – 54
Valvola cursore
Pos. 45 – 50, 52 – 54
578275R
55
O-Ring
Locking ring
Joint torique
Guarnizione O-Ring
060306
56
Ausgleichsbehälter
Compensating reservoir
Reservoir de compensation
Contenitore di compensazione 578215 R
57
Stopfen mit Stabmagnet
Plug with magnet
Bouchon avec magnet
Tappo con calamita
571249 R
––
Gleichstrommotor
mit Planetengetriebe
Pos. 58 – 71 und 85
D.C. Motor
with planetary gear drive
Pos. 58 – 71 and 85
Moteur à courant continú
avec engranage planetaire
Pos. 58 – 71 et 85
Motore monofasico
con ingranaggio planetario
Pos. 58 – 71 e 85
578501 R
––
Pumpe kompl.
Pos. 72 – 77, 83, 85 und 86
Pump compl.
Pos. 72 – 77, 83, 85 and 86
Pompe compl.
Pos. 72 – 77, 83, 85 et 86
Pompa compl.
Pos. 72 – 77, 83, 85 e 86
578224 R
––
Pumpenkolben kompl.
Pos. 78 – 81
Pump piston compl.
Pos. 78 – 81
Piston de pompe compl.
Pos. 78 – 81
Pistone a pompa compl.
Pos. 78 – 81
578271R
87
Schalter mont. mit Leitung
Switch with cable mount.
Interrupteur avec cable monté
Interruttore con cavo mont.
575528 R
––
Gehäuseschalen
Pos. 88 und 89
Housing shells
Pos. 88 and 89
Coquille carcasse
Pos. 88 et 89
Calotta carcassa
Pos. 88 e 89
578503 R
90
Blechschraube
Sheet metal screw
Vis à tôle
Vite da lamiera
083064
91
ROLLER’S Akku 12 V, 1,3 Ah
ROLLER’S Akku 12 V, 1.3 Ah
ROLLER’S Akku 12 V, 1,3 Ah
ROLLER’S Akku 12 V, 1,3 Ah
571513 A12
ROLLER’S Axial-Press 15
Teileverzeichnis
Spare parts list
Liste des pièces
Elenco dei pezzi
ROLLER’S Axial-Press 15
deu
eng
fra
ita
1
Linsenschraube
Fillister head screw
Vis tête fraisée bombée
Vite a testa svasata con perno
2
Schutz
Protector
Protection
Protezione
573258 R
3
Buchse
Bush
Douille
Boccola
573256 R
4
Zylinderschraube
Fillister head screw
Vis à tête cylindrique
Vite a testa cilindrica
081137
5
Druckplatte
Pressure plate
Plaque d’appui
Piastra di pressione
573262 R
6
Sicherungsring
Locking ring
Circlip
Anello di sicurezza
059110
7
Scheibe
Washer
Rondelle
Ranella
573257 R
8
Druckfeder
Pressure spring
Ressort de compression
Molla di compressione
061058
9
083177
Druckfeder
Pressure spring
Ressort de compression
Molla di compressione
061059
10
Vorschubkolben
Feed piston
Piston d’avance
Pistone d’avanzamento
573253 R
11
Stützring
Back-up ring
Bague d’appui
Rondella d’appoggio
060267
12
O-Ring
Locking ring
Joint torique
Guarnizione O-Ring
13
Feder-Druckstück
Spring-thrust piece
Ressort-pièce de compression Molla-pezzo di compressione
061053
14
Führungszylinder
Guiding cylinder
Cylindre de guidage
Cilindro di guida
573251 R
15
Führungsgehäuse
Guiding housing
Carcasse de guidage
Carcassa di guida
573263 R
16
O-Ring
Locking ring
Joint torique
Guarnizione O-Ring
060251
17
Gewindestift
Grub screw
Vis sans tête
Perno filettato
084072
18
Hülse
Bushing
Douille
Astuccio
573209 AST
19
O-Ring
Locking ring
Joint torique
Guarnizione O-Ring
060244
20
Dichtkolben
Sealing piston
Piston d’éntancheité
Pistone ermetico
573210 R
––
Ersatz Ventil Druckseite
Pos. 22– 24
Valve pressure side
Pos. 22– 24
Soupape coté pression
Pos. 22 – 24
Valvola lato di pressione
Pos. 22 – 24
571278 R
––
Hydraulikblock Standard kompl. Hydraulic block Standard compl. Bloc hydraul. Standard compl.
Pos. 22 – 25, 30,
Pos. 22 – 25, 30,
Pos. 22 – 25, 30,
33 – 37, 42 – 48 und 88
33 – 37, 42 – 48 and 88
33 – 37, 42 – 48 et 88
Blocco idraulico Standard compl.
Pos. 22 – 25, 30,
33 – 37, 42 – 48 e 88
571240
27
Zylinderstift
Straight pin
Tige cylindrique
Spina cilindrica
088189
28
Hebel
Lever
Levier
Leva
571208 R
29
Betätigungsknopf
Actuating button
Bouton d’actionnement
Pulsante d’azionamento
571214 R
30
Spiralspannstift
Spiral pin
Goupille spiralée
Spina elastica
088120
31
Stützring
Back-up ring
Bague d’appui
Rondella d’appoggio
060264
32
O-Ring
Locking ring
Joint torique
Guarnizione O-Ring
060258
33
Druckfeder
Pressure spring
Ressort de compression
Molla di compressione
061049
34
Stahlkugel
Steel ball
Bille d’acier
Sfera di acciaio
057046
––
Ventilschraube Saugseite
Pos. 35– 37, 42 und 48
Valve screw suction side
Pos. 35– 37, 42 and 48
Vis de soupape coté aspiration Vite a valvola lato d’aspirazione
Pos. 35 – 37, 42 et 48
Pos. 35 – 37, 42 e 48
571229 R
38
O-Ring
Locking ring
Joint torique
Guarnizione O-Ring
39
Ausgleichsbehälter
Compensating reservoir
Reservoir de compensation
Contenitore di compensazione 571212 R
40
Stopfen mit Stabmagnet
Plug with magnet
Bouchon avec magnet
Tappo con calamita
––
Gehäuseschalen
Pos. 41 und 77
Housing shells
Pos. 41 and 77
Coquille carcasse
Pos. 41 et 77
Calotta carcassa
Pos. 41 e 77
571503 R
43
O-Ring
Locking ring
Joint torique
Guarnizione O-Ring
060241
––
Überdruckventil
Pos. 43 – 47
Valve body
Pos. 43 – 47
Corps de soupape
Pos. 43 – 47
Corpo valvola
Pos. 43 – 47
571228
49
Linsenschraube
Fillister head screw
Vis tête fraisée bombée
Vite a testa svasata con perno
083137
––
Motor kompl.
Pos. 50, 53, 54 und 57
Motor compl.
Pos. 50, 53, 54 und 57
Moteur compl.
Pos. 50, 53, 54 und 57
Motore compl.
Pos. 50, 53, 54 und 57
575500 R12
51
O-Ring
Locking ring
Joint torique
Guarnizione O-Ring
060253
52
Linsenschraube
Fillister head screw
Vis tête fraisée bombée
Vite a testa svasata con perno
083134
55
Zylinderschraube
Fillister head screw
Vis à tête cylindrique
Vite a testa cilindrica
081123
––
Planetengetriebe
Pos. 49, 51, 52, 56, 58 – 67
Planetary gear drive
Pos. 49, 51, 52, 56, 58 – 67
Engranage planetaire
Pos. 49, 51, 52, 56, 58 – 67
Ingranaggio planetario
Pos. 49, 51, 52, 56, 58 – 67
571235
––
Pumpe kompl.
Pos. 31, 32, 55, 68 – 76
Pump compl.
Pos. 31, 32, 55, 68 – 76
Pompe compl.
Pos. 31, 32, 55, 68 – 76
Pompa compl.
Pos. 31, 32, 55, 68 – 76
571220
––
Schalter mit Leitung
Pos. 78, 81 und 82
Switch with cable
Pos. 78, 81 and 82
Interrupteur avec cable
Pos. 78, 81 et 82
Interruttore con cavo
Pos. 78, 81 e 82
575528 R
79
Blechschraube
Sheet metal screw
Vis à tôle
Vite da lamiera
083064
80
ROLLER’S Akku
ROLLER’S Akku
ROLLER’S Akku
ROLLER’S Akku
571510A12
––
ROLLER’S Aufweitvorrichtung P
Pos. 83– 87
ROLLER’S Expanding
adapter P
Pos. 83– 87
ROLLER’S Dispositif
d'emboîture P
Pos. 83 – 87
ROLLER’S Dispositivo
espansore P
Pos. 83 – 87
573260 A
83
Aufweithalter
Expander holder
Porte emboîture
Portaespansore
573241 R
84
Zylinderschraube
Fillister head screw
Vis à tête cylindrique
Vite a testa cilindrica
081007
85
Aufweiterbolzen
Expander bolt
Pointeau emboîture
Perno espansore
573242 R
86
Druckfeder
Pressure spring
Ressort de compression
Molla di compressione
573236
87
Sicherungsscheibe
Locking washer
Rondelle de sécurité
Ranella di sicurezza
059106
060255
060015
571249 R
ROLLER’S Axial-Press 40
Teileverzeichnis
Spare parts list
Liste des pièces
Elenco dei pezzi
ROLLER’S Axial-Press 40
deu
eng
fra
ita
1
Linsenschraube
Fillister head screw
Vis tête fraisée bombée
Vite a testa svasata con perno
2
Schutz
Protector
Protection
Protezione
573213 R
3
Buchse
Bush
Douille
Boccola
573211 R
4
Zylinderschraube
Fillister head screw
Vis à tête cylindrique
Vite a testa cilindrica
081021
5
Druckplatte
Pressure plate
Plaque d’appui
Piastra di pressione
573206 R
6
Sprengring
Snap ring
Jonc
Rondella
059104
7
Scheibe
Washer
Rondelle
Ranella
573207
8
083179
Druckfeder
Pressure spring
Ressort de compression
Molla di compressione
573212 R
10
Vorschubkolben
Feed piston
Piston d’avance
Pistone d’avanzamento
573203 R
11
Stützring
Back-up ring
Bague d’appui
Rondella d’appoggio
060245
12
O-Ring
Locking ring
Joint torique
Guarnizione O-Ring
060244
13
Feder-Druckstück
Spring-thrust piece
Ressort-pièce de compression Molla-pezzo di compressione
061053
14
Führungszylinder
Guiding cylinder
Cylindre de guidage
Cilindro di guida
573201 R
15
Führungsgehäuse
Guiding housing
Carcasse de guidage
Carcassa di guida
573208 R
16
O-Ring
Locking ring
Joint torique
Guarnizione O-Ring
060251
17
Gewindestift
Grub screw
Vis sans tête
Perno filettato
084072
18
Hülse
Bushing
Douille
Astuccio
573209 AST
20
Dichtkolben
Sealing piston
Piston d’éntancheité
Pistone ermetico
573210 R
––
Ersatz Ventil Druckseite
Pos. 22– 24
Valve pressure side
Pos. 22– 24
Soupape coté pression
Pos. 22 – 24
Valvola lato di pressione
Pos. 22 – 24
571278 R
––
Hydraulikblock Standard kompl. Hydraulic block Standard compl. Bloc hydraul. Standard compl.
Pos. 22– 26, 30,
Pos. 22– 26, 30,
Pos. 22 – 26, 30,
33 – 37, 43– 48 und 83
33– 37, 43– 48 and 83
33 – 37, 43 – 48 et 83
Blocco idraulico Standard compl.
Pos. 22 – 26, 30,
33 – 37, 43 – 48 e 83
571240
27
Zylinderstift
Straight pin
Tige cylindrique
Spina cilindrica
088189
28
Hebel
Lever
Levier
Leva
571208 R
29
Betätigungsknopf
Actuating button
Bouton d’actionnement
Pulsante d’azionamento
571214 R
30
Spiralspannstift
Spiral pin
Goupille spiralée
Spina elastica
088120
31
Stützring
Back-up ring
Bague d’appui
Rondella d’appoggio
060264
32
O-Ring
Locking ring
Joint torique
Guarnizione O-Ring
060258
33
Druckfeder
Pressure spring
Ressort de compression
Molla di compressione
061049
34
Stahlkugel
Steel ball
Bille d’acier
Sfera di acciaio
057046
––
Ventilschraube Saugseite
Pos. 26, 35– 37 und 48
Valve screw suction side
Pos. 26, 35– 37 and 48
Vis de soupape coté aspiration Vite a valvola lato d’aspirazione
Pos. 26, 35 – 37 et 48
Pos. 26, 35 – 37 e 48
571229 R
38
O-Ring
Locking ring
Joint torique
Guarnizione O-Ring
39
Ausgleichsbehälter
Compensating reservoir
Reservoir de compensation
Contenitore di compensazione 571212 R
40
Stopfen mit Stabmagnet
Plug with magnet
Bouchon avec magnet
Tappo con calamita
571249 R
––
Gehäuseschalen
Pos. 47 und 77
Housing shells
Pos. 47 and 77
Coquille carcasse
Pos. 47 et 77
Calotta carcassa
Pos. 47 e 77
571503 R
060241
060015
43
O-Ring
Locking ring
Joint torique
Guarnizione O-Ring
––
Überdruckventil
Pos. 43– 47
Valve body
Pos. 43– 47
Corps de soupape
Pos. 43 – 47
Corpo valvola
Pos. 43 – 47
571228
49
Linsenschraube
Fillister head screw
Vis tête fraisée bombée
Vite a testa svasata con perno
083137
––
Motor kompl.
Pos. 50, 53, 54 und 57
Motor compl.
Pos. 50, 53, 54 and 57
Moteur compl.
Pos. 50, 53, 54 et 57
Motore compl.
Pos. 50, 53, 54 e 57
575500 R12
51
O-Ring
Locking ring
Joint torique
Guarnizione O-Ring
060253
52
Linsenschraube
Fillister head screw
Vis tête fraisée bombée
Vite a testa svasata con perno
083134
55
Zylinderschraube
Fillister head screw
Vis à tête cylindrique
Vite a testa cilindrica
081123
––
Planetengetriebe
Pos. 49, 51, 52, 56, 58– 67
Planetary gear drive
Pos. 49, 51, 52, 56, 58 – 67
Engranage planetaire
Pos. 49, 51, 52, 56, 58 – 67
Ingranaggio planetario
Pos. 49, 51, 52, 56, 58 – 67
571235
––
Pumpe kompl.
Pos. 31, 32, 55, 68– 76
Pump compl.
Pos. 31, 32, 55, 68– 76
Pompe compl.
Pos. 31, 32, 55, 68 – 76
Pompa compl.
Pos. 31, 32, 55, 68 – 76
571220
––
Schalter mit Leitung
Pos. 78, 81 und 82
Switch with cable
Pos. 78, 81 and 82
Interrupteur avec cable
Pos. 78, 81 et 82
Interruttore con cavo
Pos. 78, 81 e 82
575528 R
79
Blechschraube
Sheet metal screw
Vis à tôle
Vite da lamiera
083064
80
ROLLER’S Akku
ROLLER’S Akku
ROLLER’S Akku
ROLLER’S Akku
571510 A12
ROLLER’S Akku-Exparo Mini Q&E
Teileverzeichnis
Spare parts list
Liste des pièces
Elenco dei pezzi
ROLLER’S Akku-Exparo Mini Q & E
deu
eng
fra
ita
––
Hydraulikblock
Akku-Exparo Mini Q & E
kompl. im Tausch
Pos. 1–33
Hydraulic block
Akku-Exparo Mini Q & E
compl.
Pos. 1–33
Bloc hydraulique
Akku-Exparo Mini Q & E
compl.
Pos. 1–33
Blocco idraulico
Akku-Exparo Mini Q & E
compl.
Pos. 1–33
575247
––
Rückschlagventil Druckseite
Pos. 5–9
Valve pressure side
Pos. 5–9
Soupape coté pression
Pos. 5–9
Valvola lato di pressione
Pos. 5–9
578278R
––
Ventil Saugseite
Pos. 10 –15
Valve suction side
Pos. 10 –15
Valve coté aspiration
Pos. 10 –15
Valvola lato d’aspirazione
Pos. 10 –15
578280R
Überdruckventil
Pos. 9, 16 –18, 22, 23
Valve body
Pos. 9, 16 –18, 22, 23
Corps de soupape
Pos. 9, 16 –18, 22, 23
Corpo valvola
Pos. 9, 16 –18, 22, 23
578279R
––
Ventil Steuerkolben
Pos. 25–33
Piston valve
Pos. 25–33
Soupape piston pilote
Pos. 25–33
Valvola cursore
Pos. 25–33
575250R
34
Ausgleichsbehälter
Compensating reservoir
Reservoir de compensation
Contenitore di compensazione 578215R
35
O-Ring
Locking ring
Joint torique
Guarnizione O-Ring
060306
36
Stopfen mit Stabmagnet
Plug with magnet
Bouchon avec magnet
Tappo con calamita
571249 R
––
Gleichstrommotor
mit Planetengetriebe
Pos. 37 – 49, 63, 78
D.C. Motor
with planetary gear drive
Pos. 37– 49, 63, 78
Moteur à courant continú
avec engranage planetaire
Pos. 37 – 49, 63, 78
Motore monofasico
con ingranaggio planetario
Pos. 37 – 49, 63, 78
578501 R
Pumpe kompl.
Pos. 50, 51, 57–62
Pump compl.
Pos. 50, 51, 57–62
Pompe compl.
Pos. 50, 51, 57–62
Pompa compl.
Pos. 50, 51, 57–62
578224R
––
Pumpenkolben kompl.
Pos. 52–56
Pump piston compl.
Pos. 52–56
Piston de pompe compl.
Pos. 52–56
Pistone a pompa compl.
Pos. 52–56
578271R
––
Aufweithalter
mit Hülse kompl.
Pos. 64 – 77, 73– 77
Expander holder
with bushing compl.
Pos. 64– 77, 73– 77
Porte emboîture
avec douille compl.
Pos. 64 – 77, 73 – 77
Portaespansore
con astuccio compl.
Pos. 64 – 77, 73 – 77
575248 R
––
Vorschubkolben kompl.
Pos. 19–21, 68
Feed piston compl.
Pos. 19–21, 68
Piston d’avance compl.
Pos. 19–21, 68
Pistone d’avanzamento compl.
Pos. 19–21, 68
575249R
––
Gehäuseschalen
Pos. 70 und 71
Housing shells
Pos. 70 and 71
Coquille carcasse
Pos. 70 et 71
Calotta carcassa
Pos. 70 e 71
578503R
62
Zylinderschraube
Fillister head screw
Vis à tête cylindrique
Vite a testa cilindrica
081123
69
Schalter mont.
mit Leitung
Switch mounted
with cable
Interrupteur montée
avec cable
Interruttore montato
con cavo
575528R
72
Blechschraube
Sheet metal screw
Vis à tôle
Vite da lamiera
083064
80
ROLLER’S Akku 12 V, 1,3 Ah
ROLLER’S Akku 12 V, 1,3 Ah
ROLLER’S Akku 12 V, 1,3 Ah
ROLLER’S Akku 12 V, 1,3 Ah
571513 A12
––
––
ROLLER’S Akku-Exparo Q&E
Teileverzeichnis
Spare parts list
Liste des pièces
Elenco dei pezzi
ROLLER’S Akku-Exparo Q & E
––
deu
eng
fra
ita
Aufweitvorrichtung
Pos. 1–6
Expanding adapter
Pos. 1–6
Dispositif d'emboîture
Pos. 1–6
Dispositivo espansore
Pos. 1–6
575260R
1
Aufweitbolzen
Expander bolt
Pointeau emboîture
Perno espansore
575261R
2
Zylinderschraube
Fillister head screw
Vis à tête cylindrique
Vite a testa cilindrica
081116
3
Aufweithalter
Expander holder
Porte emboîture
Portaespansore
573241 R
4
Druckfeder
Pressure spring
Ressort de compression
Molla di compressione
573236
5
Scheibe
Washer
Rondelle
Ranella
575262R
6
Senkschraube
Countersunk screw
Vis à tête fraisée
Vite a testa svasata
082006
Hülse kompl.
Pos. 7–9 und 16
Bushing compl.
Pos. 7–9 and 16
Douille compl.
Pos. 7–9 et 16
Astuccio compl.
Pos. 7–9 e 16
575217A
––
8
Gewindestift
Grub screw
Vis sans tête
Perno filettato
084072
9
Scheibe
Washer
Rondelle
Ranella
086054
Hydraulikblock kompl.
Pos. 10, 11, 22–26, 30,
33–37, 43–47, 84–96
Hydraulic block compl.
Pos. 10, 11, 22–26, 30,
33–37, 43–47, 84–96
Bloc hydraulique compl.
Pos. 10, 11, 22–26, 30,
33–37, 43–47, 84–96
Blocco idraulico compl.
Pos. 10, 11, 22–26, 30,
33–37, 43–47, 84–96
575243
––
10
O-Ring
Locking ring
Joint torique
Guarnizione O-Ring
060244
11
Zylinder
Cylinder
Cylindre
Cilindro
575212R
––
Vorschubkolben kompl.
Pos. 12–15
Feed piston compl.
Pos. 12–15
Piston d’avance compl.
Pos. 12–15
Pistone d’avanzamento compl.
Pos. 12–15
575209R
13
Stützring
Back-up ring
Bague d’appui
Rondella d’appoggio
060267
14
O-Ring
Locking ring
Joint torique
Guarnizione O-Ring
060255
16
O-Ring
Locking ring
Joint torique
Guarnizione O-Ring
060005
––
Ersatz Ventil Druckseite
Pos. 22–24
Valve pressure side
Pos. 22–24
Soupape coté pression
Pos. 22–24
Valvola lato di pressione
Pos. 22–24
571278R
27
Zylinderstift
Straight pin
Tige cylindrique
Spina cilindrica
088189
28
Hebel
Lever
Levier
Leva
571268R
29
Betätigungsknopf
Actuating button
Bouton d’actionnement
Pulsante d’azionamento
571214R
30
Spiralspannstift
Spiral pin
Goupille spiralée
Spina elastica
088120
31
Stützring
Back-up ring
Bague d’appui
Rondella d’appoggio
060264
32
O-Ring
Locking ring
Joint torique
Guarnizione O-Ring
060258
––
Ventil Saugseite
Pos. 33–37 und 94
Valve suction side
Pos. 33–37 and 94
Valve coté aspiration
Pos. 33–37 et 94
Valvola lato d’aspirazione
Pos. 33–37 e 94
571229R
38
O-Ring
Locking ring
Joint torique
Guarnizione O-Ring
060015
39
Ausgleichsbehälter
Compensating reservoir
Reservoir de compensation
Contenitore di compensazione 571212R
40
Stopfen mit Stabmagnet
Plug with magnet
Bouchon avec magnet
Tappo con calamita
571249R
––
Gehäuseschalen
Pos. 41 und 77
Housing shells
Pos. 41 and 77
Coquille carcasse
Pos. 41 et 77
Calotta carcassa
Pos. 41 e 77
571503R
43
O-Ring
Locking ring
Joint torique
Guarnizione O-Ring
060241
––
Überdruckventil
Pos. 43–47
Valve body
Pos. 43–47
Corps de soupape
Pos. 43–47
Corpo valvola
Pos. 43–47
571228
49
Linsenschraube
Fillister head screw
Vis tête fraisée bombée
Vite a testa svasata con perno
083137
––
Motor kompl.
Pos. 50, 53, 54 und 57
Motor compl.
Pos. 50, 53, 54 and 57
Moteur compl.
Pos. 50, 53, 54 et 57
Motore compl.
Pos. 50, 53, 54 e 57
575500R12
51
O-Ring
Locking ring
Joint torique
Guarnizione O-Ring
060253
52
Linsenschraube
Fillister head screw
Vis tête fraisée bombée
Vite a testa svasata con perno
083134
55
Zylinderschraube
Fillister head screw
Vis à tête cylindrique
Vite a testa cilindrica
081123
––
Planetengetriebe
Pos. 49, 51, 52, 56, 58–67
Planetary gear drive
Pos. 49, 51, 52, 56, 58–67
Engranage planetaire
Pos. 49, 51, 52, 56, 58–67
Ingranaggio planetario
Pos. 49, 51, 52, 56, 58–67
571235
––
Pumpe kompl.
Pos. 31, 32, 55, 68–76
Pump compl.
Pos. 31, 32, 55, 68–76
Pompe compl.
Pos. 31, 32, 55, 68–76
Pompa compl.
Pos. 31, 32, 55, 68–76
571220
––
Schalter mit Leitung
Pos. 78, 81 und 82
Switch with cable
Pos. 78, 81 and 82
Interrupteur avec cable
Pos. 78, 81 et 82
Interruttore con cavo
Pos. 78, 81 e 82
575528R
79
Blechschraube
Sheet metal screw
Vis à tôle
Vite da lamiera
083064
80
ROLLER’S Akku
ROLLER’S Akku
ROLLER’S Akku
ROLLER’S Akku
571510 A12
––
Ventil Steuerkolben
Pos. 84–92
Piston valve
Pos. 84–92
Soupape piston pilote
Pos. 84–92
Valvola cursore
Pos. 84–92
575244R