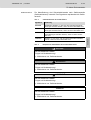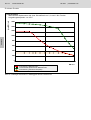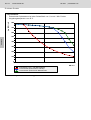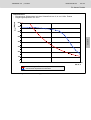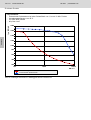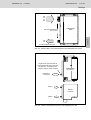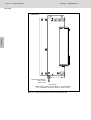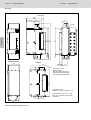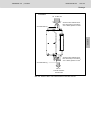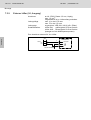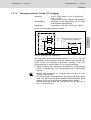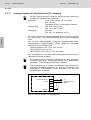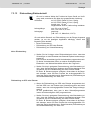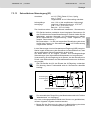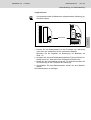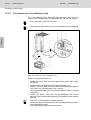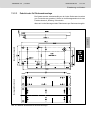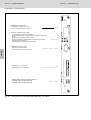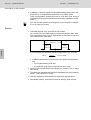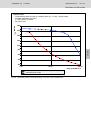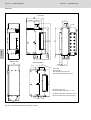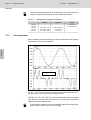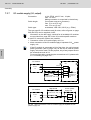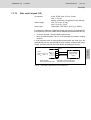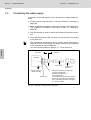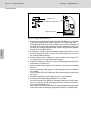
1
Electric Drives and Controls Hydraulics Linear Motion and Assembly Technologies Pneumatics Service Rexroth PSI 6xxx 1070080028 Edition 06 ENGLISH Betriebsanleitung | Operating Instructions DEUTSCH Schweißsteuerung mit Mittelfrequenz-Umrichter Weld Timer with Medium-Frequency Inverter DEUTSCH 2/402 Bosch Rexroth AG PSI 6xxx | 1070080028 / 06 Die angegebenen Daten dienen der Produktbe schreibung. Sollten auch Angaben zur Verwendung gemacht werden, stellen diese nur Anwendungsbei spiele und Vorschläge dar. Katalogangaben sind keine zugesicherten Eigenschaften. Die Angaben entbinden den Verwender nicht von eigenen Beurteilungen und Prüfungen. Unsere Produkte unterliegen einem natürlichen Verschleiß und Alterungsprozess. ENGLISH © Alle Rechte bei Bosch Rexroth AG, auch für den Fall von Schutzrechtsanmeldungen. Jede Verfügungsbefugnis, wie Kopier und Wei tergaberecht, bei uns. Auf der Titelseite ist eine Beispielkonfiguration abge bildet. Das ausgelieferte Produkt kann daher von der Abbildung abweichen. Sprachversion des Dokumentes: Originalsprache des Dokumentes: DE | EN DE Beginn deutschsprachiger Teil: Seite 3 Beginn englischsprachiger Teil: Seite 203 The data indicated below is intended to describe the product. Should information on its use be provided, such information represents application examples and suggestions only. Catalog specifications shall not be deemed as warranted quality. This information does not release the user from per forming his own assessments and verifications. Our products are subject to natural wear and aging. © This manual is the exclusive property of Bosch Rexroth AG, Germany also in the case of intellec tual property right applications. Reproduction or distribution by any means subject to our prior written permission. An example configuration is shown on the cover page. The delivered product may therefore deviate from the picture. Language version of the document: DE | EN Original language of the document: DE German part begins on: English part begins on: page 3 page 203 1070080028 / 06 | PSI 6xxx Bosch Rexroth AG 3/402 Inhalt Inhalt 1.1 1.2 1.3 1.3.1 1.3.2 1.3.3 1.3.4 2 2.1 2.2 2.3 2.4 2.5 2.6 2.6.1 2.6.2 2.6.3 2.6.4 2.6.5 2.6.6 2.6.7 2.6.8 2.7 3 3.1 3.2 3.3 3.4 3.5 Zu dieser Dokumentation . . . . . . . . . . . . . . . . . . . . Gültigkeit der Dokumentation . . . . . . . . . . . . . . . . . . . . . . . . . . . Zusätzliche Dokumentationen . . . . . . . . . . . . . . . . . . . . . . . . . . . Darstellung von Informationen . . . . . . . . . . . . . . . . . . . . . . . . . . Sicherheitshinweise . . . . . . . . . . . . . . . . . . . . . . . . . . . . . . . . . . Symbole . . . . . . . . . . . . . . . . . . . . . . . . . . . . . . . . . . . . . . . . . . . . Bezeichnungen . . . . . . . . . . . . . . . . . . . . . . . . . . . . . . . . . . . . . . Abkürzungen . . . . . . . . . . . . . . . . . . . . . . . . . . . . . . . . . . . . . . . . Sicherheitshinweise . . . . . . . . . . . . . . . . . . . . . . . . . Zu diesem Kapitel . . . . . . . . . . . . . . . . . . . . . . . . . . . . . . . . . . . . . Bestimmungsgemäße Verwendung . . . . . . . . . . . . . . . . . . . . . . Nicht bestimmungsgemäße Verwendung . . . . . . . . . . . . . . . . . Qualifikation des Personals . . . . . . . . . . . . . . . . . . . . . . . . . . . . . Allgemeine Sicherheitshinweise . . . . . . . . . . . . . . . . . . . . . . . . . Produkt- und technologieabhängige Sicherheitshinweise . . . Evtl. verwendete Symbolik am Produkt . . . . . . . . . . . . . . . . . Transport . . . . . . . . . . . . . . . . . . . . . . . . . . . . . . . . . . . . . . . . . . . Einbau und Montage . . . . . . . . . . . . . . . . . . . . . . . . . . . . . . . . . Elektrischer Anschluss . . . . . . . . . . . . . . . . . . . . . . . . . . . . . . . Betrieb des Produktes . . . . . . . . . . . . . . . . . . . . . . . . . . . . . . . . Nachrüstungen und Veränderungen durch den Betreiber . Wartung und Reparatur . . . . . . . . . . . . . . . . . . . . . . . . . . . . . . . Konformitätserklärung / CE-Kennzeichnung . . . . . . . . . . . . . Pflichten des Betreibers . . . . . . . . . . . . . . . . . . . . . . . . . . . . . . . . Allgemeine Hinweise zu Sachschäden und Produktschäden . . . . . . . . . . . . . . . . . . . . . . . . . . . . Transport und Lagerung . . . . . . . . . . . . . . . . . . . . . . . . . . . . . . . . Einbau und Montage . . . . . . . . . . . . . . . . . . . . . . . . . . . . . . . . . . . Elektrischer Anschluss . . . . . . . . . . . . . . . . . . . . . . . . . . . . . . . . . Betrieb . . . . . . . . . . . . . . . . . . . . . . . . . . . . . . . . . . . . . . . . . . . . . . . Wartung und Reparatur . . . . . . . . . . . . . . . . . . . . . . . . . . . . . . . . 7 7 7 8 8 10 10 10 11 11 11 11 12 14 15 15 15 16 18 20 22 23 24 25 27 27 28 30 32 33 4 Lieferumfang . . . . . . . . . . . . . . . . . . . . . . . . . . . . . . . 35 5 Zu diesem Produkt . . . . . . . . . . . . . . . . . . . . . . . . . . 37 5.1 Leistungsbeschreibung . . . . . . . . . . . . . . . . . . . . . . . . . . . . . . . . 39 DEUTSCH 1 4/402 Bosch Rexroth AG PSI 6xxx | 1070080028 / 06 DEUTSCH Inhalt 5.2 5.2.1 5.2.2 5.2.3 5.2.3.1 5.2.3.2 5.2.4 5.2.4.1 5.2.4.2 5.2.4.3 5.2.4.4 5.2.4.5 5.2.4.6 5.2.4.7 5.2.4.8 5.2.4.9 5.2.4.10 5.2.4.11 5.2.4.12 5.2.4.13 5.2.4.14 5.2.4.15 5.3 5.3.1 5.3.2 5.3.3 5.4 Produktbeschreibung . . . . . . . . . . . . . . . . . . . . . . . . . . . . . . . . . . Programmierung und Bedienung . . . . . . . . . . . . . . . . . . . . . . . Funktionsprinzip des Mittelfrequenzschweißens . . . . . . . . . Aufbau . . . . . . . . . . . . . . . . . . . . . . . . . . . . . . . . . . . . . . . . . . . . . Teil-Frontansicht PSI 6x00.xxx . . . . . . . . . . . . . . . . . . . . . . Teil-Frontansicht PSI 6xCx.xxx . . . . . . . . . . . . . . . . . . . . . . Module . . . . . . . . . . . . . . . . . . . . . . . . . . . . . . . . . . . . . . . . . . . . . AnyBus-Modul ”ProfiNet IO“ . . . . . . . . . . . . . . . . . . . . . . . . . AnyBus-Modul ”CC Ethernet 100 Mbit” . . . . . . . . . . . . . . . . Baugruppe ”CC Ethernet 100 Mbit“ . . . . . . . . . . . . . . . . . . Baugruppe ”CC ProfiNet“ . . . . . . . . . . . . . . . . . . . . . . . . . . . Baugruppe ”LWL ProfiNet“ . . . . . . . . . . . . . . . . . . . . . . . . . . Diagnosemodul . . . . . . . . . . . . . . . . . . . . . . . . . . . . . . . . . . . . E/A-Modul ”E/A DISK R2ED” und ”E/A DISK R4ED“ . . . . E/A-Modul ”E/A DISK” . . . . . . . . . . . . . . . . . . . . . . . . . . . . . . E/A-Module ”E/A DISK 2R” und ”E/A DISK 4R“ . . . . . . . . . E/A-Modul ”E/A IBS OPC mit LWL” (INTERBUS-S) . . . . . E/A-Modul ”E/A IBS FERN” (INTERBUS-S) . . . . . . . . . . . . E/A-Modul ”E/A IBS X_FERN_8EA” (INTERBUS-S) . . . . . E/A-Modul ”DEV-NET” (DeviceNet) . . . . . . . . . . . . . . . . . . . E/A-Modul ”ComnetM-DP” (PROFIBUS-DP) . . . . . . . . . . . UI-Regler-Modul (PSQ 6000 XQR) . . . . . . . . . . . . . . . . . . . Belastung und Dimensionierung . . . . . . . . . . . . . . . . . . . . . . . . . Grundlegendes . . . . . . . . . . . . . . . . . . . . . . . . . . . . . . . . . . . . . . Wird der Umrichter überlastet? . . . . . . . . . . . . . . . . . . . . . . . . Belastungsdiagramme . . . . . . . . . . . . . . . . . . . . . . . . . . . . . . . . Identifikation des Produkts . . . . . . . . . . . . . . . . . . . . . . . . . . . . . . 42 43 44 46 48 50 52 52 54 55 56 57 58 62 65 67 71 75 79 83 85 87 90 90 90 92 106 6 Transport und Lagerung . . . . . . . . . . . . . . . . . . . . . 107 7 Montage . . . . . . . . . . . . . . . . . . . . . . . . . . . . . . . . . . . 109 7.1 7.1.1 7.2 7.2.1 7.2.2 7.2.3 7.2.4 7.2.5 7.2.6 7.2.7 7.2.8 7.2.9 7.2.10 7.2.11 7.2.12 7.2.13 7.2.14 7.2.15 7.2.16 7.3 Produkt montieren . . . . . . . . . . . . . . . . . . . . . . . . . . . . . . . . . . . . . Maßbilder und Anschlusspositionen . . . . . . . . . . . . . . . . . . . . Produkt elektrisch anschließen . . . . . . . . . . . . . . . . . . . . . . . . . . Entstörung . . . . . . . . . . . . . . . . . . . . . . . . . . . . . . . . . . . . . . . . . . Netzanschluss . . . . . . . . . . . . . . . . . . . . . . . . . . . . . . . . . . . . . . . Trafoanschluss (Primärkreis) . . . . . . . . . . . . . . . . . . . . . . . . . . Anschluss Programmiergerät . . . . . . . . . . . . . . . . . . . . . . . . . . 24 VDC-Logikversorgung (X4, Eingang) . . . . . . . . . . . . . . . . 24 VDC-Spannungserzeugung (X4, Ausgang) . . . . . . . . . . . E/A-Modul-Versorgung (X4, Ausgang) . . . . . . . . . . . . . . . . . . 24 VDC-Spannungsverteilung (X4) . . . . . . . . . . . . . . . . . . . . . Externer Lüfter (X4, Ausgang) . . . . . . . . . . . . . . . . . . . . . . . . . Versorgung externer Geräte (X5, Ausgang) . . . . . . . . . . . . . Analoge Ausgabe der Elektrodenkraft (X2, Ausgang) . . . . . Rückmeldung Elektrodenkraft . . . . . . . . . . . . . . . . . . . . . . . . . Sekundärstrom-Messeingang (X3) . . . . . . . . . . . . . . . . . . . . . Überwachung Transformator-Temperatur (X3) . . . . . . . . . . . Sekundärspannungs-Messeingang . . . . . . . . . . . . . . . . . . . . Hauptschalter-Auslösung (X8) . . . . . . . . . . . . . . . . . . . . . . . . . Wasserversorgung anschließen . . . . . . . . . . . . . . . . . . . . . . . . . 109 110 127 127 128 130 130 132 133 134 135 138 139 140 141 143 145 146 147 148 1070080028 / 06 | PSI 6xxx Bosch Rexroth AG 5/402 Inhalt 8 Inbetriebnahme . . . . . . . . . . . . . . . . . . . . . . . . . . . . . 149 9 Betrieb . . . . . . . . . . . . . . . . . . . . . . . . . . . . . . . . . . . . 153 10 Instandhaltung und Instandsetzung . . . . . . . . . . . . 155 Wartungsplan . . . . . . . . . . . . . . . . . . . . . . . . . . . . . . . . . . . . . . . . . Wartung . . . . . . . . . . . . . . . . . . . . . . . . . . . . . . . . . . . . . . . . . . . . . . Batteriewechsel . . . . . . . . . . . . . . . . . . . . . . . . . . . . . . . . . . . . . Firmware-Update . . . . . . . . . . . . . . . . . . . . . . . . . . . . . . . . . . . . . . Firmware-Update per ”WinBlow” . . . . . . . . . . . . . . . . . . . . . . . Firmware-Update per ”MemTool” . . . . . . . . . . . . . . . . . . . . . . . Firmware-Update per ”FWUpdate” . . . . . . . . . . . . . . . . . . . . . Ersatzteile . . . . . . . . . . . . . . . . . . . . . . . . . . . . . . . . . . . . . . . . . . . . 155 156 156 158 159 160 161 165 11 Demontage und Austausch . . . . . . . . . . . . . . . . . . . 167 12 Entsorgung . . . . . . . . . . . . . . . . . . . . . . . . . . . . . . . . 171 12.1 13 13.1 13.2 13.2.1 13.2.2 13.2.3 Umweltschutz . . . . . . . . . . . . . . . . . . . . . . . . . . . . . . . . . . . . . . . . . Erweiterung und Umbau . . . . . . . . . . . . . . . . . . . . . Optionales Zubehör . . . . . . . . . . . . . . . . . . . . . . . . . . . . . . . . . . . Produkt erweitern . . . . . . . . . . . . . . . . . . . . . . . . . . . . . . . . . . . . . Ein-/Ausbau AnyBus-Modul . . . . . . . . . . . . . . . . . . . . . . . . . . . Ein-/Ausbau der Lizenz-Memory-Card . . . . . . . . . . . . . . . . . . Zubehörsatz für Rückwandmontage . . . . . . . . . . . . . . . . . . . . 171 173 173 174 174 176 177 14 Fehlersuche und Fehlerbehebung . . . . . . . . . . . . . 179 15 Technische Daten . . . . . . . . . . . . . . . . . . . . . . . . . . . 181 16 Anhang . . . . . . . . . . . . . . . . . . . . . . . . . . . . . . . . . . . . 189 16.1 Konformitätserklärung / CE-Kennzeichnung . . . . . . . . . . . . . . 189 17 Tabellenverzeichnis . . . . . . . . . . . . . . . . . . . . . . . . . 191 18 Abbildungsverzeichnis . . . . . . . . . . . . . . . . . . . . . . . 193 19 Abkürzungen . . . . . . . . . . . . . . . . . . . . . . . . . . . . . . . 195 20 Stichwortverzeichnis . . . . . . . . . . . . . . . . . . . . . . . . 199 DEUTSCH 10.1 10.2 10.2.1 10.3 10.3.1 10.3.2 10.3.3 10.4 6/402 Bosch Rexroth AG DEUTSCH Notizen | Notes: PSI 6xxx | 1070080028 / 06 1070080028 / 06 | PSI 6xxx Bosch Rexroth AG 7/402 Zu dieser Dokumentation 1 Zu dieser Dokumentation Dieses Kapitel enthält Informationen, die zur Nutzung der Dokumenta tion bedeutsam sind. " Gültigkeit der Dokumentation Für welches Produkt? Zielgruppe? Behandelte Themen? 1.2 Vorliegende Dokumentation • gilt für die Schweißsteuerung PSI 6xxx • richtet sich an Planer, Monteure, Bediener, Inbetriebnehmer, Servicetechniker, Anlagenbetreiber. • informiert über • mechanischen Aufbau • Bestellnummern und Zubehör • Funktionsprinzip • Belastung und Dimensionierung • Montage, Kühlwasseranschluss, elektr. Anschluss • In-/Außerbetriebnahme und Wartung • mögliche Störfälle im laufenden Betrieb. Zusätzliche Dokumentationen Für das Produkt sind mehrere Unterlagen verfügbar, die gemeinsam zur umfassenden Information erforderlich sind. " Nehmen Sie das Produkt erst dann in Betrieb, wenn Sie mindestens die mit D gekennzeichneten Unterlagen kennen und verstanden haben. Tab.1: Erforderliche (D) und ergänzende Unterlagen Titel Dok.-Nr. Dokumentart D PSI 6xxx: Schweißsteuerung mit Mittelfrequenz-Umrichter 1070080028 Betriebsanleitung D PSI 6xxx.xxx xx: Schweißsteue rung mit Mittelfrequenz-Umrichter, typspezifische Ergänzung je nach Typ Betriebsanleitung (typspezifische Ergänzung) D PSG xxxx: MF-Schweißtransfor matoren 1070087062 Betriebsanleitung BOS 6000 Online-Help 1070086446 Referenz PSI 6xxx: UI-Regelung und -Überwachung 1070087069 Anwendungs beschreibung PSI 6xxx: Prozessregelung und -überwachung für AluminiumPunktschweißen R911172829 Anwendungs beschreibung DEUTSCH 1.1 Informieren Sie sich über das Produkt, bevor Sie damit arbeiten! 8/402 Bosch Rexroth AG PSI 6xxx | 1070080028 / 06 Zu dieser Dokumentation 1.3 Darstellung von Informationen Wir verwenden in dieser Dokumentation einheitliche Symbolik, Begriffe und Abkürzungen. Diese werden in den folgenden Abschnitten erklärt. 1.3.1 Sicherheitshinweise Sicherheitshinweise machen Sie auf Gefahrenpotentiale oder Risiken gezielt aufmerksam. DEUTSCH Wo? Aufbau? Wir unterscheiden folgende Stellen, an denen Sicherheitshinweise er forderlich sein können: • Grundsätzliche Sicherheitshinweise: Sie betreffen allgemein wichtige Dinge und gelten für die komplette Dokumentation. Sie finden diese Sicherheitshinweise im Kap. 2 ab Seite 11. • Vorangestellte Sicherheitshinweise: Sie betreffen themenbezogene Dinge und stehen am Anfang eines Kapitels oder am Anfang eines kompletten Handlungsablaufes. • Integrierte Sicherheitshinweise: Sie betreffen genau einen separaten Handlungsschritt und stehen unmittelbar vor dem relevanten Handlungsschritt. Ein Sicherheitshinweis ist stets folgendermaßen strukturiert: • Warnzeichen (nur bei Personenschäden) • Signalwort zur Angabe der Gefahrenstufe • Art und Quelle der Gefahr • Folgen bei Nichtbeachtung • Maßnahmen zur Gefahrenabwehr. Tab.2: Beispiel zum Aufbau eines Sicherheitshinweises Warnzeichen + SIGNALWORT Art und Quelle der Gefahr! Folgen bei Nichtbeachtung! " Maßnahme zur Gefahrenabwehr. " Weitere Maßnahme(n) zur Gefahrenabwehr. Integrierte Sicherheitshinweise können in das Format der Umge bung eingebettet sein, um keinen ”visuellen” Bruch in einer Hand lungssequenz zu provozieren. Sie verwenden daher nicht zwangsläufig das im Beispiel gezeigte Layout, wohl aber die angegebene Struktur. 1070080028 / 06 | PSI 6xxx Bosch Rexroth AG 9/402 Zu dieser Dokumentation Zur Klassifizierung sind Sicherheitshinweise nach Gefahrenstufen (Gefahrenklassen) unterteilt. Das Signalwort repräsentiert die Gefah renstufe. Tab.3: Gefahrenklassen nach ANSI Z535.6 Signalwort Bedeutung GEFAHR Gefährliche Situation, in der Tod oder schwere Körperver letzungen eintreten werden, wenn sie nicht vermieden wird. WARNUNG Gefährliche Situation, in der Tod oder schwere Körperver letzungen eintreten können, wenn sie nicht vermieden wird. VORSICHT Gefährliche Situation, in der leichte bis mittelschwere Kör perverletzungen eintreten können, wenn sie nicht vermie den wird. HINWEIS Situation, in der Sach- oder Umgebungsschäden eintreten können, wenn sie nicht vermieden wird. Tab.4: Beispiele zur Klassifikation der Sicherheitshinweise GEFAHR Art und Quelle der Gefahr! Folgen bei Nichtbeachtung! " Maßnahmen zur Gefahrenabwehr. WARNUNG Art und Quelle der Gefahr! Folgen bei Nichtbeachtung! " Maßnahmen zur Gefahrenabwehr. VORSICHT Art und Quelle der Gefahr! Folgen bei Nichtbeachtung! " Maßnahmen zur Gefahrenabwehr. HINWEIS Art und Quelle der Gefahr! Folgen bei Nichtbeachtung! " Maßnahmen zur Gefahrenabwehr. DEUTSCH Gefahrenstufen? 10/402 Bosch Rexroth AG PSI 6xxx | 1070080028 / 06 Zu dieser Dokumentation 1.3.2 Symbole Die folgende Symbolik wird verwendet, um Textpassagen besonders zu kennzeichnen. Tab.5: Symbol " • DEUTSCH 1. 2. 3. 1.3.3 Verwendete Symbolik Bedeutung Kennzeichnung für einen Tipp oder eine Information. Hilft, das Produkt optimal zu nutzen, zu betreiben, oder Zusammenhänge besser zu verstehen. Kennzeichnung, dass etwas zwingend beachtet/durch geführt werden muss. Kennzeichnung für eine (unsortierte) Aufzählung. Kennzeichnung für eine (sortierte) Aufzählung oder Handlungsschritte, bei denen die Einhaltung der vorgegebenen Reihenfolge notwendig ist. Bezeichnungen In unserer Dokumentation können folgende Bezeichnungen vorkom men: Tab.6: 1.3.4 Bezeichnungen Bezeichnung Bedeutung BOS Bedienoberfläche Schweißen BQR Bedienoberfläche U/I-Regler PE Protective Earth. Schutzleiter. PG Programmiergerät/Schweißrechner. PSG Trafo-Gleichrichtereinheit für PSI-Typen. Mittelfrequenz-Schweißtransformator 1000 Hz PSI Programmierbare Schweißsteuerung mit Inverter. PSQ 6000 XQR Steckmodul für PSI mit UI-Reglerfunktionalität. Wird bei PSI 6xCx-Typen nicht benötigt. PST Programmierbare Schweißsteuerung mit Thyristor-Leis tungsteil. SPS Speicherprogrammierbare Steuerung. SST Schweißsteuerung. Wird auch als Schub, Takter oder Widerstandsschweiß steuerung bezeichnet. Abkürzungen Siehe Kap. 19 ab Seite 195. 1070080028 / 06 | PSI 6xxx Bosch Rexroth AG 11/402 Sicherheitshinweise 2 Sicherheitshinweise Dieses Kapitel enthält wichtige Informationen zum sicheren Umgang mit dem beschriebenen Produkt. 2.1 Zu diesem Kapitel 2.2 " Bewahren Sie die Dokumentation so auf, dass sie jederzeit für alle Benutzer zugänglich ist. " Geben Sie das Produkt an Dritte stets zusammen mit der ProduktDokumentation weiter. Bestimmungsgemäße Verwendung Bei dem beschriebenen Produkt handelt es sich um einen elektrischen Ausrüstungsteil für Maschinen. • Das Produkt dient in Verbindung mit einem - zum integrierten Leis tungsteil passenden - Schweißtransformator zum Widerstands schweißen von Metallen. • Das Produkt ist nur zur professionellen/industriellen und nicht zur privaten Verwendung bestimmt. • Das Produkt ist für den Betrieb im industriellen Bereich (Emission Klasse A, Gruppe 2) bestimmt und erfüllt folgende Richtlinien und Normen: Richtlinien • Niederspannungsrichtlinie2006/95/EG • EMV-Richtlinie2004/108/EG Normen • EN50178 • EN60204‐1 • EN62135 Die bestimmungsgemäße Verwendung schließt auch ein, dass Sie die Dokumentation zum Produkt gelesen und verstanden haben. 2.3 Nicht bestimmungsgemäße Verwendung Eine nicht bestimmungsgemäße Verwendung des Produktes kann in Ihrer Applikation Betriebszustände provozieren, die Personen- und/ oder Sachschäden verursachen. Jeder andere Gebrauch als unter “bestimmungsgemäße Verwendung” beschrieben, ist “nicht bestimmungsgemäß” und deshalb unzulässig. Zur nicht bestimmungsgemäßen Verwendung des Produkts gehören insbesondere: • Betrieb in explosionsgefährdeten Bereichen, DEUTSCH Das beschriebene Produkt wurde unter Beachtung der EG-Normen entwickelt, gefertigt, geprüft und dokumentiert. Trotzdem besteht die Gefahr von Personen- und Sachschäden, wenn Sie dieses Kapitel und die Sicherheitshinweise in dieser Dokumenta tion nicht beachten. " Lesen Sie deshalb die Dokumentation gründlich und vollständig, be vor Sie mit dem Produkt arbeiten. 12/402 Bosch Rexroth AG PSI 6xxx | 1070080028 / 06 Sicherheitshinweise • Betrieb in sicherheitsrelevanten Anwendungen, sofern diese Anwendungen nicht ausdrücklich in der Produktdokumentation spe zifiziert bzw. erlaubt sind, • Betrieb ohne ein Gehäuse, das mindestens der Schutzart IP54 ent spricht, • Betrieb bei offener Schaltschranktür, • Betrieb ohne entsprechende Kühlung, • Einsatz nicht zugelassener/passender Schweißtransformatoren, • Betrieb ohne dauerhafte/unzureichende Befestigung, • Betrieb außerhalb der technischen Daten, • Betrieb oder Lagerung außerhalb der vorgegebenen Umweltbe dingungen (z.B. Luftfeuchtigkeit), DEUTSCH • Elektrischer Anschluss entspricht nicht der Dokumentation. Für Schäden bei nicht bestimmungsgemäßer Verwendung übernimmt die Bosch Rexroth AG keine Haftung. Die Risiken bei nicht bestim mungsgemäßer Verwendung trägt allein der Betreiber/Benutzer. 2.4 Qualifikation des Personals Diese Dokumentation wendet sich an speziell ausgebildetes Fachper sonal, das über besondere Kenntnisse in der Schweißtechnik verfügt. Dieser Personenkreis benötigt fundierte Kenntnisse über die Soft‐ und Hardwarekomponenten der Schweißanlage. WARNUNG Einsatz von unqualifiziertem Personal oder Nichtbeachten von Warnhinweisen Reduzierung der Personen-/Anlagensicherheit, Funktionsstö rungen/-einschränkungen möglich! " Stellen Sie sicher, dass alle Arbeiten nur von entsprechend quali fiziertem Personal durchgeführt werden. " Stellen Sie sicher, dass Warnhinweise/Anweisungen am Produkt oder in der zugehörigen Dokumentation beachtet werden. Starke elektromagnetische Felder während des Schweißablaufes Funktionsstörung von Herzschrittmachern, metallischen Implanta ten oder auch Hörgeräten möglich! " Stellen Sie sicher, dass Personen, die auf solche Geräte ange wiesen sind oder diese Geräte benutzen, Widerstands-Schweiß anlagen meiden. " Stellen Sie sicher, dass in ausreichendem Abstand von Widerstands-Schweißanlagen entsprechende Warnzeichen angebracht werden. 1070080028 / 06 | PSI 6xxx Bosch Rexroth AG 13/402 " Projektierung, Programmierung, Start und Bedienung sowie das Verändern von Programmparametern darf nur durch entsprechend geschultes Fachpersonal erfolgen! Dieses Personal muss in der Lage sein, mögliche Gefahren zu erkennen, die durch Program mierung, Programmänderungen und allgemein durch die me chanische, elektrische oder elektronische Ausrüstung verursacht werden können. " Eingriffe in Hard- und Software unserer Produkte - soweit nicht in der Dokumentation beschrieben - dürfen nur von unserem eigenen Fachpersonal vorgenommen werden. Im Zusammenhang mit anderen Personenkreisen ist unsere schrift liche Zustimmung erforderlich! " Nur Fachkräfte, die den Inhalt der relevanten Dokumentation kennen, dürfen die beschriebenen Produkte installieren, bedienen und warten. Dies sind Personen, die • aufgrund ihrer fachlichen Ausbildung, Kenntnisse und Erfah rungen sowie aufgrund ihrer Kenntnis der einschlägigen Normen die auszuführenden Arbeiten beurteilen, mögliche Gefahren er kennen und geeignete Sicherheitsmaßnahmen treffen können. • aufgrund einer mehrjährigen Tätigkeit auf vergleichbarem Gebiet den gleichen Kenntnisstand wie nach einer fachlichen Ausbil dung haben. Beachten Sie bezüglich der Personal-Qualifikation unser umfang reiches Schulungsangebot! Schulungsmöglichkeiten Aktuellste Informationen über Trainingsmaßnahmen, Teachware und Training Systems finden Sie unter www.boschrexroth.com/training . Auskünfte erteilt Ihnen auch Bosch Rexroth AG Berliner Straße 25 64711 Erbach Tel. +49 (0) 6062 78-0 DEUTSCH Sicherheitshinweise 14/402 Bosch Rexroth AG PSI 6xxx | 1070080028 / 06 Sicherheitshinweise DEUTSCH 2.5 Allgemeine Sicherheitshinweise " Beachten Sie die gültigen Vorschriften zur Unfallverhütung und zum Umweltschutz. " Beachten Sie die Sicherheitsvorschriften und -bestimmungen des Landes, in dem das Produkt eingesetzt/angewendet wird. " Verwenden Sie unsere Produkte nur in technisch einwandfreiem Zu stand. " Beachten Sie alle Hinweise auf dem Produkt. Siehe dazu auch Kap. 2.6.1 Seite 15. " Personen, die unsere Produkte montieren, bedienen, demontieren oder warten, dürfen nicht unter dem Einfluss von Alkohol, sonstigen Drogen oder Medikamenten, die die Reaktionsfähigkeit beeinflus sen, stehen. " Verwenden Sie nur zugelassene Zubehör- und Ersatzteile, um Per sonengefährdungen wegen nicht geeigneter Ersatzteile auszu schließen. " Halten Sie die in der Produktdokumentation angegebenen technischen Daten und Umgebungsbedingungen ein. " Wenn in sicherheitsrelevanten Anwendungen ungeeignete Pro dukte eingebaut oder verwendet werden, können unbeabsichtigte Betriebszustände in der Anwendung auftreten, die Personen- und/ oder Sachschäden verursachen können. Setzen Sie daher ein Pro dukt nur dann in sicherheitsrelevanten Anwendungen ein, wenn diese Verwendung ausdrücklich in der Dokumentation des Produkts spezifiziert und erlaubt ist. " Sie dürfen unser Produkt erst dann in Betrieb nehmen, wenn festge stellt wurde, dass das Endprodukt (beispielsweise eine Maschine oder Anlage), in das unser Produkt eingebaut ist, den landesspezi fischen Bestimmungen, Sicherheitsvorschriften und Normen der Anwendung entspricht. 1070080028 / 06 | PSI 6xxx Bosch Rexroth AG 15/402 Sicherheitshinweise 2.6 Produkt- und technologieabhängige Sicherheitshinweise In diesem Kapitel finden Sie grundsätzliche Hinweise und Anwei sungen, die für Ihre Sicherheit beim Handling mit dem Produkt und der Technologie im Umfeld des Produktes wichtig sind. 2.6.1 Evtl. verwendete Symbolik am Produkt Tab.7: Symbol Mögliche Symbole am Produkt Bedeutung Gefahren durch Batterien Elektrostatisch gefährdete Bauelemente Schutzleiter PE Funktionserde, fremdspannungsarme Erde Erde allgemein 2.6.2 Transport VORSICHT Schwere Last und scharfe Blechkanten Erhöhung des Verletzungsrisikos durch Verheben, Quetschen oder Schneiden! " Berücksichtigen Sie bei Planung und Durchführung der Arbeiten stets das Gewicht des Produktes (siehe technische Daten) und verwenden Sie ggf. geeignetes Hebe- und Transportwerkzeug. " Tragen Sie passende Arbeitskleidung und verwenden Sie ge eignete Schutzausrüstung (z.B. Sicherheitshelm/-schuhe, Schutzhandschuhe). DEUTSCH Gefährliche elektrische Spannung 16/402 Bosch Rexroth AG PSI 6xxx | 1070080028 / 06 Sicherheitshinweise 2.6.3 Einbau und Montage WARNUNG Gefährliche elektrische Spannung Herz-Rhythmusstörung, Verbrennung, Schock möglich! DEUTSCH " Stellen Sie sicher, dass alle Anlagenteile, an denen während Montagevorgängen gearbeitet wird, spannungsfrei und gegen willkürliches/unbeabsichtigtes Wiedereinschalten ausreichend gesichert sind! Unzureichende Schutzart Reduzierung der Personen-/Anlagensicherheit! " Die Schutzart des beschriebenen Produkts entspricht IP20. Bauen Sie es stets in einen Schaltschrank ein, der mindestens der Schutzart IP 54 genügt. VORSICHT Nicht fachgerechte Durchführung von Einbau-/Montagearbeiten Reduzierung der Personen-/Anlagensicherheit, Funktionsstö rungen/-einschränkungen möglich! " Stellen Sie sicher, dass Einbau und Montage von einer Fachkraft vorgenommen werden, die auch über Fachkenntnisse auf dem Gebiet der elektromagnetischen Verträglichkeit verfügt. " Beachten Sie alle Angaben in den technischen Daten (z.B. die Umgebungsbedingungen). " Beachten Sie geltende Sicherheits‐ und Unfallverhütungsvor schriften. " Setzen Sie nie Sicherheitseinrichtungen außer Kraft. Unzureichende Ergonomie Reduzierung der Personen-/Anlagensicherheit, negative Aus wirkungen auf Gesundheit und/oder Konzentration, Funktionsstö rungen/-einschränkungen, Fehlbedienung möglich! " Stellen Sie sicher, dass Geräte und vor allem Bedienelemente so eingebaut werden, dass eine optimale Ergonomie gewährleistet ist. Bedienelemente müssen stets gut erreichbar und Anzeigen gut ablesbar sein! " Stellen Sie sicher, dass Geräte und Bedienelemente gegen un beabsichtigte Betätigung oder Berührung ausreichend geschützt sind. 1070080028 / 06 | PSI 6xxx Bosch Rexroth AG 17/402 Sicherheitshinweise VORSICHT Unzureichende Befestigung Reduzierung der Personen-/Anlagensicherheit, Funktionsstö rungen möglich! " Stellen Sie sicher, dass Einbauort und Befestigung der Komponenten auf deren Gewicht ausgelegt sind! Berücksichtigen Sie hierbei auch dynamische Kräfte, die ggf. auf das Produkt einwirken. Schwere Last und scharfe Blechkanten " Berücksichtigen Sie bei Planung und Durchführung der Ein bau-/Montagearbeiten stets das Gewicht des Produktes (siehe technische Daten) und verwenden Sie ggf. geeignetes Hebe werkzeug. " Tragen Sie passende Arbeitskleidung und verwenden Sie ge eignete Schutzausrüstung (z.B. Sicherheitshelm/-schuhe, Schutzhandschuhe). DEUTSCH Erhöhung des Verletzungsrisikos durch Verheben, Quetschen oder Schneiden! 18/402 Bosch Rexroth AG PSI 6xxx | 1070080028 / 06 Sicherheitshinweise 2.6.4 Elektrischer Anschluss WARNUNG Gefährliche elektrische Spannung DEUTSCH Herz-Rhythmusstörung, Verbrennung, Schock möglich! " Der elektrische Anschluss darf nur von einer Elektrofachkraft un ter Beachtung der gültigen Sicherheitsbestimmungen, der Netz spannung und der maximalen Stromaufnahme der Anlagenteile ausgeführt werden. " Verwenden Sie für alle elektrischen Anschlussarbeiten geeigne tes, isoliertes Elektrowerkzeug. " Verwenden Sie netzseitig passende elektrische Absicherungen. Es sind als strombegrenzende Schutzelemente z.B. Si cherungen oder Hauptschalter mit Überstromauslösung erforder lich. Unzureichendes Schutzleitersystem Reduzierung der Personen-/Anlagensicherheit! " Das Produkt muss korrekt an das Schutzleitersystem (PE) der Anlage angeschlossen werden. " Achten Sie bei der Schutzleiterverdrahtung auf ausreichenden Leiterquerschnitt. " Die durchgehende Verbindung des Schutzleitersystems muss nach EN 60204 Teil 1 geprüft werden Unzureichende Not-Aus/Not-Halt-Einrichtungen Reduzierung der Personen-/Anlagensicherheit! " Not-Aus/Not-Halt-Einrichtungen müssen in allen Betriebsarten der Anlage wirksam und erreichbar bleiben. " Beachten Sie EN 60204-1. " Ein Entriegeln der Not-Aus/Not-Halt-Einrichtung darf keinen un kontrollierten Wiederanlauf der Anlage bewirken. " Stellen Sie sicher, dass bewegliche Anlagenteile vor dem Zugriff oder Zutritt in den Gefahrenbereich der Anlage sicher zum Still stand gebracht werden! " Prüfen Sie vor der Inbetriebnahme die korrekte Funktion der NotAus/Not-Halt-Kette. 1070080028 / 06 | PSI 6xxx Bosch Rexroth AG 19/402 Sicherheitshinweise WARNUNG Nicht oder falsch ausgewertete Fehlermeldungen " Viele Meldungen können in der SST entsprechend Ihren An forderungen als ”Warnung” (keine Blockade) oder ”Fehler” (mit Blockade) frei konfiguriert werden. Meldungen mit Fehlercharakteristik müssen aber stets als ”Feh ler” konfiguriert sein und so zur Blockade der angeschlossenen Steuerung führen! " Nutzen Sie die zur Verfügung stehenden Meldesignale, um den Prozess an Ihrer Applikation möglichst sicher zu gestalten. Zur Einspeisung von Fehlersignalen aus dem Prozess und zur Fehlerausgabe an den Prozess (SPS, Roboter) stellt die Steue rung eine Vielzahl von Meldungssignalen (z.B. per diskreten und /oder seriellen Ein-/Ausgängen) zur Verfügung. " Beachten Sie zur Fehlerauswertung auch die Angaben in Kapitel „Fehlersuche und Fehlerbehebung“. Fehlerhafter oder unvollständiger Anschluss von E/A-Signalen Reduzierung der Personen-/Anlagensicherheit, Funktionsstö rungen/-einschränkungen möglich! " Jeder Anwender, Linienbauer, Schweißmaschinenhersteller und Schweißzangenbauer ist verpflichtet, Ausgangssignale, die eine Bewegung auslösen (wie z.B. Magnetventil und Vorhub), so zu verschalten, dass gültige Sicherheitsbestimmungen (z.B. ISO 13849) eingehalten werden und eine Gefährdung des Personals sicher verhindert wird! " Beachten Sie, dass elektronische Ausgänge nach den Si cherheitsbestimmungen als „nicht sicher” gelten. Deshalb muss z.B. die Zangenansteuerung zusätzlich per Relais abgesichert werden. " Beachten Sie die Informationen zur Wirkungsweise verfügbarer E/A-Signale und zu Status- und Fehlermeldungen. " Spätestens zur Inbetriebnahme müssen alle E/A-Signale ord nungsgemäß angeschlossen sein und korrekt übertragen werden. " Verwenden Sie z.B. ”Zweihand-Start”, Schutzgitter, Lichtschran ken usw., um das Verletzungsrisiko an der Anlage zu minimieren. DEUTSCH Reduzierung der Personen-/Anlagensicherheit, Funktionsstö rungen möglich! 20/402 Bosch Rexroth AG PSI 6xxx | 1070080028 / 06 Sicherheitshinweise WARNUNG Fehlerhafter Anschluss von Anschlusskabeln DEUTSCH Reduzierung der Personen-/Anlagensicherheit, Funktionsstö rungen/-einschränkungen möglich! 2.6.5 " Dimensionieren Sie alle Leiterquerschnitte entsprechend der An schlussleistung. " Stellen Sie sicher, dass sich keine Anschlusskabel ungewollt lö sen können. " Beachten Sie das in den technischen Daten vorgegebene An zugsdrehmoment für Schrauben und Klemmen. " Stellen Sie sicher, dass alle Kontaktflächen blank, d.h. frei von Farbe, Kunststoffbeschichtungen oder Schmutz/Oxidation sind. " Stellen Sie sicher, dass Isolierungen von Anschlusskabeln nicht beschädigt sind. Betrieb des Produktes WARNUNG Starke elektromagnetische Felder während des Schweißablaufes Funktionsstörung von Herzschrittmachern, sonstigen Implantaten oder auch Hörgeräten möglich! " Stellen Sie sicher, dass Personen, die auf solche Geräte ange wiesen sind oder diese Geräte benutzen, Widerstands-Schweiß anlagen prinzipiell meiden. " Stellen Sie sicher, dass in ausreichendem Abstand von Widerstands-Schweißanlagen entsprechende Warnzeichen angebracht werden. " Beachten Sie die EG-Richtlinie „Elektromagnetische Felder (2004/40/EG)“. Dort sind Grenzwerte für Extremitäten definiert, die insbesondere bei Handzangenapplikationen überschritten werden können. Führen Sie in Zweifelsfällen Feldstärkemessungen durch und treffen Sie zusätzliche Maßnahmen zum Arbeitsschutz. " Beachten Sie die Berufsgenossenschaftliche Vorschrift BGV B11 “Unfallverhütungsvorschrift elektromagnetische Felder”. 1070080028 / 06 | PSI 6xxx Bosch Rexroth AG 21/402 Sicherheitshinweise WARNUNG Hohe dynamische Kräfte und sehr schnelle Bewegungsabläufe " Rechnen Sie stets mit Bewegungsabläufen, die durch auftre tende Fehler an der Anlage hervorgerufen werden können und verhalten Sie sich entsprechend umsichtig und besonnen. " Setzen Sie nie sicherheitsrelevante Funktionen außer Kraft! " Halten Sie sich nie bei aktiver Anlage im Gefahrenbereich der Schweißeinrichtung auf! " Stellen Sie sicher, dass bewegliche Anlagenteile vor dem Zugriff oder Zutritt in den Gefahrenbereich der Anlage zum Stillstand ge kommen sind! Roboter und Fixierelemente können sehr hohe dynamische Kräfte und sehr schnelle Bewegungsabläufe erzeugen. Außerdem sind während eines Schweißablaufes Schweißspritzer möglich. Fehler rücksetzen Gefährliche Maschinenbewegungen möglich! " Überzeugen Sie sich vor dem Quittieren von Fehlermeldungen, dass sich niemand in der Gefahrenzone der Schweißvorrichtung aufhält! Steht beim Quittieren von Fehlermeldungen noch das Startsignal an, dann beginnt die Schweißsteuerung sofort mit dem Pro grammablauf. Beschädigte Anlagenteile Reduzierung der Personen-/Anlagensicherheit, Funktionsstö rungen/-einschränkungen möglich! " Prüfen Sie vor Arbeitsbeginn die Anlage angemessen und durch führbar auf Beschädigungen (z.B. optisch). " Melden Sie Beschädigungen und Störungen an der Anlage sofort Ihrem Vorgesetzten und Ihrer Instandhaltungs‐ bzw. Reparatur abteilung. DEUTSCH Schlag-, Quetsch-, Einzugs- und Verbrennungsgefahr! 22/402 Bosch Rexroth AG PSI 6xxx | 1070080028 / 06 Sicherheitshinweise VORSICHT Schweißspritzer, heiße Oberflächen, scharfe Blechkanten DEUTSCH Verbrennungen, Augenverletzungen möglich! 2.6.6 " Tragen Sie Schutzhandschuhe, um sich vor Verletzungen an scharfen Blechkanten oder vor Verbrennungen am Schweißgut zu schützen! " Tragen Sie eine Schutzbrille, um Ihre Augen vor weg geschleu derten Schweißspritzern oder heißen Metallspänen zu schützen. " Tragen Sie nur schwer entflammbare Arbeitskleidung. Nachrüstungen und Veränderungen durch den Betreiber WARNUNG Veränderungen am Produkt Reduzierung der Personen-/Anlagensicherheit, Funktionsstö rungen/-einschränkungen möglich! " Normalerweise sind Veränderungen am Produkt unzulässig. Wenn Sie meinen, das Produkt nur nach einer Modifikation nutzen zu können, müssen Sie vor dessen Veränderung Kontakt mit uns aufnehmen. Nur so kann geklärt werden, ob Ver änderungen unproblematisch sind. In jedem Fall dürfen Sie das Produkt nur mit unserem schriftlichen Einverständnis modifizieren! 1070080028 / 06 | PSI 6xxx Bosch Rexroth AG 23/402 Sicherheitshinweise Wartung und Reparatur WARNUNG Gefährliche elektrische Spannung Herz-Rhythmusstörung, Verbrennung, Schock möglich! " Wartungsarbeiten sind - wenn nicht anders beschrieben - grund sätzlich nur bei ausgeschalteter und ausreichend gesicherter Anlage durchzuführen! Sind Mess- oder Prüfarbeiten an der aktiven Anlage erforderlich, müssen diese von Elektrofachkräften durchgeführt werden. " Verwenden Sie für alle Wartungsarbeiten an elektrisch leitfähigen Teilen geeignetes, isoliertes Werkzeug. " Interpretieren Sie nie das Verlöschen aller LEDs am Produkt als Spannungsfreiheit! " Berücksichtigen Sie, dass geräteinterne Spannungen direkt nach dem Abschalten der Netzversorgung noch nicht auf ein ungefähr liches Maß abgebaut sind. " Stellen Sie mit geeignetem Messgerät und mit geeigneter Mess methode stets sicher, dass der betreffende Anlagenteil und das betreffende Gerät spannungsfrei ist, bevor daran hantiert wird. " Öffnen Sie nie das Produktgehäuse! Es darf nur in speziellen Fällen nach Rücksprache mit uns und auch nur mit unserer schriftlichen Erlaubnis geöffnet werden. Einsatz von unqualifiziertem Personal Reduzierung der Personen-/Anlagensicherheit, Funktionsstö rungen/-einschränkungen möglich! " Lassen Sie Reparatur- und Wartungsarbeiten nur von unserem Service, oder von entsprechend autorisierten Reparatur- oder Wartungsstellen durchführen! Hohe dynamische Kräfte und sehr schnelle Bewegungsabläufe Schlag-, Quetsch-, Einzugs- und Verbrennungsgefahr! " Rechnen Sie stets mit Bewegungsabläufen, die durch auftre tende Fehler an der Anlage hervorgerufen werden können und verhalten Sie sich entsprechend umsichtig und besonnen. " Halten Sie sich nie bei aktiver Anlage im Gefahrenbereich der Schweißeinrichtung auf! " Setzen Sie nie sicherheitsrelevante Funktionen außer Kraft! Roboter und Fixierelemente können sehr hohe dynamische Kräfte und sehr schnelle Bewegungsabläufe erzeugen. Außerdem sind während eines Schweißablaufes Schweißspritzer möglich. DEUTSCH 2.6.7 24/402 Bosch Rexroth AG PSI 6xxx | 1070080028 / 06 Sicherheitshinweise VORSICHT Unsachgemäße Handhabung von Lithium-Batterien Verätzung, Explosion möglich! " Öffnen Sie Lithium-Batterien nicht gewaltsam. " Laden Sie eine verbrauchte Lithium-Batterie nicht wieder auf. " Erhitzen Sie Lithium-Batterien nicht über 100Grad Celsius. Umlaufende Lüfterräder Handverletzungen möglich! DEUTSCH " Bringen Sie bei eingeschalteter 24V-Logikversorgung der SST keine Finger oder Gegenstände in die Lüftereinheiten. Geräte mit Luftkühlung müssen mit Zwangsbelüftung betrieben werden. Dazu sind sie zur Ansteuerung externer Lüfter mit einer temperaturgesteuerten Ein-/Abschaltautomatik ausgerüstet. 2.6.8 Konformitätserklärung / CE-Kennzeichnung Näheres zur Konformitätserklärung/zum CE-Kennzeichen siehe Seite 189. " Die Bewertung der elektrischen und mechanischen Sicherheit, der Umwelteinflüsse (Fremdkörper, Feuchtigkeit) muss im eingebauten Zustand am Endprodukt erfolgen. Da sich im eingebauten Zustand die EMV-Eigenschaften dieses Produktes ändern können, ist für das Endprodukt (Endgeräte, Ma schine, Anlagen) eine Überprüfung der EMV-Eigenschaften durch den Endprodukthersteller zweckmäßig. 1070080028 / 06 | PSI 6xxx Bosch Rexroth AG 25/402 Sicherheitshinweise Pflichten des Betreibers Der Betreiber ist verantwortlich für die Anlage. Deswegen muss er • die bestimmungsgemäße Verwendung der Anlage sicherstellen, • das Betriebspersonal regelmäßig unterweisen, • bestehende Gefahren für alle Personen unübersehbar und eindeu tig kennzeichnen, • die Sicherheitsvorschriften und -bestimmungen des Landes, in dem das Gerät zur Anwendung kommt, beachten, • für seine individuelle Anwendung die Eignung der gelieferten Komponenten und die in dieser Dokumentation gemachten Angaben zu ihrer Verwendung selbst überprüfen, • die für seine Anwendung geltenden Sicherheitsvorschriften und Normen abstimmen und die erforderlichen Maßnahmen, Änderungen, Ergänzungen durchführen, • sicherstellen, dass die Inbetriebnahme der gelieferten Komponenten erst dann erfolgt, wenn die Maschine oder Anlage inkl. der gelieferten Komponenten den landesspezifischen Bestim mungen, Sicherheitsvorschriften und Normen der Anwendung ent spricht. DEUTSCH 2.7 26/402 Bosch Rexroth AG Sicherheitshinweise DEUTSCH Notizen | Notes: PSI 6xxx | 1070080028 / 06 1070080028 / 06 | PSI 6xxx Bosch Rexroth AG 27/402 Allgemeine Hinweise zu Sachschäden und Produktschäden 3 Allgemeine Hinweise zu Sachschäden und Produktschäden Vorliegendes Kapitel enthält Hinweise, die zum Schutz vor Sach- und Produktschäden wichtig sind. Transport und Lagerung HINWEIS Frost, Korrosion Leck im Kühlkörper, Verschmutzung des Kühlmediums möglich! " Stellen Sie sicher, dass das Kühlsystem vor der Lagerung voll ständig entleert wird. " Beachten Sie den maximalen Lagertemperaturbereich aller Komponenten (siehe Angaben in den technischen Daten). Defekte oder verbrauchte Batterien Beschädigungen durch defekte (ausgelaufene) Batterien und Verlust der im RAM gespeicherten Informationen möglich! " Stellen Sie sicher, dass wichtige Daten der Steuerung vor deren Lagerung per Backup gesichert wurden. Daten im RAM-Bereich gehen verloren, wenn die Pufferbatterie verbraucht ist. " Zur Einlagerung des Produkts (> 2 Jahre) entnehmen Sie die zur Pufferung des RAM-Speichers vorgesehene Batterie. DEUTSCH 3.1 28/402 Bosch Rexroth AG PSI 6xxx | 1070080028 / 06 Allgemeine Hinweise zu Sachschäden und Produktschäden 3.2 Einbau und Montage HINWEIS Metallspäne bei Bohr- und Sägearbeiten Kurzschlüsse, Schäden an der elektrischen Ausrüstung, unvor hersehbare Anlagenreaktionen möglich! " Schotten Sie vor Beginn der Arbeiten im Schaltschrank ge fährdete Komponenten gut ab! Bei Nichtbeachtung erlischt jeglicher Garantieanspruch. " Entfernen Sie nach den Arbeiten alle Metallspäne sorgfältig. DEUTSCH Wasseraustritt beim Anschluss von Kühlwasserleitungen Schäden an der elektrischen Ausrüstung, unvorhersehbare An lagenreaktionen möglich! " Schotten Sie vor Beginn der Arbeiten im Schaltschrank ge fährdete Komponenten gut ab! Bei Nichtbeachtung erlischt jeglicher Garantieanspruch. " Entfernen Sie nach den Arbeiten vorhandene Restfeuchtigkeit sorgfältig. Leck im Kühlmittelkreislauf Schäden an der elektrischen Ausrüstung, unvorhersehbare An lagenreaktionen möglich! " Bauen Sie Komponenten mit Wasserkühlung so ein, dass Geräte im Schaltschrank gegen austretendes Kühlwasser ausreichend abgeschottet sind. Stauwärme durch unzureichenden Geräteabstand Temporäres Stocken des Schweißablaufes, Verminderung der Produktlebensdauer, Zerstörung des Gerätes, Schäden an der elektrischen Ausrüstung, unvorhersehbare Anlagenreaktionen möglich! " Stellen Sie sicher, dass über- und unterhalb des Produktes ein Einbaufreiraum von mindestens 100 mm verbleibt. 1070080028 / 06 | PSI 6xxx Bosch Rexroth AG 29/402 Allgemeine Hinweise zu Sachschäden und Produktschäden HINWEIS Überhitzung oder Schwitzwasser durch unzureichende Kühlung " Stellen Sie sicher, dass die Bedingungen in den technischen Da ten für eine ausreichende Kühlleistung erfüllt werden. " Stellen Sie sicher, dass für luftgekühlte Geräte eine Zwangsküh lung installiert wird. Kühlung per Konvektion reicht nicht aus! " Stellen Sie sicher, dass sich an Wasser führenden Bauteilen kein Schwitzwasser bilden kann. Ist das nicht möglich, muss für eine ausreichende Ableitung und Abschottung des Schwitzwassers gesorgt werden. Setzen Sie ggf. Klimaanlagen ein. DEUTSCH Temporäres Stocken des Schweißablaufes, Verminderung der Produktlebensdauer, Zerstörung des Gerätes, Schäden an der elektrischen Ausrüstung, unvorhersehbare Anlagenreaktionen möglich! 30/402 Bosch Rexroth AG PSI 6xxx | 1070080028 / 06 Allgemeine Hinweise zu Sachschäden und Produktschäden 3.3 Elektrischer Anschluss HINWEIS Falsche Spannungsversorgung DEUTSCH Schäden an der elektrischen Ausrüstung möglich! " Prüfen Sie, ob die Netzspannung mit der auf dem Typenschild des Produkts angegebenen Nennspannung übereinstimmt! Das Produkt darf nur bei Übereinstimmung an das Netz ange schlossen werden. " Stellen Sie sicher, dass Schwankungen oder Abweichungen der Netzspannung vom Nennwert stets in den erlaubten Toleranz grenzen (siehe technische Daten) liegen. Kapazitive oder induktive Einstreuungen in Leitungen Funktionsstörungen möglich! " Verlegen Sie Leistungs- und Steuerleitungen getrennt. Empfohlene Richtwerte für Verlegeabstände: > 100 mm bei paralleler Verlegung von Leitungen < 10 m, > 250 mm bei paralleler Verlegung von Leitungen > 10 m. " Installieren Sie das Produkt in der Nähe der Schweißeinrichtung, um die Längen erforderlicher Leitungen zu minimieren. Ziehen oder Stecken von Baugruppen oder Steckverbindungen unter Spannung Schäden an der elektrischen Ausrüstung, unvorhersehbare An lagenreaktionen möglich! " Wenn nicht anders beschrieben, Steckverbindungen nie unter Spannung stecken oder ziehen. " Schalten Sie vor dem Einstecken/Ziehen von SSTBaugruppen/ Modulen stets die Spannungsversorgung der SST ab. 1070080028 / 06 | PSI 6xxx Bosch Rexroth AG 31/402 Allgemeine Hinweise zu Sachschäden und Produktschäden HINWEIS Elektrostatische Aufladung " Halten Sie beim Umgang mit Baugruppen und Bauelementen alle Vorkehrungen zum ESDSchutz ein und vermeiden Sie elektrostatische Entladungen. " Beachten Sie folgende Schutzmaßnahmen für elektrostatisch gefährdete Baugruppen und Bauelemente (EGB): • Das für die Lagerung, Transport und Handhabung verantwort liche Personal muss im ESDSchutz ausgebildet sein. • EGB müssen in den vorgeschriebenen Schutzverpackungen gelagert und transportiert werden. • EGB dürfen grundsätzlich nur an dafür eingerichteten ESDArbeitsplätzen gehandhabt werden. • Personal, Arbeitsplatten und alle Geräte und Werkzeuge, die mit EGB in Berührung kommen können, müssen auf gleichem Potential (z.B. geerdet) sein. • Ein zugelassenes Erdungsarmband anlegen. Das Erdungs armband muss über ein Kabel mit integriertem 1MOhmWiderstand mit der Arbeitsplatte verbunden sein. • EGB dürfen auf keinen Fall mit aufladbaren Gegenständen in Berührung kommen, dazu gehören die meisten Kunststoffe. • Beim Einsetzen von EGB in Geräte und bei ihrer Heraus nahme muss das Gerät spannungsfrei sein. DEUTSCH Schäden an der elektrischen Ausrüstung möglich! 32/402 Bosch Rexroth AG PSI 6xxx | 1070080028 / 06 Allgemeine Hinweise zu Sachschäden und Produktschäden 3.4 Betrieb HINWEIS HF-Störstrahlung Störungen anderer Geräte in der Umgebung möglich! DEUTSCH " Stellen Sie sicher, dass durch den Betrieb des Produktes andere Geräte nicht in ihrer Funktion beeinträchtigt werden können. Das Produkt ist Teil einer Widerstandsschweißeinrichtung mit KlasseA. Widerstandsschweißeinrichtungen der Klasse A sind für Industrienetze konzipiert (siehe auch „bestimmungsgemäßer Ge brauch“ Seite 11). Ein Gebrauch im öffentlichen Niederspannungs-Netzwerk - das u. a. Wohnbereiche versorgt - erfordert deswegen Sondermaß nahmen. Ziehen oder Stecken von Baugruppen oder Steckverbindungen unter Spannung Schäden an der elektrischen Ausrüstung, unvorhersehbare An lagenreaktionen möglich! " Wenn nicht anders beschrieben, Steckverbindungen nie unter Spannung stecken oder ziehen. " Nie SSTBaugruppen/Module während des Betriebs stecken oder ziehen. Überhitzung durch unzureichende Kühlung Temporäres Stocken des Schweißablaufes, Verminderung der Produktlebensdauer möglich! " Stellen Sie sicher, dass luftgekühlte Geräte nur mit funktionierender Zwangskühlung betrieben werden. Kühlung per Konvektion reicht nicht aus! " Stellen Sie sicher, dass wassergekühlte Geräte nur mit ausrei chendem Kühlwasserdurchfluss, passender Zulauftemperatur und geeigneter Kühlmittelqualität betrieben werden. Nähere In formationen siehe technische Daten. Starke elektromagnetische Felder während des Schweißablaufes Schädigung von Armband/Taschenuhren, Disketten oder auch Magnetstreifenkarten (z. B. ECKarten) möglich! " Führen Sie deshalb solche Dinge nicht mit sich, wenn Sie in un mittelbarer Nähe der Schweißanlage arbeiten. 1070080028 / 06 | PSI 6xxx Bosch Rexroth AG 33/402 Allgemeine Hinweise zu Sachschäden und Produktschäden Wartung und Reparatur HINWEIS Ziehen oder Stecken von Baugruppen oder Steckverbindungen unter Spannung Schäden an der elektrischen Ausrüstung, unvorhersehbare An lagenreaktionen möglich! " Wenn nicht anders beschrieben, Steckverbindungen nie unter Spannung stecken oder ziehen. " Schalten Sie vor dem Einstecken/Ziehen von SSTBaugruppen/ Modulen stets die Spannungsversorgung der SST ab. Unsachgemäße Handhabung von Lithium-Batterien Umweltschäden möglich! " Entsorgen Sie verbrauchte Batterien nur entsprechend den gesetzlichen Bestimmungen. Elektrostatische Aufladung Schäden an der elektrischen Ausrüstung möglich! " Halten Sie beim Umgang mit Baugruppen und Bauelementen alle Vorkehrungen zum ESDSchutz ein und vermeiden Sie elektrostatische Entladungen. " Beachten Sie folgende Schutzmaßnahmen für elektrostatisch gefährdete Baugruppen und Bauelemente (EGB): • Das für die Lagerung, Transport und Handhabung verantwort liche Personal muss im ESDSchutz ausgebildet sein. • EGB müssen in den vorgeschriebenen Schutzverpackungen gelagert und transportiert werden. • EGB dürfen grundsätzlich nur an dafür eingerichteten ESDArbeitsplätzen gehandhabt werden. • Personal, Arbeitsplatten und alle Geräte und Werkzeuge, die mit EGB in Berührung kommen können, müssen auf gleichem Potential (z.B. geerdet) sein. • Ein zugelassenes Erdungsarmband anlegen. Das Erdungs armband muss über ein Kabel mit integriertem 1MOhmWiderstand mit der Arbeitsplatte verbunden sein. • EGB dürfen auf keinen Fall mit aufladbaren Gegenständen in Berührung kommen, dazu gehören die meisten Kunststoffe. • Beim Einsetzen von EGB in Geräte und bei ihrer Heraus nahme muss das Gerät spannungsfrei sein. DEUTSCH 3.5 34/402 Bosch Rexroth AG Allgemeine Hinweise zu Sachschäden und Produktschäden DEUTSCH Notizen | Notes: PSI 6xxx | 1070080028 / 06 1070080028 / 06 | PSI 6xxx Bosch Rexroth AG 35/402 Lieferumfang Lieferumfang Der Lieferumfang ist abhängig vom Auftrag. Deswegen ist an dieser Stelle keine global gültige Aussage über den Umfang Ihrer speziellen Lieferung möglich. " Kontrollieren Sie den Lieferumfang anhand des Lieferscheins. DEUTSCH 4 36/402 Bosch Rexroth AG Lieferumfang DEUTSCH Notizen | Notes: PSI 6xxx | 1070080028 / 06 1070080028 / 06 | PSI 6xxx Bosch Rexroth AG 37/402 Zu diesem Produkt Zu diesem Produkt Die Geräte der Baureihe PSI 6xxx enthalten standardmäßig • Schweißsteuerung (SST) und • Mittelfrequenz-Leistungsteil (MF-Umrichter). Aufgaben des MF-Umrichters: • Erzeugung der erforderlichen Leistungen • Ansteuerung eines Mittelfrequenz-Schweißtransformators (MFTrafo, z.B. PSG) Aufgaben der Schweißsteuerung: • Steuerung, Regelung und Überwachung aller programmierten Schweißabläufe • Ansteuerung des integrierten MF-Umrichters • Kommunikation mit Geräten auf der selben Prozessebene per E/A-Anbindung (z.B. Roboter, SPS, Bedientableau). Zweck: Einbindung des Produktes in den Automationsprozess. • Kommunikation mit Geräten auf einer übergeordneten Leitebene (z.B. Bereichszentrale, Programmiergerät). Zweck: Programmierung, Anzeige von Status/Meldungen/Fehlern, Protokollierung, Bedienung. Neben verschiedenen Steuerungstypen, die sich primär in der E/A-An bindung an die übergeordnete SPS-/Robotereinheit und in der Steue rungsfunktionalität unterscheiden, sind auch unterschiedliche Leistungsteiltypen (siehe Tabelle auf Seite 38) mit un terschiedlichen Kühlsystemen (Luft/Wasser) in abgestuften Leistungs klassen zur Ansteuerung eines MF-Schweißtransformators verfügbar. Für die einzelnen Steuerungstypen existieren deshalb jeweils zu sätzliche Dokumente, in denen die typspezifische SST-Funktionali tät beschrieben ist. Hauptmerkmale • Steuerungskonzept zum Gleichstrom-Schweißen (DC-Schweißen) • Geeignet zur Ansteuerung vieler MF-Schweißtransformatoren • Die integrierte Schweißsteuerung ist geeignet für Punkt- (z.B. in Ver bindung mit einem Roboter), Buckel-, Serienpunkt- (z.B. Hand zangen) und Standard-Nahtschweißaufgaben (z.B. Rollnaht). Speziell für Nahtschweißaufgaben sind die Typen PSI 6xxx.190 ge eignet (siehe Tabelle auf Seite 38). • Integrierte Regelung und Überwachung im 1ms-Takt • Trennung zwischen Regelung und Überwachung • Hohe Funktionalität zur Optimierung der Schweißqualität • Umschaltbar zwischen Primärstrommessung (kein externer Strom sensor im Sekundärkreis erforderlich) und Sekundärstrommessung (externer Stromsensor im Sekundärkreis erforderlich) • Unterschiedliche Kühlsysteme (Luft, Wasser) und abgestufte Leis tungsklassen verfügbar. Informationen zur Dimensionierung und Belastung siehe Kap. 5.3. DEUTSCH 5 38/402 Bosch Rexroth AG PSI 6xxx | 1070080028 / 06 Zu diesem Produkt • Unterschiedlichste verfügbare E/A-Schnittstellen zur Kommunika tion mit SPS, Roboter oder zur Anbindung eines Maschinenbedien feldes • Optional verfügbare Feldbusschnittstellen zur Kommunikation mit einer übergeordneten Leitebene • Komfortable Programmierung, Bedienung und Diagnose per PCSoftware (Bedienoberfläche ”BOS”) In Kap. 5.1 finden Sie eine detailliertere Auflistung der Merkmale. Tab.8: Überblick über die Leistungsteiltypen Ausführung DEUTSCH Typ Kühlung Luft ... mit Standard-CPU PSI 6100.xxx L1 PSI 6100.xxx L2 PSI 6100.xxx W1 PSI 6100.190 W1 PSI 6100.xxx W2 PSI 6200.xxx W1 PSI 6200.190 W1 PSI 6300.xxx L1 PSI 6300.xxx L2 PSI 6300.xxx W1 PSI 6300.xxx W2 PSI 6500.xxx W1 PSI 6500.190 W1 ... mit TriCore-CPU PSI 61C0.xxx L1 PSI 61C0.xxx L2 PSI 61C0.xxx W1 PSI 62C0.xxx W1 PSI 62C0.190 W1 PSI 63C0.xxx L1 PSI 63C0.xxx L2 PSI 63C0.xxx W1 PSI 63C0.xxx W2 PSI 64C0.xxx W1 PSI 65C0.xxx W1 PSI 65C0.190 W1 Wasser n n Netzversorgung 400 ... 480 V 500 ... 690 V auch verfügbar mit Funktionalität1) Naht Master/ Slave n n n n n n n n n n n n n n n n n n n n n n n n n n n n n n n n n n n n n n n n n n n n n n n n n n n n n n max. Schweiß strom2) in kA 3 ... 20 3 ... 20 3 ... 20 3 ... 5 3 ... 20 9 ... 16 3 ... 5 6 ... 36 6 ... 36 6 ... 36 6 ... 36 9 ... 120 9 ... 50 3 ... 20 3 ... 20 3 ... 20 9 ... 54 9 ... 16 6 ... 36 6 ... 36 6 ... 36 6 ... 36 9 ... 54 9 ... 120 9 ... 50 1) Naht: Spezielle SST ausschließlich für das Nahtschweißen mit Rollelektroden. Hauptunterschiede zur Stan dard-Nahtfunktion der ”normalen“ SSTs: der Schweißtakt lässt sich an den jeweils aktuellen Bahnvorschub anpassen, reduzierte Ausgangsströme, nur Primärstrommessung/-regelung Master/Slave: Synchronisation von max. 3PSI6500.xxx gleichen Typs zur Erhöhung der Schweißleistung. Hierbei sind Schweißströme von 360kA bei Trafos mit einer Übersetzung von n=50 erreichbar. 2) abhängig vom verwendeten Schweißtransformator 1070080028 / 06 | PSI 6xxx Bosch Rexroth AG 39/402 Zu diesem Produkt Leistungsbeschreibung • Oberfläche für Bedienung, Programmierung und Diagnose: - komplett per grafischer Bedienoberfläche BOS; lauffähig auf PCs mit Betriebssystem ab Windows XP Service Pack 3. - mit eingeschränktem Funktionsumfang per Kleinbedienfeld VCP05.2 (Anbindung per RS232 bzw. Ethernet). • Optionaler Zugriffsschutz für Bedienung/Programmierung - per Anmeldung mit eigenem Benutzernamen und eigenem Pass wort • Programmier-Anbindung zum PC (BOS): - Standard: für eine einzelne Steuerung per V24/RS232 (z.B. zur Programmierung vor Ort) - Option: gleichzeitige Anbindung mehrerer Steuerungen per Feldbus schnittstelle (z.B. Ethernet). • Typabhängige E/A-Anbindungen (Kommunikation mit z.B. Roboter/SPS): - parallel (diskrete E/A-Verdrahtung) - seriell (per Bussystem): ProfibusDP InterbusS DeviceNet Ethernet-IP ProfiNet • Programmanzahl: - 256 (typabhängig sind auch mehr Programme möglich) - symbolische Punktansprache möglich. • Programmierung von Zeiten im Millisekunden-Raster • Universell anpassbarer Schweißablauf: - 3 programmierbare Stromzeiten (1.STZ: Vorwärmstromzeit; 2.STZ: Schweißstromzeit; 3.STZ: Nachwärmstromzeit). Die Stromzeiten lassen sich sowohl gemeinsam in einer Rege lungsbetriebsart betreiben (Standard-Betrieb), als auch in unter schiedlichen Regelungsbetriebsarten (Mix-Betrieb). - 1.STZ und 3.STZ abschaltbar - programmierbarer Impulsbetrieb für 2.STZ - programmierbarer Slope (Stromanstiegs-/-abfallzeit) für 2.STZ • Schweißbetriebsarten: - Einzelpunkt - Serienpunkt (typabhängig) - Naht • Regelungsbetriebsarten: - PHA (Phasenanschnitt) - KSR (Konstant-Strom-Regelung) - UIR (Adaptiver Regler; optional) Die Regelungsbetriebsarten PHA und KSR sind für jede Stromzeit separat einstellbar (Mix-Betrieb). UIR nur in 2.STZ. DEUTSCH 5.1 40/402 Bosch Rexroth AG PSI 6xxx | 1070080028 / 06 Zu diesem Produkt • Stromüberwachung: - Referenzströme sind unabhängig von den Regelungssollwerten programmierbar - prozentuales Toleranzband, asymmetrisch programmierbar - Standard- oder Mix-Betrieb (Mix-Betrieb: Überwachung für 1.STZ, 2.STZ und 3.STZ separat einstellbar). • Automatische Punktwiederholung bei zu kleinem Strom DEUTSCH • Zeitüberwachung • Elektroden-Management: - Verwaltung für bis zu 31 Elektroden (Anzahl abhängig vom Steuerungstyp) - Stepperfunktion für Leistung (Leistungsnachstellung) - Elektrodenfräsen inkl. Startfräsen - Stepperfunktion für Druck (Nachstellung der Elektrodenkraft) - Vorwarntabelle mit grafischer Darstellung des Elektrodenver schleißes • Erzeugung der Zangenkraft: - Programmierung der Kraft für jedes Schweißprogramm - Ausgabe als analoge (Spannung, Strom) und/oder digitale Stell größe (abhängig vom Steuerungstyp) - analoge oder digitale Rückmeldung (abhängig vom Steuerungs typ) - Kraft-Skalierung zur Anpassung der Kraftstellgröße an die verwendete Aktorik • Druckprofil: - bis zu 10 verschiedene Elektrodenkräfte während eines Pro grammablaufes programmierbar • Frei programmierbarer Ausgang (abhängig vom Steuerungstyp): bis zu 3 programmierbare Ein-/Ausschaltzeitpunkte während eines Programmablaufes. Dient z.B. zur Ansteuerung eines Gegendruck ventils oder allgemein zum Triggern weiterer Prozesse. • Skalierung: - für Strom (Abgleich der Schweißeinrichtung auf externes Refe renz-Strommessgerät) - für Kraft (Abgleich der Elektrodenkraft auf externes ReferenzKraftmessgerät) • Protokollfunktionen (ISO 9000): - Fehler-/Ereignisprotokoll - Stromfehler-Protokoll - Datenänderungs-Protokoll - Stromwerte-Protokoll • integrierter Diagnosespeicher • Fehlerzuordnung: - bestimmte Prozessfehler sind als ”Fehler” oder ”Warnung” de finierbar • Statusanzeige der E/A-Signale im Onlinebetrieb • Leistungskorrektur: - programmspezifische Vorgabe - elektrodenspezifische Vorgabe 1070080028 / 06 | PSI 6xxx Bosch Rexroth AG 41/402 Zu diesem Produkt • Gesamt-Übersicht über die Schweißlinie per Anlagenbild • SST-globale Anzeige der - Ablaufsperre (P) - Zündung intern ein (P) - Zeitüberwachung - Stromüberwachung - Strombetriebsart der 2. STZ (PHA / KSR) - benutzten Elektroden - Programme, die mit einer bestimmten Elektrode arbeiten. • Backup/Auto-Backup (Datensicherung) • Restore (Datenwiederherstellung) • Vergleich zwischen Steuerungen und/oder Backupdateien • Startsimulation: - Programmanwahl und Ablaufstart per BOS initiierbar • Online- und Offline-Programmierung möglich DEUTSCH • Kopieren von Schweißprogrammen 42/402 Bosch Rexroth AG PSI 6xxx | 1070080028 / 06 Zu diesem Produkt 5.2 Produktbeschreibung Steuerung und Leistungsteil sind in einem gemeinsamen Gehäuse montiert. PSI 6500.XXX DEUTSCH PSI 6200.XXX PSI 6100.XXX PSI 6300.XXX 1 Abb.1: 2 3 1 2 3 1 2 3 Beispiele: Mittelfrequenz-Umrichter mit Standard-CPU 1 Funktionsbereich ”Kühlung“. Kühlkörper/Kühlwasser anschlüsse siehe Kap. 7.1.1 und 7.3. 3 Funktionsbereich ”Schweiß steuerung“ und ”E/A-An bindung“. Details siehe ab Seite 48. 2 Funktionsbereich ”MF-Umrich ter“. Netzanschluss: Seite 128 Trafoanschluss: Seite 130 Verfügbare Typen: siehe Seite 38, Tab. 8: Überblick über die Leistungsteiltypen. 1070080028 / 06 | PSI 6xxx Bosch Rexroth AG 43/402 Zu diesem Produkt Programmierung und Bedienung Alle erforderlichen Parameter werden immer im steuerungsinternen batteriegepufferten RAM gehalten. Die Bedienung, Programmierung und Diagnose erfolgt per ange koppeltem PC. Zur Ankopplung des PC stehen zur Verfügung: • V24-Schnittstelle X1 (bei den Typen PSI 6x00.xxx) • V24-Schnittstelle X3C oder USB-Schnittstelle X3U (bei den Typen PSI 6xCx.xxx; alternativ nutzbar) • optional erhältliche Feldbusschnittstelle (z.B. Ethernet). Während die V24/USB-Anbindung nur für den Zugriff auf eine einzelne Steuerung vorgesehen ist (z.B. Programmierung vor Ort), erlaubt die Feldbusschnittstelle die gleichzeitige Anbindung mehrerer Steue rungen. Voraussetzungen zur Programmierung und Bedienung am PC: • PC mit Betriebssystem ab Windows XP Service Pack 3 • Software BOS (Bedienoberfläche Schweißen) • V24/USB-Verbindungskabel bzw. bei Feldbusschnittstelle entspre chende Installation. Per BOS ist sowohl Online-, als auch Offline-Programmierung möglich. • offline: keine aktive Verbindung zur Steuerung erforderlich. Diagnose und Visualisierung sind nicht möglich. Die Programmierung erfolgt im PC, wird dort abgespeichert und lässt sich später in die Steuerung transferieren. • online: aktive Verbindung zur Steuerung erforderlich. Diagnose und Visualisierung sind möglich. Die Programmierung erfolgt per PC. Jeder Parameter wird aus der Steuerung ausgelesen und nach Quittierung wieder in die Steue rung zurückgeschrieben. Geänderte Parameter werden somit nach der Quittierung spätestens zum nächsten Programmstart an der Anlage wirksam. Ausführliche Informationen zur Software BOS finden Sie in der BOS-Online-Hilfe. DEUTSCH 5.2.1 44/402 Bosch Rexroth AG PSI 6xxx | 1070080028 / 06 Zu diesem Produkt 5.2.2 Funktionsprinzip des Mittelfrequenzschweißens PSI 6xxx PSG + 3~ 1000 Hz Steuerteil Abb.2: MF-Umrichter TransformatorGleichrichter Schweißvorrichtung Übersichts-Blockschaltbild: PSI 6000 mit Trafo DEUTSCH Der im PSI integrierte MF-Umrichter steuert den Schweißtransformator mit einer bipolaren, rechteckförmigen Spannung mit einer Frequenz von 1000 Hz an. Um die resultierende Leistung im Sekundärkreis zu beeinflussen, wird die Pulsbreite verwendet (siehe Abb. folgende Seite). Im PSG findet die sekundärseitige Gleichrichtung des Schweißstroms statt. 6-Puls-Brücken gleichrichtung Netz 50/60 Hz L1 U1 L2 V1 L3 W1 Gleichspannungszwischenkreis Transistorwechselrichter PSI Treiber Netzteil Regler U2 U V2 V Schweiß transformator zur Temperatur überwachung Steuerteil PSG zur Konstantstrom regelung im PSI * Gleichrichter Sekundär spannungsabgriff * *: je nach Transformator ausführung zur Zange Abb.3: Detail-Blockschaltbild einer Mittelfrequenz-Umrichteranlage 1070080028 / 06 | PSI 6xxx Bosch Rexroth AG 45/402 Zu diesem Produkt Ausgangsspannung des Mit telfrequenz-Umrichters resultierender Schweißstrom U I t t Abb.4: Primärspannung UPRIM Sekundärseitige Gleichrichtung durch den PSG-Transformator kleine Pulsbreite f = 1 kHz resultierender Sekundärstrom ISEK Primärspannung UPRIM resultierende Leistung große Pulsbreite f = 1 kHz resultierender Sekundärstrom ISEK resultierende Leistung Abb.5: Zusammenhang: Pulsbreite der Primärspannung und Sekundärstrom beim Mittelfrequenzschweißen DEUTSCH 1 ms 46/402 Bosch Rexroth AG PSI 6xxx | 1070080028 / 06 Zu diesem Produkt 5.2.3 Aufbau Das Leistungsteil ist im linksseitigen, das Steuerungsmodul im rechts seitigen Gehäuseteil fest montiert. Am Leistungsteil befinden sich immer die Anschlüsse für • Netzversorgung, • Schweißtransformator und • Kühlwasser (nur bei Typen mit Wasserkühlung). Das Steuerungsmodul enthält neben Anzeige- und Bedienelementen alle Anschlüsse/Module zur Ankopplung der PSI 6xxx an die überge ordnete SPS-/Robotereinheit und an das Programmiergerät. DEUTSCH Steuerungsmodul: • Kommunikation mit Roboter/SPS • Kommunikation mit Programmiergerät (BOS) U1 Netz V1 • W1 per RS232 oder USB (typabhängig) Kommunikation mit Programmiergerät (BOS) per Feldbus (optional) • Aufnahme verschiedener Zusatzmodule Details siehe ab Seite 48. Leistungsteil: • Erzeugung der Schweißleistung PSI 6xxx • Ansteuerung des Mittelfrequenz-Schweiß transformators *): Möglichkeiten zur Schweißstrommessung: • Sekundärkreis-Stromsensor im PSG • separater Sekundärkreis-Stromsensor • Primärkreis-Stromsensor im PSI Trafo U2 V2 zur KonstantstromRegelung (KSR) Spannungsabgriff (wird für die optionale UI-Regelung benötigt) Stromsensor*) MF-Schweiß transformator (PSG) Primärkreis Abb.6: Elektroden Sekundärkreis Prinzipieller Aufbau einer MF-Schweißeinrichtung mit PSI 6xxxx Die Abmessungen des Gesamtgehäuses und die Funktionseinhei ten zur Kühlung sind abhängig von der Größe des integrierten Leis tungsteils und können daher von der Beispielabbildung abweichen. Bosch Rexroth AG 47/402 Zu diesem Produkt Informationen zur Montage und zum Anschluss siehe Kap. 7 ab Seite 109. Für die Beschreibung typabhängiger Funktionen/Anschlüsse des Steuerungsmoduls sind zusätzliche Dokumente verfügbar (siehe Seite 7). Für die verfügbaren Mittelfrequenz-Transformatoren existiert ein se parates Dokument (siehe Seite 7). Ausführliche Informationen zur Software BOS finden Sie in der BOS-Online-Hilfe. DEUTSCH 1070080028 / 06 | PSI 6xxx 48/402 Bosch Rexroth AG PSI 6xxx | 1070080028 / 06 Zu diesem Produkt 5.2.3.1 Teil-Frontansicht PSI 6x00.xxx LED LOGIK; grün. Leuchtet, wenn 24 VDC (Logik-Versorgungsspannung) ansteht. LED ZWISCHENKREIS; rot (nur funktionsfähig, wenn LED LOGIK grün leuchtet). Leuchtet, wenn Zwischenkreisspannung aufgebaut ist RESET-Taste. Bringt die Steuerung nach einem aufgetretenen (und beseitigten) Fehler wieder in den Zustand BEREIT. DIP-Schalter. Funktion ist typabhängig. Boot-LED; rot. Leuchtet, wenn die Steuerung im ”Boot”-Modus ist. A D R ”Boot”-Taste zum Einsprung in den ”Boot”-Modus. Wird zum Firmware tausch in Verbindung mit der Software ”WinBlow” (siehe Seite 159) be nötigt. Im ”Boot”-Modus ist kein Schweißbetrieb mehr möglich. BootModus verlassen: 24 V-Logikspannung aus- und wieder einschalten. V24-Anbindung zum Programmiergerät (zur Programmierung vor Ort). Siehe Kap. 7.2.4 ab Seite 130 24 VDC-Ausgang zur E/A-Modul-Versorgung (siehe Seite 134). 24 VDC-Ausgang der internen Spannungsquelle (siehe Seite 133). 24 VDC-Eingang zur Logik-Spannungsversorgung (siehe Seite 132). Klemmen zur 24 VDC-Spannungsverteilung (siehe Seite 135). Temperaturgesteuerter 24 VDC-Ausgang zur Versorgung/Ansteue rung externer Lüfter (siehe Seite 138). X1 X4 24 VDC-Ausgang z.B. zur Versorgung externer Verbraucher. Siehe Kap. 7.2.10 Seite 139. X5 Anschlüsse für ”Hauptschalterauslösung“ (siehe Seite 147) X8 Typabhängig: Analoger Ausgang für die Kraftstellgröße. Siehe Kap. 7.2.11 ab Seite 140. Typabhängig: Digitaler (24 VDC) und analoger (0..10 VDC) Eingang zur (Kraft-)Rückmeldung. Siehe Kap. 7.2.12 ab Seite 141. Typabhängig: Ausgang zur Ausgabe des Signals ”Operate” Typabhängig: Analoger Eingang zur (Kraft-)Rückmeldung. Siehe Kap. 7.2.12 ab Seite 141. Typabhängig: 0 V-Bezug für Ausgang ”Operate”. Messeingang für Sekundärstrommessung. Siehe Kap. 7.2.13 Seite 143. Typabhängig: Aus-/Eingang zur Überwachung der Trafotemperatur (siehe Kap. 7.2.14 Seite 145). Batterie zur Pufferung des internen RAM (Tausch siehe Seite 156). Abb.7: Teil-Frontansicht PSI 6x00.xxx X2 X9 X3 Optionales Feldbus-Modul. Siehe ab Seite 52 DEUTSCH LED BATTERIEFEHLER; rot. Leuchtet, wenn eine neue Batterie eingesetzt werden muss (siehe Seite 156). Typspezifisches E/A-Modul. Siehe ab Seite 62 LED STROMZEIT; gelb. Leuchtet, wenn das Leistungsteil angesteuert wird. Optionales Ultraschall- bzw. U/I-Reglersystem (PSQ 6000 XQR) LED BEREIT; grün. Leuchtet, wenn in der Steuerung kein Fehler ansteht. Das Gerät ist schweißbereit. 1070080028 / 06 | PSI 6xxx Bosch Rexroth AG 49/402 Zu diesem Produkt Die LEDs können den Status der SST nur dann melden, wenn die Logik-Versorgungsspannung ansteht! HINWEIS Willkürliches Drücken des Boot-Tasters Negative Auswirkungen auf die laufende Produktion möglich! " Boot-Taster nie während laufender Produktion betätigen. " Boot-Taster darf nur von autorisiertem Personal betätigt werden. DEUTSCH Die Steuerung bricht nach Drücken des Boot-Tasters den Pro grammablauf ab, setzt alle Signal-Ausgänge zurück und geht in den ”Boot”-Modus (zum Firmwaretausch). 50/402 Bosch Rexroth AG PSI 6xxx | 1070080028 / 06 Zu diesem Produkt 5.2.3.2 Teil-Frontansicht PSI 6xCx.xxx 24 VDC-Ausgang zur E/A-Modul-Versorgung (siehe Seite 134). 24 VDC-Ausgang der internen Spannungsquelle (siehe Seite 133). 24 VDC-Eingang zur Logik-Spannungsversorgung (siehe Seite 132). Klemmen zur 24 VDC-Spannungsverteilung (siehe Seite 135). Temperaturgesteuerter 24 VDC-Ausgang zur Versorgung/Ansteue rung externer Lüfter (siehe Seite 138). Typabhängig: Ausgang zur Ausgabe des Signals ”Operate” Typabhängig: Analoger Eingang zur (Kraft-)Rückmel dung. Siehe Kap. 7.2.12 ab Seite 141. Typabhängig: 0 V-Bezug für Ausgang ”Operate”. Messeingang für Sekundärstrommessung. Siehe Kap. 7.2.13 Seite 143. Typabhängig: Aus-/Eingang zur Überwachung der Trafotemperatur (siehe Kap. 7.2.14 Seite 145). Messeingang für Sekundärspannungsmessung bei UI-Regelung. Siehe Kap. 7.2.15 Seite 146. Anschluss Programmiergerät (zur Programmierung vor Ort). Siehe Kap. 7.2.4 ab Seite 130. X3C: RS232 / V24 oder alternativ X3U: USB X4 X5 X8 Optionales Modul Typabhängig: Analoger Ausgang für die Kraftstell größe. Siehe Kap. 7.2.11 ab Seite 140. Typabhängig: Digitaler (24 VDC) und analoger (0..10 VDC) Eingang zur (Kraft-)Rückmeldung. Siehe Kap. 7.2.12 ab Seite 141. X2 X9 X3 LED ZWISCHENKREIS: Leuchtet rot, wenn Zwischenkreisspannung aufgebaut ist. LED STATUS: Leuchtet gelb, wenn das Leistungsteil angesteuert wird (Stromzeit). Leuchtet rot, wenn keine Firmware geladen oder der BootModus aktiv ist. Typspezifisch: AnyBus-Modul. Z.B. zur Kommunikation mit einem Programmiergerät (BOS), Anbindung serieller E/A an Roboter/SPS (ProfiNet). Informationen zu den Modulen und deren LED-Anzeigen siehe ab Seite 52. Ein-/Ausbau siehe Seite 174. Batterie zur Pufferung des internen RAM (Tausch siehe Seite 156). Aufnahmeschacht für Lizenz-Memory-Card Siehe Seite 176. Diagnosemodul; u.a. zur Fehleranzeige, Fehlerquittung, Aktivierung des Boot-Modus, SST-Reset (siehe Kap. 5.2.4.6 Seite 58) Abb.8: Teil-Frontansicht PSI 6xCx.xxx X3C X3U X7E1 Optionales Feldbus-Modul. Siehe ab Seite 52 DEUTSCH Anschlüsse für ”Hauptschalterauslösung“ (siehe Seite 147) Typspezifisches E/A-Modul. Siehe ab Seite 62 24 VDC-Ausgang zur Versorgung externer Verbraucher Siehe Kap. 7.2.10 Seite 139 Bosch Rexroth AG 51/402 Zu diesem Produkt LEDs und Diagnosemodul können den Status der SST nur dann melden, wenn die Logik-Versorgungsspannung ansteht! DEUTSCH 1070080028 / 06 | PSI 6xxx 52/402 Bosch Rexroth AG PSI 6xxx | 1070080028 / 06 DEUTSCH Zu diesem Produkt 5.2.4 Module 5.2.4.1 AnyBus-Modul ”ProfiNet IO“ Merkmale: • Geeignet für PSI 6xCx.xxx (Steckplatz X7E1) • ProfiNet (RT-Klassifikation, Konformitätsklasse B) • Fast-Ethernet (100 MBit/s), Full-Duplex-Betrieb • Als 1- oder 2-Port-Variante verfügbar. 2-Port-Variante mit In tegriertem Switch • Integrierter WEB-Server • Einfache IP-Konfiguration Funktion: • Anbindung der Steuerungs-E/A an übergeordnete SPS/Roboter via ProfiNet und • Anbindung der SST an ein Programmiergerät (BOS) via Ethernet. PSI 6xCx.xxx 1 2 3 4 5 ETH1 6 7 Abb.9: AnyBus-Modul ”ProfiNet IO“ (2-Port-Variante) 1 Schrauben zur Fixierung 2 LED für Netzwerkstatus (bzgl. ProfiNet-Controller): aus: keine Verbindung zum ProfiNet-Controller grün: Verbindung zum ProfiNet-Controller etabliert grün, blinkend: Verbindung zum ProfiNet-Controller etabliert, ProfiNet-Controller ist im Stopp-Status 3,5 LED für Link/Activity (Port 1 bzw. 2): aus: keine Verbindung zum Netzwerk grün: Verbindung zum Netzwerk hergestellt grün, blinkend: Datentransfer aktiv 4,6 Ethernet-Schnittstellenanschlüsse mit integriertem Switch 4: Port 1; 6: Port 2 7 LED für Modulstatus: aus: Modul ist nicht initialisiert grün: Modul arbeitet normal grün, 1 x blinkend: Diagnoseereignis aufgetreten grün, 2 x blinkend: Ausgelöst per SW-Tool zur Identifikation des Mo duls im Netzwerk rot: Per SST-Hochlauf evtl. behebbarer Modulfehler rot, 1 x blinkend: Konfigurationsfehler rot, 2 x blinkend: IP-Adresse ist nicht gesetzt rot, 3 x blinkend: Stationsname wurde nicht gesetzt rot, 4 x blinkend: Modulfehler Bosch Rexroth AG 53/402 Zu diesem Produkt Informationen zum Einbau siehe Kap. 13.2.1 ab Seite 174. Zur Ethernet-Konfiguration verwenden Sie die Software ”Anybus IP config” (Installationsdatei ist im BOS-Softwarepaket enthalten; siehe BOS-Datenträger: Verzeichnispfad „Tools/Anybus“). DEUTSCH 1070080028 / 06 | PSI 6xxx 54/402 Bosch Rexroth AG PSI 6xxx | 1070080028 / 06 Zu diesem Produkt 5.2.4.2 AnyBus-Modul ”CC Ethernet 100 Mbit” Merkmale: • Geeignet für PSI 6xCx.xxx (Steckplatz X7E1) • Fast-Ethernet (100 MBit/s), Full-Duplex-Betrieb • Als 1- oder 2-Port-Variante verfügbar. 2-Port-Variante mit In tegriertem Switch • Integrierter WEB-Server • Einfache IP-Konfiguration DEUTSCH Funktion: • Zur gleichzeitigen Anbindung mehrerer Steuerungen an die Lei tebene via Ethernet (z.B. Anbindung BOS-Programmiergerät). 1 2 3 ETH1 4 5 Abb.10: AnyBus-Modul ”CC Ethernet 100 Mbit” (1-Port-Variante) 1 Schrauben zur Fixierung 2 LED NS: Netzwerkstatus. Aus: Keine Versorgung oder keine IP-Adresse Grün Modul ist aktiv oder im Wartezustand Grün, blinkend Warten auf Verbindungen Rot Doppelte IP Adresse, oder fatales Ereignis Rot, blinkend Modul nicht im aktiven Zustand 3 Ethernet-Interface. RJ45-Buchse 4 LED LINK: Verbindungsstatus. Aus Keine Verbindung, keine Aktivität Grün Verbindung aufgebaut Grün, flackernd Verbindungsaktivität 5 LED MS: Modulstatus. Aus Keine Versorgung Grün Normale Funktion Rot Schwerer Fehler oder fatales Ereignis Rot, blinkend Leichter Fehler Informationen zum Einbau siehe Kap. 13.2.1 ab Seite 174. Zur Ethernet-Konfiguration verwenden Sie die Software ”Anybus IP config” (Installationsdatei ist im BOS-Softwarepaket enthalten; siehe BOS-Datenträger: Verzeichnispfad „Tools/Anybus“). 1070080028 / 06 | PSI 6xxx Bosch Rexroth AG 55/402 Zu diesem Produkt 5.2.4.3 Baugruppe ”CC Ethernet 100 Mbit“ DEUTSCH Merkmale: • Geeignet für PSI 6xxx.xxx (Steckplatz für Feldbus-Modul) • Ethernet-Einschub-Baugruppe auf der Basis eines AnyBus-Moduls. • Fast-Ethernet (100 MBit/s), Full-Duplex-Betrieb • Als 1- oder 2-Port-Variante verfügbar. 2-Port-Variante mit In tegriertem Switch • Integrierter WEB-Server • Einfache IP-Konfiguration Funktion: Zur gleichzeitigen Anbindung mehrerer Steuerungen an die Leitebene via Ethernet (z.B. Anbindung BOS-Programmiergerät). PSI 6x00.xxx 1 2 PSI 6xCx.xxx ETH2 Abb.11: Baugruppe ”CC Ethernet 100 Mbit” 1 Schraube zur Fixierung der Baugruppe 2 AnyBus-Modul ”CC Ethernet 100 Mbit” (hier: mit 1 Port) Details siehe Kap. 5.2.4.2, Seite 54. Zur Ethernet-Konfiguration verwenden Sie die Software ”Anybus IP config” (Installationsdatei ist im BOS-Softwarepaket enthalten; siehe BOS-Datenträger: Verzeichnispfad „Tools/Anybus“). 56/402 Bosch Rexroth AG PSI 6xxx | 1070080028 / 06 Zu diesem Produkt 5.2.4.4 Baugruppe ”CC ProfiNet“ DEUTSCH Merkmale: • Geeignet für PSI 6xxx.xxx (Steckplatz für Feldbus-Modul) • ProfiNet-Einschub-Baugruppe auf der Basis eines AnyBus-Moduls. • ProfiNet (RT-Klassifikation, Konformitätsklasse B) • Fast-Ethernet (100 MBit/s), Full-Duplex-Betrieb • Als 1- oder 2-Port-Variante verfügbar. 2-Port-Variante mit in tegriertem Switch • Integrierter WEB-Server • Einfache IP-Konfiguration auch per Software ”Anybus IPconfig” Funktion: • Anbindung der Steuerungs-E/A an übergeordnete SPS/Roboter via ProfiNet und • Anbindung der SST an ein Programmiergerät (BOS) via Ethernet. PSI 6x00.xxx 1 2 PSI 6xCx.xxx ETH2 Abb.12: Baugruppe ”CC ProfiNet“ 1 Schraube zur Fixierung der Baugruppe 2 AnyBus-Modul ”CC ProfiNet” (hier: mit 2 Ports). Details siehe Kap. 5.2.4.1, Seite 52. Zur Ethernet-Konfiguration verwenden Sie die Software ”Anybus IP config” (Installationsdatei ist im BOS-Softwarepaket enthalten; siehe BOS-Datenträger: Verzeichnispfad „Tools/Anybus“). 1070080028 / 06 | PSI 6xxx Bosch Rexroth AG 57/402 Zu diesem Produkt 5.2.4.5 Baugruppe ”LWL ProfiNet“ Merkmale: • Geeignet für PSI 6xxx.xxx (Steckplatz für Feldbus-Modul) • LWL ProfiNet-Einschub-Baugruppe • ProfiNet-Anschaltung gemäß IRT-Klassifikation, Konformitäts klasse C • Integrierter WEB-Server • Einfache IP-Konfiguration per Software ”Anybus IPconfig” Funktion: • Anbindung der Steuerungs-E/A an übergeordnete SPS/Roboter via ProfiNet und • Anbindung der SST an ein Programmiergerät (BOS) via Ethernet. DEUTSCH PSI 6xCx.xxx 1 PSI 6x00.xxx 2 3 ETH2 4 6 5 7 Abb.13: Baugruppe ”LWL ProfiNet“ 1 Schraube zur Fixierung der Baugruppe 2 X51: SC-RJ-LWL-Anschluss Port 1 3 X52: SC-RJ-LWL-Anschluss Port 2 4 / 6 LED „L/A x“ für Link/Activity (Port 2 bzw. 1): aus: keine Verbindung zum Netzwerk grün: Verbindung zum Netzwerk hergestellt grün, blinkend: Datentransfer aktiv 5 LED „MS“ für Modulstatus: aus: Modul ist nicht initialisiert grün: Modul arbeitet normal grün, 1 x blinkend: Diagnoseereignis aufgetreten grün, 2 x blinkend: Ausgelöst per SW-Tool zur Identifikation des Moduls im Netzwerk rot: Per SST-Hochlauf evtl. behebbarer Modulfehler rot, 1 x blinkend: Konfigurationsfehler rot, 2 x blinkend: IP-Adresse ist nicht gesetzt rot, 3 x blinkend: Stationsname wurde nicht gesetzt rot, 4 x blinkend: Modulfehler 7 LED „CS“ für Kommunikationsstatus (bzgl. ProfiNet-Controller): aus: keine Verbindung zum ProfiNet-Controller grün: Verbindung zum ProfiNet-Controller etabliert grün, blinkend: Verbindung zum ProfiNet-Controller etabliert, ProfiNet-Controller ist im Stopp-Sta tus 58/402 Bosch Rexroth AG PSI 6xxx | 1070080028 / 06 Zu diesem Produkt 5.2.4.6 Diagnosemodul Nur in Verbindung mit PSI 6xCx.xxx. 8-stelliges Display Esc B Y Enter Abb.14: Frontansicht Diagnosemodul DEUTSCH Funktionen: • Anzeigen von SST-Zustand, -Typ, -Zeit, Ethernet-Konfiguration • Fehler/Warnungen quittieren • Boot-Modus aktivieren • SST-Reset auslösen (Neuhochlauf der SST) • Display testen Falls am Display außer der Hintergrundbeleuchtung nichts ange zeigt wird oder die LED STATUS (siehe Seite 50) rot leuchtet, sind folgende Zustände der SST möglich: • Firmware der SST fehlt. Abhilfe: Firmware laden. • Boot-Modus der SST ist aktiv. Abhilfe: ”Firmware laden” starten bzw. Ende des Ladens abwarten. Wirkung der Bedientasten Esc Y (Up) B (Down) Enter Springt eine Anzeige/-ebene zurück. Navigiert innerhalb eines Menüs nach oben. Navigiert innerhalb eines Menüs nach unten. Quittiert - oder - ruft die nächste Anzeige/-ebene auf. Die Tasten Y und B sind mit einer Autorepeatfunktion versehen. Werden diese Tasten länger als eine Sekunde betätigt, schaltet sich deren Autorepeatfunktion zu. Automatische Anzeigen INIT Die SST läuft momentan hoch. RUN Die SST ist im Zustand ”Bereit” (Normalzustand). RUN <w> Eine Warnung steht an. <w> repräsentiert den Kode der Warnung. Existiert ein Zu satzkode, wird das durch einen rechtsseitigen Pfeil vi sualisiert. Taste ”Enter” zeigt den Zusatzkode. <f> Ein Fehler steht an. <f> repräsentiert die Fehlernummer mit Zusatzkode. Um die SST wieder in den Zustand ”Bereit” zu bringen, muss der Fehler behoben und danach quittiert werden. 1070080028 / 06 | PSI 6xxx Bosch Rexroth AG 59/402 Zu diesem Produkt Hardwarefehler lassen sich nicht quittieren. Selbstquittierende Fehler quittiert das System bei Wegfall der Fehlerursache automatisch (z.B. Netzspannung Aus/Ein). Auch bei anstehenden Fehlern lassen sich am Display weitere In formationen anzeigen (siehe Abschnitt ”Weitere Informationen anzeigen” ab Seite 59). Nach ca. 3 Min. ohne Tastendruck schaltet das Display aber wieder auf die Fehleranzeige zurück. Kodenummern mit Erläuterungen und Abhilfemöglichkeiten siehe Online-Hilfe der BOS unter Kapitel ”Meldungen“. Nach dem Hochlauf der Steuerung (Anzeige INIT) befindet sich die SST im Zustand ”Bereit” (Anzeige RUN) oder in einem Fehlerzustand (Anzeige der Fehlernummer und des Zusatzkodes). In beiden Fällen haben Sie Zugriff auf weitere Informationen, die per ”Hauptmenü” auswählbar sind. Hauptmenü Enter Anzeige TYPE Esc Y B Enter Anzeige ETHERNET Esc Y B Enter Anzeige DISPLAY Esc Y B Enter Anzeige TIME Esc Abb.15: Diagnosemodul: Hauptmenü Hauptmenüpunkt TYPE: Laufschriftanzeige von SST-Typ, Zeichnungsnr. und Ausgabe. Mögliche Tasten in dieser Ebene: • ”Esc”: Rücksprung ins Hauptmenü. • ”Enter”: Die Laufschrift stoppt. Die Informationen sind jetzt mit den Tasten ”Enter” und ”Esc” in statischen Blöcken zu je 8 Zeichen abrufbar. DEUTSCH Weitere Informationen anzeigen 60/402 Bosch Rexroth AG PSI 6xxx | 1070080028 / 06 Zu diesem Produkt Hauptmenüpunkt ETHERNET: Anzeige der Ethernet-Konfiguration für ein AnyBus-Modul (ETHERN.1) oder - sofern gesteckt - für die Baugruppe ”CC Ethernet 100 Mbit“ (ETHERN.2). Folgendes Diagramm gibt Ihnen eine Strukturübersicht: zum / vom Hauptmenü Esc 1 2 Enter B Y Enter Enter ETHERN.1 IP-Adr.<n> Esc Y B DEUTSCH ETHERN.2 Y Struktur wie bei ETHERN.1 B B ETHERN.1 ETHERN.2 Esc Enter 3 Subnet<n> Y n = 1: n = 2: 3 Esc Enter Gateway<n> Y B 3 Esc Enter B Y Enter <y> <x> MAC-Adr.<n> Esc Esc 1 2 Enter 3 ExAA:<1> Enter ExBB:<2> Esc Enter ExCC:<3> Esc ExDD:<4> Esc <x>: MAC-Adresse Teil 1 <y>: MAC-Adresse Teil 2 Beispiel: MAC-Adresse = 00-e0-98-82-c9-79 x = 00-e0-98, y = 82-c9-79 <1>: <2>: <3>: <4>: 1. Zahlenblock der Adresse 2. Zahlenblock der Adresse 3. Zahlenblock der Adresse 4. Zahlenblock der Adresse Beispiel: IP-Adresse = 192.168.0.1 <1> = 192, <2> = 168, <3> = 000, <4> = 001 Abb.16: Diagnosemodul: Menü ETHERNET Hauptmenüpunkt DISPLAY: Display-Prüfung. Der Test startet immer mit der Ansteuerung aller Pixel. Danach lassen sich per Tasten Y und B alle verfügbaren Zeichen durchsteppen. ”Esc” führt ins Hauptmenü zurück. Hauptmenüpunkt TIME: Anzeige von Zeit und Datum der SST. ”Esc” führt ins Hauptmenü zurück. Zeit und Datum der SST werden bei aktiver BOS automatisch mit der PC-Uhr synchronisiert. Manuelles Einstellen ist nicht erforderlich. Warnungen quittieren 1. Drücken Sie so oft Taste ”Enter”, bis das Display ”Quit” anzeigt. 2. Drücken Sie Taste ”Esc” um das Quittieren abzubrechen oder Taste ”Enter” um zu quittieren. 1070080028 / 06 | PSI 6xxx Bosch Rexroth AG 61/402 Zu diesem Produkt Fehler quittieren 1. Drücken Sie Taste ”Enter”. Das Display zeigt ”Err Quit” an. 2. Drücken Sie Taste ”Esc” um das Quittieren abzubrechen oder Taste ”Enter” um zu quittieren. Boot-Modus aktivieren HINWEIS Willkürliches Aktivieren des Boot-Modus " Boot-Modus nie während laufender Produktion aktivieren. " Boot-Modus darf nur von autorisiertem Personal aktiviert werden. Die Steuerung bricht den Programmablauf ab, setzt alle SignalAusgänge zurück und geht in den ”Boot”-Modus (zum Firmware tausch). " Drücken Sie gleichzeitig die Tasten ”Esc” und ”Enter”. Am Display erscheint ”Boot! x”. x: verbleibende Sekunden bis zum Aktivieren des Boot-Modus. Innerhalb der verbleibenden Zeit lässt sich die Aktivierung der Funktion durch Loslassen der Tasten abbrechen. SST-Reset auslösen HINWEIS Willkürliches Auslösen des SST-Resets Negative Auswirkungen auf die laufende Produktion möglich! " SST-Reset nie während laufender Produktion auslösen. " SST-Reset darf nur autorisiertes Personal auslösen. Nach Aktivierung des SST-Reset ist bis zum Ende des SST-Hoch laufs kein Schweißbetrieb mehr möglich! Die Steuerung bricht den Programmablauf ab und setzt alle Signal-Ausgänge zurück. " Drücken Sie gleichzeitig die Tasten B und ”Enter”. Am Display erscheint ”Reset! x”. x: verbleibende Sekunden bis zum Auslösen des SST-Reset. Innerhalb der verbleibenden Zeit lässt sich die Aktivierung der Funktion durch Loslassen der Tasten abbrechen. DEUTSCH Negative Auswirkungen auf die laufende Produktion möglich! 62/402 Bosch Rexroth AG PSI 6xxx | 1070080028 / 06 Zu diesem Produkt 5.2.4.7 E/A-Modul ”E/A DISK R2ED” und ”E/A DISK R4ED“ Merkmale: • 26 diskrete Eingänge (24VDC) • 1 Ausgang als geschaltetes Relais (1 x EIN) • 18 diskrete Ausgänge (24VDC) Funktion: • Ankopplung diskreter E/A-Signale. DEUTSCH Die E/A‐Module EA DISK R2ED und EA DISK R4ED sind bis auf die Steckerbezeichnungen (EA DISK R2ED: X1x; EA DISK R4ED: X2x) und einer internen Kodierung identisch. Werden beide in einer SST eingesetzt, sind die verwendeten E/A-Si gnale fest an das jeweilige Modul gekoppelt. Deshalb erscheinen auch nach einem Steckplatztausch beider Module alle E/A‐Signale immer am selben E/A‐Modul. Tab.9: Technische Daten: E/A-Modul ”E/A DISK R2ED“ / ”E/ADISKR4ED“ Betriebsspannung +24 V= +20 %, -15 % mit max. +/-5 % Welligkeit Stromaufnahme max. 2 A je nach Beschaltung der Signal-Ein-/Ausgänge Verlustleistung 0,5 VA pro aktivem Eingang 2,4 VA pro aktivem Ausgang Signal-Eingänge logisch 1: +16 V ... +30 V, 20 mA logisch 0: -1 V ... +4 V Signal-Ausgänge A0, A13...A15: +24 V, max. 0,7 A (für Magnet- und Vorhubventile) A1...A10, A12, A16...A18: +24 V, max. 0,1 A A11: +24 V, max. 0,2 A (potentialfreier Relaiskontakt) Absicherung SignalAusgänge elektronisch Spannungsversorgung Anschluss: E/A DISK R2ED: X10: 4polig E/A DISK R4ED: X20: 4polig STKK, Raster 3,5 mm, max. 1,5 mm2. Gegenstecker ist im Lieferumfang enthalten. Leitungslänge: (von Spannungsquelle bis zum Verbraucher) max. 10 m bei 0,75 mm2 max. 75 m bei 1,5 mm2 Leitungstyp: ungeschirmt, VDE 0281, 0812 (z.B.: Ölflex) 1070080028 / 06 | PSI 6xxx Bosch Rexroth AG 63/402 Zu diesem Produkt Diskrete Signal-Aus- und -Eingänge Anschluss: DEUTSCH E/A DISK R2ED: X11:8pol.; X12:14pol.; X13:12pol.; X14:16pol. E/A DISK R4ED: X21:8pol.; X22:14pol.; X23:12pol.; X24:16pol. STKK, Raster 3,5 mm, max. 1,5 mm2. Gegenstecker sind im Lieferumfang enthalten. Leitungslänge max. 100 m bei 0,5 mm2 Davon abweichend gilt für A0 und A13...A15: max. 30 m bei 0,5 mm2 max. 50 m bei 1,0 mm2 max. 100 m bei 1,5 mm2 (Spannungsabfall max. 10%) Leitungstyp: ungeschirmt, VDE 0281, 0812 (z.B.: Ölflex) 64/402 Bosch Rexroth AG PSI 6xxx | 1070080028 / 06 DEUTSCH Zu diesem Produkt - Signal-Eingänge E0 bis E13 (24VDC), mit Kontroll-LED 2x Spannungsausgang zur Versorgung der ext. Ein gangsschaltungen (intern von X10 abgegriffen) - Signal-Eingänge E14 bis E25 (24VDC), mit Kontroll-LED - Signal-Ausgänge, mit Kontroll-LED. A0...A10 und A12: 24VDC; A11.x: potentialfreier Relaiskontakt, max. 0,2 A - Signal-Ausgänge A13 bis A18 (24VDC), mit Kontroll-LED 0V-Bezugspotential für die 24VDC-Signal-Ausgänge (intern von X10 abgegriffen) - Spannungsversorgung des E/A-Moduls (24VDC) Klemme 1 und 3 intern verbunden Klemme 2 und 4 intern verbunden Abb.17: Frontansicht: E/A-Modul ”E/A DISK R2ED“ Die E/A‐Module EA DISK R2ED und EA DISK R4ED sind bis auf die Steckerbezeichnungen (EA DISK R2ED: X1x; EA DISK R4ED: X2x) und einer internen Kodierung identisch. 1070080028 / 06 | PSI 6xxx Bosch Rexroth AG 65/402 Zu diesem Produkt 5.2.4.8 E/A-Modul ”E/A DISK” Merkmale: • 21 diskrete Eingänge (24VDC) • 13 diskrete Ausgänge (24VDC) Funktion: • Ankopplung diskreter E/A-Signale. Technische Daten: E/A-Modul ”E/A DISK“ Betriebsspannung +24 V= +20 %, -15 % mit max. +/-5 % Welligkeit Stromaufnahme max. 3 A je nach Beschaltung der Signal-Ein-/Ausgänge Verlustleistung 0,5 VA pro aktivem Eingang 2,4 VA pro aktivem Ausgang Signal-Eingänge logisch 1: +16 V ... +30 V, 20 mA logisch 0: -1 V ... +4 V Signal-Ausgänge A0: +24 V, max. 1 A (für Magnetventil) A1...A12: +24 V, max. 0,1 A Absicherung SignalAusgänge 2x Feinsicherung 5 x 20. A0: M 1,6 A A1...A12: M 1,6 A Spannungsversorgung Anschluss: Leitungslänge: Leitungstyp: X10: 4polig; STKK, Raster 3,5 mm, max. 1,5 mm2. Gegenstecker ist im Lieferumfang enthalten. (von Spannungsquelle bis zum Verbraucher) max. 10 m bei 0,75 mm2 max. 75 m bei 1,5 mm2 ungeschirmt, VDE 0281, 0812 (z.B.: Ölflex) Diskrete Signal-Aus- und -Eingänge Anschluss: Leitungslänge X11: 14polig; X12: 8polig; X13: 16polig STKK, Raster 3,5 mm, max. 1,5 mm2. Gegenstecker sind im Lieferumfang enthalten. max. 100 m bei 0,5 mm2 Davon abweichend gilt für A0: max. 30 m bei 0,5 mm2 max. 50 m bei 1,0 mm2 max. 100 m bei 1,5 mm2 (Spannungsabfall max. 10%) Leitungstyp: ungeschirmt, VDE 0281, 0812 (z.B.: Ölflex) DEUTSCH Tab.10: 66/402 Bosch Rexroth AG Zu diesem Produkt Feinsicherung M 1,6 A; zur Absicherung von Ausgang A0 - Feinsicherung M 1,6 A; zur Absicherung der Ausgänge A1 bis A12 - Signal-Eingänge E0 bis E13 (24VDC), mit Kontroll-LED 2x Spannungsausgang zur Versorgung der ext. Ein gangsschaltungen (intern von X10 abgegriffen) - Signal-Eingänge E14 bis E20 (24VDC), mit Kontroll-LED 1x Spannungsausgang zur Versorgung der ext. Ein gangsschaltungen (intern von X10 abgegriffen) - Signal-Ausgänge A0 bis A12 (24VDC), mit Kontroll-LED 0V-Bezugspotential für die 24VDC-Signal-Ausgänge (intern von X10 abgegriffen) - Spannungsversorgung des E/A-Moduls (24VDC) Klemme 1 und 3 intern verbunden Klemme 2 und 4 intern verbunden DEUTSCH - Abb.18: Frontansicht: E/A-Modul ”E/A DISK“ PSI 6xxx | 1070080028 / 06 1070080028 / 06 | PSI 6xxx Bosch Rexroth AG 67/402 Zu diesem Produkt 5.2.4.9 E/A-Module ”E/A DISK 2R” und ”E/A DISK 4R“ Merkmale: • je 22 diskrete Eingänge (24VDC) • je 1 Ausgang als geschaltetes Relais (1 x EIN) • je 14 diskrete Ausgänge (24VDC) Funktion: Die E/A‐Module EA DISK 2R und EA DISK 4R sind bis auf die Steckerbezeichnungen (E/A DISK 2R: X1x; E/A DISK 4R: X2x) und einer internen Kodierung identisch. Werden beide in einer SST eingesetzt, sind die verwendeten E/A-Si gnale fest an das jeweilige Modul gekoppelt. Deshalb erscheinen auch nach einem Steckplatztausch beider Module alle E/A‐Signale immer am selben E/A‐Modul. Tab.11: Technische Daten: E/A-Module ”E/A DISK 2R“ / ”E/A DISK 4R“ Betriebsspannung +24 V= +20 %, -15 % mit max. +/-5 % Welligkeit Stromaufnahme max. 3 A je nach Beschaltung der Signal-Ein-/Ausgänge Verlustleistung 0,5 VA pro aktivem Eingang 2,4 VA pro aktivem Ausgang Signal-Eingänge logisch 1: +16 V ... +30 V, 20 mA logisch 0: -1 V ... +4 V Signal-Ausgänge A0, A13...A15: +24 V, max. 1 A (für Magnetund Vorhubventile zusammen) A1...A10: +24 V, max. 0,1 A A11...A12: +24 V, max. 0,2 A (potentialfreier Re laiskontakt) Absicherung SignalAusgänge 2x Feinsicherung 5 x 20. A0, A13...A15: M 1,6 A A1...A10: M 1,6 A Spannungsversorgung Anschluss: E/A DISK 2R: X10; 4polig E/A DISK 4R: X20; 4polig STKK, Raster 3,5 mm, max. 1,5 mm2. Gegenstecker ist im Lieferumfang enthalten. Leitungslänge: (von Spannungsquelle bis zum Verbraucher) max. 10 m bei 0,75 mm2 max. 75 m bei 1,5 mm2 Leitungstyp: ungeschirmt, VDE 0281, 0812 (z.B.: Ölflex) DEUTSCH • Ankopplung diskreter E/A-Signale. 68/402 Bosch Rexroth AG PSI 6xxx | 1070080028 / 06 Zu diesem Produkt Diskrete Signal-Aus- und -Eingänge E/A DISK 2R: X11: 18polig; X12: 8polig; X13: 16polig E/A DISK 4R: X21: 18polig; X22: 8polig; X23: 16polig STKK, Raster 3,5 mm, max. 1,5 mm2. Gegenstecker sind im Lieferumfang enthalten. Leitungslänge max. 100 m bei 0,5 mm2 Davon abweichend gilt für A0 und A13...A15: max. 30 m bei 0,5 mm2 max. 50 m bei 1,0 mm2 max. 100 m bei 1,5 mm2 (Spannungsabfall max. 10%) Leitungstyp: ungeschirmt, VDE 0281, 0812 (z.B.: Ölflex) DEUTSCH Anschluss: 1070080028 / 06 | PSI 6xxx Bosch Rexroth AG 69/402 - Feinsicherung M 1,6 A; zur Absicherung von Ausgang A0 und A13 bis A15 - Feinsicherung M 1,6 A; zur Absicherung der Ausgänge A1 bis A10 - Signal-Eingänge E0 bis E13 (24VDC), mit Kontroll-LED 2x Spannungsausgang zur Versorgung der ext. Ein gangsschaltungen (intern von X10 abgegriffen) - Signal-Eingänge E14 bis E20 (24VDC), mit Kontroll-LED 1x Spannungsausgang zur Versorgung der ext. Ein gangsschaltungen (intern von X10 abgegriffen) - Signal-Ausgänge, mit Kontroll-LED. A0...A10 und A13...A15: 24VDC; A11...A12: potentialfreier Relaiskontakt, max. 0,2 A 0V-Bezugspotential für die 24VDC-Signal-Ausgänge (intern von X10 abgegriffen) - - Spannungsversorgung des E/A-Moduls (24VDC) Klemme 1 und 3 intern verbunden Klemme 2 und 4 intern verbunden Abb.19: Frontansicht: E/A-Modul ”E/A DISK 2R“ Die E/A‐Module EA DISK 2R und EA DISK 4R sind bis auf die Steckerbezeichnungen (EA DISK 2R: X1x; EA DISK 4R: X2x) und einer internen Kodierung identisch. DEUTSCH Zu diesem Produkt 70/402 Bosch Rexroth AG Zu diesem Produkt DEUTSCH Notizen | Notes: PSI 6xxx | 1070080028 / 06 1070080028 / 06 | PSI 6xxx Bosch Rexroth AG 71/402 Zu diesem Produkt E/A-Modul ”E/A IBS OPC mit LWL” (INTERBUS-S) Nur in Verbindung mit PSI 6x00.xxx. Merkmale: • 8 diskrete Eingänge (24VDC) • 8 diskrete Ausgänge (24VDC) • INTERBUS-S-Anschluss per LWL • Vernetzung mit Programmiergerät (BOS) via SPS-Master möglich Funktion: • Anbindung der Steuerungs-E/A an die übergeordnete SPS oder den Roboter • per INTERBUS-S mittels Lichtwellenleiter an X12 bis X15 (seri elle E/A) und • per diskreten 24 V-Signalen an X11 (parallele E/A). • transparente Vernetzung der Steuerung über die LWL-Anschlüsse. Ident-Kode 229 Ident-Kode 47 Ob die INTERBUS-S-Verbindung zur Vernetzung der Steuerung verwendet werden soll, ist per Schalterbank ADR (Steuerungsfront seite) einstellbar. Hier gilt: • Alle Schalter auf Stellung ”off”: Über die Baugruppe wird sowohl der E/A-Austausch, als auch die Vernetzung abgewickelt. Die Steuerung meldet sich als INTERBUSS-Teilnehmer mit dem dezimalen Ident-Kode 229. Das Programmiergerät (BOS) wird in dieser Applikationsvariante per Ethernet an die SPS angekoppelt, die den Datenverkehr zu den angeschlossenen Schweißsteuerungen via INTERBUS-S ”tunnelt”. • Mindestens 1 Schalter auf Stellung ”on”: Über die Baugruppe wird ausschließlich der E/A-Austausch abgewi ckelt. Die Steuerung meldet sich als INTERBUS-S-Teilnehmer mit dem dezimalen Ident-Kode 47. Die Vernetzung zum Programmiergerät (BOS) erfolgt per Bau gruppe im Feldbusschacht (siehe Seite 48). Tab.12: Technische Daten: E/A-Modul ”E/A IBS OPC mit LWL“ Betriebsspannung +24 V= +20 %, -15 % mit max. +/-5 % Welligkeit Stromaufnahme max. 2 A je nach Beschaltung der Signal-Ein-/Ausgänge Verlustleistung 0,5 VA pro aktivem Eingang 2,4 VA pro aktivem Ausgang Signal-Eingänge logisch 1: +16 V ... +30 V, 20 mA logisch 0: -1 V ... +4 V Signal-Ausgänge +24 V, max. 0,1 A, kurzschlussfest DEUTSCH 5.2.4.10 72/402 Bosch Rexroth AG PSI 6xxx | 1070080028 / 06 Zu diesem Produkt Spannungsversorgung Anschluss: Leitungslänge: Leitungstyp: X10: 4polig; STKK, Raster 3,5 mm, max. 1,5 mm2. Gegenstecker ist im Lieferumfang enthalten. (von Spannungsquelle bis zum Verbraucher) max. 10 m bei 0,75 mm2 max. 75 m bei 1,5 mm2 ungeschirmt, VDE 0281, 0812 (z.B.: Ölflex) Diskrete Signal-Aus- und -Eingänge DEUTSCH Anschluss: Leitungslänge: Leitungstyp: X11: 16polig; STKK, Raster 3,5 mm, max. 1,5mm2. Gegenstecker ist im Lieferumfang enthalten. max. 100 m bei 0,5 mm2 ungeschirmt, VDE 0281, 0812 (z.B.: Ölflex) INTERBUS-S-Anschluss Anschluss IBS-IN: Anschluss IBS-OUT: Leitungslänge: Leitungstyp: X14 und X15 (vom vorherigen Teilnehmer kommend); X14: Empfangs-LED, X15: Sende-LED X12 und X13 (zum nächsten Teilnehmer gehend); X12: Empfangs-LED, X13: Sende-LED nach INTERBUS-S-Spezifikation Lichtwellenleiter, nach INTERBUS-S-Spezifi kation 1070080028 / 06 | PSI 6xxx Bosch Rexroth AG 73/402 Zu diesem Produkt Diagnosemeldungen der Baugruppe: - TR: Transmit/Receive; hier keine Bedeutung. - CC: Cable Check; Busverbindung (vom vorherigen IB-S-Teil nehmer kommend) besteht. Erlischt bei Reset am Master. - UL: Unit Supply; Leuchtet: Versorgungsspannung steht an (X10). - BA: Bus Active; Leuchtet: Datenübertragung findet statt. - RD: Remote Disable; Leuchtet: zeigt die Abschaltung der Busver bindung (zum nächsten IB-S-Teilnehmer gehend) an. - FO1: leuchtet, wenn eingehender LWL gestört ist. - FO2: leuchtet, wenn weiterführender LWL gestört ist. X15 X14 X13 INTERBUS-S-Anschlüsse OUT für LWL-Ankopplung (zum nächsten IB-S-Teilnehmer gehend) X12 - Signal-Eingänge E0 bis E7 (24VDC), mit Kontroll-LED X11 - Signal-Ausgänge A0 bis A7 (24VDC), mit Kontroll-LED X11 - Spannungsversorgung des E/A-Moduls (24VDC) Klemme 1 und 3 intern verbunden Klemme 2 und 4 intern verbunden X10 Abb.20: Frontansicht: E/A-Modul ”E/A IBS OPC mit LWL“ DEUTSCH INTERBUS-S-Anschlüsse IN für LWL-Ankopplung (vom vorherigen IB-S-Teilnehmer kommend) 74/402 Bosch Rexroth AG PSI 6xxx | 1070080028 / 06 Zu diesem Produkt Einstellung Baudrate und Sendeleistung " Verändern der Sendeleistung ist ohne Rücksprache mit uns nicht erlaubt. E/A-Modul 8 7 1 off on DEUTSCH Frontseite Sendeleistung Baudrate: on: 500 kB off: 2 MB Manuelle Markierungen mit den Werkseinstellungen der Sendeleistung. Abb.21: E/A-Modul ”E/A IBS OPC mit LWL“: Einstellungen der Sendeleistung und der Baudrate. Die Leistung der Sendedioden wird ab Werk kalibriert. Die manuellen Markierungen zeigen die Werkseinstellungen der Sendeleistungs-Schalter. So können die Werkseinstellungen jederzeit wieder hergestellt werden. 1070080028 / 06 | PSI 6xxx Bosch Rexroth AG 75/402 Zu diesem Produkt 5.2.4.11 E/A-Modul ”E/A IBS FERN” (INTERBUS-S) Merkmale: • 8 diskrete Eingänge (24VDC) • 8 diskrete Ausgänge (24VDC) • INTERBUS-S-Anschluss per Kupferkabel Funktion: • Anbindung der Steuerungs-E/A an die übergeordnete SPS oder den Roboter • per INTERBUS-S mittels Kupferkabel an X12 und X13 (serielle E/A) und • per diskreten 24 V-Signalen an X11 (parallele E/A). Technische Daten: E/A-Modul ”E/A IBS FERN“ Betriebsspannung +24 V= +20 %, -15 % mit max. +/-5 % Welligkeit Stromaufnahme max. 2A; je nach Beschaltung der SignalEin-/Ausgänge Verlustleistung 0,5 VA pro aktivem Eingang 2,4 VA pro aktivem Ausgang Signal-Eingänge logisch 1: +16 V ... +30 V, 20 mA logisch 0: -1 V ... +4 V Signal-Ausgänge +24 V, max. 0,1 A, kurzschlussfest Spannungsversorgung Anschluss: Leitungslänge: Leitungstyp: X10: 4polig; STKK, Raster 3,5 mm, max. 1,5 mm2. Gegenstecker ist im Lieferumfang enthalten. (von Spannungsquelle bis zum Verbraucher) max. 10 m bei 0,75 mm2 max. 75 m bei 1,5 mm2 ungeschirmt, VDE 0281, 0812 (z.B.: Ölflex) Diskrete Signal-Aus- und -Eingänge Anschluss: Leitungslänge: Leitungstyp: X11: 16polig; STKK, Raster 3,5 mm, max. 1,5mm2. Gegenstecker ist im Lieferumfang enthalten. max. 100 m bei 0,5 mm2 ungeschirmt, VDE 0281, 0812 (z.B.: Ölflex) INTERBUS-S-Anschluss Anschluss IBS-IN: Anschluss IBS-OUT: Leitungslänge: Leitungstyp: ID-Kode: X13 (vom vorherigen Teilnehmer kommend) D-Sub, 9polig, kabelseitig per Buchse X12 (zum nächsten Teilnehmer gehend) D-Sub, 9polig, kabelseitig per Stecker nach INTERBUS-S-Spezifikation Kupferkabel, nach INTERBUS-S-Spezifikation 47 (dez.) DEUTSCH Tab.13: 76/402 Bosch Rexroth AG PSI 6xxx | 1070080028 / 06 Zu diesem Produkt INTERBUS‐S‐Anschluss IN (vom vorherigen IB‐S‐Teilnehmer kommend) - Pinbelegung siehe Seite 77 X13 DEUTSCH Diagnosemeldungen der Baugruppe: - US: Unit Supply; Versorgungsspannung steht an - RC: Remotebus Check; Busverbindung (vom vorherigen IB‐S‐Teilnehmer kommend) besteht. - BA: Bus Active; Datenübertragung findet statt - RD: Remote Disable; zeigt die Abschaltung der Busverbindung (zum nächsten IB‐S‐Teilnehmer gehend) an. - TR: Transmit/Receive; zeigt PCP‐Kommunikation an INTERBUS‐S‐Anschluss OUT (zum nächsten IB‐S‐Teilnehmer gehend) - Pinbelegung siehe Seite 77 - Signal‐Eingänge E0 bis E7 (24VDC) - Signal‐Ausgänge A0 bis A7 (24VDC) - Spannungsversorgung des E/A-Moduls (24VDC) Klemme 1 und 3 intern verbunden Klemme 2 und 4 intern verbunden Abb.22: Frontansicht: E/A-Modul ”E/A IBS FERN“ X12 X11 X10 1070080028 / 06 | PSI 6xxx Bosch Rexroth AG 77/402 Zu diesem Produkt Schweißsteuerung X13 (IBS-IN) DO1 DI1 GND /DO1 /DI1 1 2 3 4 5 6 7 8 9 vorheriger INTERBUS-S-Teilnehmer Stecker DEUTSCH Schirm großflächig über metallisches Gehäuse der Steckverbindung X12 (IBS-OUT) DO2 DI2 GND +5 V /DO2 /DI2 RBST 1 2 3 4 5 6 7 8 9 Buchse nachfolgender INTERBUS-S-Teilnehmer Schirm großflächig über metallisches Gehäuse der Steckverbindung Abb.23: Klemmenbelegung der INTERBUS‐S‐Anschlüsse 78/402 Bosch Rexroth AG Zu diesem Produkt DEUTSCH Notizen | Notes: PSI 6xxx | 1070080028 / 06 1070080028 / 06 | PSI 6xxx Bosch Rexroth AG 79/402 Zu diesem Produkt 5.2.4.12 E/A-Modul ”E/A IBS X_FERN_8EA” (INTERBUS-S) Merkmale: • 8 diskrete Eingänge (24VDC) • 8 diskrete Ausgänge (24VDC) • INTERBUS-S-Anschluss per Kupferkabel Funktion: • Anbindung der Steuerungs-E/A an die übergeordnete SPS oder den Roboter • per INTERBUS-S mittels Kupferkabel an X12 und X13 (serielle E/A) und • per diskreten 24 V-Signalen an X14 und X15 (parallele E/A). Technische Daten: E/A-Modul ”E/A IBS X_FERN_8EA“ Betriebsspannung +24 V= +20 %, -15 % mit max. +/-5 % Welligkeit Stromaufnahme je nach Beschaltung der Signal-Ein-/Ausgänge Verlustleistung 0,5 VA pro aktivem Eingang 2,4 VA pro aktivem Ausgang Signal-Eingänge logisch 1: +16 V ... +30 V, 20 mA logisch 0: -1 V ... +4 V Signal-Ausgänge +24 V, max. 0,1 A, kurzschlussfest Spannungsversorgung Anschluss: Leitungslänge: Leitungstyp: X14...X15 (per Klemmen 24V und 0V): 10polig; STKK, Raster 3,5 mm, max. 1,5 mm2. Gegenstecker ist im Lieferumfang enthalten. (von Spannungsquelle bis zum Verbraucher) max. 10 m bei 0,75 mm2 max. 75 m bei 1,5 mm2 ungeschirmt, VDE 0281, 0812 (z.B.: Ölflex) Diskrete Signal-Aus- und -Eingänge Anschluss: Leitungslänge: Leitungstyp: X14...X15: 10polig; STKK, Raster 3,5 mm, max. 1,5mm2. Gegenstecker ist im Lieferumfang enthalten. max. 100 m bei 0,5 mm2 ungeschirmt, VDE 0281, 0812 (z.B.: Ölflex) INTERBUS-S-Anschluss Anschluss IBS-IN: Anschluss IBS-OUT: Leitungslänge: Leitungstyp: ID-Kode: X13 (vom vorherigen Teilnehmer kommend) D-Sub, 9polig, kabelseitig per Buchse X12 (zum nächsten Teilnehmer gehend) D-Sub, 9polig, kabelseitig per Stecker nach INTERBUS-S-Spezifikation Kupferkabel, nach INTERBUS-S-Spezifikation 47 (dez.) DEUTSCH Tab.14: 80/402 Bosch Rexroth AG PSI 6xxx | 1070080028 / 06 Zu diesem Produkt DEUTSCH INTERBUS‐S‐Anschluss IN (vom vorherigen IB‐S‐Teilnehmer kommend) - Pinbelegung siehe Seite 81 X13 Diagnosemeldungen der Baugruppe: - UL: Unit Supply; Versorgungsspannung steht an - RC: Remotebus Check; Busverbindung (vom vorherigen IB‐S‐Teilnehmer kommend) besteht. - BA: Bus Active; Datenübertragung findet statt - RD: Remote Disable; zeigt die Abschaltung der Busverbindung (zum nächsten IB‐S‐Teilnehmer gehend) an. - TR: Transmit/Receive; zeigt PCP‐Kommunikation an INTERBUS‐S‐Anschluss OUT (zum nächsten IB‐S‐Teilnehmer gehend) - Pinbelegung siehe Seite 81 X12 Diskrete Eingänge - Spannungsversorgung der Signal‐Eingänge (24VDC, 0 V) X15 - Signal‐Eingänge E0 bis E7 (24VDC) Diskrete Ausgänge - Spannungsversorgung der Signal‐Ausgänge (24VDC, 0 V) - Signal‐Ausgänge A0 bis A7 (24VDC) Abb.24: Frontansicht: E/A-Modul ”E/A IBS X_FERN_8EA“ X14 1070080028 / 06 | PSI 6xxx Bosch Rexroth AG 81/402 Zu diesem Produkt Schweißsteuerung X13 (IBS-IN) DO1 DI1 GND /DO1 /DI1 1 2 3 4 5 6 7 8 9 vorheriger INTERBUS-S-Teilnehmer Stecker DEUTSCH Schirm großflächig über metallisches Gehäuse der Steckverbindung X12 (IBS-OUT) DO2 DI2 GND +5 V /DO2 /DI2 RBST 1 2 3 4 5 6 7 8 9 Buchse nachfolgender INTERBUS-S-Teilnehmer Schirm großflächig über metallisches Gehäuse der Steckverbindung Abb.25: Klemmenbelegung der INTERBUS‐S‐Anschlüsse 82/402 Bosch Rexroth AG Zu diesem Produkt DEUTSCH Notizen | Notes: PSI 6xxx | 1070080028 / 06 1070080028 / 06 | PSI 6xxx Bosch Rexroth AG 83/402 Zu diesem Produkt 5.2.4.13 E/A-Modul ”DEV-NET” (DeviceNet) Merkmale: • 8 diskrete Eingänge (24VDC) • 8 diskrete Ausgänge (24VDC) • DeviceNet-Anschluss per Bus-Kupferkabel Funktion: • Anbindung der Steuerungs-E/A an die übergeordnete SPS oder den Roboter • per DeviceNet mittels Bus‐Kupferkabel (serielle E/A) und • per diskreten 24 V‐Signalen an X11 und X12 (parallele E/A). Technische Daten: E/A-Modul ”DEV-NET“ Betriebsspannung +24 V= +20 %, -15 % mit max. +/-5 % Welligkeit Stromaufnahme max. 2 A je nach Beschaltung der Signal-Ein-/Ausgänge Verlustleistung 0,5 VA pro aktivem Eingang 2,4 VA pro aktivem Ausgang Signal-Eingänge logisch 1: +16 V ... +30 V, 20 mA logisch 0: -1 V ... +4 V Signal-Ausgänge +24 V, max. 0,1 A, kurzschlussfest Spannungsversorgung Anschluss: Leitungslänge: Leitungstyp: X10: 4polig; STKK, Raster 3,5 mm, max. 1,5 mm2. Gegenstecker ist im Lieferumfang enthalten. (von Spannungsquelle bis zum Verbraucher) max. 10 m bei 0,75 mm2 max. 75 m bei 1,5 mm2 ungeschirmt, VDE 0281, 0812 (z.B.: Ölflex) Diskrete Signal-Aus- und -Eingänge Anschluss: Leitungslänge: Leitungstyp: X11...X12: 8polig; STKK, Raster 3,5 mm, max. 1,5mm2. Gegenstecker ist im Lieferumfang enthalten. max. 100 m bei 0,5 mm2 ungeschirmt, VDE 0281, 0812 (z.B.: Ölflex) DeviceNet-Anschluss Anschluss: Leitungslänge: Leitungstyp: DeviceNet-Adresse: DeviceNet-Baudrate: X13 nach DeviceNet-Spezifikation Kupferkabel, nach DeviceNet-Spezifikation Einstellung per Schalter NA. Adresse (MAC ID) nach DeviceNet‐Spezifikation. Einstellung per Schalter DR. Nach DeviceNet‐Spezifikation. DEUTSCH Tab.15: 84/402 Bosch Rexroth AG PSI 6xxx | 1070080028 / 06 Zu diesem Produkt - Diagnosemeldungen der Baugruppe (nach DeviceNet‐Spezifikation) - NA: Einstellung der Node-Adresse (Mac ID) - DR: Einstellung der Baudrate (jeweils nach DeviceNet‐Spezifikation) Wertigkeit (dez.) NA DR off on 00 01 02 03 04 05 06 07 08 09 10 11 12 1 2 4 8 16 32 ... 125 250 DEUTSCH 1 2 3 4 5 6 7 8 63 Node-Adresse (0 - 63): DIP-Schalternr. = Baudrate (kBd) : ON : OFF - Busanschluss X13 - Signal‐Eingänge E0 bis E7 (24VDC), mit Kontroll‐LED X12 - Signal‐Ausgänge A0 bis A7 (24VDC), mit Kontroll‐LED X11 - Spannungsversorgung des E/A‐Moduls (24VDC) Klemme 1 und 3 intern verbunden Klemme 2 und 4 intern verbunden Abb.26: Frontansicht: E/A-Modul ”DEV-NET“ X10 1070080028 / 06 | PSI 6xxx Bosch Rexroth AG 85/402 Zu diesem Produkt 5.2.4.14 E/A-Modul ”ComnetM-DP” (PROFIBUS-DP) Merkmale: • 16 diskrete Eingänge (24VDC) • 16 diskrete Ausgänge (24VDC) • PROFIBUS-DP-Anschluss per Bus-Kupferkabel Funktion: • Anbindung der Steuerungs-E/A an die übergeordnete SPS oder den Roboter • per PROFIBUS-DP mittels Bus‐Kupferkabel (serielle E/A) und • per diskreten 24 V‐Signalen an X11...X14 (parallele E/A). Technische Daten: E/A-Modul ”ComnetM-DP“ Betriebsspannung +24 V= +20 %, -15 % mit max. +/-5 % Welligkeit Stromaufnahme max. 2 A je nach Beschaltung der Signal-Ein-/Ausgänge Verlustleistung 0,5 VA pro aktivem Eingang 2,4 VA pro aktivem Ausgang Signal-Eingänge logisch 1: +16 V ... +30 V, 20 mA logisch 0: -1 V ... +4 V Signal-Ausgänge +24 V, max. 0,1 A, kurzschlussfest Spannungsversorgung Anschluss: Leitungslänge: Leitungstyp: X10: 4polig; STKK, Raster 3,5 mm, max. 1,5 mm2. Gegenstecker ist im Lieferumfang enthalten. (von Spannungsquelle bis zum Verbraucher) max. 10 m bei 0,75 mm2 max. 75 m bei 1,5 mm2 ungeschirmt, VDE 0281, 0812 (z.B.: Ölflex) Diskrete Signal-Aus- und -Eingänge Anschluss: Leitungslänge: Leitungstyp: X11...X14: 8polig; STKK, Raster 3,5 mm, max. 1,5mm2. Gegenstecker ist im Lieferumfang enthalten. max. 100 m bei 0,5 mm2 ungeschirmt, VDE 0281, 0812 (z.B.: Ölflex) PROFIBUS-Anschluss Anschluss: Leitungslänge: Leitungstyp: X15 nach PROFIBUS-DP-Spezifikation Kupferkabel, nach PROFIBUS-DP-Spezifika tion PROFIBUS-Adresse: Einstellung per Schalter ”DP-ADR“. DEUTSCH Tab.16: 86/402 Bosch Rexroth AG PSI 6xxx | 1070080028 / 06 Zu diesem Produkt - Diagnosemeldungen der Baugruppe (nach PROFIBUS‐Spezifikation) DEUTSCH - Busanschluss. Pinbelegung: 1: Schirm 2: 3: RXD / TXD ‐P 4: CNTR ‐P 5: DGND 6: VP 7: 8: RXD / TXD ‐N X15 - DP‐ADR: Einstellung der PROFIBUS-DP-Adresse. Drehschalter ”*10“: Zehnerstelle (0...9) Drehschalter ”*1“: Einerstelle (0...9) - Signal‐Eingänge E0 bis E7 (24VDC), mit Kontroll‐LED X14 - Signal‐Eingänge E8 bis E15 (24VDC), mit Kontroll‐LED X13 - Signal‐Ausgänge A0 bis A7 (24VDC), mit Kontroll‐LED X12 - Signal‐Ausgänge A8 bis A15 (24VDC), mit Kontroll‐LED X11 - Spannungsversorgung des E/A‐Moduls (24VDC) Klemme 1 und 3 intern verbunden Klemme 2 und 4 intern verbunden Abb.27: Frontansicht: E/A-Modul ”ComnetM-DP“ X10 1070080028 / 06 | PSI 6xxx Bosch Rexroth AG 87/402 Zu diesem Produkt UI-Regler-Modul (PSQ 6000 XQR) Nur bei entsprechend benötigter Funktion/Ausbaustufe in Ver bindung mit PSI 6x00.xxx erforderlich. Merkmale: • Optionale Einsteckkarte PSI6x00.xxx. zur Funktionserweiterung einer Funktionen: • UI-Regelung • UI-Überwachung • Erlaubt die grafische Darstellung des Schweißablaufes (U, I, R) • Erlaubt die grafische Darstellung des Istwertverlaufes über die Zeit (Histogrammanzeige) • Zangenwiderstands-Kompensation • Q-Stopp Ausführliche Informationen zur Funktionalität und Programmierung finden Sie in der BOS-Online-Hilfe und im Handbuch ”UI-Regelung und -Überwachung“ (siehe Kap. 1.2 Seite 7). DEUTSCH 5.2.4.15 88/402 Bosch Rexroth AG PSI 6xxx | 1070080028 / 06 Zu diesem Produkt 1 2 3 DEUTSCH 4 5 6 Abb.28: Frontansicht: UI-Regler-Modul PSQ 6000 XQR“ 1 Eingänge zum Anschluss der geschirmten Spannungsmessleitungen U1 und U2. 2 Anzeige CAN-Bus-Kommunikation: grüne LED: Kommunikation ok rote LED: Kommunikation gestört 3 Anzeige Baugruppen-Betriebszustand: grüne LED: ok rote LED: fehlerhaft 4 RS232-Schnittstelle. Zum Anschluss an ein Programmiergerät mit der Software BQR (Standalone-Bedienober fläche für UI-Regler). Wird beim Einsatz der BOS6000 nicht benötigt. 5 +24 V-Spannungseingang für die Versorgung von speziellen CAN-Bus-Teilnehmern. Wird im Zusammenhang mit UI-Regelung nicht verwendet. 6 CAN-Bus-Interface zu speziellen CAN-BusTeilnehmern. Wird im Zusammenhang mit UI-Regelung nicht verwendet. 1070080028 / 06 | PSI 6xxx Bosch Rexroth AG 89/402 Zu diesem Produkt DEUTSCH Notizen | Notes: 90/402 Bosch Rexroth AG PSI 6xxx | 1070080028 / 06 Zu diesem Produkt 5.3 Belastung und Dimensionierung 5.3.1 Grundlegendes Prinzipiell haben Halbleiter, solange sie innerhalb der Spezifikation be trieben werden, eine nahezu unendliche Lebensdauer. Aufgrund thermischer Belastungen wirken aber auf die Halbleiterchips auch mechanische Kräfte, die in Abhängigkeit der Halbleitergröße die Lebensdauer dieser Bauelemente durchaus beeinflussen können. Deshalb geben Halbleiterhersteller in der Regel Lebensdauerkurven an, in denen - abhängig von der Höhe eines Sperrschichttemperaturhu bes - die Anzahl der Temperaturzyklen bis zum rechnerischen Lebens dauerende ausgewiesen ist. Ein Temperaturzyklus entspricht hierbei einem Schweißpunkt. DEUTSCH Bei der Auslegung unserer Anlagen wurden diese Verhältnisse berück sichtigt. Unsere Belastungsdiagramme sind deshalb durch eine Spitzenstromkurve mit rechnerischer Lebensdauer erweitert. In die rechnerische Lebensdauer geht der thermische Hub - unter anderem bedingt durch den Schweißstrom, den Sekundärkreiswiderstand, die Schweißzeit und die Umgebungstemperatur - ein. Unsere Kurven sind für 45°C Umgebungstemperatur angegeben; realistisch sind aber z.B. 25°C, woraus sich in etwa eine dreifache Lebensdauer ergibt. Prinzipiell erhöht sich demnach die Lebensdauer bei der ”kälteren” Wasserkühlung gegenüber der Luftkühlung. Allerdings kann sich je nach Applikation bei Wasserkühlung der Temperaturfall nach einem Schweißpunkt erhöhen (aufgrund der hohen Kühlleistung des Wassers während der Abkühlphase). Dieser Effekt kann durch den höheren resultierenden Temperaturhub die Lebensdauer jedoch wieder redu zieren. Hier ergibt sich allerdings die Möglichkeit, nur während der Schweißzeit das Kühlwasser laufen zu lassen. 5.3.2 Wird der Umrichter überlastet? Durch die Typenzuordnung zu bestimmten maximalen Schweißtrans formatorgrößen ist die Belastbarkeit eines Mittelfrequenz-Umrichters grundsätzlich vorgegeben. " Trotzdem muss sichergestellt werden, dass die vorliegende Applika tion nicht zur Überlast der Geräte führt. HINWEIS Überlast durch nicht ordnungsgemäße Projektierung Beschädigungen des Gerätes, Verkürzung der Lebensdauer mög lich! " Prüfen Sie die tatsächliche Belastung des MittelfrequenzUmrichters! Bei Schäden durch Überlast erlischt jeder Garantieanspruch. Zur Überprüfung dienen die Belastungsdiagramme. Darin sind die vom Mittelfrequenz-Umrichter schaltbaren • Primär-Ausgangsströme (IPRIM in A) in Abhängigkeit der 1070080028 / 06 | PSI 6xxx Bosch Rexroth AG 91/402 Zu diesem Produkt • Einschaltdauer (ED in %) für 45°C Umgebungstemperatur (siehe auch Seite 90) angegeben. Die resultierenden Sekundärströme (Schweißströme) lassen sich durch Multiplikation mit dem jeweiligen Trafoübersetzungsverhält nis errechnen. " Überprüfen Sie außerdem den maximal zulässigen Schweißstrom bei einer Schweißzeit für eine rechnerische Lebensdauer von 10 Millionen Punkten. Dazu gibt es Diagramme, welche die Grenze bei 10% ED wieder geben und für eine typische Trafo-/Sekundärwiderstandskombina tion gelten. Beispiel 1. Berechnen Sie die max. Einschaltdauer ED des Umrichters. Aufgrund der geringen Wärmekapazität der Halbleiter wird deren maximal erlaubte Einschaltdauer anhand der Zeitspanne ”Stromzeit zu Schweißzykluszeit” ermittelt. Schweißzykluszeit 1000 ms STZ 200 ms STZ 200 ms Für ED ergibt sich hier im Beispiel: ED = " 200 ms 1000 ms x 100 % = 20 % Kommen innerhalb der Applikation unterschiedlich lange Stromzeiten oder Schweißzykluszeiten vor, verwenden Sie zur Berechnung der ED • die längste Stromzeit und • die kürzeste Schweißzykluszeit. 2. Suchen Sie das gerätespezifische Belastungsdiagramm in Kapitel 5.3.3 ab Seite 92. 3. Zeichnen Sie zuerst die Senkrechte an der zuvor berechneten Ein schaltdauer (siehe Punkt 1.: ED = 20 %). 4. Verwenden Sie die entsprechenden Kennlinien, um den max. Primär-Dauerstrom oder -spitzenstrom zu ermitteln. DEUTSCH Sie finden das relevante Belastungsdiagramm Ihres Gerätes in Ka pitel 5.3.3 ab Seite 92. 92/402 Bosch Rexroth AG PSI 6xxx | 1070080028 / 06 Zu diesem Produkt 5.3.3 Belastungsdiagramme Erläuterungen zu Belastungsdiagrammen siehe ab Seite 90. Iprim (ED) in A DEUTSCH Diagrammbasis: - rechnerischer Spitzenstrom bei einer Schweißzeit von 0,1s und 1 Mio. Punkte - Umgebungstemperatur von 45°C 500 400 300 200 100 0 1,00 10,00 100,00 ED in % Dauerleistung ohne Lüfter Dauerleistung Luft− oder Wasserkühler rechnerischer Spitzenstrom Luftkühler rechnerischer Spitzenstrom Wasserkühler Dauerleistung PSI 61xx.190 (Naht) Abb.29: Zulässiger Primärstrom in Abhängigkeit der ED: PSI 61xx.xxx 1070080028 / 06 | PSI 6xxx Bosch Rexroth AG 93/402 Zu diesem Produkt Iprim in A Diagrammbasis: - Umgebungstemperatur von 45°C - PSG 3100 - 10% ED - 200 µOhm Last 500 450 DEUTSCH 400 350 300 250 200 0,1 0,2 0,3 0,4 0,5 0,6 0,7 0,8 0,9 1,0 Stromzeit in Sek. 10 Millionen Punkte 1 Million Punkte Abb.30: Zulässiger Primärstrom in Abhängigkeit der Stromzeit: PSI 61xx.xxx L1/W1 94/402 Bosch Rexroth AG PSI 6xxx | 1070080028 / 06 Zu diesem Produkt Iprim in A Diagrammbasis: - Umgebungstemperatur von 45°C - PSG 3100 - 10% ED - 200 µOhm Last 500 450 DEUTSCH 400 350 300 250 200 0,1 0,2 0,3 0,4 0,5 0,6 0,7 0,8 0,9 1,0 Stromzeit in Sek. 10 Millionen Punkte 1 Million Punkte Abb.31: Zulässiger Primärstrom in Abhängigkeit der Stromzeit: PSI 61xx.xxx L2/W2 1070080028 / 06 | PSI 6xxx Bosch Rexroth AG 95/402 Zu diesem Produkt DEUTSCH Notizen | Notes: 96/402 Bosch Rexroth AG PSI 6xxx | 1070080028 / 06 Zu diesem Produkt Iprim (ED) in A Diagrammbasis: - rechnerischer Spitzenstrom bei einer Schweißzeit von 0,1s und 1 Mio. Punkte - Umgebungstemperatur von 45°C 1600 1400 1200 DEUTSCH 1000 800 600 400 200 0 1,00 10,00 100,00 ED in % Dauerleistung Wasserkühler rechnerischer Spitzenstrom Wasserkühler Dauerleistung PSI 62xx.190 (Naht) Abb.32: Zulässiger Primärstrom in Abhängigkeit der ED: PSI 62xx.xxx 1070080028 / 06 | PSI 6xxx Bosch Rexroth AG 97/402 Zu diesem Produkt Iprim in A Diagrammbasis: - Umgebungstemperatur von 45°C - 2 x PSG 3100 parallel - 10% ED - 50 µOhm Last 1400 DEUTSCH 1200 1000 800 600 400 0,1 0,2 0,3 0,4 0,5 0,6 0,7 0,8 0,9 1,0 Stromzeit in Sek. 10 Millionen Punkte 1 Million Punkte Abb.33: Zulässiger Primärstrom in Abhängigkeit der Stromzeit: PSI 62xx.xxx 98/402 Bosch Rexroth AG PSI 6xxx | 1070080028 / 06 Zu diesem Produkt Iprim (ED) in A Diagrammbasis: - rechnerischer Spitzenstrom bei einer Schweißzeit von 0,1s und 1 Mio. Punkte - Umgebungstemperatur von 45°C 800 700 600 DEUTSCH 500 400 300 200 100 0 1,00 10,00 100,00 ED in % Dauerleistung Luft− oder Wasserkühler rechnerischer Spitzenstrom Luftkühler rechnerischer Spitzenstrom Wasserkühler Abb.34: Zulässiger Primärstrom in Abhängigkeit der ED: PSI 6300/63C0.xxx L1/W1 1070080028 / 06 | PSI 6xxx Bosch Rexroth AG 99/402 Zu diesem Produkt Iprim (ED) in A Diagrammbasis: - rechnerischer Spitzenstrom bei einer Schweißzeit von 0,1s und 1 Mio. Punkte - Umgebungstemperatur von 45°C 800 700 600 DEUTSCH 500 400 300 200 100 0 1,00 10,00 100,00 ED in % Dauerleistung Luftkühler rechnerischer Spitzenstrom Luftkühler Abb.35: Zulässiger Primärstrom in Abhängigkeit der ED: PSI 6300/63C0.xxx L2 100/402 Bosch Rexroth AG PSI 6xxx | 1070080028 / 06 Zu diesem Produkt Diagrammbasis: - Umgebungstemperatur von 45°C - PSG 3100 - 10% ED - 100 µOhm Last Iprim in A 800 700 DEUTSCH 600 500 400 300 200 0,1 0,2 0,3 0,4 0,5 0,6 0,7 0,8 0,9 1,0 Stromzeit in Sek. 10 Millionen Punkte 1 Million Punkte Abb.36: Zulässiger Primärstrom in Abhängigkeit der Stromzeit: PSI 6300/63C0.xxx L1/W1 1070080028 / 06 | PSI 6xxx Bosch Rexroth AG 101/402 Zu diesem Produkt Diagrammbasis: - Umgebungstemperatur von 45°C - PSG 3100 - 10% ED - 100 µOhm Last Iprim in A 800 700 DEUTSCH 600 500 400 300 200 0,1 0,2 0,3 0,4 0,5 0,6 0,7 0,8 0,9 1,0 Stromzeit in Sek. 10 Millionen Punkte 1 Million Punkte Abb.37: Zulässiger Primärstrom in Abhängigkeit der Stromzeit: PSI 6300/63C0.xxx L2/W2 102/402 Bosch Rexroth AG PSI 6xxx | 1070080028 / 06 Zu diesem Produkt DEUTSCH Iprim (ED) in A Diagrammbasis: - rechnerischer Spitzenstrom bei einer Schweißzeit von 0,1s und 10 Mio. Punkte - Umgebungstemperatur von 45°C - 2 x PSG 6250 parallel - 66 µOhm Last 1800 1600 1400 1200 1000 800 600 400 200 1,00 10,00 100,00 ED in % Dauerleistung rechnerischer Spitzenstrom Abb.38: Zulässiger Primärstrom in Abhängigkeit der ED: PSI 64xx.xxx 1070080028 / 06 | PSI 6xxx Bosch Rexroth AG 103/402 Zu diesem Produkt Iprim in A Diagrammbasis: - Umgebungstemperatur von 45°C - 2 x PSG 6250 parallel - 10% ED - 66 µOhm Last 1900 1800 1700 DEUTSCH 1600 1500 1400 1300 1200 1100 1000 0,1 0,2 0,3 0,4 0,5 0,6 0,7 0,8 0,9 1,0 Stromzeit in Sek. 10 Millionen Punkte 1 Million Punkte Abb.39: Zulässiger Primärstrom in Abhängigkeit der Stromzeit: PSI 64xx.xxx 104/402 Bosch Rexroth AG PSI 6xxx | 1070080028 / 06 Zu diesem Produkt Iprim (ED) in A Diagrammbasis: - rechnerischer Spitzenstrom bei einer Schweißzeit von 0,1s und 1 Mio. Punkte - Umgebungstemperatur von 45°C 2600 2400 2200 2000 1800 DEUTSCH 1600 1400 1200 1000 800 600 400 200 0 1,00 10,00 100,00 ED in % Dauerleistung mit Wasserkühlung, ohne Schrankkühlung Dauerleistung mit Wasserkühlung, mit Schrankkühlung rechnerischer Spitzenstrom Wasserkühler Dauerleistung PSI 65xx.190 (Naht) mit Wasserkühlung, mit Schrankkühlung Dauerleistung PSI 65xx.190 (Naht) mit Wasserkühlung, ohne Schrankkühlung Abb.40: Zulässiger Primärstrom in Abhängigkeit der ED: PSI 65xx 1070080028 / 06 | PSI 6xxx Bosch Rexroth AG 105/402 Zu diesem Produkt Iprim in A Diagrammbasis: - Umgebungstemperatur von 45°C - 4 x PSG 3100 parallel - 10% ED - 25 µOhm Last 2600 2400 2200 DEUTSCH 2000 1800 1600 1400 1200 1000 0,1 0,2 0,3 0,4 0,5 0,6 0,7 0,8 0,9 1,0 Stromzeit in Sek. 10 Millionen Punkte 1 Million Punkte Abb.41: Zulässiger Primärstrom in Abhängigkeit der Stromzeit: PSI 65xx.xxx 106/402 Bosch Rexroth AG PSI 6xxx | 1070080028 / 06 Zu diesem Produkt 5.4 Identifikation des Produkts Der Typenschlüssel gibt Auskunft über die Produktvariante: DEUTSCH PS_ 6___.___ __ Netzspannungsbereich (nur bei MF-Umrichtern): 1: 400-480 VAC 2: 500-690 VAC Kühlung: L: Luft W: Wasser Steuerungstyp erste Ziffer: E/A-Anbindung:: 1: diskret per 24 V 2: PROFIBUS 3: INTERBUS 4: RS232 6: DeviceNet 7: Ethernet (z.B. PROFINET) 2.+3. Ziffer: Versionsnummer Leistungsklasse des Leistungsteils und Varianten xCx: mit TriCore-CPU x00: mit Standard-CPU Leistungsteiltyp T: Thyristor-Leistungsteil I: Mittelfrequenz-Umrichter (Inverter) Beispiel: PSI 63C0.100 L1:Programmierbare Schweißsteuerung mit Mittelfrequenz-Umrichter (Inverter) mit TriCore-CPU, 24 V-E/A MF-Umrichter Luftgekühlt Netzversorgung 400-480 VAC Abb.42: Typenschlüssel der PSx 6xxx-Baureihe 1070080028 / 06 | PSI 6xxx Bosch Rexroth AG 107/402 Transport und Lagerung Transport und Lagerung " Beachten Sie die Hinweise zum Transport im Kapitel ”Sicherheits hinweise” auf Seite 15. " Beachten Sie die Hinweise zu Transport und Lagerung im Kapitel ”Allgemeine Hinweise zu Sachschäden und Produktschäden” auf Seite 27. " Stellen Sie sicher, dass das Produkt während des Transports keinen Bedingungen ausgesetzt ist, die außerhalb der Spezifikation liegen (siehe Kap. 15 „Technische Daten“ ab Seite 181). " Stellen Sie sicher, dass das Produkt nach Lagerung/Transport in kalter Umgebung ausreichend akklimatisiert ist, bevor es verwendet wird. Transport über größere Entfernungen und Lagerung sollten in der Originalverpackung oder in einer für den jeweiligen Zweck entspre chend geeigneten Verpackung erfolgen. DEUTSCH 6 108/402 Bosch Rexroth AG Transport und Lagerung DEUTSCH Notizen | Notes: PSI 6xxx | 1070080028 / 06 1070080028 / 06 | PSI 6xxx Bosch Rexroth AG 109/402 Montage 7 Montage 7.1 Produkt montieren Informationen zu Einbaubedingungen (wie z.B. Einbaulage, erlaubte Umgebungstemperaturen) finden Sie in Kapitel 15 ab Seite 181. " Beachten Sie die Hinweise zu Einbau und Montage in Kapitel 2.6.3 ab Seite 16 und Kap. 3.2 ab Seite 28. " Verwenden Sie zur Befestigung des Produktes Bolzen M6 und selbstsichernde Kombi-Muttern DIN 267 M6. Beim Anziehen der Schrauben gilt: max. Anzugsmoment 6 Nm. DEUTSCH Informationen über Abmessungen, erforderliche Ausbrüche und Schraubbefestigungen finden Sie in Kap. 7.1.1 ab Seite 110. 110/402 Bosch Rexroth AG PSI 6xxx | 1070080028 / 06 Montage 7.1.1 Maßbilder und Anschlusspositionen Seitenansicht rechts Vorderansicht (Frontseite) 25,5 239 96,5 270 DEUTSCH 96,5 1) 1) 245,6 231,5 Zubehörsatz zur alternativen Befestigung. Siehe Seite 177. Dichtfläche. Flachdichtung mit 3mm Dicke not wendig. 146,5 Empfohlener Montageausbruch bei Montage an linker Seitenwand Alle Maße in mm. Maße ohne Toleranzangabe: $0,5 Abb.43: Maßbild: PSI 61xx.xxx L1 Ansicht von oben 1) notwendiger Einbaufreiraum: 100 mm 1070080028 / 06 | PSI 6xxx Bosch Rexroth AG 111/402 Montage Seitenansicht rechts Vorderansicht (Frontseite) DEUTSCH 1) 1) Zubehörsatz zur alternativen Befestigung. Siehe Seite 177. Dichtfläche. Flachdichtung mit 3mm Dicke not wendig. Empfohlener Montageausbruch bei Montage an linker Seitenwand Alle Maße in mm. Maße ohne Toleranzangabe: $0,5 Abb.44: Maßbild: PSI 61xx.xxx L2 Ansicht von oben 1) notwendiger Einbaufreiraum: 100 mm 112/402 Bosch Rexroth AG PSI 6xxx | 1070080028 / 06 Montage Seitenansicht rechts DEUTSCH Vorderansicht (Frontseite) Zubehörsatz zur alternativen Befestigung. Siehe Seite 177. Dichtfläche. Flachdichtung mit 3mm Dicke not wendig. Empfohlener Montageausbruch bei Montage an linker Seitenwand Alle Maße in mm. Maße ohne Toleranzangabe: $0,5 Abb.45: Maßbild: PSI 61xx.xxx Wx Ansicht von oben Einbaufreiraum von min. 100 mm über- und unterhalb vom Produkt erforderlich! 1070080028 / 06 | PSI 6xxx Bosch Rexroth AG 113/402 Montage vom Netz PE U1 V1 W1 Seitenansicht rechts DEUTSCH alle Anschlussklemmen max. 50 mm2 U2 V2 zum Schweißtransformator Abb.46: Position Netz- und Trafoanschluss: PSI 61xx.xxx Lx/Wx Gegenstücke: Schlauchtülle mit Überwurfmutter M16x1,5 nach DIN EN 560.Mat.: CuZn39Pb3 oder Parker Teil B-Nr. 35C82-10-6BK Vorderansicht (Frontseite) Kühlwasser anschlüsse Zufluss Ansicht von oben Abfluss Abb.47: Position Kühlwasseranschluss: PSI61xx.xxx Wx 114/402 Bosch Rexroth AG PSI 6xxx | 1070080028 / 06 Montage Seitenansicht rechts Vorderansicht (Frontseite) DEUTSCH Freiraum für Belüftung Freiraum für Belüftung Abb.48: Maßbild: PSI 62xx.xxx W1 Alle Maße in mm. Maße ohne Toleranzangabe: $0,5 1070080028 / 06 | PSI 6xxx Bosch Rexroth AG 115/402 Montage Frontansicht vom Netz Anschluss von oben Anschlussklemmen max. 95 mm2 DEUTSCH U1 V1 W1 U2 V2 Anschlussklemmen max. 95 mm2 Anschluss von unten zum MF-Schweiß transformator Abb.49: Position Netz- und Trafoanschluss: PSI 62xx.xxx W1 116/402 Bosch Rexroth AG PSI 6xxx | 1070080028 / 06 Montage DEUTSCH Frontansicht Kühlwasseranschlüsse: Zufluss hinten Abfluss vorne Gegenstücke: Schlauchtülle mit Überwurfmutter M16x1,5 nach DIN EN 560. Mat.: CuZn39Pb3 oder Parker Teil B-Nr. 35C82-10-6BK Abb.50: Position Kühlwasseranschluss: PSI62xx.xxx W1 1070080028 / 06 | PSI 6xxx Bosch Rexroth AG 117/402 Montage Seitenansicht rechts Vorderansicht (Frontseite) DEUTSCH 1) 1) Zubehörsatz zur alternativen Befestigung. Siehe Seite 177. Dichtfläche. Flachdichtung mit 3mm Dicke not wendig. Empfohlener Montageausbruch bei Montage an linker Seitenwand Alle Maße in mm. Maße ohne Toleranzangabe: $0,5 Abb.51: Maßbild: PSI 6300/63C0.xxx Lx Ansicht von oben 1) notwendiger Einbaufreiraum: 100 mm 118/402 Bosch Rexroth AG PSI 6xxx | 1070080028 / 06 Montage Seitenansicht rechts DEUTSCH Vorderansicht (Frontseite) Zubehörsatz zur alternativen Befestigung. Siehe Seite 177. Dichtfläche. Flachdichtung mit 3mm Dicke not wendig. Empfohlener Montageausbruch bei Montage an linker Seitenwand Alle Maße in mm. Maße ohne Toleranzangabe: $0,5 Abb.52: Maßbild: PSI 6300/63C0.xxx Wx Ansicht von oben Einbaufreiraum von min. 100 mm über- und unterhalb vom Produkt erforderlich! 1070080028 / 06 | PSI 6xxx Bosch Rexroth AG 119/402 Montage vom Netz PE U1 V1 W1 Seitenansicht rechts DEUTSCH alle Anschlussklemmen max. 50 mm2 U2 V2 zum Schweißtransformator Abb.53: Position Netz- und Trafoanschluss: PSI 6300/63C0.xxx Lx/Wx Gegenstücke: Schlauchtülle mit Überwurfmutter M16x1,5 nach DIN EN 560.Mat.: CuZn39Pb3 oder Parker Teil B-Nr. 35C82-10-6BK Vorderansicht (Frontseite) Kühlwasser anschlüsse Zufluss Ansicht von oben Abfluss Abb.54: Position Kühlwasseranschluss: PSI 6300/63C0.xxx Wx 120/402 Bosch Rexroth AG PSI 6xxx | 1070080028 / 06 Montage Seitenansicht rechts Vorderansicht (Frontseite) DEUTSCH Freiraum für Belüftung Freiraum für Belüftung Abb.55: Maßbild: PSI 64C0.xxx W1 Alle Maße in mm. Maße ohne Toleranzangabe: $0,5 1070080028 / 06 | PSI 6xxx Bosch Rexroth AG 121/402 Montage Frontansicht vom Netz Anschluss von oben Anschlussklemmen max. 95 mm2 DEUTSCH U1 V1 W1 U2 V2 Anschlussklemmen max. 95 mm2 Anschluss von unten zum MF-Schweiß transformator Abb.56: Position Netz- und Trafoanschluss: PSI 64C0.xxx W1 122/402 Bosch Rexroth AG PSI 6xxx | 1070080028 / 06 Montage DEUTSCH Frontansicht Kühlwasseranschlüsse: Zufluss hinten Abfluss vorne Gegenstücke: Schlauchtülle mit Überwurfmutter M16x1,5 nach DIN EN 560. Mat.: CuZn39Pb3 oder Parker Teil B-Nr. 35C82-10-6BK Abb.57: Position Kühlwasseranschluss: PSI64C0.xxx W1 1070080028 / 06 | PSI 6xxx Bosch Rexroth AG 123/402 Montage DEUTSCH Notizen | Notes: 124/402 Bosch Rexroth AG PSI 6xxx | 1070080028 / 06 Montage Seitenansicht rechts Vorderansicht (Frontseite) Rückansicht 396 358 194,5 110 99 638 7,5 26,5 103,5 96 411 600 653 860 DEUTSCH für M6 Seitenansicht links Bohrbild 280 110$0,2 38 30,75 70 110$0,2 110 637$0,5 Ansicht von vorne. Für Bolzen M6. Max. Anzugsmoment 6 Nm. Selbstsichernde Kombi-Mut tern DIN 267 M6 verwenden. Alle Maße in mm. Maße ohne Toleranzangabe: $0,5 110 Abb.58: Maßbild: PSI 65xx.xxx W1 110 Einbaufreiraum von min. 100 mm über- und unterhalb vom Produkt rforderlich! 1070080028 / 06 | PSI 6xxx Bosch Rexroth AG 125/402 Montage Frontansicht vom Netz U1 V1 W1 PE Anschluss über Kabelschuhe. M10-Schraube pro Anschluss. 2 bis 4 Kabel; jeweils 120 mm2 DEUTSCH Schutzabdeckung Anschluss über Kabelschuhe. M10-Schraube pro Anschluss. 2 bis 4 Kabel; jeweils 120 mm2 Schutzabdeckung U2 V2 zum MF-Schweiß transformator Abb.59: Position Netz- und Trafoanschluss: PSI 65xx.xxx W1 126/402 Bosch Rexroth AG PSI 6xxx | 1070080028 / 06 Montage DEUTSCH Frontansicht Schlauchbrücke Kühlwasseranschlüsse: Zufluss Abfluss Gegenstücke: Schlauchtülle mit Überwurfmutter M16x1,5 nach DIN EN 560. Mat.: CuZn39Pb3 oder Parker Teil B-Nr. 35C82-10-6BK Abb.60: Position Kühlwasseranschluss: PSI65xx.xxx W1 1070080028 / 06 | PSI 6xxx Bosch Rexroth AG 127/402 Montage 7.2.1 Produkt elektrisch anschließen " Beachten Sie die Sicherheitshinweise zum elektrischen Anschluss in Kapitel 2.6.4 ab Seite 18 und in Kap. 3.3 ab Seite 30. " Stellen Sie sicher, dass vor und während der elektrischen An schlussarbeiten alle betreffenden Anlagenteile spannungsfrei sind. " Stellen Sie sicher, dass geforderte Bedingungen zum elektrischen Anschluss eingehalten werden. Siehe Kap. 15 ab Seite 181. Dort finden Sie auch die maximal möglichen Anschlussquerschnitte und Anzugsdrehmomente für Netz- und Trafoleitungen. " Zur Erfüllung der Norm EN 62135 stellen Sie sicher, dass der Um richter im Fehlerfall (z. B. Kurzschluss eines internen Elkos) automa tisch vom Netz getrennt wird. Verwenden Sie dazu den HSA-Ausgang der SST (X8, siehe Seite 147) in Verbindung z.B. mit einem geeigneten (fernauslösbaren) Hauptschalter. Entstörung Störungen werden durch Schaltspitzen verursacht und können direkt oder per Kopplung über Verbindungsleitungen in die Steuerung einge streut werden. Deshalb sind Maßnahmen zur Unterdrückung von Stö reinflüssen erforderlich. " Beseitigen Sie Störungen schon an deren Quelle. Ist das nicht mög lich, müssen die Entstörglieder so nah wie möglich an der Störungs quelle angebracht werden. " Stellen Sie sicher, dass alle Komponenten die Induktivitäten oder Schaltelemente enthalten, ordnungsgemäß entstört werden. " Montieren Sie Entstörelemente immer bruchfest, da an Maschinen starke Vibrationen auftreten können. DIODE + RC−GLIED GND ∼ MP Diode, geeignet für kleine Gleichspannungsrelais RC−Glied für Wechselspannungsrelais und Wechselspannungsmotoren DIODE UND ZENERDIODE RC−GLIED + GND DI−ZD−Dämpfungsglied, für große Gleichspannungsschütze und definierte Abfallzeiten Abb.61: Entstörbeispiele RC−Glied zur Funkenlöschung bei induktiver Last DEUTSCH 7.2 128/402 Bosch Rexroth AG PSI 6xxx | 1070080028 / 06 Montage Die folgende Tabelle gilt nur als Beispiel. Die Dimensionierung der erforderlichen Bauteile richtet sich nach den tatsächlichen Lastver hältnissen. Tab.17: 24 VDC 48 VDC 110 VAC 220 VAC 440 VAC DEUTSCH 7.2.2 Dimensionierung Entstörkomponenten Widerstand Kondensator Diode 220 Ohm / 1 W 220 Ohm / 5 W 220 Ohm / 5 W 0,5 uF 400/600 V 0,1 uF 500 V 0,1 uF 1000 V 1 N 5060/ZL 12 1 N 5060/ZL 22 Netzanschluss Beim Betrieb der Mittelfrequenz-Umrichter Oberschwingungsströme im Netz. entstehen Typisch 300 Hz Abb.62: Typischer Verlauf der Netzspannung (oben) und des dazugehö rigen Netzstromes (unten) in einer Phase während des Schweißvorganges Die 5., 7., 11., 13., 15. und 17. Oberschwingung sind die im Netzstrom verlauf kennzeichnenden Oberschwingungen. Der jeweilige Oberschwingungsanteil hängt von der Schweißleistung ab. Durch den Einsatz von Netzdrosseln mit 4% Uk lassen sich die Oberschwingungsströme deutlich reduzieren. 1070080028 / 06 | PSI 6xxx Bosch Rexroth AG 129/402 Montage Beachten Sie im Zusammenhang mit dem elektrischen Anschluss folgende Punkte: • Der Betrieb der Umrichter ist lediglich für die Verwendung in Ge bäuden/Grundstücken mit einem Betriebsstrom größer/gleich 100A pro Phase vorgesehen. • Der Betrieb der Umrichter an unsymmetrischen Netzen (eine Netzphase geerdet) ist unzulässig. • Die Umrichter dürfen nur an geerdeten Netzen wie z.B. TT- oder TN-Netzen betrieben werden. Bei nicht geerdeten Netzen (z.B. IT-Netz) muss ein Trenntrafo mit sekundär geerdetem Mittelpunkt eingesetzt werden. Die einsei tige Erdung des Zwischenkreises ist unzulässig. • Es ist eine netzseitige elektrische Absicherung erforderlich. • Der Betrieb an Anlagen mit normalen FI-Schutzschaltern ist nicht zulässig, da Fehlerströme aus dem Zwischenkreis über Erde in das Netz zurückfließen können, ohne den FI-Schutzschalter auszulösen. • Falls Sie netzseitig eine Fehlerstrom-Schutzeinrichtung verwenden, muss diese für den Betrieb mit Mit telfrequenzanlagen mit Gleichstromzwischenkreis und einer Frequenz von 1000 Hz geeignet sein! Überprüfen Sie hierzu die entsprechenden Herstellerangaben! Halten Sie jeweils geltende Vorschriften ein! • Stellen Sie sicher, dass die Netzspannung innerhalb des erlaub ten Bereiches liegt. Sie finden die umrichterspezifischen Bereichsangaben in Kap. 15 ab Seite 181 und auf dem Typenschild des jeweiligen Umrich ters. Die Position der Anschlüsse finden Sie in Kap. 7.1.1 ab Seite 110. " Verbinden Sie den PE-Anschluss am Umrichter mit einem geeigne ten Erdungspunkt. Beachten Sie im Zusammenhang mit dem Schutzleiteranschluss auch die entsprechenden An- und Vorgaben im Handbuch ”MFSchweißtransformatoren, Technische Information” (siehe Seite 7). " Verbinden Sie Klemme U1 am Umrichter mit Netzphase L1. " Verbinden Sie Klemme V1 am Umrichter mit Netzphase L2. " Verbinden Sie Klemme W1 am Umrichter mit Netzphase L3. DEUTSCH " 130/402 Bosch Rexroth AG PSI 6xxx | 1070080028 / 06 Montage 7.2.3 Trafoanschluss (Primärkreis) " Befestigen Sie die Leitungen für U2 und V2 mit Aluschellen und füh ren Sie die Leitungen - sofern erforderlich - immer gemeinsam durch Gehäusebleche (wegen induktiver Erwärmung). Die Position der Anschlüsse finden Sie in Kap. 7.1.1 ab Seite 110. " Verbinden Sie Klemme U2 am Umrichter mit Anschluss U am Trans formator. " Verbinden Sie Klemme V2 am Umrichter mit Anschluss V am Trans formator. DEUTSCH Weitere Informationen zum Transformatoranschluss (Parallel schaltung mehrerer Transformatoren, Sensorik usw.) entnehmen Sie dem Handbuch ”MF-Schweißtransformatoren, Technische In formation” (siehe Seite 7). 7.2.4 Anschluss Programmiergerät Zur Punkt-zu-Punkt-Ankopplung des Programmiergerätes (PC/Laptop mit Software BOS zur Administration, Diagnose, Archivierung, Backup). Zur Vernetzung steht eine optionale Ethernet-Baugruppe zur Verfü gung. Siehe Seite 54. X1 (V24/RS232-Interface, D-Sub) Nur in Verbindung mit PSI 6x00.xxx! Anschluss: Leitungslänge: Leitungstyp: an X1; D-Sub, 9pol., Stecker max. 20 m (bei empfohlenem Leitungstyp) geschirmt, Aderquerschnitt min. 0,2 mm2, Kapazität max. 2,5 nF (z.B.: 3 x 2 x 0,2 mm2 LifYCY, Metrofunk) 19200 Bit/s 8E1 (8 Datenbit, gerade Parität, 1 Stopp-Bit) Übertragungsrate: Parameter: X1 RX TX GND 1 2 3 4 5 6 7 8 9 PC (COM1 oder COM2) 2 3 4 5 Stecker RX TX GND Stecker Schirm großflächig über metallisches Gehäuse der Steckverbindung Abb.63: Anschluss Programmiergerät per X1 1070080028 / 06 | PSI 6xxx Bosch Rexroth AG 131/402 Montage Passende Verbindungskabel siehe Kap. 13.1 Seite 173. X3C (V24/RS232-Interface, Mini-DIN) Nur in Verbindung mit PSI 6xCx.xxx! an X3C; Mini-DIN, 8pol., Stecker max. 20 m (bei empfohlenem Leitungstyp) geschirmt, Aderquerschnitt min. 0,2 mm2, Kapazität max. 2,5 nF (z.B.: 3 x 2 x 0,2 mm2 LifYCY, Metrofunk) 19200 Bit/s 8E1 (8 Datenbit, gerade Parität, 1 Stopp-Bit) Übertragungsrate: Parameter: X3C TX GND RX PC (COM1 oder COM2) 1 2 3 4 5 6 7 8 2 RX 3 TX 4 5 GND Buchse Stecker Schirm großflächig über metallisches Gehäuse der Steckverbindung kontaktieren Abb.64: Anschluss Programmiergerät per X3C Passende Verbindungskabel siehe Kap. 13.1 Seite 173. X3U (USB-Interface) Nur in Verbindung mit PSI 6xCx.xxx! Anschluss: Leitungslänge: an X3U; USB Stecker Typ B max. 3 m Passende Verbindungskabel siehe Kap. 13.1 Seite 173. Bei gesteckter USB-Verbindung ist die Schnittstelle X3C automa tisch deaktiviert! DEUTSCH Anschluss: Leitungslänge: Leitungstyp: 132/402 Bosch Rexroth AG PSI 6xxx | 1070080028 / 06 Montage 7.2.5 24 VDC-Logikversorgung (X4, Eingang) Anschluss: an X4; STKK, Raster 3,5 mm, 14polig, max. 1,5 mm2 . Gegenstecker ist im Lieferumfang enthalten. (von Spannungsquelle bis zum Verbraucher) max. 10 m bei 0,75 mm2 max. 75 m bei 1,5 mm2 ungeschirmt, VDE 0281, 0812 (z.B.: Ölflex) Leitungslänge Leitungstyp: Die Steuerungslogik muss mit 24VDC versorgt werden. Steuerung DEUTSCH X4 10 24VDC 11 0V Einspeisung zur Versorgung der internen Steuerungslogik Abb.65: Logikversorgungseingang der Steuerung Welche Spannungsquelle die Steuerung versorgen soll, legen Sie durch die restliche Beschaltung von X4 fest. Möglichkeiten: • Versorgung durch die geräteinterne Spannungserzeugung (siehe Seite 133) • Versorgung über ein externes Netzteil. Dazu müssen an X4 nur einige Brücken gesetzt/entfernt werden. Nähere Informationen über die Verschaltung von X4 finden Sie in Kap. 7.2.8 ab Seite 135. Während die Versorgung durch die geräteinterne Spannungserzeu gung bevorzugt bei Standalone-Anlagen verwendet wird (z.B. Hängeanlagen; es sind keine zusätzlichen 24 VDC-Netzteile erforder lich), kommt die Versorgung per externem Netzteil hauptsächlich bei vernetzten Anlagen zum Einsatz (Steuerung lässt sich auch bei abge schaltetem Schweißnetz noch z.B. vom Linien-PC aus program mieren). " Stellen Sie bei Verwendung externer Spannungsquellen sicher, dass diese nach der Niederspannungs-Richtlinie (2006/95/EG) als ”sicher getrennt” spezifiziert sind! 1070080028 / 06 | PSI 6xxx Bosch Rexroth AG 133/402 Montage 24 VDC-Spannungserzeugung (X4, Ausgang) Anschluss: Leitungslänge Leitungstyp: an X4; STKK, Raster 3,5 mm, 14polig, max. 1,5 mm2. Gegenstecker ist im Lieferumfang enthalten. (von Spannungsquelle bis zum Verbraucher) max. 10 m bei 0,75 mm2 max. 75 m bei 1,5 mm2 ungeschirmt, VDE 0281, 0812 (z.B.: Ölflex) An X4 steht Ihnen eine 24 VDC-Versorgungsspannung zur Verfügung, die vom Leistungsteil aus der Netzspannung abgeleitet wird. Die Versorgung durch die interne 24 VDC-Spannungserzeugung und damit die Funktionstüchtigkeit aller daraus gespeisten Geräte ist nur dann gewährleistet, wenn am Netzeingang des Leistungsteils Netzspannung ansteht! Steuerung X4 + 24 VDC 5 0V 8 Verwendbar z.B. zur Versor gung der Steuerungslogik und des E/A-Moduls Abb.66: Intern erzeugte 24 VDC -Versorgungsspannung " Berücksichtigen Sie bei Verwendung der internen 24 VDCSpannungserzeugung folgende Sachverhalte: • Technische Daten auf Seite 183. • Bei Versorgung der Steuerungslogik: Abschalten der Netzspannung am Netzeingang des Leistungs teils schaltet auch die Steuerung ab. In diesem Zustand ist • keine Programmierung, Diagnose oder Visualisierung über die Steuerung und • keine Kommunikation zwischen Steuerung und SPS/Roboter mehr möglich. • Bei Versorgung des E/A-Moduls: Abschalten der Netzspannung am Netzeingang des Leistungs teils schaltet auch das E/A-Modul ab. In diesem Zustand ist • keine Kommunikation zwischen Steuerung und SPS/Roboter über die diskreten Signale mehr möglich. " Sind die beschriebenen Sachverhalte für Ihre Applikation nicht trag bar, muss die 24 VDC-Versorgung von Steuerung bzw. E/A-Modul durch externe Netzteile sichergestellt sein! DEUTSCH 7.2.6 134/402 Bosch Rexroth AG PSI 6xxx | 1070080028 / 06 Montage 7.2.7 E/A-Modul-Versorgung (X4, Ausgang) Anschluss: Leitungslänge DEUTSCH Leitungstyp: an X4; STKK, Raster 3,5 mm, 14polig, max. 1,5 mm2 . Gegenstecker ist im Lieferumfang enthalten. (von Spannungsquelle bis zum Verbraucher) max. 10 m bei 0,75 mm2 max. 75 m bei 1,5 mm2 ungeschirmt, VDE 0281, 0812 (z.B.: Ölflex) Verwendete typspezifische E/A-Module (Steckplatz siehe Abbildungen auf Seite 48 und 50) lassen sich per X4 versorgen. Informationen zum Versorgungsanschluss aller verfügbaren E/A-Module finden Sie ab Seite 62 in den E/A-Modulspezifischen Kapiteln. Es kommen 2 Anschlussvarianten in Betracht: 1. Anschluss der E/A-Modulversorgung an X4, oder 2. direkter Anschluss der E/A-Modulversorgung an separatem 24VDCNetzteil. Wenn das E/A-Modul an X4 der Steuerung angeschlossen wird, kann sowohl die geräteinterne Spannungsversorgung (siehe Seite 133), als auch ein externes Netzteil verwendet werden. Dazu müs sen an X4 nur einige Brücken gesetzt/entfernt werden. Nähere Informationen über die Verschaltung von X4 finden Sie in Kap. 7.2.8 ab Seite 135. Steuerung E/A-Modul X4 24VDC 24VDC 0V 0V 1 2 3 4 potentialfreier Kontakt Belastung: 24VDC, max. 3A SST-interne Auswertung des Stopp kreises Stoppkreis Abb.67: Anschluss der E/A-Modulversorgung an X4 der Steuerung Stoppkreis E/A-Modul 24VDC 0V potentialfreier Kontakt Belastung: 24VDC, max. 3A 24 VDC-Netzteil 24VDC 0V Abb.68: Direkter Anschluss der E/A-Modulversorgung an separatem 24 VDC -Netzteil 1070080028 / 06 | PSI 6xxx Bosch Rexroth AG 135/402 7.2.8 " Stellen Sie sicher, dass stets die einwandfreie Funktion des Stopp kreises gewährleistet ist! Bei gefährlichen Zuständen an der Schweißanlage oder beim ge wollten Ausschalten der Schweißsteuerung sind Ein- und Ausgänge des E/A-Feldes auf Low-Pegel zu schalten. Dazu muss eine externe Überwachungs-Einrichtung den potentialfreien Kontakt öffnen und so die Spannungsversorgung des E/A-Moduls unterbrechen. Die Steuerung meldet bei offenem Stoppkreis: ”Stoppkreis of fen/24V fehlt”. Die Meldung ist selbstquittierend, d.h. sie verschwindet beim Schließen des Stoppkreises automatisch. " Stellen Sie sicher, dass die verwendete Spannungsquelle nach der Niederspannungs-Richtlinie (2006/95/EG) als ”sicher getrennt” spe zifiziert ist! " Falls Potentialtrennung zwischen E/A-Feld und Steuerung erforder lich ist, müssen Steuerung und E/A-Modul über unterschiedliche 24V DC-Spannungsversorgungen betrieben werden! " Gegebenenfalls kann die am E/A-Modul ankommende Versor gungsspannung auch an zusätzliche Geräte weitergeleitet werden (modulseitig durch eine interne Brückung an X10). Stellen Sie in solchen Fällen sicher, dass spezifizierte Grenzwerte für Strombelastung (Spannungsquelle, Verbindungen) und Leitungslängen nicht überschritten werden! 24 VDC-Spannungsverteilung (X4) Anschluss: Leitungslänge: Leitungstyp: an X4; STKK, Raster 3,5 mm, 14polig, max. 1,5 mm2. Gegenstecker ist im Lieferumfang enthalten. (von Spannungsquelle bis zum Verbraucher) max. 10 m bei 0,75 mm2 max. 75 m bei 1,5 mm2 ungeschirmt, VDE 0281, 0812 (z.B.: Ölflex) Die interne Beschaltung von X4 erleichtert Ihnen die Verdrahtung der 24V DC-Versorgungszweige. Durch Stecken oder Entfernen einiger Brücken lassen sich so verschiedene Versorgungsvarianten realisieren, ohne die restliche Verdrahtung im Schaltschrank zu ändern. Dazu speist man die relevante Spannungsquelle an X4/6 (24 VDC) und X4/7 (0 V) ein. Hier die Beschreibung von 4 Varianten. Für welche Variante Sie sich entscheiden, hängt von den Anforderungen Ihrer Applikation ab. DEUTSCH Montage 136/402 Bosch Rexroth AG PSI 6xxx | 1070080028 / 06 Montage 1. Steuerungslogik und E/A-Modul werden per interner 24 VDC- Spannungserzeugung gespeist. Einsatz: Vorzugsweise an Standalone-Anlagen. Vorteil: Keine separaten Netzteile erforderlich. Nachteil: 24 VDC wird nur bei anstehender Netzspannung am Netzeingang des Leistungsteils generiert. Programmierung, Diagnose oder E/A-Kommunikation zwischen Steuerung und SPS/Roboter sind nach Ab schalten der Netzspannung am Netzeingang des Leis tungsteils nicht mehr möglich. 2. E/A-Modul wird per interner 24 VDC-Spannungserzeugung, die DEUTSCH Steuerungslogik per externem Netzteil gespeist. Einsatz: An vernetzten Anlagen. Vorteil: Programmierung, Diagnose oder Visualisierung auch nach Abschalten der Netzspannung am Netzeingang des Leistungsteils noch möglich. Potentialtrennung zwischen Steuerung und E/A-Modulen mit diskreten Ein-/Ausgängen (parallel-E/A) ist möglich. Nachteil: Nach Abschalten der Netzspannung am Netzeingang des Leistungsteils ist keine E/A-Kommunikation zwischen Steuerung und SPS/Roboter mehr möglich. 3. Steuerungslogik und E/A-Modul werden durch gemeinsames exter nes 24V-Netzteil versorgt. Einsatz: Vorzugsweise an vernetzten Anlagen. Vorteil: E/A-Kommunikation zwischen Steuerung und SPS/Robo ter, Programmierung, Diagnose oder Visualisierung auch nach Abschalten der Netzspannung am Netzeingang des Leistungsteils noch möglich. Nachteil: Keine Potentialtrennung zwischen Steuerung und E/A-Modulen möglich. 4. Steuerungslogik und E/A-Modul werden durch getrennte externe 24V-Netzteile versorgt. Einsatz: An vernetzten Anlagen. Vorteil: E/A-Kommunikation zwischen Steuerung und SPS/Robo ter, Programmierung, Diagnose oder Visualisierung auch nach Abschalten der Netzspannung am Netzeingang des Leistungsteils noch möglich. Potentialtrennung zwischen Steuerung und E/A-Modulen mit diskreten Ein-/Ausgängen (parallel-E/A) ist möglich. Nachteil: 2 externe Netzteile erforderlich. " Stellen Sie sicher, dass bei jeder verwendeten Anschlussvariante immer die einwandfreie Funktion des Stoppkreises (siehe folgende Abbildung) gewährleistet ist! Bei gefährlichen Zuständen an der Schweißanlage oder beim ge wollten Ausschalten der Schweißsteuerung muss eine externe Überwachungs-Einrichtung den potentialfreien Kontakt öffnen. Die Steuerung meldet bei offenem Stoppkreis: ”Stoppkreis of fen/24V fehlt”. Die Meldung ist selbstquittierend, d.h. sie verschwindet beim Schließen des Stoppkreises automatisch. " Stellen Sie sicher, dass nur solche externe Versorgungsquellen verwendet werden, die nach der Niederspannungs-Richtlinie (2006/95/EG) als ”sicher getrennt” spezifiziert sind! 1070080028 / 06 | PSI 6xxx Bosch Rexroth AG 137/402 Montage zu Variante 1: zu Variante 2: Steuerung Steuerung X4 2 zum E/A-Modul (siehe Seite 134) 3 *) 4 24VDC interne Spannu ngs erzeu gung 2 8 interne Logik 0V 7 0V 10 interne Logik 11 0V zu Variante 3: 1 2 zum E/A-Modul (siehe Seite 134) *) 4 0V 12 externes Netzteil 24VDC 0V 8 externes Netzteil 10 11 2 zum E/A-Modul (siehe Seite 134) 3 *) 4 24VDC 7 9 interne Logik 0V 1 interne Auswertung des Stopp kreises 5 6 24VDC 11 X4 3 0V 24VDC Steuerung X4 interne Spannu ngs erzeu gung 10 zu Variante 4: Steuerung 24VDC 8 9 24VDC 12 interne Auswertung des Stopp kreises 5 6 9 24VDC *) 4 interne Spannu ngs erzeu gung 7 zum E/A-Modul (siehe Seite 134) 3 24VDC 5 6 0V 1 interne Auswertung des Stopp kreises interne Spannu ngs erzeu gung 5 6 0V 7 0V 8 externes Netzteil 9 24VDC interne Logik 12 0V 10 24VDC 11 0V 12 externes Netzteil *) Stoppkreis: potentialfreier Kontakt Belastung: 24VDC, max. 3A Abb.69: Verdrahtungsbeispiele zur 24V-Spannungsverteilung 24VDC DEUTSCH 1 interne Auswertung des Stopp kreises X4 138/402 Bosch Rexroth AG PSI 6xxx | 1070080028 / 06 Montage 7.2.9 Externer Lüfter (X4, Ausgang) Anschluss: an X4; STKK, Raster 3,5 mm, 14polig, max. 1,5 mm2 . Gegenstecker ist im Lieferumfang enthalten. max. 10 m bei 0,75 mm2 max. 75 m bei 1,5 mm2 ungeschirmt, VDE 0281, 0812 (z.B.: Ölflex) Lüfter EIN: größer/gleich 55 Grad Celsius Lüfter AUS: kleiner/gleich 50 Grad Celsius (bezogen auf die Kühlkörpertemperatur) Leitungslänge Leitungstyp: Schaltschwellen: DEUTSCH Zum Anschluss externer 24 VDC-Lüfter. X4 +24 VDC 13 0V 14 Lüftermodul 1 PE 2 zur PE-Schiene Abb.70: Anschluss eines externen Lüftermoduls +24 VDC 0V 1070080028 / 06 | PSI 6xxx Bosch Rexroth AG 139/402 Montage Versorgung externer Geräte (X5, Ausgang) Anschluss: an X5; STKK, Raster 3,5 mm, 2 bzw.6polig, max. 1,5 mm2. Gegenstecker sind im Lieferumfang enthalten. abhängig von der Beschaltung an X4. Siehe nachfolgende Beschreibung. ungeschirmt, VDE 0281, 0812 (z.B.: Ölflex) Leitungslänge: Leitungstyp: Zur 24 VDC-Versorgung externer Geräte. Steuerung X4 10 24VDC 11 0V int. Logik max. 0,5 A Einspeisung zur Versorgung von - interner Steuerungslogik und - X5 X5 externer Verbraucher 1 24VDC 2 0V Abb.71: Versorgung ext. Verbraucher Die maximale Strombelastung/Leitungslänge an X5 ist von der verwendeten Spannungsquelle und der Gesamt-Leitungslänge zwi schen Quelle und externem Verbraucher abhängig. Die max. Strombelastung an X5 darf jedoch 0,5 A nicht überschreiten. " Stellen Sie sicher, dass spezifizierte Grenzwerte für Strombelastung (Quelle, Verbindungen) und Leitungslängen nicht überschritten werden! Welche Spannungsquelle X5 versorgt, legen Sie durch die Be schaltung von X4 fest. Hier kann sowohl die geräteinterne Spannungserzeugung (siehe Seite 133), als auch ein externes Netzteil verwendet werden. Dazu müssen an X4 nur einige Brücken gesetzt/entfernt werden. Nähere Informationen über die Verschaltung von X4 finden Sie in Kap. 7.2.8 ab Seite 135. DEUTSCH 7.2.10 140/402 Bosch Rexroth AG PSI 6xxx | 1070080028 / 06 Montage 7.2.11 Analoge Ausgabe der Elektrodenkraft (X2, Ausgang) Ob die Funktion bei Ihrem Gerät zur Verfügung steht, entnehmen Sie bitte der typspezifischen Anleitung. Anschluss: Leitungslänge: DEUTSCH Leitungstyp: an X2; STKK, Raster 3,5 mm, 5polig, max. 1,5 mm2. Gegenstecker ist im Lieferumfang enthalten. max. 50 m bei 0,5 mm2 max. 100 m bei 0,75 mm2 geschirmt (z.B.: NFL 13, Metrofunk; LiYCY) An X2 Pin 1 steht ein analoges Ausgangssignal zur Verfügung, das sich zur Ansteuerung einer krafterzeugenden Komponente verwenden lässt. Der Typ des Ausgangssignals ist alternativ programmierbar (BOSThemenbereich ”Programmierung”, Reiter ”Allgemein”, Parameter ”Betriebsart Druck-Ausgang”) als • Spannungssignal (0 bis +10V; max. 20mA), • Stromsignal 0 bis 20 mA oder • Stromsignal 4 bis 20 mA ( an max. 500 Ohm). Wie die Stellgröße in eine Elektrodenkraft umgesetzt wird, ist von der verwendeten Aktorik abhängig. Zur Anpassung ist die Funktion „Kraft-Skalierung“ bzw. Parameter ”Umrechnungs-Faktor” (Kennliniensteigung) und ”Nullpunktver schiebung” (Y-Kennlinienverschiebung) verfügbar. Das Ausgangssignal an X2 wird normalerweise sofort nach der An wahl eines Schweißprogrammes und nicht erst mit dessen Start ausgegeben! Abweichungen hiervon entnehmen Sie bitte der typspezifischen Anleitung. Steuerung X2 Druckansteuerung 1 GND 2 zur krafterzeugenden Aktorik 3 4 Schirm 5 D Abb.72: Analoge Ausgabe der Kraftstellgröße 1070080028 / 06 | PSI 6xxx Bosch Rexroth AG 141/402 Montage 7.2.12 Rückmeldung Elektrodenkraft Ob und in welcher Weise die Funktion bei Ihrem Gerät zur Verfü gung steht, entnehmen Sie bitte der typspezifischen Anleitung. Leitungslänge: Leitungstyp: an X2; STKK, Raster 3,5 mm, 5polig, an X9; STKK, Raster 3,5 mm, 6polig, jeweils max. 1,5 mm2. Gegenstecker sind im Lieferumfang enthalten. max. 50 m bei 0,5 mm2 max. 100 m bei 0,75 mm2 geschirmt (z.B.: NFL 13, Metrofunk; LiYCY) Ob und welche Sensorik zur Rückmeldung von der Zange eingesetzt werden, ist von der jeweiligen Applikation abhängig. Hierzu sind folgende Fälle denkbar: • Keine Rückmeldung • Rückmeldung an SPS oder Roboter • Rückmeldung an Schweißsteuerung Keine Rückmeldung " Stellen Sie bei Anlagen ohne Rückmeldesignal sicher, dass das Schweißgut vor dem Einsetzen der Stromzeit optimal zusammenge presst ist! Dazu müssen ausreichend große Vorhaltezeiten programmiert sein. Zu kleine Vorhaltezeiten führen zu starken Schweißspritzern! Elektroden- und Werkstückschäden können die Folge sein. " Stellen Sie durch geeignete Parametrierung oder Beschaltung si cher, dass die Steuerung bei Anlagen ohne Rückmeldesignal nicht vergebens auf eine Rückmeldung aus dem Prozess wartet. Es sind z.B. Steuerungstypen verfügbar, die erst dann in die Strom zeit eintreten, wenn aus dem Prozess der ordnungsgemäße Zu stand der Zange signalisiert wird. Siehe Abschnitt „Rückmeldung an die Schweißsteuerung“ auf Seite 142. Rückmeldung an SPS oder Roboter " Wenn die Rückmeldung per SPS oder Roboter ausgewertet wird, darf die SPS bzw. der Roboter das Schweißprogramm erst dann starten, wenn der ordnungsgemäße Zustand der Zange sicherge stellt ist. Ist das gewährleistet, kann man in allen Schweißprogrammen immer die kleinstmögliche VHZ programmieren. " Stellen Sie durch geeignete Parametrierung oder Beschaltung si cher, dass die Steuerung bei solchen Applikationsvarianten nicht vergebens auf eine Rückmeldung aus dem Prozess wartet. Es sind z.B. Steuerungstypen verfügbar, die erst dann in die Strom zeit eintreten, wenn aus dem Prozess der ordnungsgemäße >Zu stand der Zange signalisiert wird. Siehe Abschnitt „Rückmeldung an die Schweißsteuerung“ auf Seite 142. DEUTSCH Anschluss: 142/402 Bosch Rexroth AG PSI 6xxx | 1070080028 / 06 Montage Rückmeldung an Schweißsteuerung Um der Steuerung eine geschlossene Zange bzw. das Erreichen der Soll-Kraft zu signalisieren, existieren verschiedene typspezifische Vari anten. Die gewünschte Variante lässt sich in der Regel per Parameter ”Be triebsmode” im BOS-Fenster ”Programmierung / Elektrode” auswäh len. Die Existenz des Parameter „Betriebsmode“ ist ebenfalls typspezi fisch. Steuerung X2 DEUTSCH 1 GND für Klemme 1 und 3 2 analoger Druckeingang (0...10V) 3 digitaler Druckeingang (+24VDC) 4 Schirm 5 D X9 1 2 3 analoger Krafteingang (1 V = 1 kN) 4 GND 5 Schirm 6 D Abb.73: Mögliche Rückmeldeeingänge für Druck/Kraft Welche Eingänge bei Ihrem Gerät zur Verfügung stehen und wie die SST auf diese Signale reagiert, entnehmen Sie bitte der typspezi fischen Anleitung. 1070080028 / 06 | PSI 6xxx Bosch Rexroth AG 143/402 Montage Sekundärstrom-Messeingang (X3) Anschluss: an X3; STKK, Raster 3,5 mm, 8polig, max. 1,5 mm2. Gegenstecker ist im Lieferumfang enthalten. Leitungslänge: max. 100 m (bei empfohlenem Leitungstyp) Leitungstyp: geschirmt, Aderquerschnitt min. 0,75 mm2, (z.B.: 2 x 2 x 0,75 mm2 LiYCY, Best.-Nr.: 1070 913 494) Zum Anschluss eines - im Sekundärkreis installierten - Stromsensors. PSI-Geräte besitzen zusätzlich einen integrierten Stromsensor für den Primärkreis des Schweißtransformators. Dadurch haben Sie die Möglichkeit, zwischen Sekundär- und Primärmessung zu wählen (BOS-Themenbereich ”Programmierung”, Reiter ”Allgemein”, Pa rameter ”Strommessung”). Bei Stromzeiten > 1 s oder zur temporären Überbrückung bei einem Ausfall des Sensors im Sekundärkreis muss auf Primärmessung umgeschaltet werden. In den Steuerungen ist eine Konstantstrom-Regelung (KSR) integriert. Hierbei regelt die Steuerung den Stromfluss im Sekundärkreis so, dass der programmierte Sollstrom tatsächlich erreicht wird. Auf diese Weise ist es möglich, prozess- und handlingsbedingte Schwankungen des Sekundärkreiswiderstandes zu kompensieren. Voraussetzung für die Regelung ist ein Sensor, der den Stromfluss im Primär- oder Sekundärkreis des Schweißtransformators an die Steue rung meldet. Alle PSI-Geräte sind für den Einsatz der UI-Regelung vorbereitet. Zur Nutzung dieser Funktionalität wird ein Stromsensor ebenfalls benötigt. X3 Toroid-Eingang Toroid-Eingang Schirm 1 2 3 4 D 5 Schirmanschluss an X3 Klemme 3 ! Sekundärkreis Abb.74: Anschluss eines sekundärseitigen KSR-Sensors Zur automatischen Überprüfung des Messkreises steht die Funktion ”Messkreistest” zur Verfügung. Um einen ordnungsgemäßen Betrieb des Sensors zu gewährleisten, müssen folgende Vorgaben beachtet werden: " Bauen Sie den Sensor so ein, dass er vor Beschädigung durch das Werkstück sowie vor Schweißspritzern geschützt ist. DEUTSCH 7.2.13 144/402 Bosch Rexroth AG PSI 6xxx | 1070080028 / 06 Montage Wählen Sie nur Montageorte mit größtmöglichem Abstand zu Stromschienen oder Hochstromkabeln. Das reduziert den stö renden Einfluss von Fremdfeldern. Beachten Sie hierbei die oben angegebenen Kabel-Spezifikationen. " Verwenden Sie zur Befestigung des Stromsensors keinesfalls magnetisierbare Metallteile, sondern vorzugsweise Kupfer oder Messing. " Stellen Sie sicher, dass der stromführende Leiter möglichst zentrisch und geradlinig durch den Sensor geführt wird. Die im Sen sor induzierte Spannung (und damit die Messgröße) hat ihr Maxi mum, wenn der Leiter senkrecht zur aufgespannten Sensorebene verläuft. " Falls der Sensor an beweglichen Einrichtungen eingesetzt wird (z.B. Robotern), sind bestimmte Leitungsstrecken starker mechanischer Beanspruchung ausgesetzt (z.B. Schleppkette). Verwenden Sie deshalb in solchen Fällen geeignete Leitungen und legen Sie die Konstruktion der Verbindungsleitungen so aus, dass im Fehlerfall ein schneller und problemloser Austausch möglich ist! " Schließen Sie den Leitungsschirm nur steuerungsseitig an! " Sorgen Sie dafür, dass der komplette Regelkreis der Steuerung zur Vermeidung von Messfehlern in regelmäßigen Abständen neu abgeglichen wird (Strom-Skalierung). Dazu ist ein externes Refe renz-Schweißstrommessgerät erforderlich. DEUTSCH " 1070080028 / 06 | PSI 6xxx Bosch Rexroth AG 145/402 Montage Überwachung Transformator-Temperatur (X3) Ob die Funktion bei Ihrem Gerät zur Verfügung steht, entnehmen Sie bitte der typspezifischen Anleitung. Anschluss: Leitungslänge: Leitungstyp: an X3; STKK, Raster 3,5 mm, 8polig, max. 1,5 mm2. Gegenstecker ist im Lieferumfang enthalten. max. 100 m (bei empfohlenem Leitungstyp) geschirmt, Aderquerschnitt min. 0,75 mm2, (z.B.: 2 x 2 x 0,75 mm2 LiYCY, Best.-Nr.: 1070 913 494) Zum Schutz des angeschlossenen Schweißtransformators stellt die Steuerung einen Eingang zur Temperaturüberwachung zur Verfü gung. Über einen potentialfreien Kontakt, der bei zu hoher Temperatur öffnen muss, wird die Temperaturüberschreitung an die Steuerung gemeldet. Die Steuerung arbeitet bei Übertemperatur (Meldung: TransformatorTemperatur zu hoch) einen laufenden Schweißprozess noch ab, un terbricht aber bei Nahtbetrieb sofort. Ein erneuter Start ist nur dann möglich, wenn die Transformatortempe ratur wieder unter die kritische Grenze sinkt. Die Adern für Transformator-Temperatur und KSR-Sensor dürfen sich in einer gemeinsamen Verbindungsleitung befinden. Wir bieten hierfür passende Leitungen mit 4 Adern an. X3 Schirm Trafo-Temperatur 3 Trafo-Temperatur 5 Schweißtransformator D 4 Temperaturkontakt Schirmanschluss nur an X3 Klemme 3 ! Abb.75: Anschluss zur Überwachung der Schweißtrafo-Temperatur Natürlich sind auch Applikationen möglich, bei denen die Schweiß transformator-Temperatur nicht durch die Steuerung, sondern per SPS überwacht wird. " Stellen Sie in diesen Fällen sicher, dass die SPS beim Überschreiten des erlaubten Temperaturbereiches weitere Schweißabläufe sperrt! Falls die Steuerung trotz existierender Überwachungsfunktion die Schweißtransformator-Temperatur nicht überwachen soll, ist folgende Verdrahtung erforderlich: X3 Trafo-Temperatur 4 Trafo-Temperatur 5 Brücke Abb.76: Keine Überwachung der Trafo-Temperatur durch die Steuerung DEUTSCH 7.2.14 146/402 Bosch Rexroth AG PSI 6xxx | 1070080028 / 06 Montage 7.2.15 Sekundärspannungs-Messeingang Die Funktion zur Sekundärspannungsmessung ist nur bei aktivierter Option ”UI-Regelung” verfügbar! Zur UI-Regelung/-Überwachung existiert die ausführliche Doku mentation Best.-Nr. 1070087069. In Verbindung mit PSI 6x00.xxx DEUTSCH Anschluss: Leitungslänge: Leitungstyp: an X8A der Baugruppe PSQ 6000 XQR (siehe Seite 87); STKK, Raster 3,5 mm, 4polig, max. 1,5 mm2. Gegenstecker ist im Lieferumfang enthalten. max. 100 m (bei empfohlenem Leitungstyp) geschirmt, Aderquerschnitt min. 0,75 mm2, (z.B.: 2 x 2 x 0,75 mm2 LiYCY, Best.-Nr.: 1070 913 494) X8A Spannungs-Eingang Schirm Spannungs-Eingang Schirm 1 2 3 4 D Schirmanschluss an X8A Klemme 4 ! Sekundärkreis Abb.77: Bei PSI 6x00.xxx: Anschluss zur Sekundärspannungsmessung In Verbindung mit PSI 6xCx.xxx Anschluss: Leitungslänge: Leitungstyp: an X3; STKK, Raster 3,5 mm, 8polig, max. 1,5 mm2. Gegenstecker ist im Lieferumfang enthalten. max. 100 m (bei empfohlenem Leitungstyp) geschirmt, Aderquerschnitt min. 0,75 mm2, (z.B.: 2 x 2 x 0,75 mm2 LiYCY, Best.-Nr.: 1070 913 494) X3 Spannungs-Eingang Spannungs-Eingang Schirm 6 7 8 D Schirmanschluss an X3 Klemme 8 ! Sekundärkreis Abb.78: Bei PSI 6xCx.xx: Anschluss zur Sekundärspannungsmessung 1070080028 / 06 | PSI 6xxx Bosch Rexroth AG 147/402 Montage Hauptschalter-Auslösung (X8) Anschluss: Leitungslänge: Leitungstyp: an X8; STKK, Raster 3,5 mm, 3polig, max. 1,5 mm2. Gegenstecker ist im Lieferumfang enthalten. max. 10 m bei 0,75 mm2 max. 75 m bei 1,5 mm2 ungeschirmt, VDE 0281, 0812 (z.B.: Ölflex) Wenn bei der Überprüfung der internen Zwischenkreis-Kondensatoren ein defekter Kondensator erkannt wird, spricht die Hauptschalter-Aus lösung an (Vorgabe EN 62135): • Die Steuerung meldet „Hauptschalter ausgelöst“ und • schaltet an X8 (Umschalter; potentialfrei) die Klemmen 2 und 3 kurz. Sofern Hauptschalter mit geeigneter Funktionalität eingesetzt werden, führt das bei passender Verdrahtung von X8 (Öffner/Schließer) zum automatischen Auslösen des Hauptschalters und damit zur Ab schaltung der Leistungsversorgung. X8 Belastung: 24 VDC, max. 6 A 42 VAC, max. 1 A 1 2 3 SST Einrichtung zum Auslösen des Hauptschalters Kein Fehlerzustand: Klemmen 1 und 2 kurzgeschlossen Steuerung erkennt Fehlerzustand: Klemmen 2 und 3 kurzgeschlossen Abb.79: Anschlussklemmen zur Hauptschalter-Auslösung DEUTSCH 7.2.16 148/402 Bosch Rexroth AG PSI 6xxx | 1070080028 / 06 Montage 7.3 Wasserversorgung anschließen DEUTSCH Der Anschluss einer Wasserversorgung ist nur bei wassergekühlten Produkten erforderlich. " Beachten Sie die Vorgaben zur Kühlung in Kapitel 3.2 ab Seite 28. " Stellen Sie sicher, dass geforderte Bedingungen zur Kühlung einge halten werden. Sie finden diese Angaben in Kap. 15 ab Seite 181. " Verwenden Sie DIN-Gewinde, um den benötigten Kraftschluss zu erreichen. " Beim Anschluss der Schlauchtülle an den Kühlkörper mit Gabel schlüssel (SW 17) gegenhalten. Die mechanische Ausführung des Kühlwasseranschlusses ist bei allen PSI-Typen mit Wasserkühlung gleich. Unterschiedlich sind ggf. nur die Anschlusspositionen. Sie finden die Positionen im Kap. 7.1.1 ab Seite 110. PSI 6xxx extern Kühlkörper Schlauchtülle Überwurfmutter M16x1,5 Intern an PE-An schluss gekoppelt Dichtungsring Nippel mit Standardinnenkegel nach DIN EN 560; Außengewinde M16 x 1,5; Durchgangsbohrung ∅9+0,5 Gegenstück: Schlauchtülle mit Überwurfmutter M16x1.5 nach DIN EN 560 Mat.: CuZn39Pb3 oder Parker Teil: B-Nr.: 35C82-10-6BK Abb.80: Beispiel: Kühlwasseranschluss 1070080028 / 06 | PSI 6xxx Bosch Rexroth AG 149/402 Inbetriebnahme 8 Inbetriebnahme WARNUNG Gefährliche elektrische Spannung Herz-Rhythmusstörung, Verbrennung, Schock möglich! " Stellen Sie sicher, dass Unbefugte nicht am/im Schaltschrank hantieren. Voraussetzung zur Inbetriebnahme ist die ordnungsgemäße In stallation und Funktion • der kompletten Mechanik der Schweißeinrichtung • aller Not-Aus-Einrichtungen • des elektrischen Anschlusses inkl. aller benötigten Sensoren • der Druckluftversorgung und Kühleinrichtungen. " Stellen Sie sicher, dass die genannten Voraussetzungen zur Inbe triebnahme gegeben sind. Einschalten des Mittelfrequenz-Umrichters 1. Aktivieren Sie die Druckluftversorgung und die Kühleinrichtungen, sofern dies manuell erforderlich sein sollte. 2. Sofern die 24 V-Versorgung der Steuerungslogik (Einspeisung an X4) extern erzeugt wird, schalten Sie die 24 V-Versorgung ein. Sofern die 24 V-Versorgung der Steuerungslogik (Einspeisung an X4) intern durch das integrierte Leistungsteil erzeugt wird, schalten Sie die Netzversorgung des Umrichters ein. Informationen zum Anschluss von externer oder interner Logikver sorgung finden Sie in Kap. 7.2.5 Seite 132. Bei PSI 6x00: Die LED LOGIK an der Frontseite der Steuerung muss nach dem Hochlauf der SST grün leuchten. Bei PSI 6xCx: Die Anzeige am Diagnosemodul sollte nach dem Hochlauf der SST „RUN“ oder mindestens eine Ziffernfolge anzei gen. DEUTSCH Im Verlauf der Inbetriebnahme sind Mittelfrequenz-Umrichter und weitere spannungsführende Anlagenteile bei geöffnetem Schalt schrank zugänglich! Das reduziert die Personen-/Anlagensi cherheit! 150/402 Bosch Rexroth AG PSI 6xxx | 1070080028 / 06 Inbetriebnahme PSI 6x00 PSI 6xC0 LED LOGIK LED ZWISCHENKREIS SPANNUNG Diagnosemodul DEUTSCH Abb.81: Anzeigen am Steuerungsteil 3. Schließen Sie ein Programmiergerät mit installierter BOS an (An 4. 5. 6. 7. 8. 9. schluss Programmiergerät: siehe Kap. 7.2.4 ab Seite 130). In der SST-Zuordnung der BOS müssen zum erfolgreichen Ver bindungsaufbau die passenden Daten konfiguriert sein. Ausführli che Informationen hierzu finden Sie in der Online-Hilfe der BOS 6000 (Stichwort „Steuerungen an der BOS 6000 anmelden“). Konfigurieren Sie - sofern erforderlich - den eingesetzten Bus master, so dass die SST korrekt als Client erkannt und ihr E/A-Feld beim zyklischen Datenaustausch berücksichtigt wird. Prüfen Sie, ob die E/A-Signale zur Kommunikation mit Roboter, SPS oder Bedienfeld ordnungsgemäß ausgegeben/eingelesen werden. Überprüfen Sie die ordnungsgemäße Programmierung der verwendeten Schweißprogramme (z.B. Stromzeiten, Leistungen usw.). Schalten Sie - sofern noch nicht geschehen - die Netzversorgung des Umrichters ein. Der Umrichter läuft an. Nach ca. 10 Sekunden ist der Zwischenkreis auf volle Spannung geladen. Die LED ZWISCHENKREISSPANNUNG an der Frontseite der Steuerung muss jetzt rot leuchten. Prüfen Sie alle Not-Aus-Einrichtungen auf korrekte Funktion. Testen Sie die realisierte Anlagenfunktionalität auf Fehler. Wir haften nicht für Folgeschäden, die aus der Abarbeitung eines Programmes, eines einzelnen Programmsatzes oder durch manu elles Verfahren der Handlingseinheiten resultieren. Wir haften ebenfalls nicht für Folgeschäden, die durch entspre chende SPS-Programmierung hätten vermieden werden können. 1070080028 / 06 | PSI 6xxx Bosch Rexroth AG 151/402 Inbetriebnahme Abschalten des Mittelfrequenz-Umrichters " Schalten Sie die Leistungsversorgung (Netz) aus. Die rote LED ZWISCHENKREISSPANNUNG an der Frontblende der Steuerung erlischt. Die Brückengleichrichter werden gesperrt und die Zwischenkreis spannung entlädt sich langsam. Bei externer 24 V-Versorgung der Steuerungslogik (an X4) leuchtet die grüne LED LOGIK weiter. WARNUNG Gefährliche elektrische Spannung " Interpretieren Sie nie das Verlöschen aller LEDs am Produkt als Spannungsfreiheit. " Berücksichtigen Sie, dass geräteinterne Spannungen direkt nach dem Abschalten der Netzversorgung noch nicht auf ein ungefähr liches Maß abgebaut sind. " Berühren Sie nach dem Abschalten der Netzversorgung für mindestens 5 Minuten weder Netz- noch Trafoanschlüsse. " Stellen Sie mit geeignetem Messgerät und mit geeigneter Mess methode stets sicher, dass der betreffende Anlagenteil und das betreffende Gerät spannungsfrei ist, bevor daran hantiert wird. DEUTSCH Herz-Rhythmusstörung, Verbrennung, Schock möglich! 152/402 Bosch Rexroth AG Inbetriebnahme DEUTSCH Notizen | Notes: PSI 6xxx | 1070080028 / 06 1070080028 / 06 | PSI 6xxx Bosch Rexroth AG 153/402 Betrieb Betrieb " Beachten Sie die Hinweise zum Betrieb des Produktes ab Seite 20 und ab Seite 32. PSI 6x00 PSI 6xC0 LED BEREIT LED STROMZEIT Diagnosemodul Abb.82: Anzeigen bei Normalbetrieb ohne anstehende Fehler • LED STROMZEIT; gelb. Leuchtet, wenn das Leistungsteil angesteuert wird (= Stromzeit läuft ab). Bei PSI 6x00: • LED BEREIT. Leuchtet grün, wenn in der Steuerung kein Fehler ansteht. Das Ge rät ist schweißbereit. Bei PSI 6xCx: • Das Diagnosemodul zeigt ”RUN”, wenn in der Steuerung kein Fehler ansteht. Das Gerät ist schweißbereit. Informationen zur Programmierung und zum Handling finden Sie in der Online-Hilfe der BOS 6000. Welche Bedienvorgänge möglich sind und wie sie ausgelöst werden, ist von der jeweiligen Applikation abhängig. DEUTSCH 9 154/402 Bosch Rexroth AG Betrieb DEUTSCH Notizen | Notes: PSI 6xxx | 1070080028 / 06 1070080028 / 06 | PSI 6xxx Bosch Rexroth AG 155/402 Instandhaltung und Instandsetzung 10.1 Instandhaltung und Instandsetzung " Beachten Sie die Hinweise zu Wartung und Reparatur ab Seite 22 und ab Seite 33. " Nehmen Sie folgende Tätigkeiten in den Wartungsplan mit auf: Wartungsplan • Mindestens halbjährlich die Funktionstüchtigkeit aller verwende ten Schutzeinrichtungen prüfen. Das betrifft besonders die Funktionstüchtigkeit von Schutzleiter verdrahtung und (sofern eingesetzt) Fehlerstrom-Schutzeinrich tung und Fehlerstrom-Schutzwiderstand. Fehlerzustände müssen zum schnellen Auslösen des Anlagen hauptschalters führen. • Bei wassergekühlten Geräten: Kühlwasserkreislauf auf Dichtheit und auf korrekte Funktion prüfen. Es darf keine Korrosion oder Betauung auftreten. Verwenden Sie geeignete Kühlwasserzusätze, um z.B. Algenbil dung zu verhindern. • Bei luftgekühlten Geräten: reinigen Sie den Luftkühler von Staub und anderen Verschmutzungen. • Verbindungen und Klemmstellen aller Anschlußkabel auf Beschädigungen und auf festen Sitz prüfen. Tauschen Sie defekte Teile umgehend aus. • Spätestens alle 2 Jahre Pufferbatterie tauschen. Bestellnummer siehe Kap. ”Erweiterung und Umbau”, Seite 173. Vorgehensweise siehe Kap. 10.2.1. DEUTSCH 10 156/402 Bosch Rexroth AG PSI 6xxx | 1070080028 / 06 Instandhaltung und Instandsetzung 10.2 Wartung Vorliegendes Kapitel informiert, wie eine bestimmte Wartungsarbeit durchzuführen ist. Zur kompletten Liste mit erforderlichen Tätigkeiten siehe Kap. 10.1 „Wartungsplan“. 10.2.1 Batteriewechsel DEUTSCH Zur Pufferung des Arbeitsspeichers (enthält die komplette Parametrie rung mit allen Schweißprogrammen) und der internen Uhr ist eine Bat terie integriert. Wenn die verbleibende Batteriekapazität kritisch wird, generiert die Steuerung eine Fehler- bzw. Warnmeldung (parametrierbar), die in der BOS-Fehlertabelle erscheint. Bei PSI 6x00: • Die LED BATTERIEFEHLER an der Frontseite leuchtet. Bei PSI 6xCx: • Das Diagnosemodul zeigt den Fehlercode 84. PSI 6x00 PSI 6xC0 LED BATTERIEFEHLER Diagnosemodul Abb.83: Anzeige Batteriefehler Falls das Ereignis als Fehlermeldung definiert wurde, ist in diesem Zu stand kein Schweißablauf mehr möglich. HINWEIS Batteriewechsel bei ausgeschalteter Logikversorgung Datenverlust möglich. " Halten Sie eine neue Batterie bereit und setzen Sie die neue Bat terie direkt nach Entnahme der verbrauchten Batterie ein. Ohne anstehende 24VDC-Versorgungsspannung und nach Ent nahme der Batterie ist die Pufferung des SST-Arbeitsspeichers nur noch max. 24 Stunden gewährleistet. 1070080028 / 06 | PSI 6xxx Bosch Rexroth AG 157/402 Instandhaltung und Instandsetzung Vorgehensweise Vorzugsweise sollte die Batterie bei eingeschalteter Steuerung ge wechselt werden. PSI 6x00 PSI 6xC0 DEUTSCH Batteriefach Abb.84: Batteriefach 1. Drehen Sie den Batteriedeckel an der Frontseite der Steuerung nach links und entnehmen Sie die verbrauchte Batterie. Beachten Sie die Angaben zur Entsorgung von Batterien auf Seite171. 2. Schlagen Sie die neue Pufferbatterie (gleichen Typs!) auf fester Un terlage leicht auf, damit die innere Oxydschicht zerstört wird. 3. Setzen Sie die neue Batterie korrekt ein. Zur Polarität beachten Sie die Zeichnung an der Frontseite der Steuerung. 4. Verschließen Sie den Batterieschacht wieder mit dem Batterie deckel. Der Batterietausch ist vollzogen. 158/402 Bosch Rexroth AG PSI 6xxx | 1070080028 / 06 Instandhaltung und Instandsetzung 10.3 Firmware-Update Bei Auslieferung ist die Steuerung bereits mit der aktuellen Firmware ausgerüstet. Per Programmiergerät (BOS) können Sie sich die Firm ware-Version anzeigen lassen. In seltenen Fällen kann einmal ein Update der Firmware erforderlich sein. HINWEIS Willkürlicher und unsachgemäßer Wechsel der Firmware Schäden durch unsachgemäßen Umgang möglich! DEUTSCH " Softwaretools Firmware-Updates dürfen deshalb nur auf unsere Anweisung und nur durch autorisiertes Fachpersonal durchgeführt werden! Zum Firmware-Update stehen folgende Softwaretools zur Verfügung: • WinBlow (siehe Kap. 10.3.1 ab Seite 159): Zum Firmware-Update von Steuerungen des Typs PSI 6x00.xxx per Schnittstelle X1. Ein Firmware-Update der optionalen Baugruppe PSQ 6000 XQR ist mit dem Tool „Winblow“ nicht möglich. Verwenden Sie hierfür das Tool „FWUpdate“. • MemTool (siehe Kap. 10.3.2 ab Seite 160): Zum Firmware-Update von Steuerungen des Typs PSI 6xCx.xxx per Schnittstelle X3C oder X3U. • FWUpdate (siehe Kap. 10.3.3 ab Seite 161): Zum Firmware-Update aller Steuerungen per Feldbusschnittstelle Ethernet. 1070080028 / 06 | PSI 6xxx Bosch Rexroth AG 159/402 Instandhaltung und Instandsetzung Firmware-Update per ”WinBlow” Zum Firmware-Update von Steuerungen des Typs PSI 6x00.xxx per Schnittstelle X1. Sie benötigen zum Firmware-Update • einen spitzen Gegenstand zum Betätigen des ”Boot”-Tasters (nur in Verbindung mit PSI 6x00.xxx; Position siehe Seite 48), • einen PC mit installierter Software ”WinBlow”, • eine passende Verbindung zwischen Steuerung und PC (siehe ab Seite 130) und • die Firmware als *.hex-Datei. " Gehen Sie wie folgt vor: 1. Verbinden Sie eine V24-Schnittstelle des PC (COM1 oder COM2) mit X1 an der Steuerung. 2. Starten Sie die Software ”WinBlow”. Wählen Sie die gewünschte Sprache und die verwendete V24-Schnittstelle aus. 3. Wählen Sie Pfad und Dateinamen der Firmware aus. Firmware-Dateien besitzen die Dateinamenserweiterung ”.hex”. 4. Klicken Sie auf Schaltfläche ”Backup - Firmware laden - Restore”. Sie erhalten die Aufforderung, den Bootstrap-Modus am Gerät einzustellen. Im weiteren Verlauf ist kein Schweißablauf mehr möglich! 5. Aktivieren Sie den Boot-Modus der SST. Betätigen Sie den versenkten Boot-Taster an der Frontseite der Steuerung (siehe Seite 48). Sie schalten dadurch das Gerät vom Be triebs- in den Bootstrap-Modus. Dieser Zustand wird durch die BootLED oberhalb des Tasters angezeigt. Falls Sie an dieser Stelle den Bootstrap-Modus verlassen möchten, müssen Sie die 24 VDC-Versorgungsspannung der Steuerung (siehe Seite 132) unterbrechen. HINWEIS Unterbrechung der Versorgungsspannung Geräteschaden möglich! " Nach dem Einleiten des nächsten Schrittes darf die Versorgungs spannung solange nicht mehr unterbrochen werden, bis die Firm ware komplett geladen wurde! 6. Bestätigen Sie am PC ggf., dass der Bootstrap-Modus aktiviert wurde. Die Firmware wird jetzt geladen. Ein Balken zeigt den aktu ellen Verlaufsstatus an. 7. Warten Sie ab, bis das Übertragungsende am PC signalisiert wird. 8. Unterbrechen Sie die 24 VDC-Versorgungsspannung der Steuerung für mindestens 5 Sekunden (X4 ziehen) und stecken Sie dann X4 wieder auf. Die Steuerung läuft jetzt mit der neuen Firmware hoch. 9. Kontrollieren Sie die Firmware-Version per Programmiergerät (BOS). DEUTSCH 10.3.1 160/402 Bosch Rexroth AG PSI 6xxx | 1070080028 / 06 Instandhaltung und Instandsetzung 10.3.2 Firmware-Update per ”MemTool” Zum Firmware-Update von Steuerungen des Typs PSI 6xCx.xxx per Schnittstelle X3C oder X3U. Sie benötigen zum Firmware-Update • einen PC mit installierter Software ”MemTool”, • eine passende Verbindung zwischen Steuerung und PC (siehe ab Seite 130) und • die Firmware als *.hex-Datei. " Gehen Sie wie folgt vor: 1. Verbinden Sie eine V24-Schnittstelle des PC (COM1 oder COM2) DEUTSCH mit X3C der Steuerung oder eine USB-Schnittstelle des PC mit X3U der Steuerung. Für USB muss auf dem PC der notwendige virtuelle Com-PortTreiber installiert sein! 2. Starten Sie die Software ”MemTool”. 3. Wählen Sie das Target-File „PS6000TC(MiniMonitor)“ aus und be stätigen Sie den Dialog mit OK. 4. Wählen Sie den verwendeten COM-Port (per „Target - Setup“). 5. Mit dem Button “Open File” wählen Sie Pfad und Dateinamen der Firmware aus. Firmware-Dateien besitzen die Dateinamenserweite rung ”.hex”. Im weiteren Verlauf ist kein Schweißablauf mehr möglich! 6. Betätigen Sie gleichzeitig die Tasten ”ESC” und ”Enter” am Dia gnosemodul für mindestens 8 Sekunden. Sie schalten dadurch die Schweißsteuerung in den Bootstrap-Modus. Dieser Zustand wird durch die rote ”Status”-LED angezeigt. Das Aktivieren des Boot-Modus lässt sich abbrechen, wenn man die beiden Tasten ”ESC” und ”Enter” am Diagnosemodul vor Ablauf der 8 Sekunden los lässt. 7. Mit dem Button “Connect” bauen Sie die Verbindung zur Schweiß steuerung auf. Nach erfolgreichem Verbindungsaufbau müssen alle Speicherbereiche im linken Fenster mit “Select All“ markiert und mit dem Button “Add.Sel.” ins rechte Fenster transferiert werden. HINWEIS Unterbrechung der Versorgungsspannung Geräteschaden möglich! " Nach dem Einleiten des nächsten Schrittes darf die Versorgungs spannung solange nicht mehr unterbrochen werden, bis die Firm ware komplett geladen wurde! 8. Starten Sie das Programmieren des Flash mit dem Button “Pro gram”. 9. Die Firmware wird geladen. Warten Sie das Übertragungsende ab. 1070080028 / 06 | PSI 6xxx Bosch Rexroth AG 161/402 Instandhaltung und Instandsetzung 10.Nach Übertragungsende trennen Sie die Verbindung mit “Disconnect”. 11.Betätigen Sie gleichzeitig die Tasten ”Down” und ”Enter” am Dia gnosemodul für mindestens 8 Sekunden. Alternativ können Sie auch die Logikspannung der SST aus- und nach ein paar Sekunden wieder einschalten. Die Steuerung läuft jetzt mit der neuen Firmware hoch. 12.Kontrollieren Sie die Firmware-Version per Programmiergerät (BOS). Firmware-Update per ”FWUpdate” Zum Firmware-Update aller Steuerungen per Feldbusschnittstelle Ethernet. Sie benötigen zum Firmware-Update • einen PC mit installierter Software ”FWUpdate”, • eine funktionsfähige Anbindung des PC per Feldbusschnittstelle Ethernet, • eine auf dem PC existierende BOS-Datenbank mit gültiger SST-Zu ordnung (installiertes BOS 6000) und • die Firmware als *.hex-Datei. " Gehen Sie wie folgt vor: 1. Starten Sie die Software ”FWUpdate”. Beim Start sucht die Software nach einer gültigen SST-Zuordnung (wird aus der BOS6000-Datenbank gelesen) und zeigt Ihnen alle entsprechend angekoppelten Steuerungen in Tabellenform an: DEUTSCH 10.3.3 162/402 Bosch Rexroth AG PSI 6xxx | 1070080028 / 06 Instandhaltung und Instandsetzung DEUTSCH 2. Wählen Sie per Schaltfläche ”SST-Firmware” bzw. ”UIR-Firmware” Pfad und Dateinamen der gewünschten Firmware aus. Firmware-Dateien besitzen die Dateinamenserweiterung ”.hex”. Die aktuell gewählte Firmware-Datei wird Ihnen in den korrespon dierenden Eingabefeldern angezeigt. Bei Steuerungen des Typs PSI 6xCx.xxx ist eine separate Auswahl der UIR-Firmware (Schaltfläche „UIR-Firmware“) nicht erforderlich. 3. Selektieren Sie per Checkbox am linken Zeilenrand diejenigen Steuerungen, bei denen das Firmware-Update vollzogen werden soll. Um alle Steuerungen gemeinsam aus-/abzuwählen, verwenden Sie die linke Checkbox in der Kopfzeile der Tabelle. 4. Wählen Sie die gewünschten Optionen für das Firmware-Update per Checkbox aus. Die ausgewählten Optionen gelten für alle selektierten Steuerungen. Zur Verfügung stehen: • ”Change after Load”: Das System löst (nach ggf. aktivierten Backupvorgängen; siehe Optionen ”Save Counter”, ”Backup”, ”UIR Backup”) in der Steue rung die Neuprogrammierung des steuerungsinternen FlashSpeichers aus. Bei diesem Vorgang kopiert die Steuerung den Inhalt eines speziell reservierten und per Schaltfläche ”FW Load” beschriebenen RAM-Bereiches in den Flash-Speicher. Wird ”Change after Load” nicht aktiviert, muss der Kopiervorgang im Zuge des Firmware-Updates manuell per Schaltfläche ”FW Change” gestartet werden. Verwenden Sie ”Change after Load” nur dann, wenn alle beteilig ten Schweißsteuerungen für die Dauer des kompletten Firm ware-Updates an keinem Produktionsprozess aktiv beteiligt sind! • ”Quit after done”: Das Programm beendet sich nach dem Firmware-Update (und einem ggf. aktivierten Restore; siehe Optionen ”Save Counter”, ”Backup”, ”UIR Backup”) aller gewählten Steuerungen automa tisch. • ”Save Counter”: Alle Istzählerstände (Elektroden- und ggf. Fräsmesserver schleiß) werden vor der Programmierung des Flash-Speichers auf dem Programmiergerät gesichert und nach einem SST-Reset in die Steuerung zurück geschrieben. • ”Backup” bzw. ”UIR-Backup”: Alle Schweißparameter bzw. UI-Reglerparameter werden vor der Programmierung des Flash-Speichers auf dem Programmier gerät gesichert und nach einem SST-Reset in die Steuerung zu rück geschrieben. 5. Prüfen Sie, ob eine Kommunikation mit den zum Firmware-Update ausgewählten Steuerungen möglich ist. Klicken Sie dazu auf Schaltfläche ”List”. Die Kommunikation ist in Ordnung, wenn nach einigen Sekunden im neu erscheinenden Fenster ”SW-Version” alle derzeit aktiven Firm ware-Versionen angezeigt werden. Schließen Sie danach das Fenster ”SW Version”. 1070080028 / 06 | PSI 6xxx Bosch Rexroth AG 163/402 Instandhaltung und Instandsetzung Die Kommunikation ist gestört, falls anstelle der Firmware-Version der Text: ”--N/A---” angezeigt wird. Prüfen Sie in diesem Fall, ob die betreffende Steuerung korrekt angeschlossen, eingeschaltet und komplett hoch gelaufen ist. Auch eine auf dem Programmiergerät laufende Firewall kann die Kom munikation blockieren. Schließen Sie danach das Fenster ”SW Version” und prüfen Sie die Kommunikation erneut. 6. Klicken Sie auf Schaltfläche ”FW Load”. Ist das Laden abgeschlossen, zeigt Ihnen das System die geladene Firmware-Version im Feld ”SST” an. Ist die geladene Firmware prinzipiell für die Steuerung geeignet, er scheint der Hintergrund des Feldes ”SST” grün, andernfalls rot. Nur geeignete Firmware-Versionen lassen sich im weiteren Verlauf in den Flash-Speicher der Steuerung programmieren. 7. Sofern aktiviert (siehe Schritt 4.: Optionen ”Save Counter”, ”Backup”, ”UIR Backup”), werden die relevanten Daten automatisch auf dem Programmiergerät gesichert. Während dieses Vorganges erscheint im Feld ”Status” der Text ”Backup”. HINWEIS Unterbrechung der Versorgungsspannung Geräteschaden möglich! " Nach dem Einleiten des nächsten Schrittes darf die Versorgungs spannung solange nicht mehr unterbrochen werden, bis die Firm ware komplett geladen wurde! 8. Sofern ”Change after Load” aktiviert ist (siehe Schritt 4.), wird in der Steuerung automatisch die Neuprogrammierung des Flash-Spei chers ausgelöst. Ist die Option nicht aktiviert, starten Sie die Neuprogrammierung per Schaltfläche ”FW Change”. Während der Neuprogrammierung des Flash-Speichers ist an den beteiligten Steuerungen • kein Schweißablauf möglich • ”Bereit” zurückgesetzt. Ab Beginn der Neuprogrammierung erscheint das Fenster ”Wait”. Warten Sie ab, bis das Fenster ”Wait” automatisch wieder geschlos sen wird (Dauer: ca. 100 s). Nach der Neuprogrammierung (Dauer: ca. 60 s) löst ein automa tischer Reset den Neuhochlauf der Steuerung aus. 9. Sofern aktiviert (siehe Schritt 4.: Optionen ”Save Counter”, ”Backup”), werden die in Schritt 7. gesicherten Daten automatisch vom Programmiergerät in die Steuerung zurück geladen. DEUTSCH Die aktuell gewählte Firmware-Datei (siehe Schritt 2.) wird vom Pro grammiergerät in einen speziell reservierten RAM-Bereich der Steuerung geladen. Über den Fortgang informiert Sie ein Statusbal ken im Feld ”SST”. 164/402 Bosch Rexroth AG PSI 6xxx | 1070080028 / 06 Instandhaltung und Instandsetzung Während dieses Vorganges erscheint im Feld ”Status” der Text ”Re store”. 10.Kontrollieren Sie, ob das Firmware-Update aller selektierten Steue rungen korrekt durchgeführt wurde. Klicken Sie dazu auf Schaltfläche ”List”. Im neu erscheinenden Fenster ”SW-Version” werden alle derzeit aktiven Firmware-Ver sionen angezeigt. Schließen Sie danach das Fenster ”SW Version” und die Software ”FWUpdate”. DEUTSCH Eine im reservierten RAM-Bereich der Steuerung geladene Firm ware-Version können Sie sich auch per Schaltfläche ”Dsp.FW” im Feld ”SST” anzeigen lassen. Die zuletzt gesicherten Daten einer Steuerung lassen sich per Schaltfläche ”Bkup+Ctr -> SST” auch außerhalb der beschriebenen Vorgehensweise manuell wieder in die Steuerung laden. Ein Steuerungs-Reset lässt sich per Schaltfläche ”SST Reset” auch außerhalb der beschriebenen Vorgehensweise manuell auslösen. 1070080028 / 06 | PSI 6xxx Bosch Rexroth AG 165/402 Instandhaltung und Instandsetzung Ersatzteile " Zum Ordern von Ersatzteilen setzen Sie sich bitte mit uns in Ver bindung. " Bestellnummern aller verfügbaren PSI-Typen oder MF-Schweiß transformatoren entnehmen Sie bitte der aktuellen Preisliste, oder fragen bei uns nach. " Beachten Sie im Zusammenhang mit Bestellnummern auch die In formationen in Kap. ”Erweiterung und Umbau” ab Seite 173. DEUTSCH 10.4 166/402 Bosch Rexroth AG Instandhaltung und Instandsetzung DEUTSCH Notizen | Notes: PSI 6xxx | 1070080028 / 06 1070080028 / 06 | PSI 6xxx Bosch Rexroth AG 167/402 Demontage und Austausch Demontage und Austausch WARNUNG Gefährliche elektrische Spannung Herz-Rhythmusstörung, Verbrennung, Schock möglich! " Verwenden Sie für alle Arbeiten an elektrisch leitfähigen Teilen geeignetes, isoliertes Werkzeug. " Interpretieren Sie nie das Verlöschen aller LEDs am Produkt als Spannungsfreiheit. " Berücksichtigen Sie, dass geräteinterne Spannungen direkt nach dem Abschalten der Netzversorgung noch nicht auf ein ungefähr liches Maß abgebaut sind. " Berühren Sie nach dem Abschalten der Netzversorgung für mindestens 5 Minuten weder Netz- noch Trafoanschlüsse. " Stellen Sie mit geeignetem Messgerät und mit geeigneter Mess methode stets sicher, dass der betreffende Anlagenteil und das betreffende Gerät spannungsfrei ist, bevor daran hantiert wird. " Öffnen Sie nie das Produktgehäuse. Es darf nur in speziellen Fällen nach Rücksprache mit uns und auch nur mit unserer schriftlichen Erlaubnis geöffnet werden. VORSICHT Schwere Last und scharfe Blechkanten Erhöhung des Verletzungsrisikos durch Verheben, Quetschen oder Schneiden! " Berücksichtigen Sie bei Planung und Durchführung der Arbeiten stets das Gewicht des Produktes (siehe technische Daten) und verwenden Sie ggf. geeignetes Hebe- und Transportwerkzeug. " Tragen Sie passende Arbeitskleidung und verwenden Sie ge eignete Schutzausrüstung (z.B. Sicherheitshelm/-schuhe, Schutzhandschuhe). " Beachten Sie auch die Hinweise zu Einbau und Montage in Kapitel 2.6.3 ab Seite 16 sowie Kap. 3.2 ab Seite 28. " Die Arbeiten müssen von einer Fachkraft durchgeführt werden. Sichern Sie - sofern erforderlich - notwendige Daten der Schweiß steuerung. Dazu steht Ihnen innerhalb der BOS-Bedienoberfläche die Funktionalität „Backup“ zur Verfügung. Die Vorgehensweise ist in der Online-Hilfe der BOS ausführlich be schrieben (Stichwort „Backup“ oder „SST-Daten sichern“). 1. Schalten Sie die Leistungsversorgung (Netz) aus und sichern Sie die Leistungsversorgung gegen unbefugtes/unbeabsichtigtes Wie dereinschalten. DEUTSCH 11 168/402 Bosch Rexroth AG PSI 6xxx | 1070080028 / 06 Demontage und Austausch Die LED ZWISCHENKREISSPANNUNG an der Geräte-Frontseite erlischt. PSI 6x00 PSI 6xC0 LED LOGIK LED ZWISCHENKREIS SPANNUNG DEUTSCH Diagnosemodul Abb.85: Anzeigen am Steuerungsteil 2. Sofern die 24 V-Versorgung der Steuerungslogik (Einspeisung an X4) extern erzeugt wird, schalten Sie die 24 V-Versorgung aus. Bei PSI 6x00: Die LED LOGIK an der Geräte-Frontseite erlischt. Bei PSI 6xCx: Die Anzeige am Diagnosemodul erlischt. 3. Sperren Sie die geräte-relevanten Anschlüsse für Druckluftversor gung und ggf. den Kühlwasserzu- und ablauf, sofern dies manuell erforderlich sein sollte. Stellen Sie sicher, dass ein versehentliches Öffnen verhindert wird. Koppeln Sie anschließend ggf. vorhandene Wasserleitungen ab. 4. Stellen Sie mit geeignetem Messgerät und mit geeigneter Messme thode sicher, dass Netz- und Trafoanschlüsse des betreffenden Ge rätes spannungsfrei sind. Berücksichtigen Sie, dass interne Spannungen nach dem Abschal ten der Netzversorgung zur Entladung mindestens 5 Minuten benö tigen. Berühren Sie innerhalb dieser Zeitspanne weder Netz- noch Trafoanschlüsse des Gerätes. 5. Sofern das Gerät getauscht wird, notieren Sie sich alle Schalterstel lungen an der SST-Frontseite. Stellen Sie die Schalter am neuen Gerät identisch ein. Sofern möglich, verwenden Sie das AnyBus-Modul bzw. die Ether net-Einschub-Baugruppe im neuen Gerät weiter. Auf diese Weise ist eine Neukonfiguration der zugehörigen Schnittstellen nicht erforder lich. 6. Stellen Sie sicher, dass alle Verbindungen zur SST-Frontseite eindeutig gekennzeichnet sind und ziehen Sie dann die Ver bindungen ab. 7. Lösen Sie die Verbindungen für Netz- und Trafoanschluss. 8. Stellen Sie sicher, dass sich das Gerät nach dem Lösen der Halte schrauben/Schnellspanner nicht unkontrolliert bewegen kann und lösen Sie dann die Halteschrauben/Schnellspanner. 1070080028 / 06 | PSI 6xxx Bosch Rexroth AG 169/402 Demontage und Austausch 9. Entfernen Sie das Gerät. Zusätzliche Schritte, sofern das demontierte Gerät getauscht werden soll: 11.Montieren Sie das neue Gerät (siehe Kap. „Montage“ ab Seite 109). 12.Beenden Sie eine ggf. laufende BOS. Die Vorgehensweise ist in der Online-Hilfe der BOS beschrieben (Stichwort „BOS 6000 beenden“). 13.Führen Sie eine Inbetriebnahme durch (siehe ab Seite 149). 14.Spielen Sie nach der Inbetriebnahme - sofern erforderlich - notwen dige Daten der Schweißsteuerung wieder ein. Beachten Sie in diesem Zusammenhang die Informationen zum Tausch einer defekten SST. Sie finden diese Informationen in der Online-Hilfe der BOS (Stich wort „Defekte SST austauschen“). DEUTSCH Berücksichtigen Sie für Transport und Lagerung die Informationen in Kap. „Transport und Lagerung“ Seite 107 und für Entsorgung die Informationen in Kap. „Entsorgung“ Seite 171. 10.Stellen Sie bei einer Demontage sicher, dass alle verbleibenden An schlusskabel ausreichend isoliert und vor Berührung gesichert sind. Damit ist die Demontage abgeschlossen. 170/402 Bosch Rexroth AG Demontage und Austausch DEUTSCH Notizen | Notes: PSI 6xxx | 1070080028 / 06 1070080028 / 06 | PSI 6xxx Bosch Rexroth AG 171/402 Entsorgung 12 Entsorgung Materialrücknahme Die von uns hergestellten Produkte können zur Entsorgung kostenlos an uns zurückgegeben werden. Voraussetzungen dazu sind: • keine Anhaftungen wie Öle, Fette oder sonstige Verunreinigungen • keine enthaltenen unangemessenen Fremdstoffe oder Fremd komponenten. Die Produkte sind frei Haus an folgende Adresse zu liefern: Bosch Rexroth AG Bürgermeister-Dr.-Nebel-Straße 2 97816 Lohr am Main Wiederverwertung Hauptbestandteile unserer Elektronikgeräte: • Stahl, Aluminium, Kupfer, Kunststoffe. Durch den hohen Metallanteil können unsere Produkte überwiegend stofflich wieder verwertet werden. Um eine optimale Metallrückge winnung zu erreichen, ist eine Demontage in einzelne Baugruppen er forderlich. Die Metalle, die in den elektrischen und elektronischen Baugruppen enthalten sind, können mittels spezieller Trennverfahren ebenfalls zu rückgewonnen werden. Die hierbei anfallenden Kunststoffe können einer thermischen Verwertung zugeführt werden. " 12.1 Batterien oder Akkumulatoren müssen - sofern vorhanden - vor dem Recycling der Produkte entfernt werden! Beachten Sie bitte auch die Informationen im nachfolgenden Ab schnitt ”Batterieentsorgung”. Umweltschutz Unsere Produkte enthalten keine Gefahrstoffe, die sie bei bestim mungsgemäßem Gebrauch freisetzen können. Im Normalfall sind da her keine negativen Auswirkungen auf die Umwelt zu befürchten. Batterieentsorgung Unser Produkt enthält eine auswechselbare Batterie. Laut Batteriegesetz der EU sind Endverbraucher dazu verpflichtet, Batterien oder Akkumulatoren zur Entsorgung an einen Vertreiber oder an den öffentlichen Rücknahmestellen abzugeben. " Um Kurzschlüsse in Batterie-Sammelboxen zu vermeiden, kleben Sie die Batteriepole mit Klebestreifen ab oder verpacken Sie die Batterien einzeln. DEUTSCH Die Verpackungsmaterialien bestehen aus Pappe, Holz und Styropor. Aus ökologischen Gründen sollte auf den Rücktransport leerer Verpa ckungen an uns verzichtet werden. Sie können problemlos der Verwer tung zugeführt werden. 172/402 Bosch Rexroth AG Entsorgung DEUTSCH Notizen | Notes: PSI 6xxx | 1070080028 / 06 1070080028 / 06 | PSI 6xxx Bosch Rexroth AG 173/402 Erweiterung und Umbau 13.1 Erweiterung und Umbau " Beachten Sie die Hinweise zu Nachrüstungen und Veränderungen durch den Betreiber im Kapitel ”Sicherheitshinweise” auf Seite 22. " Zum Ordern von Ersatzteilen setzen Sie sich bitte mit uns in Ver bindung. " Bestellnummern aller verfügbaren PSI-Typen und MF-Schweiß transformatoren entnehmen Sie bitte der aktuellen Preisliste, oder fragen bei uns nach. PSI-Typen mit UL-Zertifizierung auf Anfrage. Optionales Zubehör Optionales Zubehör gehört nicht zum Standard-Lieferumfang. Tab.18: Optionales Zubehör Bezeichnung Erläuterung Länge Bestellnummer V24-Kabel (mit 2 x D-SubBuchsen) Zur Ankopplung eines Programmiergerätes (PC) an Schnitt stelle X1 (nur für PSI 6x00.xxx) 1,5 m 1070 066 749 2m R 911 296 708 5m R 911 296 710 10 m R 911 306 743 15 m R 911 306 925 0,5 m R 911 171 165 1m R 911 171 166 3m R 911 171 167 V24-Kabel (mit Mini-DINStecker und D-Sub-Buchse) Zur Ankopplung eines Programmiergerätes (PC) an Schnitt stelle X3C (nur für PSI 6xCx.xxx). USB-Kabel Zur Ankopplung eines Programmiergerätes (PC) an Schnitt stelle X3U (nur für PSI 6xCx.xxx). Lithiumbatterie AA, 3.6 V. Zur Pufferung von RAM / interner Uhr. 1070 914 446 Einlegeprofil für Stiftkabelschuhe Bei kleinerem Adernquerschnitt zum Netz- und Schweißtrans formatoranschluss. 1070 918 779 Montagesatz Zubehörsatz für Rückwandmontage von PSI61xx und PSI 63xx. Maßbild siehe Seite 177. 1070 078 273 Anybus-CC Mo dul Ethernet/IP Zur Anbindung mehrerer Steuerungen an das Programmier gerät (BOS) per Ethernet. Beschreibung siehe Seite 54. Einbau siehe ab Seite 174. Lüfterhaube Zur Zwangskühlung von luftgekühlten Umrichtertypen. 1070 086 148 MG260 Strommessgürtel 1070 916 712 SSR 81.20/M12 Stromsensor - R 911 171 800 1070 081 808 mm2; Kabel für Senso LiYCY 2 x 2 x 0,75 geschirmt. rik Nicht Schleppkettentauglich. Bei Bestellung gewünschte Länge angeben. 1070913 494 DEUTSCH 13 174/402 Bosch Rexroth AG PSI 6xxx | 1070080028 / 06 Erweiterung und Umbau 13.2 Produkt erweitern 13.2.1 Ein-/Ausbau AnyBus-Modul Sie benötigen zum Einbau: - AnyBus-Modul - Schraubendreher, geeignet für Torx 8. Die folgenden Abbildungen zeigen ein AnyBus-Modul mit EthernetSchnittstelle, gelten aber auch - bezogen auf das Handling - für andere AnyBus-Module. DEUTSCH Einbau Gehen Sie zum Einbau folgendermaßen vor: 1. Stellen Sie sicher, dass die 24V-Logikversorgung der SST ausge schaltet ist. 2. Ziehen Sie die Blindblende (1) nach vorne ab. Man erkennt Trägerleiterplatte (2) und Steckerleistenführung (3). 2 1 3 3. Führen Sie das Modul entlang der Kante (4) - unter leichtem Druck nach rechts (5) - nach hinten bis zu einem fühlbaren Widerstand ein (6). Dadurch wird das Modul zunächst in die steuerungsinterne Stecker leistenführung (3) eingebracht. Zwischen Frontplatte der Steuerung und der Frontplatte des Moduls existiert jetzt noch ein Spalt von 1 bis 2 mm (7). 7 6 4 5 4. Drücken Sie das Modul nach links (8) und schieben es nach hinten bis zum Anschlag ein (9). Dadurch wird das Modul per linksseitigem Zapfen (10) korrekt auf der Trägerleiterplatte (2) fixiert. Der ursprüngliche Spalt zwischen Frontplatte der Steuerung und der Frontplatte des Moduls (7) darf danach nicht mehr vorhanden sein! 1070080028 / 06 | PSI 6xxx Bosch Rexroth AG 175/402 Erweiterung und Umbau 11 8 9 9 8 11 10 2 5. Drehen Sie die beiden Schrauben (11) zur Fixierung des Moduls ein Zur Ethernet-Konfiguration des AnyBus-Moduls verwenden Sie die Software ”Anybus IPconfig” (Installationsdatei ist im BOS-Software paket enthalten; siehe BOS-Datenträger: Verzeichnispfad ”Tools/ Anybus). Ausbau Gehen Sie zum Ausbau folgendermaßen vor: 1. Stellen Sie sicher, dass die 24V-Logikversorgung der SST ausge schaltet ist. 2. Lösen Sie die beiden Schrauben (11). 3. Ziehen Sie das Modul an den beiden Schrauben aus dem Modul schacht. 4. Verschließen Sie den Modulschacht mit einer Blindblende (1). DEUTSCH (max. 0,25 Nm). 176/402 Bosch Rexroth AG PSI 6xxx | 1070080028 / 06 Erweiterung und Umbau 13.2.2 Ein-/Ausbau der Lizenz-Memory-Card Die Lizenz-Memory-Card (Mikro-SD-Speicherkarte) dient zum Ak tivieren von lizenzpflichtigen Ausbaustufen wie zB. des UI-Reglers. Nur in Verbindung mit PSI 6xCx.xxx. Lizenzierte Ausbaustufen sind nur bei installierter Karte verfügbar. 2 3 DEUTSCH 1 5 4 5 Abb.86: Position der Lizenz-Memory-Card Gehen Sie folgendermaßen vor: 1. Stellen Sie sicher, dass die 24V-Logikversorgung der SST ausge schaltet ist. 2. Entfernen Sie das Bedienteil des Diagnosemoduls (4). Drücken Sie dazu oben und unten auf die Verriegelungszungen (5) und ziehen Sie das Bedienteil nach vorne ab. Der Aufnahmeschacht (2) für die Lizenz-Memory-Card (1) ist jetzt zugänglich. 3. Achten Sie darauf, dass sich die Kontaktflächen der LizenzMemory-Card hinten/rechts befinden und schieben Sie die Karte in den Slot. Falls sich im Slot bereits eine Karte befindet: Installierte Karte zunächst leicht in den Aufnahmeschacht drücken. Das entriegelt die Karte. Entriegelte Karte anschließend entnehmen. 1070080028 / 06 | PSI 6xxx Bosch Rexroth AG 177/402 Erweiterung und Umbau 13.2.3 Zubehörsatz für Rückwandmontage Die Geräte werden standardmäßig an der linken Seitenwand montiert (von Frontseite aus gesehen). Hierzu ist ein Montageausbruch für den Funktionsbereich „Kühlung“ erforderlich. Montageplatte Zubehörsatz Bemaßung Montageplatte DEUTSCH Alternativ ist die Montage mittels Zubehörsatz per Rückwand möglich. Abb.87: Maßbild: Zubehörsatz für Rückwandmontage 178/402 Bosch Rexroth AG Erweiterung und Umbau DEUTSCH Notizen | Notes: PSI 6xxx | 1070080028 / 06 1070080028 / 06 | PSI 6xxx Bosch Rexroth AG 179/402 Fehlersuche und Fehlerbehebung Fehlersuche und Fehlerbehebung Die Geräte sind robust gebaut. Trotzdem kann es in Ausnahmefällen zu Störungen kommen: • durch falschen elektrischen Anschluss oder durch Überspannung im Netz, • durch ungenügende Kühlung, Wartung oder Überlast, • durch Überschreiten der maximalen Stromwerte (Parametrierung) oder Überwachungswerte. Nach einem aufgetretenen Fehler geht die Steuerung in Blockade. In diesem Zustand ist bis zur Quittierung des Fehlers kein Schweiß ablauf mehr möglich. Bei anstehenden Warnungen ist Schweißen weiterhin möglich. Fehleranzeigen Bei PSI 6x00: Im Störfall erlischt die grüne LED “BEREIT” auf der Frontblende der Schweißsteuerung. Bei PSI 6xC0: Im Störfall zeigt das Diagnosemodul die Fehlernummer an. PSI 6x00 PSI 6xC0 LED BEREIT LED Batteriefehler Diagnosemodul Abb.88: Anzeigen am Steuerungsteil (Fehler) Genauere Informationen über alle aufgetretenen Fehler erhalten Sie • per BOS 6000 über die „Fehlertabelle“ • per Kleinbedienfeld (VCP05.2). Eine Liste aller Fehler- und Statusmeldungen finden Sie in der On line-Hilfe der BOS 6000. Dort sind zu den möglichen Ursachen auch Informationen zur Feh lerbehebung angegeben. Fehler quittieren Sowohl Fehler, als auch Warnungen können ”selbst quittierend” oder ”nicht selbst quittierend” sein. ”Selbst quittierend” bedeutet, dass Ereignisse nach Behebung der Fehler- bzw. Warnungsursache automatisch von der Steuerung wieder gelöscht werden. Sie erfordern also kein manuelles Fehler rücksetzen. DEUTSCH 14 180/402 Bosch Rexroth AG PSI 6xxx | 1070080028 / 06 Fehlersuche und Fehlerbehebung Beispiele selbst quittierender Fehler: - Stoppkreis offen / 24V fehlt - Netzspannung aus / zu niedrig - Synchronisations-/Netz-/Zwischenkreisspannungsfehler. ”Nicht selbst quittierende” Fehler lassen sich quittieren per • Software (BOS) • positiver Flanke an den Fehlerquittungseingängen des E/A-Feldes der Schweißsteuerung • RESET-Taste an der SST-Frontseite (bei PSI 6x00) • Diagnosemodul (bei PSI 6xCx) DEUTSCH Die Fehler ”Kühlertemperatur zu hoch” und ”Überstrom oder Erd strom” müssen stets manuell per RESET-Taste bzw. am Dia gnosemodul quittiert werden. Fehlerbeispiel: Temperaturüberwachung spricht an 1. Das integrierte Leistungsteil meldet Temperaturen größer/gleich 65° C (+5° C) an die integrierte Schweißsteuerung. 2. Daraufhin stoppt die Schweißsteuerung alle weiteren Abläufe. 3. Der Fehler ”Temperatur Leistungsteil” wird ausgegeben. Mögliche Ursache Maßnahme Verschmutzter Kühlkörper. Kühlkörper reinigen. Umgebungstemperatur zu hoch. Kühlung des Einbauraumes auf ord nungsgemäße Installation und auf Funktion prüfen. Zu schwach dimensioniertes Leis tungsteil. ED errechnen und Auswahl anhand Belastungsdiagramm prüfen. Kühlwasser zu warm, oder zu geringer Kühlwasserdurchfluss. Zufluss und/oder Temperatur des Kühlwassers kontrollieren. Zwangsbelüftung bei luftgekühlten Geräten ist defekt. Zwangsbelüftung kontrollieren. 1070080028 / 06 | PSI 6xxx Bosch Rexroth AG 181/402 Technische Daten 15 Technische Daten Informationen zur Dimensionierung und Belastung siehe Kap. 5.3 ab Seite 90! Leistungsteil-übergreifende allgemeine Daten Bauart 3-Phasen-Mittelfrequenzumrichter inkl. Schweiß steuerung in einem Gehäuse E/A-Schnittstellen Entsprechend verwendetem E/A-Modul. Siehe ab Seite 62. Anzahl der Programme 256 Anzahl der Elektroden Typspezifisch. Max. 32 (0 ... 31). Elektrodennummer 0 ist für spezielle Funktionen reserviert. Programmspeicher Batteriegepuffertes RAM Stellgröße für Elektrodenkraft Je nach Steuerungstyp als Analogsignal (an X2) und/ oder digital per seriellem E/A-Feld. Analogsignal ist programmierbar als: 0 bis +10 V, max. 20 mA oder 0 bis 20 mA oder 4 bis 20 mA (an max. 500 Ohm). Rückmeldung für Druck/Elektrodenkraft Je nach Steuerungstyp 1 x Digitaleingang (24VDC; 3 mA; nach EN 61131-2 Typ 3) bzw. 2 x Analogeingang (0 ... 10 V). Gewünschter Eingang ist typspezifisch selektierbar. DEUTSCH Tab.19: 182/402 Bosch Rexroth AG PSI 6xxx | 1070080028 / 06 Technische Daten Tab.20: Leistungsteil-übergreifende umgebungsbezogene Daten Schutzart IP 20; Einbauraum mit IP 54 ist erforderlich Einbaulage senkrecht oder auf Rückseite liegend Temperaturbereich Kühlung Betrieb (im Einbauraum) +10 ... +55 Grad Celsius Lagerung / Transport -25 ... +70 Grad Celsius luftgekühlte Geräte max. 45 Grad Celsius; Zwangskühlung per tempera turgesteuerter Lüfterhaube ist erforderlich. wassergekühlte Geräte • max. 30 Grad Celsius Zulauftemperatur; • max. 10 bar Wasserdruck. DEUTSCH Weitere erforderliche Eigenschaften siehe 1) Temperaturüberwachung integriert Max. Höhe des Betriebsstandortes 2000 m über NN Klimaklasse 3K3 nach EN 60721-3-3 Luftfeuchtigkeit Betauung nicht zulässig Korrosion Die Umgebungsluft muss frei sein von höheren Kon zentrationen an Säuren, Laugen, Korrosionsmitteln, Salzen, Metalldämpfen 1) Weitere erforderliche Kühlwassereigenschaften: • pH_Wert: 7 bis 8,5 • Härtegrad Dmax: 10 deutschgrad = 12,5 engl. Grad =10,5 USGrad = 18 franz. Grad • Chloride: max. 20 mg/l • Nitrate: max. 10 mg/l • Sulfate: max. 100 mg/l • Unlösliche Substanzen: max. 250 mg/l In der Regel genügt Leitungswasser diesen Anforderungen. Allerdings muss ein Mittel gegen Algenbildung beigegeben werden. 1070080028 / 06 | PSI 6xxx Bosch Rexroth AG 183/402 Technische Daten Leistungsteil-übergreifende elektrische Daten Netzanschluss An geerdetem TN- oder TT-Netz. Netzfrequenz 50 oder 60 Hz Überspannungsschutz Metall-Oxid-Varistor (MOV) Spannungsversorgung Netz Abhängig vom integrierten Leistungsteil. Logik (X4) Typ. 24 VDC ; 19 … 30 VDC nach EN 61131-2 E/A-Feld Entsprechend verwendetem E/A-Modul. Siehe ab Seite 62. Möglichkeiten zur Erzeugung der Versorgungs spannung für die Logik Per externem 24 VDC-Netzteil Stromaufnahme Netz Abhängig vom integrierten Leistungsteil. Nennstrom Logik ca. 1,5 A (bei 24 VDC; ohne Lüfterhaube, ohne E/A-Modul und ohne zusätzliche Verbraucher an X5) Einschaltstrom Logik ca. 2 A für 10 ms (bei 24 VDC; ohne Lüfterhaube, ohne E/A-Modul und ohne zusätzliche Verbraucher an X5) Nennstrom Lüfterhaube ca. 2 A (bei 24 VDC) E/A-Feld Entsprechend verwendetem E/A-Modul. Siehe ab Seite 62. Per Eigenversorgung durch das integrierte Netzteil (wird intern über den Netzanschluss gespeist). Eigenschaften der Primärspannung (zum MF-Trafo) 1 kHz; pulsbreitenmoduliert Integriertes Netzteil Ausgangsspannung (Ausgang: X4 zwischen Ausgangsstrom Klemmen 5 und 8) 24 VDC max. 2 A " Beachten Sie: Der angegebene Ausgangsstrom steht beim Ein schalten der PSI-Netzversorgung erst ab Netznenn spannung, danach auch bis zum Absinken der PSINetzversorgung auf deren untere Toleranzgrenze zur Verfügung. DEUTSCH Tab.21: 184/402 Bosch Rexroth AG PSI 6xxx | 1070080028 / 06 Technische Daten Tab.22: PSI 61xx - Mechanische Daten Bezeichnung Gewicht L1 L2 W1 W2 ca. 20 kg ca. 21 kg ca. 25 kg ca. 25 kg Abmessungen Rahmenklemmen; max. 50 mm2 klemmbar erforderliches Anzugsdrehmoment 6 … 8 Nm. Bei Weidmüller-Anschlussklemmen: 4 Nm Tab.23: PSI 61xx - Umgebungsbezogene Daten Bezeichnung DEUTSCH Siehe Maßzeichnungen ab Seite 110 Anschlussklemmen für Netz- und Trafoanschluss L1 L2 W1 W2 Schaltschrankgrundverluste 69 W 100 W 69 W 100 W Schaltschrankverluste bei max. Leistung 170 W 200 W 110 W 140 W Max. Kühlverluste 360 W 420 W Wasserkühlung: min. Durchflussmenge - 4 l/min. Wasserkühlung: typ. Druckabfall - 0,1 bar bei 4 l/min. Tab.24: PSI 61xx - Elektrische Daten Bezeichnung L1 L2 W1 W2 Netzspannungsbereich 400 … 480 V 500 … 690 V 400 … 480 V 500 … 690 V Netzspannungstoleranz 400 V: -15 % 500 V: -15 % 400 V: -15 % 500 V: -15 % 480 V: +10 690 V: +10 480 V: +10 690 V: +10 % % % % Netz-Nennstrom (max. thermischer Dauerstrom) 110 A max. Primärstrom (Ausgangsstrom zum Trafo) 400 A max. Sekundärstrom (trafoabhängiger Ausgangsstrom zur Elektrode) Erforderlicher Anschlussquerschnitt (für Netz- und Trafoanschluss) 20 kA (mit Trafotyp PSG 3100) min. 35 mm2 1070080028 / 06 | PSI 6xxx Bosch Rexroth AG 185/402 Technische Daten PSI 62xx - Mechanische Daten Bezeichnung Gewicht ca. 40 kg Abmessungen Anschlussklemmen für Netz- und Trafoanschluss erforderliches Anzugsdrehmoment Tab.26: W1 siehe Maßzeichnungen HDFK Durchführungsklemme; 25 … 95 mm2 klemmbar 15 … 20 Nm PSI 62xx - Umgebungsbezogene Daten Bezeichnung W1 Schaltschrankgrundverluste 69 W Schaltschrankverluste bei max. Leistung 210 W Max. Kühlverluste 700 W Wasserkühlung: min. Durchflussmenge 4 l/min. Wasserkühlung: typ. Druckabfall Tab.27: 0,6 bar bei 4 l/min. PSI 62xx - Elektrische Daten Bezeichnung W1 Netzspannungsbereich 400 … 480 V Netzspannungstoleranz 400 V: -15 %; 480 V: +10 % Netz-Nennstrom (max. thermischer Dauerstrom) 220 A max. Primärstrom (Ausgangsstrom zum Trafo) 1200 A max. Sekundärstrom (trafoabhängiger Ausgangsstrom zur Elektrode) Erforderlicher Anschlussquerschnitt (für Netz- und Trafoanschluss) 54 kA (mit Trafotyp PSG 3100) 95 mm2 DEUTSCH Tab.25: 186/402 Bosch Rexroth AG PSI 6xxx | 1070080028 / 06 Technische Daten Tab.28: PSI 6300/63C0 - Mechanische Daten Bezeichnung Gewicht L1 L2 W1 W2 ca. 20 kg ca. 21 kg ca. 25 kg ca. 25 kg Abmessungen siehe Maßzeichnungen Rahmenklemmen; max. 50 mm2 klemmbar Anschlussklemmen für Netz- und Trafoanschluss erforderliches Anzugsdrehmoment Tab.29: PSI 6300/63C0 - Umgebungsbezogene Daten Bezeichnung DEUTSCH 6 … 8 Nm L1 L2 W1 W2 Schaltschrankgrundverluste 69 W 100 W 69 W 100 W Schaltschrankverluste bei max. Leistung 170 W 200 W 110 W 140 W Max. Kühlverluste 360 W 420 W Wasserkühlung: min. Durchflussmenge - 4 l/min. Wasserkühlung: typ. Druckabfall - 0,1 bar bei 4 l/min. Tab.30: PSI 6300/63C0 - Elektrische Daten Bezeichnung L1 L2 W1 W2 Netzspannungsbereich 400 … 480 V 500 … 690 V 400 … 480 V 500 … 690 V Netzspannungstoleranz 400 V: -15 % 500 V: -15 % 400 V: -15 % 500 V: -15 % 480 V: +10 690 V: +10 480 V: +10 690 V: +10 % % % % Netz-Nennstrom (max. thermischer Dauerstrom) 110 A max. Primärstrom (Ausgangsstrom zum Trafo) 800 A max. Sekundärstrom (trafoabhängiger Ausgangsstrom zur Elektrode) Erforderlicher Anschlussquerschnitt (für Netz- und Trafoanschluss) 36 kA (mit Trafotyp PSG 3100) min. 35 mm2 1070080028 / 06 | PSI 6xxx Bosch Rexroth AG 187/402 Technische Daten PSI 64C0 - Mechanische Daten Bezeichnung Gewicht ca. 40 kg Abmessungen Anschlussklemmen für Netz- und Trafoanschluss erforderliches Anzugsdrehmoment Tab.32: W1 siehe Maßzeichnungen HDFK Durchführungsklemme; 25 … 95 mm2 klemmbar 15 … 20 Nm PSI 64C0 - Umgebungsbezogene Daten Bezeichnung W1 Schaltschrankgrundverluste 69 W Schaltschrankverluste bei max. Leistung 210 W Max. Kühlverluste 700 W Wasserkühlung: min. Durchflussmenge 4 l/min. Wasserkühlung: typ. Druckabfall Tab.33: 0,6 bar bei 4 l/min. PSI 64C0 - Elektrische Daten Bezeichnung W1 Netzspannungsbereich 400 … 480 V Netzspannungstoleranz 400 V: -15 %; 480 V: +10 % Netz-Nennstrom (max. thermischer Dauerstrom) 220 A max. Primärstrom (Ausgangsstrom zum Trafo) 1600 A max. Sekundärstrom (trafoabhängiger Ausgangsstrom zur Elektrode) Erforderlicher Anschlussquerschnitt (für Netz- und Trafoanschluss) 54 kA (mit Trafotyp PSG 3100) 95 mm2 DEUTSCH Tab.31: 188/402 Bosch Rexroth AG PSI 6xxx | 1070080028 / 06 Technische Daten Tab.34: PSI 65xx - Mechanische Daten Bezeichnung Gewicht ca. 70 kg; mechanisch teilbar Abmessungen Anschluss für Netz- und Trafo erforderliches Anzugsdrehmoment Tab.35: siehe Maßzeichnungen über Kabelschuhe; M10-Schraube pro Anschluss 41 … 46 Nm PSI 65xx - Umgebungsbezogene Daten Bezeichnung DEUTSCH W1 W1 Schaltschrankgrundverluste 100 W Schaltschrankverluste bei max. Leistung 850 W Max. Kühlverluste 4400 W Wasserkühlung: min. Durchflussmenge 10 l/min. Wasserkühlung: typ. Druckabfall Tab.36: 0,65 bar bei 10 l/min. (beide Kühler) PSI 65xx - Elektrische Daten Bezeichnung W1 Netzspannungsbereich 400 … 480 V Netzspannungstoleranz 400 V: -15 %; 480 V: +10 % Netz-Nennstrom (max. thermischer Dauerstrom) max. Primärstrom (Ausgangsstrom zum Trafo) max. Sekundärstrom (trafoabhängiger Ausgangsstrom zur Elektrode) Erforderlicher Anschlussquerschnitt (für Netz- und Trafoanschluss) 330 A (ohne Schrankkühlung) 660 A (mit Schrankkühlung) 2400 A 120 kA (mit Trafotyp PSG 3100) 2 bis 4 Kabel; pro Kabel 120 mm2 1070080028 / 06 | PSI 6xxx Bosch Rexroth AG 189/402 Anhang 16 Anhang 16.1 Konformitätserklärung / CE-Kennzeichnung In der Konformitätserklärung wird bestätigt, dass das Produkt folgende Richtlinien und Normen erfüllt: Normen • EN50178 • EN60204‐1 • EN62135 " Fordern Sie bitte bei Bedarf die Konformitätserklärung zum Produkt direkt bei uns an. " Beachten Sie, dass das Produkt eine Einbaukomponente ist. Im ein gebauten Zustand können sich die EMV-Eigenschaften ändern. DEUTSCH Richtlinien • Niederspannungsrichtlinie2006/95/EG • EMV-Richtlinie2004/108/EG 190/402 Bosch Rexroth AG Anhang DEUTSCH Notizen | Notes: PSI 6xxx | 1070080028 / 06 1070080028 / 06 | PSI 6xxx Bosch Rexroth AG 191/402 Tabellenverzeichnis Tabellenverzeichnis Tab.1: Tab.2: Tab.3: Tab.4: Tab.5: Tab.6: Tab.7: Tab.8: Tab.9: Tab.10: Tab.11: Tab.12: Tab.13: Tab.14: Tab.15: Tab.16: Tab.17: Tab.18: Tab.19: Tab.20: Tab.21: Tab.22: Tab.23: Tab.24: Tab.25: Tab.26: Tab.27: Tab.28: Tab.29: Tab.30: Tab.31: Tab.32: Tab.33: Tab.34: Tab.35: Tab.36: Tab.37: Erforderliche (D) und ergänzende Unterlagen . . . . . . . . . . . . . . . . . . . . . . . Beispiel zum Aufbau eines Sicherheitshinweises . . . . . . . . . . . . . . . . . . . . Gefahrenklassen nach ANSI Z535.6 . . . . . . . . . . . . . . . . . . . . . . . . . . . . . . . Beispiele zur Klassifikation der Sicherheitshinweise . . . . . . . . . . . . . . . . . . Verwendete Symbolik . . . . . . . . . . . . . . . . . . . . . . . . . . . . . . . . . . . . . . . . . . . . Bezeichnungen . . . . . . . . . . . . . . . . . . . . . . . . . . . . . . . . . . . . . . . . . . . . . . . . . . Mögliche Symbole am Produkt . . . . . . . . . . . . . . . . . . . . . . . . . . . . . . . . . . . . Überblick über die Leistungsteiltypen . . . . . . . . . . . . . . . . . . . . . . . . . . . . . . . Technische Daten: E/A-Modul ”E/A DISK R2ED“ / ”E/ADISKR4ED“ . . . Technische Daten: E/A-Modul ”E/A DISK“ . . . . . . . . . . . . . . . . . . . . . . . . . . Technische Daten: E/A-Module ”E/A DISK 2R“ / ”E/A DISK 4R“ . . . . . . . Technische Daten: E/A-Modul ”E/A IBS OPC mit LWL“ . . . . . . . . . . . . . . . Technische Daten: E/A-Modul ”E/A IBS FERN“ . . . . . . . . . . . . . . . . . . . . . . Technische Daten: E/A-Modul ”E/A IBS X_FERN_8EA“ . . . . . . . . . . . . . . . Technische Daten: E/A-Modul ”DEV-NET“ . . . . . . . . . . . . . . . . . . . . . . . . . . Technische Daten: E/A-Modul ”ComnetM-DP“ . . . . . . . . . . . . . . . . . . . . . . . Dimensionierung Entstörkomponenten . . . . . . . . . . . . . . . . . . . . . . . . . . . . . Optionales Zubehör . . . . . . . . . . . . . . . . . . . . . . . . . . . . . . . . . . . . . . . . . . . . . . Leistungsteil-übergreifende allgemeine Daten . . . . . . . . . . . . . . . . . . . . . . . Leistungsteil-übergreifende umgebungsbezogene Daten . . . . . . . . . . . . . Leistungsteil-übergreifende elektrische Daten . . . . . . . . . . . . . . . . . . . . . . . PSI 61xx - Mechanische Daten . . . . . . . . . . . . . . . . . . . . . . . . . . . . . . . . . . . . PSI 61xx - Umgebungsbezogene Daten . . . . . . . . . . . . . . . . . . . . . . . . . . . . PSI 61xx - Elektrische Daten . . . . . . . . . . . . . . . . . . . . . . . . . . . . . . . . . . . . . . PSI 62xx - Mechanische Daten . . . . . . . . . . . . . . . . . . . . . . . . . . . . . . . . . . . . PSI 62xx - Umgebungsbezogene Daten . . . . . . . . . . . . . . . . . . . . . . . . . . . . PSI 62xx - Elektrische Daten . . . . . . . . . . . . . . . . . . . . . . . . . . . . . . . . . . . . . . PSI 6300/63C0 - Mechanische Daten . . . . . . . . . . . . . . . . . . . . . . . . . . . . . . PSI 6300/63C0 - Umgebungsbezogene Daten . . . . . . . . . . . . . . . . . . . . . . PSI 6300/63C0 - Elektrische Daten . . . . . . . . . . . . . . . . . . . . . . . . . . . . . . . . PSI 64C0 - Mechanische Daten . . . . . . . . . . . . . . . . . . . . . . . . . . . . . . . . . . . PSI 64C0 - Umgebungsbezogene Daten . . . . . . . . . . . . . . . . . . . . . . . . . . . PSI 64C0 - Elektrische Daten . . . . . . . . . . . . . . . . . . . . . . . . . . . . . . . . . . . . . PSI 65xx - Mechanische Daten . . . . . . . . . . . . . . . . . . . . . . . . . . . . . . . . . . . . PSI 65xx - Umgebungsbezogene Daten . . . . . . . . . . . . . . . . . . . . . . . . . . . . PSI 65xx - Elektrische Daten . . . . . . . . . . . . . . . . . . . . . . . . . . . . . . . . . . . . . . Abkürzungen und Begriffserklärungen . . . . . . . . . . . . . . . . . . . . . . . . . . . . . . 7 8 9 9 10 10 15 38 62 65 67 71 75 79 83 85 128 173 181 182 183 184 184 184 185 185 185 186 186 186 187 187 187 188 188 188 195 DEUTSCH 17 192/402 Bosch Rexroth AG DEUTSCH Notizen | Notes: PSI 6xxx | 1070080028 / 06 1070080028 / 06 | PSI 6xxx Bosch Rexroth AG 193/402 Abbildungsverzeichnis Abbildungsverzeichnis Abb.1: Abb.2: Abb.3: Abb.4: Abb.5: Abb.6: Abb.7: Abb.8: Abb.9: Abb.10: Abb.11: Abb.12: Abb.13: Abb.14: Abb.15: Abb.16: Abb.17: Abb.18: Abb.19: Abb.20: Abb.21: Abb.22: Abb.23: Abb.24: Abb.25: Abb.26: Abb.27: Abb.28: Abb.29: Abb.30: Abb.31: Abb.32: Abb.33: Abb.34: Abb.35: Abb.36: Abb.37: Abb.38: Abb.39: Abb.40: Abb.41: Abb.42: Abb.43: Abb.44: Abb.45: Beispiele: Mittelfrequenz-Umrichter mit Standard-CPU . . . . . . . . . . . . . . . Übersichts-Blockschaltbild: PSI 6000 mit Trafo . . . . . . . . . . . . . . . . . . . . . . Detail-Blockschaltbild einer Mittelfrequenz-Umrichteranlage . . . . . . . . . . . Sekundärseitige Gleichrichtung durch den PSG-Transformator . . . . . . . . Zusammenhang: Pulsbreite der Primärspannung und Sekundärstrom beim Mittelfrequenzschweißen . . . . . . . . . . . . . . . . . . . . . . . . . . . . . . . . . . . . Prinzipieller Aufbau einer MF-Schweißeinrichtung mit PSI 6xxxx . . . . . . . Teil-Frontansicht PSI 6x00.xxx . . . . . . . . . . . . . . . . . . . . . . . . . . . . . . . . . . . . Teil-Frontansicht PSI 6xCx.xxx . . . . . . . . . . . . . . . . . . . . . . . . . . . . . . . . . . . . AnyBus-Modul ”ProfiNet IO“ (2-Port-Variante) . . . . . . . . . . . . . . . . . . . . . . . AnyBus-Modul ”CC Ethernet 100 Mbit” (1-Port-Variante) . . . . . . . . . . . . . . Baugruppe ”CC Ethernet 100 Mbit” . . . . . . . . . . . . . . . . . . . . . . . . . . . . . . . . Baugruppe ”CC ProfiNet“ . . . . . . . . . . . . . . . . . . . . . . . . . . . . . . . . . . . . . . . . . Baugruppe ”LWL ProfiNet“ . . . . . . . . . . . . . . . . . . . . . . . . . . . . . . . . . . . . . . . . Frontansicht Diagnosemodul . . . . . . . . . . . . . . . . . . . . . . . . . . . . . . . . . . . . . . Diagnosemodul: Hauptmenü . . . . . . . . . . . . . . . . . . . . . . . . . . . . . . . . . . . . . . Diagnosemodul: Menü ETHERNET . . . . . . . . . . . . . . . . . . . . . . . . . . . . . . . . Frontansicht: E/A-Modul ”E/A DISK R2ED“ . . . . . . . . . . . . . . . . . . . . . . . . . . Frontansicht: E/A-Modul ”E/A DISK“ . . . . . . . . . . . . . . . . . . . . . . . . . . . . . . . Frontansicht: E/A-Modul ”E/A DISK 2R“ . . . . . . . . . . . . . . . . . . . . . . . . . . . . Frontansicht: E/A-Modul ”E/A IBS OPC mit LWL“ . . . . . . . . . . . . . . . . . . . . E/A-Modul ”E/A IBS OPC mit LWL“: Einstellungen der Sendeleistung und der Baudrate. . . . . . . . . . . . . . . . . . . . . . . . . . . . . . . . . . . . . . . . . . . . . . . . Frontansicht: E/A-Modul ”E/A IBS FERN“ . . . . . . . . . . . . . . . . . . . . . . . . . . . Klemmenbelegung der INTERBUS‐S‐Anschlüsse . . . . . . . . . . . . . . . . . . . . Frontansicht: E/A-Modul ”E/A IBS X_FERN_8EA“ . . . . . . . . . . . . . . . . . . . . Klemmenbelegung der INTERBUS‐S‐Anschlüsse . . . . . . . . . . . . . . . . . . . . Frontansicht: E/A-Modul ”DEV-NET“ . . . . . . . . . . . . . . . . . . . . . . . . . . . . . . . Frontansicht: E/A-Modul ”ComnetM-DP“ . . . . . . . . . . . . . . . . . . . . . . . . . . . . Frontansicht: UI-Regler-Modul PSQ 6000 XQR“ . . . . . . . . . . . . . . . . . . . . . Zulässiger Primärstrom in Abhängigkeit der ED: PSI 61xx.xxx . . . . . . . . . Zulässiger Primärstrom in Abhängigkeit der Stromzeit: PSI 61xx.xxx L1/W1 . . . . . . . . . . . . . . . . . . . . . . . . . . . . . . . . . . . . . . . . . . . . . Zulässiger Primärstrom in Abhängigkeit der Stromzeit: PSI 61xx.xxx L2/W2 . . . . . . . . . . . . . . . . . . . . . . . . . . . . . . . . . . . . . . . . . . . . . Zulässiger Primärstrom in Abhängigkeit der ED: PSI 62xx.xxx . . . . . . . . . Zulässiger Primärstrom in Abhängigkeit der Stromzeit: PSI 62xx.xxx . . . Zulässiger Primärstrom in Abhängigkeit der ED: PSI 6300/63C0.xxx L1/W1 . . . . . . . . . . . . . . . . . . . . . . . . . . . . . . . . . . . . . . . . Zulässiger Primärstrom in Abhängigkeit der ED: PSI 6300/63C0.xxx L2 Zulässiger Primärstrom in Abhängigkeit der Stromzeit: PSI 6300/63C0.xxx L1/W1 . . . . . . . . . . . . . . . . . . . . . . . . . . . . . . . . . . . . . . . . Zulässiger Primärstrom in Abhängigkeit der Stromzeit: PSI 6300/63C0.xxx L2/W2 . . . . . . . . . . . . . . . . . . . . . . . . . . . . . . . . . . . . . . . . Zulässiger Primärstrom in Abhängigkeit der ED: PSI 64xx.xxx . . . . . . . . . Zulässiger Primärstrom in Abhängigkeit der Stromzeit: PSI 64xx.xxx . . . Zulässiger Primärstrom in Abhängigkeit der ED: PSI 65xx . . . . . . . . . . . . Zulässiger Primärstrom in Abhängigkeit der Stromzeit: PSI 65xx.xxx . . . Typenschlüssel der PSx 6xxx-Baureihe . . . . . . . . . . . . . . . . . . . . . . . . . . . . Maßbild: PSI 61xx.xxx L1 . . . . . . . . . . . . . . . . . . . . . . . . . . . . . . . . . . . . . . . . . Maßbild: PSI 61xx.xxx L2 . . . . . . . . . . . . . . . . . . . . . . . . . . . . . . . . . . . . . . . . . Maßbild: PSI 61xx.xxx Wx . . . . . . . . . . . . . . . . . . . . . . . . . . . . . . . . . . . . . . . . 42 44 44 45 45 46 48 50 52 54 55 56 57 58 59 60 64 66 69 73 74 76 77 80 81 84 86 88 92 93 94 96 97 98 99 100 101 102 103 104 105 106 110 111 112 DEUTSCH 18 194/402 Bosch Rexroth AG PSI 6xxx | 1070080028 / 06 DEUTSCH Abbildungsverzeichnis Abb.46: Abb.47: Abb.48: Abb.49: Abb.50: Abb.51: Abb.52: Abb.53: Abb.54: Abb.55: Abb.56: Abb.57: Abb.58: Abb.59: Abb.60: Abb.61: Abb.62: Abb.63: Abb.64: Abb.65: Abb.66: Abb.67: Abb.68: Abb.69: Abb.70: Abb.71: Abb.72: Abb.73: Abb.74: Abb.75: Abb.76: Abb.77: Abb.78: Abb.79: Abb.80: Abb.81: Abb.82: Abb.83: Abb.84: Abb.85: Abb.86: Abb.87: Abb.88: Position Netz- und Trafoanschluss: PSI 61xx.xxx Lx/Wx . . . . . . . . . . . . . . Position Kühlwasseranschluss: PSI61xx.xxx Wx . . . . . . . . . . . . . . . . . . . . Maßbild: PSI 62xx.xxx W1 . . . . . . . . . . . . . . . . . . . . . . . . . . . . . . . . . . . . . . . . Position Netz- und Trafoanschluss: PSI 62xx.xxx W1 . . . . . . . . . . . . . . . . Position Kühlwasseranschluss: PSI62xx.xxx W1 . . . . . . . . . . . . . . . . . . . . Maßbild: PSI 6300/63C0.xxx Lx . . . . . . . . . . . . . . . . . . . . . . . . . . . . . . . . . . . Maßbild: PSI 6300/63C0.xxx Wx . . . . . . . . . . . . . . . . . . . . . . . . . . . . . . . . . . Position Netz- und Trafoanschluss: PSI 6300/63C0.xxx Lx/Wx . . . . . . . . Position Kühlwasseranschluss: PSI 6300/63C0.xxx Wx . . . . . . . . . . . . . . . Maßbild: PSI 64C0.xxx W1 . . . . . . . . . . . . . . . . . . . . . . . . . . . . . . . . . . . . . . . Position Netz- und Trafoanschluss: PSI 64C0.xxx W1 . . . . . . . . . . . . . . . . Position Kühlwasseranschluss: PSI64C0.xxx W1 . . . . . . . . . . . . . . . . . . . . Maßbild: PSI 65xx.xxx W1 . . . . . . . . . . . . . . . . . . . . . . . . . . . . . . . . . . . . . . . . Position Netz- und Trafoanschluss: PSI 65xx.xxx W1 . . . . . . . . . . . . . . . . Position Kühlwasseranschluss: PSI65xx.xxx W1 . . . . . . . . . . . . . . . . . . . . Entstörbeispiele . . . . . . . . . . . . . . . . . . . . . . . . . . . . . . . . . . . . . . . . . . . . . . . . . Typischer Verlauf der Netzspannung (oben) und des dazugehörigen Netzstromes (unten) in einer Phase während des Schweißvorganges . . Anschluss Programmiergerät per X1 . . . . . . . . . . . . . . . . . . . . . . . . . . . . . . . Anschluss Programmiergerät per X3C . . . . . . . . . . . . . . . . . . . . . . . . . . . . . . Logikversorgungseingang der Steuerung . . . . . . . . . . . . . . . . . . . . . . . . . . . Intern erzeugte 24 VDC-Versorgungsspannung . . . . . . . . . . . . . . . . . . . . . Anschluss der E/A-Modulversorgung an X4 der Steuerung . . . . . . . . . . . . Direkter Anschluss der E/A-Modulversorgung an separatem 24VDC-Netzteil . . . . . . . . . . . . . . . . . . . . . . . . . . . . . . . . . . . . . . . . . . . . . . . . . Verdrahtungsbeispiele zur 24V-Spannungsverteilung . . . . . . . . . . . . . . . . Anschluss eines externen Lüftermoduls . . . . . . . . . . . . . . . . . . . . . . . . . . . . Versorgung ext. Verbraucher . . . . . . . . . . . . . . . . . . . . . . . . . . . . . . . . . . . . . . Analoge Ausgabe der Kraftstellgröße . . . . . . . . . . . . . . . . . . . . . . . . . . . . . . Mögliche Rückmeldeeingänge für Druck/Kraft . . . . . . . . . . . . . . . . . . . . . . . Anschluss eines sekundärseitigen KSR-Sensors . . . . . . . . . . . . . . . . . . . . Anschluss zur Überwachung der Schweißtrafo-Temperatur . . . . . . . . . . . Keine Überwachung der Trafo-Temperatur durch die Steuerung . . . . . . . Bei PSI 6x00.xxx: Anschluss zur Sekundärspannungsmessung . . . . . . . Bei PSI 6xCx.xx: Anschluss zur Sekundärspannungsmessung . . . . . . . . Anschlussklemmen zur Hauptschalter-Auslösung . . . . . . . . . . . . . . . . . . . . Beispiel: Kühlwasseranschluss . . . . . . . . . . . . . . . . . . . . . . . . . . . . . . . . . . . . Anzeigen am Steuerungsteil . . . . . . . . . . . . . . . . . . . . . . . . . . . . . . . . . . . . . . Anzeigen bei Normalbetrieb ohne anstehende Fehler . . . . . . . . . . . . . . . . Anzeige Batteriefehler . . . . . . . . . . . . . . . . . . . . . . . . . . . . . . . . . . . . . . . . . . . . Batteriefach . . . . . . . . . . . . . . . . . . . . . . . . . . . . . . . . . . . . . . . . . . . . . . . . . . . . . Anzeigen am Steuerungsteil . . . . . . . . . . . . . . . . . . . . . . . . . . . . . . . . . . . . . . Position der Lizenz-Memory-Card . . . . . . . . . . . . . . . . . . . . . . . . . . . . . . . . . . Maßbild: Zubehörsatz für Rückwandmontage . . . . . . . . . . . . . . . . . . . . . . . Anzeigen am Steuerungsteil (Fehler) . . . . . . . . . . . . . . . . . . . . . . . . . . . . . . . 113 113 114 115 116 117 118 119 119 120 121 122 124 125 126 127 128 130 131 132 133 134 134 137 138 139 140 142 143 145 145 146 146 147 148 150 153 156 157 168 176 177 179 1070080028 / 06 | PSI 6xxx Bosch Rexroth AG 195/402 Abkürzungen Abkürzungen Tab.37: Abkürzungen und Begriffserklärungen Abkürzung Bedeutung AC Alternate Current. Wechselstrom. AE Ablaufende. Siehe FK. BOS Bedienoberfläche Schweißen BQR Bedienoberfläche U/I-Regler CAN Controller Area Network; Datenbus Cyc Cycles. Siehe P. daN Deka-Newton. 1 daN = 10 N DC Direct Current. Gleichstrom. EGB Elektrostatisch gefährdete Baugruppen. ELMO Elektromotorisch. EMV Elektromagnetische Verträglichkeit EP Einzelpunkt-Betriebsart. Für Automaten und Handanlagen ESD ElectroStatic Discharge. Abkürzung für alle Bezeichnungen, die elektrostatische Entladungen betreffen. Z.B. ESD-Schutz, ESD-Gefähr dung. ESZ Endslopezeit. Zeit, in der die LST bis zum Ende der 2. STZ abfällt. FK Fortschaltkontakt. Das Signal wird nach Fertigstellung des Schweißablaufes ausgegeben. FPA Frei programmierbarer Ausgang. Nicht bei allen Steuerungen verfügbar. HSA Hauptschalter-Auslösung. gedimmt Das relevante Objekt oder dessen Text wird grau ange zeigt. In diesem Zustand ist die betreffende Funktionalität gesperrt, oder aus systembedingten Gründen nicht akti vierbar. IMP Impulszahl. Anzahl der Impulse, die die 2. STZ bilden. IP Internetprotokoll. kA Kilo-Ampere (Stromstärke) kN Kilo-Newton (Kraft) KSR Konstantstromregelung. Hält den Strom im Schweißkreis konstant. KUR Konstantspannungsregelung. Regelt Netz-Spannungsschwankungen aus. LST(G) Allgemeine Abkürzung für Leistung. Kann sich auf SKT (Skalenteile) oder kA beziehen. LT Leistungsteil (Thyristor oder Umrichter). MF Mittelfrequenz. ms Millisekunden. DEUTSCH 19 196/402 Bosch Rexroth AG PSI 6xxx | 1070080028 / 06 DEUTSCH Abkürzungen Abkürzung Bedeutung MV Magnetventil. Ansteuerung für die Zangenzylinder, um die Elektroden zu schließen. NBS Netzlast-Begrenzungs-Steuerung. Überwacht und beeinflusst die Belastung im Netz. NHZ Nachhaltezeit. Zeit nach der letzten Stromzeit, in der das Schweißgut auskühlen kann. NWI Nachwärmimpuls. NWZ Nachwärmzeit. Auch 3. STZ genannt. OHZ Offenhaltezeit. Zeit zwischen zwei Schweißpunkten, in der das Magnet ventil nicht angesteuert wird. Nur in Betriebsart ”Serien punkt” relevant. Options schalter Rundes Objekt innerhalb der Bedienoberfläche zum Ein-/Ausschalten einer Funktion. P Perioden (Netzperioden, Cycles). Bei 50 Hz Netzfrequenz: 1 P -> 20 ms. Bei 60 Hz Netzfrequenz: 1.P -> 16.6 PE Protective Earth. Schutzleiter. Per siehe P. PG Programmiergerät/Schweißrechner. PHA Phasenanschnitt. PSF Prozessstabilität. PSG Trafo-Gleichrichtereinheit für PSI-Typen. Mittelfrequenz-Schweißtransformator 1000 Hz PSI Programmierbare Schweißsteuerung mit Inverter. PST Programmierbare Schweißsteuerung mit Thyristor-Leis tungsteil. PSZ Pausenzeit. Zeit zwischen Stromimpulsen/-blöcken (1., 2., 3.PSZ). RA Relaisausgang. RadioButton Siehe ”Optionsschalter”. SKT Skalenteile. Bei Thyristor-Leistungsteilen: Maß für den elektrischen Phasenanschnitt. Bei MF-Umrichtern: Maß für die Pulsbreite. Slope Stromrampe. Strom steigt/fällt von einer Anfangs- bis zu einer Endlei stung. SP Serienpunkt. Betriebsart für manuell bediente Anlagen. SPS Speicherprogrammierbare Steuerung. SST Schweißsteuerung. Wird auch als Schub, Takter oder Widerstandsschweiß steuerung bezeichnet. 1070080028 / 06 | PSI 6xxx Bosch Rexroth AG 197/402 Abkürzung Bedeutung SSZ Startslopezeit. Zeit, in der die LST vom Anfang der 2. STZ an ansteigt. Stepper Leistungsnachstellung zur Elektrodenverschleiß-Kompen sation. STZ Stromzeit. Man unterscheidet 1.STZ (Vorwärmstromzeit), 2.STZ (Haupt-Schweißstromzeit) und 3.STZ (Nachwärmstrom zeit). Alle 3 Stromzeiten können bzgl. Zeit und Leistung unter schiedlich programmiert werden. Die Programmierung von Impulsen und Slope ist nur in der 2.STZ möglich. TCP Transmission Control Protocol. TCP regelt, wie Daten zwischen Computern ausgetauscht werden sollen. Es ist ein verbindungsorientiertes, paket vermittelndes Transportprotokoll und Teil der Internetpro tokollfamilie (IP). Temp. Temperatur. Tooltipp Erläuterungstext. Erscheint, wenn der Mauszeiger im aktiven Fenster einen Moment auf einem Eingabefeld/Objekt verharrt. UIP Prozessqualität. UIR UI-Regelung ÜK Überwachungskontakt. Z.B. zur Überwachung des Druck-Zylinders (der die Elek troden schließt) oder zur Überwachung der Elektrodenpo sition (z.B. ”Zange zu”). VHZ Vorhaltezeit. Zeit, die vor der Schweißstromzeit abläuft. Die Elektroden drücken das Schweißgut zusammen. VWZ Vorwärmzeit. Auch 1. STZ genannt. Zdg. Zündung. Ein- und Ausschalten der Zündimpulse zur Ansteuerung des Leistungsteils. DEUTSCH Abkürzungen 198/402 Bosch Rexroth AG Abkürzungen DEUTSCH Notizen | Notes: PSI 6xxx | 1070080028 / 06 1070080028 / 06 | PSI 6xxx Bosch Rexroth AG 199/402 Stichwortverzeichnis Stichwortverzeichnis A Abkürzungen, 195 Abmessungen, 110 Abschalten des Mittelfrequenz-Umrichters, 151 AC, 195 AE, 195 Anschluss elektrisch, 127 Kühlwasser, 148 Programmiergerät, 130 Anschlusselemente (Übersicht), 46 Anschlusspositionen, 110 AnyBus-Modul CC Ethernet 100 Mbit, 54 Ein-/Ausbau, 174 Profinet IO-Modul, 52 Anzeige Ethernet-Konfiguration, 60 Fehler, 58 INIT, 58 RUN, 58 SST-Typ, 59 SST-Zeit und Datum, 60 Warnung, 58 Anzeige-, Bedienelemente, 46 Anzeigeelemente, 48, 50 Anzeigen bei Normalbetrieb, 153 Aufbau, 46 Austausch, 167 B Batterieentsorgung, 171 Batteriewechsel, 156 Baugruppe CC Ethernet 100 Mbit, 55 CC ProfiNet, 56 LWL ProfiNet, 57 Bedienelemente, 46, 48, 50 Bedienung, 43 Belastung und Dimensionierung, 90 Belastungsdiagramm 6300/63C0.xxx L1/W1, I primär (ts), 100 6300/63C0.xxx L2/W2, I primär (ts), 101 PSI 61xx.xxx, I primär (ED), 92 PSI 61xx.xxx L1/W1, I primär (ts), 93 PSI 61xx.xxx L2/W2, I primär (ts), 94 PSI 62xx.xxx I primär (ED), 96 I primär (ts), 97 PSI 6300/63C0.xxx L1/W1, I primär (ED), 98 PSI 6300/63C0.xxx L2, I primär (ED), 99 PSI 64xx.xxx I primär (ED), 102 I primär (ts), 103 PSI 65xx, I primär (ED), 104 PSI 65xx.xxx, I primär (ts), 105 Bestimmungsgemäße Verwendung, 11 Betriebsstandort (max. Höhe), 182 Bezeichnungen, 10 Boot-Modus aktivieren, 61 Boot-Taster, 48 BOS, 10 BQR, 10 C CC Ethernet 100 Mbit, 54, 55 CC ProfiNet, 56 CE-Kennzeichnung, 24, 189 D DC, 195 Demontage, 167 DeviceNet-Anschluss, 83 Diagnosemodul, 58 Displaytest, 60 Dimensionierung, 90 Druckansteuerung , 140 E E/A-Modul ”ComnetM-DP”, 85 E/A-Modul ”DEV-NET”, 83 E/A-Modul ”E/A DISK 2R/4R”, 67 E/A-Modul ”E/A DISK R2ED/R4ED”, 62 E/A-Modul ”E/A DISK”, 65 E/A-Modul ”E/A IBS FERN”, 75 E/A-Modul ”E/A IBS OPC mit LWL”, 71 E/A-Modul ”E/A IBS X_FERN_8EA”, 79 E/A-Modul „E/A IBS OPC mit LWL“ Baudrate, 74 Sendeleistung, 74 E/A-Modul-Versorgung, 134 E/A-Modulversorgung, 134 EGB, 195 Einbau, 109 Einbaulage, 182 Einschaltdauer ED, 91 Einschalten des Mittelfrequenz-Umrichters, 149 Elektrischer Anschluss, 127 PSI 61xx.xxx Lx/Wx, 113 PSI 62xx.xxx, 115 PSI 6300/63C0.xxx Lx/Wx, 119 PSI 64C0.xxx, 121 PSI 65xx.xxx, 125 Elektrodenkraft Ausgabe, 140 Rückmeldung, 141 ELMO, 195 EMV, 195 EMV , 127 Entsorgung, 171 Entstörung, 127 Ersatzteile, 165 ESD, 195 DEUTSCH 20 200/402 Bosch Rexroth AG PSI 6xxx | 1070080028 / 06 Stichwortverzeichnis Ethernet 100 Mbit CC, 55 F Fehler, 179 Fehler quittieren, 61 Fehler rücksetzen, 180 Feldbus-Modul Ethernet, 54 FI-Schutzschalter, 129 Firmware-Update, 158 Funktionsprinzip des Mittelfrequenzschweißens, 44 FWUpdate, 158 DEUTSCH G Gefahrstoffe, 171 Gleichspannungszwischenkreis, 44 H Hauptbestandteile unserer Elektronikgeräte, 171 unserer Verpackungsmaterialien, 171 Hauptschalter-Auslösung, 147 HSA, 195 I Ident-Kode, 71 Inbetriebnahme, 149 Instandhaltung, 155 INTERBUS-S-Anschluss, 72, 75, 79 K Klimaklasse, 182 Konformitätserklärung, 24, 189 Konstantstrom-Regelung, 143 Korrosion, 182 KSR, 195 KSR-Sensor, 143 Kühlung, 182 Kühlwasseranschluss, 148 PSI 61xx.xxx Wx, 113 PSI 62xx.xxx W1, 116 PSI 6300/63C0.xxx Wx, 119 PSI 64C0.xxx W1, 122 PSI 65xx.xxx W1, 126 Kühlwassereigenschaften, 182 KUR, 195 L Lagerung, 107 LED Bereit, 179 LED's, 48, 50 Leistungsbeschreibung, 39 Leistungsteil, 46 Lieferumfang, 35 Lizenz-Memory-Card, Ein-/Ausbau, 176 Logikversorgung , 132 Lüfteranschluss , 138 Luftfeuchtigkeit, 182 LWL ProfiNet, 57 M Maßbild PSI 61xx.xxx L1, 110 PSI 61xx.xxx L2, 111 PSI 61xx.xxx Wx, 112 PSI 62xx.xxx W1, 114 PSI 6300/63C0.xxx Lx, 117 PSI 6300/63C0.xxx Wx, 118 PSI 64C0.xxx W1, 120 PSI 65xx.xxx W1, 124 Maßbilder, 110 Materialrücknahme, 171 Memory-Card, 176 MemTool, 158 Merkmale, 39 MF, 195 Mikro-SD-Speicherkarte, 176 Mittelfrequenzschweißen, Funktionsprinzip, 44 Montage, 109 MV, 196 N NBS, 196 Netzanschluss, 128 O offline, 43 OHZ, 196 online, 43 P PG, 10, 196 Positionen der Netz-, Trafo- und Kühlwasseranschlüsse, 110 Primärkreis, Anschluss, 130 Primärkreis , 143 Primärspannung, 45 Produktbeschreibung, 42 Produktschäden, 27 PROFIBUS-Anschluss, 85 ProfiNet CC, 56 Profinet IO-Modul, 52 ProfiNet LWL, 57 Programmiergerät, 130 Programmierung , 43 PSF, 196 PSG, 10, 196 PSI, 10, 196 PSQ 6000 XQR, 87 PST, 10, 196 Q Qualifikation des Personals, 12 R RC-Glied, 127 Reparatur, 155 Rückwandmontage, 177 Rückwandmontage, Zubehörsatz, 173 1070080028 / 06 | PSI 6xxx Bosch Rexroth AG 201/402 Stichwortverzeichnis T Technische Daten, 181 PSI 61xx.xxx Lx/Wx, 184 PSI 62xx.xxx Wx, 185, 187 PSI 6300/63C0.xxx Lx/Wx, 186 PSI 65xx.xxx Wx, 188 Teil-Frontansicht PSI 6x00.xxx, 48 PSI 6xCx.xxx, 50 Temperatur, 145 Temperatur Leistungsteil, 180 Temperaturen, 182 Temperaturüberwachung, 180 Toroid-Eingang, 143 Trafoanschluss, 130 Transformator-Temperatur, 145 Transport, 107 Typenschlüssel , 106 Ü Überblick, 37 UI-Regler-Modul, 87 UIP, 197 UIR, 197 ÜK, 197 Umgebungstemperatur, 182 Umweltschutz, 171 V Versorgung E/A-Modul, 134 Logik, 132 Netz/Leistung, 128 Versorgung externer Geräte, 139 Verwendung bestimmungsgemäß, 11 nicht bestimmungsgemäß, 11 W Warnungen quittieren, 60 Wartung, 155 Wartungsplan, 155 Wasserdruck, 182 Wasserversorgung anschließen, 148 Wiederverwertung, 171 WinBlow, 158 X X2 analoge Ausgabe der Elektrodenkraft, 140 Elektrodenkraft Rückmeldung, 141 X3 KSR-Sensoranschluss, 143 Sekundärspannungs-Messeingang, 146 Transformator-Temperatur, 145 X4 24V-Spannungserzeugung, 133 Ausgang zur E/A-Modulversorgung, 134 Ausgang zur Lüfterversorgung, 138 Eingang zur Logikversorgung, 132 X5, 139 X8, 147 X8A, 146 X9, Elektrodenkraft Rückmeldung, 141 Z Zubehör, 173 Zubehörsatz für Rückwandmontage, 173, 177 Zulauftemperatur, 182 DEUTSCH S Sachschäden, 27 Schulung, 13 Schutzart, 182 Schweißzykluszeit, 91 Sekundärspannungs-Messeingang, 146 Sekundärstrom, 45 Sekundärstrom-Messeingang, 143 Slope, 196 Spannungserzeugung , 133 Spannungsversorgung, 183 Spannungsverteilung , 135 SPS, 10, 196 SST, 10, 196 SST-Reset auslösen, 61 Stepper, 197 Steuerungsmodul, 46 Störungen, 179 Stromaufnahme, 183 Symbole, 10 202/402 Bosch Rexroth AG DEUTSCH Notizen | Notes: PSI 6xxx | 1070080028 / 06 1070080028 / 06 | PSI 6xxx Bosch Rexroth AG 203/402 Contents Contents 1.1 1.2 1.3 1.3.1 1.3.2 1.3.3 1.3.4 2 2.1 2.2 2.3 2.4 2.5 2.6 2.6.1 2.6.2 2.6.3 2.6.4 2.6.5 2.6.6 2.6.7 2.6.8 2.7 3 3.1 3.2 3.3 3.4 3.5 Regarding this documentation . . . . . . . . . . . . . . . . Validity of the documentation . . . . . . . . . . . . . . . . . . . . . . . . . . . Additional documentation . . . . . . . . . . . . . . . . . . . . . . . . . . . . . . . Presentation of information . . . . . . . . . . . . . . . . . . . . . . . . . . . . . Safety instructions . . . . . . . . . . . . . . . . . . . . . . . . . . . . . . . . . . . Icons . . . . . . . . . . . . . . . . . . . . . . . . . . . . . . . . . . . . . . . . . . . . . . . Designations . . . . . . . . . . . . . . . . . . . . . . . . . . . . . . . . . . . . . . . . Abbreviations . . . . . . . . . . . . . . . . . . . . . . . . . . . . . . . . . . . . . . . Safety instructions . . . . . . . . . . . . . . . . . . . . . . . . . . On this section . . . . . . . . . . . . . . . . . . . . . . . . . . . . . . . . . . . . . . . . Intended use . . . . . . . . . . . . . . . . . . . . . . . . . . . . . . . . . . . . . . . . . Inappropriate use . . . . . . . . . . . . . . . . . . . . . . . . . . . . . . . . . . . . . Qualification of personnel . . . . . . . . . . . . . . . . . . . . . . . . . . . . . . General safety instructions . . . . . . . . . . . . . . . . . . . . . . . . . . . . . Product- and technology-dependent safety instructions . . . . Possible icons on the product . . . . . . . . . . . . . . . . . . . . . . . . . Transport . . . . . . . . . . . . . . . . . . . . . . . . . . . . . . . . . . . . . . . . . . . Installation and assembly . . . . . . . . . . . . . . . . . . . . . . . . . . . . . Electrical connection . . . . . . . . . . . . . . . . . . . . . . . . . . . . . . . . . Operating the product . . . . . . . . . . . . . . . . . . . . . . . . . . . . . . . . Retrofits and modifications by the operator . . . . . . . . . . . . . . Maintenance and repair . . . . . . . . . . . . . . . . . . . . . . . . . . . . . . Declaration of conformity / CE marking . . . . . . . . . . . . . . . . . Obligations of the operator . . . . . . . . . . . . . . . . . . . . . . . . . . . . . General information on damage to property and products . . . . . . . . . . . . . . . . . . . . . . . . . . . . . . . . . . . Transport and storage . . . . . . . . . . . . . . . . . . . . . . . . . . . . . . . . . Installation and assembly . . . . . . . . . . . . . . . . . . . . . . . . . . . . . . . Electrical connection . . . . . . . . . . . . . . . . . . . . . . . . . . . . . . . . . . . Operation . . . . . . . . . . . . . . . . . . . . . . . . . . . . . . . . . . . . . . . . . . . . Maintenance and repair . . . . . . . . . . . . . . . . . . . . . . . . . . . . . . . . 207 207 207 208 208 210 210 210 211 211 211 211 212 214 215 215 215 216 218 220 222 223 224 225 227 227 228 230 232 233 4 Scope of delivery . . . . . . . . . . . . . . . . . . . . . . . . . . . 235 5 Information on this product . . . . . . . . . . . . . . . . . . . 237 5.1 Description of performance . . . . . . . . . . . . . . . . . . . . . . . . . . . . . 239 ENGLISH 1 204/402 Bosch Rexroth AG PSI 6xxx | 1070080028 / 06 Contents ENGLISH 5.2 5.2.1 5.2.2 5.2.3 5.2.3.1 5.2.3.2 5.2.4 5.2.4.1 5.2.4.2 5.2.4.3 5.2.4.4 5.2.4.5 5.2.4.6 5.2.4.7 5.2.4.8 5.2.4.9 5.2.4.10 5.2.4.11 5.2.4.12 5.2.4.13 5.2.4.14 5.2.4.15 5.3 5.3.1 5.3.2 5.3.3 5.4 Product description . . . . . . . . . . . . . . . . . . . . . . . . . . . . . . . . . . . . Programming and operation . . . . . . . . . . . . . . . . . . . . . . . . . . . Functional principle of medium-frequency welding . . . . . . . Structure . . . . . . . . . . . . . . . . . . . . . . . . . . . . . . . . . . . . . . . . . . . . Partial front-panel view PSI 6x00.xxx . . . . . . . . . . . . . . . . . Partial front-panel view PSI 6xCx.xxx . . . . . . . . . . . . . . . . . Modules . . . . . . . . . . . . . . . . . . . . . . . . . . . . . . . . . . . . . . . . . . . . AnyBus module ”ProfiNet IO“ . . . . . . . . . . . . . . . . . . . . . . . . AnyBus module ”CC Ethernet 100 Mbit” . . . . . . . . . . . . . . . ”CC Ethernet 100 Mbit“ module . . . . . . . . . . . . . . . . . . . . . . ”CC ProfiNet“ module . . . . . . . . . . . . . . . . . . . . . . . . . . . . . . . Module ”Optical fiber ProfiNet“ . . . . . . . . . . . . . . . . . . . . . . . Diagnosis module . . . . . . . . . . . . . . . . . . . . . . . . . . . . . . . . . . ”E/A DISK R2ED” and ”E/A DISK R4ED“ I/O module . . . . ”E/A DISK” I/O module . . . . . . . . . . . . . . . . . . . . . . . . . . . . . . ”E/A DISK 2R” and ”E/A DISK 4R“ I/O modules . . . . . . . . ”E/A IBS OPC with optical fiber” (INTERBUS-S) I/O module 271 ”E/A IBS FERN” (INTERBUS-S) I/O module . . . . . . . . . . . ”E/A IBS X_FERN_8EA” (INTERBUS-S) I/O module . . . . ”DEV-NET” (DeviceNet) I/O module . . . . . . . . . . . . . . . . . . ”ComnetM-DP" (PROFIBUS-DP) I/O module . . . . . . . . . . . UI controller module (PSQ 6000 XQR) . . . . . . . . . . . . . . . . Load and rating . . . . . . . . . . . . . . . . . . . . . . . . . . . . . . . . . . . . . . . Basics . . . . . . . . . . . . . . . . . . . . . . . . . . . . . . . . . . . . . . . . . . . . . . Is the inverter overloaded? . . . . . . . . . . . . . . . . . . . . . . . . . . . . Load diagrams . . . . . . . . . . . . . . . . . . . . . . . . . . . . . . . . . . . . . . Identification of the product . . . . . . . . . . . . . . . . . . . . . . . . . . . . . 242 243 244 246 248 250 252 252 254 255 256 257 258 262 265 267 ... 275 279 283 285 287 289 289 289 291 305 6 Transport and storage . . . . . . . . . . . . . . . . . . . . . . . 307 7 Assembly . . . . . . . . . . . . . . . . . . . . . . . . . . . . . . . . . . 309 7.1 7.1.1 7.2 7.2.1 7.2.2 7.2.3 7.2.4 7.2.5 7.2.6 7.2.7 7.2.8 7.2.9 7.2.10 7.2.11 7.2.12 7.2.13 7.2.14 7.2.15 7.2.16 7.3 Assembling the product . . . . . . . . . . . . . . . . . . . . . . . . . . . . . . . . Dimensioned drawings and locations of connections . . . . . Electrical connection of the product . . . . . . . . . . . . . . . . . . . . . . Interference suppression . . . . . . . . . . . . . . . . . . . . . . . . . . . . . Line connection . . . . . . . . . . . . . . . . . . . . . . . . . . . . . . . . . . . . . . Transformer connection (primary circuit) . . . . . . . . . . . . . . . . Connection for programming terminal . . . . . . . . . . . . . . . . . . 24 VDC logic supply (X4, input) . . . . . . . . . . . . . . . . . . . . . . . . 24 VDC voltage generator (X4, output) . . . . . . . . . . . . . . . . . I/O module supply (X4, output) . . . . . . . . . . . . . . . . . . . . . . . . 24 VDC voltage distribution (X4) . . . . . . . . . . . . . . . . . . . . . . . External fan (X4, output) . . . . . . . . . . . . . . . . . . . . . . . . . . . . . . Power supply to external units (X5, output) . . . . . . . . . . . . . . Analog output of the electrode force (X2, output) . . . . . . . . Electrode force feedback . . . . . . . . . . . . . . . . . . . . . . . . . . . . . Input for secondary current measurement (X3) . . . . . . . . . . Transformer temperature monitoring (X3) . . . . . . . . . . . . . . . Measuring input for secondary voltage measurement . . . . . Main switch tripped (X8) . . . . . . . . . . . . . . . . . . . . . . . . . . . . . . Connecting the water supply . . . . . . . . . . . . . . . . . . . . . . . . . . . . 309 310 327 327 328 330 330 332 333 334 335 338 339 340 341 343 345 346 347 348 1070080028 / 06 | PSI 6xxx Bosch Rexroth AG 205/402 Contents 8 Commissioning . . . . . . . . . . . . . . . . . . . . . . . . . . . . . 349 9 Operation . . . . . . . . . . . . . . . . . . . . . . . . . . . . . . . . . . 353 10 Service and repair . . . . . . . . . . . . . . . . . . . . . . . . . . 355 Maintenance schedule . . . . . . . . . . . . . . . . . . . . . . . . . . . . . . . . . Maintenance . . . . . . . . . . . . . . . . . . . . . . . . . . . . . . . . . . . . . . . . . . Battery replacement . . . . . . . . . . . . . . . . . . . . . . . . . . . . . . . . . . Firmware update . . . . . . . . . . . . . . . . . . . . . . . . . . . . . . . . . . . . . . Firmware update via ”WinBlow” . . . . . . . . . . . . . . . . . . . . . . . . Firmware update via "MemTool" . . . . . . . . . . . . . . . . . . . . . . . Firmware update via "FWUpdate" . . . . . . . . . . . . . . . . . . . . . . Spare parts . . . . . . . . . . . . . . . . . . . . . . . . . . . . . . . . . . . . . . . . . . . 355 356 356 358 359 360 361 365 11 Dismantling and replacement . . . . . . . . . . . . . . . . . 367 12 Disposal . . . . . . . . . . . . . . . . . . . . . . . . . . . . . . . . . . . 371 12.1 13 13.1 13.2 13.2.1 13.2.2 13.2.3 Environmental protection . . . . . . . . . . . . . . . . . . . . . . . . . . . . . . . Extension and conversion . . . . . . . . . . . . . . . . . . . . Optional accessories . . . . . . . . . . . . . . . . . . . . . . . . . . . . . . . . . . . Expand product . . . . . . . . . . . . . . . . . . . . . . . . . . . . . . . . . . . . . . . Installation/Removal of AnyBus module . . . . . . . . . . . . . . . . . Installation/Removal of the licence memory card . . . . . . . . . Accessory kit for rear panel installation . . . . . . . . . . . . . . . . . 371 373 373 374 374 376 377 14 Troubleshooting . . . . . . . . . . . . . . . . . . . . . . . . . . . . 379 15 Technical data . . . . . . . . . . . . . . . . . . . . . . . . . . . . . . 381 16 Annex . . . . . . . . . . . . . . . . . . . . . . . . . . . . . . . . . . . . . 389 16.1 Declaration of conformity / CE marking . . . . . . . . . . . . . . . . . . . 389 17 List of tables . . . . . . . . . . . . . . . . . . . . . . . . . . . . . . . 391 18 List of figures . . . . . . . . . . . . . . . . . . . . . . . . . . . . . . . 393 19 Abbreviations . . . . . . . . . . . . . . . . . . . . . . . . . . . . . . . 395 20 Index . . . . . . . . . . . . . . . . . . . . . . . . . . . . . . . . . . . . . . 399 ENGLISH 10.1 10.2 10.2.1 10.3 10.3.1 10.3.2 10.3.3 10.4 206/402 ENGLISH Notes: Bosch Rexroth AG PSI 6xxx | 1070080028 / 06 1070080028 / 06 | PSI 6xxx Bosch Rexroth AG 207/402 Regarding this documentation 1 Regarding this documentation This chapter includes important information on the use of the docu mentation. " Validity of the documentation For which product? Target group? Topics dealt with? 1.2 The present documentation • applies to the weld timer PSI 6xxx • is designed for Planning, assembly personnel, operators, start-up, service techni cians, plant operators. • provides information about • Mechanical construction • Part numbers and accessories • Functional principle • Load and dimensioning • Assembly, cooling water connection, electr. connection • Commissioning/shutdown and maintenance • Possible faults while operation is running. Additional documentation Several documents are available for the product which are needed to gether for comprehensive information. " Only start the product when you are at least familiar with and un derstand the documents marked with D. Table1: Necessary (D) and supplementary documents Title Doc. no. Document type D PSI 6xxx: Weld timer with medium- 1070080028 Operating instruc frequency inverter tions D PSI 6xxx.xxx xx: Weld timer with medium-frequency inverter, typespecific supplement depending on type D PSG xxxx: MF welding trans formers 1070087062 Operating instruc tions Operating instruc tions (type-speci fic supplement) BOS 6000 online help 1070086446 Reference PSI 6xxx: UI regulation and moni toring 1070087072 Description of ap plication ENGLISH 1.1 Inform yourself about the product before you work with it! 208/402 Bosch Rexroth AG PSI 6xxx | 1070080028 / 06 Regarding this documentation 1.3 Presentation of information We use uniform icons, terms and abbreviations in this documentation. They will be explained in the following paragraphs. 1.3.1 Safety instructions Safety instructions call your attention specifically to danger potentials or risks. ENGLISH Where? Structure? We distinguish among the following places where safety instructions may be required: • Basic safety instructions: They are related to general important matters and apply to the com plete documentation. You will find these safety instructions in Section 2 from page 211. • Preceding safety instructions: They refer to topic-related matters and are provided at the beginning of a chapter or at the beginning of a whole procedure. • Integrated safety instructions: They are related exactly to a separate procedure step and are provi ded right before the relevant step within the procedure. A • • • • • safety instruction is always structured as follows: Warning sign (only in case of personal injury) Signal word to indicate the danger level Type and source of danger Consequences of failure to observe Action for averting danger. Table2: Example for the structure of a safety instruction Warning sign + SIGNAL WORD Type and source of danger! Consequences of failure to observe! " Action for averting danger! " Further action(s) for averting danger. Integrated safety instructions may be embedded in the format of the environment so that no ”visual” break in the action sequence is pro voked. Therefore they do not necessarily use the layout shown in the example but they do use the indicated structure. 1070080028 / 06 | PSI 6xxx Bosch Rexroth AG 209/402 Regarding this documentation The safety instructions are classified into danger levels (danger classes). The signal word represents the danger level. Table3: Danger classes according to ANSI Z535.6 Signal word Meaning DANGER Dangerous situation where death or serious physical injuries will occur if it is not avoided. WARNING Dangerous situation where death or serious physical injuries may occur if it is not avoided. CAUTION Dangerous situation where light to moderate physical inju ries may occur if it is not avoided. NOTICE Situation where damage to property or the environment may occur if it is not avoided. Table4: Examples for classification of safety instructions DANGER Type and source of danger! Consequences of failure to observe! " Action for averting danger. WARNING Type and source of danger! Consequences of failure to observe! " Action for averting danger. CAUTION Type and source of danger! Consequences of failure to observe! " Action for averting danger. NOTICE Type and source of danger! Consequences of failure to observe! " Action for averting danger. ENGLISH Danger levels? 210/402 Bosch Rexroth AG PSI 6xxx | 1070080028 / 06 Regarding this documentation 1.3.2 Icons The following icons are used to mark text passages specifically. Table5: Icons used Icon Meaning This icon indicates a tip or an information. It helps use and operate the product optimally or understand the context better. This icon indicates the need to observe/perform certain things. This icon indicates an (unsorted) list. This icon indicates a (sorted) list or specific procedure steps where a certain sequence has to be observed. " • 1. 2. 3. 1.3.3 Designations ENGLISH The following designations may appear in our documentation: Table6: 1.3.4 Designations Designation Meaning BOS Welding user interface BQR User interface for U/I controller PE Protective Earth. PE conductor. PG Programming terminal/welding computer. PLC Programmable Logic Controller. PSG Transformer-rectifier unit for PSI types. Medium-frequency welding transformer 1000 Hz PSI Programmable weld timer with inverter. PSQ 6000 XQR Plug-in module for PSI with UI controller functionality. Is not needed for PSI 6xCx types. PST Programmable weld timer with thyristor power unit. WT Weld timer. Also referred to as timer, module or resistance weld timer. Abbreviations Refer to Section 19 from page 395. 1070080028 / 06 | PSI 6xxx Bosch Rexroth AG 211/402 Safety instructions 2 Safety instructions This section includes important information on the safe handling of the described product. 2.1 On this section The described product has been developed, manufactured, tested and documented in compliance with the EU standards. Nevertheless there is a danger of personal injuries and damage to property if you fail to observe this section and the safety instruction in this documentation. Therefore read this documentation carefully and fully before you work with the product. " Keep the documentation so that all users have access to it any time. " Always provide the product to third parties together with the product documentation. Intended use The described product is an electrical equipment component for ma chines. • The product serves in connection with an integrated power unit and appropriate welding transformer for resistance welding of metals. • The product is only intended for professional/industrial operation and not for private use. • The product is intended for operation in industrial environments (emission class A, group 2) and complies with the following direc tives and standards: Directives • Low-voltage directive2006/95/EC • EMC directive 2004/108/EC Standards • EN50178 • EN60204‐1 • EN62135 Intended use also means that you have read and understood the pro duct documentation. 2.3 Inappropriate use The inappropriate use of the product may lead to operating statuses in your application which cause physical injury and/or damage to property. Any use other than described as “intended use” is “inappropriate” and therefore inadmissible. Inappropriate use of the product includes in particular: • operation in potentially explosive atmospheres, ENGLISH 2.2 " 212/402 Bosch Rexroth AG PSI 6xxx | 1070080028 / 06 Safety instructions • operation in safety-relevant applications, unless these applications are not expressly specified or permitted in the product documenta tion, • operation without a housing which complies at least with degree of protection IP54, • operation with cabinet door open, • operation without corresponding cooling, • use of non-approved/suitable welding transformers, • operation without permanent/with insufficient fastening, • operation outside the technical data, • operation or storage outside the specified environmental conditions (e.g. air humidity), • electrical connection does not correspond to documentation. Bosch Rexroth AG does not assume any liability for damages caused by inappropriate use. The risks resulting from inappropriate use are borne by the operator/user alone. ENGLISH 2.4 Qualification of personnel The present documentation is designed for specifically trained, skilled personnel with special knowledge of the welding technology. This group of persons must have profound knowledge of the software and hardware components of the welding system. WARNING Use of unqualified personnel or non-compliance with warning notes Possibility of reduction of safety of persons/systems, function disturbances/restrictions! " Make sure that all work is carried out by properly qualified per sonnel only. " Make sure that warning notes/instructions on the product or the related documentation are observed. Strong electromagnetic fields during the welding sequence Possibility of function disturbances of cardiac pacemakers, metal implants or also hearing aids! " Make sure that persons dependent on or using devices of this kind avoid resistance welding equipment. " Make sure that corresponding warning signs are posted at a proper distance from resistance welding equipment. " Project engineering, programming, start and operation as well as the modification of program parameters is reserved to properly trained skilled personnel! This personnel must be able to judge potential ha zards arising from programming, program changes and in general from the mechanical, electrical, or electronic equipment. 1070080028 / 06 | PSI 6xxx Bosch Rexroth AG 213/402 Safety instructions " Interventions in the hardware and software of our products, unless described otherwise in the related documentation, are reserved to our specialized personnel. Our written approval is required with respect to other persons! " Only skilled personnel who are familiar with the contents of the rele vant documentation may install, operate and service the products described. Such personnel are • those who, being well trained and experienced in their field and familiar with the relevant norms, are able to analyze the jobs being carried out, recognize any hazards which may have arisen and take suitable safety measures. • those who have acquired the same amount of expert knowledge through years of experience that would normally be acquired through formal technical training. Training options For the latest information on training courses, teachware and training systems please refer to www.boschrexroth.com/training. For more information, you may also contact Bosch Rexroth AG Berliner Strasse 25 64711 Erbach Tel. +49 (0) 6062 78-0 ENGLISH Please note our comprehensive range of training courses for per sonnel qualification! 214/402 Bosch Rexroth AG PSI 6xxx | 1070080028 / 06 Safety instructions General safety instructions " Please not the applicable accident prevention and environmental protection provisions. " Please note the safety instructions and regulations of the country where the product is used/applied. " Use our products in technically perfect condition only. " Please note all information on the product. Also refer to Sect. 2.6.1 page 215. " Persons who assemble, operate, disassemble or service our pro ducts must not be under the influence of alcohol, other drugs or me dication influencing the responsiveness. " Use approved accessories and spare parts only to rule out hazards to persons caused by unsuitable spare parts. " Observe the technical data and environmental conditions specified in the product documentation. " If unsuitable products are built into or used in safety-relevant appli cations, unintended operating conditions may occur in the applica tion which may cause physical injury and/or damage to property. Therefore only use a product in safety-relevant applications if this use is expressly specified and permitted in the product documenta tion. " You may only commission our product after establishing that the fi nal product (for instance a machine or plant) into which our product has been installed, complies with the country-specific regulations, safety instructions and application standards. ENGLISH 2.5 1070080028 / 06 | PSI 6xxx Bosch Rexroth AG 215/402 Safety instructions 2.6 Product- and technology-dependent safety instructions This section contains general notes and instructions which are import ant with regard to your safety when handling the product and the tech nology in the environment of the product. 2.6.1 Possible icons on the product Table7: Icon Possible icons on the product Meaning Dangerous electrical voltage Electrostatically sensitive components Lug for connecting PE conductor only Function ground, ground with low parasitic voltage Connection of shield conductor only 2.6.2 Transport CAUTION Heavy loads and sharp metal edges Higher risk of injuries through lifting of excessive weights, bruises or cutting! " When you plan and perform the work, please always note the weight of the product (refer to technical data) and use appropriate hoisting and transportation equipment, if necessary. " Wear appropriate working clothes and use suitable protective equipment (e.g. protective helmet/shoes, protective gloves). ENGLISH Hazards associated with batteries! 216/402 Bosch Rexroth AG PSI 6xxx | 1070080028 / 06 Safety instructions 2.6.3 Installation and assembly WARNING Dangerous electrical voltage Possibility of cardiac arrhythmia, burns, shock! " Please ensure that all plant sections worked on in the course of the assembly have been safely isolated from supply and suffi ciently protected against accidental/unintended reclosing! Insufficient degree of protection Reduction of personal/plant safety! " The degree of protection of the product described corresponds to IP20. Always install it in a switch cabinet satisfying at least degree of protection IP 54. ENGLISH CAUTION Inappropriate performance of installation or assembly works Possibility of reduction of safety of persons/systems, function disturbances/restrictions! " Make sure that installation and assembly are performed by quali fied personnel who also has expert knowledge in the field of elec tromagnetic compatibility. " Please note the information provided in the technical data (e.g. the environmental conditions). " Please note the valid safety and accident prevention regulations. " Do not ever deactivate any safety-relevant equipment. Insufficient ergonomics Possibility of reduction of personal/plant safety, negative effects on health and/or concentration, function disturbances/restrictions, operating errors! " Make sure that the devices and especially the operating elements are installed to ensure optimum ergonomics. Operating elements must be easy to reach at all times, and displays must be easy to read! " Make sure that the devices and the operating elements are suffi ciently protected against inadvertent operation or contact. 1070080028 / 06 | PSI 6xxx Bosch Rexroth AG 217/402 Safety instructions CAUTION Inappropriate fastening Possibility of reduction of personal/plant safety, function disturban ces! " Make sure that the place of installation and the method of fastening the modules are selected according to their weight! Please also note dynamic forces which may affect the product. Heavy loads and sharp metal edges " When you plan and perform the work, please always note the weight of the product (refer to technical data) and use appropriate hoisting and transportation equipment, if necessary. " Wear appropriate working clothes and use suitable protective equipment (e.g. protective helmet/shoes, protective gloves ENGLISH Higher risk of injuries through lifting of excessive weights, bruises or cutting! 218/402 Bosch Rexroth AG PSI 6xxx | 1070080028 / 06 Safety instructions 2.6.4 Electrical connection WARNING Dangerous electrical voltage Possibility of cardiac arrhythmia, burns, shock! " The electrical connection may only be made by a skilled electri cian who observes the valid safety regulations, the mains voltage and the maximum current consumption of the plant sections. " Use suitable, insulated tools for all electrical connection work. " Use appropriate fuses for the mains system. E.g. fuses or main switches with overcurrent tripping are required as current-limiting protective elements. Insufficient PE conductor system ENGLISH Reduction of personal/plant safety! " The product must be connected to the PE conductor system of the plant correctly. " Make sure that the conductor cross-section of the PE conductor is of sufficient size. " The electrical continuity of the PE conductor system must be veri fied in accordance with EN 60204 Part 1. Insufficient emergency–stop/emergency-halt facilities Reduction of personal/plant safety! " Emergency–stop/emergency-halt facilities must be active and wi thin reach in all system modes. " Please note EN 60204-1. " Releasing an emergency–stop/emergency-halt facility must not result in an uncontrolled restart of the system. " Make sure that moving system elements are halted safely before accessing the danger area of the system! " Check the proper functioning of the emergency-stop/emergencyhalt circuit prior to start-up. 1070080028 / 06 | PSI 6xxx Bosch Rexroth AG 219/402 Safety instructions WARNING Inappropriate or missing evaluation of error messages Possibility of reduction of personal/plant safety, function disturban ces! " Many messages can be configured freely in the WT depending on your requirements, either as”warning” (no inhibition) or ”error ” (with inhibition). However, messages with error characteristic always have to be configured as ”error” and thus lead to inhibition of the connected timer! " Use the available message signals to design the process of your application as safely as possible. The timer provides a large variety of message signals to feed in error signals from the process and output errors to the process (PLC, robot) (e.g. via discrete and/or serial inputs/outputs). " Wit respect to fault analysis, please also refer to the information in Section „Troubleshooting“. ENGLISH Defective or incomplete connection of I/O signals Possibility of reduction of safety of persons/systems, function disturbances/restrictions! " Any user, line supplier, welding machine manufacturer and wel ding gun provider is obligated to connect all output signals that cause movements (such as solenoid and prelift) in compliance with the applicable safety regulations (e.g. ISO 13849) and to en sure that risks to personnel are safely avoided! " Please note that electronic outputs are considered "unsafe" in ac cordance with the safety regulations. For this reason, e.g. the gun control must be additionally protected by relays. " Also note t " he information concerning the effects of the I/O signals available and concerning the status and error messages. " Make sure upon commissioning at the latest that all I/O signals have been properly wired and are correctly transmitted. " Use e.g. ”two-handed start”, guards, light barriers, etc. minimize the risk of injury at the system. to 220/402 Bosch Rexroth AG PSI 6xxx | 1070080028 / 06 Safety instructions WARNING Defective connection of cables ENGLISH Possibility of reduction of safety of persons/systems, function disturbances/restrictions! 2.6.5 " All conductor cross-sections should be rated in accordance with the installed load. " Make sure that the connecting cables cannot become detached inadvertently. " Please note the maximum tightening torque for screws and termi nals specified in the technical data. " Please ensure that the contact areas are bare, i.e. free from paint, plastic coats or dirt/oxidation. " Please ensure that the insulation of connecting cables is not damaged. Operating the product WARNING Strong electromagnetic fields during the welding sequence Possibility of function disturbances of cardiac pacemakers, other implants or also hearing aids! " Make sure that persons dependent on or using devices of this kind generally avoid resistance welding equipment. " Make sure that corresponding warning signs are posted at a proper distance from resistance welding equipment. " Please observe EC directive „Electromagnetic fields (2004/40/EC)“. It defines the limit values for extremities which may be exceeded especially in manual welding gun applications. In cases of doubt, please measure the field strength and provide additional measures to ensure health and safety at work. " Please note the Instructions BGV B11, “Accident prevention regu lation relating to electromagnetic fields” issued by the Berufsge nossenschaft (employers’ third party liability insurance associa tion). 1070080028 / 06 | PSI 6xxx Bosch Rexroth AG 221/402 Safety instructions WARNING High dynamic forces and extremely fast movements Danger of impacts, bruises, entanglement and burns! " You should always be aware of the possibility that motions can be triggered by faults of the system and behave with the appropriate care and sense of responsibility. " Do not ever deactivate any safety–relevant functions! " Always stay outside the danger area of the welding system when it is running! " Make sure that moving system elements are halted safely before accessing the danger area of the system! Robots and fixing elements may generate very high dynamic forces and extremely fast movements. In addition, expulsion may occur during a welding schedule. Fault reset " Prior to acknowledging error messages, make sure that there is no-one in the hazard area of the welding equipment! If the start signal is present when an error message is acknowled ged, the weld timer will start its program run immediately. Damaged system parts Possibility of reduction of safety of persons/systems, function disturbances/restrictions! " Before starting to work, subject the plant to a reasonable, practical check for possible damages (e.g. visual inspection). " Report any damages and malfunctions of the unit to your super visor and servicing or repair department immediately. CAUTION Expulsions, hot surfaces, sharp metal edges Possibility of burns, eye injuries! " Wear protective gloves in order to protect yourself against injuries on sharp metal edges and burns on the parts to be welded! " Wear protective goggles in order to protect your eyes against ex pulsion or hot metal burr. " Only wear flame-retardant working clothes. ENGLISH Dangerous machine movements possible! 222/402 Bosch Rexroth AG PSI 6xxx | 1070080028 / 06 Safety instructions 2.6.6 Retrofits and modifications by the operator WARNING Modification of the product Possibility of reduction of safety of persons/systems, function disturbances/restrictions! ENGLISH " Modifications of the product are normally not permitted. If you think that you can only use the product after a change, you have to contact us before performing the change. This is the only way to find out whether or not changes can be made safely. You may, in any case, only perform changes on the product with our written consent! 1070080028 / 06 | PSI 6xxx Bosch Rexroth AG 223/402 Safety instructions Maintenance and repair WARNING Dangerous Electrical Voltage Possibility of cardiac arrhythmia, burns, shock! " Unless described otherwise, maintenance work must be per formed on inactive systems that have been sufficiently protected against reclosing! Measuring or test activities that might be necessary on the live system are reserved to qualified electrical personnel! " Use suitable, insulated tools for all work on electrically conductive parts. " Never interpret the extinguishing of all LEDs on the product as zero voltage! " Please note that the voltage inside the unit directly after switching off the mains supply has not been reduced to a harmless level yet. " Use suitable measuring equipment and an appropriate measu ring method to ensure that the respective unit is de-energized be fore carrying out any work on the unit. " Do not ever open the housing of the product! It may only be opened in special cases after consultation with us and only with our written permission. Employing unqualified personnel Possibility of reduction of safety of persons/systems, function disturbances/restrictions! " Make sure that repair and maintenance work is performed by our service or corresponding authorized repair or service points only! High dynamic forces and extremely fast movements Danger of impacts, bruises, entanglement and burns! " You should always be aware of the possibility that motions can be triggered by faults of the system and behave with the appropriate care and sense of responsibility. " Always stay outside the danger area of the welding system when it is running! " Do not ever deactivate any safety–relevant functions! Robots and fixing elements may generate very high dynamic forces and extremely fast movements. In addition, expulsion may occur during a welding schedule. ENGLISH 2.6.7 224/402 Bosch Rexroth AG PSI 6xxx | 1070080028 / 06 Safety instructions CAUTION Improper handling of lithium batteries Possibility of burns, explosion! " Do not open lithium batteries by force. " Do not recharge used lithium batteries. " Do not heat lithium batteries to above 100degrees Centigrade. Rotating fan impellers Possibility of hand injuries! " Do not place your fingers or any objects into the fan units when the 24V logic supply of the WT is switched on. Devices with air cooling must be operated with forced ventilation. They are equipped with a temperature-controlled automatic switch on/off system for the control of external fans. Declaration of conformity / CE marking ENGLISH 2.6.8 For details on declaration of conformity/on the CE-mark, please refer to page 389. " The evaluation of the electrical and mechanical safety, the environ mental influences (foreign bodies, moisture) must be carried out on the final product when installed. When installed in an enclosure, the EMC properties of this product may be subject to change. For this reason, the final product (end user device, machine, systems) should be subjected to a verification of its EMC characteristics by the end product manufacturer. 1070080028 / 06 | PSI 6xxx Bosch Rexroth AG 225/402 Safety instructions Obligations of the operator The operator is responsible for the system. Therefore he has to • ensure that the system is operated according to its intended use, • provide regular training to the operating personnel, • provide signals of existing dangers that are clearly visible and unam biguous to all persons, • comply with the safety regulations and provisions of the country where the device is employed, • check the suitability of the delivered components for his individual application and check the information provided in this documenta tion on their use, • coordinate the safety regulations and standards applicable to his ap plication and perform the necessary measures, changes, supple ments, • ensure that the delivered components are only commissioned when the machine or system, incl. the delivered components are in ac cordance with the country-specific provisions, safety regulations and standards of the application. ENGLISH 2.7 226/402 Bosch Rexroth AG Safety instructions ENGLISH Notes: PSI 6xxx | 1070080028 / 06 1070080028 / 06 | PSI 6xxx Bosch Rexroth AG 227/402 General information on damage to property and products 3 General information on damage to property and products The present section includes information which is important for protec tion against damage to property and products. Transport and storage NOTICE Frost, corrosion Possibility of leak in the heat sink, contamination of the cooling agent! " Make sure that the cooling system is fully drained prior to storage. " Please note the maximum storage temperature range of all components (refer to information provided in the technical data). Defective or spent batteries Possibility of damage due to defective (leaked) batteries and loss of information stored in the RAM! " Make sure that a backup of important timer data is made prior to its storage. The data in the RAM will be lost when the buffer battery is spent. " For storage of the product (> 2 years), please remove the battery provided as RAM buffer. ENGLISH 3.1 228/402 Bosch Rexroth AG PSI 6xxx | 1070080028 / 06 General information on damage to property and products 3.2 Installation and assembly NOTICE Metal burrs from drilling and sawing work Possibility of short-circuits, damage to electrical equipment, unex pected plant reactions! " All affected components in the switch cabinet should be well parti tioned prior to all work! Non-compliance will result in the extinction of any warranty claims. " Remove all metal burrs carefully after work. Water leakage while connecting cooling water lines ENGLISH Possibility of damage to the electrical equipment, unexpected plant reactions! " All affected components in the switch cabinet should be well parti tioned prior to all work! Non-compliance will result in the extinction of any warranty claims. " Remove residual moisture carefully after work. Leakage in the cooling fluid circuit Possibility of damage to the electrical equipment, unexpected plant reactions! " Install the water-cooled modules so that the units inside the switch cabinet are sufficiently protected against leaking cooling water. Heat accumulation caused by insufficient clearance Possibility of temporary interruption of the welding process, a re duced useful life of the product, destruction of the device, damage to the electrical equipment, unexpected plant reactions! " Make sure that an installation clearance of at least 100 mm re mains above and below the product. 1070080028 / 06 | PSI 6xxx Bosch Rexroth AG 229/402 General information on damage to property and products NOTICE Overheating or condensation due to insufficient cooling " Make sure that the conditions for sufficient cooling set forth in the technical data are met. " Make sure that air-cooled devices are equipped with forced coo ling. Cooling by means of convection is not sufficient! " Make sure that no condensation forms on water-conducting components. If that is not possible, a sufficient discharge and protection against condensation must be provided. Use air conditioning systems, if required. ENGLISH Possibility of temporary interruption of the welding process, a re duced useful life of the product, destruction of the device, damage to the electrical equipment, unexpected plant reactions! 230/402 Bosch Rexroth AG PSI 6xxx | 1070080028 / 06 General information on damage to property and products 3.3 Electrical connection NOTICE Incorrect voltage supply Possibility of damage to the electrical equipment! " Check whether the supply voltage coincides with the nominal vol tage indicated on the nameplate of the product! The product may only connected to the mains if these values coin cide. " Make sure that fluctuations or deviations of the supply voltage from the nominal value always range within the permitted tole rance limits (refer to technical data). Capacitive or inductive interferences in the cables ENGLISH Possibility of function disturbances! " Install the power lines and control cables separately. The following clearances are recommended: > 100 mm with parallel installation of cables < 10m, > 250 mm with parallel installation of cables > 10m. " The product should be installed in close proximity to the welding equipment in order to keep the lengths of the necessary connec tion cords to a minimum. Plugging or unplugging modules or connectors/terminals into/from live systems Possibility of damage to the electrical equipment, unexpected plant reactions! " Unless described otherwise, never unplug or plug any connec tors/terminals on live systems. " The timer's power supply should always be disconnected before inserting/removing any timer modules. 1070080028 / 06 | PSI 6xxx Bosch Rexroth AG 231/402 General information on damage to property and products NOTICE Electrostatic charge " Observe all precautions for ESD protection when handling modu les and components and avoid electrostatic discharge. " Observe the following protective measures for modules and components sensitive to electrostatic discharge (ESD): • Personnel responsible for storage, transport, and handling must have training in ESD protection. • ESD-sensitive components must be stored and transported in the prescribed protective packaging. • ESD-sensitive components may only be handled at special ESD workplaces. • Personnel, working surfaces, as well as all equipment and tools which may come into contact with ESD-sensitive components must have the same potential (e.g. by groun ding). • Wear an approved grounding bracelet. The grounding bracelet must be connected with the working surface through a cable with an integrated 1 megaohm resistor. • ESD-sensitive components may by no means come into con tact with chargeable objects, including most plastic materials. • When inserting or removing ESD in/from other devices, the de vice must be safely disconnected from the supply. ENGLISH Possibility of damage to the electrical equipment! 232/402 Bosch Rexroth AG PSI 6xxx | 1070080028 / 06 General information on damage to property and products 3.4 Operation NOTICE High-frequency interference Possibility of interference with other devices in the environment! " Make sure that no other devices or their functioning can be affec ted if the present product is operated. The product is part of class A resistance welding equipment. Class A resistance welding equipment is designed for industrial networks (also refer to „intended use“ page 211). Use in the public low-voltage network which supplies e.g. residential areas therefore requires special measures. Plugging or unplugging modules or connectors/terminals into/from live systems ENGLISH Possibility of damage to the electrical equipment, unexpected plant reactions! " Unless described otherwise, never unplug or plug any connec tors/terminals on live systems. " Do not ever plug or unplug timer components/modules during operation. Overheating due to insufficient cooling Possibility of temporary interruption of the welding process, a re duced useful life of the product! " Make sure that air-cooled devices are only operated with func tioning forced cooling. Cooling by means of convection is not suffi cient! " Make sure that water-cooled devices are only operated with suffi cient cooling water flow, matching supply temperature and suita ble cooling fluid quality. For further information, please refer to technical data. Strong electromagnetic fields during the welding sequence Possibility of damage to wrist watches/pocket watches, floppy disks or even cards with magnetic strips (e. g. EC cards)! " Therefore, you should not carry any such items on you when wor king in the direct vicinity of the welding equipment. 1070080028 / 06 | PSI 6xxx Bosch Rexroth AG 233/402 General information on damage to property and products Maintenance and repair NOTICE Plugging or unplugging modules or connectors/terminals into/from live systems Possibility of damage to the electrical equipment, unexpected plant reactions! " Unless described otherwise, never unplug or plug any connec tors/terminals on live systems. " The timer's power supply should always be disconnected before inserting/removing any timer modules. Improper handling of lithium batteries Possibility of environmental hazards! " Dispose of spent batteries in accordance with the provisions of the law only. Electrostatic charge Possibility of damage to the electrical equipment! " Observe all precautions for ESD protection when handling modu les and components and avoid electrostatic discharge. " Observe the following protective measures for modules and components sensitive to electrostatic discharge (ESD): • Personnel responsible for storage, transport, and handling must have training in ESD protection. • ESD-sensitive components must be stored and transported in the prescribed protective packaging. • ESD-sensitive components may generally only be handled at special ESD workplaces. • Personnel, working surfaces, as well as all equipment and tools which may come into contact with ESD-sensitive components must have the same potential (e.g. by groun ding). • Wear an approved grounding bracelet. The grounding bracelet must be connected with the working surface through a cable with an integrated 1 megaohm resistor. • ESD-sensitive components may by no means come into con tact with chargeable objects, including most plastic materials. • When inserting or removing ESD in/from other devices, the de vice must be safely disconnected from the supply. ENGLISH 3.5 234/402 Bosch Rexroth AG General information on damage to property and products ENGLISH Notes: PSI 6xxx | 1070080028 / 06 1070080028 / 06 | PSI 6xxx Bosch Rexroth AG 235/402 Scope of delivery Scope of delivery The scope of delivery is dependent on the order. Therefore we cannot provide any globally valid information on the scope of your specific delivery. " Check the scope of delivery against the delivery note. ENGLISH 4 236/402 Bosch Rexroth AG Scope of delivery ENGLISH Notes: PSI 6xxx | 1070080028 / 06 1070080028 / 06 | PSI 6xxx Bosch Rexroth AG 237/402 Information on this product Information on this product The units of the PSI 6xxx series include by default • weld timer (WT), and • medium-frequency power unit (MF inverter). Tasks of the MF inverter: • generating the required %I • controlling a medium-frequency welding transformer (MF trans former, e.g. PSG) Tasks of the weld timer: • control, regulation and monitoring of all programmed welding sche dules • controlling the integrated MF inverter • Communication with devices on the same process level via I/O connection (e.g. robot, PLC, operator panel). Purpose: integration of the product into the automation process. • Communication with devices on a higher host level (e.g. area center, programming terminal). Purpose: programming, display of status/messages/errors, logging, operation. In addition to various timer types that can be mainly distinguished by their I/O connection to the host PLC/robot unit and the timer functio nality, different types of power units (please refer to table on page 238) with different cooling methods (air/water) and graduated power ratings are also available for controlling an MF welding transformer. Therefore additional documents exist for each timer type which de scribe the type-specific weld timer functionality. Main features • Timer concept for direct current welding (DC welding) • Suitable for activation of numerous MF welding transformers • The integrated weld timer is suited for spot (e.g. in connection with a robot), projection, repeat (e.g. manual guns) and standard seam welding tasks (e.g. roll seam). The PSI 6xxx.190 types are especially suited for seam welding tasks (refer to the table on page 238). • The integrated weld timer is suitable for spot welding (e.g. in combi nation with a robot), projection welding, repeat welding (e.g. manual guns), and seam welding tasks (e.g. roll seam) • Integrated regulation and monitoring in a 1 ms cycle • Separation between regulation and monitoring • High functionality for optimization of welding quality • Ability to switch between primary current measurement (no external current sensor necessary in the secondary circuit) and secondary current measurement (external current sensor in the secondary cir cuit necessary) • Different cooling systems (air, water) and graduated power ratings available. For information on dimensioning and load, refer to Section 5.3. ENGLISH 5 238/402 Bosch Rexroth AG PSI 6xxx | 1070080028 / 06 Information on this product • Broad variety of available I/O interfaces for communication with PLC, robot or for connection of machine control panel • Optionally available field bus interfaces for communication with a higher host level • Comfortable programming, operation and diagnosis via PC software (”BOS” user interface). In Section 5.1 you will find a detailed list of the features. Table 8: Overview of the types of power units Design Type Cooling ENGLISH Air … with standard CPU PSI 6100.xxx L1 PSI 6100.xxx L2 PSI 6100.xxx W1 PSI 6100.190 W1 PSI 6100.xxx W2 PSI 6200.xxx W1 PSI 6200.190 W1 PSI 6300.xxx L1 PSI 6300.xxx L2 PSI 6300.xxx W1 PSI 6300.xxx W2 PSI 6500.xxx W1 PSI 6500.190 W1 ... with TriCore CPU PSI 61C0.xxx L1 PSI 61C0.xxx L2 PSI 61C0.xxx W1 PSI 62C0.xxx W1 PSI 62C0.190 W1 PSI 63C0.xxx L1 PSI 63C0.xxx L2 PSI 63C0.xxx W1 PSI 63C0.xxx W2 PSI 64C0.xxx W1 PSI 65C0.xxx W1 PSI 65C0.190 W1 Water n n Mains supply 400 ... 480 V 500 ... 690 V also available with functionality1) Seam Master/ Slave n n n n n n n n n n n n n n n n n n n n n n n n n n n n n n n n n n n n n n n n n n n n n n n n n n n n n n max. welding current2) in kA 3 ... 20 3 ... 20 3 ... 20 3 ... 5 3 ... 20 9 ... 16 3 ... 5 6 ... 36 6 ... 36 6 ... 36 6 ... 36 9 ... 120 9 ... 50 3 ... 20 3 ... 20 3 ... 20 9 ... 54 9 ... 16 6 ... 36 6 ... 36 6 ... 36 6 ... 36 9 ... 54 9 ... 120 9 ... 50 1) Seam: Special WT exclusively for seam welding with rolling electrodes. Main difference to standard seam function of ”normal“ WTs: the welding cycle can be adjusted to the respective current path feedrate, reduced output currents, only primary current measurement/regulation Master/Slave: Synchronization of up to max. 3 PSI 6500.xxx of the same type to increase the welding %I. Welding currents of 360 kA using transformers with a transmission of n=50 can be reached in the process. 2) dependent on the welding transformer used 1070080028 / 06 | PSI 6xxx Bosch Rexroth AG 239/402 Information on this product Description of performance • User interface for operation, programming and diagnosis: - complete graphical user interface BOS, executable on PCs with operating systems Windows XP with Ser vice Pack 3 or higher. - with limited functional scope using the small operator terminal VCP05.2 (link via RS232 or Ethernet). • optional access protection for operation/programming - by registration with own user name and own password • Programming link to PC (BOS). - Standard: for one individual timer via V24/RS232 (e.g. for local programming) - Option: simultaneous connection of several timers via field bus interface (e.g. Ethernet). • Type-dependent I/O connections (communication with, e.g., robot/PLC): - parallel (discrete I/O wiring) - serial (via bus system): ProfibusDP InterbusS DeviceNet Ethernet-IP ProfiNet • Number of programs: - 256 (more programs are also possible, depending on the type) - symbolic spot addressing is possible. • Programming of times in millisecond intervals • Universal adaptability of the welding schedule - 3 programmable weld times (PreWLD: pre-heating time, Main WLD: welding current time, PstWLD post-heating time). The weld times can be jointly operated in a single control mode (standard mode) and in different control modes (mixed mode). - PreWLD and PstWLD can be deactivated - programmable pulse operation for MainWLD - programmable slope (current upslope/downslope time) for Main WLD • Welding modes: - spot welding (e.g. for applications with a robot) - repeat welding (e.g. in applications with manual guns) - Roll seam • Closed-loop control modes: - PHA (phase angle) - KSR (CCR - Constant-current regulation) - UIR (adaptive controller; optional) PHA and KSR control modes can be separately configured for each weld time (mixed operation). UIR only in MainWLD. • Current monitoring: ENGLISH 5.1 240/402 Bosch Rexroth AG PSI 6xxx | 1070080028 / 06 Information on this product - Reference currents can be programmed independent of the regu lation command values - Tolerance band in percent, with asymmetric programming capab ility - Standard or mixed mode (mixed mode: monitoring can be sepa rately configured for PreWLD, MainWLD and PstWLD). • Automatic spot repetition if current was too low ENGLISH • Time monitoring • Electrode management: - Management of up to 31 electrodes (number dependent on type of timer) - Stepper function for %I (%I stepping) - Electrode tip dressing including initial dressing - Stepper function for pressure (electrode force stepping) - Warning table with graphic representation of electrode wear • Generating the gun force: - Programming the force in kN for each welding program - Output as analog (voltage, current) and/or digital actuating vari able (depending on timer type) - Analog or digital feedback (depending on timer type) - Force calibration for adjustment of the actuating variable to the actuators used • Pressure profile: - up to 10 different electrode forces can be programmed during a program schedule • Freely programmable output: (depending on timer type): up to 3 different on/off times during a program schedule can be pro grammed. Serves e.g. for controlling a back-pressure control valve or generally for triggering further processes. • Calibration: - for current (to adjust the welding equipment to an external refer ence ammeter) - for force (to adjust the electrode force to an external reference force meter) • Logging functions (ISO 9000): - Fault/event log - Weld fault protocol - Data change protocol - Welding current log • integrated diagnosis memory • Fault allocation: - certain process errors/faults can be programmed as “faults” or “warnings“ • Status display of I/O signals in online mode • %I correction: - program-specific input - electrode-specific input • General overview of the welding equipment in the plant image • Global timer display of - Start inhibit (P) 1070080028 / 06 | PSI 6xxx Bosch Rexroth AG 241/402 Information on this product - Weld internal on (P) - Time monitoring - Current monitoring - Current mode in MainWLD (PHA / KSR) - Electrodes used - Programs using a certain electrode. • Backup/Auto-Backup (data backup) • Restore (data retrieval) • Copying welding programs • Comparison between timers and/or backup files ENGLISH • Start simulation: - Program selection and schedule start can be initiated by BOS • Online and offline programming is possible. 242/402 Bosch Rexroth AG PSI 6xxx | 1070080028 / 06 Information on this product 5.2 Product description Timer and power unit assembled in a joint housing. PSI 6500.XXX PSI 6200.XXX PSI 6100.XXX ENGLISH PSI 6300.XXX 1 2 3 1 2 3 1 2 3 Fig.1:Examples: Medium-frequency inverter with standard CPU 1 Functional area ”cooling“. For information on heat sink/ cooling water connections, refer to Section 7.1.1 and 7.3. 3 Functional area ”weld timer“ and ”I/O connection“. For details, refer to page 248 et seq. 2 Functional area ”MF inverter“. Line connection: Page 328 Transformer connection: Page 330 Available types: refer to page 238, table 8: Overview of the types of power units. 1070080028 / 06 | PSI 6xxx Bosch Rexroth AG 243/402 Information on this product Programming and operation All necessary parameters are always kept in a battery-buffered RAM in side the timer. Operation, programming and diagnosis are performed via the connec ted PC. The following options are available for connecting the PC: • V24 interface X1 (for the PSI 6x00.xxx types) • V24 interface X3C or USB interface X3U (for the PSI 6xCx.xxx types; can be used alternatively) • optionally available field bus interface (e.g. Ethernet). While the V24/USB connection is intended for accessing a single timer only (e.g. local programming), the field bus interface provides for the si multaneous connection of several timers. Conditions for programming and operation at the PC: • PC with operating system Windows XP with Service Pack 3 or higher • BOS software (Bedienoberfläche Schweissen = welding user inter face) • V24/USB interface cable or corresponding installation for field bus interface. Via BOS both "online" and "offline” programming are possible. • offline: no active connection to timer possible. Diagnosis or visualization are not possible. Programming is carried out on the PC, where the program is stored and can be transferred to the timer later. • online: requires active connection to timer. Diagnosis and visualization are possible. Programming is carried out on the PC. Each parameter is retrieved from the timer and written back to the timer after confirmation. As a result, any parameters that have been modified will take effect upon the next program start of the systemat the latest. For detailed information on the BOS software, please refer to the BOS online help. ENGLISH 5.2.1 244/402 Bosch Rexroth AG PSI 6xxx | 1070080028 / 06 Information on this product 5.2.2 Functional principle of medium-frequency welding PSI 6xxx PSG + 3~ 1000 Hz Weld timer MF inverter Transformerrectifier Welding equipment Fig.2:Block diagram overview: PSI 6000 with transformer The MF inverter integrated in the PSI controls the welding transformer by a bipolar, rectangular voltage with a frequency of 1000 Hz. In order to influence the resulting heat in the secondary circuit, the pulse width is adjusted (refer to Fig. on following page). ENGLISH Secondary rectification of the weld current is performed in the PSG. 6-pole bridge rectifier Mains 50/60 Hz L1 U1 L2 V1 L3 W1 Direct current link circuit Transistorized transformer-rectifier PSI Driver Power supply Controller U2 U V2 V Welding transformer to temperature monitoring Weld timer PSG to constant-current regulation in the PSI * Rectifier Secondary vol tage tapping * *: depending on trans former design to electrode gun Fig.3:Detailed block diagram of a medium-frequency inverter system 1070080028 / 06 | PSI 6xxx Bosch Rexroth AG 245/402 Information on this product Medium‐frequency inverter output voltage resulting welding current U I t t 1 ms Fig.4:Secondary rectification by the PSG transformer small pulse width f = 1 kHz ENGLISH Primary voltage UPRIM resulting se condary current ISEC Primary voltage UPRIM resulting heat large pulse width f = 1 kHz resulting se condary current ISEC resulting heat Fig.5:Interrelationship: Pulse width of primary voltage and secondary current with medium-frequency welding 246/402 Bosch Rexroth AG PSI 6xxx | 1070080028 / 06 Information on this product 5.2.3 Structure The power unit is permanently installed in the left part of the housing, the timer module in the right side of the housing. The power unit is always provided with connections for • mains supply, • welding transformer and • cooling water (only for types with water cooling). The timer module includes display and operating elements in addition to all connections/modules for coupling the PSI 6xxx to the higher level PLC/robot unit and to the programming terminal. Timer module: • Communication with robot/PLC • Communication with programming device (BOS) U1 Mains via RS232 or USB (depending on type) V1 • Communication with programming device (BOS) W1 via field bus (optional) ENGLISH • Inclusion of various additional modules For details, please refer to page 248 et seq. Power unit: • Generating the %I PSI 6xxx • Controlling the medium-frequency welding transformer *): Options for welding current measurement: • Current sensor in the secondary circuit of the PSG • Separate secondary circuit current sensor • Current sensor in the primary circuit of the PSI Transformer U2 V2 to constant-current regulation (KSR) Voltage tapping (necessary for the optio nal UI regulation) Current sensor*) MF welding transformer (PSG) Primary circuit Electrodes Secondary circuit Fig.6:General structure of an MF welding system with PSI 6xxx The dimensions of the unit's housing and the functional units for coo ling depend on the size of the integrated power unit, therefore, they may differ from the example shown in the figure above. Bosch Rexroth AG 247/402 Information on this product For information on assembly and connection, please refer to Sec tion 7 from page 309. Additional documents are available for the description of typedependent functions/connections of the timer (refer to page 207). A separate document exists for the available medium-frequency transformers (refer to page 207). For detailed information on the BOS software, please refer to the BOS online help. ENGLISH 1070080028 / 06 | PSI 6xxx 248/402 Bosch Rexroth AG PSI 6xxx | 1070080028 / 06 Information on this product 5.2.3.1 Partial front-panel view PSI 6x00.xxx LOGIC LED; green. Is on when 24 VDC (logic power supply) is available. DC LINK CIRCUIT LED; red (only operative if LOGIC LED is illumina ted in green). Is on if DC link voltage is present. READY LED; green. Is on if no error is present in the timer. The unit is ready for welding. RESET button. Returns the timer to READY state when a fault has occur red (and has been corrected). DIP switch. Function depends on timer type. A D R ”Boot” key for calling up the ”Boot” mode. Required for a firmware upgrade in connection with the ”WinBlow” software (refer to page 359). Welding is not possible in ”Boot” mode. Exiting Boot mode: Toggle 24 V logic voltage off / on. V24 connection to programming terminal (for programming on location). Refer to Sect. 7.2.4 from page 330. 24 VDC output for power supply to I/O module (refer to page 334). 24 VDC output of the internal voltage source (refer to page 333). 24 VDC input for logic power supply (refer to page 332). Terminals for 24 VDC voltage distribution (refer to page 335). Temperature-controlled 24 VDC supply output for the supply/control of external fans (refer to page 338). X1 X4 24 VDC output, e.g. for power supply to external consumers. Refer to Sect. 7.2.10 on page 339. X5 Terminals for ”Main switch release“ (refer to page 347) X8 Type-dependent: Analog output for force actuating variable. Refer to Sect. 7.2.11 from page 340. Type-dependent: Digital (24 VDC) and analog (0..10 VDC) input for (force) feedback. Refer to Sect. 7.2.12 from page 341. Type-dependent: Output for ”Operate” signal output. Type-dependent: Analog input for (force) feedback. Refer to Sect. 7.2.12 from page 341. Type-dependent: 0 V reference for output ”Operate”. Measuring input for secondary current measurement. Refer to Sect. 7.2.13 on page 343. Type-dependent: Output/input for monitoring the transformer temperature (refer to Sect. 7.2.14 on page 345). Battery for buffering the unit's internal RAM (for replacement of battery, please refer to page 356). Fig.7:Partial front-panel view PSI 6x00.xxx X2 X9 X3 Optional fieldbus module. Refer to page 252 et. seq. ENGLISH Boot LED; red. Is on while the timer is in ”Boot” mode. Optional ultrasonic or U/I controller system (PSQ 6000 XQR) BATTERY FAULT LED; red. Is on if a new battery is to be inserted (refer to page 356). Type‐specific I/O module. Refer to page 262 et seq. WELD TIME LED; yellow. Is on while the power unit is activated. 1070080028 / 06 | PSI 6xxx Bosch Rexroth AG 249/402 Information on this product The LEDs can only display the status of the WT if the logic supply voltage is present! NOTICE Arbitrary pressing of the boot button Possibility of negative effects on the ongoing production! " Do not ever activate the boot button during ongoing production. " The boot button may be activated by authorized personnel only. ENGLISH When you press the boot button, the timer aborts the program se quence, resets all signal outputs and returns to the ”boot” mode (to firmware upgrade). 250/402 Bosch Rexroth AG PSI 6xxx | 1070080028 / 06 Information on this product 24 VDC output for power supply to I/O module (refer to page 334). 24 VDC output of the internal voltage source (refer to page 333). 24 VDC input for logic power supply (refer to page 332). Terminals for 24 VDC voltage distribution (refer to page 335). Temperature-controlled 24 VDC supply output for the supply/control of external fans (refer to page 338). 24 VDC output, e.g. for power supply to external consumers. Refer to Sect. 7.2.10 on page 339. Terminals for ”Main switch release“ (refer to page 347) Type-dependent: Analog output for force actua ting variable. Refer to Sect. 7.2.11 from page 340. Type-dependent: Digital (24 VDC) and analog (0..10 VDC) input for (force) feedback. Refer to Sect. 7.2.12 from page 341. Measuring input for secondary current measurement. Refer to Sect. 7.2.13 on page 343. Type-dependent: Output/input for monitoring the transformer temperature (refer to Sect. 7.2.14 on page 345). Measuring input for secondary voltage measurement in the case of UI regulation. Refer to Sect. 7.2.15 on page 346. Connector for programming unit (for local programming) (refer to Sect. 7.2.4 from page 330. X3C: RS232 / V24 or alternatively X3U: USB X4 X5 X8 X2 X9 X3 DC LINK CIRCUIT LED: Illuminated red if DC link voltage is present. STATUS LED: Illuminated yellow while the power unit is activated (weld time) Illuminated red if no firmware has been loaded or while the timer is in "Boot" mode. Type-specific: AnyBus module. E.g. for communication with a programming terminal (BOS), connection of serial I/O to robot/ PLC (ProfiNet). For information on the modules and their LED displays, refer to page 252 et seq. For installation/removal, refer to page 374. Battery for buffering the unit's internal RAM (for replacement of battery, please refer to page 356). Slot for licence memory card. Refer to page 376. Diagnosis module, for fault display, fault reset, activating the boot mode, weld timer reset. (Refer to Sect. 5.2.4.6 on page 258.) Fig.8:Partial front-panel view PSI 6xCx.xxx X3C X3U X7E1 Optional field bus module. Refer to page 252 et. seq. ENGLISH Type-dependent: Output for ”Operate” signal output. Type-dependent: Analog input for (force) feedback. Refer to Sect. 7.2.12 from page 341. Type-dependent: 0 V reference for output ”Operate”. Optional module Partial front-panel view PSI 6xCx.xxx Type‐specific I/O module. Refer to page 262 et seq. 5.2.3.2 Bosch Rexroth AG 251/402 Information on this product The LEDs can only display the status of the WT if the logic supply voltage is present! ENGLISH 1070080028 / 06 | PSI 6xxx 252/402 Bosch Rexroth AG PSI 6xxx | 1070080028 / 06 Information on this product 5.2.4 Modules 5.2.4.1 AnyBus module ”ProfiNet IO“ Features: • Suitable for PSI 6xCx.xxx (slot X7E1) • ProfiNet (RT classification, conformity class B) • Fast Ethernet (100 Mbit/s), full-duplex mode • Available as 1-port or 2-port variant. 2-port variant with integrated switch • Integrated WEB server • Simple IP configuration Function: • Connects the timer I/O to the higher-level PLC or the robot via Pro fiNet and • connects the timer to a programming terminal (BOS) via Ethernet. PSI 6xCx.xxx 1 2 ENGLISH 3 4 5 ETH1 6 7 Fig.9:AnyBus module ”ProfiNet IO“ (2-port variant) 1 Fastening screws 2 LED for network status (with respect to ProfiNet controller): Off: no connection to ProfiNet controller Green: connection to ProfiNet controller established Green, flashing: connection to ProfiNet controller established, ProfiNet controller is in stop mode 3,5 LED for Link/Activity (port 1/port 2): Off: no connection to network Green: connection to network established Green, flashing: data transfer active 4,6 Ethernet port connectors with integrated switch 4: Port 1; 6: Port 2 1070080028 / 06 | PSI 6xxx Bosch Rexroth AG 253/402 Information on this product 7 LED for module status: Off: module not initialized Green: module is working normally Green, flashing once: diagnostic event detected Green, flashing twice: triggered by SW tool for module identification in the network Red: module error that can possibly be corrected by rebooting the timer Red, flashing once: configuration error Red, flashing twice: IP address not defined Red, flashing 3 times: station name not defined Red, flashing 4 times: module error For information on installation, refer to Section 13.2.1 from page 374. ENGLISH Use the "AnyBus IPconfig" software for the configuration of the Ethernet (installation file is included in the BOS software package, refer to BOS data medium: directory path "Tools/Anybus”). 254/402 Bosch Rexroth AG PSI 6xxx | 1070080028 / 06 Information on this product 5.2.4.2 AnyBus module ”CC Ethernet 100 Mbit” Features: • Suitable for PSI 6xCx.xxx (slot X7E1) • Fast Ethernet (100 Mbit/s), full-duplex mode • Available as 1-port or 2-port variant. 2-port variant with integrated switch • Integrated WEB server • Simple IP configuration Function: • For the simultaneous connection of several timers to the host level via Ethernet (e.g. connection BOS programming terminal). 1 2 3 ENGLISH ETH1 4 5 Fig.10: AnyBus module ”CC Ethernet 100 Mbit” (1-port variant) 1 Fastening screws 2 NS LED: Network Off: Green Green, flashing Red Red, flashing 3 Ethernet interface. RJ45 female connector 4 LINK LED: Connection status. Off No connection, no activity Green Connection established Green, flickering Data transmission active 5 MS LED: Module status. Off No power supply Green Normal function Red Severe error or fatal event Red, flashing Light error status. No power supply or no IP address The module is active or in wait mode Waiting for connection Double IP address or fatal event Module not active For information on installation, refer to Section 13.2.1 from page 374. Use the "Anybus IPconfig" software for the configuration of the Ethernet (installation file is included in the BOS software package, refer to BOS data medium: directory path "Tools/Anybus”). 1070080028 / 06 | PSI 6xxx Bosch Rexroth AG 255/402 Information on this product 5.2.4.3 ”CC Ethernet 100 Mbit“ module Features: • Suitable for PSI 6xxx.xxx (slot for field bus module) • Ethernet plug-in module on the basis of an AnyBus module. • Fast Ethernet (100 Mbit/s), full-duplex mode • Available as 1-port or 2-port variant. 2-port variant with integrated switch • Integrated WEB server • Simple IP configuration Function: For the simultaneous connection of several timers to the host level via Ethernet (e.g. connection BOS programming terminal). 1 2 PSI 6xCx.xxx ETH2 Fig.11: ”CC Ethernet 100 Mbit” module 1 Screw for attachment of the module 2 AnyBus module ”CC Ethernet 100 Mbit” (here: with 1 port) For details, please refer to Sect. 5.2.4.2, page 254. Use the "Anybus IPconfig" software for the configuration of the Ethernet (installation file is included in the BOS software package, refer to BOS data medium: directory path "Tools/Anybus”). ENGLISH PSI 6x00.xxx 256/402 Bosch Rexroth AG PSI 6xxx | 1070080028 / 06 Information on this product 5.2.4.4 ”CC ProfiNet“ module ENGLISH Features: • Suitable for PSI 6xxx.xxx (slot for fieldbus module) • ProfiNet plug-in module on the basis of an AnyBus module. • ProfiNet (RT classification, conformity class B) • Fast Ethernet (100 Mbit/s), full-duplex mode • Available as 1-port or 2-port variant. 2-port variant with integrated switch • Integrated WEB server • Simple IP configuration also via ”Anybus IPconfig” software Function: • Connects the timer I/O to a higher-level PLC or robot via ProfiNet and • Connects the timer to a programming terminal (BOS) via Ethernet. PSI 6x00.xxx 1 2 PSI 6xCx.xxx ETH2 Fig.12: ”CC ProfiNet“ module 1 Screw for attachment of the module 2 ”CC ProfiNet” AnyBus module (here: with 2 ports). For details, please refer to Sect. 5.2.4.1, page 252. Use the "Anybus IPconfig" software for the configuration of the Ethernet (installation file is included in the BOS software package, refer to BOS data medium: directory path "Tools/Anybus”). 1070080028 / 06 | PSI 6xxx Bosch Rexroth AG 257/402 Information on this product 5.2.4.5 Module ”Optical fiber ProfiNet“ Features: • Suitable for PSI 6xxx.xxx (slot for fieldbus module) • Optical fiber ProfiNet withdrawable module • ProfiNet interface according to IRT classification, conformity class C • Integrated WEB server • Simple IP configuration via ”Anybus IP config” software Function: • Linking the timer I/O to the higher-level PLC or the robot • and linking the timer to a programming terminal (BOS) via Ethernet. PSI 6xCx.xxx 1 2 ENGLISH PSI 6x00.xxx 3 ETH2 4 6 5 7 Fig.13: “Optical fiber ProfiNet” module 1 Screw for attachment of the module 2 X51: SC-RJ-optical fiber connection port 1 3 X52: SC-RJ-optical fiber connection port 2 4 / 6 LED „L/A x“ for link/activity (port 2 or 1, respectively): off: no connection to network green: connection to network established green, flashing: data transfer active 5 LED„ms“ for module status: off: module not initialized green: module is working normally green, flashing once: diagnostic event detected green, flashing twice: triggered by SW tool for module identification in the network red: module error that can possibly be corrected by rebooting the timer red, flashing once: configuration error red, flashing twice: IP address not defined red, flashing 3 times: station name not defined red, flashing 4 times: module error 7 LED „CS“ for communication status (regarding ProfiNet controller): off: no connection to ProfiNet controller green: connection to ProfiNet controller established green, flashing: connection to ProfiNet controller established, ProfiNet controller is in stop mode 258/402 Bosch Rexroth AG PSI 6xxx | 1070080028 / 06 Information on this product 5.2.4.6 Diagnosis module Only in combination with PSI 6xCx.xxx. 8-digit display Esc B Y Enter Fig.14: Diagnosis module: Front panel view ENGLISH Functions: • Display the timer status, type, time, Ethernet configuration • Reset faults / warnings • Activate Boot mode • Trigger "Timer Reset" (timer will be rebooted) • Test display. If nothing is shown on the display except the backlight, or if the STA TUS LED (cf. page 250) is illuminated red, the following timer sta tuses may be present: • No timer firmware available. Remedy: Load firmware. • Timer boot mode is active. Remedy: Initiate "Load firmware" or wait until firmware load has been completed. Effect of control keys Esc Y (Up) B (Down) Enter Return to previous display / level. Move up within a menu. Move down within a menu. Acknowledge - or - call up the next display / level. The Y and B keys both have an autorepeat function. If these keys are pressed down for more than one second, the autorepeat function is activated. Automatic displays INIT: the timer is currently booting RUN: the timer is in "Ready" state (normal state) RUN <w>: a warning is present. <w> represents the warning code. An additional code de fined, if any, is visualized by an arrow to the right. The "En ter" key displays the additional code. <f>: a fault is present. <f> represents the fault number and additional code. The fault must be eliminated and reset in order to return the timer to "Ready" state. 1070080028 / 06 | PSI 6xxx Bosch Rexroth AG 259/402 Information on this product Hardware faults cannot be reset. Self-acknowledging faults are automatically reset by the system when the cause of the fault is no longer present (e.g. line voltage off/ on). The display can also show more information concerning any faults present (refer to section "Displaying more information" starting on page 259). After approx. 3 min without pressing a key, the display returns to the fault display. For code numbers with explanations and possible remedies, refer to the BOS Online Help function, Section „Messages“. Displaying more information In both cases, you can access more information that can be selected via the "main menu". Main menu Enter Display TYPE Esc B Y Enter Display ETHERNET Esc B Y Enter Display DISPLAY Esc B Y Enter Display TIME Esc Fig.15: Diagnosis module: Main menu TYPE main menu item Ticker showing the timer type, drawing number and version. Possible keys at this level: • ”ESC”: Return to the main menu. • ”Enter”: The ticker will stop. The information can now be retrieved in static blocks of 8 characters, each, using the "Enter" and "ESC" keys. ENGLISH When the timer has booted (INIT is displayed), it is in "Ready" state (RUN is displayed) or in a fault state (display of fault number and additional code). 260/402 Bosch Rexroth AG PSI 6xxx | 1070080028 / 06 Information on this product ETHERNET main menu item: Display showing the Ethernet configuration of the AnyBus module (ETHERN.1) or - if inserted - of the ”CC Ethernet 100 Mbit“ module (ETHERN.2). The following diagram provides an overview of the structure: to / from main menu 1 2 Esc Enter Enter ETHERN.1 B Y Enter IP addr.<n> Esc Y B ETHERN.2 Y Structure same as ETHERN.1 B B ETHERN.1 ETHERN.2 Esc Enter 3 Subnet<n> Y n = 1: n = 2: 3 Esc Enter Gateway<n> Y B 3 Esc Enter ENGLISH B Y Enter <y> <x> MAC addr.<n> Esc Esc 1 2 Enter 3 ExAA:<1> Enter ExBB:<2> Esc Enter ExCC:<3> Esc ExDD:<4> Esc <x>: MAC address part 1 <x>: MAC address part 2 Example: MAC address = 00-e0-98-82-c9-79 x = 00-e0-98, y = 82-c9-79 <1>: <2>: <3>: <4>: 1st number block of the address 2nd number block of the address 3rd number block of the address 4th number block of the address Example: IP address = 192.168.0.1 <1> = 192, <2> = 168, <3> = 000, <4> = 001 Fig.16: Diagnosis module: ETHERNET menu DISPLAY main menu item: Display test The test always starts by driving all pixels. Afterwards, all available characters can be scrolled through using the Y and B keys. "ESC" leads back to the main menu. TIME main menu item: Display shows the timer's date and time. "ESC" leads back to the main menu. The timer's time and date are automatically synchronized with the PC clock if BOS is active. Manual settings are not necessary. Reset warnings 1. Press the "Enter" key several times until the display shows "Quit". 2. Press the "ESC" key to cancel acknowledgement, or the "Enter" key to acknowledge the warning. 1070080028 / 06 | PSI 6xxx Bosch Rexroth AG 261/402 Information on this product Reset faults 1. Press the "Enter" key. The display now shows "Err Quit". 2. Press the "ESC" key to cancel acknowledgement, or the "Enter" key to acknowledge the fault. Activate Boot mode NOTICE Arbitrary activation of the boot mode Possibility of negative effects on the ongoing production! " Do not ever activate the boot mode during ongoing production. " The boot mode may be activated by authorized personnel only. " Press the "ESC" and "Enter" keys simultaneously. The display shows "Boot! x". x: seconds remaining until boot mode is activated. Within the time remaining, activation of this function can be aborted by releasing the keys. Initiate timer reset NOTICE Arbitrary activation of WT reset Possibility of negative effects on the ongoing production! " Do not ever activate WT reset during ongoing production. " WT reset may be activated by authorized personnel only. When timer reset has been activated, welding is no longer possi ble until the timer has completely booted! The timer cancels pro gram execution and resets all signal outputs. " Press the B and "Enter" keys simultaneously. The display shows "Reset! x". x: seconds remaining until timer reset is activated. Within the time remaining, activation of this function can be aborted by releasing the keys. ENGLISH The timer aborts the program sequence, resets all signal outputs and goes into the ”boot” mode (for firmware upgrade). 262/402 Bosch Rexroth AG PSI 6xxx | 1070080028 / 06 Information on this product 5.2.4.7 ”E/A DISK R2ED” and ”E/A DISK R4ED“ I/O module Features: • 26 discrete inputs (24VDC) • 1 output as switched relay (1 x ON) • 18 discrete outputs (24VDC) Function: • Coupling of discrete I/O signals. The I/O modules EA DISK R2ED and EA DISK R4ED are identical except for the connector designations (EA DISK R2ED: X1x; EA DISK R4ED: X2x) and an internal coding. If both are used in a WT, the I/O signals used are permanently cou pled to the respective module. That is why all I/O signals always ap pear at the same I/O module even after exchanging the slots of both modules. ENGLISH Table9: Technical data: ”E/A DISK R2ED“ / ”E/ADISKR4ED“ I/O mo dule Operating voltage +24 V= +20 %, -15 % with max. +/-5 % ripple Power input max. 2 A subject to circuitry connected to the signal inputs/ outputs Power loss 0.5 VA per active input 2.4 VA per active output Signal inputs logic 1: +16 V ... +30 V, 20 mA logic 0: -1 V ... +4 V Signal outputs O0, O13...O15: +24 V, max. 0.7 A (for solenoid and prelift valves) O1...O10, O12, O16...O18: +24 V, max. 0.1 A O11: +24 V, max. 0.2 A (floating relay contact) Fusing of signal out puts electronic Voltage supply Connection: Cable length: Cable type: E/A DISK R2ED: X10: 4-pole E/A DISK R4ED: X20: 4-pole STKK, grid 3.5 mm, max. 1.5 mm2. Mating connector is comprised in the delivery. (from power source to consumer) max. 10 m at 0.75 mm2 max. 75 m at 1.5 mm2 unshielded, VDE 0281, 0812 (e.g.: Ölflex) 1070080028 / 06 | PSI 6xxx Bosch Rexroth AG 263/402 Information on this product Discrete signal outputs and inputs Connection: ENGLISH E/A DISK R2ED: X11:8-pole; X12:14-pole; X13:12-pole; X14:16-pole E/A DISK R4ED: X21:8-pole; X22:14-pole; X23:12-pole; X24:16-pole STKK, grid 3.5 mm, max. 1.5 mm2. Mating connectors are comprised in the delivery. Cable length: max. 100 m at 0.5 mm2 Nevertheless, the following applies to O0 and O13...O15: max. 30 m at 0.5 mm2 max. 50 m at 1.0 mm2 max. 100 m at 1.5 mm2 (voltage drop max. 10%) Cable type: unshielded, VDE 0281, 0812 (e.g.: Ölflex) 264/402 Bosch Rexroth AG PSI 6xxx | 1070080028 / 06 Information on this product Signal inputs I0 to I13 (24VDC), with control LED 2x voltage output for power supply to the ext. input circuits (internally tapped from X10) - Signal inputs I14 to I25 (24VDC), with control LED - Signal outputs, with control LED. O0...O10 and O12: 24VDC; O11.x: floating relay contact, max. 0.2 A - Signal outputs O13 to O18 (24VDC), with control LED 0 V reference potential of the 24 VDC signal outputs (internally tapped from X10) ENGLISH - - Power supply to the I/O module (24 VDC) Terminals 1 and 3 linked internally Terminals 2 and 4 linked internally Fig.17: Front panel view: ”E/A DISK R2ED“ I/O module The I/O ‐modules EA DISK R2ED and EA DISK R4ED are identical except for the connector designations (EA DISK R2ED: X1x; EA DISK R4ED: X2x) and an internal coding. 1070080028 / 06 | PSI 6xxx Bosch Rexroth AG 265/402 Information on this product 5.2.4.8 ”E/A DISK” I/O module Features: • 21 discrete inputs (24VDC) • 13 discrete outputs (24VDC) Function: • Coupling of discrete I/O signals. Technical data: ”E/A DISK“ I/O module Operating voltage +24 V= +20 %, -15 % with max. +/-5 % ripple Power input max. 3 A subject to circuitry connected to the signal inputs/ outputs Power loss 0.5 VA per active input 2.4 VA per active output Signal inputs logic 1: +16 V ... +30 V, 20 mA logic 0: -1 V ... +4 V Signal outputs O0: +24 V, max. 1 A (for solenoid valve) O1...O12: +24 V, max. 0.1 A Fusing of signal out puts 2 miniature fuses 5 x 20. O0: M 1.6 A O1...O12: M 1.6 A Voltage supply Connection: Cable length: Cable type: X10: 4-pole; STKK, grid 3.5 mm, max. 1.5 mm2. Mating connector is comprised in the delivery. (from power source to consumer) max. 10 m at 0.75 mm2 max. 75 m at 1.5 mm2 unshielded, VDE 0281, 0812 (e.g.: Ölflex) Discrete signal outputs and inputs Connection: X11: 14-pole; X12: 8-pole; X13: 16-pole STKK, grid 3.5 mm, max. 1.5 mm2. Mating connectors are comprised in the delivery. Cable length: max. 100 m at 0.5 mm2. Nevertheless, the following applies to O0: max. 30 m at 0.5 mm2 max. 50 m at 1.0 mm2 max. 100 m at 1.5 mm2 (voltage drop max. 10%) Cable type: unshielded, VDE 0281, 0812 (e.g.: Ölflex) ENGLISH Table10: 266/402 Bosch Rexroth AG ENGLISH Information on this product - Miniature fuse M 1.6 A; for fusing output O0 - Miniature fuse M 1.6 A; for fusing the outputs O1 to O12 - Signal inputs I0 to I13 (24VDC), with control LED 2x voltage output for power supply to the ext. input circuits (internally tapped from X10) - Signal inputs I14 to I20 (24VDC), with control LED 1x voltage output for power supply to the ext. input circuits (internally tapped from X10) - Signal outputs O0 to O12 (24VDC), with control LED 0 V reference potential of the 24 VDC signal outputs (internally tapped from X10) - Power supply to the I/O module (24 VDC) Terminals 1 and 3 linked internally Terminals 2 and 4 linked internally Fig.18: Front panel view: ”E/A DISK“ I/O module PSI 6xxx | 1070080028 / 06 1070080028 / 06 | PSI 6xxx Bosch Rexroth AG 267/402 Information on this product 5.2.4.9 ”E/A DISK 2R” and ”E/A DISK 4R“ I/O modules Features: • 22 discrete inputs (24VDC) each • 1 output each as switched relay (1 x ON) • 14 discrete outputs (24VDC) each Function: • Coupling of discrete I/O signals. The I/O modules EA DISK R2ED and EA DISK R4ED are identical except for the connector designations (EA DISK R2ED: X1x; EA DISK R4ED: X2x) and an internal coding. If both are used in a WT, the I/O signals used are permanently cou pled to the respective module. That is why all I/O signals always ap pear at the same I/O module even after exchanging the slots of both modules. Technical data: ”E/A DISK 2R“ / ”E/A DISK 4R“ I/O modules Operating voltage +24 V= +20 %, -15 % with max. +/-5 % ripple Power input max. 3 A subject to circuitry connected to the signal inputs/ outputs Power loss 0.5 VA per active input 2.4 VA per active output Signal inputs logic 1: +16 V ... +30 V, 20 mA logic 0: -1 V ... +4 V Signal outputs O0, O13...O15: +24 V, max. 1 A (for solenoid and prelift valves together) O1...O10: +24 V, max. 0.2 A O11...O12: +24 V, max. 0.2 A (floating relay con tact) Fusing of signal out puts 2 miniature fuses 5 x 20. O0, O13...O15: M 1.6 A O1...O10: M 1.6 A Voltage supply Connection: Cable length: Cable type: E/A DISK 2R: X10; 4-pole E/A DISK 4R: X20; 4-pole STKK, grid 3.5 mm, max. 1.5 mm2. Mating connector is comprised in the delivery. (from power source to consumer) max. 10 m at 0.75 mm2 max. 75 m at 1.5 mm2 unshielded, VDE 0281, 0812 (e.g.: Ölflex) ENGLISH Table11: 268/402 Bosch Rexroth AG PSI 6xxx | 1070080028 / 06 Information on this product Discrete signal outputs and inputs E/A DISK 2R: X11: 18-pole; X12: 8-pole; X13: 16-pole E/A DISK 4R: X21: 18-pole; X22: 8-pole; X23: 16-pole STKK, grid 3.5 mm, max. 1.5 mm2. Mating connectors are comprised in the delivery. Cable length: max. 100 m at 0.5 mm2 Nevertheless, the following applies to O0 and O13...O15: max. 30 m at 0.5 mm2 max. 50 m at 1.0 mm2 max. 100 m at 1.5 mm2 (voltage drop max. 10%) Cable type: unshielded, VDE 0281, 0812 (e.g.: Ölflex) ENGLISH Connection: 1070080028 / 06 | PSI 6xxx Bosch Rexroth AG 269/402 - Miniature fuse M 1.6 A; for fusing the outputs O0 and O13 to O15 - Miniature fuse M 1.6 A; for fusing the outputs O1 to O10 - Signal inputs I0 to I13 (24VDC), with control LED 2x voltage output for power supply to the ext. input circuits (internally tapped from X10) - Signal inputs I14 to I20 (24VDC), with control LED 1x voltage output for power supply to the ext. input circuits (internally tapped from X10) - - - Signal outputs, with control LED O0…O10 and O13…O15: (24VDC); O11…O12: floating relay contact, max. 0.2 A 0 V reference potential of the 24 VDC signal outputs (internally tapped from X10) Power supply to the I/O module (24 VDC) Terminals 1 and 3 linked internally Terminals 2 and 4 linked internally Fig.19: Front panel view: ”E/A DISK 2R“ / ”E/A DISK 4R“ I/O module The I/O ‐modules EA DISK R2ED and EA DISK R4ED are identical except for the connector designations (EA DISK R2ED: X1x; EA DISK R4ED: X2x) and an internal coding. ENGLISH Information on this product 270/402 Bosch Rexroth AG Information on this product ENGLISH Notes: PSI 6xxx | 1070080028 / 06 1070080028 / 06 | PSI 6xxx Bosch Rexroth AG 271/402 Information on this product ”E/A IBS OPC with optical fiber” (INTERBUS-S) I/O module Only in combination with PSI 6x00.xxx. Features: • 8 discrete inputs (24VDC) • 8 discrete outputs (24VDC) • INTERBUS-S connection via optical fiber • Networking with programming terminal (BOS) possible via PLC ma ster Function: • Linking the timer's I/Os to the higher-level PLC or the robot • via INTERBUS-S and an optical fiber at X12 to X15 (serial I/Os) and • via discrete 24 V signals at X11 (parallel I/O). • transparent networking of the timer using the optical fiber ports. Ident. code 229 Ident. code 47 Whether or not the INTERBUS-S connection is used for networking the timer can be set on the ADR dip switch (timer front panel). The following applies: • all switches in "off" position: Both the I/O data exchange and networking is handled by the mo dule. The timer responds as an INTERBUS-S drop with the decimal ident. code 229. The programming terminal (BOS) is linked to the PLC via an Ether net port in this application variety which "tunnels" data traffic with the connected weld timers via INTERBUS-S. • at least 1 switch in "on" position: Only I/O data exchange is handled by the module. The timer re sponds as an INTERBUS-S drop with the decimal ident. code 47. Networking with the programming terminal (BOS) is achieved using the Ethernet module in the field bus slot (refer to page 248). Table12: Technical data: ”E/A IBS OPC with optical fiber“ I/O module Operating voltage +24 V= +20 %, -15 % with max. +/-5 % ripple Power input max. 2 A subject to circuitry connected to the signal inputs/ outputs Power loss 0.5 VA per active input 2.4 VA per active output Signal inputs logic 1: +16 V ... +30 V, 20 mA logic 0: -1 V ... +4 V Signal outputs +24 V, max. 0.1 A , short-circuit-proof ENGLISH 5.2.4.10 272/402 Bosch Rexroth AG PSI 6xxx | 1070080028 / 06 Information on this product Voltage supply Connection: Cable length: Cable type: X10: 4-pole; STKK, grid 3.5 mm, max. 1.5 mm2. Mating connector is comprised in the delivery. (from power source to consumer) max. 10 m at 0.75 mm2 max. 75 m at 1.5 mm2 unshielded, VDE 0281, 0812 (e.g.: Ölflex) Discrete signal outputs and inputs Connection: Cable length: Cable type: X11: 16-pole; STKK, grid 3.5 mm, max. 1.5 mm2. Mating connector is comprised in the delivery. max. 100 m at 0.5 mm2 unshielded, VDE 0281, 0812 (e.g.: Ölflex) INTERBUS-S connection ENGLISH IBS-IN connection: X14 and X15 (coming from the previous node); X14: Receive LED, X15: Transmit LED IBS-OUT connection: X12 and X13 (going to the next node); X12: Receive LED, X13: Transmit LED Cable length: according to INTERBUS-S specification Cable type: optical fiber, according to INTERBUS-S spe cification 1070080028 / 06 | PSI 6xxx Bosch Rexroth AG 273/402 Information on this product Diagnosis messages of the module: - TR: Transmit/Receive; no meaning in this case. - CC: Cable check; bus connection (coming from the previous IB‐S node) exists. Is switched off in the case of reset at the master. - UL: Unit Supply; illuminated: supply voltage is present (X10). - BA: Bus Active; illuminated: data transfer takes place. - RD: Remote Disable; illuminated: indicates that the bus connec tion (to the next IB‐S node) is switched off. - FO1: Illuminated if incoming optical fiber disturbed. - FO2: Illuminated if outgoing optical fiber disturbed X15 INTERBUS-S connection IN for optical fiber connection (coming from the previous IB‐S node) X14 X12 - Signal inputs I0 to I7 (24VDC), with control LED X11 - Signal outputs O0 to O7 (24VDC), with control LED X11 - Power supply to the I/O module (24 VDC) Terminals 1 and 3 linked internally Terminals 2 and 4 linked internally Fig.20: Front panel view: ”E/A IBS OPC with optical fiber“ I/O module X10 ENGLISH X13 INTERBUS‐S connection OUT for optical fiber connection (going to the next IB‐S node) 274/402 Bosch Rexroth AG PSI 6xxx | 1070080028 / 06 Information on this product Setting of baud rate and transmission power " The transmission power must not be changed without consulting with us. I/O module 8 7 1 off on Front side Transmission power Baud rate: on: 500 kB off: 2 MB ENGLISH Manual markings with the factory settings for trans mission power. Fig.21: ”E/A IBS OPC with optical fiber“ I/O module: Setting of transmission power and the baud rate. The power of the transmission diodes is calibrated ex factory. The manual markings show the factory settings of the transmission power switches. Thus the factory setting can be restored any time. 1070080028 / 06 | PSI 6xxx Bosch Rexroth AG 275/402 Information on this product 5.2.4.11 ”E/A IBS FERN” (INTERBUS-S) I/O module Features: • 8 discrete inputs (24VDC) • 8 discrete outputs (24VDC) • INTERBUS-S connection via copper cable Function: • Linking the timer's I/Os to the higher-level PLC or the robot • via INTERBUS-S with copper cable to X12 and X13 (serial I/Os) and • via discrete 24 V signals to X11 (parallel I/Os). Technical data: ”E/A IBS FERN“ I/O module Operating voltage +24 V= +20 %, -15 % with max. +/-5 % ripple Power input max. 2 A; subject to circuitry connected to the signal inputs/outputs Power loss 0.5 VA per active input 2.4 VA per active output Signal inputs logic 1: +16 V ... +30 V, 20 mA logic 0: -1 V ... +4 V Signal outputs +24 V, max. 0.1 A , short-circuit-proof Voltage supply Connection: Cable length: Cable type: Discrete signal outputs and inputs Connection: Cable length: Cable type: X10: 4-pole; STKK, grid 3.5 mm, max. 1.5 mm2. Mating connector is comprised in the delivery. (from power source to consumer) max. 10 m at 0.75 mm2 max. 75 m at 1.5 mm2 unshielded, VDE 0281, 0812 (e.g.: Ölflex) X11: 16-pole; STKK, grid 3.5 mm, max. 1.5 mm2. Mating connector is comprised in the delivery. max. 100 m at 0.5 mm2 unshielded, VDE 0281, 0812 (e.g.: Ölflex) INTERBUS-S connection IBS-IN connection: X13 (coming from the previous node) sub D, 9-pole, using female connector on cable side IBS-OUT connection: X12 (going to the next node) sub D, 9-pole, using male connector on cable side Cable length: according to INTERBUS-S specification Cable type: copper cable according to INTERBUS-S spe cification ID code: 47 (dec.) ENGLISH Table13: 276/402 Bosch Rexroth AG PSI 6xxx | 1070080028 / 06 Information on this product INTERBUS-S connection IN (coming from previous IB-S node) - For pin assignment, refer to page 277 X13 Diagnostic messages of the module: - US: Unit Supply; power supply available - RC: Remote bus Check; bus link (coming from previous IB-S node) exists. - BA: Bus Active; data transmission is active. - RD: Remote Disable; indicates that the bus link (to the next IB-S node) has been switched off. - Transmit/Receive; signals PCP communication. X12 ENGLISH INTERBUS-S connection OUT (going to the next IB-S node) - For pin assignment, refer to page 277 - Signal inputs I0 to I7 (24 VDC) - Signal outputs O0 to O7 (24 VDC) - Voltage supply of the I/O module (24VDC) Terminals 1 and 3 linked internally Terminals 2 and 4 linked internally Fig.22: Front panel view: ”E/A IBS FERN (REMOTE)“ I/O module X11 X10 1070080028 / 06 | PSI 6xxx Bosch Rexroth AG 277/402 Information on this product Weld timer X13 (IBS‐IN) DO1 DI1 GND /DO1 /DI1 previous INTERBUS-S node 1 2 3 4 5 6 7 8 9 Male connector Screen continuity through large-area connection to metal housing of the plug connection DO2 DI2 GND +5 V /DO2 /DI2 RBST 1 2 3 4 5 6 7 8 9 Female connector ENGLISH X12 (IBS‐OUT) subsequent INTERBUS‐S node Screen continuity through large-area connection to metal housing of the plug connection Fig.23: Terminal assignment of the INTERBUS-S ports 278/402 Bosch Rexroth AG Information on this product ENGLISH Notes: PSI 6xxx | 1070080028 / 06 1070080028 / 06 | PSI 6xxx Bosch Rexroth AG 279/402 Information on this product 5.2.4.12 ”E/A IBS X_FERN_8EA” (INTERBUS-S) I/O module Features: • 8 discrete inputs (24VDC) • 8 discrete outputs (24VDC) • INTERBUS-S via copper cable Function: • Linking the timer I/O to the higher-level PLC or the robot • via INTERBUS-S with copper cable at X12 and X13 (serial I/Os) and • via discrete 24 V signals at X14 and X15 (parallel I/Os). Technical data: ”E/A IBS X_FERN_8EA“ I/O module Operating voltage +24 V= ; +20 %, -15 % with max. +/-5 % ripple Power input subject to circuitry connected to the signal inputs/ outputs Power loss 0.5 VA per active input 2.4 VA per active output Signal inputs logic 1: +16 V ... +30 V, 20 mA logic 0: -1 V ... +4 V Signal outputs +24 V, max. 0.1 A, short-circuit-proof Voltage supply Connection: Cable length: Cable type: X14...X15 (via terminals 24V and 0V): 10-pole; STKK, grid 3.5 mm, max. 1.5 mm2. Mating connector is comprised in the delivery. (from power source to consumer) max. 10 m at 0.75 mm2 max. 75 m at 1.5 mm2 unshielded, VDE 0281, 0812 (e.g.: Ölflex) Discrete signal outputs and inputs Connection: Cable length: Cable type: X14...X15: 10-pole; STKK, grid 3.5 mm, max. 1.5 mm2. Mating connector is comprised in the delivery. max. 100 m at 0.5 mm2 unshielded, VDE 0281, 0812 (e.g.: Ölflex) INTERBUS-S connection IBS-IN connection: X13 (coming from the previous node) sub D, 9-pole, using female connector on cable side IBS-OUT connection: X12 (going to the next node) sub D, 9-pole, using male connector on cable side Cable length: according to INTERBUS-S specification ENGLISH Table14: 280/402 Bosch Rexroth AG PSI 6xxx | 1070080028 / 06 Information on this product Cable type: ID code: copper cable, according to INTERBUS-S spe cification 47 (dec.) INTERBUS-S connection IN (coming from previous IB-S node) - For pin assignment, refer to page 281 X13 ENGLISH Diagnostic messages of the module: US: Unit Supply; power supply available - RC: Remote bus Check; bus link (coming from previous IB-S node) exists. - BA: Bus Active; data transmission is active - RD: Remote Disable; indicates that the bus link (to the next IB-S node) has been switched off. - TR: Transmit/Receive; signals PCP communication INTERBUS-S connection OUT (going to the next IB-S node) - For pin assignment, refer to page 281 X12 Discrete inputs - Voltage supply of the signal inputs (24VDC, 0 V) X15 - Signal inputs I0 to I7 (24 VDC) Discrete outputs - Voltage supply of the signal outputs (24VDC, 0 V) - Signal outputs O0 to O7 (24 VDC) Fig.24: Front panel view: ”E/A IBS X_FERN_8EA“ I/O module X14 1070080028 / 06 | PSI 6xxx Bosch Rexroth AG 281/402 Information on this product Weld timer X13 (IBS‐IN) DO1 DI1 GND /DO1 /DI1 previous INTERBUS-S node 1 2 3 4 5 6 7 8 9 Male connector Screen continuity through large-area connection to metal housing of the plug connection DO2 DI2 GND +5 V /DO2 /DI2 1 2 3 4 5 6 7 8 9 RBST Female connector ENGLISH X12 (IBS‐OUT) subsequent INTERBUS‐S node Screen continuity through large-area connection to metal housing of the plug connection Fig.25: Terminal assignment of the INTERBUS-S ports 282/402 Bosch Rexroth AG Information on this product ENGLISH Notes: PSI 6xxx | 1070080028 / 06 1070080028 / 06 | PSI 6xxx Bosch Rexroth AG 283/402 Information on this product 5.2.4.13 ”DEV-NET” (DeviceNet) I/O module Features: • 8 discrete inputs (24VDC) • 8 discrete outputs (24VDC) • DeviceNet connection via bus copper cable Function: • Linking the timer's I/Os to the higher-level PLC or the robot • via DeviceNet with bus copper cable (serial I/Os) and • via discrete 24 V signals at X11 and X12 (parallel I/Os). Technical data: ”DEV-NET“ I/O module Operating voltage +24 V= +20 %, -15 % with max. +/- 5 % ripple Power input max. 2 A subject to circuitry connected to the signal inputs/ outputs Power loss 0.5 VA per active input 2.4 VA per active output Signal inputs logic 1: +16 V ... +30 V, 20 mA logic 0: -1 V ... +4 V Signal outputs +24 V, max. 0.1 A, short-circuit-proof Voltage supply Connection: Cable length: Cable type: X10: 4-pole; STKK, grid 3.5 mm, max. 1.5 mm2. Mating connector is comprised in the delivery. (from power source to consumer) max. 10 m at 0.75 mm2 max. 75 m at 1.5 mm2 unshielded, VDE 0281, 0812 (e.g.: Ölflex) Discrete signal outputs and inputs Connection: Cable length: Cable type: X11...X12: 8-pole; STKK, grid 3.5 mm, max. 1.5 mm2. Mating connector is comprised in the delivery. max. 100 m at 0.5 mm2 unshielded, VDE 0281, 0812 (e.g.: Ölflex) DeviceNet connection Connection: Cable length: Type: X13 according to DeviceNet specification copper cable, according to DeviceNet specific ation DeviceNet address: Setting via NA switch. Address (MAC ID) ac cording to DeviceNet specification. DeviceNet baud rate: Setting via DR switch. According to DeviceNet specification. ENGLISH Table15: 284/402 Bosch Rexroth AG PSI 6xxx | 1070080028 / 06 Information on this product - Diagnostic messages of the module: (according to DeviceNet specification) - NA: Switches for setting the node address (MAC ID) - DR: Switches for setting the baud rate (each according to DeviceNet specification) Value (dec.) NA DR ENGLISH off on 00 01 02 03 04 05 06 07 08 09 10 11 12 1 2 4 8 16 32 ... 125 250 1 2 3 4 5 6 7 8 63 Node address (0 - 63): DIP switch no. = baud rate (kBd) : ON : OFF - Bus connection X13 - Signal inputs I0 to I7 (24 VDC), with control LED X12 - Signal outputs O0 to O7 (24 VDC), with control LED X11 Voltage supply of the I/O module (24VDC) Terminals 1 and 3 linked internally Terminals 2 and 4 linked internally Fig.26: Front panel view: ”DEV-NET“ I/O module X10 1070080028 / 06 | PSI 6xxx Bosch Rexroth AG 285/402 Information on this product 5.2.4.14 ”ComnetM-DP" (PROFIBUS-DP) I/O module Features: • 16 discrete inputs (24VDC) • 16 discrete outputs (24VDC) • PROFIBUS-DP connection via bus copper cable Function: • Linking the timer's I/Os to the higher-level PLC or the robot • via PROFIBUS-DP and a copper cable (serial I/Os) and • via discrete 24 V signals at X11...X14 (parallel I/Os). Technical data: "ComnetM-DP" I/O module Operating voltage +24 V= ; +20 %, -15 % with max. +/-5 % ripple Power input max. 2 A subject to circuitry connected to the signal inputs/ outputs Power loss 0.5 VA per active input 2.4 VA per active output Signal inputs logic 1: +16 V ... +30 V, 20 mA logic 0: -1 V ... +4 V Signal outputs +24 V, max. 0.1 A, short-circuit-proof Voltage supply Connection: Cable length: Cable type: X10: 4-pole; STKK, grid 3.5 mm, max. 1.5 mm2. Mating connector is comprised in the delivery. (from power source to consumer) max. 10 m at 0.75 mm2 max. 75 m at 1.5 mm2 unshielded, VDE 0281, 0812 (e.g.: Ölflex) Discrete signal outputs and inputs Connection: Cable length: Cable type: X11...X14: 8-pole; STKK, grid 3.5 mm, max. 1.5 mm2. Mating connector is comprised in the delivery. max. 100 m at 0.5 mm2 unshielded, VDE 0281, 0812 (e.g.: Ölflex) PROFIBUS connection Connection: Cable length: Cable type: X15 according to PROFIBUS-DP specification copper cable, according to PROFIBUS-DP specification PROFIBUS address: Setting via "DP-ADR“ switches. ENGLISH Table16: 286/402 Bosch Rexroth AG PSI 6xxx | 1070080028 / 06 Information on this product - Diagnostic messages of the module: (according to PROFIBUS specification) - Bus connection. Pin assignment: 1: Shield 2: 3: RXD / TXD ‐P 4: CNTR ‐P 5: DGND 6: VP 7: 8: RXD / TXD ‐N X15 ENGLISH - DP‐ADR: Setting of the PROFIBUS-DP address. Rotary switch ”*10“: Tens place (0...9) Rotary switch ”*1“: Units place (0...9) - Signal inputs I0 to I7 (24VDC), with control LED X14 - Signal inputs I8 to I15 (24VDC), with control LED X13 - Signal outputs O0 to O7 (24 VDC), with control LED X12 - Signal outputs O8 to O15 (24 VDC), with control LED X11 - Voltage supply of the I/O module (24VDC) Terminals 1 and 3 linked internally Terminals 2 and 4 linked internally Fig.27: Front panel view: "ComnetM-DP" I/O module X10 1070080028 / 06 | PSI 6xxx Bosch Rexroth AG 287/402 Information on this product UI controller module (PSQ 6000 XQR) Only required for necessary function/controller module in connec tion with PSI 6x00.xxx. Features: • Optional plug-in board for enhanced functions of a PSI6x00.xxx weld timer. Functions: • UI regulation • UI monitoring • Allows for the graphic representation of the welding schedule (U, I, R) • Allows for the graphic representation of the actual value characteri stic over time (histogram display) • Gun resistance compensation • Q Stop For detailed information on functionality and programming, refer to the BOS online help and the ”UI regulation and monitoring “manual (refer to Section 1.2 Page 207). ENGLISH 5.2.4.15 288/402 Bosch Rexroth AG PSI 6xxx | 1070080028 / 06 Information on this product 1 2 3 4 ENGLISH 5 6 Fig.28: Front panel view: "PSQ 6000 XQR“ UI controller module 1 Inputs for connection of screened voltage measuring leads U1 and U2. 2 Display CAN bus communication: green LED: Communication OK red LED: Communication disturbed 3 Display module operating condition: green LED: OK red LED: not OK 4 RS232 interface. For connection to a programming terminal with the BQR software (standalone user inter face for UI controller). Is not required for the use of BOS6000. 5 +24 V voltage input for the supply of special CAN bus stations. Is not used in connection with UI regulation. 6 CAN bus interface to special CAN bus sta tions. Is not used in connection with UI regu lation. 1070080028 / 06 | PSI 6xxx Bosch Rexroth AG 289/402 Information on this product 5.3 Load and rating 5.3.1 Basics In general, semi‐conductors have an almost infinite life if they are used within their specifications. As a result of thermal load, however, mechanical forces act on the semi‐conductor chips, and this may influence their life depending on the component size. For this reason, semi‐conductor manufacturers normally provide life curves showing the number of temperature cycles until the calculated end of life – in dependence on the junction temperature rise. In this case, one temperature cycle corresponds to one spot weld. Our curves are specified for 45°C ambient temperature; however, e.g. 25°C are realistic which results in three times the life. In principle, the life would have to increase in systems with the ”colder” water cooling as opposed to air cooling. Depending on the application, however, water cooling may lead to a bigger temperature drop after a spot weld (due to the higher cooling capacity of water during the cooling phase). This effect results in a bigger temperature rise and may thus reduce the life. However the possibility is given here to only let the coo ling water flow in the course of the welding schedule. 5.3.2 Is the inverter overloaded? The maximum load of a medium-frequency inverter is generally speci fied by the assignment of types to specific maximum welding trans former sizes. Nevertheless it must be ensured that the present application does not lead to overload of the units. NOTICE Overload by inadequate project engineering Possibility of damage to the device, reduction of useful life! " Check the actual load of the medium-frequency inverter! Damages due to overload will result in the extinction of any warranty claims. This can be checked using load diagrams. They represent the • primary output currents (IPRIM in A) as a function of the • duty cycle (ED in %) for an ambient temperature of 45°C (also refer to page 289) that can be switched by the medium-frequency inverter. The resulting secondary currents (welding currents) can be calcula ted by multiplication by the respective transformer ratio. ENGLISH These conditions were taken into account in the design of our systems. Our load diagrams are therefore extended by a peak current curve with calculatory maximum life. The calculated life takes into account the thermal rise which is influenced by the welding current, secondary cir cuit resistance, the welding time and the ambient temperature, among others. 290/402 Bosch Rexroth AG PSI 6xxx | 1070080028 / 06 Information on this product " In addition, check the maximum permitted welding current for a wel ding time for a computational useful life of 10 million spots. There are diagrams showing the limit at 10% duty cycle and are considered to be a typical transformer/secondary resistance combi nation. You will find the relevant load diagram of your inverter in Section 5.3.3 on page 291 et seq. Example 1. Calculate the max. duty cycle ED of the inverter. As a result of the low heat capacity of semi‐conductors, their maxi mum permissible duty cycle is determined on the basis of the time ratio ”weld time to cycle time”. Cycle time 1000 ms ENGLISH WLD 200 ms WLD 200 ms In this example, the following result is obtained for duty cycle ED: ED = " 200 ms 1000 ms x 100 % = 20 % If different weld times or cycle times occur within the application, use • the longest welding time and • the shortest cycle time to calculate the duty cycle. 2. Look for the inverter‐specific load diagram in section 5.3.3 on page 291 et seq. 3. First draw the vertical at the previously calculated duty cycle (refer to point 1.: duty cycle ED = 20 %). 4. Use the respective characteristics to determine the maximum 5. permissible primary continuous current or primary peak current. 1070080028 / 06 | PSI 6xxx Bosch Rexroth AG 291/402 Information on this product 5.3.3 Load diagrams For descriptions of load diagrams, refer to page 289 et seq. Iprim (ED) in A Diagram basis: - computational peak current at a welding time of 0.1 s and 1 million spots - Ambient temperature of 45°C 500 400 ENGLISH 300 200 100 0 1,00 10,00 100,00 Duty cycle (ED) in % continuous power without fan continuous power of air or water cooler calculated peak current of air cooler calculated peak current of water cooler continuous power of PSI 61xx.190 (seam) Fig.29: Permitted primary current depending on the duty cycle: PSI 61xx.xxx 292/402 Bosch Rexroth AG PSI 6xxx | 1070080028 / 06 Information on this product Iprim in A Diagram basis: - Ambient temperature of 45°C - PSG 3100 - 10% duty cycle - 200 µOhm load 500 450 400 ENGLISH 350 300 250 200 0,1 0,2 0,3 0,4 0,5 0,6 0,7 0,8 0,9 1,0 Weld time in sec. 10 million spots 1 million spots Fig.30: Permitted primary current depending on the welding time: PSI 61xx.xxx L1/W1 1070080028 / 06 | PSI 6xxx Bosch Rexroth AG 293/402 Information on this product Iprim in A Diagram basis: - Ambient temperature of 45°C - PSG 3100 - 10% duty cycle - 200 µOhm load 500 450 400 350 ENGLISH 300 250 200 0,1 0,2 0,3 0,4 0,5 0,6 0,7 0,8 0,9 1,0 Weld time in sec. 10 million spots 1 million spots Fig.31: Permitted primary current depending on the welding time: PSI 61xx.xxx L2/W2 294/402 Bosch Rexroth AG Information on this product ENGLISH Notes: PSI 6xxx | 1070080028 / 06 1070080028 / 06 | PSI 6xxx Bosch Rexroth AG 295/402 Information on this product Iprim (ED) in A Diagram basis: - computational peak current at a welding time of 0.1 s and 1 million spots - Ambient temperature of 45°C 1600 1400 1200 1000 800 600 ENGLISH 400 200 0 1,00 10,00 100,00 Duty cycle (ED) in % continuous power water cooler calculated peak current of water cooler continuous power of PSI 62xx.190 (seam) Fig.32: Permitted primary current depending on the duty cycle: PSI 62xx.xxx 296/402 Bosch Rexroth AG PSI 6xxx | 1070080028 / 06 Information on this product Iprim in A Diagram basis: - Ambient temperature of 45°C - 2 x PSG 3100 in parallel - 10% duty cycle - 50 µOhm load 1400 1200 1000 ENGLISH 800 600 400 0,1 0,2 0,3 0,4 0,5 0,6 0,7 0,8 0,9 1,0 Weld time in sec. 10 million spots 1 million spots Fig.33: Permitted primary current depending on the welding time: PSI 62xx.xxx 1070080028 / 06 | PSI 6xxx Bosch Rexroth AG 297/402 Information on this product Iprim (ED) in A Diagram basis: - computational peak current at a welding time of 0.1 s and 1 million spots - Ambient temperature of 45°C 800 700 600 500 400 300 ENGLISH 200 100 0 1,00 10,00 100,00 Duty cycle (ED) in % continuous power of air or water cooler calculated peak current of air cooler calculated peak current of water cooler Fig.34: Permitted primary current depending on the duty cycle: PSI 6300/63C0.xxx L1/W1 298/402 Bosch Rexroth AG PSI 6xxx | 1070080028 / 06 Information on this product Iprim (ED) in A Diagram basis: - computational peak current at a welding time of 0.1 s and 1 million spots - Ambient temperature of 45°C 800 700 600 500 400 ENGLISH 300 200 100 0 1,00 10,00 100,00 Duty cycle (ED) in % continuous power of air cooler calculated peak current of air cooler Fig.35: Permitted primary current depending on the duty cycle: PSI 6300/63C0.xxx L2 1070080028 / 06 | PSI 6xxx Bosch Rexroth AG 299/402 Information on this product Diagram basis: - Ambient temperature of 45°C - PSG 3100 - 10% duty cycle - 100 µOhm load Iprim in A 800 700 600 500 ENGLISH 400 300 200 0,1 0,2 0,3 0,4 0,5 0,6 0,7 0,8 0,9 1,0 Weld time in sec. 10 million spots 1 million spots Fig.36: Permitted primary current depending on the welding time: PSI 6300/63C0.xxx L1/W1 300/402 Bosch Rexroth AG PSI 6xxx | 1070080028 / 06 Information on this product Diagram basis: - Ambient temperature of 45°C - PSG 3100 - 10% duty cycle - 100 µOhm load Iprim in A 800 700 600 ENGLISH 500 400 300 200 0,1 0,2 0,3 0,4 0,5 0,6 0,7 0,8 0,9 1,0 Weld time in sec. 10 million spots 1 million spots Fig.37: Permitted primary current depending on the welding time: PSI 6300/63C0.xxx L2/W2 1070080028 / 06 | PSI 6xxx Bosch Rexroth AG 301/402 Information on this product Iprim (ED) in A Diagram basis: - computational peak current at a welding time of 0.1 s and 1 million spots - Ambient temperature of 45°C - 2 x PSG 6250 in parallel - 66 µOhm load 1800 1600 1400 1200 1000 ENGLISH 800 600 400 200 1,00 10,00 100,00 Duty cycle (ED) in % continuous power calculated peak current Fig.38: Permitted primary current depending on the duty cycle: PSI 64xx.xxx 302/402 Bosch Rexroth AG PSI 6xxx | 1070080028 / 06 Information on this product Iprim in A Diagram basis: - Ambient temperature of 45°C - 2 x PSG 6250 in parallel - 10% duty cycle - 66 µOhm load 1900 1800 1700 1600 1500 ENGLISH 1400 1300 1200 1100 1000 0,1 0,2 0,3 0,4 0,5 0,6 0,7 0,8 0,9 1,0 Weld time in sec. 10 million spots 1 million spots Fig.39: Permitted primary current depending on the welding time: PSI 64xx.xxx 1070080028 / 06 | PSI 6xxx Bosch Rexroth AG 303/402 Information on this product Iprim (ED) in A Diagram basis: - computational peak current at a welding time of 0.1 s and 1 million spots - Ambient temperature of 45°C 2600 2400 2200 2000 1800 1600 1400 1200 1000 ENGLISH 800 600 400 200 0 1,00 10,00 continuous power with water cooling, without cabinet cooling continuous power with water cooling, with cabinet cooling calculated peak current of water cooler continuous power PSI 65xx.190 (seam) with water cooling, with cabinet cooling continuous power PSI 65xx.190 (seam) with water cooling, without cabinet cooling Fig.40: Permitted primary current depending on the duty cycle: PSI 65xx 100,00 Duty cycle (ED) in % 304/402 Bosch Rexroth AG PSI 6xxx | 1070080028 / 06 Information on this product Iprim in A Diagram basis: - Ambient temperature of 45°C - 4 x PSG 3100 in parallel - 10% duty cycle - 25 µOhm load 2600 2400 2200 2000 1800 ENGLISH 1600 1400 1200 1000 0,1 0,2 0,3 0,4 0,5 0,6 0,7 0,8 0,9 1,0 Weld time in sec. 10 million spots 1 million spots Fig.41: Permitted primary current depending on the welding time: PSI 65xx.xxx 1070080028 / 06 | PSI 6xxx Bosch Rexroth AG 305/402 Information on this product Identification of the product The type designation provides information on the product variant: PS 6___.___ __ Line voltage range (only for MF inverters): 1: 400-480 VAC 2: 500-690 VAC Cooling: L: Air W: Water Timer type First digit: I/O connection: 1: discrete via 24 V 2: PROFIBUS 3: INTERBUS 4: RS232 6: DeviceNet 7: Ethernet (e.g. PROFINET) 2nd and 3rd digit: version number Power class of the power unit and variants xCx: with TriCore CPU x00: with standard CPU Type of power unit T: Thyristor power unit I: Medium-frequency inverter Example: PSI 63C0.100 L1: Programmable weld timer with medium-frequency inverter with TriCore CPU, 24 V I/Os MF inverter air-cooled line voltage 400-480 VAC Fig.42: Type designation of the PSx 6xxx series ENGLISH 5.4 1070080028 / 06 | PSI 6xxx Bosch Rexroth AG 307/402 Transport and storage Transport and storage " Please note the instructions on transport in the chapter ”Safety in structions” on page 215. " Please note the instructions on transport and storage in the chapter ”General information on damage to property and products” on page 227. " Please ensure that the product is not exposed to conditions outside the specification during transport (refer to Chapter 15 „Technical data“ on page 381 et seq.). " Please ensure that the product becomes acclimatized in a cold envi ronment after storage/transport before it is used. The product should only be transported over larger distances in the original packaging or in packaging suitable for the respective pur pose. ENGLISH 6 308/402 Bosch Rexroth AG Transport and storage ENGLISH Notes: PSI 6xxx | 1070080028 / 06 1070080028 / 06 | PSI 6xxx Bosch Rexroth AG 309/402 Assembly 7 Assembly 7.1 Assembling the product Information on installation conditions (e.g. orientation, permitted am bient temperatures) are provided in Chapter 15 on page 381 et seq. " Please also note the instructions on installation and assembly in Section 2.6.3 from page 216 as well as Section 3.2 from page 228. " Use M6 bolts and DIN 267 M6 selflocking nuts for fastening of the product. For tightening of the screws: max. tightening torque 6 Nm. ENGLISH Information on dimensions, necessary cutouts and screw fastenings are provided in Section 7.1.1 starting on page 310. 310/402 Bosch Rexroth AG PSI 6xxx | 1070080028 / 06 Assembly 7.1.1 Dimensioned drawings and locations of connections Side view, right Front view (Front side) 25,5 239 96,5 ENGLISH 270 96,5 1) 1) 245,6 231,5 Accessory kit for alternative mounting. Refer to page 377. Seal face. Flat gasket with 3mm thickness required. 146,5 Recommended mounting cut-out in case of mounting on the left side panel All dimensions in mm. Dimensions without tolerance: $0.5 Fig.43: Dimensioned drawing: PSI 61xx.xxx L1 Top view 1) necessary installation clearance: 100 mm 1070080028 / 06 | PSI 6xxx Bosch Rexroth AG 311/402 Assembly Side view, right Front view (Front side) 1) Accessory kit for alternative mounting. Refer to page 377. Seal face. Flat gasket with 3mm thickness required. Recommended mounting cut-out in case of mounting on the left side panel All dimensions in mm. Dimensions without tolerance: $0.5 Fig.44: Dimensioned drawing: PSI 61xx.xxx L2 Top view 1) necessary installation clearance: 100 mm ENGLISH 1) 312/402 Bosch Rexroth AG PSI 6xxx | 1070080028 / 06 Assembly ENGLISH Side view, right Front view (Front side) Accessory kit for alternative mounting. Refer to page 377. Seal face. Flat gasket with 3mm thickness required. Recommended mounting cut-out in case of mounting on the left side panel All dimensions in mm. Dimensions without tolerance: $0.5 Fig.45: Dimensioned drawing: PSI 61xx.xxx Wx Top view An installation clearance of min. 100 mm must remain above and below the product! 1070080028 / 06 | PSI 6xxx Bosch Rexroth AG 313/402 Assembly from mains PE U1 V1 W1 Side view, right all connection terminals max. 50 mm2 U2 V2 to the welding transformer ENGLISH Fig.46: Location of the mains and transformer connections: PSI 61xx.xxx Lx/Wx Counterparts: Hose nozzle with coupling nut M16x1.5 to DIN EN 560. Mat.: CuZn39Pb3 or Parker. Part order no.: 35C82-1ß0-GBK Front view (Front side) Cooling water connections inlet Top view outlet Fig.47: Location of cooling water connection: PSI 61xx.xxx Wx 314/402 Bosch Rexroth AG PSI 6xxx | 1070080028 / 06 Assembly Side view, right Front view (Front side) ENGLISH Ventilation clearance Ventilation clearance All dimensions in mm. Dimensions without tolerance: $0.5 Fig.48: Dimensioned drawing: PSI 62xx.xxx W1 1070080028 / 06 | PSI 6xxx Bosch Rexroth AG 315/402 Assembly Front view from mains Connection from above Connection terminals max. 95 mm2 ENGLISH U1 V1 W1 U2 V2 Connection terminals max. 95 mm2 Connection from below to MF welding transformer Fig.49: Location of mains and transformer connection: PSI 62xx.xxx W1 316/402 Bosch Rexroth AG PSI 6xxx | 1070080028 / 06 Assembly ENGLISH Front view Cooling water connections: rear inlet front outlet Counterparts: Hose nozzle with coupling nut M16x1.5 to DIN EN 560. Mat.: CuZn39Pb3 or Parker. Part order no.: 35C82-1ß0-GBK Fig.50: Location of cooling water connection: PSI 62xx.xxx W1 1070080028 / 06 | PSI 6xxx Bosch Rexroth AG 317/402 Assembly Side view, right Front view (Front side) 1) Accessory kit for alternative mounting. Refer to page 377. Seal face. Flat gasket with 3mm thickness required. Recommended mounting cut-out in case of mounting on the left side panel All dimensions in mm. Dimensions without tolerance: $0.5 Fig.51: Dimensioned drawing: PSI 6300/63C0.xxx Lx Top view 1) necessary installation clearance: 100 mm ENGLISH 1) 318/402 Bosch Rexroth AG PSI 6xxx | 1070080028 / 06 Assembly ENGLISH Side view, right Front view (Front side) Accessory kit for alternative mounting. Refer to page 377. Seal face. Flat gasket with 3mm thickness required. Recommended mounting cut-out in case of mounting on the left side panel All dimensions in mm. Dimensions without tolerance: $0.5 Fig.52: Dimensioned drawing: PSI 6300/63C0.xxx Wx Top view An installation clearance of min. 100 mm must remain above and below the product! 1070080028 / 06 | PSI 6xxx Bosch Rexroth AG 319/402 Assembly from mains PE U1 V1 W1 all connection terminals max. 50 mm2 Side view, right U2 V2 to the welding transformer ENGLISH Fig.53: Location of mains and transformer connection: PSI 6300/63C0.xxx Lx/Wx Counterparts: Hose nozzle with coup ling nut M16x1.5 to DIN EN 560. Mat.: CuZn39Pb3 or Parker. Part order no.: 35C82-1ß0-GBK Front view (Front side) Cooling water connections inlet Top view outlet Fig.54: Location of cooling water connection: PSI 6300/63C0.xxx Wx 320/402 Bosch Rexroth AG PSI 6xxx | 1070080028 / 06 Assembly Side view, right Front view (Front side) ENGLISH Ventilation clearance Ventilation clearance All dimensions in mm. Dimensions without tolerance: $0.5 Fig.55: Dimensioned drawing: PSI 64C0.xxx W1 1070080028 / 06 | PSI 6xxx Bosch Rexroth AG 321/402 Assembly Front view from mains Connection from above Connection terminals max. 95 mm2 ENGLISH U1 V1 W1 U2 V2 Connection terminals max. 95 mm2 Connection from below to MF welding transformer Fig.56: Location of mains and transformer connection: PSI 64C0.xxx W1 322/402 Bosch Rexroth AG PSI 6xxx | 1070080028 / 06 Assembly ENGLISH Front view Cooling water connections: rear inlet front outlet Counterparts: Hose nozzle with coupling nut M16x1.5 to DIN EN 560. Mat.: CuZn39Pb3 or Parker. Part order no.: 35C82-10-6BK Fig.57: Location of cooling water connection: PSI64C0.xxx W1 1070080028 / 06 | PSI 6xxx Bosch Rexroth AG 323/402 Assembly ENGLISH Notes: 324/402 Bosch Rexroth AG PSI 6xxx | 1070080028 / 06 Assembly Side view, right Front view (Front side) Rear view 396 358 194,5 110 99 638 7,5 26,5 103,5 ENGLISH 96 411 600 653 860 for M6 Side view, left 280 Bore-hole pattern 110$0.2 38 30,75 70 110$0.2 110 637$0.5 Front view For bolts M6. Max. tightening torque 6 Nm. Use DIN 267 M6 selflocking nuts. All dimensions in mm. Dimensions without tolerance: $0.5 Installation clearance of at least 100 mm above and below the product required! 110 Fig.58: Dimensioned drawing: PSI 65xx.xxx W1 110 1070080028 / 06 | PSI 6xxx Bosch Rexroth AG 325/402 Assembly Front view from mains U1 V1 W1 PE Connection via cable lugs. 1 screw M10 per connection. 2 to 4 cables; 120 mm2 each ENGLISH Protective cover Connection via cable lugs. 1 screw M10 per connection. 2 to 4 cables; 120 mm2 each Protective cover U2 V2 to MF welding transformer Fig.59: Location of mains and transformer connection: PSI 65xx.xxx W1 326/402 Bosch Rexroth AG PSI 6xxx | 1070080028 / 06 Assembly Front view ENGLISH Hose bridge Cooling water connections: inlet outlet Counterparts: Hose nozzle with coupling nut M16x1.5 to DIN EN 560. Mat.: CuZn39Pb3 or Parker. Part order no.: 35C82-1ß0-GBK Fig.60: Location of cooling water connection: PSI 65xx.xxx W1 1070080028 / 06 | PSI 6xxx Bosch Rexroth AG 327/402 Assembly 7.2.1 Electrical connection of the product " Please note the safety instructions relevant for electrical connection in Section 2.6.4 starting on page 218 and in Sect. 3.3 starting on page 230. " Make sure that all respective plant sections are deenergized before and during the electrical connection work. " Make sure that the required conditions for electrical connection are complied with. Refer to Section 15 starting on page 381. The maximum possible connection crosssections and tightening torques for mains and transformer cables are provided there. " In order to comply with the EN 62135 standard, make sure that the inverter is - in the case of a fault - automatically separated from the power supply (e.g. shortcircuit of an internal electrolytic capacitor). Use the HSA output of the weld timer for this purpose (X8, refer to page 347) in connection with e.g. a suitable (remote controlled) main switch. Interference suppression Noise is caused by switching peaks and can interfere with the timer di rectly or through coupling with connecting lines. Therefore, measures must be taken to suppress noise. " Eliminate all noise at its very source. Where this is not possible, the noise suppression elements must be attached as close as possible to the source of noise. " First make sure that proper noise suppression is available for all components containing inductive elements or switchgear. " Noise suppression equipment must be installed resistant to fracture because strong vibration may occur on machines. DIODE RC ELEMENT + GND ∼ MP Diode, suitable for small DC voltage re lays RC element for AC voltage relays and AC motors DIODE AND ZENER DIODE RC ELEMENT + GND DI-ZD attenuation element for large DC voltage con tactors and defined dropout times Fig.61: Noise suppression examples RC element for spark quenching with inductive load ENGLISH 7.2 328/402 Bosch Rexroth AG PSI 6xxx | 1070080028 / 06 Assembly The following table serves as an example only. The rating of the ne cessary components depends on the actual load situation. Table17: 24 VDC 48 VDC 110 VAC 220 VAC 440 VAC 7.2.2 Rating of noise suppression equipment Resistor Capacitor Diode 220 Ohm / 1 W 220 Ohm / 5 W 220 Ohm / 5 W 0.5 uF 400/600 V 0.1 uF 500 V 0.1 uF 1000 V 1 N 5060/ZL 12 1 N 5060/ZL 22 Line connection ENGLISH When operating medium-frequency inverters a harmonic load must be accounted for in the mains system. Typical 300 Hz Fig.62: Typical curve of the mains voltage (top) and the related mains cur rent (bottom) in one phase during the welding process The 5th, 7th, 11th, 13th, 15th and 17th harmonic wave are the characte ristic harmonics in the mains current curve. The harmonic component depends om the welding power. The harmonic content max be considerably reduced by using smoo thing reactors with 4% short-circuit voltage. 1070080028 / 06 | PSI 6xxx Bosch Rexroth AG 329/402 Assembly Please note the following prescriptions in the context of electrical connection: • Operation of the inverter is only intended for use in buildings/ property with an operating current greater than/equal to 100A for each phase. • Operation of the inverter at asymmetrical systems (one system phase grounded) is not admissible. • The inverters may only be connected to earthed systems such as TT or TN systems. In the case of nonearthed systems (e.g. IT system), an isolating transformer with secondary earthed center has to be used. The onesided earthing of the DC link is not permitted. • The mains system must be appropriately fused. • The operation in systems with normal ELCBs is not permitted because residual currents from the DC link may flow back into the system via earthing without activating the ELCB. • If you use residual current protective equipment, it must be suita ble for being operated in conjunction with medium-frequency sys tems with a DC link and a frequency of 1000 Hz! Check the applicable manufacturer data! Comply with all applicable regulations! • Make sure that the mains voltage is within the permitted range. For information on inverter-specific range, refer to Section 15 from page 381 and the nameplate of the respective inverter. The positions of the connections are indicated in Section 7.1.1 from page 310. " Connect the PE connector at the inverter to a suitable grounding point. In connection with the PE conductor connection, also observe the information and specifications in the manual ”MF welding trans formers, Technical information” (refer to page 207). " Connect terminal U1 at the inverter to system phase L1. " Connect terminal V1 at the inverter to system phase L2. " Connect terminal W1 at the inverter to system phase L3. ENGLISH " 330/402 Bosch Rexroth AG PSI 6xxx | 1070080028 / 06 Assembly 7.2.3 Transformer connection (primary circuit) " Attach the cables for U2 and V2 with aluminum brackets and always guide the cables - if necessary - through the housing metal together (because of inductive temperature rise). The position of the connections is indicated in Section 7.1.1 from page 310. " Connect terminal U2 at the inverter to connection U at the trans former. " Connect terminal V2 at the inverter to connection V at the trans former. Additional information on transformer connection (parallel connec tion of several transformers, sensors, etc.) is provided in the manual ”MF welding transformers, Technical information” (cf. page 207). ENGLISH 7.2.4 Connection for programming terminal Point-to-point connection of the programming terminal (PC/laptop computer with BOS software for administration, diagnosis, archiving, backup). The optional Ethernet module can be used for networking, refer to page 254. X1 (V24/RS232 interface, sub D) Only in connection with PSI 6x00.xxx! Connection: Cable length: Cable type: at X1; sub D, 9-pole, male connector max. 20 m (with recommended cable type) shielded, core area min. 0.2 mm2, capacitance max. 2.5 nF (e.g.: 3 x 2 x 0.2 mm2 LifYCY, Metrofunk) 19200 bit/sec 8E1 (8 data bits, even parity, 1 stop bit) Transmission rate: Parameters: X1 RX TX GND Male connector 1 2 3 4 5 6 7 8 9 PC (COM1 or COM2) 2 3 4 5 RX TX GND Male connector Screen continuity through large-area connection to metal housing of the plug connection. Fig.63: Connection of programming terminal via X1 1070080028 / 06 | PSI 6xxx Bosch Rexroth AG 331/402 Assembly For suitable connecting cables, please refer to Section 13.1 on page 373. X3C (V24/RS232 interface, miniature DIN) Only in connection with PSI 6xCx.xxx! Connection: Cable length: Cable type: to X3C; miniature DIN, 8-pole, male connector max. 20 m (with recommended cable type) shielded, core area min. 0.2 mm2, capacitance max. 2.5 nF (e.g.: 3 x 2 x 0.2 mm2 LifYCY, Metrofunk) 19200 bit/sec 8E1 (8 data bits, even parity, 1 stop bit) Transmission rate: Parameters: X3C 1 2 3 4 5 6 7 8 2 RX 3 TX 4 5 GND ENGLISH TX GND RX PC (COM1 or COM2) Female connector Male connector Ensure screen continuity through large-area connection to metal housing of the plug connection. Fig.64: Connection of programming terminal via X3C For suitable connecting cables, refer to Section 13.1 page 373. X3U (USB interface) Only in connection with PSI 6xCx.xxx! Connection: Cable length: to X3U; USB type B connector max. 3 m For suitable connecting cables, refer to Section 13.1 on page 373. When the USB connector has been plugged in, the X3C interface is automatically deactivated! 332/402 Bosch Rexroth AG PSI 6xxx | 1070080028 / 06 Assembly 7.2.5 24 VDC logic supply (X4, input) Connection: to X4; STKK, grid 3.5 mm, 14-pole, max. 1.5 mm2 . Mating connector is comprised in the delivery. (from power source to consumer) max. 10 m at 0.75 mm2 max. 75 m at 1.5 mm2 unshielded, VDE 0281, 0812 (e.g.: Ölflex) Cable length: Cable type: The control logic must be supplied with 24 VDC. Timer ENGLISH X4 10 24 VDC 11 0V Power infeed for power supply to the internal control logic Fig.65: Logic supply input of the timer The voltage source to be used for supplying the timer is defined by the other circuitry connected to X4. Options: • Supply by the unit's internal power generator (refer to page 333) • Supply via an external power supply unit. For this purpose, only a few jumpers have to be inserted/removed at X4. For more information concerning the connections to X4, please refer to 7.2.8 starting on page 335. Whereas voltage supply by the unit's internal voltage generator is preferably used in stand-alone systems (e.g. suspended systems, be cause no additional 24 VDC power supply units are required), external power supply units are the preferred solution in networked systems (timer can be programmed by the line PC even if the welding network is switched off). " Any external voltage sources used must be designed according to the principles of "safety separation" in accordance with the Low-Vol tage Directive (2006/95/EC). 1070080028 / 06 | PSI 6xxx Bosch Rexroth AG 333/402 Assembly 24 VDC voltage generator (X4, output) Connection: to X4; STKK, grid 3.5 mm, 14-pole, max. 1.5 mm2. Mating connector is comprised in the delivery. (from power source to consumer) max. 10 m at 0.75 mm2 max. 75 m at 1.5 mm2 unshielded, VDE 0281, 0812 (e.g.: Ölflex) Cable length: Cable type: A 24 VDC voltage supply is available at X4 which is derived from the line voltage by the power unit. Power supply by the internal 24 VDC voltage generator and thus the operativeness of the devices supplied by it is ensured only if line power is supplied to to the line input of the power unit! Timer X4 +24 VDC 0V 5 8 Can be used, e.g., for supply ing the control logic and the I/O module. Fig.66: Internally generated 24 VDC voltage supply " When using the internal 24 VDC voltage generator, the following notes should be observed: • For technical data, refer to page 383. • For power supply to control logic: When the line voltage is switched off at the line input of the power unit, the timer is also turned off. In this state • programming, diagnosis or visualization via the timer, and • communication are no longer possible between the timer and the PLC/robot. • For power supply to the I/O module: When the line voltage is switched off at the line input of the power unit, the I/O module is also turned off. In this state • communication is no longer possible between the timer and the PLC/robot via the discrete signals. " If these conditions are not suitable for your application, the 24 VDC supply to the timer and/or the I/O module must be provided by external power supply units! ENGLISH 7.2.6 334/402 Bosch Rexroth AG PSI 6xxx | 1070080028 / 06 Assembly 7.2.7 I/O module supply (X4, output) Connection: Cable length: Cable type: to X4; STKK, grid 3.5 mm, 14-pole, max. 1.5 mm2 . Mating connector is comprised in the delivery. (from power source to consumer) max. 10 m at 0.75 mm2 max. 75 m at 1.5 mm2 unshielded, VDE 0281, 0812 (e.g.: Ölflex) The type-specific I/O modules used (for slots, refer to figures on page 248 and 250) can be supplied via X4. Information on the the supply terminal for all available I/O modules are provided from page 262 in the I/O module-specific sections. ENGLISH A total of 2 connection options are possible: 1. Connection of the I/O module supply at X4, or 2. direct connection of the I/O module supply to separate 24 VDC power supply unit. If the I/O module is connected to X4 of the timer, the unit's internal power generator (refer to page 333) as well as an external power supply unit can be used. For this purpose, only a few jumpers have to be inserted/removed at X4. For more information concerning the connections to X4, please refer to 7.2.8 starting on page 335. Timer I/O module X4 24 VDC 24 VDC 0V 0V 1 2 3 4 floating contact Load: 24VDC, max. 3A timer-internal evaluation of the stop cir cuit Stop circuit Fig.67: Connection of the I/O module supply at X4 of the timer Stop circuit I/O module 24 VDC 0V floating contact Load: 24VDC, max. 3A 24 VDC power supply unit 24 VDC 0V Fig.68: Direct connection of the I/O module supply to separate 24 VDC power supply unit 1070080028 / 06 | PSI 6xxx Bosch Rexroth AG 335/402 7.2.8 " You should ensure that the proper functioning of the stop circuit is always guaranteed! In the event of dangerous conditions at the welding system or the in tentional switch-off of the weld timer, the inputs and outputs of the I/O array must be set to LOW level. For this purpose, an external monitoring device must open the floating contact and thus interrupt the power supply of the I/O module. If the stop circuit is open, the timer signals "Stop / No 24V". This mes sage is self-acknowledging, i.e. it automatically disappears when the stop circuit is closed. " Any external voltage sources used must be designed according to the principles of "safety separation" in accordance with the Low-Vol tage Directive (2006/95/EC). " If potential separation is necessary between the I/O array and the timer, the timer and the I/O module must be operated at different 24 VDC power supply units! " The incoming power supply at the I/O module may, if necessary, also be transmitted to additional units (at the module by internal bridging at X10). Please make sure in such cases, that the maximum current load (vol tage source, connections) and cable lengths are not exceeded! 24 VDC voltage distribution (X4) Connection: Cable length: Cable type: to X4; STKK, grid 3.5 mm, 14-pole, max. 1.5 mm2. Mating connector is comprised in the delivery. (from power source to the consumer) max. 10 m at 0.75 mm2 max. 75 m at 1.5 mm2 unshielded, VDE 0281, 0812 (e.g.: Ölflex) The internal circuitry connected to X4 ensures easier wiring of the 24 VDC supply branches. Different supply options can be implemented by inserting or removing a few jumpers without modifying the other wi ring in the switch cabinet. For this purpose, the relevant power source is connected to X4/6 (24 VDC) and X4/7 (0 V). 4 possible options are described below. The option to be selected depends on the requirements of your application. ENGLISH Assembly 336/402 Bosch Rexroth AG PSI 6xxx | 1070080028 / 06 Assembly ENGLISH 1. The control logic and the I/O module receive power supply from the internal 24 VDC voltage generator. Used for: preferably on stand-alone systems. Advantage: no separate power supply unit required. Disadvantage: 24 VDC is only generated if line voltage is present at the line input of the power unit. Programming, diagnosis or I/O communication between the timer and the PLC/robot is no longer possible when the line voltage has been switched off at the line input of the power unit. 2. The I/O module receives power supply from the internal 24 VDC vol tage generator, the control logic from the external power supply unit. Used for: networked systems. Advantage: Programming, diagnosis and visualization are still possible when the line voltage has been switched off at the line input of the power unit. Potential separation is possible between the timer and I/O modules with discrete inputs/outputs (paral lel I/Os). Disadvantage: No I/O communication between the timer and the PLC/robot possible when the line voltage has been switched off at the line input of the power unit. 3. The control logic and I/O module receive power supply from a joint external 24 V power supply unit. Used for: preferably for networked systems. Advantage: I/O communication between the timer and the PLC/ robot, programming, diagnosis and visualization are still possible when the line voltage has been switched off at the line input of the power unit. Disadvantage: no potential separation is possible between the timer and I/O modules. 4. The control logic and I/O module receive power supply from sepa rate external 24 V power supply units. Used for: networked systems. Advantage: I/O communication between the timer and the PLC/ robot, programming, diagnosis and visualization are still possible when the line voltage has been switched off at the line input of the power unit. Potential separation is possible between the timer and I/O modules with discrete inputs/outputs (paral lel I/Os). Disadvantage: 2 external power supply units required. " " You should ensure that the proper functioning of the stop circuit (refer to figure below) is guaranteed by any connection option used! In the event of dangerous conditions at the welding system or the in tentional switch-off of the weld timer, an external monitoring device must open the floating contact. If the stop circuit is open, the timer signals "Stop / No 24V". This mes sage is self-acknowledging, i.e. it automatically disappears when the stop circuit is closed. Any external voltage sources used must be designed according to the principles of "safety separation" in accordance with the Low-Vol tage Directive (2006/95/EC). 1070080028 / 06 | PSI 6xxx Bosch Rexroth AG 337/402 Assembly re. Option 1: re. Option 2: Timer Timer X4 X4 1 2 3 *) 4 24 VDC internal voltage genera tor 1 internal evaluation of the stop circuit 2 3 *) 4 24 VDC 5 internal voltage genera tor 6 7 7 8 8 0V 9 24 VDC 5 6 0V internal logic to I/O module (refer to page 334) 9 24 VDC 10 internal logic 11 0V 10 24 V DC 11 0V 0V 12 12 re. Option 3: external power sup ply unit re. Option 4: Timer Timer X4 1 internal evaluation of the stop circuit 2 X4 to I/O module (refer to page 334) 3 *) 4 24 VDC internal voltage genera tor 7 8 0V 9 24 VDC internal evaluation of the stop circuit 2 24 VDC 0V 11 0V 5 6 0V 8 external power supply unit 9 24 VDC internal logic 10 11 0V 12 *) Stop circuit: floating contact; load: 24VDC, max. 3A Fig.69: Wiring examples for 24V voltage distribution 24 VDC 7 0V 10 *) 4 internal voltage genera tor external power sup ply unit to I/O module (refer to page 334) 3 24 VDC 5 6 internal logic 1 12 24 VDC 0V external power sup ply unit ENGLISH internal evaluation of the stop circuit to I/O module (refer to page 334) 338/402 Bosch Rexroth AG PSI 6xxx | 1070080028 / 06 Assembly 7.2.9 External fan (X4, output) Connection: to X4; STKK, grid 3.5 mm, 14-pole, max. 1.5 mm2. Mating connector is comprised in the delivery. Cable length: max. 10 m at 0.75 mm2 max. 75 m at 1.5 mm2 Cable type: unshielded, VDE 0281, 0812 (e.g.: Ölflex) Operating thresholds: Fan ON: greater than/equal to 55 degrees Centigrade Fan OFF: lower than/equal to 50 degrees Centigrade (with reference to the heat sink temperature) For connecting of external 24 VDC fans. X4 +24 VDC ENGLISH 0V Fan module 1 13 +24 VDC PE 14 2 to PE bar Fig.70: Connecting an external fan module 0V 1070080028 / 06 | PSI 6xxx Bosch Rexroth AG 339/402 Assembly Power supply to external units (X5, output) Connection: to X5; STKK, grid 3.5 mm, 2- or 6-pole, max. 1.5 mm2. Mating connectors are comprised in the delivery. subject to the circuitry connected to X4. Refer to description below. unshielded, VDE 0281, 0812 (e.g.: Ölflex) Cable length: Cable type: For 24 VDC power supply to external devices. Timer X4 10 24 VDC 11 0V int. logic max. 0.5 A Power infeed for supply to - internal control logic and - X5 X5 1 2 external consumer 24 VDC 0V Fig.71: Power supply to external consumers The maximum current-carrying capacity/cable length connected to X5 is subject to the voltage source used and the total cable length between the source and the external consumer. However, the max. current load on X5 must not exceed 0.5 A. " Please make sure that the maximum current load (source, connec tions) and cable lengths specified are not exceeded! The voltage source to be used for supplying X5 is defined by the other circuitry connected to X4. The unit's internal power generation (refer to page 333) as well as an external power supply unit can be used here. For this purpose, only a few jumpers have to be inserted/removed at X4. For more information concerning the connections to X4, please refer to Sect. 7.2.8 starting on page 335. ENGLISH 7.2.10 340/402 Bosch Rexroth AG PSI 6xxx | 1070080028 / 06 Assembly 7.2.11 Analog output of the electrode force (X2, output) For information on whether the function is available in your unit, please refer to the type-specific manual. Connection: to X2; STKK, grid 3.5 mm, 5-pole, max. 1.5 mm2. Mating connector is comprised in the delivery. max. 50 m at 0.5 mm2 max. 100 m at 0.75 mm2 shielded (e.g.: NFL 13, Metrofunk; LiYCY) Cable length: Cable type: ENGLISH An analog output signal is available at X2, pin 1, which can be used to drive a force generating component. The type of output signal can alternatively be programmed (BOS theme ”Programming”, ”General” tab, ”Pressure output mode" parameter) as • Voltage signal (0 to +10V; max. 20mA), • Current signal 0 to 20mA or • Current signal 4 to 20 mA (at max. 500 ohms). How the actuating variable is converted into electrode force is dependent on the actuators used. The „force calibration“ function and/or ”conversion factor ” (characte ristic slope) and ”zero shift” (Y characteristic shift) parameters are available for adjustment. The output signal at X2 is normally output immediately after a wel ding program has been selected, rather than after program start! For deviations from this, please refer to the type-specific manual. Timer X2 Pressure control GND 1 to force generating ac tuators 2 3 4 Shield 5 D Fig.72: Analog output of the force actuating variable 1070080028 / 06 | PSI 6xxx Bosch Rexroth AG 341/402 Assembly 7.2.12 Electrode force feedback For information on whether and how the function is available in your unit, please refer to the type-specific manual. Cable length: Cable type: to X2; STKK, grid 3.5 mm, 5-pole, to X9; STKK, grid 3.5 mm, 6-pole, max. 1.5 mm2 each. Mating connectors are comprised in the delivery. max. 50 m at 0.5 mm2 max. 100 m at 0.75 mm2 shielded (e.g.: NFL 13, Metrofunk; LiYCY) Whether or not any sensors are used to feed back the gun condition, and which ones, depends on the relevant application. The following alternatives appear to be possible: • No feedback • Feedback to PLC or robot • Feedback to weld timer No feedback " If your plant does not provide a feedback signal, you should make sure that the parts to be welded are optimally squeezed together be fore the beginning of the weld time! Sufficiently long squeeze times have to be programmed in this case. If the squeeze time is too short, strong expulsion will be experienced! This may result in damages to the electrodes and workpiece. " Ensure by means of suitable parametrization or circuitry that the timer in systems without feedback signal does not wait for a feed back from the process in vain. Timer types are available for instancewhere the weld time only starts after the process has signaled the appropriate condition of the gun. Refer to Section „Feedback to weld timer“ on page 342. " If the feedback is evaluated by a PLC or a robot, the PLC or robot must not start the welding program unless the proper gun condition has been ensured. If this is the case, the shortest possible SQZ can be programmed in all welding programs. " Ensure by means of suitable parametrization or circuitry that the timer in systems without feedback signal does not wait for a feed back from the process in vain. Timer types are available for instancewhere the weld time only starts after the process has signaled the appropriate condition of the gun. Refer to Section „Feedback to weld timer“ on page 342. Feedback to PLC or robot ENGLISH Connection: 342/402 Bosch Rexroth AG PSI 6xxx | 1070080028 / 06 Assembly Feedback to weld timer Different type-specific options are available to signal gun closed or pro grammed force reached to the timer. The required option can normally be selected through the ”Operating mode” parameter in the ”Programming / Electrode” BOS window. The existence of the „Operating mode“ parameter is also type-speci fic. Timer X2 1 GND for terminals 1 and 3 2 analog pressure input (0...10V) 3 digital pressure input (+24 VDC) 4 Shield 5 D X9 ENGLISH 1 2 3 analog force input (1 V = 1 kN) 4 GND 5 Shield 6 D Fig.73: Possibly available feedback signal inputs for pressure/force Information on the inputs available in your unit and how the WT re acts to these signals is provided in the type-specific manual. 1070080028 / 06 | PSI 6xxx Bosch Rexroth AG 343/402 Assembly Input for secondary current measurement (X3) Connection: to X3; STKK, grid 3.5 mm, 8-pole, max. 1.5 mm2. Mating connector is comprised in the delivery. Cable length: max. 100 m (with recommended cable type) Cable type: shielded, core area min. 0.75 mm2, (e.g.: 2 x 2 x 0.75 mm2 LiYCY, Order no.: 1070 913 494) For the connection of a current sensor, installed in the secondary cir cuit. PSI units also have an integrated current sensor for the primary cir cuit of the welding transformer. This gives you the possibility to choose between secondary and primary measurement (BOS theme ”Programming”, "General” tab, ”Current measurement” parameter). With weld times > 1 s or for temporary suppression in the event of a sensor failure in the secondary circuit, however, you have to change over to primary measurement. The timers contain an integrated constant-current regulation (KSR). Using this function, the timer controls the current flow in the secondary circuit in such a manner that the programmed command current is ac tually reached. In this way, it is possible to compensate for any process- and handlinginduced fluctuations of the secondary circuit resistance. This regulation requires a sensor that signals the current flown in the primary or secondary circuit of the welding transformer to the timer. All PSI units have been prepared for using the UI regulation. A cur rent sensor is equally required for using this functionality. X3 Toroid input 1 Toroid input 2 Shield 3 D 4 5 Shield connection to terminal 3 of X3 ! Secondary circuit Fig.74: Connecting a KSR sensor on the secondary side The ”Measuring loop check” function is available for the automatic check of the measuring loop. In order to ensure the proper operation of the sensor, the following points should be noted: " When installing the sensor, it must be ensured that it is protected against damages resulting from the part to be welded and from ex pulsion. ENGLISH 7.2.13 344/402 Bosch Rexroth AG PSI 6xxx | 1070080028 / 06 ENGLISH Assembly " The place of installation should be selected at the greatest possible distance from current bus bars and high-current cables. This will re duce the noise resulting from external fields. Please also note the cable specifications provided above. " Do not use any magnetizable metal parts for fastening the current sensor but rather copper or brass. " Make sure that the current conductor is routed through the middle of the sensor in the straightest line possible. The voltage induced in the sensor (and thus the measured quantity) reaches its maximum if the conductor runs vertically to the sensor level. " If the sensor is used on mobile equipment, such as robots, certain parts of the cable are subject to strong mechanical stress (e.g. trailing cable). In these cases, therefore, you should use suitable cables and design the construction of the connecting lines so as to ensure a quick, trou ble-free replacement in the event of a fault. " The cable shield should only be connected to the weld timer! " Make sure that the timer's complete control loop is readjusted in re gular intervals in order to avoid measuring errors (current calibra tion). An external reference welding ammeter is required for this purpose. 1070080028 / 06 | PSI 6xxx Bosch Rexroth AG 345/402 Assembly Transformer temperature monitoring (X3) For information on whether and how the function is available in your unit, please refer to the type-specific manual. Connection: Cable length: Cable type: to X3; STKK, grid 3.5 mm, 8-pole, max. 1.5 mm2. Mating connector is comprised in the delivery. max. 100 m (with recommended cable type) shielded, core area min. 0.75 mm2, (e.g.: 2 x 2 x 0.75 mm2 LiYCY, Order no.: 1070 913 494) The timer has a temperature monitoring input which ensures protection of the connected welding transformer. An excessive temperature is signalled to the timer via a floating contact that must open if the transformer gets too hot. In the event of overtemperature (message: transformer temp too high), the timer will complete a running welding process, while immediately in terrupting a seam operation. A restart is not possible unless the transformer temperature has retur ned to values below the critical limit. The cores for the transformer temperature and the KSR sensor may be in a common connection line. We offer suitable cables containing 4 cores for this purpose. X3 Shield Transformer temperature 3 Transformer temperature 5 Welding transformer D 4 Temperature contact Shield connection to terminal 3 of X3 only ! Fig.75: Connection for monitoring the welding transformer temperature Of course, applications can be implemented involving welding trans former monitoring not by the timer, but rather by a PLC. " You should also make sure that the PLC inhibits additional welding schedules if the permitted temperature range is exceeded! If the timer - in spite of an existing monitoring function - is not supposed to monitor the welding transformer temperature, the following wiring has to be made: X3 Transformer temperature 4 Transformer temperature 5 Jumper Fig.76: Transformer temperature not monitored by timer ENGLISH 7.2.14 346/402 Bosch Rexroth AG PSI 6xxx | 1070080028 / 06 Assembly 7.2.15 Measuring input for secondary voltage measurement This function is only available if the "UI Regulation" option has been activated! The detailed documentation, part no. 1070087072, is available on UI regulation/monitoring. In connection with PSI 6x00.xxx Connection: to X8A of the PSQ 6000 XQR module (refer to page 287); STKK, grid 3.5 mm, 4-pole, max. 1.5 mm2. Mating connector is comprised in the delivery. max. 100 m (with recommended cable type) shielded, core area min. 0.75 mm2, (e.g.: 2 x 2 x 0.75 mm2 LiYCY, Order no.: 1070 913 494) Cable length: Cable type: ENGLISH X8A Voltage input 1 Shield 2 Voltage input 3 Shield 4 D Shield connection to terminal 4 of X8A ! Secondary circuit Fig.77: With PSI 6x00.xxx: Connection for secondary voltage measure ment In connection with PSI 6xCx.xxx Connection: to X3; STKK, grid 3.5 mm, 8-pole, max. 1.5 mm2. Mating connector is comprised in the delivery. max. 100 m (with recommended cable type) shielded, core area min. 0.75 mm2, (e.g.: 2 x 2 x 0.75 mm2 LiYCY, Order no.: 1070 913 494) Cable length: Cable type: X3 Voltage input 6 Voltage input 7 Shield 8 D Shield connection to terminal 3 of X8 ! Secondary circuit Fig.78: With PSI 6xCx.xx: Connection for secondary voltage measurement 1070080028 / 06 | PSI 6xxx Bosch Rexroth AG 347/402 Assembly Main switch tripped (X8) Connection: Cable length: Cable type: to X8; STKK, grid 3.5 mm, 3-pole, max. 1.5 mm2. Mating connector is comprised in the delivery. max. 10 m at 0.75 mm2 max. 75 m at 1.5 mm2 unshielded, VDE 0281, 0812 (e.g.: Ölflex) If a defective capacitor is detected during the check of the internal DC link capacitors, the main switch will be tripped (requirement EN 62135): • The timer signals „Circuit breaker tripped“ and • short-circuits terminals 2 and 3 at X8 (change-over switch; floating contact). If main switches with an appropriate functionality are used, this will automatically trip the circuit breaker (main switch), and thus the power supply, provided that X8 has been wired accordingly (ncc/noc). Timer X8 Load: 24 VDC, max. 6 A 42 VAC, max. 1 A No error state: Timer detects error state: 1 2 3 Device for trip ping the main switch Terminals 1 and 2 are shorted Terminals 2 and 3 are shorted Fig.79: Connection terminals for main switch trip ENGLISH 7.2.16 348/402 Bosch Rexroth AG PSI 6xxx | 1070080028 / 06 Assembly 7.3 Connecting the water supply Connection of a water supply is only necessary for water-cooled pro ducts. " Please note the requirements on cooling in Section 3.2 starting on page 228. " Make sure that the conditions required for cooling are complied with. The respective information is provided in Sect. 15, starting on page 381. " Use DIN threads in order to reach the necessary frictional connec tion. " Press with flat spanner (SW 17) when you connect the hose nozzle to the heat sink. ENGLISH The mechanical construction of the cooling water connection is identical for all PSI timer types with water cooling. Only the position of the connections may be different. You will find the positions in Section 7.1.1 from page 310. PSI 6xxx external Heat sink Hose nozzle Coupling nut M16x1.5 Coupled to PE con ductor internally Gasket ring Fitting with standard inner taper ac cording to DIN EN 560; external thread M16 x 1.5; through-bore ∅9+0.5 Counterpart: Hose nozzle with coupling nut M16x1.5 according to DIN EN 560. Mat.: CuZn39Pb3 or Parker. Part order no.: 35C82-10-6BK Fig.80: Example: Cooling water connection 1070080028 / 06 | PSI 6xxx Bosch Rexroth AG 349/402 Commissioning 8 Commissioning WARNING Dangerous electrical voltage Possibility of cardiac arrhythmia, burns, shock! " Make sure that unauthorized persons do not work on/in the switch cabinet. During commissioning, medium-frequency inverters and other live plant components are accessible at the open switch cabinet! This reduces the safety of persons and the plant! " Make sure that the above mentioned prerequisites for commis sioning are met. Switching on the medium-frequency inverter 1. Activate the compressed air supply and the cooling units, should this have to be done manually. 2. If the 24 V supply of the control logic (infeed at X4) is generated externally, switch on the 24 V supply. If the 24 V supply of the control logic (infeed at X4) is generated in ternally by the integrated power unit, switch on the mains supply of the inverter. For information on the connection of external or internal logic supply, please refer to Section 7.2.5 on page 332. For PSI 6x00: the LOGIC LED at the front side of the timer must be lit green after booting of the WT. For PSI 6xCx: the display in the diagnosis module should be on „RUN“ after booting of the WT or at least display a sequence of num bers. ENGLISH Prerequisite for commissioning is the proper installation and function • of the entire mechanics of the welding equipment • of all Emergency-Stop/Emergency-Halt devices • of the electrical connection including all required sensors • of the compressed air supply and cooling units. 350/402 Bosch Rexroth AG PSI 6xxx | 1070080028 / 06 Commissioning PSI 6x00 PSI 6xC0 LOGIC LED DC LINK VOLTAGE LED Diagnosis module Fig.81: Display at the timer unit ENGLISH 3. Connect a programming terminal with installed BOS (for connection 4. 5. 6. 7. 8. 9. of programming terminal: refer to Section 7.2.4 from page 330). The matching data have to be configured in the timer reference of the BOS for a successful connection setup. Detailed information on this topic is provided in the BOS 6000 online help (keyword „Registe ring timers in the BOS 6000“). If necessary, configure the bus master used so that the WT is reco gnized correctly as client and your I/O field is taken into account in the cyclical data exchange. Check whether the I/O signals for communication with robots, PLC or control panel are output/imported properly. Check the proper programming of the welding programs used (e.g. weld times, %I (heat), etc.). Switch on the power supply of the inverter, if you have not already done so. The inverter starts. After approx. 10 seconds the DC link is loaded to full voltage. The DC LINK VOLTAGE LED at the front side of the timer now has to be lit red. Check all emergency-stop equipment for correct function. Test the plant functionality installed for any faults. We do not accept any liability for damage resulting from the execu tion of a program, an individual program block or the manual move ment of the handling units. We furthermore accept no liability for consequential damages which could have been avoided by programming the PLC appropriately. 1070080028 / 06 | PSI 6xxx Bosch Rexroth AG 351/402 Commissioning Switching the medium-frequency inverter off " Turn the power supply (mains) off. The red DC LINK VOLTAGE LED at the front panel of the timer is extinguished. The bridge rectifiers are inhibited and the DC link voltage is slowly discharged. The green LOGIC LED continues to be lit green in the case of external 24 V supply (at X4). WARNING Dangerous electrical voltage " Never interpret the extinguishing of all LEDs on the product as zero voltage! " Please note that the voltage inside the unit directly after switching off the mains supply has not been reduced to a harmless level yet. " Do not touch either mains or transformer connections for at least 5 minutes after switching the mains supply off. " Use suitable measuring equipment and an appropriate measu ring method to ensure that the unit is de-energized before carrying out any work on the unit. ENGLISH Possibility of cardiac arrhythmia, burns, shock! 352/402 Bosch Rexroth AG Commissioning ENGLISH Notes: PSI 6xxx | 1070080028 / 06 1070080028 / 06 | PSI 6xxx Bosch Rexroth AG 353/402 Operation Operation " Please note the instructions on operation of the product from page 220 and from page 232. PSI 6x00 PSI 6xC0 READY LED WELD TIME LED Diagnosis module Fig.82: Display during normal operation if no error is present • WELD TIME LED; yellow. Is lit while the power unit is activated (= weld time is executed). For PSI 6x00: • READY LED. Is illuminated in green if no error is present in the timer. The unit is ready for welding. For PSI 6xCx: • The diagnosis module displays ”RUN” if no error is present in the timer. The unit is ready for welding. For information on programming and handling, please refer to the online help of BOS 6000. The operating procedures that are possible and how they are ac tivated is dependent on the respective application. ENGLISH 9 354/402 Operation ENGLISH Notes: Bosch Rexroth AG PSI 6xxx | 1070080028 / 06 1070080028 / 06 | PSI 6xxx Bosch Rexroth AG 355/402 Service and repair Service and repair " 10.1 Please note the information on maintenance and repair from page 222 and from page 233. Maintenance schedule " Include the following activities in the maintenance schedule: • Check the functionality of all protective devices in intervals not ex ceeding six months. This refers to, in particular, the operativeness of the protective conductor wiring and (if used) the ground fault protection device and the ground fault protection resistor. Error states must quickly release the system's main switch. • In case of water‐cooled units: Check the cooling water circuit for leaks and proper functioning. Corrosion or condensation may not occur. Use suitable cooling water additives, e.g., in order to avoid algae growth. • In case of air‐cooled units: remove dust and other contamination from the air‐cooling system. • Check terminal and clamp connections of all cables for damages and firm sit. Replace defective parts immediately. • Replace buffer battery at least every 2 years. For part number, refer to Section ”Extension and conversion”, page 373. For procedure, refer to Section 10.2.1. ENGLISH 10 356/402 Bosch Rexroth AG PSI 6xxx | 1070080028 / 06 Service and repair 10.2 Maintenance The present section provides information on how a specific mainte nance work has to be carried out. The complete list with the required activities is provided in Section 10.1 „Maintenance schedule“. 10.2.1 Battery replacement A battery is integrated into the unit for buffering the main memory (con taining all parameter settings with all welding programs) and the internal clock. The timer generates a fault or a warning (subject to configuration) which appears in the BOS error table when the remaining battery power beco mes critical. ENGLISH For PSI 6x00: • the BATTERY FAULT LED on the timer front panel is lit. For PSI 6xCx: • The diagnosis module shows the error code 84. PSI 6x00 PSI 6xC0 BATTERY FAULT LED Diagnosis module Fig.83: Battery fault display Welding is not possible if the event is defined as a fault message. NOTICE Replacement of battery with logic supply switched off Loss of data possible. " Have a new battery ready at hand for replacement and insert the new battery immediately after removing the spent battery. If no 24VDC supply voltage is present and when the battery has been removed, buffering of the weld timer's main memory is guaranteed for max. 24 hours only. 1070080028 / 06 | PSI 6xxx Bosch Rexroth AG 357/402 Service and repair Procedure The battery should preferably be replaced while the timer is switched on. PSI 6x00 PSI 6xC0 Battery compartment Fig.84: Battery compartment and take out the spent battery. Please note the information concerning the disposal of batteries on page 371. 2. Slightly hit the new buffer battery (of the same type!) on a firm surface in order to destroy the internal oxide layer. 3. Then properly insert the new battery. Concerning the polarity, please note the drawing on the front side of the timer. 4. Replace the battery cover to close the battery compartment. Battery replacement is now complete. ENGLISH 1. Turn the battery cover on the front side of the unit counter-clockwise 358/402 Bosch Rexroth AG PSI 6xxx | 1070080028 / 06 Service and repair 10.3 Firmware update Upon delivery, the most current firmware is installed on the timer. You may display the firmware version using the programming terminal (BOS). In rare cases, it may be necessary to update the firmware. NOTICE Arbitrary and improper firmware replacement Damages possible through improper handling! " ENGLISH Software tools Therefore, firmware updates may only be performed at our request and by authorized personnel only! The following software tools are available for firmware update: • WinBlow (refer to Sect. 10.3.1, starting on page 359): For firmware update of PSI 6x00.xxx timer types via interface X1. A firmware update of the optional PSQ 6000 XQR module is not pos sible with the „WinBlow“ tool. Use the „FWUpdate“ tool for this pur pose. • MemTool (refer to Sect. 10.3.2, starting on page 360): For firmware update of PSI 6xCx.xxx timer types via interface X3C or X3U. • FWUpdate (refer to Sect. 10.3.3, starting on page 361): For firmware update of all timers via the Ethernet field bus interface. 1070080028 / 06 | PSI 6xxx Bosch Rexroth AG 359/402 Service and repair Firmware update via ”WinBlow” For firmware update of PSI 6x00.xxx timer types via interface X1. The following is needed to perform a firmware update: • a pointed object for operating the ”Boot” button (only in connection with PSI 6x00.xxx; for position, refer to description on page 248), • a PC with the ”WinBlow” software installed, • a suitable connection between timer and PC; refer to page 330 et seq.) and • the firmware as *.hex file. " Proceed as follows: 1. Connect a V24 interface of your PC (COM1 or COM2) to X1 on the timer. 2. Start the ”WinBlow” software. Select the desired language and the V24 interface used. 3. Select the path and file name of the firmware. Firmware files have the filename extension ”.hex”. 4. Click on “Backup - Load firmware - Restore” command button. You are prompted to set the bootstrap mode on the unit. Welding is not possible if you proceed! 5. Activate the boot mode of the weld timer. Press the recessed Boot button on the front side of the timer (refer to page 248). Thus, the unit is switched from operating to bootstrap mode. This condition is indicated by the Boot LED above the button. If you want to exit the bootstrap mode at this point, you have to inter rupt the 24 VDC power supply of the timer (refer to page 332). NOTICE Interruption of power supply Possibility of damage to the unit! " When the next step has been initiated, the power supply must not be interrupted until the complete firmware has been loaded! 6. Confirm, if necessary, at the PC that the bootstrap mode has been activated. The firmware is now being loaded. A bar indicates the cur rent status of the process. 7. Wait until the PC signals the end of the transmission. 8. Interrupt the 24 VDC power supply of the timer for at least 5 seconds (pull out X4), and then reinstall X4. The timer is now booted with the new firmware. 9. Check the firmware version using the programming terminal (BOS). ENGLISH 10.3.1 360/402 Bosch Rexroth AG PSI 6xxx | 1070080028 / 06 Service and repair 10.3.2 Firmware update via "MemTool" For firmware update of PSI 6xCx.xxx timer types via interface X3C or X3U. The following is needed to perform a firmware update: • a PC with the ”MemTool” software installed, • a suitable connection between timer and PC; refer to page 330 et seq.) and • the firmware as *.hex file. ENGLISH " Proceed as follows: 1. Connect a V24 interface of your PC (COM1 or COM2) to X3C on the timer or an USB port of the PC to X3U on the timer. For USB, the required virtual Com-Port driver must be installed on the PC! 2. Start the ”MemTool” software. 3. Select the target file „PS6000TC(MiniMonitor)“ and confirm the dia log by hitting OK. 4. Select the COM port used (via „Target setup“). 5. Select the path and file name of the firmware using the "Open File" button. Firmware files have the file name extension ”.hex”. Welding is not possible if you proceed! 6. Press the "ESC" and "Enter" keys on the diagnosis module si multaneously for at least 8 seconds. Thus, the weld timer is switched to bootstrap mode. This condition is indicated by the red "Status" LED. Activation of the boot mode can be aborted by releasing the two keys "ESC" and "Enter" on the diagnosis module before the 8 seconds have elapsed. 7. Press the "Connect" button to establish connection with the timer. When connection has successfully been established, all memory areas in the left window must be marked using "Select All" and trans ferred to the right window using the "Add. Sel." button. NOTICE Interruption of power supply Possibility of damage to the unit! " When the next step has been initiated, the power supply must not be interrupted until the complete firmware has been loaded. 8. Start programming the flash memory using the "Program" button. 9. The firmware is loaded. Wait for the end of the transmission. 10.After the end of the transmission, separate the connection using "Disconnect". 11.Press the "Down" and "Enter" keys on the diagnosis module si multaneously for at least 8 seconds. Alternatively, you may comple tely switch off the timer's logic supply and turn it on again after a few seconds. Then, the timer is booted with the new firmware. 1070080028 / 06 | PSI 6xxx Bosch Rexroth AG 361/402 Service and repair 12.Check the firmware version using the programming terminal (BOS). Firmware update via "FWUpdate" For firmware update of all timers via the Ethernet field bus interface. The following is needed to perform a firmware update • a PC with the "FWUpdate" software installed, • a working connection to the PC via the Ethernet field bus interface. • a BOS database installed on the PC with a valid timer reference (BOS 6000 installed) and • the firmware as a *.hex file. " Proceed as follows: 1. Start the "FWUpdate" software. When the software is started, it will search for a valid timer reference (is read from the BOS6000 database) and show you all properly lin ked timers in tabular format: ENGLISH 10.3.3 2. Use the "SST-Firmware" or the ”UIR-Firmware” command button to select the path and file name of the desired firmware. Firmware files have the file name extension ”.hex”. The selected firmware file will be displayed in the corresponding in put fields. A separate selection of the UIR firmware („UIR firmware“ command button) is not necessary for type PSI 6xCx.xxx timers. 3. Select the timer(s) for which the firmware update is to be carried out by ticking the proper check boxes at the left margin of the lines. To select/deselect all of the timers, use the check box at the left mar gin of the table's header line. 362/402 Bosch Rexroth AG PSI 6xxx | 1070080028 / 06 Service and repair 4. Select the desired options for the firmware update by ticking the ap ENGLISH propriate check box(es). These options will be applicable for all selected timers. The following options are available. • ”Change after Load”: The system will initiate reprogramming of the timer's internal flash memory (if necessary, after all backup processes have been ac tivated, refer to "Save Counter", "Backup", "UIR Backup" options). During this process, the timer will copy the contents of a dedicated RAM memory range to which data was stored using the "FW Load" command button into the flash memory. If "Change after Load" is not activated, the copying process must be manually started later on in the course of the firmware update by pressing the "FW Change" command button. Do not use "Change after Load" unless none of the weld timers involved actively participates in the production process for the du ration of the complete firmware update! • ”Quit after done”: The program will be automatically closed after the firmware up date (and the completion of Restore, if activated; refer to "Save Counter", "Backup", "UIR Backup" functions) of all selected timers. • ”Save Counter”: All actual counter statuses (electrode count and cutter wear, if programmed) will be saved on the programming terminal prior to programming the flash memory and will be restored to the timer after Timer Reset. • "Backup" and "UIR Backup": All welding parameters or UI controller parameters will be saved in the programming terminal prior to programming the flash memory and will be restored to the timer after Timer Reset. 5. Check whether communication with the timers selected for the firm ware update is still possible. Click on the "List" command button. Communication works properly if all currently active firmware ver sions are displayed in the new "SW Version" window after a few se conds. Then close the "SW Version" window. Communication is interrupted if the firmware version is not dis played, but rather the text: "--N/A---". In this case, you should check whether the timer in question has been properly connected, switched on, and completely booted. A fi rewall activated on the programming terminal may also inhibit com munication. Then close the "SW Version" window and check the communication again. 6. Click on the "FW Load" command button. The currently selected firmware file (refer to step 2.) is loaded by the programming terminal to a dedicated RAM memory range of the timer. The progress is indicated by a status bar in the "SST" (German abbreviation of 'weld timer') field. 1070080028 / 06 | PSI 6xxx Bosch Rexroth AG 363/402 Service and repair When loading has been completed, the system will display the new firmware version loaded in the "SST" field. If the firmware is generally suitable for the timer, the background of the "SST" field will be green, otherwise it will be red. Only suitable firmware versions can be programmed into the timer's flash memory in the course of the process. 7. If activated (refer to step 4.: "Save Counter", "Backup", "UIR Backup" options) the relevant data will be automatically saved on the pro gramming terminal. During this process, the message "Backup" will be displayed in the "Status" field. NOTICE Interruption of power supply Possibility of damage to the unit! When the next step has been initiated, the power supply must not be interrupted until the complete firmware has been loaded. 8. If "Change after Load" has been activated (refer to step 4.), repro gramming of the flash memory is automatically initiated in the timer. If the option has not been activated, you can start reprogramming with the "FW Change" command button. While the flash memory is reprogrammed, the timers involved • cannot be used for welding tasks, • are not "Ready". As soon as programming starts, the "Wait" window will be displayed. Wait until the "Wait" window is automatically closed (duration: ap prox. 100s). When programming has been completed (duration: approx. 60s), an automatic Reset will cause the timer to be rebooted. 9. If activated (refer to step 4.: "Save Counter", "Backup" options) the data backed up in step 7. will be automatically restored from the pro gramming terminal to the timer. During this process, the message "Restore" will be displayed in the "Status" field. 10.Make sure that the firmware update was properly carried out for all selected timers. Click on the "List" command button. All currently active firmware ver sions are displayed in the new "SW Version" window that is now dis played. Then close the "SW Version" window and the "FWUpdate" software. A firmware version loaded into the dedicated RAM memory range of the timer can also be displayed in the "SST" (German abbreviation of 'weld timer') field using the "Dsp.FW" command button. The data of a timer that was saved last can also be manually restored to the timer using the "Bkup+Ctr->SST" command button without in voking the procedure described above. ENGLISH " 364/402 Bosch Rexroth AG PSI 6xxx | 1070080028 / 06 Service and repair ENGLISH Timer Reset can also be manually triggered by clicking on the "SST Reset" (Timer Reset) command button without performing the pro cedure described above. 1070080028 / 06 | PSI 6xxx Bosch Rexroth AG 365/402 Service and repair Spare parts " For ordering spare parts, please contact us. " Part numbers of all available PSI types or MF welding transformers are provided in the current price list or can be obtained from us. " In connection with part numbers, please also note the information in Chapter ”Extension and conversion” from page 373. ENGLISH 10.4 366/402 Bosch Rexroth AG Service and repair ENGLISH Notes: PSI 6xxx | 1070080028 / 06 1070080028 / 06 | PSI 6xxx Bosch Rexroth AG 367/402 Dismantling and replacement Dismantling and replacement WARNING Dangerous electrical voltage Possibility of cardiac arrhythmia, burns, shock! " Use suitable, insulated tools for all work on electrically conductive parts. " Never interpret the extinguishing of all LEDs on the product as zero voltage! " Please note that the voltage inside the unit directly after switching off the mains supply has not been reduced to a harmless level yet. " Do not touch either mains or transformer connections for at least 5 minutes after switching the mains supply off. " Use suitable measuring equipment and an appropriate measu ring method to ensure that the unit is de-energized before carrying out any work on the unit. " Do not ever open the housing of the product. It may only be opened in special cases after consultation with us and only with our written permission. CAUTION Heavy loads and sharp metal edges Higher risk of injuries through lifting of excessive weights, bruises cutting! " When you plan and perform the work, please always note the weight of the product (refer to technical data) and use appropriate lifting and transportation tools, if necessary. " Wear appropriate working clothes and use suitable protective equipment (e.g. protective helmet/shoes, protective gloves). " Please also note the instructions on installation and assembly in Section 2.6.3 from page 216 as well as Section 3.2 from page 228. " Installation and assembly are reserved to qualified personnel. Make a backup of necessary weld timer data - if necessary. The „Backup“ functionality is available within the BOS user interface for this purpose. The procedure is described in detail in the online help of the BOS (keyword „Backup“ or „Timer reference backup“). 1. Switch off the power supply (mains) and secure the power supply against unauthorized/unintended reclosing. The DC LINK VOLTAGE LED is extinguished. ENGLISH 11 368/402 Bosch Rexroth AG PSI 6xxx | 1070080028 / 06 Dismantling and replacement PSI 6x00 PSI 6xC0 LOGIC LED DC LINK VOLTAGE LED Diagnosis module Fig.85: Display at the timer unit 2. If the 24 V supply of the control logic (infeed at X4) is generated ENGLISH externally, switch off the 24 V supply. For PSI 6x00: The LOGIC LED at the front side of the unit is extinguished. For PSI 6xCx: The display on the diagnosis module is extinguished. 3. Block the unit-related connections for compressed air supply and, if necessary, the cooling water supply and discharge should this be necessary manually. Make sure that inadvertent opening is avoided. Then disconnect the existing water conduits. 4. Use suitable measuring equipment and an appropriate measuring method to ensure that the mains and transformer connections of the respective unit are de-energized. Take into consideration that internal voltages need at least 5 minu tes for discharge after switching the power supply off. Do not touch the mains and transformer connection of the unit during this period of time. 5. If the unit is replaced, write down all switch positions on the front side of the timer. Set the switches on the new unit identically. If possible, continue to use the AnyBus module or the withdrawable Ethernet module in the new unit. A reconfiguration of the relevant in terfaces is thus not necessary. 6. Make sure that all connections to the front side of the timer are marked clearly and then pull off the connections. 7. Loosen the connections for mains and transformer connections. 8. Make sure that the unit cannot make uncontrolled movements after loosening of the retaining screws/quick-action clamps and then loosen the retaining screws/quick-action clamps. 9. Remove the unit. For transport and storage, please take into account the information provided in Section „Transport and storage“ on page 307 and for dis posal the information provided in Section „Disposal“ on page 371. 10.When dismantling the unit, make sure that all remaining connection cables are sufficiently insulated and protected against contact. Dismantling has now been completed. Bosch Rexroth AG 369/402 Dismantling and replacement Additional steps if the dismantled unit is to be replaced: 11.Install the new unit (refer to Section „Assembly“ from page 309). 12.Exit the BOS, if it is active. The procedure is described in the online help of the BOS (keyword „Exiting BOS 6000“). 13.Carry out a commissioning procedure (refer to page et seq. 349). 14.If necessary after commissioning, enter the necessary data into the weld timer again. In this context, please also note the information on the replacement of a defective timer. This information is provided in the online help of the BOS (keyword „Replace defective WT“). ENGLISH 1070080028 / 06 | PSI 6xxx 370/402 Bosch Rexroth AG Dismantling and replacement ENGLISH Notes: PSI 6xxx | 1070080028 / 06 1070080028 / 06 | PSI 6xxx Bosch Rexroth AG 371/402 Disposal 12 Disposal Recovery of materials The products manufactured by us can be returned to us free of charge for proper disposal. However, the following conditions have to be satisfied for this purpose: • no deposits such as oil, grease or other contamination • no inappropriate extraneous materials or third-party components in cluded. The packaging materials are made of cardboard, wood and polysty rene. For environmental reasons, please do not return any empty packagings to us. They can be easily recycled. Recycling Principal components of our electronic equipment: • Steel, aluminum, copper, plastic materials. Due to their high metal content, most of the materials of our products can be recycled. In order to ensure optimum recovery of metals, the equipment has to be split into individual components. The metals that are contained in the electric and electronic modules can also be recovered using special separating methods. The plastic mate rials recovered by this process can be disposed of thermally. " 12.1 Simple or rechargeable batteries, if any, must be removed from the pro ducts prior to recycling them! Please also note the information provided in the following "Battery disposal" section! Environmental protection Our products do not contain any hazardous materials which may be re leased by their intended use. Therefore, no negative effects on the en vironment are to be expected under normal circumstances. Battery disposal Our product contains a replaceable battery. In accordance with the EU provisions relating to batteries, the end user has to return any simple or rechargeable batteries to a dealer or the pu blic collection facilities for disposal. " In order to avoid short-circuit in the battery collection boxes, please fix adhesive tape to the battery poles or wrap each battery indivi dually. ENGLISH The products are to be sent postage prepaid to the following address: Bosch Rexroth AG Bürgermeister-Dr.-Nebel-Straße 2 D-97816 Lohr am Main Germany 372/402 Disposal ENGLISH Notes: Bosch Rexroth AG PSI 6xxx | 1070080028 / 06 1070080028 / 06 | PSI 6xxx Bosch Rexroth AG 373/402 Extension and conversion 13 13.1 Extension and conversion " Please note the instructions on retrofits and modifications by the operator in Section ”Safety instructions” on page 222. " For ordering spare parts, please contact us. " Part numbers of all available PSI types or MF welding transformers are provided in the current price list or can be obtained from us. PSI types with UL certification on request. Optional accessories Optional accessories are not part of the standard scope of delivery. Optional accessories Name Description Length Part number V24 cable (with 2 x sub D fe male connectors) For coupling a programming terminal (PC) to interface X1 (for PSI 6x00.xxx only). 1.5 m 1070 066 749 2m R 911 296 708 5m R 911 296 710 10 m R 911 306 743 15 m R 911 306 925 0.5 m R 911 171 165 1m R 911 171 166 3m R 911 171 167 V24 cable (with miniature DIN For coupling a programming terminal (PC) to interface X3C male connector and (for PSI 6xCx.xxx only). sub D female con nector) USB cable Lithium battery For coupling a programming terminal (PC) to interface X3U (for PSI 6xCx.xxx only). AA, 3.6 V. For buffering the RAM and internal clock. 1070 914 446 Profiled insert for In case of smaller core cross-section for connecting mains terminal connectors and welding transformer. Assembly kit Accessory kit for installation at the rear panel of PSI61xx and PSI 63xx. For dimensioned drawing, refer to page 377. 1070 918 779 - For connection of several timers to the programming terminal AnyBus CC Module (BOS) via Ethernet Ethernet/IP For description, cf. page 254, for installation - cf. page 374. Fan hood Current measuring belt SSR 81.20/M12 Current sensor Sensor cables R 911 171 800 1070 086 148 For forced cooling of air-cooled inverter types. MG260 1070 078 273 - 1070 916 712 - 1070 081 808 - 1070913 494 mm2; LiYCY 2 x 2 x 0.75 shielded. Not suitable for drag chains. Please specify desired length in order. ENGLISH Table 18: 374/402 Bosch Rexroth AG PSI 6xxx | 1070080028 / 06 Extension and conversion 13.2 Expand product 13.2.1 Installation/Removal of AnyBus module For installation, you need - AnyBus module - screw driver, suitable for Torx 8. The following figures show an AnyBus module with an Ethernet port, but the handling is the same for other AnyBus modules. For installation, proceed as follows: 1. Make sure that the 24 V logic supply of the weld timer has been swit ched off. 2. Pull off blind cover (1) towards you. The mother board (2) and pin connector support (3) become visible. 2 ENGLISH Installation 1 3 3. Insert the module along the edge (4) - pressing it slightly to the right (5) - backwards until resistance can be felt (6). The module is first inserted into the timer's internal pin connector support (3) by this process. Now, a 1-2 mm gap (7) remains between the timer's front panel and the module's front panel. 7 6 4 5 4. Press the module to the left (8) and push it backward until the stop is reached (9). The module is properly fixed to the timer's internal mother board (2) via the peg (10) on the left by this process. The original gap between the timer's front panel and the module's front panel (7) must no longer be present afterwards! 1070080028 / 06 | PSI 6xxx Bosch Rexroth AG 375/402 Extension and conversion 11 8 9 9 8 11 10 2 5. Turn in the two screws (11) to fix the module in place (max. 0.25 Nm). Removal For removal, proceed as follows: 1. Make sure that the 24V logic supply of the timer has been switched off! 2. Loosen the two screws (11). 3. Grab the two screws and pull the module out of the slot. 4. Use a blanking plate (1) to cover the slot. ENGLISH Use the "AnyBus IPconfig" software for the Ethernet configuration of the AnyBus module (installation file is included in the BOS software package, refer to BOS data medium: directory path "Tools/Any Bus”). 376/402 Bosch Rexroth AG PSI 6xxx | 1070080028 / 06 Extension and conversion 13.2.2 Installation/Removal of the licence memory card The Licence Memory Card (Micro SD memory card) serves for ac tivating options such as the UI controller, for which a license is requi red). Only in connection with PSI 6xCx.xxx. Licensed options are only available with installed card. 2 3 ENGLISH 1 5 4 5 Fig.86: Location of the licence memory card Proceed as follows: 1. Make sure that the 24V logic supply of the timer has been switched off! 2. Remove control element of diagnosis module (4). Press on the latching tongues (5) from above and below and pull the control element off to the front. The slot (2) for the license memory card (1) is now accessible. 3. Pay attention that the contact surfaces of the license memory card are located at the back/right and push the card into the slot. If there is a card in the slot already: First press the installed card slightly into the slot. This unlocks the card. Then remove the unlocked card. 1070080028 / 06 | PSI 6xxx Bosch Rexroth AG 377/402 Extension and conversion 13.2.3 Accessory kit for rear panel installation By default, the units are installed at the left side wall (looking from the front side). A cutout for the functional area „cooling “ is required for this purpose. Fig.87: Dimensioned drawing: Accessory kit for rear panel installation ENGLISH 1.5 thick non-dimensioned radii = R2 Mounting plate accessory kit Dimensions mounting plate As an alternative, installation via the rear panel is possible using the ac cessory kit. 378/402 Bosch Rexroth AG Extension and conversion ENGLISH Notes: PSI 6xxx | 1070080028 / 06 1070080028 / 06 | PSI 6xxx Bosch Rexroth AG 379/402 Troubleshooting Troubleshooting The units are sturdily built. Nevertheless, disturbances may occur in ex ceptional cases: • by wrong electrical connection or overvoltage in the mains, • by insufficient cooling, maintenance or overload, • by exceeding the maximum current values (parametrization) or monitoring values. When an error has occurred, the timer will be inhibited. In this con dition, no welding schedule is possible until the error has been reset. If warnings are present, welding is still possible. Error displays For PSI 6x00: In case of fault, the green “READY” LED is extinguished on the front panel of the weld timer. For PSI 6xC0: In case of fault, the diagnosis module shows the fault number. PSI 6x00 PSI 6xC0 READY LED Battery fault LED Diagnosis module Fig.88: Display at the timer unit (error) More detailed information on the errors that occurred is provided • via BOS 6000 in the „Fault table“ • via the small operator terminal (VCP05.2). A list of all error and status messages is provided in the online help of BOS 6000. There you will also find information on error elimination in addition to the possible causes. Reset fault Both faults and warnings may be ”self‐resetting” or ”non-self‐resetting”. ”Self‐resetting” means that events are automatically reset by the timer when the cause of the fault or the warning has been corrected. There fore, they do not require a manual fault reset. ENGLISH 14 380/402 Bosch Rexroth AG PSI 6xxx | 1070080028 / 06 Troubleshooting Examples of self‐resetting faults include: - Stop / No 24V - Power voltage off / too low - Synchronization / mains / DC-link voltage error. ”Non-self-resetting” faults can be reset via • the BOS software • a positive edge at the fault reset inputs of the I/O array of the weld timer • the RESET button on the timer's front side (for PSI 6x00) • the diagnosis module (for PSI 6xCx) The "Heat sink temperature too high” and ”Overcurrent or earth fault” errors must always be manually reset via the RESET button or on the diagnosis module. Example of a fault: Temperature monitoring responds 1. The integrated power unit indicates temperatures greater than/ equal to 65° C (+5° C) to the integrated weld timer. ENGLISH 2. As a result, the weld timer stops all further sequences. 3. The ”Power unit temperature” error is displayed. Possible cause Action Contaminated heat sink. Clean heat sink. Ambient temperature too high. Check installation area cooling for proper installation and functioning. Rating of the power unit too low. Calculate duty cycle and check selection on the basis of the load diagram. Cooling water too warm or cooling water flow too low. Check flow and/or temperature of cooling water. Forced ventilation of air‐cooled units Check forced ventilation. is defective. 1070080028 / 06 | PSI 6xxx Bosch Rexroth AG 381/402 Technical data 15 Technical data For information on dimensioning and load, refer to Section 5.3 from page 289! General data across power units Type of construction 3-phase medium-frequency inverter incl. weld timer in one housing I/O interfaces According to I/O module used. Refer to page 262 et seq. Number of programs 256 Number of electrodes Type-specific. Max. 32 (0 ... 31). Electrode number 0 is reserved for special functions. Program memory Battery-buffered RAM Actuating variable for electrode force Depending on timer type as analog signal (at X2) and/or digital via serial I/O array. Analog signal is programmable as: 0 to +10 V, max. 20 mA or 0 to 20 mA or 4 to 20 mA (at max. 500 ohms). Feedback for pressure/electrode force Depending on timer type 1 x digital input (24VDC; 3 mA; according to EN 61131-2 Type 3) or 2 x analog input (0 ... 10 V). Desired input can be selected type-specifically. ENGLISH Table 19: 382/402 Bosch Rexroth AG PSI 6xxx | 1070080028 / 06 Technical data Table 20: Environmental data across power units Degree of protection IP 20; installation area with IP 54 is required Orientation vertically or placed on the back side Temperature range Cooling Operation (in installation area) +10 ... +55 degrees Centigrade Storage / transport -25 ... +70 degrees Centigrade air-cooled units max. 45 degrees Centigrade; forced cooling via tem perature-controlled fan hood is required. water-cooled units • max. 30 degrees Centigrade supply temperature; • max. 10 bar water pressure. ENGLISH For other required properties, refer to 1) Temperature monitoring integrated Max. height of the operating location 2000 m above sea level Climatic category 3K3 according to EN 60721-3-3 Air humidity Condensation is not permitted. Corrosion The ambient air must be free from high levels of acids, lyes, corrosive materials, salt, metal vapors. 1) Other required cooling water properties: • pH value: 7 to 8.5 • Degree of hardness Dmax: 10 German degrees = 12.5 British degrees = 10.5 US degrees = 18 French degrees • Chlorides: max. 20 mg/l • Nitrates: max. 10 mg/l • Sulfates: max. 100 mg/l • Insoluble components: max. 250 mg/l Tap water usually meets these conditions. However, an algaecide must be added to the water. 1070080028 / 06 | PSI 6xxx Bosch Rexroth AG 383/402 Technical data Electrical data across power units Mains connection Connection to earthed TN or TT mains. Mains frequency 50 or 60 Hz Overvoltage protection Metal oxide varistor (MOV) Power supply Power system Dependent on the integrated power unit. Logic (X4) Typ. 24 VDC ; 19 … 30 VDC to EN 61131-2 I/O array According to I/O module used. Refer to page 262 et seq. Options for generation of supply voltage for the logic Via external 24 VDC power supply unit or via own supply through the integrated power supply unit (is fed internally by mains). Power input Power system Dependent on the integrated power unit. Nominal current logic approx. 1.5 A (at 24 VDC; without fan hood, without I/O module and without additional consumers at X5) Making current logic approx. 2 A for 10 ms (at 24 VDC; without fan hood, without I/O module and without additional consumers at X5) Nominal current fan hood approx. 2 A (at 24 VDC) I/O array According to I/O module used. Refer to page 262 et seq. Properties of primary voltage (to the MF transformer) 1 kHz; pulse-width modulated Integrated power sup ply unit (Output: X4 between terminals 5 and 8) Output voltage 24 VDC Output current max. 2 A " Please note: When the PSI mains supply is switched on, the spe cified output current is only available from mains vol tage on, and then only until the PSI mains supply drops to its lower tolerance limit. ENGLISH Table 21: 384/402 Bosch Rexroth AG PSI 6xxx | 1070080028 / 06 Technical data Table 22: PSI 61xx - Mechanical data Designation Weight Dimensions L1 L2 W1 W2 approx. 20 kg approx. 21 kg approx. 25 kg approx. 25 kg Also refer to dimensioned drawings starting on page 310 Connection terminals for power supply and transformer connection Frame terminals: max. 50 mm2 for clamping Required tightening torque Table 23: 6 … 8 Nm PSI 61xx - Environmental data Designation L1 L2 W1 W2 Switch cabinet basic losses 69 W 100 W 69 W 100 W Switch cabinet losses at max. %I 170 W 200 W 110 W 140 W Max. cooling losses 360 W 420 W Water cooling: min. flow quantity - 4 l/min. Water cooling: typ. pressure drop - 0.1 bar at 4 l/min. ENGLISH • min. 4 l/min flow quantity; Table 24: PSI 61xx - Electrical data Designation L1 L2 W1 W2 Line voltage range 400 … 480 V 500 … 690 V 400 … 480 V 500 … 690 V Mains voltage tolerance 400 V: -15 % 480 V: +10 % 500 V: -15 % 690 V: +10 % 400 V: -15 % 480 V: +10 % 500 V: -15 % 690 V: +10 % Mains nominal current (max. thermal continu ous current) 110 A max. primary current (output current to the transformer) 400 A max. secondary current (transformer-dependent output current to the electrode) Required connection cross-section (for mains and transformer connection) 20 kA (with transformer type PSG 3100) min. 35 mm2 1070080028 / 06 | PSI 6xxx Bosch Rexroth AG 385/402 Technical data Table 25: PSI 62xx - Mechanical data Designation W1 Weight approx. 56 kg Dimensions Also refer to dimensioned drawings Connection terminals for power supply and trans former connection HDFK lead-through terminal; 25 … 95 mm2 for clamping Required tightening torque Table 26: 15 … 20 Nm PSI 62xx - Environmental data Designation W1 Switch cabinet basic losses 69 W Switch cabinet losses at max. %I 210 W Max. cooling losses 700 W Water cooling: min. flow quantity 4 l/min. Water cooling: typ. pressure drop 0.6 bar at 4 l/min. Table 27: PSI 62xx - Electrical data Designation W1 Line voltage range 400 … 480 V Mains voltage tolerance 400 V: -15 % 480 V: +10 % Mains nominal current (max. thermal continuous current) 220 A max. primary current (output current to the transformer) 1200 A max. secondary current (transformer-dependent output current to the electrode) Required connection cross-section (for mains and transformer connection) 54 kA (with transformer type PSG 3100) 95 mm2 ENGLISH Water cooling: min. flow quantity 386/402 Bosch Rexroth AG PSI 6xxx | 1070080028 / 06 Technical data Table 28: PSI 6300/63C0 - Mechanical data Designation Weight L1 L2 W1 W2 approx. 20 kg approx. 21 kg approx. 25 kg approx. 25 kg Dimensions Also refer to dimensioned drawings Frame terminals: max. 50 mm2 for clamping Connection terminals for power supply and transformer connection Required tightening torque Table 29: 6 … 8 Nm PSI 6300/63C0 - Environmental data Designation L1 L2 W1 W2 Switch cabinet basic losses 69 W 100 W 69 W 100 W Switch cabinet losses at max. %I 170 W 200 W 110 W 140 W Max. cooling losses 420 W Water cooling: min. flow quantity - 4 l/min. Water cooling: typ. pressure drop - 0.1 bar at 4 l/min. Table 30: ENGLISH 360 W PSI 6300/63C0 - Electrical data Designation L1 L2 W1 W2 Line voltage range 400 … 480 V 500 … 690 V 400 … 480 V 500 … 690 V Mains voltage tolerance 400 V: -15 % 480 V: +10 % 500 V: -15 % 690 V: +10 % 400 V: -15 % 480 V: +10 % 500 V: -15 % 690 V: +10 % Mains nominal current (max. thermal conti nuous current) 110 A max. primary current (output current to the transformer) 800 A max. secondary current (transformer-dependent output current to the electrode) Required connection cross-section (for mains and transformer connection) 36 kA (with transformer type PSG 3100) min. 35 mm2 1070080028 / 06 | PSI 6xxx Bosch Rexroth AG 387/402 Technical data PSI 64C0 - Mechanical data Designation Weight approx. 40 kg Dimensions refer to dimensioned drawings Connection terminals for power supply and trans former connection Required tightening torque Table 32: W1 HDFK lead-through terminal; 25 … 95 mm2 for clamping 15 … 20 Nm PSI 64C0 - Environmental data Designation W1 Switch cabinet basic losses 69 W Switch cabinet losses at max. %I 210 W Max. cooling losses 700 W Water cooling: min. flow quantity 4 l/min. Water cooling: typ. pressure drop 0.6 bar at 4 l/min. Table 33: PSI 64C0 - Electrical data Designation W1 Line voltage range 400 … 480 V Mains voltage tolerance 400 V: -15 %; 480 V: +10 % Mains nominal current (max. thermal continuous current) 220 A max. primary current (output current to the transformer) 1600 A max. secondary current (transformer-dependent output current to the electrode) Required connection cross-section (for mains and transformer connection) 54 kA (with transformer type PSG 3100) 95 mm2 ENGLISH Table 31: 388/402 Bosch Rexroth AG PSI 6xxx | 1070080028 / 06 Technical data Table 34: PSI 65xx - Mechanical data Designation Weight approx. 70 kg; may be separated mechanically Dimensions Also refer to dimensioned drawings Power supply and transformer connection Required tightening torque Table 35: via cable lugs; 1 screw M10 per connection 41 … 46 Nm PSI 65xx - Environmental data Designation W1 Switch cabinet basic losses 100 W Switch cabinet losses at max. %I 850 W Max. cooling losses 4400 W Water cooling: min. flow quantity 10 l/min. Water cooling: typ. pressure drop 0.65 bar at 10 l/min. (both coolers) Table 36: PSI 65xx - Electrical data Designation ENGLISH W1 W1 Line voltage range 400 … 480 V Mains voltage tolerance 400 V: -15 % 480 V: +10 %; Mains nominal current (max. thermal continuous current) max. primary current (output current to the transformer) max. secondary current (transformer-dependent output current to the electrode) Required connection cross-section (for mains and transformer connection) 330 A (without cabinet cooling) 660 A (with cabinet cooling) 2400 A 120 kA (with transformer type PSG 3100) 2 to 4 cables; each cable 120 mm2 1070080028 / 06 | PSI 6xxx Bosch Rexroth AG 389/402 Annex 16 Annex 16.1 Declaration of conformity / CE marking The declaration of conformity confirms that the product complies with the following directives and standards: Directives • Low-voltage directive2006/95/EC • EMC directive2004/108/EC " The declaration of conformity is available from us directly on request. " Please note that the product is a build-in component. When installed in an enclosure, the EMC properties may be subject to change. ENGLISH Standards • EN50178 • EN60204‐1 • EN62135 390/402 Annex ENGLISH Notes: Bosch Rexroth AG PSI 6xxx | 1070080028 / 06 1070080028 / 06 | PSI 6xxx Bosch Rexroth AG 391/402 List of tables List of tables Table1: Table2: Table3: Table4: Table5: Table6: Table7: Table 8: Table9: Table10: Table11: Table12: Table13: Table14: Table15: Table16: Table17: Table 18: Table 19: Table 20: Table 21: Table 22: Table 23: Table 24: Table 25: Table 26: Table 27: Table 28: Table 29: Table 30: Table 31: Table 32: Table 33: Table 34: Table 35: Table 36: Table37: Necessary (D) and supplementary documents . . . . . . . . . . . . . . . . . . . . . . . Example for the structure of a safety instruction . . . . . . . . . . . . . . . . . . . . . Danger classes according to ANSI Z535.6 . . . . . . . . . . . . . . . . . . . . . . . . . . Examples for classification of safety instructions . . . . . . . . . . . . . . . . . . . . . Icons used . . . . . . . . . . . . . . . . . . . . . . . . . . . . . . . . . . . . . . . . . . . . . . . . . . . . . . Designations . . . . . . . . . . . . . . . . . . . . . . . . . . . . . . . . . . . . . . . . . . . . . . . . . . . . Possible icons on the product . . . . . . . . . . . . . . . . . . . . . . . . . . . . . . . . . . . . . Overview of the types of power units . . . . . . . . . . . . . . . . . . . . . . . . . . . . . . . Technical data: ”E/A DISK R2ED“ / ”E/ADISKR4ED“ I/O module . . . . . . Technical data: ”E/A DISK“ I/O module . . . . . . . . . . . . . . . . . . . . . . . . . . . . . Technical data: ”E/A DISK 2R“ / ”E/A DISK 4R“ I/O modules . . . . . . . . . . Technical data: ”E/A IBS OPC with optical fiber“ I/O module . . . . . . . . . . Technical data: ”E/A IBS FERN“ I/O module . . . . . . . . . . . . . . . . . . . . . . . . Technical data: ”E/A IBS X_FERN_8EA“ I/O module . . . . . . . . . . . . . . . . . Technical data: ”DEV-NET“ I/O module . . . . . . . . . . . . . . . . . . . . . . . . . . . . . Technical data: "ComnetM-DP" I/O module . . . . . . . . . . . . . . . . . . . . . . . . . Rating of noise suppression equipment . . . . . . . . . . . . . . . . . . . . . . . . . . . . . Optional accessories . . . . . . . . . . . . . . . . . . . . . . . . . . . . . . . . . . . . . . . . . . . . . General data across power units . . . . . . . . . . . . . . . . . . . . . . . . . . . . . . . . . . Environmental data across power units . . . . . . . . . . . . . . . . . . . . . . . . . . . . . Electrical data across power units . . . . . . . . . . . . . . . . . . . . . . . . . . . . . . . . . PSI 61xx - Mechanical data . . . . . . . . . . . . . . . . . . . . . . . . . . . . . . . . . . . . . . . PSI 61xx - Environmental data . . . . . . . . . . . . . . . . . . . . . . . . . . . . . . . . . . . . PSI 61xx - Electrical data . . . . . . . . . . . . . . . . . . . . . . . . . . . . . . . . . . . . . . . . . PSI 62xx - Mechanical data . . . . . . . . . . . . . . . . . . . . . . . . . . . . . . . . . . . . . . . PSI 62xx - Environmental data . . . . . . . . . . . . . . . . . . . . . . . . . . . . . . . . . . . . PSI 62xx - Electrical data . . . . . . . . . . . . . . . . . . . . . . . . . . . . . . . . . . . . . . . . . PSI 6300/63C0 - Mechanical data . . . . . . . . . . . . . . . . . . . . . . . . . . . . . . . . . PSI 6300/63C0 - Environmental data . . . . . . . . . . . . . . . . . . . . . . . . . . . . . . . PSI 6300/63C0 - Electrical data . . . . . . . . . . . . . . . . . . . . . . . . . . . . . . . . . . . PSI 64C0 - Mechanical data . . . . . . . . . . . . . . . . . . . . . . . . . . . . . . . . . . . . . . PSI 64C0 - Environmental data . . . . . . . . . . . . . . . . . . . . . . . . . . . . . . . . . . . . PSI 64C0 - Electrical data . . . . . . . . . . . . . . . . . . . . . . . . . . . . . . . . . . . . . . . . PSI 65xx - Mechanical data . . . . . . . . . . . . . . . . . . . . . . . . . . . . . . . . . . . . . . . PSI 65xx - Environmental data . . . . . . . . . . . . . . . . . . . . . . . . . . . . . . . . . . . . PSI 65xx - Electrical data . . . . . . . . . . . . . . . . . . . . . . . . . . . . . . . . . . . . . . . . . Abbreviations and definitions . . . . . . . . . . . . . . . . . . . . . . . . . . . . . . . . . . . . . . 207 208 209 209 210 210 215 238 262 265 267 271 275 279 283 285 328 373 381 382 383 384 384 384 385 385 385 386 386 386 387 387 387 388 388 388 395 ENGLISH 17 392/402 DEUTSCH Notes: Bosch Rexroth AG PSI 6xxx | 1070080028 / 06 1070080028 / 06 | PSI 6xxx Bosch Rexroth AG 393/402 List of figures List of figures Fig.1: Fig.2: Fig.3: Fig.4: Fig.5: Fig.6: Fig.7: Fig.8: Fig.9: Fig.10: Fig.11: Fig.12: Fig.13: Fig.14: Fig.15: Fig.16: Fig.17: Fig.18: Fig.19: Fig.20: Fig.21: Fig.22: Fig.23: Fig.24: Fig.25: Fig.26: Fig.27: Fig.28: Fig.29: Fig.30: Fig.31: Fig.32: Fig.33: Fig.34: Fig.35: Fig.36: Fig.37: Fig.38: Fig.39: Fig.40: Fig.41: Fig.42: Fig.43: Fig.44: Examples: Medium-frequency inverter with standard CPU . . . . . . . . . . . . Block diagram overview: PSI 6000 with transformer . . . . . . . . . . . . . . . . . . Detailed block diagram of a medium-frequency inverter system . . . . . . . . Secondary rectification by the PSG transformer . . . . . . . . . . . . . . . . . . . . . Interrelationship: Pulse width of primary voltage and secondary current with medium-frequency welding . . . . . . . . . . . . . . . . . . . . . . . . . . . . . . . . . . . General structure of an MF welding system with PSI 6xxx . . . . . . . . . . . . Partial front-panel view PSI 6x00.xxx . . . . . . . . . . . . . . . . . . . . . . . . . . . . . . . Partial front-panel view PSI 6xCx.xxx . . . . . . . . . . . . . . . . . . . . . . . . . . . . . . AnyBus module ”ProfiNet IO“ (2-port variant) . . . . . . . . . . . . . . . . . . . . . . . . AnyBus module ”CC Ethernet 100 Mbit” (1-port variant) . . . . . . . . . . . . . . ”CC Ethernet 100 Mbit” module . . . . . . . . . . . . . . . . . . . . . . . . . . . . . . . . . . . . ”CC ProfiNet“ module . . . . . . . . . . . . . . . . . . . . . . . . . . . . . . . . . . . . . . . . . . . . “Optical fiber ProfiNet” module . . . . . . . . . . . . . . . . . . . . . . . . . . . . . . . . . . . . Diagnosis module: Front panel view . . . . . . . . . . . . . . . . . . . . . . . . . . . . . . . . Diagnosis module: Main menu . . . . . . . . . . . . . . . . . . . . . . . . . . . . . . . . . . . . Diagnosis module: ETHERNET menu . . . . . . . . . . . . . . . . . . . . . . . . . . . . . . Front panel view: ”E/A DISK R2ED“ I/O module . . . . . . . . . . . . . . . . . . . . . Front panel view: ”E/A DISK“ I/O module . . . . . . . . . . . . . . . . . . . . . . . . . . . Front panel view: ”E/A DISK 2R“ / ”E/A DISK 4R“ I/O module . . . . . . . . . . Front panel view: ”E/A IBS OPC with optical fiber“ I/O module . . . . . . . . . ”E/A IBS OPC with optical fiber“ I/O module: Setting of transmission power and the baud rate. . . . . . . . . . . . . . . . . . . . . . . . . . . . . . Front panel view: ”E/A IBS FERN (REMOTE)“ I/O module . . . . . . . . . . . . Terminal assignment of the INTERBUS-S ports . . . . . . . . . . . . . . . . . . . . . Front panel view: ”E/A IBS X_FERN_8EA“ I/O module . . . . . . . . . . . . . . . . Terminal assignment of the INTERBUS-S ports . . . . . . . . . . . . . . . . . . . . . Front panel view: ”DEV-NET“ I/O module . . . . . . . . . . . . . . . . . . . . . . . . . . . Front panel view: "ComnetM-DP" I/O module . . . . . . . . . . . . . . . . . . . . . . . . Front panel view: "PSQ 6000 XQR“ UI controller module . . . . . . . . . . . . . Permitted primary current depending on the duty cycle: PSI 61xx.xxx . . Permitted primary current depending on the welding time: PSI 61xx.xxx L1/W1 . . . . . . . . . . . . . . . . . . . . . . . . . . . . . . . . . . . . . . . . . . . . . Permitted primary current depending on the welding time: PSI 61xx.xxx L2/W2 . . . . . . . . . . . . . . . . . . . . . . . . . . . . . . . . . . . . . . . . . . . . . Permitted primary current depending on the duty cycle: PSI 62xx.xxx . . Permitted primary current depending on the welding time: PSI 62xx.xxx Permitted primary current depending on the duty cycle: PSI 6300/63C0.xxx L1/W1 . . . . . . . . . . . . . . . . . . . . . . . . . . . . . . . . . . . . . . . . Permitted primary current depending on the duty cycle: PSI 6300/63C0.xxx L2 . . . . . . . . . . . . . . . . . . . . . . . . . . . . . . . . . . . . . . . . . . . Permitted primary current depending on the welding time: PSI 6300/63C0.xxx L1/W1 . . . . . . . . . . . . . . . . . . . . . . . . . . . . . . . . . . . . . . . . Permitted primary current depending on the welding time: PSI 6300/63C0.xxx L2/W2 . . . . . . . . . . . . . . . . . . . . . . . . . . . . . . . . . . . . . . . . Permitted primary current depending on the duty cycle: PSI 64xx.xxx . . Permitted primary current depending on the welding time: PSI 64xx.xxx Permitted primary current depending on the duty cycle: PSI 65xx . . . . . . Permitted primary current depending on the welding time: PSI 65xx.xxx Type designation of the PSx 6xxx series . . . . . . . . . . . . . . . . . . . . . . . . . . . . Dimensioned drawing: PSI 61xx.xxx L1 . . . . . . . . . . . . . . . . . . . . . . . . . . . . . Dimensioned drawing: PSI 61xx.xxx L2 . . . . . . . . . . . . . . . . . . . . . . . . . . . . . 242 244 244 245 245 246 248 250 252 254 255 256 257 258 259 260 264 266 269 273 274 276 277 280 281 284 286 288 291 292 293 295 296 297 298 299 300 301 302 303 304 305 310 311 ENGLISH 18 394/402 Bosch Rexroth AG PSI 6xxx | 1070080028 / 06 List of figures Fig.45: Fig.46: Fig.47: Fig.48: Fig.49: Fig.50: Fig.51: Fig.52: Fig.53: ENGLISH Fig.54: Fig.55: Fig.56: Fig.57: Fig.58: Fig.59: Fig.60: Fig.61: Fig.62: Fig.63: Fig.64: Fig.65: Fig.66: Fig.67: Fig.68: Fig.69: Fig.70: Fig.71: Fig.72: Fig.73: Fig.74: Fig.75: Fig.76: Fig.77: Fig.78: Fig.79: Fig.80: Fig.81: Fig.82: Fig.83: Fig.84: Fig.85: Fig.86: Fig.87: Fig.88: Dimensioned drawing: PSI 61xx.xxx Wx . . . . . . . . . . . . . . . . . . . . . . . . . . . . Location of the mains and transformer connections: PSI 61xx.xxx Lx/Wx Location of cooling water connection: PSI 61xx.xxx Wx . . . . . . . . . . . . . . . Dimensioned drawing: PSI 62xx.xxx W1 . . . . . . . . . . . . . . . . . . . . . . . . . . . . Location of mains and transformer connection: PSI 62xx.xxx W1 . . . . . . Location of cooling water connection: PSI 62xx.xxx W1 . . . . . . . . . . . . . . Dimensioned drawing: PSI 6300/63C0.xxx Lx . . . . . . . . . . . . . . . . . . . . . . . Dimensioned drawing: PSI 6300/63C0.xxx Wx . . . . . . . . . . . . . . . . . . . . . . Location of mains and transformer connection: PSI 6300/63C0.xxx Lx/Wx . . . . . . . . . . . . . . . . . . . . . . . . . . . . . . . . . . . . . . . . Location of cooling water connection: PSI 6300/63C0.xxx Wx . . . . . . . . . Dimensioned drawing: PSI 64C0.xxx W1 . . . . . . . . . . . . . . . . . . . . . . . . . . . Location of mains and transformer connection: PSI 64C0.xxx W1 . . . . . . Location of cooling water connection: PSI64C0.xxx W1 . . . . . . . . . . . . . . Dimensioned drawing: PSI 65xx.xxx W1 . . . . . . . . . . . . . . . . . . . . . . . . . . . . Location of mains and transformer connection: PSI 65xx.xxx W1 . . . . . . Location of cooling water connection: PSI 65xx.xxx W1 . . . . . . . . . . . . . . Noise suppression examples . . . . . . . . . . . . . . . . . . . . . . . . . . . . . . . . . . . . . . Typical curve of the mains voltage (top) and the related mains current (bottom) in one phase during the welding process . . . . . . . Connection of programming terminal via X1 . . . . . . . . . . . . . . . . . . . . . . . . . Connection of programming terminal via X3C . . . . . . . . . . . . . . . . . . . . . . . Logic supply input of the timer . . . . . . . . . . . . . . . . . . . . . . . . . . . . . . . . . . . . . Internally generated 24 VDC voltage supply . . . . . . . . . . . . . . . . . . . . . . . . . Connection of the I/O module supply at X4 of the timer . . . . . . . . . . . . . . . Direct connection of the I/O module supply to separate 24VDC power supply unit . . . . . . . . . . . . . . . . . . . . . . . . . . . . . . . . . . . . . . . . Wiring examples for 24V voltage distribution . . . . . . . . . . . . . . . . . . . . . . . . Connecting an external fan module . . . . . . . . . . . . . . . . . . . . . . . . . . . . . . . . Power supply to external consumers . . . . . . . . . . . . . . . . . . . . . . . . . . . . . . . Analog output of the force actuating variable . . . . . . . . . . . . . . . . . . . . . . . . Possibly available feedback signal inputs for pressure/force . . . . . . . . . . . Connecting a KSR sensor on the secondary side . . . . . . . . . . . . . . . . . . . . Connection for monitoring the welding transformer temperature . . . . . . . Transformer temperature not monitored by timer . . . . . . . . . . . . . . . . . . . . . With PSI 6x00.xxx: Connection for secondary voltage measurement . . . With PSI 6xCx.xx: Connection for secondary voltage measurement . . . . Connection terminals for main switch trip . . . . . . . . . . . . . . . . . . . . . . . . . . . Example: Cooling water connection . . . . . . . . . . . . . . . . . . . . . . . . . . . . . . . . Display at the timer unit . . . . . . . . . . . . . . . . . . . . . . . . . . . . . . . . . . . . . . . . . . Display during normal operation if no error is present . . . . . . . . . . . . . . . . . Battery fault display . . . . . . . . . . . . . . . . . . . . . . . . . . . . . . . . . . . . . . . . . . . . . . Battery compartment . . . . . . . . . . . . . . . . . . . . . . . . . . . . . . . . . . . . . . . . . . . . . Display at the timer unit . . . . . . . . . . . . . . . . . . . . . . . . . . . . . . . . . . . . . . . . . . Location of the licence memory card . . . . . . . . . . . . . . . . . . . . . . . . . . . . . . . Dimensioned drawing: Accessory kit for rear panel installation . . . . . . . . . Display at the timer unit (error) . . . . . . . . . . . . . . . . . . . . . . . . . . . . . . . . . . . . 312 313 313 314 315 316 317 318 319 319 320 321 322 324 325 326 327 328 330 331 332 333 334 334 337 338 339 340 342 343 345 345 346 346 347 348 350 353 356 357 368 376 377 379 1070080028 / 06 | PSI 6xxx Bosch Rexroth AG 395/402 Abbreviations Abbreviations Table37: Abbreviations and definitions Abbreviation Meaning %I General abbreviation for heat. May be specified in %I (scale values) or kA Scale values (%I) With thyristor power units: Measure for the electrical phase value. For MF inverters: Measure for the pulse width. AC Alternating current. BOS Bedienoberfläche Schweissen (Graphical User Interface (GUI) for welding) BQR User interface for U/I controller CAN Controller Area Network; data bus CT Cool time Time between the current impulses/blocks (1., 2., 3. CT) Cyc Cycles. Refer to P. daN Dekanewton. 1 daN = 10 N DC Direct current. dimmed The relevant object or its text is shown in grey color. In this condition, the relevant functionality is inhibited, or cannot be activated for reasons of the very system. DST Downslope time. Time in which the %I decreases until the end of the MainWLD. ELMO Electromotive. EMC Electromagnetic compatibility EOS End of Sequence. Refer to WC. ESD Electrostatic discharge. Abbreviation for all names that are related to electrostatic discharge. e.g. ESD protection, ESD hazards, ESD-sensi tive components. FPO Freely programmable output. Is not offered for all timers. HLD Hold time. Time after the last weld time in which the parts to be wel ded can cool down. HSA Main switch trip. Ignition Ignition: Firing pulses for triggering the power unit are switched on and off IMP Number of impulses. Impulses forming the MainWLD. IP Internet Protocol kA Kilo-Ampere (amount of current) kN Kilo-Newton (force) KSR Constant-current regulation. Keeps the current in the welding circuit constant. ENGLISH 19 396/402 Bosch Rexroth AG PSI 6xxx | 1070080028 / 06 ENGLISH Abbreviations Abbreviation Meaning KUR Constant-voltage regulation Compensates line voltage fluctuations. LT Power unit (thyristor or inverter) MF Medium Frequency ms Milliseconds. NBS Mains load limitation control Monitors and influences the mains load. NWI Post-warming pulse. OFF Off Time. Time between two spot welds in which the solenoid valve is not driven. Relevant for Repeat mode only. Option button Round object on the user interface for toggling a function on/off. P Cycles (mains cycles) With a line frequency of 50 Hz: 1 P -> 20 ms. With a line frequency of 60 Hz: 1 P -> 16.6 ms PE Protective Earth. PE conductor. PG Programming terminal/welding computer PHA Phase angle PLC Programmable Logic Controller Post-heat Post-heating time, also referred to as PstWLD or 3.WLD Pre-heat Pre-heating time, also referred to as PreWLD or 1.WLD PreWLD Refer to Pre-heat. PSF Process stability. PSG Transformer-rectifier unit for PSI types. PSI Programmable weld timer with inverter. PST Programmable weld timer with thyristor power unit. PstWLD Refer to Post-heat. Radio button Refer to "Option button". REPEAT Repeat mode. Operating mode for manually operated systems. RO Relay output Slope Current increase. Current increases/decreases from an initial to a final heat value. Solenoid Solenoid valve. Drives the gun cylinders for closing the electrodes SINGLE Single spot operating mode. For automatic and manual systems SQZ Squeeze time. Time that runs before the weld time. The electrodes squeeze the parts to be welded together. Stepper %I stepping in order to compensate for electrode wear 1070080028 / 06 | PSI 6xxx Bosch Rexroth AG 397/402 Abbreviation Meaning TCP Transmission Control Protocol. TCP controls the way in which data is exchanged between computers. It is a link-oriented, packet-switching transport protocol and belongs to the range of Internet protocols (IP). Temp. Temperature. Tool tip Explanatory text. Appears when the mouse pointer remains on an input field/object for a moment. ÜK Monitoring contact e.g. for monitoring the pressure inside the cylinder (that closes the electrodes) or monitoring of the electrode posi tion (e.g. "gun closed") UIP Process quality. UIR UI control UST Upslope time Time in which the %I increases from the beginning of the MainWLD. WC Weld complete contact. This signal is output when the schedule has been com pleted. WLD Weld time A distinction is made between PreWLD (pre-heating time or 1.WLD), MainWLD (main weld time or 2.WLD), and PstWLD (post-heating time or 3.WLD). All 3 weld times can be programmed separately in terms of duration and %I. Impulses and slope values can only be programmed for the MainWLD. WT Weld timer. Weld timer, also referred to as resistance weld timer or simply as timer. ENGLISH Abbreviations 398/402 Bosch Rexroth AG Abbreviations ENGLISH Notes: PSI 6xxx | 1070080028 / 06 1070080028 / 06 | PSI 6xxx Bosch Rexroth AG 399/402 Index Index A Abbreviations, 395 AC, 395 Accessories, 373 Accessory kit for rear panel installation, 373, 377 Activate Boot mode, 261 Air humidity, 382 Ambient temperature, 382 AnyBus module CC Ethernet 100 Mbit, 254 Installation/Removal, 374 ProfiNet IO module, 252 Assembly, 309 B Battery disposal, 371 Battery replacement, 356 BOS, 210 BQR, 210 C CC Ethernet 100 Mbit, 254, 255 CC ProfiNet, 256 CE marking, 224, 389 Climatic category, 382 Commissioning, 349 ComnetM-DP I/O module, 285 Connecting the water supply, 348 Connection Cooling water, 348 electrical, 327 Programming terminal, 330 Connection elements (overview), 246 Constant-current regulation, 343 Cooling, 382 Cooling water connection, 348 PSI 61xx.xxx Wx, 313 PSI 62xx.xxx W1, 316 PSI 6300/63C0.xxx Wx, 319 PSI 64C0.xxx W1, 322 PSI 65xx.xxx W1, 326 Cooling water properties, 382 Corrosion, 382 Cycle time, 290 D Damage to products, 227 Damage to property, 227 DC, 395 Declaration of conformity, 224, 389 Degree of protection, 382 Description of performance, 239 Designations, 210 DEV-NET I/O module, 283 DeviceNet connection, 283 Diagnosis module, 258 Display test, 260 Dimensioned drawing PSI 61xx.xxx L1, 310 PSI 61xx.xxx L2, 311 PSI 61xx.xxx Wx, 312 PSI 62xx.xxx W1, 314 PSI 6300/63C0.xxx Lx, 317 PSI 6300/63C0.xxx Wx, 318 PSI 64C0.xxx W1, 320 PSI 65xx.xxx W1, 324 Dimensioned drawings, 310 Dimensions, 310 Direct current link circuit, 244 Dismantling, 367 Display Ethernet configuration, 260 Fault, 258 INIT, 258 RUN, 258 Timer time and date, 260 Timer type, 259 Warning, 258 Display and operating elements, 246 Display during normal operation, 353 Display elements, 248, 250 Disposal, 371 Disturbances, 379 Duty cycle ED, 290 E E/A DISK 2R/4R I/O module, 267 E/A DISK I/O module, 265 E/A DISK R2ED/R4ED I/O module, 262 E/A IBS FERN I/O module, 275 E/A IBS OPC with optical fiber I/O module, 271 Baudrate, 274 Transmission power, 274 E/A IBS X_FERN_8EA I/O module, 279 ELCB, 329 Electrical connection, 327 PSI 61xx.xxx Lx/Wx, 313 PSI 62xx.xxx, 315 PSI 6300/63C0.xxx Lx/Wx, 319 PSI 64C0.xxx, 321 PSI 65xx.xxx, 325 Electrode force Feedback, 341 Output, 340 ELMO, 395 EMC, 327, 395 Environmental protection, 371 EOS, 395 ESD, 395 Ethernet 100 Mbit CC, 255 ENGLISH 20 400/402 Bosch Rexroth AG PSI 6xxx | 1070080028 / 06 Index Ethernet field bus module, 254 F Fan connection, 338 Fault reset, 380 Faults, 379 Features, 239 Firmware update, 358 Flow quantity, 384 Functional principle of medium-frequency welding, 244 FWUpdate, 358 ENGLISH H Hazardous materials, 371 HSA (main switch trip), 395 I I/O module supply, 334 Icons, 210 Ident. code, 271 Initiate timer reset, 261 Input for secondary current measurement, 343 Installation, 309 Intended use, 211 INTERBUS-S connection, 272, 275, 279 Interference suppression, 327 K KSR, 395 KSR sensor, 343 KUR, 396 L LEDs, 248, 250 Licence Memory Card, Installation/removal, 376 Line connection, 328 Load and rating, 289 Load diagram 6300/63C0.xxx L1/W1, I primary (ts), 299 6300/63C0.xxx L2/W2, I primary (ts), 300 PSI 61xx.xxx, I primary (duty cycle), 291 PSI 61xx.xxx L1/W1, I primary (ts), 292 PSI 61xx.xxx L2/W2, I primary (ts), 293 PSI 62xx.xxx I primary (duty cycle), 295 I primary (ts), 296 PSI 6300/63C0.xxx L1/W1, I primary (duty cycle), 297 PSI 6300/63C0.xxx L2, I primary (duty cycle), 298 PSI 64xx.xxx I primary (duty cycle), 301 I primary (ts), 302 PSI 65xx, I primary (duty cycle), 303 PSI 65xx.xxx, I primary (ts), 304 Locations of connections, 310 Locations of mains, transformer and cooling water connections, 310 Logic supply, 332 M Main switch tripped, 347 Maintenance, 355 Maintenance schedule, 355 Measuring input for secondary voltage measurement, 346 Medium-frequency welding, Functional principle, 244 Memory card, 376 MemTool, 358 MF, 396 Micro SD memory card, 376 Module CC Ethernet 100 Mbit, 255 CC ProfiNet, 256 Optical fiber ProfiNet, 257 N NBS, 396 O OFF, 396 offline, 243 online, 243 Operating elements, 246, 248, 250 Operating location (max. height), 382 Operation, 243 Optical fiber ProfiNet, 257 Orientation, 382 Overview, 237 P Partial front panel view PSI 6x00.xxx, 248 PSI 6xCx.xxx, 250 PG, 210, 396 PLC, 210, 396 Power input, 383 Power supply, 383 Power supply to external units, 339 Power unit, 246 Power unit temperature, 380 Pressure control, 340 Primary circuit, 343 Connection, 330 Primary voltage, 245 Principal components of our electronic equipment, 371 of our packaging materials, 371 Product description, 242 PROFIBUS connection, 285 ProfiNet CC, 256 ProfiNet IO module, 252 ProfiNet optical fiber, 257 Programming, 243 Programming terminal, 330 PSF, 396 PSG, 210, 396 PSI, 210, 396 PSQ 6000 XQR, 287 PST, 210, 396 1070080028 / 06 | PSI 6xxx Bosch Rexroth AG 401/402 Index R Rating, 289 RC ELEMENT, 327 READY LED, 379 Rear panel installation, 377 Rear panel installation, accessory kit, 373 Recovery of materials, 371 Recycling, 371 Repair, 355 Replacement, 367 Reset faults, 261 Reset warnings, 260 Timer module, 246 Toroid input, 343 Training, 213 Transformer connection, 330 Transformer temperature, 345 Transport, 307 Type designation, 305 U UI controller module, 287 UIP, 397 UIR, 397 Use inappropriate, 211 intended, 211 S Scope of delivery, 235 Secondary current, 245 Service, 355 Slope, 396 Solenoid, 396 Spare parts, 365 Stepper, 396 Storage, 307 Structure, 246 Supply I/O module, 334 Logic, 332 Mains/output, 328 Supply temperature, 382 Switching on the medium-frequency inverter, 349 Switching the medium-frequency inverter off, 351 V Voltage distribution, 335 Voltage generator, 333 T Technical data, 381 PSI 61xx.xxx Lx/Wx, 384 PSI 62xx.xxx Wx, 385, 387 PSI 6300/63C0.xxx Lx/Wx, 386 PSI 65xx.xxx Wx, 388 Temperature, 345 Temperature monitoring, 380 Temperatures, 382 X4 W Water pressure, 382 WinBlow, 358 WT, 210, 397 X X2 Analog output of the electrode force, 340 Electrode force feedback, 341 X3 KSR sensor connection, 343 Measuring input for secondary voltage measurement, 346 Transformer temperature, 345 24V voltage generator, 333 Input for logic supply, 332 Output for I/O module supply, 334 Output for power supply to fans, 338 X5, 339 X8, 347 X8A, 346 X9, Electrode force feedback, 341 ENGLISH Q Qualification of personnel, 212 Bosch Rexroth AG Electric Drives and Controls P.O. Box 13 57 97803 Lohr, Germany Bgm.-Dr.-Nebel-Str. 2 97816 Lohr, Germany Tel. +49 9352 18 0 Fax +49 9352 18 8400 www.boschrexroth.com/electrics R911080028 DOK-PS6000-MF-UMRICHT*-IT06-D0-P