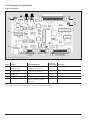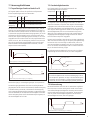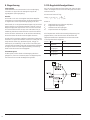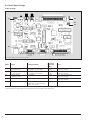
1
BETRIEBSANLEITUNG USER MANUAL Positioniersteuerung Position Control Unit D-A-CH Laser 2000 GmbH 82234 Wessling Tel. +49 8153 405-0 [email protected] www.laser2000.de France – Telecom Laser 2000 SAS 78860 St-N. l. Bretèche Tel. +33 1 30 80 00 60 [email protected] www.laser2000.fr PS 10 9013.0185 / 15.11.2012 France – Photonic Laser 2000 SAS FR-33600 Pessac Tel. +33 5 57 10 92 80 [email protected] www.laser2000.fr Iberia Laser 2000 SAS 28034 Madrid Tel. +34 650 529 806 [email protected] www.laser2000.es Nordics Laser 2000 GmbH 112 51 Stockholm Tel. +46 8 555 36 235 [email protected] www.laser2000.se 1 Änderungen vorbehalten 2 Copyright reserved by OWIS (2008) Subject to change without notice Inhalt Content 1. Allgemeines..............................................................................5 2. Ausführung und Lieferumfang...................................................5 2.1 Standard..............................................................................5 2.2 Zubehör..............................................................................5 2.3 Option.................................................................................5 3. Sicherheit..................................................................................6 Ströme und Spannungen........................................................6 4. Normen und Richtlinien.............................................................6 5. Technische Übersicht.................................................................6 6. Aufbau der Steuerung...............................................................7 Status-LEDs............................................................................7 Anzeige der Status-LEDs........................................................7 6.1 Anschlüsse..........................................................................8 USB-Schnittstelle....................................................................8 Universal-Motoranschluss......................................................8 End- und Referenzschalter......................................................8 Encodereingang.....................................................................8 Stromversorgung....................................................................8 Sicherungskonzept.................................................................8 BUS-Schnittstelle....................................................................8 Anschluss der Stromversorgung..............................................9 6.2 Eingänge und Ausgänge......................................................9 6.3 Strombereichsumschaltung der Motorendstufe.....................9 Vorwahl des Phasenstromes bei 2-Phasen-Schrittmotoren......9 Einstellung der Strombegrenzung für DC-Servomotoren..........9 6.4 Einstellungen der Steuerplatine..........................................10 Jumpereinstellungen............................................................10 7. Steuerungsfunktionen.............................................................. 11 7.1 Trapezförmiges Punkt-zu-Punkt-Profil................................. 11 7.2 Geschwindigkeitsmodus..................................................... 11 7.3 Referenzierung................................................................... 11 8. Wegerfassung.........................................................................12 Lageregelung.......................................................................12 Encoder...............................................................................12 Linearmesssystem................................................................12 9. PID-Regelschleifenalgorithmus................................................12 10. Positioniergeschwindigkeit und - beschleunigung, Berechnung.13 10.1 2-Phasen-Schrittmotor (Open Loop)..................................13 Allgemeines.........................................................................13 Periodendauer.....................................................................13 Endgeschwindigkeit.............................................................13 Beschleunigung bei Trapezprofil...........................................13 10.2 DC-Servomotor................................................................13 Allgemeines.........................................................................13 Abtastzeit............................................................................13 Endgeschwindigkeit.............................................................13 Beschleunigung bei Trapezprofil...........................................14 11. Inbetriebnahme der PS 10......................................................14 11.1 Vorbereitung der Steuerung..............................................14 Aufstellung..........................................................................14 11.2 Anschluss der Peripherie und Geräte................................14 11.3 Systemstart......................................................................14 Initialisierung.......................................................................14 Software..............................................................................14 PS 10-32 CANopen-Vernetzung............................................15 12. Fehlerüberwachung...............................................................15 12.1 Endschalter......................................................................15 Funktion der Endschalter-Überwachung...............................15 Konfiguration der End- und Referenzschalter........................16 Wiederinbetriebnahme nach Achsenfehler............................16 12.2 Endstufen-Fehlerüberwachung.........................................16 1. General Information................................................................29 2. Setup and Scope of Delivery....................................................29 2.1 Standard............................................................................29 2.2 Accessories........................................................................29 2.3 Option...............................................................................29 3. Safety.....................................................................................30 Currents and Voltages..........................................................30 4. Standards and Directives.........................................................30 5. Technical Overview.................................................................30 6. Setup of the Control Unit........................................................31 Status LEDs..........................................................................31 Display of the status LEDs....................................................31 6.1 Connections......................................................................32 USB Interface.......................................................................32 Universal Motor Connector..................................................32 Limit and Reference Switches...............................................32 Encoder Input......................................................................32 Power Supply.......................................................................32 Safety Fuse Concept.............................................................32 BUS Interface.......................................................................32 Connection for Power Supply...............................................33 6.2 In- and Outputs.................................................................33 6.3 Selection of the Current Range for the Motor Power Stage.33 Phase Current Setting for 2-Phase Step Motors.....................33 Current Limiting Setting for DC Servo Motors.......................33 6.4 Control Board Settings.......................................................34 Jumper Settings...................................................................34 7. Control Functions....................................................................35 7.1 Trapezoidal Point-to-Point Profile........................................35 7.2 Velocity Mode....................................................................35 7.3 Reference run....................................................................35 8. Travel Measuring.....................................................................36 Position Feedback Control....................................................36 Encoder...............................................................................36 Linear Measuring System......................................................36 9. PID Servo Loop Algorithm.......................................................36 10. Positioning, Velocity and Acceleration, Calculation................37 10.1 2-Phase Stepper Motor (Open Loop).................................37 General Information.............................................................37 Cycle Time...........................................................................37 Final Velocity.......................................................................37 Acceleration for Trapezoidal Velocity Profiling.......................37 10.2 DC Servo Motor...............................................................37 General Information.............................................................37 Servo Loop Cycle Time.........................................................37 Final Velocity.......................................................................37 Acceleration for Trapezoidal Velocity Profiling.......................38 11. Initial Operation of the PS 10.................................................38 11.1 Preparation of the Control Unit.........................................38 Installation...........................................................................38 11.2 Connection of Peripherals and Devices.............................38 11.3 System Start-up................................................................39 Initialization.........................................................................39 Software..............................................................................39 CANopen-Networking of PS 10-32.......................................39 12. Malfunction Monitoring.........................................................39 12.1 Limit Switches..................................................................39 Working Principle of the Limit Switch Monitoring..................40 Configuration of Limit and Reference Switches.....................40 Reconection after Axis Error.................................................40 12.2 Output Stage Error Monitoring.........................................40 Subject to change without notice Betriebsanleitung-User Manual PS 10 Änderungen vorbehalten 3 12.3 Time-Out-Überwachung..................................................16 13. Hinweise zum Aufbau einer eigenen Applikationssoftware.....17 14. Befehlssatz der PS 10............................................................18 14.1 PS 10-32 CANopen-Vernetzung........................................18 12.3 Time-Out Monitoring.......................................................40 13. Instructions Concerning the Setup of User Application Software.. 41 14. Command Set for the PS 10...................................................42 14.1 CANopen-Networking of PS 10-32...................................42 Anhang: I Befehlstabelle........................................................................19 II Relevanz der Parameter für verschiedene Motortypen...........25 III Belegungstabelle.................................................................25 Ein- /Ausgänge.....................................................................25 BUS-System.........................................................................25 Universal-Motorstecker........................................................26 EU Konformitätserklärung........................................................51 Attachment: I Command Table....................................................................43 II Relevance of the Parameters for different Motor Types..........49 III Connecting Table.................................................................49 In- /Outputs.........................................................................49 BUS System..........................................................................49 Universal Motor Connector..................................................50 UE Declaration of Conformity...................................................51 Änderungen vorbehalten 4 Betriebsanleitung-User Manual PS 10 Subject to change without notice 1. Allgemeines 2. Ausführung und Lieferumfang Die OWIS® Steuerung PS 10 ist eine 1-Achs-Positioniersteuerung, die für einfache Steuerungsaufgaben eingesetzt werden kann. Die PS 10 besteht aus einem Grundgerät mit vorkonfigurierter Endstufe. Das Gerät wird bei OWIS® getestet und anschlussfertig geliefert. Sie kann entweder 2-Phasen-Schrittmotoren (Open Loop) bis 1,8 A oder DC-Motoren mit Encoder (Cosed-Loop) bis 3,5 A steuern. Für die Kommunikation mit einem PC ist eine USB-Schnittstelle integriert. Weitere Peripherie kann über zahlreiche Ein- und Ausgänge wie z.B. TTL-, Analog-Eingänge so wie SPS-Ausgänge angebunden werden. Die PS 10 kann Punkt-zu-Punkt-Positionierbetrieb und trapezförmige Geschwindigkeitsprofile ausführen. In der Version PS 10-32 können bis zu 32 Einheiten vernetzt werden. Beliebige Kombinationen beider Motortypen sind dabei möglich. Die Vernetzung erfolgt über ein rudimentäres, vereinfachtes CANopen-Protokoll. Zwei der insgesamt vier digitalen SPS Ausgänge sind in der PS 10-32 als PWM konfiguriert, um beispielsweise eine Bremse steuern zu können. Zum Lieferungsumfang der Steuerung gehört auch das Softwaretool OWISoft. Damit kann die PS 10 komfortabel konfiguriert und betrieben werden. OWIS® Positioniereinheiten sind in OWISoft hinterlegt und müssen nur den jeweiligen Antrieb zugeordnet werden. Integration und Betrieb von Fremdmotoren ist ebenfalls möglich. Zum Lieferumfang der Steuerung gehören: • USB-Kabel mit 2 m Länge • CD mit OWISoft und Dokumentation in Deutsch und Englisch • gedruckte Version der Betriebsanleitung in Deutsch und Englisch 2.1 Standard Die Steuerung verfügt über: • USB-Anschluss • 4 Eingänge für Referenz- bzw. Endschalter • 4 TTL-Eingänge • 4 Analogeingänge • 1 TTL-Ausgang • 4 SPS-Ausgänge • Anschluss für Freigabe der Motorendstufe (I/O-Anschluss) • Motoranschluss D-Sub 37-polig mit Anschluss für Motorhaltebremse (Option), End-/Referenzschalter und weitere Signale (siehe Pinbelegung, S.26) • Rundstecker zum Durchschleifen der Stromversorgung von PS 10-32 zu PS 10-32 2.2 Zubehör Folgendes Zubehör ist erhältlich: • Externes Tischnetzteil zur Stromversorgung AC 100-240 V, DC 24 V, 90 W • Anschlusskabel mit Stecker für unterschiedliche Positioniersysteme 2.3 Option Die Version PS 10-32 verfügt zusätzlich über: • 2 der 4 SPS-Ausgänge als PWM konfiguriert (z.B. zur Ansteuerung der Motorhaltebremse) • BUS-Schnittstelle (an CANopen-Bus angelehnt) Folgendes Zubehör ist erhältlich: • Verbindungskabel für Bus-Schnittstelle 2 m lang • Abschlussstecker für Bus-Schnittstelle (Abschlusswiderstand) • Verbindungskabel zum Durchschleifen der Stromversorgung 2 m lang Subject to change without notice Betriebsanleitung-User Manual PS 10 Änderungen vorbehalten 5 3. Sicherheit 4. Normen und Richtlinien Die Verwendung der PS 10 sollte ausschließlich von autorisiertem Fachpersonal und unter Berücksichtigung der Vorschriften der Unfallverhütung sowie den Vorschriften der Elektroindustrie durchgeführt werden. Beachten Sie hierzu auch die entsprechenden (im Datenblatt aufgeführten) Sicherheitshinweise. Die Positioniersteuerung PS 10 erfüllt folgende Normen und Richtlinien: Nicht qualifizierte Personen dürfen die Steuerung nicht in Betrieb nehmen. • EMV-Richtlinie 2004/108/EG Das Steuergerät ist für Betriebstemperaturen von +10 bis +40 °C und Lagerungstemperaturen von -10 bis +50 °C konzipiert. Störfestigkeit nach Fachgrundnorm EN 61000-6-1 mit: Es muss vor hoher Luftfeuchtigkeit, Erschütterungen sowie explosiven Gasen geschützt werden. Vor dem Öffnen des Gerätes muss es spannungsfrei geschaltet und von der Stromversorgung getrennt sein. Anschluss- und Montagearbeiten dürfen nur im stromlosen Zustand des Gerätes ausgeführt werden. Montage und Einsatz von Betriebsmitteln muss gemäß den Normen der Konformitätserklärung erfolgen. Um die Motorendstufe freigeben zu können, muss der Jumper JP7 auf der Hauptplatine gesetzt sein (siehe 6.4). Falls der Jumper nicht gesetzt ist, kann die Freigabe extern über den galvanisch getrennten Freigabe-Eingang erfolgen. Dazu muss der Eingang mit einer Spannung von 5 V versorgt werden. Sind weder der Jumper gesetzt noch die Freigabeeingang mit Spannung versorgt, ist kein Freischalten der Endstufen möglich. Ferner wird der an einer Motorendstufe angeschlossene Motortyp über einen Codierwiderstand erkannt. So wird verhindert, dass ein versehentlich falsch angeschlossener Motortyp (z.B. ein DC-Motor an einer Schrittmotor-Endstufe) unkontrolliert startet. Die jeweilige Konfiguration der Steuerung darf nur mit den für sie konfigurierten Motortypen betrieben werden. Andere oder weiterführende Nutzungen entsprechen nicht dem vorgesehenen Verwendungszweck. Ströme und Spannungen Der Stromeingang ist über eine Feinsicherung 5 AT abgesichert. Ausgangsseitig sind keine besonderen Sicherheitsvorkehrungen erforderlich, da die PS 10 ausschließlich mit Kleinspannung (PELV) bis 24 VDC arbeitet. • RoHS-konform • CE-Richtlinie - Störfestigkeit gegen elektrostatische Entladung (ESD), Basisnorm: EN 61000-4-2 - Störfestxigkeit gegen elektromagnetische Felder, Basisnorm: EN 61000-4-3 Störaussendung nach Fachgrundnorm EN 61000-6-3 mit: - Störstrahlung, Basisnorm: EN 55014-1 (Hausgeräte) 5. Technische Übersicht Stromversorgung: Anzahl der Antriebe: Antriebsart: Kommunikation: Aufbau: Schutzart: Encoder: Funktionen: Bewegungsabläufe: Netzteil 24 V, 90 W extern (PS 10-32: Verbindungskabel zum Durchschleifen der Stromversorgung) 1 Achse (PS 10-32: Vernetzung bis zu 32 Einheiten) 2-Phasen-Schrittmotoren, Open Loop (OL) oder DC-Servomotoren, Closed-Loop (CL) USB 2.0 Tischgerät in Metallgehäuse IP 20 Quadratur-Signale A / B und Index, RS-422- oder TTL-Pegel, mit 4-fach-Auswertung, max. Zählfrequenz 1,875 MHz (Signal) bzw. 7,5 MHz (Quadratur) Parametrierbare Beschleunigungsrampe ( / Bremsrampe), Dreieckiges- bzw. trapezförmiges Geschwindigkeitsprofil Punkt-zu-Punkt-Positionierbetrieb Die Positioniersteuerung PS 10 ist nach den anerkannten sicherheitstechnischen Regeln gebaut und erfüllt die im folgenden Kapitel aufgeführten Normen und Richtlinien. Änderungen vorbehalten 6 Betriebsanleitung-User Manual PS 10 Subject to change without notice 6. Aufbau der Steuerung PS 10 USB-Anschluss I/O-Anschluss Status-LED PS 10-32 USB-Anschluss I/O-Anschluss Status-LED CAN-OUT-Anschluss CAN-IN-Anschluss Bild 1: Gehäuse Frontansicht Stromversorgung Universal-Motoranschluss Freigabe-Jumper Ein-/Aus-Taster Bild 2: Gehäuse Rückansicht Die PS 10 ist in einem stabilen Metallgehäuse untergebracht. Die Abwärme der eingebauten Steuerplatine wird an die Umgebungsluft abgegeben. Anzeige der Status-LEDs grüne LED rote LED ein Achse ist initialisiert und die Referenzposition ist gültig aus Achse ist nicht initialisiert blinken langsam 1 Hz Achse ist initialisiert und die Referenzposition ist ungültig blinken schnell 2 Hz Achse fährt Status-LEDs Die Betriebsanzeige der Steuerung wird über eine Status-LED angezeigt. Die angezeigten Zustände sind: - Versorgung ein - Motor initialisiert Beschreibung ein - Referenz gültig - Fehler Es ist kein Fehler bei der Achse gesetzt blinken langsam 1 Hz Es ist ein Fehler bei der Achse gesetzt Die Anzeige erfolgt über die Farben und Blinkzustände. Fehler bedeutet: Limit-Schalter, Bremsschalter, Endstufenfehler, Timeoutfehler Subject to change without notice Betriebsanleitung-User Manual PS 10 Änderungen vorbehalten 7 6.1 Anschlüsse Die Anschlüsse der PS 10 befinden sich auf der Gehäusevorder- und auf der Gehäuserückseite. Dies sind Schnittstellen zur Kommunikation, Ein- und Ausgänge für Peripherie, sowie der Anschluss für den Positionierer (siehe Bild 1 und 2). Anschluss USB-Slave Funktionen Kommunikation mit einem PC Buchse USB-Buchse Typ B TTL-Ein-/Ausgänge Interaktion mit externer Hardware D-Sub 25-poliger Stecker Analog-Eingänge Interaktion mit externer Hardware D-Sub 25-poliger Stecker SPS-Ausgänge Interaktion mit externer Hardware D-Sub 25-poliger Stecker UniversalMotorversorgung mit D-Sub Anschlussstecker Motor-Haltebremse und 37-poliger Stecker Encoder-/Endschalteranschluss 24 V Netzanschluss / Spannungsversorgung DC-Rundstecker Verbindungskabel 5,5 x 2,1 x 11 mm in Version PS 10-32: BUS-Schnittstelle Interaktion mit weiterer Steuerung D-Sub (an CAN angelehnt) 9-poliger Stecker USB-Schnittstelle Die PS 10 hat eine USB 2.0-Slave-Schnittstelle, der Anschluss befindet sich auf der Gerätevorderseite. Die Schnittstelle ist USB 1.1 und 2.0 kompatibel. Die USB-Schnittstelle der PS 10 ist als sogenannte COM-Brücke realisiert. Der Windows-Gerätetreiber erkennt die PS 10 als „USB-Serial-Port“ und weist ihr eine COM-Portnummer zu, die vom Anwender bei Bedarf verändert werden kann. Die USB-Schnittstelle wird nach erfolgreicher Installation als virtuelle RS-232-Schnittstelle angesprochen. Die PS 10 kann mit Übertragungsraten von 9 600, 19 200, 38 400, 57 600 oder 115 200 Baud arbeiten. Es ist unbedingt darauf zu achten, dass die Übertragungsrate der PS 10 mit der im Gerätetreiber eingestellten Übertragungsrate übereinstimmt, sonst ist keine Kommunikation möglich. Voreinstellung ist 9 600 Baud. (Kann aus dem Abnahmeprotokoll entnommen werden.) Universal-Motoranschluss Mit dem passenden OWIS® Anschlusskabel werden die OWIS® Positioniereinheiten angeschlossen. Über diesen Anschluss stecker wird der Motor mit Leistung versorgt, die Signale des Encoders und der Endschalter übertragen, sowie die Motor-Haltebremse, falls vorhanden, gesteuert. Die Endstufe hat eine zusätzliche Schutzeinrichtung, die dafür sorgt, dass ein versehentlich falsch angeschlossener Motortyp (z.B. ein DC-Motor an einer Schrittmotor-Endstufe) nicht unkontrolliert startet. Am Motoranschlusskabel ist zwischen Pin 14 und Pin 15 ein Widerstand zur Codierung des Motortyps eingebaut. Codierung: • 0 Ohm: DC-Servomotor • Widerstand unendlich: 2-Phasen-Schrittmotor Beim Einschalten misst die Steuerung den Widerstandswert und signalisiert einen Fehler, wenn der gemessene Wert nicht zu der jeweiligen Steuerplatine passt. Die Fehlermeldung der Endstufe wird über das Kommando „?ASTAT“ ausgelesen (siehe Befehlssatz ab S.18). End- und Referenzschalter An die Achse können maximal vier Endschalter angeschlossen werden. Dies können Mikroschalter, TTL-Hall-Effekt-Endschalter oder TTL-Lichtschranken sein. An die Eingänge können Öffner oder Schließer, gegen Masse schaltend, angeschlossen werden. Einer der vier Schalter ist zusätzlich als Referenzschalter definiert. Der aktive Pegel und die Zuordnung der Schalter werden per Software konfiguriert. Encodereingang Der Encodereingang ermöglicht sowohl Anschluss von Encodern mit Leitungstreibern (antivalente Signale für CHA, CHB und optional Index I), als auch von Encodern mit TTL- / CMOS-Signalen. Folgende Eingangssignale sind definiert: VersorgungVcc (+ 5 V); GND Kanal A (TTL oder CMOS) Kanal A invertiert Kanal B (TTL oder CMOS) Kanal B invertiert Kanal I (TTL oder CMOS) Kanal I invertiert Die Umsetzung der antivalenten Signale auf TTL-Signale erfolgt mit RS-422-Leitungsempfängern. Schließt man einen Encoder mit TTL- / CMOS-Signalen an, so bleibt der Eingang für das invertierte Signal offen und wird intern mit einem hochohmigen Spannungsteiler auf 1,4 V gezogen. Stromversorgung Das optionale Schaltnetzteil der PS 10 ist für eine Eingangsspannung von 100 VAC bis 240 VAC mit 50/60 Hz ausgelegt (Weitbereichseingang) und generiert 24 VDC, 90W ebenso versorgt es die Ein- und Ausgänge auf der Platine. Diese Versorgungsspannungen für Logik und Leistung sind nicht galvanisch getrennt. Sicherungskonzept Für die Steuerung ist eine Schmelzsicherung vorhanden, die entsprechend dem maximal auftretenden Strom ausgelegt ist. Standardmäßige Absicherung der Steuerung: 5 AT Für die Endstufe ist eine entsprechende Übertemperatursicherung vorhanden. In Version PS 10-32 zusätzlich: BUS-Schnittstelle Über ein an CANopen-angelehntes BUS-System können bis zu 32 Einheiten miteinander vernetzt werden. Die erste PS 10-32 wird via USB an einen PC angeschlossen (Master), alle weiteren Einheiten können über die BUS-Kommunikationsverbindung weiter vernetzt werden (Slaves). Bei Kommandos, die nicht für die MasterSteuerung bestimmt sind, sendet sie die Kommandos über den Bus zu den übrigen PS 10-32 weiter. Die Rückantwort der adressierten PS 10-32 wird von der ersten (Master) empfangen und über USB an den PC zurückgegeben. Die Master-Steuerung scannt den Bus, deswegen wird sie als letzte angeschaltet. Die Endstufe ist mit dem Universal-Anschlussstecker verbunden, an dem der Motor mit seinen Wicklungen, der Encoder und die Schalter, die zu dieser Antriebsachse gehören, angeschlossen sind. Änderungen vorbehalten 8 Betriebsanleitung-User Manual PS 10 Subject to change without notice 6.3 Strombereichsumschaltung der Motorendstufe PC USB PS10-32 (1) PS10-32 (2) PS10-32 (3) USB USB USB BUS BUS BUS AMPSHNT<n>=1 (Befehl zum Einstellen des Strombereiches 1 oder 2) Bild 3: Multipoint-Vernetzung der PS 10-32 Anschluss der Stromversorgung Prinzipiell können mehrere PS 10-32 von einem externen Netzteil versorgt werden. Zum Durchschleifen der Versorgung von einer PS 10-32 zur nächsten sind auf einer Rückseite je zwei Rundstecker-Anschlüsse vorgesehen. Über ein Verbindungskabel wird die Versorgung dann an die folgende PS 10-32 weitergegeben. Man speist also an der ersten PS 10-32 mit dem 24 V-Netzteil ein und schleift die Versorgung von dort auf die anderen durch. Dabei ist auf den Gesamtstromverbrauch der Positioniereinheiten zu achten. Für den Dauerbetrieb kann die Steuerung Schrittmotoren bis zu 1,8 A, DC-Servomotoren bis zu 3,5 A betreiben. ! Hinweis: Die maximale Leistung des Netzteiles darf nicht überschritten werden! 6.2 Eingänge und Ausgänge INIT<n> (Befehl zum Initialisieren der Achse) Vorwahl des Phasenstromes bei 2-Phasen-Schrittmotoren Für 2-Phasen-Schrittmotoren können Fahrstrom und Haltestrom separat voreingestellt werden. Die Einstellung für Achse <n> kann wie nachfolgend beschrieben vorgenommen werden. Die Angabe <uv> erfolgt als ganzzahliger Prozentwert des Maximalstromes im vorgewählten Strombereich (1 oder 2). Fahrstrom: DRICUR<n>=<uv> (Befehl zum Einstellen des Fahrstromes in %) Haltestrom: HOLCUR<n>=<uv> (Befehl zum Einstellen des Haltestromes in %) Strombereich 1 (entsprechend 100%): 1,2 A ! ! Strombereich 2 (entsprechend 100%): 3,3 A Zur Interaktion mit externen Sensoren und Aktoren sind entsprechende digitale und analoge Ein- und Ausgänge vorgesehen. An die TTL-kompatiblen Eingänge können einfache Gabellichtschranken etc. angeschlossen werden. Mit dem TTL-Ausgang ist es möglich, digitale Hardware in der Anwendung direkt anzusteuern. Die SPS-Ausgänge steuern Magnetventile oder sonstige induktive und ohmsche Lasten direkt an (gegen + 24 V schaltend). Pegel 0-5 V 0-5 VDC 0-5 V 0-24 VDC Strom 10 mA 0-100 mA Sonstiges — Auflösung 10 Bit — — 0-24 VDC 1,0 A PWM in Version PS 10-32: Leistungsausgänge Der gewählte Strombereich wird im statischen RAM abgespeichert. Um den neuen Strombereich zu aktivieren, ist es erforderlich, die Achse <n> nach der Bereichsumschaltung neu zu initialisieren. Auswahl von Strombereich 1 (niedrig), bzw. 2 (hoch) für Achse <n> erfolgt über folgende Kommandofolge: BUS (an CAN angelehnt) Eigenschaften TTL-Eingänge Analogeingänge TTL-Ausgang SPS-Ausgänge Die PS 10-Endstufe besitzt zwei umschaltbare Strombereiche, um möglichst hohe Auflösung der Stromeinstellung bzw. möglichst feinen Mikroschrittbetrieb zu ermöglichen. Hinweis: Für den Dauerbetrieb ist ein Strom von 1,8 A zulässig (entsprechen 54 % in Strombereich 2). Es sollte generell der kleinstmögliche Strombereich gewählt werden, um eine optimale Mikroschrittauflösung zu erhalten. Einstellung der Strombegrenzung für DC-Servomotoren Für DC-Servomotoren ist der geeignete Strombereich unter Berücksichtigung des thermisch zulässigen Dauerstroms des jeweiligen Motortyps vorzuwählen. Maximale Strombegrenzung: DRICUR<n>=<uv> (Befehl zum Einstellen der Strombegrenzung in %) Strombereich 1 (entsprechend 100%): 2,4 A Strombereich 2 (entsprechend 100%): 6,6 A Die analogen Eingänge können Spannungen zwischen 0 V und 5 V direkt messen und mit 10-Bit Auflösung wandeln (Referenzspannung: 5 V). Die Ein- und Ausgänge sind nicht galvanisch getrennt. ! Hinweis: Für den Dauerbetrieb ist ein Strom von 3,5 A zulässig (entsprechen 54 % in Strombereich 2). Die Abfragebefehle „?ANIN<uv>“ und „?INPUTS“ beziehen sich auf dieselben Eingänge der PS 10 (siehe Befehlssatz ab S.18). Die Auswertung der Eingänge erfolgt entweder analog oder digital. In der Version PS 10-32 sind die zwei Leistungsausgänge pulsweitenmoduliert und nach Masse schaltend. Sie können induktive Lasten ansteuern, die kurzzeitig einen hohen Anzugsstrom und anschließend nur noch einen geringen Haltestrom brauchen, wie Haltebremsen oder Hubmagnete. Die Leistungsausgänge können als Haltebremsenansteuerung konfiguriert werden. Subject to change without notice Betriebsanleitung-User Manual PS 10 Änderungen vorbehalten 9 6.4 Einstellungen der Steuerplatine Jumpereinstellungen F1 JP7 JP4 JP3 JP1 JP2 Bild 4: Werkseitige Jumpereinstellungen der Steuerplatine Jumper Funktion Einstellmöglichkeiten JP1 1-2 gesteckt = 2-Phasen-Schrittmotor 2-3 gesteckt = DC-Servomotor 1-2 gesteckt = 2-Phasen-Schrittmotor 2-3 gesteckt = DC-Servomotor 2-3: Betrieb JP2 JP3 JP4 JP7 2-Phasen-Schrittmotor bzw. DC-Servomotor 2-Phasen-Schrittmotor bzw. DC-Servomotor Modus „Firmware-Update“ oder „Betrieb“ interne Verwendung Endstufenfreigabe 2-3: normaler Betrieb Jumper gesteckt = Freigabe; Jumper nicht gesteckt = Freigabe extern möglich werksseitige Voreinstellung entsprechend gesteckt entsprechend gesteckt gesteckt gesteckt gesteckt Anmerkung Werkseinstellung darf nicht verändert werden Werkseinstellung darf nicht verändert werden Werkseinstellung darf nicht verändert werden Werkseinstellung darf nicht verändert werden F1: 5 A träge, zur Absicherung des externen 24 V Versorgungseinganges der Steuerung. Änderungen vorbehalten 10 Betriebsanleitung-User Manual PS 10 Subject to change without notice 7. Steuerungsfunktionen 7.2 Geschwindigkeitsmodus 7.1 Trapezförmiges Punkt-zu-Punkt-Profil Die folgende Tabelle fasst die Profilparameter für den Geschwindigkeitsmodus zusammen: Die folgende Tabelle umfasst die spezifischen Profilparameter für den trapezförmigen Punkt-zu-Punkt-Modus: Profilparameter Format Wort- Bereich länge Geschwindigkeit 32.0 32 bit (-2.147.483.647…+2.147.483.647) Counts / Cycle Beschleunigung/ 32.0 16 bit (1…2.147.483.647) Counts / Cycle² Verzögerung Profilparameter Format Wortlänge Position 32.0 32 bit Geschwindigkeit 32.0 16 bit Beschleunigung/ 32.0 16 bit Verzögerung Bereich (-2.147.483.647…+2.147.483.647) Counts (1…2.147.483.647) Counts / Cycle (1…2.147.483.647) Counts / Cycle² Die Bahn wird ausgeführt, indem die Achse mit dem angegebenen Wert kontinuierlich beschleunigt, bis die jeweilige Endgeschwindigkeit erreicht wird. Die Achse fängt an abzubremsen, wenn eine neue Geschwindigkeit angegeben wird, die einen kleineren Wert hat als die aktuelle Geschwindigkeit oder ein anderes Vorzeichen hat, als die aktuelle Richtung vorgibt. Ein einfaches Geschwindigkeitsprofil sieht aus wie ein einfaches trapezförmiges Punkt-zu-Punkt-Profil, wie in Bild 7 dargestellt. A D Zeit t Geschwindigkeit v Geschwindigkeit v Für dieses Profil errechnet der Host eine Beschleunigung, eine Verzögerung, eine Geschwindigkeit und eine Endposition. Das Profil ist nach der Kurvenform (Bild 5) benannt: die Achse beschleunigt linear (anhand des programmierten Beschleunigungswertes), bis sie die programmierte Geschwindigkeit erreicht. Die Achse bremst dann linear ab (den negativen Verzögerungswert nutzend), bis sie an der vorgegebenen Position stehen bleibt. Falls die programmierte Fahrdistanz so kurz ist, dass die Verzögerung einsetzen muss, bevor die Achse die programmierte Geschwindigkeit erreicht, wird das Profil keinen konstanten Geschwindigkeitsbereich aufweisen, und das Trapez wird zum Dreieck (Bild 6). Im Gegensatz zu dem trapezförmigen Profilmodus, bei dem die Endposition bestimmt, ob positive oder negative Geschwindigkeit vorgegeben wird, bestimmt das Vorzeichen des im Geschwindigkeitsmodus übergebenen Geschwindigkeitswerts, ob in positiver oder negativer Richtung gefahren werden soll. Deswegen kann der Geschwindigkeitswert, der zur PS 10 übermittelt wird, positive Werte (für positive Bewegungsrichtung) oder negative Werte (für entgegengesetzte Bewegungsrichtung) annehmen. Bei diesem Profil wird keine Endposition angegeben. Bild 5: Trapezprofil, A = Beschleunigung, D = Verzögerung Geschwindigkeit ändern A D Richtungsumkehr Geschwindigkeit v -A A Zeit t -D Bild 7: Geschwindigkeitsprofil, A = Beschleunigung, D = Verzögerung D Zeit t Bild 6: Dreiecksprofil, A = Beschleunigung, D = Verzögerung Die Beschleunigungs- und Verzögerungsrampen sind symmetrisch. Hinweis: Im Geschwindigkeitsmodus ist die Achsenbewegung nicht an eine Endposition gebunden. Es liegt in der Verantwortung des Anwenders Geschwindigkeits- und Beschleunigungswerte zu verwenden, die einen sicheren Bewegungsablauf garantieren. 7.3 Referenzierung Bei der Referenzfahrt wird einer der vier Endschalter angefahren. Die Position kann an dieser Stelle genullt werden. Dazu werden zwei Referenzfahrtgeschwindigkeiten mit Betrag und Vorzeichen und eine Referenzbeschleunigung parametriert. Der Endschalter wird mit großer Geschwindigkeit angefahren und mit kleiner Geschwindigkeit verlassen, dann wird gestoppt. Geschwindigkeit v Der Beschleunigungsparameter wird immer am Anfang der Bewegungssequenz benutzt. Danach wird der Wert für die Beschleunigung in dieselbe Richtung verwendet, und der Wert für die Verzögerung wird in entgegengesetzter Richtung eingesetzt. Der Beschleunigungs wert wird verwendet, bis die maximale Geschwindigkeit erreicht wurde. Der Verzögerungswert wird für die Abbremsrampe eingesetzt, bis die Geschwindigkeit auf Null sinkt. ! A -A D Zeit t -D Bild 8: Referenzfahrt, A = Beschleunigung, D = Verzögerung Subject to change without notice Betriebsanleitung-User Manual PS 10 Änderungen vorbehalten 11 8. Wegerfassung 9. PID-Regelschleifenalgorithmus Lageregelung Für den Betrieb von DC-Servomotoren ist ein Encodereingang vorhanden. Das Signal dient der Datengewinnung für den Lage-Regelkreis (PID-Lageregelung). Der in der PS 10 benutzte Servofilter arbeitet nach einem PID-Algorithmus. Ein Integrationslimit sichert nach oben gegen einen akkumulierten Fehler ab. Encoder Der Encoder ist ein auch als Drehgeber bezeichnetes Wegerfassungssystem zur Positionsrückmeldung, die für den Motorcontroller im sogenannten Closed-Loop-Betrieb (geregelt) genutzt wird. K outputn=KpEn+Kd(En–E(n-1))+S Ej 2_5i_6 Ohne Encoder ist nur der gesteuerte Betrieb (Open Loop) mit Schrittmotoren möglich. Um DC-Motoren betreiben zu können, muss ein Wegerfassungssystem angeschlossen sein. Dies kann ein Encoder sein. Üblicherweise besitzen sie 500, 1250 oder 2500 Linien pro Umdrehung. Über den Encoder erfasst der Controller die aktuelle Position der Achse und berechnet aus der zeitlichen Veränderung der Positionswerte die aktuelle Geschwindigkeit des Rotors. En Ki Kd KP Encoder sind fest am Motor angeflanscht und direkt mit dem Rotor verbunden. Die Signale des Encoders sind Kanal A und B (CHA und CHB), 90 Grad versetzt (sog. Quadratur-Signale), und ggf. ein Index-Impuls pro Umdrehung. Die PS 10 kann als Encodersignale TTL-Pegel oder antivalente Signale (über Leitungstreiber) verarbeiten. Die Signale werden nach einer Pegelumwandlung und Filterung direkt an den Microcontroller weitergegeben. Linearmesssystem Ein Messsystem, welches direkt an die Bewegung des Aktors gekoppelt ist, nennt man Linearmesssystem. Das Wegmesssystem kann alternativ zum Encoder der Wegerfassung dienen. Die PID-Formel lautet wie folgt: n j=0 Hierbei ist: Regelabweichung zum diskreten Zeitpunkt n Integralanteil des Lagereglers Differentialanteil des Lagereglers Proportionalanteil des Lagereglers Alle Filterparameter und die Drehmomentsignalbegrenzung sind programmierbar, so dass der Filter durch den Anwender fein abgestimmt werden kann. Wertebereiche und Formate werden in der folgenden Tabelle aufgelistet: Terminus Name Ilim Begrenzung Integralanteil Ki Integralanteil des Lagereglers Kd Differentialanteil des Lagereglers Kp Proportionalanteil des Lagereglers Bereich 32 bit unsigned (0…2.124.483.647) 16 bit unsigned (0…32.767) 16 bit unsigned (0…32.767) 16 bit unsigned (0…32.767) – Bild 9: Struktur des digitalen Filters Änderungen vorbehalten 12 Betriebsanleitung-User Manual PS 10 Subject to change without notice 10. Positioniergeschwindigkeit und - beschleunigung, Berechnung 10.1 2-Phasen-Schrittmotor (Open Loop) Allgemeines Jede schrittmotorgetriebene Mechanik besitzt eine insbesondere von Motortyp, Systemreibung und Last (Trägheitsmoment!) abhängige sog. Start-Stop-Frequenz. Die Start-Stop-Frequenz bezeichnet die maximale Fahrfrequenz des betreffenden Schrittmotors, mit welcher dieser noch aus dem Stillstand ohne Beschleunigungsphase loslaufen kann. Es ist üblich, diese und andere Kennfrequenzen von Schrittmotoren in Hertz Vollschritt (“Hz VS”), d.h. Vollschritte pro Sekunde, anzugeben. Die Welle eines Schrittmotors mit Schrittwinkel 1,8 °, d.h. R = 200 Vollschritte pro Motorumdrehung, der z.B. mit 400 Hz VS läuft, dreht mit einer Geschwindigkeit von 2 Umdrehungen pro Sekunde oder 120 Umdrehungen pro Minute. Um höhere Geschwindigkeiten als die Start-Stop-Frequenz zu erreichen, muss der Schrittmotor über diese Frequenz hinaus mittels geeigneter Beschleunigungsrampe beschleunigt, bzw. unter diese Frequenz mittels geeigneter Bremsrampe abgebremst werden. Diese Beschleunigung bzw. Bremsung erfolgt mit trapezförmigem Profil. Gegebenenfalls ist eine Dämpfung (Rotationsdämpfer, am zweiten Wellenende des Motors montiert) erforderlich, um überhaupt höhere Drehzahlen erreichen zu können. Fast alle Standard-Schrittmotoren, die bei OWIS® eingesetzt werden, sind in der Lage, einer Frequenz von 400 Hz VS im Start-Stop-Betrieb zu folgen. Die PS 10 besitzt einen digitalen Profilgenerator. Die Geschwindigkeitsprofile werden periodisch berechnet und an den 2-PhasenSchrittmotor ausgegeben. Periodendauer Die Periodendauer des digitalen Profilgenerators ist durch die Hardware festgelegt. TP = 256 µs Endgeschwindigkeit Die Positionierung der Achsen wird im Punkt-zu-Punkt-Verfahren vorgenommen. Die Achse beschleunigt mit trapezförmigem Geschwindigkeits-Profil. Die Endgeschwindigkeit V nach der Beschleunigungsrampe wird als 16-bit-Wort angegeben. Ihr Wertebereich reicht von 1 bis 2.147.483.647. ! Hinweis: Keinesfalls darf eine höhere Geschwindigkeit vorgegeben werden, als die Mechanik in der Lage ist zu fahren, da sonst die angeschlossene Mechanik beschädigt oder zerstört werden kann. Bei gegebener Geschwindigkeit V (dimensionslos) und gegebenem Mikroschrittfaktor Mcstp errechnet sich die Schrittfrequenz f wie folgt: fMcstp = 1 · V s (Schrittfrequenz im Mikroschrittmodus) bzw. fVS = ! 1 · s V Mcstp (auf Vollschrittmodus normierte Schrittfrequenz) Hinweis: Maximal ist eine Frequenz von fVS, max = Subject to change without notice 1 TP Hieraus ergibt sich Motordrehzahl (ohne Berücksichtigung eines evtl. vorhandenen Getriebes) bei einem Schrittmotor mit R Vollschritten pro Motorumdrehung: nRPM = 60 V · min Mcstp · R (Umdrehungen/Minute) bzw. 1 V · (Umdrehungen/Sekunde) s Mcstp · R Für die Umrechnung von Motordrehzahl in eine Positioniergeschwindigkeit der Mechanik sind zusätzlich die mechanischen Daten, wie z.B. Spindelsteigung und ggf. die Getriebeübersetzung, zu berücksichtigen. nRPS = Beschleunigung bei Trapezprofil Als Beschleunigung („ACC“) ist ein 16-bit-Wort anzugeben, der Wertebereich reicht von 1 bis 2.147.483.647. Dauer der Trapezprofil-Beschleunigungsrampe bei gegebener Geschwindigkeit V und Beschleunigung ACC: Dt = 1 s · V ACC (Anlauf-/Nachlaufdauer in Sekunden) Zurückgelegte Distanz während der Trapezprofil-Beschleunigungsrampe: Ds = 1 Mikroschritt · V2 2 · ACC (Nachlaufweg in Mikroschritten) 10.2 DC-Servomotor Allgemeines Die PS 10 hat einen digitalen Lage-Geschwindigkeits-Regler. Stellund Regelgröße werden periodisch berechnet. Die Erfassung des Positions-Istwertes geschieht im einfachsten Fall mittels eines Drehgebers, der am 2. Wellenende des Motors angeflanscht ist. Wichtigste Kenngröße des Encoders ist die Encoder-Strichzahl R. Sie gibt die Anzahl der sog. Linien, d.h. Hell-Dunkel-Perioden je Motorwellenumdrehung, an. Die Signale durchlaufen eine Vierfach-Auswertung, woraus sich generell eine 4-fach höhere Auflösung als die Encoder-Strichzahl ergibt. Abtastzeit Die Periodendauer des digitalen Reglers wird auch als Abtastzeit bezeichnet und ist durch die Hardware festgelegt. Die minimale Abtastzeit beträgt 204 µs. Sie kann bei Bedarf erhöht werden: Ts = (204,...,20.000) µs Als Abtastzeit können nur ganzzahlige Werte an die PS 10 übergeben werden. Standardwert (Voreinstellung): Ts = 256 µs. Endgeschwindigkeit Die Positionierung der Achse wird im Punkt-zu-Punkt-Verfahren vorgenommen. Hierbei beschleunigt die Achse mit trapezförmigem Geschwindigkeits-Profil. Die Endgeschwindigkeit V (dimensionslos) nach der Beschleunigungsrampe wird als 16-bit-Wert angegeben. Ihr Wertebereich reicht von 1 bis 2.147.483.647. einstellbar. Betriebsanleitung-User Manual PS 10 Änderungen vorbehalten 13 ! Hinweis: Keinesfalls darf eine höhere Geschwindigkeit vorgegeben werden, als die Mechanik in der Lage ist zu fahren, da sonst die angeschlossene Mechanik beschädigt oder zerstört werden kann. Bei gegebener Geschwindigkeit V und der Encoder-Linienzahl R errechnet sich die Motordrehzahl (ohne Berücksichtigung eines evtl. vorhandenen Getriebes) wie folgt: n = 60 · min V 4R (Umdrehungen pro Minute) V 4R (Umdrehungen pro Sekunde) bzw. n = 1 s · 1 Inkrement s ·V (Inkremente pro Sekunde) Die letzte Formel kann auch wie folgt verstanden werden: Für die Umrechnung von Motordrehzahl in eine Positioniergeschwindigkeit der Mechanik sind zusätzlich die mechanischen Daten, wie z.B. Spindelsteigung und ggf. die Getriebeübersetzung, zu berücksichtigen. Beispiel: Es ist eine Positionierung mit einer Nenndrehzahl n = 1800 U / min auszuführen. Es wird ein Encoder mit R = 500 Linien (entsprechen 2000 Impulsen / Umdrehung) am Motor eingesetzt. Wie ist V zu wählen? Berechnung: Es ergibt sich allgemein nach Umstellen der Drehzahlgleichung für die Geschwindigkeit: n 60 ! Hinweis: Wärmestau an der Steuerung ist zu vermeiden. Vor dem Einschalten der Steuerung müssen sämtliche Anschluss stecker für Geräte und Peripherie angeschlossen sein, damit sie von der Steuerung erkannt und initialisiert werden. Es müssen: • die Positioniereinheit • der Computer sowie für eine Multipoint-Vernetzung der PS 10-32: • das Verbindungskabel zur Signalübertragung mit Abschlusssteckern (Abschlusswiderstand) • die Vernetzung der Stromversorgung (bzw. alternativ ein oder weitere Netzteile) angeschlossen werden. Die Verbindung zum Computer erfolgt über die USB-Schnittstelle. Dafür ist eine Treiberinstallation notwendig. Der Treiber befindet sich auf der mitgelieferten CD. Für die Installation starten Sie bitte „setup.exe“. ! · 4 · R Hinweis: Jegliche Geräte und Peripherie müssen vor dem Systemstart angeschlossen sein, da sie sonst von der Steuerung nicht erkannt und initialisiert werden. Damit wird V = 60000 für n = 1800 / min bei Einsatz eines 500‑LinienEncoders. Unter Verwendung einer direktgetriebenen Spindel mit 1 mm Steigung entspricht dies einer Verstellgeschwindigkeit von genau 1,8 m / min. bzw. 30 mm / s. 11.3 Systemstart Beschleunigung bei Trapezprofil Als Beschleunigung („ACC“) ist ein 16-bit Wort anzugeben, der Wertebereich reicht von 1 bis 2.147.483.647 Beim ersten Windows-Start mit angeschlossener PS 10 sollte das Betriebssystem die neue Hardware erkennen. Die Treiber können nun installiert werden. Hierzu sind ggf. Administratorrechte erforderlich. Dauer der Trapezprofil-Beschleunigungsrampe bei gegebener Geschwindigkeit V und Beschleunigung ACC: Initialisierung Nachdem die Stromversorgung eingeschaltet und das Gerät aktiviert wurde, muss die Achse zunächst per INIT-Befehl initialisiert werden. Achsenparameter, die verändert werden, werden ebenfalls mit der Initialisierung übernommen. Dt = 1 s · V ACC (Anlauf-/Nachlaufdauer in Sekunden) Zurückgelegte Distanz während der Trapezprofil-Beschleunigungsrampe: Ds = 1 Inkrement · V2 2 · ACC Änderungen vorbehalten 14 Aufstellung Die Steuerung ist für einfache Steuerungsaufgaben in Forschung, Entwicklung sowie für industrielle Anwendungen konzipiert. Sie darf nur in trockener, staubarmer Umgebung betrieben werden. Grundsätzlich wird sie freistehend betrieben. • die Stromversorgung Der Controller verfährt V Inkremente je Sekunde. V = 11.1 Vorbereitung der Steuerung 11.2 Anschluss der Peripherie und Geräte bzw. n = 11. Inbetriebnahme der PS 10 (Nachlaufweg in Inkrementen) Software Für die Inbetriebnahme gehören zum Lieferumfang der Steuerung das Softwaretool OWISoft, der USB-Treiber und die Software-Schnittstelle (SDK / API) für C, C++,C# und LabView (ab Version 5.0). Der USB-Treiber ist für Windows 2000, Windows XP, Windows Vista (32 / 64-Bit), Windows 7 (32 / 64-Bit) geeignet. Die Software-Schnittstelle enthält Beispielprogramme mit dem Quellcode und Hilfedateien. Betriebsanleitung-User Manual PS 10 Subject to change without notice Für die Inbetriebnahme mit OWISoft sind die jeweiligen Parameter der Positionierer für die Achse hinterlegt, die nur noch angewählt werden müssen. 12. Fehlerüberwachung ! Die PS 10 besitzt vier Endschaltereingänge, davon jeweils zwei Eingänge für Limit-Schalter (MINSTOP, MAXSTOP) und zwei für Bremsschalter (MINDEC, MAXDEC), sowie Auswertemöglichkeit für einen Referenzschalter. Einer der vier Schalter ist als Referenzschalter definiert. Hinweis: Die hinterlegten Parameter sind für unbelastete Positionierer voreingestellt. Für optimalen Lauf müssen die Reglerparameter der konkreten Belastungen angepasst werden. 12.1 Endschalter Lesen Sie hierfür bitte Kapitel 3.7 der Bedienungsanleitung OWISoft. Für die Inbetriebnahme mittels eigener Applikationssoftware folgt im Anschluss das Kapitel „Hinweise zum Aufbau einer eigenen Applikationssoftware”. Dort ist im Anschluss auch eine Tabelle mit den Befehlssätzen der PS 10 angefügt. PS 10-32 CANopen-Vernetzung Das Ansprechen der vernetzten Steuerungen erfolgt über Master/Slave-Adressierung (ID). Die über USB vernetzte Steuerung wird automatisch zum Master. Die jeweiligen ID´s sind vorkonfiguriert und können dem Abnahmeprotokoll der jeweiligen Steuerung (siehe „Slave ID”) entnommen werden. Sollte eine Änderung der Slave-ID notwendig sein, starten Sie bitte die Anwendung „PS10 CANconfig.exe”aus dem Verzeichnis „..\OWISoft\Application\System”. Bild 10: Endschalterkennzeichnung Die Endschalter in negativer Fahrrichtung (Bewegung des Schiebers zum Motor hin) werden mit MINDEC und MINSTOP bezeichnet. Die Endschalter in positiver Fahrrichtung (Bewegung des Schiebers vom Motor weg) werden mit MAXDEC und MAXSTOP bezeichnet. Endschalter positiver Bereich Endschalter negativer Bereich Für diese Änderung muss die entsprechende Steuerung hierfür als Master (über USB-Port verbunden) angesprochen werden. In „Schritt 1” werden die Slave-ID´s von 0-99 gescannt und die angeschlossenen Steuerungen jeweils angezeigt. In „Schritt 2” kann nun durch Auswahl des Master-Slave die gewünschte ID-Nummer gewählt und gesetzt werden. verbotener erlaubter Bewegungsbereich positiver Bereich Bild 11: Endschalterfunktionen verbotener negativer Bereich Funktion der Endschalter-Überwachung 1.MINSTOP: Auslösen dieses Schalters bei Fahrt in negative Richtung bewirkt nach einer gewissen Reaktionszeit, die einige Millisekunden betragen kann, einen sofortigen, abrupten Motorstop. Der Motor wird hierbei stromlos geschaltet. DC-Servomotor: Der Motor wird stromlos geschaltet, jedoch führt die vorhandene kinetische Energie zu einer Restbewegung, bis sie durch Reibung oder mechanische Anschläge verbraucht wurde. Schrittmotor (Open Loop): Fals die aktuelle Fahrfrequenz, von der aus gestoppt wurde, höher gewesen ist als die Start-StopFrequenz des Systems, führt dies auf Grund der kinetischen Energie im System dazu, dass der Motor noch eine Bewegung ausführt. Dies kann von der Steuerung nicht erfasst werden, so dass der angezeigte Positionswert falsch ist. Eine Referenzfahrt ist nötig, um die Motorschritte wieder mit der angezeigten Position übereinstimmen zu lassen. 2.MINDEC: Dieser Endschalter löst bei Betätigung während negativer Fahrt eine Bremsrampe mit programmierbarer Verzögerung aus. Der Motor wird nach ausgeführter Bremsrampe nicht abgeschaltet, sondern bleibt weiterhin aktiv. Falls der Nachlaufweg der Bremsrampe zu groß gewesen sein sollte, und die Positioniereinheit anschließend den MINSTOP-Endschalter erreicht, siehe 1. Subject to change without notice Betriebsanleitung-User Manual PS 10 Änderungen vorbehalten 15 3.MAXDEC: Die Reaktion ist äquivalent zum MINDEC-Endschalter, jedoch wirkt dieser Endschalter nur bei Fahrt in positiver Richtung. 4.MAXSTOP: Die Reaktion ist äquivalent zum MINSTOP-Endschalter, jedoch wirkt dieser Endschalter nur bei Fahrt in positiver Richtung. Konfiguration der End- und Referenzschalter Welche Endschalter an der jeweils angeschlossenen Positioniereinheit vorhanden sind, kann mit dem Befehl „SMK...“ definiert werden. Ein gesetztes Bit (=1) bedeutet, dass der jeweilige Schalter ausgewertet wird. Die Endschalterpolarität wird mit dem Kommando „SPL...“ vorgewählt. Der übergebene Wert definiert, ob Endschalter bzw. Referenzschalter „low“ oder „high“ aktiv sein sollen. Ein gelöschtes Bit bedeutet, dass der jeweilige Schalter „low“ aktiv ist (z.B. Schließerkontakt nach Masse, d.h. offen in nicht betätigtem Zustand). Ein gesetztes Bit (Standardkonfiguration) bedeutet, dass der jeweilige Schalter „high“ aktiv ist (z.B. Öffnerkontakt nach Masse, d.h. geschlossen in nicht betätigtem Zustand). Die Endschaltereingänge arbeiten standardmäßig mit 5 V-CMOS-Pegel, wobei Open-Collector-NPN- oder Push-Pull-Ausgänge gleichermaßen angeschlossen werden können, da hochohmige Pullup-Widerstände (4,7 kOhm) nach +5 V bereits gerätintern vorgesehen sind. Wiederinbetriebnahme nach Achsenfehler Nachdem ein Achsenfehler durch Betätigung eines Limit-Schalters (MINSTOP oder MAXSTOP) aufgetreten ist, wird die Achse <n> wie folgt wieder in Betrieb genommen: 1.Initialisierung mittels Befehl: INIT<n> 2.Freifahren des Limit-Schalters mittels Befehl: EFREE<n> 12.2 Endstufen-Fehlerüberwachung Die Endstufe meldet ihren Status zurück. Dieses Signal wird zyklisch kontrolliert. Meldet eine Endstufe einen Fehler, so wird der Antrieb stromlos geschaltet, d.h. die Regelschleife wird geöffnet und das Endstufen-Freigabe-Signal wird inaktiv gesetzt. 12.3 Time-Out-Überwachung Für jede Achse kann zusätzlich als Parameter eine Timeout-Zeit (in ms, Wertebereich 32-Bit) definiert werden. Die Überwachung kann durch die Einstellung Timeout-Zeit = 0 abgeschaltet werden. Während eine Bewegung (PGO, REF, EFREE) durchgeführt wird, wird zyklisch diese Timeout-Zeit überwacht. Dauert die Bewegung länger als diese Zeit, so wird der Antrieb stromlos geschaltet (?ASTAT „Z“, siehe Befehlssatz ab S.19), d.h. die Regelschleife wird geöffnet und das Endstufen-Freigabe-Signal wird inaktiv gesetzt. Diese Funktion ist nützlich, wenn z.B. bei der Referenzfahrt der Referenzschalter nicht gefunden wird. Änderungen vorbehalten 16 Betriebsanleitung-User Manual PS 10 Subject to change without notice 13. Hinweise zum Aufbau einer eigenen Applikationssoftware Eine PS 10-Applikation besteht allgemein aus einem Initialisierungsteil, welcher die erforderlichen Achsparameter für die zu verwendende Achse <n> setzt und die Achse einschaltet, einer Schleife, die eine Referenzfahrt für die Achse durchführt, und dem eigentlichen Anwenderprogramm, welches die vom Anwender gewünschte Funktionalität beinhaltet. Soll eine Referenzfahrt für die Achse durchgeführt werden, sind Referenzmaske und Referenzpolarität vorher zu setzen, falls dies nicht bereits erfolgt ist oder entsprechende Werte in den Standardeinstellungen hinterlegt worden sind. Danach wird die Referenzfahrt gestartet. PS 10-Applikation Bild 14: PS 10-Referenzfahrt für Achse Bild 12: PS 10-Applikations-Architektur Die Initialisierung der gewünschten Achse geschieht im einfachsten Fall über das INIT-Kommando, falls die im statischen RAM gespeicherten Parameter übernommen werden sollen. Andernfalls ist es erforderlich, die gewünschten Parameter vor Senden des INIT-Kommandos zu übertragen. Zwischen zwei einzelnen Befehlen, die zur PS 10 gesendet werden, ist eine Verarbeitungszeit (Interpreterzeit) von ca. 20 bis 40 Millisekunden zu berücksichtigen. Empfangene Gerätmeldungen können z.B. Zeichen für Zeichen im Millisekunden-Takt abgeholt werden, bis die definierte Stringende-Kennung empfangen wird. Eine Verwendung des mitgelieferten Softwarepakets OWISoft (inklusive SDK und DLL) erleichtert die Inbetriebnahme wesentlich, da häufig verwendete Befehlsfolgen bereits als Funktionen bzw. Prozeduren zusammengefasst sind, und der erforderliche Laufzeitabgleich ebenfalls implementiert ist. Bild 13: PS 10-Initialisierungs-Architektur Subject to change without notice Betriebsanleitung-User Manual PS 10 Änderungen vorbehalten 17 14. Befehlssatz der PS 10 14.1 PS 10-32 CANopen-Vernetzung Generelles zum Format der Befehle: Das Protokoll auf der USB-Schnittstelle wurde um die Slave-Adresse erweitert. Diese wird in dezimaler Form immer mit zwei Stellen den ASCII-Befehlen vorangestellt: Jeder Befehl wird über die USB-Schnittstelle in Form von ASCII-Zeichen übertragen. Die einzelnen Zeichen eines Befehls werden automatisch in Grossbuchstaben umgewandelt. Jeder Befehl wird mit CR oder CR+LF oder LF (einstellbar) abgeschlossen. Weiterhin ist der Antwortmodus einstellbar (TERM). Dazu gibt es 3 Einstellungen: 1) Beim Auslesen des Message-Ausgangs-Buffers wird nur eine zweistellige Zahl zurückgegeben (Fehlercode). Diese Einstellung wird vorzugsweise bei Ansteuerung über Software gewählt, da die Gerätemeldungen hier am kürzesten sind, womit der Befehlsdurchsatz optimiert wird. 2) Beim Auslesen des Message-Ausgangs-Buffers wird eine zweistellige Zahl mit Klartext ausgegeben. 3) Wie 2) und zusätzlich wird jeder ausgeführte Befehl, der keinen Wert zurückmeldet, mit „OK” quittiert. Rückmeldungen werden auch entweder mit CR oder CR + LF oder LF zurückgesendet (einstellbar). Im ersten Antwortmodus (TERM=0) werden die binären Informationen (z.B. Endschalterkonfiguration, Endschalterstatus, digitale/analoge Eingänge/Ausgänge usw.) als Bits einer Dezimalzahl angegeben. In den anderen Modi (TERM=1, TERM=2) werden diese Werte als binäre Zahl angegeben. Dies gilt sowohl für die Abfrage als auch für die Einstellung eines Wertes. Die Daten im Arbeitsspeicher werden mit dem Ausschalten der Steuerung gelöscht. Nach dem erneuten Einschalten werden die Parameter aus dem EEPROM geladen. Mit dem Befehl SAVEPARA kann nach dem Verändern der Konfiguration die Änderung resident abgespeichert werden. 64?VERSION 64PVEL1 = 100000 01?VERSION 01PVEL1=100000 Die Kommandos, die über USB empfangen werden, überprüft die PS 10-32 zunächst auf die Slave-Adresse. Ist keine Slave-Adresse vorangestellt, so wird das Kommando direkt bearbeitet. Wird eine Adresse vorangestellt, wird zuerst auf die eigene Adresse überprüft. Ist es die eigene, so wird das Kommando ebenfalls sofort ausgeführt. Ist es eine fremde Adresse, so wird das Kommando umgeformt und es erfolgt mit dem CANopen-Protokoll ein Zugriff auf das ObjektVerzeichnis des entsprechenden PS 10-32-Slave, wodurch das Kommando dann auf der Slave-PS 10-32 ausgeführt wird. Die Antwort wird von dieser Slave-PS 10-32 wieder zurück übertragen und von der Master-PS 10-32 an den PC weitergegeben. Als Übertragungsrate auf dem CANopen-Bus wird fest 500kBit/s verwendet. Eine bestehende USB-Verbindung legt dabei den Master- oder den Slave-Betrieb auf der CANopen Seite fest. Besteht eine USB-Verbindung, so verhält sich diese PS 10-32 wie ein CANopen Master, besteht keine USB-Verbindung, so verhält sich die PS 10-32 wie ein CANopen Slave. Bei einer Vernetzung mehrerer PS 10-32 darf also nur eine per USB mit dem PC verbunden sein. ! Hinweis: Das Verbinden der PS 10-32 zum Computer oder das Trennen von dem PC sollte nur im ausgeschaltetem Zustand (der PS 10-32) erfolgen. Bei Befehlen mit einer Rückantwort (z.B. Abfragen von Parametern) wird die Antwort sofort zum PC zurückgeschickt. <n> = Achsennummer = 1 <uv> = Zahlenwert ohne Vorzeichen <sv> = Zahlenwert mit Vorzeichen Änderungen vorbehalten 18 Betriebsanleitung-User Manual PS 10 Subject to change without notice Anhang: I Befehlstabelle BefehlsKommando gruppe Beispiel Antwort ?ASTAT Statusabfrage der Achse. Für die Achse wird ein Zeichen zurückgeschickt, das den aktuellen Zustand der Achse beschreibt: „I“ = Achse nicht initialisiert „O“ = Achse stromlos in Ruhe „R“ = Achse bestromt in Ruhe „T“ = Achse positioniert im Trapez-Profil „V“ = Achse arbeitet im Geschwindigkeitsmodus „P“ = Achse fährt auf Referenzposition „F“ = Achse fährt einen Endschalter frei „L“ = Achse stromlos nachdem sie auf Limitschalter (MINSTOP, MAXSTOP) gefahren ist „B“ = Achse wird gestoppt nachdem sie auf einen Bremsschalter (MINDEC, MAXDEC) gefahren ist „A“ = Achse stromlos nach Endstufen-Fehler „M“ = Achse stromlos nach Motion-Controller-Fehler „Z“ = Achse stromlos nach Timeout-Fehler „H“ = Phaseninitialisierung aktiv (Schrittmotor-Achse) „U“ = Achse nicht freigegeben „E“ = Achse stromlos nach Bewegungsfehler „?“ = Fehler, unbekannter Achsenstatus ?ASTAT IIORRTTJV ?MSG Liest den Message-Ausgangs-Buffer aus, der Message-Ausgangs-Buffer ?MSG wird nur für Fehlermeldungen, die die Kommando-Schnittstelle betreffen (falscher Befehl, fehlende Parameter, ungültiger Wert) verwendet. Folgende Meldungen sind möglich: „00 NO MESSAGE AVAILABLE“ (wird ausgegeben, wenn der Meldungspuffer ausgelesen wird, obwohl keine Meldung verfügbar ist) „01 PARAMETER BEFORE EQUAL WRONG“ (wird in den Meldungspuffer geschrieben, wenn der Befehlsinterpreter den Parameter vor dem Gleichheitszeichen nicht korrekt in einen Zahlenwert umwandeln konnte) „02 AXIS NUMBER WRONG“ (wird in den Meldungspuffer geschrieben, wenn der Befehlsinterpreter die übergebene Achsennummer nicht auswerten konnte; zulässig 1) „03 PARAMETER AFTER EQUAL WRONG“ (wird in den Meldungspuffer geschrieben, wenn der Befehlsinterpreter den Parameter nach dem Gleichheitszeichen nicht korrekt in einen Zahlenwert umwandeln konnte) „04 PARAMETER AFTER EQUAL RANGE“ (wird in den Meldungspuffer geschrieben, wenn der Befehlsinterpreter erkannt hat, dass der Parameter hinter dem Gleichheitszeichen außerhalb des zulässigen Wertebereichs liegt) „05 WRONG COMMAND ERROR“ (wird in den Meldungspuffer geschrieben, wenn der gesendete Befehl syntaktisch nicht korrekt war, d.h. vom Befehlsinterpreter nicht erkannt wurde) „06 REPLY IMPOSSIBLE“ (wird ausgegeben, wenn die Antwort nicht gesendet werden konnte, z.B., weil der Sendepuffer noch nicht leer ist) „07 AXIS IS IN WRONG STATE“ (wird in den Meldungspuffer geschrieben, wenn ein Fahr- oder Konfigurierungsbefehl gesendet wurde, der nicht ausgeführt werden konnte, da sich die Achse momentan in einem anderen Fahrzustand befindet) 00 NO MESSAGE... ?ESTAT<n> Aktuellen, logischen Zustand der Endschalter und Endstufenrückmeldung der Achse auslesen: Bit 0 = MINSTOP Bit 1 = MINDEC Bit 2 = MAXDEC Bit 3 = MAXSTOP Bit 4 = Rückmeldung der Endstufe 10101 ?ERR Abfrage eines Fehlers aus dem Fehlerspeicher mit einer Speichertiefe von 20. ?ERR Die Fehlernummer wird immer als 4-stellige Zahl zurückgegeben. Anhand des Fehlercodes kann die Ursache ermittelt werden. Wird 0 zurückgegeben, so sind keine weiteren Fehler mehr gespeichert. 1211 ?EMERGINP Gibt den aktuellen Zustand des NOT-AUS-Eingangs zurück. 1 Allgemeine Statusabfragen Funktionsbeschreibung Subject to change without notice Betriebsanleitung-User Manual PS 10 ?ESTAT1 ?EMERGINP Änderungen vorbehalten 19 Basis-Konfiguration Allgemeine Statusabfragen BefehlsKommando Funktionsbeschreibung gruppe ?READOWID<n>=<uv> Auslesen des Speicherinhaltes des One-Wire-Chips in der Positioniereinheit bis zur 0x00 Endkennung und Übertragen der Daten an den PC. Als Parameter wird die Anfangsadresse 0x00 bis 0x70 im One-Wire-Chip übergeben, ab dieser Adresse werden dann max. 16 Bytes gelesen oder es wird bis zur Enderkennung gelesen. ?READOWUB<n> Auslesen des Speicherinhaltes des One-Wire-Chips aus Adresse 0x86 und 0x87 (=UserBytes) in der Positioniereinheit und Übertragen der Daten an den PC. MOTYPE<n>=<uv> Motortype für die Achse einstellen: 0 = DC-Brush 1 = Schrittmotor Open Loop ?MOTYPE<n> Motortyp für die Achse auslesen. AMPSHNT<n>=<uv> Shunt-Umschaltung der Endstufe einstellen. Mit diesem Befehl wird der Ausgang TTL-OUT zur MP-UNI hin eingestellt und damit die Shunt-Umschaltung eingestellt. 0 = Strombereich 1 (niedrig) 1 = Strombereich 2 (hoch) ?AMPSHNT<n> Shunt-Umschaltung der Endstufe abfragen. TERM=<uv> Terminalmodus einstellen: Modus 0 = kurze Antwort Modus 1 = Antwort mit Klartext Modus 2 = Antwort mit Klartext und OK nach jedem Befehl ohne Rückmeldung ?TERM Terminalmodus abfragen. BAUDRATE=<uv> Baudrate der seriellen Schnittstelle einstellen, erlaubte Werte sind: 9 600, 19 200, 38 400, 57600, 115 200 Diese Einstellung wird erst nach dem nächsten Reset aktiv. ?BAUDRATE Aktuelle Baudrate der seriellen Schnittstelle abfragen. COMEND=<uv> Befehlsenderkennung einstellen: 0 = CR 1 = CR+LF 2 = LF ?COMEND Befehlsendekennung abfragen. ?SERNUM Serien-Nummer der Steuerung abfragen. SAVEPARA Abspeichern der globalen und der Achsen-Parameter im EEPROM. Dieser Befehl muss nach dem Verändern der Konfiguration gesendet werden, damit die Änderung resident abgespeichert wird. ?VERSION Software-Version SP-Firmware auslesen. ?POSERR<n> Auslesen des aktuellen Positionsfehlers der Achse. Zurückgegeben wird die Differenz zwischen Encoder-Position und Sollposition. Kann auch “on the fly” benutzt werden um den Schleppfehler auszulesen. ?MXSTROKE<n> Gemessenen Tischhub auslesen. Bei der Referenzierung in den Modi 6 und 7 wird der Tischhub ermittelt und kann mit diesem Kommando ausgelesen werden. ?AMPST<n> Endstufenstatus abfragen: Bit 0 = Fehler Endstufentemperatur Bit 1 = Fehler Endstufe wegen NOT-AUS abgeschaltet Bit 2 = Fehler falsche Motorkodierung gelesen Bit 3 = Fehler Kurzschlußschutz hat angesprochen AMPMODE<n> Endstufenmodus einstellen. Mit diesem Kommando wird die Art der Schnellentregung für die Endstufen eingestellt: Bit 0 und Bit 1 = Entregungsart Stromchopper 00 : slow, 01 : 15% mixed, 10 : 48% mixed, 11 : fast Bit 2 = Blanking-Time 0 = kurz, 1 = lang Bit 3 = ExtMode, Entregung wenn Enable auf low 0 = fast, 1 = slow Bit 4 = Enable beim Nulldurchgang des Stromes wegnehmen Bit 5 = Schrittmotor Drehrichtung invertieren ?AMPMODE<n> Endstufenmodus abfragen. SLAVEID=<uv> Slave-ID einstellen für CANopen-Vernetzung, 00 bis 99. ?SLAVEID Slave-ID abfragen. RESETMB Reset der Hauptplatine auslösen. ERRCLEAR Fehlerspeicher löschen. Änderungen vorbehalten 20 Betriebsanleitung-User Manual PS 10 Beispiel Antwort ?READOWID1=0 INFO1|INFO2|.... ?READOWUB1 10 MOTYPE1=0 ?MOTYPE1 AMPSHNT1=0 0 ?AMPSHNT1 TERM=2 0 ?TERM 2 BAUDRATE=9600 ?BAUDRATE COMEND=0 9600 ?COMEND ?SERNUM SAVEPARA 0 09080145 ?VERSION ?POSERR1 PS10-V3.0-181010 -15 ?MXSTROKE1 340000 ?AMPST1 0 AMPMODE1 ?AMPMODE1 SLAVEID=64 ?SLAVEID RESETMB ERRCLEAR 3 64 Subject to change without notice BefehlsKommando gruppe INIT<n> PSET<n>=<sv> Positionierbetrieb ?PSET<n> VVEL<n>=<sv> ?VVEL<n> PGO<n> VGO<n> STOP<n> VSTP<n> EFREE<n> MON<n> MOFF<n> CNT<n>=<sv> ?CNT<n> CRES<n> ?VACT<n> ?ENCPOS<n> Positionierparameter RELAT<n> ABSOL<n> ?MODE<n> PVEL<n>=<uv> ?PVEL<n> FVEL<n>=<uv> ?FVEL<n> ACC<n>=<uv> ?ACC<n> Subject to change without notice Funktionsbeschreibung Beispiel Endstufe Freigabe einschalten und Positionsregler aktivieren. Mit diesem Befehl wird die Achse komplett initialisiert und befindet sich anschließend im bestromten Zustand mit aktivem Positionsregler. Dieser Befehl muss nach dem Einschalten der Steuerung übermittelt werden, damit die Achse anschließend mit den Befehlen REF, PGO, VGO etc. bewegt werden kann. Vorher müssen folgende Parameter eingestellt worden sein: Motortyp, Limitschalter-Maske und -Polarität, Anfangs-Regelparameter. Der Kurzschlußschutz der Endstufe wird zurückgesetzt. Zielposition bzw. Relativweg (ABSOL/RELAT) für die Achse setzen. Ist absolutes Positionsangabeformat eingeschaltet, so wird der Parameter als absolute Position mit Vorzeichen interpretiert, ist relative Positionsangabe gewählt, so wird der Parameter als Weg mit Vorzeichen interpretiert. Die neue absolute Zielposition berechnet sich dann aus der Summe von letzter absoluter Zielposition und übergebenem Weg. Zielposition bzw. Relativweg für die Achse auslesen. Sollgeschwindigkeit der Achse für Geschwindigkeitsmodus setzen. Mit diesem Befehl wird die Startgeschwindigkeit und auch evtl. eine neue Geschwindigkeit, während die Achse im Geschwindigkeitsmodus fährt, übergeben. Sollgeschwindigkeit für Geschwindigkeitsmodus auslesen. Positionierung der Achse starten. Die Achse fährt die neue Zielposition im Trapez-Profil an. Geschwindigkeitsmodus der Achse starten. Bewegung der Achse stoppen. Jegliche aktive Bewegung der Achse wird abgebrochen. Der Antrieb stoppt mit der programmierten Bremsrampe und bleibt stehen. Geschwindigkeitsmodus der Achse stoppen. Arbeitet die Achse im Geschwindigkeitsmodus, so wird dieser mit diesem Befehl beendet und die Achse gestoppt. Endschalter der Achse freifahren. Nachdem ein Antrieb in einen Limit-Schalter (MINSTOP, MAXSTOP) oder Bremsschalter (MINDEC, MAXDEC) gefahren ist, kann mit diesem Befehl der Antrieb aus dem Schalter heraus gefahren werden. Die Richtung der Bewegung wird dabei selbsttätig entschie den, je nachdem, ob ein positiver oder negativer Endschalter aktiviert ist. Endstufe Freigabe einschalten und Positionsregler aktivieren. Mit diesem Befehl wird die Achse, nachdem der Motor stromlos geschaltet war, wieder eingeschaltet und befindet sich anschließend im bestromten Zustand mit aktivem Positionsregler. Endstufe Freigabe ausschalten und Positionsregler deaktivieren. Mit diesem Befehl wird der Positionsregler deaktiviert und die Freigabe-Leitung für die Endstufe deaktiviert. Aktuellen Positionszähler für die Achse setzen. Aktuellen Positionszähler für die Achse auslesen. Aktuellen Positionszähler für die Achse nullen. Aktuelle Geschwindigkeit der Achse auslesen. Aktuellen Positionszähler des Encoders für die Achse auslesen. Dieser Befehl liefert bei Open-Loop-Schrittmotorachsen, die aber mit Encoder betrieben werden, die aktuelle Encoder-Position zurück. Positionsangaben für die Achse auf „relativ" umschalten. (= Angabe des Weges mit Vorzeichen) Positionsangaben für die Achse auf „absolut" umschalten. (= Angabe der Zielposition mit Vorzeichen) Abfrage des aktuell eingestellten Positionsangabeformates für die Achse. Maximale Positioniergeschwindigkeit für die Achse setzen. Wird für das Trapez-Profil verwendet. Maximale Positioniergeschwindigkeit für die Achse auslesen. Endschalterfreifahrtgeschwindigkeit für die Achse setzen (ohne Vorzeichen). Endschalterfreifahrtgeschwindigkeit für die Achse auslesen. Beschleunigung (= Anfahrrampe) für die Achse setzen. Wird für alle Modi verwendet (Trapez, Geschwindigkeitsmodus, etc). Beschleunigung für die Achse auslesen. INIT1 Betriebsanleitung-User Manual PS 10 Antwort PSET1=100000 ?PVEL1 VVEL1=-20000 10000 ?VVEL1 PGO1 -20000 VGO1 STOP1 VSTP1 EFREE1 MON1 MOFF1 CNT1=5000 ?CNT1 CRES1 ?VACT1 ?ENCPOS1 5000 10000 5000 RELAT1 ABSOL1 ?MODE1 PVEL1=10000 ABSOL ?PVEL1 FVEL1=1000 ?FVEL1 ACC1=300000 10000 ?ACC1 300000 1000 Änderungen vorbehalten 21 Achsparameter BefehlsKommando gruppe Funktionsbeschreibung Beispiel MCSTP<n>=<uv> Mikroschrittauflösung bei Schrittmotorachse einstellen. MCSTP1=50 ?MCSTP<n> Mikroschrittauflösung bei Schrittmotorachse auslesen. ?MCSTP1 DRICUR<n>=<uv> Fahrstrom bei Schrittmotorachse als ganzzahligen Prozentwert des Maximalstromes einstellen. DRICUR1=50 ?DRICUR<n> Fahrstrom bei Schrittmotorachse in Prozent auslesen. ?DRICUR1 HOLCUR<n>=<uv> Haltestrom bei Schrittmotorachse in Prozent einstellen. HOLCUR1=30 ?HOLCUR<n> Haltestrom bei Schrittmotorachse in Prozent auslesen. ?HOLCUR1 ATOT<n>=<uv> Achsen-Timeout-Zeit einstellen (in Millisekunden). 0 schaltet die Timeout-Überwachung ab. ATOT1=20000 ?ATOT<n> Achsen-Timeout-Zeit abfragen. ?ATOT1 FKP<n>=<uv> Regelparameter KP für die Achse einstellen. FKP1=25 ?FKP<n> Regelparameter KP für die Achse abfragen. ?FKP1 FKD<n>=<uv> Regelparameter KD für die Achse einstellen. FKD1=5 ?FKD<n> Regelparameter KD für die Achse abfragen. ?FKD1 FKI<n>=<uv> Regelparameter KI für die Achse einstellen. FKI1=10 ?FKI<n> Regelparameter KI für die Achse abfragen. ?FKI1 FIL<n>=<uv> Regelparameter Integrationslimit für die Achse einstellen. FIL1=100000 ?FIL<n> Regelparameter Integrationslimit für die Achse abfragen. ?FIL1 FST<n>=<uv> Sample-Zeit für die Achse einstellen (in Mikrosekunden). FST1=500 ?FST<n> Sample-Zeit für die Achse abfragen (in Mikrosekunden). ?FST1 FDT<n>=<uv> Verzögerungszeit des D-Anteils für die Achse einstellen (in Sample-Zeit-Zyklen). FDT1=5 ?FDT<n> Verzögerungszeit des D-Anteils für die Achse abfragen (in Sample-Zeit-Zyklen). ?FDT1 50 30 20000 25 5 100000 500 MXPOSERR1=50 ?MXPOSERR<n> Maximalen Positionsfehler einer Achse abfragen. ?MXPOSERR1 MAXOUT<n>=<uv> Maximalen Ausgabewert der Servoregelschleife als ganzzahligen Prozentwert einstellen. Mit diesem Befehl kann der maximale Wert für die Achse, der an den Servo-Verstärker ausgegeben wird, eingestellt werden. Maximal zulässiger Wert: 99 %. MAXOUT1=95 ?MAXOUT<n> Maximalen Ausgabewert in Prozent auslesen. ?MAXOUT1 AMPPWMF<n>=<uv> PWM-Frequenz für Endstufe einstellen, 20000 oder 80000 ist möglich. AMPPWMF1 =20000 ?AMPPWMF<n> PWM-Frequenz für Endstufe abfragen. ?AMPPWMF1 PHINTIM<n>=<uv> Phasen-Initialisierungszeit in Sample-Zeit-Zyklen einstellen. PHINTIM1=10 ?PHINTIM<n> Phasen-Initialisierungszeit in Sample-Zeit-Zyklen abfragen. ?PHINTIM1 Betriebsanleitung-User Manual PS 10 50 10 MXPOSERR<n>=<uv> Maximalen Positionsfehler für eine Achse setzen, wird dieser Wert überschritten, so schaltet die Achse ab. Diese Abschaltung gilt nur für den Motortyp DC-Brush. Änderungen vorbehalten 22 Antwort 5 50 95 20000 10 Subject to change without notice BefehlsKommando gruppe REF<n>=<uv> RVELS<n>=<sv> ?RVELS<n> RVELF<n>=<sv> ?RVELF<n> RDACC<n>=<uv> Endschalterkonfiguration und Referenzfahrt ?RDACC<n> SMK<n>=<uv> ?SMK<n> SPL<n>=<uv> ?SPL<n> RMK<n>=<uv> ?RMK<n> RPL<n>=<uv> ?RPL<n> ?HYST<n> ?REFST<n> LMK<n>=<uv> ?LMK<n> ?LSTAT<n> SLMIN<n>=<uv> ?SLMIN<n> SLMAX<n>=<uv> ?SLMAX<n> Subject to change without notice Funktionsbeschreibung Beispiel Referenzfahrt mit Angabe des Referenzfahrtmodus für die Achse starten: Modus 0 = nächsten Index-Impuls suchen und stehenbleiben Modus 1 = Referenzschalter anfahren und stehenbleiben Modus 2 = Referenzschalter anfahren, nächsten Index-Impuls suchen und stehenbleiben Modus 3 = Modus 0, zusätzlich aktuelle Positon auf 0 setzen Modus 4 = Modus 1, zusätzlich aktuelle Positon auf 0 setzen Modus 5 = Modus 2, zusätzlich aktuelle Positon auf 0 setzen Modus 6 = Maximalen Referenzschalter anfahren, minimalen Referenzschalter anfahren, aktuelle Position auf 0 setzen Modus 7 = Minimalen Referenzschalter anfahren, maximalen Referenzschalter anfahren, aktuelle Positon auf 0 setzen Referenzfahrtgeschwindigkeit „langsam" für die Achse setzen. Mit dieser Geschwindigkeit wird der Index gesucht bzw. aus dem Referenzschalter herausgefahren (vorzeichenbehaftet). Referenzfahrtgeschwindigkeit „langsam" für die Achse auslesen. Referenzfahrtgeschwindigkeit „schnell" für die Achse setzen. Mit dieser Geschwindigkeit fährt der Antrieb auf den Referenzschalter (vorzeichenbehaftet). Referenzfahrtgeschwindigkeit „schnell" für die Achse auslesen. Referenzfahrt-Verzögerung für die Achse einstellen. Diese Verzögerung wird benutzt, wenn der Referenzpunkt angefahren wird. Referenzfahrt-Verzögerung der Achse auslesen. Endschaltermaske für die Achse setzen. Mit diesem Befehl werden die Limit-Schalter und die Brems-Schalter aktiv bzw. inaktiv gesetzt. Wird auf einen Limit-Schalter gefahren, so wird die Bewegung abrupt gestoppt und der Motor danach stromlos geschaltet. Bit-Reihenfolge: <MAXSTOP, MAXDEC, MINDEC, MINSTOP>. Endschaltermaske für die Achse auslesen. Endschalterpolarität für die Achse setzen. Mit diesem Befehl wird der aktive Pegel für die Limit-Schalter und Brems-Schalter festgelegt. Bit-Reihenfolge: <MAXSTOP, MAXDEC, MINDEC, MINSTOP>. Endschalterpolarität für die Achse auslesen. Referenzschaltermaske für die Achse setzen. Mit dem Befehl wird definiert, welcher der 4 Endschalter der Achse als Referenzschalter interpretiert werden soll. Es muss eine Maske mit genau einer „1" übergeben werden. Bit-Reihenfolge: <MAXSTOP, MAXDEC, MINDEC, MINSTOP>. Referenzschaltermaske für die Achse auslesen. Referenzschalterpolarität für die Achse setzen. Dieser Befehl definiert den aktiven Pegel des Referenzschalters. Bit-Reihenfolge: <MAXSTOP, MAXDEC, MINDEC, MINSTOP>. Referenzschalterpolarität für die Achse auslesen. Referenzschalterhysterese der Achse auslesen. Nach erfolgter Referenzfahrt kann mit diesem Kommando die Hysterese des Schalters ausgelesen werden. (Der Wert ist nur korrekt, wenn die Achse nicht im Referenzschalter stand) Abfrage der Gültigkeit der Referenzfahrt. Nach erfolgter Referenzfahrt wird der Status auf 1 = „Gültig“ gesetzt. Schaltet man einen Antrieb ohne Encoder (z.B. Schrittmotor Open-Loop) stromlos, so wird die Gültigkeit auf 0 zurückgesetzt. Limit-Positionsüberwachungsmaske für die Achse setzen. Mit diesem Befehl wird die Limit-Positionsüberwachung für die untere und/oder die obere Grenzposition aktiv bzw. inaktiv geschaltet. Die Limit-Positionsüberwachung verhält sich beim Überschreiten der Grenzen wie der entsprechende DEC-Schalter. Bit-Reihenfolge: <MAXDEC, MINDEC>. Limit-Positionsüberwachungsmaske für die Achse auslesen. Aktuellen, logischen Zustand der Limit-Positionsüberwachung der Achse auslesen. Bit 0 = MINDEC untere Grenze überschritten Bit 1 = MAXDEC obere Grenze überschritten Negative Limit-Position für die Achse einstellen. Negative Limit-Position für die Achse auslesen. Positive Limit-Position für die Achse einstellen. Positive Limit-Position für die Achse auslesen. REF1=4 Betriebsanleitung-User Manual PS 10 Antwort RVELS1= 2000 ?RVELS1 2000 RVELF1= -20000 ?RVELF1 RDACC1 = 300000 ?RDACC1 SMK1=0110 -20000 ?SMK1 SPL1=1111 0110 ?SPL1 RMK1=0001 1111 ?RMK1 RPL1=1110 0001 ?RPL1 ?HYST1 1110 28 ?REFST1 1 300000 LMK1=01 ?LMK1 ?LSTAT1 01 01 SLMIN1=100 ?SLMIN1 100 SLMAX1=100000 ?SLMAX1 100000 Änderungen vorbehalten 23 Haltebremsenansteuerung Ein-/Ausgänge 1) BefehlsKommando gruppe 1) Funktionsbeschreibung Beispiel Antwort ?INPUTS Aktuellen Zustand der Eingänge auslesen (4-Bit Binärzahl). ?INPUTS 0010 OUTPUT<uv>=<uv> Aktuellen Zustand eines Ausgangs ändern. OUTPUT1=0 ?OUTPUTS Aktuellen Zustand aller Ausgänge auslesen (5-Bit Binärzahl). ?OUTPUTS OUTMODE=<uv> Ausgangsbetriebsart für die Ausgänge Out1 und Out2 einstellen. Diese Ausgänge können jeweils sowohl als digitaler Ausgang als auch alternativ als PWM-Ausgang betrieben werden. Ausgangsmodus = 0 : OUT1 und OUT2 digitale Ausgänge Ausgangsmodus = 1 : OUT1 digitaler Ausgang, OUT2 PWM-Ausgang Ausgangsmodus = 2 : OUT1 und OUT2 PWM Ausgänge OUTMODE=1 ?OUTMODE Ausgangsbetriebsart für die Ausgänge Out1 und Out2 abfragen. ?OUTMODE 1 ?ANIN<uv> Analog-Eingang abfragen. Angegeben wird die Kanal-Nummer von 1 bis 4 zurückgegeben wird der gewandelte 10-Bit Wert. ?ANIN3 234 OPWM<uv>=<uv> PWM-Ausgang setzen. Angegeben wird die Kanal-Nummer von 1 bis 2 und der Aussteuerungswert von 0 bis 100%. OPWM1=55 ?OPWM<uv> PWM-Ausgang abfragen. Angegeben wird die Kanal-Nummer von 1 bis 2 und zurückgegeben wird der zuletzt eingestellte Aussteuerungswert von 0 bis 100%. ?OPWM1 HBCH<n>=<uv> PWM-Ausgang für Haltebremse der Achse zuordnen: <Achsennummer> = <PWM-Kanal> PWM-Kanal = 0 für Haltebremsenfunktion aus HBCH1=1 ?HBCH<n> Zuordnung Haltebremse PWM-Kanal der Achse abfragen. ?HBCH1 HBFV<n>=<uv> Ersten PWM-Wert (zum Anziehen) bei der Ansteuerung der Haltebremse einstellen: <Achsennummer> = <Prozentwert>. HBFV1=50 ?HBFV<n> Ersten PWM-Wert (zum Anziehen) bei der Ansteuerung der Haltebremse abfragen. ?HBFV1 HBSV<n>=<uv> Zweiten PWM-Wert (zum Halten) bei der Ansteuerung der Haltebremse einstellen: <Achsennummer> = <Prozentwert>. ?HBSV<n> Zweiten PWM-Wert (zum Halten) bei der Ansteuerung der Haltebremse abfragen. ?HBSV1 HBTI<n>=<uv> Zeit für ersten PWM-Wert bei der Ansteuerung der Haltebremse einstellen: <Achsennummer> = <Zeit für ersten PWM-Wert in ms> HBTI1=300 ?HBTI<n> Zeit für ersten PWM-Wert bei der Ansteuerung der Haltebremse abfragen. ?HBTI1 55 1 50 HBSV1=20 20 300 Die mit <uv> anzusprechenden Pins auf dem I/O-Stecker können der Belegungstabelle (im Anhang III) entnommen werden. Änderungen vorbehalten 24 00101 Betriebsanleitung-User Manual PS 10 Subject to change without notice II Relevanz der Parameter für verschiedene Motortypen III Belegungstabelle Ein- /Ausgänge 2-PhasenSchrittmotor Open Loop DC-Brush Parameter Pinbelegung des 25-poligen D-Sub (male) Funktion Pin Analogeingang 1 6 Analogeingang 2 5 MOTYPE + + Analogeingang 3 4 FKP + – Analogeingang 4 3 FKD + – TTL-Eingang 1 10 FDT + – TTL-Eingang 2 9 FKI + – TTL-Eingang 3 8 FIL + – TTL-Eingang 4 7 FST + – SPS-Output 1 16 MAXOUT + +1) SPS-Output 2 15 SMK + + SPS-Output 3 14 SPL + + SPS-Output 4 13 RMK - + TTL-Output 5 17 RPL + + +5 V, max. 300 mA Gesamtstrom 1, 2 RVELF + + PWM-Output 1, max. 1 A *) 20 RVELS + + PWM-Output 2, max. 1 A *) 21 ACC + + +24 V, max. 0,5 A Gesamtstrom 18, 19 PVEL + + GND 11, 12, 24, 25 FVEL + + Freigabe-Eingang + (5V) **) 22 ABSOL + + Freigabe-Eingang - (GND) 23 RELAT + + AMPPWMF + + MCSTP – + DRICUR + + HOLCUR – + AMPSHNT + + PHINTIM – + ATOT + + Funktion Pin HBCH (+) (+) GND 3, 6 HBFV (+) (+) CAN-H 7 HBTI (+) (+) CAN-L 2 HBSV (+) (+) SubD-25 male 1 14 13 25 *) nur in PS 10-32 vorhanden, nach Masse (GND) schaltend **) Freigabe der Motorendstufe über Optokoppler (UB = 5V) erforderlich; z.B. Brücke Pin 2 –> Pin 22 und Pin 23 –> Pin 24 BUS-System Pinbelegung der 9-poligen D-Sub 1 6 DSub-9 5 9 + benötigt – nicht benötigt (+) optional 1) Verwendung ist möglich, jedoch ist darauf zu achten, dass der hier gesetzte Wert größer oder gleich dem maximalen PWM-Wert für DRICUR bzw. HOLCUR ist. Der Ausgang wird auf jeden Fall auf den per MAXOUT definierten Wert begrenzt. Wird ein zu kleiner Wert gewählt, funktioniert der Mikroschrittbetrieb nicht mehr ordnungsgemäß. Subject to change without notice Betriebsanleitung-User Manual PS 10 Änderungen vorbehalten 25 Universal-Motorstecker Signale Leistung Pinbelegung des 37-poligen D-Sub (female): Pin DC-Motor Schrittmotor OL 19 Motor + Phase 1 + 18 Motor - Phase 1 - 17 Motor + Phase 2 + 16 Motor - Phase 2 - 15 Motorcodierung 14 Motorcodierung 13 GND 12 +5 V 11 Encoder A – Encoder A 10 Schalter + Signale 9 8 Encoder B – Encoder B 7 Encoder Index 6 Encoder Index 5 MINSTOP 4 MINDEC 3 MAXDEC 2 MAXSTOP 1 GND 37 Motorhaltebremse +24 V 36 Motorhaltebremse - 35 (reserviert) 34 (reserviert) 33 (reserviert) 32 (reserviert) 31 GND 30 +5 V 29 OWISid 28 (reserviert) 27 (reserviert) 26 (reserviert) 25 (reserviert) 24 (reserviert) 23 (reserviert) 22 +5 V 21 GND 20 +24 V Änderungen vorbehalten 26 Betriebsanleitung-User Manual PS 10 Subject to change without notice USER MANUAL Position Control Unit PS 10 9013.0185 / 15.11.2012 D-A-CH Laser 2000 GmbH 82234 Wessling Tel. +49 8153 405-0 [email protected] www.laser2000.de France – Telecom Laser 2000 SAS 78860 St-N. l. Bretèche Tel. +33 1 30 80 00 60 [email protected] www.laser2000.fr France – Photonic Laser 2000 SAS FR-33600 Pessac Tel. +33 5 57 10 92 80 [email protected] www.laser2000.fr Iberia Laser 2000 SAS 28034 Madrid Tel. +34 650 529 806 [email protected] www.laser2000.es Nordics Laser 2000 GmbH 112 51 Stockholm Tel. +46 8 555 36 235 [email protected] www.laser2000.se 27 Änderungen vorbehalten 28 Copyright reserved by OWIS (2008) Subject to change without notice 1. General Information 2. Setup and Scope of Delivery The OWIS® PS 10 is a single-axis position control unit for basic control functions. The PS 10 consists of a single unit for different output power classes and motor voltages. The unit is completely assembled and tested by OWIS® and will be supplied ready for installation. The valid firmware for operation is installed. It can control either a 2-phase stepper motor (open loop) up to 1.8 A, or DC motors with an encoder (closed loop) up to 3.5 A. The control has an USB interface to communicate with a PC. Many of the inputs and outputs, like TTL, analog inputs and SPS outputs, are integrated for communication. Point-to-point positioning mode and trapezoidal velocity profiles are possible with the PS 10. Up to 32 units can be combined with the PS 10-32 version. Any motor-type combination is possible. The connection is via a rudimentary, simplified CANopen protocol. Two of the four SPS outputs at the PS 10-32 are configured as PWM to control a holding brake. The software tool OWISoft is also included, so the PS 10 can be configured and controlled easily. The parameters of the positioning units of OWIS® are stored at OWISoft and can be selected to the respective units. Foreign motors can also be controlled. Following products are also included: • USB cable, 2 m length • CD with software tool OWISoft and documentation in English/German • printed version of the manual in German and English 2.1 Standard The basic version of the PS 10 comes with: • USB port • 4 inputs for switches (reference and limit-switches) • 4 TTL inputs • 4 analog inputs • 1 TTL output • 4 SPS outputs • connection for enabling the motor output stage • motor plug D-Sub-37 with additional connections for motor holding brake (option), limit / reference switches and other signals (see pin asignment, p. 50) • circular connector for power supply from PS 10-32 to PS 10-32 2.2 Accessories The following accessories are available: • external desktop power supply AC 100 - 240 V, DC 24 V, 90 W • connecting cable with plugs for different positioning systems 2.3 Option The Version PS 10-32 is additionally equipped with: • 2 of the 4 SPS outputs are configured a PWM (e.g. to control a motor holding brake) • bus interface for cross linking (based on CANopen) Following accessories are available: • connecting cable for bus interface 2 m long • terminating connectors for bus interface • connecting cable 2 m long for power supply Subject to change without notice Betriebsanleitung-User Manual PS 10 Änderungen vorbehalten 29 3. Safety 4. Standards and Directives The PS 10 should only be used by authorized, qualified personnel, and under consideration of the regulations for the prevention of industrial accidents and for the electrical industry. Read the safety instructions (on the data sheet). The position control unit PS 10 complies with following standards and regulations: Unqualified persons should not operate the position control. The control unit is designed for an operating temperature range from +10 up to +40 °C, and storage temperature from -10 up to +50 °C. Protect against high humidity, vibration and explosive gases. Before opening, the device must be switched off and unplugged. Connection and installation work should only be done with equipment unpowered. Installation and use of equipment must be in accordance with the standards of the declaration of conformity. In order to enable the motor output stage jumper JP7 on the control board must be plugged (see 6.4). If the jumper is not plugged, the galvanically separated external release input can be used. For that purpose, the input must be supplied with a voltage of 5 V. If neither the jumper is plugged nor the external voltage is supplied no activating of the output stages is possible. Furthermore, each type of motor is identified to the motor power stage through a coding resistor. This helps to avoid motor damage if the wrong type of motor has been connected (e.g. a DC motor to a stepper motor output stage). The respective control unit is only intended to be operated with the preconfigured motor type. Other or related uses are not the intended purpose. Currents and Voltages The power input is protected by a 5 A slow-blow microfuse. • CE Directive • EMV Directive 2004/108/EG Interference immunity, according to the generic standard EN 61000-6-1 with: - Electrostatic discharge immunity test Basic standard: EN 61000-4-2 (ESD) - Radiated, radio-frequency, electromagnetic field immunity test Basic standard: EN 61000-4-3 (radiated RF) RF emission, according to the generic standard EN 61000-6-3 with: - Radiated RF according to Basic standard: EN 55014-1 (household appliance) 5. Technical Overview power supply: number of axis: motor type: communication: installation: protection class: encoder: No special safety precautions are necessary for the outputs, as the PS 10 only works with safe, low voltages (PELV) to 24 VDC. functions: The position control unit PS 10 is built in accordance with accepted safety rules and satisfies the following standards and directives. motion profiles: Änderungen vorbehalten 30 • RoHS conform Betriebsanleitung-User Manual PS 10 external power supply max. 24 V, 90 W (PS 10-32: connecting cable for power supply) 1 axis (PS 10-32: cross linking up to 32 units) 2-phase step motors Open Loop (OL) DC servo motors Closed-Loop (CL) USB 2.0 desktop unit in metal housing IP 20 quadrature signals A / B and index, RS-422 or TTL level, with quad evaluation, max. counting frequency 1.875 MHz (signal) respectively 7.5 MHz (quadrature) parametrizable acceleration ( / deceleration) ramp, trapezoidal velocity profiles point-to-point positioning operation Subject to change without notice 6. Setup of the Control Unit PS 10 USB port I/O port status LEDs PS 10-32 USB port I/O port status LEDs CAN-OUT port CAN-IN port fig. 1: front housing view power supply (daisy chain) universal motor connector enable jumper ON / OFF switch fig. 2: back housing view Display of the status LEDs The PS 10 is embedded in a robust metal housing. The waste heat from the control board is emitted to the ambient air. green LED Status LEDs on The operating state of the control unit is shown by status LEDs at the front side. The displayed states are: axis is initialized and reference position is valid off axis is not initialized - Power on blinking slow 1 Hz axis is initialized and reference position is invalid blinking fast 2 Hz axis drives red LED - Motor initialised - Reference valid description - Error on no error is set to the axis The display signal is given by colours and blinking mode. blinking slow 1 Hz an error is set to the axis Error can mean: limit switch, break switch, power stage error, time-out error Subject to change without notice Betriebsanleitung-User Manual PS 10 Änderungen vorbehalten 31 6.1 Connections The connections of the PS 10 are located on the front and rear side of the housing. These are communication interfaces, inputs and outputs for peripherals as well as connections for the positioning units (see fig. 1 and 2). Limit and Reference Switches Maximum four limit switches per axis can be connected. They can be micro switches, TTL Hall switches or TTL light barriers with +5 V voltage. Various n.c. or n.o. contacts, switching towards GND, can be attached to the inputs. One of the four switches is defined as reference switch, if necessary. connection USB slave TTL in-/outputs analog inputs SPS outputs universal motor connector 24 V external/ connecting cable function communication with a PC interaction with external hardware interaction with external hardware interaction with external hardware motor supply with motor holding brake and encoder / limit switch-connection operating voltage for the motor output stage in Version PS 10-32: BUS interface interaction with further control (based on CAN) unit socket USB port type B D-Sub 25-pole connector D-Sub 25-pole connector D-Sub 25-pole connector D-Sub 37-pole connector DC circular connector 5.5 x 2.1 x 11 mm D-Sub 9-pole connector USB Interface The PS 10 has a USB 2.0 slave-interface. Its connector is placed on the front side of the control unit. The interface is compatible with USB 1.1 and 2.0. The USB interface of the PS 10 is implemented as a so-called “COM bridge”. The Windows device driver recognizes the PS 10 as “USB serial port” and assigns a COM port number to it. This number can be changed by the user, if necessary. After successful installation, the USB interface is addressed as virtual RS-232 interface. The PS 10 can operate with transfer rates of 9 600, 19 200, 38 400, 57 600 or 115 200 baud. Please make sure that the transfer rate of the PS 10 corresponds to the transfer rate defined in the device driver, otherwise no communication is possible. Preset is 9 600 baud. (It can be found in the acceptance certificate.) Universal Motor Connector The positioning units are connected using the suitable OWIS® connecting cable. The universal motor connector enables the current supply of the motor, control of the motor holding brake, where applicable, and the transfer of the encoder and limit-switch. The motor power stage contains an additional protection device which helps to avoid motor damage if a wrong motor type has been connected (e.g., a DC motor to a stepper motor output stage). For detection of the motor type, a coding resistor is provided in the 37-pin D-Sub connector of the motor connecting cable between pin 14 and 15. Coding: • 0 Ohm: DC servo motor • infinite resistance (no resistor): 2-phase step motor When being switched on, the PS 10 measures the resistance value and reports an error message, if the measured value does not match the type of the motor power stage. The error message of the output stage can be read out using the command "?ASTAT" (see command set, page 42). The active level and the switch assignment are configured by software. Encoder Input The encoder input enables both the connection of encoders with line drivers (antivalent signals for CHA, CHB and optionally Index I), and of encoders with TTL / CMOS signals. The following input signals are defined: supply voltage channel channel channel channel channel channel Vcc (+ 5 V); GND A (TTL or CMOS) A inverted B (TTL or CMOS) B inverted I (TTL or CMOS) I inverted The conversion of the antivalent signals to TTL signals takes place with RS-422 receivers. If an encoder with TTL / CMOS signals is connected, then the input for the inverted signal remains open and is internally pulled to 1.4 V by a high-impedance voltage divider. Power Supply The switch-mode power supply of the PS 10 has been designed for an input voltage of 100 VAC to 240 VAC at 50/60 Hz (wide-range input). It generates 24 VDC, 90 W and supplies the outputs and the inputs on the main board. The supply voltages for logic and motor power are not galvanically separated. Safety Fuse Concept There is a separate fuse for the control, rated according to the maximum possible current. Standard fuse protection of control: 5 AT For the motor power stage an appropriate fuse against high temperatures is embedded. In Version PS 10-32 Additionally: BUS Interface Up to 32 units can be networked with a bus system based on CANopen. The first PS 10-32 is connected to a PC via USB (master), and all other units can be linked among each other (slaves). Commands that are not intended for the master controller are sent on to the subsequent units. The reply of the addressed PS 10-32 will be received from the first control unit (master) and returned via USB to the PC. The master control unit scans the bus, therefore it will be switched on at last. On the motor power stage the universal motor connector is fitted. On this connector, all the necessary signals, such as motor current, limit switches, encoder and holding brake (if any), can be found. Änderungen vorbehalten 32 Betriebsanleitung-User Manual PS 10 Subject to change without notice 6.3 Selection of the Current Range for the Motor Power Stage PC USB PS10-32 (1) PS10-32 (2) PS10-32 (3) USB USB USB BUS BUS BUS AMPSHNT<n> = 1 (command to set current range 1 or 2) fig. 3: multi-point crosslinking PS 10-32 Connection for Power Supply In principle, several PS 10-32 can be operated by a single external power supply. To loop the supply of a PS 10-32 to the next there are two circular connector ports at the back. Using a connecting cable the power supply is sent to the downstream PS 10-32 units. Thus, the first PS 10-32 is connected to the supply unit and from there power is passed through to the other units. The total current consumption of the positioning units has to be considered. The controller can drive stepper motors up to 1.8 A, and DC servo motors up to 3.5 A in continuous operation. Note: The maximum capacity of the power supply must not be exceeded! 6.2 In- and Outputs For interaction with external sensors and actuators, corresponding digital and analog inputs and outputs are provided. Forked light barriers, etc. can be connected to the TTL-compatible inputs. Using the TTL output it is possible to control digital hardware directly in the application setup. The SPS outputs control single solenoid valves or other inductive and resistive loads directly (switching towards +24 V). features TTL inputs Analog inputs TTL output SPS outputs level 0-5 V 0-5 VDC 0-5 V 0-24 VDC current others 10 mA 0-100 mA — resolution 10 Bit — — INIT<n> (command to initialise the axis) Phase Current Setting for 2-Phase Step Motors Driving and holding current can be separately preset with 2-phase stepper motors. The selection for axis <n> can be done as in the following description. The value <uv> is defined as integer percentage of the maximum current in the pre-selected current range (1 or 2). driving current: DRICUR<n>=<uv> (command to set the drive current in %) holding current: HOLCUR<n>=<uv> (command to set the holding current in %) current range 1 (corresponding to 100%): 1.2 A current range 2 (corresponding to 100%): 3.3 A ! Note: For continuous operation a current of 1.8 A is permitted (corresponding to 54 % in current range 2). In general, the lowest possible current range should be selected, in order to obtain the optimal precision in high-resolution micro step operation. Current Limiting Setting for DC Servo Motors The suitable current range for the DC servo motors has to be set in accordance with the thermally admissible continuous current of the corresponding motor type. maximum current limiting: DRICUR<n>=<uv> (command to set the current limiting in %) in version PS 10-32: power outputs After switching on the control unit, the current range selected is stored in the static RAM. In order to activate a new current range, it is necessary to re-initialize the axis <n> after the preset has been done. Preselection of the current range 1 (low) and 2 (high), respectively for axis <n> takes place after e.g. following command sequence: BUS (based on CAN) ! The PS 10 motor power stage has two configurable current ranges in order to obtain high precision in the current value. 0-24 VDC 1,0 A PWM current range 1 (corresponding to 100%): 2.4 A The analog inputs can measure voltages between 0 V and 5 V directly and convert them with a 10-bit resolution (reference voltage: 5 V). The inputs are not galvanically separated. The query commands “?ANIN<uv>“ and “?INPUTS“ correspond to the same inputs of the PS 10 (see command set, page 42). The evaluation of the inputs takes place either analog or digital. current range 2 (orresponding to 100%): 6.6 A ! Note: For continuous operation a current of 3.5 A is permitted (corresponding to 54 % in current range 2). The two power outputs in Version PS 10-32 are PWM-type and switching towards GND. They are designed to drive inductive loads which need a high actuating current for a short time and a low stand-by current afterwards, such as holding brakes or solenoids. These power outputs can therefore be configured for driving a motor holding brake. Subject to change without notice Betriebsanleitung-User Manual PS 10 Änderungen vorbehalten 33 6.4 Control Board Settings Jumper Settings F1 JP7 JP4 JP3 JP1 JP2 fig. 4: Jumper presets for the control card, defined by OWIS® jumper function setting possibilities JP1 1-2 plugged = 2-phase step motor 2-3 plugged = DC servo motor 1-2 plugged = 2-phase step motor 2-3 plugged = DC servo motor 2-3: operation JP4 2-phase step motor resp. DC servo motor 2-phase step motor resp. DC servo motor “Firmware Update” or “Operation” mode internal use presetting defined by OWIS® plugged suitably plugged suitably plugged 2-3: normal operation plugged JP7 output stage release jumper plugged = release; jumper open = release with external release input possible plugged JP2 JP3 note value preset by manufacturer must not be changed value preset by manufacturer must not be changed value preset by manufacturer must not be changed value preset by manufacturer must not be changed F1: 5 A slow-blow, for the protection of the external 24 V power input for the control unit. Änderungen vorbehalten 34 Betriebsanleitung-User Manual PS 10 Subject to change without notice 7. Control Functions 7.2 Velocity Mode 7.1 Trapezoidal Point-to-Point Profile The following table presents the profile parameters for the velocity mode: The following table contains the specific profile parameters for the trapezoidal point-to-point mode: profile parameters position velocity acceleration/ deceleration format word length 32.0 32 bit 32.0 16 bit 32.0 16 bit range (-2.147.483.648…+2.147.483.647) counts (1…2.147.483.647) counts / cycle (1…2.147.483.647) counts / cycle² For this profile, them host specifies an initial acceleration and deceleration, a velocity and a destination position. The profile is named after the curve shape (fig. 5): the axis accelerates linearly (on the basis of the programmed acceleration value), until it reaches the programmed speed. Afterwards, the axis slows down linearly (using the deceleration value), until it stops at the defined position. If the programmed travelling distance is so short that deceleration must begin before the axis reaches the programmed velocity, the profile will not have a constant-velocity range, and the trapeze becomes a triangle (fig. 6). profile parameters velocity acceleration/ deceleration format word range length 32.0 32 bit (-2.147.483.648…+2.147.483.647) counts / cycle 32.0 16 bit (1…2.147.483.647) counts / cycle² Unlike in trapezoidal profiling mode, where the final position determines whether positive or negative speed is defined, it is the sign of the velocity value transmitted within the velocity mode that determines whether the axis moves in positive or negative direction. Therefore, the velocity value sent to the PS 10 can take positive values (for positive direction of motion) or negative values (for reverse direction of motion). For this profile no destination position is specified. The trajectory is executed by continuously accelerating the axis at the specified rate until the corresponding end velocity is reached. The axis begins to slow down, if a new velocity is defined which value is smaller than the current velocity or if it has another sign than indicated by the current direction. velocity v A simple velocity profile looks like a simple trapezoidal point-to-point profile as shown in fig. 7. A D time t velocity v change velocity fig. 5: Trapezoidal profile, A = acceleration, D = deceleration A D reverse direction velocity v -A A time t -D fig. 7: Velocity profile, A = acceleration, D = deceleration D time t fig. 6: Triangle profile, A = acceleration, D = deceleration The acceleration and deceleration ramps are symmetric. Note: In the velocity mode, the axis movement is not bound to a final position. It is up to the user to select such velocity and acceleration values which guarantee a safe course of motion. 7.3 Reference run The reference move drives onto one of the four limit switches. The position can be zeroized at this point. Therefor, two reference driving speeds with amount and sign and a reference acceleration are parameterised. The limit switch is approached with high speed and left with a low, then it is stopped. A velocity v The acceleration parameter is always used at the beginning of the movement sequence. Afterwards, the value for acceleration is used in the same direction, and the value for deceleration is used in opposite direction. The acceleration value is used, until the maximum velocity was reached. The deceleration value is used, until the velocity drops to zero. ! -A D time t -D fig. 8: Reference drive, A = acceleration, D = deceleration Subject to change without notice Betriebsanleitung-User Manual PS 10 Änderungen vorbehalten 35 8. Travel Measuring 9. PID Servo Loop Algorithm Position Feedback Control For the operation of DC servo motors an encoder input is included. The signal is used to capture data for the position control loop (PID position control). The servo filter used in the PS 10 operates according to a PID algorithm. An integration limit provides an upper bound for the accumulated error. Encoder The travel measuring system, also known as ”rotary encoder”, for the position feedback signals is evaluated only in the so-called closed-loop operation mode. K outputn=KpEn+Kd(En–E(n-1))+S Ej 2_5_i6 Without encoder, only open-loop operation with 2-phase step motors is possible. In order to be able to operate DC motors, each axis must be equipped with a travel measuring system. This can be an encoder. Usually, encoders with 500, 1250 or 2500 lines per revolution are used. The motion processor measures the current axis position via encoder and calculates the appropriate rotational speed of the motor, considering the temporal change of the position parameters. En accumulated error terms from the main encoder Ki integral gain of feedback control loop Kd differential gain of feedback control loop KP proportional gain of feedback control loop Encoders are fixed on the motor and directly connected to the rotor. The encoder output signals are named A and B (CHA and CHB) with a phase-shift of 90 degrees (so-called quadrature signals), and, if necessary, one index pulse I per revolution. The PS 10 can process TTL level or antivalent signals (line-driver outputs). After a level transformation and a filtering, the signals are transmitted directly to the microprocessor. Linear Measuring System A position sensor, directly coupled to the actuator motion, is called linear measuring system. The linear measuring system can be used instead of the encoder for position measuring. The PID formula is as follows: n j=0 Meaning of following abbreviations: All filter parameters and the torque signal limit are programmable, so that the user is able to fine-tune the filter. The ranges of values and formats are listed in the following table: terminus Ilim Ki Kd Kp name integration limit integral gain derivative gain proportional gain range 32 bit unsigned (0…2 124 483 647) 16 bit unsigned (0…32 767) 16 bit unsigned (0…32 767) 16 bit unsigned (0…32 767) – fig. 9: Structure of the digital filters Änderungen vorbehalten 36 Betriebsanleitung-User Manual PS 10 Subject to change without notice 10. Positioning, Velocity and Acceleration, Calculation 10.1 2-Phase Stepper Motor (Open Loop) General Information Each stepper-motor-driven system has a so-called start-stop frequency which is especially dependent on motor type, system friction and load (moment of inertia!). The start-stop frequency defines the maximum travel frequency of the stepper motor concerned, with which it starts directly from standstill without acceleration phase. It is usual to indicate these and other characteristic frequencies of stepper motors in Hertz full-step (“Hz FS”), i.e. full steps per second. The shaft of a stepper motor with a step angle of 1.8 °, i.e. R = 200 full steps per motor revolution, which runs with e.g. 400 Hz FS, rotates with a speed of 2 revolutions per second or 120 revolutions per minute. In order to reach speeds higher than the start-stop frequency, the stepper motor must be accelerated beyond this frequency with a suitable acceleration ramp, or be slowed down to a lower frequency with a suitable brake ramp. This acceleration or deceleration takes place by means of trapezoidal velocity-time profile. If necessary, damping (clean damper, installed at the second motor shaft end) is used in order to reach a higher rotary speed. Herefrom, the motor rotary speed for a stepper motor (without consideration of a gearbox) with R full steps per motor revolution results to: nRPM = 60 V · min Mcstp · R (revolutions per minute) respectively nRPS = 1 1 · s Mcstp · R (revolutions per second) For the conversion of the motor rotary speed to the positioning velocity of mechanism, mechanical data, such as spindle pitch, and, where appropriate, the influence of a gearbox, must also be taken into consideration. Acceleration for Trapezoidal Velocity Profiling The acceleration (“ACC”) is specified by a 16-bit word. The values of “ACC“ range from 1 to 2 147 483 647. When the velocity V and the acceleration ACC are given, the duration of trapezoidal profile acceleration ramp is calculated as follows: Dt = 1 s · V ACC (acceleration/deceleration duration in seconds) Nearly all standard stepper motors used by OWIS® are able to comply with a frequency of 400 Hz FS in start-stop operation mode. Travelled distance during the trapezoidal profile acceleration/ deceleration: The PS 10 has a digital profile generator. The speed profiles are periodically calculated and sent to the 2-phase stepper motor. Ds = 1 Mcstp · Cycle Time The cycle duration of the digital profile generator is defined by hardware. TP = 256 µs 10.2 DC Servo Motor Final Velocity The positioning of the axis is done by means of the “point-to-point” method. The axis follows a trapezoidal velocity profile. The final velocity V after the acceleration ramp is specified by one 32-bit word. The value of V ranges from 1 to 2 147 483 647. ! Note: It must be ensured that no higher velocity is entered than the equipment is able to withstand, since otherwise the mechanism may be damaged or destroyed. When the speed V (without dimension) and the encoder line number R is given, the motor speed (without consideration of a gearbox!) is calculated as follows: fMcstp = 1 · V s (step frequency in micro step mode) respectively fVS = ! 1 V · s Mcstp (step frequency normed for full step mode) Note: A maximum frequency of fVS, max = Subject to change without notice 1 TP can be set. V2 2 · ACC (deceleration in microsteps) General Information The PS 10 has a digital position/speed controller. Output and control variables are periodically calculated. The acquisition of the actual position value is done in the simplest case by means of a rotary encoder (also just called an “encoder”), which is attached to the 2nd shaft extension of the motor. The most important parameter of the encoder is the number of encoder lines R. This is the number of the light/dark periods on the encoder disc for each motor shaft revolution. The signals go through a quad evaluation, which results in a generally 4-fold higher resolution than the number of encoder lines. Servo Loop Cycle Time The cycle duration of the digital controller is also called cycle time. It is defined by hardware. The minimum cycle time is 204 μs. If necessary, it can be increased: Ts = (204,...,20 000) µs Only integer values can be sent to the PS 10. Default value (presetting): Ts = 256 µs Final Velocity The positioning of the axis is done by means of the “point-to-point” method. The axis follows alternatively a trapezoidal velocity profile. The final speed V (without dimension) after acceleration ramp is specified by a 32-bit word. Its values range from 1 to 2 147 483 647. Betriebsanleitung-User Manual PS 10 Änderungen vorbehalten 37 ! Note: It must be ensured that no higher speed is entered than the equipment is able to withstand, otherwise the mechanism may be damaged or destroyed. At a given speed V (dimensionless) and an encoder line number R, the motor speed (without consideration of a gearbox) is calculated as follows: n = 60 · min V 4R (revolutions per minute) respectively n = 1 s · 11.1 Preparation of the Control Unit Installation The control is designed for simple control tasks in research and development as well as for industrial applications. It may only be operated in dry, dust-free environment. Normally, it is operated as a free-standing tabletop unit. ! Note: Heat accumulation in the control should be avoided. 11.2 Connection of Peripherals and Devices V 4R (revolutions per second) respectively n = 11. Initial Operation of the PS 10 1 increment s ·V (increments per second) Before switching on the control, all connecting plugs for devices and peripherals have to be connected, so that they are recognized and initialized by the control during start-up. This is: • the positioning unit The last formula can be understood as: • the power supply The controller travels V increments each second. • the computer For the conversion of motor rotary speed into positioning velocity of mechanics, mechanical data such as spindle pitch and, if appropriate, the influence of a gearbox have to be considered. For a multipoint connection of PS 10-32 as well as: Example: Positioning is to be effected at a rated speed of n = 1800 rpm. An encoder with R = 500 lines is to be used. What value of V should be selected? • connecting cable for power supply (and alternatively one or further external desktop power supply) The controller is connected via the USB interface to the computer. For this, a driver installation is required. The driver is on the included CD. For the installation please start "setup.exe". Solution: It results after resolving the equation for the speed of rotation: V = • connecting cable for signal transfer with terminating connectors n 60 · 4 · R ! Note: Any equipment and peripherals must be connected before the system starts, as otherwise it will not be recognized by the controller and will not be initialized. Thus, V = 60000 for n = 1800 rpm when using a 500 line encoder. A spindle pitch of 1 mm gives a speed of 1.8 m / min or 30 mm / s then. Acceleration for Trapezoidal Velocity Profiling A 32-bit word is to be entered as acceleration (“ACC”), the values range from 1 to 2 147 483 647. Duration of the trapezoidal profile acceleration ramp at given speed V and acceleration ACC: Dt = 1 s · V ACC (acceleration/deceleration duration in seconds) Travelled distance during the trapezoidal acceleration/ deceleration ramp: Ds = 1 increment · V2 2 · ACC Änderungen vorbehalten 38 (deceleration in increments) Betriebsanleitung-User Manual PS 10 Subject to change without notice 11.3 System Start-up When Windows is first started after the PS 10 has been connected, the operating system should recognize the new hardware. The driver can then be installed. In order to do this, administrator rights are necessary. Initialization After having switched on the power supply and activated the unit, the axis has to be initialized by the INIT command first. Axis parameters that have been changed will also be overwritten during the initialization. Software Following tools are included with purchase: the software tool OWISoft, the USB driver and the software interface (SDK/API) for C, C++, C# and LabView (Version 5.0 and above). The USB driver is compatible with Windows 2000, Windows XP, Windows Vista (32 / 64 bit), Windows 7 (32 / 64 bit). The software interface includes example programs with source code and help files. When starting up using OWISoft, the respective parameters of the OWIS® positioning units are stored, and need only be selected. ! Note: The stored parameters are for unloaded positioning. For optimum running the control parameters for the PID control loop have to be set for specific loads. Please see the OWISoft user‘s guide, chapter 3.7. For start up by a user application software the chapter “Instructions Concerning the Setup of User Application Software” follows. In addition, the command table for the PS 10 can be found. CANopen-Networking of PS 10-32 Activating a networked control unit is made by master/slave addressing (ID). The control connected via USB becomes automatically the master. The corresponding IDs to the control units are preconfigured and can be seen in the acceptance certification (see “Slave ID”). 12. Malfunction Monitoring 12.1 Limit Switches The PS 10 has four limit switch inputs, two for limit switches (MINSTOP, MAXSTOP) and two for brake switches (MINDEC, MAXDEC), as well as capability for a reference switch for each axis. One of the four limit switches is defined as reference switch. If a reconsigment of a slave ID is necessary, please start the application “PS10 CANconfig.exe” in the directory “..\OWISoft\Application\System”. To change an ID of the control unit it has to be connected as the master (via USB port, respectively) to the PC. “Step 1” scans all slave IDs from 0-99 and detects the connected controls. In “Step 2” the desired ID can be choosen and set by selecting the master slave ID. Subject to change without notice fig. 10: Identification of limit switches OWIS® positioning units are provided with maximum of four limit switches. The limit switches working in negative direction (motion of the slide towards the motor) are named MINDEC and MINSTOP. The limit switches working in positive direction (motion of the slide away from the motor) are similarly named MAXDEC and MAXSTOP. Betriebsanleitung-User Manual PS 10 Änderungen vorbehalten 39 Reconection after Axis Error When the axis error occurs after activating a limit switch (MINSTOP or MAXSTOP), the axis <n> should be released as follows: 1.Initialize via command: INIT<n> 2.Release limit switch via command: EFREE<n> 12.2 Output Stage Error Monitoring The motor power stage is return its status. This signal is periodically monitored. If a power stage detects an error, then the motor is shut off, i.e. the control loop is opened and the power stage is disabled. fig. 11: Function of limit switches Working Principle of the Limit Switch Monitoring 1. MINSTOP: Actuation of this limit switch with motion in negative direction results in immediate disable of the motor power, after a certain reaction time which can be some milliseconds. DC servo motor: The motor is disabled. However, the residual kinetic energy leads to some remaining movement until it is used up by friction or stoppers. Step motor open loop: If the current travel frequency with which it is stopped was higher than the system start-stop frequency, the kinetic energy in the system leads to a remaining motion. This motion cannot be detected by the control unit, thus resulting in a wrongly indicated potision. A reference travel is necessary to match the current position with the motor steps. 2.MINDEC: Actuation of this limit switch results in execution of a deceleration ramp, using a programmable deceleration value. After execution of the braking ramp, the motor will not be switched off but is still under control. If the follow up path of the deceleration ramp has been too big and the slide reached the MINSTOP limit switch afterwards, see 1. 3.MAXDEC: The reaction is similar to the MINDEC limit switch, but the effect is in positive direction. 4.MAXSTOP: The reaction is similar to the MINSTOP limit switch, but the effect is in positive direction. 12.3 Time-Out Monitoring Additionally, a timeout value (in ms, 32-bit range) can be defined as parameter for the axis. The monitoring can be switched off by setting the timeout to 0. This timeout is monitored periodically, while a motion is executed (PGO, REF, EFREE). If the motion lasts longer than this time, then the motor is shut off (?ASTAT "Z", see command reverence, p. 43). This function is useful, if, for instance, during the reference motion one of the reference switches cannot be found. Configuration of Limit and Reference Switches The command “SMK…” defines which end switches should be used with the corresponding positioning units connected. If one bit is set (=1), the corresponding limit switch will be recognized. The limit switch polarity is preset with the command “SPL…”. The value handed over defines whether the limit or reference switches should be set to “low” or “high” A cleared bit means that the respective switch is “low” active (e.g., normally-open contact towards GND, which means “not connected” in inactive mode). If one bit is set (standard configuration), then the corresponding switch is “high” active (e.g., normally-open contact towards GND, which means “connected” in inactive mode). The limit switch inputs work normally with 5 V-CMOS-level, while NPN open-collector or push-pull outputs can also be connected, as high-impedance pull-up resistors (4.7 kOhm) towards +5 V are already built-in. Änderungen vorbehalten 40 Betriebsanleitung-User Manual PS 10 Subject to change without notice 13. Instructions Concerning the Setup of User Application Software Generally, a PS 10 application consists of an initialization part which sets the necessary axis parameters for the axis <n> to be used, and which switches on the axis. Furthermore, it consists of a loop which executes a reference motion for the axis and of the actual user program with all the required functions. If a reference motion for the axis is to be executed, reference mask and reference polarity must be set before. This is necessary only if it has not already been done before, or if no appropriate values have been set for the standard settings. Then, the reference motion is started. PS 10-Application initialization of the control for axis <n> execute reference travel user program fig. 14: PS 10 reference motion for axis fig. 12: PS 10 application architecture The simplest initialization of the required axis is done with the INIT command, if the parameters stored in the static RAM are to be used. Otherwise, it is necessary to transfer the necessary parameters, before sending the INIT command. Initialization A command processing time (interpretation time) of about 20 to 40 milliseconds has to be considered between two individual commands sent to the PS 10. The control unit signals received can be, for example, retrieved character by character every millisecond, until the defined end-of-string identifier is received. The use of the provided software tool OWISoft (including SDK and DLL) facilitates the setup considerably, since frequently used command sequences are already recorded as functions or routines. Furthermore, the necessary running time check is implemented, too. for axis <n> take over standard parameters stored? yes no set relevant parameters fig. 13: PS 10 initialization architecture Subject to change without notice Betriebsanleitung-User Manual PS 10 Änderungen vorbehalten 41 14. Command Set for the PS 10 14.1 CANopen-Networking of PS 10-32 General information concerning the command format: The protocol on the USB interface has been extended by the slave address. It is always put in front of the ASCII commands with two decimal places. Each command is transferred over the interface (USB) in ASCII format. The individual characters of a command are converted automatically into capital letters. Each command ends with CR or CR+LF or LF (adjustable). Furthermore, the response mode can be preset (TERM). For this purpose, there are three settings available: 1) When reading out the message buffer, only a two digit number is returned (error code). This setting is especially selected when a control takes place via software through a host PC, since the message strings are shortest, and therefore the command throughput is optimized. 2) Reading the message buffer returns a two digit number (error code) and an additional plain text string explaining the error code. 3) Similar to 2) and, additionally, each executed command giving no return value will be acknowledged with “OK”. Acknowledgment is returned with CR or CR + LF or LF (adjustable). In the first response mode (TERM=0), the binary information (e.g. limit switch configuration, limit switch status, digital/analog inputs/outputs, etc.) is represented as bits of a decimal number. In the other modes (TERM=1, TERM=2) these values are indicated as binary number (one bit is represented by one ASCII character, “0” or “1”). 64?VERSION 64PVEL1 = 100000 01?VERSION 01PVEL1=100000 First, the PS 10-32 tests the slave address by the commands received via USB. If no slave address is placed in front, then the command is executed directly. Otherwise the own address is tested first. In case it is the own, then the command is executed directly, as well. Alternatively the command will be transformed and an access to the object directory of the corresponding PS 10-32 slave is executed by the CANopen protocol. The answer is retransferred and passed on from the master PS 10-32 to the computer. The transfer rate of the CANopen bus is fix at 500kBit/s. An existing USB connection specifies thereby the master or the slave operation on the CANopen side of the PS 10-32. If an USB connection exists, then this PS 10-32 behaves like a CANopen master or else the PS 10-32 behaves like a CANopen slave. Thus, only one PS 10-32 can be connected with the PC by USB when networking several ones together. ! Note: Connecting and switching to another port of the PS 10-32 to the computer should only be done with unpowered control unit! All data in the RAM are deleted by switching off the control. At a restart the parameters are loaded from the EEPROM. Storing a changed configuration locally can be done by the command SAVEPARA. For commands that give a response (e.g., parameter queries) the answer is sent back to the PC, immediately. <n> = axis number = 1 <uv> = unsigned integer value <sv> = signed integer value Änderungen vorbehalten 42 Betriebsanleitung-User Manual PS 10 Subject to change without notice Attachment: I Command Table command command group example response ?ASTAT Axis state inquiry, a character for each axis is returned to describe the current axis mode: “I“= axis is not initialized “O“= axis is disabled “R“= axis initialized and ready “T“= axis is positioning in trapezoidal profile “V“= axis is operating in velocity mode “P“= reference motion is in progress “F“= axis is releasing a limit switch “L“= axis has been disabled after approaching a hardware limit switch (MINSTOP, MAXSTOP) “B“= axis has been stopped after approaching a brake switch (MINDEC, MAXDEC) “A” = axis has been disabled after limit switch error “M” = axis has been disabled after motion-controller error “Z“ = axis has been disabled after timeout error “H“ = phase initialization active (step motor axis) “U“ = axis not enabled “E“ = axis has been disabled after motion error “?“ = error, unknown state of axis ?ASTAT IIORRTTJV ?MSG Read out the message exit buffer, the message exit buffer is used only for ?MSG error messages, which concern the command interface (wrong command, missing parameters, invalid value). Possible messages are: ”00 NO MESSAGE AVAILABLE“ (will be returned after the attempt to read out the message buffer, even though no message is currently present) “01 PARAMETER BEFORE EQUAL WRONG“ (will be written into the message buffer, if the command interpreter has failed to convert the parameter before the equals sign into a number correctly) “02 AXIS NUMBER WRONG“ (will be written into the message buffer, if the command interpreter has failed to evaluate the given axis number correctly; valid: 1) “03 PARAMETER AFTER EQUAL WRONG“ (will be written into the message buffer, if the command interpreter has failed to convert the parameter after the equals sign into a number correctly) “04 PARAMETER AFTER EQUAL RANGE“ (will be written into the message buffer, if the command interpreter has recognized that the parameter after the equals sign is beyond its valid range) “05 WRONG COMMAND ERROR“ (will be written into the message buffer, if a syntax error has occurred, i.e., the command interpreter has not been able to recognize the given command) “06 REPLY IMPOSSIBLE“(will be returned, if the reply could not be transferred to the host, because the output buffer is not yet empty, e.g.) “07 AXIS IS IN WRONG STATE“ (will be written into the message buffer, if a positioning command or a confi guration parameter has been sent that could not be recognized because the axis is currently in a different motion state) 00 NO MESSAGE... ?ESTAT<n> Read out current logical state of the limit switches and power stage feedback for the axis: Bit 0 = MINSTOP Bit 1 = MINDEC Bit 2 = MAXDEC Bit 3 = MAXSTOP Bit 4 = motor power-stage error ?ESTAT1 10101 ?ERR Error query from the error memory with a memory depth of 20. The error number is always returned as number with four digits. Based on the error code its cause can be determined. If the returned value is 0, there are no further error messages stored. ?ERR 1211 ?EMERGINP Returns current state of emergency-stop. ?EMERGINP 1 general status request function description Subject to change without notice Betriebsanleitung-User Manual PS 10 Änderungen vorbehalten 43 command command group function description example base configuration general status request ?READOWID<n> Read out memory contents of ONE-Wire-Chip from positioning unit until 0x00 limit detection and data transfer to the PC. As parameter the initial address 0x00 up to 0x70 will be passed in the ONE-Wire-Chip. From this Address max. 16 bytes will be detected or it will be read until the end recognition. ?READOWUB<n> Read out memory contents of ONE-Wire-Chip from address 0x86 and 0x87 (=UserBytes) in the positioning unit and transmission of data to the PC. MOTYPE<n>=<uv> Set motor type for the axis: 0 = DC brush 1 = stepper motor Open Loop ?MOTYPE<n> Read out motor type for the axis. AMPSHNT<n>=<uv> Set current range for axis: 0 = current range 1 (low) 1 = current range 2 (high) ?AMPSHNT<n> Query current range for axis. TERM=<uv> Set terminal mode: mode 0 = short response mode 1 = response with plain text mode 2 = response with plain text and “OK“ handshake after each command without feedback ?TERM Query terminal mode. BAUDRATE=<uv> Set baud rate for the serial interface, allowed values: 9 600, 19 200, 38 400, 57 600, 115 200 This setting becomes active only after the next reset or power-on. ?BAUDRATE Query current baud rate for the serial interface. COMEND=<uv> Set command end indentification: 0 = CR 1 = CR+LF 2 = LF ?READOWID1=0 INFO1|INFO2|.... ?BAUDRATE COMEND=0 9600 ?COMEND Read out command end identification. ?COMEND 0 ?SERNUM SAVEPARA ?SERNUM SAVEPARA 09080145 ?VERSION ?POSERR1 PS10-V3.0-181010 -15 ?MXSTROKE1 340000 ?AMPST1 0 ?AMPMODE<n> SLAVEID=<uv> ?SLAVEID RESETMB Query serial number of the PS 10. Save global- and axis parameters to EEPROM. This command has to be sent when the configuration has changed to save the modification locally. Read out software version of the firmware installed on the main board. Read out current position error for the axis. The difference between encoder position and default position is returned. Read out measured travel. This command reads out the travel ascertained by referencing in mode 6 and 7. Query state of the axis. Bit 0 = temperature error for the axis Bit 1 = error for axis because of emergency-stop is switched off Bit 2 = error by reading a wrong motor code Bit 3 = error by activated short-circuit protection Set state for the axis. With this command the type of quick de-excitation for the axis can be set: Bit 0 and Bit 1 = type of de-excitation for the chopper 00 : slow, 01 : 15% mixed, 10 : 48% mixed, 11 : fast Bit 2 = blanking-time 0 = short, 1 = long Bit 3 = Ext. Mode, de-excitation when enable to low 0 = fast, 1 = slow Bit 4 = Enable, withdraws current at zero crossing Bit 5 = inverts rotational direction for stepper motor Query mode for axis. Set Slave-ID for CAN-Daysy-Chain, 00 to 99. Query Slave-ID. Release reset main board. ERRCLEAR Clear error memory. ERRCLEAR ?VERSION ?POSERR<n> ?MXSTROKE<n> ?AMPST<n> AMPMODE<n> Änderungen vorbehalten 44 response Betriebsanleitung-User Manual PS 10 ?READOWUB1 10 MOTYPE1=0 ?MOTYPE1 AMPSHNT1=0 0 ?AMPSHNT1 TERM=2 0 ?TERM 2 BAUDRATE=9600 AMPMODE1 ?AMPMODE1 SLAVEID=64 ?SLAVEID RESETMB 3 64 Subject to change without notice command command group INIT<n> PSET<n>=<sv> positioning operation ?PSET<n> VVEL<n>=<sv> ?VVEL<n> PGO<n> VGO<n> STOP<n> VSTP<n> EFREE<n> MON<n> MOFF<n> CNT<n>=<sv> ?CNT<n> CRES<n> ?VACT<n> ?ENCPOS<n> positioning parameters RELAT<n> ABSOL<n> ?MODE<n> PVEL<n>=<uv> ?PVEL<n> FVEL<n>=<uv> ?FVEL<n> ACC<n>=<uv> ?ACC<n> Subject to change without notice function description example Enable the motor power stage, release and activate position control loop. With this command, the axis is initialized completely, the motor is powered and the position control feedback loop is active. This command must be transferred after switching-on the PS 10, so that the axis can be taken into operation, using the commands REF, PGO, VGO, etc. Before this, the following parameters must have been preset: motor type, limit switch mask and polarity, feedback control loop parameters, current range of the motor output stage. Resets the power stages short-circuit protection. Set target position respectively relative travel distance (ABSOL/RELAT) for the axis. If absolute position format is switched on, then the parameter is interpreted as signed absolute position; if relative position indication is chosen, then the parameter is interpreted as signed travel distance. The new absolute target position is the sum of last absolute target position and transferred travel. Read out target position respectively relative travel distance for the axis. Set target speed for velocity mode for the axis. With this command, the start speed is transmitted, while the axis moves in the velocity mode. Read out target speed for velocity mode. Start positioning for the axis. The axis approaches the new target position in trapezoidal mode. Start velocity mode for the axis. Stop motion of the axis. Any active motion command for the axis is interrupted. The drive decelerates with the preset ramp parameters and halts.. Stop velocity mode for the axis. If the axis is in the velocity mode, this command will terminate this mode and stop the axis. Release limit switch(es) of the axis. After a drive has moved onto a limit switch (MINSTOP, MAXSTOP) or brake switch (MINDEC, MAXDEC), the active switch(es) can be released using this command. The direction of the movement is automatically decided according to whether a positive or negative limit or break switch is activated. Enable the motor power stage and activate position control feedback loop. With this command, the axis that has been switched off previously (by means of the “MOFF” command) can be switched on again. Position control loop and the enable input for the power stage are activated. Disable the motor power stage and deactivate position control feedback loop. With this command, position control loop and the enable input for the power stage are deactivated. The motor is switched off. Set current position counter for the axis. Read out current position counter for the axis. Reset current position counter for the axis. Read out current speed for the axis. Read out current encoder position counter for the axis. This command provides the current encoder position for an open-loop stepper motor, run with an encoder. Set entry mode of coordinates for the axis to “relative“ (= indication of the signed travel distance). Set entry mode of coordinates for the axis to “absolute“ (= indication of the signed target position). Query the active/current entry mode of coordinates for the axis. Set maximum positioning velocity for the axis. Used for the trapezoidal profile. Read out maximum positioning velocity for the axis. Set limit switch release speed for the axis (unsigned value). Read out limit switch release speed for the axis. Set acceleration (= run-up ramp) for the axis. Used for all modi (trapezoidal, velocity mode, etc.). Read out acceleration for the axis. INIT1 Betriebsanleitung-User Manual PS 10 response PSET1=100000 ?PVEL1 VVEL1=-20000 10000 ?VVEL1 PGO1 -20000 VGO1 STOP1 VSTP1 EFREE1 MON1 MOFF1 CNT1=5000 ?CNT1 CRES1 ?VACT1 ?ENCPOS1 5000 10000 5000 RELAT1 ABSOL1 ?MODE1 PVEL1=10000 ABSOL ?PVEL1 FVEL1=1000 ?FVEL1 ACC1=300000 10000 ?ACC1 300000 1000 Änderungen vorbehalten 45 axis parameters command command group function description example MCSTP<n>=<uv> Set micro step resolution with the stepper motor axis. MCSTP1=50 ?MCSTP<n> Read out micro step resolution with the stepper motor axis. ?MCSTP1 DRICUR<n>=<uv> Set driving current with stepper motors in percent of the maximum output value defined by the selected current range of the motor power stage. DRICUR1=50 ?DRICUR<n> Read out driving current with stepper motors in percent. ?DRICUR1 HOLCUR<n>=<uv> Set holding current with stepper motor axes in percent. HOLCUR1=30 ?HOLCUR<n> Read out holding current with stepper motor axis in percent. ?HOLCUR1 ATOT<n>=<uv> Set timeout in milliseconds, 0 switches off the timeout monitoring. ATOT1=20000 ?ATOT<n> Query time-out for the axis. ?ATOT1 FKP<n>=<uv> Set control parameter KP for the axis. FKP1=25 ?FKP<n> Query control parameter KP for the axis. ?FKP1 FKD<n>=<uv> Set control parameter KD for the axis. FKD1=5 ?FKD<n> Query control parameter KD for the axis. ?FKD1 FKI<n>=<uv> Set control parameter KI for the axis. FKI1=10 ?FKI<n> Query control parameter KI for the axis. ?FKI1 FIL<n>=<uv> Set control parameter integration limit for the axis. FIL1=100000 ?FIL<n> Query control parameter integration limit for the axis. ?FIL1 FST<n>=<uv> Set sample time for the axis (in micro seconds). FST1=500 ?FST<n> Query sample time for the axis (in micro seconds). ?FST1 FDT<n>=<uv> Set delay time of the differential term (KD) for the axis (in sample time cycles). FDT1=5 ?FDT<n> Query delay time of the differential term (KD) for the axis (in sample time cycles). ?FDT1 50 30 20000 25 5 100000 500 MXPOSERR1=50 ?MXPOSERR<n> Read out maximum positioning error for an axis. ?MXPOSERR1 MAXOUT<n>=<uv> Set maximum output value for the servo loop in percent. With this command, the maximum value for the axis to be returned at the servo amplifier can be set. Maximum value allowed: 99 %. MAXOUT1=95 ?MAXOUT<n> Read out maximum output value in percent. ?MAXOUT1 AMPPWMF<n>=<uv> Set PWM output frequency of drive controller board, 20000 or 80000 is possible. AMPPWMF1 =20000 ?AMPPWMF<n> Query PWM frequency of drive controller board. ?AMPPWMF1 PHINTIM<n>=<uv> Set phase initialization time in multiples of the cycle time. PHINTIM1=10 ?PHINTIM<n> Read out phase initialization time in multiples of the cycle time. ?PHINTIM1 Betriebsanleitung-User Manual PS 10 50 10 MXPOSERR<n>=<uv> Sets maximum positioning error for an axis. When this limit is exeeded the axis is switched off. This shut-off is only valid for the DC motor type. Änderungen vorbehalten 46 response 5 50 95 20000 10 Subject to change without notice command command group REF<n>=<uv> RVELS<n>=<sv> ?RVELS<n> RVELF<n>=<sv> ?RVELF<n> RDACC<n>=<uv> limit switch configuration and reference travel ?RDACC<n> SMK<n>=<uv> ?SMK<n> SPL<n>=<uv> ?SPL<n> RMK<n>=<uv> ?RMK<n> RPL<n>=<uv> ?RPL<n> ?HYST<n> ?REFST<n> LMK<n>=<uv> ?LMK<n> ?LSTAT<n> SLMIN<n>=<uv> ?SLMIN<n> SLMAX<n>=<uv> ?SLMAX<n> Subject to change without notice function description example Start reference travel while indicating the reference mode for the axis: mode 0 = search next index impulse and stop mode 1 = approach reference switch and stop mode 2 = approach reference switch, search next index impulse and stop mode 3 = mode 0, additionally set act. position to 0 mode 4 = mode 1, additionally set act. position to 0 mode 5 = mode 2, additionally set act. position to 0 mode 6 = approach maximum reference switch, approach minimum reference switch, set current position to 0 mode 7 = approach minimum reference switch, approach maximum reference switch, set current position to 0 Set reference travel speed “slow” for the axis. Using this speed, the index pulse will be searched or the reference switch will be released, respectively (signed value). Read out reference travel speed „slow“ for the axis. Set reference travel speed „fast“ for the axis. The drive moves with this speed towards the limit switch (signed value). Read out reference travel speed „fast“ for the axis. Set reference travel deceleration for the axis. This value is used when the reference point is approached. Read out reference travel deceleration for the axis. Set limit switch mask for the axis. This command activates or deactivates the limit and break switches. If a limit switch is approached, the movement is stopped abruptly and the motor is shut off. Bit sequence : <MAXSTOP, MAXDEC, MINDEC, MINSTOP>. Read out limit switch mask for the axis. Set limit switch polarity for the axis. With this command, the active level for the limit and brake switches is defined. Bit sequence: <MAXSTOP, MAXDEC, MINDEC, MINSTOP>. Read out limit switch polarity for the axis. Set reference switch mask for the axis. With this command, it can be defined which of the 4 limit switches for the axis should be interpreted as reference switch. A mask with exactly one character “1“ has to be transferred. Bit sequence: <MAXSTOP, MAXDEC, MINDEC, MINSTOP>. Read out reference switch mask for one axis. Set reference switch polarity for one axis. This command defines the active level of the reference switch. Bit sequence: <MAXSTOP, MAXDEC, MINDEC, MINSTOP>. Read out reference switch polarity for one axis. Read out reference switch hysteresis for the axis. After a reference motion has been terminated successfully, the hysteresis of the switch can be read out with this command. (The value is correct only, if none of the reference/limit switches is active any more) Inquiry of reference motion validity. When reference motion successfully completed, the state is set on 1 = “valid“. If a motor without encoder is switched off (e.g. open-loop stepper), then the validity is reset to 0. Set mask for limit-positioning monitoring for the axis. With this command the limit-positioning monitoring for tho lower limit and/or upper limit for position can be set activ and inactive, respectively. The limit-positioning monitoring behaves like the according DEC-switch. Bit sequence: <MAXDEC, MINDEC>. Read out limit-positioning monitoring mask for axis Read current, logical state of limit-positioning monitoring for the axis. Bit 0 = MINDEC lower limit is transcanded Bit 1 = MAXDEC upper limit is transcanded Set negative limit position for the axis. Read out negative limit position for the axis. Set positve limit position for the axis. Read out positive limit position for the axis. REF1=4 Betriebsanleitung-User Manual PS 10 response RVELS1= 2000 ?RVELS1 2000 RVELF1= -20000 ?RVELF1 RDACC1 =300000 ?RDACC1 SMK1=0110 -20000 ?SMK1 SPL1=1111 0110 ?SPL1 RMK1=0001 1111 ?RMK1 RPL1=1110 0001 ?RPL1 ?HYST1 1110 28 ?REFST1 1 300000 LMK1=01 ?LMK1 ?LSTAT1 01 01 SLMIN1=100 ?SLMIN1 100 SLMAX1=100000 ?SLMAX1 100000 Änderungen vorbehalten 47 holding brake control in-/outputs 1) command command group 1) The function description example response ?INPUTS Read out state of inputs (4-bit binary number). ?INPUTS 0010 OUTPUT<uv>=<uv> Change current state of an output. OUTPUT1=0 ?OUTPUTS Read out current state of all outputs. ?OUTPUTS OUTMODE=<uv> Set output operating mode for the outputs Out1 and Out2. OUTMODE=1 These outputs can either be driven as a digital or as PWM output, alternatively. output modus = 0 : OUT1 and OUT2 digital outputs output modus = 1 : OUT1 digital output, OUT2 PWM output output modus = 2 : OUT1 and OUT2 PWM outputs ?OUTMODE Read out output operating mode for outputs Out1 and Out2. ?OUTMODE 1 ?ANIN<uv> Query analog input. The port number from 1 to 4 will be set, and the converted 10-bit value will be returned. ?ANIN3 234 OPWM<uv>=<uv> Set PWM output, the port number from 1 to 2 and the level control value are set from 0 to 100 %. OPWM1=55 ?OPWM<uv> Query PWM output. The port number from 1 to 2 is entered and the level control value that has been set is returned from 0 to 100 %. ?OPWM1 HBCH<n>=<uv> Assign PWM output for holding brake to the axis: <AxisNumber> = <PWM port> PWM port = 0 for holding break function off HBCH1=1 ?HBCH<n> Query holding brake assignment PWM port to the axis. ?HBCH1 HBFV<n>=<uv> Set first PWM value to activate the holding brake: <AxisNumber> = <Percent Value>. HBFV1=50 ?HBFV<n> Query first PWM value for activation of the holding brake. ?HBFV1 HBSV<n>=<uv> Set second PWM value for clamping the holding brake: <AxisNumber> = <Percent Value>. HBSV1=20 ?HBSV<n> Query second PWM value for clamping the holding brake. ?HBSV1 HBTI<n>=<uv> Set settling time for the holding brake. The first PWM value will be set for this amount of time after activation of the holding brake: <AxisNumber> = <Time for fi rst PWM value in ms>. HBTI1=300 ?HBTI<n> Query settling time for the holding brake. The first PWM value will be set for ?HBTI1 this amount of time after activation of the holding brake. 55 1 50 20 300 pins which have to be addressed with <uv> on the I/O connector can be taken in the connecting table (attachement III). Änderungen vorbehalten 48 00101 Betriebsanleitung-User Manual PS 10 Subject to change without notice III Connecting Table In- /Outputs MOTYPE + + Analog input 2 5 FKP + – Analog input 3 4 FKD + – Analog input 4 3 FDT + – TTL input 1 10 FKI + – TTL input 2 9 FIL + – TTL input 3 8 FST + – TTL input 4 7 MAXOUT + +1) SPS output 1 16 SMK + + SPS output 2 15 SPL + + SPS output 3 14 SPS output 4 13 TTL output 5 17 +5 V, max. 300 mA total current 1, 2 PWM output 1, max. 1 A *) 20 PWM output 2, max. 1 A *) 21 parameter 2-phase step motor open-loop Pin assignment of the 25-pin D-Sub male connector: DC brush II Relevance of the Parameters for different Motor Types RMK + + RPL + + RVELF + + RVELS + + ACC + + PVEL + + FVEL + + ABSOL + RELAT function pin Analog input 1 6 SubD-25 male 1 14 +24 V, max. 1 A total current 18, 19 GND 11, 12, 24, 25 + enable input + (5 V) **) 22 + + enable input - (GND) 23 AMPPWMF + + MCSTP – + DRICUR + + HOLCUR – + AMPSHNT + + BUS System PHINTIM – + Pin assignment of the 9-pin D-Sub connector: ATOT + + HBCH (+) (+) HBFV (+) (+) HBTI (+) (+) HBSV (+) (+) 13 25 *) only in PS 10-32, switching towards GND **) enable motor output stage over optoelectronic coupler (UB = 5V) necessary; e.g. jumper pin 2 –> pin 22 and pin 23 –> pin 24 function pin GND 3, 6 CAN-H 7 CAN-L 2 1 6 DSub-9 5 9 + necessary – not necessary (+) optional 1) The command may be used, however, it is important that the value set here is larger than or equal to the maximum PWM value for DRICUR or HOLCUR. In any case, the output is limited to the value defined by MAXOUT. If a too small value is selected, the micro-step operation will not work properly. Subject to change without notice Betriebsanleitung-User Manual PS 10 Änderungen vorbehalten 49 Universal Motor Connector signals performance Pin assignment of the 37-pin D-Sub female connector: pin DC motor stepper motor OL 19 motor + phase 1 + 18 motor - phase 1 - 17 motor + phase 2 + 16 motor - phase 2 - 15 motor type encoding 14 motor type encoding 13 GND 12 +5 V 11 encoder A – encoder A 10 switches + signals 9 8 encoder B – encoder B 7 encoder Index 6 encoder Index 5 MINSTOP 4 MINDEC 3 MAXDEC 2 MAXSTOP 1 GND 37 motor holding brake +24 V 36 motor holding brake - 35 (reserved) 34 (reserved) 33 (reserved) 32 (reserved) 31 GND 30 +5 V 29 OWISid 28 (reserved) 27 (reserved) 26 (reserved) 25 (reserved) 24 (reserved) 23 (reserved) 22 +5 V 21 GND 20 +24 V Änderungen vorbehalten 50 Betriebsanleitung-User Manual PS 10 Subject to change without notice EU Konformitätserklärung UE Declaration of Conformity EU/UE Konformitätserklärung/Declaration of conformity Wir We OWIS GmbH Im Gaisgraben 7 79219 Staufen / Germany +49(0)7633/9504-0 +49(0)7633/9504-44 www.owis.eu [email protected] erklären in alleiniger Verantwortung, dass das Produkt declare under our sole responsibility that the product PS 10 PS 10-32 auf das sich diese Erklärung bezieht, mit den folgenden Normen oder normativen Dokumenten übereinstimmt. to which this declaration relates is in conformity with the following standards or other normative documents. EN 61000-6-1:2007 mit/with EN 61000-4-2:2008, EN 61000-4-3:2008 EN 61000-6-3:2007 mit/with EN 55014-1:2007 Gemäss den Bestimmungen der Richtlinie: Following the provisions of directive: 2004/108/EG Ort und Datum der Ausstellung Place and date of issue Staufen, 02.11.2009 Name und Unterschrift Name and signature D. J. Schuhen Jürgen Loy 1/ Aktuelle Ausgabe: 10.10.03 DB / DSCH, 2.01.112 FO Konformitätserklärung Subject to change without notice Betriebsanleitung-User Manual PS 10 Änderungen vorbehalten 51 52 D-A-CH Laser 2000 GmbH 82234 Wessling Änderungen Tel. +49 8153vorbehalten 405-0 [email protected] www.laser2000.de France – Telecom Laser 2000 SAS 78860 St-N. l. Bretèche Tel. +33 1 30 80 00 60 [email protected] www.laser2000.fr France – Photonic Laser 2000 SAS FR-33600 Pessac Betriebsanleitung-User PS 10 Tel. +33 5 57 Manual 10 92 80 [email protected] www.laser2000.fr Iberia Laser 2000 SAS 28034 Madrid Subject Tel. +34 650 529 806 [email protected] www.laser2000.es to Nordics Laser 2000 GmbH 112 51 Stockholm change without notice Tel. +46 8 555 36 235 [email protected] www.laser2000.se