1
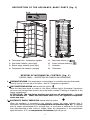
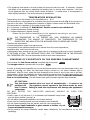
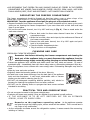
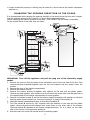
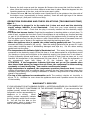
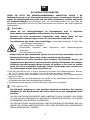
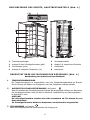
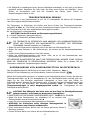
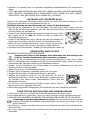
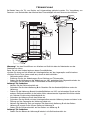
GEFRIERSCHRANK
FREEZER
BETRIEBSANLEITUNG
INSTRUCTION MANUAL
GB
SAFETY INSTRUCTIONS
CAREFULLY READ THE INSTRUCTION MANUAL! If instructions are not followed,
there is a risk of injury, damage of the appliance and loss of the right to free
warranty service. We recommend to keep the Instruction manual the whole time you have
the appliance. When you sell the appliance pass the Instruction manual to the new owner of
the appliance.
–
WARNING!
Do not cover the ventilation holes at the top and on the sides of the appliance.
–
Do not use any mechanical means or electrical devices to hasten the thawing
process when cleaning the freezer compartment.
–
Do not use electrical appliances inside the food storage compartments of the
appliance, unless they are of the type recommended by the manufacturer.
–
If the supply cord is damaged it must be replaced by the manufacturer,
manufacturer service agent or a similarly qualified person, in order to avoid a
hazard.
–
Disposal of the appliance should be according to national rules.
Do not damage the appliance refrigeration system. It contains the
refrigerant gas R600a. If the refrigeration system is damaged:
x Do not use any open flame.
x Avoid sparks ― do not turn on any electrical devices or lighting fixtures.
x Immediately ventilate the room.
–
–
Do not allow children to play with the appliance or to plug it in or unplug from the
electricity supply socket. Do not allow children to play with the packaging material
from the appliance.
–
The appliance should not be used by children or mentally challenged individuals,
unless they have previously been shown how to operate the appliance by someone
responsible for their safety.
x If the appliance is brought in from the cold (temperature is not higher than +12 °C), you should
wait for two hours before connecting it to the mains.
x The appliance should not be connected to the mains until all packing and transport materials
aren’t removed.
x Once the appliance is unpacked, make sure that it is complete, that the body and the electrical
cord aren’t damaged.
x It is forbidden to use a technically damaged appliance.
CONNECTION TO THE MAINS
–
The appliance must be plugged into an earthed electricity supply socket. The
earthed electrical socket by which the appliance is connected to the mains should
be in an accessible place.
–
IF THE APPLIANCE IS PRODUCED WITH THE SPECIAL SUPPLY CORD IT CAN BE EXCHANGED
ONLY BY THE SAME SPECIAL SUPPLY CORD PROVIDED BY THE MANUFACTURER.
1
–
TO AVOID HAZARDS, DAMAGED POWER SUPPLY CORDS SHOULD BE REPLACED ONLY BY THE
MANUFACTURER, A MAINTENANCE TECHNICIAN, OR A PERSON WITH AN EQUIVALENT
QUALIFICATION.
–
DO NOT USE extension cords or connectors (adapters) or couplers.
–
The frequency and power of the electricity supply in your house must conform to
the general data parameters of the appliance as it is shown in the product label.
–
When positioning the appliance be careful that the electrical cord isn’t squeezed in
order to avoid its damage. Do not store heavy objects such as cooling devices,
furniture or other domestic devices next the appliance in such a way that they
could squeeze and damage the electrical cord. This can cause a short circuit and a
fire.
–
Make sure that the plug of the electrical cord is not squeezed by the back wall of
the appliance or otherwise damaged. A damaged plug can be the cause of a fire!
x IF THE APPLIANCE IS UNPLUGGED (FOR CLEANING, MOVING TO ANOTHER PLACE, ETC.), IT
MAY BE REPEATEDLY SWITCHED ON AFTER 15 MIN.
x The appliance should be used only for freezing and storing foodstuffs.
x The appliance can’t be disposed of by burning.
x Do not place any switched on electrical devices (such as microwave ovens, hair dryers, irons,
electric kettles or other electrical devices) on top of the appliance because this may cause ignition
of plastic parts.
x Do not place any dishes with liquids on top of the appliance and do not keep flowers in vases or
other liquid-filled vessels on the appliance.
x Do not climb on or sit on the appliance, do not lean on or hang on the appliance doors and do
not allow children to do this.
IF THE APPLIANCE IS OUT OF ORDER AND IT IS NOT POSSIBLE TO REPAIR IT BY
MEANS OF GIVEN RECOMMENDATIONS, UNPLUG IT, OPEN THE DOORS AND CALL THE
SERVICE EXPERT. ONLY A SERVICE REPRESENTATIVE CAN REMEDY ALL TECHNICAL OR
CONSTRUCTION FAULTS.
TRANSPORT
THE MANUFACTURER WILL NOT BE RESPONSIBLE FOR ANY DAMAGE OF THE
APPLIANCE THAT RESULTS FROM NON-COMPLIANCE WITH THE INSTRUCTIONS FOR
TRANSPORTATION.
x The appliance should be transported in the vertical position.
x When being transported, the appliance should be protected from atmospheric conditions (rain,
snow, dampness).
x The appliance should be firmly secured in place while being transported, to avoid slippage or any
shocks in the transport vehicle.
x If the appliance was transported not vertically, it may be connected to the mains after 4 hours at
least. If this is not done, the appliance compressor may fail.
2
ENVIRONMENTAL PROTECTION INFORMATION
This symbol indicates that once the appliance is no longer needed, it cannot be
disposed together with other miscellaneous municipal waste. It should be collected and
eliminated separately, i.e. in containers specially marked with this symbol in largedimension rubbish collection areas. Full information on where to submit the old
appliance safety can be obtained from local government authorities, the shop where
you bought the appliance or the manufacturer’s representatives.
If you decided to scrap the appliance, make it impossible to use in order to prevent possible
misadventure. Pull out the electric plug from the electricity supply socket and then cut off the cord.
Tear off the gasket. Break the door lock if any.
W A R N I N G ! Do not dismantle the appliance yourself. Pass it on to recycling
companies.
GENERAL INFORMATION
The appliance is a upright freezer. The freezer is intended for freezing and long-term storage of
foodstuffs.
THE APPLIANCE IS ECOLOGICALLY CLEAN, CONTAINING NO MATERIALS HARMFUL TO THE
OZONE LAYER: the refrigerant used is R600a, the foaming agent used for the appliance insulation
is cyclopentane C5H10.
THE MANUFACTURER GUARANTEES RELIABLE OPERATION OF THE FREEZER WHEN THE
RELATIVE AIR HUMIDITY NOT GREATER THAN 70 PER CENT AND THE AMBIENT TEMPERATURE
IS:
+16 TO +32 DEGREES CELSIUS (Climate class N);
+16 TO +38 DEGREES CELSIUS (Climate class ST);
+16 TO +43 DEGREES CELSIUS (Climate class T).
Total gross volume, L
215
Freezer net volume, L
196
Actual consumption will depend on how the appliance is used a
nd where it is located
Energy efficiency class
Energy consumption:
kWh / 24 h
kWh / year
Climate class
A+
A++
0,670
245
0,530
193
N - ST
N-T
Noise level, dB(A) re 1pw
41
Dimensions (HxWxD), cm
145 x 60 x 62
145 x 60 x 65
Freezing capacity, kg/24 h
20
Freezer temperature rising time from storage
temperature to -9 ºC after power-cut, h
20
Electrical Data
see in the product label
NOTE. The manufacturer reserves the right to make future changes to technical parameters and
specifications.
3
DESCRIPTION OF THE APPLIANCE, BASIC PARTS (fig. 1)
1 Thermostat knob - temperature regulator
5
Fast-freeze section (s)
2 Fast-freeze indicator (yelow light)
6
Frozen products section(s)
3 Electric supply indicator (green light)
7
Condenser
4 Temperature rise indicator (red light)
8
Compressor
REVIEW OF MECHANICAL CONTROL (fig. 1)
CONTROL PANEL — DESCRIPTION OF SYMBOLS AND OPERATIONS
1 THERMOSTAT KNOB. The temperature in the appliance is controlled using the thermostat
knob by turning it to one side or the other. More in “Temperature regulation”.
2 FAST-FREEZE INDICATOR marked with the symbol
When the fast-freeze mode is turned on, the yellow indicator light is illuminated. Instructions
on how to use the fast-freeze function are in the section entitled "Freezing of foodstuffs in the
freezer compartment".
A T T E N T I O N ! The fast-freeze function does not turn off automatically — it needs
to be switched off! When the fast-freeze mode is on, the appliance compressor
works non-stop.
3 ELECTRICITY SUPPLY INDICATOR marked with the symbol
When the appliance is connected to the electricity supply, the green indicator light is
illuminated. Simultaneously also the the temperature rise indicator lights up. It indicates
that the freezer was switched off for a longer time, i.e. the freezer is switched on for the first
time, after defrosting or after losing of voltage. When the temperature in the compartment
again falls below -9 ºC, the temperature rise indicator light will go out.
4
4 THE TEMPERATURE RISE INDICATOR marked with the symbol
When the temperature in the freezer rises above -9 ºC, the red indicator light is illuminated. It
indicates that:
x The freezer was switched off for a longer time, i.e. the freezer is switched on for the first
time, after defrosting or after losing of voltage.
x The door of the freezer is opened or is being opened too frequently.
x It is loaded a large amount of unfrozen foodstuffs.
x The freezing system is failed, i.e. the indicator does not go out longer 6 hours and it is heard
running compressor or the compressor does not switch off. In this case you should apply to
your service agent (at first make sure that three above items were taken into account).
PREPARING THE APPLIANCE FOR OPERATION
It is recommended to prepare the appliance for operation with a helper.
x Remove package. Lift the appliance away from foamed polystyrene base.
If your freezer is fit with screwed handles to not rise or push it taking by
handles. Handles may break.
x Tear away the red-coloured adhesive tapes – they are intended only for the transport of the
appliance. Remove the separate polystyrene part (transport protection) between the rear of the
device and condenser – metal grid (if available).
NOTE. When you open the freezer compartment door a little red packing detail will fall
out – IT IS FOR TRANSPORTATION PURPOSES ONLY.
x When positioning the appliance in chosen location, it will move more easily into position if you lift
the front a little and incline it backward, allowing it to roll on
its casters.
x Suitably dispose the packaging material.
x Take two supports 1 from the bag and insert them into the
guides 2 at the top back part of the appliance.f
POSITIONING
x Place the appliance in a dry, well ventilated room.
x W A R N I N G ! The appliance should not be operated in an unheated room or porch.
Place the appliance away from heat sources such as kitchen stove/oven, radiators, or
direct sunlight.
x WARNING! The appliance must not touch any
pipes for heating, gas or water supply or any
other electrical devices.
x Do not cover the ventilation holes at the top
of the appliances–it must be a good air
circulation around the appliance.
There
should be a gap of at least 10 cm between
the top of the appliance body and any
furniture that may be above it. If this
requirement is not followed, the appliance
consumes more electrical energy and its
compressor may overheat. X
x W If the appliance is placed in a corner, a
gap of at least 6 cm must be left between the appliance body and
the wall so that the freezer door can be opened enough to pull out
the frozen product drawer (see fig.).
5
x The appliance must stand on a level surface and must not touch the wall. If necessary, regulate
the height of the appliance by adjusting the levelling feet: by turning them clockwise – the front
of the appliance rises, by turning them counter clockwise – it comes down. If the appliance is
tilted slightly backward – the doors will close by themselves.
TEMPERATURE REGULATION
Temperature set in the freezer by the manufacturer is -18 0C
The temperature in the appliance is controlled using the thermostat knob 1 (fig. 1) by turning it to
one side or the other. The temperature indication in digits is shown beside the thermostat knob.
The temperature is regulated on the scale of seven digits.
0 = Compressor is switched off. W A R N I N G ! Electric current is not switched off.
1 = highest temperature (lowest cooling)
7 = lowest temperature (highest cooling)
Please set the desired temperature in the appliance according to your own
requirements!
THE TEMPERATURE IN THE FREEZER MAY VARY DEPENDING ON AMBIENT
TEMPERATURE, THE AMOUNT OF FOODSTUFFS, THE TEMPERATURE OF THE
FOODSTUFFS, AND HOW OFTEN THE APPLIANCE DOOR IS OPENED AND CLOSED.
Therefore we recommend:
x locate the appliance away from heat sources,
x food placed in the appliance should not be warmer than the room temperature,
x appliance door must not to be left open,
x the appliance door should not be open longer than it is necessary to take out or put in foodstuffs.
IF THE ROOM IS COOL, THE APPLIANCE COOLS LESS. THE TEMPERATURE IN THE APPLIANCE
MAY THEREFORE RISE. Use the thermostat wheel to set a lower temperature.
FREEZING OF FOODSTUFFS IN THE FREEZER COMPARTMENT
In the freezer the fast-freeze section is marked with the symbol
The storage section is marked with the symbol
In order to freeze fresh foodstuffs turn on the fast-freeze function turn the thermostat knob to the
setting S (see fig. 1). When the fast-freeze mode is turned on, the yellow indicator light is
illuminated. After 24 hours, place the fresh foodstuffs to be frozen in one or two rows in the fastfreeze section. When the foodstuffs are frozen should be removed from the fast-freeze section and
placed in the storage section drawer(s). When the foodstuffs are frozen, return the thermostat
knob to its initial setting. The fast-freeze mode yellow indicator light will stop illuminate.
ATTENTION!
The fast-freeze function does not turn off automatically — it needs to be
switched off!
The appliance cannot operate in fast-freeze mode for more
than 72 hours. Failing to heed this requirement will damage the appliance's
compressor.
DO NOT EXCEED THE INDICATED MAXIMUM AMOUNT OF FOOD FOR
FREEZING.
x Leave a gap of not less than 2,5 cm between the foodstuffs being frozen
and the upper partition (see fig.).f
x Do not place unwrapped foodstuffs in the freezer sections.
x Fresh food for freezing should not touch already frozen foodstuffs.
x Do not freeze foodstuffs that are warmer than the room temperature.
x Do not freeze liquid foodstuffs in glass vessels or bottles. Do not
freeze carbonated beverages.
x Strictly observe the frozen foodstuffs validity dates indicated by the manufacturer on the their
packaging.
6
x WE RECOMMEND THAT FROZEN FISH AND SAUSAGE SHOULD BE STORED IN THE FREEZER
COMPARTMENT NOT LONGER THAN 6 MONTHS; CHEESE, POULTRY, PORK, LAMB – NOT MORE
THAN 8 MONTHS; BEEF, FRUIT AND VEGETABLES – NOT LONGER THAN 12 MONTHS.
DEFROSTING THE FREEZER COMPARTMENT
The freezer compartment should be thawed not less than twice a year or when a layer of ice
thicker than 5 mm forms in it. Do the actions below in the order they are listed:
W A R N I N G ! Turn the appliance off and pull the plug out of the electrical socket.
x Remove foodstuffs from freezer compartment. The frozen foodstuffs will not warm up too much
while you are thawing the freezer compartment if you cover them with a thick cloth and keep
them in a cool place.
x Pull out the melt water channel, turn it by 180° and hang it (Fig. 4). Place a vessel under the
melt water channel.
x Place a dish under the thaw water channel. Leave door of freezer
compartment open.
x When the ice melts, clean and wipe dry the surfaces and fixtures of
the freezer compartment.
x Remove the melt water channel, turn it by 180° again and put it
back in its original place.
x Close the freezer compartment door.
x Plug in and turn on the appliance.
CLEANING AND CARE
! REGULARLY CLEAN THE APPLIANCE.
Remember that before defrosting the freezer compartment and cleaning the
back part of the appliance body you must disconnect the appliance from the
electrical energy supply socket by pulling the plug out of the electricity outlet.
x Protect the appliance inner surfaces and plastic parts from fats, acids and sauces. In case of
accidental spills – immediately clean with warm soapy water or dishwashing detergent. Wipe dry.
x Clean the appliance inner surfaces with warm soapy water. Dishwashing detergent may also be
used.
x Wipe dry inner and outer surfaces.
x Regularly clean the hermetic gaskets of the doors. Wipe dry.
x At least once a year clean dust away from the back part of the appliance
body and the compressor. A soft brush, electrostatic cloth or vacuum
cleaner may be used for cleaning (see fig.).f
x DO NOT use detergents containing abrasive particles, acid, alcohol or
benzene for cleaning the appliance inner and outer surfaces.
x DO NOT use for cleaning cloths or sponges that have coarse surfaces
intended for scrubbing.
x
PRACTICAL TIPS AND OBSERVATIONS
x Do not consume ice made in the freezer straight away.
x Products will freeze more quickly if they are divided up and packed in small portions.
x IF THE APPLIANCE IS TO BE LEFT SWITCHED OFF FOR AN EXTENDED
PERIOD, LEAVE ITS DOORS OPEN.
R e m a r k s o n t h e a p p l i a n c e o p e r a t i n g n o i s e . As the appliance operates
and goes through the freezing cycle, various noises will be emitted. This is normal and is
not a sign of any malfunction.
x As the refrigerant circulates around the refrigeration system, it causes sounds like murmuring,
bubbling or rustling.
7
x Louder sounds like popping or clicking may be heard for a short time as the freezer compressor
switches on.
CHANGING THE OPENING DIRECTION OF THE DOORS
It is recommended that changing the opening direction of the doors should be done with a helper.
You will need two spanners No. 8 and No. 10 and a Philips head screwdriver.
! When changing the opening direction of the door YOU CAN NOT lay the freezer horizontally.
Do the actions below in the order they are listed:
W A R N I N G ! Turn off the appliance and pull the plug out of the electricity supply
socket.
1. Remove the covers c from the body of the refrigerator and of the inner side of the door. Also
remove the upper bracket 6 together with the nut and washers and the spacer under the
bracket.
2. Remove the door of the freezer compartment.
3. Remove the bottom cover 1.
4. Remove the bottom bracket 2 together with washers on the axle and the plastic spacer.
Unscrew the axle together with washers from the bracket and screw them into the aperture on
the opposite side of the bracket symmetrically to former position.
5. Remove the bottom bracket 7 and fix the bottom bracket 2 together with washers on the axle
and the plastic spacer instead of it. Screw the bracket 7 in place of the bracket 2.
6. Hang the freezer compartment door on the axle of bracket 7.
7. Turn the bracket 6 around by 180° together with the washers on the axle and the plastic
spacer. Unsrew the axle and the washers and screw them on the other side of the bracket.
Once the bracket 6 is attached to the freezer compartment door, fix it in place on the other
side of the freezer in the uppermost apertures.
8. Use the covers c to cover the bracket and the remaining space.
8
9. Remove the bolt covers a and the stoppers b. Remove the screws that hold the handles in
place. Move the handles to the other side and screw them in place. Place the stoppers into the
remaining apertures in the door, and put the screw caps in place.
10. Remove the cover 10 from the bottom cover 1 and insert it to the guides on the other side of
the bottom cover (symmetrically to former position). Insert left and right legs of the bottom
cover 1 (see pic.) and push it until cover fixing.
OPERATION PROBLEMS AND THEIR SOLUTIONS (TROUBLESHOOTING)
What if …
x The appliance is plugged in to the mains but it does not work and the electricity
supply voltage indicator is not illuminated. Check that your house electricity supply
installations are in order. Check that the plug is correctly inserted into the electricity supply
socket.
x The noise has become louder. Check that the appliance is standing stable on a level place. To
make it level, regulate the front feet. Check if the appliance is not touching any furniture and that
no part of the refrigeration system at the back part of the appliance body is touching the wall.
Pull the appliance away from any furniture or walls. Check that the cause of increased noise isn’t
due to bottles, cans or dishes in the appliance that might be touching each other.
x When the appliance door is opened, the rubber sealing gasket pulls out. The gasket is
smeared with sticky foodstuffs (fat, syrup). Clean the sealing gasket and the groove for it with
warm water containing soap or dishwashing detergent and wipe dry. Put the rubber sealing
gasket back into the place.
x The temperature rise indicator light is illuminated red. This means the appliance is being
connected to the electricity supply for the first time or it was disconnected for a significant period
(for thawing or during an interruption to the electricity supply), the freezer door is not closed or
is being frequently opened and closed, or a large amount of fresh food has been put in, and
therefore the temperature in the compartment has risen above -9 ºC. When the temperature in
the compartment again falls below -9 ºC, the indicator light will go out.
ATTENTION! If the temperature indicator light does not go out (for reasons other
than those listed above) for longer than six hours, the compressor is either working
constantly or is not functioning. You need to consult service people.
x High temperature in appliance, the compressor operation pauses are short. Ascertain
whether the appliance door are shutting tightly, whether the door wasn’t kept open longer than
necessary when taking out or putting in foodstuffs or whether a large amount of warm food was
placed in the appliance.
x The top of the appliance has condensation on it. The ambient relative air humidity is
above 70 %. Ventilate the room where the appliance stands and if possible remove the cause
of the humidity.
WARRANTY SERVICE
IF YOUR APPLIANCE IS NOT WORKING PROPERLY, ASCERTAIN WHETHER YOU CAN REMEDY THE
CAUSE OF THE FAULTY FUNCTIONING OF THE APPLIANCE YOURSELF. If you cannot solve the
problem yourself, contact the nearest
refrigerator service representative by
telephone or in writing.
When
making contact necessarily indicate
the refrigerator model 1 and number
2. You will find this data on the
product label, which is glued to the
wall of the freezer compartment.
9
DE
SICHERHEITSHINWEISE
LESEN SIE BITTE DIE GEBRAUCHSANWEISUNG SORGFÄLTIG DURCH ! Bei
Nichtbeachtung der in der Gebrauchsanweisung genannten Anweisungen besteht die
Gefahr der Beschädigung des Geräts und des damit verbundenen Verlusts des Rechts
auf Garantieleistungen. Wir empfehlen ihnen, die Gebrauchsanweisung bis zum Ende der
Betriebszeit aufzubewahren und sie im Falle eines Verkaufs des Geräts an den neuen Eigentümer
weiterzugeben.
ACHTUNG!
Halten Sie die Lüftungsöffnungen im Gerategehäuse oder in
Seitenwändenvon umgebenden Einbauwänden frei von Hindemissen.
möglichen
Benutzen Sie keine mechanichen Gegenstände order andere Mittel, um den
Abtauprozess zu beschleunigen, ausser den vom Hersteller empfohlenen.
Das Kühlsystem des Geräts nicht beschädigen. Verwendetes Kühlmittel: R 600a. Falls
das Kühlsystem beschädigt ist:
x Kein offenes Feuer verwenden.
x Funkenschlag vermeiden, keine elektrischen sowie Beleuchtungsgeräte
einschalten.
x Den Raum sofort durchlüften.
Kinder nicht mit dem Kühlschrank spielen oder ihn ans Netz anschließen oder den
Stecker ziehen lassen. Kinder nicht mit der Verpackung spielen lassen.
Diese Gerät ist nict dafür bestimmt durch Personen (einschließlich Kinder), mit
eingeschränkten physischen, sensorischen oder geistigen Fähigkeiten oder mangels
Erfahtung und/oder mangels Wissen benutzt zu warden, es sei denn sie warden
durch eine für ihre Sicherheit zuständige Person beaufsichtigt order erhielten von
ihr Anweisungen wie das Gerät zu benutzen ist.
Falls der Kühlschrank sich in kühler Umgebung befunden hat (Außentemperatur weniger
als +12 o C), diesen erst nach Ablauf von zwei Stunden ans Netz anschließen.
Das Gerät nicht ans Netz anschließen ohne vorher alle Verpackungs- und Transportelemente
entfernt zu haben.
Bitte überprüfen Sie nach dem Auspacken des Geräts, ob alle Bestandteile vorhanden sind und
ob Gehäuse und Kabel keine Beschädigungen aufweisen.
Die Benutzung eines technisch nicht einwandfreien Geräts ist zu unterlassen.
x
x
x
x
NETZANSCHLUSS
Das Kühlgerät unbedingt an eine geerdete Steckdose anschließen. Die geerdete
Steckdose für den Netzanschluss des Geräts sollte sich an gut zugänglicher Stelle
befinden.
VOR DEM AUFSTELLEN EIN DEFEKTES KABEL UNBEDINGT DURCH EIN NEUES VOM SELBEN
TYP WIE DAS VOM HERSTELLER DES KÜHLGERÄTS VERWENDETE ERSETZEN, UM SCHADEN
AN GESUNDHEIT UND EIGENTUM ZU VERMEIDEN.
UM JEGLICHES RISIKO AUSZUSCHLIESSEN, DARF EIN SCHADHAFTES NETZKABEL NUR VOM
HERSTELLER, DESSEN WARTUNGSMEISTER ODER EINER ENTSPRECHEND AUSGEBILDETEN
PERSON AUSGEWECHSELT WERDEN.
10
–
Das Verwenden von Verlängerungskabeln, Adaptern oder Mehrfachsteckdosen ist
NICHT ZULÄSSIG.
Netzspannung und -frequenz müssen mit den in Angaben in der Tabelle über die
allgemeinen Eigenschaften des Kühlschranks übereinstimmen.
Beachten Sie bitte beim Aufstellen des Kühlgeräts, dass dieser das Netzkabel nicht
beschädigt. Nichts Schweres wie Kühlgeräte, Möbel oder andere Haushaltgeräte
auf das Stromkabel stellen, um dieses nicht zu beschädigen. Andernfalls könnte
dies zu einem Kurzschluss und zu einem Brand führen.
Achten Sie darauf, dass die Rückwand des Kühlgeräts den Netzstecker nicht
berührt oder letzterer in irgendeiner Weise beschädigt ist. Ein defekter Netzstecker
kann zu einem Brand führen!
x NACH DEM AUSSCHALTEN DES GERÄTS (ZUR REINIGUNG, ZUM AUFSTELLEN AN EINEM
ANDEREN PLATZ USW.) DIESES ERST NACH MINDESTENS 15 MINUTEN WIEDER ANS NETZ
ANSCHLIEßEN.
x Das Kühlgerät nur zur Kühlung und Aufbewahrung von Esswaren verwenden.
x Vor der Reinigung das Gerät ausschalten und den Netzstecker aus der Steckdose ziehen.
x Das Gerät darf nicht verbrannt werden.
x Schützen Sie die Innenwände und alle Kunststoffteile des Kühlgeräts vor Kontakt mit Fett,
Säuren und Soßen.
x Bitte keine elektrischen Geräte wie Mikrowellengeräte, Haartrockner, Bügeleisen, Wasserkocher
und ähnliche auf den Kühlschrank stellen: Kunststoffteile könnten sich entzünden.
NUR DER SERVICE-FACHMANN IST IMSTANDE, TECHNISCHE MÄNGEL ZU BEHEBEN.
TRANSPORT
x
x
x
x
BEI NICHTBEACHTUNG DER TANSPORTVORSCHRIFTEN KANN DER HERSTELLER NICHT
FÜR ENTSTEHENDE SCHÄDEN HAFTBAR GEMACHT WERDEN.
Das Kühlgerät nur in vertikaler Lage transportieren.
Während des Transports muss das Kühlgerät vor atmosphärischen Einwirkungen (Regen,
Schnee, Feuchtigkeit) geschützt sein.
Das Kühlgerät muss gut befestigt sein, um Verrutschen und Beulen durch Schläge während des
Transports zu vermeiden.
Falls das Gerät nicht in vertikaler Lage transportiert wurde, darf es erst nach mindestens vier
Stunden ans Netz angeschlossen werden. Bei Nichtbeachtung dieser Vorschrift droht der Ausfall
des Kompressors.
11
UMWELTHINWEISE
Dieses Symbol bedeutet, dass der Kühlschrank nach Ablauf der Betriebszeit nicht über
den normalen Haushaltsabfall entsorgt werden darf, sondern getrennt, in speziellen, mit
diesem Zeichen versehenen Containern, über eine spezielle Sammelstelle entsorgt
werden muss.
Genauere Informationen, wo alte Kühlschränke zur Entsorgung abgegeben werden
können, erhalten sie von den örtlichen Behörden, dem Geschäft, in dem Sie den Kühlschrank
gekauft haben, oder vom Hersteller.
Vor der Entsorgung des Geräts machen Sie dieses bitte unbrauchbar, damit mögliche Unfälle
verhindert werden können. Ziehen Sie den Netzstecker aus der Steckdose, zerschneiden sie das
Kabel. Reißen Sie dann den Dichtungsgummi vom Kühlgerät. Falls vorhanden, machen Sie das
Türschloss unbrauchbar.
ACHTUNG! Zerlegen Sie das Kühlgerät auf keinen Fall selbst. Bringen Sie es zu einem
Abfallentsorgungsunternehmen.
ALLGEMEINE DATEN
Bei Ihrem Kühlgerät handelt es sich um einen Gefrierschrank (Standmodell). Das Gefrierfach dient
zum Einfrieren und längeren Aufbewahren von Esswaren und zur Herstellung von Speiseeis.
DER KÜHLGERÄT IST UMWELTFREUNDLICH, ER BEINHALTET KEINE DIE OZONSCHICHT
SCHÄDIGENDEN MATERIALIEN: als Kühlmittel wird R 600a verwendet, die Isolierung Ihres Geräts
besteht aus Zyklopentan C5H10.
DER HERSTELLER GARANTIERT EINE ZUVERLÄSSIGE FUNKTION DES KÜHLSCHRANKS EINER
VERHÄLTNISMÄSSIGEN LUFTFEUCHTIGKEIT VON BIS ZU 70 PROZENT UND BEI EINER
UMGEBUNGSTEMPERATUR:
VON +16 BIS +32 GRAD CELSIUS. Der Kühlschrank gehört der Klimaklasse N an.
VON +16 BIS +38 GRAD CELSIUS. Der Kühlschrank gehört der Klimaklasse ST an.
VON +16 BIS +43 GRAD CELSIUS. Der Kühlschrank gehört der Klimaklasse T an.
Gesamtbruttovolumen, L
215
Nutzinhalt Kühlteil, L
196
Der tatsächliche Verbrauch hängt von der Nutzung und vom Standort des Gerätes ab
Energieeffiziensklasse
Energieverbrauch:
kWh/24 h
kWh/Jahr
Klimaklasse
A+
A++
0,670
245
0,530
193
N - ST
N-T
Geräuschemission dB(A) 1 pW
41
Abmessungen, mm
145 x 60 x 62
145 x 60 x 65
Gefriervermögen, kg / 24 h
20
Lagerzeit bei Störung , h
20
Elektrische Daten
siehe Typenschild
ANMERKUNG. Der Hersteller behält sich das Recht vor, die in der Gebrauchsanweisung genannten
technischen Eigenschaften des Geräts sowie dessen Ausstattung zu ändern.
12
BESCHREIBUNG DES GERÄTS, HAUPTBESTANDTEILE (Abb. 1.)
1
Temperaturdrehregler
5
Schnellgefrierabteil
2
Anzeige für den Schnellgefriermodus (gelb)
6
Abteil(e) für eingefrorene Produkte
3
Stromanzeige (grün)
7
Kondensator
4
Anzeige für steigende Temperatur (rot)
8
Kompressor
ÜBERSICHT ÜBER DIE MECHANISCHE BEDIENUNG (Abb. 1.)
Beschreibung der Symbole auf dem Schaltpult
1-
TEMPERATURDREHREGLER.
Die Temperaturregelung ist ausgeschaltet, wenn die Temperaturregelanzeige auf 0 steht.
Durch Drehung des Reglers im Uhrzeigersinn wird die Temperatur niedriger gestellt.
2-
ANZEIGE FÜR SCHNELLGEFRIERMODUS, mit Symbol
Nach Einschalten des Schnellgefriermodus leuchtet die Anzeige gelb. Näheres zur Benutzung
der Schnellgefrierfunktion lesen Sie bitte im Abschnitt „Aufbewahrung von Nahrungsmitteln
im Gefrierfach“ nach.
ACHTUNG!
Der Schnellgefriermodus schaltet sich nicht automatisch ab. Sie müssen ihn von
Hand abschalten!
Im Schnellgefriermodus bleibt der Kompressor ununterbrochen eingeschaltet.
3 - STROMANZEIGE, mit Symbol
Nach dem Netzanschluss des Geräts leuchtet die Anzeige grün.
13
4 - ANZEIGE FÜR STEIGENDE TEMPERATUR, mit Symbol
Bei Anstieg der Temperatur auf über -9 ºC leuchtet die Anzeige rot. Bei Anschluss des
Gefrierschranks ans Netz leuchtet auch die rote Lampe. Si signalisiert:
x Gefrierschrank blieb eine längere Zeit ausgeschaltet, d.h. es wird zum ersten mal
eingeschaltet; nach dem Auftauen oder nach dem Stromausfall.
x Die Tür des Gefrierschrankes ist nicht geschlossen oder wird oft geöffnet.
x Es ist zu grosse Menge der zum Gefrieren vorbereiteten Produkten eingelegt.
x Das Kühlsystem ist kaputt (länger als 6 Stunden erlösccht die Lampe nicht und die Arbeit
des Kompressors ist zu hören oder er schaltet sich nicht aus, und es gibt keine oben
erwähnte Gründe - sich zum Servicedienst wenden).
VORBEREITUNG DES GERÄTS
Wir empfehlen, für die Vorbereitungsarbeiten eine weitere Person heranzuziehen.
x Die Verpackung entfernen.
x Den Kühlgerät von der Schaumstoffunterlage nehmen.
x Klebebänder entfernen. Entnehmen Sie das separate Styroporteil (Transportschutz) zwischen
Geräterückwand und Kondensator -Metallgitter (falls vorhanden).
Ist Ihr Gefrierschrank mit angeschraubten Handgriffen ausgestattet, so beim
Anheben und Verschieben des Kühlschranks bitte nicht auf Handgriffe zu
nehmen, um ihren Abbruch zu vermeiden.
x Neigen Sie beim Aufstellen den Vorderteil des Kühlgeräts ein wenig nach hinten, dann können
Sie ihn auf den Rädchen leicht an den gewünschten Platz rollen.
x Entfernen Sie die roten Klebestreifen, diese sind nur während des Transports erforderlich.
ANMERKUNG. Beim Öffnen der Gefrierschranktür fällt ein rotes Kleinteil heraus – DIESES WIRD
NUR FÜR DEN TRANSPORT BENÖTIGT.
x Entsorgen Sie die Verpackungen fachgerecht.
e Nehmen Sie die zwei Streben 1 und setzen Sie sie in die
Führungen 2 im oberen Teil der Rückwand ein.
AUFSTELLUNG
Stellen Sie den Kühlgerät in einem trockenen, gut gelüfteten Raum auf.
A C H T U N G ! Der Kühlgerät darf nicht in ungeheizten Räumen
oder auf dem Balkon betrieben werden. Das Gerät nicht in
unmittelbarer Nähe einer Heizquelle (Kochherd, Heizkörper,
direkte Sonneneinstrahlung) aufstellen.
ACHTUNG! Der Kühlgerät darf nicht in Kontakt
mit Heizungs- Gas- und Abwasserrohre geraten
sowie elektrische Geräte nicht berühren.
x Die Lüftungsöffnung an der Oberseite des
Kühlgeräts darf nicht abgedeckt werden,
eine ungehinderte Lufzirkulation muss
gewährleistet sein. Der Zwischenraum
zwischen der Oberseite des Kühlschranks
und einem darüber befindlichen Möbel
sollte mindestens 10 cm betragen.
Andernfalls steigt der Stromverbrauch des
Kühlgeräts an oder der Kompressor kann
sich überhitzen.X
x W Falls der Kühlgerät in einer Ecke aufgestellt werden soll,
belassen Sie einen seitlichen Abstand von mindestens 6 cm, damit
Sie die
Kühlgerätür genügend weit öffnen können, um die
Schubladen aus dem Gefrierfach herausziehen zu können.
14
x Der Kühlgerät ist unbedingt auf einer ebenen Oberfläche aufzustellen, er darf nicht an die Wand
angelehnt werden. Regulieren Sie, falls nötig, die Höhe durch Drehen der Stützfüße : durch
Drehen im Uhrzeigersinn hebt sich der Vorderteil des Geräts, durch Drehen im
Gegenuhrzeigersinn senkt er sich.
TEMPERATURREGULIERUNG
Die Temperatur in der Gefrierkammer ist auf -18 ºC voreingestellt. Sie können die Temperatur
nach Ihren eigenen Bedürfnissen einstellen
Die Temperatur im Gefrierfach des Geräts wird durch Drehen des Temperaturdrehreglers
eingestellt 1 (Abb. 1.). Die Zahlen auf dem Temperaturdrehregler zeigen die Temperatur an.
Die Temperatur kann auf einer siebenteiligen Skala reguliert werden:
0= der Kompressor wird abgeschaltet
ACHTUNG! Das Gerät ist noch am Stromnetz angeschlossen.
1 = höchste Temperatur (geringste Kühlung)
7 = niedrigste Temperatur (stärkste Kühlung)
DIE TEMPERATUR IM GEFRIERFACH KANN ABHÄNGIG VON UMGEBUNGSTEMPERATUR,
MENGE UND TEMPERATUR DER NAHRUNGSMITTEL, HÄUFIGKEIT DER TÜRÖFFNUNG
SCHWANKEN. Deshalb empfehlen wir Folgendes:
x Stellen Sie den Gefrierschrank möglichst nicht in der Nähe von Wärmequellen auf;
x Stellen Sie keine Esswaren in den Gefrierschrank, die wärmer als die Umgebungstemperatur
sind;
x Lassen Sie die Gefrierschranktüren nicht offen stehen;
x Halten Sie dieGefrierschranktüren nicht länger offen, als es für das Herausnehmen oder
Hineinstellen der Produkte erforderlich ist.
BEI NIEDRIGER RAUMTEMPERATUR KÜHLT DER GEFRIERSCHRANK WENIGER STARK, DESHALB
KANN DIE TEMPERATUR IM GEFRIERSCHRANK ANSTEIGEN. Stellen Sie in diesem Fall die
Temperatur mithilfe des Temperaturreglers niedriger.
AUFBEWAHRUNG VON NAHRUNGSMITTELN IM GEFRIERFACH
Das Schnellgefrierabteil im Gefrierfach ist mit dem Symbol bezeichnet
Abteil(e) für die Aufbewahrung von Kühlprodukten, markiert mit dem Symbol
Wollen Sie Frischprodukte einfrieren, so schalten sie auf Schnellgefriermodus: Drehen Sie dazu den
Temperaturdrehregler auf S. Die Anzeigelampe für den Schnellgefriermodus leuchtet gelb auf.
Legen Sie die zum Einfrieren bestimmten Lebensmittel in einer oder zwei Reihen ins
Schnellgefrierabteil. Nehmen Sie die Esswaren nach 24 Stunden aus dem Schnellgefrierabteil und
legen Sie sie in die Schubladen des Aufbewahrungsabteils (Abb. 1). Drehen auch den
Temperaturdrehregler in seine Ausgangsposition zurück. Die Anzeigelampe für den
Schnellgefriermodus erlischt.
x
x
x
x
x
x
ACHTUNG! Das Kühlgerät darf nicht mehr als drei Tage im Schnellgefriermodus
belassen werden, sonst kann der Kompressor kaputtgehen!
ÜBERSTEIGEN SIE DIE MAXIMALE EINFRIERMENGE NICHT - 20 KG IN 24 STUNDEN.
Halten Sie einen Zwischenraum von mindestens 2,5 cm zwischen den
Gefrierprodukten und der Zwischenwand ein.X
Legen Sie keine unverpackten Nahrungsmittel ins Gefrierfach.
ACHTUNG! Im Gefrierfach keine flüssigen Nahrungsmittel in
Glasbehältnissen oder Flaschen aufbewahren.
Frisch einzufrierende Waren dürfen nicht mit bereits gefrorenen Waren in
Berührung kommen.
Frieren Sie keine Waren von höherer als der Außentemperatur ein.
15
x Beachten Sie unbedingt das vom Hersteller angegebene Haltbarkeitsdatum der eingefrorenen
Waren.
x FISCH UND WURST EMPFEHLEN WIR FÜR NICHT LÄNGER ALS SECHS MONATE EINZUFRIEREN,
KÄSE, GEFLÜGEL, SCHWEINEFLEISCH, SCHAFFLEISCH NICHT LÄNGER ALS ACHT MONATE,
RINDFLEISCH, OBST UND GEMÜSE NICHT LÄNGER ALS 12 MONATE.
ABTAUEN DES GEFRIERFACHS
Tauen Sie das Gefrierfach mindestens zweimal jährlich ab, damit die Dicke der Eisschicht 5 mm
nicht überschreitet Gehen Sie zum Abtauen wie folgt vor:
ACHTUNG! Schalten Sie den Kühlschrank aus, ziehen Sie den Netzstecker.
x Nehmen Sie die Kühlprodukte aus dem Gefrierfach. Die gefrorenen Produkte tauen nicht auf,
während Sie das Gefrierfach abtauen, wenn Sie diese mit einem dicken Tuch zudecken und sie
an einem kühlen Ort aufbewahren.
x Ziehen Sie die Tauwasserauffangrinne heraus, wenden Sie sie um 180º
und hängen Sie sie ein (Abb. 4). Stellen Sie bitte ein Gefäß unter
Tauwasserauffangrinne.
x Lassen Sie die Gefrierfachtür offen. Wischen Sie nach dem Abtauen der
Eisschicht die Oberflächen des Gefrierfachs und das Zubehör trocken.
x Ziehen Sie die Tauwasserauffangrinne heraus, wenden Sie sie erneut
um 180º und setzen Sie sie an der ursprünglichen Stelle wieder ein.
x Schließen Sie die Gefrierfachtür. Schalten Sie den Kühlschrank wieder ein.
REINIGUNG UND PFLEGE
! REINIGEN SIE DEN KÜHLGERÄT REGELMÄSSIG.
Vergessen Sie nicht vor dem Abtauen des Gefrierfachs oder dem Reinigen des
hinteren Teils des Gehäuses das Gerät vom Netz zu nehmen.
x Bewahren Sie die Innenoberflächen des Geräts und alle Kunststoffteile vor Fett, Säure, Soßen.
Falls Sie unabsichtlich davon ausgießen, reinigen Sie die betroffenen Flächen sofort mit warmem
Seifenwasser oder Spülmittel. Reiben Sie sie anschließend trocken.
x Reinigen Sie die Innenflächen des Gefrierschranks mit warmem Seifenwasser. Es kann auch
Geschirrspülmittel verwendet werden.
x Reiben Sie die Innen- und Außenflächen trocken.
x Reinigen Sie die Türdichtung regelmäßig. Reiben Sie sie trocken.
x Reinigen Sie die Schalen und das andere Zubehör regelmäßig.
x Wischen Sie mindestens einmal im Jahr den Staub ab, der sich an
derKühlschrankrückwand und auf dem Kompressor angesammelt hat.
Zur Reinigung eine weiche Bürste, elektrostatische Tücher oder den
Staubsauger benutzen.
x Für die Innen- und Außenreinigung KEINE, körnigen, säure-, alkohol-,
oder benzinhaltigen Putzmittel verwenden.
x Bei der Reinigung KEINE Scheuerlappen oder Schwämme mit rauer Oberfläche verwenden.
PRAKTISCHE RATSCHLÄGE UND BEMERKUNGEN
x Essen Sie Eis nicht sofort, nachdem Sie es aus dem Gefrierfach genommen haben.
x Die Produkte gefrieren viel schneller, wenn sie in kleine Portionen zerteilt verpackt worden sind.
x WENN SIE DAS KÜHLGERÄT FÜR LÄNGERE ZEIT AUSSCHALTEN, LASSEN SIE DIE TÜR OFFEN.
Anmerkungen zum Betriebsgeräusch des Geräts. Die vom Kühlschrank während des
Betriebs verbreiteten verschiedenen Betriebsgeräusche sind normal und deuten nicht auf
einen Defekt hin.
x Das Plätschern, Gurgeln und Rauschen kommt vom Kühlmittel, das durch das Kühlsystem des
Geräts zirkuliert.
x Ein kurzes, lauteres Aufheulen oder ein Klicken hört man, wenn der Kompressor des Geräts sich
einschaltet.
16
TÜRANSCHLAG
Bei Bedarf kann die Tür von Rechts- auf Linksanschlag geändert werden. Zur Vermeidung von
Personen- und Sachschäden den Wechsel des Türanschlages mit zwei Personen durchführen.
Warnung! Vor dem Durchführen von Arbeiten am Gerät ist stets der Netzstecker aus der
Steckdose zu ziehen.
Bevor Sie mit dem Umbau beginnen etwas Grundsätzliches:
x Achten Sie immer auf die Anzahl der Unterlegscheiben auf den Lagerzapfen und Schrauben.
x Richten Sie die Türen immer exakt aus, damit sie dicht schließen.
Gefrierschranktür öffnen
Entfernen Sie die vier Abdeckungen C von Gehäuse und Türinnenseite.
Setzen Sie die Verlängerung der Abdeckung um 180° gedreht auf der Gegenseite wieder ein.
Schrauben Sie den Bolzen in der Türinnenseite im Bereich C/6 heraus.
Achtung! Tür festhalten.
Nehmen Sie die Gefrierschranktür ab.
Schrauben Sie die obere Halterung 6 ab. Beachten Sie das Kunststoffplättchen unter der
Halterung.
Drehen Sie die Halterung 6 samt Kunststoffplättchen um 180° und schrauben Sie sie auf der
anderen Gefrierschrankseite in die beiden freien nebeneinander liegenden Bohrlöcher wieder
ein. Nehmen Sie die untere Abdeckleiste 1 ab.
Schrauben sie Halterung 2 mit dem Bolzen ab.
Schrauben Sie den Bolzen mit den Unterlegscheiben aus der Halterung heraus und dann in der
Öffnung auf der Gegenseite der Halterung wieder ein.
Nehmen Sie Halterung 7 ab und ersetzen Sie diese durch Halterung 2 mit dem Bolzen.
Halterung 7 kommt an die frühere Stelle von Halterung 2.
Setzen Sie die Gefrierschranktür auf den Bolzen von Halterung 2.
Achtung! Tür festhalten.
Setzen Sie den Bolzen der Halterung 6 wieder in die Gefrierschranktür ein.
17
Decken Sie die Halterung und die freien Öffnungen mit den vier Abdeckkappen C ab.
Entnehmen Sie die Abdeckkappe 10 aus Abdeckleiste 1 und setzen Sie sie auf der
gegenüberliegenden Seite wieder ein.
Setzen Sie die Abdeckleiste 1 wieder in das Gerät ein.
Entfernen Sie die Schraubenabdeckkappen a und die Verschlussstopfen b.
Drehen Sie die Schrauben des Türgriffes heraus. Schrauben Sie den Griff auf der Gegenseite
wieder fest. Die mitgelieferten Verschlussstopfen drücken Sie in die verbliebenen Öffnungen in
der Tür und die Schraubenabdeckkappen auf die Schrauben.
Wenn Sie das Gerät um mehr als 30° geneigt haben, warten Sie bitte 4 Stunden bevor
Sie das Gerät an das Stromnetz anschließen.
STÖRUNGEN UND DEREN BEHEBUNG
Was, wenn...
x Der ans Stromnetz angeschlossene Kühlgerät nicht funktioniert, die Stromanzeige
nicht aufleuchtet. Überprüfen Sie, ob die Elektroinstallation bei Ihnen zu Hause in Ordnung ist.
Überprüfen Sie, ob der Stecker richtig in die Steckdose gesteckt wurde.
x Anzeige für steigende Temperatur leuchtet rot. Das Gerät wurde zum ersten Mal
eingeschaltet oder war während längerer Zeit ausgeschaltet (zum Beispiel zum Abtauen oder
nach einem Stromausfall), die Gerätetüren sind nicht geschlossen oder wurden häufig auf- und
zugemacht, eine große Menge Frischprodukte befindet sich im Gefrierabteil und die Temperatur
ist auf über –9 ºC angestiegen. Sinkt die Innentemperatur auf unter – 9 ºC, erlischt das
Warnlicht. ACHTUNG! Erlischt die Anzeige für steigende Temperatur (wegen oben
genannter Ursachen) länger als 6 Stunden nicht,
so ist der Kompressor
ununterbrochen in Betrieb oder schaltet sich nicht ein. Wenden Sie sich in diesem
Fall an die Servicefachleute.
x Der Lärmpegel des Geräts ansteigt. Überprüfen Sie, ob das Gerät stabil und waagrecht
steht. Zur Regulierung bedienen Sie sich der vorderen Stützfüße des Geräts.
x Überprüfen Sie, ob zwischen dem Kühlgerät und anderen Möbeln oder den Teilen an der
Hinterseite des Geräts und der Wand ein Zwischenraum ist. Ziehen Sie den Kühlgerät weg von
den Möbeln oder der Wand. Überprüfen Sie, ob die lauteren Geräusche nicht von Flaschen,
Dosen, Geschirr im Kühlgerät stammen, die sich gegenseitig berühren.
x Beim Öffnen der Kühlschranktüren quillt das Gummidichtungsband hervor. Die
Dichtung ist mit klebrigen Nahrungsmitteln (Fett, Sirup) verschmutzt. Reinigen Sie die Dichtung
und die Vertiefung für die Dichtung mit warmem Seifenwasser oder Spülmittel, reiben sie beides
trocken. Setzen Sie die Gummidichtung wieder in die Vertiefung ein.
x Hohe Temperatur im Kühlgerät, Betriebspausen des Kompressors kurz. Achten Sie
darauf, ob die Kühlschranktüren sich gut dicht schließen lassen, ob nicht die Türen beim
Herausnehmen oder Hineinstellen von Produkten länger als erforderlich offen gelassen wurden,
ob nicht zu viele und zu warme Esswaren in den Kühlschrank gestellt wurden.
x Die Oberfläche des Kühlgeräts beschlägt sich. Die Luftfeuchtigkeit in der Umgebung
beträgt mehr als 70 Prozent. Lüften Sie den Raum, in dem das Kühlgerät steht, beseitigen sie
falls möglich die Ursache für die Feuchtigkeit.
GARANTIELEISTUNGEN
FALLS IHR KÜHLGERÄT NICHT MEHR RICHTIG FUNKTIONIERT, ÜBERZEUGEN SIE SICH, OB SIE
DIE URSACHE DES NICHT ZUFRIEDENSTELLENDEN
BETRIEBS DES GERÄTS NICHT SELBST BEHEBEN
KÖNNEN. Können Sie das Problem nicht selbst lösen,
wenden Sie sich telefonisch oder schriftlich an einen
Serviceverteter in Ihrer Nähe. Geben Sie dabei
unbedingt Modell (1) und Gerätenummer (2) an.
Diese Angaben finden Sie auf der Geräteetikette.
18
N00F2200-1