1
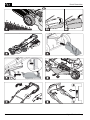
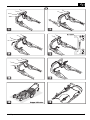
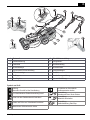
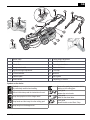
LAWN MOWER ML190EA/ML190EB I H C A IT D DK GB S NL N F FIN E EST P LV I LT SLO RUS HR UA SRB BG PL RO CZ GR SK MK H TR H AC HIT HI INFORMATION I MANUALS I SERVICE Handling instructions 4 41 113_a I 12/ 2013 Benzin-Rasenmäher D:Betriebsanleitung...................................10 DK:Brugsanvisning....................................204 GB: Operating Instructions...........................20 S:Bruksanvisning....................................218 NL: Instructies voor gebruik.........................26 N:Bruksanvisning....................................232 F : Mode d’emploi.......................................36 FIN:Käyttöohjeet.........................................246 E: Instrucciones de uso..............................46 EST:Kasutusjuhend.....................................260 P: Instruções para o uso............................78 LV:Instrukcijas...........................................274 I: Libretto di istruzioni................................92 LT: Instrukcijų vadovas..............................288 SLO: Navodilo za uporabo............................106 RUS:Руководство по эксплуатации...........302 HR: Upute za uporabu................................120 UA: Посібник з експлуатації.....................316 SRB: Упутства за употребу.........................134 BG: Ръководство за експлоатация..........330 PL: Instrukcja obsługi.................................148 RO: Instrucţiuni...........................................344 CZ: Návod k použití....................................162 GR: Οδηγίες λειτουργίας............................358 SK: Návod na použitie................................176 МК: Упатство за работа............................372 H:Használat.............................................190 TR: Kullanım kılavuzu................................386 © Copyright 2009 AL-KO KOBER GROUP Kötz, Germany This documentation is allowed to-also in excerpts-only with express authorization of the AL-KO KOBER GROUP duplicates or third accessible is done. Technical alterations of influence of the function reservations. 2 Original-Betriebsanleitung Notice 441 113_a 3 Benzin-Rasenmäher 4 Original-Betriebsanleitung 441 113_a 5 Benzin-Rasenmäher 17 6 Original-Betriebsanleitung 441 113_a 7 Benzin-Rasenmäher 8 Original-Betriebsanleitung Benzin-Rasenmäher 9 Original-Betriebsanleitung D Benzin-Rasenmäher Zu diesem Handbuch Produktbeschreibung Lesen Sie diese Dokumentation vor der Inbetriebnahme durch. Dies ist Voraussetzung für sicheres Arbeiten und störungsfreie Handhabung. Machen Sie sich vor der Benutzung mit den Bedienelementen und dem Gebrauch der Maschine vertraut. In dieser Dokumentation werden verschiedene Modelle von Benzin-Rasenmähern beschrieben. Beachten Sie die Sicherheits- und Warnhinweise in dieser Dokumentation und auf dem Gerät Diese Dokumentation ist permanenter Bestandteil des beschriebenen Produkts und sollte bei Veräußerung dem Käufer mit übergeben werden Zeichenerklärung Achtung! Genaues Befolgen dieser Warnhinweise kann Personen- und / oder Sachschäden vermeiden. Spezielle Hinweise zur besseren Verständlichkeit und Handhabung. Das Kamerasymbol verweist auf Abbildungen. Inhaltsverzeichnis Zu diesem Handbuch................................................... 10 Produktbeschreibung.................................................... 10 Sicherheits- und Schutzeinrichtungen.......................... 10 Sicherheitshinweise...................................................... 12 Montage........................................................................ 13 Tanken.......................................................................... 13 Inbetriebnahme............................................................. 14 Wartung und Pflege...................................................... 16 Lagerung...................................................................... 18 Garantie........................................................................ 18 Identifizieren Sie ihr Modell anhand der Produktbilder und der Beschreibung der verschiedenen Optionen. Bestimmungsgemäße Verwendung Dieses Gerät ist zum Mähen eines Rasenbodens im privaten Bereich bestimmt und darf nur auf abgetrocknetem Rasen eingesetzt werden. Eine andere oder darüber hinausgehende Verwendung, gilt als nicht bestimmungsgemäß. Möglicher Fehlgebrauch Dieser Rasenmäher ist nicht zur Verwendung in öffentlichen Anlagen, Parks, Sportstätten sowie in der Land- und Forstwirtschaft geeignet Sicherheitseinrichtungen dürfen nicht demontiert oder überbrückt werden Das Gerät nicht bei Regen oder auf nassem Rasen benutzen Das Gerät darf nicht im gewerblichen Einsatz betrieben werden Sicherheits- und Schutzeinrichtungen Achtung - Verletzungsgefahr! Sicherheits- und Schutzeinrichtungen dürfen nicht außer Kraft gesetzt werden! Sicherheitsbügel Das Gerät ist mit einem Sicherheitsbügel ausgerüstet. Im Gefahrenmoment Sicherheitsbügel loslassen. Geräte ohne Messerkupplung: Schneidmesser wird gestoppt Motor wird gestoppt Reparatur...................................................................... 18 Prallklappe Entsorgung................................................................... 18 Die Prallklappe schützt vor herausschleudernden Teilen. EG-Konformitätserklärung............................................ 18 Hilfe bei Störungen....................................................... 19 10 Original-Betriebsanleitung D A IT I H C H HI AC HIT 1 Starterseil 2 Gasfernbedienung 3 4 9 Schnitthöhenverstellung 10 Variogetriebe* Radantrieb 11 Betriebsanleitung Sicherheitsbügel 12 Auswurfeinsatz 5 Ergonomische Höhenverstellung 13 Verschlussklappe 6 Füllstandsanzeige 14 Mulchkit 7 Prallklappe 15 Kurzbedienungsanleitung 8 Grasfangbox Symbole am Gerät Achtung! Besondere Vorsicht bei der Handhabung. Vor Inbetriebnahme Gebrauchsanleitung lesen! Dritte aus dem Gefahrenbereich fernhalten! Hände und Füße vom Schneidwerk fernhalten! * je nach Ausführung Vor Arbeiten am Schneidwerk Zündkerzenstecker ziehen. Kurzanleitung Motorbremse lösen. Motor Starten Kurzanleitung Radantrieb einschalten. Kurzanleitung Gasfernbedienung Start/Stop Abstand zum Gefahrenbereich halten. 441 113_a 11 D Benzin-Rasenmäher Zusatzsymbole bei Geräten mit Elektrostart Achtung! Gefahr durch Stromschlag. Anschlussleitung von Schneidmessern fernhalten. Gerät vor Wartungsarbeiten oder bei beschädigtem Kabel immer vom Netz trennen. Gehörschutz Beim Arbeiten an Hängen immer auf sicheren Stand achten immer quer zum Hang mähen, niemals aufoder abwärts nicht an Hängen mit einer Steigung von mehr als 20° mähen Besondere Vorsicht beim Wenden Sicherheitshinweise Achtung! Gerät nur in technisch einwandfreiem Zustand benutzen! Nur bei ausreichendem Tageslicht oder künstlicher Beleuchtung arbeiten Körper, Gliedmaßen und Kleidung vom Schneidwerk fernhalten Achtung - Verletzungsgefahr! Landesspezifische Bestimmungen für die Betriebszeit beachten Sicherheits- und Schutzeinrichtungen dürfen nicht außer Kraft gesetzt werden! Nur mit scharfem Schneidmesser mähen Achtung - Brandgefahr! Betankte Maschine nicht in Gebäuden aufbewahren, in denen Benzindämpfe mit offenem Feuer oder Funken in Berührung kommen könnten! Bereich um Motor, Auspuff, Batteriekasten, Kraftstofftank frei von Mähgut, Benzin, Öl halten. Warnung - Brandgefahr! Benzin und Öl sind hochgradig entflammbar! Dritte aus dem Gefahrenbereich fernhalten Mähen Sie niemals, während Personen, besonders Kinder, oder Haustiere in der Nähe sind Der Maschinenführer oder der Benutzer ist für Unfälle mit anderen Personen und deren Eigentum verantwortlich Kinder oder andere Personen, die die Betriebsanleitung nicht kennen, dürfen das Gerät nicht benutzen. Örtliche Bestimmungen zum Mindestalter der Bedienungsperson beachten Gerät nicht unter Einfluss von Alkohol, Drogen oder Medikamenten bedienen Zweckmäßige Arbeitskleidung tragen Lange Hose Betriebsbereites Gerät nicht unbeaufsichtigt lassen Gerät nie mit beschädigten Schutzeinrichtungen / Schutzgittern betreiben Gerät nie ohne vollständig eingebaute Schutzeinrichtungen betreiben (z. B.: Prallklappe, Grasfangeinrichtungen) Gerät vor jedem Gebrauch auf Beschädigungen prüfen, vor erneutem Gebrauch beschädigte Teile ersetzen lassen Abgenutzte oder beschädigte Messer und Befestigungsbolzen nur satzweise austauschen, um Unwucht zu vermeiden Bevor Sie den Motor starten, kuppeln Sie alle Messer und Antriebe aus Motor abstellen, Stillstand des Gerätes abwarten und Zündkerzenstecker abziehen Beim Verlassen des Gerätes bei der Überprüfung, Reinigung oder Arbeiten am Gerät nach dem Auftreten von Störungen vor dem Lösen von Blockierungen vor dem Beseitigen von Verstopfungen nach dem Kontakt mit Fremdkörpern bevor Sie nachtanken Störungen und ungewöhnliche Vibrationen am Gerät auftreten Festes und rutschsicheres Schuhwerk 12 Original-Betriebsanleitung D Suchen sie nach Beschädigungen am Rasenmäher und führen Sie die erforderlichen Reparaturen durch, bevor Sie erneut starten und mit dem Rasenmäher arbeiten. Zündkerzenstecker aufstecken und Motor starten nach Störungsbeseitigung (siehe Störungstabelle) und Prüfung des Gerätes nach dem Reinigen des Gerätes Starten Sie den Motor nicht, wenn Sie vor dem Auswurfkanal stehen Das zu mähende Terrain vollständig und sorgfältig prüfen, alle Fremdkörper entfernen Besondere Aufmerksamkeit beim Umkehren des Rasenmähers oder wenn Sie den Rasenmäher zu sich heranziehen Nicht über Hindernisse mähen (z. B. Zweige, Baumwurzeln) Tanken Vor der Inbetriebnahme müssen Sie den Rasenmäher auftanken. Warnung - Brandgefahr! Benzin und Öl sind hochgradig entflammbar! Immer die mitgelieferte Bedienungsanleitung des Motorenherstellers beachten. Betriebsmittel Benzin Motoröl Sorte Normalbenzin / bleifrei siehe Hinweise des Motorenherstellers Füllmenge siehe Hinweise des Motorenherstellers ca. 0,6 l Schnittgut nur bei stehendem Motor entfernen Motor / Schneidmesser abschalten, wenn eine andere als die zu mähende Fläche überquert wird Gerät niemals mit laufendem Motor heben oder tragen Beim Einfüllen von Benzin oder Motoröl nicht Essen oder Trinken Benzindämpfe nicht einatmen Führen Sie das Gerät im Schrittempo Vor Gebrauch auf festen Sitz der Muttern, Schrauben und Bolzen achten Beim Auslaufen des Motors die Drosselkappe schließen . Falls der Motor einen Benzinabsperrhahn besitzt, ist dieser nach dem Mähen zu schließen.Führen Sie das Gerät im Schrittempo Vor Gebrauch auf festen Sitz der Muttern, Schrauben und Bolzen achten Montage Beiliegende Montageanleitung beachten. Achtung! Das Gerät darf erst nach vollständiger Montage betrieben werden. Sicherheit Warnung! Motor nie in geschlossenen Räumen laufen lassen. Vergiftungsgefahr! Benzin und Öl nur in dafür vorgesehene Behälter aufbewahren Benzin und Öl nur bei kaltem Motor im Freien einfüllen oder entleeren Nicht bei laufendem Motor Benzin oder Öl einfüllen Tank nicht überfüllen (Benzin dehnt sich aus) Beim Tanken nicht rauchen Den Tankververschluss bei laufendem oder heißen Motor nicht öffnen Beschädigten Tank oder Tankverschluss austauschen Tankdeckel immer fest schließen Falls Benzin übergelaufen ist, darf kein Versuch unternommen werden, den Motor zu starten. Stattdessen ist die Maschine von der benzinverschmutzten Fläche zu entfernen. Jeglicher Zündversuch ist zu vermeiden bis sich die Benzindämpfe verflüchtigt haben. Wenn Motoröl ausgelaufen ist: 441 113_a 13 D Benzin-Rasenmäher Motor nicht starten Ausgelaufenes Motoröl mit Ölbindemittel oder Lappen aufsaugen und sachgemäß entsorgen Gerät reinigen Altöl nicht: in den Abfall geben in die Kanalisation, den Abfluss oder auf die Erde schütten Wir empfehlen, Altöl in einem geschlossenen Behälter beim Recycling-Center oder einer Kundendienststelle abzugeben. ▪▪ Immer alle Räder auf die gleiche Schnitthöhe einstellen. ▪▪ Schnitthöhenverstellung ist modellabhängig. Zentralverstellung ( 1) 1. Hebel zum Entriegeln zur Seite drücken und halten. 2. Hebel nach links oder rechts in die gewünschte Schnitthöhe schieben. 3. Hebel einrasten lassen. 4. Auf gleiche Rastposition bei allen Rädern achten. Mähen mit Grasfangbox Benzin einfüllen Achtung - Verletzungsgefahr! 1. Tankdeckel abschrauben, an sauberer Stelle lagern. Grasfangbox nur bei ausgeschaltetem Motor und stillstehendem Schneidmesser abnehmen oder anbringen. 2. Benzin mit einem Trichter einfüllen. 3. Tankeinfüllöffnung fest verschließen und reinigen. Motoröl einfüllen 1. Öleinfülldeckel abschrauben, Verschluß an sauberer Stelle lagern. 2. Öl mit einem Trichter einfüllen. 3. Öleinfüllöffnung fest verschließen und reinigen. Inbetriebnahme Achtung! Mit losem, beschädigtem oder abgenutztem Schneidwerk oder Befestigungsteilen darf das Gerät nicht benutzt werden! Führen Sie vor jeder Inbetriebnahme eine Sichtkontrolle durch. Das Kamerasymbol auf den folgenden Seiten verweist auf die Abbildungen, Seite 4–6. Schnitthöhe einstellen Achtung - Verletzungsgefahr! Schnitthöhe nur bei abgeschaltetem Motor und stillstehendem Schneidmesser verstellen. 14 1. Prallklappe anheben und Grasfangbox in die Halter einhängen ( 3). Füllstandsanzeige Die Füllstandsanzeige wird durch den Luftstrom beim Mähen nach oben gedrückt ( 2a). Ist die Grasfangbox voll, liegt die Füllstandsanzeige an der Box an ( 2b). Die Grasfangbox muss geleert werden. Grasfangbox leeren 1. Prallklappe anheben. 2. Grasfangbox aushängen und nach hinten abnehmen ( 3). 3. Grasfangbox leeren. 4. Prallklappe anheben und Grasfangbox wieder in die Halter einhängen ( 3). Mähen ohne Grasfangbox Achtung! Nur bei funktionsfähiger Drehfeder der Prallklappe ohne Grasfangbox mähen. Original-Betriebsanleitung D Die Prallklappe liegt durch Federkraft am Rasenmähergehäuse an. Der Grasschnitt wird so nach hinten unten ausgeworfen. Mulchen mit Mulchkit Beim Mulchen wird das Schnittgut nicht aufgesammelt, sondern verbleibt auf dem Rasen. Der Mulch schützt den Boden vor dem Austrocknen und versorgt ihn mit Nährstoffen. Die besten Ergebnisse werden durch regelmäßigen Rückschnitt um ca. 2 cm erreicht. Nur junges Gras mit weichem Blattgewebe verrottet schnell. Grashöhe vor dem Mulchen: Maximal 8 cm Grashöhe nach dem Mulchen: Mindestens 4 cm Schrittgeschwindigkeit dem Mulchen anpassen, nicht zu schnell gehen. Mulchkit einsetzen Mulchkit nur bei ausgeschaltetem Motor und stillstehendem Schneidmesser einsetzen oder entfernen. 3). 2. Prallklappe anheben und Mulchkit in den Auswurfschacht einsetzen ( 4). Verriegelung muss einrasten. Rastet das Mulchkit nicht ein, können Mulchkit und Schneidmesser beschädigt werden. Seitenauswurf nur bei ausgeschaltetem Motor und stillstehendem Schneidmesser abnehmen oder anbringen. Seitenauswurf einsetzen 1. Grasfangbox entfernen und Mulchkit einsetzen. 2. Abdeckung für Seitenauswurf aufklappen und festhalten ( 6/1). 3. Seitenauswurfkanal einsetzen ( 6/2). 4. Abdeckung langsam schließen. Die Abdeckung sichert den Seitenauswurfkanal vor dem Herausfallen. Seitenauswurf entfernen 2. Seitenauswurf entfernen und Abdeckung schließen ( 6/2). Griffhöhe einstellen Klemmverstellung 1. Holm festhalten und beide Klemmungen lösen ( 7). 2. Holm in gewünschte Position bringen 3. Klemmungen schließen. Motor starten Mulchkit entfernen Achtung - Vergiftungsgefahr! 1. Prallklappe anheben. 2. Verriegelung am Mulchkit lösen ( 3. Mulchkit herausziehen ( Achtung - Verletzungsgefahr! 1. Abdeckung für Seitenauswurf aufklappen und festhalten ( 6/1). Achtung - Verletzungsgefahr! 1. Grasfangbox abnehmen ( Mähen mit Seitenauswurf 5/2). 5/1). Motor nie in geschlossenen Räumen laufen lassen. Achtung - Verletzungsgefahr! Gerät bei Startvorgang nicht kippen. ▪▪ Motor nur bei montiertem Messer starten (Messer dient als Schwungmasse) ▪▪ Reglereinstellungen am Motor nicht verändern 441 113_a 15 D Benzin-Rasenmäher Gerät nicht starten, wenn der Auswurfkanal nicht durch eines der folgenden Teile abgedeckt ist: Radantrieb ( 12) Grasfangbox Achtung! Prallklappe Getriebe nur bei laufendem Motor zuschalten. Mulchkit Betätigen Sie den Anlass-Schalter mit besonderer Aufmerksamkeit, entsprechend den Herstelleranweisungen Radantrieb einschalten Achten Sie auf ausreichendem Abstand der Füße zum Schneidwerkzeug 1. Getriebeschaltbügel gegen den Oberholm drücken und festhalten ( 11) – Getriebeschaltbügel rastet nicht ein. - Radantrieb wird eingeschaltet. Gerät in niedrigem Gras starten Radantrieb ausschalten Positionszeichen am Gerät: 1. Getriebeschaltbügel loslassen ( 13). - Radantrieb wird ausgeschaltet. * je nach Ausführung Variogetriebe (Speed Control) ( Option) Manuelles Starten Mit dem Variogetriebe kann die Fahrtgeschwindigkeit des Rasenmähers stufenlos verändert werden. mit Gasfernbedienung 1. Gashebel auf Position max stellen ( 8/1). 2. Sicherheitsbügel zum Oberholm herziehen und festhalten ( 9) - Sicherheitsbügel rastet nicht ein. 3. Starterseil zügig herausziehen und danach langsam wieder aufrollen lassen ( 10). 4. Nach dem Aufwärmen des Motors (ca. 15–20 Sekunden) Gashebel auf eine Position zwischen min und max stellen. Motor ausschalten 1. Gashebel auf Position min stellen ( 8/2) 2. Sicherheitsbügel loslassen ( - Motor schaltet aus. 14). Achtung schwere Schnittverletzung! Motor kann nachlaufen. Nach Ausschalten vergewissern, dass Motor steht. Achtung! Hebel nur bei laufendem Motor betätigen. Schalten ohne Motorantrieb kann den Antriebsmechanismus beschädigen. Für höhere Geschwindigkeit den Hebel ( in Richtung ( 12/1) ziehen Für niedrigere Geschwindigkeit den Hebel ( in Richtung ( 12/2) ziehen 12) 12) Fahrtgeschwindigkeit immer dem aktuellen Boden- und Rasenzustand anpassen. Wartung und Pflege Achtung - Verletzungsgefahr! ▪▪ Vor allen Wartungs- und Pflegearbeiten immer Motor abschalten und den Zündkerzenstecker ziehen. ▪▪ Motor kann nachlaufen. Nach Ausschalten vergewissern, dass Motor steht. ▪▪ Bei Wartungs- und Pflegearbeiten am Schneidmesser immer Arbeitshandschuhe tragen! Alle Muttern, Bolzen und Schrauben müssen fest angezogen sein Das Gerät muss in einem sicheren Arbeitszustand sein 16 Original-Betriebsanleitung D Motor abkühlen lassen, bevor die Maschine abgestellt wird Grasfangeinrichtung regelmäßig auf Funktion und Verschleiß prüfen. Das Gerät nach jedem Gebrauch reinigen Gerät nicht mit Wasser abspritzen Eindringendes Wasser kann zu Störungen führen (Zündanlage, Vergaser) Schneidmesser regelmäßig auf Beschädigungen kontrollieren Defekte Schalldämpfer immer ersetzen Altöl nicht ▪▪ in den Abfall geben ▪▪ in Kanalisation oder Abfluss schütten ▪▪ auf die Erde schütten Luftfilter wechseln Hinweise des Motorenherstellers beachten. Mäher neigen Zündkerze wechseln Je nach Motorenhersteller muss: die Zündkerze nach oben zeigen ( Gebrauchtes Motoröl umweltfreundlich entsorgen! Wir empfehlen, Altöl in einem geschlossenen Behälter beim Recycling-Center oder einer Kundendienststelle abzugeben. 15) Bedienungsanleitung des Motorenherstellers beachten! Schneidmesser nachschleifen / auswechseln Stumpfe oder beschädigte Schneidmesser nur bei einer Servicestelle oder einem autorisierten Fachbetrieb schärfen / erneuern lassen Nachgeschliffene Schneidmesser müssen ausgewuchtet sein Achtung! Nicht ausgewuchtete Messer führen zu starken Vibrationen und beschädigen den Mäher. Motorpflege Motoröl wechseln 1. Zum Auffangen des Öls einen geeigneten Behälter bereitstellen. 2. Öl über die Öleinfüllöffnung vollständig ablaufen lassen oder absaugen. Hinweise des Motorenherstellers beachten. Radantrieb Bowdenzug einstellen Lässt sich bei laufendem Motor der Radantrieb nicht mehr ein- oder ausschalten, muss der entsprechende Bowdenzug nachgestellt werden. Achtung! Bowdenzug nur bei ausgeschaltetem Motor verstellen. 1. Drehen Sie das Verstellteil am Bowdenzug in Pfeilrichtung ( 16). 2. Zum Prüfen der Einstellung den Motor starten und den Radantrieb einschalten. 3. Funktioniert der Radantrieb immer noch nicht, muss der Rasenmäher zu einer Servicestelle oder einem autorisierten Fachbetrieb gebracht werden. Antriebsritzel ölen Antriebsritzel auf Getriebewelle von Zeit zu Zeit mit Sprühöl einölen Das Getriebe des Radantriebs ist wartungsfrei. 441 113_a 17 D Benzin-Rasenmäher Lagerung Achtung - Explosionsgefahr! Gerät nicht bei offenen Flammen oder Hitzequellen lagern. Motor auskühlen lassen Zum platzsparenden Aufbewahren den Oberholm abklappen ( 17) Gerät trocken und unzugänglich für Kinder und unbefugte Personen lagern Benzintank entleeren Zündkerzenstecker ziehen Reparatur Reparaturarbeiten dürfen nur Servicestellen und autorisierte Fachbetriebe durchführen. Entsorgung Ausgediente Geräte, Batterien oder Akkus nicht über den Hausmüll entsorgen! Verpackung, Gerät und Zubehör sind aus recyclingfähigen Materialien hergestellt und entsprechend zu entsorgen. EG-Konformitätserklärung siehe Seite Garantie 18 Original-Betriebsanleitung D Hilfe bei Störungen Achtung! Messer und Motorwelle dürfen nicht ausgerichtet werden. Störung Motor springt nicht an Lösung ▪▪ Benzin einfüllen ▪▪ Gashebel auf „Start“ stellen ▪▪ Motorschalterbügel zum Oberholm drücken ▪▪ Zündkerzen prüfen, eventuell erneuern ▪▪ Luftfilter reinigen ▪▪ Mähmesser frei drehen Motorleistung lässt nach ▪▪ Auf gemähter Fläche starten ▪▪ Schnitthöhe korrigieren ▪▪ Mähmesser nachschleifen / erneuern ▪▪ Auswurfkanal/Gehäuse reinigen ▪▪ Luftfilter reinigen Unsauberer Schnitt Grasfangbox füllt nicht ausreichend ▪▪ Arbeitsgeschwindigkeit verringern ▪▪ Mähmesser nachschleifen / erneuern ▪▪ Schnitthöhe korrigieren ▪▪ Schnitthöhe korrigieren ▪▪ Rasen abtrocknen lassen ▪▪ Mähmesser nachschleifen / erneuern ▪▪ Gitter der Grasfangbox säubern Radantrieb funktioniert nicht ▪▪ Auswurfkanal/Gehäuse reinigen ▪▪ Bowdenzug nachstellen ▪▪ Keilriemen defekt ▪▪ Kundendienst-Werkstatt aufsuchen ▪▪ Schmutz in Radantrieb, Zahnriemen und Getriebe entfernen ▪▪ Freiläufe (Antriebsritzel auf Getriebewelle) mit Sprühöl ölen Räder drehen bei eingeschal- ▪▪ Radschrauben nachziehen tetem Getriebe nicht ▪▪ Radnabe defekt ▪▪ Keilriemen defekt Gerät vibriert außergewöhnlich stark ▪▪ Kundendienst-Werkstatt aufsuchen ▪▪ Mähmesser überprüfen Bei Störungen, die nicht in dieser Tabelle aufgeführt sind oder die Sie nicht selbst beheben können, wenden Sie sich bitte an unseren zuständigen Kundendienst 441 113_a 19 GB Petrol lawnmower About this handbook Product description Read through these operating instructions before starting up the machine. This is a prerequisite for safe and trouble-free working. Before use, familiarize yourself with the control elements and the correct use of the machine. This document describes various models of petrol lawnmowers. You should save these instructions, and also pass them on to any subsequent users. Observe the safety and warning signs on the machine. Pictogram description Please identify your particular model in the product illustrations and descriptions of the various options. Proper use This equipment is intended for moving lawns on private property and should be used on dry grass only. Use for any other purpose is considered improper use. Caution! Incorrect use Strict following of these warning alerts can prevent injury to persons and/or materials. This lawnmower is not suitable for use in public spaces, parks, sports grounds, farming or forestry Special information for better understanding and handling. The camera symbol refers to illustrations Contents About this handbook..................................................... 20 Safety devices must not be removed or bypassed Do not use the equipment on damp grass, or if it is raining The equipment is intended for domestic use only Safety and protection devices Caution - Risk of injury! Safety/protection devices should not be disabled! Product description....................................................... 20 Safety and protection devices...................................... 20 Safety brake handle Safety instructions........................................................ 22 The lawnmower is equipped with a safety brake. Release the brake handle if there is an immediate danger. Assembly...................................................................... 23 Fuelling......................................................................... 23 Initial startup................................................................. 24 Maintenance and care.................................................. 26 Lawnmower without blade coupling: Mower blade is stopped Motor is stopped Repairs......................................................................... 27 Deflector plate Storage......................................................................... 27 The deflector plate provides protection against any projectiles thrown up. Disposal........................................................................ 27 EC declaration of conformity........................................ 27 Faults and remedies..................................................... 28 Warranty....................................................................... 29 20 Translation of original user instructions GB A IT I H C H HI AC HIT 1 Starter cable 9 Cutting height adjustment 2 Start, stop* 10 Vario transmission* 3 Wheel drive 11 Operating instructions 4 Safety brake handle 12 Outlet shaft insert 5 Ergonomic height adjustment 13 Cover flap 6 Fill level indicator 14 Mulch kit 7 Deflector plate 15 Quick guide 8 Grass catcher *depending on version Symbols on the device Caution! Be particularly careful when handling. Before initial startup read the instructions for use! Keep other people out of the danger area! Keep hands and feet away from the cutting gear! Remove the spark plug connector before working on the cutting gear. Quick guide Release the motor brake. Quick guide Switch on the wheel drive. Quick guide Remote throttle control Start / Stop. Keep away from the danger area. 441113_a 21 GB Additional symbols on lawnmowers with Electrostart Caution! Risk of electric shock. Keep the connection line away from the mower blades. If the cable is damaged, or when carrying out maintenance work, always disconnect the equipment from the mains supply. Safety instructions Hearing protection When working on slopes Always make sure the unit is in a safe position. Always mow across slopes, never up or down. Never mow slopes with a gradient of more than 20°. Take special care when turning. Only work when there is adequate daylight or proper artificial lighting Caution! Keep body, body parts and clothing away from the cutter area. Use the equipment only if it is in correct operating condition! Observe country-specific ordinances for operating times Caution - Risk of injury! Never leave the unit unattended when it is ready for operation Safety/protection devices should not be disabled! Mow only with a sharp cutting blade Caution - risk of fire! Never operate the unit with damaged safety devices/safety grilles After fuelling, do not store the machine in buildings where the petrol fumes might come into contact with naked flames or sparks! Never operate the unit without completely installed safety devices (e.g., baffle plate, grass catchers) Keep the area around the motor, exhaust, battery case, and fuel tank clear of grass cuttings, petrol and oil. Warning - risk of fire! Petrol and oil are highly flammable! Keep other persons away from the danger area. Never mow while persons, especially children or pets are nearby. The unit operator or user is responsible for accidents involving other persons and their property. Children or persons who are not familiar with these operating instructions are not permitted to use the unit. Observe the local regulations governing the minimum age of the operator. Do not operate the unit when under the influence of alcohol, drugs or medication. Wear suitable work clothing. Long trousers Firm and slip-resistant footwear 22 Petrol lawnmower Prior to each use, check the unit for damage and have damaged parts replaced before using again. Only replace used or damaged blades and mounting bolts as a set to prevent imbalance Before starting the motor, disengage all blades and drives Shut down the motor, wait until the unit comes to a standstill, and remove the ignition key and pull the spark plug connector When leaving the unit When inspecting, cleaning or working on the unit After faults occur Before loosening blockages Before eliminating stoppages After contact with foreign bodies Before refuelling If malfunctions or unusual vibrations occur on the unit (immediate inspection required) Inspect for damage to the lawn mower and perform the necessary repairs before starting again and working with the lawn mower. Translation of original user instructions GB Attach the spark plug connector and start the motor After rectification of the malfunction (see troubleshooting table) and inspection of the unit After cleaning the unit Do not start the motor if you are standing in front of the discharge chute Check the terrain to be mowed completely and carefully and remove all foreign bodies. Be especially careful when turning the lawn mower around or when pulling the lawn mower towards you Do not mow over obstacles (e.g. branches, roots of trees) Only remove cuttings when the motor is at a standstill. Switch the motor / cutting blades off when an area other than the area to be mowed is crossed Never lift or carry the unit while the motor is running. Do not eat or drink while refuelling or adding motor oil Do not breathe in fuel vapours Guide the unit at walking speed Warning - risk of fire! Petrol and oil are highly inflammable! Always observe the operating instructions supplied by the motor manufacturer. Operating fluids Petrol Motor oil Grade Regular petrol / unleaded Refer to the motor manufacturer's instructions Filling capacity Refer to the motor manufacturer's instructions about 0.6 l Safety Warning! Never leave a motor running in an enclosed space. Toxic hazard! Store petrol and oil in suitable containers Only fill or empty petrol and oil outdoors when the motor is cold Before use, make sure the seat of nuts, screws, and bolts is firm. Never fill petrol or oil when the motor is running Close the throttle valve* when running out the motor. If the motor has a fuel stopcock, it should be closed after mowing Do not smoke while refuelling *depending on versionMove the machine at walking speed Before use, ensure that all nuts, screws and bolts are securely fastened. Assembly Follow the accompanying assembly instructions. Caution! The equipment can be used only after complete assembly. Fuelling Do not overfill the fuel tank (petrol expands) Do not open the fuel tank while the motor is running or if the motor is hot Replace damaged fuel tank or fuel tank cap Always close the fuel tank tightly If fuel overflows never attempt to start the motor. Instead, move the machine away from the fuel contaminated area. Avoid any attempt to start the ignition until the fuel vapours have evaporated. If motor oil has leaked out: Do not start the motor Soak up the leaked motor oil using an oil binding agent or rag and dispose of it properly Clean the unit Fill the lawnmower with fuel before the initial startup. 441113_a 23 GB Used oil should not be: Petrol lawnmower Central adjustment ( 1) disposed of with domestic rubbish 1. To release the lever, press to the side and hold. poured into the sewage system, drains, or onto the ground 2. Push the lever to the left or right to select the desired cutting height. We recommend to collect the used oil in a closed container and to deliver it to a suitable recycling or service station. Adding petrol 1. Unscrew the tank cap, and keep in a clean place. 2. Pour in petrol using a funnel. 3. Firmly replace the cap on the filler opening and clean it. 3. Let the lever click into position. 4. Check that all wheels are set to the same position. Mowing with the grass catcher Caution - Risk of injury! Attach/detach the grass catcher only when the motor is switched off and the mower blade has come to a standstill. Adding motor oil 1. Lift the deflector plate and insert the grass catcher in the holders ( 3). 1. Unscrew the filler cap, and keep in a clean place. Fill level indicator 2. Pour in oil using a funnel. The fill level indicator is pushed upward by the air flow when mowing ( 2a). 3. Firmly replace the cap on the filler opening and clean it. Initial startup Caution! The equipment should not be used if the cutting gear and/or fastenings are loose, damaged or worn. Carry out a visual inspection before each startup. The camera symbol on the following page refers to the illustrations on Page 4–6. Adjusting the cutting height If the grass catcher is full, the indicator points to the box ( 2b). The grass catcher must be emptied. Emptying the grass catcher 1. Lift the deflector plate. 2. Unhook the grass catcher and pull backward to remove ( 3). 3. Empty the grass catcher. 4. Lift the deflector plate and insert the grass catcher in the holders ( 3). Mowing without the grass catcher Caution - Risk of injury! Caution! Adjust the cutting height only with the motor switched off and when the mower blade has come to a standstill. Only work without the grass catcher if the deflector plate torsion spring is working correctly. ▪▪ Always set all the wheels to the same cutting height. The deflector plate is held to the mower housing by spring force. This causes the mowed grass to be thrown backward and downward. ▪▪ Cutting height adjustment depends on the particular model. 24 Translation of original user instructions GB Mulching with the mulch kit 3. Insert the side outlet duct ( When mulching, the grass cuttings are not collected, but are left on the lawn. The grass mulch prevents the soil from drying out, and supplies it with nutrients. 4. Slowly close the cover. The cover holds the side outlet duct and prevents it falling out. The best results are obtained by cutting back regularly by about 2 cm. Only young grass with a soft leaf texture decomposes quickly. Removing the side outlet Grass height before mulching: 8 cm maximum Grass height after mulching: 4 cm minimum Adapt your walking pace to the mulching process, do not walk too fast. 2. Remove the side outlet and close the cover ( 6/2). Setting the handle height (optional) Clamp adjustment 7). 2. Move the bar to the desired position Caution - Risk of injury! Insert/remove the mulch kit only with the motor switched off and when the mower blade has come to a standstill. 1. Remove the grass catcher ( 6/1). 1. Fold up the side outlet cover and hold it ( 1. Hold the bar and loosen both clamps ( Inserting the mulch kit 3). 2. Lift the deflector plate and insert the mulch kit in the outlet shaft ( 4). It must lock into place. If the mulch kit is not locked into position, both the mulch kit and the mower blade may be damaged. 3. Lock the clamps. Starting the motor Caution - risk of poisoning! Never leave a motor running in an enclosed space. Caution - Risk of injury! Do not tilt the lawnmower while starting. ▪▪ Start the motor only when the blade is mounted (the blade acts as a flywheel mass) ▪▪ Do not change the motor controller settings Removing the mulch kit Do not start the equipment if the outlet shaft is not covered by one of the following parts: 1. Lift the deflector plate. 2. Release the lock on the mulch kit ( 3. Pull out the mulch kit ( 6/2). 5/1). Grass catcher Deflector plate 5/2). Mowing with the side outlet duct (optional) Mulch kit Caution - risk of injury! Be particularly careful when operating the starter switch - follow the manufacturer's instructions Attach/detach the side outlet only when the motor is switched off and the mower blade has come to a standstill. Start the lawnmower where the grass is shorter Keep your feet at a safe distance from the cutting gear Inserting the side outlet 1. Remove the grass catcher and insert the mulch kit. 2. Fold up the side outlet cover and hold it ( 441113_a 6/1). 25 GB Petrol lawnmower Starting manually To increase the speed, pull the lever ( towards ( 12/2) with remote throttle control To lower the speed, pull the lever ( ( 12/1) 1. Set the throttle lever to position max ( 8/1). 2. Pull in the safety brake handle on the handlebar and hold it ( 9) - the brake handle does not lock. 3. Pull out the starter cord sharply, then allow it to slowly rewind ( 10). 12) 12) towards Always adjust the ground speed to suit the current ground and lawn conditions. Maintenance and care Caution - Risk of injury! 4. When the motor has warmed up (about 15–20 seconds), set the throttle lever to a position between min and max. ▪▪ Before carrying our any care or maintenance work, always switch off the motor and pull out the spark plug connector. Turn the motor off ▪▪ The motor may continue running. After switching off, make sure the motor has stopped turning. 1. Set the throttle lever to position min ( 2. Release the safety brake handle ( - The motor is switched off. 8/2). 14). ▪▪ Always wear working gloves when carrying out maintenance or repair work. All nuts, bolts, and screws must be tightened firmly Caution - danger of serious cut injuries! The unit must be in a safe working condition The motor may continue running. After switching off, make sure the motor has stopped turning. Allow the motor to cool off before the machine is shut down Wheel drive ( Regularly check the grass catcher system for correct function and wear. 12) Caution! Engage the transmission only when the motor is running. Switching on the wheel drive Cleaning the unit after every use Do not hose down the unit with water Water ingress can lead to malfunctions (ignition system, carburettor) Regularly check the cutter blade for damage 1. Press the transmission control handle against the handlebar and hold it ( 11) – the transmission control handle does not lock. - The wheel drive is switched on. Always replace defective silencers Switching off the wheel drive the spark plug must be facing upward ( 1. Release the transmission control handle ( - The wheel drive is switched off. 13). Vario transmission (Speed Control) (optional) The Vario transmission allows continuous variation of the ground speed of the lawnmower. Caution! Operate the lever only when the motor is running. Operating the lever without the motor drive may damage the drive mechanism. 26 Tilting the lawnmower Depending on the motor manufacturer: 15) Follow the operating instructions of the motor manufacturer! Resharpening/replacing the mower blade Blunt or damaged blades should be resharpened / replaced only at a service point or by an authorised specialist Resharpened blades must be rebalanced Translation of original user instructions GB Caution! Blades that have not been rebalanced can cause serious vibrations, and may result in damage to the lawnmower. Care of the motor Changing the motor oil 3. If the wheel drive is still not working, the lawnmower must be taken to a service point or an authorised specialist. Lubricating the drive pinion From time to time, lubricate the drive pinion on the transmission shaft The wheel drive gearing is maintenance free. 1. Have a suitable container ready to collect the used oil. Repairs 2. Drain or suction off all the oil through the oil filler opening. Repairs should be carried out only by a service point or an authorised specialist. Dispose of used motor oil in a manner that is compatible with the environment! We recommend to collect the used oil in a closed container and to deliver it to a suitable recycling or service station. Used oil should not be Storage Caution - risk of explosion! Do not store the equipment where there are naked flames or heat sources. ▪▪ disposed of with domestic rubbish Allow the motor to cool down ▪▪ poured into the sewage system or drains To save storage space, fold the handlebar down ( 17) ▪▪ poured out onto the ground Changing the air filter Follow the instructions of the manufacturer of the motor. Changing the spark plug Follow the instructions of the manufacturer of the motor. Wheel drive Adjusting the Bowden cable If the wheel drive can no longer be switched on or off while the motor- is running, the related Bowden cable needs to be adjusted. Caution! Adjust the Bowden cable only when the motor is switched off. 1. Turn the adjuster on the Bowden cable in the direction of the arrow ( 16). Store the equipment in an area which is kept dry, and which cannot be accessed by children or unauthorised persons Store the starter battery where it will be protected from frost Recharge the starter battery from time to time Drain the fuel tank Pull out the spark plug connector Disposal Do not dispose of old equipment, batteries or accumulators as household waste! Machine, packaging, and accessories were made with recyclable materials, and should be disposed of accordingly. EC declaration of conformity see side 2. To test the cable setting, switch on the motor and switch on the wheel drive. 441113_a 27 GB Petrol lawnmower Faults and remedies Caution! The motor shaft and mower blade should not be aligned. Fault The motor does not start Solution ▪▪ Add petrol ▪▪ Set throttle lever to "Start" ▪▪ Press the motor switch at the handlebar ▪▪ Check the spark plugs and replace if necessary. ▪▪ Clean the air filter. ▪▪ Spin the mower blade Motor power reduced ▪▪ Start on a surface already mowed ▪▪ Adjust the cutting height ▪▪ Resharpen / replace the mower blade ▪▪ Clean the outlet shaft/housing ▪▪ Clean the air filter. Lawnmower cuts unevenly Grass catcher does not fill sufficiently ▪▪ Reduce the working speed ▪▪ Resharpen/replace the mower blade ▪▪ Adjust the cutting height ▪▪ Adjust the cutting height ▪▪ Allow the lawn to dry ▪▪ Resharpen/replace the mower blade ▪▪ Clear the grille on the grass catcher Wheel drive does not work ▪▪ Clean the outlet shaft/housing ▪▪ Adjust the Bowden cable ▪▪ V-belt faulty ▪▪ Contact the service-workshop ▪▪ Clean any dirt away from the wheel drive, toothed belt and gearing ▪▪ Lubricate the freewheels (drive pinion on drive shaft) with spray oil Wheels do not turn when the ▪▪ Retighten the wheel bolts transmission is switched on ▪▪ Wheel hub faulty ▪▪ V-belt faulty ▪▪ Contact the service-workshop Unusually strong vibrations in ▪▪ Check the mower blade the lawnmower For faults not listed in this table, or which you cannot resolve by yourself, please contact our customer service. 28 Translation of original user instructions GB Warranty 441113_a 29