1
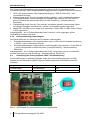
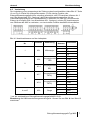
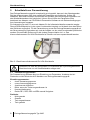
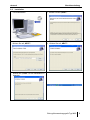
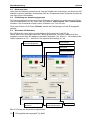
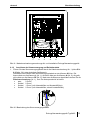
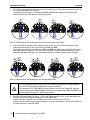
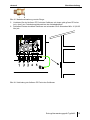
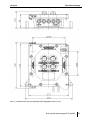
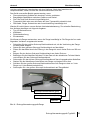
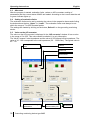
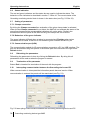
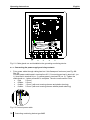
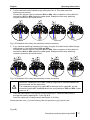
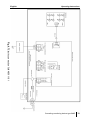
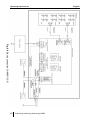
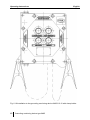
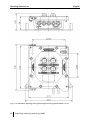
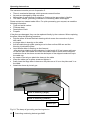
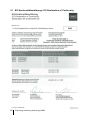
Typ/Type 8485 Erdungsüberwachungsgerät Grounding Monitoring Device Betriebsanleitung Operating Instruction Inhaltsverzeichnis 1 2 3 4 5 6 7 8 9 Sicherheitshinweise ........................................................................................................................... 3 Normenkonformität ............................................................................................................................ 3 Kennzeichnung und technische Daten ............................................................................................ 4 Funktion ............................................................................................................................................... 5 4.1 Allgemein ................................................................................................................................. 5 4.2 Anwendung ............................................................................................................................. 5 4.3 Funktionsbeschreibung ........................................................................................................... 5 4.4 Umstellung des Erdungsobjektes LKW / Schienenfahrzeug .................................................. 6 4.5 Verdrahtung............................................................................................................................. 7 Schnittstelle zur Parametrierung ...................................................................................................... 8 5.1 Parametrierungssoftware ........................................................................................................ 8 5.2 Installation ............................................................................................................................... 9 5.3 Nach dem Start ..................................................................................................................... 10 5.4 Einstellung der Auswertungsgrenzen ................................................................................... 10 5.5 Werte des A/D-Wandlers ...................................................................................................... 10 5.6 Anzeige der Zustände ........................................................................................................... 11 5.7 Einstellung der Parametern .................................................................................................. 11 5.8 Laden der Parameter ............................................................................................................ 11 5.9 Programm beenden .............................................................................................................. 11 5.10 Unterbrechung der Kommunikation zwischen 8485 und PC ................................................ 11 Installation und Montage ................................................................................................................. 12 6.1 Elektrische Montage.............................................................................................................. 12 6.2 Mechanische Montage .......................................................................................................... 18 Inbetriebnahme ................................................................................................................................. 22 7.1 Einstellung ............................................................................................................................. 22 7.2 Betrieb- und Betriebszustände.............................................................................................. 22 Reparatur und Instandhaltung ........................................................................................................ 22 Zubehör und Ersatzteile................................................................................................................... 24 Content 1 2 3 4 5 6 7 8 9 Safety instructions ........................................................................................................................... 25 Conformity to standards .................................................................................................................. 25 Marking and technical data ............................................................................................................. 26 Function ............................................................................................................................................. 27 4.1 General .................................................................................................................................. 27 4.2 Application ............................................................................................................................. 27 4.3 Function description .............................................................................................................. 27 4.4 Setting of the sensed tank type............................................................................................. 28 4.5 Connections .......................................................................................................................... 29 Interface for configuration ............................................................................................................... 30 5.1 The configuration of software ................................................................................................ 30 5.2 Installation ............................................................................................................................. 31 5.3 After start ............................................................................................................................... 32 5.4 Setting of evaluation limits .................................................................................................... 32 5.5 Value on the converter .......................................................................................................... 32 5.6 Status indication .................................................................................................................... 33 5.7 Setting of parameters ............................................................................................................ 33 5.8 Refreshing the parameters ................................................................................................... 33 5.9 Termination of the parameter ................................................................................................ 33 5.10 Interrupting communication between the Grounding device and PC ................................... 33 Installation and assembly ................................................................................................................ 34 6.1 Electrical connection ............................................................................................................. 34 6.2 Mechanical Mounting ............................................................................................................ 40 Commissioning ................................................................................................................................. 44 7.1 Setup ..................................................................................................................................... 44 7.2 Operation and operational states .......................................................................................... 44 Maintenance and repair ................................................................................................................... 44 Accessories and spare parts .......................................................................................................... 46 EG-Konformitätserklärung / EC-Declaration of Conformity................................................................ 47 2 Grounding monitoring device type 8485 deutsch 1 Betriebsanleitung Sicherheitshinweise In diesem Kapitel sind die wichtigsten Sicherheitsmaßnahmen zusammengefasst. Es ergänzt die entsprechenden Vorschriften, zu deren Studium das verantwortliche Personal verpflichtet ist. Bei Arbeiten in explosionsgefährdeten Bereichen hängt die Sicherheit von Personen und Anlagen von der Einhaltung aller relevanten Sicherheitsvorschriften ab. Das Montage- und Wartungspersonal trägt deshalb eine besondere Verantwortung. Die Voraussetzung dafür ist die genaue Kenntnis der geltenden Vorschriften und Bestimmungen. Bei Errichtung und Betrieb ist Folgendes zu beachten: Es gelten die nationalen Montage- und Errichtungsvorschriften (z.B. EN 60079-14) Die Erdungsüberwachungsgeräte Typen 8485 sind für den Betrieb in Zone 1, Zone 2 oder außerhalb explosionsgefährdeter Bereichen zu installieren. Der eigensichere Überwachungsstromkreis (Erdungszange) darf an metallische Objekte wie Tankfahrzeuge oder Schienenfahrzeug angeschlossen werden. Die Meldekontakte der Erdungsüberwachungsgeräte dürfen nur an Geräte angeschlossen werden, in denen keine höheren Spannungen als AC 253 V (50 Hz) auftreten können. Bei der Verladung von brennbaren Flüssigkeiten oder Gasen ist darauf zu achten, dass Schläuche oder Verladearme erst nach einer ordnungsgemäßen elektrostatischen Erdung mit einem Tankfahrzeug verbunden werden. Kennwerte, Bemessungsbetriebsbedingungen, Temperaturklasse und Explosionsschutz der Typ- und Datenschilder Die nationalen Sicherheits- und Unfallverhütungsvorschriften Die allgemein anerkannten Regeln der Technik Die Sicherheitshinweise dieser Betriebsanleitung Beschädigungen können den Explosionsschutz aufheben. Zusätzliche Hinweisschilder auf dem Gerät Verwenden Sie das Gerät bestimmungsgemäß, nur für den zugelassenen Einsatzzweck (siehe „Funktion“). Fehlerhafter oder unzulässiger Einsatz sowie das Nichtbeachten der Hinweise dieser Betriebsanleitung schließen eine Gewährleistung unsererseits aus. Umbauten und Veränderungen am Gerät, die den Explosionsschutz beeinträchtigen, sind nicht gestattet. Das Gerät darf nur in unbeschädigtem, trockenem und sauberem Zustand eingebaut und betrieben werden Vor dem Öffnen des Erdungsüberwachungsgeräts in explosionsgefährdeten Bereichen das Gerät spannungsfrei schalten und eine Minute warten. 2 Normenkonformität Die Erdungsüberwachungsgeräte Typen 8485 entsprechen den folgenden Normen bzw. der folgenden Richtlinie: Richtlinie 94/9/EC EN 60079-0 EN 60079-1 EN 60079-11 Die aktuelle Baumusterprüfbescheinigung können Sie vom Internet herunterladen. Erdungsüberwachungsgerät Typ 8485 3 Betriebsanleitung 3 deutsch Kennzeichnung und technische Daten Hersteller R. STAHL Typbezeichnung CE-Kennzeichnung Ex-Kennzeichnung 8485/11*-31 c0158 e Kennzeichnung Explosionsschutz Prüfstelle und Bescheinigungsnummer Schutzart Nennspannung UN Leistungsaufnahme Zange Ausgang meldekontakt Maximale Belastung II 2G Ex d [ib] IIB T4 FTZÚ 09 ATEX 0059X IP 65 230 ± 10 V 10 VA Verzinkt , Kontakt aus Kupfer Potentialfreier Wechsler/Kanal Wechsler 230 V AC / 3 A Wechsler 230 V DC / 0.25 A 40 V DC / 3 A 10 V DC / 100 mA Minimale Belastung Kabel Normal Kabel (10 m) Spiralkabel (10 m) Maximale Länge Klemmbereich Kabelverschraubung Umgebungsbedingungen Geräte: Betriebstemperatur Lagertemperatur Kabel: Normal Kabel Spiralkabel Abmessungen Gehäuse Material Gewicht 8485/111-31 8485/112-31 Relative Feuchte (keine Betauung) ÖLFLEX 540 P 3Gx2,5 ÖLFLEX 540 P 3Gx2,5 20 m 6 … 12 mm -50...+60 °C *) -50...+60 °C -50...+60 °C) -30...+60 °C) 126 x 351 x 325 mm Druckfest gekapseltes Gehäuse aus Aluminium 10,2 Kg 10,9 Kg < 95 % Weitere technische Daten sind dem aktuellen Datenblatt zu entnehmen. *) Bei Temperatur keiner als -40 °C muss das Gerät immer eingeschaltet bleiben. Bei anderen vom Standard abweichenden Betriebsbedingungen nehmen Sie bitte Rücksprache mit dem Hersteller. 4 Erdungsüberwachungsgerät Typ 8485 deutsch 4 Funktion 4.1 Allgemein Betriebsanleitung Das Erdungsüberwachungsgerät dient dazu, eine sichere Be- oder Entladung von brennbaren Flüssigkeiten in Tanklastwagen oder Schienenfahrzeuge in explosionsgefährdeten Bereichen sicherzustellen. Das Gerät leitet die durch die Verladung der Flüssigkeiten oder Stäube entstehenden elektrostatischen Aufladungen sicher ab. Der Ableitwiderstand wird während der Verladung ständig überwacht und der Zustand der elektrostatischen Erdung über einen grünen und roten Leuchtmelder sowie potentialfreien Kontakten signalisiert. Das Gerät kann für den Einsatz an Tanklastwagen konfiguriert werden. In diesem Betriebszustand ist das Gerät in der Lage, die Verbindung der Erdungszange zu einem Fahrzeug von der zu der Verladeplattform zu unterscheiden. Fehlbedienungen werden dadurch verhindert. 4.2 Anwendung Die Erdungsüberwachungsgeräte dienen: 1. Zur Überwachung des Stromkreises, bestehend aus Tank und Betankungs/Entleerungsstelle. 2. Zur Erdung des Tanks, um die statische Elektrizität über einen definierten Widerstand (100 kΩ) gegen Erde abzuleiten. 3. Zur Kontrolle der korrekten Befestigung der Erdungszange am geerdeten Objekt Der Tank wird über die Erdungszange und ein maximal 20 m langes Kabel an das Erdungsüberwachungsgerät angeschlossen. Das Erdungsüberwachungsgerät unterscheidet drei Anschlusszustände der Erdungszange: korrekter Anschluss an den Tank Anschluss an ein geerdetes metallisches Teil der Verladeeinrichtung Zange im unbenutzten Zustand ohne Verbindung zur Erde Das Erdungsüberwachungsgerät unterscheidet zusätzlich die korrekte Abfolge der Zustände. Eine Verladung erfolgt in folgenden Schritten: Das Fahrzeug fährt in die Verladeplattform ein. Das Erdungsüberwachungsgerät wird über die Zange an den Erdungspunkt des Fahrzeugs angeschlossen. Das Gerät verifiziert die Verbindung zum Fahrzeug (nur LKW) mit Hilfe einer kapazitiven Messung. Gleichzeitig wird das Fahrzeug über einen Widerstand von 100 kΩ elektrostatisch geerdet. Der Ableitwiderstand wird laufend überwacht. Der Anschluss des Verladearms an das Fahrzeug führt zu einer direkten Erdung des Fahrzeugs. Diese direkte Erdung nach erfolgreicher Identifizierung des Fahrzeugs wird jedoch durch das Gerät nicht als Fehlbedienung interpretiert. 4.3 Funktionsbeschreibung 4.3.1 Tanklastwagen (LKW) Bei Anwendung der 8485 werden zwei Parameter der elektrostatischen Erdung – Impedanz und Ohmscher Widerstand ausgewertet. Liegt der Wert zwischen 50 Ω und 3000 Ω, dann entscheidet die Elektronik, dass das die Erdung vom elektrostatischen Gesichtspunkt aus in Ordnung ist und der grüne Leuchtmelder leuchtet. Liegt der Wert der geprüften Impedanz unter 50 Ω, wertet das 8485 diesen Zustand als direkte Verbindung mit dem Erdungssystem der Verladeeinrichtung und der rote Leuchtmelder leuchtet. Diese Bedingung dient dazu den fehlerhaften Anschluss des Erdungsüberwachungsgerätes auszuschließen, falls die Zange z.B. direkt an die Stahlkonstruktion der Verladeeinrichtung angeschlossen wird. Erdungsüberwachungsgerät Typ 8485 5 Betriebsanleitung deutsch Der Zustand des Erdungsüberwachungsgerätes wird durch die Leuchtmelder auf der Frontseite angezeigt. Das Erdungsüberwachungsgerätes kann folgende Zustände annehmen: 1 2 3 4 5 Tank nicht angeschlossen, oder Impedanzbedingung < 3000 Ω nicht erfüllt – roter Leuchtmelder leuchtet. Erdungszange direkt über die Verladeeinrichtung geerdet – roter Leuchtmelder leuchtet. Tank angeschlossen und die Impedanz des Systems liegt zwischen 50 Ω bis 3000 Ω – grüner Leuchtmelder leuchtet oder blinkt (je nach Einstellung – Werkseinstellung: Dauerlicht). Erdungszange direkt über den Tank und den Verladearm geerdet, nachdem das Objekt mit richtiger Impedanz erkannt wurde – grüner Leuchtmelder leuchtet oder blinkt. Relais RE1 und RE2 sind zu Zange (K1) zugewiesen. Relais RE3 und RE4 sind zu Zange 2 (K2) zugewiesen. Ausgangsrelais – nur im Falle entsprechend den Punkten 3 und 4 angezogen, grüner Leuchtmelder leuchtet oder blinkt. 4.3.2 Schienenfahrzeug (Kesselwagen) Das Gerät 8485 kann nur zwischen zwei Zuständen unterscheiden: 1. 2. Eisenbahnkesselwagen nicht angeschlossen oder er erfüllt nicht die Impedanzbedingung < 3000Ω – roter Leuchtmelder leuchtet. Eisenbahnkesselwagen angeschlossen und die Impedanz liegt zwischen 0 Ω bis 3000 Ω – grüner Leuchtmelder leuchtet oder blinkt (je nach Einstellung – Werkseinstellung: Dauerlicht). Ausgangsrelais – nur im Falle entsprechend den Punkt 2 angezogen, grüner Leuchtmelder leuchtet oder blinkt (je nach Einstellung – Werkseinstellung: Dauerlicht). 4.4 Umstellung des Erdungsobjektes LKW / Schienenfahrzeug Zur Einstellung des zu erdenden Objektes (LKW oder Schienenfahrzeug) dient der DIPSchalter mit der Bezeichnung XC5. Folgende Tabelle beschreibt die Einstellung des DIPSchalters: Zange K1, DIP-Schalter 1 Zange K2, DIP-Schalter 2 Position der DIP-Schalter Tanklastwagen Tanklastwagen ON Schienenfahrzeug Schienenfahrzeug OFF Bild: 4.1 DIP-Schalter für die Einstellung des Erdungsobjektes 6 Erdungsüberwachungsgerät Typ 8485 deutsch 4.5 Betriebsanleitung Verdrahtung Die Verdrahtung muss entsprechend der Zeichnung des Anschlussbildes (siehe Bild: 6.7 Seite 16 und Fig. 6.8 Seite 28) durchgeführt werden. Für die richtige Funktion vom Erdungsüberwachungsgerät ist es unbedingt erforderlich, den PE Anschluss (Klemme Nr. 3 und 4 der Klemmleiste XC1 „Speisung“) des Erdungsüberwachungsgerätes mit der Potentialausgleichschiene der Verladeplattform zu verbinden. Im Falle von unzureichender Erdung ist es möglich PIN 4 von Klemmleiste XC1 „Speisung“ mit dem PE Anschlusspunkt vom Gehäuse des 8485 zu verbinden, um eine korrekte Funktion des 8485 sicherzustellen. Bild: 4.2 Anschlussklemmen auf der Leiterplatte KabelverschraubungKlemme Nr. 1 XC1 XC2 2 XC 4 XC 7 3 Hilfsenergie PIN Nummer Anschluss 1 L 2 N 3 PE 4 PE 1 NO Ausgangkontakt 2 RE2 3 XC3 COM NC 1 Ausgangkontakt 2 RE1 3 NC 1 NO Ausgangkontakt 2 RE4*) 3 1 XC 8 4 und 5 Anwendung Ausgangkontakt 2 RE3*) 3 Zange COM NO COM NC NC COM NO 1 Zange 1 2 GND 3 Zange 2 *) *) nur bei zweikanaligem Erdungsüberwachungsgerät 8485/112-31 Bemerkung: die Kabelverschraubungszuordnungs-Nr. können Sie vom Bild: 6.1 auf Seite 13 entnehmen. Erdungsüberwachungsgerät Typ 8485 7 Betriebsanleitung 5 deutsch Schnittstelle zur Parametrierung Das Erdungsüberwachungsgerät ist werkseitig so eingestellt, dass es in der überwiegenden Zahl der Anwendungen ohne eine zusätzliche Parametrierung funktioniert. Sollten Sie feststellen, dass trotz korrekten Anschlusses des Gerätes, die Erkennung der Impedanz und des Ableitwiderstandes nicht funktioniert, können Sie mit Hilfe des Parametrier-Sets bestehend aus Adapter und CD-ROM mit Parametrier-Software an die Rahmenbedingungen ihrer Anwendungen anpassen. Zur Ankopplung an den PC muss ein Adapter für die Infrarotschnittstelle verwendet werden. Diese IrDA-Schnittstelle ist in den roten Leuchtmelder integriert und ist damit ohne das Öffnen des Gehäuses zugänglich. Für die Parametrierung muss das Erdungsüberwachungsgerät mit der Stromversorgung verbunden sein und der Adapter vor den roten Leuchtmelder positioniert werden. Die maximale Entfernung für die sichere Kommunikation ist 1 m. Das Kommunikationsmodul für IrDA-Schnittstelle ist Zubehör und kann separat bestellt werden. Bild: 5.1 Das Kommunikationsmodul für IrDA-Schnittstelle Beachten Sie, dass die Konfiguration nur außerhalb des explosionsgefährdeten Bereichen bzw. nur mit Sondererlaubnis erfolgen darf 5.1 Parametrierungssoftware Die Parametrierung-Software dient zur Einstellung von Parametern, Auslesen des IstZustandes und die Werte des A/D Wandlers vom Erdungsüberwachungsgerät. Einstellungsparameter: obere Auswertungsgrenzen untere Auswertungsgrenzen Anschluss der Klemmen Blinkt, wenn der Tanker angeschlossen ist Kommunikationsport Relais RE1, RE2, RE3 und RE4 manuell freigeben Zustände: Nicht geerdet Geerdet Tank angeschlossen Tank geerdet 8 Erdungsüberwachungsgerät Typ 8485 deutsch 5.2 Betriebsanleitung Installation 1. CD-ROM starten 2. Klicken Sie auf „NEXT“. 3. Klicken Sie auf „NEXT“. 4. Klicken Sie auf „NEXT“. 5. Klicken Sie „Close“ um die Installation zu beenden. Erdungsüberwachungsgerät Typ 8485 9 Betriebsanleitung 5.3 deutsch Nach dem Start Nach dem die Software gestartet wurde, liest die Software alle Grenzwerte, die Werte des A/D Wandlers und den jeweiligen Zustand des 8485 ein. Entsprechend des Zustandes leuchtet der rote oder grüne Leuchtmelder. 5.4 Einstellung der Auswertungsgrenzen Die Auswertungsgrenzen kann man durch Eintragen der Werte in die entsprechenden Felder und durch das Klicken auf die Tasten über den Feldern „obere Grenze“ oder „untere Grenze“ einstellen. Die Grenzwerte müssen immer im Bereich von 7 bis 225 sein. Durch das Klicken auf die Taste „Refresh“ werden die Einstellungen auf das Erdungsgerät geladen. 5.5 Werte des A/D-Wandlers Der A/D-Wandler nimmt einen unveränderbaren Wert zwischen 0 und 255 an. Dieser Wert ist nur informativ Daten der Fahrzeug-Impedanz. Der Wert 0 bedeutet 0 Ohm Impedanz und der Wert 255 bedeutet unendliche Impedanz. Der Wert 10 - 160 entspricht der realen Impedanz ca. 50 ... 3000 Ohm. Der typische Wert beträgt 40…60 Einstellung der Auswertungsgrenzen Leuchtmelder Statuszeile Wert des Wandlers Parameter auf Gerät Speichern Bild: 5.2 Fenster der Parametrierungssoftware 10 Erdungsüberwachungsgerät Typ 8485 Wahl des Kommunikationsport Parameter deutsch 5.6 Betriebsanleitung Anzeige der Zustände Ein roter und grüner Leuchtmelder und das Feld Status Box zeigen den Zustand des Gerätes an. Das Verhalten der Anzeigeelemente ist aus dem Kapitel 7.2 Seite 22 zu entnehmen. In der Statuszeile ist der momentane Zustand des Erdungsüberwachungsgerätes eingetragen (siehe Bild: 5.2 Seite 10). 5.7 Einstellung der Parametern 5.7.1 Anschließen der Zangen Durch die Aktivierung des Feldes „Zange ist angeschlossen“ wird die Auswertung dieser Zange aktiviert. Wenn das Feld „Zange ist angeschlossen“ nicht aktiviert ist, wird das Gerät den Zustand der Erdungszange nicht auswerten und die entsprechenden Anzeigen werden inaktiv. Ebenso werden Leuchtmelder auf der Frontseite des Erdungsüberwachungsgerätes für die Zange deaktiviert. 5.7.2 Verhalten des grünen Leuchtmelders (Dauerlicht oder Blinken) Der grüne Leuchtmelder wird bei angeschlossenem, korrekt identifiziertem Tank blinken, wenn das Feld „Blinken“ aktiviert ist. Wenn das Feld „Blinken“ nicht aktiviert ist, dann erfolgt die Anzeige mittels Dauerlicht. 5.7.3 Kommunikationsport Infrarot (IrDA) Kommunikationsmodul für IR Kommunikation wird an den PC über die USB Schnittstelle angekoppelt. Die Auswahl des Kommunikationsports erfolgt über das Auswahlfeld im unteren Teil des Fensters rechts neben der Taste mit der Bezeichnung Refresh. 5.8 Laden der Parameter Die geänderten Parameter werden erst durch das erneute Laden in das Gerät übernommen. Das Laden der Parameter erfolgt durch Klick auf die Taste refresh. 5.9 Programm beenden Um das Programm zu Beenden bitte die Taste Ende per Mausklick betätigen. 5.10 Unterbrechung der Kommunikation zwischen 8485 und PC Dabei werden die Informationselemente inaktiv. Nach erneutem Aufbau der Kommunikation werden die Informationselemente wieder aktiv (siehe Bild: 5.3). Bild: 5.3 Unterbrechung der Kommunikation zwischen Erdungsüberwachungsgerät und PC Erdungsüberwachungsgerät Typ 8485 11 Betriebsanleitung 6 deutsch Installation und Montage Bei Montage, Bedienung und Wartung des Erdungsüberwachungsgerätes müssen die Bestimmungen entsprechend den gültigen Normen und Sicherheitsvorschriften eingehalten werden. 6.1 Elektrische Montage 6.1.1 Leitungsverlegung Die Leitungsverlegung muss so erfolgen, dass die für Ex e erforderlichen Kriech und Luftstrecken eingehalten sind. 6.1.2 Äußere Verdrahtung Die Anschlussleitungen sind mit der kompletten äußeren Isolation durch die Kabeleinführungen (KLE) in den Anschlussraum zu führen. Dabei ist sicherzustellen, dass der Leiteraußendurchmesser mit dem auf der KLE angegebenen Klemmdurchmesser übereinstimmt. Zur Sicherstellung der Dichtheit des Anschlussraumes sowie des Zugentlastungsschutzes der Anschlussstellen sind die Sechskantmuttern der KLE fest anzuziehen. Die Verlegung der Anschlussleitungen im Anschlussraum hat so zu erfolgen, dass die für den jeweiligen Leiterquerschnitt zulässigen minimalen Biegeradien nicht unterschritten werden und dass mechanische Beschädigungen der Leiterisolation an scharfkantigen oder beweglichen Metallteilen ausgeschlossen sind. Bitte beachten Sie folgende Punkte: Der Leiteranschluss ist mit besonderer Sorgfalt durchzuführen. Die Leiterisolation muss bis an die Klemmen heranreichen. Beim Abisolieren darf der Leiter selbst nicht beschädigt (eingekerbt) werden. Durch eine geeignete Auswahl der verwendeten Leitungen sowie durch die Art der Verlegung (Vermeidung von Leiterbündelungen) ist sicherzustellen, dass die maximal zulässigen Leitertemperaturen nicht überschritten werden. Es ist sicherzustellen, dass ein ausreichend guter Potentialausgleich zwischen Erdungsüberwachungsgerät und Verladeplattform besteht und eine Erdung beider Komponenten erreicht ist. Dies ist eine Grundvoraussetzung für die sichere Funktion des Erdungsüberwachungsgerätes. Gefahr durch offene Bohrungen und nicht benutzte Kabeleinführungen Durch offene Bohrungen und nicht genutzte Kabeleinführungen ist der Explosionsschutz nicht mehr gewährleistet. Offene Bohrungen und nicht genutzte Kabeleinführungen immer mit dafür zugelassenen Verschlussstopfen bzw. Stopfen verschließen. Bei der Auswahl bzw. Einsatz der Verschlussstopfen ist die Gewindeart und Größe zu beachten. 12 Erdungsüberwachungsgerät Typ 8485 deutsch Betriebsanleitung 1 2 3 4 5 Bild: 6.1 Kabelverschraubungszuordnungs-Nr. und Installation Erdungsüberwachungsgerät 6.1.3 Anschluss der Stromversorgung und Relaiskontakte 1. Führen Sie das Stromversorgungskabel durch die Kabelverschraubung Nr. 1 (siehe Bild: 6.2 Seite 13) in das druckfeste Gehäuse ein. Schließen Sie die Adern des Stromversorgungskabels an der Klemme XC1 an. Die braune Ader an die Klemme L (Nr. 1), die blaue Ader an die Klemme N (Nr. 2), die gelbgrüne Ader an die Klemme PE (Nr. 3). Nach dem Aufklemmen des Kabels ziehen Sie die Kabelverschraubung (Nr. 1), fest. Der Aderquerschnitt ist hierfür: starr 2.5 mm² flexibel 2.5 mm² flexibel 1.5 mm² (mit Aderendhülse und Kunststoffhülse) flexibel 2.5 mm² (mit Aderendhülse, ohne Kunststoffhülse) Bild: 6.2 Beschaltung des Stromversorgungskabels Erdungsüberwachungsgerät Typ 8485 13 Betriebsanleitung deutsch 2. Führen Sie das Kabel zur Auswertung des Kontaktes durch die Kabelverschraubung Nr.2 ein in das druckfeste Gehäuse ein. Schließen Sie das Kabel an die Klemme XC2 oder XC4 an. Nach dem Auflegen des Kabels ziehen Sie die Kabeldurchführung Nr.2 an. Bild: 6.3 Beispiele der Beschaltung eines Umschaltkontakts vom Relais 3. Sollten Sie beide Wechsler des Relais nutzen, führen Sie ein Vierleiterkabel durch die Kabelverschraubung Nr.2 zu den Klemmen XC2 und XC4. Das Kabel legen Sie auf die Klemmen XC2 und XC4 auf. Nach dem Anschluss der Adern des Kabels an die Klemmen XC2 und XC4 ziehen Sie die Kabelverschraubung Nr.2 an. Beispiele der Beschaltungen der Umschaltkontakte der Relais werden unten angeben. Bild: 6.4 Beispiele der Beschaltungen der Umschaltkontakte Vor der Installation des Kabels muss ein Dichtring zwischen der Gehäusewand und dem Einführungsgewindestück eingesetzt werden. Die Installation für Zange K2 ist erfolgt genauso wie für die Zange K1. Statt der Anschlussklemmen XC2 und XC4 müssen aber die Klemmen XC7 und XC8 „die Kabelverschraubung Nr.3“ verwendet werden. 4. Schieben Sie das Kabel für Zange 1 durch die Gehäuseöffnung Nr. 4 und das Kabel der Zange 2 durch die Gehäuseöffnung Nr. 5 (siehe Bild: 6.1). Stecken Sie den Kabelöse auf den Bolzen und ziehen Sie ihn fest (10 Nm). Schrauben Sie das Einführungsgewindestück (1) in das Gehäuse ein, dann den Druckring (2) festschrauben (siehe Bild: 6.5). 14 Erdungsüberwachungsgerät Typ 8485 deutsch Betriebsanleitung Bild: 6.5 Kabelverschraubung von der Zange 5. Verbinden Sie den äußeren PE Punkt des Gehäuses mit einem gelb-grünen PE-Leiter (min. 4mm²) zur Potentialausgleichsschiene der Verladeplattform. 6. Schließen Sie das druckfeste Gehäuse und schrauben Sie 8 Schrauben M8 x 16 (20-25 Nm) ein. 1 2 3 4 5 Bild: 6.6 Verbindung der äußeren PE Punkt des Gehäuses Erdungsüberwachungsgerät Typ 8485 15 Betriebsanleitung Bild: 6.7 Elektrische Anschlussplan bei 8485/111-31 16 Erdungsüberwachungsgerät Typ 8485 deutsch deutsch Betriebsanleitung Bild: 6.8 Elektrische Anschlussplan bei 8485/112-31 Erdungsüberwachungsgerät Typ 8485 17 Betriebsanleitung 6.2 deutsch Mechanische Montage Das Erdungsüberwachungsgerät wird vertikal montiert, damit der Anwender die Leuchtmelder ablesen kann. Das Gerät wird mit vier Schrauben M10 montiert (Anzugsmoment der Schrauben liegt bei 35-40 Nm). Für ordnungsgemäße Installation des 8485 ist es nötig den Installationsort nach Bild: 6.9 vorzubereiten. An das Erdungsüberwachungsgerät ist eine Zange mit normalen Kabel, Spiralkabel oder einer Aufrollautomatik angeschlossen. Dem Benutzer stehen zwei potentialfreie Relaisumschaltkontakte (Wechsler) zur Verfügung. Mit Hilfe des Wechsler-Kontaktes kann die korrekte Erdung überwacht werden und die Verladung bei inkorrekter Erdung abgebrochen werden. Bild: 6.9 Installation Erdungsüberwachungsgerät 18 Erdungsüberwachungsgerät Typ 8485 deutsch Betriebsanleitung Bild: 6.10 Installation Erdungsüberwachungsgerät 8485/112-31 mit Zangenhalter Erdungsüberwachungsgerät Typ 8485 19 Betriebsanleitung Bild: 6.11 Maßzeichnung Erdungsüberwachungsgerät 8485/111-31 20 Erdungsüberwachungsgerät Typ 8485 deutsch deutsch Betriebsanleitung Bild: 6.12 Maßzeichnung Erdungsüberwachungsgerät 8485/112-31 Erdungsüberwachungsgerät Typ 8485 21 Betriebsanleitung 7 7.1 deutsch Inbetriebnahme Einstellung Das Erdungsüberwachungsgerät ist werkseitig so eingestellt, dass es in der überwiegenden Zahl der Anwendungen ohne eine zusätzliche Parametrierung funktioniert. Sollten Sie feststellen, dass trotz korrekten Anschlusses des Gerätes, die Erkennung der Impedanz und des Ableitwiderstandes nicht funktioniert, können Sie mit Hilfe des Parametrier-Sets bestehend aus Adapter und CD-ROM mit Parametrier-Software an die Rahmenbedingungen ihrer Anwendungen anpassen. Zur Ankopplung an den PC muss ein Adapter für die Infrarotschnittstelle „IrDA-Schnittstelle“ verwendet werden. Diese IrDA-Schnittstelle ist in den roten Leuchtmelder integriert und ist damit ohne das Öffnen des Gehäuses zugänglich. Für die Parametrierung muss das Erdungsüberwachungsgerät mit der Stromversorgung verbunden sein und der Adapter vor den roten Leuchtmelder positioniert werden. Die maximale Entfernung für die Sichere Kommunikation ist 1 m. 7.2 Betrieb- und Betriebszustände Bevor Sie das Gerät in Betrieb nehmen, stellen Sie sicher, dass das Gerät vorschriftsmäßig im korrekten Steckplatz installiert wurde das Gerät nicht beschädigt ist die Kabel ordnungsgemäß angeschlossen sind Die Einstellung des DIP-Schalters XC5 auf LKW oder Schienenfahrzeug Simulieren Sie alle Situationen, die während des Betriebes auftreten können. Es handelt sich um folgende Situationen: Nr. Simulationsschritte Erwartung 1 Zange an dem Fahrzeug nicht angeschlossen Roter Leuchtmelder leuchtet 2 Zange an dem Fahrzeug angeschlossen Grüner Leuchter leuchtet 3 Zange an dem Fahrzeug angeschlossen und der Fahrzeug wird zusätzlich geerdet. Grüner Leuchter leuchtet 8 Reparatur und Instandhaltung Es wird empfohlen, Reparaturen an unseren Geräten ausschließlich durch die Fa. R.STAHL durchführen zu lassen. In Ausnahmefällen kann die Reparatur auch durch eine andere, zugelassene Stelle erfolgen. Präventive Kontrollen werden nach Bedarf des Anwenders durchgeführt, jedoch mindesten alle 6 Monate. Vor allem wird die Qualität aller Kontaktverbindungen und Einstellungen entscheidender Grenzwerte zur Überwachung der angeschlossenen Impedanz überprüft. Das Gehäuse ist eine explosionsgeschützte druckfeste Kapselung. Die Flächen der Gehäuse-Spalte sind gegen Korrosion und Wasser durch eine nichtverharze säurefreie Fett-Schicht zu schützen. Vor dem Öffnen des Gehäuses im Ex Bereich muss die Speisungsspannung ausgeschaltet und mindestens eine Minute gewartet werden. Kontrollieren Sie den Zustand des Gehäuses und Kabeleinführungen 1 x pro Jahr. Beseitigen Sie Staub und Schmutz von den Oberflächen des Gehäuses. Nach dem Öffnen des Gehäuses ist es notwendig die Schicht des Fettes wieder zu erneuen. Hinweis: Kommt es bei der Montage vom Deckel zum Versatz der Löcher für die Befestigungsschrauben zwischen dem Gehäuse und Deckel, lösen Sie bitte die Schrauben an den Angeln (ca. um zwei Drehungen). Dies erleichtert das genaue Wiederansetz des Deckels 22 Erdungsüberwachungsgerät Typ 8485 deutsch Betriebsanleitung und das nachfolgende Verschrauben mit dem Gehäuse. Nach dem festziehen der Hauptschrauben, ziehen Sie bitte die Scharnierschrauben auch fest. Das Gerät muss außer Betrieb gesetzt werden, wenn: Die mechanischen Schäden die korrekte Funktion verhindern. Beschädigte Spaltflächen zwischen Gehäuse und Deckel. Die Teile durch tiefe Korrosion beschädigt sind. Typenschild fehlt oder wenn die Daten auf dem Typenschild unleserlich sind. Das Kabel, Zange, Schutzleiter oder Anschlussleitung beschädigt sind. Wenden Sie sich bitte an unsere nächste Vertriebsniederlassung. Zur schnellen Bearbeitung Ihre Anfragen benötigen wir folgende Angaben: Typ und Seriennummer, Kaufdaten, Fehlerbeschreibung, Einsatzzweck Sie können die Zange austauschen, wenn die Zange beschädigt ist. Die Zange darf nur nach folgendem Verfahren ausgetauscht werden: Schneiden Sie den großen Schrumpf-/Isolierschlauch ab, die die Verbindung der Zange mit dem Kabel abdeckt. Setzen Sie den größeren Schrumpf-/Isolierschlauch auf das Kabel. Ziehen Sie das Kabel durch die Öffnung in der Zange bis es ein freies Ende von 200 mm hat. Bringen Sie den kleinen Schrumpf-/Isolierschlauch am freien Ende an. Befestigen Sie die Kabelöse über den Fuß der Öse auf den abisolierten Teil des Kabels und schieben Sie den Schrumpf-/Isolierschlauch. Schrumpfen Sie den kleinen Schrumpf-/Isolierschlauch über die angebrachten Kabelöse. Stecken Sie die Kabelöse auf den Bolzen der Zange und ziehen Sie ihn fest. Schieben Sie den großen Schrumpf-/Isolierschlauch auf die Zange so dass ca. ¾ der Zange und ¼ des Kabels bedeckt sind. Schrumpfen Sie den großen Schrumpf-/Isolierschlauch auf Zange/Kabel. Schrumpf-/Isolierschlauch (groß) Schrumpf-/Isolierschlauch (klein) Kabelöse Bild: 8.1 Erdungsüberwachungsgerät-Zange Erdungsüberwachungsgerät Typ 8485 23 Betriebsanleitung 9 deutsch Zubehör und Ersatzteile Verwenden Sie nur Original-Zubehör sowie Original-Ersatzteile der Fa. R.STAHL Schaltgeräte GmbH. Benennung Abbildung 10 m Kabel mit Zange Beschreibung Bestell- Gewicht Nr. [Kg] Normal Kabel ÖLFLEX 540 P 3Gx2,5. mit Kabelverschraubung 202500 1,9 2 x Normal Kabel ÖLFLEX 540 P 3Gx2,5 Eine Zange markiert mit gelbem Aufkleber und die andere mit schwarzem Aufkleber und Kabelverschraubungen 202501 3,8 202502 3 2 x Spiralkabel ÖLFLEX 540 P 3Gx2,5. Eine Zange Markiert mit gelbem Aufkleber und die andere mit schwarzem Aufkleber und Kabelverschraubungen 202503 6 Aufrollautomatik mit 15 m isoliertem Kabel und robuster ergonomischer Erdungszange aus Edelstahl und Schnellstecker - II 1 GD T6 105544 16 Infrarotschnittstelle bestehend aus Adapter und CD-ROM mit Konfigurationssoftware 202511 0,17 12638 2 x 10 m Kabelset mit Zange 126379 Spiralkabel ÖLFLEX 540 P 3Gx2,5. mit Kabelverschraubung 10 m Spiralkabel mit Zange 12640 10 m Spiralkabelset mit Zange 12641 Erdungszange mit Kabel-Aufrollautomatik 12715 Konfigurationsset IrDA 12643 24 Erdungsüberwachungsgerät Typ 8485 English 1 Operating Instructions Safety instructions The most important safety instructions are summarised in this chapter. It is intended to supplement the relevant regulations which must be studied by the personnel responsible. When working in hazardous areas, the safety of personnel and plant depends on complying with all relevant safety regulations. Assembly and maintenance staff working on installations therefore have a particular responsibility. The precondition for this is an accurate knowledge of the applicable regulations and provisions. When installing and operating the device, the following are to be observed: The national installation and assembly regulations (e.g. EN 60079-14) apply. The Type 8485 grounding device may be installed in Zone 1, 2 or outside the explosion hazardous areas. The intrinsic safe monitoring circuit (grounding clamp) can be set to metallic objects such as road tanks or railway tanks. The output circuits of grounding devices may only be connected to devices which will not be subjected to voltages higher than AC 253 V (50 Hz). During the loading of flammable liquids or gases it is important to ensure that hoses or loading arms be connected only after a proper electrostatic grounding with road tanks. The safe maximum values of the connected field device must correspond to the values of the data sheet or the EC-type examination certificate. National safety and accident prevention regulations The generally recognised technical regulations. The safety guidelines in these operating instructions. Any damage can compromise and even neutralise the explosion protection. Additional notes on the device. Use the device in accordance with the regulations and for its intended purpose only (see “Function”). Incorrect or impermissible use or non-compliance with these instructions invalidates our warranty provision. No changes to the devices or components impairing their explosion protection are permitted. The device may only be fitted and used if it is in an undamaged, dry and clean state. When opening the housing in the hazardous area the power supply must be switched off and wait at least a minute before opening. 2 Conformity to standards The Type 8485 grounding monitoring device complies with the following standards and directives: Directives 94/9/EC EN 60079-0 EN 60079-1 EN 60079-11 The current EC-Type Examination Certificate can be downloaded from the Internet. 25 Grounding monitoring device type 8485 Operating Instructions 3 English Marking and technical data Manufacturer R. STAHL Type designation 8485/11*-31 CE marking c0158 Ex marking e Explosion protection marking II 2G Ex d [ib] IIB T4 Testing authority and certificate number FTZÚ 09 ATEX 0059X Protection class IP 65 Nominal voltage UN 230 ± 10 V Power consumption 10 VA Clamp pressed galvanised steel, contact point – copper Output signal contact Maximum load Potential-free switching contact / channel switching contact 230 V AC / 3 A switching contact 230 V DC / 0.25 A 40 V DC / 3 A 10 V DC / 100 mA Minimum load Cable Straight cable (10 m) Spiral cable (10 m) Maximum length Cable Glands Ambient conditions Devices : Operating temperature Storage temperature Cable: Straight cable Spiral cable ÖLFLEX 540 P 3Gx2,5 ÖLFLEX 540 P 3Gx2,5 20 m 6 … 12 mm -50...+60 °C *) -50...+60 °C -50...+60 °C) -30...+60 °C) Dimension 126 x 351 x 325 mm Enclosure material with flameproof enclosure an aluminium Weight 8485/111-31 8485/112-31 Relative humidity (no condensation) 10,2 Kg 10,9 Kg < 95 % Further technical information can be obtained from the current data sheet. *) For temperature lower then -40°C keep the device always switched on. Please consult with the manufacturer before operating under conditions which deviate from the standard operating conditions 26 Grounding monitoring device type 8485 English 4 Function 4.1 General Operating Instructions The Grounding monitoring devices ensure that objects like road tankers or railway tanks are electrostatically grounded correctly during the loading and unloading of flammable liquids or dust. The device provides a conductive connection to the ground and monitors in parallel the quality of the electrostatic grounding. The electrostatic charge of the tank is kept at a safe level. The device can be configured for use on tank. The operating errors are prevented. 4.2 Application The equipment serves: 1. to test the system, consisting of a tanker and filling/discharging point 2. to earth the tanker with regard to static electricity via a defined resistance (100kΩ) 3. to check that the clamps of the devices are correctly connected to the tanker The tanker is connected to the equipment by clamps with a cable with maximum length of 20m. The grounding device distiguishes three connection states of grounding clamps: namely whether the tanker is connected correctly connection to the earth point of the building status when the clamps are not connected at all The Grounding monitoring device also differentiates the correct sequence of states. A loading is carried out through the following steps: The vehicle pulls into the loading platform. The Grounding monitoring device is connected via the clamp to the grounding point of the vehicle. The device verifies the connection to the vehicle (only road tanker) with help a capacitive measurement. The vehicle is simultaneously grounded electrostatically through a resistance of 100 kΩ. The bleeder resistor is continuously monitored. The connection of the loading arm to the vehicle leads to a direct grounding of the vehicle. This direct ground after a successful identification of the vehicle but is not interpreted by the device as faulty operation. 4.3 Function description 4.3.1 Road Tanks (Tanker vehicles) When in operation the Grounding monitoring device 8485 monitors two parameters of the electrostatic grounding impedance and ohmic resistance. If the value is in the range 50 Ω to 3000 Ω, the electronics evaluate the system to be correct with regard to electrostatic discharge and the green indicator is on. If the monitored impedance value is less than 50 Ω the Grounding monitoring device evaluates this status as a direct connection between the clamps and the terminal’s grounding system and the red indicator is on. This condition serves to eliminate incorrect connection of the Grounding monitoring device when the clamps are, for instance, directly connected to the terminal’s steel structure. The status of the grounding monitoring device is indicated by the signalling elements on the front panel of the instrument. The Grounding monitoring device can be in the following states: 1. The tanker is not connected or does not meet the condition of the impedance <3000Ω The red indicator is on 2. The earth clamps are directly connected to the grounding point of the structure The red indicator is on 3. The tanker is connected and the impedance is in the range 50 Ω to 3000 Ω The green indicator is on or is flashing according to user setting. Grounding monitoring device type 8485 27 Operating Instructions English 4. The earth clamps are connected directly to the grounding point of the structure after being connected to the tanker The green indicator is on. 5. Relays RE1 and RE2 are assigned to clamp K1. Relays RE3 and RE4 are assigned to clamp K2. Output relay is switched on only in the case as described in points 3 and 4 when the green indicator is on or flashing. 4.3.2 Railway tanks Only two states apply for railway tanks. 1. The tanker is not connected or does not meet the condition that the impedance <3000 Ω The red indicator is on. 2. The tanker is connected and the impedance of the system is in the range 0 Ω to 3000Ω - The green indicator is on. Output relay is switched on only in the case as described in point 2, when the green indicator is on or flashing. 4.4 Setting of the ground object road tanks / railway tanks DIP switch with XC5 reference is used for setting of the ground object type. The setting is done as per the following table. K1 clamps, switch no. 1 K2 clamps, switch no. 2 Switch status road tanks road tanks ON railway tanks railway tanks OFF Fig. 4.1 DIP switches for setting the ground object 28 Grounding monitoring device type 8485 English 4.5 Operating Instructions Connections The connections are made according to the electrical wiring diagram drawing (see Fig. 6.7 page 38 and Fig. 6.8 page 39). For correct function of the grounding element it is essential that the PE lead (terminal 3 or 4 on terminal box XC1 “Power supply”) is connected to the frame of the bridge. In case of improper local grounding it is possible to connect terminal 4 of terminal box XC1 “Power supply” to the grounding point for correct operation of the ground monitoring device. Without this connection 8485 may not operate properly. Fig. 4.2 Terminals on the printed circuit board Cable Glands 1 Terminal XC1 XC2 Application Power supply Output contact RE2 2 XC 4 XC 7 Output contact RE1 Output contact RE4*) 3 XC 8 4 and 5 XC3 Output contact RE3*) Clamp PIN-#. Connection 1 L 2 N 3 PE 4 PE 1 NO 2 COM 3 NC 1 NC 2 COM 3 NO 1 NC 2 COM 3 NO 1 NC 2 COM 3 NO 1 Clamp 1 2 GND 3 Clamp 2 *) *) only for two channel of the Grounding monitoring device 8485/112-31 Note: You can see the Cable Glands number of Fig. 6.1on page 35 Grounding monitoring device type 8485 29 Operating Instructions 5 English Interface for configuration The ground monitoring device is set factory made so that it works in the vast majority of applications without additional parameterization. If you find that the detection of the impedance and the bleeder resistor is not working despite correct connection of the device. You can use the parameterization sets of adapters and CD-ROM with parameterization software to the conditions of your applications. For coupling to the PC an adapter has be use for the infrared port. This IrDA interface is integrated into the red indicator light and is therefore accessible without opening the housing. The parameters can only be set after the power supply has been connected and the adapter is positioned in front of the red indicator light. The maximum distance for reliable communication is 1 m. The communication module for IrDA interface is an accessory and can be ordered separately. Fig. 5.1 The communication module for IrDA interface The configuration may take place only outside hazardous areas or only with special permission. 5.1 The configuration of software The configuration software is used to setup the parameters, reading the current status and values of the A/D converter of the grounding monitoring device. Setup parameters: Upper evaluation limits Lower evaluation limits Connection of the clamps Flashing when tanker is connected Communication port Relays RE1,RE2,RE3 and RE4 manually release Status: Not earthed Earthed Tanker connected Tanker earthed 30 Grounding monitoring device type 8485 English 5.2 Operating Instructions Installation 1. CD-ROM start 2. Select „NEXT“ to continue the installation 3. Click „NEXT“. 4. Click „NEXT“. 5. Click „NEXT“to finish installation. Grounding monitoring device type 8485 31 Operating Instructions 5.3 English After start After the program is started, evaluation limits, values on A/D converters, setting of parameters and the current status of 8485 are loaded. According to the current state the red or green indicator lights up. 5.4 Setting of evaluation limits The evaluation limits can be set by entering the values in the respective boxes and clicking the button above the box „Upper" or „Lower". The evaluation limits must always be set within the range of 7 to 225 converter points. The settings are loaded by clicking on the button „Refresh" on the grounding monitoring device 5.5 Value on the A/D converter The value on the A/D converter is displayed in the „A/D converter" window. It has a value in the range of 0 to 255. This value cannot be altered, it is only informative. The Value 0 means 0 ohm Impedance and the value of 255 means infinite impedance. The value of 10 - 160 corresponds to the real impedance (50 ... 3000 Ohm). The typical value is 40 ... 60. Setting of evaluation limits Indictors Staatus line AD Converter Button for refreshing of parameters 32 Grounding monitoring device type 8485 Selection of communication port Parameters English Operating Instructions Fig. 5.2 Control program Windows Grounding monitoring device type 8485 33 Operating Instructions 5.6 English Status indication The red and green indicators and the status box are used to indicate the status. The behaviour of the indicators is described in section 7.2 Site 44. The current status of the Grounding monitoring device block is shown in the status box (see Fig. 5.2 Site 32). 5.7 Setting of parameters 5.7.1 Clamps connection By ticking the Clamps connected box evaluation of the given clamp states is activated. When the box Clamps connected is not ticked, the 8485 will not evaluate the status of the grounding clamps and the corresponding indicators will not be active. Similarly the indicators on the front panel of the 8485 for the given clamps will not be active. 5.7.2 Behaviour of the green indicator The green indicator will flash when a tanker is connected and Flashing when tanker connected box is ticked. If this box is not ticked the green indicator will be only on. 5.7.3 Communication port (IrDA) The communication module for IR communication connects to a PC via USB interface. The port can be selected using the options in the bottom part of the window to the right of the Refresh button. 5.8 Refreshing the parameters Refreshing the parameters is done by clicking the Refresh button. By doing this all parameters will be read as when the program is started. 5.9 Termination of the parameter Button End is intended for termination of the work with the program. 5.10 Interrupting communication between the Grounding device and PC When communication is interrupted the information panels become inactive. When communication is restored the panels will be reactivated (see Fig. 5.3). Fig. 5.3 Interrupting communication between the Grounding monitoring device and PC 34 Grounding monitoring device type 8485 English 6 Operating Instructions Installation and assembly When mounting, operating and maintaining of the Grounding monitoring device and the stipulated valid standards and safety regulations must be adhered to. 6.1 Electrical connection 6.1.1 Cable running The cables must be run such that the leakage and air distances necessary for Ex „e” are maintained. 6.1.2 External cable Connecting cables must be led through the cable glands into the connection chamber complete with their external insulation. This means that care must be taken to ensure that the external diameter of the cable matches the clamping cross section specified for the cable gland. To ensure that the connection chamber is fully sealed and all connections protected from strain, the hexagonal nuts of the cable glands must be fully tightened. The cables must be run in the connection chamber such that the minimum permissible bending radius for each cross-section is not exceeded and mechanical damage to cable insulation from sharp edges or moving metal parts is avoided. Please observe the following points: Connections must be made with special care. The conductor insulation must reach to the terminal. The conductor itself must not be damaged when removing the insulation. Ensure that the maximum permissible conductor temperatures are not exceeded by suitable selection of cables and means of running them (avoid bunched cables). Please ensure that the both loading platform and grounding monitoring device are grounded properly. This is a prerequisite for the safe function of the grounding monitoring device. Risk through open holes and unused cable glands If holes are open and cable glands not in place safety is not ensured. Plug or stopping plugs must be used when hole is open and cable glands not in place. The correct stopping plug must be selected according to the thread type and size. Grounding monitoring device type 8485 35 Operating Instructions English 1 2 3 4 5 Fig. 6.1 Cable glands no. and Installation the grounding monitoring device 6.1.3 Connecting the power supply and relay contacts 1. Put a power cable through cable gland no.1 into flameproof enclosure (see Fig. 6.2 Site 35). Connect power cable leads in terminal box XC1. Connect brown lead in terminal L (no. 1), blue lead in terminal N (no. 2), yellow-green in terminal PE (no. 3). Tighten the cable gland no. 1 when connection is complete. The wire cross-section is this: rigid 2.5 mm² flexible 2.5 mm² flexible 1.5 mm² (with end covering sleeves and plastic sleeving) flexible 2.5 mm² (with end covering sleeves without plastic sleeving) Fig. 6.2 Connect power cable 36 Grounding monitoring device type 8485 English Operating Instructions 2. Put the two-lead control cable through cable gland no. 2. This cable uses one switching relay contact. Connect the control cable to connector XC2 or XC4. After connection of the cable into terminal box XC2 or XC4 tighten the cable gland. Examples of the relay switching contacts connection are shown below. Fig. 6.3 Examples of the relay one switching contact connection 3. If you use both switching contacts of the relay, bring the four-lead control cable through cable gland no. 2 to terminal box XC2 and XC4. Connect the control cable to connector XC2 or XC4. After connection of the cable into terminal box XC2 or XC4 tighten the cable gland. Examples of the relay switching contacts connection are shown below. Fig. 6.4 Examples of the relay both switching contact connection Before the installation of the cable a sealing ring must be inserted between the enclosure wall and the male union. The installation procedure for clamp K2 is the same as for clamp K1, but the connection boxes XC7 and XC8 have to be used instead of XC2 and XC4 “cable gland no. 3”. 4. Push the cable clamp 1 through the housing opening no. 4 and the cable clamp 2 through the housing opening No. 5 (see Fig. 6.1). Insert the cable eye on clamps screw and tighten it (10 Nm). Screw the male union (1) in the housing, then the pressure ring (2) screw (see Fig. 6.5). Grounding monitoring device type 8485 37 Operating Instructions Fig. 6.5 Cable gland of the clamp 4. Connect external grounding point of flameproof enclosure to an earthed part (frame) of the fuel depot by means of the yellow-green lead (1mm2 diameter). 5. Close the flameproof enclosure and tighten with 8 screws M8 x 16 (20-25 Nm). 1 2 3 4 5 Fig. 6.6 Connection external grounding point of flameproof enclosure 38 Grounding monitoring device type 8485 English English Operating Instructions Fig. 6.7 Electric connection to 8485/111-31 Grounding monitoring device type 8485 39 Operating Instructions Fig. 6.8 Electric connection to 8485/112-31 40 Grounding monitoring device type 8485 English English 6.2 Operating Instructions Mechanical Mounting The box of the grounding monitoring device is mounted in a vertical position, so that the operator can see the indicators when grounding vehicles. The Devices for 8485 are flameproof using 4 x M10 (Screw tightening torque is 35-40 Nm) bolts with connecting dimensions according. When a clamp holder is used, connecting holes according to Fig. 6.9 are used. To the grounding monitoring device is connected a clamp with standard cable, spiral cable, or a retracting reel. The user has two potential-free switching contacts. With the help of the potential-free switching contacts can be monitored the correct grounding and stopped at the loading of incorrect grounding. Fig. 6.9 Installation the grounding monitoring device Grounding monitoring device type 8485 41 Operating Instructions English Fig. 6.10 Installation to the grounding monitoring device 8485/112-31 with clamp holder 42 Grounding monitoring device type 8485 English Operating Instructions Fig. 6.11 Dimension drawing to the grounding monitoring device 8485/111-31 Grounding monitoring device type 8485 43 Operating Instructions Fig. 6.12 Dimension drawing to the grounding monitoring device 8485/112-31 44 Grounding monitoring device type 8485 English English 7 7.1 Operating Instructions Commissioning Setup The ground monitoring device is set factory made so that it works in the vast majority of applications without additional parameterization. If you find that the detection of the impedance and the bleeder resistor is not working despite correct connection of the device. You can use the parameterization sets of adapters and CD-ROM with parameterization software to the conditions of your applications. For coupling to the PC an adapter has be use for the infrared port. This IrDA interface is integrated into the red indicator light and is therefore accessible without opening the housing. The parameters can only be set after the power supply has been connected and the adapter is positioned in front of the red indicator light. The maximum distance for reliable communication is 1 m. 7.2 Operation and operational states Before commissioning the enclosure, ensure that it has been correctly installed it is not damaged the cables have been correctly brought in The setting of DIP switch XC5 on tanker vehicles or railway tanks During testing it is necessary to simulate all the situations that can occur during operation. It concerns the following situations: No. Simulation steps 1 The clamps are not connected to an earthed object 2 The clamps are connected to an earthed object The clamps are connected to the tanker, which is 3 then earthed without disconnecting the clamps 8 pending Red light lit Green light lit Green light lit Maintenance and repair It is recommended that all repairs to our devices be carried out by R. Stahl. In exceptional cases, repair may be performed by approved third-parties. Preventative checks are performed according to the requirements of operation however at least every 6 months. The quality of all mechanical connections and contacts is checked and setting of evaluation limits for testing of connected impedance. The housing is a flameproof enclosure. The surfaces of the housing-gap are to be protected against corrosion and water through a layer of fatty acid-free. Before opening the housing in the hazardous area the power supply voltage must be switched off and work on the housing might not be started for at least a minute. Check the condition of the housing and cable glands at least once a year. Remove dust and dirt from the surfaces of the housing. After opening the housing, it is necessary, the layer of fat to renew again. Recommendation: If during cover installation misalignment of openings for fixing bolts between the bottom and the cover occurs, release 4 bolts on hinges (by about 2 turns). This will enable correct cover seating and bolting with the bottom. After tightening of main bolts tighten also the bolts of the hinges. Grounding monitoring device type 8485 45 Operating Instructions English The instrument must be put out of operation if: There is mechanical damage, which prevents correct function Its parts are damaged by deep corrosion Name plate of manufacturer is missing or if data on the name plate is illegible The cable, clamps, grounding conductor or connecting cable is damaged Please contact our nearest sales office. For quick processing your request, we need the following information: Type and serial number Purchase data Description of fault Purpose If the pliers are damaged, they can be replaced directly by the customer. When replacing the pliers follow the following procedure: Snip the pliers off close the black sleeving which covers the connection of pliers with cable. put larger blow-in sleeving on the cable pull the cable through pliers opening so as its free end has 200 mm and the sleeving is behind the pliers insert smaller blow-in sleeving on the free end after previous stripping of the conductors (in the length of 20 mm) press cable eye on the free part of the cable and insert the smaller blow-in sleeve on the stripped conductors so as the sleeve covers the whole part of the stripped conductors up to the cable eye. by means of hot air gun attach the sleeve to the cable Insert the cable eye on pliers screw and tighten it. finally insert the large blow-in sleeve on the pliers so as ¾ is on the pliers and ¼ on the cable Attach the sleeve by hot air gun. Blow-in sleeving (larger) Blow-in sleeving (smaller) Cable eye Fig. 8.1 The clamp of grounding monitouring device 46 Grounding monitoring device type 8485 English 9 Operating Instructions Accessories and spare parts Use only original accessories and spare parts from R. STAHL Schaltgeräte GmbH. Designation Illustration 10m Straight cable with clamp Order-No. Weight [Kg] Straight cable ÖLFLEX 540 P 3Gx2,5. With cable Glands 202500 1,9 2 x Straight cable ÖLFLEX 540 P 3Gx2,5 One clamp marked with a yellow sticker and the other clamp with a black sticker and cable glands 202501 3,8 Spiral cable ÖLFLEX 540 P 3Gx2,5. With cable glands 202502 3 2 x Spiral cable ÖLFLEX 540 P 3Gx2,5. One clamp marked with a yellow sticker and the other clamp with a black sticker and cable glands 202503 6 105544 16 202511 0,17 Description 12638 2 x 10m Straight cable set with clamp 126379 10 x Spiral cable with clamp 12640 2 x 10 m Spiral cable set with clamp 12641 Automatic winder with 15 m of insulated cable Grounding clamp with automatic cable winder 12715 and robust ergonomic grounding clamp, stainless steel, and fast-action plug II 1 GD T6. Infrared interface consisting of adapter and CD-ROM with configuration software Configuration set IrDA 12643 Grounding monitoring device type 8485 47 10 EG-Konformitätserklärung / EC-Declaration of Conformity 48 Grounding monitoring device type 8485 R. STAHL Schaltgeräte GmbH Am Bahnhof 30, D-74638 Waldenburg, Germany Telefon +49 7942 943-0 Telefax +49 7942 943-4333 E-Mail: [email protected] Internet: http://www.stahl.de SAP: 201166 ID-Nr.848560300010 S-BA-8485-004-de/en-07/2011