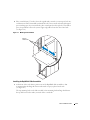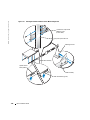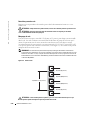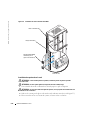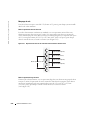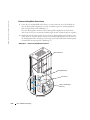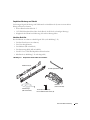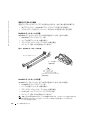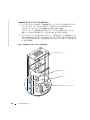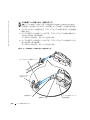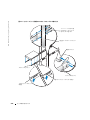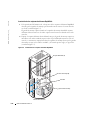
1
Dell™ Systems
Rack Installation Guide
Guide d'installation en rack
Rack-Installations-anleitung
Guía de instalación del rack
www.dell.com | support.dell.com
Dell™ Systems
Rack Installation Guide
www.dell.com | support.dell.com
Notes, Notices, and Cautions
NOTE: A NOTE indicates important information that helps you make better use of your computer.
NOTICE: A NOTICE indicates either potential damage to hardware or loss of data and tells you how
to avoid the problem.
CAUTION: A CAUTION indicates a potential for property damage, personal injury, or death.
____________________
Information in this document is subject to change without notice.
© 2003 Dell Inc. All rights reserved.
Reproduction in any manner whatsoever without the written permission of Dell Inc. is strictly forbidden.
Trademarks used in this text: Dell, the DELL logo, RapidRails, and VersaRails are trademarks of Dell Inc.
Other trademarks and trade names may be used in this document to refer to either the entities claiming the marks and names
or their products. Dell Inc. disclaims any proprietary interest in trademarks and trade names other than its own.
December 2003
P/N C4624
Rev. A00
Contents
CAUTION: Safety Instructions
. . . . . . . . . . . . . . . . . . . . . .
Rack Mounting of Systems .
Installation Instructions
. . . . . . . . . . . . . . . . . . . . .
1-5
. . . . . . . . . . . . . . . . . . . . . . . . .
1-6
Four-Post Rack Installation.
. . . . . . . . . . . . . . . . . . . . . . .
Before You Begin . . . . . . . . . . . . . . . . .
Recommended Tools and Supplies . . . . . . . . .
RapidRails Rack Kit Contents . . . . . . . . . . .
VersaRails Rack Kit Contents . . . . . . . . . . .
Installation Tasks . . . . . . . . . . . . . . . . .
Removing the Rack Doors . . . . . . . . . . . . .
Marking the Rack . . . . . . . . . . . . . . . . .
Installing the RapidRails Slide Assemblies . . . . .
Installing the VersaRails Slide Assemblies . . . . .
Installing the System in the Rack . . . . . . . . . .
Installing the Cable-Management Arm, if Applicable
Routing Cables . . . . . . . . . . . . . . . . . .
Replacing the Rack Doors . . . . . . . . . . . . .
Two-Post Rack Installation .
. . . . . . . . .
1-7
. . . . . . . . .
1-7
1-7
1-8
1-8
1-9
1-9
1-10
1-11
1-13
1-14
1-16
1-18
1-19
. . . . . . . . . . . . . . . . . . . . . . .
1-20
Two-Post Rack Installation Tasks . . . . . . . . .
Recommended Tools and Supplies . . . . . . . . .
Rack Kit Contents . . . . . . . . . . . . . . . . .
Marking the Rack . . . . . . . . . . . . . . . . .
Installing the Slide Assemblies in the Rack . . . . .
Installing the System in the Rack . . . . . . . . . .
Installing the Cable-Management Arm, if Applicable
Routing Cables . . . . . . . . . . . . . . . . . .
Index
1-5
. . . . . . . . .
. . . . . . . . .
. . . . . . . . .
. . . . . . . . .
. . . . . . . . .
. . . . . . . . .
. . . . . . . . .
. . . . . . . . .
. . . . . . . . .
. . . . . . . . .
. . . . . . . . .
. . . . . . . . .
. . . . . . . . .
. . . . . . . . .
. . . . . . . . .
. . . . . . . . .
. . . . . . . . .
. . . . . . . . .
. . . . . . . . .
. . . . . . . . . . . . . . . . . . . . . . . . . . . . . . . . . .
1-20
1-20
1-21
1-22
1-24
1-29
1-29
1-29
1-31
Contents
1-3
Figures
Figure 1-1.
RapidRails Rack Kit Contents
. . . . . . . . . .
1-8
Figure 1-2.
VersaRails Rack Kit Contents
. . . . . . . . . .
1-9
Figure 1-3.
One Rack Unit .
. . . . . . . . . . . . . . . . .
1-10
Figure 1-4.
Marking the Vertical Rails
. . . . . . . . . . . .
1-11
Figure 1-5.
Installing the RapidRails Slide Assemblies
. . . .
1-12
Figure 1-6.
Installing the VersaRails Slide Assemblies
. . . .
1-14
Figure 1-7.
Installing the System in the Rack
(RapidRails or VersaRails) . . . .
. . . . . . . .
1-15
Figure 1-8.
Figure 1-9.
1-17
Installing the System Status Indicator,
if Applicable . . . . . . . . . . . .
. . . . . .
1-18
. . . . . . . . . . . . . . . . .
1-19
. . . . . . . . .
1-21
Routing Cables
Figure 1-11.
Two-Post Rack Kit Components
Figure 1-12.
Two-Post, Open-Frame Relay Rack
Universal-Hole Spacing . . . . . .
. . . . . . .
1-22
Two-Post, Open-Frame Relay Rack
Wide-Hole Spacing . . . . . . . .
. . . . . . .
1-23
. . . . . . . . .
1-25
Figure 1-14.
Figure 1-15.
Figure 1-16.
Contents
. . . . . .
Figure 1-10.
Figure 1-13.
1-4
Installing the Cable-Management Arm,
if Applicable . . . . . . . . . . . .
Installing the Slide Assemblies
for Center-Mount Configuration
Rotating the Front Mounting Bracket
for Flush-Mount Installation . . . .
Installing the Slide Assemblies
for Flush-Mount Configuration .
. . . . . . .
1-27
. . . . . . . . .
1-28
CAUTION: Safety Instructions
Use the following safety guidelines to help ensure your own personal safety and to help
protect your system and working environment from potential damage. For complete safety
information, see the System Information Guide.
Rack Mounting of Systems
Observe the following precautions for rack stability and safety.
Systems are considered to be components in a rack. Thus, "component" refers to any system
as well as to various peripherals or supporting hardware.
CAUTION: Installing systems in a rack without the front and side stabilizers installed could
cause the rack to tip over, potentially resulting in bodily injury under certain circumstances.
Therefore, always install the stabilizers before installing components in the rack.
After installing system/components in a rack, never pull more than one component out of the rack
on its slide assemblies at one time. The weight of more than one extended component could
cause the rack to tip over and may result in serious injury.
NOTE: Your system is safety-certified as a free-standing unit and as a component for use in a
Dell™ rack cabinet using the customer rack kit. The installation of your system and rack kit in any
other rack cabinet has not been approved by any safety agencies. It is your responsibility to ensure
that the final combination of system and rack complies with all applicable safety standards and
local electric code requirements. Dell disclaims all liability and warranties in connection with such
combinations.
•
System rack kits are intended to be installed in a rack by trained service technicians.
If you install the kit in any other rack, be sure that the rack meets the specifications
of a Dell rack.
CAUTION: Do not move racks by yourself. Due to the height and weight of the rack, a minimum
of two people should accomplish this task.
•
Before working on the rack, make sure that the stabilizers are secured to the rack,
extended to the floor, and that the full weight of the rack rests on the floor. Install front
and side stabilizers on a single rack or front stabilizers for joined multiple racks before
working on the rack.
•
Always load the rack from the bottom up, and load the heaviest item in the rack first.
•
Make sure that the rack is level and stable before extending a component from the rack.
•
Use caution when pressing the component rail release latches and sliding a component
into or out of a rack; the slide rails can pinch your fingers.
•
After a component is inserted into the rack, carefully extend the rail into a locking
position, and then slide the component into the rack.
Rack Installation Guide
1-5
www.dell.com | support.dell.com
CAUTION: Safety Instructions (continued)
•
Do not overload the AC supply branch circuit that provides power to the rack. The total
rack load should not exceed 80 percent of the branch circuit rating.
•
Ensure that proper airflow is provided to components in the rack.
•
Do not step on or stand on any component when servicing other components in a rack.
Installation Instructions
This installation guide provides instructions for trained service technicians installing one or more
systems in an open-frame relay rack or in a rack cabinet. The RapidRails™ rack kit can be installed
in all the manufacturer’s rack cabinets without tools, and the VersaRails™ rack kit can be installed
in many industry-standard rack cabinets. The procedures for installing both RapidRails and
VersaRails rack kits are similar. One rack kit is required for each system to be installed in the rack
cabinet.
This guide includes procedures for the following rack kits:
•
RapidRails kit in a four-post rack cabinet
•
VersaRails kit in a four-post rack cabinet
•
Two-post kit (installed in either center-mount or flush-mount configuration, for 3- or 6-inchwide racks)
Also, some systems provide a status-indicator cable for ease in troubleshooting and the
identification of system health. The rack kits for these systems include a status-indicator cable that
extends the information on the two-color status indicators on the front and back panels to the back
of the cable-management arm. For more information about these indicators and to verify that your
system uses this cable, see your system User’s Guide.
Before attempting this installation, you should read through this entire document carefully.
CAUTION: Do not install rack kit components designed for another system. Use only the rack kit for
your system. Using the rack kit for another system may result in damage to the system and personal
injury to yourself and to others.
Rack Requirements for VersaRails
NOTICE: The VersaRails rack kit is intended to be installed by trained service technicians in a rack
that meets the specifications of American National Standards Institute (ANSI)/Electronic Industries
Association (EIA) standard ANSI/EIA-310-D-92, International Electrotechnical Commission (IEC) 297, and
Deutsche Industrie Norm (DIN) 41494. One rack kit is required for each system that is installed in a rack.
1-6
Rack Installation Guide
Four-Post Rack Installation
Before attempting this installation, you should read through this entire procedure carefully.
Before You Begin
Before you begin installing your system in the rack, carefully read "CAUTION: Safety Instructions,"
found earlier in this guide, as well as the safety instructions found in your system’s System
Information document for additional information.
CAUTION: When installing multiple systems in a rack, complete all of the procedures for the current
system before attempting to install the next system.
CAUTION: Rack cabinets can be extremely heavy and move easily on the casters. The cabinet has no
brakes. Use extreme caution while moving the rack cabinet. Retract the leveling feet when relocating
the rack cabinet. Avoid long or steep inclines or ramps where loss of cabinet control may occur. Extend
the leveling feet for support and to prevent the cabinet from rolling.
Important Safety Information
Observe the safety precautions in the following subsections when installing your system in the rack.
CAUTION: You must strictly follow the procedures in this document to protect yourself as well as
others who may be involved. Your system may be very large and heavy, and proper preparation and
planning are important to prevent injury to yourself and to others. This becomes increasingly important
when systems are installed high up in the rack.
Rack Stabilizer Feet
CAUTION: Installing systems in a rack without the front and side stabilizer feet installed could cause
the rack to tip over, potentially resulting in bodily injury under certain circumstances. Therefore,
always install the stabilizer feet before installing components in the rack.
CAUTION: After installing systems in a rack, never pull more than one system out of the rack on its
slide assemblies at one time. The weight of more than one extended system could cause the rack to tip
over and cause injury.
The stabilizer feet help prevent the rack from tipping over when a system or other component
is pulled out of the rack with the slide assemblies fully extended. Refer to the documentation
provided with the rack cabinet for instructions on installing and anchoring the stabilizer feet.
Recommended Tools and Supplies
You may need the following tools and supplies to install the system in a four-post rack:
•
A #2 Phillips screwdriver (for installing VersaRails slide assemblies)
•
Masking tape or a felt-tip pen, for use in marking the mounting holes to be used
Rack Installation Guide
1-7
www.dell.com | support.dell.com
RapidRails Rack Kit Contents
The RapidRails rack kit includes the following items (see Figure 1-1):
•
One pair of RapidRails slide assemblies
•
One cable-management arm, if applicable
•
One status indicator cable, if applicable
•
Tie-wraps (not shown in Figure 1-1)
Figure 1-1.
RapidRails Rack Kit Contents
cable-management arm,
if applicable
slide assemblies (2)
status indicator cable,
if applicable
VersaRails Rack Kit Contents
The VersaRails rack kit includes the following items (see Figure 1-2):
•
One pair of VersaRails slide assemblies
•
One cable-management arm, if applicable
•
One status indicator cable, if applicable
•
Eight 10-32 x 0.5-inch flange-head Phillips screws
•
Tie-wraps (not shown in Figure 1-2)
NOTE: The nonmetric screws described in illustrations and in procedural steps are identified by size and
number of threads per inch. For example, a #10 Phillips-head screw with 32 threads per inch is identified
as a 10-32 screw.
1-8
Rack Installation Guide
Figure 1-2. VersaRails Rack Kit Contents
slide assemblies (2)
cable-management arm,
if applicable
10-32 x 0.5-inch
flange-head
Phillips screw (8)
status indicator cable,
if applicable
Installation Tasks
Installing a rack kit involves performing the following tasks in their numbered order:
1
Removing the rack doors
2
Marking the rack
3
Installing the slide assemblies in the rack:
•
RapidRails installation
•
VersaRails installation
4
Installing the system in the rack
5
Installing the cable-management arm, if applicable
6
Routing cables
7
Replacing the rack doors
Removing the Rack Doors
See the procedures for removing doors in the documentation provided with your rack cabinet.
CAUTION: Because of the size and weight of the rack cabinet doors, never attempt to remove or install
them by yourself.
CAUTION: Store the two doors where they will not injure someone if the doors accidently fall over.
Rack Installation Guide
1-9
www.dell.com | support.dell.com
Marking the Rack
You must allow 2 U (88 mm, or 3.5 inches) of vertical space for each system you install in the rack.
Rack cabinets that meet EIA-310 standards have an alternating pattern of three holes per rack unit
with center-to-center hole spacing (beginning at the top hole of a 1-U space) of 15.9 mm, 15.9 mm,
and 12.7 mm (0.625 inch, 0.625 inch, and 0.5 inch) for the front and back vertical rails
(see Figure 1-3). Rack cabinets may have round or square holes.
NOTE: The vertical rails may be marked by horizontal lines and numbers in 1-U increments. If you wish,
you can make a note of the number marking on the rack’s vertical rail. It is not necessary to mark or place
tape on the rack. If you choose this method, skip ahead to the procedure "Installing the RapidRails Slide
Assemblies."
Figure 1-3.
One Rack Unit
12.7 mm (0.5 inch)
15.9 mm (0.625 inch)
1 U (44 mm or 1.75 inches)
15.9 mm (0.625 inch)
12.7 mm (0.5 inch)
CAUTION: If you are installing more than one system, install the slide assemblies so that the first
system is installed in the lowest available position in the rack.
To mark the rack, perform the following steps:
1
Place a mark on the rack’s front vertical rails where you want to locate the bottom of
the system you are installing in the rack cabinet.
The bottom of each 1-U space is at the middle of the narrowest metal area between holes
(marked with a horizontal line on some rack cabinets—see Figure 1-4).
1-10
Rack Installation Guide
2
Place a mark 88 mm (3.5 inches) above the original mark you made (or count up six holes in a
rack that meets EIA-310 standards) and mark the rack’s front vertical rails with a felt-tipped
pen or masking tape (if you counted holes, place a mark just above the top hole). This mark or
piece of tape indicates where the system’s upper edge will be located on the vertical rails
(see Figure 1-4).
Figure 1-4. Marking the Vertical Rails
tape on
vertical rail
Installing the RapidRails Slide Assemblies
1
At the front of the rack cabinet, position one of the RapidRails slide assemblies so that
its mounting-bracket flange fits between the marks or tape you placed on the rack
(see Figure 1-5).
The top mounting hook on the slide assembly’s front mounting bracket flange should enter
the top hole between the marks you made on the vertical rails.
Rack Installation Guide
1-11
www.dell.com | support.dell.com
2
Push the slide assembly forward until the top mounting hook enters the top square hole that
you placed a mark just above on the vertical rail, and then push down on the mountingbracket flange until the mounting hooks seat in the square holes and the push button pops
out and clicks (see Figure 1-5).
Figure 1-5.
Installing the RapidRails Slide Assemblies
slide assembly (2)
mounting hooks (2)
push button
mountingbracket flange
front of rack
1-12
3
At the back of the cabinet, pull back on the mounting-bracket flange until the top mounting
hook is in the top square hole, and then push down on the flange until the mounting hooks
seat in the square holes and the push button pops out and clicks.
4
Repeat steps 1 through 3 for the slide assembly on the other side of the rack.
5
Ensure that the rails are mounted at the same vertical position on both sides of the rack.
Rack Installation Guide
Installing the VersaRails Slide Assemblies
1
At the front of the rack cabinet, position one of the VersaRails slide assemblies so that its
mounting-bracket flange fits between the marks or tape (or numbered location) on the rack
(see Figure 1-6).
The four holes on the front of the mounting bracket should align with four of the holes
between the marks you made on the front vertical rail.
2
Install two 10-32 x 0.5-inch flange-head Phillips screws in the mounting flange’s top hole and
the third-from-top hole to secure the slide assembly to the front vertical rail (see Figure 1-6).
3
At the back of the cabinet, pull back on the mounting-bracket flange until the mounting
holes align with their respective holes on the back vertical rail.
4
Install two 10-32 x 0.5-inch flange-head Phillips screws in the back mounting flange’s top
and third-from-top holes to secure the slide assembly to the back vertical rail.
5
Repeat steps 1 through 4 for the slide assembly on the other side of the rack.
6
Ensure that the slide assemblies are mounted at the same position on the vertical rails on
each side of the rack.
Rack Installation Guide
1-13
www.dell.com | support.dell.com
Figure 1-6.
Installing the VersaRails Slide Assemblies
slide assembly (2)
mounting-bracket
flange
10-32 x 0.5-inch
flange-head Phillips
screw (4 per slide
assembly)
front of rack
Installing the System in the Rack
CAUTION: If you are installing more than one system, install the first system in the lowest available
position in the rack.
CAUTION: Never pull more than one component out of the rack at a time.
1
Pull the two slide assemblies out of the rack until they lock in the fully extended position.
CAUTION: Because of the size and weight of the system, never attempt to install the system in the slide
assemblies by yourself.
1-14
2
Lift the system into position in front of the extended slides (see Figure 1-7).
3
Place one hand on the front-bottom of the system and the other hand on the back-bottom
of the system.
Rack Installation Guide
4
Tilt the back of the system down while aligning the back shoulder screws on the sides
of the system with the back slots on the slide assemblies.
5
Engage the back shoulder screws into their slots.
Figure 1-7. Installing the System in the Rack (RapidRails or VersaRails)
shoulder screw
on system
slide release
latch (green)
system release
latch (yellow)
6
Lower the front of the system and engage the front and middle shoulder screws in their slots
(the middle slot is just behind the yellow system release latch) (see Figure 1-7).
When all shoulder screws are properly seated, the yellow latch on each slide assembly clicks
and locks the system into the slide assembly.
Rack Installation Guide
1-15
www.dell.com | support.dell.com
7
Press up on the green slide release latch at the side of each slide to slide the system completely
into the rack (see Figure 1-7).
8
Push in and turn the captive thumbscrews on each side of the front chassis panel to secure
the system to the rack.
NOTE: Use the yellow system release latch whenever you wish to remove the system from the slide
assemblies.
Installing the Cable-Management Arm, if Applicable
NOTICE: The cable-management arm can only be installed on the right side of the rack cabinet (as
viewed from the back).
If your system has a cable-management arm, install the cable-management arm by performing
the following steps:
1
Facing the back of the rack cabinet, locate the latch on the end of the slide assembly.
2
Push the tab on the back end of the cable-management arm into the latch on the end of
the slide assembly (see Figure 1-8).
The latch clicks when locked.
3
Push the tab on the front end of the cable-management arm into a mating latch on the inner
segment of the slide assembly (see Figure 1-8).
The latch clicks when locked.
1-16
Rack Installation Guide
Figure 1-8. Installing the Cable-Management Arm, if Applicable
latch on end of slide
assembly
latch on inner
segment of slide
assembly
tab on front end
tab on back end
cable-management arm,
if applicable
4
If your system has a system status indicator cable, install the cable plug into its connector
(see Figure 1-9). Otherwise, continue to step 5.
5
Open the wire covers on the cable-management arm by lifting the center of the wire over the
top of the embossed round button on the front of the forward part of the arm and lifting the
wire over the top of a similar round button on the back part of the arm.
The wire cover swings open to enable cables to be routed within the arm.
6
If your system has a system status indicator cable, route the end of the cable through the
cable-management arm, and install the indicator in its slot at the back end of the cablemanagement arm (see Figure 1-9). Otherwise, continue to "Routing Cables."
Rack Installation Guide
1-17
www.dell.com | support.dell.com
Figure 1-9. Installing the System Status Indicator, if Applicable
system status
indicator cable plug
wire covers in
open position
system status indicator
Routing Cables
CAUTION: Allow some slack in each cable as you route them around hinges in the cable-management
arm.
1
Connect the power cords to their receptacles on the back panel.
2
Attach the I/O cable connectors to their respective connectors on the system back panel.
For details on cable connections, see your system’s Installation and Troubleshooting Guide
and the User’s Guide.
3
Route the power and I/O cables through the cable-management arm, using four loosely
secured tie-wraps (two in the middle and one on each end of the cable-management arm).
Do not fully tighten the tie-wraps at this time (see Figure 1-10).
Allow some cable slack in the cable-management arm to prevent damage to the cables.
1-18
Rack Installation Guide
4
Secure the cables to the cable-management arm:
a
After connecting the cables to the system, unscrew the thumbscrews that secure the front
of the system to the front vertical rail.
b
Slide the system forward to the fully extended position.
c
Route the cables along the cable-management arm, make any adjustments needed to the
cable slack at the hinge positions, secure the cables to the cable-management arm with
the tie-wraps, and close the wire covers over the cable-management arm.
NOTE: As you pull the system out to its furthest extension, the slide assemblies will lock in the
extended position. To push the system back into the rack, press the slide release latch on the side
of the slide, and then slide the system completely into the rack.
5
Slide the system in and out of the rack to verify that the cables are routed correctly and do not
bind, stretch, or pinch with the movement of the cable-management arm.
6
Tighten the tie-wraps just enough to ensure that the cable slack is neither too tight, causing
excessive pinching, nor too loose, causing the cables to slip as the system is moved in and out
of the rack.
Figure 1-10.
Routing Cables
tie-wrap
tie-wrap
tie-wrap
tie-wrap
Replacing the Rack Doors
Refer to the procedures for replacing doors in the documentation provided with your rack.
CAUTION: Because of the size and weight of the rack cabinet doors, never attempt to remove or install
them by yourself.
This completes the rack installation of your system in a four-post rack cabinet.
Rack Installation Guide
1-19
www.dell.com | support.dell.com
Two-Post Rack Installation
The two-post rack kit is used to install a system in a two-post, open-frame relay rack, such as those
found in telecommunications equipment facilities. Both 3-inch and 6-inch wide two-post racks
with universal-hole spacing or wide-hole spacing are accommodated. You can install this kit in a
center-mount or a flush-mount configuration. The two-post kit incorporates slide assemblies that
enable the system to be pulled out of the rack for servicing.
You must properly secure the two-post, open-frame relay rack to the floor, the ceiling or upper wall,
and where applicable, to adjacent racks, using floor and wall fasteners and bracing specified or
approved by the rack manufacturer or by industry standards. See the two-post, open-frame relay
rack manufacturer’s installation documentation for precautionary warnings before attempting this
installation.
CAUTION: Do not attempt to install the system into a two-post, open-frame relay rack that has not been
securely anchored in place. Damage to the system and personal injury to yourself and to others may
result.
See "CAUTION: Safety Instructions" at the front of this document for additional safety
information regarding rack installation.
Two-Post Rack Installation Tasks
Installing a two-post rack kit includes performing the following tasks in their numbered order:
1
Marking the rack
2
Installing the slide assemblies in the rack:
•
Center-mount installation
•
Flush-mount installation
3
Installing the system in the rack
4
Installing the cable-management arm, if applicable
5
Routing cables
Recommended Tools and Supplies
You need the following tools and supplies to install the system in a two-post
open-frame relay rack:
1-20
•
#2 Phillips screwdriver
•
11/32-inch wrench or nut driver (if changing to a flush-mount configuration)
•
Masking tape or felt-tip pen to mark the mounting holes
Rack Installation Guide
Rack Kit Contents
The two-post rack kit includes the following items (see Figure 1-11):
•
One pair of slide assemblies (two-post)
•
One stiffening bracket
•
One cable-management arm, if applicable
•
One status indicator cable, if applicable
•
Twelve 12-24 x 0.5-inch pan-head Phillips screws
•
Tie-wraps (not shown in Figure 1-11)
Figure 1-11.
Two-Post Rack Kit Components
slide assemblies (2)
stiffening
bracket
cable-management arm,
if applicable
status indicator cable,
if applicable
12-24 x 0.5-inch pan-head
Phillips screw (12)
Rack Installation Guide
1-21
www.dell.com | support.dell.com
Marking the Rack
You must allow 2 U (88 mm or 3.5 inches) of vertical space for each system you install
in the two-post rack.
Universal-Hole Spacing Racks
Industry-standard two-post racks with universal-hole spacing have an alternating pattern of
three holes per U with center-to-center hole spacing (beginning at the top hole of a 1-U space)
of 15.9 mm, 15.9 mm, and 12.7 mm (0.625 inch, 0.625 inch, and 0.5 inch) for the front and back
vertical column of holes (see Figure 1-12).
Figure 1-12. Two-Post, Open-Frame Relay Rack Universal-Hole Spacing
15.9 mm (0.625 inch)
12.7 mm (0.5 inch)
15.9 mm (0.625 inch)
44 mm 1.75 inches (1 U)
15.9 mm (0.625 inch)
Wide-Hole Spacing Racks
Some two-post racks with wide-hole spacing have an alternating pattern of two holes per U with
center-to-center hole spacing (beginning at the top hole of a 1-U space) of 31.7 mm and 12.7 mm
(1.25 inches and 0.5 inch) for the front and back vertical column of holes (see Figure 1-13).
1-22
Rack Installation Guide
Figure 1-13.
Two-Post, Open-Frame Relay Rack Wide-Hole Spacing
12.7 mm (0.5 inch)
44 mm (1.75 inches) (1 U)
31.7 mm (1.25 inches)
To mark the rack, perform the following steps:
1
Place a mark on the rack’s front vertical rails where you want to locate the bottom of
the system you are installing in the two-post rack.
The bottom of each 1-U space is at the middle of the narrowest metal area between holes.
NOTE: If your rack has wide-hole spacing, go to step 3.
2
Place a mark 88 mm (3.5 inches) above the original mark you made (or count up six holes
in a rack with universal-hole spacing (see Figure 1-12).
Each 1-U (44 mm, or 1.75 inches) of vertical space on a rack with universal-hole spacing has
three holes with center-to-center spacing between holes (beginning at the top of a 1-U space)
of 0.625, 0.625, and 0.5 inches (see Figure 1-12).
NOTE: If your rack has universal-hole spacing, you have completed the procedure for marking the rack.
3
Place a mark 88 mm (3.5 inches) above the original mark you made (or count up to the fourth
hole in the rack with wide-hole spacing (see Figure 1-13).
Each 1-U (44 mm, or 1.75 inches) of vertical space on a rack with wide-hole spacing has
two holes with center-to-center spacing between holes (beginning at the top of a
1-U space) of 31.7 mm (1.25 inches) (see Figure 1-13).
Rack Installation Guide
1-23
www.dell.com | support.dell.com
Installing the Slide Assemblies in the Rack
You can install the slide assemblies in a two-post open-frame rack having either universal-hole
spacing (see Figure 1-12) or wide-hole spacing (see Figure 1-13). You can install the 2-U slide
assemblies in either a flush-mount or center-mount configuration.
CAUTION: Do not attempt to install another system using this rack kit. Use only the rack kit intended
for your system. Using the rack kit for another system may result in damage to the system and personal
injury to yourself and to others.
Center-Mount Installation
The two-post rack kit is shipped with the brackets configured for center-mount installation.
To complete the installation, perform the following steps:
1-24
1
Locate the right slide assembly and push the back bracket toward the back of the slide
assembly (see Figure 1-14).
2
Position the right slide assembly in the two-post rack at the location you marked, push the
back bracket forward against the vertical two-post rack, secure the front center mounting
bracket with two 12-24 x 0.5-inch pan-head Phillips screws, and secure the back centermounting bracket to the rack with three 12-24 x 0.5-inch pan-head Phillips screws
(see Figure 1-14).
3
Repeat steps 1 and 2 to install the left slide assembly in the rack.
4
Install the stiffening bracket between the back ends of the slide assemblies and secure
the bracket with a 12-24 0.5-inch pan-head Phillips screw on each slide assembly
(see Figure 1-14).
Rack Installation Guide
Figure 1-14.
Installing the Slide Assemblies for Center-Mount Configuration
12-24 x 0.5-inch pan-head
Phillips screw
(5 per slide assembly)
two-post open-frame rack
stiffening bracket
slide
assembly
system release
latch (yellow)
slide assembly
slide release latch (green)
Rack Installation Guide
1-25
www.dell.com | support.dell.com
Flush-Mount Installation
The two-post rack kit is shipped with the brackets configured for center-mount installation.
To prepare the slide assemblies for flush-mount installation in the two-post rack, perform the
following steps:
1
Locate the two slide assemblies and place them, side by side, on a smooth work surface, with
the front ends of the slide assemblies toward you. Position both slide assemblies so that the
center brackets are facing upward (see Figure 1-15).
NOTE: To prepare the slides for flush-mount installation, remove the front mounting bracket,
rotate it 180 degrees, and reinstall it on the opposite slide assembly.
2
Using a #2 Phillips screwdriver and an 11/32-inch wrench or nut driver, remove two 12-24 x
0.5-inch pan-head Phillips screws, two nuts, and two shoulder washers from each front center
bracket (see Figure 1-15).
3
Remove the front bracket from both slide assemblies.
4
Place the bracket from one slide assembly onto the threaded studs on the opposite slide
assembly, with the bracket turned 180 degrees so that the mounting flange faces forward
(see Figure 1-15).
5
Secure each front center-mount bracket (by its nuts and shoulder washers) by fingertightening them on their opposite slide assemblies using the two shoulder washers and
two nuts you removed in step 2 (see Figure 1-15).
The joined bracket becomes the new extended back bracket.
1-26
Rack Installation Guide
Figure 1-15.
Rotating the Front Mounting Bracket for Flush-Mount Installation
shoulder washer
(2 per bracket)
nut (2 per bracket)
12-24 x 0.5-inch pan-head Phillips
screws (install 2 per bracket)
mounting flange
12-24 x 0.5-inch pan-head Phillips screws
(remove 2 per bracket)
NOTE: These screws are shown reinstalled
on the other slide assembly.
6
Repeat steps 4 and 5 to configure the other slide assembly.
7
Holding the left slide assembly into position in the two-post rack at the location you marked,
adjust the extended back bracket tightly against the vertical two-post rack and secure it with
three 12-24 x 0.5-inch pan-head Phillips screws (see Figure 1-16).
8
Secure the front bracket on the slide assembly to the two-post rail with two
12-24 x 0.5- inch pan-head Phillips screws (see Figure 1-16).
9
Perform steps 7 and 8 to install the right slide assembly in the rack.
10
Use an 11/32-inch wrench or nut driver to fully tighten the nuts on the mounting brackets
on both slide assemblies that you tightened with your fingers.
11
Install the stiffening bracket between the back ends of the slide assemblies and secure
the bracket with a 12-24 0.5-inch pan-head Phillips screw on each slide assembly
(see Figure 1-16).
Rack Installation Guide
1-27
www.dell.com | support.dell.com
Figure 1-16. Installing the Slide Assemblies for Flush-Mount Configuration
12-24 x 0.5-inch pan-head
Phillips screws
(5 each slide)
two-post open-frame rack
stiffening bracket
slide assembly
system release
latch (yellow)
slide assembly
slide release latch (green)
1-28
Rack Installation Guide
Installing the System in the Rack
CAUTION: Due to the size and weight of the system, never attempt to install the system by yourself.
NOTE: The procedure for installing a system into a rack is identical for flush-mount and center-mount
slide assemblies.
1
Pull the slides out to their fully extended position.
CAUTION: Because of the size and weight of the system, never attempt to install the system in the slide
assemblies by yourself.
2
Lift the system into position (see Figure 1-16).
3
Place one hand on the front-bottom of the system and the other hand on the back-bottom of
the system.
4
Tilt the back of the system down while aligning the back shoulder screws on the sides of the
system with the back slots on the slide assemblies.
5
Engage the back shoulder screws into their slots.
6
Lower the front of the system, and engage the front and middle shoulder screws in their slots
(the middle slot is just behind the yellow system release latch) (see Figure 1-16).
When all shoulder screws are properly seated, the yellow latch on each slide assembly clicks
and locks the system into the slide assembly.
7
Press up on the green slide release latch at the side of each slide to slide the system completely
into the rack (see Figure 1-16).
8
Push in and turn the captive thumbscrews on each side of the front chassis panel to secure
the system to the rack.
NOTE: Use the yellow system release latch whenever you wish to remove the system from the slide
assemblies.
Installing the Cable-Management Arm, if Applicable
See "Installing the Cable-Management Arm" in "Four-Post Rack Installation" found earlier
in this document.
Routing Cables
See "Routing Cables" in "Four-Post Rack Installation" found earlier in this document.
You have completed the installation of the rack kit in a two-post rack.
Rack Installation Guide
1-29
1-30
Rack Installation Guide
www.dell.com | support.dell.com
Index
C
cable-management arm
installing, 1-16, 1-29
routing cables, 1-19, 1-29
four-post kit (continued)
VersaRails kit contents, 1-8
VersaRails slide
assemblies, 1-13
cables, 1-19
contents listed
RapidRails kit, 1-8
two-post kit, 1-21
VersaRails kit, 1-8
D
doors
removing, 1-9
replacing, 1-19
F
four-post kit
installing cable-management
arm, 1-16
installing system, 1-14
marking rack, 1-10
RapidRails kit contents, 1-8
RapidRails slide
assemblies, 1-11
routing cables, 1-18
tasks, 1-9
tools, 1-7
I
installing
cable-management arm, 1-29
RapidRails slide
assemblies, 1-11
two-post slide
assemblies, 1-24
VersaRails slide
assemblies, 1-13
installing in rack
system, 1-14 to 1-15
installing system
four-post rack, 1-14
two-post rack, 1-29
K
kit contents
RapidRails, 1-8
VersaRails, 1-9
M
marking rack
four-post kits, 1-10
two-post kit, 1-22
R
rack mount precautions, 1-7
rack requirements for
VersaRails, 1-6
rack stabilizer feet, 1-7
rack unit, 1-10
RapidRails kit contents, 1-8
routing cables, 1-18, 1-29
S
safety instructions, 1-5
stiffening bracket, 1-21
installing, 1-24, 1-27
T
tasks
four-post kit, 1-9
two-post kit, 1-20
tools
four-post kits, 1-7
two-post kits, 1-20
two-post kit
center-mount
installation, 1-24
contents, 1-21
flush-mount installation, 1-26
installing cable-management
arm, 1-29
Index
1-31
32
Index
two-post kit (continued)
installing slide
assemblies, 1-24
installing system, 1-29
marking rack, 1-22
routing cables, 1-29
stiffening bracket, 1-21, 1-27
tasks, 1-20
tools, 1-20
1-32
Index
V
VersaRails kit contents, 1-8
vertical rails
marking, 1-10
one rack unit, 1-10
Systèmes Dell™
Guide d'installation
en rack
www.dell.com | support.dell.com
Remarques, avis et avertissements
REMARQUE : une REMARQUE indique des informations importantes qui vous permettent de mieux utiliser
votre ordinateur.
AVIS : un AVIS vous avertit d’un risque de dommage matériel ou de perte de données et vous indique
comment éviter le problème.
ATTENTION : le message ATTENTION indique une situation potentiellement dangereuse qui, si elle
n'est pas évitée, peut provoquer une détérioration du matériel et des blessures pouvant entraîner la mort.
____________________
Les informations contenues dans ce document peuvent être modifiées sans préavis.
© 2003 Dell Inc. Tous droits réservés.
La reproduction de ce document de quelque manière que ce soit sans l'autorisation écrite de Dell Inc. est strictement interdite.
Les marques utilisées dans ce document : Dell, le logo DELL, RapidRails et VersaRails, sont des marques de Dell Inc.
Tous les autres noms de marques et marques déposées utilisés dans ce document se rapportent aux sociétés propriétaires des
marques et des noms de ces produits. Dell Inc. décline tout intérêt dans l'utilisation des marques déposées et des noms de marques
ne lui appartenant pas.
Décembre 2003
P/N C4624
Rev. A00
Sommaire
ATTENTION : Consignes de sécurité
. . . . . . . . . . . . . . . . . . .
2-5
Montage en rack des systèmes
. . . . . . . . . . . . . . . . . . .
2-5
. . . . . . . . . . . . . . . . . . . . . . . .
2-6
Instructions d'installation
Installation dans un rack à quatre montants.
. . . . . . . . . . . . . . .
Avant de commencer . . . . . . . . . . . . . . . . . . .
Outils et fournitures recommandés . . . . . . . . . . . . .
Contenu du kit du rack RapidRails . . . . . . . . . . . . .
Contenu du kit du rack VersaRails . . . . . . . . . . . . .
Tâches d'installation . . . . . . . . . . . . . . . . . . .
Retrait des portes du rack . . . . . . . . . . . . . . . . .
Marquage du rack . . . . . . . . . . . . . . . . . . . .
Installation des rails coulissants RapidRails . . . . . . . .
Installation des rails coulissants VersaRails . . . . . . . .
Installation du système dans le rack . . . . . . . . . . . .
Installation du bras de maintien des câbles (le cas échéant).
Routage des câbles . . . . . . . . . . . . . . . . . . . .
Remise en place des portes du rack . . . . . . . . . . . .
Installation dans un rack à deux montants
. . . . .
2-7
2-8
2-8
2-9
2-9
2-10
2-10
2-12
2-13
2-14
2-16
2-18
2-20
. . . . . . . . . . . . . . . .
2-20
Tâches d'installation du rack à deux montants . . . . . . .
Outils et fournitures recommandéss . . . . . . . . . . . .
Contenu du kit de rack . . . . . . . . . . . . . . . . . . .
Marquage du rack . . . . . . . . . . . . . . . . . . . .
Installation des rails coulissants dans le rack . . . . . . . .
Installation du système dans le rack . . . . . . . . . . . .
Installation du bras de maintien des câbles (le cas échéant).
Routage des câbles . . . . . . . . . . . . . . . . . . . .
Index
. . . . .
2-7
. . . . .
. . . . .
. . . . .
. . . . .
. . . . .
. . . . .
. . . . .
. . . . .
. . . . .
. . . . .
. . . . .
. . . . .
. . . . .
. . . . .
. . . . .
. . . . .
. . . . .
. . . . .
. . . . .
. . . . . . . . . . . . . . . . . . . . . . . . . . . . . . . . . .
2-20
2-21
2-21
2-22
2-24
2-29
2-29
2-29
2-31
Sommaire
2-3
Figures
Figure 2-1.
Contenu du kit du rack RapidRails
. . . . . . . .
2-8
Figure 2-2.
Contenu du kit du rack VersaRails
. . . . . . . .
2-9
Figure 2-3.
Unité de rack
. . . . . . . . . . . . . . . . . .
2-10
Figure 2-4.
Marquage des rails verticaux
. . . . . . . . . .
2-11
Figure 2-5.
Installation des rails coulissants RapidRails
. . .
2-12
Figure 2-6.
Installation des rails coulissants VersaRails
. . .
2-14
Figure 2-7.
Installation du système dans le rack
(RapidRails ou VersaRails) . . . .
. . . . . . .
2-15
Figure 2-8.
Figure 2-9.
2-17
. . . . .
2-18
. . . . . . . . . . . . . . .
2-19
. .
2-21
. . .
2-22
. . . . .
2-23
Installation du voyant d’état du système
(le cas échéant) . . . . . . . . . . .
Routage des câbles
Figure 2-11.
Composants du kit pour rack à deux montants
Figure 2-12.
Espacement des trous sur un rack universel
à 2 montants et châssis ouvert . . . . . .
Figure 2-14.
Figure 2-15.
Figure 2-16.
Sommaire
. . .
Figure 2-10.
Figure 2-13.
2-4
Installation du bras de maintien des câbles
(le cas échéant) . . . . . . . . . . . . .
Espacement large des trous sur un rack
à 2 montants avec châssis ouvert . . .
Installation des rails coulissants
pour une configuration en montage central
Rotation du support de montage avant
pour une installation en encastrement
. . .
2-25
. . . . . .
2-27
Installation des rails coulissants
pour une configuration en encastrement
. . . . .
2-28
ATTENTION : Consignes de sécurité
Respectez ces consignes de sécurité pour assurer votre sécurité personnelle et pour contribuer
à protéger votre système et votre environnement de travail des dommages potentiels.
Pour obtenir des informations complètes sur la sécurité, reportez-vous au Guide Informations
sur le système.
Montage en rack des systèmes
Pour la stabilité du rack et pour votre sécurité, respectez les précautions suivantes.
Les systèmes montés dans un rack sont également appelés des composants. Le terme
“composant” fait donc référence à un système mais aussi aux différents périphériques
ou matériels associés.
ATTENTION : l'installation de systèmes dans un rack non équipé de stabilisateurs avant et
latéraux peut provoquer son basculement, et entraîner des blessures. C'est pourquoi il faut
toujours installer ces stabilisateurs avant de mettre en place des composants dans le rack.
Après avoir installé un système ou des composants dans un rack, ne faites jamais coulisser hors
du rack plus d’un composant à la fois. Le poids de plusieurs composants sortis du rack risquerait
de le faire basculer et de blesser quelqu'un gravement.
REMARQUE : votre système est certifié sur le plan de la sécurité en tant qu'unité autonome ou
comme composant destiné à être monté dans une armoire rack Dell™, à l'aide du kit de rack client.
L’installation de votre système et du kit de rack dans une autre armoire n’a été approuvée par
aucun organisme de sécurité. Il vous incombe de veiller à ce que la combinaison finale système
et rack soit conforme à toutes les normes de sécurité en vigueur ainsi qu'aux normes électriques
locales. Dell décline toute responsabilité et toutes garanties liées à ce type de combinaisons.
•
Les kits de rack sont destinés à être installés par des techniciens de maintenance
qualifiés. Si vous installez ce kit dans un autre rack, assurez-vous qu’il correspond
à toutes les spécifications d'un rack Dell.
ATTENTION : ne déplacez pas de rack sans aide. En raison de la hauteur et du poids du rack,
cette tâche doit être réalisée par deux personnes au minimum.
•
Avant de travailler sur le rack, vérifiez que les pieds stabilisateurs sont fixés au rack,
qu'ils touchent le sol et que tout le poids du rack repose sur le sol. Avant d’intervenir
sur un rack isolé, installez d’abord les pieds stabilisateurs avant et latéraux.
Pour plusieurs racks associés, installez les pieds stabilisateurs avant.
•
Remplissez toujours le rack en partant du bas, avec les éléments les plus lourds
en premier.
•
Assurez-vous que le rack est d’aplomb et stable avant de tirer un composant hors
de son compartiment.
Guide d'installation en rack
2-5
www.dell.com | support.dell.com
ATTENTION : Consignes de sécurité (suite)
•
Faites attention lorsque vous appuyez sur les loquets de déverrouillage des rails et que
vous faites glisser un composant dans ou hors d'un rack, car vous risquez de vous pincer
les doigts dans les glissières.
•
Une fois le composant inséré, étendez avec précaution le rail en position de verrouillage,
puis faites glisser le composant dans le rack.
•
Ne surchargez pas le circuit d’alimentation secteur du rack. La consommation totale
du rack ne doit pas dépasser 80 % de la capacité du circuit.
•
Assurez-vous que les composants du rack sont correctement ventilés.
•
Ne montez pas sur un composant lorsque vous intervenez sur d’autres composants
du rack.
Instructions d'installation
Ce guide d'installation contient des instructions s'adressant à des techniciens de maintenance
qualifiés. Il explique comment installer un ou plusieurs systèmes dans un rack à châssis ouvert
ou une armoire rack. Le kit de rack RapidRails™ peut être installé sans outils dans toutes les
armoires rack du fabricant ; le kit de rack VersaRails™ peut être installé dans de nombreuses
armoires rack conformes aux standards. Les procédures d'installation des kits de rack RapidRails
et VersaRails sont similaires. Un kit de rack est nécessaire pour chaque système devant être installé
dans l'armoire rack.
Ce guide comprend les procédures relatives aux kits de rack suivants :
•
Kit RapidRails dans une armoire rack à quatre montants
•
Kit VersaRails dans une armoire rack à quatre montants
•
Kit pour armoire à deux montants (installé dans une configuration en montage central
ou en encastrement, pour les racks de 3 ou 6 pouces de largeur)
Certains systèmes disposent d’un câble pour voyant d’état, qui facilite la visualisation de l’état
du système et le dépannage. Les kits pour rack de ces systèmes disposent d’une rallonge de câble
d’indicateur d’état, qui permet de reporter à l’arrière du bras de maintien des câbles les informations affichées par les voyants à deux couleurs des faces avant et arrière. Pour plus d’informations
sur ces voyants, et pour savoir si votre système utilise ce genre de câble, consultez son Guide
d’utilisation.
Avant de commencer l'installation, lisez soigneusement ce document en entier.
ATTENTION : n'installez pas de composants de kit de rack prévus pour un autre système. Utilisez
uniquement le kit de rack de votre système. Si vous employez le kit d'un autre système, vous risquez
d'endommager le système et d'exposer autrui et vous-même à des risques de blessures.
2-6
Guide d'installation en rack
Spécifications de rack requises pour les rails VersaRails
AVIS : le kit de rack VersaRails est prévu pour être installé par des techniciens de maintenance qualifiés
dans un rack conforme aux standards suivants : ANSI/EIA-310-D-92 (American National Standards
Institute/Electronic Industries Association), IEC 297 (International Electrotechnical Commission) et DIN 41494
(Deutsche Industrie Norm). Un kit de rack est nécessaire pour chaque système installé dans le rack.
Installation dans un rack à quatre montants
Avant de commencer l'installation, lisez soigneusement cette procédure en entier.
Avant de commencer
Avant de commencer à installer votre système dans le rack, lisez attentivement la section
“ATTENTION : Consignes de sécurité”, ainsi que les instructions de sécurité du Guide
Informations sur le système, qui vous fourniront des renseignements supplémentaires.
ATTENTION : lorsque vous installez plusieurs systèmes dans un rack, effectuez toutes les procédures
s'appliquant au système en cours avant d'essayer d'installer le système suivant.
ATTENTION : les racks peuvent être extrêmement lourds, mais se déplacent assez facilement sur
leurs roulettes Cependant, ils ne possèdent pas de système de freinage. Procédez par conséquent avec
la plus grande prudence pour déplacer un rack. Rentrez ses pieds de mise à niveau lorsque vous le
changez d'emplacement. Evitez de le déplacer le long de rampes ou de plans inclinés trop longs ou
trop abrupts, sur lesquels il pourrait vous échapper. Ressortez les pieds de mise à niveau lorsqu'il est
nécessaire de soutenir l'armoire ou pour lui éviter de glisser sur ses roulettes.
Informations importantes sur la sécurité
Respectez les précautions décrites dans les sous-sections suivantes lors de l'installation
de votre système dans le rack.
ATTENTION : vous devez respecter à la lettre les procédures de ce document afin de garantir
votre propre protection ainsi que celle d'autrui. Votre système peut être très lourd et volumineux.
Une préparation et une planification adéquates sont donc importantes afin d'éviter tout risque de
blessure pour vous-même ou autrui. Ces précautions prennent d'autant plus d’importance au fur
et à mesure que le rack est rempli, de bas en haut.
Guide d'installation en rack
2-7
www.dell.com | support.dell.com
Pieds stabilisateurs du rack
ATTENTION : l'installation de systèmes dans un rack sans placer de pieds stabilisateurs avant et
latéraux peut provoquer le basculement du rack, et comporte dans certaines situations un risque
de blessures. C'est pourquoi il faut toujours installer les pieds stabilisateurs avant d'installer les
composants du rack.
ATTENTION : après avoir installé des systèmes dans un rack, ne faites jamais coulisser hors du rack
plus d’un système à la fois. Le poids de plusieurs systèmes sortis du rack risquerait de le faire basculer
et de blesser quelqu'un gravement.
Les stabilisateurs évitent au rack de basculer lorsqu’un système ou composant est totalement
sorti du rack sur ses glissières. Consultez la documentation fournie avec l'armoire rack pour savoir
comment installer et fixer les pieds stabilisateurs.
Outils et fournitures recommandés
Les outils et fournitures suivants peuvent être nécessaires pour installer le système dans un rack
à quatre montants :
•
•
Un tournevis Phillips n° 2 (pour installer un kit de rails coulissants VersaRails)
De la bande protectrice adhésive ou un stylo feutre pour marquer les trous de montage
à utiliser
Contenu du kit du rack RapidRails
Le kit de rack RapidRails comprend les éléments suivants (voir la figure 2-1) :
•
•
•
•
Une paire de rails coulissants RapidRails
Un bras de maintien des câbles (le cas échéant)
Un câble de voyant d'état (le cas échéant)
Des attache-câbles (non représentés sur la figure 2-1)
Figure 2-1.
Contenu du kit du rack RapidRails
Rails coulissants (2)
Bras de maintien des
câbles (le cas échéant)
Câble de voyant d'état
(le cas échéant)
2-8
Guide d'installation en rack
Contenu du kit du rack VersaRails
Le kit du rack VersaRails comprend les éléments suivants (voir la figure 2-2) :
•
Une paire de rails coulissants VersaRails
•
Un bras de maintien des câbles (le cas échéant)
•
Un câble de voyant d'état (le cas échéant)
•
Huit vis à tête Phillips 10-32 x 0,5 pouce
•
Des attache-câbles (non représentés sur la figure 2-2)
REMARQUE : les vis au pas non métrique décrites dans les illustrations et dans les étapes des
procédures sont identifiées par la taille et le nombre de filets par pouce. Par exemple, une vis à tête
Phillips n° 10 avec 32 filets par pouce est désignée par l'appellation vis 10-32.
Figure 2-2. Contenu du kit du rack VersaRails
Rails coulissants (2)
Bras de maintien des
câbles (le cas échéant)
Vis Phillips à tête
plate 10-32 x 0,5 (8)
Câble de voyant d'état
(le cas échéant)
Tâches d'installation
Pour installer un kit de rack, vous devez effectuer les tâches suivantes dans l'ordre indiqué :
1
Retrait des portes du rack
2
Marquage du rack
3
Installation des rails coulissants dans le rack :
•
•
Installation du kit RapidRails
Installation du kit VersaRails
4
Installation du système dans le rack
5
Installation du bras de maintien des câbles (le cas échéant)
6
Routage des câbles
7
Remise en place des portes du rack
Guide d'installation en rack
2-9
www.dell.com | support.dell.com
Retrait des portes du rack
Reportez-vous aux procédures de retrait des portes dans la documentation fournie avec votre
armoire rack.
ATTENTION : compte tenu de leur poids et taille, ne retirez ou n'installez jamais les portes tout seul.
ATTENTION : placez les deux portes dans un endroit sûr où elles ne risquent pas de tomber
accidentellement et de blesser quelqu'un.
Marquage du rack
Vous devez laisser un espace vertical de 2 U (88 mm ou 3,5 pouces) pour chaque système installé
dans le rack. Les racks conformes aux normes EIA-310 alternent un groupe de trois trous par U
(unité). L’espacement entre les trous, mesuré du centre d'un trou au centre du trou suivant
(en commençant par le trou supérieur) est respectivement de 15,9, 15,9 et 12,7 mm (0,625, 0,625
et 0,5 pouces) pour les rails verticaux avant et arrière (voir la figure 2-3). Les armoires rack peuvent
comporter des trous ronds ou carrés.
REMARQUE : les rails verticaux peuvent être marqués par des lignes horizontales et des chiffres
progressant par incréments de 1 U. Si vous le souhaitez, vous pouvez noter le nombre figurant sur le rail
vertical du rack. Dans ce cas, il n'est pas nécessaire de marquer le rack ou d'y apposer un morceau de
bande adhésive. Si vous choisissez cette méthode, passez directement à la section “Installation des rails
coulissants RapidRails”.
Figure 2-3.
Unité de rack
12,7 mm (0,5 pouce)
15,9 mm (0,625 pouce)
1 U (44 mm ou 1,75 pouce)
15,9 mm (0,625 pouce)
12,7 mm (0,5 pouce)
ATTENTION : si vous installez plusieurs systèmes, placez les rails coulissants de façon à ce que
le premier système soit disposé le plus bas possible dans le rack.
2-10
Guide d'installation en rack
Pour marquer le rack, procédez comme suit :
1
Placez une marque sur les rails verticaux avant du rack, à l'endroit correspondant au bas du
système à installer.
Le bas de chaque espace 1 U se trouve au milieu de la zone métallique la plus étroite entre les
trous (repérée par une ligne horizontale sur certaines armoires rack — voir la figure 2-4).
2
Placez une marque à 88 mm (3,5 pouces) au-dessus de la marque originale que vous avez faite
(ou comptez jusqu'à six trous dans les racks conformes aux normes EIA-310), puis marquez
les rails verticaux du rack avec un stylo feutre ou de la bande protectrice adhésive (si vous avez
compté les trous, placez une marque juste au-dessus du trou du haut). Cette marque ou ce
morceau de bande adhésive indique l'endroit où le rebord supérieur du système sera installé
sur les rails verticaux (voir la figure 2-4).
Figure 2-4. Marquage des rails verticaux
Bande adhésive
sur le rail vertical
Guide d'installation en rack
2-11
www.dell.com | support.dell.com
Installation des rails coulissants RapidRails
1
À l'avant de l'armoire rack, positionnez l'un des rails RapidRails de façon à ce que sa plaque de
fixation soit située entre les marques (ou le morceau de bande adhésive) placées sur le rack
(voir la figure 2-5).
Le crochet de fixation supérieur sur la plaque de fixation avant du rail coulissant doit pénétrer
dans le trou supérieur situé entre les marques que vous avez faites sur les rails verticaux.
2
Poussez le rail coulissant vers l'avant jusqu'à ce que le crochet de fixation soit positionné dans
son trou carré sur le rail vertical, puis poussez vers le bas sur la plaque de fixation jusqu'à ce
que les crochets de fixation s'enclenchent dans les trous carrés et que le bouton poussoir
ressorte avec un déclic (voir la figure 2-5).
Figure 2-5.
Installation des rails coulissants RapidRails
Rails coulissants (2)
Crochets de fixation (2)
Bouton poussoir
Plaque de fixation
Avant du rack
2-12
Guide d'installation en rack
3
À l'arrière de l'armoire, tirez sur la plaque de fixation jusqu'à ce que le crochet de fixation
supérieur soit positionné dans le trou carré, puis poussez vers le bas sur la plaque de fixation
jusqu'à ce que le crochet de fixation s'enclenche dans les trous carrés et que le bouton
poussoir ressorte avec un déclic.
4
Répétez les étapes 1 à 3 pour le rail coulissant de l'autre côté du rack.
5
Vérifiez que les rails sont placés à la même hauteur de chaque côté du rack.
Installation des rails coulissants VersaRails
1
À l'avant de l'armoire rack, positionnez l'un des rails VersaRails de façon à ce que sa plaque
de fixation soit située entre les marques ou la bande adhésive (ou l'emplacement numéroté)
sur le rack (voir la figure 2-6).
Les quatre trous à l'avant de la plaque de fixation doivent correspondre avec quatre des trous
entre les marques que vous avez effectuées sur le rail vertical avant.
2
Insérez deux des vis Phillips 10-32 x 0,5 dans le trou du haut et le troisième trou à partir
du haut de la plaque de fixation, afin de fixer le rail coulissant au rail vertical avant
(voir la figure 2-6)
3
À l'arrière de l'armoire, tirez sur la plaque de fixation jusqu'à ce que les trous de montage
s'alignent avec les trous respectifs sur le rail vertical arrière.
4
Insérez deux des vis Phillips 10-32 x 0,5 dans le trou du haut et le troisième trou à partir
du haut de la plaque de fixation arrière, afin de fixer le rail coulissant au rail vertical arrière.
5
Répétez les étapes 1 à 4 pour le rail coulissant de l'autre côté du rack.
6
Vérifiez que les rails coulissants sont placés à la même hauteur sur les rails verticaux
de chaque côté du rack.
Guide d'installation en rack
2-13
www.dell.com | support.dell.com
Figure 2-6.
Installation des rails coulissants VersaRails
Rails coulissants (2)
Plaque de fixation
Vis à tête plate Phillips
10-32 x 0,5 pouce
(4 par rail coulissant)
Avant du rack
Installation du système dans le rack
ATTENTION : si vous installez plusieurs systèmes, installez le premier le plus bas possible
dans le rack.
ATTENTION : ne retirez jamais plusieurs composants du rack en même temps.
1
Tirez à fond les deux rails coulissants hors du rack jusqu'à ce qu'ils se bloquent.
ATTENTION : en raison de la taille et du poids du système, n’essayez jamais de l'installer tout seul
dans les rails coulissants.
2-14
2
Soulevez le système pour le placer à l'avant des rails coulissants étendus (voir la figure 2-7).
3
Placez une main en bas et à l’avant du système, et l'autre en bas et à l’arrière.
Guide d'installation en rack
4
Inclinez l'arrière du système vers le bas tout en alignant les vis à épaulement arrière des côtés
du système avec les fentes arrière des rails coulissants.
5
Engagez les vis à épaulement arrière dans leurs fentes.
Figure 2-7. Installation du système dans le rack (RapidRails ou VersaRails)
Vis à épaulement
sur le système
Loquet de déverrouillage (vert)
Loquet de dégagement
du système (jaune)
6
Abaissez l'avant du système et engagez les vis à épaulement avant et centrale dans leurs fentes
(la fente centrale se trouve juste derrière le loquet de dégagement jaune) (voir la figure 2-7).
Lorsque toutes les vis à épaulement sont en place, le loquet jaune sur chaque rail coulissant
s'enclenche et verrouille le système.
Guide d'installation en rack
2-15
www.dell.com | support.dell.com
7
Poussez vers le haut sur le loquet de déverrouillage vert de chaque rail pour faire coulisser
le système entièrement dans le rack (voir la figure 2-7).
8
Enfoncez et serrez les vis à molette captives situées de chaque côté du panneau avant
du châssis, pour fixer le système au rack.
REMARQUE : utilisez le loquet jaune pour retirer le système des rails coulissants.
Installation du bras de maintien des câbles (le cas échéant)
AVIS : le bras de maintien des câbles ne peut être installé que sur le côté droit de l'armoire rack,
vu de l'arrière.
Si votre système dispose d’un bras de maintien des câbles, installez ce bras en procédant de la façon
suivante :
1
En vous plaçant face à l'arrière de l'armoire rack, repérez le loquet à l'extrémité du rail
coulissant.
2
Poussez la languette à l'extrémité arrière du bras de maintien des câbles pour la faire pénétrer
dans le loquet à l'extrémité du rail coulissant (voir la figure 2-8).
Le loquet émet un déclic lorsqu'il s'enclenche.
3
Poussez la languette à l'extrémité avant du bras de maintien des câbles pour la faire pénétrer
dans le loquet correspondant sur le segment interne du rail coulissant (voir la figure 2-8 ).
Le loquet émet un déclic lorsqu'il s'enclenche.
2-16
Guide d'installation en rack
Figure 2-8. Installation du bras de maintien des câbles (le cas échéant)
Loquet à l’extrémité
du rail coulissant
Loquet sur le
segment interne
du rail coulissant
Languette à l'extrémité avant
Languette à l'extrémité arrière
Bras de maintien des
câbles (le cas échéant)
4
Si votre système dispose d’un câble pour voyant d’état, insérez la fiche correspondante
dans son connecteur (voir la figure 2-9). Sinon, passez à l'étape 5.
5
Ouvrez les fixe-câbles sur le bras de maintien. Pour cela, et sur chacune des parties du bras
(avant et arrière), soulevez la partie centrale du fixe-câbles au-dessus du bouton embouti
qui se trouve sur le devant.
Le fixe-câbles pivote et s'ouvre pour permettre de placer les câbles dans le bras.
6
Si votre système dispose d’un câble pour voyant d’état, faites-en passer une extrémité dans le
bras de maintien des câbles, puis insérez le voyant dans sa fente, à l'extrémité arrière du bras
(selon la figure 2-9). Dans le cas contraire, passez à la section “Routage des câbles”.
Guide d'installation en rack
2-17
www.dell.com | support.dell.com
Figure 2-9.
Installation du voyant d’état du système (le cas échéant)
Fiche du câble du voyant
d'état du système
Fixe-câbles en
position ouverte
Voyant d'état du système
Routage des câbles
ATTENTION : laissez un peu de mou à chaque câble lorsque vous les passez autour des charnières
du bras de maintien des câbles.
1
Branchez les cordons d'alimentation sur leurs connecteurs en face arrière.
2
Branchez les connecteurs des câbles d'E/S sur les connecteurs correspondants en face arrière
du système.
Pour obtenir plus de détails sur les connexions des câbles, reportez-vous au Guide
d'installation et de dépannage et au Guide de l'utilisateur.
3
Faites passer le cordon d'alimentation et les câbles d'E/S dans le bras de maintien des câbles,
à l'aide de quatre attache-câbles détachables peu serrés (deux au centre et une à chaque
extrémité du bras). À ce stade, ne serrez pas encore à fond les attache-câbles
(voir la figure 2-10).
Laissez un peu de mou aux câbles dans le bras, afin d'éviter de les endommager.
2-18
Guide d'installation en rack
4
Fixez les câbles sur le bras de maintien des câbles :
a
Après avoir branché les câbles au système, dévissez les vis à molette fixant l'avant
du système au rail vertical avant.
b
Sortez le système vers l'avant, en position étendue maximale.
c
Faites passer les câbles le long du bras de maintien. Réglez si nécessaire le mou au niveau
des charnières, puis fixez les câbles au bras de maintien à l'aide des attache-câbles
détachables. Enfin, rabattez les fixe-câbles sur le bras de maintien des câbles.
REMARQUE : lorsque vous tirez le système au maximum, les charnières vont se verrouiller dans
cette position. Pour replacer le système dans le rack, appuyez sur le loquet de déverrouillage sur
le côté du rail coulissant, puis repoussez le système à fond dans le rack.
5
Poussez le système dans le rack puis ressortez-le, pour vérifier que les câbles sont installés
correctement et ne se bloquent pas, ne se tendent pas et ne se coincent pas lors du
déplacement du bras de maintien des câbles.
6
Resserrez juste assez les attache-câbles pour que le câbles aient un mou suffisant, ni trop
tendu, ce qui les coincerait, ni trop lâche pour éviter qu’ils ne glissent lors de l'introduction
et de l'extraction du système dans le rack.
Figure 2-10.
Routage des câbles
Attache-câbles
Attache-câbles
Attache-câbles
Attache-câbles
Guide d'installation en rack
2-19
www.dell.com | support.dell.com
Remise en place des portes du rack
Reportez-vous aux procédures de remise en place des portes dans la documentation fournie
avec l'armoire rack.
ATTENTION : compte tenu de leur poids et taille, ne retirez ou n'installez jamais les portes tout seul.
L'installation de votre système dans une armoire en rack à quatre montants est maintenant
terminée.
Installation dans un rack à deux montants
Le kit du rack à deux montants sert à installer un système dans un rack à deux montants et à
châssis ouvert, système couramment utilisé en télécommunications. Les racks à deux montants de
3 et 6 pouces de large avec un espacement des trous universel ou large sont utilisables. Vous pouvez
installer ce kit dans une configuration en montage central ou en encastrement. Ce kit pour rack à
deux montants comprend des rails coulissants permettant d'extraire le système du rack lorsque des
opérations de maintenance sont requises.
Le rack à deux montants et châssis ouvert doit être correctement fixé au sol, au plafond ou en haut
de mur (le cas échéant aux racks adjacents), à l'aide de fixations et de renforts au sol et muraux,
recommandés ou agréés par le fabricant du rack ou par les normes de l'industrie. Consultez la
documentation d'installation fournie par le fabricant du rack à deux montants avec châssis ouvert
pour connaître les précautions à respecter avant de commencer l'installation.
ATTENTION : n'essayez pas d'installer ce système dans un rack à deux montants avec châssis ouvert
qui n’est pas solidement fixé en place. Vous risqueriez d'endommager le système, de vous blesser ou de
blesser d'autres personnes.
Reportez-vous à la section “ATTENTION : Consignes de sécurité”, au début de ce document,
pour connaître d’autres informations de sécurité concernant l'installation du rack.
Tâches d'installation du rack à deux montants
Pour installer un kit pour rack à deux montants, vous devez effectuer les tâches suivantes
dans l'ordre indiqué :
2-20
1
Marquage du rack
2
Installation des rails coulissants dans le rack :
•
Installation en montage central
•
Installation en encastrement
3
Installation du système dans le rack
4
Installation du bras de maintien des câbles (le cas échéant)
5
Routage des câbles
Guide d'installation en rack
Outils et fournitures recommandés
Les outils et fournitures suivants peuvent être nécessaires pour installer le système dans un rack
à deux montants et châssis ouvert :
•
Tournevis Phillips n°2
•
Clé de 11/32ème de pouce ou tournevis à douille
(si vous passez à une configuration en encastrement)
•
De la bande adhésive ou un stylo feutre pour marquer les trous de montage à utiliser
Contenu du kit de rack
Le kit pour rack à deux montants comprend les éléments suivants (voir la figure 2-11) :
•
Une paire de rails coulissants (pour rack à deux montants)
•
Une bride de renfort
•
Un bras de maintien des câbles (le cas échéant)
•
Un câble de voyant d'état (le cas échéant)
•
Douze vis à tête plate Phillips 12-24 x 0,5 pouce
•
Des attache-câbles (non représentés sur la figure 2-11)
Figure 2-11.
Composants du kit pour rack à deux montants
Rails coulissants (2)
Bride de
renfort
Bras de maintien des
câbles (le cas échéant)
Câble de voyant d'état
(le cas échéant)
Vis Phillips 10-32 x 0,5 (12)
Guide d'installation en rack
2-21
www.dell.com | support.dell.com
Marquage du rack
Vous devez laisser un espace vertical de 2 U (88 mm ou 3,5 pouces) pour chaque système installé
dans le rack à deux montants.
Racks à espacement universel des trous
Les rack à deux montants conformes aux standards, avec un espacement universel des trous,
alternent un groupe de trois trous par U (unité). Les espacements entre les trous, mesurés du
centre d'un trou jusqu'au centre du trou suivant (en commençant par le trou supérieur d'un espace
de 1 U) sont respectivement de 15,9, 15,9 et 12,7 mm (0,625, 0,625 et 0,5 pouce) pour chaque
colonne verticale de trous, à l’avant et à l’arrière (voir la figure 2-12).
Figure 2-12. Espacement des trous sur un rack universel à 2 montants et châssis ouvert
15,9 mm (0,625 pouce)
12,7 mm (0,5 pouce)
15,9 mm (0,625 pouce)
44 mm 1,75 pouce (1 U)
15,9 mm (0,625 pouce)
Racks à espacement large des trous
Certains racks à deux montants, avec un espacement large des trous, alternent un groupe de deux
trous par U (unité). L’espacement des trous, mesuré du centre d'un trou jusqu'au centre du trou
suivant (en commençant par le trou supérieur d'un espace de 1 U) est de 31,7 et 12,7 mm
(1,25 et 0,5 pouce) pour chaque colonne verticale de trous, à l’avant et à l’arrière
(voir la figure 2-13).
2-22
Guide d'installation en rack
Figure 2-13.
Espacement large des trous sur un rack à 2 montants avec châssis ouvert
12,7 mm (0,5 pouce)
44 mm 1,75 pouce (1 U)
31,7 mm (1,25 pouce)
Pour marquer le rack, procédez comme suit :
1
Placez une marque sur les rails verticaux avant du rack, à l'endroit correspondant au bas
du système à installer dans le rack à deux montants.
La partie inférieure de chaque espacement de 1 U se trouve au centre de la zone métallique
la plus étroite entre les trous.
REMARQUE : si votre rack est doté d'un espacement large entre les trous, passez à l'étape 3.
2
Placez une marque à 88 mm (3,5 pouces) au-dessus de la marque originale que vous avez
faite, ou comptez jusqu'à six trous dans un rack doté d'un espacement universel des trous
(voir la figure 2-12).
Chaque unité de 1 U (44 mm ou 1,75 pouce) dans un rack à espacement universel comporte
trois trous. L’espacement des trous, mesuré du centre d'un trou jusqu'au centre du trou
suivant (en commençant par le trou supérieur d'un espace de 1 U) est de 15,9, 15,9
et 12,7 mm (0,625, 0,625 et 0,5 pouce) (voir la figure 2-12).
REMARQUE : pour un rack avec espacement universel des trous, la procédure de marquage est
terminée.
3
Placez une marque à 88 mm (3,5 pouces) au-dessus de la marque originale que vous avez
faite, ou comptez jusqu'au quatrième trou suivant dans un rack avec espacement large des
trous (voir la figure 2-13).
Chaque unité 1 U (soit 44 mm ou 1,75 pouce) d'espace vertical dans un rack à espacement
universel des trous comporte deux trous. L’espacement des trous, mesurés du centre d'un trou
jusqu'au centre du trou suivant (en commençant par le trou supérieur d’un espace de 1 U) est
de 31,7 mm (1,25 pouce) (voir la figure 2-13).
Guide d'installation en rack
2-23
www.dell.com | support.dell.com
Installation des rails coulissants dans le rack
Vous pouvez installer les rails coulissants dans un rack à deux montants à châssis ouvert doté d'un
espacement universel des trous (voir la figure 2-12) ou bien doté d'un espacement large des trous
(voir la figure 2-13). Vous pouvez installer les rails coulissants 2 U dans une configuration en
encastrement ou en montage central.
ATTENTION : n'essayez pas d'installer d'autre système avec ce kit de rack. Utilisez uniquement le kit
de rack prévu pour votre système. Si vous employez le kit d'un autre système, vous risquez d'endommager le système et d'exposer autrui et vous-même à des risques de blessures.
Installation en montage central
Le kit de rack à deux montants est fourni avec des supports configurés pour une installation
en montage central. Pour effectuer l'installation, procédez comme suit :
2-24
1
Repérez le rail coulissant droit et poussez le support arrière vers l'arrière du rail coulissant
(voir la figure 2-14).
2
Positionnez le rail coulissant droit dans le rack à deux montants à l'emplacement que vous
avez marqué, poussez le support arrière vers l'avant contre le rack vertical à deux montants,
fixez la plaque de montage centrale avant avec deux des vis Phillips 12-24 x 0,5, puis fixez
la plaque de montage centrale arrière au rack à l'aide de trois vis Phillips 12-24 x 0,5
(voir la figure 2-14).
3
Répétez les étapes 1 et 2 pour installer le rail coulissant gauche dans le rack.
4
Installez la bride de renfort entre les extrémités arrière des rails coulissants et fixez-la
avec une vis Phillips 12-24 x 0,5 sur chaque rail coulissant (voir la figure 2-14).
Guide d'installation en rack
Figure 2-14.
Installation des rails coulissants pour une configuration en montage central
Vis Phillips 12-24 x 0,5 pouce
(5 par rail coulissant)
Rack à deux montants
à châssis ouvert
Bride de renfort
Rails coulissants
Loquet de
dégagement
du système
(jaune)
Rails coulissants
Loquet de déverrouillage (vert)
Guide d'installation en rack
2-25
www.dell.com | support.dell.com
Installation en encastrement
Le kit de rack à deux montants est fourni avec des supports configurés pour une installation
en montage central. Pour préparer les rails coulissants en vue d'une installation en encastrement
dans le rack à deux montants, procédez comme suit :
1
Repérez les deux rails coulissants et placez-les côte à côte sur une surface de travail lisse,
l’avant des rails vers vous. Positionnez les deux rails coulissants de façon à ce que les supports
centraux soient orientés vers le haut (voir la figure 2-15).
REMARQUE : pour préparer les rails coulissants pour une installation en encastrement, retirez
la plaque de montage avant, faites-la pivoter de 180 degrés, puis réinstallez-la sur le rail coulissant
opposé.
2
À l'aide d'un tournevis Phillips n° 2 et d'une clé de 11/32ème ou d'un tournevis à douille,
retirez deux vis Phillips 12-24 x 0,5 pouce, deux écrous et deux rondelles à embase de chaque
support central avant (voir la figure 2-15).
3
Retirez le support avant des deux rails coulissants.
4
Faites pivoter de 180 degrés le support d’un rail coulissant, afin d'orienter sa plaque de
montage vers l’avant, et placez-le sur les goujons filetés du rail opposé (voir la figure 2-15).
5
Resserrez à la main chaque support de montage central avant sur leur rail opposé à l'aide
des deux rondelles à embase et des deux écrous que vous avez retirés à l'étape 2
(voir la figure 2-15).
Le support ainsi assemblé devient le nouveau support arrière étendu.
2-26
Guide d'installation en rack
Figure 2-15.
Rotation du support de montage avant pour une installation en encastrement
Rondelle à embase
(2 par support)
Écrou (2 par support)
Vis Phillips 12-24 x 0,5 pouce
(2 à installer par support)
Plaque de montage
Vis Phillips 12-24 x 0,5 pouce (2 à retirer par support)
REMARQUE : ces vis sont représentées réinstallées
sur l'autre rail coulissant.
6
Répétez les étapes 4 à 5 pour l'autre rail coulissant.
7
En maintenant le rail coulissant gauche à l'emplacement que vous avez marqué dans le rack
à deux montants, appliquez étroitement le support arrière étendu contre le rack, et fixez-le
à l'aide de trois vis Phillips 12-24 x 0,5 pouce (voir la figure 2-16).
8
Fixez le support avant du rail coulissant au rack, à l'aide de deux vis Phillips 12-24 x 0,5 pouce
(voir la figure 2-16).
9
Répétez les étapes 7 et 8 pour installer le rail coulissant droit dans le rack.
10
À l'aide d'une clé de 11/32ème de pouce ou d'un tournevis à douille, resserrez à fond les écrous
que vous aviez serrés à la main sur les supports de montage des deux rails coulissants.
11
Installez la bride de renfort entre les extrémités arrière des rails coulissants et fixez-la avec
une vis Phillips 12-24 x 0,5 sur chaque rail coulissant (voir la figure 2-16).
Guide d'installation en rack
2-27
www.dell.com | support.dell.com
Figure 2-16. Installation des rails coulissants pour une configuration en encastrement
Vis Phillips 12-24 x 0,5 pouce
(5 pour chaque rail coulissant)
Rack à deux montants à châssis ouvert
Bride de renfort
Rails coulissants
Loquet de dégagement
du système (jaune)
Rails coulissants
Loquet de déverrouillage (vert)
2-28
Guide d'installation en rack
Installation du système dans le rack
ATTENTION : en raison de la taille et du poids du système, ne tentez jamais de l'installer seul.
REMARQUE : la procédure d'installation d'un système dans un rack est identique à celle des rails
coulissants à encastrement ou à montage central.
1
Tirez à fond les rails coulissants.
ATTENTION : en raison de la taille et du poids du système, n’essayez jamais de l'installer tout seul
dans les rails coulissants.
2
Soulevez le système et placez-le dans la bonne position (voir la figure 2-16).
3
Placez une main en bas et à l’avant du système, et l'autre en bas et à l’arrière.
4
Inclinez l'arrière du système vers le bas tout en alignant les vis à épaulement arrière des côtés
du système avec les fentes arrière des rails coulissants.
5
Engagez les vis à épaulement arrière dans leurs fentes.
6
Abaissez l'avant du système et engagez les vis à épaulement avant et centrale dans leurs fentes
(la fente centrale se trouve juste derrière le loquet de dégagement jaune du système)
(voir la figure 2-16).
Lorsque toutes les vis à épaulement sont en place, le loquet jaune sur chaque rail coulissant
s'enclenche et verrouille le système.
7
Poussez vers le haut sur le loquet de déverrouillage vert de chaque rail pour faire coulisser
le système entièrement dans le rack (voir la figure 2-16).
8
Enfoncez et serrez les vis à molette captives situées de chaque côté du panneau avant
du châssis, pour fixer le système au rack.
REMARQUE : utilisez le loquet jaune pour retirer le système des rails coulissants.
Installation du bras de maintien des câbles (le cas échéant)
Reportez-vous à “Installation du bras de maintien des câbles” dans la section
“Installation dans un rack à quatre montants” au début de ce document.
Routage des câbles
Reportez-vous à “Routage des câbles”, dans la section “Installation dans un rack
à quatre montants” au début de ce document.
Vous avez maintenant terminé l'installation du kit dans un rack à deux montants.
Guide d'installation en rack
2-29
www.dell.com | support.dell.com
2-30
Guide d'installation en rack
Index
B
Bras de maintien des câbles
installation, 2-16, 2-29
routage des câbles, 2-19, 2-29
Bride de renfort, 2-21
installation, 2-24, 2-27
Installation dans le rack
système, 2-14 à 2-15
Installation du système
rack à deux montants, 2-29
rack à quatre montants, 2-14
K
C
Câbles, 2-19
Consignes de sécurité, 2-5
Contenu
kit pour rack à
deux montants, 2-21
kit RapidRails, 2-8
kit VersaRails, 2-9
I
Installation
bras de maintien
des câbles, 2-29
rails coulissants pour rack
à deux montants, 2-24
rails coulissants
RapidRails, 2-12
rails coulissants
VersaRails, 2-13
Kit pour armoire à
quatre montants
contenu du kit RapidRails, 2-8
contenu du kit VersaRails, 2-9
installation du bras de
maintien des câbles, 2-16
installation du système, 2-14
marquage du rack, 2-10
outils, 2-8
rails coulissants
RapidRails, 2-12
rails coulissants
VersaRails, 2-13
routage des câbles, 2-18
tâches, 2-9
Kit pour rack à deux montants
bride de renfort, 2-21, 2-27
contenu, 2-21
installation des rails
coulissants, 2-24
installation du bras de
maintien des câbles, 2-29
Kit pour rack à deux montants
(suite)
installation du système, 2-29
installation en
encastrement, 2-26
installation en montage
central, 2-24
marquage du rack, 2-22
outils, 2-21
routage des câbles, 2-29
tâches, 2-20
M
Marquage du rack
kit pour armoire à
quatre montants, 2-10
kit pour rack à deux
montants, 2-22
O
Outils
kit pour rack à
deux montants, 2-21
Kit pour rack à
quatre montants, 2-8
Index
2-31
32
Index
P
S
Pieds stabilisateurs
du rack, 2-8
Spécifications de rack
requises pour les rails
VersaRails, 2-7
Portes
remise en place, 2-20
retrait, 2-10
Précautions de montage
des racks, 2-7
R
Rails verticaux
marquage, 2-10
unité de rack, 2-10
Routage des câbles, 2-18, 2-29
2-32
Index
T
Tâches
kit pour armoire à
quatre montants, 2-9
kit pour rack à deux
montants, 2-20
U
Unité de rack, 2-10
Dell™-Systeme
Rack-Installationsanleitung
www.dell.com | support.dell.com
Anmerkungen, Hinweise und Vorsichtshinweise
ANMERKUNG: Eine ANMERKUNG macht auf wichtige Informationen aufmerksam, mit denen Sie
den Computer besser einsetzen können.
HINWEIS: Ein HINWEIS warnt vor möglichen Beschädigungen der Hardware oder Datenverlust und zeigt,
wie diese vermieden werden können.
VORSICHT: VORSICHT zeigt eine möglicherweise gefährliche Situation an, die bei Nichtbeachtung
zu Sachschäden, Körperverletzungen oder zum Tod führen könnte.
____________________
Irrtümer und technische Änderungen vorbehalten.
© 2003 Dell Inc. Alle Rechte vorbehalten.
Eine Reproduktion dieses Dokuments in jeglicher Form ist nur mit vorheriger schriftlicher Genehmigung von Dell Inc. erlaubt.
Marken in diesem Text: Dell, das DELL-Logo, RapidRails und VersaRails sind Marken von Dell Inc.
Alle anderen in diesem Dokument genannten Marken und Handelsbezeichnungen sind Eigentum der entsprechenden Hersteller
und Firmen. Dell Inc. erhebt keinen Anspruch auf Marken und Handelsbezeichnungen mit Ausnahme der eigenen.
Dezember 2003
P/N C4624
Rev. A00
Inhalt
VORSICHT: Sicherheitshinweise .
. . . . . . . . . . . . . . . . . . . .
3-5
. . . . . . . . . . . . . . . . . .
3-5
. . . . . . . . . . . . . . . . . . . . . . . . . .
3-6
. . . . . . . . . . . . . . . . .
3-7
Montieren von Systemen im Rack
Installationsanleitung
Montage in einem Rack mit vier Stützen
Bevor Sie beginnen . . . . . . . . . . .
Empfohlene Werkzeuge und Zubehör . .
Inhalt des RapidRails-Rack-Kits . . . . .
Inhalt des VersaRails-Rack-Kits . . . . .
Ablauf der Installation . . . . . . . . . .
Abnehmen der Rack-Türen . . . . . . .
Markieren des Racks . . . . . . . . . .
Einbauen der RapidRails-Gleitschienen. .
Einbauen der VersaRails-Gleitschienen .
Installieren des Systems im Rack. . . . .
Einbau des Kabelarms (falls erforderlich) .
Verlegen der Kabel . . . . . . . . . . .
Wiederanbringen der Rack-Türen . . . .
Montage in einem Zwei-Stützen-Rack
. . . . . . . . . . . . . .
3-7
3-8
3-8
3-9
3-9
3-10
3-10
3-12
3-13
3-14
3-16
3-18
3-20
. . . . . . . . . . . . . . . . . .
3-20
Montage eines Racks mit zwei Stützen . .
Empfohlene Werkzeuge und Zubehör . .
Inhalt des Rack-Kits . . . . . . . . . . .
Markieren des Racks . . . . . . . . . .
Einbau der Gleitschienen im Rack . . . .
Montieren des Systems im Rack . . . . .
Einbau des Kabelarms (falls erforderlich) .
Verlegen der Kabel . . . . . . . . . . .
Index
. . . . . . . . . . . . . .
. . . . . . . . . . . . . .
. . . . . . . . . . . . . .
. . . . . . . . . . . . . .
. . . . . . . . . . . . . .
. . . . . . . . . . . . . .
. . . . . . . . . . . . . .
. . . . . . . . . . . . . .
. . . . . . . . . . . . . .
. . . . . . . . . . . . . .
. . . . . . . . . . . . . .
. . . . . . . . . . . . . .
. . . . . . . . . . . . . .
. . . . . . . . . . . . . .
. . . . . . . . . . . . . .
. . . . . . . . . . . . . .
. . . . . . . . . . . . . .
. . . . . . . . . . . . . .
. . . . . . . . . . . . . .
. . . . . . . . . . . . . .
. . . . . . . . . . . . . . . . . . . . . . . . . . . . . . . . . .
3-20
3-21
3-21
3-22
3-24
3-29
3-29
3-29
3-31
Inhalt
3-3
Abbildungen
Abbildung 3-1.
Inhalt des RapidRails-Rack-Kits
. . . . . . . . .
3-8
Abbildung 3-2.
Inhalt des VersaRails-Rack-Kits
. . . . . . . . .
3-9
Abbildung 3-3.
Eine Rack-Einheit
. . . . . . . . . . . . . . . .
3-10
Abbildung 3-4.
Markieren der vertikalen Schienen .
Abbildung 3-5.
Einbauen der RapidRails-Gleitschienen .
. . . . .
3-12
Abbildung 3-6.
Einbauen der VersaRails-Gleitschienen
. . . . .
3-14
Abbildung 3-7.
Installation des Systems im Rack
(RapidRails oder VersaRails) . .
. . . . . . . .
3-15
. . . . .
3-17
. . . . . .
3-18
. . . . . . . . . . . . . . .
3-19
Abbildung 3-8.
Einbau des Kabelarms (falls erforderlich)
Abbildung 3-9.
Installieren der Systemstatusanzeige
(falls erforderlich) . . . . . . . . .
Abbildung 3-10.
Verlegen der Kabel
Abbildung 3-11.
Komponenten des Rack-Kits mit zwei Stützen .
Abbildung 3-12.
Universeller Lochabstand beim offenen
Relaisgestell mit zwei Stützen . . . . .
Abbildung 3-13.
Abbildung 3-14.
Abbildung 3-15.
Abbildung 3-16.
3-4
Inhalt
. . . . . . .
. .
3-21
. . . . .
3-22
. . . . . . . .
3-23
. . . . . . . . . . .
3-25
Weiter Lochabstand beim offenen
Relaisgestell mit zwei Stützen . .
Einbauen der Gleitschienen
für die Mittenmontage . .
Drehen der vorderen Montagehalterung
für bündige Montage . . . . . . . . .
Einbauen der Gleitschienen
für die bündige Montage .
3-11
. . . . .
3-27
. . . . . . . . . . .
3-28
VORSICHT: Sicherheitshinweise
Beachten Sie die nachfolgenden Sicherheitshinweise, um Ihre eigene Sicherheit zu
gewährleisten und eine Beschädigung Ihres Systems sowie Ihrer Arbeitsumgebung zu
vermeiden. Vollständige Informationen über die Sicherheitsanforderungen finden Sie
in den Systeminformationen.
Montieren von Systemen im Rack
Folgende Vorsichtsmaßnahmen dienen der Stabilität und Sicherheit des Racks.
Systeme gelten als Komponenten in einem Rack. Der Begriff „Komponente“ kann also
ein beliebiges System oder verschiedene Peripheriegeräte oder Zusatzhardware bezeichnen.
VORSICHT: Werden Systemkomponenten in einem Rack installiert, an dem die vorderen und
seitlichen Stabilisatoren fehlen, kann das Rack umkippen, was unter Umständen schwere
Verletzungen zur Folge haben kann. Befestigen Sie daher immer zuerst die Stabilisatoren,
bevor Sie Komponenten im Rack einbauen.
Ziehen Sie nach dem Einbau von Systemen/Komponenten in einem Rack niemals mehr als eine
Komponente gleichzeitig auf ihren Gleitschienen aus dem Rack. Durch das Gewicht von mehr
als einer Komponente kann das Rack umkippen und Verletzungen verursachen.
ANMERKUNG: Ihr System ist als frei stehende Einheit und für die Verwendung als Komponente
in Dell™-Racks sicherheitszertifiziert, wobei das Customer Rack Kit eingesetzt werden muss. Der
Einbau Ihres Systems und Rack-Kits in anderen Racks wurde von keiner Prüfbehörde untersucht.
Sie sind selbst dafür verantwortlich, dass die endgültige Kombination von System und Rack alle
geltenden Sicherheitsstandards und die lokalen Elektrizitätsrichtlinien erfüllt. Dell lehnt jede
Haftung und Gewährleistung für solche Kombinationen ab.
•
System-Rack-Kits müssen von geschulten Servicetechnikern in einem Rack installiert
werden. Wenn Sie das Kit in einem anderen Rack installieren, vergewissern Sie sich,
dass das Rack die Spezifikationen eines Dell-Racks erfüllt.
VORSICHT: Große Racks dürfen nicht von einer Person allein bewegt werden. Wegen der Höhe
und des Gewichtes des Racks sollte diese Arbeit mit mindestens zwei Personen durchgeführt
werden.
•
Bevor Sie an einem Rack arbeiten, vergewissern Sie sich, dass die Stabilisatoren sicher
am Rack befestigt sind, fest auf dem Boden aufliegen und dass das gesamte Gewicht
des Racks auf dem Boden lastet. Montieren Sie an einem einzelnen Rack vordere
und seitliche Stabilisatoren, an mehreren miteinander verbundenen Racks vordere
Stabilisatoren, bevor Sie Arbeiten am Rack durchführen.
•
Bestücken Sie das Rack immer von unten nach oben, und bauen Sie die schwerste
Komponente zuerst in das Rack ein.
•
Vergewissern Sie sich, dass das Rack gerade und stabil steht, bevor Sie eine Komponente
aus dem Rack ziehen.
Rack-Installationsanleitung
3-5
www.dell.com | support.dell.com
VORSICHT: Sicherheitshinweise (fortsetzung)
•
Achten Sie auf Ihre Finger, wenn Sie auf die Schienenverriegelung der Komponente
drücken und eine Komponente in das Rack schieben oder aus dem Rack ziehen:
Quetschgefahr!
•
Wenn Sie eine Komponente in das Rack eingesetzt haben, ziehen Sie die Schienen
vorsichtig in eine Verriegelungsposition heraus und schieben Sie dann die Komponente
in das Rack.
•
Überlasten Sie nicht den Wechselstromkreis, über den das Rack mit Strom versorgt
wird. Die Gesamtlast des Racks sollte 80 Prozent der Nennbelastbarkeit des
Stromkreises nicht überschreiten.
•
Überprüfen Sie, ob eine ausreichende Luftzufuhr zu den Komponenten im Rack
gewährleistet ist.
•
Treten Sie nicht auf Komponenten oder stellen sich darauf, wenn Sie an anderen
Komponenten in einem Rack Arbeiten durchführen.
Installationsanleitung
Diese Installationsanleitung enthält Anweisungen für geschulte Servicetechniker zur Montage
eines oder mehrerer Systeme in einem offenen Relaisgestell oder einem Gestellschrank. Das
RapidRails™ Rack-Kit kann ohne Werkzeug in sämtlichen Gestellschränken des Herstellers
installiert werden, das VersaRails™ Rack-Kit in vielen Standardgestellschränken. Die Montage der
RapidRails- und VersaRails-Rack-Kits verläuft ähnlich. Für jedes im Rack installierte System wird
ein Rack-Kit benötigt.
Diese Anleitung enthält eine Anleitung für folgende Rack-Kits:
•
RapidRails-Kit in einem Gestellschrank mit vier Stützen
•
VersaRails-Kit in einem Gestellschrank mit vier Stützen
•
Zwei-Stützen-Kit (entweder für Mittenmontage oder bündige Montage in 3 oder 6 Zoll
breiten Racks)
Einige Systeme verfügen zur leichteren Fehlersuche und Überprüfung des Systemzustands über
ein Statusanzeigekabel. Die Rack-Kits dieser Systeme enthalten ein Statusanzeigekabel, das die
Daten von den zweifarbigen Statusanzeigen an der Vorder- und Rückwand zur Rückseite des
Kabelarms leitet. Weitere Informationen zu diesen Anzeigekabeln finden Sie im Benutzerhandbuch
zu Ihrem System.
Bevor Sie mit der Installation beginnen, lesen Sie dieses gesamte Dokument sorgfältig durch.
VORSICHT: Installieren Sie keine Rack-Kit-Komponenten, die für andere Systeme vorgesehen sind.
Verwenden Sie ausschließlich das für Ihr System konzipierte Rack-Kit. Wenn Sie das Rack-Kit für
ein anderes System verwenden, könnte das System beschädigt und Sie selbst oder andere Personen
verletzt werden.
3-6
Rack-Installationsanleitung
Rack-Anforderungen für VersaRails
HINWEIS: Das VersaRails-Rack-Kit muss von geschulten Servicetechnikern in einem Rack installiert
werden, das den Spezifikationen des American National Standards Institute (ANSI)/Electronic Industries
Association (EIA) Standard ANSI/EIA-310-D-92, der International Electrotechnical Commission (IEC) 297
und der Deutschen Industrie Norm (DIN) 41494 entspricht. Für jedes in einem Rack montierte System wird
ein Rack-Kit benötigt.
Montage in einem Rack mit vier Stützen
Bevor Sie mit der Installation beginnen, lesen Sie diese gesamte Vorgehensweise sorgfältig durch.
Bevor Sie beginnen
Lesen Sie vor dem Einbau Ihres Systems im Rack sorgfältig die Sicherheitshinweise am Anfang
dieser Anleitung sowie die Sicherheitshinweise in den Ihrem System beigefügten
Systeminformationen.
VORSICHT: Wenn Sie mehrere Systeme in einem Rack installieren, beenden Sie alle Prozeduren
für das gerade installierte System, bevor Sie das nächste System installieren.
VORSICHT: Gestellschränke können sehr schwer sein und leicht auf ihren Gleitrollen wegrollen.
Die Schränke haben keine Bremsen. Bewegen Sie das Rack nur mit größter Vorsicht. Fahren Sie die
höhenverstellbaren Füße ein, bevor Sie das Rack bewegen. Vermeiden Sie lange bzw. steile Neigungen
oder Rampen, auf denen Sie die Kontrolle über das Rack verlieren könnten. Fahren Sie die
höhenverstellbaren Füße aus, damit das Rack abgestützt wird und nicht wegrollen kann.
Wichtige Sicherheitshinweise
Beachten Sie beim Einbau Ihres Systems im Rack die Sicherheitsmaßnahmen in den folgenden
Unterabschnitten.
VORSICHT: Befolgen Sie die in diesem Dokument angegebene Vorgehensweise genau, um sich selbst
und Ihre Mitarbeiter nicht zu gefährden. Ihr System kann sehr groß und schwer sein. Sie sollten die
Installation sorgfältig vorbereiten und planen, um Verletzungen zu vermeiden. Dies gilt besonders,
wenn Systeme weiter oben im Rack installiert werden.
Rack-Installationsanleitung
3-7
www.dell.com | support.dell.com
Rack-Stabilisatoren
VORSICHT: Werden Systeme in einem Rack installiert, an dem die vorderen und seitlichen
Stabilisatoren fehlen, kann das Rack umkippen, was unter Umständen schwere Verletzungen nach
sich ziehen kann. Befestigen Sie daher immer zuerst die Stabilisatoren, bevor Sie Komponenten im
Rack installieren.
VORSICHT: Wenn Sie Systeme in einem Rack installiert haben, ziehen Sie niemals mehr als ein
System gleichzeitig auf den Gleitschienen aus dem Rack. Durch das Gewicht von mehr als einem
herausgezogenen System kann das Rack umkippen und Verletzungen hervorrufen.
Die Stabilisatoren verhindern, dass das Rack umkippt, wenn ein System oder eine andere
Komponente auf den Gleitschienen vollständig aus dem Rack gezogen wird. Eine Anleitung
zur Montage und Verankerung der Stabilisatoren finden Sie in der Dokumentation des Racks.
Empfohlene Werkzeuge und Zubehör
Für die Installation des Systems in einem Rack mit vier Stützen benötigen Sie eventuell folgende
Werkzeuge und Zubehörteile:
•
Einen Kreuzschlitz-Schraubendreher Nr. 2 (für die Befestigung der VersaRails-Gleitschienen)
•
Kreppband oder einen Filzstift zur Markierung der verwendeten Montagelöcher
Inhalt des RapidRails-Rack-Kits
Das RapidRails-Rack-Kit enthält folgende Teile (siehe Abbildung 3-1):
•
Ein Paar RapidRails-Gleitschienen
•
Ein Kabelarm (falls erforderlich)
•
Ein Statusanzeigekabel (falls erforderlich)
•
Kabelbinder (in Abbildung 3-1 nicht dargestellt)
Abbildung 3-1. Inhalt des RapidRails-Rack-Kits
Gleitschienen (2)
Kabelarm
(falls erforderlich)
Statusanzeige
(falls erforderlich)
3-8
Rack-Installationsanleitung
Inhalt des VersaRails-Rack-Kits
Das VersaRails-Rack-Kit enthält folgende Teile (siehe Abbildung 3-2):
•
Ein Paar VersaRails-Gleitschienen
•
Ein Kabelarm (falls erforderlich)
•
Ein Statusanzeigekabel (falls erforderlich)
•
Acht 10-32 x 0,5-Zoll Kreuzschlitz-Bundschrauben
•
Kabelbinder (in Abbildung 3-2 nicht dargestellt)
ANMERKUNG: Die in den Abbildungen und Prozeduren genannten nichtmetrischen Schrauben werden
nach ihrer Größe und der Anzahl der Windungen pro Zoll bezeichnet. So wird z. B. eine Kreuzschlitzschraube Nr. 10 mit 32 Windungen pro Zoll als 10-32-Schraube bezeichnet.
Abbildung 3-2.
Inhalt des VersaRails-Rack-Kits
Gleitschienen (2)
Kabelarm
(falls erforderlich)
10-32 x 0,5-ZollKreuzschlitzBundschrauben (8)
Statusanzeige
(falls erforderlich)
Ablauf der Installation
Bei der Montage eines Rack-Kits sind die Arbeitsschritte in folgender Reihenfolge auszuführen:
1
Abnehmen der Rack-Türen
2
Markieren des Racks
3
Installation der Gleitschienen im Rack:
•
•
Einbau der RapidRails
Einbau der VersaRails
4
Einbauen des Systems im Rack
5
Einbau des Kabelarms (falls erforderlich)
6
Verlegen der Kabel
7
Wiederanbringen der Rack-Türen
Rack-Installationsanleitung
3-9
www.dell.com | support.dell.com
Abnehmen der Rack-Türen
Siehe Vorgehensweise zum Entfernen der Türen in der Dokumentation Ihres Racks.
VORSICHT: Wegen der Größe und des Gewichts der Rack-Türen sollten Sie keinesfalls versuchen,
sie alleine abzunehmen oder einzubauen.
VORSICHT: Verstauen Sie die Türen so, dass niemand verletzt wird, falls sie versehentlich umfallen.
Markieren des Racks
Zwischen den einzelnen Systemen, die Sie im Rack installieren, müssen Sie einen vertikalen
Abstand von jeweils 2 U (88 mm bzw. 3,5 Zoll) lassen. Gestellschränke, die den EIA-310-Standards
entsprechen, haben ein sich wiederholendes Muster aus drei Löchern pro Rack-Einheit, deren
Mittenabstand zueinander (beginnend mit dem oberen Loch einer 1-U-Einheit) 15,9 mm,
15,9 mm und 12,7 mm (0,625, 0,625 und 0,5 Zoll) an den vorderen und hinteren vertikalen
Schienen beträgt (siehe Abbildung 3-3). Die Racks haben meist runde oder rechteckige Löcher.
ANMERKUNG: Die vertikalen Schienen sind eventuell in Abständen von 1 U mit horizontalen Linien und
Zahlen markiert. Am besten notieren Sie sich die Nummer der Markierung auf der vertikalen Schiene. So
brauchen Sie keine zusätzlichen Markierungen oder Kreppband am Rack anzubringen. Wenn Sie sich für
dieses Verfahren entscheiden, gehen Sie direkt zum Abschnitt „Einbauen der RapidRails-Gleitschienen“.
Abbildung 3-3. Eine Rack-Einheit
12,7 mm (0,5 Zoll)
15,9 mm (0,625 Zoll)
1 U (44 mm bzw. 1,75 Zoll)
15,9 mm (0,625 Zoll)
12,7 mm (0,5 Zoll)
VORSICHT: Wenn Sie mehr als ein System installieren, montieren Sie die Gleitschienen so,
dass das erste System in die unterste mögliche Position im Rack zu liegen kommt.
3-10
Rack-Installationsanleitung
Zum Markieren des Racks gehen Sie wie folgt vor:
1
Bringen Sie auf den vorderen vertikalen Schienen des Racks eine Markierung an der Stelle an,
an der sich die Unterseite des Systems befinden soll, das Sie in den Gestellschrank einbauen
möchten.
Die Unterkante jeder 1-U-Einheit befindet sich in der Mitte des schmalsten Metallstücks
zwischen den Löchern (bei einigen Racks mit einer horizontalen Linie gekennzeichnet,
siehe Abbildung 3-4.
2
Bringen Sie 88 mm (3,5 Zoll) über Ihrer ersten Markierung eine weitere Markierung an
(oder zählen Sie in einem Rack nach EIA-310-Standard sechs Löcher nach oben). Markieren
Sie die vorderen vertikalen Schienen des Racks mit einem Filzstift oder einem Stück
Kreppband. Falls Sie die Löcher gezählt haben, bringen Sie direkt über dem obersten Loch
eine Markierung an. Die Markierung bzw. das Kreppband zeigt die spätere Position der
Oberkante des Systems an den vertikalen Schienen (siehe Abbildung 3-4).
Abbildung 3-4.
Markieren der vertikalen Schienen
Kreppband auf
vertikale Schiene
Rack-Installationsanleitung
3-11
www.dell.com | support.dell.com
Einbauen der RapidRails-Gleitschienen
1
Setzen Sie eine der RapidRails-Gleitschienen so an der Vorderseite des Gestellschranks an,
dass der Montagehalterungsflansch zwischen den Markierungen bzw. dem Kreppband am
Rack zu liegen kommt (siehe Abbildung 3-5).
Der obere Montagehaken auf dem vorderen Montagehalterungsflansch der Gleitschiene
sollte in das obere Loch zwischen Ihren Markierungen auf den vertikalen Schienen eingreifen.
2
Drücken Sie die Gleitschiene nach vorn, bis der obere Montagehaken in das markierte obere
rechteckige Loch eingreift. Drücken Sie dann den Montagehalterungsflansch nach unten, bis
die Montagehaken in die rechteckigen Löcher eingerastet sind und der blaue Druckknopf mit
einem Klicken herausspringt (siehe Abbildung 3-5).
Abbildung 3-5. Einbauen der RapidRails-Gleitschienen
Gleitschienen (2)
Montagehaken (2)
Druckknopf
Flansch der Montagehalterung
Rack-Vorderseite
3-12
Rack-Installationsanleitung
3
Ziehen Sie an der Rückseite des Gestellschranks den Flansch der Montagehalterung nach
hinten, bis der obere Montagehaken an dem zugehörigen Loch positioniert ist. Drücken Sie
dann den Montagehalterungsflansch nach unten, bis die Montagehaken in die rechteckigen
Löcher einrasten, der Druckknopf herausspringt und ein Klicken zu hören ist.
4
Wiederholen Sie Schritt 1 bis 3 für die Gleitschienen auf der anderen Seite des Racks.
5
Achten Sie darauf, dass die Schienen auf jeder Rack-Seite in der gleichen Höhe an den
vertikalen Schienen befestigt werden.
Einbauen der VersaRails-Gleitschienen
1
Setzen Sie eine der VersaRails-Gleitschienen so an der Vorderseite des Gestellschranks an,
dass der zugehörige Montagehalterungsflansch zwischen den Markierungen bzw. den
Kreppbändern (oder an der Markierung mit der richtigen Zahl) am Rack zu liegen kommt
(siehe Abbildung 3-6).
Die vier Löcher an der Vorderseite der Montagehalterung sollten mit vier Löchern zwischen
Ihren Markierungen an der vorderen vertikalen Schiene übereinstimmen.
2
Befestigen Sie die Gleitschiene durch je eine 10-32 × 0,5 Zoll (1,27 cm) KreuzschlitzBundschraube im oberen und dritten Loch des Montageflanschs an der vorderen vertikalen
Schiene (siehe Abbildung 3-6).
3
Ziehen Sie den Montagehalterungsflansch auf der Rack-Rückseite nach hinten, bis seine
Montagelöcher mit den rechteckigen Löchern auf der hinteren vertikalen Schiene
übereinstimmen.
4
Befestigen Sie die Gleitschiene durch je eine 10-32 x 0,5 Zoll (1,27 cm) KreuzschlitzBundschraube im oberen und dritten Loch des Montageflanschs an der hinteren vertikalen
Schiene.
5
Wiederholen Sie Schritt 1 bis 4 für die Gleitschienen auf der anderen Seite des Racks.
6
Achten Sie darauf, die Schienen auf beiden Rack-Seiten in der gleichen Höhe auf den
vertikalen Schienen anzubringen.
Rack-Installationsanleitung
3-13
www.dell.com | support.dell.com
Abbildung 3-6. Einbauen der VersaRails-Gleitschienen
Gleitschienen (2)
Flansch der Montagehalterung
10-32 × 0,5-Zoll
KreuzschlitzBundschrauben
(4 pro Gleitschiene)
Rack-Vorderseite
Installieren des Systems im Rack
VORSICHT: Wenn Sie mehr als ein System installieren, installieren Sie das erste System
in der untersten möglichen Position im Rack.
VORSICHT: Ziehen Sie niemals mehr als eine Komponente gleichzeitig aus dem Rack heraus.
1
Ziehen Sie die beiden Gleitschienen aus dem Rack, bis sie in der vollständig ausgezogenen
Position einrasten.
VORSICHT: Das System ist sehr groß und schwer, so dass es niemals durch eine Einzelperson
in den Gleitschienen montiert werden darf.
3-14
2
Heben Sie das System vor die herausgezogenen Gleitschienen in Position
(siehe Abbildung 3-7).
3
Fassen Sie das System mit der einen Hand unter der System-Vorderseite und mit der anderen
Hand auf der System-Rückseite an.
Rack-Installationsanleitung
4
Kippen Sie die Rückseite des Systems nach unten und bringen Sie die hinteren Ansatzschrauben auf den Seiten des Systems mit den hinteren Schlitzen der Gleitschienen in
Übereinstimmung.
5
Setzen Sie die hinteren Ansatzschrauben in ihre jeweiligen Einbaupositionen ein.
Abbildung 3-7.
Installation des Systems im Rack (RapidRails oder VersaRails)
Ansatzschraube am System
Sperrklinke der
Gleitschiene (grün)
System-Sperr-klinke (gelb)
6
Senken Sie die Systemvorderseite ab, und führen Sie die vorderen und mittleren Ansatzschrauben in ihre Einbaupositionen ein (die mittlere Position befindet sich genau hinter
der gelben Sperrklinke; siehe Abbildung 3-7).
Wenn alle Ansatzschrauben korrekt eingerastet sind, ist bei den gelben Sperrklinken auf den
beiden Gleitschienen ein Klicken zu hören. Damit ist das System in den Schienen gesichert.
Rack-Installationsanleitung
3-15
www.dell.com | support.dell.com
7
Drücken Sie die grünen Sperrklinken an den Seiten der Gleitschienen nach oben,
um das System vollständig ins Rack zu schieben (siehe Abbildung 3-7).
8
Schrauben Sie das System mit den Rändelschrauben an der Gehäuse-Frontplatte des Racks
fest.
ANMERKUNG: Mit Hilfe der gelben Sperrklinke können Sie das System jederzeit aus den Gleitschienen
entfernen.
Einbau des Kabelarms (falls erforderlich)
HINWEIS: Der Kabelarm kann nur an der rechten Seite des Gestellschranks (von hinten gesehen)
befestigt werden.
Wenn Ihr System über einen Kabelarm verfügt, können Sie diesen wie folgt installieren:
1
Stellen Sie sich hinter den Gestellschrank, und suchen Sie die Klinke am Ende der
Gleitschiene.
2
Drücken Sie die Zunge am hinteren Ende des Kabelarms in die Verriegelung am Ende
der Gleitschiene (siehe Abbildung 3-8).
Der Riegel rastet mit einem Klicken ein.
3
Drücken Sie die Zunge am vorderen Ende des Kabelarms in den entsprechenden Riegel
im inneren Teil der Gleitschiene (siehe Abbildung 3-8).
Der Riegel rastet mit einem Klicken ein.
3-16
Rack-Installationsanleitung
Abbildung 3-8.
Einbau des Kabelarms (falls erforderlich)
Zunge am Ende
der Gleitschiene
Innere Zunge
der Gleitschiene
Zunge vorn
Zunge hinten
Kabelarm
(falls erforderlich)
4
Wenn Ihr System ein Statusanzeigekabel enthält, stecken Sie den Kabelstecker in den
zugehörigen Anschluss (siehe Abbildung 3-9). Ansonsten fahren Sie mit Schritt 5 fort.
5
Öffnen Sie die Kabelabdeckungen des Kabelarms, indem Sie die Mitte des Kabels über
den gewölbten runden Knopf an der Vorderseite des vorderen Teils des Kabelarms hinaus
und dann über den ähnlichen runden Knopf auf der Rückseite des Kabelarms heben.
Die Kabelabdeckung öffnet sich, und die Kabel können innerhalb des Arms verlegt werden.
6
Wenn Ihr System ein Statusanzeigekabel enthält, führen Sie das Kabelende durch den
Kabelarm, und installieren Sie die Anzeige im dafür vorgesehen Steckplatz am hinteren Ende
des Kabelarms (siehe Abbildung 3-9). Ansonsten fahren Sie mit „Verlegen der Kabel“ fort.
Rack-Installationsanleitung
3-17
www.dell.com | support.dell.com
Abbildung 3-9. Installieren der Systemstatusanzeige (falls erforderlich)
Stecker des Systemstatusanzeigenkabels
Geöffnete Kabelabdeckungen
Systemstatusanzeige
Verlegen der Kabel
VORSICHT: Lassen Sie die Kabel leicht durchhängen, wenn Sie sie um die Scharniere des Kabelarms
führen.
1
Schließen Sie die Netzkabel an den entsprechenden Anschlüssen an der rückseitigen
Abdeckung an.
2
Schließen Sie die E/A-Kabelstecker an die entsprechenden Anschlüsse auf der Rückseite
des Systems an.
Näheres zu Kabelsteckern finden Sie in der Anleitung zur Installation und Fehlersuche
und im Benutzerhandbuch.
3
Führen Sie das Netz- und E/A-Kabel durch den Kabelarm. Befestigen Sie sie locker mit vier
Kabelbindern (zwei in der Mitte und jeweils einer am Ende des Kabelarms). Ziehen Sie die
Kabelbinder jetzt noch nicht vollständig fest (siehe Abbildung 3-10).
Lassen Sie die Kabel im Kabelarm leicht durchhängen, um Beschädigungen an den Kabeln
zu verhindern.
3-18
Rack-Installationsanleitung
4
Befestigen Sie die Kabel am Kabelarm:
a
Wenn Sie die Kabel am System angeschlossen haben, lösen Sie die Flügelschrauben
zwischen der System-Vorderseite und der vorderen vertikalen Schiene.
b
Ziehen Sie das System in die vollständig ausgezogene Position heraus.
c
Führen Sie die Kabel am Kabelarm entlang, sorgen Sie für ausreichend Kabelzuschlag
an den Scharnieren, befestigen Sie die Kabel mit den Kabelbindern am Kabelarm und
schließen Sie die Kabelabdeckungen über dem Kabelarm.
ANMERKUNG: Wenn Sie das System vollständig herausziehen, werden die Gleitschienen in der
ausgezogenen Position verriegelt. Um das System in das Rack zurückzuschieben, drücken Sie auf
die Sperrklinke an der Seite der Gleitschiene und schieben Sie das System dann vollständig in das
Rack.
5
Schieben Sie das System in das Rack hinein, und ziehen Sie es wieder heraus, um zu
überprüfen, ob die Kabel korrekt verlegt sind und bei Bewegung des Kabelarms nicht
eingeklemmt, gedehnt oder gequetscht werden.
6
Ziehen Sie die Kabelbinder gerade so fest an, dass der Kabelzuschlag weder zu groß noch zu
klein ist, die Kabel aber trotzdem an Ort und Stelle bleiben, wenn das System in das Rack
eingesetzt bzw. herauszogen wird.
Abbildung 3-10.
Verlegen der Kabel
Kabelbinder
Kabelbinder
Kabelbinder
Kabelbinder
Rack-Installationsanleitung
3-19
www.dell.com | support.dell.com
Wiederanbringen der Rack-Türen
Siehe Vorgehensweise zum Einsetzen der Türen in der Dokumentation Ihres Racks.
VORSICHT: Wegen der Größe und des Gewichts der Rack-Türen sollten Sie keinesfalls versuchen,
sie alleine abzunehmen oder einzubauen.
Damit ist die Rack-Montage Ihres Systems in einem Gestellschrank mit vier Stützen
abgeschlossen.
Montage in einem Zwei-Stützen-Rack
Das Zwei-Stützen-Rack-Kit wird für die Montage eines Systems in einem offenen Relaisgestell
mit zwei Stützen verwendet, wie man es zum Beispiel bei Telekommunikationsanlagen findet. Es
können sowohl 3 Zoll als auch 6 Zoll breite Racks mit zwei Stützen und universellem Lochabstand
oder weitem Lochabstand installiert werden. Sie können dieses Kit entweder für die Mittenmontage oder für die bündige Montage verwenden. Das Kit für zwei Stützen enthält
Gleitschienen, mit denen das System zur Wartung aus dem Rack gezogen werden kann.
Sie müssen das offene Relaisgestell mit zwei Stützen ordnungsgemäß am Boden, der Decke oder
oben an der Wand und soweit möglich an benachbarten Gestellschränken befestigen. Verwenden
Sie hierzu Boden- und Wandbefestigungen sowie Stützen, die vom Rack-Hersteller oder durch
Industriestandards spezifiziert oder zugelassen sind. Bevor Sie mit der Installation beginnen, lesen
Sie bitte die Vorsichtsmaßnahmen in der Installationsanleitung des Herstellers des offenen
Relaisgestells mit zwei Stützen.
VORSICHT: Montieren Sie niemals Systeme in einem offenen Relaisgestell mit zwei Stützen, das nicht
sicher verankert ist. Andernfalls kann das System beschädigt oder Sie bzw. andere Personen verletzt
werden.
Weitere Sicherheitshinweise zur Rack-Montage finden Sie in den Sicherheitshinweisen am Anfang
dieses Dokuments.
Montage eines Racks mit zwei Stützen
Bei der Installation eines Rack-Kits mit zwei Stützen sind die folgenden Arbeitsschritte
in der nummerierten Reihenfolge auszuführen:
3-20
1
Markieren des Racks
2
Installation der Gleitschienen im Rack:
•
Befestigung in Mittenmontage
•
Befestigung in bündiger Montage
3
Einbauen des Systems im Rack
4
Einbau des Kabelarms (falls erforderlich)
5
Verlegen der Kabel
Rack-Installationsanleitung
Empfohlene Werkzeuge und Zubehör
Sie benötigen folgende Werkzeuge und Zubehörteile zur Installation des Systems in einem offenen
Relaisgestell mit zwei Stützen:
•
Kreuzschlitzschraubendreher Nr. 2
•
11/32-Zoll Schraubenschlüssel oder Steckschlüssel (bei Wechsel zur bündigen Montage)
•
Kreppband oder Filzstift zur Markierung der korrekten Montagelöcher
Inhalt des Rack-Kits
Das Rack-Kit mit zwei Stützen enthält folgende Teile (siehe Abbildung 3-11):
•
Ein Paar Gleitschienen (zwei Stützen)
•
Eine Versteifungsklammer
•
Ein Kabelarm (falls erforderlich)
•
Ein Statusanzeigekabel (falls erforderlich)
•
Zwölf 12-24 x 0,5-Zoll Flachkopf-Kreuzschlitzschrauben
•
Kabelbinder (in Abbildung 3-11 nicht dargestellt)
Abbildung 3-11.
Komponenten des Rack-Kits mit zwei Stützen
Gleitschienen (2)
Versteifungsklammer
Kabelarm
(falls erforderlich)
Statusanzeige
(falls erforderlich)
12-24 x 0,5-Zoll-FlachkopfKreuzschlitz-Bundschrauben (12)
Rack-Installationsanleitung
3-21
www.dell.com | support.dell.com
Markieren des Racks
Zwischen verschiedenen Systemen, die Sie im Rack mit zwei Stützen installieren, müssen Sie
2 Einheiten (U = 88 mm bzw. 3,5 Zoll) vertikalen Abstand lassen.
Racks mit universellem Lochabstand
Standard-Racks mit zwei Stützen und universellem Lochabstand haben ein sich wiederholendes
Muster aus drei Löchern pro Einheit, deren Mittenabstand (beginnend in der Mitte des oberen
Lochs einer 1-U-Einheit) 15,875 mm, 15,875 mm und 12,70 mm (0,625, 0,625 und 0,5 Zoll)
für die vordere und hintere vertikale Lochreihe beträgt (siehe Abbildung 3-12).
Abbildung 3-12. Universeller Lochabstand beim offenen Relaisgestell mit zwei Stützen
15,9 mm (0,625 Zoll)
12,7 mm (0,5 Zoll)
15,9 mm (0,625 Zoll)
44 mm 1,75 Zoll (1 U)
15,9 mm (0,625 Zoll)
Racks mit weitem Lochabstand
Einige Racks mit zwei Stützen und weitem Lochabstand haben ein sich wiederholendes Muster
aus zwei Löchern pro Einheit, deren Mittenabstand (beginnend mit dem oberen Loch einer 1-UEinheit) 31,7 mm und 12,7 mm (1,25 und 0,5 Zoll) für die vordere und hintere vertikale Lochreihe
beträgt (siehe Abbildung 3-13).
3-22
Rack-Installationsanleitung
Abbildung 3-13.
Weiter Lochabstand beim offenen Relaisgestell mit zwei Stützen
12,7 mm (0,5 Zoll)
44 mm (1,75 Zoll) (1 U)
31,7 cm (1,25 Zoll)
Zum Markieren des Racks gehen Sie wie folgt vor:
1
Bringen Sie auf den vorderen vertikalen Schienen des Racks eine Markierung an der Stelle an,
an der sich die Unterseite des Systems befinden soll, das Sie in das Rack mit zwei Stützen
einbauen.
Die Unterkante jeder 1-U-Einheit befindet sich in der Mitte des schmalsten Metallstücks
zwischen den Löchern.
ANMERKUNG: Wenn Ihr Rack einen weiten Lochabstand hat, gehen Sie zu Schritt 3.
2
Setzen Sie eine Markierung 88 mm (3,5 Zoll) über Ihre erste Markierung (oder zählen Sie in
einem Rack mit universellem Lochabstand sechs Löcher nach oben; siehe Abbildung 3-12).
Jede vertikale 1-U-Einheit (44 mm oder 1,75 Zoll) in einem Rack mit universellem
Lochabstand verfügt über drei Löcher, deren Mittenabstand zueinander (beginnend mit dem
oberen Loch einer 1-U-Einheit) 0,625, 0,625 und 0,5 Zoll beträgt (siehe Abbildung 3-12).
ANMERKUNG: Wenn Ihr Rack einen universellen Lochabstand hat, ist das Markieren des Racks damit
abgeschlossen.
3
Setzen Sie eine Markierung 88 mm (3,5 Zoll) über Ihre erste Markierung (oder zählen Sie
in einem Rack mit weitem Lochabstand bis zum vierten Loch nach oben;
siehe Abbildung 3-13).
Jede vertikale 1-U-Einheit (44 mm oder 1,75 Zoll) in einem Rack mit universellem
Lochabstand hat zwei Löcher, deren Mittenabstand zueinander (beginnend mit dem oberen
Loch einer 1-U-Einheit) 31,7 mm (1,25 Zoll) beträgt (siehe Abbildung 3-13).
Rack-Installationsanleitung
3-23
www.dell.com | support.dell.com
Einbau der Gleitschienen im Rack
Sie können die Gleitschienen in einem offen Rack mit zwei Stützen entweder mit universellem
Lochabstand (siehe Abbildung 3-12) oder mit weitem Lochabstand (siehe Abbildung 3-13)
installieren. Sie können die 2-U Gleitschienen entweder mit bündiger Montage oder mit
Mittenmontage einbauen.
VORSICHT: Versuchen Sie nicht, mit diesem Rack-Kit andere Systeme zu installieren. Verwenden Sie
ausschließlich das für Ihr System konzipierte Rack-Kit. Wenn Sie das Rack-Kit für ein anderes System
verwenden, könnte das System beschädigt und Sie selbst oder andere Personen verletzt werden.
Mittenmontage
Im Lieferumfang des Zwei-Stützen-Rack-Kits sind Haltungen für eine Mittenmontage enthalten.
Um die Montage abzuschließen, führen Sie folgende Schritte aus:
3-24
1
Drücken Sie die hintere Halterung der rechten Gleitschiene nach hinten
(siehe Abbildung 3-14).
2
Setzen Sie die rechte Gleitschiene in die markierte Position am Rack mit zwei Stützen,
drücken Sie die hintere Halterung nach vorne in Richtung auf das vertikale Rack
mit zwei Stützen, befestigen Sie die vordere Halterung für die Mittenmontage mit
zwei 12-24 × 0,5-Zoll Flachkopf-Kreuzschlitzschrauben und befestigen Sie die hintere
Halterung für die Mittenmontage mit drei 12-24 × 0,5-Zoll FlachkopfKreuzschlitzschrauben (siehe Abbildung 3-14).
3
Wiederholen Sie Schritt 1 und 2 für die Montage der linken Gleitschiene im Rack.
4
Bauen Sie die Versteifungsklammer an der Rückseite der Gleitschienen ein und sichern Sie
die Klammer mit je einer 12-24 × 0,5-Zoll Flachkopf-Kreuzschlitzschraube an den
Gleitschienen (siehe Abbildung 3-14).
Rack-Installationsanleitung
Abbildung 3-14.
Einbauen der Gleitschienen für die Mittenmontage
12-24 x 0,5-Zoll FlachkopfKreuzschlitzschrauben
(5 pro Gleitschiene)
Offenes Rack mit zwei Stützen
Versteifungsklammer
Gleitschiene
Systemsperrklinke
(gelb)
Gleitschiene
Sperrklinke der Gleitschiene (grün)
Rack-Installationsanleitung
3-25
www.dell.com | support.dell.com
Befestigung in bündiger Montage
Im Lieferumfang des Zwei-Stützen-Rack-Kits sind Haltungen für eine Mittenmontage enthalten.
Zur Vorbereitung der Gleitschienen für die bündige Montage im Rack mit zwei Stützen führen Sie
folgende Schritte aus:
1
Legen Sie die beiden Gleitschienen nebeneinander auf eine glatte Arbeitsoberfläche, wobei
die vorderen Enden der Gleitschienen zu Ihnen zeigen. Setzen Sie die beiden Gleitschienen
so an, dass die Halterungen für die Mittenmontage nach oben zeigen (siehe Abbildung 3-15).
ANMERKUNG: Zur Vorbereitung der Gleitschienen für die bündige Montage entfernen Sie
die vordere Montagehalterung, drehen diese um 180 Grad und montieren sie an der
gegenüberliegenden Gleitschiene.
2
Entfernen Sie mit einem Kreuzschlitzschraubendreher Nr. 2 und einem 11/32 Schraubenschlüssel bzw. Steckschlüssel die beiden 12-24 × 0,5-Zoll Flachkopf-Kreuzschlitzschrauben,
die beiden Muttern und die beiden Unterlegscheiben von den vorderen Halterungen für die
Mittenmontage (siehe Abbildung 3-15).
3
Entfernen Sie die vordere Halterung von den beiden Gleitschienen.
4
Legen Sie die Halterung einer Gleitschiene auf die Gewindebolzen der gegenüberliegenden
Gleitschiene. Drehen Sie dabei die Halterung um 180 Grad, so dass der Montageflansch nach
vorne zeigt (siehe Abbildung 3-15).
5
Befestigen Sie die vorderen Halterungen für die Mittenmontage (mit Hilfe der in Schritt 2
entfernten Muttern und Unterlegscheiben mit Bund), indem Sie sie von Hand an der
gegenüberliegenden Gleitschiene festziehen (siehe Abbildung 3-15).
Diese zusammengesetzte Halterung dient nun als neue verlängerte hintere Halterung.
3-26
Rack-Installationsanleitung
Abbildung 3-15.
Drehen der vorderen Montagehalterung für bündige Montage
Unterlegscheibe
(2 pro Klammer)
Mutter (2 pro Halterung) 12-24 x 0,5-Zoll Flachkopf-Kreuzschlitzschrauben (2 pro Halterung befestigen)
Montageflansch
12-24 x 0,5-Zoll Flachkopf-Kreuzschlitzschrauben (2 pro Halterung entfernen)
HINWEIS: In der Abbildung sind die Schrauben
bereits an der anderen Gleitschiene befestigt.
6
Wiederholen Sie Schritt 4 und 5, für die Befestigung der anderen Gleitschiene.
7
Halten Sie die linke Gleitschiene im Rack mit zwei Stützen an die markierte Stelle, stellen Sie
die verlängerte hintere Halterung so ein, dass sie fest an der Rückseite des vertikalen Racks
mit zwei Stützen anliegt, und befestigen Sie sie mit drei 12-24 × 0,5-Zoll FlachkopfKreuzschlitzschrauben (siehe Abbildung 3-16).
8
Befestigen Sie die vordere Halterung der Gleitschiene mit zwei 12-24 × 0,5-Zoll FlachkopfKreuzschlitzschrauben an der Schiene für zwei Stützen (siehe Abbildung 3-16).
9
Wiederholen Sie Schritt 7 und 8 für die Installation der rechten Gleitschiene im Rack.
10
Ziehen Sie jetzt die zuvor nur mit der Hand angezogenen Muttern an den
Montagehalterungen beider Gleitschienen mit einem 11/32-Zoll Schraubenschlüssel bzw.
Steckschlüssel fest.
11
Bauen Sie die Versteifungsklammer an der Rückseite der Gleitschienen ein, und sichern Sie
die Klammer mit je einer 12-24 × 0,5-Zoll Flachkopf-Kreuzschlitzschraube an den
Gleitschienen (siehe Abbildung 3-16).
Rack-Installationsanleitung
3-27
www.dell.com | support.dell.com
Abbildung 3-16. Einbauen der Gleitschienen für die bündige Montage
12-24 x 0,5-Zoll FlachkopfKreuzschlitzschrauben
(5 pro Gleitschiene)
Offenes Rack mit zwei Stützen
Versteifungsklammer
Gleitschiene
Systemsperrklinke
(gelb)
Gleitschiene
Sperrklinke der Gleitschiene (grün)
3-28
Rack-Installationsanleitung
Montieren des Systems im Rack
VORSICHT: Das System ist sehr groß und schwer, so dass es niemals durch eine Einzelperson montiert
werden darf.
ANMERKUNG: Die Installation eines Systems in einem Rack ist bei bündig und mittig installierten
Gleitschienen identisch.
1
Ziehen Sie die Gleitschienen bis zum Anschlag heraus.
VORSICHT: Das System ist sehr groß und schwer, so dass es niemals durch eine Einzelperson
in den Gleitschienen montiert werden darf.
2
Heben Sie das System in Position (siehe Abbildung 3-16).
3
Fassen Sie das System mit der einen Hand unter der System-Vorderseite und mit der anderen
Hand auf der System-Rückseite an.
4
Kippen Sie die Rückseite des Systems nach unten, und bringen Sie die hinteren Ansatzschrauben auf den Seiten des Systems mit den hinteren Schlitzen der Gleitschienen
in Übereinstimmung.
5
Setzen Sie die hinteren Ansatzschrauben in ihre jeweiligen Einbaupositionen ein.
6
Senken Sie die Systemvorderseite ab, und führen Sie die vorderen und mittleren Ansatzschrauben in ihre Einbaupositionen ein (die mittlere Position befindet sich genau hinter
der gelben Sperrklinke; siehe Abbildung 3-16).
Wenn alle Ansatzschrauben korrekt eingerastet sind, ist bei den gelben Sperrklinken auf den
beiden Gleitschienen ein Klicken zu hören. Damit ist das System in den Schienen gesichert.
7
Drücken Sie die grünen Sperrklinken an den Seiten der Gleitschienen nach oben, um das
System vollständig ins Rack zu schieben (siehe Abbildung 3-16).
8
Schrauben Sie das System mit den Rändelschrauben an der Gehäuse-Frontplatte des Racks
fest.
ANMERKUNG: Mit Hilfe der gelben Sperrklinke können Sie das System jederzeit aus den Gleitschienen
entfernen.
Einbau des Kabelarms (falls erforderlich)
Siehe „Einbau des Kabelarms“ im Abschnitt „Montage in einem Rack mit vier Stützen“ weiter
oben in diesem Dokument.
Verlegen der Kabel
Siehe „Verlegen der Kabel“ im Abschnitt „Montage in einem Rack mit vier Stützen“ weiter oben
in diesem Dokument.
Damit ist die Installation eines Rack-Kits in einem Rack mit zwei Stützen abgeschlossen.
Rack-Installationsanleitung
3-29
www.dell.com | support.dell.com
3-30
Rack-Installationsanleitung
Index
E
Einbau im Rack
System, 3-14 bis 3-15
I
Inhalt des VersaRailsKits, 3-9
Inhaltsliste
RapidRails-Kit, 3-8
VersaRails-Kit, 3-9
Zwei-Stützen-Kit, 3-21
Installieren
Gleitschienen für
zwei Stützen, 3-24
Kabelführungsarm, 3-29
RapidRailsGleitschienen, 3-12
VersaRailsGleitschienen, 3-13
K
Kabel, 3-19
Kabelführungsarm
Installieren, 3-16, 3-29
Verlegen der
Kabel, 3-19, 3-29
Kit-Inhalt
RapidRails, 3-8
VersaRails, 3-9
T
Türen
Auswechseln, 3-20
Entfernen, 3-10
M
Markieren des Racks
Vier-Stützen-Kits, 3-10
Zwei-Stützen-Kit, 3-22
R
Rack-Anforderungen
für VersaRails, 3-7
Rack-Einheit, 3-10
Rack-Stabilisatoren, 3-8
RapidRails-Kit, Inhalt, 3-8
S
Schritte
Vier-Stützen-Rack-Kit, 3-9
Zwei-Stützen-Kit, 3-20
Sicherheitshinweise, 3-5
Systeminstallation
Rack mit vier Stützen, 3-14
Rack mit zwei Stützen, 3-29
V
Verlegen
der Kabel, 3-18, 3-29
Versteifungsklammer, 3-21
Installieren, 3-24, 3-27
Vertikale Schienen
Eine Rack-Einheit, 3-10
Markieren, 3-10
Vier-Stützen-Rack-Kit
Einbau des Kabelarms, 3-16
Inhalt des VersaRails-Kits, 3-9
Markieren des Racks, 3-10
RapidRailsGleitschienen, 3-12
RapidRails-Kit, Inhalt, 3-8
Schritte, 3-9
Systeminstallation, 3-14
Verlegen der Kabel, 3-18
VersaRailsGleitschienen, 3-13
Werkzeuge, 3-8
Vorsichtsmaßnahmen
bei der
Rack-Montage, 3-7
Index
3-31
32
Index
W
Werkzeuge
Vier-Stützen-Kits, 3-8
Zwei-Stützen-Kits, 3-21
Z
Zwei-Stützen-Kit
Befestigung in bündiger
Montage, 3-26
Befestigung in
Mittenmontage, 3-24
3-32
Index
Einbau der
Gleitschienen, 3-24
Einbau des Kabelarms, 3-29
Inhalt, 3-21
Markieren des Racks, 3-22
Schritte, 3-20
Systeminstallation, 3-29
Verlegen der Kabel, 3-29
Versteifungsklammer, 3-21, 3-27
Werkzeuge, 3-21
Dell™ システム
ラック取り付けガイド
w w w. d e l l . c o m | s u p p o r t . d e l l . c o m
メモ、注意および警告
メモ:メモは、コンピュータを使いやすくするための重要な情報を説明しています。
注意:注意は、ハードウェアの損傷やデータの損失の可能性があることを示し、
その危険を回避するための方法を説明しています。
警告:警告は、物的損害、けが、または死亡の原因となる可能性があることを示します。
____________________
ここに記載されている内容は予告なく変更されることがあります。
© 2003 すべての著作権は Dell Inc. にあります。
Dell Inc. の書面による許可のない複写は、いかなる形態においても厳重に禁じられています。
本書で使用されている商標について:Dell、DELL ロゴ、RapidRails、および VersaRails は Dell Inc. の商標です。
本書では、必要に応じて上記記載以外の商標および会社名が使用されている場合がありますが、これらの商標や
会社名は、一切 Dell Inc. に所属するものではありません。
2003 年 12 月
P/N C4624
Rev. A00
目次
警告:安全にお使いいただくために
. . . . . . . . . . . . . . . . .
4-5
システムのラックへの取り付け
. . . . . . . . . . . . . . . . .
4-5
. . . . . . . . . . . . . . . . . . . . . . . . . . .
4-6
インストール手順
4 柱型ラックの取り付け
. . . . . . . . . . . . . . . . . . . . . . . .
はじめに . . . . . . . . . . . . . . . . . . . . . . .
推奨する工具および備品 . . . . . . . . . . . . . .
RapidRails ラックキットの内容 . . . . . . . . . .
VersaRails ラックキットの内容 . . . . . . . . . .
取り付け手順 . . . . . . . . . . . . . . . . . . . .
ラック扉の取り外し . . . . . . . . . . . . . . . .
ラックへの印付け . . . . . . . . . . . . . . . . . .
RapidRails スライドアセンブリの取り付け . . . .
VersaRails スライドアセンブリの取り付け . . . .
ラックへのシステムの取り付け . . . . . . . . . .
ケーブル処理アームの取り付け(必要に応じて) .
ケーブルの配線 . . . . . . . . . . . . . . . . . . .
ラック扉の取り付け . . . . . . . . . . . . . . . .
2 柱型ラックの取り付け
. . . . . . .
. . . . . . .
. . . . . . .
. . . . . . .
. . . . . . .
. . . . . .
. . . . . .
. . . . . .
. . . . . .
. . . . . .
. . . . . .
. . . . . .
. . . . . . . . . . . . . . . . . . . . . . . .
2 柱型ラックの取り付け手順 . . . . . . . . . . . .
推奨する工具および備品 . . . . . . . . . . . . . .
ラックキットの内容 . . . . . . . . . . . . . . . .
ラックへの印付け . . . . . . . . . . . . . . . . . .
ラックへのスライドアセンブリの取り付け . . . .
ラックへのシステムの取り付け . . . . . . . . . .
ケーブル処理アームの取り付け(必要に応じて) .
ケーブルの配線 . . . . . . . . . . . . . . . . . . .
索引
. . . . . . .
4-7
4-7
4-8
4-8
4-8
4-9
4-9
4-10
4-12
4-13
4-14
4-16
4-18
4-19
4-19
. . . . . .
4-20
4-20
4-20
4-21
4-23
4-28
4-28
4-28
. . . . . . . . . . . . . . . . . . . . . . . . . . . . . . . . . . .
4-29
. . . . . .
. . . . . .
. . . . . .
. . . . . .
. . . . . .
. . . . . .
. . . . . .
目次
4-3
図
図 4-1
RapidRails ラックキットの内容
. . . . . . .
4-8
図 4-2
VersaRails ラックキットの内容
. . . . . . .
4-9
図 4-3
1 ラックユニット(1 U) .
図 4-4
垂直レールの印付け
図 4-5
RapidRails スライドアセンブリ
の取り付け . . . . . . . . . . .
. . . . . .
4-12
VersaRails スライドアセンブリ
の取り付け . . . . . . . . . . .
. . . . . .
4-14
システムのラックへの取り付け
(RapidRails または VersaRails)
. . . . . .
4-15
ケーブル処理アームの取り付け
(必要に応じて) . . . . . . . . .
. . . . . .
4-16
図 4-6
図 4-7
図 4-8
図 4-9
. . . . . . . . . . . .
4-11
システムステータスインジケータの取り付け
4-17
(必要に応じて) . . . . . . . . . . . . . . .
ケーブルの配線
図 4-11
2 柱型ラックキットの部品
図 4-12
2 柱型オープンフレームリレーラック
のユニバーサル間隔の穴 . . . . . . .
. . .
4-22
2 柱型オープンフレームリレーラック
のワイド間隔の穴 . . . . . . . . . .
. . .
4-22
センターマウント構成でのスライドア
センブリの取り付け . . . . . . . . .
. . .
4-24
. . . .
4-26
図 4-14
図 4-15
図 4-16
目次
4-10
図 4-10
図 4-13
4-4
. . . . . . . . .
. . . . . . . . . . . . . . .
. . . . . . . . .
フラッシュマウントでの前部取り付
けブラケットの回転 . . . . . . . .
フラッシュマウント構成でのスライドア
センブリの取り付け . . . . . . . . . . .
.
4-19
4-21
4-27
警告:安全にお使いいただくために
ご自身の身体の安全を守り、システムおよび作業環境を保護するために、以下の安
全に関するガイドラインに従ってください。安全に関する詳細な情報については、
『システム情報ガイド』を参照してください。
システムのラックへの取り付け
ラックの安定性や安全性に関して、次の点にご注意ください。
システムはラックの一部とみなします。したがって、「コンポーネント」には、
さまざまな周辺機器やサポートハードウェアと同様に、システムも含まれます。
警告:ラック前面および横の安定板を取り付けずにシステムを取り付けると、場合に
よってはラックが転倒し、けがをする恐れがあります。したがって、必ず安定板を取り
付けてからラックにコンポーネントを取り付けてください。
ラックにシステム / コンポーネントを取り付けた後は、一度に 2 台以上のコンポーネン
トをラックのスライドアセンブリを使って引き出さないでください。重みでラックが転
倒し、けがをする恐れがあります。
メモ:お使いのシステムは、独立型のユニットとして、また、カスタマラックキットで
構成される Dell ラックキャビネットに取り付けるコンポーネントとして、その安全性が
保証されています。システムおよびラックキットをデル以外のメーカーのラックキャビ
ネットに取り付ける場合は、安全性が保証されません。最終的に組み合わせたシステム
およびラックについては、ユーザーの責任において、適用される安全基準および地域の
電気規約の要件に適合することを確認してください。デルでは、このような組み合わせ
に関連するいかなる保証責任も負いません。
•
システムラックキットは、トレーニングを受けたサービス技術者がラックに取
り付けます。キットを別のラックに取り付ける場合は、そのラックがデルの
ラック仕様に適合していることを確認してください。
警告:大型ラックを 1 人で移動しないでください。ラックの高さと重さを考慮して、
少なくとも 2 人以上でラックを移動することをお勧めします。
•
ラックで作業をする前に、安定板がラックに固定されて床面に伸び、ラックの
全重量が床面にかかっていることを確認してください。ラックで作業をする前
に、ラックが 1 つの場合は前面と横の安定板、複数のラックを連結する場合は
前面の安定板を取り付けます。
•
ラックには必ず下から上へと、最も重いものから順に設置します。
•
コンポーネントをラックから引き出す前に、ラックが水平で安定していること
を確認してください。
•
レールリリースラッチを押してコンポーネントをラックから出し入れするとき
は、スライドレールに指をはさまれないように注意してください。
ラック取り付けガイド
4-5
www.dell.com | support.jp.dell.com
警告:安全にお使いいただくために (続き)
•
コンポーネントをラックに挿入したら、レールをロック位置まで静かに伸ば
し、コンポーネントをスライドさせてラックに設置します。
•
ラックに電力を送る AC 分岐回路に過重電流を流さないでください。
ラックの総負荷が分岐回路定格の 80 % を超えないようにしてください。
•
ラック内のコンポーネントが十分に通気されることを確認します。
•
ラックに取り付けたコンポーネントの作業中に、他のコンポーネントの上に
乗ったり、足をかけたりしないでください。
インストール手順
このガイドは、トレーニングを受けたサービス技術者が、オープンフレームリレーラッ
クやラックキャビネットに 1 台または複数のシステムを取り付ける作業を行う場合の手
順書です。RapidRails™ ラックキットは、工具を使わずにすべてのメーカーのラック
キャビネットに取り付けることができます。VersaRails™ ラックキットは、統一規格に
適合するほとんどのラックキャビネットに取り付けることができます。RapidRails およ
び VersaRails ラックキットの取り付け手順はほとんど同じです。ラックキットは、ラッ
クキャビネットに取り付けるシステム 1 基ごとに 1 セットずつ必要です。
このガイドには、以下のラックキットを取り付ける手順が説明されています。
•
RapidRails キット(4 柱型ラックキャビネットへの取り付け)
•
VersaRails キット(4 柱型ラックキャビネットへの取り付け)
•
2 柱型キット (3 インチ幅または 6 インチ幅ラックへのセンターマウント構成また
はフラッシュマウント構成での取り付け)
システムによっては、トラブルシューティングとシステムの状態確認を容易にするス
テータスインジケータケーブルを使用します。これらのシステムのラックキットには、
システムの前面パネルと背面パネルに装備された 2 色のステータスインジケータの情報
をケーブル処理アームの背面まで延長するためのステータスインジケータケーブルが付
属しています。これらのインジケータの詳細と、お使いのシステムでこのケーブルを必
要とするかどうかについては、システムに付属の『ユーザーズガイド』を参照してくだ
さい。
取り付けを開始する前に、このマニュアルを最後までよくお読みください。
警告:別のシステム用に設計されたラックキットの部品は取り付けないでください。お使い
のシステム用のラックキットのみをお使いください。別のシステム用のラックキットを使用
すると、システムが損傷し、ご自身や作業者がけがをする恐れがあります。
4-6
ラック取り付けガイド
VersaRails のラック要件
注意:VersaRails ラックキットは、米国規格協会(ANSI)/ 米国電子工業会(EIA)規格
ANSI/EIA-310-D-92、国際電気標準会議(IEC)297、ドイツ工業規格(DIN)41494 の仕様を
満たすラックについて、トレーニングを受けたサービス技術者が取り付けるように設計され
ています。ラックキットはラックに取り付けるシステム 1 基につき 1 セット必要です。
4 柱型ラックの取り付け
以下の取り付けを開始する前に、手順を最後までよくお読みください。
はじめに
システムをラックへ取り付ける前に、このガイドの「警告:安全にお使いいただくため
に」と、お使いのシステムの『システム情報ガイド』の安全上の注意をよくお読みくだ
さい。
警告:複数のシステムをラックに取り付ける場合は、1 台のシステムの取り付け手順を完了
してから、次のシステムの取り付けに進んでください。
警告:ラックキャビネットはサイズが非常に大きく重量もあるため、キャスターで簡単に移
動できるようになっています。このキャスターにはブレーキがありません。したがってラッ
クキャビネットを移動するときは十分な注意が必要です。ラックキャビネットを別の場所に
移動するときは、水平調節用の脚を収納してください。長い傾斜面、急勾配のある場所、ス
ロープなど、バランスが取りにくい場所にはキャビネットを設置しないでください。水平調
節用の脚を伸ばしてキャビネットを支え、キャビネットが移動しないようにしてください。
安全に関する重要な注意
システムをラックに取り付けるときは、次の各項の安全に関する注意を遵守してくださ
い。
警告:作業者は、自分自身と関係者を保護するために、本書の手順に必ず従ってください。
本システムは非常に重量があり大きいため、自分自身や関係者のけがを防ぐために準備と計
画を適切に行うことが重要です。この注意は、特にシステムをラックの高い位置に取り付け
る場合に重要になります。
ラック安定板
警告:ラック前面および横の安定板を取り付けずに、ラックにシステムを取り付けると、状
況によってはラックが転倒し、けがをする恐れがあります。このため、必ず安定板を取り付
けてから、ラックにコンポーネントを取り付けるようにしてください。
警告:ラックにシステムを取り付けた後は、スライドアセンブリ上の複数のシステムを同時
にラックから引き出さないでください。引き出された複数のシステムの重みでラックが転倒
し、けがをする恐れがあります。
安定板は、スライドアセンブリが伸びきった状態でラックからシステムやその他のコン
ポーネントを引き出す際に、ラックの転倒を防ぎます。安定用の脚を取り付けて床に固
定する手順については、ラックキャビネットに付属のマニュアルを参照してください。
ラック取り付けガイド
4-7
www.dell.com | support.jp.dell.com
推奨する工具および備品
4 柱型ラックキャビネットにシステムを取り付けるには、次の工具と備品が必要です。
•
#2 プラスドライバ (VersaRails スライドアセンブリを取り付ける場合)
•
マスキングテープまたはフェルトペン(取り付け穴に印を付けるときに使用)
RapidRails ラックキットの内容
RapidRails ラックキットには、以下の部品が含まれています(図 4-1 参照)。
•
RapidRails スライドアセンブリ 1 組
•
ケーブル処理アーム 1 本(必要な場合)
•
ステータスインジケータケーブル 1 本(必要な場合)
•
タイラップ(図 4-1 には記載されていません)
図 4-1 RapidRails ラックキットの内容
スライドアセンブリ(2)
ケーブル処理アーム 1 本
(必要な場合)
ステータスインジケータケーブル
(必要な場合)
VersaRails ラックキットの内容
VersaRails ラックキットには、以下の部品が含まれています(図 4-2 参照)。
•
VersaRails スライドアセンブリ 1 組
•
ケーブル処理アーム 1 本(必要な場合)
•
ステータスインジケータケーブル 1 本(必要な場合)
•
10-32 x 0.5 インチフランジヘッドプラスネジ 8 本
•
タイラップ(図 4-2 には記載されていません)
メモ:図と手順の説明に示すメートル法規格以外のネジは、サイズとインチ当たりのネジ山
数で表記されています。たとえば 1 インチに 32 本のネジ山がある #10 プラスネジは、
10-32 ネジと表記します。
4-8
ラック取り付けガイド
図 4-2 VersaRails ラックキットの内容
スライドアセンブリ(2)
ケーブル処理アーム 1 本
(必要な場合)
10-32 x 0.5 インチ
フランジヘッド
プラスネジ(8)
ステータスインジケータケーブル
(必要な場合)
取り付け手順
ラックキットを取り付けるには、次の手順を番号順に行います。
1
ラック扉の取り外し
2
ラックへの印付け
3
ラックへのスライドアセンブリの取り付け
•
RapidRails の取り付け
•
VersaRails の取り付け
4
ラックへのシステムの取り付け
5
ケーブル処理アームの取り付け(必要に応じて)
6
ケーブルの配線
7
ラック扉の取り付け
ラック扉の取り外し
ラックキャビネットに同梱のマニュアルに記載されている扉の取り外し手順を参照して
ください。
警告:ラックキャビネットの扉の大きさと重さを考慮して、取り付けおよび取り外しは 1 人
では行わないでください。
警告:取り外した扉は、不意に倒れてけがをしないような場所に保管してください。
ラック取り付けガイド
4-9
www.dell.com | support.jp.dell.com
ラックへの印付け
ラックに取り付ける各システムごとに、2 ラックユニット (88 mm または 3.5 インチ )
の高さの空間が必要です。EIA-310 規格を満たすラックキャビネットには、1 ラックユ
ニット(1 U)ごとに 3 つの穴が交互に並んでいます。穴の中心から中心まで距離は、
前部および後部垂直レールの 1 U スペースの一番上の穴から計測して 15.9 mm、
15.9 mm、12.7 mm (0.625 インチ、0.625 インチ、0.5 インチ ) となっています
(図 4-3 参照)。ラックキャビネットの穴には丸型と角型があります。
メモ:垂直レールには、1 U 間隔の水平の線と数字で印が付いていることがあります。ラッ
クの垂直レールについている印の番号を控える方法もあるので、ラックに印を付けたりテー
プを貼る作業は必須ではありません。この方法で作業を行う場合は、「RapidRails スライドア
センブリの取り付け」に進んでください。
図 4-3 1 ラックユニット(1 U)
12.7 mm(0.5 インチ)
15.9 mm(0.625 インチ)
1 U(44 mm、1.75 インチ)
15.9 mm(0.625 インチ)
12.7 mm(0.5 インチ)
警告:複数のシステムを取り付ける場合は、ラックの最下段に 1 基目のシステムを取り付け
られるように、スライドアセンブリを取り付けてください。
4-10
ラック取り付けガイド
ラックに印を付けるには、次の手順を行います。
1
ラックの前面垂直レール上で、ラックキャビネットに取り付けるシステムの底部の
位置を決め、印を付けます。
底部にあたる各 1 U スペースの位置は、穴と穴の間が狭い方の金属部分の中央です。
横線で印が付いているラックキャビネットもあります(図 4-4 を参照)。
2
底部の印から 88 mm 上(または EIA-310 規格に適合しているラックの場合は上へ
6 個目の穴)の位置を確認して、ラックの前面垂直レールにフェルトペンやマスキ
ングテープで印を付けます (穴の数を数えて印を付けた場合は 6 個目の穴のすぐ上
に印を付けます)。垂直レール上のこのマークまたはテープがシステムの上端の位
置を示します(図 4-4 参照)。
図 4-4
垂直レールの印付け
垂直レール上のテープ
ラック取り付けガイド
4-11
www.dell.com | support.jp.dell.com
RapidRails スライドアセンブリの取り付け
1
ラックキャビネットの前面で、RapidRails スライドアセンブリの取り付けブラケッ
トのフランジが、ラックに付けた印やテープの間のスペースに収まるように、
1 つ目のスライドアセンブリの位置を合わせます(図 4-5 参照)。
スライドアセンブリの前部取り付けブラケットフランジの上部取り付けフックを、
垂直レールに付けた印の間のスペースにある一番上の穴に差し込みます。
2
スライドアセンブリを正面に向かって押して、上部取り付けフックを垂直レールの
対応する角型の穴に差し込み、取り付けブラケットのフランジを下に押して取り付
けフックを穴に固定します。完全に固定されると押しボタンがカチッと飛び出しま
す(図 4-5 参照)。
図 4-5 RapidRails スライドアセンブリの取り付け
スライドアセンブリ(2)
取り付けフック (2)
押しボタン
取り付けブラケットのフランジ
ラック正面
4-12
ラック取り付けガイド
3
キャビネットの背面で、取り付けブラケットのフランジを後ろに引いて、上部取り
付けフックを対応する角型の穴に差し込み、フランジを下に押して取り付けフック
を穴に固定します。完全に固定されると押しボタンがカチッと飛び出します。
4
ラックの反対側にあるもう 1 つのスライドアセンブリについて、手順 1 から 3 を繰
り返します。
5
左右の垂直レールで、取り付け用レールが同じ高さに取り付けられていることを確
認します。
VersaRails スライドアセンブリの取り付け
1
ラックキャビネットの前面で、VersaRails スライドアセンブリの取り付けブラケッ
トのフランジが、ラックに付けたの印やテープの間のスペース(またはメモした目
盛りの位置内)に収まるように、1 つ目のスライドアセンブリの位置を合わせます
(図 4-6 参照)。
取り付けブラケット前部にある 4 個の穴が、前面垂直レールに付けた印の間にある
4 個の穴と合うようにします。
2
2 本 の 10-32 x 0.5 インチフランジヘッドプラスネジを取り付け用フランジの一番
上の穴と上から 3 個目の穴に差し込んで、スライドアセンブリを前部垂直レールに
固定します(図 4-6 参照)。
3
キャビネットの背面から、取り付けブラケットのフランジを後ろに引いて、取り付
け穴を背面垂直レールのそれぞれ対応する穴に合わせます。
4
2 本 の 10-32 x 0.5 インチフランジヘッドプラスネジを背面側取り付け用フランジ
の一番上の穴と上から 3 個目の穴に差し込んで、スライドアセンブリを背面垂直
レールに固定します。
5
ラックの反対側にあるもう 1 つのスライドアセンブリについて、手順 1 から 4 を繰
り返します。
6
ラック両側の垂直レールで、スライドアセンブリが同じ高さに取り付けられている
ことを確認します。
ラック取り付けガイド
4-13
www.dell.com | support.jp.dell.com
図 4-6 VersaRails スライドアセンブリの取り付け
スライドアセンブリ(2)
取り付けブラケットのフランジ
10-32 x 0.5 インチフラ
ンジヘッドプラスネジ
(スライドアセンブリにつき 4 本)
ラック正面
ラックへのシステムの取り付け
警告:複数のシステムを取り付ける場合は、1 基目のシステムをラックの最下段の位置に取
り付けてください。
警告:一度に複数の部品をラックから引き出さないでください。
1
2 本のスライドアセンブリを、ラックから完全に伸びきった位置でロックするまで
引き出します。
警告:システムの大きさと重さを考慮して、システムのスライドアセンブリへの取り付けは
決して 1 人で行わないでください。
4-14
2
引き伸ばしたスライドの前面の位置までシステムを持ち上げます(図 4-7 参照)。
3
片方の手をシステム前面の下に、もう片方の手をシステム背面の下に置きます。
4
システムの側面にある後部肩付きネジを、スライドアセンブリの背面スロットに合
わせながら、システム背面を下に傾けます。
5
後部肩付きネジをスロットにはめ込みます。
ラック取り付けガイド
図 4-7
システムのラックへの取り付け(RapidRails または VersaRails)
システムの肩付きネジ
スライドリリースラッチ
(緑色)
システムリリース ラッチ(黄色)
6
システム前面を下げて、前部と中央の肩付きネジをそれぞれ対応するスロットに差
し込みます。中央のスロットは黄色のシステムリリースラッチのすぐ後ろにありま
す(図 4-7 参照)。
すべての肩付きネジが正しくはまると、スライドアセンブリの黄色のラッチがカチッ
とはまり、システムがスライドアセンブリに完全に固定されます。
7
左右のスライドアセンブリの側面にあるスライドリリースラッチを押し上げて、
システムをラックに収納します(図 4-7 参照)。
8
前面パネルの両側にある拘束つまみネジを押し込んで締め付け、システムをラック
に固定します。
メモ:システムをスライドアセンブリから取り外すときは、黄色のシステムリリースラッチ
を使用します。
ラック取り付けガイド
4-15
www.dell.com | support.jp.dell.com
ケーブル処理アームの取り付け(必要に応じて)
注意:ケーブル処理アームはキャビネットの背面から見て右側にしか取り付けられません。
ケーブル処理アーム付きのシステムでは、次の手順でケーブル処理アームを取り付けます。
1
ラックキャビネットの背面に回り、スライドアセンブリの端にあるラッチの位置を
確認します。
2
ケーブル処理アームの後部パーツのタブを、スライドアセンブリ後端の外側のラッ
チに差し込みます(図 4-8 参照)。
ラッチがロックされると、カチッという音がします。
3
ケーブル処理アームの前部パーツのタブを、スライドアセンブリの内側のラッチに
差し込みます(図 4-8 参照)。
ラッチがロックされると、カチッという音がします。
図 4-8 ケーブル処理アームの取り付け(必要に応じて)
スライドアセンブリ後端のラッチ
スライドアセンブ
リ内側のラッチ
前端部のタブ
後端部のタブ
4-16
ラック取り付けガイド
ケーブル処理アーム 1 本
(必要な場合)
4
システムステータスインジケータケーブル付きのシステムでは、ケーブルのプラグ
をコネクタに差し込みます(図 4-9 参照)。これ以外の場合は、手順 5 に進んでく
ださい。
5
ケーブル処理アームのワイヤカバーを開きます。まず、前部パーツ正面の丸いボタ
ン状の穴で固定されているワイヤを中央部分から開き、次に後部パーツの同じよう
な丸いボタン状の穴で固定されているワイヤを開きます。
ワイヤカバーが自動的に開き、アーム内にケーブルを配線できるようになります。
6
ステータスインジケータケーブル付きのシステムでは、ケーブルの端をケーブル処
理アームに通し、ケーブル処理アームの後部パーツにあるスロットにインジケータ
の端を取り付けます(図 4-9 参照)。これ以外の場合は、「ケーブルの配線」に進ん
でください。
図 4-9
システムステータスインジケータの取り付け(必要に応じて)
システムステータスインジ
ケータケーブルのプラグ
開いた状態のワイヤカバー
システムステータスインジケータ
ラック取り付けガイド
4-17
www.dell.com | support.jp.dell.com
ケーブルの配線
警告:ケーブルは、ヒンジの動きを妨げないように多少余裕を持たせながらケーブル処理
アームに通してください。
1
電源ケーブルを背面パネルの接続端子に接続します。
2
I/O ケーブルコネクタを、システム背面パネルのそれぞれのコネクタに接続します。
ケーブル接続の詳細については、お使いのシステムに付属の『インストール&トラブ
ルシューティングガイド』と『ユーザーズガイド』を参照してください。
3
電源ケーブルと I/O ケーブルをケーブル処理アームに通します。4 本のタイラップ
で緩めに固定してください(2 本はアームの中央で、2 本はアームの両端で固定し
ます)。この時点では、タイラップをきつく締めないでください(図 4-10 参照)。
ケーブルの損傷を防ぐため、ケーブルはケーブル処理アームの中で多少たるませてお
きます。
4
ケーブルをケーブル処理アームに固定します。
a
ケーブルをシステムに接続したら、システム前面を前面垂直レールに固定してい
るつまみネジを緩めます。
b
システムを前方にスライドさせて完全に引き出します。
c
ヒンジの動きを妨げないように多少余裕を持たせながら、ケーブルをケーブル処
理アームに通します。タイラップでケーブルをアームに固定し、ケーブル処理
アームのワイヤカバーを閉じます。
メモ:システムを引き出せる限度まで引き出すと、伸びきった位置でスライドアセンブ
リにロックがかかります。システムをラック内に戻すには、スライドの両側にあるスラ
イドリリースラッチを押しながら、システムをスライドさせて完全にラックの中に戻し
ます。
4-18
5
システムをラックから引き出してからラックに押し戻して、ケーブルが正しく取り
付けられているか、ケーブル処理アームの動きでケーブルが絡まったり、引きつっ
たり、締め付けられたりしないか確認します。
6
ケーブルの張りがきつすぎたり緩すぎる場合は、必要に応じて張りを調節し、
システムをラックから出し入れしてもケーブルがずれないようにします。
ラック取り付けガイド
図 4-10 ケーブルの配線
タイラップ
タイラップ
タイラップ
タイラップ
ラック扉の取り付け
ラックキャビネットに同梱のマニュアルに記載されている扉の取り付け手順を参照して
ください。
警告:ラックキャビネットの扉の大きさと重さを考慮して、取り付けおよび取り外しは 1 人
では行わないでください。
これで 4 柱型ラックキャビネットへのシステムの取り付けは完了です。
2 柱型ラックの取り付け
2 柱型ラックキットは、電気通信機器設備などで使用される 2 柱型オープンフレームリ
レーラックにシステムを取り付けるために使用します。3 インチおよび 6 インチ幅 2 柱
型ラック(取り付け穴の間隔はユニバーサルまたはワイド)に対応しています。この
キットは、センターマウントまたはフラッシュマウントのどちらの構成にも取り付けら
れます。2 柱型キットに入っているスライドアセンブリを使用すると、システムをラッ
クから引き出してサービスを行えます。
2 柱型オープンフレームリレーラックは、床面、天井、壁の上部、あるいは隣接する
ラックに正しく固定する必要があります。固定する際には、ラックの製造元が指定する
固定具や産業規格に適合した床面固定具または壁面固定具を使用してください。この取
り付け作業を行う前に、2 柱型オープンフレームリレーラックの製造元が提供する取り
付けマニュアルを参照して、取り付けに関する注意事項を確認してください。
ラック取り付けガイド
4-19
www.dell.com | support.jp.dell.com
警告:正しい位置にしっかりと固定されていない 2 柱型オープンフレームリレーラックには、
システムを取り付けないでください。システムの損傷や作業者および関係者のけがを招く恐
れがあります。
ラックの取り付けに関するその他の安全情報については、このガイドの最初にある「警
告:安全にお使いいただくために」を参照してください。
2 柱型ラックの取り付け手順
2 柱型ラックキットを取り付けるには、次の手順を番号順に行います。
1
ラックへの印付け
2
ラックへのスライドアセンブリの取り付け
•
センターマウント
•
フラッシュマウント
3
ラックへのシステムの取り付け
4
ケーブル処理アームの取り付け(必要に応じて)
5
ケーブルの配線
推奨する工具および備品
2 柱型オープンフレームリレーラックにシステムを取り付けるには、
次の工具と備品が必要です。
•
#2 プラスドライバ
•
11/32 インチレンチまたはナットドライバ (ブラケットをフラッシュマウント構成
に変更する場合)
•
取り付け穴に印を付けるために使用するマスキングテープまたはフェルトペン
ラックキットの内容
2 柱型ラックキットの付属品は次のとおりです(図 4-11 参照)。
4-20
•
スライドアセンブリ(2 柱型)1 組
•
補強ブラケット 1 本
•
ケーブル処理アーム 1 本(必要な場合)
•
ステータスインジケータケーブル 1 本(必要な場合)
•
12-24 x 0.5 インチなべ頭プラスネジ 12 本
•
タイラップ(図 4-11 には記載されていません)
ラック取り付けガイド
図 4-11 2 柱型ラックキットの部品
スライドアセンブリ(2)
補強ブラケット
ケーブル処理アーム 1 本
(必要な場合)
ステータスインジケータ
ケーブル(必要な場合)
12-24 x 0.5インチなべ頭
プラスネジ(12)
ラックへの印付け
2 柱型ラックに取り付ける各システムごとに、2 ラックユニット(2 U)(88 mm)
の高さの空間が必要です。
ユニバーサル間隔で穴があるラック
産業規格に適合している 2 柱型ラック(ユニバーサル規格)には、1 ラックユニット
(1 U)ごとに 3 つの穴が交互に並んでいます。穴の中心から中心まで距離は、前部およ
び後部垂直コラムの 1 U スペースの一番上の穴から計測して 15.9 mm、15.9 mm、
12.7 mm となっています(図 4-12 参照)。
ラック取り付けガイド
4-21
www.dell.com | support.jp.dell.com
図 4-12 2 柱型オープンフレームリレーラックのユニバーサル間隔の穴
15.9 mm(0.625 インチ)
12.7 mm(0.5 インチ)
15.9 mm(0.625 インチ)
44 mm(1 U)
15.9 mm(0.625 インチ)
ワイド間隔で穴があるラック
一部の 2 柱型ラック(ワイド規格)には、1 U ごとに 2 つの穴が交互に並んでいます。
穴の中心から中心までの距離は、前部および後部垂直コラムの 1 U スペースの一番上の
穴から計測して 31.7 mm、12.7 mm となっています(図 4-13 参照)。
図 4-13 2 柱型オープンフレームリレーラックのワイド間隔の穴
12.7 mm(0.5 インチ)
44 mm(1 U)
4-22
ラック取り付けガイド
31.7 mm(1.25 インチ)
ラックに印を付けるには、次の手順を行います。
1
前部垂直レール上で、2 柱型ラックに取り付けるシステムの底部の位置を決め、
印を付けます。
各 1 U スペースの底部は、レールの穴の一番間隔が狭い部分の真ん中になります。
メモ:ワイド間隔で穴があるラックの場合は、手順 3 に進みます。
2
最初に印を付けた場所から 88 mm 上(あるいはユニバーサル間隔で穴があるラッ
クでは、ラックの穴を上に 6 つ数えた場所)に印を付けます(図 4-12 参照)。
ユニバーサル間隔で穴があるラックには、1 U(44 mm)ごとに 3 つの穴が並んでい
ます。各穴の中心から中心までの距離は、1 U スペースの一番上の穴から計測して
15.9 mm、15.9 mm、12.7 mm となっています(図 4-12 参照)。
メモ:ユニバーサル間隔で穴があるラックの場合、ラックの印付け手順はこれで完了です。
3
底部の印から 88 mm(3.5 インチ)上に(またはワイド規格のラックの場合は 4 個
上の穴に)印を付けます(図 4-13 参照)。
ワイド間隔で穴があるラックには、1 U(44 mm)ごとに 2 つの穴が並んでいます。
穴の中心から中心までの距離は、1 U スペースの一番上の穴から計測して、31.7 mm
となっています(図 4-13 参照)。
ラックへのスライドアセンブリの取り付け
スライドアセンブリは、ユニバーサル間隔(図 4-12 参照)またはワイド間隔
(図 4-13 参照)のどちらの穴がある 2 柱型オープンフレームラックにも取り付けること
ができます。また、2 U スライドアセンブリは、フラッシュマウント構成またはセン
ターマウント構成で取り付けることができます。
警告:このラックキットを使って別のシステムを取り付けないでください。お使いのシステ
ム用のラックキットのみをお使いください。別のシステム用のラックキットを使用すると、
システムが損傷し、ご自身や作業者がけがをする恐れがあります。
センターマウント
2 柱型ラックキットは、センターマウント用のブラケット構成で出荷されています。
取り付けを完了するには、次の手順を行います。
1
右側のスライドアセンブリで、後部ブラケットをスライドアセンブリの背面方向に
押します(図 4-14 参照)。
2
右側のスライドアセンブリを、2 柱型ラックの印を付けた場所に合わせ、後部ブラ
ケットを垂直 2 柱型ラックに押しつけるように前方に押して、12-24 x 0.5 インチな
べ頭プラスネジ 2 本を使って、前部センターマウント用ブラケットを固定し、
12-24 x 0.5 インチなべ頭プラスネジ 3 本を使って、後部センターマウント用ブラ
ケットを固定します(図 4-14 参照)。
3
手順 1 と 2 を繰り返して、左側のスライドアセンブリもラックに取り付けます。
4
補強ブラケットをスライドアセンブリ後端に取り付け、12-24 x 0.5 インチなべ頭プ
ラスネジで、各スライドアセンブリに固定します(図 4-14 参照)。
ラック取り付けガイド
4-23
www.dell.com | support.jp.dell.com
図 4-14 センターマウント構成でのスライドアセンブリの取り付け
12-24 x 0.5 インチなべ頭
プラスネジ (スライドア
センブリにつき 5 本)
2 柱型オープンフレームラック
補強ブラケット
スライドアセンブリ
スライドアセンブリ
スライドリリースラッチ(緑色)
システムリリースラッチ
(黄色)
4-24
ラック取り付けガイド
フラッシュマウント
2 柱型ラックキットは、センターマウント用のブラケット構成で出荷されています。
2 柱型ラックキットでフラッシュマウントを行うためにスライドアセンブリを構成する
には、次の手順を行います。
1
滑らかな作業面に、スライドアセンブリの前端を手前にして 2 つのスライドアセン
ブリを並べます。どちらのスライドアセンブリもセンターブラケットが上を向くよ
うにしてください(図 4-15 参照)。
メモ:フラッシュマウント用のスライドアセンブリを組み立てるには、前部取り付けブ
ラケットを取り外し、180 度回転させてから、反対側のスライドアセンブリに取り付け
ます。
2
#2 プラスドライバと 11/32 インチレンチまたはナットドライバを使って、左右の前
部センターブラケットから 2 本 の 12-24 x 0.5 インチなべ頭プラスネジ、2 個の
ナット、および 2 個の肩付きワッシャを取り外します(図 4-15 参照)。
3
前部ブラケットを両方のスライドアセンブリから取り外します。
4
片方のスライドアセンブリから取り外したブラケットを、180 度回転させて取り付
けフランジが前方を向くようにしてから、反対側のスライドアセンブリのねじ山が
付いたスタッドの上に置きます(図 4-15 参照)。
5
手順 2 で取り外した 2 個の肩付きワッシャと 2 個のナットを使って、前部センター
マウントブラケットを反対側のスライドアセンブリに仮留めします。ナットは指で
回せる程度まで締めておきます(図 4-15 参照)。
接続されたブラケットが新たに延長された後部ブラケットになります。
ラック取り付けガイド
4-25
www.dell.com | support.jp.dell.com
図 4-15 フラッシュマウントでの前部取り付けブラケットの回転
肩付きワッシャー
(ブラケットにつき 2 個)
ナット(ブラケッ
トにつき 2 個)
12-24 x 0.5 インチなべ頭プラスネジ
(ブラケットごとに 2 本取り付ける)
取り付け用フランジ
12-24 x 0.5 インチなべ頭プラスネジ
(ブラケットごとに 2 本取り外す)
メモ:これらのネジは反対側のスライドア
センブリに取り付けます。
4-26
6
手順 4 から 5 を繰り返して、反対側のスライドアセンブリを組み立てます。
7
左側のスライドアセンブリを 2 柱型ラックの印を付けた位置に合わせ、延長された
後部ブラケットを垂直 2 柱型ラックの背面にぴったり合うように調整して、
12-24 x 0.5 インチなべ頭プラスネジ 3 本で 固定します(図 4-16 参照)。
8
スライドアセンブリの前部ブラケットを 2 本の 12-24 x 0.5 インチなべ頭プラスネジ
を使って、2 柱型ラックに固定します(図 4-16 参照)。
9
手順 7 と 8 を繰り返して、右側のアセンブリもラックに取り付けます。
10
11/32 インチのレンチまたはナットドライバを使って、両側のスライドアセンブリ
の取り付けブラケットの手締めしておいたナットを完全に締め付けます。
11
補強ブラケットをスライドアセンブリ後端に取り付け、12-24 x 0.5 インチなべ頭プ
ラスネジで、各スライドアセンブリに固定します(図 4-16 参照)。
ラック取り付けガイド
図 4-16 フラッシュマウント構成でのスライドアセンブリの取り付け
12-24 x 0.5 インチなべ頭プ
ラスネジ (スライドアセン
ブリ 1 本につき 5 本)
2 柱型オープンフレームラック
補強ブラケット
スライドアセンブリ
システムリリース
ラッチ(黄色)
スライドアセンブリ
スライドリリースラッチ(緑色)
ラック取り付けガイド
4-27
www.dell.com | support.jp.dell.com
ラックへのシステムの取り付け
警告:システムの大きさと重さを考慮して、システムの取り付けは決して 1 人で行わないで
ください。
メモ:ラックへのシステムの取り付け手順は、フラッシュマウント構成の場合もセンターマ
ウント構成の場合も同様です。
1
スライドを完全に伸びきった位置まで引き出します。
警告:システムの大きさと重さを考慮して、システムのスライドアセンブリへの取り付けは
決して 1 人で行わないでください。
2
システムを適切な位置まで持ち上げます(図 4-16 参照)。
3
片方の手をシステム前面の下に、もう片方の手をシステム背面の下に置きます。
4
システムの側面にある後部肩付きネジを、スライドアセンブリの背面スロットに合
わせながら、システム背面を下に傾けます。
5
後部肩付きネジをスロットにはめ込みます。
6
システム前面を下げて、前部と中央の肩付きネジをそれぞれ対応するスロットに差
し込みます。中央のスロットは黄色のシステムリリースラッチのすぐ後ろにありま
す(図 4-16 参照)。
すべての肩付きネジが正しくはまると、スライドアセンブリの黄色のラッチがカチッ
とはまり、システムがスライドアセンブリに完全に固定されます。
7
左右のスライドアセンブリの側面にあるスライドリリースラッチを押し上げて、
システムをラックに収納します(図 4-16 参照)。
8
前面パネルの両側にある拘束つまみネジを押し込んで締め付け、システムをラック
に固定します。
メモ:システムをスライドアセンブリから取り外すときは、黄色のシステムリリースラッチ
を使用します。
ケーブル処理アームの取り付け(必要に応じて)
このマニュアルで前述した「4 柱型ラックへの取り付け」の「ケーブル処理アームの取
り付け」を参照してください。
ケーブルの配線
このマニュアルで前述した「4 柱型ラックへの取り付け」の「ケーブルの配線」を参照
してください。
これで 2 柱型キットへのシステムの取り付けは完了です。
4-28
ラック取り付けガイド
索引
数字
R
し
2 柱型キット
ケ―ブルの配線 , 4-28
ケ―ブル処理ア―ムの取り
付け , 4-28
システムの取り付け , 4-28
スライドアセンブリの取り
付け , 4-23
センタ―マウント , 4-23
ツ―ル , 4-20
フラッシュマウント , 4-25
ラックへの印付け , 4-21
手順 , 4-20
内容 , 4-20
補強ブラケット , 4-20, 4-26
RapidRails キット
の内容 , 4-8
システムの取り付け
2 柱型ラック , 4-28
4 柱型ラック , 4-14
4 柱型キット
RapidRails キット
の内容 , 4-8
RapidRails スライド
アセンブリ , 4-12
VersaRails キット
の内容 , 4-8
VersaRails スライドア
センブリ , 4-13
ケ―ブルの配線 , 4-18
ケ―ブル処理ア―ムの取り
付け , 4-16
システムの取り付け , 4-14
ツ―ル , 4-8
ラックへの印付け , 4-10
手順 , 4-9
V
VersaRails キット
の内容 , 4-8
す
VersaRails のラッ
ク要件 , 4-7
垂直レ―ル
1 ラックユニット , 4-10
印付け , 4-10
あ
つ
安全にお使いいただ
くために , 4-5
ツ―ル
2 柱型キット , 4-20
4 柱型キット , 4-8
き
キットの内容
RapidRails, 4-8
VersaRails, 4-9
け
ケ―ブル , 4-18
ケ―ブルの配線 , 4-18, 4-28
ケ―ブル処理ア―ム
ケ―ブルの配線 , 4-18, 4-28
取り付け , 4-16, 4-28
て
手順
2 柱型キット , 4-20
4 柱型キット , 4-9
と
扉
取り付け , 4-19
取り外し , 4-9
索引
4-29
30
索引
取り付け
2 柱型スライドア
センブリ , 4-23
RapidRails スライドアセン
ブリ , 4-12
VersaRails スライドア
センブリ , 4-13
ケ―ブル処理ア―ム , 4-28
ほ
補強ブラケット , 4-20
取り付け , 4-23, 4-26
ら
ラック安定板 , 4-7
ラック取り付け時
の注意事項 , 4-7
な
内容のリスト
2 柱型キット , 4-20
RapidRails キット , 4-8
VersaRails キット , 4-8
ラックへの印付け
2 柱型キット , 4-21
4 柱型キット , 4-10
ラックへの取り付け
システム , 4-14, 4-15
ラックユニット , 4-10
4-30
索引
Sistemas Dell™
Guía de instalación
del rack
www.dell.com | support.dell.com
Notas, avisos y precauciones
NOTA: una NOTA proporciona información importante que le ayudará a utilizar mejor el ordenador.
AVISO: un AVISO indica un posible daño en el hardware o la pérdida de datos e informa de cómo evitar
el problema.
PRECAUCIÓN: una PRECAUCIÓN indica el riesgo de daños en la propiedad, lesiones corporales
o incluso la muerte.
____________________
La información contenida en este documento puede modificarse sin notificación previa.
© 2003 Dell Inc. Reservados todos los derechos.
Queda estrictamente prohibida la reproducción de este documento de cualquier forma sin la autorización por escrito de Dell Inc.
Marcas comerciales que aparecen en el texto: Dell, el logotipo de DELL, RapidRails y VersaRails son marcas comerciales de Dell Inc.
Las demás marcas registradas y nombres comerciales que puedan utilizarse en este documento se refieren a las entidades que
reivindican dichos nombres y marcas o sus productos. Dell Inc. renuncia a cualquier interés sobre la propiedad de marcas y
nombres comerciales que no sean los suyos.
Diciembre de 2003
P/N C4624
Rev. A00
Contenido
. . . . . . . . . . . . . . . .
5-5
. . . . . . . . . . . . . . . . . . . .
5-5
. . . . . . . . . . . . . . . . . . . . . .
5-6
PRECAUCIÓN: Instrucciones de seguridad
Montaje de sistemas en rack
Instrucciones de instalación .
Instalación del rack de cuatro postes .
. . . . . . . . . . . . . . . . . .
Antes de empezar . . . . . . . . . . . . . . . . . . .
Herramientas y material recomendados . . . . . . . .
Contenido del kit de rack RapidRails . . . . . . . . . .
Contenido del kit de rack VersaRails . . . . . . . . . .
Tareas de instalación . . . . . . . . . . . . . . . . .
Extracción de las puertas del rack . . . . . . . . . . .
Marcado del rack . . . . . . . . . . . . . . . . . . .
Instalación de los conjuntos deslizantes RapidRails . . .
Instalación de los conjuntos deslizantes VersaRails . . .
Instalación del sistema en el rack . . . . . . . . . . .
Instalación del brazo para tendido de cables, si procede
Cableado . . . . . . . . . . . . . . . . . . . . . . .
Colocación de las puertas del rack . . . . . . . . . . .
Instalación de rack de dos postes
. . . . . . .
5-7
5-8
5-8
5-9
5-9
5-10
5-10
5-12
5-13
5-14
5-16
5-18
5-20
. . . . . . . . . . . . . . . . . . . .
5-20
Tareas de instalación del rack de dos postes . . . . . .
Herramientas y material recomendados . . . . . . . .
Contenido del kit de rack . . . . . . . . . . . . . . .
Marcado del rack . . . . . . . . . . . . . . . . . . .
Instalación de los conjuntos deslizantes en el rack . . .
Instalación del sistema en el rack . . . . . . . . . . .
Instalación del brazo para tendido de cables, si procede
Cableado . . . . . . . . . . . . . . . . . . . . . . .
Índice
. . . . . . .
5-7
. . . . . . .
. . . . . . .
. . . . . . .
. . . . . . .
. . . . . . .
. . . . . . .
. . . . . . .
. . . . . . .
. . . . . . .
. . . . . . .
. . . . . . .
. . . . . . .
. . . . . . .
. . . . . . .
. . . . . . .
. . . . . . .
. . . . . . .
. . . . . . .
. . . . . . .
. . . . . . . . . . . . . . . . . . . . . . . . . . . . . . . . . .
5-20
5-21
5-21
5-22
5-24
5-29
5-29
5-29
5-31
Contenido
5-3
Figuras
Figura 5-1.
Contenido del kit de rack RapidRails
. . . . . . .
5-8
Figura 5-2.
Contenido del kit de rack VersaRails
. . . . . . .
5-9
Figura 5-3.
Una unidad de rack
. . . . . . . . . . . . . . .
5-10
Figura 5-4.
Marcado de los rieles verticales
. . . . . . . . .
5-11
Figura 5-5.
Instalación de los conjuntos deslizantes
RapidRails . . . . . . . . . . . . . .
. . . . .
5-12
Instalación de los conjuntos deslizantes
VersaRails . . . . . . . . . . . . . .
. . . . .
5-14
. . . . . . . .
5-15
Figura 5-6.
Figura 5-7.
Figura 5-8.
Figura 5-9.
5-18
. . . . . . . . . . . . . . . . . . . .
5-19
Componentes del kit de rack de dos postes .
Figura 5-12.
Separación universal entre los orificios
en un rack abierto de dos postes . . .
Figura 5-16.
5-17
.
Figura 5-11.
Figura 5-15.
. .
Instalación del indicador de estado del sistema,
si procede . . . . . . . . . . . . . . . . . .
Cableado
Figura 5-14.
Contenido
Instalación del brazo para tendido de cables,
si procede . . . . . . . . . . . . . . . . .
Figura 5-10.
Figura 5-13.
5-4
Instalación del sistema en el rack
(RapidRails o VersaRails) . . . .
Separación ancha entre los orificios
en un rack abierto de dos postes .
. . .
5-21
. . . . .
5-22
. . . . . . .
5-23
Instalación de los conjuntos deslizantes
para una configuración de montaje centrado
Rotación del soporte de montaje frontal
para el montaje a ras . . . . . . . . .
Instalación de los conjuntos deslizantes
para una configuración de montaje a ras
. . .
5-25
. . . . .
5-27
. . . .
5-28
PRECAUCIÓN: Instrucciones de seguridad
Siga estas directrices de seguridad para garantizar su propia seguridad y proteger el sistema
y el entorno de trabajo frente a posibles daños. Para obtener información completa acerca
de la seguridad, consulte la guía de información del sistema.
Montaje de sistemas en rack
Tenga en cuenta las precauciones siguientes para garantizar la estabilidad y la seguridad
del rack.
Los sistemas son considerados como componentes de un rack. Por lo tanto, “componente”
se refiere a cualquier sistema, así como a los distintos periféricos o al hardware de soporte.
PRECAUCIÓN: la instalación de sistemas en un rack sin los estabilizadores frontales y laterales
puede causar la inclinación y caída del rack, lo que podría producir lesiones físicas. Por lo tanto,
instale siempre los estabilizadores antes de montar componentes en el rack.
Una vez que haya instalado el sistema o los componentes en el rack, no extraiga nunca del rack
más de un componente a la vez sobre sus conjuntos deslizantes. El peso de más de un
componente puede hacer que vuelque el rack y producir lesiones graves.
NOTA: el sistema está homologado en cuanto a seguridad como unidad autónoma y
como componente para su uso en un armario rack Dell™ utilizando el kit de rack del cliente.
La instalación del sistema y del kit de rack de Dell en otros armarios rack no ha sido aprobada
por ninguna agencia de seguridad. Es su responsabilidad asegurarse de que la combinación
final de sistema y rack cumpla los estándares de seguridad correspondientes y los requisitos de
códigos de electricidad locales. Dell declina toda responsabilidad y garantías con relación a tales
combinaciones.
•
Los kits de rack están diseñados para ser instalados en un rack por técnicos de servicio
cualificados. Si instala el kit en cualquier otro rack, cerciórese de que éste cumpla las
especificaciones de un rack Dell.
PRECAUCIÓN: no mueva los racks sin la ayuda de otra persona. Debido a la altura y el peso
del rack, se recomienda un mínimo de dos personas para realizar dicha tarea.
•
Antes de realizar alguna operación en el rack, asegúrese que los estabilizadores estén
fijados al rack, que lleguen hasta el suelo y que todo el peso del rack descanse sobre
el suelo. Instale los estabilizadores frontales y laterales para un único rack, o los
estabilizadores frontales para varios racks unidos.
•
Cargue siempre el rack desde la parte inferior hacia arriba, colocando en primer lugar
el elemento más pesado.
•
El rack debe estar nivelado y estabilizado antes de extraer un componente.
Guía de instalación del rack
5-5
www.dell.com | support.dell.com
PRECAUCIÓN: Instrucciones de seguridad (continuación)
•
Tenga cuidado al presionar los pasadores de liberación de los rieles de componentes y
al extraer o introducir un componente en el rack, puesto que puede pillarse los dedos
con los rieles deslizantes.
•
Una vez insertado un componente en el rack, extienda con cuidado el riel hasta su
posición de bloqueo y deslice el componente hacia el interior del rack.
•
No sobrecargue el circuito de alimentación de CA que suministra energía al rack.
La carga total del rack no debe ser superior al 80 por ciento de la corriente nominal
del circuito.
•
Los componentes del rack deben disponer de una ventilación suficiente.
•
No suba sobre ningún componente ni lo utilice como escalón para realizar operaciones
en los componentes de un rack.
Instrucciones de instalación
En esta guía de instalación se proporcionan instrucciones para técnicos de servicio cualificados que
instalen uno o más sistemas en un rack abierto o en un armario rack. El kit de rack RapidRails™
se puede instalar en todos los armarios rack del fabricante sin herramientas y el kit de rack
VersaRails™ se puede instalar en la mayoría de los armarios rack estándar del sector. Los procedimientos para instalar los kits de rack RapidRails y VersaRails son similares. Por cada sistema que
se vaya a instalar en el armario rack se precisa un kit de rack.
En la guía se incluyen los procedimientos para los kits de rack siguientes:
•
Kit RapidRails en un armario rack de cuatro postes
•
Kit VersaRails en un armario rack de cuatro postes
•
Kit de dos postes (instalado en la configuración de montaje centrado o a ras, para racks
con una anchura de 3 o 6 pulgadas)
Además, algunos sistemas proporcionan un cable de indicador de estado para facilitar la solución
de problemas y la identificación del estado del sistema. Los kits de rack para estos sistemas incluyen
un cable de indicador de estado que transfiere la información de los indicadores de estado de dos
colores de los paneles frontal y posterior a la parte posterior del brazo para tendido de cables.
Para obtener más información sobre estos indicadores y verificar que el sistema utiliza este cable,
consulte la Guía del usuario del sistema.
Antes de llevar a cabo la instalación, lea detenidamente el documento completo.
PRECAUCIÓN: no instale componentes del kit de rack que se hayan diseñado para otro sistema.
Utilice únicamente el kit de rack para su sistema. Si utiliza un kit de rack para otro sistema, el sistema
puede resultar dañado y usted u otras personas podrían lesionarse.
5-6
Guía de instalación del rack
Requisitos del rack para VersaRails
AVISO: el kit de rack VersaRails lo deben montar únicamente técnicos de servicio cualificados
en un rack que cumpla las especificaciones siguientes: American National Standards Institute
(ANSI)/Electronic Industries Association (EIA) ANSI/EIA-310-D-92, International Electrotechnical
Commission (IEC) 297 y Deutsche Industrie Norm (DIN) 41494. Se precisa un kit de rack para cada
sistema que se instale en el rack.
Instalación del rack de cuatro postes
Antes de llevar a cabo la instalación, lea detenidamente el procedimiento completo.
Antes de empezar
Antes de empezar a montar el sistema en el rack, lea atentamente la sección anterior de este
documento titulada “PRECAUCIÓN: Instrucciones de seguridad”, así como las instrucciones
de seguridad incluidas en el documento de información del sistema para obtener información
adicional.
PRECAUCIÓN: cuando instale varios sistemas en un rack, realice todos los procedimientos para
el sistema actual antes de instalar el siguiente sistema.
PRECAUCIÓN: los armarios rack pueden ser muy pesados y moverse fácilmente con las ruedas.
El armario no tiene frenos. Preste extremo cuidado al mover el armario rack. Si traslada el armario
rack, repliegue primero los pies niveladores. Evite rampas o inclinaciones largas o pronunciadas para
evitar perder el control del armario. Extienda los pies niveladores de apoyo para evitar que el armario
se desplace.
Información de seguridad importante
Cuando instale el sistema en el rack, tome las precauciones de seguridad que se indican en las
subsecciones siguientes.
PRECAUCIÓN: debe seguir estrictamente los procedimientos que se explican en este documento para
protegerse a sí mismo y a otras personas que puedan verse involucradas. El sistema puede tener una
envergadura y un peso considerables, por lo que son importantes una preparación y planificación
adecuadas para evitar lesiones personales a uno mismo y a otros. Esto es más importante aún cuando
se instalan sistemas en la parte alta del rack.
Guía de instalación del rack
5-7
www.dell.com | support.dell.com
Pies estabilizadores del rack
PRECAUCIÓN: la instalación de sistemas en un rack sin haber instalado previamente los pies
estabilizadores delanteros y laterales puede hacer que vuelque el rack, lo que puede llegar a producir
lesiones personales. Por lo tanto, instale siempre los pies estabilizadores antes de instalar los
componentes en el rack.
PRECAUCIÓN: tras instalar sistemas en un rack, nunca extraiga a la vez más de un sistema del rack
sobre sus conjuntos deslizantes. El peso de más de un sistema extendido puede hacer que vuelque el
rack y causar algún daño.
Los pies estabilizadores evitan que vuelque el rack cuando se extrae más de un sistema u otro
componente con los conjuntos deslizantes totalmente extendidos. Consulte la documentación
que se facilita con el armario rack para obtener instrucciones sobre la instalación y la fijación
de las patas estabilizadoras.
Herramientas y material recomendados
Para instalar el sistema en un rack de cuatro postes, necesita las herramientas y material siguientes:
•
Un destornillador Phillips del nº 2 (para instalar los conjuntos deslizantes VersaRails)
•
Cinta adhesiva o rotulador de punta de fieltro para marcar los orificios de montaje que se
utilizarán
Contenido del kit de rack RapidRails
El kit de rack RapidRails incluye los elementos siguientes (consulte la figura 5-1):
•
Un par de conjuntos deslizantes RapidRails
•
Un brazo para tendido de cables, si procede
•
Un cable de indicador de estado, si procede
•
Abrazaderas (no mostradas en la figura 5-1)
Figura 5-1.
Contenido del kit de rack RapidRails
Conjuntos deslizantes (2)
Brazo para tendido
de cables, si procede
Cable de indicador de
estado, si procede
5-8
Guía de instalación del rack
Contenido del kit de rack VersaRails
El kit de rack VersaRails incluye los elementos siguientes (consulte la figura 5-2):
•
Un par de conjuntos deslizantes VersaRails
•
Un brazo para tendido de cables, si procede
•
Un cable de indicador de estado, si procede
•
Ocho tornillos Phillips con arandela 10-32 x 0,5 pulgadas
•
Abrazaderas (no mostradas en la figura 5-2)
NOTA: los tornillos no métricos que se describen en las ilustraciones y en los pasos de los procedimientos se identifican por el tamaño y el número de roscas por pulgada. Por ejemplo, un tornillo Phillips
del nº 10 con 32 roscas por pulgada se identifica como un tornillo 10-32.
Figura 5-2. Contenido del kit de rack VersaRails
Conjuntos deslizantes (2)
Brazo para tendido
de cables, si procede
Tornillo Phillips con arandela
10-32 x 0,5 pulgadas (8)
Cable de indicador
de estado, si procede
Tareas de instalación
La instalación de un kit de rack implica realizar las tareas siguientes en el orden indicado:
1
Extracción de las puertas del rack
2
Marcado del rack
3
Instalación de los conjuntos deslizantes en el rack:
•
•
Instalación de RapidRails
Instalación de VersaRails
4
Instalación del sistema en el rack
5
Instalación del brazo para tendido de cables, si procede
6
Cableado
7
Colocación de las puertas del rack
Guía de instalación del rack
5-9
www.dell.com | support.dell.com
Extracción de las puertas del rack
Para extraer las puertas, consulte los procedimientos correspondientes en la documentación
suministrada con el armario rack.
PRECAUCIÓN: debido al tamaño y al peso de las puertas del armario rack, nunca debe intentar
montarlas ni desmontarlas sin ayuda.
PRECAUCIÓN: guarde las dos puertas en un lugar donde, en caso de caer accidentalmente,
no puedan lesionar a nadie.
Marcado del rack
Debe dejar 2 U (88 mm) de espacio vertical para cada sistema que instale en el rack. Los armarios
rack que cumplan los estándares EIA-310 tienen un patrón alterno de tres orificios por unidad de
rack con un espacio entre orificios de centro a centro (comenzando en el orificio superior de un
espacio 1-U) de 15,9 mm, 15,9 mm y 12,7 mm para los rieles verticales frontal y posterior
(consulte la figura 5-3). Los armarios rack pueden tener orificios redondos o cuadrados.
NOTA: los rieles verticales se pueden marcar con líneas horizontales y números a incrementos de 1-U.
Si lo desea, puede señalar el número realizando una marca en el riel vertical del rack. No es necesario
marcar ni colocar una cinta en el rack. Si elige este método, pase al procedimiento descrito en
“Instalación de los conjuntos deslizantes RapidRails”.
Figura 5-3.
Una unidad de rack
12,7 mm
15,9 mm
1 U (44 mm)
15,9 mm
12,7 mm
PRECAUCIÓN: si va a instalar más de un sistema, instale los conjuntos deslizantes de modo
que el primer sistema quede instalado en la posición más baja disponible en el rack.
5-10
Guía de instalación del rack
Para marcar el rack, realice los pasos siguientes:
1
Coloque una marca en los rieles verticales frontales del rack en los que desee colocar la parte
inferior del sistema que está instalando en el armario rack.
La parte inferior de cada espacio 1-U se encuentra en el centro de la zona metálica más
estrecha entre orificios (marcados con una línea horizontal en algunos armarios rack;
consulte la figura 5-4).
2
Coloque una marca 88 mm por encima de la marca original (o cuente hasta el sexto orificio
en un rack que cumpla los estándares EIA-310) y marque los rieles verticales frontales del rack
con un rotulador de punta de fieltro o con cinta adhesiva (si ha contado orificios, coloque una
marca justo encima del orificio superior). Esta marca o trozo de cinta indica dónde se va a
situar el borde superior del sistema en los rieles verticales (consulte la figura 5-4).
Figura 5-4. Marcado de los rieles verticales
Cinta en riel vertical
Guía de instalación del rack
5-11
www.dell.com | support.dell.com
Instalación de los conjuntos deslizantes RapidRails
1
En la parte frontal del armario rack, coloque uno de los conjuntos deslizantes RapidRails
de modo que la superficie de montaje quede situada entre las marcas o la cinta colocada
en el rack (consulte la figura 5-5).
El gancho de montaje superior situado en la superficie de montaje frontal del conjunto
deslizante deberá insertarse en el orificio superior entre las marcas realizadas en los rieles
verticales.
2
Empuje el conjunto deslizante hacia adelante hasta que el gancho de montaje superior se
introduzca en el orificio cuadrado superior sobre el que ha dibujado una marca en el riel
vertical y, a continuación, empuje hacia abajo la superficie de montaje hasta que los ganchos
de montaje encajen en los orificios cuadrados, y el botón de presión salga y se oiga un clic
(consulte la figura 5-5).
Figura 5-5.
Instalación de los conjuntos deslizantes RapidRails
Conjunto deslizante (2)
Ganchos de montaje (2)
Pulsador
Superficie de montaje
Parte anterior del rack
5-12
Guía de instalación del rack
3
En la parte posterior del armario, tire hacia atrás de la superficie de montaje hasta que el
gancho de montaje superior quede colocado en el orificio cuadrado superior y, a continuación,
empuje hacia abajo la superficie hasta que los ganchos de montaje se introduzcan en los
orificios cuadrados y el botón de presión salga y emita un clic.
4
Repita los pasos del 1 al 3 para el conjunto deslizante del otro lateral del rack.
5
Asegúrese de que los rieles estén montados en la misma posición en ambos lados del rack.
Instalación de los conjuntos deslizantes VersaRails
1
En la parte frontal del armario rack, coloque uno de los conjuntos deslizantes VersaRails de
modo que la superficie de montaje quede situada entre las marcas o la cinta (o la ubicación
numerada) del rack (consulte la figura 5-6).
Los cuatro orificios de la parte frontal del soporte de montaje deben alinearse con los
cuatro orificios situados entre las marcas realizadas en el riel vertical frontal.
2
Coloque dos tornillos Phillips con arandela 10-32 x 0,5 pulgadas en el orificio superior de
la superficie de montaje y en el tercer orificio contando desde la parte superior para sujetar
el conjunto deslizante al riel vertical frontal (consulte la figura 5-6).
3
En la parte posterior del armario, tire hacia atrás de la superficie de montaje hasta que
los orificios de montaje queden alineados con los orificios correspondientes del riel vertical
posterior.
4
Coloque dos tornillos Phillips con arandela 10-32 x 0,5 pulg. en el orificio superior de la
superficie de montaje posterior y en el tercer orificio contando desde la parte superior para
fijar el conjunto deslizante al riel vertical posterior.
5
Repita los pasos del 1 al 4 para el conjunto deslizante del otro lateral del rack.
6
Asegúrese de que los conjuntos deslizantes están montados en la misma posición en los rieles
verticales en cada lado del rack.
Guía de instalación del rack
5-13
www.dell.com | support.dell.com
Figura 5-6.
Instalación de los conjuntos deslizantes VersaRails
Conjunto deslizante (2)
Superficie de montaje
Tornillo Phillips con arandela
10-32 x 0,5 pulgadas
(4 por conjunto deslizante)
Parte anterior del rack
Instalación del sistema en el rack
PRECAUCIÓN: si va a instalar más de un sistema, instale el primero en la posición más baja que haya
disponible en el rack.
PRECAUCIÓN: no extraiga nunca más de un componente del rack a la vez.
1
Tire de los dos conjuntos deslizantes hacia afuera del rack hasta que queden totalmente
extendidos.
PRECAUCIÓN: debido al tamaño y al peso del sistema, no intente nunca instalarlo en los conjuntos
deslizantes sin ayuda.
2
5-14
Levante el sistema hasta su posición en la parte delantera de los conjuntos deslizantes
(consulte la figura 5-7).
Guía de instalación del rack
3
Coloque una mano en la parte inferior delantera del sistema y la otra en la parte inferior
trasera.
4
Incline la parte posterior del sistema hacia abajo mientras alinea los tornillos de pivote
posteriores situados en los laterales del sistema con las ranuras posteriores de los conjuntos
deslizantes.
5
Coloque los tornillos de pivote posteriores en sus ranuras.
Figura 5-7. Instalación del sistema en el rack (RapidRails o VersaRails)
Tornillo de pivote
del sistema
Pasador de liberación del
conjunto deslizante (verde)
Pasador de liberación
del sistema (amarillo)
Guía de instalación del rack
5-15
www.dell.com | support.dell.com
6
Baje la parte frontal del sistema y coloque los tornillos de pivote frontal y central en sus
ranuras (la ranura central está justo detrás del pasador amarillo de liberación del sistema
(consulte la figura 5-7).
Cuando todos los tornillos de pivote estén colocados correctamente, el pasador amarillo
de cada conjunto deslizante encajará en su sitio y bloqueará el sistema en el conjunto.
7
Presione el pasador de liberación verde situado en el lateral de cada conjunto deslizante
para deslizar el sistema completamente hacia el interior del rack (consulte la figura 5-7).
8
Apriete los tornillos moleteados cautivos en cada lado del panel frontal del chasis para sujetar
el sistema al rack.
NOTA: utilice este pasador amarillo de liberación del sistema siempre que desee extraer el sistema
de los conjuntos deslizantes.
Instalación del brazo para tendido de cables, si procede
AVISO: el brazo para tendido de cables sólo se puede instalar en el lado derecho del armario rack
(visto desde la parte posterior).
Si el sistema tiene un brazo para tendido de cables, instálelo llevando a cabo los pasos siguientes:
1
Sitúese frente a la parte posterior del armario rack y localice el pasador del extremo
del conjunto deslizante.
2
Inserte la lengüeta del extremo posterior del brazo para tendido de cables en el pasador
del extremo del conjunto deslizante (consulte la figura 5-8).
El pasador emite un clic al encajar en su sitio.
3
Inserte la lengüeta del extremo frontal del brazo para tendido de cables en el pasador
correspondiente del segmento interno del conjunto deslizante (consulte la figura 5-8).
El pasador emite un clic al encajar en su sitio.
5-16
Guía de instalación del rack
Figura 5-8. Instalación del brazo para tendido de cables, si procede
Pasador situado en el extremo
del conjunto deslizante
Pasador situado en el
segmento interior del
conjunto deslizante
Lengüeta del extremo frontal
Lengüeta del extremo posterior
Brazo para tendido
de cables, si procede
4
Si el sistema tiene un cable de indicador de estado del sistema, instale la clavija del cable
en su conector (consulte la figura 5-9). En caso contrario, siga con el paso 5.
5
Abra las cubiertas de los cables del brazo para tendido de cables levantando el centro del cable
sobre la parte superior del botón circular repujado en la parte frontal delantera del brazo y
levantando el cable sobre la parte superior del botón circular similar de la parte posterior
del brazo.
La cubierta de alambre se abre para permitir que los cables se tiendan en el brazo.
6
Si el sistema tiene un cable de indicador de estado del sistema, pase el extremo del cable a
través del brazo para tendido de cables e instale el indicador en su ranura situada en la parte
posterior del brazo (consulte la figura 5-9). En caso contrario, vaya a “Cableado”.
Guía de instalación del rack
5-17
www.dell.com | support.dell.com
Figura 5-9.
Instalación del indicador de estado del sistema, si procede
Clavija del cable de indicador
de estado del sistema
Cubiertas de
alambre abiertas
Indicador de estado del sistema
Cableado
PRECAUCIÓN: deje cierta holgura en cada cable conforme los tiende alrededor de las bisagras
del brazo para tendido de cables.
1
Conecte los cables de alimentación a sus receptáculos del panel posterior.
2
Conecte los conectores de cables de E/S a sus respectivos conectores situados en el panel
posterior del sistema.
Para obtener más información sobre las conexiones de los cables, consulte la Guía
de instalación y solución de problemas y la Guía del usuario.
3
Pase los cables de alimentación y de E/S a través del brazo para tendido de cables. Para ello,
utilice cuatro abrazaderas que tengan suficiente holgura (dos en el medio y una en cada
extremo del brazo). No apriete completamente las abrazaderas (consulte la figura 5-10).
Deje que los cables queden algo flojos en el brazo para tendido de cables para evitar que
se dañen.
5-18
Guía de instalación del rack
4
Fije los cables en el brazo para tendido de cables:
a
Después de conectar los cables al sistema, desenrosque los tornillos moleteados
que sujetan la parte delantera del sistema al riel vertical delantero.
b
Deslice el sistema hacia adelante hasta que esté completamente extraído.
c
Pase los cables a lo largo del brazo para tendido de cables, realice los ajustes de holgura
necesarios en los cables en las posiciones de las bisagras, fije los cables al brazo con las
abrazaderas y cierre las cubiertas sobre el brazo para tendido de cables.NOTA: al extraer el sistema completamente, los conjuntos deslizantes quedarán bloqueados.
Para volver a colocar el sistema en el rack, presione el pasador de liberación del lateral del
conjunto deslizante y, a continuación, deslice completamente el sistema hasta el interior del rack.
5
Deslice el sistema dentro y fuera del rack para comprobar que los cables están colocados
correctamente y no quedan doblados, estirados o pinzados con el movimiento del brazo
para tendido de cables.
6
Apriete las abrazaderas lo suficiente para garantizar que la holgura permita que el cable
no esté ni demasiado tenso (lo cual puede provocar pinzamientos) ni demasiado suelto
(podría deslizarse cuando el sistema se instala o se extrae del rack).
Figura 5-10.
Cableado
Abrazadera
Abrazadera
Abrazadera
Abrazadera
Guía de instalación del rack
5-19
www.dell.com | support.dell.com
Colocación de las puertas del rack
Consulte los procedimientos para volver a colocar las puertas en la documentación suministrada
con el rack.
PRECAUCIÓN: debido al tamaño y al peso de las puertas del armario rack, nunca debe intentar
montarlas ni desmontarlas sin ayuda.
Con esto queda completada la instalación del rack de su sistema en un armario rack de
cuatro postes.
Instalación de rack de dos postes
El kit de rack de dos postes se utiliza para instalar un sistema en un rack abierto de dos postes,
como los que se encuentran en las instalaciones de equipos de telecomunicaciones. Es posible
colocar los racks de dos postes con una anchura de 3 y 6 pulgadas con una separación entre orificios
universal. Puede instalar este kit en una configuración de montaje centrado o a ras. El kit de dos
postes incorpora conjuntos deslizantes que permiten la extracción del sistema del rack para su
reparación.
Debe fijar de forma adecuada el rack de relevo de estructura abierta de dos postes al suelo, al techo
o a la pared y, si procede, a otros racks adyacentes, mediante dispositivos de fijación para el suelo y
la pared especificados o aprobados por el fabricante del rack o por estándares de la industria. Antes
de iniciar la instalación, consulte las advertencias de seguridad indicadas en la documentación de
instalación del rack abierto de dos postes del fabricante.
PRECAUCIÓN: no intente instalar el sistema en un rack abierto de dos postes que no se haya fijado en
su ubicación de forma segura. Si no sigue esta precaución, el sistema puede resultar dañado y usted u
otras personas podrían lesionarse.
Consulte “PRECAUCIÓN: Instrucciones de seguridad” al principio de este documento para ver
información adicional de seguridad relativa a la instalación del rack.
Tareas de instalación del rack de dos postes
La instalación de un kit de rack de dos postes incluye las tareas siguientes en el orden indicado:
5-20
1
Marcado del rack
2
Instalación de los conjuntos deslizantes en el rack:
•
Montaje centrado
•
Montaje a ras
3
Instalación del sistema en el rack
4
Instalación del brazo para tendido de cables, si procede
5
Cableado
Guía de instalación del rack
Herramientas y material recomendados
Para instalar el sistema en un rack abierto necesitará las herramientas y el material siguientes:
•
Destornillador Phillips del nº 2
•
Llave de 11/32 pulgadas (si se cambia a una configuración de montaje a ras)
•
Cinta adhesiva o rotulador de punta de fieltro para marcar los orificios de montaje
Contenido del kit de rack
El kit de rack de dos postes incluye los elementos siguientes (consulte la figura 5-11):
•
Un par de conjuntos deslizantes (de dos postes)
•
Un soporte de refuerzo
•
Un brazo para tendido de cables, si procede
•
Un cable de indicador de estado, si procede
•
Doce tornillos Phillips de cabeza cónica 12-24 x 0,5 pulgadas
•
Abrazaderas (no mostradas en la figura 5-11)
Figura 5-11.
Componentes del kit de rack de dos postes
Conjuntos deslizantes (2)
Soporte de
refuerzo
Brazo para tendido
de cables, si procede
Cable de indicador
de estado, si procede
Tornillo Phillips de cabeza cónica
10-32 x 0,5 pulg. (12)
Guía de instalación del rack
5-21
www.dell.com | support.dell.com
Marcado del rack
Debe dejar 2 U (88 mm) de espacio vertical para cada sistema que monte en el rack de dos postes.
Racks con separación entre orificios universal
Los racks de dos postes estándar del sector con separación universal entre orificios tienen un patrón
alterno de tres orificios por unidad con un espacio entre orificio de centro a centro (comenzando
en el orificio superior de un espacio de 1-U) de 15,9 mm, 15,9 mm y 12,7 mm para la columna
de orificios vertical frontal y posterior (consulte la figura 5-12).
Figura 5-12. Separación universal entre los orificios en un rack abierto de dos postes
15,9 mm
12,7 mm
15,9 mm
44 mm (1 U)
15,9 mm
Racks con separación entre orificios ancha
Algunos racks de dos postes con separación ancha entre orificios tienen un patrón alterno de dos
orificios por unidad con un espacio entre orificios de centro a centro (comenzando en el orificio
superior de un espacio de 1-U) de 31,7 mm y 12,7 mm para la columna de orificios vertical frontal
y posterior (consulte la figura 5-13).
5-22
Guía de instalación del rack
Figura 5-13.
Separación ancha entre los orificios en un rack abierto de dos postes
12,7 mm
44 mm (1 U)
31,7 mm
Para marcar el rack, realice los pasos siguientes:
1
Marque los rieles verticales frontales en los que desee colocar la parte inferior del sistema
que está instalando en el rack de dos postes.
La parte inferior de cada espacio 1-U se encuentra en el centro de la zona metálica
más estrecha entre los orificios.
NOTA: si el rack tiene una separación ancha entre orificios, vaya al paso 3.
2
Haga una marca 88 milímetros por encima de la marca original realizada o cuente
seis orificios en un rack con separación universal entre orificios (consulte la figura 5-12).
Cada 1 U (44 mm) de espacio vertical en un rack con separación universal entre orificios
tiene tres orificios con separación de centro a centro entre orificios (empezando por la parte
superior de un espacio de 1-U) de 15,8 mm, 15,8 mm y 12,7 mm (consulte la figura 5-12).
NOTA: si el rack tiene una separación universal entre orificios, el procedimiento de marcado del rack
ha finalizado.
3
Haga una marca 88 milímetros por encima de la marca original realizada o cuente cuatro
orificios en un rack con separación ancha entre orificios (consulte la figura 5-13).
Cada 1-U (44 mm) de espacio vertical en un rack con una separación entre orificios ancha
tiene dos orificios con separación de centro a centro entre los orificios (empezando por la
parte superior de un espacio de 1-U) de 31,7 mm (consulte la figura 5-13).
Guía de instalación del rack
5-23
www.dell.com | support.dell.com
Instalación de los conjuntos deslizantes en el rack
Puede instalar los conjuntos deslizantes en un rack abierto de dos postes con separación
universal entre orificios (consulte la figura 5-12) o con separación ancha entre orificios
(consulte la figura 5-13). Puede instalar los conjuntos deslizantes de 2-U en una configuración
de montaje centrado o a ras.
PRECAUCIÓN: no intente instalar otro sistema utilizando este kit de rack. Utilice únicamente el kit
de rack diseñado para su sistema. Si utiliza un kit de rack para otro sistema, el sistema puede resultar
dañado y usted u otras personas podrían lesionarse.
Montaje centrado
El kit de rack de dos postes se entrega con los soportes configurados para el montaje centrado.
Para completar la instalación, realice los pasos siguientes:
5-24
1
Localice el conjunto deslizante derecho y presione el soporte posterior hacia la parte posterior
del conjunto (consulte la figura 5-14).
2
Coloque el conjunto deslizante derecho en el punto marcado del rack de dos postes, presione
el soporte posterior hacia adelante contra el rack vertical de dos postes, fije el soporte de
montaje centrado frontal mediante dos tornillos Phillips con arandela 12-24 x 0,5 pulgadas y
fije el soporte de montaje centrado posterior al rack con tres tornillos Phillips con arandela
12-24 x 0,5 pulgadas (consulte la figura 5-14).
3
Repita los pasos 1 y 2 para instalar el conjunto deslizante izquierdo en el rack.
4
Instale el soporte de refuerzo entre los extremos posteriores de los conjuntos deslizantes y fije
el soporte mediante un tornillo Phillips con arandela 12-24 x 0,5 pulgadas en cada conjunto
deslizante (consulte la figura 5-14).
Guía de instalación del rack
Figura 5-14.
Instalación de los conjuntos deslizantes para una configuración de montaje centrado
Tornillo Phillips de cabeza
cónica 12-24 x 0,5 pulg.
(5 por conjunto deslizante)
Rack abierto de dos postes
Soporte de refuerzo
Conjunto
deslizante
Pasador de liberación del sistema
(amarillo)
Conjunto deslizante
Pasador de liberación del conjunto
deslizante (verde)
Guía de instalación del rack
5-25
www.dell.com | support.dell.com
Montaje a ras
El kit de rack de dos postes se entrega con los soportes configurados para el montaje centrado.
Para preparar los conjuntos deslizantes para el montaje a ras en el rack de dos postes, siga estos
pasos:
1
Localice los dos conjuntos deslizantes y colóquelos uno al lado del otro en una superficie lisa
con los extremos frontales hacia sí. Coloque ambos conjuntos deslizantes de forma que los
soportes centrales queden hacia arriba (consulte la figura 5-15).
NOTA: para preparar los conjuntos deslizantes para el montaje a ras, extraiga el soporte de
montaje frontal, gírelo 180 grados y vuelva a colocarlo en el conjunto deslizante opuesto.
2
Con un destornillador Phillips del nº 2 y una llave de 11/32 pulgadas, quite los dos tornillos
Phillips con arandela 12-24 x 0,5 pulgadas, las dos tuercas y las dos arandelas separadoras
de cada soporte central (consulte la figura 5-15).
3
Extraiga el soporte frontal de ambos conjuntos deslizantes.
4
Coloque el soporte de uno de los conjuntos deslizantes en los espárragos del conjunto
deslizante opuesto, con el soporte girado 180 grados, de modo que la superficie de montaje
quede hacia adelante (consulte la figura 5-15).
5
Fije cada soporte de montaje centrado frontal (con sus tuercas y arandelas separadoras)
apretándolos con los dedos en sus conjuntos deslizantes opuestos utilizando las dos arandelas
separadoras y las dos tuercas extraídas en el paso 2 (consulte la figura 5-15).
El soporte unido pasa a ser el nuevo soporte posterior extendido.
5-26
Guía de instalación del rack
Figura 5-15.
Rotación del soporte de montaje frontal para el montaje a ras
Arandela separadora
(2 por soporte)
Tuerca (2 por soporte)
Tornillos Phillips de cabeza cónica
12-24 x 0,5 pulg. (instalar 2 por soporte)
Superficie de montaje
Tornillos Phillips con arandela 12-24 x 0,5 pulgadas
(quitar 2 por soporte)
NOTA: estos tornillos se muestran montados
en otro conjunto deslizante.
6
Repita los pasos 4 y 5 para configurar el otro conjunto deslizante.
7
Sujetando el conjunto deslizante izquierdo en su sitio en el punto marcado del rack de
dos postes, ajuste el soporte posterior extendido contra el rack vertical de dos postes y fíjelo
mediante tres tornillos Phillips con arandela 12-24 x 0,5 pulgadas (consulte la figura 5-16).
8
Fije el soporte frontal del conjunto deslizante al riel de dos postes mediante dos tornillos
Phillips con arandela 12-24 x 0,5 pulgadas (consulte la figura 5-16).
9
Realice los pasos 7 y 8 para instalar el conjunto deslizante derecho en el rack.
10
Utilice una llave o un destornillador para tuercas hexagonales de 11/32 pulgadas para apretar
firmemente las tuercas de los soportes de montaje de ambos conjuntos deslizantes que antes
apretó con los dedos.
11
Instale el soporte de refuerzo entre los extremos posteriores de los conjuntos deslizantes y fije
el soporte mediante un tornillo Phillips con arandela 12-24 x 0,5 pulgadas en cada conjunto
deslizante (consulte la figura 5-16).
Guía de instalación del rack
5-27
www.dell.com | support.dell.com
Figura 5-16. Instalación de los conjuntos deslizantes para una configuración de montaje a ras
Tornillos Phillips de cabeza
cónica 12-24 x 0,5 pulg.
(5 por conjunto deslizante)
Rack abierto de dos postes
Soporte de refuerzo
Conjunto deslizante
Pasador de liberación del sistema
(amarillo)
Conjunto deslizante
Pasador de liberación del conjunto
deslizante (verde)
5-28
Guía de instalación del rack
Instalación del sistema en el rack
PRECAUCIÓN: debido al tamaño y al peso del sistema, no intente nunca instalarlo sin ayuda.
NOTA: el procedimiento para instalar un sistema en un rack es idéntico tanto para los conjuntos
deslizantes de montaje a ras como de montaje centrado.
1
Extraiga completamente los conjuntos deslizantes.
PRECAUCIÓN: debido al tamaño y al peso del sistema, no intente nunca instalarlo en los conjuntos
deslizantes sin ayuda.
2
Levante el sistema hasta que quede en su sitio (consulte la figura 5-16).
3
Coloque una mano en la parte inferior delantera del sistema y la otra en la parte inferior
trasera.
4
Incline la parte posterior del sistema hacia abajo mientras alinea los tornillos de pivote
posteriores situados en los laterales del sistema con las ranuras posteriores de los conjuntos
deslizantes.
5
Coloque los tornillos de pivote posteriores en sus ranuras.
6
Baje la parte frontal del sistema y coloque los tornillos de pivote frontal y central en sus
ranuras; la ranura central está justo detrás del pasador amarillo de liberación del sistema
(consulte la figura 5-16).
Cuando todos los tornillos de pivote estén colocados correctamente, el pasador amarillo
de cada conjunto deslizante encajará en su sitio y bloqueará el sistema en el conjunto.
7
Presione el pasador de liberación verde situado en el lateral de cada conjunto deslizante
para deslizar el sistema completamente hacia el interior del rack (consulte la figura 5-16).
8
Apriete los tornillos moleteados cautivos en cada lado del panel frontal del chasis para sujetar
el sistema al rack.
NOTA: utilice este pasador amarillo de liberación del sistema siempre que desee extraer el sistema
de los conjuntos deslizantes.
Instalación del brazo para tendido de cables, si procede
Consulte “Instalación del brazo para tendido de cables” en la sección “Instalación del rack de
cuatro postes” que aparece anteriormente en este documento.
Cableado
Consulte “Cableado” en la sección “Instalación del rack de cuatro postes” que aparece
anteriormente en este documento.
Ha completado la instalación del kit de rack en un rack de dos postes.
Guía de instalación del rack
5-29
www.dell.com | support.dell.com
5-30
Guía de instalación del rack
Índice
B
I
brazo para tendido
de cables
cablear, 5-19, 5-29
instalar, 5-16, 5-29
instalar
brazo para tendido
de cables, 5-29
conjuntos deslizantes
de dos postes, 5-24
conjuntos deslizantes
RapidRails, 5-12
conjuntos deslizantes
VersaRails, 5-13
C
cablear, 5-18, 5-29
cables, 5-19
contenido del kit
RapidRails, 5-8
instalar el sistema
rack de cuatro postes, 5-14
rack de dos postes, 5-29
contenido del kit
VersaRails, 5-9
instrucciones de
seguridad, 5-5
contenido enumerado
kit de dos postes, 5-21
kit RapidRails, 5-8
kit VersaRails, 5-9
K
H
herramientas
kits de cuatro postes, 5-8
kits de dos postes, 5-21
kit de cuatro postes
cablear, 5-18
conjuntos deslizantes
RapidRails, 5-12
conjuntos deslizantes
VersaRails, 5-13
contenido del kit
RapidRails, 5-8
contenido del kit
VersaRails, 5-9
kit de cuatro postes
(continuación)
herramientas, 5-8
instalar el brazo para
tendido de cables, 5-16
instalar el sistema, 5-14
marcar el rack, 5-10
tareas, 5-9
kit de dos postes
cablear, 5-29
contenido, 5-21
herramientas, 5-21
instalar conjuntos
deslizantes, 5-24
instalar el brazo para
tendido de cables, 5-29
instalar el sistema, 5-29
marcar el rack, 5-22
montaje a ras, 5-26
montaje centrado, 5-24
soporte de refuerzo,
5-21, 5-27
tareas, 5-20
kit, contenido
RapidRails, 5-8
VersaRails, 5-9
Índice
5-31
32
Índice
M
marcar el rack
kit de dos postes, 5-22
kits de cuatro postes, 5-10
montaje en rack
sistema, 5-14 a 5-15
rieles verticales
marcar, 5-10
una unidad de rack, 5-10
S
soporte de refuerzo, 5-21
instalar, 5-24, 5-27
P
pies estabilizadores
del rack, 5-8
T
precauciones para
el montaje del rack, 5-7
tareas
kit de cuatro postes, 5-9
kit de dos postes, 5-20
puertas
extraer, 5-10
reemplazar, 5-20
U
unidad de rack, 5-10
R
requisitos del rack
para VersaRails, 5-7
5-32
Índice