1
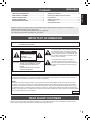
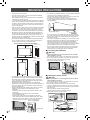
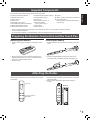
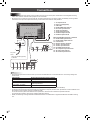
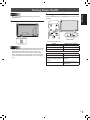
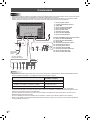
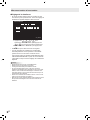
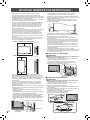
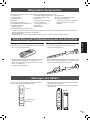
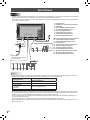
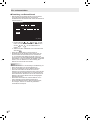
ENGLISH FRANÇAIS PN-L601B DEUTSCH LCD MONITOR MONITEUR LCD LCD FARBMONITOR SETUP MANUAL MANUEL D’INSTALLATION INSTALLATIONSANLEITUNG 香港電器安全規格 (國際電工委員會規格適合) ENGLISH ...... E1 FRANÇAIS..... F1 DEUTSCH . ... D1 ( . ﺍﳌﺮﻓﻘﺔCD-ROM ) ﺍﻟﺪﻟﻴﻞ ﺑﺎﻟﻠﻐﺔ ﺍﻟﻌﺮﺑﻴﺔ ﻳﻮﺟﺪ ﰲ ﺃﺳﻄﻮﺍﻧﺔ IMPORTANT: To aid reporting in case of loss or theft, please record the product’s model and serial numbers in the space provided. The numbers are located in the rear of the product. Model No.: Serial No.: U.S.A. ONLY FOR CUSTOMERS IN U.K. IMPORTANT The wires in this mains lead are coloured in accordance with the following code: GREEN-AND-YELLOW: Earth BLUE: Neutral BROWN: Live As the colours of the wires in the mains lead of this apparatus may not correspond with the coloured markings identifying the terminals in your plug proceed as follows: •The wire which is coloured GREEN-AND-YELLOW must be connected to the terminal in the plug which is marked by the letter E or by the safety earth or coloured green or green-and-yellow. •The wire which is coloured BLUE must be connected to the terminal which is marked with the letter N or coloured black. •The wire which is coloured BROWN must be connected to the terminal which is marked with the letter L or coloured red. Ensure that your equipment is connected correctly. If you are in any doubt consult a qualified electrician. “WARNING: THIS APPARATUS MUST BE EARTHED.” Products that have earned the ENERGY STAR® are designed to protect the environment through superior energy efficiency. Les produits labellisés ENERGY STAR® sont conçus pour protéger l’environnement par un rendement énergétique supérieur. Mit dem ENERGY STAR® ausgezeichnete Produkte zeichnen sich durch ein besonders energiesparendes Design aus und schützen die Umwelt. Authorised representative responsible for the European Union Community Market Représentant autorisé pour le marché de la communauté européenne Autorisierter Repräsentant in der Europäischen Union SHARP ELECTRONICS (Europe) GmbH Sonninstraße 3, D-20097 Hamburg Contents Supplied Components......................................................5 Preparing the Remote Control Unit and the Touch Pen...................................................................5 Attaching the Holder........................................................5 Connections......................................................................6 Turning Power On/Of........................................................7 ENGLISH IMPORTANT INFORMATION.............................................1 DEAR SHARP CUSTOMER...............................................1 SAFETY PRECAUTIONS...................................................2 SAFETY INSTRUCTION....................................................3 MOUNTING PRECAUTIONS.............................................4 [ENGLISH] Read the manuals in the “Manual” folder of the provided CD-ROM. (Adobe Reader is required to view the manuals.) Operation Manual (PNL601B_manual_English.pdf) Touch Panel Driver Operation Manual (PNL601B_driver_English.pdf) Pen Software Operation Manual (PenSoftware_manual.pdf) IMPORTANT INFORMATION WARNING: TO REDUCE THE RISK OF FIRE OR ELECTRIC SHOCK, DO NOT EXPOSE THIS PRODUCT TO RAIN OR MOISTURE. CAUTION RISK OF ELECTRIC SHOCK DO NOT OPEN CAUTION: TO REDUCE THE RISK OF ELECTRIC SHOCK, DO NOT REMOVE COVER. NO USER-SERVICEABLE PARTS INSIDE. REFER SERVICING TO QUALIFIED SERVICE PERSONNEL. The lightning flash with arrowhead symbol, within an equilateral triangle, is intended to alert the user to the presence of uninsulated “dangerous voltage” within the product’s enclosure that may be of sufficient magnitude to constitute a risk of electric shock to persons. The exclamation point within a triangle is intended to alert the user to the presence of important operating and maintenance (servicing) instructions in the literature accompanying the product. WARNING: FCC Regulations state that any unauthorized changes or modifications to this equipment not expressly approved by the manufacturer could void the user’s authority to operate this equipment. NOTE: This equipment has been tested and found to comply with the limits for Class A digital device, pursuant to Part 15 of the FCC Rules. These limits are designed to provide reasonable protection against harmful interference when the equipment is operated in a commercial environment. This equipment generates, uses, and can radiate radio frequency energy and, if not installed and used in accordance with the instruction manual, may cause harmful interference to radio communications. Operation of this equipment in a residential area is likely to cause harmful interference in which case the user will be required to correct the interference at his own expense. U.S.A. ONLY DEAR SHARP CUSTOMER Thank you for your purchase of a SHARP LCD product. To ensure safety and many years of trouble-free operation of your product, please read the Safety Precautions carefully before using this product. 1 E SAFETY PRECAUTIONS Electricity is used to perform many useful functions, but it can also cause personal injuries and property damage if improperly handled. This product has been engineered and manufactured with the highest priority on safety. However, improper use can result in electric shock and/or fire. In order to prevent potential danger, please observe the following instructions when installing, operating and cleaning the product. To ensure your safety and prolong the service life of your LCD product, please read the following precautions carefully before using the product. 1. Read instructions — All operating instructions must be read and understood before the product is operated. E 2 2.Keep this manual in a safe place — These safety and operating instructions must be kept in a safe place for future reference. 3. Observe warnings — All warnings on the product and in the instructions must be observed closely. 4. Follow instructions — All operating instructions must be followed. 5.Cleaning — Unplug the power cord from the AC outlet before cleaning the product. Use a dry cloth to clean the product. Do not use liquid cleaners or aerosol cleaners. 6.Attachments — Do not use attachments not recommended by the manufacturer. Use of inadequate attachments can result in accidents. 7. Water and moisture — Do not use the product near water. Do not install the product in a place where water may splash onto it. Be careful of equipment which drains water such as an air-conditioner. 8. Ventilation — The vents and other openings in the cabinet are designed for ventilation. Do not cover or block these vents and openings since insufficient ventilation can cause overheating and/or shorten the life of the product. Do not place the product on a sofa, rug or other similar surface, since they can block ventilation openings. Do not place the product in an enclosed place such as a bookcase or rack, unless proper ventilation is provided or the manufacturer’s instructions are followed. 9.Power cord protection — The power cords must be routed properly to prevent people from stepping on them or objects from resting on them. 10.The screen used in this product is made of glass. Therefore, it can break when the product is dropped or applied with impact. Be careful not to be injured by broken glass pieces in case the screen breaks. 11. Overloading — Do not overload AC outlets or extension cords. Overloading can cause fire or electric shock. 12. Entering of objects and liquids — Never insert an object into the product through vents or openings. High voltage flows in the product, and inserting an object can cause electric shock and/or short internal parts. For the same reason, do not spill water or liquid on the product. 13.Servicing — Do not attempt to service the product yourself. Removing covers can expose you to high voltage and other dangerous conditions. Request a qualified service person to perform servicing. 14. Repair — If any of the following conditions occurs, unplug the power cord from the AC outlet, and request a qualified service person to perform repairs. a. When the power cord or plug is damaged. b. When a liquid was spilled on the product or when objects have fallen into the product. c. When the product has been exposed to rain or water. d. When the product does not operate properly as described in the operating instructions. Do not touch the controls other than those described in the operating instructions. Improper adjustment of controls not described in the instructions can cause damage, which often requires extensive adjustment work by a qualified technician. e. When the product has been dropped or damaged. f. When the product displays an abnormal condition. Any noticeable abnormality in the product indicates that the product needs servicing. 15.Replacement parts — In case the product needs replacement parts, make sure that the service person uses replacement parts specified by the manufacturer, or those with the same characteristics and performance as the original parts. Use of unauthorized parts can result in fire, electric shock and/or other danger. 16.Safety checks — Upon completion of service or repair work, request the service technician to perform safety checks to ensure that the product is in proper operating condition. 17. Wall mounting — When mounting the product on a wall, be sure to install the product according to the method recommended by the manufacturer. 18.Heat sources — Keep the product away from heat sources such as radiators, heaters, stoves and other heat-generating products (including amplifiers). 19. Batteries — Incorrect use of batteries may cause the batteries to burst or ignite. A leaky battery may corrode the equipment, dirty your hands or spoil your clothing. In order to avoid these problems, make sure to observe the precautions below: • Use the specified batteries only. • Install the batteries with due attention to the plus (+) and minus (-) sides of the batteries according to the instructions in the compartment. • Do not mix old and new batteries. • Do not mix batteries of different types. Voltage specifications of batteries of the same shape may vary. • Replace an exhausted battery with a new one promptly. • If you will not use the remote control for a long time, remove the batteries. • If leaked battery fluid gets on your skin or clothing, rinse immediately and thoroughly. If it gets into your eye, bathe your eye well rather than rubbing and seek medical treatment immediately. Leaked battery fluid that gets into your eye or your clothing may cause a skin irritation or damage your eye. 20.Usage of the monitor must not be accompanied by fatal risks or dangers that, could lead directly to death, personal injury, severe physical damage or other loss, including nuclear reaction control in nuclear facility, medical life support system, and missile launch control in a weapon system. SAFETY PRECAUTIONS (Continued) WARNING: This is a class A product. In a domestic environment this product may cause radio interference in which case the user may be required to take adequate counter measures. ENGLISH 21.Do not stay in contact with the parts of the product that become hot for long periods of time. Doing so may result in low-temperature burns. If a monitor is not positioned in a sufficiently stable location, it can be potentially hazardous due to falling. Many injuries, particularly to children, can be avoided by taking simple precautions such as: • Using fixing devices like wall mount brackets recommended by the manufacturer. • Only using furniture that can safely support the monitor. • Ensuring the monitor is not overhanging the edge of the supporting furniture. • Not placing the monitor on tall furniture (for example, cupboards or bookcases) without anchoring both the furniture and the monitor to a suitable support. • Not standing the monitors on cloth or other materials placed between the monitor and supporting furniture. • Educating children about the dangers of climbing on furniture to reach the monitor or its controls. Especially for child safety - Don’t allow children to climb on or play with the monitor. - Don’t place the monitor on furniture that can easily be used as steps, such as a chest of drawers. - Remember that children can become excited while watching a program, especially on a “larger than life” monitor. Care should be taken to place or install the monitor where it cannot be pushed, pulled over, or knocked down. - Care should be taken to route all cords and cables connected to the monitor so that they cannot be pulled or grabbed by curious children. SAFETY INSTRUCTION - Do not use the monitor where there is a lot of dust, where humidity is high, or where the monitor may come into contact with oil or steam, as this could lead to fire. - Ensure that the monitor does not come into contact with water or other fluids. Ensure that no objects such as paper clips or pins enter the monitor as this could lead to fire or electric shock. - Do not place the monitor on top of unstable objects or in unsafe places. Do not allow the monitor to receive strong shocks or to strongly vibrate. Causing the monitor to fall or topple over may damage it. - Do not use the monitor near heating equipment or in places where there is likelihood of high temperature, as this may lead to generation of excessive heat and outbreak of fire. - Do not use the monitor in places where it may be exposed to direct sunlight. The Power Cord - Use only the power cord supplied with the monitor. - Do not damage the power cord nor place heavy objects on it, stretch it or over bend it. Also, do not add extension cords. Damage to the cord may result in fire or electric shock. - Do not use the power cord with a power tap. Adding an extension cord may lead to fire as a result of overheating. - Do not remove or insert the power plug with wet hands. Doing so could result in electric shock. - Unplug the power cord if it is not used for a long time. - Do not attempt to repair the power cord if it is broken or malfunctioning. Refer the servicing to the service representative. - The AC outlet shall be installed near the equipment and shall be easily accessible. - Do not operate the screen with a hard or pointed object such as a fingernail, pen, or pencil. 3 E MOUNTING PRECAUTIONS • This product is for use indoors. • Since the monitor is heavy, consult your dealer before installing, removing or moving the monitor. • When installing, removing or moving the monitor, ensure that this is carried out by at least 2 people. • A mounting bracket compliant with VESA specifications is required. Do not use any screw holes other than VESA holes for installation. • To attach a VESA-compliant mounting bracket, use M6 screws that are 5/16 inch (8 mm) to 3/8 inch (10 mm) longer than the thickness of the mounting bracket. • When moving the monitor, be sure to hold it with either both handles or the 4 corners on the bottom of the unit. Do not place your hand on the screen. This may cause product damage, failure, or injury. • Install the monitor with the surface perpendicular to a level surface. • Mounting the monitor on the wall requires special expertise and the work must be performed by an authorized SHARP dealer. You should never attempt to perform any of this work yourself. Our company will bear no responsibility for accidents or injuries caused by improper mounting or mishandling. • This monitor should be used at an ambient temperature between 41°F (5°C) and 95°F (35°C). Provide enough space around the monitor to prevent heat from accumulating inside. For the monitor in horizontal orientation Unit: inch [cm] 7-7/8 [20] 2 [5] 1-7/16 [3.5] Logo Do not remove the factory-affixed sticker but affix the logo sticker over it. Be careful not to cover the remote control sensor or buttons. • Be sure to use a wall-mount bracket designed or designated for mounting the monitor. • This monitor is designed to be installed on a concrete wall or pillar. Reinforced work might be necessary for some materials such as plaster / thin plastic board / wood before starting installation. This monitor and bracket must be installed on a wall which can endure at least 4 times or more the weight of the monitor. Install by the most suitable method for the material and the structure. • Do not use the product in locations where the unit is exposed to direct sunlight or other strong light. Since this product operates with infrared rays, such light may cause a malfunction. Warning: 2 [5] For the monitor in vertical orientation Unit: inch [cm] 2 [5] Operation panel ■Connecting the USB cable 2 [5] 7-7/8 [20] • Do not block any ventilation openings. If the temperature inside the monitor rises, this could lead to a malfunction. • After mounting, please carefully ensure the monitor is secure, and not able to come loose from the wall or mount. • Do not place the monitor on a device which generates heat. • Use the supplied vertical sticker when you install the monitor in vertical orientation. 1-13/16 [4.5] •• Contact your dealer or a service engineer to have the USB cable installed or removed. Risk of electrical shock or injury if you attempt the work yourself. • Before connecting the USB cable, turn off the main power switch and disconnect the power cable from the outlet. • Use only the supplied USB cable. 2 [5] 2 [5] • If it is difficult to provide sufficient space for any reason such as the installation of the monitor inside a housing, or if the ambient temperature may be outside of the range of 41°F (5°C) to 95°F (35°C), install a fan or take other measures to keep the ambient temperature within the required range. • Temperature condition may change when using the display together with the optional equipments recommended by SHARP. In such cases, please check the temperature condition specified by the optional equipments. • Adhere to the following when installing the monitor in its vertical orientation. Failing to adhere to the following may cause malfunctions. - Install the monitor such that the power LED is located on the bottom side. - Set the MONITOR on the SETUP menu to PORTRAIT. (See Operation manual.) - Be sure to clamp the power cord (supplied) onto the cable clamp attachment below using the supplied cable clamp. When clamping the power cord, take care not to stress the terminal of the power cord. Do not bend the power cord excessively. Power cord (Supplied) ■Installing the power switch Warning: •• Contact your dealer or a service engineer to have the power switch installed or removed. Risk of electrical shock or injury if you attempt the work yourself. 1. Remove the screw (x1) from the monitor. 2. Remove the protective seal and connect the power switch connector, making sure the connector is in the correct orientation. 3.Align the clamps with the slot in the bottom of the unit and tighten the screws (x2). Make sure that the clamps are firmly secured. Take care that the cable is not caught or pinched. 4. Replace the screw that was removed in 1. Protective seal Connector Bottom Power switch Cable clamp E 4 Cable clamp attachment Mounting bracket Mounting bracket Supplied Components Liquid Crystal Display Monitor: 1 Remote control unit: 1 Cable clamp: 2 Power cord R-6 battery (“AA” size): 2 CD-ROM (Utility Disk for Windows): 1 Setup Manual (this manual): 1 Stand hole protection cover: 2 Vertical sticker (Operation panel): 1 Eraser: 1 Holder: 1 (With 2 hook and loop fasteners) Vertical sticker (Logo): 1 Cover Sharp logo: 1 Touch pen: 1 Place this sticker onto the SHARP logo to Pen tip (for touch pen): 2 cover the logo. Touch pen battery (LR-03 (“AAA” size)): 1 USB cable: 1 Power switch: 1 ENGLISH If any component should be missing, please contact your dealer. * Sharp Corporation holds authorship rights to the Utility Disk program. Do not reproduce it without permission. * For environmental protection! Do not dispose of batteries in household waste. Follow the disposal instructions for your area. Preparing the Remote Control Unit and the Touch Pen Installing the batteries Inserting the battery 1. Press the cover gently and slide it in the direction of the arrow. 1. Rotate the battery cap and remove it, and then pull out the cover. Battery cap 2. See the instructions in the compartment and put in the supplied batteries (R-6 (“AA” size) x 2) with their plus (+) and minus (-) sides oriented correctly. 3. Close the cover. 2. Insert the supplied battery (LR-03 (“AAA” size)) in the orientation shown, and attach the cover and battery cap. Attaching the Holder The touch pen, remote control unit, and eraser can be stored in the holder. 1. Remove the peel-off sheets from the fasteners on the back side of the holder. 2. With the holder spread taut, affix it to the side of the monitor. Touch pen Back side Remote control unit and Eraser 5 E Connections Caution • Be sure to turn off the main power switch and disconnect the plug from the power outlet before connecting/disconnecting cables. Also, read the manual of the equipment to be connected. • Be careful not to confuse the input terminal with the output terminal when connecting cables. Accidentally reversing cables connected to the input and output terminals may cause malfunctions and the other problems. 1. 2. 3. 4. 5. 6. 7. 8. 9. 3 1 2 4 5 6 7 8 9 For power outlet AC input terminal Power cord (Supplied) USB cable PC/AV HDMI input terminal PC D-sub input terminal Audio input terminal Audio output terminals RS-232C output terminal RS-232C input terminal When the PN-ZB01 (optional) is attached 10. PC/AV DVI-D input terminal 11. PC/AV DVI-D output terminal 12. LAN terminal 13. External speaker terminals 14. Audio 1 input terminals 15. Audio 2 input terminals 16. PC RGB input terminals 17. AV component input terminals 18. AV video input terminal 19. AV S-video input terminal When the PN-ZB01 (optional) is attached 16 18 10 11 12 13 14 15 17 19 TIPS • Set the audio input terminal used for each input mode in AUDIO SELECT on the OPTION menu. The factory settings are shown below. Input mode PC D-SUB, PC DVI-D, PC RGB AV DVI-D AV component, AV S-video, AV video PC HDMI, AV HDMI Audio input terminal (Factory setting) Audio input terminal Audio1 input terminal Audio2 input terminal PC/AV HDMI input terminal • When connecting the external speaker, attach the speaker cable core (included with the PN-ZB01). • To use the touch panel, the touch panel must be connected to a computer, and the touch panel driver and Pen Software must be installed on the computer from the provided CD-ROM. To connect the touch panel and install the touch panel driver, see the Touch Panel Driver Operation Manual. To install the Pen Software, see the Pen Software Operation Manual. • HDMI, the HDMI logo and High-Definition Multimedia Interface are trademarks or registered trademarks of HDMI Licensing LLC. E 6 Turning Power On/Off • Turn on the monitor first before turning on the PC or playback device. Turning power on/off Press the POWER button or POWER switch to turn the power ON/OFF. Turning on the main power ENGLISH Caution Touch panel power LED Main power switch Power LED • Status of the power LED Status Caution • The main power must be turned on/off with the main power switch. Do not connect/disconnect the power cord or turn the breaker on/off while the main power switch is on. • When switching the main power switch or the POWER button off and back on, always wait for at least 5 seconds. • For a complete electrical disconnection, pull out the main plug. Status of the monitor Green lit Power on Orange lit Power off (Standby mode) Green flashing Input signal waiting mode • Status of the touch panel power LED Status Status of the touch panel Green lit Operating normally Blinking orange Alternately blinking green and Initializing orange Touch panel off (power not Off supplied, etc.) 7 E Turning Power On/Off nDate/time setting • If the time has yet to be set when the monitor is first turned on, the date/time setting screen appears. Set the date and time. DATE/TIME SETTING / SET 20 / 10 / : 01 / 01 : 00 : 00 CANCEL OK···[MENU] 1. Press , , or to select the date and or to change the numerical time, and press values. 2. Select SET and then press MENU . • Be sure to set the date and time. • The date/time setting screen will close automatically if no operation is performed for about 15 seconds. The date and time can be set using DATE/TIME SETTING from the OPTION menu when the date/time setting screen disappears. TIPS Set the date in “Year/Month/Day” order. Set the time on a 24-hour basis. The clock is maintained by the internal battery. If you already set the time but the date/time setting screen appears when the power is turned on, the internal battery may be exhausted. Please contact your local Sharp servicing dealer or service center for assistance with battery replacement. • Estimated service life of the internal battery: About 5 years (depending on monitor operation) • As the first battery was inserted at the factory, it may be exhausted prior to the expected continuous operation life. • • • • E 8 Table des matières INFORMATION IMPORTANTE..........................................1 CHER CLIENT....................................................................1 PRÉCAUTIONS DE SÉCURITÉ........................................2 MESURES DE SÉCURITÉ.................................................3 PRÉCAUTIONS POUR LE MONTAGE..............................4 [FRANÇAIS] Composants fournis.........................................................5 Préparation de la télécommande et du stylet................5 Fixation du porte-accessoires.........................................5 Connexions.......................................................................6 Mise sous tension et hors tension..................................7 INFORMATION IMPORTANTE FRANÇAIS Lisez les manuels se trouvant dans le dossier “Manual” du CD-ROM fourni. (Adobe Reader est nécessaire pour pouvoir visualiser les manuels.) Mode d’emploi (PNL601B_manual_French.pdf) Mode d’emploi du pilote d’écran tactile (PNL601B_driver_French.pdf) Mode d’emploi du Pen Software (PenSoftware_manual.pdf) AVERTISSEMENT : POUR RÉDUIRE LE RISQUE D’INCENDIE OU DE DÉCHARGE ÉLECTRIQUE, NE PAS EXPOSER CE PRODUIT À LA PLUIE OU À LA POUSSIÈRE. Le symbole représenté par l’éclair à la tête en pointe de flèche à l’intérieur d’un triangle équilatéral, est placé pour alerter l’utilisateur de la présence d’une “tension dangereuse” non isolée à l’intérieur du produit. Cette tension peut avoir une valeur suffisante pour constituer un risque d’électrocution à toute personne. ATTENTION RISQUE DE DÉCHARGE ÉLECTRIQUE NE PAS OUVRIR ATTENTION : POUR RÉDUIRE LE RISQUE DE DÉCHARGE ÉLECTRIQUE, NE PAS RETIRER LE COUVERCLE. IL N’Y A AUCUNE PIÈCE RÉPARABLE PAR L’UTILISATEUR À L’INTÉRIEUR. AVERTIR LE PERSONNEL DE SERVICE QUALIFIÉ POUR TOUTE PROCÉDURE D’ENTRETIEN. Le point d’exclamation à l’intérieur d’un triangle est placé pour alerter l’utilisateur de la présence d’une procédure particulière ou d’une procédure de maintenance (entretien) importante dans les manuels accompagnant le produit. AVERTISSEMENT : Les lois FCC établissent que tout changement ou modification non-autorisés de cet équipement qui n’ont pas été expressément approuvés par le producteur, constituent un motif d’annulation des droits de l’utilisateur d’utiliser cet appareil. REMARQUE : Cet équipement, après les tests, a été jugé conforme aux limites d’un équipement numérique de Classe A, conformément à la section 15 de la règlementation FCC. Ces limites sont établies pour fournir une protection raisonnable contre les interférences nuisibles lorsque l’équipement est utilisé dans un environnement commercial. Cet équipement produit, utilise et peut rayonner de l’énergie sous forme de radiofréquences et, s’il n’est pas installé et utilisé conformément aux instructions du mode d’emploi, peut provoquer des interférences nuisibles aux communications par radio. Le fonctionnement de cet équipement dans une zone résidentielle peut vraisemblablement provoquer des interférences nuisibles, auquel cas l’utilisateur est prié de corriger ces interférences à ses propres frais. ÉTATS-UNIS SEULEMENT CHER CLIENT Nous vous remercions d’avoir acheté cet appareil SHARP à écran LCD. Afin de garantir le bon fonctionnement de ce moniteur, nous vous conseillons de lire attentivement cette brochure et de la conserver pour toute référence ultérieure. 1 F PRÉCAUTIONS DE SÉCURITÉ F 2 L’électricité remplit de nombreuses fonctions utiles, mais elle peut provoquer des blessures et des dégâts matériels si elle n’est pas utilisée correctement. Cet appareil a été conçu et fabriqué en attachant la plus grande importance à la sécurité. Cependant, une utilisation inadéquate peut entraîner une décharge électrique et/ou un incendie. Afin d’éviter tout danger potentiel, veuillez respecter les consignes suivantes lors de l’installation, de l’utilisation et du nettoyage de l’appareil. Afin d’assurer votre propre sécurité et de prolonger la durée de service de votre moniteur LCD, veuillez lire attentivement les précautions ci-dessous avant d’utiliser l’appareil. 1.Lisez ces explications — Vous devez lire et comprendre toutes les informations relatives au fonctionnement de l’appareil avant de l’utiliser. 2.Conservez cette brochure dans un endroit sûr — Ces explications concernant la sécurité et le fonctionnement doivent être conservées dans un endroit sûr pour vous y référer en cas de besoin. 3.Respectez les avertissements — Tous les avertissements figurant sur l’appareil et dans ce mode d’emploi doivent être strictement respectés. 4.Suivez les instructions — Toutes les explications sur le fonctionnement doivent être respectées. 5.Nettoyage — Débranchez le cordon d’alimentation au niveau de la prise du secteur avant de nettoyer l’appareil. Servez-vous d’un linge sec, et n’employez pas de détergents liquides ou en atomiseur. 6.Accessoires — N’utilisez pas d’accessoires non recommandés par le fabricant, car ceci pourrait provoquer des accidents. 7.Eau et humidité — N’utilisez pas cet appareil près de l’eau. N’installez pas le produit à un endroit où il pourrait recevoir de l’eau. Évitez en particulier les emplacements sous les appareils à vidange d’eau tels que les climatiseurs. 8.Ventilation — Des ouïes et autres ouvertures sont prévues dans le coffret de l’appareil pour sa ventilation. Ne recouvrez pas et ne bouchez pas ces ouvertures car une ventilation insuffisante peut provoquer une surchauffe et réduire la durée de vie de l’appareil. Ne placez pas l’appareil sur un sofa, un tapis ou toute autre surface analogue car ceci pourrait obstruer les ouvertures de ventilation. Cet appareil n’est pas conçu pour une installation encastrée; ne le placez donc pas dans un endroit fermé comme une bibliothèque ou une baie à moins qu’une ventilation adéquate ne soit prévue et que les consignes du fabricant ne soient respectées. 9.Protection du cordon d’alimentation — Faites passer les cordons d’alimentation à un endroit où ils ne seront pas écrasés ou coincés par d’autres objets. 10.L’écran utilisé dans ce produit est en verre et, par conséquent, il peut se briser si l’appareil tombe ou s’il reçoit un fort impact. Veillez à ne pas être blessé par les éclats de verre au cas où l’écran se romprait. 11.Surcharge — Ne surchargez pas les prises de courant ou les rallonges car ceci peut entraîner un risque d’incendie ou d’électrocution. 12.Insertion de solides ou de liquides — N’introduisez jamais des objets par les orifices de cet appareil, car ils pourraient provoquer une électrocution et/ou un court-circuit en touchant des pièces internes sous haute tension. Pour la même raison, ne renversez jamais de l’eau ou un liquide sur l’appareil. 13.Entretien — N’essayez pas de réparer vous-même l’appareil. La dépose des couvercles peut vous exposer à une haute tension ou à d’autres dangers. Confiez toute réparation à un personnel qualifié. 14.Réparation — Dans les cas suivants, débranchez le cordon d’alimentation au niveau de la prise secteur et demandez à un personnel qualifié d’effectuer les réparations. a. Dégât sur le cordon ou la prise de courant. b. Infiltration d’un liquide ou pénétration d’un objet à l’intérieur de l’appareil. c. Exposition de l’appareil à la pluie ou à l’eau. d. Fonctionnement anormal malgré une conformité aux explications du mode d’emploi. Ne réglez que les commandes dont il est fait mention dans le mode d’emploi. Un réglage incorrect des autres commandes peut provoquer des dégâts qui nécessiteraient des réparations complexes par un technicien spécialisé. e. Chute ou dégâts subis par l’appareil. f. Tout changement notoire ou situation anormale de l’appareil indique qu’une réparation est nécessaire. 15.Pièces de rechange — Lorsque des pièces doivent être remplacées, assurez-vous que le technicien a utilisé les pièces spécifiées par le fabricant ou des pièces dont les performances et les caractéristiques sont identiques. Des changements non autorisés de pièces peuvent entraîner un incendie, une électrocution et/ou d’autres dangers. 16.Contrôles de sécurité — Après une intervention d’entretien ou de réparation, demandez au technicien de procéder à un contrôle pour être sûr que l’appareil peut être utilisé en toute sécurité. 17.Installation sur paroi — Si l’appareil doit être fixé sur une paroi, installez-le en respectant la méthode recommandée par le fabricant. 18.Sources de chaleur — Tenez l’appareil à l’écart de sources de chaleur, telles que radiateurs, dispositifs de chauffage, poêles et autres appareils dégageant de la chaleur (y compris les amplificateurs). 19.Piles — Une utilisation incorrecte des piles peut les faire éclater ou prendre feu. Une pile qui fuit peut causer des corrosions dans l’équipement, des salissures aux mains ou abîmer vos vêtements. Afin d’éviter ces problèmes, assurez-vous que les précautions suivantes sont appliquées : •Utilisez seulement des piles prescrites. •Installez les piles en faisant bien attention aux polarités plus (+) et moins (-) des piles selon les instructions dans le compartiment. •Ne mélangez pas des piles usagées avec des neuves. •Ne mélangez pas des piles de différents types. Les spécifications de voltage des piles de même forme peuvent varier. •Remplacez rapidement une pile épuisée par une nouvelle. •Si vous n’avez pas l’intention d’utiliser la télécommande pendant une longue période, retirez les piles. •Si le liquide provenant d’une pile qui fuit touche votre peau ou vos habits, rincez immédiatement et complètement les parties touchées. Si un œil est touché, faites immédiatement un bain d’œil plutôt que de le frotter et cherchez immédiatement un traitement médical. Le liquide provenant de la fuite d’une pile qui atteint votre œil ou vos habits peut causer une irritation de la peau ou des dommages à votre œil. 20.L’utilisation de ce moniteur ne doit pas entraîner des risques mortels ou des dangers qui pourraient provoquer directement la mort, des blessures sur le personnel, des dommages physiques sévères ou d’autres destructions, y compris dans le contrôle des réactions nucléaires dans les installations nucléaires, dans le système médical de réanimation, et dans le contrôle de lancement des missiles dans les systèmes d’armes. PRÉCAUTIONS DE SÉCURITÉ (Suite) 21.N’entrez pas en contact direct avec les parties du produit ayant chauffé pendant de longues périodes. Il pourrait en résulter des brûlures à basse température. AVERTISSEMENT : Ce produit appartient à la Classe A. Dans un environnement résidentiel, il peut provoquer des interférences radio et, dans ce cas, l’utilisateur peut être obligé de prendre les mesures nécessaires. FRANÇAIS Un moniteur placé sur un support instable est dangereux en raison des risques de chute qu’il présente. De nombreuses blessures, touchant en particulier les enfants, peuvent être évitées en prenant quelques précautions simples : • Utiliser les dispositifs de fixation tels que les supports muraux fournis par le fabricant. • Utiliser uniquement des meubles capables d’accueillir le moniteur en toute sécurité. • Vérifier que le moniteur ne dépasse pas du bord du meuble sur lequel il est posé. • Ne pas placer le moniteur sur des meubles hauts, armoires ou étagères, par exemple, sans fixer le meuble concerné et le moniteur à un support approprié. • Ne pas intercaler de tissu ou toute autre matière entre le moniteur et le meuble sur lequel il est posé. • Expliquer aux enfants qu’il est dangereux de grimper sur les meubles pour atteindre le moniteur ou ses boutons de commande. En particulier pour la sécurité des enfants - Ne laissez pas les enfants grimper sur ou jouer avec le moniteur. - Ne placez pas le moniteur sur des meubles qui peuvent facilement se transformer en marches comme une commode avec tiroirs. - Souvenez-vous que les enfants s’excitent souvent en visionnant un programme, surtout sur un moniteur « plus grand que la normale ». Il faut faire en sorte d’installer le moniteur là où il ne peut pas être poussé, tiré, ni basculé. - Il faut faire en sorte de placer les fils et les câbles connectés au moniteur de façon à ce que des enfants curieux ne puissent pas les tirer ni les saisir. MESURES DE SÉCURITÉ - N’utilisez pas le moniteur dans un endroit où il y a beaucoup de poussières, où le degré d’humidité est élevé, ou encore là où il pourrait se trouver en contact avec de l’huile ou de la vapeur, car cela pourrait provoquer un début d’incendie. - Assurez-vous que le moniteur ne se trouve pas en contact avec de l’eau ou d’autres fluides. Assurez-vous qu’aucun objet tel que des agrafes et des trombones ne pénètre dans le moniteur, car cela pourrait provoquer un début d’incendie ou un choc électrique. - N’installez pas le moniteur au dessus des objets instables ou dans des endroits peu sûrs. Faites attention que le moniteur ne reçoive pas de chocs violents ni de fortes vibrations. Provoquer la chute du moniteur ou le culbuter peut l’endommager. - N’utilisez pas le moniteur à proximité d’un appareil de chauffage ou dans des endroits où la température est élevée, car cela pourrait conduire à un dégagement excessif de chaleur et provoquer un début d’incendie. - N’utilisez pas le moniteur dans des endroits exposés directement à la lumière du soleil. - La prise de secteur doit être installée près de l’équipement et être facilement accessible. - Ne faites pas fonctionner l’écran avec un objet rigide ou pointu tel qu’un ongle, un stylo ou un crayon. Le cordon d’alimentation - Utilisez seulement le cordon d’alimentation fourni avec le moniteur. - N’endommagez pas le cordon d’alimentation, ne déposez pas d’objets lourds sur le cordon d’alimentation, ne tirez pas dessus et ne le pliez pas de manière excessive. De même, n’ajoutez pas de rallonges. Tout endommagement du cordon d’alimentation peut provoquer un début d’incendie ou un choc électrique. - Ne branchez pas le cordon d’alimentation sur une prise multiple. Ajouter une rallonge peut entraîner une surchauffe et provoquer un début d’incendie. - Ne débranchez pas ni ne branchez la prise d’alimentation avec des mains humides. En ce faisant, vous risquez un choc électrique. - Débranchez le cordon d’alimentation si l’équipement n’est pas utilisé pendant une longue période. - Ne tentez pas de réparer le cordon d’alimentation s’il est coupé ou s’il ne fonctionne pas correctement. Veuillez prendre contact avec le service après vente et suivre ses recommandations. 3 F PRÉCAUTIONS POUR LE MONTAGE • Ce produit est destiné à être utilisé en intérieur. • Comme le moniteur est lourd, consultez votre revendeur avant l’installation, le démontage ou le déplacement du moniteur. • L’installation, le démontage ou le déplacement du moniteur doit être fait par 2 personnes ou plus. • Un support de montage conforme aux spécifications VESA est nécessaire. N’utilisez pas de trous de vis autres que les trous standard VESA pour l’installation. • Pour fixer un support de montage compatible avec VESA, utilisez des vis M6 de 8 mm à 10 mm plus longues que l’épaisseur du support de montage. • Lorsque vous déplacez le moniteur, veillez à le saisir par les deux poignées ou par les 4 coins situés en bas de l’appareil. Ne mettez pas votre main sur l’écran. Ceci pourrait causer une panne, un dysfonctionnement ou une blessure. • Installez le moniteur perpendiculairement à la surface horizontale. • Le montage du moniteur sur le mur demande des compétences techniques spéciales et le travail doit être fait par un revendeur agréé par SHARP. Vous ne devez jamais tenter de faire ce travail vous-même. Notre société déclinera toute responsabilité pour les accidents ou blessures causés par un montage incorrect ou par une mauvaise manipulation. • Ce moniteur doit être utilisé sous une température ambiante entre 5°C et 35°C. Laissez assez d’espace autour du moniteur pour empêcher que la chaleur ne s’accumule à l’intérieur. Pour le moniteur en position horizontale Unité : cm 20 5 3.5 5 Panneau de fonctionnement Logo N’enlevez pas l’autocollant fixé en usine, mais fixez l’autocollant du logo sur l’autre. Assurez-vous de ne pas recouvrir le capteur de télécommande ou des boutons. • Veillez à utiliser un support mural conçu ou prévu pour la fixation du moniteur. • Ce moniteur est prévu pour être installé sur un mur ou un pilier en béton. Un travail de renforcement pourrait s’avérer nécessaire pour certains matériaux tels que le plâtre, un mince panneau de plastique ou le bois avant de commencer l’installation. Le mur sur lequel ce moniteur et le support doivent être installés doit pouvoir supporter, au moins, 4 fois son poids ou davantage. Installez de la manière qui convient le mieux en fonction du matériau et de la structure. • N’utilisez pas le produit à des endroits où l’unité est exposée aux rayons directs du soleil ou à un autre éclairage puissant. Comme ce produit fonctionne avec des rayons infrarouges, une telle lumière risque de causer des dysfonctionnements. ■Connexion du câble USB Avertissement : 5 Pour le moniteur en position verticale Unité : cm 20 5 • Ne bloquez pas les ouvertures de ventilation. Si la température dans le moniteur s’élève, ceci pourrait causer un dysfonctionnement. • Après le montage, assurez-vous que le moniteur est bien fixé au mur ou au support, sans risque de relâche. • Ne placez le moniteur sur un équipement qui dégage de la chaleur. • Utilisez l’autocollant vertical quand vous installez le moniteur dans une direction verticale. 4.5 •• Contactez votre revendeur ou un technicien de service pour faire installer ou enlever le câble USB. Si vous tentez d’effectuer les travaux vous-même, vous risquerez de subir un choc électrique. • Avant de connecter le câble USB, mettez l’interrupteur principal en position arrêt et débranchez le cordon d’alimentation de la prise. • Utilisez seulement le câble USB fourni. 5 5 • S’il est difficile de laisser un espace suffisant pour une raison ou pour une autre (installation du moniteur dans une enceinte, par exemple) ou si la température ambiante est susceptible de dépasser la plage de valeurs prévue (de 5 à 35°C), installez un ventilateur ou prenez d’autres mesures appropriées pour maintenir la température ambiante dans la plage de valeurs requise. • La température de fonctionnement du moniteur peut être différente de celle des accessoires additionnels recommandés par SHARP. Lorsque c’est le cas, veuillez vérifier la température de fonctionnement des accessoires additionnels. • Respectez la condition suivante quand vous installez le moniteur dans la direction verticale. Le non respect de cette condition peut causer des dysfonctionnements. - Installez le moniteur de manière que la diode d’alimentation soit située en bas. - Réglez le MONITOR <MONITEUR> sur PORTRAIT dans le menu SETUP <INSTALLATION>. (Voir le MODE D’ENPLOI.) - Veillez à accrocher le cordon d’alimentation (fourni) sur la fixation du serre-câble située en-dessous à l’aide du serre-câble. Lorsque vous accrochez le cordon d’alimentation, veillez à ne pas exercer une force excessive sur la borne du cordon d’alimentation. Ne pliez pas excessivement le cordon d’alimentation. Cordon d’alimentation (fourni) ■Installation de l’interrupteur d’alimentation Avertissement : •• Contactez votre revendeur ou un technicien de service pour faire installer ou enlever l’interrupteur d’alimentation. Si vous tentez d’effectuer les travaux vous-même, vous risquerez de subir un choc électrique. 1. Retirez la vis (x1) du moniteur. 2.Retirez le joint de protection et branchez le connecteur de l’interrupteur d’alimentation, en veillant à orienter correctement le connecteur. 3.Alignez les supports de montage sur la fente située en bas de l’unité et serrez les vis (x2). Assurez-vous que les supports de montage soient solidement fixés. Veillez à ce que le câble ne soit pas coincé ou pincé. 4. Remettez en place la vis qui avait été retirée à l’étape 1. Joint de protection Connecteur Bas Interrupteur d’alimentation Serre-câble Fixation du serre-câble F 4 Support de montage Support de montage Composants fournis Si un composant venait à manquer, veuillez contacter votre revendeur. Moniteur à cristaux liquides : 1 Télécommande : 1 Serre-câble : 2 Cordon d’alimentation Pile du format R-6 (format “AA”) : 2 CD-ROM (Utility Disk pour Windows) : 1 Manuel d’Installation (ce manuel) : 1 Protection de trou de support : 2 Autocollant vertical (Panneau de fonctionnement) : 1 Autocollant vertical (Logo) : 1 Stylet : 1 Pointe du stylet (pour le stylet) : 2 Pile de stylet (LR-03 (format “AAA”)) : 1 Câble USB : 1 Interrupteur d’alimentation : 1 Gomme : 1 Porte-accessoires : 1 (Avec 2 fermetures à boucles et crochets) Logo Sharp sur le couvercle : 1 Placez cet autocollant sur le logo SHARP pour le couvrir. Préparation de la télécommande et du stylet Mise en place des piles Insertion de la pile 1. Appuyez doucement sur le capot et faites le glisser dans la direction de la flèche. 1. Tournez le couvercle de pile et enlevez-le, puis retirez le couvercle. FRANÇAIS * Sharp Corporation détient les droits d’auteur du programme de l’Utility Disk. Veuillez ne pas le reproduire sans autorisation de la société. * Pensez à votre environnement ! Ne pas jeter les piles avec les ordures ménagères, exige un traitement spécial. Couvercle de pile 2. Reportez-vous aux instructions dans le compartiment et insérez les piles fournies (2 piles du format R-6, ou “AA”) avec leurs pôles positifs (+) et négatifs (-) orientés correctement. 3. Refermer le capot. 2. Insérez la pile fournie (LR-03 (format “AAA”)) en l’orientant comme indiqué sur l’illustration, puis fixez le couvercle et le couvercle de pile. Fixation du porte-accessoires Vous pouvez ranger le stylet, la télécommande et la gomme dans le porte-accessoires. 1. Enlevez les feuilles détachables des fermetures se trouvant au dos du porte-accessoires. 2. En tendant bien droit le porte-accessoires, fixez-le sur le côté du moniteur. Stylet Dos La télécommande et la gomme 5 F Connexions Attention • Veillez à bien mettre hors tension l’interrupteur principal puis débranchez la prise de l’alimentation secteur avant de connecter ou de déconnecter les câbles. Lisez également le manuel de l’équipement à connecter. • Veillez à ne pas confondre la borne d’entrée avec la borne de sortie quand vous connectez les câbles. En confondant les câbles branchés aux bornes d’entrée et de sortie, vous pouvez causer des dysfonctionnements et d’autres problèmes. 1. 2. 3. 4. 5. 6. 7. 8. 9. 3 1 2 4 Vers la prise d’alimentation secteur 5 6 7 8 9 Borne d’entrée secteur Cordon d’alimentation (fourni) Câble USB Borne d’entrée PC/AV HDMI Borne d’entrée PC D-sub Borne d’entrée audio Bornes de sortie audio Borne de sortie RS-232C Borne d’entrée RS-232C Lorsque le PN-ZB01 (optionnel) est raccordé 10. Borne d’entrée PC/AV DVI-D 11. Borne de sortie PC/AV DVI-D 12. Borne LAN 13. Bornes du haut-parleur externe 14. Bornes d’entrée audio 1 15. Bornes d’entrée audio 2 16. Bornes d’entrée PC RVB 17. Bornes d’entrée AV composant 18. Borne d’entrée AV vidéo 19. Borne d’entrée AV S-vidéo Lorsque le PN-ZB01 (optionnel) est raccordé 16 18 10 11 12 13 14 15 17 19 Conseils • Réglez la borne d’entrée audio utilisée pour chaque mode d’entrée dans AUDIO SELECT <SÉLECTION ENTRÉE AUDIO> du menu OPTION <OPTIONS>. Les réglages par défaut sont indiqués ci-dessous. Mode d’entrée Borne d’entrée audio (paramètre d’origine) PC D-SUB, PC DVI-D, PC RGB < PC RVB> AV DVI-D AV component <AV composant>, AV S-video <AV S-vidéo>, AV video <AV vidéo> PC HDMI, AV HDMI Borne d’entrée audio Borne d’entrée audio 1 Borne d’entrée audio 2 Borne d’entrée PC/AV HDMI • Lorsque vous connectez le haut-parleur extérieur, fixez le noyau du câble de haut-parleur (fourni avec le PN-ZB01). • Pour utiliser l’écran tactile, vous devez connecter l’écran tactile à un ordinateur, et installer le pilote d’écran tactile et le Pen Software sur l’ordinateur à partir du CD-ROM fourni. Pour plus de détails concernant la connexion de l’écran tactile et l’installation du pilote d’écran tactile, reportez-vous au Mode d’emploi du pilote d’écran tactile. Pour plus de détails concernant l’installation du Pen Software, reportez-vous au Mode d’emploi du Pen Software. • HDMI, le Logo HDMI et High-Definition Multimedia Interface sont des marques de commerce ou des marques déposées de la société HDMI Licensing LLC. F 6 Mise sous tension et hors tension Attention • Mettez sous tension le moniteur d’abord avant de mettre sous tension le PC ou l’équipement de lecture. Mise sous/hors tension Appuyez sur la bouton POWER ou sur l’interrupteur d’alimentation pour mettre sous/hors tension. Mise sous tension de l’interrupteur principal Interrupteur principal FRANÇAIS Diode d'alimentation d'écran tactile Diode d’alimentation • État de la diode d’alimentation Attention • La mise sous/hors doit être effectuée à l’aide de l’interrupteur d’alimentation. Ne branchez/débranchez pas le cordon d’alimentation ou ne mettez pas le disjoncteur sous/hors tension lorsque l’interrupteur d’alimentation est en position marche. • Lors de la mise hors tension et de la remise sous tension, ou lorsque vous appuyez sur l’interrupteur principal ou le bouton POWER, attendez toujours au moins 5 secondes. • Pour déconnecter complètement l’alimentation électrique, retirez la fiche principale de la prise. État Allumé en vert Allumé en orange Clignotement en vert État du moniteur Power en position marche Power en position arrêt (mode Veille) Mode attente du signal d’entrée • État de la diode d’alimentation d’écran tactile État Allumé en vert Clignote en orange Clignote alternativement en vert et en orange Éteint État de l’écran tactile Fonctionne normalement Initialisation en cours Écran tactile éteint (alimentation non fournie, etc.) 7 F Mise sous tension et hors tension nRéglage de la date/heure • Si l’heure doit être réglée lorsque le moniteur est mis sous tension pour la première fois, l’écran de réglage de la date/heure apparaît. Réglez la date et l’heure. DATE/TIME SETTING / SET 20 / 10 / : 01 / 01 : 00 : 00 CANCEL OK···[MENU] 1.Appuyez sur , , ou pour sélectionner la date et l’heure, puis appuyez sur ou pour changer les valeurs numériques. 2.Sélectionnez SET <RÉGLER> puis appuyez sur MENU . • Assurez-vous que la date et l’heure sont réglées. • L’écran de réglage de la date/heure va disparaître automatiquement si aucune opération n’est réalisée pendant environ 15 secondes. La date et l’heure peuvent être réglées en utilisant DATE/TIME SETTING <RÉGLAGE DATE/HEURE> à partir du menu OPTION <OPTIONS> lorsque l’écran de réglage de la date/heure disparaît. Conseils • • • • Réglez la date dans l’ordre “Année/Mois/Jour”. Réglez l’heure sur la base de 24 heures. L’horloge est alimentée par la batterie interne. Si vous avez déjà réglé l’heure, mais que l’écran de réglage de la date/de l’heure apparaît lors de la mise sous tension, alors la batterie est déchargée. Contactez votre revendeur Sharp ou votre centre de services local pour le remplacement de la batterie. • Durée de vie estimée de la batterie interne : environ 5 ans (selon le fonctionnement du moniteur) • Étant donné que la première batterie a été insérée à l’usine, elle peut être déchargée avant la fin de la durée de vie attendue. F 8 Inhalt WICHTIGE INFORMATIONEN...........................................1 VEREHRTE KUNDIN, VEREHRTER KUNDE...................1 SICHERHEITSVORKEHRUNGEN.....................................2 SICHERHEITSANLEITUNG...............................................3 WICHTIGE HINWEISE ZUR BEFESTIGUNG....................4 [DEUTSCH] Mitgelieferte Komponenten.............................................5 Vorbereitung der Fernbedienung und von Touch-Pen...........................................................5 Anbringen des Halters.....................................................5 Anschlüsse........................................................................6 Ein- und ausschalten........................................................7 Lesen Sie die Anleitungen, die sich im Ordner “Manual” auf der mitgelieferten CD-ROM befinden. (Zum Öffnen der Dateien wird Adobe Reader benötigt.) Bedienungsanleitung (PNL601B_manual_German.pdf) Bedienungsanleitung für Touch-Panel-Treiber (PNL601B_driver_German.pdf) Pen Software-Bedienungsanleitung (PenSoftware_manual.pdf) WICHTIGE INFORMATIONEN VORSICHT ELEKTROSCHOCKGEFAHR NICHT ÖFFNEN VORSICHT: ABDECKUNG NICHT ENTFERNEN: GEFAHR VON ELEKTROSCHOCK. KEINE WARTUNGSTEILE IM INNEREN. SERVICEARBEITEN NUR VON QUALIFIZIERTEM FACHPERSONAL DURCHFÜHREN LASSEN. Das Blitzsymbol innerhalb eines gleichseitigen Dreiecks weist den Benutzer auf das Vorhandensein nicht isolierter “gefährlicher Spannung” im Geräteinneren hin, die ausreichend groß ist, um einen Elektroschock hervorzurufen. DEUTSCH ACHTUNG:HALTEN SIE DAS GERÄT VON REGEN UND JEGLICHER ART VON FEUCHTIGKEIT FERN, UM DIE GEFAHR VON BRAND ODER STROMSCHLAG ZU VERRINGERN. Das Ausrufezeichen innerhalb eines Dreiecks weist den Benutzer auf wichtige Betriebs- und Wartungs- bzw. Serviceanweisungen in der Produktdokumentation hin. VEREHRTE KUNDIN, VEREHRTER KUNDE Wir danken Ihnen für den Kauf eines SHARP LCD-Gerätes. Um Ihre Sicherheit sowie einen jahrelangen, störungsfreien Betrieb dieses Produkts zu gewährleisten, lesen Sie bitte den Abschnitt “Sicherheitsvorkehrungen” vor der Verwendung des Produkts durch. 1 D SICHERHEITSVORKEHRUNGEN D 2 Elektrizität erfüllt viele nützliche Aufgaben, kann aber auch Personen- und Sachschäden verursachen, wenn sie unsachgemäß gehandhabt wird. Dieses Produkt wurde mit Sicherheit als oberster Priorität konstruiert und hergestellt. Dennoch besteht bei unsachgemäßer Handhabung u.U. Stromschlag- und Brandgefahr. Um mögliche Gefahren zu vermeiden, befolgen Sie beim Aufstellen, Betreiben und Reinigen des Produkts bitte die nachstehenden Anleitungen. Lesen Sie im Interesse Ihrer eigenen Sicherheit sowie einer langen Lebensdauer des LCD-Gerätes zunächst die nachstehenden Hinweise durch, bevor Sie das Produkt in Verwendung nehmen. 1. Bedienungsanleitungen lesen — Nehmen Sie das Produkt erst in Betrieb, nachdem Sie alle diesbezüglichen Hinweise gelesen und verstanden haben. 2.Bedienungsanleitung aufbewahren — Diese Bedienungsanleitung mit den Sicherheits- und Bedienungshinweisen sollte aufbewahrt werden, damit Sie im Bedarfsfall jederzeit darauf zurückgreifen können. 3. Warnungen beachten — Alle Warnungen auf dem Gerät und in den Bedienungsanleitungen sind genauestens zu beachten. 4. Anleitungen befolgen — Alle Anleitungen zur Bedienung müssen befolgt werden. 5. Reinigung — Ziehen Sie vor dem Reinigen des Produkts das Netzkabel. Reinigen Sie das Gerät mit einem trockenen Tuch. Verwenden Sie keine flüssigen Reiniger oder Aerosol-Sprays. 6. Zusatzgeräte und Zubehör — Verwenden Sie ausschließlich vom Hersteller empfohlenes Zubehör. Bei Verwendung anderer Zusatzgeräte bzw. Zubehörteile besteht evtl. Unfallgefahr. 7. Wasser und Feuchtigkeit — Benutzen Sie das Gerät nicht in der Nähe von Wasser. Montieren Sie das Gerät unter keinen Umständen an einer Stelle, an der Wasser darauf tropfen kann. Achten Sie dabei besonders auf Geräte, aus denen zuweilen Wasser tropft, wie etwa Klimaanlagen. 8. Belüftung — Die Belüftungsschlitze und andere Öffnungen im Gehäuse dienen der Belüftung des Geräts. Halten Sie diese Öffnungen unbedingt frei, da eine unzureichende Belüftung zu einer Überhitzung bzw. Verkürzung der Lebensdauer des Produkts führen kann. Stellen Sie das Gerät nicht auf ein Sofa, einen Lappen oder ähnliche Oberflächen, da die Belüftungsschlitze dadurch blockiert werden können. Stellen Sie das Gerät auch nicht in ein umschlossenes Gehäuse, wie z.B. in ein Bücherregal oder einen Schrank, sofern dort nicht für eine ausreichende Belüftung gesorgt ist oder die Anweisungen des Herstellers befolgt werden. 9.Netzkabel-Schutz — Die Netzkabel sind so zu verlegen, dass sie vor Tritten geschützt sind und keine schweren Objekte darauf abgestellt werden. 10. Der Bildschirm für dieses Gerät ist aus Glas hergestellt. Es kann daher brechen, wenn es zu Boden fällt oder einen Schlag oder Stoß erhält. Seien Sie vorsichtig, dass Sie sich bei einem Bruch des Bildschirms nicht an den Scherben verletzen. 11. Überlastung — Vermeiden Sie eine Überlastung von Netzsteckdosen und Verlängerungskabeln. Bei Überlastung besteht Brand- und Stromschlaggefahr. 12.Eindringen von Gegenständen und Flüssigkeiten — Schieben Sie niemals irgendwelche Gegenstände durch die Gehäuseöffnungen in das Innere des Geräts. Im Produkt liegen hohe Spannungen vor. Durch das Einschieben von Gegenständen besteht Stromschlaggefahr bzw. die Gefahr von Kurzschlüssen zwischen den Bauteilen. Aus demselben Grunde dürfen auch keine Flüssigkeiten auf das Gerät verschüttet werden. 13.Wartung — Versuchen Sie auf keinen Fall, selbst Wartungsarbeiten am Gerät durchzuführen. Durch das Entfernen von Abdeckungen setzen Sie sich hohen Spannungen und anderen Gefahren aus. Lassen Sie sämtliche Wartungsarbeiten ausschließlich von qualifiziertem Service-Personal ausführen. 14.Reparaturen — Ziehen Sie in den folgenden Situationen sofort das Netzkabel und lassen Sie das Produkt von qualifiziertem Service-Personal reparieren: a. Wenn das Netzkabel oder der Netzstecker beschädigt ist. b. Wenn Flüssigkeit in das Gerät eingedrungen ist oder Gegenstände in das Gerät gefallen sind. c. Wenn das Gerät nass geworden ist (z.B. durch Regen). d. Wenn das Gerät nicht wie in der Bedienungsanleitung beschrieben funktioniert. Nehmen Sie nur die in den Bedienungsanleitungen beschriebenen Einstellungen vor. Unsachgemäße Einstellungen an anderen Reglern können zu einer Beschädigung führen und machen häufig umfangreiche Einstellarbeiten durch einen qualifizierten Service-Techniker erforderlich. e. Wenn das Produkt fallen gelassen oder beschädigt wurde. f.Wenn das Gerät einen anormalen Zustand aufweist. Jedes erkennbare anormale Verhalten zeigt an, dass der Kundendienst erforderlich ist. 15.Ersatzteile — Wenn Ersatzteile benötigt werden, stellen Sie bitte sicher, dass der Service-Techniker nur die vom Hersteller bezeichneten Teile oder Teile mit gleichen Eigenschaften und gleichem Leistungsvermögen wie die Originalteile verwendet. Die Verwendung anderer Teile kann zu einem Brand, zu Stromschlag oder anderen Gefahren führen. 16. Sicherheitsüberprüfungen — Lassen Sie vom Service-Techniker nach Service- oder Reparaturarbeiten eine Sicherheitsüberprüfung vornehmen, um sicherzustellen, dass das Produkt in einem einwandfreien Betriebszustand ist. 17.Wandmontage — Bei der Montage des Gerätes an der Wand ist sicherzustellen, dass die Befestigung nach der vom Hersteller empfohlenen Methode erfolgt. 18.Wärmequellen — Stellen Sie das Produkt nicht in der Nähe von Heizkörpern, Heizgeräten, Öfen oder anderen Geräten (wie z.B. Verstärkern) auf, die Hitze abstrahlen. 19.Batterien — Durch falsche Anwendung können die Batterien explodieren oder sich entzünden. Eine undichte Batterie kann Korrosion am Gerät verursachen sowie Hände und Kleidung verschmutzen. Um diese Probleme zu vermeiden, beachten Sie bitte die folgenden Sicherheitshinweise: •Verwenden Sie nur empfohlene Batterietypen. •Achten Sie beim Einlegen der Batterien darauf, dass die Plus- (+) und die Minus- (-) Seite der Batterien gemäß den Anweisungen im Fachinneren richtig ausgerichtet sind. •Verwenden Sie nicht alte und neue Batterien gemeinsam. •Verwenden Sie keine Batterien unterschiedlichen Typs. Batterien derselben Form können unterschiedliche Spannungswerte besitzen. SICHERHEITSVORKEHRUNGEN (Fortsetzung) •Ersetzen Sie eine leere Batterie sofort durch eine neue. •Wenn Sie die Fernbedienung längere Zeit nicht verwenden, entnehmen Sie die Batterien. •Wenn ausgetretene Batterieflüssigkeit auf Haut oder Kleidung gelangt, müssen Sie diese sofort gründlich mit Wasser spülen. Wenn Batterieflüssigkeit in die Augen gelangt, dürfen Sie die Augen auf keinen Fall reiben, sondern am besten mit viel Wasser spülen und sofort einen Arzt aufsuchen. Batterieflüssigkeit kann Hautreizungen hervorrufen oder Augenschäden verursachen. 20.Bei der Verwendung des Monitors ist darauf zu achten, dass Gefahren für Leib und Leben, Schäden an Gebäuden und anderen Gegenständen sowie eine Beeinflussung von wichtigen oder gefährlichen Geräten, wie z.B. der Nuklearreaktionssteuerung in Atomanlagen, lebenserhaltenden Geräten in medizinischen Einrichtungen oder Raketenabschusssteuerungen in Waffensystemen vermieden werden. 21.Vermeiden Sie es, Teile des Produkts, die sich erwärmen, über längere Zeit hinweg zu berühren. Dies könnte zu leichten Verbrennungen führen. ACHTUNG: Dieses Gerät ist ein Produkt der Klasse A. In Wohnräumen kann dieses Gerät Störsignale erzeugen, die durch entsprechende Abhilfemaßnahmen beseitigt werden müssen. DEUTSCH Wenn ein Monitor nicht auf einer stabilen Unterlage aufgestellt wird, besteht die Gefahr, dass er kippt oder fällt. Zahlreiche Verletzungen, besonders bei Kindern, können durch einfache Vorsichtsmaßnahmen vermieden werden: • Bei Verwendung der vom Hersteller empfohlenen Befestigungsvorrichtungen, wie z.B. Wandhaken. • Stellen Sie den Monitor nur auf Möbelstücke, die ausreichend stark sind. • Achten Sie darauf, dass der Monitor nicht über den Rand des Möbelstücks, auf dem er steht, vorsteht. • Stellen Sie den Monitor niemals auf ein großes Möbelstück (z.B. einen Schrank oder in ein Bücherregal), ohne sowohl das Möbelstück als auch den Monitor an einem geeigneten Element sicher zu verankern. • Stellen Sie den Monitor niemals auf ein Tuch oder andere Materialen, die zwischen dem Monitor und dem Möbelstück, auf dem er steht, liegen. • Weisen Sie Kinder eindringlich darauf hin, dass es gefährlich ist, auf ein Möbelstück zu klettern, um an den Monitor oder seine Regler zu gelangen. Wichtige Hinweise für die Sicherheit von Kindern - Lassen Sie Kinder niemals auf den Monitor klettern oder am Monitor spielen. - Stellen Sie den Monitor nicht auf Möbelstücke, die leicht als Stufen verwendet werden könnten, wie zum Beispiel eine Truhe oder Kommode. - Bedenken Sie, dass Kinder bei Betrachtung eines Fernsehprogramms – und ganz besonders bei einem “überlebensgroßen” Monitor – in starke Aufregung verfallen können. Der Monitor sollte so aufgestellt werden, dass er nicht umgestoßen oder gekippt werden kann. - Alle am Monitor angeschlossenen Kabel und Stränge sollten so verlegt werden, dass neugierige Kinder nicht daran ziehen oder sie ergreifen können. SICHERHEITSANLEITUNG - Verwenden Sie den Monitor nicht an Orten mit hoher Staubentwicklung, hoher Luftfeuchtigkeit oder an Orten, an denen der Monitor mit Öl oder Dampf in Kontakt kommen könnte, da dies zu einem Brand führen könnte. - Achten Sie darauf, dass der Monitor nicht mit Wasser oder anderen Flüssigkeiten in Berührung kommt. Achten Sie auch darauf, keine Gegenstände, wie z.B. Büroklammern oder sonstige spitze Gegenstände, in den Monitor zu stecken. Die Folge könnte ein Brand oder Stromschlag sein. - Stellen Sie den Monitor nicht auf instabile Gegenstände oder an andere unsichere Stellen. Setzen Sie den Monitor keinen starken Stößen oder Erschütterungen aus. Wenn der Monitor hinunterfällt oder umkippt, könnte er Schaden nehmen. - Stellen Sie den Monitor nicht in der Nähe von Heizungen oder an anderen Stellen auf, an denen hohe Temperaturen auftreten, da dies zu einer übermäßig starken Erhitzung mit der Folge eines Brandes führen könnte. - Stellen Sie den Monitor nicht an Orten auf, an denen er direktem Sonnenlicht ausgesetzt ist. - Die Wandsteckdose sollte sich in der Nähe des Gerätes befinden und leicht zugänglich sein. -B edienen Sie den Bildschirm nicht mit harten oder spitzen Gegenständen, wie Fingernägel, Kugelschreiber oder Bleistift. Das Netzkabel - Verwenden Sie nur das mit dem Monitor gelieferte Netzkabel. - Beschädigen Sie das Netzkabel nicht, stellen Sie keine schweren Gegenstände darauf, und überdehnen oder knicken Sie es nicht. Verwenden Sie keine Verlängerungskabel. Ein beschädigtes Kabel kann einen Brand oder Stromschlag verursachen. - Verwenden Sie das Netzkabel nicht mit einer Mehrfachsteckdose. Die Verwendung eines Verlängerungskabels kann aufgrund von Überhitzung zu einem Brand führen. - Achten Sie darauf, dass Sie beim Einstecken oder Ausstecken des Netzsteckers keine nassen Hände haben, um einen Elektroschlag zu vermeiden. - Ziehen Sie das Netzkabel aus der Steckdose, wenn Sie das Gerät längere Zeit über nicht verwenden. - Führen Sie keine Reparaturversuche an einem beschädigten oder nicht funktionstüchtigen Netzkabel durch. Überlassen Sie Reparaturarbeiten ausschließlich dem Kundendienst. 3 D WICHTIGE HINWEISE ZUR BEFESTIGUNG • Dieses Produkt ist nicht für den Gebrauch im Freien gedacht. • Da der Monitor sehr schwer ist, sollten Sie Ihren Händler vor dem Befestigen, Abmontieren oder Transportieren des Monitors um Rat fragen. • Für das Befestigen, Abmontieren oder Transportieren des Monitors müssen mindestens zwei Personen zur Verfügung stehen. • Ein Montagewinkel, der den VESA-Spezifikationen entspricht, ist erforderlich. Verwenden Sie für die Installation nur VESA-Bohrungen. • Verwenden Sie die M6-Schrauben, die 8 bis 10 mm länger als die Dicke der Halterung sind, zum Befestigen der VESA-kompatiblen Halterung. • Halten Sie den Monitor beim Tragen entweder an beiden Griffen oder an den vier Ecken der Unterseite. Legen Sie die Hand nicht auf den Bildschirm. Das Gerät könnte dadurch beschädigt werden, oder Sie könnten sich dabei verletzen. • Stellen Sie den Monitor mit der Vorderseite senkrecht zu einer ebenen Fläche auf. • Für die Wandbefestigung des Monitors sind Spezialkenntnisse erforderlich. Diese Arbeit darf daher nur von einem autorisierten SHARP-Händler durchgeführt werden. Führen Sie diese Arbeit niemals selbst durch. Unser Unternehmen übernimmt keine Verantwortung für Unfälle oder Verletzungen, die sich durch eine falsche Befestigung oder einen falschen Umgang mit dem Gerät ergeben. • Dieser Monitor sollte bei einer Umgebungstemperatur zwischen 5°C und 35°C verwendet werden. Rund um den Monitor muss genügend Luft sein, damit die Wärme aus dem Geräteinneren gut entweichen kann. Monitor in horizontaler Ausrichtung Einheit: cm 20 5 3,5 5 Einheit: cm 5 Operation panel Logo Entfernen Sie den werkseitig angebrachten Aufkleber nicht, sondern überkleben Sie ihn mit dem Logo-Aufkleber. Verdecken Sie jedoch nicht den Fernbedienungssensor oder andere Tasten. • Verwenden Sie dazu einen Wandhaken, der für die Befestigung des Monitors geeignet sind. • Dieser Monitor wurde für die Befestigung an einer Betonwand oder an einer Betonsäule gebaut. Vor der Aufstellung des Monitors kann es notwendig sein, Wände, die aus bestimmten Materialien (z.B. Gips, dünnem Kunststoff usw.) bestehen, entsprechend zu verstärken. Der Monitor und der Befestigungswinkel dürfen nur an einer Wand montiert werden, die mindestens das vierfache Gewicht des Monitors tragen kann. Wählen Sie das für Material und Wandstruktur jeweils am besten geeignete Befestigungsverfahren aus. • Verwenden Sie das Gerät nicht an Orten, an denen es direkter Sonneneinstrahlung oder anderem starken Lichteinfall ausgesetzt ist. Weil für die Bedienung Infrarotstrahlen verwendet werden, können Störungen durch Lichteinfall verursacht werden. ■Anschließen des USB-Kabels 5 Monitor in vertikaler Ausrichtung 20 • Alle Belüftungsöffnungen müssen stets frei bleiben. Wenn die Temperatur innerhalb des Monitors ansteigt, kann dies zu Fehlfunktionen führen. • Überprüfen Sie nach der Befestigung des Monitors sorgfältig, dass der Monitor sicher befestigt ist und sich auf keinen Fall von der Wand oder der Befestigungsvorrichtung lösen kann. • Stellen Sie den Monitor nicht auf ein anderes Gerät, das Wärme erzeugt. • Verwenden Sie den mitgelieferten vertikalen Aufkleber, wenn Sie den Monitor vertikal installieren. 4,5 Warnung: • Wenden Sie sich zum Installieren oder Entfernen des USB-Kabels an Ihren Händler oder an einen Fachmann. Falls Sie versuchen, das selbst zu machen, besteht die Gefahr eines elektrischen Schlags oder Verletzungsgefahr. • Zum Anschließen des USB-Kabels muss zuerst der Hauptnetzschalter ausgeschaltet und das Netzkabel aus der Steckdose abgezogen werden. • Verwenden Sie nur das mitgelieferte USB-Kabel. 5 5 • Wenn es aus irgendeinem Grund schwierig ist, ausreichend Platz frei zu lassen, etwa weil der Monitor in ein Gehäuse eingebaut wird, oder wenn die Umgebungstemperatur außerhalb des zulässigen Bereichs von 5°C bis 35°C liegen könnte, so müssen Sie ein Gebläse installieren oder andere Maßnahmen ergreifen, um die Umgebungstemperatur innerhalb des vorgeschriebenen Bereichs zu halten. • Die Temperaturbedingungen können sich ändern, wenn das Display zusammen mit von SHARP empfohlenem Zubehör verwendet wird. Überprüfen Sie in diesem Fall bitte die für das Zubehör empfohlenen Temperaturbedingungen. • Beachten Sie für die Installation des Monitors in vertikaler Ausrichtung die folgenden Punkte. Werden die folgenden Punkte nicht beachtet, kann dies zu Fehlfunktionen führen. - Installieren Sie den Monitor so, dass sich die Betriebs-LED an der Unterseite befindet. - Stellen Sie den MONITOR im Menü SETUP <KONFIG.> auf PORTRAIT <HOCHFORMAT>. (Siehe BEDIENUNGSANLEITUNG.) - Das Netzkabel (im Lieferumfang enthalten) muss mit der mitgelieferten Kabelklemme am Befestigung der Kabelklammer befestigt werden. Beim Festklemmen des Netzkabels darf auf die Netzkabelklemme keine Zugkraft ausgeübt werden. Das Netzkabel darf nicht zu stark gebogen werden. Netzkabel (im Lieferumfang enthalten) ■Installation des Netzschalters Warnung: • Wenden Sie sich zum Installieren oder Entfernen des Netzschalters an Ihren Händler oder an einen Fachmann. Falls Sie versuchen, das selbst zu machen, besteht die Gefahr eines elektrischen Schlags oder Verletzungsgefahr. 1. Entfernen Sie die Schraube (x1) vom Monitor. 2. Entfernen Sie die Schutzfolie und schließen Sie den Netzschalterstecker richtig gerichtet an. 3. Richten Sie die Halterungen auf den Schlitz an der Geräteunterseite aus und ziehen Sie die Schrauben (x2) fest. Kontrollieren Sie, ob die Halterungen richtig gesichert sind. Das Kabel darf dabei nicht eingeklemmt werden. 4. Bringen Sie die in 1 entfernte Schraube wieder an. Schutzfolie Stecker Unterseite Netzschalter Kabelklammer D 4 Befestigung der Kabelklammer Halterung Halterung Mitgelieferte Komponenten Sollte eine der angeführten Komponenten fehlen, kontaktieren Sie bitte Ihren Händler. LCD-Monitor: 1 Fernbedienung: 1 Kabelklammer: 2 Netzkabel R-6 Batterie (Größe “AA”): 2 CD-ROM (Utility Disk für Windows): 1 Installationsanleitung (diese Anleitung): 1 Schutzabdeckungen für Fußöffnungen: 2 Vertikaler Aufkleber (Bedienfeld): 1 Radiergummi: 1 Halter: 1 (mit 2 Klettverschlüssen) Vertikaler Aufkleber (Logo): 1 Sharp-Logo-Aufkleber: 1 Touch-Pen: 1 Um das Logo zu verdecken, überkleben Pen-Spitze (für Touch-Pen): 2 Sie das SHARP-Logo mit diesem Touch-Pen-Batterie Aufkleber. (LR-03 (Größe “AAA”)): 1 USB-Kabel: 1 Netzschalter: 1 * Die Sharp Corporation besitzt die Autorenrechte am Utility Disk Programm. Eine Vervielfältigung dieses Programms ohne schriftliche Genehmigung ist daher nicht gestattet. * Der Umwelt zuliebe ! Batterien dürfen nicht mit den Siedlungsabfällen entsorgt werden, sondern verlangen Sonderbehandlung. Vorbereitung der Fernbedienung und von Touch-Pen Einsetzen der Batterie 1. Drücken Sie leicht auf den Batteriefachdeckel und schieben Sie ihn in die Richtung des Pfeils. 1. Drehen Sie den Batteriedeckel zum Abnehmen und entfernen Sie die Abdeckung. DEUTSCH Einlegen der Batterien Batteriedeckel 2. Beachten Sie die Anweisungen im Fachinneren und legen Sie die mitgelieferten Batterien (2 R-6 Batterien, d. h. Größe “AA”, Mignonzelle) richtig ein (auf die Plus- (+) und Minus- (-) Seite achten). 3. Schließen Sie die Abdeckung. 2. Setzen Sie die mitgelieferte Batterie (LR-03 (Größe “AAA”)) wie nachstehend gezeigt gerichtet ein und bringen Sie die Abdeckung und den Batteriedeckel wieder an. Anbringen des Halters Der Touch-Pen, die Fernbedienung und den Radiergummi können in diesem Halter aufbewahrt werden. 1. Ziehen Sie die Folie von den Befestigungselementen an der Rückseite des Halters ab. 2. Spannen Sie den Halter und bringen Sie ihn an der Seite des Monitors an. Touch-Pen Rückseite Fernbedienung und Radiergummi 5 D Anschlüsse Vorsicht • Schalten Sie unbedingt den Hauptschalter aus und ziehen Sie den Netzstecker, bevor Sie Kabel anschließen oder abziehen. Lesen Sie auch das Handbuch des Gerätes, das Sie an den Monitor anschließen möchten. • Verwechseln Sie beim Anschließen nicht die Eingangsklemmen mit den Ausgangsklemmen. Dies könnte zu Fehlfunktionen und anderen Problemen führen. 1. 2. 3. 4. 5. 6. 7. 8. 9. 3 1 2 4 5 6 7 8 9 Zur Wandsteckdose Netzsteckdose Netzkabel (im Lieferumfang enthalten) USB-Kabel PC/AV HDMI-Eingangsanschluss PC D-sub-Eingangsanschluss Audioeingangsanschluss Audioausgangsanschlüsse RS-232C-Ausgangsanschluss RS-232C-Eingangsanschluss Wenn das PN-ZB01 (optional) angeschlossen ist 10. PC/AV DVI-D-Eingangsanschluss 11. PC/AV DVI-D-Ausgangsanschluss 12. LAN-Anschluss 13. Anschlüsse für externe Lautsprecher 14. Audio1 Eingangsanschlüsse 15. Audio2 Eingangsanschlüsse 16. PC RGB-Eingangsanschlüsse 17. AV Component-Eingangsanschlüsse 18. AV Video-Eingangsanschluss 19. AV S-Video-Eingangsanschluss Wenn das PN-ZB01 (optional) angeschlossen ist 16 18 10 11 12 13 14 15 17 19 TIPPS • Stellen Sie die Audioeingangsbuchse für die einzelnen Eingangsmodi in AUDIO SELECT <AUDIO AUSWAHL> im Menü OPTION <OPTIONEN> ein. Die Einstellungen bei der Auslieferung sind nachstehend gezeigt. Eingangsmodus PC D-SUB, PC DVI-D, PC RGB AV DVI-D AV Component, AV S-Video, AV Video PC HDMI, AV HDMI Audioeingangsanschluss (Werkseinstellung) Audioeingangsanschluss Audio1 Eingangsanschluss Audio2 Eingangsanschluss PC/AV HDMI-Eingangsanschluss • Bei Anschluss eines externen Lautsprechers muss des Lautsprecherkabels (mit PN-ZB01 mitgeliefert) angebracht werden. • Für die Verwendung muss das Touch-Panel am Computer angeschlossen sein und der Touch-Panel-Treiber und die Pen Software müssen von der mitgelieferten CD-ROM im Computer installiert worden sein. Für den Anschluss des Touch-Panels und die Installation des Touch-Panel-Treibers wird auf die Bedienungsanleitung für Touch-Panel-Treiber verwiesen. Für die Installation der Pen Software wird auf die Pen Software-Bedienungsanleitung verwiesen. • HDMI, das HDMI-Logo und High-Definition Multimedia Interface sind Warenzeichen oder eingetragene Warenzeichen von HDMI Licensing LLC. D 6 Ein- und ausschalten Vorsicht • Schalten Sie zuerst den Monitor und erst danach den PC oder ein anderes Wiedergabegerät ein. Ein- und ausschalten Drücken Sie auf die POWER-Taste oder auf den Netzschalter, um die Stromversorgung ein- oder auszuschalten. Einschalten des Netzstroms Touch-Panel-LED Hauptnetzschalter Betriebs-LED • Status der Betriebs-LED • Die Hauptstromversorgung muss mithilfe des Hauptnetzschalters ein- und ausgeschaltet werden. Während der Hauptschalter eingeschaltet ist, darf das Netzkabel nicht abgezogen/angeschlossen oder der Trennschalter ein- und ausgeschaltet werden. • Warten Sie zwischen dem Ein- und Ausschalten des Hauptnetzschalters oder der POWER-Taste immer mindestens 5 Sekunden. • Für eine komplette elektrische Trennung muss der Netzstecker abgezogen werden. Betriebszustand des Monitors Leuchtet grün Monitor eingeschaltet Leuchtet orange Monitor ausgeschaltet (Standby-Modus) Grün blinkend Eingangssignal-Wartemodus DEUTSCH Status Vorsicht • Status der Touch-Panel-LED Status Leuchtet grün Status des Touch-Panels Normaler Betrieb Blinkt orange Blinkt abwechslungsweise Initialisierung grün und orange Aus Touch-Panel aus (keine Stromversorgung usw.) 7 D Ein- und ausschalten nEinstellung von Datum/Uhrzeit • Muss die Zeit erst eingestellt werden, wenn der Monitor zum ersten Mal eingeschaltet wird, erscheint der Einstellbildschirm für Datum/Uhrzeit. Stellen Sie das Datum und die Uhrzeit ein. DATE/TIME SETTING / SET 20 / 10 / : 01 / 01 : 00 : 00 CANCEL OK···[MENU] 1. Drücken Sie auf , , oder , um das Datum und die Uhrzeit auszuwählen, und drücken Sie auf oder , um die Zahlenwerte zu ändern. 2. Wählen Sie SET <GESETZT> aus und drücken Sie dann auf MENU . • Stellen Sie jetzt das Datum und die Uhrzeit ein. • Der Bildschirm für die Einstellung des Datums bzw. der Uhrzeit schließt sich automatisch, wenn innerhalb von ca. 15 Sekunden keine Bedienung erfolgt. Datum und Uhrzeit können mit DATE/TIME SETTING <EINSTELLUNG DATUM/ZEIT> im Menü OPTION <OPTIONEN> eingestellt werden, wenn der Bildschirm für die Einstellung des Datums bzw. der Uhrzeit verschwindet. TIPPS • • • • Geben Sie das Datum in der Reihenfolge “Jahr/Monat/Tag” ein. Geben Sie die Zeit in der 24h-Schreibweise ein. Die Uhr wird mithilfe der internen Batterie betrieben. Wenn beim Einschalten des Geräts das Fenster zur Einstellung von Uhrzeit und Datum erscheint, obwohl Sie Zeit und Datum bereits eingestellt haben, ist möglicherweise die interne Batterie leer. Wenden Sie sich für den Austausch der Batterie an Ihren Sharp-Händler oder das nächstgelegene Sharp Servicecenter. • Geschätzte Lebensdauer der internen Batterie: circa 5 Jahre (abhängig von der Nutzung des Monitors) • Da die erste Batterie bereits im Werk eingebaut wurde, ist es möglich, dass sie vor Ablauf der geschätzten Lebensdauer erschöpft ist. D 8 Printed in China Imprimé en Chine Gedruckt in China 10J KS1 TINSM1186MPZZ(1)