1
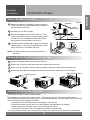
Please read through this manual. It contains valuable
information about your air conditioner. This manual may help
save time and money by explaining proper product
maintenance and preventing improper use.
Pay close attention to precautions in order to prevent
potential hazards and damage from misuse or improper
installation. LG is not responsible for any damages caused by
misuse of the product.
FR A N Ç A I S
PRECAUTIONS
E S PA Ñ O L
IMPORTANT
I T A LI A N O
OWNER'S MANUAL
E N G LI S H
LG
Window-Type Air Conditioner LG
Model: W07AC W09AC W12AC W09AH W12AH W18AC W22AC
D E U T S CH
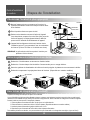
Prior to installation, this air-conditioning
unit must be submitted for approval by the
utility service which provides electricity
(EN 61000-3 Norm.)
Window-Type Air Conditioner Owner’s Manual
TABLE OF CONTENTS
F or Your Records
Write the model and serial numbers here:
Model #
Serial #
1. Safety Precautions
You can find them on a label on the side of each unit.
2. Operating Instructions
Dealer's Name
3. Care and Maintenance
Date Purchased
4. Hardware Installation
R ead This Manual
5. Common Issues
Inside you will find many helpful hints on how to use
and maintain your air conditioner properly. Just a little
preventive care on your part can save you a great
deal of time and money over the life of your air
conditioner.
You'll find many answers to common problems in the
chart of troubleshooting tips. If you review our chart of
Troubleshooting Tips first, you may not need to call
for service at all.
CAUTION
• Contact the authorized service technician for repair
or maintenance of this unit.
• Contact the installer for installation of this unit.
• The air conditioner is not intended for use by young
children or invalids without supervision.
• Young children should be supervised to ensure that
they do not play with the air conditioner.
• When the power cord is to be replaced, replacement
work shall be performed by authorized personnel
only.
• Installation work must be performed in accordance
with the national wiring standards by authorized
personnel only.
2
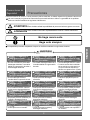
Safety
Precautions
Precautions
Incorrect operation due to ignoring instructions will cause harm or damage, the seriousness of which is
indicated by the following symbols.
WARNING
This symbol shows the possibility of death or serious injury.
CAUTION
This symbol indicates the possibility of injury or damage to property.
Never Do This
Always Do This
■ The following items are classified by these symblos.
WARNING
WARNING
Plug in the power plug
properly.
• Otherwise, it will cause electric
shock or fire due to heat
generation or electric shock.
Do not modify power cord
length or share the outlet
with other appliances.
Do not operate or stop the
unit by inserting or pulling
out the power plug.
• It will cause electric shock or fire
due to heat generation.
Do not operate with wet
hands or in damp
environment.
• It will cause electric shock or fire
due to heat generation.
Always perform grounding
work.
• It may cause electric shock.
• No grounding may cause electric
shock.
Unplug the unit if strange
sounds, smell, or smoke
comes from it.
• It may cause fire and electric
shock accident.
Keep firearms away.
• It may cause failure of machine
or electric shock.
Do not use the socket if it is
loose or damaged.
• It may cause fire.
• It may cause fire and electric
shock.
Do not allow water to run
into electric parts.
• It may cause fire and electric
shock.
Do not use the power cord close to
the heating tools.
3
Do not damage or use an
unspecified power cord.
• It will cause electric shock or fire.
• In the supply cord is damaged, it mut be
replaced by the manufacturer or its
service agent or a similarly quallfied
person in order to avoid a hazard.
(Y Attachment)
Do not direct airflow at
room occupants only.
• This could damage your health.
Always install air leakage
breaker and a dedicated
switching board.
• No installation may cause fire
and electric shock accident.
Do not open the entrance
during operation.
• It may cause electric shock.
Do not use the power cord near
flammable gas or combustibles, such
as gasoline, benzene, thinner, etc.
• It may cause an explosion or fire.
ENGLISH
To prevent injury and property damage, follow these instructions.
WARNING
WARNING
Ventilate before operating air conditioner
when gas goes out.
Do not disassemble or modify products
randomly.
• It may cause explosion, fire and, burn.
• It may cause failure and electric shock.
CAUTION
CAUTION
Never touch the metal parts
of the unit when removing
the filter.
• They are sharp and may cause
injury.
When cleaning the unit, first
make sure the power and
breaker are turned off.
Do not clean the air
conditioner with water.
• Water may enter the unit and
degrade the insulation. It may
cause an electric shock.
Do not put a pet or house
plant where it will be
exposed to direct air flow.
• Since the fan rotates at high
speed during operation, it may
cause injury.
• This could injure the pet or plant.
Stop operation and close
the window in storm or
hurricane.
Hold the plug by the head of
the power plug when taking
it out.
• Operation with windows opened
may cause wetting of indoor and
soaking of household furniture.
Do not place obstacles around
the absorption inlet or instead
of blowing-out inlet.
• It may cause failure of appliance
or accident.
Do not use strong detergent
such as wax or thinner but
use a soft cloth.
• Appearance may be deteriorated
due to change of product color or
scratching of its surface.
• It may cause electric shock and
damage.
Ensure that an installation console of
the outdoor appliance is not damaged
due to the use for a long time.
• If leaving appliance damaged,
there is concern of damage due
to the falling of product.
Do not place heavy object on the
power cord and take care so that
the cord should not be pressed.
• There is danger of fire or electric
shock.
Use caution when unpacking and installing.
Sharp edges could cause injury.
Ventilate well when used
together with a stove, etc.
• An oxygen shortage may occur.
Do not use appliance for special
purpose such as animals or
vegetables, precision machine, or
conservation of art articles.
• It may cause damage of animals
or vegetables or loss of property.
Turn off the main power
switch when not using it for
a long time.
• It may cause failure of product or
fire.
Always insert the filters
securely. Clean it once every
two weeks.
• Operation without filters may
cause failure.
Do not drink water drained
from air conditioner.
• It contains contaminants and will
make you sick.
If water enters the product, turn the power
switch of the main body of appliance off. After
taking the power-plug out from the socket,
contact with the service center.
4
Safety
Precautions
Prior to Operation
ENGLISH
Preparing for operation
1 Contact an installation specialist for installation.
2 Plug in the power plug properly.
3 Do not use a damaged or non-standard power cord.
4 Do not share the same outlet with other appliances
5 Do not use an extension cord.
6 Do not start/stop operation by plugging/unplugging the power cord.
Usage
1 Being exposed to direct airflow for an extended period of time could be hazardous to your health. Do not
expose occupants, pets, or plants to direct airflow for extended periods of time.
2 Due to the possibility of oxygen deficiency, ventilate the room when used together with stoves or other
heating devices.
3 Do not use this air conditioner for non-specified special purposes (e.g. preserving precision devices,
food, pets, plants, and art objects). Usage in such a manner could harm such property.
Cleaning and maintenance
1 Do not touch the metal parts of the unit when removing the filter. Injuries can occur when handling sharp
metal edges.
2 Do not use water to clean inside the air conditioner. Exposure to water can destroy the insulation, leading
to possible electric shock.
3 When cleaning the unit, first make sure that the power and breaker are turned off. The fan rotates at a
very high speed during operation. There is a possibility of injury if the unit’s power is accidentally
triggered on while cleaning inner parts of the unit.
Service
For repair and maintenance, contact your authorized service dealer.
5
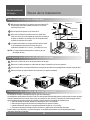
Operating
Instructions
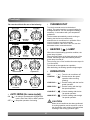
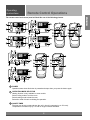
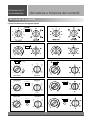
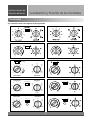
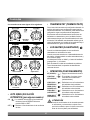
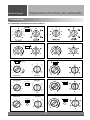
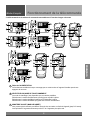
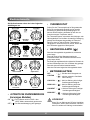
Location and Function of Controls
Controls
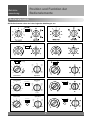
The controls will look like one of the following.
On
Off
Auto Swing
5
OFF
4
6
MED
FAN
3
7
2
8
1
HIGH
COOL
LOW
FAN
9
MED
COOL
LOW COOL
Thermostat
Operation
Thermostat
Operation
Auto Swing
5
4
6
Off
3
7
2
8
1
OFF
On
MED
FAN
HIGH
COOL
LOW
FAN
9
MED
COOL
LOW COOL
Thermostat
Operation
Auto Swing
5
4
Off
6
Off
3
On
Med
Fan
High
Cool
7
2
8
1
9
Low
Fan
Med
Cool
Low Cool
6
High Cool (
), Med Cool (
) and
Low Cool (
) provide cooling with different fan speeds. Med Fan (
) or Low Fan (
circulation and filtering without cooling. Off ( o ) turns the air conditioner off.
) provides air
NOTE: If you move the switch from a cool setting to off or to a fan setting, wait at least 3 minutes before
switching back to a cool setting.
Cooling Descriptions
For Normal Cooling- Select High Cool or Med Cool with the Operation knob at the midpoint of
Thermostat knob.
For Maximum Cooling- Select High Cool with the Operation knob at the highest number available on your
Thermostat knob.
For Quieter & Nighttime Cooling- Select Low Cool with the Operation knob at the midpoint of
Thermostat knob.
■ THERMOSTAT
The THERMOSTAT is used to maintain the room temperature. The compressor will cycle on and off to keep
the room at the same level of comfort. When you turn the knob to a higher number(the right side) and the
indoor air will become cooler.
The 5 or 6 position (the middle position of arc) is a normal setting for average conditions.
■ AUTO SWING
Auto swing switch controls the horizontal air direction by air swing system (not on all models).
ON (
) : Auto swing is operated.
OFF (
) : Auto swing is not operated.
CAUTION
When the air conditioner has been performed its cooling operation and is turned off or set to the fan
position, wait at least 3 minutes before resetting to the cooling operation again.
7
ENGLISH
■ OPERATION
Controls
• THERMOSTAT
The controls will look like one of the following.
FAN
Turn the thermostat control to the desired
setting. The control position is a normal setting for
average conditions. You can change this setting, if
necessary, in accordance with your temperature
preference.
The thermostat automatically controls cooling or
heating, but the fan runs continuously
whenever the air conditioner is in operation. If the
room is too warm, turn the thermostat
control clockwise. If the room is too cool, turn the
thermostat control counterclockwise.
FAN
• HEATER (
) LAMP
When the unit sets heating operation condition, the
green lamp is lighted.
When the frost settles on the heat exchanger of the
outside, defrosting is made automatically and the
green lamp is turned off.
The unit may give a "hiss" and the fan motor stops for
1 to 10 minutes.
This should not be regarded as a problem.
After defrosting, the heating operation begins again.
Thermostat
• OPERATION
Operation
Heater
Warmer
Cooler
Thermostat
Operation
• AUTO SWING (for some models)
ON (
) : Air swing is operated while OPERATION
knob is set to the COOL or HEAT position.
OFF (
) : Stops the operation of air swing.
OFF
(
LOW FAN
(
o ) : Turns the air conditioner off.
) : Permits the low fan speed
operation without cooling
(heating).
LOW COOL (
) : Permits cooling with the low fan
speed operation.
HIGH COOL (
) : Permits cooling with the high
fan speed operation.
LOW HEAT (
) : Permits heating with the low
fan speed operation.
HIGH HEAT (
) : Permits heating with the high
fan speed operation.
CAUTION
When the air conditioner has been performed
its cooling operation and is turned off or set to
the fan position, wait at least 3 minutes before
resetting to the cooling operation again.
8
Operating
Instructions
Remote Control Operations
2
3
7
4
7
1
3
1
2
5
1
4
5
2
5
5
4
4
3
3
4
3
2
2
5
1
7
7
1
1
4
2
3
5
3
7
1
1
5
5
4
4
5
4
6
3
2
1
2
3
2
3
7
1
4
5
6
1 POWER
Operation starts when this button is pressed and stops when you press the button again.
2 OPERATION MODE SELECTOR
Heating function is only available in some models.
Select cooling mode to cool the room.
Select heating mode to heat the room.
Select fan mode for basic ventilating fan operation.
3 ON/OFF TIMER
The timer can be set to start and stop the unit in hourly increments (up to 12 hours).
Temperature increases only by 2°C and no longer increase thereafter.
9
2
ENGLISH
The remote control and control panel will look like one of the following pictures.
4 FAN SPEED SELECTOR
For increased power while cooling or heating, select a higher fan speed.
Cooling Model: 3 steps{High[F3] ➔ Low[F1] ➔ Med[F2]
Heating Model: 2 steps{High[F2] ➔ Low[F1]
5 TEMPERATURE CONTROL
The thermostat monitors room temperature to maintain the desired temperature.
The thermostat can be set between 16°C~30°C (61°F~81°F).
The unit takes an average of 30 minutes to adjust the room temperature by 1°C (1.8°F).
6 AUTO SWING BUTTON (available in some models)
Allows the unit to automatically swing its louvers left and right during operation. If the option is
de-selected, the louvers will stop in their last position and orient the airflow in the corresponding direction.
7 REMOTE SENSOR
Auto Restart
In case the power comes on again after a power failure, Auto Restarting Operation is the function to operate
procedures automatically to the previous operating conditions.
Inserting the Remote Control Batteries
1 Push out the cover on the back of the remote control with your thumb
2 Pay attention to polarity and insert two new AAA 1.5V batteries.
3 Reattach the cover.
NOTE: Do not use rechargeable batteries. Make sure that both batteries are new.
• In order to prevent discharge, remove the batteries from the remote control if the
air conditioner is not going to be used for an extended period of time
Keep the remote control away from extremely hot or humid places.
To maintain optimal operation of the remote control, the remote sensor should
not be exposed to direct sunlight.
• The remote control can be mounted on a wall using the mountable holder.
10
Operating
Instructions
Adjusting the Air Flow Direction
ENGLISH
Vent Control
The vent control is located above the control knobs.
For maximum cooling efficiency, CLOSE the vent. This will allow internal air
circulation.
OPEN the vent to discharge stale air.
CLOSE
VENT
OPEN
To open the vent, pull the lever toward you.
To close it, push it in.
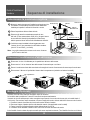
Adjusting the air flow Direction
Airflow can be adjusted by changing the direction of the air conditioner°s
louvers. This can also increase the cooling efficiency of the air
conditioner.
Adjusting Horizontal Air Flow Direction
Adjusting the vertical louvers left and right will change horizontal airflow.
Adjusting Vertical Air flow Direction
Adjusting the horizontal louvers up and down will change vertical airflow.
The louvers can be adjusted by nudging the back or up and down of the
vertical louvers.
Recommended Orientation of louvers
Adjust louvers to face upwards when cooling to maximize cooling
efficiency.
Care and
Maintenance
Care and Maintenance
Turn the power off and unplug the power plug before cleaning the air conditioner.
Grille and Case
Use water and mild detergent when cleaning. Do not use bleach or harsh abrasives.
Rear Coils
Check the rear coils on a regular basis. It should be professionally steam- cleaned if
it is clogged with dirt or soot. Professional cleaning service is available at your local
dealer or service center.
11
Air Filter
The air filter behind the inlet grille should be checked and cleaned at least once
every 2 weeks (or as necessary) to maintain optimal performance of the air
conditioner.
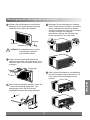
How to remove the air filter
1
The grille may be opened from the top or bottom for easy maintenance
after installation.
2 Open the inlet grille by pulling off the exposed door on the bottom or top of
the unit (based on installation). Refer to the Using the reversible inlet
grille in the Hardware Installation Guide section if you want to change the
opening side.
3 Pull the tab slightly to release the filter. Pull the filter in the same direction
as the opening.
4 Clean the filter with warm, soapy water. The water should be below 40°C
(104°F).
5 Rinse off and gently shake off excess water from the filter. Let it dry
before replacing it.
Drainage (Optional)
The base pan may overflow due to high humidity. To drain the excess water,
remove the drain cap from the back of the unit and secure the drainpipe.
1
Take the drain pan which is shipped in the air discharge or on the barrier.
2
Remove the rubber plug from the bottom of the base pan.
3
Install the drain pan over the corner of the cabinet where
you removed the plug with 4 (or 2) screws.
4
Connect the drain hose to the outlet
located at the bottom of the drain pan. You
can purchase the drain hose or tubing
locally to satisfy your particular needs.
(Drain hose is not supplied).
5
Drain pipe
Drain cap
CABINET
DRAIN
PAN
SCREW
Select the most appropriate connection
from among the following figures (by
considering the hole of the unit) to fit drain
pan to your own unit.
Fig. 1
DRAIN HOSE
Fig. 3
12
Fig. 2
Fig. 4
Hardware
Installation
Hardware Installation
ENGLISH
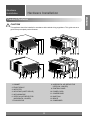
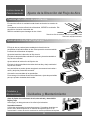
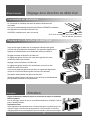
Product Features
CAUTION
This appliance should be installed in accordance with national wiring regulations. This guide acts as a
guide to help to explain product features.
1
2
3
1
4
2 3
7
5 8 6
4
5
6
7
8
9
9
10
10
11 12 14 13
11 12 13 14
8. HORIZONTAL AIR DEFLECTOR
(VERTICAL LOUVER)
1. CABINET
2. FRONT GRILLE
9. CONTROL PANEL
3. AIR FILTER
4. AIR INTAKE (INLET GRILLE)
10. POWER CORD
5. AIR DISCHARGE
11. COMPRESSOR
6. VERTICAL AIR DEFLECTOR
(HORIZONTAL LOUVER)
12. BASE PAN
7. EVAPORATOR
14. CONDENSER
13. BRACE
13
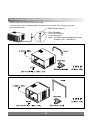
Circuit Breaker Installation and Parts for Installation
Read thoroughly and follow all directions provided.
A circuit breaker must be installed between the power source and the unit if the plug is not used
(see illustration below).
Main Power source
Circuit Breaker
Use a circuit breaker
or time delay fuse.
Note : Use 20A circuit breaker for some
models (21k ~ 26k Btu/h).
14
Hardware
Installation
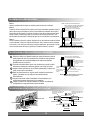
Installation Steps
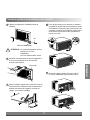
FOAM
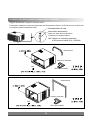
1 Measure the space for installation to assure a good fit.
The air conditioner must be installed firmly into place to
prevent vibration and noise.
2 Avoid exposure to direct sunlight.
3 Remove all obstacles from the rear of the unit. There
must be at least 50cm (20in.) of cleared space around
the rear of the unit. Obstacles restricting the airflow
may reduce the cooling efficiency of the unit.
70-150cm
COOLED
AIR
4 The unit should be installed with a slight tilt towards the
AWNING
FENCE
HEAT
RADIATION
10~15mm
Over 50cm
1/4 Bubble
outside (approx. 3°) to allow condensed water to drain.
(About 10~15mm or 1/4 bubble with level)
NOTE: The external grille must be exposed outside for air
discharge.
Level
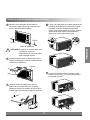
Remove the Air Conditioner From the Case
1 Remove 2 shipping screws from the back of the case.
2 Remove the 2 screws on each side of the case. Keep these for later use.
3 Slide out the air conditioner from the case by pulling the base-pan handle while bracing the case.
4 Remove the white Styrofoam shipping block from the compressor. (Applicable for some models)
White styrofoam block
Shipping screws
Attaching the Drain Pan (Optional)
The drain pan is used to collect condensed water.
The base-pan may overflow due to high humidity. The base-pan may also collect excess water when in
reverse mode (in Reverse Cycle models only). To drain the excess water, remove the drain cap from the back
of the unit and secure the drainpipe as follows:
1. Remove the drain pan located in the air discharge or on the barrier.
2. Remove the rubber cap from the hole on the base-pan. (Not applicable to all models)
3. Install the drain pan to the left corner of the cabinet with 2-4 screws.
4. Connect the drain hose to the hole located on the bottom of the drain pan.
You can purchase the drain hose or tubing locally to satisfy your particular needs. (Drain hose not included)
15
ENGLISH
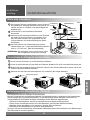
Select the Best Location
Installation of the Housing
Step 1
Remove the air conditioner from it’s packaging and slide the air conditioner
out of it’s housing.
NOTE: UNIT MAY BE SUPPORTED BY A
SOLID FRAME FROM BELOW OR
BY A HANGER FROM A SOLID
OVERHEAD SUPPORT.
FLASH OR SEAL AROUND EXTERNAL
WALL FRAME OR ARCHITRAVE
Step 2
Prepare the hole in the wall so that the bottom of the housing is well
supported, the top has minimum clearace and the air inlet louveres have
clearance as shown. Holes from the outside through to the cavity should
be sealed. The housing should slope down towards the rear by about 5mm
to allow water formed during operation to drain.
DRAIN CHUTE
Step 3
Install the housing into the wall and secure. Ensure the foam seals
are not damaged. Flash, seal or fill gaps around the inside and
outside to provide satisfactory appearance and protection against
the weather, insects and rodents.
STURDY TIMBER
FRAME ALL ROUND
UNIT
EXTERNAL SUPPORT
FRAME AT BALANCE
POINT OF RAC
TIMBER FRAMED
WALL OR PARTITION
ALTERNATIVELY, BRACKETS
AS ILLUSTRATED BELOW
MAY BE USED.
Preferred method of installation into
a timber framed wall, partition or window.
Installations of the unit into the Housing
FLASH OR SEAL AROUND EXTERNAL
WALL FRAME OR ARCHITRAVE
1 Slide the unit into the housing until it is firmly against the rear of
the housing. Care is required to ensure the foam sealing strips
on the housing remain in position.
ENSURE LOUVRES
ARE ENTIRELY
OUTSIDE THE WALL.
2 Connect the air conditioner to the power and coil excess cord
length beneath the air conditioner base or control box.
3 Engage the Chassis Lock into the bottom housing rail and secure
DRAIN CHUTE
STURDY TIMBER
FRAME
STEADYING BRACKET
(ONE PER SIDE)
TIMBER FRAMED
WALL OR PARTITION
to the base with the screw provided.
SOLID TIMBER SUPPORT
4 Remove the front panel from i’s carton and plastic bag and fit as
per the Operating Instruction.
Alternative method of installation if external
support cannot be provided.
5 Switch unit on. Check for operation of the unit and check for
vibration in the installation.
6 Fit the drain chute to the housing and run a drain line to a
suitable location if required.
Installations of the unit into the wall
45° BRICK CUT AWAY
TO CLEAR LOUVRES
45° BRICK CUT AWAY
TO CLEAR LOUVRES
FRONT
AIR IN
BRICK
WALL
AIR IN
100mm
TOP
VIEW
AIR IN
BRICK
WALL
AIR IN
AIR IN
100mm
LOUVRE
AIR OUT
AIR OUT
100mm minimum
OPTION A
OPTION B
16
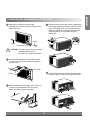
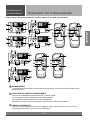
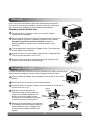
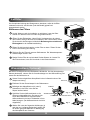
4 Attach the front grille to the case by inserting the
1 Slide the air conditioner into the case.
tabs on the grille into the slots on the front of the
case. Push the grille in until it snaps into place.
When you detach the front grille from the case,
push the grille to your right side and pull it
toward you.
Reinstall the 2 screws removed earlier on each
side of the case.
Screw
Screw
Power Cord
CAUTION: The power cord must be connected
to an independent circuit.
The green wire must be grounded.
2 Stuff the foam between the top of the unit and
the wall to prevent air and insects from getting
into the room.
The Foam
5 Lift the inlet grill and secure the front grille with a
screw(L:10mm). Lower the inlet grille into place.
3 Before installing the front grille, pull out the vent
control lever located above the unit control
knobs, as shown. (for some models)
17
ENGLISH
Install the Air Conditioner in the Case
Hardware
Installation
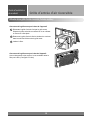
Reversible Inlet Grille
Using the Reversible Inlet Grille (on some models)
Opening the front grille from the top of the unit:
1 Disassemble the inlet grille from the front grille. Separate
the hinged part by removing the screws using a flat-head
screwdriver.
2 Turn the inlet grille upside down and insert the hooks into
the lower holes of the front grille.
3 Insert the filter.
Opening the front grille from the bottom of the unit:
No change is required if you want to remove the filter from the
bottom side. (Factory configured)
18
Common
Issues
Common Problems and Solutions
The air conditioner is operating normally when:
• You hear a pinging noise. This is caused by water being picked up by the condenser on rainy days or in highly
humid conditions. This feature is designed to help remove moisture in the air and improve cooling efficiency.
• You hear the thermostat click. This is caused by the compressor cycle starting and stopping.
• You see water dripping from the rear of the unit. Water may be collected in the base pan in highly humid
conditions or on rainy days. This water overflows and drips from the rear of the unit.
• You hear the fan running while the compressor is silent. This is a normal operational feature.
The air conditioner may be operating abnormally when:
Problem
Possible Causes
What To Do
■ The air conditioner is unplugged or • Make sure the plug is completely plugged into
not plugged in completely
the outlet
The air conditioner
does not operate
at all
Air conditioner
does not cool
■ The fuse is blown/circuit breaker is • Check the fuse/circuit breaker box and replace
triggered
the fuse or reset the breaker
■ Power failure.
• In the event of a power failure, set the power
control to OFF. When the power is restored,
wait 3 minutes to restart the air conditioner to
prevent the compressor from overloading
■ Air flow is restricted
• Make sure there are no curtains, blinds,
furniture or other obstacles in front of the air
conditioner
■ The THERMOSTAT may not be
set cool enough
• Turn the knob to a higher setting. The highest
setting provides maximum cooling
■ The air filter is dirty.
• Clean the filter at least every 2 weeks. Refer to
the Care and Maintenance section (p.11) of
the manual.
■ The air conditioner was just
turned on.
• After the air conditioner is turned on, you need
to give the air conditioner some time to cool the
room.
■ Cold air is escaping.
• Check for open furnace floor resisters and cold
air returns.
• CLOSE the air conditioner vent
■ Cooling coils are iced up
• See “Ice appears on the air conditioner” below
■ The cooling coils are iced over.
• Ice may block the air flow and obstruct the air
conditioner from properly cooling the room. Set
the fan at MED or HIGH while setting the
thermostat at 1 or 2 until the ice melts.
Ice appears on the
air conditioner.
19
ENGLISH
Before calling for service, please review the following list of common problems and solutions.
Memo
20
MANUALE DELL’UTENTE
IMPORTANTE
Si prega di leggere attentamente questo manuale. Contiene
informazioni molto importanti relative al prodotto. Questo
manuale può essere di aiuto per risparmiare tempo e denaro
spiegando come eseguire una manutenzione corretta del
prodotto e prevenendo un uso errato.
PRECAUZIONI
Si prega di osservare con cura le disposizioni di sicurezza al
fine di prevenire possibili pericoli e danni derivanti da un
uso non corretto o da un’installazione errata. LG non è
responsabile per gli eventuali danni causati da un uso errato
del prodotto.
Prima di procedere con l’installazione,
questo climatizzatore deve essere
sottoposto all’approvazione dell’azienda di
fornitura elettrica (EN-61000-3 Norm.)
ITALIANO
LG
Condizionatore d’aria da finestra LG
Manuale dell’utente per condizionatori d’aria di tipo da finestra
INDICE
P er vostro riferimento futuro
Annotare qui modello e numero di serie:
Modello n°
N° di serie
1. Precauzioni di sicurezza
Sarà possibile rilevare queste informazioni
dall’etichetta riportata sul fianco di ciascuna unità.
2. Istruzioni per il funzionamento
Nome del rivenditore
Data Acquisto
3. Cura e manutenzione
4. Guida all’installazione
dell’hardware
L eggere questo manuale
All’interno si potranno trovare molti consigli utili su
l’uso e la manutenzione corretti del condizionatore
d’aria. L’investimento minimo in manutenzione
preventiva aiuterà a risparmiare successivamente
molto tempo e denaro, un risparmio che durerà tutta
la vita di esercizio utile del condizionatore.
Nella sezione relativa ai consigli per la risoluzione dei
problemi si potranno trovare molte risposte ai
problemi più comuni. Una consultazione preventiva
dei Consigli per la risoluzione dei problemi
potranno evitare in molti casi la necessità di rivolgersi
all’assistenza.
5. Argomenti comuni
PERICOLO
• Per la manutenzione e riparazione di questa unità
si prega di rivolgersi ad un tecnico autorizzato.
• Si prega di rivolgersi ad un installatore per
l’installazione di questa unità.
• L’apparecchio non è stato progettato per l’uso da
parte di bambini e infermi senza supervisione.
• I bambini devono essere tenuti sotto controllo per
evitare che giochino con l’unità.
2
Precauzioni di
sicurezza
Precauzioni
È necessario seguire le seguenti istruzioni per prevenire lesioni all’utente o a terzi e danni alla proprietà.
Un uso non corretto dettato da ignoranza delle istruzioni può causare lesioni o danni, la serietà dei quali
viene classificata dalle indicazioni seguenti.
AVVISO
Questo simbolo indica la possibilità di morte o lesioni gravi.
PERICOLO
Questo simbolo indica la possibilità di lesioni o danni alla sola proprietà.
Fare sempre cosi
■ Gli elementi che seguono sono sempre classificati secondo i seguenti simboli.
AVVISO
AVVISO
Inserire correttamente la
spina di alimentazione
• In caso contrario può causare
pericolo di folgorazione o
incendio a causa della
generazione del calore o
folgorazione.
Non modificare la lunghezza del cavo
di alimentazione o condividere la
presa di corrente con altri dispositivi.
Non mettere in funzione o spegnere
l’unità inserendo o staccando la
spina di alimentazione.
• Può provocare folgorazione o
incendio a causa della
generazione di calore.
Non usare con mani bagnate
o in ambienti umidi.
• Può provocare folgorazione o incendio • Può provocare folgorazione.
a causa della generazione di calore.
Non danneggiare o usare un
cavo di alimentazione che
non soddisfa le specifiche.
• Può provocare folgorazione o incendio.
• Se il cavo di alimentazione è danneggiato,
deve essere sostituito con un cavo speciale
o assieme disponibile presso il produttore o
agente rappresentante. (Y attaccamento)
Non dirigere il flusso d’aria
direttamente sui presenti
nell’ambiente.
• Questo può provocare problemi
alla salute
Eseguire sempre
correttamente la messa a
terra.
• L’assenza di messa a terra può
provocare il rischio di folgorazione.
Se dal prodotto si sentono odori strani o si verifica
fuoriuscita di fina staccare sempre la spina del cavo
di alimentazione dalla presa della corrente.
Impedire l’ingresso di acqua
nei componenti elettrici.
Installare sempre un interruttore
automatico per perdita aria e un
quadro elettrico dedicato.
• Può provocare guasti alla
• La mancata installazione può provocare
macchina o rischio di folgorazione.
incendi e il rischio di folgorazione.
Non usare una presa di
Non aprire l’entrata durante il
corretta quando questa è
funzionamento.
danneggiata o allentata.
• Può provocare incendi e pericolo
di folgorazione.
Tenere lontano dalle armi da
fuoco.
• Può provocare incendi e pericolo
di folgorazione.
Non usare il cavo di alimentazione
a distanze troppo ravvicinate agli
strumenti di riscaldamento.
• Può provocare folgorazione.
• Può provocare incendi.
• Può provocare incendi e pericolo
di folgorazione.
• Può causare esplosioni o incendi.
3
Non usare il cavo di alimentazione vicino a gas
infiammabile e altre sostanze infiammabili
(benzene, benzina, diluente ecc.)
ITALIANO
Non fare mai cosi
AVVISO
AVVISO
Prima di mettere in funzione il condizionatore
o il telecomando quando si esaurisce il gas
aprire la finestra per ventilare l’ambiente
Non smontare o modificare i prodotti a caso.
• Può causare esplosioni o incendi e bruciare.
• Può provocare incendi e pericolo di folgorazione.
PERICOLO
PERICOLO
Quando si rimuove il filtro
non toccare mai gli elementi
metallici dell’unità.
• Può provocare lesioni.
Durante la pulizia del prodotto
assicurarsi che l’interruttore
automatico e l’alimentazione
siano disattivati.
Non pulire il condizionatore
con acqua.
• Vi possono essere infiltrazioni di acqua • Si può verificare un’insufficienza
che possono rovinare l’isolamento.
di ossigeno.
Può provocare folgorazione.
Non lasciare animali
domestici o piante esposti al
flusso diretto dell’aria.
• Poiché il ventilatore gira a velocità • Potrebbe causare lesioni
elevate durante il funzionamento
all’animale domestico o pianta.
esso può essere causa di lesioni.
Nel caso di temporali o tifoni
chiudere le finestre e
spegnere l’apparecchio.
Afferrare bene per la spina
quando si stacca il cavo di
alimentazione
• L’uso dell’apparecchio con le finestre aperte • Può provocare folgorazione e
può provocare la formazione di acqua
danni.
all’interno della casa e bagnare i mobili.
Non posizionare possibili ostacoli
tra la feritoia di assorbimento o la
feritoia di emissione dell’aria.
• Può causare incidenti o un
cattivo funzionamento
dell’apparecchio.
Non usare prodotti detergenti
molto forti quali cera o
diluente , bensì utilizzare un
panno morbido.
• L’aspetto può essere rovinato a causa
di modifiche di colore del prodotto
oppure di graffi sulla superficie.
Ventilare bene quando usato
insieme ad una stufa ecc.
Assicurarsi che la consolle di
installazione dell’apparecchio
esterno non sia rovinato da un
uso prolungato.
• Quando si lascia l’apparecchio danneggiato
c’è la preoccupazione che si verifichino danni
dovuti alla caduta dell’apparecchio stesso.
Non posiziona re oggetti
pesanti sul cavo di
alimentazione ed evitare che
il cavo venga schiacciato.
• C’è il pericolo di incendio o
folgorazione.
Quando si estrae una delle celle utilizzate nel
dispositivo, assicurarsi che questa non possa
essere messa in bocca da bambini. Posizionare
la cella in un punto fuori portata dei bambini.
Non usare l’apparecchio per impieghi
speciali quali animali domestici o
piante, macchinari di precisione o per
la conservazione di opere d’arte.
• Può causare danni a animali,
piante o alla proprietà.
Staccare la spina principale di
alimentazione quando il
prodotto non viene usato per un
periodo prolungato di tempo.
• Può causare un cattivo
funzionamento dell’apparecchio
o incendi.
Inserire sempre con
sicurezza i filtri in uso e
pulire una volta la settimana.
• Il funzionamento senza filtri può
provocare guasti.
Non spurgare acqua dal
condizionatore.
• Può provocare problemi allo
stomaco.
Quando si verificano infiltrazioni di acqua nel
prodotto, spegnere l’interruttore di alimentazione del
corpo principale della macchina. Dopo avere staccato
la spina dalla presa rivolgersi al centro di assistenza.
4
Precauzioni di
sicurezza
Prima di iniziare
Preparazione all’uso
1 Per l’installazione rivolgersi a un tecnico specializzato.
2 Inserire correttamente la spina di alimentazione.
4 Non utilizzare la stessa presa per altri apparecchi.
5 Non utilizzare una prolunga elettrica.
6 Non avviare/interrompere il funzionamento inserendo/staccando il cavo di alimentazione.
USO
1 L’esposizione al flusso diretto dell’aria per un periodo prolungato di tempo può essere pericoloso per la
salute. Do not expose occupants, pets, or plants to direct airflow for extended periods of time.
2 A causa di una possibile carenza di ossigeno, ventilare la stanza quando viene usato insieme a stufe o
altri dispositivi di riscaldamento.
3 Non usare questo condizionatore d’aria per scopi speciali non specificati (es. per conservare strumenti di
precisione, cibo, animali, piante o oggetti d’arte.) Questo tipo di uso può rovinare questo tipo di oggetti.
Pulizia e manutenzione
1 Quando si rimuove il filtro non toccare mai gli elementi metallici dell’unità. Si possono procurare lesioni
quando si maneggiano i bordi affilati di metallo.
2 Non pulire l’interno del condizionatore d’aria con acqua. L’esposizione all’acqua può rovinare
l’isolamento e provocare di conseguenza scosse elettriche.
3 Durante la pulizia del prodotto assicurarsi che l’interruttore automatico e l’alimentazione siano disattivati.
Durante il funzionamento la ventola gira a velocità elevata. Esiste la possibilità di provocare lesioni se
l’unità viene accidentalmente accesa mentre si puliscono i componenti interni dell’apparecchio.
Assistenza
Per le riparazioni e la manutenzione rivolgersi al proprio rivenditore autorizzato.
5
ITALIANO
3 Non usare un cavo di alimentazione rovinato o di tipo non standard.
Istruzioni per il
funzionamento
Ubicazione e funzione dei controlli
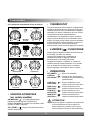
Manopole di controllo
I controlli avranno uno dei seguenti aspetti.
On
Off
Auto Swing
5
OFF
4
6
MED
FAN
3
7
2
8
1
HIGH
COOL
LOW
FAN
9
MED
COOL
LOW COOL
Thermostat
Operation
Thermostat
Operation
Auto Swing
5
4
6
Off
3
7
2
8
1
OFF
On
MED
FAN
HIGH
COOL
LOW
FAN
9
MED
COOL
LOW COOL
Thermostat
Operation
Auto Swing
5
4
Off
6
Off
3
On
Med
Fan
High
Cool
7
2
8
1
9
Low
Fan
Med
Cool
Low Cool
6
■ FUNZIONAMENTO
High Cool (
), Med Cool (
)e
Low Cool (
) forniscono raffreddamento a velocità diverse del ventilatore. Med Fan (
)o
Low Fan (
) forniscono circolazione d’aria e filtraggio senza raffreddamento. Off ( o ) spegne il
condizionatore.
NOTA : Se si sposta l’interruttore da una posizione di raffreddamento o su un’impostazione del ventilatore,
attendere almeno 3 minuti prima ritornare a un’impostazione di raffreddamento.
Per il raffreddamento normale – Selezionare High Cool o Med Cool ponendo il selettore di funzionamento
al punto centrale della manopola del termostato. Selettore del termostato.
Per un raffreddamento massimo – Selezionare High Cool con il selettore di funzionamento impostandolo
sul numero più alto disponibile sulla manopola del termostato. Selettore del termostato.
Per un raffreddamento più tranquillo per le ore notturne – Selezionare Low Cool ponendo la manopola
di funzionamento sul punto centrale della manopola del termostato. Selettore del termostato.
■ TERMOSTATO
Il TERMOSTATO viene usato per mantenere la temperatura ambiente. Il compressore si accende e si
spegne per mantenere la stanza allo stesso livello di comfort. Quando si imposta la manopola su un numero
più alto (lato destro) l’aria all’interno della stanza si raffredda.
La posizione 5 o 6 (la posizione mediana dell’arco) è l’impostazione normale per le condizioni medie di uso.
■ OSCILLAZIONE AUTOMATICA
L’interruttore di oscillazione automatica controlla la direzione orizzontale dell’aria tramite il sistema di
oscillazione dell’aria (non su tutti i modelli).
ON (ATTIVATO) (
) : L’oscillazione automatica è in funzione.
OFF (SPENTO) (
) : L’oscillazione automatica non è in funzione.
PERICOLO
Quando il Condizionatore d’aria ha terminato l’operazione di raffreddamento e viene posto sul modo
ventilatore o spento, attendere almeno 3 minuti prima di riattivare il funzionamento di raffreddamento.
7
ITALIANO
Descrizioni di raffreddamento
Manopole di controllo
• TERMOSTATO
I controlli avranno uno dei seguenti aspetti
FAN
Portare il selettore del termostato sull’impostazione
desiderata. La posizione del controllo è un’impostazione
normale per condizioni medie di uso. Se necessario, è
possibile modificare l’impostazione per conformarsi alle
impostazioni di temperatura desiderata.
Il termostato controlla automaticamente il
raffreddamento o riscaldamento, ma il ventilatore
funziona continuamente quando il condizionatore
d’aria è in funzione. Se l’ambiente è troppo caldo,
girare il selettore in senso orario. Se l’ambiente è
troppo freddo, girare il selettore in senso antiorario.
FAN
• SPIA (
) RISCALDATORE
Quando l’unità imposta le condizioni di riscaldamento, si
accende la spia verde.
Quando la si accumula brina sullo scambiatore di calore
esterno, lo sbrinamento viene effettuato automaticamente e la
spia verde si spegne.
È possibile che l’unità emetta un “sibilo” ed il motore del
ventilatore si ferma per un periodo da 1 a 10 minuti.
Questo non deve essere considerato un problema.
Effettuato lo sbrinamento, l’operazione di riscaldamento riparte.
Thermostat
• FUNZIONAMENTO
Operation
Heater
Warmer
Cooler
Thermostat
Operation
• OSCILLAZIONE AUTOMATICA
(per alcuni modelli)
ON (ATTIVATO) (
) : L’oscillazione dell’aria entra in
funzione quando il selettore di FUNZIONAMENTO è impostato sulla
posizione di COOL (raffreddamento) o HEAT (riscaldamento)
OFF (SPENTO) (
OFF
(
LOW FAN
(
o ) : Spegne il condizionatore.
) : Permette l’uso della ventola a
bassa velocità senza
raffreddamento (riscaldamento)
LOW COOL (
) : Permette il raffreddamento con il
funzionamento a bassa velocità.
HIGH COOL (
) : Permette il raffreddamento con
il funzionamento a alta velocità.
LOW HEAT (
) : Permette il riscaldamento con il
funzionamento a bassa velocità.
HIGH HEAT (
) : Permette il riscaldamento con il
funzionamento a alta velocità.
PERICOLO
Quando il Condizionatore d’aria ha terminato
l’operazione di raffreddamento e viene posto sul
modo ventilatore o spento, attendere almeno 3 minuti
prima di riattivare il funzionamento di raffreddamento.
) : Interrompe l’azione dell’oscillatore aria.
8
Istruzioni per il
funzionamento
Operazioni con il telecomando
Il telecomando e il pannello di controllo avranno l’aspetto di una delle seguenti figure.
2
3
7
4
7
1
3
1
5
4
5
2
5
5
4
4
3
3
4
3
2
2
5
7
7
1
1
4
2
3
5
3
7
1
1
5
5
4
4
5
4
6
3
2
1
2
3
2
3
7
1
4
5
6
1 ALIMENTAZIONE
Il funzionamento inizia quando viene premuto questo pulsante, e si arresta quando il pulsante viene
premuto di nuovo.
2 SELETTORE DEL MODO DI FUNZIONAMENTO
La funzione di riscaldamento è disponibile solo su alcuni modelli
Per rinfrescare la stanza selezionare il modo raffrescamento.
Per riscaldare la stanza selezionare il modo riscaldamento.
Selezionare il modo ventilatore per attivare il funzionamento normale del ventilatore.
3 TIMER ACCESO/SPENTO
Il timer può essere impostato per avviare e spegnere l’unità a incrementi di un’ora (fino a 12 ore).
La temperatura aumenta di soli 2°C poi non aumenta più.
9
2
ITALIANO
2
1
1
4 SELETTORE VELOCITÀ VENTILATORE
Per aumentare la potenza durante il riscaldamento e raffreddamento selezionare una velocità maggiore del ventilatore.
Modello Raffreddamento: 3 posizioni [ALTO[F3] → BASSO[F1] → MEDIO[F2]
Modello riscaldamento: 2 posizioni {ALTO[F2] → BASSO[F1]
5 CONTROLLO DELLA TEMPERATURA
Il termostato effettua un monitoraggio della temperatura dell’ambiente per mantenere la temperatura
desiderata. Il termostato può essere impostato tra 16°C~30°C (61°F~81°F).
L’unità impiega una media di 30 minuti per regolare la temperatura dell’ambiente di 1°C (1,8°F)
6 PULSANTE DI OSCILLAZIONE AUTOMATICA (disponibile su alcuni modelli)
Permette all’unità di oscillare automaticamente le alette verso destra e verso sinistra durante il
funzionamento. Se l’opzione non è selezionata, le alette si arrestano nell’ultima posizione raggiunta
orientando il flusso dell’aria nella direzione corrispondente.
7 SENSORE TELECOMANDO
Interruttore di Riavviamento Automatico
Nel caso di interruzione dell’alimentazione, l’unità può essere impostata in modo da riprendere
automaticamente, al ritorno della corrente, il funzionamento con le impostazioni precedenti.
Inserimento delle batterie nel telecomando
1 Premere con il pollice ed estrarre il coperchio posteriore del telecomando.
2 Facendo attenzione a mantenere la polarità corretta inserire due batteria AAA 1,5V nuove.
3 Rimettere il coperchio.
NOTE: Non usare batterie ricaricabili. Assicurarsi che ambedue le batterie siano nuove
• Per impedire lo scaricamento delle batterie, rimuoverle dal telecomando se si
prevede di non utilizzare il condizionatore d’aria per un periodo prolungato di
tempo. Conservare il telecomando lontano da punti estremamente caldi o umidi.
Per garantire un funzionamento ottimale del telecomando, non esporre il
telecomando alla luce diretta del sole.
• Il telecomando può essere montato su una parete usando l’apposito supporto.
10
Istruzioni per il
funzionamento
Regolazione della direzione del flusso d’aria
Controllo della griglia
Il dispositivo di controllo delle griglie d’aria si trova sopra alle manopole di
selezione.
Per ottenere la massima efficienza di raffreddamento CHIUDERE la griglia
Questo permetta la circolazione interna dell’aria.
CHIUDI
SFIATO
APRI
Per aprire la griglia tirare la leva verso se stessi
Per chiuder premere verso l’interno
Regolazione della direzione del flusso d’aria
Il flusso d’aria può essere regolato cambiando la direzione delle alette del
condizionatore d’aria Questo può anche aumentare l’efficienza di
raffreddamento del condizionatore.
Regolazione della direzione del flusso d’aria orizzontale
La regolazione delle alette verticali sinistra e destra modifica il flusso
d’aria orizzontale.
Regolazione della direzione del flusso d’aria verticale
La regolazione delle alette orizzontali verso l’alto e il basso modifica il
flusso d’aria orizzontale. Le alette possono essere regolate spostando il
retro o su e giù delle alette verticali.
Inclinazione raccomandata delle alette.
Regolare le alette in modo che siano volte verso l’alto durante il
raffreddamento per massimizzare l’efficienza di raffreddamento.
Cura e
manutenzione
Cura e manutenzione
Spegnere l’unità e staccare la spina prima di pulire il condizionatore.
Griglia e rivestimento
Usare acqua e liquido detergente leggero per la pulizia.
Non usare candeggiante o detergenti pesanti.
Spire posteriori
Controllare le spire posteriori regolarmente
Quando sono ostruite da sporco o morchia devono essere pulite professionalmente a vapore Il
vostro rivenditore o centro di assistenza è in grado di fornire un servizio di pulizia professionale.
11
ITALIANO
APERTO permette alla griglia di scaricare l’aria stantia.
Filtro aria
Il filtro dell’aria posto dietro alla griglia anteriore deve essere controllato e pulito
almeno una volta ogni 2 settimane (o come necessario) per poter garantire le
prestazioni originali del condizionatore d’aria.
Come rimuovere i filtri dell’aria
1 La griglia può essere aperta dall’alto verso o dal basso per una facile
manutenzione dopo l’installazione.
2 Aprire la griglia di aspirazione tirando lo sportello esposto sul fondo o
parte superiore dell’unità (a seconda dell’installazione).
Fare riferimento a Uso della griglia di aspirazione reversibile nella
sezione della guida relativa all’installazione dell’hardware se si desidera
modificare il lato di apertura.
3 Tirare leggermente la linguetta per liberare il filtro.
Tirare il filtro nella stessa direzione dell’apertura.
4 Lavare il filtro con acqua saponata calda.
Il calore dell’acqua deve essere inferiore a 40°C (104°F).
5 Risciacquare e scuotere per eliminare dal filtro l’acqua in eccesso.
Lasciare asciugare prima di inserire nuovamente.
Scarico (Opzionale)
Se l’umidità è alta è possibile che il vassoio di raccolto si riempia
eccessivamente. Per scaricare l’acqua eccedente, rimuovere il tappo dello
scarico dal retro dell’unità e fissare un tubo di scarico.
1
Prendere il vassoio di raccolta che si trova spedito nello scarico dell’aria o barriera.
2
Rimuovere il tappo di plastica dalla base del vassoio.
3
Installare il vassoio di raccolta sull’angolo
dell’armadietto dal quale avete rimosso il
tappo con 4 (o 2) viti.
4
5
Tubo di scarico
Tappo di scarico
Armadio
Connettere il tubo flessibile di scarico
Vassoio di
all’uscita che si trova sul fondo del vassoio raccolta
di raccolta. Il tubo flessibile di scarico
Vite
adatto alle proprie necessità può essere
acquistato localmente. (Il tubo flessibile di
scarico non viene fornito in dotazione)
Selezionare la connessione maggiormente
adeguata tra quelle delle figure (prendendo in
considerazione il foro sull’unità) per montare il
vassoio di raccolta sulla propria unità.
Fig. 1
Tubo flessibile
di scarico
Fig. 3
12
Fig. 2
Fig. 4
Guida all’installazione
Hardware
Installazione hardware
Caratteristiche del prodotto
PERICOLO
Avete appena acquistato un condizionatore d’aria del tipo da finestra ed è stato installato da un tecnico
installatore. L’apparecchio deve essere installato in modo conforme alle regole nazionale per i cablaggi
.Questa guida ha il compito di spiegare le caratteristiche dei prodotti.
ITALIANO
1
2
3
1
4
2 3
7
5 8 6
4
5
6
7
8
9
9
10
10
11 12 14 13
11 12 13 14
2. GRIGLIA ANTERIORE
8. DEFLETTORE ARIA ORIZZONTALE
(ALETTE VERTICALI)
3. FILTRO AIRA
9. PANNELLO DI CONTROLLO
4. ASPIRAZIONE ARIA
(GRIGLIA ASPIRAZIONE)
10. CAVO ALIMENTAZIONE
5. SCARICO ARIA
12. VASSOIO DI RACCOLTA
6. DEFLETTORE ARIA VERTICALE
(ALETTA ORIZZONTALE)
13. STAFFA
1. ARMADIO
11. COMPRESSORE
14. CONDENSATORE
7 EVAPORATORE
13
Installazione interruttore automatico e componenti per l’installazione
Leggere attentamente e seguire le istruzioni fornite.
È necessario installare un interruttore automatico tra l’alimentazione di rete e l’unità nel caso non si faccia uso
di una spina (vedere l’illustrazione sotto).
Alimentazione di rete
Interruttore automatico
Usare un interruttore automatico
o fusibile con temporizzatore.
Nota: Utilizzare un interruttore automatico
a 20A per alcuni modelli (21k ~ 26k Btu/h).
Guarnizione
Vassoio di raccolta
Vite
(Per certi modelli)
Guarnizione
Vassoio di raccolta
Vite
(Per certi modelli)
14
Guida all’installazione
Hardware
Sequenza di installazione
Selezionare la posizione migliore
1 Misurare lo spazio riservato per l’installazione ed assicurarsi che
Guarnizione
sia ottimale. Il condizionatore d’aria deve essere saldamente
installato per impedire il verificarsi di vibrazioni e rumore.
2 Evitare l’esposizione alla luce diretta del sole.
dell’unità. Ci deve essere almeno 50cm (20 in.) di spazio intorno
al retro dell’unità. Ostacoli che impediscono il libero flusso
dell’aria possono ridurre l’efficienza di raffreddamento dell’unità.
4 L’unità deve essere installata inclinata leggermente verso
Calore
irradiazione
10~15mm
Superiore a 50 cm
1/4 Bolla
l’esterno (circa 3°) per permettere lo scarico della condensa.
(circa 10~15 mm o bolla _ con livello)
Nota : La griglia esterna deve essere volta verso l’esterno
per lo scarico dell’aria.
Livello
Rimuovere il condizionatore d’aria dalla cassa
1 Rimuovere le due viti utilizzate per la spedizione dal retro della cassa.
2 Rimuovere le 2 viti su ciascun lato della cassa Conservarle per uso futuro.
3 Estrarre il condizionatore d’aria dalla cassa tirando sulla maniglia del vassoio di base tenendo allo stesso tempo ferma la cassa.
4 Rimuovere il blocco di polistirolo bianco dal compressore (relativo ad alcuni modelli).
Blocco di polistirolo bianco
Viti di spedizione
Montaggio (Opzionale)
Il vassoio di raccolta viene usato per raccogliere l’acqua di condensa.
Se l’umidità è alta è possibile che il vassoio di raccolta si riempia eccessivamente.
Il vassoio che si trova sulla base può anche raccogliere acqua quando si trova nel modo inverso (solo nei modelli dotati di
ciclo inverso) Per scaricare l’acqua eccedente, rimuovere il tappo dello scarico dal retro dell’unità e fissare un tubo di scarico.
1. Prendere il vassoio di raccolta che si trova nello scarico dell’aria o barriera.
2. Rimuovere il tappo di plastica dal foro sulla base del vassoio. (Non applicabile a tutti i modelli)
3. Fissare il vassoio di raccolta all’angolo sinistro della struttura con 2-4 viti.
4. Connettere il tubo flessibile di scarico al foro che si trova sul fondo del vassoio di scarico.
Il tubo flessibile di scarico adatto alle proprie necessità può essere acquistato localmente. (Tubo flessibile di scarico non è incluso)
15
ITALIANO
3 Rimuovere gli ostacoli eventualmente presenti sul retro
70-150cm
Raffreddato
aria
Staccionata
Telone
Installazione dell’alloggiamento
Fase 1
Rimuovere il condizionatore d’aria dal suo imballo ed estrarre il
condizionatore d’aria dal suo rivestimento.
Nota: L’UNITÀ PUÒ ESSERE SOSTENUTA
DA UN ROBUSTO TELAIO OPPURE
APPESO AD SOSTEGNO AEREO
FASCIARE O SIGILLARE INTORNO AL TELAIO
ESTERNO DELLA PARETE O ARCHITRAVE
Fase 2
Preparare il foro nel muro in modo che la parte inferiore dell’alloggiamento abbia
un sostegno sicuro, la parte superiore una luce minima e che le feritoie
d’ingresso dell’aria abbiano l’aria specificata. I fori dall’esterno attraverso al cavità
devono essere sigillati. Il rivestimento deve essere inclinato verso il posteriore di
circa 5 mm per permettere lo scolo dell’acqua prodotta durante il funzionamento.
CANALE DI SCOLO
Fase 3
Installare il rivestimento nella parete e fissare.
Assicurarsi che le guarnizioni di gomma non siano danneggiate.
Fasciare, sigillare o riempire le cavità intorno alla parte interna ed esterne
per fornire un aspetto e protezione dalle intemperie, insetti e roditori.
SOLIDO TELAIO
DI LEGNO INTORNO
A TUTTA L’UNITÀ
TELAIO ESTERNO DI
SOSTEGNO AL PUNTO
DI EQUILIBRIO DEL RAC
PARTIZIONE O PARETE
CON TELAIO DI LEGNO
IN ALTERNATIVA UTILIZZARE
STAFFE COME INDICATO AL
DISEGNO SUCCESSIVO.
Modo preferito di installazione su parete
di legno, partizione o finestra
Installazione dell’unità nel rivestimento
FASCIARE O SIGILLARE INTORNO AL TELAIO
ESTERNO DELLA PARETE O ARCHITRAVE
1 Inserire l’unità nel rivestimento fino a quando l’unità non sia bene inserita
nel rivestimento. E’ necessario fare molta attenzione che i nastri di
guarnizione sul rivestimento rimangano in posizione.
ASSICURARSI CHE LE
ALETTE SIANO
COMPLETAMENTE
ALL’ESTERNO DELLA
PARETE
2 Connettere il condizionatore d’aria all’alimentazione e fare una matassa
del cavo in eccesso sotto al condizionatore d’aria o centralina di controllo.
3 Inserire il blocco del telaio nella guida del rivestimento inferiore e fissare
alla base con la vite fornita in dotazione.
CANALE DI SCARICO
ROBUSTO TELAIO
DI LEGNO
PARTIZIONE O
PARETE CON
TELAIO DI LEGNO
STAFFA DI SOSTEGNO
(UNA PER LATO)
SOSTEGNO SOLIDO DI LEGNO
4 Rimuovere il pannello anteriore dalla scatola di cartone e di plastica e
montare come indicato dalle Istruzioni d’uso.
Modo alternativo di fissaggio nel caso sia
impossibile fornire un sostegno esterno.
5 Accendere l’unità. Controllare il funzionamento dell’unità e controllare
l’eventuale presenza di rumore o vibrazioni nell’installazione.
6 Fissare il canale di scarico all’alloggiamento e montare una linea di scarico
adeguata, come richiesto.
Installazione dell’unità alla parete
RITAGLIO 45° PER
LUCE ALETTE
RITAGLIO 45° PER
LUCE ALETTE
ANTERIORE
Ingresso aria
PARETE DI
MATTONE
Ingresso aria
INGRESSO
ARIA
Ingresso aria
100mm
VISTA
SUPERIROE
Uscita aria
USCITA ARIA
OPZIONE A
OPZIONE B
16
INGRESSO
ARIA
100mm
ALETTA
Minimo 100mm
PARETE DI
MATTONE
Installazione del condizionatore d’aria nel rivestimento
4 Fissare la griglia anteriore al rivestimento inserendo
1 Inserire l’unità nel rivestimento Installare
nuovamente le 2 viti rimosse in precedenza al
lato del rivestimento.
Vite
Vite
Cavo di
alimentazione
PERICOLO: Il cavo di alimentazione deve
essere connesso a un circuito
separato. Il filo verde deve essere
messo a terra
2 Inserire la guarnizione di gomma alla parte
superiore dell’unità e la parete per impedire
l’entrata di aria, insetti nella stanza.
La guarnizione
di gomma
5 Sollevare la griglia di aspirazione e fissare la
griglia con una vite (L.10mm) Abbassare la
griglia in posizione.
3 Prima di montare la griglia anteriore ed estrarre
la leva di controllo della feritoia posizionata
sopra ai selettori di controllo dell’unità come
indicato (su alcuni modelli).
17
ITALIANO
le linguette della griglia nelle fessure che si trovano
sulla parte anteriore del rivestimento. Premere sulla
griglia fino a quando non scatta in posizione.
Quando si stacca la parte anteriore della griglia dal
rivestimento, premere la griglia verso destra e tirare
verso di se.
Guida all’installazione
dell’hardware
Griglia di ingresso invertibile
Uso della griglia invertibile (alcuni modelli)
Apertura della griglia anteriore dalla parte superiore
dell’unità
1 Smontare la griglia di ingresso dalla griglia anteriore.
Separare la sezione incernierata rimuovendo le viti con
un cacciavite a punta piatta.
2 Capovolgere la griglia di aspirazione ed inserire i ganci
dei fori inferiori della griglia anteriore.
3 Inserire il filtro.
Apertura della griglia anteriore dalla parte inferiore
dell’unità
Non sono necessarie modifiche se si desidera rimuovere il
filtro dalla parte inferiore dell’unità. (Impostazione di Fabbrica)
18
Argomenti
comuni
Problemi comuni e soluzioni
Prima di rivolgersi all’assistenza si prega di controllare il seguente elenco di problemi comuni e le loro soluzioni.
Il condizionatore funziona normalmente quando:
È possibile che il condizionatore funzioni in modo anomalo quando:
Problema
Il condizionatore
d’aria non funziona
Possibili cause
Cosa fare
■ Il condizionatore non è collegato
all’alimentazione o o non è ben
collegato.
• Assicurarsi che la spina sia inserita
completamente.
■ Il fusibile è bruciato o è scatta
l’interruttore automatico.
• Controllare il fusibile o interruttore automatico e
sostituire il fusibile o riattivare l’interruttore
automatico.
■ Interruzione della corrente.
• Nel caso di interruzione della corrente, impostare il
selettore di alimentazione su OFF. Quando viene
riattivata l’alimentazione di rete attendere 3 minuti
prima di riavviare il condizionatore per impedire un
sovraccarico del compressore.
■ Il flusso d’aria è limitato
• Assicurarsi che non vi siano tendaggi, persiane,
mobili o altri ostacoli davanti al condizionatore
d’aria.
■ È possibile che il TERMOSTATO
non sia stato impostato in modo
corretto
• Impostare il selettore su un’impostazione
maggiore. L’impostazione più alta fornisce il
massimo raffreddamento.
■ Il filtro d’aria è sporco.
• Pulire il filtro almeno una volta ogni 2 settimane
Consultare la sezione Cura e manutenzione
(p. 11) del manuale.
■ Il condizionatore d’aria è appena
stato acceso
• Dopo l’accensione del condizionatore d’aria è
necessario dare al condizionatore tempo
sufficiente per raffreddare la stanza.
■ L’aria fredda viene dispersa
• Controllare la presenza di aperture sul pavimento
o ritorni di aria fredda.
• CHIUDERE la ventilazione del condizionatore d’aria
■ Le spire di raffreddamento sono
piene di ghiaccio
• Vedere la sezione seguente “Formazione di
ghiaccio sul condizionatore d’aria”.
■ Le spire di raffreddamento sono
piene di ghiaccio
• Il ghiaccio può bloccare il flusso d’aria e impedire
al condizionatore d’aria di raffreddare con
efficienza la stanza. Impostare il ventilatore su
MED o HIGH impostando il termostato su 1 o 2
fino allo scioglimento del ghiaccio.
Il condizionatore
d’aria non raffredda
Formazione di
ghiaccio sul
condizionatore d’aria.
19
ITALIANO
• Si ode un rumore picchiettante. Questo è causato dall’acqua raccolta dal condensatore nei giorni piovosi o in
condizioni di alta umidità. La funzione è stata progettata per rimuovere l’umidità nell’aria migliorando l’efficienza
del raffreddamento.
• Si sente un clic nel termostato. Questo è provocato dall’avviamento e arresto del ciclo del compressore.
• Si vede acqua gocciolare dal retro dell’unità. Nei giorni piovosi o molto umidi vi può essere accumulo d’acqua
nel vassoio di raccolta. L’acqua fuoriesce e gocciola dal retro dell’unità.
• Si sente il rumore della ventola in funzione mentre il compressore è silenzioso. “ Questa è una caratteristica
normale di funzionamento.
Nota
20
LG
Système de Climatisation Type-Fenêtre LG
GUIDE DE L’UTILISATEUR
IMPORTANTES
Merci de consacrer un moment à la lecture de ce guide. Il
contient des informations importantes sur votre produit. En
expliquant les conseils d’entretien de ce produit et en évitant
ainsi toute erreur d’utilisation, ce guide vous aidera à
économiser du temps et de l’argent.
Lisez attentivement les conseils de sécurité afin d’éviter
d’éventuels dangers et dégâts de votre appareil dus à une
mauvaise utilisation ou à une installation non conforme. LG
décline toute responsabilité en cas de dégâts provoqués par
une mauvaise utilisation du produit.
Avant l’installation, cet appareil de
climatisation doit être approuvé par le
service fournissant l’électricité
(EN 61000-3 Norm.)
FRANÇAIS
PRÉCAUTIONS
LG
Acondicionador de Aire para Ventana LG
MANUAL DEL USUARIO
Por favor, dedique un poco de tiempo a leer detenidamente
este manual. Contiene información útil sobre su producto.
Este manual puede ayudarle a ahorrar tiempo y dinero ya que
le explica cómo realizar un correcto mantenimiento del
aparato y cómo evitar su uso indebido.
PRECAUCIONES
Para evitar los potenciales peligros y daños ocasionados por
un uso indebido o una instalación incorrecta, preste mucha
atención a los avisos de precaución. LG no se hace
responsable de ningún daño provocado por el mal uso del
producto.
Antes de proceder a la instalación, esta
unidad de aire acondicionado debe recibir
la aprobación de la compañía de
suministro eléctrico (Norma EN 61000-3)
ESPAÑOL
IMPORTANTE
Manual del Usuario – Acondicionador de Aire para Ventana
ÍNDICE
P ara sus archivos
Escriba aquí el modelo y número de serie:
Modelo nº:
Serie nº:
1. Precauciones de Seguridad
Puede encontrar estos datos en la etiqueta situada
en el lateral de cada unidad.
2. Instrucciones de Funcionamiento
Nombre del distribuidor:
Fecha de compra:
3. Cuidados y Mantenimiento
4. Guía de Instalación del Equipo
L ea este manual
5. Problemas Habituales
En su interior encontrará muchos consejos útiles
sobre la utilización y mantenimiento de su
acondicionador de aire. Unos pocos cuidados por su
parte le pueden ahorrar mucho tiempo y dinero
durante la vida de su acondicionador de aire.
En la tabla de consejos para la solución rápida de
problemas encontrará muchas respuestas a los
problemas más habituales. Si revisa primero nuestra
Tabla de Consejos para la solución rápida de
problemas, tal vez no necesite llamar nunca al
servicio técnico.
PRECAUCIÓN
• Póngase en contacto con un técnico del servicio
autorizado para realizar la reparación y
mantenimiento de esta unidad.
• Póngase en contacto con un instalador para realizar
la instalación de esta unidad.
• El acondicionador de aire no debe ser utilizado por
niños o personas con sus facultades mermadas sin
supervisión.
• Se debe vigilar a los niños para que no jueguen con
el acondicionador de aire.
2
Precauciones de
Seguridad
Precauciones
Para evitar lesiones al usuario o a otras personas y daños materiales, se deben respetar las siguientes instrucciones.
Un uso incorrecto por ignorar las instrucciones provocará lesiones o daños. La gravedad de los posibles
daños se clasifica mediante las siguientes indicaciones.
ADVERTENCIA Este símbolo señala la posibilidad de provocar lesiones graves o muerte.
ATENCIÓN Este símbolo indica sólo la posibilidad de lesiones o daños materiales.
No haga nunca esto
Haga esto siempre
■ Los apartados que deben respetarse siempre se clasifican mediante los siguientes símbolos.
Enchufe correctamente el
cable de la corriente.
• En caso contrario se provocarán
descargas eléctricas o incendios
debido a la generación de calor o
de descargas eléctricas.
No modifique la longitud del cable de
la corriente ni utilice la misma toma
de corriente para otros aparatos.
• Provocará descargas eléctricas o
incendios debido a la generación de calor.
Realice siempre una
conexión a tierra.
No ponga en marcha o detenga la
unidad enchufando o desenchufando
el cable de la corriente.
• Provocará descargas eléctricas o
incendios debido a la generación
de calor.
No ponga en funcionamiento la
unidad con las manos mojadas
ni en un entorno empapado.
• Puede provocar descargas
eléctricas.
No dañe el cable de la
corriente ni utilice un cable
no especificado.
• Provocará descargas eléctricas o incendios.
• Si el cable de suministro eléctrico está dañado
debe ser sustituido por un cable especial o por
un conjunto. Ambos están disponibles en el
fabricante o en su agente de servicio. (Y fijación)
No dirija el flujo de aire sólo
para los ocupantes de la
habitación.
• Podría ser perjudicial para su
salud.
Instale siempre un interruptor
automático de fugas de aire y un
tablero de conmutación específico.
• Si no se realiza la conexión a tierra se
• Puede provocar fallos de funcionamiento
• Si no se instalan, pueden provocarse
pueden provocar descargas eléctricas.
de la máquina o descargas eléctricas.
incendios y descargas eléctricas.
Si el producto emitiera ruidos
No utilice nunca una toma de
No abra la entrada durante
extraños o generara humo,
corriente que esté dañada o
el funcionamiento.
desenchufe el cable de la corriente.
floja.
• Se pueden provocar accidentes por • Puede provocar incendios y
• Puede provocar descargas
incendio o descarga eléctrica.
descargas eléctricas.
eléctricas.
No acerque armas de fuego
No utilice herramientas que
No utilice el cable de la corriente cerca de
al aparato.
despidan calor cerca del
gases inflamables o sustancias que puedan
cable de la corriente.
encenderse (benceno, gasolina, etc.)
• Puede provocar un incendio.
No debe entrar agua en los
componentes eléctricos.
• Puede provocar incendios y
descargas eléctricas.
3
• Puede provocar una explosión o
un incendio.
ESPAÑOL
ADVERTENCIA
ADVERTENCIA
ADVERTENCIA
ADVERTENCIA
Si se produjera algún escape de gas, abra las ventanas
para que se ventile la habitación antes de poner en marcha
el acondicionador de aire o de utilizar el mando a distancia.
No desmonte ni modifique ningún
componente.
• Se puede provocar una explosión, un incendio y
quemaduras.
• Se pueden provocar fallos de funcionamiento y
descargas eléctricas.
ATENCIÓN
ATENCIÓN
No toque nunca las partes
metálicas de la unidad
cuando desmonte el filtro.
• Puede provocar lesiones.
Cuando limpie la unidad, asegúrese
primero de que el suministro de
energía y el interruptor automático
están desconectados.
• Como el ventilador gira a gran
velocidad durante el funcionamiento,
puede provocar lesiones.
Durante una tormenta,
detenga el aparato y cierre
las ventanas.
• El funcionamiento con ventanas abiertas
puede provocar el humedecimiento de la
habitación y que se empape el mobiliario.
No coloque obstáculos
alrededor de las aberturas de
entrada y expulsión de aire.
• Puede provocar fallos del
aparato o un accidente.
No utilice detergentes fuertes
como cera o diluyentes. Utilice
un paño suave.
• El aspecto externo puede deteriorarse
debido a cambios en el color del
producto o al rayado de su superficie.
No limpie el acondicionador
de aire con agua.
• El agua puede entrar en la unidad
y degradar el aislamiento. Puede
provocar una descarga eléctrica.
No coloque animales ni
plantas en un lugar expuesto
al flujo directo de aire.
• Puede ser perjudicial para
animales y plantas.
Cuando desenchufe el
aparato, estire de la cabeza
del enchufe.
• Puede provocar descargas
eléctricas y daños.
Asegúrese de que la consola
exterior de instalación de la
unidad no esté dañada debido a
un prolongado uso del aparato.
• Se pueden provocar daños
debido a la caída del producto.
No coloque objetos pesados sobre
el cable de la corriente y tenga
cuidado de que éste no resulte
presionado por ningún objeto.
• Existe peligro de incendio o de
descargas eléctricas.
Disponga de una buena ventilación
cuando utilice el aparato al mismo
tiempo que estufas o similares.
• Se puede provocar escasez de
oxígeno.
No utilice el aparato para otros fines
como animales o plantas,
maquinaria de precisión o para la
conservación de obras de arte.
• Puede provocar daños en
animales o plantas y pérdidas
materiales.
Desconecte el interruptor
principal cuando no se vaya a
utilizar el aparato durante un
prolongado espacio de tiempo.
• Puede provocar fallos del
producto o un incendio.
Coloque correctamente los
filtros y límpielos una vez a
la semana.
• El funcionamiento sin filtros
puede provocar fallos de
funcionamiento.
No ingiera el agua que
desagua el acondicionador
de aire.
• Puede provocar desordenes
estomacales.
Cuando en los productos entre agua u otros objetos,
desconecte el interruptor del cuerpo principal del
aparato. Después de desenchufar el cable de la
corriente, póngase en contacto con el servicio técnico.
Cuando se extraiga una pila utilizada en un
aparato, tenga cuidado de que los niños no la
ingieran por descuido. Colóquelas en un
lugar donde los niños no puedan tocarla.
4
Precauciones de
Seguridad
Antes del Funcionamiento
Preparación para el funcionamiento
1 Para la instalación del aparato, póngase en contacto con un especialista.
2 Enchufe correctamente el cable de la corriente.
3 No utilice un cable de la corriente dañado o que no sea estándar.
4 En la toma de corriente no se deben enchufar otros aparatos.
5 No utilice prolongadores.
6 No ponga en marcha ni detenga el aparato enchufando/desenchufando el cable de la corriente.
1 Quedar expuesto al flujo directo del aire durante un prolongado espacio de tiempo puede resultar
perjudicial para su salud. Las personas (así como animales o plantas) no deben quedar expuestas a ese
flujo directo durante mucho tiempo.
2 Debido a la posibilidad de que se produzca una escasez de oxígeno, ventile la habitación cuando se
utilice el aparato al mismo tiempo que estufas u otros aparatos de calefacción.
3 No utilice este acondicionador de aire para otros fines distintos a los especificados (por ejemplo, para el
mantenimiento de dispositivos de precisión, para conservar alimentos, para animales o plantas y objetos
de arte). Tales usos podrían ser perjudiciales para todos ellos.
Limpieza y mantenimiento
1 Cuando desmonte el filtro, no toque las partes metálicas de la unidad . Cuando se manipulan cantos
metálicos afilados se pueden provocar heridas.
2 No utilice agua para limpiar el interior del acondicionador de aire. La exposición al agua puede destruir el
aislamiento, lo que podría provocar descargas eléctricas.
2 Cuando limpie la unidad, asegúrese primero de que el aparato y el interruptor automático están
desconectados. El ventilador gira a velocidades muy altas durante el funcionamiento. Existe la
posibilidad de provocar lesiones si se pone en marcha la unidad accidentalmente mientras se están
limpiando las partes internas de la unidad.
Servicio Técnico
Para trabajos de reparación y mantenimiento, póngase en contacto con su concesionario del servicio técnico
autorizado.
5
ESPAÑOL
Utilización
Instrucciones de
Funcionamiento
Localización y Función de los Controles
Controles
Los controles serán como alguno de los siguientes.
On
Off
Auto Swing
5
OFF
4
6
MED
FAN
3
7
2
8
1
HIGH
COOL
LOW
FAN
9
MED
COOL
LOW COOL
Thermostat
Operation
Thermostat
Operation
Auto Swing
5
4
6
Off
3
7
2
8
1
OFF
On
MED
FAN
HIGH
COOL
LOW
FAN
9
MED
COOL
LOW COOL
Thermostat
Operation
Auto Swing
5
4
Off
6
Off
3
On
Med
Fan
High
Cool
7
2
8
1
9
Low
Fan
Med
Cool
Low Cool
6
■ OPERATION (FUNCIONAMIENTO)
High Cool
(Enfriamiento Alto), Med Cool
(Enfriamiento Medio) y Low Cool
(Enfriamiento Bajo)
enfrían con distintas velocidades del ventilador. Med Fan
(Ventilador Medio) o Low Fan
(Ventilador Bajo) proporcionan circulación del aire y filtrado sin enfriamiento. Off o (Desactivado)
desconecta el acondicionador de aire.
NOTA : Si cambia el conmutador desde una configuración de enfriamiento a OFF o a una configuración de
ventilador, espere 3 minutos como mínimo antes de volver a conectar a una configuración de enfriamiento.
Descripciones del Enfriamiento
Para una Enfriamiento normal – Seleccione High Cool o Med Cool con el mando Operation en el punto
medio del mando Thermostat.
Para una Enfriamiento máximo – Seleccione High Cool con el mando Operation en el número más alto
disponible en su mando Thermostat.
Para una Enfriamiento más suave y durante las horas nocturnas – Seleccione Low Cool con el mando
Operation en el punto medio del mando Thermostat.
El THERMOSTAT se utiliza para mantener la temperatura de la habitación. El compresor se apagará y
encenderá de forma cíclica para mantener la habitación con el mismo nivel de confort. Cuando gire el mando
a un número mayor (hacia la derecha), el aire se hará más frío.
Las posiciones 5 o 6 (posición media del arco) es una configuración normal para unas condiciones medias.
■ AUTO SWING (OSCILACIÓN AUTOMÁTICA)
El interruptor Auto Swing controla la dirección horizontal del aire mediante un sistema de oscilación (no en
todos los modelos).
ON (
): La oscilación automática está en funcionamiento
OFF (
): la oscilación automática no está en funcionamiento
ATENCIÓN
Cuando el acondicionador de aire ha estado realizando su función de enfriamiento y se desconecta o
pasa a la posición de ventilador, espere como mínimo 3 minutos antes de volver a ajustarlo para
enfriamiento.
7
ESPAÑOL
■ THERMOSTAT (TERMOSTATO)
Controles
• THERMOSTAT (TERMOSTATO)
Los controles serán como alguno de los siguientes.
FAN
Gire el control del termostato a la configuración deseada. La
posición del control es una configuración normal para las
condiciones habituales. Si es necesario, puede cambiar esta
configuración según sus preferencias de temperatura.
El termostato controla automáticamente las funciones de
enfriamiento o calentamiento, pero el ventilador funciona
continuamente siempre que el acondicionador de aire esté
en marcha. Si la habitación está demasiado caliente, gire el
control del termostato en el sentido de las agujas del reloj; si
está demasiado fría, gírelo en sentido contrario.
FAN
• LUZ HEATER (CALENTADOR)
Cuando la unidad está ajustada en una condición de
calentamiento se enciende la luz verde.
Cuando se acumula escarcha en el intercambiador térmico
del exterior, el desescarchado se realiza automáticamente y
la luz verde se apaga.
La unidad puede emitir un “silbido” y el motor del ventilador
se apaga entre 1 y 10 minutos.
Esta circunstancia no debe ser considerada un problema.
Tras el desescarchado, la operación de calentamiento
comienza de nuevo.
Thermostat
• OPERATION (FUNCIONAMIENTO)
Operation
OFF (APAGADO) : (
LOW FAN (
(VENTILADOR BAJO)
Heater
Warmer
Cooler
Thermostat
Operation
• AUTO SWING (OSCILACIÓN
AUTOMÁTICA) (para algunos modelos)
ON (
OFF (
) : La oscilación del aire está en funcionamiento
mientras el mando OPERATION está en
posición COOL o HEAT.
o ) : Apaga el acondicionador de aire.
) : El ventilador funciona a baja
velocidad sin enfriamiento
(calentamiento).
LOW COOL (
(ENFRIAMIENTO BAJO)
) : Enfriamiento con un funcionamiento
del ventilador a baja velocidad.
HIGH COOL (
(ENFRIAMIENTO ALTO)
LOW HEAT (
(CALENTAMIENTO BAJO)
HIGH HEAT (
(CALENTAMIENTO ALTO)
) : Enfriamiento con un funcionamiento
del ventilador a alta velocidad.
) : Calentamiento con un funcionamiento
del ventilador a baja velocidad.
) : Calentamiento con un funcionamiento
del ventilador a alta velocidad.
ATENCIÓN
Cuando el acondicionador de aire ha estado operando
en enfriamiento y se desconecta o se ajusta a una
posición de ventilador, espere 3 minutos como mínimo
antes de volver a ajustarlo para enfriamiento.
) : Detiene el funcionamiento de la oscilación
de aire.
8
Instrucciones de
Funcionamiento
Operaciones del Mando a Distancia
El mando a distancia y el panel de control serán como alguno de los siguientes.
2
3
7
4
7
1
3
1
2
5
1
4
5
2
5
5
4
4
3
3
4
3
2
7
7
1
1
4
2
3
2
5
3
7
1
1
5
5
4
4
5
4
6
3
2
1
2
3
2
3
7
1
4
5
6
1 POWER
El funcionamiento comienza cuando se pulsa este botón y se detiene cuando se pulsa de nuevo.
2 SELECTOR DEL MODO DE FUNCIONAMIENTO
La función de calentamiento sólo está disponible en algunos modelos.
Seleccione el modo de enfriamiento para enfriar la habitación.
Seleccione el modo de calentamiento para calentar la habitación.
Seleccione el modo de ventilación para el funcionamiento básico del ventilador.
3 CONEXIÓN/DESCONEXIÓN DEL TEMPORIZADOR
El temporizador se puede ajustar para que la unidad se ponga en marcha y se detenga en incrementos
de una hora (hasta 12 horas).
La temperatura aumenta sólo 2°C sin ningún incremento posterior.
9
ESPAÑOL
2
5
1
4 SELECTOR DE LA VELOCIDAD DEL VENTILADOR
Para obtener una mayor potencia durante las funciones de enfriamiento o calentamiento, seleccione una
velocidad superior del ventilador.
Modelo Enfriamiento: 3 pasos {Alto[F3] → Bajo[F1] → Medio[F2]
Modelo Calentamiento: 2 pasos {Alto[F2] → Bajo[F1]
5 CONTROL DE LA TEMPERATURA
El termostato supervisa la temperatura de la habitación para que se mantenga la temperatura deseada.
El termostato se puede ajustar entre 16°C – 30°C (61°F – 81°F)
La unidad necesita una media de 30 minutos para ajustar la temperatura de la habitación en 1°C (1,8°F).
6 BOTÓN OSCILACIÓN AUTOMÁTICA (disponible en algunos modelos)
Permite que la unidad haga oscilar automáticamente las persianillas a derecha e izquierda durante su
funcionamiento. Si se desactiva esta opción, las persianillas se detendrán en su última posición y
orientarán el flujo de aire en la dirección correspondiente.
7 SENSOR DEL MANDO A DISTANCIA
Interruptor de Reinicio Automático
En caso de fallo del suministro eléctrico, la unidad se puede ajustar automáticamente para que cuando se
recupere el suministro reinicie su funcionamiento con la configuración anterior.
Colocación de las pilas en el mando a distancia
1 Empuje hacia fuera con el pulgar la tapa posterior del mando a distancia.
2 Preste atención a las polaridades e introduzca dos pilas nuevas AAA, 1,5 V con la alineación correcta.
3 Vuelva a colocar la tapa
NOTA: No utilice pilas recargables. Asegúrese de que las dos pilas son nuevas.
• Para evitar descargas, extraiga las pilas del mando a distancia si el
acondicionador de aire no va a ser utilizado durante un periodo de tiempo
prolongado.
Mantenga el mando a distancia alejado de lugares extremadamente calientes o
húmedos.
Para mantener el mando a distancia en óptimas condiciones de funcionamiento,
el sensor del mando no debe quedar expuesto a la luz directa del sol.
• El mando a distancia se puede instalar en una pared utilizando el soporte
correspondiente.
10
Instrucciones de
Funcionamiento
Ajuste de la Dirección del Flujo de Aire
Control del orificio de ventilación
El control del orificio de ventilación está situado encima de los mandos de
control.
Para obtener la máxima eficacia de enfriamiento, CIERRE la ventilación. Ello
permitirá la circulación interna del aire.
ABRA la ventilación para descargar el aire viciado.
CERRAR
VENTILACIÓN
ABRIR
Para abrir el orificio de ventilación, estire de la palanca hacia usted.
Para cerrarlo, empújela hacia dentro.
Ajuste de la dirección del flujo de aire
Ajuste horizontal de la dirección del flujo de aire
El ajuste de las persianillas verticales a izquierda y derecha cambiará el
flujo de aire horizontal.
Ajuste vertical de la dirección del flujo de aire
El ajuste de las persianillas horizontales hacia arriba y abajo cambiará el
flujo de aire vertical.
Las persianillas se pueden ajustar empujando suavemente hacia atrás o
arriba y abajo las persianillas verticales.
Orientación recomendada de las persianillas
Para conseguir la máxima eficacia de enfriamiento, ajuste las persianillas
para que queden orientadas hacia arriba.
Cuidados y
Mantenimiento
Cuidados y Mantenimiento
Antes de limpiar el acondicionador de aire, desconéctelo y desenchúfelo.
Rejilla y Tapa
Utilice agua y un detergente suave. No utilice lejía ni abrasivos.
Serpentines traseros
Compruebe regularmente los serpentines traseros. Si quedaran obstruidos con
polvo u hollín, deben limpiarse con un sistema de limpieza a vapor. En su
concesionario o centro de servicio encontrará un servicio profesional de limpieza.
11
ESPAÑOL
El flujo de aire se puede ajustar cambiando la dirección de las
persianillas del acondicionador de aire. Esta operación aumenta también
la eficacia de enfriamiento del aparato.
Filtro del aire
Para mantener el acondicionador de aire en perfectas condiciones de
funcionamiento, el filtro del aire situado detrás de la rejilla frontal se debe
revisar y limpiar cada 2 semanas como mínimo (o cuando sea necesario).
Cómo extraer el filtro del aire
1 La rejilla se puede abrir desde la parte superior o inferior para un fácil
mantenimiento.
2 Abra la rejilla de entrada estirando hacia fuera la puerta expuesta en la
parte inferior o superior de la unidad (según la instalación). Consulte el
apartado Utilización de la rejilla reversible de entrada de la sección
Guía de Instalación del Equipo si desea modificar el lado de apertura.
3 Estire ligeramente la pestaña para liberar el filtro. Estire del filtro en la
misma dirección de la apertura.
4 Limpie el filtro con agua jabonosa caliente. El agua debe estar por debajo
de 40°C (104°F).
5 Enjuague el filtro y sacuda con suavidad el exceso de agua. Déjelo secar
antes de volver a instalarlo.
Drenaje (Opcional)
La bandeja base puede desbordarse si existe un alto grado de humedad. Para
drenar el exceso de agua, retire el tapón de drenaje de la parte posterior de la unidad
y sujete la tubería de drenaje.
1 Coja la bandeja de drenaje montada en la descarga de aire o en la pantalla.
2 Retire el tapón de goma de la parte inferior de la bandeja base.
Tubería de drenaje
3 Instale la bandeja de drenaje por encima de la esquina de la tapa de donde
Tapón de drenaje
retiró el tapón con 4 (o 2) tornillos.
TAPA
4 Conecte la manguera de drenaje a la salida
situada en la parte inferior de la bandeja de
drenaje. Puede adquirir una manguera de BANDEJA
DE DRENAJE
drenaje o una tubería apropiada en su
localidad que satisfaga sus necesidades
TORNILLOS
particulares (la manguera no se suministra).
Fig. 1
Fig. 2
MANGUERA
DE DRENAJE
5 Seleccione la conexión más apropiada entre
Fig. 4
las figuras siguientes (teniendo en cuenta el
orificio de la unidad) para acoplar la bandeja
de drenaje en su unidad.
Fig. 3
12
Guía de Instalación
del Equipo
Instalación del Equipo
Características del Producto
ATENCIÓN
Acaba de comprar un acondicionador de aire para ventana y ha sido instalado por un especialista en este tipo
de instalaciones. Este aparato debe instalarse de conformidad con la normativa nacional sobre instalaciones
eléctricas. La presente guía es una orientación para ayudarle a conocer las características del producto.
2
1
3
4
2 3
7
5 8 6
4
5
6
7
8
9
9
10
10
11 12 14 13
11 12 13 14
8. DEFLECTOR HORIZONTAL DE AIRE
(PERSIANILLA VERTICAL)
1. TAPA
2. REJILLA FRONTAL
9. PANEL DE CONTROL
3. FILTRO DEL AIRE
4. ADMISIÓN DE AIRE
(REJILLA DE ENTRADA)
10. CABLE DE LA CORRIENTE
5. DESCARGA DE AIRE
12. BANDEJA BASE
6. DEFLECTOR VERTICAL DE AIRE
(PERSIANILLA HORIZONTAL)
13. ABRAZADERA
11. COMPRESOR
14. CONDENSADOR
7. EVAPORADOR
13
ESPAÑOL
1
Instalación del interruptor automático y piezas para la instalación
Lea detenidamente y siga las instrucciones que se indican.
Si no se utiliza enchufe, entre el punto de suministro eléctrico y la unidad se debe instalar un interruptor
automático (vea la siguiente ilustración).
Suministro eléctrico
Interruptor automático
Utilice un interruptor automático o
un fusible de retardo
Nota: utilice un cortocircuitador de 20A en
algunos modelos (21k ~ 26k Btu/h).
(L: 30 mm 5EA)
Espuma
Bandeja de drenaje
Tornillo
(Para algunos modelos)
(L:8 mm 4EA)
(Para la rejilla frontal, L: 10 mm, 1EA)
Espuma
(L: 30 mm 5EA)
Bandeja
de drenaje
Tornillo
(L:8 mm 4EA)
(Para algunos modelos)
(Para la rejilla frontal, L: 10 mm, 1EA)
14
Guía de Instalación
del Equipo
Pasos de la Instalación
Seleccione la mejor ubicación
ESPUMA
1 Mida el espacio disponible a fin de garantizar una buena instalación. El
MARQUESINA
acondicionador de aire debe instalarse firmemente en su sitio para
evitar vibraciones y ruidos.
3 Retire todos los obstáculos de la parte trasera de la unidad. Debe
existir como mínimo 50 cm (20 pulgadas) de espacio libre por detrás de
la unidad. Los obstáculos que restrinjan el flujo de aire pueden reducir
la eficacia de enfriamiento de la unidad.
70-150cm
AIRE FRÍO
2 Evite la exposición del aparato a la luz directa del sol.
4 La unidad se debe instalar con una ligera inclinación hacia el exterior
BARANDILLA
RADIACIÓN
DE CALOR
10 a 15 mm
Más de 50 cm
1/4de burbuja
(3º aproximadamente) para permitir el drenaje del agua de
condensación (alrededor de 10 a 15 mm o _ de burbuja de un nivel).
Nivel
Extraiga el acondicionador de aire de la tapa
1 Retire los 2 tornillos de envío de la parte trasera de la tapa.
2 Retire los 2 tornillos situados en cada lado de la tapa. Guárdelos para su uso posterior.
3 Deslice hacia fuera el acondicionador de aire estirando del tirador de la bandeja base mientras sujeta la tapa.
4 Retire el bloque de espuma blanca del compresor (en algunos modelos).
Bloque de espuma blanca
Tornillos
Colocación de la bandeja de drenaje (Opcional)
La bandeja de drenaje se utiliza para recoger el agua de condensación.
La bandeja base puede rebosar si existe un alto nivel de humedad. Esta bandeja también puede recoger el exceso de agua
cuando el aparato funcione en modo inverso (sólo en modelos con ciclo inverso). Para drenar el exceso de agua, retire el
tapón de drenaje de la parte posterior de la unidad y sujete la tubería de drenaje de la siguiente forma:
1. Retire la bandeja de drenaje ubicada en la descarga de aire o en la pantalla.
2. Retire el tapón de goma del orificio de la bandeja base (en algunos modelos).
3. Instale la bandeja de drenaje en la esquina izquierda de la tapa con 2 o 4 tornillos.
4. Conecte la manguera de drenaje al orificio situado en la parte inferior de la bandeja de drenaje.
Puede comprar una manguera o un tubo de drenaje en su localidad para satisfacer sus necesidades particulares
(manguera de drenaje no incluida).
15
ESPAÑOL
NOTA: La rejilla externa debe quedar al exterior para la
descarga del aire.
Instalación del bastidor
Paso 1
Saque el acondicionador de aire de su embalaje y deslícelo fuera de su bastidor.
Paso 2
Prepare el orificio en la pared de forma que la parte inferior del bastidor quede bien sujeta, la
parte superior tenga una separación mínima y las persianillas de entrada de aire tengan el
espacio libre que se muestra. Los orificios al exterior a través de la cavidad existente deben
quedar sellados. El bastidor debe tener una inclinación hacia la parte posterior de 5 mm
aproximadamente para permitir el drenaje del agua que se forma durante el funcionamiento.
NOTA: LA UNIDAD PUEDE SUJETARSE MEDIANTE UNA
ESTRUCTURA SÓLIDA EN SU PARTE INFERIOR O MEDIANTE
UN COLGANTE DESDE UN SOPORTE AÉREO SÓLIDO.
PROTEJA CON CHAPA DE ESCURRIMIENTO O
SELLE ALREDEDOR DE LA PARED O ARQUITRABE.
CONDUCTO DE DRENAJE
Paso 3
MARCO DE MADERA
MARCO SOPORTE EXTERNO EN
MACIZA ALREDEDOR DE
EQUILIBRIO PUNTO DE RAC
LA UNIDAD
Instale el bastidor en la pared y sujételo. Asegúrese de que las bandas de sellado de espuma
ALTERNATIVAMENTE, SE PUEDEN
no estén dañadas. Proteja con chapa de escurrimiento, selle o rellene los huecos existentes
PARED O TABIQUE DE ESUTILIZAR ABRAZADERAS COMO LAS
TRUCTURA DE MADERA
MOSTRADAS
en el interior y en el exterior para que tenga un aspecto satisfactorio, para proteger el equipo
contra las inclemencias del tiempo y para evitar la entrada de insectos y roedores.
Método preferente de instalación en una pared con
estructura de madera, en un tabique o en una ventana.
Instalaciones de la unidad en el bastidor
1 Deslice la unidad en el bastidor hasta que quede firmemente contra la
2
3
4
5
6
parte posterior de éste. Es necesario tener cuidado en esta operación
para garantizar que los bandas sellantes de espuma del bastidor
permanezcan en su posición.
Conecte el acondicionador de aire a la red eléctrica y enrolle el cable
sobrante por debajo de la base del aparato o de la caja de control.
Acople el cierre del chasis en el raíl inferior del bastidor y sujételo a la
base con el tornillo suministrado.
Retire el panel frontal de su caja de cartón, sáquelo de la bolsa de
plástico y acóplelo como se indica en las instrucciones de
funcionamiento.
Ponga en marcha la unidad. Compruebe su funcionamiento y la
existencia de posibles vibraciones en la instalación.
Acople el conducto de drenaje al bastidor y coloque una tubería de
drenaje hasta un lugar adecuado si fuera necesario.
PROTEJA CON CHAPA DE ESCURRIMIENTO O
SELLE ALREDEDOR DE LA PARED O ARQUITRABE.
ASEGÚRESE DE QUE LAS
PERSIANILLAS QUEDAN
TOTALMENTE FUERA DE
LA PARED
CONDUCTO DE DRENAJE
MARCO DE MADERA
MACIZA
PARED O TABIQUE
DE ESTRUCTURA DE
MADERA
PUNTAL RÍGIDO
(UNO PARA CADA LATERAL)
SOPORTE SÓLIDO DE MADERA
Método alternativo de instalación si no se puede
disponer de un soporte externo
Instalaciones de la unidad en la pared
CORTE DE 45° EN EL LADRILLO PARA
DEJAR ESPACIO LIBRE PARA LAS
PERSIANILLAS
ENTRADA DE AIRE
PARED DE LADRILLO
CORTE DE 45° EN EL LADRILLO PARA
DEJAR ESPACIO LIBRE PARA LAS
PARTE PERSIANILLAS
DELANTERA
100mm
ENTRADA DE AIRE
PARED DE LADRILLO
VISTA SUPERIOR
ENTRADA DE AIRE
ENTRADA DE AIRE
ENTRADA DE AIRE
100 mm
PERSIANILLA
SALIDA DE AIRE
SALIDA DE AIRE
100 mm mínimo
OPCIÓN A
OPCIÓN B
16
Instale el acondicionador de aire en la tapa
4 Coloque la rejilla frontal en la tapa insertando las
1 Deslice el acondicionador de aire hacia el
interior de la tapa. Coloque en cada lado los 2
tornillos que retiró anteriormente .
pestañas de la rejilla en las ranuras de la parte
delantera de la tapa. Empuje la rejilla hacia
dentro hasta que se acople en su lugar. Cuando
desmonte la rejilla frontal, empújela hacia la
derecha de usted y estire hacia usted.
Tornillo
Tornillo
Cable de la corriente
ESPAÑOL
ATENCIÓN El cable de la corriente debe estar
conectado a un circuito
independiente. El hilo verde debe
estar conectado a tierra.
2 Apriete la espuma entre la parte superior de la
unidad y la pared para evitar la entrada de aire e
insectos en la habitación.
Espuma
5 Levante la rejilla de entrada y sujete la rejilla
frontal con un tornillo (L: 10 mm). Baje la rejilla
de entrada a su sitio.
3 Antes de instalar la rejilla frontal, estire la
palanca de control del orificio de ventilación
ubicada encima de los mandos de control de la
unidad, según se muestra (en algunos modelos).
17
Guía de Instalación
del Equipo
Rejilla Reversible de Entrada
Utilización de la rejilla reversible de entrada (algunos modelos)
Apertura de la rejilla frontal desde la parte superior de la
unidad:
1 Desmonte la rejilla de entrada de la rejilla frontal. Separe
la parte articulada retirando los tornillos con un
destornillador de cabeza plana.
2 Coloque la parte superior de la rejilla de entrada hacia
abajo e inserte los ganchos en los orificios inferiores de
la rejilla frontal.
3 Coloque el filtro.
Apertura de la rejilla frontal desde la parte inferior de la
unidad.
Si desea retirar el filtro desde la parte inferior no es necesario
realizar ningún cambio (configurado de fábrica).
18
Problemas
Habituales
Problemas Habituales y Soluciones
Antes de llamar al servicio técnico, revise la siguiente lista de problemas habituales y soluciones.
El acondicionador de aire funciona con normalidad cuando:
• Se puede oír un silbido. Lo provoca el agua que es recogida por el condensador en días lluviosos o si existe un
alto grado de humedad. Esta prestación está diseñada para ayudar a eliminar la humedad del aire y mejorar la
eficacia de enfriamiento.
• Se oye el “clic” del termostato. Lo provoca la puesta en marcha y parada de los ciclos del compresor.
• Se ve agua goteando en la parte trasera de la unidad. Si hay mucha humedad o en días lluviosos, el agua
puede ser recogida en la bandeja base . El agua rebosa y gotea por la parte trasera de la unidad.
• Se oye el ventilador en funcionamiento mientras el compresor está silencioso. Ésta es una prestación normal
de funcionamiento.
El acondicionador de aire puede estar funcionando anormalmente cuando:
Problema
El acondicionador
de aire no enfría
Aparece escarcha en
el acondicionador de
aire
Qué hacer
■ El acondicionador de aire está
desenchufado o no está enchufado
completamente.
• Asegúrese de que el enchufe está completamente
enchufado en la toma de corriente.
■ El fusible se ha fundido/el interruptor
automático se ha disparado.
• Compruebe la caja del fusible/interruptor automático y
sustituya el fusible o vuelva a activar el automático.
■ Fallo del suministro eléctrico
• En el supuesto de un fallo en el suministro eléctrico,
coloque el conmutador de energía en OFF. Cuando
se recupere el suministro, espere 3 minutos para
poner en marcha el acondicionador a fin de evitar una
sobrecarga en el compresor.
■ El flujo de aire está restringido
• Asegúrese de que no hay cortinas, muebles u otros
objetos delante del aparato.
■ El TERMOSTATO no se ajusta lo
suficiente a frío.
• Gire el mando hasta una configuración superior. La
configuración más alta proporciona el máximo
enfriamiento.
■ El filtro del aire está sucio
• Limpie el filtro cada 2 semanas como mínimo.
Consulte la sección Cuidados y Mantenimiento
(p. 11) del manual.
■ El acondicionador acaba de ser
conectado.
• Después de conectar el aparato, éste necesita un
poco de tiempo para enfriar la habitación.
■ El aire frío se escapa.
• Compruebe si existen lugares o puntos abiertos.
• CIERRE la ventilación del acondicionador.
■ Los serpentines de enfriamiento están
helados.
• Ver el siguiente apartado “Aparece escarcha en el
acondicionador de aire”.
■ Los serpentines de enfriamiento están
llenos de escarcha.
• La escarcha puede bloquear el flujo de aire e impedir
que el aparato enfríe la habitación correctamente.
Ajuste el ventilador a MED o HIGH mientras configura
el termostato a 1 o 2 hasta que se funda la escarcha.
19
ESPAÑOL
El acondicionador
de aire no
funciona
Posibles Causas
LG ESPAÑA, S.A.
RED DE SERVICIOS
DE ASISTENCIA TECNICA
AIRE ACONDICIONADO
POLIGONO INDUSTRIAL, "SECTOR 13", PARCELA 27 A
46190 RIBARROJA DEL TURIA (Valencia)
TEL. 96 305 05 00
FAX 96 305 05 01
20
ANDALUCIA
ELECTRO ALTAMIRA, S.A.
C/. ALTAMIRA, 10, BAJO
04005 ALMERIA
TEL. 950 22 01 54
SERVIRAP
C/. ANGEL OCHOTORENA, 11
04005 ALMERIA
TEL. 950 27 40 67
CRUZ Y LATORRE
CENTRAL DE SERVICIOS
C/. UNIVERSIDAD DE
TEXAS, 2
(ESQ. DR. CARRACI)
04005 ALMERIA
TELS. 950 22 43 00 / 22 4
JUAN MANUEL LLORCA
SOLIS
C/. VILLA MARIA, 119
04008 CRUZ DE CARAVACA
ALMERIA
TEL. 950 27 39 57
ELECTRONICA SATEC, S.L.
C/. MANUEL MELGAR, 37
14500 PUENTE GENIL
CORDOBA
TEL. 957 60 32 50
ELECTRONICA
GONZALEZ, S.L.
C/. FUENSANTA, 12
14640 VILLA DEL RIO
CORDOBA
TEL. 957 17 63 26
FRILUC
C/. LA ESTRELLA, 1, A, BAJO
14900 LUCENA - CORDOBA
TEL. 957 50 93 03
SERYVEN CANTILLANA,
S.L.
AVDA. DE ANDALUCIA, 37
41320 CANTILLANA
SEVILLA
TEL. 95 573 11 69
A.M.S.A.
C/. ISIDORO ANTILLON, 97
07008 PALMA DE MALLORCA
TEL. 971 27 27 57
ELECTRONICA J.J.
DOMINGUEZ
C/. PRINCIPE DE ASTURIAS, 1
41340 TOCINA - SEVILLA
TEL. 95 474 07 98
TECLURAMI MENORCA,
S.A.L.
C/. PINTOR CALBO, 57
07703 MAHON
TEL. 971 35 28 02
REP. ELEC. MARQUEZ
C/. DR. SANCHEZ MALO, 3-A
(LA ALMAZARA)
41400 ECIJA - SEVILLA
TEL. 95 483 55 75
CONSTAN
VIA ROMANA, 15
07800 IBIZA
TEL. 971 30 61 23
ELECTRO 93, S.L.
C/. MELLIZA, 3
41700 DOS HERMANAS
SEVILLA
TEL. 95 472 37 16
RELEGRA, S.L.
C/. DR. GOMEZ ROMAN, 5
18012 GRANADA
TEL. 958 27 24 50
GONZALEZ INFANTES, S.L.
C/. BLAS DE OTERO, 26
41730 LAS CABEZAS DE SAN
JUAN - SEVILLA
TEL. 95 587 10 49
TALLERES ESPEJO
C/. MANUEL SANCHEZ, 15
21006 HUELVA
TEL. 959 22 09 04
ARAGON
BALEARES
CANTABRIA
BEZANILLA PURAS, S.L.
C/. LOS ESTUDIANTES, S/N.
(FRENTE AL N.º 20)
39006 SANTANDER
TEL. 942 22 00 15
REPARACIONES-CICERO, S.L.
C/. LOS CLAVELES, 1
39796 CICERO
TEL. 942 61 65 30
CASTILLA LA MANCHA
TECNI-HOGAR
C/. TOLOSA LATOUR, 19
11007 CADIZ
TEL. 956 28 10 82
ISIDRO FERNANDEZ
REYES
C/. LUSITANIA, 27
21400 AYAMONTE - HUELVA
TEL. 959 32 06 35
SERV. ELECTROD.
GRASAN, S.C.
C/. RAMON Y CAJAL, 59
22006 HUESCA
TEL. 974 22 90 93
LAUREANO GARCIA MURCIA
C/. ALCALDE MARTINEZ DE LA
OSSA, 1
02001 ALBACETE
TEL. 967 24 04 31
ELECTRONICA
MARCHANTE, S.L.
C/. SIERRA BLANQUILLA, 14
11170 MEDINA SIDONIA
CADIZ
TEL. 956 41 03 03
MANUEL SANCHEZ
CASTILLO
C/. RUIZ ROMERO, 8
23003 JAEN
TEL. 953 22 58 05
S.A.T. TEOFILO
SEBASTIAN PEREZ
C/. SAN MIGUEL, 8 - BAJO
44001 TERUEL
TEL. 978 60 91 19
SOTO ALBACETE, S.L.
C/. PEREZ PASTOR, 80
02004 ALBACETE
TEL. 967 22 01 42
SEYGAR
C/. LAS DESCALZAS, 2
23700 LINARES - JAEN
TEL. 953 69 18 20
SERVICIO A.T. MARIO
CASES QUILEZ
AVDA. GALAN BERGUA, 1
44600 ALCAÑIZ - TERUEL
TEL. 978 83 38 51
FRANCISCO JAVIER CABA
NARANJO
PZA. DEL QUERER, 2, BAJO
URB. LAS COLINAS
11205 ALGECIRAS - CADIZ
TEL. 956 66 77 79
SERVITEC
C/. LAS PALOMAS, 9
11406 JEREZ DE FRONTERA
CADIZ
TEL. 956 34 88 78
TECNI-REPUESTOS
REYES, S.L.
AVDA. DE ROTA, 72
11550 CHIPIONA - CADIZ
TEL. 956 37 04 53
DOMEFRI
C/. ESCRITOR HOYOS DE
NORIEGA, 13, BAJO, LOC.
14014 CORDOBA
TEL. 957 43 52 85
ALFREDO GARCIA
GARCIA
C/. PABLO PICASSO, 5
14209 EL PORVERNIR DE LA
IND. - CORDOBA
TEL. 957 57 69 03
MANUEL CANTUDO
ORTEGA
C/. QUINTERIA, 4
23740 ANDUJAR - JAEN
TEL. 953 50 29 44
INSTALACIONES
VILLAGRASA
C/. DOMINGO LOBERA, 6-8
LOCAL
50008 ZARAGOZA
TELS. 976 42 34 63 / 25 5
CLIMAIRE PLUS, S.L.
POL. AZUCARERA
C/. GUARO, 4
29004 MALAGA
95 223 98 22
TAEL
C/. JUSLIBOL, 6-8
50015 ZARAGOZA
TEL. 976 73 67 35
T.R. VIDEOTV
ALAMEDA CAPUCHINOS, 5
29014 MALAGA
TEL. 95 225 91 44
S.T.O. JUAN JOSE LAZARO
PLAZA COSTA, 6
50300 CALATAYUD
ZARAGOZA
TEL. 976 88 51 58
ELECTRO DAVID
C/. LA PAZ, 16 - BAJO
29500 ALORA - MALAGA
TEL. 952 49 88 93
AROCA-OLAYA, S.L.
C/. SAN ANTONIO, 22-BAJO
02640 ALMANSA - ALBACETE
TEL. 967 34 57 96
SATELEC, S.L.
LIBERTAD, 13, LOCAL 1
13003 CIUDAD REAL
TEL. 926 22 01 55
VITORIANO QUILES PARRA
C/. JOSE RAMON OSORIO, 53
13300 VALDEPEÑAS
CIUDAD REAL
TEL. 926 32 54 38
TALLERES MARI PAZ
C/. SANTA LUCIA, 17
13500 PUERTOLLANO
CIUDAD REAL
TEL. 926 42 49 50
LUCERON UTRILLA, S.L.
C/. JUAN BAUTISTA CONCEP., 16
13600 ALCAZAR DE SAN JUAN
CIUDAD REAL
TEL. 926 54 28 56
ASTURIAS
INTERSAT SEVILLA, S.L.
C/. BEETHOVEN, LOCAL 5
41008 SEVILLA
TEL. 95 443 02 26
SERVITAD
AVDA. CONSTITUCION, 102
33207 GIJON
TEL. 98 538 68 11
21
ANGEL RODERO BELLON
C/. ASTURIAS, 26
13700 TOMELLOSO
CIUDAD REAL
TEL. 926 51 52 76
ESPAÑOL
M.J. RODRIGUEZ
PELEGRIN, S.L.
C/. CONVENTO, 27, BAJO
04610 CUEVAS DE
ALMANZOR - ALMERIA
TEL. 950 45 65 44
REPARACIONES LLERGO
C/. DELFIN PEREZ, 20-B
14400 POZOBLANCO
CORDOBA
TEL. 957 13 07 34
CENTRAL SERVICIOS SM,
S.L.
AVDA. REP. ARGENTINA, 5-B
16002 CUENCA
TEL. 969 21 20 20
CASCALLAR
C/. LA PRESA, 2
24010 TROBAJO DEL
CAMINO - LEON
TEL. 987 80 18 15
TECNO MAE, S.C.P.
C/. LLIBERTAT, 45-47
08240 MANRESA
BARCELONA
TEL. 93 874 66 08
CAMUÑASE, S.L.
C/. ISABEL I DE CASTILLA, 52
16630 MOTA DEL CUERVO
CUENCA
TEL. 967 18 22 25
MULTISER
C/. EMBALSES DE
BARCENA, 11, 1º D
24400 PONFERRADA - LEON
TEL. 987 41 05 80
S.A.T. FCO. BLANDINO
C/. LAYNA SERRANO, 26
19002 GUADALAJARA
TEL. 949 22 25 46
MULTISERVICIO
PALENCIA, S.L.
C/. CARDENAL CISNEROS, 20
34002 PALENCIA
TEL. 979 72 20 57
REP. ELEC.
GALVEZ & GALVEZ
RDA. SAN OLEGUER, 9-11
08304 MATARO
BARCELONA
TEL. 93 757 59 39
FRANCISCO RODRIGUEZ
HERNANDEZ
C/. GRAL. MOSCARDO
GUZMAN, 22
19004 GUADALAJARA
TELS. 949 21 87 37/8
MANUEL ALONSO DE
MIGUEL
C/. DE LA FUCCIA, 1
37004 SALAMANCA
TEL. 923 22 97 51
ELECTROMECANIA
VICFRIO
C/. ESPEJO, 13
45164 GALVEZ - TOLEDO
TEL. 925 40 00 79
JOSE ANDRES OBREGON
MATEOS
C/. DOCTOR SANCHEZ, 15
37540 FUENTEGUINALDO
SALAMANCA
TEL. 923 47 14 82
ELECTRO SERVICE
C/. CALVO SOTELO, 15
45510 FUENSALIDA
TOLEDO
TEL. 925 73 07 85
REFRIGERACION
CASTILLA
C/. SOL, 31
45600 TALAVERA DE LA
REINA - TOLEDO
TEL. 925 81 68 79
REPARACIONES
ELECTROMATIC
C/. ANGEL DEL ALCAZAR, 52
45600 TALAVERA DE LA
REINA - TOLEDO
TEL. 925 80 48 26
CASTILLA LEON
ANTONIO SAN SEGUNDO,
C.B.
C/. SORIA, 6
05003 AVILA
TEL. 920 22 33 21
ANGEL MORENO
C/. SANTO TORIBIO, 17
09003 BURGOS
TELS. 947 20 37 69 / 20 52
SERVIREZ BURGOS, S.L.
C/. SAN FRANCISCO, 29-B.
09005 BURGOS
TEL. 947 23 09 90
MAYOR TELESERVICIO
C/. ARLAZON, 2
09400 ARANDA DE DUERO
BURGOS
TEL. 947 50 20 94
ENRIQUE GARCIA TENA
C/. SANTA ENGRACIA, 4,
LOCAL 2
24008 LEON
TEL. 987 22 32 39
SERVEI TECNIC JOYMA,
S.L.
AVDA. VIRGEN DE
MONTSERRAT, 19
08380 MALGRAT DE MAR
SUR GERONA
TEL. 93 765 36 33
INST. Y ASIST. HNOS.
GORDO
C/. MORILLO, 9
40002 SEGOVIA
TEL. 921 43 79 33
ELECTRODOM. BALAGUER
C/. PARE MANYANET, 23
25620 TREMP - LERIDA
TEL. 973 65 02 57
ELECTRONICA
ALMENTERO
C/. SAN JUAN BOSCO, 34,
LOCAL 2
08915 SANT BOI
BARCELONA
TEL. 93 640 68 04
CATALUÑA
INGENIERIA DE SISTEMAS
C/. PERE IV, 161
08018 BARCELONA
TELS. 93 485 58 56 / 93 3
CLIMADIS, S.L.
C/. AUSIAS MARCH, 111
08915 BADALONA
BARCELONA
TELS. 93 383 89 62 / 46 03
S.A.T. PARERA
C/. BARRI XIROTA, 1
08186 LLIÇA D'AMUNT
BARCELONA
TEL. 93 841 44 02
LINEA BLANCA
BURGUILLOS, S.L.
C/. SANT FRANCESC
XAVIER, 45
08950 ESPLUGUES DE
LLOBREGAT - BARCELONA
TEL. 93 371 40 46
ALIGUE, S.L.
C/. SANTIAGO ROSIÑOL, 30
08192 SANT QUIRZE VALLES
BARCELONA
TEL. 93 721 06 41
TECNOSERVEI LLEIDA, S.L.
C/. MARAGALL, 4
25003 LLEIDA
TEL. 973 27 06 11
CAN-DO
AVDA. PAISOS CATALANS, 91
08700 IGUALADA
BARCELONA
TEL. 93 803 75 52
VALVERDE, S.C.P.
C/. MONTAÑA, 16, LOCAL 2
08913 BADALONA
BARCELONA
TEL. 93 398 61 67
ELECTRODO MONCASA,
S.L.
C/. URSICINO ALVAREZ, 10
49011 ZAMORA
TEL. 980 52 95 28
GARRIGA
C/. SANT JAUME, 30
17844 CORNELLA DE TERRI
GIRONA
TEL. 972 59 43 06
SATEF
AVDA. RAVAL DEL CARME, 12
25300 TARREGA - LERIDA
TEL. 973 50 08 48
TOT SERVEI
C/. SANTA MADRONA, 13
08800 VILANOVA I LA
GELTRU - BARCELONA
TEL. 93 893 15 93
TEFRISA
C/. MIRLO, 55
47011 VALLADOLID
TEL. 983 29 34 11
COMSELEC
C/. REC ARNAU, 17, BAJO
17600 FIGUERES - GIRONA
TEL. 972 50 52 16
S.A.T. JUVANTENY, S.L.
C/. NUEVA, 109
08500 VIC - BARCELONA
TEL. 93 886 20 23
SATE-PENEDES, S.L.
C/. BOTERS, 4, LOCAL 2
08720 VILAFRANCA DEL
PENEDES - BARCELONA
TEL. 93 890 17 79
JESUS REVUELTO
SANCHEZ
C/. SANTO TOME, 9
42004 SORIA
TEL. 975 22 00 85
CATEIC, S.L.
C/. CARME, 40, BAIXOS
17004 GIRONA
TEL. 972 46 91 48
GERMANS ALEGRET, S.L.
C/. SOLS, 45
25620 TREMP - LERIDA
TEL. 973 65 14 01
ELECTRO-CUPE, S.L.
C/. SIETE, 28, BAJOS DCHA.
43100 BONAVISTA
TARRAGONA
TEL. 977 54 99 85
ELECTRONICA I
MULTISERVEIS JIA, S.L.
C/. MONASTIR RIPOLL, 9
43205 REUS - TARRAGONA
TEL. 977 77 55 04
GOMBAU GARCIA, S.L.
C/. MAYOR, 30
43590 JESUS-TORTOSA
TARRAGONA
TEL. 977 50 12 20
INSTALACIONS BILBE, C.B.
C/. MOLI, 65
43784 CORBERA D'EBRE
TARRAGONA
TEL. 977 42 02 92
CATALUÑA
(DELEGACION SERVICIO
TECNICO)
SR. ALMENTERO
AVDA. ROMA,
ESQ. VILAMARI, 29
BARCELONA
TEL. 93 363 27 10
CEUTA
SERVEI TECNIC FERRER,
S.C.P.
C/. SARDA, 37
08203 SABADELL
BARCELONA
TEL. 93 710 51 38
IMTEC, S.L.
C/. CAN CALDERS, 8, LOC. 2
LLOBREGAT - BARCELONA
TEL. 93 666 66 98
22
TECNOGAS CEUTA, C.B.
P.I. LA CHIMENEA, NAVE 39
51003 CEUTA
TEL. 956 50 56 43
COMUNIDAD
VALENCIANA
JOASA SERVICIOS, S.L.
C/. ESCORPION, 8, LOC. IZQ.
03006 ALICANTE
TEL. 96 528 73 33
ANGEL JOSE COMPAÑ
GARCIA
C/. CUESTA DE LAS
NARICES, 34 - ED. EL PERAL
03590 ALTEA - ALICANTE
TEL. 96 584 36 94
ELECTRONICA CENTENO
AVDA. DE ZAFRA, BLOQUE 1
06310 PUEBLA SAN PEREZ
BADAJOZ
TEL. 924 55 27 03
B. AGUILAR
AVDA. ALICANTE, 3
03700 DENIA - ALICANTE
TEL. 96 578 19 69
DAVID TORREGROSA
JORDA
C/. TARRASA, 6, BAJO
03803 ALCOY - ALICANTE
TEL. 96 533 43 06
VILARSERVI, S.L.
C/. SAN ROQUE, 78
12004 CASTELLON
TEL. 964 23 25 55
SERVIMART
AVDA. CORTS
VALENCIANES, 6
12530 BURRIANA
CASTELLON
TEL. 964 51 32 05
ESMA, C.B.
C/. ESCUELAS CRISTIANAS, 19
CASTELLON
TEL. 964 46 03 08
KELFRI, S.L.
C/. SERPIS, 10, BAJO
46021 VALENCIA
TEL. 96 362 01 62
EFITEC, C.B.
C/. JOSE GROLLO, 14, BAJO
46025 VALENCIA
TEL. 96 346 23 24
J.J. INSTALACIONES
C/. SAN LORENZO, ED. FANI,
LOCAL 4
46400 CULLERA - VALENCIA
TEL. 96 173 18 86
LAVA-FRED, S.L.
C/. OBISPO GILABERTO
MARTI, 5, BAJO
46600 ALZIRA - VALENCIA
TEL. 96 240 49 85
CLIMAELEC MORAGUES,
S.L.
C/. BENIARJO, 4
46700 GANDIA - VALENCIA
TEL. 96 286 02 95
FRICO HIGUERAS, S.L.
CTRA. SAN ANTONIO, 17
46920 MISLATA - VALENCIA
TEL. 96 379 77 42
PABLO PENAS
C/. NOSA SRA. DO CARME,
ED. CELTA 70-4 BAJO, 1º A
27880 BURELA - LUGO
TEL. 982 58 14 62
TALLER DIEZ
C/. ERVEDELO, 94
32002 ORENSE
TEL. 988 22 71 83
VIDEOSAT ALJOCHA, S.L.
RONDA DEL VALLE, 16, B.
06480 MONTIJO
BADAJOZ
TEL. 924 45 33 44
IMASON, S.L.
C/. LOUREIRO CRESPO, 43
36004 PONTEVEDRA
TEL. 986 84 16 36
FLORE MERA SEGADOR,
S.L.
POL. IND. CAGANCHA, P. 13
06700 VILLANUEVA DE LA
SERENA - BADAJOZ
TEL. 924 84 09 07
SERTELEC
AVDA. FLORIDA, 123
(125 BAJO)
36210 VIGO - PONTEVEDRA
TEL. 986 20 72 53
ATINSA
C/. STA. RAMONA, 3
06800 MERIDA -BADAJOZ
TEL. 924 31 47 51
ISLAS CANARIAS
CAPRI CANARIAS, S.L.
C/. SAO PAULO, 40
35008 LAS PALMAS
TELS. 928 46 35 91 / 46 2
ELECTRO-MOVACAVE, S.L.
C/. SANGUINO MICHEL, 42
10002 CACERES
TEL. 927 23 69 09
LA RIOJA
ELECTRO XABIER
C/. ALFAMBRA, 4
10004 CACERES
TEL. 927 22 02 33
BENITO MUÑOZ PINILLOS
C/. ESCUELAS PIAS, 7, BAJO
26004 LOGROÑO
LA RIOJA
TEL. 941 26 30 88
REP. ELECTROD. PEDRO
FERNANDEZ
C/. GENARO CAJAL, 23
10300 NAVALMORAL DE LA
MA. - CACERES
TEL. 927 53 57 00
MADRID
REPARACIONES JUAN
DUQUE, S.L.
RONDA SEGOVIA, 2
28005 MADRID
TEL. 91 365 79 69
ELECTRODOMESTICOS
ALEMAN
C/. URBANO GONZALEZ
SERRANO, 85
10300 NAVALMORAL DE LA
MA. - CACERES
TEL. 927 53 12 02
MICRO AIRE, S.L.
C/. VICTOR DE LA SERNA, 5
28016 MADRID
TELS. 91 413 34 73 / 92
INELSAT, S.L.
C/. PAULINA ODIAGA, 21
28019 MADRID
TELS. 91 472 48 71 / 37
CENTRO TECNICO HERTE,
S.L.
RONDA DEL SALVADOR, 61
10600 PLASENCIA
CACERES
TEL. 927 41 27 39
ACORAIR, S.L.
C/. CIUDAD DE FRIAS, 24,
NAVE 64
28021 MADRID
TELS. 91 505 32 28 / 79 73
GALICIA
ALPO, S.L.
AVDA. PASAJE, 31
15006 LA CORUÑA
TEL. 981 28 08 68
CENTRO DE ASISTENCIA
TECNICA CA
C/. OCAÑA, 92
28047 MADRID
TEL. 91 465 34 76
VICTOR SAT, S.L.
C/. ENTRERRIOS, 35
15705 SANTIAGO
LA CORUÑA
TEL. 981 58 43 92
RELAFRI, S.L.
C/. LA GRANJA, 96
28100 ALCOBENDAS
MADRID
TEL. 91 661 71 70
23
FRIO Y VOLTIO, S.L.
C/. O, NAVE 37,
POLIGONO EUROPOLIS
28230 LAS ROZAS
MADRID
TEL. 91 640 60 49
RUBEN LOZANO
CARRACEDO
C/. SAN NICOLAS, 14
28912 LEGANES - MADRID
TEL. 91 686 33 17
JEYFER
C/. ZARAGOZA, 19 POST.
28934 MOSTOLES - MADRID
TEL. 91 617 70 13
SERTECSUR
C/. LA PALOMA, 33
28980 PARLA - MADRID
TEL. 91 699 40 10
MELILLA
RED DE SERVICIOS VILLEGA
C/. HERMANOS MIRANDA, 17
52005 MELILLA
TEL. 95 267 89 91
MURCIA
KELVIFRIO, S.L.
C/. MATEOS, 51
30002 MURCIA
TEL. 968 25 18 28
SAJOYSA
C/. CONTINENTAL, 5
30310 LOS DOLORES
CARTAGENA
TEL. 968 53 47 15
NAVARRA
LUZ Y SONIDO MARQUEZ
C/. DELGADO GARCES, 2
31500 TUDELA - NAVARRA
TEL. 948 82 28 68
PAIS VASCO
SOGOTZI SERVICIOS, S.L.
C/. ANGLO VASCO, 3
01002 VITORIA-GASTEIZ
ALAVA
TEL. 945 27 13 33
ALZATEK SERVICIOS
C/. ELIZASU, 12, BAJO (ALZA)
20017 SAN SEBASTIAN
TEL. 943 35 14 93
ERNESTO PEREZ DES
PZA. UNZAGA, 11
20600 EIBAR - GUIPUZCOA
TEL. 943 70 26 97
E.C.E., S.L.
C/. SAGARMINAGA, 9
48004 BILBAO - VIZCAYA
TEL. 94 411 12 29
LACOFRIS, S.L.
C/. KASUNE, 18
48990 GETXO
BILBAO - VIZCAYA
TEL. 94 430 52 00
ESPAÑOL
VENSAT REPARACIONES,
S.L.
C/. PINTOR LOPEZ, 43
12004 CASTELLON
TEL. 964 25 55 19
ELECTRODOMESTICOS
BALEA
C/. RUA CATASOL, 3
27002 LUGO
TEL. 982 24 10 22
EXTREMADURA
J. FCO. CALDERON
LONGARES
C/. MARTIRES, 11
06300 ZAFRA - BADAJOZ
TEL. 924 55 17 64
CENTRAL ASSISTÊNCIA TÉCNICA PORTUGAL
MEGALÃNDIA
Rua Actriz Adelina Fernandes, n°7-7 A
2795 Linda-a-Velha (Lisboa)
(also MNT SVC)
Telefone 4146480
Fax 4146499
LINHA BRANCA
- ÁLVARO JOSÉ MORAIS
Lugar do Ratiço
Noura 5090 Murça
Tel.059/511117
Fax.059/511117
- RUI VAS,Lda
Quinta da Carriça - Apartado 169
6230 Fundão
Tel.075/776375
Fax.075/776375
- ELECTRO REPARADOURA DA COLINA,Lda.
Rua de São Sebastião,122
4700 Braga
Tel.053/273131
Fax.053/273131
- CLIMALBI - Lúcio Ribeiro Costa,Lda.
Largo São João, Ger.1
6000 Castelo Branco
Tel.072/328449
Fax.072/328449
- SETEL - Soc.Técnica Rep.Electro. Vcnda de
Acessórios,Lda.
Rua Silva Tapada,91
4200 Porto
Tel.02/591972
Fax.025506111
- CODELPOR,S A
Estrada Nacional,118 - Km 38
Zona Industrial de Vale Tripeiro,Lote 5
2130 Benavente
Tel.063/519120
Fax.063/519125
- ELECTRMÁQUINAS Com.Rcp.Electrodomésticos,Lda.
Rua da Republica - Alagoas
Esgueira 3800 Aveiro
- J.B.Frio,Lda.
Parque Industrial e Tecnológico de Évora
Rua T, Lote 17
7000 Évora
Tel.066/771222
Fax.066/771222
Tel.034/315845
Fax.034/311277
- JOSÉ GUERREIRO ESTEVAM
Rua Frei Amador Arrais,20
7800 Beja
Tel.084/323460
Fax.084/323460
- CENTRO DE ASSIST.TECNICA LEONIDIO
B.FIGUEIREDO
Tondelinha - Apatado 113
3510 Viseu
Tel.032/411380
Fax.411380
- RICAFRE - Reparações de Electrodomésticos,Lda.
Bairro Mendonça à Penha,11
8000 Faro
Tel.089/863663
Fax.089/864256
- EGIFRIO TOSÉ REPARAÇÕES,Lda
Rau Vila Nova de Foz Côa,Lote 13
6300 Guarda
Tel.071/221732
Fax.071/221732
- FRIO DOMÉSTICO
Zona Industrial Coca Maravilhas,Lote 45
8500 Portimão
Tel.082/417876
Fax.082/416292
- STE - Serviços Técnicos de Electrodomésticos,Lda.
Estrada de Coselhas,71
3000 Coimbra
Tel.039/492750
Fax.039/493088
Sr. José Neto
24
Guide de l’utilisateur du Système de Climatisation Type Fenêtre
TABLE DES MATIÈRES
P our Mémoire
Ecrivez le numéro du modèle et le numéro de série ici:
N° de modèle
N° de série
1. Conseils de sécurité
Vous les trouverez sur l’étiquette collée sur le côté de
chaque appareil.
2. Mode d’emploi
Nom du Fournisseur
Date d’achat
3. Entretien
4. Guide d’installation du
matériel
L isez ce Guide
A l’intérieur, vous trouverez de nombreux conseils
très utiles concernant la bonne utilisation et
l’entretien correct de votre système de climatisation.
Une simple petite attention de votre part peut vous
faire économiser un temps précieux et beaucoup
d’argent et prolonger la durée de vie de votre
système de climatisation.
Vous trouverez de nombreuses réponses aux
problèmes courants dans le tableau des procédés de
dépannage. En commençant par consulter notre
tableau Procédés de dépannage, vous trouverez
certaines réponses et cela vous évitera de faire appel
au service.
5. Problèmes courants
ATTENTION
• Contactez un technicien de service après-vente agrée pour
la réparation ou l’entretien de cet appareil.
• Contactez un installateur pour l’installation de cet appareil.
• Ce système de climatisation n’est pas conçu pour être
utilisé par de jeunes enfants ou des personnes
handicapées laissées sans surveillance.
• Vous devrez veiller à ce que les enfants en bas âge ne
jouent pas avec le climatiseur.
2
Prudence
Précautions
Précautions
Pour éviter de réels préjudices ou pour éviter que l’utilisateur ou d’autres personnes ne se blessent, vous
devez respecter les instructions suivantes.
En ne tenant pas compte de ces instructions, vous prenez le risque de faire une mauvaise manipulation qui
entraînera des préjudices ou des dommages dont la gravité est indiquée ci-dessous.
MISE EN GARDE
Ce symbole indique le danger de mort ou de graves blessures.
ATTENTION
Ce symbole indique le risque de préjudices ou de dégâts concernant
uniquement les biens.
Ne faites jamais cela
Faites toujours ceci
■ Les éléments à respecter sont classés par les symboles suivants.
MISE
MISE EN
EN GARDE
GARDE
Branchez correctement la
prise.
• Sinon, cela provoquera une
électrocution ou un incendie du à
un dégagement de chaleur ou à
une décharge électrique.
• Cela provoquera une électrocution ou un
incendie du à un dégagement de chaleur.
Mettez toujours à la masse.
• Aucune mise à la terre ne peut causer le
choc électrique (voir le manuel d'installation)
Prière de débrancher la prise si un
son puissant/une odeur forte apparaît
ou si de la fumée sort de l’appareil.
Ne touchez pas l’appareil si vous avez
les mains mouillées et ne le faites pas
fonctionner dans un endroit humide.
• Risque d’électrocution.
L’eau ne doit pas s’infiltrer
dans les parties électriques.
• Il peut causer la panne de la machine ou le
choc électrique.
N’utilisez jamais de prise
abîmée ou desserrée.
• Risques d’incendies et d’accidents
de type électrocutions.
Eloignez les armes à feu.
• Risques d’incendies ou
d’électrocutions.
N’utilisez pas le cordon
d’alimentation à proximité
d’outils chauffants.
• Risques d’incendies.
• Risques d’incendies et
d’électrocutions.
3
N’utilisez pas un cordon
d’alimentation abîmé ou
non-conforme.
• Cela provoquera une électrocution ou
un incendie.
• Si le cordon d’alimentation est abîmé, vous
devez le remplacer par un cordon spécial ou
un montage disponible chez votre fabricant
ou chez ses revendeurs. (Y Attachement)
Ne dirigez pas le débit d’air
seulement en direction des
personnes présentes dans la pièce.
• Ceci pourrait nuire à votre santé.
Installez toujours un joint
d’étanchéité empêchant les
fuites d’air et un tableau de
commande efficace.
• Aucune installation ne peut causer
l'accident du feu et de choc électrique.
N’ouvrez pas l’entrée
pendant le fonctionnement.
• Risques d’électrocutions.
N’utilisez pas le cordon d’alimentation
à proximité de gaz inflammables et de
substances inflammables (benzène,
essence, solvants, etc.)
• Risques d’explosions ou
d’incendies.
FRANÇAIS
Ne modifiez pas la longueur de
fil et ne branchez pas d’autres
appareils sur la même prise.
Ne mettez pas en marche/n’arrêtez
pas l’appareil en débranchant le
cordon d’alimentation.
• Cela provoquera une
électrocution ou un incendie du à
un dégagement de chaleur.
MISE
MISE EN
EN GARDE
GARDE
Afin de permettre la ventilation, ouvrez la fenêtre avant
de faire fonctionner le système de climatisation ou la
télécommande lorsque le gaz s’échappe.
Ne démontez pas et ne modifiez pas l’appareil
au hasard.
• Risque d’explosions, incendies ou brûlures.
• Risque de pannes ou d’ électrocutions.
ATTENTION
ATTENTION
Ne touchez jamais les parties
en métal parts de l’appareil
lorsque vous retirez le filtre.
• Risques de préjudices.
Lorsque vous nettoyez
l’appareil, vérifiez d’abord
que l’alimentation et le
disjoncteur sont éteints.
• Puisque, pendant le fonctionnement,
le ventilateur tourne à une vitesse très
élevée, il y a un risque de préjudices.
Arrêtez le fonctionnement de
l’appareil et fermez la fenêtre
en cas d’orage ou de typhon.
Ne nettoyez pas la
climatisation à l’eau.
• L’eau peut s’infiltrer dans l’appareil et
dégrader l’isolation. Cela pourrait
provoquer une électrocution.
Ne mettez pas d’animaux
domestiques ni de plantes
devant le débit d’air direct.
• Cela pourrait abîmer les plantes
ou blesser les animaux
domestiques.
Débranchez l’appareil en
tirant sur la prise et non pas
sur e fil.
• Si vous faites fonctionner l’appareil avec • Risques d’électrocutions et de
les fenêtres ouvertes, vous risquez
préjudices
d’augmenter l’humidité de la pièce et
cette humidité peut abîmer vos meubles.
Ne placez pas d’obstacles
Vérifiez que la console
autour de l’ouïe d’absorption
d’installation de l’appareil externe
et l’ouïe de sortie.
n’est pas abîmée par l’usure.
• L’appareil risque de tomber en
panne ou cela peut provoquer un
accident.
• Si vous laissez l’appareil abîmé en
l’état, en se détériorant, le produit
risque de provoquer des dégâts.
N’utilisez pas de détergents
puissants tel que de la cire ou un
solvant mais utilisez un chiffon doux.
Ne placez pas d’objets lourds sur
le cordon d’alimentation et veillez
à ne pas appuyer sur le cordon.
• L’apparence peut se dégrader à cause
d’une modification de la couleur du
produit ou d’une surface rayée.
• Danger d’incendie ou
d’électrocution.
Si vous retirez un élément de l’appareil,
veillez à ce qu’aucun enfant ne l’avale, par
mégarde. Placez l’élément dans un endroit
que les enfants ne peuvent pas atteindre.
Aérez correctement
lorsqu’un four (etc.…)
fonctionne en même temps.
• Un manque d’oxygène peut
subvenir.
N’utilisez pas l’appareils à des fins
spécifiques, tels que les animaux,
les végétaux, les machines outils ou
la conservation des œuvres d’art.
• Cela pourrait blesser les
animaux ou les végétaux ou
entraîner des pertes matérielles.
Tirez l’interrupteur d’alimentation
principal si vous n’utilisez pas
l’appareil pendant un certain temps.
• Le produit risque de tomber en
panne ou cela peut provoquer un
incendie.
Utilisez toujours des filtres
installés correctement et
nettoyez-les une fois par semaine.
• L’appareil risque de tomber en
panne si vous le faites
fonctionner sans filtres.
Ne purgez pas l’eau du
système de climatisation.
• Risques de troubles gastriques.
Quand de l’eau etc. entre dans les éléments,
éteignez l’interrupteur principal de l’appareil.
Après avoir retiré la fiche de la prise,
contactez le service après-vente.
4
Prudence
Précautions
Avant de le faire fonctionner
Avant de le faire fonctionner
1 Contactez un installateur spécialisé pour qu’il vous l’installe.
2 Branchez correctement le cordon d’alimentation.
3 N’utilisez pas un cordon d’alimentation abîmé ou non-conforme.
4 Ne branchez pas d’autres appareils sur la même prise.
5 N’utilisez pas de rallonge.
6 Ne mettez pas en marche/n’arrêtez pas l’appareil en débranchant le cordon d’alimentation.
Utilisation
1 Une exposition prolongée à un débit d’air direct pourrait nuire à votre santé. Ne laissez pas les
occupants, les animaux ou les plantes exposés trop longtemps à un débit d’air direct.
2 A cause d’un possible risque de manque d’oxygène, aérez la pièce lorsque vous faites fonctionner des
fours ou d’autres appareils chauffants.
3 N’utilisez pas cette climatisation à des fins non spécifiques (par exemple pour conserver des appareils
Nettoyage et entretien
1 Ne touchez pas les pièces en métal de l’appareil lorsque vous retirez le filtre. Vous risquez de vous
blesser en manipulant des bords pointus en métal.
2 N’utilisez pas d’eau pour nettoyer l’intérieur du système de climatisation. Le contact avec l’eau pourrait
détruire l’isolation, ce qui pourrait provoquer à de possibles électrocutions.
3 En nettoyant l’appareil, vérifiez d’abord que le courant et l’interrupteur sont éteints. Pendant le
fonctionnement, le ventilateur tourne à une vitesse très élevée. Il peut entraîner des blessures si le
courant de l’appareil se déclenche accidentellement lors du nettoyage des parties internes de l’appareil.
Service
Pour la réparation et l’entretien, contactez votre revendeur agrée.
5
FRANÇAIS
de précision, de la nourriture, des animaux, des plantes et des objets d’art). Une telle utilisation pourrait
provoquer des dégâts sur ce matériel.
Emplacement et fonctions des commandes
Mode d’emploi
Commandes
Les commandes ressembleront à l’une de celles-ci.
On
Off
Auto Swing
5
OFF
4
6
MED
FAN
3
7
2
8
1
HIGH
COOL
LOW
FAN
9
MED
COOL
LOW COOL
Thermostat
Operation
Thermostat
Operation
Auto Swing
5
4
6
Off
3
7
2
8
1
OFF
On
MED
FAN
HIGH
COOL
LOW
FAN
9
MED
COOL
LOW COOL
Thermostat
Operation
Auto Swing
5
4
Off
6
Off
3
On
Med
Fan
High
Cool
7
2
8
1
9
Low
Fan
Med
Cool
Low Cool
6
■ FONCTIONNEMENT
High Cool (Froid Fort) ( ), Med Cool (Froid Moyen) ( ) et Low Cool (Froid Léger) ( ) produisent
du froid à différentes vitesses de ventilateur. Med Fan (Ventilateur Moyen) (
) ou Low Fan (Ventilateur
léger) ( ) font circuler l’air et le filtrent sans le refroidir. Off (Arrêt) ( o ) éteint la climatisation.
REMARQUE: Si vous basculez l’interrupteur d’un réglage de refroidissement vers l’arrêt ou vers une commande de
ventilateur, attendez au moins 3 minutes avant de le re basculer sur un réglage de refroidissement.
Descriptions de refroidissements
Pour le Normal Cooling (Refroidissement normal) - Sélectionnez High Cool (Froid Fort) ou Med Cool
(Froid Moyen) avec le bouton Operation (Fonctionnement) au milieu du bouton Thermostatique.
Pour un Maximum Cooling (Refroidissement maximal) - Sélectionnez High Cool (Froid Fort) avec le
bouton Operation (Fonctionnement) sur le chiffre le plus élevé de votre bouton Thermostatique
Pour le Quieter & Nighttime Cooling (Refroidissement plus silencieux et nocturne) - Sélectionnez Low
Cool (Froid léger) avec le bouton Operation (Fonctionnement) au milieu du bouton Thermostatique.
■ THERMOSTAT
Le THERMOSTAT sert à maintenir la température de la pièce. Le compresseur mettra en marche et arrêtera
le cycle pour garder le même niveau de confort dans la pièce. Quand vous tournez le bouton sur un chiffre
supérieur (côté droit), l’air de la pièce se refroidira.
La position 5 ou 6 (au milieu de l’arc) est le réglage normal pour des conditions moyennes.
L’interrupteur de variation automatique commande la direction horizontale de l’air par un système de variation
d’air (seulement disponible sur certains modèles)
ON (
) : La variation automatique fonctionne.
OFF (
) : La variation automatique ne fonctionne pas.
ATTENTION
Lorsque vous éteignez la climatisation alors qu’elle travaille en mode refroidissement ou qu’elle est réglée
sur la position ventilateur (fan), attendez au moins 3 minutes avant de déclencher de nouveau le mode
refroidissement.
7
FRANÇAIS
■ VARIATION AUTOMATIQUE
Commandes
• THERMOSTAT
Les commandes ressembleront à l’une de celles-ci.
FAN
Tournez la commande du thermostat sur le réglage désiré.
La position de commande est le réglage normal pour des
conditions moyennes. Vous pouvez modifier ce réglage, si
nécessaire, pour obtenir la température qui vous convient.
Le thermostat commande automatiquement le
refroidissement ou le réchauffement, mais le ventilateur
tourne en continu chaque fois que la climatisation est en
marche. Si la pièce est trop chaude, tournez la commande
du thermostat dans le sens des aiguilles d’une montre. Si
la pièce est trop froide, tournez la commande du
thermostat dans le sens inverse des aiguilles d’une montre.
FAN
• LUMIÈRE (
) CHAUFFAGE
Lorsque l’appareil règle les conditions de fonctionnement
du chauffage, la lumière verte s’allume.
Lorsque le gel se dépose sur le condenseur de
récupérateur d’énergie, le dégivrage s’effectue
automatiquement et la lumière verte s’éteint.
L’appareil peut émettre un “sifflement” et le moteur du
ventilateur cesse de fonctionner pendant 1 à 10 minutes.
Ceci ne doit pas être considéré comme un problème.
Après le dégivrage, le chauffage se remet en marche.
Thermostat
• OPERATION
Operation
OFF (ARRÊT) (
LOW FAN (
(VETILATEUR BAS)
Heater
Warmer
Cooler
Thermostat
Operation
• VARIATION AUTOMATIQUE
(sur certains modèles)
ON (MARCHE) ( ) : La variation automatique
fonctionne lorsque le bouton OPERATION
(FONCTIONNEMENT) est réglé sur la position COOL
(FROID) ou HEAT (CHAUD)
o ) : Eteint la climatisation.
) : Permet de faire fonctionner le
ventilateur sans refroidissement
(réchauffement)
LOW COOL (
(FROID LÉGER)
) : Permet le refroidissement avec le
ventilateur fonctionnant à basse vitesse.
HIGH COOL (
(FROID FORT)
LOW HEAT (
(CHAUFFAGE LÉGER)
HIGH HEAT (
(CHAUFFAGE fort)
) : Permet le refroidissement avec le
ventilateur fonctionnant à vitesse élevée.
) : Permet le réchauffement avec le
ventilateur fonctionnant à basse vitesse.
) : Permet le réchauffement avec le
ventilateur fonctionnant à vitesse élevée.
ATTENTION
Lorsque vous éteignez la climatisation alors qu’elle travaille
en mode refroidissement ou qu’elle est réglée sur la
position ventilateur (fan), attendez au moins 3 minutes
avant de déclencher de nouveau le mode refroidissement.
OFF (ETEINT) ( ) : Stoppe le fonctionnement de la
variation automatique.
8
Fonctionnement de la télécommande
Mode d’emploi
La télécommande et le tableau de commande ressembleront à l’une des images suivantes.
2
3
7
4
7
1
3
1
2
5
1
4
5
2
5
5
4
4
3
3
4
3
2
2
5
1
7
7
1
1
4
2
3
2
5
3
7
1
1
5
5
4
5
4
6
3
2
2
3
2
3
7
1
4
5
6
1 Début de l‘ALIMENTATION
Le fonctionnement débute lorsque vous appuyez sur cette touche et l’appareil s’arrête quand vous
appuyez de nouveau.
2 SÉLÉCTEUR DU MODE DE FONCTIONNEMENT
Le mode de chauffage n’est disponible que sur certains modèles.
Sélectionnez le mode refroidissement (cooling) pour refroidir la pièce.
Sélectionnez le mode chauffage (heating) pour réchauffer la pièce.
Sélectionnez le mode ventilateur (fan) pour faire ventiler normalement.
3 MINUTERIE ON/OFF (MARCHE/ARRÉT)
Vous pouvez régler la minuterie pour différer l’heure de mise en marche ou d’arrêt de l’appareil (jusqu’à 12 heures).
La température n’augmente seulement que de 2°C et n’augmente plus après cela.
9
FRANÇAIS
4
1
4 SÉLÉCTEUR DE LA VITESSE DU VENTILATEUR
Pour augmenter la puissance lors du refroidissement ou du chauffage, sélectionnez une vitesse de
ventilateur plus élevée.
Modèle de Refroidissement: 3 étapes {High (FORT)[F3] → Low (BAS)[F1] → Med (MOYEN) [F2]
Modèle de chauffage : 2 étapes{High(FORT)[F2] → Low (BAS)[F1]
5 COMMANDE DE LA TEMPÉRATURE
Le thermostat contrôle la température de la pièce pour que la température désirée soit maintenue.
Le thermostat peut être réglé entre 16°C~30°C (61°F~81°F)
L’appareil met en moyenne 30 minutes à un degré près (1°) (1.8°F) pour régler la température de la pièce.
6 BOUTON DE VARIATION AUTOMATIQUE (AUTO SWING)(seulement disponible sur certains modèles)
Permet à l’appareil de basculer automatiquement ses grilles d’arrivée d’air à gauche et à droite pendant le
fonctionnement si vous désélectionnez l’option, les grilles d’arrivée d’air s’arrêteront sur la dernière
position et orienteront le débit d’air dans la direction correspondante.
7 DÉTECTEUR DE TÉLÉCOMMANDE
Interrupteur de Remise en Marche Automatique
En cas de panne de courant, l’appareil peut être réglé sur une remise en marche automatique sur le réglage
précédent dès que le courant revient.
Insérer les piles de la télécommande
1 Ouvrez le couvercle au dos de la télécommande avec votre pouce
2 Insérez deux piles neuves AAA, 1.5V en prenant soin de bien respecter la polarité.
3 Refermez le couvercle.
REMARQUE: N’utilisez pas de piles rechargeables. Vérifiez que les deux piles sont neuves.
• Pour éviter qu’elles ne se déchargent, retirez les piles de la télécommande si
le système de climatisation doit resté inutilisé pendant un certain laps de
temps. Eloignez la télécommande des endroits extrêmement chauds ou
humides.
Pour que la télécommande continue à fonctionner parfaitement, le détecteur
de la télécommande ne doit pas être exposé à une lumière directe.
• Vous pouvez fixer la télécommande sur un mur en utilisant le support mural.
10
Mode d’emploi
Réglage de la direction du débit d’air
Commande de Ventilation
La commande de ventilation est située au-dessus des boutons de
commande.
Pour que le refroidissement soit pleinement efficace, FERMEZ la ventilation.
Cela permettra une circulation interne de l’air.
OUVREZ la ventilation pour vider l’air confiné.
FERMÉ
VENTILATION
OUVERT
Pour ouvrir la ventilation, tirez le levier vers vous.
Pour le refermer, poussez-le.
Réglage de la direction de débit d’air
Vous pouvez régler le débit d’air en changeant la direction des grilles
d’arrivée d’air du système de climatisation. Ceci permettra également au
système de refroidissement de la climatisation d’être plus efficace.
Réglage Horizontal de Direction du Débit d’air
Le réglage des grilles d’arrivée d’air verticales à gauche et à droite
modifiera le débit d’air horizontal.
Réglage Vertical de Direction du Débit d’air.
Vous pouvez régler les grilles d’arrivée d’air en augmentant légèrement
l’arrière ou le haut et le bas des grilles d’arrivée d’air verticales.
Orientation recommandée des grilles d’arrivée d’air
Réglez les grilles d’arrivée d’air, faces vers le haut lors du refroidissement
pour optimiser l’efficacité du refroidissement.
Entretien
Entretien
Eteignez l’alimentation et débranchez la prise de courant avant de nettoyer la climatisation.
Grille et armature
Pour le nettoyage, utilisez de l’eau et un produit d’entretien doux. N’utilisez ni eau de
javel ni abrasifs puissants.
Serpentins arrières
Vérifiez régulièrement les serpentines arrière. Vous devez faire appel à un professionnel pour les
nettoyer à la vapeur s’ils sont bouchés par la poussière ou s’ils sont encrassés. Un service de
nettoyage professionnel est à votre disposition chez votre revendeur ou dans votre service agrée.
11
FRANÇAIS
Le réglage des grilles d’arrivée d’air horizontales en haut et en bas
modifiera le débit d’air vertical.
Filtre à air
Le filtre à air se trouvant derrière la grille avant doit être vérifié et nettoyé au
moins une fois toutes les deux semaines (ou aussi souvent qu’il se doit) pour
que le système de climatisation continue à fonctionner parfaitement.
Comment retirer le filtre à air
1 Vous pouvez ouvrir la grille par le haut ou par le bas pour faciliter
l’entretien après l’installation.
2 Ouvrez la grille d’entrée d’air en retirant la porte parement sur le bas ou le
haut de l’appareil (située sur l’installation). Reportez-vous à la section
Utilisation de la grille d’entrée d’air réversible du chapitre 4
Guide d’installation du matériel si vous souhaitez modifier le côté
d’ouverture.
3 Tournez légèrement la languette pour dégager le filtre. Tirez le filtre dans
la même direction que l’ouverture.
4 Nettoyez le filtre avec de l’eau chaude et savonneuse. La température de
l’eau ne doit pas supérieure à 40°C (104°F).
5 Rincez et secouer doucement pour dégager le filtre du trop plein d’eau.
Laissez-le sécher avant de le remettre en place.
Drainage (Facultatif)
Le plateau peut déborder à cause d’un trop plein d’humidité. Pour vider le trop-plein d’eau,
retirez le bouchon du drain se trouvant au fond de l’appareil et serrez le drain.
1 Prenez le plateau de vidange qui est expédié dans l’air de rejet ou sur la limite
étanche.
2 Retirez le bouchon en caoutchouc situé en bas du plateau.
Drain
3 Installez le plateau de vidange au-dessus du coin du boîtier d’où vous avez le
bouchon avec 4 (ou 2) vis.
4 Branchez le tuyau d’évacuation sur
Couvercle drain
MEUBLE/
CARCASSE
l’évacuation située en bas du plateau de
vidange. Pour satisfaire pleinement vos
BAC DE
besoins, vous pouvez acheter le tuyau
ÉCUPÉRATION
d’évacuation ou le tubage dans votre région.
VIS
(le tuyau d’évacuation n’est pas fourni)
Fig. 1
Fig. 2
TUYAU DE VIDANGE
Fig. 4
5 Sélectionnez le branchement le plus approprié
en choisissant parmi les schémas suivants (en
tenant compte de l’orifice de l’appareil) pour
que le plateau de vidange s’adapte à votre
appareil.
Fig. 3
12
Installation du
matériel
Caractéristiques du produit
Caractéristiques du produit
ATTENTION
Vous venez d’acheter un système de climatisation de type fenêtre et il a été installé par un installateur
spécialisé. Cet appareil doit être installé en respectant les normes d’électricité en vigueur dans votre
pays. Ce manuel sert de guide pour vous aider à comprendre les caractéristiques du produit.
1
2
3
4
7
5 8 6
9
10
11 12 14 13
FRANÇAIS
1
2 3
4
5
6
1. BOîTIER
7
8
9
10
11 12 13 14
8. DÉFLECTEUR D’AIR HORIZONTAL
(GRILLE D’ARRIVÉE D’AIR VERTICALE)
2. GRILLE AVANT
9. PANNEAU DE COMMANDE
3. FILTRE A AIR
4. PRISE D’AIR (GRILLE D’ENTRÉE D’AIR)
10. CORDON D’ALIMENTATION
5. AIR DE REJET
11. COMPRESSEUR
6. COLLECTEUR VERTICAL
(GRILLE D’ARRIVÉE D’AIR HORIZONTALE )
12. PLATEAU
7. EVAPORATEUR
14. CONDENSATEUR
13
13. ÉCHARPE
Installation du disjoncteur et pièces pour l’installation
Lisez attentivement ce qui suit et respectez toutes les instructions.
Vous devez installer un disjoncteur entre la source d’alimentation et l’appareil si vous n’utilisez pas de prise
(voir illustration ci-dessous).
Source d’alimentation principale
Disjoncteur
Utilisez un disjoncteur ou un
dispositif de surcharge
Remarque : Utlisez un disjoncteur 20A pour
certains modèles (21k ~ 26k Btu/h).
(L: 30mm, 5EA)
Forme
Bac de récupération
Vis
(Pour certains modèles)
(L: 8mm, 4EA)
(Pour la grille avant, L: 10mm, 1EA)
Forme
(L: 30mm, 5EA)
Bac de
récupération
Vis
(L: 8mm, 4EA)
(Pour la grille avant, L: 10mm, 1EA)
(Pour certains modèles)
14
Guide d’installation
du matérie
Etapes de l’installation
Choisissez l‘endroit le plus approprié
MOUSSE
1 Mesurez l’espace prévu pour vous assurer qu’il convient. Le
2 Eviter l’exposition directe aux rayons du soleil.
AIR
REFROIDI
3 Retirez tous les obstacles se trouvant à l’arrière de l’appareil.
Vous devez laisser un espace d’au moins 50cm (20in.) autour de
l’arrière de l’appareil. Les objets gênants limitant le débit d’air
peuvent nuire à l’efficacité de refroidissement de l’appareil.
70-150 cm
système de climatisation doit être bien calé pour éviter les bruits
et les vibrations.
CLOISON
TOILE
4 L’appareil doit être légèrement incliné vers l’extérieur lors de
RADIATION
DE CHALEUR
10~15 mm
Over 50 cm
1/4 Bulle
l’installation (environ 3°) pour permettre à l’eau de condensation
de s’évacuer. (Environ 10~15mm ou 1/4 de bulle avec niveau)
REMARQUE: La grille extérieure doit être exposée à l’extérieur pour
permettre à l’air de s’évacuer.
Niveau
Retirez le système de climatisation de son boîtier
1 Retirez les 2 vis d’armature se trouvant au fond du boîtier.
3 Sortez le système de climatisation du boîtier en tirant la poignée du plateau tout en soutenant le boîtier.
4 Retirez du compresseur le polystyrène blanc de livraison. (Disponible sur certains modèles)
Mousse polystyrène blanc
Vis d’armature
Fixer le bac de récupération (Facultatif)
Le plateau de vidange est utilisé pour récupérer l’eau condensée.
Un taux d’humidité trop élevée peut faire déborder le plateau. Le plateau peut également récupérer le trop-plein d’eau en mode inversé
(seulement sur les modèles de Cycle Inversé) Pour évacuer le trop-plein d’eau, retirez le bouchon de vidange situé à l’arrière de l’appareil
et mettez le drain en place comme il l’est expliqué ci-dessous:
1. Retirez le plateau d’évacuation situé dans l’air de rejet ou sur la limite étanche.
2. Retirez le bouchon en caoutchouc situé sur l’orifice du plateau. (Disponible seulement sur certains modèles)
3. Installez le plateau d’évacuation à gauche du boîtier avec 2-4 vis.
4. Branchez le tuyau d’évacuation de l’orifice situé en bas du plateau d’évacuation.
Pour satisfaire pleinement vos besoins, vous pouvez acheter le tuyau d’évacuation ou le tubage dans votre région. (tuyau non fourni).
15
FRANÇAIS
2 Retirez les 2 vis de chaque côté du boîtier. Conservez-les pour un usage ultérieur.
Installation de la carrosserie
Etape 1
Retirez le système de climatisation de son emballage et sortez la climatisation de son
enveloppe.
REMARQUE: L’APPAREIL PEUT ÊTRE SUPPORTÉ PAR UNE
SOLIDE STRUCTURE PAR LE BAS OU PAR UN
CROCHET DE SUSPENSION DE PLAFONNIER.
FILM MINCE OU CACHET AUTOUR DE LA STRUCTURE
EXTERNE DU MUR OU SOLIDE CHAMBRANLE EN BOIS
Etape 2
Faites un trou dans le mur pour que le bas de l’enveloppe soit bien maintenue, mais
également de manière à laisser un espace suffisant en haut et pour que l’aération des
grilles d’arrivée d’air soient conformes à l’illustration. Les orifices allant de l’extérieur vers
l’orifice doivent être rebouchés. L’enveloppe doit être inclinée d’environ 5 mm vers le bas
pour permettre à l’eau qui s’est formée lors du fonctionnement de s’évacuer.
Etape 3
Installez l’enveloppe dans le mur et fixez-la. Vérifiez que les cachets en mousse ne sont
pas abîmés. Couvrez d’un film mince, cachetez ou rebouchez les trous autour de
l’intérieur et de l’extérieur pour une question d’esthétique et pour protéger l’appareil des
mauvaises conditions climatiques, des insectes et des rongeurs.
CANAL DE DRAINAGE
SOLIDE STRUCTURE
DE BOIS TOUT AUTOUR
DE L’APPAREIL
MUR OU CLOISON EN
BOIS
STRUCTURE DE SUPPORT EXTERNE EN
POINT D’ÉQUILIBRE DU RAC
ALTERNATIVEMENT, LES SUPPORTS
PEUVENT ÊTRE UTILISÉS COMME
ILLUSTRÉ CI-DESSOUS.
Méthode d’installation conseillée dans un mur,
une cloison ou une fenêtre à structure en bois.
Installations de l’appareil dans la carrosserie
FILM MINCE OU CACHET AUTOUR DE LA STRUCTURE
EXTERNE DU MUR OU SOLIDE CHAMBRANLE EN BOIS
1 Glissez l’appareil dans son enveloppe et emboîtez-le bien au fond de
l’enveloppe. Nous vous recommandons de vérifier que les bandes de
fermeture en mousse de l’enveloppe sont toujours à la même place.
ASSURE QUE LES
LOUVRES (GRILLES
D’AÉRATION SONT
COMPLÈTEMENT A
L’EXTÉRIEUR DU MUR.
2 Branchez le système de climatisation sur le secteur et placez la longueur
superflue du cordon enroulé en dessous de la base du système de
climatisation ou de la boîte des commandes.
CANAL DE DRAINAGE
STRUCTURE
EN BOIS SOLIDE
3 Engagez le Verrouillage de Châssis (Chassis Lock) en bas de la glissière
de l’enveloppe et fixez-le à la base à l’aide des vis fournies.
MUR EN STRUCTURE
DE BOIS OU CLOISON
SUPPORT STABLE
(UN PAR FACE)
SUPPORT EN BOIS SOLIDE
4 Retirez le panneau avant de son carton et de son sac plastique et
Autre méthode d’installation si vous
en pouvez pas utiliser de support externe.
mettez-le en place en suivant le mode d’emploi.
5 Allumez l’appareil. Vérifiez que l’appareil fonctionne correctement et
vérifiez qu’il n’y a pas de vibrations dues à une mauvaise installation.
6 Placez le drain de glissière dans l’enveloppe et passez une conduite de
récupération dans un endroit approprié si nécessaire.
Installations de l’appareil dans le mur
45°C BRIQUE FENDUE POUR
DÉGAGER LES FENTES D’AÉRATION
45°C BRIQUE FENDUE POUR
DÉGAGER LES FENTES D’AÉRATION
AVANT
ENTRÉE D’AIR
BRIQUE
MURALE
ENTRÉE D’AIR
100mm
BRIQUE
MURALE
VUE SUPÉRIEURE
ENTRÉE D’AIR
ENTRÉE D’AIR
ENTRÉE D’AIR
100mm
FENTES D’AÉRATION
SORTIE D’AIR
SORTIE D’AIR
100mm minimum
OPTION A
OPTION B
16
Installer le système de climatisation dans le boîtier
4 Fixez la grille avant sur la structure en insérant
1 Glissez le système de climatisation dans la
les pattes de la grille dans les encoches à l’avant
de l’armature. Poussez la grille jusqu’à ce qu’elle
s’emboîte. Lorsque vous détachez la grille avant
de la structure, poussez-la vers votre droite et
tirez-la vers vous.
structure.
Vis
Vis
Cordon d’alimentation
ATTENTION : Le cordon d’alimentation doit être
branché sur un circuit
indépendant.
Le fil vert doit être relié à la terre.
2 Bouchez la mousse entre le haut de l’appareil et
le mur pour empêcher l’air et les insectes
d’entrer dans la pièce.
5 Soulevez la grille d’entrée d’air avec une vis
(L:10mm). Rabaissez la grille d’entrée d’air.
3 Avant d’installer la grille avant, retirez le levier de
commande de la ventilation situé au-dessus des
boutons de contrôle de l’appareil, comme sur
l’image. (sur certains modèles)
17
FRANÇAIS
La mousse
Guide d’installation
du matériel
Grille d’entrée d’air réversible
Utilisation d’une grille d’entrée réversible (Certains modèles)
Ouverture de la grille avant par le haut de l’appareil:
1 Démontez la grille d’arrivée d’air par la grille avant.
Séparez la pièce articulée en retirant les vis en utilisant
un tournevis à tête plate.
2 Retournez la grille d’arrivée d’air et insérez les crochets
dans les orifices inférieurs de la grille avant.
3 Insérez le filtre.
Ouverture de la grille avant par le bas de l’appareil:
Aucun changement n’est requis si vous souhaitez retirer le
filtre par le bas. (Configuré à l’usine)
18
Problèmes
courants
Problèmes courants et Solutions
Avant de faire appel au service dépannage, prière de relire la liste suivante décrivant les problèmes courants et les solutions.
Le système de climatisation fonctionne normalement lorsque:
• Vous entendez un bruit de cliquetis. Ceci est du à l’eau collectée par le condensateur quand le temps est pluvieux ou lors de
conditions météorologiques très humides.
Cette caractéristique permet de mieux retirer l’humidité de l’air et permet également d’améliorer l’efficacité du refroidissement.
• Vous entendez un clic provenant du thermostat. Ceci est provoqué par le début et l’arrêt du cycle de compresseur.
• Vous voyez de l’eau s’écouler à l’arrière de l’appareil. L’eau peut être récupérée dans le plateau dans des conditions très
humides ou par temps pluvieux. Cette eau déborde et ruisselle à l’arrière de l’appareil.
• Vous entendez le bruit du ventilateur alors que le compresseur est silencieux. Ceci est une caractéristique normale de
fonctionnement.
Le système de climatisation peut présenter des anomalies de fonctionnement lorsque:
Problèmes
Le système de
climatisation ne
fonctionne pas du
tout
De la glace
apparaît sur le
système de
climatisation.
Que faire ?
■ Le système de climatisation est
débranché ou mal branché
• Vérifiez que la fiche est bien enfoncée dans la prise
■ Le fusible a sauté/le disjoncteur
est enclenché
• Vérifiez la boîte à fusibles/le disjoncteur et remplacez
le fusible ou ré enclenchez le disjoncteur
■ Panne de courant.
• Dans le cas d’une panne de courant, réglez la
commande d’alimentation sur OFF. Lorsque le
courant est revenu, attendez au moins 3 minutes
avant de remettre en marche la climatisation pour
éviter la surcharge du compresseur
■ Le débit d’air est restreint
• Vérifiez qu’il n’y a pas de rideaux, de volets, de
meubles ou tout autre obstacle devant le système de
climatisation.
■ Le THERMOSTAT n’est peut-être
pas réglé sur un froid assez fort
• Tournez le bouton sur un réglage supérieur. Le
réglage le plus élevé permet un refroidissement
maximal.
■ Le filtre à air est sale.
• Nettoyez le filtre au moins 2 fois par mois.
Reportez-vous au chapitre Entretien (p.11) de ce
guide.
■ Vous venez juste d’allumer la
climatisation.
• Après avoir allumé la climatisation, vous devez
patienter un certain temps avant que la climatisation
n’ait refroidi la pièce.
■ L’air froid s’échappe.
• Vérifiez les résistances au sol de générateurs ouverts
et les retours d’air froid.
• FERMEZ la ventilation de la climatisation
■ Serpentins de refroidissement
gelés
• Voir “de la glace apparaît sur le système de
climatisation” ci-dessous
■ Les serpentins de refroidissement
sont gelés.
• De la glace peut bloquer et obstruer la climatisation,
l’empêchant ainsi de refroidir correctement la pièce.
Réglez le ventilateur sur MED (MOYEN) ou HIGH
(FORT) en réglant le thermostat sur 1 ou 2 jusqu’à ce
que la glace fonde.
19
FRANÇAIS
Le système de
climatisation ne
refroidit pas
Causes Possible
NOTE
20
LG
FENSTERKLIMAGERÄT
LG
BENUTZERHANDBUCH
WICHTIG
Bitte nehmen Sie sich ein wenig Zeit, um dieses Benutzerhandbuch
durchzulesen. Es enthält wertvolle Informationen zur korrekten
Handhabung dieses Geräts und zur Vorbeugung von
unsachgemäßer Benutzung und kann Ihnen deshalb helfen, Zeit
und Geld zu sparen.
SICHERHEITSHINWEISE
Lesen Sie die Sicherheitshinweise aufmerksam durch, um
potentiellen Gefahren und Schäden vorzubeugen, die durch
unsachgemäße Benutzung oder falsche Installation entstehen
können. LG übernimmt keine Verantwortung für Schäden, die auf
unsachgemäße Benutzung zurückgehen.
DEUTSCH
Vor der Installation muss dieses Klimagerät
von der örtlichen Elektrizitätsgesellschaft
genehmigt werden (EN 61000-3 Norm).
Fensterklimagerät – Benutzerhandbuch
INHALTSANGABE
Z ur Erinnerung
Tragen Sie hier das Modell und die Seriennummer ein:
Modell #
Seriennummer #
1. Sicherheitshinweise
Die Nummern finden Sie auf dem Etikett auf beiden
Seiten des Geräts.
2. Betriebsanweisung
Name des Händlers
Kaufdatum
3. Pflege und Wartung
4. Installationsanleitung
L esen Sie dieses Handbuch
5. Allgemeine Hinweise
Es enthält viele wertvolle Hinweise zur korrekten Benutzung
und Instandhaltung Ihres Klimageräts. Ein wenig
vorbeugende Aufmerksamkeit kann Ihnen helfen, viel Zeit
und Geld zu sparen.
Lösungen für häufig auftretende Probleme finden Sie unter
Fehlersuche. Wenn Sie beim Auftreten von Problemen
zunächst die aufgelisteten Lösungsvorschläge durchlesen,
brauchen Sie den Kundenservice möglicherweise gar nicht
zu rufen.
Vorsicht
• Für Reparaturen und Wartung wenden Sie sich bitte
an einen autorisierten Servicepartner.
• Lassen Sie das Gerät von einem Fachinstallateur
installieren.
• Dieses Gerät sollte nicht ohne Beaufsichtigung von
kleinen Kindern oder gebrechlichen Personen
benutzt werden.
• Um sicherzustellen, dass Kinder nicht mit dem
Gerät spielen, sollten sie beaufsichtigt werden.
2
SicherheitsHinweise
Sicherheitshinweise
Um Verletzungen des Benutzers oder anderer Personen sowie Sachschäden zu vermeiden, müssen die
folgenden Anweisungen befolgt werden.
Unsachgemäße Benutzung, die auf der Nichtbeachtung dieser Anweisungen beruht, kann Verletzungen und
Beschädigungen zur Folge haben. Die Schwere dieser Gefahren wird durch die folgenden Zeichen signalisiert:
ACHTUNG
Dieses Zeichen weist auf die Gefahr von Tod oder schweren Verletzungen hin.
VORSICHT
Dieses Zeichen weist auf die Gefahr von Verletzungen oder Sachschäden hin.
Verbotene Tätigkeiten
Obligatorische Tätigkeiten
■ Die folgenden Anweisungen werden durch diese Zeichen klassifiziert.
ACHTUNG
ACHTUNG
Stecken Sie den Netzstecker
ordnungsgemäß in die
Steckdose.
• Andernfalls kann es zu
Stromschlägen oder aufgrund
von Wärmeerzeugung zu Brand
kommen.
Schalten Sie das Gerät niemals durch
Hineinstecken bzw. Herausziehen des
Steckers ein oder aus.
• Es kann andernfalls zu
Stromschlägen oder aufgrund
von Wärmeerzeugung zu Brand
kommen.
Verändern Sie nicht die Länge des
Bedienen Sie das Gerät nicht mit
Netzkabels und schließen Sie das Gerät
nassen Händen und benutzen Sie
nicht an eine Mehrfachsteckdose an.
es nicht in feuchter Umgebung.
• Es kann andernfalls zu Stromschlägen oder
• Es kann andernfalls zu
aufgrund von Wärmeerzeugung zu Brand kommen.
Stromschlägen kommen.
• Es kann andernfalls zu Stromschlägen oder Brand kommen.
• Wenn das Anschlusskabel beschädigt ist, muss
es durch ein spezielles Kabel ersetzt werden, das
Sie vom Hersteller oder einem seiner
Servicepartner erhalten können. (Y Befestigung)
Richten Sie den Luftstrom
nicht direkt auf Personen.
• Dies würde der Gesundheit
schaden.
Lassen Sie kein Wasser an
die elektrischen Leitungen
kommen.
• Fehlende Erdung kann zu Stromschlägen • Es kann andernfalls zu Funktionsstörungen
führen.
oder Stromschlägen kommen.
Sollten ungewöhnliche Geräusche oder
Benutzen Sie niemals eine
Gerüche aus dem Gerät herauskommen,
beschädigte oder lose Steckdose.
ziehen Sie den Netzstecker.
Installieren Sie stets einen
Luftentweichungsschutzschalter
und eine zugeordnete Schalttafel.
• Andernfalls besteht die Gefahr von
Brand und Stromschlägen.
Öffnen Sie während des Betriebs
nicht den Lufteinlass.
• Es kann andernfalls zu Brand
oder Stromschlägen kommen.
Halten Sie Schusswaffen von dem
Gerät fern.
• Es kann andernfalls zu Brand
oder Stromschlägen kommen.
Achten Sie darauf, dass sich das
Netzkabel nicht in der Nähe von
Heizkörpern befindet.
• Es kann andernfalls zu
Stromschlägen kommen.
Halten Sie das Netzkabel fern von entflammbaren
Gasen und entzündlichen Substanzen (Benzol,
Benzin, Verdünnungsmittel etc.).
• Es kann andernfalls zu Brand
kommen.
• Es kann andernfalls zu Brand
oder Stromschlägen kommen.
• Es kann andernfalls zu
Explosionen oder Brand kommen.
3
DEUTSCH
Achten Sie darauf, das Gerät
zu erden.
Achten Sie darauf, dass Netzkabel
nicht zu beschädigen und benutzen
Sie kein Kabel ohne Spezifikationen.
ACHTUNG
ACHTUNG
Bei Gasaustritt öffnen Sie zur Belüftung das
Fenster, bevor Sie das Klimagerät oder die
Fernbedienung benutzen.
Nehmen Sie das Gerät nicht auseinander und
nehmen Sie keine Modifikationen daran vor.
• Es kann andernfalls zu Explosionen, Brand oder
Stromschlägen kommen.
• Es kann andernfalls zu Funktionsstörungen oder
Stromschlägen kommen.
VORSICHT
VORSICHT
Berühren Sie bei dem
Entfernen des Filters nicht
die Metallteile des Geräts.
• Es kann andernfalls zu
Verletzungen kommen.
Vor der Reinigung des Geräts
achten Sie darauf, den
Netzschalter und den
Trennschalter auszuschalten.
• Aufgrund der hohen Geschwindigkeit
des Ventilators kann es andernfalls
zu Verletzungen kommen.
Bei Sturm oder Wirbelsturm
schalten Sie das Gerät aus
und schließen Sie das Fenster.
• Andernfalls kann Feuchtigkeit
austreten, und die Haushaltsmöbel
können nass werden.
Stellen Sie keine Hindernisse
vor den Lufteinlass oder
Luftaustritt.
Reinigen Sie das Klimagerät
nicht mit Wasser.
Achten Sie auf gute Lüftung. wenn
außer dem Luftreiniger auch eine
Heizung eingeschaltet ist.
• Wasser könnte in das Gerät
eindringen und die Isolierung
beschädigen. Es könnte zu
Stromschlägen kommen.
Setzen Sie Haustiere oder
Pflanzen nicht dem direkten
Luftstrom aus.
• Es kann andernfalls
Sauerstoffmangel entstehen.
• Es kann andernfalls zu
Verletzungen der Tiere bzw.
Pflanzen kommen.
• Es kann andernfalls zu Schäden
an den Tieren, am Gemüse oder
an den Gegenständen kommen.
Fassen Sie beim Herausziehen
des Netzkabels immer am
Stecker an.
• Es kann andernfalls zu
Stromschlägen oder
Beschädigungen kommen.
Vergewissern Sie sich, dass die
Installationskonsole der
Außeneinheit nicht durch langjährige
Benutzung beschädigt ist.
Benutzen Sie das Gerät nicht zur
Kühlung von Tieren, Gemüse,
Präzisionsmaschinen oder
Kunstartikeln.
Bei längerer Abwesenheit
schalten Sie den
Hauptschalter aus.
• Es kann andernfalls zu
Funktionsstörungen oder Brand
kommen.
Achten Sie darauf, den Filter
stets sicher in das Gerät
einzusetzen, und reinigen Sie ihn
einmal pro Woche.
• Es kann andernfalls zu
Funktionsstörungen oder zu
Unfällen kommen.
• Wenn die Schäden nicht behoben
werden, kann das Gerät durch
Herunterfallen beschädigt werden.
Benutzen Sie keine aggressiven
Reinigungsmittel wie Wachs
oder Verdünnungsmittel,
sondern nur ein weiches Tuch.
• Die Oberfläche des Geräts kann
andernfalls die Farbe ändern
oder zerkratzt werden.
Stellen Sie keine schweren
Trinken Sie nicht das aus
Gegenstände auf das Netzkabel
dem Klimagerät
und achten Sie darauf, dass es
ausgetretene Wasser.
nicht eingeklemmt wird.
• Es besteht andernfalls die Gefahr • Dies könnte zu
von Brand oder Stromschlägen.
Magenbeschwerden führen.
Wenn Sie eine Zelle aus dem Gerät
herausnehmen, achten Sie darauf, dass Kinder
sie nicht in den Mund stecken. Legen Sie sie an
einen Platz, an dem Kinder sie nicht erreichen.
• Die Benutzung ohne Filter kann
zu Funktionsstörungen führen.
Wenn Wasser o. ä. in das Gerät eintritt, schalten
Sie den Netzschalter auf der Haupteinheit aus.
Ziehen Sie den Netzstecker und wenden Sie sich
an den Kundenservice.
4
SicherheitsHinweise
Vor der Inbetriebnahme
Vorbereitung auf die Inbetriebnahme
1 Wenden Sie sich für die Installation an einen Fachinstallateur.
2 Stecken Sie den Netzstecker sicher in die Netzsteckdose.
3 Benutzen Sie kein defektes oder nicht standardmäßiges Netzkabel.
4 Schließen Sie das Gerät nicht an eine Mehrfachsteckdose an.
5 Benutzen Sie kein Verlängerungskabel.
6 Schalten Sie das Gerät nicht durch Hineinstecken bzw. Herausziehen des Steckers ein oder aus.
Benutzung
1 Dem direkten Luftstrom über längere Zeit ausgesetzt zu sein, kann der Gesundheit schaden. Setzen Sie
Personen, Tiere oder Pflanzen nicht über längere Zeit dem direkten Luftstrom aus.
2 Bei gleichzeitigem Betrieb einer Heizung sorgen Sie für gute Belüftung des Raums, da es andernfalls zu
Sauerstoffmangel kommen kann.
3 Benutzen Sie dieses Klimagerät nicht für unsachgemäße Zwecke (z. B. Aufbewahrung von
Präzisionsmaschinen, Lebensmitteln, Tieren oder Pflanzen). Eine solche Benutzung des Geräts kann
schädigend sein.
Reinigung und Pflege
1 Berühren Sie bei der Entfernung des Filters nicht die Metallteile des Geräts. Bei der Handhabung von
Gegenständen mit scharfen Metallrändern können Verletzungen auftreten.
die Isolierung beschädigt werden, was Stromschläge verursachen kann.
3 Vor der Reinigung des Geräts stellen Sie sicher, dass der Netzschalter und der Trennschalter
ausgeschaltet sind. Während des Betriebs dreht sich der Ventilator bei hoher Geschwindigkeit. Bei
versehentlichem Einschalten des Netzschalters während der Reinigung der inneren Teile des Geräts
besteht Verletzungsgefahr.
Kundendienst
Wenden Sie sich für Reparaturen und Wartung an einen autorisierten Servicepartner.
5
DEUTSCH
2 Benutzen Sie zur Reinigung des Geräteinnern kein Wasser. Wird das Gerät Wasser ausgesetzt, kann
Position und Funktion der
Bedienelemente
Betriebsanweisung
Bedienelemente
Die Bedienelemente sehen wie in den folgenden Abbildungen aus.
On
Off
Auto Swing
5
OFF
4
6
MED
FAN
3
7
2
8
1
HIGH
COOL
LOW
FAN
9
MED
COOL
LOW COOL
Thermostat
Operation
Thermostat
Operation
Auto Swing
5
4
6
Off
3
7
2
8
1
OFF
On
MED
FAN
HIGH
COOL
LOW
FAN
9
MED
COOL
LOW COOL
Thermostat
Operation
Auto Swing
5
4
Off
6
Off
3
On
Med
Fan
High
Cool
7
2
8
1
9
Low
Fan
Med
Cool
Low Cool
6
■ BETRIEBSARTEN
Die Einstellungen High Cool ( ), Med Cool ( ) und Low Cool (
) sorgen für Kühlung mit
unterschiedlichen Ventilatorgeschwindigkeiten. Die Einstellungen Med Fan (
) und Low Fan ( ) sorgen
für Ventilation und Luftfilterung ohne Kühlung. In der Einstellung Off ( o ) ist das Klimagerät ausgeschaltet.
ANMERKUNG: Wenn Sie von Kühlung auf Off oder Ventilation umschalten, warten Sie mindestens 3
Minuten, bevor Sie wieder auf Kühlung zurückschalten.
Kühlungsmodi
Für normale Kühlung wählen Sie High Cool oder Med Cool aus und stellen Sie den Thermostat auf die
mittlere Stufe.
Für maximale Kühlung wählen Sie High Cool aus und stellen Sie den Thermostat auf den höchsten Wert.
Für schwache & nächtliche Kühlung wählen Sie Low Cool aus und stellen Sie den Thermostat auf die
mittlere Stufe.
■ THERMOSTAT
Der Thermostat dient zur Aufrechterhaltung der Raumtemperatur. Der Kompressor sorgt dafür, dass die
Temperatur stabil bleibt. Wenn Sie den Knopf auf eine höhere Stufe (nach rechts) stellen, wird die Innenluft
kühler.
Die Stufen 5 und 6 (die mittleren Stufen) sind die normale Einstellung für durchschnittliche Bedingungen.
■ AUTOMATISCHE SCHWENKBEWEGUNG
Der Auto-Swing-Schalter steuert die horizontale Luftrichtung durch das Luftschwenksystem (nicht bei allen
Modellen).
ON (
): Die automatische Schwenkbewegung ist aktiviert.
OFF (
): Die automatische Schwenkbewegung ist deaktiviert.
Wenn Sie von Kühlung auf Off oder Ventilation umschalten, warten Sie mindestens 3 Minuten, bevor Sie
wieder auf Kühlung zurückschalten.
7
DEUTSCH
VORSICHT
Bedienelemente
Die Bedienelemente sehen wie in den folgenden
Abbildungen aus.
FAN
• THERMOSTAT
Stellen Sie den Thermostat-Knopf auf die gewünschte
Stufe. Die voreingestellte Position ist eine normale
Einstellung für durchschnittliche Bedingungen. Sie
können diese Einstellung bei Bedarf je nach der von
Ihnen bevorzugten Temperatur ändern.
Der Thermostat steuert automatisch den Kühlungs- oder
Heizungsbetrieb. Der Ventilator ist ständig in Bewegung,
solange das Klimagerät eingeschaltet ist. Wenn der
Raum zu warm ist, drehen Sie den Thermostat im
Uhrzeigersinn. Wenn der Raum zu kalt ist, drehen Sie
den Thermostat gegen den Uhrzeigersinn.
FAN
• HEIZUNGSLAMPE (
)
Wenn der Heizungsbetrieb eingeschaltet ist, leuchtet die
grüne Lampe.
Wenn sich Frost auf dem Wärmeaustauscher der
Außeneinheit bildet, wird automatisch entfrostet und die
grüne Lampe erlischt.
Das Gerät gibt möglicherweise ein zischendes Geräusch ab,
und der Ventilatormotor wird 1 bis 10 Minuten lang gestoppt.
Dies sollte nicht als Problem betrachtet werden.
Nach dem Entfrosten beginnt der Heizungsbetrieb wieder.
Thermostat
• BETRIEBSARTEN
Operation
OFF
LOW FAN
Heater
Warmer
Cooler
Thermostat
Operation
): Der Luftstrom wird im COOL- oder
HEAT-Modus automatisch geschwenkt.
OFF (
): Die Schwenkbewegung wird gestoppt.
o ) : Schaltet das Klimagerät aus.
) : aktiviert schwache Ventilation
ohne Kühlung.
LOW COOL (
) : Aktiviert Kühlung bei niedriger
Ventilatorgeschwindigkeit.
HIGH COOL (
) : Aktiviert Kühlung bei hoher
Ventilatorgeschwindigkeit.
LOW HEAT
) : Aktiviert Heizung bei niedriger
Ventilatorgeschwindigkeit.
(
HIGH HEAT (
• AUTOMATISCHE SCHWENKBEWEGUNG
(bei einigen Modellen)
ON (
(
(
) : Aktiviert Heizung bei hoher
Ventilatorgeschwindigkeit.
VORSICHT
Wenn Sie von Kühlung auf Off oder Ventilation
umschalten, warten Sie mindestens 3 Minuten,
bevor Sie wieder auf Kühlung zurückschalten.
8
Betriebsanweisung
Funktionen der Fernbedienung
Die Fernbedienung und das Steuerpult sehen wie in den folgenden Abbildungen aus.
2
3
7
4
7
1
3
1
2
5
1
4
5
2
5
5
4
4
3
3
4
3
2
2
5
1
7
7
1
1
4
2
3
2
5
3
7
1
1
5
5
4
4
5
4
6
3
2
1
2
3
2
3
7
1
5
6
1 POWER
Diese Taste dient zum Ein- und Ausschalten des Geräts.
2 BETRIEBSART-WAHLSCHALTER
Die Heizungsfunktion ist nur bei einigen Modellen verfügbar.
Wählen Sie den Cool-Modus, um den Raum zu kühlen.
Wählen Sie den Heat-Modus, um den Raum zu beheizen.
Wählen Sie den Fan-Modus, um den Raum zu ventilieren.
3 ZEITSCHALTER
Mit Hilfe des Zeitschalters kann eine gewünschte Zeit eingegeben werden, zu der das Gerät automatisch einbzw. ausgeschaltet werden soll. Es werden volle Stunden eingestellt, die Höchstdauer beträgt 12 Stunden.
Die Temperatur steigt nur um 2°C an und anschließend nicht weiter.
9
DEUTSCH
4
4 VENTILATORGESCHWINDIGKEITSTASTE
Wenn Sie die Leistung der Kühlung bzw. Heizung stärker einstellen möchten, wählen Sie eine höhere
Ventilatorgeschwindigkeit.
Kühlungsmodell: 3 Stufen (Hoch F3 → Niedrig F1 → Mittel F2).
Heizungsmodell: 2 Stufen (Hoch F2 → Niedrig F1).
5 TEMPERATUREINSTELLUNG
Der Thermostat prüft die Raumtemperatur und sorgt für die Aufrechterhaltung der gewünschten Temperatur.
Der Thermostat kann auf 16-30°C eingestellt werden.
Das Gerät braucht zirka 30 Minuten, um die Raumtemperatur um 1°C zu verändern.
6 SCHWENK-TASTE (bei einigen Modellen)
Durch Betätigung dieser Taste wird die automatische Schwenkbewegung der Luftleitbleche aktiviert.
Wenn diese Option deaktiviert wird, bleiben die Luftleitbleche in der letzten Position stehen und die Luft
strömt in die entsprechende Richtung.
7 FERNBEDIENUNGSSENSOR
Neustart-Taste
Im Falle eines Stromausfalls dient diese Taste dazu, das Gerät bei Wiederherstellung des Stroms automatisch
neu zu starten, wobei die vorherigen Einstellungen erhalten bleiben.
Einsetzen der Batterien für die Fernbedienung
1 Schieben Sie den Deckel des Batteriefachs auf der Rückseite der Fernbedienung mit dem Daumen auf.
2 Achten Sie auf korrekte Polung und benutzen Sie zwei neue AAA-Batterien mit 1,5 V.
3 Setzen Sie den Deckel des Batteriefachs wieder auf.
ANMERKUNG: Benutzen Sie keine aufladbaren Batterien. Vergewissern Sie sich, dass
beide Batterien neu sind.
• Wenn das Klimagerät über längere Zeit nicht benutzt wird, nehmen Sie die
Batterien aus dem Fach der Fernbedienung, damit sie sich nicht entladen.
Halten Sie die Fernbedienung fern von extrem heißen oder feuchten Orten.
Um die einwandfreie Funktionsfähigkeit der Fernbedienung zu bewahren,
setzen Sie den Fernbedienungssensor nicht dem direkten Sonnenlicht aus.
• Die Fernbedienung kann mit Hilfe einer Halterung an der Wand befestigt
werden.
10
Betriebsanweisung
Einstellen der Richtung des Luftstroms
Regulierung des Abzugs
Der Abzugsregler befindet sich über den Drehknöpfen.
Um die maximale Kühlleistung zu erhalten, schließen Sie den Abzug, so
dass die Innenluft zirkuliert.
Öffnen Sie den Abzug, um verbrauchte Luft hinauszulassen.
SCHLIESSEN
ABZUG
ÖFFNEN
Um den Abzug zu öffnen, ziehen Sie den Regler zu sich heran.
Um den Abzug zu schließen, schieben Sie den Regler hinein.
Einstellen der Luftrichtung
Durch Verstellen der Luftleitbleche kann die Richtung des Luftstroms
eingestellt werden. Auf diese Weise kann auch die Kühlleistung des
Klimageräts erhöht werden.
Horizontale Einstellung des Luftstroms
Durch Verstellen der Luftleitbleche nach links oder rechts wird die
horizontale Richtung des Luftstroms eingestellt.
Vertikale Einstellung des Luftstroms
Durch Verstellen der Luftleitbleche nach oben oder unten wird die
vertikale Richtung des Luftstroms eingestellt. Die Luftleitbleche können
nach oben und unten sowie nach rechts und links verstellt werden.
Empfohlene Ausrichtung der Luftleitbleche
Um die maximale Kühlleistung zu erreichen, richten Sie die Luftleitbleche
nach unten.
Pflege und Wartung
Vor der Reinigung des Klimageräts schalten Sie den Netzschalter aus und ziehen Sie den Netzstecker.
Gitter und Gehäuse
Benutzen Sie zur Reinigung Wasser und mildes Reinigungsmittel. Verwenden Sie
kein Bleichmittel oder scharfes Reinigungsmittel.
Kühlschlange
Reinigen Sie regelmäßig die Kühlschlange an der Rückwand. Sollte sie durch Schmutz oder Ruß
verstopft sein, lassen Sie sie professionell mit Dampf reinigen.
Für eine professionelle Reinigung wenden Sie sich an Ihren Händler oder einen Servicepartner.
11
DEUTSCH
Pflege und
Wartung
Luftfilter
Um die optimale Leistung des Klimageräts zu bewahren, sollte der Luftfilter
mindestens einmal in zwei Wochen (oder bei Bedarf) geprüft und
ausgewechselt werden.
Entfernen des Filters
1 Um die Wartung nach der Installation zu erleichtern, kann das Gitter
sowohl von oben als auch von unten aus geöffnet werden.
2 Öffnen Sie das Einlassgitter, indem Sie die Vorderwand an der oberen
oder unteren Seite (je nach Art der Installation) nach vorne ziehen. Halten
Sie sich an die Anweisungen im Abschnitt Benutzung des umkehrbaren
Einlassgitters in der Installationsanleitung.
3 Ziehen Sie leicht an der Lasche, um den Filter zu lösen. Ziehen Sie den
Filter in die Richtung der Öffnung.
4 Reinigen Sie den Filter mit warmem Seifenwasser. Die Wassertemperatur
sollte niedriger als 40°C sein.
5 Spülen Sie den Filter ab und schütteln Sie das Wasser ab. Lassen Sie
den Filter trocknen, bevor Sie ihn wieder in das Gerät einsetzen.
Wasserablass (Optional)
Bei hoher Feuchtigkeit kann die Bodenwanne überlaufen. Um das überschüssige
Wasser abzulassen, nehmen Sie die Verschlusskappe von der Abflussöffnung und
setzen Sie das Abflussrohr an.
1 Setzen Sie das mitgelieferte Abtropfblech in den Luftaustritt oder auf die
Absperrvorrichtung.
Abflussrohr
2 Entfernen Sie den Gummistöpsel in der Bodenwanne.
Verschlusskappe
3 Befestigen das Abtropfblech mit 4 (oder 2)
CABINET
4 Schließen Sie den Abflussschlauch an die
ABTROPFBLECH
Schrauben in der Ecke, in der Sie den
Stöpsel entfernt haben.
Öffnung im Abtropfblech an. Sie können sich
einen Ihren Bedürfnissen entsprechenden
Abflussschlauch bei einem Fachhändler in Ihrer
Nähe besorgen. (Der Abflussschlauch wird nicht
mitgeliefert.)
5 Wählen Sie unter den folgenden Abbildungen (je
nach den zur Verfügung stehenden Löchern) die
am besten geeignete Methode zur Befestigung
des Abtropfblechs am Gerät aus.
12
SCHRAUBE
Fig. 1
Fig. 2
ABFLUSSSCHLAUCH
Fig. 4
Fig. 3
Installationsanleitung
Installation
Produktmerkmale
VORSICHT
Sie haben ein Fensterklimagerät gekauft und es von einem Fachinstallateur installieren lassen. Dieses
Gerät muss gemäß den nationalen Verdrahtungsvorschriften installiert werden. In dieser
Installationsanleitung werden die Produktmerkmale erläutert.
1
2
3
1
4
2 3
7
5 8 6
4
5
6
8
9
10
10
11 12 14 13
11 12 13 14
8. HORIZONTALREGLER
(VERTIKALE LUFTLEITBLECHE)
2. VORDERGITTER
9. SCHALTTAFEL
3. LUFTFILTER
4. LUFTEINLASS (EINLASSGITTER)
10. NETZKABEL
5. LUFTAUSLASS
11. VERDICHTER
6. VERTIKALREGLER
(HORIZONTALE LUFTLEITBLECHE)
12. BODENWANNE
7. VERDAMPFER
14. VERFLÜSSIGER
13. STREBE
13
DEUTSCH
1. GEHÄUSE
7
9
Installation des Trennschalters und benötigte Bauteile
Halten Sie sich bei der Installation genau an die folgenden Anweisungen.
Ein Trennschalter muss zwischen der Stromquelle und dem Gerät installiert werden, wenn der Stecker nicht
benutzt wird. (Siehe unten stehende Zeichnung).
Hauptstromquelle
Trennschalter
Benutzen Sie einen Trennschalter oder
eine Zeitverzögerungssicherung.
Hinweis: Bei manchen Modellen (21.000 ~ 26.000 Btu/h)
muss ein 20A Schutzschalter verwendet werden.
(L: 30 mm, 5EA)
Schaumstoffschicht
Abtropfblech
Schraube
(Für andere Modelle)
(L: 8 mm, 4EA)
(Für Vordergitter, L: 10 mm, 1EA)
Schaumstoffschicht
(L: 30 mm, 5EA)
Abtropfblech
Schraube
(L: 8 mm, 4EA)
(Für Vordergitter, L: 10 mm, 1EA)
(Für andere Modelle)
14
Installationsanleitung
Installationsschritte
Wahl des Standorts
1 Um einen gute Passung zu gewährleisten, messen Sie den für
SCHAUMSTOFFSCHICHT
SONNENDACH
die Installation zur Verfügung stehenden Raum genau ab. Um
Vibration und Lärm zu vermeiden, muss das Klimagerät fest
GEKÜHLTE
angebracht sein.
LUFT
2 Vermeiden Sie es, das Gerät direktem Sonnenlicht
auszusetzen.
3 Entfernen Sie alle eventuellen Hindernisse von der Rückwand
des Geräts. Es muss ein Freiraum von mindestens 50 cm
hinter dem Gerät vorhanden sein. Gegenstände, die den
Luftstrom behindern, können die Kühlleistung des Geräts
einschränken.
4 Das Gerät sollte mit einer leichten Neigung nach hinten
installiert werden (ca. 3°), damit das Kondenswasser ablaufen
kann (ca. 10-15 mm oder _ Blase der Wasserwaage).
ZAUN
70-150 cm
WÄRMEABSTRAHLUNG
10~15 mm
Über 50 cm
1/4 BLASE
ANMERKUNG: Das Außengitter muss ins Freie weisen, damit
die Luft abgelassen werden kann.discharge.
WASSERWAAGE
Herausnehmen des Klimageräts aus dem Gehäuse
1 Lösen Sie zwei Schrauben an der Rückseite des Gehäuses.
2 Lösen Sie zwei Schrauben auf jeder Seite des Gehäuses. Bewahren Sie sie für eine spätere Benutzung auf.
3 Nehmen Sie das Klimagerät aus dem Gehäuse, indem Sie am Griff der Bodenwanne ziehen und mit der
anderen Hand das Gehäuse festhalten.
4 Entfernen Sie das weiße Schaumstoffpolster vom Verdichter. (Bei einigen Modellen)
Weißes Schaumstoffpolster
Transportschrauben
Das Abtropfblechen dient zum Auffangen von Kondenswasser.
Bei hoher Feuchtigkeit kann die Bodenwanne überlaufen. Das Abtropfblech kann im Umkehrmodus auch überschüssiges
Wasser auffangen (nur bei Umkehrzyklus-Modellen). Um das überschüssige Wasser abzulassen, entfernen Sie die
Verschlusskappe auf der Rückwand des Geräts und befestigen Sie das Abflussrohr folgendermaßen:
1. Entfernen Sie das Abtropfblech, dass sich im Luftaustritt oder auf der Absperrvorrichtung befindet.
2. Ziehen Sie den Gummistöpsel aus dem Loch in der Bodenwanne. (Nicht bei allen Modellen anwendbar)
3. Befestigen Sie das Abtropfblech mit 2-4 Schrauben in der linken Ecke des Gehäuses.
4. Schließen Sie den Abflussschlauch an das Loch in der Bodenwanne an.
Sie können sich einen Ihren Bedürfnissen entsprechenden Abflussschlauch bei einem Fachhändler in Ihrer Nähe besorgen.
(Der Abflussschlauch wird nicht mitgeliefert.)
15
DEUTSCH
Befestigung des Abtropfblechs (Optional)
Installation des Gehäuses
ANMERKUNG: ANMERKUNG: DAS GERÄT VON UNTEN DURCH
Schritt 1
EINEN MASSIVEN RAHMEN ODER VON OBEN
DURCH EINE AN EINEM MASSIVEN TRÄGER
Nehmen Sie das Klimagerät aus der Verpackung und ziehen Sie es aus
BEFESTIGTE AUFHÄNGUNG GESTÜTZT WERDEN.
dem Gehäuse heraus.
ABDICHTUNG AM ÄUSSEREN
WANDRAHMEN ODER STURZ
Schritt 2
Bereiten Sie die Öffnung in der Wand vor. Achten Sie darauf, dass das Gerät nach
unten hin sicher gestützt wird, dass an der Oberseite ein minimaler Freiraum besteht
und dass die Lufteinlassleitbleche genügend Freiraum haben, wie es auf den
Abbildungen zu sehen ist. Löcher in der Wand, die von außen in den Hohlraum
führen, sollten abgedichtet werden. Das Gehäuse sollte um etwa 5 mm nach hinten
ABFLUSSRINNE
ÄUSSERER STÜgeneigt sein, damit das während des Betriebs entstehende Wasser ablaufen kann.
STABILER HOLZTZRAHMEN AM
RAHMEN RINGS
SCHWERPUNKT
UM DAS GERÄT
Schritt 3
ALS ALTERNATIVE KÖNNEN TRAFACHWERKGARME VERWENDET WERDEN,
Setzen Sie das Gehäuse in die Wand und befestigen Sie es. Vergewissern Sie
WAND ODER
WIE SIE AUF DER UNTEN STEHENZWISCHENWAND
DEN ABBILDUNG ZU SEHEN SIND
sich, dass die Schaumstoffdichtungen nicht beschädigt sind. Dichten Sie alle
Löcher auf der Innen- und Außenseite ab, um eine einwandfreie Ästhetik sowieEmpfohlene Installationsmethode in Fachwerkwänden,
Schutz gegen Wetter, Insekten und Nagetiere zu gewährleisten.
Zwischenwänden oder Fenstern
Einsetzen des Geräts in das Gehäuse
1 Schieben Sie das Gerät in das Gehäuse, bis es an die Rückwand stößt.
2
3
4
5
6
Achten Sie darauf, dass die Schaumstoff-Dichtungsstreifen am Gehäuse
nicht verrutschen.
Schließen Sie das Klimagerät ans Stromnetz an und ziehen Sie den
überschüssigen Teil des Kabels unter das Klimagerät oder das
Steuergehäuse.
Schließen Sie den Riegel an der Unterkante des Gehäuses und
befestigen Sie es mit der mitgelieferten Schraube an der Unterlage.
Nehmen Sie die Vorderwand aus der Verpackung und setzen Sie sie so
ein, wie es in der Betriebsanweisung beschrieben wird.
Schalten Sie das Gerät ein. Überprüfen Sie den Betrieb des Geräts und
vergewissern Sie sich, dass es nicht vibriert.
Bringen Sie die Abflussrinne am Gehäuse an und legen Sie, wenn nötig,
eine Abflussleitung zu einer geeigneten Stelle.
ABDICHTUNG AM ÄUSSEREN
WANDRAHMEN ODER STURZ
ACHTEN SIE DARAUF,
DASS DIE LUFTLEITBLECHE SICH VOLLSTÄNDIG
AUSSERHALB DER WAND
BEFINDEN.
ABFLUSSRINNE
STABILER
HOLZRAHMEN
FACHWERKWAND
ODER ZWISCHENWAND
TRAGARME
(EINER AUF JEDER SEITE)
MASSIVE HOLZSTÜTZE
Alternative Installationsmethode, wenn keine
äußere Stütze verwendet werden kann.
Einsetzen des Geräts in die Wand
45°-AUSSCHNITT IM
MAUERSTEIN ZUR
FREIMACHUNG DER
LUFTLEITBLECHE
LUFTEINLASS
ZIEGELWAND
LUFTEINLASS
VORDERSEITE
100mm
45°-AUSSCHNITT IM
MAUERSTEIN ZUR
FREIMACHUNG DER
LUFTLEITBLECHE
ZIEGELWAND
DRAUFSICHT
LUFTEINLASS
LUFTEINLASS
LUFTEINLASS
100mm
LUFTLEITBLECH
LUFTAUSTRITT
LUFTAUSTRITT
mindestens 100 mm
OPTION A
OPTION B
16
Befestigung des Klimageräts im Gehäuse
4 Befestigen Sie das Vordergitter am Gehäuse,
1 Schieben Sie das Klimagerät in das Gehäuse.
indem Sie die Laschen am Gitter in die Schlitze
auf der Vorderkante des Gehäuses stecken.
Schieben Sie das Gitter hinein, bis es einrastet.
Um das Vordergitter vom Gehäuse
abzunehmen, schieben Sie das Gitter nach
rechts und ziehen Sie es zu sich heran.
Befestigen Sie die vorher gelösten Schrauben
wieder auf beiden Seiten des Gehäuses.
Schraube
Schraube
Netzkabel
VORSICHT: Das Netzkabel muss an einen
unabhängigen Schaltkreis
angeschlossen werden.
2 Stopfen Sie den Schaumstoff zwischen die
Oberwand des Geräts und die Hauswand, um zu
vermeiden, dass Luft und Insekten in den Raum
eindringen.
Schaumstoff
5 Heben Sie das Einlassgitter an und befestigen
Sie das Vordergitter mit einer Schraube (L: 10
mm). Lassen Sie das Einlassgitter wieder
herunter.
DEUTSCH
3 Bevor Sie das Vordergitter anbringen, ziehen Sie
– wie auf der Abbildung gezeigt wird – den
Abzugsregler heraus, der sich über den
Drehknöpfen befindet. (Bei einigen Modellen)
17
Installationsanleitung
Umkehrbares Einlassgitter
Benutzung des umkehrbaren Einlassgitters (bei einigen Modellen)
Öffnung des Vordergitters nach oben:
1 Montieren Sie das Einlassgitter von dem Vordergitter ab.
Entfernen Sie die Beschläge, indem Sie die Schrauben
mit einem Senkschraubendreher lösen.
2 Drehen Sie das Einlassgitter um und stecken Sie die
Haken in die unteren Löcher des Vordergitters.
3 Setzen Sie den Filter ein.
Öffnung des Vordergitters nach unten:
Wenn das Vordergitter nach unten geöffnet werden soll,
braucht nichts verändert zu werden. (Werkseinstellung)
18
Allgemeine
Hinweise
Probleme und Lösungsvorschläge
Bevor Sie den Kundendienst rufen, überprüfen Sie bitte die folgende Liste von Problemen und Lösungsvorschlägen.
Das Klimagerät arbeitet normal, wenn Sie
• Ein klickendes Geräusch hören. Dieses Geräusch entsteht durch Wasser, das an regnerischen Tagen oder bei
hoher Feuchtigkeit vom Verflüssiger aufgenommen wird. Diese Funktion dient dazu, die Feuchtigkeit aus der
Luft zu filtern und die Kühlleistung zu verbessern.
• Das Klicken des Thermostats hören. Dieses Geräusch entsteht beim Start und bei der Beendigung des
Verdichterzyklus.
• Wasser von der Rückwand des Geräts tropfen sehen. Bei hoher Feuchtigkeit oder an regnerischen Tagen kann
sich Wasser in der Bodenwanne ansammeln, so dass es überläuft und von der Rückwand heruntertropft.
• Die Bewegung des Ventilators hören, während der Verdichter keine Geräusche macht. Dies ist der normale
Betriebszustand.
Folgende Erscheinungen können auf unnormalen Betrieb hinweisen.
Problem
Das Klimagerät
arbeitet nicht.
Das Klimagerät
kühlt nicht.
Lösungsvorschläge
■ Das Netzkabel ist nicht richtig oder gar
nicht angeschlossen.
• Vergewissern Sie sich, dass das Netzkabel an die
Steckdose angeschlossen ist.
■ Die Sicherung ist durchgebrannt bzw.
der Trennschalter ist ausgelöst.
• Überprüfen Sie die Sicherung/den Trennschalter und
ersetzen Sie die Sicherung oder setzen Sie den
Trennschalter zurück.
■ Stromausfall
• Bei Stromausfall schalten Sie den Hauptschalter aus.
Wenn der Strom wieder hergestellt ist, warten Sie 3
Minuten, bevor Sie das Gerät wieder einschalten, um
eine Überlastung des Verdichters zu verhindern.
■ Der Luftstrom wird behindert.
• Entfernen Sie Hindernisse wie Gardinen, Rouleaus,
Möbel o. ä. vor dem Klimagerät.
■ Der Thermostat könnte nicht kühl
genug eingestellt sein.
• Stellen Sie den Drehknopf auf eine höhere Stufe.
Die höchste Stufe bietet die maximale Kühlung.
■ Der Luftfilter ist schmutzig.
• Reinigen Sie den Filter alle 2 Wochen. Konsultieren
Sie den Abschnitt Pflege und Wartung (T. 11) in
diesem Handbuch.
■ Das Klimagerät wurde gerade erst
eingeschaltet.
• Das Klimagerät braucht nach dem Einschalten eine
gewisse Zeit, um den Raum zu kühlen.
■ Kalte Luft entweicht.
• Überprüfen Sie, ob offene Widerstände und Rückläufe
von kalter Luft vorhanden sind.
• Schließen Sie den Abzug.
■ Die Kühlschlangen sind vereist.
• Siehe „Auf dem Klimagerät bildet sich Eis“.
■ Die Kühlschlangen sind vereist.
• Eis kann den Luftstrom versperren und dadurch eine
einwandfreie Kühlung verhindern. Stellen Sie den
Ventilator auf MED oder HIGH und den Thermostat
auf 1 oder 2, bis das Eis schmilzt.
19
DEUTSCH
Auf dem
Klimagerät bildet
sich Eis.
Mögliche Ursachen
P/No.: 3828A20528N
Printed in Thailand
After reading this manual, keep it in a place easily accessible to the user for future reference.