1
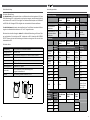
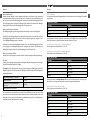
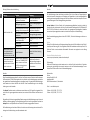
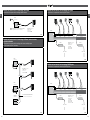
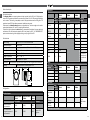
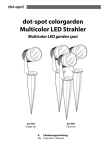
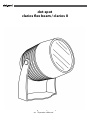
dot-spot clarios flex beam / clarios II de en І Bedienungsanleitung І Operator‘s Manual Umgang mit der Gebrauchsanleitung Vielen Dank, dass Sie sich für den dot-spot clarios Gartenstrahler entschieden haben. dot-spot Produkte werden nach sehr hohen Qualitätsrichtlinien in Deutschland entwickelt und gefertigt. Die hohe Qualität und lange Lebensdauer der Produkte sind ein aktiver Beitrag zur Ressourcenschonung und zum Umweltschutz. Lesen Sie diese Gebrauchsanleitung vollständig durch, bevor Sie den Strahler installieren oder verwenden. Bewahren Sie die Anleitung gut auf. Falls Sie den Strahler an Dritte weitergeben, geben Sie auch die Gebrauchsanleitung mit. Die Nichtbeachtung dieser Anleitung kann zu Gefahren für Personen und Schäden an Gegenständen führen. Für Personen und Sachschäden, die aufgrund der Nichtbeachtung dieser Gebrauchsanleitung entstehen, übernimmt dot-spot keine Haftung. Inhaltsverzeichnis Umgang mit der Gebrauchsanleitung ............................................................................................... 3 Lieferumfang ........................................................................................................................................ 3 Montagewerkzeug ............................................................................................................................... 3 Montagezubehör (optional) ................................................................................................................ 3 Produktbeschreibung .......................................................................................................................... 3 4 Technische Beschreibung Technische Daten ................................................................................................................................. 4 Ausstattungsvarianten ........................................................................................................................ 5 5 Modell und Leistung 5 Lichtfarben 5 Optik 6 Anschluss Sicherheit .............................................................................................................................................. 6 6 Bestimmungsgemäßer Gebrauch 6 Hinweis auf Installation durch den Fachmann 6 Sicherheitshinweise Montage ................................................................................................................................................ 7 7 Vorbereitung 7 Mechanische Montage 8 Montage mit Erdspieß 8 Montage mit Montageverlängerung 8 Montage von anderem Zubehör 8 Anschluss 9 Freie Verkabelung 10 M12 Stecker und Verkabelungssystem 10 Einstellung des flex beam Betrieb ................................................................................................................................................. 11 Wartung, Entsorgung ........................................................................................................................ 11 11 Pflege 11 Leuchtmittel 11 Entsorgung Störung, Fehlersuche und -behebung ............................................................................................. 12 Garantie .............................................................................................................................................. 12 12 Service 13 Rücksendung 13 Servicestelle 2 de de Danke! Lieferumfang 1 x Leuchte clarios (unterschiedliche Ausführungen) 1 x Bedienungsanleitung 1 x Beipackbeutel mit: 1 x Montagebügel zur Befestigung auf festen Untergründen 2 x Innensechskant-Linsenkopfschraube M6x10 zur Befestigung der Leuchte im Montagebügel 2 x Sprengring M6 zur Schraubensicherung 2 x Kunststoffunterlegscheibe M6 1 x Montageschraube 5 x 50, Kreuzschlitz- / PZ2-Antrieb 1 x Kunststoffdübel S8 1 x Innensechskant-Schlüssel SW1,5 zum Einstellen des flex beam (nur bei clarios flex beam) Montagewerkzeug Zur Montage der Leuchte im Montagebügel wird ein Innensechskant-Schlüssel SW4 benötigt. Bei der Verwendung der Montageschraube zur Befestigung des Montagebügels wird ein Schraubendreher oder Bit–Aufsatz für Kreuzschlitz / PZ Größe 2 benötigt. Je nach Montageuntergrund wird ein Bohrer Ø 3 oder 8 mm benötigt. Für die Elektroinstallation bei der Variante mit offenem Kabelende (Bestellnummern .33) ist das benötigte Werkzeug von der gewählten Verbindungstechnik abhängig. Montagezubehör (optional) Optional kann ein Edelstahl-Erdspieß und Montageverlängerungen in verschiedenen Längen zur Anbringung in verschiedenen Höhen als Sonderzubehör geliefert werden. Zum Schutz vor Tierverbiss ist ein Marderschutz lieferbar: Länge pro Set ist 50 cm. Für die Elektroninstallation sind umfangreiches Verkabelungszubehör im M12 Verkabelungssystem, wasserdichte Kabelverschraubungen und Gel-Boxen für freie Verkabelung, sowie Netzteile und Dimmer für M12 Verkabelungssystem und freie Verkabelung lieferbar. Produktbeschreibung EG-Konformitätserklärung Hiermit erklärt dot-spot Gmbh & Co. KG dass die Leuchte clarios der Richtlinie 2004/108/EG entspricht und mit CE gelabelt ist. Der vollständige Text der EU-Konformitätserklärung ist unter der folgenden Internetadresse verfügbar: www.dot-spot.de/clarios_flex_beam und www.dot-spot.de/ clarios_II 3 Ausstattungsvarianten de Technische Beschreibung Der dot-spot clarios ist ein kompakter Garten- und Objektstrahler mit fest eingebauter 10 W oder 15 W Hochleistungs-LED. Im Gartenstrahler ist ein Konverter integriert, der den direkten Betrieb je nach Variante an 12 V oder 24 V DC ermöglicht. Das Gehäuse besteht komplett aus V4A Edelstahl und ESG-Glas. Der Schutzgrad IP 68 ermöglicht auch den dauerhaften Einsatz unter Wasser. Der clarios flex beam besitzt zudem eine einstellbare Linse. Durch Drehen des vorderen Gehäuserings kann der Abstrahlwinkel stufenlos von 10° bis 45° eingestellt werden. Mit seiner hohen Leuchtkraft sorgt der clarios für die effektvolle Beleuchtung von Bäumen, Pflanzen und Architektur. Er ist stufenlos um 360° drehbar und um 180° schwenkbar. Das THERMOPROTECT-System verhindert die Überhitzung des Strahlers und sorgt damit für eine sehr hohe Lebensdauer der LED. Modell und Leistung de Produktbeschreibung clarios flex beam 10 Watt clarios flex beam 15 Watt clarios II 15 Watt Bestellnummer ohne zusätzlichen Blendschutz Bemerkung 20110. 20115. 20015. Modelvarianten "hc", mit eingebautem Waben20111. blendschutz 20116. 20016. ca. 10% Lichtverlust Lichtfarben clarios flex beam 10 Watt Technische Daten clarios flex beam clarios II 15 Watt 15 Watt BestellLumen, nur zur allgemeinen Information nummer Betriebsspannung .00. 829 lm 1000 lm 1502 lm 24 V neutralweiß, .11. 4000 K 893 lm 1080 lm 1502 lm 24 V 956 lm 1150 lm 1570 lm 24 V 389 lm 24 V Nennspannung 24 V DC, bzw. 12 V DC bei RGB und RGBW Leistungsaufnahme 10 W oder 15 W Anschlusskabel 5 m mit offenem Kabelende, 0,3 m oder 5 m mit M12 Stecker Schutzart Leuchte IP 68, bis 1 m Wassertiefe Temperaturbereich - 25 °C – +45 °C Lagertemperatur - 40 °C – +80 °C kaltweiß, 5000 K .01. Überhitzungsschutz THERMOPROTECT System blau .02. Leuchtmittel nicht austauschbar, Marken Hochleistungs-LED, integrierte Treiberelektronik rot .03. 762 lm 24 V Gehäuse V4A Edelstahl; gehärtete Glasscheibe, 4 mm grün .04. 869 lm 24 V amber .05. 762 lm 24 V RGB .99. 70 mm warmweiß, 2700 K 270 lm 12 V 386 lm 12 V, nur Anschluss 5 m mit offenem Kabelende ( .33 ) 82 mm RGBW .98. 65 mm Optik 100 mm Halbwertswinkel (FWHM) Bestell- clarios flex beam nummer 10 Watt 10° - 45° 4 clarios flex beam clarios II 15 Watt 15 Watt 13° .13. 20° .20. 30° .30. 5 Ausstattungsvarianten Sicherheit Bestell- clarios flex beam nummer 10 Watt clarios flex beam clarios II 15 Watt 15 Watt 5 m mit offenem Kabelende .33 0,3 m mit M12 Stecker .41 5 m mit M12 Stecker .42 nicht bei RGBW-Version (.98.) de mittelgrau = nicht lieferbar. Sicherheit Bestimmungsgemäßer Gebrauch Der Garten- und Objektstrahler clarios flex beam und clarios II ist für die Effektbeleuchtung von Pflanzen und Gegenständen und fester Montage bestimmt. Er ist für den Betrieb in gemäßigten Klimazonen und unter Wasser (Tauchtiefe 1 m) ausgelegt. Die Leuchte ist zum Betrieb an Schutzkleinspannung bestimmt. Bei detaillierten Lichtplanungen bitte Lichtverteilungskurve (LVK) anfordern. Der Einstellmechanismus des Leuchtwinkels bei der clarios flex beam ist für das Einrichten ausgelegt. Hinweis auf Installation durch den Fachmann Die Montage darf nur durch entsprechend ausgebildete Fachkräfte erfolgen. Sicherheitshinweise Bei der Montage sind die jeweils gültigen Sicherheitsvorschriften zu beachten. Der Strahler wird mit Schutzkleinspannung 12 V DC oder 24 V DC (Leuchtenvariante beachten) betrieben. Um Gefahren und Defekte zu vermeiden, trennen Sie vor allen Arbeiten am Strahler oder der Installation das Netzteil vom Stromnetz. Der Strahler kann nicht geöffnet werden. Schließen Sie den Strahler nur an Netzteile an, deren Ausgangsspannung 12 V DC oder 24 V DC (Leuchtenvariante beachten) nicht überschreitet. Eine falsche Spannung kann den Strahler und das Netzteil zerstören. Installationsanleitung des Netzteils beachten. Netzteil nicht überlasten! Die Gesamtleistung aller an das Netzteil angeschlossenen Verbraucher sollte ca. 10 % kleiner sein, als die Nennleistung des eingesetzten Netzteils. Um das freiliegende Anschlusskabel bei Gefahr von Tierverbiss zu schützen, sollte es mit einem Marderschutz (siehe Montagezubehör) versehen werden. 6 de Sicherheitshinweise Hohe Umgebungstemperaturen verkürzen die Lebensdauer der LED’s. Um eine lange Lebensdauer der LED zu gewährleisten, ist für eine gute Wärmeableitung zu sorgen. Den Strahler daher während des Betriebes nicht Umgebungstemperaturen > 45°C aussetzen. Den Strahler nicht abdecken, auf freie Luftzirkulation achten. Anschluss Das Gehäuse der Leuchte nicht öffnen. Die Dichtheit des clarios ist nur gewährleistet, wenn auch der Außenmantel des Anschlusskabels unbeschädigt und das Anschlusskabel wasserdicht verklemmt ist. Andernfalls kann eindringende Feuchtigkeit durch den Kapillareffekt bis zur Elektronik in der Leuchte vordringen und diese zerstören. Montage Vorbereitung Packen Sie den gesamten Lieferumfang aus und überprüfen Sie den Inhalt je nach Ausstattung auf Vollständigkeit und Unversehrtheit. Entsorgen Sie nicht mehr benötigtes Verpackungsmaterial entsprechend den geltenden Vorschriften. Wenn Sie einen Transportschaden bemerken, wenden Sie sich umgehend an den Händler, von dem Sie den Strahler bezogen haben. Mechanische Montage Zeichnen Sie die Bohrung zur Befestigung auf dem Untergrund durch ein Loch im Fuß des Montagewinkels an. Der im Lieferumfang enthaltene Dübel eignet sich für die Montage auf Untergründen aus Beton, Stein und Mauerwerk. Bohren Sie ein Loch Ø 8 mm, tiefer als 50 mm in den Untergrund und versehen Sie das Loch mit dem Dübel. Bei Holzuntergründen kann der Montagewinkel direkt, ohne Dübel mit der mitgelieferten Schraube befestigt werden. Bei Hartholz muss ggf. mit einem Bohrer Ø 3 mm vorgebohrt werden. Platzieren Sie den Montagewinkel über dem Dübel, richten Sie ihn zur gewünschten Richtung aus und schrauben Sie ihn mit der mitgelieferten Schraube fest. Nun kann der clarios am Montagewinkel befestigt werden. 1. Fädeln Sie einen Sprengring auf eine Schraube, stecken Sie diese durch ein Loch am oberen Ende des Montagebügels, fädeln Sie eine Kunststoffunterlegscheibe auf die Schraube und drehen Sie die Schraube seitlich in die Gewindebohrungen am Leuchtengehäuse. Halten Sie dazu den Strahler in den Montagebügel. 2. Wiederholen Sie dies mit der zweiten Schraube, Sprengring und Kunststoffunterlegscheibe auf der anderen Seite. 3. Richtige Sortierung beachten: Schraubenkopf, Sprengring, Montagebügel, Kunststoffunterlegscheibe, Leuchtengehäuse. 4. Richten Sie den Strahler in die gewünschte Richtung aus und schrauben Sie ihn mit einem 4 mm Innensechskant-Schlüssel fest. 7 Montage Montage mit Erdspieß Rammen Sie den Erdspieß mit einem passenden Hilfsmittel in den Boden. Bei der Verwendung eines Metallhammers legen Sie bitte ein Stück Holz o. ä. dazwischen, um den Erdspieß zu schützen. Schrauben Sie dann den Montagebügel der Leuchte mit der dem Erdspieß beigelegten Schraube und Sprengring auf den Erdspieß. Der Sprengring wird zwischen Schraubenkopf und Montagebügel platziert. Richten Sie den Montagebügel vor dem Festziehen aus. Freie Verkabelung Der Anschluss erfolgt nach Belegungstabellen. Der Anschluss muss nach benötigter IP-Klassifizierung erfolgen. Montage mit Montageverlängerung Die Montageverlängerungen sind zur gemeinsamen Verwendung mit dem Erdspieß gedacht. Schrauben Sie die Montageverlängerung mittels des Gewindezapfens auf den Erdspieß. Ziehen Sie die Montageverlängerung fest: Dazu verwenden Sie eine Zange und legen einen Lappen o. ä. bei, um die Montageverlängerung nicht zu verkratzen. Schrauben Sie dann den Montagebügel der Leuchte mit der dem Erdspieß beigelegten Schraube und Sprengring auf die Montageverlängerung. Der Sprengring wird zwischen Schraubenkopf und Montagebügel platziert. Richten Sie den Montagebügel vor dem Festziehen aus. Montage von anderem Zubehör Beachten Sie bei der Montage von anderem Zubehör die jeweils beiliegende Montageanweisung. Anschluss Achtung: Die Auslegung der Gesamtanlage und benötigter Netzteile muss sorgsam und nach Vorgaben der Schutzkleinspannung SELV erfolgen! Die clarios wird mit Gleichspannung versorgt und mittels separatem PWM-Signal (Puls-WeitenModulation) gedimmt. Pro Lichtfarbe wird ein PWM-Signal (S-PWM) benötigt. Der PWM-Eingang hat folgende Eigenschaften: PWM-Leitung mit Masse (-) verbunden LED an PWM-Leitung offen LED aus PWM-Leitung mit Betriebsspannung (+) verbunden LED aus PWM-Frequenz = 0 bis 1.000 Hz Der Schaltpunkt der Leuchte zwischen An und Aus für den PWM-Pegel ist nicht definiert: Es sollte am besten mit einem Schaltimpuls zwischen Masse und offenem Kontakt gearbeitet werden oder wahlweise mit einem Impuls zwischen Masse und Betriebsspannung. Ein von der Betriebsspannung abweichendes PWM-Signal ist nicht zulässig. 8 de de Montage clarios weiß / einfarbig Aderfarbe Belegung rot + 24 V blau S-PWM schwarz Masse (-) Achtung: Wird die Leuchte ungedimmt verwendet, muss die PWM-Leitung (Ader für das PWMSignal) an die Masse (-) geklemmt werden. Ansonsten bleibt die LED aus. Anschlussplan der clarios weiß / einfarbig ohne Dimmer Siehe entsprechende Grafik Heftmitte (S. 14+15). Anschlussplan der clarios weiß / einfarbig mit Dimmer Siehe entsprechende Grafik Heftmitte (S. 14+15). clarios flex beam RGB Aderfarbe Belegung weiß + 12 V rot rot S-PWM grün grün S-PWM blau blau S-PWM schwarz Masse (-) Achtung: Das Kabel der clarios flex beam RGB hat eine nicht benötigte Ader (braun oder grau). Diese Ader ist in der Regel ab Werk gekürzt und soll nicht angeschlossen werden. Anschlussplan der clarios flex beam RGB Siehe entsprechende Grafik Heftmitte (S. 14+15). clarios flex beam RGBW Aderfarbe Belegung weiß + 12 V rot rot S-PWM grün grün S-PWM blau blau S-PWM braun weiß S-PWM schwarz Masse (-) 9 Betrieb Anschlussplan der clarios flex beam RGBW Siehe entsprechende Grafik Heftmitte (S. 14+15). LED-Leuchten sind äußerst energiesparend und haben im normalen Betrieb eine sehr lange Lebensdauer. Um die maximale Lebensdauer der LED und Energieeffizienz zu gewährleisten, sollten folgende Punkte beachtet werden: M12 Stecker und Verkabelungssystem Der Anschluss der clarios Varianten mit M12-Stecker ist denkbar einfach, sowohl gedimmt als auch ungedimmt. Den Stecker der Leuchte in eine freie Buchse des M12 Verkabelungssystems stecken. Das M12 Verkabelungssystem ist so kodiert, dass keine Fehlverschaltungen möglich sind, bzw. keine Defekte entstehen. Die benötigten Komponenten der Elektroinstallation (Netzteile, Verteiler, Verlängerungen und Stopfen für nicht belegte M12-Buchsen) bitte vor Bestellung an Hand der Verkaufsunterlagen des M12-Verkabelungssystems planen. Belegung des M12 Steckersystems Pinnummer M12 Stecker Aderfarbe (wenn Stecker abgezwickt) 5-pol Stecker clarios weiß / einfarbig 5-pol Stecker clarios flex beam RGB 1 braun 24 V + rot S-PWM 2 weiss 24 V + grün S-PWM 3 blau S-PWM 12 V + 4 schwarz Masse blau S-PWM 5 grün/gelb (grau) Masse Masse Einstellung des flex beam (Nur clarios flex beam) Der clarios flex beam verfügt über eine einstellbare Linse, mittels derer der Abstrahlwinkel nach Montage zwischen 10° und 45° (Halbwertswinkel, FWHM) geändert werden kann. Abstrahlwinkel am besten bei kalter, aber angeschalteter Leuchte im Dunkeln einstellen. Beide Madenschrauben M3 am vorderen Ring der Leuchte mit Hilfe des mitgelieferten Innensechskant-Schlüssels SW1,5 lösen. Achtung: Madenschrauben wegen Gefahr des Verlustes nicht komplett herausdrehen. Ring drehen und damit den Abstrahlwinkel ändern: ■ ■ ■ ■ Drehrichtung im Uhrzeigersinn (Blickrichtung mit dem Lichtstrahl) verengt den Abstrahlwinkel. Drehrichtung gegen den Uhrzeigersinn (Blickrichtung mit dem Lichtstrahl) erweitert den Abstrahlwinkel. Der engste und der weiteste Punkt liegen mehrere Umdrehungen auseinander. Am engsten und weitesten Punkt gibt es einen Anschlag. Den Ring nicht darüber hinaus drehen, da die Mechanik der Leuchte sonst zerstört werden kann. de de Montage ■ ■ An-/Abschalten der Leuchte sollte über die eingangsseitige Schaltung des Netzteils erfolgen. Abschalten der Leuchte per PWM-Signal sollte nicht dauerhaft erfolgen, da in diesem Fall die Elektronik der Leuchte weiterarbeitet. ■ Auch wenn die Leuchte über ein THERMOPROTECT System verfügt, das die Leuchte vor Hitzeschäden schützt, ist der dauerhaft anormale Betrieb zu vermeiden. ■ Die Wärmeabfuhr von der LED darf nicht behindert werden. Decken Sie den Strahler daher nicht ab. Betrieb ■ ■ Vermeiden Sie den Betrieb des Strahlers bei direkter Sonneneinstrahlung. Strahler bei Automatikbetrieb über Schaltuhr und / oder Dämmerungsschalter steuern. Wartung, Entsorgung Pflege ■ Reinigen Sie den Strahler von Zeit zu Zeit mit einem feuchten Tuch. ■ Die Leuchten sind aus rostfreiem V4A Stahl gefertigt. Je nach Umgebungsbedingungen und Einbaumaterial kann dennoch auf den Metallteilen sogenannter Flugrost auftreten, dies stellt keinen Mangel dar. Der Flugrost kann mit entsprechenden Edelstahlreinigern leicht entfernt werden. Flugrost tritt insbesondere auf, wenn das Gehäuse mit eisenhaltigen Partikeln (z. B. Eisen-Schleifstaub, eisenhaltigen Pflanzendüngern o. ä.) in Berührung kommt. Leuchtmittel LED-Leuchten haben im normalen Betrieb eine sehr lange Lebensdauer. Daher ist der Austausch des Leuchtmittels nicht vorgesehen. Bei Fragen siehe Kapitel Service. Entsorgung Wenn das Gebrauchsende erreicht ist, entsorgen Sie den Strahler und alle Zubehörteile entsprechend den geltenden Umweltvorschriften. Elektrische Abfälle dürfen nicht zusammen mit Haushaltsabfällen entsorgt werden. Nach der Einstellung die Madenschrauben fingerfest andrehen, am sichersten nur das kurze Ende des Schlüssels als Hebel benutzen. 10 11 Störung, Fehlersuche und -behebung Strahler leuchtet nicht Ursachen Behebung PWM-Leitung nicht mit Masse oder Dimmer verbunden zum Prüfen PWM-Ader mit Masse kontaktieren PWM-Signal liegt nicht an Dimmer (PWM-Signalgeber) prüfen M12-Steckersystem nicht richtig Komponenten des M12-Steausgelegt, falsche Komponenten ckersystems überprüfen Leitung zum Netzteil, Dimmer unterbrochen Leitung prüfen, ggf. ersetzen Spannungsversorgung zum Netzteil unterbrochen Eingangsspannung am Netzteil prüfen Netzteil defekt Netzteil austauschen Leuchte defekt Leuchte einschicken Strahler blinkt, flackert oder schaltet sich nach kurzer Betriebszeit ab, das Netzteil wird sehr heiß Netzteil überlastet Netzteil mit höherer Leistung einsetzen Leuchtkraft des Strahlers nimmt während des Betriebs ab oder der Strahler leuchtet nicht mehr Betrieb bei hoher Gehäusetemperatur, das THERMOPROTECT System reduziert zum Schutz der LED die Leistung bis zum Abschalten der LED Betrieb des Strahlers bei niedrigerer Umgebungstemperaturen oder bei besserer Luftzirkulation Garantie Diese Garantiebedingungen gelten für den Kauf und Einsatz unserer Produkte in der Bundesrepublik Deutschland. Für das Ausland gelten die in den Verkaufs- und Lieferbedingungen vereinbarten bzw. gesetzlichen Garantiebedingungen des jeweiligen Landes. Die gesetzlichen Gewährleistungsrechte werden durch diese Garantie nicht berührt. Diese Garantieerklärung ist eine freiwillige Leistung von uns als Hersteller. Alle dot-spot Produkte werden vor Verlassen unseres Hauses zu 100 % geprüft und getestet. Dennoch kann nicht ganz ausgeschlossen werden, dass vereinzelt Fehler während des Betriebs auftreten. Die Gewährleistung umfasst den Ersatz der defekten Teile. Auf den Ersatz von Folgeschäden besteht kein Anspruch. Insbesondere auf Erstattung von Folgeschäden, die bei unsachgemäßer Verwendung oder unsachgemäßer Montage der Produkte entstehen, besteht kein Anspruch. Die fachgerechte Montage ist in der Montageanleitung beschrieben. de de Störung Garantie dot-spot clarios ist für den Betrieb mit Konstantspannungs-Netzteilen konzipiert, welche die Normen einhalten, insbesondere die Norm für elektronische Betriebsgeräte für LED-Module IEC 61347-2-13. Bei Schäden, die durch den Betrieb mit ungeeigneten Vorschaltgeräten, Netzteilen oder anderen Spannungsquellen entstehen, besteht kein Anspruch auf Gewährleistung. Diese Garantiebedingungen gelten seit dem 01.01.2006 / Technische Änderungen und Irrtum vorbehalten. Service Richten Sie Ihre Reklamation mit Schadensmeldung (Was geht nicht? Wie äußert sich der Fehler?), einer Kopie der Rechnung (Fax, Scan, Digitalfoto) sowie Ihrer Kontaktdaten zunächst per Email, Fax, Brief oder Telefon an unten stehende Servicestelle. Wir werden uns umgehend um eine Lösung kümmern. Download Reklamationsformular: www.dot-spot.de/download/reklamationsformular.pdf Rücksendung Sollte eine Rücksendung vereinbart worden sein, so schicken Sie die Leuchte bitte in Originalverpackung oder gleichwertig sicher verpackt zusammen mit den Reklamationsunterlagen an uns. Vereinbaren Sie bitte vorab mit uns die Versandbedingungen. Servicestelle Service dot-spot GmbH & Co. KG Industriestraße 1 90592 Schwarzenbruck / Deutschland Email: [email protected] Telefon: +49 (0) 9128 / 72 22 17 - 0 Telefax: +49 (0) 9128 / 72 22 17 - 9 Wir gewähren im Rahmen der gesetzlichen Bestimmungen eine Gewährleistung von zwei Jahren ab Kaufdatum (Rechnungsbeleg). Die Gewährleistung bezieht sich auf die einwandfreie Funktion der dot-spot Garten- und Objektstrahler und Zubehör bei bestimmungsgemäßem Gebrauch. Die Gewährleistung umfasst keine Schäden, die durch normale Abnutzung oder mechanische Zerstörung durch Krafteinwirkung von außen entstanden sind. 12 13 Achtung: Brücke zwischen (–) und (– Dim) zwingend notwendig! Attention: bridge between (–) and (– dim) is mandatory! Adernfarben ▪ wire colors: Schwarz ▪ black = rot ▪ red = + blau ▪ blue = DIM de Anschluss der Leuchten bei freier Verkabelung, RGB System Connection of the spots with free cabling, RGB system de Anschluss der Leuchten bei freier Verkabelung, ohne Dimmer Connection of the spots with free cabling, without dimmer Netzteil power supply Netzteil power supply bloc d'alimentation - Dim - Dim PWM Dimmer PWM Dimmer variateur PWM Adernfarben ▪ wire colors: Achtung: Brücke zwischen (–) und (– Dim) zwingend notwendig! Schwarz ▪ black = Attention: bridge between (–) and (– dim) is mandatory! rot ▪ red + Stripes) Input Dimmer Konstant Spannungs-Ausgang (Dimmer für= LED ▪ blue = DIM Dimmer constant voltage output (dimmer blau for LED stripes) Output Dim Variateur constant sortie de tension (variateur pour les barrettes LED) Dim Controller F1u1 An = Dim-Kontakt zu Masse geschlossen, Aus = Dim-Kontakt offen, PWM-Frequenz maximal 1.000 Hz On = Dimming contact to against ground closed, Off = Dimming contact open, maximum PWM frequency 1,000 Hz Marche = contact variateur fermé vers la masse, Arrêt = contact variateur ouvert, fréquence MLI au maximum 1.000 Hz R G B Anschluss der Leuchten bei freier Verkabelung, mit Dimmer, mehrere Leuchten, ggf. mehrere Netzteile Connection of the spots with free cabling, with dimmer; multiple spots, multiple power supplies if necessary nt 12/30 Netzteil power supply bloc d'alimentation Input Output Dim Dim nt 12/30 230 V / 50 Hz - Dim PWM Dimmer PWM Dimmer variateur PWM Adernfarben ▪ wire colors: Schwarz ▪ black = weiß ▪ white = + rot ▪ red = R grün ▪ green = G blau ▪ blue = B 230 V / 50 Hz Netzteil Dimmer Konstant Spannungs-Ausgang (Dimmer für LED Stripes) power supply Dimmer constant voltage output (dimmer for LED stripes) F3d3 Variateur constant sortie de tension (variateur pour les barrettes LED) Anschluss der Leuchten bei freier Verkabelung, RGBW System Connection of the spots with free cabling, RGBW system An = Dim-Kontakt zu Masse geschlossen, Aus = Dim-Kontakt offen, PWM-Frequenz maximal 1.000 Hz On = Dimming contact to against ground closed, Off = Dimming contact open, maximum PWM frequency 1,000 Hz - Dim Marche = contact variateur fermé vers la masse, Arrêt = contact variateur ouvert, fréquence MLI au maximum 1.000 Hz Adernfarben ▪ wire colors: Schwarz ▪ black = rot ▪ red = + blau ▪ blue = DIM - Dim Netzteil power supply Controller Netzteil power supply R G B W - Dim - Dim Nicht mit den anderen Netzteilen verbinden! Do not connect Adernfarben ▪ wire colors:to other power supplies! Schwarz ▪ black = rot ▪ red = + blau ▪ blue = DIM PWM Dimmer PWM Dimmer Input Adernfarben ▪ wire colors: Schwarz ▪ black = weiß ▪ white = + rot ▪ red = R grün ▪ green = G blau ▪ blue = B braun ▪ brown = W nt 12/30 Output Dim Dim 230 V / 50 Hz - Dim Netzteil power supply F1d3 14 nt 12/30 230 V / 50 Hz F4d3 15 - Dim Handling the operator‘s manual Thank you very much for buying the dot-spot clarios garden spot. dot-spot products are developed and manufactured in Germany according to very high quality guidelines. The high quality and long life of the products are an active contribution to resource conservation and environmental protection. Read the operator‘s manual completely before installing or using the spot. Keep this manual in a safe place. In case you forward the spot towards third persons, also give them the operating manual. Failure to follow these instructions may cause danger to persons and damage to property. dot-spot will not assume any liability for damage to persons and property resulting from failure to follow this operator‘s manual. Table of contents Handling the operator‘s manual ...................................................................................................... 17 Scope of delivery ................................................................................................................................ 17 Installation tools ................................................................................................................................ 17 Mounting accessories (optional) ..................................................................................................... 17 Product description ........................................................................................................................... 17 18 Technical description Technical data .................................................................................................................................... 18 Configurations ................................................................................................................................... 18 18 Model and power 19 Light colors 19 Optics 19 Connection Safety ................................................................................................................................................... 20 20 Intended use 20 Note on the installation to be carried by an expert 20 Safety instructions Assembly ............................................................................................................................................. 20 20 Preparation 21 Mechanical installation 21 Installation using the ground spike 21 Installation using the mounting extension 21 Installation of other accessories 21 Connection 22 Free cabling 23 M12 plug and cabling system 23 Setting the flex beam Operation ............................................................................................................................................ 24 Maintenance, disposal ..................................................................................................................... 24 24 Care 24 Illuminants 25 Disposal Malfunction, failure detection and elimination ............................................................................. 25 Warranty .............................................................................................................................................. 25 26 Service 26 Return 26 Service center 16 en en Thank you! Scope of delivery 1 x clarios spot (different configurations) 1 x Operator‘s manual 1 x Accessories kit including: 1 x Mounting bracket for mounting on solid grounds 2 x Rounded head screw with hexagon socket M6x10 for mounting the spot to the mounting bracket 2 x Snap rings M6 for securing screws 2 x Plastic washers M6 1 x Mounting screw 5 x 50, recessed head / PZ2 drive 1 x Plastic dowel S8 1 x Hex key size 1.5 for setting the flex beam (for clarios flex beam only) Installation tools A hex key with the size 4 is required for mounting the spot to the mounting bracket. When using the mounting screw for attaching the mounting bracket, a Phillips type / PZ size 2 screw driver or bit is required. Depending on the mounting surface, a Ø 3 or 8 mm drill bit is needed. Regarding the electrical installation for the version with open cable end (order numbers .33) the required tool depends on the chosen connection technique. Mounting accessories (optional) Optionally a stainless steel ground spike as well as mounting extensions in different lengths for installation at different heights is available as special accessories. An anti-marten protection against animal bites is available: length per set is 50 cm. Comprehensive cabling accessories for the M12 cabling system, waterproof cable glands and gel boxes for free cabling as well as power supplies and dimmers for the M12 cabling system and for free cabling are available for the electrical installation. Product description EC declaration of conformity Hereby declares dot-Spot GmbH & Co. KG that the luminaire clarios corresponds to Directive 2004/108 / EC and is labeled with CE. A copy of the EU declaration of conformity is available at the following Internet address: www.dot-spot.de/clarios_flex_beam and www.dot-spot.de/clarios_II 17 Product description Light colors Technical data clarios flex beam 10 Watt Order number Lumens, for general information only Operating voltage warm white, 2700 K .00. 829 lm 1000 lm 1502 lm 24 V neutral white, 4000 K .11. 893 lm 1080 lm 1502 lm 24 V cold white, 5000 K .01. 956 lm 1150 lm 1570 lm 24 V blue .02. 389 lm 24 V 24 V DC, or 12 V DC with RGB and RGBW red .03. 762 lm 24 V Power consumption 10 W or 15 W green .04. 869 lm 24 V Connection cable 5 m with open cable end, 0.3 m or 5 m with M12 plug amber .05. Protection class of the spot IP 68, up to 1 m water depth RGB .99. Temperature range - 25 °C – +45 °C Storage Temperature - 40 °C – +80 °C Thermal protection THERMOPROTECT system Rated voltage Illuminants RGBW not replaceable, high-performance quality LED with integrated driver electronics Housing V4A stainless steel; hardened glass, 4 mm 70 mm 82 mm clarios flex beam 15 Watt clarios II 15 Watt Order number „hc“ versions, with integrated honeycomb glare protection 20110. Comment 20115. 386 lm Order number clarios flex beam 10 Watt clarios flex beam clarios II 15 Watt 15 Watt .13. 20° .20. 30° .30. Connection Model and power without additional glare protection .98. 12 V, only 5 m connection with open cable end ( .33 ) 13° Order number clarios flex beam 10 Watt clarios flex beam clarios II 15 Watt 15 Watt 5 m with open cable end .33 0.3 m with M12 plug .41 5 m with M12 plug .42 Configurations clarios flex beam 10 Watt 24 V 12 V 10° - 45° 100 mm 762 lm 270 lm Optics Beam angles (FWHM) 65 mm 18 clarios flex beam clarios II 15 Watt 15 Watt en en Technical description The dot-spot clarios is a compact garden and object spot with built-in 10 W or 15 W high-performance LED. The garden spot features a converter which allows 12 or 24 V DC operation depending on the version. The housing is completely made of V4A-type stainless steel and ESG glass. The protection class of IP 68 also allows permanent installation under water. Furthermore, the clarios flex beam features an adjustable lens. The beam angle can be continuously adjusted between 10° and 45° by rotating the front bezel. Thanks to its high brightness the clarios offers an atmospheric illumination for trees, plants and architecture. It can be continuously rotated by 360° and pivoted by 180°. The THERMOPROTECT system avoids overheating of the spotlight ensuring a very long life of the LED. 20015. not for RGBW-Version (.98.) medium gray = not available. 20111. 20116. 20016. approx. 10% light loss 19 Assembly Intended use The garden and object spots clarios flex beam and clarios II are designed for providing effect lighting for plants and objects as well as for permanent installation. They are designed for operating in moderate climatic zones and under water (depth 1 m). The luminary is meant for operating with protective low voltage. In case of detailed lighting planning, please request the light distribution curves (LDC). Mechanical installation Mark the hole for substrate mounting through a hole in base of the mounting bracket. The dowel included in the scope of delivery is suitable for installation in concrete, stone and masonry. Drill a hole of Ø 8 mm and deeper than 50 mm into the substrate and insert the dowel into the hole. In case of wooden substrates the mounting bracket can directly fixed using the supplied screw, without the dowel. In case of hardwood the holes may require pre-drilling with Ø 3 mm. The adjustment mechanism for the light angle of the clarios flex beam is laid out for setting up. Position the mounting bracket over the dowel, orientate it into the desired direction and screw it down with the supplied screw. Note on the installation to be carried by an expert The installation may only be carried out by appropriately trained professionals. Safety instructions During installation, the relative safety regulations have to be followed. The spot is operated with protective low voltage of 12 V DC or 24 DC (observe spot version). To avoid danger and failures, prior or any work at the spot or installation, disconnect the power supply from the mains. The spot can‘t be opened. Connect the sport only to power supplies with a maximum output voltage of 12 V DC or 24 V DC (observe spot version). A wrong voltage may destroy the spot and the power supply. Observe the installation manual of the power supply. Do not overload the power supply! The overall power consumed by all consumers connected to the power supply should be approx. 10% lower than the rated power of the power supply being used. In order to protect the exposed connection cable from rodents it should be protected against martens (see installation accessories). High ambient temperatures shorten the life of the LED‘s. Ensure a good heat dissipation in order to guarantee a long life of the LED. During operation, do not expose the spot to ambient temperatures of > 45°C. Do not cover the spot, provide free air circulation. Do not open the housing of the luminary. The tightness of the clarios is only guaranteed if also the outer sheath of the connection cable is undamaged and if the connection cable is bonded in a waterproof way. Otherwise, because of the capillary effect, the penetrating moisture can reach and destroy the electronics of the spot. Assembly Preparation Depending on the configuration, unpack all the parts included in the scope of delivery and check them for completeness and intactness. Dispose of the packaging material no longer needed in accordance with applicable regulations. If you notice any damage from transport, immediately contact the dealer where you purchased the luminary. 20 en en Safety Now, the clarios can be attached to the mounting bracket. 5. Thread a snap ring onto a screw, insert it through a hole at the upper end of the mounting bracket, thread a plastic washer onto the screw and screw it laterally into the threaded holes on the luminary housing. In order to do so, insert the spot in the mounting bracket. 6. Repeat that with the second screw, snap ring and plastic washer on the other side. 7. Pay attention to correct sorting: screw head, snap ring, mounting bracket, plastic washer, luminary housing. 8. Orientate the spot in the desired direction and screw it tight with a 4 mm hex key. Installation using the ground spike Drive the ground spike into the ground using a suitable tool. When using a metal hammer, please put a piece of wood or the like between the hammer and the ground spike in order to protect the latter. Then, screw the mounting bracket with the luminary onto the ground spike using the screw and the snap ring provided with the ground spike. The snap ring is placed between screw head and mounting bracket. Orientate the mounting bracket before screwing it down. Installation using the mounting extension The mounting extensions are designed for the use with the ground spike. Screw the mounting extension onto the ground spike using the threaded pin. Screw tight the mounting extension: in order to do so, use a pair of pliers and put a cloth or the like around the mounting extension. Then, screw the mounting bracket with the luminary onto the mounting extension using the screw and the snap ring provided with the ground spike. The snap ring is placed between screw head and mounting bracket. Orientate the mounting bracket before screwing it down. Installation of other accessories During the installation of other accessories, refer to the respective installation instructions attached. Connection Attention: The design of the complete system and of the required power supplies must be carried according to the protective low voltage SELV prescriptions! 21 Assembly Connection The clarios is supplied with DC power and dimmed via a separate PWM signal (pulse width modulation). A PWM signal (S-PWM) is required for each light color. The PWM input has the following characteristics: Attention: The cable of the clarios flex beam RGB features a wire which is not used (brown or gray). Normally, the wire is shortened ex works and should not be connected. LED on PWM line open LED off clarios flex beam RGBW PWM line connected to operating voltage (+) LED off Wire color Assignment white + 12 Volts red red S-PWM green green S-PWM blue blue S-PWM brown white S-PWM black ground (-) The switching point of the luminary between on and off for the PWM level is not defined: Ideally it should be worked with a switching impulse between ground and open contact or optionally with an impulse between ground and operating voltage. A PWM signal differing from the operating voltage is not allowed. Free cabling The connect is made according to the assignment tables. The connection must be carried out according to the required IP classification. clarios white / monochromatic Wire color Assignment red + 24 Volts blue S-PWM black ground (-) Attention: In case the luminary is used without the dimming function, the PWM line (wire for the PWM signal) must be connected to ground (-). Otherwise the LED remains off. Connection diagram of the clarios white / monochromatic without dimmer See respective drawing in the middle of this manual (p. 14+15). Connection diagram of the clarios white / monochromatic with dimmer See respective drawing in the middle of this manual (p. 14+15). clarios flex beam RGB 22 Connection diagram of the clarios flex beam RGB See respective drawing in the middle of this manual (p. 14+15). PWM line connected to ground (-) PWM frequency = 0 to 1,000 Hz Wire color Assignment white + 12 red red S-PWM green green S-PWM blue blue S-PWM black ground (-) en en Assembly Connection diagram of the clarios flex beam RGBW See respective drawing in the middle of this manual (p. 14+15). M12 plug and cabling system The connection of the clarios versions with M12 connector is quite simple, either with or without dimming function. Plug the connector of the luminary in a free socket of the M12 cabling system. The M12 cabling system is coded in a way to avoid wrong wiring or failures. Please plan the components required for the electrical installation (power supplies, distributors, extensions and plugs for unassigned M12 sockets) according to the sales documentation of the M12 cabling system before placing an order. Assignment of the M12 connector system Pin number M12 plug Wire color (if plug is pinched off) 5-pin plug clarios white / monochromatic 5-pin plug clarios flex beam RGB 1 brown 24 V + red S-PWM 2 white 24 V + green S-PWM 3 blue S-PWM 12 V + 4 black Masse blue S-PWM 5 green/yellow (gray) ground ground Setting the flex beam (clarios flex beam only) The clarios flex beam is provided with an adjustable lens with which the beam angle can be changed between 10° and 45° (half beam angle, FWHM) after installation. Ideally the beam angle is set in the dark with the cold, but switched on luminary. 23 Maintenance, disposal Setting the flex beam (clarios flex beam only) Loosen the two grub screws M3 on the front ring of the luminary using the provided hex key of the size 1.5. Attention: Do not completely unscrew grub screws due to the risk of loss. Rotating the bezel and changing the beam angle: Disposal At the end of the useful life, dispose of the spot and all accessories in accordance with the applicable environmental regulations. Electrical waste must not be disposed of with domestic waste. ■ ■ ■ ■ Clockwise rotation (viewing direction with the light beam) narrows the beam angle. Counterclockwise rotation (viewing direction with the light beam) increases the beam angle. The narrowest and the widest point are several rotations apart from each other. There is a limit stop at the narrowest and the widest point. Do not turn the bezel over those points, otherwise the lens mechanism may be destroyed. Malfunction, failure detection and elimination Malfunction After adjustment, screw the grub screws finger-tight, in order to be on the safe side, only use the short end of the key as lever. Operation Spot does not work LED lights are extremely energy efficient and, under normal operation, have a very long life. To ensure the maximum life of the LED and to increase the energy efficiency, the following should be considered: ■ ■ ■ ■ ■ ■ The turning on and off of the luminary should be carried out by the input circuit of the power supply. The turning off of the luminary via the PWM signal should not occur permanently since in this case the electronics unit of the luminary continues operating. Even if the luminary is equipped with a THERMOPROTECT system that protects the luminary against thermal damage, a permanent abnormal operation should be avoided. The heat dissipation of the LED must not be hindered. Therefore, do not cover the spot. Avoid operating the spot in case of direct solar radiation. In automatic mode, control the spot via timer and / or twilight switch. Maintenance, disposal Care ■ Clean the spot with a damp cloth every now and then. ■ The luminaries are made of stainless V4A steel. However, depending on the environmental conditions and the surfacing material, the metal parts may present the so-called flash rust, but this does not constitute a defect. Flash rust can be removed easily with appropriate stainless steel cleaners. Flash rust is particularly likely when the housing comes into contact with ferrous particles (e.g. iron and grinding dust, ferrous plant fertilizers or the like). Illuminants LED lights, under normal operation, have a very long life. Therefore, the replacement of the lamp is not provided. In case of questions, see the Service chapter. 24 en en Assembly Cause Correction PWM line not connected to ground or dimmer check by connecting the PWM wire to ground PWM signal not present Check dimmer (PWM signal generator) M12 connector system non laid out properly, wrong components Check components of the M12 connector system Line leading to the power supply, Check cable, dimmer is interrupted replace if necessary Supply voltage towards the power supply is interrupted Check input voltage at the power supply Power supply defective Replace power supply Luminary is defective Send in luminary Spot flashes, flickers or switches off after a short time of operation, the power supply gets very hot Power supply is overloaded Use power supply with higher power output The luminosity of the spot decreases during operation or the spot does not work anymore Operation at high housing temperatures, the THERMOPROTECT Operation of the spot at low ambient temperatures or with system reduces the power until the spot switches off, in order to better air circulation protect the LED Warranty These terms of warranty apply to the purchase and use of our products in the Federal Republic of Germany. In other countries the warranty conditions will be those stipulated in the terms of sales and shipment for the respective country or by law. The legal warranty rights are not affected by this warranty. This warranty statement is our voluntary service as manufacturer. All dot-spot products are 100% checked and tested before leaving the factory. However, the occurrence of occasional failures during operation may not be completely excluded. In accordance with legal provisions, we grant a two-year warranty from the date of purchase (invoice receipt). This warranty refers to the proper function of the dot-spot garden and object spots and accessories under normal conditions of use. 25 Warranty Notes en en The warranty does not cover any damages resulting from normal wear or mechanical destructions by outside forces. The warranty covers replacement of defective parts. There shall be no entitlement to the compensation for consequential damages. In particular, there shall be no right to reimbursement of consequential damages resulting from improper use or improper installation of the products. The professional installation is described in the installation manual. These terms of warranty apply since 2006-01-01 / Technical changes and errors reserved. dot-spot clarios is designed for the operation with constant voltage power supplies that comply with the standards, in particular with the standard for electronic control gear for LED modules IEC 61347-2-13. In case of damage resulting from operation with unsuitable electronic ballasts, power supplies or other power sources, no guarantee claims can be made. Service First of all, send your complaint containing the damage report (what does not work? what are the symptoms of the failure?), a copy of your invoice (fax, scan, digital image) as well as your contact information by e-mail, fax-message, letter or phone to the service center specified below. We will immediately make sure to find the solution. Download complaint form: www.dot-spot.de/download/reklamationsformular.pdf Return In case a return has been agreed, please send us the luminary in its original packaging or in an equally safe packaging together with the complaint documents. Please, contact us for shipment terms first. Service center Service dot-spot GmbH & Co. KG Industriestraße 1 90592 Schwarzenbruck / Germany Email [email protected] Phone +49 (0) 9128 / 72 22 17 - 0 Fax +49 (0) 9128 / 72 22 17 - 9 26 27 Unter diesem Link finden Sie weitere Informationen zu der Leuchte clarios flex beam / This link contains further information about the clarios flex beam spot: www.dot-spot.de/clarios_flex_beam Unter diesem Link finden Sie weitere Informationen zu der Leuchte clarios II / This link contains further information about the clarios II spot: www.dot-spot.de/clarios_II de ■ ■ ■ ■ ■ ■ Details zum Produkt Lichtverteilungskurven Gebrauchsanleitung als PDF EG-Konformitätserklärung als PDF Zubehör Weitere technische Unterlagen, wie z.B. Planungshilfen, Videoanleitungen, Schritt-für-Schritt-Anleitungen … en ■ ■ ■ ■ ■ ■ Details on the product Light distribution curves Operator's manual in PDF format EC Declaration of Conformity in PDF format Accessories Other technical documents such as e.g. planning aids, video tutorials, step-by-step instructions … dot-spot GmbH & Co. KG Entwicklung – Produktion – Vertrieb Industriestraße 1 90592 Schwarzenbruck / Deutschland Telefon +49 (0) 9128 / 72 22 17 - 0 Telefax +49 (0) 9128 / 72 22 17 - 9 Email [email protected] www.dot-spot.de Gebrauchsanleitung | dot-spot clarios flex beam / II | 20110GA Rev. 1 | Juni 2015