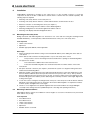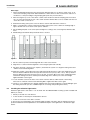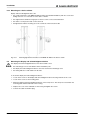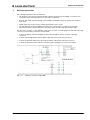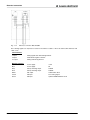
1
CPSET-M20
COMPACTplus
– Zugangssicherung mit Muting
Art-Nr 607054- 2009/01
Technische Änderungen vorbehalten
Subject to change without prior notice
COMPACTplus
– access guarding with muting
E R G Ä N Z U N G Z U R A N S C H L U S S - U N D B E T R I E B S A N L E I T U N G C O M P A C T plus – m
S U P P L E M E N T T O T H E C O N N E C T I N G A N D O P E R A T I N G I N S T R U C T I O N S C O M P A C T plus – m
Über die Anschluss- und Betriebsanleitung
Diese Anschluss- und Betriebsanleitung enthält Informationen über den bestimmungsgemäßen Gebrauch
und den Einsatz von CPSET-M20.
Alle Angaben der Anschluss- und Betriebsanleitung, insbesondere die Sicherheitshinweise müssen unbedingt
beachtet werden.
Sicherheits- und Warnhinweise sind mit dem Symbol
gekennzeichnet.
Hinweise zu wichtigen Informationen sind mit dem Symbol
gekennzeichnet.
Diese Anschluss- und Betriebsanleitung ist sorgfältig aufzubewahren. Sie muss während der gesamten
Einsatzdauer von CPSET-M20 verfügbar sein.
Die Leuze electronic GmbH + Co. KG haftet nicht für Schäden, die durch unsachgemäße Benutzung
entstehen. Zur sachgerechten Verwendung gehört auch die Kenntnis dieser Anschluss- und
Betriebsanleitung.
© Nachdruck und Vervielfältigung, auch auszugsweise, nur mit ausdrücklicher Genehmigung durch
Leuze electronic GmbH + Co. KG
Liebigstraße 4
D-82256 Fürstenfeldbruck
Telefon +49 (0) 8141 5350-0
Telefax +49 (0) 8141 5350-190
[email protected]
www.leuze.com
2
CPSET-M20
Leuze electronic
Inhaltsverzeichnis
Allgemeines.................................................................................................................................................................4
1.1
Zertifizierungen ............................................................................................................................................4
1.2
Symbole und Begriffe ..................................................................................................................................5
Sicherheitshinweise ...................................................................................................................................................6
2.1
Gefahren bei Nichtbeachtung der Sicherheitshinweise ...........................................................................6
2.2
Einsatzbedingungen und bestimmungsgemäßer Gebrauch....................................................................6
2.3
Zusätzliche Sicherheitshinweise für die Muting-Funktion .......................................................................6
Systemaufbau und Einsatz ........................................................................................................................................7
Funktion.......................................................................................................................................................................8
4.1
Basisfunktion................................................................................................................................................8
4.2
Wiederanlaufsperre......................................................................................................................................8
4.3
Schützkontrolle ............................................................................................................................................8
4.4
Muting ...........................................................................................................................................................8
4.5
Muting- Zeitbegrenzung...............................................................................................................................9
4.6
Muting-Restart ..............................................................................................................................................9
Anzeige- und Bedienelemente .................................................................................................................................10
5.1
Muting-Transceiver ....................................................................................................................................10
5.2
Anzeige- und Quittiereinheit .....................................................................................................................10
Montage .....................................................................................................................................................................11
6.1
Montage am Schutzzaun ...........................................................................................................................11
6.2
Montage in Gerätesäulen...........................................................................................................................11
6.3
Montage der Reflexlichtlichtschranke......................................................................................................12
6.4
6.3.1
Montage an der Seiten-Nut.............................................................................................................13
6.3.2
Montage an der Maschine ..............................................................................................................13
6.3.3
Montage an der Gerätesäule ..........................................................................................................14
Montage der Anzeige- und Quittiereinheit ...............................................................................................14
Elektrischer Anschluss ............................................................................................................................................15
Parametrierung .........................................................................................................................................................17
Lieferumfang .............................................................................................................................................................18
Zubehör .....................................................................................................................................................................19
Leuze electronic
CPSET-M20
3
Allgemeines
1
Allgemeines
Die in CPSET-M20 enthaltene berührungslose Schutzeinrichtung COMPACTplus ist eine aktive optoelektronische Schutzeinrichtung (Active Opto-electronic Protective Device, AOPD) Typ 4 gemäß
EN IEC 61496-1, prEN IEC 61496-2 und SIL 3 gemäß IEC 61508. Der eingesetzte Muting-Transceiver
CPRT-m realisiert eine Muting-Funktion, die es ermöglicht, die Schutzfunktion der Muting- Transceivers
temporär zu unterdrücken, um z. B. Material durch das Schutzfeld zu transportieren. Details zum MutingTransceiver CPRT-m finden Sie in der beiliegenden Anschluss- und Betriebsanleitung COMPACTplus-m.
Detaillierte Informationen zur Inbetriebnahme und Prüfung von CPSET-M20 entnehmen Sie ebenfalls der
Anschluss- und Betriebsanleitung COMPACTplus-m, Kapitel 9 und 10.
1.1
Zertifizierungen
Unternehmen
Leuze electronic GmbH & Co. KG in D-82256 Fürstenfeldbruck besitzt ein zertifiziertes QualitätsManagementsystem gemäß ISO 9001.
Produkte
Das Herzstück von CPSET, der Muting-Transceiver CPRT-m wurde unter Beachtung geltender europäischer
Richtlinien und Normen entwickelt und gefertigt.
EG-Baumusterpüfung nach
EN IEC 61496-1, prEN IEC 61496-2
durch:
TÜV PRODUCT SERVICE GmbH, IQSE
Ridlerstraße 65
D-80339 München
4
CPSET-M20
Leuze electronic
Allgemeines
1.2
Symbole und Begriffe
Verwendete Symbole
¾
Warnhinweis, dieses Zeichen weist auf mögliche Gefahren hin.
Bitte beachten Sie diese Hinweise besonders sorgfältig!
Hinweis, auch Handlungshinweis, dient zur Information über Besonderheiten oder
beschreibt Einstellvorgänge.
Hinweis zu wichtigen Informationen.
Tabelle 1.2-1 Symbole
Verwendete Begriffe
Anlauf/Wiederanlaufsperre
AOPD
Ansprechzeit der
AOPD
Anzeige- und
Quittiereinheit
CPRT-m
CPM500/2V
MS
Muting
Muting-Restart
OSSD1
OSSD2
Parallel-Muting
Reflex-Lichtschranke
RES
SafetyLab
WE
Verhindert automatischen Start nach Zuschalten der Versorgungsspannung und
nach Eingriff in das Schutzfeld
Aktive opto-elektronische Schutzeinrichtung
(Active Opto-electronic Protective Device)
Zeit zwischen dem Eingriff/Eintritt ins aktive Schutzfeld der AOPD und dem
tatsächlichen Abschalten der OSSDs.
Gerät mit Muting-Leuchtmelder, Start-Taste und Anschlüssen für Muting-Sensoren
und Muting-Transceiver.
COMPACTplus Transceiver mit Muting-Funktion
Passiv-Umlenkspiegel für Muting-Transceiver
Muting-Sensor, z. B. Lichtschranken, Induktionsschleifen oder Schalter
Bestimmungsgemäße, zeitlich begrenzte Unterdrückung der Sicherheitsfunktion
des Schutzfeldes.
Muting-Restart ist nach einer Störung zum Freifahren der Schutzeinrichtung
erforderlich (Muting-Leuchtmelder blinkt).
Sicherheits-Schaltausgang
Output Signal Switching Device
Muting wird eingeleitet, wenn zwei definierte Signaleingänge gleichzeitig innerhalb
einer festgelegten Zeit aktiviert werden.
Sender und Empfänger sind in einem Gehäuse vereint und weisen in die gleiche
Richtung um das von einem Reflektor zurück kommende Licht des Senders durch
den Empfänger zu erfassen.
Anlauf-/Wiederanlaufsperre (Start/REStart interlock)
Diagnose- und Parametrier-Software für COMPACTplus
Werkseinstellung (Wert eines Parameters bei Auslieferung ab Werk, der durch
Schalter und/oder SafetyLab verändert werden kann).
Tabelle 1.2-2 Begriffe
Leuze electronic
CPSET-M20
5
Sicherheitshinweise
2
Sicherheitshinweise
2.1
Gefahren bei Nichtbeachtung der Sicherheitshinweise
Entwicklung und Fertigung von CPSET-M20 erfolgen unter sorgfältiger Anwendung der anerkannten Regeln
der Technik. Die Schutzfunktion kann jedoch beeinträchtigt werden, wenn CPSET-M20 nicht gemäß seinem
bestimmungsgemäßen Gebrauch oder unsachgemäß eingesetzt wird. In diesem Fall können Gefahren für
Leib und Leben der an den Maschinen/Anlagen arbeitenden Personen oder Sachschäden entstehen.
2.2
Einsatzbedingungen und bestimmungsgemäßer Gebrauch
Für den Einsatz von CPSET-M20 gelten die einschlägigen Vorschriften der Maschinensicherheit. Die
zuständigen örtlichen Behörden (z. B. Berufsgenossenschaft) stehen für sicherheitstechnische Fragen zur
Verfügung. Generell sind die folgenden Einsatzbedingungen einzuhalten:
• die Maschinenrichtlinie 98/37/EG
• die Arbeitsmittelbenutzungsrichtlinie 89/655/EWG
sowie die entsprechend umgesetzten nationalen Gesetze in den einzelnen Mitgliedsstaaten. Für die
Bundesrepublik Deutschland gelten das Gerätesicherheitsgesetz, die Betriebssicherheitsverordnung in
Verbindung mit dem Arbeitsschutzgesetz und den Unfallverhütungsvorschriften, die Sicherheitsregeln bzw.
sonstige relevante Sicherheitsvorschriften und Normen. Die Einhaltung dieser Regeln obliegen dem Hersteller
und dem Betreiber der Maschine oder Einrichtung, an welche die optische Schutzeinrichtung angebaut ist.
Die zuständigen örtlichen Behörden (z. B. Gewerbeaufsicht, Berufsgenossenschaft, Arbeitsinspektorat)
stehen für sicherheitstechnische Fragen zur Verfügung. Generell sind die folgenden Einsatzbedingungen
einzuhalten:
Der Anbau, der elektrische Anschluss, die Parametrierung sowie die erforderliche Prüfung vor der ersten
Inbetriebnahme und regelmäßige Prüfungen sind nur von sachkundigem Personal durchzuführen und
nachvollziehbar zu dokumentieren. Die Kenntnis der Sicherheitshinweise dieser Anschluss- und
Betriebsanleitung ist Teil der Sachkunde.
Diese Betriebsanleitung sowie die mitgelieferte Anschluss- und Betriebsanleitung COMPACTplus-m sind der
Dokumentation der Maschine oder Anlage, an der CPSET-M20 montiert ist beizufügen, so dass sie dem
Bediener jederzeit zur Verfügung steht. Der Betreiber muss dafür Sorge tragen, dass der Bediener durch
einen Fachkundigen eingewiesen wird.
2.3
Zusätzliche Sicherheitshinweise für die Muting-Funktion
Muting ist die bestimmungsgemäße Unterdrückung der Sicherheitsfunktion einer AOPD. Sie erlaubt mittels
zusätzlicher Sensor- und Steuerungs- Signale die Schutzfeldwirkung, z. B. bei Materialtransport in oder aus
der Gefahrenzone, zeitlich begrenzt zu unterdrücken.
Während der Aktivierung von Muting ist die Schutzwirkung der AOPD aufgehoben! Es muss daher auf andere
Weise sichergestellt sein, dass während des Mutingvorgangs kein Zugriff/Zugang zur Gefahrstelle möglich ist,
z. B. weil der Materialtransport den Zugang zur Gefahrstelle verhindert. Muting- Sensoren müssen so
angeordnet und eingestellt werden, dass eine Manipulation mit einfachen Mitteln ausgeschlossen ist. Das gilt
ebenso für Steuerungssignale, die so erzeugt werden müssen, dass sie unabhängig von den für Muting
verwendeten Sensorsignalen sind und keine einfache Manipulation ermöglichen.
Vor der Entriegelung der Anlauf-/Wiederanlaufsperre oder dem Muting-Restart muss sich die Bedienperson
überzeugt haben, dass sich keine Person innerhalb der Gefahrzone aufhält.
Muting darf nur temporär aktiviert sein und nur solange der Zugang zur Gefahrzone durch das Transportgut
versperrt ist. Kann eine Person während des Mutings neben dem Transportgut in die Gefahrzone gelangen,
müssen Maßnahmen ergriffen werden, die ein Eintreten erkennen und die gefährliche Bewegung zum
Stillstand bringen. Bewährt haben sich Trittmatten oder mit Sicherheitsschaltern überwachte Schwingtüren.
Sie verhindern Verletzungen, z. B. Quetschungen im Zugangsbereich.
Muting muss automatisch erfolgen, darf aber nicht von einem einzigen Sensorsignal und auch nicht
vollständig von Software-Signalen abhängen.
Die Muting-Funktion muss sofort nach Durchfahrt des Transportguts aufgehoben werden, so dass eine
eventuell hinter dem Transportgut gehende Person von der Schutzeinrichtung erkannt wird. Dazu muss die
Gleichzeitigkeit der Muting-Signale an die Anwendung angepasst sein.
Das Bedienpersonal ist ausdrücklich darauf hinzuweisen, dass die optische Schutzeinrichtung im
überbrückten Zustand keinen Schutz bietet, so dass bei Manipulation oder unerlaubtem Eindringen in die
Anlage eine unmittelbare Gefährdung für Personen besteht.
Die Anzeige- und Quittiereinheit muss gut sichtbar nahe am Überbrückungsbereich angebracht sein.
6
CPSET-M20
Leuze electronic
Systemaufbau und Einsatz
3
Systemaufbau und Einsatz
CPSET-M20 besteht aus einer berührungslosen Schutzeinrichtung AOPD mit einem Muting-Transceiver
CPRT-m und einem Passiv-Umlenkspiegel CPM. Die Muting- Funktion zur temporären Unterdrückung der
Schutzfeldfunktion wird durch eine im Lieferumfang enthaltene Reflexlichtschranke und ein weiteres Signal,
i.d.R. von einer SPS, ausgelöst.
CPSET-M20 ist für Ausfahr-Applikationen vorgesehen, bei denen das zu mutende Transportgut aus dem
Gefahrbereich heraus fährt und dabei die Muting-Lichtschranke vor dem Schutzfeld unterbrochen wird.
Benutzen Sie es nicht in Einfahr-Anwendungen, wo es möglich ist, dass Personen in den Gefahrbereich
gelangen können wenn das SPS-Signal aktiviert wurde.
1
2
=
=
3
4
5
=
=
=
Muting-Transceiver CPRT500/2-m04/T4
Reflektor und Halterung, Teil von
MMS-AP-N60
Passiv-Umlenkspiegel CPM500/2V
Sensorhalterung aus MMS-AP-N60
Reflexlichtschranke PRK46B
Abb. 3.1-1
6
7
=
=
8
9
d
=
=
=
Splitterkabel CB-M12-SC24
CB-M12-CC15 zur Lokalbuchse, mit CB-M12-SC24
verbinden
Anzeige- und Quittiereinheit AC-ABF-SL1
CB-M12-15000S-8GF zum Schaltschrank
Vmax x T – b mit T = Gleichzeitigkeit L1 & M5 (WE: 4s)
Aufbau der opto-elektronischen Schutzeinrichtung CPSET-M20
Die Komponenten des Systems sind optimal aufeinander abgestimmt und so parametriert, dass das System
einfach montiert und ohne weitere Einstellungen in Betrieb genommen werden kann, sofern die bauseits
vorgegebenen Maße der Parametrierung des CPRT-m (Kapitel 8) entsprechen. Andernfalls müssen die
Parameter mit SafetyLab angepasst werden.
Alle für den elektrischen Anschluss nötigen Kabel und Zubehörteile sind Teil des Lieferumfangs.
Die in Abb. 3.1-1 gezeigte Anordnung darf so nicht eingesetzt werden, wenn die Zugänge neben der
Rollenbahn begehbar sind. Dann sind dort z.B. Trittmatten oder horizontal angeordnete SicherheitsLichtvorhänge zur Gefahrbereichssicherung vorzusehen.
Systemkomponenten:
CPSET-M20 besteht aus folgenden Komponenten:
• Muting-Transceiver CPRT500/2-m04/T4 mit spezifischer Parametrierung
•
Passiv-Umlenkspiegel CPM500/2V
•
Anzeige- und Quittiereinheit AC-ABF-SL1 mit LED Muting- Leuchtmelder, Start-/Restart-Taste und
Befestigungsplatte für Montage am Schutzzaun
•
Reflexlichtlichtschranke PRK46B mit Reflektor inkl. Befestigungssystem für Nut-Montage
•
Splitterkabel 1 + 2 / 5 m zum Anschluss von Reflexlichtschranke und Anzeige- und Quittiereinheit an die
Lokalbuchse M12 / 8-polig des Muting – Transceivers
•
Kabel 15 m mit M12 – Buchse 8-polig zw. Transceiver CPRT-m und Maschinensteuerung
Leuze electronic
CPSET-M20
7
Funktion
4
Funktion
4.1
Basisfunktion
Der Muting-Transceiver CPRT-m baut mit dem Passiv-Umlenkspiegel ein Schutzfeld auf. Ein Zugang durch
das Schutzfeld löst einen Schaltbefehl aus, der von der Maschinensteuerung ausgewertet wird und die
Anlage stoppt. Die Muting-Funktion des CPRT-m wertet die Signale von einer Reflexlichtschranke und einer
Steuerung aus und unterdrückt die Auslösung des Abschaltbefehls z. B. während eines Materialtransports
durch das Schutzfeld.
CPSET-M20 ist für Ausfahr-Anwendungen vorgesehen, bei denen das zu mutende Transportgut aus dem
Gefahrbereich heraus transportiert wird. Detaillierte Informationen zum Muting-Transceiver CPRT-m finden
Sie in der beiliegenden Anschluss- und Betriebsanleitung COMPACTplus-m.
4.2
Wiederanlaufsperre
Die Anlauf-/Wiederanlaufsperre verhindert die automatische Freigabe des Sicherheitskreises bei Einschalten
oder bei Wiederkehr der Versorgungsspannung nach Stromausfall. Nur durch Drücken und Loslassen der
Start/Restart-Taste in der Anzeige- und Quittiereinheit innerhalb eines Zeitfensters von 0,1 bis 4 Sekunden
schaltet der Muting-Transceiver bei freiem Schutzfeld in den EIN-Zustand.
Bei Zugang durch das Schutzfeld sorgt die Anlauf-/Wiederanlaufsperre dafür, dass der Transceiver auch
nach Freigabe des Schutzfeldes im AUS-Zustand verbleibt. Erst durch Drücken und Loslassen der Start/Restart-Taste innerhalb des o. a. Zeitfensters schaltet der Transceiver wieder in den EIN-Zustand.
Für Zugangssicherungen ist die Anlauf-/Wiederanlaufsperre obligatorisch, da lediglich der Zugang zur
Gefahrzone, nicht aber der Bereich zwischen dem Schutzfeld und den Gefahrstellen überwacht wird. Vor der
Entriegelung der Anlauf-/Wiederanlaufsperre muss sich die Bedienperson überzeugt haben, dass sich keine
Person innerhalb der Gefahrenzone aufhält.
4.3
Schützkontrolle
Die Schützkontroll-Funktion EDM ist in Werkeinstellung abgewählt, um die Einbindung in einen
übergeordneten Sicherheitskreis durch nachgeschaltete Sicherheitsrelais oder Sicherheits-Steuerungen, die
i.d.R. die Schützkontrolle realisieren, einfach zu ermöglichen. Sie kann aber mittels SafetyLab aktiviert
werden; der Rückführkreis wird dann an Leitung 1 (M2) des 7-poligen Anschlusskabels erwartet.
4.4
Muting
Muting ist die bestimmungsgemäße, zeitlich begrenzte Unterdrückung der Schutzfeld-Sicherheitsfunktion.
Während des Mutingvorgangs bleiben die OSSDs bei Unterbrechung des Schutzfeldes im EIN-Zustand.
Deshalb sind besondere Vorkehrungen für die Sicherheit zu beachten. Siehe spezielle Sicherheitshinweise in
Kapitel 2.3.
Der Muting- Betrieb wird durch die Muting-Signale eingeleitet. Ab Werk ist eingestellt: „2-Sensor ParallelMuting (L1, M5)“.
Muting wird an CPSET-M20 nur dann ausgelöst, wenn zunächst ein 24V Steuerungssignal an Eingang M5
angelegt wird und innerhalb von 4 s das dunkelschaltende Signal der Reflexlichtschranke an Eingang L1
durch das Muting-Objekt (z.B. die beladene Palette) gleichzeitig aktiviert wird Æ der LED MutingLeuchtmelder auf der Anzeige- und Quittiereinheit wird eingeschaltet.
Das Steuersignal an M5 darf in keiner Weise logisch mit dem Muting-Sensor an L1 verbunden sein.
Wird das Gleichzeitigkeits-Fenster von 4 Sekunden überschritten, so wird kein Muting ausgelöst Æ der LED
Muting – Leuchtmelder bleibt aus. Durch das für eine Bedienperson nicht sichtbare Steuerungssignal an M5
ist einfache Manipulation des Muting nur sehr schwer zu realisieren.
Muting bleibt max. 4 Sekunden aktiv, solange mindestens ein Mutingsignal aktiv ist. Verlässt das MutingObjekt den Strahl der Reflexlichtschranke bleiben demnach 4 Sekunden Zeit um auch das Schutzfeld des
Muting- Transceivers zu verlassen, solange das Steuerungssignal an M5 aktiviert bleibt.
Während dieser Zeit muss verhindert werden, dass Personen von außen durch das noch gemutete
Schutzfeld in den Gefahrbereich gelangen können. Das kann z.B. durch einen hinreichend langen
Schutzzaun geschehen wie in Abb. 3.1-1 dargestellt.
Eine weitere Möglichkeit ist die Reduzierung der Gleichzeitigkeit auf einen kleineren Wert als 4 s. Dann muss
allerdings auch sichergestellt werden, dass die Aktivierung des SPS-Signals an M5 und die darauf folgende
Unterbrechung der Muting-Lichtschranke innerhalb dieses Zeitfensters erfolgen.
8
CPSET-M20
Leuze electronic
Funktion
Kann die Gleichzeitigkeit von 4 s betriebsbedingt nicht wesentlich reduziert werden, besteht eine weitere
Möglichkeit zur Gewährleistung der Sicherheit darin, mittels SafetyLab die Funktion „Vorzeitiges Mutingende
nach Freiwerden des Schutzfeldes...“ zu aktivieren. Muting wird dann zusätzlich beendet, wenn bei aktivem
Muting das Schutzfeld erstmalig frei wird.
4.5
Muting- Zeitbegrenzung
In CPSET-M20 ist die sicherheitsrelevante Muting-Zeitbegrenzung auf 30 Sekunden gesetzt. Nach Ablauf
dieser Zeit wird Muting beendet, ein Muting-Restart zum Freifahren der Mutingstrecke kann nötig sein.
Falls diese Zeit zu kurz sein sollte, kann dieser Wert mit SafetyLab erhöht werden. Alternativ ist es möglich,
ein Steuersignal für den Muting-Timer mit SafetyLab zu definieren, das bei Stillstand der Transporteinrichtung
den Muting-Timer anhält. Details dazu sind im Benutzerhandbuch „SafetyLab“ zu finden.
4.6
Muting-Restart
Betriebsbedingt kann eine gültige Muting-Sequenz unterbrochen werden, z. B. bei Ausfall der
Versorgungsspannung, während ein zulässiges Objekt gerade die Muting-Strecke passiert. Bei Wiederkehr
der Versorgungsspannung wird der Muting-Vorgang nicht automatisch fortgeführt, da die erwartete EinschaltSequenz von den bereits aktivierten Muting-Signalen nicht geliefert wird. Der Muting-Leuchtmelder blinkt, um
diesen Zustand anzuzeigen. Damit ein manuelles Entfernen des Objektes aus der Muting-Strecke vermieden
werden kann, bietet CTSET-M20 einen integrierten Freifahr-Modus über die Start-/Restart-Taste. Dabei
werden die OSSDs eingeschaltet, sofern mindestens ein Muting-Signal aktiviert ist und innerhalb von 4
Sekunden (WE):
•
die Start-/Restart-Taste gedrückt,
•
wieder losgelassen und
•
erneut gedrückt wird.
Beim zweiten Drücken der Start-/Restart-Taste wird der Sicherheitskreis sofort frei gegeben (OverrideFunktion)! Während des Muting-Restart-Vorgangs leuchtet die blaue LED des Transceivers, um anzuzeigen,
dass dessen Schutzfunktion überbrückt ist.
Vor Auslösen des Muting-Restart muss sich die Bedienperson überzeugt haben, dass sich keine Person
innerhalb der Gefahrzone aufhält.
Beim zweiten Loslassen der Start-/Restart-Taste untersucht der Transceiver die Muting-Signale auf eine
gültige Belegung. Wird eine gültige Muting-Kombination festgestellt, bleiben die OSSDs im EIN-Zustand; die
Anlage nimmt ihren Normalbetrieb wieder auf. Wird hingegen eine ungültige Muting-Kombination festgestellt,
bleibt die Freigabe nur so lange erhalten, wie die Taste gedrückt bleibt. Falls sie losgelassen wird, bleibt die
Anlage wieder stehen. Dies tritt sowohl bei dejustiertem, verschmutztem oder beschädigtem Muting-Sensor
auf, aber auch wenn das Transportgut die Lichtschranke bereits verlassen hat und noch im Schutzfeld steht.
Das Steuersignal an M5 muss vor Muting-Restart immer anliegen, damit der Muting-Restart somit auch bei
freier oder defekter Reflexlichtschranke möglich bleibt.
Auch in diesem Fall ist das Freifahren im Tipp-Betrieb unter der Bedingung möglich, dass eine
verantwortliche Person den Vorgang beobachtet und jederzeit durch Loslassen der Start-/Restart-Taste die
gefahrbringende Bewegung unterbrechen kann. Der Fehler ist von einer fachkundigen Person zu
untersuchen.
Das Freifahren ist auf 60 s zeitbegrenzt. Danach muss erneut die o. a. Sequenz an der Start-/Restart-Taste
gedrückt werden, um den Vorgang fortzusetzen.
Es muss sichergestellt sein, dass vom Anbauort der Start-/Restart-Taste die gesamte Gefahrzone
überschaubar ist.
Leuze electronic
CPSET-M20
9
Anzeige- und Bedienelemente
5
Anzeige- und Bedienelemente
5.1
Muting-Transceiver
Eine genaue Beschreibung der Anzeigen am Muting-Transceiver CPRT-m finden Sie in der beiliegenden
Anschluss- und Betriebsanleitung COMPACTplus-m.
5.2
Anzeige- und Quittiereinheit
Zum Lieferumfang von CPSET-M20 gehört die Anzeige- und Quittiereinheit mit Montageplatte AC-ABF-SL1.
Das Splitterkabel wird mit dem längeren Kabelende (5 m) an die Anzeige- und Quittiereinheit angeschlossen.
Am Muting-Transceiver CPRT-m wird der 8-polige gewinkelte M12-Stecker des Adapterkabels an die M12Buchse in der Kappe angeschlossen.
Abb. 5.2-1
Anzeige- und Quittiereinheit AC-ABF-SL1
Start-/Restart-Taste
Nach Drücken und Loslassen der Start-/Restart-Taste schalten bei freiem Schutzfeld die OSSDs ein. Die
Start-/Restart-Taste ermöglicht auch einen Restart, wenn eine Muting-Sequenz unterbrochen wurde. Dadurch
ist das Freifahren der Anlage nach einer Muting-Störung möglich.
Vor der Entriegelung der Anlauf-/Wiederanlaufsperre über die Start-/Restart-Taste muss sich die
Bedienperson überzeugt haben, dass sich keine Person innerhalb der Gefahrenzone aufhält.
Muting-Leuchtmelder
Der Muting-Leuchtmelder (auf der Anzeige- und Quittiereinheit signalisiert dem Bedienpersonal durch
konstantes Leuchten, dass Muting korrekt eingeleitet wurde und die Schutzfunktion des Muting-Transceivers
überbrückt ist. Blinkt der Muting-Leuchtmelder, liegt eine Muting-Störung vor. Es ist ein Muting-Restart
erforderlich.
10
CPSET-M20
Leuze electronic
Montage
6
Montage
CPSET-M20 ist zur Montage am Schutzzaun vorgesehen. Es ist aber ebenso möglich, die Komponenten in
bzw. an Gerätesäulen DC oder UDC zu montieren. Gerätesäulen sind separat zu bestellen. Folgende
Arbeitsschritte sind nötig:
6.1
•
entweder Montage der Sicherheitsgeräte am Schutzzaun
•
oder Montage der Sicherheitsgeräte in Gerätesäulen, Befestigung der Gerätesäulen am Boden
•
Elektrischer Anschluss des Muting- Transceivers (siehe Kap. 7)
•
Justage des Muting-Transceivers und des Passiv-Umlenkspiegels
•
Montage und Justage der Reflexlichtschranke und des Reflektors
•
Montage der Anzeige- und Quittiereinheit
Montage am Schutzzaun
Muting – Transceiver und Umlenkspiegel werden an einer der seitlichen Nuten mit Hilfe der mitgelieferten
Haltewinkel oder mit separat zu bestellenden Schwenkhalterungen an Pfosten des Schutzzauns montiert.
Erforderliche Werkzeuge:
• 10 mm Sechskantschlüssel
•
Wasserwaage
•
ggf. Bohrmaschine mit Bohrer
Arbeitsschritte:
Befestigen Sie die Haltewinkel mit den mitgelieferten Sperrzahnschrauben an den Nuten-steinen in einer
Seiten-Nut des Geräts.
Befestigen Sie die Geräte mit angeschraubtem Haltewinkel an einem Pfosten des Schutzzauns so dass
•
sich die Schutzscheibe des Muting- Transceivers und die Spiegel-Öffnungen des Umlenkspiegel
gegenüber stehen
•
•
sich der unterste Strahl 400 mm über der Bezugsebene befindet
Transceiver und Umlenkspiegel senkrecht zueinander montiert sind und sich in einer vertikalen
Ebene befinden
Führen Sie den elektrischen Anschluss durch (siehe Kapitel 7) und schalten Sie die Anlage ein, um die
Justierung des Muting- Transceivers und des Passiv-Umlenkspiegels vornehmen zu können.
Justieren Sie die Oberkante von Muting-Transceiver und Passiv-Umlenkspiegel auf gleiche Höhe und zwar
so, dass sich der untere Strahl 400 mm über der jeweiligen Bezugsebene (Rollenbahn oder Boden)
befindet. Der obere Strahl verläuft damit in Höhe von 900 mm über der Bezugsebene. Lösen Sie dazu die
Sperrzahn-Schrauben in den Nutensteinen und verschieben Sie den Muting-Transceiver bzw. den PassivUmlenkspiegel bis sie auf gleicher Höhe stehen. Ziehen Sie die Sperrzahn-Schrauben wieder fest.
Lockern Sie die Schrauben zur Befestigung der Haltewinkel am Pfosten des Schutzzauns. Kippen Sie die
Geräte bis der Lichtstrahl des Muting-Transceivers mittig auf den Passiv-Umlenkspiegel auftrifft. Benutzen
Sie ggf. Unterlegscheiben um diese Position zu fixieren und ziehen Sie die Schrauben (wieder fest.
Kontrollieren Sie die korrekte Justage. Optimale Justage ist erreicht, wenn die orange LED im MutingTransceiver konstant leuchtet (Anschluss- und Betriebsanleitung COMPACTplus-m).
6.2
Montage in Gerätesäulen
Als Zubehör sind Gerätesäulen UDC-xx00-S1 in verschiedenen Längen erhältlich. Die Geräte werden darin
geschützt und sind einfach auszurichten.
Erforderliche Werkzeuge:
• 4 mm Inbusschlüssel
•
6 mm Inbusschlüssel
•
16 mm Sechskantschlüssel
•
17 mm Sechskantschlüssel
•
Wasserwaage
•
Bohrmaschine mit 10 mm Steinbohrer
Leuze electronic
CPSET-M20
11
Montage
Arbeitsschritte:
1. Befestigen Sie Muting- Transceiver und Passiv- Umlenkspiegel von CPSET-M20 in jeweils einer
Gerätesäule. Benutzen Sie dazu die mit der Säule gelieferten Klemmbefestigungen, die zunächst an die
Seitennuten der Geräte so geschraubt werden, dass die heraus ragenden beweglichen Klemmteile vom
Gerät weg zeigen.
2. Nach Abnehmen der Deckplatte der Gerätesäule führen Sie die Geräte mit den Klemmteile von oben in
eine der inneren senkerechten Nuten der Säule ein und befestigen sie mit der von vorn zugänglichen
Inbusschraube. Schrauben Sie den Säulendeckel wieder an.
3. Bestimmen Sie die Befestigungsmittelpunkte der beiden Gerätesäulen und markieren Sie diese auf dem
Boden.
Markieren Sie am Boden eine Verbindungslinie zwischen den Befestigungsmittelpunkten der Säulen. Es
reicht eine Markierungslänge von ca. 90 mm von jedem Säulenmittelpunkt.
Setzen Sie die Bohrschablone auf die Mittelpunkte auf und richten Sie sie gemäß den Verbindungslinien aus.
Markieren Sie die Bohrungen.
Bohren Sie die Befestigungslöcher 80 mm tief und setzen Sie die Bodenanker ein.
Abb. 6.2-1 Befestigungslöcher Bodenanker
Setzen Sie die Säulen auf und schrauben Sie sie mit dem 17 mm Sechskantschlüssel fest.
Justieren Sie die Bodensäulen an den Justageschrauben mit Hilfe der Wasserwaage senkrecht.
Führen Sie den elektrischen Anschluss durch (siehe Kapitel 7) und schalten Sie die Anlage ein, um die
Justierung des Muting-Transceivers und des Passiv-Umlenkspiegels vornehmen zu können.
Justieren Sie die Oberkante von Muting-Transceiver und Passiv-Umlenkspiegel auf gleiche Höhe und zwar
so, dass sich der untere Strahl 400 mm über der jeweiligen Bezugsebene (Rollenbahn oder Boden)
befindet. Der obere Strahl verläuft damit in Höhe von 900 mm über der Bezugsebene. Lösen Sie dazu die
Inbusschraube der Klemmhalterungen und verschieben Sie den Muting-Transceiver bzw. den PassivUmlenkspiegel bis sie auf gleicher Höhe sind. Ziehen Sie die Inbusschrauben wieder fest.
Lockern Sie die Inbusschrauben im Säulenfuß. Drehen Sie die Säulen bis der Lichtstrahl des MutingTransceivers mittig auf den Passiv-Umlenkspiegel auftrifft. Ziehen Sie die Inbusschrauben wieder fest.
Kontrollieren Sie die korrekte Justage. Optimale Justage ist erreicht, wenn die orange LED im MutingTransceiver leuchtet (siehe auch Anschluss- und Betriebsanleitung COMPACTplus-m).
6.3
Montage der Reflexlichtlichtschranke
Reflexlichtschranke und Reflektor können mit dem im Lieferumfang enthaltenen Montagesystem MMS-APN60 folgendermaßen befestigt werden.:
•
direkt an einer Seiten-Nut der Geräte
•
an der Maschine oder der Transporteinrichtung neben den Geräten
•
an der rückseitigen Längs-Nut der Gerätesäulen
Um einfache Manipulation zu verhindern sollte die Montagehöhe so gewählt werden, dass vor zufälliger
Unterbrechung des Lichtstrahls der Reflexlichtschranke der Schutzfeldstrahl des Muting- Transceivers
unterbrochen wird.
12
CPSET-M20
Leuze electronic
Montage
6.3.1 Montage an der Seiten-Nut
Befestigen Sie
•
die Gussteile des mitgelieferten Befestigungssatzes MMS-AP-N60 mit je zwei Schrauben und
Nutensteinen an einer Seiten-Nut der Geräte
•
die gewinkelte Rundstange mit dem kürzeren Teil an den beiden Schrauben am Gussteil
•
den Reflektor auf der passiven Seite an der Rundstange
•
die Lichtschranke mit dem Befestigungssatz an der Rundstange auf der Transceiver- Seite
Abb. 6.3-1
Montage von Lichtschranke und Reflektor mit MMS-AP-N60 an einer Seiten-Nut
6.3.2 Montage an der Maschine
Befestigen Sie
•
die Rundstangenhalterung des mitgelieferten Befestigungssatzes MMS-AP-N60 mit je zwei Schrauben
über Bohrungen an der Maschine
•
die gewinkelte Rundstange mit den beiden Schrauben am Rundstangenhalter
•
den Reflektor auf der passiven Seite mit CPM500/2V an der Rundstange
•
die Lichtschranke mit dem Befestigungssatz an der Rundstange auf der Transceiver- Seite
Abb. 6.3-1
Leuze electronic
Montage von Lichtschranke und Reflektor mit MMS-AP-N60 an Transporteinrichtung
CPSET-M20
13
Montage
6.3.3 Montage an der Gerätesäule
Befestigen Sie
•
die Rundstangenhalter des mitgelieferten Befestigungssatzes MMS-AP-N60 mit je zwei Schrauben und
Nutensteinen an einer rückseitigen Längs-Nut der Gerätesäulen
•
die gewinkelte Rundstange mit dem längeren Teil an den beiden Schrauben am Rundstangenhalter
•
den Reflektor auf der passiven Seite an der Rundstange
•
die Lichtschranke mit dem Befestigungssatz an der Rundstange auf der Transceiver- Seite
Abb. 6.3-1
6.4
Montage von Lichtschranke und Reflektor mit MMS-AP-N60 an Gerätesäule
Montage der Anzeige- und Quittiereinheit
Die Anzeige- und Quittiereinheit muss so angebracht sein, dass
•
vom Anbauort aus der gesamte Gefahrbereich eingesehen werden kann
•
die Anzeige- und Quittiereinheit nicht aus dem Gefahrbereich heraus erreicht werden kann
•
der Muting – Leuchtmelder von allen Seiten aus gut sichtbar ist
Zur Montage
¾ lösen Sie die 4 Schrauben am Gehäuse der Anzeige- und Quittiereinheit und nehmen Sie den Deckel ab.
¾ lösen Sie die 4 Schrauben der Befestigungsplatte.
¾ montieren Sie die Anzeige- und Quittiereinheit am Schutzzaun. Der Schutzzaun befindet sich zwischen
der Befestigungsplatte und dem Gehäuseunterteil.
¾ setzen Sie den Deckel wieder auf das Gehäuseunterteil und ziehen die Schrauben fest.
¾ führen Sie den elektrischen Anschluss über den M12-Stecker durch.
14
CPSET-M20
Leuze electronic
Elektrischer Anschluss
7
Elektrischer Anschluss
Folgende Vorschriften sind zu beachten:
•
Der elektrische Anschluss ist nur von sachkundigem Personal durchzuführen. Kenntnis aller
Sicherheitshinweise dieser Betriebsanleitung ist Teil der Sachkunde.
•
Es sind grundsätzlich beide Sicherheits-Schaltausgänge OSSD1 und OSSD2 in den Arbeitskreis der
Maschine einzuschleifen.
•
Signalausgänge dürfen nicht zum Schalten von Sicherheits-Folgeschaltungen verwendet werden.
•
Während der Elektroinstallation ist es unbedingt erforderlich, dass die abzusichernde Maschine oder
Anlage spannungslos geschaltet und gegen Wiedereinschalten gesichert ist, um unbeabsichtigtes
Anlaufen der gefahrbringenden Bewegung zu verhindern.
Die elektrische Verbindung der einzelnen Komponenten erfolgt über vorkonfektionierte Kabel mit M12 Steckverbindern. Folgende Verbindungen müssen vorgenommen werden:
¾ Anzeige- und Quittiereinheit mit Splitterkabel (5 m) über 4-poligen Steckverbinder verbinden
¾ Reflexlichtschranke mit Splitterkabel (2 m) über 4-poligen Steckverbinder verbinden
¾ Muting-Transceiver CPRT-m mit Splitterkabel über 8-poligen Steckverbinder verbinden
¾ Maschinen-Interface mit beiliegendem Anschlusskabel (15 m) zum Schaltschrank verbinden
Abb. 7.1-1
Leuze electronic
Elektrischer Anschluss CPSET-M20
CPSET-M20
15
Elektrischer Anschluss
Abb. 7.1-2
Elektrischer Anschluss MS, RES/ML
Folgende Signale werden an den Interface-Leitungen des Lokal- und des Maschinen-Interface erwartet bzw.
ausgegeben (Farbe der Leitung in Klammern):
Lokal-Interface:
16
L1 – Eingang
Muting -Signal von der Reflexlichtschranke
L5 – Eingang
Reset – Taste gegen +24VDC
L5 – Ausgang
Muting – Leuchtmelder gegen 0V
Maschinen-Interface:
Braun
Versorgungsspannung
+24V
Blau
Versorgungsspannung
0V
Grau
Sicherheitsausgang
OSSD1
Rosa
Sicherheitsausgang
OSSD2
Weiß
M4 Meldeausgang
OSSD – Zustand / Störung, Fehler
Gelb
M5 Steuereingang
SPS – Mutingsignal
Grün
M2 Steuereingang
Optionaler Schützrückführkreis
CPSET-M20
Leuze electronic
Parametrierung
8
Parametrierung
Der Muting-Transceivers CPRT-m ist ab Werk mit folgenden Abweichungen gegenüber der Werkseinstellung
des Funktionspakets „Muting“ voreingestellt:
•
MultiScan – Faktor auf H=21; die Ansprechzeit beträgt demzufolge 49 ms
•
Muting - Leuchtmelder ohne Überwachung angeschlossen an L5
•
Anlauf-/Wiederanlaufsperre aktiviert, Reset – Signal an L5 erwartet
•
Schützkontrolle EDM nicht angewählt
•
2-Sensor-Parallel-Muting (L1, M5)
•
L1: Filterzeit t(aus) = 500 ms
•
Gleichzeitigkeit der Aktivierung der Muting – Sensoren (SPS-Signal an M5 und Lichtschranke an L1
innerhalb von 4 Sekunden
•
Muting-Zeitbegrenzung = 30 s
•
Muting-Restart (Freifahren) durch zweimaliges Drücken der Reset – Taste an L5
•
Meldeausgang M4 (Leitung weiß):
•
statisch: Ausgabe OSSD – Schaltzustand wenn Gerät fehlerfrei
•
schnell blinkend: Ausgabe Fehlermeldesignal
Leuze electronic
CPSET-M20
17
Lieferumfang
9
18
Lieferumfang
Art. Nr.
909979
68900074
909606
426364
Anz.
1
1
1
1
Artikel
CPSET-M20
CPRT500/2-m04/T4
CPM500/2V
CPSET-ACS1
Beschreibung
426364
426363
1
1
CPSET-ACS1
AC-ABF-SL1
430306
50105987
50030556
150757
150758
429085
607054
1
1
1
1
1
1
1
MMS-AP-N60
PRK46B/4D.2-S12
BT46.1
CB-M12-CC15
CB-M12-SC24
CB-M12-15000S-8GF
607014
1
Muting-Transceiver mit Parametrierung M20
Umlenkspiegel für passive Seite
Zubehörsatz
Anzeige- und Quittiereinheit mit LED MutingLeuchtmelder
Montagesystem für 1 PRK inkl. Reflektor
Reflexlichtschranke
Befestigungsteil für Baureihe 46
Anschlusskabel für Splitterkabel, 1m
Splitterkabel 2 + 5 m
Maschinen-Interfacekabel M12, 7-adrig
Diese zusätzliche Anschluss- und Betriebsanleitung
CPSET-M20
Anschluss- und Betriebsanleitung
COMPACTplus-m deutsch/englisch
CPSET-M20
Leuze electronic
Zubehör
10
Zubehör
Art.-Nr.
520073
549827
549828
549814
549829
429081
429083
429085
429181
548510
Leuze electronic
Artikel
SLAB-SWC
UDC-1000-S1
UDC-1300-S1
UDC-1600-S1
UDC-1900-S1
CB-M12-5000S-8GF
CB-M12-10000S-8GF
CB-M12-15000S-8GF
CB-M12-25000S-8GF
CB-M12-10000S-8GF/GM
Beschreibung
SafetyLab inkl. PC-Kabel
Gerätesäule 1000 mm
Gerätesäule 1300 mm
Gerätesäule 1600 mm
Gerätesäule 1900 mm
Anschlusskabel 5 m
Anschlusskabel 10 m
Anschlusskabel 15 m
Anschlusskabel 25 m
Verlängerungskabel 10 m
CPSET-M20
19
About these connecting and operating instructions
These connecting and operating instructions include information on the proper use of CPSET-M20 in
accordance with its intended application.
All the information contained herein, in particular the safety notes, must be carefully observed.
Safety and warning information is shown with this symbol
.
Important information is identified with this symbol .
These connecting and operating instructions must be stored carefully. They must be available for the entire
operating time of the CPSET-M20.
Leuze electronic GmbH + Co. KG does not accept any liability for damage caused by improper use of
its equipment. Knowledge of these instructions is an element of the status required for proper use.
© Reprints and reproduction, in whole or in part, are permitted only with the explicit consent of
Leuze electronic GmbH + Co. KG
Liebigstrasse 4
82256 Fuerstenfeldbruck / Germany
Phone +49 8141 5350-0
Telefax +49 8141 5350-190
info.leuze.de
www.leuze.com
20
CPSET-M20
Leuze electronic
Contents
General ......................................................................................................................................................................22
1.1
Certifications ..............................................................................................................................................22
1.2
Symbols and terms ....................................................................................................................................23
Safety notes...............................................................................................................................................................24
2.1
Dangers if the safety notes are not observed..........................................................................................24
2.2
Operating conditions and proper use ......................................................................................................24
2.3
Additional safety notes for the muting function......................................................................................24
System setup and application .................................................................................................................................25
Function.....................................................................................................................................................................26
4.1
Basic function.............................................................................................................................................26
4.2
Restart interlock .........................................................................................................................................26
4.3
Contactor monitoring.................................................................................................................................26
4.4
Muting .........................................................................................................................................................26
4.5
Muting time limit.........................................................................................................................................27
4.6
Muting restart .............................................................................................................................................27
Display and control elements ..................................................................................................................................28
5.1
Muting transceiver .....................................................................................................................................28
5.2
Display and acknowledgement device .....................................................................................................28
Installation .................................................................................................................................................................29
6.1
Mounting on the safety fence....................................................................................................................29
6.2
Mounting in device columns .....................................................................................................................29
6.3
Installing the reflective light barrier..........................................................................................................30
6.4
6.3.1
Mounting on the side slot ................................................................................................................31
6.3.2
Mounting on the machine................................................................................................................31
6.3.3
Mounting on a device column .........................................................................................................32
Mounting the display and acknowledgement device ..............................................................................32
Electrical connection................................................................................................................................................33
Parametering .............................................................................................................................................................35
Scope of delivery ......................................................................................................................................................36
Accessories...............................................................................................................................................................37
Leuze electronic
CPSET-M20
21
General
1
General
The COMPACTplus in the CPSET-M20 is an active opto-electronic protective device (AOPD), type 4 in acc.
with EN IEC 61496-1, prEN IEC 61496-2 and SIL 3 in acc. with IEC 61508. The CPRT-m muting transceiver
used here performs a muting function that enables the protective function of the muting transceiver to be
temporarily suppressed so that material can be transported through the protective field, for example. You will
find details on the CPRT-m muting transceiver in the accompanying COMPACTplus-m connecting and
operating instructions.
You will also find detailed information on the CPSET-M20 start-up and testing in the COMPACTplus-m
connecting and operating instructions, in chapters 9 and 10.
1.1
Certifications
Company
Leuze electronic GmbH & Co. KG in 82256 Fuerstenfeldbruck, Germany, has a certified quality management
system that complies with ISO 9001.
Products
The CPSET centerpiece, the CPRT-m muting transceiver is developed and manufactured in compliance with
applicable European directives and standards.
EC prototype test in acc. with
EN IEC 61496-1, prEN IEC 61496-2,
performed by:
TÜV PRODUCT SERVICE GmbH, IQSE
Ridlerstraße 65
80339 Munich
Germany
22
CPSET-M20
Leuze electronic
General
1.2
Symbols and terms
Symbols used:
Warning sign. This symbol indicates possible dangers.
Please pay especially close attention to these instructions!
This symbol, which also refers to a course of action, provides information about
special particulars or describes set-up procedures.
Sign indicating important information.
¾
Table 1.1-1
Symbols
Terms used:
Start/restart interlock
AOPD
AOPD response time
Display and
acknowledgement
device
CPRT-m
CPM500/2V
MS
Muting
Muting restart
OSSD1
OSSD2
Parallel muting
Reflective light barrier
RES
SafetyLab
FS
Table 1.1-2
Leuze electronic
Prevents automatic start after the supply voltage has been turned on and after the
protective field has been penetrated.
Active opto-electronic protective device
Time between penetration/entry into the active protective field of the AOPD and
when the OSSDs actually switch off.
Device with muting indicator, start button and connections for muting sensors and
muting transceiver.
COMPACTplus transceiver with muting function.
Passive deflecting mirror for muting transceiver.
Muting sensor, e.g. light beam devices, induction loops or switches.
Proper, application-intended, time-limited suppression of the protective field’s
safety function.
Muting restart is required for overriding the protective device after a fault has
occurred (muting indicator flashes).
Safety switching output
Output Signal Switching Device
Muting is started when two defined signal inputs are activated simultaneously
within a defined time.
Transmitter and receiver are combined in one housing and point in the same
direction to record the light of the transmitter returning from a reflector with the
receiver.
Start/REStart interlock.
Diagnostics and Parametering software for COMPACTplus
Factory setting (value of a parameter with delivery from the factory, which can be
changed with switches and/or SafetyLab).
Terms
CPSET-M20
23
Safety notes
2
Safety notes
2.1
Dangers if the safety notes are not observed
CPSET-M20 is developed and manufactured with stringent application of recognized technical regulations.
The protective function can, however, be impaired if CPSET-M20 is used improperly or is not used according
to its specified application. Such instances can jeopardize the health and lives of the people operating the
machinery/systems and may cause damage to property.
2.2
Operating conditions and proper use
The applicable requirements for machine safety apply when using CPSET-M20. The responsible local
authorities (e.g. health and safety at work authorities) are available to answer questions concerning safety.
The following requirements for use must be complied with:
•
Machine Directive 98/37/EC,
•
Machine Utilization Directive 89/655/EEC
and the corresponding applicable national regulations in the individual member states. It is the responsibility
of the manufacturer and the operator of the machine or equipment on which the optical safety device is
installed to comply with these rules and regulations. The responsible local authorities (e.g. health and safety
at work authorities) are available to answer questions concerning safety. The following requirements for use
must be complied with:
The installation, electrical connection, parametering and required test before start-up and regular tests must
only be carried out by specialist personnel and the results must be transparently documented. Knowledge of
the safety notes in these connecting and operating instructions is a constituent part of this competence.
The operating instructions as well as the Connecting and Operating Instructions COMPACTplus-m that is part
of delivery must be included with the documentation of the machine on which CPSET-M20 is installed so that
they are available for the operator at all times. The owner/provider of the machinery must ensure that the
operator is instructed by an experienced specialist. This also applies for the accompanying COMPACTplus-m
connecting and operating instructions.
2.3
Additional safety notes for the muting function
Muting is the suppression of an AOPD’s safety function in accordance with the intended application. Using
additional sensor and control signals, it enables the protective field effect to be suppressed for a limited time,
e.g. with material transport in or out of the danger zone.
The AOPD’s protective function is not effective while muting is active! Another method must therefore be
provided to ensure that access to the danger point is not possible during the muting process, e.g. because the
material transport prevents access to the danger point. Muting sensors must be arranged and set so that any
manipulation with simple means is excluded. The same is valid for control signals, that must be generated in
such a way that they are independent of muting sensor signals and thus do not enable easy manipulation.
Before unlocking the start/restart interlock or the muting restart, the operator must be absolutely sure that
nobody is inside the danger zone.
Muting may only be temporarily activated, and only while the access to the danger zone is blocked by the
transport material. If the distance between the transceiver and passive deflecting mirror is that much wider
than the transport material that a person can get by during the muting beside the transport material into the
danger zone, then measures must be implemented that will detect the person’s entry and stop the dangerous
movement. Safety mats or swing doors monitored with safety switches have been tried, tested and proven
here. Such measures prevent injuries caused, for example, by crushing in the access area.
Muting must be automatic, it may not, however, be dependent on one single sensor signal, nor may it be fully
dependent on software signals.
The muting function must be released immediately after the transport material has passed through, so that
anybody passing through behind the transport material will be detected by the safety device. To ensure this,
the simultaneousness of the muting signals must be adapted to the application.
The operating staff must be explicitly instructed that the optical protective device does not provide any
protection in the bridged-over state, so that there is an immediate danger for people with any manipulation or
inadmissible penetration into the system.
The display and acknowledgement device must be mounted close to the muting zone where it can be easily
seen.
24
CPSET-M20
Leuze electronic
System setup and application
3
System setup and application
CPSET-M20 consists of an active opto-electronic protective device (AOPD) with a CPRT-m muting
transceiver and a CPM Passive Deflecting Mirror. The muting function for temporarily suppressing the
protective field function is activated by a reflective light barrier included with delivery and another signal,
usually from a PLC.
CPSET-M20 is designed for outlet applications where the transport good to be muted comes out of the
danger zone and interrupts the muting sensor before interrupting the protective field. Do not use it for inlet
applications where it is possible, that persons pass into the danger zone when the PLC signal is activated.
1
2
=
=
3
4
5
=
=
=
CPRT500/2-m04/T4 muting transceiver
Reflector and bracket, part from
MMS-AP-N60
CPM500/2V Passive Deflecting Mirror
Sensor bracket from MMS-AP-N60
PRK46B reflective light barrier
Fig. 3.1-1
6
7
=
=
8
9
d
=
=
=
CB-M12-SC24 splitter cable
CB-M12-CC15 to local connection socket, connects with
CB-M12-SC24
AC-ABF-SL1 display and acknowledgement device
CB-M12-15000S-8GF to the control cabinet
Vmax x T – b with T = simultaneity L1 & M5 (FS: 4s)
CPSET-M20 opto-electronic safety device setup
The system’s components are optimally arranged with one another and parametered so that the system can
be easily mounted and put into operation without any further settings, as long as the parameter set of the
CPRT-m (chapter 8) fits to the measures of the application. Otherwise the parameters must be adapted
accordingly using SafetyLab.
All cables and accessory components required for the electrical connection are included with delivery.
The arrangement shown in Fig. 3.1-1 must not be used in this form, if the access beside the conveyor can be
accessed. In that case there must be used for example safety mats or horizontal safety light curtains to
protect this danger zone.
System components
CPSET-M20 consists of the following components:
• CPRT500/2-m04/T4 muting transceiver with specific parametering
•
CPM500/2V Passive Deflecting Mirror
•
AC-ABF-SL1 display and acknowledgement device with LED muting indicator, start/restart button and
mounting plate for mounting on the safety fence
•
PRK46B reflective light barrier with reflector incl. fixing system for slot mounting
•
1 + 2 / 5 m splitter cable for connecting reflective light barrier and display and acknowledgement device to
the M12 / 8-pin local connection socket of the muting transceiver
•
15 m cable with M12 connection socket, 8-pin between the CPRT-m transceiver and the machine control
unit
Leuze electronic
CPSET-M20
25
Function
4
Function
4.1
Basic function
The CPRT-m muting transceiver sets up a protective field with the Passive Deflecting Mirror. An access
through the protective field activates a switching command, which is evaluated by the machine control unit
and stops the system. The muting function of the CPRT-m evaluates the signals from reflective light barrier
and a control unit and suppresses the activation of the switch-off command, during a material transport
through the protective field, for example.
CPSET-M20 is designed for outlet applications, where the transport object to be muted comes out of the
danger zone. You will find detailed information on the CPRT-m muting transceiver in the accompanying
COMPACTplus-m connecting and operating instructions.
4.2
Restart interlock
The start/restart interlock function prevents the safety circuit from being released automatically when the
machine is turned on or the supply voltage is restored after a power failure. The muting transceiver only
switches to the ON state by pressing and releasing the start/restart button in the display and
acknowledgement device within a time window of 0.1 to 4 seconds when the protective field is free.
With access through the protective field, the start/restart interlock function ensures that the transceiver will
remain in the OFF state after the protective field is released again. The transceiver only switches to the ON
state by pressing and releasing the start/restart button within the abovementioned time window.
In the case of access guarding applications, the start/restart interlock is obligatory because only the access to
the danger zone is monitored – the area between the protective field and the points of operation is not
monitored. Before unlocking the start/restart interlock, the operator must be absolutely certain that nobody is
inside the danger zone.
4.3
Contactor monitoring
The EDM contactor monitoring function is disabled in the factory setting to enable integration into a higher
level safety circuit with downstream safety relays or safety control units, which generally perform the contactor
monitoring. This can be activated via SafetyLab; the feedback circuit is then expected on Pin 1 (M2) of the 7pin connecting cable.
4.4
Muting
Muting is the properly intended, regulated and time-limited suppression of the protective field safety function.
During the muting process the OSSDs remain in the ON state with interruption of the protective field. Special
precautions must therefore be taken to ensure the required safety. See special safety notes in chapter 2.3.
The muting operation is started by the muting signals. Factory-set is: “2-sensor parallel muting (L1, M5)”
Muting is only activated on the CPSET-M20 when a 24 V control signal is first received at the M5 input and
within 4 sec the dark-switching signal of the reflective light barrier is activated simultaneously at input L1 by
the muting object (e.g. the loaded palette) Æ the LED muting indicator on the display and acknowledgement
device is switched on.
The control signal at M5 must not be linked logically in any way with the muting sensor at L1.
If the 4-second simultaneity window is exceeded, muting is not activated Æ the LED muting indicator stays
off. The control signal at M5 which the operator cannot see, makes it difficult to manipulate the muting.
Muting stays active for max. 4 seconds, as long as at least one muting signal is active. If the muting object
leaves the beam of the reflective light barrier, 4 seconds remain for it to also leave the muting transceiver’s
protective field, as long as the control signal stays active on M5.
During this time it must be prevented that persons can get into the danger zone from outside through the still
muted protective field. This can be done for example by a protective fence that is long enough as shown in
Fig. 3.1-1.
Another possibility is the reduction of the simultaneity down to a value smaller than 4 s. In this case it must be
ensured that the activation of the PLC signal at M5 and the following interruption of the muting light barrier
takes place within this time frame.
If simultaneity can not be reduced due to operational reasons, another possibility to ensure safety is the
activation of the function “Premature end of muting after the protective field becomes free...” by SafetyLab.
Muting ends then also when the protective field gets free the first time during muting.
26
CPSET-M20
Leuze electronic
Function
4.5
Muting time limit
The safety-relevant muting time limit in CPSET-M20 is set to 30 seconds. After this time muting is terminated;
a muting restart to free-up the muting line may be necessary.
If this time should be too short, the value can be increased by SafetyLab. Alternatively it is possible to define
by SafetyLab a control signal for the muting timer, that holds the muting timer when the conveyor stops.
Details can be found in the “SafetyLab” user manual.
4.6
Muting restart
An applicable muting sequence can be interrupted according to the operating conditions, e.g. with failure of
the supply voltage while a permissible object is just passing the muting line. When the supply voltage returns,
the muting process does not continue automatically, because the expected switch-on sequence is not
supplied by the already activated muting signals. The muting indicator blinks to show this state. In order to
prevent a manual removal of the object from the muting line, CTSET-M20 provides an integrated override
mode via the start/restart button. The OSSDs are switched on here, provided at least one muting signal is
activated, and within 4 seconds (FS),
•
start/restart button is pressed,
•
released again and
•
pressed again.
On the second pressing of the start/restart button the safety circuit is released immediately (override
function)! The blue LED of the transceiver lights up during the muting restart process to show that its
protective function has been bridged.
The operator must also be absolutely certain before activating the muting restart that nobody is inside the
danger zone.
With the second releasing of the start/restart button, the transceiver checks the muting signals for a valid
assignment. If a valid muting combination is determined, the OSSDs remain in the ON state; the system
returns to its normal operation. If, on the other hand, an invalid muting combination is determined, the release
is maintained only for as long as the button is pressed. If it is released, the system stops again. This happens
both, with a dealigned, dirty or damaged muting sensor and when the transport good has already left the
muting reflective light barrier but is still in the protective field. The control signal at M5 must always be active
during muting restart to enable it also with a free or defective reflective light barrier.
Here too the override in tip mode is therefore possible with the condition that a responsible person observes
the procedure, and can interrupt the dangerous movement at any time by releasing the start/restart button.
The error must be checked by a qualified specialist.
The override is limited to 60 sec. Thereafter the above mentioned sequence must be pressed on the
start/restart button again for the process to continue.
It must be ensured that the entire danger zone is fully visible from the installation point of the start/restart
button.
Leuze electronic
CPSET-M20
27
Display and control elements
5
Display and control elements
5.1
Muting transceiver
You will find an exact description of the displays on the CPRT-m muting transceiver in the accompanying
COMPACTplus-m connection and operating instructions manual.
5.2
Display and acknowledgement device
The CPSET-M20 scope of delivery includes the display and acknowledgement device with mounting plate
AC-ABF-SL1. The splitter cable is connected to the display and acknowledgement device with the longer
cable (5 m). The 8-pin angled M12 plug of the adapter cable is connected to the CPRT-m muting transceiver
on the M12 connection socket in the cap.
Fig. 5.2-1
AC-ABF-SL1 display and acknowledgement device
Start/restart button
The OSSDs turn on after pressing and releasing the start/restart button with free protective field. The
start/restart button also enables a restart when a muting sequence has been interrupted. The system override
is consequently also possible after a muting fault.
Before unlocking the start/restart interlock via the start/restart button, the operator must be absolutely certain
that nobody is inside the danger zone.
Muting indicator
The muting indicator on the display and acknowledgement device signals to the operator by constant lighting
that muting has been correctly initiated and the protective function of the muting transceiver has been
bridged. If the muting indicator flashes, there is a muting fault. A muting restart is required.
28
CPSET-M20
Leuze electronic
Installation
6
Installation
CPSET-M20 is designed for mounting on the safety fence. It is also possible, however, to mount the
components in and on the DC or UDC device columns. Device columns must be ordered separately. The
following steps are required:
6.1
•
Mounting of the safety devices on the safety fence or
•
mounting of the safety devices in device columns with the device columns fixed to the floor.
•
Electrical connection of the muting transceiver (see chapter 7).
•
Alignment of the muting transceiver and the Passive Deflecting Mirror.
•
Mounting and alignment of the reflective light barrier and the reflector.
•
Mounting of the display and acknowledgement device.
Mounting on the safety fence
Muting transceiver and Deflecting Mirror are mounted on one of the side slots using the mounting bracket
included with delivery, or with separately ordered swivel brackets on the posts of the safety fence.
Tools required:
• 10 mm socket wrench
•
Spirit level
•
Drill with appropriate drill bits, where applicable
Work steps:
1. Fix the mounting bracket with the locking screws included with delivery to the sliding nuts in the side slot
of the device.
2. Fix the devices with screwed on mounting bracket to a post of the safety fence so that:
•
The protective screen of the muting transceiver and the mirror openings of the Deflecting Mirror
are opposite one another.
•
•
The lowest beam is 400 mm above the reference level.
Transceiver and Deflecting Mirror are mounted vertical with one anther and are on the same
vertical level.
3. Set up the electrical connection (see chapter 7) and switch the system on to align the muting transceiver
and the Passive Deflecting Mirror.
4. Align the top edge of the muting transceiver and passive deflecting mirror at the same height and so that
the lower beam is 400 mm above the respective reference level (conveyor line or floor). The top beam is
therefore 900 mm above the reference level. To do this, loosen the locking screws in the sliding nuts and
shift the muting transceiver and the passive deflecting mirror until they are at the same height. Tighten the
locking screws again.
5. Loosen the screws for fixing the mounting bracket on the post of the safety fence. Tilt the devices until the
light beam of the muting transceiver is centered on the Passive Deflecting Mirror. If required use washers
to fix this position and tighten the screws again.
6. Check for correct alignment. The optimum alignment has been achieved when the orange LED lights
constantly in the muting transceiver (COMPACTplus-m connecting and operating instructions).
6.2
Mounting in device columns
UDC-xx00-S1 device columns are available in various lengths as accessories. The devices are protected in
these and are easy to align.
Tools required:
• 4 mm Allen wrench
• 6 mm Allen wrench
• 16 mm socket wrench
• 17 mm socket wrench
• Spirit level
• Drill with 10 mm concrete bit
Leuze electronic
CPSET-M20
29
Installation
Work steps:
1. Fix the CPSET-M20 muting transceiver and passive deflecting mirror in one device column each. To do
this use the clamping components delivered with the column, which are first screwed to the side slots of
the devices, so that protruding moving clamping parts point away from the device.
2. After removing the top cover of the device column, insert the devices with the clamping parts from above
into one of the internal vertical slots of the column and fix it with the Allen screw accessible from the front.
Screw the column cover back on.
3. Determine the fixing center points of the two device columns and mark them on the floor.
4. Mark a connecting line on the floor between the fixing center points of the columns. A marking length of
approx. 90 mm from each column center point is sufficient.
5. Set the drilling template on the center point and align it according to the connecting lines. Mark the drill
holes.
6. Drill the fixing holes 80 mm deep and insert the floor anchors.
Fig. 6.2-1
Floor anchor fixing holes
7. Set the columns up and screw them tight with the 17 mm socket wrench.
8. Align the floor columns with the alignment screws using the spirit level vertically.
9. Set up the electrical connection (see chapter 7) and switch the system on to align the muting transceiver
and the Passive Deflecting Mirror.
10. Align the top edge of the muting transceiver and passive deflecting mirror at the same height and so that
the lower beam is 400 mm above the respective reference level (conveyor line or floor). The top beam is
therefore 900 mm above the reference level. To do this, loosen the Allen screw of the clamping brackets
and shift the muting transceiver and the passive deflecting mirror until they are at the same height.
Tighten the Allen screws again.
11. Loosen the Allen screws in the base of the column. Turn the devices until the beam of the muting
transceiver is centered on the Passive Deflecting Mirror. Tighten the Allen screws again.
12. Check for correct alignment. The optimum alignment has been achieved when the orange LED lights up in
the muting transceiver (see also, COMPACTplus-m connecting and operating instructions).
6.3
Installing the reflective light barrier
Reflective light barrier and reflector can be fixed with the MMS-AP-N60 mounting system included with
delivery as follows:
•
Directly to the side slot of the devices.
•
To the machine or the transport unit beside the devices.
•
To the slot on the rear of the device columns.
To prevent any easy manipulation, the mounting height should be selected so that the muting transceiver’s
protective field beam is interrupted before an accidental interruption of the light beam of the reflective light
barrier.
30
CPSET-M20
Leuze electronic
Installation
6.3.1 Mounting on the side slot
Fix
•
the cast components of the MMS-AP-N60 mounting set included with delivery with two screws and sliding
nuts each on a side slot of the devices.
•
the angled rod with the shorter part to the two screws on the cast component.
•
the reflector on the passive side on the rod.
•
the light barrier with the mounting set on the rod on the transceiver side.
Fig. 6.3-1
Mounting light barrier and reflector with MMS-AP-N60 on a side slot
6.3.2 Mounting on the machine
Fix
•
the round rod bracket of the MMS-AP-N60 mounting set included with delivery with two screws each with
drill holes on the machine.
•
the angled round rod with the two screws on the round rod bracket.
•
the reflector on the passive side with CPM500/2V on the round rods.
•
the light barrier with the mounting set on the round rod on the transceiver side.
Fig. 6.3-1
Leuze electronic
Mounting light barrier and reflector with MMS-AP-N60 on the transport unit
CPSET-M20
31
Installation
6.3.3 Mounting on a device column
display and acknowledgement device Fix
•
the round rod brackets of the MMS-AP-N60 mounting set included with delivery with two screws and
sliding nuts each on a rear-side slot of the device columns.
•
the angled round rod with the longer part to the two screws on the round rod bracket.
•
the reflector on the passive side on the round rod.
•
the light barrier with the mounting set on the round rod on the transceiver side.
Fig. 6.3-1
6.4
Mounting light barrier and reflector with MMS-AP-N60 on the device column
Mounting the display and acknowledgement device
The display and acknowledgement device must be mounted so that
•
the entire danger zone is well visible from the installation point.
•
the display and acknowledgement device cannot be reached from the danger zone.
•
the muting indicator is well visible from all sides.
To mount the display and acknowledgement device:
¾ Loosen the 4 screws on the display and acknowledgement device housing and remove the cover.
¾ Loosen the 4 screws of the mounting plate.
¾ Mount the display and acknowledgement device on the safety fence. The safety fence is between the
mounting plate and the underside of the housing.
¾ Replace the cover on the underside of the housing and tighten the screws.
¾ Connect the cable via the M12 plug.
32
CPSET-M20
Leuze electronic
Electrical connection
7
Electrical connection
The following requirements must be observed:
•
The electrical connection must be performed by experienced personnel. Knowledge of all safety notes
contained in these operating instructions is part of this competence.
•
Basically both safety-related switching outputs OSSD1 and OSSD2 must be looped into the machine’s
work circuit.
•
Signal outputs may not be used for switching downstream safety circuits.
•
It is vital during the electrical installation that the power of the machine or system to be secured is
switched off locked, so that the dangerous movement cannot be started up again unintentionally.
The electrical connection of the individual components is made via ready prepared cable with M12 plug
connectors. The following connections must be made:
¾ Connect the display and acknowledgement device with the splitter cable (5 m) via the 4-pin plug
connectors.
¾ Connect reflective light barrier with the splitter cable (2 m) via the 4-pin plug connectors.
¾ Connect the CPRT-m muting transceiver with the splitter cable via the 8-pin plug connectors.
¾ Connect the machine interface with the connecting cable included (15 m) to the control cabinet.
Fig. 7.1-1
Leuze electronic
Electrical connection CPSET-M20
CPSET-M20
33
Electrical connection
Fig. 7.1-2
Electrical connection MS, RES/ML
The following signals are expected or issued on the interface cables of the local and machine interface with
cable colors.:
Local interface:
34
L1 input
Muting signal from reflective light barrier
L5 input
Reset button against +24VDC
L5 output
Muting indicator against 0V
Machine interface
Brown
Power supply
+24V
Blue
Power supply
0V
Grey
Safety switching output
OSSD1
Pink
Safety switching output
OSSD2
White
M4 output
OSSD state / Error
Yellow
M5 input
PLC muting signal
Green
M2 input
Optional EDM feedback circuit
CPSET-M20
Leuze electronic
Parametering
8
Parametering
The CPRT-m muting transceiver is set at the factory with some deviations from the factory settings of the
“muting” function package:
•
MultiScan factor on H=21; the response time is therefore 49 ms
•
Muting indicator without monitoring connected to L5
•
Start/restart interlock activated, reset signal expected on L5
•
Contactor monitoring (EDM) not activated
•
2-sensor parallel muting (L1, M5)
•
L1 filtering time t(off) = 500 ms
•
Simultaneity of muting sensors activation (PLC signal on M5 and light barrier on L1 within 4 seconds)
•
Muting time limit = 30 s
•
Muting restart (override) by pressing the reset button on L5 twice
•
Signal output M4 (white cable):
•
Static: OSSD output switching state when device is fault-free.
•
Rapid flashing: Error signal output.
Leuze electronic
CPSET-M20
35
Scope of delivery
9
Scope of delivery
Article no.
36
Article
Description
909979
68900074
909606
426364
Quantity
1
1
1
1
CPSET-M20
CPRT500/2-m04/T4
CPM500/2V
CPSET-ACS1
Muting transceiver with M20 parametering
Deflecting Mirror for passive side
Accessory set
426364
426363
1
1
CPSET-ACS1
AC-ABF-SL1
430306
50105987
50030556
150757
150758
429085
607054
1
1
1
1
1
1
1
MMS-AP-N60
PRK46B/4D.2-S12
BT46.1
CB-M12-CC15
CB-M12-SC24
CB-M12-15000S-8GF
607014
1
Display and acknowledgement device with LED
muting indicator
Mounting system for 1 PRK incl. reflector
Reflective light barrier
Fixing component for 46 series
Connecting cable for splitter cable, 1m
Splitter cable, 2 + 5 m
Machine interface cable, M12, 7-wire
This additional CPSET-M20 connecting and operating
instructions
COMPACTplus-m connecting and operating
instructions, German/English
CPSET-M20
Leuze electronic
Accessories
10
Accessories
Article no.
520073
549827
549828
549814
549829
429081
429083
429085
429181
548510
Leuze electronic
Article
SLAB-SWC
UDC-1000-S1
UDC-1300-S1
UDC-1600-S1
UDC-1900-S1
CB-M12-5000S-8GF
CB-M12-10000S-8GF
CB-M12-15000S-8GF
CB-M12-25000S-8GF
CB-M12-10000S-8GF/GM
Description
SafetyLab incl. PC cable
Device column, 1000 mm
Device column, 1300 mm
Device column, 1600 mm
Device column, 1900 mm
Connecting cable, 5 m
Connecting cable, 10 m
Connecting cable, 15 m
Connecting cable, 25 m
Extension cable, 10 m
CPSET-M20
37