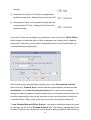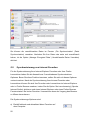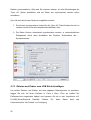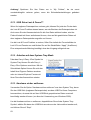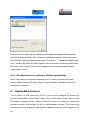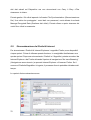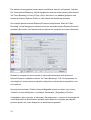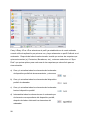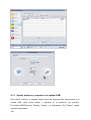
1
Carry it Easy +Plus™ User Manual Manuel de l’utilisateur Benutzerhandbuch Manuale utente Manual de usuario User Manual Version 2.12 © 2004-2007 CoSoSys SRL Carry it Easy+Plus ™ User Manual ...........................................................................................................2 Manuel de l'utilisateur.........................................................................................22 Benutzerhandbuch..............................................................................................43 Guida utente ........................................................................................................66 Guía de usuario ...................................................................................................87 Carry it Easy + Plus™ 1 User Manual User Manual ...........................................................................................................2 1. Introduction ...................................................................................................3 2. System Requirements ..................................................................................4 3. Installation .....................................................................................................5 4. Getting Started ..............................................................................................5 5. 4.1. Starting Carry it Easy +Plus....................................................................5 4.2. General navigation..................................................................................6 4.3. USB Drive / Portable Storage Capacity ..................................................6 Working with Carry it Easy +Plus ................................................................6 5.1. Security Settings.....................................................................................6 5.2. Internet Favorites Synchronization .........................................................8 5.3. No Trace Internet Browsing ....................................................................9 5.4. Deleting Internet Browsing history ........................................................11 5.5. Portable Outlook Express/Windows Mail Data .....................................11 5.6. Portable Outlook Data ..........................................................................12 5.7. My Documents synchronization............................................................15 5.8. View and Edit My Documents on portable storage ...............................16 5.9. Data Compression on the Device .........................................................16 5.10. Folder and Desktop synchronization.....................................................17 5.11. Sync All Function ..................................................................................18 5.12. Adding files and folders to your portable storage device ......................19 5.13. USB Drive Lost & Found™ ...................................................................19 5.14. Work with the system tray menu...........................................................20 5.15. Safely remove hardware.......................................................................20 5.16. Configuring Multiple Devices at the same time.....................................21 6. Update Mechanism .....................................................................................21 7. Support ........................................................................................................21 2 1. Introduction Carry it Easy +Plus™ will enhance the functionality of your portable storage device and help you keep your personal data available on the road. With Carry it Easy +Plus and your portable storage device you can: keep your Internet Explorer Favorites/Firefox Bookmarks synchronized, keep your Outlook Express/Windows Mail data portable, keep your Microsoft Office Outlook data synchronized, keep your Folders, Desktop and My Documents data synchronized, compress your data to save valuable memory space, password protect / (encrypt )all the data on your portable storage device, surf the internet without leaving a trace behind with Internet Explorer and Firefox, and in case you loose your portable storage device, the finder can contact you just by using the USB Drive Lost & Found™ information (without having access to your private files). Warning! While using Carry it Easy +Plus, you should never disconnect your Device without closing Carry it Easy +Plus properly first, via the exit button and then using the “Safely Remove Hardware” option of Windows (see description below). 3 2. System Requirements Operating Systems: o Windows 2000 Service Pack 4 o Windows XP (Service Pack 2 is recommended) o Windows Vista Internet Explorer (version 5.0 and higher) or Mozilla Firefox version 1.0 and higher Outlook Express version 5.0 and higher / Windows Mail and to be able to use the portable Outlook Express/Windows Mail e-mail, the remote PC has to have Outlook Express/Windows Mail installed as well. In case your Outlook Express/Windows Mail was uninstalled, you will still be able to use the other functions of Carry it Easy +Plus. The Outlook Express/Windows Mail option will be disabled. Microsoft Office Outlook (XP - 2002, 2003 and higher) and to be able to synchronize and use the portable Microsoft Office Outlook email, the remote PC has to have Microsoft Outlook installed as well. In case your Microsoft Outlook was uninstalled, you will still be able to use the other functions of Carry it Easy. The Microsoft Outlook option will be disabled. Available USB port USB Drive (USB Flash Memory Drive) or flash based MP3 Player or SD Card, of many storage card formats. If your portable storage device has a manual write protection switch (lock) it must be in the unprotected position in order to be able to use Carry it Easy +Plus. 4 3. Installation Carry it Easy +Plus usually comes pre-installed on your portable storage device (e.g. USB Flash Drive). No installation process on your PC is needed. Simply double-click on the CarryitEasy.exe file and you can immediately start using the application. In case your USB Drive didn’t include a CD-ROM with a copy of Carry it Easy +Plus we recommend, that you make a backup copy of the CarryitEasy.exe to another storage device. In order to use Carry it Easy +Plus you should always start the CarryItEasy.exe file from your USB Device. 4. Getting Started 4.1. Starting Carry it Easy +Plus To start Carry it Easy +Plus, plug in your USB Drive or your portable storage device and open My Computer (Windows Explorer). Open the USB Drive or the removable storage drive with the drive letter e.g. D: or F: depending on your computer and double-click on the CarryitEasy.exe file to start the application. The CarryitEasy.exe file will remain on your USB Drive in order to be able to use the application when you switch between different computers. Please always run the application from the USB Drive and not from your hard disk or your desktop. 5 4.2. General navigation On the left side of the welcome window you will have the main functions permanently available (see picture on the left). Just click for example the Internet Favorites option, and you will have the function available. You also have access to most features through the system tray icon. The system tray functions are described below. 4.3. USB Drive / Portable Storage Capacity On the bottom of the main window, you always have displayed a fill bar indicating the available space and the already used capacity of your USB Drive. When you make a new selection e.g. of a My Documents folder you want to synchronize, the fill bar will jump to the new capacity used to indicate what capacity would still be left on the Device. 5. Working with Carry it Easy +Plus 5.1. Security Settings When using Carry it Easy +Plus for the first time, we recommend that you change the he login window if you already have set a password and want to change it. 6 To set a password, select in the main “Security Settings” window the option “Password protect my data” and enter a password as well as the password confirmation and the password reminder, then click the “Apply” button. Changing your existing password is also done in this window, by selecting the option “Change password”. In order to be able to change the password you have to give your old password and enter the new password with the password confirmation and the new password reminder followed by clicking the “Apply” button. If password protection is not required and you already have password protection, you have to select the “No password protection required” option and give your old password and click the “Apply” button. If you choose to password protect your device, Carry it Easy +Plus will encrypt the “Personal Data” folder on your portable storage device. Other data that are stored on the Device but are not synchronized with Carry it Easy +Plus will remain unencrypted. Carry it Easy +Plus encrypts only the data synchronized with Carry it Easy +Plus. 7 You can manage the encrypted files by going to the File Synchronization window. After you password protect your data, the Manage Encrypted Data tab is activated. You can decrypt & open any of your files and then re-encrypt them. Changing the security settings can take a few minutes depending on how many files are saved on the USB Drive. You will see a progress bar that indicates what the current status is. 5.2. Internet Favorites Synchronization To synchronize your Internet Explorer Favorites or your Firefox bookmarks, you have the choice of 5 different synchronization options. Before you start using this feature, you should familiarize yourself with these options. After you have synchronized your Favorites or Bookmarks, you can view them in Internet Explorer or in Firefox, when you activate the No Trace Browsing option and launch Internet Explorer or the Firefox browser. When you have a large number of Favorites or Bookmarks the launching process launching can take some time. 8 The synchronization options are: a) Creates and/or updates older Favorites on the Computer b) Replaces all Favorites on Computer with the device’s Favorites + c) Creates and updates all missing or older Favorites d) Creates and/or updates older Favorites on the device (default option) e) Replaces all Favorites on the device with the Computer’s Favorites + Options a, c and d are chosen by selecting the respective arrow buttons and options b and e are chosen by selecting the “Delete existing…” tick box and the respective arrow buttons. After you have selected your preferred synchronization option you can start the synchronization process by clicking the “Synchronize” button. When synchronization starts a progress bar will indicate that the process has begun and that your Internet Favorites or Bookmarks are being transferred. The “View Details” option in the progress bar will only display possible errors that have occurred during synchronization. When the synchronization is finished the “Finished” button becomes active indicating that the process has ended. It can take a few minutes to synchronize a large number of Internet Favorites or Bookmarks to and from your portable storage device. To delete Internet Favorites/Bookmarks on your portable storage or on your Computer you can use the options in the No Trace Browsing window. 5.3. No Trace Internet Browsing With the “No Trace Browsing with Internet Explorer and Mozilla Firefox” option you can surf the internet without leaving a trace behind on the computer you have your portable storage device connected to. 9 To activate No Trace Browsing simply click on the “Activate No Trace Internet Browsing” option in the No Trace Browsing window of Carry it Easy +Plus. In case you have an Internet Explorer/Firefox window already open you will be asked if you want to close it so you can proceed. Now, when you open Internet Explorer or Firefox, either via the “Start No Trace Browsing” button or any other way, you will not leave a trace behind on the used computer. When No Trace Browsing is active you will see in the Internet Explorer windows header “No Trace Browsing” written. All the temporary files, history and cookies will be redirected and saved to your portable storage device and not to the Computer. If you have synchronized your Internet Favorites/Bookmarks you can access them through the “Favorites” button in the Internet Explorer or the “Bookmarks” button in Firefox. After every use we recommend that you delete the Temporary Files, Cookies and the History from your portable storage device as described below, in order to save valuable memory space on your portable storage device. 10 5.4. Deleting Internet Browsing history To delete your Internet browsing history from your Computer or from your portable storage device, go to the “No Trace Browsing” window of Carry it Easy +Plus. Choose the “No Trace Browsing” mode. Select the objects you want to remove such as Internet Favorites, Temporary Files, History or Cookies and click the “Delete trace” button. You will be asked if you are sure you want to permanently delete the selected objects. After confirming a progress bar will indicate that the deletion is in progress. If you are removing a large amount of files (especially from your USB Drive), it can take a few minutes until the process is finished. 5.5. Portable Outlook Express/Windows Mail Data To keep your Outlook Express/Windows Mail Data portable, you can select the “Outlook Express/Windows Mail” option in the main window of Carry it Easy +Plus. Follow these steps to make your Outlook Express/Windows Mail Data portable. 1. To create a backup on your portable storage device, select the Outlook Express/Windows Mail identity you wish to make portable. The selected identity will also include its respective address book / contacts. Carry it Easy +Plus selects the main identity by default. After selecting you have to click the “Create Backup” button. Now your Outlook Express/Windows Mail identity including e-mail messages, contacts, message rules etc. is saved on your portable storage device. Your e-mail account passwords are not saved on the portable storage for security reasons (Windows doesn’t allow it) so please make sure that you know the passwords for your e-mail accounts so that you will be able to check your e-mail with Carry it Easy +Plus, when you are on the road. 2. To run Portable Outlook Express/Windows Mail, you need to select the identity backup you wish to view and then click the “Run Outlook Express/Windows Mail” button. If the computer has an internet connection, you will be able to check your e-mail after providing the password for your e11 mail account. In case the computer doesn’t have an internet connection, you will still be able to view your saved e-mail messages and contacts. 3. To manage your portable Outlook Express/Windows Mail data, select the “Manage Backups on Device” option. Then you will be able to remove the backup of one identity at a time by selecting it and clicking the “Remove” button. In case you have received new e-mails and you want to restore your Outlook Express/Windows Mail data back to your computer, you can do so by using the restore function. Select the identity that you want to restore and click the restore “Restore…” button. Then you can choose if you want to create a new identity or if you want to replace an existing identity. 5.6. Portable Outlook Data To keep your Microsoft Outlook Data portable, you can select the “Microsoft Outlook” option in the main window of Carry it Easy +Plus. This feature of Carry it Easy +Plus can be used for two different scenarios. One, to make a backup of your Outlook data on your portable storage device so you can access the data on a remote PC and work with it, or two, to use Carry it Easy +Plus to synchronize your Outlook data between different PCs (e.g. between your work and home PC). In order to make your Microsoft Outlook Data portable, please follow the steps described below: To create a backup to the portable storage device, click on the "Add profile pair..." button and select on computer side (left) the Microsoft Outlook profile you want to make portable. 12 On the portable storage device (right) select the destination. When using this feature for the first time, the destination will always be the "New Backup" option. In case you have already a backup on your portable device you can also select this from the drop down menu. In this way you will select the profiles that will be synchronized with one another. Carry it Easy +Plus selects the default profile in standard mode when using the application for the first time and there is only one Outlook profile on the PC. After selecting it you have to check the folders you want to synchronize (e.g. Contacts, Drafts etc.), then select the "Sync Rule" you want to apply for each of the folders you selected for synchronization. a) Creates and/or updates all items from PC to portable storage devive and vice versa b) Creates and/or updates all items from portable storage to PC c) Creates and/or updates all items from PC to portable 13 storage d) Overwrites all items on PC with the correspondent portable storage item , deleting first the item from PC e) Overwrites all items on the portable storage with the correspondent PC item , deleting first the item from portable storage If you want to filter the messages you synchronize, then click on the "Define Filters" button where you have the option to filter messages by a certain size or a defined time period. This gives you the option to decrease the size of the Outlook data you synchronize/backup significantly. After choosing the synchronization settings, click on the "Synchronize selected" button from the "Create & Sync" window and the synchronization process will start. Information! Your e-mail account passwords are not saved on the portable storage for security reasons (Windows doesn’t allow it) so please make sure that you know the passwords for your e-mail accounts so that you will be able to check your e-mail with Carry it Easy +Plus, when you are on the road (using a remote PC). To run Portable Microsoft Office Outlook , you need to select the backup you want to view from the list on the "Portable Outlook" tab. This function requires that on the remote PC that you are using at the time, Outlook is also preinstalled. After selecting 14 the backup you want to start, you have to click “Run Backup” and Outlook will start viewing your data from the storage device. If the remote PC has an internet connection, you will be able to check your e-mail after providing the password for your e-mail account. In case the computer doesn’t have an internet connection, you will still be able to view your Outlook data. To delete a backup from your device you need to select it and then click on the "Remove Backup” button. 5.7. My Documents synchronization To synchronize your My Documents, go to the File Synchronization option in the main navigation menu on the left. On the “My Documents” tab sheet you will see the My Documents directory with all the included subdirectories (“Hard Disk” image). The folders you wish to synchronize with your USB Drive can simply be selected by clicking them. You then have to choose one of the three synchronization rules available. a) Creates and/or updates older My Documents on the Computer b) Creates and updates all missing or older My Documents 15 c) Creates and/or updates older My Documents on the device To synchronize data between the Computer and your portable storage device you have to apply one of the three synchronization options and go either to the “Hard Drive” or the “USB Drive” image. Select the folders you want to synchronize and click the “Synchronize” button. When the synchronization has begun, a progress bar will appear. In the progress bar an option “View Details” is available to show errors that might occur during the process. When the synchronization is finished the “Finished” button becomes active indicating that the process has ended. 5.8. View and Edit My Documents on portable storage To view, edit or delete files and folders that are stored on your USB Drive, you can simply click on the “USB Drive” image in the My Documents tab sheet. When right clicking over the respective folder, you have the option to open the data or to delete them. When you have your data compressed you will not be able to use the right click function. 5.9. Data Compression on the Device Carry it Easy +Plus offers you the possibility to compress the documents you want to synchronize in order to use the space on your Device more efficiently. Just click on the “Data compression” tick box (screw clamp image) in the “My Documents” or the “Folder Synchronization” tab sheet. When you click on the synchronization button the documents you selected for synchronization will be compressed and moved to the USB Flash Drive. 16 5.10. Folder and Desktop synchronization Carry it Easy +Plus lets you create profiles so you can easily synchronize documents between two or more computers. Go to the “File synchronization” window and click on the “Folder Synchronization” tab. To add a folder to the synchronization list, just push the “+” button. If you want to edit the synchronization options push the “i” button. If you want to delete a profile push the “x” button. To synchronize the selected profiles with your Device push the “Synchronize” button. The first time you connect to another computer and try to synchronize your documents you will be asked to select a folder on that computer with which the data from your Device should be synchronized. You can do that by selecting the profile you want to synchronize and then pushing the “i” button. The next time you want to synchronize your data, just select it and click on the “Synchronize button”. To synchronize your Desktop items follow the same steps as described above. 17 5.11. Sync All Function In order to make easier working with Carry it Easy, you have the possibility to use the “Sync All” function. With this feature you can synchronize at once your Internet Favorits/Bookmarks, your Outlook data, your files and folders, including My Documents. All you have to do is choosing from the Settings / “Sync All” Settings the items that you want to synchronize. Then, you have two options: 1. You can synchronize them now, by clicking on the “Sync All” button from the bottom right of the window, or 2. You can have them synchronized automatically, at a period of time that you can choose in the “Automatically Sync All every…” tab. 18 5.12. Adding files and folders to your portable storage device To add further files and folders to your portable storage device, you have to login with your password in Carry it Easy +Plus (if you have selected password protection) and copy them into the directory e.g. E:[USB Drive]\Personal Data\My Folders. For these data, the subfolder “My Folders” is available. Attention! Save your data only in “My Folders”, otherwise if the security settings are changed the data will be permanently lost. 5.13. USB Drive Lost & Found™ In case your portable storage device gets lost you can now, thanks to our Lost & Found function, let the finder know who the owner of the device is. Even if you have chosen to password protect all your data, the finder will still be able to contact you, without having access to your protected data on the portable storage device. To use Lost & Found, simply fill out the form fields provided in the Lost & Found window and click the “Apply” button. A message will confirm you that the process was successful. 19 5.14. Work with the system tray menu Via the Carry it Easy +Plus Icon in the system tray you are able to reach all the Carry it Easy +Plus options. With the Quick start option, you are able to view your My Documents content or to open an Internet Explorer window with your Favorites/Bookmarks. 5.15. Safely remove hardware Before you unplug your portable storage device (USB Drive) from the USB port of your computer, you have to use the “Safely Remove Hardware” option from the system tray, otherwise you risk corrupting the data on your USB Drive (especially when using Windows 2000). To Safely Remove Hardware, double-click on the system tray icon, then select the USB Drive you want to remove from the list and click on the “Stop” button. A message will appear indicating that the portable storage device can now be securely removed. If a message saying “The ‘ …’ device cannot be stopped right now” appears, you have to close your Windows Explorer or any other application that is still accessing the data on the USB Drive. 20 5.16. Configuring Multiple Devices at the same time If you have more than one portable storage device connected to your computer, you have to select from the Carry it Easy +Plus Device list which one you want to configure. 6. Update Mechanism You can check for the availability of a new Carry it Easy +Plus version by clicking the “Update” button in the “About Carry it Easy” window. If there is a newer version available you will be asked if you want to download it. The application will be downloaded directly to your portable storage device. If it is not possible to replace the running version on your portable storage device the new version will be saved on your desktop. You will then be required to replace the older version on the portable storage device with the newer version by replacing it via copying/overwriting. 7. Support In case additional help, such as the FAQs or e-mail support is required, click on the “Online Help” link in the “About Carry it Easy” window and you will be automatically directed to our support website. You can visit the support website directly at http://www.cososys.com/help.html Corporation. All other names and trademarks are property of their respective owners. 21 Carry it Easy +Plus™ Manuel de l'utilisateur Manuel de l'utilisateur.........................................................................................22 1. Introduction .................................................................................................23 2. Configuration requise.................................................................................24 3. Installation ...................................................................................................24 4. Premiers pas ...............................................................................................25 5. 4.1 Démarrage de Carry it Easy .................................................................25 4.2 Navigation générale..............................................................................25 4.3 Capacité du disque USB.......................................................................26 Utilisation de Carry it Easy.........................................................................26 5.1 Paramètres de sécurité.........................................................................26 5.2 Synchronisation des favoris Internet....................................................28 5.3 Navigation Internet sans trace .............................................................29 5.4 Suppression de l'historique de navigation Internet ...............................30 5.5 Données Outlook Express /Windows Mail portables ...............................30 5.6 Données Outlook portables ....................................................................31 5.7 Synchronisation du répertoire Mes documents .....................................35 5.8 Affichage et édition du dossier Mes documents sur le ...........................36 disque USB ....................................................................................................36 5.9 Compression des données sur le disque USB ......................................37 5.10 Synchronisation des dossiers...............................................................37 5.11 La function Sync All...............................................................................39 5.12. Ajout de fichiers et de dossiers au disque USB....................................40 5.13. USB Drive Lost & Found™...................................................................40 5.14. Utilisation du menu situé dans la zone de notification ..........................40 5.15. Retrait du matériel en toute sécurité.....................................................40 5.16. Configuration simultanée de plusieurs périphériques............................41 6. Mécanisme de mise à jour .............................................................................42 7. Support............................................................................................................42 22 1. Introduction Carry it Easy™ améliorera les fonctionnalités de votre disque USB et garantira la disponibilité de vos données personnelles lors de vos déplacements. Avec Carry it Easy et votre disque USB, vous pouvez : assurer la synchronisation de vos favoris Internet Explorer/signets Firefox; garantir la portabilité de vos données Outlook Express/Windows Mail; assurer la synchronisation de vos fichiers, des données du dossier Mes documents et de votre bureau; compresser les données afin de libérer de l'espace mémoire; protéger par mot de passe / crypter toutes les données hébergées sur votre disque USB; surfer sur le Web sans laisser de trace et, si vous perdez votre disque USB, la personne qui le trouve peut vous contacter en utilisant les informations USB Drive Lost & Found™ (sans accéder pour autant à vos fichiers privés). Avertissement ! Lorsque vous utilisez Carry it Easy, vous ne devez jamais débrancher le disque USB sans avoir préalablement fermé Carry it Easy au moyen du bouton Exit (Quitter) et de l'option 'Retirer le périphérique en toute sécurité' de Windows (voir la description ci-dessous). 23 2. Configuration requise Systèmes d'exploitation : o Windows 2000 Service Pack 4 o Windows XP (Service Pack 2 recommandé) o Windows Vista Internet Explorer version 5.0 ou ultérieure ou Mozilla Firefox version 1.0 ou ultérieure Outlook Express version 5.0 ou ultérieure / Windows Mail De plus, pour que vous puissiez utiliser le système de messagerie Outlook Express/Windows Mail portable, Outlook Express doit également être installé sur le PC distant. Si vous avez désinstallé Outlook Express/Windows Mail, vous pourrez malgré tout utiliser les autres fonctions de Carry it Easy. L'option Outlook Express/Windows Mail sera désactivée. Port USB disponible Disque USB (disque mémoire flash USB) ou lecteur flash MP3. Si votre disque USB est équipé d'un commutateur de protection en écriture, il doit être placé en position 'disque non protégé' pour que vous puissiez utiliser Carry it Easy. 3. Installation Carry it Easy est préinstallé sur votre disque USB. Vous n'avez besoin d'effectuer aucune procédure d'installation sur votre PC. Il vous suffit de cliquer deux fois sur le fichier CarryitEasy.exe pour utiliser l'application. Si votre disque USB ne vous a pas été fourni avec un CD-ROM contenant une copie de Carry it Easy, nous vous recommandons de faire une copie de sauvegarde de CarryitEasy.exe sur un autre périphérique de stockage. Pour démarrer/utiliser Carry it Easy, exécutez systématiquement le fichier CarryItEasy.exe depuis votre périphérique USB. 24 4. 4.1 Premiers pas Démarrage de Carry it Easy Pour démarrer Carry it Easy, branchez votre disque USB et ouvrez la fenêtre Poste de travail (Explorateur Windows). Ouvrez le disque USB ou le périphérique de stockage amovible assorti de la lettre de lecteur D: ou F: selon votre ordinateur et cliquez deux fois sur CarryitEasy.exe pour démarrer l'application. Le fichier CarryitEasy.exe reste sur votre disque USB de sorte que vous puissiez continuer d'utiliser l'application lorsque vous changez d'ordinateur. Veuillez toujours exécuter l'application depuis le disque USB et non depuis votre disque dur ou votre ordinateur. 4.2 Navigation générale Chaque fois que vous démarrez Carry it Easy, la fenêtre de bienvenue s'affiche directement ou après la saisie d'un mot de passe. Les principales fonctions sont disponibles en permanence sur le côté gauche de la fenêtre. À titre d'exemple, il vous suffit de cliquer sur l'option Internet Favorites (Favoris Internet) pour que la fonction soit disponible (voir illustration de gauche). La plupart des fonctions sont également accessibles via l'icône située dans la zone de notification du système. Les fonctions de la zone de notification sont décrites ci-dessous. 25 4.3 Capacité du disque USB Une barre indiquant la capacité disponible et la capacité utilisée de votre disque s'affiche toujours en bas de la fenêtre principale. Lorsque vous sélectionnez par exemple un dossier Mes documents en vue de le synchroniser, la barre se remplit, indiquant ainsi la capacité désormais utilisée et la capacité restante sur le périphérique. Lorsque le disque flash USB est partitionné, la barre indique la taille de la zone privée uniquement (zone protégée par mot de passe). Pour afficher la taille de la zone publique (non protégée par mot de passe), appuyez sur le bouton ‘Device Information’ (Informations sur le périphérique). 5. Utilisation de Carry it Easy 5.1 Paramètres de sécurité Si vous choisissez de protéger par mot de passe votre dispositif, Carry it Easy crypte le dossier ‘Personal Data’ (‘Données personnelles’) sur votre dispositif. Les autres données stockées sur le dispositif, qui ne sont pas synchronisées avec Carry it Easy, restent non cryptées. 26 Vous pouvez gérer les fichiers cryptés dans la fenêtre ‘File Synchronization‘ (‘Synchronisation Fichiers’). Apres avoir protégé par mot de passe vos données, l’onglet ‘Manage Encrypted Data’ (‘Gérer les données cryptées’) est activé. Vous pouvez décrypter & ouvrir vos fichiers et les crypter à nouveau. 27 5.2 Synchronisation des favoris Internet Pour synchroniser les favoris d'Internet Explorer ou les signets de Firefox, vous disposez de cinq options de synchronisation distinctes. Avant d'utiliser cette fonction, vous devez vous familiariser avec ces options. Après avoir synchronisé vos favoris ou signets, vous pouvez les afficher dans Internet Explorer ou Firefox en activant l'option de navigation sans trace et en lançant le navigateur Internet Explorer ou Firefox. Si vous disposez d'un nombre important de favoris/signets, le processus de lancement peut prendre un certain temps. Les options de synchronisation dont vous disposez sont les suivantes : a) Création des favoris manquants et actualisation des favoris plus anciens sur l'ordinateur : b) Remplacement de tous les favoris de l'ordinateur par les favoris du disque USB : + c) Création et actualisation de tous les favoris manquants ou plus anciens : d) d) Création des favoris manquants et actualisation des favoris plus anciens sur le disque USB (option par défaut): e) Remplacement de tous les favoris du disque USB par les favoris de l'ordinateur : + Les options a, c et d sont activées en sélectionnant les boutons fléchés correspondants et les options b et e en cochant la case 'Delete existing… (Supprimer existant…)' et en sélectionnant les boutons fléchés correspondants. Une fois l'option de synchronisation de votre choix sélectionnée, vous pouvez lancer le processus de synchronisation en cliquant sur le bouton 'Synchronize (Synchroniser)'. Lorsque la synchronisation s'initialise, une barre de progression s'affiche, vous indiquant ainsi que le processus vient de commencer et que vos favoris/signets Internet sont transférés. L'option 'View Details (Détails)' de la barre de progression ne vous permet d'afficher que les erreurs qui se sont produites lors de la synchronisation. Une fois la synchronisation terminée, le bouton 'Finished (Terminé)' est activé, indiquant ainsi la fin du processus. La synchronisation d'un grand nombre de favoris/signets Internet vers/depuis le disque USB peut prendre quelques minutes. 28 Pour supprimer des favoris/signets Internet du disque USB ou de votre ordinateur, vous pouvez utiliser les options fournies dans la fenêtre d'Internet Explorer. 5.3 Navigation Internet sans trace L'option 'No Trace Browsing with Internet Explorer and Mozilla Firefox (Navigation sans trace avec Internet Explorer et Mozilla Firefox)' vous permet de surfer sur le Web sans laisser de trace sur l'ordinateur auquel le disque USB est branché. Pour activer la navigation sans trace, il vous suffit de cliquer sur l'option 'Activate No Trace Internet Browsing (Activer la navigation Internet sans trace)' dans la fenêtre 'No Trace Browsing (Navigation sans trace)' de Carry it Easy. Si une fenêtre d'Internet Explorer/de Firefox est déjà ouverte, il vous est demandé si vous voulez la fermer. Désormais, lorsque vous ouvrez une fenêtre d'Internet Explorer/de Firefox via le bouton 'Start No Trace Browsing (Lancer la navigation sans trace)' ou de quelque autre façon que ce soit, vous ne laissez aucune trace sur l'ordinateur utilisé. 29 Lorsque la navigation sans trace est active, l'en-tête 'No trace browsing (Navigation sans trace)' s'affiche dans les fenêtres d'Internet Explorer. Tous les fichiers temporaires, l'historique et les cookies sont réacheminés et enregistrés sur le disque USB et non sur l'ordinateur. Si vous avez synchronisé vos favoris/signets Internet, vous pouvez y accéder via le bouton 'Favoris' d'Internet Explorer ou le bouton 'Signets' de Firefox.. Après chaque utilisation, nous vous recommandons de supprimer les fichiers temporaires, les cookies et l'historique du disque USB tel que décrit ci-dessous afin de libérer de l'espace mémoire sur le disque USB. 5.4 Suppression de l'historique de navigation Internet Pour supprimer votre historique de navigation Internet sur l'ordinateur ou le disque USB, ouvrez la fenêtre 'No Trace Browsing (Navigation sans trace)' de Carry it Easy. Passez en mode 'No Trace Browsing (Navigation sans trace)'. Sélectionnez les objets que vous voulez supprimer (les favoris Internet, les fichiers temporaires, l'historique ou les cookies) et cliquez sur le bouton 'Delete trace (Supprimer trace)'. Il vous est demandé si vous êtes sûr de vouloir supprimer définitivement les objets sélectionnés. Après confirmation, une barre de progression indiquant que la suppression est en cours s'affiche. Si vous supprimez un grand nombre de fichiers (plus particulièrement depuis le disque USB), la procédure peut prendre quelques minutes. 5.5 Données Outlook Express /Windows Mail portables Pour garantir la portabilité de vos données Outlook Express/Windows Mail, sélectionnez l'option 'Outlook Express/Windows Mail ' dans la fenêtre principale de Carry it Easy et procédez comme suit. 1. Créez une sauvegarde du disque USB en sélectionnant l'identité Outlook Express/Windows Mail qui doit être portable. L'identité sélectionnée 30 comprendra également le carnet d'adresses/les contacts qui lui sont propres. Par défaut, Carry it Easy sélectionne l'identité principale. Une fois la sélection terminée, cliquez sur le bouton 'Create Backup (Créer sauvegarde)'. L'identité Outlook Express/Windows Mail sélectionnée (y compris les e-mails, les contacts, les règles de messagerie, etc.) est enregistrée sur le disque USB. Les mots de passe de vos comptes de messagerie ne sont pas enregistrés sur le disque USB pour des raisons de sécurité (Windows ne le permet pas). Par conséquent, mémorisez-les afin de pouvoir vérifier vos e-mails avec Carry it Easy lorsque vous êtes en déplacement. 2. Pour exécuter la version portable d'Outlook Express/Windows Mail, vous devez sélectionner la sauvegarde de l'identité de votre choix et cliquer sur le bouton 'Run Outlook Express/Windows Mail (Exécuter Outlook Express/Windows Mail)'. Si l'ordinateur auquel le disque USB est branché est assorti d'une connexion Internet, vous pourrez vérifier vos e-mails après avoir fourni le mot de passe de votre compte de messagerie. Si l'ordinateur auquel le disque USB est branché ne dispose pas d'une connexion Internet, vous pourrez malgré tout consulter vos e-mails et vos contacts enregistrés. 3. Pour gérer vos données Outlook Express/Windows Mail portables, sélectionnez l'option '3. Manage Backups on USB (3. Gérer des sauvegardes sur USB)' et supprimez une sauvegarde d'identité à la fois en la sélectionnant et en cliquant sur le bouton 'Remove (Supprimer)'. Si vous avez reçu de nouveaux e-mails et que vous voulez restaurer vos données Outlook Express/Windows Mail sauvegardées sur l'ordinateur, vous pouvez utiliser la fonction de restauration. Sélectionnez l'identité devant être restaurée et cliquez sur le bouton 'Restore… (Restaurer…)'. Vous pouvez alors choisir de créer une nouvelle identité ou de remplacer une identité existante. 5.6 Données Outlook portables Pour garder vos données Outlook portables, vous pouvez utiliser l’option “Microsoft Outlook” du menu principal de Carry it Easy . Cette fonctionnalité de Carry it Easy peut être utilisée avec deux scénarios différents : 31 a) pour faire une copie de sauvegarde de vos données Outlook sur votre dispositif de stockage portable afin de pouvoir accéder aux données sur un PC à distance b) utiliser Carry it Easy pour synchroniser vos données Outlook entre des différents ordinateurs (par exemple, entre votre ordinateur de travail et celui de la maison). Afin de rendre vos données Outlook portables, veuillez suivre les étapes ci-dessous: Pour créer une copie de sauvegarde sur le dispositif de stockage, cliquez sur le bouton «Add profile pair…(Ajouter paire de profils…)» et sélectionnez de l’ordinateur (gauche) le profil Microsoft Outlook que vous désirez rendre portable. Sur le dispositif, veuillez choisir la destination. Pour la première utilisation de cette fonctionnalité, la destination sera l’option “Nouveau Backup”. Si vous avez déjà une copie de sauvegarde sur votre dispositif de stockage, vous pouvez la sélectionner dans le menu déroulant. Ainsi, vous pouvez choisir les profils qui seront synchronisés l’un avec l’autre. 32 Carry it Easy +Plus sélectionne le profil implicite en mode standard quand vous utilisez l’application pour la première fois et il y a seulement un profil Outlook sur l’ordinateur. Après l’avoir sélectionné, vous devez cocher les dossiers que vous désirez synchroniser (par exemple Contactes, Brouillons etc.), puis choisissez la règle de synchronisation que vous voulez appliquer pour chaque dossier sélectionné. a) Créer et/ou mettre à jour tous les éléments depuis l’ordinateur sur le dispositif de stockage et vice-versa b) Créer et/ou mettre à jour tous les éléments depuis le dispositif de stockage sur l’ordinateur c) Créer et/ou mettre à jour tous les éléments depuis l’ordinateur sur le dispositif de stockage d) Écraser tous les éléments de l’ordinateur avec les éléments correspondants du dispositif de stockage, en supprimant d’abord les éléments de l’ordinateur e) Écraser tous les éléments du dispositif de stockage avec les éléments correspondants de l’ordinateur, en 33 supprimant d’abord les éléments du dispositif de stockage Si vous désirez filtrer les messages que vous synchronisez, cliquez sur le bouton “Define filters (Définir filtres…)”, et vous avez la possibilité de filtrer les messages par une certaine taille ou une période de temps définie. Ainsi, vous avez l’option de réduire de façon significative la taille des données Outlook que vous synchronisez. Après avoir choisi les paramètres de synchronisation, cliquez sur le bouton “Synchronize selected (Synchroniser la sélection)” dans la fenêtre «Create & Sync (Créer et synchroniser)» et le processus de synchronisation va démarrer. Information! Vos mots de passe pour les comptes de courriel ne sont pas sauvegardés sur le dispositif de stockage pour des raisons de sécurité (Windows ne le permet pas) ; veuillez vous assurer que vous savez vos mots de passe pour vos comptes de courriel afin de pouvoir vérifier vos courriels avec Carry it Easy +Plus, quand vous êtes en déplacement (en utilisant un ordinateur à distance). 34 Pour lancer Microsoft Office Outlook portable, vous devez sélectionner la copie de sauvegarde que vous désirez visualiser dans la liste de l’onglet “Outlook portable”. Cette fonction nécessite que Outlook soit installé aussi sur l’ordinateur à distance utilisé. Après avoir sélectionné le backup que vous désirez démarrer, vous devez cliquer sur le bouton “Run Backup (Lancer backup)” et Outlook sera démarré en affichant vos données du dispositif. Si l’ordinateur à distance est connecté à Internet, vous aurez la possibilité de vérifier vos courriels après avoir fourni le mot de passe pour votre compte de courriel. Si l’ordinateur n’est pas connecté à Internet, vous aurez la possibilité de visualiser vos données Outlook. Pour supprimer une copie de sauvegarde depuis votre dispositif, vous devez la sélectionner et cliquer sur le bouton «Remove Backup (Éliminer backup)».c 5.7 Synchronisation du répertoire Mes documents Pour synchroniser le répertoire Mes documents, sélectionnez l'option My Documents (Mes documents) située côté gauche de la fenêtre de navigation principale. Dans la fenêtre Mes documents, le répertoire Mes documents, ainsi que tous les sous35 dossiers qu'il contient (image du disque dur), s'affichent. Il vous suffit de sélectionner les dossiers que vous voulez synchroniser avec le disque USB en cliquant dessus. Vous devez alors opter pour l'une des trois règles de synchronisation disponibles. a) Création des dossiers Mes documents manquants et actualisation des dossiers Mes documents plus anciens sur l'ordinateur : b) Création et actualisation de tous les dossiers Mes documents manquants ou plus anciens : c) Création des dossiers Mes documents manquants et actualisation des dossiers Mes documents plus anciens sur le disque USB: Pour synchroniser les données entre l'ordinateur et le disque USB, vous devez appliquer l'une des trois options de synchronisation et sélectionner l'onglet 'Hard Drive (Disque dur)' ou 'USB Drive (Disque USB)'. Sélectionnez les dossiers que vous voulez synchroniser et cliquez sur le bouton 'Synchronize (Synchroniser)'. Lorsque la synchronisation s'initialise, une barre de progression s'affiche. La barre de progression est assortie d'une option nommée 'View Details (Détails)' qui vous permet d'afficher les erreurs susceptibles de se produire au cours du processus. Une fois la synchronisation terminée, le bouton 'Finished (Terminé)' est activé, indiquant ainsi la fin du processus. 5.8 Affichage et édition du dossier Mes documents sur le disque USB Pour afficher, éditer ou supprimer des fichiers et des dossiers stockés sur le disque USB, il vous suffit de sélectionner l'onglet 'Show USB Drive (Voir disque USB)' accessible via l'option My Documents (Mes documents). Cliquez avec le bouton droit de votre souris sur le dossier de votre choix et sélectionnez l'option permettant d'afficher les données ou de les supprimer. Une fois vos données compressées, vous ne pouvez plus utiliser la fonction clic droit. 36 5.9 Compression des données sur le disque USB Carry it Easy vous permet de compresser les documents que vous voulez synchroniser afin de pouvoir utiliser plus efficacement l'espace du disque flash USB. Rendez-vous dans la fenêtre 'Mes documents' et sélectionnez l'option 'Data compression (Compression de données)' (icône de compression). Il vous suffit alors de cliquer sur le bouton de synchronisation pour que les documents sélectionnés pour synchronisation soient compressés et transférés sur le disque flash USB. 5.10 Synchronisation des dossiers Carry it Easy vous permet de créer des profils ainsi que vous pouvez facilement synchroniser des documents entre deux ou plusieurs ordinateurs. Dans la fenêtre ‘File Synchronization’ (“Synchronisation fichier”), cliquez sur l’onglet ‘Folder Synchronization’ (“Synchronisation dossier”). Pour ajouter un dossier à la liste de synchronisation, cliquez sur le bouton “+”. Si vous voulez éditer les options de synchronisation, cliquez sur le bouton “i”. Si vous voulez supprimer un profil, cliquez sur le bouton “x”. Pour synchroniser les profils sélectionnés avec votre dispositif, cliquez sur le bouton “Synchroniser”. 37 Pour synchroniser les éléments de votre ordinateur, suivez les mêmes étapes que celles décrites ci-dessus. 38 5.11 La function Sync All Afin de rendre plus facile l’utilisation de Carry it Easy +Plus, vous avez la possibilité d’utiliser la fonction « Sync All ». Avec cette fonctionnalité vous pouvez synchroniser simultanément vos Favoris d’Internet, vos données Outlook, vos fichiers et dossiers, y compris Mes Documents. Tout ce que vous devez faire c’est de choisir dans la fenêtre de Paramètres / Paramètres «Sync All» les éléments que vous désirez synchroniser. Ensuite, vous avez deux options: 3. Vous pouvez les synchroniser maintenant, en cliquant sur le bouton “Sync All” dans la fenêtre principale de l’application, ou 2. Vous pouvez les faire synchronizer automatiquement, après une période de temps que vous pouvez établir dans l’onglet “Sync 39 5.12. Ajout de fichiers et de dossiers au disque USB Pour ajouter des fichiers et des dossiers externes au répertoire Mes documents au disque USB, vous devez ouvrir une session et copier les fichiers et les dossiers dans le répertoire (E:(USB_Drive)\Personal Data\My Folders, par exemple). Le sousdossier 'My Folders' peut être utilisé pour recevoir ces données. Attention! N'enregistrez vos données que dans le sous-dossier 'My Folders'. Dans le cas contraire, vous perdrez définitivement toutes vos données si vous modifiez les paramètres de sécurité. 5.13. USB Drive Lost & Found™ Si vous perdez le disque USB, la personne qui le trouve peut désormais savoir qui en est le propriétaire grâce à la fonction Lost & Found. Même si vous avez protégé toutes vos données par mot de passe, elle pourra vous contacter sans pour autant être en mesure d'accéder aux données protégées sur le disque USB. Pour utiliser la fonction Lost & Found, il vous suffit de remplir les champs du formulaire fourni dans la fenêtre Lost & Found et de cliquer sur le bouton 'Apply (Appliquer)'. Un message confirme que le processus s'est correctement déroulé. 5.14. Utilisation du menu situé dans la zone de notification L'icône de Carry it Easy située sans la zone de notification du système vous permet d'accéder à toutes les options de Carry it Easy. Avec l'option Quick start (Démarrage rapide), vous pouvez afficher le contenu du répertoire Mes documents ou ouvrir une fenêtre d'Internet Explorer avec vos favoris/signets. 5.15. Retrait du matériel en toute sécurité Avant de débrancher le disque USB du port USB de l'ordinateur, vous devez utiliser l'option 'Safely Remove Hardware (Retirer le périphérique en toute sécurité)' de la 40 zone de notification du système. Dans le cas contraire, vous risquez de corrompre les données stockées sur le disque USB (plus particulièrement sous Windows 2000). Pour retirer le périphérique en toute sécurité, cliquez deux fois sur l'icône située dans la zone de notification, sélectionnez le disque USB que vous voulez supprimer de la liste et cliquez sur 'Stop (Arrêter)'. Un message indiquant que le disque USB peut être retiré en toute sécurité s'affiche. Si un message tel que 'The device '…' cannot be stopped right now (Le périphérique '…' ne peut être arrêté maintenant)' s'affiche, vous devez fermer l'Explorateur Windows ou toute autre application susceptible d'accéder aux données stockées sur le disque USB. 5.16. Configuration simultanée de plusieurs périphériques Si plusieurs disques USB sont branchés sur l'ordinateur, vous devez sélectionner celui que vous continuerez de configurer dans la liste des périphériques de Carry it Easy. 41 6. Mécanisme de mise à jour Vous pouvez vérifier la disponibilité de nouvelles versions de Carry it Easy en cliquant sur le bouton 'Update (Mettre à jour)' situé dans l'onglet 'About Carry it Easy (À propos de Carry it Easy). Si une version plus récente est disponible, vous en serez informé et il vous sera demandé si vous voulez la télécharger. L'application sera téléchargée directement sur le disque USB. La version actuellement installée sur le disque USB ne pouvant être remplacée, la nouvelle version sera enregistrée sur votre ordinateur. Vous devrez alors remplacer l'ancienne version par la nouvelle sur le disque USB Drive par copie/écrasement. 7. Support Si vous avez besoin d'aide supplémentaire (FAQ ou support par e-mail), cliquez sur l'option 'About Carry it Easy (À propos de Carry it Easy)' de l'application au niveau du lien 'Online Help (Aide en ligne)' pour être automatiquement réacheminé vers notre site Web de support. Vous pouvez également visiter le site Web de support http://www.cososys.com/help.html. © 2004 - 2007 CoSoSys SRL;Carry it Easy est une marque déposée et USB Drive Lost & Found™ une marque commerciale de CoSoSys SRL. Tous droits réservés. Windows est une marque déposée de Microsoft Corporation. Tous les autres noms et marques cités sont la propriété de leurs détenteurs respectifs. 42 Carry it Easy +Plus™ Benutzerhandbuch 1. Einleitung.....................................................................................................44 2. Systemanforderungen ................................................................................45 3. Installation ...................................................................................................46 4. Inbetriebnahme ...........................................................................................46 5. 4.1. Carry it Easy +Plus™ starten................................................................46 4.2. Allgemeine Navigation ..........................................................................47 4.3. Kapazität des USB Sticks / Tragbaren Datenspeichers........................48 Arbeiten mit Carry it Easy +Plus................................................................48 5.1. Sicherheitseinstellungen.......................................................................48 5.2. Synchronisierung von Internet-Favoriten ..............................................50 5.3. Spurlos Internet Surfen.........................................................................51 5.4. Löschen des Internet Surf Verlaufs ......................................................53 5.5. Portable Outlook Express/Windows Mail Daten ...................................53 5.6. Portable Outlook Daten ........................................................................54 5.7. Synchronisieren von Eigenen Dateien..................................................58 5.8. Anzeigen / Bearbeiten von Eigenen Dateien auf tragbarem Datenspeicher 59 5.9. Datenkompression auf dem tragbaren Datenspeicher..........................59 5.10. Ordner und Desktop Synchronisation ...................................................60 5.11. Sync All Funktion ..................................................................................61 5.12. Dateien und Ordner zum USB Stick hinzufügen...................................62 5.13. USB Drive Lost & Found™ ...................................................................63 5.14. Arbeiten mit dem System-Tray-Menü ...................................................63 5.15. Hardware sicher entfernen ...................................................................63 5.16. Konfigurieren von mehreren Geräten gleichzeitig.................................64 6. Update-Mechanismus .................................................................................64 7. Support ........................................................................................................65 43 1. Einleitung Carry it Easy +Plus™ verbessert die Funktionalität Ihres tragbaren Datenspeichers und hilft Ihnen dabei, auch unterwegs schnell auf Ihre persönlichen Daten zugreifen zu können. Mit Carry it Easy +Plus und Ihrem tragbaren Datenspeicher können Sie: Ihre Internet Explorer Favoriten und Firefox Lesezeichen synchronisieren; halten Sie Ihre Microsoft Office Outlook Daten synchronisiert; Ihre Outlook Express Daten portabel machen; Ihre Ordner, Desktop und Eigene Dateien-Daten synchronisiert; Ihre Daten komprimieren, um wertvollen Speicherplatz zu sparen; alle Daten auf Ihrem USB Stick mit einem Kennwort schützen / (verschlüsseln); sowie im Internet surfen, ohne eine Spur zu hinterlassen mit Internet Explorer und Firefox; und falls Sie Ihr tragbaren Datenspeicher verlieren, kann der Finder Sie einfach mit Hilfe der USB Drive Lost & Found™ Informationen kontaktieren (ohne Zugang zu Ihren privaten Dateien zu haben). Warnung! Wenn Sie Carry it Easy +Plus verwenden, sollten Sie immer erst Carry it Easy +Plus ordnungsgemäß Beenden (Exit) und dann die Option „Hardware sicher entfernen“ von Windows (siehe nachstehende Beschreibung) nutzen, bevor Sie Ihr USB Stick ausstecken. 44 2. Systemanforderungen Betriebssysteme: o Windows 2000 Service Pack 4 o Windows XP (Service Pack 2 wird empfohlen) o Windows Vista Internet Explorer (ab Version 5.0) oder Mozilla Firefox (ab Version 1.0) Outlook Express ab Version 5.0 / Windows Mail Um die portable Outlook Express/Windows Mail e-Mail nutzen zu können, muss auf dem verwendeten PCs ebenfalls Outlook Express/Windows Mail installiert sein. Wenn Ihr Outlook Express/Windows Mail deinstalliert wurde, können Sie trotzdem noch die anderen Funktionen von Carry it Easy +Plus nutzen. Lediglich die Outlook Express/Windows Mail Option wird deaktiviert sein. Microsoft Office Outlook (XP - 2002, 2003 oder höhere Version). Um im Stande zu sein die Daten zu synchronisieren und das portable Microsoft Office Outlook E-Mail zu nutzen, muss der verwendete PC auch Microsoft Outlook installiert haben. Wenn auf dem benutzten PC kein Outlook installiert wurde, können Sie trotzdem noch die anderen Funktionen von Carry it Easy +Plus nutzen. Lediglich die Microsoft Outlook Option wird deaktiviert sein. Verfügbarer USB-Port USB Stick (USB Flash Memory Drive), oder auf Flash Speicher basierenderenden MP3 Player. Wenn Ihr USB Stick über einen manuellen Schreibschutzschalter verfügt, muss dieser auf die ungeschützte Position gestellt werden, um Carry it Easy +Plus nutzen zu können. 45 3. Installation Carry it Easy +Plus ist normalerweise auf Ihrem tragbaren Datenspeicher (z.B. USB Stick) vorinstalliert. Wenn Sie Carry it Easy +Plus aus dem Internet heruntergeladen haben, müssen Sie die CarryItEasy.exe auf Ihren tragbaren Datenspeicher oder auf einen anderen unterstützten tragbaren Datenspeicher kopieren. Auf dem PC braucht keine Installation durchgeführt zu werden. Doppelklicken Sie einfach auf die CarryitEasy.exe Datei. Sie können dann sofort mit der Anwendung arbeiten. Falls Ihr USB Stick keine CD-ROM mit einer Kopie von Carry it Easy +Plus enthielt, empfehlen wir Ihnen, eine Sicherheitskopie der CarryitEasy.exe Datei auf einem anderen Speichermedium zu erstellen. Zum Starten/Benutzen von Carry it Easy +Plus starten Sie immer die Datei CarryItEasy.exe von Ihrem USB Stick aus. 4. Inbetriebnahme 4.1. Carry it Easy +Plus™ starten Um Carry it Easy +Plus zu starten, stecken Sie Ihr USB Stick oder den anderen verwendeten tragbaren Datenspeicher in den passenden USB Port und öffnen Sie „Arbeitsplatz“ (My Computer) (Windows Explorer). Öffnen Sie den USB Stick oder das herausnehmbare Speicherlaufwerk mit dem Laufwerksbuchstaben z.B. D: oder F: je nach Computer, und doppelklicken Sie auf CarryitEasy.exe, um die Anwendung zu starten. 46 Die Datei CarryitEasy.exe bleibt auf Ihrem USB Stick, damit die Anwendung auch genutzt werden kann, wenn Sie zwischen verschiedenen Computern wechseln. Bitte führen Sie die Anwendung immer vom USB Stick aus und nicht von Ihrer Festplatte oder Ihrem Desktop. 4.2. Allgemeine Navigation Im linken linken Bereich der Bedienoberfläche befindet sich eine Auswahl für die Hauptfunktionen die dauernd verfügbar sind (siehe Bild links). Klicken Sie zum Beispiel einfach auf die Option Internet Favorites (Internet Favoriten), um auf diese Funktion zugreifen zu können (siehe nebenstehende Abbildung). Auf die meisten Funktionen haben Sie auch über das System-Tray47 Symbol Zugriff. Die System-Tray-Funktionen werden nachstehend beschrieben. 4.3. Kapazität des USB Sticks / Tragbaren Datenspeichers Unten im Hauptfenster wird immer ein Balken angezeigt, der Ihnen den verfügbaren und den bereits belegten Speicherplatz auf Ihrem tragbaren Speicher angibt. Wenn Sie eine neue Auswahl treffen, z.B. einen My Documents Ordner (Eigene Dateien Ordner) wählen, den Sie synchronisieren möchten, springt der Balken auf den neu belegten Speicherplatz, um anzugeben, wie viel Speicherplatz dann noch bei dem Gerät zur Verfügung stehen würde. 5. Arbeiten mit Carry it Easy +Plus 5.1. Sicherheitseinstellungen Wenn Sie Carry it Easy +Plus zum ersten Mal benutzen, sollten Sie bei den Sicherheitseinstellungen für Ihren USB Stick einen Kennwortschutz wählen. Es gibt zwei Fenster, in denen die Sicherheitseinstellungen geändert werden können. Im Hauptfenster der Anwendung durch Wählen der Option “Security Settings” (Sicherheitseinstellungen) und im Login-Fenster, wenn Sie bereits ein Kennwort eingestellt haben und es dort ändern möchten. Zum Einstellen eines Kennworts wählen Sie im Hauptfenster “Security Settings” (Sicherheitseinstellungen) die Option “Password protect my data” (Meine Daten mit einem Kennwort schützen) und geben Sie ein Kennwort, die Kennwortbestätigung und eine Kennworterinnerung ein. Klicken Sie anschließend auf die Schaltfläche “Apply” (Ausführen). Auch ein existierendes Kennwort kann in diesem Fenster geändert werden, indem die Option “Change password” (Kennwort ändern) gewählt wird. Um das Kennwort ändern zu können, müssen Sie Ihr altes Kennwort angeben, dann das neue 48 Kennwort eingeben, dieses Kennwort zur Bestätigung wiederholen und anschließend die neue Kennworterinnerung eingeben. Danach klicken Sie auf die Schaltfläche “Apply” (Ausführen). Wenn kein Kennwortschutz erforderlich ist und Sie den Kennwortschutz bereits aktiviert haben, wählen Sie die Option “No password protection is required” (Kein Kennwortschutz gewünscht), geben Sie Ihr altes Kennwort ein und klicken Sie auf die Schaltfläche “Apply” (Ausführen). Sollten Sie jetzt die Auswahl „Password protect my data“ (Paßwortschutz einrichten) treffen, dann wird Carry it Easy +Plus alle Daten auf ihrem tragbaren Datenspeicher die sich im Ordner „Personal Data“ Ordern befinden verschlüsseln. Carry it Easy +Plus verschlüsselt nur die Daten die auch mit Carry it Easy +Plus synchronisiert wurden. 49 Sie können die verschlüsselten Daten im Fenster „File Synchronization“ (Datei Synchronisation) verwalten. Nachdem Sie Ihre Daten das erste mal verschlüsselt haben, ist die Option „Manage Encrypted Data“ (Verschlüsselte Daten Verwalten) aktiviert. 5.2. Synchronisierung von Internet-Favoriten Für die Synchronisierung Ihrer Internet Explorer Favoriten oder Ihrer Firefox Lesezeichen haben Sie die Auswahl aus 5 verschiedenen SynchronisationsOptionen. Bevor Sie diese Funktion benutzen, sollten Sie sich mit diesen Optionen vertraut machen. Nach der Synchronisierung Ihrer Internet Favoriten oder Lesezeichen können Sie sich Ihre Favoriten oder Lesezeichen im Internet Explorer oder in Firefox Browser ansehen, indem Sie die Option “No trace browsing“ (Spurlos Internet Surfen) aktivieren und einen Internet Explorer oder einen Firefox Browser Fenster starten. Bei vielen Favoriten / Lesezeichen kann der Vorgang den Browser zu öffnen etwas dauern. Die Synchronisierungs-Optionen sind: a) Erstellt fehlende und aktualisiert ältere Favoriten auf dem Computer 50 b) Ersetzt alle Favoriten auf dem Computer durch die Favoriten des tragbaren Datenspeichers + c) Erstellt und aktualisiert alle fehlenden oder älteren Favoriten d) Erstellt fehlende und aktualisiert ältere Favoriten auf dem tragbaren Datenspeicher (Standardoption) e) Ersetzt alle Favoriten auf dem tragbaren Datenspeicher durch die Favoriten des Computers + Die Optionen a, c und d werden gewählt, indem die betreffenden Pfeilschaltflächen angeklickt werden. Die Optionen b und e werden gewählt, indem das jeweilige Ankreuzkästchen “Delete existing ” (Zuerst vorhandene löschen) und die entsprechenden Pfeilschaltflächen gewählt werden. Wenn Sie die gewünschte Synchronisierungsoption gewählt haben, können Sie den Synchronisierungsvorgang starten, indem Sie auf die Schaltfläche “Synchronize” (Synchronisieren) klicken. Wenn die Synchronisierung beginnt, wird ein Laufbalken den Fortschritt anzeigen und darauf hinweisen, dass Ihre Internet Favoriten / Lesezeichen übertragen werden. Die Option “View Details” (Details anzeigen) im Fortschrittsbalken dient nur zum Anzeigen von eventuell während der Synchronisierung aufgetretenen Fehlern. Nach Abschluß der Synchronisierung wird die Schaltfläche “Finished” (Fertig) aktiv, um darauf hinzuweisen, dass der Vorgang beendet ist. Wenn viele Internet Favoriten / Lesezeichen vom und zum tragbaren Datenspeicher synchronisiert werden müssen, kann dieser Vorgang einige Minuten dauern. Zum Löschen von Internet Favoriten / Lesezeichen auf Ihrem tragbaren Datenspeicher oder auf Ihrem Computer können Sie die Optionen im Fenster des Internet Explorers nutzen. 5.3. Spurlos Internet Surfen Mit der Option “No Trace Browsing with Internet Explorer and Mozilla Firefox” (Spurlos Internet Surfen mit Internet Explorer und Mozilla Firefox) können Sie im Internet surfen, ohne auf dem Computer, an dem Sie Ihren tragbaren Datenspeicher angeschlossen haben, Spuren zu hinterlassen. 51 Zum Aktivieren dieser Option klicken Sie einfach auf “Activate No Trace Internet Browsing” (Spurlos Internet Surfen Aktivieren) im Fenster „No Trace Browing“ (Spurlos Internet Surfen) von Carry it Easy +Plus. Falls bereits ein Internet Explorer oder Firefox Fenster geöffnet ist, werden Sie gefragt, ob Sie es schließen möchten. Wenn Sie jetzt ein Internet Explorer oder Firefox Fenster öffnen, entweder über die Schaltfläche “Start No Trace Browsing” (Spurlos Surfen Starten) oder durch Starten des Internet Explorers oder Firefox auf andere Weise, hinterlassen Sie auf dem benutzten Computer keine Spuren. Wenn “No Trace Browsing” aktiv ist, sehen Sie in der Titelzeile des Internet Explorers oder Firefox Browser Fensters die Angabe “No Trace Browsing”. Alle temporären Dateien, History und Cookies werden umgeleitet und nicht auf dem Computer, sondern auf Ihrem tragbaren Datenspeicher gespeichert. Wenn Sie Ihre Internet-Favoriten/Lesezeichen synchronisiert haben, können Sie über die Schaltfläche “Favorites” (Favoriten) im Internet Explorer oder die Schaltfläche „Bookmarks“ (Lesezeichen) in Firefox Browser darauf zugreifen. Wir empfehlen Ihnen, nach jeder Benutzung die temporären Dateien, Cookies und History von Ihrem tragbaren Datenspeicher wie unten beschrieben zu löschen, um wertvollen Speicherplatz auf Ihrem Datenspeicher zu sparen. 52 5.4. Löschen des Internet Surf Verlaufs Um Ihren Internet Surf Verlauf auf dem Computer oder auf Ihrem tragbaren Datenspeicher zu löschen, gehen Sie zum Fenster “No Trace Internet Browsing” von Carry it Easy +Plus. Rufen Sie den Modus „No Trace Browsing“ auf. Wählen Sie die zu löschenden Objekte, zum Beispiel temporäre Dateien, History oder Cookies, und klicken Sie auf die Schaltfläche “Delete trace” (Spur löschen). Sie werden gefragt, ob Sie tatsächlich diese ausgewählten Objekte unwiederbringlich löschen möchten. Nach der Bestätigung zeigt ein Balken den Fortschritt des Löschvorgangs an. Wenn Sie viele Dateien löschen (vor allem auf einem USB Stick), kann der Vorgang einige Minuten dauern. 5.5. Portable Outlook Express/Windows Mail Daten Um Ihre Outlook Express/Windows Mail Daten portabel zu halten, können Sie die Option “Outlook Express/Windows Mail” im Hauptfenster von Carry it Easy +Plus wählen. Befolgen Sie die aufgeführten Schritte, um Ihre Outlook Express/Windows Mail Daten portabel zu machen. 4. Erstellen Sie ein Backup auf den tragbaren Datenspeicher, indem Sie das Outlook Express/Windows Mail Profil wählen, das portabel gemacht werden soll. Das gewählte Profil enthält auch ihre jeweiliges Adressbuchdaten / Kontakte. Carry it Easy +Plus wählt standardmäßig das Hauptprofil. Nach der Auswahl klicken Sie auf die Schaltfläche “Create Backup” (Backup erstellen). Jetzt wird Ihr Outlook Express/Windows Mail Profil einschließlich e-MailNachrichten, Kontakten, Nachrichtenregeln usw. auf Ihrem tragbaren Datenspeicher gespeichert. Ihre e-Mail Account-Kennwörter werden aus Sicherheitsgründen nicht auf dem tragbaren Datenspeicher gespeichert (Windows lässt dies nicht zu). Vergewissern Sie sich daher bitte, dass Sie die Kennwörter für Ihre e-Mail-Accounts kennen, damit Sie Ihre e-Mails mit Carry it Easy +Plus abrufen können, wenn Sie unterwegs sind. 53 5. Zum Ausführen von Portable Outlook Express/Windows Mail wählen Sie das gewünschte Profil-Backup und klicken Sie auf die Schaltfläche “Run Outlook Express/Windows Mail ” (Outlook Express/Windows Mail starten). Wenn der Computer, an den der tragbare Datenspeicher angeschlossen wurde, eine Internet-Verbindung hat, können Sie Ihre e-Mails nach der Angabe Ihres Kennworts für Ihre e-Mail-Account kontrollieren. Hat der Computer, in den Sie den tragbaren Datenspeicher gesteckt haben, keine Internet-Verbindung, können Sie sich trotzdem Ihre gespeicherten e-MailNachrichten und Kontakte ansehen. 6. Zum Verwalten Ihrer portablen Outlook Express/Windows Mail Daten wählen Sie die Option “3. Manage Backups on USB” (Backups Verwalten) und entweder entfernen Sie das Backup eines Profils, indem Sie es markieren und dann die Schaltfläche “Remove” (Entfernen) anklicken. Wenn Sie neue e-Mail empfangen haben und Ihre Outlook Express/Windows Mail Daten auf Ihrem Computer wiederherstellen möchten, können Sie dies mit Hilfe der RestoreFunktion. Wählen Sie das wiederherzustellende Profil und klicken Sie auf die Schaltfläche “Restore…” (Wiederherstellen). Sie können jetzt wählen, ob Sie ein neues Profil erstellen oder ein vorhandenes Profil überschreiben möchten. 5.6. Portable Outlook Daten Um Ihre Microsoft Outlook Daten portable zu machen, können Sie die Option “Microsoft Outlook” im Hauptfenster von Carry it Easy +Plus wählen. Diese Funktion von Carry it Easy +Plus kann für zwei verschiedene Szenarien genutzt werden. Erstens, können Sie einen Backup von Ihren Outlook Dateien auf Ihren tragbaren Datenspeicher erstellen, so dass Sie auf die Daten auch an einem anderen PC zugreifen können und damit arbeiten, zweitens nutzen Sie Carry it Easy +Plus um Ihren Outlook Daten zwischen verschiedenen PCs (z.B. der PC im Büro und vom zu Hause) zu synchronisieren. Um Ihre Microsoft Outlook Daten portabel zu machen, befolgen Sie bitte diese Schritte: 54 Um einen Backup auf dem Datenspeicher zu erstellen, klicken Sie die „Profilpaar Hinzufügen“ Option und wählen Sie das Outlook Profil das Portabel gemacht werden soll. Auf dem tragbaren Datenspeicher (rechts) wählen Sie den gewünschten Bestimmungsort. Wenn Sie diese Funktion zum ersten Mal benutzen, ist der Bestimmungsort immer die “New Backup” Option. Im Falle das Sie schon auf Ihrem tragbaren Datenspeicher eine Backup von Outlook haben, können Sie dieses auch vom “drop down“ Menü wählen. Auf diesem Weg wählen Sie die Profile die miteinander synchronisiert werden sollen. 55 Carry it Easy +Plus wählt standardmäßig das Hauptprofil, wenn die Anwendung zum ersten Mal verwendet wird und nur einen Outlook Profile auf dem PC existiert. Nachdem Sie es ausgewählt haben, überprüfen Sie die Ordner die synchronisiert werden (z.B. Kontakte, Entwürfe, etc.). Wählen Sie die Option „SynchronisationsRegel“ "Sync Rule", die Sie verwenden wollen für die Ordner die zur Synchronisierung ausgewählt wurden. a) Erstellt und/oder aktualisiert alle Daten vom PC auf den tragbaren Datenspeicher und vice versa. b) Erstellt und/oder aktualisiert alle Daten vom tragbaren Datenspeicher auf den PC. c) Erstellt und/oder aktualisiert alle Daten vom PC auf den tragbaren Datenspeicher d) Übersteuert alle Daten vom PC mit den entsprechenden Daten vom Datenspeicher, indem zuerst die Daten vom PC gelöscht werden. e) Übersteuert alle Daten von dem Datenspeicher mit den entsprechenden Daten vom PC, indem zuerst die Daten vom Datenspeicher gelöscht werden Wenn Sie die Nachrichten die synchronisiert werden sollen filtern möchten, klicken Sie bitte auf die "Filtereinstellung" Option und jetzt können Sie die Nachrichten nach Ihrer Größe oder einer bestimmten Zeitdauer filtern. Mit Hilfe dieser Option können Sie Größe der Outlook Daten die synchronisiert werden verringern. 56 Nachdem wählen der Synchronisierungseinstellungen, bitte „Auswahl Synchronisieren“ Option vom "Erstellen & Sync" Fenster anklicken und die Synchronisierung wird beginnen. Achtung! Aus Sicherheitsgründen werden Ihre EMail Passwörter nicht auf dem tragbaren Datenspeicher gespeichert. Stellen Sie bitte sicher dass Sie Ihre E-Mail Passwörter kennen, um mit Carry it Easy +Plus +Plus Ihre E-Mails abrufen können, auch wenn sie unterwegs sind. Um das portable Outlook zu starten, müssen Sie einen Backup von der "Backup starten" Funktion wählen. Um diese Funktion zu nutzen muss auf dem verwendeten PC, Microsoft Outlook installiert sein. Nachdem Sie den Backup den Sie starten wollen ausgewählt haben, bitte “Gewähltes Backup starten” anklicken und Outlook wird starten und Ihre Daten vom tragbaren Datenspeicher anzeigen. Wenn auf dem verwendeten PC eine Internet Verbindung existiert, können Sie ihre E-Mais abrufen, nachdem Sie das richtige Passwort eingegeben haben. Im Falle dass keine Internet Verbindung existiert, können Sie trotzdem Ihre Outlook Daten 57 einsehen. Um einen Backup vom Ihren Datenspeicher zu löschen müssen Sie das zu löschende Backup zuerst auswählen und danach auf "Backup entfernen” klicken. 5.7. Synchronisieren von Eigenen Dateien Um die Eigenen Dateien zu synchronisieren, rufen Sie die Option My Documents (Eigene Dateien) auf der linken Navigationsseite auf. In dem Fenster My Documents (Eigene Dateien) sehen Sie Ihren Eigene-Dateien-Ordner mit allen Unterverzeichnissen (“Show Hard Disk”) (Festplatte Zeigen). Die Ordner, die mit dem tragbaren Speicher synchronisiert werden sollen, können einfach durch Anklicken ausgewählt werden. Sie haben dann die Möglichkeit, eine von drei zur Verfügung stehenden Synchronisierungsregeln auszuwählen. a) Erstellt fehlende und aktualisiert ältere Eigene Dateien auf dem Computer b) Erstellt und aktualisiert alle fehlenden oder älteren Eigenen Dateien c) Erstellt fehlende und aktualisiert ältere Eigene Dateien auf dem tragbaren Datenspeicher Zum Synchronisieren der Daten zwischen Computer und tragbarem Datenspeicher muss eine der drei Synchronisierungsoptionen aktiviert und entweder das 58 Registerblatt “Show Hard Drive” (Festplatte zeigen) oder das “Show USB Drive” (USB Stick zeigen) aufgerufen werden. Wählen Sie die zu synchronisierenden Ordner und klicken Sie auf die Schaltfläche “Synchronisieren”. Wenn die Synchronisierung begonnen hat, erscheint ein Fortschrittsbalken. In dem Fortschrittsbalken steht die Option “View Details” (Details anzeigen) zur Verfügung, um eventuelle Fehler während des Synchronisierungsvorgangs anzuzeigen. Nach Abschluss der Synchronisierung wird die Schaltfläche “Finished” (Fertig) aktiv, um darauf hinzuweisen, dass der Vorgang beendet ist. 5.8. Anzeigen / Bearbeiten von Eigenen Dateien auf tragbarem Datenspeicher Um Dateien und Ordner, die auf dem USB Stick gespeichert wurden, anzuzeigen, zu bearbeiten oder zu löschen, können Sie einfach das Registerblatt “Show USB Drive” (USB Speicher anzeigen) in der Option My Documents (Eigene Dateien) wählen. Wenn Sie mit der rechten Maustaste auf den betreffenden Ordner klicken, haben Sie die Möglichkeit, sich die Daten anzusehen oder sie zu löschen. Wenn Sie Ihre Daten komprimiert haben, können Sie die Rechtsklick-Funktion nicht nutzen. 5.9. Datenkompression auf dem tragbaren Datenspeicher Carry it Easy +Plus bietet Ihnen die Möglichkeit, die zu synchronisierenden Dokumente zu komprimieren, um den Platz auf dem tragbaren Datenspeicher effizienter zu nutzen. Wählen Sie in dem Fenster ‘My Documents’ (Eigene Dateien) die Option ‘Data compression’ (Datenkompression) (Schraubzwingen Symbol) .Wenn Sie die Synchronisierungstaste drücken, werden die zur ausgewählten Dateien komprimiert und zum USB Stick verschoben. 59 Synchronisierung 5.10. Ordner und Desktop Synchronisation Mit Carry it Easy +Plus können Sie Profile für zu Daten / Ordner anlegen die Sie zwischen mehreren PCs oder Ihrem PC und tragbaren Datenträger synchronisieren möchten. Um ein Profil zu erstellen, gehen Sie zum Menüpunkt “Data Synchronization” (Datei Synchronisation) und wählen das Untermenü „Folder Synchronization“ (Ordner Synchronisation) aus. Um einen Ordner / Profil hinzuzufügen, klicken Sie die „+“ Schaltfläche und wählen den Pfad des gewünschten Ordners aus. Wenn die die Einstellungen eines zuvor bereits eingerichteten Profils / Ordners ändern möchten, klicken Sie auf die „i“ Schaltfläche. Um einen zuvor eingerichtetes Profil / Ordner zu löschen, klicken Sie auf die „x“ Schaltfläche. Um die Daten der eingerichteten Ordner / Profile zu synchronisieren, müssen sie auf die Schaltfläche „Synchronisieren“ klicken. Wenn Sie mit Ihrem tragbaren Datenspeicher nun das erste mal an einem anderen als dem ursprünglichen PC arbeiten, müssen Sie an diesem den Pfad definieren mit dem der Ordner / Profil hier synchronisiert werden soll. Das machen Sie, indem Sie den Ordner / Profil auswählen und auf die „i“ Schaltfläche klicken und den Pfad festlegen. Bei jedem weiteren Wechsel zwischen diesen PCs wird sich Carry it Easy +Plus an die getroffene Einstellung erinnern. Dann können Sie ganz bequem mit klicken der „Synchronisation“ Schaltfläche Ihre Daten synchronisieren. 60 Um Ihren Desktop zu synchronisieren, folgen Sie einfach den oben erläuterten Schritten zum hinzufügen eines neuen Ordners / Profils. 5.11. Sync All Funktion Um das arbeiten mit Carry it Easy +Plus einfacher zu machen, haben Sie die Möglichkeit die “Sync All” Option zu benutzen. Mit dieser Funktionalität können Sie ihre Internet Favoriten/Lesezeichen, Outlook Daten, Dateien und Ordern und Eigene 61 Dateien synchronisieren. Alles was Sie machen müssen, ist unter Einstellungen die “Sync All“ Option auswählen und die Daten die synchronisiert werden sollen auswählen. Sync All kann durch zwei Optionen ausgeführt werden: 1. Sie können synchronisieren indem Sie die „Sync All“ Taste klicken die sich im rechten unteren Ecke des Hauptfensters befindet, oder 2. Die Daten können automatisch synchronisiert werden, in unterschiedlichen Zeitspannen durch dass auswählen der Funktion “Automatisch alle ... Synchronisieren“. 5.12. Dateien und Ordner zum USB Stick hinzufügen Um weitere Dateien und Ordner, auf dem tragbaren Datenspeicher zu speichern, loggen Sie sich mit Ihrem Paßwort in Carry it Easy +Plus ein (sollten Sie Paßwortschutz eingerichtet haben) und kopieren Sie sie in das Verzeichnis z.B. E:(USB_Drive)\Personal Data\My Folders. Unterverzeichnis “My Folders” zur Verfügung. 62 Für diese Daten steht das Achtung! Speichern Sie Ihre Daten nur in “My Folders”, da sie sonst unwiederbringlich verloren gehen, wenn die Sicherheitseinstellungen geändert werden. 5.13. USB Drive Lost & Found™ Wenn Ihr tragbarer Datenspeicher verloren geht, können Sie jetzt den Finder dank der Lost & Found Funktion wissen lassen, wer der Besitzer des Datenspeichers ist. Auch wenn Sie den Kennwortschutz für alle Ihre Daten aktiviert haben, wird der Finder Kontakt mit Ihnen aufnehmen können, ohne auf die geschützten Daten auf dem tragbaren Datenspeicher zugreifen zu können. Um die Lost & Found Funktion zu nutzen, füllen Sie einfach die Formularfelder im Lost & Found Fenster aus und klicken Sie auf die Schaltfläche “Apply” (Ausführen). Eine entsprechende Meldung bestätigt, dass der Vorgang erfolgreich war. 5.14. Arbeiten mit dem System-Tray-Menü Über das Carry it Easy +Plus Symbol im System-Tray können Sie alle Carry it Easy +Plus Optionen erreichen. Mit der Schnellstart-Option können Sie sich den Inhalt Ihrer Eigenen Dateien ansehen oder ein Internet Explorer Fenster mit Ihren Favoriten/Lesezeichen starten. 5.15. Hardware sicher entfernen Verwenden Sie die Option “Hardware sicher entfernen” aus dem System-Tray, bevor Sie den USB Stick (tragbaren Datenspeicher) aus dem USB Port Ihres Computers herausziehen, da sonst die auf dem USB Stick gespeicherten Daten eventuell beschädigt werden können (vor allem bei Verwendung von Windows 2000). Um die Hardware sicher zu entfernen, doppelklicken Sie auf das System-TraySymbol, wählen Sie dann den USB Stick aus der aus der Liste entfernt werden soll, und klicken Sie auf “Stop”. 63 Es erscheint eine Meldung, die darauf hinweist, dass der tragbare Datenspeicher jetzt sicher entfernt werden kann. Wenn eine Meldung erscheint, die besagt, dass das Gerät jetzt nicht gestoppt werden kann (‘The device ‘…’ cannot be stopped right now’), müssen Sie Ihren Windows Explorer oder eine andere Anwendung schließen, die immer noch Zugriff auf die auf dem tragbaren Datenspeicher gespeicherten Daten haben könnte. 5.16. Konfigurieren von mehreren Geräten gleichzeitig Wenn mehr als einen tragbaren Datenspeicher mit Ihrem Computer verbunden haben, wählen Sie aus der Carry it Easy +Plus Geräteliste, welches Laufwerk Sie konfigurieren möchten. 6. Update-Mechanismus Um zu prüfen, ob eine neue Carry it Easy +Plus Version verfügbar ist, können Sie auf dem Registerblatt „About Carry it Easy +Plus“ (Über Carry it Easy +Plus) auf die Schaltfläche „Update“ klicken. Steht eine neuere Version zur Verfügung, werden Sie darüber informiert und gefragt, ob Sie sie herunterladen möchten. Die Anwendung wird direkt auf Ihren tragbaren Datenspeicher geladen. Wenn es nicht möglich ist, die 64 aktuelle Version auf Ihrem tragbaren Datenspeicher zu ersetzen, wird die neue Version auf Ihrem Desktop gespeichert. Die ältere Version auf dem tragbaren Datenspeicher muss dann mittels Kopieren/Überschreiben durch die neuere Version ersetzt werden. 7. Support Falls Sie zusätzliche Hilfe benötigen, zum Beispiel Antworten auf häufig gestellte Fragen oder e-Mail- Support, klicken Sie bei der Option “Über Carry it Easy +Plus” der Anwendung auf das “Online Help” Link. Sie werden dann automatisch zu unserer Support Website geleitet. Sie können unsere Support Website auch direkt aufrufen: http://www.cososys.com/help.html . © 2004 – 2007 CoSoSys SRL; „Carry it Easy +Plus“ und „USB Drive Lost & Found“ sind Warenzeichen CoSoSys SRL. Alle Rechte vorbehalten. Windows, Outlook Express und Internet Explorer sind eingetragene Warenzeichen der Microsoft Corporation. Mozilla Firefox ist ein Warenzeichen der Mozilla Foundation. Alle anderen Namen und Warenzeichen sind Eigentum ihrer jeweiligen Inhaber. 65 Carry it Easy +Plus™ Guida utente 1. Introduzione ................................................................................................67 2. Requisiti di sistema ....................................................................................68 3. Installazione ................................................................................................69 4. Per iniziare...................................................................................................69 5. 4.1. Avviare Carry it Easy +Plus ..................................................................69 4.2. Navigazione di base .............................................................................70 4.3. Capacità unità USB ..............................................................................70 Lavorare con Carry it Easy +Plus ..............................................................71 5.1. Impostazioni di sicurezza......................................................................71 5.2. Sincronizzazione dei Preferiti Internet ..................................................72 5.3. Navigare in Internet senza lasciare traccia ...........................................73 5.4. Eliminare la cronologia Internet ............................................................75 5.5. Portable Outlook Express/Windows Mail Data .....................................75 5.6. Portable Outlook Data ..........................................................................76 5.7. Sincronizzazione Documenti ................................................................80 5.8. Visualizzare e modificare i Documenti sull'unità USB...........................80 5.9. Compressione dati Documenti sull'unità USB.......................................81 5.10. Sincronizzazione Desktop e Cartelle ....................................................81 5.11. Funzione Sync All .................................................................................82 5.12. Aggiungere file e cartelle sull'unità USB ...............................................83 5.13. Funzione Lost & Found™ dell'unità USB..............................................83 5.14. Lavorare con il menu dell'icona nell'Area di notifica..............................84 5.15. Rimozione sicura dell'hardware ............................................................84 5.16. Configurare più periferiche contemporaneamente................................85 6. Procedura di aggiornamento .....................................................................85 7. Supporto ......................................................................................................86 66 1. Introduzione Carry it Easy +Plus™ potenzia le funzioni del vostro dispositivo di archiviazione portatile e vi aiuta ad avere sempre a portata di mano i vostri dati personali, anche in viaggio. Con Carry it Easy +Plus e il vostro dispositivo di archiviazione portatile potrete: mantenere sincronizzati i Preferiti Internet/Segnalibri Firefox, rendere i dati di Outlook Express/Windows Mail portabili, mantenere sincronizzati i vostri dati di Microsoft Office Outlook, mantenere sincronizzate le vostre Cartelle, Desktop e Documenti, comprimere i vostri dati per liberare spazio prezioso in memoria, proteggere via password/cifrare tutti i dati sul vostro dispositivo di archiviazione portatile, navigare in Internet senza lasciare tracce con Internet Explorer e FireFox, e, in caso perdiate il vostro dispositivo di archiviazione portatile, la persona che la ritrova potrà contattarvi utilizzando semplicemente le informazioni USB Drive Lost & Found™ (senza dover accedere ai vostri file privati). Avvertenza! Mentre utilizzate Carry it Easy +Plus, non dovete mai disconnettere la vostra periferica senza aver preventivamente chiuso Carry it Easy +Plus nel modo corretto, tramite il pulsante di uscita e l'opzione “Rimozione sicura dell'hardware” (Vedi descrizione seguente). 67 2. Requisiti di sistema Sistemi operativi: o Windows 2000 Service Pack 4 o Windows XP (si raccomanda il Service Pack 2) o Windows Vista Internet Explorer versione 5.0 e successive o Mozilla Firefox versione 1.0 e successive Outlook Express versione 5.0 e successive / Windows Mail E per essere in grado di utilizzare la funzione Portable Outlook Express/Windows Mail e-mail, sul PC remoto deve essere installato Outlook Express/Windows Mail. Se Outlook Express/Windows Mail non fosse installato, potrete comunque utilizzare le altre funzioni di Carry it Easy +Plus L'opzione Outlook Express/Windows Mail sarà disabilitata. Microsoft Office Outlook (XP - 2002, 2003 e versioni successive) E per essere in grado di sincronizzare e usare la funzione portable Microsoft Office Outlook e-mail, sul PC remoto deve essere installato Microsoft Outlook. Se Microsoft Outlook non fosse installato, potrete comunque utilizzare le altre funzioni di Carry it Easy +Plus. L’opzione Microsoft Outlook sarà disabilitata. Una porta USB libera Un'unità USB (USB Flash Memory Drive) o lettore MP3 Flash. Se l'unità USB include un selettore manuale di protezione contro la copia, per poter utilizzare Carry it Easy +Plus è necessario impostarlo su non protetto. 68 3. Installazione Carry it Easy +Plus è preinstallato sul vostro dispositivo di archiviazione portatile (ad esempio la vostra Unità di Memoria Flash). Se avete scaricato Carry it Easy +Plus da Internet dovete copiare CarryItEasy.exe sulla vostra unità USB o un’altra periferica di archiviazione portatile supportata. Non è necessaria alcuna procedura d'installazione sul PC. E' sufficiente fare un doppio clic sul file CarryitEasy.exe per utilizzare immediatamente l'applicazione. Se l'unità USB non include un CD-ROM contenente una copia di Carry it Easy +Plus, raccomandiamo di realizzare un backup del file CarryitEasy.exe su un'altra periferica. Per utilizzare Carry it Easy +Plus eseguite sempre CarryItEasy.exe dalla periferica USB. 4. Per iniziare 4.1. Avviare Carry it Easy +Plus Per avviare Carry it Easy +Plus, collegate l'unità USB e aprite risorse del computer (Esplora risorse di Windows). Aprite l'unità USB o l'unità di archiviazione rimovibile identificata dalla lettera di unità D: o F: a seconda del computer e fate doppio clic su CarryItEasy.exe per aprire l'applicazione. 69 Il file CarryitEasy.exe rimarrà sull'unità USB, per consentirne l'utilizzo su più computer. Eseguite sempre l'applicazione dall'unità USB e non dall'hard disk o dal desktop. 4.2. Navigazione di base Sulla destra della finestra di benvenuto avrete le funzioni principali sempre disponibili (vedi figura a sinistra). Ad esempio, un semplice clic sull'opzione “Internet Favorites” (Preferiti Internet), attiverà questa funzione. La maggior parte delle funzioni sono anche disponibili tramite l'icona nell'Area di notifica, descritte di seguito. 4.3. Capacità unità USB Nella parte inferiore della finestra principale è presente una barra che riporta la capacità disponibile e lo spazio utilizzato dell'unità USB. Quando effettuate una nuova selezione, ad esempio di una cartella Documenti da sincronizzare, la barra indicherà la capacità residua sulla periferica, disponibile dopo questa operazione. Quando l'unità USB Flash è partizionata la barra indicherà solamente la dimensione dell'area Privata (area protetta da password). Per verificare la dimensione dell'area Pubblica (area non protetta da password) premete il pulsante “Device Information” (Informazioni sulla periferica). 70 5. Lavorare con Carry it Easy +Plus 5.1. Impostazioni di sicurezza Per impostare una password selezionate nella finestra “Security Settings”(Impostazioni di sicurezza) l'opzione “Password protect my data”(Protezione via password dei miei dati) ed inserite una password, la password di conferma e un promemoria, poi fate clic sul pulsante “Apply” (Applica). In questa finestra è anche possibile cambiare la password esistente, selezionando l'opzione “Change password” (Cambia password). Per cambiare la password è necessario inserire la password attuale, quella nuova, quella di conferma e il nuovo promemoria, e confermare con un clic sul pulsante “Apply” (Applica). Se la protezione via password non è necessaria, ma è già stata abilitata, selezionate l'opzione “No password protection required” (Nessuna password richiesta), inserite la password corrente e fate clic sul pulsante “Apply”(Applica). Se scegliete di proteggere con password il vostro Dispositivo, Carry it Easy +Plus cifrerà la vostra cartella “Personal Data” (Dati personali) sul vostro Dispositivo. Gli 71 altri dati salvati sul Dispositivo ma non sincronizzati con Carry it Easy +Plus rimarranno in chiaro. Potrete gestire i file cifrati aprendo la finestra File Synchronization (Sincronizzazione file). Una volta che proteggete i vostri dati con password, verrà attivata la scheda Manage Encrypted Data (Gestione dati cifrati). Potrete cifrare e aprire ciascuno dei vostri file e cifrarli nuovamente. 5.2. Sincronizzazione dei Preferiti Internet Per sincronizzare i Preferiti di Internet Explorero i segnalibri Firefox, sono disponibili cinque opzioni. Prima di utilizzare questa funzione, è consigliabile familiarizzare con queste opzioni. Dopo aver sincronizzato i Preferiti o i Segnalibri, potrete accedervi da Internet Explorer o da Firefox attivando l'opzione di navigazione “No trace Browsing” (Navigazione senza traccia ) e aprendo Internet Explorer o il browser Firefox. Se il numero di Preferito/Segnalibro è ingente, il processo di avvio potrebbe richiedere del tempo. Le opzioni di sincronizzazione sono: 72 a) Crea i Preferiti mancanti e aggiorna i Preferiti obsoleti sul computer: b) Sostituisci tutti i Preferiti sul computer con quelli dell'unità USB: + c) Crea e aggiorna tutti i Preferiti mancanti o obsoleti: d) Crea i Preferiti mancanti e aggiorna i Preferiti obsoleti sull'unità USB (opzione predefinita): e) Sostituisci tutti i Preferiti sull'unità USB con quelli del computer: + Selezionate le opzioni a, c e d mediante i rispettivi pulsanti freccia e le opzioni b ed e selezionando la casella di spunta “Delete existing…” (Cancella esistenti...) ed i rispettivi pulsanti freccia. Una volta selezionata l'opzione di sincronizzazione desiderata, avviate l'operazione di sincronizzazione facendo clic sul pulsante “Synchronize” (Sincronizza). Quando inizia la sincronizzazione compare una barra di progressione ad indicare il trasferimento dei Preferiti Internet/Segnalibri in corso. L'opzione “View Details” (Visualizza dettagli) nella barra di progressione mostrerà soltanto gli eventuali errori che potrebbero essersi verificati durante la sincronizzazione. Quando la sincronizzazione termina, il pulsante “Finished” (Completata) diventa attivo per indicare che l'operazione è terminata. Se i Preferiti Internet/Segnalibri da sincronizzare dal/al vostro dispositivo di archiviazione portatile sono in numero elevato, l'operazione potrebbe richiedere qualche minuto. Per cancellare i Preferiti Internet/Segnalibri sull'unità USB o sul computer utilizzate le opzioni nella finestra di Internet Explorer. 5.3. Navigare in Internet senza lasciare traccia Con l'opzione “No Trace Browsing with Internet Explorer and Mozilla Firefox” (Navigare senza lasciare traccia in Internet Explorer e Mozilla Firefox) potete navigare in Internet senza lasciarvi dietro alcuna traccia nel computer a cui avete collegato il dispositivo di archiviazione portatile. 73 Per attivare la navigazione senza traccia è sufficiente fare clic sull'opzione “Activate No Trace Internet Browsing” (Attiva Navigazione internet senza traccia) nella finestra 'No Trace Browsing' di Carry it Easy +Plus. Nel caso in cui abbiate già aperto una finestra di Internet Explorer/Firefox vi sarà chiesto se desiderate chiuderla. Ora quando aprirete Internet Explorer/Firefox sia dal pulsante “Start No Trace Browsing” (Inizia Navigazione senza traccia) sia avviando Internet Explorer/Firefox in qualsiasi altro modo, non lascerete alcuna traccia nel computer che state utilizzando. Quando la navigazione senza traccia è attiva nell'intestazione delle finestre di Internet Explorer comparirà la scritta “No Trace Browsing”.Tutti i file temporanei, la cronologia ed i cookie saranno salvati sul dispositivo di archiviazione portatile e non sul computer. Se avete sincronizzato i Preferiti Internet/Segnalibri potete accedervi con il menu “Preferiti” di Internet Explorer o il pulsante “Bookmarks” (Segnalibri) di Firefox. Consigliamo, dopo ogni uso, di eliminare i file temporanei, i cookie e la cronologia dal vostro dispositivo di archiviazione portatile come descritto di seguito, per liberare prezioso spazio sul vostro dispositivo di archiviazione portatile. 74 5.4. Eliminare la cronologia Internet Per eliminare la cronologia Internet sul computer o dal dispositivo di archiviazione portatile aprite la finestra “No Trace Internet Browsing” di Carry it Easy +Plus. Accedete alla modalità “No Trace Browsing”. Selezionate gli oggetti da eliminare come ad es. i Preferiti Internet, i file temporanei, la cronologia o i cookie e fate clic sul pulsante “Delete trace” (Elimina traccia) .Vi sarà chiesto se siete certi di voler eliminare definitivamente gli oggetti selezionati. Dopo la vostra conferma, comparirà una barra di progressione ad indicare l'eliminazione in corso. Se i file da eliminare sono molti (specialmente dall'unità USB), l'operazione potrebbe richiedere qualche minuto. 5.5. Portable Outlook Express/Windows Mail Data Per rendere portatili i dati di Outlook Express /Windows Mail selezionate l'opzione “Outlook Express/Windows Mail” nella finestra principale di Carry it Easy +Plus. Svolgete i seguenti passaggi per rendere portatili i dati di Outlook Express/Windows Mail. 7. Create un backup sul vostro dispositivo di archiviazione portatile, selezionando l'identità di Outlook Express/Windows Mail che desiderate rendere portatile. L'identità selezionata comprenderà anche la relativa rubrica ed i relativi contatti. Come predefinizione Carry it Easy +Plus seleziona l'identità principale. Dopo la selezione fate clic sul pulsante “Create Backup” (Crea backup). Ora l'identità di Outlook Express inclusi messaggi email, contatti, regole messaggio ecc. è stata salvata sul vostro dispositivo di archiviazione portatile. Le password dei vostri account di posta elettronica non vengono salvate sul dispositivo di archiviazione portatile per ragioni di sicurezza (Windows non lo consente), per cui siate certi di tenerle a portata di mano per poter controllare la vostra posta con Carry it Easy +Plus quando siete in viaggio. 75 8. Per eseguire Portable Outlook Express/Windows Mail, selezionate il backup dell'identità che desiderate visualizzare e quindi fate clic sul pulsante “Run Outlook Express/Windows Mail” (Esegui Outlook Express/Windows Mail). Se il computer al quale è collegata l'unità USB Drive è connesso ad internet, potete controllare le vostre email dopo aver fornito la password corrispondente all'account. Se il computer al quale è collegata l'unità USB non è connesso ad Internet potete comunque visualizzare i messaggi email salvati ed i contatti. 9. Per gestire i dati di Outlook Express/Windows Mail portabili, selezionate l'opzione “Manage Backups on USB” (Gestisci backup sull'unità USB) e poi eliminate il backup di una identità alla volta selezionandolo e poi facendo clic sul pulsante “Remove” (Elimina). Se avete ricevuto nuovi messaggi email e volete ripristinare i dati di Outlook Express sul vostro computer, potete usare la funzione “Restore” (Ripristina). Selezionate l'identità da ripristinare e fate clic sul pulsante di ripristino “Restore…” Quindi scegliete se creare una nuova identità o se sostituirne una esistente. 5.6. Portable Outlook Data Per mantenere portatili i vostri dati di Microsoft Outlook, potete selezionare l’opzione “Microsoft Outlook” nella finestra principale di Carry it Easy +Plus +Plus. Questa funzionalità di Carry it Easy +Plus +Plus può essere utilizzata in due differenti scenari. Nel primo caso, per creare un backup dei vostri dati di Outlook sulla vostra periferica di archiviazione portatile, in modo che possiate accedere ai dati su un PC remoto e lavorare su di essi. Nel secondo caso, per usare Carry it Easy +Plus +Plus per sincronizzare i vostri dati Outlook tra diversi PC (ad esempio tra il vostro PC al lavoro e in ufficio). Per rendere portatili i vostri dati di Microsoft Outlook, seguite le riportate di seguito: Per creare un backup sul dispositivo di archiviazione portatile, fate clic sul pulsante “Aggiungi una coppia di profili..." e selezionate dal lato computer (a sinistra) il profilo Microsoft Outlook che volete rendere portabile. 76 Sulla periferica di archiviazione portatile (a destra), selezionate la destinazione. La prima volta che utilizzate questa funzionalità, utilizzate sempre “Nuovo backup” come destinazione. Nel caso in cui abbiate già un backup sulla vostra periferica di archiviazione portatile, potete selezionarlo dal menu a tendina. In questo modo selezionerete i profili che saranno sincronizzati. Carry it Easy +Plus +Plus seleziona il profilo predefinito in modalità standard quando l’applicazione viene utilizzata la prima volta e c’è un solo profilo Outlook sul PC. Dopo averlo selezionato, è necessario contrassegnare le cartelle da sincronizzare (ad esempio Contatti, Bozze, ecc), successivamente selezionate la “Regola di sincronizzazione” che volete applicare per ciascuna delle cartelle che avete contrassegnato per la sincronizzazione. 77 a) Crea e/o aggiorna tutti gli elementi dal pc alla periferica di archiviazione portatile e viceversa b) Crea e/o aggiorna tutti gli elementi dalla periferica di archiviazione al PC c) Crea e/o aggiorna tutti gli elementi dal PC alla periferica di archiviazione d) Sovrascrivi tutti gli elementi su PC con i corrispondenti elementi sulla periferica di archiviazione, eliminando prima l’elemento su PC e) Sovrascrivi tutti gli elementi sulla periferica di archiviazione con i corrispondenti elementi su PC, eliminando prima l’elemento sulla periferica di archiviazione Se volete filtrare i messaggi che sincronizzate, potete fare click sul pulsante “Definisci Filtri", col quale avete l’opzione di filtrare i messaggi per dimensione o periodo di tempo. Questo vi dà la possibilità di diminuire in modo significativo lo spazio occupato dai dati di Outlook che sincronizzate o di cui fate backup. Dopo aver scelto le impostazioni di sincronizzazione, fate clic sul pulsante 78 “Sincronizza gli elementi selezionati" dalla finestra "Crea & Sincronizza" e il processo di sincronizzazione avrà inizio. Informazione! Le password dei vostri account e-mail non sono salvate sulla periferica di archiviazione portatile per ragioni di sicurezza (Windows non lo consente) perciò assicuratevi di ricordarvi le password dei vostri account e-mail così che siate in grado di controllare la vostra e-mail con Carry it Easy +Plus +Plus, quando siete in viaggio (utilizzando un PC remoto). Per eseguire Portable Microsoft Office Outlook, avrete bisogno di selezionare il backup che volete visualizzare dalla lista sulla scheda "Portable Outlook". Questa funzione richiede che sul PC remoto che state usando in quel momento, Outlook sia anch’esso preinstallato. Dopo aver selezionato il backup che volete avviare, dovete fare clic su “Avvia Backup” e Outlook inizierà a visualizzare i vostri dati dalla periferica di archiviazione. Se il PC remoto ha una connessione ad internet, sarete in grado di controllare la vostra e-mail dopo aver fornito la password del vostro account di posta. Nel caso in cui il computer non disponesse di una connessione ad internet, sarete comunque in grado di visualizzare i vostri dati Outlook. Per rimuovere un backup dalla vostra periferica dovrete selezionarlo e fare clic sul pulsante "Rimuovi Backup”. 79 5.7. Sincronizzazione Documenti Per sincronizzare Documenti, selezionate l'opzione “File Synchronization” (Sincronizzazione File) nel pannello di navigazione a sinistra. Nella finestra My Documents potete vedere la vostra cartella Documenti comprese le sottocartelle (l’immagine “Hard Disk” - "Disco fisso"). E' sufficiente selezionare con un clic le cartelle che volete sincronizzare con l'unità USB. Selezionate poi una delle tre opzioni di sincronizzazione disponibili. a) Crea i Documenti mancanti e aggiorna i Documenti obsoleti sul computer: b) Crea e aggiorna tutti i Documenti mancanti o obsoleti: c) Crea i Documenti mancanti e aggiorna i Documenti obsoleti sull'unità USB: Per sincronizzare i dati tra il computer e l'unità USB applicate una delle tre opzioni di sincronizzazione e andate alla scheda “Hard Drive”( Disco fisso) o alla scheda “USB Drive” (Unità USB). Selezionate le cartelle da sincronizzare e fate clic sul pulsante “Synchronize”. Quando inizia la sincronizzazione compare una barra di progressione. Nella barra di progressione l'opzione “View Details” (Visualizza dettagli) permette di visualizzare gli errori che potrebbero verificarsi durante l'operazione. Quando la sincronizzazione termina, il pulsante “Finished” (Completata) diventa attivo per indicare che l'operazione è terminata. 5.8. Visualizzare e modificare i Documenti sull'unità USB Per visualizzare, modificare od eliminare file e cartelle archiviati sull'unità USB, selezionate semplicemente la scheda “USB Drive” nell'opzione My Documents. Facendo clic col tasto destro sulla cartella potrete visualizzare i dati od eliminarli. Se i dati sono compressi non sarà possibile utilizzare la funzione clic destro. 80 5.9. Compressione dati Documenti sull'unità USB Carry it Easy +Plus include un'opzione per comprimere i documenti da sincronizzare, in modo da ottimizzare lo spazio sull'unità USB Flash Drive. Nella finestra My Documents selezionate l'opzione “Data compression” (Compressione dati) (icona di una morsa). Premendo il pulsanti di sincronizzazione i documenti selezionati verranno compressi e spostati sull'unità USB Flash Drive. 5.10. Sincronizzazione Desktop e Cartelle Carry it Easy +Plus vi permette di creare profili in modo da sincronizzare facilmente documenti tra due o più computer. Andate alla finestra “File synchronization” (Sincronizzazione File) e fate clic sulla scheda “Folder Synchronization” (Sincronizzazione Cartelle). Per aggiungere una cartella alla lista di sincronizzazione premete il pulsante “+”. Se volete modificare le impostazioni di sincronizzazione, premete il pulsante “i”. Se volete eliminare un profilo, premete il pulsante “x”. Per sincronizzare i profili selezionati con il vostro Dispositivo premete il pulsante “Synchronize” (Sincronizza). La prima volta che vi collegate ad un altro computer e tentate di sincronizzare i vostri documenti vi sarà chiesto di selezionare una cartella su quel computer con la quale i dati sul vostro dispositivo dovrebbero essere sincronizzati. Potete farlo selezionando il profilo che volete sincronizzare e premendo successivamente il pulsante “i”. La prossima volta che vorrete sincronizzare i vostri dati semplicemente selezionateli e premete il pulsante “Synchronize” (Sincronizza). Per sincronizzare il vostro Desktop seguite le stesse istruzioni descritte precedentemente. 81 5.11. Funzione Sync All Per rendere più semplice l’utilizzo di Carry it Easy +Plus, avete la possibilità di usare la funzione “Sync All”. Con questa funzionalità potete sincronizzare contemporaneamente i vostri Preferiti/Segnalibri Internet, i vostri dati Outlook, i vostri file e cartelle, compresa Documenti. Tutto ciò che dovete fare è scegliere nelle impostazioni “Sync All” tutti gli elementi che volete sincronizzare. 82 Fatto questo, avete due opzioni: 4. Potete sincronizzarli immediatamente, facendo clic sul pulsante “Sync All”, in basso a destra, o 5. Potete fare in modo che vengano sincronizzati automaticamente, ad un intervallo o ad una data determinata che potrete scegliere nella scheda “Sincronizza automaticamente ogni…”. 5.12. Aggiungere file e cartelle sull'unità USB Per aggiungere file e cartelle fuori dalla cartella Documenti sull'unità USB dovete eseguire il login e copiarli nella cartella ad es. E:(USB_Drive)\Personal Data\My Folders. La sottocartella “My Folders” è disponibile per contenere questi dati. Attenzione! Salvate i vostri dati soltanto in “My Folders”, o eventuali modifiche delle impostazioni di sicurezza ne causeranno la perdita definitiva. 5.13. Funzione Lost & Found™ dell'unità USB In caso perdiate il vostro dispositivo di archiviazione portatile, potete far sapere alla persona che la ritrova chi è il proprietario dell'unità grazie alla funzione Lost & Found. Anche se avete protetto tutti i vostri dati via password la persona che la ritroverà 83 potrà comunque contattarvi senza avere l'accesso ai vostri dati protetti sul dispositivo di archiviazione portatile. Per utilizzare Lost & Found, compilate i campi del modulo che appare nella finestra Lost & Found e poi fate clic sul pulsante “Apply” (Applica). Un messaggio vi confermerà che l'operazione è avvenuta correttamente. 5.14. Lavorare con il menu dell'icona nell'Area di notifica Con il sistema delle icone nell'area di notifica di Carry it Easy +Plus potete raggiungere tutte le opzioni di Carry it Easy +Plus. Con l'opzione Quick start (Avvio rapido), potete visualizzare il contenuto dei vostri Documenti o aprire una finestra di Internet Explorer con i vostri Preferiti/Segnalibri. 5.15. Rimozione sicura dell'hardware Prima di scollegare il vostro dispositivo di archiviazione portatile dalla porta USB del computer, utilizzate l'opzione "Rimozione sicura dell'hardware" dell'area di notifica, per non rischiare di alterare i dati archiviati sull'unità USB (in particolare utilizzando Windows 2000). Per rimuovere l'hardware in modo sicuro fate doppio clic sull'icona dell'area di notifica e poi selezionate l'unità USB che volete eliminare dall'elenco, quindi fate clic su “Disattiva”. 84 Un messaggio vi dirà che il dispositivo di archiviazione portatile può adesso essere rimosso in modo sicuro e corretto. Se compare il messaggio ‘”he device ‘…’ cannot be stopped right now” (“La periferica ... non può essere rimossa ora) è necessario chiudere le finestra di Esplora risorse o qualsiasi altra applicazione che fa accesso ai dati memorizzati sull'unità USB. 5.16. Configurare più periferiche contemporaneamente Se avete più di un dispositivo di archiviazione portatile collegato al computer selezionate dalla lista delle periferiche di Carry it Easy +Plus quella di cui volete continuare la configurazione. 6. Procedura di aggiornamento Per verificare la disponibili di nuove versioni di Carry it Easy +Plus è sufficiente fare clic sul pulsante “Update” (Aggiorna) nella scheda ‘About Carry it Easy” (Informazioni su Carry it Easy). Se è disponibile un aggiornamento, verrà richiesto se desiderate scaricarlo. L'applicazione verrà scaricata automaticamente sul vostro dispositivo di archiviazione portatile. Se non fosse possibile sostituire la versione in esecuzione sul dispositivo di archiviazione portatile con l'aggiornamento verrà salvato sul desktop. Sarà quindi necessario sostituire la versione obsoleta sul dispositivo di archiviazione portatile con la nuova versione, mediante la copia/sovrascrittura del file. 85 7. Supporto Se avete bisogno di maggiore aiuto, come domande frequenti o assistenza via email, fate clic sull'opzione “About Carry it Easy” (Informazioni su Carry it Easy) e poi sul link "Online Help” e verrete indirizzati automaticamente al nostro sito di assistenza. Oppure potete visitare il nostro sito direttamente all'indirizzo internet http://www.cososys.com/help.html. © 2004-2007 CoSoSys SRL; Carry it Easy +Plus è un marchio registrato e USB Drive Lost &Found è un marchio di fabbrica di CoSoSys SRL.Tutti i diritti riservati. Windows,Outlook Express e Internet Explorer sono marchi registrati di Microsoft Corporation. Mozilla Firefox è un marchio di fabbrica di Mozilla Foundation.Tutti gli ulteriori nomi di società o di prodotti sono di proprietà dei rispettivi depositari. 86 Carry it Easy +PLus™ Guía de usuario 1. Introducción ................................................................................................88 2. Requisitos de sistema ................................................................................89 3. Instalación ...................................................................................................89 4. Primeros pasos ...........................................................................................90 5. 4.1. Iniciar Carry it Easy...............................................................................90 4.2. Navegación general..............................................................................91 4.3. Capacidad de la unidad USB................................................................91 Trabajar con Carry it Easy..........................................................................92 5.1. Configuración de seguridad..................................................................92 5.2. Sincronización de favoritos de Internet.................................................93 5.3. No Trace Internet Browsing (Exploración de Internet sin seguimiento) 94 5.4. Borrar el historial de exploración de Internet ........................................95 5.5. Datos portátiles de Outlook Express/Windows Mail .............................95 5.6. Datos portátiles de Outlook ..................................................................97 5.7. Sincronización de Mis documentos ....................................................100 5.8. Ver y editar Mis documentos en el almacén portátil ...........................101 5.9. Compresión de datos de Mis documentos en la unidad USB.............101 5.10. Sincronización de Carpetas y Escritorio .............................................102 5.11. Añadir archivos y carpetas a la unidad USB.......................................103 5.12. USB Drive Lost & Found™ .................................................................104 5.13. Función Sync All .................................................................................104 5.14. Trabajar con el menú de la bandeja del sistema ................................105 5.15. Quitar hardware de forma segurae .....................................................105 5.16. Configuración simultánea de varios dispositivos ................................106 6. Procedimiento de actualización ..............................................................106 7. Soporte ......................................................................................................107 87 1. Introducción Carry it Easy™ ampliará las funciones de su dispositivo portátil de almacenamiento y le ayudará a tener disponibles sus datos personales cuando viaje. Con Carry it Easy y la unidad USB puede: mantener sincronizados sus Favoritos de Internet Explorer/Marcadores de Firefox, tener siempre disponibles los datos de Outlook Express/Windows Mail, mantener sincronizados sus datos en las Carpetas, el Escritorio y en Mis Documentos, comprimir sus datos para ahorrar un valioso espacio de memoria, proteger con contraseña/código todos los datos en su dispositivo portátil de almacenamiento, navegar en Internet sin dejar rastro con el Explorador de Internet y FireFox y, en caso de que pierda su dispositivo portátil de almacenamiento, quien lo encuentre puede ponerse en contacto con usted utilizando la información de USB Drive Lost & Found™ (sin tener acceso a sus archivos privados). Atención: Cuando utilice Carry it Easy, nunca debe desconectar su dispositivo sin cerrar primero Carry it Easy correctamente, mediante el botón Salir, y luego utilizando la opción ‘Quitar hardware con seguridad’ de Windows (ver descripción siguiente). 88 1. Requisitos de sistema Sistemas operativos: o Windows 2000 Service Pack 4 o Windows XP (se recomienda Service Pack 2) o Windows Vista Internet Explorer versión 5.0 y posteriores o Mozilla Firefox versión 1.0 y posteriores Outlook Express versión 5.0 y posteriores / Windows Mail Para utilizar el correo electrónico portátil de Outlook Express/Windows Mail, el PC remoto también debe tener instalado Outlook Express/Windows Mail. Si Outlook Express/Windows Mail se ha desinstalado, seguirá teniendo acceso a otras funciones de Carry it Easy. La opción Outlook Express/Windows Mail estará desactivada. Puerto USB disponible Unidad USB (unidad de memoria flash USB) o reproductor MP3 Flash Si la unidad USB tiene un mando de protección contra escritura manual, debe estar en la posición “desprotegida” para poder utilizar Carry it Easy. 2. Instalación Carry it Easy está instalado previamente en su dispositivo portátil de almacenamiento (ej. un dispositivo Flash USB). Si descargó Carry it Easy de la Internet, debe copiar CarryItEasy.exe en su Dispositivo USB u otro dispositivo portátil de almacenamiento. No se necesita ninguna instalación en el PC. Simplemente haga doble clic en el archivo CarryitEasy.exe y podrá empezar a utilizar la aplicación de inmediato. 89 Si la unidad de USB no incluía un CD-ROM con una copia de Carry it Easy, le recomendamos que realice una copia de seguridad del archivo CarryitEasy.exe en otro dispositivo de almacenamiento. Para utilizar Carry It Easy fácilmente, inicie CarryItEasy.exe desde el dispositivo USB. 3. Primeros pasos 3.1. Iniciar Carry it Easy Para iniciar Carry it Easy, conecte la unidad USB y abra Mi PC (Explorador de Windows). Abra la unidad USB o unidad de almacenamiento extraíble con la letra de unidad, p. ej. D: o F: que aparezca en el ordenador y haga doble clic en CarryitEasy.exe para iniciar la aplicación. El archivo CarryitEasy.exe permanecerá en la unidad de USB para que pueda utilizar la aplicación cuando conecte la unidad a otros ordenadores. Ejecute siempre la aplicación desde la unidad USB, no desde el disco duro del PC. 90 3.2. Navegación general Cada vez que inicia Carry it Easy, lo primero que aparece es la ventana de bienvenida, ya sea directamente o después de haber iniciado sesión con su contraseña. En la parte izquierda de la ventana se encuentran las funciones principales, disponibles en todo momento. Haga clic por ejemplo en la opción Internet Favorites (Favoritos de Internet) para tener acceso a esta función (ver imagen a la izquierda).También puede acceder a la mayoría de las funciones a través del icono en la bandeja del sistema. Las funciones de la bandeja del sistema se describen a continuación. 3.3. Capacidad de la unidad USB En la parte inferior de la ventana principal se muestra de manera permanente una barra que indica la capacidad disponible y la ya utilizada de la unidad USB. Cada vez que realiza una nueva selección (p. ej. de una carpeta de Mis documentos que desea sincronizar), la barra se actualiza mostrando la nueva capacidad restante del dispositivo. Cuando se divide en particiones la unidad Flash USB, la barra indica únicamente el tamaño del área privada (el área protegida con contraseña). Puede ver el tamaño del área pública (no protegida con contraseña) pulsando el botón “Device Information” (Información del dispositivo). 91 4. Trabajar con Carry it Easy 4.1. Configuración de seguridad Si decide proteger su Dispositivo con contraseña, Carry it Easy codificará la carpeta de Datos Personales en su Dispositivo. Cualquier otro dato que esté almacenado en el Dispositivo y que no esté sincronizado con Carry it Easy quedará sin odificar. Puede manipular los ficheros codificados si utiliza la ventana de Sincronización de Ficheros (File Synchronization). Después que su contraseña ha protegido sus datos, la pestaña “Manipular Datos Codificados” (Manage Encrypted Data) se activa. Puede 92 decodificar y abrir cualquiera de sus ficheros y volver a codificarlos. 4.2. Sincronización de favoritos de Internet Para sincronizar sus Favoritos de Internet Explorer o marcadores de Firefox, puede elegir entre 5 opciones de sincronización distintas. Antes de utilizar esta función, familiarícese con estas opciones. Una vez sincronizados los Favoritos o Marcadores, puede verlos en Internet Explorer o Firefox activando la opción No trace browsing (Exploración sin seguimiento) e iniciando Internet Explorer o Firefox. Este proceso puede tardar bastante si tiene muchos Favoritos o Marcadores. Las opciones de sincronización son: a) Crea Favoritos nuevos y actualiza los antiguos en el ordenador: b) Sustituye todos los Favoritos del ordenador por los Favoritos de la unidad USB: + c) Crea Favoritos nuevos y actualiza los antiguos: d) Crea Favoritos nuevos y actualiza los antiguos en la unidad USB (opción predeterminada): e) e) Sustituye todos los Favoritos en la unidad USB por los Favoritos en el ordenador: + Las opciones a, c y d se eligen seleccionando los botones de flecha respectivos y las opciones b y e se eligen seleccionando la casilla de verificación "Delete existing..." y los botones de flecha respectivos. Una vez seleccionada la opción de sincronización preferida, inicie el proceso haciendo clic en el botón “Synchronize” (Sincronizar). Una barra de progreso indica que el proceso ha comenzado y que los Favoritos o Marcadores de Internet se están transfiriendo. La opción “View Details” (Ver detalles) de la barra de progreso muestra únicamente los posibles errores que se produzcan durante la sincronización. Una vez finalizada la sincronización, el botón “Finished” (Finalizada) se activa para indicar que el proceso ha terminado. La sincronización de una gran cantidad de Favoritos y Marcadores de Internet a y desde su dispositivo portátil de almacenamiento puede tardar varios minutos. 93 Para borrar Favoritos o Marcadores de Internet de la unidad USB o del ordenador, puede utilizar las opciones de la ventana Internet Explorer. 4.3. No Trace Internet Browsing (Exploración de Internet sin seguimiento) Con la opción “No Trace Browsing with Internet Explorer and Mozilla Firefox” (Exploración de Internet sin seguimiento con Internet Explorer y Mozilla Firefox) puede navegar por Internet sin dejar rastro en el ordenador donde conecte su dispositivo portátil de almacenamiento. Para activar esta función, haga clic en la opción “Activate No Trace Internet Browsing” (Activar exploración de Internet sin seguimiento) en la ventana “No Trace Browsing” (Exploración sin seguimiento) de Carry it Easy. Si la ventana Internet Explorer/Firefox ya está abierta, se le preguntará si desea cerrarla. Desde ahora, cuando abra Internet Explorer o Firefox mediante el botón “Start No Trace Browsing” (Iniciar Exploración de Internet sin seguimiento) o de cualquier otra forma, podrá navegar por Internet sin dejar rastro en el ordenador. Mientras esta función esté activa verá en el título de la ventana de Internet Explorer el mensaje “No trace browsing” (Exploración sin seguimiento). Los archivos 94 temporales, el historial y los cookies se redirigen y se guardan su dispositivo portátil de almacenamiento en lugar de en el ordenador. Si ha sincronizado los Favoritos o Marcadores de Internet, puede acceder a ellos a través del botón ‘Favoritos’ de Internet Explorer o el botón “Bookmarks” (Marcadores) de Firefox. Después de cada uso se recomienda borrar los archivos temporales, los cookies y el historial de su dispositivo portátil de almacenamiento como se describe abajo para liberar espacio de memoria en su dispositivo portátil de almacenamiento. 4.4. Borrar el historial de exploración de Internet Para borrar el historial de exploración de Internet del ordenador o de su dispositivo portátil de almacenamiento, vaya a la ventana “No Trace Internet Browsing” de Carry it Easy. Active el modo “No Trace Browsing” (Exploración sin seguimiento). Seleccione los objetos que desea eliminar como Favoritos de Internet, archivos temporales, historial o cookies y haga clic en el botón “Delete trace” (Borrar rastro). Se le pedirá que confirme si desea borrar permanentemente los objetos seleccionados. Tras confirmar, una barra de progreso indicará que la eliminación está en curso. Si elimina una gran cantidad de archivos (especialmente de la unidad USB), el proceso puede tardar varios minutos. 4.5. Datos portátiles de Outlook Express/Windows Mail Para tener disponibles los datos de Outlook Express/Windows Mail, puede seleccionar la opción “Outlook Express/Windows Mail” en la ventana principal de Carry it Easy. Siga estos pasos para que los datos de Outlook Express/Windows Mail estén disponibles. 95 1. Cree una copia de seguridad en su dispositivo portátil de almacenamiento seleccionando la identidad de Outlook Express/Windows Mail que desee hacer portátil. La identidad seleccionada también incluirá los contactos de la libreta de direcciones. Carry it Easy selecciona la identidad principal de manera predeterminada. Una vez seleccionada, haga clic en el botón “Create Backup” (Crear copia de seguridad). Ahora la identidad de Outlook Express/Windows Mail, que incluye los mensajes de correo electrónico, contactos, reglas de correo, etc., se guardan en su dispositivo portátil de almacenamiento. Las contraseñas de cuenta de correo no se guardan en el dispositivo portátil de almacenamiento por razones de seguridad (Windows no lo permite), por lo tanto asegúrese de memorizar las contraseñas de las cuentas de correo para poder comprobar el correo con Carry it Easy cuando esté de viaje. 2. Para ejecutar Outlook Express/Windows Mail portátil, debe seleccionar la copia de seguridad de la identidad que desee ver y hacer clic en el botón “Run Outlook Express/Windows Mail” (Ejecutar Outlook Express/Windows Mail). Si el ordenador al que está conectada la unidad USB dispone de conexión a Internet, podrá comprobar el correo después de introducir la contraseña de su cuenta de correo. Aunque el ordenador al que esté conectada la unidad USB no disponga de conexión a Internet, puede ver los mensajes de correo y los contactos guardados. 3. Para administrar los datos portátiles de Outlook Express/Windows Mail, seleccione la opción “Manage Backups on USB” (Administrar copias de seguridad en USB) y elimine una a una la copia de seguridad de cada identidad seleccionándola y haciendo clic en el botón “Remove” (Eliminar). Si ha recibido nuevos mensajes de correo electrónico y desea restaurar los datos de Outlook Express/Windows Mail en el ordenador, puede hacerlo mediante la función de restauración. Seleccione la identidad a restaurar y haga clic en el botón “Restore…”. A continuación, elija entre crear una nueva identidad o sustituir una identidad existente. 96 4.6. Datos portátiles de Outlook Para que los datos de Microsoft Outlook sean portátiles, puede seleccionar la opción “Microsoft Outlook” en la ventana principal de Carry it Easy +Plus +Plus. Esta característica de Carry it Easy +Plus +Plus puede tener dos usos diferentes. Uno, para hacer una copia de seguridad de sus datos de Outlook en su dispositivo portátil de almacenamiento y de esta manera pueda acceder a los datos en un ordenador remoto y trabajar con ellos, o dos, para utilizar Carry it Easy +Plus +Plus para sincronizar sus datos de Outlook entre ordenadores diferentes (ej. Entre el ordenador de su casa y el de su trabajo). Para que sus datos de Microsoft Outlook sean portátiles, por favor siga los pasos descritos a continuación: Para crear una copia de seguridad en el dispositivo portátil de almacenamiento, haga clic en el botón “Add profile pair…” y seleccione del lado del ordenador (izquierda) el perfil de Microsoft Outlook que quiera convertir a portátil. Del lado del dispositivo portátil de almacenamiento (derecha) seleccione el destino. Cuando utilice esta característica por primera vez, el destino siempre será la opción “New Backup”. En caso de que ya tenga una copia de seguridad en su dispositivo portátil, también puede seleccionar este del menú desplegable. De esta manera seleccionará los perfiles que serán sincronizados. 97 Carry it Easy +Plus +Plus selecciona el perfil ya establecido en el modo estándar cuando utilice la aplicación por primera vez y haya solamente un perfil Oultlook en el ordenador. Después de haberlo seleccionado, tendrá que revisar las carpetas que quiera sincronizar (ej. Contactos, Borradores, etc.), entonces seleccione el “Sync Rule” que quiera aplicar para cada una de las carpetas que selecciónó para su sincronización. a) Crea y/o actualiza todos los elementos del ordenador al dispositivo portátil de almacenamiento y viceversa b) Crea y/o actualiza todos los elementos del dispositivo portátil al ordenador c) Crea y/o actualiza todos los elementos del ordenador hacia el dispositivo portátil d) Intercambia todos los elementos en el ordenador por el elemento correspondiente del dispositivo portátil, después de haber eliminado los elementos del ordenador 98 e) Intercambia todos los elementos en el dispositivo portátil por el elemento correspondiente del ordenador, después de haber eliminado el elmento del dispositivo portátil Si desea filtrar los mensajes que sincroniza, haga clic en el botón “Define Filters” donde tiene la opción de filtrar los mensajes por un determinado tamaño o un período de tiempo definido. Esto le da la opción de desminuir significativamente el tamaño de los datos de Outlook que sincronizó/creó copias de seguridad. Después de haber seleccionado la configuración de sincronización, haga clic en el botón “Synchronize selected” en la ventana “Create & Sync” y el proceso de sincronización comenzará. ¡Información! Sus contraseñas de las cuentas de correo no se guardan en el dispositivo portátil por razones de seguridad (Windows no lo permite) así que, por favor asegúrese de conocer las contraseñas de sus cuentas de correo para que pueda revisar su correo con Carry it Easy +Plus +Plus, cuando vaya de camino (utilizando un ordenador remoto). Para iniciar el Outlook portátil de Microsoft Office, debe seleccionar la copia que quiere ver de la lista en la pestaña “Portable Outlook”. Para realizar esta función, Outlook debe haber sido instalado previamente en el ordenador que utiliza en ese 99 momento. Después de seleccionar la copia que quiere iniciar, debe hacer clic en “Run Backup” y Outlook comenzará a visualizar sus datos del dispositivo portátil. Si el ordenador remoto tiene una conexión a Internet, podrá revisar su correo después de haber suministrado su contraseña para su cuenta de correos. En caso de que el ordenador no tenga una conexión a Internet, podrá ver sus datos de Outlook. Para eliminar una copia de su dispositivo, debe seleccionarla y después hacer clic en el botón “Remove Backup”. 4.7. Sincronización de Mis documentos Para sincronizar la carpeta Mis documentos, seleccione la opción “File Synchronization” (Sincronización de archivos) en el panel de navegación principal de la izquierda. En la ventana My Documents (Mis Documentos) verá el directorio Mis documentos con las subcarpetas correspondientes (imagen “Hard Drive”-Disco Duro). Para seleccionar las carpetas que desea sincronizar con la unidad USB, sólo tiene que hacer clic en ellas. Después, seleccione una de las tres reglas de sincronización disponibles. 100 a) Crea Mis documentos nuevos y actualiza los antiguos en el ordenador: b) Crea Mis documentos nuevos y actualiza los antiguos: c) Crea Mis documentos nuevos y actualiza los antiguos en la unidad USB: Para sincronizar los datos entre el ordenador y su dispositivo portátil de almacenamiento, seleccione una de estas tres opciones de sincronización y acceda a la imagen “Hard Drive” (Disco duro) o a la imagen “USB Drive” (Unidad USB). Seleccione las carpetas que desea sincronizar y haga clic en el botón “Synchronize” (Sincronizar”). Cuando empiece la sincronización, aparecerá una barra de progreso. En la barra de progreso está disponible la opción "View Details" (Ver detalles), que muestra los errores que puedan producirse durante el proceso. Una vez finalizada la sincronización, el botón “Finished” (Finalizada) se activa para indicar que el proceso ha terminado. 4.8. Ver y editar Mis documentos en el almacén portátil Para ver, editar o borrar archivos y carpetas guardados en la unidad USB, seleccione la imagen “USB Drive” (Unidad USB) de la opción My Documents (Mis documentos). Al hacer clic con el botón derecho en la carpeta correspondiente, tiene la opción de ver los datos que contiene o borrarla. Una vez comprimidos los datos, no podrá utilizar la función de clic con el botón derecho. 4.9. Compresión de datos de Mis documentos en la unidad USB Carry it Easy le ofrece la opción de comprimir los documentos que desee sincronizar para utilizar el espacio de la unidad Flash USB de forma más eficiente. En la ventana “My Documents” (Mis documentos) seleccione la opción “Data compression” (Compresión de datos) (la imagen del torniquete). Al pulsar el botón de 101 sincronización, los documentos seleccionados se comprimen y se mueven a la unidad Flash USB. 4.10. Sincronización de Carpetas y Escritorio Carry it Easy le permite crear perfiles para que pueda sincronizar fácilmente los documentos entre dos o más computadoras. Diríjase a la ventana “File Synchronization” (Sincronización de archivos) y de un clic en la pestaña “Folder Synchronization” (Sincronización de carpetas). Para añadir una carpeta a la lista de sincronización, presione el botón “+”. Si desea editar las opciones de sincronización presione el botón “i”. Si desea eliminar un perfil, presione el botón “x”. Para sincronizar los archivos seleccionados con su dispositivo, presione el botón “Synchronize” (Sincronizar). La primera vez que se conecte a otra computadora e intente sincronizar sus documentos se le pedirá que seleccione una carpeta en esa computadora con la cual se deben sincronizar los datos de su Dispositivo. Esto puede hacerse al seleccionar el perfil que desea sincronizar y luego presionando el botón “i”. La próxima vez que desee sincronizar sus datos, solo seleccionelos y presione el botón “Synchronize” (Sincronizar). Para sincronizar los elementos del Escritorio, realice los mismos pasos descritos anteriormente. 102 4.11. Añadir archivos y carpetas a la unidad USB Para añadir archivos y carpetas desde fuera del directorio Mis documentos a la unidad USB, debe iniciar sesión y copiarlos en el directorio; por ejemplo, E:(Unidad_USB)\Personal Data\My Folders. La subcarpeta “My Folders” puede contener estos datos. 103 Atención: Guarde los datos sólo en “My Folders”, ya que si no los datos se perderán de manera irreversible al modificar la configuración de seguridad. 4.12. USB Drive Lost & Found™ Gracias a la función Lost & Found, si pierde su dispositivo portátil de almacenamiento, la persona que la encuentre sabrá quién es su propietario. Aunque haya protegido con contraseña todos los datos, esta persona podrá ponerse en contacto con usted sin tener acceso a sus datos protegidos en el dispositivo portátil de almacenamiento. Para utilizar Lost & Found, rellene los campos del formulario en la ventana Lost & Found y haga clic en el botón “Apply” (Aplicar). Un mensaje confirmará que el proceso se ha realizado con éxito. 4.13. Función Sync All Para facilitar el trabajo con Carry it Easy +Plus, puede utilizar la función “Sync All”. Con esta característica puede sincronizar de una vez sus Marcadores/Favoritos de Internet, sus datos de Outlook, sus ficheros y carpetas, incluyendo Mis Documentos. Lo único que debe hacer es seleccionar de la configuración “Sync All” los elementos que quiera sincronizar. Entonces, tiene dos opciones: 1. Puede sincronizarlos ahora, haciendo clic en el botón “Sync All” abajo en la parte derecha en la ventana, o 2. Puede dejar que se sincronicen automáticamente, a un intervalo o una fecha fijada que puede escoger en la pestaña “Automatically Sync All every…”. 104 3. 4.14. Trabajar con el menú de la bandeja del sistema Mediante el icono de Carry it Easy en la bandeja del sistema puede acceder a todas las opciones de Carry it Easy. Con la opción Quick start (Inicio rápido), puede ver el contenido de Mis documentos o abrir una ventana de Internet Explorer con sus Favoritos/Marcadores. 4.15. Quitar hardware de forma segurae Antes de desconectar su dispositivo portátil de almacenamiento del puerto USB del ordenador, utilice la opción “Quitar hardware de forma segura” de la bandeja del sistema; si no lo hace, corre el riesgo de dañar los datos almacenados en la unidad USB (especialmente al utilizar Windows 2000). 105 Para acceder a “Quitar hardware de forma segura”, haga doble clic en el icono de la bandeja del sistema, seleccione en la lista la unidad USB que desea quitar y haga clic en “Detener”. Aparecerá un mensaje que indica que el dispositivo portátil de almacenamiento se puede quitar de forma segura. Si aparece un mensaje como “El dispositivo ‘…’ no se puede detener ahora”, debe cerrar el Explorador de Windows u otra aplicación que esté accediendo a los datos guardados en la unidad USB. 5.16 Configuración simultánea de varios dispositivos Si tiene más de un dispositivo portátil de almacenamiento conectado al ordenador, debe seleccionar en la lista de dispositivos de Carry it Easy la que desea continuar configurando. 6. Procedimiento de actualización Para saber si está disponible una nueva versión de Carry it Easy, haga clic en el botón “Update” (Actualizar) de la ficha “About Carry it Easy” (Acerca de Carry it Easy). Si existe una versión nueva, se le comunicará y se le preguntará si desea descargarla. La aplicación se descargará directamente en su dispositivo portátil de 106 almacenamiento. Si no es posible sustituir la versión que se está ejecutando en su dispositivo portátil de almacenamiento, la versión nueva se guardará en el escritorio. A continuación, se le solicitará que sustituya la versión antigua en el dispositivo portátil de almacenamiento B por la versión nueva copiándola o sobrescribiéndola. 7. Soporte Si necesita ayuda adicional como, por ejemplo, las preguntas frecuentes o asistencia sobre correo electrónico, haga clic en el vínculo “Online help” (Ayuda en Línea) en la ventana “About Carry it Easy” (Acerca de Carry it Easy) y será dirigido automáticamente a nuestro sitio Web de ayuda. También puede visitar directamente el sitio Web de soporte en http://www.cososys.com/help.html. © 2004-2007 CoSoSys SRL;Carry it Easy es una marca comercial registrada y USB Drive Lost & Found es una marca comercial de CoSoSys SRL. Reservados todos los derechos. Windows, Outlook Express e Internet Explorer son marcas comerciales registradas de Microsoft Corporation. Mozilla Firefox es una marca comercial de Mozilla Foundation. Todos los demás nombres y marcas comerciales son propiedad de sus respectivos titula 107