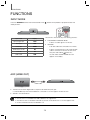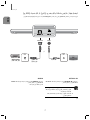
1
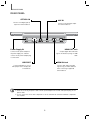
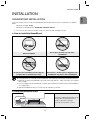
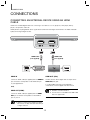
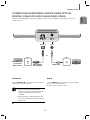
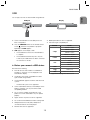
HW-H600 User manual Wireless Audio - SoundStand Imagine the possibilities Thank you for purchasing this Samsung product. To receive a more complete service, please register your product at www.samsung.com/register FEATURES FEATURES TV SoundConnect TV SoundConnect lets you listen to audio from your TV on your SoundStand via a Bluetooth connection and lets you control the sound. HDMI HDMI transmits video and audio signals simultaneously, and provides a clearer picture. The unit is also equipped with the ARC function which lets you listen to sound from your TV through the SoundStand via an HDMI cable.This function is only available if you connect the unit to an ARC compliant TV. Surround Sound Expansion The Surround Sound Expansion feature adds depth and spaciousness to your listening experience. Surround Sound Expansion is powered by Sonic Emotion. Special Sound Modes You can select different sound modes - CINEMA / SPORTS / VOICE / MUSIC / STANDARD (OFF) - depending on the type of content you want to enjoy. Multi-function Remote Control You can use the supplied remote control to control various operations with the simple press of a button. USB Host Support You can connect and play music files from external USB storage devices such as MP3 players, USB flash memory, etc. using the SoundStand's USB HOST function. Bluetooth Function You can use connect a Bluetooth device to the SoundStand and enjoy music with high quality stereo sound, all without wires! NFC Connect your NFC compatible device via Bluetooth to the SoundStand using this simple set-up procedure and play music on the device through the SoundStand. 2 SAFETY INFORMATION SAFETY INFORMATION ENG SAFETY WARNINGS TO REDUCE THE RISK OF ELECTRIC SHOCK, DO NOT REMOVE THE COVER (OR BACK). NO USER-SERVICEABLE PARTS ARE INSIDE. REFER SERVICING TO QUALIFIED SERVICE PERSONNEL. This symbol indicates “dangerous voltage” inside the product that presents a risk of electric shock or personal injury. CAUTION RISK OF ELECTRIC SHOCK DO NOT OPEN This symbol indicates important instructions accompanying the product. WARNING : To reduce the risk of fire or electric shock, do not expose this appliance to rain or moisture. CAUTION : TO PREVENT ELECTRIC SHOCK, MATCH WIDE BLADE OF PLUG TO WIDE SLOT, FULLY INSERT. • This apparatus shall always be connected to a AC outlet with a protective grounding connection. • To disconnect the apparatus from the mains, the plug must be pulled out from the mains socket, therefore the mains plug shall be readily operable. CAUTION • Do not expose this apparatus to dripping or splashing. Do not put objects filled with liquids, such as vases on the apparatus. • To turn this apparatus off completely, you must pull the power plug out of the wall socket. Consequently, the power plug must be easily and readily accessible at all times. 3 SAFETY INFORMATION PRECAUTIONS 68.6 mm 99.1mm 99.1mm 99.1mm Ensure that the AC power supply in your house complies with the power requirements listed on the identification sticker located on the back of your product. Install your product horizontally, on a suitable base (furniture), with enough space around it for ventilation 7~10 cm. Make sure the ventilation slots are not covered. Do not place the unit on amplifiers or other equipment which may become hot. This unit is designed for continuous use. To fully turn off the unit, disconnect the AC plug from the wall outlet. Unplug the unit if you intend to leave it unused for a long period of time. D i thunderstorms, During h d di disconnect the h AC plug l ffrom the wall outlet. Voltage peaks due to lightning could damage the unit. D not expose the h uniti to di li h or other h h Do direct sunlight heat sources. This could lead to overheating and cause the unit to malfunction. P t t th d t ffrom moisture i t (i(i.e. vases),) and d Protect the product excess heat (e.g. a fireplace) or equipment creating strong magnetic or electric fields. Disconnect the power cable from the AC supply if the unit malfunctions. Your product is not intended for industrial use. It is for personal use only. Condensation may occur if your product has been stored in cold temperatures. If transporting the unit during the winter, wait approximately 2 hours until the unit has reached room temperature before using. Th batteries b tt i used d with ith this thi product d t contain t i chemicals h i The that are harmful to the environment. Do not dispose of batteries in the general household trash. Do not dispose of batteries in a fire. Do not short circuit, disassemble, or overheat the batteries. Danger of explosion if battery is incorrectly replaced. Replace only with the same or equivalent type. 4 CONTENTS CONTENTS ENG 2 FEATURES 14 Input mode 3 SAFETY INFORMATION 14 ARC (HDMI OUT) 3 Safety warnings 15 Bluetooth 4 Precautions 17 NFC 18 TV SoundConnect GETTING STARTED 19 USB 6 Before reading the user’s manual 20 Software upgrade 6 What’s included 7 DESCRIPTIONS 7 Top/front panel 22 APPENDIX 8 Rear panel 22 Specifications 22 License 6 14 FUNCTIONS 21 TROUBLESHOOTING 9 REMOTE CONTROL 9 Tour and using the remote control 11 INSTALLATION 11 SoundStand installation 12 CONNECTIONS 12 Connecting an external device using an HDMI cable 13 Connecting an external device using OPTICAL (DIGITAL) cable or AUDIO (ANALOGUE) cable 5 GETTING STARTED GETTING STARTED BEFORE READING THE USER’S MANUAL Note the following terms before reading the user manual. + Icons used in this manual Icon Term Caution Note Definition Indicates a situation where a function does not operate or settings may be canceled. Indicates tips or instructions on the page that help you operate a function. + Safety Instructions and Troubleshooting 1) Be sure to familiarise yourself with the Safety Instructions before using this product. (See page 3) 2) If a problem occurs, check Troubleshooting. (See page 21) + Copyright ©2014 Samsung Electronics Co.,Ltd. All rights reserved; no part of this user’s manual may be reproduced or copied without the prior written permission of Samsung Electronics Co.,Ltd. WHAT’S INCLUDED Check for the supplied accessories shown below. (Protection pad : 4ea) Remote Control / Lithium Battery (3V : CR2032) User Manual AUX Cable Pad Adapter Power Cord USB Cable NFC Sticker ● The appearance of the accessories may differ slightly from the illustrations above. ● Use the dedicated USB cable to connect external USB devices to the unit. 6 DESCRIPTIONS DESCRIPTIONS ENG TOP/FRONT PANEL FUNCTION BUTTON Selects the D.IN, AUX, HDMI, BT, TV, USB input. ● While the unit is powered on, pressing the ( ) button for more than 3 seconds sets the button to act as MUTE button. To cancel MUTE button setup, press the ( ) button for more than 3 seconds again. VOLUME +/Controls the volume level. The numeric value of the volume level appears in the front panel display. POWER BUTTON Turns the power on and off. REMOTE CONTROL SENSOR DISPLAY The remote control can operate SoundStands made by SAMSUNG only. Displays the current mode. ● When you turn on this unit, there will be a 4 to 5 second delay before it produces sound. ● If you want to enjoy the sound only from the SoundStand, you must turn off the TV's speakers in the Audio Setup menu of your TV. Refer to the owner's manual supplied with your TV. 7 DESCRIPTIONS REAR PANEL OPTICAL IN AUX IN Connect to the digital (optical) output of an external device. Connect to the Analogue output of an external device. Power Supply IN HDMI OUT Jack Connect the AC power adaptor to the power supply jack, and then connect the AC power adaptor plug to a wall outlet. Outputs digital video and audio signals simultaneously using an HDMI cable. USB PORT HDMI IN Jack Connect USB devices such as MP3 players here to the play files on the devices. Connects both video and audio signals using an HDMI cable.Use when connecting a supported external device. ● When disconnecting the power cable of the AC power adaptor from the wall outlet, pull the plug. Do not pull the cable. ● Do not connect this unit or other components to an AC outlet until all connections between components are complete. 8 REMOTE CONTROL REMOTE CONTROL SOURCE Press to select a source connected to the SoundStand. POWER SOURCE MUTE WOOFER LEVEL VOL Surr. Sound SOUND EFFECT Bluetooth POWER DIMMER SYNC SYNC REPEAT Surr.Sound (Surround Sound Expansion) Press the Surr.Sound button on the remote to control the adds depth and spaciousness to the sound. SURROUND SOUND AUTO : If the sound source is more than 2 channels then SURROUND SOUND ON turns on automatically. On the other hand, if the sound source is less than 2 channels (STEREO), then mode is automatically set to SURROUND SOUND OFF. WOOFER LEVEL You can control the woofer volume. Press or button on the WOOFER LEVEL button to increase or decrease the woofer volume. You can set it from SW -6 to SW +6. DIMMER/ANYNET+ DIMMER : Press the DIMMER/ANYNET+ button on the remote to control the brightness of the display. ANYNET+ : Turns on the ANYNET+ function which lets the remote from your ANYNET+ Samsung TV control the SoundStand. The ANYNET+ function toggles on and off each time the DIMMER/ ANYNET+ button is pressed and held for more than 5 seconds. Skip Forward If there is more than one file on the device you are playing, and you press the $ button, the next file is selected. REPEAT You can set the REPEAT function during music playback from a USB device. REPEAT OFF : Cancels Repeat Playback. REPEAT FILE : Repeatedly play a track. REPEAT ALL : Repeatedly play all tracks. REPEAT RANDOM : Plays tracks in random order. (A track that has already been played may be played again.) Play/Pause Press the ► button again to pause playing the file temporarily. Press the ► button again to play the selected file. ● SoundStand is a Samsung proprietary name. ● Operate the TV using the TV's remote control. 9 ENG TOUR AND USING THE REMOTE CONTROL REMOTE CONTROL POWER Turns the SoundStand on and off. POWER SOURCE MUTE You can turn the volume down to 0 with the push of a button. Press again to restore the sound to the previous volume level. VOLUME Adjusts the volume level of the unit. SOUND EFFECT Press SOUND EFFECT on the remote control to select a sound mode. Select the STANDARD mode if you want to enjoy the original sound. We recommend that you select a Sound Effect mode based on the source material and your personal taste. Skip Back If there is more than one file on the device you are playing, and you press the # button, the previous file is selected. MUTE WOOFER LEVEL VOL Surr. Sound SOUND EFFECT Bluetooth POWER DIMMER SYNC SYNC REPEAT Bluetooth POWER Press the Bluetooth POWER button on the remote to turn the Bluetooth Power function on and off. See pages 16 and 18 for details. AUDIO SYNC If the SoundStand is connected to a digital TV and the video appears out of sync with the audio, press the Audio Sync buttons to sync the audio with the video. Press the AUDIO SYNC +/- buttons to set the audio delay from 0 to 300 ms. In USB mode, TV mode, or BT mode, the Audio Sync function may not work. + Installing Batteries in the Remote Control 1. Use a coin to turn the remote control cover counterclockwise to remove it as shown in the figure above. 2. Insert a 3V lithium battery. Keep the positive (+) pole facing up when inserting the battery. Put the battery cover on and align the ' ' marks side by side as shown in the figure above. 10 3. Use a coin to turn the cover clockwise as far as it will go to fix it in place. INSTALLATION INSTALLATION If you want to place your TV on top of the SoundStand, please make sure that your TV satisfies the two conditions below: - Maximum TV weight : 35 kg - Maximum TV stand dimension : Smaller than 720 mm X 320 mm Fits most TVs up to 1524mm and up to 35kg (*TV screen size and stand type may vary) + How to install the SoundStand Correct installation Do not place the TV to one side on the SoundStand Do not place the SoundStand near the edge of a TV shelf, table, or entertainment center. Do not place a TV whose base is bigger than the SoundStand’s top surface on the SoundStand. ● Do not place the TV to one side on the SoundStand. The TV may tip over and may cause physical injury. ● Make sure to place the SoundStand in the center of the shelf, table, etc., when you install it. Do not place it near an edge. ● If the TV is bigger than the SoundStand, consider a wall-mounted TV installation or place the SoundStand on a stable surface. ● Keep the SoundStand at least 5 cm away from the wall when you install it. + Using the protection pads Place the included protective pads on top of the product and then place the TV stand on top of them to prevent scratches on the product’s surface. 11 ENG SOUNDSTAND INSTALLATION CONNECTIONS CONNECTIONS CONNECTING AN EXTERNAL DEVICE USING AN HDMI CABLE HDMI is the standard digital interface for connecting to such devices as a TVs, projectors, DVD players, Blu-ray players, set top boxes, and more. HDMI prevents any degradation to the signal due to conversion to analogue and maintains the video and audio quality of the original digital source. HDMI IN HDMI OUT HDMI Cable (not supplied) HDMI Cable (not supplied) Digital Devices HDMI IN HDMI OUT (ARC) Connect an HDMI cable (not supplied) from the HDMI IN jack on the back of the product to the HDMI OUT jack on your digital device. The ARC function allows digital audio to output via the HDMI OUT(ARC) port. and, It can be enabled only when the SoundStand is connected to a TV that supports the ARC function ● ANYNET+ must be turned on. ● This function is not available if the HDMI cable does not support ARC. HDMI OUT (HDMI) Connect an HDMI cable (not supplied) from the HDMI OUT jack on the back of the product to the HDMI IN jack on your TV. ● HDMI is an interface that enables the digital transmission of video and audio data with just a single connector. 12 CONNECTIONS CONNECTING AN EXTERNAL DEVICE USING OPTICAL (DIGITAL) CABLE OR AUDIO (ANALOGUE) CABLE AUX IN OPTICAL IN or OPTICAL OUT BD/ DVD player/ Set-top box/ Game console AUDIO OUT Optical Cable (not supplied) Audio Cable OPTICAL IN AUX IN Connect OPTICAL IN on the main unit to the OPTICAL OUT of the TV or Source Device. Connect AUX IN (Audio) on the main unit to the AUDIO OUT of the TV or Source Device. Be sure to match connector colours. ● Do not connect the power cord of this product or your TV to the wall outlet until all connections between components are complete. ● Before moving or installing this product, be sure to turn off the power and disconnect the power cord or, 13 ENG This unit comes equipped with one optical in digital jack and one audio analogue in jack, giving you two ways to connect it to a TV. FUNCTIONS FUNCTIONS INPUT MODE Press the SOURCE button on the remote control or the ( mode you want. ) button on the product's top panel to select the SOURCE POWER SOURCE MUTE VOL Input mode Display Optical Digital input D.IN AUX input AUX WOOFER The unit turns off automatically in the following situations. ● D.IN/HDMI/BT/TV/USB/ARC Mode - If there is no audio signal for 25 minutes. ● AUX Mode HDMI input HDMI - If the AUX cable is disconnected for 25 minutes. BLUETOOTH mode BT - TV mode TV USB mode USB If there is no KEY input for 8 hours when the AUX cable is connected. To turn this function ON or OFF, press and hold the button for 5 seconds. AUTO POWER DOWN ON / OFF appears on the display. ARC (HDMI OUT) HDMI Cable ● The ARC function allows digital audio to output via the HDMI OUT (ARC) port. It can be enabled only when the SoundStand is connected to a TV that supports the ARC function. ● ANYNET+ must be turned on. ● This function is not available if the HDMI cable does not support ARC. ● The ARC function is activated in D.IN mode if you have connected the unit to a TV that supports ARC. ● To turn off the ARC function, turn ANYNET+ off. 14 FUNCTIONS BLUETOOTH You can use a Bluetooth device to enjoy music with high quality stereo sound, all without wires! ENG + To connect the SoundStand to a Bluetooth device Check if the Bluetooth device supports the Bluetooth compliant stereo headset function. Connect Bluetooth device 1. Press the SOURCE button on the remote control or the ( ) button on the product's top panel to display the BT message. 2. Select the Bluetooth menu on the Bluetooth device you want to connect. (Refer to the Bluetooth device's user manual.) 3. Select the Stereo headset menu on the Bluetooth device. • You will see a list of scanned devices. 4. Select "[Samsung] SoundStand" from the list. • When the SoundStand is connected to the Bluetooth device, it will display [Bluetooth device name] ➞ BT on the front display. • The device name can only be displayed in English. An underline " _ " will be displayed if the name is not in English. • If the Bluetooth device has failed to pair with the SoundStand, delete the previous "[Samsung] SoundStand" found by the Bluetooth device and have it search for the SoundStand again. 5. Play music on the connected device. • You can listen to the music playing on the connected Bluetooth device over the SoundStand. • In BT mode, the Play/Pause/Next/Prev functions are not available. However, these functions are available in Bluetooth devices supporting AVRCP. 15 ● If asked for PIN code when connecting a Bluetooth device, enter <0000>. ● Only one Bluetooth device can be paired at a time. ● Bluetooth connection will be terminated when you turn the SoundStand off. ● The SoundStand may not perform Bluetooth search or connection correctly under the following circumstances: - If there is a strong electrical field around the SoundStand. - If several Bluetooth devices are simultaneously paired with SoundStand. - If the Bluetooth device is turned off, not in place, or malfunctions. - Note that such devices as microwave ovens, wireless LAN adaptors, fluorescent lights, and gas stoves use the same frequency range as the Bluetooth device, which can cause electric interference. ● The SoundStand supports SBC data (44.1kHz, 48kHz). ● Connect only to a Bluetooth device that supports the A2DP (AV) function. ● You cannot connect the SoundStand to a Bluetooth device that supports only the HF (Hands Free) function. FUNCTIONS + Bluetooth POWER on (Bluetooth POWER) ● In Bluetooth connection mode, the Bluetooth connection will be lost if the distance between the SoundStand and the Bluetooth device exceeds 5m. ● If the Bluetooth device comes back into the effective range after disconnecting, you can restart the SoundStand to restore the pairing with the Bluetooth device. ● The SoundStand automatically turns off after 25 minutes in the Ready state. When the Bluetooth Power On function is on and the SoundStand is turned off, if a previously paired Bluetooth device tries to pair with the SoundStand, the SoundStand turns on automatically. 1. Press the Bluetooth POWER button on the SoundStand remote control. 2. Bluetooth POWER on appears on the SoundStand's display. ● Available only if the SoundStand is listed among the Bluetooth device’s paired devices. (The Bluetooth device and the SoundStand must have been previously paired at least once.) ● SoundStand will appear in the Bluetooth device’s searched devices list only when the SoundStand is displaying [BT READY]. ● In the TV SoundConnect mode, the SoundStand cannot be paired to another Bluetooth device. ● If the SoundStand is connected to a TV through TV SoundConnect, and you turn the the SoundStand off by turning off the TV, the Bluetooth Power function will not turn the SoundStand on. + To disconnect the Bluetooth device from the SoundStand You can disconnect the Bluetooth device from the SoundStand. For instructions, see the Bluetooth device's user manual. ● The SoundStand will be disconnected. ● When the SoundStand is disconnected from the Bluetooth device, the SoundStand will display BT DISCONNECTED on the front display. + To disconnect the SoundStand from the Bluetooth device Press the SOURCE button on the remote control or the ( ) button on the product's top panel to switch from BT to another mode or turn off the SoundStand. ● The connected Bluetooth device will wait a certain amount of time for a response from the SoundStand before terminating the connection. (Disconnection time may differ, depending on the Bluetooth device) More About Bluetooth Bluetooth is a technology that enables Bluetoothcompliant devices to interconnect easily with each other using a short wireless connection. ● A Bluetooth device may cause noise or malfunction, depending on usage, when: - A part of your body is in contact with the receiving/transmitting system of the Bluetooth device or the SoundStand. - It is subject to electrical variation from obstructions caused by a wall, corner, or office partition. - It is exposed to electrical interference from same frequency-band devices including medical equipment, microwave ovens, and wireless LANs. ● Pair the SoundStand with the Bluetooth device while they are close together. ● The further the distance between the SoundStand and Bluetooth device, the worse the quality is. If the distance exceeds the Bluetooth operational range, the connection is lost. ● In poor reception-sensitivity areas, the Bluetooth connection may not work properly. ● The Bluetooth connection only works when it is close to the unit. The connection will be automatically cut off if the Bluetooth device is out of range. Even within range, the sound quality may be degraded by obstacles such as walls or doors. ● This wireless device may cause electric interference during its operation. 16 FUNCTIONS NFC + Connecting with NFC and smart devices Attach the NFC sticker label on a desired and then approach your smart device to the NFC label. + Connecting with NFC 1. Detach the NFC sticker label and attach it to a desired spot. • Putting the NFC sticker within a 3m radius from the unit is recommanded. 2. Enable the NFC function of your smart device. 3. Bring your smart device’s NFC antenna close to the NFC label. 4. When the connection prompt appears on your smart device’s display, select <Yes>. • Once the connection is established, the completion message appears. + Disconnecting NFC Bring your smart device’s NFC antenna close to the NFC label on the SoundStand again. The disconnection message appears on the smart device's display. + To connect another smart device to the SoundStand which is already connected to another NFC compatible device After disconnecting from the previously connected device, bring the new smart device close to the NFC label of the SoundStand. ● The NFC function is implemented in Android v4.1.2 Jelly Bean and later operating systems. - To make NFC connections, your smart device needs both Android OS 4.1.2 Jelly Bean or later and the NFC tag for NFC function execution. You also need to download the “Samsung NFC Connection” application from the Google Playstore and install it on your smart device. For further details, please refer to the smart device’s user manual. ● The location of the NFC antenna is different in different devices. Confirm the location of your smart device’s antenna in the device's user manual before attempting to pair it with the SoundStand. ● If your smart device is in a thick housing or case, the NFC connection may not be stable. ● The N-mark is a trade mark or registered trade mark of the NFC Forum Inc. in the United States and other countries. ● If you have trouble with an NFC connection - Actually touching your smart device to the NFC label can cause NFC connection failure. - If the “Empty tag” error is displayed on the smart device, please try again. - Check whether your smart device’s antenna is close enough to the NFC logo on the SoundStand. ● If you turn off the SoundStand when the Bluetooth Power On feature is ON, and then try to connect a Bluetooth device that has been previously connected using NFC, the SoundStand will turn on automatically when the device connects. To set the Bluetooth Power On option, see page 16. 17 ENG You can connect your SoundStand to an NFC-enabled smart device through a Bluetooth connection with a simple setup. Once connected, you can enjoy music stored in your smart device through the SoundStand. FUNCTIONS TV SOUNDCONNECT You can enjoy TV sound through your SoundStand connected to a Samsung TV that supports TV SoundConnect function. + Connecting a TV to the SoundStand Connect 1. Turn on the TV and SoundStand. • Set the "Add New Device" menu of the TV to "On". 2. Press the ( ) button on the main unit’s top panel or the SOURCE button on the remote control to select the TV mode. 3. On the TV, a message asking whether to enable the TV SoundConnect function. "[Samsung] SoundStand" is displayed on the TV screen. 4. Select <Yes> to finish connecting the TV and SoundStand. ● Switching the SoundStand’s mode from TV to another automatically terminates TV SoundConnect. ● To connect the SoundStand to another TV, the existing connection must be terminated. ● Terminate the connection to the existing TV, button on the remote control then press the for 5 seconds to connect to another TV. ● TV SoundConnect Operational Range - Recommended pairing range: within 50 cm - Recommended operational range: within 5m ● PLAY, NEXT, PREV and STOP buttons are not operable in TV SoundConnect mode. + Using the Bluetooth POWER On function After the TV and the SoundStand have been connected using TV SoundConnect, if you set the Bluetooth Power On function on, the SoundStand will turn on and off automatically when you turn the TV on or off. 1. Connect the TV with your SoundStand using the TV SoundConnect function. 2. Press the Bluetooth POWER button on the SoundStand remote. "BLUETOOTH POWER ON" appears on the SoundStand's display. ● The TV SoundConnect (SoundShare) function is supported by some Samsung TVs released from 2012 on. Check whether your TV supports the TV SoundConnect (SoundShare) function before you begin. (For further information, refer to the TV’s user manual.) ● If your Samsung TV is released before 2014, check the SoundShare setting menu. ● If the distance between the TV and SoundStand exceeds 5m, the connection may not be stable or the audio may stutter. If this occurs, relocate the TV or SoundStand so that they are within operational range, and then re-establish the TV SoundConnect connection. 18 • BLUETOOTH POWER ON : The SoundStand turns on and off when you turn the TV on or off. • BLUETOOTH POWER OFF : The SoundStand only turns off when you turn the TV off. ● This function is supported only by some Samsung TVs released from 2013 on. ● If the SoundStand is connected to a TV through TV SoundConnect, and you turn the SoundStand off by turning off the TV, the Bluetooth Power function will not turn the SoundStand on, even if you connect another Bluetooth device to it. FUNCTIONS USB You can play music files located on USB storage devices. ● Mobile phone devices are not supported. 1. Connect the USB device to the USB port on the back of the product. ● File Format Type Compatibility list: 2. Press the SOURCE button on the remote control or the ( ) button on the product's top panel repeatedly until USB appears. Format Codec MPEG 1 Layer2 3. USB appears on the display screen. *.mp3 • The SoundStand connection to the USB device is complete. • The SoundStand automatically turns off (Auto Power Off) if no USB device has been connected for more than 25 minutes. MPEG 1 Layer3 MPEG 2 Layer3 MPEG 2.5 Layer3 *.wma + Before you connect a USB device Be aware of the following: ● If the file name of a file or folder on a USB device exceeds 10 characters, it is not displayed on the SoundStand's display. Wave_Format_MSAudio1 Wave_Format_MSAudio2 AAC *.aac AAC-LC HE-AAC *.wav - *.ogg OGG 1.1.0 *.flac FLAC 1.1.0, FLAC 1.2.1 Supported Sampling Rate above 16KHz ● This product may not be compatible with certain types of USB storage media. ● The SoundStand supports the FAT16 and FAT32 file systems. - ENG Display USB port The NTFS file system is not supported. ● Connect USB devices directly to the USB port of the product. Otherwise, you may encounter a USB compatibility problem. ● Do not connect multiple storage devices to the product via a multi-card reader. It may not operate properly. ● Digital camera PTP protocols are not supported. ● Do not remove the USB device while it is being read. ● DRM-protected music files (MP3, WMA) from a commercial web site cannot be played. ● External HDDs are not supported. 19 FUNCTIONS SOFTWARE UPGRADE Samsung may offer upgrades for the SoundStand's system firmware in the future. ● Insert a USB device containing the firmware upgrade into the USB port on the main unit. ● Do not disconnect the power or remove the USB device while upgrades are being applied. The main unit will turn off automatically after completing the firmware upgrade. When software is upgraded, all settings are reset to their factory default settings. We recommend you write down your settings so that you can easily reset them after the upgrade. ● Once the software upgrade is completed, turn off the product and then press and hold the (►) button for a while to reset the product. ● If the firmware fails to upgrade, we recommend formatting the USB device in FAT16 and trying again. ● Do not format the USB device in the NTFS format. The SoundStand does not support the NTFS file system. ● Depending on the manufacturer, some USB devices may not be supported. If an upgrade is offered, you can upgrade the firmware by connecting a USB device with the firmware upgrade stored on it to the USB port on your SoundStand. Note that if there are multiple upgrade files, you must load them onto the USB device singly and use them to upgrade the firmware one at a time. Please visit samsung.com or contact the Samsung call centre to receive more information about downloading upgrades files. 20 TROUBLESHOOTING TROUBLESHOOTING ENG Before requesting service, please check the following. The unit will not turn on. Connect the power plug to the outlet. • Is the power cord plugged into the outlet? A function does not work when the button is pressed. Disconnect the power plug and connect it again. • Is there static electricity in the aerial? Sound is not produced. • Is the Mute function on? Press the Mute button to cancel the function. • Is the volume set to minimum? Adjust the volume . The remote control does not work. • Are the batteries drained? Replace with new batteries. • Is the distance between the remote control and main unit too far? Move closer to the unit. The TV SoundConnect (TV pairing) failed. • Does your TV support TV SoundConnect? TV SoundConnect is supported by some Samsung TVs released after 2012. Check your TV to see if it supports TV SoundConnect. • Is your TV firmware the latest version? Update your TV with the latest firmware. • Does an error occur when connecting? Contact the Samsung call centre. • Reset the TV MODE and connect again. Press and hold the ► button for 5 seconds to reset the TV SoundConnect connection. 21 APPENDIX APPENDIX SPECIFICATIONS Model name GENERAL AMPLIFIER HW-H600 USB 5V/0.5A Weight 5 kg Dimensions (W x H x D) 735 x 36.5 x 360 mm Operating temperature range +5°C ~ +35°C Operating humidity range 10 % to 75 % Rated output power 80 W(MID/TWT = 8 OHM, SW = 4 OHM) THD = 10 %, 1 kHz S/N ratio (analogue input) 65 dB Separation (1kHz) 65 dB * S/N ratio, distortion, separation, and usable sensitivity are based on measurements using AES (Audio Engineering Society) guidelines. * Nominal specification - Samsung Electronics Co., Ltd reserves the right to change the specifications without notice. - Weight and dimensions are approximate. - For the power supply and Power Consumption, refer to the label attached to the product. LICENSE Manufactured under license from Dolby Laboratories. Dolby and the double-D symbol are trademarks of Dolby Laboratories. For DTS patents, see http://patents.dts.com. Manufactured under license from DTS Licensing Limited. DTS, the Symbol, & DTS and the Symbol together are registered trademarks, and DTS 2.0 Channel is a trademark of DTS, Inc. © DTS, Inc. All Rights Reserved. The terms HDMI and HDMI High-Definition Multimedia Interface, and the HDMI Logo are trademarks or registered trademarks of HDMI Licensing LLC in the United States and other countries. - To send inquiries and requests regarding open sources, contact Samsung via Email ([email protected]). As an ENERGY STAR Partner, Samsung has determined that this product or product models meets the ENERGY STAR guidelines for energy efficiency. 22 Contact SAMSUNG WORLD WIDE If you have any questions or comments relating to Samsung products, please contact the SAMSUNG customer care Centre. Contact Centre Area ` Asia Pacific AUSTRALIA NEW ZEALAND CHINA 1300 362 603 0800 SAMSUNG (0800 726 786) 400-810-5858 HONG KONG (852) 3698 4698 INDIA INDONESIA JAPAN MALAYSIA PHILIPPINES SINGAPORE THAILAND TAIWAN VIETNAM ` MENA U.A.E OMAN KUWAIT BAHRAIN QATAR EGYPT ALGERIA PAKISTAN TUNISIA JORDAN SYRIA IRAN MOROCCO 1800 3000 8282 - Toll Free 1800 266 8282 - Toll Free 30308282 - Non Toll Free 0800112888 021-56997777 0120-327-527 1800-88-9999 1-800-10-7267864 [PLDT] 1-800-8-7267864 [Globe landline and Mobile] 02-4222111 [Other landline] 1800-SAMSUNG (726-7864) 0-2689-3232, 1800-29-3232 0800-32-9999 1800 588 889 800-SAMSUNG (726-7864) 800-SAMSUNG (726-7864) 183-2255 (183-CALL) 8000-4726 800-2255 (800-CALL) 08000-726786 16580 021 36 11 00 0800-Samsung (72678) 80-1000-12 0800-22273 06 5777444 18252273 021-8255 080 100 2255 SAUDI ARABIA 920021230 TURKEY ` Africa NIGERIA 444 77 11 Ghana Cote D’ Ivoire SENEGAL CAMEROON KENYA UGANDA TANZANIA RWANDA BURUNDI DRC SUDAN SOUTH AFRICA BOTSWANA NAMIBIA ZAMBIA MOZAMBIQUE 0800-726-7864 0800-10077 0302-200077 8000 0077 800-00-0077 7095- 0077 0800 545 545 0800 300 300 0685 88 99 00 9999 200 499999 1969 0860 SAMSUNG (726 7864) 8007260000 08 197 267 864 0211 350370 847267864 / 827267864 Web Site www.samsung.com/au/support www.samsung.com/nz/support www.samsung.com/cn/support www.samsung.com/hk/support (Chinese) www.samsung.com/hk_en/support (English) www.samsung.com/in/support www.samsung.com/id/support www.samsung.com/jp/support www.samsung.com/my/support www.samsung.com/ph/support www.samsung.com/sg/support www.samsung.com/th/support www.samsung.com/tw/support www.samsung.com/vn/support www.samsung.com/ae/support (English) www.samsung.com/ae_ar/support (Arabic) www.samsung.com/eg/support www.samsung.com/n_africa/support www.samsung.com/pk/support www.samsung.com/n_africa/support www.samsung.com/Levant/support (English) www.samsung.com/Levant/support (English) www.samsung.com/iran/support www.samsung.com/n_africa/support www.samsung.com/sa/support www.samsung.com/sa_en/support (English) www.samsung.com/tr/support www.samsung.com/africa_en/support www.samsung.com/africa_fr/support www.samsung.com/support www.samsung.com/support AH68-02697V-00 HW-H600 ﺩﻟﻴﻞ ﺍﻟﻤﺴﺘﺨﺪﻡ Wireless Audio - SoundStand ﺗﺨﻴﻞ ﺍﻹﻣﻜﺎﻧﻴﺎﺕ ﻧﺸﻜﺮﻙ ﻋﻠﻰ ﺷﺮﺍء ﻫﺬﺍ ﺍﻟﻤﻨﺘﺞ ﻣﻦ ﻣﻨﺘﺠﺎﺕ ﺳﺎﻣﺴﻮﻧﺞ. ﻟﻠﺤﺼﻮﻝ ﻋﻠﻰ ﻣﺠﻤﻮﻋﺔ ﺍﻟﺨﺪﻣﺎﺕ ﺍﻟﻜﺎﻣﻠﺔ ،ﻳﺮﺟﻰ ﺗﺴﺠﻴﻞ ﺍﻟﻤﻨﺘﺞ ﺍﻟﺨﺎﺹ ﺑﻚ ﻋﻠﻰ www.samsung.com/register ﺍﻟﻤﻴﺰﺍﺕ ﺍﻟﻤﻴﺰﺍﺕ TV SoundConnect ﺗﺘﻴﺢ ﻟﻚ ﻭﻇﻴﻔﺔ TV SoundConnectﺍﻻﺳﺘﻤﺎﻉ ﺇﻟﻰ ﺍﻟﺼﻮﺕ ﻣﻦ ﺍﻟﺘﻠﻔﺰﻳﻮﻥ ﻋﻠﻰ SoundStandﻋﺒﺮ ﺍﺗﺼﺎﻝ ،Bluetoothﻛﻤﺎ ﻳﺴﻤﺢ ﻟﻚ ﺑﺎﻟﺘﺤﻜﻢ ﻓﻲ ﺍﻟﺼﻮﺕ. HDMI ﻭﺿﻮﺣﺎ. ﻳﻨﻘﻞ ﻣﻨﻔﺬ HDMIﺇﺷﺎﺭﺍﺕ ﺍﻟﺼﻮﺕ ﻭﺍﻟﺼﻮﺭﺓ ﻓﻲ ﻧﻔﺲ ﺍﻟﻮﻗﺖ ،ﻭﻳﻮﻓﺮ ﺻﻮﺭﺓ ﺃﻛﺜﺮ ً ﻛﻤﺎ ﺃﻥ ﺍﻟﻮﺣﺪﺓ ﻣﺠﻬﺰﺓ ﺑﻮﻇﻴﻔﺔ ARCﻭﺍﻟﺘﻲ ﺗﺘﻴﺢ ﻟﻚ ﺇﻣﻜﺎﻧﻴﺔ ﺍﻻﺳﺘﻤﺎﻉ ﺇﻟﻰ ﺍﻟﺼﻮﺕ ﻣﻦ ﺍﻟﺘﻠﻔﺰﻳﻮﻥ ﻣﻦ ﺧﻼﻝ ﻛﺒﻞ HDMIﻋﺒﺮ SoundStandﺑﻜﺒﻞ .HDMI ﻭﺗﺘﻮﺍﻓﺮ ﺗﻠﻚ ﺍﻟﻮﻇﻴﻔﺔ ﻓﻘﻂ ﻓﻲ ﺣﺎﻟﺔ ﻗﻴﺎﻣﻚ ﺑﺘﻮﺻﻴﻞ ﺍﻟﻮﺣﺪﺓ ﺑﺠﻬﺎﺯ ﺗﻠﻔﺰﻳﻮﻥ ﻣﺘﻮﺍﻓﻖ ﻣﻊ ﻭﻇﻴﻔﺔ .ARC ) Surround Sound Expansionﺗﻤﺪﻳﺪ ﺍﻟﺼﻮﺕ ﺍﻟﻤﺤﻴﻄﻲ( ﺗﻀﻴﻒ ﻣﻴﺰﺓ ﺗﻤﺪﻳﺪ ﺍﻟﺼﻮﺕ ﺍﻟﻤﺤﻴﻄﻲ ﺍﻟﻌﻤﻖ ﻭﺍﻟﻮﺿﻮﺡ ﻟﺘﺠﺮﺑﺔ ﺍﻻﺳﺘﻤﺎﻉ ﺍﻟﺨﺎﺻﺔ ﺑﻚ .ﻣﻴﺰﺓ ﺗﻤﺪﻳﺪ ﺍﻟﺼﻮﺕ ﺍﻟﻤﺤﻴﻄﻲ ﻣﺪﻋﻮﻣﺔ ﻣﻦ ﻗﺒﻞ ﺷﺮﻛﺔ .Sonic Emotion ﻭﺿﻊ ﺍﻟﺼﻮﺕ ﺍﻟﺨﺎﺹ ﻳﻤﻜﻨﻚ ﺗﺤﺪﻳﺪ ﺃﻭﺿﺎﻉ ﺍﻟﺼﻮﺕ ﺍﻟﻤﺨﺘﻠﻔﺔ – ) CINEMAﺳﻴﻨﻤﺎ( ) SPORTS /ﺭﻳﺎﺿﺔ( ) VOICE /ﺻﻮﺕ( ) MUSIC /ﻣﻮﺳﻴﻘﻰ( (OFF)STANDARD / )ﻗﻴﺎﺳﻲ )ﺇﻳﻘﺎﻑ(( – ً ﻭﻓﻘﺎ ﻟﻨﻮﻉ ﺍﻟﻤﺤﺘﻮﻯ ﺍﻟﺘﻲ ﺗﺮﻳﺪ ﻣﺸﺎﻫﺪﺗﻪ. ﻭﺣﺪﺓ ﺍﻟﺘﺤﻜﻢ ﻋﻦ ﺑﻌﺪ ﺍﻟﻤﺘﻌﺪﺩﺓ ﺍﻟﻮﻇﺎﺋﻒ ﻳﻤﻜﻦ ﺍﺳﺘﺨﺪﺍﻡ ﻭﺣﺪﺓ ﺍﻟﺘﺤﻜﻢ ﻋﻦ ﺑﻌﺪ ﻟﻠﺘﺤﻜﻢ ﻓﻲ ﺍﻟﻌﺪﻳﺪ ﻣﻦ ﺍﻟﻌﻤﻠﻴﺎﺕ ﺑﺎﺳﺘﺨﺪﺍﻡ ﺃﺯﺭﺍﺭ ﺍﻟﺘﺤﻜﻢ. ﺩﻋﻢ )(USB Host ﻳﻤﻜﻨﻚ ﺗﻮﺻﻴﻞ ﻭﺗﺸﻐﻴﻞ ﻣﻠﻔﺎﺕ ﺍﻟﻤﻮﺳﻴﻘﻰ ﻣﻦ ﻭﺣﺪﺍﺕ ﺗﺨﺰﻳﻦ ) (USBﺍﻟﺨﺎﺭﺟﻴﺔ ﻣﺜﻞ ﻣﺸﻐﻼﺕ ) ،(MP3ﻭﻭﺣﺪﺍﺕ ﺍﻟﺬﺍﻛﺮﺓ ﺍﻟﻮﻣﻴﻀﺔ )،(USB flash memory ﺇﻟﺦ .ﺑﺎﺳﺘﺨﺪﺍﻡ ﻭﻇﻴﻔﺔ ).(SoundStand's USB HOST ﻭﻇﻴﻔﺔ ﺍﻟﺒﻠﻮﺗﻮﺙ ﻳﻤﻜﻨﻚ ﺗﻮﺻﻴﻞ ﺟﻬﺎﺯ ﺑﻠﻮﺗﻮﺙ ﺑﺠﻬﺎﺯ SoundStandﻭﺍﻻﺳﺘﻤﺘﺎﻉ ﺑﺴﻤﺎﻉ ﺍﻟﻤﻮﺳﻴﻘﻰ ﺑﺼﻮﺕ ﺍﺳﺘﺮﻳﻮ ﻋﺎﻟﻲ ﺍﻟﺠﻮﺩﺓ ،ﺑﺪﻭﻥ ﺗﻮﺻﻴﻼﺕ ﺳﻠﻜﻴﺔ! ﻭﻇﻴﻔﺔ NFC ﻗﻢ ﺑﺘﻮﺻﻴﻞ ﺟﻬﺎﺯﻙ ﺍﻟﻤﺘﻮﺍﻓﻖ ﻣﻊ ﻭﻇﻴﻔﺔ NFCﻋﺒﺮ ﺍﻟﺒﻠﻮﺗﻮﺙ ﺑﺠﻬﺎﺯ SoundStandﺑﺎﺳﺘﺨﺪﺍﻡ ﺧﻄﻮﺓ ﺍﻹﻋﺪﺍﺩ ﺍﻟﺒﺴﻴﻂ ﻭﻗﻢ ﺑﺘﺸﻐﻴﻞ ﺍﻟﻤﻮﺳﻴﻘﻰ ﻋﻠﻰ ﺍﻟﺠﻬﺎﺯ ﻣﻦ ﺧﻼﻝ .SoundStand ٢ ﻣﻌﻠﻮﻣﺎﺕ ﺍﻟﺴﻼﻣﺔ ﻣﻌﻠﻮﻣﺎﺕ ﺍﻟﺴﻼﻣﺔ ﻳﺸﻴﺮ ﻫﺬﺍ ﺍﻟﺮﻣﺰ ﺇﻟﻰ ﻭﺟﻮﺩ "ﺟﻬﺪ ﻛﻬﺮﺑﻲ ﺧﻄﻴﺮ" ﺩﺍﺧﻞ ﺍﻟﻤﻨﺘﺞ ﻳﻤﺜﻞ ﺧﻄﺮ ﺍﻟﺘﻌﺮﺽ ﻟﺼﺪﻣﺔ ﻛﻬﺮﺑﻴﺔ ﺃﻭ ﺇﺻﺎﺑﺔ ﺟﺴﺪﻳﺔ. ﺗﻨﺒﻴﻪ ﺧﻄﺮ ﺍﻹﺻﺎﺑﺔ ﺑﺼﺪﻣﺔ ﻛﻬﺮﺑﻴﺔ ﻻ ﺗﻔﺘﺢ ﻳﺸﻴﺮ ﻫﺬﺍ ﺍﻟﺮﻣﺰ ﺇﻟﻰ ﻭﺟﻮﺩ ﺇﺭﺷﺎﺩﺍﺕ ﻫﺎﻣﺔ ﻣﺮﻓﻘﺔ ﻣﻊ ﺍﻟﻤﻨﺘﺞ. ﺗﺤﺬﻳﺮ :ﻟﻠﺤﺪ ﻣﻦ ﺧﻄﺮ ﻧﺸﻮﺏ ﺍﻟﺤﺮﻳﻖ ﺃﻭ ﺍﻟﺘﻌﺮﺽ ﻟﺼﺪﻣﺔ ﻛﻬﺮﺑﻴﺔ ،ﻻ ﺗﻌﺮﺽ ﻫﺬﺍ ﺍﻟﺠﻬﺎﺯ ﻟﻸﻣﻄﺎﺭ ﺃﻭ ﺍﻟﺮﻃﻮﺑﺔ. ﺗﻨﺒﻴﻪ :ﻟﻠﺤﻴﻠﻮﻟﺔ ﺩﻭﻥ ﻭﻗﻮﻉ ﺍﻟﺼﺪﻣﺎﺕ ﺍﻟﻜﻬﺮﺑﻴﺔ ،ﻗﻢ ﺑﻤﻄﺎﺑﻘﺔ ﺍﻟﺸﻔﺮﺓ ﺍﻟﻌﺮﻳﻀﺔ ﻟﻠﻘﺎﺑﺲ ﻣﻊ ﺍﻟﻔﺘﺤﺔ ﺍﻟﻌﺮﻳﻀﺔ ﺛﻢ ﺃﺣﻜﻢ ﺇﺩﺧﺎﻟﻬﺎ. ً ﺃﺭﺽ ﻭﺍﻗﻴﺔ. • ﻳﻨﺒﻐﻲ ﺃﻥ ﻳﻜﻮﻥ ﻫﺬﺍ ﺍﻟﺠﻬﺎﺯ ﻣﺘﺼﻼ ﺩﻭﻣًﺎ ﺑﻤﺄﺧﺬ ﺍﻟﺘﻴﺎﺭ ﺍﻟﻤﺘﺮﺩﺩ ﻣﻊ ﻭﺟﻮﺩ ﻭﺻﻠﺔ ٍ ً ﺟﺎﻫﺰﺍ ﻟﻠﺘﺸﻐﻴﻞ. • ﻟﻔﺼﻞ ﺍﻟﺠﻬﺎﺯ ﻋﻦ ﺍﻟﺘﻴﺎﺭ ﺍﻟﻜﻬﺮﺑﻲ ﺍﻟﺮﺋﻴﺴﻲ ،ﻳﺠﺐ ﺳﺤﺐ ﺍﻟﻘﺎﺑﺲ ﻣﻦ ﻣﻘﺒﺲ ﺍﻟﺘﻴﺎﺭ ﺍﻟﻜﻬﺮﺑﻲ ﺍﻟﺮﺋﻴﺴﻲ ﻭﻟﺬﺍ ﻳﻨﺒﻐﻲ ﺃﻥ ﻳﻜﻮﻥ ﻗﺎﺑﺲ ﺍﻟﺘﻴﺎﺭ ﺍﻟﻜﻬﺮﺑﻲ ﺍﻟﺮﺋﻴﺴﻲ ﺗﻨﺒﻴﻪ • ﻻ ﺗُﻌﺮﺽ ﻫﺬﺍ ﺍﻟﺠﻬﺎﺯ ﻟﻘﻄﺮﺍﺕ ﺍﻟﺴﻮﺍﺋﻞ ﺃﻭ ﺗﻨﺎﺛﺮﻫﺎ .ﻻ ﺗﻀﻊ ﺃﺷﻴﺎء ﻣﻠﻴﺌﺔ ﺑﺎﻟﺴﻮﺍﺋﻞ ،ﻛﺂﻧﻴﺔ ﺍﻟﺰﻫﻮﺭ ﻋﻠﻰ ﺍﻟﺠﻬﺎﺯ. • ﻹﻳﻘﺎﻑ ﺗﺸﻐﻴﻞ ﻫﺬﺍ ﺍﻟﺠﻬﺎﺯ ﺗﻤﺎﻣًﺎ ،ﻳﺠﺐ ﺳﺤﺐ ﻗﺎﺑﺲ ﺍﻟﺘﻴﺎﺭ ﺍﻟﻜﻬﺮﺑﻲ ﻣﻦ ﺍﻟﻤﻘﺒﺲ ﺍﻟﺠﺪﺍﺭﻱ .ﻭﻟﻬﺬﺍ ،ﻳﺠﺐ ﺃﻥ ﻳﻜﻮﻥ ﺍﻟﻮﺻﻮﻝ ﺇﻟﻰ ﻗﺎﺑﺲ ﺍﻟﺘﻴﺎﺭ ﺍﻟﻜﻬﺮﺑﻲ ً ﻭﻣﺘﺎﺣﺎ ﺩﺍﺋﻤًﺎ. ﺳﻬﻼ ً ٣ ARA ﺗﺤﺬﻳﺮﺍﺕ ﺍﻟﺴﻼﻣﺔ ﻟﺘﻘﻠﻴﻞ ﻣﺨﺎﻃﺮ ﺍﻟﺘﻌﺮﺽ ﻟﺼﺪﻣﺔ ﻛﻬﺮﺑﻴﺔ ،ﻻ ﺗﻘﻢ ﺑﺈﺯﺍﻟﺔ ﺍﻟﻐﻄﺎء )ﺃﻭ ﺍﻟﻐﻄﺎء ﺍﻟﺨﻠﻔﻲ(. ﻓﻼ ﺗﻮﺟﺪ ﺃﺟﺰﺍء ﻳﻤﻜﻦ ﻟﻠﻤﺴﺘﺨﺪﻡ ﺻﻴﺎﻧﺘﻬﺎ ﺑﺎﻟﺪﺍﺧﻞ .ﻭﺇﻧﻤﺎ ﻳُﺮﺟﻰ ﺗﺮﻙ ﻋﻤﻠﻴﺔ ﺍﻟﺼﻴﺎﻧﺔ ﻟﻤﻮﻇﻔﻲ ﺍﻟﺼﻴﺎﻧﺔ ﺍﻟﻤﺆﻫﻠﻴﻦ. ﻣﻌﻠﻮﻣﺎﺕ ﺍﻟﺴﻼﻣﺔ ﺍﻻﺣﺘﻴﺎﻃﺎﺕ 68.6 mm 99.1mm 99.1mm 99.1mm ﺗﺄﻛﺪ ﻣﻦ ﺗﻮﺍﻓﻖ ﻣﺼﺪﺭ ﺍﻟﺘﻴﺎﺭ ﺍﻟﻤﺘﺮﺩﺩ ﺍﻟﻤﻮﺟﻮﺩ ﻓﻲ ﻣﻨﺰﻟﻚ ﻣﻊ ﻣﺘﻄﻠﺒﺎﺕ ﺍﻟﻄﺎﻗﺔ ﺍﻟﻤﻮﺿﺤﺔ ﻋﻠﻰ ﻣﻠﺼﻖ ﺍﻟﺘﻌﺮﻳﻒ ﺍﻟﻤﻮﺟﻮﺩ ﻋﻠﻰ ﻇﻬﺮ ﺍﻟﻤﻨﺘﺞ .ﻗﻢ ﺑﺘﺮﻛﻴﺐ ﺍﻟﻤﻨﺘﺞ ﺑﺸﻜﻞ ﺃﻓﻘﻲ ،ﻋﻠﻰ ﺳﻄﺢ ﻣﻨﺎﺳﺐ )ﺃﺛﺎﺙ( ،ﻣﻊ ﺗﺮﻙ ﻣﺴﺎﺣﺔ ﻛﺎﻓﻴﺔ ﺣﻮﻟﻪ ﻟﺘﻮﻓﻴﺮ ﺍﻟﺘﻬﻮﻳﺔ 7ﺇﻟﻰ 10ﺳﻨﺘﻴﻤﺘﺮﺍﺕ .ﺗﺄﻛﺪ ﻣﻦ ﻋﺪﻡ ﺗﻐﻄﻴﺔ ﻓﺘﺤﺎﺕ ﺍﻟﺘﻬﻮﻳﺔ .ﻻ ﺗﻀﻊ ﺍﻟﻮﺣﺪﺓ ﻋﻠﻰ ﺍﻟﻤﻜﺒﺮﺍﺕ ﺃﻭ ﻏﻴﺮﻫﺎ ﻣﻦ ﺍﻷﺟﻬﺰﺓ ﺍﻟﺘﻲ ﺭﺑﻤﺎ ﺗﺮﺗﻔﻊ ﺩﺭﺟﺔ ﺣﺮﺍﺭﺗﻬﺎ ﺗﻢ ﺗﺼﻤﻴﻢ ﻫﺬﻩ ﺍﻟﻮﺣﺪﺓ ﻟﻼﺳﺘﺨﺪﺍﻡ ﺑﺸﻜﻞ ﻣﺴﺘﻤﺮ .ﻹﻳﻘﺎﻑ ﺗﺸﻐﻴﻞ ﺍﻟﻮﺣﺪﺓ ﺑﺸﻜﻞ ﻛﺎﻣﻞ ،ﺍﻓﺼﻞ ﻗﺎﺑﺲ ﺍﻟﺘﻴﺎﺭ ﺍﻟﻤﺘﺮﺩﺩ ﻣﻦ ﻣﻨﻔﺬ ﺍﻟﺘﻴﺎﺭ ﺍﻟﻜﻬﺮﺑﻲ ﺍﻟﻤﻮﺟﻮﺩ ﺑﺎﻟﺤﺎﺋﻂ .ﺍﻓﺼﻞ ﺍﻟﺘﻴﺎﺭ ﺍﻟﻜﻬﺮﺑﻲ ﻋﻦ ﺍﻟﻮﺣﺪﺓ ﻓﻲ ﺣﺎﻟﺔ ﺍﻟﺮﻏﺒﺔ ﻓﻲ ﻋﺪﻡ ﺍﺳﺘﺨﺪﺍﻣﻬﺎ ﻟﻔﺘﺮﺓ ﻃﻮﻳﻠﺔ. ﺍﻟﻤﺘﺮﺩﺩ ﻣﻦ ﻨﻔﺬ ﺍﻟﺘﻴﺎﺭ ﺍﻟ ﺘ ﺍﻓﺼﻞ ﻗﺎﻗﺎﺑﺲ ﺍﻟﺘ ﺎ ﺍﻟﺮﻋﺪﻳﺔ ،ﺍﻓ ﻞ ﺍﻟﻌﻮﺍﺻﻒ ﺍﻟ ﺔ ﻋﻨﺪ ﻫﺒﻮﺏ ﺍﻟ ﺍ ﻒ ﻨ ﻣﻨﻔﺬ ﺍﻟﻜﻬﺮﺑﺎء ﺍﻟﻤﻮﺟﻮﺩ ﺑﺎﻟﺤﺎﺋﻂ .ﻣﻦ ﺍﻟﻤﻤﻜﻦ ﺃﻥ ﻳﺆﺩﻱ ﺍﺭﺗﻔﺎﻉ ﺍﻟﺠﻬﺪ ﺍﻟﻜﻬﺮﺑﻲ ﺇﻟﻰ ﺇﺗﻼﻑ ﺍﻟﻮﺣﺪﺓ. ﺍﻟﻤﺒﺎﺷﺮ ﺃﺃﻭ ﻏﻏﻴﺮ ﺫﻟﻚ ﻣﻦ ﺎ ﺍﻟﺸﻤﺲ ﺍﻟ ﺎﺷ ﺍﻟﻮﺣﺪﺓ ﺇﻟﺇﻟﻰ ﺿﻮء ﺍﻟﺸ ﻻ ﺗﺗﻌﺮﺽ ﺍﻟ ﺓ ﻣﺼﺎﺩﺭ ﺍﻟﺤﺮﺍﺭﺓ. ﻣﻦ ﺍﻟﻤﻤﻜﻦ ﺃﻥ ﻳﺆﺩﻱ ﺫﻟﻚ ﺇﻟﻰ ﺯﻳﺎﺩﺓ ﺩﺭﺟﺔ ﺍﻟﺤﺮﺍﺭﺓ ﺑﺸﻜﻞ ﻛﺒﻴﺮ ﻣﻤﺎ ﻗﺪ ﻳﺘﺴﺒﺐ ﻓﻲ ﺗﻌﻄﻞ ﺍﻟﻮﺣﺪﺓ. ﻭﻓﺮ ﺍﻟﺤﻤﺎﻳﺔ ﻟﻠﻤﻨﺘﺞ ﻣﻦ ﺍﻟﺮﻃﻮﺑﺔ )ﺁﻧﻴﺔ ﺍﻟﺰﻫﻮﺭ( ،ﻭﺍﻟﺤﺮﺍﺭﺓ ﺍﻟﺰﺍﺋﺪﺓ )ﺍﻟﻤﺪﻓﺄﺓ( ﺃﻭ ﺍﻟﻤﻌﺪﺍﺕ ﺍﻟﺘﻲ ﺗﺼﺪﺭ ﻣﺠﺎﻻﺕ ﻣﻐﻨﺎﻃﻴﺴﻴﺔ ﺃﻭ ﻛﻬﺮﺑﻴﺔ ﻗﻮﻳﺔ .ﺍﻓﺼﻞ ﻛﺒﻞ ﺍﻟﺘﻴﺎﺭ ﺍﻟﻜﻬﺮﺑﻲ ﻣﻦ ﻣﺼﺪﺭ ﺍﻟﺘﻴﺎﺭ ﺍﻟﻤﺘﺮﺩﺩ ﻓﻲ ﺣﺎﻟﺔ ﺗﻌﻄﻞ ﺍﻟﺠﻬﺎﺯ .ﺍﻟﻤﻨﺘﺠﺎﻟﺨﺎﺹ ﺑﻚ ﻏﻴﺮ ﻣﺼﻤﻢ ﻟﻼﺳﺘﺨﺪﺍﻡ ﺍﻟﺼﻨﺎﻋﻲ .ﻳﺘﻢ ﺍﺳﺘﺨﺪﺍﻡ ﻫﺬﺍ ﺍﻟﻤﻨﺘﺞ ﻟﻸﻏﺮﺍﺽ ﺍﻟﺸﺨﺼﻴﺔ ﻓﻘﻂ. ﻣﻦ ﺍﻟﻤﻤﻜﻦ ﺃﻥ ﻳﺤﺪﺙ ﺗﻜﺎﺛﻒ ﻓﻲ ﺣﺎﻟﺔ ﺗﺨﺰﻳﻦ ﺍﻟﻤﻨﺘﺞ ﻓﻲ ﺩﺭﺟﺎﺕ ﺣﺮﺍﺭﺓ ﻣﻨﺨﻔﻀﺔ .ﻓﻲ ﺣﺎﻟﺔ ﻧﻘﻞ ﺍﻟﻮﺣﺪﺓ ﺧﻼﻝ ﻓﺼﻞ ﺍﻟﺸﺘﺎء ،ﺍﻧﺘﻈﺮ ﻟﻤﺪﺓ ﺳﺎﻋﺘﻴﻦ ﺗﻘﺮﻳﺒًﺎﺣﺘﻰ ﺗﺼﻞ ﺩﺭﺟﺔ ﺣﺮﺍﺭﺓ ﺍﻟﻮﺣﺪﺓ ﺇﻟﻰ ﺩﺭﺟﺔ ﺣﺮﺍﺭﺓ ﺍﻟﻐﺮﻓﺔ ﻗﺒﻞ ﺍﻻﺳﺘﺨﺪﺍﻡ. ﺗﺤﺘﻮﻱ ﺍﻟﺒﻄﺎﺭﻳﺎﺕ ﺍﻟﻤﺴﺘﺨﺪﻣﺔ ﻣﻊ ﻫﺬﺍ ﺍﻟﻤﻨﺘﺞ ﻋﻠﻰ ﻣﻮﺍﺩ ﻛﻴﻤﻴﺎﺋﻴﺔ ﻣﻀﺮﺓ ﺑﺎﻟﺒﻴﺌﺔ. ﻻ ﺗﺘﺨﻠﺺ ﻣﻦ ﺍﻟﺒﻄﺎﺭﻳﺎﺕ ﺑﺈﻟﻘﺎﺋﻬﺎ ﻓﻲ ﺳﻠﺔ ﺍﻟﻤﻬﻤﻼﺕ ﺍﻟﻤﻨﺰﻟﻴﺔ ﺍﻟﻌﺎﺩﻳﺔ .ﻳﺤﻈﺮ ﺍﻟﺘﺨﻠﺺ ﻣﻦ ﺍﻟﺒﻄﺎﺭﻳﺎﺕ ﻋﻦ ﻃﺮﻳﻖ ﺣﺮﻗﻬﺎ .ﻻ ﺗﻌﺮﺽ ﺍﻟﺒﻄﺎﺭﻳﺎﺕ ﻟﺪﻭﺍﺋﺮ ﻗﺼﺮ ﺃﻭ ﺍﻟﻔﻚ ﺃﻭ ﺍﻟﺤﺮﺍﺭﺓ ﺍﻟﺰﺍﺋﺪﺓ .ﻫﻨﺎﻙ ﺍﺣﺘﻤﺎﻝ ﺑﺤﺪﻭﺙ ﺍﻧﻔﺠﺎﺭ ﺇﺫﺍ ﺗﻢ ﺍﺳﺘﺒﺪﺍﻝ ﺍﻟﺒﻄﺎﺭﻳﺔ ﺑﻄﺮﻳﻘﺔ ﻏﻴﺮ ﺻﺤﻴﺤﺔ .ﻗﻢ ﺑﺎﺳﺘﺒﺪﺍﻟﻬﺎ ﺑﺒﻄﺎﺭﻳﺎﺕ ﻣﻦ ﻧﻔﺲ ﺍﻟﻨﻮﻉ ﺃﻭ ﻣﻦ ﻧﻮﻉ ﻣﻤﺎﺛﻞ. ٤ ﺍﻟﻤﺤﺘﻮﻳﺎﺕ ﺍﻟﻤﺤﺘﻮﻳﺎﺕ ARA ٢ ﺍﻟﻤﻴﺰﺍﺕ ٣ ﻣﻌﻠﻮﻣﺎﺕ ﺍﻟﺴﻼﻣﺔ ١٤ ٣ ﺗﺤﺬﻳﺮﺍﺕ ﺍﻟﺴﻼﻣﺔ ١٥ ٤ ﺍﻻﺣﺘﻴﺎﻃﺎﺕ ١٧ NFC ١٨ TV SoundConnect ٦ ﺑﺪء ﺍﻟﺘﺸﻐﻴﻞ ١٩ USB ٦ ﻗﺒﻞ ﻗﺮﺍءﺓ ﺩﻟﻴﻞ ﺍﻟﻤﺴﺘﺨﺪﻡ ٢٠ ﺗﺤﺪﻳﺚ ﺑﺮﺍﻣﺞ ﺍﻟﺘﺸﻐﻴﻞ ٦ ﺍﻟﻤﻜﻮﻧﺎﺕ ﺍﻟﻤﺮﻓﻘﺔ ٧ ﺍﻟﻮﺻﻒ ٧ ﺍﻟﻠﻮﺣﺔ ﺍﻟﻌﻠﻮﻳﺔ /ﺍﻷﻣﺎﻣﻴﺔ ٨ ﺍﻟﻠﻮﺣﺔ ﺍﻟﺨﻠﻔﻴﺔ ٩ ﻭﺣﺪﺓ ﺍﻟﺘﺤﻜﻢ ﻋﻦ ﺑُﻌﺪ ٩ ﺍﻟﺘﻌﺮﻑ ﻋﻠﻰ ﻭﺣﺪﺓ ﺍﻟﺘﺤﻜﻢ ﻋﻦ ﺑﻌﺪ ﻭﺍﺳﺘﺨﺪﺍﻣﻬﺎ ١٤ﺍﻟﻮﻇﺎﺋﻒ ١٢ﺍﻟﺘﻮﺻﻴﻼﺕ ١٢ ﺗﻮﺻﻴﻞ ﺟﻬﺎﺯ ﺧﺎﺭﺟﻲ ﺑﺎﺳﺘﺨﺪﺍﻡ ﻛﺒﻞ HDMI ١٣ ﺍﻟﺒﻠﻮﺗﻮﺙ ٢٢ﺍﻟﻤﻠﺤﻖ ﺗﺮﻛﻴﺐ ﻧﻈﺎﻡ SoundStand ﺗﻮﺻﻴﻞ ﺟﻬﺎﺯ ﺧﺎﺭﺟﻲ ﺑﺎﺳﺘﺨﺪﺍﻡ ﻛﺒﻞ ﺑﺼﺮﻱ )ﺭﻗﻤﻲ( ﺃﻭ ﻛﺒﻞ ﺻﻮﺕ )ﺗﻨﺎﻇﺮﻱ( (HDMI OUT) ARC ٢١ﺍﺳﺘﻜﺸﺎﻑ ﺍﻷﻋﻄﺎﻝ ﻭﺇﺻﻼﺣﻬﺎ ١١ﺍﻟﺘﺮﻛﻴﺐ ١١ ١٤ ﻭﺿﻊ ﺍﻹﺩﺧﺎﻝ ٥ ٢٢ ﺍﻟﻤﻮﺍﺻﻔﺎﺕ ٢٢ ﺍﻟﺘﺮﺧﻴﺺ ﺑﺪء ﺍﻟﺘﺸﻐﻴﻞ ﺑﺪء ﺍﻟﺘﺸﻐﻴﻞ ﻗﺒﻞ ﻗﺮﺍءﺓ ﺩﻟﻴﻞ ﺍﻟﻤﺴﺘﺨﺪﻡ ﻻﺣﻆ ﺍﻟﻤﺼﻄﻠﺤﺎﺕ ﺍﻟﺘﺎﻟﻴﺔ ﻗﺒﻞ ﻗﺮﺍءﺓ ﺩﻟﻴﻞ ﺍﻟﻤﺴﺘﺨﺪﻡ. _ ﺍﻟﺮﻣﻮﺯ ﺍﻟﻤﺴﺘﺨﺪﻣﺔ ﻓﻲ ﻫﺬﺍ ﺍﻟﺪﻟﻴﻞ ﺍﻟﺮﻣﺰ ﺍﻟﻤﺼﻄﻠﺢ ﺗﻨﺒﻴﻪ ﻣﻼﺣﻈﺔ ﺍﻟﺘﻌﺮﻳﻒ ﻳﺸﻴﺮ ﺇﻟﻰ ﺃﻥ ﺍﻟﻮﻇﻴﻔﺔ ﻻ ﺗﻌﻤﻞ ﺃﻭ ﺍﺣﺘﻤﺎﻝ ﺇﻟﻐﺎء ﺍﻹﻋﺪﺍﺩﺍﺕ. ﺗﺸﻴﺮ ﺇﻟﻰ ﺍﻟﺘﻌﻠﻴﻤﺎﺕ ﺃﻭ ﺍﻟﺘﻠﻤﻴﺤﺎﺕ ﻋﻠﻰ ﺍﻟﺼﻔﺤﺔ ﺍﻟﺘﻲ ﺗﺴﺎﻋﺪﻙ ﻋﻠﻰ ﺗﺸﻐﻴﻞ ﺍﻟﻮﻇﻴﻔﺔ. _ ﺗﻌﻠﻴﻤﺎﺕ ﺍﻟﺴﻼﻣﺔ ﻭﺍﺳﺘﻜﺸﺎﻑ ﺍﻷﻋﻄﺎﻝ ﻭﺇﺻﻼﺣﻬﺎ (١ﺗﺄﻛﺪ ﻣﻦ ﺍﻻﻃﻼﻉ ﻋﻠﻰ ﺗﻌﻠﻴﻤﺎﺕ ﺍﻟﺴﻼﻣﺔ ﻗﺒﻞ ﺍﺳﺘﺨﺪﺍﻡ ﺍﻟﻤﻨﺘﺞ) .ﺭﺍﺟﻊ ﺻﻔﺤﺔ (٣ (٢ﻓﻲ ﺣﺎﻟﺔ ﺣﺪﻭﺙ ﻣﺸﻜﻠﺔ ،ﺭﺍﺟﻊ ﻗﺴﻢ ﺍﺳﺘﻜﺸﺎﻑ ﺍﻷﻋﻄﺎﻝ ﻭﺇﺻﻼﺣﻬﺎ) .ﺭﺍﺟﻊ ﺻﻔﺤﺔ (٢١ _ ﺣﻘﻮﻕ ﺍﻟﻄﺒﻊ ﻭﺍﻟﻨﺸﺮ ﺣﻘﻮﻕ ﺍﻟﻄﺒﻊ ﻭﺍﻟﻨﺸﺮ ﻟﻌﺎﻡ 2014ﻣﺤﻔﻮﻇﺔ ﻟﺸﺮﻛﺔ ﺳﺎﻣﺴﻮﻧﺞ ﺇﻟﻜﺘﺮﻭﻧﻴﻜﺲ ﺍﻟﻤﺤﺪﻭﺩﺓ. ﻛﺎﻓﺔ ﺍﻟﺤﻘﻮﻕ ﻣﺤﻔﻮﻇﺔ؛ ﻻ ﻳﺠﻮﺯ ﺇﻋﺎﺩﺓ ﺇﺻﺪﺍﺭ ﺃﻭ ﻧﺴﺦ ﻫﺬﺍ ﺍﻟﺪﻟﻴﻞ ﺃﻭ ﺃﻱ ﺟﺰء ﻣﻨﻪ ﺩﻭﻥ ﺇﺫﻥ ﻛﺘﺎﺑﻲ ﻣﺴﺒﻖ ﻣﻦ ﺷﺮﻛﺔ ﺳﺎﻣﺴﻮﻧﺞ ﺇﻟﻜﺘﺮﻭﻧﻴﻜﺲ ﺍﻟﻤﺤﺪﻭﺩﺓ. ﺍﻟﻤﻜﻮﻧﺎﺕ ﺍﻟﻤﺮﻓﻘﺔ ﺭﺍﺟﻊ ﺍﻟﻤﻠﺤﻘﺎﺕ ﺍﻟﻤﺮﻓﻘﺔ ﺍﻟﻤﻮﺿﺤﺔ ﺃﺩﻧﺎﻩ. )ﺍﻟﺴﺪﺍﺩﺓ ﺍﻟﻮﺍﻗﻴﺔ 4 :ﻟﻜﻞ ﺟﻬﺎﺯ( ﻭﺣﺪﺓ ﺍﻟﺘﺤﻜﻢ ﻋﻦ ﺑﻌﺪ / ﺑﻄﺎﺭﻳﺔ ﻟﻴﺜﻴﻮﻡ ) 3ﻓﻮﻟﺖ(CR2032 : ﺩﻟﻴﻞ ﺍﻟﻤﺴﺘﺨﺪﻡ ﻛﺒﻞ AUX ﺍﻟﺴﺪﺍﺩﺓ ﻣﺤﻮﻝ ﺳﻠﻚ ﺍﻟﺘﻴﺎﺭ ﺍﻟﻜﻬﺮﺑﻲ ﻛﺒﻞ USB ﻋﻼﻣﺔ NFC ● ﺭﺑﻤﺎ ﻳﺨﺘﻠﻒ ﺷﻜﻞ ﺍﻟﻤﻠﺤﻘﺎﺕ ً ﻗﻠﻴﻼ ﻋﻦ ﺍﻟﺼﻮﺭ ﺍﻟﻤﻮﺿﺤﺔ ﺃﻋﻼﻩ. ● ﺍﺳﺘﺨﺪﻡ ﻛﺒﻞ USBﺍﻟﻤﺨﺼﺺ ﻟﺘﻮﺻﻴﻞ ﺃﺟﻬﺰﺓ USBﺍﻟﺨﺎﺭﺟﻴﺔ ﺑﺎﻟﻮﺣﺪﺓ. ٦ ﺍﻟﻮﺻﻒ ﺍﻟﻮﺻﻒ ARA ﺍﻟﻠﻮﺣﺔ ﺍﻟﻌﻠﻮﻳﺔ /ﺍﻷﻣﺎﻣﻴﺔ ﺯﺭ ﺍﻟﻮﻇﺎﺋﻒ ﻟﻼﺧﺘﻴﺎﺭ ﻣﻦ ﺑﻴﻦ ،TV ،BT ،HDMI ،AUX ،D.IN .USB input ● ﻋﻨﺪﻣﺎ ﺗﻜﻮﻥ ﺍﻟﻮﺣﺪﺓ ﻣﺸﻐﻠﺔ ،ﻓﺈﻥ ﺍﻟﻀﻐﻂ ﻋﻠﻰ ﺯﺭ ) ( ﻷﻛﺜﺮ ﻣﻦ 3ﺛﻮﺍﻥ ﻳﻀﺒﻄﻪ ﻟﻴﻌﻤﻞ ﺑﻤﺜﺎﺑﺔ ﺯﺭ ) MUTEﻛﺘﻢ ﺍﻟﺼﻮﺕ( .ﻹﻟﻐﺎء ﺇﻋﺪﺍﺩ ﺯﺭMUTE )ﻛﺘﻢ ﺍﻟﺼﻮﺕ( ،ﺍﻧﻘﺮ ﻋﻠﻰ ﺯﺭ ) ( ﻷﻛﺜﺮ ﻣﻦ 3 ﺛﻮﺍﻥ ﻣﺮﺓ ﺃﺧﺮﻯ. ﺯﻳﺎﺩﺓ/ﺗﻘﻠﻴﻞ ﻣﺴﺘﻮﻯ ﺍﻟﺼﻮﺕ ﻟﻠﺘﺤﻜﻢ ﻓﻲ ﻣﺴﺘﻮﻯ ﺍﻟﺼﻮﺕ. ﺗﻈﻬﺮ ﺍﻟﻘﻴﻤﺔ ﺍﻟﺮﻗﻤﻴﺔ ﻟﻤﺴﺘﻮﻯ ﺍﻟﺼﻮﺕ ﻋﻠﻰ ﺷﺎﺷﺔ ﻋﺮﺽ ﺍﻟﻠﻮﺣﺔ ﺍﻷﻣﺎﻣﻴﺔ. ﺯﺭ ﺍﻟﻄﺎﻗﺔ ﻟﺘﺸﻐﻴﻞ ﺍﻟﻤﻨﺘﺞ ﻭﺇﻳﻘﺎﻑ ﺗﺸﻐﻴﻠﻪ. ﻣﺴﺘﺸﻌﺮ ﻭﺣﺪﺓ ﺍﻟﺘﺤﻜﻢ ﻋﻦ ﺑُﻌﺪ ﺍﻟﺸﺎﺷﺔ ﺗﻘﻮﻡ ﻭﺣﺪﺓ ﺍﻟﺘﺤﻜﻢ ﻋﻦ ﺑﻌﺪ ﺑﺘﺸﻐﻴﻞ ﺃﻧﻈﻤﺔ SoundStandﻣﻦ ﺇﻧﺘﺎﺝ ﺳﺎﻣﺴﻮﻧﺞ ﻓﻘﻂ. ﺗﻌﺮﺽ ﺍﻟﻮﺿﻊ ﺍﻟﺤﺎﻟﻲ. ● ﻋﻨﺪﻣﺎ ﺗﻘﻮﻡ ﺑﺘﺸﻐﻴﻞ ﻫﺬﻩ ﺍﻟﻮﺣﺪﺓ ،ﺳﻴﻜﻮﻥ ﻫﻨﺎﻙ ﻓﺘﺮﺓ ﺗﺄﺧﻴﺮ ﻟﻤﺪﺓ 4ﺇﻟﻰ 5ﺛﻮﺍﻥ ﻗﺒﻞ ﺻﺪﻭﺭ ﺍﻟﺼﻮﺕ. ● ﺇﺫﺍ ﺃﺭﺩﺕ ﺍﻻﺳﺘﻤﺘﺎﻉ ﺑﺎﻟﺼﻮﺕ ﻓﻘﻂ ﻣﻦ ﺟﻬﺎﺯ ،SoundStandﻓﻴﺠﺐ ﻋﻠﻴﻚ ﺇﻳﻘﺎﻑ ﺗﺸﻐﻴﻞ ﺳﻤﺎﻋﺎﺕ ﺍﻟﺘﻠﻔﺰﻳﻮﻥ ﻣﻦ ﻗﺎﺋﻤﺔ ) Audio Setupﺇﻋﺪﺍﺩ ﺍﻟﺼﻮﺕ( ﺍﻟﺨﺎﺻﺔ ﺑﺎﻟﺘﻠﻔﺰﻳﻮﻥ .ﺍﺭﺟﻊ ﺇﻟﻰ ﺩﻟﻴﻞ ﺍﻟﻤﺎﻟﻚ ﺍﻟﻤﺮﻓﻖ ﻣﻊ ﺍﻟﺘﻠﻔﺰﻳﻮﻥ ﺍﻟﺨﺎﺹ ﺑﻚ. ٧ ﺍﻟﻮﺻﻒ ﺍﻟﻠﻮﺣﺔ ﺍﻟﺨﻠﻔﻴﺔ OPTICAL IN AUX IN ﻭﺻﻞ ﺑﺎﻟﻤﺨﺮﺝ ﺍﻟﺮﻗﻤﻲ )ﺍﻟﺒﺼﺮﻱ( ﺍﻟﺨﺎﺹ ﺑﺎﻟﺠﻬﺎﺯ ﺍﻟﺨﺎﺭﺟﻲ. ﻭﺻﻞ ﺑﺎﻟﻤﺨﺮﺝ ﺍﻟﺘﻨﺎﻇﺮﻱ ﺍﻟﺨﺎﺹ ﺑﺎﻟﺠﻬﺎﺯ ﺍﻟﺨﺎﺭﺟﻲ. ) Power Supplyﻣﺼﺪﺭ ﺍﻟﻄﺎﻗﺔ( ﻣﺪﺧﻞ ﻣﻘﺒﺲ HDMI OUT ﻳﺼﺪﺭ ﺇﺷﺎﺭﺍﺕ ﺍﻟﺼﻮﺭﺓ ﻭﺍﻟﺼﻮﺕ ﺍﻟﺮﻗﻤﻴﺔ ﻓﻲ ﻧﻔﺲ ﺍﻟﻮﻗﺖ ﺑﺎﺳﺘﺨﺪﺍﻡ ﻛﺒﻞ .HDMI ﻭﺻﻞ ﻣﻘﺒﺲ ﻣﺤﻮﻝ ﺍﻟﺘﻴﺎﺭ ﺍﻟﻤﺘﺮﺩﺩ ﺑﻤﺪﺧﻞ ﻣﺼﺪﺭ ﺍﻟﻄﺎﻗﺔ ﺑﺸﻜﻞ ﺻﺤﻴﺢ ،ﺛﻢ ﻭﺻﻞ ﻗﺎﺑﺲ ﻣﺤﻮﻝ ﺍﻟﺘﻴﺎﺭ ﺍﻟﻤﺘﺮﺩﺩ ﺑﻤﻨﻔﺬ ﺍﻟﻄﺎﻗﺔ ﺍﻟﻤﻮﺟﻮﺩ ﺑﺎﻟﺤﺎﺋﻂ. ﻣﻨﻔﺬ USB ﻣﻘﺒﺲ HDMI IN ﻗﻢ ﺑﺘﻮﺻﻴﻞ ﺃﺟﻬﺰﺓ USBﻣﺜﻞ ﻣﺸﻐﻼﺕ MP3 ﻫﻨﺎ ﻟﺘﺸﻐﻴﻞ ﺍﻟﻤﻠﻔﺎﺕ ﻋﻠﻰ ﺍﻷﺟﻬﺰﺓ. ﻳﻮﺻﻞ ﻛﻞ ﻣﻦ ﺇﺷﺎﺭﺗﻲ ﺍﻟﻔﻴﺪﻳﻮ ﻭﺍﻟﺼﻮﺕ ﺑﺎﺳﺘﺨﺪﺍﻡ ﻛﺒﻞ .HDMIﺍﺳﺘﺨﺪﻣﻪ ﻋﻨﺪ ﺗﻮﺻﻴﻞ ﺟﻬﺎﺯ ﺧﺎﺭﺟﻲ ﻣﺪﻋﻮﻡ. ● ﻋﻨﺪ ﻓﺼﻞ ﻛﺒﻞ ﺍﻟﺘﻴﺎﺭ ﺍﻟﻜﻬﺮﺑﻲ ﻣﻦ ﻣﺤﻮﻝ ﺍﻟﺘﻴﺎﺭ ﺍﻟﻜﻬﺮﺑﻲ ﻣﻦ ﻣﻨﻔﺬ ﺍﻟﺘﻴﺎﺭ ﺍﻟﻜﻬﺮﺑﻲ ﺍﻟﻤﻮﺟﻮﺩ ﺑﺎﻟﺤﺎﺋﻂ ،ﺃﻣﺴﻚ ﺍﻟﻜﺒﻞ ﻣﻦ ﺍﻟﻤﻘﺒﺲ .ﺗﺠﻨﺐ ﺳﺤﺐ ﺍﻟﻜﺒﻞ. ● ﻻ ﺗﻘﻢ ﺑﺘﻮﺻﻴﻞ ﻫﺬﻩ ﺍﻟﻮﺣﺪﺓ ﺃﻭ ﻏﻴﺮﻫﺎ ﻣﻦ ﺍﻟﻤﻜﻮﻧﺎﺕ ﺑﻤﺨﺮﺝ ﺍﻟﺘﻴﺎﺭ ﺍﻟﻤﺘﺮﺩﺩ ﺣﺘﻰ ﺗﻨﺘﻬﻲ ﻣﻦ ﺗﻮﺻﻴﻞ ﻛﺎﻓﺔ ﺍﻟﺘﻮﺻﻴﻼﺕ ﺑﻴﻦ ﺍﻟﻤﻜﻮﻧﺎﺕ. ٨ ﻭﺣﺪﺓ ﺍﻟﺘﺤﻜﻢ ﻋﻦ ﺑُﻌﺪ ﻭﺣﺪﺓ ﺍﻟﺘﺤﻜﻢ ﻋﻦ ﺑُﻌﺪ ARA ﺍﻟﺘﻌﺮﻑ ﻋﻠﻰ ﻭﺣﺪﺓ ﺍﻟﺘﺤﻜﻢ ﻋﻦ ﺑﻌﺪ ﻭﺍﺳﺘﺨﺪﺍﻣﻬﺎ SOURCE ﺍﺿﻐﻂ ﻋﻠﻴﻪ ﻟﺘﺤﺪﻳﺪ ﻣﺼﺪﺭ ﻣﺘﺼﻞ ﺑﺠﻬﺎﺯ .SoundStand POWER SOURCE ) Surr.Soundﺗﻤﺪﻳﺪ ﺍﻟﺼﻮﺕ ﺍﻟﻤﺤﻴﻄﻲ( ﺍﺿﻐﻂ ﻋﻠﻰ ﺯﺭ Surr.Soundﺍﻟﻤﻮﺟﻮﺩ ﻋﻠﻰ ﻭﺣﺪﺓ ﺍﻟﺘﺤﻜﻢ ﻋﻦ ﺑﻌﺪ ﻹﺿﺎﻓﺔ ﺍﻟﻌﻤﻖ ﻭﺍﻟﻘﻮﺓ ﻟﻠﺼﻮﺕ. : SURROUND SOUND AUTOﺇﺫﺍ ﻛﺎﻥ ﻣﺼﺪﺭ ﺍﻟﺼﻮﺕ ﻳﺰﻳﺪ ﻋﻦ ﻗﻨﺎﺗﻴﻦ ﺳﻴﺘﻢ ﺗﺸﻐﻴﻞ ﻭﻇﻴﻔﺔ SURROUND SOUND ONﺗﻠﻘﺎﺋﻴًﺎ .ﻭﻣﻦ ﻧﺎﺣﻴﺔ ﺃﺧﺮﻯ، ﺇﺫﺍ ﻛﺎﻥ ﻣﺼﺪﺭ ﺍﻟﺼﻮﺕ ﺃﻗﻞ ﻣﻦ ﻗﻨﺎﺗﻴﻦ ،STEREOﻳﺘﻢ ﺿﺒﻂ ﺍﻟﻮﺿﻊ ﺗﻠﻘﺎﺋﻴًﺎ ﻋﻠﻰ .SURROUND SOUND OFF MUTE WOOFER LEVEL VOL Surr. Sound WOOFER ﻳﻤﻜﻨﻚ ﺍﻟﺘﺤﻜﻢ ﻓﻲ ﻣﺴﺘﻮﻯ ﺻﻮﺕ ﻣﻀﺨﻢ ﺍﻟﺼﻮﺕ. ﺍﺿﻐﻂ ﻋﻠﻰ ﺯﺭ ﺃﻭ ﺍﻟﻤﻮﺟﻮﺩ ﺑﻤﻔﺘﺎﺡ WOOFER LEVELﺇﺫﺍ ﻛﻨﺖ ﺗﺮﻏﺐ ﻓﻲ ﺭﻓﻊ ﺃﻭ ﺧﻔﺾ ﻣﺴﺘﻮﻯ ﺻﻮﺕ ﺍﻟﻤﻀﺨﻢ .ﻳﻤﻜﻨﻚ ﺿﺒﻂ ﺍﻟﻘﻴﻤﺔ ﻣﻦ SW 6ﺇﻟﻰ .SW +6DIMMER/ANYNET+ : DIMMERﺍﺿﻐﻂ ﻋﻠﻰ ﺯﺭ DIMMER/ANYNET+ﺍﻟﻤﻮﺟﻮﺩ ﻋﻠﻰ ﻟﻮﺣﺔ ﺍﻟﺘﺤﻜﻢ ﻋﻦ ﺑﻌﺪ ﻟﻠﺘﺤﻜﻢ ﻓﻲ ﻣﺴﺘﻮﻯ ﺳﻄﻮﻉ ﺍﻟﺸﺎﺷﺔ. : ANYNET+ﻳﺸﻐﻞ ﻭﻇﻴﻔﺔ ANYNET+ﺍﻟﺘﻲ ﺗﺴﻤﺢ ﺑﺎﻟﺘﺤﻜﻢ ﻓﻲ ﻧﻈﺎﻡ SoundStandﻣﻦ ﺧﻼﻝ ﻭﺣﺪﺓ ﺍﻟﺘﺤﻜﻢ ﻋﻦ ﺑﻌﺪ ﺍﻟﺨﺎﺻﺔ ﺑﺘﻠﻔﺰﻳﻮﻥ .Samsung ﻭﻳﻤﻜﻦ ﺗﺸﻐﻴﻞ ﻭﻇﻴﻔﺔ ANYNET+ﻭﺇﻳﻘﺎﻑ ﺗﺸﻐﻴﻠﻬﺎ ﻓﻲ ﻛﻞ ﻣﺮﺓ ﻳﺘﻢ ﻓﻴﻬﺎ ﺍﻟﻀﻐﻂ ﻋﻠﻰ ﺯﺭ DIMMER/ANYNET+ﺑﺸﻜﻞ ﻣﺴﺘﻤﺮ ﻟﻤﺪﺓ ﺗﺰﻳﺪ ﻋﻦ 5ﺛﻮﺍﻧﻲ. ﺍﻟﺘﺨﻄﻲ ﻟﻸﻣﺎﻡ ﻓﻲ ﺣﺎﻟﺔ ﻭﺟﻮﺩ ﺃﻛﺜﺮ ﻣﻦ ﻣﻠﻒ ﻋﻠﻰ ﺍﻟﺠﻬﺎﺯ ﺗﻘﻮﻡ ﺑﺘﺸﻐﻴﻠﻪ ،ﻭﻗﻴﺎﻣﻚ ﺑﺎﻟﻀﻐﻂ ﻋﻠﻰ ﺯﺭ ،$ﻳﺘﻢ ﺗﺤﺪﻳﺪ ﺍﻟﻤﻠﻒ ﺍﻟﺘﺎﻟﻲ. REPEAT ﻳﻤﻜﻨﻚ ﺿﺒﻂ ﻭﻇﻴﻔﺔ ) REPEATﺍﻹﻋﺎﺩﺓ( ﺃﺛﻨﺎء ﺇﻋﺎﺩﺓ ﺗﺸﻐﻴﻞ ﺍﻟﻤﻮﺳﻴﻘﻰ ﻣﻦ ﻣﺤﺮﻙ .USB : REPEAT OFFﻹﻟﻐﺎء ﺗﺸﻐﻴﻞ ﻭﻇﻴﻔﺔ ) Repeatﺍﻹﻋﺎﺩﺓ(. : REPEAT FILEﺗﺸﻐﻴﻞ ﻣﺴﺎﺭ ﺑﺸﻜﻞ ﻣﺘﻜﺮﺭ. : REPEAT ALLﺗﺸﻐﻴﻞ ﻛﺎﻓﺔ ﺍﻟﻤﺴﺎﺭﺍﺕ ﺑﺸﻜﻞ ﻣﺘﻜﺮﺭ. : REPEAT RANDOMﺗﺸﻐﻴﻞ ﺍﻟﻤﻠﻔﺎﺕ ﺑﺘﺮﺗﻴﺐ ﻋﺸﻮﺍﺋﻲ. )ﺍﻟﻤﺴﺎﺭ ﺍﻟﺬﻱ ﺗﻢ ﺗﺸﻐﻴﻠﻪ ﺑﺎﻟﻔﻌﻞ ﺭﺑﻤﺎ ﻳﺘﻢ ﺗﺸﻐﻴﻠﻪ ﻣﺮﺓ ﺃﺧﺮﻯ(. ﺍﻟﺘﺸﻐﻴﻞ/ﺍﻹﻳﻘﺎﻑ ﺍﻟﻤﺆﻗﺖ ﺍﺿﻐﻂ ﻋﻠﻰ ﺯﺭ & ﻣﺮﺓ ﺃﺧﺮﻯ ﻹﻳﻘﺎﻑ ﺗﺸﻐﻴﻞ ﺍﻟﻤﻠﻒ ﺑﺸﻜﻞ ﻣﺆﻗﺖ. ﺍﺿﻐﻂ ﻋﻠﻰ ﺯﺭ & ﻟﺘﺸﻐﻴﻞ ﺍﻟﻤﻠﻒ ﺍﻟﻤﺤﺪﺩ. ● ﺍﺳﻢ SoundStandﻫﻮ ﻣﻠﻚ ﺧﺎﺹ ﻟﺸﺮﻛﺔ .Samsung ● ﺷﻐﻞ ﺍﻟﺘﻠﻔﺰﻳﻮﻥ ﺑﺎﺳﺘﺨﺪﺍﻡ ﻭﺣﺪﺓ ﺍﻟﺘﺤﻜﻢ ﻋﻦ ﺑﻌﺪ ﺍﻟﺨﺎﺻﺔ ﺑﺎﻟﺘﻠﻔﺰﻳﻮﻥ. ٩ DIMMER SYNC REPEAT SYNC SOUND EFFECT Bluetooth POWER ﻭﺣﺪﺓ ﺍﻟﺘﺤﻜﻢ ﻋﻦ ﺑُﻌﺪ POWER POWER ﻟﺘﺸﻐﻴﻞ ﻭﺇﻳﻘﺎﻑ ﺗﺸﻐﻴﻞ ﻧﻈﺎﻡ .SoundStand SOURCE MUTE ﻳﻤﻜﻨﻚ ﺗﺨﻔﻴﺾ ﺍﻟﺼﻮﺕ ﺇﻟﻰ ﻣﺴﺘﻮﻯ ﻋﻦ ﻃﺮﻳﻖ ﺍﻟﻀﻐﻂ ﻋﻠﻰ ﺍﻟﺰﺭ .ﺍﺿﻐﻂ ﻣﺮﺓ ﺃﺧﺮﻯ ﻻﺳﺘﻌﺎﺩﺓ ﺍﻟﺼﻮﺕ ﺑﺎﻟﻤﺴﺘﻮﻯ ﺍﻟﺴﺎﺑﻖ. MUTE WOOFER LEVEL VOL Surr. Sound DIMMER SYNC REPEAT SYNC SOUND EFFECT Bluetooth POWER VOLUME ﻟﻀﺒﻂ ﻣﺴﺘﻮﻯ ﺻﻮﺕ ﺍﻟﻮﺣﺪﺓ. SOUND EFFECT ﺍﺿﻐﻂ ﻋﻠﻰ SOUND EFFECTﻋﻠﻰ ﻭﺣﺪﺓ ﺍﻟﺘﺤﻜﻢ ﻋﻦ ﺑُﻌﺪ ﻟﺘﺤﺪﻳﺪ ﻭﺿﻊ ﺻﻮﺕ. ﺍﺧﺘﺮ ﻭﺿﻊ STANDARDﺇﺫﺍ ﻛﻨﺖ ﺗﺮﻏﺐ ﻓﻲ ﺍﻻﺳﺘﻤﺘﺎﻉ ﺑﺎﻟﺼﻮﺕ ﺍﻷﺻﻠﻲ .ﻧﻮﺻﻴﻚ ﺑﺎﺧﺘﻴﺎﺭ ) Sound Effectﺍﻟﻤﺆﺛﺮﺍﺕ ﺍﻟﺼﻮﺗﻴﺔ( ً ﻭﻓﻘﺎ ﻟﻠﻤﺎﺩﺓ ﺍﻟﻤﺼﺪﺭ ﻭﺫﻭﻗﻚ ﺍﻟﺸﺨﺼﻲ. ﺍﻟﺘﺨﻄﻲ ﻟﻠﺨﻠﻒ ﻓﻲ ﺣﺎﻟﺔ ﻭﺟﻮﺩ ﺃﻛﺜﺮ ﻣﻦ ﻣﻠﻒ ﻋﻠﻰ ﺍﻟﺠﻬﺎﺯ ﺗﻘﻮﻡ ﺑﺘﺸﻐﻴﻠﻪ ،ﻭﻗﻴﺎﻣﻚ ﺑﺎﻟﻀﻐﻂ ﻋﻠﻰ ﺯﺭ ،#ﻳﺘﻢ ﺗﺤﺪﻳﺪ ﺍﻟﻤﻠﻒ ﺍﻟﺴﺎﺑﻖ. Bluetooth POWER ﺍﺿﻐﻂ ﻋﻠﻰ ﺯﺭﻱ Bluetooth POWERﻋﻠﻰ ﻭﺣﺪﺓ ﺍﻟﺘﺤﻜﻢ ﻋﻦ ﺑُﻌﺪ ﻟﺘﻌﻴﻴﻦ ﺗﺸﻐﻴﻞ ﻭﻇﻴﻔﺔ ) Bluetooth Powerﺗﺸﻐﻴﻞ (Bluetoothﺃﻭ ﺇﻳﻘﺎﻑ ﺗﺸﻐﻴﻠﻬﺎ. ﺭﺍﺟﻊ ﺻﻔﺤﺔ ١٦ﻭ١٨ AUDIO SYNC ً ﻣﺘﺼﻼ ﺑﺘﻠﻔﺰﻳﻮﻥ ﺭﻗﻤﻲ ﻭﺑﺪﺍ ﺍﻟﻔﻴﺪﻳﻮ ﻏﻴﺮ ﻣﺘﺰﺍﻣﻦ ﻣﻊ ﺍﻟﺼﻮﺕ، ﺇﺫﺍ ﻛﺎﻥ ﺟﻬﺎﺯ SoundStand ﻓﺎﺿﻐﻂ ﻋﻠﻰ ﺯﺭﻱ ) Audio Syncﻣﺰﺍﻣﻨﺔ ﺍﻟﺼﻮﺕ( ﻟﻤﺰﺍﻣﻨﺔ ﺍﻟﺼﻮﺕ ﻣﻊ ﺍﻟﻔﻴﺪﻳﻮ. ﺍﺿﻐﻂ ﻋﻠﻰ ﺯﺭﻱ AUDIO SYNC +/-ﻟﺘﻌﻴﻴﻦ ﺗﺄﺧﻴﺮ ﺍﻟﺼﻮﺕ ﻣﻦ 0ﺇﻟﻰ 300ﻣﻠﻠﻲ ﺛﺎﻧﻴﺔ .ﻓﻲ ﻭﺿﻊ ،USBﻭﺿﻊ TVﺃﻭ ﻭﺿﻊ ،BTﺭﺑﻤﺎ ﻻ ﺗﻌﻤﻞ ﻭﻇﻴﻔﺔ ) Audio Syncﻣﺰﺍﻣﻨﺔ ﺍﻟﺼﻮﺕ(. _ ﺗﺮﻛﻴﺐ ﺍﻟﺒﻄﺎﺭﻳﺎﺕ ﻓﻲ ﻭﺣﺪﺓ ﺍﻟﺘﺤﻜﻢ ﻋﻦ ﺑﻌﺪ .١ﺍﺳﺘﺨﺪﻡ ﻋﻤﻠﺔ ﻣﻌﺪﻧﻴﺔ ﻹﺩﺍﺭﺓ ﻏﻄﺎء ﻭﺣﺪﺓ ﺍﻟﺘﺤﻜﻢ ﻋﻦ ﺑﻌﺪ ﻓﻲ ﻋﻜﺲ ﺍﺗﺠﺎﻩ ﺣﺮﻛﺔ ﻋﻘﺎﺭﺏ ﺍﻟﺴﺎﻋﺔ ﻹﺯﺍﻟﺘﻪ ﻋﻠﻰ ﺍﻟﻨﺤﻮ ﺍﻟﻤﻮﺿﺢ ﻓﻲ ﺍﻟﺸﻜﻞ ﺃﻋﻼﻩ. .٢ﱢ ﺭﻛﺐ ﺑﻄﺎﺭﻳﺔ ﻟﻴﺜﻴﻮﻡ ﺑﺠﻬﺪ 3ﻓﻮﻟﺖ .ﺍﺟﻌﻞ ﺍﻟﻘﻄﺐ ﺍﻟﻤﻮﺟﺐ )(+ ﻣﺘﺠﻬًﺎ ﻷﻋﻠﻰ ﻋﻨﺪ ﺗﺮﻛﻴﺐ ﺍﻟﺒﻄﺎﺭﻳﺔ .ﻋﺪ ﺗﺮﻛﻴﺐ ﻏﻄﺎء ﺍﻟﺒﻄﺎﺭﻳﺔ ﻣﻊ ﻣﺤﺎﺫﺍﺓ ﻋﻼﻣﺎﺕ ' ' ﻋﻠﻰ ﺍﻟﻨﺤﻮ ﺍﻟﻤﻮﺿﺢ ﻓﻲ ﺍﻟﺸﻜﻞ ﺃﻋﻼﻩ. ١٠ .٣ﺍﺳﺘﺨﺪﻡ ﻋﻤﻠﺔ ﻣﻌﺪﻧﻴﺔ ﻹﺩﺍﺭﺓ ﺍﻟﻐﻄﺎء ﻓﻲ ﺍﺗﺠﺎﻩ ﺣﺮﻛﺔ ﻋﻘﺎﺭﺏ ﺍﻟﺴﺎﻋﺔ ﺣﺘﻰ ﻳﺜﺒﺖ ﻓﻲ ﻣﻜﺎﻧﻪ. ﺍﻟﺘﺮﻛﻴﺐ ﺍﻟﺘﺮﻛﻴﺐ ﺇﺫﺍ ﻛﻨﺖ ﺗﺮﻏﺐ ﻓﻲ ﻭﺿﻊ ﺍﻟﺘﻠﻔﺰﻳﻮﻥ ﻓﻮﻕ ﻧﻈﺎﻡ ،SoundStandﻳﺮﺟﻰ ﺍﻟﺘﺄﻛﺪ ﻣﻦ ﺃﻥ ﺗﻠﻔﺰﻳﻮﻧﻚ ﻳﻔﻲ ﺑﺎﻟﺸﺮﻃﻴﻦ ﺍﻟﺘﺎﻟﻴﻴﻦ: - ﺍﻟﺤﺪ ﺍﻷﻗﺼﻰ ﻟﻮﺯﻥ ﺍﻟﺘﻠﻔﺰﻳﻮﻥ ٣٥ :ﻛﺠﻢ - ﺍﻟﺤﺪ ﺍﻷﻗﺼﻰ ﻷﺑﻌﺎﺩ ﺣﺎﻣﻞ ﺍﻟﺘﻠﻔﺰﻳﻮﻥ :ﺃﺻﻐﺮ ﻣﻦ ٧٢٠ﻣﻠﻢ × ٣٢٠ﻣﻠﻢ ﻳﻨﺎﺳﺐ ﻣﻌﻈﻢ ﺃﺟﻬﺰﺓ ﺍﻟﺘﻠﻔﺰﻳﻮﻥ ﺣﺘﻰ ١٥٢٤ﻣﻢ ,ﺣﺘﻰ ﻭﺯﻥ ٣٥ﻛﺠﻢ )*ﻗﺪ ﻳﺨﺘﻠﻒ ﺣﺠﻢ ﺷﺎﺷﺔ ﺍﻟﺘﻠﻔﺰﻳﻮﻥ ﻭﻧﻮﻉ ﺣﺎﻣﻠﻬﺎ( _ ﻛﻴﻔﻴﺔ ﺗﺮﻛﻴﺐ ﻧﻈﺎﻡ SoundStand ﺍﻟﺘﺮﻛﻴﺐ ﺍﻟﺴﻠﻴﻢ ﻻ ﺗﻀﻊ ﺍﻟﺘﻠﻔﺰﻳﻮﻥ ﻋﻠﻰ ﺟﺎﻧﺐ ﻭﺍﺣﺪ ﻣﻦ ﻧﻈﺎﻡ SoundStand ﻻ ﺗﻀﻊ SoundStandﺑﺎﻟﻘﺮﺏ ﻣﻦ ﺣﺎﻓﺔ ﺭﻑ ﺍﻟﺘﻠﻔﺰﻳﻮﻥ ﺃﻭ ﺍﻟﻄﺎﻭﻟﺔ ﺃﻭ ﻣﺮﻛﺰ ﺍﻟﺘﺮﻓﻴﻪ ﻻ ﺗﻀﻊ ﺟﻬﺎﺯ ﺗﻠﻔﺰﻳﻮﻥ ﺗﻜﻮﻥ ﻗﺎﻋﺪﺗﻪ ﺃﻛﺒﺮ ﻣﻦ ﺍﻟﺴﻄﺢ ﺍﻟﻌﻠﻮﻱ ﻟﻨﻈﺎﻡ SoundStandﻋﻠﻰ ﻧﻈﺎﻡ SoundStand ● ● ● ● ﻻ ﺗﻀﻊ ﺍﻟﺘﻠﻔﺰﻳﻮﻥ ﻋﻠﻰ ﺟﺎﻧﺐ ﻭﺍﺣﺪ ﻣﻦ ﻧﻈﺎﻡ .SoundStandﻓﻘﺪ ﻳﻨﻘﻠﺐ ﺍﻟﺘﻠﻔﺰﻳﻮﻥ ﻭﻳﺘﺴﺒﺐ ﻓﻲ ﺣﺪﻭﺙ ﺇﺻﺎﺑﺔ ﺑﺪﻧﻴﺔ. ﺗﺄﻛﺪ ﻣﻦ ﻭﺿﻊ ﻧﻈﺎﻡ SoundStandﻓﻲ ﻣﻨﺘﺼﻒ ﺍﻟﺮﻑ ﺃﻭ ﺍﻟﻄﺎﻭﻟﺔ ،ﺇﻟﺦ ،.ﻋﻨﺪ ﺗﺜﺒﻴﺘﻪ .ﻭﻻ ﺗﻀﻌﻪ ﺑﺎﻟﻘﺮﺏ ﻣﻦ ﺣﺎﻓﺔ. ﺇﺫﺍ ﻛﺎﻥ ﺍﻟﺘﻠﻔﺰﻳﻮﻥ ﺃﻛﺒﺮ ﻣﻦ ﻧﻈﺎﻡ ،SoundStandﻓﻘﻢ ﺑﺘﺜﺒﻴﺖ ﺍﻟﺘﻠﻔﺰﻳﻮﻥ ﻋﻠﻰ ﺍﻟﺤﺎﺋﻂ ﺃﻭ ﺿﻌﻪ ﻋﻠﻰ ﺳﻄﺢ ﺛﺎﺑﺖ. ﺣﺎﻓﻆ ﻋﻠﻰ ﺑُﻌﺪ ﻧﻈﺎﻡ SoundStandﻋﻦ ﺍﻟﺤﺎﺋﻂ ﺑﻤﺴﺎﻓﺔ ﺑﻮﺻﺘﻴﻦ ) ٥ﺳﻢ( ﻋﻠﻰ ﺍﻷﻗﻞ ﻋﻨﺪ ﺗﺜﺒﻴﺘﻪ. _ ﺍﺳﺘﺨﺪﺍﻡ ﻭﺳﺎﺋﺪ ﺍﻟﺤﻤﺎﻳﺔ ﺿﻊ ﻭﺳﺎﺋﺪ ﺍﻟﺤﻤﺎﻳﺔ ﺍﻟﻤﻀﻤﻨﺔ ﺃﻋﻠﻰ ﺍﻟﻤﻨﺘﺞ ﺛﻢ ﺿﻊ ﺣﺎﻣﻞ ﺍﻟﺘﻠﻔﺰﻳﻮﻥ ﺃﻋﻠﻰ ﻣﻨﻬﺎ ﻟﺘﺠﻨﺐ ﺧﺪﺵ ﺳﻄﺢ ﺍﻟﻤﻨﺘﺞ. ١١ ARA ﺗﺮﻛﻴﺐ ﻧﻈﺎﻡ SOUNDSTAND ﺍﻟﺘﻮﺻﻴﻼﺕ ﺍﻟﺘﻮﺻﻴﻼﺕ ﺗﻮﺻﻴﻞ ﺟﻬﺎﺯ ﺧﺎﺭﺟﻲ ﺑﺎﺳﺘﺨﺪﺍﻡ ﻛﺒﻞ HDMI ﻳﻌﺪ HDMIﺍﻟﻮﺍﺟﻬﺔ ﺍﻟﺮﻗﻤﻴﺔ ﺍﻟﻘﻴﺎﺳﻴﺔ ﻟﻠﺘﻮﺻﻴﻞ ﺑﺘﻠﻚ ﺍﻷﺟﻬﺰﺓ ﻣﺜﻞ ﺃﺟﻬﺰﺓ ﺍﻟﺘﻠﻔﺰﻳﻮﻥ ،ﺃﺟﻬﺰﺓ ﺍﻟﻌﺮﺽ ،ﻣﺸﻐﻼﺕ ،DVDﻣﺸﻐﻼﺕ ،Blu-rayﻭﺃﺟﻬﺰﺓ ﺍﻻﺳﺘﻘﺒﺎﻝ ﺍﻟﺮﻗﻤﻲ ،set top boxesﻭﻏﻴﺮﻫﺎ. ﺗﺤﻮﻝ ﻭﺻﻼﺕ HDMIﺩﻭﻥ ﺣﺪﻭﺙ ﻓﻘﺪﺍﻥ ﻟﻺﺷﺎﺭﺓ ﻭﺍﻟﺬﻱ ﻳﻨﺘﺞ ﻋﺎﺩﺓ ﻋﻨﺪ ﺗﺤﻮﻳﻞ ﺍﻹﺷﺎﺭﺓ ﺇﻟﻰ ﺇﺷﺎﺭﺓ ﺗﻨﺎﻇﺮﻳﺔ ﻭﻳﺤﺎﻓﻆ ﻋﻠﻰ ﺟﻮﺩﺓ ﺍﻟﺼﻮﺕ ﻭﺍﻟﻔﻴﺪﻳﻮ ﻟﻠﻤﺼﺪﺭ ﺍﻟﺮﻗﻤﻲ ﺍﻷﺻﻠﻲ. HDMI OUT HDMI IN ﻛﺎﺑﻞ HDMI )ﻏﻴﺮ ﻣﺮﻓﻘﺔ( ﻛﺎﺑﻞ HDMI )ﻏﻴﺮ ﻣﺮﻓﻘﺔ( ﺍﻷﺟﻬﺰﺓ ﺍﻟﺮﻗﻤﻴﺔ HDMI IN (ARC) HDMI OUT ﻗﻢ ﺑﺘﻮﺻﻴﻞ ﻛﺒﻞ ) HDMIﻏﻴﺮ ﻣﺮﻓﻘﺔ( ﻣﻦ ﻣﻘﺒﺲ HDMI INﺍﻟﻤﻮﺟﻮﺩ ﺑﺎﻟﺠﺰء ﺍﻟﺨﻠﻔﻲ ﻣﻦ ﺍﻟﻤﻨﺘﺞ ﺑﻤﻘﺒﺲ HDMI OUTﺍﻟﻤﻮﺟﻮﺩ ﺑﺄﺟﻬﺰﺗﻚ ﺍﻟﺮﻗﻤﻴﺔ. ﺗﺘﻴﺢ ﻭﻇﻴﻔﺔ ARCﺇﻣﻜﺎﻧﻴﺔ ﺇﺧﺮﺍﺝ ﺍﻟﺼﻮﺕ ﺍﻟﺮﻗﻤﻲ ﻣﻦ ﺧﻼﻝ ﻣﻨﻔﺬ .(ARC) HDMI OUT ﻭ، ﻻ ﻳﻤﻜﻦ ﺗﺸﻐﻴﻞ ﺗﻠﻚ ﺍﻟﻮﻇﻴﻔﺔ ﺇﻻ ﻓﻲ ﺣﺎﻟﺔ ﺗﻮﺻﻴﻞ ﻧﻈﺎﻡ SoundStandﺑﺠﻬﺎﺯ ﺍﻟﺘﻠﻔﺰﻳﻮﻥ ﺍﻟﺬﻱ ﻳﺪﻋﻢ ﻭﻇﻴﻔﺔ .ARC (HDMI) HDMI OUT ● ﻳﺠﺐ ﺗﺸﻐﻴﻞ ﻭﻇﻴﻔﺔ .ANYNET+ ● ﻟﻦ ﺗﻜﻮﻥ ﻫﺬﻩ ﺍﻟﻮﻇﻴﻔﺔ ﻣﺘﺎﺣﺔ ﺇﺫﺍ ﻛﺎﻥ ﻛﺒﻞ HDMIﻻ ﻳﺪﻋﻢ .ARC ﻭﺻﻞ ﻛﺎﺑﻞ ) HDMIﻏﻴﺮ ﻣﺮﻓﻖ( ﻣﻦ ﻣﻘﺒﺲ HDMI OUTﺍﻟﻤﻮﺟﻮﺩ ﺑﺎﻟﺠﺰء ﺍﻟﺨﻠﻔﻲ ﻣﻦ ﺍﻟﻤﻨﺘﺞ ﺑﻤﻘﺒﺲ HDMI INﺍﻟﻤﻮﺟﻮﺩ ﺑﺎﻟﺘﻠﻔﺰﻳﻮﻥ. ● ﻳﻌﺪ HDMIﻫﻮ ﺍﻟﻮﺳﻴﻂ ﺍﻟﺬﻱ ﻳﺘﻴﺢ ﺇﻣﻜﺎﻧﻴﺔ ﺍﻹﺭﺳﺎﻝ ﺍﻟﺮﻗﻤﻲ ﻟﺒﻴﺎﻧﺎﺕ ﺍﻟﺼﻮﺭﺓ ﻭﺍﻟﺼﻮﺕ ﺑﻤﻮﺻﻞ ﻭﺍﺣﺪ ﻓﻘﻂ. ١٢ ﺍﻟﺘﻮﺻﻴﻼﺕ ﺗﻮﺻﻴﻞ ﺟﻬﺎﺯ ﺧﺎﺭﺟﻲ ﺑﺎﺳﺘﺨﺪﺍﻡ ﻛﺒﻞ ﺑﺼﺮﻱ )ﺭﻗﻤﻲ( ﺃﻭ ﻛﺒﻞ ﺻﻮﺕ )ﺗﻨﺎﻇﺮﻱ( ﺗﺄﺗﻲ ﻫﺬﻩ ﺍﻟﻮﺣﺪﺓ ﻣﺰﻭﺩﺓ ﺑﻤﻘﺒﺲ optical inﺭﻗﻤﻲ ﻭﺍﺣﺪ ﻭﻣﻘﺒﺲ analogue inﻟﻠﺼﻮﺕ ﻣﻤﺎ ﻳﻮﻓﺮ ﻟﻚ ﻃﺮﻳﻘﺘﻴﻦ ﻟﻠﺘﻮﺻﻴﻞ ﺑﺎﻟﺘﻠﻔﺰﻳﻮﻥ. ARA AUX IN OPTICAL IN ﺃﻭ OPTICAL OUT AUDIO OUT ﺍﻟﻜﺒﻞ ﺍﻟﺒﺼﺮﻱ )ﻏﻴﺮ ﻣﺮﻓﻘﺔ( ﻛﺒﻞ ﺍﻟﺼﻮﺕ /BDﻣﺸﻐﻞ /DVD /Set-top box ﺟﻬﺎﺯ ﺃﻟﻌﺎﺏ ﺍﻟﻔﻴﺪﻳﻮ OPTICAL IN AUX IN ﻭﺻﻞ ﻣﻘﺒﺲ OPTICAL INﺍﻟﻤﻮﺟﻮﺩ ﺑﺎﻟﻮﺣﺪﺓ ﺍﻟﺮﺋﻴﺴﻴﺔ ﺑﻤﻨﻔﺬ OPTICAL OUTﺑﺎﻟﺘﻠﻔﺰﻳﻮﻥ ﺃﻭ ﺍﻟﺠﻬﺎﺯ ﺍﻟﻤﺼﺪﺭ. ﻭﺻﻞ ﻣﻘﺒﺲ ) AUX INﺍﻟﺼﻮﺕ( ﺍﻟﻤﻮﺟﻮﺩ ﺑﺎﻟﻮﺣﺪﺓ ﺍﻟﺮﺋﻴﺴﻴﺔ ﺑﻤﻨﻔﺬ AUDIO OUTﺑﺎﻟﺘﻠﻔﺰﻳﻮﻥ ﺃﻭ ﺍﻟﺠﻬﺎﺯ ﺍﻟﻤﺼﺪﺭ. ﺗﺄﻛﺪ ﻣﻦ ﻣﻄﺎﺑﻘﺔ ﺃﻟﻮﺍﻥ ﺍﻟﻤﻮﺻﻼﺕ. ● ﻻ ﺗﻘﻢ ﺑﺘﻮﺻﻴﻞ ﺳﻠﻚ ﺍﻟﺘﻴﺎﺭ ﺍﻟﻜﻬﺮﺑﻲ ﺍﻟﺨﺎﺹ ﺑﻬﺬﺍ ﺍﻟﻤﻨﺘﺞ ﺃﻭ ﺟﻬﺎﺯ ﺍﻟﺘﻠﻔﺰﻳﻮﻥ ﺑﻤﻨﻔﺬ ﺍﻟﺘﻴﺎﺭ ﺍﻟﻜﻬﺮﺑﻲ ﺍﻟﻤﻮﺟﻮﺩ ﺑﺎﻟﺤﺎﺋﻂ ﺣﺘﻰ ﺇﺗﻤﺎﻡ ﻛﺎﻓﺔ ﺍﻟﺘﻮﺻﻴﻼﺕ ﺑﻴﻦ ﺍﻟﻤﻜﻮﻧﺎﺕ. ● ﻗﺒﻞ ﻧﻘﻞ ﻫﺬﺍ ﺍﻟﻤﻨﺘﺞ ﺃﻭ ﺗﺮﻛﻴﺒﻪ ،ﺗﺄﻛﺪ ﻣﻦ ﺇﻳﻘﺎﻑ ﺗﺸﻐﻴﻠﻪ ﻭﻓﺼﻞ ﺳﻠﻚ ﺍﻟﺘﻴﺎﺭ ﺍﻟﻜﻬﺮﺑﻲ. ﺃﻭ، ١٣ ﺍﻟﻮﻇﺎﺋﻒ ﺍﻟﻮﻇﺎﺋﻒ ﻭﺿﻊ ﺍﻹﺩﺧﺎﻝ ﺍﺿﻐﻂ ﻋﻠﻰ ﺯﺭ SOURCEﺍﻟﻤﻮﺟﻮﺩ ﻋﻠﻰ ﻭﺣﺪﺓ ﺍﻟﺘﺤﻜﻢ ﻋﻦ ﺑﻌﺪ ﺃﻭ ﺯﺭ ) SOURCE ( ﺍﻟﻤﻮﺟﻮﺩ ﻋﻠﻰ ﺍﻟﻠﻮﺣﺔ ﺍﻟﻌﻠﻮﻳﺔ ﻣﻦ ﺍﻟﻤﻨﺘﺞ ﻟﺘﺤﺪﻳﺪ ﺍﻟﻮﺿﻊ ﺍﻟﻤﺮﻏﻮﺏ. POWER SOURCE MUTE WOOFER VOL ﻭﺿﻊ ﺍﻹﺩﺧﺎﻝ ﺍﻟﺸﺎﺷﺔ ﺍﻟﻤﺪﺧﻞ ﺍﻟﺮﻗﻤﻲ ﺍﻟﺒﺼﺮﻱ D.IN ﻣﺪﺧﻞ AUX AUX ﻳﺘﻢ ﺇﻳﻘﺎﻑ ﺗﺸﻐﻴﻞ ﺍﻟﻮﺣﺪﺓ ﺗﻠﻘﺎﺋﻴًﺎ ﻓﻲ ﺍﻟﺤﺎﻻﺕ ﺍﻟﺘﺎﻟﻴﺔ: ● ﻭﺿﻊ ARC/USB/TV/BT/HDMI/D.IN - ﻓﻲ ﺣﺎﻟﺔ ﻋﺪﻡ ﺻﺪﻭﺭ ﺇﺷﺎﺭﺓ ﺻﻮﺗﻴﺔ ﻟﻤﺪﺓ 25ﺩﻗﻴﻘﺔ. ● ﻭﺿﻊ AUX ﻣﺪﺧﻞ HDMI HDMI - ﻭﺿﻊ BLUETOOTH BT - ﻭﺿﻊ TV TV ﻭﺿﻊ USB USB ً ﺇﺫﺍ ﻟﻢ ﻛﺎﺑﻞ AUX ﻣﺘﺼﻼ ﻟﻤﺪﺓ ٢٥ﺩﻗﻴﻘﺔ. ﻓﻲ ﺣﺎﻟﺔ ﻋﺪﻡ ﺍﻟﻀﻐﻂ ﻋﻠﻰ ﺃﻱ ﻣﻔﺘﺎﺡ ﻟﻤﺪﺓ ٨ﺳﺎﻋﺎﺕ ﺃﺛﻨﺎء ﺗﻮﺻﻴﻞ ﻛﺒﻞ .AUXﻟﺘﺸﻐﻴﻞ ﻫﺬﻩ ﺍﻟﻮﻇﻴﻔﺔ ﺃﻭ ﺇﻳﻘﺎﻑ ﺗﺸﻐﻴﻠﻬﺎ ،ﺍﺿﻐﻂ ﻣﻊ ﺛﻮﺍﻥ .ﻳﻈﻬﺮ AUTO POWER ﺍﻻﺳﺘﻤﺮﺍﺭ ﻋﻠﻰ ﺯﺭ & ﻟﻤﺪﺓ ٍ ٥ ) DOWN ON / OFFﺗﺸﻐﻴﻞ/ﺇﻳﻘﺎﻑ ﺍﻟﺘﺸﻐﻴﻞ ﺍﻟﺘﻠﻘﺎﺋﻲ( ﻋﻠﻰ ﺍﻟﺸﺎﺷﺔ. (HDMI OUT) ARC ﻛﺎﺑﻞ HDMI ● ﺗﺘﻴﺢ ﻭﻇﻴﻔﺔ ARCﺇﻣﻜﺎﻧﻴﺔ ﺇﺧﺮﺍﺝ ﺍﻟﺼﻮﺕ ﺍﻟﺮﻗﻤﻲ ﻣﻦ ﺧﻼﻝ ﻣﻨﻔﺬ .(ARC) HDMI OUT ﻻ ﻳﻤﻜﻦ ﺗﺸﻐﻴﻞ ﺗﻠﻚ ﺍﻟﻮﻇﻴﻔﺔ ﺇﻻ ﻓﻲ ﺣﺎﻟﺔ ﺗﻮﺻﻴﻞ ﻧﻈﺎﻡ SoundStandﺑﺠﻬﺎﺯ ﺍﻟﺘﻠﻔﺰﻳﻮﻥ ﺍﻟﺬﻱ ﻳﺪﻋﻢ ﻭﻇﻴﻔﺔ .ARC ● ﻳﺠﺐ ﺗﺸﻐﻴﻞ ﻭﻇﻴﻔﺔ .ANYNET+ ● ﻟﻦ ﺗﻜﻮﻥ ﻫﺬﻩ ﺍﻟﻮﻇﻴﻔﺔ ﻣﺘﺎﺣﺔ ﺇﺫﺍ ﻛﺎﻥ ﻛﺒﻞ HDMIﻻ ﻳﺪﻋﻢ .ARC ● ﻳﺘﻢ ﺗﻔﻌﻴﻞ ﻭﻇﻴﻔﺔ ARCﻓﻲ ﻭﺿﻊ D.INﻓﻲ ﺣﺎﻟﺔ ﺗﻮﺻﻴﻞ ﺍﻟﻮﺣﺪﺓ ﺑﺠﻬﺎﺯ ﺗﻠﻔﺰﻳﻮﻥ ﻳﺪﻋﻢ ﻭﻇﻴﻔﺔ .ARC ● ﻹﻳﻘﺎﻑ ﺗﺸﻐﻴﻞ ﻭﻇﻴﻔﺔ ،ARCﻗﻢ ﺑﺈﻳﻘﺎﻑ ﺗﺸﻐﻴﻞ ﻭﻇﻴﻔﺔ .ANYNET+ ١٤ ﺍﻟﻮﻇﺎﺋﻒ ﺍﻟﺒﻠﻮﺗﻮﺙ ﻳﻤﻜﻨﻚ ﺍﺳﺘﺨﺪﺍﻡ ﺟﻬﺎﺯ ﺑﻠﻮﺗﻮﺙ ﻟﻼﺳﺘﻤﺘﺎﻉ ﺑﺴﻤﺎﻉ ﺍﻟﻤﻮﺳﻴﻘﻰ ﺑﺼﻮﺕ ﺍﺳﺘﺮﻳﻮ ﻋﺎﻟﻲ ﺍﻟﺠﻮﺩﺓ ،ﺑﺪﻭﻥ ﺗﻮﺻﻴﻼﺕ ﺳﻠﻜﻴﺔ! ARA _ ﻟﺘﻮﺻﻴﻞ ﻧﻈﺎﻡ SoundStandﺑﺠﻬﺎﺯ ﺑﻠﻮﺗﻮﺙ ﺗﺄﻛﺪ ﻣﻦ ﺃﻥ ﺟﻬﺎﺯ ﺍﻟﺒﻠﻮﺗﻮﺙ ﻳﺪﻋﻢ ﺗﺸﻐﻴﻞ ﺳﻤﺎﻋﺔ ﺍﻻﺳﺘﺮﻳﻮ ﺍﻟﻤﺘﻮﺍﻓﻘﺔ ﻣﻊ ﺍﻟﺒﻠﻮﺗﻮﺙ. ﺗﻮﺻﻴﻞ ﺟﻬﺎﺯ ﺍﻟﺒﻠﻮﺗﻮﺙ .١ﺍﺿﻐﻂ ﻋﻠﻰ ﺯﺭ SOURCEﺍﻟﻤﻮﺟﻮﺩ ﺑﻮﺣﺪﺓ ﺍﻟﺘﺤﻜﻢ ﻋﻦ ﺑﻌﺪ ﺃﻭ ﻋﻠﻰ ﺯﺭ ) ( ﺍﻟﻤﻮﺟﻮﺩ ﻋﻠﻰ ﺍﻟﻠﻮﺣﺔ ﺍﻷﻣﺎﻣﻴﺔ ﺍﻟﻌﻠﻮﻳﺔ ﻟﻌﺮﺽ ﺭﺳﺎﻟﺔ .BT .٢ﺍﺧﺘﺮ ﻗﺎﺋﻤﺔ ﺍﻟﺒﻠﻮﺗﻮﺙ ﻣﻦ ﺟﻬﺎﺯ ﺍﻟﺒﻠﻮﺗﻮﺙ ﺍﻟﺬﻱ ﺗﺮﻏﺐ ﻓﻲ ﺗﻮﺻﻴﻠﻪ) .ﺭﺍﺟﻊ ﺩﻟﻴﻞ ﺍﻟﻤﺴﺘﺨﺪﻡ ﺍﻟﺨﺎﺹ ﺑﺠﻬﺎﺯ ﺍﻟﺒﻠﻮﺗﻮﺙ(. .٣ﺍﺧﺘﺮ ﻗﺎﺋﻤﺔ ﺳﻤﺎﻋﺔ ﺍﻻﺳﺘﺮﻳﻮ ﻓﻲ ﺟﻬﺎﺯ ﺍﻟﺒﻠﻮﺗﻮﺙ. • ﺳﺘﻈﻬﺮ ﻟﻚ ﻗﺎﺋﻤﺔ ﺑﺎﻷﺟﻬﺰﺓ ﺍﻟﺘﻲ ﺗﻢ ﺍﻟﻌﺜﻮﺭ ﻋﻠﻴﻬﺎ. ● ● ● ● .٤ﺍﺧﺘﺮ" "[Samsung] SoundStandﻣﻦ ﺍﻟﻘﺎﺋﻤﺔ. • ﻋﻨﺪ ﺗﻮﺻﻴﻞ SoundStandﺑﺠﻬﺎﺯ ﺍﻟﺒﻠﻮﺗﻮﺙ ،ﺳﻴﻌﺮﺽ ]ﺍﺳﻢ ﺟﻬﺎﺯ ﺍﻟﺒﻠﻮﺗﻮﺙ[ BT ﻋﻠﻰ ﺍﻟﺸﺎﺷﺔ ﺍﻷﻣﺎﻣﻴﺔ. • ﻳﻤﻜﻦ ﻋﺮﺽ ﺍﺳﻢ ﺍﻟﺠﻬﺎﺯ ﺑﺎﻟﻠﻐﺔ ﺍﻹﻧﺠﻠﻴﺰﻳﺔ ﻓﻘﻂ .ﺳﻴﺘﻢ ﻋﺮﺽ " _ " ﻭﺗﺤﺘﻪ ﺧﻂ ﺇﺫﺍ ﻟﻢ ﻳﻜﻦ ﺍﺳﻢ ﺍﻟﺠﻬﺎﺯ ﺑﺎﻟﻠﻐﺔ ﺍﻹﻧﺠﻠﻴﺰﻳﺔ. • ﻓﻲ ﺣﺎﻟﺔ ﻓﺸﻞ ﺟﻬﺎﺯ ﺍﻟﺒﻠﻮﺗﻮﺙ ﻓﻲ ﺍﻻﻗﺘﺮﺍﻥ ﺑﻨﻈﺎﻡ ،SoundStand ﻗﻢ ﺑﺤﺬﻑ " "[Samsung] SoundStandﺍﻟﺘﻲ ﺗﻢ ﺍﻟﻌﺜﻮﺭ ﻋﻠﻴﻬﺎ ﻣﻦ ﻗﺒﻞ ﺟﻬﺎﺯ ﺍﻟﺒﻠﻮﺗﻮﺙ ﻭﻗﻢ ﺑﺎﻟﺒﺤﺚ ﻋﻦ ﻧﻈﺎﻡ SoundStandﻣﺮﺓ ﺃﺧﺮﻯ. .٥ﻗﻢ ﺑﺘﺸﻐﻴﻞ ﻣﻠﻔﺎﺕ ﺍﻟﻤﻮﺳﻴﻘﻰ ﻋﻠﻰ ﺍﻟﺠﻬﺎﺯ ﺍﻟﺬﻱ ﺗﻢ ﺗﻮﺻﻴﻠﻪ. • ﻳﻤﻜﻨﻚ ﺍﻻﺳﺘﻤﺎﻉ ﺇﻟﻰ ﺍﻟﻤﻮﺳﻴﻘﻰ ﻋﻠﻰ ﺟﻬﺎﺯ ﺍﻟﺒﻠﻮﺗﻮﺙ ﺍﻟﻤﺘﺼﻞ ﻋﺒﺮ ﻧﻈﺎﻡ .SoundStand ● • ﻓﻲ ﻭﺿﻊ ) BTﺍﻟﺒﻠﻮﺗﻮﺙ( ،ﻻ ﺗﺘﻮﺍﻓﺮ ﻭﻇﺎﺋﻒ ) Playﺍﻟﺘﺸﻐﻴﻞ( / ) Pauseﺍﻹﻳﻘﺎﻑ ﺍﻟﻤﺆﻗﺖ( ) Next /ﺍﻟﺘﺎﻟﻲ( ) Back /ﺍﻟﺴﺎﺑﻖ(. ﻣﻊ ﺫﻟﻚ ،ﺗﺘﻮﺍﻓﺮ ﻫﺬﻩ ﺍﻟﻮﻇﺎﺋﻒ ﻓﻲ ﺃﺟﻬﺰﺓ Bluetoothﺍﻟﺘﻲ ﺗﺪﻋﻢ ﻭﻇﻴﻔﺔ ).(AVRCP ● ● ١٥ ﺇﺫﺍ ﻃﻠﺐ ﻣﻨﻚ ﺭﻗﻢ PINﻋﻨﺪ ﺍﻻﺗﺼﺎﻝ ﺑﺠﻬﺎﺯ ﺍﻟﺒﻠﻮﺗﻮﺙ ،ﺃﺩﺧﻞ >.<0000 ﻻ ﻳﻤﻜﻦ ﺇﻗﺮﺍﻥ ﺃﻛﺜﺮ ﻣﻦ ﺟﻬﺎﺯ ﺑﻠﻮﺗﻮﺙ ﻓﻲ ﻧﻔﺲ ﺍﻟﻮﻗﺖ. ﺳﻴﺘﻢ ﺇﻟﻐﺎء ﺍﺗﺼﺎﻝ ﺍﻟﺒﻠﻮﺗﻮﺙ ﻋﻨﺪ ﺇﻳﻘﺎﻑ ﻧﻈﺎﻡ .SoundStand ﻻ ﻳﻤﻜﻦ ﺃﻥ ﻳُﺠﺮﻱ ﺟﻬﺎﺯ SoundStandﺍﻟﺒﺤﺚ ﻋﻦ Bluetoothﺃﻭ ﺍﻻﺗﺼﺎﻝ ﺑﻬﺎ ﺑﺸﻜﻞ ﺻﺤﻴﺢ ﺗﺤﺖ ﺃﻱ ﻣﻦ ﺍﻟﻈﺮﻭﻑ ﺍﻟﺘﺎﻟﻴﺔ: ﻓﻲ ﺣﺎﻟﺔ ﻭﺟﻮﺩ ﻣﺠﺎﻝ ﻛﻬﺮﺑﻲ ﻗﻮﻱ ﺣﻮﻝ ﻧﻈﺎﻡ.SoundStand ﻓﻲ ﺣﺎﻟﺔ ﺇﻗﺮﺍﻥ ﻋﺪﺓ ﺃﺟﻬﺰﺓ ﺑﻠﻮﺗﻮﺙ ﻣﻊ ﻧﻈﺎﻡ SoundStandﻓﻲ ﻧﻔﺲ ﺍﻟﻮﻗﺖ. ﻓﻲ ﺣﺎﻟﺔ ﺇﻳﻘﺎﻑ ﺗﺸﻐﻴﻞ ﺟﻬﺎﺯ ﺑﻠﻮﺗﻮﺙ ،ﻋﺪﻡ ﻭﺿﻌﻪ ﻓﻲﺍﻟﻤﻜﺎﻥ ﺍﻟﻤﻨﺎﺳﺐ ،ﺃﻭ ﻭﺟﻮﺩ ﺃﻋﻄﺎﻝ. ﻻﺣﻆ ﺃﻥ ﺃﺟﻬﺰﺓ ﻣﺜﻞ ﺃﻓﺮﺍﻥ ﺍﻟﻤﻴﻜﺮﻭﻭﻳﻒ ،ﻣﺤﻮﻻﺕ ﻭﺻﻼﺕ LANﺍﻟﻼﺳﻠﻜﻴﺔ ،ﻣﺼﺎﺑﻴﺢ ﺍﻟﻔﻠﻮﺭﻳﺴﻨﺖ ،ﻭﺃﻓﺮﺍﻥ ﺍﻟﻐﺎﺯ ﺗﺴﺘﺨﺪﻡ ﻧﻔﺲ ﻧﻄﺎﻕ ﺍﻟﺘﺮﺩﺩ ﺍﻟﺬﻱ ﻳﺴﺘﺨﺪﻣﻪ ﺟﻬﺎﺯ ﺍﻟﺒﻠﻮﺗﻮﺙ، ﻣﻤﺎ ﻗﺪ ﻳﺘﺴﺒﺐ ﻓﻲ ﺣﺪﻭﺙ ﺗﺪﺍﺧﻞ ﻛﻬﺮﺑﻲ. ﻳﺪﻋﻢ ﻧﻈﺎﻡ SoundStandﺑﻴﺎﻧﺎﺕ SBC ) ٤٤٫١ﻛﻴﻠﻮ ﻫﺮﺗﺰ ٤٨ ،ﻛﻴﻠﻮ ﻫﺮﺗﺰ(. ﻗﻢ ﺑﺎﻟﺘﻮﺻﻴﻞ ﻓﻘﻂ ﺑﺠﻬﺎﺯ ﺑﻠﻮﺗﻮﺙ ﻳﺪﻋﻢ ﻭﻇﻴﻔﺔ ) A2DPﺍﻟﺼﻮﺕ ﻭﺍﻟﺼﻮﺭﺓ(. ﻻ ﻳﻤﻜﻨﻚ ﺗﻮﺻﻴﻞ ﺟﻬﺎﺯ SoundStandﺑﺠﻬﺎﺯ Bluetooth ﻳﺪﻋﻢ ﻓﻘﻂ ﻭﻇﻴﻔﺔ ) HFﺍﻟﺴﻤﺎﻋﺔ ﺍﻟﻤﻨﻔﺼﻠﺔ(. ﺍﻟﻮﻇﺎﺋﻒ _ Bluetooth POWER on )(Bluetooth POWER ● ﻓﻲ ﻭﺿﻊ ﺗﻮﺻﻴﻞ ﺍﻟﺒﻠﻮﺗﻮﺙ ،ﺳﻴﻨﻘﻄﻊ ﺍﻻﺗﺼﺎﻝ ﺑﺎﻟﺒﻠﻮﺗﻮﺙ ﻓﻲ ﺣﺎﻝ ﺗﺨﻄﺖ ﺍﻟﻤﺴﺎﻓﺔ ﺑﻴﻦ ﻧﻈﺎﻡ SoundStandﻭﺟﻬﺎﺯ ﺍﻟﺒﻠﻮﺗﻮﺙ ٥ﺃﻣﺘﺎﺭ. ● ﻭﻓﻲ ﺣﺎﻟﺔ ﺩﺧﻮﻝ ﺟﻬﺎﺯ ﺍﻟﺒﻠﻮﺗﻮﺙ ﻣﺮﺓ ﺃﺧﺮﻯ ﻓﻲ ﻧﻄﺎﻕ ﺍﻟﺘﺸﻐﻴﻞ ﻭﺇﻋﺎﺩﺓ ﺍﻻﺗﺼﺎﻝ ﻣﺮﺓ ﺃﺧﺮﻯ ﺑﻌﺪ ﻓﺼﻠﻪ ،ﻳﻤﻜﻨﻚ ﺇﻋﺎﺩﺓ ﺍﻟﺘﺸﻐﻴﻞ ﻻﺳﺘﻌﺎﺩﺓ ﺍﻻﻗﺘﺮﺍﻥ ﻣﻊ ﺟﻬﺎﺯ ﺍﻟﺒﻠﻮﺗﻮﺙ. ● ﻳﺘﻢ ﺇﻳﻘﺎﻑ ﺗﺸﻐﻴﻞ ﻧﻈﺎﻡ SoundStandﺗﻠﻘﺎﺋﻴًﺎ ﺑﻌﺪ ٢٥ﺩﻗﻴﻘﺔ ﻓﻲ ﺣﺎﻟﺔ ) Readyﺍﻟﺘﺄﻫﺐ(. ﻋﻨﺪﻣﺎ ﺗﻜﻮﻥ ﻭﻇﻴﻔﺔ ) Bluetooth Power Onﺗﺸﻐﻴﻞ (Bluetoothﻗﻴﺪ ً ﻣﺘﻮﻗﻔﺎ ،ﺇﺫﺍ ﺣﺎﻭﻝ ﺟﻬﺎﺯ Bluetooth ﺍﻟﺘﺸﻐﻴﻞ ،ﻭﻳﻜﻮﻥ ﺟﻬﺎﺯ SoundStand َ ﺍﻻﻗﺘﺮﺍﻥ ﺑﺠﻬﺎﺯ ،SoundStandﻳﺘﻢ ﺗﺸﻐﻴﻞ SoundStand ﺳﺒﻖ ﺇﻗﺮﺍﻧﻪ ﺗﻠﻘﺎﺋﻴًﺎ. .١ﺍﺿﻐﻂ ﻋﻠﻰ ﺯﺭ Bluetooth POWERﻋﻠﻰ ﻭﺣﺪﺓ ﺍﻟﺘﺤﻜﻢ ﻋﻦ ﺑُﻌﺪ ﺑﺠﻬﺎﺯ .SoundStand .٢ﺗﻈﻬﺮ ﻭﻇﻴﻔﺔ ) Bluetooth POWERﺗﺸﻐﻴﻞ (Bluetoothﻋﻠﻰ ﺷﺎﺷﺔ .SoundStand ● ● ● ● ﺍﻟﻤﺰﻳﺪ ﺣﻮﻝ Bluetooth ﺗﺘﻮﻓﺮ ﻓﻘﻂ ﺇﺫﺍ ﻛﺎﻥ ﻧﻈﺎﻡ SoundStandﻣﺪﺭﺝ ﻓﻲ ﻗﺎﺋﻤﺔ ﺍﻷﺟﻬﺰﺓ ﺍﻟﻤﻘﺘﺮﻧﺔ ﺑﺠﻬﺎﺯ ﺍﻟﺒﻠﻮﺗﻮﺙ) .ﻳﺠﺐ ﺍﻗﺘﺮﺍﻥ ﻧﻈﺎﻡ SoundStandﻭﺟﻬﺎﺯ ﺍﻟﺒﻠﻮﺗﻮﺙ ﻟﻤﺮﺓ ﻭﺍﺣﺪﺓ ﻋﻠﻰ ﺍﻷﻗﻞ ﻗﺒﻞ ﺫﻟﻚ ﺍﻟﻮﻗﺖ(. ﺳﻴﻈﻬﺮ ﻧﻈﺎﻡ SoundStandﻓﻲ ﻗﺎﺋﻤﺔ ﺍﻟﺒﺤﺚ ﻋﻦ ﺍﻷﺟﻬﺰﺓ ﻓﻲ ﺟﻬﺎﺯ ﺍﻟﺒﻠﻮﺗﻮﺙ ﻓﻘﻂ ﻋﻨﺪﻣﺎ ﻳﻌﺮﺽ ﻧﻈﺎﻡ SoundStand ﺭﺳﺎﻟﺔ ].[BT READY ﻓﻲ ﻭﺿﻊ ،TV SoundConnectﻻ ﻳﻤﻜﻦ ﺍﻗﺘﺮﺍﻥ ﻧﻈﺎﻡ SoundStandﺑﺠﻬﺎﺯ ﺑﻠﻮﺗﻮﺙ ﺁﺧﺮ. ﺇﺫﺍ ﺗﻢ ﺗﻮﺻﻴﻞ ﺟﻬﺎﺯ SoundStandﺑﺘﻠﻔﺰﻳﻮﻥ ﺑﺎﺳﺘﺨﺪﺍﻡ ﻭﻇﻴﻔﺔ ،TV SoundConnectﻭﺃﻭﻗﻔﺖ ﺗﺸﻐﻴﻞ ﺟﻬﺎﺯ SoundStandﺑﺈﻳﻘﺎﻑ ﺗﺸﻐﻴﻞ ﺍﻟﺘﻠﻔﺰﻳﻮﻥ ،ﻓﻠﻦ ﻳﺘﻢ ﺗﺸﻐﻴﻞ ﻭﻇﻴﻔﺔ ) Bluetooth Powerﺗﺸﻐﻴﻞ (Bluetoothﻋﻠﻰ .SoundStand ﻳﻌﺘﺒﺮ ﺍﻟﺒﻠﻮﺗﻮﺙ ﺗﻘﻨﻴﺔ ﺗﺘﻴﺢ ﺇﻣﻜﺎﻧﻴﺔ ﺭﺑﻂ ﺍﻷﺟﻬﺰﺓ ﺍﻟﻤﺘﻮﺍﻓﻘﺔ ﻣﻊ ﺍﻟﺒﻠﻮﺗﻮﺙ ﺑﺴﻬﻮﻟﺔ ﻣﻊ ﺑﻌﻀﻬﺎ ﺍﻟﺒﻌﺾ ﻣﻦ ﺧﻼﻝ ﺍﺗﺼﺎﻝ ﻻﺳﻠﻜﻲ ﻗﺼﻴﺮ ﺍﻟﻤﺪﻯ. ● ﺭﺑﻤﺎ ﻳﺘﺴﺒﺐ ﺟﻬﺎﺯ ﺍﻟﺒﻠﻮﺗﻮﺙ ﻓﻲ ﺇﺣﺪﺍﺙ ﺗﺸﻮﻳﺶ ﺃﻭ ﻋﻄﻞً ، ﻭﻓﻘﺎ ﻟﻼﺳﺘﺨﺪﺍﻡ، ﻓﻲ ﺣﺎﻟﺔ: - ﻳﺨﻀﻊ ﺍﻷﻣﺮ ﻟﻠﺘﺮﺩﺩ ﺍﻟﻜﻬﺮﺑﻲ ﻣﻦ ﺍﻟﻌﻮﺍﺋﻖ ﺍﻟﻨﺎﺗﺠﺔ ﻋﻦ ﻭﺟﻮﺩ ﺣﺎﺋﻂ، ﺯﺍﻭﻳﺔ ،ﺃﻭ ﻓﻮﺍﺻﻞ ﻣﻜﺘﺒﻴﺔ. - ﺍﻟﺘﻌﺮﺽ ﻟﺘﺪﺍﺧﻞ ﻛﻬﺮﺑﻲ ﻣﻦ ﺃﺟﻬﺰﺓ ﺗﺴﺘﺨﺪﻡ ﻧﻔﺲ ﺗﺮﺩﺩ ﺍﻟﻨﻄﺎﻕ ﺑﻤﺎ ﻓﻲ ﺫﻟﻚ ﺍﻷﺟﻬﺰﺓ ﺍﻟﻄﺒﻴﺔ ،ﺃﻓﺮﺍﻥ ﺍﻟﻤﻴﻜﺮﻭﻭﻳﻒ ،ﻭﻭﺻﻼﺕ LAN ﺍﻟﻼﺳﻠﻜﻴﺔ. ● ﻗﻢ ﺑﺈﻗﺮﺍﻥ ﻧﻈﺎﻡ SoundStandﻣﻊ ﺟﻬﺎﺯ ﺍﻟﺒﻠﻮﺗﻮﺙ ﻋﻨﺪﻣﺎ ﻳﻜﻮﻧﺎﻥ ﻗﺮﻳﺒﻴﻦ ﻣﻦ ﺑﻌﻀﻬﻤﺎ. _ ﻟﻔﺼﻠﺠﻬﺎﺯ ﺍﻟﺒﻠﻮﺗﻮﺙ ﻣﻦ ﻧﻈﺎﻡ SoundStand ﻳﻤﻜﻨﻚ ﻓﺼﻞ ﺟﻬﺎﺯ ﺍﻟﺒﻠﻮﺗﻮﺙ ﻣﻦ ﻧﻈﺎﻡ .SoundStandﻟﻼﻃﻼﻉ ﻋﻠﻰ ﺍﻟﺘﻌﻠﻴﻤﺎﺕ ،ﺭﺍﺟﻊ ﺩﻟﻴﻞ ﺍﻟﻤﺴﺘﺨﺪﻡ ﺍﻟﺨﺎﺹ ﺑﺠﻬﺎﺯ ﺍﻟﺒﻠﻮﺗﻮﺙ. ● ﺳﻴﺘﻢ ﻓﺼﻞ ﻧﻈﺎﻡ .SoundStand ● ﻋﻨﺪ ﻓﺼﻞ ﻧﻈﺎﻡ SoundStandﻋﻦ ﺟﻬﺎﺯ ﺍﻟﺒﻠﻮﺗﻮﺙ ،ﺳﺘﻈﻬﺮ ﻋﻠﻰ ﺷﺎﺷﺔ ﻧﻈﺎﻡ SoundStandﺭﺳﺎﻟﺔ BT DISCONNECTEDﻋﻠﻰ ﺍﻟﺸﺎﺷﺔ ﺍﻷﻣﺎﻣﻴﺔ. _ ﻟﻔﺼﻞ ﻧﻈﺎﻡ SoundStandﻋﻦ ﺟﻬﺎﺯ ﺍﻟﺒﻠﻮﺗﻮﺙ ﺍﺿﻐﻂ ﺯﺭ SOURCEﺍﻟﻤﻮﺟﻮﺩ ﺑﻮﺣﺪﺓ ﺍﻟﺘﺤﻜﻢ ﻋﻦ ﺑﻌﺪ ﺃﻭ ﻋﻠﻰ ﺯﺭ ) ﺍﻟﻤﻮﺟﻮﺩ ﺑﺎﻟﻠﻮﺣﺔ ﺍﻷﻣﺎﻣﻴﺔ ﺍﻟﻌﻠﻮﻳﺔ ﻟﻠﺘﺤﻮﻳﻞ ﻣﻦ ﻭﺿﻊ BTﺇﻟﻰ ﻭﺿﻊ ﺁﺧﺮ ﺃﻭ ﺇﻳﻘﺎﻑ ﺗﺸﻐﻴﻞ ﻧﻈﺎﻡ .SoundStand ● ﺳﻴﺴﺘﻐﺮﻕ ﺟﻬﺎﺯ ﺍﻟﺒﻠﻮﺗﻮﺙ ﺍﻟﻤﺘﺼﻞ ﻣﺪﺓ ﻣﻌﻴﻨﺔ ﺣﺘﻰ ﻳﺴﺘﺠﻴﺐ ﻟﻨﻈﺎﻡ SoundStandﻗﺒﻞ ﻓﺼﻞ ﺍﻻﺗﺼﺎﻝ) .ﺭﺑﻤﺎ ﻳﺨﺘﻠﻒ ﺍﻟﻮﻗﺖ ﺍﻟﻤﻄﻠﻮﺏ ﻟﻔﺼﻞ ﺍﻻﺗﺼﺎﻝ ،ﻭﻓﻘﺎ ﻟﻨﻮﻉ ﺟﻬﺎﺯ ﺍﻟﺒﻠﻮﺗﻮﺙ( - ﻣﻼﻣﺴﺎ ﻟﻨﻈﺎﻡ ﺍﻻﺳﺘﻘﺒﺎﻝ/ﺍﻹﺭﺳﺎﻝ ﺍﻟﺨﺎﺹ ﺑﺠﻬﺎﺯ ﺟﺰء ﻣﻦ ﺟﺴﺪﻙ ً ﺍﻟﺒﻠﻮﺗﻮﺙ ﺃﻭ ﻧﻈﺎﻡ .SoundStand ● ﻛﻠﻤﺎ ﺯﺍﺩﺕ ﺍﻟﻤﺴﺎﻓﺔ ﺑﻴﻦ ﻧﻈﺎﻡ SoundStandﻭﺟﻬﺎﺯ ﺍﻟﺒﻠﻮﺗﻮﺙ ،ﻛﻠﻤﺎ ﺍﻧﺨﻔﻀﺖ ﺍﻟﺠﻮﺩﺓ. ﻓﻲ ﺣﺎﻟﺔ ﺗﺨﻄﻲ ﺍﻟﻤﺴﺎﻓﺔ ﻟﻠﻨﻄﺎﻕ ﺍﻟﺘﺸﻐﻴﻠﻲ ﻟﻠﺒﻠﻮﺗﻮﺙ ،ﻳﻨﻘﻄﻊ ﺍﻻﺗﺼﺎﻝ. ● ﻓﻲ ﺍﻟﻤﻨﺎﻃﻖ ﺍﻟﺘﻲ ﺗﺘﺴﻢ ﺑﻀﻌﻒ ﺣﺴﺎﺳﻴﺔ ﺍﻻﺳﺘﻘﺒﺎﻝ ،ﺭﺑﻤﺎ ﻻ ﻳﻌﻤﻞ ﺍﻟﺒﻠﻮﺗﻮﺙ ﺑﺎﻟﺸﻜﻞ ﺍﻟﻤﻨﺎﺳﺐ. ● ﻳﻌﻤﻞ ﺍﺗﺼﺎﻝ ﺍﻟﺒﻠﻮﺗﻮﺙ ﻓﻘﻂ ﻋﻨﺪﻣﺎ ﻳﻜﻮﻥ ﻗﺮﻳﺒًﺎ ﻣﻦ ﺍﻟﻤﺠﻤﻮﻋﺔ .ﻳﺘﻢ ﻗﻄﻊ ﺍﻻﺗﺼﺎﻝ ﺗﻠﻘﺎﺋﻴًﺎ ﻓﻲ ﺣﺎﻝ ﺗﺨﻄﺖ ﺍﻟﻤﺴﺎﻓﺔ ﻫﺬﺍ ﺍﻟﻨﻄﺎﻕ .ﺣﺘﻰ ﺿﻤﻦ ﻫﺬﺍ ﺍﻟﻨﻄﺎﻕ ،ﺭﺑﻤﺎ ﺗﺘﺄﺛﺮ ﺟﻮﺩﺓ ﺍﻟﺼﻮﺕ ﺑﺴﺒﺐ ﺍﻟﻌﻮﺍﺋﻖ ﺍﻟﻤﺘﻤﺜﻠﺔ ﻓﻲ ﺍﻟﺤﻮﺍﺋﻂ ﺃﻭ ﺍﻷﺑﻮﺍﺏ. ● ﺭﺑﻤﺎ ﻳﺘﺴﺒﺐ ﺍﻟﺠﻬﺎﺯ ﺍﻟﻼﺳﻠﻜﻲ ﻓﻲ ﺣﺪﻭﺙ ﺗﺪﺍﺧﻞ ﻛﻬﺮﺑﻲ ﺃﺛﻨﺎء ﺗﺸﻐﻴﻠﻪ. ( ١٦ ﺍﻟﻮﻇﺎﺋﻒ NFC _ ﺍﻟﺘﻮﺻﻴﻞ ﻣﻊ NFCﻭﺍﻷﺟﻬﺰﺓ ﺍﻟﺬﻛﻴﺔ ﻗﺮﺏ ﺟﻬﺎﺯﻙ ﺍﻟﺬﻛﻲ ﺇﻟﻰ ﻣﻠﺼﻖ ﻋﻼﻣﺔ .NFC ﻗﻢ ﺑﺘﻮﺻﻴﻞ ﻣﻠﺼﻖ ﻋﻼﻣﺔ NFCﺍﻟﻤﻄﻠﻮﺏ ،ﺛﻢ ﱢ _ ﺍﻟﺘﻮﺻﻴﻞ ﺑـ NFC .١ﺍﻧﺰﻉ ﻋﻼﻣﺔ NFCﺍﻟﻤﻮﺟﻮﺩ ﺑﺎﻟﺠﺰء ﺍﻟﻌﻠﻮﻱ ﻣﻦ ﻧﻈﺎﻡ SoundStandﻭﺿﻌﻪ ﻓﻲ ﺍﻟﻨﻘﻄﺔ ﺍﻟﺘﻲ ﺗﻔﻀﻠﻬﺎ. • ﻳﻨﺼﺢ ﺑﻮﺿﻊ ﻣﻠﺼﻖ NFCﻓﻲ ﻧﻄﺎﻕ ﻧﺼﻒ ﻗﻄﺮ ﻳﺒﻠﻎ ٣ﻡ ﻣﻦ ﺍﻟﻮﺣﺪﺓ. .٢ﺗﺸﻐﻴﻞ ﻭﻇﻴﻔﺔ NFCﻓﻲ ﺟﻬﺎﺯﻙ ﺍﻟﺬﻛﻲ. ﻗﺮﺏ ﻫﻮﺍﺋﻲ NFCﺍﻟﺨﺎﺹ ﺑﺠﻬﺎﺯﻙ ﺍﻟﺬﻛﻲ ﻣﻦ ﻣﻠﺼﻖ .NFC .٣ﱢ .٤ﻋﻨﺪ ﻇﻬﻮﺭ ﺇﺷﺎﺭﺓ ﺍﻻﺗﺼﺎﻝ ﻋﻠﻰ ﺷﺎﺷﺔ ﺟﻬﺎﺯﻙ ﺍﻟﺬﻛﻲ ،ﺣﺪﺩ ﺍﻟﺨﻴﺎﺭ >) <Yesﻧﻌﻢ(. • ﺑﻤﺠﺮﺩ ﺍﻛﺘﻤﺎﻝ ﻋﻤﻠﻴﺔ ﺍﻻﺗﺼﺎﻝ ،ﺗﻈﻬﺮ ﺭﺳﺎﻟﺔ ﺍﻻﻛﺘﻤﺎﻝ. _ ﻓﺼﻞ ﻭﻇﻴﻔﺔ NFC ﻗﺮﺏ ﻫﻮﺍﺋﻲ NFCﺍﻟﺨﺎﺹ ﺑﺠﻬﺎﺯﻙ ﺍﻟﺬﻛﻲ ﻣﻦ ﻣﻠﺼﻖ NFCﻋﻠﻰ ﻧﻈﺎﻡ SoundStandﻣﺮﺓ ﺃﺧﺮﻯ .ﻭﺗﻈﻬﺮ ﺭﺳﺎﻟﺔ ﺍﻟﻔﺼﻞ ﻋﻠﻰ ﺷﺎﺷﺔ ﺍﻟﺠﻬﺎﺯ ﺍﻟﺬﻛﻲ. ﱢ _ ﻟﺘﻮﺻﻴﻞ ﺟﻬﺎﺯ ﺫﻛﻲ ﺁﺧﺮ ﺑﻨﻈﺎﻡ SoundStandﺍﻟﻤﺘﺼﻞ ﺑﺎﻟﻔﻌﻞ ﺑﺠﻬﺎﺯ ﺁﺧﺮ ﻣﺘﻮﺍﻓﻖ ﻣﻊ ﻭﻇﻴﻔﺔ NFC ﺑﻌﺪ ﺍﻟﻔﺼﻞ ﻣﻦ ﺍﻟﺠﻬﺎﺯ ﺍﻟﻤﺘﺼﻞ ً ﻗﺮﺏ ﺍﻟﺠﻬﺎﺯ ﺍﻟﺬﻛﻲ ﺍﻟﺠﺪﻳﺪ ﻣﻦ ﻣﻠﺼﻖ NFCﺑﻨﻈﺎﻡ .SoundStand ﺳﺎﺑﻘﺎ ،ﱢ ● ● ● ● ● ● ﺗﻢ ﺗﻀﻤﻴﻦ ﻭﻇﻴﻔﺔ NFCﻓﻲ ﻧﻈﺎﻡ ﺍﻟﺘﺸﻐﻴﻞ ) (Android v4.1.2 Jelly Beanﺃﻭ ﺃﻧﻈﻤﺔ ﺍﻟﺘﺸﻐﻴﻞ ﺍﻷﺣﺪﺙ. ﻟﺘﻮﺻﻴﻞ ،NFCﻳﺤﺘﺎﺝ ﺟﻬﺎﺯﻙ ﺍﻟﺬﻛﻲ ﻧﻈﺎﻡ ﺍﻟﺘﺸﻐﻴﻞ Androidﺍﻹﺻﺪﺍﺭ Jelly Bean 4.1.2ﺃﻭ ﺃﺣﺪﺙ ﻭﻣﻠﻒ ﺗﻌﺮﻳﻒ NFCﻟﺘﺸﻐﻴﻞ ﻭﻇﻴﻔﺔ .NFCﻭﺗﺤﺘﺎﺝ ً ﺃﻳﻀﺎ ﺇﻟﻰ ﺗﻨﺰﻳﻞ ﺗﻄﺒﻴﻖ " "Samsung NFC Connectionﻣﻦ ﻣﺘﺠﺮ Google Playstoreﻭﺗﺜﺒﻴﺘﻪ ﻋﻠﻰ ﺟﻬﺎﺯﻙ ﺍﻟﺬﻛﻲ. ﻭﻟﻠﻤﺰﻳﺪ ﻣﻦ ﺍﻟﺘﻔﺎﺻﻴﻞ ،ﻳﺮﺟﻰ ﺍﻻﻃﻼﻉ ﻋﻠﻰ ﺩﻟﻴﻞ ﻣﺴﺘﺨﺪﻡ ﺍﻟﺠﻬﺎﺯ ﺍﻟﺬﻛﻲ. ﻣﻮﻗﻊ ﻫﻮﺍﺋﻲ NFCﻳﺨﺘﻠﻒ ﻣﻦ ﺟﻬﺎﺯ ﻵﺧﺮ .ﻭﻟﺬﺍ ،ﺗﺄﻛﺪ ﻣﻦ ﻣﻮﻗﻊ ﺍﻟﻬﻮﺍﺋﻲ ﺑﺠﻬﺎﺯ ﺍﻟﺬﻛﻲ ﻓﻲ ﺩﻟﻴﻞ ﻣﺴﺘﺨﺪﻡ ﺍﻟﺠﻬﺎﺯ ﻗﺒﻞ ﻣﺤﺎﻭﻟﺔ ﺇﻗﺮﺍﻧﻪ ﺑﻨﻈﺎﻡ .SoundStand ﻣﺴﺘﻘﺮﺍ. ﺇﺫﺍ ﻛﺎﻥ ﺟﻬﺎﺯﻙ ﺍﻟﺬﻛﻲ ﺩﺍﺧﻞ ﻫﻴﻜﻞ ﺃﻭ ﺣﺎﻓﻈﺔ ﺳﻤﻴﻜﺔ ،ﻓﻘﺪ ﻻ ﻳﻜﻮﻥ ﺍﺗﺼﺎﻝ NFC ً ﺍﻟﻌﻼﻣﺔ ) (Nﺗﻌﺘﺒﺮ ﻋﻼﻣﺔ ﺗﺠﺎﺭﻳﺔ ﺃﻭ ﻋﻼﻣﺔ ﺗﺠﺎﺭﻳﺔ ﻣﺴﺠﻠﺔ ﻟﺸﺮﻛﺔ NFC Forumﻓﻲ ﺍﻟﻮﻻﻳﺎﺕ ﺍﻟﻤﺘﺤﺪﺓ ﻭﺍﻟﺪﻭﻝ ﺍﻷﺧﺮﻯ. ﺇﺫﺍ ﻛﻨﺖ ﺗﻮﺍﺟﻬﺔ ﻣﺸﺎﻛﻞ ﻓﻲ ﺍﺗﺼﺎﻝ NFC ﺇﻥ ﻣﻼﻣﺴﺔ ﺟﻬﺎﺯﻙ ﺍﻟﺬﻛﻲ ﻟﻤﻠﺼﻖ NFCﻓﻲ ﻭﺍﻗﻊ ﺍﻷﻣﺮ ﻳﻤﻜﻦ ﺃﻥ ﺗﺘﺴﺒﺐ ﻓﻲ ﻓﺸﻞ ﺍﺗﺼﺎﻝ .NFC ﻓﻲ ﺣﺎﻟﺔ ﻇﻬﻮﺭ ﺭﺳﺎﻟﺔ " "Empty tagﻋﻠﻰ ﺷﺎﺷﺔ ﺍﻟﺠﻬﺎﺯ ﺍﻟﺬﻛﻲ ،ﻳﺮﺟﻰ ﺇﻋﺎﺩﺓ ﺍﻟﻤﺤﺎﻭﻟﺔ. ﺗﺄﻛﺪ ﻣﻤﺎ ﺇﺫﺍ ﻛﺎﻥ ﻫﻮﺍﺋﻲ ﺟﻬﺎﺯﻙ ﺍﻟﺬﻛﻲ ﻗﺮﻳﺒًﺎ ﻣﻦ ﺷﻌﺎﺭ NFCﺍﻟﻤﻮﺟﻮﺩ ﻋﻠﻰ ﻧﻈﺎﻡ .SoundStandﺇﺫﺍ ﻗﻤﺖ ﺑﺈﻳﻘﺎﻑ ﺗﺸﻐﻴﻞ ﻧﻈﺎﻡ SoundStandﻋﻨﺪﻣﺎ ﺗﻜﻮﻥ ﻭﻇﻴﻔﺔ ) Bluetooth Power Onﺗﺸﻐﻴﻞ (Bluetoothﻗﻴﺪ ﺍﻟﺘﺸﻐﻴﻞ ﻭﺣﺎﻭﻟﺖ ﺑﻌﺪ ﺫﻟﻚ ﺗﻮﺻﻴﻞ ﺟﻬﺎﺯ Bluetoothﺳﺒﻖ ﺗﻮﺻﻴﻠﻪ ﺑﺎﺳﺘﺨﺪﺍﻡ ،NFCﻓﺴﻴﻌﻤﻞ ﻧﻈﺎﻡ SoundStandﺗﻠﻘﺎﺋﻴًﺎ ﻋﻨﺪ ﺗﻮﺻﻴﻞ ﺍﻟﺠﻬﺎﺯ .ﻭﻟﻀﺒﻂ ﺧﻴﺎﺭ ) Bluetooth Power Onﺗﺸﻐﻴﻞ ،(Bluetoothﺭﺍﺟﻊ ﺍﻟﺼﻔﺤﺔ .16 ١٧ ARA ﻳﻤﻜﻨﻚ ﺗﻮﺻﻴﻞ ﻧﻈﺎﻡ SoundStandﺑﺠﻬﺎﺯ ﺫﻛﻲ ﻳﺪﻋﻢ ﻭﻇﻴﻔﺔ NFCﻣﻦ ﺧﻼﻝ ﺍﺗﺼﺎﻝ ﺍﻟﺒﻠﻮﺗﻮﺙ ﺑﺈﻋﺪﺍﺩ ﺑﺴﻴﻂ .ﻭﺑﻤﺠﺮﺩ ﺍﻟﺘﻮﺻﻴﻞ ،ﻳﻤﻜﻨﻚ ﺍﻻﺳﺘﻤﺘﺎﻉ ﺑﺴﻤﺎﻉ ﻣﻠﻔﺎﺕ ﺍﻟﻤﻮﺳﻴﻘﻰ ﺍﻟﻤﺤﻔﻮﻇﺔ ﻓﻲ ﺟﻬﺎﺯ ﺍﻟﺬﻛﻲ ﻣﻦ ﺧﻼﻝ ﻧﻈﺎﻡ .SoundStand ﺍﻟﻮﻇﺎﺋﻒ TV SOUNDCONNECT ﻳﻤﻜﻨﻚ ﺍﻻﺳﺘﻤﺘﺎﻉ ﺑﺼﻮﺕ ﺍﻟﺘﻠﻔﺰﻳﻮﻥ ﻣﻦ ﺧﻼﻝ ﺗﻮﺻﻴﻞ ﻧﻈﺎﻡ SoundStandﺑﺘﻠﻔﺰﻳﻮﻥ Samsungﺍﻟﺬﻱ ﻳﺪﻋﻢ ﻭﻇﻴﻔﺔ .TV SoundConnect _ ﺗﻮﺻﻴﻞ ﺍﻟﺘﻠﻔﺰﻳﻮﻥ ﺑﻨﻈﺎﻡ SoundStand ﺗﻮﺻﻴﻞ .١ .٢ .٣ .٤ ﻗﻢ ﺑﺘﺸﻐﻴﻞ ﺍﻟﺘﻠﻔﺰﻳﻮﻥ ﻭﻧﻈﺎﻡ .SoundStand • ﺍﺿﺒﻂ ﻗﺎﺋﻤﺔ ﺇﺿﺎﻓﺔ ﺟﻬﺎﺯ ﺟﺪﻳﺪ " "Add New Deviceﻓﻲ ﺍﻟﺘﻠﻔﺰﻳﻮﻥ ﻋﻠﻰ ﻭﺿﻊ ﺍﻟﺘﺸﻐﻴﻞ "."On ﺍﺿﻐﻂ ﻋﻠﻰ ﺍﻟﺰﺭ ) ( ﺍﻟﻤﻮﺟﻮﺩ ﺑﺎﻟﻠﻮﺣﺔ ﺍﻟﻌﻠﻴﺎ ﻟﻠﻮﺣﺪﺓ ﺍﻟﺮﺋﻴﺴﻴﺔ ﺃﻭ ﺯﺭ SOURCEﺍﻟﻤﻮﺟﻮﺩ ﺑﻮﺣﺪﺓ ﺍﻟﺘﺤﻜﻢ ﻋﻦ ﺑﻌﺪ ﻟﺘﺤﺪﻳﺪ ﻭﺿﻊ ﺍﻟﺘﻠﻔﺰﻳﻮﻥ. ﺑﺠﻬﺎﺯ ﺍﻟﺘﻠﻔﺰﻳﻮﻥ ،ﺳﺘﻈﻬﺮ ﺭﺳﺎﻟﺔ ﺗﺴﺄﻟﻚ ﻋﻤﺎ ﺇﺫﺍ ﻛﻨﺖ ﺗﺮﻳﺪ ﺗﺸﻐﻴﻞ ﻭﻇﻴﻔﺔ "[Samsung] SoundStand" .TV SoundConnectﻋﻠﻰ ﺷﺎﺷﺔ ﺍﻟﺘﻠﻔﺰﻳﻮﻥ. ﺣﺪﺩ ﺍﻟﺨﻴﺎﺭ > <Yesﻹﺗﻤﺎﻡ ﺗﻮﺻﻴﻞ ﺍﻟﺘﻠﻔﺰﻳﻮﻥ ﺑﻨﻈﺎﻡ .SoundStand ● ﺗﺤﻮﻳﻞ ﻭﺿﻊ ﻧﻈﺎﻡ SoundStandﻣﻦ ﺗﻠﻔﺰﻳﻮﻥ ﺇﻟﻰ ﺁﺧﺮ ﺳﻴﻮﻗﻒ ﺗﻠﻘﺎﺋﻴًﺎ ﻭﻇﻴﻔﺔ .TV SoundConnect ● ﻟﺘﻮﺻﻴﻞ ﺟﻬﺎﺯ SoundStandﺑﺘﻠﻔﺰﻳﻮﻥ ﺁﺧﺮ ،ﻳﺠﺐ ﺇﻧﻬﺎء ﺍﻻﺗﺼﺎﻝ ﺍﻟﺤﺎﻟﻲ. ● ﻗﻢ ﺑﺈﻳﻘﺎﻑ ﺍﻟﺘﻮﺻﻴﻞ ﺑﺎﻟﺘﻠﻔﺰﻳﻮﻥ ﺍﻟﺤﺎﻟﻲ ،ﺛﻢ ﺍﺿﻐﻂ ﻋﻠﻰ ﺯﺭ ﺍﻟﻤﻮﺟﻮﺩ ﺑﻮﺣﺪﺓ ﺍﻟﺘﺤﻜﻢ ﻋﻦ ﺑﻌﺪ ﻟﻤﺪﺓ 5ﺛﻮﺍﻧﻲ ﻟﻠﺘﻮﺻﻴﻞ ﺑﺠﻬﺎﺯ ﺗﻠﻔﺰﻳﻮﻥ ﺁﺧﺮ. ● ﻧﻄﺎﻕ ﺗﺸﻐﻴﻞ TV SoundConnect ﻧﻄﺎﻕ ﺍﻻﻗﺘﺮﺍﻥ ﺍﻟﻤﻮﺻﻰ ﺑﻪ :ﻓﻲ ﻧﻄﺎﻕ ٥٠ﺳﻢ ﻧﻄﺎﻕ ﺍﻻﻗﺘﺮﺍﻥ ﺍﻟﻤﻮﺻﻰ ﺑﻪ :ﻓﻲ ﻧﻄﺎﻕ ٥ﻡ● ﺍﻷﺯﺭﺍﺭ PREV ،NEXT ،PLAYﻭ STOPﻻ ﺗﻌﻤﻞ ﻓﻲ ﻭﺿﻊ .TV SoundConnect _ ﺍﺳﺘﺨﺪﺍﻡ ﻭﻇﻴﻔﺔ Bluetooth POWER On ﺑﻌﺪ ﺗﻮﺻﻴﻞ ﺍﻟﺘﻠﻔﺰﻳﻮﻥ ﻭﺟﻬﺎﺯ SoundStandﺑﺎﺳﺘﺨﺪﺍﻡ TV ،SoundConnectﺇﺫﺍ ﻗﻤﺖ ﺑﺘﺸﻐﻴﻞ ﻭﻇﻴﻔﺔ Bluetooth Power On )ﺗﺸﻐﻴﻞ ،(Bluetoothﻓﺴﻴﺘﻢ ﺗﺸﻐﻴﻞ ﺟﻬﺎﺯ SoundStandﺃﻭ ﺇﻳﻘﺎﻑ ﺗﺸﻐﻴﻠﻪ ﺗﻠﻘﺎﺋﻴًﺎ ﻋﻨﺪ ﺗﺸﻐﻴﻞ ﺍﻟﺘﻠﻔﺰﻳﻮﻥ ﺃﻭ ﺇﻳﻘﺎﻑ ﺗﺸﻐﻴﻠﻪ. .١ﻗﻢ ﺑﺘﻮﺻﻴﻞ ﺟﻬﺎﺯ ﺍﻟﺘﻠﻔﺰﻳﻮﻥ ﺑﻨﻈﺎﻡ SoundStandﺍﻟﺨﺎﺹ ﺑﻚ ﻣﻦ ﺧﻼﻝ ﻭﻇﻴﻔﺔ .TV SoundConnect .٢ﺍﺿﻐﻂ ﻋﻠﻰ ﺯﺭ Bluetooth POWERﻋﻠﻰ ﻭﺣﺪﺓ ﺍﻟﺘﺤﻜﻢ ﻋﻦ ﺑُﻌﺪ ﺑﺠﻬﺎﺯ .SoundStandﺗﻈﻬﺮ ﻭﻇﻴﻔﺔ "BLUETOOTH "POWER ONﻋﻠﻰ ﺷﺎﺷﺔ .SoundStand ● ﻭﻇﻴﻔﺔ ) TV SoundConnect (SoundShareﻣﺪﻋﻮﻣﺔ ﻣﻦ ﺑﻌﺾ ﺗﻠﻔﺰﻳﻮﻧﺎﺕ Samsungﺍﺑﺘﺪﺍ ًء ﻣﻦ ﻃﺮﺍﺯ ﻋﺎﻡ .2012 ﺗﺤﻘﻖ ﻣﻤﺎ ﺇﺫﺍ ﻛﺎﻥ ﺍﻟﺘﻠﻔﺰﻳﻮﻥ ﺍﻟﺬﻱ ﺗﺴﺘﺨﺪﻣﻪ ﻳﺪﻋﻢ ﻭﻇﻴﻔﺔ ) TV SoundConnect (SoundShareﻗﺒﻞ ﺍﻟﺒﺪء) .ﻟﻠﻤﺰﻳﺪ ﻣﻦ ﺍﻟﺘﻔﺎﺻﻴﻞ ،ﻳﺮﺟﻰ ﺍﻟﺮﺟﻮﻉ ﺇﻟﻰ ﺩﻟﻴﻞ ﺍﻟﻤﺴﺘﺨﺪﻡ ﺍﻟﺨﺎﺹ ﺑﺠﻬﺎﺯ ﺍﻟﺘﻠﻔﺰﻳﻮﻥ(. ● ﺇﺫﺍ ﻛﺎﻥ ﺟﻬﺎﺯ ﺗﻠﻔﺰﻳﻮﻥ Samsungﺍﻟﺨﺎﺹ ﺑﻚ ﻣﻦ ﻃﺮﺍﺯ ﻗﺒﻞ ﻋﺎﻡ ،2014ﺭﺍﺟﻊ ﻗﺎﺋﻤﺔ ﺇﻋﺪﺍﺩ .SoundShare ● ﺇﺫﺍ ﻛﺎﻧﺖ ﺍﻟﻤﺴﺎﻓﺔ ﺑﻴﻦ ﺟﻬﺎﺯ ﺍﻟﺘﻠﻔﺰﻳﻮﻥ ﻭﺟﻬﺎﺯ SoundStand ﺗﺰﻳﺪ ﻋﻦ 5ﺃﻣﺘﺎﺭ ،ﻓﻘﺪ ﻻ ﻳﻜﻮﻥ ﺍﻻﺗﺼﺎﻝ ﻣﺴﺘﻘﺮﺍ ﺃﻭ ﻗﺪ ﻳﺤﺪﺙ ً ﺗﻘﻄﻴﻊ ﻓﻲ ﺍﻟﺼﻮﺕ .ﻓﻲ ﺣﺎﻟﺔ ﺣﺪﻭﺙ ﺫﻟﻚ ،ﻗﻢ ﺑﺘﻐﻴﻴﺮ ﻣﻜﺎﻥ ﺍﻟﺘﻠﻔﺰﻳﻮﻥ ﺃﻭ ﺟﻬﺎﺯ SoundStandﺑﺤﻴﺚ ﻳﺼﺒﺤﺎﻥ ﻓﻲ ﻧﻄﺎﻕ ﺍﻟﺘﺸﻐﻴﻞ ،ﺛﻢ ﺃﻋﺪ ﺇﻧﺸﺎء ﺍﻻﺗﺼﺎﻝ ﺑﻮﻇﻴﻔﺔ TV .SoundConnect • : BLUETOOTH POWER ONﻳﺘﻢ ﺗﺸﻐﻴﻞ ﺟﻬﺎﺯ SoundStandﻭﺇﻳﻘﺎﻑ ﺗﺸﻐﻴﻠﻪ ﻋﻨﺪ ﺗﺸﻐﻴﻞ ﺍﻟﺘﻠﻔﺰﻳﻮﻥ ﺃﻭ ﺇﻳﻘﺎﻑ ﺗﺸﻐﻴﻠﻪ. • : BLUETOOTH POWER OFFﻳﺘﻢ ﺇﻳﻘﺎﻑ ﺗﺸﻐﻴﻞ ﺟﻬﺎﺯ SoundStandﻓﻘﻂ ﻋﻨﺪ ﺇﻳﻘﺎﻑ ﺗﺸﻐﻴﻞ ﺍﻟﺘﻠﻔﺰﻳﻮﻥ. ● ﻫﺬﻩ ﺍﻟﻮﻇﻴﻔﺔ ﻣﺪﻋﻮﻣﺔ ﻓﻘﻂ ﺑﻮﺍﺳﻄﺔ ﺑﻌﺾ ﺃﺟﻬﺰﺓ ﺍﻟﺘﻠﻔﺰﻳﻮﻥ ﺍﻟﺘﻲ ﺍﻋﺘﺒﺎﺭﺍ ﻣﻦ ﻋﺎﻡ .2013 ﺃﻧﺘﺠﺘﻬﺎ Samsung ً ● ﺇﺫﺍ ﺗﻢ ﺗﻮﺻﻴﻞ ﺟﻬﺎﺯ SoundStandﺑﺘﻠﻔﺰﻳﻮﻥ ﺑﺎﺳﺘﺨﺪﺍﻡ ﻭﻇﻴﻔﺔ ،TV SoundConnectﻭﺃﻭﻗﻔﺖ ﺗﺸﻐﻴﻞ ﺟﻬﺎﺯ SoundStandﺑﺈﻳﻘﺎﻑ ﺗﺸﻐﻴﻞ ﺍﻟﺘﻠﻔﺰﻳﻮﻥ ،ﻓﻠﻦ ﻳﺘﻢ ﺗﺸﻐﻴﻞ ﻭﻇﻴﻔﺔ ) Bluetooth Powerﺗﺸﻐﻴﻞ (Bluetoothﻋﻠﻰ ،SoundStandﺣﺘﻰ ﺇﺫﺍ ﻗﻤﺖ ﺑﺘﻮﺻﻴﻞ ﺟﻬﺎﺯ Bluetooth ﺁﺧﺮ ﺑﻪ. ١٨ ﺍﻟﻮﻇﺎﺋﻒ USB ﻳﻤﻜﻨﻚ ﺗﺸﻐﻴﻞ ﻣﻠﻔﺎﺕ ﺍﻟﻤﻮﺳﻴﻘﻰ ﺍﻟﻤﻮﺟﻮﺩﺓ ﻋﻠﻰ ﺃﺟﻬﺰﺓ ﺗﺨﺰﻳﻦ .USB .١ﻗﻢ ﺑﺘﻮﺻﻴﻞ ﺟﻬﺎﺯ USBﺑﻤﻨﻔﺬ USBﺑﺎﻟﻠﻮﺣﺔ ﺍﻟﺨﻠﻔﻴﺔ ﻟﻠﻤﻨﺘﺞ. ● ﻗﺎﺋﻤﺔ ﺍﻟﺘﻮﺍﻓﻖ .٢ﺍﺿﻐﻂ ﻋﻠﻰ ﺯﺭ SOURCEﺍﻟﻤﻮﺟﻮﺩ ﻓﻲ ﻭﺣﺪﺓ ﺍﻟﺘﺤﻜﻢ ﻋﻦ ﺑﻌﺪ ﺃﻭ ﻋﻠﻰ ﺯﺭ ) ( ﺍﻟﻤﻮﺟﻮﺩ ﻋﻠﻰ ﺍﻟﻠﻮﺣﺔ ﺍﻟﻌﻠﻮﻳﺔ ﺣﺘﻰ ﺗﻈﻬﺮ ﻛﻠﻤﺔ .USB .٣ﺗﻈﻬﺮ ﻛﻠﻤﺔ USBﻋﻠﻰ ﺷﺎﺷﺔ ﺍﻟﻌﺮﺽ. • ﺍﻛﺘﻤﻞ ﺗﻮﺻﻴﻞ ﺟﻬﺎﺯ SoundStandﺑﺠﻬﺎﺯ .USB • ﻳﺘﻢ ﺇﻳﻘﺎﻑ ﺍﻟﺘﺸﻐﻴﻞ ﺗﻠﻘﺎﺋﻴًﺎ ) (Auto Power Offﻓﻲ ﺣﺎﻟﺔ ﻋﺪﻡ ﺗﻮﺻﻴﻞ ﺟﻬﺎﺯ USBﻟﻤﺪﺓ ﺗﺰﻳﺪ ﻋﻦ ٢٥ﺩﻗﻴﻘﺔ. ﺍﻟﺼﻴﻐﺔ ﻧﻈﺎﻡ ﺍﻟﺘﺮﻣﻴﺰ MPEG 1 Layer2 *.mp3 MPEG 1 Layer3 MPEG 2 Layer3 MPEG 2.5 Layer3 *.wma _ ﻗﺒﻞ ﻗﻴﺎﻣﻚ ﺑﺘﻮﺻﻴﻞ ﺟﻬﺎﺯ USB Wave_Format_MSAudio1 Wave_Format_MSAudio2 AAC *.aac ﺍﻧﺘﺒﻪ ﻟﻤﺎ ﻳﻠﻲ: ● ﺇﺫﺍ ﻛﺎﻥ ﺍﺳﻢ ﺍﻟﻤﻠﻒ ﺑﻤﻠﻒ ﺃﻭ ﻣﺠﻠﺪ ﻣﻮﺟﻮﺩ ﻋﻠﻰ ﺟﻬﺎﺯ USBﻳﺰﻳﺪ ﻋﻦ 10 ﺃﺣﺮﻑ ،ﻓﻠﻦ ﻳﻈﻬﺮ ﻋﻠﻰ ﺷﺎﺷﺔ .SoundStand ً ﻣﺘﻮﺍﻓﻘﺎ ﻣﻊ ﺑﻌﺾ ﺃﻧﻮﺍﻉ ﻭﺳﺎﺋﻂ ﺗﺨﺰﻳﻦ .USB ● ﻫﺬﺍ ﺍﻟﻤﻨﺘﺞ ﺭﺑﻤﺎ ﻻ ﻳﻜﻮﻥ ● ﺃﻧﻈﻤﺔ ﺍﻟﻤﻠﻔﺎﺕ FAT16ﻭ FAT32ﻣﺪﻋﻮﻣﺔ. - ARA ﺍﻟﺸﺎﺷﺔ ﻣﻨﻔﺬ USB AAC-LC HE-AAC *.wav - *.ogg OGG 1.1.0 *.flac FLAC 1.1.0, FLAC 1.2.1 ﻳﺪﻋﻢ ﻣﻌﺪﻝ ﻋﻤﻞ ﺍﻟﻨﻤﺎﺫﺝ ﻓﻮﻕ ١٦ﻛﻴﻠﻮﻫﺮﺗﺰ ﻧﻈﺎﻡ ﺍﻟﻤﻠﻔﺎﺕ NTFSﻏﻴﺮ ﻣﺪﻋﻮﻡ. ● ﻗﻢ ﺑﺘﻮﺻﻴﻞ ﺟﻬﺎﺯ USBﻣﺒﺎﺷﺮﺓ ﺑﻤﻨﻔﺬ USBﺍﻟﺨﺎﺹ ﺑﺎﻟﻤﻨﺘﺞً . ﺧﻼﻓﺎ ﻟﺬﻟﻚ ،ﺭﺑﻤﺎ ﺗﺼﺎﺩﻑ ﻣﺸﻜﻠﺔ ﻓﻲ ﺗﻮﺍﻓﻖ .USB ● ﻻ ﺗﻘﻢ ﺑﺘﻮﺻﻴﻞ ﻋﺪﺓ ﻭﺣﺪﺍﺕ ﺗﺨﺰﻳﻦ ﺑﺎﻟﻤﻨﺘﺞ ﻋﺒﺮ ﻗﺎﺭﺉ ﺑﻄﺎﻗﺎﺕ ﻣﺘﻌﺪﺩ. ﻓﺮﺑﻤﺎ ﻻ ﻳﻌﻤﻞ ﺑﺸﻜﻞ ﺻﺤﻴﺢ. ● ﺑﺮﻭﺗﻮﻛﻮﻻﺕ PTPﺍﻟﺨﺎﺻﺔ ﺑﺎﻟﻜﺎﻣﻴﺮﺍ ﺍﻟﺮﻗﻤﻴﺔ ﻏﻴﺮ ﻣﺪﻋﻮﻣﺔ. ● ﻻ ﺗﻘﻢ ﺑﺈﺯﺍﻟﺔ ﺟﻬﺎﺯ USBﺃﺛﻨﺎء ﻋﻤﻠﻴﺔ ﺍﻟﻘﺮﺍءﺓ. ● ﻟﻦ ﻳﺘﻢ ﺗﺸﻐﻴﻞ ﻣﻠﻔﺎﺕ ﺍﻟﻤﻮﺳﻴﻘﻰ )ﺑﺘﻨﺴﻴﻘﻲ MP3ﻭ (WMAﺍﻟﻤﺤﻤﻴﺔ ﺑﻮﺍﺳﻄﺔ DRMﱠ ﺍﻟﻤﻨﺰﻟﺔ ﻣﻦ ﺍﻟﻤﻮﺍﻗﻊ ﺍﻹﻟﻜﺘﺮﻭﻧﻴﺔ ﺍﻟﺘﺠﺎﺭﻳﺔ. ● ﻣﺤﺮﻛﺎﺕ ﺍﻷﻗﺮﺍﺹ ﺍﻟﺼﻠﺒﺔ ) (HDDsﺍﻟﺨﺎﺭﺟﻴﺔ ﻏﻴﺮ ﻣﺪﻋﻮﻣﺔ. ● ﺃﺟﻬﺰﺓ ﺍﻟﻬﺎﺗﻒ ﺍﻟﻤﺤﻤﻮﻝ ﻏﻴﺮ ﻣﺪﻋﻮﻣﺔ. ١٩ ﺍﻟﻮﻇﺎﺋﻒ ﺗﺤﺪﻳﺚ ﺑﺮﺍﻣﺞ ﺍﻟﺘﺸﻐﻴﻞ ﺭﺑﻤﺎ ﺗﻘﻮﻡ ﺷﺮﻛﺔ ﺳﺎﻣﺴﻮﻧﺞ ﻓﻲ ﺍﻟﻤﺴﺘﻘﺒﻞ ﺑﺘﻮﻓﻴﺮ ﺗﺤﺪﻳﺜﺎﺕ ﻟﻠﺒﺮﻧﺎﻣﺞ ﺍﻟﺜﺎﺑﺖ ﺍﻟﺨﺎﺹ ﺑﺘﺸﻐﻴﻞ ﻧﻈﺎﻡ .SoundStand ● ﻋﻨﺪ ﺗﻮﺍﻓﺮ ﺍﻟﺘﺮﻗﻴﺔ ،ﻳﻤﻜﻨﻚ ﺗﺮﻗﻴﺔ ﺍﻟﺒﺮﻧﺎﻣﺞ ﺍﻟﺜﺎﺑﺖ ﻣﻦ ﺧﻼﻝ ﺗﻮﺻﻴﻞ ﻣﺤﺮﻙ USBﺍﻟﺬﻱ ﻳﺤﺘﻮﻱ ﻋﻠﻰ ﺍﻟﺘﺮﻗﻴﺔ ﺑﻤﻨﻔﺬ USBﺍﻟﻤﻮﺟﻮﺩ ﺑﻨﻈﺎﻡ SoundStand ﺍﻟﺨﺎﺹ ﺑﻚ. ● ﻻﺣﻆ ﺃﻧﻪ ﻓﻲ ﺣﺎﻟﺔ ﻭﺟﻮﺩ ﻋﺪﺓ ﻣﻠﻔﺎﺕ ﻟﻠﺘﺮﻗﻴﺔ ،ﻳﺘﻌﻴﻦ ﻋﻠﻴﻚ ﺗﺤﻤﻴﻞ ﻛﻞ ﻣﻠﻒ ﺑﻤﻔﺮﺩﻩ ﻋﻠﻰ ﻣﺤﺮﻙ USBﻭﺍﺳﺘﺨﺪﺍﻡ ﻣﻠﻒ ﻓﻲ ﻛﻞ ﻣﺮﺓ ﻟﺘﺤﺪﻳﺚ ﺍﻟﺒﺮﻧﺎﻣﺞ ﺍﻟﺜﺎﺑﺖ. ﻳﺮﺟﻰ ﺯﻳﺎﺭﺓ ﺍﻟﻤﻮﻗﻊ ﺍﻹﻟﻜﺘﺮﻭﻧﻲ ) (Samsung.comﺃﻭ ﺍﻻﺗﺼﺎﻝ ﺑﻤﺮﻛﺰ ﺧﺪﻣﺔ ﺍﻟﻌﻤﻼء ﺑﺸﺮﻛﺔ ﺳﺎﻣﺴﻮﻧﺞ ﻟﻠﺘﻌﺮﻑ ﻋﻠﻰ ﺍﻟﻤﺰﻳﺪ ﻣﻦ ﺍﻟﻤﻌﻠﻮﻣﺎﺕ ﺍﻟﻤﺘﻌﻠﻘﺔ ﺑﺘﻨﺰﻳﻞ ﻣﻠﻔﺎﺕ ﺍﻟﺘﺤﺪﻳﺚ. ● ● ● ● ٢٠ ﺃﺩﺧﻞ ﻣﺤﺮﻙ USBﺍﻟﺬﻱ ﻳﺤﺘﻮﻱ ﻋﻠﻰ ﺗﺮﻗﻴﺔ ﺍﻟﺒﺮﻧﺎﻣﺞ ﺍﻟﺜﺎﺑﺖ ﺑﻤﻨﻔﺬ USBﺍﻟﻤﻮﺟﻮﺩ ﺑﺎﻟﻮﺣﺪﺓ ﺍﻷﺳﺎﺳﻴﺔ. ﻳﺮﺟﻰ ﻋﺪﻡ ﻓﺼﻞ ﺍﻟﺘﻴﺎﺭ ﺍﻟﻜﻬﺮﺑﻲ ﺃﻭ ﺇﺯﺍﻟﺔ ﻣﺤﺮﻙ USBﻋﻨﺪﻣﺎ ﺗﻜﻮﻥ ﺍﻟﺘﺮﻗﻴﺎﺕ ﻗﻴﺪ ﺍﻟﺘﻄﺒﻴﻖ .ﺳﻴﺘﻢ ﺇﻳﻘﺎﻑ ﺗﺸﻐﻴﻞ ﺍﻟﻮﺣﺪﺓ ﺍﻷﺳﺎﺳﻴﺔ ﺗﻠﻘﺎﺋﻴًﺎ ﺑﻌﺪ ﺍﻻﻧﺘﻬﺎء ﻣﻦ ﺗﺤﺪﻳﺚ ﺍﻟﺒﺮﻧﺎﻣﺞ ﺍﻟﺜﺎﺑﺖ. ﻋﻨﺪ ﺗﺮﻗﻴﺔ ﺍﻟﺒﺮﺍﻣﺞ ،ﺗﺘﻢ ﺇﻋﺎﺩﺓ ﺗﻌﻴﻴﻦ ﺟﻤﻴﻊ ﺍﻹﻋﺪﺍﺩﺍﺕ ﺇﻟﻰ ﺇﻋﺪﺍﺩﺍﺕ ﺍﻟﻤﺼﻨﻊ ﺍﻻﻓﺘﺮﺍﺿﻴﺔ. ﻧﻘﺘﺮﺡ ﺗﺪﻭﻳﻦ ﺍﻹﻋﺪﺍﺩﺍﺕ ﺍﻟﺨﺎﺻﺔ ﺑﻚ ﺣﺘﻰ ﻳﻤﻜﻨﻚ ﺇﻋﺎﺩﺓ ﺿﺒﻄﻬﺎ ﺑﺴﻬﻮﻟﺔ ﺑﻌﺪ ﺍﻻﻧﺘﻬﺎء ﻣﻦ ﻋﻤﻠﻴﺔ ﺍﻟﺘﺤﺪﻳﺚ. ﺑﻤﺠﺮﺩ ﺍﻛﺘﻤﺎﻝ ﺗﺮﻗﻴﺔ ﺑﺮﻧﺎﻣﺞ ﺍﻟﻤﻨﺘﺞ ،ﻗﻢ ﺑﺈﻳﻘﺎﻑ ﺗﺸﻐﻴﻞ ﺍﻟﻤﻨﺘﺞ ﺛﻢ ﺍﺿﻐﻂ ﻣﻊ ﺍﻻﺳﺘﻤﺮﺍﺭ ﻋﻠﻰ ﺯﺭ )&( ﻟﻔﺘﺮﺓ ﻭﺟﻴﺰﺓ ﻹﻋﺎﺩﺓ ﺿﺒﻂ ﺍﻟﻤﻨﺘﺞ. ﺇﺫﺍ ﻓﺸﻞ ﺍﻟﺒﺮﻧﺎﻣﺞ ﺍﻟﺜﺎﺑﺖ ﻓﻲ ﺍﻟﺘﺮﻗﻴﺔ ،ﻓﻨﻮﺻﻲ ﺑﺘﻬﻴﺌﺔ ﺟﻬﺎﺯ USBﻓﻲ FAT16ﻭﺇﻋﺎﺩﺓ ﺍﻟﻤﺤﺎﻭﻟﺔ. ﻻ ﺗﻘﻢ ﺑﺘﻬﻴﺌﺔ ﺟﻬﺎﺯ USBﺑﺘﻬﻴﺌﺔ .NTFSﻻ ﻳﺪﻋﻢ ﺟﻬﺎﺯ SoundStandﻧﻈﺎﻡ ﻣﻠﻔﺎﺕ .NTFS ً ﻭﻓﻘﺎ ﻟﺠﻬﺔ ﺍﻟﺘﺼﻨﻴﻊ ،ﺭﺑﻤﺎ ﻳﻜﻮﻥ ﻣﺤﺮﻙ USBﻏﻴﺮ ﻣﺪﻋﻮﻣًﺎ. ﺍﺳﺘﻜﺸﺎﻑ ﺍﻷﻋﻄﺎﻝ ﻭﺇﺻﻼﺣﻬﺎ ﺍﺳﺘﻜﺸﺎﻑ ﺍﻷﻋﻄﺎﻝ ﻭﺇﺻﻼﺣﻬﺎ ARA ﻗﺒﻞ ﻃﻠﺐ ﺍﻟﺨﺪﻣﺔ ،ﻳﺮﺟﻰ ﺍﻟﺘﺄﻛﺪ ﻣﻤﺎ ﻳﻠﻲ. ﻻ ﻳﻤﻜﻦ ﺗﺸﻐﻴﻞ ﺍﻟﻮﺣﺪﺓ. ﻗﻢ ﺑﺘﻮﺻﻴﻞ ﻗﺎﺑﺲ ﺍﻟﺘﻴﺎﺭ ﺍﻟﻜﻬﺮﺑﻲ ﻓﻲ ﺍﻟﻤﻨﻔﺬ. • ﻫﻞ ﺗﻢ ﺗﻮﺻﻴﻞ ﺳﻠﻚ ﺍﻟﺘﻴﺎﺭ ﺍﻟﻜﻬﺮﺑﻲ ﻓﻲ ﻣﻨﻔﺬ ﺍﻟﺘﻴﺎﺭ ﺍﻟﻜﻬﺮﺑﻲ؟ ﺍﻟﻮﻇﻴﻔﺔ ﻻ ﺗﻌﻤﻞ ﻋﻨﺪ ﺍﻟﻀﻐﻂ ﻋﻠﻰ ﺍﻟﺰﺭ ﺍﻟﺨﺎﺹ ﺑﻬﺎ. ﺍﻓﺼﻞ ﻗﺎﺑﺲ ﺍﻟﺘﻴﺎﺭ ﺍﻟﻜﻬﺮﺑﻲ ﻭﻗﻢ ﺑﺘﻮﺻﻴﻠﻪ ﻣﺮﺓ ﺃﺧﺮﻯ. • ﻫﻞ ﺗﻮﺟﺪ ﺷﺤﻨﺔ ﻛﻬﺮﺑﺎء ﺍﺳﺘﺎﺗﻴﻜﻴﺔ ﻓﻲ ﺍﻟﻬﻮﺍء؟ ﺍﻟﺠﻬﺎﺯ ﻻ ﻳﺼﺪﺭ ﺻﻮ ًﺗﺎ. • ﻫﻞ ﻗﻤﺖ ﺑﺘﺸﻐﻴﻞ ﻭﻇﻴﻔﺔ ﻛﺘﻢ ﺍﻟﺼﻮﺕ؟ ﺍﺿﻐﻂ ﻋﻠﻰ ﺯﺭ ) Muteﻛﺘﻢ ﺍﻟﺼﻮﺕ( ﻹﻳﻘﺎﻑ ﺗﺸﻐﻴﻞ ﺍﻟﻮﻇﻴﻔﺔ. • ﻫﻞ ﺗﻢ ﺿﺒﻂ ﻣﺴﺘﻮﻯ ﺍﻟﺼﻮﺕ ﻋﻠﻰ ﺍﻟﺤﺪ ﺍﻷﺩﻧﻰ؟ ﺍﺿﺒﻂ ﻣﺴﺘﻮﻯ ﺍﻟﺼﻮﺕ. ﻭﺣﺪﺓ ﺍﻟﺘﺤﻜﻢ ﻋﻦ ﺑﻌﺪ ﻻ ﺗﻌﻤﻞ. • ﻫﻞ ﻳﻮﺟﺪ ﺍﺭﺗﺸﺎﺡ ﺑﺎﻟﺒﻄﺎﺭﻳﺎﺕ؟ ﺍﺳﺘﺨﺪﻡ ﺑﻄﺎﺭﻳﺎﺕ ﺟﺪﻳﺪﺓ. • ﻫﻞ ﺍﻟﻤﺴﺎﻓﺔ ﺑﻴﻦ ﻭﺣﺪﺓ ﺍﻟﺘﺤﻜﻢ ﻋﻦ ﺑﻌﺪ ﻭﺍﻟﻮﺣﺪﺓ ﺍﻷﺳﺎﺳﻴﺔ ﻛﺒﻴﺮﺓ ًّ ﺟﺪﺍ؟ ﺍﻗﺘﺮﺏ ﻣﻦ ﺍﻟﻮﺣﺪﺓ. ﺗﻌﺬﺭ ) TV SoundConnectﺍﻗﺘﺮﺍﻥ ﺍﻟﺘﻠﻔﺰﻳﻮﻥ(. • ﻫﻞ ﺟﻬﺎﺯ ﺍﻟﺘﻠﻔﺰﻳﻮﻥ ﺍﻟﺨﺎﺹ ﺑﻚ ﻳﺪﻋﻢ TV SoundConnect؟ ﻭﻇﻴﻔﺔ TV SoundConnectﻣﺪﻋﻮﻣﺔ ﻣﻦ ﺑﻌﺾ ﻃﺮﺍﺯﺍﺕ ﺗﻠﻔﺰﻳﻮﻥ Samsungﺍﻟﻤﺼﻨﻌﺔ ﺑﻌﺪ ﻋﺎﻡ .2012ﺍﻓﺤﺺ ﺗﻠﻔﺰﻳﻮﻧﻚ ﻟﻠﺘﺄﻛﺪ ﻣﻤﺎ ﺇﺫﺍ ﻛﺎﻥ ﻳﺪﻋﻢ .TV SoundConnect • ﻫﻞ ﺍﻟﺒﺮﻧﺎﻣﺞ ﺍﻟﺜﺎﺑﺖ ﺍﻟﺨﺎﺹ ﺑﺘﻠﻔﺰﻳﻮﻧﻚ ﺃﺣﺪﺙ ﺇﺻﺪﺍﺭ؟ ﻗﻢ ﺑﺘﺤﺪﻳﺚ ﺗﻠﻔﺰﻳﻮﻧﻚ ﺑﺄﺣﺪﺙ ﺇﺻﺪﺍﺭﺍﺕ ﺍﻟﺒﺮﻧﺎﻣﺞ ﺍﻟﺜﺎﺑﺖ. • ﻫﻞ ﻳﺤﺪﺙ ﺧﻄﺄ ﻋﻨﺪ ﺍﻟﺘﻮﺻﻴﻞ؟ ﺍﺗﺼﻞ ﺑﻤﺮﻛﺰ ﺧﺪﻣﺔ ﺍﻟﻌﻤﻼء. • ﺃﻋﺪ ﺿﺒﻂ ) TV MODEﻭﺿﻊ (TVﻭﻗﻢ ﺑﺘﻮﺻﻴﻠﻬﺎ ﻣﺮﺓ ﺃﺧﺮﻯ. ﺍﺿﻐﻂ ﻣﻊ ﺍﻻﺳﺘﻤﺮﺍﺭ ﻋﻠﻰ ﺯﺭ & ﻟﻤﺪﺓ ٥ﺛﻮﺍﻧﻲ ﻹﻋﺎﺩﺓ ﺿﺒﻂ .TV SoundConnect ٢١ ﺍﻟﻤﻠﺤﻖ ﺍﻟﻤﻠﺤﻖ ﺍ ﺫ ﺍﻟﻤﻮﺍﺻﻔﺎﺕ HW-H600 ﺍﺳﻢ ﺍﻟﻄﺮﺍﺯ USB ﻋﺎﻡ ﺍﻟﻤﻜﺒﺮ ٥ﻓﻮﻟﺖ ٠٫٥ /ﺃﻣﺒﻴﺮ ﺍﻟﻮﺯﻥ ٥ﻛﺠﻢ ﺍﻷﺑﻌﺎﺩ )ﺍﻟﻌﺮﺽ × ﺍﻻﺭﺗﻔﺎﻉ × ﺍﻟﻌﻤﻖ( ٣٦٠ × ٣٦٫٥ × ٧٣٥ﻣﻠﻢ ﺩﺭﺟﺔ ﺍﻟﺤﺮﺍﺭﺓ ﺍﻟﻤﻨﺎﺳﺒﺔ ﻟﻠﺘﺸﻐﻴﻞ ﻣﻦ ٥+ﺩﺭﺟﺎﺕ ﻣﺌﻮﻳﺔ ﺇﻟﻰ ٣٥+ﺩﺭﺟﺔ ﻣﺌﻮﻳﺔ ﺩﺭﺟﺔ ﺍﻟﺮﻃﻮﺑﺔ ﺍﻟﻤﻨﺎﺳﺒﺔ ﻟﻠﺘﺸﻐﻴﻞ ١٠ ٪ﺇﻟﻰ ٧٥ ٪ ﻣﻌﺪﻝ ﻃﺎﻗﺔ ﺍﻟﺨﺮﺝ (SW = ٤ OHM ,MID/TWT = ٨ OHM) ٨٠W ﺍﻟﺘﺸﻮﻳﺶ ﺍﻟﺘﻮﺍﻓﻘﻲ ﺍﻟﻜﻠﻲ = ١ ،٪١٠ﻛﻴﻠﻮ ﻫﺮﺗﺰ ﻧﺴﺒﺔ ﺍﻹﺷﺎﺭﺓ ﺇﻟﻰ ﺍﻟﻀﺠﻴﺞ )ﺍﻟﺪﺧﻼﻟﺘﻨﺎﻇﺮﻱ( ٦٥ﺩﻳﺴﻴﺒﻞ ﺍﻟﻔﺎﺻﻞ ) 1ﻛﻴﻠﻮ ﻫﺮﺗﺰ( ٦٥ﺩﻳﺴﻴﺒﻞ * ﻧﺴﺒﺔ ﺍﻹﺷﺎﺭﺓ ﺇﻟﻰ ﺍﻟﻀﺠﻴﺞ ،ﺍﻟﺘﺸﻮﻳﺶ ،ﺍﻟﻔﺎﺻﻞ ﻭﺍﻟﺤﺴﺎﺳﻴﺔ ﺍﻟﻘﺎﺑﻠﺔ ﻟﻼﺳﺘﻌﻤﺎﻝ ﺗﻜﻮﻥ ﻋﻠﻰ ﺃﺳﺎﺱ ﺍﻟﻤﻌﺎﻳﻴﺮ ﺍﻟﺘﻲ ﺗﺴﺘﺨﺪﻡ ﺗﻮﺟﻴﻬﺎﺕ ) AESﺟﻤﻌﻴﺔ ﺍﻟﻬﻨﺪﺳﺔ ﺍﻟﺼﻮﺗﻴﺔ(. * ﺍﻟﻤﻮﺍﺻﻔﺎﺕ ﺍﻻﺳﻤﻴﺔ - ﺗﺤﺘﻔﻆ ﺷﺮﻛﺔ ﺳﺎﻣﺴﻮﻧﺞ ﺇﻟﻜﺘﺮﻭﻧﻴﻜﺲ ﺍﻟﻤﺤﺪﻭﺩﺓ ﺑﺎﻟﺤﻖ ﻓﻲ ﺗﻌﺪﻳﻞ ﺍﻟﻤﻮﺍﺻﻔﺎﺕ ﺩﻭﻥ ﺇﺧﻄﺎﺭ. - ﻗﻴﻢ ﺍﻟﻮﺯﻥ ﻭﺍﻷﺑﻌﺎﺩ ﺗﻘﺮﻳﺒﻴﺔ. - ﻟﻼﻃﻼﻉ ﻋﻠﻰ ﻣﺼﺪﺭ ﺍﻟﻄﺎﻗﺔ ﻭﺍﺳﺘﻬﻼﻙ ﺍﻟﻄﺎﻗﺔ ،ﺭﺍﺟﻊ ﺍﻟﻤﻠﺼﻖ ﺍﻟﻤﺮﻓﻖ ﻣﻊ ﺍﻟﻤﻨﺘﺞ. ﺍﻟﺘﺮﺧﻴﺺ ﻣﺼﻨﻌﺔ ﺑﺘﺮﺧﻴﺺ ﻣﻦ ﻣﻌﺎﻣﻞ Dolby .Dolby Laboratoriesﻭﺭﻣﺰ double-Dﻫﻲ ﻋﻼﻣﺎﺕ ﺗﺠﺎﺭﻳﺔ ﻣﺴﺠﻠﺔ ﻟﻤﻌﺎﻣﻞ .Dolby Laboratories ﺻﻨﻌﺖ ﺑﺘﺮﺧﻴﺺ ﻣﻦ ﺷﺮﻛﺔ ،DTS .DTS Licensing Limitedﺍﻟﺮﻣﺰ ،ﻭ DTS ﻟﺒﺮﺍءﺍﺕ ﺍﺧﺘﺮﺍﻉ ) (DTSﺭﺍﺟﻊ ﺍﻟﺮﺍﺑﻂ ُ .http://patents.dts.com ﻭﺍﻟﺮﻣﺰ ﻣﻌًﺎ ﻫﻲ ﻋﻼﻣﺎﺕ ﺗﺠﺎﺭﻳﺔ ﻣﺴﺠﻠﺔ ﻭ DTS 2.0 Channelﻫﻲ ﻋﻼﻣﺔ ﺗﺠﺎﺭﻳﺔ ﺧﺎﺻﺔ ﺑﺸﺮﻛﺔ .DTSﺍﻟﻤﻨﺘﺞ ﻳﺘﻀﻤﻦ ﺑﺮﺍﻣﺞ ﺍﻟﺘﺸﻐﻴﻞ. ﻋﺒﺎﺭﺍﺕ ) (HDMIﻭ ) ،(HDMI High-Definition Multimediaﻭﺷﻌﺎﺭ ) (HDMIﻫﻲ ﻋﻼﻣﺎﺕ ﺗﺠﺎﺭﻳﺔ ﺃﻭ ﻋﻼﻣﺎﺕ ﺗﺠﺎﺭﻳﺔ ﻣﺴﺠﻠﺔ ﻟﺸﺮﻛﺔ )HDMI (Licensing LLCﻓﻲ ﺍﻟﻮﻻﻳﺎﺕ ﺍﻟﻤﺘﺤﺪﺓ ﻭﺍﻟﺪﻭﻝ ﺍﻷﺧﺮﻯ. -ﻹﺭﺳﺎﻝ ﺍﻻﺳﺘﻔﺴﺎﺭﺍﺕ ﻭﺍﻟﻄﻠﺒﺎﺕ ﺍﻟﻤﺘﻌﻠﻘﺔ ﺑﺎﻟﻤﺼﺎﺩﺭ ﺍﻟﻤﻔﺘﻮﺣﺔ ،ﻳﺮﺟﻰ ﺍﻻﺗﺼﺎﻝ ﺑﺸﺮﻛﺔ Samsungﻋﺒﺮ ﺍﻟﺒﺮﻳﺪ ﺍﻹﻟﻜﺘﺮﻭﻧﻲ ).([email protected] ﻛﺸﺮﻳﻚ ﻓﻲ ﺑﺮﻧﺎﻣﺞ ،ENERGY STARﻗﺮﺭﺕ Samsungﺃﻥ ﻳﻄﺎﺑﻖ ﻫﺬﺍ ﺍﻟﻤﻨﺘﺞ ﺃﻭ ﻃﺮﺯ ﺍﻟﻤﻨﺘﺠﺎﺕ ﺇﺭﺷﺎﺩﺍﺕ ﺑﺮﻧﺎﻣﺞ ENERGY STARﻟﺘﻮﻓﻴﺮ ﺍﻟﻄﺎﻗﺔ. ٢٢ ﺍﻻﺗﺼﺎﻝ ﺑﺴﺎﻣﺴﻮﻧﺞ ﺣﻮﻝ ﺍﻟﻌﺎﻟﻢ . ﻳﺮﺟﻰ ﺍﻻﺗﺼﺎﻝ ﺑﻤﺮﻛﺰﺧﺪﻣﺔﺍﻟﻌﻤﻼء ﺍﻟﺘﺎﺑﻊ ﻟﺴﺎﻣﺴﻮﻧﺞ،ﺫﺍ ﻛﺎﻥ ﻟﺪﻳﻚ ﺃﻳﺔﺍﺳﺘﻔﺴﺎﺭﺍﺕ ﺃﻭ ﻣﻼﺣﻈﺎﺕ ﺗﺘﻌﻠﻖ ﺑﻤﻨﺘﺠﺎﺕ ﺳﺎﻣﺴﻮﻧﺞ ﻣﺮﻛﺰ ﺍﻻﺗﺼﺎﻻﺕ ﺍﻟﻤﻨﻄﻘﺔ Asia Pacific ` AUSTRALIA NEW ZEALAND CHINA 603 362 1300 (SAMSUNG (0800 726 786 0800 400-810-5858 HONG KONG 4698 3698 (852) INDIA INDONESIA JAPAN MALAYSIA PHILIPPINES SINGAPORE THAILAND TAIWAN VIETNAM MENA ` U.A.E OMAN KUWAIT BAHRAIN QATAR Toll Free - 8282 3000 1800 Toll Free - 8282 266 1800 Non Toll Free - 30308282 0800112888 021-56997777 0120-327-527 1800-88-9999 [PLDT] 1-800-10-7267864 [Globe landline and Mobile] 1-800-8-7267864 [Other landline] 02-4222111 (1800-SAMSUNG (726-7864 ,0-2689-3232 1800-29-3232 0800-32-9999 889 588 1800 SYRIA IRAN MOROCCO (800-SAMSUNG (726-7864 (800-SAMSUNG (726-7864 (183-CALL) 183-2255 8000-4726 (800-CALL) 800-2255 08000-726786 16580 00 11 36 021 (0800-Samsung (72678 80-1000-12 0800-22273 5777444 06 18252273 021-8255 2255 100 080 SAUDI ARABIA 920021230 TURKEY Africa ` NIGERIA 11 77 444 EGYPT ALGERIA PAKISTAN TUNISIA JORDAN Ghana Cote D’ Ivoire SENEGAL CAMEROON KENYA UGANDA TANZANIA RWANDA BURUNDI DRC SUDAN SOUTH AFRICA BOTSWANA NAMIBIA ZAMBIA MOZAMBIQUE AH68-02697V-00 0800-726-7864 0800-10077 0302-200077 0077 8000 800-00-0077 0077 7095545 545 0800 300 300 0800 00 99 88 0685 9999 200 499999 1969 (SAMSUNG (726 7864 0860 8007260000 864 267 197 08 350370 0211 827267864 / 847267864 ﻣﻮﻗﻊ ﺍﻟﻮﻳﺐ www.samsung.com/au/support www.samsung.com/nz/support www.samsung.com/cn/support (www.samsung.com/hk/support (Chinese (www.samsung.com/hk_en/support (English www.samsung.com/in/support www.samsung.com/id/support www.samsung.com/jp/support www.samsung.com/my/support www.samsung.com/ph/support www.samsung.com/sg/support www.samsung.com/th/support www.samsung.com/tw/support www.samsung.com/vn/support (www.samsung.com/ae/support (English (www.samsung.com/ae_ar/support (Arabic www.samsung.com/eg/support www.samsung.com/n_africa/support www.samsung.com/pk/support www.samsung.com/n_africa/support (www.samsung.com/Levant/support (English (www.samsung.com/Levant/support (English www.samsung.com/iran/support www.samsung.com/n_africa/support www.samsung.com/sa/support (www.samsung.com/sa_en/support (English www.samsung.com/tr/support www.samsung.com/africa_en/support www.samsung.com/africa_fr/support www.samsung.com/support www.samsung.com/support