1
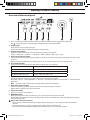
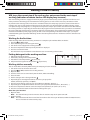
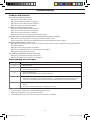
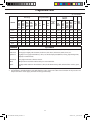
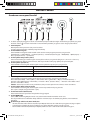
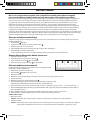
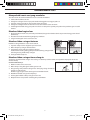
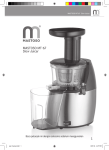
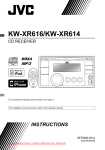
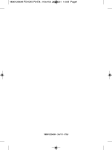
Washing Machine Owner’s Instructions WF- J1461(V/S/C/R), J1261(V/S/C/R), J1061(V/S/C/R), J861(V/S/C/R) WF- B1461(V/S/C/R), B1261(V/S/C/R), B1061(V/S/C/R), B861(V/S/C/R) WF- R1261(V/S/C/R), R1061(V/S/C/R), R861(V/S/C/R) WF- F1261(V/S/C/R), F1061(V/S/C/R), F861(V/S/C/R) WF-S1061(V/S/C/R), S861(V/S/C/R) Safety Precautions . . . . . . . . . . . . . . . . . . . . . . . . . . . . . 2 Before using the appliance . . . . . . . . . . . . . . . . . . . . . . . . . . 2 Safety instructions. . . . . . . . . . . . . . . . . . . . . . . . . . . . . . . . 2 . . . . . . . . . . . . . . . . . . . . . . . . . . . . . . . . . . . . . . . . . . . . . . . . . . . . . . . . . . . . . . . . . . . . . . . . . . . . . . . . . . . . . . . . . . . . . . . . . . . . . . . . . . . . . . . . . . . . . . . . . . . . . . . . . . . . . . . . . . . . . . . . . . . . . . . . . . . . . . . . . . . . . . . . . . . . . . . . . . . .3 .3 .3 .3 .3 .4 .4 .4 .5 Washing a Load of Laundry . . . . . . . . . . . . . . . . . Overview of the control panel . . . . . . . . . . . . . . . . . Washing for the first time . . . . . . . . . . . . . . . . . . . . Putting detergent in the washing machine:. . . . . . . . . Washing clothes manually. . . . . . . . . . . . . . . . . . . . Selecting options . . . . . . . . . . . . . . . . . . . . . . . . . Washing tips and hints . . . . . . . . . . . . . . . . . . . . . . . . . . . . . . . . . . . . . . . . . . . . . . . . . . . . . . . . . . . . . . . . .6 .6 .7 .7 .7 .8 .8 Maintaining the Washing Machine . . . . . . . . . . . . Repairing a frozen washing machine . . . . . . . . . . . . . Cleaning the exterior . . . . . . . . . . . . . . . . . . . . . . . Cleaning the debris filter. . . . . . . . . . . . . . . . . . . . . Cleaning the water hose mesh filter. . . . . . . . . . . . . . . . . . . . . . . . . . . . . . . . . . . . . . . . . . . . .9 .9 .9 .9 .9 Installing the Washing Machine . Unpacking the Washing Machine . Overview of the washing machine Selecting a location . . . . . . . . . . Adjusting the leveling feet . . . . . Removing the shipping bolts . . . . Connecting the water supply hose Positioning the drain hose. . . . . . Plugging in the machine . . . . . . . Troubleshooting. . . . . . . . . . . . . . . . . . . . . . . . . . . . . . 10 Problems and solutions . . . . . . . . . . . . . . . . . . . . . . . . . . . 10 Understanding error messages. . . . . . . . . . . . . . . . . . . . . . . 10 Programme Chart . . . . . . . . . . . . . . . . . . . . . . . . . . . . . 11 Appendix . . . . . . . . . . . Fabric care chart . . . . . . . . Electrical warnings . . . . . . Protecting the environment. Declaration of conformity . . Specification . . . . . . . . . . . . . . . . . . . . . . . . . . . . . . . . . . . . . . . . . . . . . . . . . . . . . . . . . . . . . . . . . . . . . . . . . . . . . . . . . . . . . . . . . . . . . . . . . . . . . . . . . . . . . . . . . . . . . . . . . . . . . . . . . . . . . . . . . . . . . . . . . . . . 12 . 12 . 12 . 12 . 12 . 13 Register your product at www.samsung.com/global/register CODE NO. : DC68-02456M_EN WF-J1061EW-02456M_EN.indd 1 2007-07-18 ¿ÀÈÄ 4:20:11 Safety Precautions Congratulations on your purchase of this Samsung washing machine. These Owner’s Instructions contain valuable information on the installation, use, and care of this appliance. Please take the time to read these instructions so that you can take full advantage of the washing machine’s features and enjoy this appliance for many years to come. Before using the appliance • • • • • Packing materials can be dangerous to children; keep all packing material (plastic bags, polystyrene, etc.) well out of the reach of children. The appliance is designed for home use only. Make sure that water and electrical connections are made by qualified technicians, observing the manufacturer’s instructions (see “Installing the Washing Machine”) and local safety regulations. All packaging and shipping bolts must be removed before the appliance is used. Serious damage may occur if they are not removed. See “Removing the shipping bolts”. Before washing clothes for the first time, you must run a complete cycle without clothes. See “Washing for the first time”. Safety instructions • • • • • • • • • • • • • • • • Before cleaning or carrying out maintenance, unplug the appliance from the electrical outlet or set the (On/Off ) button to Off. Make sure that the pockets of all clothing to be washed are empty. Hard, sharp objects, such as coins, safety pins, nails, screws, or stones can cause extensive damage to the appliance. Always unplug the appliance and turn off the water after use. Before you open the door of the appliance, check that the water has drained. Do not open the door if you can still see water. Pets and small children may climb into the appliance. Check the appliance before each use. The glass door becomes very hot during the washing cycle. Keep children away from the appliance while it is in use. Do not attempt to repair the appliance yourself. Repairs made by inexperienced or unqualified persons may cause injury and/or make more serious repairs to the appliance necessary. If the plug (power supply cord) is damaged, it must be replaced by the manufacturer or its service agent or a similar qualified person in order to avoid a hazard. This appliance should only be serviced by an authorized service center, and only genuine spare parts should be used. This appliance is not intended for use by young children or infirm persons unless theyhave been adequately supervised by a responsible person to ensure that they can use the appliance safely. Young children should be supervised to ensure that they do not play with the appliance. This appliance has to be connected to the plug endurable to proper power consumption. This appliance has to be positioned so that the plug is accessible after installation. Do not use processed water containing oil, cream or lotion, which is usually found in skin-care shops or massage clinics. - Otherwise this will cause the packing to be deformed, which causes a malfunction or water leak. A stainless washing tube does not usually rust. However if some metal such as a hair pin is left in the tube for an extended time, the tube could rust. - Do not leave water or bleach containing chlorine in the tube for an extended period of time. - Do not regularly use or leave water containing iron in the tube for an extended period of time. - If rust starts appearing on the surface of the tube, apply a cleansing agent (neutral) to the surface and use a sponge or soft cloth to clean it. (Under no circumstances use a metal brush) For washing machines with ventilation openings in the base, that a carpet must not obstruct the openings. Use the new hose-sets and old hose-sets should not be reused. • SAVE THESE2INSTRUCTION WF-J1061EW-02456M_EN.indd 2 2007-07-18 ¿ÀÈÄ 4:20:12 Installing the Washing Machine Unpacking the Washing Machine Unpack your washing machine and inspect it for shipping damage. Also make sure that you have received all of the items shown below. If the washing machine was damaged during shipping or you do not have all of the items, contact your Samsung dealer immediately. Overview of the washing machine Cover top Control panel Detergent drawer Drain Hose Door Cold Water supply hose Debris filter Bolt hole covers Plug Base cover Adjustable feet Selecting a location Before you install the washing machine, select a location with the following characteristics: • A hard, level surface (if the surface is uneven, see “Adjusting the leveling feet,” below) • Away from direct sunlight. • Adequate ventilation • Room temperature that will not fall below 0˚C • Away from sources of heat such as coal or gas Make sure that the washing machine does not stand on its power cord. Ventilation openings must not be obstructed by carpeting when the washing machine is installed on a carpeted floor. Cotton Remaining Time 12:00 Check o C rpm Min Delay Start Pre-wash Wash Rinse Spin Synthetic Delicate Wool Speedy Eco Fuzzy control Temp Spin Delay Start START PAUSE Power Door open Function Adjusting the leveling feet If the floor is uneven, adjust the feet (do not insert pieces of wood or any other objects under the feet): 1. Loosen the leg bolt by turning it with your hand until it is at the desired height. 2. Tighten the locking nut by turning it with the wrench. • Place the washer on a sturdy, flat surface. If the washer is placed on an uneven or weak surface, noise or vibration occurs. (Only a 1 degrees angle is allowed.) 3 WF-J1061EW-02456M_EN.indd 3 2007-07-18 ¿ÀÈÄ 4:20:12 Installing the Washing Machine Removing the shipping bolts Before using the washing machine, you must remove all of the shipping bolts from the back of the unit. To remove the bolts: 1. Loosen all bolts with the wrench before removing them. 2. Take each bolt head and pull it through the wide part of the hole. Repeat for each bolt. 3. Fill the holes with the supplied plastic covers. 4. Keep the shipping bolts for future use. Connecting the water supply hose The water supply hose must be connected to the washing machine at one end and to the water faucet at the other. Do not stretch the water supply hose. If the hose is too short and you do not wish to move the water faucet, replace the hose with a longer, high pressure hose. To connect the water supply hose: 1. Take the L-shaped arm fitting for the cold water supply hose and connect to the cold water supply intake on the back of the machine. Tighten by hand. 2. Connect the other end of the cold water supply hose to your sink’s cold water faucet and tighten it by hand. If necessary, you can reposition the water supply hose at the washing machine end by loosening the fitting, rotating the hose, and retightening the fitting. Positioning the drain hose The end of the drain hose may be positioned in three ways: Over the edge of a sink The drain hose must be placed at a height of between 60 and 90 cm. To keep the drain hose spout bent, use the supplied plastic hose guide. Secure the guide to the wall with a hook or to the faucet with a piece of string to prevent the drain hose from moving. ln a sink drain pipe branch The drain pipe branch must be above the sink siphon so that the end of the hose is at least 60 cm above the ground. ln a drain pipe Samsung recommends that you use a 65 cm high vertical pipe; it must be no shorter than 60 cm and no longer than 90 cm. 4 WF-J1061EW-02456M_EN.indd 4 2007-07-18 ¿ÀÈÄ 4:20:13 Installing the Washing Machine Plugging in the machine You MUST ground the plug of the washing machine. Check with a licensed electrician before using the machine to make sure it is properly grounded. For U.K. Users. GREEN AND Wiring lnstructions YELLOW 13 AMP FUSE - WARNING THIS APPLIANCE MUST BE EARTHED. This appliance must be earthed. In the event of an electrical short circuit, earthing reduces the risk of electric shock providing an escape wire for the electric current. The appliance is equipped with a mains lead which includes an earth wire for connecting to the earth terminal of your mains plug. The plug must be plugged into a socket that is properly installed and earthed. * The wires in this mains lead are coloured in accordance with the following code: • Green and yellow : Earth • Blue : Neutral • Brown : Live • AS the colours of the wires in the mains lead of this appliance may not correspond with the coloured markings indentifying the terminals in your plug, proceed as follows. • Connect the green and yellow wire to the terminal in the plug marked with the letter E or the earth symbol ( ) or coloured green or green-and-yellow. BLUE BROWN • Connect the blue wire to the terminal marked with the letter N or coloured black. WARNING • Connect the brown wire to the terminal marked with the letter L or coloured Ensure that the plug and red. power cord are not damaged * Consult a qualified electrician or service technician if in doubt about any of before use. If you have any these instructions. reason to remove the moulded The manufacturer of this washing machine will not accept any liability for plug from this appliance, damage to persons or material for non observance of these requirements. There are no user serviceable parts inside the washing machine and if the mains immediately remove the fuse and dispose of the plug. lead of this appliance is damaged, it must only be replaced by qualified service Do not connect the plug to personnel approved by the manufacturer because special tools are required. a mains socket under any circumstances as there is a danger of electric shock. CIRCUITS Your washing machine should be operated on a separate circuit from other appliances. Failure to do this may cause the circuit breaker to trip or the fuse to blow. 5 WF-J1061EW-02456M_EN.indd 5 2007-07-18 ¿ÀÈÄ 4:20:14 Washing a Load of Laundry Overview of the control panel A This is a general manual. The INLAY system may be different from that of the product you purchased. For ( � ), see item 4 below to select the right specifications that match your product. 1. Display panel Displays wash cycle and error messages. During execution of the program, the program indicator blinks. 2. Program Select button Press the button repeatedly to select one of the six available wash program. Cotton Coloureds Synthetics Handwash Wool Quick Rinse+Spin Spin 3. Temperature selection button Press the button repeatedly to cycle through the available water temperature options (cold wash, 30˚C, 40˚C , 60˚C and 95˚C). When pressing this button during washing, you can see the selected temperature in the display panel. 4. Spin selection button Press the button repeatedly to cycle through the available spin speed options. WF-J1461/B1461 no spin, 400, 800, 1400 rpm WF-J1261/B1261/R1261/F1261 no spin, 400, 800, 1200 rpm WF-J1061/B1061/R1061/F1061/S1061 no spin, 400, 800, 1000 rpm WF-J861/B861/R861/F861/S861 no spin, 400, 800, 800+ rpm 5. Option button Press the button repeatedly to cycle through the available partial wash options Rinse Hold Rinse+ Rinse Hold+Rinse+ Prewash Prewash+Rinse Hold Prewash+Rinse+ Prewash+Rinse Hold+Rinse+ Note: Prewash is only available when washing cotton, synthetic or Coloureds. 6. Delay Start selection button Press this button repeatedly to rotate between the retarded start options available. (from 3 Hours to 24 Hours, in 1 hour increments) 7. Start/Pause button Press to pause and restart programs. 8. (On/Off) button Press once to turn the washing machine on, press again to turn the washing machine off. If the washing machine power is left on for longer than 10 minutes without any buttons being touched, the power automatically turns off. What is the “Child Lock” function? - If you press the “Child Lock” button(Spin+Option button) longer than 2 sec during operation, this function is selected. - If once this function is selected, no change can be done until the end of laundry. - Press the “Child Lock” button(Spin+Option button) longer than 2 sec to cancel the function. 6 WF-J1061EW-02456M_EN.indd 6 2007-07-18 ¿ÀÈÄ 4:20:15 Washing a Load of Laundry WM stops the current step of the cycle or does not proceed to the next step of washing (indication of remain time on LED display may increase). Your new washing machine is equipped with Fuzzy Logic system, which not only sets the optimum level of water and other parameters of washing, but also controls the washing process as well as makes necessary corrections in order to provide better washing results. In the above- mentioned matter, the Fuzzy Logic system has detected deviations in washing cycle such as: high quantity of detergent at the end of the cycle, high vibration level while spinning, etc.You can adjust existing wash programs, i.e. change wash temperature and spin speed. After detection of such abnormalities, the washing machine is suspending the normal course of program in order to normalize these parameters and continue the cycle. Fuzzy logic system makes 7 attempts to eliminate such deviations. If it is impossible to normalize the above mentioned deviations by Fuzzy Logic system, you will see the corresponding indication on LED lamps. (see chapter “Troubleshooting”) The operation of Washing machine that corresponds to above- mentioned scheme is considered to be normal. Washing for the first time Before washing clothes for the first time, you must run a complete cycle without clothes. To do this: 1. Press the (On/Off ) button. 2. Pour a little detergent in the detergent drawer . 3. Turn on the water supply to the washing machine. 4. Press the Temperature button repeatedly until 40˚C is displayed. 5. Press the Start/Pause button. • This will remove any water from the manufacturer’s test run remaining in the machine. Putting detergent in the washing machine: 1. 2. 3. 4. Pull out the detergent drawer. Add laundry detergent into compartment . Add softener into compartment (if you desire). Add prewash detergent into compartment (if you desire). Washing clothes manually You can wash clothes manually without using the Fuzzy Logic feature. To do so: 1. Turn on the water at the water source sink. 2. Press the (On/Off ) button on the washing machine. 3. Open the door. 4. Load the articles one at a time loosely into the drum, without overfilling. 5. Close the door. 6. Put the detergent in the detergent drawer . 7. Repeatedly press the Program button to select the cycle you prefer: Cotton, Coloureds, Synthetics, and Quick... 8. Press the Spin button to select the spin speed (No Spin, 400, 800,...,No Spin,...) 9. Repeatedly press the Option button to select the cycle you prefer (Prewash, Rinse+, Rinse hold, ... ) 10. Press the Temperature button to select the temperature (cold wash, 30˚C, 40˚C, 60˚C, 95˚C). 11. Press the Start/Pause button and the machine will begin the cycle. When the cycle is finished: 1. Open the door. Note: The door will not open until 3 minutes after the machine stops or the power turns off. 2. Remove laundry. Note: The Slow rotation of drum is not fail of the machine after the last spin of Cotton, Coloureds or Quick course. That is a function to remove laundry easily. 7 WF-J1061EW-02456M_EN.indd 7 2007-07-18 ¿ÀÈÄ 4:20:17 Washing a Load of Laundry Selecting options Prewash Prewash is only available when washing cotton, coloureds, synthetics, delicate clothes. To use prewash: 1. Load the prewash detergent into compartment of the detergent drawer. 2. Select “Cotton”, ”Coloureds” or ”Synthetic” with the Program select button. 3. Press the Option button until the “Prewash” indicator lights up on the control panel. 4. Press Start/Pause to begin the cycle. Rinse+ Your machine will run through an additional rinsing cycle. The washing duration will be prolonged accordingly. Rinse Hold The laundry remains soaking in the final rinse water. Before the laundry can be unloaded, the “Spin” program must be run. Washing tips and hints Sorting your laundry: Sort your laundry according to the following characteristics: • Type of fabric care label symbol: Sort laundry into cottons, mixed fibers, synthetics, silks, wools and rayon. • Colour: Divide whites and colours. Wash new, coloured items separately. • Size: Placing items of different sizes in the same load will improve the washing action. • Sensitivity: Wash delicate items separately, using the Wool wash program for pure new wool, curtains and silk articles. Check the labels on the items you are washing or refer to the fabric care chart in the appendix. Emptying pockets: Coins, safety pins and similar items can damage linen, the washing machine drum, and the water tank. Securing fasteners: Close zippers and fasten buttons or hooks; loose belts or ribbons should be tied together. Determining load capacity: Do not overload the washing machine or your laundry may not wash properly. Use the chart below to determine the load capacity for the type of laundry you are washing. Load Capacity Fabfic Type WF-J1461/J1261/ J1061/J861 WF-B1461/B1261/ B1061/B861 WF-R1261/ R1061/R861 WF-F1261/ F1061/F861 WF-S1061/S861 Cotton 7.5 kg 6.5 kg 5.5 kg 5.0 kg 4.0 kg Coloureds 7.5 kg 6.5 kg 5.5 kg 5.0 kg 4.0 kg Synthetics 3.0 kg 3.0 kg 2.5 kg 2.5 kg 2.0 kg Wool 2.0 kg 2.0 kg 1.5 kg 1.5 kg 1.0 kg Detergent tips: The type of detergent you should use is based on the type of fabric (Cotton, Synthetic, Wool items) coloureds, wash temperature, degree and type of soiling. Always use “low suds” laundry soap, which is designed for automatic washing machines. When determining the detergent quantity, it’s necessary to consider recommendations of the detergent manufacturer, indicated on the package, as well as weight, type of laundry, it’s fouling factor and water hardness in your region. Note: Keep detergents and additives in a safe, dry place out of the reach of children. 8 WF-J1061EW-02456M_EN.indd 8 2007-07-18 ¿ÀÈÄ 4:20:17 Maintaining the Washing Machine Repairing a frozen washing machine If the temperature drops below freezing and your washing machine is frozen: 1. Unplug the washing machine. 2. Pour warm water on the source faucet to loosen the water supply hose. 3. Remove the water supply hose and soak it in warm water. 4. Pour warm water into the washing machine drum and let it sit for 10 minutes. 5. Reconnect the water supply hose to the water faucet and check if the water supply and drain operations are normal. Cleaning the exterior 1. Wipe the washing machine surfaces, including the control panel, with a soft cloth and non-abrasive household detergents. 2. Use a soft cloth to dry the surfaces. 3. Do not pour water on the washing machine. Cleaning the debris filter Clean the debris filter 2 or 3 times a year. 1. Remove the base cover from the front of the washing machine. 2. Unscrew the filter cap and take it out. 3. Wash any dirt or other material from the filter. Make sure the drain pump propeller behind the filter is not blocked. Replace the filter cap. 4. Replace the base cover. Cleaning the water hose mesh filter You should clean the water hose mesh filter at least one time per year, or when the lamps on your machine flickers: To do this: 1. Turn off the water source to the washing machine. 2. Unscrew the hose from the back of the washing machine. 3. With a pair of pliers, gently pull out the mesh filter from the end of the hose and rinse it under water until clean. Also clean the inside and outside of the threaded connector. 4. Push the filter back into place. 5. Screw the hose back onto the washing machine. 6. Turn on the faucet and make sure the connections are watertight. 9 WF-J1061EW-02456M_EN.indd 9 2007-07-18 ¿ÀÈÄ 4:20:18 Troubleshooting Problems and solutions The washing machine will not start • Make sure the door is firmly closed. • Make sure the washing machine is plugged in. • Make sure the water source faucet is turned on. • Make sure to press the Start/Pause button. No water or insufficient water supply • Make sure the water source faucet is turned on. • Make sure the water source hose is not frozen. • Make sure the water intake hose is not bent. • Make sure the filter on the water intake hose is not clogged. Detergent remains in the detergent drawer after the wash program is complete • Make sure the washing machine is running with sufficient water pressure. • Put the detergents in the inner parts of the detergent drawer(away from the outside edges). Washing machine vibrates or is too noisy • Make sure the washing machine is set on a level surface. If the surface is not level, adjust the washing machine feet to level the appliance. • Make sure that the shipping bolts are removed. • Make sure the washing machine is not touching any other object. • Make sure the laundry load is balanced. The washing machine does not drain and/or spin • Make sure the drain hose is not squashed or bent. • Make sure the water hose mesh filter is not clogged. Understanding error messages Error displayed Solution dE • Close the door. 4E • • Make sure the source water faucet is turned on. Check the water pressure. 5E • • Clean the debris filter. Make sure the drainage hose is installed correctly. UE • • Laundry load is unbalanced; loosen any tangled laundry. If only one item of clothing needs washing, such as a bathrobe or jeans, the final spin result might be unsatisfactory and an “UE” error message will be shown in the display window. LE • Check the end of the drain hose is too low. (Make sure the holder of drain hose in the back is intact) Check the end of the drain hose is submerged in water. • Before contacting After-Sales service: 1. Try to remedy the problem (See “Troubleshooting” on this page). 2. Restart the programme to see if the fault is repeated. 3. If the malfunction persists, call after-sales service and describe the problem. 10 WF-J1061EW-02456M_EN.indd 10 2007-07-18 ¿ÀÈÄ 4:20:18 Programme Chart ( user option) Max load (kg) PROGRAM Spin Speed (MAX) rpm Detergent And Additives WFWFWFWFJ1461/ B1461/ WFR1261/ F1261/ J1261/ B1261/ S1061/ R1061/ F1061/ J1061/ B1061/ S861 R861 F861 J861 B861 Prewash Wash Softener Temperature (MAX) ˚C WFWFJ1061/ WFJ1261/ B1061/ J1461/ B1261/ R1061/ B1461 R1261/ F1061/ F1261 S1061 WFJ861/ B861/ R861/ F861/ S861 Delay start Cycle Time (min) Cotton 7.5 6.5 5.5 5.0 4.0 yes 95 1400 1200 1000 800+ 126 Coloureds 7.5 6.5 5.5 5.0 4.0 yes 60 1400 1200 1000 800+ 98 Synthetics 3.0 3.0 2.5 2.5 2.0 yes 60 800 800 800 800 73 Wool 2.0 2.0 1.5 1.5 1.0 - yes 40 400 400 400 400 42 Handwash 2.0 2.0 1.5 1.5 1.0 - yes 40 400 400 400 400 37 Quick 3.0 3.0 2.0 2.0 1.5 - yes 60 1400 1200 1000 800+ 28 PROGRAM Type of WASH Cotton Averagely or lightly soiled cottons, bed linen, table linen, underwear, towels, shirts,etc. Coloureds Averagely or lightly soiled cottons, bed linen, table linen, underwear, towels, shirts, etc. Synthetics Lightly or averagely soiled blouses, shirts, etc. Made of polyester(Diolen, Trevira), polyamide(perlon, Nylon) or similar blends. Handwash Very light wash course like hand wash. Wool Only machine washable wollens with pure new wool label. Quick Lightly soiled cottons or linen blouses, shirts, dark coloured terry cloth, coloured linen articles, jeans, etc. 1. The programme duration data has been measured under the conditions specified in Standard IEC 456. 2. Consumption in individual homes may differ from the values given in the table due to variations in the pressure and temperature of the water supply, the load and the type of laundry. 11 WF-J1061EW-02456M_EN.indd 11 2007-07-18 ¿ÀÈÄ 4:20:18 Appendix Fabric care chart Resistant material Can be ironed at 100˚C max Delicate fabric Do not iron Item may be washed at 95˚C Can be dry cleaned using any solvent Item may be washed at 60˚C Dry clean with perchloride, lighter fuel, pure alcohol or R113 only Item may be washed at 40°C. Dry clean with aviation fuel, pure alcohol or R113 only Item may be washed at 30°C. Do not dry clean Item may be hand washed Dry flat Dry clean only Can be hung to dry Can be bleached in cold water Dry on clothes hanger Do not bleach Tumble dry, normal heat Can be ironed at 200˚C max Tumble dry, reduced heat Can be ironed at 150˚C max Do not tumble dry Electrical warnings To reduce the risk of fire, electrical shock, and other injuries, keep these safety precautions in mind: • Operate the appliance only from the type of power source indicated on the marking label. If you are not sure of the type of power supplied to your home, consult your appliance dealer or local power company. • Use only a grounded or polarized outlet. This plug will fit into the power outlet only one way. If you are unable to insert the plug fully into the outlet, try reversing the plug. If the plug still doesn’t fit, contact your electrician to replace your outlet. • Protect the power cord. Power supply cords should be routed so that they are unlikely to be walked on or pinched by items placed on or against them. Pay particular attention to cords at plugs, convenience receptacles, and the point where they exit from the unit. • Do not overload the wall outlet or extension cords. Overloading can result in fire or electric shock. Protecting the environment • • • • This appliance is manufactured from recyclable materials. If you decide to dispose of this appliance, please observe local waste disposal regulations. Cut off the power cord so that the appliance cannot be connected to a power source. Remove the door so that animals and small children cannot get trapped inside the appliance. Do not exceed the detergent quantities recommended in the detergent manu-facturers’ instructions. Use stain removal products and bleaches before the wash cycle only when strictly necessary. Save water and electricity by only washing full loads (the exact amount depends upon the program used). Declaration of conformity This appliance complies with European safety standards, EC directive 93/68 and EN Standard 60335. 12 WF-J1061EW-02456M_EN.indd 12 2007-07-18 ¿ÀÈÄ 4:20:22 Appendix Specification TYPE FRONT LOADING WASHER DIMENSION WF-J1461/J1261/J1061/J861 WF-B1461/B1261/B1061/B861 WF-R1261/R1061/R861 W598mm X D600mm X H844mm W598mm X D550mm X H844mm W598mm X D450mm X H844mm W598mm X D404mm X H844mm W598mm X D340mm X H844mm 49 ℓ 48 ℓ 43 ℓ WATER PRESSURE 50 kPa ~ 800 kPa WATER VOLUME NET WEIGHT 68 ℓ 59 ℓ WF-J1461/J1261 WF-J1061/J861 74 kg 71 kg WASH AND SPIN CAPACITY WF-J1461/J1261/J1061/J861 WASHING AND HEATING SPIN MODEL 230V WF-B1461/B1261 WF-B1061/B861 WF-R1261/R1061 WF-R861 WF-F1261/F1061/F861 WF-S1061/S861 71 kg 7.5 kg (DRY LAUNDRY) MODEL POWER CONSUMPTION 70 kg SPIN REVOLUTION 65 kg 64 kg 6.5 kg (DRY LAUNDRY) 5.5 kg (DRY LAUNDRY) WF-B1461/B1261/B1061/ B861 WF-R1261/R1061/ R861 61 kg 51 kg 5.0 kg (DRY LAUNDRY) 4.0 kg (DRY LAUNDRY) WF-F1261/F1061/F861 WF-S1061/S861 220 V 2000 W 220 V 2000 W 220 V 1900 W 220 V 1800 W 220 V 1800 W 240 V 2400 W 240 V 2400 W 240 V 2200 W 240 V 2100 W 240 V 2100 W WFJ1461 WFJ1261 WFJ1061 WFJ861 WFWFWFB1461 B1261 B1061 WFB861 WFWFR1261 R1061 WFR861 WFWFF1261 F1061 700 W 360 W 320 W 270 W 580 W 530 W 500 W 430 W 550 W 500 W 430 W 270 W 230 W 180 W 230 W 180 W PUMPING PACKAGE Wt WF-F1261/F1061/F861 WF-S1061/S861 WFF861 WFS1061 WFS861 34 W MODEL WF-J1461/J1261/J1061/J861 WF-B1461/B1261/B1061/ B861 WF-R1261/R1061/ R861 WF-F1261/F1061/F861 WF-S1061/S861 PAPER 2.5 kg 2.5 kg 2.1 kg 1.9 kg 1.8 kg PLASTIC 1.0 kg 1.0 kg 0.9 kg 0.8 kg 0.8 kg MODEL WF-J1461/B1461 WF-J1261/B1261/R1261/ F1261 WF-J1061/B1061/R1061/ F1061/S1061 WF-J861/B861/R861/F861/S861 rpm 1400 1200 1000 800 13 WF-J1061EW-02456M_EN.indd 13 2007-07-18 ¿ÀÈÄ 4:20:22 QUESTIONS OR COMMENTS? Country CALL OR VISIT US ONLINE AT CHINA 800-810-5858 , 010- 6475 1880 www.samsung.com.cn HONG KONG 3698 - 4698 www.samsung.com/hk INDIA 3030 8282 1800 110011 www.samsung.com/in/ INDONESIA 0800-112-8888 www.samsung.com/id JAPAN 0120-327-527 www.samsung.com/jp MALAYSIA 1800-88-9999 www.samsung.com/my PHILIPPINES 1800-10-SAMSUNG (7267864) www.samsung.com/ph SINGAPORE 1800-SAMSUNG (7267864) www.samsung.com/sg THAILAND 1800-29-3232 02-689-3232 www.samsung.com/th TAIWAN 0800-329-999 www.samsung.com/tw VIETNAM 1 800 588 889 www.samsung.com/vn WF-J1061EW-02456M_EN.indd 14 2007-07-18 ¿ÀÈÄ 4:20:23 Mesin Cuci Petunjuk Penggunaan WF- J1461(V/S/C/R), J1261(V/S/C/R), J1061(V/S/C/R), J861(V/S/C/R) WF- B1461(V/S/C/R), B1261(V/S/C/R), B1061(V/S/C/R), B861(V/S/C/R) WF- R1261(V/S/C/R), R1061(V/S/C/R), R861(V/S/C/R) WF- F1261(V/S/C/R), F1061(V/S/C/R), F861(V/S/C/R) WF-S1061(V/S/C/R), S861(V/S/C/R) Pencegahan Keselamatan. . . . . . . . . . . . . . . . . . . . . . . . . 2 Sebelum menggunakan peralatan . . . . . . . . . . . . . . . . . . . . . 2 Petunjuk keselamatan . . . . . . . . . . . . . . . . . . . . . . . . . . . . . 2 Memasang Mesin Cuci . . . . . . . . . . . . . . . . . . . . Membuka Kemasan Mesin Cuci . . . . . . . . . . . . . . . . Gambaran umum mesin cuci . . . . . . . . . . . . . . . . . . Memilih lokasi . . . . . . . . . . . . . . . . . . . . . . . . . . . Mengatur ketinggian kaki . . . . . . . . . . . . . . . . . . . . Melepaskan baut pengiriman . . . . . . . . . . . . . . . . . Menyambungkan selang penyedia air . . . . . . . . . . . . Penempatan selang pembuangan . . . . . . . . . . . . . . Menancapkan steker listrik mesin cuci . . . . . . . . . . . . . . . . . . . . . . . . . . . . . . . . . . . . . . . . . . . . . . . . . . . . . . . . . . . . . . . . . . .3 .3 .3 .3 .3 .4 .4 .4 .5 Mencuci Pakaian. . . . . . . . . . . . . . . . . . . . . . . . Gambaran umum panel kendali . . . . . . . . . . . . . . . . Mencuci untuk pertama kalinya . . . . . . . . . . . . . . . . Memasukkan deterjen ke dalam mesin cuci: . . . . . . . . Mencuci pakaian secara manual . . . . . . . . . . . . . . . . Memilih opsi . . . . . . . . . . . . . . . . . . . . . . . . . . . . Tips dan petunjuk untuk mencuci . . . . . . . . . . . . . . . . . . . . . . . . . . . . . . . . . . . . . . . . . . . . . . . . . . . . . . . . . .6 .6 .7 .7 .7 .8 .8 Merawat Mesin Cuci . . . . . . . . . . . . . . . . . . . . . Memperbaiki mesin cuci yang membeku . . . . . . . . . . Membersihkan bagian luar . . . . . . . . . . . . . . . . . . . Membersihkan saringan kotoran . . . . . . . . . . . . . . . Membersihkan saringan kasa selang air . . . . . . . . . . . . . . . . . . . . . . . . . . . . . . . . . . . . . . . . . .9 .9 .9 .9 .9 Pemecahan masalah . . . . . . . . . . . . . . . . . . . . . . . . . . . 10 Masalah dan pemecahannya . . . . . . . . . . . . . . . . . . . . . . . . 10 Memahami pesan kesalahan . . . . . . . . . . . . . . . . . . . . . . . . 10 Bagan Program . . . . . . . . . . . . . . . . . . . . . . . . . . . . . . 11 Lampiran . . . . . . . . . Bagan perawatan serat . . Peringatan listrik . . . . . . Melestarikan lingkungan Penyataan kesesuaian . . Spesifikasi . . . . . . . . . . . . . . . . . . . . . . . . . . . . . . . . . . . . . . . . . . . . . . . . . . . . . . . . . . . . . . . . . . . . . . . . . . . . . . . . . . . . . . . . . . . . . . . . . . . . . . . . . . . . . . . . . . . . . . . . . . . . . . . . . . . . . . . . . . . . . . . . . . . . . . . . . . . . . . . . 12 . 12 . 12 . 12 . 12 . 13 Silakan mendaftarkan kartu garansi dan produk Samsung anda di www.samsung.com/global/register CODE NO. : DC68-02456M_ID WF-J1061EW-02456M_ID.indd 1 2007-07-23 ¿ÀÈÄ 1:44:02 Pencegahan Keselamatan Selamat atas pembelian mesin cuci Samsung Anda. Petunjuk Penggunaan ini berisi informasi yang berguna untuk pemasangan, penggunaan dan perawatan peralatan ini. Harap meluangkan waktu untuk membaca buku petunjuk ini sehingga Anda dapat memanfaatkan sepenuhnya fitur-fitur mesin cuci ini serta menikmatinya untuk waktu lama. Sebelum menggunakan peralatan • • • • • Bahan kemasan dapat membahayakan anak-anak; simpan semua bahan kemasan (kantong plastik, poly styrene, dll.) jauh dari jangkauan anak-anak. Peralatan ini dirancang hanya untuk penggunaan di rumah. Pastikan bahwa sambungan air dan listrik dilakukan oleh teknisi yang memenuhi syarat, sesuai petunjuk pabrik pembuat (Simak “Pemasangan Mesin Cuci”) dan peraturan keselamatan setempat. Semua bahan kemasan dan baut pengiriman harus dilepaskan sebelum peralatan digunakan. Jika tidak dilepaskan dapat menyebabkan kerusakan yang parah. Simak “Melepaskan baut pengiriman”. Sebelum mencuci pakaian untuk pertama kalinya, Anda harus menjalankan mesin satu siklus penuh tanpa pakaian. Simak “Mencuci untuk pertama kalinya”. Petunjuk keselamatan • • • • • • • • • • • • • • • • Sebelum membersihkan atau melakukan perawatan, cabut steker peralatan dari stop-kontak listrik atau atur tombol (On/Off ) ke Off (Mati). Pastikan semua kantung pakaian yang akan dicuci sudah kosong. Benda yang keras, tajam, seperti uang logam, peniti, paku, sekrup, atau batu dapat menyebabkan kerusakan yang parah pada peralatan. Selalu cabut steker listrik peralatan dan matikan air setelah selesai digunakan. Sebelum Anda membuka pintu mesin cuci, pastikan bahwa air telah habis terkuras. Jangan membuka pin tunya jika Anda masih dapat melihat air. Hewan dan anak kecil mungkin memanjat masuk ke dalam peralatan. Periksa mesin cuci setiap kali akan menggunakan. Pintu kaca menjadi panas selama siklus pencucian. Jauhkan anak-anak sewaktu mesin cuci sedang digu nakan. Jangan mencoba untuk memperbaiki sendiri peralatan ini. Perbaikan yang dilakukan orang yang tidak berpengalaman atau tidak memenuhi syarat dapat menyebabkan cedera dan/atau kerusakan yang lebih parah. Jika steker (kabel listrik) rusak, harus diganti oleh pabrik pembuat atau pusat servisnya atau tenaga lain yang memenuhi syarat untuk menghindari bahaya. Peralatan ini hanya boleh diservis oleh pusat servis resmi, dan hanya menggunakan suku cadang yang asli. Peralatan ini tidak ditujukan untuk digunakan oleh anak kecil atau orang yang tidak mampu kecuali di bawah pengawasan yang memadai dari orang yang bertanggung jawab untuk memastikan bahwa mereka dapat menggunakan peralatan ini dengan aman. Anak-anak harus diawasi untuk memastikan mereka tidak bermain dengan peralatan ini. Peralatan ini harus dihubungkan ke steker yang memadai untuk konsumsi daya yang diperlukan. Peralatan ini harus ditempatkan sedemikian hingga steker dapat diakses setelah pemasangan. Jangan menggunakan air olahan yang mengandung minyak, krim atau cairan pembersih, yang umum dite mukan di salon atau panti pijat. Jika tidak hal ini dapat menyebabkan badan mesin berubah bentuk, yang menyebabkan kerusakan atau kebocoran air. Tabung cuci baja anti karat umumnya tidak berkarat. Meskipun demikian jika ada logam misalnya jepit rambut tertinggal di dalam tabung dalam waktu lama, tabung mungkin berkarat. Jangan tinggalkan air atau pemutih yang mengandung klorin di dalam tabung dalam waktu lama. Jangan sering menggunakan atau meninggalkan air atau pemutih yang mengandung besi di dalam tabung dalam waktu lama. Jika karat mulai tampak di permukaan tabung, oleskan zat pembersih (netral) ke permukaan dan gunakan spons atau kain lembut untuk membersihkannya. (Dalam keadaan apa pun jangan gunakan sikat logam) Untuk mesin cuci yang dilengkapi celah ventilasi di bagian alas, karpet tidak boleh menutup celah tersebut. Gunakan selang baru dan jangan gunakan kembali selang yang lama. • SIMPANLAH2PETUNJUK INI WF-J1061EW-02456M_ID.indd 2 2007-07-23 ¿ÀÈÄ 1:44:03 Memasang Mesin Cuci Membuka Kemasan Mesin Cuci Buka kemasan mesin cuci Anda dan periksa apakah ada kerusakan pengiriman. Pastikan juga apakah Anda telah menerima semua barang di bawah ini. Jika mesin cuci rusak dalam pengiriman atau ada barang yang tidak Anda terima, segera hubungi penyalur Samsung Anda. Gambaran umum mesin cuci Tutup Atas Panel kontrol Kotak deterjen Pintu Selang pembuangan Selang penyedia Air Dingin Saringan kotoran Penutup lubang sekrup Steker Tutup alas Kaki yang dapat diatur Memilih lokasi Sebelum Anda memasang mesin cuci, pilih lokasinya dengan karakteristik berikut ini: • Permukaan yang keras, rata (jika permukaan tidak rata, simak “Mengatur ketinggian kaki,” di bawah ini) • Jauh dari sinar matahari langsung • Ventilasi yang memadai • Suhu ruangan yang tidak akan turun di bawah 0 °C • Jauh dari sumber panas seperti batubara atau gas Pastikan bahwa kabel listrik tidak terjepit di bawah mesin cuci. Celah ventilasi tidak boleh terhalang oleh karpet apabila mesin cuci dipasang di lantai berkarpet. Cotton Remaining Time 12:00 Check o C rpm Min Delay Start Pre-wash Wash Rinse Spin Synthetic Delicate Wool Speedy Eco Fuzzy control Temp Spin Delay Start START PAUSE Power Door open Function Mengatur ketinggian kaki Jika lantai tidak rata, atur kakinya (jangan mengganjal dengan potongan kayu atau benda lainnya di bawah kaki mesin cuci): 1. Kendorkan baut kaki dengan tangan Anda sampai ketinggian yang diinginkan. 2. Kencangkan sekrup pengunci menggunakan kunci pas yang tersedia. • Letakkan mesin cuci di permukaan yang kokoh, rata. Jika mesin cuci diletakkan di atas permukaan yang tidak rata atau tidak kokoh, dapat menimbulkan suara atau getaran. (Hanya kemiringan 1 derajat yang diperbolehkan.) 3 WF-J1061EW-02456M_ID.indd 3 2007-07-23 ¿ÀÈÄ 1:44:04 Memasang Mesin Cuci Melepaskan baut pengiriman Sebelum menggunakan mesin cuci, Anda harus melepaskan kelima baut pengiriman dari bagian belakang unit. Untuk melepaskan baut: 1. Kendorkan semua baut dengan kunci pas yang tersedia sebelum melepaskannya. 2. Pegang kepala baut dan tarik melalui bagian lubang yang lebar. Ulangi untuk setiap baut. 3. Isi lubang dengan penutup plastik yang tersedia. 4. Simpan baut pengiriman seandainya diperlukan lagi. Menyambungkan selang penyedia air Salah satu ujung selang penyedia air harus disambungkan ke mesin cuci dan ujung yang lain ke keran air. Jangan meregangkan selang penyedia air. Jika selang terlalu pendek dan Anda tidak ingin memindahkan keran air, ganti selang dengan selang yang lebih panjang, dan tahan terhadap tekanan tinggi air. Untuk menyambungkan selang penyedia air: 1. Ambil lengan sambungan berbentuk-L untuk selang penyedia air dingin dan sambungkan ke lubang masuk air dingin di bagian belakang mesin. Kencangkan dengan tangan. 2. Sambungkan ujung selang penyedia air dingin lainnya ke keran air dingin Anda dan kencangkan dengan tangan. Bila perlu, Anda dapat mengubah posisi selang penyedia air pada mesin cuci dengan mengendorkan sambungan, memutar selangnya, dan mengencangkan kembali sambungannya. Penempatan selang pembuangan Ujung selang pembuangan dapat diletakkan dengan tiga cara: Pada bagian tepi bak cuci Selang pembuangan harus diletakkan pada ketinggian antara 60 dan 90 cm. Untuk menjaga selang pembuangan tetap melengkung, gunakan pemandu selang plastik yang tersedia. Tahan pemandu ke tembok dengan kait atau ke keran dengan seutas tali untuk mencegah selang pembuangan bergeser. Di cabang pipa bak cuci Cabang pipa pembuangan harus di atas lubang kuras bak cuci sehingga ujung selang setidaknya 60 cm di atas tanah. Di pipa pembuangan Samsung menganjurkan Anda untuk menggunakan pipa tegak 60 cm; tidak lebih rendah dari 60 cm dan tidak lebih tinggi dari 90 cm. 4 WF-J1061EW-02456M_ID.indd 4 2007-07-23 ¿ÀÈÄ 1:44:05 Memasang Mesin Cuci Menancapkan steker listrik mesin cuci Anda HARUS mentanahkan steker mesin cuci. Pastikan dengan teknisi listrik berlisensi sebelum menggunakan mesin untuk memastikan pentanahan yang baik. Untuk Pengguna U.K. Petunjuk Pengawatan - PERINGATAN PERALATAN INI HARUS DITANAHKAN. HIJAU DAN Peralatan ini harus ditanahkan. Apabila terjadi arus pendek, pentanahan KUNING SEKRING 13 AMP mengurangi risiko kejutan listrik dengan menyediakan kawat pelepasan aliran arus listrik. Peralatan ini dilengkapi dengan kabel listrik termasuk kawat pentanahan untuk disambungkan ke terminal pentanahan steker listrik Anda. Steker harus ditancapkan ke stopkontak yang diinstalasi dan ditanahkan dengan baik. * Kawat di dalam kabel listrik ini diberi kode warna sebagai berikut: • Hijau dan kuning : Arde • Biru : Netral • Coklat : Aktif • Mengingat warna kawat di dalam kabel peralatan ini mungkin tidak sama dengan penandaan warna pada terminal steker listrik Anda, ikuti petunjuk berikut ini. • Sambungkan kawat hijau dan kuning ke terminal steker yang ditandai dengan huruf E atau simbol tanah ( ) atau berwarna hijau atau hijau-dan-kuning. • Sambungkan kawat biru ke terminal yang ditandai dengan huruf N atau BIRU COKLAT berwarna hitam. • Sambungkan kawat coklat ke terminal yang ditandai dengan huruf L atau PERINGATAN berwarna merah. Pastikan bahwa steker dan * Tanyakan pada ahli listrik atau teknisi servis yang memenuhi syarat jika Anda kabel listrik tidak rusak sebelum ragu-ragu. digunakan. Jika Anda merasa Pabrik pembuat mesin cuci ini tidak akan bertanggung jawab atas cedera atau perlu untuk melepaskan steker kerugian apa pun yang ditimbulkan oleh pengabaian persyaratan ini. Tidak ada cetakan plastik dari peralatan bagian di dalam mesin cuci yang dapat diperbaiki pengguna dan jika kabel listrik ini, segera lepaskan sekring dan buang stekernya. Jangan peralatan ini rusak, ia harus diganti oleh tenaga servis yang memenuhi syarat tancapkan steker tersebut ke yang disetujui oleh pabrik pembuat karena memerlukan alat khusus. stopkontak dalam keadaan apa pun karena berisiko kejutan listrik. SIRKUIT Mesin cuci Anda harus dioperasikan pada sirkuit listrik yang terpisah dari peralatan lainnya. Jika tidak dilakukan dapat menyebabkan pemutus arus (MCB) mati atau sekring putus. 5 WF-J1061EW-02456M_ID.indd 5 2007-07-23 ¿ÀÈÄ 1:44:06 Mencuci Pakaian Gambaran umum panel kendali A Ini adalah petunjuk penggunaan umum. Sistem INLAY (tampilan tombol) mungkin berbeda dengan produk yang telah Anda beli. Untuk ( � ), lihat item 4 di bawah ini untuk memilih spesifikasi yang benar sesuai dengan produk Anda. 1. Panel tampilan Menampilkan siklus pencucian dan pesan kesalahan. Selama program dijalankan, indikator program berkedip. 2. Tombol Pilihan Program Tekan tombol berulang kali untuk memilih salah satu dari enam program pencucian yang tersedia. Cotton(Katun) Colour(Warna) Synthetics(Sintetis) Handwash(Cuci Tangan) Wool(Wool) Quick(Cepat) Rinse+Spin(Cuci+Peras) Spin(Peras) 3. Tombol pilihan Temperature (Suhu) Tekan tombol berulang kali untuk bergulir di antara pilihan suhu air yang tersedia (dingin, 30 °C, 40 °C, 60 °C dan 95 °C). Apabila tombol ini ditekan selama mencuci, Anda dapat melihat suhu yang dipilih pada panel tampilan. 4. Tombol pilihan Spin (Peras) Tekan tombol ini berulang kali untuk bergulir di antara pilihan kecepatan peras yang tersedia. WF-J1461/B1461 tanpa peras, 400, 800, 1400 rpm WF-J1261/B1261/R1261/F1261 tanpa peras, 400, 800, 1200 rpm WF-J1061/B1061/R1061/F1061/S1061 tanpa peras, 400, 800, 1000 rpm WF-J861/B861/R861/F861/S861 tanpa peras, 400, 800, 800+ rpm 5. Tombol Opsi Tekan tombol berulang kali untuk bergulir di antara opsi per bagian pencucian yang tersedia. Rinse Hold (Tahan Bilas) Rinse+ (Bilas+) Rinse Hold + Rinse+ (Tahan Bilas + Blias+) Prewash (Pracuci) Prewash + Rinse Hold (Pracuci + Tahan Bilas) Prewash + Rinse+ (Pracuci + Bilas+) Prewash + Rinse Hold + Rinse+ (Pracuci + Tahan Bilas + Bilas+) Catatan: Prewash (Pracuci/Pencucian pendahuluan) hanya tersedia apabila mencuci katun, sintetis atau Warna. 6. Tombol pilihan Delay Start (Penunda) Tekan tombol ini berulang kali untuk bergulir di antara opsi tunda mulai yang tersedia. (dari 3 jam s/d 24jam, dengan kenaikan 1 jam) 7. Tombol Start/Pause (Mulai/Jeda) Tekan untuk berhenti sejenak dan menjalankan ulang program. 8. Tombol (On/Off) Tekan sekali untuk menghidupkan mesin cuci, tekan kembali untuk mematikan mesin cuci. Jika daya listrik mesin cuci dibiarkan hidup lebih dari 10 menit tanpa ada tombol yang ditekan, mesin otomatis dimatikan. Apakah fungsi “Child Lock” (Kunci Anak) itu? - Jika Anda menekan tombol “Child Lock” (tombol Spin+Option) lebih lama dari 2 detik selama pengoperasian, fungsi ini dipilih. - Setelah fungsi ini dipilih, tidak ada perubahan yang dapat dilakukan sampai pencucian selesai. - Tekan tombol “Child Lock” (tombol Spin+Option) lebih lama dari 2 detik untuk membatalkan fungsi ini. 6 WF-J1061EW-02456M_ID.indd 6 2007-07-23 ¿ÀÈÄ 1:44:08 Mencuci Pakaian Mesin cuci menghentikan langkah siklus yang aktif atau tidak melanjutkan ke langkah pencucian berikutnya (indikasi waktu tersisa pada tampilan LED mungkin bertambah). Mesin cuci baru Anda dilengkapi dengan sistem Fuzzy Logic, yang tidak hanya mengatur ketinggian air yang optimal dan parameter pencucian lainnya, tetapi juga mengendalikan proses pencucian di samping melakukan perbaikan yang diperlukan untuk memberikan hasil pencucian yang lebih baik. Dalam kasus yang disebutkan di atas, sistem Fuzzy Logic mendeteksi penyimpangan dalam siklus pencucian, seperti: deterjen dalam jumlah banyak di akhir siklus, level getaran tinggi saat pemerasan, dll. Anda dapat mengatur program pencucian yang ada, mis. mengubah suhu pencucian dan kecepatan peras. Setelah mendeteksi kejadian tidak normal tersebut, mesin cuci menghentikan pengoperasian program untuk menormalkan parameter tersebut dan melanjutkan siklusnya. Sistem Fuzzy Logic mencoba 7 kali untuk menghilangkan penyimpangan tersebut. Jika penyimpangan yang disebutkan di atas tidak dapat dinormalkan oleh sistem Fuzzy Logic, Anda akan melihat indikasi yang terkait pada lampu LED. (simak bab “Pemecahan Masalah”) Pengoperasian Mesin cuci yang terkait dengan skema yang disebutkan di atas dianggap normal. Mencuci untuk pertama kalinya Sebelum mencuci pakaian untuk pertama kalinya, Anda harus menjalankan mesin satu siklus penuh tanpa pakaian. Untuk melakukannya: 1. Tekan tombol (On/Off ). 2. Tuangkan sedikit deterjen ke dalam kotak deterjen . 3. Hidupkan penyedia air ke mesin cuci. 4. Tekan tombol Temperature (Suhu) berulang kali sampai 40°C ditampilkan. 5. Tekan tombol Start/Pause (Mulai/Jeda). • Ini akan membuang semua air dari uji coba pabrik pembuat yang masih tersisa di dalam mesin. Memasukkan deterjen ke dalam mesin cuci: 1. 2. 3. 4. Tarik keluar kotak deterjen. Tambahkan deterjen pencucian ke wadah . Isikan pelembut ke wadah (jika diinginkan). Isikan deterjen pra-cuci ke wadah (jika diinginkan). Mencuci pakaian secara manual Anda dapat mencuci pakaian secara manual tanpa menggunakan fitur Fuzzy Logic. Untuk melakukannya: 1. Hidupkan air pada keran sumber air. 2. Tekan tombol (On/Off ) pada mesin cuci. 3. Buka pintu mesin. 4. Masukkan cucian dengan longgar satu demi satu ke dalam drum, jangan terlalu penuh. 5. Tutup pintu mesin. 6. Masukkan deterjen ke dalam kotak deterjen . 7. Tekan tombol Program berulang kali untuk memilih siklus yang Anda sukai: Cotton(Katun), Colour(Warna), Synthetics(Sintetis), dan Quick(Cepat)... 8. Tekan tombol Spin (Peras) untuk memilih kecepatan peras (no spin(tanpa peras), 400, 800, …, no spin(tanpa peras), … ) 9. Tekan tombol Option (Opsi) berulang kali untuk memilih siklus yang Anda sukai (Prewash(Pracuci), Rinse+(Bilas+), Rinse hold(Tahan bilas), ... ) 10. Tekan tombol Temperature (Suhu) untuk memilih suhunya (air dingin, 30°C, 40°C, 60°C, 95°C). 11. Tekan tombol Start/Pause (Mulai/Jeda) dan mesin akan memulai siklus pencucian. Setelah siklus selesai: 1. Buka pintu mesin. Catatan: Pintu tidak akan terbuka sampai 3 menit setelah mesin cuci berhenti atau daya dimatikan. 2. Keluarkan cucian. Catatan: Drum yang berputar Pelan setelah pemerasan terakhir pada proses Cotton (Katun), Colour (Warna) atau Quick (Cepat) tidak menunjukkan kerusakan mesin. Itu adalah fungsi untuk memudahkan pengeluaran cucian. 7 WF-J1061EW-02456M_ID.indd 7 2007-07-23 ¿ÀÈÄ 1:44:10 Mencuci Pakaian Memilih opsi Prewash (Pra-cuci) Prewash (Pracuci/Pencucian pendahuluan) hanya tersedia apabila mencuci pakian cotton(katun), colour (warna), synthetics(sintetis), delicates(bahan halus). Untuk menggunakan prewash (pencucian pendahuluan): 1. Isikan deterjen pencucian pendahuluan ke dalam wadah di kotak deterjen. 2. Pilih “Cotton” (Katun), “Colour” (Warna) atau “Synthetic” (Sintetis) dengan tombol pilihan Program select. 3. Tekan tombol Option (Opsi) sampai indikator “Prewash” (Pencucian pendahuluan) menyala pada panel kendali. 4. Tekan Start/Pause (Mulai/Jeda) untuk memulai siklus. Rinse+ (Bilas+) Mesin Anda akan menjalankan siklus pembilasan tambahan. Lama pencucian akan diperpanjang untuk menyesuaikan. Rinse hold (Tahan bilas) Cucian tetap direndam di dalam air bilasan terakhir. Sebelum cucian dapat dikeluarkan, program “Spin(Peras) harus dijalankan. Tips dan petunjuk untuk mencuci Memisahkan cucian Anda: Pisahkan cucian Anda menurut karakteristik berikut ini: • Jenis simbol label perawatan serat: Pisahkan cucian kapas, serat campuran, sintetis, sutra, wool dan rayon. • Warna: Pisahkan cucian putih dan berwarna. Cucilah pakaian baru, berwarna secara terpisah. • Ukuran: Mengumpulkan cucian berbagai ukuran dalam tumpukan yang sama akan meningkatkan proses pencucian. • Kepekaan: Cuci pakaian yang halus secara terpisah, menggunakan program cuci Delicate wash (Cuci halus) untuk wool murni baru, tirai dan sutra. Periksa label pada cucian Anda atau rujuk pada bagan per awatan serat pada lampiran. Mengosongkan saku: Uang logam, peniti dan benda serupa lainnya dapat merusak linen, drum mesin cuci, dan tangki air. Mengencangkan penutup: Tutup resleting dan kancingkan kancing atau kait; sabuk atau pita yang lepas harus diikat. Menentukan kapasitas beban: Jangan melebihi kapasitas mesin cuci atau cucian Anda tidak akan tercuci dengan baik. Gunakan bagan di bawah ini untuk menentukan kapasitas beban untuk jenis cucian Anda. Kapasitas Beban Jenis Serat WF-J1461/J1261/ J1061/J861 WF-B1461/B1261/ B1061/B861 WF-R1261/ R1061/R861 WF-F1261/ F1061/F861 WF-S1061/S861 Cotton (katun) 7.5 kg 6.5 kg 5.5 kg 5.0 kg 4.0 kg Colour (Warna) 7.5 kg 6.5 kg 5.5 kg 5.0 kg 4.0 kg Synthetics (Sintetis) 3.0 kg 3.0 kg 2.5 kg 2.5 kg 2.0 kg Wool (Wool) 2.0 kg 2.0 kg 1.5 kg 1.5 kg 1.0 kg Tips deterjen: Jenis deterjen yang Anda gunakan harus sesuai dengan jenis seratnya (Cotton (katun), Synthetic (sintetis), Delicates (bahan halus)), warna, suhu pencucian, tingkat dan jenis perendaman. Selalu gunakan sabun cuci “sedikit busa”, yang dirancang untuk mesin cuci otomatis. Apabila menentukan jumlah deterjen, Anda perlu mempertimbangkan saran dari pabrikan deterjen, yang tercantum pada kemasannya, di samping berat, jenis cucian, tingkat kekotorannya dan keras tidaknya air di wilayah Anda. Catatan: Simpan deterjen dan bahan tambahan di tempat yang aman, kering di luar jangkauan anak-anak. 8 WF-J1061EW-02456M_ID.indd 8 2007-07-23 ¿ÀÈÄ 1:44:10 Merawat Mesin Cuci Memperbaiki mesin cuci yang membeku Jika suhu turun di bawah titik beku dan mesin cuci Anda membeku: 1. Cabut steker listrik mesin cuci. 2. Tuangkan air hangat ke keran penyedia untuk melonggarkan selang penyedia air. 3. Lepaskan selang penyedia air dan rendam dalam air hangat. 4. Tuangkan air hangat ke dalam drum mesin cuci dan biarkan selama 10 menit. 5. Sambungkan kembali selang penyedia air ke keran air dan periksa apakah penyediaan dan pembuangan air sudah normal. Membersihkan bagian luar 1. Usap permukaan mesin cuci, termasuk panel kontrol, dengan kain lembut dan deterjen rumah tangga non-abrasif (tidak keras). 2. Gunakan kain lembut untuk mengeringkan permukaan. 3. Jangan menuangkan air ke atas mesin cuci. Membersihkan saringan kotoran Bersihkan saringan kotoran 2 atau 3 kali setahun. 1. Lepaskan tutup alas dari bagian depan mesin cuci. 2. Buka sekrup kap saringan dan keluarkan. 3. Cuci kotoran atau benda lain di dalam saringan. Pastikan bahwa baling-baling pompa kuras di belakang saringan tidak terhalang. Pasang kembali kap saringan. 4. Pasang kembali tutup alas. Membersihkan saringan kasa selang air Anda harus membersihkan saringan kasa selang air setidaknya sekali setahun, atau apabila lampu pada mesin cuci Anda berkedip: Untuk melakukannya: 1. Matikan sumber air ke mesin cuci. 2. Buka sekrup selang di bagian belakang mesin cuci. 3. Dengan tang, tarik perlahan saringan kasa dari ujung selang dan bilas di bawah air sampai bersih. Bersihkan juga bagian dalam dan bagian luar konektor berulir. 4. Masukkan kembali saringan ke tempatnya. 5. Kencangkan kembali sekrup selang ke mesin cuci. 6. Hidupkan keran dan pastikan sambungannya tidak bocor. 9 WF-J1061EW-02456M_ID.indd 9 2007-07-23 ¿ÀÈÄ 1:44:11 Pemecahan masalah Masalah dan pemecahannya Mesin cuci tidak mau bekerja • Pastikan pintunya tertutup rapat. • Pastikan steker listrik mesin cuci ditancapkan ke stopkontak. • Pastikan keran sumber air dihidupkan. • Pastikan untuk menekan tombol Start/Pause (Mulai/Jeda). Tidak ada air atau penyediaan air tidak mencukupi • Pastikan keran sumber air dihidupkan. • Pastikan selang sumber air tidak membeku. • Pastikan selang sumber air tidak tertekuk. • Pastikan saringan pada selang air masuk tidak tersumbat. Deterjen masih tersisa dalam kotak deterjen setelah program cuci selesai • Pastikan mesin cuci bekerja dengan tekanan air yang memadai. • Masukkan deterjen ke dalam bagian dalam kotak deterjen (jauh dari tepi luarnya). Mesin cuci bergetar atau terlalu bising • Pastikan mesin cuci diletakkan pada permukaan yang rata. Jika permukaan tidak rata, atur kaki mesin cuciuntuk meratakan peralatan. • Pastikan bahwa baut pengiriman sudah dilepaskan. • Pastikan bahwa mesin cuci tidak menyentuh benda lain di sekitarnya. • Pastikan bahwa beban cucian sudah seimbang. Mesin cuci tidak dapat dikuras dan/atau memeras • Pastikan bahwa selang pembuangan tidak tertekan atau tertekuk. • Pastikan bahwa saringan kasa selang air tidak tersumbat. Memahami pesan kesalahan Kesalahan yang ditampilkan Pemecahan dE • Tutup pintu mesin. 4E • • Pastikan keran air masuk dihidupkan. Periksa tekanan air. 5E • • Bersihkan saringan kotoran. Pastikan selang pembuangan terpasang dengan benar. UE • • Beban cucian tidak merata; lepaskan cucian yang saling membelit. Jika hanya satu potong pakaian yang perlu dicuci, seperti baju mandi atau jeans, hasil pemerasan akhir mungkin tidak memuaskan dan pesan kesalahan “UE” akan ditampilkan pada jendela tampilan. LE • Periksa apakah ujung selang pembuangan terlalu rendah. (Pastikan bahwa penyangga selang air di belakang mesin masih terpasang) Periksa apakah ujung selang pembuangan terendam air. • Sebelum menghubungi layanan Purna-Jual: 1. Cobalah untuk mengatasi masalah tersebut (Simak “Pemecahan Masalah” di halaman ini). 2. Jalankan ulang program untuk melihat apakah kesalahan berulang. 3. Jika tetap bermasalah, hubungi layanan purna-jual dan kemukakan masalahnya. 10 WF-J1061EW-02456M_ID.indd 10 2007-07-23 ¿ÀÈÄ 1:44:12 Bagan Program ( pilihan pengguna) DETERJEN DAN BAHAN TAMBAHAN Beban maks (kg) PROGRAM WFWFWFWFJ1461/ B1461/ WFR1261/ F1261/ J1261/ B1261/ S1061/ R1061/ F1061/ J1061/ B1061/ S861 R861 F861 J861 B861 Pracuci wash pelembut (cuci) Kec. Peras (MAKS) rpm TSuhu (MAKS)˚C WFWFJ1261/ J1461/ B1261/ B1461 R1261/ F1261 WFJ1061/ B1061/ R1061/ F1061/ S1061 WFJ861/ B861/ R861/ F861/ S861 Waktu Tunda Siklus mulai (men) Cotton (Katun) 7.5 6.5 5.5 5.0 4.0 yes 95 1400 1200 1000 800+ 126 Colour (Warna) 7.5 6.5 5.5 5.0 4.0 yes 60 1400 1200 1000 800+ 98 Synthetics (Sintetis) 3.0 3.0 2.5 2.5 2.0 yes 60 800 800 800 800 73 Wool (Wool) 2.0 2.0 1.5 1.5 1.0 - yes 40 400 400 400 400 42 Handwash (Cuci Tangan) 2.0 2.0 1.5 1.5 1.0 - yes 40 400 400 400 400 37 Quick (Cepat) 3.0 3.0 2.0 2.0 1.5 - yes 60 1400 1200 1000 800+ 28 PROGRAM Jenis WASH (Cuci) Cotton (Katun) Cucian biasa atau sedikit kotor seperti katun, seprei linen, taplak linen, pakaian dalam, handuk, kaus, dll. Colour (Warna) Cucian biasa atau sedikit kotor seperti katun, seprei linen, taplak linen, pakaian dalam, handuk, kaus, dll. Synthetic (Sintetis) Blus, baju, dll. yang cukup atau sedikit kotor. Terbuat dari polyester (Diolen, Trevira), polyamide (perlon, Nylon) atau campuran serupa. Handwash (Cuci Tangan) Proses cuci yang sangat ringan seperti dengan tangan. Wool (Wool) Hanya wool yang dapat dicuci mesin dengan label wool murni baru. Quick (Cepat) Cucian sedikit kotor seperti katun atau blus linen, baju, kain handuk berwarna gelap, bahan linen berwarna, jeans, dll. 1. Data lama program diukur berdasarkan kondisi yang ditetapkan dalam Standar IEC 456. 2. Konsumsi daya di setiap rumah dapat berbeda dari nilai pada tabel karena variasi dalam tekanan dan suhu penyediaan air, beban dan jenis cuciannya. 11 WF-J1061EW-02456M_ID.indd 11 2007-07-23 ¿ÀÈÄ 1:44:12 Lampiran Bagan perawatan serat Bahan resisten (kuat) Dapat disetrika maks. 100°C Serat lembut Jangan disetrika Bahan dapat dicuci pada 95°C Dapat dicuci kering menggunakan larutan apa saja Bahan dapat dicuci pada 60°C Cuci kering hanya dengan perchloride, minyak korek, alkohol murni atau R113 Bahan dapat dicuci pada 40°C Cuci kering hanya dengan perchloride, minyak korek, alkohol murni atau R113 Bahan dapat dicuci pada 30°C Jangan dicuci kering Bahan dapat dicuci dengan tangan Keringkan dengan ratas Hanya cuci kering Dapat digantung sampai kering Dapat diputihkan dalam air dingin Keringkan dengan gantungan Jangan memakai pemutih Keringkan dg mesin, panas normal Dapat disetrika maks. 200°C Keringkan dg mesin, panas rendah Dapat disetrika maks. 150°C Jangan dikeringkan dg mesin Peringatan listrik Untuk mengurangi risiko kebakaran, kejutan listrik, dan cedera lainnya, selalu ikuti tindakan pencegahan berikut ini: • Operasikan perangkat hanya dari sumber listrik yang ditunjukkan pada label penandaan listrik. Jika Anda tidak yakin dengan jenis listrik di rumah Anda, hubungi penyalur peralatan Anda atau perusahaan listrik setempat. • Gunakan hanya stopkontak yang ditanahkan atau dengan colokan yang dibedakan. Steker ini hanya dapat masuk ke stopkontak dengan satu cara. Jika Anda tidak bisa menancapkan penuh steker ke stopkontak, coba balik stekernya. Jika steker masih belum pas, hubungi ahli listrik Anda untuk mengganti stopkontak Anda. • Lindungi kabel listrik. kabel listrik harus dilewatkan sedemikian hingga tidak akan terinjak atau terjepit benda yang diletakkan di atasnya atau yang menyentuhnya. Periksa dengan seksama kabel pada steker, stopkontak, dan titik tempat kabel keluar dari unit. • Jangan memberi beban berlebih pada stopkontak dinding atau kabel perpanjangan. Beban berlebihan dapat mengakibatkan kebakaran atau kejutan listrik. Melestarikan lingkungan • • • • Peralatan ini dibuat dari bahan yang dapat didaur ulang. Jika Anda ingin membuang peralatan ini, perhatikan peraturan pembuangan sampah di daerah Anda. Potong kabel listriknya sehingga peralatan tidak dapat ditancapkan ke sumber listrik. Lepaskan pintunya sehingga hewan dan anak kecil tidak akan terjebak di dalam peralatan. Jangan melebihi jumlah deterjen yang dianjurkan pada petunjuk dari pabrik pembuat deterjen. Gunakan produk penghilang noda dan pemutih sebelum siklus pencucian hanya jika benar-benar perlu. Hemat air dan listrik dengan hanya mencuci dengan beban penuh (jumlah tepatnya tergantung pada program yang digunakan). Penyataan kesesuaian Peralatan ini memenuhi syarat keselamatan Eropa, , EC directive 93/68 dan EN Standard 60335. 12 WF-J1061EW-02456M_ID.indd 12 2007-07-23 ¿ÀÈÄ 1:44:19 Lampiran Spesifikasi JENIS MESIN CUCI PINTU DEPAN WF-J1461/J1261/J1061/ WF-B1461/B1261/B1061/ WF-R1261/R1061/ WF-F1261/F1061/ WF-S1061/S861 J861 B861 R861 F861 DIMENSI P598mm x L600mm x T844mm P598mm x L550mm x T844mm 68 ℓ 59 ℓ TEKANA N AIR 50 kPa ~ 800 kPa VOLUME AIR WF-J1461/ WF-J1061/ WF-B1461/ J1261 J861 B1261 BERAT BERSIH 74 kg KAPASITAS CUCI dan PERAS MODEL KONSUMSI DAYA Berat KEMASAN KECEPATAN PUTARAN P598mm x L450mm P598mm x L404mm P598mm x L340mm x T844mm x T844mm x T844mm 71 kg 7.5 kg (CUCIAN KERING) 49 ℓ WF-B1061/ B861 71 kg 70 kg 6.5 kg (CUCIAN KERING) 48 ℓ 43 ℓ WF-R1261/ WF- WF-F1261/F1061/ WF-S1061/S861 R1061 R861 F861 65 kg 64 kg 61 kg 51 kg 5.5 kg 5.0 kg 4.0 kg (CUCIAN KERING) (CUCIAN KERING) (CUCIAN KERING) WF-J1461/J1261/J1061/ WF-B1461/B1261/B1061/ WF-R1261/R1061/ WF-F1261/F1061/ WF-S1061/S861 J861 B861 R861 F861 MENCUCI DAN MEMANASKAN 220 V 2000 W 220 V 2000 W 220 V 1900 W 220 V 1800 W 220 V 1800W 240 V 2400 W 240 V 2400 W 240 V 2200 W 240 V 2100 W 240 V 2100W WF- WF- WF- WF- WF- WF- WF- WF- WF- WF- WF- WF- WF- WFMEM- MODEL J1461 J1261 J1061 J861 B1461 B1261 B1061 B861 R1261 R1061 R861 F1261 F1061 F861 WF-S1061 WF-S861 ERAS 230V 700W 360W 320W 270W 580W 530W 500W 430W 550W 500W 430W 270W 230W 180W 230W 180W MEMOMPA 34 W MODEL WF-J1461/J1261/J1061/ WF-B1461/B1261/B1061/ WF-R1261/R1061/ WF-F1261/F1061/ WF-S1061/S861 J861 B861 R861 F861 KERTAS 2.5 kg 2.5 kg 2.1 kg 1.9 kg 1.8 kg PLASTIK 1.0 kg 1.0 kg 0.9 kg 0.8 kg 0.8 kg MODEL WF-J1461/B1461 rpm 1400 WF-J1261/B1261/R1261/ WF-J1061/B1061/R1061/ F1261 F1061/S1061 1200 1000 WF-J861/B861/R861/F861/ S861 800 13 WF-J1061EW-02456M_ID.indd 13 2007-07-23 ¿ÀÈÄ 1:44:20 PERTANYAAN ATAU KOMENTAR? Negara HUBUNGI ATAU KUNJUNGI KAMI SECARA ONLINE DI CHINA 800-810-5858 , 010- 6475 1880 www.samsung.com.cn HONG KONG 3698 - 4698 www.samsung.com/hk INDIA 3030 8282 1800 110011 www.samsung.com/in/ INDONESIA 0800-112-8888 www.samsung.com/id JAPAN 0120-327-527 www.samsung.com/jp MALAYSIA 1800-88-9999 www.samsung.com/my PHILIPPINES 1800-10-SAMSUNG (7267864) www.samsung.com/ph SINGAPORE 1800-SAMSUNG (7267864) www.samsung.com/sg THAILAND 1800-29-3232 02-689-3232 www.samsung.com/th TAIWAN 0800-329-999 www.samsung.com/tw VIETNAM 1 800 588 889 www.samsung.com/vn WF-J1061EW-02456M_ID.indd 14 2007-07-23 ¿ÀÈÄ 1:44:20