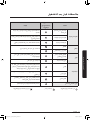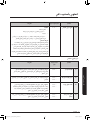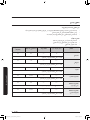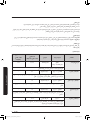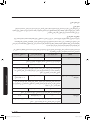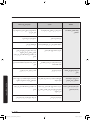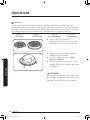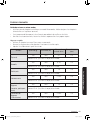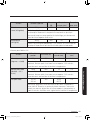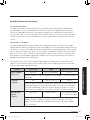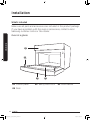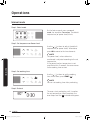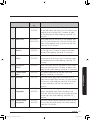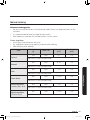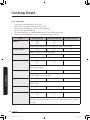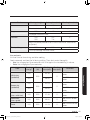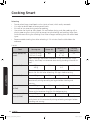
1
فرن امليكروويف دليل املستخدم **MC35J8088 4/3/2015 4:29:29 PM MC35J8088CT_SG_DE68-04321B-00_AR.indd 1 احملتويات يوتحملا 2 استخدام هذا الدليل 3 فيما يلي الرموز املستخدمة في هذا الدليل: 3 إرشادات السالمة 4 إرشادات هامة تتعلق بالسالمة 4 التركيب 12 األدوات املرفقة مكان التركيب الصينية الدوارة 12 15 15 الصيانة 16 التنظيف االستبدال (اإلصالح) العناية في حاالت عدم االستخدام لفترات طويلة 16 17 17 مالحظات قبل بدء التشغيل 18 الساعة ّ تشغيل/إيقاف الصوت توفير الطاقة نظرة عامة على طاقة امليكروويف أدوات الطهي اخلاصة بامليكروويف 18 19 19 20 21 عمليات الطهي 23 لوحة التحكم الوضع اليدوي الوضع اآللي وظائف خاصة 23 26 33 35 الطهي بأسلوب ذكي 37 الطهي التلقائي الطهي اليدوي سريع وسهل 37 45 57 استكشاف املشكالت وحلها 58 تعليمات الفحص رموز املعلومات 58 65 املواصفات الفنية 66 ةيبرعلا 4/3/2015 4:29:29 PM MC35J8088CT_SG_DE68-04321B-00_AR.indd 2 استخدام هذا الدليل ليلدلا اذه مادختسا لقد حصلت اآلن على فرن ميكروويف .SAMSUNGتتضمن إرشادات املالك معلومات مهمة حول الطهي باستخدام فرن امليكروويف: •احتياطات السالمة •األدوات اإلضافية وأدوات الطهي املناسبة •تلميحات مفيدة للطهي •تلميحات للطهي فيما يلي الرموز املستخدمة في هذا الدليل: حتذير املمارسات العشوائية أو غير اآلمنة قد ينجم عنها حدوث إصابات جسدية خطيرة أو الوفاة. تنبيه املمارسات العشوائية أو غير اآلمنة قد ينجم عنها حدوث إصابات جسدية طفيفة أو تلف باملمتلكات. مالحظة تلميحات أو مقترحات أو معلومات مفيدة تساعد املستخدمني في التعامل مع املنتج. ةيبرعلا 4/3/2015 4:29:29 PM 3 MC35J8088CT_SG_DE68-04321B-00_AR.indd 3 إرشادات السالمة إرشادات هامة تتعلق بالسالمة اقرأ اإلرشادات بعناية واحتفظ بها كمرجع في املستقبل. مالسلا تاداشرإ دائما. تأكد من اتّباع احتياطات السالمة ً قبل استخدام الفرن ،تأكد من اتباع اإلرشادات اآلتية. وظيفة امليكروويف فقط حتذير :في حالة تعرض الباب أو قفلي الباب للتلف ،ال يجب تشغيل الفرن حتى يتم إصالح الفرن بواسطة شخص مؤهل. حتذير :في حالة قيام شخص غير الشخص املؤهل بالصيانة أو عملية إصالح يتم خاللها إزالة الغطاء الذي يقي من التعرض ألشعة امليكروويف فإنه بذلك يعرض نفسه للخطر. حتذير :يجب عدم تسخني السوائل أو األطعمة في حاويات مغلقة حتى ال تتعرض لالنفجار. هذا اجلهاز مخصص لالستخدام املنزلي فقط وال يجب استخدامه في األماكن التالية: •مجموعة املطابخ املوجودة باحملالت واملكاتب وبيئات العمل األخرى؛ •البيوت امللحقة باملزارع؛ •بواسطة نزالء الفنادق واالستراحات والبيئات السكنية األخرى؛ •أماكن النوم وتناول الفطور. حتذير :يجب عدم السماح لألطفال باستخدام الفرن دون مراقبة إال بعد إعطاء اإلرشادات املناسبة بحيث يتمكن الطفل من استخدام الفرن بطريقة آمنة ويتفهم جي ًدا اخملاطر التي قد يتعرض لها نتيجة االستخدام غير الصحيح. 4 ةيبرعلا 4/3/2015 4:29:29 PM MC35J8088CT_SG_DE68-04321B-00_AR.indd 4 استخدم األواني املناسبة لالستخدام في أفران امليكروويف فقط. عند تسخني األطعمة في أواني بالستيكية أو ورقية ،احرص على مراقبة الفرن للتمكن من اتخاذ اإلجراءات الالزمة جتن ًبا الشتعالها. مالسلا تاداشرإ حتذيرُ :يكن استخدام هذا اجلهاز من ِقبل األطفال البالغني من العمر 8سنوات أو أكثر أو األشخاص الذين لديهم قدرات عقلية أو حسية أو جسدية ضعيفة أو من لديهم نقص في اخلبرة أو املعرفة إذا مت إعطائهم إرشادات وأصبحوا مدركني جلميع اخملاطر املوجودة .ينبغي على وتوصيات فيما يتعلق باستخدام اجلهاز بطريقة آمنة ُ األطفال عدم العبث باجلهاز .ينبغي عدم إجراء عمليات التنظيف والصيانة التي ميكن للمستخدم القيام بها بواسطة األطفال أقل من 8سنوات ودون اخلضوع لإلشراف. فرن امليكروويف مخصص لتسخني األغذية واملشروبات .وقد يؤدي جتفيف األغذية أو األقمشة وتسخني ألواح التدفئة أو نعال البابوج أو قطع اإلسفنج أو األقمشة الرطبة أو املواد املشابهة لذلك إلى مخاطر اإلصابة أو االشتعال أو احلرائق. في حالة مالحظة تصاعد دخان ،قم بإيقاف تشغيل الفرن أو فصله عن التيار الكهربائي ،واترك باب الفرن مغلقً ا إلخماد أي اشتعال. حتذير :قد ينتج عن تسخني املشروبات باستخدام فرن امليكروويف حدوث فوران شديد عند غليانها؛ لذا يجب توخي احلذر عند عند اإلمساك باحلاوية. حتذير :يجب رج محتويات زجاجات الرضاعة وبرطمانات طعام األطفال أو تقليبها والتحقق من درجة حرارتها قبل استخدامها لتجنب حدوث أي حروق. يحظر سلق البيض ويحظر كذلك تسخني البيض املسلوق جي ًدا دون تقشيره ألنه قد ينفجر حتى بعد انتهاء عملية التسخني بامليكروويف. يجب تنظيف الفرن بشكل منتظم وإزالة أي بقايا للطعام. ُيكن أن يؤدي اإلهمال في تنظيف الفرن إلى تدهور حالة سطحه مما قد يؤثر بشكل سلبي على اجلهاز وقد ينتج عن ذلك خطورة عند االستخدام. هذا اجلهاز غير مخصص لالستخدام داخل املركبات أو العربات املغطاة أو ما يشبهها. ةيبرعلا 4/3/2015 4:29:29 PM 5 MC35J8088CT_SG_DE68-04321B-00_AR.indd 5 مالسلا تاداشرإ هذا اجلهاز غير مخصص الستخدامه بواسطة أشخاص يعانون من إعاقات جسدية أو حسية أو ذهنية (مبا في ذلك األطفال) أو ممن لديهم نقص في اخلبرة واملعلومات إال إذا خضعوا لإلشراف أو مت تزويدهم بإرشادات تتعلق باستخدام اجلهاز من قبل شخص مسئول عن سالمتهم. يجب مراقبة األطفال لضمان عدم عبثهم باجلهاز. مالسلا تاداشرإ إذا تعرض سلك التيار الكهربي للتلف ،فيجب استبداله بواسطة الشركة املصنّعة أو مسؤول الصيانة التابع لها أو أشخاص مؤهلني بنفس الكفاءة لتجنب التعرض للمخاطر. يجب عدم تنظيف اجلهاز باستخدام آلة نفاثة للمياه. يجب وضع هذه الفرن في االجتاه واالرتفاع الصحيحني بحيث ميكن الوصول إلى جتويف الفرن ومنطقة التحكم بها بسهولة. يجب تشغيل الفرن مع املاء ملدة 10دقائق قبل استخدامه ألول مرة. إذا أصدر الفرن ضجة غريبة أو رائحة حريق أو دخان ،افصل مأخذ الكهرباء على الفور واتصل بأقرب مركز خدمة. يجب وضع امليكروويف بحيث يكون قري ًبا من مأخذ التيار الكهربي بحيث يسهل توصيله. ينبغي استخدام فرن امليكروويف أعلى املنضدة فقط (في وضع حر) ،ويجب عدم وضعه في خزانة. 6 ةيبرعلا 4/3/2015 4:29:29 PM MC35J8088CT_SG_DE68-04321B-00_AR.indd 6 وظيفة الفرن فقط -اختياري حتذير :عند تشغيل اجلهاز في وضع الطهي اجملمع ،يجب أال يستخدم األطفال الفرن إال حتت إشراف أشخاص بالغني حلمايتهم من درجات احلرارة الناجتة. مالسلا تاداشرإ يسخن اجلهاز أثناء االستخدام .يجب توخي احلذر لتجنب مالمسة أجزاء التسخني داخل الفرن. حتذير :قد تسخن األجزاء الظاهرة أثناء االستخدام .يجب إبعاد األطفال الصغار عن الفرن. يجب عدم استخدام منظف يعمل بالبخار. حتذير :تأكد من إيقاف تشغيل اجلهاز قبل وضع املصباح لتجنب التعرض لصدمة كهربية. ال تستخدم منظفات كاشطة خشنة أو أدوات كشط معدنية حادة لتنظيف زجاج باب الفرن ألنها قد تؤدي إلى خدش السطح ،مما قد يؤدي إلى كسر الزجاج. حتذير :يُصبح اجلهاز واألجزاء التي ميكن الوصول إليها ساخنة أثناء االستخدام. ثم ،يتعني عليك توخي احلذر لتجنّب ملس األجزاء الساخنة. ومن ّ يجب احلفاظ على األطفال أقل من 8سنوات بعي ًدا عن املنتج إال إذا كانوا مراقبني بصفة مستمرة. ُيكن استخدام هذا اجلهاز من ِقبل األطفال البالغني من العمر 8سنوات أو أكثر أو األشخاص الذين لديهم قدرات عقلية أو حسية أو جسدية ضعيفة أو من لديهم نقص في اخلبرة أو املعرفة إذا مت إعطائهم إرشادات وتوصيات وأصبحوا مدركني جلميع اخملاطر املوجودة .ينبغي على األطفال عدم فيما يتعلق باستخدام اجلهاز بطريقة آمنة ُ العبث باجلهاز .ال ُيكن لألطفال إجراء التنظيف وصيانة اجلهاز دون مراقبة. قد تكون درجة حرارة األسطح مرتفعة عندما يكون اجلهاز قيد التشغيل. قد يصبح الباب أو السطح اخلارجي ساخنًا عندما يكون اجلهاز قيد التشغيل. يجب أن يكون اجلهاز والسلك اخلاص به بعي ًدا عن متناول األطفال ممن يقل عمرهم عن 8سنوات. هذا اجلهاز غير مخصص ليتم تشغيله بواسطة وسائل للتوقيت اخلارجي أو نظام منفصل للتحكم عن بُعد. ةيبرعلا 4/3/2015 4:29:29 PM 7 MC35J8088CT_SG_DE68-04321B-00_AR.indd 7 مالسلا تاداشرإ السالمة العامة حتذير يقتصر تعديل فرن امليكروويف أو إصالحه على فريق العمل املؤهل. مالسلا تاداشرإ ال تسخن السوائل أو األطعمة األخرى في أواني مغلقة عند استخدام وظيفة امليكروويف. يجب عدم استخدام منظفات مائية عالية الضغط أو منظفات نفث البخار للحفاظ على سالمتك. ال تقم بتركيب اجلهاز؛ بالقرب من السخان أو مواد قابلة لالشتعال؛ أو في مكان رطب أو ملوث بالزيت أو مليء باألتربة ،أو في مكان ُمعرض ألشعة الشمس املباشرة واملاء أو في مكان قد يتسرب فيه الغاز؛ أو على أرضية غير مستوية. يجب تثبيت هذا اجلهاز على األرض بشكل سليم وفقً ا للمعايير احمللية والدولية. قم بإزالة جميع املواد الغريبة كاألتربة أو املاء من أطراف قابس التيار الكهربي ونقاط االتصال باستخدام قطعة قماش جافة بصفة دورية. ال تقم بسحب سلك التيار الكهربي أو ثنيه بشكل مفرط أو تضع أشياء ثقيلة عليه. عند تسرب الغاز (مثل غاز البروبان أو الغاز النفطي املسال أو غيره من الغازات) ،قم بالتهوية فورًا دون ملس قابس التيار الكهربي. ال تلمس قابس التيار الكهربي بأي ٍد مبتلة. ال توقف تشغيل اجلهاز عن طريق فصل قابس التيار الكهربي عندما يكون قيد التشغيل. ال تُدخل أصابعك أو أي مواد غريبة إلى الفرن .وفي حالة دخول أي مواد غريبة إلى الفرن (مثل املاء) ،افصل مأخذ الكهرباء واتصل بأقرب مركز خدمة. جتنّب تعريض اجلهاز لضغط مفرط. ال تضع اجلهاز فوق سطح قابل للكسر ،مثل حوض املاء أو سطح زجاجي. ال تستخدم البنزين أو التِنر أو منظفات البخار أو املنظفات ذات الضغط العالي لتنظيف اجلهاز. تأكد من تطابق مستوى فولطية الكهرباء والتردد والتيار الكهربي لديك مع مواصفات املنتج. محول كهرباء. ًا إضافيا أو محول كهرباء متعدد املقابس أو سلك قم بتوصيل قابس التيار الكهربي مبأخذ احلائط بإحكام .ال تستخدم ّ ّ ً ال تعلق سلك الكهرباء على شيء معدني أو تُدخله بني أي أشياء أو تضعه وراء الفرن. وال تستخدم مقبس كهرباء أو سلك كهرباء تالف أو مأخذ حائط مفكوك .عند تلف قابس أو سلك الكهرباء ،اتصل بأقرب مركز خدمة. تصب ما ًء أو ترشه مباشرة داخل الفرن. ال ُ ال تضع أي أشياء على الفرن أو داخله أو على باب الفرن. 8 ةيبرعلا 4/3/2015 4:29:29 PM MC35J8088CT_SG_DE68-04321B-00_AR.indd 8 ال ترش مواد متطايرة ،مثل املبيدات احلشرية على سطح الفرن. ال تخزّن أي مواد قابلة لالشتعال داخل الفرن .توخ احلذر عند تسخني أطباق أو مشروبات حتتوي على الكحول؛ حيث إن أبخرة الكحول قد تلمس جز ًءا ساخنًا بالفرن. رمبا تشر أصابعهم داخل الباب. يجب إبعاد األطفال عن الباب عند فتحه أو غلقه ألنهم رمبا يحشرون أنفسهم عند الباب أو ُ مالسلا تاداشرإ حتذير :قد ينتج عن تسخني املشروبات باستخدام فرن امليكروويف حدوث فوران شديد عند غليانها ،لذا يجب توخي احلذر عند التعامل مع األواني؛ "دوما" ملدة تبلغ 20ثانية على األقل بعد إيقاف تشغيل الفرن للسماح مبعادلة درجة احلرارة .قم بالتقليب أثناء ملنع حدوث مثل هذا املوقف ،انتظر ً "دوما" بعد التسخني. التسخني إذا لزم األمر والتقليب ً في حالة تعرضك لإلصابة باحلروق ،اتبع إرشادات "اإلسعافات األولية" اآلتية: •اغمر اجلزء الذي تعرض للحرق باملاء البارد ملدة 10دقائق على األقل. •قم بتغطية مكان احلرق بقطعة جافة ونظيفة من الشاش الطبي. •ال تضع دهان كرمي أو زي ًتا أو غسوال ً على احلرق. ال تضع الصينية أو الرف في املاء بعد الطهي بفترة قصيرة؛ فقد يؤدي ذلك إلى كسر الصينية أو الرف أو تلفه. ال تشغل فرن امليكروويف لقلي األطعمة التي حتتوي على دهون عالية ،وذلك بسبب عدم القدرة على التحكم في درجة حرارة الزيت .قد يؤدي ذلك إلى فوران السائل الساخن. تنبيه استخدم األواني املناسبة لالستخدام في أفران امليكروويف "فقط"؛ و"ال" تستخدم األواني املعدنية أو أدوات املائدة ذات الزخارف الذهبية أو الفضية أو املاسكات املعدنية والشوك ،وغيرها من األدوات. قم بإزالة األربطة السلكية من األكياس الورقية والبالستيكية. السبب :قد يحدث ماس كهربائي أو شرارة تؤدي إلى تلف الفرن. ال تستخدم فرن امليكروويف لتجفيف األوراق أو املالبس. حدد مدد تسخني قصيرة ملقادير الطعام القليلة؛ وذلك لتجنّب التسخني الزائد أو تعرّض الطعام لالحتراق. ال تضع كبل الطاقة أو املقبس في املاء ،واحرص على إبعاد كبل الطاقة عن األسطح الساخنة. يحظر سلق البيض ويحظر كذلك تسخني البيض املسلوق جي ًدا دون تقشيره ألنه قد يتفتق حتى بعد انتهاء عملية التسخني بامليكروويف؛ كذلك ال يجب تسخني الزجاجات والبرطمانات واألواني التي مت تفريغها من الهواء واملغلقة بإحكام والبندق غير املقشر والطماطم ،إلخ. ال تقم بتغطية فتحات التهوية سواء بقطع من القماش أو الورق؛ إذ قد تشتعل النيران في القماش أو الورق عند تفريغ الهواء الساخن من الفرن. كاف. كما قد ترتفع درجة حرارة الفرن بشكل زائد وتتوقف عن العمل تلقائيا حتى تبرد بشكل ٍ ً دوما قفازات عند إخراج طبق من الفرن لتجنب اإلصابة بحروق غير متوقعة. استخدم ً ةيبرعلا 4/3/2015 4:29:30 PM 9 MC35J8088CT_SG_DE68-04321B-00_AR.indd 9 مالسلا تاداشرإ جزئي أثناء عملية التسخني أو بعد انتهائها ،مع ترك السوائل دون تقليب ملدة 20ثانية بعد التسخني مباشرة لتجنّب بشكل حرّك السوائل ٍ ٍ الغليان املفاجئ. قف بعي ًدا عن الفرن مبقدار طول ذراعك عند فتح باب الفرن لتجنّب التعرّض حلروق من جرّاء الهواء الساخن املندفع منها. مالسلا تاداشرإ ال تقم بتشغيل فرن امليكروويف عندما يكون فارغًا .وعند حدوث ذلك ،سيتم إيقاف تشغيل فرن امليكروويف ملدة 30دقيقة للحفاظ على سالمتك. ثم ،فإننا نوصي بوضع كوب ماء داخل الفرن بشكل دائم المتصاص طاقة امليكروويف في حالة تشغيل الفرن بشكل غير مقصود. ومن َّ ركّب الفرن وفقً ا للمسافات املذكورة في هذا الدليل( .راجع "تركيب فرن امليكروويف"). يجب توخي احلذر عند توصيل أي أجهزة كهربائية باملقابس القريبة من الفرن. 10 ةيبرعلا 4/3/2015 4:29:30 PM MC35J8088CT_SG_DE68-04321B-00_AR.indd 10 احتياطات لتجنب التعرض احملتمل لقدر كبير من أشعة امليكروويف( .وظيفة امليكروويف فقط) قد يؤدي عدم االلتزام باحتياطات السالمة التالية إلى التعرض ألشعة امليكروويف الضارة. مالسلا تاداشرإ .أيجب عدم تشغيل الفرن حتت أي ظرف من الظروف عندما يكون باب الفرن مفتو ًحا أو العبث بقفلي األمان (قفلي الباب) أو وضع أي شيء في فتحتي قفلي األمان. .بال تضع أي شيء بني باب الفرن والسطح األمامي وال تسمح بتراكم فضالت الطعام أو املنظِّ ف على أسطح إحكام اإلغالق .وتأكد من نظافة الباب وأسطح إحكام اإلغالق بواسطة مسحها بعد االستعمال باستخدام قطعة قماش مبلَّلة ثم قطعة قماش جافة ناعمة. .جال تقم بتشغيل امليكروويف في حالة وجود تلف به حتى يتم إصالحه بواسطة فني صيانة أجهزة ميكروويف مؤ َّهل ومدرَّب لدى الشركة املصنعة .ويجب إغالق الباب بإحكام والتأكد من عدم وجود تلف في: 1 )1الباب (تعرّضه للثني) مفصالت الباب (مكسورة أو غير مربوطة بإحكام) َّ 2 )2 3 )3قفلي الباب وأسطح إحكام اإلغالق .ديجب عدم ضبط الفرن أو إصالحه من قبل أي شخص آخر غير فني صيانة أجهزة ميكروويف مؤ َّهل ومدرَّب لدى الشركة املصنِّعة. ستقوم Samsungبفرض رسوم مقابل استبدال أ ّي أجزاء ملحقة أو إصالح أ ّي عيب جتميلي في حالة تلف الوحدة و/أو تلف األجزاء امللحقة أو فقدها بسبب العميل .العناصر التي يغطيها هذا الشرط: .أوجود نتوء أو كشط أو كسر في الباب أو املقبض أو اللوحة اخلارجية أو لوحة التحكم. .بكسر في صينية الفرن أو موجهة الدوران أو أداة التدوير أو احلامل السلكي أو فقد أي منهم. •استخدم هذا اجلهاز للغرض اخملصص له فقط كما هو مذكور في دليل اإلرشادات .ال تغطي التحذيرات وإرشادات السالمة املهمة الواردة في هذا الدليل جميع الظروف واملواقف احملتمل حدوثها .لذا ،يقع على عاتقك مسؤولية اتباع املنطق السليم والتعامل بحذر ومراعاة االنتباه عند تركيب اجلهاز وصيانته وتشغيله. •ونظرًا ألن إرشادات التشغيل التالية تنطبق على طُ رز متعددة ،فإن خصائص امليكروويف التي تستعمله قد تختلف قليال ً عن تلك املوصوفة في هذا الدليل ،كما أن بعض عالمات التحذير املذكورة قد تكون غير قابلة للتطبيق .إذا كانت لديك أي أسئلة أو استفسارات ،اتصل بأقرب مركز خدمة أو انتقل مباشرة إلى املوقع www.samsung.comللحصول على التعليمات أو املعلومات. •يُستخدم هذا امليكروويف بغرض تسخني الطعام ،ويقتصر على االستخدام املنزلي فقط .ال تقم بتسخني أي نوع من األقمشة أو الوسائد احملببة حتى ال حتترق أو تؤدي إلى نشوب حريق .ولن تتحمل الشركة املصنّعة أية أضرار ناجمة عن االستخدام اخلاطئ للجهاز. •قد يؤدي اإلهمال في تنظيف الفرن إلى تدهور حالة سطحه مما قد يؤثر بشكل سلبي على اجلهاز وقد ينتج عن ذلك خطورة عند االستخدام. ةيبرعلا 4/3/2015 4:29:30 PM 11 MC35J8088CT_SG_DE68-04321B-00_AR.indd 11 التركيب األدوات املرفقة تأكد أن جميع األجزاء وامللحقات مرفقة في عبوة املنتج .إذا كانت لديك مشكلة تتعلق بالفرن أو امللحقات، فاتصل بخدمة عمالء Samsungاحمللي أو اتصل ببائع التجزئة. نظرة عامة على ميزات الفرن بيكرتلا ٠١ ٠٢ ٠٤ 0 01لوحة التحكم 0 02قفل أمان باب ٠٣ 0 03مقبض الباب 0 04الباب 12 ةيبرعلا 4/3/2015 4:29:30 PM MC35J8088CT_SG_DE68-04321B-00_AR.indd 12 األدوات اإلضافية تُرفق مع الفرن ملحقات مختلفة ملساعدتك على حتضير أنواع متنوعة من الطعام. احلامل السفلي احلامل العلوي وحدة الطهي بالبخار بيكرتلا احللقة الدوارة الصينية الدوارة طبق التحمير ةيبرعلا 4/3/2015 4:29:30 PM 13 MC35J8088CT_SG_DE68-04321B-00_AR.indd 13 بيكرتلا احللقة الدوارة توضع في منتصف قاعدة الفرن لتدعم الصينية الدوارة. الصينية الدوارة توضع على احللقة الدوارة مع تعشيق مركزها في أداة التدوير .وتعمل كقاعدة للطهي. احلوامل استخدم أحد هذه احلوامل على النحو املناسب لطهي طبقني في ٍآن واحد .ضع الطبق األصغر على الصينية الدوارة ،واآلخر على احلامل احملدد .ميكنك استخدام أو الطهي اجملمع. هذه احلوامل في الشي بالنقل احلراري َّ مالحظة بيكرتلا ال تستخدم حوامل سلكية مع الوضع ميكروويف. طبق التحمير ضعه على الصينية الدوارة .يُستخدم طبق التحمير لتحمير الطعام ،أو حتمير الفطائر احملالة أو البيتزا. وحدة الطهي بالبخار وحدة الطهي بالبخار هي عبارة عن مجموعة مكونة من غطاء مصنوع من الفوالذ غير القابل للصدأ وصينية طهي بالبخار وطبق حتمير ،وهي مصممة خصيصا للطهي بالبخار .وتُستخدم لتحمير الطعام مثل عجائن الفطائر احملالة ً والبيتزا مع الوضع ميكروويف أو الشي بالنقل احلراري. مالحظة •ال تشغّل الفرن دون وضع الصينية الدوارة على احللقة الدوارة. 14 ةيبرعلا 4/3/2015 4:29:30 PM MC35J8088CT_SG_DE68-04321B-00_AR.indd 14 مكان التركيب ٠٤ ٠٢ ٠٣ 01 02 03 04 0ارتفاع 85سم عن األرض 100سم من اجلدار اخللفي 100سم من اجلانب 200سم من أعلى بيكرتلا ٠١ •ضع الفرن فوق سطح أملس ومسطح يرتفع عن األرض حوالي 85سم .يجب أن يكون السطح قويًا بدرجة تكفي لتحمل وزن الفرن. •عند تركيب الفرن ،تأكد من تهويته بشكل جيد عن طريق ترك مسافة 10سم على األقل من اجلهة اخللفية واجلانبني ومسافة 20سم من اجلهة العلوية. •يُحظر تركيب فرن امليكروويف بجوار أشياء تنبعث منها حرارة أو رطوبة ،على سبيل املثال، وضعه بجوار أفران ميكروويف أخرى أو مدفأة. •التزم مبواصفات مصدر الطاقة اخلاصة بهذا الفرن .استخدم كبالت التمديد املعتمدة فقط في حالة الضرورة. •امسح اجلدران الداخلية وقفلي الباب بقطعة قماش مبللة قبل استخدام الفرن للمرة األولى. الصينية الدوارة قم بإزالة كافة مواد التغليف من داخل الفرن .وقم بتركيب احللقة الدوارة والقرص الدوار .تأكد من دوران القرص الدوار بحرية. ةيبرعلا 4/3/2015 4:29:31 PM 15 MC35J8088CT_SG_DE68-04321B-00_AR.indd 15 الصيانة التنظيف نظف الفرن بشكل منتظم ملنع تراكم القاذورات فوقه الفرن أو داخله .كما يجب عليك العناية بالباب وقفله (في الطرز املتوفرة بها هذه العناصر فقط). والصينية الدوارة واحللقة الدوارة ُ في حالة تعذر الفتح أو اإلغالق بسهولة ،حتقق أوال ً من عدم تراكم قاذورات على قفلي الباب .واستخدم قطعة قماش ناعمة مبللة مباء وصابون لتنظيف األسطح الداخلية واخلارجية للفرن ،ثم اشطفها وجففها جي ًدا. إلزالة القاذورات الصعبة والروائح الكريهة من داخل الفرن ةنايصلا 1 .1ضع كوبًا به عصير ليمون مخفف في منتصف الصينية الدوارة. 2 .2وقم بالتسخني ملدة عشر دقائق باستخدام الطاقة القصوى. 3 .3بعد اكتمال دورة التسخني ،انتظر حتى يبرد الفرن ،ثم افتح الباب ونظف حجيرة الفرن. الطرز ذات السخان املتأرجح للتنظيف داخل ُ A لتنظيف اجلهة العلوية من حجيرة الفرن ،قم بخفض عنصر التسخني العلوي بزاوية 45درجة ( )Aكما هو موضح بالصورة .سيسهل ذلك تنظيف اجلزء العلوي. عند االنتهاء ،أعد عنصر التسخني العلوي إلى وضعه األصلي. تنبيه •حافظ على نظافة الباب وقفله وتأكد من إمكانية فتح الباب وإغالقه بسهولة .وإال فقد يتأثر عمر الفرن سل ًبا. •يجب عدم سكب ماء في فتحات تهوية الفرن. 16 •ال تستخدم أي مواد كاشطة أو كيماوية للتنظيف. •بعد كل مرة يتم استخدام فيها الفرن ،استعمل منظفًا مخففً ا لتنظيف حجيرة الفرن بعد انتظار مدة كافية ليبرد الفرن. ةيبرعلا 4/3/2015 4:29:31 PM MC35J8088CT_SG_DE68-04321B-00_AR.indd 16 االستبدال (اإلصالح) حتذير ال يحتوي اجلزء الداخلي لهذا الفرن على أي أجزاء قابلة لإلزالة بواسطة املستخدم .لذا يرجى عدم محاولة استبدال محتويات الفرن أو إصالحه بنفسك. •إذا واجهتك أي مشكلة مع اجلسم اخلارجي للفرن، •إذا واجهتك أي مشكلة مع املفصالت و/أو األقفال فافصل سلك التيار الكهربائي من مصدر و/أو الباب ،فاتصل بفني مختص أو مركز خدمة الطاقة ،ثم اتصل مبركز خدمة Samsungاحمللي. Samsungاحمللي للحصول على دعم فني. •إذا أردت استبدال مصباح اإلضاءة ،فاتصل مبركز خدمة Samsungاحمللي .ويرجى عدم استبداله بنفسك. ةنايصلا العناية في حاالت عدم االستخدام لفترات طويلة •إذا كنت ال تستخدم الفرن لفترة زمنية طويلة ،فافصل سلك التيار الكهربائي وانقل الفرن إلى موقع جاف وخال من األتربة .فقد تؤثر األتربة والرطوبة املتراكمة داخل الفرن على أدائه. ٍ ةيبرعلا 4/3/2015 4:29:31 PM 17 MC35J8088CT_SG_DE68-04321B-00_AR.indd 17 مالحظات قبل بدء التشغيل هناك مكونان يجب معرفتهما قبل بدء تنفيذ وصفة الطعام مباشرةً .ميكنك ضبط/تغيير الساعة أو مؤقت املطبخ وفقً ا الحتياجاتك وذلك قبل بدء أي وضع للطهي أو خالله. الساعة ّ يجب ضبط التوقيت الصحيح للساعة لضمان صحة العمليات التلقائية. ثوان حتى الدخول في حالة 1 .1قم بتشغيل الفرن ،ثم انتظر عدة ٍ االستعداد .فيومض عنصر الساعة. 2 .2استخدم أزرار األسهم لضبط الساعة ،ثم اضغط على ( OKموافق) .فيومض عنصر الدقيقة. يغشتلا ءدب لبق تاظحالم 3 .3استخدم أزرار األسهم لضبط الدقيقة ،ثم اضغط على ( OKموافق). مالحظة •لتغيير الوقت احلالي فيما بعد ،اضغط مطوال ً على ثوان ،ثم اتبع اخلطوات املوضحة أدناه. السهم ألعلى ( ) ملدة ٍ 3 •ال ميكن تغيير وقت الساعة أثناء عمليات الطهي. 18 ةيبرعلا 4/3/2015 4:29:32 PM MC35J8088CT_SG_DE68-04321B-00_AR.indd 18 تشغيل/إيقاف الصوت ميكنك تشغيل أو إيقاف تشغيل نغمة املفتاح أو صوت التنبيه أو املنبه .ويتوفر هذا اإلعداد في حالة االستعداد فقط (عند عرض الوقت احلالي). ثوان. لكتم الصوت ،اضغط مطوال ً على ملدة ٍ 3 فيظهر الرمز "( OFFإيقاف)" على شاشة العرض. توفير الطاقة لتقليل معدل استهالك الطاقة ،اضغط على ويتوفر هذا اإلعداد في حالة االستعداد فقط (عند عرض الوقت احلالي). ملدة ثانية واحدة. يغشتلا ءدب لبق تاظحالم ثوان. إللغاء كتم الصوت ،اضغط مطوال ً على مرة أخرى ملدة ٍ 3 فيظهر الرمز "( ONتشغيل)" على شاشة العرض. مالحظة •عند ضبط الفرن بعد مرور 5دقائق من عدم إجراء املستخدم ألي عملية ،يقوم الفرن بإلغاء أي عملية جارية ،ويدخل في حالة االستعداد. •إذا مت إيقاف الفرن مؤق ًتا ملدة تزيد عن 25دقيقة أثناء الطهي ،يدخل الفرن في حالة االستعداد. ةيبرعلا 4/3/2015 4:29:32 PM 19 MC35J8088CT_SG_DE68-04321B-00_AR.indd 19 يغشتلا ءدب لبق تاظحالم نظرة عامة على طاقة امليكروويف عالية التردد .يستخدم الفرن املاجنترون املضمن لتوليد أشعة ميكروويف تستخدم في أشعة امليكروويف هي عبارة عن موجات كهرومغناطيسية ّ طهي الطعام أو إعادة تسخينه دون التأثير على شكله أو لونه. 1 .1يتم توزيع أشعة امليكروويف التي تتولد بواسطة املاجنترون متساو باستخدام نظام التوزيع الدوار .ولذلك يتم طهي بشكل ٍ الطعام بدرجة متساوية. 2 .2ميتص الطعام أشعة امليكروويف حتى عمق 2.5سم تقري ًبا. بعد ذلك ،تتشتت أشعة امليكروويف داخل الطعام مع مواصلة الطهي. 3 .3تتأثر مدة الطهي بحاالت الطعام التالية: •الكمية والكثافة •رطوبة احملتوى •درجة احلرارة األولية (خاص ًة في حالة جتمد الطعام) مالحظة يغشتلا ءدب لبق تاظحالم يحتفظ الطعام املطهي باحلرارة داخله بعد اكتمال عملية الطهي؛ لذلك يجب مراعاة أوقات االنتظار احملددة في هذه الدليل لضمان طهي متساو حتى اجلزء الداخلي منه. الطعام بشكل ٍ 20 ةيبرعلا 4/3/2015 4:29:32 PM MC35J8088CT_SG_DE68-04321B-00_AR.indd 20 أدوات الطهي اخلاصة بامليكروويف يجب أن تسمح أدوات الطهي التي تستخدم مع وضع "امليكروويف" بأن تتخلل أشعة امليكروويف الطعام وتنتشر خالله .هذا وتنعكس أشعة امليكروويف بواسطة معادن مثل اإلستنلس واأللومنيوم والنحاس .لذلك ،ال تستخدم أدوات للطهي مصنوعة من املواد املعدنية .استخدم أدوات دائما الستخدامها مع امليكروويف .للحصول على معلومات الطهي التي حتتوي على عالمة مسموح باستخدامها مع امليكروويف فهي آمنة ً إضافية حول أدوات الطهي املناسبة ،راجع الدليل اآلتي وضع كوبًا من املاء أو بعض الطعام على القرص الدوار. املتطلبات: مستو وجوانب قائمة •قاع ٍ •غطاء محكم الغلق •إناء متوازن بشكل جيد ومزود مبقابض يقل وزنها عن وزن اإلناء نفسه ورق األملونيوم يُستخدم مع الوجبات صغيرة احلجم حلمايتها من النضج الزائد .قد يحدث شرر إذا كان ورق األملونيوم قري ًبا من جدار الفرن أو إذا مت استخدام كميات مفرطة منه. طبق التحمير ال يُستخدم ملدة أكثر من 8دقائق في حالة التسخني املسبق. األواني الصينية أو الفخارية تعد األواني اخلزفية والفخارية اخلام واملطلية والصينية آمنة دائما مع امليكروويف ،ما لم تكن مزينة بزخارف معدنية. ً األطباق الكرتون املصنوعة من البوليستر التي تستخدم مرة واحدة يتم تغليف بعض األطعمة اجملمدة في هذه األطباق. تغليف األطعمة السريعة األكواب أو األوعية املصنوعة من مادة البوليستيرين قد يتسبب التسخني الزائد في صهرها. األكياس الورقية أو الصحف قد حتترق. الورق املعاد تصنيعه أو األدوات الزجاجية املزينة بزخارف معدنية قد يتسبب في حدوث شرر. ةيبرعلا 4/3/2015 4:29:32 PM يغشتلا ءدب لبق تاظحالم اخلامات مسموح باستخدامها مع امليكروويف الوصف 21 MC35J8088CT_SG_DE68-04321B-00_AR.indd 21 يغشتلا ءدب لبق تاظحالم اخلامات األدوات الزجاجية املعادن مسموح باستخدامها مع امليكروويف أدوات الفرن التي تستخدم على املائدة آمنة االستخدام مع امليكروويف ما لم تكن مزينة بزخارف معدنية. األدوات الزجاجية الرقيقة قد تتعرض األواني الزجاجية الرقيقة للكسر أو الشرخ بسبب التسخني السريع. البرطمانات الزجاجية مناسبة للتدفئة فقط .يجب إزالة الغطاء قبل الطهي. األطباق قد تتسبب في حدوث شرر أو نشوب حريق. كيس فريزر برباط سلكي يغشتلا ءدب لبق تاظحالم الورق البالستيك األطباق واألكواب ومناديل املائدة وورق املطبخ تُستخدم في طهي الطعام لفترات قصيرة ،فهي متتص الرطوبة الزائدة. الورق املعاد تصنيعه قد يتسبب في حدوث شرر. األواني تُستخدم األوعية املصنوعة من البالستيك احلراري فقط .قد يحدث التواء لبعض أنواع األوعية البالستيكية أو رمبا يتغير لونها عند استخدامها في درجات احلرارة املرتفعة. الورق احلراري يُستخدم الورق احلراري للحفاظ على الرطوبة بعد االنتهاء من الطهي. أكياس الفريزر تُستخدم األكياس التي حتتمل درجة الغليان أو األكياس الصاحلة لالستخدام في األفران فقط. الورق الشمعي أو الدهني :آمن االستخدام مع امليكروويف 22 الوصف يُستخدم لالحتفاظ بالرطوبة ومنع تناثر الطعام. :يستخدم بحذر :غير آمن االستخدام مع امليكروويف ةيبرعلا 4/3/2015 4:29:32 PM MC35J8088CT_SG_DE68-04321B-00_AR.indd 22 عمليات الطهي لوحة التحكم تتوفر اللوحة األمامية بتشكيلة متنوعة من اخلامات واأللوان .ولتحسني مستوى اجلودة ،يخضع املظهر اخلارجي للفرن إلى التغيير دون إشعار مسبق. ١١ ٠٩ ٠٧ ٠٥ ١٠ ٠٨ ٠٦ ٠٤ ٠٢ ٠٣ ٠١ 0 02لوحة الوظائف اضغط على هذا الزر لتحديد وضع أو وظيفة الطهي املطلوبة. 0 03شاشة العرض تُظهر املعلومات الالزمة للوظيفة أو اإلعدادات احملددة. 0 04أعلى/أسفل استخدم هذا الزر لضبط قيمة اإلعداد اخلاصة بتحديدك. ( OK0 05موافق) اضغط على الزر لتأكيد إعداداتك. 0 06اخللف اضغط على هذا الزر للعودة إلى اإلعداد االفتراضي. 0 07درجة احلرارة/مستوى الطاقة استخدم هذا الزر لتغيير درجة احلرارة أو مستوى الطاقة. 0 08الصينية الدوارة اضغط على هذا الزر لتبديل تشغيل الصينية الدوارة وإيقاف تشغيلها. 0 09تشغيل أيضا لتسخني الفرن تسخينًا مسبقً ا سريعا بأقصى ً اضغط هذا الزر لبدء عملية الطهي .ويُستخدم ً مستوى للطاقة. 1 10إيقاف أيضا إللغاء الوضع احلالي. اضغط على هذا الزر إليقاف عملية .ويُستخدم ً 1 11التأمني ضد عبث األطفال ثوان للتنشيط أو إلغاء التنشيط. اضغط مطوال ً على هذا الزر ملدة ٍ 3 ويتوفر الزر التأمني ضد عبث األطفال في حالة االستعداد فقط. يهطلا تايلمع 0 01الطاقة اضغط على هذا الزر لتشغيل الفرن أو إيقاف تشغيله. مالحظة •حالة االستعداد :بعد مرور 5دقائق من عدم إجراء املستخدم ألي عملية على لوحة التحكم ،يدخل الفرن في حالة االستعداد فقط عند عرض الوقت احلالي .وبعد مرور 25دقيقة أخرى من عدم إجراء أي عملية ،يدخل الفرن في حالة اإليقاف. •حالة اإليقاف :عند إعادة تشغيل الفرن بعد إيقاف تشغيله ،تضيء األزرار ذات الصلة بآخر إجراء للمستخدم فقط .للتبديل إلى حالة االستعداد ،اضغط على الزر الطاقة مرة أخرى. ةيبرعلا 4/3/2015 4:29:33 PM 23 MC35J8088CT_SG_DE68-04321B-00_AR.indd 23 يهطلا تايلمع نظرة عامة على الوظائف الوظيفة الهواء الساخن نطاق درجة احلرارة درجة احلرارة االفتراضية احلد األقصى للوقت 230 - 160درجة مئوية 200درجة مئوية 60دقيقة تعمل وظيفة الهواء الساخن نفس عمل النقل احلراري .ومع ذلك ،تعمل أجزاء التسخني على توليد حرارة أشد ،وتوزيع تيار هوائي أقوى داخل الفرن. خصيصا لتسريع وتيرة الطهي مع االحتفاظ وصممت هذه الوظيفة ُ ً بجودة املذاق أو حتسينها. 230 - 40درجة مئوية النقل احلراري الوضع اليدوي (ميكروويف +نقل حراري) تعمل أجزاء التسخني على توليد احلرارة التي تتوزع بالتساوي داخل الفرن بواسطة مروحة النقل احلراري .ويُفضل استخدام هذا الوضع مع األطعمة اجملمدة أو اخلبز. 200 - 40درجة مئوية 450 - 100واط يهطلا تايلمع الشواية ميكروويف +شواية 24 180درجة مئوية 450واط 60دقيقة تعمل أجزاء التسخني على توليد احلرارة ،ثم توزعها مروحة النقل احلراري داخل الفرن ،وتعززها الطاقة املنبعثة من امليكروويف. 900 - 100واط امليكروويف 180درجة مئوية 60دقيقة 900وات 90دقيقة تعمل الطاقة املنبعثة من امليكروويف على طهي الطعام أو تسخينه دون تغيير شكله أو لونه. 180درجة مئوية 180درجة مئوية 60دقيقة استخدام هذا الوضع لشي األطعمة كاللحم مثالً. 180درجة مئوية 600 - 100واط 180درجة مئوية 600واط 60دقيقة تعمل أجزاء التسخني على توليد احلرارة التي تعززها الطاقة املنبعثة من امليكروويف. ةيبرعلا 4/3/2015 4:29:33 PM MC35J8088CT_SG_DE68-04321B-00_AR.indd 24 الوظيفة الوضع اآللي نطاق درجة احلرارة الهواء الساخن التلقائي لتلبية متطلبات مستخدمي وضع الهواء الساخن ألول مرة ،يوفر الفرن 10 برامج تلقائية. تلقائي ا تلقائيا للطهي. برنامج يوفر الفرن للطهاة املبتدئني إجمالي 25 ً ً فك التجميد السريع يوفر الفرن 5برامج لفك التجميد من أجل راحتك. 80 - 50درجة مئوية وظائف خاصة درجة احلرارة االفتراضية احلد األقصى للوقت االحتفاظ بالسخونة 60درجة مئوية 3ساعات استخدم هذه الوظيفة فقط لالحتفاظ بسخونة األطعمة التي مت طهيها توا. ً يهطلا تايلمع ةيبرعلا 4/3/2015 4:29:34 PM 25 MC35J8088CT_SG_DE68-04321B-00_AR.indd 25 يهطلا تايلمع الوضع اليدوي اخلطوة .1حتديد الوضع من لوحة الوظائف ،اضغط على الوضع اليدوي ،على سبيل املثال النقل احلراري. فيومض عنصر درجة احلرارة االفتراضية (أو مستوى الطاقة). اخلطوة .2ضبط درجة احلرارة أو مستوى الطاقة استخدم الزرين /لضبط درجة احلرارة االفتراضية (أو مستوى الطاقة) .عند االنتهاء ،اضغط على ( OKموافق) لالنتقال إلى عناصر الوقت. مالحظة يتم ضبط مستوى الطاقة وفقً ا لدرجة احلرارة املضبوطة ،ما لم يُذكر خالف ذلك. ثوان، 5 غضون في درجة احلرارة أو مستوى الطاقة حتديد إذا لم يتم ٍ ينتقل الفرن إلى جلسة مدة الطهي. يهطلا تايلمع اخلطوة .3تعيني وقت الطهي استخدم الزرين /لضبط مدة الطهي .عند االنتهاء ،اضغط على تشغيل ( ). مالحظة ميكنك ضبط مدة الطهي بعد التسخني املسبق. اخلطوة .4التسخني املسبق يبدأ الفرن عملية التسخني املسبق حتى يصل إلى درجة احلرارة املضبوطة .عند اكتمال العملية ،يُصدر الفرن صوت تنبيه ،ويختفي املؤشر 26 . ةيبرعلا 4/3/2015 4:29:35 PM MC35J8088CT_SG_DE68-04321B-00_AR.indd 26 تنبيه دائما. •استخدم قفازات الفرن أثناء إخراج الطعام ً •قد يعمل فرن امليكروويف ملدة 5دقائق حتى يتم تبريده عندما تكون . درجة حرارة جتويف الفرن عالية بعد الطهي .وسيتم عرض لتغيير مدة الطهي أثناء عملية الطهي استخدم الزرين /لضبط مدة الطهي. وسيتم تطبيق تغييراتك على الفور ،ويستأنف الفرن عملية الطهي باإلعدادات اجلديدة. لتغيير درجة احلرارة أو مستوى الطاقة أثناء عملية الطهي 1 .1اضغط على . فيومض عنصر درجة احلرارة (أو مستوى الطاقة). 2 .2استخدم الزرين /لضبط درجة احلرارة (أو مستوى الطاقة)، لتأكيد تغييراتك. ثم اضغط على ( OKموافق) أو يهطلا تايلمع إليقاف عملية اضغط على إيقاف ( ) مرة واحدة إليقاف العملية ،أو مرتني إللغاء الوضع احلالي ،والدخول في حالة االستعداد. ةيبرعلا 4/3/2015 4:29:36 PM 27 MC35J8088CT_SG_DE68-04321B-00_AR.indd 27 يهطلا تايلمع الهواء الساخن تعمل وظيفة الهواء الساخن نفس عمل النقل احلراري .ومع ذلك ،تعمل أجزاء التسخني على توليد حرارة أشد ،وتوزيع تيار هوائي أقوى داخل خصيصا لتسريع وتيرة الطهي مع االحتفاظ بجودة املذاق أو حتسينها .وميكنك استخدام احلامل السفلي ،أو احلامل وصممت هذه الوظيفة الفرنُ . ً معا على الصينية الدوارة. السفلي وطبق التحمير ً اخلطوة 1 الهواء الساخن > اخلطوة 2 درجة احلرارة > اخلطوة 3 مدة الطهي > اخلطوة 4 التسخني املسبق معا على 1 .1ضع احلامل السفلي ،أو احلامل السفلي وطبق التحمير ً الصينية الدوارة. 2 .2ضع الطعام في وعاء طهي مناسب ،وضع الوعاء على احلامل ،ثم أغلق الباب. 3 .3اتبع اخلطوات من 1إلى 4املوضحة في الوضع اليدوي في صفحة .26 4 .4عند اكتمال عملية الطهي ،يومض عنصر " ."0:00استخدم قفازات الفرن إلخراج الطعام. يهطلا تايلمع تنبيه ال تستخدم هذا الوضع خلبز أرغفة اخلبز ،أو طهي احللوى .فيمكن أن تؤدي احلرارة الشديدة إلى احتراق الطبقة العليا من األطعمة. 28 ةيبرعلا 4/3/2015 4:29:36 PM MC35J8088CT_SG_DE68-04321B-00_AR.indd 28 النقل احلراري تعمل أجزاء التسخني على توليد احلرارة التي تتوزع بالتساوي داخل الفرن بواسطة مروحة النقل احلراري .وميكنك استخدام احلامل السفلي ،أو معا على الصينية الدوارة .استخدم هذا الوضع لتحضير جميع أنواع البسكويت والكعك واخلبز وكعك الفاكهة احلامل السفلي وطبق التحمير ً وعجينة الشو والسوفليه. اخلطوة 1 النقل احلراري > اخلطوة 2 درجة احلرارة > اخلطوة 3 مدة الطهي > اخلطوة 4 التسخني املسبق معا على 1 .1ضع احلامل السفلي ،أو احلامل السفلي وطبق التحمير ً الصينية الدوارة. 2 .2ضع الطعام في وعاء طهي مناسب ،وضع الوعاء على احلامل ،ثم أغلق الباب. 3 .3اتبع اخلطوات من 1إلى 4املوضحة في الوضع اليدوي في صفحة .26 4 .4عند اكتمال عملية الطهي ،يومض عنصر " ."0:00استخدم قفازات الفرن إلخراج الطعام. يهطلا تايلمع ةيبرعلا 4/3/2015 4:29:36 PM 29 MC35J8088CT_SG_DE68-04321B-00_AR.indd 29 يهطلا تايلمع (ميكروويف +نقل حراري) يجمع هذا الوضع بني طاقة امليكروويف والهواء الساخن ،مما يؤدي إلى تقليص مدة الطهي ،وإنتاج طعام بطبقة سطحية محمرة هشة .استخدم هذا الوضع مع جميع أنواع اللحوم والدواجن باإلضافة إلى الطواجن وأطباق احملمصات والكيك اإلسفنجي وكعك الفاكهة اخلفيف والفطائر واخلضراوات احملمصة واخلبز. اخلطوة 1 (ميكروويف +نقل حراري) اخلطوة 2 > درجة احلرارة ومستوى الطاقة اخلطوة 3 > مدة الطهي اخلطوة 4 > التسخني املسبق معا على 1 .1ضع احلامل السفلي ،أو احلامل السفلي وطبق التحمير ً الصينية الدوارة. 2 .2ضع الطعام في وعاء طهي مناسب ،وضع الوعاء على احلامل ،ثم أغلق الباب. 3 .3اتبع اخلطوات من 1إلى 4املوضحة في الوضع اليدوي في صفحة .26 4 .4عند اكتمال عملية الطهي ،يومض عنصر " ."0:00استخدم قفازات الفرن إلخراج الطعام. يهطلا تايلمع تنبيه ال تستخدم سوى أوعية الطهي القابلة لالستخدام داخل الفرن مثل األوعية الزجاجية أو اخلزفية أو الصينية غير املزينة بزخارف معدنية. 30 ةيبرعلا 4/3/2015 4:29:36 PM MC35J8088CT_SG_DE68-04321B-00_AR.indd 30 امليكروويف أشعة امليكروويف هي عبارة عن موجات كهرومغناطيسية عالية التردد .تعمل الطاقة املنبعثة من امليكروويف على طهي الطعام أو تسخينه دون تغيير شكله أو لونه. •استخدم أدوات الطهي آمنة االستخدام مع امليكروويف فقط. اخلطوة 1 امليكروويف اخلطوة 2 > مستوى الطاقة اخلطوة 3 > مدة الطهي اخلطوة 4 > - 1 .1ضع الطعام في وعاء آمن االستخدام مع امليكروويف ،ثم ضع الوعاء في منتصف الصينية الدوارة .أغلق الباب. 2 .2اتبع اخلطوات من 1إلى 3املوضحة في الوضع اليدوي في صفحة .26 3 .3عند اكتمال عملية الطهي ،يومض عنصر " ."0:00استخدم قفازات الفرن إلخراج الطعام. التشغيل البسيط لتسخني الطعام بطريقة بسيطة ملدة زمنية قصيرة بأقصى طاقة ( 900واط) ،حدد ميكروويف ،ثم اضغط على تشغيل ( ). مستوى الطاقة املستوى الوصف النسبة املئوية ()% الطاقة الناجتة (واط) عالي 100 900 عالي منخفض 83 750 عالي متوسط 67 600 متوسط 50 450 منخفض متوسط 33 300 استخدم هذين املستويني لطهي اللحوم وتسخني اخلضروات. فك التجميد 20 180 استخدم هذا املستوى لفك التجميد قبل الطهي. منخفض 11 100 استخدم هذا املستوى لفك جتميد اخلضروات. استخدم هذين املستويني للتسخني والطهي. ةيبرعلا 4/3/2015 4:29:36 PM يهطلا تايلمع استخدم هذا املستوى لتسخني السوائل. 31 MC35J8088CT_SG_DE68-04321B-00_AR.indd 31 يهطلا تايلمع الشواية تعمل أجزاء التسخني على توليد احلرارة .لذا ،تأكد من أنها في وضع أفقي. اخلطوة 1 الشواية > اخلطوة 2 - > اخلطوة 3 مدة الطهي > اخلطوة 4 - معا على 1 .1ضع احلامل العلوي ،أو احلامل العلوي وطبق التحمير ً الصينية الدوارة. 2 .2ضع الطعام في وعاء طهي مناسب ،وضع الوعاء على احلامل ،ثم أغلق الباب. 3 .3اتبع اخلطوات من 1إلى 3املوضحة في الوضع اليدوي في صفحة .26 4 .4عند اكتمال عملية الطهي ،يومض عنصر " ."0:00استخدم قفازات الفرن إلخراج الطعام. ميكروويف +شواية يهطلا تايلمع تعمل أجزاء التسخني على توليد احلرارة التي تعززها الطاقة املنبعثة من امليكروويف .وال تستخدم سوى األوعية القابلة لالستخدام داخل الفرن، مثل األوعية الزجاجية أو اخلزفية. اخلطوة 1 ميكروويف +شواية > اخلطوة 2 مستوى الطاقة > اخلطوة 3 مدة الطهي > اخلطوة 4 - معا على 1 .1ضع احلامل العلوي ،أو احلامل العلوي وطبق التحمير ً الصينية الدوارة. 2 .2ضع الطعام في وعاء طهي مناسب ،وضع الوعاء على احلامل ،ثم أغلق الباب. 3 .3اتبع اخلطوات من 1إلى 3املوضحة في الوضع اليدوي في صفحة .26 4 .4عند اكتمال عملية الطهي ،يومض عنصر " ."0:00استخدم قفازات الفرن إلخراج الطعام. 32 ةيبرعلا 4/3/2015 4:29:37 PM MC35J8088CT_SG_DE68-04321B-00_AR.indd 32 الوضع اآللي يوفر الفرن 3أوضاع تلقائية مختلفة من أجل راحتك؛ أال وهي :الهواء الساخن التلقائي والطهي التلقائي وفك التجميد السريع .حدد الوضع الذي يناسب احتياجاتك على أكمل وجه. اخلطوة .1حتديد الوضع من لوحة الوظائف ،اضغط على الوضع التلقائي ،على سبيل املثال الهواء الساخن التلقائي .فيومض رقم البرنامج االفتراضي. اخلطوة .2حتديد البرنامج استخدم الزرين /لتحديد برنامجك املفضل ،ثم ا ضغط على ( OKموافق) .بعد ذلك ،يومض الوزن االفتراضي للبرنامج. اخلطوة .3ضبط حجم الوجبة أو وزنها يهطلا تايلمع استخدم الزرين /لضبط حجم الوجبة (أو وزنها) .عند االنتهاء، اضغط على تشغيل ( ). تنبيه دائما. استخدم قفازات الفرن أثناء إخراج الطعام ً مالحظة تتم برمجة مدة الطهي مسبقً ا وفقً ا للوضع التلقائي ،وال ميكن تغييرها. ةيبرعلا 4/3/2015 4:29:37 PM 33 MC35J8088CT_SG_DE68-04321B-00_AR.indd 33 يهطلا تايلمع الهواء الساخن التلقائي تعمل وظيفة الهواء الساخن نفس عمل النقل احلراري .ومع ذلك ،تعمل أجزاء التسخني على توليد حرارة أشد ،وتوزيع تيار هوائي أقوى داخل الفرن. خصيصا لتسريع وتيرة الطهي مع االحتفاظ بجودة املذاق أو حتسينها. وصممت هذه الوظيفة ُ ً لتلبية متطلبات مستخدمي وضع الهواء الساخن ألول مرة ،يوفر الفرن 10برامج تلقائية. اخلطوة 1 الهواء الساخن التلقائي > اخلطوة 2 > من 1إلى 10 اخلطوة 3 حجم الوجبة 1 .1ضع الطعام في وعاء طهي مناسب ،وضع الوعاء على الصينية الدوارة ،ثم أغلق الباب. 2 .2اتبع اخلطوات من 1إلى 3املوضحة في الوضع اآللي في صفحة .33 3 .3عند اكتمال عملية الطهي ،يومض عنصر " ."0:00استخدم قفازات الفرن إلخراج الطعام. تنبيه ال تستخدم هذا الوضع خلبز أرغفة اخلبز ،أو طهي احللوى .فيمكن أن تؤدي احلرارة الشديدة إلى احتراق الطبقة العليا من األطعمة. الطهي التلقائي ا تلقائيا للطهي .استفد من هذه امليزة في توفير الوقت أو تقليل الوقت الالزم للتعرف على امليزات برنامج يوفر الفرن للطهاة املبتدئني إجمالي 25 ً ً بالنسبة لك .سيتم تعديل وقت الطهي ودرجة احلرارة وفقً ا لوصفة الطعام احملددة. يهطلا تايلمع اخلطوة 1 تلقائي > اخلطوة 2 من 1إلى 25 > اخلطوة 3 حجم الوجبة 1 .1ضع الطعام في وعاء طهي مناسب ،وضع الوعاء على الصينية الدوارة ،ثم أغلق الباب. 2 .2اتبع اخلطوات من 1إلى 3املوضحة في الوضع اآللي في صفحة .33 3 .3عند اكتمال عملية الطهي ،يومض عنصر " ."0:00استخدم قفازات الفرن إلخراج الطعام. 34 ةيبرعلا 4/3/2015 4:29:37 PM MC35J8088CT_SG_DE68-04321B-00_AR.indd 34 فك التجميد السريع تلقائيا وفقً ا للبرنامج احملدد. يوفر الفرن 5برامج لفك التجميد من أجل راحتك .ويتم ضبط املدة ومستوى الطاقة ً اخلطوة 1 فك التجميد السريع > اخلطوة 2 من 1إلى 5 > اخلطوة 3 الوزن 1 .1ضع الطعام في وعاء طهي مناسب ،وضع الوعاء على الصينية الدوارة ،ثم أغلق الباب. 2 .2اتبع اخلطوات من 1إلى 3املوضحة في الوضع اآللي في صفحة .33 3 .3عند اكتمال عملية الطهي ،يومض عنصر " ."0:00استخدم قفازات الفرن إلخراج الطعام. وظائف خاصة االحتفاظ بالسخونة مع هذه الوظيفة ،يعمل جزء التسخني بالنقل احلراري فقط ،ويتم تشغيله وإيقاف تشغيله لالحتفاظ بسخونة الطعام. عند اكتمال عملية الطهي، يهطلا تايلمع 1 .1من لوحة الوظائف ،اضغط على احلرارة االفتراضية ( 60درجة مئوية). .فيومض عنصر درجة 2 .2استخدم الزرين /لضبط درجة احلرارة ،ثم اضغط على ( OKموافق) لالنتقال إلى عنصر الوقت. 3 .3استخدم الزرين /لضبط الوقت ،ثم اضغط على تشغيل ( ) .بعد ذلك ،يبدأ الفرن عملية التسخني. ةيبرعلا 4/3/2015 4:29:37 PM 35 MC35J8088CT_SG_DE68-04321B-00_AR.indd 35 يهطلا تايلمع مالحظة تنبيه دائما. •استخدم قفازات الفرن أثناء إخراج الطعام ً •ال تستخدم هذه الوظيفة إلعادة تسخني األطعمة الباردة .استخدم هذه الوظيفة فقط لالحتفاظ بسخونة األطعمة التي مت طهيها توا. ً •وال تقم بتشغيلها ملدة أكثر من 3ساعات .وإال ،قد تتأثر جودة الطعام. •لالحتفاظ بتحمير الطعام ،ال تقم بتغطيته مع وظيفة االحتفاظ بالسخونة. لتغيير درجة احلرارة أثناء الدورة ،اضغط على املوضحة أعاله. ،ثم كرر اخلطوة 2 دليل االحتفاظ بالسخونة احلرارة (بالدرجة املئوية) مدة االنتظار (بالدقيقة) الوجبات 80 30 لالحتفاظ بسخونة اللحوم والدواجن واخلبز احملمص والبيتزا والبطاطس والوجبات الرئيسية. املشروبات 80 30 لالحتفاظ بسخونة املاء واللنب والقهوة. اخلبز/الفطائر احملالة 60 30 لالحتفاظ بسخونة أرغفة اخلبز والتوست واملافن والكعك. األطباق/أدوات املائدة 70 30 لتسخني األطباق وأدوات املائدة مسبقً ا .رتب األطباق على الصينية الدوارة .وال تزد احلمل على الصينية( .أقصى حمل 7 :كجم) الطعام يهطلا تايلمع 36 الطريقة ةيبرعلا 4/3/2015 4:29:38 PM MC35J8088CT_SG_DE68-04321B-00_AR.indd 36 الطهي بأسلوب ذكي الطهي التلقائي دليل الهواء الساخن التلقائي الطريقة H1 اجملمدة البيتزا 450-400 قم بإزالة الغالف ،ثم ضع البيتزا على حامل سفلي .ضع البيتزا في الفرن. بعد الطهي ،انتظر ملدة من دقيقتني إلى 3دقائق. H2 (طبق منزلي) البيتزا 550-500 املكونات جراما) •عجينة البيتزا (220 - 200 ً جراما من دقيق اخلبز األبيض املستوفر و 3جرامات من اخلميرة اجملففة 150 ً و 0.5ملعقة كبيرة من زيت الزيتون و 100مللي من املاء الدافئ و 0.5ملعقة كبيرة من السكر وامللح •اإلضافات 100جرام من اخلضروات املقطعة إلى شرائح و 100جرام من صلصة الطماطم و 100 - 80جرام من جنب املوزاريال املبشور طريقة التحضير ضع الدقيق واخلميرة والزيت وامللح واملاء الدافئ في وعاء ،ثم اخلط هذه املكونات حتى حتصل على عجينة رطبة .اعجن العجينة الرطبة في خالط أو يدويًا ملدة تتراوح من 5إلى 10دقائق تقري ًبا .قم بتغطية العجينة بغطاء ،ثم عرضها للهواء ملدة 30دقيقة. افرد العجينة على طبق التحمير .انثر صلصة الطماطم على العجينة ،ثم أضف اخلضروات .افرد اجلنب بالتساوي فوقها. ضع املكونات على احلامل السفلي .بعد الطهي ،انتظر ملدة من دقيقتني إلى 3 دقائق. ةيبرعلا 4/3/2015 4:29:38 PM يكذ بولسأب يهطلا الطعام حجم الوجبة (جم) 37 MC35J8088CT_SG_DE68-04321B-00_AR.indd 37 يكذ بولسأب يهطلا الطعام H3 (طبق منزلي) الالزانيا 1100-1000 املكونات معلقتان كبيرتان من زيت الزيتون و 500جرام من اللحم البقري املفروم و 100جرام جراما من لفائف من صلصة الطماطم و 100مللي من قطع اللحم البقري و150 ً الالزانيا اجملففة وبصلة (مقطعة) وملعقة صغيرة من كل من رقائق البقدونس اجملففة والبردقوش والريحان و 200جرام من جنب املوزاريال املبشور طريقة التحضير الصلصة :قم بتسخني الزيت في مقالة ،ثم قم بطهي اللحم البقري املفروم والبصلة املقطعة ملدة 10دقائق تقري ًبا حتى درجة التحمير من جميع اجلوانب. اسكب صلصة الطماطم ،ثم ضع قطع اللحم البقري ،مع إضافة األعشاب اجملففة .اترك هذه املكونات حتى تغلي ،ثم قم بالطهي على نار هادئة ملدة 10 دقائق. استخدم نودلز الالزانيا اجملففة التي مت طهيها مسبقً ا. ضع النودلز وصلصة اللحم واجلنب في شكل طبقات ،ثم كرر ذلك .بعد ذلك ،افرد جنب املوزاريال املتبقي بالتساوي على الطبقة العليا من النودلز ،ثم ضع املكونات على احلامل السفلي .بعد الطهي ،انتظر ملدة من دقيقتني إلى 3دقائق. H4 (طبق منزلي) اجلراتان 650-600 1250-1200 جراما) املكونات (1250- 1200 ً جراما 800جرام من البطاطس و 100مللي من اللنب و 100مللي من الكرمية و50 ً من البيض الكامل اخملفوق وملعقة صغيرة من كل من امللح والفلفل وجوزة جراما من جنب املوزاريال املبشور والزبد والزعتر الطيب و150 ً جراما ،استخدم نصف الكمية. 650 600 * في حالة ً طريقة التحضير قشر البطاطس ،ثم قطعها إلى شرائح سمكها 3مم .افرد الزبد على جميع جوانب طبق محمصات 28 × 18سم تقري ًبا .انثر شرائح البطاطس على منشفة نظيفة ،وتغطيتها باملنشفة حتى االنتهاء من حتضير بقية املكونات. اخلط بقية املكونات فيما عدا اجلنب املبشور في وعاء كبير ،ثم قلبها جي ًدا. ضع شرائح البطاطس في الطبق في شكل طبقات فوق بعضها قليالً ،ثم اسكب اخلليط على البطاطس .انثر اجلنب املبشور فوق الطبقة العليا ،ثم قم باخلبز .ضع املكونات على احلامل السفلي .بعد انتهاء عملية الطهي ،تُقدم مفرودة مع قليل من أوراق الزعتر الطازجة .بعد الطهي ،انتظر ملدة من دقيقتني إلى 3دقائق. H5 البطاطس املقلية 350-300 450-400 وزع شرائح البطاطس اجملمدة اخملصصة للطهي بالتساوي على طبق التحمير. ضع الطبق على الرف السفلي .بعد الطهي ،انتظر ملدة من دقيقتني إلى 3دقائق. يكذ بولسأب يهطلا حجم الوجبة (جم) الطريقة 38 ةيبرعلا 4/3/2015 4:29:38 PM MC35J8088CT_SG_DE68-04321B-00_AR.indd 38 الطعام حجم الوجبة (جم) الطريقة H7 قطع الدجاج املشوي 600-500 1000-900 قم بوزن قطع الدجاج ،ثم ادهنها بالزيت والتوابل .ضعها بالتساوي على الرف العلوي .وعند سماع صوت التنبيه ،اقلب الدجاجة ،ثم اضغط على تشغيل للمتابعة .بعد الطهي ،انتظر ملدة من دقيقتني إلى 3دقائق. H8 دجاجة مشوية كاملة 1300-1200 ادهن الدجاجة بالكامل بالزيت والتوابل .ضع أوال ً جانب الصدر ألسفل ،في منتصف احلامل السفلي .وعند سماع صوت التنبيه ،اقلب الدجاجة باستخدام ماسك ،ثم اضغط على تشغيل للمتابعة .بعد الطهي ،انتظر ملدة من دقيقتني إلى 3دقائق. H9 فطيرة اللحمة 600-500 املكونات 200جرام من اللحم البقري ،مكعب ،ملعقة كبيرة من زيت الزيتون ونصف جراما من عيش الغراب (مقطع إلى شرائح) بصلة (مقطعة إلى شرائح) و80 ً وملعقة كبيرة من كل من البقدونس والزعتر ،مقطع ،وملعقة كبيرة من صلصة ورسيستيرشاير وامللح والفلفل وملعقتان كبيرتان من الدقيق و 100مللي من جراما من عجينة الفطائر اجلاهزة وصفار شرائح اللحم البقري الساخنة و120 ً بيضة (مخفوق) طريقة التحضير افرد اللحم البقري مع الدقيق وامللح والفلفل .قم بقليهم في مقالة بها زيت، مع التقليب من حني آلخر حتى درجة التحمير .أضف البصلة وعيش الغراب والبقدونس والزعتر وصلصة ورسيستيرشاير وشرائح اللحم البقري ،ثم قم بالتحمير .بعد التحمير ،اخفض احلرارة للطهي على نار هادئة ملدة ساعة. اسكب خليط احلشو في طبق الفرن ،وقم بتغطيته بلفافة الفطيرة ،ثم اضغط معا إلحكام الغلق .قم بتزيني الوجبة بإضافات الفطائر مع السكني على احلواف ً و الشوكة .اقطع الطبقة العليا ،ثم ادهنها بصفار البيض اخملفوق .ضع املكونات على احلامل السفلي .بعد الطهي ،انتظر ملدة من دقيقتني إلى 3دقائق. ةيبرعلا 4/3/2015 4:29:38 PM يكذ بولسأب يهطلا H6 أجنحة الدجاج اجملمدة 450-400 550-500 ضع أجنحة البافلو اجملمدة (التي مت طهيها وتتبيلها مسبقً ا) على طبق حتمير. ضع الطبق على الرف العلوي .ضع املكونات في الفرن .بعد الطهي ،انتظر ملدة من دقيقتني إلى 3دقائق. 39 MC35J8088CT_SG_DE68-04321B-00_AR.indd 39 يكذ بولسأب يهطلا الطعام H10 (طبق منزلي) الكيش حجم الوجبة (جم) الطريقة 500-400 املكونات •فطيرة محالة جراما من الزبد وبيضة و80 من الدقيق 200جرام ً •خليط جراما من و60 ا من الكرمية جرام و60 مكعب، ا من اللحم املقدد، جرام 30 ً ً ً جراما من اجلنب املبشور وامللح والفلفل كرمية اخلفق وبيضتان و40 ً طريقة التحضير لتحضير الفطيرة احملالة ،ضع الدقيق والزبد والبيض في وعاء ،واخلط هذه املكونات للحصول على فطيرة طرية ،ثم ضعها في الثالجة ملدة 30دقيقة .افرد الفطيرة ،ثم ضعها في أواني معدنية مدهونة بالزبد (مثل قالب املافن الذي يكفي لتحضير 6فطائر كيش صغيرة) اخلط الكرمية واللحم املقدد املكعب وكرمية اخلفق والبيض واجلنب وامللح والفلفل ،ثم اسكب هذا اخلليط في القوالب. ضع املكونات على احلامل السفلي .بعد الطهي ،انتظر ملدة 5دقائق. دليل الطهي التلقائي يكذ بولسأب يهطلا 40 الطريقة الطعام حجم الوجبة (جم) A1 اجملمدة الالزانيا 450-400 ضع الالزانيا اجملمدة في طبق بحجم مناسب مسموح باستخدامه مع ّ امليكروويف .ثم ضع الطبق على الرف السفلي .بعد الطهي ،انتظر ملدة من 3إلى 4دقائق. A2 البيتزا اجملمدة الرقيقة 350-300 450-400 ضع البيتزا اجملمدة على احلامل السفلي .بعد الطهي ،انتظر ملدة من دقيقة إلى دقيقتني. A3 (ثالث اطباق) وجبة 350-300 450-400 ضعها في طبق خزفي وقم بتغطيتها بطبقة من ورق امليكروويف احلراري. يناسب هذا البرنامج الوجبات املكونة من 3مكونات (مثل اللحم بالصلصة واخلضروات وأحد األطباق اجلانبية مثل البطاطس أو األرز أو املعجنات) .بعد الطهي ،انتظر ملدة من دقيقتني إلى 3دقائق. A4 (طبق واحد) وجبة جاهزة 350-300 450-400 ضعها في طبق خزفي وقم بتغطيتها بطبقة من ورق امليكروويف احلراري .بعد الطهي ،انتظر ملدة من دقيقتني إلى 3دقائق. ةيبرعلا 4/3/2015 4:29:38 PM MC35J8088CT_SG_DE68-04321B-00_AR.indd 40 الطعام حجم الوجبة (جم) الطريقة A5 سمك مشوي 400-300 600-500 ادهن السمك بالكامل (سواء سمك ُمرقّط أو سمك الرأس الذهبية) بقليل من الزيت مع إضافة األعشاب والتوابل .ضع األسماك بجانب بعضهما في اجتاه عكسي على الرف العلوي .ثم قم بقلبها مبجرد إصدار الفرن أصوات التنبيه. بعد الطهي ،انتظر ملدة من دقيقتني إلى 3دقائق. A6 حلم مشوي 1000-800 1400-1200 ادهن اللحم البقري بالزيت ،ثم تبِّله بالفلفل وامللح .ضع اللحم على الرف السفلي ،ولكن في البداية ضع اجلزء السمني لألسفل .بعد الطهي ،لف اللحم في ورق األلومنيوم ،ثم انتظر ملدة من 10إلى 15دقيقة. A9 سمك سلمون فيليه - مشوي 400-300 600-500 ادهن شرائح السلمون بالزيت والتوابل .ضع شرائح السمك على الرف العلوي بشكل متساو .ثم قم بقلبها مبجرد إصدار الفرن أصوات التنبيه .بعد الطهي، انتظر ملدة من دقيقتني إلى 3دقائق. A10 سمك فيليه مشوي 600-500 ادهن شرائح السمك بالزيت والتوابل .ضع شرائح السمك على احلامل العلوي بشكل متساو .ثم قم بقلبها مبجرد إصدار الفرن أصوات التنبيه .بعد الطهي، انتظر ملدة من دقيقتني إلى 3دقائق. A11 لفائف اخلبز اجملمدة 500-400 ضع أرغفة اخلبز اجملمدة على احلامل السفلي .بعد الطهي ،انتظر ملدة من دقيقة إلى دقيقتني. A12 البراونيز 750-700 ضع اخلليط املسبق والبيض واملاء وزيت عباد الشمس في وعاء ،ثم اخلط هذه املكونات جي ًدا .اسكب اخلليط في صينية زجاجية على احلامل السفلي .بعد الطهي ،انتظر ملدة 10دقائق .ميكنك وضع بعض اجلوز والكعك إذا كنت تفضل ذلك. A13 اخلضار املشوي 250-200 350-300 قطع اخلضروات الطازجة إلى شرائح (مثل قطع الفلفل والبصل وشرائح الكوسا وعيش الغراب) ،ثم ادهنها بالزيت والتوابل .ضع هذه املكونات على طبق التحمير .ضع الطبق على احلامل العلوي .بعد الطهي ،انتظر ملدة من دقيقتني إلى 3دقائق. ةيبرعلا 4/3/2015 4:29:38 PM يكذ بولسأب يهطلا A8 صدر دجاج مشوي 400-300 600-500 اشطف صدور الدجاج ،وانقعها ثم ضعها على الرف العلوي .ثم قم بقلبها مبجرد إصدار الفرن أصوات التنبيه .بعد الطهي ،انتظر ملدة من دقيقتني إلى 3 دقائق. 41 MC35J8088CT_SG_DE68-04321B-00_AR.indd 41 يكذ بولسأب يهطلا الطعام يكذ بولسأب يهطلا 42 حجم الوجبة (جم) الطريقة A14 كروكية بطاطا اجملمدة 350-300 450-400 وزع البطاطس الكروكيت اجملمدة اخملصصة للطهي في الفرن بالتساوي على طبق التحمير .ضع الطبق على الرف السفلي .بعد الطهي ،انتظر ملدة من دقيقتني إلى 3دقائق. A15 (طبق منزلي) بطاطس مقلية 350-300 450-400 بسمك 10 × 10مم ،وانقعها في املاء البارد قطع البطاطس وقطعها إلى أصابع ُ (ملدة 30دقيقة) .جففها مبنشفة ،وقم بوزنها ،ثم ادهنها مبقدار 5جرامات من الزيت والتوابل .وزع شرائح البطاطس بالتساوي على طبق التحمير .ضع الطبق على الرف السفلي .بعد الطهي ،انتظر ملدة من دقيقتني إلى 3دقائق. A16 البطاطس املقطعة -ودج 350-300 450-400 اغسل البطاطس العادية وقطعها إلى أجزاء .امسحها بزيت الزيتون والتوابل. وضعها بحيث يكون جانب القطع على طبق التحمير .ضع الطبق على الرف العلوي .بعد الطهي ،انتظر ملدة من دقيقتني إلى 3دقائق. A17 اجملمد البصل الدائري 250-200 350-300 وزع حلقات البصل اجملمدة على طبق التحمير بالتساوي .ضع الطبق على الرف السفلي .بعد الطهي ،انتظر ملدة من دقيقتني إلى 3دقائق. A18 روبيان مجمد 350-300 450-400 وزع قطع اجلمبري اجملمدة على طبق التحمير بالتساوي .ضع الطبق على الرف السفلي .بعد الطهي ،انتظر ملدة من دقيقتني إلى 3دقائق. A19 احلبار املقلي اجملمد 250-200 350-300 وزع قطع احلبار املقلية اجملمدة على طبق التحمير بالتساوي .ضع الطبق على الرف السفلي .بعد الطهي ،انتظر ملدة من دقيقتني إلى 3دقائق. A20 دجاج “ناجتس” مجمد 350-300 450-400 وزع قطع الدجاج اجملمدة اخملصصة للطهي في الفرن بالتساوي على طبق التحمير .ضع الطبق على الرف العلوي .بعد الطهي ،انتظر ملدة من دقيقتني إلى 3دقائق. A21 عجني بيتزا 500-300 ضع العجني في وعاء مناسب احلجم وضعه على الرف السفلي .قم بتغطيته بورق األلومنيوم. A22 عجينة الكعك 800-500 ضع العجني في وعاء مناسب احلجم وضعه على الرف السفلي .قم بتغطيته بورق األلومنيوم. A23 عجينة اخلبز 900-600 ضع العجني في وعاء مناسب احلجم وضعه على الرف السفلي .قم بتغطيته بورق األلومنيوم. ةيبرعلا 4/3/2015 4:29:38 PM MC35J8088CT_SG_DE68-04321B-00_AR.indd 42 الطعام حجم الوجبة (جم) الطريقة A24 اللنب -كوب سيراميك صغير 500 ضع 150جم من الزبادي في 5أكواب خزفية أو برطمانات زجاجية بالتساوي جراما) .أضف 100مل من اللنب في كل كوب .استخدم لنب (لكل واحد 30 ً محفوظ (درجة حرارة الغرفة؛ % 3.5دسم) .قم بتغطية كل كوب بورق حراري وضعه في شكل دائرة على الصينية الدوارة .وبعد االنتهاء ،احفظه ملدة 6 ساعات في ثالجة .نوصي ألول مرة باستخدام خميرة بكتريا زبادي مجففة. A25 اللنب -وعاء زجاجي كبير 500 اخلط 150جم من الزبادي الطبيعي مع 500مل من اللنب احملفوظ (درجة حرارة الغرفة؛ % 3.5دسم) .اسكب الزبادي في أوعية زجاجية بالتساوي .قم بتغطية الوعاء بالورق احلراري وضعه على الصينية الدوارة .وبعد االنتهاء ،احفظه ملدة 6 ساعات في ثالجة .نوصي ألول مرة باستخدام خميرة بكتريا زبادي مجففة. مالحظة ال تدور الصينية الدوارة أثناء تخمير الزبادي. يكذ بولسأب يهطلا ةيبرعلا 4/3/2015 4:29:38 PM 43 MC35J8088CT_SG_DE68-04321B-00_AR.indd 43 يكذ بولسأب يهطلا دليل فك التجميد السريع الطعام يكذ بولسأب يهطلا 44 حجم الوجبة (جم) الطريقة d1 اللحوم 1500-200 قم بحماية احلواف بورق األملونيوم ،ثم قلّب اللحوم عندما يُصدر الفرن صوت تنبيه .يتناسب هذ ا البرنامج مع اللحم البقري وحلم الضأن وشرائح الستيك وقطع اللحم و اللحم ا ملفروم .اتركها ملدة من 20إلى 60دقيقة. d2 الدواجن 1500-200 قم بحماية أطراف األرجل واألجنحة باستخدام ورق األملونيوم ،ثم قلّب الدواجن، عندما يُصدر الفرن صوت تنبيه .يناسب هذا البرنامج الدجاجة الكاملة أو أجزاء الدجاج .اتركها ملدة من 20إلى 60دقيقة. d3 السمك 1500-200 قم بتغليف ذيل السمكة باستخدام ورق األملونيوم ،ثم قلّب األسماك عندما يُصدر الفرن صوت تنبيه .يناسب هذا البرنامج األسماك الكاملة وشرائح السمك الفيليه .اتركها ملدة من 20إلى 50دقيقة. d4 اخلبز/الكعك 1000-100 أفقيا على قطعة من ورق املطبخ وقم بقلبه عندما يُصدر الفرن ضع اخلبز ً صوت تنبيه .وضع الكعك على طبق خزفي وقم بقلبه ،إن أمكن ،عند إصدار الفرن صوت تنبيه( .يظل الفرن يعمل ويتوقف عند فتح بابه ).يناسب هذا البرنامج كافة أنواع اخلبز سواء كان كامال ً أو شرائح وأرغفة اخلبز بأنواعه واخلبز الفرنساوي الطويل .ضع أرغفة اخلبز في شكل دائرة .يناسب هذا البرنامج كافة أنواع الكيك اخملبوز والبسكويت وكيك اجلنب والفطيرة احملالة .وال يناسب احللوى وكيك الفواكه والكرمية وكذلك الكيك املغطى بالشوكوالتة .اتركها ملدة تتراوح بني 10و 30دقيقة. d5 الفواكه 600-100 وزّع الفاكهة بشكل متساو في طبق زجاجي مسطح .يناسب هذا البرنامج كافة أنواع الفاكهة .انتظر ملدة من 5إلى 20دقيقة. ةيبرعلا 4/3/2015 4:29:38 PM MC35J8088CT_SG_DE68-04321B-00_AR.indd 44 الطهي اليدوي دليل الطهي باستخدام امليكروويف دائما. •ال تستخدم أواني معدنية مع الوضع ( Microwaveميكروويف) .بل ضع أواني الطعام على الصينية الدوارة ً •يُوصى بتغطية الطعام للحصول على أفضل النتائج. •بعد اكتمال عملية الطهي ،تناول الطعام مع البخار املنبعث منه. اخلضروات امل َُّمدة •استخدم إنا ًء مصنوعًا من زجاج البيركس وله غطاء. •قلب اخلضروات مرتني أثناء الطهي ومرة بعد الطهي. •أضف التوابل بعد الطهي. الطعام السبانخ البروكلي البازالء اخلضراوات املشكلة (جزر وبازالء وذرة) اخلضراوات املشكلة (الطريقة الصيني) 150 600 7-5 3-2 أضف 15مللي (ملعقة كبيرة) من املاء البارد. 300 600 10-8 3-2 أضف 30مللي (ملعقتني كبيرتني) من املاء البارد. 300 600 9-7 3-2 أضف 15مللي (ملعقة كبيرة) من املاء البارد. 300 600 9.5-7.5 3-2 أضف 30مللي (ملعقتني كبيرتني) من املاء البارد. 300 600 9-7 3-2 أضف 15مللي (ملعقة كبيرة) من املاء البارد. 300 600 9.5-7.5 3-2 أضف 15مللي (ملعقة كبيرة) من املاء البارد. ةيبرعلا 4/3/2015 4:29:38 PM يكذ بولسأب يهطلا الفاصوليا اخلضراء حجم الوجبة (جم) الطاقة (واط) مدة الطهي (بالدقيقة) مدة االنتظار (بالدقيقة) 45 MC35J8088CT_SG_DE68-04321B-00_AR.indd 45 يكذ بولسأب يهطلا اخلضراوات الطازجة •استخدم إنا ًء مصنوعًا من زجاج البيركس وله غطاء. جراما. •أضف من 30إلى 45مللي من املاء البارد إلى كل 250 ً •قلب اخلضروات مرة أثناء الطهي ومرة بعد الطهي. •أضف التوابل بعد الطهي. •يُوصى بتقطيع اخلضروات إلى أحجام صغيرة ومتساوية لتسريع وتيرة الطهي. •ميكنك طهي جميع اخلضراوات الطازجة باستخدام طاقة امليكروويف الكاملة ( 900واط). الطعام البروكلي حجم الوجبة (جم) مدة الطهي (بالدقيقة) مدة االنتظار (بالدقيقة) 250 500 4-3 7-6 3 قّطع الثمار إلى قطع ذات أحجام متساوية .ضع السيقان مرتبة باجتاه الوسط. الكرنب املسلوق 250 6-5 3 أضف من 60إلى 75مللي (من 4إلى 5مالعق كبيرة) من املاء. اجلزر 250 5-4 3 قّطع اجلزر إلى شرائح ذات أحجام متساوية. القرنبيط 250 500 5-4 8-7 3 قطع الثمار الكبيرة إلى أنصاف .ضع السيقان إلى الوسط. قّطع الثمار إلى قطع ذات أحجام متساويةّ . الكوسة 250 4-3 3 يكذ بولسأب يهطلا قطع الكوسة إلى شرائح .أضف 30مللي (ملعقتني كبيرتني) من املاء أو قطعة من الزبد .يستمر الطهي ّ حتى تنضج. الباذجنان 250 4-3 3 قطع الباذجنان إلى شرائح صغيرة ،ثم انثر ملعقة كبيرة من عصير الليمون عليه. البصل األخضر 250 4-3 3 قطع البصل األخضر إلى شرائح سميكة. ّ عيش الغراب 125 250 2-1 3-2 3 جهز عيش الغراب إما كقطع صغيرة كاملة أو قطعه إلى شرائح .ال تضف أي مقدار من املاء .انثر عصير الليمون فوقه .وأضف امللح والفلفل .يصفى قبل التقدمي. 46 ةيبرعلا 4/3/2015 4:29:38 PM MC35J8088CT_SG_DE68-04321B-00_AR.indd 46 الطعام حجم الوجبة (جم) مدة الطهي (بالدقيقة) مدة االنتظار (بالدقيقة) 250 5-4 3 البصل قطع البصل إلى شرائح أو أنصاف .أضف 15مللي (ملعقة كبيرة) من املاء. ّ الفلفل 250 3 5-4 قطع الفلفل إلى شرائح صغيرة. ّ بطاطس 250 500 3 5-4 8-7 زن البطاطس التي مت تقشيرها واقطعها إلى أنصاف أو إلى أرباع ذات أحجام متساوية. اللفت 250 3 6-5 قطع اللفت إلى مكعبات صغيرة. ّ األرز واملعجنات قم بالتقليب من حني آلخر أثناء الطهي وبعده. قم بالطهي دون غطاء ،وأغلق الغطاء أثناء التسوية .وبعد ذلك ،قم بتصفية املاء بعناية. •األرز :استخدم إنا ًء كبيرا ً مصنوعًا من زجاج البيركس مزودًا بغطاء ،حيث يتضاعف األرز في احلجم أثناء الطهي. •املعجنات :استخدم إنا ًء كبيرًا مصنوعًا من زجاج البيركس. الطعام األرز البني (مسلوق) 250 375 250 375 900 900 18-16 20-18 23-22 25-24 5 5 أضف 500مللي من املاء البارد. يكذ بولسأب يهطلا األرز األبيض (مسلوق) حجم الوجبة (جم) الطاقة (واط) مدة الطهي (بالدقيقة) مدة االنتظار (بالدقيقة) الطريقة أضف 750مللي من املاء البارد. أضف 500مللي من املاء البارد. أضف 750مللي من املاء البارد. أرز مخلوط (أرز +أرز بري) 250 900 19-17 5 أضف 500مللي من املاء البارد. ذرة مخلوطة (أرز +حبوب) 250 900 20-19 5 أضف 400مللي من املاء البارد. املعجنات 250 900 13-11 5 أضف 1000مللي من املاء الساخن. ةيبرعلا 4/3/2015 4:29:38 PM 47 MC35J8088CT_SG_DE68-04321B-00_AR.indd 47 يكذ بولسأب يهطلا التسخني •ال تقم بتسخني األطعمة كبيرة احلجم مثل قطع اللحم الكبيرة التي تتعرض للنضج الزائد بسهولة. •قم بتسخني األطعمة مبستويات طاقة أقل ألمان أفضل. •قلب الطعام جي ًدا ،أو اقلبه أثناء الطهي وبعده. •استخدم التنبيه للسوائل أو ألطعمة األطفال .وقلب الطعام جي ًدا قبل الطهي وأثناءه وبعده باستخدام ملعقة بالستيكية أو عصا تقليب زجاجية ملنع الفوران واإلصابة باحلروق .واترك الطعام في الفرن أثناء فترة االنتظار .وقم بتسخينه لفترة أطول من فترة تسخني أنواع األطعمة األخرى. •تتراوح مدة االنتظار املوصى بها بعد التسخني من دقيقتني إلى 4دقائق راجع اجلدول املرجعي املوضح أدناه. السوائل الطعام املشروبات (القهوة والشاي واملاء) حجم الوجبة الطاقة (واط) مدة الطهي (بالدقيقة) 250مل (كوب خزفي واحد) 500مل (كوبان) 900 2 -1.5 3.5 - 3 مدة االنتظار (بالدقيقة) 2-1 تصب املشروبات في األكواب وتُسخن دون غطاء :كوب في املنتصف ،وكوبان جن ًبا إلى جنب .تترك في فرن امليكروويف أثناء مدة االنتظار وتُقلب جي ًدا. احلساء (بارد) جراما 250 ً جراما 450 ً 900 4-3 5-4 3-2 يصب في طبق خزفي عميق أو سلطانية خزفية .قم بتغطيته بغطاء بالستيكي .يقلب جي ًدا بعد إعادة التسخني .ثم يُقلب مرة أخرى قبل التقدمي. اليخني (بارد) جراما 450 ً 600 6.5-5.5 3-2 يكذ بولسأب يهطلا ضع اليخني في طبق خزفي عميق .قم بتغطيته بغطاء بالستيكي .قم بالتقليب من حني آلخر أثناء إعادة التسخني ومرة أخرى قبل مدة االنتظار والتقدمي. املعجنات بالصلصة (مثلجة) جراما 350 ً 600 5.5-4.5 3 ضع املعجنات (املكرونة اإلسباجتي أو نودلز البيض) في طبق خزفي مسطح .ثم قم بتغطيتها بطبقة من ورق امليكروويف احلراري .قم بالتقليب قبل التقدمي. املعجنات احملشوة مع الصلصة (مثلجة) الوجبات املغلفة (مثلجة) جراما 350 ً 600 6.5-5.5 3 ضع املعجنات احملشوة (على سبيل املثال ،رافيولي ،تورتليني) في طبق خزفي عميق .قم بتغطيته بغطاء بالستيكي .قم بالتقليب من حني آلخر أثناء إعادة التسخني ومرة أخرى قبل مدة االنتظار والتقدمي. جراما 450 ً 600 7-6 3 ضع وجبة مكونة من مكونني أو ثالث مكونات باردة في طبق خزفي .قم بالتغطية بطبقة من ورق امليكروويف احلراري. 48 ةيبرعلا 4/3/2015 4:29:38 PM MC35J8088CT_SG_DE68-04321B-00_AR.indd 48 أطعمة األطفال واللنب الطعام طعام األطفال (خضراوات +حلم) طعام األطفال (حبوب +لنب +فاكهة) لنب األطفال حجم الوجبة الطاقة (واط) مدة الطهي (بالثانية) مدة االنتظار (بالدقيقة) جراما 190 ً 600 30 3-2 ضع املكونات في طبق خزفي عميق .يرجى تغطية اإلناء .وقم بالتقليب بعد مدة الطهي .انتظر ملدة من دقيقتني إلى 3دقائق .قلب جي ًدا وتأكد من درجة احلرارة بعناية قبل التقدمي. جراما 190 ً 600 20 3-2 ضع املكونات في طبق خزفي عميق .يرجى تغطية اإلناء .وقم بالتقليب بعد مدة الطهي .انتظر ملدة من دقيقتني إلى 3دقائق .قلب جي ًدا وتأكد من درجة احلرارة بعناية قبل التقدمي. 100مللي 200مل 300 40-30 70-60 3-2 قلب اللنب أو رجه جيدا ً ثم صبه في زجاجة معقمة .ضع الزجاجة في وسط الصينية الدوارة .ال تضع الغطاء أثناء الطهي .يُرج جي ًدا ويترك ملدة 3دقائق على األقل .رجه جي ًدا وتأكد من درجة احلرارة بعناية قبل التقدمي. يكذ بولسأب يهطلا ةيبرعلا 4/3/2015 4:29:39 PM 49 MC35J8088CT_SG_DE68-04321B-00_AR.indd 49 يكذ بولسأب يهطلا فك التجميد ضع الطعام اجملمد في إناء مسموح باستخدامه في امليكروويف دون غطاء .اقلب الطعام أثناء فك التجميد ،ثم قم بتصريف السوائل وتفريغ احملتويات بعد فك التجميد .قطع الطعام إلى شرائح صغيرة ،ثم لف الشرائح بورق األلومنيوم قبل فك التجميد ،وذلك لتسريع وتيرة فك التجميد. وعندما تبدأ الطبقة اخلارجية من األطعمة اجملمدة في الذوبان ،قم بإيقاف فك التجميد ،ثم انتظر كما هو مبني في اجلدول أدناه. ال تقم بتغيير مستوى الطاقة االفتراضي ( 180واط) لفك التجميد. الطعام اللحوم اللحم املفروم حجم الوجبة (جم) مدة فك التجميد (بالدقيقة) 250 500 6-4 11-9 مدة االنتظار (بالدقيقة) 30-15 ضع اللحم على طبق خزفي .قم بحماية احلواف الرفيعة بورق األملونيوم .اقلبها بعد مرور نصف الوقت اخملصص إلذابة التجميد! الدواجن قطع الدجاج ( 500قطعتان) 14-12 دجاجة كاملة 1200 32-28 60-15 ضع قطع الدجاج مع وضع الناحية التي بها اجللد ألسفل ،أو الدجاجة الكاملة مع وضع ناحية الصدر ألسفل في طبق خزفي .قم بحماية األجزاء الرفيعة مثل األجنحة واألطراف بورق األملونيوم .اقلبها بعد مرور نصف الوقت اخملصص إلذابة التجميد! السمك شرائح السمك الفيليه 200 7-6 سمكة كاملة 400 13-11 25-10 ضع السمك اجملمد في وسط طبق خزفي .ضع األجزاء الرفيعة أسفل األجزاء السميكة .قم بحماية الرقائق الرفيعة من شرائح السمك وذيل السمك الكامل بورق األلومنيوم .اقلبها بعد مرور نصف الوقت اخملصص إلذابة التجميد! يكذ بولسأب يهطلا الفاكهة التوت 300 7-6 10-5 قم بتوزيع الفاكهة على طبق زجاجي دائري مسطح (ذو قطر كبير). اخلبز 2قطع 4قطع 1.5-1 3-2.5 أرغفة اخلبز جراما) 50 حوالي (كل رغيف ً التوست /الشطائر 250 4.5-4 اخلبز األملاني 500 9-7 20-5 أفقيا على ورق املطبخ في وسط الطبق اخلزفي .اقلبها بعد مرور نصف الوقت اخملصص إلذابة ضع األرغفة على شكل دائرة أو ً التجميد! 50 ةيبرعلا 4/3/2015 4:29:39 PM MC35J8088CT_SG_DE68-04321B-00_AR.indd 50 دليل الشي توجد أجزاء التسخني اخلاصة بالشواية فوق سقف حجيرة الفرن .وهي تعمل فقط عند غلق الباب ودوران الصينية الدوارة. ص باتباع أي إرشادات أخرى. عند شي الطعام ،ضع الطعام على احلامل العلوي ،ما لم يو َ ص باتباع أي قم بتسخني الشواية مسبقً ا ملدة من دقيقتني إلى 3دقائق من خالل وضع الشواية ،ثم قم بشي الطعام على احلامل العلوي ،مالم يو َ إرشادات أخرى .بعد اكتمال الشي ،استخدم قفازات الفرن إلخراج الطعام. أوعية الطهي الشواية :استخدم أواني غير قابلة لالشتعال ،وهي التي رمبا حتتوي على أجزاء معدنية .ال تستخدم أوعية الطهي البالستيكية من أي نوع. ميكروويف +شواية :ال تستخدم أوعية الطهي املصنوعة من مواد معدنية أو بالستيكية. نوع الطعام ريش الضأن والسجق وشرائح اللحم والهامبرجر وشرائح اللحم املقدد وحلم الفخذ وشرائح السمك الرفيعة والشطائر وجميع أنواع التوست الذي يعلوه إضافات. عملية الشواء الطعام شرائح التوست حجم الوجبة الوضع مدة الطهي (اجلانب األول) (بالدقيقة) مدة الطهي (اجلانب الثاني) (بالدقيقة) 4قطع جراما) 25 (كل قطعة ً الشواية فقط 4.5-3.5 2.5-2 ضع شرائح التوست جن ًبا إلى جنب على الرف العلوي. الطماطم املشوية قطعتان ( 400جرام) 300واط +الشواية 7-6 - طماطم +توست اجلنب 4قطع ( 300جرام) 180واط +الشواية 6-5 يكذ بولسأب يهطلا قطع الطماطم إلى أنصاف .ضع فوقها بعضا ً من اجلنب .ضعها على شكل دائرة في طبق بايركس مسطح. ّ ثم ضعه على الرف العلوي .انتظر ملدة من دقيقتني إلى 3دقائق. - قم بتحميص شرائح اخلبز أوالً .ضع التوست املغطى باإلضافات على الرف العلوي .يترك ملدة دقيقتني إلى 3 دقائق خبز توست هاواي 4قطع ( 500جرام) 300واط +الشواية 6-5 - قم بتحميص شرائح اخلبز أوالً .ضع التوست املغطى باإلضافات على الرف العلوي .انتظر ملدة من دقيقتني إلى 3دقائق. البطاطس املشوية 500جرام 450واط +شوي 16-14 - قطع البطاطس إلى أنصاف .ادهن البطاطس بالزيت والبقدونس .ضعها على هيئة دائرة على الرف العلوي على أن توضع الناحية املقطوعة على الشواية. ةيبرعلا 4/3/2015 4:29:39 PM 51 MC35J8088CT_SG_DE68-04321B-00_AR.indd 51 يكذ بولسأب يهطلا الطعام التفاح اخملبوز حجم الوجبة الوضع مدة الطهي (اجلانب األول) (بالدقيقة) مدة الطهي (اجلانب الثاني) (بالدقيقة) 2ثمرات تفاح 300واط +الشواية 7-6 - بعضا من شرائح اللوز على سطحها .ضع ثمرات انزع لُب ثمرات التفاح وقم بحشوها بالزبيب واملربى .ضع ً التفاح في طبق ُمسطح من البايركس .ثم ضع الطبق مباشرةً على الرف السفلي. الدجاج املشوي 1300 - 1200جرام 450واط +شوي 24-20 23-19 بقليل من الزيت والتوابل .ضع الدجاجة على جنبها بحيث يكون أحد جانبي صدر الدجاجة إلى ادهن الدجاجة ٍ أسفل واآلخر على الرف السفلي .بعد الطهي ،اتركها ملدة 5دقائق. قطع الدجاج 500جرام (قطعتان) 300واط +الشواية 10-8 11-9 ادهن قطع الدجاج بقليل من الزيت والتوابل .ضعها على شكل دائرة على الرف العلوي .بعد اكتمال الشواء اتركه ملدة دقيقتني إلى 3دقائق. شرائح اللحم البقري (متوسط) 400جرام (قطعتان) الشواية فقط 10-6 12-8 قم مبسح شرائح اللحم البقري بالزيت .ضعها على شكل دائرة على احلامل العلوي .بعد اكتمال الشواء اتركه ملدة دقيقتني إلى 3دقائق. األسماك املشوية 500 - 400جرام 300واط +الشواية 6.5-5.5 8-6 يكذ بولسأب يهطلا ادهن السمك بالكامل بقليل من الزيت مع إضافة األعشاب والتوابل .ضع السمكتني إلى جانب بعضهما (في اجتاه عكسي) على احلامل العلوي .بعد اكتمال الشواء اتركه ملدة دقيقتني إلى 3دقائق. طبق التحمير يوصى بتسخني طبق التحمير مسبقً ا عندما يكون على الصينية الدوارة ملدة من 3إلى 4دقائق. التسخني املسبق الطعام اللحم املقدد حجم الوجبة (جم) 6 - 4( 80شرائح) الطهي الوضع الوقت (بالدقيقة) 600وات + الشواية 3 الشواية واحلمل احلراري 600وات + الشواية الوقت (بالدقيقة) 4-3 قم بتسخني طبق التحمير أوالً .ضع الشرائح جن ًبا إلى جنب على طبق التحمير .ضع الطبق على احلامل العلوي. 52 ةيبرعلا 4/3/2015 4:29:39 PM MC35J8088CT_SG_DE68-04321B-00_AR.indd 52 التسخني املسبق الطعام الطماطم املشوية حجم الوجبة (جم) 200 الطهي الوضع الوقت (بالدقيقة) 600وات + الشواية 3 الشواية واحلمل احلراري 300واط + الشواية الوقت (بالدقيقة) 4.5-3.5 قم بتسخني طبق التحمير أوالً .قطع الطماطم إلى أنصاف .ضع فوقها بعضا ً من اجلنب .ضع الطماطم على شكل دائرة على الطبق وضعه على احلامل العلوي. قطع البطاطس 250 600وات + الشواية 4 450واط +شوي 10-8 اشطف البطاطس وقم بتنظيفها .قّطعها إلى قطع أو مكعبات .أضف إليها زيت الزيتون واألعشاب والتوابل. وزع املكعبات بشكل متساو على الطبق .ضع الطبق على احلامل العلوي .قم بالتقليب بعد مرور 5إلى 7دقائق. قطع دجاج الناجتس 300 600وات + الشواية 4 600وات + الشواية 8-6 قم بتسخني طبق التحمير أوالً .امسح الطبق مبعلقة كبيرة من الزيت .ضع قطع الدجاج في طبق التحمير .ضع الطبق على احلامل العلوي .قم بالتقليب بعد مرور 4إلى 5دقائق. يكذ بولسأب يهطلا ةيبرعلا 4/3/2015 4:29:39 PM 53 MC35J8088CT_SG_DE68-04321B-00_AR.indd 53 يكذ بولسأب يهطلا دليل الهواء الساخن يعد الطهي بالهواء الساخن اندما ًجا قويًا جلزء التسخني اخلاص بالشواية الداخلية وجزء التسخني اخلاص بحلقة النقل احلراري واملروحة على اجلانب .ينتقل الهواء الساخن من أعلى التجويف إلى الفرن من خالل الفتحات .ويعمل جزء التسخني املوجود باجلزء العلوي وعلى اجلانب ،واملروحة املوجودة باجلدار اجلانبي ،على مترير الهواء الساخن بالتساوي. استخدم هذا الوضع لتحضير جميع أنواع البسكويت والكعك واخلبز وكعك الفاكهة وعجينة الشو والسوفليه. ميكنك استخدام جميع أدوات الطهي وأوراق التغليف -أي شيء ميكنك استخدامه مع فرن الطهي باحلمل احلراري التقليدي. الطعام وجبات البيتزا اخلفيفة/التورتات الصغيرة اجملمدة شرائح البطاطس اجملمدة اخملصصة للطهي في الفرن قطع الدجاج اجملمدة حجم الوجبة (جم) الوضع (درجة مئوية) مدة الطهي (بالدقيقة) 250 200 12-9 ضع وجبات البيتزا اخلفيفة على طبق التحمير .ضع الطبق على الرف السفلي. 300 200 16-13 وزع رقائق البطاطس اجملمدة اخملصصة للطهي في الفرن على طبق التحمير .ضع الطبق على الرف السفلي. 300 200 9-6 ضع القطع اجملمدة على طبق التحمير .ضع الطبق على احلامل العلوي. البيتزا اجملمدة 300 200 15-13 ضع البيتزا اجملمدة على احلامل السفلي. املعجنات احملمصة/الالزانيا املنزلية 500 180 30-25 ضع املعجنات في طبق مسموح باستخدامه في الفرن .ثم ضع الطبق على الرف السفلي. يكذ بولسأب يهطلا اخلضروات املشوية 300 200 10-6 اشطف اخلضروات ،وقم بتحضيرها في شكل شرائح (على سبيل املثال ،الكوسا والباذجنان والفلفل والقرع) .وادهنها بزيت الزيتون ،ثم أضف التوابل .بعد ذلك ،ضعها في طبق التحمير على احلامل السفلي. 54 ةيبرعلا 4/3/2015 4:29:39 PM MC35J8088CT_SG_DE68-04321B-00_AR.indd 54 دليل احلمل احلراري النقل احلراري معا على تدوير احلرارة داخل حجيرة الفرن .استخدم هذا الوضع في وضع النقل احلراري ،يعمل جزء التسخني واملروحة املوجودة باجلدار اجلانبي ً لتحضير جميع أنواع البسكويت والكعك واخلبز وكعك الفاكهة وعجينة الشو والسوفليه .ميكنك استخدام جميع أدوات الطهي وأوراق التغليف أي شيء ميكنك استخدامه مع فرن الطهي باحلمل احلراري التقليدي.امليكروويف +النقل احلراري يجمع هذا الوضع بني طاقة امليكروويف والهواء الساخن ،مما يؤدي إلى تقليص مدة الطهي ،وإنتاج طعام بطبقة سطحية محمرة هشة .ويوفر الفرن 5أوضاع جمع مختلفة من أجل راحتك .استخدم هذا الوضع مع جميع أنواع اللحوم والدواجن باإلضافة إلى الطواجن وأطباق احملمصات والكيك اإلسفنجي وكعك الفاكهة اخلفيف والفطائر واخلضراوات احملمصة واخلبز .ال تستخدم سوى أوعية الطهي القابلة لالستخدام داخل الفرن مثل األوعية الزجاجية أو اخلزفية أو الصينية غير املزينة بزخارف معدنية. قم بتسخني الشواية مسبقً ا من خالل وضع التسخني املسبق السريع ،ثم انتظر حتى تكتمل الدورة .اضبط مستوى الطاقة ومدة الطهي على النحو املبني أدناه .استخدم قفازات الفرن أثناء إخراج الطعام منه. الطعام بيتزا مجمدة (مخبوزة) حجم الوجبة (جم) الشواية واحلمل احلراري مدة الطهي (بالدقيقة) 400-300 200درجة مئوية فقط 17-15 ضع البيتزا على الرف السفلي .بعد اخلبز اتركها ملدة دقيقتني إلى 3دقائق الالزانيا اجملمدة 400 450واط 200 +درجة مئوية 18-16 ضع املعجنات في طبق بيركس زجاجي مناسب احلجم أو اتركها في تغليفها األصلي (مع التأكد من أن التغليف يناسب حرارة أشعة امليكروويف والفرن) .ضع الالزانيا اجملمدة على احلامل السفلي .بعد الطهي ،انتظر ملدة من دقيقتني إلى 3دقائق. يكذ بولسأب يهطلا اللحم البقري/حلم الضأن املشوي (متوسط) 1200-1000 450واط 160 +درجة مئوية ( 20 - 18اجلانب األول) ( 17 - 15اجلانب الثاني) ادهن اللحم البقري/حلم الضأن بالزيت والتوابل ،الفلفل وامللح والفلفل احللو .ضع اللحم على الرف السفلي ،ولكن في البداية ضع اجلزء السمني لألسفل .بعد الطهي ،لف اللحم في ورق األلومنيوم ،ثم انتظر ملدة من 10إلى 15دقيقة. أرغفة اخلبز اجملمدة 6( 350قطع) 100واط 160 +درجة مئوية 8-6 ضع أرغفة اخلبز على شكل دائرة على الرف السفلي .اتركها ملدة دقيقتني إلى 3دقائق. ماربل كيك 700 180درجة مئوية فقط 80-70 ضع العجينة الطازجة في طبق خبيز معدني أسود مستطيل صغير (طوله حوالي 25سم) .ضع الطبق على احلامل السفلي .بعد اخلبز اتركه ملدة 5إلى 10دقائق. ةيبرعلا 4/3/2015 4:29:39 PM 55 MC35J8088CT_SG_DE68-04321B-00_AR.indd 55 يكذ بولسأب يهطلا الطعام قطع كيك صغيرة حجم الوجبة (جم) الشواية واحلمل احلراري مدة الطهي (بالدقيقة) جراما كل 30 ً 165درجة مئوية فقط 35-25 ضع من 12إلى 15كعكة صغيرة/كعكة مافن تقري ًبا في أكواب ورقية على طبق التحمير .ضع الطبق على الرف السفلي .بعد اخلبز اتركه ملدة 5دقائق. الكرواسون/أرغفة اخلبز (عجينة طازجة) الكيك اجملمد 250-200 200درجة مئوية فقط 18-13 ضع الكرواسون املثلج أو أرغفة اخلبز على ورق اخلبز على احلامل السفلي. 1000 180واط 160 +درجة مئوية 18-16 ضع الكيك اجملمد على الرف السفلي مباشرة .بعد فك التجميد ،اتركها لتدفأ ملدة تتراوح بني 15إلى 20دقيقة. البطاطس احملمصة املنزلية 500 600واط 180 +درجة مئوية ( 7 - 5اجلانب األول) ( 16 - 12اجلانب الثاني) ضع احملمصات في طبق مسموح باستخدامه في الفرن .ضع الطبق على احلامل السفلي. فطائر الكيش املنزلية (احلجم املتوسط) فطائر الكيش املنزلية (احلجم الكبير) يكذ بولسأب يهطلا 56 600-500 170درجة مئوية 42-40 قم بتسخني الفرن مسبقً ا عند 170درجة مئوية باستخدام وضع النقل احلراري .قم بتحضير فطائر الكيش باستخدام وعاء معدني متوسط احلجم ،ثم ضعه على احلامل السفلي .راجع الوصفة املذكورة في دليل الطهي بالهواء الساخن التلقائي. 1000-900 180واط 170 +درجة مئوية 40-38 قم بتسخني الفرن مسبقً ا عند 170درجة مئوية من خالل وضع النقل احلراري دون استخدام طبق التحمير .قم بتحضير فطائر الكيش باستخدام طبق التحمير ،ثم ضعه على احلامل السفلي .راجع الوصفة املذكورة في دليل الطهي بالهواء الساخن التلقائي . ةيبرعلا 4/3/2015 4:29:39 PM MC35J8088CT_SG_DE68-04321B-00_AR.indd 56 سريع وسهل الزبد الذائب ضع 50جرام من الزبد في طبق زجاجي عميق صغير .قم بتغطيته بغطاء بالستيكي .ثم قم بالتسخني ملدة من 30إلى 40ثانية باستخدام طاقة تبلغ 900واط حتى تتم إذابة الزبد. الشوكوالتة الذائبة ضع 100جرام من الشوكوالته في طبق زجاجي عميق صغير .ثم قم بالتسخني ملدة من 3إلى 5دقائق ،باستخدام طاقة تبلغ 450واط، حتى تتم إذابة الشوكوالتة .قم بتقليب الشوكوالتة مرة أو مرتني أثناء الذوبان .استخدم قفازات الفرن أثناء إخراجها! إذابة العسل اجملمد جراما من العسل اجملمد في طبق زجاجي عميق صغير .قم ضع 20 ً بتسخينه ملدة من 20إلى 30ثانية باستخدام طاقة تبلغ 300واط، حتى تتم إذابة العسل. إذابة اجليالتني ضع أوراق اجليالتني اجلافة ( 10جرام) ملدة 5دقائق في املاء البارد .ضع اجليالتني الذي مت جتفيفه في وعاء بايركس صغير .قم بالتسخني ملدة دقيقة واحدة باستخدام طاقة تصل إلى 300واط .قم بالتقليب بعد اإلذابة. إعداد املربى ضع 600جم من الفاكهة (على سبيل املثال توت مشكل) في وعاء زجاجي مناسب من البيركس له غطاء .أضف 300جرام من السكر وقم بالتقليب جي ًدا .قم بتغطيته أثناء الطهي ملدة 10إلى 12دقيقة باستخدام طاقة مقدارها 900واط ،وقم بتقليبه عدة مرات أثناء الطهي .ضعها مباشرة في برطمانات مربى زجاجية صغيرة احلجم لها غطاء محكم .واتركها مغطاة ملدة 5دقائق. إعداد البودجن يقلب مسحوق البودجن مع السكر واللنب ( 500مل) مع اتباع تعليمات الشركات املصنعة والتقليب اجليد .استخدم وعا ًء مصنوعًا من زجاج البيركس بحجم مناسب وله غطاء .قم بتغطيته أثناء الطهي ملدة 7.5 -6.5دقيقة باستخدام طاقة تبلغ 900وات .ثم قم بتقليبه عدة مرات أثناء الطهي. حتميص قطع اللوز ضع 30جرام من اللوز املقطع بالتساوي في طبق خزفي متوسط احلجم .قم بتقليبه عدة مرات أثناء التحميص ملدة 3.5إلى 4.5دقيقة باستخدام طاقة مقدارها 600وات .واتركها ملدة 3-2دقيقة في الفرن. استخدم قفازات الفرن أثناء إخراجها! يكذ بولسأب يهطلا عمل اجليلي /الغطاء الثلجي (للكعك واجلاتوه) قلب اجليلي السريع التحضير (تقريبا ً 14جرام) مع 40جرام من السكر و 250مللي من املاء البارد. ضعه في إناء بيركس بدون غطاء ملدة تتراوح من 3.5إلى 4.5دقيقة باستخدام طاقة تبلغ 900واط حتى يصبح لون اجليلي /الغطاء اجلليدي شفافًا .قم بتقليبه مرتني أثناء الطهي. ةيبرعلا 4/3/2015 4:29:39 PM 57 MC35J8088CT_SG_DE68-04321B-00_AR.indd 57 استكشاف املشكالت وحلها رمبا تواجهك مشكلة عند استخدام الفرن .وفي هذه احلالة ,يجب أوال ً التحقق من اجلدول التالي وجتربة االقتراحات الواردة فيه .في حالة استمرار املشكلة ،أو في حالة استمرار ظهور أي رمز معلومات على الشاشة ،اتصل مبركز خدمة Samsungاحمللي. تعليمات الفحص إذا واجهتك مشكلة أثناء استخدام الفرن ,يجب أوال ً التحقق من اجلدول التالي وجتربة االقتراحات. السبب املشكلة اإلجراء الذي يجب اتخاذه عام تعذر الضغط على األزرار بسهولة. ال يتم عرض الوقت. الفرن ال يعمل. لحو تالكشملا فاشكتسا يتوقف الفرن عن العمل أثناء تشغيله. 58 احتمال تعلق مواد غريبة بني األزرار. إزالة املواد الغريبة ،ثم احملاولة مرة أخرى. بالطرُز التي تعمل باللمس :تصبح فيما يتعلق ُ الرطوبة على اجلزء اخلارجي. امسح الرطوبة من اجلزء اخلارجي. تنشيط التأمني ضد عبث األطفال. قم بإلغاء تنشيط التأمني ضد عبث األطفال. ال يوجد تيار كهربائي. تأكد من توصيل مصدر تيار كهربي. ضبط الوظيفة توفير الطاقة. قم بإيقاف تشغيل الوظيفة توفير الطاقة. ال يوجد تيار كهربائي. تأكد من توصيل مصدر تيار كهربي. الباب مفتوح. أغلق الباب ثم حاول مرة أخرى. تعلق مواد غريبة بأجزاء أمان فتح الباب. إزالة املواد الغريبة ،ثم احملاولة مرة أخرى. قام املستخدم بفتح الباب لتقليب الطعام. بعد االنتهاء من تقليب الطعام ،اضغط على الزر تشغيل مرة أخرى لبدء التشغيل. ةيبرعلا 4/3/2015 4:29:39 PM MC35J8088CT_SG_DE68-04321B-00_AR.indd 58 املشكلة إيقاف تشغيل الطاقة أثناء التشغيل. السبب اإلجراء الذي يجب اتخاذه مروحة التبريد ال تعمل. استمع لصوت مروحة التبريد. محاولة تشغيل الفرن بدون وضع الطعام بداخله. ضع الطعام في الفرن. ال توجد مساحة تهوية كافية للفرن. توجد منافذ إدخال/إخراج للهواء في اجلزئني األمامي واخللفي من الفرن للتهوية. لذا ،حافظ على املسافات احملددة في دليل تركيب املنتج. يتم استخدام العديد من مقابس الطاقة في مأخذ احلائط نفسه. خصص مأخذ حائط واح ًدا فقط الستخدامه مع الفرن. ال يوجد تيار كهربائي متصال ً بالفرن. ال يوجد تيار كهربائي. تأكد من توصيل مصدر تيار كهربي. سماع صوت "فرقعة" أثناء التشغيل ،والفرن ال يعمل. طهو أطعمة معلبة ،أو استخدام إناء بغطاء يصدر أصوات فرقعة. ال تستخدم احلاويات املغلقة؛ حيث إنها قد تنفجر أثناء الطهي نتيجة متدد احملتويات بداخلها. األجزاء اخلارجية للفرن ساخنة ج ًدا أثناء التشغيل. ال توجد مساحة تهوية كافية للفرن .توجد منافذ إدخال/إخراج للهواء في اجلزئني األمامي واخللفي من الفرن للتهوية. لذا ،حافظ على املسافات احملددة في دليل تركيب املنتج. وجود أغراض أعلى الفرن. قم بإزالة جميع األغراض املوجودة فوق الفرن. ةيبرعلا 4/3/2015 4:29:39 PM لحو تالكشملا فاشكتسا استمرار الفرن في الطهي لفترة طويلة ج ًدا. بعد االنتهاء من الطهي لفترة زمنية طويلة ،اترك الفرن حتى يبرد. 59 MC35J8088CT_SG_DE68-04321B-00_AR.indd 59 لحو تالكشملا فاشكتسا املشكلة لحو تالكشملا فاشكتسا 60 السبب اإلجراء الذي يجب اتخاذه تعذر فتح الباب بسهولة. تعلق بقايا الطعام بني الباب واألجزاء الداخلية من الفرن. نظِّ ف الفرن ثم افتح الباب. الفرن ال يقوم بالتسخني. الفرن ال يعمل ،أو إنه يتم طهو كمية طعام كبيرة، أو إنه يتم استخدام أدوات طهي غير مناسبة. ضع كوب ماء واح ًدا في إناء مسموح باستخدامه مع امليكروويف ،وشغِّل امليكروويف ملدة دقيقة أو دقيقتني للتحقق مما إذا مت تسخني املاء أم ال. قلل من مقدار الطعام ،وابدأ التشغيل مرة أخرى. مستو. استخدم إناء طهي بقاع ٍ التسخني ضعيف أو بطيء. الفرن ال يعمل ،أو إنه يتم طهو كمية طعام كبيرة، أو إنه يتم استخدام أدوات طهي غير مناسبة. ضع كوب ماء واح ًدا في إناء مسموح باستخدامه مع امليكروويف ،وشغِّل امليكروويف ملدة دقيقة أو دقيقتني للتحقق مما إذا مت تسخني املاء أم ال. قلل من مقدار الطعام ،وابدأ التشغيل مرة أخرى. مستو. استخدم إناء طهي بقاع ٍ وظيفة التدفئة ال تعمل. الفرن ال يعمل ،أو إنه يتم طهو كمية طعام كبيرة، أو إنه يتم استخدام أدوات طهي غير مناسبة. ضع كوب ماء واح ًدا في إناء مسموح باستخدامه مع امليكروويف ،وشغِّل امليكروويف ملدة دقيقة أو دقيقتني للتحقق مما إذا مت تسخني املاء أم ال. قلل من مقدار الطعام ،وابدأ التشغيل مرة أخرى. مستو. استخدم إناء طهي بقاع ٍ وظيفة فك التجميد ال تعمل. الفرن ال يعمل ،أو إنه يتم طهو كمية طعام كبيرة، أو إنه يتم استخدام أدوات طهي غير مناسبة. ضع كوب ماء واح ًدا في إناء مسموح باستخدامه مع امليكروويف ،وشغِّل امليكروويف ملدة دقيقة أو دقيقتني للتحقق مما إذا مت تسخني املاء أم ال. قلل من مقدار الطعام ،وابدأ التشغيل مرة أخرى. مستو. استخدم إناء طهي بقاع ٍ ةيبرعلا 4/3/2015 4:29:39 PM MC35J8088CT_SG_DE68-04321B-00_AR.indd 60 املشكلة املصباح الداخلي قامت أو ال يعمل. السبب اإلجراء الذي يجب اتخاذه رمبا يكون املصباح الداخلي مغطى مبواد غريبة. نظِّ ف الفرن من الداخل ،وافحص املصباح مرة أخرى. حدوث صوت تنبيه أثناء الطهي. في حالة استخدام الوظيفة الطهي التلقائي، فهذا يشير إلى أن صوت التنبيه يعني أنه قد حان وقت تقليب الطعام أثناء فك التجميد. بعد االنتهاء من تقليب الطعام ،اضغط على الزر تشغيل مرة أخرى إلعادة التشغيل. مستو الفرن غير ٍ مستو. مت تثبيت الفرن على سطح غير ٍ مستو وثابت. تأكد من تثبيت الفرن على سطح ٍ تولد شرر أثناء الطهي. استخدام األواني املعدنية أثناء وظيفتي الفرن/فك التجميد. ال تستخدم األواني املعدنية. عند توصيل التيار الكهربائي، يبدأ الفرن في العمل فورًا. لم يتم إغالق الباب جي ًدا. أغلق الباب ثم حتقق من األمر مرة أخرى. الكهرباء تخرج من الفرن. لم يتم تأريض سلك التيار الكهربائي أو مقبس الطاقة بشكل سليم. تأكد من تأريض سلك التيار الكهربائي أو مقبس الطاقة بشكل سليم. تساقط املاء. رمبا يحتوي الطعام في بعض األحيان على ماء أو بخار. هذا ليس قصورًا في وظيفة الفرن. اترك الفرن حتى يبرد ،ثم امسحه مبنشفة أطباق جافة. ةيبرعلا 4/3/2015 4:29:39 PM لحو تالكشملا فاشكتسا ترك الباب مفتو ًحا لفترة طويلة. تلقائيا قد يتم إيقاف تشغيل املصباح الداخلي ً عندما يتم تشغيل الوظيفة توفير الطاقة. أغلق الباب ثم أعد فتحه ،أو اضغط على الزر "إلغاء". 61 MC35J8088CT_SG_DE68-04321B-00_AR.indd 61 لحو تالكشملا فاشكتسا املشكلة السبب اإلجراء الذي يجب اتخاذه البخار يتسرب من الباب. رمبا يحتوي الطعام في بعض األحيان على ماء أو بخار. هذا ليس قصورًا في وظيفة الفرن. اترك الفرن حتى يبرد ،ثم امسحه مبنشفة أطباق جافة. يوجد ماء داخل الفرن. رمبا يحتوي الطعام في بعض األحيان على ماء أو بخار. هذا ليس قصورًا في وظيفة الفرن. اترك الفرن حتى يبرد ،ثم امسحه مبنشفة أطباق جافة. تختلف مستويات السطوع داخل الفرن. تختلف مستويات السطوع حسب تغيير مقدار خرج الطاقة وفقً ا للوظيفة. تغير مقدار خرج الطاقة أثناء الطهي ليس عي ًبا. هذا ليس قصورًا في وظيفة الفرن. بعد االنتهاء من الطهي ال تزال مروحة التبريد قيد التشغيل. لتهوية الفرن ،تستمر مروحة التبريد في العمل بعد اكتمال الطهي بحوالي 5دقائق. هذا ليس قصورًا في وظيفة الفرن. يؤدي الضغط على الزر30sec+ ( 30+ثانية) إلى تشغيل الفرن. حتدث هذه احلالة عندما ال يعمل الفرن. مت تصميم فرن امليكروويف ليتم تشغيله عن طريق الضغط على الزر 30s+( 30 +ثانية) عندما ال يعمل. الصينية الدوارة لحو تالكشملا فاشكتسا 62 أثناء الدوران ،تخرج الصينية الدوارة عن مكانها ،أو أنها تتوقف عن الدوران. ال توجد حلقة دوارة ،أو أنها غير مثبتة جي ًدا في مكانها. ثبِّت احللقة الدوارة ،ثم جرّب مرة أخرى. الصينية الدوارة يتم سحبها أثناء الدوران. احللقة الدوارة ليست مثبتة جي ًدا في مكانها ،أو أن هناك الكثير من الطعام ،أو أن اإلناء كبير احلجم ويالمس اجلزء الداخلي للميكروويف. اضبط كمية الطعام ،وال تستخدم األواني كبيرة احلجم. الصينية الدوارة تهتز أثناء دورانها وتصدر ضوضاء. بقايا الطعام عالقة في قاع الفرن. قم بإزالة بقايا الطعام العالقة في قاع الفرن. ةيبرعلا 4/3/2015 4:29:39 PM MC35J8088CT_SG_DE68-04321B-00_AR.indd 62 السبب املشكلة اإلجراء الذي يجب اتخاذه الشواية يتصاعد الدخان أثناء التشغيل. أثناء التشغيل املسبق ،قد يتصاعد دخان من عناصر التسخني عند تشغيل الفرن ألول مرة. هذا ليس عي ًبا في الفرن ،وإذا كررت تشغيل الفرن ملرتني أو ثالث مرات ،فسيتوقف تصاعد الدخان. مالمسة الطعام لعناصر التسخني . اترك الفرن حتى يبرد ،ثم قم بإزالة الطعام من عناصر التسخني. الطعام قريب ج ًدا من الشواية. ضع الطعام على بُعد مسافة مناسبة أثناء الطهي. لم يتم حتضير الطعام أو تنظيمه بشكل جيد. تأكد من حتضير الطعام أو تنظيمه بشكل جيد. الفرن يتصاعد الدخان أثناء التسخني املسبق. أثناء التشغيل املسبق ،قد يتصاعد دخان من عناصر التسخني عند تشغيل الفرن ألول مرة. هذا ليس عي ًبا في الفرن ،وإذا كررت تشغيل الفرن ملرتني أو ثالث مرات ،فسيتوقف تصاعد الدخان. مالمسة الطعام لعناصر التسخني. اترك الفرن حتى يبرد ،ثم قم بإزالة الطعام من عناصر التسخني. استخدام أدوات طهي بالستيكية أو غير مقاومة للحرارة. استخدم أدوات طهي زجاجية تالئم درجات احلرارة العالية. هناك رائحة شيء يحترق أو رائحة بالستيك عند استخدام الفرن. ةيبرعلا 4/3/2015 4:29:40 PM لحو تالكشملا فاشكتسا الفرن ال يقوم بالتسخني. الباب مفتوح. أغلق الباب ثم حاول مرة أخرى. 63 MC35J8088CT_SG_DE68-04321B-00_AR.indd 63 لحو تالكشملا فاشكتسا املشكلة السبب اإلجراء الذي يجب اتخاذه هناك رائحة سيئة قادمة من داخل الفرن. ذوبان بقايا الطعام أو البالستيك والتصاقها باألجزاء الداخلية للفرن. استخدم وظيفة البخار ،ثم امسح الفرن بقطعة قماش جافة. ميكن وضع شريحة ليمون داخل الفرن ثم تشغيله إلزالة الرائحة بسرعة شديدة. الفرن ال يطهو بشكل جيد. يتم فتح باب الفرن بشكل متكرر أثناء الطهي. ال تفتح الباب بشكل متكرر إال إذا كنت تطهو طعاما بحاجة إلى التقليب .إذا كنت تفتح الباب ً بشكل متكرر ،فستنخفض درجة احلرارة الداخلية، مما يؤثر على نتائج الطهي. عدم ضبط عناصر التحكم في الفرن بشكل صحيح. اضبط عناصر التحكم في الفرن بشكل صحيح وأعد احملاولة. لم يتم تركيب الشواية أو امللحقات األخرى بشكل صحيح. ركب امللحقات بشكل صحيح. استخدام النوع أو احلجم اخلطأ من أدوات الطهي. أعد ضبط عناصر التحكم في الفرن ،أو استخدم أدوات الطهي املناسبة ذات القاع املستوي. لحو تالكشملا فاشكتسا 64 ةيبرعلا 4/3/2015 4:29:40 PM MC35J8088CT_SG_DE68-04321B-00_AR.indd 64 رموز املعلومات إذا تعذر تشغيل الفرن ،فيمكنك مراجعة رمز املعلومات على شاشة العرض .راجع اجلدول املوضح أدناه ،ثم جرب االقتراحات الواردة فيه. الرمز C-20 الوصف مستشعر درجة احلرارة مفتوح. مستشعر درجة احلرارة قصير. C-A1 يظهر هذا الرمز إذا تعذر على الفرن استشعار الرطوبة للفتح أو الغلق ملدة دقيقة واحدة. C-F0 عدم وجود اتصال بني وحدة التحكم الدقيقة الرئيسية والفرعية C-21 يظهر هذا الرمز عندما تكون درجة حرارة الفرن مرتفعة. إذا ارتفعت درجة احلرارة عن حد درجة احلرارة أثناء تشغيل كل وضع. (استشعار احلريق) C-F2 افصل سلك التيار الكهربائي اخلاص بالفرن ،ثم اتصل مبركز خدمة Samsungاحمللي. افصل سلك التيار الكهربائي ملدة كافية حتى يبرد فرن امليكروويف ،ثم أعد تشغيله مرة أخرى. اضغط على إيقاف ( يوجد قصور في وظائف مفتاح اللمس. C-d0 اإلجراء الذي يجب اتخاذه ) للمحاولة مرة أخرى. افصل سلك التيار الكهربائي ملدة كافية للتبريد ،ثم نظف الزر( .األتربة واملاء) عند ظهور نفس املشكلة ،اتصل مبركز خدمة Samsungاحمللي. لحو تالكشملا فاشكتسا ةيبرعلا 4/3/2015 4:29:40 PM 65 MC35J8088CT_SG_DE68-04321B-00_AR.indd 65 املواصفات الفنية ينفلا تافصاوملا تسعى شركة SAMSUNGجاهدة إلى حتسني جودة منتجاتها باستمرار .لذا ،تخضع مواصفات التصميم وإرشادات املستخدم للتغيير دون إشعار مسبق. مصدر التيار الكهربي استهالك الطاقة 230فولت بتردد 50هرتز الطاقة القصوى 2950واط امليكروويف 1450واط الشواية 2250واط النقل احلراري 2500واط الهواء الساخن 2750واط الطاقة الناجتة 100وات 900/وات ()IEC - 705 تردد التشغيل 2450ميجاهرتز املاجنترون OM75P (20) طريقة التبريد محرك مروحة التبريد األبعاد (العرض × االرتفاع × العمق) الوحدة الرئيسية (بها مقبض) 470 × 404 × 528مم حجيرة الفرن 396.5 × 219 × 400مم احلجم الوزن 35لترًا الصافي 28.5كجم تقري ًبا ينفلا تافصاوملا 66 ةيبرعلا 4/3/2015 4:29:40 PM MC35J8088CT_SG_DE68-04321B-00_AR.indd 66 مالحظة MC35J8088CT_SG_DE68-04321B-00_AR.indd 67 4/3/2015 4:29:40 PM ال يغطي اتصاالت اخلدمة اخلاصة بشرح تشغيل املنتج أو تصحيح التركيب غير السليم أو تنفيذ عملياتSamsung يرجى العلم بأن ضمان .الصيانة أو التنظيف العادية لطرح األسئلة أو التعليقات؟ أو قم بزيارة موقعنا على اإلنترنت على www.samsung.com/ae/support (English) www.samsung.com/ae_ar/support (Arabic) www.samsung.com/eg/support اتصل بنا البلد 800-SAMSUNG (800 - 726 7864) U.A.E 800-SAMSUNG (800 - 726 7864) OMAN 183-CALL (183-2255) KUWAIT 8000-GSAM (8000-4726) BAHRAIN 800-CALL (800-2255) QATAR 08000-7267864 16580 EGYPT www.samsung.com/n_africa/support 021 36 11 00 ALGERIA www.samsung.com/pk/support 0800-Samsung (72678) PAKISTAN www.samsung.com/n_africa/support 80-1000-12 TUNISIA www.samsung.com/Levant/support (English) 0800-22273 06 5777444 JORDAN 18252273 SYRIA www.samsung.com/iran/support 021-8255 IRAN www.samsung.com/n_africa/support 080 100 22 55 MOROCCO www.samsung.com/sa/support www.samsung.com/sa_en/support (English) 8002474357 SAUDI ARABIA www.samsung.com/tr/support 444 77 11 TURKEY 0800-726-7864 NIGERIA www.samsung.com/africa_en/support 0800-10077 0302-200077 Ghana 8000 0077 Cote D’Ivoire www.samsung.com/africa_fr/support 800-00-0077 SENEGAL 7095-0077 CAMEROON www.samsung.com/support 0800 545 545 KENYA 0800 300 300 UGANDA 0800 755 755 / 0685 889 900 TANZANIA 9999 RWANDA 200 BURUNDI 499999 DRC 1969 SUDAN 0860 SAMSUNG (726 7864) SOUTH AFRICA 8007260000 BOTSWANA 08 197 267 864 NAMIBIA 0211 350370 ZAMBIA 23052574020 MAURITIUS 262508869 REUNION 847267864 / 827267864 MOZAMBIQUE DE68-04321B-00 MC35J8088CT_SG_DE68-04321B-00_AR.indd 68 4/3/2015 4:29:40 PM Four micro-ondes Manuel d’utilisation MC35J8088** MC35J8088CT_SG_DE68-04321B-00_FR.indd 1 4/3/2015 4:29:25 PM Table des matières Table des matières Utilisation de ce manuel d'utilisation 3 Les symboles suivants sont utilisés dans ce manuel d'utilisation : 3 Consignes de sécurité 4 Consignes de sécurité importantes 4 Installation 12 Accessoires fournis Site d'installation Plateau tournant 12 15 15 Entretien 16 Nettoyage Remplacement (réparation) Précautions contre une période prolongée de non-utilisation 16 17 17 Avant de commencer 18 Horloge Activation/désactivation du son Économie d'énergie À propos de l'énergie des micro-ondes Récipients utilisés pour la cuisson aux micro-ondes 18 19 19 20 21 Opérations 23 Tableau de commande Mode Manuel Mode Auto Fonctions spéciales 23 26 33 35 Cuisiner intelligemment 37 Cuisson automatique Cuisson manuelle Simple et rapide 37 45 57 Dépannage 58 Points à contrôler Codes d'information 58 65 Caractéristiques techniques 66 2 Français MC35J8088CT_SG_DE68-04321B-00_FR.indd 2 4/3/2015 4:29:25 PM Utilisation de ce manuel d'utilisation Les symboles suivants sont utilisés dans ce manuel d'utilisation : AVERTISSEMENT Risques ou manipulations dangereuses susceptibles d'entraîner des blessures graves, voire mortelles. ATTENTION Risques ou manipulations dangereuses susceptibles d'entraîner des blessures légères ou des dégâts matériels. REMARQUE Astuces utiles, conseils ou informations aidant les utilisateurs à manipuler l'appareil. Français 3 MC35J8088CT_SG_DE68-04321B-00_FR.indd 3 4/3/2015 4:29:26 PM Utilisation de ce manuel d'utilisation Vous venez d'acquérir un four micro-ondes SAMSUNG. Ce manuel contient de nombreux conseils et instructions sur l'utilisation de votre micro-ondes : • Consignes de sécurité • Récipients et ustensiles recommandés • Conseils utiles • Conseils de cuisson Consignes de sécurité CONSIGNES DE SÉCURITÉ IMPORTANTES Consignes de sécurité LISEZ ATTENTIVEMENT CE MANUEL ET CONSERVEZ-LE PRÉCIEUSEMENT EN VUE D'UNE CONSULTATION ULTÉRIEURE. ASSUREZ-VOUS QUE CES CONSIGNES DE SÉCURITÉ SONT RESPECTÉES À TOUT MOMENT. AVANT D'UTILISER LE FOUR, VÉRIFIEZ QUE LES INSTRUCTIONS SUIVANTES SONT SUIVIES. Fonction micro-ondes uniquement AVERTISSEMENT : si la porte ou les joints de la porte sont endommagés, le four ne doit pas être utilisé tant que ces pièces n'ont pas été réparées par une personne qualifiée. AVERTISSEMENT : il est très dangereux pour toute personne non habilitée d'effectuer des manipulations ou des réparations impliquant le démontage de l'habillage de protection contre les micro-ondes. AVERTISSEMENT : les liquides et autres aliments ne doivent pas être réchauffés dans des récipients fermés car ils risquent d'exploser. Cet appareil est destiné à une utilisation domestique uniquement et il n'est pas destiné à être utilisé : • dans l'espace cuisine réservé au personnel de magasins, bureaux ou autres environnements professionnels ; • dans les fermes ; • par les clients d'hôtels, motels et autres lieux résidentiels ; • dans les lieux de type « bed and breakfast ». AVERTISSEMENT : n'autorisez un enfant à utiliser le four sans surveillance que si vous lui avez donné les instructions appropriées lui permettant de se servir de l'appareil en toute sécurité et de comprendre les dangers qu'implique une mauvaise utilisation. 4 Français MC35J8088CT_SG_DE68-04321B-00_FR.indd 4 4/3/2015 4:29:26 PM Utilisez uniquement des ustensiles adaptés à la cuisson au four micro-ondes. Lorsque vous faites réchauffer des aliments dans des récipients en plastique ou en papier, veillez à ce que ces derniers ne s'enflamment pas. Ce four micro-ondes est prévu pour faire chauffer des aliments et des liquides. Le séchage des aliments ou de vêtements et le chauffage de compresses chauffantes, pantoufles, éponges, chiffon mouillé ou similaire peut entraîner des blessures, des flammes ou un incendie. Si de la fumée s'échappe de l'appareil (ou semble s'échapper), laissez la porte de celui-ci fermée afin d'étouffer les flammes et éteignez-le ou débranchez-le de la prise murale. AVERTISSEMENT : Si vous faites réchauffer des liquides au four à microondes, l’ébullition peut survenir à retardement. Faites donc bien attention lorsque vous sortez le récipient du four. AVERTISSEMENT : avant de consommer le contenu des biberons et des petits pots pour bébé, vérifiez-en toujours la température pour éviter tout risque de brûlure ; pour ce faire, mélangez-en le contenu ou secouez-les. Ne faites jamais réchauffer d'œufs (frais ou durs) dans leur coquille car ils risquent d'éclater, et ce même une fois le cycle de cuisson terminé. Le four doit être nettoyé régulièrement afin d'en retirer tout reste de nourriture. Français 5 MC35J8088CT_SG_DE68-04321B-00_FR.indd 5 4/3/2015 4:29:26 PM Consignes de sécurité AVERTISSEMENT : Cet appareil peut être utilisé par des enfants à partir de 8 ans et des personnes ayant des capacités physiques, sensorielles ou mentales réduites ou un manque d'expérience et de connaissance uniquement s'ils sont assistés ou si vous leur avez donné les instructions appropriées leur permettant de se servir de l'appareil en toute sécurité et de comprendre les risques encourus. Les enfants ne doivent pas jouer avec l'appareil. Le nettoyage et l'entretien de l'appareil ne doivent pas être effectués par un enfant âgé de moins de 8 ans si celui-ci est sans surveillance. Consignes de sécurité En négligeant la propreté de votre four, vous risquez d'en détériorer les surfaces et par conséquent, d'en réduire la durée de vie et de créer des situations dangereuses. Consignes de sécurité L'appareil n'est pas destiné à être installé dans un véhicule (ex. : caravane ou tout autre véhicule similaire). Cet appareil n'est pas conçu pour être utilisé par des personnes (y compris les enfants) inexpérimentées ou dont les capacités physiques, sensorielles ou mentales sont réduites, sauf si celles-ci sont sous la surveillance ou ont reçu les instructions d'utilisation appropriées de la personne responsable de leur sécurité. Les enfants ne doivent pas utiliser l'appareil sans la surveillance d'un adulte. Si le cordon d'alimentation de l'appareil est endommagé, il devra être remplacé par le fabricant, son réparateur agréé ou par toute personne qualifiée afin d'éviter tout danger. Ne tentez jamais de nettoyer le four au jet d'eau. Ce four doit être positionné dans une direction appropriée et à une hauteur permettant un accès facile à la zone intérieure et aux commandes. Avant d'utiliser votre four pour la première fois, celui-ci doit fonctionner pendant 10 minutes avec de l'eau. Si l'appareil génère un bruit anormal, une odeur de brûlé ou de la fumée, débranchez immédiatement la prise et contactez le service de dépannage le plus proche. Installez le four à micro-ondes de telle façon que la prise reste facilement accessible. Le four micro-ondes est destiné à être posé sur un comptoir ou un plan de travail (non encastrable) uniquement ; il ne doit pas être installé dans un meuble. 6 Français MC35J8088CT_SG_DE68-04321B-00_FR.indd 6 4/3/2015 4:29:26 PM Fonction du four uniquement - En option Cet appareil devient très chaud pendant son utilisation. Prenez garde à ne pas toucher les éléments chauffants situés à l'intérieur du four. AVERTISSEMENT : les parties accessibles peuvent devenir très chaudes pendant l'utilisation. Les enfants en bas âge doivent être tenus à l'écart du four. Un nettoyeur vapeur ne doit pas être utilisé. AVERTISSEMENT : Afin d'éviter tout risque d'électrocution, veillez à ce que l'appareil soit hors tension avant de procéder au remplacement de l'ampoule. N'utilisez jamais de produits abrasifs ou de grattoirs métalliques pour nettoyer la porte du four ; ils pourraient en rayer la surface et, par conséquent, casser le verre. AVERTISSEMENT : L'appareil et ses parties accessibles chauffent pendant l'utilisation. Prenez garde à ne pas toucher les éléments chauffants. Les enfants de moins de 8 ans ne doivent pas s'approcher de l'appareil s'ils sont sans surveillance. Cet appareil peut être utilisé par des enfants à partir de 8 ans et des personnes ayant des capacités physiques, sensorielles ou mentales réduites ou un manque d'expérience et de connaissance uniquement s'ils sont assistés ou si vous leur avez donné les instructions appropriées leur permettant de se servir de l'appareil en toute sécurité et de comprendre les risques encourus. Les enfants ne doivent pas jouer avec l'appareil. Le nettoyage et l'entretien de l'appareil ne doivent pas être effectués par un enfant si celui-ci est sans surveillance. Français 7 MC35J8088CT_SG_DE68-04321B-00_FR.indd 7 4/3/2015 4:29:26 PM Consignes de sécurité AVERTISSEMENT : en raison des températures élevées que le four génère, l'appareil ne doit être utilisé par des enfants que sous la surveillance d'un adulte lorsqu'il fonctionne en mode combiné. Consignes de sécurité Lors de l'utilisation du four, les surfaces accessibles peuvent devenir très chaudes. Consignes de sécurité Lors de l'utilisation du four, la porte ou la surface extérieure peut devenir chaude. Maintenez l'appareil et son cordon hors de la portée des enfants âgés de moins de 8 ans. L'appareil n'est pas conçu pour être utilisé avec une minuterie extérieure ou une télécommande. Consignes de sécurité générales AVERTISSEMENT Seul un personnel qualifié est autorisé à modifier ou réparer l'appareil. Ne faites pas chauffer de liquides ou d'autres aliments dans des récipients fermés hermétiquement pour la fonction Micro-ondes. Pour votre sécurité, ne nettoyez jamais l'appareil à l'aide d'un nettoyeur haute pression (eau ou vapeur). N'installez pas cet appareil à proximité d'un élément chauffant ou d'un produit inflammable. N'installez pas cet appareil dans un endroit humide, graisseux ou poussiéreux et veillez à ce qu'il ne soit pas exposé directement à la lumière du soleil ou à une source d'eau (eau de pluie). N'installez pas cet appareil dans un endroit susceptible de présenter des fuites de gaz, ni sur une surface qui n'est pas plane. Cet appareil doit être correctement relié à la terre en conformité aux normes locales et nationales. Retirez régulièrement toute substance étrangère (poussière ou eau) présente sur les bornes et les points de contact de la fiche d'alimentation à l'aide d'un chiffon sec. Ne tirez pas sur le cordon d'alimentation et faites en sorte de ne jamais le plier à l'excès ou poser d'objets lourds dessus. En cas de fuite de gaz (propane, GPL, etc.), aérez immédiatement la pièce sans toucher la prise d'alimentation. Ne touchez pas la fiche d'alimentation si vous avez les mains mouillées. N'éteignez pas l'appareil en débranchant le cordon d'alimentation alors qu'il est en cours de fonctionnement. 8 Français MC35J8088CT_SG_DE68-04321B-00_FR.indd 8 4/3/2015 4:29:26 PM N'insérez pas vos doigts ou de substances étrangères (ex. : eau) dans l'appareil ; si de l'eau pénètre dans l'appareil, débranchez le cordon d'alimentation et contactez votre centre de dépannage le plus proche. N'exercez pas de pression excessive ni de choc sur l'appareil. Consignes de sécurité Ne placez pas le four sur un support fragile, comme un évier ou un objet en verre. N'utilisez pas de benzène, de diluant, d'alcool ou de nettoyeur vapeur ou haute pression pour nettoyer l'appareil. Veillez à ce que la tension, la fréquence et l'intensité du courant soient conformes aux caractéristiques de l'appareil. Branchez correctement la fiche dans la prise murale. N'utilisez pas d'adaptateur multiprise, de rallonge ou de transformateur électrique. N'accrochez pas le cordon d'alimentation sur un objet métallique, ne le faites pas passer entre des objets ou derrière le four. N'utilisez jamais une fiche ou un cordon d'alimentation endommagé(e) ou une prise murale mal fixée. Si la prise ou le cordon d'alimentation est endommagé(e), contactez le centre de dépannage le plus proche. Ne versez et ne vaporisez jamais d'eau directement sur le four. Ne posez pas d'objets sur le dessus du four, à l'intérieur ou sur la porte. Ne vaporisez pas de substances volatiles (ex. : insecticide) sur la surface du four. N'entreposez aucun produit inflammable dans le four. Soyez particulièrement vigilant lors du réchauffage de plats de service ou de boissons contenant de l'alcool ; en cas de contact avec une partie chaude du four, les vapeurs risquent de s'enflammer. Veillez à ce que les enfants soient éloignés de la porte lors de son ouverture ou de sa fermeture car ils pourraient se cogner contre la porte ou se prendre les doigts dedans. AVERTISSEMENT : Si vous faites réchauffer des liquides au four micro-ondes, l'ébullition peut survenir à retardement ; faites donc bien attention lorsque vous sortez le récipient du four. Pour éviter cette situation, laissez-les TOUJOURS reposer au moins une vingtaine de secondes une fois le four éteint, ceci afin de permettre à la température de s'homogénéiser. Remuez SYSTÉMATIQUEMENT le contenu une fois le temps de cuisson écoulé (et pendant la cuisson si nécessaire). En cas d'accident, effectuez les gestes de PREMIERS SECOURS suivants : • immergez la zone brûlée dans de l'eau froide pendant au moins 10 minutes ; • recouvrez-la d'un tissu propre et sec ; • n'appliquez aucune crème, huile ou lotion ; Ne trempez pas la plaque ou la grille dans l'eau peu de temps après la cuisson car cela pourrait entraîner la rupture ou endommager la plaque ou la grille. Français 9 MC35J8088CT_SG_DE68-04321B-00_FR.indd 9 4/3/2015 4:29:26 PM Consignes de sécurité N'utilisez pas le four à micro-ondes pour une cuisson à bain d'huile car la température de l'huile ne peut pas être contrôlée. Cela pourrait entraîner un débordement soudain du liquide chaud. ATTENTION Consignes de sécurité Seuls les ustensiles qui sont adaptés aux fours micro-ondes peuvent être utilisés. N'utilisez JAMAIS de récipients métalliques, de vaisselle comportant des ornements dorés ou argentés, de brochettes, de fourchettes, etc. Retirez les attaches métalliques des sacs en papier ou en plastique. Pourquoi ? Des arcs électriques ou des étincelles risqueraient de se former et d'endommager les parois du four. N'utilisez pas votre four micro-ondes pour sécher des papiers ou des vêtements. Utilisez des temps de cuisson ou de chauffe réduits pour les petites quantités d'aliments afin de leur éviter de surchauffer et de brûler. Évitez que le câble électrique ou la prise n'entre en contact avec de l'eau et maintenez le câble éloigné de la chaleur. Ne faites jamais chauffer d'œufs (frais ou durs) dans leur coquille car ils risquent d'exploser, et ce même une fois le cycle de cuisson terminé ; ne faites jamais réchauffer de bouteilles, de pots ou de récipients fermés hermétiquement ou emballés sous vide. Il en va de même pour les noix dans leur coquille ou encore les tomates etc. Ne couvrez jamais les orifices de ventilation du four avec un torchon ou du papier. Ils risquent de s'enflammer lorsque l'air chaud est évacué du four. Le four peut également surchauffer et se mettre hors tension lui-même automatiquement et rester arrêté jusqu'à ce qu'il soit suffisamment refroidi. Utilisez toujours des maniques pour retirer un plat du four afin d'éviter toute brûlure accidentelle. Remuez les liquides à la moitié du temps de chauffe et laissez reposer au moins 20 secondes une fois le temps écoulé pour éviter les projections brûlantes. Lorsque vous ouvrez la porte du four, maintenez une certaine distance entre vous et l'appareil pour éviter d'être brûlé par l'air chaud ou la vapeur sortant du four. Ne faites jamais fonctionner le four à vide. Le four micro-ondes s'arrête automatiquement pendant 30 minutes pour des raisons de sécurité. Nous vous recommandons de laisser en permanence un verre d'eau à l'intérieur du four ; ainsi, si vous le mettez en marche par inadvertance alors qu'il est vide, l'eau absorbera les micro-ondes. Installez le four en respectant les dégagements indiqués dans le manuel (voir Installation du four micro-ondes). Soyez prudent lorsque vous branchez d'autres appareils électriques sur une prise située à proximité du four. 10 Français MC35J8088CT_SG_DE68-04321B-00_FR.indd 10 4/3/2015 4:29:26 PM Consignes permettant d'éviter une exposition excessive aux microondes. (Fonction micro-ondes uniquement) Samsung facturera les travaux de réparation lorsqu'un accessoire doit être réparé ou un défaut esthétique corrigé, si l'endommagement de l'appareil et/ou l'endommagement ou la perte de l'accessoire a été occasionné(e) par le client. Les éléments concernés par cette stipulation sont : A. Une porte, une poignée, un panneau extérieur ou le tableau de commandes bosselé(e), rayé(e) ou brisé(e). B. Un plateau, un guide de plateau roulant, un coupleur, ou une grille métallique brisé(e) ou manquant(e). • Utilisez ce four uniquement pour l'usage auquel il est destiné (tel que décrit dans ce manuel). Les avertissements et les consignes de sécurité importantes contenus dans ce manuel ne sont pas exhaustifs. Il est de votre responsabilité de faire appel à votre bon sens et de faire preuve de prudence et de minutie lors de l'installation, de l'entretien et de l'utilisation du four. • Ces consignes d'utilisation couvrant plusieurs modèles, les caractéristiques de votre four micro-ondes peuvent différer légèrement de celles décrites dans ce manuel et certains symboles d'avertissement peuvent ne pas s'appliquer. Pour toute question, contactez votre centre de dépannage le plus proche ou recherchez de l'aide et des informations en ligne sur www.samsung.com. • Ce four micro-ondes est prévu pour faire chauffer des aliments. Il est uniquement destiné à un usage domestique. Ne faites jamais chauffer de textiles ou de coussins remplis de grains, car ceux-ci pourraient s'enflammer. Le fabricant ne peut être tenu responsable des dommages provoqués par une utilisation non conforme ou incorrecte de l'appareil. • En négligeant la propreté de votre four, vous risquez d'en détériorer les surfaces et par conséquent, d'en réduire la durée de vie et de créer des situations dangereuses. Français 11 MC35J8088CT_SG_DE68-04321B-00_FR.indd 11 4/3/2015 4:29:26 PM Consignes de sécurité La non-observation des consignes de sécurité suivantes peut se traduire par une exposition dangereuse à l'énergie des micro-ondes. A. Ne tentez jamais d'utiliser le four porte ouverte, de modifier les systèmes de verrouillage (loquets) ou d'insérer un objet dans les orifices de verrouillage de sécurité. B. Ne placez aucun objet entre la façade du four et la porte et ne laissez aucune tache ni aucun reste de produit d'entretien s'accumuler sur les surfaces assurant l'étanchéité. Maintenez la porte et les joints d'étanchéité propres en permanence : après chaque utilisation du four, essuyez-les d'abord avec un chiffon humide, puis avec un chiffon doux et sec. C. Si le four est endommagé, NE L'UTILISEZ PAS tant qu'il n'a pas été réparé par un technicien micro-ondes qualifié formé par le fabricant. Il est impératif que la porte du four ferme correctement et que les éléments suivants ne soient pas endommagés : 1) porte (risque de déformation) ; 2) charnières de porte (cassées ou desserrées) ; 3) joints de la porte et surfaces d'étanchéité. D. Le four doit être réglé ou réparé exclusivement par un technicien micro-ondes qualifié formé par le fabricant. Installation Accessoires fournis Assurez-vous que toutes les pièces et tous les accessoires sont inclus dans l'emballage de l'appareil. Si vous avez un souci avec le four ou ses accessoires, contactez un service après-vente Samsung ou le revendeur. Coup d'œil sur le four Installation 01 02 03 01 Tableau de commande 04 02 Verrouillage de sécurité de la porte 03 Poignée de la porte 04 Porte 12 Français MC35J8088CT_SG_DE68-04321B-00_FR.indd 12 4/3/2015 4:29:26 PM Accessoires Le four est livré accompagné de plusieurs accessoires pour vous assister dans la préparation de différents types d'aliment. Installation Anneau de guidage Plateau tournant Plat croustilleur Grille inférieure Grille supérieure Cuiseur vapeur Pro Steamer Français 13 MC35J8088CT_SG_DE68-04321B-00_FR.indd 13 4/3/2015 4:29:27 PM Installation Placez-le sur le centre de la base. Il supporte le plateau tournant. Plateau tournant Placez-le sur l’anneau de guidage en enclenchant la partie centrale sur le coupleur. Il constitue la base de la cuisson. Grilles Utilisez une de ces grilles de la façon appropriée pour cuisiner deux plats simultanément. Une assiette plus petite sur le plateau tournant et l'autre sur la grille sélectionnée. Vous pouvez utiliser ces grilles avec le mode Convection au gril ou Cuisson combinée. Installation Anneau de guidage REMARQUE N'utilisez pas de grilles métalliques en mode Microondes. Plat croustilleur Posez-le sur le plateau tournant. Utilisez-le pour faire brunir les aliments, ou pour conserver le croustillant des pâtisseries ou des pizzas. Cuiseur vapeur Pro Steamer Le Cuiseur vapeur est un ensemble contenant un couvercle en acier inoxydable, un plateau, et un plat croustilleur et il est destiné à la cuisson à la vapeur. Utilisez-le pour faire brunir les aliments comme les pâtisseries et les pâtes à pizza en mode Micro-ondes ou Convection au gril. REMARQUE • Ne faites pas fonctionner le four sans le plateau tournant sur l'anneau de guidage. 14 Français MC35J8088CT_SG_DE68-04321B-00_FR.indd 14 4/3/2015 4:29:27 PM Site d'installation 04 02 03 01 02 03 04 85 cm du sol 10 cm de la paroi arrière 10 cm du côté 20 cm du haut Plateau tournant Retirez tous les éléments d'emballage situés à l'intérieur du four. Installez l'anneau de guidage et le plateau. Vérifiez que le plateau tourne librement. Français 15 MC35J8088CT_SG_DE68-04321B-00_FR.indd 15 4/3/2015 4:29:27 PM Installation 01 • Sélectionnez une surface plane située à environ 85 cm du sol. La surface doit supporter le poids du four. • Ménagez de la place pour la ventilation : il doit se trouver à au moins 10 cm de la paroi arrière et des deux côtés et à 20 cm du haut. • N'installez pas le four dans un environnement chaud ou humide (ex. : à côté d'un autre four à microondes ou d'un radiateur). • Respectez les spécifications électriques de ce four. Utilisez uniquement les câbles d'extension agréés si vous devez en utiliser. • Avant d'utiliser votre four pour la première fois, nettoyez l'intérieur de celui-ci ainsi que le joint d'étanchéité de la porte à l'aide d'un chiffon humide. Entretien Nettoyage Nettoyez le four régulièrement pour éviter que des impuretés se forment sur ou à l'intérieur du four. Prêtez également une attention particulière à la porte, aux joints de la porte, au plateau tournant et à l'anneau de guidage (sur les modèles concernés uniquement). Si la porte ne s'ouvre pas ou ne se ferme pas correctement, vérifiez d'abord s'il n'y a pas d'impuretés qui se sont formées sur les joints de la porte. Utilisez un chiffon doux avec de l'eau savonneuse pour nettoyer les surfaces intérieures et extérieures du four. Rincez et séchez minutieusement. Entretien Pour retirer les impuretés incrustées produisant de mauvaises odeurs à l'intérieur du four 1. Lorsque le four est vide, mettez une tasse de jus de citron dilué sur le centre du plateau tournant. 2. Faites chauffer le four pendant 10 minutes à puissance maximale. 3. Une fois le cycle terminé, attendez que le four refroidisse. Ensuite, ouvrez la porte et nettoyez le compartiment de cuisson. Pour nettoyer l'intérieur des modèles à élément chauffant oscillant A Pour nettoyer la zone supérieure du compartiment de cuisson, abaissez l'élément chauffant supérieur de 45° (A), comme indiqué. Cela permettra de nettoyer la zone supérieure. Une fois cela fait, repositionnez l'élément chauffant supérieur. 16 Français MC35J8088CT_SG_DE68-04321B-00_FR.indd 16 4/3/2015 4:29:27 PM ATTENTION • Veillez à ce que la porte et les joints de la porte soient toujours propres et assurez-vous que la porte s'ouvre et se ferme correctement. Si ce n'est pas le cas, le cycle de vie du four peut en être réduit. • Faites attention à ne pas renverser d'eau à l'intérieur des orifices de ventilation du four. • N'utilisez aucune substance abrasive ou chimique pour le nettoyage. • Après chaque utilisation du four, utilisez un détergent doux pour nettoyer le compartiment de cuisson, après avoir attendu que le four refroidisse. Remplacement (réparation) Ce four ne possède pas de pièces remplaçables par l'utilisateur à l'intérieur. N'essayez pas de remplacer ou de réparer le four vous-même. • Si vous rencontrez un problème • Si vous rencontrez un problème avec les charnières, les joints avec la protection extérieure du et/ou la porte, contactez un four, débranchez d'abord le câble technicien qualifié ou un centre d'alimentation de la source, puis de service Samsung local pour contactez un centre de service obtenir de l'assistance technique. Samsung local. • Si vous souhaitez remplacer l'ampoule, contactez un centre de service Samsung local. Ne la remplacez pas vous-même. Précautions contre une période prolongée de non-utilisation • Si vous n'utilisez pas le four pendant une période prolongée, débranchez le câble d'alimentation et déplacez le four dans un endroit sec et sans poussière. La poussière et l'humidité qui se forment à l'intérieur du four peuvent affecter les performances du four. Français 17 MC35J8088CT_SG_DE68-04321B-00_FR.indd 17 4/3/2015 4:29:28 PM Entretien AVERTISSEMENT Avant de commencer Vous devez connaître un bon nombre de composants avant de vous lancer directement dans une recette. Avant ou pendant un mode de cuisson, vous pouvez régler/modifier l'horloge ou la minuterie de la cuisine selon vos besoins. Horloge Il est important de régler l'heure de l'horloge correctement pour vous assurer d'effectuer des opérations automatiques appropriées. 1. Allumez le four et patientez pendant plusieurs secondes pour entrer en mode Veille. L'élément Heure clignote. 2. Utilisez les touches fléchées pour régler l'heure, puis appuyez sur OK. L'élément Minute clignote. Avant de commencer 3. Utilisez les touches fléchées pour régler les minutes, puis appuyez sur OK. REMARQUE • • Pour changer l'heure actuelle plus tard, maintenez enfoncé la flèche vers le haut ( ) pendant 3 secondes et suivez les étapes ci-dessus. L'heure de l'horloge ne peut pas être modifiée durant les opérations. 18 Français MC35J8088CT_SG_DE68-04321B-00_FR.indd 18 4/3/2015 4:29:28 PM Activation/désactivation du son Vous pouvez activer ou désactiver le son des touches, le signal sonore ou l'alarme. Ce réglage est disponible uniquement en mode Veille (lorsque l'heure actuelle est affichée). Pour désactiver le son, maintenez appuyé durant 3 secondes. « OFF » apparaît sur l’écran d’affichage. Pour réactiver le son, maintenez appuyé à nouveau durant 3 secondes. « ON » apparaît sur l’écran d’affichage. Pour réduire la consommation électrique, appuyez sur pendant 1 seconde. Ce réglage est disponible uniquement en mode Veille (lorsque l'heure actuelle est affichée). REMARQUE • • Lors du réglage du four après 5 minutes d'inactivité de l'utilisateur, le four annule toute opération en cours et passe en mode Veille. Si le four est mis en pause pendant plus de 25 minutes durant la cuisson, il passe en mode Veille. Français 19 MC35J8088CT_SG_DE68-04321B-00_FR.indd 19 4/3/2015 4:29:28 PM Avant de commencer Économie d'énergie Avant de commencer À propos de l'énergie des micro-ondes Les micro-ondes sont des ondes électromagnétiques à haute fréquence. Le four utilise le magnétron préintégré pour générer des micro-ondes qui sont utilisées pour faire cuire ou pour réchauffer des aliments sans les déformer ou décoller. Avant de commencer 1. Les micro-ondes générées par le magnétron sont réparties de manière uniforme au moyen d'un répartiteur tournant. C'est pourquoi les aliments sont cuits de façon uniforme. 2. Les micro-ondes sont absorbées par les aliments jusqu'à une profondeur d'environ 2,5 cm. Puis elles se dissipent à l'intérieur des aliments pour la cuisson continue. 3. La durée de cuisson est affectée par les conditions suivantes des aliments. • quantité et densité ; • Quantité d'humidité • Température initiale (en particulier lorsque les aliments sont congelés) REMARQUE Les aliments cuits conservent la chaleur en eux après que la cuisson est terminée. C'est pourquoi vous devez respecter la durée de repos spécifiée dans ce manuel, ce qui permet de garantir une cuisson uniforme jusqu'au noyau. 20 Français MC35J8088CT_SG_DE68-04321B-00_FR.indd 20 4/3/2015 4:29:29 PM Récipients utilisés pour la cuisson aux micro-ondes Les récipients utilisés pour le mode Micro-ondes doivent laisser passer les micro-ondes afin que celles-ci pénètrent les aliments. Les métaux tels que l'inox, l'aluminium et le cuivre ont pour effet de renvoyer les micro-ondes. Les récipients métalliques ne doivent par conséquent jamais être utilisés. Les récipients présentés comme étant adaptés à la cuisson aux micro-ondes peuvent être utilisés sans danger. Pour obtenir davantage d'informations sur les récipients appropriés, reportez-vous au guide suivant et placez un verre d'eau ou des aliments sur le plateau tournant. Exigences • • • Fond plat et bords droits Couvercle hermétique Plats bien équilibrés avec des poignées pesant moins lourd que le plat principal Matériau Adapté à la cuisson aux micro-ondes Description Plat croustilleur Le temps de préchauffage ne doit pas excéder 8 minutes. Récipients en terre cuite et en faïence S'ils ne comportent pas d'ornements métalliques, les récipients en céramique, en terre cuite, en faïence et en porcelaine sont généralement adaptés au four à micro-ondes. Plats jetables en carton ou en polyester Certains aliments surgelés sont emballés dans ce type de plat. Emballages de fastfood Tasses ou récipients en polystyrène Une température trop élevée peut les faire fondre. Sacs en papier ou journal Ils peuvent s'enflammer. Papier recyclé ou ornements métalliques Ils peuvent créer des arcs électriques. Français 21 MC35J8088CT_SG_DE68-04321B-00_FR.indd 21 4/3/2015 4:29:29 PM Avant de commencer Aluminium Peut être utilisé pour des aliments de petite quantité pour protéger contre toute surcuisson. Des arcs électriques peuvent se former si le papier aluminium est placé trop près des parois du four ou si vous en avez utilisé en trop grande quantité. Avant de commencer Matériau Plats en verre Adapté à la cuisson aux micro-ondes Description Plats de service adaptés à la cuisson au four S'ils ne comportent pas d'ornements métalliques, ils sont généralement adaptés au four à micro-ondes. Plats en cristal Les objets fragiles peuvent se briser ou se fendre s'ils sont brusquement soumis à une chaleur excessive. Pots en verre Pour faire réchauffer uniquement. Retirez le couvercle avant la cuisson. Plats Métal Avant de commencer Papier Plastique Sacs de congélation avec attaches métalliques Ils peuvent provoquer des arcs électriques ou s'enflammer. Assiettes, tasses, serviettes de table et papier absorbant Pour une cuisson de courte durée. Ils absorbent l'humidité excessive. Papier recyclé Ils peuvent provoquer des arcs électriques. Récipients Utilisez des récipients en thermoplastique. Certaines matières plastiques peuvent se voiler ou se décolorer lorsqu'elles sont soumises à des températures élevées. Film étirable Utilisez-le pour maintenir de l'humidité après la cuisson. Sacs de congélation Utilisez des sacs qui supportent la température d'ébullition ou qui sont adaptés à la cuisson au four uniquement. Papier paraffiné ou sulfurisé : Plat adapté au micro-ondes Utilisez-le pour maintenir de l'humidité et éviter les projections. : à utiliser avec précaution : Plat non adapté au micro-ondes 22 Français MC35J8088CT_SG_DE68-04321B-00_FR.indd 22 4/3/2015 4:29:29 PM Opérations Tableau de commande Le tableau en façade est disponible dans une vaste gamme de matériaux et de couleurs. A des fins d'amélioration de la qualité, l'aspect réel du four est sujet à modification sans préavis. 04 05 07 09 01 02 03 06 08 10 11 Permet d'allumer ou d'éteindre le four. 02 Tableau des fonctions Permet de sélectionner une fonction ou un mode de cuisson souhaité(e). 03 Affichage Permet d'afficher les informations nécessaires de la fonction sélectionnée ou les paramètres. 04 Haut / Bas Permet de régler la valeur de réglage de votre sélection. 05 OK Permet de confirmer vos paramètres. 06 Précédent Permet de restaurer les réglages par défaut. 07 Température/ Puissance Permet de changer la température ou la puissance. 08 Plateau tournant Permet d'activer ou de désactiver le plateau tournant. 09 Départ Permet de démarrer la cuisson. Ce bouton permet également de faire préchauffer rapidement le four à son niveau de puissance maximale. 10 Arrêt Permet d'arrêter le fonctionnement. Ce bouton permet également d'annuler le mode actuel. 11 Sécurité enfants Appuyez sur ce bouton pendant 3 secondes pour activer ou désactiver. La Sécurité enfants est disponible uniquement en mode Veille. Opérations 01 Puissance REMARQUE • Mode Veille : Après 5 minutes d'inactivité sur le panneau de commande, le four passe en mode Veille dans lequel seul l'heure actuelle est affichée. Après 25 minutes d'inactivité, le four passe en mode Arrêt. • Mode Arrêt : Lorsque le four redémarre après l'avoir éteint, seul les boutons correspondant à la dernière action de l'utilisateur sont allumés. Pour passer en mode Veille, appuyez à nouveau sur le bouton Puissance. Français 23 MC35J8088CT_SG_DE68-04321B-00_FR.indd 23 4/3/2015 4:29:29 PM Opérations Descriptif des fonctions Fonction Air chaud Plage de température Température par défaut Durée maxi. 160-230 °C 200 °C 60 min. L'Air chaud est similaire au mode Convection. Toutefois, les éléments chauffants génèrent davantage de chaleur et distribuent un courant d'air plus fort à l'intérieur du four. Cela permet de cuire plus vite tout en maintenant ou améliorant le goût. 40-230 °C Cuisson par convection Mode Manuel Opérations Cuisson combinée par convection 40-200 °C 100-450 W Cuisson au gril combinée 180 °C 450 W 60 min. Les éléments chauffants génèrent de la chaleur et le ventilateur de convection distribue la chaleur à l'intérieur du four, renforcée par l'énergie des micro-ondes. 900 W 90 min. L'énergie des micro-ondes permet de faire cuire ou réchauffer les aliments sans en altérer la forme ni la couleur. 180 °C Gril 60 min. Les éléments chauffants génèrent de la chaleur, distribuée de façon uniforme à l'intérieur du four par le ventilateur de convection. Utilisez ce mode pour les aliments congelés ou pour la cuisson. 100-900 W Micro-ondes 180 °C 180 °C 60 min. Permet de faire cuire au gril des aliments comme de la viande. 180 °C 100-600 W 180 °C 600 W 60 min. Les éléments chauffants génèrent de la chaleur, renforcée par l'énergie des micro-ondes. 24 Français MC35J8088CT_SG_DE68-04321B-00_FR.indd 24 4/3/2015 4:29:30 PM Plage de température Fonction Mode Auto Durée maxi. Air chaud Auto Pour permettre aux nouveaux utilisateurs de s'adapter au mode Air chaud, le four offre 10 programmes automatiques. Automatique Pour les débutants en cuisine, le four offre un total de 25 programmes de cuisson automatique. Décongélation Le four met 5 programmes de décongélation à votre disposition. 50-80 °C Fonctions spéciales Température par défaut Maintien au chaud 60 °C 3h Utilisez cette option uniquement pour maintenir chauds des aliments qui viennent juste d'être cuits. Opérations Français 25 MC35J8088CT_SG_DE68-04321B-00_FR.indd 25 4/3/2015 4:29:30 PM Opérations Mode Manuel Étape 1 : Sélectionner le mode Sur le tableau des fonctions, appuyez sur un mode manuel., par exemple, Convection. La température par défaut (ou la puissance) clignote. Étape 2 : Réglez la température ou la Puissance Utilisez les boutons / pour régler la température par défaut (ou la puissance). Une fois terminé, appuyez sur OK pour passer aux éléments concernant l'heure. REMARQUE Opérations La puissance, à moins que cela ait été mentionné autrement, est réglée selon la température réglée. Si la puissance ou la température n'est pas spécifiée dans les 5 secondes, le four passe à la session sur la durée de cuisson. Étape 3 : Réglage du temps de cuisson Utilisez les boutons / pour régler la durée de cuisson. Une fois terminé, appuyez sur DÉPART ( ). REMARQUE Vous pouvez régler la durée de cuisson après le préchauffage. Étape 4 : Préchauffage Le four démarre le préchauffage jusqu'à avoir atteint la température réglée. Une fois terminé, le four émet un signal sonore et le voyant disparaît. 26 Français MC35J8088CT_SG_DE68-04321B-00_FR.indd 26 4/3/2015 4:29:31 PM ATTENTION • Utilisez toujours des maniques pour sortir vos aliments du four. • Le four à micro-ondes peut avoir besoin de 5 minutes de refroidissement lorsque la température de la cavité du four est chaude après la cuisson. s'affiche. Pour changer la durée de cuisson durant la cuisson Utilisez les boutons / pour régler la durée de cuisson. Vos changements seront appliqués instantanément, et le four reprend la cuisson avec les nouveaux paramètres. Pour changer la température ou la puissance durant la cuisson 1. Appuyez sur . L'élément Température (ou Puissance) clignote. Pour arrêter le fonctionnement Appuyez une fois sur ARRÊT ( ) pour arrêter le fonctionnement, ou deux fois pour annuler le mode actuel et passer en mode Veille. Français 27 MC35J8088CT_SG_DE68-04321B-00_FR.indd 27 4/3/2015 4:29:32 PM Opérations 2. Utilisez les boutons / pour régler la température (ou la puissance), puis appuyez sur OK ou pour confirmer les changements. Opérations Air chaud L'Air chaud est similaire au mode Convection. Toutefois, les éléments chauffants génèrent davantage de chaleur et distribuent un courant d'air plus fort à l'intérieur du four. Cela permet de cuire plus vite tout en maintenant ou améliorant le goût. Vous pouvez utiliser la grille inférieure, ou la combinaison de la grille inférieure et du plat croustilleur sur le plateau tournant. Étape 1 : Air chaud > Étape 2 : Température > Étape 3 : Durée de cuisson > Étape 4 : Préchauffage 1. Placez la grille inférieure, ou la combinaison de la grille inférieure et du plat croustilleur sur le plateau tournant. 2. Placez les aliments dans des récipients adaptés et fermez la porte. 3. Suivez les étapes 1-4 dans le Mode Manuel à la page 26. 4. Lorsque la cuisson est terminée, « 0:00 » clignote. Utilisez des maniques pour retirer les aliments. Opérations ATTENTION N'utilisez pas ce mode pour la cuisson du pain, ou la cuisson des confiseries. Une chaleur plus forte peut faire brûler le haut des aliments. 28 Français MC35J8088CT_SG_DE68-04321B-00_FR.indd 28 4/3/2015 4:29:33 PM Convection Les éléments chauffants génèrent de la chaleur, distribuée de façon uniforme à l'intérieur du four par le ventilateur de convection. Vous pouvez utiliser la grille inférieure, ou la combinaison de la grille inférieure et du plat croustilleur sur le plateau tournant. Utilisez ce mode pour des biscuits, des scones individuels, des viennoiseries et des gâteaux, ainsi que des cakes aux fruits, des choux et des soufflés. Étape 1 : Cuisson par convection Étape 2 : > Température Étape 3 : > Durée de cuisson Étape 4 : > Préchauffage 1. Placez la grille inférieure, ou la combinaison de la grille inférieure et du plat croustilleur sur le plateau tournant. Français 29 MC35J8088CT_SG_DE68-04321B-00_FR.indd 29 4/3/2015 4:29:33 PM Opérations 2. Placez les aliments dans des récipients adaptés et fermez la porte. 3. Suivez les étapes 1-4 dans le Mode Manuel à la page 26. 4. Lorsque la cuisson est terminée, « 0:00 » clignote. Utilisez des maniques pour retirer les aliments. Opérations Cuisson combinée par convection Ce mode de combinaison associe l'énergie du micro-ondes avec de l'air chaud, ce qui a pour conséquence de réduire le temps de cuisson et de produire une surface dorée et croustillante sur les aliments. Utilisez-le pour tous les types de viande et de volaille, ainsi que plats en cocotte et gratins, gâteaux de Savoie, gâteaux aux fruits, tartes, crumbles, légumes grillés, scones et pains. Étape 1 : Cuisson combinée > par convection Étape 2 : Température et Puissance Étape 3 : > Durée de cuisson Étape 4 : > Préchauffage 1. Placez la grille inférieure, ou la combinaison de la grille inférieure et du plat croustilleur sur le plateau tournant. Opérations 2. Placez les aliments dans des récipients adaptés et fermez la porte. 3. Suivez les étapes 1-4 dans le Mode Manuel à la page 26. 4. Lorsque la cuisson est terminée, « 0:00 » clignote. Utilisez des maniques pour retirer les aliments. ATTENTION Utilisez uniquement des plats adaptés au micro-ondes, comme des récipients en verre, en céramique ou en faïence ne comportant pas d'ornements métalliques. 30 Français MC35J8088CT_SG_DE68-04321B-00_FR.indd 30 4/3/2015 4:29:33 PM Micro-ondes Les micro-ondes sont des ondes électromagnétiques à haute fréquence. L'énergie des micro-ondes permet de faire cuire ou réchauffer les aliments sans en altérer la forme ni la couleur. • Utilisez uniquement des plats adaptés au micro-ondes. Étape 1 : Micro-ondes > Étape 2 : Niveau de puissance Étape 3 : > Durée de cuisson Étape 4 : > - 1. Placez les aliments dans un récipient adapté au micro-ondes, puis au centre du plateau tournant. Fermez la porte. 2. Suivez les étapes 1-3 dans le Mode Manuel à la page 26. 3. Lorsque la cuisson est terminée, « 0:00 » clignote. Utilisez des maniques pour retirer les aliments. Démarrage simple Pour faire réchauffer simplement les aliments pendant une courte durée à puissance maximale (900 W), sélectionnez Micro-ondes, puis appuyez sur DÉPART ( ). Opérations Niveau de puissance Pourcentage (%) Puissance émise (W) Description ÉLEVÉ 100 900 Permet de réchauffer les liquides. RELATIVEMENT ÉLEVÉE 83 750 MOYENNEMENT ÉLEVÉE 67 600 MOYENNE 50 450 MOYENNEMENT FAIBLE 33 300 DÉCONGÉLATION 20 180 Permet de décongeler avant la cuisson. FAIBLE 11 100 Permet de décongeler les légumes. Niveau Permet de réchauffer et cuire. Permet de cuire la viande et de réchauffer les légumes. Français 31 MC35J8088CT_SG_DE68-04321B-00_FR.indd 31 4/3/2015 4:29:33 PM Opérations Gril Les éléments chauffants génèrent de la chaleur. Assurez-vous qu'ils sont en position horizontale. Étape 1 : Grill (Gril) Étape 2 : - > > Étape 3 : Durée de cuisson > Étape 4 : - 1. Placez la grille supérieure, ou la combinaison de la grille supérieure et du plat croustilleur sur le plateau tournant. 2. Placez les aliments dans des récipients adaptés et fermez la porte. 3. Suivez les étapes 1 et 3 dans le Mode Manuel à la page 26 4. Lorsque la cuisson est terminée, « 0:00 » clignote. Utilisez des maniques pour retirer les aliments. Cuisson au gril combinée Opérations Les éléments chauffants génèrent de la chaleur, renforcée par l'énergie des micro-ondes. Utilisez uniquement des plats adaptés au micro-ondes, comme des récipients en verre ou en céramique. Étape 1 : Cuisson au gril combinée > Étape 2 : Niveau de puissance Étape 3 : > Durée de cuisson Étape 4 : > - 1. Placez la grille supérieure, ou la combinaison de la grille supérieure et du plat croustilleur sur le plateau tournant. 2. Placez les aliments dans des récipients adaptés et fermez la porte. 3. Suivez les étapes 1-3 dans le Mode Manuel à la page 26. 4. Lorsque la cuisson est terminée, « 0:00 » clignote. Utilisez des maniques pour retirer les aliments. 32 Français MC35J8088CT_SG_DE68-04321B-00_FR.indd 32 4/3/2015 4:29:34 PM Mode Auto Le four met 3 programmes automatiques à votre disposition. Air chaud Auto, Cuisson automatique et Décongélation automatique. Sélectionnez celui qui correspond à vos besoins. Étape 1 : Sélectionner le mode Sur le tableau des fonctions, appuyez sur un mode automatique., par exemple, Air chaud Auto. Le numéro du programme par défaut clignote. Étape 2 : Sélectionnez le programme Utilisez les boutons / pour sélectionner votre programme favori, puis appuyez sur OK. Le poids par défaut pour le programme clignote. Étape 3 : Réglez la quantité ou le poids Opérations Utilisez les boutons / pour régler la quantité (ou le poids). Une fois terminé, appuyez sur DÉPART ( ). ATTENTION Utilisez toujours des maniques pour sortir vos aliments du four. REMARQUE La durée de cuisson est pré-programmée selon le mode automatique et ne peut pas être modifiée. Français 33 MC35J8088CT_SG_DE68-04321B-00_FR.indd 33 4/3/2015 4:29:34 PM Opérations Air chaud Auto L'Air chaud est similaire au mode Convection. Toutefois, les éléments chauffants génèrent davantage de chaleur et distribuent un courant d'air plus fort à l'intérieur du four. Cela permet de cuire plus vite tout en maintenant ou améliorant le goût. Pour permettre aux nouveaux utilisateurs de s'adapter au mode Air chaud, le four offre 10 programmes automatiques. Étape 1 : Air chaud Auto > Étape 2 : 1 à 10 > Étape 3 : Taille de la portion 1. Placez les aliments dans des récipients adaptés, puis sur le plateau tournant et fermez la porte. 2. Suivez les étapes 1-3 dans le Mode Auto à la page 33. 3. Lorsque la cuisson est terminée, « 0:00 » clignote. Utilisez des maniques pour retirer les aliments. ATTENTION N'utilisez pas ce mode pour la cuisson du pain, ou la cuisson des confiseries. Une chaleur plus forte peut faire brûler le haut des aliments. Opérations Cuisson automatique Pour les débutants en cuisine, le four offre un total de 25 programmes de cuisson automatique. Bénéficiez de ces fonctions pour gagner du temps ou raccourcir votre courbe d'apprentissage. La durée et la température de cuisson seront ajustées en fonction de la recette sélectionnée. Étape 1 : Automatique > Étape 2 : 1 à 25 > Étape 3 : Taille de la portion 1. Placez les aliments dans des récipients adaptés, puis sur le plateau tournant et fermez la porte. 2. Suivez les étapes 1-3 dans le Mode Auto à la page 33. 3. Lorsque la cuisson est terminée, « 0:00 » clignote. Utilisez des maniques pour retirer les aliments. 34 Français MC35J8088CT_SG_DE68-04321B-00_FR.indd 34 4/3/2015 4:29:34 PM Décongélation automatique Le four met 5 programmes de décongélation à votre disposition. La durée et la puissance sont automatiquement réglées selon le programme sélectionné. Étape 1 : Décongélation > Étape 2 : 1à5 > Étape 3 : poids 1. Placez les aliments dans des récipients adaptés, puis sur le plateau tournant et fermez la porte. 2. Suivez les étapes 1-3 dans le Mode Auto à la page 33. 3. Lorsque la cuisson est terminée, « 0:00 » clignote. Utilisez des maniques pour retirer les aliments. Fonctions spéciales Maintien au chaud Avec cette fonction, seul l'élément chauffant par convection fonctionne, et est coupé puis activé par intervalles afin de maintenir les aliments chauds. 1. Sur le tableau des fonctions, appuyez sur . La température par défaut (60 °C) clignote. 2. Utilisez les boutons / pour régler la température puis appuyez sur OK pour passer à l'élément Heure. 3. Utilisez les boutons / pour régler l'heure puis appuyez sur DÉPART ( ). Le four commence à chauffer. Français 35 MC35J8088CT_SG_DE68-04321B-00_FR.indd 35 4/3/2015 4:29:34 PM Opérations Lorsque la cuisson est terminée, Opérations ATTENTION • • • • REMARQUE Utilisez toujours des maniques pour sortir vos aliments du four. N’utilisez pas cette fonction pour faire réchauffer des aliments froids. Utilisez cette option uniquement pour maintenir chauds des aliments qui viennent juste d'être cuits. N'utilisez pas cette fonction pendant plus d'3 heure. Sinon, cela peut affecter la qualité des aliments. Pour garder les aliments croustillants, ne les couvrez avec le Maintien au chaud. Pour changer la température durant le cycle, appuyez sur , puis répétez l'étape 2 cidessus. Guide de maintien au chaud Aliment Opérations Température (°C) Temps de repos (min) Instructions Repas 80 30 Pour maintenir au chaud de la viande, du poulet, un gratin, une pizza, des pommes de terre et des assiettes-repas. Boissons 80 30 Pour maintenir au chaud de l'eau, du lait et du café. Pains/ pâtisseries 60 30 Pour maintenir au chaud du pain frais, du pain grillé, des viennoiseries, des muffins et des gâteaux. Plats/ vaisselle 70 30 Pour préchauffer les plats et la vaisselle. Disposez les plats sur le plateau tournant. Veillez à ne pas le surcharger. (charge maximale : 7 kg) 36 Français MC35J8088CT_SG_DE68-04321B-00_FR.indd 36 4/3/2015 4:29:35 PM Cuisiner intelligemment Cuisson automatique Guide de cuisson automatique à l'air chaud Aliment Quantité (g) Instructions Pizza surgelée 400-450 Retirez l'emballage et placez la pizza sur une grille inférieure. Placez-la dans le four. Laissez reposer 2 à 3 minutes une fois la cuisson terminée. H2 Pizza maison 500-550 Ingrédients • Pâte à pizza (200-220 g) 150 g de farine de blé, 3 g de levure en poudre, 0,5 cuillères à soupe d'huile d'olive, 100 ml d'eau chaude, 0,5 cuillère à soupe de sucre et de sel • Garniture 100 g de légumes coupés en tranches, 100 g de purée de tomates, 80-100 g de mozzarella râpée Instructions Mettez la farine, la levure, l'huile, le sel et l'eau chaude dans un saladier et mélangez le tout pour obtenir une pâte un peu humide. Malaxez-la dans un mixeur ou à la main pendant environ 5 à 10 minutes. Couvrez avec un couvercle et faites lever pendant 30 min. Roulez dans le plat croustilleur. Répartissez la purée de tomates sur la pâte et ajoutez les légumes. Saupoudrez-les d'une couche uniforme de fromage sur le dessus. Placez-les sur la grille inférieure. Laissez reposer 2 à 3 minutes une fois la cuisson terminée. Français 37 MC35J8088CT_SG_DE68-04321B-00_FR.indd 37 4/3/2015 4:29:35 PM Cuisiner intelligemment H1 Cuisiner intelligemment Aliment Quantité (g) Instructions Lasagnes maison 1000-1100 Ingrédients 2 cuillères à soupe d'huile d'olive, 500 g de bœuf haché, 100 g de sauce tomate, 100 ml de bouillon de bœuf, 150 g de feuilles séchées pour lasagnes, 1 oignon (émincé), 1 cuillère à soupe de feuilles de persil séché, d'origan, de basilic, 200 g de mozzarella râpée Instructions Sauce : Faites chauffer l'huile dans une poêle, puis faites cuire le bœuf haché et l'oignon émincé pendant 10 minutes environ jusqu'à ce que le tout soit doré. Versez la sauce à la tomate et le bouillon de bœuf, puis ajoutez les herbes séchées. Portez à ébullition, puis faites mijoter pendant 10 minutes. Utilisez des pâtes à lasagnes sèches et précuisinées. Disposez les pâtes à lasagnes, la sauce de viande et le fromage en plusieurs couches. Ensuite, saupoudrez uniformément avec la mozzarella restante sur le dessus des pâtes à lasagnes et placez-les sur la grille inférieure. Laissez reposer 2 à 3 minutes une fois la cuisson terminée. H4 Gratin maison 600-650 1200-1250 Ingrédients (1200-1250 g) 800 g de pommes de terre, 100 ml de lait, 100 ml de crème, 50 g de jaunes d'œuf battus, 1 cuillère à soupe de sel, poivre, muscade, 150 g de mozzarella râpée, beurre, thym * Dans le cas d'une quantité de 600-650 g, partagez les quantités en deux. Instructions Épluchez les pommes de terre et coupez-les en rondelles de 3 mm d'épaisseur. Beurrez toute la surface d'un plat à gratin (environ 18 x 28 cm). Répartissez les rondelles sur un torchon propre et couvrez-les pendant que vous préparez le reste des ingrédients. Placez le reste des ingrédients, sauf le fromage râpé, dans un grand saladier et mélangez bien. Disposer les rondelles de pommes de terre en plusieurs couches dans le plat, en les faisant se chevaucher légèrement ; puis versez la préparation sur les pommes de terre. Étalez le fromage râpé sur le dessus et faites cuire le tout. Placez-les sur la grille inférieure. Après la cuisson, servez-le tout décoré avec quelques feuilles de thym frais. Laissez reposer 2 à 3 minutes une fois la cuisson terminée. Cuisiner intelligemment H3 38 Français MC35J8088CT_SG_DE68-04321B-00_FR.indd 38 4/3/2015 4:29:35 PM Aliment Quantité (g) Instructions H5 Frites surgelées 300-350 400-450 Répartissez uniformément les frites sur le plat croustilleur. Posez le plat sur la grille hauteur mini. Laissez reposer 2 à 3 minutes une fois la cuisson terminée. H6 Ailes de poulet Buffalo surgelées 400-450 500-550 Disposez les ailes de poulet Buffalo surgelées (précuites et épicées) sur le plat croustilleur. Placez le plat sur la grille supérieure. Placez-les dans le four. Laissez reposer 2 à 3 minutes une fois la cuisson terminée. H7 Pièces de poulets rôtis 500-600 900-1000 Pesez les pièces de poulets et badigeonnez-les d'huile et d'épices. Placez-les uniformément sur la grille supérieure. Lorsqu'un signal sonore est émis, retournez le poulet et appuyez sur Start (Départ) pour continuer. Laissez reposer 2 à 3 minutes une fois la cuisson terminée. H8 Poulet rôti 1200-1300 Badigeonnez complètement le poulet d’huile et d’épices. Tournez le côté poitrine vers le bas, au centre de la grille inférieure. Lorsqu'un signal sonore est émis, retournez le poulet en utilisant des pinces et appuyez sur Start (Départ) pour continuer. Laissez reposer 2 à 3 minutes une fois la cuisson terminée. H9 Tourte au bœuf 500-600 Français 39 MC35J8088CT_SG_DE68-04321B-00_FR.indd 39 4/3/2015 4:29:35 PM Cuisiner intelligemment Ingrédients 200 g de bœuf (en cubes), 1 cuillère à soupe d'huile d'olive, 1/2 oignon (coupé), 80 g de champignons (coupés), 1 cuillère à soupe de feuilles de persil et de thym séchés (émincées), 1 cuillère à soupe de sauce Worcestershire, sel et poivre, 2 cuillères à soupe de farine, 100 ml de bouillon de bœuf chaud, 120 g de pâte prête à l’emploi, 1 jaune d'œuf (battu) Instructions Saupoudrez le bœuf de farine, de sel et de poivre. Faites frire dans une poêle à frire avec de l'huile, en remuant fréquemment, jusqu’à ce qu’il brunisse. Ajoutez les oignons, les champignons, le persil, le thym, la sauce Worcestershire et le bouillon de bœuf chaud et faites griller. Après avoir fait griller, baissez le feu et laissez mijoter pendant une heure. Versez le mélange dans un plat adapté au four et couvrez avec la plaque à tarte et appuyez délicatement sur les bords pour les coller. Décorez avec des chutes de pâte à l'aide d'un couteau et d'une fourchette. Pratiquez des incisions sur le dessus et badigeonnez de jaune d'œuf battu. Placez-les sur la grille inférieure. Laissez reposer 2 à 3 minutes une fois la cuisson terminée. Cuisiner intelligemment Aliment H10 Quantité (g) Mini quiche maison 400-500 Instructions Ingrédients • Pâtisseries 200 g de farine, 80 g de beurre, 1 œuf • Mélange 30 g de bacon (en cubes), 60 g de crème, 60 g de crème fraîche, 2 œufs, 40 g de fromage râpé, sel et poivre Instructions Pour faire la pâte, mettez la farine, le beurre et les œufs dans un saladier et mélangez le tout pour obtenir une pâte souple, puis laissez-la reposer au réfrigérateur pendant 30 minutes. Roulez la pâte et placez-la dans des moules beurrés (comme des moules à muffins pour 6 mini quiches). Mélangez la crème, le bacon en cubes, la crème fraîche, les œufs, le fromage, le sel, le poivre et versez le mélange dans les moules. Placez-les sur la grille inférieure. Laissez reposer 5 minutes après la cuisson. Guide de cuisson automatique Cuisiner intelligemment Aliment Quantité (g) Instructions A1 Lasagnes surgelées 400-450 Placez les lasagnes surgelées dans un plat adapté au four et suffisamment grand. Posez le plat sur la grille inférieure. Laissez reposer 3 à 4 minutes après la cuisson. A2 Fine pizza surgelée 300-350 400-450 Placez la pizza surgelée sur la grille inférieure. Laissez reposer 1 à 2 minutes après la cuisson. A3 Plat préparé (3 composants) 300-350 400-450 Placez les aliments dans une assiette en céramique et recouvrez-la d'un film plastique spécial micro-ondes. Ce programme convient à la cuisson de plats composés de trois aliments différents (ex. : viande en sauce, légumes et accompagnements tels que pommes de terre, riz ou pâtes). Laissez reposer 2 à 3 minutes une fois la cuisson terminée. A4 Plat préparé (1 composant) 300-350 400-450 Placez les aliments dans une assiette en céramique et recouvrez-la d'un film plastique spécial micro-ondes. Laissez reposer 2 à 3 minutes une fois la cuisson terminée. 40 Français MC35J8088CT_SG_DE68-04321B-00_FR.indd 40 4/3/2015 4:29:35 PM Aliment Quantité (g) Instructions Poisson grillé 300-400 500-600 Badigeonnez le poisson (truite ou dorade) d'huile, puis ajoutez des herbes et des épices. Placez les poissons côte à côte (tête contre queue) sur la grille supérieure. Retournez dès que le signal sonore retentit. Laissez reposer 2 à 3 minutes une fois la cuisson terminée. A6 Rôti de bœuf 800-1000 1200-1400 Badigeonnez le bœuf d'huile et saupoudrez de poivre et de sel. Placez la viande sur la grille inférieure, côté gras vers le bas. Après la cuisson, recouvrez-la de papier d'aluminium et laissez reposer 10 à 15 minutes. A8 Blancs de poulet grillés 300-400 500-600 Rincez les blancs de poulet, faites-les mariner puis placez-les sur la grille supérieure. Retournez dès que le signal sonore retentit. Laissez reposer 2 à 3 minutes une fois la cuisson terminée. A9 Filets de saumon grillés 300-400 500-600 Badigeonnez les filets de saumon d'huile et saupoudrez d'épices. Placez les steaks de poisson uniformément sur la grille hauteur maxi. Retournez dès que le signal sonore retentit. Laissez reposer 2 à 3 minutes une fois la cuisson terminée. A10 Filets de poisson grillés 500-600 Badigeonnez les filets de poisson d'huile et saupoudrez d'épices. Placez les filets de poisson uniformément sur la grille supérieure. Retournez dès que le signal sonore retentit. Laissez reposer 2 à 3 minutes une fois la cuisson terminée. A11 Petits pains surgelés 400-500 Placez les petits pains surgelés sur la grille inférieure. Laissez reposer 1 à 2 minutes après la cuisson. A12 Brownies 700-750 Placez le pré-mélange, les œufs, l'eau l'huile de tournesol dans un saladier et mélangez bien. Versez le mélange dans un plateau en verre sur la grille inférieure. Laissez reposer 10 minutes après la cuisson. Selon vos préférences, vous pouvez mettre certaines noix dans le brownie. Français 41 MC35J8088CT_SG_DE68-04321B-00_FR.indd 41 4/3/2015 4:29:35 PM Cuisiner intelligemment A5 Cuisiner intelligemment Aliment Quantité (g) Instructions Cuisiner intelligemment A13 Légumes grillés 200-250 300-350 Coupez les légumes frais (ex : morceaux de poivre, oignons, courgettes en tranches et champignons) et badigeonnez d'huile et d'épices. Placez-les sur le plat croustilleur. Posez le plat sur la grille supérieure. Laissez reposer 2 à 3 minutes une fois la cuisson terminée. A14 Croquettes de pommes de terre surgelées 300-350 400-450 Répartissez uniformément les croquettes de pommes de terre surgelées sur le plat croustilleur. Posez le plat sur la grille hauteur mini. Laissez reposer 2 à 3 minutes une fois la cuisson terminée. A15 Frites maison 300-350 400-450 Pelez les pommes de terre et coupez-les en bâtons d'une épaisseur de 10 x 10 mm. Trempez-les dans l'eau froide (pendant 30 min). Séchez-les dans une serviette, pesez-les et badigeonnez-les de 5 g d'huile et d'épices. Répartissez uniformément les frites maison sur le plat croustilleur. Posez le plat sur la grille hauteur mini. Laissez reposer 2 à 3 minutes une fois la cuisson terminée. A16 Pommes de terre en morceaux 300-350 400-450 Lavez les pommes de terre de taille normale et coupez-les en morceaux. Badigeonnez-les d'un mélange d'huile d'olive et d'épices. Placez-les avec la face coupée sur le plat croustilleur. Placez le plat sur la grille supérieure. Laissez reposer 2 à 3 minutes une fois la cuisson terminée. A17 Rondelles d'oignon surgelées 200-250 300-350 Répartissez uniformément les rondelles d'oignon surgelées sur le plat croustilleur. Posez le plat sur la grille hauteur mini. Laissez reposer 2 à 3 minutes une fois la cuisson terminée. A18 Crevettes surgelées 300-350 400-450 Répartissez uniformément les crevettes surgelées sur le plat croustilleur. Posez le plat sur la grille hauteur mini. Laissez reposer 2 à 3 minutes une fois la cuisson terminée. A19 Calamars frits surgelés 200-250 300-350 Répartissez uniformément les calamars frits surgelés sur le plat croustilleur. Posez le plat sur la grille hauteur mini. Laissez reposer 2 à 3 minutes une fois la cuisson terminée. 42 Français MC35J8088CT_SG_DE68-04321B-00_FR.indd 42 4/3/2015 4:29:35 PM Aliment Quantité (g) Instructions Beignets de poulet surgelés 300-350 400-450 Répartissez uniformément les beignets de poulet surgelés sur le plat croustilleur. Placez le plat sur la grille supérieure. Laissez reposer 2 à 3 minutes une fois la cuisson terminée. A21 Pâte à pizza 300-500 Placez la pâte dans un bol de taille appropriée et placez celui-ci sur la grille inférieure. Recouvrez d'aluminium. A22 Pâte pour gâteau 500-800 Placez la pâte dans un bol de taille appropriée et placez celui-ci sur la grille inférieure. Recouvrez d'aluminium. A23 Pâte à pain 600-900 Placez la pâte dans un bol de taille appropriée et placez celui-ci sur la grille inférieure. Recouvrez d'aluminium. A24 Yaourt – Petite tasse en céramique 500 Répartissez uniformément 150 g de yaourt nature dans 5 tasses en céramique ou dans des petits ramequins (30 g chacun). Ajoutez 100 ml de lait dans chaque tasse. Utilisez du lait longue conservation (température ambiante ; 3,5 % de matière grasse). Couvrez-les de film plastique et placez-les en cercle sur le plateau tournant. Une fois terminé, placez-les 6 heures au réfrigérateur. Pour la première tentative, nous recommandons d'utiliser un ferment sec de yaourt avec des bactéries. A25 Yaourt – Grand bol en verre 500 Mélangez 150 g de yaourt nature avec 500 ml de lait longue conservation (température ambiante ; 3,5 % de matière grasse). Versez uniformément dans un grand bol en verre. Couvrez-les avec du film plastique et placez-les sur le plateau tournant. Une fois terminé, placez-les 6 heures au réfrigérateur. Pour la première tentative, nous recommandons d'utiliser un ferment sec de yaourt avec des bactéries. REMARQUE Le plateau tournant n'est pas en cours de rotation lors de la fermentation du yaourt. Français 43 MC35J8088CT_SG_DE68-04321B-00_FR.indd 43 4/3/2015 4:29:35 PM Cuisiner intelligemment A20 Cuisiner intelligemment Guide pour la décongélation automatique Aliment Quantité (g) Instructions Viande 200-1500 Protégez les extrémités avec de l'aluminium. Retournez la viande au signal sonore. Ce programme convient à la décongélation du bœuf, de l'agneau, des côtelettes ou des émincés. Laissez reposer 20 à 60 minutes. d2 Volaille 200-1500 Protégez les extrémités des cuisses et des ailes avec de l'aluminium. Retournez la volaille au signal sonore. Ce programme convient aussi bien à la décongélation d'un poulet entier qu'à celle de morceaux. Laissez reposer 20 à 60 minutes. d3 Poisson 200-1500 Protégez la queue d'un poisson entier avec du papier d'aluminium. Retournez le poisson au signal sonore. Ce programme convient aussi bien à la cuisson des poissons entiers qu'à celle des filets. Laissez reposer 20 à 50 minutes. d4 Pain/gâteaux 100-1000 Placez le pain bien à plat sur une feuille de papier absorbant et retournez-le au signal sonore. Posez le gâteau sur une assiette en céramique et, si possible, retournez-le au signal sonore (le four continue de fonctionner et s'arrête automatiquement lorsque vous ouvrez la porte). Ce programme convient à la décongélation de toutes sortes de pains, en tranches ou entier, ainsi qu'à celle des petits pains et des baguettes. Disposez les petits pains en cercle. Ce programme convient à la décongélation de toutes sortes de gâteaux à base de levure ainsi qu'à celle des biscuits, de la tarte au fromage et de la pâte feuilletée. Il n'est pas adapté à la cuisson des pâtes brisées, des gâteaux à la crème et aux fruits ou des gâteaux nappés de chocolat. Laissez reposer 10 à 30 minutes. d5 Fruits 100-600 Répartissez uniformément les fruits dans un récipient en verre à fond plat. Ce programme convient à la décongélation de toutes sortes de fruits. Laissez reposer 5 à 20 minutes. Cuisiner intelligemment d1 44 Français MC35J8088CT_SG_DE68-04321B-00_FR.indd 44 4/3/2015 4:29:35 PM Cuisson manuelle Guide de cuisson au micro-ondes • • • N'utilisez pas de récipients métalliques en mode Micro-ondes. Mettez toujours les récipients alimentaires sur le plateau tournant. Il est recommandé de recouvrir les aliments pour obtenir de meilleurs résultats. Une fois la cuisson terminée, laissez les aliments reposer dans leur propre vapeur. Légumes surgelés • Utilisez un récipient en verre Pyrex avec un couvercle. • Remuez les légumes deux fois pendant la cuisson et une fois après. • Ajoutez l'assaisonnement après la cuisson. Aliment Épinards Brocolis Haricots verts Jardinière de légumes (carottes, petits pois, maïs) Jardinière de légumes (à la chinoise) Puissance (W) Temps de cuisson (min) Temps de repos (min) 150 600 5-7 2-3 Ajoutez 15 ml (1 cuillère à soupe) d'eau froide. 300 600 8-10 2-3 Ajoutez 30 ml (2 cuillère à soupe) d'eau froide. 300 600 7-9 2-3 Cuisiner intelligemment Petits pois Quantité (g) Ajoutez 15 ml (1 cuillère à soupe) d'eau froide. 300 600 7½-9½ 2-3 Ajoutez 30 ml (2 cuillère à soupe) d'eau froide. 300 600 7-9 2-3 Ajoutez 15 ml (1 cuillère à soupe) d'eau froide. 300 600 7½-9½ 2-3 Ajoutez 15 ml (1 cuillère à soupe) d'eau froide. Français 45 MC35J8088CT_SG_DE68-04321B-00_FR.indd 45 4/3/2015 4:29:35 PM Cuisiner intelligemment Légumes frais • Utilisez un récipient en verre Pyrex avec un couvercle. • Ajoutez 30 à 45 ml d'eau froide pour 250 g. • Remuez une fois pendant la cuisson et une fois après. • Ajoutez l'assaisonnement après la cuisson. • Pour une cuisson plus rapide, il est recommandé de couper les aliments avec une taille plus petite et régulière. • Cuisinez tous les légumes frais avec le micro-ondes à pleine puissance (900 W). Aliment Brocolis Quantité (g) Temps de cuisson (min) 250 500 3-4 6-7 Temps de repos (min) 3 Préparez des sommités de taille égale. Disposez les tiges orientées vers le centre. Choux de Bruxelles 250 5-6 3 Ajoutez 60 à 75 ml (4 à 5 cuillères à soupe) d'eau. Carottes 250 4-5 3 Coupez les carottes en rondelles de taille égale. Chou-fleur 250 500 4-5 7-8 3 Cuisiner intelligemment Préparez des sommités de taille égale. Coupez les plus gros morceaux en deux. Orientez les tiges vers le centre. Courgettes 250 3-4 3 Coupez les courgettes en rondelles. Ajoutez 30 ml (2 cuillères à soupe) d'eau ou une noix de beurre. Faites-les cuire jusqu'à ce qu'elles soient tendres. Aubergines 250 3-4 3 Coupez les aubergines en fines rondelles et arrosez-les d'un filet de jus de citron. Poireaux 250 3-4 3 Coupez les poireaux en épaisses rondelles. Champignons 125 250 1-2 2-3 3 Coupez les champignons en morceaux ou prenez des petits champignons entiers. N'ajoutez pas d'eau. Arrosez de jus de citron. Salez et poivrez. Égouttez avant de servir. 46 Français MC35J8088CT_SG_DE68-04321B-00_FR.indd 46 4/3/2015 4:29:35 PM Aliment Oignons Quantité (g) Temps de cuisson (min) Temps de repos (min) 250 4-5 3 Émincez les oignons ou coupez-les en deux. N'ajoutez que 15 ml (1 cuillère à soupe) d'eau. 250 Poivrons 4-5 3 Coupez les poivrons en fines lamelles. 250 500 Pommes de terre 4-5 7-8 3 Pesez les pommes de terre épluchées et coupez-les en deux ou quatre morceaux de taille égale. 250 Chou-rave 5-6 3 Coupez le chou-rave en petits dés. Riz et pâtes Remuez de temps en temps pendant et après la cuisson. Cuisinez sans couvercle et laissez reposer avec le couvercle. Ensuite, égouttez soigneusement. • Riz : Utilisez un grand récipient en verre Pyrex avec un couvercle pour empêcher le riz de doubler de volume. • Pâtes : Utilisez un grand récipient en verre Pyrex. Riz blanc (étuvé) 250 Riz complet (étuvé) 250 375 375 Puissance (W) 900 900 Temps de cuisson (min) 16-18 18-20 22-23 24-25 Temps de repos (min) 5 5 Instructions Ajoutez 500 ml d'eau froide. Ajoutez 750 ml d'eau froide. Ajoutez 500 ml d'eau froide. Ajoutez 750 ml d'eau froide. Riz mélangé (riz blanc + riz sauvage) 250 900 17-19 5 Ajoutez 500 ml d'eau froide. Céréales mélangées (riz + blé) 250 900 19-20 5 Ajoutez 400 ml d'eau froide. Pâtes 250 900 11-13 5 Ajoutez 1 L d'eau froide. Français 47 MC35J8088CT_SG_DE68-04321B-00_FR.indd 47 4/3/2015 4:29:36 PM Cuisiner intelligemment Aliment Quantité (g) Cuisiner intelligemment Réchauffage • Ne réchauffez pas des aliments de trop grande taille (ex : grosse pièce de viande) car une cuisson excessive est vite arrivée. • Il est plus prudent de réchauffer les aliments avec des niveaux de puissance inférieurs. • Remuez bien et retournez pendant et après la cuisson. • Soyez prudents avec les liquides et les aliments pour bébés. Remuez bien avant, pendant et après la cuisson avec une cuillère en plastique ou un bâtonnet à coquetel en verre, afin d'éviter l'ébullition éruptive et les brûlures. Laissez-les reposer dans le four le temps recommandé. Prolongez le temps de réchauffage par rapport à d'autres types d'aliments. • Le temps de repos recommandé est de 2 à 4 minutes après le réchauffage. Voir le tableau cidessous pour plus d’informations. Liquides Aliment Boissons (café, thé, eau) Taille de la portion 250 ml (1 grande tasse) 500 ml (2 grandes tasses) Puissance (W) Temps de cuisson (min) Temps de repos (min) 900 1½-2 3-3½ 1-2 Versez la boisson dans les grandes tasses et faites réchauffer sans couvrir. Une tasse au centre, 2 tasses côte à côte. Laissez-les reposer dans le four à micro-ondes le temps nécessaire et remuez bien. Soupe (réfrigérée) 250 g 450 g 900 3-4 4-5 2-3 Cuisiner intelligemment Versez la soupe dans une assiette creuse ou un bol en céramique. Recouvrez le récipient d'un couvercle en plastique. Remuez bien après le réchauffage. Remuez de nouveau avant de servir. Plat mijoté (réfrigéré) Pâtes en sauce (réfrigérées) 450 g 600 5½-6½ 2-3 Placez le plat mijoté dans une assiette creuse en céramique. Recouvrez le récipient d'un couvercle en plastique. Remuez de temps en temps pendant le réchauffage, puis de nouveau avant de laisser reposer et de servir. 350 g 600 4½-5½ 3 Placez les pâtes (ex : spaghetti ou pâtes aux œufs) dans une assiette plate en céramique. Recouvrez-les de film étirable spécial micro-ondes. Remuez avant de servir. 48 Français MC35J8088CT_SG_DE68-04321B-00_FR.indd 48 4/3/2015 4:29:36 PM Aliment Pâtes farcies en sauce (réfrigérées) Plat préparé (réfrigérés) Taille de la portion Puissance (W) Temps de cuisson (min) Temps de repos (min) 350 g 600 5½-6½ 3 Mettez les pâtes farcies (ex. : ravioli, tortellini) dans une assiette creuse en céramique. Recouvrez le récipient d'un couvercle en plastique. Remuez de temps en temps pendant le réchauffage, puis de nouveau avant de laisser reposer et de servir. 450 g 600 6-7 3 Placez le plat réfrigéré composé de 2 à 3 aliments sur une assiette en céramique. Recouvrez le tout de film étirable spécial micro-ondes. Aliments pour bébé et lait Aliment Aliments pour bébé (légumes + viande) Lait pour bébé Puissance (W) Temps de cuisson (sec) Temps de repos (min) 190 g 600 30 2-3 Versez les aliments dans une assiette creuse en céramique. Faites cuire à couvert. Remuez après la cuisson. Laissez reposer 2 à 3 minutes. Avant de servir, remuez bien et vérifiez la température. 190 g 600 20 2-3 Versez les aliments dans une assiette creuse en céramique. Faites cuire à couvert. Remuez après la cuisson. Laissez reposer 2 à 3 minutes. Avant de servir, remuez bien et vérifiez la température. 100 ml 200 ml 300 30-40 60-70 2-3 Remuez ou agitez bien avant de verser le tout dans un biberon en verre stérilisé. Placez-le au centre du plateau tournant. Faites cuire le tout sans couvrir. Agitez bien et laissez reposer le tout pendant au moins 3 minutes. Avant de servir, agitez bien et vérifiez la température. Français 49 MC35J8088CT_SG_DE68-04321B-00_FR.indd 49 4/3/2015 4:29:36 PM Cuisiner intelligemment Bouillie pour bébé (céréales + lait + fruits) Taille de la portion Cuisiner intelligemment Décongélation Placez les aliments congelés dans un récipient adapté au micro-ondes sans couvercle. Retournezles pendant la décongélation, égouttez-les et retirez les abats après la décongélation. Pour une décongélation plus rapide, coupez les aliments en petits morceaux et enveloppez-les d'aluminium avant la décongélation. Lorsque la surface extérieure des aliments congelés commence à fondre, arrêtez la décongélation et laissez reposer comme indiqué dans le tableau ci-dessous. Ne changez pas le niveau de puissance par défaut (180 W) pour la décongélation. Aliment Viande Viande hachée Quantité (g) Temps de décongélation (min.) 250 500 4-6 9-11 Temps de repos (min) 15-30 Placez la viande dans l'assiette en céramique. Protégez les parties les plus fines avec de l'aluminium. Retournez à la moitié du temps de décongélation. Volaille Morceaux de poulet Poulet entier 500 (2 morceaux) 12-14 1200 28-32 15-60 Posez tout d'abord les morceaux de poulet côté peau vers le bas ou, dans le cas d'un poulet entier, côté poitrine vers le bas, dans une assiette en céramique. Recouvrez les parties les plus fines (ex. : ailes et extrémités) d'aluminium. Retournez à la moitié du temps de décongélation. Poisson Cuisiner intelligemment Filets de poisson 200 6-7 Poisson entier 400 11-13 10-25 Placez le poisson surgelé au centre d'une assiette en céramique. Glissez les parties les plus fines sous les plus épaisses. Recouvrez les extrémités les plus fines des filets et la queue du poisson entier d'aluminium. Retournez à la moitié du temps de décongélation. Fruits Baies 300 6-7 5-10 Disposez les fruits dans un récipient rond en verre et à fond plat (de grand diamètre). Pain Petits pains (50 g chacun) 2 portions 4 portions 1-1½ 2½-3 Tartine/Sandwich 250 4-4½ Pain complet 500 7-9 5-20 Placez une feuille de papier absorbant sur l'assiette en céramique et disposez les petits pains (en cercle) ou le pain (à l'horizontale) dessus. Retournez à la moitié du temps de décongélation. 50 Français MC35J8088CT_SG_DE68-04321B-00_FR.indd 50 4/3/2015 4:29:36 PM Guide de cuisson au gril Les éléments chauffants du gril sont situés sur la paroi supérieure du compartiment de cuisson. Ces éléments fonctionnent uniquement lorsque la porte est fermée et que le plateau tourne. Lorsque vous faites griller des aliments, placez-les sur la grille supérieure, sauf indication contraire. Faites préchauffer le gril pendant 2 à 3 minutes en mode Gril et, sauf indication contraire cidessous, faites griller les aliments sur la grille supérieure. Une fois que vous avez fini de faire griller vos aliments, utilisez des maniques pour les sortir du four. Récipient Gril : Utilisez des récipients ignifuges, qui peuvent avoir des éléments métalliques. N'utilisez pas des ustensiles en plastique, quels qu'ils soient. Micro-ondes + Gril : N'utilisez pas des ustensiles composés de substances en métal ou en plastique. Type d'aliment Côtelettes, saucisses, steaks, hamburgers, tranches de bacon et de jambon fumé, filets de poisson, sandwiches et tous types de tartine garnie. Faire griller Aliment Tartines grillées Taille de la portion Durée de cuisson 1er côté (min) Durée de cuisson 2ème côté (min) gril seul 3½-4½ 2-2½ Cuisiner intelligemment 4 morceaux (25 g chacun) Mode Placez les tartines côte à côte sur la grille supérieure. Tomates grillées 2 morceaux (400 g) 300 W + Gril 6-7 - Coupez les tomates en deux. Parsemez-les d'un peu de fromage. Disposez-les en cercle dans un plat en Pyrex. Placez-les sur la grille supérieure. Laissez reposer 2 à 3 minutes. Tartine tomate + fromage 4 morceaux (300 g) 180 W + Gril 5-6 - Faites d'abord griller les tranches de pain. Placez la tartine garnie sur la grille supérieure. Laissez reposer 2 à 3 minutes. Français 51 MC35J8088CT_SG_DE68-04321B-00_FR.indd 51 4/3/2015 4:29:36 PM Cuisiner intelligemment Aliment Tartine Hawaï Taille de la portion 4 morceaux (500 g) Mode Durée de cuisson 1er côté (min) Durée de cuisson 2ème côté (min) 300 W + Gril 5-6 - Faites d'abord griller les tranches de pain. Placez la tartine garnie sur la grille supérieure. Laissez reposer 2 à 3 minutes. Pommes de terre au four Pommes au four 500 g 450 W + Gril 14-16 - Coupez les pommes de terre en deux. Badigeonnez les pommes de terre d'huile et de persil. Disposez-les en cercle sur la grille supérieure, côté chair tourné vers le gril. 2 pommes 300 W + Gril 6-7 - Retirez le cœur des pommes et farcissez-les de raisins secs et de confiture. Parsemez d'amandes effilées. Disposez les pommes dans un plat en Pyrex. Placez le plat directement sur la grille inférieure. Poulet rôti 1200 à 1300 g 450 W + Gril 19-23 20-24 Badigeonnez le poulet d'huile et saupoudrez d'épices. Placez tout d'abord le poulet poitrine vers le bas, puis vers le haut sur la grille inférieure. Laissez reposer 5 minutes après la cuisson. Morceaux de poulet 500 g (2 morceaux) 300 W + Gril 9-11 8-10 Cuisiner intelligemment Badigeonnez les morceaux de poulet d’huile et d’épices. Disposez-les en cercle sur la grille supérieure. Laissez reposer 2 à 3 minutes après le passage sous le gril. Biftecks (à point) 400 g (2 morceaux) gril seul 8-12 6-10 Badigeonnez les biftecks d'huile. Disposez-les en cercle sur la grille supérieure. Laissez reposer 2 à 3 minutes après le passage sous le gril. Poisson grillé 400 à 500 g 300 W + Gril 6-8 5½-6½ Badigeonnez le poisson d'huile, puis ajoutez des herbes et des épices. Placez deux poissons côte à côte (tête contre queue) sur la grille supérieure. Laissez reposer 2 à 3 minutes après le passage sous le gril. 52 Français MC35J8088CT_SG_DE68-04321B-00_FR.indd 52 4/3/2015 4:29:36 PM Plat croustilleur Nous vous recommandons de faire préchauffer le plat croustilleur pendant qu'il est sur le plateau tournant, pendant 3 à 4 minutes. Aliment Bacon Quantité (g) 80 (4 à 6 tranches) Préchauffage Cuisson Mode Temps (min) Mode Temps (min) 600 W + Gril 3 600 W + Gril 3-4 Faites préchauffer le plat croustilleur. Disposez les tranches côte à côte sur le plat. Posez le plat sur la grille supérieure. Tomates grillées 200 600 W + Gril 3 300 W + Gril 3½-4½ Faites préchauffer le plat croustilleur. Coupez les tomates en deux. Parsemez-les d'un peu de fromage. Disposez-les en cercle sur le plat et placez-les sur la grille supérieure. Pommes de terre en morceaux 250 600 W + Gril 4 450 W + Gril 8-10 Rincez et nettoyez les pommes de terre. Coupez-les en quartiers ou en cubes. Badigeonnez-les d'huile d'olive, de fines herbes et d'épices. Répartissez les cubes uniformément sur le plat. Posez le plat sur la grille supérieure. Retournez au bout de 5 à 7 minutes. 300 600 W + Gril 4 600 W + Gril Cuisiner intelligemment Chicken Nuggets (Beignets de poulet) 6-8 Faites préchauffer le plat croustilleur. Graissez le plat avec 1 c. à soupe d'huile. Disposez les beignets de poulet sur le plat croustilleur. Posez le plat sur la grille supérieure. Retournez au bout de 4 à 5 minutes. Français 53 MC35J8088CT_SG_DE68-04321B-00_FR.indd 53 4/3/2015 4:29:36 PM Cuisiner intelligemment Guide de cuisson à l'air chaud Cuisiner à l'air chaud est une combinaison puissante de l'élément chauffant du gril intérieur et de l'élément chauffant de la bague à convection avec ventilateur sur le côté. De l'air chaud souffle dans le four par le haut du compartiment, à travers des orifices. L'élément chauffant en haut et sur le côté, ainsi que le ventilateur sur la paroi latérale, permettent d'assurer une circulation régulière de l'air chaud. Utilisez ce mode pour des biscuits, des scones individuels, des viennoiseries et des gâteaux, ainsi que des cakes aux fruits, des choux et des soufflés. Tous les ustensiles, moules et plaques à pâtisserie que vous utilisez d'habitude dans un four à convection traditionnel peuvent être utilisés. Aliment Mini-tartes / Minipizzas surgelées Frites au four surgelées Quantité (g) Mode (°C) Temps de cuisson (min) 250 200 9-12 Posez les mini-pizzas sur le plat croustilleur. Posez le plat sur la grille inférieure. 300 200 13-16 Répartissez les frites au four surgelées sur le plat croustilleur. Posez le plat sur la grille inférieure. Beignets de poulet surgelés Cuisiner intelligemment Pizza surgelée 300 200 6-9 Posez les beignets de poulet surgelés sur le plat croustilleur. Posez le plat sur la grille supérieure. 300 200 13-15 Placez la pizza surgelée sur la grille inférieur. Lasagnes/gratin de pâtes fait(es) maison Légumes grillés 500 180 25-30 Mettez les pâtes dans un plat allant au four. Posez le plat sur la grille inférieure. 300 200 6-10 Rincez et préparez les légumes en tranches (par ex. courgette, aubergine, poivron, potiron). Badigeonnez-les d'huile d'olive et ajoutez des épices. Placez-les sur le plat croustilleur sur la grille inférieure. 54 Français MC35J8088CT_SG_DE68-04321B-00_FR.indd 54 4/3/2015 4:29:36 PM Guide d'utilisation de la convection Cuisson par convection En mode Convection, l'élément chauffant et le ventilateur de la paroi latérale fonctionnent ensemble pour assurer la circulation de la chaleur à l'intérieur du compartiment de cuisson. Utilisez ce mode pour des biscuits, des scones individuels, des viennoiseries et des gâteaux, ainsi que des cakes aux fruits, des choux et des soufflés. Tous les ustensiles, moules et plaques à pâtisserie que vous utilisez d'habitude dans un four à convection traditionnel peuvent être utilisés. Micro-ondes + Convection Ce mode de combinaison associe l'énergie du micro-ondes avec de l'air chaud, ce qui a pour conséquence de réduire le temps de cuisson et de produire une surface dorée et croustillante sur les aliments. Le four met 5 modes de combinaison différents à votre disposition. Utilisez-le pour tous les types de viande et de volaille, ainsi que plats en cocotte et gratins, gâteaux de Savoie, gâteaux aux fruits, tartes, crumbles, légumes grillés, scones et pains. Utilisez uniquement des plats adaptés au micro-ondes, comme des récipients en verre, en céramique ou en faïence ne comportant pas d'ornements métalliques. Faites préchauffer le gril avec le Préchauffage rapide, et attendez que le cycle soit terminé. Réglez le niveau de puissance et le temps de cuisson, tels qu'indiqués ci-dessous. Utilisez des maniques pour sortir votre plat du four. Aliment Lasagnes surgelées Rôti de bœuf/ Agneau (à point) Mode Temps de cuisson (min) 300-400 200 °C uniquement 15-17 Placez la pizza sur la grille inférieure. Laissez reposer 2 à 3 minutes après la cuisson. 400 450 W + 200 °C 16-18 Placez-les dans un plat en Pyrex de taille adéquate ou laissez-les dans leur emballage d'origine (si celui-ci est conçu pour la cuisson aux micro-ondes et au four traditionnel). Placez les lasagnes encore surgelées sur la grille inférieure. Laissez reposer 2 à 3 minutes une fois la cuisson terminée. 1000-1200 450 W + 160 °C 18-20 (premier côté) 15-17 (deuxième côté) Badigeonnez le bœuf/l'agneau d'huile et saupoudrez de poivre, sel et paprika. Placez la viande sur la grille inférieure, côté gras vers le bas. Après la cuisson, recouvrez-la de papier d'aluminium et laissez reposer 10 à 15 minutes. Français 55 MC35J8088CT_SG_DE68-04321B-00_FR.indd 55 4/3/2015 4:29:36 PM Cuisiner intelligemment Pizza surgelée (déjà cuite) Quantité (g) Cuisiner intelligemment Aliment Petits pains surgelés Gâteau marbré Quantité (g) Mode Temps de cuisson (min) 350 (6 morceaux) 100 W + 160 °C 6-8 Disposez les petits pains en cercle sur la grille inférieure. Laissez reposer 2 à 3 minutes. 700 180 °C uniquement 70-80 Versez la pâte fraîche dans un petit moule rectangulaire en métal à revêtement noir de 25 cm. Placez le plat sur la grille inférieure. Laissez reposer 5 à 10 minutes après la cuisson. Gâteaux de petite taille Croissants/Petits pains (pâte fraîche) Gâteau surgelé 30 chacun 165 °C uniquement 25-35 Placez jusqu'à 12-15 petits gâteaux / muffins dans des gobelets en papier sur le plat croustilleur. Posez le plat sur la grille inférieure. Laissez reposer 5 minutes après la cuisson. 200-250 200 °C uniquement 13-18 Placez les croissants ou les petits pains surgelés sur du papier sulfurisé sur la grille inférieure. 1000 180 W + 160 °C 16-18 Placez le gâteau surgelé directement sur la grille inférieure. Une fois la décongélation et le préchauffage terminés, laissez reposer pendant 15 à 20 minutes. Cuisiner intelligemment Gratin de pommes de terre fait maison Quiche maison (taille moyenne) Quiche faite maison (grande taille) 500 600 W + 180 °C 5-7 (premier côté) 12-16 (deuxième côté) Faites le gratin dans un plat allant au four. Posez-le sur la grille inférieure. 500-600 170 °C 40-42 Préchauffez le four à 170 °C à l'aide du mode Convection. Préparez la quiche en utilisant une poêle métallique de taille moyenne et posez-la sur la grille inférieure. Reportez-vous à une recette dans le Guide de cuisson automatique à l'air chaud. 900-1000 180 W + 170 °C 38-40 Faites préchauffer le four à 170 °C à l'aide du mode Convection sans le plat croustilleur. Préparez la quiche avec le plat croustilleur et posez-le sur la grille inférieure. Reportez-vous à une recette dans le Guide de cuisson automatique à l'air chaud. 56 Français MC35J8088CT_SG_DE68-04321B-00_FR.indd 56 4/3/2015 4:29:36 PM Simple et rapide Faire fondre du beurre Mettez 50 g de beurre dans un petit plat creux en verre. Recouvrez le récipient d'un couvercle en plastique. Faites chauffer pendant 30 à 40 secondes à 900 W jusqu'à ce que le beurre ait entièrement fondu. Faire fondre du chocolat Mettez 100 g de chocolat dans un petit plat creux en verre. Faites chauffer pendant 3 à 5 minutes à 450 W jusqu'à ce que le chocolat ait entièrement fondu. Remuez une ou deux fois en cours de cuisson. Utilisez des maniques pour sortir le plat du four. Faire fondre du miel cristallisé Mettez 20 g de miel cristallisé dans un petit plat creux en verre. Faites chauffer pendant 20 à 30 secondes à 300 W, jusqu'à ce que le miel ait entièrement fondu. Confectionner un glaçage (pour gâteaux) Mélangez le glaçage instantané (environ 14 g) avec 40 g de sucre et 250 ml d'eau froide. Faites cuire à découvert dans une cocotte en Pyrex pendant 3 ½ à 4 ½ minutes à 900 W, jusqu'à ce que le glaçage devienne transparent. Remuez deux fois en cours de cuisson. Faire cuire du pudding Mélangez la préparation pour pudding avec du sucre et du lait (500 ml) en suivant les instructions du fabricant et remuez bien. Utilisez un bol en verre Pyrex de taille adaptée et munie d’un couvercle. Couvrez et faites cuire pendant 6 ½ à 7 ½ minutes à 900 W. Remuez plusieurs fois en cours de cuisson. Faire dorer des amandes effilées Disposez uniformément 30 g d'amandes effilées sur une assiette en céramique de taille moyenne. Remuez plusieurs fois au cours du brunissage, pendant 3 ½ à 4 ½ minutes à 600 W. Laissez reposer 2 à 3 minutes dans le four. Utilisez des maniques pour sortir le plat du four. Français 57 MC35J8088CT_SG_DE68-04321B-00_FR.indd 57 4/3/2015 4:29:36 PM Cuisiner intelligemment Faire fondre de la gélatine Faites tremper des feuilles de gélatine (10 g) pendant 5 minutes dans de l'eau froide. Placez la gélatine égouttée dans un petit bol en Pyrex. Faites chauffer pendant 1 minute à 300 W. Remuez une fois fondue. Faire de la confiture Mettez 600 g de fruits (ex. : mélange de fruits) dans une cocotte en Pyrex et couvrez. Ajoutez 300 g de sucre spécial confiture et remuez bien. Couvrez et faites cuire pendant 10 à 12 minutes à 900 W. Remuez plusieurs fois en cours de cuisson. Placez directement dans des petits pots à confiture munis de couvercles quart de tour. Laissez reposer 5 minutes à couvert. Dépannage Il est possible que vous rencontriez un problème lors de l'utilisation du four. Si tel est le cas, vérifiez d'abord le tableau ci-dessous et essayez les suggestions proposées. Si un problème persiste, ou si un code d'information continue d'apparaître à l'écran, contactez un centre de service Samsung local. Points à contrôler Si vous rencontrez un problème avec votre four, consultez tout d'abord le tableau ci-dessous et essayez les suggestions. Problème Cause Action Général Les boutons ne peuvent pas être réinitialisés correctement. L'heure n'est pas affichée. Le four ne fonctionne pas. Dépannage Le four s'arrête en cours de fonctionnement. Des corps étrangers peuvent se coincer entre les boutons. Retirez les corps étrangers et réessayez. Pour les modèles tactiles : Il y a de l'humidité à l'extérieur. Essuyez l'humidité à l'extérieur. La sécurité enfants est activée. Désactivez la sécurité enfants. Il n'y a pas d'alimentation. Assurez-vous que la prise est alimentée. La fonction Éco (économie d'énergie) est activée. Désactivez la fonction Éco. Il n'y a pas d'alimentation. Assurez-vous que la prise est alimentée. La porte est ouverte Fermez la porte et réessayez. Les mécanismes de sécurité d'ouverture de la porte sont recouverts de corps étrangers. Retirez les corps étrangers et réessayez. L'utilisateur a ouvert la porte pour retourner les aliments. Après avoir retourné les aliments, appuyez sur le bouton Départ à nouveau pour démarrer le fonctionnement. 58 Français MC35J8088CT_SG_DE68-04321B-00_FR.indd 58 4/3/2015 4:29:36 PM Cause Action L’appareil s'éteint lors du fonctionnement. La four a effectué une très longue cuisson. Après une longue cuisson, laissez le four refroidir. Le ventilateur de refroidissement ne fonctionne pas. Écoutez le bruit émis par le ventilateur de refroidissement. Essayez de faire fonctionner le four sans aliments à l'intérieur. Placez les aliments dans le four. L'espace de ventilation est insuffisant pour le four. Des systèmes d'entrée/ d'évacuation sont présents à l'avant et à l'arrière du four pour la ventilation. Maintenez les espaces spécifiés dans le guide d'installation du produit. Plusieurs fiches d'alimentation sont utilisées dans la même prise. Affectez au four une prise en exclusivité. Le four n'est pas sous tension. Il n'y a pas d'alimentation. Assurez-vous que la prise est alimentée. Un crépitement est audible durant le fonctionnement et le four ne fonctionne pas. La cuisson d'aliments fermés hermétiquement ou utilisant un récipient muni d'un couvercle peut provoquer des bruits de crépitement. N'utilisez pas de récipients fermés hermétiquement car ils peuvent exploser au cours de la cuisson en raison de la dilatation du contenu. L'extérieur du four est trop chaud lors du fonctionnement. L'espace de ventilation est insuffisant pour le four. Des systèmes d'entrée/d'évacuation sont présents à l'avant et à l'arrière du four pour la ventilation. Maintenez les espaces spécifiés dans le guide d'installation du produit. Des objets sont situés sur le four. Retirez tous les objets situés sur le four. Des résidus d'aliments sont collés entre la porte et l'intérieur du four. Nettoyez le four correctement puis ouvrez la porte. La porte ne peut pas être ouverte correctement. Français 59 MC35J8088CT_SG_DE68-04321B-00_FR.indd 59 4/3/2015 4:29:36 PM Dépannage Problème Dépannage Problème Dépannage Cause Action Le four ne chauffe pas. Le four peut ne pas fonctionner, trop d'aliments ont été mis à cuire ou un ustensile incorrect est utilisé. Placez une tasse d'eau dans un récipient adapté aux micro-ondes. et lancez le micro-ondes durant 1 à 2 minutes pour vérifier si l'eau chauffe. Réduire la quantité d'aliments et démarrez à nouveau la fonction. Utilisez un récipient de cuisson à fond plat. Le chauffage est faible ou lent. Le four peut ne pas fonctionner, trop d'aliments ont été mis à cuire ou un ustensile incorrect est utilisé. Placez une tasse d'eau dans un récipient adapté aux micro-ondes. et lancez le micro-ondes durant 1 à 2 minutes pour vérifier si l'eau chauffe. Réduire la quantité d'aliments et démarrez à nouveau la fonction. Utilisez un récipient de cuisson à fond plat. La fonction de maintien au chaud ne fonctionne pas. Le four peut ne pas fonctionner, trop d'aliments ont été mis à cuire ou un ustensile incorrect est utilisé. Placez une tasse d'eau dans un récipient adapté aux micro-ondes. et lancez le micro-ondes durant 1 à 2 minutes pour vérifier si l'eau chauffe. Réduire la quantité d'aliments et démarrez à nouveau la fonction. Utilisez un récipient de cuisson à fond plat. La fonction de décongélation ne fonctionne pas. Le four peut ne pas fonctionner, trop d'aliments ont été mis à cuire ou un ustensile incorrect est utilisé. Placez une tasse d'eau dans un récipient adapté aux micro-ondes. et lancez le micro-ondes durant 1 à 2 minutes pour vérifier si l'eau chauffe. Réduire la quantité d'aliments et démarrez à nouveau la fonction. Utilisez un récipient de cuisson à fond plat. 60 Français MC35J8088CT_SG_DE68-04321B-00_FR.indd 60 4/3/2015 4:29:36 PM Problème Action La porte a été laissée ouverte un long moment. L'éclairage intérieur peut s'éteindre automatiquement lorsque la fonction Éco est activée. Fermez puis ouvrez à nouveau la porte ou appuyez sur le bouton « Annuler ». L'éclairage intérieur est recouvert de corps étrangers. Nettoyez l'intérieur du four puis vérifiez à nouveau. Un signal sonore retentit durant la cuisson. Si la fonction Cuisson automatique est utilisée, ce signal sonore signifie que vous devez retourner les aliments qui sont en cours de décongélation. Après avoir retourné les aliments, appuyez à nouveau sur le bouton Départ pour redémarrer le fonctionnement. Le four n'est pas de niveau. Le four est installé sur une surface irrégulière. Assurez-vous que le four est installé sur une surface plane et stable. Des étincelles apparaissent durant la cuisson. Des récipients métalliques sont utilisés durant l'utilisation du four/de la décongélation. N'utilisez pas de récipients métalliques. Lorsqu'il est sous tension, le four fonctionne immédiatement. La porte n'est pas correctement fermée. Fermez la porte et vérifiez à nouveau. Il y a de l'électricité provenant du four. L'alimentation ou la prise n'est pas correctement reliée à la terre. Assurez-vous que l'alimentation et la prise sont correctement reliées à la terre. De l'eau goutte. Dans certains cas, il se peut qu'il y ait de l'eau ou de la vapeur selon les aliments. Il ne s’agit pas d’un dysfonctionnement du four. Laissez le four refroidir puis essuyez avec un chiffon sec. L'éclairage intérieur est faible ou ne s'allume pas. Français 61 MC35J8088CT_SG_DE68-04321B-00_FR.indd 61 4/3/2015 4:29:36 PM Dépannage Cause Dépannage Problème Cause Action Fuites de vapeur à partir de la porte. Dans certains cas, il se peut qu'il y ait de l'eau ou de la vapeur selon les aliments. Il ne s’agit pas d’un dysfonctionnement du four. Laissez le four refroidir puis essuyez avec un chiffon sec. Il reste de l'eau dans votre four. Dans certains cas, il se peut qu'il y ait de l'eau ou de la vapeur selon les aliments. Il ne s’agit pas d’un dysfonctionnement du four. Laissez le four refroidir puis essuyez avec un chiffon sec. La luminosité à l'intérieur du four varie. La luminosité varie en fonction des changements de puissance selon la fonction utilisée. Les changements de puissance au cours de la cuisson ne constituent pas des dysfonctionnements. Il ne s’agit pas d’un dysfonctionnement du four. La cuisson est terminée, mais le ventilateur de refroidissement fonctionne toujours. Pour ventiler le four, le ventilateur continue de fonctionner environ 5 minutes après la fin de la cuisson. Il ne s’agit pas d’un dysfonctionnement du four. Appuyer sur le bouton +30 sec actionne le four. Cela se produit lorsque le four n'était pas en fonctionnement. Le four micro-ondes est conçu pour fonctionner en appuyant sur le bouton +30 sec lorsqu'il est à l'arrêt. Lorsqu'il tourne; le plateau tournant se déplace ou il cesse de tourner Il n'y a pas l'anneau de guidage, ou de dernier n'est pas positionné correctement. Installez l'anneau de guidage et réessayez. Le plateau tournant frotte lorsqu'il tourne. L'anneau de guidage n'est pas correctement positionné, la quantité d'aliments est trop importante ou le récipient est trop grand et il est en contact avec les parois intérieures du micro-ondes. Ajustez la quantité d'aliments et n'utilisez pas de récipients trop grands. Plateau tournant Dépannage 62 Français MC35J8088CT_SG_DE68-04321B-00_FR.indd 62 4/3/2015 4:29:37 PM Problème Cause Action Le plateau tournant claque lorsqu'il tourne et il est bruyant. Des résidus d'aliments sont collés dans le fond du four. Retirez les résidus d'aliments collés dans le fond du four. Lors du fonctionnement initial, de la fumée peut s'échapper des éléments chauffants lorsque vous utilisez le four pour la première fois. Ceci n'est pas un dysfonctionnement, et si vous lancez le four 2 ou 3 fois, cela doit s'arrêter. Des aliments sont présents sur les éléments chauffants. Laissez le four refroidir et retirez les aliments présents sur les éléments chauffants. Des aliments sont situés trop près du gril. Placez les aliments à une distance raisonnable durant la cuisson. Les aliments ne sont pas correctement préparés et/ou disposés. Assurez-vous que les aliments sont correctement préparés et disposés. Le four ne chauffe pas. La porte est ouverte Fermez la porte et réessayez. De la fumée s'échappe lors du préchauffage. Lors du fonctionnement initial, de la fumée peut s'échapper des éléments chauffants lorsque vous utilisez le four pour la première fois. Ceci n'est pas un dysfonctionnement, et si vous lancez le four 2 ou 3 fois, cela doit s'arrêter. Des aliments sont présents sur les éléments chauffants. Laissez le four refroidir et retirez les aliments présents sur les éléments chauffants. Des ustensiles en plastique ou non résistants à la chaleur sont utilisés. Utilisez des ustensiles en verre adaptés à de hautes températures. Grill (Gril) De la fumée s'échappe lors du fonctionnement. Four Français 63 MC35J8088CT_SG_DE68-04321B-00_FR.indd 63 4/3/2015 4:29:37 PM Dépannage Il y a une odeur de brûlé ou de plastique lorsque vous utilisez le four. Dépannage Problème Cause Action Une mauvaise odeur provient de l'intérieur du four. Des résidus d'aliments ou du plastique a fondu et adhèrent à l'intérieur. Utilisez la fonction de nettoyage vapeur puis essuyez à l'aide d'un chiffon sec. Vous pouvez placer une tranche de citron à l'intérieur et faire fonctionner le four pour retirer plus rapidement l'odeur. Le four ne cuit pas correctement. La porte du four est fréquemment ouverte pendant la cuisson des aliments. N'ouvrez pas fréquemment la porte sauf si vous cuisez des aliments qui doivent être retournés. Si la porte est ouverte souvent, la température intérieure sera abaissée et cela affectera les résultats de votre cuisson. Les commandes du four n'ont pas été correctement configurées Configurez correctement les commandes du four et réessayez. Le gril ou d'autres accessoires ne sont pas insérés correctement. Insérez correctement les accessoires. Des ustensiles de taille ou de type inadapté(e) sont utilisés. Réinitialisez les commandes du four ou utilisez des ustensiles adaptés ayant des fonds plats. Dépannage 64 Français MC35J8088CT_SG_DE68-04321B-00_FR.indd 64 4/3/2015 4:29:37 PM Codes d'information Si le four ne fonctionne pas correctement, un code d'information apparaîtra à l'écran. Vérifiez le tableau ci-dessous et essayez les suggestions proposées. Code C-20 Description Action Le capteur de température est ouvert. Le capteur de température est court-circuité. C-A1 Ce code s'affiche lorsque le four ne détecte pas le registre d'ouverture ou de fermeture pendant 1 minute. C-F0 S'il n'y a aucune communication entre le MICOM principal et secondaire. C-21 Ce code apparaît lorsque la température du four est trop haute. Si la température dépasse la température limite lors du fonctionnement de chaque mode. (Flammes détectées.) Débranchez le cordon d'alimentation du four et contactez un centre de service Samsung local. Débranchez le cordon d'alimentation pendant une durée de refroidissement suffisante, puis redémarrez le four à micro-ondes. Appuyez sur Arrêt ( réessayer. C-d0 Débranchez le cordon d'alimentation pendant une durée de refroidissement suffisante, puis nettoyez le bouton. (Poussière, Eau) Si le même problème apparaît à nouveau, contactez un centre de service Samsung local. La touche tactile connaît un dysfonctionnement. ) pour Français 65 MC35J8088CT_SG_DE68-04321B-00_FR.indd 65 4/3/2015 4:29:37 PM Dépannage C-F2 Caractéristiques techniques SAMSUNG s'efforce sans cesse d'améliorer ses produits. Les caractéristiques et le mode d'emploi de ce produit peuvent être modifiés sans préavis. 230 V ~ 50 Hz Alimentation Consommation électrique Puissance maximale 2950 W Micro-ondes 1450 W Gril 2250 W Cuisson par convection 2500 W Soufflage chaud 2750 W Puissance de sortie 100 W / 900 W (IEC - 705) Fréquence de fonctionnement 2450 MHz Magnétron OM75P (20) Système de refroidissement Moteur de ventilation Dimensions (l x H x P) Unité principale (y compris la poignée) 528 x 404 x 470 mm Enceinte de cuisson 400 x 219 x 396,5 mm 35 litres Capacité Poids Net env. 28,5 kg Caractéristiques techniques 66 Français MC35J8088CT_SG_DE68-04321B-00_FR.indd 66 4/3/2015 4:29:37 PM Notes MC35J8088CT_SG_DE68-04321B-00_FR.indd 67 4/3/2015 4:29:37 PM Veuillez noter que la garantie Samsung n'inclut pas les déplacements du service aprèsvente pour expliquer le fonctionnement de l'appareil, corriger une installation non correcte ou exécuter des travaux de nettoyage ou d'entretien réguliers. UNE QUESTION ? UN COMMENTAIRE ? PAYS N° DE TÉLÉPHONE U.A.E 800-SAMSUNG (800 - 726 7864) SITE INTERNET OMAN 800-SAMSUNG (800 - 726 7864) KUWAIT 183-CALL (183-2255) BAHRAIN 8000-GSAM (8000-4726) QATAR 800-CALL (800-2255) EGYPT 08000-7267864 16580 www.samsung.com/eg/support www.samsung.com/n_africa/support www.samsung.com/ae/support (English) www.samsung.com/ae_ar/support (Arabic) ALGERIA 021 36 11 00 PAKISTAN 0800-Samsung (72678) www.samsung.com/pk/support TUNISIA 80-1000-12 www.samsung.com/n_africa/support JORDAN 0800-22273 06 5777444 www.samsung.com/Levant/support (English) SYRIA 18252273 IRAN 021-8255 www.samsung.com/iran/support MOROCCO 080 100 22 55 www.samsung.com/n_africa/support SAUDI ARABIA 8002474357 www.samsung.com/sa/support www.samsung.com/sa_en/support (English) www.samsung.com/tr/support TURKEY 444 77 11 NIGERIA 0800-726-7864 Ghana 0800-10077 0302-200077 Cote D’Ivoire 8000 0077 SENEGAL 800-00-0077 CAMEROON 7095-0077 KENYA 0800 545 545 UGANDA 0800 300 300 TANZANIA 0800 755 755 / 0685 889 900 RWANDA 9999 BURUNDI 200 DRC 499999 SUDAN 1969 SOUTH AFRICA 0860 SAMSUNG (726 7864) BOTSWANA 8007260000 NAMIBIA 08 197 267 864 ZAMBIA 0211 350370 MAURITIUS 23052574020 REUNION 262508869 MOZAMBIQUE 847267864 / 827267864 www.samsung.com/africa_en/support www.samsung.com/africa_fr/support www.samsung.com/support DE68-04321B-00 MC35J8088CT_SG_DE68-04321B-00_FR.indd 68 4/3/2015 4:29:37 PM Microwave oven User manual MC35J8088** MC35J8088CT_SG_DE68-04321B-00_EN.indd 1 4/3/2015 4:29:22 PM Contents Contents Using this user manual 3 The following symbols are used in this User Manual: 3 Safety instructions 4 IMPORTANT SAFETY INSTRUCTIONS 4 Installation 12 What’s included Installation site Turntable 12 15 15 Maintenance 16 Cleaning Replacement (repair) Care against an extended period of disuse 16 17 17 Before you start 18 Clock Sound On/Off Power saving About microwave energy Cookware for microwave 18 19 19 20 21 Operations 23 Control panel Manual mode Auto mode Special functions 23 26 33 35 Cooking Smart 37 Auto cooking Manual cooking Quick & Easy 37 45 57 Troubleshooting 58 Checkpoints Information codes 58 65 Technical specifications 66 2 English MC35J8088CT_SG_DE68-04321B-00_EN.indd 2 4/3/2015 4:29:22 PM Using this user manual Using this user manual You have just purchased a SAMSUNG microwave oven. Your Owner’s Instructions contains valuable information on cooking with your microwave oven: • Safety precautions • Suitable accessories and cookware • Useful cooking tips • Cooking tips The following symbols are used in this User Manual: WARNING Hazards or unsafe practices that may result in severe personal injury or death. CAUTION Hazards or unsafe practices that may result in minor personal injury or property damage. NOTE Useful tips, recommendations, or information that helps users manipulate the product. English 3 MC35J8088CT_SG_DE68-04321B-00_EN.indd 3 4/3/2015 4:29:22 PM Safety instructions IMPORTANT SAFETY INSTRUCTIONS READ CAREFULLY AND KEEP FOR FUTURE REFERENCE. Safety instructions MAKE SURE THAT THESE SAFETY PRECAUTIONS ARE OBEYED AT ALL TIMES. BEFORE USING THE OVEN, CONFIRM THAT THE FOLLOWING INSTRUCTIONS ARE FOLLOWED. Microwave function only WARNING: If the door or door seals are damaged, the oven must not be operated until it has been repaired by a competent person. WARNING: It is hazardous for anyone other than a competent person to carry out any service or repair operation that involves the removal of a cover which gives protection against exposure to microwave energy. WARNING: Liquids and other foods must not be heated in sealed containers since they are liable to explode. This appliance is intended to be used in household only and it is not intended to be used such as: • • • • staff kitchen areas in shops, offices and other working environments; farm houses; by clients in hotels, motels and other residential environments; bed and breakfast type environments. WARNING: Only allow children to use the oven without supervision when adequate instructions have been given so that the child is able to use the oven in a safe way and understands the hazards of improper use. 4 English MC35J8088CT_SG_DE68-04321B-00_EN.indd 4 4/3/2015 4:29:22 PM Safety instructions WARNING: This appliance can be used by children aged from 8 years and above and persons with reduced physical, sensory or mental capabilities or lack of experience and knowledge if they have been given supervision or instruction concerning use of the appliance in a safe way and understand the hazards involved. Children shall not play with the appliance. Cleaning and user maintenance shall not be made by children unless they are aged from 8 years and above and supervised. Only use utensils that are suitable for use in microwave ovens. When heating food in plastic or paper containers, keep an eye on the oven due to the possibility of ignition. The microwave oven is intended for heating food and beverages. Drying of food or clothing and heating of warming pads, slippers, sponges, damp cloth and similar may lead to risk of injury, ignition or fire. If smoke is emitted (observed), switch off or unplug the appliance and keep the door closed in order to stifle any flames. WARNING: Microwave heating of beverages can result in delayed eruptive boiling, therefore care must be taken when handling the container. WARNING: The contents of feeding bottles and baby food jars shall be stirred or shaken and the temperature checked before consumption, in order to avoid burns. Eggs in their shell and whole hard-boiled eggs should not be heated in microwave ovens since they may explode, even after microwave heating has ended. The oven should be cleaned regularly and any food deposits removed. English 5 MC35J8088CT_SG_DE68-04321B-00_EN.indd 5 4/3/2015 4:29:22 PM Safety instructions Failure to maintain the oven in a clean condition could lead to deterioration of the surface that could adversely affect the life of the appliance and possibly result in a hazardous situation. Safety instructions The appliance is not intended for installing in road vehicles, caravans and similar vehicles etc. This appliance is not intended for use by persons (including children) with reduced physical, sensory or mental capabilities, or lack of experience and knowledge, unless they have been given supervision or instruction concerning use of the appliance by a person responsible for their safety. Children should be supervised to ensure that they do not play with the appliance. If the supply cord is damaged, it must be replaced by the manufacturer, its service agent or similarly qualified persons in order to avoid a hazard. The appliance should not be cleaned with a water jet. This oven should be positioned proper direction and height permitting easy access to cavity and control area. Before using the your oven first time, oven should be operated with the water during 10 minute and then used. If the oven generates a strange noise, a burning smell, or smoke is emitted, unplug the power plug immediately and contact your nearest service center. The microwave oven has to be positioned so that plug is accessible. The microwave oven is intended to be used on the counter top (freestanding) use only, the microwave oven shall not be placed in a cabinet. 6 English MC35J8088CT_SG_DE68-04321B-00_EN.indd 6 4/3/2015 4:29:22 PM Oven function only - Optional During use the appliance becomes hot. Care should be taken to avoid touching heating elements inside the oven. WARNING: Accessible parts may become hot during use. Young children should be kept away. A steam cleaner is not to be used. WARNING: Ensure that the appliance is switched off before replacing the lamp to avoid the possibility of electric shock. Do not use harsh abrasive cleaners or sharp metal scrapers to clean the oven door glass since they can scratch the surface, which may result in shattering of the glass. WARNING: The appliance and its accessible parts become hot during use. Care should be taken to avoid touching heating elements. Children less than 8 years of age shall be kept away unless continuously supervised. This appliance can be used by children aged from 8 years and above and persons with reduced physical, sensory or mental capabilities or lack of experience and knowledge if they have been given supervision or instruction concerning use of the appliance in a safe way and understand the hazards involved. Children shall not play with the appliance. Cleaning and user maintenance shall not be made by children without supervision. English 7 MC35J8088CT_SG_DE68-04321B-00_EN.indd 7 4/3/2015 4:29:22 PM Safety instructions WARNING: When the appliance is operated in the combination mode, children should only use the oven under adult supervision due to the temperatures generated. Safety instructions The temperature of accessible surfaces may be high when the appliance is operating. Safety instructions The door or the outer surface may get hot when the appliance is operating. Keep the appliance and its cord out of reach of children less than 8 years. Appliances are not intended to be operated by means of an external timer or separate remote-control system. General safety WARNING Only qualified staff should be allowed to modify or repair the appliance. Do not heat liquids and other food in sealed containers for microwave function. For your safety, do not use high-pressure water cleaners or steam jet cleaners. Do not install this appliance; near heater, inflammable material; in a humid, oily or dusty location, in a location exposed to direct sunlight and water or where gas may leak; on un level ground. This appliance must be properly grounded in accordance with local and national codes. Remove all foreign substances such as dust or water from the power plug terminals and contact points using a dry cloth on a regular basis. Do not pull or excessively bend or place heavy objecton the power cord. In the event of a gas leak (such as propane gas, LP gas, etc.), ventilate immediately without touching the power plug. Do not touch the power plug with wet hands. Do not turn the appliance off by unplugging the power plug while an operation is in progress. Do not insert fingers or foreign substances, If any foreign substance such as water has entered the appliance, unplug the power plug and contact your nearest service centre. Do not apply excessive pressure or impact to the appliance. Do not place the oven over a fragile object such as a sink or glass object. 8 English MC35J8088CT_SG_DE68-04321B-00_EN.indd 8 4/3/2015 4:29:22 PM Do not use benzene, thinner, alcohol, steam cleaner or high pressure cleaner to clean the appliance. Ensure that the power voltage, frequency and current are the same as those of the product specifications. Do not hook the power cord on a metal object, insert the power cord between the objects or behind the oven. Do not use a damaged power plug, damaged power cord or loose wall socket. When the power plug or power cord is damaged, contact your nearest service centre. Do not pour or directly spray water onto the oven. Do not place objects on the oven, inside or on the door of the oven. Do not spray volatile material such as insecticide onto the surface of the oven. Do not store flammable materials in the oven. Take special care when heating dishes or drinks that contain alcohol as alcohol vapours may contact a hot part of the oven. Keep children away from the door when opening or closing it as they may bump themselves on the door or catch their fingers in the door. WARNING: Microwave heating of beverages can result in delayed eruptive boiling, therefore care must be taken when handling the container; To prevent this situation ALWAYS allow a standing time of at least 20 seconds after the oven has been switched off so that the temperature can equalize. Stir during heating, if necessary, and ALWAYS stir after heating. In the event of scalding, follow these FIRST AID instructions: • Immerse the scalded area in cold water for at least 10 minutes. • Cover with a clean, dry dressing. • Do not apply any creams, oils or lotions. Do not put the tray or rack in water shortly after cooking because it may cause breakage or damage of the tray or rack. Do not operate the microwave oven for deep fat frying because the oil temperature cannot be controlled. This could result in a sudden boil over of the hot liquid. CAUTION Only use utensils that are suitable for use in microwave ovens; DO NOT use any metallic containers, Dinnerware with gold or silver trimmings, Skewers, forks, etc. Remove wire twist ties from paper or plastic bags. English 9 MC35J8088CT_SG_DE68-04321B-00_EN.indd 9 4/3/2015 4:29:22 PM Safety instructions Plug the power plug into the wall socket firmly. Do not use a multiple plug adapter, an extension cord or an electric transformer. Safety instructions Reason: Electric arcing or sparking may occur and may damage the oven. Do not use your microwave oven to dry papers or clothes. Use shorter times for smaller amounts of food to prevent overheating and burning food. Safety instructions Do not immerse the power cable or power plug in water and keep the power cable away from heat. Eggs in their shell and whole hard-boiled eggs should not be heated in microwave ovens since they may explode, even after microwave heating has ended; Also do not heat airtight or vacuum-sealed bottles, jars, containers, nuts inshells, tomatoes etc. Do not cover the ventilation slots with cloth or paper. They may catch fire as hot air escapes from the oven. The oven may also overheat and switch itself off automatically, and will remain off until it cools sufficiently. Always use oven mitts when removing a dish from the oven to avoid unintentional burns. Stir liquids halfway during heating or after heating ends and allow the liquid stand at least 20 seconds after heating to prevent eruptive boiling. Stand at arms length from the oven when opening the door to avoid getting scalded by escaping hot air or steam. Do not operate the microwave oven when it is empty. The microwave oven will automatically shut down for 30 minutes for safety purposes. We recommend placing a glass of water inside the oven at all times to absorb microwave energy in case the microwave oven is started accidentally. Install the oven in compliance with the clearances stated in this manual. (See installing your microwave oven.) Take care when connecting other electrical appliances to sockets near the oven. Precautions to avoid possible exposure to excessive microwave energy. (Microwave function only) Failure to observe the following safety precautions may result in harmful exposure to microwave energy. A. Under no circumstances should any attempt be made to operate the oven with the door open or to tamper with the safety interlocks (door latches) or to insert anything into the safety interlock holes. 10 English MC35J8088CT_SG_DE68-04321B-00_EN.indd 10 4/3/2015 4:29:22 PM Samsung will charge a repair fee for replacing an accessory or repairing a cosmetic defect if the damage to the unit and/or damage to or loss of the accessory was caused by the customer. Items this stipulation covers include: A. A dented, scratched, or broken door, handle, out-panel, or control panel. B. A broken or missing tray, guide roller, coupler, or wire rack. • Use this appliance only for its intended purpose as described in this instruction manual. Warnings and Important Safety Instructions in this manual do not cover all possible conditions and situations that may occur. It is your responsibility to use common sense, caution, and care when installing, maintaining, and operating your appliance. • Because these following operating instructions cover various models, the characteristics of your microwave oven may differ slightly from those described in this manual and not all warning signs may be applicable. If you have any questions or concerns, contact your nearest service centre or find help and information online at www.samsung.com. • This microwave oven is supposed for heating food. It is intended for domestic home-use only. Do not heat any type of textiles or cushions filled with grains, which could cause burns and fire. The manufacturer cannot be held liable for damage caused by improper or incorrect use of the appliance. • Failure to maintain the oven in a clean condition could lead to deterioration of the surface that could adversely affect the life of the appliance and possible result in a hazardous situation. English 11 MC35J8088CT_SG_DE68-04321B-00_EN.indd 11 4/3/2015 4:29:22 PM Safety instructions B. Do NOT place any object between the oven door and front face or allow food or cleaner residues to accumulate on sealing surfaces. Ensure that the door and door sealing surfaces are kept clean by wiping after use first with a damp cloth and then with a soft dry cloth. C. Do NOT operate the oven if it is damaged until it has been repaired by a qualified microwave service technician trained by the manufacturer. It is particularly important that the oven door closes properly and that there is no damage to the: 1) door (bent) 2) door hinges (broken or loose) 3) door seals and sealing surfaces D. The oven should not be adjusted or repaired by anyone other than a properly qualified microwave service technician trained by the manufacturer. Installation What’s included Make sure all parts and accessories are included in the product package. If you have a problem with the oven or accessories, contact a local Samsung customer centre or the retailer. Oven at a glance Installation 01 02 03 01 Control panel 04 02 Safety Door Lock 03 Door Handle 04 Door 12 English MC35J8088CT_SG_DE68-04321B-00_EN.indd 12 4/3/2015 4:29:23 PM Accessories The oven comes with different accessories that help you prepare different types of food. Turntable Crusty plate Low rack High rack Pro Steamer Installation Roller ring English 13 MC35J8088CT_SG_DE68-04321B-00_EN.indd 13 4/3/2015 4:29:24 PM Installation Put in the centre of the base. It supports the turntable. Turntable Put on the roller ring with the centre fitting the coupler. It serves as a cooking base. Racks Use one of these racks as appropriate to cook two dishes simultaneously. A smaller dish on the turntable, and the other on the selected rack. You can use these racks with Grill Convection or Combination Cooking. Installation Roller ring NOTE Do not use wire racks with Microwave mode. Crusty plate Put on the turntable. Use this to brown food, or to keep pastries or pizza crisp. Pro Steamer Pro Steamer is a set of the stainless-steel cover, steam tray, and Crusty plate, which is designed for steam cooking. Use this to brown food such as pastry and pizza dough with Microwave or Grill Convection mode. NOTE • Do not operate the oven without the turntable on the roller ring. 14 English MC35J8088CT_SG_DE68-04321B-00_EN.indd 14 4/3/2015 4:29:24 PM Installation site 04 02 03 01 02 03 04 85 cm from the floor 10 cm from the rear wall 10 cm from the side 20 cm from above Turntable Remove all packing materials inside the oven.Install the roller ring and turntable. Check that the turntable rotates freely. English 15 MC35J8088CT_SG_DE68-04321B-00_EN.indd 15 4/3/2015 4:29:24 PM Installation 01 • Select a flat, level surface approx. 85 cm above the floor. The surface must support the weight of the oven. • Secure room for ventilation, at least 10 cm from the rear wall and both sides, and 20 cm from above. • Do not install the oven in hot or damp surroundings, such as next to other microwave ovens or radiators. • Conform to the power supply specifications of this oven. Use only approved extension cables if you need to use. • Wipe the interior and the door seal with a damp cloth before using your oven for the first time. Maintenance Cleaning Clean the oven regularly to prevent impurities from building up on or inside the oven. Also pay special attention to the door, door sealing, and turntable and roller ring (applicable models only). If the door won’t open or close smoothly, first check if the door seals have built up impurities. Use a soft cloth in soapy water to clean both the inner and outer sides of the oven. Rinse and dry well. To remove stubborn impurities with bad smells from inside the oven Maintenance 1. With an empty oven, put a cup of diluted lemon juice on the centre of the turntable. 2. Heat the oven for 10 minutes at max power. 3. When the cycle is complete, wait until the oven cools down. Then, open the door and clean the cooking chamber. To clean inside swing-heater models A To clean the upper area of the cooking chamber, lower the top heating element by 45 ° (A) as shown. This will help clean the upper area. When done, reposition the top heating element. CAUTION • Keep the door and door sealing clean and ensure the door opens and closes smoothly. Otherwise, the oven’s lifecycle may be shortened. • Take caution not to spill water into the oven vents. • Do not use any abrasive or chemical substances for cleaning. • After each use of the oven, use a mild detergent to clean the cooking chamber after waiting for the oven to cool down. 16 English MC35J8088CT_SG_DE68-04321B-00_EN.indd 16 4/3/2015 4:29:24 PM Replacement (repair) WARNING Care against an extended period of disuse • If you don’t use the oven for an extended period of time, unplug the power cord and move the oven to a dry, dust-free location. Dust and moisture that builds up inside the oven may affect the performance of the oven. English 17 MC35J8088CT_SG_DE68-04321B-00_EN.indd 17 4/3/2015 4:29:24 PM Maintenance This oven has no user-removable parts inside. Do not try to replace or repair the oven yourself. • If you encounter a problem • If you encounter a problem with hinges, sealing, and/or with the outer housing of the the door, contact a qualified oven, first unplug the power technician or a local Samsung cord from the power source, service centre for technical and then contact a local assistance. Samsung service centre. • If you want to replace the light bulb, contact a local Samsung service centre. Do not replace it yourself. Before you start There are a couple of components that you should know before going directly to a recipe. Before or during any cooking mode, you can set/change the clock or the kitchen timer to your needs. Clock It is important to set the correct clock time to ensure correct automatic operations. 1. Turn on the oven and wait for several seconds to enter Standby state. The hour element blinks. 2. Use the arrow buttons to set the hour, and then press OK. The minute element blinks. Before you start 3. Use the arrow buttons to set the minute, and then press OK. NOTE • • To change the current time later, hold down the up arrow ( ) for 3 seconds and follow the above steps. The clock time cannot be changed during operations. 18 English MC35J8088CT_SG_DE68-04321B-00_EN.indd 18 4/3/2015 4:29:25 PM Sound On/Off You can turn on or off the key tone, beep, or alarm. This setting is available only in Standby state (when the current time is displayed). To mute the sound, hold down for 3 seconds. “OFF” appears on the display. To unmute the sound, hold down again for 3 seconds. “ON” appears on the display. To reduce power consumption, press for 1 second. This setting is available only in Standby state (when the current time is displayed). NOTE • • When setting the oven after 5 minutes of user inactivity, the oven cancels any ongoing operation and enters Standby state. If the oven is paused for over 25 minutes while cooking, the oven enters Standby state. English 19 MC35J8088CT_SG_DE68-04321B-00_EN.indd 19 4/3/2015 4:29:26 PM Before you start Power saving Before you start About microwave energy Microwaves are high-frequency electromagnetic waves. The oven uses the prebuilt magnetron to generate microwaves which are used to cook or reheat food without deforming or discolouring the food. Before you start 1. The microwaves generated by the magnetron are distributed uniformly through the whirling distribution system. This is why the food is cooked evenly. 2. The microwaves are absorbed down to the food up to a depth of approx. 2.5 cm. Then, the microwaves are dissipated inside the food as cooking continues. 3. The cooking time is affected by the following conditions of the food. • Quantity and density • Moisture content • Initial temperature (especially, when frozen) NOTE The cooked food keeps heat in its core after cooking is complete. This is why you must respect the standing time specified in this manual, which ensures cooking evenly down to the core. 20 English MC35J8088CT_SG_DE68-04321B-00_EN.indd 20 4/3/2015 4:29:26 PM Cookware for microwave Cookware used for Microwave Mode must allow microwaves to pass through and penetrate food. Metals such as stainless steel, aluminum and copper reflect microwaves. Therefore, do not use cookware made of metallic materials. Cookware marked microwave - safe is always safe for use. For additional information on appropriate cookware refer to the following guide and place a glass of water or some food on the turntable. Requirements: • • • Flat bottom and straight sides Tight-fitting lid Well-balanced pan with handles that weigh less than the main pan Material Microwavesafe Description Crusty plate Do not use for preheating for more than 8 minutes. Bone china or earthenware Porcelain, pottery, glazed earthenware and bone china are usually microwavesafe, unless decorated with a metal trim. Disposable polyester cardboard dishes Some frozen foods are packaged in these dishes. Fast-food packaging Polystyrene cups or containers Overheating may cause these to melt. Paper bags or newspaper These may catch fire. Recycled paper or metal trims These may cause arcing English 21 MC35J8088CT_SG_DE68-04321B-00_EN.indd 21 4/3/2015 4:29:26 PM Before you start Aluminium foil Use for a small serving size to protect against overcooking. Arcing can occur if the foil is near the oven wall or if using an excessive amount of foil. Before you start Material Glassware Microwavesafe Description Oven-to-table ware Microwave-safe unless decorated with metal trims. Fine glassware Delicate glassware may break or crack by rapid heating. Glass jars Appropriate for warming only. Remove the lid before cooking. Dishes Metal Paper These may cause arcing or fire. Freezer bag with twist-ties Before you start Plates, cups, napkins, and kitchen paper Use to cook for a short time. These absorb excess moisture. Recycled paper Causes arcing. Containers Use thermoplastic containers only. Some plastics may warp or discolour at high temperatures. Cling film Use to maintain moisture after cooking. Freezer bags Use boilable or ovenproof bags only. Plastic Use to maintain moisture and prevent spattering. Wax or grease-proof paper : Microwave safe : Use caution : Microwave unsafe 22 English MC35J8088CT_SG_DE68-04321B-00_EN.indd 22 4/3/2015 4:29:26 PM Operations Control panel The front panel comes in a wide range of materials and colours. For improved quality, the actual appearance of the oven is subject to change without notice. 04 05 07 09 01 02 03 06 08 10 11 Press to turn the oven on or off. 02 Feature panel Press to select a desired cooking mode or function. 03 Display Shows necessary information of selected function or settings. 04 Up / Down Use to adjust the setting value for your selection. 05 OK Press to confirm your settings. 06 Back Press to return to the default setting. 07 Temperature/ Power Level Use to change the temperature or power level. 08 Turntable Press to toggle on and off the turntable. 09 Start Press to start cooking. This button is also used to fast preheat the oven at maximum power level. 10 Stop Press to stop operation. This button is also used to cancel the current mode. 11 Child Lock Press and hold for 3 seconds to activate or deactivate. Child Lock is available only in Standby state. NOTE • Standby state: After 5 minutes of inactivity on the control panel, the oven enters Standby state where only the current time is displayed. After 25 more minutes of inactivity, the oven enters Stop state. • Stop state: When the oven restarts after powering off, only the relevant buttons to the last user action are lit. To switch to Standby state, press Power again. English 23 MC35J8088CT_SG_DE68-04321B-00_EN.indd 23 4/3/2015 4:29:26 PM Operations 01 Power Operations Feature overview Feature Hot Blast Temperature range Default temperature Max. time 160-230 °C 200 °C 60 min. Hot Blast is similar to Convection mode. However, the heating elements generate stronger heat and distribute stronger air current inside the oven. This is designed to cook faster while keeping or improving the taste. 40-230 °C Convection Manual mode Operations Grill Grill Combo 180 °C 450 W 60 min. The heating elements generate heat and the convection fan distributes the heat inside the oven, which is reinforced by the microwave energy. 100-900 W Microwave 60 min. The heating elements generate heat, which is evenly distributed inside the oven by the convection fan. Use this mode for frozen food or baking. 40-200 °C 100-450 W Convection Combo 180 °C 900 W 90 min. The microwave energy enables food to be cooked or reheated without changing either the form or the colour. 180 °C 180 °C 60 min. Use this for grilling food such as meat. 180 °C 100-600 W 180 °C 600 W 60 min. The heating elements generate heat, which is reinforced by the microwave energy. 24 English MC35J8088CT_SG_DE68-04321B-00_EN.indd 24 4/3/2015 4:29:27 PM Temperature range Feature Auto mode Special functions Default temperature Max. time Hot Blast Auto To accommodate first-time users of Hot Blast mode, the oven offers 10 auto programmes. Auto For cooking beginners, the oven offers a total of 25 auto cooking programmes. Power Defrost The oven offers 5 defrosting programmes for your convenience. 50-80 °C Keep Warm 60 °C 3 hrs. Use this only for keeping foods warm that have just been cooked. Operations English 25 MC35J8088CT_SG_DE68-04321B-00_EN.indd 25 4/3/2015 4:29:28 PM Operations Manual mode Step 1. Select mode On the feature panel, press a manual mode., for example, Convection. The default temperature (or power level) blinks. Step 2. Set temperaure or Power level Use the / buttons to adjust the default temperature (or power level). When done, press OK to move to the time elements. NOTE Operations The power level, unless otherwise mentioned, is adjusted according to the set temperature. If the power level or temperature is not specified within 5 seconds, the oven moves to the cooking time session. Step 3. Set cooking time Use the / buttons to set the cooking time. When done, press START ( ). NOTE You can set cooking time after preheating. Step 4. Preheat The oven starts preheating until it reaches the set temperature. When complete, the oven beeps and the indicator disappears. 26 English MC35J8088CT_SG_DE68-04321B-00_EN.indd 26 4/3/2015 4:29:28 PM CAUTION • Always use oven gloves while taking out food. • Microwave oven may operate for 5 minutes to be cooled when the temperature of oven cavity is hot after cooking. will be displayed. To change the cooking time during cooking Use the / buttons to adjust the cooking time. Your changes will be applied instantly, and the oven resumes cooking with the new settings. To change the temperature or power level during cooking 1. Press . The temperature (or power level) element blinks. To stop operation Press Stop ( ) once to stop operation, or twice to cancel the current mode and enter Standby state. English 27 MC35J8088CT_SG_DE68-04321B-00_EN.indd 27 4/3/2015 4:29:29 PM Operations 2. Use the / buttons to adjust the temperature (or power level), and then press OK or to confirm the changes. Operations Hot Blast Hot Blast is similar to Convection mode. However, the heating elements generate stronger heat and distribute stronger air current inside the oven. This is designed to cook faster while keeping or improving the taste. You can use the Low rack, or combination of the Low rack and Crusty plate on the turntable. Step 1 Hot Blast > Step 2 Temperature > Step 3 Cooking time > Step 4 Preheating 1. Put the Low rack, or combination of the Low rack and Crusty plate on the turntable. 2. Put food in suitable cookware, then on the rack, and then close the door. 3. Follow steps 1-4 in the Manual mode on page 26. 4. When cooking is complete, “0:00” blinks. Use oven gloves to take out food. Operations CAUTION Do not use this mode for baking breads, or cooking confectionery. The stronger heat can burn the top of the foods. 28 English MC35J8088CT_SG_DE68-04321B-00_EN.indd 28 4/3/2015 4:29:30 PM Convection The heating elements generate heat, which is evenly distributed inside the oven by the convection fan. You can use the Low rack, or combination of the Low rack and Crusty plate on the turntable. Use this mode for biscuits, individual scones, rolls, and cakes as well as fruit cakes, choux, and soufflés. Step 1 Convection > Step 2 Temperature > Step 3 Cooking time > Step 4 Preheating 1. Put the Low rack, or combination of the Low rack and Crusty plate on the turntable. 2. Put food in suitable cookware, then on the rack, and then close the door. 3. Follow steps 1-4 in the Manual mode on page 26. 4. When cooking is complete, “0:00” blinks. Use oven gloves to take out food. Operations English 29 MC35J8088CT_SG_DE68-04321B-00_EN.indd 29 4/3/2015 4:29:30 PM Operations Convection Combo This combination mode combines the microwave energy with hot air, resulting in reduced cooking time and producing a brown, crispy surface of the food. Use this for all kinds of meat and poultry as well as casseroles and gratin dishes, sponge cakes and light fruit cakes, pies and crumbles, roast vegetables, scones, and breads. Step 1 Convection Combo > Step 2 Temperature and Power level Step 3 > Cooking time Step 4 > Preheating 1. Put the Low rack, or the combination of the Low rack and Crusty plate on the turntable. 2. Put food in suitable cookware, then on the rack, and then close the door. 3. Follow steps 1-4 in the Manual mode on page 26. 4. When cooking is complete, “0:00” blinks. Use oven gloves to take out food. Operations CAUTION Use only ovenproof cookware, such as glasses, potteries, or bone china without metal trim. 30 English MC35J8088CT_SG_DE68-04321B-00_EN.indd 30 4/3/2015 4:29:30 PM Microwave Microwaves are high-frequency electromagnetic waves. The microwave energy enables food to be cooked or reheated without changing either the form or the colour. • Use only microwave-safe cookware. Step 1 Microwave > Step 2 Power level Step 3 Cooking time > > Step 4 - 1. Put food in a microwave-safe container, then in the centre of the turntable. Close the door. 2. Follow steps 1-3 in the Manual mode on page 26. 3. When cooking is complete, “0:00” blinks. Use oven gloves to take out food. Simple start To simply heat food for a short period of time at maximum power (900 W), select Microwave, and then press START ( ). Power level Percentage (%) Output power (W) 100 900 HIGH LOW 83 750 MEDIUM HIGH 67 600 MEDIUM 50 450 MEDIUM LOW 33 300 Use to cook meat and heat up vegetables. DEFROST 20 180 Use to defrost before cooking. LOW 11 100 Use to defrost vegetables. HIGH Description Operations Level Use to heat up liquid. Use to heat up and cook. English 31 MC35J8088CT_SG_DE68-04321B-00_EN.indd 31 4/3/2015 4:29:30 PM Operations Grill The heating elements generate heat. Make sure they are in the horizontal position. Step 1 Grill > Step 2 - > Step 3 Cooking time > Step 4 - 1. Put the High rack, or the combination of High rack and Crusty plate on the turntable. 2. Put food in suitable cookware, then on the rack, and then close the door. 3. Follow steps 1 and 3 in the Manual mode on page 26. 4. When cooking is complete, “0:00” blinks. Use oven gloves to take out food. Grill Combo Operations The heating elements generate heat, which is reinforced by the microwave energy. Use only microwave-safe cookware, such as glass or ceramic cookware. Step 1 Grill Combo > Step 2 Power level > Step 3 Cooking time > Step 4 - 1. Put the High rack, or the combination of High rack and Crusty plate on the turntable. 2. Put food in suitable cookware, then on the rack, and then close the door. 3. Follow steps 1-3 in the Manual mode on page 26. 4. When cooking is complete, “0:00” blinks. Use oven gloves to take out food. 32 English MC35J8088CT_SG_DE68-04321B-00_EN.indd 32 4/3/2015 4:29:30 PM Auto mode The oven offers 3 different auto modes for your convenience: Hot Blast Auto, Auto Cook, and Power Defrost. Select one that best fits your needs. Step 1. Select mode On the feature panel, press an auto mode, for example, Hot Blast Auto. The default programme number blinks. Step 2. Select programme Use the / buttons to select a preferred programme, and then press OK. The default weight for the programme blinks. Step 3. Set serving size or weight CAUTION Always use oven gloves while taking out food. NOTE The cooking time is pre-programmed according to the auto mode, which cannot be changed. English 33 MC35J8088CT_SG_DE68-04321B-00_EN.indd 33 4/3/2015 4:29:31 PM Operations Use the / buttons to set the serving size (or weight). When done, press START ( ). Operations Hot Blast Auto Hot Blast is similar to Convection mode. However, the heating elements generate stronger heat and distribute stronger air current inside the oven. This is designed to cook faster while keeping or improving the taste. To accommodate first-time users of Hot Blast mode, the oven offers 10 auto programmes. Step 1 Hot Blast Auto > Step 2 1 to 10 > Step 3 Serving size 1. Put food in suitable cookware, then on the turntable, and then close the door. 2. Follow steps 1-3 in the Auto mode on page 33. 3. When cooking is complete, “0:00” blinks. Use oven gloves to take out food. CAUTION Do not use this mode for baking breads, or cooking confectionery. The stronger heat can burn the top of the foods. Auto Cook Operations For cooking beginners, the oven offers a total of 25 auto cooking programmes. Take advantage of this feature to save you time or shorten your learning curve. The cooking time and temperature will be adjusted according to the selected recipe. Step 1 Auto > Step 2 1 to 25 > Step 3 Serving size 1. Put food in suitable cookware, then on the turntable, and then close the door. 2. Follow steps 1-3 in the Auto mode on page 33. 3. When cooking is complete, “0:00” blinks. Use oven gloves to take out food. 34 English MC35J8088CT_SG_DE68-04321B-00_EN.indd 34 4/3/2015 4:29:31 PM Power Defrost The oven offers 5 defrosting programmes for your convenience. The time and power level are automatically adjusted according to the selected programme. Step 1 Power Defrost > Step 2 1 to 5 > Step 3 weight 1. Put food in suitable cookware, then on the turntable, and then close the door. 2. Follow steps 1-3 in the Auto mode on page 33. 3. When cooking is complete, “0:00” blinks. Use oven gloves to take out food. Special functions Keep Warm With this function, only the convection heating element operates, and it cycles on and off to keep food warm. Operations When cooking is complete, 1. On the feature panel, press . The default temperature (60 °C) blinks. 2. Use the / buttons to adjust the temperature, and then press OK to move to the time element. 3. Use the / buttons to set the time, and then press START ( ). The oven starts warming. English 35 MC35J8088CT_SG_DE68-04321B-00_EN.indd 35 4/3/2015 4:29:31 PM Operations CAUTION • • • • NOTE Always use oven gloves while taking out food. Do not use this function to reheat cold foods. Use this only for keeping foods warm that have just been cooked. Do not run this function for more than 3 hour. Otherwise, this may affect the food quality. To keep food crispy, do not cover the food with Keep Warm. To change the temperature during the cycle, press , and repeat step 2 above. Keep Warm guide Food Operations Temperature (°C) Standing time (min.) Directions Meals 80 30 For keeping meat, chicken, gratin, pizza, potatoes, and plated meals warm. Drinks 80 30 For keeping water, milk, and coffee warm. Breads/ pastries 60 30 For keeping bread, toast, rolls, muffins, and cake warm. Dishes/ crockery 70 30 For preheating dishes and crockery. Arrange the dishes over the turntable. Do not overload. (maximum load: 7 kg) 36 English MC35J8088CT_SG_DE68-04321B-00_EN.indd 36 4/3/2015 4:29:32 PM Cooking Smart Auto cooking Hot Blast Auto guide Food Serving size (g) Directions Frozen Pan Pizza 400-450 Remove a package and place the Pizza on a low rack. Put in the oven. After cooking, stand for 2-3 minutes. H2 Homemade Pizza 500-550 Ingredients • Pizza dough (200-220 g) 150 g strong white bread flour, 3 g dried yeast, 0.5 tbsp olive oil, 100 ml warm water, 0.5 tbsp sugar and salt • Topping 100 g Sliced Vegetables, 100 g Tomato puree, 80-100 g grated Mozzarella cheese Method Put the flour, yeast, oil, salt and warm water in a bowl and mix to a wettish dough. Knead in a mixer or by hand about 5-10 mins. Cover with lid and prove for 30 min. Roll out into crusty plate. Spread the tomato puree on the dough and add vegetables. Sprinkle cheese evenly on top. put them on the low rack. After cooking, stand for 2-3 minutes. English 37 MC35J8088CT_SG_DE68-04321B-00_EN.indd 37 4/3/2015 4:29:32 PM Cooking Smart H1 Cooking Smart Food Serving size (g) Directions Homemade Lasagne 1000-1100 Ingredients 2 tbsp olive oil, 500 g minced beef, 100 g tomato sauce, 100 ml beef stock, 150 g dried lasagne sheets, 1 onion (chopped) 1 tsp each of dried parsley flakes, oregano, basil, 200 g grated mozzarella cheese Method Sauce: Heat the oil in a frying pan, then cook the minced beef and chopped onion for about 10 min until browned all over. Pour over the tomato sauce and beef stock, add the dried herbs. Bring up to the boil, then simmer for 10 min. Use dried, precooked lasagna noodles. Layer noodle, meat sauce, and cheese then repeat. Then sprinkle evenly with remaining mozzarella cheese on the top of noodles and put them on the low rack. After cooking, stand for 2-3 minutes. H4 Homemade Gratin 600-650 1200-1250 Ingredients (1200-1250 g) 800 g potatoes, 100 ml milk, 100 ml cream, 50 g beaten whole egg, 1 tsp each of salt, pepper, nutmeg, 150 g grated mozzarella cheese, butter, thyme * In case of 600-650 g, Use half quantity. Method Peel potatoes and slice them to 3 mm thickness. Rub the butter all over the surface of a gratin dish, about 18 x 28 cm. Spread the slices on a clean towel and keep them covered with the towel while you prepare the rest of the ingredients. Mix the rest of the ingredients except for grated cheese into a large bowl and stir well. Layer the potato slices in the dish slightly overlapping and pour the mixture over the potatoes. Spread the grated cheese over the top and bake. Put them on the low rack. After cooking, serve sprinkled with a few fresh thyme leaves. After cooking, stand for 2-3 minutes. Cooking Smart H3 38 English MC35J8088CT_SG_DE68-04321B-00_EN.indd 38 4/3/2015 4:29:32 PM Food Serving size (g) Directions H5 Frozen French Fries 300-350 400-450 Distribute frozen oven chips evenly on the crusty plate. Set plate on low rack. After cooking, stand for 2-3 minutes. H6 Frozen Buffalo Wings 400-450 500-550 Put the Frozen Buffalo wings (pre-cooked and spiced) on a crusty plate. Set plate on high rack. Put them in the oven. After cooking, stand for 2-3 minutes. H7 Roast Chicken Pieces 500-600 900-1000 Weigh chicken pieces and brush with oil and spices. Place them evenly on high rack. When the beep sounds, turn the chicken over and press start to continue. After cooking, stand for 2-3 minutes. H8 Roast Chicken 1200-1300 H9 Beef Steak Pie 500-600 Brush the chicken oil and spices fully. Put Breast side down first, in the middle of low rack. When the beep sounds, turn the chicken over by using tongs and press the start to continue. After cooking, stand for 2-3 minutes. English 39 MC35J8088CT_SG_DE68-04321B-00_EN.indd 39 4/3/2015 4:29:32 PM Cooking Smart Ingredients 200 g beef, cubed, 1 tbsp olive oil, 1/2 onion(sliced), 80 g mushroom(sliced), 1 tbsp each of parsley and thyme, chopped, 1 tbsp Worcestershire sauce, salt and pepper, 2 tbsp flour, 100 ml hot beef stock,120 g ready-made pastry dough, 1 egg yolk (beaten) Method Sprinkle the beef with four, salt and pepper. Fry them in a frying pan with oil, stirring frequently until browned. Add onion, mushroom, parsley, thyme, Worcestershire sauce and beef stock and broil. After broiling, reduce to simmer for an hour. Pour the filling mixture to an oven dish and cover with the pie pastry sheet and press the edge together to seal. Decorate with pastry trimming with knife and fork. Cut cross the top and brush with beaten egg yolk. Put them on the low rack. After cooking, stand for 2-3 minutes. Cooking Smart Food H10 Homemade Mini Quiche Serving size (g) Directions 400-500 Ingredients • Pastry 200 g plain flour, 80 g butter, 1 egg • Mixture 30 g bacon, cubed, 60 g Cream, 60 g Cream fraiche, 2 egg, 40 g grated cheese, salt and pepper Method To make the pastry, put the flour, butter and eggs in a bowl and mix to a soften pastry and then rest it in the refrigerator for 30 mins. Roll out the pastry and place in buttered metal tins (like muffin mould for 6 mini quiches). Mix the cream, cubed bacon, cream fraiche, egg, cheese, salt, pepper and pour the mixture into the moulds. Put them on the low rack. After cooking, stand for 5 minutes. Serving size (g) Directions Auto cook guide Food Cooking Smart A1 Frozen Lasagne 400-450 Put frozen lasagne into a suitable sized ovenproof dish. Put dish on low rack. After cooking, stand for 3-4 min. A2 Frozen Thin Pizza 300-350 400-450 Put frozen pizza on the low rack. After cooking, stand for 1-2 min. A3 Plated Meal (3 components) 300-350 400-450 Put on a ceramic plate and cover with microwave cling film. This programme is suitable for meals consisting of 3 components (e.g. meat with sauce, vegetables and a side dish like potatoes, rice or pasta). After cooking, stand for 2-3 minutes. A4 Ready Meal (1 component) 300-350 400-450 Put on a ceramic plate and cover with microwave cling film. After cooking, stand for 2-3 minutes. 40 English MC35J8088CT_SG_DE68-04321B-00_EN.indd 40 4/3/2015 4:29:32 PM Food Serving size (g) Directions A5 Roast Fish 300-400 500-600 Brush skin of whole fish (trout or gilthead) with oil and add herbs and spices. Put fish side by side, head to tail on the high rack. Turnover as soon as the beep sounds. After cooking, stand for 2-3 minutes. A6 Roast Beef 800-1000 1200-1400 A8 Grilled Chicken Breasts 300-400 500-600 Rinse chicken breast, marinate and put them on the high rack. Turnover as soon as the beep sounds. After cooking, stand for 2-3 minutes. A9 Grilled Salmon Fillets 300-400 500-600 Brush salmon fillets with oil and spice. Put fish steaks evenly on the high rack. Turnover as soon as the beep sounds. After cooking, stand for 2-3 minutes. A10 Grilled Fish Fillets 500-600 Brush fish fillets with oil and spice. Put fish fillets evenly on the high rack. Turnover as soon as the beep sounds. After cooking, stand for 2-3 minutes. A11 Frozen Bread Rolls 400-500 Put frozen bread rolls on the low rack. After cooking, stand for 1-2 minutes. A12 Brownies 700-750 Put pre-mixture, egg, water, sunflower oil in a bowl and mix well. Pour mixture in a glass tray on the low rack. After cooking, stand for 10 minutes. As your preference, you can put some nuts in brownie. A13 Roast Vegetables 200-250 300-350 Slice fresh vegetables (e.g. pieces of pepper, onions, courgette slices and mushrooms) and brush oil, spice. Put them on crusty plate. Set plate on the high rack. After cooking, stand for 2-3 minutes. A14 Frozen Potato Croquettes 300-350 400-450 Distribute frozen potato croquettes evenly on the crusty plate. Set plate on low rack. After cooking, stand for 2-3 minutes. Brush beef with oil and spice it with pepper and salt. Put it on the low rack, first with the fat side down. After cooking, wrap in aluminium foil and stand for 10-15 minutes. MC35J8088CT_SG_DE68-04321B-00_EN.indd 41 4/3/2015 4:29:32 PM Cooking Smart English 41 Cooking Smart Food Serving size (g) Directions Cooking Smart A15 Homemade French Fries 300-350 400-450 Peel potatoes and cut into sticks with a thickness of 10x10 mm. Soak in cold water (for 30 min.). Dry them with a towel, weigh them and brush with 5 g oil and spice. Distribute homemade fries evenly on the crusty plate. Set plate on low rack. After cooking, stand for 2-3 minutes. A16 Potato Wedges 300-350 400-450 Wash normal sized potatoes and cut them into wedges. Brush with olive oil and spices. Put them with the cut side on the crusty plate. Set plate on high rack. After cooking, stand for 2-3 minutes. A17 Frozen Onion Rings 200-250 300-350 Distribute frozen onion rings evenly on the crusty plate. Set plate on low rack. After cooking, stand for 2-3 minutes. A18 Frozen Prawns 300-350 400-450 Distribute frozen prawns evenly on the crusty plate. Set plate on low rack. After cooking, stand for 2-3 minutes. A19 Frozen Fried Squids 200-250 300-350 Distribute frozen fried squids evenly on the crusty plate. Set plate on low rack. After cooking, stand for 2-3 minutes. A20 Frozen Chicken Nuggets 300-350 400-450 Distribute frozen chicken nuggets evenly on the crusty plate. Set plate on high rack. After cooking, stand for 2-3 minutes. A21 Pizza Dough 300-500 Put dough in suitable sized bowl and set on the low rack. Cover with aluminium foil. A22 Cake Dough 500-800 Put dough in suitable sized bowl and set on the low rack. Cover with aluminium foil. A23 Bread Dough 600-900 Put dough in suitable sized bowl and set on the low rack. Cover with aluminium foil. 42 English MC35J8088CT_SG_DE68-04321B-00_EN.indd 42 4/3/2015 4:29:32 PM Food Serving size (g) Directions A24 Yogurt – Small Ceramic Cup 500 Distribute 150 g natural yogurt into 5 ceramic cups or small glass jars evenly (30 g each). Add 100 ml milk into each cup. Use long-life milk (room-temperature; 3.5 % fat). Cover each with cling film and set in a circle on turntable. After finish, keep 6 hours in a refrigerator. For the first time we recommend to use dried yogurt bacteria ferment. A25 Yogurt – Large Glass Bowl 500 Mix 150 g natural yogurt with 500 ml long-life milk (room-temperature; 3.5 % fat). Pour evenly into large glass bowl. Cover with cling film and set on turntable. After finish, keep 6 hours in a refrigerator. For the first time we recommend to use dried yogurt bacteria ferment. NOTE The turntable is not rotating while fermenting yogurt. Cooking Smart English 43 MC35J8088CT_SG_DE68-04321B-00_EN.indd 43 4/3/2015 4:29:32 PM Cooking Smart Power Defrost guide Food Serving size (g) Directions Meat 200-1500 Shield the edges with aluminium foil. Turn the meat over, when the oven beeps. This programme is suitable for beef, lamb, steaks, chops, minced meat. Stand for 20-60 minutes. d2 Poultry 200-1500 Shield the leg and wing tips with aluminium foil. Turn the poultry over, when the oven beeps. This programme is suitable for whole chicken as well as for chicken portions. Stand for 20-60 minutes. d3 Fish 200-1500 Shield the tail of a whole fish with aluminium foil. Turn the fish over, when the oven beeps. This programme is suitable for whole fishes as well as for fish fillets. Stand for 20-50 minutes. d4 Bread/Cake 100-1000 Put bread horizontally on a piece of kitchen paper and turn over, as soon as the oven beeps. Place cake on a ceramic plate and if possible, turn over, as soon as the oven beeps. (Oven keeps operating and is stopped, when you open the door.) This programme is suitable for all kinds of bread, sliced or whole, as well as for bread rolls and baguettes. Arrange bread rolls in a circle. This programme is suitable for all kinds of yeast cake, biscuit, cheese cake and puff pastry. It is not suitable for short/ crust pastry, fruit and cream cakes as well as for cake with chocolate topping. Stand for 10-30 minutes. d5 Fruit Cooking Smart d1 100-600 Spread fruits evenly into a flat glass dish. This programme is suitable for all kind of fruits. Stand for 5-20 minutes. 44 English MC35J8088CT_SG_DE68-04321B-00_EN.indd 44 4/3/2015 4:29:32 PM Manual cooking Microwave cooking guide • • • Do not use metal containers with Microwave mode. Always put food containers on the turntable. It is recommended to cover the food for best results. After cooking is complete, let the food settle in its own steam. Frozen vegetables • Use a glass Pyrex container with a lid. • Stir vegetables twice during cooking, and once after cooking. • Add seasoning after cooking. Food Spinach Broccoli Peas Mixed vegetables (carrots, peas, corn) Mixed vegetables (Chinese style) Power (W) Cooking time (min.) Standing time (min.) 150 600 5-7 2-3 8-10 2-3 7-9 2-3 7½-9½ 2-3 7-9 2-3 7½-9½ 2-3 Add 15 ml (1 tbsp.) of cold water. 300 600 Add 30 ml (2 tbsp.) of cold water. 300 600 Add 15 ml (1 tbsp.) of cold water. 300 600 Cooking Smart Green beans Serving size (g) Add 30 ml (2 tbsp.) of cold water. 300 600 Add 15 ml (1 tbsp.) of cold water. 300 600 Add 15 ml (1 tbsp.) of cold water. English 45 MC35J8088CT_SG_DE68-04321B-00_EN.indd 45 4/3/2015 4:29:32 PM Cooking Smart Fresh vegetables • Use a glass Pyrex container with a lid. • Add 30-45 ml of cold water for every 250 g. • Stir once during cooking, and once after cooking. • Add seasoning after cooking. • For faster cooking, it is recommended to cut into smaller, even sizes. • Cook all fresh vegetables using full microwave power (900 W). Food Broccoli Serving size (g) Cooking time (min.) Standing time (min.) 250 500 3-4 6-7 3 Prepare even sized florets. Arrange the stems to the centre Brussels sprouts 250 5-6 3 Add 60–75 ml (4-5 tbsp.) of water. Carrots 250 4-5 3 Cut carrots into even sized slices. Cauliflower 250 500 4-5 7-8 3 Prepare even sized florets. Cut big florets into halves. Arrange stems to the centre. Courgettes 250 3-4 3 Cooking Smart Cut courgettes into slices. Add 30 ml (2 tbsp.) of water or a knob of butter. Cook until just tender. Egg Plants 250 3-4 3 Cut egg plants into small slices and sprinkle with 1 tablespoon lemon juice. Leeks 250 3-4 3 1-2 2-3 3 Cut leeks into thick slices. Mushrooms 125 250 Prepare small whole or sliced mushrooms. Do not add any water. Sprinkle with lemon juice. Spice with salt and pepper. Drain before serving. 46 English MC35J8088CT_SG_DE68-04321B-00_EN.indd 46 4/3/2015 4:29:32 PM Food Serving size (g) Cooking time (min.) Standing time (min.) 250 4-5 3 Onions Cut onions into slices or halves. Add only 15 ml (1 tbsp.) water. 250 Peppers 4-5 3 4-5 7-8 3 Cut pepper into small slices. 250 500 Potatoes Weigh the peeled potatoes and cut them into similar sized halves or quarters. 250 Turnip cabbage 5-6 3 Cut turnip cabbage into small cubes. Rice and pasta Stir from time to time during and after cooking. Cook uncovered, and close the lid during settling. Then, drain water thoroughly. • Rice: Use a large glass Pyrex container with a lid against the rice doubling in volume. • Pasta: Use a large glass Pyrex container. Food Brown rice (parboiled) Power (W) 250 Cooking time (min.) Standing time (min.) 16-18 900 5 Directions Add 500 ml of cold water. 375 18-20 Add 750 ml of cold water. 250 22-23 Add 500 ml of cold water. 900 375 5 24-25 Add 750 ml of cold water. Mixed rice (rice + wild rice) 250 900 17-19 5 Add 500 ml of cold water. Mixed corn (rice + grain) 250 900 19-20 5 Add 400 ml of cold water. Pasta 250 900 11-13 5 Add 1000 ml of hot water. English 47 MC35J8088CT_SG_DE68-04321B-00_EN.indd 47 4/3/2015 4:29:32 PM Cooking Smart White rice (parboiled) Serving size (g) Cooking Smart Reheating • Do not reheat large-sized foods such as joints of meat, which easily overcook. • It is safer to reheat foods at lower power levels. • Stir well or turn over during and after cooking. • Use caution for liquids or baby foods. Stir well before, during, and after cooking with a plastic spoon or glass stirring stick to prevent eruptive boiling and scalding. Keep them inside the oven during the standing time. Allow a longer reheating time than other food types. • Recommended standing time after reheating is 2-4 minutes. See the table below for reference. Liquids Food Drinks (coffee, tea, water) Serving size Power (W) 250 ml (1 mug) 500 ml (2 mugs) 900 Cooking time (min.) Standing time (min.) 1½- 2 3 – 3½ 1-2 Pour into mugs and reheat uncovered: 1 cup in the centre, 2 cups side by side. Keep in microwave oven during standing time and stir well. Soup (chilled) 250 g 450 g 900 3-4 4-5 2-3 Pour into a deep ceramic plate or deep ceramic bowl. Cover with plastic lid. Stir well after reheating. Stir again before serving. Cooking Smart Stew (chilled) 450 g 600 5½ – 6½ 2-3 Put stew in a deep ceramic plate. Cover with plastic lid. Stir occasionally during reheating and again before standing and serving. Pasta with sauce (chilled) Filled pasta with sauce (chilled) 350 g 600 4½ – 5½ 3 Put pasta (e.g. spaghetti or egg noodles) on a flat ceramic plate. Cover with microwave cling film. Stir before serving. 350 g 600 5½ – 6½ 3 Put filled pasta (e.g. ravioli, tortellini) in a deep ceramic plate. Cover with plastic lid. Stir occasionally during reheating and again before standing and serving. 48 English MC35J8088CT_SG_DE68-04321B-00_EN.indd 48 4/3/2015 4:29:33 PM Food Plated meal (chilled) Serving size Power (W) Cooking time (min.) Standing time (min.) 450 g 600 6-7 3 Plate a meal of 2-3 chilled components on a ceramic dish. Cover with microwave cling-film. Baby foods & milk Food Serving size Power (W) Cooking time (sec.) Standing time (min.) Baby food (vegetables + meat) 190 g 600 30 2-3 Baby porridge (grain + milk + fruit) Baby milk Put into ceramic deep plate. Cook covered. Stir after cooking time. Stand for 2-3 minutes. Before serving, stir well and check the temperature carefully. 190 g 600 20 2-3 Put into ceramic deep plate. Cook covered. Stir after cooking time. Stand for 2-3 minutes. Before serving, stir well and check the temperature carefully. 100 ml 200 ml 300 30-40 60-70 2-3 English 49 MC35J8088CT_SG_DE68-04321B-00_EN.indd 49 4/3/2015 4:29:33 PM Cooking Smart Stir or shake well and pour into a sterilized glass bottle. Place into the centre of turn-table. Cook uncovered. Shake well and stand for at least 3 minutes. Before serving, shake well and check the temperature carefully. Cooking Smart Defrost Put frozen food in a microwave-safe container without a cover. Turn over during defrosting, and drain off liquid and remove giblets after defrosting. For faster defrosting, cut the food into small pieces, and wrap them with aluminum foil before defrosting. When the outer surface of frozen foods begins to melt, stop defrosting and let stand as instructed in the table below. Do not change the default power level (180 W) for defrosting. Food Meat Minced meat Serving size (g) Defrosting time (min.) Standing time (min.) 250 500 4-6 9-11 15-30 Place the meat on the ceramic plate. Shield thinner edges with aluminium foil. Turn over after half of defrosting time! Poultry Chicken pieces 500 (2 pcs.) 12-14 Whole chicken 1200 28-32 15-60 First, put chicken pieces first skin-side down, whole chicken first breast-sidedown on ceramic plate. Shield the thinner parts like wings and ends with aluminium foil. Turn over after half of defrosting time! Fish Fish fillets 200 6-7 Whole fish 400 11-13 10-25 Cooking Smart Put frozen fish in the middle of ceramic plate. Arrange the thinner parts under the thicker parts. Shield narrow ends of fillets and tail of whole fish With aluminium foil. Turn over after half of defrosting time! Fruit Berries 300 6-7 5-10 Spread fruit on a flat, round glass dish (with a large diameter). Bread Bread rolls (each ca. 50 g) 2 pcs 4 pcs 1-1½ 2½-3 Toast/sandwich 250 4-4½ German bread 500 7-9 5-20 Arrange rolls in a circle or bread horizontally on kitchen paper on the ceramic plate. Turn over after half of defrosting time! 50 English MC35J8088CT_SG_DE68-04321B-00_EN.indd 50 4/3/2015 4:29:33 PM Grilling guide The grill-heating elements are located on the ceiling of the cooking chamber. These elements operate only when the door is closed and the turntable is rotating. When grilling food, put the food on the high rack unless otherwise instructed. Preheat the grill for 2-3 minutes with Grill mode, and, unless otherwise instructed below, grill food on the high rack. When grilling is complete, use oven gloves to take out the food. Cookware Grill: Use flameproof containers, which may include metal parts. Do not use plastic cookware of any kind. Microwave + Grill: Do not use cookware that is made of metal or plastic substances. Food type Chops, sausages, steaks, hamburgers, bacon and gammon rashers, thin fish portions, sandwiches, and all kinds of toast with toppings. Grilling Food Serving size Mode Cooking time (1st side) (min.) Cooking time (2nd side) (min.) Toast Slices 4 pcs. (each 25 g) Grill only 3½-4½ 2-2½ Put toast slices side by side on the high rack. Grilled tomatoes 2 pcs. (400 g) 300 W + Grill 6-7 - Tomato + cheese toast Toast Hawaii 4 pcs. (300 g) 180 W + Grill 5-6 - Toast the bread slices first. Put the toast with topping on the high rack. Stand for 2-3 minutes 4 pcs. (500 g) 300 W + Grill 5-6 - Toast the bread slices first. Put the toast with topping on the high rack. Stand for 2-3 minutes. Baked potatoes 500 g 450 W + Grill 14-16 - Cut potatoes into halves. Brush potatoes with oil and parsley. Put them in a circle on the high rack with the cut side to the grill. English 51 MC35J8088CT_SG_DE68-04321B-00_EN.indd 51 4/3/2015 4:29:33 PM Cooking Smart Cut tomatoes into halves. Put some cheese on top. Arrange in a circle in a flat glass pyrex dish. Place it on the high rack. Stand for 2-3 minutes. Cooking Smart Food Baked apples Serving size Mode Cooking time (1st side) (min.) Cooking time (2nd side) (min.) 2 apples 300 W + Grill 6-7 - Core the apples and fill them with raisins and jam. Put some almond slices on top. Put apples on a flat glass pyrex dish. Place the dish directly on the low rack. Roast Chicken 1200-1300 g 450 W + Grill 19-23 20-24 Brush chicken with oil and spices. Put chicken first breast side down, second side breast side up on the low rack. After cooking stand for 5 minutes. Chicken pieces 500 g (2 pcs.) 300 W + Grill 9-11 8-10 Brush chicken pieces with oil and spices. Put them in a circle on the high rack. After grilling stand for 2-3 minutes. Beef steaks (medium) 400 g (2 pcs.) Grill only 8-12 6-10 Brush the beef steaks with oil. Lay them in a circle on the high rack. After grilling stand for 2-3 minutes. Roast fish 400-500 g 300 W + Grill 6-8 5½-6½ Cooking Smart Brush skin of whole fish with oil and add herbs and spices. Put two fish side by side (head to tail) on the high rack. After grilling stand for 2-3 minutes. Crusty plate We recommend you to preheat the crusty plate while it’s on the turntable for 3-4 minutes. Food Bacon Serving size (g) 80 (4-6 slices) Preheat Cooking Mode Time (min.) Mode Time (min.) 600 W + Grill 3 600 W + Grill 3-4 Preheat crusty plate. Put slices side by side on crusty plate. Put plate on high rack. 52 English MC35J8088CT_SG_DE68-04321B-00_EN.indd 52 4/3/2015 4:29:33 PM Food Serving size (g) Grilled tomatoes 200 Preheat Cooking Mode Time (min.) Mode Time (min.) 600 W + Grill 3 300 W + Grill 3½-4½ Preheat crusty plate. Cut tomatoes in halves. Put some cheese on top. Arrange in a circle on plate and set on high rack. Potato wedges 250 600 W + Grill 4 450 W + Grill 8-10 Rinse and clean potatoes. Cut into wedges or cubes. Brush with olive oil, herbs and spices. Distribute cubes evenly on plate. Put plate on high rack. Turn over after 5-7 minutes. Chicken nuggets 300 600 W + Grill 4 600 W + Grill 6-8 Preheat crusty plate. Brush plate with 1 tbsp. oil. Put chicken nuggets on crusty plate. Put plate on the high rack. Turn over after 4-5 minutes. Cooking Smart English 53 MC35J8088CT_SG_DE68-04321B-00_EN.indd 53 4/3/2015 4:29:33 PM Cooking Smart Hot blast guide Cooking with hot blast is a powerful combination of the inner grill heater and the convection ring heater with fan at side. The hot air blows from the top of the cavity through holes into the oven. The heating element at top and side and the fan at the side-wall, keeps the hot air circulating evenly. Use this mode for biscuits, individual scones, rolls, and cakes as well as fruit cakes, choux, and soufflés. All conventional ovenproof cookware, baking tins and sheets – anything you would normally use in a traditional convection oven – can be used. Food Frozen mini tartes/ pizza snacks Frozen Oven Chips Serving size (g) Mode (°C) Cooking Time (min.) 250 200 9-12 Put pizza snacks on the crusty plate. Put plate on low rack. 300 200 13-16 Distribute frozen oven chips on crusty plate. Put plate on low rack. Frozen chicken nuggets Frozen Pizza 300 200 6-9 Put frozen nuggets on crusty plate. Put plate on the high rack. 300 200 13-15 Put frozen Pizza on the low rack. Homemade Lasagna/ Pasta Gratin Cooking Smart Roast Vegetables 500 180 25-30 Put pasta in ovenproof dish. Put dish on low rack. 300 200 6-10 Rinse and prepare vegetables in slices (e.g. courgette, egg plants, pepper, pumpkin). Brush with olive oil and add spices. Put on crusty plate on low rack. 54 English MC35J8088CT_SG_DE68-04321B-00_EN.indd 54 4/3/2015 4:29:33 PM Convection guide Convection In Convection mode, both the heating element and the side-wall fan operate together to circulate the heat inside the cooking chamber. Use this mode for biscuits, individual scones, rolls, and cakes as well as fruit cakes, choux, and soufflés. All conventional ovenproof cookware, baking tins and sheets – anything you would normally use in a traditional convection oven – can be used. Microwaves+Convection This combination mode combines the microwave energy with hot air, resulting in reduced cooking time and producing a brown, crispy surface of the food. The oven offers 5 different combination modes for your convenience. Use this for all kinds of meat and poultry as well as casseroles and gratin dishes, sponge cakes and light fruit cakes, pies and crumbles, roast vegetables, scones, and breads. Use only ovenproof cookware, such as glasses, potteries, or bone china without metal trim. Preheat the grill with Fast Preheat, and wait until the cycle is complete. Set the power level and cooking time as instructed below. Use oven gloves when taking out food. Food Frozen Pizza (ready baked) Frozen lasagne Serving size (g) Mode Cooking Time (min.) 300-400 Only 200 °C 15-17 Place the pizza on the low rack. After baking stand for 2-3 minutes 400 450 W + 200 °C 16-18 Roast beef/lamb (medium) 1000-1200 450 W + 160 °C 18-20 (first side) 15-17 (second side) Brush beef/ lamb with oil and spice it with pepper, salt and paprika. Put it on the low rack, first with the fat side down. After cooking wrap in aluminium foil and stand for 10-15 minutes. Frozen bread rolls 350 (6 pcs.) 100 W + 160 °C 6-8 Put bread rolls in a circle on the low rack. Stand 2-3 minutes. English 55 MC35J8088CT_SG_DE68-04321B-00_EN.indd 55 4/3/2015 4:29:33 PM Cooking Smart Put into a suitable sized glass pyrex dish or leave in the original packaging (take care that this is suitable for microwaves and oven heat). Put frozen lasagne on the low rack. After cooking stand for 2-3 minutes. Cooking Smart Food Marble cake Serving size (g) Mode Cooking Time (min.) 700 Only 180 °C 70-80 Put the fresh dough in a small rectangular black metal baking dish (length 25 cm). Put the dish on the low rack. After baking stand for 5-10 minutes. Small Cakes each 30 Only 165°C 25-35 Put up to 12-15 small cakes / muffins in paper cups on crusty plate. Put plate on low rack. After baking stand for 5 minutes. Croissants/bread rolls (fresh dough) Frozen cake 200-250 Only 200 °C 13-18 Put the chilled croissants or bread rolls on baking paper on the low rack. 1000 180 W + 160 °C 16-18 Put the frozen cake directly on the low rack. After defrost and warming keep standing for 15-20 minutes. Homemade Potato Gratin 500 600 W + 180 °C 5-7 (first side) 12-16 (second side) Put Gratin in ovenproof dish. Set on low rack. Homemade Quiche (Medium size) Cooking Smart Homemade quiche (Large size) 500-600 170 °C 40-42 Preheat oven for 170 °C by using convection mode. Prepare quiche using metal medium size pan and put on low rack. Refer a recipe in Hot Blast auto cook guide. 900-1000 180 W + 170 °C 38-40 Preheat oven for 170 °C by using convection mode without crusty plate. Prepare quiche using crusty plate and put on low rack. Refer a recipe in Hot Blast auto cook guide. 56 English MC35J8088CT_SG_DE68-04321B-00_EN.indd 56 4/3/2015 4:29:33 PM Quick & Easy Melting butter Put 50 g butter into a small deep glass dish. Cover with plastic lid. Heat for 30-40 seconds using 900 W, until butter is melted. Melting chocolate Put 100 g chocolate into a small deep glass dish. Heat for 3-5 minutes, using 450 W until chocolate is melted. Stir once or twice during melting. Use oven gloves while taking out! Meltng crystallized honey Put 20 g crystallized honey into a small deep glass dish. Heat for 20-30 seconds using 300 W, until honey is melted. Melting gelatine Lay dry gelatine sheets (10 g) for 5 minutes into cold water. Put drained gelatine into a small glass pyrex bowl. Heat for 1 minute using 300 W. Stir after melting. Cooking pudding Mix pudding powder with sugar and milk (500 ml) by following the manufacturers instructions and stir well. Use a suitable sized glass pyrex bowl with lid. Cook covered for 6 ½ to 7 ½ minutes using 900 W. Stir several times well during cooking. Browning almond slices Spread 30 g sliced almonds evenly on a medium sized ceramic plate. Stir several times during browning for 3 ½ to 4 ½ minutes using 600 W. Let it stand for 2-3 minutes in the oven. Use oven gloves while taking out! English 57 MC35J8088CT_SG_DE68-04321B-00_EN.indd 57 4/3/2015 4:29:33 PM Cooking Smart Cooking glaze/icing (for cake and gateaux) Mix instant glaze (approximately 14 g) with 40 g sugar and 250 ml cold water. Cook uncovered in a glass pyrex bowl for 3 ½ to 4 ½ minutes using 900 W, until glaze/icing is transparent. Stir twice during cooking. Cooking jam Put 600 g fruits (for example mixed berries) in a suitable sized glass pyrex bowl with lid. Add 300 g preserving sugar and stir well. Cook covered for 10-12 minutes using 900 W. Stir several times during cooking. Put directly into small jam glasses with twist-off lids. Stand on lid for 5 minutes. Troubleshooting You may encounter a problem using the oven. In that case, first check the table below and try the suggestions. If a problem persists, or if any information code keeps appearing on the display, contact a local Samsung service centre. Checkpoints If you encounter a problem with the oven, first check the table below and try the suggestions. Problem Cause Action General Foreign matter may be caught between the buttons. Remove the foreign matter and try again. For touch models: Moisture is on the exterior. Wipe the moisture from the exterior. Child lock is activated. Deactivate Child lock. The time is not displayed. Power is not supplied. Make sure power is supplied. The Eco (power-saving) function is set. Turn off the Eco function. The oven does not work. Power is not supplied. Make sure power is supplied. The door is open. Close the door and try again. The door open safety mechanisms are covered in foreign matter. Remove the foreign matter and try again. The user has opened the door to turn food over. After turning over the food, press the Start button again to start operation. The buttons cannot be pressed properly. The oven stops while in operation. Troubleshooting 58 English MC35J8088CT_SG_DE68-04321B-00_EN.indd 58 4/3/2015 4:29:33 PM Problem Cause Action After cooking for an extended period of time, let the oven cool. The cooling fan is not working. Listen for the sound of the cooling fan. Trying to operate the oven without food inside. Put food in the oven. There is not sufficient ventilation space for the oven. There are intake/exhaust outlets on the front and rear of the oven for ventilation. Keep the gaps specified in the product installation guide. Several power plugs are being used in the same socket. Designate only one socket to be used for the oven. There is no power to the oven. Power is not supplied. Make sure power is supplied. There is a popping sound during operation, and the oven doesn't work. Cooking sealed food or using a container with a lid may causes popping sounds. Do not use sealed containers as they may burst during cooking due to expansion of the contents. The oven exterior is too hot during operation. There is not sufficient ventilation space for the oven. There are intake/exhaust outlets on the front and rear of the oven for ventilation. Keep the gaps specified in the product installation guide. Objects are on top of the oven. Remove all objects on the top of the oven. Food residue is stuck between the door and oven interior. Clean the oven and then open the door. The door cannot be opened properly. English 59 MC35J8088CT_SG_DE68-04321B-00_EN.indd 59 4/3/2015 4:29:33 PM Troubleshooting The oven has been cooking for an extended period of time. The power turns off during operation. Troubleshooting Problem Cause Action Troubleshooting The oven does not heat. The oven may not work, too much food is being cooked, or improper cookware is being used. Put one cup of water in a microwave-safe container and run the microwave for 1-2 minutes to check whether the water is heated. Reduce the amount of food and start the function again. Use a cooking container with a flat bottom. Heating is weak or slow. The oven may not work, too much food is being cooked, or improper cookware is being used. Put one cup of water in a microwave-safe container and run the microwave for 1-2 minutes to check whether the water is heated. Reduce the amount of food and start the function again. Use a cooking container with a flat bottom. The warm function does not work. The oven may not work, too much food is being cooked, or improper cookware is being used. Put one cup of water in a microwave-safe container and run the microwave for 1-2 minutes to check whether the water is heated. Reduce the amount of food and start the function again. Use a cooking container with a flat bottom. The thaw function does not work. The oven may not work, too much food is being cooked, or improper cookware is being used. Put one cup of water in a microwave-safe container and run the microwave for 1-2 minutes to check whether the water is heated. Reduce the amount of food and start the function again. Use a cooking container with a flat bottom. 60 English MC35J8088CT_SG_DE68-04321B-00_EN.indd 60 4/3/2015 4:29:33 PM Cause Action The interior light is dim or does not turn on. The door has been left open for a long time. The interior light may automatically turn off when the Eco function operates. Close and reopen the door or press the "Cancel" button. The interior light is covered by foreign matter. Clean the inside of the oven and check again. A beeping sound occurs during cooking. If the Auto Cook function is being used, this beeping sound means it's time to turn over the food during thawing. After turning over the food, press the Start button again to restart operation. The oven is not level. The oven is installed on an uneven surface. Make sure the oven is installed on flat, stable surface. There are sparks during cooking. Metal containers are used during the oven/thawing functions. Do not use metal containers. When power is connected, the oven immediately starts to work. The door is not properly closed. Close the door and check again. There is electricity coming from the oven. The power or power socket is not properly grounded. Make sure the power and power socket are properly grounded. There is water dripping. There may be water or steam in some cases depending on the food. This is not an oven malfunction. Let the oven cool and then wipe with a dry dish towel. Steam leaks from the door. There may be water or steam in some cases depending on the food. This is not an oven malfunction. Let the oven cool and then wipe with a dry dish towel. English 61 MC35J8088CT_SG_DE68-04321B-00_EN.indd 61 4/3/2015 4:29:33 PM Troubleshooting Problem Troubleshooting Problem Cause Action There is water left in the oven. There may be water or steam in some cases depending on the food. This is not an oven malfunction. Let the oven cool and then wipe with a dry dish towel. The brightness inside the oven varies. Brightness changes depending on power output changes according to function. Power output changes during cooking are not malfunctions. This is not an oven malfunction. Cooking is finished, but the cooling fan is still running. To ventilate the oven, the cooling fan continues to run for about 5 minutes after cooking is complete. This is not an oven malfunction. Pressing the +30sec button operates the oven. This happens when the oven was not operating. The microwave oven is designed to operate by pressing the +30 sec button when it was not operating. While turning, the turntable comes out of place or stops turning. There is no roller ring, or the roller ring is not properly in place. Install the roller ring and then try again. The turn table drags while turning. The roller ring is not properly in place, there is too much food, or the container is too large and touches the inside of the microwave. Adjust the amount of food and do not use containers that are too large. The turn table rattles while turning and is noisy. Food residue is stuck to the bottom of the oven. Remove any food residue stuck to the bottom of the oven. Turntable Troubleshooting 62 English MC35J8088CT_SG_DE68-04321B-00_EN.indd 62 4/3/2015 4:29:34 PM Problem Cause Action During initial operation, smoke may come from the heating elements when you first use the oven. This is not a malfunction, and if you run the oven 2-3 times, it should stop. Food is on the heating elements. Let the oven cool and then remove the food from the heating elements. Food is too close to the grill. Put the food a suitable distance away while cooking. Food is not properly prepared and/or arranged. Make sure food is properly prepared and arranged. The oven does not heat. The door is open. Close the door and try again. Smoke comes out during preheating. During initial operation, smoke may come from the heating elements when you first use the oven. This is not a malfunction, and if you run the oven 2-3 times, it should stop. Food is on the heating elements. Let the oven cool and then remove the food from the heating elements. There is a burning or plastic smell when using the oven. Plastic or non heat-resistant cookware is used. Use glass cookware suitable for high temperatures. There is a bad smell coming from inside the oven. Food residue or plastic has melted and stuck to the interior. Use the steam function and then wipe with a dry cloth. You can put a lemon slice inside and run the oven to remove the odour more quickly. Grill Smoke comes out during operation. Oven MC35J8088CT_SG_DE68-04321B-00_EN.indd 63 4/3/2015 4:29:34 PM Troubleshooting English 63 Troubleshooting Problem The oven does not cook properly. Cause Action The oven door is frequently opened during cooking. Do not frequently open the door unless you are cooking things that need to be turned. If you open the door often, the interior temperature will be lowered and this may affect the results of your cooking. The oven controls are not correctly set. Correctly set the oven controls and try again. The grill or other accessories are not correctly inserted. Correctly insert the accessories. The wrong type or size of cookware is used. Reset the oven controls or use suitable cookware with flat bottoms. Troubleshooting 64 English MC35J8088CT_SG_DE68-04321B-00_EN.indd 64 4/3/2015 4:29:34 PM Information codes If the oven fails to operate, you may see an information code on the display. Check the table below and try the suggestions. Code C-20 Description Action The temperature sensor is open. The temperature sensor is short. C-A1 This code appears when the oven fails to sense the damper to open or close for 1 minute. C-F0 If there is no communication between the main and sub MICOM. C-21 This code appears when the oven temperature high. In case the temperature rises over the limit temperature during operation of each mode. (Fire sensed.) Unplug the power cord of the oven, and contact a local Samsung service centre. Unplug the power cord for cooling enough time, and restart the microwave oven. C-F2 Press Stop ( C-d0 Unplug the power cord for cooling enough time, and clean the button. (Dust, Water) When appear same problem, contact a local Samsung service centre. The touch key is malfunction. ) to try again. Troubleshooting English 65 MC35J8088CT_SG_DE68-04321B-00_EN.indd 65 4/3/2015 4:29:34 PM Technical specifications specification SAMSUNG strives to improve its products at all times. Both the design specifications and these user instructions are thus subject to change without notice. 230 V ~ 50 Hz Power Source Power Consumption Maximum power 2950 W Microwave 1450 W Grill 2250 W Convection 2500 W Hotblast 2750 W Output Power 100 W / 900 W (IEC - 705) Operating Frequency 2450 MHz Magnetron OM75P (20) Cooling Method Cooling fan motor Dimensions (W x H x D) Main unit (Include Handle) 528 x 404 x 470 mm Cooking chamber 400 x 219 x 396.5 mm 35 liter Volume Weight Net Approx. 28.5 kg Technical specification 66 English MC35J8088CT_SG_DE68-04321B-00_EN.indd 66 4/3/2015 4:29:34 PM Memo MC35J8088CT_SG_DE68-04321B-00_EN.indd 67 4/3/2015 4:29:34 PM Please be advised that the Samsung warranty does NOT cover service calls to explain product operation, correct improper installation, or perform normal cleaning or maintenance. QUESTIONS OR COMMENTS? COUNTRY CALL U.A.E 800-SAMSUNG (800 - 726 7864) OR VISIT US ONLINE AT OMAN 800-SAMSUNG (800 - 726 7864) KUWAIT 183-CALL (183-2255) BAHRAIN 8000-GSAM (8000-4726) QATAR 800-CALL (800-2255) EGYPT 08000-7267864 16580 www.samsung.com/eg/support www.samsung.com/n_africa/support www.samsung.com/ae/support (English) www.samsung.com/ae_ar/support (Arabic) ALGERIA 021 36 11 00 PAKISTAN 0800-Samsung (72678) www.samsung.com/pk/support TUNISIA 80-1000-12 www.samsung.com/n_africa/support JORDAN 0800-22273 06 5777444 www.samsung.com/Levant/support (English) SYRIA 18252273 IRAN 021-8255 www.samsung.com/iran/support MOROCCO 080 100 22 55 www.samsung.com/n_africa/support SAUDI ARABIA 8002474357 www.samsung.com/sa/support www.samsung.com/sa_en/support (English) www.samsung.com/tr/support TURKEY 444 77 11 NIGERIA 0800-726-7864 Ghana 0800-10077 0302-200077 Cote D’Ivoire 8000 0077 SENEGAL 800-00-0077 CAMEROON 7095-0077 KENYA 0800 545 545 UGANDA 0800 300 300 TANZANIA 0800 755 755 / 0685 889 900 RWANDA 9999 BURUNDI 200 DRC 499999 SUDAN 1969 SOUTH AFRICA 0860 SAMSUNG (726 7864) BOTSWANA 8007260000 NAMIBIA 08 197 267 864 ZAMBIA 0211 350370 MAURITIUS 23052574020 REUNION 262508869 MOZAMBIQUE 847267864 / 827267864 www.samsung.com/africa_en/support www.samsung.com/africa_fr/support www.samsung.com/support DE68-04321B-00 MC35J8088CT_SG_DE68-04321B-00_EN.indd 68 4/3/2015 4:29:34 PM