1
WA85F5S2
Washing Machine
user manual
This manual is made with 100% recycled paper.
imagine the possibilities
Thank you for purchasing a Samsung
product.
To receive a more complete service, please
register your product at
www.samsung.com/register
DC68-03273R-00
F500S_W3050_DC68-03273R_EN.indd 1
contents
SAFETY INSTRUCTIONS
3
Important safety precautions
SETTING UP YOUR WASHER
6
7
10
Description of part
Checking before washing and caring for
garments
How to wash automatically depends on the
laundry
Control Panel
MANUAL FUNCTIONS
12
Manual functions
INSTALLATION & MAINTENANCE
13
13
13
14
15
16
16
17
17
17
17
Environment
Levelling
Connecting the water supply hose
Assembling the rat protection panel (option)
How to connect the drain hose (option)
Adding detergent
Adding fabric softener
Water supply connector filter
Cleaning the filter
Cleaning the pump filter (option)
Cleaning the detergent compartment
TROUBLESHOOTING
18
Troubleshooting
WASHING MACHINE WON’T WORK?
19
Washing machine won’t work?
SPECIFICATION
21
Specification
3
6
12
13
18
19
21
2_contents
9
safety instructions_3
F700S_W3050_WA18F7-03271K-01_EN
F700S_W3050_WA18F7-03271K_EN.indd
Sec2:4
25/02/2014
2013-04-26
4:42:21
4_safety instructions
F700S_W3050_WA18F7-03271K-01_EN
F700S_W3050_WA18F7-03271K_EN.indd
Sec2:5
25/02/2014
2013-04-26
4:42:21
safety instructions_5
F700S_W3050_WA18F7-03271K-01_EN
F700S_W3050_WA18F7-03271K_EN.indd
Sec2:6
25/02/2014
2013-04-26
4:42:21
setting up your washer
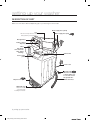
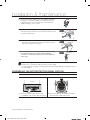
DESCRIPTION OF PART
The User’s Manual is for common use.
Make use of the User’s Manual depending upon your washing machine model.
Water supply hose (Cold)
Lid
Be sure to keep the lid closed
during washing and spinning.
Water supply hose (Hot)
Detergent box
Fabric softener
dispenser
Filter
Lint will be
collected in the
filter during
washing.
Spin basket
Front control
panel
Power cord
Ground lead
When the water pipe
is metal, make sure
to cover the end of
the ground wire.
Rat protection panel
Adjustable legs
Adjust the length
of the legs when
installing the washer.
6_setting up your washer
F500S_W3050_WA10F5-03273E_EN.indd Sec3:8
Water drain hose
CHECKING BEFORE WASHING AND CARING FOR GARMENTS
01 SETTING UP YOUR WASHER
Must follow the checkpoints in order to avoid machine problems or damages on garments.
• If the below problems are caused by customer’s faults, separate service fee will be charged.
Checkpoints Before Starting Washing
Check if the clothes are bleaching or not.
• Add liquid detergent to a white towel and the garment where you can’t notice well. Then, rub
together strongly. Check if the color transferred to the towel.
• Be careful for scarves and imported clothes since they are easily discoloring.
• Check for stains or partial dirt.
• If stains are found, use the towel wet with detergents to rub on in a single direction.
• Before washing, the sleeves, collar, dress hem and pockets are pre-treated by brushing with
detergents.
The wrinkle-processed clothes made of wool are specially treated by fixing them with threads
before washing. The threads shall be removed after the clothes are dried.
Not washable laundry
Clothes those are easily transformable even by soaking in water.
• Even by soaking in water, neckties, brassieres, jackets, suits and coats can be easily
transformed like shrinking and discoloring on the garment surfaces because they are mostly
made of rayon, polynosic, cuff and their blend fabrics.
• The wrinkle-processed, embossed, or resin processed products are easy to transform even
by soaking in water.
• Easily discoloring products made of cotton and wool, wrinkled silk, leather products, leather
accessory, leather ornamented clothes and its accessory.
• Don’t wash those clothes without handling guideline or material indication tag.
About Detergent
• When detergents are not dissolving well, use warm water (about 40°C) to dissolve the
detergent.
• Use an appropriate amount.
• Even if excess amount of detergent is used, there is not much difference in washing
CAUTION
result. It may cause damages to the garments because rinsing is not enough.
• The bleaching agent may cause damages to garments since it is strong alkali.
• Do sufficient rinsing because the powder detergent is easily remained on the garments
causing bad odors.
• If too much detergent is used or cold water is used, it doesn’t dissolve completely and
remain on the garments, hose or spin basket, causing contamination on clothes.
• In case of reserved washing, detergents must be put in the detergent box. If the powder
detergents are spread on laundry directly, it may cause discoloration.
setting up your washer_7
F500S_W3050_WA10F5-03273E_EN.indd Sec3:9
2013-04-19
6:50:11
setting up your washer
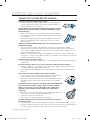
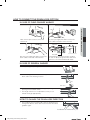
CARING FOR CLOTHES BEFORE WASHING
Take out personal belongings from pockets.
• Caution, Check the pockets! Hairpins and coins cause damages to
clothes and washing machine. They make noise and problems to
the machine. Must check the pocket.
If pants zippers are open while washing, the spin basket may be
damaged. The zipper should be closed and fixed with a string
before washing.
• Metal on the clothing may cause damage to the clothes and the tub.
• Turn clothing with buttons and embroidered clothes inside out before
washing them.
• Clothing with long strings may become entangled with other clothes,
and may cause damage to the clothing. Be sure to fix the strings
before washing.
Waterproof clothes (Ski Wear, Diaper Covers, Footboards) are not
allowed for washing.
• This may cause the laundry to be ejected or cause the washing machine to vibrate
abnormally, which may result in personal injury or damage the washing machine, the floor
or the clothing. (Diapers, waterproof clothing, raincoats, umbrella covers, skiwear, car cover
sheets, and sleeping bags, etc.).
• When the tub rotates, water may become trapped in the waterproof clothing or fabric and
can collect in a corner, causing abnormal vibrations. In addition, the laundry rises and may be
ejected and cause personal injury.
Shake the dirt or soils from clothes.
• Soil and sands may rub delicate garments to cause damages and the washing result may be
unsatisfactory.
Do pre-washing for white socks, sleeves, and collars before the main washing.
• For stains and dirt on collars, sleeves, hems, and pockets, apply some detergent to them
and apply it lightly with a brush before washing.
• Use powdered or liquid detergent. Do not use soap as the tub may become dirty from the
dirt on it.
Turn inside out for those nappy clothes before washing.
• If clothes have too much foreign matter, separate them for washing.
Other clothes may pick up those dirty matters (dirt, thread).
• Wash black colored clothes and cotton towels separately. If they are
washed together, towels may pick up dirty matters. Check before
washing.
Cashmilon and those garments having big volume and lightweight
(eg. Lasedecorated clothes, lingerie, nylon stocking, synthetic
fabrics etc.) may rise and cause damages to the clothes and
problems to the machine. Use the laundry net or wash them
separately.
• Must put those long stringed clothes, lase-worked clothes, bed cover
sheet, wool clothes into a laundry net before washing.
• Put delicate clothes in the laundry net.
• Use only those commercial laundry net for washing.
Curtains, floating garments or blue jeans shall be pressed not to
float on the water.
• If they are floated on the water, press Start/Pause button to stop and press them to sock in
the water. If the washing goes on with clothes floating on the water, it may cause damages to
the clothes and the washing machine as well as unsatisfactory washing result.
8_setting up your washer
F500S_W3050_WA10F5-03273E_EN.indd Sec3:10
2013-04-19
6:50:11
HOW TO WASH AUTOMATICALLY DEPENDS ON THE LAUNDRY
Before starting washing, check the following;
• Connect the water supply hose to the water tap. Leave a tap open. Plug the power cord in. Make sure
to lay down the drain hose.
01 SETTING UP YOUR WASHER
Washing for the first time
Before washing clothes for the first time, you must run a complete cycle without clothes.
To do this:
1. Press the Power button.
2. Open the detergent drawer and insert a little detergent.
3. Turn on the water supply to the washing machine.
4. Press the Start/Pause button.
This will remove any water from the manufacturer’s test run remaining in the machine.
Special notes!
Automatic Sensing Function
• According to the selected program, the amount of laundry is automatically sensed and then
the appropriate water level, wash time, rinse cycle, and spinning time are automatically
selected for the automatic wash.
• After the power is on, a program is selected and Start/Pause button is pressed. Then,
the washing board starts spinning without water. This action senses how much laundry is
in the washing basket, not a machine problem. After this sensing process, water supplies
automatically.
Adding Detergent and Softener
• It senses the amount of laundry and indicates the water level and amount of detergent. Then,
it starts water supply right away.
• During the water supply, it is possible to open the detergent box and add detergent.
However, it is better to press Start/Pause button to stop water supply and add detergent.
Close the lid and press Start/Pause button again. This way is much more convenient.
• If the softener is inserted in the softener dispenser, it automatically adds in at the last rinsing
cycle.
Put the laundry into the washer and add detergent, too.
• Be careful not to overload. Use right detergent for the fabrics you are washing.
•
•
•
If the lid is open while running, the washing machine is stopped automatically for safety.
(Except, water supply continues while the lid is open.)
When hot water is selected, both cold and hot water are supplied for the first
20 seconds in order to protect the clothes.
Possible to control the washing time, rinsing cycle, and spinning time at every program
during the washing.
setting up your washer_9
F500S_W3050_WA10F5-03273E_EN.indd Sec3:11
2013-04-19
6:50:11
setting up your washer
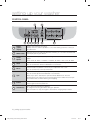
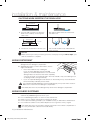
CONTROL PANEL
For more details, see control panel of your washing machine.
1
2
3
4
5
7
6
8
9
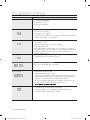
1
Digital
graphic
display
Displays the remaining wash time.
Displays the error state if a problem occurs in the washing machine so that you
can take action.
2
Water Label
The water level is automatically adjusted. However, you can select the water level
manually by pressing this button.
3
Temp./
Option
Press this button repeatedly to cycle through the water temperature and Air Turbo
option:
Cold > Cold, Air Turbo > Cold/Hot > Cold/Hot, Air Turbo > Hot > Hot, Air Turbo
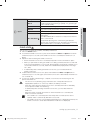
4
Wash
Press this button to perform a wash only or to adjust the washing time.
You can set the wash time from between 6 to 30 minutes.
5
Rinse
Press this button to perform a rinse only or to adjust the rinse count.
You can set the rinse count up to five times.
6
Spin
Press this button to perform a spin cycle only or to adjust the spin time.
You can set the spin time from between 1 to 9 minutes.
When only a spin is selected, the spin time will be different from the total
remaining time. This is because the total remaining time includes the actual spin
time and the times for water draining and stopping.
7
Power
Press this button once to operate.
Press it again to turn the power off.
8
Start/Pause
Use to pause and restart the operation.
To change the washing procedure during an operation,
press this button to stop, and again to restart after changing the procedure.
10_setting up your washer
F500S_W3050_WA10F5-03273E_EN.indd Sec3:12
2013-04-19
6:50:11
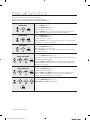
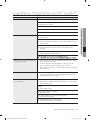
Cycle
Selects the best washing program automatically.
Quick
If you want to wash those frequently used towels or less dirty
laundry time. Because washing is speedy, it is good for light
or less stained laundry.
Delicate
Washable sweater, cardigan, delicate clothes etc.
Blanket
Big volume laundry like blanket and bed cover sheets
Jeans
For a more thorough wash.
Eco Tub Clean
Use this program to clean the tub, it will keep the tub clean
and sanitary.
The TUB CHECK LED is turned on to notify the user that it is
time to clean the tub.
The powerful spinning force of the washing tub pulsator
removes the contaminations from the exterior of the washing
tub to prevent odors or secondary contamination.
01 SETTING UP YOUR WASHER
9
Fuzzy
CHILD LOCK
This function is for protecting children, the elderly and the frail.
1. Press the Power button.
2. To activate the Child Lock function, press and hold both the Rinse and Spin buttons down
simultaneously for 3 seconds. (If the Child Lock function is activated, the Child Lock icon
blinks.)
3. Operations after activating the Child Lock function.
• Even if the Child Lock function is activated, every button works until the door opens.
• When you open the door during the Child Lock is being activated, the alarm sounds and
an error message appears. In 30 seconds, draining begins automatically. However, if you
close the door within 30 seconds, water will not be drained. (Displayed error message
“CL”, “dE”).
• To add laundry after activating the Child Lock function, you must deactivate the
Child Lock function.
4. To deactivate the Child Lock function, press and hold both the Rinse and Spin buttons
simultaneously for 3 seconds again. (If the Child Lock function is deactivated, the Child Lock
icon is turned off.)
5. To clear “CL” display, after draining is complete, close the door of the washing turn the
power off and then on.
- This function is for preventing injury and malfunction of the product because of
inappropriate operations or actions by children, the elderly or the frail.
CAUTION
- If the door opens when the Child Lock function is activated, the water is drained by
force to prevent children from drowning.
- To add laundry after activating the Child Lock function, you must deactivate the
Child Lock.
- Even if the power is turned off and then on when the Child Lock is activated, the
Child Lock remains activated.
- Once Child Lock is activated, even when the power is turned off, if the door is
opened, water is automatically drained in 30 seconds.
- The Child Lock function cannot be deactivated when CL is displayed. (However, the
Child Lock function can be deactivated when the dE error is displayed.)
setting up your washer_11
F500S_W3050_WA10F5-03273E_EN.indd Sec3:13
2013-04-19
6:50:11
manual functions
Possible to select the function for each program.
(Example) For a simple washing as the little dirt program :
Power Select the little dirt program Wash Start/Pause
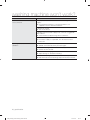
WASH ONLY
RINSE ONLY
SPIN ONLY
WASH AND RINSE
RINSE AND SPIN
WASH, RINSE AND SPIN
12_manual functions
F500S_W3050_WA10F5-03273E_EN.indd 14
Press the Power button.
Press the Wash button.
Press the Start/Pause button.
Washing goes on for 1 times.
When the Wash button is pressed during washing, the wash time
can be changed to between 6 and 30 minutes in duration.
Press the Rinse button.
Press the Start/Pause button.
Rinsing goes on for 1 times.
When the Rinse button is pressed, the rinse times can be changed
to between 1 to 5 times in duration.
Press the Spin button.
Press the Start/Pause button.
Spin drying goes on for 4 minutes.
When the Spin button is pressed, the spin time can be changed to
from 1 to 9 minutes.
Press the Wash and Rinse button.
Press the Start/Pause button once.
Detects the amount of laundry, and determines wash and rinse time
period automatically. (Option)
When the Wash and Rinse button is pressed, wash time period is
determined between 6 to 30 minutes, and rinse time is determined
between 1 and 5 times.
Press the Rinse and Spin button.
Press the Start/Pause button once.
Rinsing and spin drying follow.
When the Rinse and Spin button is pressed, the number of rinse
times is determined between 1 and 5, and spin time period for
drying is determined between 1 to 9 minutes.
Press the Wash, Rinse and Spin button.
Press the Start/Pause button once.
Wash, Rinse and Spin is performed.
installation & maintenance
The User’s Manual is for common use.
Make use of the User’s Manual depending upon your washing machine model.
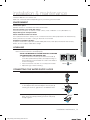
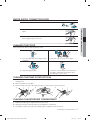
ENVIRONMENT
LEVELLING
•
If the washer is not leveled with the ground, it makes the machine tremble more or be out of order. So,
make sure that the washer is leveled properly.
SEE IF THE MACHINE IS PLACED LEVEL BY CHECKING
Water
THE POSITION OF THE WASHING TUB.
• Open the lid of the machine, pour water into the tub up
to the level just below the pulsator, and adjust the legs so
that the pulsator is positioned at the center of the water as
shown in the figure.
LOOSEN
LOCK
• Place the machine more than 10 cm away from the wall.
• Adjust the legs on feet for leveling.
CONNECTING THE WATER SUPPLY HOSE
1. Remove the adaptor from the water supply hose.
2. First, using a “+” type screw driver, loosen the four screws
on the adaptor. Next, take the adaptor and turn part (b)
following the arrow for gap about 5 mm between them.
5 mm
3. Connect adaptor to the water tap by tightening the screws
firmly. Then, turn part (b) following the arrow and put (a)
and (b) together.
a
b
installation & maintenance _13
F500S_W3050_WA10F5-03273E_EN.indd Sec10:15
03 INSTALLATION & MAINTENANCE
Leave some space
Maintain at least 10 cm between the washer and the wall.
Place the washer on a sturdy flat surface.
If the washer is placed on an uneven or weak surface, noise or vibration occurs. (Allowable is 1˚)
Adjust the legs for even placement.
Never install the washer near water.
Do not place the washer in steamy rooms or where the washer is directly exposed to rain. Moisture may
destroy the electrical insulation causing an electrical shock hazard.
Avoid direct sunlight or heaters.
As plastic an electrical components are affected by direct heat, never place the washer near furnaces,
boilers, etc. Do not place under direct sunlight.
installation & maintenance
4. Connect the water supply hose to the adaptor. Pull down
the part (c) of the water supply hose. When the part (c)
is released, the hose is automatically connected to the
adaptor making a ‘click’ sound.
c
5. Connect the other end of the water supply hose to the
inlet water valve at the back of the washer. Screw the hose
clockwise all the way in.
5-1. Connect the other end of the water supply hose to the
inlet water valve at the back side of the washer. Screw
the hose clockwise all the way in.
•
If the water tap is a screw type, assemble a water supply
hose that fits to the tap as shown. After completing
connection, if water leaks from the hose, then repeat the
same steps.
After completing connection, if water leaks from the hose, then repeat the same steps.
Use the most conventional type of faucet for water supply.
In case the faucet is square or too big, remove the spacing ring before inserting the faucet
into the adaptor.
ASSEMBLING THE RAT PROTECTION PANEL (OPTION)
Tilt the washer a little and lift up the panel until it clicks as shown in the figure.
Front
1. Insert the rat protection panel to the
assembling hole on front side to the end.
14_installation & maintenance
F500S_W3050_WA10F5-03273E_EN.indd Sec5:16
2. If you have difficulty inserting the panel lift
up the washer a little and insert it.
HOW TO CONNECT THE DRAIN HOSE (OPTION)
IN CASE OF PUMP-DRAINED WASHER
Take out the cap-hose and connect the
outlet-hose.
Be sure to join tightly the drain hose into the
drain outlet on the back of the machine.
90~100 cm
Drain hose
Hose guide
Be sure to join tightly the drain hose into the
drain outlet on the side of the machine.
Install the drain hose in the position of about
90~100 cm above the ground. The end of the
drain hose can not be sinked under water.
IN CASE OF GENERAL WASHER
1. After pressing the joint ring, insert to the drain hose.
2. After directing the drain hose to a drain, join to the
drain outlet of the washing machine.
drain-outlet
3. Be sure to join them tightly by pressing the joint ring and
pushing it into the drain-outlet.
• The length of drain hose is adjustable so that you can
extend the length appropriately.
HOW TO CHANGE THE DRAIN HOSE DIRECTION
•
The handle of joint ring is pressed to pull out the drain hose.
Change the direction of the drain hose and follow the above
guideline again.
installation & maintenance_15
F500S_W3050_WA10F5-03273E_EN.indd Sec6:17
03 INSTALLATION & MAINTENANCE
cap-hose
installation & maintenance
CAUTIONS WHEN INSERTING THE DRAIN HOSE
Less than 3 m
1. Don’t exceed more than 3 m when the
drain hose is used by connecting with
other hoses.
2. Be careful to drain water out at the end of
the drain hose.
Less than 3 m
Less than
5 cm
3. The doorsill shouldn’t be more than 5cm. 4. Don’t install the drain hose underneath the
wash machine.
Test run
Make sure that you install your washing machine correctly by running the Rinse+Spin cycle
after the installation is complete.
ADDING DETERGENT
1. Open the detergent drawer and then add the powder
detergent into the detergent compartment.
2. Add detergent evenly so that it doesn’t brim over the
edge of the drawer.
• Use a reasonable amount of detergent.
If you use more detergent than the standard
quantity or the water temperature is too low and the
detergent does not dissolve in the water completely
causing it to remain on the laundry and in the hose and tub, it may cause damage such
as dirtying and discoloring the laundry.
• If you use a powder detergent and it remains on the laundry, it may cause a bad odor.
Rinse the laundry sufficiently in fresh water.
If you spread a powder detergent over the laundry directly, it may result in discoloration.
CAUTION
Make sure to insert it into the detergent compartment.
If the water pressure is low, the detergent may remain in the detergent compartment.
ADDING FABRIC SOFTENER
1. When the proper amount (one time dose) of fabric softener is stored in the softener inlet, it is
automatically added during the last rinse cycle.
2. Do not add detergent, bleach or starch into the softener inlet.
3. Using too much softener may produce unsatisfactory results.
4. Do not open the lid during the Spin cycle. If added too early, its effectiveness will decrease.
5. Do not leave the softener in the softener dispenser for a long time as it may congeal.
If the water pressure is low, the fabric softener may remain in the softener compartment. In
this case, put the fabric softener into the tub directly.
16_installation & maintenance
F500S_W3050_WA10F5-03273E_EN.indd Sec6:18
WATER SUPPLY CONNECTOR FILTER
1. Pull out the filter and wash well.
03 INSTALLATION & MAINTENANCE
2. Pull in the filter and connect the hose to the inlet water valve
tightly.
3. Check if there is a leakage.
Note to tighten up the connector.
CLEANING THE FILTER
Clean the filter net often to keep the washer clean.
1. Push the upper part of the Hygiene filter
and pull in.
2. Open the cover as shown in the figure.
3. Clean the Hygiene filter.
4. Close the cover and insert the lower part of
the filter in the basket first and then push
the filter with “click” sound.
CLEANING THE PUMP FILTER (OPTION)
1. Place a rag or towel under the wash filter to avoid wetting the floor, and rotate the filter counterclockwise
and pull it out.
2. Remove any dirt from the filter.
3. Return the filter to its place by rotating the filter clockwise until it locks into position.
1
2
3
CLEANING THE DETERGENT COMPARTMENT
1. Separate the detergent compartment from the washer.
2. Separate and clean the Rinse-Cap from the detergent compartment.
3. Assemble the Rinse-Cap and insert the detergent compartment into the washer.
installation & maintenance_17
F500S_W3050_WA10F5-03273E_EN.indd Sec6:19
2013-04-19
6:50:13
troubleshooting
PROBLEM
Washing machine won’t work
CHECK
•
•
•
•
Is the water tap opened?
Is the washer plugged in?
Is the power cut off?
Is there enough water?
Water dose not drain
•
•
•
•
Is the drain hose down?(No pump)
Is the drain hose frozen?
Is the drain hose clogged?
If the water dose not drain in 30 minutes, a buzzer will sound, and the
remaining time indicator will show “5E”.
Water is not supplied
•
•
•
•
•
Spinning does not work
•
•
Is the water tap opened?
Is the water cut off?
Is the water supply hose or hose connection clogged?
Is the water tap frozen?
If the water supply is not finished in 1 hour or there is no change in
the water level 5 minutes (10minutes for some models) after the water
supply has started, the buzzer rings and “4E” is displayed on the
remaining time indicator.
Is the laundry spread out evenly in the washer?
In the washer set on a sturdy flat surface?
Water is overflowed
•
•
Restart after spinning.
If the error sign still indicates, call agency.
This indicates that a Child Lock •
error occurred
•
•
Water leakage error
•
•
•
The error message blinks at a 1 second interval and the water is
drained with an alarm sound.
(Displayed message: “CL” or “dE”)
This function is to prevent children from drowning when falling into
the wash tub. When draining is complete and you turn the power off
and then on, the washing machine will operate normally.
To clear “CL” display, after draining is complete, close the door of
the washing machine, turn the power off and then on.
Check if the end of the drain hose is placed on the floor. (The hose
should be hung over the pump - hose guide.)
Check if the drain hose is clogged by any foreign substances.
If the error remains, call the service center.
18_troubleshooting
F500S_W3050_WA10F5-03273E_EN.indd 20
2013-04-19
6:50:14
washing machine won’t work?
PROBLEM
CHECK
The power is cut off.
Is the electric voltage normal?
Is the washer plugged in? Plug in the electric cord.
Water does not drain.
Is the drain hose down? Put the drain hose down.
05 WASHING MACHINE WON’T WORK?
Is the drain hose folded? Unfold the drain hose.
Is the drain hose outlet clogged? Remove the waste cleanly.
Washing machine won’t work.
Is the washer lid open?
Close the lid.
Is the Pause button on?
Press the Start/Pause button one more time and check if the
washer starts.
Is enough water filled to the water level?
If the water pressure is low, it takes a long time to start
washing.
Is the faucet closed?
Open the faucet to supply water.
If the drain hose and spin basket are
frozen, do as follows.
•
•
•
•
Add hot water to the frozen water tap and remove the drain
hose. Soak into hot water.
Pour hot water into the spin basket for about 10 minutes.
Put a hot water towel on the drain hose connector.
If the drain hose defrosts, connect again and check for proper
water draining.
The water drains out immediately.
•
The water leaks at the water supply
hose connector.
If the faucet connecting part is loose, water may leak.
Repeat the assembling steps again. (Refer to “Connecting the
water supply hose”)
The drain is clogged with coins or pins. The drain hose is
hung over the drain hose hook. Half fill the spin basket with
water and try for spinning again.
Check if the rubber packing of water supply hose is in the right
position.
Screw tightly again.
Is the water supply hose folded?
Unfold the hose.
If the water supply is too strong, water may leak.
Close the faucet a little.
Is water leaking from the faucet itself?
Fix the faucet. Water is not supplied.
washing machine won’t work? _19
F500S_W3050_WA10F5-03273E_EN.indd Sec11:21
2013-04-19
6:50:14
washing machine won’t work?
PROBLEM
CHECK
The water leaks at the water supply
hose connector.
Did you press the Start/Pause button after selecting the water
supply?
If the Start/Pause button is not pressed, water is not
supplied. Press the Start/Pause button.
Is the faucet closed?
Turn on the faucet.
Is the filter net at the water supply hose connector clogged with
dirty matters?
Clean the filter net by brushing with a toothbrush.
Is the water supply cut off?
If the water supply is suspended, turn off the faucet and
power off.
Spinning makes loud noises and
vibrations.
Check if the laundry is spread evenly in the washer.
Spread out the laundry evenly and start again.
Check if the washing machine levels on a sturdy flat floor.
Set the machine at level.
Is the handle for leveling legs loose?
Adjust the legs on the feet for leveling.
Is around the washing machine filled with unnecessary stuffs?
Remove those unnecessary things away from the wash machine.
20_specification
F500S_W3050_WA10F5-03273E_EN.indd Sec7:22
2013-04-19
6:50:14
specification
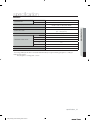
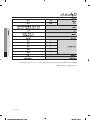
WA85F5S2
POWER
CONSUMPTION
WASH
SPIN
WEIGHT
41 kg
WASHING TYPE
Stirring Type
5
74 ℓ
4
65 ℓ
3
51 ℓ
2
44 ℓ
1
SPIN SPEED
34 ℓ
146 ℓ
700 rpm
The energy label specifications have been determined by using the following program according to
UAE.S 5010 2:2013.
- The program os “energy test course”.
specification _21
F500S_W3050_WA10F5-03273Q_EN.indd Sec7:23
06 SPECIFICATION
0.05~0.78 Mpa
(0.5 ~ 8.0 kg·f/cm2)
WATER PRESSURE
WATER USAGE
280 W
W680 x L670 x H983 (LOW BASE)
W610 x L670 x H1003 (HIGH BASE)
DIMENSIONS(mm)
STANDARD WATER LEVEL
480 W
QUESTIONS OR COMMENTS?
Country
U.A.E
CALL
800-SAMSUNG (726-7864)
OR VISIT US ONLINE AT
www.samsung.com/ae/support (English)
www.samsung.com/ae_ar/support (Arabic)
Code No. DC68-03273R_EN
F500S_W3050_DC68-03273R_EN.indd Sec7:24
WA85F5S2
ﻏﺴﺎﻟﺔ ﻣﻼﺑﺲ
ﺩﻟﻴﻞ ﺍﳌﺴﺘﺨﺪﻡ
ﰎ ﺗﺼﻨﻴﻊ ﻫﺬﺍ ﺍﻟﺪﻟﻴﻞ ﻣﻦ ﻭﺭﻕ ﻣﻌﺎﺩ ﺗﺪﻭﻳﺮﻩ ﺑﻨﺴﺒﺔ .٪100
ﺇﻣﻜﺎﻧﺎﺕ ﻫﺎﺋﻠﺔ
ﺷﻜﺮﺍ ﹰ ﻟﺸﺮﺍﺋﻚ ﺃﺣﺪ ﻣﻨﺘﺠﺎﺕ .Samsung
ﻟﻠﺤﺼﻮﻝ ﻋﻠﻰ ﺧﺪﻣﺔ ﺃﻛﺜﺮ ﺗﻜﺎﻣﻼﹰ ،ﺍﻟﺮﺟﺎﺀ ﺗﺴﺠﻴﻞ ﺍﳌﻨﺘﺞ ﻋﻠﻰ
ﺍﳌﻮﻗﻊ
www.samsung.com/register
ﺭﻗﻢ ﺍﻟﻜﻮﺩ DC68-03273R_AR
F500S_W3050_WA10F5-03273N_AR.indd 1
ﺍﶈﺘﻮﻳﺎﺕ
ﺇﻋﺪﺍﺩ ﺍﻟﻐﺴﻻﺔ
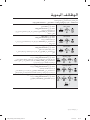
ﺍﻟﻮﻇﺎﺋﻒ ﺍﻟﻴﺪﻭﻳﺔ
ﺍﻟﺘﺮﻛﻴﺐ ﻭﺍﻟﺼﻴﺎﻧﺔ
ﺍﺳﺘﻜﺸﺎﻑ ﺍﳌﺸﺎﻛﻞ ﻭﺣﻠﻬﺎ
ﺍﻟﻐﺴﻻﺔ ﻻ ﺗﻌﻤﻞ؟
ﺍﳌﻮﺍﺻﻔﺎﺕ
_٢ﺍﶈﺘﻮﻳﺎﺕ
ﻭﺻﻒ ﺍﻷﺟﺰﺍﺀ
ﺍﻟﺘﺤﻘﻖ ﻣﻦ ﺍﻟﺴﻼﻣﺔ ﻗﺒﻞ ﺍﻟﻐﺴﻴﻞ ﻭﺍﻻﻋﺘﻨﺎﺀ ﺑﺎﳌﻼﺑﺲ
ﺗﻌﺘﻤﺪ ﻃﺮﻳﻘﺔ ﺍﻟﻐﺴﻞ ﺑﺸﻜﻞ ﺗﻠﻘﺎﺋﻲ ﻋﻠﻰ ﻧﻮﻋﻴﺔ ﺍﻟﻐﺴﻴﻞ
ﻟﻮﺣﺔ ﺍﻟﺘﺤﻜﻢ
ﺍﻟﻮﻇﺎﺋﻒ ﺍﻟﻴﺪﻭﻳﺔ
ﺍﻟﺒﻴﺌﺔ
ﻣﺴﺘﻮ
ﻭﺿﻊ ﺍﻟﻐﺴﻻﺔ ﻋﻠﻰ ﺳﻄﺢ
ﹺ
ﺗﻮﺻﻴﻞ ﺧﺮﻃﻮﻡ ﺗﺰﻭﻳﺪ ﺍﳌﺎﺀ
ﺗﺮﻛﻴﺐ ﻟﻮﺣﺔ ﺍﳊﻤﺎﻳﺔ ﻣﻦ ﺍﻟﻔﺌﺮﺍﻥ )ﺍﺧﺘﻴﺎﺭﻱ(
ﻛﻴﻔﻴﺔ ﺗﻮﺻﻴﻞ ﺧﺮﻃﻮﻡ ﺍﻟﺘﺼﺮﻳﻒ )ﺍﺧﺘﻴﺎﺭﻱ(
ﺇﺿﺎﻓﺔ ﺍﳌﺴﺤﻮﻕ
ﻣﻨﻌﻢ ﺍﻷﻗﻤﺸﺔ
ﺇﺿﺎﻓﺔ ﹼ
ﻣﺼﻔﺎﺓ ﻭﺻﻠﺔ ﺍﻟﺘﺰﻭﹼﺩ ﺑﺎﳌﺎﺀ
ﺗﻨﻈﻴﻒ ﺍﳌﺼﻔﺎﺓ
ﺗﻨﻈﻴﻒ ﻣﺼﻔﺎﺓ ﺍﳌﻀﺨﺔ )ﺍﺧﺘﻴﺎﺭﻱ(
ﺗﻨﻈﻴﻒ ﺣﺠﻴﺮﺓ ﺍﳌﺴﺤﻮﻕ
ﺍﺳﺘﻜﺸﺎﻑ ﺍﳌﺸﺎﻛﻞ ﻭﺣﻠﻬﺎ
ﺍﻟﻐﺴﻻﺔ ﻻ ﺗﻌﻤﻞ؟
ﺍﳌﻮﺍﺻﻔﺎﺕ
ﺇﺭﺷﺎﺩﺍﺕ ﻣﻦ ﺃﺟﻞ ﺍﻟﺴﻼﻣﺔ
ﺍﻟﺮﺟﺎﺀ ﻣﻼﺣﻈﺔ ﺃﻥ ﺍﺣﺘﻴﺎﻃﺎﺕ ﺍﻟﺴﻼﻣﺔ ﺍﻟﺘﺎﻟﻴﺔ ﺗﻬﺪﻑ ﺇﻟﻰ ﲡﻨﺐ ﺍﻟﺘﻌﺮﺽ ﻟﻸﺧﻄﺎﺭ ﺃﻭ ﺍﻷﺿﺮﺍﺭ ﻏﻴﺮ ﺍﳌﺘﻮﻗﻌﺔ ﻭﺫﻟﻚ ﻋﻦ ﻃﺮﻳﻖ ﺍﳌﺴﺎﻋﺪﺓ ﻓﻲ ﺍﻻﺳﺘﺨﺪﺍﻡ ﺍﳌﻼﺋﻢ
ﻣﻦ ﺃﺟﻞ ﺍﻟﺴﻼﻣﺔ.
ﻋﻨﺪ ﺍﺳﺘﺨﺪﺍﻡ ﺍﳌﺎﺀ ﺍﻟﺴﺎﺧﻦ ﻓﻲ ﺍﻟﻐﺴﻴﻞ ،ﺍﻟﺮﺟﺎﺀ ﺍﻟﺘﺄﻛﺪ ﺃﻥ ﺩﺭﺟﺔ ﺣﺮﺍﺭﺓ ﺍﳌﺎﺀ ﻻ ﺗﺘﻌﺪﻯ ٥٠ﺩﺭﺟﺔ ﻣﺌﻮﻳﺔ.
• ﻗﺪ ﺗﺘﻌﺮﺽ ﺍﻷﺟﺰﺍﺀ ﺍﻟﺒﻼﺳﺘﻴﻜﻴﺔ ﻟﻠﺘﺸﻮﻩ ﺃﻭ ﺍﻟﺘﻠﻒ ،ﻭﻗﺪ ﲢﺪﺙ ﺻﺪﻣﺎﺕ ﻛﻬﺮﺑﻴﺔ ﺃﻭ ﺣﺮﻳﻖ.
ﺍﺣﺘﻴﺎﻃﺎﺕ ﺍﻟﺴﻼﻣﺔ ﺍﻟﻬﺎﻣﺔ
ﲢﺬﻳﺮ :ﻟﺘﻘﻠﻴﻞ ﺍﺣﺘﻤﺎﻻﺕ ﻧﺸﻮﺏ ﺣﺮﻳﻖ ﺃﻭ ﺍﻟﺘﻌﺮﹼﺽ ﻟﺼﺪﻣﺔ ﻛﻬﺮﺑﻴﺔ ﺃﻭ ﺣﺪﻭﺙ ﺇﺻﺎﺑﺔ ﺟﺴﺪﻳﺎﺕ ﻷﺷﺨﺎﺹ ﺃﺛﻨﺎﺀ ﺍﺳﺘﺨﺪﺍﻡ ﺍﳉﻬﺎﺯ ،ﺍﺗ ﹼﺒﻊ
ﺍﺣﺘﻴﺎﻃﺎﺕ ﺍﻟﺴﻼﻣﺔ ﺍﻷﺳﺎﺳﻴﺔ ﺍﻟﺘﺎﻟﻴﺔ:
ﻻ ﺗﺪﻉ ﺍﻷﻃﻔﺎﻝ )ﺃﻭ ﺍﳊﻴﻮﺍﻧﺎﺕ ﺍﻷﻟﻴﻔﺔ( ﻳﻠﻌﺒﻮﻥ ﺩﺍﺧﻞ ﺍﻟﻐﺴﺎﻟﺔ ﺃﻭ ﻓﻮﻗﻬﺎ ،ﺣﻴﺚ ﺇﻧﻪ ﻻ ﳝﻜﻦ
ﻓﺘﺢ ﺑﺎﺏ ﺍﻟﻐﺴﺎﻟﺔ ﺑﺴﻬﻮﻟﺔ ﻣﻦ ﺍﻟﺪﺍﺧﻞ ،ﻭﻗﺪ ﻳﺼﺎﺏ ﺍﻷﻃﻔﺎﻝ ﺑﺈﺻﺎﺑﺎﺕ ﺑﺎﻟﻐﺔ ﺍﳋﻄﻮﺭﺓ
ﻓﻲ ﺣﺎﻟﺔ ﺍﺣﺘﺒﺎﺳﻬﻢ ﺑﺪﺍﺧﻠﻬﺎ.
ﻻ ﻳﺠﺐ ﺃﻥ ﻳﺴﺘﺨﺪﻡ ﺃﺷﺨﺎﺹ ﻣﻦ ﺫﻭﻱ ﺍﻹﻋﺎﻗﺎﺕ ﺍﻟﺒﺪﻧﻴﺔ ﺃﻭ ﺍﳊﺴﻴﺔ ﺃﻭ ﺍﻟﻌﻘﻠﻴﺔ ﺃﻭ ﻣﻦ
ﺗﻨﻘﺼﻬﻢ ﺍﳌﻌﺮﻓﺔ ﻭﺍﳋﺒﺮﺓ )ﲟﺎ ﻓﻲ ﺫﻟﻚ ﺍﻷﻃﻔﺎﻝ( ﻫﺬﺍ ﺍﳉﻬﺎﺯ ،ﺇﻻ ﺇﺫﺍ ﻛﺎﻧﻮﺍ ﲢﺖ ﺇﺷﺮﺍﻑ
ﺷﺨﺺ ﻳﻮﻓﺮ ﻟﻬﻢ ﺇﺭﺷﺎﺩﺍﺕ ﺍﻻﺳﺘﺨﺪﺍﻡ ﻭﻳﻜﻮﻥ ﻣﺴﺆﻭﻻ ﹰ ﻋﻦ ﺳﻼﻣﺘﻬﻢ.
ﳝﻜﻦ ﺃﻥ ﻳﺴﺘﺨﺪﻡ ﻫﺬﺍ ﺍﳉﻬﺎﺯ ﺍﻷﻃﻔﺎﻝ ﺍﻟﺬﻳﻦ ﺗﺒﺪﺃ ﺃﻋﻤﺎﺭﻫﻢ ﻣﻦ ٨ﺳﻨﻮﺍﺕ ﻓﻴﻤﺎ ﺃﻛﺜﺮ،
ﺑﺎﻹﺿﺎﻓﺔ ﺇﻟﻰ ﺍﻷﺷﺨﺎﺹ ﺍﻟﺬﻳﻦ ﻳﺘﻤﻴﺰﻭﻥ ﺑﻘﺪﺭﺍﺕ ﻋﻀﻠﻴﺔ ﺃﻭ ﺣﺴﻴﺔ ﺃﻭ ﻋﻘﻠﻴﺔ ﻗﻠﻴﻠﺔ ﺃﻭ
ﺃﻭﻟﺌﻚ ﺍﻟﺬﻳﻦ ﺗﻨﻘﺼﻬﻢ ﺍﳌﻌﺮﹼﻓﺔ ﻭﺍﳋﺒﺮﺓ ﺇﺫﺍ ﻛﺎﻧﻮﺍ ﲢﺖ ﺍﻹﺷﺮﺍﻑ ﻭﻭﺍﻋﲔ ﻟﻺﺭﺷﺎﺩﺍﺕ ﺍﻟﺘﻲ
ﺗﺘﻌﻠﻖ ﺑﺎﺳﺘﺨﺪﺍﻡ ﺍﳉﻬﺎﺯ ﺑﻄﺮﻳﻘﺔ ﺁﻣﻨﺔ ﻭﻓﻬﻢ ﺍﺎﻃﺮ ﺍﳌﺘﻀﻤﻨﺔ ﻓﻲ ﻋﻤﻠﻴﺔ ﺍﻻﺳﺘﺨﺪﺍﻡ.
ﻭﻳﺠﺐ ﻋﺪﻡ ﺍﻟﺴﻤﺎﺡ ﻟﻸﻃﻔﺎﻝ ﺑﺎﻟﻠﻌﺐ ﺑﺎﻟﻐﺴﺎﻟﺔ .ﻳﺠﺐ ﻋﺪﻡ ﻗﻴﺎﻡ ﺍﻷﻃﻔﺎﻝ ﺑﺎﻟﺘﻨﻈﻴﻒ
ﺃﻭ ﺍﻟﺼﻴﺎﻧﺔ ﺍﻟﺘﻲ ﻳﻘﻮﻡ ﺑﻬﺎ ﺍﳌﺴﺘﺨﺪﻡ ﺩﻭﻥ ﺇﺷﺮﺍﻑ.
ﲡﺐ ﻣﺮﺍﻗﺒﺔ ﺍﻷﻃﻔﺎﻝ ﻟﻀﻤﺎﻥ ﻋﺪﻡ ﻋﺒﺜﻬﻢ ﺑﺎﳉﻬﺎﺯ.
ﻓﻲ ﺣﺎﻟﺔ ﺗﻠﻒ ﺍﻟﻘﺎﺑﺲ ﺃﻭ ﺳﻠﻚ ﺍﻟﺘﻴﺎﺭ ﺍﻟﻜﻬﺮﺑﻲ ،ﻳﺠﺐ ﺃﻥ ﺗﺴﺘﺒﺪﻟﻪ ﺍﻟﺸﺮﻛﺔ ﺍﳌﺼﻨﻌﺔ ﺃﻭ
ﻭﻛﻴﻞ ﺍﻟﺼﻴﺎﻧﺔ ﺃﻭ ﺃﻱ ﻓﻨﻲ ﻣﺆﻫﻞ ﺑﻨﻔﺲ ﺗﺄﻫﻴﻠﻬﻤﺎ.
ﻳﺠﺐ ﻭﺿﻊ ﺍﳉﻬﺎﺯ ﺑﺤﻴﺚ ﻳﺴﻬﻞ ﺍﻟﻮﺻﻮﻝ ﺇﻟﻰ ﻗﺎﺑﺲ ﺍﻟﺘﻴﺎﺭ ﺍﻟﻜﻬﺮﺑﻲ ﻭﺻﻨﺎﺑﻴﺮ ﺍﻟﺘﺰﻭﹼﺩ ﺑﺎﳌﺎﺀ
ﻭﺃﻧﺎﺑﻴﺐ ﺗﺼﺮﻳﻒ ﺍﳌﺎﺀ.
ﺑﺎﻟﻨﺴﺒﺔ ﻟﻠﻐﺴﺎﻻﺕ ﺫﺍﺕ ﻓﺘﺤﺎﺕ ﺗﻬﻮﻳﺔ ﺑﻘﺎﻋﺪﺗﻬﺎ ،ﺗﺄﻛﺪ ﻣﻦ ﻋﺪﻡ ﺳﺪ ﺍﻟﺴﺠﺎﺩ ﺃﻭ ﺃﻳﺔ
ﻋﻮﺍﺋﻖ ﺃﺧﺮﻯ ﻟﻬﺬﻩ ﺍﻟﻔﺘﺤﺎﺕ.
ﺍﻟﺮﺟﺎﺀ ﺍﺳﺘﺨﺪﺍﻡ ﺍﳋﺮﺍﻃﻴﻢ ﺍﳉﺪﻳﺪﺓ ،ﻭﻻ ﺗﺴﺘﺨﺪﻡ ﺍﻟﻘﺪﳝﺔ ﻣﻨﻬﺎ.
ﺇﺭﺷﺎﺩﺍﺕ ﻣﻦ ﺃﺟﻞ ﺍﻟﺴﻼﻣﺔ_٣
25/02/2014 5:40:38
2013-04-26
F700S_W3050_WA18F7-03271K-01_ARSec2:4
F700S_W3050_WA18F7-03271K_AR.indd
ﲢﺬﻳﺮ
ﻗﺪ ﲢﺪﺙ ﺇﺻﺎﺑﺎﺕ ﺑﺎﻟﻐﺔ ﺃﻭ ﺣﻮﺍﺩﺙ ﻣﻬﻠﻜﺔ ﻓﻲ ﺣﺎﻟﺔ ﺧﺮﻕ ﻫﺬﻩ ﺍﻟﺘﻌﻠﻴﻤﺎﺕ.
• ﻓﻲ ﺣﺎﻟﺔ ﺗﻠﻒ ﺍﻟﻘﺎﺑﺲ )ﺳﻠﻚ ﺍﻟﺘﻴﺎﺭ ﺍﻟﻜﻬﺮﺑﻲ( ،ﻳﺠﺐ ﺗﻐﻴﻴﺮﻩ ﻣﻦ ﹺﻗﺒﻞ ﺍﻟﺸﺮﻛﺔ ﺍﳌﺼﻨﹼﻌﺔ ﺃﻭ ﻭﻛﻴﻞ ﺍﻟﺼﻴﺎﻧﺔ ﺍﳋﺎﺹ ﺑﻬﺎ ﺃﻭ ﺃﻱ ﻓﻨﻲ ﻣﺆﻫﻞ
ﻟﺘﻔﺎﺩﻱ ﺍﻟﺘﻌﺮﺽ ﻷﻱ ﺧﻄﺮ.
• ﻻ ﺗﻨﺰﻉ ﺳﻠﻚ ﺍﻟﺘﻴﺎﺭ ﺃﻭ ﺗﻠﻤﺴﻪ ﺑﺄﻳ ﹴﺪ ﻣﺒﺘﻠﺔ.
−ﻗﺪ ﲢﺪﺙ ﺻﺪﻣﺔ ﻛﻬﺮﺑﻴﺔ ﺃﻭ ﻳﻨﺸﺐ ﺣﺮﻳﻖ.
• ﻻ ﲢﺎﻭﻝ ﺛﻨﻲ ﺳﻠﻚ ﺍﻟﺘﻴﺎﺭ ﺑﺎﻟﻘﻮﺓ ﺃﻭ ﺍﻟﻀﻐﻂ ﻋﻠﻴﻪ ﺑﺄﺷﻴﺎﺀ ﺛﻘﻴﻠﺔ.
−ﻗﺪ ﲢﺪﺙ ﺻﺪﻣﺔ ﻛﻬﺮﺑﻴﺔ ﺃﻭ ﻳﻨﺸﺐ ﺣﺮﻳﻖ.
• ﻻ ﺗﻀﻊ ﺍﻟﻐﺴﺎﻟﺔ ﺑﺎﻟﻘﺮﺏ ﻣﻦ ﺃﺩﻭﺍﺕ ﻛﻬﺮﺑﺎﺋﻴﺔ ﻭﻻ ﺗﻀﻊ ﻣﻮﻗﺪ ﺷﻤﻌﺔ ﺃﻭ ﺳﺠﺎﺋﺮ ﻓﻮﻕ ﺍﻟﻐﺴﺎﻟﺔ.
−ﻗﺪ ﻳﺤﺪﺙ ﺣﺮﻳﻖ.
• ﻻ ﺗﻀﻊ ﻳﺪﻳﻚ ﺃﻭ ﺃﻱ ﺃﺩﻭﺍﺕ ﻣﻌﺪﻧﻴﺔ ﺃﺳﻔﻞ ﺍﻟﻐﺴﺎﻟﺔ ﺃﺛﻨﺎﺀ ﺍﻟﺘﺸﻐﻴﻞ.
−ﻗﺪ ﺗﺘﻌﺮﺽ ﻟﻸﺫﻯ ﻋﻦ ﻃﺮﻳﻖ ﻟﻮﺡ ﺍﻟﺪﻭﺭﺍﻥ ﺍﳌﻮﺟﻮﺩ ﺃﺳﻔﻞ ﺍﻟﻐﺴﺎﻟﺔ.
• ﺍﺑﺘﻌﺪ ﻋﻦ ﺍﻟﻐﺴﺎﻟﺔ ﻋﻨﺪﻣﺎ ﻳﻜﻮﻥ ﻗﺎﻉ ﺍﻟﻐﺴﺎﻟﺔ ﻣﻐﻤﻮﺭﹰﺍ ﺑﺎﳌﺎﺀ.
−ﻗﺪ ﲢﺪﺙ ﺻﺪﻣﺔ ﻛﻬﺮﺑﻴﺔ .ﺍﻟﺮﺟﺎﺀ ﺍﻻﻧﺘﻈﺎﺭ ﺣﺘﻰ ﻳﺘﻢ ﺗﺼﺮﻳﻒ ﺍﳌﺎﺀ ﺑﺸﻜﻞ ﻛﺎﻣﻞ.
• ﻻ ﺗﻀﻊ ﻣﻼﺑﺲ ﻣﻠﻄﺨﺔ ﺑﺎﳉﺎﺯﻭﻟﲔ ﺃﻭ ﺍﻟﺒﻨﺰﻳﻦ ﺃﻭ ﺍﻟﻜﺤﻮﻝ ﻓﻲ ﺍﻟﻐﺴﺎﻟﺔ ،ﻭﺍﺣﺘﻔﻆ ﺑﺘﻠﻚ ﺍﳌﻼﺑﺲ ﺑﻌﻴﺪﺍ ﹰ ﻋﻦ ﺍﻟﻐﺴﺎﻟﺔ.
−ﻗﺪ ﻳﺤﺪﺙ ﺍﻧﻔﺠﺎﺭ ﺃﻭ ﻳﻨﺸﺐ ﺣﺮﻳﻖ.
• ﺃﺛﻨﺎﺀ ﺍﻟﺘﻨﺸﻴﻒ ،ﻻ ﺗﻀﻊ ﻳﺪﻳﻚ ﻓﻲ ﺣﻮﺽ ﺍﻟﺘﻨﺸﻴﻒ.
−ﻗﺪ ﺗﺘﻌﺮﺽ ﻳﺪﺍﻙ ﻟﻸﺫﻯ .ﻓﻲ ﺣﺎﻟﺔ ﻋﺪﻡ ﺗﻮﻗﻒ ﺍﻟﻐﺴﺎﻟﺔ ﻋﻦ ﺍﻟﻌﻤﻞ ﻓﻲ ﻏﻀﻮﻥ ١٥ﺛﺎﻧﻴﺔ ﺑﻌﺪ ﻓﺘﺢ ﺍﻟﻐﻄﺎﺀ ،ﺍﺗﺼﻞ ﺑﻮﻛﻴﻞ ﺍﻟﺼﻴﺎﻧﺔ
ﻋﻠﻰ ﺍﻟﻔﻮﺭ.
• ﻫﺬﺍ ﺍﳉﻬﺎﺯ ﻏﻴﺮ ﻣﺨﺼﺺ ﻟﻼﺳﺘﺨﺪﺍﻡ ﺑﻮﺍﺳﻄﺔ ﺍﻷﻃﻔﺎﻝ ﺍﻟﺼﻐﺎﺭ ﺃﻭ ﺍﻷﺷﺨﺎﺹ ﺫﻭﻱ ﺍﻻﺣﺘﻴﺎﺟﺎﺕ ﺍﳋﺎﺻﺔ ﻣﺎ ﻟﻢ ﻳﺨﻀﻌﻮﺍ ﻹﺷﺮﺍﻑ
ﺑﺸﻜﻞ ﺁﻣﻦ.
ﺷﺨﺺ ﻣﺴﺆﻭﻝ ﻟﻠﺘﺄﻛﺪ ﻣﻦ ﺇﻣﻜﺎﻧﻴﺔ ﺍﺳﺘﺨﺪﺍﻣﻬﻢ ﻟﻠﺠﻬﺎﺯ
ﹴ
ﻭﻳﺠﺐ ﺃﻥ ﻳﺨﻀﻊ ﺍﻷﻃﻔﺎﻝ ﻟﻺﺷﺮﺍﻑ ﻟﻀﻤﺎﻥ ﻋﺪﻡ ﻋﺒﺜﻬﻢ ﺑﺎﻟﻐﺴﺎﻟﺔ.
• ﻳﺠﺐ ﺃﻥ ﻳﺘﻢ ﺗﻮﺻﻴﻞ ﻫﺬﺍ ﺍﳉﻬﺎﺯ ﲟﺄﺧﺬ ﻗﻮﻱ ﺍﻻﺣﺘﻤﺎﻝ ﻟﻀﻤﺎﻥ ﺍﺳﺘﻬﻼﻙ ﺍﻟﻄﺎﻗﺔ ﻋﻠﻰ ﻧﺤﻮ ﻣﻨﺎﺳﺐ.
• ﻳﺠﺐ ﻭﺿﻊ ﺍﻟﻐﺴﺎﻟﺔ ﺑﻌﺪ ﺗﺮﻛﻴﺒﻬﺎ ﺑﺎﻟﻘﺮﺏ ﻣﻦ ﻣﺄﺧﺬ ﺍﻟﺘﻮﺻﻴﻞ ﺑﺤﻴﺚ ﻳﺴﻬﻞ ﺍﻟﻮﺻﻮﻝ ﺇﻟﻴﻪ.
• ﻻ ﻳﻮﺟﺪ ﺑﺪﺍﺧﻞ ﺍﻟﻐﺴﺎﻟﺔ ﺃﺟﺰﺍﺀ ﳝﻜﻦ ﻟﻠﻤﺴﺘﺨﺪﻡ ﺇﺻﻼﺣﻬﺎ ﺑﻨﻔﺴﻪ .ﻟﺬﺍ ،ﻳﺠﺐ ﺍﻻﺳﺘﻌﺎﻧﺔ ﺑﻔﻨﻲ ﺻﻴﺎﻧﺔ ﻣﺆﻫﻞ ﻟﻠﻘﻴﺎﻡ ﺑﺄﻋﻤﺎﻝ ﺍﻟﺼﻴﺎﻧﺔ.
−ﻭﺇﻻ ﻓﻘﺪ ﻳﺤﺪﺙ ﺧﻄﺄ ﻣﻴﻜﺎﻧﻴﻜﻲ ﺃﻭ ﺻﺪﻣﺔ ﻛﻬﺮﺑﻴﺔ ﺃﻭ ﻳﻨﺸﺐ ﺣﺮﻳﻖ ﺃﻭ ﻳﺤﺪﺙ ﺗﻠﻒ ﻣﺎﺩﻱ.
−ﻻ ﻳﺴﺮﻱ ﺿﻤﺎﻥ ﺍﳌﻨﺘﺞ ﻋﻠﻰ ﺍﳌﺸﺎﻛﻞ ﺍﻟﻨﺎﲡﺔ ﻋﻦ ﻓﻜﻪ.
• ﻻ ﺗﺴﺘﺨﺪﻡ ﻫﺬﺍ ﺍﳌﻨﺘﺞ ﻟﻸﻏﺮﺍﺽ ﺍﻟﺘﺠﺎﺭﻳﺔ.
• ﺑﺨﺼﻮﺹ ﺍﻟﻐﺴﺎﻻﺕ ﺍﻟﺘﻲ ﲢﺘﻮﻱ ﻋﻠﻰ ﻓﺘﺤﺎﺕ ﺗﻬﻮﻳﺔ ﺑﻘﺎﻋﺪﺗﻬﺎ ،ﻳﺠﺐ ﺃﻻ ﺗﻌﻮﻕ ﺍﳌﻔﺮﻭﺷﺎﺕ ﺍﻷﺭﺿﻴﺔ ﻫﺬﻩ ﺍﻟﻔﺘﺤﺎﺕ.
_٤ﺇﺭﺷﺎﺩﺍﺕ ﻣﻦ ﺃﺟﻞ ﺍﻟﺴﻼﻣﺔ
25/02/2014 5:40:39
2013-04-26
F700S_W3050_WA18F7-03271K-01_ARSec2:5
F700S_W3050_WA18F7-03271K_AR.indd
ﺇﺭﺷﺎﺩﺍﺕ ﻣﻦ ﺃﺟﻞ ﺍﻟﺴﻼﻣﺔ
ﺗﻨﺒﻴﻬﺎﺕ
ﻗﺪ ﺗﺘﻌﺮﺽ ﻹﺻﺎﺑﺎﺕ ﺧﻔﻴﻔﺔ ﺃﻭ ﺃﺿﺮﺍﺭ ﻃﻔﻴﻔﺔ ﻓﻲ ﺣﺎﻟﺔ ﺧﺮﻕ ﻫﺬﻩ ﺍﻹﺭﺷﺎﺩﺍﺕ.
• ﻻ ﺗﻘﻢ ﺑﺘﺮﻛﻴﺐ ﺍﻟﻐﺴﺎﻟﺔ ﻓﻲ ﻣﻨﻄﻘﺔ ﺭﻃﺒﺔ ﺃﻭ ﺧﺎﺭﺝ ﺍﳌﻨﺰﻝ ﺣﻴﺚ ﻳﺘﺴﺎﻗﻂ ﺍﳌﻄﺮ ﺃﻭ ﺍﳉﻠﻴﺪ.
−ﻗﺪ ﲢﺪﺙ ﺻﺪﻣﺔ ﻛﻬﺮﺑﻴﺔ ﺃﻭ ﻳﻨﺸﺐ ﺣﺮﻳﻖ.
• ﺍﻟﺮﺟﺎﺀ ﻓﺼﻞ ﺳﻠﻚ ﺍﻟﺘﻴﺎﺭ ﺍﻟﻜﻬﺮﺑﻲ ﻋﻨﺪ ﻋﺪﻡ ﺍﺳﺘﺨﺪﺍﻣﻪ.
−ﻗﺪ ﲢﺪﺙ ﺻﺪﻣﺔ ﻛﻬﺮﺑﻴﺔ ﺃﻭ ﻳﻨﺸﺐ ﺣﺮﻳﻖ.
• ﻓﻲ ﺣﺎﻟﺔ ﻭﺟﻮﺩ ﺃﺗﺮﺑﺔ ﺃﻭ ﻣﺎﺀ ﻋﻠﻰ ﻗﺎﺑﺲ ﺍﻟﺘﻴﺎﺭ ﺍﻟﻜﻬﺮﺑﻲ ﻭﺍﳉﺰﺀ ﺍﳌﺘﺼﻞ ﺑﻪ ،ﺍﻟﺮﺟﺎﺀ ﺇﺯﺍﻟﺘﻪ ﺑﺎﻟﻜﺎﻣﻞ.
−ﻗﺪ ﲢﺪﺙ ﺻﺪﻣﺔ ﻛﻬﺮﺑﻴﺔ ﺃﻭ ﻳﻨﺸﺐ ﺣﺮﻳﻖ.
• ﻻ ﲡﻌﻞ ﺃﻃﻔﺎﻟﻚ ﻳﻨﻈﺮﻭﻥ ﺩﺍﺧﻞ ﺍﻟﻐﺴﺎﻟﺔ.
−ﺇﺫﺍ ﺳﻘﻂ ﺍﻷﻃﻔﺎﻝ ﺩﺍﺧﻞ ﺍﻟﻐﺴﺎﻟﺔ ،ﻗﺪ ﺗﻜﻮﻥ ﺣﻴﺎﺗﻬﻢ ﻋﺮﺿﺔ ﻟﻠﺨﻄﺮ.
• ﻗﻢ ﺑﺎﻟﺘﻬﻮﻳﺔ ﻋﻠﻰ ﺍﻟﻔﻮﺭ ﺩﻭﻥ ﳌﺲ ﺍﻟﻘﺎﺑﺲ ﻓﻲ ﺣﺎﻟﺔ ﺗﺴﺮﺏ ﺍﻟﻐﺎﺯ.
−ﻗﺪ ﲢﺪﺙ ﺻﺪﻣﺔ ﻛﻬﺮﺑﻴﺔ ﺃﻭ ﻳﻨﺸﺐ ﺣﺮﻳﻖ ﻓﻲ ﺣﺎﻟﺔ ﺍﺷﺘﻌﺎﻟﻪ.
• ﺇﺫﺍ ﺃﺣﺪﺛﺖ ﺍﻟﻐﺴﺎﻟﺔ ﺻﻮﺗﹰﺎ ﻏﺮﻳ ﹰﺒﺎ ،ﺃﻭ ﺃﺧﺮﺟﺖ ﺭﺍﺋﺤﺔ ﻏﻴﺮ ﻋﺎﺩﻳﺔ ﺃﻭ ﺩﺧﺎﻧ ﹰﺎ ،ﻗﻢ ﺑﻔﺼﻠﻬﺎ ﺑﺴﺮﻋﺔ ﻭﺍﺗﺼﻞ ﺑﻮﻛﻴﻞ ﺍﻟﺼﻴﺎﻧﺔ.
−ﻗﺪ ﲢﺪﺙ ﺻﺪﻣﺔ ﻛﻬﺮﺑﻴﺔ ﺃﻭ ﻳﻨﺸﺐ ﺣﺮﻳﻖ.
• ﻋﻨﺪ ﺗﻨﻈﻴﻒ ﺍﻟﻐﺴﺎﻟﺔ ،ﻻ ﺗﺮﺵ ﺍﳌﺎﺀ ﻋﻠﻰ ﺃﺟﺰﺍﺀ ﺍﻟﻐﺴﺎﻟﺔ ﺑﺸﻜﻞ ﻣﺒﺎﺷﺮ.
−ﻗﺪ ﻳﺆﺛﺮ ﺫﻟﻚ ﻋﻠﻰ ﻋﻤﺮ ﺍﻟﻐﺴﺎﻟﺔ.
ﺃﻳﻀﺎ ﺻﺪﻣﺔ ﻛﻬﺮﺑﻴﺔ ﺃﻭ ﻳﻨﺸﺐ ﺣﺮﻳﻖ.
ﻭﻗﺪ ﲢﺪﺙ ﹰ
• ﻻ ﺗﺴﺘﺨﺪﻡ ﻋﺎﻣﻞ ﺗﻨﻈﻴﻒ ﺣﻤﻀﻲ ﻗﻮﻱ.
• ﻻ ﺗﻘﻢ ﺑﺘﻮﺻﻴﻞ ﻋﺪﺓ ﺃﺟﻬﺰﺓ ﻓﻲ ﺁﻥ ﻭﺍﺣﺪ ﲟﺼﺪﺭ ﺗﻴﺎﺭ ﻛﻬﺮﺑﻲ ﻭﺍﺣﺪ.
−ﻗﺪ ﻳﺤﺪﺙ ﺣﺮﻳﻖ ﺑﺴﺒﺐ ﺍﳊﺮﺍﺭﺓ ﺍﻟﺰﺍﺋﺪﺓ.
• ﻻ ﺗﻀﻐﻂ ﺍﻟﺰﺭ ﲟﺜﻘﺎﺏ ﺃﻭ ﺑﺪﺑﻮﺱ.
−ﻗﺪ ﲢﺪﺙ ﺻﺪﻣﺔ ﻛﻬﺮﺑﻴﺔ ﺃﻭ ﻳﻨﺸﺐ ﺣﺮﻳﻖ.
• ﺍﺳﺘﺨﺪﻡ ﺃﻃﻘﻢ ﺧﺮﺍﻃﻴﻢ ﺟﺪﻳﺪﺓ ،ﺣﻴﺚ ﻳﺠﺐ ﻋﺪﻡ ﺇﻋﺎﺩﺓ ﺍﺳﺘﺨﺪﺍﻡ ﺍﳋﺮﺍﻃﻴﻢ ﺍﻟﻘﺪﳝﺔ ﻣﺮﺓ ﺃﺧﺮﻯ.
ﺣﺎﻟﻴﺎ ،ﻳﺠﺐ ﺍﺳﺘﺒﺪﺍﻟﻪ ﲟﻌﺮﻓﺔ ﺍﻟﺸﺮﻛﺔ ﺍﳌﺼﻨﱢﻌﺔ ﺃﻭ ﻣﺮﻛﺰ ﺍﻟﺼﻴﺎﻧﺔ ﺃﻭ ﺃﻱ ﺷﺨﺺ ﻣﺴﺆﻭﻝ ﻭﺫﻟﻚ
• ﻓﻲ ﺣﺎﻟﺔ ﺗﻠﻒ ﺍﻟﺴﻠﻚ ﺍﳌﺴﺘﺨﺪﻡ
ﹰ
ﻟﺘﺠﻨﺐ ﺍﻟﺘﻌﺮﺽ ﻷﻳﺔ ﻣﺨﺎﻃﺮ.
• ﻗﻢ ﺑﺘﻮﺻﻴﻞ ﺍﻟﺴﻠﻚ ﺍﻷﺭﺿﻲ ﺑﺎﻟﻠﻮﺣﺔ ﺍﻷﺳﺎﺳﻴﺔ ﻭﺩﻓﻨﻪ ﲢﺖ ﺍﻷﺭﺽ ﻋﻠﻰ ﻋﻤﻖ ٢٥ﺳﻢ ﺗﻘﺮﻳ ﹰﺒﺎ ،ﺃﻭ ﺗﻮﺻﻴﻞ ﺍﻟﺴﻠﻚ ﺍﻷﺭﺿﻲ ﺑﻄﺮﻑ
ﺗﺄﺭﻳﻀﺎ ﻣﻨﺎﺳ ﹰﺒﺎ .ﻳﺤﻈﺮ ﺗﻮﺻﻴﻞ ﺍﻟﺴﻠﻚ ﺑﺴﻠﻚ ﻫﺎﺗﻒ ﺃﻭ ﺃﺫﺭﻉ ﻣﺼﺎﺑﻴﺢ ﺃﻭ ﺃﻧﺒﻮﺏ ﻏﺎﺯ.
ﻣﻨﺎﺳﺐ ﻓﻲ ﻣﻘﺒﺲ ﺍﻟﻄﺎﻗﺔ ﺍﳌﺆﺭﹶﺽ
ﹰ
• ﰎ ﺗﺼﻤﻴﻢ ﺍﳌﻨﺘﺞ ﺍﻟﺬﻱ ﻗﻤﺖ ﺑﺸﺮﺍﺋﻪ ﻟﻼﺳﺘﺨﺪﺍﻡ ﺍﳌﻨﺰﻟﻲ ﻓﻘﻂ.
ﻳﹸﻌﺪ ﺍﺳﺘﺨﺪﺍﻡ ﺍﳌﻨﺘﺞ ﻷﻏﺮﺍﺽ ﲡﺎﺭﻳﺔ ﺳﻮﺀ ﺍﺳﺘﺨﺪﺍﻡ ﻟﻪ .ﻭﻓﻲ ﻫﺬﻩ ﺍﳊﺎﻟﺔ ،ﻻ ﻳﺘﻢ ﺗﻐﻄﻴﺔ ﺍﳌﻨﺘﺞ ﻣﻦ ﻗﺒﻞ ﺍﻟﻀﻤﺎﻥ ﺍﻷﺳﺎﺳﻲ ﺍﻟﺬﻱ ﺗﻘﺪﻣﻪ
ﺷﺮﻛﺔ ،Samsungﻛﻤﺎ ﺃﻥ ﺷﺮﻛﺔ Samsungﻻ ﺗﺘﺤﻢﻝ ﺃﻳﺔ ﻣﺴﺌﻮﻟﻴﺔ ﻋﻦ ﺍﻷﻋﻄﺎﻝ ﺃﻭ ﺍﳋﺴﺎﺋﺮ ﺍﻟﺘﻲ ﺗﻨﺠﻢ ﻋﻦ ﺳﻮﺀ ﺍﻻﺳﺘﺨﺪﺍﻡ.
ﺇﺭﺷﺎﺩﺍﺕ ﻣﻦ ﺃﺟﻞ ﺍﻟﺴﻼﻣﺔ_٥
25/02/2014 5:40:39
2013-04-26
F700S_W3050_WA18F7-03271K-01_ARSec2:6
F700S_W3050_WA18F7-03271K_AR.indd
ﺇﻋﺪﺍﺩ ﺍﻟﻐﺴﺎﻟﺔ
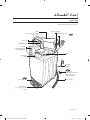
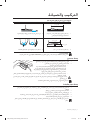
ﻭﺻﻒ ﺍﻷﺟﺰﺍﺀ
ﺩﻟﻴﻞ ﺍﳌﺴﺘﺨﺪﻡ ﻣﺨﺼﺺ ﻟﻼﺳﺘﺨﺪﺍﻡ ﺍﻟﻌﺎﻡ.
ﺍﺳﺘﻌﻦ ﺑﺪﻟﻴﻞ ﺍﳌﺴﺘﺨﺪﻡ ﺍﳋﺎﺹ ﺑﻄﺮﺍﺯ ﺍﻟﻐﺴﺎﻟﺔ.
ﺧﺮﻃﻮﻡ ﺗﺰﻭﻳﺪ ﺍﳌﺎﺀ )ﺍﻟﺒﺎﺭﺩ(
ﺧﺮﻃﻮﻡ ﺗﺰﻭﻳﺪ ﺍﳌﺎﺀ )ﺍﻟﺴﺎﺧﻦ(
ﺍﻟﻐﻄﺎﺀ
ﺗﺄﻛﺪ ﻣﻦ ﺇﻏﻼﻕ ﺍﻟﻐﻄﺎﺀ ﺃﺛﻨﺎﺀ ﻋﻤﻠﻴﺘﻲ
ﺍﻟﻐﺴﻞ ﻭﺍﻟﺘﻨﺸﻴﻒ.
ﺩﺭﺝ ﺍﳌﺴﺤﻮﻕ
ﻣﻮﺯﹼﻉ ﻣﻨﻌﹼ ﻢ ﺍﻷﻗﻤﺸﺔ
ﺍﳌﺼﻔﺎﺓ
ﺳﻴﺘﻢ ﲡﻤﻴﻊ ﺍﻟﻨﺴﺎﻻﺕ ﻓﻲ
ﺍﳌﺼﻔﺎﺓ ﺃﺛﻨﺎﺀ ﺍﻟﻐﺴﻴﻞ.
ﺍﻔﻒ
ﻟﻮﺣﺔ ﺍﻟﺘﺤﻜﻢ
ﺍﻷﻣﺎﻣﻴﺔ
ﺳﻠﻚ ﺍﻟﺘﻴﺎﺭ
ﺍﻟﻜﻬﺮﺑﻲ
ﺍﻟﻮﺻﻠﺔ ﺍﻷﺭﺿﻴﺔ
ﺇﺫﺍ ﻛﺎﻧﺖ ﻣﺎﺳﻮﺭﺓ ﺍﳌﺎﺀ ﻣﺼﻨﻮﻋﺔ
ﻣﻦ ﻣﻌﺪﻥ ،ﺗﺄﻛﺪ ﻣﻦ ﺗﻐﻄﻴﺔ
ﻧﻬﺎﻳﺔ ﺍﻟﺴﻠﻚ ﺍﻷﺭﺿﻲ.
ﺧﺮﻃﻮﻡ ﺗﺼﺮﻳﻒ ﺍﳌﺎﺀ
ﻟﻮﺣﺔ ﺍﳊﻤﺎﻳﺔ ﻣﻦ ﺍﻟﻔﺌﺮﺍﻥ
ﺃﺭﺟﻞ ﻗﺎﺑﻠﺔ ﻟﻠﻀﺒﻂ
ﺍﺿﺒﻂ ﻃﻮﻝ ﺍﻷﺭﺟﻞ ﻋﻨﺪ ﺗﺮﻛﻴﺐ
ﺍﻟﻐﺴﺎﻟﺔ.
_٦ﺇﻋﺪﺍﺩ ﺍﻟﻐﺴﺎﻟﺔ
6:51:07
2013-04-19
F500S_W3050_WA10F5-03273N_AR.indd Sec3:8
ﺍﻟﺘﺤﻘﻖ ﻣﻦ ﺍﻟﺴﻼﻣﺔ ﻗﺒﻞ ﺍﻟﻐﺴﻴﻞ ﻭﺍﻻﻋﺘﻨﺎﺀ ﺑﺎﳌﻼﺑﺲ
٠١ﺇﻋﺪﺍﺩ ﺍﻟﻐﺴﺎﻟﺔ
ﻳﺠﺐ ﺇﺗﺒﺎﻉ ﺗﻌﻠﻴﻤﺎﺕ ﺍﻟﻔﺤﺺ ﻟﺘﺠﻨﺐ ﺍﳌﺸﺎﻛﻞ ﺍﻟﺘﻲ ﻗﺪ ﺗﻮﺍﺟﻬﻬﺎ ﺃﺛﻨﺎﺀ ﺍﺳﺘﺨﺪﺍﻡ ﺍﻟﻐﺴﺎﻟﺔ ﺃﻭ ﺍﻟﺘﻠﻔﻴﺎﺕ ﺍﻟﺘﻲ ﻗﺪ ﺗﺼﻴﺐ ﺍﳌﻼﺑﺲ.
• ﺇﺫﺍ ﺣﺪﺛﺖ ﺍﳌﺸﺎﻛﻞ ﺍﳌﺬﻛﻮﺭﺓ ﺃﺩﻧﺎﻩ ﺑﺴﺒﺐ ﺃﺧﻄﺎﺀ ﻣﻦ ﻗﺒﻞ ﺍﻟﻌﻤﻴﻞ ،ﻳﺘﻢ ﲢﺼﻴﻞ ﻣﺼﺎﺭﻳﻒ ﺧﺪﻣﺔ ﻣﻨﻔﺼﻠﺔ.
ﺗﻌﻠﻴﻤﺎﺕ ﺍﻟﻔﺤﺺ ﺍﳌﺘﺒﻌﺔ ﻗﺒﻞ ﺑﺪﺀ ﺍﻟﻐﺴﻴﻞ
ﺗﺄﻛﺪ ﳑﺎ ﺇﺫﺍ ﻛﺎﻧﺖ ﺍﳌﻼﺑﺲ ﺗﺒﻬﺖ ﺃﻡ ﻻ.
ﻣﻌﺎ ﺑﻘﻮﺓ .ﲢﻘﻖ ﳑﺎ ﺇﺫﺍ
• ﺃﺿﻒ ﻣﻨﻈﻒ ﺳﺎﺋﻞ ﺇﻟﻰ ﻣﻨﺸﻔﺔ ﺑﻴﻀﺎﺀ ﻭﻗﻄﻌﺔ ﺍﳌﻼﺑﺲ ﻓﻲ ﻣﻜﺎﻥ ﻻ ﻳﺒﺪﻭ ﻋﻠﻰ ﻧﺤﻮ ﺟﻴﺪ .ﺛﻢ ﻗﻢ ﺑﺪﻋﻜﻬﻤﺎ ﹰ
ﻛﺎﻥ ﺍﻟﻠﻮﻥ ﻗﺪ ﺍﻧﺘﻘﻞ ﺇﻟﻰ ﺍﳌﻨﺸﻔﺔ ﺃﻡ ﻻ.
• ﺗﻌﺎﻣﻞ ﺑﺤﺬﺭ ﻣﻊ ﺍﻟﻮﺷﺎﺣﺎﺕ ﻭﺍﳌﻼﺑﺲ ﺍﳌﺴﺘﻮﺭﺩﺓ ﺣﻴﺚ ﺃﻧﻬﺎ ﺗﻔﻘﺪ ﻟﻮﻧﻬﺎ ﺑﺴﻬﻮﻟﺔ.
• ﲢﻘﻖ ﳑﺎ ﺇﺫﺍ ﻛﺎﻥ ﻳﻮﺟﺪ ﺃﻳﺔ ﺑﻘﻊ ﺃﻭ ﺃﻭﺳﺎﺥ ﺑﺎﳌﻼﺑﺲ.
• ﻓﻲ ﺣﺎﻟﺔ ﺍﻟﻌﺜﻮﺭ ﻋﻠﻰ ﺑﻘﻊ ،ﺍﺳﺘﺨﺪﻡ ﻣﻨﺸﻔﺔ ﺭﻃﺒﺔ ﻋﻠﻴﻬﺎ ﻣﺴﺤﻮﻕ ﻏﺴﻴﻞ ﻭﺍﺩﻋﻜﻬﺎ ﻓﻲ ﺍﲡﺎﻩ ﻭﺍﺣﺪ.
• ﻗﺒﻞ ﺍﻟﻐﺴﻴﻞ ،ﻳﺠﺐ ﺍﻟﻘﻴﺎﻡ ﲟﻌﺎﳉﺔ ﺃﻭﻟﻴﺔ ﻟﻸﻛﻤﺎﻡ ،ﻭﺍﻟﻴﺎﻗﺎﺕ ،ﻭﺛﻨﻴﺎﺕ ﺍﻟﻔﺴﺎﺗﲔ ﻭﺍﳉﻴﻮﺏ ﺑﺎﻟﺘﻨﻈﻴﻒ ﺑﻔﺮﺷﺎﺓ ﻋﻠﻴﻬﺎ ﻣﺴﺤﻮﻕ.
ﻳﺘﻢ ﺍﻟﺘﻌﺎﻣﻞ ﻣﻊ ﺍﻷﻗﻤﺸﺔ ﺍﳌﺼﻨﻮﻋﺔ ﻣﻦ ﺍﻟﺼﻮﻑ ﻭﺍﳌﻌﺎﳉﺔ ﺿﺪ ﺍﻟﺘﺠﻌﻴﺪ ﺑﺸﻜﻞ ﺧﺎﺹ ،ﻭﺫﻟﻚ ﺑﺘﺜﺒﻴﺘﻬﺎ ﺑﺎﳋﻴﻮﻁ ﻗﺒﻞ ﺍﻟﻐﺴﻞ .ﺗﺘﻢ ﺇﺯﺍﻟﺔ ﻫﺬﻩ
ﺍﳋﻴﻮﻁ ﺑﻌﺪ ﺟﻔﺎﻑ ﺍﳌﻼﺑﺲ.
ﺍﳌﻼﺑﺲ ﻏﻴﺮ ﺍﻟﻘﺎﺑﻠﺔ ﻟﻠﻐﺴﻴﻞ
ﺍﳌﻼﺑﺲ ﺍﻟﺘﻲ ﺗﺘﺄﺛﺮ ﺑﺴﻬﻮﻟﺔ ﺣﺘﻰ ﺑﺎﻟﻨﻘﻊ ﻓﻲ ﺍﳌﺎﺀ.
• ﺣﺘﻰ ﺑﺎﻟﻨﻘﻊ ﻓﻲ ﺍﳌﺎﺀ ،ﳝﻜﻦ ﺃﻥ ﻳﺤﺪﺙ ﺗﻐﻴﻴﺮ ﻓﻲ ﺃﺭﺑﻄﺔ ﺍﻟﻌﻨﻖ ﻭﺣﻤﺎﻻﺕ ﺍﻟﺼﺪﺭ ﻭﺍﻟﺴﺘﺮﺍﺕ ﻭﺍﻟﺒﺪﻝ ﻭﺍﳌﻌﺎﻃﻒ ﻓﻘﺪ ﺗﻨﻜﻤﺶ ﻫﺬﻩ ﺍﳌﻼﺑﺲ
ﺃﻭ ﻳﺘﻐﻴﺮ ﻟﻮﻧﻬﺎ ﺍﳋﺎﺭﺟﻲ ﻭﺫﻟﻚ ﻷﻥ ﻣﻌﻈﻤﻬﺎ ﻣﺼﻨﻮﻉ ﻣﻦ ﺍﳊﺮﻳﺮ ﺍﻟﺼﻨﺎﻋﻲ ﻭﺍﻟﻔﺴﻜﻮﺯ ﻭﺍﻷﻟﻴﺎﻑ ﻭﻣﺸﺘﻘﺎﺗﻬﺎ ﻣﻦ ﺍﻷﻟﻴﺎﻑ ﺍﺘﻠﻄﺔ.
• ﳝﻜﻦ ﺃﻥ ﺗﺘﻐﻴﺮ ﺃﻟﻮﺍﻥ ﺍﻷﻗﻤﺸﺔ ﺍﳌﻌﺎﳉﺔ ﺃﻭ ﺍﳌﻨﻘﻮﺷﺔ ﺃﻭ ﺍﻟﺼﻨﺎﻋﻴﺔ ﺣﺘﻰ ﲟﺠﺮﺩ ﺍﻟﻨﻘﻊ ﻓﻲ ﺍﳌﺎﺀ.
• ﻭﺗﻌﺘﺒﺮ ﺍﻷﻗﻤﺸﺔ ﺍﳌﺼﻨﻮﻋﺔ ﻣﻦ ﺍﻟﻘﻄﻦ ﻭﺍﻟﺼﻮﻑ ﻭﺍﳊﺮﻳﺮ ﺍﳌﻌﺎﻟﺞ ﻭﺍﳌﻨﺘﺠﺎﺕ ﺍﳉﻠﺪﻳﺔ ﻭﺍﻷﺩﻭﺍﺕ ﺍﳌﺼﻨﻮﻋﺔ ﻣﻦ ﺍﳉﻠﻮﺩ ﻭﺍﳌﻼﺑﺲ ﺍﳌﺰﻳﻨﺔ ﺑﺎﳉﻠﺪ
ﻣﻦ ﺍﳌﻨﺘﺠﺎﺕ ﺍﻟﺘﻲ ﺗﻔﻘﺪ ﻟﻮﻧﻬﺎ ﺑﺴﻬﻮﻟﺔ.
• ﻻ ﺗﻐﺴﻞ ﺗﻠﻚ ﺍﳌﻼﺑﺲ ﺩﻭﻥ ﻣﻌﺮﻓﺔ ﺇﺭﺷﺎﺩﺍﺕ ﺍﻟﻐﺴﻴﻞ ﺃﻭ ﺍﳌﻨﺘﺞ ﺍﻟﺘﻲ ﺗﻮﺿﺢ ﻛﻴﻔﻴﺔ ﺍﻟﺘﻌﺎﻣﻞ ﻣﻌﻪ.
ﻧﺒﺬﺓ ﻋﻦ ﻣﺴﺤﻮﻕ ﺍﻟﻐﺴﻴﻞ
• ﻋﻨﺪﻣﺎ ﻳﻜﻮﻥ ﻣﺴﺤﻮﻕ ﺍﻟﻐﺴﻴﻞ ﻏﻴﺮ ﻗﺎﺑﻞ ﻟﻠﺬﻭﺑﺎﻥ ﺑﺸﻜﻞ ﺟﻴﺪ ،ﺍﺳﺘﺨﺪﻡ ﺍﳌﺎﺀ ﺍﻟﺪﺍﻓﺊ )ﺣﻮﺍﻟﻲ ٤٠ﺩﺭﺟﺔ ﻣﺌﻮﻳﺔ( ﻹﺫﺍﺑﺔ ﺍﳌﺴﺤﻮﻕ.
• ﺍﺳﺘﺨﺪﻡ ﻛﻤﻴﺔ ﻣﻼﺋﻤﺔ ﻣﻦ ﻣﺴﺤﻮﻕ ﺍﻟﻐﺴﻴﻞ.
• ﺣﺘﻰ ﺇﺫﺍ ﰎ ﺍﻹﻓﺮﺍﻁ ﻓﻲ ﺍﺳﺘﺨﺪﺍﻡ ﻣﺴﺤﻮﻕ ﺍﻟﻐﺴﻴﻞ ،ﻓﻠﻦ ﺗﺨﺘﻠﻒ ﺍﻟﻨﺘﻴﺠﺔ ﺑﻌﺪ ﺍﻟﻐﺴﻞ .ﻓﻘﺪ ﻳﺆﺩﻱ ﺫﻟﻚ ﺇﻟﻰ ﺗﻠﻒ ﺍﳌﻼﺑﺲ ﻟﻌﺪﻡ
ﺗﻨﺒﻴﻪ
ﺷﻄﻔﻬﺎ ﺑﺪﺭﺟﺔ ﻛﺎﻓﻴﺔ.
• ﻗﺪ ﺗﺘﺴﺒﺐ ﻣﻮﺍﺩ ﺍﻟﺘﺒﻴﻴﺾ ﻓﻲ ﺇﺗﻼﻑ ﺍﳌﻼﺑﺲ ﺣﻴﺚ ﺇﻧﻬﺎ ﻣﻮﺍﺩ ﺷﺪﻳﺪﺓ ﺍﻟﻘﻠﻮﻳﺔ.
• ﺍﺷﻄﻒ ﺍﳌﻼﺑﺲ ﺑﺎﻟﺸﻜﻞ ﺍﻟﻜﺎﻓﻲ ﺣﻴﺚ ﺃﻥ ﺑﻘﺎﺀ ﺍﳌﺴﺤﻮﻕ ﻋﻠﻴﻬﺎ ﻳﺴﺒﺐ ﺭﻭﺍﺋﺢ ﻛﺮﻳﻬﺔ.
• ﺇﺫﺍ ﰎ ﺍﻹﻓﺮﺍﻁ ﻓﻲ ﺍﺳﺘﺨﺪﺍﻡ ﺍﳌﺴﺤﻮﻕ ﺃﻭ ﺍﳌﺎﺀ ﺍﻟﺒﺎﺭﺩ ،ﻓﻠﻦ ﻳﺬﻭﺏ ﺍﳌﺴﺤﻮﻕ ﺑﺎﻟﻜﺎﻣﻞ ﻭﺳﻴﻈﻞ ﻋﺎﻟﻘﹰ ﺎ ﺑﺎﳌﻼﺑﺲ ﺃﻭ ﺍﳋﺮﻃﻮﻡ ﺃﻭ ﺳﻠﺔ
ﺍﻟﺘﻨﺸﻴﻒ ﳑﺎ ﻳﺴﺒﺐ ﺗﻠﻮﺛﻬﺎ.
ﻣﺘﺒﻖ ،ﻳﺠﺐ ﻭﺿﻊ ﺍﳌﺴﺤﻮﻕ ﻓﻲ ﺩﺭﺝ ﺍﳌﺴﺤﻮﻕ .ﻗﺪ ﻳﺆﺩﻱ ﺗﻮﺯﻳﻊ ﻣﺴﺤﻮﻕ ﺍﻟﻐﺴﻴﻞ ﻋﻠﻰ ﺍﻟﻐﺴﻴﻞ ﺑﺸﻜﻞ
• ﻓﻲ ﺣﺎﻟﺔ ﻭﺟﻮﺩ ﻏﺴﻴﻞ
ﹴ
ﻣﺒﺎﺷﺮ ﺇﻟﻰ ﺗﻠﻄﺦ ﺍﻷﻟﻮﺍﻥ.
ﺇﻋﺪﺍﺩ ﺍﻟﻐﺴﺎﻟﺔ_٧
6:51:07
2013-04-19
F500S_W3050_WA10F5-03273N_AR.indd Sec3:9
ﺇﻋﺪﺍﺩ ﺍﻟﻐﺴﺎﻟﺔ
ﺍﻟﻌﻨﺎﻳﺔ ﺑﺎﳌﻼﺑﺲ ﻗﺒﻞ ﺍﻟﻐﺴﻴﻞ
ﺃﺧﺮﺝ ﺍﳌﺘﻌﻠﻘﺎﺕ ﺍﻟﺸﺨﺼﻴﺔ ﻣﻦ ﺍﳉﻴﻮﺏ.
• ﺗﻨﺒﻴﻪ ،ﺍﻓﺤﺺ ﺍﳉﻴﻮﺏ! ﺗﺘﺴﺒﺐ ﺑﻨﺲ ﺍﻟﺸﻌﺮ ﻭﺍﻟﻌﻤﻼﺕ ﺍﳌﻌﺪﻧﻴﺔ ﻓﻲ ﺗﻠﻒ ﺍﳌﻼﺑﺲ ﻭﺍﻟﻐﺴﺎﻟﺔ .ﺣﻴﺚ
ﺃﻧﻬﺎ ﺗﺴﺒﺐ ﺿﻮﺿﺎﺀ ﻭﻣﺸﺎﻛﻞ ﻟﻠﻐﺴﺎﻟﺔ .ﻟﺬﺍ ،ﻳﺠﺐ ﻓﺤﺺ ﺍﳉﻴﻮﺏ.
ﺤﺎﺑﺎﺕ ﺍﻟﺴﺮﺍﻭﻳﻞ ﻣﻔﺘﻮﺣﺔ ﺃﺛﻨﺎﺀ ﺍﻟﻐﺴﻴﻞ ،ﻓﺈﻥ ﻫﺬﺍ ﻗﺪ ﻳﺘﺴﺒﺐ ﻓﻲ ﺗﻠﻒ ﺍﻔﻒ .ﻳﺠﺐ
ﺇﺫﺍ ﺗﹸﺮﻛﺖ ﹶﺳ ﱠ
ﺤﺎﺑﺎﺕ ﻭﺗﺜﺒﻴﺘﻬﺎ ﺑﺨﻴﻂ ﻗﺒﻞ ﺍﻟﻐﺴﻞ.
ﺍﻟﺴ ﱠ
ﻏﻠﻖ ﹶ
• ﻗﺪ ﺗﺆﺩﻱ ﺍﳌﻌﺎﺩﻥ ﺍﳌﻮﺟﻮﺩﺓ ﻋﻠﻰ ﺍﳌﻼﺑﺲ ﺇﻟﻰ ﺗﻠﻒ ﻫﺬﻩ ﺍﳌﻼﺑﺲ ﻭﺣﻮﺽ ﺍﻟﻐﺴﻴﻞ.
• ﺍﻗﻠﺐ ﺍﳌﻼﺑﺲ ﺍﻟﺘﻲ ﺑﻬﺎ ﺃﺯﺭﺍﺭ ﺃﻭ ﺍﳌﻼﺑﺲ ﺍﳌﻄﺮﹼﺯﺓ ﻗﺒﻞ ﻏﺴﻠﻬﺎ.
• ﻗﺪ ﺗﺘﺸﺎﺑﻚ ﺍﳌﻼﺑﺲ ﺫﺍﺕ ﺍﳋﻴﻮﻁ ﺍﻟﻄﻮﻳﻠﺔ ﻣﻊ ﻣﻼﺑﺲ ﺃﺧﺮﻯ ﻭﻗﺪ ﻳﺆﺩﻱ ﺫﻟﻚ ﺇﻟﻰ ﺗﻠﻒ ﻫﺬﻩ ﺍﳌﻼﺑﺲ.
ﺍﺣﺮﺹ ﻋﻠﻰ ﺗﺜﺒﻴﺖ ﺍﳋﻴﻮﻁ ﻗﺒﻞ ﺍﻟﻐﺴﻴﻞ.
ﻏﻴﺮ ﻣﺴﻤﻮﺡ ﺑﻮﺿﻊ ﺍﳌﻼﺑﺲ ﺍﳌﻘﺎﻭﻣﺔ ﻟﻠﻤﺎﺀ )ﻟﺒﺎﺱ ﺍﻟﺘﺰﺣﻠﻖ ﻋﻠﻰ ﺍﳉﻠﻴﺪ ﻭﺣﻔﺎﺿﺎﺕ ﺍﻷﻃﻔﺎﻝ
ﻭﺍﻟﺪﻭﺍﺳﺎﺕ( ﻓﻲ ﺍﻟﻐﺴﻴﻞ.
• ﻗﺪ ﻳﺆﺩﻱ ﺫﻟﻚ ﺇﻟﻰ ﺇﺧﺮﺍﺝ ﺍﻟﻐﺴﻴﻞ ﺃﻭ ﺍﻫﺘﺰﺍﺯ ﺍﻟﻐﺴﺎﻟﺔ ﺑﺸﻜﻞ ﻏﻴﺮ ﻃﺒﻴﻌﻲ ،ﳑﺎ ﻗﺪ ﻳﺆﺩﻱ ﺇﻟﻰ ﺇﳊﺎﻕ
ﺇﺻﺎﺑﺎﺕ ﺑﺎﻷﺷﺨﺎﺹ ﺃﻭ ﺗﻠﻒ ﺑﺎﻟﻐﺴﺎﻟﺔ ﺃﻭ ﺍﻷﺭﺿﻴﺔ ﺃﻭ ﺍﳌﻼﺑﺲ) .ﺍﳊﻔﺎﺿﺎﺕ ﻭﺍﳌﻼﺑﺲ ﺍﳌﻘﺎﻭﻣﺔ ﻟﻠﻤﺎﺀ
ﻭﻣﻌﺎﻃﻒ ﺍﳌﻄﺮ ﻭﺃﻏﻄﻴﺔ ﺍﳌﻈﻼﺕ ﻭﻣﻼﺑﺲ ﺍﻟﺘﺰﺣﻠﻖ ﻋﻠﻰ ﺍﳉﻠﻴﺪ ﻭﺃﻏﻄﻴﺔ ﺍﻟﺴﻴﺎﺭﺍﺕ ﻭﺣﻘﺎﺋﺐ ﺍﻟﻨﻮﻡ،
ﺇﻟﺦ(.
• ﻋﻨﺪ ﺩﻭﺭﺍﻥ ﺍﳊﻮﺽ ،ﻗﺪ ﻳﺒﻘﻰ ﺍﳌﺎﺀ ﺩﺍﺧﻞ ﺍﳌﻼﺑﺲ ﺃﻭ ﺍﻷﻗﻤﺸﺔ ﺍﳌﻘﺎﻭﻣﺔ ﻟﻠﻤﺎﺀ ﻭﻗﺪ ﻳﺘﺠﻤﻊ ﻓﻲ ﺃﺣﺪ ﺍﻷﺭﻛﺎﻥ ﳑﺎ ﻳﺆﺩﻱ ﺇﻟﻰ ﺍﻫﺘﺰﺍﺯ ﺍﻟﻐﺴﺎﻟﺔ
ﺑﺸﻜﻞ ﻏﻴﺮ ﻃﺒﻴﻌﻲ .ﻭﻗﺪ ﻳﺮﺗﻔﻊ ﺍﻟﻐﺴﻴﻞ ﻭﻳﺨﺮﺝ ﻣﻦ ﺍﻟﻐﺴﺎﻟﺔ ﳑﺎ ﻳﺆﺩﻱ ﺇﻟﻰ ﺇﳊﺎﻕ ﺇﺻﺎﺑﺎﺕ ﺑﺎﻷﺷﺨﺎﺹ.
ﺍﻧﻔﺾ ﺍﻷﻭﺳﺎﺥ ﻭﺍﻷﺗﺮﺑﺔ ﻋﻦ ﺍﳌﻼﺑﺲ.
• ﻳﺆﺩﻱ ﺩﻋﻚ ﺍﻷﺗﺮﺑﺔ ﻭﺣﺒﻴﺒﺎﺕ ﺍﻟﺮﻣﻞ ﺍﳌﺘﺮﺍﻛﻤﺔ ﻋﻠﻰ ﺍﳌﻼﺑﺲ ﺍﻟﺮﻗﻴﻘﺔ ﺇﻟﻰ ﺗﻌﺮﻳﻀﻬﺎ ﻟﻠﺘﻠﻒ ﻭﺍﳊﺼﻮﻝ ﻋﻠﻰ ﻧﺘﺎﺋﺞ ﻏﻴﺮ ﻣﺮﺿﻴﺔ ﺑﻌﺪ ﺍﻟﻐﺴﻞ.
ﺍﻏﺴﻞ ﺍﳉﻮﺍﺭﺏ ﺍﻟﺒﻴﻀﺎﺀ ﻭﺍﻷﻛﻤﺎﻡ ﻭﺍﻟﻴﺎﻗﺎﺕ ﻣﺴﺒﻘﹰ ﺎ ﻗﺒﻞ ﺩﻭﺭﺓ ﺍﻟﻐﺴﻞ ﺍﻷﺳﺎﺳﻴﺔ.
• ﻹﺯﺍﻟﺔ ﺃﻱ ﺑﻘﻊ ﺃﻭ ﺃﻭﺳﺎﺥ ﻋﻠﻰ ﺍﻟﻴﺎﻗﺎﺕ ﻭﺍﻷﻛﻤﺎﻡ ﻭﺍﻟﺜﻨﻴﺎﺕ ﻭﺍﳉﻴﻮﺏ ،ﺿﻊ ﺑﻌﺾ ﻣﻦ ﻣﺴﺤﻮﻕ ﺍﻟﻐﺴﻴﻞ ﻋﻠﻴﻬﺎ ﻭﺍﻓﺮﻛﻬﺎ ﺑﺮﻓﻖ ﻗﺒﻞ ﺍﻟﻐﺴﻞ.
• ﳝﻜﻦ ﺍﺳﺘﺨﺪﺍﻡ ﺍﳌﻨﻈﻔﺎﺕ ﺍﻟﺴﺎﺋﻠﺔ ﺃﻭ ﺍﳌﺴﺎﺣﻴﻖ .ﻻ ﺗﺴﺘﺨﺪﻡ ﺍﻟﺼﺎﺑﻮﻥ ﻓﻘﺪ ﻳﺘﺴﺦ ﺍﳊﻮﺽ ﻣﻦ ﺍﻷﻭﺳﺎﺥ ﺍﳌﻮﺟﻮﺩﺓ ﻋﻠﻴﻪ.
ﺍﻗﻠﺐ ﻣﻼﺑﺲ ﺍﻷﻃﻔﺎﻝ ﺍﻟﺮﺿﻊ ﺗﻠﻚ ﻋﻠﻰ ﻇﻬﺮﻫﺎ ﻗﺒﻞ ﺍﻟﻐﺴﻴﻞ.
• ﺇﺫﺍ ﻛﺎﻧﺖ ﺍﳌﻼﺑﺲ ﺑﻬﺎ ﺃﻭﺳﺎﺥ ﺧﺎﺭﺟﻴﺔ ،ﻳﺠﺐ ﻓﺼﻠﻬﺎ ﻗﺒﻞ ﺍﻟﻐﺴﻴﻞ .ﺣﻴﺚ ﻗﺪ ﺗﻌﻠﻖ ﻫﺬﻩ ﺍﻷﻭﺳﺎﺥ
)ﺍﻷﻭﺳﺎﺥ ﻭﺍﳋﻴﻮﻁ( ﺑﺎﳌﻼﺑﺲ ﺍﻷﺧﺮﻯ.
• ﺍﻏﺴﻞ ﺍﳌﻼﺑﺲ ﺍﻟﺴﻮﺩﺍﺀ ﻭﺍﳌﻨﺎﺷﻒ ﺍﻟﻘﻄﻨﻴﺔ ﻛﻼ ﹰ ﻋﻠﻰ ﺣﺪﺓ .ﺇﺫﺍ ﰎ ﻏﺴﻠﻬﺎ ﻣﻌﺎ ﹰ ،ﻗﺪ ﺗﻌﻠﻖ ﺍﻷﻭﺳﺎﺥ
ﺑﺎﳌﻨﺎﺷﻒ .ﺍﻓﺤﺺ ﺍﳌﻼﺑﺲ ﻗﺒﻞ ﺍﻟﻐﺴﻴﻞ.
ﻗﺪ ﺗﺴﺒﺐ ﻏﺴﻴﻞ ﺍﳌﻼﺑﺲ ﺍﻟﻜﺸﻤﻴﺮﻳﺔ ﻭﺫﺍﺕ ﺍﻷﺣﺠﺎﻡ ﺍﻟﻜﺒﻴﺮﺓ ﻭﺍﻷﻭﺯﺍﻥ ﺍﳋﻔﻴﻔﺔ )ﻋﻠﻰ ﺳﺒﻴﻞ ﺍﳌﺜﺎﻝ
ﺍﳌﻼﺑﺲ ﺫﺍﺕ ﺍﻟﺘﻄﺮﻳﺰ ﺍﻟﺒﺴﻴﻂ ،ﻭﺍﳌﻼﺑﺲ ﺍﻟﻨﺴﺎﺋﻴﺔ ،ﻭﺍﳌﻨﺴﻮﺟﺎﺕ ﺍﳌﺼﻨﻮﻋﺔ ﻣﻦ ﺍﻟﻨﻴﻠﻮﻥ ﻭﺍﻷﻗﻤﺸﺔ
ﺍﻟﺼﻨﺎﻋﻴﺔ ،ﺇﻟﻰ ﺁﺧﺮﻩ( ﻓﻲ ﺇﳊﺎﻕ ﺍﻟﻀﺮﺭ ﺑﺎﳌﻼﺑﺲ ﻧﻔﺴﻬﺎ ﻛﻤﺎ ﻗﺪ ﺗﺘﺴﺒﺐ ﻓﻲ ﻣﺸﺎﻛﻞ ﻟﻐﺴﺎﻟﺔ
ﺍﳌﻼﺑﺲ .ﺍﺳﺘﺨﺪﻡ ﺷﺒﻜﺔ ﺍﻟﻐﺴﻴﻞ ﺃﻭ ﺍﻏﺴﻠﻬﺎ ﻋﻠﻰ ﺣﺪﺓ.
ﺍﻷﺳﺮﺓ ،ﻭﺍﳌﻼﺑﺲ ﺍﻟﺼﻮﻓﻴﺔ ﻓﻲ ﺷﺒﻜﺔ ﻏﺴﻴﻞ ﻗﺒﻞ
• ﻳﺠﺐ ﻭﺿﻊ ﺍﳌﻼﺑﺲ ﺍﳌﺰﻳﻨﺔ ﺑﺎﳋﻴﻮﻁ ،ﻭﺍﻟﺪﺍﻧﺘﻴﻞ ،ﻭﻣﻼﺀﺍﺕ ﹼ
ﻭﺿﻌﻬﺎ ﻓﻲ ﺍﻟﻐﺴﺎﻟﺔ.
• ﺿﻊ ﺍﳌﻼﺑﺲ ﺍﳋﻔﻴﻔﺔ ﻓﻲ ﺷﺒﻜﺔ ﺍﻟﻐﺴﻴﻞ.
• ﻻ ﺗﺴﺘﺨﺪﻡ ﺳﻮﻯ ﺷﺒﻜﺎﺕ ﺍﻟﻐﺴﻴﻞ ﺍﻟﺘﺠﺎﺭﻳﺔ ﻓﻲ ﻋﻤﻠﻴﺔ ﺍﻟﻐﺴﻴﻞ.
ﻳﺠﺐ ﺿﻐﻂ ﺍﻟﺴﺘﺎﺋﺮ ﻭﺍﳌﻼﺑﺲ ﺍﳋﻔﻴﻔﺔ ﻭﺍﳉﻴﻨﺰ ﺑﺪﻓﻌﻬﺎ ﻓﻲ ﺍﳌﺎﺀ ﺣﺘﻰ ﻻ ﺗﻄﻔﻮ ﻓﻮﻕ ﺳﻄﺢ ﺍﳌﺎﺀ.
• ﻓﻲ ﺣﺎﻟﺔ ﻃﻔﻮ ﻫﺬﻩ ﺍﳌﻼﺑﺲ ﻓﻮﻕ ﺳﻄﺢ ﺍﳌﺎﺀ ،ﺍﺿﻐﻂ ﻋﻠﻰ ﺍﻟﺰﺭ ) Start/Pauseﺗﺸﻐﻴﻞ/ﺗﻮﻗﻒ( ﻹﻳﻘﺎﻑ
ﺍﻟﺘﺸﻐﻴﻞ ﺛﻢ ﺍﺿﻐﻂ ﻋﻠﻰ ﺗﻠﻚ ﺍﳌﻼﺑﺲ ﺣﺘﻰ ﻳﻐﻤﺮﻫﺎ ﺍﳌﺎﺀ .ﺇﺫﺍ ﺍﺳﺘﻤﺮﺕ ﻋﻤﻠﻴﺔ ﺍﻟﻐﺴﻴﻞ ﻭﺍﳌﻼﺑﺲ ﻃﺎﻓﻴﺔ
ﻓﻮﻕ ﺳﻄﺢ ﺍﳌﺎﺀ ،ﻗﺪ ﻳﺘﺴﺒﺐ ﺫﻟﻚ ﻓﻲ ﺇﳊﺎﻕ ﺍﻟﻀﺮﺭ ﺑﺎﳌﻼﺑﺲ ﻭﺍﻟﻐﺴﺎﻟﺔ ﻋﻼﻭﺓ ﻋﻠﻰ ﺍﳊﺼﻮﻝ ﻋﻠﻰ ﻧﺘﺎﺋﺞ ﻏﻴﺮ
ﻣﺮﺿﻴﺔ ﺑﻌﺪ ﺍﻟﻐﺴﻴﻞ.
_٨ﺇﻋﺪﺍﺩ ﺍﻟﻐﺴﺎﻟﺔ
6:51:07
2013-04-19
F500S_W3050_WA10F5-03273N_AR.indd Sec3:10
ﺗﻌﺘﻤﺪ ﻃﺮﻳﻘﺔ ﺍﻟﻐﺴﻞ ﺑﺸﻜﻞ ﺗﻠﻘﺎﺋﻲ ﻋﻠﻰ ﻧﻮﻋﻴﺔ ﺍﻟﻐﺴﻴﻞ
ﻗﺒﻞ ﺑﺪﺀ ﻋﻤﻠﻴﺔ ﺍﻟﻐﺴﻞ ،ﲢﻘﻖ ﳑﺎ ﻳﻠﻲ؛
ﺣﺎ .ﻗﻢ ﺑﺘﻮﺻﻴﻞ ﺳﻠﻚ ﺍﻟﺘﻴﺎﺭ ﺍﻟﻜﻬﺮﺑﻲ ﻭﺗﺄﻛﺪ ﺃﻥ ﺧﺮﻃﻮﻡ ﺍﻟﺘﺼﺮﻳﻒ ﻣﺘﺠﻪ
• ﻗﻢ ﺑﺘﻮﺻﻴﻞ ﺧﺮﻃﻮﻡ ﺗﺰﻭﻳﺪ ﺍﳌﺎﺀ ﺑﺼﻨﺒﻮﺭ ﺍﳌﺎﺀ .ﺍﺗﺮﻙ ﺍﻟﺼﻨﺒﻮﺭ ﻣﻔﺘﻮ ﹰ
ﻷﺳﻔﻞ.
٠١ﺇﻋﺪﺍﺩ ﺍﻟﻐﺴﺎﻟﺔ
ﺍﻟﻐﺴﻞ ﻟﻠﻤﺮﺓ ﺍﻷﻭﻟﻰ
ﻗﺒﻞ ﻏﺴﻞ ﺍﳌﻼﺑﺲ ﻟﻠﻤﺮﺓ ﺍﻷﻭﻟﻰ ،ﻳﺠﺐ ﺗﺸﻐﻴﻞ ﺍﳉﻬﺎﺯ ﺩﻭﺭﺓ ﻛﺎﻣﻠﺔ ﺩﻭﻥ ﻣﻼﺑﺲ.
ﻟﻠﻘﻴﺎﻡ ﺑﺬﻟﻚ:
.١ﺍﺿﻐﻂ ﻋﻠﻰ ﺍﻟﺰﺭ ) Powerﺍﻟﻄﺎﻗﺔ(.
.٢ﺍﻓﺘﺢ ﺩﺭﺝ ﺍﳌﺴﺤﻮﻕ ﻭﺿﻊ ﻗﻠﻴﻼ ﹰ ﻣﻨﻪ.
.٣ﻗﻢ ﺑﺘﺸﻐﻴﻞ ﺗﺰﻭﻳﺪ ﺍﳌﺎﺀ ﺍﳌﺘﺼﻞ ﺑﺎﻟﻐﺴﺎﻟﺔ.
.٤ﺍﺿﻐﻂ ﻋﻠﻰ ﺍﻟﺰﺭ ) Start/Pauseﺗﺸﻐﻴﻞ/ﺗﻮﻗﻒ(.
ﻳﺰﻳﻞ ﺫﻟﻚ ﺃﻱ ﻣﺎﺀ ﻣﺘﺒﻖ ﻓﻲ ﺍﻟﻐﺴﺎﻟﺔ ﻧﺘﻴﺠﺔ ﻟﻠﺘﺸﻐﻴﻞ ﺍﻻﺧﺘﺒﺎﺭﻱ ﺍﻟﺬﻱ ﻗﺎﻣﺖ ﺑﻪ ﺍﻟﺸﺮﻛﺔ ﺍﳌﺼﻨﱢﻌﺔ ﻟﻠﺠﻬﺎﺯ.
ﻣﻼﺣﻈﺎﺕ ﺧﺎﺻﺔ!
ﻭﻇﻴﻔﺔ ﺍﻟﺘﺤﺴﺲ ﺍﻟﺘﻠﻘﺎﺋﻲ
ﺗﻠﻘﺎﺋﻴﺎ ﻭﻣﻦ ﺛﻢ ﻳﺘﻢ ﲢﺪﻳﺪ ﻣﺴﺘﻮﻯ ﺍﳌﺎﺀ ﺍﳌﻨﺎﺳﺐ ﻭﻭﻗﺖ ﺍﻟﻐﺴﻴﻞ ﻛﻤﺎ ﻳﺘﻢ ﲢﺪﻳﺪ
• ﻃﺒﻘﹰ ﺎ ﻟﻠﺒﺮﺍﻣﺞ ﺍﶈﺪﺩﺓ ،ﻳﺘﻢ ﺍﺳﺘﺸﻌﺎﺭ ﺣﺠﻢ ﺍﻟﻐﺴﻴﻞ
ﹰ
ﺗﻠﻘﺎﺋﻴﺎ ﻟﻠﻐﺴﻞ ﺍﻟﺘﻠﻘﺎﺋﻲ.
ﺩﻭﺭﺓ ﺍﻟﺸﻄﻒ ﻭﻭﻗﺖ ﺍﻟﺘﻨﺸﻴﻒ
ﹰ
ﺑﺮﻧﺎﻣﺠﺎ ﻭﺍﺿﻐﻂ ﻋﻠﻰ ﺍﻟﺰﺭ ) Start/Pauseﺗﺸﻐﻴﻞ/ﺗﻮﻗﻒ( .ﺛﻢ ﺗﺒﺪﺃ ﻟﻮﺣﺔ ﺍﻟﻐﺴﻴﻞ ﻓﻲ ﺍﻟﺪﻭﺭﺍﻥ ﺑﺪﻭﻥ ﻣﺎﺀ .ﻳﺘﻢ
• ﺑﻌﺪ ﺍﻟﺘﺸﻐﻴﻞ ،ﺣﺪﺩ
ﹰ
ﺍﻟﺘﻌﺮﱡﻑ ﺑﻬﺬﺍ ﺍﻹﺟﺮﺍﺀ ﻋﻠﻰ ﺣﺠﻢ ﺍﻟﻐﺴﻴﻞ ﺍﳌﻮﺟﻮﺩ ﻓﻲ ﺣﻮﺽ ﺍﻟﻐﺴﻴﻞ ،ﺃﻱ ﺇﻧﻪ ﻟﻴﺲ ﺧﻠﻼ ﹰ ﻓﻲ ﺃﺩﺍﺀ ﺍﳉﻬﺎﺯ .ﺑﻌﺪ ﻋﻤﻠﻴﺔ ﺍﻟﺘﺤﺴﺲ ﻫﺬﻩ،
ﺗﻠﻘﺎﺋﻴﺎ.
ﻳﺘﻢ ﺗﺰﻭﻳﺪ ﺍﳌﺎﺀ
ﹰ
ﻭﻣﻨﻌﻢ ﺍﻷﻗﻤﺸﺔ
ﺇﺿﺎﻓﺔ ﻣﺴﺤﻮﻕ ﺍﻟﻐﺴﻴﻞ
ﹼ
• ﻳﺘﻌﺮﻑ ﻫﺬﺍ ﺍﻹﺟﺮﺍﺀ ﻋﻠﻰ ﻛﻢ ﺍﻟﻐﺴﻴﻞ ﻭﻳﺸﻴﺮ ﺇﻟﻰ ﻣﺴﺘﻮﻯ ﺍﳌﺎﺀ ﻭﻛﻤﻴﺔ ﺍﳌﺴﺤﻮﻕ .ﺛﻢ ﻳﺒﺪﺃ ﺗﺰﻭﻳﺪ ﺍﳌﺎﺀ ﻓﻲ ﺍﳊﺎﻝ.
• ﺃﺛﻨﺎﺀ ﻋﻤﻠﻴﺔ ﺗﺰﻭﻳﺪ ﺍﳌﺎﺀ ،ﳝﻜﻦ ﻓﺘﺢ ﺩﺭﺝ ﺍﳌﺴﺤﻮﻕ ﻹﺿﺎﻓﺔ ﺍﳌﺴﺤﻮﻕ .ﻭﻟﻜﻦ ﻳﻔﻀﻞ ﺿﻐﻂ ﺍﻟﺰﺭ ) Start/Pauseﺗﺸﻐﻴﻞ/ﺗﻮﻗﻒ( ﻹﻳﻘﺎﻑ
ﺗﺰﻭﻳﺪ ﺍﳌﺎﺀ ﻭﺇﺿﺎﻓﺔ ﺍﳌﺴﺤﻮﻕ .ﺃﻏﻠﻖ ﺍﻟﺒﺎﺏ ﻭﺍﺿﻐﻂ ﺍﻟﺰﺭ ) Start/Pauseﺗﺸﻐﻴﻞ/ﺗﻮﻗﻒ( ﻣﺮﺓ ﺃﺧﺮﻯ .ﺗﹸﻌﺪ ﻫﺬﻩ ﺍﻟﻄﺮﻳﻘﺔ ﻣﻨﺎﺳﺒﺔ ﺃﻛﺜﺮ.
ﺗﻠﻘﺎﺋﻴﺎ ﻓﻲ ﺩﻭﺭﺓ ﺍﻟﺸﻄﻒ ﺍﻷﺧﻴﺮﺓ.
ﺍﳌﻨﻌﻢ ،ﻳﺘﻢ ﺇﺿﺎﻓﺘﻪ
ﻣﻨﻌﻢ ﺍﻷﻗﻤﺸﺔ ﻓﻲ ﻣﻮﺯﻉ ﹼ
• ﺇﺫﺍ ﰎ ﻭﺿﻊ ﹼ
ﹰ
ﺃﻳﻀﺎ ﺍﳌﺴﺤﻮﻕ.
ﺿﻊ ﺍﻟﻐﺴﻴﻞ ﻓﻲ ﺍﻟﻐﺴﺎﻟﺔ ﻭﺃﺿﻒ ﹰ
• ﻳﺠﺐ ﺍﻻﻧﺘﺒﺎﻩ ﺇﻟﻰ ﻋﺪﻡ ﲡﺎﻭﺯ ﻭﺯﻥ ﺍﳌﻼﺑﺲ ﺍﶈﺪﺩ ﻓﻲ ﺍﻟﻐﺴﺎﻟﺔ .ﺍﺳﺘﺨﺪﻡ ﺍﳌﺴﺤﻮﻕ ﺍﳌﻼﺋﻢ ﻟﻠﻤﻨﺴﻮﺟﺎﺕ ﺍﻟﺘﻲ ﺗﻐﺴﻠﻬﺎ.
ﺗﻠﻘﺎﺋﻴﺎ ﻟﻸﻣﺎﻥ) .ﺑﺎﺳﺘﺜﻨﺎﺀ ﺗﺰﻭﻳﺪ ﺍﳌﺎﺀ ﺍﻟﺬﻱ ﳝﻜﻦ ﺃﻥ ﻳﺴﺘﻤﺮ
• ﺇﺫﺍ ﻛﺎﻥ ﺍﻟﺒﺎﺏ ﻣﻔﺘﻮ ﹰﺣﺎ ﺃﺛﻨﺎﺀ ﺍﻟﺘﺸﻐﻴﻞ ،ﺗﺘﻮﻗﻒ ﺍﻟﻐﺴﺎﻟﺔ ﻋﻦ ﺍﻟﻌﻤﻞ
ﹰ
ﻭﺍﻟﻐﻄﺎﺀ ﻣﻔﺘﻮ ﹰﺣﺎ(.
• ﻋﻨﺪ ﺍﺧﺘﻴﺎﺭ ﺍﳌﺎﺀ ﺍﻟﺴﺎﺧﻦ ،ﻳﺘﻢ ﺗﺰﻭﻳﺪ ﻛﻞ ﻣﻦ ﺍﳌﺎﺀ ﺍﻟﺒﺎﺭﺩ ﻭﺍﻟﺴﺎﺧﻦ ﻓﻲ ﺍﻟﻌﺸﺮﻳﻦ ﺛﺎﻧﻴﺔ ﺍﻷﻭﻟﻰ ﻣﻦ ﺃﺟﻞ ﺣﻤﺎﻳﺔ ﺍﳌﻼﺑﺲ.
• ﳝﻜﻦ ﺍﻟﺘﺤﻜﻢ ﻓﻲ ﻭﻗﺖ ﺍﻟﻐﺴﻴﻞ ﻭﺩﻭﺭﺓ ﺍﻟﺸﻄﻒ ﻭﻭﻗﺖ ﺍﻟﺪﻭﺭﺍﻥ ﻓﻲ ﻛﻞ ﺩﻭﺭﺓ ﺃﺛﻨﺎﺀ ﺍﻟﻐﺴﻴﻞ.
ﺇﻋﺪﺍﺩ ﺍﻟﻐﺴﺎﻟﺔ_٩
6:51:08
2013-04-19
F500S_W3050_WA10F5-03273N_AR.indd Sec3:11
ﺇﻋﺪﺍﺩ ﺍﻟﻐﺴﺎﻟﺔ
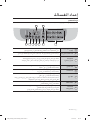
ﻟﻮﺣﺔ ﺍﻟﺘﺤﻜﻢ
ﻟﻠﺤﺼﻮﻝ ﻋﻠﻰ ﻣﺰﻳﺪ ﻣﻦ ﺍﻟﺘﻔﺎﺻﻴﻞ ،ﺭﺍﺟﻊ ﻟﻮﺣﺔ ﺍﻟﺘﺤﻜﻢ ﺍﳋﺎﺻﺔ ﺑﺎﻟﻐﺴﺎﻟﺔ.
٧
٩
٨
١
٦
٥
٤
٢
٣
١
ﻟﻮﺣﺔ ﺍﻟﻌﺮﺽ ﺍﻟﺮﺳﻮﻣﻴﺔ
ﺍﻟﺮﻗﻤﻴﺔ
ﻋﺮﺽ ﺍﻟﻮﻗﺖ ﺍﳌﺘﺒﻘﻲ ﻟﻠﻐﺴﻞ.
ﻋﺮﺽ ﺣﺎﻟﺔ ﺍﳋﻄﺄ ﺇﺫﺍ ﺣﺪﺛﺖ ﻣﺸﻜﻠﺔ ﻓﻲ ﺍﻟﻐﺴﺎﻟﺔ ﻟﺘﺘﻤﻜﻦ ﻣﻦ ﺍﺗﺨﺎﺫ ﺍﻹﺟﺮﺍﺀ ﺍﻟﻼﺯﻡ.
٢
) Water Levelﻣﺴﺘﻮﻯ ﺍﳌﺎﺀ(
ﺗﻠﻘﺎﺋﻴﺎ .ﻭﻣﻊ ﺫﻟﻚ ،ﳝﻜﻨﻚ ﲢﺪﻳﺪ ﻣﺴﺘﻮﻯ ﺍﳌﺎﺀ ﻳﺪﻭﻳﹰﺎ ﺑﺎﻟﻀﻐﻂ ﻋﻠﻰ ﻫﺬﺍ ﺍﻟﺰﺭ.
ﻳﺘﻢ ﺿﺒﻂ ﻣﺴﺘﻮﻯ ﺍﳌﺎﺀ
ﹰ
٣
Temp./Option
)ﺍﺧﺘﻴﺎﺭ ﺩﺭﺟﺔ ﺍﳊﺮﺍﺭﺓ(
ﺍﺿﻐﻂ ﻋﻠﻰ ﻫﺬﺍ ﺍﻟﺰﺭ ﺑﺸﻜﻞ ﻣﺘﻜﺮﺭ ﻟﻠﺘﺒﺪﻳﻞ ﺑﲔ ﺧﻴﺎﺭ ﺩﺭﺟﺔ ﺣﺮﺍﺭﺓ ﺍﳌﻴﺎﻩ ﻭﺍﻟﻬﻮﺍﺀ ﺍﻟﻨﻔﺎﺙ:
ﺑﺎﺭﺩ < ﺑﺎﺭﺩ ،ﻫﻮﺍﺀ ﻧﻔﺎﺙ < ﺑﺎﺭﺩ/ﺳﺎﺧﻦ < ﺑﺎﺭﺩ/ﺳﺎﺧﻦ ،ﻫﻮﺍﺀ ﻧﻔﺎﺙ < ﺳﺎﺧﻦ < ﺳﺎﺧﻦ ،ﻫﻮﺍﺀ ﻧﻔﺎﺙ
٤
) Washﻏﺴﻴﻞ(
ﺍﺿﻐﻂ ﻋﻠﻰ ﻫﺬﺍ ﺍﻟﺰﺭ ﻟﻠﻘﻴﺎﻡ ﺑﺎﻟﻐﺴﻞ ﻓﻘﻂ ﺃﻭ ﻟﻀﺒﻂ ﻣﺪﺓ ﺍﻟﻐﺴﻞ.
ﳝﻜﻨﻚ ﺿﺒﻂ ﻣﺪﺓ ﺍﻟﻐﺴﻞ ﺑﲔ ٦ﺇﻟﻰ ٣٠ﺩﻗﻴﻘﺔ.
٥
) Rinseﺷﻄﻒ(
ﺍﺿﻐﻂ ﻋﻠﻰ ﻫﺬﺍ ﺍﻟﺰﺭ ﻟﻠﻘﻴﺎﻡ ﺑﺎﻟﺸﻄﻒ ﻓﻘﻂ ﺃﻭ ﻟﻀﺒﻂ ﻋﺪﺩ ﻣﺮﺍﺕ ﺍﻟﺸﻄﻒ.
ﳝﻜﻨﻚ ﺿﺒﻂ ﻋﺪﺩ ﻣﺮﺍﺕ ﺍﻟﺸﻄﻒ ﺣﺘﻰ ﺧﻤﺲ ﻣﺮﺍﺕ.
٦
) Spinﺩﻭﺭﺍﻥ(
ﺍﺿﻐﻂ ﻋﻠﻰ ﻫﺬﺍ ﺍﻟﺰﺭ ﻹﺟﺮﺍﺀ ﻋﻤﻠﻴﺔ ﺍﻟﺘﻨﺸﻴﻒ ﺃﻭ ﻟﻀﺒﻂ ﻣﺪﺓ ﺍﻟﺘﻨﺸﻴﻒ.
ﳝﻜﻨﻚ ﺿﺒﻂ ﻣﺪﺓ ﺍﻟﺘﻨﺸﻴﻒ ﺑﲔ ١ﺇﻟﻰ ٩ﺩﻗﺎﺋﻖ.
ﻋﻨﺪ ﲢﺪﻳﺪ ﺍﻟﺘﻨﺸﻴﻒ ﻓﻘﻂ ،ﺳﺘﺨﺘﻠﻒ ﻣﺪﺓ ﺍﻟﺘﻨﺸﻴﻒ ﻋﻦ ﺍﻟﻮﻗﺖ ﺍﻟﻜﻠﻲ ﺍﳌﺘﺒﻘﻲ .ﻭﻳﺮﺟﻊ ﺫﻟﻚ ﺇﻟﻰ ﺃﻥ ﺍﻟﻮﻗﺖ
ﺍﻟﻜﻠﻲ ﺍﳌﺘﺒﻘﻲ ﻳﺘﻀﻤﻦ ﻭﻗﺖ ﺍﻟﺪﻭﺭﺍﻥ ﺍﻟﻔﻌﻠﻲ ﻭﻭﻗﺖ ﺗﺼﺮﻳﻒ ﺍﳌﺎﺀ ﻭﺍﻹﻳﻘﺎﻑ.
٧
) Powerﺍﻟﻄﺎﻗﺔ(
ﺍﺿﻐﻂ ﻫﺬﺍ ﺍﻟﺰﺭ ﻣﺮﺓ ﻭﺍﺣﺪﺓ ﻟﻠﺘﺸﻐﻴﻞ.
ﺍﺿﻐﻂ ﻫﺬﺍ ﺍﻟﺰﺭ ﻣﺮﺓ ﺃﺧﺮﻯ ﻹﻳﻘﺎﻑ ﺍﻟﺘﺸﻐﻴﻞ.
٨
Start/Pause
)ﺗﺸﻐﻴﻞ/ﺗﻮﻗﻒ(
ﺍﺳﺘﺨﺪﻡ ﻫﺬﺍ ﺍﻟﺰﺭ ﻟﻺﻳﻘﺎﻑ ﺍﳌﺆﻗﺖ ﻟﻌﻤﻠﻴﺔ ﺍﻟﺘﺸﻐﻴﻞ ﻭﺇﻋﺎﺩﺓ ﺍﻟﺘﺸﻐﻴﻞ.
ﻟﺘﻐﻴﻴﺮ ﺃﺣﺪ ﺇﺟﺮﺍﺀﺍﺕ ﺍﻟﻐﺴﻴﻞ ﺃﺛﻨﺎﺀ ﻋﻤﻠﻴﺔ ﺍﻟﺘﺸﻐﻴﻞ،
ﺍﺿﻐﻂ ﻋﻠﻰ ﻫﺬﺍ ﺍﻟﺰﺭ ﻟﻺﻳﻘﺎﻑ ،ﻭﻣﺮﺓ ﺃﺧﺮﻯ ﻹﻋﺎﺩﺓ ﺍﻟﺘﺸﻐﻴﻞ ﺑﻌﺪ ﺗﻐﻴﻴﺮ ﺍﻹﺟﺮﺍﺀ.
_١٠ﺇﻋﺪﺍﺩ ﺍﻟﻐﺴﺎﻟﺔ
6:51:08
2013-04-19
F500S_W3050_WA10F5-03273N_AR.indd Sec3:12
) Quickﺳﺮﻳﻊ(
) Delicateﻣﻼﺑﺲ ﺭﻗﻴﻘﺔ(
ﻳﹸﺴﺘﺨﺪﻡ ﻫﺬﺍ ﺍﻟﺒﺮﻧﺎﻣﺞ ﻟﻠﺴﺘﺮﺍﺕ ﺍﻟﻘﺎﺑﻠﺔ ﻟﻠﻐﺴﻴﻞ ﻭﺍﻟﺴﺘﺮﺍﺕ ﺍﻟﺼﻮﻓﻴﺔ
ﻭﺍﳌﻼﺑﺲ ﺍﳋﻔﻴﻔﺔ ،ﺇﻟﺦ.
) Blanketﺑﻄﺎﻧﻴﺔ(
ﺍﻷﺳﺮﺓ
ﺍﻟﻐﺴﻴﻞ ﺫﻭ ﺍﳊﺠﻢ ﺍﻟﻜﺒﻴﺮ ﻣﺜﻞ ﺍﻟﺒﻄﺎﻃﲔ ﻭﻣﻼﺀﺍﺕ ﹼ
) Jeansﺟﻴﻨﺰ(
ﻟﻠﺤﺼﻮﻝ ﻋﻠﻰ ﻋﻤﻠﻴﺔ ﻏﺴﻞ ﺃﻓﻀﻞ.
Eco Tub Clean
)ﺗﻨﻈﻴﻒ ﺍﳊﻮﺽ(
ﺍﺳﺘﺨﺪﻡ ﻫﺬﺍ ﺍﻟﺒﺮﻧﺎﻣﺞ ﻟﺘﻨﻈﻴﻒ ﺍﳊﻮﺽ ،ﻭﺳﻮﻑ ﻳﺴﺎﻋﺪﻙ ﻋﻠﻰ ﺍﳊﻔﺎﻅ ﻋﻠﻰ
ﻭﻣﻌﻘﻤﺎ.
ﺍﳊﻮﺽ ﻧﻈﻴﻔﹰ ﺎ
ﹰ
ﻳﺘﻢ ﺗﺸﻐﻴﻞ ﺿﻮﺀ ﻣﺆﺷﺮ ﻓﺤﺺ ﺍﳊﻮﺽ ﻹﻋﻼﻡ ﺍﳌﺴﺘﺨﺪﻡ ﺑﺤﻠﻮﻝ ﺃﻭﺍﻥ
ﺗﻨﻈﻴﻒ ﺍﳊﻮﺽ.
ﺗﻌﻤﻞ ﻗﻮﺓ ﺍﻟﺪﻭﺭﺍﻥ ﺍﳉﺒﺎﺭﺓ ﳌﻀﺨﺔ ﺣﻮﺽ ﺍﻟﻐﺴﻴﻞ ﻋﻠﻰ ﺇﺯﺍﻟﺔ ﺍﳌﻠﻮﺛﺎﺕ ﻣﻦ
ﺍﻷﺟﺰﺍﺀ ﺍﳋﺎﺭﺟﻴﺔ ﻟﻠﺤﻮﺽ ﳌﻨﻊ ﺗﻜﻮﻥ ﺭﻭﺍﺋﺢ ﺃﻭ ﻣﻠﻮﺛﺎﺕ ﺛﺎﻧﻮﻳﺔ.
٠١ﺇﻋﺪﺍﺩ ﺍﻟﻐﺴﺎﻟﺔ
٩
ﺍﻟﺪﻭﺭﺓ
) Fuzzyﺭﻗﻤﻲ(
ﲢﺪﻳﺪ ﺩﻭﺭﺓ ﺍﻟﻐﺴﻴﻞ ﺍﳌﺜﻠﻰ ﺗﻠﻘﺎﺋﻴﺎ ﹰ.
ﺗﺴﺘﺨﺪﻡ ﻫﺬﻩ ﺍﻟﺪﻭﺭﺓ ﻋﻨﺪﻣﺎ ﺗﺮﻳﺪ ﻏﺴﻞ ﺍﳌﻨﺎﺷﻒ ﺍﻟﺘﻲ ﺗﺴﺘﺨﺪﻡ ﺑﺸﻜﻞ
ﻣﺘﻜﺮﺭ ﺃﻭ ﺍﻟﻐﺴﻴﻞ ﻗﻠﻴﻞ ﺍﻻﺗﺴﺎﺥ .ﲟﺎ ﺃﻥ ﻋﻤﻠﻴﺔ ﺍﻟﻐﺴﻴﻞ ﺗﻜﻮﻥ ﺳﺮﻳﻌﺔ،
ﻳﹸﻔﻀﻞ ﺍﺳﺘﺨﺪﺍﻡ ﻫﺬﻩ ﺍﻟﺪﻭﺭﺓ ﻟﻠﻐﺴﻴﻞ ﺍﳌﺘﺴﺦ ﺍﺗﺴﺎ ﹰﺧﺎ ﺧﻔﻴﻔﹰ ﺎ ﺃﻭ ﺃﻗﻞ.
ﺍﻟﺘﺄﻣﲔ ﺿﺪ ﻋﺒﺚ ﺍﻷﻃﻔﺎﻝ
ﻫﺬﻩ ﺍﻟﻮﻇﻴﻔﺔ ﻣﺨﺼﺼﺔ ﳊﻤﺎﻳﺔ ﺍﻷﻃﻔﺎﻝ ﻭﻛﺒﺎﺭ ﺍﻟﺴﻦ ﻭﻗﻠﻴﻠﻲ ﺍﳋﺒﺮﺓ.
.١ﺍﺿﻐﻂ ﻋﻠﻰ ﺍﻟﺰﺭ ) Powerﺍﻟﻄﺎﻗﺔ(.
ﺛﻮﺍﻥ) .ﻓﻲ
.٢ﻟﺘﻨﺸﻴﻂ ﻭﻇﻴﻔﺔ ) Child Lockﻗﻔﻞ ﺍﻷﻃﻔﺎﻝ( ،ﺍﺿﻐﻂ ﺑﺎﺳﺘﻤﺮﺍﺭ ﻋﻠﻰ ﺍﻟﺰﺭﻳﻦ ) Rinseﺷﻄﻒ( ﻭ) Spinﺩﻭﺭﺍﻥ( ﹰ
ﻣﻌﺎ ﳌﺪﺓ ﺛﻼﺙ ﹴ
ﺣﺎﻟﺔ ﺗﻨﺸﻴﻂ ) Child Lockﻗﻔﻞ ﺍﻷﻃﻔﺎﻝ( ،ﻳﻮﻣﺾ ﺭﻣﺰ ) Child Lockﻗﻔﻞ ﺍﻷﻃﻔﺎﻝ((.
.٣ﺍﻟﻌﻤﻠﻴﺎﺕ ﺑﻌﺪ ﺗﻨﺸﻴﻂ ﻭﻇﻴﻔﺔ ) Child Lockﻗﻔﻞ ﺍﻷﻃﻔﺎﻝ(.
• ﺣﺘﻰ ﺇﺫﺍ ﰎ ﺗﻨﺸﻴﻂ ﻭﻇﻴﻔﺔ ) Child Lockﻗﻔﻞ ﺍﻷﻃﻔﺎﻝ( ،ﺗﻌﻤﻞ ﻛﻞ ﺍﻷﺯﺭﺍﺭ ﺣﺘﻰ ﻳﺘﻢ ﻓﺘﺢ ﺍﻟﺒﺎﺏ.
• ﻋﻨﺪ ﻓﺘﺢ ﺍﻟﺒﺎﺏ ﺃﺛﻨﺎﺀ ﺗﻨﺸﻴﻂ ) Child Lockﻗﻔﻞ ﺍﻷﻃﻔﺎﻝ( ،ﺗﺼﺪﺭ ﺃﺻﻮﺍﺕ ﺗﻨﺒﻴﻪ ﻣﻊ ﻇﻬﻮﺭ ﺭﺳﺎﻟﺔ ﺧﻄﺄ.
ﺗﻠﻘﺎﺋﻴﺎ .ﻭﻟﻜﻦ ﺇﺫﺍ ﻗﻤﺖ ﺑﺈﻏﻼﻕ ﺍﻟﺒﺎﺏ ﺧﻼﻝ ٣٠ﺛﺎﻧﻴﺔ ،ﻓﻠﻦ ﻳﺘﻢ ﺗﺼﺮﻳﻒ
ﻭﻓﻲ ﺧﻼﻝ ٣٠ﺛﺎﻧﻴﺔ ﻳﺒﺪﺃ ﺗﺼﺮﻳﻒ ﺍﳌﺎﺀ
ﹰ
ﺍﳌﺎﺀ) .ﺭﺳﺎﻟﺔ ﺍﳋﻄﺄ ﺍﳌﻌﺮﻭﺿﺔ " "CLﻭ".("dE
• ﻹﺿﺎﻓﺔ ﻏﺴﻴﻞ ﺑﻌﺪ ﺗﻨﺸﻴﻂ ﻭﻇﻴﻔﺔ ) Child Lockﻗﻔﻞ ﺍﻷﻃﻔﺎﻝ( ،ﻳﺠﺐ ﺗﻌﻄﻴﻞ ﻭﻇﻴﻔﺔ
) Child Lockﻗﻔﻞ ﺍﻷﻃﻔﺎﻝ(.
ﺛﻮﺍﻥ
.٤ﻹﻟﻐﺎﺀ ﺗﻨﺸﻴﻂ ﻭﻇﻴﻔﺔ ) Child Lockﻗﻔﻞ ﺍﻷﻃﻔﺎﻝ( ،ﺍﺿﻐﻂ ﺑﺎﺳﺘﻤﺮﺍﺭ ﻋﻠﻰ ﺍﻟﺰﺭﻳﻦ ) Rinseﺷﻄﻒ( ﻭ) Spinﺩﻭﺭﺍﻥ( ﹰ
ﻣﻌﺎ ﳌﺪﺓ ﺛﻼﺙ ﹴ
ﻣﺮﺓﹰ ﺃﺧﺮﻯ) .ﻓﻲ ﺣﺎﻟﺔ ﺇﻟﻐﺎﺀ ﺗﻨﺸﻴﻂ ) Child Lockﻗﻔﻞ ﺍﻷﻃﻔﺎﻝ( ،ﻳﺘﻢ ﺇﻳﻘﺎﻑ ﺗﺸﻐﻴﻞ ﺭﻣﺰ ) Child Lockﻗﻔﻞ ﺍﻷﻃﻔﺎﻝ((.
.٥ﳌﺴﺢ ﺷﺎﺷﺔ " "CLﺑﻌﺪ ﺍﻛﺘﻤﺎﻝ ﺍﻟﺘﺼﺮﻳﻒ ،ﺃﻏﻠﻖ ﺑﺎﺏ ﺍﻟﻐﺴﺎﻟﺔ ﻭﻗﻢ ﺑﺈﻳﻘﺎﻑ ﺗﺸﻐﻴﻞ ﺍﻟﻐﺴﺎﻟﺔ ﺛﻢ ﺃﻋﺪ ﺗﺸﻐﻴﻠﻬﺎ.
ﺗﻌﻤﻞ ﻫﺬﻩ ﺍﻟﻮﻇﻴﻔﺔ ﻋﻠﻰ ﻣﻨﻊ ﺍﻹﺻﺎﺑﺎﺕ ﻭﺍﻷﻋﻄﺎﻝ ﻟﻠﻤﻨﺘﺞ ﺑﺴﺒﺐ ﻋﻤﻠﻴﺎﺕ ﺍﻟﺘﺸﻐﻴﻞ ﻏﻴﺮ ﺍﳌﻨﺎﺳﺒﺔ ﺃﻭ ﺍﻟﻌﺒﺚ ﻣﻦ ﻗﺒﻞ ﺍﻷﻃﻔﺎﻝﺃﻭ ﻛﺒﺎﺭ ﺍﻟﺴﻦ ﺃﻭ ﻗﻠﻴﻠﻲ ﺍﳋﺒﺮﺓ.
ﻓﻲ ﺣﺎﻟﺔ ﻓﺘﺢ ﺍﻟﺒﺎﺏ ﺃﺛﻨﺎﺀ ﺗﻨﺸﻴﻂ ﻭﻇﻴﻔﺔ ) Child Lockﻗﻔﻞ ﺍﻷﻃﻔﺎﻝ( ،ﻳﺘﻢ ﺗﺼﺮﻳﻒ ﺍﳌﻴﺎﻩ ﳌﻨﻊ ﻏﺮﻕ ﺍﻷﻃﻔﺎﻝ.ﺗﻨﺒﻴﻪ
ﻹﺿﺎﻓﺔ ﻏﺴﻴﻞ ﺑﻌﺪ ﺗﻨﺸﻴﻂ ﻭﻇﻴﻔﺔ ) Child Lockﻗﻔﻞ ﺍﻷﻃﻔﺎﻝ( ،ﻳﺠﺐ ﺗﻌﻄﻴﻞ ) Child Lockﻗﻔﻞ ﺍﻷﻃﻔﺎﻝ(. ﺣﺘﻰ ﻓﻲ ﺣﺎﻟﺔ ﺇﻳﻘﺎﻑ ﺗﺸﻐﻴﻞ ﺍﻟﻄﺎﻗﺔ ﺛﻢ ﺇﻋﺎﺩﺓ ﺗﺸﻐﻴﻠﻬﺎ ﻋﻨﺪ ﺗﺸﻐﻴﻞ ﻭﻇﻴﻔﺔ ) Child Lockﻗﻔﻞ ﺍﻷﻃﻔﺎﻝ( ،ﺗﻈﻞ ﻭﻇﻴﻔﺔ) Child Lockﻗﻔﻞ ﺍﻷﻃﻔﺎﻝ( ﻧﺸﻄﺔ.
ﺗﻠﻘﺎﺋﻴﺎ ﺧﻼﻝ ٣٠ﺛﺎﻧﻴﺔ ﺇﺫﺍ ﻛﺎﻥ ﺍﻟﺒﺎﺏ ﻣﻔﺘﻮ ﹰﺣﺎ ﺣﺘﻰ ﻓﻲ
ﻓﺒﻤﺠﺮﺩ ﺗﻨﺸﻴﻂ ) Child Lockﻗﻔﻞ ﺍﻷﻃﻔﺎﻝ( ،ﺳﻴﺘﻢ ﺗﺼﺮﻳﻒ ﺍﳌﺎﺀﹰ
ﺣﺎﻟﺔ ﺇﻳﻘﺎﻑ ﺗﺸﻐﻴﻞ ﺍﻟﻄﺎﻗﺔ.
ﻻ ﳝﻜﻦ ﺗﻌﻄﻴﻞ ﻭﻇﻴﻔﺔ ) Child Lockﻗﻔﻞ ﺍﻷﻃﻔﺎﻝ( ﺇﺫﺍ ﻇﻬﺮﺕ ﺭﺳﺎﻟﺔ ﺍﳋﻄﺄ ) .CLﺇﻻ ﺇﻧﻪ ﳝﻜﻦ ﺗﻌﻄﻴﻞ ﻭﻇﻴﻔﺔ) Child Lockﻗﻔﻞ ﺍﻷﻃﻔﺎﻝ( ﺇﺫﺍ ﻇﻬﺮﺕ ﺭﺳﺎﻟﺔ ﺍﳋﻄﺄ (.dE
ﺇﻋﺪﺍﺩ ﺍﻟﻐﺴﺎﻟﺔ_١١
6:51:08
2013-04-19
F500S_W3050_WA10F5-03273N_AR.indd Sec3:13
ﺍﻟﻮﻇﺎﺋﻒ ﺍﻟﻴﺪﻭﻳﺔ
ﳝﻜﻦ ﲢﺪﻳﺪ ﺍﻟﻮﻇﻴﻔﺔ ﻟﻜﻞ ﺑﺮﻧﺎﻣﺞ.
)ﻣﺜﺎﻝ( ﻟﻠﻐﺴﻴﻞ ﺍﻟﺒﺴﻴﻂ ﻛﻤﺎ ﻓﻲ ﺩﻭﺭﺓ ﺍﻷﻭﺳﺎﺥ ﺍﻟﻘﻠﻴﻠﺔ :
) Powerﺍﻟﻄﺎﻗﺔ( ﲢﺪﻳﺪ ﺑﺮﻧﺎﻣﺞ ﺍﻷﻭﺳﺎﺥ ﺍﻟﻘﻠﻴﻠﺔ ) Wash ﻏﺴﻴﻞ( ) Start/Pause ﺗﺸﻐﻴﻞ/ﺗﻮﻗﻒ(
ﺍﻟﻐﺴﻴﻞ ﻓﻘﻂ
ﺍﻟﺸﻄﻒ ﻓﻘﻂ
ﺍﻟﺘﻨﺸﻴﻒ ﻓﻘﻂ
ﺍﻟﻐﺴﻴﻞ ﻭﺍﻟﺸﻄﻒ
ﺍﻟﺸﻄﻒ ﻭﺍﻟﺘﻨﺸﻴﻒ
ﺍﻟﻐﺴﻴﻞ ﻭﺍﻟﺸﻄﻒ ﻭﺍﻟﺘﻨﺸﻴﻒ
ﺍﺿﻐﻂ ﻋﻠﻰ ﺍﻟﺰﺭ ) Powerﺍﻟﻄﺎﻗﺔ(.
ﺍﺿﻐﻂ ﻋﻠﻰ ﺍﻟﺰﺭ ) Washﻏﺴﻴﻞ(.
ﺍﺿﻐﻂ ﻋﻠﻰ ﺍﻟﺰﺭ ) Start/Pauseﺗﺸﻐﻴﻞ/ﺗﻮﻗﻒ(.
ﺗﺘﻢ ﻋﻤﻠﻴﺔ ﺍﻟﻐﺴﻴﻞ ﳌﺮﺓ ﻭﺍﺣﺪﺓ.
ﻋﻨﺪ ﺍﻟﻀﻐﻂ ﻋﻠﻰ ﺍﻟﺰﺭ ) Washﻏﺴﻴﻞ( ﺃﺛﻨﺎﺀ ﺍﻟﻐﺴﻞ ،ﳝﻜﻦ ﺗﻐﻴﻴﺮ ﻣﺪﺓ ﺍﻟﻐﺴﻴﻞ ﳌﺪﺓ ﺗﺘﺮﺍﻭﺡ ﺑﲔ ٦
ﺩﻗﺎﺋﻖ ﻭ ٣٠ﺩﻗﻴﻘﺔ.
ﺍﺿﻐﻂ ﻋﻠﻰ ﺍﻟﺰﺭ ) Rinseﺷﻄﻒ(.
ﺍﺿﻐﻂ ﻋﻠﻰ ﺍﻟﺰﺭ ) Start/Pauseﺗﺸﻐﻴﻞ/ﺗﻮﻗﻒ(.
ﺗﺘﻢ ﻋﻤﻠﻴﺔ ﺍﻟﺸﻄﻒ ﻣﺮﺓ ﻭﺍﺣﺪﺓ.
ﻋﻨﺪ ﺍﻟﻀﻐﻂ ﻋﻠﻰ ﺍﻟﺰﺭ ) Rinseﺷﻄﻒ( ،ﳝﻜﻦ ﺗﻐﻴﻴﺮ ﻋﺪﺩ ﻣﺮﺍﺕ ﺍﻟﺸﻄﻒ ﻟﺘﺘﺮﺍﻭﺡ ﻣﻦ ﻣﺮﺓ ﺇﻟﻰ ٥
ﻣﺮﺍﺕ ﻓﻲ ﺍﳌﺪﺓ.
ﺍﺿﻐﻂ ﻋﻠﻰ ﺍﻟﺰﺭ ) Spinﺩﻭﺭﺍﻥ(.
ﺍﺿﻐﻂ ﻋﻠﻰ ﺍﻟﺰﺭ ) Start/Pauseﺗﺸﻐﻴﻞ/ﺗﻮﻗﻒ(.
ﺗﺴﺘﻤﺮ ﻋﻤﻠﻴﺔ ﺍﻟﺘﻨﺸﻴﻒ ﳌﺪﺓ ٤ﺩﻗﺎﺋﻖ.
ﻋﻨﺪ ﺍﻟﻀﻐﻂ ﻋﻠﻰ ﺍﻟﺰﺭ ) Spinﺩﻭﺭﺍﻥ( ،ﳝﻜﻦ ﺗﻐﻴﻴﺮ ﻣﺪﺓ ﺩﻭﺭﺓ ﺍﻟﺘﻨﺸﻴﻒ ﻣﻦ ﺩﻗﻴﻘﺔ ﻭﺍﺣﺪﺓ ﺇﻟﻰ ٩
ﺩﻗﺎﺋﻖ.
ﺍﺿﻐﻂ ﻋﻠﻰ ﺍﻟﺰﺭﻳﻦ ) Washﻏﺴﻴﻞ( ﻭ) Rinseﺷﻄﻒ(.
ﺍﺿﻐﻂ ﻋﻠﻰ ﺍﻟﺰﺭ ) Start/Pauseﺗﺸﻐﻴﻞ/ﺗﻮﻗﻒ( ﻣﺮﺓ ﻭﺍﺣﺪﺓ.
ﺗﻠﻘﺎﺋﻴﺎ) .ﺍﺧﺘﻴﺎﺭﻱ(
ﻳﻘﻮﻡ ﺫﻟﻚ ﺑﺎﻟﺘﺤﻘﻖ ﻣﻦ ﻛﻤﻴﺔ ﺍﻟﻐﺴﻴﻞ ،ﻭﻳﺤﺪﺩ ﺯﻣﻦ ﻓﺘﺮﺓ ﺍﻟﻐﺴﻞ ﻭﺍﻟﺸﻄﻒ
ﹰ
ﻋﻨﺪ ﺍﻟﻀﻐﻂ ﻋﻠﻰ ﺍﻟﺰﺭﻳﻦ Variableﻭ ،Variableﻳﺘﻢ ﲢﺪﻳﺪ ﻣﺪﺓ ﺍﻟﻐﺴﻴﻞ ﻣﺎ ﺑﲔ ٦ﺩﻗﺎﺋﻖ ﻭ ٣٠ﺩﻗﻴﻘﺔ
ﻣﻊ ﲢﺪﻳﺪ ﻭﻗﺖ ﺍﻟﺸﻄﻒ ﻣﺎ ﺑﲔ ﻣﺮﺓ ﻭﺍﺣﺪﺓ ﻭ ٥ﻣﺮﺍﺕ.
ﺍﺿﻐﻂ ﻋﻠﻰ ﺍﻟﺰﺭﻳﻦ ) Rinseﺷﻄﻒ( ﻭ) Spinﺩﻭﺭﺍﻥ(.
ﺍﺿﻐﻂ ﻋﻠﻰ ﺍﻟﺰﺭ ) Start/Pauseﺗﺸﻐﻴﻞ/ﺗﻮﻗﻒ( ﻣﺮﺓ ﻭﺍﺣﺪﺓ.
ﺛﻢ ﺗﺒﺪﺃ ﻋﻤﻠﻴﺘﺎ ﺍﻟﺸﻄﻒ ﻭﺍﻟﺘﻨﺸﻴﻒ.
ﻋﻨﺪ ﺍﻟﻀﻐﻂ ﻋﻠﻰ ﺍﻟﺰﺭﻳﻦ ) Rinseﺷﻄﻒ( ﻭ) Spinﺩﻭﺭﺍﻥ( ،ﻳﺘﻢ ﲢﺪﻳﺪ ﻋﺪﺩ ﺩﻭﺭﺍﺕ ﺍﻟﺸﻄﻒ ﻣﺎ ﺑﲔ
ﻣﺮﺓ ﻭﺍﺣﺪﺓ ﻭ ٥ﻣﺮﺍﺕ ﻣﻊ ﲢﺪﻳﺪ ﺩﻭﺭﺓ ﺍﻟﺘﻨﺸﻴﻒ ﺍﳋﺎﺻﺔ ﺑﻌﻤﻠﻴﺔ ﺍﻟﺘﺠﻔﻴﻒ ﻣﺎ ﺑﲔ ﺩﻗﻴﻘﺔ ﻭ ٩ﺩﻗﺎﺋﻖ.
ﺍﺿﻐﻂ ﻋﻠﻰ ﺍﻷﺯﺭﺍﺭ ) Washﻏﺴﻴﻞ( ﻭ) Rinseﺷﻄﻒ( ﻭ) Spinﺩﻭﺭﺍﻥ(.
ﺍﺿﻐﻂ ﻋﻠﻰ ﺍﻟﺰﺭ ) Start/Pauseﺗﺸﻐﻴﻞ/ﺗﻮﻗﻒ( ﻣﺮﺓ ﻭﺍﺣﺪﺓ.
ﻳﺘﻢ ﺗﻨﻔﻴﺬ ) Washﻏﺴﻴﻞ( ﻭ) Rinseﺷﻄﻒ( ﻭ) Spinﺩﻭﺭﺍﻥ(.
_١٢ﺍﻟﻮﻇﺎﺋﻒ ﺍﻟﻴﺪﻭﻳﺔ
6:51:08
2013-04-19
F500S_W3050_WA10F5-03273N_AR.indd 14
ﺍﻟﺘﺮﻛﻴﺐ ﻭﺍﻟﺼﻴﺎﻧﺔ
ﺩﻟﻴﻞ ﺍﳌﺴﺘﺨﺪﻡ ﻣﺨﺼﺺ ﻟﻼﺳﺘﺨﺪﺍﻡ ﺍﻟﻌﺎﻡ.
ﺍﺳﺘﻌﻦ ﺑﺪﻟﻴﻞ ﺍﳌﺴﺘﺨﺪﻡ ﺍﳋﺎﺹ ﺑﻄﺮﺍﺯ ﺍﻟﻐﺴﺎﻟﺔ.
ﺍﻟﺒﻴﺌﺔ
٠٣ﺍﻟﺘﺮﻛﻴﺐ ﻭﺍﻟﺼﻴﺎﻧﺔ
ﺍﺗﺮﻙ ﻣﺴﺎﺣﺔ
ﺍﺗﺮﻙ ﻣﺴﺎﻓﺔ ١٠ﺳﻢ ﻋﻠﻰ ﺍﻷﻗﻞ ﺑﲔ ﺍﻟﻐﺴﺎﻟﺔ ﻭﺍﳊﺎﺋﻂ.
ﺿﻊ ﺍﻟﻐﺴﺎﻟﺔ ﻋﻠﻰ ﺃﺭﺽ ﺛﺎﺑﺘﺔ ﻭﻣﺴﺘﻮﻳﺔ.
ﺇﺫﺍ ﰎ ﻭﺿﻊ ﺍﻟﻐﺴﺎﻟﺔ ﻋﻠﻰ ﺳﻄﺢ ﻏﻴﺮ ﻣﺴﺘﻮ ﺃﻭ ﺿﻌﻴﻒ ﺳﻴﺆﺩﻱ ﻫﺬﺍ ﺇﻟﻰ ﺍﺭﺗﻔﺎﻉ ﺻﻮﺕ ﺍﻟﻐﺴﺎﻟﺔ ﺃﻭ ﺍﻫﺘﺰﺍﺯﻫﺎ ﺃﺛﻨﺎﺀ ﺍﻟﺘﺸﻐﻴﻞ) .ﺍﳌﺴﺎﻓﺔ ﺍﳌﺴﻤﻮﺡ ﺑﻬﺎ ١ﻳﺎﺭﺩﺓ(
ﻗﻢ ﺑﺘﻌﺪﻳﻞ ﺍﻷﺭﺟﻞ ﻟﻠﻮﺻﻮﻝ ﺇﻟﻰ ﻭﺿﻊ ﻣﺘﻮﺍﺯﻥ.
ﻻ ﺗﻘﻢ ﺃﺑﺪﺍ ﹰ ﺑﺘﺜﺒﻴﺖ ﺍﻟﻐﺴﺎﻟﺔ ﺑﺎﻟﻘﺮﺏ ﻣﻦ ﺍﳌﺎﺀ.
ﻻ ﺗﻀﻊ ﺍﻟﻐﺴﺎﻟﺔ ﻓﻲ ﻏﺮﻑ ﻳﻨﺒﻌﺚ ﻣﻨﻬﺎ ﺍﻷﺑﺨﺮﺓ ﺃﻭ ﺣﻴﺚ ﺗﻜﻮﻥ ﻣﻌﺮﺿﺔ ﺑﺸﻜﻞ ﻣﺒﺎﺷﺮ ﺇﻟﻰ ﺍﳌﻄﺮ .ﻗﺪ ﺗﺘﺴﺒﺐ ﺍﻟﺮﻃﻮﺑﺔ ﻓﻲ ﺗﻠﻒ ﺍﳌﺎﺩﺓ ﺍﻟﻌﺎﺯﻟﺔ ﺍﻟﺘﻲ ﲢﻴﻂ
ﺑﺎﻷﺳﻼﻙ ﺍﻟﻜﻬﺮﺑﺎﺋﻴﺔ ﳑﺎ ﻳﻨﺘﺞ ﻋﻨﻪ ﺻﺪﻣﺎﺕ ﻛﻬﺮﺑﺎﺋﻴﺔ.
ﲡﻨﺐ ﺍﻟﻀﻮﺀ ﺍﳌﺒﺎﺷﺮ ﻷﺷﻌﺔ ﺍﻟﺸﻤﺲ ﺃﻭ ﺍﻟﺴﺨﺎﻧﺎﺕ.
ﺗﺘﺄﺛﺮ ﻣﻜﻮﻧﺎﺕ ﺍﻷﺳﻼﻙ ﺍﻟﻜﻬﺮﺑﺎﺋﻴﺔ ﺍﳌﺼﻨﻮﻋﺔ ﻣﻦ ﺍﻟﺒﻼﺳﺘﻴﻚ ﺑﺎﳊﺮﺍﺭﺓ ﺍﳌﺒﺎﺷﺮﺓ ،ﻻ ﺗﻘﻢ ﺃﺑﺪﺍ ﹰ ﺑﻮﺿﻊ ﺍﻟﻐﺴﺎﻟﺔ ﺑﺎﻟﻘﺮﺏ ﻣﻦ ﺍﻷﻓﺮﺍﻥ ،ﺃﻭ ﻏﻼﻳﺎﺕ ﺍﳌﺎﺀ ،ﺇﻟﻰ ﺁﺧﺮﻩ ،ﻭﻻ
ﺗﻀﻌﻬﺎ ﲢﺖ ﺃﺷﻌﺔ ﺍﻟﺸﻤﺲ ﺍﳌﺒﺎﺷﺮﺓ.
ﻣﺴﺘﻮ
ﻭﺿﻊ ﺍﻟﻐﺴﺎﻟﺔ ﻋﻠﻰ ﺳﻄﺢ
ﹺ
•
ﺇﺫﺍ ﻟﻢ ﺗﻜﻦ ﺍﻟﻐﺴﺎﻟﺔ ﻣﺴﺘﻮﻳﺔ ﻋﻠﻰ ﺍﻷﺭﺽ ،ﻓﺴﺘﻬﺘﺰ ﺑﺸﻜﻞ ﻛﺒﻴﺮ ﺃﻭ ﻗﺪ ﺗﺘﻮﻗﻒ ﻋﻦ ﺍﻟﺘﺸﻐﻴﻞ .ﻟﺬﺍ ﻳﹸﺮﺟﻲ ﺍﻟﺘﺄﻛﺪ ﻣﻦ ﺃﻥ ﺍﻟﻐﺴﺎﻟﺔ ﻣﺴﺘﻮﻳﺔ ﺑﺸﻜﻞ
ﺻﺤﻴﺢ.
ﺍﳌﺎﺀ
ﺗﺄﻛﺪ ﻣﻦ ﻭﺿﻊ ﺍﻟﻐﺴﺎﻟﺔ ﺑﺸﻜﻞ ﻣﺴﺘﻮ ﻣﻦ ﺧﻼﻝ ﻓﺤﺺ ﻭﺿﻊ ﺣﻮﺽ ﺍﻟﻐﺴﻴﻞ.
• ﺍﻓﺘﺢ ﺑﺎﺏ ﺍﻟﻐﺴﺎﻟﺔ ،ﺛﻢ ﺍﺳﻜﺐ ﺍﳌﺎﺀ ﺩﺍﺧﻞ ﺣﺎﻭﻳﺔ ﺍﻟﻐﺴﻴﻞ ﺣﺘﻰ ﺍﳌﺴﺘﻮﻯ ﺍﻟﺬﻱ ﻳﻘﻊ ﺃﺩﻧﻰ
ﺍﳌﻀﺨﺔ ،ﻭﻗﻢ ﺑﺘﻌﺪﻳﻞ ﺍﻷﺭﺟﻞ ﺑﺤﻴﺚ ﺗﻜﻮﻥ ﺍﳌﻀﺨﺔ ﻓﻲ ﻭﺳﻂ ﺍﳌﺎﺀ ﻛﻤﺎ ﻫﻮ ﻣﺒﲔ ﻓﻲ
ﺍﻟﺸﻜﻞ.
• ﺍﺑﻌﺪ ﺍﻟﻐﺴﺎﻟﺔ ﺃﻛﺜﺮ ﻣﻦ ١٠ﺳﻢ ﻋﻦ ﺍﳊﺎﺋﻂ.
• ﺍﺿﺒﻂ ﺍﺳﺘﻮﺍﺀ ﺍﻷﺭﺟﻞ.
ﻓﻚ
ﺭﺑﻂ
ﺗﻮﺻﻴﻞ ﺧﺮﻃﻮﻡ ﺗﺰﻭﻳﺪ ﺍﳌﺎﺀ
ﺍﶈﻮﻝ ﻣﻦ ﺧﺮﻃﻮﻡ ﺗﻮﺭﻳﺪ ﺍﳌﺎﺀ.
.١ﻗﻢ ﺑﻔﻚ ﹼ
ﺑﺎﶈﻮﻝ .ﺛﻢ
.٢ﺃﻭﻻﹰ ،ﺍﺳﺘﺨﺪﻡ ﻣﻔﻚ ﻣﻦ ﻧﻮﻉ " "+ﻟﻔﻚ ﺍﳌﺴﺎﻣﻴﺮ ﺍﻟﻘﻼﻭﻭﻅ ﺍﻷﺭﺑﻌﺔ ﺍﳌﻮﺟﻮﺩﺓ
ﹼ
ﺍﶈﻮﻝ ﻭﻗﻢ ﺑﻠﻒ ﺍﳉﺰﺀ )ﺏ( ﺑﺎﲡﺎﻩ ﺍﻟﺴﻬﻢ ﻹﺣﺪﺍﺙ ﻓﺠﻮﺓ ﺗﻘﺪﺭ ﺑﻨﺤﻮ ٥ﱈ ﺑﻴﻨﻬﻤﺎ.
ﺃﺧﺮﺝ ﹼ
ﺃ
٥ﱈ
ﺏ
ﺍﶈﻮﻝ ﺑﺼﻨﺒﻮﺭ ﺍﳌﺎﺀ ﻋﻦ ﻃﺮﻳﻖ ﺭﺑﻂ ﺍﳌﺴﺎﻣﻴﺮ ﺑﺈﺣﻜﺎﻡ .ﺛﻢ ﻟﻒ ﺍﳉﺰﺀ )ﺏ( ﺑﺎﲡﺎﻩ
.٣ﺻﻞ ﹼ
ﺍﻟﺴﻬﻢ ﻭﺿﻊ ﺍﳉﺰﺃﻳﻦ )ﺃ( ﻭ)ﺏ( ﻣﻌﺎ ﹰ.
aﺃ
bﺏ
ﺍﻟﺘﺮﻛﻴﺐ ﻭﺍﻟﺼﻴﺎﻧﺔ_١٣
6:51:09
2013-04-19
F500S_W3050_WA10F5-03273N_AR.indd Sec10:15
ﺍﻟﺘﺮﻛﻴﺐ ﻭﺍﻟﺼﻴﺎﻧﺔ
ﺑﺎﶈﻮﻝ .ﺍﺳﺤﺐ ﺍﳉﺰﺀ )ﺝ( ﻣﻦ ﺧﺮﻃﻮﻡ ﺗﻮﺭﻳﺪ ﺍﳌﺎﺀ ﻷﺳﻔﻞ .ﻋﻨﺪ
ﻭﺻﻞ ﺧﺮﻃﻮﻡ ﺍﻟﺘﺰﻭﹼﺩ ﺑﺎﳌﺎﺀ
.٤
ﹼ
ﹼ
ﺑﺎﶈﻮﻝ ﺗﻠﻘﺎﺋﻴﺎ ﹰ ﻣﺤﺪﺛﺎ ﹰ ﺻﻮﺕ "ﻧﻘﺮﺓ".
ﺇﺭﺧﺎﺀ ﺍﳉﺰﺀ )ﺝ( ،ﻳﺘﺼﻞ ﺍﳋﺮﻃﻮﻡ
ﹼ
cﺝ
.٥ﺻﻞ ﺍﻟﻄﺮﻑ ﺍﻵﺧﺮ ﻣﻦ ﺧﺮﻃﻮﻡ ﺍﻟﺘﺰﻭﹼﺩ ﺑﺎﳌﺎﺀ ﺑﺼﻤﺎﻡ ﺩﺧﻮﻝ ﺍﳌﺎﺀ ﺍﳌﻮﺟﻮﺩ ﻓﻲ ﺧﻠﻔﻴﺔ
ﺍﻟﻐﺴﺎﻟﺔ .ﻟﻒ ﺍﳋﺮﻃﻮﻡ ﻓﻲ ﺍﲡﺎﻩ ﻋﻘﺎﺭﺏ ﺍﻟﺴﺎﻋﺔ ﺇﻟﻰ ﺍﻟﻨﻬﺎﻳﺔ.
.١-٥ﺻﻞ ﺍﻟﻄﺮﻑ ﺍﻵﺧﺮ ﻣﻦ ﺧﺮﻃﻮﻡ ﺍﻟﺘﺰﻭﹼﺩ ﺑﺎﳌﺎﺀ ﺑﺼﻤﺎﻡ ﺩﺧﻮﻝ ﺍﳌﺎﺀ ﺍﳌﻮﺟﻮﺩ ﻓﻲ ﺍﳉﺰﺀ
ﺍﳋﻠﻔﻲ ﻣﻦ ﺍﻟﻐﺴﺎﻟﺔ .ﻟﻒ ﺍﳋﺮﻃﻮﻡ ﻓﻲ ﺍﲡﺎﻩ ﻋﻘﺎﺭﺏ ﺍﻟﺴﺎﻋﺔ ﺇﻟﻰ ﺍﻟﻨﻬﺎﻳﺔ.
•
ﺇﺫﺍ ﻛﺎﻥ ﺻﻨﺒﻮﺭ ﺍﳌﺎﺀ ﻣﻦ ﻧﻮﻉ ﺑﺮﻏﻲ ،ﺭﻛ ﱢﺐ ﺧﺮﻃﻮﻡ ﺗﻮﺭﻳﺪ ﻟﻠﻤﺎﺀ ﻳﻼﺋﻢ ﺍﻟﺼﻨﺒﻮﺭ ﻛﻤﺎ ﻫﻮ
ﻣﻮﺿﺢ .ﺑﻌﺪ ﺍﻛﺘﻤﺎﻝ ﺍﻟﺘﻮﺻﻴﻞ ،ﺇﺫﺍ ﺗﺴﺮﺏ ﺍﳌﺎﺀ ﻣﻦ ﺍﳋﺮﻃﻮﻡ ،ﻛﺮﺭ ﻧﻔﺲ ﺍﳋﻄﻮﺍﺕ.
ﺑﻌﺪ ﺍﻛﺘﻤﺎﻝ ﺍﻟﺘﻮﺻﻴﻞ ،ﺇﺫﺍ ﺗﺴﺮﺏ ﺍﳌﺎﺀ ﻣﻦ ﺍﳋﺮﻃﻮﻡ ،ﻛﺮﺭ ﻧﻔﺲ ﺍﳋﻄﻮﺍﺕ.
ﺍﺳﺘﺨﺪﻡ ﺻﻨﺒﻮﺭ ﻣﻦ ﺍﻟﻨﻮﻉ ﺍﻟﻌﺎﺩﻱ ﻟﺘﻮﺭﻳﺪ ﺍﳌﺎﺀ.
ﺍﶈﻮﻝ.
ﺇﺫﺍ ﻛﺎﻥ ﺍﻟﺼﻨﺒﻮﺭ
ﹰ
ﻣﺮﺑﻌﺎ ﺃﻭ ﻛﺒﻴﺮﹰﺍ ﺟﺪﺍﹰ ،ﺃﺯﻝ ﺣﻠﻘﺔ ﺍﻹﺑﻌﺎﺩ ﻗﺒﻞ ﺇﺩﺧﺎﻝ ﺍﻟﺼﻨﺒﻮﺭ ﺇﻟﻰ ﹼ
ﺗﺮﻛﻴﺐ ﻟﻮﺣﺔ ﺍﳊﻤﺎﻳﺔ ﻣﻦ ﺍﻟﻔﺌﺮﺍﻥ )ﺍﺧﺘﻴﺎﺭﻱ(
ﻗﻢ ﺑﺈﻣﺎﻟﺔ ﺍﻟﻐﺴﺎﻟﺔ ﻗﻠﻴﻼ ﹰ ﻭﺍﺭﻓﻊ ﺍﻟﻠﻮﺣﺔ ﺣﺘﻰ ﻳﺘﻢ ﺇﻏﻼﻗﻬﺎ ،ﻭﻓﻲ ﺍﻟﻨﻬﺎﻳﺔ ﻗﻢ ﺑﺘﺜﺒﻴﺖ ﺍﻟﻠﻮﺣﺔ ﲟﺴﻤﺎﺭ ﻗﻼﻭﻭﻅ ﻓﻲ ﺍﻟﻘﺎﻋﺪﺓ ﻛﻤﺎ ﻫﻮ ﻣﻮﺿﺢ
ﺑﺎﻟﺸﻜﻞ.
ﻭﺍﺟﻬﺔ ﺍﻟﻐﺴﺎﻟﺔ
.١ﺃﺩﺧﻞ ﻟﻮﺣﺔ ﺍﳊﻤﺎﻳﺔ ﻣﻦ ﺍﻟﻔﺌﺮﺍﻥ ﻓﻲ ﻓﺘﺤﺔ ﺍﻟﺘﺠﻤﻴﻊ ﺍﳌﻮﺟﻮﺩﺓ .٢ﺇﺫﺍ ﻭﺍﺟﻬﺘﻚ ﺻﻌﻮﺑﺎﺕ ﻓﻲ ﺇﺩﺧﺎﻝ ﺍﻟﻠﻮﺣﺔ ،ﺍﺭﻓﻊ ﺍﻟﻐﺴﺎﻟﺔ ﻗﻠﻴﻼ ﹰ
ﻭﻗﻢ ﺑﺈﺩﺧﺎﻟﻬﺎ.
ﺧﻠﻒ ﺍﻟﻐﺴﺎﻟﺔ ﻓﻲ ﺍﳌﺆﺧﺮﺓ.
_١٤ﺍﻟﺘﺮﻛﻴﺐ ﻭﺍﻟﺼﻴﺎﻧﺔ
6:51:09
2013-04-19
F500S_W3050_WA10F5-03273N_AR.indd Sec10:16
ﻛﻴﻔﻴﺔ ﺗﻮﺻﻴﻞ ﺧﺮﻃﻮﻡ ﺍﻟﺘﺼﺮﻳﻒ )ﺍﺧﺘﻴﺎﺭﻱ(
ﻓﻲ ﺣﺎﻟﺔ ﺍﺳﺘﺨﺪﺍﻡ ﻏﺴﺎﻟﺔ ﺫﺍﺕ ﻣﻀﺨﺔ ﺗﺼﺮﻳﻒ
ﺍﻧﺰﻉ ﻏﻄﺎﺀ ﺍﳋﺮﻃﻮﻡ ﻭﺻﻞ ﺧﺮﻃﻮﻡ ﺍﻟﺼﺮﻑ.
٠٣ﺍﻟﺘﺮﻛﻴﺐ ﻭﺍﻟﺼﻴﺎﻧﺔ
ﻏﻄﺎﺀ ﺍﳋﺮﻃﻮﻡ
ﺗﺄﻛﺪ ﻣﻦ ﺗﻮﺻﻴﻞ ﺧﺮﻃﻮﻡ ﺗﺼﺮﻳﻒ ﺍﳌﺎﺀ ﺑﺈﺣﻜﺎﻡ ﲟﺨﺮﺝ ﺍﻟﺘﺼﺮﻳﻒ
ﺍﳌﻮﺟﻮﺩ ﺑﺎﳉﺰﺀ ﺍﳋﻠﻔﻲ ﻣﻦ ﺍﻟﻐﺴﺎﻟﺔ.
ﺧﺮﻃﻮﻡ ﺍﻟﺼﺮﻑ
ﻣﻦ ٩٠ﺇﻟﻰ ١٠٠ﺳﻢ
ﺣﺎﻣﻞ ﺍﳋﺮﻃﻮﻡ
ﺗﺄﻛﺪ ﻣﻦ ﺗﻮﺻﻴﻞ ﺧﺮﻃﻮﻡ ﺗﺼﺮﻳﻒ ﺍﳌﺎﺀ ﺑﺈﺣﻜﺎﻡ ﲟﺨﺮﺝ ﺍﻟﺘﺼﺮﻳﻒ
ﺍﳌﻮﺟﻮﺩ ﻓﻲ ﺟﺎﻧﺐ ﺍﻟﻐﺴﺎﻟﺔ.
ﺛﺒﺖ ﺧﺮﻃﻮﻡ ﺗﺼﺮﻳﻒ ﺍﳌﺎﺀ ﻋﻠﻰ ﺑﻌﺪ ﻳﻘﺪﺭ ﺑﻨﺤﻮ ١٠٠~٩٠ﺳﻢ ﻋﻦ
ﺍﻷﺭﺽ .ﻳﺠﺐ ﻋﺪﻡ ﺗﻐﻄﻴﺲ ﻃﺮﻑ ﺧﺮﻃﻮﻡ ﺍﻟﺘﺼﺮﻳﻒ ﲢﺖ ﺍﳌﺎﺀ:
ﻓﻲ ﺣﺎﻟﺔ ﺍﻟﻐﺴﺎﻟﺔ ﺍﻟﻌﺎﻣﺔ
.١ﺑﻌﺪ ﺍﻟﻀﻐﻂ ﻋﻠﻰ ﺣﻠﻘﺔ ﺍﻟﻮﺻﻞ ،ﺃﺩﺧﻞ ﺧﺮﻃﻮﻡ ﺗﺼﺮﻳﻒ ﺍﳌﺎﺀ.
.٢ﺑﻌﺪ ﺗﻮﺟﻴﻪ ﺧﺮﻃﻮﻡ ﺗﺼﺮﻳﻒ ﺍﳌﺎﺀ ﺇﻟﻰ ﺍﳌﺼﺮﻑ ،ﺻﻠﻪ ﲟﺨﺮﺝ ﺍﻟﺘﺼﺮﻳﻒ ﺍﳋﺎﺹ
ﺑﺎﻟﻐﺴﺎﻟﺔ.
ﻣﺨﺮﺝ ﺍﻟﺘﺼﺮﻳﻒ
.٣ﺗﺄﻛﺪ ﻣﻦ ﺍﺗﺼﺎﻟﻪ ﺑﺈﺣﻜﺎﻡ ﺑﺎﻟﻀﻐﻂ ﻋﻠﻰ ﺣﻠﻘﺔ ﺍﻟﻮﺻﻞ ﻭﺩﻓﻌﻬﺎ ﻓﻲ ﻣﺨﺮﺝ ﺍﻟﺘﺼﺮﻳﻒ.
• ﳝﻜﻦ ﺗﻌﺪﻳﻞ ﻃﻮﻝ ﺧﺮﻃﻮﻡ ﺍﻟﺘﺼﺮﻳﻒ ﺑﺤﻴﺚ ﳝﻜﻨﻚ ﺇﻃﺎﻟﺘﻪ ﻟﻴﺼﻞ ﺇﻟﻰ ﺍﻟﻄﻮﻝ ﺍﳌﻼﺋﻢ.
ﻛﻴﻔﻴﺔ ﺗﻐﻴﻴﺮ ﺍﲡﺎﻩ ﺧﺮﻃﻮﻡ ﺗﺼﺮﻳﻒ ﺍﳌﺎﺀ
•
ﻳﺘﻢ ﺍﻟﻀﻐﻂ ﻋﻠﻰ ﻣﻘﺒﺾ ﺣﻠﻘﺔ ﺍﻟﻮﺻﻞ ﻟﺪﻓﻊ ﺧﺮﻃﻮﻡ ﺗﺼﺮﻳﻒ ﺍﳌﺎﺀ .ﻗﻢ ﺑﺘﻐﻴﻴﺮ ﺍﲡﺎﻩ ﺧﺮﻃﻮﻡ
ﺍﻟﺘﺼﺮﻳﻒ ﻭﺍﺗﺒﻊ ﺍﻹﺭﺷﺎﺩﺍﺕ ﺍﳌﺬﻛﻮﺭﺓ ﺃﻋﻼﻩ ﻣﺮﺓ ﺃﺧﺮﻯ.
ﺍﻟﺘﺮﻛﻴﺐ ﻭﺍﻟﺼﻴﺎﻧﺔ_١٥
6:51:09
2013-04-19
F500S_W3050_WA10F5-03273N_AR.indd Sec10:17
ﺍﻟﺘﺮﻛﻴﺐ ﻭﺍﻟﺼﻴﺎﻧﺔ
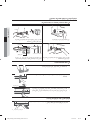
ﺗﻨﺒﻴﻬﺎﺕ ﺣﻮﻝ ﺇﺩﺧﺎﻝ ﺧﺮﻃﻮﻡ ﺗﺼﺮﻳﻒ ﺍﳌﺎﺀ
ﺃﻗﻞ ﻣﻦ ٣ﻣﺘﺮ
.١ﻳﺠﺐ ﺃﻻ ﻳﺰﻳﺪ ﻃﻮﻝ ﺧﺮﻃﻮﻡ ﺍﻟﺘﺼﺮﻳﻒ ﻋﻦ ٣ﻣﺘﺮ ﺃﺛﻨﺎﺀ
ﺍﺳﺘﺨﺪﺍﻣﻪ ﻣﻊ ﺗﻮﺻﻴﻠﻪ ﺑﺨﺮﺍﻃﻴﻢ ﺃﺧﺮﻯ.
.٢ﻛﻦ ﺣﺬﺭﺍ ﹰ ﻓﻲ ﺗﺼﺮﻳﻒ ﺍﳌﺎﺀ ﺣﺘﻰ ﻧﻬﺎﻳﺔ ﺧﺮﻃﻮﻡ ﺍﻟﺘﺼﺮﻳﻒ.
ﺃﻗﻞ ﻣﻦ ٣ﻣﺘﺮ
ﺃﻗﻞ ﻣﻦ ٥ﺳﻢ
.٣ﻳﺠﺐ ﺃﻻ ﺗﺰﻳﺪ ﻋﺘﺒﺔ ﺍﻟﺒﺎﺏ ﻋﻦ ٥ﺳﻢ.
.٤ﻻ ﺗﻘﻢ ﺑﺘﺜﺒﻴﺖ ﺧﺮﻃﻮﻡ ﺗﺼﺮﻳﻒ ﺍﳌﺎﺀ ﺃﺳﻔﻞ ﺍﻟﻐﺴﺎﻟﺔ.
ﺍﻟﺘﺸﻐﻴﻞ ﺍﻻﺧﺘﺒﺎﺭﻱ
ﺻﺤﻴﺤﺎ ﻋﻦ ﻃﺮﻳﻖ ﺗﺸﻐﻴﻞ ﺩﻭﺭﺓ ) Rinseﺷﻄﻒ() Spin+ﺩﻭﺭﺍﻥ( ﺑﻌﺪ ﺍﻛﺘﻤﺎﻝ ﺍﻟﺘﺮﻛﻴﺐ.
ﺃﻛﺪ ﻣﻦ ﺗﺮﻛﻴﺐ ﺍﻟﻐﺴﺎﻟﺔ ﺗﺮﻛﻴ ﹰﺒﺎ
ﹰ
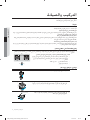
ﺇﺿﺎﻓﺔ ﺍﳌﺴﺤﻮﻕ
.١ﺍﻓﺘﺢ ﺩﺭﺝ ﻣﺴﺤﻮﻕ ﺍﻟﻐﺴﻴﻞ ﺛﻢ ﻗﻢ ﺑﺈﺿﺎﻓﺔ ﻣﺴﺤﻮﻕ ﺍﻟﺒﻮﺩﺭﺓ ﺇﻟﻰ ﺣﻴﺰ ﺍﳌﺴﺤﻮﻕ.
.٢ﺃﺿﻒ ﺍﳌﺴﺤﻮﻕ ﺑﺎﻟﺘﺴﺎﻭﻱ ﺣﺘﻰ ﻻ ﻳﻔﻴﺾ ﻋﻠﻰ ﺣﺎﻓﺔ ﺍﻟﺪﺭﺝ.
• ﺍﺳﺘﺨﺪﻡ ﻛﻤﻴﺔ ﻣﻨﺎﺳﺒﺔ ﻣﻦ ﺍﳌﺴﺤﻮﻕ.
ﺇﺫﺍ ﻗﻤﺖ ﺑﺎﺳﺘﺨﺪﺍﻡ ﻣﺴﺤﻮﻕ ﺯﻳﺎﺩﺓ ﻋﻦ ﺍﻟﻜﻤﻴﺔ ﺍﻟﻘﻴﺎﺳﻴﺔ ﺃﻭ ﻛﺎﻧﺖ ﺩﺭﺟﺔ
ﺍﳊﺮﺍﺭﺓ ﺷﺪﻳﺪﺓ ﺍﻻﻧﺨﻔﺎﺽ ﻭﻟﻢ ﻳﺘﻢ ﺇﺫﺍﺑﺔ ﺍﳌﺴﺤﻮﻕ ﻓﻲ ﺍﳌﺎﺀ ﺑﺸﻜﻞ ﺟﻴﺪ ﻓﺈﻥ
ﺫﻟﻚ ﻳﺘﺴﺒﺐ ﻓﻲ ﺗﺮﻙ ﺃﺛﺮ ﻟﻠﻤﺴﺤﻮﻕ ﻋﻠﻰ ﺍﻟﻐﺴﻴﻞ ﻭﻓﻲ ﺍﳋﺮﻃﻮﻡ ﻭﺍﳊﻮﺽ ،ﻭﻗﺪ
ﻳﺘﺴﺒﺐ ﻓﻲ ﺇﺣﺪﺍﺙ ﺗﻠﻒ ﻣﺜﻞ ﺍﺗﺴﺎﺥ ﺍﳌﻼﺑﺲ ﻭﻓﻘﺪﺍﻥ ﻟﻮﻧﻬﺎ.
• ﺇﺫﺍ ﻗﻤﺖ ﺑﺎﺳﺘﺨﺪﺍﻡ ﻣﺴﺤﻮﻕ ﺑﻮﺩﺭﺓ ﻭﻇﻞﹼ ﻟﻪ ﺃﺛﺮ ﻋﻠﻰ ﺍﻟﻐﺴﻴﻞ ،ﻓﺈﻥ ﺫﻟﻚ ﻗﺪ ﻳﺴﺒﺐ ﺭﺍﺋﺤﺔ ﻛﺮﻳﻬﺔ .ﻗﻢ ﺑﺸﻄﻒ ﺍﻟﻐﺴﻴﻞ ﺑﺸﻜﻞ
ﻛﺎﻑ ﻓﻲ ﻣﺎﺀ ﻧﻈﻴﻒ.
ﺇﺫﺍ ﻗﻤﺖ ﺑﺘﻮﺯﻳﻊ ﻣﺴﺤﻮﻕ ﺗﻨﻈﻴﻒ ﻋﻠﻰ ﺍﻟﻐﺴﻴﻞ ﻣﺒﺎﺷﺮﺓ ،ﻓﺈﻥ ﺫﻟﻚ ﻗﺪ ﻳﻨﺘﺞ ﻋﻨﻪ ﺗﻠﻄﺦ ﺃﻟﻮﺍﻥ ﺍﻟﻐﺴﻴﻞ .ﺗﺄﻛﺪ ﻣﻦ ﺇﺩﺧﺎﻝ ﺍﳌﺴﺤﻮﻕ
ﺗﻨﺒﻴﻪ ﻓﻲ ﺩﺭﺝ ﺍﳌﺴﺤﻮﻕ.
ﻗﺪ ﻳﺘﺒﻘﻰ ﺍﳌﺴﺤﻮﻕ ﻓﻲ ﺣﺠﻴﺮﺓ ﺍﳌﺴﺤﻮﻕ ﻓﻲ ﺣﺎﻟﺔ ﺍﻧﺨﻔﺎﺽ ﺿﻐﻂ ﺍﳌﺎﺀ.
ﻣﻨﻌﻢ ﺍﻷﻗﻤﺸﺔ
ﺇﺿﺎﻓﺔ ﹼ
.١
.٢
.٣
.٤
.٥
ﻋﻨﺪ ﺗﺨﺰﻳﻦ ﻛﻤﻴﺔ ﻣﻨﺎﺳﺒﺔ )ﻣﻘﺪﺍﺭ ﻣﺮﺓ ﻭﺍﺣﺪﺓ( ﻣﻦ ﻣﻠﲔ ﺍﻷﻗﻤﺸﺔ ﻓﻲ ﻣﻜﺎﻥ ﺗﻮﺭﻳﺪ ﺍﳌﻠﻴﻨﺎﺕ ،ﻳﺘﻢ ﻭﺿﻌﻬﺎ ﻓﻲ ﺍﻟﺪﻭﺭﺓ ﺍﻷﺧﻴﺮﺓ ﻣﻦ
ﺍﻟﺸﻄﻒ.
ﺍﳌﻨﻌﻢ.
ﻻ ﺗﺴﺘﺨﺪﻡ ﺍﳌﺴﺤﻮﻕ ﺃﻭ ﺍﳌﺒﻴﺾ ﺃﻭ ﺍﻟﻨﺸﺎ ﻓﻲ ﺩﺭﺝ ﹼ
ﺍﳌﻨﻌﻢ ﺇﻟﻰ ﻧﺘﺎﺋﺞ ﻏﻴﺮ ﻣﺮﺿﻴﺔ.
ﻳﺆﺩﻱ ﺍﻹﻓﺮﺍﻁ ﻓﻲ ﺍﺳﺘﺨﺪﺍﻡ ﹼ
ﻣﻨﻌﻢ ﺍﻷﻗﻤﺸﺔ ﻓﻲ ﻭﻗﺖ ﺳﺎﺑﻖ ،ﻓﺈﻥ ﻫﺬﺍ ﺳﻴﻨﻘﺺ ﻣﻦ ﻓﻌﺎﻟﻴﺘﻪ.
ﻻ ﺗﻔﺘﺢ ﺍﻟﻐﻄﺎﺀ ﺃﺛﻨﺎﺀ ﺍﻟﺪﻭﺭﺓ ) Spinﺩﻭﺭﺍﻥ( .ﺇﺫﺍ ﰎ ﺇﺿﺎﻓﺔ ﹼ
ﻻ ﺗﺘﺮﻙ ﺍﳌﻠﲔ ﻓﻲ ﻣﻮﺯﻉ ﺍﳌﻠﲔ ﳌﺪﺓ ﻃﻮﻳﻠﺔ ﻷﻧﻪ ﻗﺪ ﻳﺘﺠﻤﺪ.
ﻗﺪ ﻳﺘﺒﻘﻰ ﻣﻠﲔ ﺍﻷﻗﻤﺸﺔ ﻓﻲ ﺣﺠﻴﺮﺓ ﺍﳌﻠﲔ ﻓﻲ ﺣﺎﻟﺔ ﺍﻧﺨﻔﺎﺽ ﺿﻐﻂ ﺍﳌﺎﺀ .ﻓﻲ ﺗﻠﻚ ﺍﳊﺎﻟﺔ ،ﺿﻊ ﻣﻠﲔ ﺍﻷﻗﻤﺸﺔ ﻓﻲ ﺍﳊﻮﺽ ﺑﺸﻜﻞ
ﻣﺒﺎﺷﺮ.
_١٦ﺍﻟﺘﺮﻛﻴﺐ ﻭﺍﻟﺼﻴﺎﻧﺔ
6:51:10
2013-04-19
F500S_W3050_WA10F5-03273N_AR.indd Sec10:18
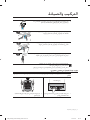
ﻣﺼﻔﺎﺓ ﻭﺻﻠﺔ ﺍﻟﺘﺰﻭﹼﺩ ﺑﺎﳌﺎﺀ
.١ﺍﻧﺰﻉ ﺍﳌﺼﻔﺎﺓ ﻭﺍﻏﺴﻠﻬﺎ ﺟﻴﺪﺍ ﹰ.
٠٣ﺍﻟﺘﺮﻛﻴﺐ ﻭﺍﻟﺼﻴﺎﻧﺔ
.٢ﺍﺩﻓﻊ ﺍﳌﺼﻔﺎﺓ ﻭﺻﻞ ﺍﳋﺮﻃﻮﻡ ﺑﺼﻤﺎﻡ ﺍﻟﺘﺰﻭﹼﺩ ﺑﺎﳌﺎﺀ ﺑﺈﺣﻜﺎﻡ.
.٣ﲢﻘﻖ ﻣﻦ ﻋﺪﻡ ﻭﺟﻮﺩ ﺗﺴﺮﺏ.
ﺍﻧﺘﺒﻪ ﺇﻟﻰ ﺇﺣﻜﺎﻡ ﺭﺑﻂ ﺍﻟﻮﺻﻠﺔ.
ﺗﻨﻈﻴﻒ ﺍﳌﺼﻔﺎﺓ
ﻗﻢ ﺑﺘﻨﻈﻴﻒ ﺷﺒﻜﺔ ﺍﳌﺼﻔﺎﺓ ﺑﺎﻧﺘﻈﺎﻡ ﻟﻠﻤﺤﺎﻓﻈﺔ ﻋﻠﻰ ﻧﻈﺎﻓﺔ ﺍﻟﻐﺴﺎﻟﺔ.
.١ﺍﺩﻓﻊ ﺍﳉﺰﺀ ﺍﻟﻌﻠﻮﻱ ﻣﻦ ﺍﳌﺼﻔﺎﺓ ﺍﻟﺼﺤﻴﺔ ﻭﺍﺟﺬﺑﻪ ﻟﻠﺪﺍﺧﻞ.
.٢ﺍﻓﺘﺢ ﺍﻟﻐﻄﺎﺀ ﻛﻤﺎ ﻫﻮ ﻣﺒﲔ ﺑﺎﻟﺸﻜﻞ.
.٣ﻧﻈﻒ ﺍﳌﺼﻔﺎﺓ ﺍﻟﺼﺤﻴﺔ.
.٤ﺃﻏﻠﻖ ﺍﻟﻐﻄﺎﺀ ﻭﻗﻢ ﺃﻭﻻ ﹰ ﺑﺈﺩﺧﺎﻝ ﺍﳉﺰﺀ ﺍﻟﺴﻔﻠﻲ ﻣﻦ ﺍﳌﺼﻔﺎﺓ ﻓﻲ
ﺍﳊﺎﻭﻳﺔ ،ﺛﻢ ﺍﺩﻓﻊ ﺍﳌﺼﻔﺎﺓ ﺣﺘﻰ ﺗﺴﻤﻊ ﺻﻮﺕ "ﻧﻘﺮﺓ".
ﺗﻨﻈﻴﻒ ﻣﺼﻔﺎﺓ ﺍﳌﻀﺨﺔ )ﺍﺧﺘﻴﺎﺭﻱ(
.١ﺿﻊ ﻗﻄﻌﺔ ﻣﻦ ﺍﻟﻘﻤﺎﺵ ﺃﻭ ﻣﻨﺸﻔﺔ ﺃﺳﻔﻞ ﻣﺼﻔﺎﺓ ﺍﻟﻐﺴﻴﻞ ﺣﺘﻰ ﻻ ﺗﺒﺘﻞ ﺍﻷﺭﺽ ،ﻭﻟﻒ ﺍﳌﺼﻔﺎﺓ ﻋﻜﺲ ﺍﲡﺎﻩ ﺣﺮﻛﺔ ﻋﻘﺎﺭﺏ ﺍﻟﺴﺎﻋﺔ ﻭﺍﺳﺤﺒﻬﺎ ﻟﻠﺨﺎﺭﺝ.
.٢ﻗﻢ ﺑﺈﺯﺍﻟﺔ ﺃﻱ ﺃﻭﺳﺎﺥ ﻣﻦ ﺍﳌﺼﻔﺎﺓ.
.٣ﻗﻢ ﺑﺈﻋﺎﺩﺓ ﺍﳌﺼﻔﺎﺓ ﺇﻟﻰ ﻣﻜﺎﻧﻬﺎ ﻋﻦ ﻃﺮﻳﻖ ﻟﻒ ﺍﳌﺼﻔﺎﺓ ﻓﻲ ﺍﲡﺎﻩ ﻋﻘﺎﺭﺏ ﺍﻟﺴﺎﻋﺔ ﺣﺘﻰ ﺗﻌﻮﺩ ﺇﻟﻰ ﻣﻜﺎﻧﻬﺎ.
١
٢
٣
ﺗﻨﻈﻴﻒ ﺣﺠﻴﺮﺓ ﺍﳌﺴﺤﻮﻕ
.١ﺍﻓﺼﻞ ﺣﺠﻴﺮﺓ ﺍﳌﺴﺤﻮﻕ ﻋﻦ ﺍﻟﻐﺴﺎﻟﺔ.
ﻭﻧﻈﻔﻪ ﻣﻦ ﺣﺠﻴﺮﺓ ﺍﳌﺴﺤﻮﻕ.
.٢ﺍﻓﺼﻞ ﻏﻄﺎﺀ ﺍﻟﺸﻄﻒ ﹼ
.٣ﻗﻢ ﺑﻔﻚ ﻏﻄﺎﺀ ﺍﻟﺸﻄﻒ ﺛﻢ ﺃﺩﺧﻞ ﺣﺠﻴﺮﺓ ﺍﳌﺴﺤﻮﻕ ﻓﻲ ﺍﻟﻐﺴﺎﻟﺔ.
ﺍﻟﺘﺮﻛﻴﺐ ﻭﺍﻟﺼﻴﺎﻧﺔ_١٧
6:51:10
2013-04-19
F500S_W3050_WA10F5-03273N_AR.indd Sec10:19
_١٨ﺍﺳﺘﻜﺸﺎﻑ ﺍﳌﺸﺎﻛﻞ ﻭﺣﻠﻬﺎ
6:51:10
2013-04-19
F500S_W3050_WA10F5-03273N_AR.indd 20
٠٥ﺍﻟﻐﺴﺎﻟﺔ ﻻ ﺗﻌﻤﻞ؟
ﺍﻟﻐﺴﺎﻟﺔ ﻻ ﺗﻌﻤﻞ؟_١٩
6:51:10
2013-04-19
F500S_W3050_WA10F5-03273N_AR.indd Sec11:21
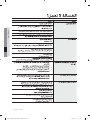
ﺍﻟﻐﺴﺎﻟﺔ ﻻ ﺗﻌﻤﻞ؟
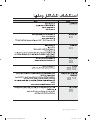
ﺍﳌﺸﻜﻠﺔ
ﺍﻟﻔﺤﺺ
ﻳﺘﺴﺮﺏ ﺍﳌﺎﺀ ﻣﻦ ﻭﺻﻠﺔ ﺧﺮﻃﻮﻡ ﺗﻮﺭﻳﺪ ﺍﳌﺎﺀ.
ﻫﻞ ﻗﻤﺖ ﺑﺎﻟﻀﻐﻂ ﻋﻠﻰ ﺍﻟﺰﺭ ) Start/Pauseﺗﺸﻐﻴﻞ/ﺗﻮﻗﻒ( ﺑﻌﺪ ﲢﺪﻳﺪ ﺗﺰﻭﻳﺪ ﺍﳌﺎﺀ؟
ﻓﻲ ﺣﺎﻟﺔ ﻋﺪﻡ ﺍﻟﻀﻐﻂ ﻋﻠﻰ ﺍﻟﺰﺭ ) Start/Pauseﺗﺸﻐﻴﻞ/ﺗﻮﻗﻒ( ،ﻓﻠﻦ ﻳﺘﻢ ﺗﺰﻭﻳﺪ ﺍﳌﺎﺀ.
ﺍﺿﻐﻂ ﻋﻠﻰ ﺍﻟﺰﺭ ) Start/Pauseﺗﺸﻐﻴﻞ/ﺗﻮﻗﻒ(.
ﻫﻞ ﺍﻟﺼﻨﺒﻮﺭ ﻣﻐﻠﻖ؟
ﺍﻓﺘﺢ ﺍﻟﺼﻨﺒﻮﺭ.
ﻫﻞ ﺷﺒﻜﺔ ﺍﳌﺼﻔﺎﺓ ﺍﳌﻮﺟﻮﺩﺓ ﻓﻲ ﻭﺻﻠﺔ ﺧﺮﻃﻮﻡ ﺗﻮﺭﻳﺪ ﺍﳌﺎﺀ ﻣﺴﺪﻭﺩﺓ ﲟﻮﺍﺩ ﻏﻴﺮ ﻧﻈﻴﻔﺔ؟
ﻧﻈﻒ ﺷﺒﻜﺔ ﺍﳌﺼﻔﺎﺓ ﺑﻔﺮﺷﺎﺓ ﺃﺳﻨﺎﻥ.
ﹼ
ﻫﻞ ﰎ ﺇﻳﻘﺎﻑ ﺗﻮﺭﻳﺪ ﺍﳌﺎﺀ؟
ﻓﻲ ﺣﺎﻟﺔ ﺗﻮﻗﻒ ﺗﻮﺭﻳﺪ ﺍﳌﺎﺀ ﻣﺆﻗﺘﺎ ﹰ ،ﺃﻏﻠﻖ ﺍﻟﺼﻨﺒﻮﺭ ﻭﺍﻓﺼﻞ ﺍﻟﺘﻴﺎﺭ.
ﻭﲢ ﹺﺪﺙ ﺍﻫﺘﺰﺍﺯﺍﺕ.
ﺗﹸﺼ ﹺﺪﺭ ﻋﻤﻠﻴﺔ ﺍﻟﺘﻨﺸﻴﻒ ﺿﺠﻴﺠﺎ ﹰ ﹸ
ﲢﻘﻖ ﳑﺎ ﺇﺫﺍ ﻛﺎﻥ ﻗﺪ ﰎ ﺗﻮﺯﻳﻊ ﺍﻟﻐﺴﻴﻞ ﺑﺎﻟﺘﺴﺎﻭﻱ ﻓﻲ ﺍﻟﻐﺴﺎﻟﺔ.
ﻗﻢ ﺑﺘﻮﺯﻳﻊ ﺍﻟﻐﺴﻴﻞ ﺑﺎﻟﺘﺴﺎﻭﻱ ﻭﺍﺑﺪﺃ ﺗﺸﻐﻴﻞ ﺍﻟﻐﺴﺎﻟﺔ ﻣﺮﺓ ﺃﺧﺮﻯ.
ﲢﻘﻖ ﳑﺎ ﺇﺫﺍ ﻛﺎﻧﺖ ﺍﻟﻐﺴﺎﻟﺔ ﻣﺴﺘﻮﻳﺔ ﻋﻠﻰ ﺃﺭﺽ ﺛﺎﺑﺘﺔ ﻭﻣﺴﻄﺤﺔ.
ﺍﺟﻌﻞ ﺍﻟﻐﺴﺎﻟﺔ ﻣﺴﺘﻮﻳﺔ.
ﻫﻞ ﺍﳌﻘﺎﺑﺾ ﺍﳋﺎﺻﺔ ﺑﺎﺳﺘﻮﺍﺀ ﺍﻷﺭﺟﻞ ﻏﻴﺮ ﻣﺮﺑﻮﻃﺔ ﺑﺈﺣﻜﺎﻡ؟
ﺍﺿﺒﻂ ﺍﺳﺘﻮﺍﺀ ﺍﻷﺭﺟﻞ.
ﻫﻞ ﻳﻮﺟﺪ ﺣﻮﻝ ﺍﻟﻐﺴﺎﻟﺔ ﻣﻮﺍﺩ ﻏﻴﺮ ﺿﺮﻭﺭﻳﺔ؟
ﺃﺑﻌﺪ ﺗﻠﻚ ﺍﻷﺷﻴﺎﺀ ﻏﻴﺮ ﺍﻟﻀﺮﻭﺭﻳﺔ ﻋﻦ ﺍﻟﻐﺴﺎﻟﺔ.
_٢٠ﺍﻟﻐﺴﺎﻟﺔ ﻻ ﺗﻌﻤﻞ؟
6:51:10
2013-04-19
F500S_W3050_WA10F5-03273N_AR.indd Sec11:22
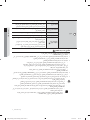
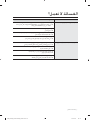
مصاوملا تسمية الطلقة قد مت حتديدهل بلستخدام البرنلمج التللي وفقل ل 2:2013 5010اﻻملراا العربيه افتحده .
-هذا البرنلمج هص ( دورة اختبلر الطلقه )
ﺍﳌﻮﺍﺻﻔﺎﺕ_٢١
www.samsung.com/ae/support (English)
www.samsung.com/ae_ar/support (Arabic)