1
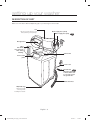
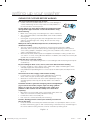
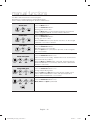
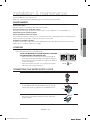
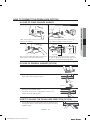
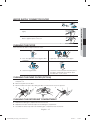
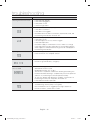
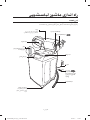
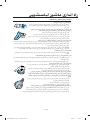
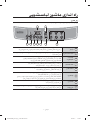
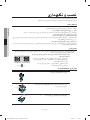
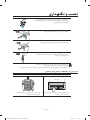
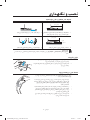
WA70H4200SW Washing Machine user manual This manual is made with 100% recycled paper. imagine the possibilities Thank you for purchasing a Samsung product. DC68-03414H WA70H4200SW_03414H_EN_140317.indd 1 contents SETTING UP YOUR WASHER 6 MANUAL FUNCTIONS 6 7 10 Description of part Checking before washing and caring for garments How to wash automatically depends on the laundry Control Panel 12 Manual functions 13 13 13 14 15 16 16 17 17 17 17 Environment Levelling Connecting the water supply hose Assembling the rat protection panel (option) How to connect the drain hose (option) Adding detergent Adding fabric softener Water supply connector filter Cleaning the filter Cleaning the pump filter (option) Cleaning the detergent compartment 18 Troubleshooting 19 Washing machine won’t work? 21 Specification 9 12 INSTALLATION & MAINTENANCE 13 TROUBLESHOOTING 18 WASHING MACHINE WON’T WORK? 19 SPECIFICATION 21 English - 2 WA70H4200SW_03414H_EN_140317.indd Sec9:2 2014-03-17 12:40:25 safety instructions Please note that the following precautions for safety intend to prevent unpredictable danger and damage by helping the proper use in safety. When using hot water in washing, please make sure that the water should not exceed 50 °C. • Plastic parts may be deformed or damaged, and an electric shock or a fire may take place. IMPORTANT SAFETY PRECAUTIONS Do not let children (or pets) play in or on your washing machine. The washing machine door does not open easily from the inside and children may be seriously injured if trapped inside. This appliance is not to be used by persons (including children) with reduced physical, sensory or mental capabilities, or lack of experience and knowledge, unless they have been given supervision or instruction concerning use of the appliance by a person responsible for their safety. Children should be supervised to ensure that they do not play with the appliance. For use in Europe : This appliance can be used by children aged from 8 years and above and persons with reduced physical, sensory or mental capabilities or lack of experience and knowledge if they have been given supervision or instruction concerning use of the appliance in a safe way and understand the hazards involved. Children shall not play with the appliance. Cleaning and user maintenance shall not be made by children without supervision. If the supply cord is damaged, it must be replaced by the manufacturer, its service agent or similarly qualified persons in order to avoid a hazard. This appliance should be positioned so that the power plug, the water supply taps, and the drain pipes are accessible. English - 3 WA70H4200SW_03414H_EN_140317.indd Sec2:3 2014-03-17 12:40:25 SAFETY INSTRUCTIONS WARNING: To reduce the risk of fire, electric shock, or injury to persons when using your appliance, follow basic precautions, including the following: safety instructions For appliances with ventilation openings in the base, that a carpet must not obstruct the openings. The new hose-sets supplied with the appliance are to be used and that old hose-sets should not be reused. CAUTION: In order to avoid a hazard due to inadvertent resetting of the thermal cut-out, this appliance must not be supplied through an external switching device, such as a timer, or connected to a circuit that is regularly switched on and off by the utility. WARNING There might be serious injury or fatal accident when you violate this instruction. • Do not pull the cord off or touch it with moist hands. − An electric shock or a fire may take place. • Do not bend the power supply cord by force or press it with heavy things. − An electric shock or a fire may take place. • Do not install the washer nearby electric implement or don’t put a candle light or cigarette light on the washer. − A fire may take place. • During operation, do not put your hands or metal materials under the washer. − You may be hurt by spinning board beneath the washer. • Stay away from the washer when the bottom of the washer sinks into the water. − There might be an electric shock. Please wait until the water drains out completely. • Do not put laundry stained with gasoline, benzene, or alcohol in the washer, and keep the materials away from the washer. − An explosion or a fire may take place. • During spinning, don’t put your hand in the spinning tub. − It may hurt your hands. If it does not stop within 15 seconds after you open the lid, call service agent immediately. • This appliance has to be connected to the plug endurable to proper power consumption. • This appliance has to be positioned so that the plug is accessible after installation. • No user-serviceable parts inside. Refer any servicing to qualified service personnel. − Otherwise this may cause a mechanical error, electric shock, fire or physical damage. − The product warranty does not cover problems resulting from disassembling the product. • Do not use this product for business purposes. English - 4 WA70H4200SW_03414H_EN_140317.indd Sec2:4 2014-03-17 12:40:25 CAUTIONS English - 5 WA70H4200SW_03414H_EN_140317.indd Sec2:5 2014-03-17 12:40:25 SAFETY INSTRUCTIONS There might be a slight injury or damage when you violate this instruction. • Don’t install it in the area with moisture or outdoor where it has rain or snow. − An electric shock or a fire may take place. • Please unplug the power supply cord when you do not use it. − An electric shock or a fire may take place. • If there is dust or water on the power supply plug and its connected part, please remove it completely. − An electric shock or a fire may take place. • Do not make your kids look into the inside of the washer. − If your kid falls into the washer, his life could be in danger. • Ventilate immediately without touching the power plug if gas is leaking. − An electric shock or a fire may take place if it catches flame. • If the washer makes strange noise, smell or smoke, unplug it promptly and call service agent. − An electric shock or a fire may take place. • When cleaning, don’t spray water to the parts of the washer directly. − It may make its life span shorten. Also an electric shock or fire may take place. • Do not use the strong acid cleaning agent. • Don’t use several appliances together with an outlet. − A fire may take place due to unusual heat. • Don’t press the button with an awl or pin. − An electric shock or a fire may take place. • If the damage is found on the current cord in use, it should be replaced by manufacturer, service center or authorized person in order to avoid the risk. • Connect the grounding wire to the shell plate, and bury it under at least 25cm of earth:alternatively, connect the ground wire to the appropriate pin on a properly grounded power receptacle. Never connect the wire to a telephone line, lightning rod, or gas pipe. • The product you have purchased is designed for domestic use only. The use for business purposes qualifies as product misuse. In this case, the product will not be covered by the standard warranty provided by Samsung and no responsibility can be attributed to Samsung for malfunctions or damages resulting from such misuse. setting up your washer DESCRIPTION OF PART The User’s Manual is for common use. Make use of the User’s Manual depending upon your washing machine model. Lid Be sure to keep the lid closed during washing and spinning. Water supply hose (Cold) Water supply hose (Hot) Detergent box Filter Lint will be collected in the filter during washing. Spin basket Front control panel Power cord Ground lead When the water pipe is metal, make sure to cover the end of the ground wire. Water drain hose Adjustable legs Adjust the length of the legs when installing the washer. English - 6 WA70H4200SW_03414H_EN_140317.indd Sec3:6 2014-03-17 12:40:25 CHECKING BEFORE WASHING AND CARING FOR GARMENTS English - 7 WA70H4200SW_03414H_EN_140317.indd Sec3:7 2014-03-17 12:40:25 SETTING UP YOUR WASHER Must follow the checkpoints in order to avoid machine problems or damages on garments. • If the below problems are caused by customer’s faults, separate service fee will be charged. Checkpoints Before Starting Washing Check if the clothes are bleaching or not. • Add liquid detergent to a white towel and the garment where you can’t notice well. Then, rub together strongly. Check if the color transferred to the towel. • Be careful for scarves and imported clothes since they are easily discoloring. • Check for stains or partial dirt. • If stains are found, use the towel wet with detergents to rub on in a single direction. • Before washing, the sleeves, collar, dress hem and pockets are pre-treated by brushing with detergents. The wrinkle-processed clothes made of wool are specially treated by fixing them with threads before washing. The threads shall be removed after the clothes are dried. Not washable laundry Clothes those are easily transformable even by soaking in water. • Even by soaking in water, neckties, brassieres, jackets, suits and coats can be easily transformed like shrinking and discoloring on the garment surfaces because they are mostly made of rayon, polynosic, cuff and their blend fabrics. • The wrinkle-processed, embossed, or resin processed products are easy to transform even by soaking in water. • Easily discoloring products made of cotton and wool, wrinkled silk, leather products, leather accessory, leather ornamented clothes and its accessory. • Don’t wash those clothes without handling guideline or material indication tag. About Detergent • When detergents are not dissolving well, use warm water (about 40 °C) to dissolve the detergent. • Use an appropriate amount. Even if excess amount of detergent is used, there is not much difference in washing CAUTION • result. It may cause damages to the garments because rinsing is not enough. • The bleaching agent may cause damages to garments since it is strong alkali. • Do sufficient rinsing because the powder detergent is easily remained on the garments causing bad odors. • If too much detergent is used or cold water is used, it doesn’t dissolve completely and remain on the garments, hose or spin basket, causing contamination on clothes. • In case of reserved washing, detergents must be put in the detergent box. If the powder detergents are spread on laundry directly, it may cause discoloration. setting up your washer CARING FOR CLOTHES BEFORE WASHING Take out personal belongings from pockets. • Caution, Check the pockets! Hairpins and coins cause damages to clothes and washing machine. They make noise and problems to the machine. Must check the pocket. If pants zippers are open while washing, the spin basket may be damaged. The zipper should be closed and fixed with a string before washing. • Metal on the clothing may cause damage to the clothes and the tub. • Turn clothing with buttons and embroidered clothes inside out before washing them. • Clothing with long strings may become entangled with other clothes, and may cause damage to the clothing. Be sure to fix the strings before washing. Waterproof clothes (Ski Wear, Diaper Covers, Footboards) are not allowed for washing. • This may cause the laundry to be ejected or cause the washing machine to vibrate abnormally, which may result in personal injury or damage the washing machine, the floor or the clothing. (Diapers, waterproof clothing, raincoats, umbrella covers, skiwear, car cover sheets, and sleeping bags, etc.). • When the tub rotates, water may become trapped in the waterproof clothing or fabric and can collect in a corner, causing abnormal vibrations. In addition, the laundry rises and may be ejected and cause personal injury. Shake the dirt or soils from clothes. • Soil and sands may rub delicate garments to cause damages and the washing result may be unsatisfactory. Do pre-washing for white socks, sleeves, and collars before the main washing. • For stains and dirt on collars, sleeves, hems, and pockets, apply some detergent to them and apply it lightly with a brush before washing. • Use powdered or liquid detergent. Do not use soap as the tub may become dirty from the dirt on it. Turn inside out for those nappy clothes before washing. • If clothes have too much foreign matter, separate them for washing. Other clothes may pick up those dirty matters (dirt, thread). • Wash black colored clothes and cotton towels separately. If they are washed together, towels may pick up dirty matters. Check before washing. Cashmilon and those garments having big volume and lightweight (eg. Lasedecorated clothes, lingerie, nylon stocking, synthetic fabrics etc.) may rise and cause damages to the clothes and problems to the machine. Use the laundry net or wash them separately. • Must put those long stringed clothes, lase-worked clothes, bed cover sheet, wool clothes into a laundry net before washing. • Put delicate clothes in the laundry net. • Use only those commercial laundry net for washing. Curtains, floating garments or blue jeans shall be pressed not to float on the water. • If they are floated on the water, press Start/Pause button to stop and press them to sock in the water. If the washing goes on with clothes floating on the water, it may cause damages to the clothes and the washing machine as well as unsatisfactory washing result. English - 8 WA70H4200SW_03414H_EN_140317.indd Sec3:8 2014-03-17 12:40:25 HOW TO WASH AUTOMATICALLY DEPENDS ON THE LAUNDRY Before starting washing, check the following; • Connect the water supply hose to the water tap. Leave a tap open. Plug the power cord in. Make sure to lay down the drain hose. Before washing clothes for the first time, you must run a complete cycle without clothes. To do this: 1. Press the Power button. 2. Open the detergent drawer and insert a little detergent. 3. Turn on the water supply to the washing machine. 4. Press the Start/Pause button. This will remove any water from the manufacturer’s test run remaining in the machine. Special notes! Automatic Sensing Function • According to the selected program, the amount of laundry is automatically sensed and then the appropriate water level, wash time, rinse cycle, and spinning time are automatically selected for the automatic wash. • After the power is on, a program is selected and Start/Pause button is pressed. Then, the washing board starts spinning without water. This action senses how much laundry is in the washing basket, not a machine problem. After this sensing process, water supplies automatically. Adding Detergent and Softener • It senses the amount of laundry and indicates the water level and amount of detergent. Then, it starts water supply right away. • During the water supply, it is possible to open the detergent box and add detergent. However, it is better to press Start/Pause button to stop water supply and add detergent. Close the lid and press Start/Pause button again. This way is much more convenient. • If the softener is applied to the softener dispenser, it is automatically dispensed in the rinse cycle. To dispense the fabric softener automatically, make sure you have selected all the necessary cycles of washing, rinse, and spin. Put the laundry into the washer and add detergent, too. • Be careful not to overload. Use right detergent for the fabrics you are washing. • • • If the lid is open while running, the washing machine is stopped automatically for safety. (Some models display an error message if the lid is not closed while water is supplied.) When hot water is selected, both cold and hot water are supplied for the first 20 seconds in order to protect the clothes. Possible to control the washing time, rinsing cycle, and spinning time at every program during the washing. English - 9 WA70H4200SW_03414H_EN_140317.indd Sec3:9 2014-03-17 12:40:26 SETTING UP YOUR WASHER Washing for the first time setting up your washer CONTROL PANEL For more details, see control panel of your washing machine. 1 2 3 4 5 7 6 8 9 1 Digital graphic display Displays the remaining wash time. Displays the error state if a problem occurs in the washing machine so that you can take action. 2 Water Level The water level is automatically adjusted. However, you can select the water level manually by pressing this button. 3 Temp. / Option Press this button repeatedly to cycle through the water temperature and Air Turbo option: Cold > Cold, Air Turbo > Cold/Hot > Cold/Hot, Air Turbo > Hot > Hot, Air Turbo 4 Wash Press this button to perform a wash only or to adjust the washing time. You can set the wash time from between 6 to 30 minutes. 5 Rinse Press this button to perform a rinse only or to adjust the rinse count. You can set the rinse count up to five times. 6 Spin Press this button to perform a spin cycle only or to adjust the spin time. You can set the spin time from between 1 to 9 minutes. When only a spin is selected, the spin time will be different from the total remaining time. This is because the total remaining time includes the actual spin time and the times for water draining and stopping. 7 Power Press this button once to operate. Press it again to turn the power off. 8 Start/Pause Use to pause and restart the operation. To change the washing procedure during an operation, press this button to stop, and again to restart after changing the procedure. English - 10 WA70H4200SW_03414H_EN_140317.indd Sec3:10 2014-03-17 12:40:26 Cycle Selects the best washing program automatically. Quick If you want to wash those frequently used towels or less dirty laundry time. Because washing is speedy, it is good for light or less stained laundry. Soak Press this button to perform a soak wash. Soak time is set up as minutes. Can not change the soak time. Blanket Big volume laundry like blanket and bed cover sheets Aqua Preserve If you wish to reuse the remaining water from the rinse cycle. This option helps save the amount of water used. Eco Tub Clean Use this program to clean the tub, it will keep the tub clean and sanitary. The TUB CHECK LED is turned on to notify the user that it is time to clean the tub. The powerful spinning force of the washing tub pulsator removes the contaminations from the exterior of the washing tub to prevent odors or secondary contamination. SETTING UP YOUR WASHER 9 Fuzzy CHILD LOCK This function is for protecting children, the elderly and the frail. 1. Press the Power button. 2. To activate the Child Lock function, press and hold both the Rinse and Spin buttons down simultaneously for 3 seconds. (If the Child Lock function is activated, the Child Lock icon blinks.) 3. Operations after activating the Child Lock function. • Even if the Child Lock function is activated, every button works until the door opens. • When you open the door during the Child Lock is being activated, the alarm sounds and an error message appears. In 30 seconds, draining begins automatically. However, if you close the door within 30 seconds, water will not be drained. (Displayed error message “CL”, “dE”). • To add laundry after activating the Child Lock function, you must deactivate the Child Lock function. 4. To deactivate the Child Lock function, press and hold both the Rinse and Spin buttons simultaneously for 3 seconds again. (If the Child Lock function is deactivated, the Child Lock icon is turned off.) 5. To clear “CL” display, after draining is complete, close the door of the washing turn the power off and then on. - This function is for preventing injury and malfunction of the product because of inappropriate operations or actions by children, the elderly or the frail. CAUTION - If the door opens when the Child Lock function is activated, the water is drained by force to prevent children from drowning. - To add laundry after activating the Child Lock function, you must deactivate the Child Lock. - Even if the power is turned off and then on when the Child Lock is activated, the Child Lock remains activated. - Once Child Lock is activated, even when the power is turned off, if the door is opened, water is automatically drained in 30 seconds. - The Child Lock function cannot be deactivated when CL is displayed. (However, the Child Lock function can be deactivated when the dE error is displayed.) - When the draining in Child Lock function, all buttons including power button can not be operated. English - 11 WA70H4200SW_03414H_EN_140317.indd Sec3:11 2014-03-17 12:40:26 manual functions Possible to select the function for each program. (Example) For a simple washing as the little dirt program : Power Select the little dirt program Wash Start/Pause WASH ONLY RINSE ONLY SPIN ONLY WASH AND RINSE RINSE AND SPIN WASH, RINSE AND SPIN Press the Power button. Press the Wash button. Press the Start/Pause button. Washing goes on for 1 time. When the Wash button is pressed during washing, the wash time can be changed to between 6 and 30 minutes in duration. Press the Rinse button. Press the Start/Pause button. Rinsing goes on for 1 time. When the Rinse button is pressed, the rinse times can be changed to between 1 to 5 times in duration. Press the Spin button. Press the Start/Pause button. Spin drying goes on for 4 minutes. When the Spin button is pressed, the spin time can be changed to from 1 to 9 minutes. Press the Wash and Rinse button. Press the Start/Pause button once. Detects the amount of laundry, and determines wash and rinse time period automatically. (Option) When the Wash and Rinse button is pressed, wash time period is determined between 6 to 30 minutes, and rinse time is determined between 1 and 5 times. Press the Rinse and Spin button. Press the Start/Pause button once. Rinsing and spin drying follow. When the Rinse and Spin button is pressed, the number of rinse times is determined between 1 and 5, and spin time period for drying is determined between 1 to 9 minutes. Press the Wash, Rinse and Spin button. Press the Start/Pause button once. Wash, Rinse and Spin is performed. English - 12 WA70H4200SW_03414H_EN_140317.indd 12 2014-03-17 12:40:26 installation & maintenance The User’s Manual is for common use. Make use of the User’s Manual depending upon your washing machine model. ENVIRONMENT LEVELING • If the washer is not leveled with the ground, it makes the machine tremble more or be out of order. So, make sure that the washer is leveled properly. SEE IF THE MACHINE IS PLACED LEVEL BY CHECKING Water THE POSITION OF THE WASHING TUB. • Open the lid of the machine, pour water into the tub up to the level just below the pulsator, and adjust the legs so that the pulsator is positioned at the center of the water as shown in the figure. LOOSEN LOCK • Place the machine more than 10 cm away from the wall. • Adjust the legs on feet for leveling. CONNECTING THE WATER SUPPLY HOSE 1. Remove the adaptor from the water supply hose. 2. First, using a “+” type screw driver, loosen the four screws on the adaptor. Next, take the adaptor and turn part (b) following the arrow for gap about 5 mm between them. 5 mm 3. Connect adaptor to the water tap by tightening the screws firmly. Then, turn part (b) following the arrow and put (a) and (b) together. a b English - 13 WA70H4200SW_03414H_EN_140317.indd Sec10:13 INSTALLATION & MAINTENANCE Leave some space Maintain at least 10 cm between the washer and the wall. Place the washer on a sturdy flat surface. If the washer is placed on an uneven or weak surface, noise or vibration occurs. (Allowable is 1˚) Adjust the legs for even placement. Never install the washer near water. Do not place the washer in steamy rooms or where the washer is directly exposed to rain. Moisture may destroy the electrical insulation causing an electrical shock hazard. Avoid direct sunlight or heaters. As plastic an electrical components are affected by direct heat, never place the washer near furnaces, boilers, etc. Do not place under direct sunlight. installation & maintenance 4. Connect the water supply hose to the adaptor. Pull down the part (c) of the water supply hose. When the part (c) is released, the hose is automatically connected to the adaptor making a ‘click’ sound. c 5. Connect the other end of the water supply hose to the inlet water valve at the back of the washer. Screw the hose clockwise all the way in. 5-1. Connect the other end of the water supply hose to the inlet water valve at the back side of the washer. Screw the hose clockwise all the way in. • If the water tap is a screw type, assemble a water supply hose that fits to the tap as shown. After completing connection, if water leaks from the hose, then repeat the same steps. After completing connection, if water leaks from the hose, then repeat the same steps. Use the most conventional type of faucet for water supply. In case the faucet is square or too big, remove the spacing ring before inserting the faucet into the adaptor. ASSEMBLING THE RAT PROTECTION PANEL (OPTION) Tilt the washer a little and lift up the panel until it clicks as shown in the figure. Rear side 1. Insert the rat protection panel to the assembling hole on rear side to the end. 2. If you have difficulty inserting the panel lift up the washer a little and insert it. English - 14 WA70H4200SW_03414H_EN_140317.indd Sec10:14 2014-03-17 12:40:27 HOW TO CONNECT THE DRAIN HOSE (OPTION) IN CASE OF PUMP-DRAINED WASHER Take out the cap-hose and connect the outlet-hose. (option) Be sure to join tightly the drain hose into the drain outlet on the back of the machine. 90~100 cm Drain hose Hose guide Be sure to join tightly the drain hose into the drain outlet on the side of the machine. Install the drain hose in the position of about 90~100 cm above the ground. The end of the drain hose can not be sinked under water. IN CASE OF GENERAL WASHER (OPTION) 1. After pressing the joint ring, insert to the drain hose. 2. After directing the drain hose to a drain, join to the drain outlet of the washing machine. drain-outlet 3. Be sure to join them tightly by pressing the joint ring and pushing it into the drain-outlet. • The length of drain hose is adjustable so that you can extend the length appropriately. HOW TO CHANGE THE DRAIN HOSE DIRECTION (OPTION) • The handle of joint ring is pressed to pull out the drain hose. Change the direction of the drain hose and follow the above guideline again. English - 15 WA70H4200SW_03414H_EN_140317.indd Sec10:15 INSTALLATION & MAINTENANCE cap-hose installation & maintenance CAUTIONS WHEN INSERTING THE DRAIN HOSE Less than 3 m 1. Don’t exceed more than 3 m when the drain hose is used by connecting with other hoses. 2. Be careful to drain water out at the end of the drain hose. Less than 3 m Less than 5 cm 3. The doorsill shouldn’t be more than 5cm. 4. Don’t install the drain hose underneath the wash machine. Test run Make sure that you install your washing machine correctly by running the Rinse+Spin cycle after the installation is complete. ADDING DETERGENT 1. Open the detergent box by pulling in the direction of the arrow as shown in the figure and then put the powder detergent in the detergent box. 2. Put in one-time amount of detergent evenly so the detergent may not brim over the box. ADDING FABRIC SOFTENER Slide and open the cover in the direction of the arrow, insert the rinse detergent, and slide and close it in the reverse direction. • • • • • Apply fabric softener to the softener inlet as appropriate. Then, the softener is automatically dispensed in the rinse cycle. To dispense the fabric softener automatically, make sure you have selected all the necessary cycles of washing, rinse, and spin. Do not use detergent, bleach or starch into the Softener Inlet. Using too much softener may produce unsatisfactory results. Do not open the lid during the Spin Dry cycle. If added too early, its effectiveness will decrease. Do not leave the softener into the Softener Dispenser for a long time. Because softner became stiff. English - 16 WA70H4200SW_03414H_EN_140317.indd Sec10:16 WATER SUPPLY CONNECTOR FILTER 1. Pull out the filter and wash well. INSTALLATION & MAINTENANCE 2. Pull in the filter and connect the hose to the inlet water valve tightly. 3. Check if there is a leakage. Note to tighten up the connector. CLEANING THE FILTER Clean the filter net often to keep the washer clean. 1. Push the upper part of the Hygiene filter and pull in. 2. Open the cover as shown in the figure. 3. Clean the Hygiene filter. 4. Close the cover and insert the lower part of the filter in the basket first and then push the filter with “click” sound. CLEANING THE PUMP FILTER (OPTION) 1. Place a rag or towel under the wash filter to avoid wetting the floor, and rotate the filter counterclockwise and pull it out. 2. Remove any dirt from the filter. 3. Return the filter to its place by rotating the filter clockwise until it locks into position. 1 2 3 CLEANING THE DETERGENT COMPARTMENT 1. Separate the detergent compartment from the washer. 2. Separate and clean the Rinse-Cap from the detergent compartment. 3. Assemble the Rinse-Cap and insert the detergent compartment into the washer. English - 17 WA70H4200SW_03414H_EN_140317.indd Sec10:17 2014-03-17 12:40:28 troubleshooting PROBLEM CHECK Washing machine won’t work • • • • Is the water tap opened? Is the washer plugged in? Is the power cut off? Is there enough water? Water dose not drain • • • • Is the drain hose down?(No pump) Is the drain hose frozen? Is the drain hose clogged? If the water dose not drain in 30 minutes, a buzzer will sound, and the remaining time indicator will show “5E”. Water is not supplied • • • • • Is the water tap opened? Is the water cut off? Is the water supply hose or hose connection clogged? Is the water tap frozen? If the water supply is not finished in 1 hour or there is no change in the water level 5 minutes (10minutes for some models) after the water supply has started, the buzzer rings and “4E” is displayed on the remaining time indicator. Spinning does not work • • Is the laundry spread out evenly in the washer? In the washer set on a sturdy flat surface? Water is overflowed • • Restart after spinning. If the error sign still indicates, call agency. This indicates that a Child Lock • error occurred • • • Water leakage error • • • The error message blinks at a 1 second interval and the water is drained with an alarm sound. (Displayed message: “CL” or “dE”) This function is to prevent children from drowning when falling into the wash tub. When draining is complete and you turn the power off and then on, the washing machine will operate normally. To clear “CL” display, after draining is complete, close the door of the washing machine, turn the power off and then on. Is the Start/Pause button pressed? Check if the end of the drain hose is placed on the floor. (The hose should be hung over the pump - hose guide.) Check if the drain hose is clogged by any foreign substances. If the error remains, call the service center. English - 18 WA70H4200SW_03414H_EN_140317.indd 18 2014-03-17 12:40:29 washing machine won’t work? PROBLEM The power is cut off. CHECK Is the electric voltage normal? Is the washer plugged in? Plug in the electric cord. Water does not drain. Is the drain hose down? Put the drain hose down. WASHING MACHINE WON’T WORK? Is the drain hose folded? Unfold the drain hose. Is the drain hose outlet clogged? Remove the waste cleanly. Washing machine won’t work. Is the washer lid open? Close the lid. Is the Pause button on? Press the Start/Pause button one more time and check if the washer starts. Is enough water filled to the water level? If the water pressure is low, it takes a long time to start washing. Is the faucet closed? Open the faucet to supply water. Did you open the door during the spinning cycle? Close the door, and press the Start/Pause button to resume. If the drain hose and spin basket are frozen, do as follows. • • • • Add hot water to the frozen water tap and remove the drain hose. Soak into hot water. Pour hot water into the spin basket for about 10 minutes. Put a hot water towel on the drain hose connector. If the drain hose defrosts, connect again and check for proper water draining. The water drains out immediately. • The drain is clogged with coins or pins. The drain hose is hung over the drain hose hook. Half fill the spin basket with water and try for spinning again. The water leaks at the water supply hose connector. If the faucet connecting part is loose, water may leak. Repeat the assembling steps again. (Refer to “Connecting the water supply hose”) Check if the rubber packing of water supply hose is in the right position. Screw tightly again. Is the water supply hose folded? Unfold the hose. If the water supply is too strong, water may leak. Close the faucet a little. Is water leaking from the faucet itself? Fix the faucet. Water is not supplied. English - 19 WA70H4200SW_03414H_EN_140317.indd Sec11:19 2014-03-17 12:40:29 washing machine won’t work? PROBLEM CHECK When no water is extracted. Did you press the Start/Pause button after selecting the water supply? If the Start/Pause button is not pressed, water is not supplied. Press the Start/Pause button. Is the faucet closed? Turn on the faucet. Is the filter net at the water supply hose connector clogged with dirty matters? Clean the filter net by brushing with a toothbrush. Is the water supply cut off? If the water supply is suspended, turn off the faucet and power off. Spinning makes loud noises and vibrations. Check if the laundry is spread evenly in the washer. Spread out the laundry evenly and start again. Check if the washing machine levels on a sturdy flat floor. Set the machine at level. Is the handle for leveling legs loose? Adjust the legs on the feet for leveling. Is around the washing machine filled with unnecessary stuffs? Remove those unnecessary things away from the wash machine. English - 20 WA70H4200SW_03414H_EN_140317.indd Sec11:20 specification WA70H4200SW POWER CONSUMPTION DIMENSIONS (mm) WATER PRESSURE WASHING TYPE SPIN 330 W 240 W W540 x D560 x H850 31 kg 0.05 ~ 0.78 Mpa (0.5 ~ 8.0 kg·f/cm2) Stirring Type English - 21 WA70H4200SW_03414H_EN_140317.indd 21 STANDARD WATER LEVEL WATER USAGE SPIN SPEED 5 60 ℓ 4 53 ℓ 3 40 ℓ 2 29 ℓ 1 22 ℓ 160 ℓ 700 rpm SPECIFICATION WEIGHT WASH QUESTIONS OR COMMENTS? Country CALL OR VISIT US ONLINE AT IRAN 021-8255 www.samsung.com/iran/support DC68-03414H WA70H4200SW_03414H_EN_140317.indd 22 2014-03-17 12:40:29 WA70H4200SW DC68-03414H ﻓﻬﺮﺳﺖ ﻣﻄﺎﻟﺐ ﺭﺍﻩ ﺍﻧﺪﺍﺯی ﻣﺎﺷﲔ ﻟﺒﺎﺳﺸﻮﻳﯽ ۶ ٧ ٩ ١٠ ﺷﺮﺡ ﻗﻄﻌﺎﺕ ﮐﻨﺘﺮﻝ ﻗﺒﻞ ﺍﺯ ﺷﺴﺘﺸﻮ ﻭ ﻣﺮﺍﻗﺒﺖ ﺍﺯ ﻟﺒﺎﺱ ﻫﺎ ﻧﺤﻮﻩ ﺷﺴﺘﺸﻮی ﺧﻮﺩﮐﺎﺭ ﺑﺴﺘﮕﯽ ﺑﻪ ﻟﺒﺎﺱ ﻫﺎ ﺩﺍﺭﺩ ﭘﻨﻞ ﮐﻨﺘﺮﻝ ﻋﻤﻠﮑﺮﺩﻫﺎی ﺩﺳﺘﯽ ١٢ ﻋﻤﻠﮑﺮﺩﻫﺎی ﺩﺳﺘﯽ ﻧﺼﺐ ﻭ ﻧﮕﻬﺪﺍﺭی ١٣ ١٣ ١٣ ١۴ ١۵ ١۶ ١۶ ١٧ ١٧ ١٧ ١٧ ﻣﺤﻴﻂ ﺯﻳﺴﺖ ﻫﻤﺘﺮﺍﺯ ﮐﺮﺩﻥ ﻭﺻﻞ ﮐﺮﺩﻥ ﺷﯿﻠﻨﮓ ﺗﻐﺬﯾﻪ ﺁﺏ ﺳﻮﺍﺭ ﮐﺮﺩﻥ ﭘﻨﻞ ﻣﺤﺎﻓﻈﺖ ﺩﺭ ﻣﻘﺎﺑﻞ ﻣﻮﺵ )ﺍﻧﺘﺨﺎﺑﯽ( ﻃﺮﻳﻘﻪ ﻣﺘﺼﻞ ﮐﺮﺩﻥ ﺷﯿﻠﻨﮓ ﺗﺨﻠﻴﻪ )ﺍﻧﺘﺨﺎﺑﯽ( ﺍﻓﺰﻭﺩﻥ ﺷﻮﯾﻨﺪﻩ ﺍﺿﺎﻓﻪ ﻛﺮﺩﻥ ﻧﺮﻡ ﻛﻨﻨﺪﻩ ﭘﺎﺭﭼﻪ ﻓﯿﻠﺘﺮ ﺍﺗﺼﺎﻟﯽ ﻣﻨﺒﻊ ﺁﺏ ﲤﻴﺰ ﮐﺮﺩﻥ ﻓﻴﻠﺘﺮ ﲤﻴﺰ ﮐﺮﺩﻥ ﻓﻴﻠﺘﺮ ﭘﻤﭗ )ﺍﻧﺘﺨﺎﺑﯽ( ﲤﯿﺰ ﮐﺮﺩﻥ ﻣﺤﻔﻈﻪ ﺷﻮﯾﻨﺪﻩ ﻋﯿﺐ ﯾﺎﺑﯽ ١٨ ﻋﯿﺐ ﯾﺎﺑﯽ ﻣﺎﺷﯿﻦ ﻟﺒﺎﺳﺸﻮﯾﯽ ﮐﺎﺭ ﳕﯽ ﮐﻨﺪ؟ ١٩ ﻣﺎﺷﯿﻦ ﻟﺒﺎﺳﺸﻮﯾﯽ ﮐﺎﺭ ﳕﯽ ﮐﻨﺪ؟ ﻣﺸﺨﺼﺎﺕ ٢١ ﻣﺸﺨﺼﺎﺕ ۶ ١٢ ١٣ ١٨ ١٩ ٢١ ﻓﺎﺭﺳﯽ ٢ - 12:42:29 2014-03-17 WA70H4200SW_03414H_FA_140317.indd Sec9:2 ﺩﺳﺘﻮﺭﺍﻟﻌﻤﻞ ﻫﺎی ﺍﳝﻨﯽ ﻟﻄﻔﺎ ﹰ ﺗﻮﺟﻪ ﺩﺍﺷﺘﻪ ﺑﺎﺷﻴﺪ ﮐﻪ ﺍﺣﺘﻴﺎﻁ ﻫﺎی ﺍﳝﻨﯽ ﺯﻳﺮ ﺑﻪ ﻣﻨﻈﻮﺭ ﺟﻠﻮﮔﻴﺮی ﺍﺯ ﻣﺨﺎﻃﺮﻩ ﻭ ﺁﺳﻴﺐ ﻏﻴﺮﻗﺎﺑﻞ ﭘﻴﺶ ﺑﻴﻨﯽ ﺑﺎ ﮐﻤﮏ ﺍﺳﺘﻔﺎﺩﻩ ﻣﻨﺎﺳﺐ ﻭ ﺑﯽ ﺧﻄﺮ ﻣﯽ ﺑﺎﺷﻨﺪ. ﻫﻨﮕﺎﻣﻴﮑﻪ ﺍﺯ ﺁﺏ ﮔﺮﻡ ﺩﺭ ﻫﻨﮕﺎﻡ ﺷﺴﺘﺸﻮ ﺍﺳﺘﻔﺎﺩﻩ ﻣﯽ ﮐﻨﻴﺪ ،ﻟﻄﻔﺎ ﹰ ﻣﻄﻤﺌﻦ ﺷﻮﻳﺪ ﮐﻪ ﺩﻣﺎی ﺁﺏ ﻧﺒﺎﻳﺴﺘﯽ ﺍﺯ ۵٠ﺩﺭﺟﻪ ﺳﺎﻧﺘﯽ ﮔﺮﺍﺩ ﲡﺎﻭﺯ ﮐﻨﺪ. • ﻗﻄﻌﺎﺕ ﭘﻼﺳﺘﻴﮑﯽ ﳑﮑﻦ ﺍﺳﺖ ﺗﻐﻴﻴﺮ ﺷﮑﻞ ﺩﺍﺩﻩ ﻳﺎ ﺁﺳﻴﺐ ﺑﺒﻴﻨﻨﺪ ﻭ ﳑﮑﻦ ﺍﺳﺖ ﻣﻮﺟﺐ ﺑﺮﻕ ﮔﺮﻓﺘﮕﯽ ﻭ ﺁﺗﺸﺴﻮﺯی ﺷﻮﻧﺪ. ﻫﺸﺪﺍﺭ :ﺑﺮﺍی ﮐﺎﻫﺶ ﺧﻄﺮ ﺁﺗﺸﺴﻮﺯی ،ﺍﻧﻔﺠﺎﺭ ،ﺑﺮﻕ ﮔﺮﻓﺘﮕﯽ ﻭﻳﺎ ﺻﺪﻣﻪ ﺷﺨﺼﯽ ﺩﺭ ﻫﻨﮕﺎﻡ ﺍﺳﺘﻔﺎﺩﻩ ﺍﺯ ﻣﺎﺷﲔ ،ﺍﺯ ﺍﺣﺘﻴﺎﻁ ﻫﺎی ﺍﳝﻨﯽ ﺳﺎﺩﻩ ﭘﻴﺮﻭی ﮐﻨﻴﺪ ﮐﻪ ﺷﺎﻣﻞ ﻣﻮﺍﺭﺩ ﺯﯾﺮ ﻣﯽ ﺷﻮﻧﺪ: ﻧﮕﺬﺍﺭﻳﺪ ﻛﻮﺩﻛﺎﻥ )ﻳﺎ ﺣﻴﻮﺍﻧﺎﺕ ﺧﺎﻧﮕﯽ( ﺩﺭ ﺩﺍﺧﻞ ﻭﻳﺎ ﺭﻭی ﻣﺎﺷﲔ ﻟﺒﺎﺳﺸﻮﻳﯽ ﺑﺎﺯی ﻛﻨﻨﺪ .ﺩﺭﻳﭽﻪ ﻣﺎﺷﲔ ﻟﺒﺎﺳﺸﻮﻳﯽ ﺑﻪ ﺁﺳﺎﻧﯽ ﺍﺯ ﺩﺍﺧﻞ ﺑﺎﺯ ﳕﯽ ﺷﻮﺩ ﻭ ﺍﮔﺮ ﻛﻮﺩﻛﺎﻥ ﺩﺭ ﺁﻥ ﺣﺒﺲ ﺷﻮﻧﺪ ﳑﻜﻦ ﺍﺳﺖ ﺑﻪ ﻃﻮﺭ ﺟﺪی ﻣﺼﺪﻭﻡ ﺷﻮﻧﺪ. ﺍﻳﻦ ﺩﺳﺘﮕﺎﻩ ﺑﺮﺍی ﺍﺳﺘﻔﺎﺩﻩ ﺗﻮﺳﻂ ﺍﺷﺨﺎﺹ )ﺷﺎﻣﻞ ﻛﻮﺩﻛﺎﻥ( ﳕﯽ ﺑﺎﺷﺪ ﻛﻪ ﺗﻮﺍﻧﺎﻳﯽ ﻫﺎی ﺟﺴﻤﯽ ،ﺣﺴﯽ ﻭﻳﺎ ﻋﻘﻼﻧﯽ ﻣﺤﺪﻭﺩ ﺩﺍﺭﻧﺪ ﻭﻳﺎ ﲡﺮﺑﻪ ﻭ ﺩﺍﻧﺶ ﮐﺎﻓﯽ ﻧﺪﺍﺭﻧﺪ ،ﻣﮕﺮ ﺍﻳﻨﻜﻪ ﺑﺮﺍی ﺍﺳﺘﻔﺎﺩﻩ ﺍﺯ ﺍﻳﻦ ﺩﺳﺘﮕﺎﻩ ،ﺗﻮﺳﻂ ﺷﺨﺼﯽ ﻛﻪ ﻣﺴﺌﻮﻝ ﺣﻔﺎﻇﺖ ﺍﺯ ﺁﻧﻬﺎﺳﺖ ﻧﻈﺎﺭﺕ ﻭﻳﺎ ﺩﺳﺘﻮﺭﺍﺗﯽ ﺭﺍ ﺩﺭﻳﺎﻓﺖ ﻛﺮﺩﻩ ﺑﺎﺷﻨﺪ. ﮐﻮﺩﮐﺎﻥ ﺑﺎﻳﺴﺘﯽ ﲢﺖ ﻧﻈﺎﺭﺕ ﺑﺎﺷﻨﺪ ﺗﺎ ﺍﻃﻤﻴﻨﺎﻥ ﺣﺎﺻﻞ ﺷﻮﺩ ﮐﻪ ﺑﺎ ﻣﺎﺷﯿﻦ ﺑﺎﺯی ﳕﯽ ﮐﻨﻨﺪ. ﻓﻘﻂ ﺑﺮﺍی ﺍﺳﺘﻔﺎﺩﻩ ﺩﺭ ﺍﺭﻭﭘﺎ :ﮐﻮﺩﮐﺎﻥ ﺑﻪ ﺳﻦ ٨ﺳﺎﻝ ﺑﻪ ﺑﺎﻻ ﻭ ﺍﺷﺨﺎﺻﯽ ﮐﻪ ﻣﻌﻠﻮﻟﯿﺖ ﻫﺎی ﺟﺴﻤﺎﻧﯽ ،ﺣﺴﯽ ﻭ ﺭﻭﺍﻧﯽ ﺩﺍﺭﻧﺪ ﯾﺎ ﺍﺯ ﲡﺮﺑﻪ ﻭ ﺩﺍﻧﺶ ﮐﺎﻓﯽ ﺑﺮﺧﻮﺭﺩﺍﺭ ﻧﯿﺴﺘﻨﺪ ﺩﺭ ﺻﻮﺭﺗﯽ ﻣﯽ ﺗﻮﺍﻧﻨﺪ ﺍﺯ ﺍﯾﻦ ﻣﺎﺷﯿﻦ ﺍﺳﺘﻔﺎﺩﻩ ﮐﻨﻨﺪ ﮐﻪ ﻧﻈﺎﺭﺕ ﻭ ﺩﺳﺘﻮﺭﺍﺕ ﻻﺯﻡ ﺭﺍ ﺩﺭ ﺭﺍﺑﻄﻪ ﺑﺎ ﺍﺳﺘﻔﺎﺩﻩ ﺍﯾﻤﻦ ﺍﺯ ﺍﯾﻦ ﻣﺎﺷﯿﻦ ﺩﺭﯾﺎﻓﺖ ﮐﺮﺩﻩ ﻭ ﺍﺯ ﺧﻄﺮﺍﺕ ﻣﺮﺑﻮﻃﻪ ﺁﮔﺎﻩ ﺑﺎﺷﻨﺪ .ﮐﻮﺩﮐﺎﻥ ﻧﺒﺎﯾﺪ ﺑﺎ ﺍﯾﻦ ﻣﺎﺷﯿﻦ ﺑﺎﺯی ﮐﻨﻨﺪ .ﮐﻮﺩﮐﺎﻥ ﻧﺒﺎﯾﺪ ﺑﺪﻭﻥ ﻧﻈﺎﺭﺕ ﮐﺎﻓﯽ ﺑﻪ ﻋﻤﻠﯿﺎﺕ ﲤﯿﺰ ﮐﺮﺩﻥ ﻭ ﺣﻔﻆ ﻭ ﻧﮕﻬﺪﺍﺭی ﺑﭙﺮﺩﺍﺯﻧﺪ. ﺍﮔﺮ ﺳﻴﻢ ﺑﺮﻕ ﺻﺪﻣﻪ ﺩﻳﺪﻩ ،ﺑﺎﻳﺴﺘﯽ ﺗﻮﺳﻂ ﺳﺎﺯﻧﺪﻩ ،ﺗﻌﻤﻴﺮﮐﺎﺭ ﻭﻳﺎ ﺷﺨﺺ ﻣﺠﺮﺏ ﻣﺸﺎﺑﻪ ﺩﻳﮕﺮی ﺗﻌﻮﻳﺾ ﺷﻮﺩ ﺗﺎ ﺍﺯ ﺧﻄﺮ ﺟﻠﻮﮔﻴﺮی ﺷﻮﺩ. ﺍﻳﻦ ﻣﺎﺷﯿﻦ ﺑﺎﻳﺴﺘﯽ ﻃﻮﺭی ﻗﺮﺍﺭ ﮔﻴﺮﺩ ﻛﻪ ﺩﻭﺷﺎﺧﻪ ﺑﺮﻕ ،ﺷﻴﺮﻫﺎی ﺁﺏ ﻭ ﻟﻮﻟﻪ ﻫﺎی ﺗﺨﻠﻴﻪ ﻗﺎﺑﻞ ﺩﺳﺘﺮﺳﯽ ﺑﺎﺷﻨﺪ. ﺑﺮﺍی ﺩﺳﺘﮕﺎﻩ ﻫﺎﯾﯽ ﮐﻪ ﺭﻭﺯﻧﻪ ﻫﺎی ﻫﻮﺍﮔﻴﺮﺷﺎﻥ ﺩﺭ ﺯﻳﺮ ﺍﺳﺖ ،ﺯﻣﲔ ﻣﻔﺮﻭﺵ ﻧﺒﺎﻳﺴﺘﯽ ﺍﻳﻦ ﺭﻭﺯﻧﻪ ﻫﺎ ﺭﺍ ﻣﺴﺪﻭﺩ ﮐﻨﺪ. ﺍﺯ ﻣﺠﻤﻮﻋﻪ ﺷﯿﻠﻨﮓ ﻫﺎی ﺟﺪﯾﺪی ﮐﻪ ﺑﻪ ﻫﻤﺮﺍﻩ ﺩﺳﺘﮕﺎﻩ ﺍﺭﺍﺋﻪ ﺷﺪﻩ ﺑﺎﯾﺪ ﺍﺳﺘﻔﺎﺩﻩ ﺷﻮﺩ ﻭ ﻧﺒﺎﯾﺪ ﺍﺯ ﻣﺠﻤﻮﻋﻪ ﺷﯿﻠﻨﮓ ﻫﺎی ﻗﺪﯾﻤﯽ ﺍﺳﺘﻔﺎﺩﻩ ﮐﺮﺩ. ﺩﺳﺘﻮﺭﺍﻟﻌﻤﻞ ﻫﺎی ﺍﳝﻨﯽ ﺍﺣﺘﯿﺎﻁ ﻫﺎی ﻣﻬﻢ ﺍﯾﻤﻨﯽ ﻓﺎﺭﺳﯽ ٣ - 12:42:29 2014-03-17 WA70H4200SW_03414H_FA_140317.indd Sec2:3 ﺩﺳﺘﻮﺭﺍﻟﻌﻤﻞ ﻫﺎی ﺍﳝﻨﯽ ﺍﺣﺘﯿﺎﻁ :ﺑﺮﺍی ﭘﺮﻫﯿﺰ ﺍﺯ ﺧﻄﺮﺍﺕ ﻣﺮﺑﻮﻁ ﺑﻪ ﺗﻨﻈﯿﻢ ﻣﺠﺪﺩ ﻏﯿﺮﻋﻤﺪی ﻓﯿﻮﺯ ﮔﺮﻣﺎﯾﯽ ،ﻧﺒﺎﯾﺪ ﺍﺯ ﻃﺮﯾﻖ ﺳﻮﯾﭻ ﺧﺎﺭﺟﯽ ﺍﺯ ﻗﺒﯿﻞ ﺗﺎﯾﻤﺮ ﺑﻪ ﺍﯾﻦ ﺩﺳﺘﮕﺎﻩ ﺑﺮﻕ ﺭﺳﺎﻧﯽ ﮐﺮﺩ ﯾﺎ ﺑﻪ ﻣﺪﺍﺭی ﻭﺻﻞ ﺷﻮﺩ ﮐﻪ ﺑﻪ ﻃﻮﺭ ﻣﺮﺗﺐ ﺗﻮﺳﻂ ﺷﺮﮐﺖ ﺑﺮﻕ ﺭﻭﺷﻦ ﻭ ﺧﺎﻣﻮﺵ ﻣﯽ ﺷﻮﺩ. ﺍﺧﻄﺎﺭ ﻋﺪﻡ ﺍﺳﺘﻔﺎﺩﻩ ﺍﺯ ﺍﻳﻦ ﺩﺳﺘﻮﺭﺍﻟﻌﻤﻞ ﻫﺎ ﳑﮑﻦ ﺍﺳﺖ ﻣﻨﺠﺮ ﺑﻪ ﺁﺳﻴﺐ ﺟﺪی ﻭﻳﺎ ﺣﺎﺩﺛﻪ ﻣﻬﻠﮏ ﺷﻮﺩ. • ﺳﻴﻢ ﺭﺍ ﺍﺯ ﭘﺮﻳﺰ ﺑﻪ ﺑﻴﺮﻭﻥ ﻧﮑﺸﻴﺪ ﻭﻳﺎ ﺁﻧﺮﺍ ﺑﺎ ﺩﺳﺖ ﻫﺎی ﺧﻴﺲ ﳌﺲ ﻧﮑﻨﻴﺪ. −ﳑﮑﻦ ﺍﺳﺖ ﻣﻨﺠﺮ ﺑﻪ ﺑﺮﻕ ﮔﺮﻓﺘﮕﯽ ﻭﻳﺎ ﺁﺗﺸﺴﻮﺯی ﺷﻮﺩ. • ﺳﻴﻢ ﺟﺮﻳﺎﻥ ﺑﺮﻕ ﺭﺍ ﺑﺎ ﺯﻭﺭ ﺧﻢ ﻧﮑﻨﻴﺪ ﻭﻳﺎ ﺁﻧﺮﺍ ﲢﺖ ﻓﺸﺎﺭ ﺍﺷﻴﺎﺀ ﺳﻨﮕﲔ ﻗﺮﺍﺭ ﻧﺪﻫﻴﺪ. −ﳑﮑﻦ ﺍﺳﺖ ﻣﻨﺠﺮ ﺑﻪ ﺑﺮﻕ ﮔﺮﻓﺘﮕﯽ ﻭﻳﺎ ﺁﺗﺸﺴﻮﺯی ﺷﻮﺩ. • ﻣﺎﺷﲔ ﻟﺒﺎﺳﺸﻮﻳﯽ ﺭﺍ ﺩﺭ ﻧﺰﺩﻳﮑﯽ ﺍﺑﺰﺍﺭ ﺑﺮﻗﯽ ﻧﺼﺐ ﻧﮑﻨﻴﺪ ﻭﻳﺎ ﻳﮏ ﺷﻤﻊ ﺭﻭﺷﻦ ﻭﻳﺎ ﺳﻴﮕﺎﺭ ﺭﻭﺷﻦ ﺭﺍ ﺑﺮ ﺭﻭی ﻣﺎﺷﲔ ﻗﺮﺍﺭ ﻧﺪﻫﻴﺪ. −ﳑﮑﻦ ﺍﺳﺖ ﻣﻨﺠﺮ ﺑﻪ ﺁﺗﺸﺴﻮﺯی ﺷﻮﺩ. • ﺩﺭ ﺣﲔ ﮐﺎﺭ ،ﺩﺳﺖ ﻫﺎﻳﺘﺎﻥ ﻭﻳﺎ ﻣﻮﺍﺩ ﻓﻠﺰی ﺭﺍ ﺩﺭ ﺯﻳﺮ ﻣﺎﺷﲔ ﻟﺒﺎﺳﺸﻮﻳﯽ ﻗﺮﺍﺭ ﻧﺪﻫﻴﺪ. −ﳑﮑﻦ ﺍﺳﺖ ﺗﺨﺘﻪ ﭼﺮﺧﺎﻥ ﺩﺭ ﺯﻳﺮ ﻣﺎﺷﲔ ﻟﺒﺎﺳﺸﻮﻳﯽ ﺑﻪ ﺷﻤﺎ ﺁﺳﻴﺐ ﻭﺍﺭﺩ ﮐﻨﺪ. • ﻫﻨﮕﺎﻣﻴﮑﻪ ﻗﺴﻤﺖ ﲢﺘﺎﻧﯽ ﻣﺎﺷﲔ ﻟﺒﺎﺳﺸﻮﻳﯽ ﺩﺭ ﺁﺏ ﻏﻮﻃﻪ ﻭﺭ ﺷﺪﻩ ﺍﺯ ﻧﺰﺩﻳﮑﯽ ﺑﻪ ﺁﻥ ﭘﺮﻫﻴﺰ ﮐﻨﻴﺪ. −ﳑﮑﻦ ﺍﺳﺖ ﻣﻮﺟﺐ ﺑﺮﻕ ﮔﺮﻓﺘﮕﯽ ﺷﻮﺩ .ﻟﻄﻔﺎ ﹰ ﻣﻨﺘﻈﺮ ﺷﻮﻳﺪ ﺗﺎ ﺁﺏ ﺑﻪ ﻃﻮﺭ ﮐﺎﻣﻞ ﺗﺨﻠﻴﻪ ﺷﻮﺩ. • ﻟﺒﺎﺱ ﻫﺎﯾﯽ ﮐﻪ ﺑﻪ ﺑﻨﺰﻳﻦ ،ﺑﻨﺰﻥ ﻭﻳﺎ ﺍﻟﮑﻞ ﺁﻏﺸﺘﻪ ﺷﺪﻩ ﺍﻧﺪ ﺭﺍ ﺩﺭ ﻣﺎﺷﲔ ﻗﺮﺍﺭ ﻧﺪﻫﻴﺪ ﻭ ﺍﻳﻨﮕﻮﻧﻪ ﻣﻮﺍﺩ ﺭﺍ ﺍﺯ ﻣﺎﺷﲔ ﺩﻭﺭ ﻧﮕﻪ ﺩﺍﺭﻳﺪ. −ﳑﮑﻦ ﺍﺳﺖ ﻣﻨﺠﺮ ﺑﻪ ﺍﻧﻔﺠﺎﺭ ﻭﻳﺎ ﺁﺗﺸﺴﻮﺯی ﺷﻮﺩ. • ﺩﺭ ﺣﲔ ﭼﺮﺧﺶ ،ﺩﺳﺖ ﺧﻮﺩ ﺭﺍ ﺩﺭ ﺩﺍﺧﻞ ﺗﺸﺖ ﭼﺮﺧﺎﻥ ﻗﺮﺍﺭ ﻧﺪﻫﻴﺪ. −ﳑﮑﻦ ﺍﺳﺖ ﺑﻪ ﺩﺳﺖ ﻫﺎﻳﺘﺎﻥ ﺁﺳﻴﺐ ﻭﺍﺭﺩ ﺷﻮﺩ .ﺍﮔﺮ ﻣﺎﺷﲔ ﺩﺭ ﻇﺮﻑ ١۵ﺛﺎﻧﻴﻪ ﺍﺯ ﺯﻣﺎﻧﻴﮑﻪ ﺩﺭﻳﭽﻪ ﺭﺍ ﺑﺎﺯ ﻣﯽ ﮐﻨﻴﺪ ﻣﺘﻮﻗﻒ ﻧﺸﻮﺩ ،ﻓﻮﺭﺍ ﹰ ﺑﺎ ﻣﺘﺼﺪی ﺗﻌﻤﻴﺮﺍﺕ ﲤﺎﺱ ﺑﮕﻴﺮﻳﺪ. • ﺍﻳﻦ ﺩﺳﺘﮕﺎﻩ ﺑﺎﻳﺴﺘﯽ ﺑﻪ ﭘﺮﻳﺰی ﻭﺻﻞ ﺷﻮﺩ ﮐﻪ ﻗﺪﺭﺕ ﲢﻤﻞ ﻣﺼﺮﻑ ﻧﻴﺮﻭی ﻣﻨﺎﺳﺐ ﺭﺍ ﺩﺍﺷﺘﻪ ﺑﺎﺷﺪ. • ﺍﻳﻦ ﺩﺳﺘﮕﺎﻩ ﺑﺎﻳﺴﺘﯽ ﻃﻮﺭی ﻗﺮﺍﺭ ﺩﺍﺩﻩ ﺷﻮﺩ ﮐﻪ ﭘﺮﻳﺰ ﺑﻌﺪ ﺍﺯ ﻧﺼﺐ ﻗﺎﺑﻞ ﺩﺳﺘﺮﺳﯽ ﺑﺎﺷﺪ. • ﻗﻄﻌﺎﺗﯽ ﺩﺭ ﺩﺍﺧﻞ ﺩﺳﺘﮕﺎﻩ ﻧﯿﺴﺖ ﮐﻪ ﻗﺎﺑﻞ ﺗﻌﻤﻴﺮ ﺗﻮﺳﻂ ﻣﺼﺮﻑ ﮐﻨﻨﺪﻩ ﺑﺎﺷﻨﺪ .ﻫﺮﮔﻮﻧﻪ ﺗﻌﻤﻴﺮﺍﺕ ﺭﺍ ﺑﻪ ﮐﺎﺩﺭ ﺗﻌﻤﻴﺮﺍﺗﯽ ﻣﺠﺮﺏ ﻣﺤﻮﻝ ﮐﻨﻴﺪ. −ﺩﺭ ﻏﻴﺮﺍﻳﻦ ﺻﻮﺭﺕ ﳑﮑﻦ ﺍﺳﺖ ﻣﻨﺠﺮ ﺑﻪ ﺧﻄﺎی ﻣﮑﺎﻧﻴﮑﯽ ،ﺑﺮﻕ ﮔﺮﻓﺘﮕﯽ ،ﺁﺗﺸﺴﻮﺯی ﻭﻳﺎ ﺁﺳﻴﺐ ﺑﺪﻧﯽ ﺷﻮﺩ. −ﺿﻤﺎﻧﺖ ﺍﻳﻦ ﻣﺤﺼﻮﻝ ﺷﺎﻣﻞ ﻣﺸﮑﻼﺗﯽ ﳕﯽ ﺷﻮﺩ ﮐﻪ ﺩﺭ ﻧﺘﻴﺠﻪ ﺍﻭﺭﺍﻕ ﮐﺮﺩﻥ ﻣﺤﺼﻮﻝ ﺍﯾﺠﺎﺩ ﻣﯽ ﺷﻮﻧﺪ. • ﺍﺯ ﺍﻳﻦ ﻣﺤﺼﻮﻝ ﺑﺮﺍی ﻣﻨﻈﻮﺭﺍﺕ ﲡﺎﺭی ﺍﺳﺘﻔﺎﺩﻩ ﻧﮑﻨﻴﺪ. ﻓﺎﺭﺳﯽ ۴ - 12:42:29 2014-03-17 WA70H4200SW_03414H_FA_140317.indd Sec2:4 ﺍﺣﺘﯿﺎﻁ ﻫﺎ ﺩﺳﺘﻮﺭﺍﻟﻌﻤﻞ ﻫﺎی ﺍﳝﻨﯽ ﻋﺪﻡ ﭘﻴﺮﻭی ﺍﺯ ﺍﻳﻦ ﺩﺳﺘﻮﺭﺍﻟﻌﻤﻞ ﻫﺎ ﳑﮑﻦ ﺍﺳﺖ ﻣﻨﺠﺮ ﺑﻪ ﺻﺪﻣﻪ ﺑﺪﻧﯽ ﻭﻳﺎ ﺁﺳﻴﺐ ﺟﺰﺋﯽ ﺷﻮﺩ. • ﺩﺭ ﻣﺤﻞ ﻫﺎی ﻣﺮﻃﻮﺏ ﻭﻳﺎ ﻫﻮﺍی ﺁﺯﺍﺩ ﮐﻪ ﺑﺎﺭﺍﻥ ﻳﺎ ﺑﺮﻑ ﻣﯽ ﺑﺎﺭﺩ ﻧﺼﺐ ﻧﮑﻨﻴﺪ. −ﳑﮑﻦ ﺍﺳﺖ ﻣﻨﺠﺮ ﺑﻪ ﺑﺮﻕ ﮔﺮﻓﺘﮕﯽ ﻭﻳﺎ ﺁﺗﺸﺴﻮﺯی ﺷﻮﺩ. • ﻫﻨﮕﺎﻣﻴﮑﻪ ﺍﺯ ﻣﺎﺷﲔ ﺍﺳﺘﻔﺎﺩﻩ ﳕﯽ ﮐﻨﻴﺪ ﻟﻄﻔﺎ ﹰ ﺳﻴﻢ ﺟﺮﻳﺎﻥ ﺑﺮﻕ ﺭﺍ ﺍﺯ ﭘﺮﻳﺰ ﺑﮑﺸﯿﺪ. −ﳑﮑﻦ ﺍﺳﺖ ﻣﻨﺠﺮ ﺑﻪ ﺑﺮﻕ ﮔﺮﻓﺘﮕﯽ ﻭﻳﺎ ﺁﺗﺸﺴﻮﺯی ﺷﻮﺩ. • ﺍﮔﺮ ﺑﺮ ﺭﻭی ﺩﻭﺷﺎﺥ ﺟﺮﻳﺎﻥ ﺑﺮﻕ ﻭﻳﺎ ﻗﻄﻌﻪ ﻣﺘﺼﻞ ﺑﻪ ﺁﻥ ﮔﺮﺩﻭﻏﺒﺎﺭ ﻭﻳﺎ ﺁﺏ ﻭﺟﻮﺩ ﺩﺍﺭﺩ ،ﻟﻄﻔﺎ ﹰ ﺁﻧﺮﺍ ﺑﻪ ﻃﻮﺭ ﮐﺎﻣﻞ ﺧﺎﺭﺝ ﮐﻨﻴﺪ. −ﳑﮑﻦ ﺍﺳﺖ ﻣﻨﺠﺮ ﺑﻪ ﺑﺮﻕ ﮔﺮﻓﺘﮕﯽ ﻭﻳﺎ ﺁﺗﺸﺴﻮﺯی ﺷﻮﺩ. • ﻧﮕﺬﺍﺭﻳﺪ ﮐﻪ ﮐﻮﺩﮐﺎﻧﺘﺎﻥ ﺑﻪ ﺩﺍﺧﻞ ﻣﺎﺷﲔ ﻟﺒﺎﺳﺸﻮﺋﯽ ﻧﮕﺎﻩ ﮐﻨﻨﺪ. −ﺍﮔﺮ ﮐﻮﺩﮐﺘﺎﻥ ﺑﻪ ﺩﺍﺧﻞ ﻣﺎﺷﲔ ﻟﺒﺎﺳﺸﻮﺋﯽ ﺑﻴﺎﻓﺘﺪ ،ﳑﮑﻦ ﺍﺳﺖ ﺟﺎﻧﺶ ﺩﺭ ﺧﻄﺮ ﺑﺎﺷﺪ. • ﺍﮔﺮ ﮔﺎﺯ ﻧﺸﺖ ﻣﯽ ﮐﻨﺪ ،ﻓﻮﺭﺍ ﹰ ﺑﺪﻭﻥ ﺩﺳﺖ ﺯﺩﻥ ﺑﻪ ﺩﻭﺷﺎﺥ ﺑﺮﻕ ﻫﻮﺍﮔﻴﺮی ﮐﻨﻴﺪ. −ﺍﮔﺮ ﺁﺗﺶ ﺑﮕﻴﺮﺩ ﳑﮑﻦ ﺍﺳﺖ ﻣﻨﺠﺮ ﺑﻪ ﺑﺮﻕ ﮔﺮﻓﺘﮕﯽ ﻭﻳﺎ ﺁﺗﺸﺴﻮﺯی ﺷﻮﺩ. • ﺍﮔﺮ ﻣﺎﺷﲔ ﻟﺒﺎﺳﺸﻮﻳﯽ ﺻﺪﺍ ،ﺑﻮ ﻭﻳﺎ ﺩﻭﺩ ﻋﺠﻴﺐ ﺗﻮﻟﻴﺪ ﻣﯽ ﮐﻨﺪ ،ﺁﻧﺮﺍ ﺑﻪ ﻃﻮﺭ ﺻﺤﻴﺢ ﺍﺯ ﭘﺮﻳﺰ ﺧﺎﺭﺝ ﮐﺮﺩﻩ ﻭ ﺑﺎ ﻣﺘﺼﺪی ﺗﻌﻤﻴﺮﺍﺕ ﲤﺎﺱ ﺑﮕﻴﺮﻳﺪ. −ﳑﮑﻦ ﺍﺳﺖ ﻣﻨﺠﺮ ﺑﻪ ﺑﺮﻕ ﮔﺮﻓﺘﮕﯽ ﻭﻳﺎ ﺁﺗﺸﺴﻮﺯی ﺷﻮﺩ. • ﺩﺭ ﺣﲔ ﲤﻴﺰ ﮐﺮﺩﻥ ،ﺁﺏ ﺭﺍ ﺑﻪ ﻃﻮﺭ ﻣﺴﺘﻘﻴﻢ ﺑﻪ ﻗﻄﻌﺎﺕ ﻣﺎﺷﲔ ﻟﺒﺎﺳﺸﻮﻳﯽ ﻧﭙﺎﺷﻴﺪ. −ﻃﻮﻝ ﻋﻤﺮ ﺁﻧﺮﺍ ﻛﻮﺗﺎﻩ ﻣﯽ ﻛﻨﺪ. ﻫﻤﭽﻨﲔ ﳑﻜﻦ ﺍﺳﺖ ﺑﺮﻕ ﮔﺮﻓﺘﮕﯽ ﻭﻳﺎ ﺁﺗﺸﺴﻮﺯی ﺍﻳﺠﺎﺩ ﺷﻮﺩ. • ﺍﺯ ﻣﻮﺍﺩ ﲤﯿﺰ ﮐﻨﻨﺪﻩ ﺍی ﮐﻪ ﺣﺎﻭی ﺍﺳﯿﺪ ﻗﻮی ﻫﺴﺘﻨﺪ ﺍﺳﺘﻔﺎﺩﻩ ﻧﮑﻨﯿﺪ. • ﭼﻨﺪ ﺩﺳﺘﮕﺎﻩ ﺭﺍ ﺑﻪ ﻃﻮﺭ ﻫﻤﺰﻣﺎﻥ ﺑﻪ ﻳﮏ ﭘﺮﻳﺰ ﻧﺰﻧﻴﺪ. −ﳑﮑﻦ ﺍﺳﺖ ﺩﺭ ﻧﺘﻴﺠﻪ ﮔﺮﻣﺎی ﻏﻴﺮﻋﺎﺩی ﻣﻨﺠﺮ ﺑﻪ ﺁﺗﺸﺴﻮﺯی ﺷﻮﺩ. • ﺩﮐﻤﻪ ﺭﺍ ﺑﺎ ﺍﺳﺘﻔﺎﺩﻩ ﺍﺯ ﻳﮏ ﻣﻴﺦ ﻭﻳﺎ ﺳﻮﺯﻥ ﻓﺸﺎﺭ ﻧﺪﻫﻴﺪ. −ﳑﮑﻦ ﺍﺳﺖ ﻣﻨﺠﺮ ﺑﻪ ﺑﺮﻕ ﮔﺮﻓﺘﮕﯽ ﻭﻳﺎ ﺁﺗﺸﺴﻮﺯی ﺷﻮﺩ. • ﺍﮔﺮ ﺩﺭ ﺳﻴﻤﯽ ﮐﻪ ﺩﺭ ﺣﺎﻝ ﺣﺎﺿﺮ ﺍﺳﺘﻔﺎﺩﻩ ﻣﯽ ﺷﻮﺩ ﺁﺳﻴﺒﯽ ﻣﺸﺎﻫﺪﻩ ﮐﺮﺩﻳﺪ ،ﺑﺎﻳﺴﺘﯽ ﺗﻮﺳﻂ ﺳﺎﺯﻧﺪﻩ ،ﻣﺮﮐﺰ ﺗﻌﻤﻴﺮﺍﺕ ﻭﻳﺎ ﺷﺨﺺ ﻣﺠﺎﺯ ﺗﻌﻮﻳﺾ ﺷﺪﻩ ﺗﺎ ﺍﺯ ﻫﺮﮔﻮﻧﻪ ﺧﻄﺮی ﺟﻠﻮﮔﻴﺮی ﺷﻮﺩ. • ﺳﻴﻢ ﺯﻣﯿﻨﯽ ﺭﺍ ﺑﻪ ﺻﻔﺤﻪ ﻓﻠﺰی ﻣﺘﺼﻞ ﮐﺮﺩﻩ ﻭ ﺁﻧﺮﺍ ﺣﺪﺍﻗﻞ ٢۵ﺳﺎﻧﺘﯽ ﻣﺘﺮ ﺩﺭ ﺯﻳﺮ ﺯﻣﲔ ﺩﻓﻦ ﮐﻨﻴﺪ ،ﺳﻴﻢ ﺯﻣﯿﻨﯽ ﺭﺍ ﺑﻪ ﺧﺎﺭ ﻣﻨﺎﺳﺐ ﺩﺭ ﻳﮏ ﭘﺮﻳﺰ ﺑﺮﻕ ﮐﻪ ﺑﻪ ﻃﻮﺭ ﻣﻨﺎﺳﺐ ﺯﻣﯿﻨﯽ ﺷﺪﻩ ﻭﺻﻞ ﮐﻨﻴﺪ. ﻫﺮﮔﺰ ﺳﻴﻢ ﺭﺍ ﺑﻪ ﻳﮏ ﺧﻂ ﺗﻠﻔﻦ ،ﻣﻴﻠﻪ ﺑﺮﻗﮕﻴﺮ ﻭﻳﺎ ﻟﻮﻟﻪ ﮔﺎﺯ ﻭﺻﻞ ﻧﮑﻨﻴﺪ. • ﻣﺤﺼﻮﻟﯽ ﮐﻪ ﺧﺮﯾﺪﺍﺭی ﮐﺮﺩﯾﺪ ﻓﻘﻂ ﺑﺮﺍی ﺍﺳﺘﻔﺎﺩﻩ ﺧﺎﻧﮕﯽ ﻃﺮﺍﺣﯽ ﺷﺪﻩ ﺍﺳﺖ. ﺍﺳﺘﻔﺎﺩﻩ ﺍﺯ ﺁﻥ ﺑﻪ ﻣﻨﻈﻮﺭ ﲡﺎﺭی ﺳﻮﺀ ﺍﺳﺘﻔﺎﺩﻩ ﺍﺯ ﻣﺤﺼﻮﻝ ﺗﻠﻘﯽ ﻣﯽ ﺷﻮﺩ .ﺩﺭ ﺍﯾﻦ ﺻﻮﺭﺕ ﻣﺤﺼﻮﻝ ﲢﺖ ﭘﻮﺷﺶ ﮔﺎﺭﺍﻧﺘﯽ ﺍﺳﺘﺎﻧﺪﺍﺭﺩی ﮐﻪ ﺗﻮﺳﻂ Samsungﺍﺭﺍﺋﻪ ﺷﺪﻩ ﳕﯽ ﺑﺎﺷﺪ ﻭ ﺑﺮﺍی ﺩﺭﺳﺖ ﮐﺎﺭ ﻧﮑﺮﺩﻥ ﯾﺎ ﺁﺳﯿﺐ ﻫﺎﺋﯽ ﮐﻪ ﺩﺭ ﻧﺘﯿﺠﻪ ﭼﻨﯿﻦ ﺳﻮﺀ ﺍﺳﺘﻔﺎﺩﻩ ﺑﺎﺷﺪ ﻣﺴﺌﻮﻟﯿﺘﯽ ﺑﻪ Samsungﻧﺴﺒﺖ ﺩﺍﺩﻩ ﳕﯽ ﺷﻮﺩ. ﻓﺎﺭﺳﯽ ۵ - 12:42:29 2014-03-17 WA70H4200SW_03414H_FA_140317.indd Sec2:5 ﺭﺍﻩ ﺍﻧﺪﺍﺯی ﻣﺎﺷﲔ ﻟﺒﺎﺳﺸﻮﻳﯽ ﺷﺮﺡ ﻗﻄﻌﺎﺕ ﺩﻓﺘﺮﭼﻪ ﺭﺍﻫﻨﻤﺎی ﺍﺳﺘﻔﺎﺩﻩ ﮐﻨﻨﺪﻩ ﺑﺮﺍی ﺍﺳﺘﻔﺎﺩﻩ ﻋﻤﻮﻣﯽ ﺍﺳﺖ. ﺍﺯ ﺩﻓﺘﺮﭼﻪ ﺭﺍﻫﻨﻤﺎی ﺍﺳﺘﻔﺎﺩﻩ ﮐﻨﻨﺪﻩ ﺑﺴﺘﮕﯽ ﺑﻪ ﻣﺪﻝ ﻣﺎﺷﲔ ﻟﺒﺎﺳﺸﻮﻳﯽ ﺧﻮﺩ ﺍﺳﺘﻔﺎﺩﻩ ﮐﻨﻴﺪ. ﺩﺭﻳﭽﻪ ﻣﻄﻤﺌﻦ ﺷﻮﻳﺪ ﮐﻪ ﺩﺭﻳﭽﻪ ﺭﺍ ﺩﺭ ﺣﲔ ﺷﺴﺘﺸﻮ ﻭ ﭼﺮﺧﻴﺪﻥ ﺑﺴﺘﻪ ﻧﮕﻪ ﺩﺍﺭﻳﺪ. ﺷﯿﻠﻨﮓ ﺗﻐﺬﯾﻪ ﺁﺏ )ﺳﺮﺩ( ﺷﯿﻠﻨﮓ ﺗﻐﺬﯾﻪ ﺁﺏ )ﺩﺍﻍ( ﺟﻌﺒﻪ ﺷﻮﯾﻨﺪﻩ ﻓﻴﻠﺘﺮ ﭘﺮﺯ ﺩﺭ ﺣﲔ ﺷﺴﺘﺸﻮ ﺩﺭ ﻓﻴﻠﺘﺮ ﺟﻤﻊ ﺧﻮﺍﻫﺪ ﺷﺪ. ﺳﺒﺪ ﭼﺮﺧﺶ ﭘﻨﻞ ﮐﻨﺘﺮﻝ ﻣﻘﺎﺑﻞ ﺳﻴﻢ ﺑﺮﻕ ﺳﻴﻢ ﺯﻣﯿﻨﯽ ﻫﻨﮕﺎﻣﯿﮑﻪ ﻟﻮﻟﻪ ﺁﺏ ﺍﺯ ﻧﻮﻉ ﻓﻠﺰی ﺍﺳﺖ ،ﻣﻄﻤﺌﻦ ﺷﻮﯾﺪ ﮐﻪ ﺍﻧﺘﻬﺎی ﺳﯿﻢ ﺯﻣﯿﻨﯽ ﺭﺍ ﺑﭙﻮﺷﺎﻧﯿﺪ. ﺷﯿﻠﻨﮓ ﺗﺨﻠﻴﻪ ﺁﺏ ﭘﺎﯾﻪ ﻫﺎی ﻗﺎﺑﻞ ﺗﻨﻈﯿﻢ ﭘﺎﯾﻪ ﻫﺎ ﺭﺍ ﺩﺭ ﻫﻨﮕﺎﻡ ﻧﺼﺐ ﻣﺎﺷﯿﻦ ﻟﺒﺎﺳﺸﻮﯾﯽ ﺗﻨﻈﯿﻢ ﮐﻨﯿﺪ. ﻓﺎﺭﺳﯽ ۶ - 12:42:29 2014-03-17 WA70H4200SW_03414H_FA_140317.indd Sec3:6 ﮐﻨﺘﺮﻝ ﻗﺒﻞ ﺍﺯ ﺷﺴﺘﺸﻮ ﻭ ﻣﺮﺍﻗﺒﺖ ﺍﺯ ﻟﺒﺎﺱ ﻫﺎ ﺭﺍﻩ ﺍﻧﺪﺍﺯی ﻣﺎﺷﲔ ﻟﺒﺎﺳﺸﻮﻳﯽ ﺑﺎﻳﺴﺘﯽ ﺍﺯ ﻧﮑﺎﺕ ﺑﺎﺯﺑﻴﻨﯽ ﺑﺮﺍی ﺍﺟﺘﻨﺎﺏ ﺍﺯ ﻣﺸﮑﻼﺕ ﻣﺎﺷﲔ ﻭﻳﺎ ﺻﺪﻣﻪ ﺑﻪ ﻟﺒﺎﺱ ﻫﺎ ﭘﻴﺮﻭی ﻛﺮﺩ. • ﺍﮔﺮ ﻣﺸﺘﺮی ﻣﺸﮑﻼﺕ ﺯﻳﺮ ﺭﺍ ﺍﻳﺠﺎﺩ ﻛﺮﺩﻩ ﺑﺎﺷﺪ ،ﻳﮏ ﻫﺰﻳﻨﻪ ﺗﻌﻤﻴﺮ ﺟﺪﺍﮔﺎﻧﻪ ﻣﻄﺎﻟﺒﻪ ﺧﻮﺍﻫﺪ ﺷﺪ. ﻧﮑﺎﺕ ﺑﺎﺯﺑﻴﻨﯽ ﻗﺒﻞ ﺍﺯ ﺷﺮﻭﻉ ﺷﺴﺘﺸﻮ ﮐﻨﺘﺮﻝ ﮐﻨﻴﺪ ﮐﻪ ﻟﺒﺎﺱ ﻫﺎ ﺭﻧﮕﺒﺮی ﻣﯽ ﺷﻮﻧﺪ ﻳﺎ ﺧﻴﺮ. • ﻣﺎﻳﻊ ﻟﺒﺎﺳﺸﻮﻳﯽ ﺭﺍ ﺑﻪ ﻳﮏ ﺣﻮﻟﻪ ﺳﻔﻴﺪ ﻭ ﻟﺒﺎﺳﯽ ﮐﻪ ﳕﯽ ﺗﻮﺍﻧﻴﺪ ﺑﻪ ﺧﻮﺑﯽ ﻣﺘﻮﺟﻪ ﺷﻮﻳﺪ ﺍﺿﺎﻓﻪ ﮐﻨﻴﺪ .ﺳﭙﺲ ﺑﻪ ﻃﻮﺭ ﻣﺤﮑﻢ ﺑﻪ ﻫﻢ ﲟﺎﻟﻴﺪ .ﮐﻨﺘﺮﻝ ﮐﻨﻴﺪ ﮐﻪ ﺁﻳﺎ ﺭﻧﮓ ﺑﻪ ﺣﻮﻟﻪ ﻣﻨﺘﻘﻞ ﺷﺪﻩ ﺍﺳﺖ. • ﻣﺮﺍﻗﺐ ﺑﺎﺷﻴﺪ ﭼﻮﻥ ﺭﻭﺳﺮی ﻭ ﻟﺒﺎﺱ ﻫﺎی ﻭﺍﺭﺩﺍﺗﯽ ﺑﻪ ﺁﺳﺎﻧﯽ ﺭﻧﮓ ﭘﺲ ﻣﯽ ﺩﻫﻨﺪ. • ﻣﺮﺍﻗﺐ ﻟﮑﻪ ﻭﻳﺎ ﮐﺜﯿﻔﯽ ﺟﺰﻳﯽ ﺑﺎﺷﻴﺪ. • ﺍﮔﺮ ﻟﮑﻪ ﻫﺎﻳﯽ ﭘﻴﺪﺍ ﮐﺮﺩﻳﺪ ،ﺍﺯ ﺣﻮﻟﻪ ﺍی ﮐﻪ ﺑﺎ ﺷﻮﯾﻨﺪﻩ ﺧﻴﺲ ﺷﺪﻩ ﺍﺳﺘﻔﺎﺩﻩ ﮐﺮﺩﻩ ﻭ ﺩﺭ ﻳﮏ ﺟﻬﺖ ﲟﺎﻟﻴﺪ. • ﻗﺒﻞ ﺍﺯ ﺷﺴﺘﺸﻮ ،ﺑﺎ ﺑﺮﺱ ﺑﻪ ﺁﺳﺘﲔ ﻫﺎ ،ﻳﻘﻪ ،ﻟﺒﻪ ﻟﺒﺎﺱ ﻭ ﺟﻴﺐ ﻫﺎ ﻣﺎﺩﻩ ﻟﺒﺎﺳﺸﻮﻳﯽ ﲟﺎﻟﻴﺪ. ﻟﺒﺎﺱ ﻫﺎﻳﯽ ﻛﻪ ﺑﻪ ﺻﻮﺭﺕ ﭼﺮﻭﻛﻴﺪﻩ ﺗﻮﻟﯿﺪ ﺷﺪﻩ ﻭ ﺍﺯ ﭘﺸﻢ ﺳﺎﺧﺘﻪ ﺷﺪﻩ ﺍﻧﺪ ﺭﺍ ﻗﺒﻞ ﺍﺯ ﺷﺴﺘﺸﻮ ﺑﺎ ﻧﺦ ﻣﯽ ﺑﻨﺪﻧﺪ .ﭘﺲ ﺍﺯ ﺍﻳﻨﻜﻪ ﻟﺒﺎﺱ ﻫﺎ ﺧﺸﻚ ﺷﺪ ،ﻧﺦ ﻫﺎ ﺭﺍ ﺑﻴﺮﻭﻥ ﻣﯽ ﺁﻭﺭﻧﺪ. ﻟﺒﺎﺱ ﻫﺎﻳﯽ ﻛﻪ ﻗﺎﺑﻞ ﺷﺴﺘﺸﻮ ﻧﻴﺴﺘﻨﺪ ﻟﺒﺎﺱ ﻫﺎﻳﯽ ﻛﻪ ﺑﻪ ﺁﺳﺎﻧﯽ ﺧﺮﺍﺏ ﻣﯽ ﺷﻮﻧﺪ ﺣﺘﯽ ﺍﮔﺮ ﺩﺭ ﺁﺏ ﺧﻴﺲ ﺑﺨﻮﺭﻧﺪ. • ﻛﺮﺍﻭﺍﺕ ،ﺳﻴﻨﻪ ﺑﻨﺪ ،ﻛﺖ ،ﻛﺖ ﻭ ﺷﻠﻮﺍﺭ ﳑﻜﻦ ﺍﺳﺖ ﺑﻪ ﺁﺳﺎﻧﯽ ﺧﺮﺍﺏ ﺷﻮﻧﺪ ﺣﺘﯽ ﺍﮔﺮ ﺩﺭ ﺁﺏ ﺧﻴﺲ ﺑﺨﻮﺭﻧﺪ ،ﺑﺮﺍی ﻣﺜﺎﻝ ﻛﻮﭼﻚ ﻣﯽ ﺷﻮﻧﺪ ﻭﻳﺎ ﺩﺭ ﺳﻄﺢ ﻟﺒﺎﺱ ﺭﻧﮓ ﭘﺲ ﻣﯽ ﺩﻫﻨﺪ ﭼﻮﻥ ﺑﻴﺸﺘﺮ ﺍﺯ ﺍﻟﯿﺎﻑ ﺭﺍﻳﻮﻥ ،ﭘﻮﻟﯽ ﻧﺎﺳﻴﻚ ،ﻛﺎﻑ ﻭ ﭘﺎﺭﭼﻪ ﻫﺎی ﺗﺮﻛﻴﺒﯽ ﺁﻧﻬﺎ ﺗﻮﻟﻴﺪ ﺷﺪﻩ ﺍﻧﺪ. • ﻣﺤﺼﻮﻻﺗﯽ ﻛﻪ ﺑﻪ ﺻﻮﺭﺕ ﭼﺮﻭﻛﻴﺪﻩ ﺗﻮﻟﯿﺪ ﺷﺪﻩ ﺍﻧﺪ ﻭﻳﺎ ﺑﺎ ﺭﺯﻳﻦ ﺗﻮﻟﯿﺪ ﺷﺪﻩ ﺍﻧﺪ ﺣﺘﯽ ﺑﺎ ﺧﻴﺲ ﺧﻮﺭﺩﻥ ﺩﺭ ﺁﺏ ﺧﺮﺍﺏ ﻣﯽ ﺷﻮﻧﺪ. • ﻣﺤﺼﻮﻻﺗﯽ ﻛﻪ ﺍﺯ ﺍﻟﻴﺎﻑ ﻧﺨﯽ ﻭ ﭘﺸﻤﯽ ﺗﻮﻟﻴﺪ ﺷﺪﻩ ﺍﻧﺪ ،ﺍﺑﺮﻳﺸﻢ ﭼﺮﻭﻛﻴﺪﻩ ،ﻣﺤﺼﻮﻻﺕ ﭼﺮﻣﯽ ،ﻟﻮﺍﺯﻡ ﭼﺮﻣﯽ ،ﻟﺒﺎﺱ ﻫﺎی ﺗﺰﻳﻴﻨﯽ ﭼﺮﻣﯽ ﻭ ﻣﻠﺤﻘﺎﺕ ﺁﻥ ﻛﻪ ﺑﻪ ﺭﺍﺣﺘﯽ ﺭﻧﮓ ﭘﺲ ﻣﯽ ﺩﻫﻨﺪ. • ﺍﻳﻦ ﻟﺒﺎﺱ ﻫﺎ ﺭﺍ ﺑﺪﻭﻥ ﺭﻋﺎﻳﺖ ﺭﻫﻨﻤﻮﺩﻫﺎ ﻭﻳﺎ ﺑﺮﭼﺴﺐ ﻧﺸﺎﻧﮕﺮ ﻣﻮﺍﺩ ﻧﺸﻮﻳﻴﺪ. ﺩﺭ ﻣﻮﺭﺩ ﻣﺎﺩﻩ ﺷﻮﯾﻨﺪﻩ • ﺯﻣﺎﻧﻴﻜﻪ ﺷﻮﯾﻨﺪﻩ ﻫﺎ ﺑﻪ ﺧﻮﺑﯽ ﺣﻞ ﳕﯽ ﺷﻮﻧﺪ ،ﺑﺮﺍی ﺣﻞ ﻛﺮﺩﻥ ﺷﻮﯾﻨﺪﻩ ﺍﺯ ﺁﺏ ﮔﺮﻡ )ﺩﺭﺣﺪﻭﺩ ۴٠ﺩﺭﺟﻪ ﺳﺎﻧﺘﯽ ﮔﺮﺍﺩ( ﺍﺳﺘﻔﺎﺩﻩ ﻛﻨﻴﺪ. • ﺍﺯ ﻣﻘﺪﺍﺭ ﻣﻨﺎﺳﺐ ﺍﺳﺘﻔﺎﺩﻩ ﻛﻨﻴﺪ. • ﺣﺘﯽ ﺍﮔﺮ ﺍﺯ ﻣﻘﺪﺍﺭ ﺯﯾﺎﺩی ﺷﻮﯾﻨﺪﻩ ﺍﺳﺘﻔﺎﺩﻩ ﺷﻮﺩ ،ﺗﻔﺎﻭﺕ ﺯﻳﺎﺩی ﺩﺭ ﻧﺘﻴﺠﻪ ﺷﺴﺘﺸﻮ ﺣﺎﺻﻞ ﳕﯽ ﺷﻮﺩ .ﳑﻜﻦ ﺍﺳﺖ ﻣﻨﺠﺮ ﺑﻪ ﺻﺪﻣﻪ ﺍﺣﺘﻴﺎﻁ ﻭﺍﺭﺩ ﺷﺪﻥ ﺑﻪ ﻟﺒﺎﺱ ﺷﻮﺩ ﭼﻮﻥ ﺁﺑﻜﺸﯽ ﻛﺎﻓﯽ ﻧﻴﺴﺖ. • ﻣﺎﺩﻩ ﺳﻔﻴﺪ ﻛﻨﻨﺪﻩ ﳑﻜﻦ ﺍﺳﺖ ﺑﻪ ﻟﺒﺎﺱ ﻫﺎ ﺻﺪﻣﻪ ﺑﺰﻧﺪ ﭼﻮﻥ ﻳﻚ ﻣﺎﺩﻩ ﻗﻠﻴﺎﻳﯽ ﻗﻮی ﺍﺳﺖ. • ﺑﻪ ﺍﻧﺪﺍﺯﻩ ﻛﺎﻓﯽ ﺁﺑﻜﺸﯽ ﻛﻨﻴﺪ ﭼﻮﻥ ﺷﻮﯾﻨﺪﻩ ﺑﻪ ﺁﺳﺎﻧﯽ ﺩﺭ ﻟﺒﺎﺱ ﻫﺎ ﺑﺎﻗﯽ ﻣﯽ ﻣﺎﻧﺪ ﻭ ﻣﻮﺟﺐ ﺑﻮی ﺑﺪ ﻣﯽ ﺷﻮﺩ. • ﺍﮔﺮ ﺯﻳﺎﺩی ﺍﺯ ﺷﻮﯾﻨﺪﻩ ﺍﺳﺘﻔﺎﺩﻩ ﺷﻮﺩ ﻭﻳﺎ ﺍﺯ ﺁﺏ ﺳﺮﺩ ﺍﺳﺘﻔﺎﺩﻩ ﺷﻮﺩ ،ﺑﻪ ﻃﻮﺭ ﻛﺎﻣﻞ ﺣﻞ ﻧﺸﺪﻩ ﻭ ﺩﺭ ﻟﺒﺎﺱ ﻫﺎ ،ﺷﯿﻠﻨﮓ ﻭﻳﺎ ﺳﺒﺪ ﭼﺮﺧﺶ ﺑﺎﻗﯽ ﻣﯽ ﻣﺎﻧﺪ ﻛﻪ ﻣﻮﺟﺐ ﺁﻟﻮﺩﮔﯽ ﻟﺒﺎﺱ ﻫﺎ ﻣﯽ ﺷﻮﺩ. • ﺩﺭ ﺻﻮﺭﺕ ﺍﳒﺎﻡ ﺷﺴﺘﺸﻮی ﺭﺯﺭﻭ ﺷﺪﻩ ،ﺷﻮﯾﻨﺪﻩ ﺭﺍ ﺑﺎﻳﺴﺘﯽ ﺩﺭ ﺟﻌﺒﻪ ﺷﻮﯾﻨﺪﻩ ﺭﯾﺨﺖ .ﺍﮔﺮ ﺷﻮﯾﻨﺪﻩ ﺑﻪ ﻃﻮﺭ ﻣﺴﺘﻘﻴﻢ ﺑﺮ ﺭﻭی ﻟﺒﺎﺱ ﻫﺎ ﭘﺎﺷﻴﺪﻩ ﺷﻮﺩ ،ﳑﻜﻦ ﺍﺳﺖ ﻣﻮﺟﺐ ﺭﻧﮓ ﺭﻓﺘﮕﯽ ﺷﻮﺩ. ﻓﺎﺭﺳﯽ ٧ - 12:42:29 2014-03-17 WA70H4200SW_03414H_FA_140317.indd Sec3:7 ﺭﺍﻩ ﺍﻧﺪﺍﺯی ﻣﺎﺷﲔ ﻟﺒﺎﺳﺸﻮﻳﯽ ﻣﺮﺍﻗﺒﺖ ﺍﺯ ﻟﺒﺎﺱ ﻫﺎ ﻗﺒﻞ ﺍﺯ ﺷﺴﺘﺸﻮ ﺍﻣﻮﺍﻝ ﺷﺨﺼﯽ ﺭﺍ ﺍﺯ ﺟﻴﺐ ﻫﺎ ﺧﺎﺭﺝ ﮐﻨﻴﺪ. • ﺍﺣﺘﻴﺎﻁ ،ﺟﻴﺐ ﻫﺎ ﺭﺍ ﻭﺍﺭﺳﯽ ﮐﻨﻴﺪ! ﮔﻴﺮﻩ ﺳﺮ ﻭ ﺳﮑﻪ ﺑﻪ ﻟﺒﺎﺱ ﻫﺎ ﻭ ﻣﺎﺷﲔ ﻟﺒﺎﺳﺸﻮﻳﯽ ﺻﺪﻣﻪ ﻣﯽ ﺯﻧﻨﺪ .ﺍﯾﻦ ﺍﻗﻼﻡ ﺳﺮﻭﺻﺪﺍ ﺭﺍﻩ ﺍﻧﺪﺍﺧﺘﻪ ﻭ ﺑﺮﺍی ﻣﺎﺷﲔ ﻣﺸﮑﻼﺗﯽ ﺑﻪ ﻭﺟﻮﺩ ﻣﯽ ﺁﻭﺭﻧﺪ .ﺑﺎﻳﺴﺘﯽ ﺟﻴﺐ ﺭﺍ ﻭﺍﺭﺳﯽ ﮐﺮﺩ. ﺍﮔﺮ ﺯﻳﭗ ﺷﻠﻮﺍﺭ ﺩﺭ ﺣﲔ ﺷﺴﺘﺸﻮ ﺑﺎﺯ ﻣﯽ ﺑﺎﺷﺪ ،ﳑﮑﻦ ﺍﺳﺖ ﺑﻪ ﺳﺒﺪ ﭼﺮﺧﺶ ﺁﺳﻴﺐ ﻭﺍﺭﺩ ﺷﻮﺩ. ﺯﻳﭗ ﺑﺎﻳﺴﺘﯽ ﺑﺴﺘﻪ ﺷﺪﻩ ﻭ ﻗﺒﻞ ﺍﺯ ﺷﺴﺘﺸﻮ ﺑﺎ ﻳﮏ ﺭﻳﺴﻤﺎﻥ ﻣﺤﮑﻢ ﺷﻮﺩ. • ﻓﻠﺰﺍﺕ ﺭﻭی ﻟﺒﺎﺱ ﳑﮑﻦ ﺍﺳﺖ ﺑﻪ ﻟﺒﺎﺱ ﻫﺎ ﻭ ﺗﺸﺖ ﺁﺳﻴﺐ ﻭﺍﺭﺩ ﮐﻨﻨﺪ. • ﻟﺒﺎﺱ ﻫﺎﻳﯽ ﮐﻪ ﺩﮐﻤﻪ ﺩﺍﺭﻧﺪ ﻭ ﻟﺒﺎﺱ ﻫﺎی ﮔﻠﺪﻭﺯی ﺷﺪﻩ ﺭﺍ ﻗﺒﻞ ﺍﺯ ﺷﺴﺘﺸﻮ ﻭﺍﺭﻭﻧﻪ ﮐﻨﻴﺪ. • ﻟﺒﺎﺱ ﻫﺎﻳﯽ ﮐﻪ ﺁﺳﺘﲔ ﺩﺭﺍﺯ ﺩﺍﺭﻧﺪ ﳑﮑﻦ ﺍﺳﺖ ﺑﻪ ﻟﺒﺎﺱ ﻫﺎی ﺩﻳﮕﺮ ﭘﻴﺞ ﺧﻮﺭﺩﻩ ﻭ ﻣﻮﺟﺐ ﺁﺳﻴﺐ ﺑﻪ ﻟﺒﺎﺱ ﻫﺎ ﺷﻮﻧﺪ .ﻣﻄﻤﺌﻦ ﺷﻮﻳﺪ ﮐﻪ ﺭﻳﺴﻤﺎﻥ ﻫﺎ ﺭﺍ ﻗﺒﻞ ﺍﺯ ﺷﺴﺘﺸﻮ ﺑﺒﻨﺪﻳﺪ. ﻟﺒﺎﺱ ﻫﺎی ﺿﺪﺁﺏ )ﻟﺒﺎﺱ ﺍﺳﮑﯽ ،ﺭﻭﯾﻪ ﭘﻮﺷﮏ ،ﺗﻮﮐﻔﺸﯽ( ﺭﺍ ﳕﯽ ﺗﻮﺍﻥ ﺷﺴﺖ. • ﭼﻨﲔ ﮐﺎﺭی ﳑﮑﻦ ﺍﺳﺖ ﻣﻮﺟﺐ ﭘﺮﺗﺎپ ﺷﺪﻥ ﻟﺒﺎﺱ ﻫﺎ ﺑﻪ ﺧﺎﺭﺝ ﺷﺪﻩ ﻭﻳﺎ ﻣﻮﺟﺐ ﻟﺮﺯﺵ ﻏﻴﺮﻋﺎﺩی ﻣﺎﺷﲔ ﻟﺒﺎﺳﺸﻮﻳﯽ ﺷﻮﺩ ﮐﻪ ﳑﮑﻦ ﺍﺳﺖ ﻣﻮﺟﺐ ﺁﺳﻴﺐ ﺷﺨﺼﯽ ﻭﻳﺎ ﺻﺪﻣﻪ ﺑﻪ ﻣﺎﺷﲔ ﻟﺒﺎﺳﺸﻮﻳﯽ ،ﺯﻣﲔ ﻭﻳﺎ ﻟﺒﺎﺱ ﻫﺎ ﺷﻮﺩ) .ﭘﻮﺷﮏ ،ﻟﺒﺎﺱ ﺿﺪﺁﺏ ،ﺑﺎﺭﺍﻧﯽ ،ﭘﻮﺷﺶ ﭼﺘﺮ ،ﻟﺒﺎﺱ ﺍﺳﮑﯽ ،ﭘﻮﺷﺶ ﺍﺗﻮﻣﺒﻴﻞ ﻭ ﮐﻴﺴﻪ ﻫﺎی ﺧﻮﺍﺏ ﻭ ﻏﻴﺮﻩ(. • ﻫﻨﮕﺎﻣﻴﮑﻪ ﺗﺸﺖ ﭼﺮﺧﺶ ﻣﯽ ﮐﻨﺪ ،ﺁﺏ ﳑﮑﻦ ﺍﺳﺖ ﺩﺭ ﻟﺒﺎﺱ ﻭﻳﺎ ﭘﺎﺭﭼﻪ ﺿﺪﺁﺏ ﺣﺒﺲ ﺷﺪﻩ ﻭ ﺩﺭ ﻳﮏ ﮔﻮﺷﻪ ﺟﻤﻊ ﺷﻮﺩ ﮐﻪ ﻣﻮﺟﺐ ﻟﺮﺯﺵ ﻫﺎی ﻏﻴﺮﻋﺎﺩی ﻣﯽ ﺷﻮﺩ .ﻋﻼﻭﻩ ﺑﺮ ﺍﻳﻦ ،ﻟﺒﺎﺱ ﻫﺎ ﺑﺎﻻ ﺁﻣﺪﻩ ﻭ ﳑﮑﻦ ﺍﺳﺖ ﺑﻪ ﺑﻴﺮﻭﻥ ﭘﺮﺗﺎﺏ ﺷﺪﻩ ﻭ ﻣﻮﺟﺐ ﺁﺳﻴﺐ ﺷﺨﺼﯽ ﺷﻮﺩ. ﮐﺜﺎﻓﺎﺕ ﻭ ﺧﺎک ﺭﺍ ﺍﺯ ﻟﺒﺎﺱ ﻫﺎ ﺑﺘﮑﺎﻧﻴﺪ. • ﺧﺎک ﻭ ﺭﻳﮓ ﳑﮑﻦ ﺍﺳﺖ ﺑﻪ ﻟﺒﺎﺱ ﻫﺎی ﻇﺮﻳﻒ ﻣﺎﻟﻴﺪﻩ ﺷﺪﻩ ﮐﻪ ﻣﻮﺟﺐ ﺻﺪﻣﻪ ﻣﯽ ﺷﻮﺩ ﻭ ﻧﺘﻴﺠﻪ ﺷﺴﺘﺸﻮ ﳑﮑﻦ ﺍﺳﺖ ﺭﺿﺎﻳﺘﺒﺨﺶ ﻧﺒﺎﺷﺪ. ﻗﺒﻞ ﺍﺯ ﺷﺴﺘﺸﻮی ﺍﺻﻠﯽ ،ﺟﻮﺭﺍﺏ ﻫﺎ ،ﺁﺳﺘﲔ ﻫﺎ ﻭ ﻳﻘﻪ ﻫﺎ ﺭﺍ ﭘﻴﺶ ﺷﺴﺘﺸﻮ ﮐﻨﻴﺪ. • ﺑﺮﺍی ﻟﮑﻪ ﻭ ﮐﺜﺎﻓﺎﺕ ﺑﺮ ﺭﻭی ﻳﻘﻪ ،ﺁﺳﺘﲔ ،ﺳﺠﺎﻑ ﻭ ﺟﻴﺐ ﻫﺎ ،ﻗﺪﺭی ﻣﺎﺩﻩ ﻟﺒﺎﺳﺸﻮﻳﯽ ﺑﻪ ﺁﻧﻬﺎ ﻣﺎﻟﻴﺪﻩ ﻭ ﻗﺒﻞ ﺍﺯ ﺷﺴﺘﺸﻮ ﺑﺎ ﺍﺳﺘﻔﺎﺩﻩ ﺍﺯ ﻳﮏ ﺑﺮﺱ ﺑﻪ ﺁﻧﻬﺎ ﺑﮑﺸﻴﺪ. • ﺍﺯ ﭘﻮﺩﺭ ﻭﻳﺎ ﻣﺎﻳﻊ ﺷﻮﯾﻨﺪﻩ ﺍﺳﺘﻔﺎﺩﻩ ﮐﻨﻴﺪ .ﺍﺯ ﺻﺎﺑﻮﻥ ﺍﺳﺘﻔﺎﺩﻩ ﻧﮑﻨﻴﺪ ﭼﻮﻥ ﳑﮑﻦ ﺍﺳﺖ ﺗﺸﺖ ﺍﺯ ﮐﺜﺎﻓﺘﯽ ﮐﻪ ﺑﺮ ﺭﻭی ﺁﻥ ﺍﺳﺖ ﮐﺜﻴﻒ ﺷﻮﺩ. ﻟﺒﺎﺱ ﻫﺎی ﮐﺮﮐﺪﺍﺭ ﺭﺍ ﻗﺒﻞ ﺍﺯ ﺷﺴﺘﺸﻮ ﻭﺍﺭﻭﻧﻪ ﮐﻨﻴﺪ. • ﺍﮔﺮ ﻟﺒﺎﺱ ﻫﺎ ﻣﻮﺍﺩ ﺧﺎﺭﺟﯽ ﺯﻳﺎﺩی ﺩﺍﺭﻧﺪ ،ﺁﻧﻬﺎ ﺭﺍ ﻗﺒﻞ ﺍﺯ ﺷﺴﺘﺸﻮ ﺟﺪﺍ ﮐﻨﻴﺪ .ﻣﻮﺍﺩ ﮐﺜﻴﻒ ﳑﮑﻦ ﺍﺳﺖ ﺑﻪ ﻟﺒﺎﺱ ﻫﺎی ﺩﻳﮕﺮ ﺑﭽﺴﺒﻨﺪ )ﮐﺜﺎﻓﺎﺕ ،ﺭﻳﺴﻤﺎﻥ(. • ﻟﺒﺎﺱ ﻫﺎی ﻣﺸﮑﯽ ﻭ ﺣﻮﻟﻪ ﻫﺎی ﭘﻨﺒﻪ ﺍی ﺭﺍ ﺟﺪﺍﮔﺎﻧﻪ ﺑﺸﻮﻳﻴﺪ .ﺍﮔﺮ ﺑﺎ ﻫﻢ ﺷﺴﺘﻪ ﺷﻮﻧﺪ ،ﻣﻮﺍﺩ ﮐﺜﻴﻒ ﳑﮑﻦ ﺍﺳﺖ ﺑﻪ ﺣﻮﻟﻪ ﻫﺎ ﺑﭽﺴﺒﻨﺪ .ﻗﺒﻞ ﺍﺯ ﺷﺴﺘﺸﻮ ﮐﻨﺘﺮﻝ ﮐﻨﻴﺪ. ﮐﺸﻤﻴﻠﻮﻥ ﻭ ﻟﺒﺎﺱ ﻫﺎﻳﯽ ﮐﻪ ﺣﺠﻢ ﺯﻳﺎﺩ ﺩﺍﺭﻧﺪ ﻭ ﺳﺒﮏ ﻭﺯﻥ ﻫﺴﺘﻨﺪ )ﺑﺮﺍی ﻣﺜﺎﻝ ﻟﺒﺎﺱ ﻫﺎی ﺗﻮﺭی، ﺯﻳﺮﭘﻴﺮﺍﻫﻨﯽ ﺯﻧﺎﻧﻪ ،ﺟﻮﺭﺍﺏ ﻧﺎﻳﻠﻮﻥ ،ﭘﺎﺭﭼﻪ ﻫﺎی ﻣﺼﻨﻮﻋﯽ ﻭ ﻏﻴﺮﻩ( ﳑﮑﻦ ﺍﺳﺖ ﺑﺎﻻ ﺁﻣﺪﻩ ﻭ ﻣﻮﺟﺐ ﺻﺪﻣﻪ ﺑﻪ ﻟﺒﺎﺱ ﻫﺎ ﻭ ﻣﺸﮑﻼﺗﯽ ﺑﺮﺍی ﻣﺎﺷﲔ ﺷﻮﻧﺪ .ﺍﺯ ﺗﻮﺭ ﻟﺒﺎﺳﺸﻮﻳﻲ ﺍﺳﺘﻔﺎﺩﻩ ﮐﻨﻴﺪ ﻭﻳﺎ ﺁﻧﻬﺎ ﺭﺍ ﺟﺪﺍﮔﺎﻧﻪ ﺑﺸﻮﻳﻴﺪ. • ﺑﺎﻳﺴﺘﯽ ﻟﺒﺎﺱ ﻫﺎﻳﯽ ﮐﻪ ﺭﻳﺴﻤﺎﻥ ﻫﺎی ﺩﺭﺍﺯ ﺩﺍﺭﻧﺪ ،ﻟﺒﺎﺱ ﻫﺎی ﺗﻮﺭی ،ﺭﻭﺗﺨﺘﯽ ،ﻟﺒﺎﺱ ﻫﺎی ﭘﺸﻤﯽ ﺭﺍ ﻗﺒﻞ ﺍﺯ ﺷﺴﺘﺸﻮ ﺩﺭ ﺗﻮﺭ ﻟﺒﺎﺳﺸﻮﻳﯽ ﺑﮕﺬﺍﺭﻳﺪ. • ﻟﺒﺎﺱ ﻫﺎی ﻇﺮﻳﻒ ﺭﺍ ﺩﺭ ﺗﻮﺭ ﺷﺴﺘﺸﻮ ﻗﺮﺍﺭ ﺩﻫﻴﺪ. • ﻓﻘﻂ ﺍﺯ ﺗﻮﺭ ﻟﺒﺎﺳﺸﻮﻳﯽ ﲡﺎﺭﺗﯽ ﺑﺮﺍی ﺷﺴﺘﺸﻮ ﺍﺳﺘﻔﺎﺩﻩ ﮐﻨﻴﺪ. ﭘﺮﺩﻩ ،ﻟﺒﺎﺱ ﻫﺎی ﺷﻨﺎﻭﺭ ﻭ ﺷﻠﻮﺍﺭﻫﺎی ﻟﯽ ﺑﺎﻳﺴﺘﯽ ﻓﺸﺎﺭ ﺩﺍﺩﻩ ﺷﻮﻧﺪ ﺗﺎ ﺑﺮ ﺭﻭی ﺁﺏ ﺷﻨﺎﻭﺭ ﻧﺒﺎﺷﻨﺪ. • ﺍﮔﺮ ﺑﺮ ﺭﻭی ﺁﺏ ﺷﻨﺎﻭﺭ ﻫﺴﻨﺘﺪ ،ﺩﮐﻤﻪ ) Start/Pauseﺷﺮﻭﻉ/ﻣﻜﺚ( ﺭﺍ ﺑﺮﺍی ﻣﺘﻮﻗﻒ ﻛﺮﺩﻥ ﻓﺸﺎﺭ ﺩﺍﺩﻩ ﻭ ﺁﻧﻬﺎ ﺭﺍ ﻓﺸﺎﺭ ﺩﻫﻴﺪ ﺗﺎ ﺩﺭ ﺁﺏ ﺧﻴﺲ ﺑﺨﻮﺭﻧﺪ .ﺍﮔﺮ ﺷﺴﺘﺸﻮ ﺩﺭ ﺣﺎﻟﻴﮑﻪ ﻟﺒﺎﺱ ﻫﺎ ﺑﺮ ﺭﻭی ﺁﺏ ﺷﻨﺎﻭﺭ ﻫﺴﺘﻨﺪ ﺍﺩﺍﻣﻪ ﭘﻴﺪﺍ ﮐﻨﺪ ،ﳑﮑﻦ ﺍﺳﺖ ﺑﻪ ﻟﺒﺎﺱ ﻫﺎ ﻭ ﻣﺎﺷﲔ ﻟﺒﺎﺳﺸﻮﻳﯽ ﺻﺪﻣﻪ ﻭﺍﺭﺩ ﺷﺪﻩ ﻭ ﻧﺘﻴﺠﻪ ﺷﺴﺘﺸﻮ ﺭﺿﺎﻳﺘﺒﺨﺶ ﻧﺒﺎﺷﺪ. ﻓﺎﺭﺳﯽ ٨ - 12:42:29 2014-03-17 WA70H4200SW_03414H_FA_140317.indd Sec3:8 ﻧﺤﻮﻩ ﺷﺴﺘﺸﻮی ﺧﻮﺩﮐﺎﺭ ﺑﺴﺘﮕﯽ ﺑﻪ ﻟﺒﺎﺱ ﻫﺎ ﺩﺍﺭﺩ ﻗﺒﻞ ﺍﺯ ﺷﺮﻭﻉ ﺷﺴﺘﺸﻮ ،ﻣﻮﺍﺭﺩ ﺯﻳﺮ ﺭﺍ ﻛﻨﺘﺮﻝ ﻛﻨﻴﺪ؛ • ﻟﻮﻟﻪ ﺗﻐﺬﯾﻪ ﺁﺏ ﺭﺍ ﺑﻪ ﺷﻴﺮ ﺁﺏ ﻭﺻﻞ ﮐﻨﻴﺪ .ﻳﮏ ﺷﻴﺮ ﺭﺍ ﺑﺎﺯ ﺑﮕﺬﺍﺭﻳﺪ .ﺳﻴﻢ ﺑﺮﻕ ﺭﺍ ﺑﻪ ﭘﺮﻳﺰ ﺑﺰﻧﻴﺪ .ﻣﻄﻤﺌﻦ ﺷﻮﻳﺪ ﮐﻪ ﻟﻮﻟﻪ ﺗﺨﻠﻴﻪ ﺭﺍ ﺁﻭﻳﺰﺍﻥ ﮐﻨﻴﺪ. ﺷﺴﺘﺸﻮ ﺑﺮﺍی ﺑﺎﺭ ﺍﻭﻝ ﺭﺍﻩ ﺍﻧﺪﺍﺯی ﻣﺎﺷﲔ ﻟﺒﺎﺳﺸﻮﻳﯽ ﻗﺒﻞ ﺍﺯ ﺷﺴﱳ ﻟﺒﺎﺱ ﻫﺎ ﺑﺮﺍی ﺑﺎﺭ ﺍﻭﻝ ،ﺑﺎﻳﺴﺘﯽ ﻳﮏ ﺳﯿﮑﻞ ﮐﺎﻣﻞ ﺭﺍ ﺑﺪﻭﻥ ﻗﺮﺍﺭ ﺩﺍﺩﻥ ﻟﺒﺎﺱ ﺍﺟﺮﺍ ﮐﻨﻴﺪ. ﺑﺮﺍﻱ ﺍﳒﺎﻡ ﺍﻳﻨﮑﺎﺭ: .١ﺩﮐﻤﻪ ) Powerﻧﯿﺮﻭ( ﺭﺍ ﻓﺸﺎﺭ ﺩﻫﻴﺪ. .٢ﮐﺸﻮی ﺷﻮﯾﻨﺪﻩ ﺭﺍ ﺑﺎﺯ ﮐﺮﺩﻩ ﻭ ﮐﻤﯽ ﺷﻮﯾﻨﺪﻩ ﺑﺮﯾﺰﯾﺪ. .٣ﺗﻐﺬﯾﻪ ﺁﺏ ﺑﻪ ﻣﺎﺷﲔ ﻟﺒﺎﺳﺸﻮﻳﯽ ﺭﺍ ﺑﺎﺯ ﮐﻨﻴﺪ. .۴ﺩﮐﻤﻪ ) Start/Pauseﺷﺮﻭﻉ/ﺗﻮﻗﻒ( ﺭﺍ ﻓﺸﺎﺭ ﺩﻫﻴﺪ. ﺍﻳﻨﮑﺎﺭ ﻫﺮﮔﻮﻧﻪ ﺁﺏ ﺑﺎﻗﻴﻤﺎﻧﺪﻩ ﺍﺯ ﺍﺟﺮﺍی ﺁﺯﻣﺎﻳﺸﯽ ﺳﺎﺯﻧﺪﻩ ﺭﺍ ﺍﺯ ﻣﺎﺷﲔ ﺗﺨﻠﻴﻪ ﺧﻮﺍﻫﺪ ﮐﺮﺩ. ﺗﺬﮐﺮﺍﺕ ﻭﻳﮋﻩ! ﻋﻤﻠﮑﺮﺩ ﺣﺴﮕﺮ ﺧﻮﺩﮐﺎﺭ • ﺑﺴﺘﮕﯽ ﺑﻪ ﺑﺮﻧﺎﻣﻪ ﺍﻧﺘﺨﺎﺏ ﺷﺪﻩ ،ﻣﻘﺪﺍﺭ ﻟﺒﺎﺱ ﺑﻪ ﻃﻮﺭ ﺧﻮﺩﮐﺎﺭ ﺗﺸﺨﻴﺺ ﺩﺍﺩﻩ ﺷﺪﻩ ﻭ ﺳﭙﺲ ﻣﻘﺪﺍﺭ ﻣﻨﺎﺳﺐ ﺁﺏ ،ﺯﻣﺎﻥ ﺷﺴﺘﺸﻮ، ﺳﯿﮑﻞ ﺁﺑﮑﺸﯽ ﻭ ﺯﻣﺎﻥ ﭼﺮﺧﺶ ﺑﻪ ﻃﻮﺭ ﺧﻮﺩﮐﺎﺭ ﺑﺮﺍی ﺷﺴﺘﺸﻮی ﺧﻮﺩﮐﺎﺭ ﺍﻧﺘﺨﺎﺏ ﻣﯽ ﺷﻮﻧﺪ. • ﭘﺲ ﺍﺯ ﺭﻭﺷﻦ ﻛﺮﺩﻥ ﻣﺎﺷﲔ ،ﻳﻚ ﺑﺮﻧﺎﻣﻪ ﺍﻧﺘﺨﺎﺏ ﺷﺪﻩ ﻭ ﺩﻛﻤﻪ ) Start/Pauseﺷﺮﻭﻉ/ﺗﻮﻗﻒ( ﻓﺸﺮﺩﻩ ﻣﯽ ﺷﻮﺩ .ﺳﭙﺲ ﺗﺨﺘﻪ ﺷﺴﺘﺸﻮ ﺑﺪﻭﻥ ﺁﺏ ﺷﺮﻭﻉ ﺑﻪ ﭼﺮﺧﺶ ﻣﯽ ﮐﻨﺪ .ﺍﻳﻦ ﻋﻤﻠﮑﺮﺩ ﻣﻘﺪﺍﺭ ﻟﺒﺎﺱ ﺩﺭ ﺳﺒﺪ ﺷﺴﺘﺸﻮ ﺭﺍ ﻣﺸﺨﺺ ﻣﯽ ﮐﻨﺪ ﻭ ﻳﮏ ﺍﺷﻜﺎﻝ ﻣﺎﺷﲔ ﻧﻴﺴﺖ. ﭘﺲ ﺍﺯ ﺍﻳﻦ ﺭﻭﺍﻝ ﺗﺸﺨﻴﺺ ﻣﻘﺪﺍﺭ ﻟﺒﺎﺱ ،ﺁﺏ ﺑﻪ ﻃﻮﺭ ﺧﻮﺩﮐﺎﺭ ﺟﺮﻳﺎﻥ ﭘﻴﺪﺍ ﻣﯽ ﻛﻨﺪ. ﺍﺿﺎﻓﻪ ﮐﺮﺩﻥ ﺷﻮﯾﻨﺪﻩ ﻭ ﻣﺎﺩﻩ ﻧﺮﻡ ﮐﻨﻨﺪﻩ • ﻣﻘﺪﺍﺭ ﻟﺒﺎﺱ ﺭﺍ ﻣﺸﺨﺺ ﮐﺮﺩﻩ ﻭ ﻣﻴﺰﺍﻥ ﺁﺏ ﻭ ﻣﻘﺪﺍﺭ ﺷﻮﯾﻨﺪﻩ ﺭﺍ ﻧﺸﺎﻥ ﻣﯽ ﺩﻫﺪ .ﺳﭙﺲ ﻓﻮﺭﺍ ﹰ ﺗﻐﺬﯾﻪ ﺁﺏ ﺭﺍ ﺷﺮﻭﻉ ﻣﯽ ﮐﻨﺪ. • ﺩﺭ ﺣﲔ ﺗﻐﺬﯾﻪ ﺁﺏ ،ﻣﯽ ﺗﻮﺍﻥ ﺟﻌﺒﻪ ﺷﻮﯾﻨﺪﻩ ﺭﺍ ﺑﺎﺯ ﮐﺮﺩ ﻭ ﺷﻮﯾﻨﺪﻩ ﺭﺍ ﺍﺿﺎﻓﻪ ﮐﺮﺩ .ﺑﺎ ﺍﻳﻦ ﻭﺟﻮﺩ ،ﺑﻬﺘﺮ ﺍﺳﺖ ﺩﮐﻤﻪ ) Start/Pauseﺷﺮﻭﻉ/ﺗﻮﻗﻒ( ﺭﺍ ﺑﺮﺍی ﻣﺘﻮﻗﻒ ﮐﺮﺩﻥ ﺗﻐﺬﯾﻪ ﺁﺏ ﻓﺸﺎﺭ ﺩﺍﺩ ﻭ ﺷﻮﯾﻨﺪﻩ ﺭﺍ ﺍﺿﺎﻓﻪ ﮐﺮﺩ .ﺩﺭﻳﭽﻪ ﺭﺍ ﺑﺴﺘﻪ ﻭ ﺩﮐﻤﻪ ) Start/Pauseﺷﺮﻭﻉ/ﺗﻮﻗﻒ( ﺭﺍ ﺩﻭﺑﺎﺭﻩ ﻓﺸﺎﺭ ﺩﻫﻴﺪ .ﺍﻳﻨﮑﺎﺭ ﺑﺴﻴﺎﺭ ﺭﺍﺣﺖ ﺗﺮ ﺍﺳﺖ. • ﺍﮔﺮ ﻣﺎﺩﻩ ﻧﺮﻡ ﮐﻨﻨﺪﻩ ﺩﺭ ﭘﺨﺸﮕﺮ ﻣﺎﺩﻩ ﻧﺮﻡ ﮐﻨﻨﺪﻩ ﺭﯾﺨﺘﻪ ﺷﻮﺩ ،ﺑﻪ ﻃﻮﺭ ﺧﻮﮐﺎﺭ ﺩﺭ ﺳﯿﮑﻞ ﺁﺑﮑﺸﯽ ﭘﺨﺶ ﻣﯽ ﺷﻮﺩ .ﺑﺮﺍی ﭘﺨﺶ ﮐﺮﺩﻥ ﺧﻮﺩﮐﺎﺭ ﻧﺮﻡ ﮐﻨﻨﺪﻩ ﭘﺎﺭﭼﻪ ،ﻣﻄﻤﺌﻦ ﺷﻮﯾﺪ ﮐﻪ ﻫﻤﻪ ﺳﯿﮑﻞ ﻫﺎی ﺷﺴﺘﺸﻮ ،ﺁﺑﮑﺸﯽ ﻭ ﮔﺮﺩﺵ ﻻﺯﻡ ﺭﺍ ﺍﻧﺘﺨﺎﺏ ﮐﺮﺩﻩ ﺑﺎﺷﯿﺪ. ﻟﺒﺎﺱ ﻫﺎ ﺭﺍ ﺩﺭ ﻣﺎﺷﲔ ﻗﺮﺍﺭ ﺩﺍﺩﻩ ﻭ ﺷﻮﯾﻨﺪﻩ ﺭﺍ ﻫﻢ ﺍﺿﺎﻓﻪ ﮐﻨﻴﺪ. • ﻣﺮﺍﻗﺐ ﺑﺎﺷﻴﺪ ﮐﻪ ﺯﻳﺎﺩی ﭘﺮﻧﮑﻨﻴﺪ .ﺍﺯ ﺷﻮﯾﻨﺪﻩ ﻣﻨﺎﺳﺐ ﺑﺮﺍی ﭘﺎﺭﭼﻪ ﻫﺎﻳﯽ ﮐﻪ ﺷﺴﺘﺸﻮ ﻣﯽ ﮐﻨﻴﺪ ﺍﺳﺘﻔﺎﺩﻩ ﮐﻨﻴﺪ. • ﺍﮔﺮ ﺩﺭﻳﭽﻪ ﺩﺭ ﺣﲔ ﮐﺎﺭ ﺑﺎﺯ ﺑﺎﺷﺪ ،ﻣﺎﺷﲔ ﻟﺒﺎﺳﺸﻮﻳﯽ ﺑﻪ ﻃﻮﺭ ﺧﻮﺩﮐﺎﺭ ﺑﺮﺍی ﺍﳝﻨﯽ ﻣﺘﻮﻗﻒ ﻣﯽ ﺷﻮﺩ) .ﺑﺮﺧﯽ ﻣﺪﻝ ﻫﺎ ﺩﺭ ﺻﻮﺭﺗﯿﮑﻪ ﺩﺭﯾﭽﻪ ﺩﺭ ﺣﯿﻦ ﺗﻐﺬﯾﻪ ﺁﺏ ﺑﺴﺘﻪ ﻧﺒﺎﺷﺪ ﯾﮏ ﭘﯿﺎﻡ ﺧﻄﺎ ﺭﺍ ﳕﺎﯾﺶ ﻣﯽ ﺩﻫﻨﺪ(. • ﻫﻨﮕﺎﻣﻴﮑﻪ ﺁﺏ ﺩﺍﻍ ﺍﻧﺘﺨﺎﺏ ﺷﺪﻩ ،ﻫﺮﺩﻭی ﺁﺏ ﺳﺮﺩ ﻭ ﺩﺍﻍ ﺑﺮﺍی ٢٠ﺛﺎﻧﻴﻪ ﺍﻭﻝ ﺗﺄﻣﲔ ﻣﯽ ﺷﻮﻧﺪ ﺗﺎ ﺍﺯ ﻟﺒﺎﺱ ﻫﺎ ﻣﺤﺎﻓﻈﺖ ﺷﻮﺩ. • ﻣﯽ ﺗﻮﺍﻥ ﺯﻣﺎﻥ ﺷﺴﺘﺸﻮ ،ﺳﯿﮑﻞ ﺁﺑﮑﺸﯽ ﻭ ﺯﻣﺎﻥ ﭼﺮﺧﺶ ﺭﺍ ﺩﺭ ﻫﺮ ﺑﺮﻧﺎﻣﻪ ﺩﺭ ﺣﲔ ﺷﺴﺘﺸﻮ ﮐﻨﺘﺮﻝ ﮐﺮﺩ. ﻓﺎﺭﺳﯽ ٩ - 12:42:29 2014-03-17 WA70H4200SW_03414H_FA_140317.indd Sec3:9 ﺭﺍﻩ ﺍﻧﺪﺍﺯی ﻣﺎﺷﲔ ﻟﺒﺎﺳﺸﻮﻳﯽ ﭘﻨﻞ ﮐﻨﺘﺮﻝ ﺑﺮﺍی ﺟﺰﻳﻴﺎﺕ ﺑﻴﺸﺘﺮ ،ﺑﻪ ﭘﻨﻞ ﮐﻨﺘﺮﻝ ﻣﺎﺷﲔ ﻟﺒﺎﺳﺸﻮﻳﯽ ﺧﻮﺩ ﻣﺮﺍﺟﻌﻪ ﮐﻨﻴﺪ. ٧ ٩ ٨ ١ ۶ ۵ ۴ ٣ ٢ ١ ﳕﺎﻳﺸﮕﺮ ﮔﺮﺍﻓﻴﮏ ﺩﻳﺠﻴﺘﺎﻝ ﻭﻗﺖ ﺑﺎﻗﻴﻤﺎﻧﺪﻩ ﺑﺮﺍی ﺷﺴﺘﺸﻮ ﺭﺍ ﻧﺸﺎﻥ ﻣﯽ ﺩﻫﺪ. ﺩﺭ ﺻﻮﺭﺗﯽ ﮐﻪ ﻣﺎﺷﲔ ﻟﺒﺎﺳﺸﻮﻳﯽ ﺩﺭﺳﺖ ﮐﺎﺭ ﻧﮑﻨﺪ ،ﻭﺿﻌﻴﺖ ﺧﻄﺎ ﺭﺍ ﻧﺸﺎﻥ ﻣﯽ ﺩﻫﺪ ﺗﺎ ﺑﺘﻮﺍﻥ ﮐﺎﺭی ﮐﺮﺩ. ٢ ) Water Levelﺳﻄﺢ ﺁﺏ( ﺳﻄﺢ ﺁﺏ ﺑﻪ ﻃﻮﺭ ﺧﻮﺩﮐﺎﺭ ﺗﻨﻈﻴﻢ ﻣﯽ ﺷﻮﺩ .ﺑﺎ ﺍﻳﻦ ﻭﺟﻮﺩ ،ﻣﯽ ﺗﻮﺍﻧﻴﺪ ﺑﺎ ﻓﺸﺎﺭ ﺍﻳﻦ ﺩﮐﻤﻪ ﺳﻄﺢ ﺁﺏ ﺭﺍ ﺑﻪ ﻃﻮﺭ ﺩﺳﺘﯽ ﺍﻧﺘﺨﺎﺏ ﮐﻨﻴﺪ. ٣ ) Temp.ﺩﻣﺎ( / ) Optionﮔﺰﻳﻨﻪ( ﺍﻳﻦ ﺩﮐﻤﻪ ﺭﺍ ﺑﺮﺍی ﮔﺮﺩﺵ ﺩﺭ ﺑﲔ ﺩﻣﺎی ﺁﺏ ﻭ ﮔﺰﻳﻨﻪ ﺗﻮﺭﺑﻮی ﻫﻮﺍ ﻓﺸﺎﺭ ﺩﻫﻴﺪ: ) Coldﺳﺮﺩ( < ﺳﺮﺩ) Air Turbo ،ﺗﻮﺭﺑﻮی ﻫﻮﺍ( < ) Cold/Hotﺳﺮﺩ/ﮔﺮﻡ( < ) Cold/Hotﺳﺮﺩ/ﮔﺮﻡ(، ) Air Turboﺗﻮﺭﺑﻮی ﻫﻮﺍ( < ) Hotﮔﺮﻡ( < ) Hotﮔﺮﻡ() Air Turbo ،ﺗﻮﺭﺑﻮی ﻫﻮﺍ(. ۴ ) Washﺷﺴﺘﺸﻮ( ﺍﻳﻦ ﺩﮐﻤﻪ ﺭﺍ ﺑﺮﺍی ﺍﺟﺮﺍی ﻓﻘﻂ ﺷﺴﺘﺸﻮ ﻭﻳﺎ ﺗﻨﻈﻴﻢ ﺯﻣﺎﻥ ﺷﺴﺘﺸﻮ ﻓﺸﺎﺭ ﺩﻫﻴﺪ. ﻣﯽ ﺗﻮﺍﻧﻴﺪ ﺯﻣﺎﻥ ﺷﺴﺘﺸﻮ ﺭﺍ ﺑﲔ ۶ﺗﺎ ٣٠ﺩﻗﻴﻘﻪ ﺗﻨﻈﻴﻢ ﮐﻨﻴﺪ. ۵ ) Rinseﺁﺑﮑﺸﯽ( ﺍﻳﻦ ﺩﮐﻤﻪ ﺭﺍ ﺑﺮﺍی ﺍﺟﺮﺍی ﻓﻘﻂ ﺁﺑﮑﺸﯽ ﻭﻳﺎ ﺗﻨﻈﻴﻢ ﺗﻌﺪﺍﺩ ﺁﺑﮑﺸﯽ ﻓﺸﺎﺭ ﺩﻫﻴﺪ. ﻣﯽ ﺗﻮﺍﻧﻴﺪ ﺗﻌﺪﺍﺩ ﺁﺑﮑﺸﯽ ﺭﺍ ﺗﺎ ﺣﺪﺍﮐﺜﺮ ﭘﻨﺞ ﺑﺎﺭ ﺗﻨﻈﻴﻢ ﮐﻨﻴﺪ. ۶ ) Spinﮔﺮﺩﺵ( ﺍﻳﻦ ﺩﮐﻤﻪ ﺭﺍ ﺑﺮﺍی ﺍﺟﺮﺍی ﻓﻘﻂ ﺳﯿﮑﻞ ﮔﺮﺩﺵ ﻭﻳﺎ ﺗﻨﻈﻴﻢ ﺯﻣﺎﻥ ﮔﺮﺩﺵ ﻓﺸﺎﺭ ﺩﻫﻴﺪ. ﻣﯽ ﺗﻮﺍﻧﻴﺪ ﺯﻣﺎﻥ ﮔﺮﺩﺵ ﺭﺍ ﺑﲔ ١ﺗﺎ ٩ﺩﻗﻴﻘﻪ ﺗﻨﻈﻴﻢ ﮐﻨﻴﺪ. ﻫﻨﮕﺎﻣﻴﮑﻪ ﻓﻘﻂ ﻳﮏ ﮔﺮﺩﺵ ﺍﻧﺘﺨﺎﺏ ﺷﺪﻩ ،ﻣﺪﺕ ﮔﺮﺩﺵ ﺍﺯ ﮐﻞ ﺯﻣﺎﻥ ﺑﺎﻗﻴﻤﺎﻧﺪﻩ ﻣﺘﻔﺎﻭﺕ ﺧﻮﺍﻫﺪ ﺑﻮﺩ .ﺩﻟﻴﻠﺶ ﺍﻳﻨﺴﺘﮑﻪ ﮐﻞ ﺯﻣﺎﻥ ﺑﺎﻗﻴﻤﺎﻧﺪﻩ ﺷﺎﻣﻞ ﺯﻣﺎﻥ ﻭﺍﻗﻌﯽ ﮔﺮﺩﺵ ﻭ ﻣﺪﺕ ﺗﺨﻠﻴﻪ ﺁﺏ ﻭ ﺗﻮﻗﻒ ﻣﯽ ﺷﻮﺩ. ٧ ) Powerﻧﯿﺮﻭ( ﺍﻳﻦ ﺩﮐﻤﻪ ﺭﺍ ﻳﮑﺒﺎﺭ ﺑﺮﺍی ﺭﺍﻩ ﺍﻧﺪﺍﺯی ﻓﺸﺎﺭ ﺩﻫﻴﺪ. ﺑﺮﺍی ﺧﺎﻣﻮﺵ ﮐﺮﺩﻥ ﺩﻭﺑﺎﺭﻩ ﻓﺸﺎﺭ ﺩﻫﻴﺪ. ٨ Start/Pause )ﺷﺮﻭﻉ/ﺗﻮﻗﻒ( ﺑﺮﺍی ﺗﻮﻗﻒ ﻭ ﺷﺮﻭﻉ ﺩﻭﺑﺎﺭﻩ ﻣﺎﺷﲔ ﺍﺳﺘﻔﺎﺩﻩ ﮐﻨﻴﺪ .ﺑﺮﺍی ﺗﻐﻴﻴﺮ ﺭﻭﺍﻝ ﺷﺴﺘﺸﻮ ﺩﺭ ﺣﲔ ﺍﺳﺘﻔﺎﺩﻩ ،ﺍﻳﻦ ﺩﮐﻤﻪ ﺭﺍ ﺑﺮﺍی ﻣﺘﻮﻗﻒ ﮐﺮﺩﻥ ﻓﺸﺎﺭ ﺩﺍﺩﻩ ﻭ ﺑﻌﺪ ﺍﺯ ﺗﻐﻴﻴﺮ ﺭﻭﺍﻝ ﺑﺮﺍی ﺷﺮﻭﻉ ﺩﻭﺑﺎﺭﻩ ﻓﺸﺎﺭ ﺩﻫﻴﺪ. ﻓﺎﺭﺳﯽ ١٠ - 12:42:29 2014-03-17 WA70H4200SW_03414H_FA_140317.indd Sec3:10 ) Quickﺳﺮﻳﻊ( ﺍﮔﺮ ﻣﯽ ﺧﻮﺍﻫﻴﺪ ﺣﻮﻟﻪ ﻫﺎﻳﯽ ﮐﻪ ﻣﺮﺗﺐ ﺍﺳﺘﻔﺎﺩﻩ ﻣﯽ ﮐﻨﻴﺪ ﻭﻳﺎ ﻟﺒﺎﺱ ﻫﺎﻳﯽ ﮐﻪ ﮐﻤﺘﺮ ﮐﺜﻴﻒ ﻫﺴﺘﻨﺪ ﺭﺍ ﺑﺸﻮﻳﻴﺪ .ﭼﻮﻥ ﺷﺴﺘﺸﻮ ﺳﺮﻳﻊ ﺍﺳﺖ ،ﺑﺮﺍی ﻟﺒﺎﺱ ﻫﺎﻳﯽ ﮐﻪ ﻗﺪﺭی ﻭﻳﺎ ﮐﻤﯽ ﮐﺜﻴﻒ ﺷﺪﻩ ﺍﻧﺪ ﻣﻨﺎﺳﺐ ﺍﺳﺖ. ) Soakﺧﯿﺴﺎﻧﺪﻥ( ﺍﯾﻦ ﺩﮐﻤﻪ ﺭﺍ ﺑﺮﺍی ﺍﺟﺮﺍی ﯾﮏ ﺷﺴﺘﺸﻮ ﺑﺎ ﺧﯿﺴﺎﻧﺪﻥ ﻓﺸﺎﺭ ﺩﻫﯿﺪ. ﻣﺪﺕ ﺧﯿﺴﺎﻧﺪﻥ ﺑﺮﺍﺳﺎﺱ ﺩﻗﯿﻘﻪ ﺗﻨﻈﯿﻢ ﺷﺪﻩ ﺍﺳﺖ .ﳕﯽ ﺗﻮﺍﻥ ﻣﺪﺕ ﺧﯿﺴﺎﻧﺪﻥ ﺭﺍ ﺗﻐﯿﯿﺮ ﺩﺍﺩ. ) Blanketﭘﺘﻮ( ﻟﺒﺎﺱ ﻫﺎی ﺑﺎ ﺣﺠﻢ ﺯﻳﺎﺩ ﺍﺯ ﻗﺒﻴﻞ ﭘﺘﻮ ﻭ ﺭﻭﺗﺨﺘﯽ Aqua Preserve )ﺻﺮﻓﻪ ﺟﻮﯾﯽ ﺁﺏ( ﺍﮔﺮ ﻣﯽ ﺧﻮﺍﻫﯿﺪ ﺍﺯ ﺁﺏ ﺑﺎﻗﯿﻤﺎﻧﺪﻩ ﺍﺯ ﭼﺮﺧﻪ ﺁﺑﮑﺸﯽ ﺩﻭﺑﺎﺭﻩ ﺍﺳﺘﻔﺎﺩﻩ ﮐﻨﯿﺪ. ﺍﯾﻦ ﮔﺰﯾﻨﻪ ﺩﺭ ﻣﻘﺪﺍﺭ ﺁﺏ ﺍﺳﺘﻔﺎﺩﻩ ﺷﺪﻩ ﺻﺮﻓﻪ ﺟﻮﺋﯽ ﻣﯽ ﮐﻨﺪ. Eco Tub Clean )ﲤﯿﺰی ﺗﺸﺖ ﻣﻘﺮﻭﻥ ﺑﻪ ﺻﺮﻓﻪ( ﺍﺯ ﺍﯾﻦ ﺑﺮﻧﺎﻣﻪ ﺑﺮﺍی ﲤﯿﺰ ﮐﺮﺩﻥ ﺗﺸﺖ ﺍﺳﺘﻔﺎﺩﻩ ﮐﻨﯿﺪ ،ﺍﯾﻦ ﺑﺮﻧﺎﻣﻪ ﺗﺸﺖ ﺭﺍ ﲤﯿﺰ ﻭ ﺑﻬﺪﺍﺷﺘﯽ ﻧﮕﻪ ﺧﻮﺍﻫﺪ ﺩﺍﺷﺖ. ﭼﺮﺍﻍ ﮐﻨﺘﺮﻝ ﺗﺸﺖ ﺭﻭﺷﻦ ﻣﯽ ﺷﻮﺩ ﺗﺎ ﺑﻪ ﮐﺎﺭﺑﺮ ﺍﻃﻼﻉ ﺩﻫﺪ ﮐﻪ ﻣﻮﻗﻊ ﲤﯿﺰ ﮐﺮﺩﻥ ﺗﺸﺖ ﺷﺪﻩ ﺍﺳﺖ. ﻧﯿﺮﻭی ﮔﺮﺩﺵ ﭘﺮﻗﺪﺭﺕ ﺩﺳﺘﮕﺎﻩ ﻟﺮﺯﻧﺪﻩ ﺗﺸﺖ ﺷﺴﺘﺸﻮ ،ﺁﻟﻮﺩﮔﯽ ﻫﺎ ﺭﺍ ﺍﺯ ﺧﺎﺭﺝ ﺗﺸﺖ ﺷﺴﺘﺸﻮ ﭘﺎک ﻣﯽ ﮐﻨﺪ ﺗﺎ ﺍﺯ ﺍﯾﺠﺎﺩ ﺑﻮ ﯾﺎ ﺁﻟﻮﺩﮔﯽ ﺛﺎﻧﻮی ﺟﻠﻮﮔﯿﺮی ﺷﻮﺩ. ﺭﺍﻩ ﺍﻧﺪﺍﺯی ﻣﺎﺷﲔ ﻟﺒﺎﺳﺸﻮﻳﯽ ٩ ﺳﯿﮑﻞ ) Fuzzyﻣﺒﻬﻢ( ﺑﻬﺘﺮﻳﻦ ﺑﺮﻧﺎﻣﻪ ﺷﺴﺘﺸﻮ ﺭﺍ ﺑﻪ ﻃﻮﺭ ﺧﻮﺩﮐﺎﺭ ﺍﻧﺘﺨﺎﺏ ﻣﯽ ﮐﻨﺪ. ﻗﻔﻞ ﻛﻮﺩﻙ ﺍﯾﻦ ﻋﻤﻠﮑﺮﺩ ﺑﺮﺍی ﻣﺤﺎﻓﻈﺖ ﺍﺯ ﮐﻮﺩﮐﺎﻥ ،ﺍﺷﺨﺎﺹ ﺳﺎﳌﻨﺪ ﻭ ﺿﻌﯿﻒ ﻣﯽ ﺑﺎﺷﺪ. .١ﺩﮐﻤﻪ ) Powerﻧﯿﺮﻭ( ﺭﺍ ﻓﺸﺎﺭ ﺩﻫﻴﺪ. .٢ﺑﺮﺍی ﻓﻌﺎﻝ ﮐﺮﺩﻥ ﻋﻤﻠﮑﺮﺩ ﻗﻔﻞ ﻛﻮﺩﻙ ،ﻫﺮ ﺩﻭ ﺩﮐﻤﻪ ) Rinseﺁﺑﮑﺸﯽ( ﻭ ) Spinﮔﺮﺩﺵ( ﺭﺍ ﺑﺮﺍی ٣ﺛﺎﻧﯿﻪ ﺑﻪ ﻃﻮﺭ ﻫﻤﺰﻣﺎﻥ ﻓﺸﺎﺭ ﺩﺍﺩﻩ ﻭ ﻧﮕﻪ ﺩﺍﺭﯾﺪ. )ﺍﮔﺮ ﻋﻤﻠﮑﺮﺩ ﻗﻔﻞ ﻛﻮﺩﻙ ﻓﻌﺎﻝ ﺷﺪﻩ ﺑﺎﺷﺪ ،ﳕﺎﺩ ﻗﻔﻞ ﻛﻮﺩﻙ ﭼﺸﻤﮏ ﻣﯽ ﺯﻧﺪ(. .٣ﮐﺎﺭﺑﺮﺩﻫﺎ ﭘﺲ ﺍﺯ ﻓﻌﺎﻝ ﮐﺮﺩﻥ ﻋﻤﻠﮑﺮﺩ ﻗﻔﻞ ﻛﻮﺩﻙ. • ﺣﺘﯽ ﺍﮔﺮ ﻋﻤﻠﮑﺮﺩ ﻗﻔﻞ ﻛﻮﺩﻙ ﻓﻌﺎﻝ ﺷﺪﻩ ﺑﺎﺷﺪ ،ﻫﺮﯾﮏ ﺍﺯ ﺩﮐﻤﻪ ﻫﺎ ﺗﺎ ﺯﻣﺎﻧﯿﮑﻪ ﺩﺭﯾﭽﻪ ﺑﺎﺯ ﺷﻮﺩ ﮐﺎﺭ ﻣﯽ ﮐﻨﺪ. • ﻫﻨﮕﺎﻣﯿﮑﻪ ﺩﺭﯾﭽﻪ ﺭﺍ ﺩﺭ ﺣﺎﻟﯿﮑﻪ ﻗﻔﻞ ﻛﻮﺩﻙ ﻓﻌﺎﻝ ﺷﺪﻩ ﺑﺎﺯ ﻣﯽ ﮐﻨﯿﺪ ،ﺁﻻﺭﻡ ﺑﻪ ﺻﺪﺍ ﺩﺭﺁﻣﺪﻩ ﻭ ﭘﯿﻐﺎﻡ ﺧﻄﺎ ﻇﺎﻫﺮ ﻣﯽ ﺷﻮﺩ .ﺩﺭ ﻇﺮﻑ ٣٠ﺛﺎﻧﯿﻪ ،ﺗﺨﻠﯿﻪ ﺑﻪ ﻃﻮﺭ ﺧﻮﺩﮐﺎﺭ ﺷﺮﻭﻉ ﻣﯽ ﺷﻮﺩ .ﺑﺎ ﺍﯾﻦ ﺣﺎﻝ ﺍﮔﺮ ﺩﺭ ﻇﺮﻑ ٣٠ﺛﺎﻧﯿﻪ ﺩﺭﯾﭽﻪ ﺭﺍ ﺑﺒﻨﺪﯾﺪ ،ﺁﺏ ﺗﺨﻠﯿﻪ ﻧﺨﻮﺍﻫﺪ ﺷﺪ. )ﭘﯿﻐﺎﻡ ﺧﻄﺎی ﻧﺸﺎﻥ ﺩﺍﺩﻩ ﺷﺪﻩ ”.(“CL”، “dE • ﺑﺮﺍی ﺍﻓﺰﻭﺩﻥ ﻟﺒﺎﺱ ﭘﺲ ﺍﺯ ﻓﻌﺎﻝ ﺳﺎﺯی ﻋﻤﻠﮑﺮﺩ ﻗﻔﻞ ﻛﻮﺩﻙ ،ﺑﺎﯾﺴﺘﯽ ﻋﻤﻠﮑﺮﺩ ﻗﻔﻞ ﻛﻮﺩﻙ ﺭﺍ ﻏﯿﺮﻓﻌﺎﻝ ﮐﻨﯿﺪ. .۴ﺑﺮﺍی ﻓﻌﺎﻝ ﮐﺮﺩﻥ ﻋﻤﻠﮑﺮﺩ ﻗﻔﻞ ﻛﻮﺩﻙ ،ﻫﺮ ﺩﻭ ﺩﮐﻤﻪ ) Rinseﺁﺑﮑﺸﯽ( ﻭ ) Spinﮔﺮﺩﺵ( ﺭﺍ ﺑﺮﺍی ٣ﺛﺎﻧﯿﻪ ﺑﻪ ﻃﻮﺭ ﻫﻤﺰﻣﺎﻥ ﺩﻭﺑﺎﺭﻩ ﻓﺸﺎﺭ ﺩﺍﺩﻩ ﻭ ﻧﮕﻪ ﺩﺍﺭﯾﺪ) .ﺍﮔﺮ ﻋﻤﻠﮑﺮﺩ ﻗﻔﻞ ﻛﻮﺩﻙ ﻏﯿﺮﻓﻌﺎﻝ ﺷﺪﻩ ﺑﺎﺷﺪ ،ﳕﺎﺩ ﻗﻔﻞ ﻛﻮﺩﻙ ﺧﺎﻣﻮﺵ ﻣﯽ ﺷﻮﺩ(. .۵ﺑﺮﺍی ﭘﺎک ﮐﺮﺩﻥ ﳕﺎﯾﺶ ” ،“CLﭘﺲ ﺍﺯ ﺍﯾﻨﮑﻪ ﺗﺨﻠﯿﻪ ﲤﺎﻡ ﺷﺪ ،ﺩﺭﯾﭽﻪ ﻣﺎﺷﯿﻦ ﻟﺒﺎﺳﺸﻮﺋﯽ ﺭﺍ ﺑﺴﺘﻪ ﻭ ﺁﻧﺮﺍ ﺧﺎﻣﻮﺵ ﻭ ﺳﭙﺲ ﺭﻭﺷﻦ ﮐﻨﯿﺪ. ﺍﯾﻦ ﻋﻤﻠﮑﺮﺩ ﺑﺮﺍی ﺟﻠﻮﮔﯿﺮی ﺍﺯ ﺁﺳﯿﺐ ﻭ ﺧﺮﺍﺑﮑﺎﺭ ﮐﺮﺩﻥ ﻣﺤﺼﻮﻝ ﺑﻪ ﻭﺍﺳﻄﻪ ﺍﺳﺘﻔﺎﺩﻩ ﯾﺎ ﻋﻤﻠﮑﺮﺩﻫﺎی ﻧﺎﻣﻨﺎﺳﺐ ﺗﻮﺳﻂ ﮐﻮﺩﮐﺎﻥ،ﺍﺷﺨﺎﺹ ﺳﺎﳌﻨﺪ ﯾﺎ ﺿﻌﯿﻒ ﺍﺳﺖ. ﺍﺣﺘﻴﺎﻁ ﺍﮔﺮ ﺩﺭﯾﭽﻪ ﺩﺭ ﺣﺎﻟﯿﮑﻪ ﻋﻤﻠﮑﺮﺩ ﻗﻔﻞ ﻛﻮﺩﻙ ﻓﻌﺎﻝ ﺷﺪﻩ ﺑﺎﺯ ﺷﻮﺩ ،ﺁﺏ ﺑﺎ ﻓﺸﺎﺭ ﺗﺨﻠﯿﻪ ﻣﯽ ﺷﻮﺩ ﺗﺎ ﺍﺯ ﻏﺮﻕ ﺷﺪﻥ ﮐﻮﺩﮐﺎﻥ ﺟﻠﻮﮔﯿﺮیﺷﻮﺩ. ﺑﺮﺍی ﺍﻓﺰﻭﺩﻥ ﻟﺒﺎﺱ ﭘﺲ ﺍﺯ ﻓﻌﺎﻝ ﺳﺎﺯی ﻋﻤﻠﮑﺮﺩ ﻗﻔﻞ ﻛﻮﺩﻙ ،ﺑﺎﯾﺴﺘﯽ ﻗﻔﻞ ﻛﻮﺩﻙ ﺭﺍ ﻏﯿﺮﻓﻌﺎﻝ ﮐﻨﯿﺪ. ﺣﺘﯽ ﺍﮔﺮ ﻫﻨﮕﺎﻣﯿﮑﻪ ﻗﻔﻞ ﻛﻮﺩﻙ ﻓﻌﺎﻝ ﺷﺪﻩ ،ﻣﺎﺷﯿﻦ ﺭﺍ ﺧﺎﻣﻮﺵ ﻭ ﺩﻭﺑﺎﺭﻩ ﺭﻭﺷﻦ ﮐﻨﯿﺪ ،ﻗﻔﻞ ﻛﻮﺩﻙ ﻓﻌﺎﻝ ﺑﺎﻗﯽ ﻣﯽ ﻣﺎﻧﺪ. ﺯﻣﺎﻧﯿﮑﻪ ﻗﻔﻞ ﻛﻮﺩﻙ ﻓﻌﺎﻝ ﺷﺪﻩ ﺣﺘﯽ ﺍﮔﺮ ﻣﺎﺷﯿﻦ ﺧﺎﻣﻮﺵ ﺷﻮﺩ ،ﺍﮔﺮ ﺩﺭﯾﭽﻪ ﺑﺎﺯ ﺑﺎﺷﺪ ،ﺁﺏ ﺩﺭ ﻇﺮﻑ ٣٠ﺛﺎﻧﯿﻪ ﺑﻪ ﻃﻮﺭﺧﻮﺩﮐﺎﺭ ﺗﺨﻠﯿﻪ ﻣﯽ ﺷﻮﺩ. ﻋﻤﻠﮑﺮﺩ ﻗﻔﻞ ﻛﻮﺩﻙ ﺭﺍ ﻫﻨﮕﺎﻣﯿﮑﻪ CLﻧﺸﺎﻥ ﺩﺍﺩﻩ ﺷﺪﻩ ﳕﯽ ﺗﻮﺍﻥ ﻏﯿﺮﻓﻌﺎﻝ ﮐﺮﺩ) .ﺑﺎ ﺍﯾﻦ ﺣﺎﻝ ﻋﻤﻠﮑﺮﺩ ﻗﻔﻞ ﻛﻮﺩﻙ ﺭﺍ ﻣﯽ ﺗﻮﺍﻥﻫﻨﮕﺎﻣﯿﮑﻪ ﺧﻄﺎی dEﻧﺸﺎﻥ ﺩﺍﺩﻩ ﺷﺪﻩ ﻏﯿﺮﻓﻌﺎﻝ ﮐﺮﺩ(. -ﻫﻨﮕﺎﻡ ﺗﺨﻠﯿﻪ ﺩﺭ ﻋﻤﻠﮑﺮﺩ ﻗﻔﻞ ﮐﻮﺩک ،ﺍﺯ ﻫﻤﻪ ﺩﮐﻤﻪ ﻫﺎ ﻣﻨﺠﻤﻠﻪ ﺩﮐﻤﻪ ﻧﯿﺮﻭ ﳕﯽ ﺗﻮﺍﻥ ﺍﺳﺘﻔﺎﺩﻩ ﮐﺮﺩ. ﻓﺎﺭﺳﯽ ١١ - 12:42:30 2014-03-17 WA70H4200SW_03414H_FA_140317.indd Sec3:11 ﻋﻤﻠﮑﺮﺩﻫﺎی ﺩﺳﺘﯽ ﻣﯽ ﺗﻮﺍﻥ ﻋﻤﻠﮑﺮﺩ ﺭﺍ ﺑﺮﺍی ﻫﺮ ﺑﺮﻧﺎﻣﻪ ﺷﺴﺘﺸﻮ ﺍﻧﺘﺨﺎﺏ ﮐﺮﺩ. )ﻣﺜﺎﻝ( ﺑﺮﻧﺎﻣﻪ ﺑﺮﺍی ﻳﮏ ﺷﺴﺘﺸﻮی ﺳﺎﺩﻩ ﭼﻮﻥ ﺯﻳﺎﺩ ﮐﺜﻴﻒ ﻧﻴﺴﺖ : ) Powerﻧﯿﺮﻭ( ﺑﺮﻧﺎﻣﻪ ﮐﻤﯽ ﮐﺜﯿﻒ ﺭﺍ ﺍﻧﺘﺨﺎﺏ ﮐﻨﯿﺪ ) Wash ﺷﺴﺘﺸﻮ( ) Start/Pause ﺷﺮﻭﻉ/ﺗﻮﻗﻒ( ﻓﻘﻂ ﺷﺴﺘﺸﻮ ﻓﻘﻂ ﺁﺑﮑﺸﯽ ﻓﻘﻂ ﮔﺮﺩﺵ ﺷﺴﺘﺸﻮ ﻭ ﺁﺑﮑﺸﯽ ﺁﺑﮑﺸﯽ ﻭ ﭼﺮﺧﺶ ﺷﺴﺘﺸﻮ ،ﺁﺑﮑﺸﯽ ﻭ ﮔﺮﺩﺵ ﺩﮐﻤﻪ ) Powerﻧﯿﺮﻭ( ﺭﺍ ﻓﺸﺎﺭ ﺩﻫﻴﺪ. ﺩﮐﻤﻪ ) Washﺷﺴﺘﺸﻮ( ﺭﺍ ﻓﺸﺎﺭ ﺩﻫﻴﺪ. ﺩﮐﻤﻪ ) Start/Pauseﺷﺮﻭﻉ/ﺗﻮﻗﻒ( ﺭﺍ ﻓﺸﺎﺭ ﺩﻫﻴﺪ. ﺷﺴﺘﺸﻮ ﺑﺮﺍی ١ﺑﺎﺭ ﺍﺩﺍﻣﻪ ﭘﻴﺪﺍ ﻣﯽ ﮐﻨﺪ. ﻫﻨﮕﺎﻣﻴﮑﻪ ﺩﮐﻤﻪ ) Washﺷﺴﺘﺸﻮ( ﺩﺭ ﺣﲔ ﺷﺴﺘﺸﻮ ﻓﺸﺎﺭ ﺩﺍﺩﻩ ﺷﻮﺩ ،ﻃﻮﻝ ﻣﺪﺕ ﺯﻣﺎﻥ ﺷﺴﺘﺸﻮ ﺭﺍ ﻣﯽ ﺗﻮﺍﻥ ﺑﲔ ۶ﺗﺎ ٣٠ﺩﻗﻴﻘﻪ ﺗﻐﻴﻴﺮ ﺩﺍﺩ. ﺩﮐﻤﻪ ) Rinseﺁﺑﮑﺸﯽ( ﺭﺍ ﻓﺸﺎﺭ ﺩﻫﻴﺪ. ﺩﮐﻤﻪ ) Start/Pauseﺷﺮﻭﻉ/ﺗﻮﻗﻒ( ﺭﺍ ﻓﺸﺎﺭ ﺩﻫﻴﺪ. ﺁﺑﮑﺸﯽ ﺑﺮﺍی ١ﺑﺎﺭ ﺍﺩﺍﻣﻪ ﭘﻴﺪﺍ ﻣﯽ ﮐﻨﺪ. ﻫﻨﮕﺎﻣﻴﮑﻪ ﺩﮐﻤﻪ ) Rinseﺁﺑﮑﺸﯽ( ﻓﺸﺎﺭ ﺩﺍﺩﻩ ﺷﻮﺩ ،ﻃﻮﻝ ﺩﻓﻌﺎﺕ ﺁﺑﮑﺸﯽ ﺭﺍ ﻣﯽ ﺗﻮﺍﻥ ﺑﲔ ١ﺗﺎ ۵ﺑﺎﺭ ﺗﻐﻴﻴﺮ ﺩﺍﺩ. ﺩﮐﻤﻪ ) Spinﮔﺮﺩﺵ( ﺭﺍ ﻓﺸﺎﺭ ﺩﻫﻴﺪ. ﺩﮐﻤﻪ ) Start/Pauseﺷﺮﻭﻉ/ﺗﻮﻗﻒ( ﺭﺍ ﻓﺸﺎﺭ ﺩﻫﻴﺪ. ﺧﺸﮏ ﮐﺮﺩﻥ ﮔﺮﺩﺷﯽ ﺑﺮﺍی ۴ﺩﻗﯿﻘﻪ ﺍﺩﺍﻣﻪ ﭘﯿﺪﺍ ﻣﯽ ﮐﻨﺪ. ﻫﻨﮕﺎﻣﯿﮑﻪ ﺩﮐﻤﻪ ) Spinﮔﺮﺩﺵ( ﻓﺸﺎﺭ ﺩﺍﺩﻩ ﺷﻮﺩ ،ﺯﻣﺎﻥ ﮔﺮﺩﺵ ﺭﺍ ﻣﯽ ﺗﻮﺍﻥ ﺍﺯ ١ﺗﺎ ٩ﺩﻗﯿﻘﻪ ﺗﻐﯿﯿﺮ ﺩﺍﺩ. ﺩﮐﻤﻪ ) Washﺷﺴﺘﺸﻮ( ﻭ ) Rinseﺁﺑﮑﺸﯽ( ﺭﺍ ﻓﺸﺎﺭ ﺩﻫﻴﺪ. ﺩﮐﻤﻪ ) Start/Pauseﺷﺮﻭﻉ/ﺗﻮﻗﻒ( ﺭﺍ ﯾﮑﺒﺎﺭ ﻓﺸﺎﺭ ﺩﻫﻴﺪ. ﻣﻘﺪﺍﺭ ﻟﺒﺎﺱ ﺭﺍ ﻣﺸﺨﺺ ﮐﺮﺩﻩ ﻭ ﻣﺪﺕ ﺯﻣﺎﻥ ﺷﺴﺘﺸﻮ ﻭ ﺁﺑﮑﺸﯽ ﺭﺍ ﺑﻪ ﻃﻮﺭ ﺧﻮﺩﮐﺎﺭ ﺗﻌﯿﯿﻦ ﻣﯽ ﮐﻨﺪ. )ﮔﺰﻳﻨﻪ( ﻫﻨﮕﺎﻣﯿﻜﻪ ﺩﻛﻤﻪ ) Washﺷﺴﺘﺸﻮ( ﻭ ) Rinseﺁﺑﮑﺸﯽ( ﻓﺸﺮﺩﻩ ﻣﯽ ﺷﻮﺩ ،ﺯﻣﺎﻥ ﺷﺴﺘﺸﻮ ﺑﯿﻦ ۶ﺗﺎ ٣٠ﺩﻗﯿﻘﻪ ﻭ ﺯﻣﺎﻥ ﺁﺑﻜﺸﯽ ﺑﯿﻦ ١ﺗﺎ ۵ﺑﺎﺭ ﺗﻌﯿﯿﻦ ﻣﯽ ﺷﻮﺩ. ﺩﮐﻤﻪ ) Rinseﺁﺑﮑﺸﯽ( ﻭ ) Spinﮔﺮﺩﺵ( ﺭﺍ ﻓﺸﺎﺭ ﺩﻫﻴﺪ. ﺩﮐﻤﻪ ) Start/Pauseﺷﺮﻭﻉ/ﺗﻮﻗﻒ( ﺭﺍ ﯾﮑﺒﺎﺭ ﻓﺸﺎﺭ ﺩﻫﻴﺪ. ﺁﺑﮑﺸﯽ ﻭ ﺧﺸﮏ ﮐﺮﺩﻥ ﮔﺮﺩﺷﯽ ﺷﺮﻭﻉ ﻣﯽ ﺷﻮﺩ. ﻫﻨﮕﺎﻣﯿﮑﻪ ﺩﮐﻤﻪ ) Rinseﺁﺑﮑﺸﯽ( ﻭ ) Spinﮔﺮﺩﺵ( ﻓﺸﺮﺩﻩ ﺷﻮﺩ ،ﺗﻌﺪﺍﺩ ﺩﻓﻌﺎﺕ ﺁﺑﮑﺸﯽ ﺑﯿﻦ ١ﻭ ۵ﺗﻨﻈﯿﻢ ﻣﯽ ﺷﻮﺩ ﻭ ﻣﺪﺕ ﮔﺮﺩﺵ ﺑﺮﺍی ﺧﺸﮏ ﮐﺮﺩﻥ ﺑﯿﻦ ١ﺗﺎ ٩ﺩﻗﯿﻘﻪ ﺗﻨﻈﯿﻢ ﻣﯽ ﺷﻮﺩ. ﺩﮐﻤﻪ ) Washﺷﺴﺘﺸﻮ() Rinse ،ﺁﺑﮑﺸﯽ( ﻭ ) Spinﮔﺮﺩﺵ( ﺭﺍ ﻓﺸﺎﺭ ﺩﻫﻴﺪ. ﺩﮐﻤﻪ ) Start/Pauseﺷﺮﻭﻉ/ﺗﻮﻗﻒ( ﺭﺍ ﯾﮑﺒﺎﺭ ﻓﺸﺎﺭ ﺩﻫﻴﺪ. ) Washﺷﺴﺘﺸﻮ() Rinse ،ﺁﺑﮑﺸﯽ( ﻭ ) Spinﮔﺮﺩﺵ( ﺍﺟﺮﺍ ﻣﯽ ﺷﻮﺩ. ﻓﺎﺭﺳﯽ ١٢ - 12:42:30 2014-03-17 WA70H4200SW_03414H_FA_140317.indd 12 ﻧﺼﺐ ﻭ ﻧﮕﻬﺪﺍﺭی ﺩﻓﺘﺮﭼﻪ ﺭﺍﻫﻨﻤﺎی ﺍﺳﺘﻔﺎﺩﻩ ﮐﻨﻨﺪﻩ ﺑﺮﺍی ﺍﺳﺘﻔﺎﺩﻩ ﻋﻤﻮﻣﯽ ﺍﺳﺖ. ﺍﺯ ﺩﻓﺘﺮﭼﻪ ﺭﺍﻫﻨﻤﺎی ﺍﺳﺘﻔﺎﺩﻩ ﮐﻨﻨﺪﻩ ﺑﺴﺘﮕﯽ ﺑﻪ ﻣﺪﻝ ﻣﺎﺷﲔ ﻟﺒﺎﺳﺸﻮﻳﯽ ﺧﻮﺩ ﺍﺳﺘﻔﺎﺩﻩ ﮐﻨﻴﺪ. ﻣﺤﻴﻂ ﺯﻳﺴﺖ ﻧﺼﺐ ﻭ ﻧﮕﻬﺪﺍﺭی ﻗﺪﺭی ﻓﺎﺻﻠﻪ ﻗﺎﺋﻞ ﺷﻮﯾﺪ ﺣﺪﺍﻗﻞ ١٠ﺳﺎﻧﺘﯽ ﻣﺘﺮ ﺑﯿﻦ ﻣﺎﺷﯿﻦ ﻟﺒﺎﺳﺸﻮﯾﯽ ﻭ ﺩﯾﻮﺍﺭ ﻓﺎﺻﻠﻪ ﻗﺎﺋﻞ ﺷﻮﯾﺪ. ﻣﺎﺷﲔ ﺭﺍ ﺑﺮ ﺭﻭﻱ ﻳﮏ ﺳﻄﺢ ﻣﻘﺎﻭﻡ ﻭ ﻣﺴﻄﺢ ﻗﺮﺍﺭ ﺩﻫﻴﺪ. ﺍﮔﺮ ﻣﺎﺷﯿﻦ ﺑﺮ ﺭﻭی ﯾﮏ ﺳﻄﺢ ﻧﺎﻫﻤﻮﺍﺭ ﻭﯾﺎ ﺳﺴﺖ ﻗﺮﺍﺭ ﺩﺍﺩﻩ ﺷﻮﺩ ،ﻣﻮﺟﺐ ﺳﺮﻭﺻﺪﺍ ﻭ ﻟﺮﺯﺵ ﻣﯽ ﺷﻮﺩ) .ﻣﻘﺪﺍﺭ ﻣﺠﺎﺯ ١ﺩﺭﺟﻪ ﺍﺳﺖ( ﭘﺎﻳﻪ ﻫﺎ ﺭﺍ ﺑﺮﺍی ﻗﺮﺍﺭ ﺩﺍﺩﻥ ﺑﻪ ﻃﻮﺭ ﻫﻢ ﺗﺮﺍﺯ ﺗﻨﻈﯿﻢ ﮐﻨﯿﺪ. ﻫﺮﮔﺰ ﻣﺎﺷﯿﻦ ﻟﺒﺎﺳﺸﻮﯾﯽ ﺭﺍ ﺩﺭ ﻧﺰﺩﯾﮑﯽ ﺁﺏ ﻧﺼﺐ ﻧﮑﻨﯿﺪ. ﻣﺎﺷﯿﻦ ﻟﺒﺎﺳﺸﻮﯾﯽ ﺭﺍ ﺩﺭ ﺍﺗﺎﻕ ﻫﺎی ﺑﺨﺎﺭﮔﺮﻓﺘﻪ ﻭﯾﺎ ﺟﺎﯾﯽ ﮐﻪ ﻣﺎﺷﯿﻦ ﺑﻪ ﻃﻮﺭ ﻣﺴﺘﻘﯿﻢ ﺩﺭ ﻣﻌﺮﺽ ﺑﺎﺭﺍﻥ ﻗﺮﺍﺭ ﺩﺍﺭﺩ ﻧﮕﺬﺍﺭﯾﺪ .ﺭﻃﻮﺑﺖ ﳑﮑﻦ ﺍﺳﺖ ﻋﺎﯾﻖ ﺑﻨﺪی ﺑﺮﻗﯽ ﺭﺍ ﺍﺯ ﺑﯿﻦ ﺑﺮﺩﻩ ﻣﻮﺟﺐ ﺧﻄﺮ ﺑﺮﻕ ﮔﺮﻓﺘﮕﯽ ﺷﻮﺩ. ﺍﺯ ﻧﻮﺭ ﻣﺴﺘﻘﻴﻢ ﺧﻮﺭﺷﻴﺪ ﻭﻳﺎ ﻭﺳﺎﻳﻞ ﮔﺮﻣﺎﺯﺍ ﺍﺟﺘﻨﺎﺏ ﮐﻨﻴﺪ. ﭼﻮﻥ ﮔﺮﻣﺎی ﻣﺴﺘﻘﯿﻢ ﺑﺮ ﺭﻭی ﺍﺟﺰﺍﺀ ﭘﻼﺳﺘﯿﮑﯽ ﻭ ﺑﺮﻗﯽ ﺗﺄﺛﯿﺮ ﻣﯽ ﮔﺬﺍﺭﻧﺪ ،ﻫﺮﮔﺰ ﻣﺎﺷﯿﻦ ﻟﺒﺎﺳﺸﻮﯾﯽ ﺭﺍ ﺩﺭ ﻧﺰﺩﯾﮑﯽ ﺗﻨﻮﺭ ،ﺩﯾﮓ ﺑﺨﺎﺭ ﺁﺏ ﻭ ﻏﯿﺮﻩ ﻗﺮﺍﺭ ﻧﺪﻫﯿﺪ .ﺩﺭ ﺯﯾﺮ ﻧﻮﺭ ﻣﺴﺘﻘﯿﻢ ﺧﻮﺭﺷﯿﺪ ﻗﺮﺍﺭ ﻧﺪﻫﯿﺪ. ﻫﻤﺘﺮﺍﺯ ﮐﺮﺩﻥ • ﺍﮔﺮ ﻣﺎﺷﲔ ﻟﺒﺎﺳﺸﻮﻳﯽ ﺑﺎ ﺯﻣﲔ ﻫﻢ ﺗﺮﺍﺯ ﻧﺸﺪﻩ ﺑﺎﺷﺪ ،ﻣﻮﺟﺐ ﻟﺮﺯﺵ ﺑﻴﺶ ﺍﺯ ﺣﺪ ﻭ ﺩﺭﺳﺖ ﮐﺎﺭ ﻧﮑﺮﺩﻥ ﻣﺎﺷﲔ ﻣﯽ ﺷﻮﺩ .ﺑﻨﺎﺑﺮﺍﯾﻦ ﻣﻄﻤﺌﻦ ﺷﻮﯾﺪ ﮐﻪ ﻣﺎﺷﯿﻦ ﻟﺒﺎﺳﺸﻮﯾﯽ ﺑﻪ ﻃﻮﺭ ﺻﺤﯿﺢ ﻫﻢ ﺗﺮﺍﺯ ﺷﺪﻩ ﺑﺎﺷﺪ. ﺑﺎ ﺗﻮﺟﻪ ﺑﻪ ﻭﺿﻌﯿﺖ ﺗﺸﺖ ﺷﺴﺘﺸﻮ ،ﮐﻨﺘﺮﻝ ﮐﻨﯿﺪ ﮐﻪ ﻣﺎﺷﯿﻦ ﻟﺒﺎﺳﺸﻮﯾﯽ ﺑﻪ ﻃﻮﺭ ﻫﻢ ﺁﺏ ﺗﺮﺍﺯ ﮔﺬﺍﺷﺘﻪ ﺷﺪﻩ ﺑﺎﺷﺪ. • ﺩﺭﯾﭽﻪ ﻣﺎﺷﯿﻦ ﺭﺍ ﺑﺎﺯ ﮐﺮﺩﻩ ،ﺗﺸﺖ ﺭﺍ ﺗﺎ ﺳﻄﺢ ﺩﺭﺳﺖ ﺯﯾﺮ ﺩﺳﺘﮕﺎﻩ ﻟﺮﺯﻧﺪﻩ ﭘﺮ ﺁﺏ ﮐﻨﯿﺪ ﻭ ﭘﺎﯾﻪ ﻫﺎ ﺭﺍ ﻃﻮﺭی ﺗﻨﻈﯿﻢ ﮐﻨﯿﺪ ﮐﻪ ﺩﺳﺘﮕﺎﻩ ﻟﺮﺯﻧﺪﻩ ﺩﺭ ﻣﺮﮐﺰ ﺁﺏ ﺑﻪ ﻃﻮﺭی ﮐﻪ ﺩﺭ ﳕﻮﺩﺍﺭ ﻧﺸﺎﻥ ﺩﺍﺩﻩ ﺷﺪﻩ ﻗﺮﺍﺭ ﮔﺮﻓﺘﻪ ﺑﺎﺷﺪ. • ﻣﺎﺷﯿﻦ ﻟﺒﺎﺳﺸﻮﯾﯽ ﺭﺍ ﺑﻪ ﻓﺎﺻﻠﻪ ﺑﯿﺶ ﺍﺯ ١٠ﺳﺎﻧﺘﯽ ﻣﺘﺮ ﺍﺯ ﺩﯾﻮﺍﺭ ﻗﺮﺍﺭ ﺩﻫﯿﺪ. • ﭘﺎﯾﻪ ﻫﺎ ﺭﺍ ﺑﺮﺍی ﻫﻢ ﺗﺮﺍﺯی ﺗﻨﻈﯿﻢ ﮐﻨﯿﺪ. ﺷﻞ ﮐﻨﻴﺪ ﻗﻔﻞ ﻭﺻﻞ ﮐﺮﺩﻥ ﺷﯿﻠﻨﮓ ﺗﻐﺬﯾﻪ ﺁﺏ .١ﺁﺩﺍﭘﺘﻮﺭ ﺭﺍ ﺍﺯ ﺷﯿﻠﻨﮓ ﺗﻐﺬﯾﻪ ﺁﺏ ﺟﺪﺍ ﮐﻨﻴﺪ. .٢ﺍﺑﺘﺪﺍ ﺑﺎ ﺍﺳﺘﻔﺎﺩﻩ ﺍﺯ ﭘﯿﭻ ﮔﻮﺷﺘﯽ ﻧﻮﻉ ” ،“+ﭼﻬﺎﺭ ﭘﯿﭻ ﺭﻭی ﺁﺩﺍﭘﺘﻮﺭ ﺭﺍ ﺷﻞ ﮐﻨﯿﺪ .ﺳﭙﺲ ﺁﺩﺍﭘﺘﻮﺭ ﺭﺍ ﮔﺮﻓﺘﻪ ﻭ ﻗﺴﻤﺖ ) (bﺭﺍ ﺩﺭ ﺟﻬﺖ ﭘﯿﮑﺎﻥ ﮔﺮﺩﺍﻧﺪﻩ ﺗﺎ ﺍﯾﻨﮑﻪ ﯾﮏ ﺷﮑﺎﻑ ۵ﻣﯿﻠﯽ ﻣﺘﺮی ﺑﻪ ﻭﺟﻮﺩ ﺑﯿﺎﯾﺪ. ۵ﻣﯿﻠﯽ ﻣﺘﺮ .٣ﺁﺩﺍﭘﺘﻮﺭ ﺭﺍ ﺑﺎ ﻣﺤﮑﻢ ﮐﺮﺩﻥ ﭘﻴﭻ ﻫﺎ ﺑﻪ ﺷﻴﺮ ﺁﺏ ﻣﺘﺼﻞ ﮐﻨﻴﺪ .ﺳﭙﺲ ﻗﺴﻤﺖ ) (bﺭﺍ ﺩﺭ ﺟﻬﺖ ﭘﯿﮑﺎﻥ ﮔﺮﺩﺍﻧﺪﻩ ﻭ ) (aﻭ ) (bﺭﺍ ﺭﻭی ﻫﻢ ﻗﺮﺍﺭ ﺩﻫﯿﺪ. a b ﻓﺎﺭﺳﯽ ١٣ - 12:42:31 2014-03-17 WA70H4200SW_03414H_FA_140317.indd Sec10:13 ﻧﺼﺐ ﻭ ﻧﮕﻬﺪﺍﺭی .۴ﺷﯿﻠﻨﮓ ﺗﻐﺬﯾﻪ ﺁﺏ ﺭﺍ ﺑﻪ ﺁﺩﺍﭘﺘﻮﺭ ﻭﺻﻞ ﮐﻨﻴﺪ .ﻗﺴﻤﺖ ) (cﺍﺯ ﺷﯿﻠﻨﮓ ﺗﻐﺬﯾﻪ ﺁﺏ ﺭﺍ ﺑﻪ ﭘﺎﻳﲔ ﺑﮑﺸﻴﺪ .ﻫﻨﮕﺎﻣﯿﮑﻪ ﻗﺴﻤﺖ ) (cﺭﻫﺎ ﺷﺪ ،ﻟﻮﻟﻪ ﺑﻪ ﻃﻮﺭ ﺧﻮﺩﮐﺎﺭ ﺑﻪ ﺁﺩﺍﭘﺘﻮﺭ ﻭﺻﻞ ﺷﺪﻩ ﺻﺪﺍی »ﮐﻠﯿﮏ« ﻣﯽ ﮐﻨﺪ. c .۵ﺳﺮ ﺩﻳﮕﺮ ﺷﯿﻠﻨﮓ ﺗﻐﺬﯾﻪ ﺁﺏ ﺭﺍ ﺑﻪ ﺳﺮﭘﻴﭻ ﻣﻨﺒﻊ ﺁﺏ ﺩﺭ ﭘﺸﺖ ﻣﺎﺷﲔ ﻣﺘﺼﻞ ﮐﻨﻴﺪ. ﺷﯿﻠﻨﮓ ﺭﺍ ﺗﺎ ﺁﺧﺮ ﺑﻪ ﺩﺍﺧﻞ ﺩﺭ ﺟﻬﺖ ﻋﻘﺮﺑﻪ ﺳﺎﻋﺖ ﭘﻴﭻ ﮐﻨﻴﺪ. .١-۵ﺳﺮ ﺩﻳﮕﺮ ﺷﯿﻠﻨﮓ ﺗﻐﺬﯾﻪ ﺁﺏ ﺭﺍ ﺑﻪ ﺳﺮﭘﻴﭻ ﻣﻨﺒﻊ ﺁﺏ ﺩﺭ ﭘﺸﺖ ﻣﺎﺷﲔ ﻣﺘﺼﻞ ﮐﻨﻴﺪ .ﺷﯿﻠﻨﮓ ﺭﺍ ﺗﺎ ﺁﺧﺮ ﺑﻪ ﺩﺍﺧﻞ ﺩﺭ ﺟﻬﺖ ﻋﻘﺮﺑﻪ ﺳﺎﻋﺖ ﭘﻴﭻ ﮐﻨﻴﺪ. • ﺍﮔﺮ ﺷﯿﺮ ﺁﺏ ﺍﺯ ﻧﻮﻉ ﭘﯿﭽﯽ ﺍﺳﺖ ،ﺷﯿﻠﻨﮓ ﺗﻐﺬﯾﻪ ﺁﺏ ﺭﺍ ﺑﻪ ﻃﻮﺭی ﮐﻪ ﻧﺸﺎﻥ ﺩﺍﺩﻩ ﺷﺪﻩ ﺑﻪ ﺷﯿﺮ ﻣﺘﺼﻞ ﮐﻨﯿﺪ .ﺑﻌﺪ ﺍﺯ ﺍﯾﻨﮑﻪ ﺍﺗﺼﺎﻝ ﮐﺎﻣﻞ ﺷﺪ ،ﺍﮔﺮ ﺁﺏ ﺍﺯ ﻟﻮﻟﻪ ﻧﺸﺖ ﻣﯽ ﮐﻨﺪ ،ﻫﻤﺎﻥ ﻣﺮﺍﺣﻞ ﺭﺍ ﺗﮑﺮﺍﺭ ﮐﻨﯿﺪ. ﭘﺲ ﺍﺯ ﺧﺎﲤﻪ ﺍﺗﺼﺎﻝ ،ﺍﮔﺮ ﺍﺯ ﻟﻮﻟﻪ ﺁﺏ ﻧﺸﺖ ﻣﯽ ﻛﻨﺪ ،ﻫﻤﺎﻥ ﻣﺮﺍﺣﻞ ﺭﺍ ﺗﻜﺮﺍﺭ ﻛﻨﯿﺪ. ﺍﺯ ﻣﻌﻤﻮﻝ ﺗﺮﯾﻦ ﻧﻮﻉ ﺷﯿﺮ ﺁﺏ ﺑﺮﺍی ﺗﻐﺬﯾﻪ ﺁﺏ ﺍﺳﺘﻔﺎﺩﻩ ﺷﻮﺩ. ﺩﺭ ﺻﻮﺭﺗﯿﻜﻪ ﺷﯿﺮ ﺁﺏ ﭼﻬﺎﺭﮔﻮﺵ ﻭﯾﺎ ﺯﯾﺎﺩی ﺑﺰﺭگ ﺑﺎﺷﺪ ،ﺣﻠﻘﻪ ﻭﺍﺷﺮ ﺭﺍ ﻗﺒﻞ ﺍﺯ ﻭﺍﺭﺩ ﻛﺮﺩﻥ ﺷﯿﺮﺁﺏ ﺑﻪ ﺁﺩﺍﭘﺘﻮﺭ ﺧﺎﺭﺝ ﻛﻨﯿﺪ. ﺳﻮﺍﺭ ﮐﺮﺩﻥ ﭘﻨﻞ ﻣﺤﺎﻓﻈﺖ ﺩﺭ ﻣﻘﺎﺑﻞ ﻣﻮﺵ )ﺍﻧﺘﺨﺎﺑﯽ( ﻣﺎﺷﯿﻦ ﻟﺒﺎﺳﺸﻮﯾﯽ ﺭﺍ ﻗﺪﺭی ﮐﺞ ﮐﺮﺩﻩ ﻭ ﭘﻨﻞ ﺭﺍ ﺑﻠﻨﺪ ﮐﻨﯿﺪ ﺗﺎ ﺑﻪ ﺻﻮﺭﺗﯽ ﮐﻪ ﺩﺭ ﺗﺼﻮﯾﺮ ﻧﺸﺎﻥ ﺩﺍﺩﻩ ﺷﺪﻩ ﮐﻠﯿﮏ ﮐﻨﺪ. ﻃﺮﻑ ﻋﻘﺐ .١ﭘﻨﻞ ﻣﺤﺎﻓﻈﺖ ﺩﺭ ﻣﻘﺎﺑﻞ ﻣﻮﺵ ﻫﺎ ﺭﺍ ﺑﻪ ﺳﻮﺭﺍﺥ ﺳﻮﺍﺭ ﮐﺮﺩﻥ ﺩﺭ .٢ﺍﮔﺮ ﺩﺭ ﻭﺍﺭﺩ ﮐﺮﺩﻥ ﭘﻨﻞ ﻣﺸﮑﻠﯽ ﺩﺍﺭﯾﺪ ،ﻣﺎﺷﯿﻦ ﻟﺒﺎﺳﺸﻮﯾﯽ ﺭﺍ ﻗﺪﺭی ﺑﻠﻨﺪ ﮐﻨﯿﺪ ﻭ ﺁﻧﺮﺍ ﻭﺍﺭﺩ ﮐﻨﯿﺪ. ﺳﻤﺖ ﻋﻘﺐ ﺗﺎ ﺁﺧﺮ ﻭﺍﺭﺩ ﮐﻨﻴﺪ. ﻓﺎﺭﺳﯽ ١۴ - 12:42:31 2014-03-17 WA70H4200SW_03414H_FA_140317.indd Sec10:14 ﻃﺮﻳﻘﻪ ﻣﺘﺼﻞ ﮐﺮﺩﻥ ﺷﯿﻠﻨﮓ ﺗﺨﻠﻴﻪ )ﺍﻧﺘﺨﺎﺑﯽ( ﺩﺭ ﺻﻮﺭﺗﯿﻜﻪ ﻭﺍﺷﺮ ﺗﺨﻠﯿﻪ ﭘﻤﭙﯽ ﺍﺳﺖ ﮐﻼﻫﮏ ﺷﯿﻠﻨﮓ ﻧﺼﺐ ﻭ ﻧﮕﻬﺪﺍﺭی ﻟﻮﻟﻪ ﮐﻼﻫﮏ ﺭﺍ ﺧﺎﺭﺝ ﮐﺮﺩﻩ ﻭ ﺷﯿﻠﻨﮓ ﺧﺮﻭﺟﯽ ﺭﺍ ﻣﺘﺼﻞ ﮐﻨﯿﺪ. )ﮔﺰﻳﻨﻪ( ﻣﻄﻤﺌﻦ ﺷﻮﯾﺪ ﮐﻪ ﺷﯿﻠﻨﮓ ﺗﺨﻠﯿﻪ ﺭﺍ ﺑﻪ ﻃﻮﺭ ﻣﺤﮑﻢ ﺑﻪ ﺧﺮﻭﺟﯽ ﺗﺨﻠﯿﻪ ﺩﺭ ﭘﺸﺖ ﻣﺎﺷﯿﻦ ﻣﺘﺼﻞ ﮐﻨﯿﺪ. ﺷﯿﻠﻨﮓ ﺗﺨﻠﻴﻪ ١٠٠~٩٠ﺳﺎﻧﺘﯽ ﻣﺘﺮ ﻫﺎﺩی ﺷﯿﻠﻨﮓ ﻣﻄﻤﺌﻦ ﺷﻮﯾﺪ ﮐﻪ ﺷﯿﻠﻨﮓ ﺗﺨﻠﯿﻪ ﺭﺍ ﺑﻪ ﻃﻮﺭ ﻣﺤﮑﻢ ﺑﻪ ﺧﺮﻭﺟﯽ ﺗﺨﻠﯿﻪ ﺩﺭ ﭘﻬﻠﻮی ﻣﺎﺷﯿﻦ ﻣﺘﺼﻞ ﮐﻨﯿﺪ. ﺷﯿﻠﻨﮓ ﺗﺨﻠﯿﻪ ﺭﺍ ﺩﺭ ﻭﺿﻌﯿﺖ ﺩﺭ ﺣﺪﻭﺩ ٩٠ﺗﺎ ١٠٠ﺳﺎﻧﺘﯽ ﻣﺘﺮ ﺩﺭ ﺑﺎﻻی ﺳﻄﺢ ﺯﻣﯿﻦ ﻧﺼﺐ ﮐﻨﯿﺪ .ﺍﻧﺘﻬﺎی ﺷﯿﻠﻨﮓ ﺗﺨﻠﯿﻪ ﺭﺍ ﳕﯽ ﺗﻮﺍﻥ ﺯﯾﺮ ﺁﺏ ﻓﺮﻭ ﮐﺮﺩ. ﺩﺭ ﺻﻮﺭﺗﯿﮑﻪ ﻭﺍﺷﺮ ﻋﺎﺩی ﺍﺳﺖ )ﮔﺰﯾﻨﻪ( .١ﭘﺲ ﺍﺯ ﻓﺸﺮﺩﻥ ﺣﻠﻘﻪ ﭘﻴﻮﺳﺖ ،ﺑﻪ ﻟﻮﻟﻪ ﺗﺨﻠﻴﻪ ﻭﺍﺭﺩ ﮐﻨﻴﺪ .٢ﭘﺲ ﺍﺯ ﻭﺍﺭﺩ ﮐﺮﺩﻥ ﻟﻮﻟﻪ ﺗﺨﻠﯿﻪ ﺑﻪ ﺩﺍﺧﻞ ﺗﺨﻠﯿﻪ ،ﺑﻪ ﺧﺮﻭﺟﯽ ﺗﺨﻠﯿﻪ ﻣﺎﺷﯿﻦ ﻟﺒﺎﺳﺸﻮﯾﯽ ﻭﺻﻞ ﮐﻨﯿﺪ. ﺧﺮﻭﺟﯽ ﺗﺨﻠﯿﻪ .٣ﻣﻄﻤﺌﻦ ﺷﻮﯾﺪ ﮐﻪ ﺑﺎ ﻓﺸﺮﺩﻥ ﺣﻠﻘﻪ ﭘﯿﻮﺳﺖ ﻭ ﻓﺸﺎﺭ ﺩﺍﺩﻥ ﺁﻥ ﺑﻪ ﺧﺮﻭﺟﯽ ﺗﺨﻠﯿﻪ ،ﺁﻧﺮﺍ ﺑﻪ ﻃﻮﺭ ﻣﺤﮑﻢ ﻭﺻﻞ ﮐﻨﯿﺪ. • ﻃﻮﻝ ﻟﻮﻟﻪ ﺗﺨﻠﻴﻪ ﻗﺎﺑﻞ ﺗﻐﻴﻴﺮ ﺍﺳﺖ ﺗﺎ ﺑﺘﻮﺍﻧﻴﺪ ﻃﻮﻝ ﺭﺍ ﺑﻪ ﻃﻮﺭ ﻣﻨﺎﺳﺐ ﺍﻣﺘﺪﺍﺩ ﺩﻫﻴﺪ. ﻧﺤﻮﻩ ﺗﻐﻴﻴﺮ ﺟﻬﺖ ﺷﯿﻠﻨﮓ ﺗﺨﻠﻴﻪ )ﮔﺰﯾﻨﻪ( • ﺩﺳﺘﻪ ﺣﻠﻘﻪ ﭘﯿﻮﺳﺖ ﻓﺸﺎﺭ ﺩﺍﺩﻩ ﻣﯽ ﺷﻮﺩ ﺗﺎ ﻟﻮﻟﻪ ﺗﺨﻠﯿﻪ ﺑﻪ ﺑﯿﺮﻭﻥ ﮐﺸﯿﺪﻩ ﺷﻮﺩ .ﺟﻬﺖ ﻟﻮﻟﻪ ﺗﺨﻠﯿﻪ ﺭﺍ ﺗﻐﯿﯿﺮ ﺩﺍﺩﻩ ﻭ ﺭﻫﻨﻤﻮﺩﻫﺎی ﻓﻮﻕ ﺭﺍ ﺩﻭﺑﺎﺭﻩ ﺩﻧﺒﺎﻝ ﮐﻨﯿﺪ. ﻓﺎﺭﺳﯽ ١۵ - 12:42:31 2014-03-17 WA70H4200SW_03414H_FA_140317.indd Sec10:15 ﻧﺼﺐ ﻭ ﻧﮕﻬﺪﺍﺭی ﺍﺣﺘﻴﺎﻁ ﻫﺎ ﺩﺭ ﻫﻨﮕﺎﻡ ﻭﺍﺭﺩ ﻛﺮﺩﻥ ﻟﻮﻟﻪ ﺗﺨﻠﻴﻪ ﮐﻤﺘﺮ ﺍﺯ ٣ﻣﺘﺮ .١ﻫﻨﮕﺎﻣﯿﮑﻪ ﺍﺯ ﺷﯿﻠﻨﮓ ﺗﺨﻠﯿﻪ ﺗﻮﺳﻂ ﺍﺗﺼﺎﻝ ﺑﺎ ﺷﯿﻠﻨﮓ ﻫﺎی ﺩﯾﮕﺮ ﺍﺳﺘﻔﺎﺩﻩ ﻣﯽ ﺷﻮﺩ ،ﺍﺯ ٣ﻣﺘﺮ ﺑﯿﺸﺘﺮ ﲡﺎﻭﺯ ﻧﮑﻨﯿﺪ .٢ﻣﺮﺍﻗﺐ ﺑﺎﺷﻴﺪ ﮐﻪ ﺁﺏ ﺭﺍ ﺍﺯ ﺁﺧﺮ ﻟﻮﻟﻪ ﺗﺨﻠﻴﻪ ﺧﺎﺭﺝ ﮐﻨﻴﺪ. ﮐﻤﺘﺮ ﺍﺯ ٣ﻣﺘﺮ ﮐﻤﺘﺮ ﺍﺯ ۵ﺳﺎﻧﺘﯽ ﻣﺘﺮ .۴ﻟﻮﻟﻪ ﺗﺨﻠﯿﻪ ﺭﺍ ﺩﺭ ﺯﯾﺮ ﻣﺎﺷﯿﻦ ﻟﺒﺎﺳﺸﻮﯾﯽ ﻧﺼﺐ ﻧﮑﻨﯿﺪ. .٣ﺁﺳﺘﺎﻧﻪ ﺩﺭ ﻧﯿﺎﯾﺴﺘﯽ ﺑﯿﺶ ﺍﺯ ۵ﺳﺎﻧﺘﯽ ﻣﺘﺮ ﺑﺎﺷﺪ. ﺍﺟﺮﺍی ﺁﺯﻣﺎﯾﺶ ﺑﺎ ﺍﺟﺮﺍی ﺳﯿﮑﻞ ) Rinseﺁﺑﮑﺸﯽ( ) Spin +ﮔﺮﺩﺵ( ﭘﺲ ﺍﺯ ﺍﳒﺎﻡ ﻧﺼﺐ ،ﻣﻄﻤﺌﻦ ﺷﻮﯾﺪ ﮐﻪ ﻣﺎﺷﯿﻦ ﻟﺒﺎﺳﺸﻮﯾﯽ ﺭﺍ ﺩﺭﺳﺖ ﻧﺼﺐ ﻣﯽ ﮐﻨﯿﺪ. ﺍﻓﺰﻭﺩﻥ ﺷﻮﯾﻨﺪﻩ .١ﺟﻌﺒﻪ ﺷﻮﯾﻨﺪﻩ ﺭﺍ ﺑﺎ ﮐﺸﯿﺪﻥ ﺁﻥ ﺩﺭ ﺟﻬﺖ ﭘﯿﮑﺎﻥ ﺑﻪ ﻃﻮﺭی ﮐﻪ ﺩﺭ ﳕﻮﺩﺍﺭ ﻧﺸﺎﻥ ﺩﺍﺩﻩ ﺷﺪﻩ ﺑﺎﺯ ﮐﺮﺩﻩ ﻭ ﺳﭙﺲ ﭘﻮﺩﺭ ﺷﻮﯾﻨﺪﻩ ﺭﺍ ﺩﺭ ﺟﻌﺒﻪ ﺷﻮﯾﻨﺪﻩ ﺑﺮﯾﺰﯾﺪ. .٢ﻣﻘﺪﺍﺭ ﺷﻮﯾﻨﺪﻩ ﺑﺮﺍی ﯾﮏ ﺑﺎﺭ ﻣﺼﺮﻑ ﺭﺍ ﺑﻪ ﻃﻮﺭ ﻣﺴﻄﺢ ﻗﺮﺍﺭ ﺩﻫﯿﺪ ﺑﻪ ﻃﻮﺭﯾﮑﻪ ﺷﻮﯾﻨﺪﻩ ﺍﺯ ﺟﻌﺒﻪ ﺑﯿﺮﻭﻥ ﻧﺮﯾﺰﺩ. ﺍﺿﺎﻓﻪ ﻛﺮﺩﻥ ﻧﺮﻡ ﻛﻨﻨﺪﻩ ﭘﺎﺭﭼﻪ ﺩﺭﻳﭽﻪ ﺭﺍ ﺩﺭ ﺟﻬﺖ ﭘﯿﮑﺎﻥ ﮐﺸﯿﺪﻩ ﻭ ﺑﺎﺯ ﮐﻨﯿﺪ ،ﺷﻮﯾﻨﺪﻩ ﺁﺑﮑﺸﯽ ﺭﺍ ﻭﺍﺭﺩ ﮐﺮﺩﻩ ﻭ ﺩﺭﯾﭽﻪ ﺭﺍ ﺩﺭ ﺟﻬﺖ ﻣﺨﺎﻟﻒ ﮐﺸﯿﺪﻩ ﻭ ﺑﺒﻨﺪﯾﺪ. • • • • • ﻧﺮﻡ ﮐﻨﻨﺪﻩ ﭘﺎﺭﭼﻪ ﺭﺍ ﺑﻪ ﻃﻮﺭ ﻣﻨﺎﺳﺐ ﺩﺭ ﻭﺭﻭﺩی ﻧﺮﻡ ﮐﻨﻨﺪﻩ ﺑﺮﯾﺰﯾﺪ .ﺳﭙﺲ ﻧﺮﻡ ﮐﻨﻨﺪﻩ ﺑﻪ ﻃﻮﺭ ﺧﻮﺩﮐﺎﺭ ﺩﺭ ﺳﯿﮑﻞ ﺁﺑﮑﺸﯽ ﭘﺨﺶ ﻣﯽ ﺷﻮﺩ .ﺑﺮﺍی ﭘﺨﺶ ﮐﺮﺩﻥ ﺧﻮﺩﮐﺎﺭ ﻧﺮﻡ ﮐﻨﻨﺪﻩ ﭘﺎﺭﭼﻪ ،ﻣﻄﻤﺌﻦ ﺷﻮﯾﺪ ﮐﻪ ﻫﻤﻪ ﺳﯿﮑﻞ ﻫﺎی ﺷﺴﺘﺸﻮ ،ﺁﺑﮑﺸﯽ ﻭ ﮔﺮﺩﺵ ﻻﺯﻡ ﺭﺍ ﺍﻧﺘﺨﺎﺏ ﮐﺮﺩﻩ ﺑﺎﺷﯿﺪ. ﺩﺭ ﻣﺤﻔﻈﻪ ﻣﺎﺩﻩ ﻧﺮﻡ ﮐﻨﻨﺪﻩ ﺍﺯ ﺷﻮﯾﻨﺪﻩ ،ﻣﺎﺩﻩ ﺳﻔﻴﺪ ﮐﻨﻨﺪﻩ ﻭﻳﺎ ﺁﻫﺎﺭ ﺍﺳﺘﻔﺎﺩﻩ ﻧﮑﻨﻴﺪ. ﺍﺳﺘﻔﺎﺩﻩ ﺑﯿﺶ ﺍﺯ ﺣﺪ ﺍﺯ ﻣﺎﺩﻩ ﻧﺮﻡ ﮐﻨﻨﺪﻩ ﳑﮑﻦ ﺍﺳﺖ ﻧﺘﺎﯾﺞ ﻧﺎﻣﻄﻠﻮﺑﯽ ﺑﻮﺟﻮﺩ ﺑﯿﺎﻭﺭﺩ. ﺩﺭﻳﭽﻪ ﺭﺍ ﺩﺭ ﺣﲔ ﺳﯿﮑﻞ ﺧﺸﮏ ﮐﻦ ﭼﺮﺧﺸﯽ ﺑﺎﺯ ﻧﮑﻨﯿﺪ .ﺍﮔﺮ ﺯﯾﺎﺩی ﺯﻭﺩ ﺍﺿﺎﻓﻪ ﺷﻮﺩ، ﺗﺄﺛﯿﺮ ﺁﻥ ﮐﺎﻫﺶ ﭘﯿﺪﺍ ﺧﻮﺍﻫﺪ ﮐﺮﺩ. ﻣﺎﺩﻩ ﻧﺮﻡ ﮐﻨﻨﺪﻩ ﺭﺍ ﺑﺮﺍی ﻣﺪﺕ ﻃﻮﻻﻧﯽ ﺩﺭ ﭘﺨﺶ ﮔﺮ ﻣﺎﺩﻩ ﻧﺮﻡ ﮐﻨﻨﺪﻩ ﻗﺮﺍﺭ ﻧﺪﻫﯿﺪ .ﭼﻮﻥ ﻣﺎﺩﻩ ﻧﺮﻡ ﮐﻨﻨﺪﻩ ﺳﻔﺖ ﻣﻲ ﺷﻮﺩ. ﻓﺎﺭﺳﯽ ١۶ - 12:42:32 2014-03-17 WA70H4200SW_03414H_FA_140317.indd Sec10:16 ﻓﯿﻠﺘﺮ ﺍﺗﺼﺎﻟﯽ ﻣﻨﺒﻊ ﺁﺏ .١ﻓﯿﻠﺘﺮ ﺭﺍ ﺑﯿﺮﻭﻥ ﮐﺸﯿﺪﻩ ﻭ ﺑﻪ ﺧﻮﺑﯽ ﺑﺸﻮﯾﯿﺪ. ﻧﺼﺐ ﻭ ﻧﮕﻬﺪﺍﺭی .٢ﻓﯿﻠﺘﺮ ﺭﺍ ﺑﻪ ﺩﺍﺧﻞ ﮐﺸﯿﺪﻩ ﻭ ﺷﯿﻠﻨﮓ ﺭﺍ ﺑﻪ ﻭﺭﻭﺩی ﺷﯿﺮ ﺁﺏ ﻣﺤﮑﻢ ﻣﺘﺼﻞ ﮐﻨﯿﺪ. .٣ﻛﻨﺘﺮﻝ ﻛﻨﯿﺪ ﻛﻪ ﺁﺏ ﻧﺸﺖ ﳕﯽ ﻛﻨﺪ. ﺍﺗﺼﺎﻟﯽ ﺭﺍ ﻣﺤﻜﻢ ﻛﻨﯿﺪ. ﲤﻴﺰ ﮐﺮﺩﻥ ﻓﻴﻠﺘﺮ ﺗﻮﺭی ﻓﯿﻠﺘﺮ ﺭﺍ ﻣﺮﺗﺐ ﲤﯿﺰ ﮐﻨﯿﺪ ﺗﺎ ﻣﺎﺷﯿﻦ ﻟﺒﺎﺳﺸﻮﯾﯽ ﲤﯿﺰ ﲟﺎﻧﺪ. .١ﻗﺴﻤﺖ ﺑﺎﻻﻳﻲ ﻓﻴﻠﺘﺮ ﺑﻬﺪﺍﺷﺘﯽ ﺭﺍ ﻓﺸﺎﺭ ﺩﺍﺩﻩ ﻭ ﺑﻪ ﺩﺍﺧﻞ ﺑﮑﺸﻴﺪ. .٢ﭘﻮﺷﺶ ﺭﺍ ﺑﻪ ﻃﻮﺭﻳﮑﻪ ﺩﺭ ﳕﻮﺩﺍﺭ ﻧﺸﺎﻥ ﺩﺍﺩﻩ ﺷﺪﻩ ﺑﺎﺯ ﮐﻨﻴﺪ. .٣ﻓﻴﻠﺘﺮ ﺑﻬﺪﺍﺷﺘﯽ ﺭﺍ ﲤﻴﺰ ﮐﻨﻴﺪ. .۴ﺳﺮﭘﻮﺵ ﺭﺍ ﺑﺴﺘﻪ ﻭ ﺍﺑﺘﺪﺍ ﻗﺴﻤﺖ ﭘﺎﻳﲔ ﻓﻴﻠﺘﺮ ﺭﺍ ﻭﺍﺭﺩ ﺳﺒﺪ ﮐﺮﺩﻩ ﻭ ﺳﭙﺲ ﻓﻴﻠﺘﺮ ﺭﺍ ﻓﺸﺎﺭ ﺩﻫﻴﺪ ﺗﺎ ﺻﺪﺍﻱ »ﮐﻠﻴﮏ« ﮐﻨﺪ. ﲤﻴﺰ ﮐﺮﺩﻥ ﻓﻴﻠﺘﺮ ﭘﻤﭗ )ﺍﻧﺘﺨﺎﺑﯽ( .١ﻳﻚ ﻛﻬﻨﻪ ﻳﺎ ﺣﻮﻟﻪ ﺭﺍ ﺯﻳﺮ ﻓﻴﻠﺘﺮ ﺷﺴﺘﺸﻮ ﻗﺮﺍﺭ ﺩﻫﻴﺪ ﺗﺎ ﺍﺯ ﺧﻴﺲ ﺷﺪﻥ ﺯﻣﲔ ﺟﻠﻮﮔﻴﺮﻱ ﺷﻮﺩ ﻭ ﻓﻴﻠﺘﺮ ﺭﺍ ﺩﺭ ﺟﻬﺖ ﻋﻜﺲ ﻋﻘﺮﺑﻪ ﺳﺎﻋﺖ ﭼﺮﺧﺎﻧﺪﻩ ﻭ ﺑﻪ ﺳﻤﺖ ﺧﺎﺭﺝ ﺑﻜﺸﻴﺪ. .٢ﻫﺮﮔﻮﻧﻪ ﻛﺜﺎﻓﺎﺕ ﺭﺍ ﺍﺯ ﻓﻴﻠﺘﺮ ﺟﺪﺍ ﻛﻨﻴﺪ. .٣ﻓﻴﻠﺘﺮ ﺭﺍ ﺑﺎ ﭼﺮﺧﺎﻧﺪﻥ ﺩﺭ ﺟﻬﺖ ﻋﻘﺮﺑﻪ ﺳﺎﻋﺖ ﺗﺎ ﺍﻳﻨﻜﻪ ﻗﻔﻞ ﺷﻮﺩ ﺑﻪ ﺳﺮﺟﺎﻳﺶ ﺑﺮﮔﺮﺩﺍﻧﻴﺪ. ١ ٢ ٣ ﲤﯿﺰ ﮐﺮﺩﻥ ﻣﺤﻔﻈﻪ ﺷﻮﯾﻨﺪﻩ .١ﻣﺤﻔﻈﻪ ﺷﻮﯾﻨﺪﻩ ﺭﺍ ﺍﺯ ﻣﺎﺷﯿﻦ ﻟﺒﺎﺳﺸﻮﺋﯽ ﺟﺪﺍ ﮐﻨﯿﺪ. .٢ﺳﺮﭘﻮﺵ ﺁﺑﮑﺸﯽ ﺭﺍ ﺍﺯ ﻣﺤﻔﻈﻪ ﺷﻮﯾﻨﺪﻩ ﺟﺪﺍ ﮐﺮﺩﻩ ﻭ ﲤﯿﺰ ﮐﻨﯿﺪ. .٣ﺳﺮﭘﻮﺵ ﺁﺑﮑﺸﯽ ﺭﺍ ﺳﻮﺍﺭ ﮐﺮﺩﻩ ﻭ ﻣﺤﻔﻈﻪ ﺷﻮﯾﻨﺪﻩ ﺭﺍ ﺑﻪ ﻣﺎﺷﯿﻦ ﻟﺒﺎﺳﺸﻮﯾﯽ ﻭﺍﺭﺩ ﮐﻨﯿﺪ. ﻓﺎﺭﺳﯽ ١٧ - 12:42:32 2014-03-17 WA70H4200SW_03414H_FA_140317.indd Sec10:17 ﻋﯿﺐ ﯾﺎﺑﯽ ﮐﻨﺘﺮﻝ ﮐﻨﻴﺪ ﻣﺸﻜﻞ ﻣﺎﺷﯿﻦ ﻟﺒﺎﺳﺸﻮﯾﯽ ﮐﺎﺭ ﳕﯽ ﮐﻨﺪ • • • • ﺁﻳﺎ ﺷﻴﺮ ﺁﺏ ﺑﺎﺯ ﺍﺳﺖ؟ ﺁﯾﺎ ﻣﺎﺷﯿﻦ ﻟﺒﺎﺳﺸﻮﯾﯽ ﺑﻪ ﭘﺮﯾﺰ ﺯﺩﻩ ﺷﺪﻩ ﺍﺳﺖ؟ ﺁﻳﺎ ﺑﺮﻕ ﻗﻄﻊ ﺷﺪﻩ؟ ﺁﯾﺎ ﺑﻪ ﺍﻧﺪﺍﺯﻩ ﮐﺎﻓﯽ ﺁﺏ ﻫﺴﺖ؟ ﺁﺏ ﺗﺨﻠﯿﻪ ﳕﯽ ﺷﻮﺩ • • • • ﺁﻳﺎ ﻟﻮﻟﻪ ﺗﺨﻠﻴﻪ ﺑﻪ ﺳﻤﺖ ﭘﺎﻳﲔ ﺍﺳﺖ؟ )ﺑﺪﻭﻥ ﭘﻤﭗ( ﺁﻳﺎ ﻟﻮﻟﻪ ﺗﺨﻠﻴﻪ ﻣﻨﺠﻤﺪ ﺷﺪﻩ؟ ﺁﻳﺎ ﻟﻮﻟﻪ ﺗﺨﻠﻴﻪ ﮔﻴﺮ ﮐﺮﺩﻩ؟ ﺍﮔﺮ ﺁﺏ ﺩﺭ ﻇﺮﻑ ٣٠ﺩﻗﻴﻘﻪ ﺗﺨﻠﻴﻪ ﻧﺸﻮﺩ ،ﻳﮏ ﺯﻧﮓ ﺍﺧﺒﺎﺭ ﺑﻪ ﺻﺪﺍ ﺩﺭﺧﻮﺍﻫﺪ ﺁﻣﺪ ﻭ ﻧﺸﺎﻧﮕﺮ ﻭﻗﺖ ﺑﺎﻗﻴﻤﺎﻧﺪﻩ " "5Eﺭﺍ ﻧﺸﺎﻥ ﺧﻮﺍﻫﺪ ﺩﺍﺩ. ﺁﺏ ﺟﺮﻳﺎﻥ ﭘﻴﺪﺍ ﻧﻜﺮﺩﻩ • • • • • ﺁﻳﺎ ﺷﻴﺮ ﺁﺏ ﺑﺎﺯ ﺍﺳﺖ؟ ﺁﻳﺎ ﺁﺏ ﻗﻄﻊ ﺷﺪﻩ؟ ﺁﯾﺎ ﺷﯿﻠﻨﮓ ﻣﻨﺒﻊ ﺁﺏ ﻭﯾﺎ ﺍﺗﺼﺎﻟﯽ ﺷﯿﻠﻨﮓ ﮔﯿﺮﮐﺮﺩﮔﯽ ﺩﺍﺭﺩ؟ ﺁﻳﺎ ﺷﻴﺮ ﺁﺏ ﻣﻨﺠﻤﺪ ﺷﺪﻩ؟ ﺍﮔﺮ ﺗﻐﺬﯾﻪ ﺁﺏ ﺩﺭ ﻇﺮﻑ ١ﺳﺎﻋﺖ ﲤﺎﻡ ﻧﺸﺪﻩ ﻭﯾﺎ ﺑﺮﺍی ۵ﺩﻗﯿﻘﻪ ﺑﻌﺪ ﺍﺯ ﺷﺮﻭﻉ ﺗﻐﺬﯾﻪ ﺁﺏ ﺗﻐﯿﯿﺮی ﺩﺭ ﺳﻄﺢ ﺁﺏ ﺍﯾﺠﺎﺩ ﻧﺸﺪﻩ ) ١٠ﺩﻗﯿﻘﻪ ﺑﺮﺍی ﺑﺮﺧﯽ ﻣﺪﻝ ﻫﺎ( ،ﺯﻧﮓ ﺑﻪ ﺻﺪﺍ ﺩﺭ ﻣﯽ ﺁﯾﺪ ﻭ ” “4Eﺩﺭ ﻧﺸﺎﻧﮕﺮ ﻭﻗﺖ ﺑﺎﻗﯿﻤﺎﻧﺪﻩ ﳕﺎﯾﺎﻥ ﻣﯽ ﺷﻮﺩ. ﭼﺮﺧﺶ ﮐﺎﺭ ﳕﯽ ﮐﻨﺪ • • ﺁﻳﺎ ﻟﺒﺎﺱ ﻫﺎ ﺑﻪ ﻃﻮﺭ ﻫﻢ ﺳﻄﺢ ﺩﺭ ﻣﺎﺷﯿﻦ ﻟﺒﺎﺳﺸﻮﯾﯽ ﻗﺮﺍﺭ ﺩﺍﺩﻩ ﺷﺪﻩ ﺍﻧﺪ؟ ﺁﻳﺎ ﻣﺎﺷﯿﻦ ﺑﺮ ﺭﻭی ﯾﮏ ﺳﻄﺢ ﻣﻘﺎﻭﻡ ﻭ ﻣﺴﻄﺢ ﻗﺮﺍﺭ ﮔﺮﻓﺘﻪ ﺍﺳﺖ؟ ﺁﺏ ﻟﺒﺮﯾﺰ ﻣﯽ ﺷﻮﺩ • • ﺑﻌﺪ ﺍﺯ ﮔﺮﺩﺵ ﺩﻭﺑﺎﺭﻩ ﺷﺮﻭﻉ ﮐﻨﻴﺪ. ﺍﮔﺮ ﻋﻼﻣﺖ ﺧﻄﺎ ﻫﻨﻮﺯ ﻧﺸﺎﻥ ﺩﺍﺩﻩ ﻣﯽ ﺷﻮﺩ ،ﺑﺎ ﺳﺎﺯﻣﺎﻥ ﲤﺎﺱ ﺑﮕﯿﺮﯾﺪ. ﺍﯾﻦ ﻣﻮﺿﻮﻉ ﻧﺸﺎﻥ ﻣﯽ ﺩﻫﺪ ﮐﻪ ﺧﻄﺎی ﻗﻔﻞ ﮐﻮﺩک ﺍﺗﻔﺎﻕ ﺍﻓﺘﺎﺩﻩ ﺍﺳﺖ • ﭘﯿﻐﺎﻡ ﺧﻄﺎ ﺩﺭ ﻓﻮﺍﺻﻞ ١ﺛﺎﻧﯿﻪ ﭼﺸﻤﮏ ﺯﺩﻩ ﻭ ﺁﺏ ﺩﺭ ﺣﺎﻟﯿﮑﻪ ﺁﻻﺭﻡ ﺑﻪ ﺻﺪﺍ ﺩﺭ ﺁﻣﺪﻩ ﺗﺨﻠﯿﻪ ﻣﯽ ﺷﻮﺩ. )ﭘﯿﻐﺎﻡ ﻧﺸﺎﻥ ﺩﺍﺩﻩ ﺷﺪﻩ “CL” :ﯾﺎ ”(“dE ﺍﯾﻦ ﻋﻤﻠﮑﺮﺩ ﺑﺮﺍی ﺟﻠﻮﮔﯿﺮی ﺍﺯ ﺧﻔﻪ ﺷﺪﻥ ﮐﻮﺩﮐﺎﻥ ﻫﻨﮕﺎﻣﯿﮑﻪ ﺑﻪ ﺩﺍﺧﻞ ﺗﺸﺖ ﺷﺴﺘﺸﻮ ﺍﻓﺘﺎﺩﻩ ﺑﺎﺷﻨﺪ ﻣﯽ ﺑﺎﺷﺪ .ﻫﻨﮕﺎﻣﯿﮑﻪ ﺗﺨﻠﯿﻪ ﺧﺎﲤﻪ ﭘﯿﺪﺍ ﮐﺮﺩ ﻭ ﻣﺎﺷﯿﻦ ﺭﺍ ﺧﺎﻣﻮﺵ ﻭ ﺳﭙﺲ ﺭﻭﺷﻦ ﮐﺮﺩﯾﺪ، ﻣﺎﺷﯿﻦ ﻟﺒﺎﺳﺸﻮﺋﯽ ﺑﻪ ﻃﺮﺯ ﻋﺎﺩی ﮐﺎﺭ ﺧﻮﺍﻫﺪ ﮐﺮﺩ. ﺑﺮﺍی ﭘﺎک ﮐﺮﺩﻥ ﳕﺎﯾﺶ ” ،“CLﭘﺲ ﺍﺯ ﺍﯾﻨﮑﻪ ﺗﺨﻠﯿﻪ ﲤﺎﻡ ﺷﺪ ،ﺩﺭﯾﭽﻪ ﻣﺎﺷﯿﻦ ﻟﺒﺎﺳﺸﻮﺋﯽ ﺭﺍ ﺑﺴﺘﻪ ﻭ ﺁﻧﺮﺍ ﺧﺎﻣﻮﺵ ﻭ ﺳﭙﺲ ﺭﻭﺷﻦ ﮐﻨﯿﺪ. ﺁﯾﺎ ﺩﮐﻤﻪ ) Start/Pauseﺷﺮﻭﻉ/ﻣﮑﺚ( ﻓﺸﺮﺩﻩ ﺷﺪﻩ ﺍﺳﺖ؟ • • • ﺧﻄﺎی ﻧﺸﺖ ﺁﺏ • • • ﮐﻨﺘﺮﻝ ﮐﻨﯿﺪ ﮐﻪ ﺍﻧﺘﻬﺎی ﺷﯿﻠﻨﮓ ﺗﺨﻠﯿﻪ ﺭﻭی ﮐﻒ ﺍﺗﺎﻕ ﮔﺬﺍﺷﺘﻪ ﺷﺪﻩ ﺍﺳﺖ) .ﺷﯿﻠﻨﮓ ﺑﺎﯾﺪ ﺭﻭی ﭘﻤﭗ ﺁﻭﯾﺰﺍﻥ ﺑﺎﺷﺪ -ﺭﺍﻫﻨﻤﺎی ﺷﯿﻠﻨﮓ( ﮐﻨﺘﺮﻝ ﮐﻨﯿﺪ ﮐﻪ ﺷﯿﻠﻨﮓ ﺗﺨﻠﯿﻪ ﺗﻮﺳﻂ ﻣﻮﺍﺩ ﺧﺎﺭﺟﯽ ﮔﯿﺮﮐﺮﺩﮔﯽ ﻧﺪﺍﺷﺘﻪ ﺑﺎﺷﺪ. ﺍﮔﺮ ﺧﻄﺎ ﺑﺎﻗﯽ ﻣﺎﻧﺪ ،ﺑﺎ ﻣﺮﮐﺰ ﺗﻌﻤﯿﺮﺍﺗﯽ ﲤﺎﺱ ﺣﺎﺻﻞ ﳕﺎﺋﯿﺪ. ﻓﺎﺭﺳﯽ ١٨ - 12:42:33 2014-03-17 WA70H4200SW_03414H_FA_140317.indd 18 ﻣﺎﺷﯿﻦ ﻟﺒﺎﺳﺸﻮﯾﯽ ﮐﺎﺭ ﳕﯽ ﮐﻨﺪ؟ ﻣﺸﻜﻞ ﮐﻨﺘﺮﻝ ﮐﻨﻴﺪ ﺟﺮﻳﺎﻥ ﺑﺮﻕ ﻗﻄﻊ ﺷﺪﻩ ﺍﺳﺖ. ﺁﯾﺎ ﻭﻟﺘﺎژ ﺑﺮﻕ ﻋﺎﺩی ﺍﺳﺖ؟ ﺁﯾﺎ ﻣﺎﺷﯿﻦ ﻟﺒﺎﺳﺸﻮﯾﯽ ﺑﻪ ﭘﺮﯾﺰ ﺯﺩﻩ ﺷﺪﻩ ﺍﺳﺖ؟ ﺳﻴﻢ ﺑﺮﻕ ﺭﺍ ﺑﻪ ﭘﺮﻳﺰ ﺑﺰﻧﻴﺪ. ﺁﺏ ﺗﺨﻠﯿﻪ ﳕﯽ ﺷﻮﺩ. ﺁﻳﺎ ﺷﯿﻠﻨﮓ ﺗﺨﻠﻴﻪ ﺗﺎ ﺷﺪﻩ؟ ﺷﯿﻠﻨﮓ ﺗﺨﻠﻴﻪ ﺭﺍ ﺑﺎﺯ ﮐﻨﻴﺪ. ﺁﻳﺎ ﺧﺮﻭﺟﯽ ﺷﯿﻠﻨﮓ ﺗﺨﻠﯿﻪ ﮔﯿﺮ ﮐﺮﺩﻩ ﺍﺳﺖ؟ ﮐﺜﺎﻓﺎﺕ ﺭﺍ ﺧﺎﺭﺝ ﮐﻨﯿﺪ ﺗﺎ ﲤﯿﺰ ﺷﻮﺩ. ﻣﺎﺷﯿﻦ ﻟﺒﺎﺳﺸﻮﯾﯽ ﮐﺎﺭ ﳕﯽ ﮐﻨﺪ. ﺁﻳﺎ ﺩﺭﻳﭽﻪ ﻣﺎﺷﲔ ﺑﺎﺯ ﺷﺪﻩ؟ ﺩﺭﻳﭽﻪ ﺭﺍ ﺑﺒﻨﺪﻳﺪ. ﺁﯾﺎ ﺩﮐﻤﻪ )Pauseﻣﮑﺚ( ﺭﻭﺷﻦ ﺍﺳﺖ؟ ﺩﮐﻤﻪ ) Start/Pauseﺷﺮﻭﻉ/ﺗﻮﻗﻒ( ﺭﺍ ﻳﮑﺒﺎﺭ ﺩﻳﮕﺮ ﻓﺸﺎﺭ ﺩﺍﺩﻩ ﻭ ﮐﻨﺘﺮﻝ ﮐﻨﻴﺪ ﮐﻪ ﻣﺎﺷﲔ ﺭﻭﺷﻦ ﺷﻮﺩ. ﻣﺎﺷﯿﻦ ﻟﺒﺎﺳﺸﻮﯾﯽ ﮐﺎﺭ ﳕﯽ ﮐﻨﺪ؟ ﺁﻳﺎ ﺷﯿﻠﻨﮓ ﺗﺨﻠﻴﻪ ﺑﻪ ﺳﻤﺖ ﭘﺎﻳﲔ ﺍﺳﺖ؟ ﺷﯿﻠﻨﮓ ﺗﺨﻠﻴﻪ ﺭﺍ ﺑﻪ ﺳﻤﺖ ﭘﺎﻳﲔ ﺑﮕﺬﺍﺭﻳﺪ. ﺁﻳﺎ ﺁﺏ ﮐﺎﻓﯽ ﺗﺎ ﺳﻄﺢ ﺁﺏ ﭘﺮ ﺷﺪﻩ ﺍﺳﺖ؟ ﺍﮔﺮ ﻓﺸﺎﺭ ﺁﺏ ﭘﺎﯾﯿﻦ ﺍﺳﺖ ،ﺷﺮﻭﻉ ﺷﺴﺘﺸﻮ ﺑﯿﺸﺘﺮ ﻃﻮﻝ ﻣﯽ ﮐﺸﺪ. ﺁﻳﺎ ﺷﻴﺮ ﺁﺏ ﺑﺴﺘﻪ ﺍﺳﺖ؟ ﺷﻴﺮ ﺭﺍ ﺑﺮﺍﻱ ﺟﺮﻳﺎﻥ ﭘﻴﺪﺍ ﻛﺮﺩﻥ ﺁﺏ ﺑﺎﺯ ﮐﻨﻴﺪ. ﺁﯾﺎ ﺩﺭﯾﭽﻪ ﺭﺍ ﺩﺭ ﻃﻮﻝ ﺳﯿﮑﻞ ﭼﺮﺧﺶ ﺑﺎﺯ ﮐﺮﺩﯾﺪ؟ ﺩﺭﻳﭽﻪ ﺭﺍ ﺑﺴﺘﻪ ﻭ ﺩﮐﻤﻪ ) Start/Pauseﺷﺮﻭﻉ/ﻣﮑﺚ( ﺭﺍ ﺑﺮﺍی ﺍﺩﺍﻣﻪ ﮐﺎﺭ ﻓﺸﺎﺭ ﺩﻫﻴﺪ. ﺍﮔﺮ ﺷﯿﻠﻨﮓ ﺗﺨﻠﻴﻪ ﻭ ﺳﺒﺪ ﮔﺮﺩﺵ ﻣﻨﺠﻤﺪ ﺷﺪﻩ ﺍﻧﺪ، ﻣﻮﺍﺭﺩ ﺯﻳﺮ ﺭﺍ ﺍﺟﺮﺍ ﮐﻨﻴﺪ. • • • • ﺁﺏ ﺩﺍﻍ ﺑﻪ ﺷﻴﺮ ﺁﺏ ﻣﻨﺠﻤﺪ ﺷﺪﻩ ﺍﺿﺎﻓﻪ ﮐﺮﺩﻩ ﻭ ﻟﻮﻟﻪ ﺗﺨﻠﻴﻪ ﺭﺍ ﺟﺪﺍ ﮐﻨﻴﺪ .ﺩﺭ ﺁﺏ ﺩﺍﻍ ﺑﺨﻴﺴﺎﻧﻴﺪ. ﺑﺮﺍی ١٠ﺩﻗﯿﻘﻪ ﺩﺭ ﺳﺒﺪ ﮔﺮﺩﺵ ﺁﺏ ﺩﺍﻍ ﺑﺮﯾﺰﯾﺪ. ﯾﮏ ﺣﻮﻟﻪ ﺁﺏ ﺩﺍﻍ ﺭﺍ ﺑﺮ ﺭﻭی ﺍﺗﺼﺎﻟﯽ ﻟﻮﻟﻪ ﺗﺨﻠﯿﻪ ﺑﮕﺬﺍﺭﯾﺪ. ﺍﮔﺮ ﻳﺦ ﻟﻮﻟﻪ ﺗﺨﻠﻴﻪ ﺁﺏ ﺷﺪ ،ﺩﻭﺑﺎﺭﻩ ﻭﺻﻞ ﮐﻨﻴﺪ ﻭ ﺗﺨﻠﻴﻪ ﺁﺏ ﻣﻨﺎﺳﺐ ﺭﺍ ﮐﻨﺘﺮﻝ ﮐﻨﻴﺪ. ﺁﺏ ﺑﻪ ﻃﻮﺭ ﺧﻮﺩﻛﺎﺭ ﺗﺨﻠﯿﻪ ﻣﯽ ﺷﻮﺩ. • ﺁﺏ ﺩﺭ ﺍﺗﺼﺎﻟﯽ ﺷﯿﻠﻨﮓ ﺗﻐﺬﯾﻪ ﺁﺏ ﻧﺸﺖ ﻣﯽ ﮐﻨﺪ. ﺍﮔﺮ ﻗﺴﻤﺖ ﺍﺗﺼﺎﻟﯽ ﺷﯿﺮ ﺁﺏ ﺷﻞ ﺑﺎﺷﺪ ،ﺁﺏ ﻧﺸﺖ ﻣﯽ ﮐﻨﺪ. ﻣﺮﺍﺣﻞ ﺳﻮﺍﺭ ﮐﺮﺩﻥ ﺭﺍ ﺩﻭﺑﺎﺭﻩ ﺗﮑﺮﺍﺭ ﮐﻨﻴﺪ) .ﺑﻪ »ﺍﺗﺼﺎﻝ ﻟﻮﻟﻪ ﺗﻐﺬﯾﻪ ﺁﺏ« ﻣﺮﺍﺟﻌﻪ ﺷﻮﺩ( ﺗﺨﻠﻴﻪ ﺗﻮﺳﻂ ﺳﮑﻪ ﻭﻳﺎ ﺳﻨﺠﺎﻕ ﮔﻴﺮ ﮐﺮﺩﻩ ﺍﺳﺖ .ﺷﯿﻠﻨﮓ ﺗﺨﻠﯿﻪ ﺑﺮ ﺭﻭی ﻗﻼﺏ ﺷﯿﻠﻨﮓ ﺗﺨﻠﯿﻪ ﺁﻭﯾﺰﺍﻥ ﺷﺪﻩ ﺍﺳﺖ .ﺳﺒﺪ ﮔﺮﺩﺵ ﺭﺍ ﺗﺎ ﻭﺳﻂ ﺑﺎ ﺁﺏ ﭘﺮ ﮐﺮﺩﻩ ﻭ ﮔﺮﺩﺵ ﺭﺍ ﺩﻭﺑﺎﺭﻩ ﺍﳒﺎﻡ ﺩﻫﻴﺪ. ﮐﻨﺘﺮﻝ ﮐﻨﯿﺪ ﮐﻪ ﭘﻮﺷﺶ ﻻﺳﺘﯿﮑﯽ ﺷﯿﻠﻨﮓ ﺗﻐﺬﯾﻪ ﺁﺏ ﺩﺭ ﻣﺤﻞ ﺩﺭﺳﺖ ﺍﺳﺖ. ﺩﻭﺑﺎﺭﻩ ﻣﺤﮑﻢ ﭘﻴﭻ ﮐﻨﻴﺪ. ﺁﻳﺎ ﺷﯿﻠﻨﮓ ﺟﺮﻳﺎﻥ ﺁﺏ ﺗﺎ ﺷﺪﻩ؟ ﻟﻮﻟﻪ ﺭﺍ ﺑﺎﺯ ﮐﻨﻴﺪ. ﺍﮔﺮ ﻓﺸﺎﺭ ﺁﺏ ﺯﻳﺎﺩ ﺑﺎﺷﺪ ،ﺁﺏ ﳑﮑﻦ ﺍﺳﺖ ﻧﺸﺖ ﮐﻨﺪ. ﺷﯿﺮ ﺁﺏ ﺭﺍ ﮐﻤﯽ ﺑﺒﻨﺪﯾﺪ. ﺁﯾﺎ ﺁﺏ ﺍﺯ ﺧﻮﺩ ﺷﯿﺮ ﺁﺏ ﻧﺸﺖ ﻣﯽ ﮐﻨﺪ؟ ﺷﻴﺮ ﺁﺏ ﺭﺍ ﺗﻌﻤﻴﺮ ﮐﻨﻴﺪ .ﺁﺏ ﺗﻐﺬﯾﻪ ﻧﺸﺪﻩ ﺍﺳﺖ. ﻓﺎﺭﺳﯽ ١٩ - 12:42:33 2014-03-17 WA70H4200SW_03414H_FA_140317.indd Sec11:19 ﻣﺎﺷﯿﻦ ﻟﺒﺎﺳﺸﻮﯾﯽ ﮐﺎﺭ ﳕﯽ ﮐﻨﺪ؟ ﻣﺸﻜﻞ ﮐﻨﺘﺮﻝ ﮐﻨﻴﺪ ﺁﺏ ﺩﺭ ﺍﺗﺼﺎﻟﯽ ﺷﯿﻠﻨﮓ ﺗﻐﺬﯾﻪ ﺁﺏ ﻧﺸﺖ ﻣﯽ ﮐﻨﺪ. ﺁﻳﺎ ﭘﺲ ﺍﺯ ﺍﻧﺘﺨﺎﺏ ﺗﻐﺬﯾﻪ ﺁﺏ ،ﺩﮐﻤﻪ ) Start/Pauseﺷﺮﻭﻉ/ﺗﻮﻗﻒ( ﺭﺍ ﻓﺸﺎﺭ ﺩﺍﺩﻳﺪ؟ ﺍﮔﺮ ﺩﮐﻤﻪ ) Start/Pauseﺷﺮﻭﻉ/ﺗﻮﻗﻒ( ﻓﺸﺎﺭ ﺩﺍﺩﻩ ﻧﺸﺪﻩ ﺑﺎﺷﺪ ،ﺁﺏ ﺗﻐﺬﯾﻪ ﳕﯽ ﺷﻮﺩ. ﺩﮐﻤﻪ ) Start/Pauseﺷﺮﻭﻉ/ﺗﻮﻗﻒ( ﺭﺍ ﻓﺸﺎﺭ ﺩﻫﻴﺪ. ﺁﻳﺎ ﺷﻴﺮ ﺁﺏ ﺑﺴﺘﻪ ﺍﺳﺖ؟ ﺷﻴﺮ ﺁﺏ ﺭﺍ ﺑﺎﺯ ﮐﻨﻴﺪ. ﺁﻳﺎ ﺗﻮﺭی ﻓﯿﻠﺘﺮ ﺩﺭ ﺍﺗﺼﺎﻟﯽ ﺷﯿﻠﻨﮓ ﺗﻐﺬﯾﻪ ﺁﺏ ﺑﺎ ﻣﻮﺍﺩ ﮐﺜﯿﻒ ﮔﯿﺮ ﮐﺮﺩﻩ ﺍﺳﺖ؟ ﺗﻮﺭی ﻓﯿﻠﺘﺮ ﺭﺍ ﺑﺎ ﯾﮏ ﻣﺴﻮﺍک ﲤﯿﺰ ﮐﻨﯿﺪ. ﺁﻳﺎ ﺗﻐﺬﯾﻪ ﺁﺏ ﻗﻄﻊ ﺷﺪﻩ ﺍﺳﺖ؟ ﺍﮔﺮ ﺗﻐﺬﯾﻪ ﺁﺏ ﻗﻄﻊ ﺷﺪﻩ ،ﺷﻴﺮ ﺁﺏ ﺭﺍ ﺑﺴﺘﻪ ﻭ ﻣﺎﺷﲔ ﺭﺍ ﺧﺎﻣﻮﺵ ﮐﻨﻴﺪ. ﮔﺮﺩﺵ ﺳﺮﻭﺻﺪﺍ ﻭ ﻟﺮﺯﺵ ﺗﻮﻟﯿﺪ ﻣﯽ ﮐﻨﺪ. ﮐﻨﺘﺮﻝ ﮐﻨﻴﺪ ﮐﻪ ﻟﺒﺎﺱ ﻫﺎ ﺑﻪ ﻃﻮﺭ ﻫﻢ ﺳﻄﺢ ﺩﺭ ﻣﺎﺷﲔ ﮔﺬﺍﺷﺘﻪ ﺷﺪﻩ ﺑﺎﺷﻨﺪ. ﻟﺒﺎﺱ ﻫﺎ ﺭﺍ ﺑﻪ ﻃﻮﺭ ﻫﻢ ﺳﻄﺢ ﻗﺮﺍﺭ ﺩﺍﺩﻩ ﻭ ﺩﻭﺑﺎﺭﻩ ﺷﺮﻭﻉ ﮐﻨﻴﺪ. ﮐﻨﺘﺮﻝ ﮐﻨﯿﺪ ﮐﻪ ﻣﺎﺷﯿﻦ ﻟﺒﺎﺳﺸﻮﯾﯽ ﺑﺮ ﺭﻭی ﯾﮏ ﺯﻣﯿﻦ ﻣﺴﻄﺢ ﻭ ﻣﺤﮑﻢ ﻗﺮﺍﺭ ﮔﺮﻓﺘﻪ ﺑﺎﺷﺪ. ﻣﺎﺷﲔ ﺭﺍ ﻫﻢ ﺗﺮﺍﺯ ﮐﻨﻴﺪ. ﺁﻳﺎ ﺩﺳﺘﻪ ﻫﺎی ﭘﺎﯾﻪ ﻫﺎی ﻫﻤﺘﺮﺍﺯ ﮐﺮﺩﻥ ﺷﻞ ﺷﺪﻩ ﺍﻧﺪ؟ ﭘﺎﯾﻪ ﻫﺎ ﺭﺍ ﺑﺮﺍی ﻫﻢ ﺗﺮﺍﺯ ﮐﺮﺩﻥ ﺗﻨﻈﯿﻢ ﮐﻨﯿﺪ. ﺁﯾﺎ ﺩﻭﺭ ﻭ ﺑﺮ ﻣﺎﺷﯿﻦ ﻟﺒﺎﺳﺸﻮﯾﯽ ﺑﺎ ﺍﺷﯿﺎﺀ ﻏﯿﺮﻻﺯﻡ ﭘﺮ ﺷﺪﻩ ﺍﺳﺖ؟ ﺍﺷﯿﺎﺀ ﻏﯿﺮ ﻻﺯﻡ ﺭﺍ ﺍﺯ ﻣﺎﺷﯿﻦ ﻟﺒﺎﺳﺸﻮﯾﯽ ﺩﻭﺭ ﮐﻨﯿﺪ. ﻓﺎﺭﺳﯽ ٢٠ - 12:42:33 2014-03-17 WA70H4200SW_03414H_FA_140317.indd Sec11:20 WA70H4200SW ﺳﻮﺍﻝ ﻭﻳﺎ ﺍﻇﻬﺎﺭ ﻧﻈﺮ؟ ﮐﺸﻮﺭ ﲤﺎﺱ ﺑﮕﻴﺮﻳﺪ ﻭﻳﺎ ﺍﺯ ﻣﺎ ﺑﻪ ﺻﻮﺭﺕ ﺁﻧﻼﻳﻦ ﺩﻳﺪﻥ ﮐﻨﻴﺪ IRAN 021-8255 www.samsung.com/iran/support DC68-03414H 12:42:33 2014-03-17 WA70H4200SW_03414H_FA_140317.indd 22