1
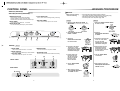
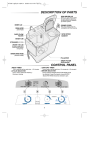
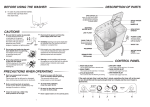
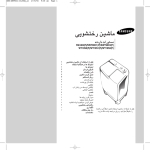
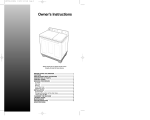
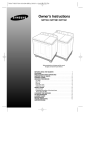
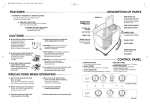
DESCRIPTION OF PARTS
BEFORE USING THE WASHER
SPIN DRYER LID
When you open this lid while
the spin basket is spinning,
the spinning will be stopped
by breake system.
LINT FILTER
OVER FLOW
FILTER
This is used for gathering
the dregs which are made
during washing.
WASH TUB LID
Be sure to keep the lid
closed during washing
and spinning.
In case of pump drained washer,
remove the cap-hose from
the drain hole.
●
CONTROL LEG
Remove the cap-hose from the drain
hose.
Adjust the control leg
for even placement.
Otherwise,excessive vibration
and noise can occur
during spinning
●
CAUTIONS
●
Be sure that the washer is grounded.
To avoid electrical shock,use
a metal pipe for the ground
connection. But, don't ground
the washer with gas pipes or
telephone lines to avoid to
dangers of explosion or lightning strike.
●
Do not put your hands into the spin
dryer basket when it is spinning.
Your fingers can be caught
by spinning laundry and
damaged.
●
Never allow children to operate
or play with the washer.
Children playing with the washer
may accidentally fall into the
washing tub.
●
Disconnect the power cord from the
power supply when not in use.
●
Ventilation opening must not be obstructed
by carpeting when the washing machine is
installed on a carpeted floor.
●
If the supply cord of this appliance is damaged,
it must only be replaced by a repair shop
appointed by the manufacturer,because
special purpose tools are required.
●
To avoid overfilling and damages this appliance
must be filled with the operator present using a
moderate water supply pressure only.
●
This appliance is to be connected to the water
mains using new hose-sets and that
old hose-sets should not be reused.
PRECAUTIONS WHEN OPERATING
2
INNER LID
1
DRAIN HOSE
Never splash water on the control panel.
(with pump)
●
SPIN DRYER BASKET
Close the water tap a little if the
water pressure is too high.
SPIN DRYER HATCH
●
WASH TUB
To avoid water splashes,
close the wash tub lid.
POWER CORD
●
The plug’s shape
may not correspond
with this drawing.
Before washing,check all pockets.
If nails or pins remain in pockets,they may
damage the washer or clothes.
EARTH WIRE
●
(Option)
Be sure to cover with the inner
cover on laundry before spinning.
This prevents laundry from
being tossed out and damaged.
WATER DRAIN HOSE
●
(WITHOUT PUMP)
Don't use excessively hot water.
(50˚C or more)
Plastic parts may be deformed or damaged.
Also, clothing may be deformed or decolored.
PULSATOR
●
CONTROL PANEL
WASHING PROCEDURE
SWT90C1(P) / SWT90C2(P)
(A)Type
SWT10H0(P) /SWT10H1(P) /SWT10H2(P)
TO WASH
Before starting washing,
check the following
4.CYCLE SELECTOR
1.WATER SELECTOR
During washing, WATER SELECTOR KNOB
should be selected to wash. During spin rinsing,
WATER SELECTOR KNOB should be selected to spin.
This is used to set the Washing/Rinsing or Draining.
(A)Type
5. SPIN DRY TIMER
2.WASH TIMER
This is used to set the spin time 1-5 minutes.
This is used to set the wash time, 1-15 minutes.
; Connect the water supply hose and open the water tap.
- Lay the drain hose down toward a sinkhole.(In case no drain pump)
- Place the drain hose in sink or bath.(In case drain pump)
- Connect the power cord to the power supply outlet .
3.WASH SELECTOR
(B)Type
1. Set the CYCLE SELECTOR KNOB to
‘WASH.RINSE’.(in case drain pump ‘WASH’)
1. Select the WASH CONTROL KNOB
for desired mode.
You can wash laundry effectively by various methods.
1
2
3
4
5
SW-903(P) (B)Type
4.WATER INTAKE
1.WASH TIMER
This is used to set the wash time, 1-15 minutes.
Connect water inlet to a tap with a suitable.
2.WASH CONTROL
You can wash laundry effectively by various methods.
2. Set the WATER SELECTOR
KNOB to WASH .
2. Press the
DRAIN SELECTOR KNOB
to ‘WASH’ .
3. Select the
WASH SELECTOR KNOB
for desired mode.
3. Fill water in the wash tub
to the ‘L1’ lower water
level by carefully
adjusting the tap water
and add the detergent.
4. Fill water in the wash
tub to the‘L1’ lower
water level by carefully
adjusting the tap water
and add the detergent.
4. Put the cloths into the
wash tub and set the
same water pressure
to fill the tub so as not to
exceed ‘H3’level.
5. Put the cloths into
the wash tub and
set the same water
pressure to fill the
tub so as not to
exceed ‘H3’level.
5. Set the WASH TIMER
1-15minutes.
6. Set the WASH TIMER
1-15minutes.
6. After washing Press the
DRAIN SELECTOR KNOB to
‘DRAIN’ for drain .
5. DRAIN SELCTOR
Be sure to press the selector knob to ‘WASH’ while washing.
3.SPIN DRY TIMER
This is used to set the spin time 1-5 minutes.
FRONT PANEL
REAR PANEL
7. After washing, set the
CYCLE SELECTOR KNOB
to ‘DRAIN’ for drain.
3
4
WASHING PROCEDURE
OVER FLOW RINSE
SPIN DRY
1. Transfer the clothes into the spin basket
and arrange the clothes evenly.
3. Close the spin dryer lid.
2. Be sure to attach the safety cover and
close the inner lid.
(A)Type
(B)Type
1. Keep suppling water(adjust water pressure
1. Keep suppling water(adjust water pressure
to ensure that the amount of water supplied
does not exceed that water drained.)
to ensure that the amount of water supplied
does not exceed that water drained.)
4. Set the SPIN DRY TIMER 1-5minutes.
2. Set the WASH
TIMER 6~8minutes.
inner lid
2. Set the WASH
TIMER 6~8minutes.
safty cover
3. As soon as the WASH TIMER
shuts off, turn off the water tap.
3. As soon as the WASH TIMER
shuts off, turn off the water tap.
4. Set the CYCLE
SELECTOR KNOB
to ‘DRAIN’.
4. Press the DRAIN SELECTOR
KNOB to ‘DRAIN’.
RINSING
(A)Type
(B)Type
1. Set the CYCLE SELECTOR KNOB to
‘WASH.RINSE’.(In case drain pump ‘WASH’)
1. Press the DRAIN SELECTOR
KNOB to ‘WASH’.
2. Supply the proper amount
of water as not to overflow
the topof the washing tub
and put the laundry
into the washing tub.
2. Supply the proper amount of water as not
to overflow the top of the washing tub.
3. Set the WASH TIMER
2~3minutes.
3. Set the WASH TIMER
2-3 minutes.
ADDITIONAL RINSE (SHOWER RINSE FOR (A)Type
After rinsing you can select this
After stopping water
for more effective rinse
1 course
(Don't select only this course
inner lid
for rinse.) Load the laundry
evenly into the spin basket.
4. Drain the water.
Set the CYCLE SELECTOR
KNOB to ‘DRAIN’
4. Drain the water.
Press the DRAIN SELECTOR
KNOB to ‘DRAIN’ .
5. Repeat this cycle until drain water
is clean. (2~3 cycle)
5. Repeat this cycle until water
becomes clean.(2-3cycle)
2
safety cover
Set the WATER SELECTOR KNOB to
SPIN and CYCLE
SELECTOR KNOB to
‘DRAIN’.
4 supply, cover the
laundry with safety cover
and close the inner lid.
the spin dryer
5 Close
lid.
water for about 1minute.
3 Supply
Adjust the water flow to prevent
the SPIN DRY
6 Set
TIMER 2~3 minutes.
overflow from the wash tub.
5
)
6
LAUNDRY GUIDE
INSTALLATION
AMOUNT OF CLOTHES
ENVIRONMENT
CHANGING THE POSITION OF THE DRAIN HOSE
Before attempting to change the position of the drain hose,
disconnect the plug from the outlet.
1. Route the drain hose inside the machine.
2.Take out the drain hose from the opposite hole and
insert the drain hose into the hose holder.
Leave some space
Space at last 15cm between the washer
and the wall.
Place the washer on a sturdy flat surface.
If the washer is placed on an uneven or weak
surface, noise or vibration may be occured.
(Allowable is 2˚)
Low
Middle
High
Shirts(Synthetics)
22 Pieces
29 Pieces
35 Pieces
Under Shirts(Cotton)
38 Pieces
48 Pieces
58 Pieces
Working clothes(Cotton)
16 Pieces
20 Pieces
25 Pieces
DETERGENT
Never install the washer near water.
Do not place the washer in steamy rooms or
where the washer is directly exposed to rain.
Moisture may destroy the electrical insulation
and cause an electrical shock hazard.
1
2
Hose holder
Avoid direct sunlight or heating devices.
As plastic and electrical components are
affected by direct heat, never place the
washer near heaters, boilers,etc.
Do not place under direct sunlight.
HOW TO CLEAN THE FILTER (In case drain pump)
1. Place a rag under the washer filter
not to wet the floor.
2. Rotate the filter counterclockwise
and pull out the filter.
3. Remove dirts and rotate
the filter clockwise until it
Open
locks in position.
70~80cm
Install the drain hose about
70~80cm above the ground
for pump model.
Water Level
SPIN DRY TIME
AMOUNT OF
DETERGENT
WATER
LEVEL
44g
Low(44l)
56g
Middle(56l)
67g
High(67l)
TIME
1min.
1~2min.
3~5min.
5min.
TYPE OF LAUNDRY
Thin(synthetic fiber)
wool
cotton
thick(cotton)
-The amount of detergent is average.
Follow the instruction detergent printed on the package for
amount of detergent.
-Choose the amount of detergent depending on the fabric type.
MAINTENANCE
Filter
Close
Rag
WHEN YOU LOAD THE LAUNDRY INTO
THE SPIN BASKET.
Press the laundry evenly and put the safety
cover into the spin basket drum as shown in
the figure.
TO PICK OUT THE CLOTHING WHICH HAS
FALLEN BETWEEN THE BASKET AND TUB.
For safty, pull the power supply plug out of the socket.
1.Disassemble two screws from the spin dryer hatch.
2.Pull up the spin dryer hatch to remove it.
3.Remove the clothing.
4.Close the spin dryer hatch.
CLEANING THE MACHINE
1. OVERFLOW FILTER
2. CLEANING THE FILTER
Pull the upper side of the
overflow filter with
your fingers into the holes
in the direction of arrow as
shown in the figure.
Pull the overflow filter out and take up the filter
by removing 3 screws as shown in figure.
Wash the filter and washing tub.
TROUBLE SHOOTING
TROUBLE
The washer
does not work.
CHECK POINT
TROUBLE
Check that the power cord is
connected to a power outlet well.
Power stoppage?
Incomplete
draining
3. CLEANING THE WASHER BODY
Wipe off strains on the cabinet and operation panel with soft cloth.
Do not use benzene,thinners,cleanser,or wax, nor scrub the washer with a brush.
Painted surfaces or plastic parts will be damaged.
7
Clothes will
not move freely. Is the laundry overloaded?
Incomplete
spinning
The spin dryer
basket will not
run.
Are the laundry arranged evenly?
8
CHECK POINT
Is the filter clogged
with lint?
● See “Cleaning the
machine” on page 7.
Is the spin dryer lid closed
completely?
Are laundry(socks,etc.)falling
out of the spin dryer basket and
clinging to the axle?
● See “To pick out...” on
page 8.
Owner’s Instructions
IF YOU NEED HELP.
Do not hesitate to call your local samsung service center.
They will be willing to help you.
Be sure to give them your name,address,telephone number and the purpose of the call.
SW-903(P)/SWT90C1(P) / SWT90C2(P)
SWT10H0(P) /SWT10H1(P) /SWT10H2(P)
Before operating the unit, please read this manual
throughly, and retain for future reference.
SPECIFICATION
BEFORE USING THE WASHER
CAUTIONS
PRECAUTIONS WHEN OPERATING
DESCRIPTION OF PARTS
CONTROL PANEL
WASHING PROCEDURE
TO WASH
SPIN DRY
RINSING
OVER FLOW RINSE
ADDITIONAL RINSE
INSTALLATION
ENVIRONMENT
CHANGING THE POSITION OF THE DRAIN HOSE
HOW TO CLEAN THE FILTER
CLEANING THE MACHINE
LAUNDRY GUIDE
MAINTENANCE
TROUBLESHOOTING
SPECIFICATIONS
1
1
1
2
3
4
4
5
5
6
6
7
7
7
7
7
8
8
8
DIMENSIONS (mm)
SWT90C1(P) / SWT90C2(P)
SW-903(P)
SWT10H0(P) /SWT10H1(P) /SWT10H2(P)
W820mm x D524mm x H1000mm W820mm x D524mm x H920mm W820mm x D524mm x H993mm
0.05~0.78 MPa
0.5 ~ 8.0 kg . f/ cm2
WATER PRESSURE
WEIGHT
36 kg
EXTRACTION EFFICIENCY
50 %
STANDARD QUANTITY OF WATER
Low : 44lMiddle : 56l High : 67l
CAPACITY
(Maximum dry mass textiles) Washing:7.0kg
Spinning:6.5kg Washing:7.0kg Spinning:6.5kg Washing:8.0kg
MOTOR INPUT
Spinning:200W Washing:580W Spinning:200W Washing:400W Spinning:200W
MOTOR MAX INPUT
RATING TIME
Washing:400W
600W
790W
Washing : 1Hour
Spinning:6.5kg
600W
Spinning : 15minutes
CODE NO : DC68-01293A